

Page 1
Page 2

**
**
**
**
**
Notice
**
Copyright (Copyright © 2001 HUMAX Corporation)
Not tobe copied, used or translated in part or whole without HUMAX's prior consent in writing except
approval of ownership of copyright and copyright law.
**
Warranty
The information in this document is subject to change without notice. HUMAX does not have any
responsibility for direct, indirect, accidental, necessary and other corruptions due to your offer or use
of the information contained in this manual.
**
Trademarks
'Dolby' and the double-D symbol are trademarks of Dolby Laboratories.
DTS and DTS Digital Out are trademarks of Digital Theatre Systems Inc.
Manufactured under license from Dolby Laboratories.
**
This product incorporates copyright protection technology that is protected by method claims of
certain U.S. patent and other intellectual property rights owned by Macrovision Corporation and
other rights owners. Use of this copyright protection technology must be authorized by Macrovision,
and is intended for home and other limited viewing uses only unless otherwise authorized by
Macrovision Corporation. Reverse engineering or disassembly is prohibited.
US Patent Nos. 4,631,603; 4,577,216; 4,819,098; 4,907,093; and 6,516,132.
**
**
**
**
**
**
Thank you for purchasing a HUMAX digital terrestrial receiver. Please read this user manual
carefully, to be able to safely install, use and maintain the receiver at maximum performance.
Keep this user manual next to your receiver for future reference.
**
**
GB 1
**
**
**
Page 3
**
**
**
**
**
Notice
**
Read this manual carefully and make sure you understand the provided instructions. For your safety,
know what the reaction upon each action will be.
**
Warnings, Cautions and Notes
Throughout the whole manual, pay special attention to the following marks that indicate hazardous
situations.
**
•
Warning
**
Indicates a hazardous situation which, if not avoided, could result in (serious) injury.
**
•
Caution
**
Indicates a situation which, if not avoided, could damage the equipment or other apparatus.
**
•
Note
**
Indicates additional information to the user to make the user aware of possible problems and
information of any importance to help the user to understand, to use and to maintain the
installation.
**
To reduce the risk of electric shock, do not remove cover (or back). No
user serviceable parts inside. Refer servicing to qualified service
personnel.
This symbol indicates dangerous voltage inside the product that
presents a risk of electric shock or personal injury.
This symbol indicates important instructions accompanying the product.
**
**
**
**
**
GB 2
**
**
**
**
**
Page 4

**
**
**
**
**
**
**
Only for DVD player
1. CAUTION
**
2. Supported disc formats
**
The following discs can be used in your DVD.
Note: Supported discs could be different with the following disc.
• DVD Video (Digital Versatile Disc)
• Super Video CD
• Video CD
• Super Audio CD (Only plays the CD layer of a hybrid SACD disc)
• Audio CD
• MP3
**
Use of controls or adjustments or performance of procedures
other than those specified herein may result in hazardous
radiation exposure.
The DVD player is classified as a CLASS 1 LASER product.The
CLASS 1 LASER PRODUCT label is located on the exterior.
**
**
**
**
**
**
**
GB 3
**
**
**
Page 5

**
**
**
**
**
**
Notice
**
3. Region code of the DVD player and DVDs
Since DVD films are not normally released in all parts of the
world at the same time, all DVD players have a specific regional
code. Discs can be given an optional regional code. If the
regional codes differ between the player and the disc, playback is
not possible.
DVDs must be marked ALL for all regions or specific number for specific region to work in this
machine. If the DVD is marked with a different region, it cannot be played in this DVD player.
Some DVD discs may not have a regional code label even though their playback is prohibited by
area limits.
Region 2 Europe, Japan, Middle East, Egypt, South Africa, Greenland
Europe European Region 2 DVDs may be sub-coded D1 through D4. D1 identifies a UK-only
release. D2 a identify European DVDs that are not sold in the UK and Ireland. D4
identifies DVDs that are distributed throughout Europe.
**
**
**
**
GB 4
**
**
**
**
**
Page 6

**
**
**
**
**
Safety and Warning
**
This digital terrestrial receiver has been manufactured to satisfy international safety standards.
Please read the following safety precautions carefully.
**
Safety Instructions and Precautions
**
1. MAINS SUPPLY
**
90 - 250V AC 50/60Hz
Operate your product only from the type of power source indicated on the marking label. If you
are not sure of the type of power supplied to your home, consult local power company.
Disconnect the receiver from the mains before you start any maintenance or installation
procedure
**
2. OVERLOADING
**
Do not overload a wall outlet, extension cord or adapter as this may result in electric fire or
shock.
**
3. LIQUIDS
**
The receiver should not be exposed to any liquids such as dripping or splashing. In addition,
no objects filled with liquids, such as vase, shall be placed on the apparatus.
**
4. CLEANING
**
Disconnect the receiver from the wall outlet before cleaning.
Use a light damp cloth (no solvents) to dust the receiver.
**
5. VENTILATION
**
The slots on top of the receiver must be left uncovered to allow proper airflow to the unit. Do
not stand the receiver on soft furnishings or carpets. Do not stack electronic equipments on
top of the receiver.
**
6. ATTACHMENTS
**
Do not use any unsupported attachments as these may be hazardous or cause damage the
receiver.
**
7. CONNECTION TO THE AERIAL
**
Disconnect the receiver from the mains before connecting or disconnecting the cable from the
aerial. Failure to do so can damage the aerial.
**
8. CONNECTION TO THE TV
**
Disconnect the receiver from the mains before connecting or disconnecting the cable from the
aerial. Failure to do so can damage the TV.
**
9. EARTHING
**
The aerial cable must be buried in the ground.
The buried cable of the system must comply with SABS 061.
**
**
**
**
**
**
**
**
GB 5
**
**
**
Page 7

**
**
**
**
**
Safety and Warning
**
10.LOCATION
**
Place the receiver indoors to avoid exposing it to lightening, rain or sun.
Do not place it near a radiator or heat register.
Make sure it has more than 10 cm clearance from any appliances susceptible to
electromagnetic influences, such as TV and VCR.
Do not block these openings with any object, and do not place the product on a bed, sofa, rug,
or other similar surface.
If you place the product on a rack or bookcase, ensure that there is adequate ventilation and
that you have followed the manufacturer's instructions for mounting.
Do not place the product on an unstable cart, stand, tripod, bracket, or table where it can fall.
A falling product can cause serious injury to a child or adult, and serious damage to the
appliance.
**
11.LIGHTNING, STORM, or NOT IN USE
**
Unplug the product from the wall outlet and disconnect the aerial during a lightning storm or
when left unattended and unused for long periods of time. This will prevent damage to the unit
due to lightning and power-line surges.
**
12.EXTRANEOUS OBJECTS
**
Do not insert anything through the openings in the unit, where they can touch dangerous
voltage point or damage parts.
**
13.REPLACEMENT of PARTS
**
When the replacement parts are required, be sure the service technician uses replacement
parts specified by the manufacturer or those that have the same characteristics as the original
part. Unauthorised substitutions may result in additional damage to the unit.
**
**
Warning
**
1. Follow these directions in order not to damage the power cord or plug.
Do not modify or process the power cord or plug arbitrarily.
Do not bend or twist the power cord too much.
Make sure to disconnect the power cord with the plug held.
Keep heating appliances as far as possible from the power cord in order to prevent the cover
vinyl from melting.
2. Follow these directions. Failure to follow one of them may cause electrical shock.
Do not open the main body.
Do not insert metals or inflammable objects inside the product.
Do not touch the power plug with a wet hand.
Disconnect the power cord in case of lightening.
3. Do not use the product when it is out of order. If you continue to use the product when
defective, serious damage can be caused toit. Make sure to contact your local product
distributor if the product is out of order.
4. Please do not insert metal or alien substance into the slots for the modules and smart cards.
In doing so can cause damage to the STB and reduce its life span.
**
**
**
**
**
GB 6
**
**
**
**
**
Page 8

**
**
**
**
**
**
**
Only for DVD player
1. Cleaning discs
Some malfunctions (frozen or distorted and broken sound for example) are due to dirt on the disc. To
avoid such problems you should clean your discs regularly.
Dirty discs should be cleaned with a soft cloth. Always wipe
from the middle to the edge.
Note: Do not use any solvents such as benzine, thinner, alcohol , commercially
available cleaning agents or antistatic sprays designed for analogue records.
2. Handling discs
Do not touch the playback side of disc.
Hold the disc by the edges so that fingerprints will not get on the surface.
**
**
**
**
3. Storing discs
After playing, store the disc in its case.
Do not expose the disc to direct sunlight or sources of heat, or leave it in a parked car exposed to
direct sunlight, as there may be a considerable temperature increase inside the car.
GB 7
**
**
**
**
**
**
Page 9

**
**
**
**
**
Contents
**
STB
1. Before Using the Receiver
1.1 Package Contents
1.2 Front Panel
1.3 Rear Panel
1.4 Remote Control
2. Setup
2.1 Connecting the Antenna for STB
2.2 Connecting for DVD player
2.3 Powering On
3. Loading
3.1 Booting Mode
3.2 Installation Wizard
4. Basic Operation
4.1 Switching Channel
4.2 Volume Control
4.3 Text and Interactive Services
4.4 Change the Subtitle Language
4.5 Change a Audio Language
4.6 Program Information (I- plate)
4.7 Option List
5. Channel List
5.1 Displaying and Switching Channel List
5.2 Changing Channel List Group
5.3 Edit Channels
5.4 Edit Favourite Channels
5.5 Channel Change Mode
6. Program Guide
6.1 Viewing Programme Guide Information
6.2 Finding a Programme
6.3 Viewing Reserved Programme
GB12
**
GB12
GB13
GB14
GB15
GB19
**
GB19
GB22
GB24
GB25
**
GB25
GB25
GB26
**
GB26
GB26
GB26
GB27
GB27
GB28
GB30
GB32
**
GB32
GB33
GB34
GB36
GB39
GB40
**
GB40
GB42
GB43
**
**
**
**
**
GB 8
**
**
**
**
**
Page 10

**
**
**
**
**
**
**
**
7. Setting Preferences
7.1 Parental Control
7.2 Language Setting
7.3 Time Setting
7.4 Schedule
7.5 A/V Control
7.6 UHF Tunning
7.7 Miscellaneous Settings
8. Installation
8.1 Automatic Search
8.2 Manual Search
8.3 Default Setting
9. Software Update
9.1 OTA (Over the Air)
9.2 Software Update from PC
10. System Information
10.1 Status
10.2 Signal Detection
11. Games GB62
12. Manipulating Your TV Using Remote Control GB63
GB48
**
GB45
GB45
GB47
GB48
GB49
GB50
GB53
GB54
**
GB54
GB55
GB56
GB57
**
GB57
GB60
GB61
**
GB61
GB61
**
**
**
**
**
**
**
**
GB 9
**
**
**
Page 11

**
**
**
**
**
Contents
**
DVD Player
1. Getting Started GB73
2. Playing a DVD-VIDEO Disc
2.1 Playing a title
2.2 General Information
2.3 Search
2.4 Skipping Chapter
2.5 Repeat Mode
2.6 Repeat a section of disc
2.7 Fast Playing
2.8 Slow Motion
2.9 Zooming in and out
2.10 Subtitle/Audio
2.11 Listening Mode
2.12 Time display
2.13 Angle
3. Playing a Audio CD
3.1 Playing Audio CD
3.2 Detail Information
3.3 Playlist Menu
3.4 Search
3.5 Listening Mode
3.6 Time Display
3.7 Fast Playing
3.8 Play Mode
3.9 Repeat Mode
3.10 Playlist Editor
3.11 MP3 Disc Scan
4. Settings (DVD part)
4.1 Language
4.2 Audio
4.3 Display
4.4 Disc
4.5 Parental Control
**
GB74
**
GB75
GB75
GB76
GB77
GB77
GB78
GB78
GB79
GB79
GB79
GB80
GB80
GB80
GB81
**
GB81
GB81
GB83
GB83
GB84
GB85
GB85
GB86
GB86
GB86
GB87
GB88
**
GB88
GB89
GB90
GB92
GB92
**
**
**
**
**
GB 10
**
**
**
**
**
Page 12

**
**
**
**
**
**
**
**
Appendix1. Menu Map GB94
Appendix2. Trouble Shooting GB96
Appendix3. Specification GB98
Appendix4. Glossary GB100
Appendix5. Service and Support GB102
**
**
**
**
**
**
**
**
**
**
**
GB 11
**
**
**
Page 13

**
**
**
**
**
**
1.Before Using the Receiver
**
This chapter describes detail instructions on the product and its accessories.
1.1 Package Contents
Please check all package contents before using your receiver.
**
**
**
**
**
Remote Control (1) User's Manual (1)
Batteries (2) Scart Cable (1)
**
Note: Since faults may occur if the remote control is being left without a battery for a long time,
always keep the battery inserted in the remote control.
GB 12
**
**
**
**
**
**
Page 14
**
**
**
**
**
**
**
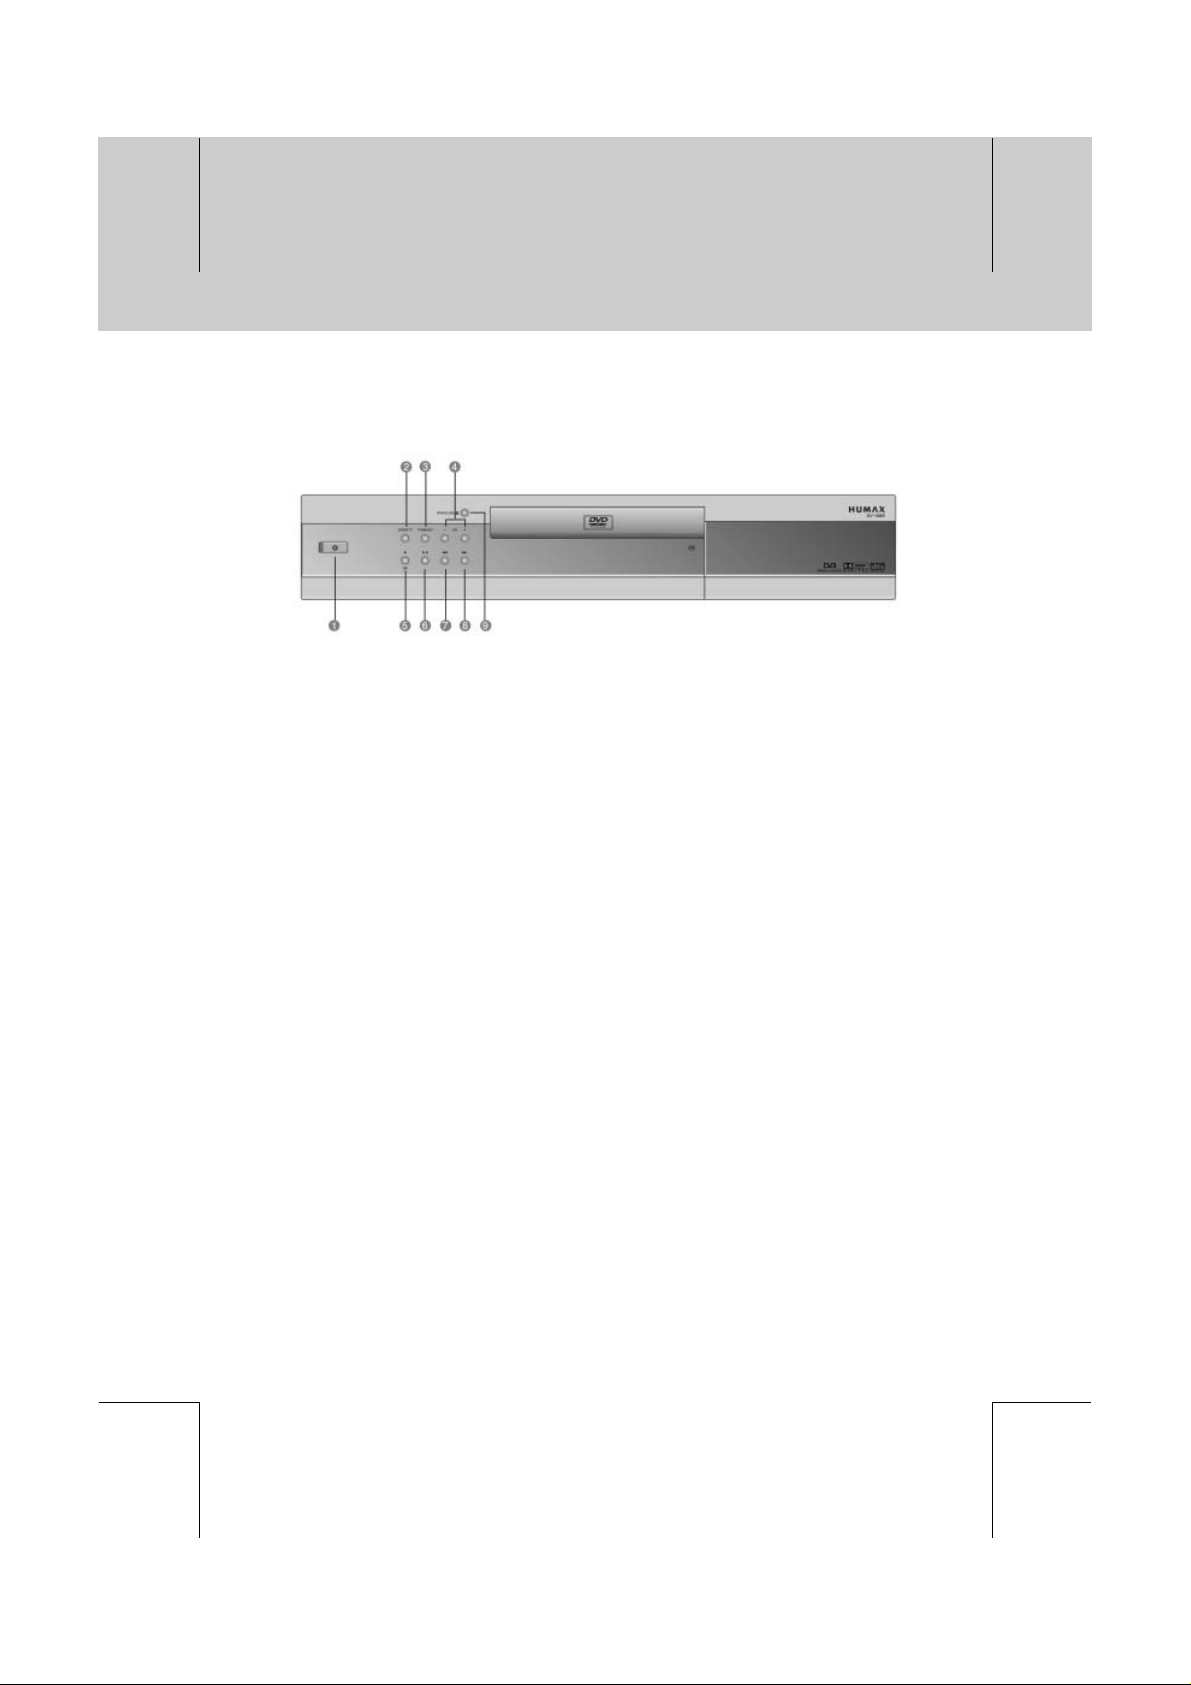
1.2 Front Panel
**
1. STANDBY Button
**
Switches between Operation and Standby modes.
**
2. DVD/DTV
**
Change mode between DTV and DVD.
**
3. TV/RADIO
**
Switches between TV and Radio modes.
**
4. CH-/CH+
**
Adjust the audio volume.
**
5. Stop
**
Stop play a disc.
**
6. Play / Pause
**
Start playback/Pause playback.
**
7. Skip previous
**
Return to the beginning of the current chapter/track or skip back to the previous chapter/track.
**
8. Skip next
**
Skip to the next chapter/track.
**
9. OPEN/CLOSE
**
Open and close the disc tray.
**
**
**
**
**
**
**
GB 13
**
**
**
Page 15
**
**
**
**
**
1. Before Using the Receiver
**
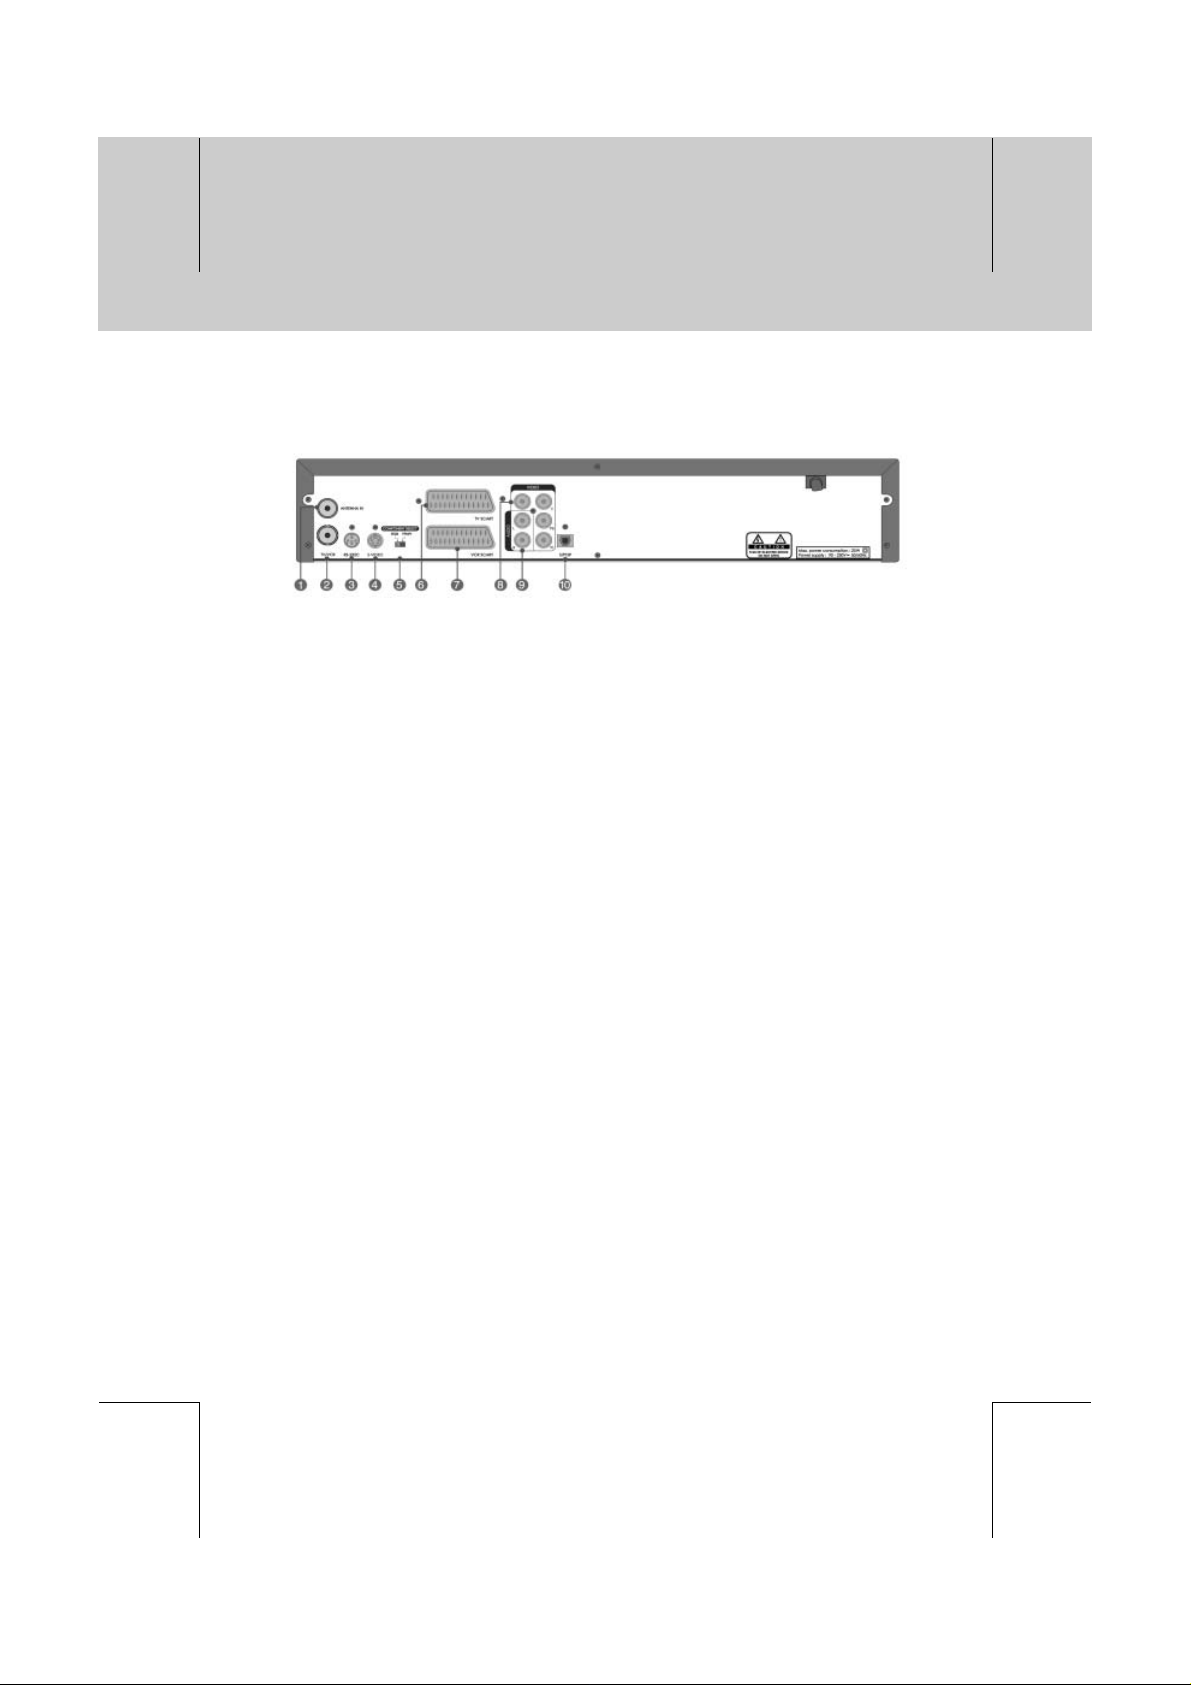
1.3 Rear Panel
**
1. ANTENNA IN
**
Connects a antenna to a antenna cable.
**
2. TV/VCR
**
Connects a RF signal from your receiver to RF(ANT) input jack on your TV or VCR.
**
3. RS-232C
**
Connects to your PC to upgrade product's software programme.
**
4. S-Video
**
Connect your receiver to a TV or VCR that accepts S-Video input.
**
5. COMPONENT SELECT
**
RGB If you select RGB, you can connect to video, audio L and R.
YPbPr If you select YPbPr, you can connect your receiver to a TV or VCR that accepts
6. TV SCART
**
Connects a TV SCART cable.
**
7. VCR SCART
**
Connects a VCR SCART cable.
**
8. VIDEO
**
Connects to your TV or VCR and output Video signals.
**
9. AUDIO L/R
**
Connects to your TV or VCR and output Audio signals.
**
10.S/PDIF
**
Outputs the digital audio signals(S/PDIF).
high-quality video input.
**
**
**
**
**
GB 14
**
**
**
**
**
Page 16
**
**
**
**
**
**
**
**
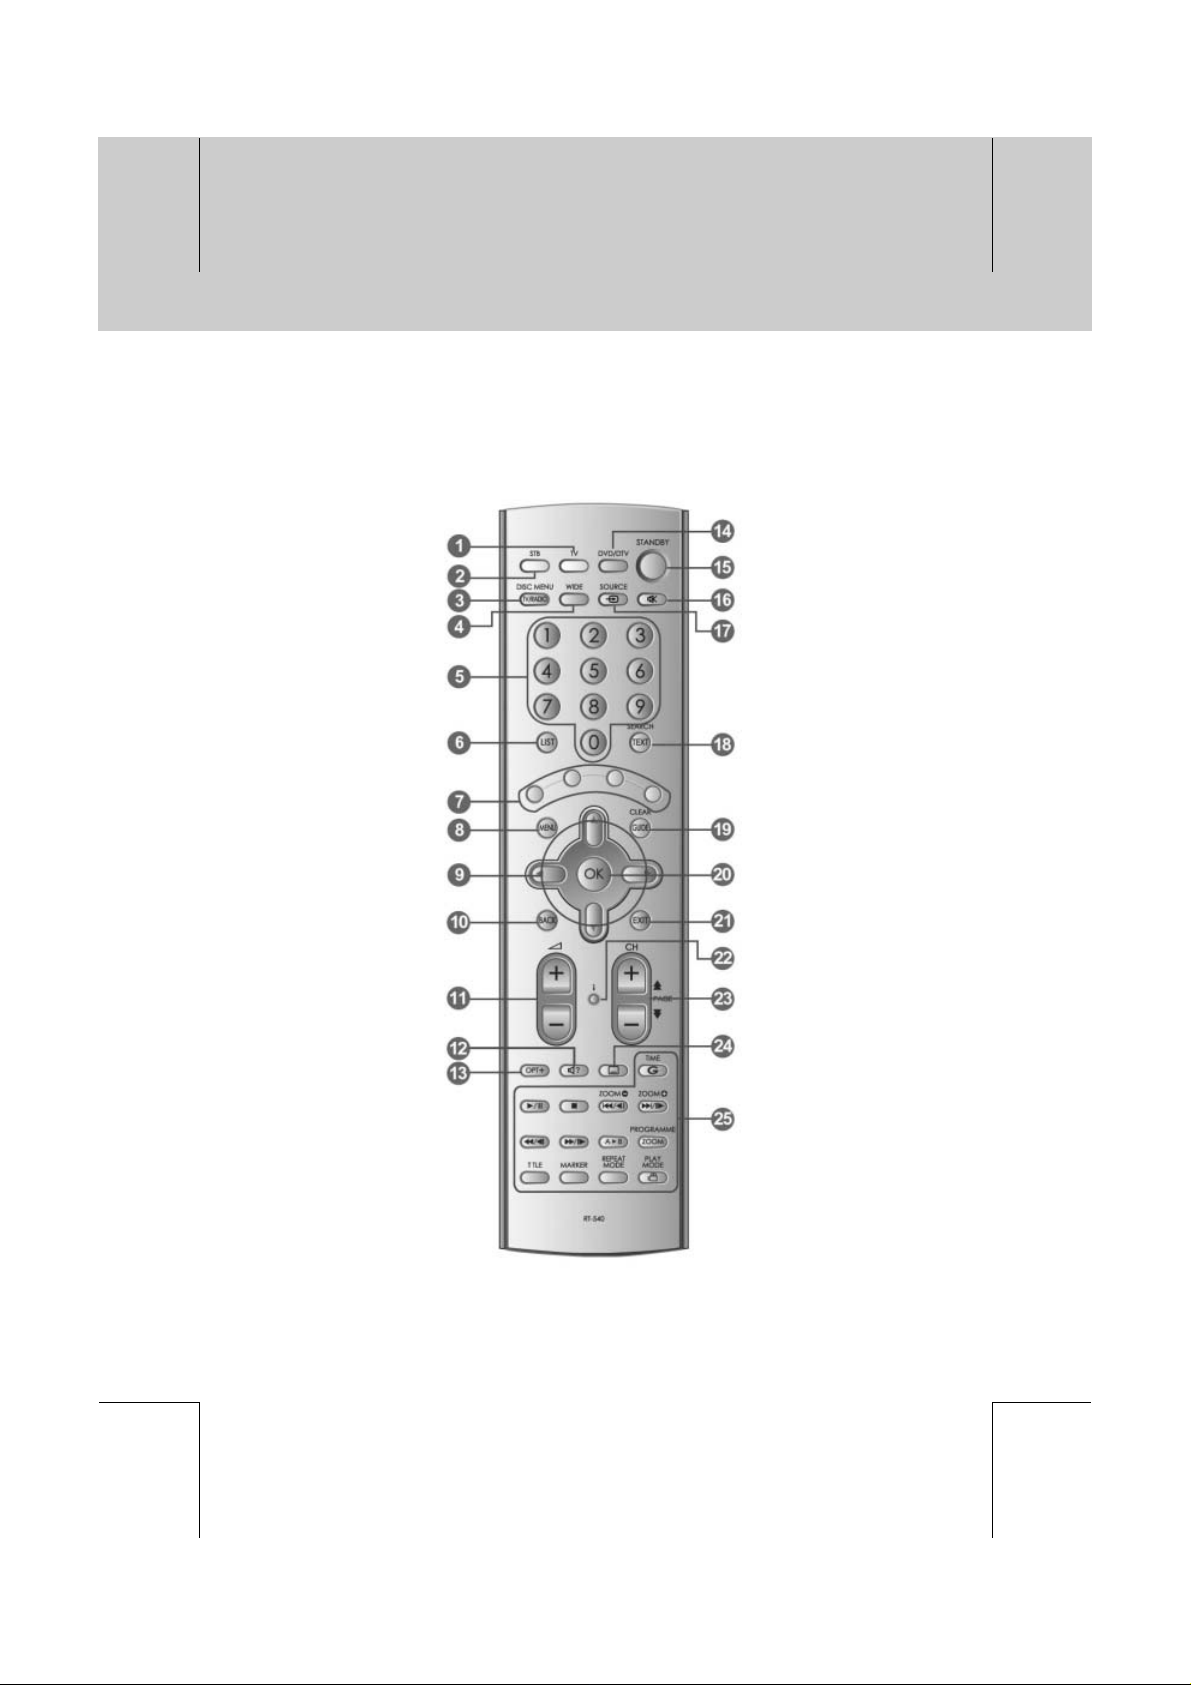
1.4 Remote Control
STB RCU
**
**
**
**
Note: This remote control can also control your TV. To set the remote control for your TV,
please refer to Chapter 12.
**
**
GB 15
**
**
**
Page 17

**
**
**
**
**
1. Before Using the Receiver
**
STB
1. TV
**
Turn on the TV.
**
2. STB
**
Turn on the STB.
**
3. TV/RADIO
**
Switches between TV and Radio
modes.
**
4. WIDE
**
Set the Display Format.
**
5. NUMERICAL BUTTONS
**
Enters a TV/Radio channel number or
menu option number.
**
6. LIST
**
Displays the channel list in DTV.
**
7. COLOR BUTTONS
**
Select color keys for interactive
applications.
**
8. MENU
**
Displays the main menu in DTV.
**
9. ARROW BUTTONS
**
Changes the channel or move the
cursor to the up, down, left or right
menu option.
**
10.BACK
**
Returns to the previous menu and
screen.
**
11.V-/+
**
Adjusts the audio volume of TV.
**
12.SOUNDTRACK
**
Displays the Soundtrack.
**
13.OPT + (OPTION)
**
Displays the channel attributes during
watching a programme.
**
14.DVD/DTV
**
Change mode between DTV and DVD.
**
15.STANDBY
**
Switches between Operation and
Standby modes.
**
16.MUTE
**
Pauses the audio temporarily. That is,
volumes on/off temporarily.
**
17.SOURCE / AUX
**
Selects the input source between TV
and receiver./Controls input mode of
TV.
**
18.TEXT
**
Displays digital text.
**
19.GUIDE
**
Displays the Programme Guide.
**
20.OK
**
Selects a menu, or confirms the
selected operation. And displays the
channel list during watching a
programme.
**
21.EXIT
**
Exits the main menu or Guide screen.
**
22.i (INFORMATION)
**
Displays the information about the
channel and programme.
**
23.CH-/+orPAGE-/+
**
Changes the Channel or Page.
**
24.SUBTITLE
**
Changes the subtitle language.
**
25.DVD FUNCTION BUTTONS
Note:
• This part explains STB function only.
• Press the G
button to display the
game.
**
**
**
**
**
GB 16
**
**
**
**
**
Page 18
**
**
**
**
**
**
**
**
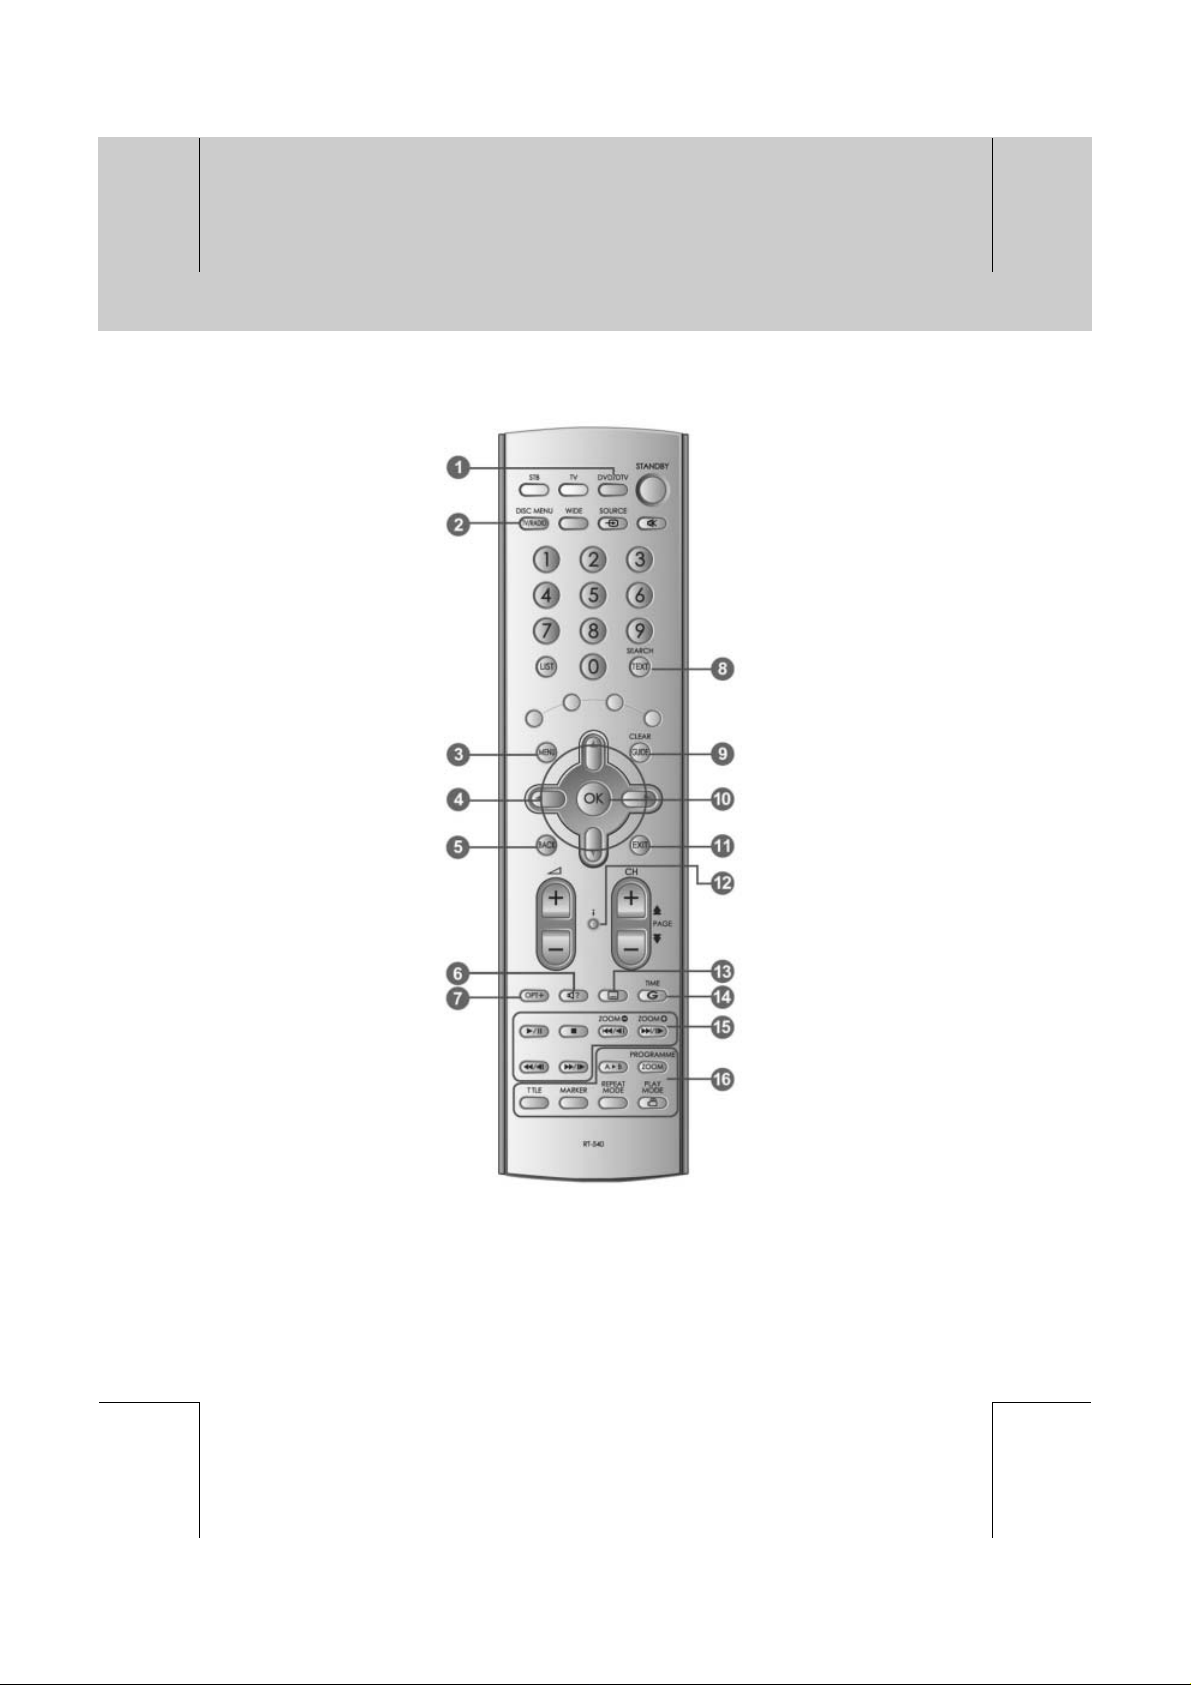
DVD RCU
**
**
**
**
**
**
GB 17
**
**
**
Page 19

**
**
**
**
**
1. Before Using the Receiver
**
DVD
1. DVD/DTV
**
Change mode between DTV and
DVD.
**
2. DISC MENU
**
Displays the main disc menu.
**
3. MENU
**
Displays the setup menu in DVD.
**
4. ARROW BUTTONS
**
Changes the channel or move the
cursor to the up, down, left or right
menu option.
**
5. BACK
**
Returns to the previous menu and
screen.
**
6. SOUNDTRACK
**
Displays the Soundtrack.
**
7. OPT+ (OPTION)
**
Set the listening mode.
**
8. SEARCH
**
Change the search mode.
**
9. CLEAR
**
Delete the track or bookmark in DVD.
**
10.OK
**
Selects a menu, or confirms the
selected operation.
**
11.EXIT
**
Exits the main menu or Guide
screen.
**
12.i (INFORMATION)
**
Displays the DISC information.
**
13.SUBTITLE
**
Changes the subtitle language in
DVD.
**
14.TIME
**
Change time display.
**
15.PLAY CONTROL BUTTONS
**
(PLAY / PAUSE)
Start playback/Pause playback.
**
(STOP)
Stop play a disc.
**
(SKIP PREVIOUS/ZOOM -)
Return to the beginning of the current
chapter or track or skip back to the
previous chapter or track./zoom
down.
**
(SKIP NEXT/ZOOM + )
Skip to the next chapter or
track./zoom up.
**
(Fast Backward/Slow
Backward)
Fast backward a disc/execute a
backward slow playback when
playing a DVD.
**
(Fast Forward/Slow
Backward)
Fast forward a disc/execute a
forward slow playback when playing
a DVD.
**
16.DVD FUNCTION BUTTONS
**
A B
Repeat between A and B in DVD.
**
ZOOM / PROGRAMME
Enlarge the picture during DVD
playback. / Edit playlist.
**
TITLE
Displays the title menu.
**
MARKER
Set bookmark in a DVD during
playback.
**
REPEAT MODE
Change repeat mode.
**
ANGLE / PLAY MODE
Change angle and play mode.
**
**
**
**
**
Note: This part explains DVD function only.
GB 18
**
**
**
**
**
Page 20
**
**
**
**
**
**
2. Setup
**
This chapter describes how to set up the receiver. Select the most appropriate procedure depending
on your requirements.
Note: If you encounter any problem when setting up the receiver, please contact your local
product distributor.
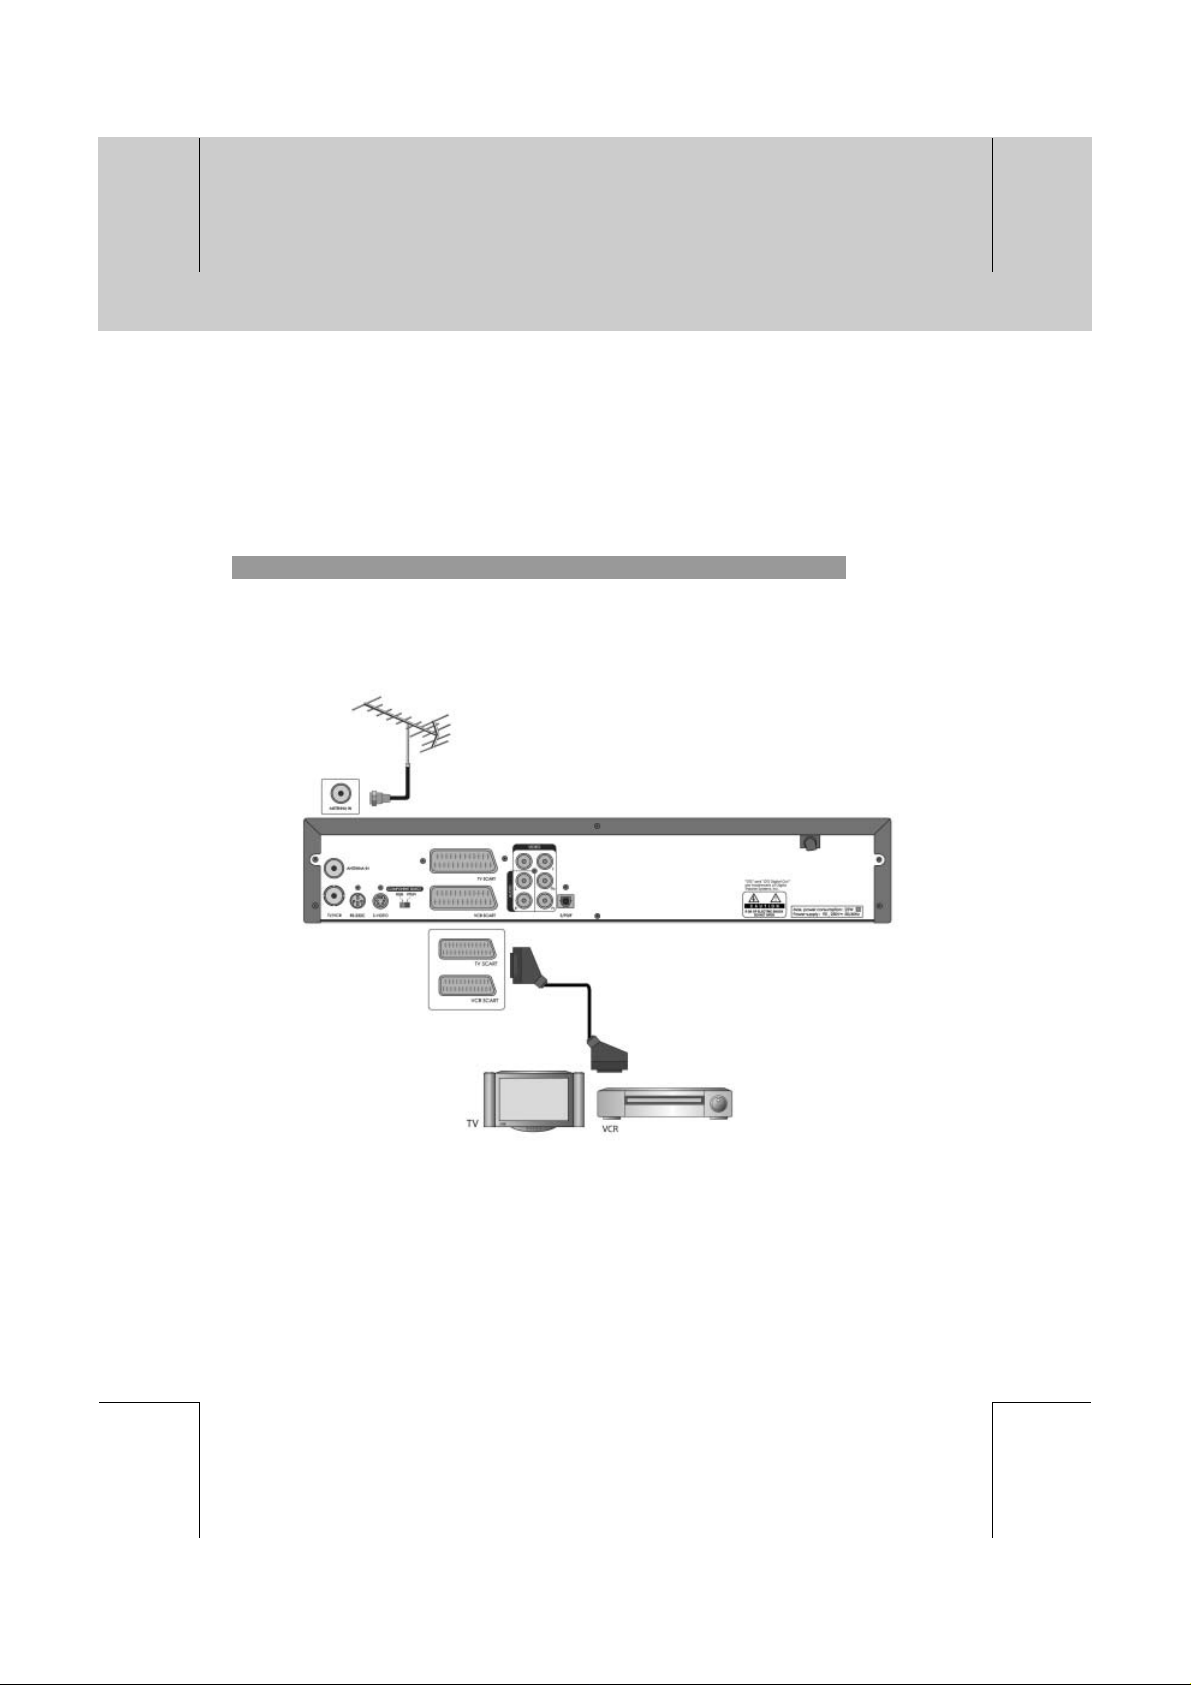
2.1 Connecting the Antenna for STB
1. Connecting TV and VCR with SCART
Connect the cable of your TV aerial to the ANTENNA IN connector on the rear of the receiver.
SCART and co-axial cable are connected as in the figure above.
**
**
**
**
**
**
**
GB 19
**
**
**
Page 21
**
**
**
**
**
**
2. Setup
**
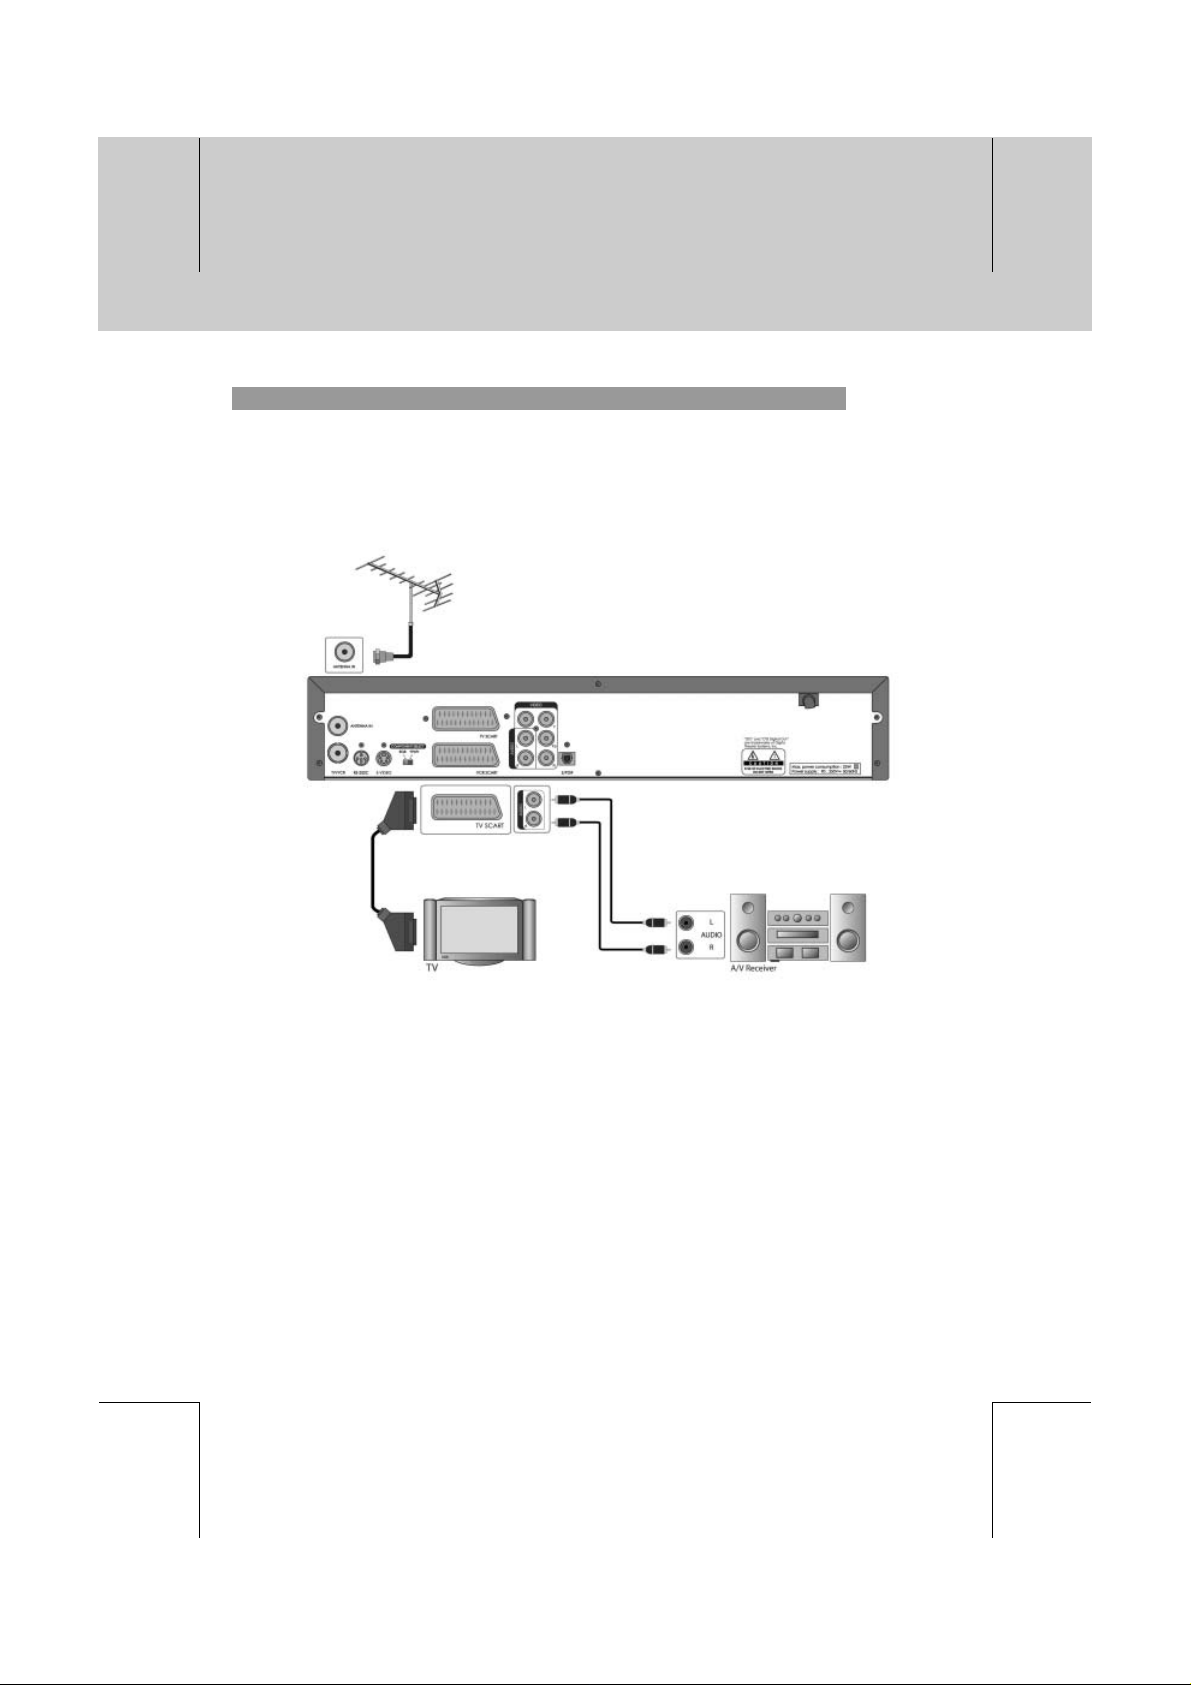
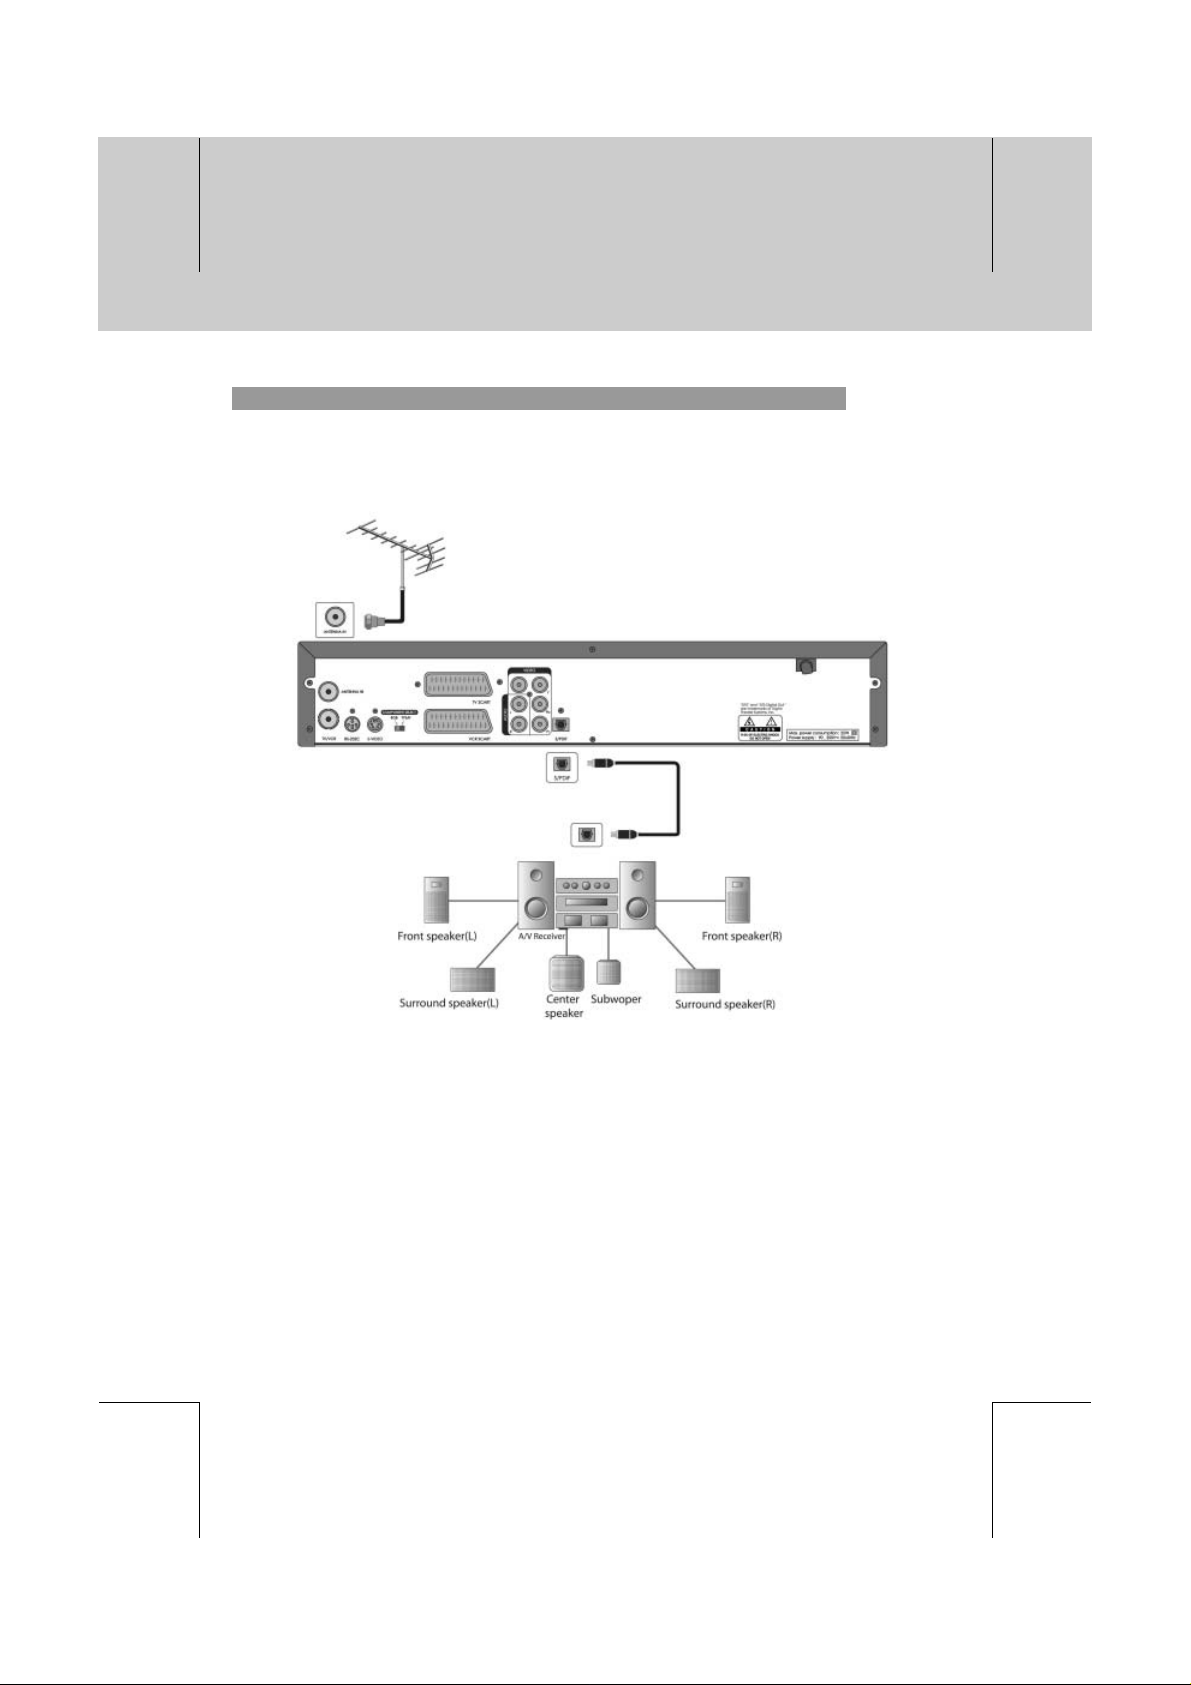
2. Connecting Hi-Fi system 1
Connect the outputs on this receiver to corresponding inputs on your Hi-Fi Audio or Dolby Prologic
Decoder.
( left audio out to left audio in, right audio out to right audio in)
**
**
**
**
**
GB 20
**
**
**
**
**
Page 22
**
**
**
**
**
**
**
**
3. Connecting Hi-Fi system 2
If you wish to connect the optical S/PDIF terminal and Dolby digital decoder to listen Dolby digital
audio, DTS audio or Multi Surround audio, connect as follows:
**
**
**
**
**
**
**
GB 21
**
**
**
Page 23
**
**
**
**
**
**
2. Setup
**
2.2 Connecting for DVD player
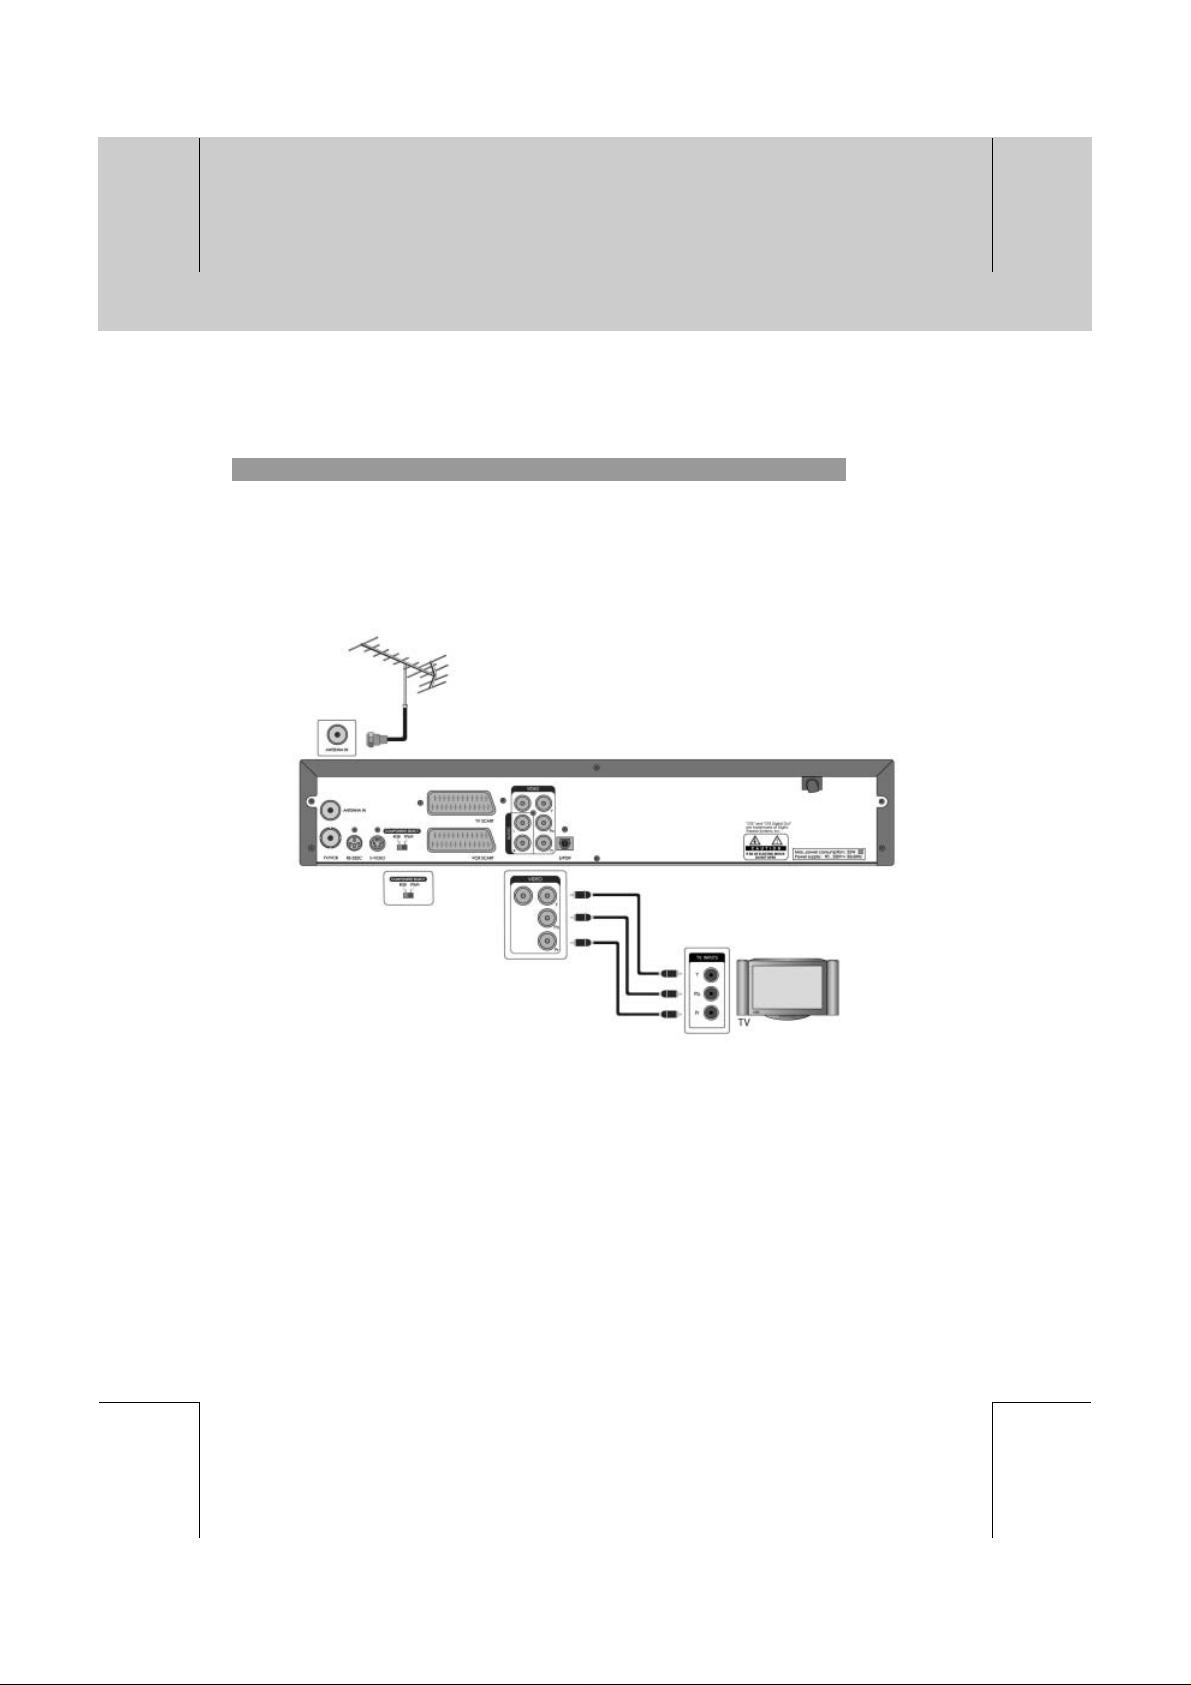
1. Connection with Component Video (Y Pb Pr ) cable
This method of transmitting pictures produces the highest quality as the video signal is split into its
Y(brightness), U and V (red minus brightness, blue minus brightness)components. Insert one end of
a component video (Y Pb Pr ) cable into the red/blue/green cinch socket at the back of the DVD
player and the other end into the component video input sockets on the TV set.
**
**
**
**
**
**
Note: the socket and connector color on the DVD player must match the color of the sockets
on the TV set(Red-Red, Blue-Blue, Green-Green). If this is not the case, the colors on
the screen may be distorted or the picture may not be visible.
GB 22
**
**
**
**
**
Page 24
**
**
**
**
**
**
**
**
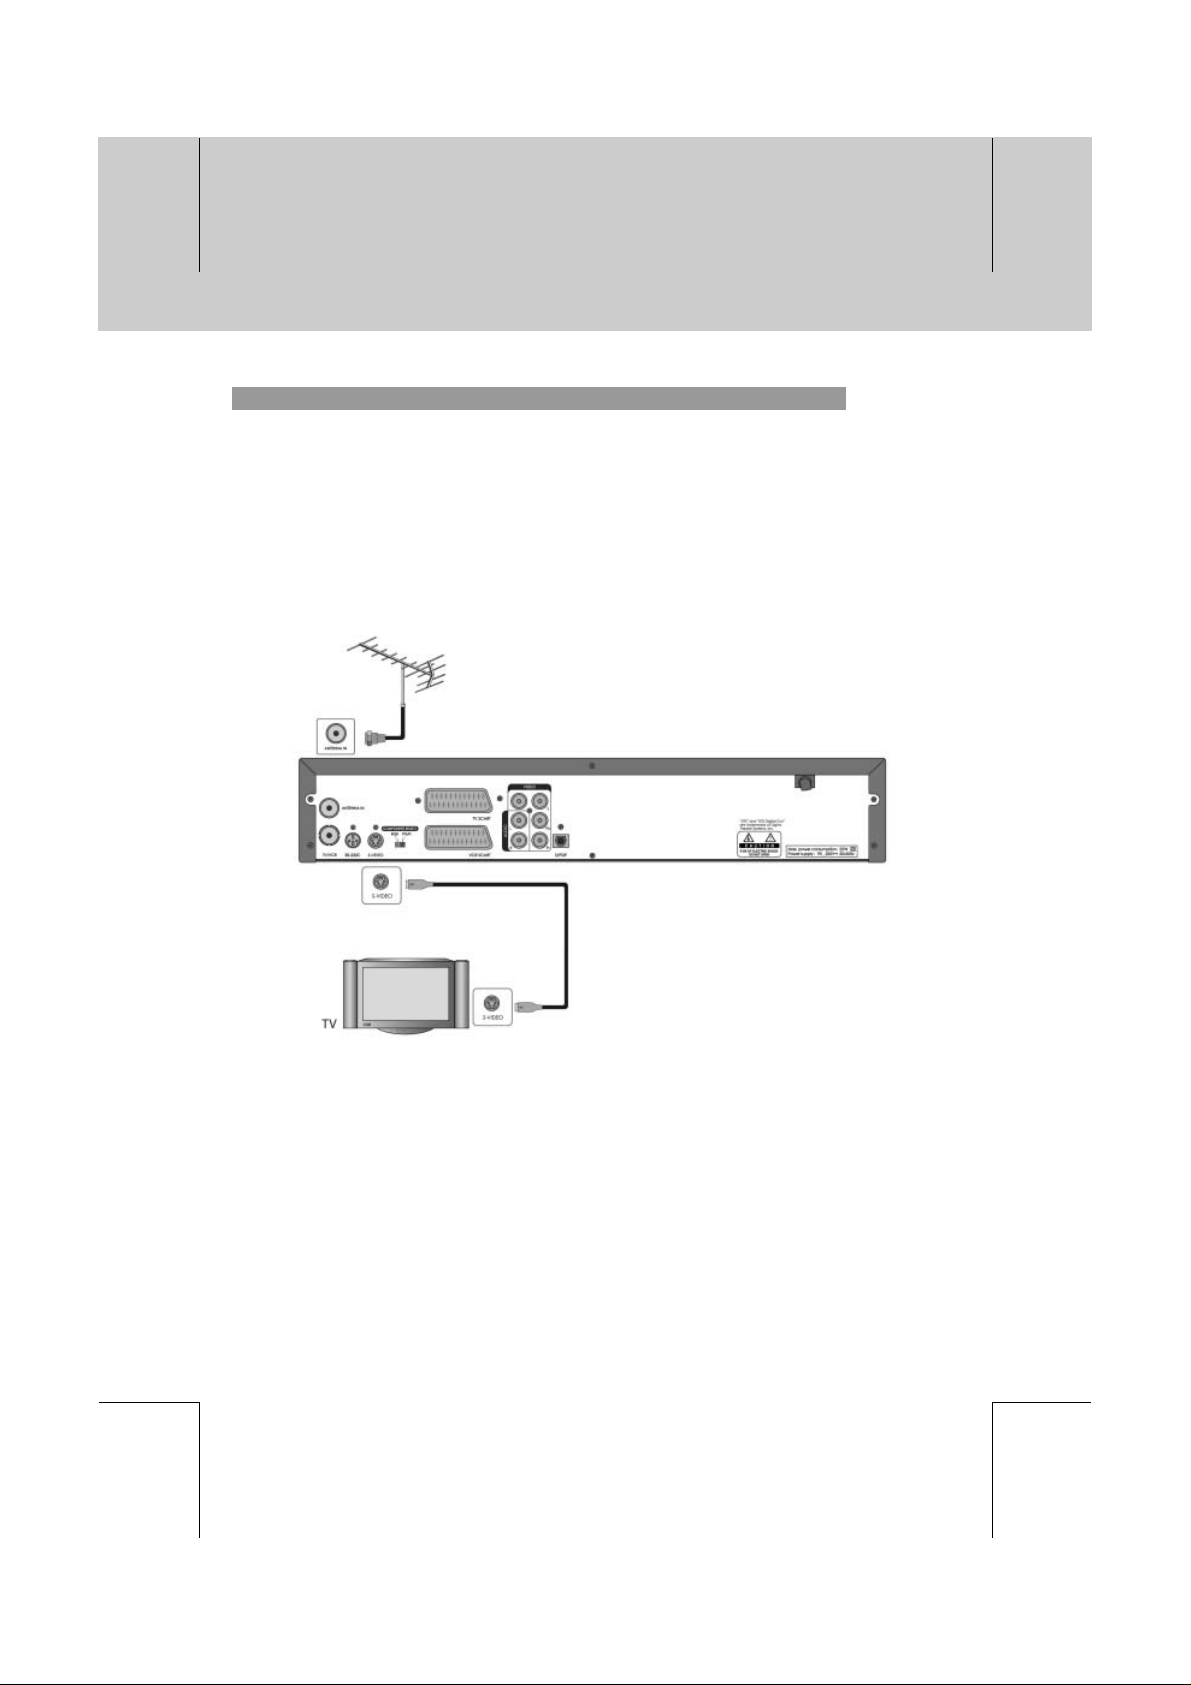
2. Connection with S-Video cable
**
First, you set the SCART Output as S-Video in the chapter 7.5.
For the highest video quality, connect to your TV using the S-Video socket.
1. Connect the S-Video connector on the rear of the player to the corresponding connector on
the TV using the S-Video cable.
2. Connect the audio left and right channel sockets on the player rear panel to the corresponding
sockets on your TV or Stereo system.
**
**
**
**
**
**
**
GB 23
**
**
**
Page 25
**
**
**
**
**
2. Setup
**
2.3 Powering On
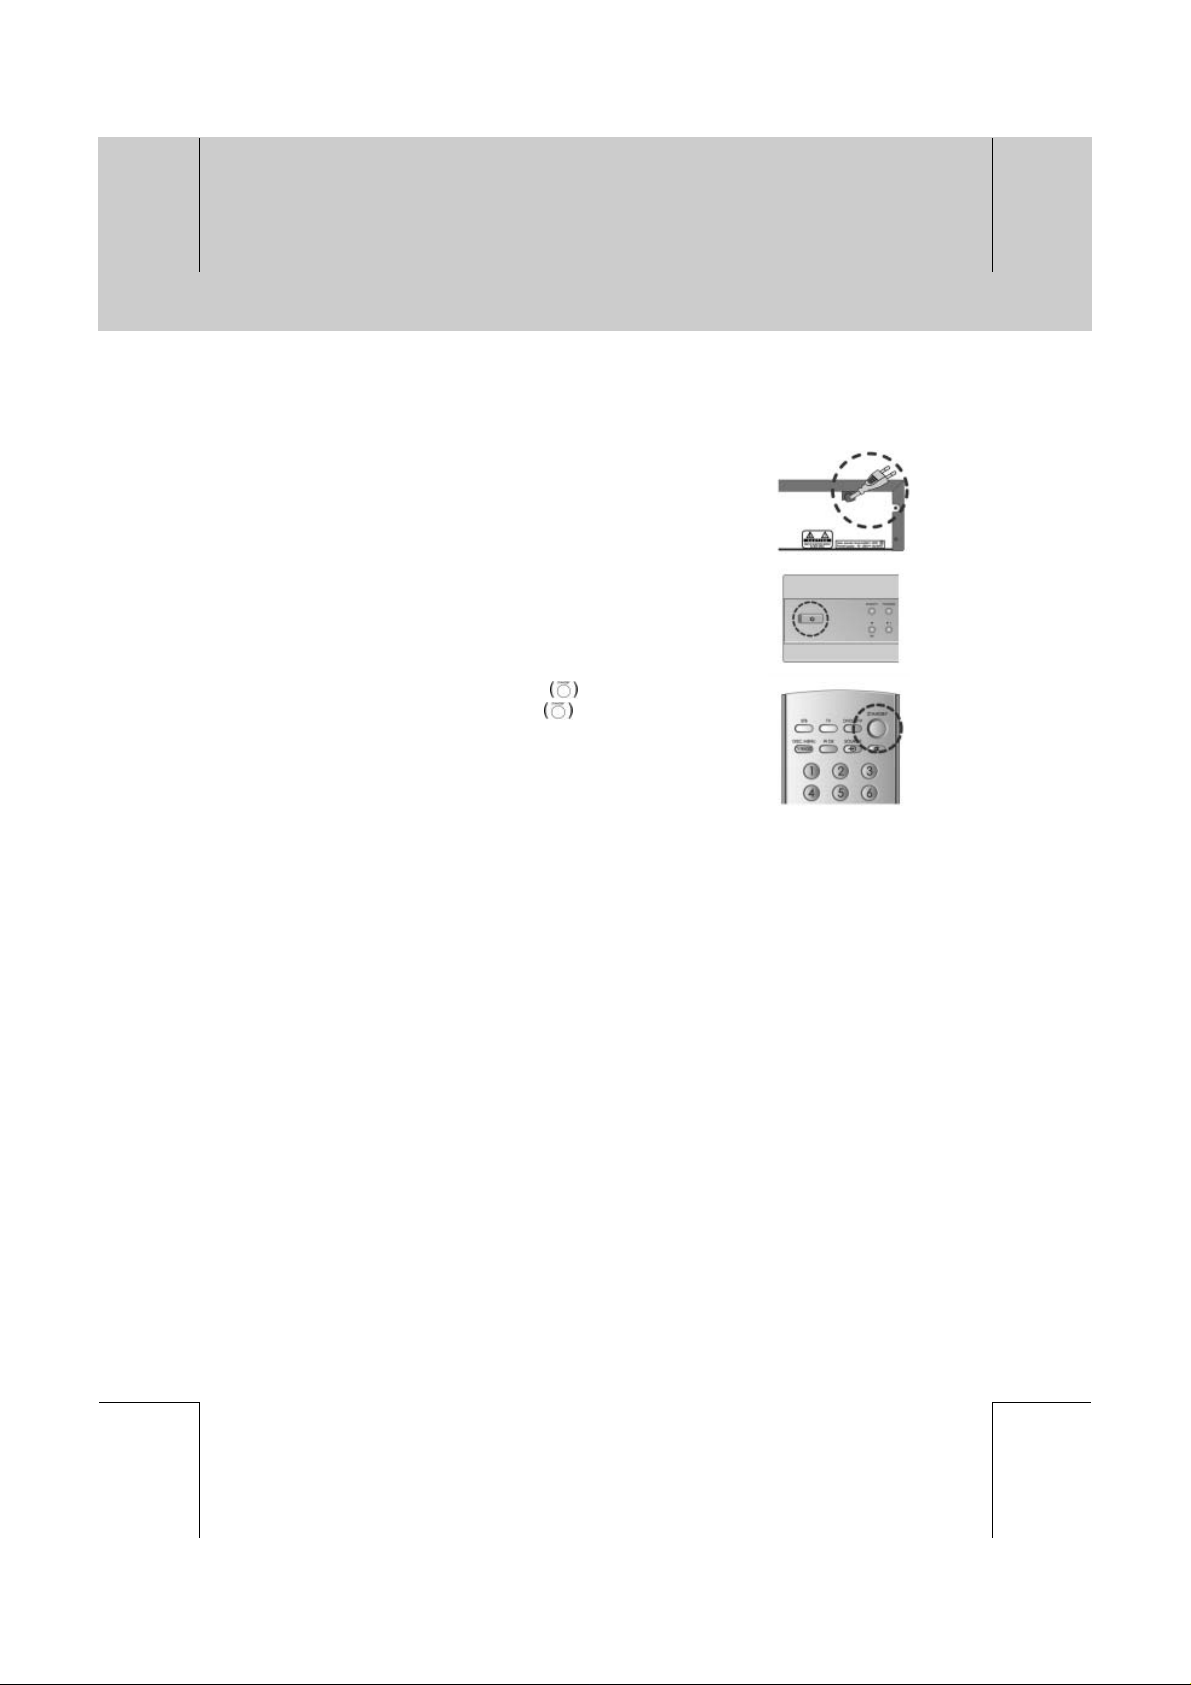
1. Connect the power cord of the receiver to a wall outlet.
2. Turn on the power button, located at the left on the back of
the receiver.
Make sure that the Standby LED indicator is turned on
Red.
3. Power on by pressing the STANDBY button at
Remote Controller or the STANDBY
of the receiver.
**
button at the front
**
**
**
**
**
GB 24
**
**
**
**
**
Page 26

**
**
**
**
**
3. Loading
**
3.1 Booting Mode
When powering on your receiver for the first time, the mode selection will automatically appear.
Select DTV or DVD using the
the OK
Please wait for booting the DTV or DVD.
Note:
If you don’t select a specific mode, then the previous mode will
be automatically selected.
button.
3.2 Installation Wizard
When using the DTV mode for the first time, a Channel Search will be performed automatically. (You
can run the Installation Wizard in Default Setting.)
1.Search
1. During operating search, the cursor is located at Stop.
Therefore, if you press the OK
the operation is stopped and the channels found so far will
be displayed.
2. Even after the search operation is complete, and no or not
all channels are found, press the OK
reset the search operation again if necessary.
3. You can delete any unwanted channels from the list of
found channels. Select your desired channels to delete
and press the OK
press the OK
Select All to select all channels, select Delete, and press
the OK
4. After completing the Channel Search and deleting unwanted channels, select Save to save
the changes. When completing Channel Search, you can enjoy digital television.
button. To delete all channels, select
button.
or DVD/DTV and press
button during searching,
button and try to
button. Then select Delete and
**
**
**
**
**
Warning : If you exit the Install Wizard without fully completing the channel searching
procedures, you may not watch any broadcasting normally. In this case, you
can use the Installation Menu to configure your receiver as you like
**
**
GB 25
**
**
**
Page 27

**
**
**
**
**
4. Basic Operation
**
This chapter describes functions such as switching channel, volume control, and basic features for
watching programmes.
4.1 Switching Channel
You can switch the current channel using one of the following methods.
1. Press the CH-/CH+
2. Enter your desired channel numeric using the NUMERICAL (0-9) buttons to move to the
channel directly.
3. Press the TV/RADIO
Note: You can switch channel using Programme Guide or Channel List. Please refer to
Chapter 5 and 6 for more information.
4.2 Volume Control
1. Press the V-/V+ buttons to adjust the audio volume of your TV.
2. Press the MUTE
Note: The mute function keeps enabled while you change the channel.
This function is only for TV. Refer to chapter 12 to set the TV.
button.
button to switch between TV channel and Radio channel.
button to stop the sound of your TV temporarily.
**
**
**
**
4.3 Text and interactive services
If your chosen channel has teletext (MHEG) features , you can access them. Teletext services often
load automatically shortly after the Digital Teletext window is displayed. In which case, simply follow
the given instructions(press color buttons).
1. Press TEXT
2. Press TEXT
3. Press the CH-/CH+
Note: You should select OFF from the subtitle language to display teletext(MHEG).
button to access teletext(MHEG) features.
button again to return to normal viewing.
button to exit this service.
GB 26
**
**
**
**
**
**
Page 28
**
**
**
**
**
4. Basic Operation
**
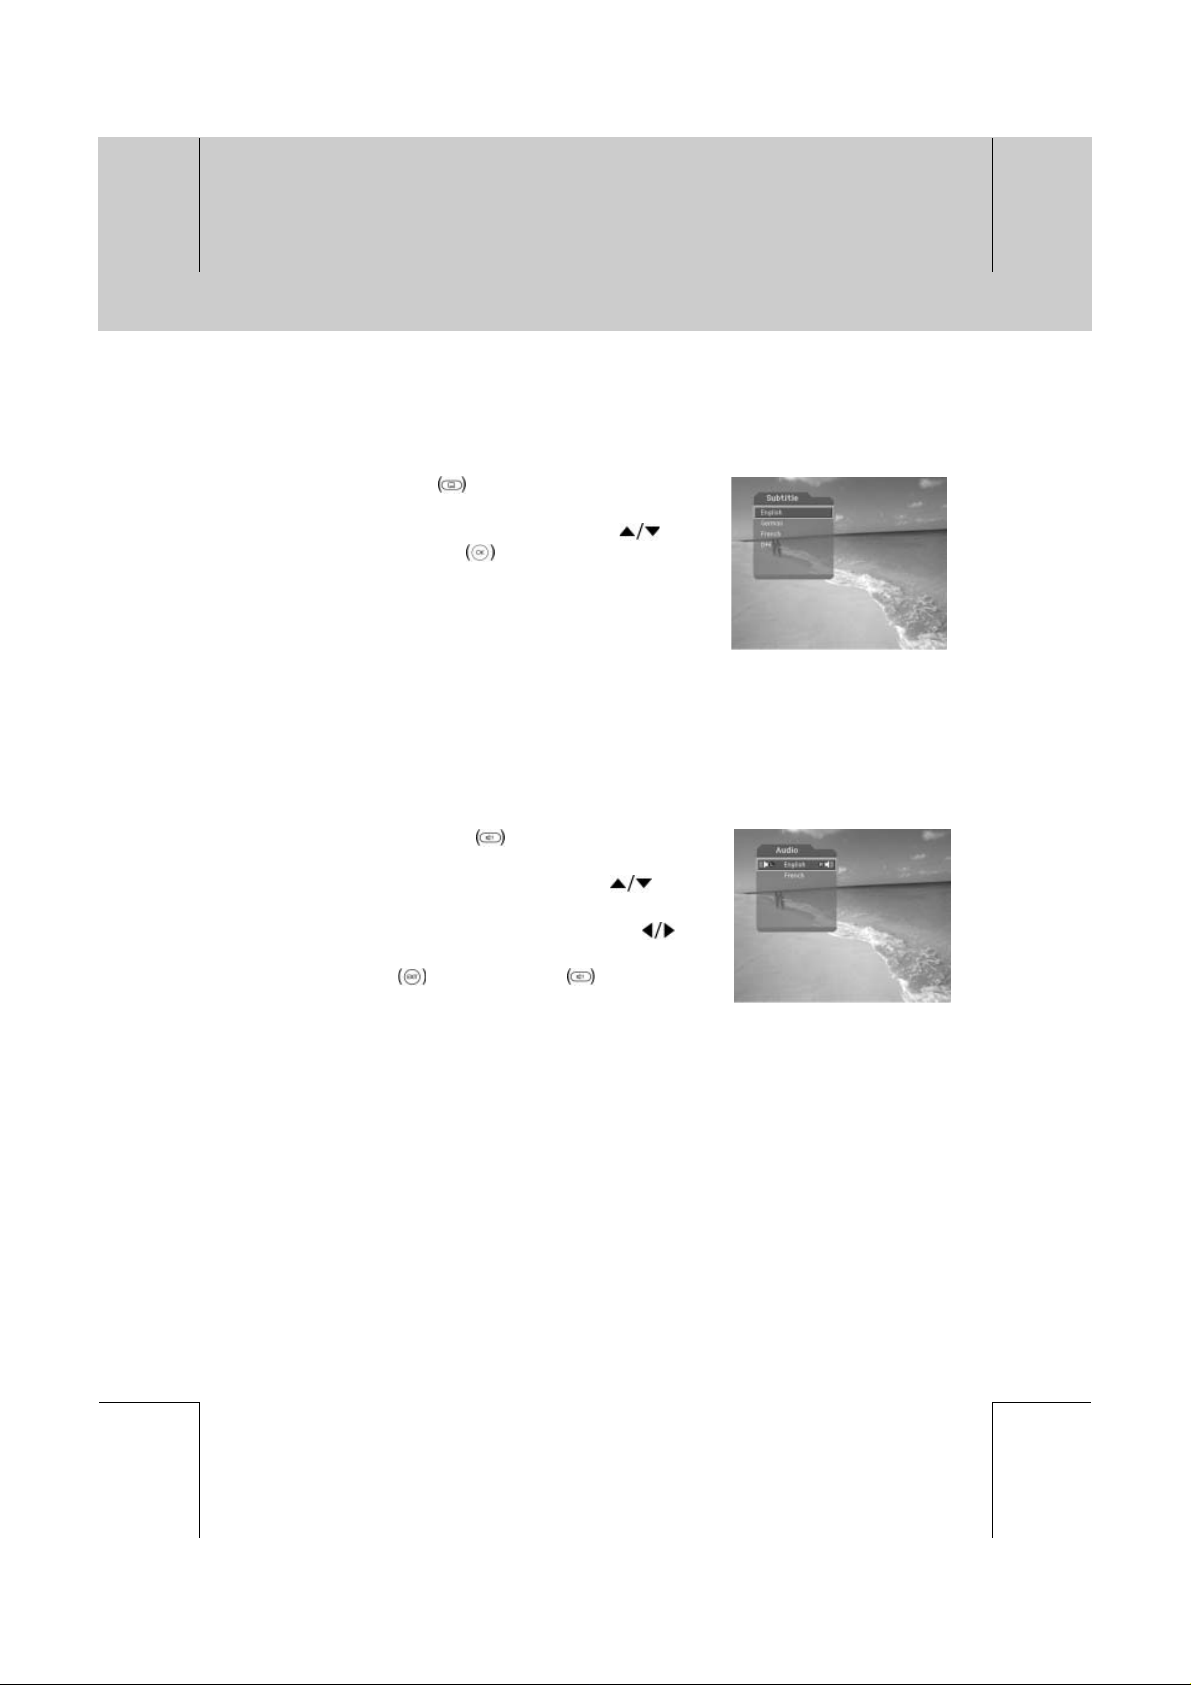
4.4 Change the Subtitle Language
If the current programme provides Subtitle information, you can select the language for the Subtitle.
1. Press the SUBTITLE
language list.
2. Select your desired subtitle language using the
button, and press the OK button. Then the subtitle will
be displayed in the selected language at the bottom of the
screen.
3. Select OFF from the subtitle language list if you do not
wish subtitles to be displayed on the screen.
Note: You can select a default subtitle language by selecting MENU - Preferences - Language
Setting - Subtitle Language.
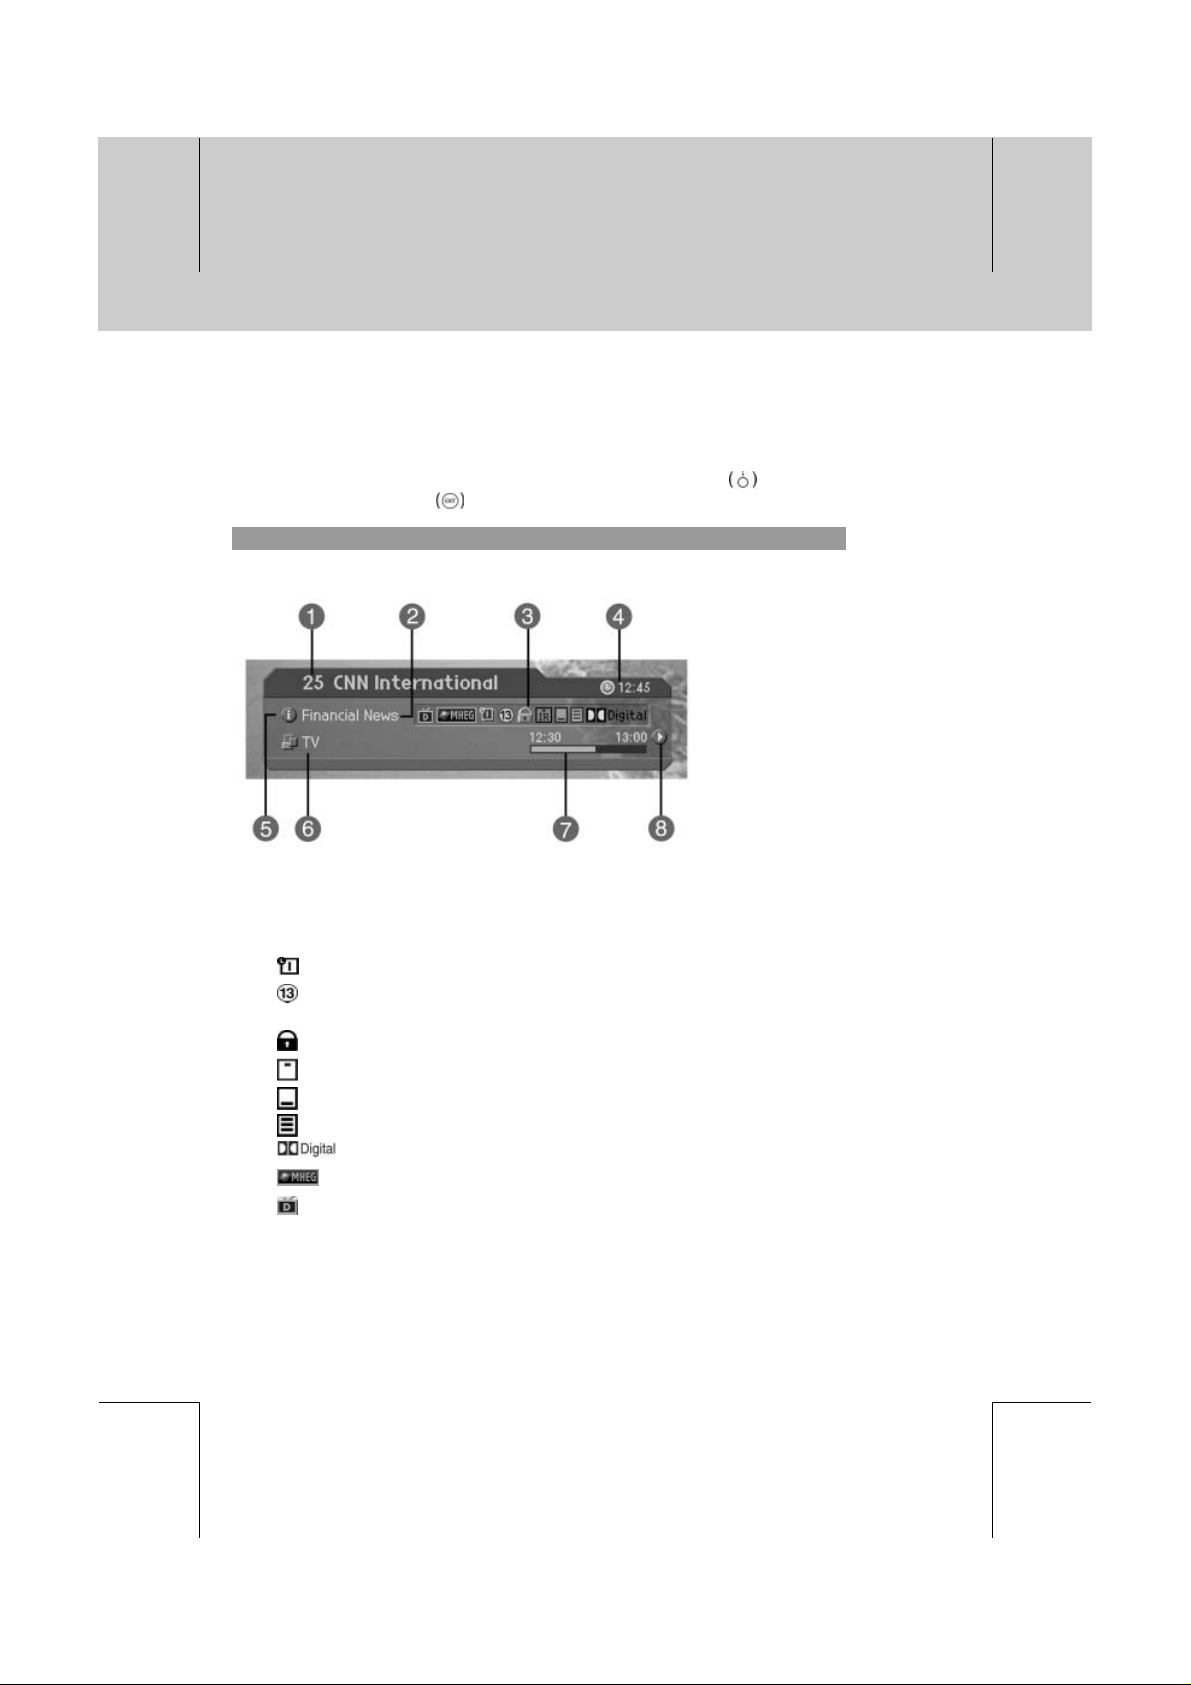
4.5 Change a Audio Language
If the current programme is available in multiple audio languages, you can select the language that
you wish to listen in.
1. Press the SOUNDTRACK
soundtrack list.
2. Select your desired audio language using the
to change Audio immediately.
3. Select Audio Direction(left, right, stereo) using the
button.
4. Press the EXIT
the soundtrack list.
button to display the subtitle
button to display
button
or SOUNDTRACK button to exit
**
**
**
**
**
Note: you can select your desired default audio language by selecting MENU - Preferences -
Language Setting -Audio Language.
GB 27
**
**
**
**
**
Page 29
**
**
**
**
**
4. Basic Operation
**
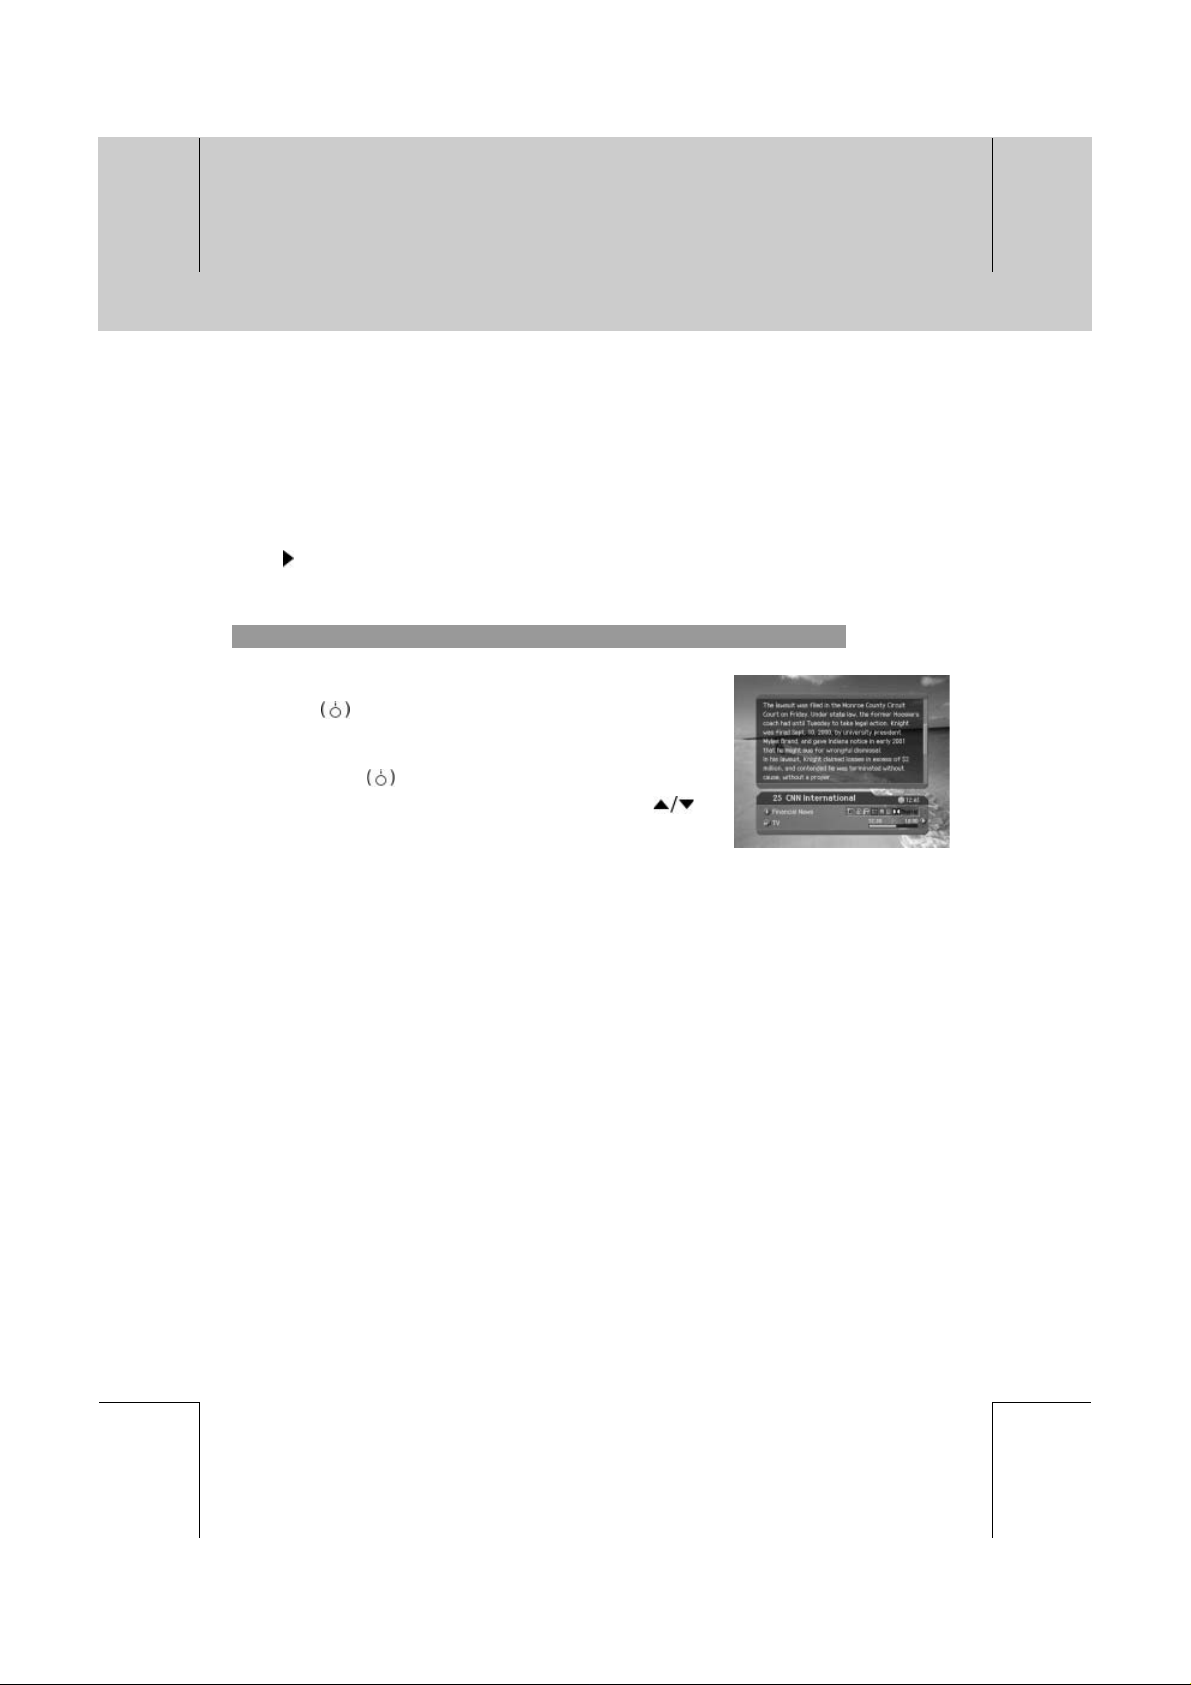
4.6 Programme Information (I- plate)
Programme information is always displayed for a specific period of time whenever you switch
channels. You can view the programme information by pressing the i
programme. Press the EXIT
1. General Information
General Information is displayed as follows on the screen.
button to hide the I-plate.
**
1. Channel number and channel name
2. Programme name
3. Icons
button while watching a
**
**
**
**
**
GB 28
Displayed only if this programme is reserved.
Represents parental level. It indicates the minimum level of ages that the programme
is targeted at.
Displayed only when the channel is a locked channel.
Displayed only when the channel is a scrambled channel.
Displayed only when subtitle information is available.
Displayed only when there is any teletext information.
Displayed only when the programme is a dolby digital one.
Displayed when the channel supports MHEG.
Displayed when the channel supports data channel.
**
**
**
**
**
Page 30
**
**
**
**
**
**
**
4. Current time
5. Detail programme information: displayed if detailed programme information is provided.
6. Channel looping mode and Channel List Name : if you select Within the current channel list
by selecting MENU - Edit channels - Channel Change Mode , the Icon of Channel looping
mode is displayed. And channel list, which you selected, is displayed.
7. Programme broadcasting time and progress bar: displays programme playing time and
progress bar.
8. Next programme Information : displayed if next programme information is provided. Press the
button to display the next programme information.
Note: If there is no available programme information, programme information is not displayed.
2. Detail Programme Information
You can see detailed information about the current programme.
Press the i
information.
Note:
• Press the i
• If the Detail information is more than one page, use
button to move to the previous or next page.
button where I-plate is displayed to view detailed
button again to hide the information box.
**
**
**
**
**
**
**
GB 29
**
**
**
Page 31

**
**
**
**
**
4. Basic Operation
**
4.7 Option List
You can view and confirm detailed information about the current channel and change the information
in necessary.
Note: Press the OPT+
following functions in the option list are performed to the current channel where cursor is
located.
1. Add a channel to favourite group
You can add current channels to the favourite group immediately. Also, you can add a channel to
multiple Favourite groups.
1. Press the OPT+
**
2. Select Favourite using the button, and press the
or OK button.
**
3. Select favourite group using the button and press
the OK
**
4. Press the OK button again on the selected Favourite
Group to release the registered channel.
**
5. Move to the parent menu using the button to save the
changes automatically.
**
button to register for Favourite Group.
button when the channel list is displayed to view Option List. Then the
button.
**
**
**
**
**
**
Note: For detailed information about how to change Favourite Group's name and how to register
Favourite Channel for the whole channels, refer to Chapter 5.
GB 30
**
**
**
**
**
Page 32

**
**
**
**
**
**
**
2. Lock/Unlock a Channel
You can lock or unlock the current channel while watching a programme.
1. Press the OPT+
**
2. Select Lock using the button, and press the or OK
button.
**
3. Select Lock option using the button, and press the
button.
OK
**
4. Select Unlock option using the button, and press the
button.
OK
**
5. You will be prompted to enter your Password. Enter your
password to unlock the channel.
**
6. Move to the parent menu using the button to save the
changes automatically.
**
Note: When switching to the Locked Channel, you must enter the password to watch a
programme.
button.
**
**
**
**
**
**
3. Delete a Channel
You can delete the current channel while watching a programme.
1. Press the OPT+
button.
**
2. Select Delete using the button, and press the OK
or button.
**
3. Select Yes in the confirmation message and press the OK
button.
**
4. Enter password using the NUMERICAL (0-9) button to
delete the current channel.
**
**
**
GB 31
**
**
**
Page 33

**
**
**
**
**
5. Channel List
**
3 types of channel lists are provided for easy and quick channel finding.
TV The list of all TV channels with 2 subgroups: one is sorted by channel number, the
Radio The list of all Radio channels with 2 subgroups: one is sorted by channel number, the
Favourite The list of the favourite channels with 5 subgroups that you can organise channels by
5.1 Displaying and Switching Channel List
You can display channel list using LIST button and switch into other channel on the channel list.
1. Press the LIST
2. Select your desired channel using the
3. Enter the channel numeric directly using NUMERICAL
4. Select On by going to MENU - Preferences -
**
Note:
• If there are multiple channels, press the PAGE-/PAGE+
• Whenever you press the TV/RADIO
other is sorted by channel name.
other is sorted by channel name.
your private taste.
button while watching a programme to
display the channel list.
button and
press the OK
(0-9) button to move cursor into your desired channel. And
then press the OK
channel.
Miscellaneous Settings - Option in CH List to display
scramble icon in the channel list.
Select OFF by going to MENU - Preferences -
Miscellaneous Settings - Optoin in CH List to display
only channel list without scramble icon.
list will be switched between TV and Radio channel list.
button to change the channel.
button to change into the selected
button while the channel list is displayed, the channel
button to move by channel.
**
**
**
**
**
GB 32
**
**
**
**
**
Page 34

**
**
**
**
**
**
**
5.2 Changing Channel List Group
You can select channel list by group.
1. Press the
view the group list.
**
**
2. Select your desired channel group using the button
to display its sub-groups.
**
**
3. Press the OK or button, select your desired
sub-group using the
**
4. The channel list for the selected sub-group is displayed.
Note:
• The sub-group of Favourite channel list may exist or not depending on your configuration.
•IfWithin the Current Channel List option is selected from MENU - Edit channels - Channel
Change Mode menu, you can only change programme within the selected channel list using
the P-/P+
button while the channel list is displayed to
button.
while your watching a programme.
button, and then press the OK
**
**
**
**
**
**
**
**
GB 33
**
**
**
Page 35

**
**
**
**
**
5. Channel List
**
5.3 Edit Channels
You can edit all channels or each channel by channel list group.
1. Press the MENU
2. Select Edit Channels using the
the OK
3. Select Edit Channel lists using the
press the OK
4. You will be prompted to enter your password. Enter your
password using NUMERICAL (0-9) button.
Note:
• Press the BACK
the MENU
• You can easily navigate all menus using the assigned numeric for each menu. Press the
MENU-2-1in order at remote control to select Edit Channel Lists menu.
1. Select a Channel Group
You can select the channel list group to edit. TV or Radio, and the subgroups from the channel
search for aerial and scramble channel lists are included as channel list groups.
1. Press the OK
List Group.
2. Select your desired Channel List Group using the
button, and press the OK button.
or button.
button.
button, and press
button, and
or button.
or button to save the changes and return to the previous menu, press
or EXIT button to exit the menu screen.
or button in group to display Channel
**
**
**
**
**
Note:
• Press the TV/RADIO
• For editing Favourite channel list, move to MENU - Edit Channels - Edit Favourite
Channels menu.
button to move to TV or RADIO channel list directly.
GB 34
**
**
**
**
**
Page 36

**
**
**
**
**
**
**
2. Delete Channels
You can delete one or more channels.
1. Move the cursor to the channel list using the
2. Select your desired channel, and then press the OK
button to delete the channel(s). You can select multiple
channels.
3. Select Delete in the right using the
button.
OK
3. Lock/Unlock Channels
You can lock or unlock one or more channels.
1. Move the cursor to the channel list using the
2. Select your desired channel, and then press the OK
button to lock/unlock the channel(s). You can select
multiple channels.
3. Select Lock in the right using the
button.
OK
button.
button, and press the
button.
button, and press the
**
**
**
**
**
Note:
• Only if locked channel(s) is selected or all channels are locked, Lock is switched into Unlock.
When you press Unlock, locked channel is switched into unlocked channel.
• Enter password using the NUMERICAL (0-9) button to watch locked channel.
4. Select/Unselect All Channels
You can select/unselect all channels at a time.
1. Select Select All in the right and press the OK
2. Select Unselect All in the right and press the OK
channels.
button to select all channels.
button to unselect all the selected
**
**
GB 35
**
**
**
Page 37

**
**
**
**
**
5. Channel List
**
5.4 Edit Favourite Channels
You can edit Favourite channel or Favourite channel list.
1. Press the MENU
2. Select Edit Channels using the
the OK
3. Select Edit Favourite Channels using the
and press the OK
Note:
• Press the BACK
the MENU
• You can easily navigate all menu items using the assigned NUMERICAL (0-9) button for each
menu. Press the MENU-2-2in order on the remote controller to select the Edit Favourite
Channels menu.
**
The buttons for editing the Favourite channel list are described in the following table.
**
Add
**
Remove
**
TV/RADIO**Switches between TV and Radio channel list.
**
Fav.Group**Changes Favourite channel list group.
**
Move
**
Rename
**
Sort
**
Unselect All**Unselect all the selected channel.
button.
button.
button, and press
button,
or button.
or button to save the changes and return to the previous menu. Press
or EXIT button to exit the Menu screen.
**
Adds Favourite channel.
**
Removes from the Favourite channel.
**
Moves the order of channel list within the Favourite channel list.
**
Renames the name of Favourite channel list.
**
Sorts channels by number or name in all TV/Radio channel list.
**
**
**
**
**
GB 36
**
**
**
**
**
Page 38

**
**
**
**
**
**
**
1. Add/Remove favourite channels
You can add favourite channel(s) to a specific Favourite channel list or remove the added favourite
channel(s) from the list.
1. Select Favourite Group using
2. Select your desired channel(s) in all TV/Radio channel list, and press
channel(s).
3. Select your desired channel(s) in Favourite channel list, and press
channel(s).
Note: You can switch between TV and Radio channel list using TV/RADIO
control or
2. Move favourite channels
You can move favourite channel to your desired location within the Favourite channel list.
This function is only changing the location without changing the channel number
1. Select Favourite Group using
2. Select your desired channel to move within the Favourite channel list and press the OK
button.
3. Select
4. Move the cursor to your desired location using the
5. The selected channel(s) is moved to the desired location you selected.
.
, and press the OK button.
.
to add Favourite
to remove Favourite
button at remote
.
button, and press the OK button.
**
**
**
**
**
3. Rename a favourite channel list
You can rename Favourite channel list.
1. Select Favourite group to rename using
2. Select
3. Enter the Favourite channel list name using the keyboard displayed on the screen.
4. When finishing entering the favourite channel list name, select OK, and press the OK
button.
, and press the OK button.
.
**
**
GB 37
**
**
**
Page 39

**
**
**
**
**
5. Channel List
**
4. Additional Features
Additional Features provides many useful functions which are necessary to add Favourite Channel.
**
Change between TV and Radio channel list
You can add not only TV channel(s) but also Radio channel(s) to Favourite channel list. Press to
switch all channel list into TV or Radio channels.
Note: You can also change into TV or Radio channel by pressing TV/RADIO
controller.
**
Select a favourite channel list
You can select your desired Favourite channel list to edit. Press
to display the Favourite channel list. Then select your desired
channel list using the
**
Sort a channel list
You can sort all TV or Radio channel lists by channel number or name for easy Favourite channel
searching. If channel lists are sorted by channel number,
button, all the channel lists are sorted by name. Or, if channel lists are sorted by channel name,
is switched into .Press this button to order channels by number.
**
Unselect all the selected channels
Press buttonto unselect all the selected channel.
button, and press the OK button.
is displayed. When you press this
button at remote
**
**
**
**
**
GB 38
**
**
**
**
**
Page 40

**
**
**
**
**
**
**
5.5 Channel Change Mode
You can change the channel either in the group or in the entire groups while watching a programme.
1. Press the MENU
2. Select Channel Change Mode using the
and press the OK
3. Select All Channels or within the current channel list
using the
Note: When Within the current channel list is selected, you can only change the channel
within the current channel list using the CH- /CH+
button.
button,
or button.
button, and press the OK button.
buttons.
**
**
**
**
**
**
**
GB 39
**
**
**
Page 41

**
**
**
**
**
6. Programme Guide
**
The Programme Guide displays programme information about each channel, based on the date and
time. You can also schedule your recording using the information given.
Note: Press the GUIDE
**
6.1 Viewing Programme Guide Information
You can view programme information for all channels.
1. Press the GUIDE
2. Move to previous or next programme within the same
channel using the
3. Move to another desired channel using the
there are multiple channels, use PAGE-/PAGE+
button to move to channels by page. Also, you can enter
your desired channel number using the NUMERICAL (0-9)
button on the remote controller to move to the channel
directly.
4. Select your desired programme, and press the OK
button. Then you can watch the programme if it is on air, or
you can reserve it if it is the following programme.
5. Press the i
Extended Information for the selected programme.
**
button in the selected programme to view
button to exit the Guide screen.
button.
button.
button. If
**
**
**
**
**
1. Viewing Guide Information by Groups
You can view programme information for desired channel list by groups.
1. Press the GUIDE
2. Press the REDbutton to display the channel list group.
3. Select your desired channel list group using the
button to display the appropriate sub-group.
4. Move the cursor to the sub-group using the
your desired sub-group using the
press the OK
5. The Programme Guide for selected channel list is
displayed.
button.
button, select
button, and then
button.
GB 40
**
**
**
**
**
Page 42

**
**
**
**
**
**
**
2. Viewing Programme Information Using Time Bar
You can quickly search for your desired time zone using the Time bar.
1. Press the GUIDE
2. Press the GREEN button to display Time Bar.
3. Select the Time Bar button using the
press the OK
of time. If you press the button repeatedly, the same
operation is repeated.
4. Each button functions as follows.
Now Moves to the current programme where the cursor is located.
Day Moves to one day before.
Day
5. Select
button and press the OK button to exit the Time Bar.
button.
button, and
button to move as your desired amount
Moves to the previous programme or 30 minutes before.
Moves to the next programme or 30 minutes after.
Moves to 2 hours before.
Moves to 2 hours after.
Moves to one day after.
**
**
**
**
Note: Guide provides programme information from the previous day to the next 7 days.
3. Reserving (Reserving a Watching)
You can automatically reserve your desired programme by selecting the scheduled programme and
pressing the OK
1. Select the desired programme and press the OK
button. The following message will be displayed.
2. Select Yes and press the OK
programme. When a reservation has been completed, the
icon is displayed on the reserved programme.
3. Select No and press the OK
programme.
4. If the channel is locked, parental controlled or restricted by
watching time, you will be prompted to enter your
Password. Enter your Password to complete the
reservation.
button.
button to reserve the
button not to reserve the
GB 41
**
**
**
**
**
**
Page 43

**
**
**
**
**
6. Programme Guide
**
6.2 Finding a Programme
You can find your desired programme by programme name or genre easily.
1. Press the GUIDE
2. Press the BLUEbutton to display Find screen.
3. Enter the programme name directly using the keyboard
displayed on the screen.
4. When completing entering programme name, select the
Find button, and press the OK
5. Select By Genre and press the OK
programme by genre.
Note:
• Select
keyboard screen.
• If you select Previous or Next on the Keyboard displayed on the screen and press OK
button, the keyboard layout is switched.
7. Select your desired genre and press the OK
**
8. If you select your desired programme from the Found
Programme List screen and press the OK
can watch the programme if it is on air, or you can reserve
your recording if it is the future programme. If you want to
find other programme, you might press the BLUE button to
display keyboard screen.
button.
button.
button to search
button and then press OK button to enter the programme name on the
button.
button, you
**
**
**
**
**
**
Note: The Found Programme List may differ depending on the provided programme information.
GB 42
**
**
**
**
**
Page 44

**
**
**
**
**
**
**
6.3 Viewing Reserved Programme
You can add or edit reserved programmes by viewing the reserved programme list.
1. Press the GUIDE
**
2. Press the YELLOW button to display the Schedule
screen.
**
3. Select the scheduled programme and press the OK
button to edit the reservation information.
**
4. Select vacant list and press the OK button to add a
new reservation schedule.
**
button.
**
**
**
**
**
1. Editing a Reserved Programme
1. Change the reserved Start Time using the button and
the NUMERICAL (0-9) buttons.
2. Change the reserved End Time using the
the NUMERICAL (0-9) buttons.
3. Change the Repeat mode using the
options are Once, Daily, and Weekly.
4. Select the Delete using the
button to delete the reserved programme.
5. Select the Cancel using the
button to cancel the editing.
6. Select the Save using the
button to complete the editing.
button and press the OK
button and press the OK
button and press the OK
button and
button. The
**
GB 43
**
**
**
**
**
Page 45

**
**
**
**
**
6. Programme Guide
**
2. Adding a Reservation
1. Enter your desired channel number using the
NUMERICAL (0-9) button. The channel name is
automatically displayed by channel number.
2. Enter your desired Start Time using the
the NUMERICAL (0-9) button.
3. Enter your desired End Time using the
NUMERICAL (0-9) button.
4. Select one of repeat mode options among Once, Daily, and Weekly using the button.
5. Select the Save button and press the OK
6. Select the Cancel button and press the OK
**
Note:
• You can reserve up to 20 programmes.
• If you desired programme is already reserved, adjust the reservation appropriately.
• IIf the channel is locked or restricted by watching time, you will be prompted to enter your
Password to complete the reservation.
button and
button and the
button to complete entering.
button to cancel the reservation.
**
**
**
**
**
GB 44
**
**
**
**
**
Page 46

**
**
**
**
**
7. Setting Preferences
**
You can set censorship, watching time, and all other items suitable for your environment.
Note:
• Press the BACK
the MENU
• You can easily select any item from the menu using the NUMERICAL (0-9) buttons.
**
7.1 Parental Control
You can set parental control for each programme and watching time. You can also change your
Password.
1. Press the MENU
2. Select the Preferences using the
the OK
3. Select the Parental Control using the
press the OK
4. When prompting message is displayed to ask Password,
enter the Password using the NUMERICAL (0-9) button.
**
1. Setting Censorship
or button.
or button to save the changes and return to the previous menu. Press
or EXIT button to exit the Menu screen.
button.
button, and press
button, and
or button.
**
**
**
**
Censorship Classification allows you to block programmes according to the age level you have
set.
1. Select the Censorship Classification using the
button.
2. Select your desired Age level using the
View All All programmes can be watched because there is no age limitation.
7 Programmes are blocked for children under the age of 7.
12 Programmes are blocked for children under the age of 12.
15 Programmes are blocked for children under the age of 15.
18 Programmes are blocked for children under the age of 18.
Lock All Programmes are blocked without considering the age level.
Note: You have to enter Password to watch the programme which is blocked by the age level.
button, and press the OK button.
button, and press the OK or
GB 45
**
**
**
**
**
**
Page 47

**
**
**
**
**
7. Setting Preferences
**
2. Setting Allow Watch Time
You can block programmes according to the watching time for all the channels.
1. Select the Allow Time Control using the
and press the
2. Select Enable or Disable the Allow Time Control using
the
**
Disable You can watch whenever you want regardless of
Enable You can watch only while the time specified by
3. When you have selected Enable, set the Start and End
Time using the NUMERICAL (0-9) buttons, and press the
OK
4. If you wish to cancel the entered time, select the Cancel
button, and press the OK
Note: Once the setting has been completed, you can watch programme only while the time
specified by Allow Time. Or you should enter the Password to watch any programme during
unspecified time.
or OK button.
button, and press the or OK button.
Allow Time.
Allow Time.
button.
button.
button,
**
**
**
**
**
3. Change Password
You can change the existing Password into new one.
1. Select Change Password using the
press the OK
2. Enter New Password using the NUMERICAL(0~9) button,
and select OK and press OK
3. Enter the New Password again to confirm the Verify
Password, and select OK and press the OK
Note: The Default Password is 0000. If you have forgotten your Password, please contact
your local product distributor.
or button.
button.
button, and
button.
GB 46
**
**
**
**
**
Page 48

**
**
**
**
**
**
**
7.2 Language Setting
You can set Language for Menu, Audio, and Subtitle.
1. Press the MENU
2. Selec Preferences using the
or button.
OK
3. Select Language Setting using the
press the OK
1. Audio/Subtitle Language
You can set the language for Audio and Subtitle. Default language is English.
1. Select Audio/Subtitle Language using the
2. Press the
3. Select your desired language using the
or OK button to display the available Language List.
2. Audio Priority
button.
button, and press the
button, and
or button.
button.
button, and press the OK button.
**
**
**
**
**
You can select the priority of audio.
1. Select Audio Priority using the
2. Press the OK
3. Select your desired option and press the OK
**
Auto Subtitles are displayed automatically in the predefined subtitle language.
Manual Subtitles are displayed in the language when you select the subtitle language by
or button to display the Language or Dolby Digital.
pressing the Subtitle
button.
button.
button at remote control.
3. Subtitle Display
You can select whether or not to display the Subtitle if provided.
1. Select Subtitle Display using the
2. Press the OK
**
Auto Subtitles are displayed automatically in the predefined subtitle language.
Manual Subtitles are displayed in the language when you select the subtitle language by
or button.
pressing the Subtitle
button.
button at remote control.
**
**
GB 47
**
**
**
Page 49

**
**
**
**
**
7. Setting Preferences
**
3. Subtitle Font
**
You can select the Subtitle font.
1. Select Subtitle Font using the
2. Press the
3. Select your desired option and press the OK
**
Variable Uses the horizontally variable Subtitle Font.
Fixed Uses the fixed Subtitle Font.
or OK button to display the Variable or Fixed option.
7.3 Time Setting
You can specify the current time and Power On/Off time.
1. Press the MENU
2. Select Preferences using the
or button.
OK
3. Select Time Setting using the
or button.
OK
button.
button.
button, and press the
button, and press the
**
button.
**
**
**
**
1.Setting Current Time
You can set the GMT Offset for current time.
1. Select GMT Offset using the
2. Press the OK
hour.
3. Select your GMT offset using the
Note:
• The current time is set automatically whenever GMT Offset changes.
• The default item is Auto. If GMT Offset is Auto, it is automatically set depending on your
country.
or button to display GMT list. GMT is changed by from 30 minutes to 1
button.
buttons, and press the OK button.
GB 48
**
**
**
**
**
Page 50

**
**
**
**
**
**
**
2. Power On
You can set the time when the product is automatically powered on.
1. Select Power On using the
2. Select either Enable or Disable the Power On using the
3. 3When you have selected Enable, enter the Channel No and Time using the
NUMERICAL(0~9) buttons, and select OK and press the OK
or button.
OK
**
Enable Uses the Power On and sets the Power on
Disable Not uses the Power On.
time.
3. Power Off
You can set the time when the product is automatically powered off.
1. Select Power Off using the
2. Select either Enable or Disable the Power Off using the
button.
**
Enable Uses the Power Off and sets the Power Off time.
Disable Not uses the Power Off.
3. When you have selected Enable enter the Time using the NUMERICAL(0~9) buttons, and
select OK
or button.
button,
button,
**
button.
button, and press the OK
**
**
**
**
Note: Once Power On/Off is specified, it is repeated everyday.
7.4 Schedule
You can reserve a programme to watch programme at your desired time.
1. Press the MENU
2. Select Preferences using the
press the OK
3. Select Schedule using the
the OK
4. Reserved Pregoramme List is displayed on the
screen. To edit the existing reservation, select your
desired reservation, and press the OK
add a new reservation, select a blank list and press
the OK
Note: For detailed information about Schedule, refer to Chapter 6.3.
or button.
button.
button.
button, and
or button.
button, and press
button. To
**
**
GB 49
**
**
**
Page 51

**
**
**
**
**
7. Setting Preferences
**
7.5 A/V Control
You can set Audio or Video Output Control.
1. Press the MENU
2. Select Preferences using the
OK
3. Select AV Control using the
OK
1. TV-SCART/VCR-SCART
You can set TV/VCR-SCART Output.
1. SelectTV-SCART using the
2. Select one option among
button
2. VCR-SCART
You can set VCR SCART Output.
1. Select VCR-SCART using the
2. Select one option among
or button.
or button.
button.
button, and press the OK or button.
CVBS/S-Video using the button, and press the OK
CVBS/S-Video using the OK or button.
**
button, and press the
button, and press the
**
button.
**
**
**
3. Audio Output
Set the Audio Output.
1. Select Audio Output using the
2. Select one option
4. Screen Ratio
You can set the aspect ratio of your TV.
1. Select Screen Ratio using the
2. Select one option
Stereo or Mono using the OK or button.
4:3 or 16:9 using the OK or button.
GB 50
button.
button.
**
**
**
**
**
Page 52

**
**
**
**
**
**
**
5. Display Format
You can select the Display Format according to TV Screen Ratio.
1. Select Display Format
2. If the Screen Ratio is set to 4:3, you can select one from 16:9 Letterbox/14:9
Letterbox/Centre Cutout using the
3. If the screen ratio is set to 16:9, this item will display Disable or Auto.
6. Dynamic Range
This function adjusts audio output of SCART, RCA, and RF cable with DOLBY DIGITAL.
When listening at a low volume, Dynamic Range reduces the volume of loud sounds such as
explosions, etc, and increases the volume of quiet sounds such as whispered dialog.
1. SelectDynamic Range using the
2. Select one option among
press the OK
Maximum No compression of Dolby Digital sound.
Standard Light compression of Dolby Digital sound. Set this when listening at low volume
Minimum Heavy compression of Dolby Digital sound. Set this when listening the TV by
button
in night. If you connect to a TV with a RCA socket, we will recommend Standard
for user.
connecting by RF cable. If you connect to a TV with a RF socket, we will
recommend Minimum for user.
button, and press the OK or button.
button, and press the OK button.
button, and press the OK or button.
Maximum/Standard/Minimum using the button, and
**
**
**
**
**
7. Downmix Mode
You can set the downmix mode
1. Select Downmix Mode using the
2. You can select one option from Dolby Surround or Stereo Normal.
button, and press the OK or button.
**
**
GB 51
**
**
**
Page 53

**
**
**
**
**
7. Setting Preferences
**
7.6 UHF Tuning
You can set the UHF Tuning channel.
1. Press the MENU
2. Select Preferences using the
OK
3. Select UHF Tuning using the
OK
1. UHF Channel
You can select UHF Channels for the TV. The Channel range and Frequency change according to
PAL Standard.
1. Select UHF Channel using the
2. Select channel range based on the following channel criteria using the
the OK
**
CH21-CH69 PAL I/G for Europe
CH28-CH69 PAL B for Europe/Australia
or button.
or button.
button.
button.
button, and press the
button, and press the
button, and press the OK or button.
button, and press
**
**
**
**
**
2. PAL
You can select the channel range and frequency table.
1. Select PAL using the
2. Select one option among PAL I/PAL G/PAL B using the
button.
3. UHF Offset
You can adjust fine tuning setting.
1. Select UHF Offset using the
2. Select a range between -4~+4 using the
button, and press the OK or button.
button, and press the OK or button.
button, and press the OK button.
GB 52
**
**
button, and press the OK
**
**
**
Page 54

**
**
**
**
**
**
7.7 Miscellaneous Settings
1. Press the MENU button.
2. Select Preferences using the
OK
3. Select Miscellaneous Settings using the
and press the OK
or button.
or button.
1. i-Plate Display Time
You can set the duration during which the Information box is to be displayed when you switch the
channel.
1. Select i-Plate Display Time using the
2. Select a value between 1~20 seconds using the
Note: When it is set to Disable, the i-Plate will not be displayed when you switch the channel.
2. OSD Transparency
You can set the transparency of On Screen Display.
1. Select OSD Transparency using the
2. Select one option among Disable/25/50/75 using the
button.
**
Disable Fully opaque screen
25, 50, 75 As the number is bigger, the screen is more transparent.
button, and press the
button,
button, and press the OK or button.
button, and press the OK button.
button, and press the OK or button.
button, and press the OK
**
**
**
**
**
3. Option in CH List
You can set the option of scrambled icon in the Option in CH List.
1. Select the Option in CH List using the
2. Select one option from On/Off using the
**
On Scrambleicon display in the channel list.
Off Scramble icon disappear in the channel list.
button, and press the OK or button.
button, and press the OK button.
**
**
GB 53
**
**
**
Page 55

**
**
**
**
**
8. Installation
**
8.1 Automatic Search
If your receiver is connected to the aerial and television, you can automatically search channels
without entering any other information.
1. Select MENU
2. Select Installation using the
or button.
OK
3. Select Automatic Search from Installation menu using the
button, and press the OK or button.
**
Search
Wait while the receiver searches for the channels, this may take a few minutes.
1. During operating search, the cursor is located at Stop
Therefore, if you press the OK
searching, the operation is stopped and the channels
found until then will be displayed.
2. If search operation is successfully completed, and the
channel does not exist, press the OK
reset the search operation again if necessary.
3. You can delete unnecessary channels from the searched
channels. Select your desired channels to delete and press
the OK
button. To delete all channels, select Select All to
select all channels, select Delete, and press the OK
button.
4. When completing Channel Search and deleting
unnecessary channels, select Save to save the changes.
button.
button, and press the
button during
button and try to
**
button. Then select Delete and press the OK
**
**
**
**
**
GB 54
**
**
**
**
**
Page 56

**
**
**
**
**
**
**
8.2 Manual Search
You can search channels manually by searching parameters, if you know the MUX information.
1. Select MENU
2. Select Installation using the
or button.
OK
3. Select Manual Search from Installation menu using the
4. Select Channel, Frequency, Mode, Guard Interval or
**
1. Channel Number
Enter your desired frequency channel to search. When entering frequency channel value, the
appropriate frequency value is entered.
Select one of channel using the
2. Frequency
button, and press the OK or button.
Network Search using the
or button.
button.
button, and press the
button, and press the OK
button, press the OK button.
**
**
**
**
Enter the your desired frequency to search directly. When entering frequency, the appropriate
channel for the entered frequency is automatically displayed on Channel.
Enter frequency using the NUMERICAL(0~9) button and press OK
3. Mode
Required for Channel Search. If you don't know the value, please select Auto.
Select among Auto, 2k and 8k using the
4. Guard Interval
Required for Channel Search. If you don't know the value, please select Auto.
Select one option among Auto, 1/4,1/8,1/16 and 1/32 using the
button.
button, and press the OK button.
button.
button, and press the OK
**
GB 55
**
**
**
**
**
Page 57

**
**
**
**
**
8. Installation
**
5. Network Search
If specified frequency channel information and other channel information are provided together, the
channel, which belongs to other frequency channel, is also searched.
Select one option between Enable and Disable using the
Note: You can search after the setting of Manual Search. Refer to 8.1 Automatic Search.
8.3 Default Setting
Default Setting restores the receiver to the default settings.
Warning: Please note that once you perform Default Setting, all data such as Channel List, and
To perform Factory Default:
6. Confirm again to start loading default setting. Enter Password using the NUMERICAL (0-9)
7. When completing the default setting, press the OK
User Configured data are deleted.
1. Press the MENU
2. Select Installation using the
or button.
OK
3. Enter Password using the NUMERICAL (0-9) button.
4. Select Default Setting using the
or button.
OK
5. Select Yes and press the OK
setting to Factory Default.
Select No and press the OK
return to the previous menu.
button to perform restoring.
Installation Wizard.
When default setting is completed, Installation Wizard is automatically displayed, which helps
Channel Search. For detailed information about Installation Wizard, refer to 3. Installation
Wizard.
button.
button, and press the
button, press the
button to restore all
or BACK button to
button.
button to automatically run the
**
**
**
**
**
GB 56
**
**
**
**
**
Page 58

**
**
**
**
**
9. Software Update
**
In order to maintain proper performance of this product, it is essential to have the most up to date
software. The latest news and release of software versions may be found at Humax website http://www.humaxdigital.com.
It is recommended that you periodically check for the availability of software upgrade.
Warning : You can search after the setting of Manual Search. Refer to 8.1 Automatic
Search.
9.1 OTA (Over the Air)
OTA, an abbreviation of Over-the-Air, means that downloads the software where the manufacturer
reserves the right to decide when and where to release through aerial.
Over the Air(OTA) is simply another alternative for downloading software versions. However, the
manufacturer reserves the right to decide when and where this software update can take place by
beaming latest software versions over the air via aerial. The software update via aerial will only
occur under the following circumstances.
1. The equipment should have appropriate loader software.
Caution: Please note that if you don't have normal loader software, the equipment may not
be updated or work after software update.
2. The manufacturer decides to release software downloading via a designated aerial
3. The equipment must be "tuned" properly to the same aerial that the manufacturer uses.
4. Update software when the quality of receiving signal strength is high. If the weather is not so
good that the quality of receiving signal strength is not recommendable, perform the software
upgrade later.
**
Caution:
• Please be careful to keep the power on and the power cord plugged in during software update.
If the power is off during software update, it may cause fatal damage to the product.
• Please be careful not to pull out the Signal line (co-axial Cable) during software update.
Update may be interrupted and the product may not work.
**
Note:
• The product cannot work at all during software update.
• It may take 5 ~10 minutes to update software.
• Scheduling operation cannot work during software update.
**
**
**
**
**
**
**
GB 57
**
**
**
Page 59

**
**
**
**
**
9. Software Update
**
**
1. If new software is found when powering on
1. A message will be displayed to notify that new software is
found.
2. Select Yes and press the OK
software.
3. Starts downloading new software. Please wait until the
updated is completed.
4. When completing the software update, the equipment is
automatically powered off and on again.
2. If updating software from Menu
1. Press the MENU button.
2. Select Installation using the
or button.
OK
3. Enter Password using the NUMERICAL (0-9) buttons.
4. Select Software Update using the
the OK
or button.
button to update the
button, and press the
button, and press
**
**
**
**
3. Automatic Update
You can set the product to find HUMAX software update site and update software automatically.
1. Select Automatic Update using the
press the OK
software.
2. When detecting update software, the following result is
displayed. If new software is not found by Automatic, use
Manual Update.
3. Select Yes and press the OK button to start updating.
Select No and press the OK
Select Later and press the OK
display as soon as you turn on the receiver next time.
4. When completing the software update, the product is automatically powered off and on again.
or button. Automatically search for new
button to return to the previous menu without updating.
button, and
button to update later. That means the update menu
GB 58
**
**
**
**
**
**
Page 60

**
**
**
**
**
**
**
4. Manual Update
You can perform Manual Update only if you know MUX information of software update correctly.
Among the Software Update Sites of HUMAX, the software search operation is performed only for
the satellites that have been set to Enable in Installation - Antenna Setting - Satellite Alternative
menu and that have all other Antenna Setting correct.
1. Select Manual Update from Software Update screen
using the
**
Select the channel number which provides update
software. You can also enter the frequency instead of
channel number in which updated software is provided.
2. Select Mode. If the information is not known, then Auto
can be selected.
3. Select Mode. If the information is not known, then Auto
can be selected.
4. Select Guard Interval. If the information is not known, then
Auto can be selected.
Note: How to setting parameters in Manual Update is
5. Select Search and Press the OK
software.
6. It is displayed whether or not New Software exist.
If new software does not exist, press the OK
return to the Manual Update Menu.
7. Select Yes and press the OK
Select NO and press the OK
previous menu.
Select Later and press the OK
That means the update menu display as soon as you turn
on the receiver next time.
8. Performs Software Update. Please wait until it is
completed.
9. When completing the software update, the product is
automatically powered off and on again.
button, and press the OK or button.
**
the same as how to set parameters in Manual
Search. Refer to Manual Search.
button to search
button to
button to start updating.
button to return to the
button to update later.
**
**
**
**
**
**
**
GB 59
**
**
**
Page 61

**
**
**
**
**
9. Software Update
**
5 Software Auto-Detecting and Time
You can specify the software detecting time.
If the receiver powers on during software auto-detecting, Detecting will stop.
1. Select Software Auto-Detecting from Software Update screen using the
2. Select Enable or Disable using OK
detecting time automatically.
3. When you select Enable, you can set the detecting time in the Auto-Detecting Time.
or button whether or not setting the software
9.2 S/W Update from PC
You can connect your receiver to the PC directly and update your software by transferring the new
software from the PC. Follow these steps to download new software from PC to this product.
1. Download new software file (HDF files) equivalent for this product model from our website into
your computer(http://www.humaxdigital.com).
2. Download and install download tool file from our website into your computer.
3. Connect your PC to this product with RS-232C serial cable.
4. Execute installed download tool, and then follow the instructions contained the download tool.
5. Press the STANDBY
**
button to make this product operating.
button.
**
**
**
**
**
GB 60
**
**
**
**
**
Page 62

**
**
**
**
**
10. System Information
**
You can view all system information, signal strength and quality.
1. Press the MENU
2. Select System using the
or button.
10.1 Status
You can view System information
1. Select Status using the
or button.
2. Confirm the information about Hardware version,
Software version, Loader version, System ID, and
Update Date
button.
button, and press the OK
button, and press the OK
**
**
**
**
10.2 Signal Detection
You can view the signal strength and signal quality receiving for the channel that is currently on AV.
1. Select Signal Detection using the
the OK
2. Displays the channel name, frequency, mode, and guard
interval of terrestrial frequency, and currently tuned
channel number and its name, which current channel
belongs to and the graphs and percentage of Signal
Strength and Quality of the channel.
or button.
button, and press
GB 61
**
**
**
**
**
**
Page 63

**
**
**
**
**
11. Games
**
This product provides various games for user's entertainment.
1. Press the MENU
2. Select Games using the
3. According to the instruction displayed on screen, you can enjoy the game using
and OK button.
Note: Press the EXIT
Press the GAME
button.
button, and press the OK or button.
or BACK button to exit the game.
button to start directly.
**
**
**
**
**
GB 62
**
**
**
**
**
Page 64

**
**
**
**
**
12. Manipulating your TV using Remote Control
**
You can manipulate TV using the remote control provided by Humax.
Note: This function may not be supported depending on TV model.
TV code setting
Note: While you are setting TV code, please keep pressing TV button.
1. Point remote control towards the remote control receiving parts of TV.
2. Press the TV
Keep pressing TV button for 3 seconds, then TV button LED turn on.
Press three numbers of TV code using the NUMERICAL (0~9) button orderly.
Refer to the following Code for TV manufacturer.
3. TV button LED blink twice when you detach your finger from the TV button.
4. TV power turns on or off when the setting is completed.
**
Brand
A MARK
ABEX
ACTION
ACURA
ADMIRAL
ADYSON
AIKO
AKAI
AKURA
ALARON
ALBA
ALLORGAN
AMBASSADOR
AMPLIVISION
AMSTRAD
ANAM
ANAM NATIONAL
ANITECH
ANITECH
ANSONIC
AOC
button, and the TV button LED blinks once.
[Code for TV manufacturer] Table
Code
002
016
110,124
004
030,042,076,099,123
016,063
029
015,099,109,124
064,071
051,055,062
004,017,018,064,123
118
049
063
004,018,047,049,145
003,004,052
024
004,071
071
127
002,009,015,056
Brand
ARCAM
ARCHER
ASUKA
ATLANTIC
AUDINAC
AUDIOSONIC
AUDIOVOX
AUMARK
AUTOVOX
BARCO
BASIC LINE
BAUR
BAYSONIC
BEAUMARK
BEC
BECRESE
BELCOR
BELL & HOWELL
BEON
BINATONE
BLACKSTRIPE
Code
062,063
002
064,071
098
081
018,071
002,029,052,084
026
068,076,097
086
004,064
018,087,097,099,102,108
052
050
099,110,124
040,099,108,109,110
009
006,038,106
018
063
040
**
**
**
**
**
**
**
GB 63
**
**
**
Page 65

**
**
**
**
**
12. Manipulating your TV using Remote Control
**
Brand
BLACKSTRIPE
BLACKSTRIPE
BLAUPUNKT
BLUE SKY
BLUE STAR
BOOTS
BOSCH-BAUER
BPL
BRADFORD
BRINKMANN
BRITANNIA
BROCKWOOD
BROKSONIC
BROTHER
BRUNS
BSR
BTC
BUSH
CANDLE
CAPEHART
CAPSONIC
CARNIVALE
CARREFOUR
CARVER
CASCADE
CATHAY
CCE
CCI
CENTURION
CGE
Code
106
108
059,060,061
064
075
063
098
075
052
123
062
009
002,067,085
071
126
093,118
064
004,017,018,064,075,093,
099,117
015,025,057
124
071
015
017
023,046
004
018
063,018,078
115
018
101,123
Brand
CIE
CIMLINE
CINERAL
CITIZEN
CLAIRTONE
CLARIVOX
CLARIVOX
CLATRONIC
CLATRONIC
CME
CONCERTO
CONDOR
CONIC
CONTEC
CONTINETAL
EDISON
CRAIG
CRIPTOVISION
CROSLEY
CROSLEY
CROWN
CTC
CURTIS MATHES
CXC
CYBERTON
DAEWOO
Code
133
004,117
029,084
015,019,025,026,029,040,
057,074
1056
018
125
098
127
004,005,017,018,028,042,
049,063,065,066,068,076,
079,087
025
098
110
004,017,052,056,062
141
052
105
023
110
004,018,019,052,127
098
006,015,019,020,021,023,
026,030,035,038, 25,040,
044,084,106
052
064
004,009,018,019,029,084,
133
**
**
**
**
**
GB 64
**
**
**
**
**
Page 66

**
**
**
**
**
**
**
Brand
DAINICHI
DANSAI
DAYTON
DE GRAAF
DECCA
DENON
DESMET
DIXI
DUAL
DUAL TEC
DUMINT
DUMONT
DYNATECH
EB TELECOM
ECTEC
ELBE
ELECTROBAND
ELECTROHOME
ELEKTA
ELIN
ELITE
ELMAN
ELTA
EMERSON
ENVISION
ERRES
EURO-FEEL
EUROMANN
**
Code
064
018
004,009,019,108
066
018,028,129
035
098
003,004,018,126
097
063
127
007,009
063
105
081
116
056
080,106,110
071
018
040,064,098,106
127
004
009,019,038,049,050,051,
051,053,054,055,056
067,072,074,075,085
015
018
071
071
**
Brand
EUROPHON
FERGUSON
FIDELITY
FINLADIA
FINLUX
FIRST LINE
FISHER
FORMENTI
FRONTECH
FUJITSU
FUNAI
FUTURETECH
GALAXIS
GBC
GE
EC
GELOSO
GENEXXA
GIBRALTER
GO VIDEO
GOLDSTAR
GOODMANS
GPM
GRADIENTE
GRADIN
GRAETZ
Code
127
018
062,097,104
106
018,028,051,093,129
118,004,062,063
038,041,063,097,106,
108,126
018,098,103
042,071,099
028,051,124
047,051,052,071,118
052
123,142
099
011,013,020,021,024,030,
034,050,075,084
018,028,063,095,110,129
004,099
042,064
007,009,015
026
000,001,009,015,016,018,
019,025,033,050,063,
071,093,110,124,140
017,018,028,051,063,133
064
022,025,046,082
098
042,099
**
**
**
**
**
**
**
GB 65
**
**
**
Page 67

**
**
**
**
**
12. Manipulating your TV using Remote Control
**
Brand
GRANADA
GRANDIN
GRUNDIG
GRUNPY
GRUNPY
HALIEAX
HALLMARK
HANSEATIC
HARLY DAVIDSON
HARMAN KARDON
HARVARD
HCM
HEMMERMANN
HINARI
HITACHI
HUANYU
HUSPI ELEKTRONIK
HYPERVISION
HYPSON
HYPSON
ICE
ICES
IMPERIAL
INDESIT
INDIANA
Code
018,028,063,109,124
075
018,059,060,068,137
051
052
071
050
018,089,097,098,099,
118,119
051
023
052
004,071,075
097
004,017,018,051,064
094,095,096,099,102,
108,109,110,111,112,
113,114,124,148,016,
017,025, 031,032,035,
037,042,048,063,066,
090,091
062
123
134
018,071,075
071,075
063,071
064
092,099,101,123
068
018
**
Brand
INFINITY
INGEKEN
INGELEN
INNOHIT
INNOVA
INTEQ
INTERBUY
INTERFUNK
INTERVISION
ISUKAI
ITT
JACSON
JBL
JCB
JEC
JVC
KAISUI
KAMP
KAPSCH
KATHREIN
KAWASHO
KEC
KENDO
KENWOOD
KINGSLEY
KLH
KLOSS
KMC
KONIG
Code
023
139
042
028,124
018
007
071
018,042,095,099
018,063,071,127,144
064
042,099,108
129
023
137
040
017,022,045,054
004,062,063,064,075
062
042,095,099
089
062,077
052
018,099,117,119,127,
009,015
062
124
012
033
004,005,017,018,042,061,
068
**
**
**
**
**
GB 66
**
**
**
**
**
Page 68

**
**
**
**
**
**
**
Brand
KORPEL
KORTING
KOYODA
KTV
KUBA ELECTRONIC
LENCO
LG
LIESENK & TTER
LIFETEC
LLOYTRON
LOGIK
LUMA
LUXMAN
LUXOR
LXI
M ELECTRONIC
MAGNAFON
MAGNASONIC
MAGNAVOX
MAJESTIC
MANDOR
MANESTH
MARANTZ
MARK
MATSUI
MATSUSHITA
MC MICHAEL
Code
018
098
004
015,019,052,055,056,
063,074
097
071,133,146,018,028,
071,118,124
025
018
071
016
000,006
099
025
068,094,099,102,124
007,020,023,038,040,
050,106
004,018,042,063,097,127
127
106
010,012,014,015,017,
023,051,057,058,110
006
071
063,071,098,117
015,018,023,089
018
004,005,018,049,063,
092,097,117
021,070
110
Brand
MEDIATOR
MEGATRON
MEI
MEMOREX
MEMPHIS
MGA
MIDLAND
MINERVA
MINUTZ
MITSUBISHI
MIVAR
MOTOROLA
MTC
MULTISTANDARD
MULTITECH
MUTIMEDIA
NAD
NAONIS
NATIONAL
NEC
NECKERMANN
NEI
NESCO
NETSAT
NIKKAI
NIKKO 007,015,020,029,038,040,
NISATO
NOBLEX
Code
018
002,035,050,109
056
004,006,025,026,033,036,
038,050,070,071,106
124
009,015,036,039,050
007,016,019,020,021,034
068
011
009,017,030,036,039,050,
068
062
024,030
009,015,025,026,056,062
127
004,052,062,063,099,127
132
040,044,050
099
068
009,015,017,025,046
018,059,087,089,099,102
018
051
018
016,018,028,040,062,064,
071124
050
1081
083
**
**
**
**
**
**
**
GB 67
**
**
**
Page 69

**
**
**
**
**
12. Manipulating your TV using Remote Control
**
Brand
NOKIA
NOSHI
NTC
OCEANIC
ONWA
OPTIMUS
OPTIONICA
ORION
OSAKI
OSAKI
OSAKI
OSAKI
OSAKI
OSAKI
OSO
OSUME
OTTO VERSAND
PALLADIUM
PANAMA
PANASONIC
PATHE CINEMA
PAUSA
Code
071,094,095,096,099,106,
108,143
008
029
042,099,106,118
052
038,044,070
030,043
018,049,051,067,085,097,
098,118
016
028
063
064
071
124
064
016,028,124
017,018,059,063,087,089,
093,097,098,099,102,
108,117,118
099
063,071
000,020,021,022,023,024,
026,030,035,036,038,
040,042,043,050,065,
068,070,079,099
062,098
004
Brand
PCE/PEC
PENNEY
PHASE
PHILCO
PHILIPS 007,008,009,010,011,012,
PHONOLA
PILOT
PIONEER
POLICOM
POLYRON
PORTLAND
PRANONI PRINCE
PRIMA
PRINZ
PRISM
PROFEX
PROLINE
PROSCAN
PROTEC
PROTECH
PROTON
PULSAR
QUASAR
**
Code
040,106,108
001,102,008,009,011,013,
015,016,019,020,021,
025,026,034,040,050
016
009,010,012,014,015,023,
035,057,058,085,123
013,014,018,019,023,
089,110,124,138,
018,098
009,015,019
042,044
068
071
009,019,029
099
040,106
124
021
004
119
015,020
099,127
004,018,063,071,
002,050
007,009,110,124,
021,024,043,070,
**
**
**
**
**
**
GB 68
**
**
**
**
**
Page 70

**
**
**
**
**
**
**
Brand
QUELLE
QUESTA
RADIO SHACK
RADIOLA
RADIOTONE
RADIX
RANK ARENA
RCA
REALISTIC
REKORD
REVOX
REX
RFT
RHAPSODY
R-LINE
ROADSTAR
ROYAL LUX
RTF
RUNCO
SABA
SAGEM
SAISHO
SAKIO
SALORA
SAMBERS
SAMPO
Code
005,018,087,093,097,099,
108,117,118
017
009,015,016,019,020,025,
038,043,050,052,106
018
071
108
017
008,009,020,021,030,034
009,015,016,019,025,038,
043,050,052,106
149
018
042,071,076,099,
088,126,
055,056,062
018
004,064,071
131
018
007,015
042,095,099
139
004,005,049,071,117
071
042,094,099,102,106,124
127
015,016,019
Brand
SAMSUNG
SAMSUX
SANDRA
SANSEI
SANSUI
SANYO
SBR
SCHAUB LORENZ
SCHNEIDER
SCIMITSU
SCOTCH
SCOTT
SEARS
SEG
SEI
SEI-SINUDYNE
SELECO
SEMIVOX
SEMP
SENTRA
SHARP
SHOGUN
SHORAI
Code
004,009,015,016,018,019,
025,026,050,063,071,
078,089,124,137
019
062
084
085
005,017,028,038,041,106,
107,108,124,129
018
099
018,064,071,097,136,143,
147
009
050
009,050,051,052,067
020,023,025,038,040,041,
047,050,051,106
017,063,071,126,127
049
097,099,117,118,127
042,076,099,100,119,120,
122,
052
040
040
017,019,030,043
009
118
**
**
**
**
**
**
**
GB 69
**
**
**
Page 71

**
**
**
**
**
12. Manipulating your TV using Remote Control
**
Brand
SIAREM
SICATEL
SIEMENS
SIGNATURE
SILVER
SIMPSON
SINGER
SINUDYNE
SKANTIC
SKY
SOGERA
SOLAVOX
SOLAVOX
SONITRON
SONOKO
SONOLOR
SONTEC
SONY
SOUND&VISION
SOUNDESIGN
SOUNDWAVE
SPECTRA
SPECTRICON
SQUAREVIEW
SR2000
SSS
STANDARD
STARLITE
STERN
SUNKAI
SUPERTECH
**
Code
127
121
018,059,060,061
006,040
017
057,058
127
049
099
018
098
016
042
108
004,018,071
042
018
005,017,073,087
127
050,051,052,057
018
133
002
047
106
009,052
004,063,064,098
052
042,076,099
117,118
097
**
Brand
SUPRA
SUSUMU
SYMPHONIC
SYSLINE
TADNDY
TANDY
TASHIKO
TASHKO
TATUNG
TEC
TECHLINE
TECHNEMA
TECHNICS
TECHNISAT
TECHNOL ACE
TECHWOOD
TEKNIKA
TELECO
TELEFUNKEN
TELEMEISTER
TELETECH
TELETON
TELEVIDEON
TENSAI
TESLA
TEXET
THOMAS
THOMAS
THOMSON
Code
025
064,010,012,014,015,023,
057,058,080
047
018
124
028,030,042,063,064
110
017,063
002,018,024,028,063,124
063,133
127button.
098
007,020,021,070
130
051
002,021,025
006,009,019,023,025,026,
029,036,051,052,057
135
025
098
004
017,057,063,099
098
064,093,098,118
135
062,064
110
124
068
**
**
**
**
**
GB 70
**
**
**
**
**
Page 72

**
**
**
**
**
**
**
Brand
THORN
TMK
TOKAI
TOMASHI
TOSHIBA
TOSONIC
TOTEVISION
TOWADA
TRIUMPH
TV TEXT
UHER
UHER
ULTRA
ULTRAVOX
UNIVERSAL
UNIVERSAL
UNIVERSUM
VECTRO RESEARCH
VESTEL
VICTRO
VIDEOTECHNIC
Code
018,028,040,087,107,
108,110,112,128,129
025,049,050
124
075
017,026,038,040,069,
106,108
056
019
099,127
049,069
089
098
127
081,124
127
011
013
018,071
015
018
012
013
Brand
VIDEOTON
VIDIKRON
VIDTECH
VISA
VISION
VOXSON
VTQ
WALTHAM
WARDS
WATSON
WATT RADIO
WEGA
WHITE
WESTINGHOUSE
WORLD-TECH
YAMAHA
YOKO
YORK
ZANUSSI
ZENITH
ZONDA
**
Code
094
023
009,017,050
004,005,017,018,042,068
098
042,099
126
063,094,099
006,009,010,011,013,014,
015,023,025,034,040,
043,050,051,058
018,098
097,127
017
018,062,098,106
133
009,015
018,063,071,133
108
076,099
006,007,029
002
**
**
**
**
**
**
**
**
GB 71
**
**
**
Page 73

**
**
**
**
**
**
**
**
DVD Player
**
**
**
**
GB 72
**
**
**
**
**
Page 74

**
**
**
**
**
**
1. Getting Started
**
Loading a Disc
You can switch to DVD player mode by pressing the DVD/STB button while in DTV mode.
1. Press the OPEN/CLOSE button to open the disc loading tray which is located at the front of
your receiver.
2. Put the selected disc on the tray and check that it is located correctly.
3. Press the OPEN/CLOSE button to close the tray.
4. The player is reading the disc. Please wait.
**
**
**
**
**
**
**
GB 73
**
**
**
Page 75

**
**
**
**
**
2. Playing a DVD-VIDEO Disc
**
You can recognise the DVD-Video disc by the logo.
Each disc has one or more chapters.
Your receiver moves within the titles or chapters to access easily and conveniently.
**
DVD-VIDEO Disc
TITLE 1 TITLE 2
Chapter 1
Buttons
Marker
2 3 Chapter 1 2 3
**
Marking
**
A-B repeat
**
Zoom on/off
**
Play / Pause
**
Fast backward/ Slow motion
**
Fast forward/Slow motion
**
Stop
**
Skip previous /Frame by frame
**
Skip next / Frame by frame
**
**
**
**
**
GB 74
**
**
**
**
**
Page 76

**
**
**
**
**
**
**
2.1 Playing a title
1. Press the OPEN/CLOSE button on the Front panel and insert a disc.
2. Press the OPEN/CLOSE button to close the disc loading tray.
3. Press the
4. Disc menu is displayed.
5. Select your desired item using the
button.
As the disc plays, the display shows the current chapter or title, and the elapsed playing time.
6. Return to menu when the title is fully played.
7. Press the
**
Stop/Resume Press the STOP button to stop playing.
Pause/Play Press the
**
2.2 General Information
Press the i button to display the information as below while playing a DVD.
Press the i
the screen.
The following information is displayed.
**
button to play the disc.
or NUMERICAL (0~9) button, and press the OK
button to move to the next title.
Press the
Press the
button, BACK button or EXIT button to hide the information displayed on
button to resume playing from where you stopped playing.
button to pause play.
button again to resume playing.
**
**
**
**
**
**
1. Title No.: Displays the title number.
2. Chapter No.: Displays the chapter number.
3. Play Time Information: Displays full playing time and currently playing time of the Disc or
chapter. Time display format can be changed by the TIME button.
4. Angle: Displays total number of angles and the number of currently playing angles.
5. Soundtrack : Displays audio information.
6. Repeat Mode : Displays repetition of the currently playing chapter.
**
**
GB 75
**
**
**
Page 77

**
**
**
**
**
2. Playing a DVD-VIDEO Disc
**
2.3 Search
You can move directly to your desired chapter/title /time/marker.
Press the SEARCH button to change search mode.
Press the EXIT
1. Chapter/Title
**
1. Press the SEARCH button repeatedly to select a chapter
or title.
2. Enter your desired chapter or title number using the
NUMERICAL (0~9) button when your desired item is
displayed.
If you enter more than the total chapter or title number, the
number entered is discarded. In that case, enter the
chapter or title number again.
Press the OK 38
button to immediately move to the beginning of a
selected chapter or title.
2. Time
**
1. Press the SEARCH button repeatedly to select time.
2. Enter your desired time using the NUMERICAL (0~9)
button when time is displayed.
If you enter more than the total play time, the entered
number is discarded. In that case, enter the time again.
3. Press the OK
immediately.
or BACK button to immediately hide search mode on the screen .
button to move to the selected time
**
**
**
**
**
3. Marker
**
1. Press the SEARCH button repeatedly to select Marker.
2. Select your desired marker from the Marker list using the
or button, and then press the OK button. The
chapter or title is played from the marked point.
3. Select a marked point in the Marker list and press the
CLEAR
button to delete the mark.
GB 76
**
**
**
**
**
Page 78

**
**
**
**
**
**
**
Note:
• If the marking list is full, you cannot add a new mark and a
Fully Marked message is displayed.
• Press the Marker MARKER button to mark while watching
a channel.
2.4 Skipping Chapter
You can move to the beginning of the current chapter, the next chapter, or the previous chapter.
1. Press the SKIP NEXT
chapter currently playing to the next chapter.
2. Press the SKIP PREVIOUS
beginning of the chapter currently playing.
3. Press the SKIP PREVIOUS
the beginning of the previous chapter.
Note: Press the SKIP NEXT
button to display the number of the chapter
currently moving on the top right of the screen.
button to move from the
button to move to the
button again to move to
or SKIP PREVIOUS
**
**
**
**
**
2.5 Repeat Mode
You can repeat the currently playing chapter, title or disc.
1. Press the REPEAT MODE button to display current repeat
mode during playing.
2. Press the REPEAT MODE button repeatedly to change
repeat mode in the order of Chapter -> Title ->Disc -> Off.
Note: Select Off to disenable repeat mode.
**
**
GB 77
**
**
**
Page 79

**
**
**
**
**
2. Playing a DVD-VIDEO Disc
**
2.6 Repeat a section of disc
You can set the sections to repeatedly switch between each other.
1. Press the A
repeat point to A.
2. Press the A
between Section A and B.
3. Play the setting start and end section repeatedly.
4. If the A
B button to release the setting.
If the A
the
press the
2.7 Fast Playing
Press the FORWARD button to increase the forward
playing speed.
Press the FORWARD
playing speed.
Each time you press the FORWARD
button, the playing speed options are rotated as below.
B button while playing a disc to set the
B button repeatedly to repeat playing
B setting is displayed on the screen, press the A
B setting is not displayed on the screen, press
button to display the screen setting, and then
button again to release the setting.
button to increase the backward
or BACKWARD
**
**
**
**
**
Forward x2 -> x4 -> x8 -> x16 -> normal play -> x2 -> x4 ...
Backward x2 -> x4 -> x8 -> x16 -> normal play-> x2 -> x4 ...
Note:
• The DVD subtitle is displayed as forward x2. If you increase the playing speed faster than this,
the subtitle is not displayed.
• Press the
button to play at normal speed.
GB 78
**
**
**
**
**
Page 80

**
**
**
**
**
**
**
2.8 Slow Motion
1. Press the PAUSE button to temporarily stop the
currently playing DVD disc.
**
2. Press the FORWARD button to play in slow motion.
Each time you press the FORWARD
slow motion speed options are rotated as below.
Slow motion 5%->8%->12%->20%->30%->40%
Note: Press the
2.9 Zooming in and out
1. Press the ZOOM button to zoom in or out. Press the
ZOOM
button to turn Off.
2. Press the ZOOM+
in or out.
Press the
in/out screen.
**
button, the
->50%-> 60%->70%->80%->90%->
normal play -> 5%->8%......
button to play at normal speed.
button to turn On. Press the ZOOM
**
or ZOOM- button to zoom
button to move within the zoomed
**
**
**
2.10 Subtitle/Audio
If the disc provides several types of subtitles or audio information, you can change the subtitle or
audio.
Press the SUBTITLE
select your desired subtitle /audio language.
Note:
• Subtitle/audio languages can be changed according to the
DVD title.
• Select Off in Subtitle to not display a subtitle.
or AUDIO button repeatedly to
GB 79
**
**
**
**
**
Page 81

**
**
**
**
**
2. Playing a DVD-VIDEO Disc
**
2.11 Listening Mode
Press the OPT+ button repeatedly to select your desired
listening mode.
Note: Listening mode can be different according to
DVD title.
2.12 Time display
Press the TIME button repeatedly to select your desired
listening mode.
Total elapsed Displays the total elapsed time since the
title has been playing.
Total remain Displays the total remaining time to be
played.
Single elapse Displays the elapsed time for the currently
playing chapter.
Single remain Displays the remaining time to be played for
the currently playing chapter.
Note:
• The selected time play mode is also adjusted in the front panel.
• Total time on the screen is displayed as Total in the front panel; Single chapter on the screen
is displayed as Single in the front panel.
**
**
**
**
**
2.13 Angle
You can select the camera angle.
Press the ANGLE
angle.
Note: The number of angles can be changed according to the
DVD.
button repeatedly to select your desired
GB 80
**
**
**
**
**
Page 82

**
**
**
**
**
3. Playing a Audio CD
**
3.1 Playing Audio CD
1. Press the OPEN/CLOSE button on the Front panel and
insert a disc.
2. Press the OPEN/CLOSE button to close the disc loading
tray.
3. The main menu will be displayed to list all audio files in the
disc as below.
4. Select your desired item using the button and press the OK button. The audio is
played.
You can move by page using the PAGE-/PAGE+
You can change play mode by pressing the PLAY MODE button repeatedly.
You can also change repeat mode by pressing the REPEAT MODE button repeatedly.
Note: You can play tracks in the same way as with a disc.Please refer to chapter 2.2 Playing
a Title.
3.2 Detail Information
If you select MP3 file on the Main Screen, press the i button to display its detailed information.
button.
**
**
**
**
**
You can press the i
button to hide the information displayed on the screen and return
to main screen.
Note: This is only available for MP3 files.
button, BACK button or EXIT
**
**
GB 81
**
**
**
Page 83

**
**
**
**
**
3. Playing a Audio CD
**
You can see current status of your audio player at a glance.
The following information is displayed.
**
**
1. Track No or Displays the track number.
2. Play Status Displaysthe play status.
3. Time Display Displays the currently playing time of an audio CD.
4. Listening Mode Displays listening mode.
5. Play Mode Displays play mode.
6. Repeat Mode Displays repetition of the currently playing track.
**
**
**
**
**
GB 82
**
**
**
**
**
Page 84

**
**
**
**
**
**
**
3.3 Playlist Menu
1. Press theLIST button while playing an Audio Disc to
display Playlist menu.
2. Press the
menu.
3. Press the OK
select an option.
Note: If Playlist is On, the Track Number is displayed in the assigned order in the Playlist and
the Disc in Repeat Mode is disabled.
Edit Playlist Edits the playlist. Refer to 3.10 to edit.Select your
Add All Tracks to Playlist Adds all tracks on the audio disc to the playlist.
Enable Playlist The playlist is set to On and track(s) on the playlist is
Disable Playlist The playlist is set to Off and all tracks on the audio disc
Delete Playlist All tracks on the playlist are deleted and the playlist is
button to select your desired Playlist
or button to move to sub-menu or
desired tracks and press the OK
BACK
(are) played.
are played.
enabled.
or EXIT button to return to the Playlist.
button. Press the
**
**
**
**
**
3.4 Search
You can directly move to your desired place. Press the SEARCH button to change search mode.
1. Track
**
1. Press the SEARCH button to select a track.
2. Enter your desired track number using the NUMERICAL
(0~9) button. If you enter more than the total number, the
number entered is discarded. In that case, enter the track
number again.
3. Press the OK
selected track immediately.
button to move to the beginning of
GB 83
**
**
**
**
**
Page 85

**
**
**
**
**
3. Playing a Audio CD
**
2. Time
**
1. Press the SEARCH button repeatedly to select time.
2. Enter your desired time using the NUMERICAL (0~9)
button when time is displayed. If you enter more than the
total play time, the entered number is discarded. In that
case, enter the time again.
3. Press the OK
immediately.
Note: Time moves to the appropriate point within current playing track.
3. Marker
**
1. Press the SEARCH button repeatedly to select a Marker.
2. Select your desired marker from Marker list using the
button, and then press the OK button. The track is
played from the marked point.
3. Select a marked point in the Marker list and press the
CLEAR
button to move to the selected time
button to delete the mark.
**
**
**
**
**
Note:
• If you press the MARKER button during playing a track, it is immediately marked at the point.
• If the marking list is full, you cannot add a new mark and a Fully Marked message is
displayed.
3.5 Listening Mode
Press the OPT+ button repeatedly to select your desired listening mode.
Note: If you change listening mode, the sound is
immediately changed into the selected option.
GB 84
**
**
**
**
**
Page 86

**
**
**
**
**
**
**
3.6 Time Display
Press the TIME button repeatedly to select your desired listening mode.
Total Displays the total time of a disc.
Total elapsed Displays the total elapsed time since the
Total remain Displays the total remaining time to be
Single Displays the total time of the current track.
Single elapsed Displays the elapsed playing time of the
Single remain Displays the remaining time to be played for
Note: The displayed time mode on the screen is also adjusted in the front panel.
3.7 Fast Playing
1. Press the FORWARD button to increase the forward
playing speed .
2. Press the FORWARD
backward playing speed.
3. Each time you press the FORWARD
BACKWARD
rotated as below.
**
Forward x2 -> x3 -> x4 -> normal play -> x2 -> x3 ...
Backward x2 -> x3 -> x4 -> normal play -> x2 -> x3 ...
disc has been playing.
played for the disc.
current track.
the currently playing track.
button to increase the
or
button, the playing speed options are
**
**
**
**
**
Note:
• Press the
• This is also applied to menu-playback, audio main screen, and playlist.
button to play at normal speed.
**
**
GB 85
**
**
**
Page 87

**
**
**
**
**
3. Playing a Audio CD
**
3.8 Play Mode
1. Press the PLAY MODE button during playing to
display play mode.
2. Press the PLAY MODE
the play mode in the order of Normal -> Shuffle ->Intro ->
Normal...
**
Normal Plays in normal track order.
Shuffle Plays in random track order.
Intro Plays the beginning of a track for 10
seconds.
3.9 Repeat Mode
1. Press the REPEAT MODE button during playing to display
current repeat mode.
2. Press the REPEAT MODE button repeatedly to rotate the
repeat mode in the order of Off -> Disc -> Track ->
Playlist -> Off.
**
button repeatedly to rotate
**
**
**
**
**
Note:
• Select Off to disenable repeat mode.
• If the playlist is set to Off, you cannot select repeat mode.
• The Disc repeat mode is disable during playing in the Playlist.
3.10 Playlist Editor
You can edit the playlist to play music file with the making lists.
1. Press the PROGRAM
playing to display Playlist Editor.
2. Select Edit Playlist using the
the OK
button.
or LIST button during
or button and press
GB 86
**
**
**
**
**
Page 88

**
**
**
**
**
4. Settings (DVD part)
**
1. Add Track
**
Select your desired track from All, and then press the OK button or directly enter your desired
track number using the NUMERICAL (0~9) button to add to the Playlist.
2. Delete Track
**
1. When All is highlighted, press the ANGLE button to move the highlight into Playlist.
2. Select your desired track and press the CLEAR
3. Play Track
**
When you complete editing the playlist, press the PLAY/PAUSE button to play tracks in the
assigned order on the Playlist.
Note: Directly enter your desired track number in playlist using the NUMERICAL (0~9) button,
and press the OK
button to add to the Playlist.
3.11 MP3 Disc Scan
In case of MP3 Disc, you can scan the total play time of the mp3 file exists in the disc.
1. Press the DISC MENU
2. Press the OK
3. The total time is displayed when completing scanning.
or button to start scanning.
button to scan an MP3 Disc.
button to delete it.
**
**
**
**
**
Note: If the tray is open and then closed, the scanning
process is reset.
You can set all other items suitable for your environment.
Note:
• Press the BACK
return to the previous menu. Press the MENU
button to exit the Menu screen.
• You can easily select all menu items using the assigned
numerical button for each menu.
or button to save the changes and
**
**
or EXIT
GB 87
**
**
**
Page 89

**
**
**
**
**
4. Settings (DVD part)
**
4.1 Language
You can set Language for Menu, Audio, and Subtitle.
1. Press the MENU
2. Select Language using the
or Stereo Normal.
OK
1. Player Menus/Disc Menus/Disc Audio/Disc Subtitle Language
**
You can set the language for Menu, Audio and Subtitle. Default language is English.
1. Select Player Menus/ Disc Menus/ Disc Audio/Disc Subtitle Language using the
button.
2. Press the OK
3. Select your desired language using the
Disc Menus Set the language of the Disc title.
Disc Audio Set the audio language of the DVD disc.
Disc Subtitle Set the subtitle language of the DVD disc.
button.
button, and press the
or button to display the available Language List.
button, and press the OK button.
**
**
**
**
**
GB 88
**
**
**
**
**
Page 90

**
**
**
**
**
4. Settings (DVD part)
**
4.2 Audio
You can set Audio.
1. Press the MENU
2. Select Audio using the
or button.
1. LPCM
You can select digital audio output according to the type of audio system you use.
Select LPCM using the
PCM Set when connecting to an audio system without a Dolby Digital, DTS, or
2. Dynamic Range
button.
button, and press the OK
button , and press the OK or button.
other special decoder.
**
**
**
**
You can set the dynamic range.
Select Dynamic Range using the
Maximum you can set the dynamic range to maximum.
Standard Light compression of Dolby Digital sound. Set this when listening at low
volume in night. If you connect to a TV with a RCA socket, we will
recommend Standard for user
Minimum Heavy compression of Dolby Digital sound. Set this when listening the TV
by connecting by RF cable. If you connect to a TV with a RF socket, we will
recommend Minimum for user
3. Downmix Mode
You can set the downmix mode.
Select Downmix Mode using the
one option from Dolby Surround or Stereo Normal.
button, and press the OK or button.
button, and press the OK or button. You can select
**
GB 89
**
**
**
**
**
Page 91

**
**
**
**
**
4. Settings (DVD part)
**
4.3 Display
You can set video display.
1. Press the MENU
2. Select Display using the
or button.
**
1. TV Aspect
**
You can set the aspect ratio of your TV.
1. Select TV Aspect using the
2. Select one option among 16:9 Widescreen/4:3 Letter Box/4:3 Pan&Scan using the
button, and press the OK button.
2. SCART Output
**
You can set the scart output.
1. Select SCART Output using the
2. Select one option among CVBS/S-Video/RGB using the
button.
**
CVBS/S-Video/RGB Ifyou set the YPbPr/RGB switch which is located in the back of
button.
button, and press the OK
button, and press the OK or button.
button, and press the OK or button.
button, and press the OK
your receiver,LPCM to YPbPr with setting scart output to RGB,
the video signal is not output to scart. Please use the component
terminal.
**
**
**
**
**
3. On Screen Info
Display the option information.
Select On Screen Info using the
On Displaythe on screen information when you change the option.
Off Not display.
button, and press the OK or button.
GB 90
**
**
**
**
**
Page 92

**
**
**
**
**
4. Settings (DVD part)
**
4. Panel Display
You can set the front luminosity.
1. Select Panel Display using the
2. Select one option among Dim/Bright/Dim for Playback using the
OK
**
5. Power Saving
You can set the power saving.
1. Select Power Saving using the
2. Select one option among Screen Saver Time/Audio
button.
Dim Front panel luminosity is dim.
Bright Front panel luminosity is bright.
the OK
Screen Saver/Standby Time using the
press the OK
or button.
or button.
button, and press the OK or button.
button, and press
button, and
**
button, and press the
**
**
**
Screen Saver Time If there's no action for assigned amount of time
(3min/10min/30min), screen saver is run. If the screen saver time is
set to NEVER, the screen saver time is not enabled.
Audio Screen Saver If standby time is set to On, audio is muted while the screen saver
is on. If standby time is set to Off, the audio screen saver is not
enabled.
Standby Time If the assigned amount of time (5min/15min/35min) has elapsed
without playing, it automatically goes to Standby status. If Standby
time is set to NEVER, Standby time is not enabled.
GB 91
**
**
**
**
**
**
Page 93

**
**
**
**
**
4. Settings (DVD part)
**
4.4 Disc
You can set the option of Disc.
1. Press the MENU
2. Select Disc using the
or button.
1. Video CD Playback Control
You can set the playback control of video CD.
Select Video CD Playback Control using the
On Displayvideo CD playback when the video CD is playing.
Off Not display video CD playback.
2. Player Version
button.
button, and press the OK
**
button, and press the OK or button.
**
**
**
**
You can view player information.
Select Player Version using the
Confirm the information about Player Version and Release Date.
button, and press the OK or button.
4.5 Parental Control
You can set parental control and change your password.
1. Press the MENU
2. Select the Parental Control using the
press the OK
3. When prompting message is displayed to ask Password,
enter the Password using the NUMERICAL (0~9) button.
button.
button, and
or button.
GB 92
**
**
**
**
**
Page 94

**
**
**
**
**
4. Settings (DVD part)
**
1. Country
You can set the Country.
Select Country using the
International You can set your desired country.
USA You can set Country to USA.
2. Parental Level
You can set the parental level.
1. Select Parental Level using the
the OK
2. If Country set to International, select one option among
Unrestricted / General / Most Audience / Mature Young
/ Teenage / Mature Teenage / Mature Audience / Adult /
Always Restricted using the
OK
If Country set to USA, select one option among
Off/G/PG/PG-13/R/NC-17/X using the
press the OK
or button.
button.
button, and press the OK or button.
button, and press
button, and press the
button, and
button.
**
**
**
**
Note: When you set to Unrestricted, the all discs play without password.
3. Password
You can change the current password into new one.
1. Select Change Password using the
press the OK
2. Enter New Password using the NUMERICAL(0~9) button,
and select OK and press OK
3. Enter the New Password again to confirm the Verify
Password, and select OK and press the OK
Note: The Default Password is 0000. If you have forgotten your Password, please contact your local
product distributor.
or button.
button.
button, and
button.
GB 93
**
**
**
**
**
**
Page 95

**
**
**
**
**
**
Appendix1. Menu Map
**
STB
**
**
**
**
GB 94
**
**
**
**
**
Page 96

**
**
**
**
**
**
**
**
DVD
**
**
**
**
**
**
GB 95
**
**
**
Page 97

**
**
**
**
**
Appendix2. Trouble Shooting
**
Before contacting your local service, please make sure following instructions. If the product does not
work normally after completing the following trouble shooting, please contact your local product
distributor or service centre.
STB and DVD
1. No message is displayed on the front panel or product has no power
- Check the main power cable and check that it is plugged into a suitable power outlet.
- Check whether the Power Switch is On.
2. No picture
- Make sure that the product is in Operation Mode.
- Make sure that the AV Cable is firmly connected to the TV.
- Make sure that Antenna line is correctly connected to the equipment.
- Check the brightness level of TV.
- Check the channel is on air.
3. Poor picture & sound quality
- Install the antenna in a place where there is no obstacle.
- Make sure there is no mobile phone or microwave oven near the equipment.
- Use 75
4. No or poor sound
- Check the volume level of the TV and Receiver.
- Check the Mute status of the TV and product.
- Press the Audio button to change the Sound Track type.
5. Remote controller does not operate
- To control the equipment with the remote controller, the remote controller's top end should
directly point towards the receiving part of receiver's remote controller.
- Check the battery of Remote controller.
6. Reservation is not available
- Check whether it it not overlapped with other reservation.
- Cehck whether the power switch is off.
7. Video from the VCR is displayed but audio is not played.
- Audio may not sound when you watch the video from the VCR through the RF terminal of the
TV when the video signal is inputted from SCART of your receiver. To watch video from the
VCR through RF terminal, connect the VCR and TV with the RF cable. (For more information,
refer to the VCR user manual.)
coaxial cable to connecting TV and antenna.
**
**
**
**
**
GB 96
**
**
**
**
**
Page 98

**
**
**
**
**
**
**
DVD only
1. Disc can't be played
- Ensure the disc label is upwards.
- Clean the disc.
- Check if the disc is defective by trying another disc.
- Check region code.
2. No return to start-up screen when disc is removed.
- Reset by switching the player off, then on again.
- Check to see if the proramme requires another disc to be loaded.
3. Distored sound from Hi-Fi amplifier
- Check to make sure that no audio connections are made to the amplifier phono input.
4. No color in picture
- The disc format is not according to the TV-set used.(PAL/NTSC)
Error Message (STB only)
Error message Possible causes What to do
No or bad signal The aerial is not pointing properly. Adjust aerial.
The channel is
scrambled or not
available.
The channel is
scrambled.
The audio is not
available.
The channel has signal, but no audio
or video.
The channel is not deleted by
broadcasting company.
The channel is for data broadcasting. Cannot watch the channel in usual
This digital terrestrial receiver does
not support the service that enables to
descramble the scrambled channels.
The channel has signal, but no Audio. Press the Audio button to confirm if
Check the cable from the aerial.If you
cannot resolve the problem you may
need to have your aerial and
installation tested by a professional.
Confirm if the channel is currently on
air.
way.
the channel has Audio.
**
**
**
**
**
**
**
GB 97
**
**
**
Page 99

**
**
**
**
**
Appendix3. Specification
**
Tuner & Channel
RF Loop through Output connector IEC-Type, IEC 169-24, male
Frequency Range 48.5MHz to 226.5MHz (VHF)
470MHZ to 862MHz (UHF)
1Signal Level -10 to –70dBm
Demodulation OFDM
Mode 2K, 8K
MPEG Transport Stream A/V
Decoding
Transport Stream MPEG-2 ISO/IEC 13818
Transport Stream Specification
Profile Level MPEG2 MP@ML
Video Input Rate 15 Mbit/s Max
1Aspect Ratio 4:3, 16:9 Letter box
Video Resolution 720x576, 720x480
Audio Decoding MPEG/MusiCam LayerI&II
Audio Mode Single channel/Dual channel/Joint Stereo/Stereo
Memory
Flash Memory
Graphics (MPEG) & System Memory
EEPROM
Available Disc(DVD)
Available Reading MP3/Audio CD/VCD/Photo
A/V & Data In/Out
Video RCA/SCART Video Output(CVBS, RGB, S-Video)
Audio R/L RCA/SCART Volume and Mute Control (Resolution:
S/PDIF Digital Audio Output, Fiber-Optic(Resolution : 20 bits)
RS-232C Transfer Rate:115,200 bps,3 pin Socket type
4 Mbytes
16 Mbytes
8 Kbytes
CD/CD-R,RW/DVD-R,RW/DVD+R,RW,SVACD
20 bits DAC, MAX. 2Vrms)
**
**
**
**
**
GB 98
**
**
**
**
**
Page 100

**
**
**
**
**
**
**
**
Power Supply
Input Voltage 90~250V AC, 50/60Hz
Type SMPS
Power Consumption Max. 35W
Stand by Power 5W
Protection 1Separate Internal Fuse.
The input should be protected against lighting
Physical Specification
Size 420mm X 75mm X 300 mm
Weight (Net) Around4.8Kg
Operating Temperature 0 to +45
Storage Temperature -10 to+70
**
**
**
**
**
**
GB 99
**
**
**
 Loading...