

Page 1

HP VISUALIZE fx5 and fx10
Configuration Guide
for Windows NT and Windows 2000
Manufacturing Part Number: A5021-90015
Edition E0600 Printed in U.S.A. June 2000
© Copyright 2000 Hewlett-Packard Company.
Page 2

Notice
The information contained in this document is subject to change without
notice.
Hewlett-Packard makes no warranty of any kind with regard to this
material, including, but not limited to, the implied warranties of
merchantability and fitness for a particular purpose. Hewlett-Packard
shall not be liable for errors contained herein or for incidental or
consequential damages in connection with the furnishing, performance,
or use of this material.
Hewlett-Packardassumesnoresponsibilityfortheuseorreliabilityofits
software on equipment that is not furnished by Hewlett-Packard.
This document contains proprietary information that is protected by
copyright. All rights reserved. No part of this document may be
photocopied, reproduced or translated to another language without the
prior written consent of Hewlett-Packard Company.
Hewlett-Packard Company 3404 E. Harmony Road Fort Collins, CO 80528-9599 USA
2
Page 3

Contents
1. HP Visualize fx5 and fx10 Graphics Cards
Overview . . . . . . . . . . . . . . . . . . . . . . . . . . . . . . . . . . . . . . . . . . . . . . . . . .10
The HP Visualize fx5 and fx10 Driver . . . . . . . . . . . . . . . . . . . . . . . . . . .11
Updating the HP Visualize fx5 and fx10 Driver . . . . . . . . . . . . . . . . . . .12
Configuring the HP Visualize fx5 and fx10 Driver . . . . . . . . . . . . . . . . .13
The About Panel . . . . . . . . . . . . . . . . . . . . . . . . . . . . . . . . . . . . . . . . . .14
The Options Panel. . . . . . . . . . . . . . . . . . . . . . . . . . . . . . . . . . . . . . . . .15
Creating Custom Driver Configurations. . . . . . . . . . . . . . . . . . . . . . . .20
The Administration Panel. . . . . . . . . . . . . . . . . . . . . . . . . . . . . . . . . . .21
The Gamma Correction Panel . . . . . . . . . . . . . . . . . . . . . . . . . . . . . . .21
The Settings Panel . . . . . . . . . . . . . . . . . . . . . . . . . . . . . . . . . . . . . . . . .21
The Customize Video Formats Panel . . . . . . . . . . . . . . . . . . . . . . . . . .22
Stereo Vision . . . . . . . . . . . . . . . . . . . . . . . . . . . . . . . . . . . . . . . . . . . . . . .26
Troubleshooting. . . . . . . . . . . . . . . . . . . . . . . . . . . . . . . . . . . . . . . . . . . . .27
Troubleshooting Video Problems. . . . . . . . . . . . . . . . . . . . . . . . . . . . . .27
Diagnostics Tool . . . . . . . . . . . . . . . . . . . . . . . . . . . . . . . . . . . . . . . . . . .29
Troubleshooting Performance Problems. . . . . . . . . . . . . . . . . . . . . . . .30
A. Regulatory Information
FCC Class B Statement. . . . . . . . . . . . . . . . . . . . . . . . . . . . . . . . . . . . . . .33
Notice for Canada. . . . . . . . . . . . . . . . . . . . . . . . . . . . . . . . . . . . . . . . . .34
Notice for Taiwan . . . . . . . . . . . . . . . . . . . . . . . . . . . . . . . . . . . . . . . . . .34
Notice for Korea . . . . . . . . . . . . . . . . . . . . . . . . . . . . . . . . . . . . . . . . . . .34
Notice for Japan (Class B) . . . . . . . . . . . . . . . . . . . . . . . . . . . . . . . . . . .34
Hardware Warranty . . . . . . . . . . . . . . . . . . . . . . . . . . . . . . . . . . . . . . . . .35
3
Page 4

Contents
4
Page 5

Preface
This guide describes how to configure your HP Visualize fx5 and fx10
Graphics Cards on Windows NT and Windows 2000 systems.
Additional Information and Help
Formore information on your graphics card and the accessories available
with this product, you can visit the following pages on HP’s web site:
• HP Visualize Personal Workstation product specifications:
http://www.hp.com/go/visualize
• HP VisualizePersonal Workstationand HP Visualize fx graphics card white papers:
http://www.hp.com/go/visualize/support/library/literature.html
• Latest drivers, FAQs, and support information:
http://www.hp.com/go/visualizesupport
Electrostatic Discharge (ESD) Precautions
Electrostatic charges can damage the integrated circuits on printed
circuit boards. To prevent such damage from occurring, observe the
following precautions during board unpacking and installation:
• Stand on a static-free mat.
• Wear a static strap to ensure that any accumulated electrostatic
charge is discharged from your body to ground.
• Create a common ground for the equipment you are working on by
connecting the static-free mat, static strap, routing nodes, and
peripheral units to that piece of equipment.
• Keep uninstalled printed circuit boards in their protective antistatic bags.
• Handle printed circuit boards by their edges, once you have removed
them from their protective antistatic bags.
5
Page 6

Important Safety Information
WARNING If you have any doubt that you can lift the HP Visualize Personal
Workstation or display safely, do not try to move it without help.
For your safety, always connect the equipment to a grounded
wall outlet. Always use a power cord with a properly grounded
plug, such as the one provided with this equipment, or one in
compliance with you national regulations. This HP Visualize
Personal Workstation is disconnected from the power by
removing the power cord from the power outlet. This means the
Personal Workstation must be located close to a power outlet
that is easily accessible.
For your safety, never remove the HP Visualize Personal
Workstation’s cover without first removing the power cord from
the power outlet, and any connection to the telecommunications
network. Always replace the cover on the Personal Workstation
before switching it on.
To avoid electric shocks, do not open the power supply. There
are no user-serviceable parts inside.
This HP Visualize Personal Workstation is a class 1 laser
product. Do not attempt to make any adjustment to the laser
units.
Before handling any HP Visualize fx Graphics Card, first wait
until the board has cooled down completely. The graphics card
can become very hot during use.
6
Page 7

Installation Notice
Products designated in the applicable Hewlett-Packard price list as
customer-installable can be installed by computer-knowledgeable
customers who carefully read and follow the instructions provided.
Customers who elect to have the product installed by our field personnel
are charged the applicable field installation charge, as covered under the
standard terms and conditions. For more information, please contact
your local sales representative.
Revision History
The revision history for each edition of the manual is listed below: Edition. Revision History E0300. First Printing E0600. Second Printing
7
Page 8

8
Page 9

1 HP Visualize fx5 and fx10
Graphics Cards
This chapter contains information on how to configure, update and
troubleshoot your HP Visualize fx5 and fx10 Graphics Cards.
Chapter 1 9
Page 10

HP Visualize fx5 and fx10 Graphics Cards
Overview
Overview
The HP Visualize fx5 and fx10 Graphics Cards are high-end OpenGL
graphics cards that feature the latest high-performance 3D graphics
technology. These OpenGL graphics cards accelerate your 3D graphics
design and visualization and improve the quality of your graphics.
The HP Visualize fx graphics subsystem occupies the Advanced Graphics
Port (AGP) slot in your Personal Workstation. It brings you:
• A world-class geometry engine, using dedicated floating-point
processors based on PA-RISC technology. The fx5 contains 3 full
geometry pipelines; the fx10 contains 6.
• 64MB SDRAM integrated frame buffer and texture memory.
• Full OpenGL 1.1 hardware features and extensions support.
• Hardware accelerated texture mapping.
• Hardware visibility testing (occlusion culling) and visibility statistics.
• Full screen anti-aliasing and hardware accumulation.
• Stereo vision support.
• Accelerated DirectDraw and Direct3D support.
• Video Overlay support.
Chapter 110
Page 11

HP Visualize fx5 and fx10 Graphics Cards
The HP Visualize fx5 and fx10 Driver
The HP Visualize fx5 and fx10 Driver
A driver for the HP Visualize fx5and fx10Graphics Cards is preloaded on
your Personal Workstation.
Should you need to reinstall or update the driver, the latest version is
provided on the HP web site:
http://www.hp.com/go/visualizesupport
For more information refer to the next section “Updating the HP
Visualize fx5 and fx10 Driver.”
If you cannot access the Internet, you can find a backup copy of the HP
Visualize fx5 and fx10 driver on the HP CD-ROM provided with your
Personal Workstation. The version number of this driver may be
different from the one preloaded on your PersonalWorkstation. However,
HP recommends that you obtain the latest version from the web site, if
possible.
Chapter 1 11
Page 12

HP Visualize fx5 and fx10 Graphics Cards
Updating the HP Visualize fx5 and fx10 Driver
Updating the HP Visualize fx5 and fx10 Driver
HP updates the HP Visualize fx5and fx10driver as needed to incorporate
feature and performance enhancements, or to fix problems found when
running specific applications.
You can download the latest version of the HP Visualize fx5 and fx
driver from HP’s web site:
http://www.hp.com/go/visualizesupport
After accessing the HP Visualize Support web site, select the HP
Visualize P-Class or X-Class, and then go to the Drivers section.
NOTE A README file is supplied with the driver. Please read it carefully as it
provides instructions to install the driver. Moreover, the information
contained in the README file supersedes any information contained in
this manual.
To update the driver, follow these instructions:
1. Download the driver from HP’s web site to a temporary folder on your
hard disk. For example, C:\TEMP\fxDRV\
2. Run the executable file to decompress the contained files. You can do
this by double-clicking on the file.
3. Follow the instructions provided in the README file that comes with
the driver.
10
Chapter 112
Page 13

HP Visualize fx5 and fx10 Graphics Cards
Configuring the HP Visualize fx5 and fx10 Driver
Configuring the HP Visualize fx5 and fx
10
Driver
You can configure the HP Visualize fx5and fx10driver using the Display
Properties dialog box.
Todisplay the Display Properties dialog box, clickStart, point to Settings
and click Control Panel.In the Control Panel, double-click on Display. On
Windows 2000 systems, there are two extra steps: click on Settings and
then click Advanced.
When the HP Visualize fx5 and fx10 driver is installed, the Display
Properties dialog box contains five extra panels:
About
Options
Administrator
Gamma Correction
Customize Video Formats
Click “?” at the top of the dialog box for help and click the item on which
you want more information.
To close the pop-up window, click inside it.
Chapter 1 13
Page 14

HP Visualize fx5 and fx10 Graphics Cards
Configuring the HP Visualize fx5 and fx10 Driver
The About Panel
The About panel (below) displays useful information, including the
version of the driver, OpenGL version and extensions, and the amount of
frame buffer memory and available texture memory.
Chapter 114
Page 15
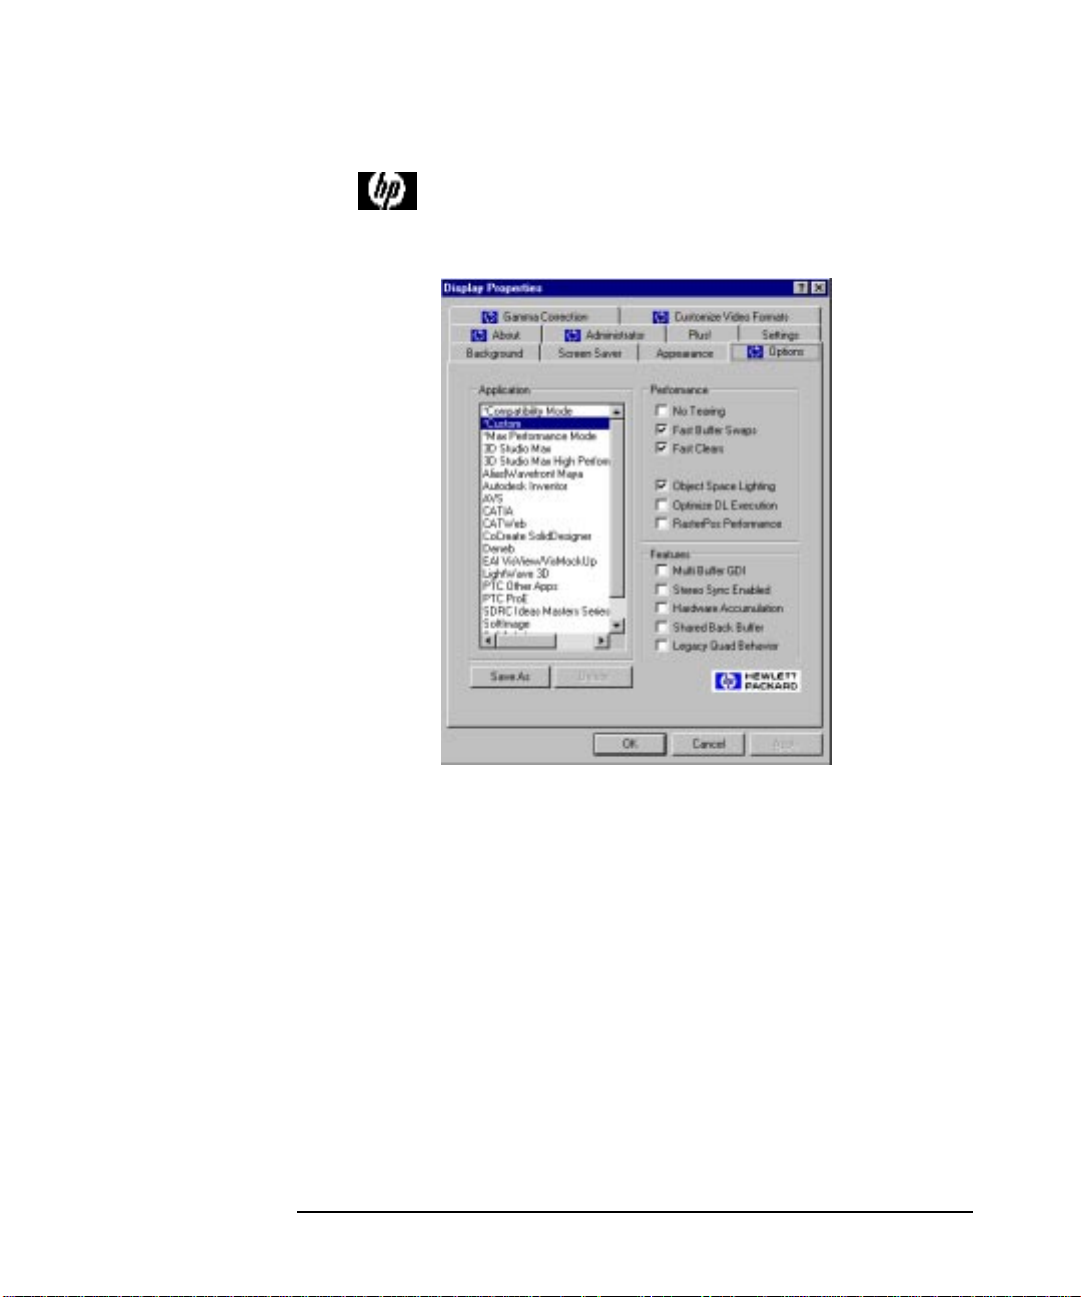
The Options Panel
Driver Basic Configuration
HP Visualize fx5 and fx10 Graphics Cards
Configuring the HP Visualize fx5 and fx10 Driver
Configure the driver for the application you are using by selecting the
application name in the Application group box (see above).
If your application is not listed, select Compatibility Mode.
You do not need to change any of the options in the Settings group box.
When you select an application, options in the Settings group box are
automatically configured for the selected application.
Chapter 1 15
Page 16

Application Box
Table 1-1
HP Visualize fx5 and fx10 Graphics Cards
Configuring the HP Visualize fx5 and fx10 Driver
Driver Advanced Configurations
Option Description
Compatibility Mode*
Max Performance Mode*
Custom* The Custom setting becomes active when the
Application Name Select the application software you are using (for
NOTE Asterisked options above, cannot be deleted by anyone, including the
system administrator.
Performance Box
The Compatibility Mode setting provides
maximum compatibility for those applications
that mix OpenGL and Windows GDI rendering
in double-buffered windows, contrary to
Microsoft specifications.If your application is not
listed, choose this option.
The Max Performance Mode setting will provide
the maximum graphics throughput. However,
some applications may exhibit visual anomalies.
user manually modifies one or more settings. For
more information refer to “Creating Custom
Driver Configurations” in a subsequent section.
example, SoftImage, Solidworks).
Table 1-2
Option Description
No Tearing No Tearing prevents the tearing effect seen when
rendering in the middle of a vertical refresh. When
this option is enabled, performance may be reduced
because rendering waits for a vertical refresh to
finish. This is especially true for large windows.
Chapter 116
Page 17

Table 1-2
HP Visualize fx5 and fx10 Graphics Cards
Configuring the HP Visualize fx5 and fx10 Driver
Option Description
Fast Buffer
a
Swaps
Fast Clears
Object Space Lighting
Fast Buffer Swaps take advantage of HP’s
multi-buffer hardware. The hardware has a
physical front and back buffer that can be swapped
very quickly. For compatibility with some
applications, this option can be turned off, and the
back buffer copied to the front buffer instead.
a
When enabled, this option speeds up OpenGL
glClear() performance, whenever possible, under
the following conditions:
• 24-bit RGB color mode (no destination alpha planes)
• Fast Buffer Swaps are enabled (SWAP_EXCHANGE)
• Stereo is disabled
• GL_SCISSOR_TEST is disabled
By default, lighting is done in Object Coordinate
(OC) space, when possible. In general, OC lighting
gives the best overall performance. OC Lighting
performs best when there are many (8 or more)
vertices between changes to light definitions or to
the modelview matrix. If your application
frequently changes the modelview matrix or light
definitions (using glLight()) OR frequently turns
fogging or spherical-texture-coordinate generation
on/off, it may be better to disable OC Lighting.
When this option is disabled, lighting is done in
Eye Coordinate (EC) space. Both lighting modes
should have the same visual appearance. The
difference is performance.
Optimize DL Execution
When checked, this enables faster performance of
OpenGL geometry display list execution at the
expense of reduced display list creation
performance.
Chapter 1 17
Page 18

Table 1-2
HP Visualize fx5 and fx10 Graphics Cards
Configuring the HP Visualize fx5 and fx10 Driver
Option Description
Features Box
Table 1-3
RasterPos Performance
a. Windows 2000 only: When using the default Windows 2000
cursor, these options may cause problems between the cursor
and OpenGL applications. If you wish to use these options,
click Start, point to Settings and click Control Panel. In the
Control Panel, double-click Mouse, click on the Pointers tab
and disable Enable Pointer Shadow.
Option Description
Multi Buffer GDI This option causes GDI (NT Graphics Device
When checked, this enables much faster
performance of glRasterPos*() and glPushAttrib()
at the expense of immediate mode glColor*(),
glNormal*() and glTexCoord*() performance.
Interface) to draw to both the physical front and
back buffers. This is useful for applications
which use GDI to draw in an OpenGL window
and the Fast Buffer Swaps option is enabled.
This option must be disabled for 2D
benchmarking purposes.
Stereo Sync Enabled
When this option is set, stereo timing is enabled
on the video output port and stereo pixel formats
are made available to applications. Note that
stereo timing is only supported in True Color
screen formats less than 1600×1200 in
resolution. Additionally, the stereo effect is
greatly enhanced at higher refresh rates, for
example, 120 Hz. Finally, note that the stereo
effect will only be visible when using appropriate
stereographic glasses or headsets.
Chapter 118
Page 19

Table 1-3
HP Visualize fx5 and fx10 Graphics Cards
Configuring the HP Visualize fx5 and fx10 Driver
Option Description
Hardware Accumulation
Shared Back Buffer Enabling this feature sets OpenGL rendering to
This option enables a special hardware
accelerated implementation of the accumulation
buffer. It speeds up advanced features such as
scene anti-aliasing and motion blur. There are
some differences with hardware accumulation
compared to the standard implementation of the
accumulation buffer:
• Only 8 bits of resolution are provided per color component.
• The accumulation buffer contains only unsigned values.
• Accumulation results are automatically
returned to the color buffer(s) with each
GL_ACCUM operation. This has the
implication that GL_RETURN is ignored.
• GL_ADD is ignored.
If these differences can be tolerated, the result
should be much improved performance when
using the accumulation buffer.
be clipped only to the window boundaries,
ignoring any obscuring windows. This option
should normally not be set, since it can cause
unexpected interactions between OpenGL
applications. It should only be set to improve the
usage of the no Redraw on Window Expose
option in 3D Studio MAX and Autocad 2000.
Chapter 1 19
Page 20

Table 1-3
HP Visualize fx5 and fx10 Graphics Cards
Configuring the HP Visualize fx5 and fx10 Driver
Option Description
Legacy Quad Behavior
This option controls how the OpenGL driver
handles concave and self-intersecting
quadrilaterals.This option is OFF by default. All
quads are broken down into triangles by simply
splitting them between vertices 0 and 2. This is
similar to the behavior of most graphics cards
and is consistent with the OpenGL restriction
that all polygons be convex. For compatibility
with previous HP Visualize fx graphics cards,
this option can be turned ON. This will enable
extra logic to decompose concave and
self-intersecting quads into the correct triangles.
Note that even with this option enabled,
non-planar quads are not guaranteed to be
rendered correctly.
Creating Custom Driver Configurations
The Options panel allows you to create customized driver configurations
for the HP Visualize fx graphics card. These configurations appear in the
Application group box.
To create a customized profile:
1. Set the desired options in the Settings group box. This will select the
Custom setting in the Application group box.
2. Click the Save As button to save the current configuration. You are prompted for a profile name.
3. Type a configuration name in the Save Configuration dialog box. This
name will appear in the Application group box.
Save As Button
Allows you to save the current Custom configuration as a named
user-specific configuration.
Chapter 120
Page 21

HP Visualize fx5 and fx10 Graphics Cards
Configuring the HP Visualize fx5 and fx10 Driver
Delete Button
Allows you to delete a custom configuration.
The Administration Panel
The Administration panel is only available if the user has system
administrator privileges. From this panel, the system administrator can
enable the user to access the Gamma Correction and Options panels and
allow the user to change and save the HP Visualize fx Custom
configuration.
The Gamma Correction Panel
Gamma correction is used to correct non-linearity in the phosphor
brightness of monitors. It can be used to improve the appearance of
anti-aliased lines, shaded graphic images, or scanned photographic
images that have not already been gamma corrected.
The Settings Panel
Use the Settings panel to change the screen resolution, number of colors
and refresh rate. Click List All Modes to view all combinations of colors,
desktop area, and refresh frequency currently configured for the HP
Visualize fx graphics card. If you select a mode, click Test to see if your
choice is compatible with your monitor. On Windows 2000, you can use
the Settings panel to change the screen resolution and number of colors.
Tochange the refresh rate, click Advanced and then click on the Monitor
tab. To find the List All Modes button, click Advanced from the Settings
panel and then click on the Adapter tab.
You can display screen resolutions up to 1920×1200 in True Color,
double-buffered mode.
Chapter 1 21
Page 22

HP Visualize fx5 and fx10 Graphics Cards
Configuring the HP Visualize fx5 and fx10 Driver
The Customize Video Formats Panel
The Customize Video Formats tab allows you to manipulate the list of
video formats reported to the system. You can create new formats,
change the list of installed formats and even fine-tune predefined
formats.
NOTE The format names displayed in the left column are used to help identify
the source of the timing information. “VESA” is a standard timing from
the VideoElectronic Standards Association. “Stereo” is a timing intended
for use with stereo display. “Standard” is a PC standard video timing.
“OEM” indicates non-standard timing defined by a display vendor.
Installed Video Formats
This window contains the list of the video formats that are currently
“installed” on the system. These are the resolutions and refresh rates
that are listed when pressing the List All Models button on the Settings
Chapter 122
Page 23

HP Visualize fx5 and fx10 Graphics Cards
Configuring the HP Visualize fx5 and fx10 Driver
panel under Display Properties1. All video formats are available for True
Color mode (32 bits per pixel) and 65536 color mode (16 bits per pixel).
When a format is selected in this panel, the Test,Remove and Edit buttons will be active. Test will temporarily switch the current video format to the selected video format. It is important to verify that a video format will work on your display device before selecting it as the video format in the Settings panel. The Test will automatically return to the current video format after a 15 second time-out.
The Remove button will remove the selected video format from the
installed list and put it on the available list. This is necessary if you want
to create a new video format with the same resolution and refresh rate as
one of the predefined video formats but you need to modify the video
timing parameters. You may also want to remove unused format to
prevent them from being selected in the Settings panel.
The Edit button allows you to modify the selected video format. You can
only change the dot-clock for predefined video formats, but you can
modify any of the timing parameters for custom video formats.
Available Video Formats
This panel presents all the defined, but not installed, video formats
available. For example, if you need to use the 70Hz 1024x768 format,
first select it and then press the Add button. This transfers the format
from the available list to the installed list. You can now test this format
to verify that it works on your display. The format will now be available
in the Settings panel.
You cannot remove any of the predefined video formats from the
AvailableVideo Formatslist, but you can remove any of your own custom
video formats.
1. On Windows 2000: click on Advanced from the Settings panel and
then click on the Adapter tab to find the List All Modes button.
Chapter 1 23
Page 24
HP Visualize fx5 and fx10 Graphics Cards
Configuring the HP Visualize fx5 and fx10 Driver
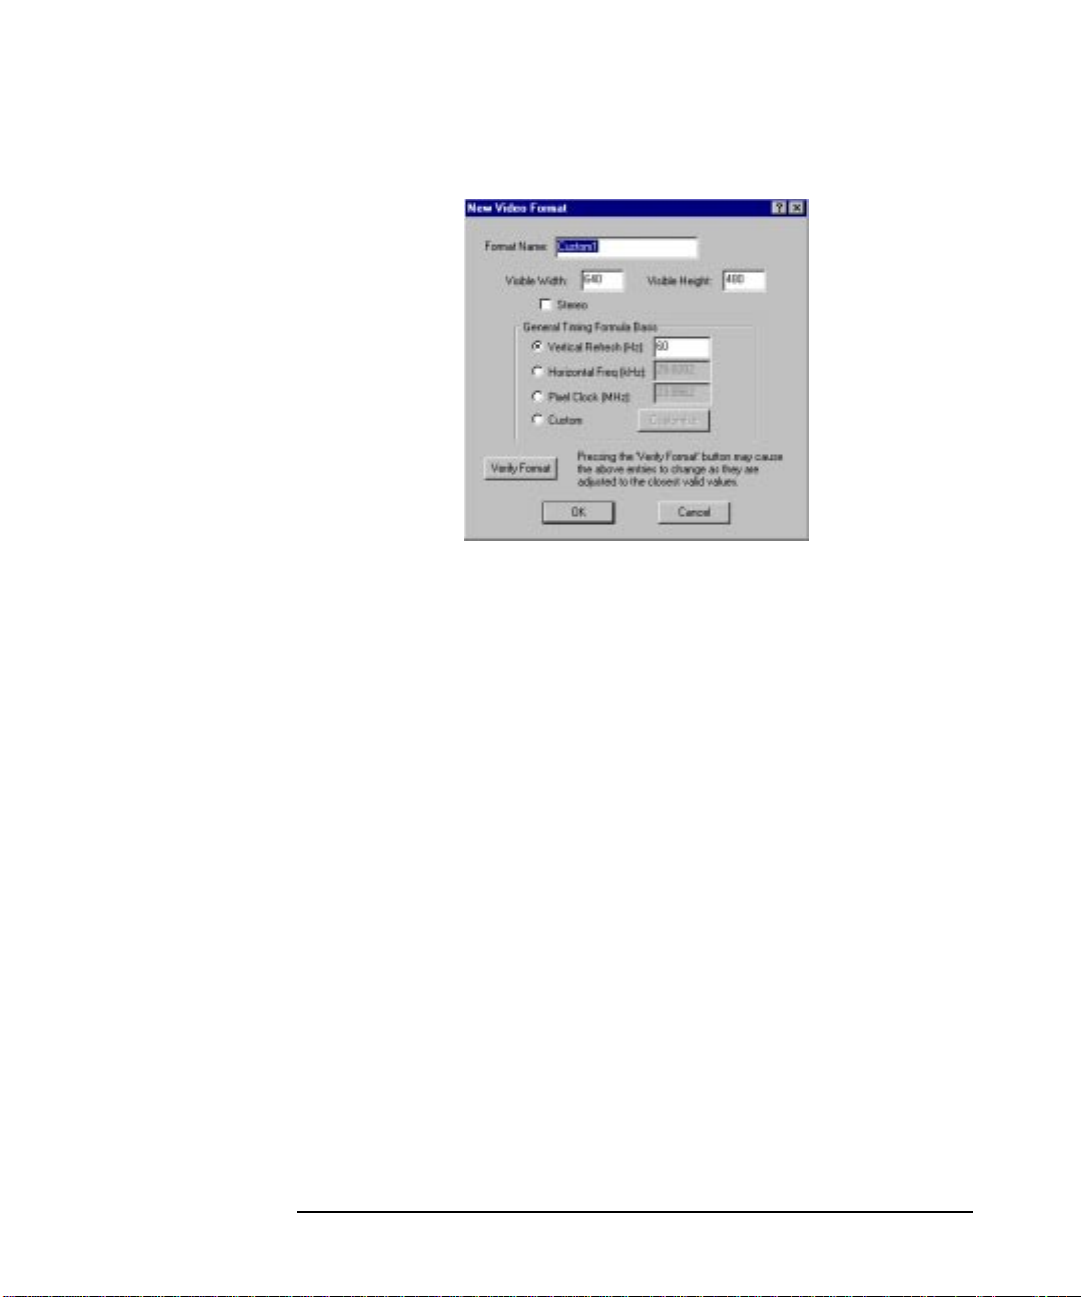
New Video Format
Pressing the New button will bring up the New Video Format dialog. This will allow advanced users to create their own custom video timing. This functionality is intended for those who have new or unique display devices or video timing needs.
VESA has defined what is called the “General Timing Formula (GTF).”
This formula takes three inputs: the width and height of the display and
one of vertical refresh, horizontal refresh or pixel clock. From this
information, the basic video timing information is generated. A device
that supports the GTF should be able to display this format as long as it
is within the device’s capabilities. If not, the GTF gives a good starting
point to further customize the timing information.
Chapter 124
Page 25

HP Visualize fx5 and fx10 Graphics Cards
Configuring the HP Visualize fx5 and fx10 Driver
NOTE The dialog box will not allow a video format that
exceeds the display capabilities of the graphics card.
Selecting the Custom mode and pressing the Customize button will bring up the above dialog. This dialog allows you to exactly specify all the necessary attributes of the video timing. The expected use of this dialog is to enable you to take the video timing information provided by the display vendor and use that information to generate a custom video format. This gives immediate access to the various formats of the display device.
Chapter 1 25
Page 26

HP Visualize fx5 and fx10 Graphics Cards
Stereo Vision
Stereo Vision
The stereo modes cause the display to alternate between the left and
right images in successive refresh cycles (thus a 120 Hz refresh rate will
display 60 left images and 60 right images per second). Stereo modes can
be enabled in the Stereo Sync Enabled check box in the Options panel of
Windows NT Display Properties. In addition, you must set the screen
resolution and refresh rate to a stereo compatible format. In the
Customize Video Formats panel, you can find a list of screen
resolution/refresh rate combinations that are compatible for stereo
display.
Toview the stereo image, a suitable device is required. This must have a
VESA 1.0P compatible Stereo connector. This device is usually a pair of
liquid crystal glasses. The lenses alternate between left-lens
transparent/right-lens opaque and left-lens opaque/right-lens
transparent, at the same rate as the screen refresh rate, so that each
image is only seen by the appropriate eye. The result is realistic depth
perception.
Chapter 126
Page 27

PROBLEM: At boot time, the screen is blank and there are no error messages.
Table 1-4
HP Visualize fx5 and fx10 Graphics Cards
Troubleshooting
Troubleshooting
This section describes how to troubleshoot problems that may arise with
your graphics subsystem. It also provides some tips on how to improve
the graphics performance.
Troubleshooting Video Problems
Solution Explanation
Check that the computer and display are turned on. (The power light should be illuminated.)
Check the display’s contrast and brightness settings.
Make sure that all cables and power cords are plugged in.
Make sure the power outlet is working.
If possible, try another monitor and set of cables.
Check the LCD screen of your
PersonalWorkstation. If the LCD
screen reports ‘Error-No Video,’
remove the HP Visualize fx
graphics card, and re-insert it.
Ensure that the graphics card is
properly inserted in the AGP slot.
Chapter 1 27
Useful routine checks, especially if you have just moved the computer.
The card may not have been seated fully across the length of the AGP slot.
Page 28

Table 1-4
HP Visualize fx5 and fx10 Graphics Cards
Troubleshooting
Solution Explanation
PROBLEM: The
computer boots in
VGA, but the
screen goes blank
or is corrupted
when switching to
high-resolution
mode.
Table 1-5
If the LCD screen does not report
any error, try another graphics
card, if available. Even if it is not
an HP Visualize fx graphics card,
the boot sequence should be
displayed using the VGA
standard driver.
Solution Explanation
Check that your monitor supports
the HP Visualize fx graphics card
resolution and refresh rate
selected. If the monitor does not
support the selected resolution,
boot in VGA and then change
your settings.
If the boot sequence is displayed
correctly using a replacement
graphics card, your HP Visualize
fx graphics card may be faulty.
This problem may occur if you have just changed your monitor.
Run the diagnostics tool. For more information on the
diagnostics tool, see the section
“Diagnostics Tool.”
Check that you are using the
correct video driver. The video
driver version is displayed in the
About panel.
You may have updated the HP
Visualize fx driver with the wrong
version. See the section “Updating
The HP Visualize fx Driver.”
Chapter 128
Page 29

PROBLEM: The
computer boots
correctly in VGA
and Hi-resolution
mode, but visual
anomalies are
observed using
applications.
Table 1-6
HP Visualize fx5 and fx10 Graphics Cards
Troubleshooting
Solution Explanation
The driver may not be optimized
for the application used. Open
Display Properties, select the
Options panel, and select the
appropriate application. Formore
information, see the section
“Driver Basic Configuration.”
Check the HP web site for an
updated driver version for your
application.
http://www.hp.com/go/visualizesu
pport
When an application setting is
selected in the Options Panel, the
driver settings are automatically
configured for optimum
performance and visual comfort
for that application.
HP frequently updates the HP
Visualize fx driver to incorporate
feature and performance
enhancements, or to fix problems
found when running specific
applications.
Diagnostics Tool
Your preloaded software includes a diagnostics tool to test your HP
Visualize fx graphics card. This tool is also available on the HP CD-ROM
provided with your Personal Workstation and on the HP web site:
http://www.hp.com/go/visualizesupport
The diagnostics tests include an in-depth check of the graphics ASICS
and frame buffer.
To run the diagnostics tool:
1. Click the Start button.
2. Point to Programs.
Chapter 1 29
Page 30

PROBLEM: Graphics performance is below expectations
Table 1-7
HP Visualize fx5 and fx10 Graphics Cards
Troubleshooting
3. Point to HP Diagnostics.
4. Click on HP Visualize fx Diagnostics
Troubleshooting Performance Problems
Solution Explanation
Check the HP web site for an updated
driver version for your application.
http://www.hp.com/go/visualizesupport
The driver may not be optimized for
the application used. Open Display
Properties, select Options panel, and
select the appropriate application.
HP frequently updates the
HP Visualize fx driver to
incorporate feature and
performance enhancements,
or to fix problems found when
running specific applications.
When an application is
selected, the driver settings
are automatically configured
foroptimum performance and
visual comfort for that
application.
Chapter 130
Page 31

A Regulatory Information
31
Page 32

Regulatory Information
Declaration of Conformity
according to ISO/IEC Guide 22 and EN 45014
Manufacturer: Hewlett-Packard Co,
3404 E. Harmony Rd.
Fort Collins, CO 80528
U.S.A
Declares that the: Product Number: graphics cards Model Number: A1264A / A1265A / A1298A Product Options: all
Conforms to the following specifications: Safety: IEC 950:1991+A1+A2+A3 +A4 / EN 60950:1992+A1+A2+A3+A4
China GB4943-1995
Russia GOST R 50377-92
EMC: CISPR 11: 1997 / EN 55011: 1998 Class B
CISPR 22: 1993+A1+A2 / EN 55022: 1994+A1+A2 Class B
EN 50082-1:1992
Also compliant with…
IEC 1000-3-2:1994 / EN 61000-3-2:1998
IEC 1000-4-2:1995+A1 / EN 61000-4-2:1999 - 4 kV CD, 8 kV AD
IEC 1000-4-3:1995 / EN 61000-4-3:1996 - 10 V/m
IEC 1000-4-4:1995 / EN 61000-4-4:1995 - 2 kV Signal, 4 kV Power Lines
Australia/New Zealand AS/NZS 2064.1/2:1992, AS/NZS 3548:1995, and AS/NZS 4251.1:1994
China GB9254-1988
Japan VCCI Class B
Russia GOST R 29216-94
Taiwan CNS13438 Class A
US FCC Part 15, Class B
and is certified by:
UL Listed to UL1950, 2nd edition
cUL Listed to CSA 22.2 No.950-M93
TÛV Certified to EN60950 2nd edition with A1+A2+A3+A4+A11
HP Fort Collins CCQD HTC
Supplementary information:
The product herewith complies with the requirements of the following Directives and carries the CE marking accordingly:
- the EMC directive 89/336/EEC, 92/31/EEC and 93/68/EEC
- the Low Voltage Directive 73/23/EEC and 93/68/EEC
This product was tested in a typical Hewlett Packard workstation configuration.
Fort Collins, CO, USA
For Compliance Information ONLY, contact:
European Contact: Your local Hewlett-Packard Sales and Service Office or Hewlett-Packard GmbH, Department HQ-TRE
Standards Europe, Herrenberger Straße 130, D-71034 Böblingen (FAX: +49-7031-14-3143)
Americas Contact: Hewlett-Packard, Fort Collins Site Quality Manager, mail stop 64, 3404 E. Harmony Rd., Ft. Collins, CO 80528,
USA
32 AppendixA
Page 33

Regulatory Information
FCC Class B Statement
FCC Class B Statement
NOTE: This equipment has been tested and found to comply with the
limits for a Class B digital device, pursuant to Part 15 of the FCC rules
and the Canadian Department of Communications. These limits are
designed to provide reasonable protection against harmful interference
in a residential installation. This equipment generates, uses, and can
radiate radio frequency energy and, if not installed and used in
accordance with the instructions, may cause harmful interference to
radio communications. However, there is no guarantee that interference
will not occur in a particular installation. If this equipment does cause
harmful interference to radio or television reception, which can be
determined by turning the equipment off and on, the user is encouraged
to try to correct the interference by one or more of the following
measures
1. Reorient or relocate the receiving antenna.
2. Increase the separation between the equipment and receiver.
3. Connect the equipment into an outlet on a circuit different from that
to which the receiver is connected.
4. Consult the dealer or an experienced radio/TV technician for help.
Hewlett-Packard's FCC Compliance Tests were conducted with
HP-supported peripheral devices and HP shielded cables, such as those
you received with your system. Changes or modifications not expressly
approved by Hewlett-Packard could void the user's authority to operate
the equipment.
Operation of this device is subject to the following conditions:
1. This device may not cause harmful interference.
2. This device must accept interference received, including interference
that may cause undesired operation
Cables used with this device must be properly shielded to comply with the requirement of the FCC.
You are cautioned that any changes or modifications not expressly
approved in this manual could void your authority to operate this
equipment.
Appendix A 33
Page 34

Regulatory Information
FCC Class B Statement
Notice for Canada
This Class B digital apparatus complies with Canadian ICES-003.
Cet appareil numérique de la Class B est conforme à la norme NMB-003
du Canada.
Notice for Taiwan
Notice for Korea
Notice for Japan (Class B)
34 AppendixA
Page 35

Regulatory Information
Hardware Warranty
Hardware Warranty
This HP accessory is covered by a limited hardware warranty for a
period of one year from the date of purchase by the original end-user.The
type of service provided is return to an HP or repair-authorized reseller
service-center.
At Hewlett-Packard’sdiscretion, a defective accessory will be repaired or
replaced by a new unit, either of the same type or of an equivalent model.
If this accessory is purchased and used together with an HP Visualize
PersonalWorkstation,it will be covered by the warranty of this computer
or workstation, under the same conditions of service and duration.
Please refer to the warranty statement provided with your HP Visualize
Personal Workstation for warranty limitations, customer
responsibilities, and other terms and conditions.
FOR CONSUMER TRANSACTIONS IN AUSTRALIA AND NEW
ZEALAND: THE WARRANTY TERMS CONTAINED IN THIS
STATEMENT, EXCEPT TO THE EXTENT LAWFULLY PERMITTED,
DO NOT EXCLUDE, RESTRICT OR MODIFY AND ARE IN ADDITION
TO THE MANDATORY STATUTORY RIGHTS APPLICABLE TO THE
SALE OF THIS PRODUCT TO YOU.
Appendix A 35
Page 36

Regulatory Information
Hardware Warranty
36 AppendixA
 Loading...