

Page 1

HP StoreOnce
Backup System
Linux and UNIX Configuration Guide
HP Part Number: EJ022-90910
Published: December 2011
Edition: Edition 7.0
Page 2

© Copyright 2007–2011 Hewlett-Packard Development Company, L.P.
The information contained herein is subject to change without notice. The only warranties for HP products and services are set forth in the express
warranty statements accompanying such products and services. Nothing herein should be construed as constituting an additional warranty. HP shall
not be liable for technical or editorial errors or omissions contained herein.
Intel, Itanium, Pentium, Intel Inside, and the Intel Inside logo are trademarks or registered trademarks of Intel Corporation or its subsidiaries in the
United States and other countries.
Microsoft, Windows, Windows XP, and Windows NT are U.S. registered trademarks of Microsoft Corporation.
Adobe and Acrobat are trademarks of Adobe Systems Incorporated.
Java is a US trademark of Sun Microsystems, Inc.
Oracle is a registered US trademark of Oracle Corporation, Redwood City, California.
UNIX is a registered trademark of The Open Group.
Page 3

Contents
1 Introduction...............................................................................................5
Overview ...............................................................................................................................5
NAS targets for backup applications......................................................................................5
Virtual Tape Library targets for backup applications..................................................................5
Hardware installation ...............................................................................................................5
Software requirements ..............................................................................................................5
Configuration stages.................................................................................................................5
2 Discovery .................................................................................................6
Overview................................................................................................................................6
Using DHCP to discover the HP StoreOnce Backup System ............................................................6
Using the HP Discovery tool ......................................................................................................6
To identify the required device...............................................................................................7
To configure the network settings of a device...........................................................................7
3 Linux (x86, x64 and IA64)..........................................................................9
Overview ...............................................................................................................................9
Configuring the HP StoreOnce Backup System for iSCSI.................................................................9
How to install the Open-iSCSI module....................................................................................9
How to configure the Open-iSCSI module using the D2Dsetup script...........................................9
How to configure the Open-iSCSI module manually using the command line.............................10
Configuring the HP StoreOnce Backup System for Fibre Channel...................................................11
Configuring the HP StoreOnce Backup System for NAS (NFS).......................................................12
Controlling an HP StoreOnce Backup System using Linux.............................................................13
Verify you are controlling the correct library .........................................................................13
To verify the device file for the robotics of the library..........................................................13
To verify the tape device file for the tape drive..................................................................13
Reviewing the media in a library..........................................................................................14
Loading a cartridge into a library tape drive.........................................................................14
Unloading a cartridge from a library tape drive ....................................................................14
Moving a cartridge to the library Mail Slot............................................................................15
Moving a cartridge from the library Mail Slot .......................................................................15
Backup and restore files using TAR in Linux.................................................................................15
Back up the Linux kernel......................................................................................................15
Restore the Linux kernel ......................................................................................................16
4 HP-UX 11i V2/V3 (PA-RISC & IA64)............................................................17
Overview..............................................................................................................................17
Configuring the HP StoreOnce Backup System for iSCSI...............................................................17
How to install the iSCSI software initiator..............................................................................17
How to configure the iSCSI software initiator using the D2Dsetup script.....................................18
How to manually configure the iSCSI software initiator using the command line.........................18
Configuring the HP StoreOnce Backup System for Fibre Channel ..................................................21
Configuring the HP StoreOnce Backup System for NAS (NFS).......................................................23
Controlling an HP StoreOnce Backup System using HP-UX............................................................24
Using large block sizes with HP-UX 11i V2.............................................................................24
Reviewing the media in a library..........................................................................................24
Loading a cartridge into a library tape drive.........................................................................25
Unloading a cartridge from a library tape drive ....................................................................25
Moving a cartridge to the library Mail Slot............................................................................25
Moving a cartridge from the library Mail Slot .......................................................................25
Backup and restore files using TAR in HP-UX...............................................................................25
Back up the HP-UX kernel....................................................................................................26
Contents 3
Page 4

Restore the HP-UX kernel ....................................................................................................26
5 Solaris (x86 and SPARC)...........................................................................27
Overview .............................................................................................................................27
Configuring the HP StoreOnce Backup System for iSCSI...............................................................27
How to enable the iSCSI software initiator.............................................................................27
How to configure the iSCSI software initiator using the D2Dsetup script.....................................27
How to manually configure the iSCSI software initiator using the command line.........................28
Configuring the HP StoreOnce Backup System for Fibre Channel...................................................30
Configuring the HP StoreOnce Backup System for NAS (NFS).......................................................31
Controlling an HP StoreOnce Backup System using Solaris...........................................................31
Verify you are controlling the correct library .........................................................................31
To verify the device file for the robotics of the library..........................................................32
To verify the tape device file for the tape drive..................................................................32
Reviewing the media in a library..........................................................................................32
Loading a cartridge into a library tape drive.........................................................................33
Unloading a cartridge from a library tape drive ....................................................................33
Backup and restore files using TAR............................................................................................33
Back up the kernel.............................................................................................................33
Restore the kernel ..............................................................................................................34
About this guide..........................................................................................35
Intended audience..................................................................................................................35
Related documentation............................................................................................................35
Document conventions and symbols..........................................................................................35
HP technical support...............................................................................................................36
Customer self repair................................................................................................................36
Product warranties..................................................................................................................36
Subscription service................................................................................................................36
HP websites...........................................................................................................................36
Documentation feedback.........................................................................................................37
4 Contents
Page 5

1 Introduction
Overview
HP StoreOnce Backup Systems are a family disk-based storage appliance for backing up host
network servers or PCs to target devices on the appliance. These devices are configured as either
Network-Attached Storage (NAS) or Virtual Tape Library (VTL) targets for backup applications.
The total number of “devices” depends upon the StoreOnce appliance ranging from the low end
HP D2D4000 Series Backup Systems that support the creation of a maximum of 16 devices to the
enterprise class B6200 Series that support the creation of 96 devices. These devices may be all
VTL, all NAS or any combination of NAS and VTL devices.
For specific details of the VTL and NAS device options available, please refer to the User Guide
for your Product.
NAS targets for backup applications
Support for both CIFS and NFS protocols means that NAS target devices may be created as backup
targets for both Windows and UNIX/Linux hosts, and may be used with most backup applications
that support backup to disk. NAS targets on an HP StoreOnce Backup System provide network
file share access that is optimized for backup to disk. They should not be used for general purpose
file storage.
Virtual Tape Library targets for backup applications
The backup target appears to the host as an Ultrium Tape Library and requires a backup application
that supports backup to tape. Tape Library emulation type is selected during initial configuration
and this determines the number of cartridge slots and embedded tape drives that may be configured
for the device. Virtual Tape Libraries provide considerable flexibility for a variety of backup rotation
schemes.
For specific details of the VTL device options available, please refer to the User Guide for your
Product.
Hardware installation
Please refer to the installation instructions provided with your product for detailed instructions on
installing the HP StoreOnce Backup System and optional tape drive.
Software requirements
1. Refer to www.hp.com/go/connect or http://www.hp.com/go/ebs to find out which versions
of UNIX and Linux are supported and which backup applications are supported.
2. Make sure that your operating system is patched with the latest service packs.
3. Upgrade your backup application to the latest version.
Configuration stages
Configuration requirements are specific to each HP StoreOnce Backup System. This guide provides
details for all products so please cross check the information provided to ensure it is relevant for
your product.
In general, there are two stages to configuration:
• Assign IP addresses to the appliance network settings
• Create a base configuration to get started
This guide describes how to perform these two stages.
Overview 5
Page 6

2 Discovery
Overview
The HP StoreOnce Backup System must be assigned an IP address before an iSCSI connection or
access to the Web Management Interface can be made.
If your product has been installed by HP Engineers, this configuration will have been carried out.
Go to Chapter 3.
If your product is a customer self-install product, use the remainder of this chapter to perform the
required configuration:
• If the network has a DHCP server, the HP StoreOnce Backup System will be configured
automatically with an IP address
• If no DHCP server is available, the HP StoreOnce Backup System must be configured manually
using the HP Discovery tool, provided on the HP StoreOnce CD-ROM supplied with your
product
Using DHCP to discover the HP StoreOnce Backup System
The IP address and other network settings are assigned automatically when you connect the HP
StoreOnce Backup System to the network. You only need to know the serial number of the HP
StoreOnce Backup System to complete the installation and create a library configuration. The serial
number can be found on a label on the top of the unit.
In the web browser type in: D2D-<serial number>
If you cannot connect to the HP StoreOnce Backup System using the Web Management interface:
• Check that you are using a supported web browser and that Active Scripting or JavaScript is
enabled. See the HP StoreOnce Backup System User Guide for more information about
recommended web browser settings.
• Check that the network light is on, on the front of the HP StoreOnce Backup System as this
indicates an IP address has been configured.
• Try connecting to the HP StoreOnce Backup System using the DHCP assigned IP address
instead.
Using the HP Discovery tool
The HP Discovery tool is a java application for configuring HP StoreOnce Backup Systems. The
tool can be run from HP StorageWorks CD-ROM by selecting HPdiscovery in the UNIX folder
or by launching it from a console as follows:
localhost:~ $ cd /media/cdrom/UNIX/
localhost:~ $ ./HPdiscovery
NOTE: Java must be installed on the system for the HP Discovery tool to work. Java can be
installed using the package manager or by visiting http://java.sun.com
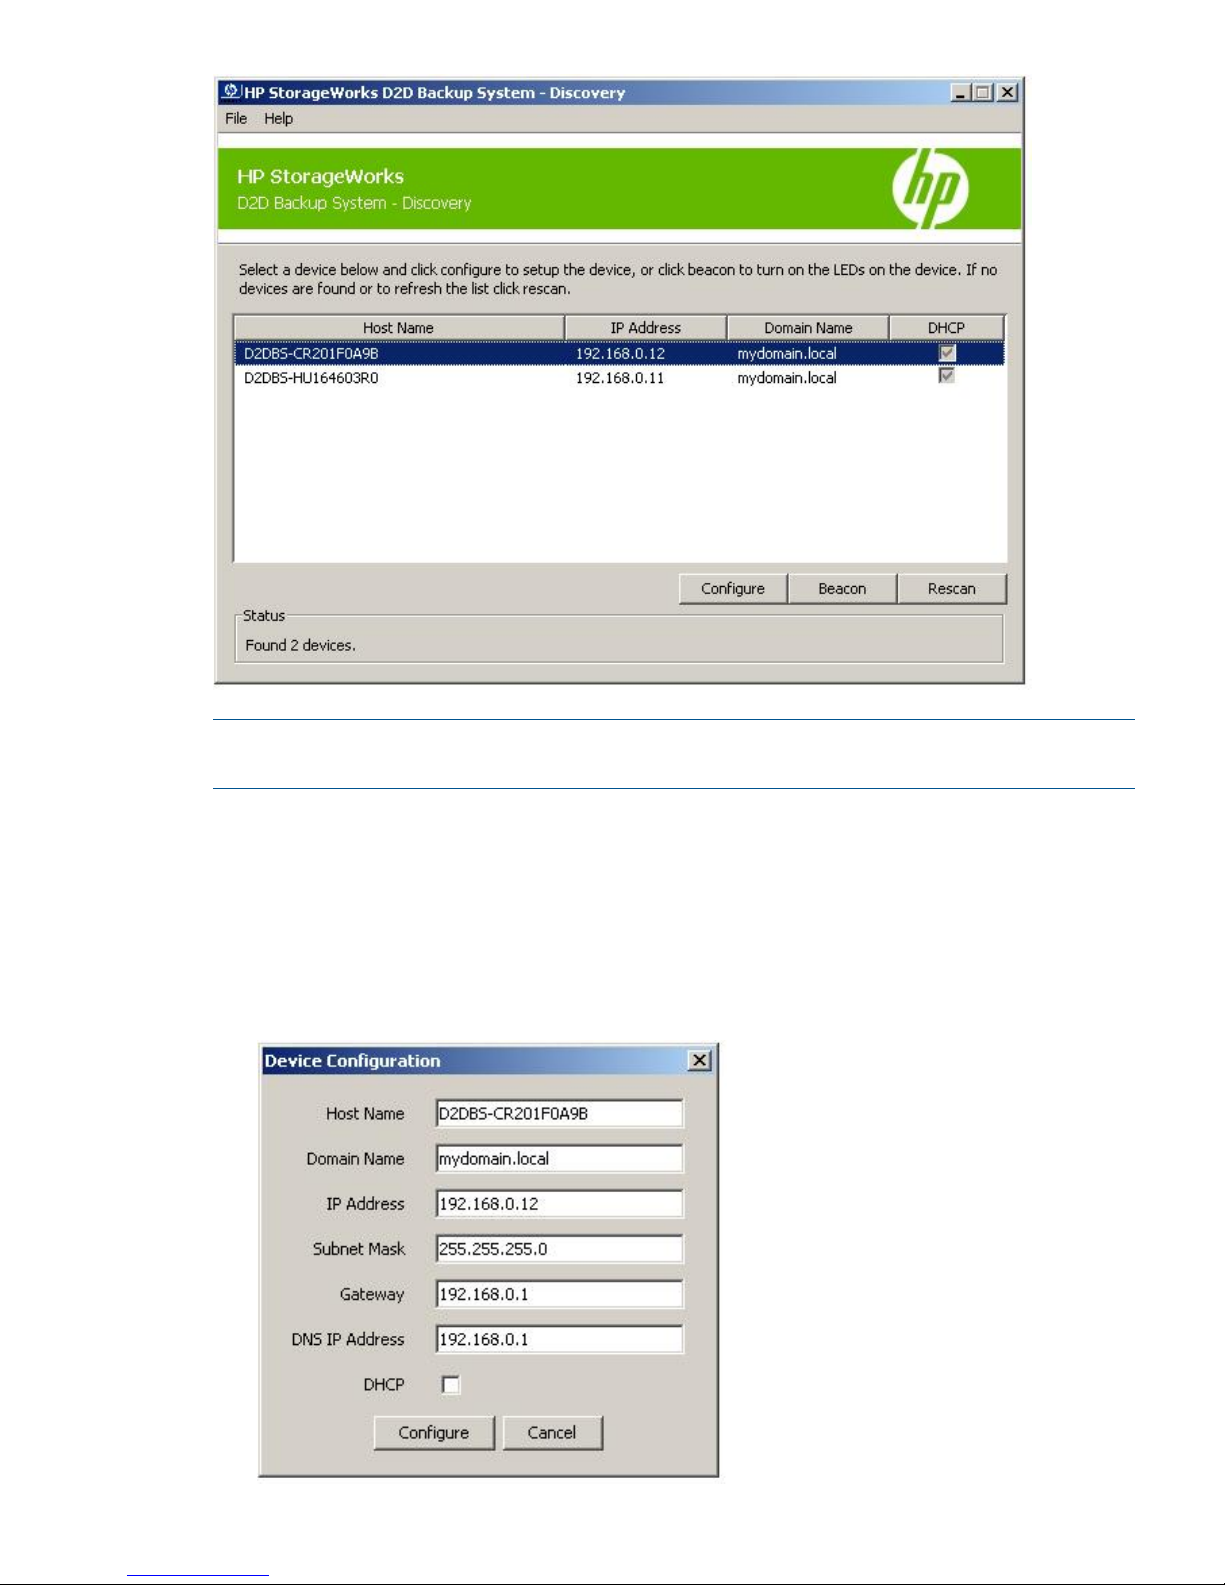
When the HP Discovery tool is run it will find any HP StoreOnce Backup Systems on the local
network and list them by name. The name displayed by the HP Discovery tool should match the
label on the top of the HP StoreOnce Backup System.
6 Discovery
Page 7
NOTE: If no HP StoreOnce Backup Systems are discovered, ensure that UDP port 8106 is open
in any firewalls that are running.
To identify the required device
If you have multiple HP StoreOnce Backup Systems on the network you can use the Beacon button
to help identify the unit that you wish to configure. Select a device in the list and click Beacon. The
lights on the front of the selected HP StoreOnce Backup System will flash.
To configure the network settings of a device
1. Select the device in the list and click Configure.
Using the HP Discovery tool 7
Page 8

2. Enter the network details and click Configure to send the details to the HP StoreOnce Backup
System. The list of available HP StoreOnce Backup System on the network will be displayed
again, this time with the updated network settings shown.
3. Make a note of the IP address of the HP StoreOnce Backup System because it will be required
during iSCSI configuration.
8 Discovery
Page 9

3 Linux (x86, x64 and IA64)
Overview
This chapter describes how to configure the HP StoreOnce Backup System for use with the following
Linux operating systems:
• SuSE Linux Enterprise Server 9 (x86, x64 and IA64)
• SuSE Linux Enterprise Server 10 (x86, x64 and IA64)
• RedHat Advanced Server 4 (x86, x64 and IA64)
• RedHat Advanced Server 5 (x86, x64 and IA64)
NOTE: HP StoreOnce Backup Systems with iSCSI interfaces are only supported with SLES 10
SP1 and RedHat 5 or greater.
Configuring the HP StoreOnce Backup System for iSCSI
If your product supports iSCSI use the information in this section to configure it.
If your product does not support iSCSI, go to Configuring the HP Backup System for Fibre
Channel (page 11).
How to install the Open-iSCSI module
SLES 10
1. Open the Software Management tool from within YaST Control Center.
2. Select and install the open-iscsi module.
RedHat 5
1. Open the Package Manager tool.
2. Select and install the iscsi-initiator-utils package.
How to configure the Open-iSCSI module using the D2Dsetup script
Use the D2Dsetup script to configure the Open-iSCSI module automatically. You must provide the
IP address as a parameter to the script.
localhost:~ $ D2Dsetup <IP_address>
If you wish to configure CHAP authentication, you should also provide the user name and password
for the initiator and the target, if required.
localhost:~ $ D2Dsetup <Initiator_CHAP_Username> <Initiator_CHAP_Password>
<Target_CHAP_Username> <Target_CHAP_Password> <IP_address>
The response from the HP StoreOnce Backup System will be similar to the following:
HP StoreOnce Backup System Linux and UNIX iSCSI Configuration Tool
Detecting OS...................................done
Checking iSCSI package.........................done
Contacting HP StoreOnce Backup System...done
Discovering available targets..................done
Configuring CHAP authentication................done
Configuring persistant logins..................done
Logging in to targets..........................done
The following library devices have been configured:
Vendor: HP Model: 1x8 G2 AUTOLDR Rev: ai89
Type: Medium Changer ANSI SCSI revision: 03
6:0:0:0: Attached scsi generic sg2 type 8
- Vendor: HP Model: Ultrium 3-SCSI Rev: ai89
Overview 9
Page 10
Type: Sequential-Access ANSI SCSI revision: 03
st 7:0:0:0: Attached scsi tape st0
How to configure the Open-iSCSI module manually using the command line
The command line tool for configuring the Open-iSCSI package is iscsiadm. Detailed instructions
for iscsiadm can be found in the iscsiadm(8) man documents. The following instructions guide
the user through the following steps required to connect a Linux host to an HP StoreOnce Backup
System.
• Discover iSCSI target devices on the HP StoreOnce Backup System
• Configure CHAP authentication
• Configure automatic iSCSI logins
• Verify the HP StoreOnce Backup System is connected
1. To discover available iSCSI target devices on an HP StoreOnce Backup System type the
following, where x.x.x.x is the IP address of the HP StoreOnce Backup System:
localhost:~ $ iscsiadm --mode discovery --type sendtargets --portal
x.x.x.x | grep x.x.x.x
The response from the HP StoreOnce Backup System will be two iSCSI Qualified Names (IQN)
for each available iSCSI target. For example:
[7db5cb] x.x.x.x:3260,1 iqn.1986-
03.com.hp:storage.d2d.cr204c84d5.500110aa76f68fcb.library1.robotics
[ebf06d] x.x.x.x:3260,1 iqn.1986-
03.com.hp:storage.d2d.cr204c84d5.500110a05ed5497b.library1.drive1
In the following configuration the parameter <iqn...> should be replaced with the IQN
value discovered in this step. Each command will need to be repeated for each IQN discovered.
NOTE: Note: If iscsiadm does not return a list of iSCSI targets, ensure that port 3260 is
open in any running firewalls.
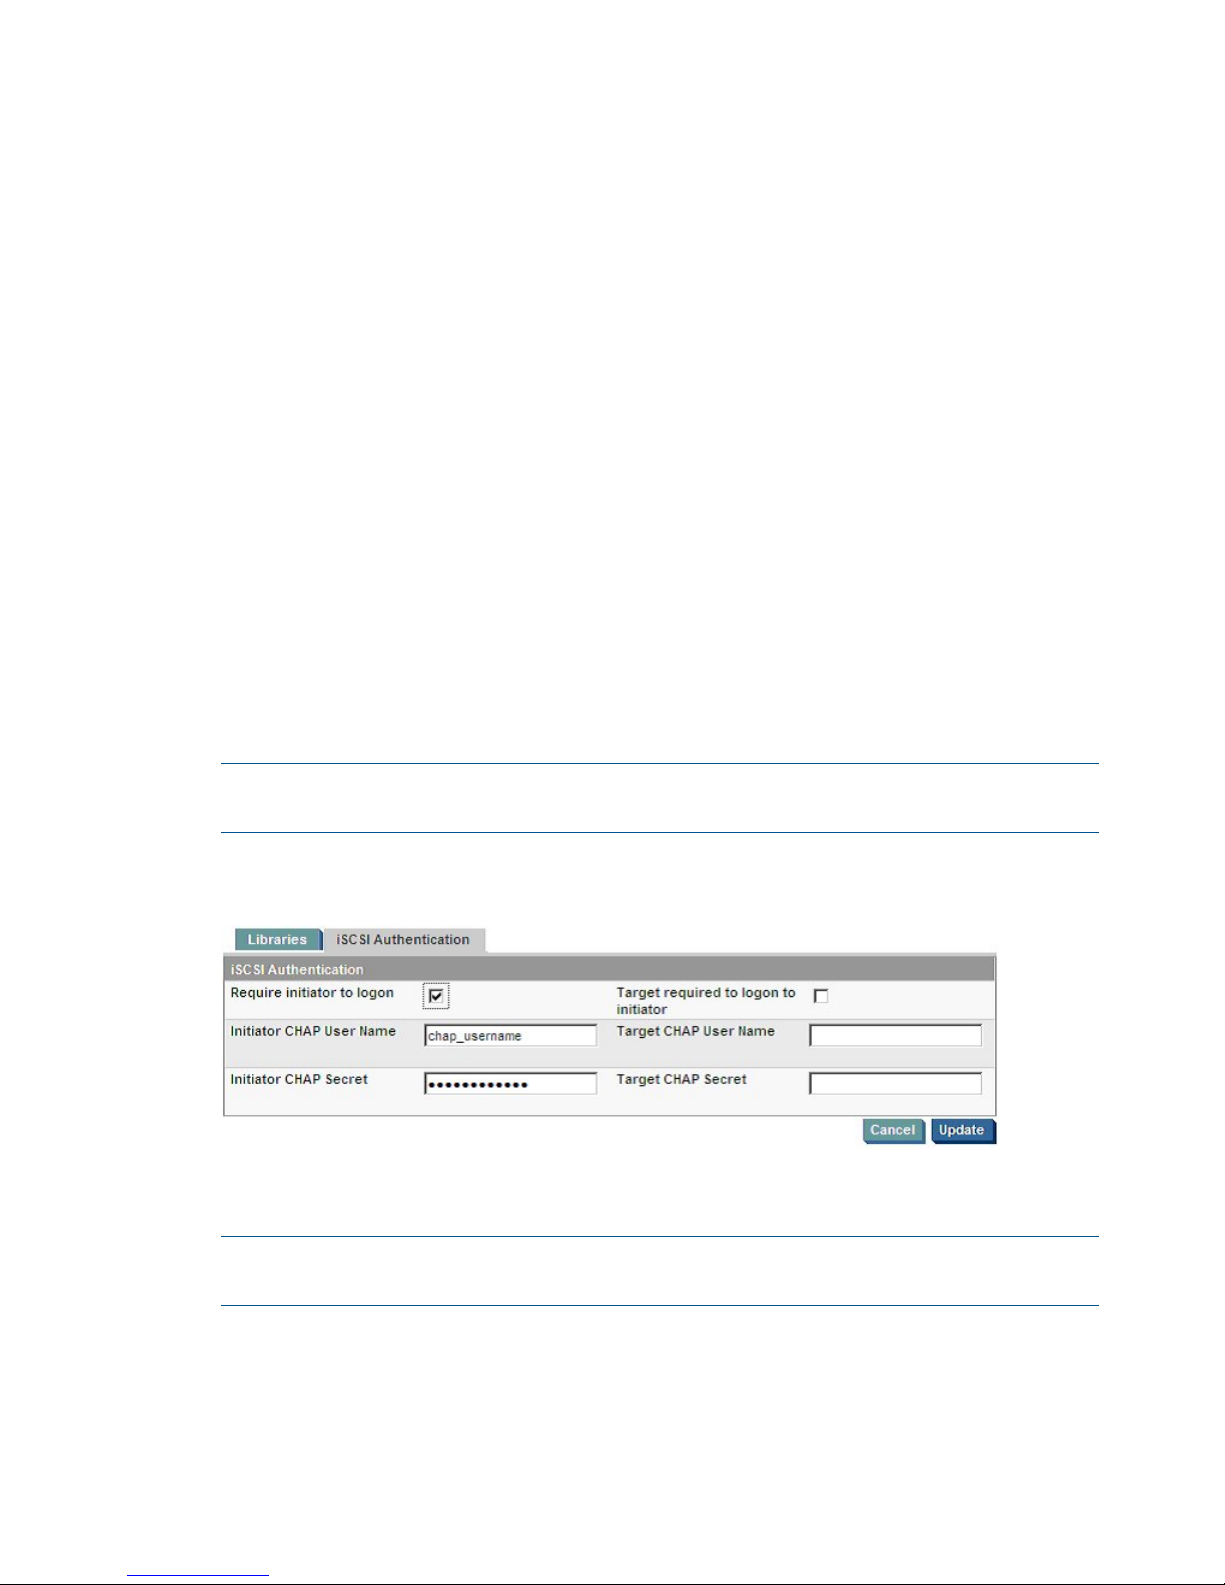
2. To optionally configure CHAP authentication you should update the iSCSI Authentication
details in the web management GUI, as shown below.
Once the HP StoreOnce Backup System has been modified, the operating system should be
modified as follows for each available target discovered in step 1:
NOTE: In the following commands, items in parentheses are user-defined strings. Substitute
the appropriate information for <iqn...>, <chap_password> and <chap_username>.
localhost:~ $ iscsiadm --mode node --targetname <iqn...>
--portal x.x.x.x:3260 --op update –-name node.session.auth.authmethod
--value CHAP
localhost:~ $ iscsiadm --mode node --targetname <iqn...>
--portal x.x.x.x:3260 --op update –-name node.session.auth.username
--value <chap_username>
10 Linux (x86, x64 and IA64)
Page 11

localhost:~ $ iscsiadm --mode node --targetname <iqn...>
--portal x.x.x.x:3260 --op update –-name node.session.auth.password
--value <chap_password>
If the target is required to logon to the Initiator then the following two commands are also
required:
localhost:~ $ iscsiadm --mode node --targetname <iqn...>
--portal x.x.x.x:3260 --op update –-name node.session.auth.username_in
--value <chap_username>
localhost:~ $ iscsiadm --mode node --targetname <iqn...>
--portal x.x.x.x:3260 --op update –-name node.session.auth.password_in
--value <chap_password>
3. The iSCSI nodes may be configured to log in automatically on system startup. The configuration
settings for each available target are modified as follows:
localhost:~ $ iscsiadm --mode node --targetname <iqn...>
--portal x.x.x.x:3260 --op update –-name node.conn[0].startup
--value automatic
4. The Linux host must now log in to each iSCSI target device. This is done using the three
command, where the IQN value matches those returned by the iscsiadm discovery command
above:
localhost:~ $ iscsiadm --mode node --targetname <iqn...>
--portal x.x.x.x:3260 --login
5. To enable the iSCSI target devices to remain persistent across system reboots, the open-iscsi
service must be configured to run at system startup. This can be done by issuing the following
command:
SLES 10
localhost:~ $ chkconfig open-iscsi on
RedHat 5
localhost:~ $ chkconfig iscsi on
6. To verify that this configuration change has been accepted, use the following command:
SLES 10
localhost:~ $ chkconfig –-list open-iscsi
open-iscsi 0:off 1:off 2:off 3:on 4:off 5:on 6:off
RedHat 5
localhost:~ $ chkconfig –-list iscsi
iscsi 0:off 1:off 2:off 3:on 4:off 5:on 6:off
7. To verify that the Linux machine now has access to the target device, use the following
command:
localhost:~ $ cat /proc/scsi/scsi
The output of this command will be a list of all the configured SCSI devices on the system,
including the HP StoreOnce Backup System. An example output would be:
Attached devices:
Host: scsi4 Channel: 00 Id: 00 Lun: 00
Vendor: HP Model: MSL G3 Series Rev: pc81
Type: Medium Changer ANSI SCSI revision: 03
Host: scsi5 Channel: 00 Id: 00 Lun: 00
Vendor: HP Model: Ultrium 3-SCSI Rev: pc81
Type: Sequential-Access ANSI SCSI revision: 03
Configuring the HP StoreOnce Backup System for Fibre Channel
For a Switched Fabric Configuration, zone the individual devices to the host concerned using the
virtual device WWNs shown on the product's GUI.
Configuring the HP StoreOnce Backup System for Fibre Channel 11
Page 12
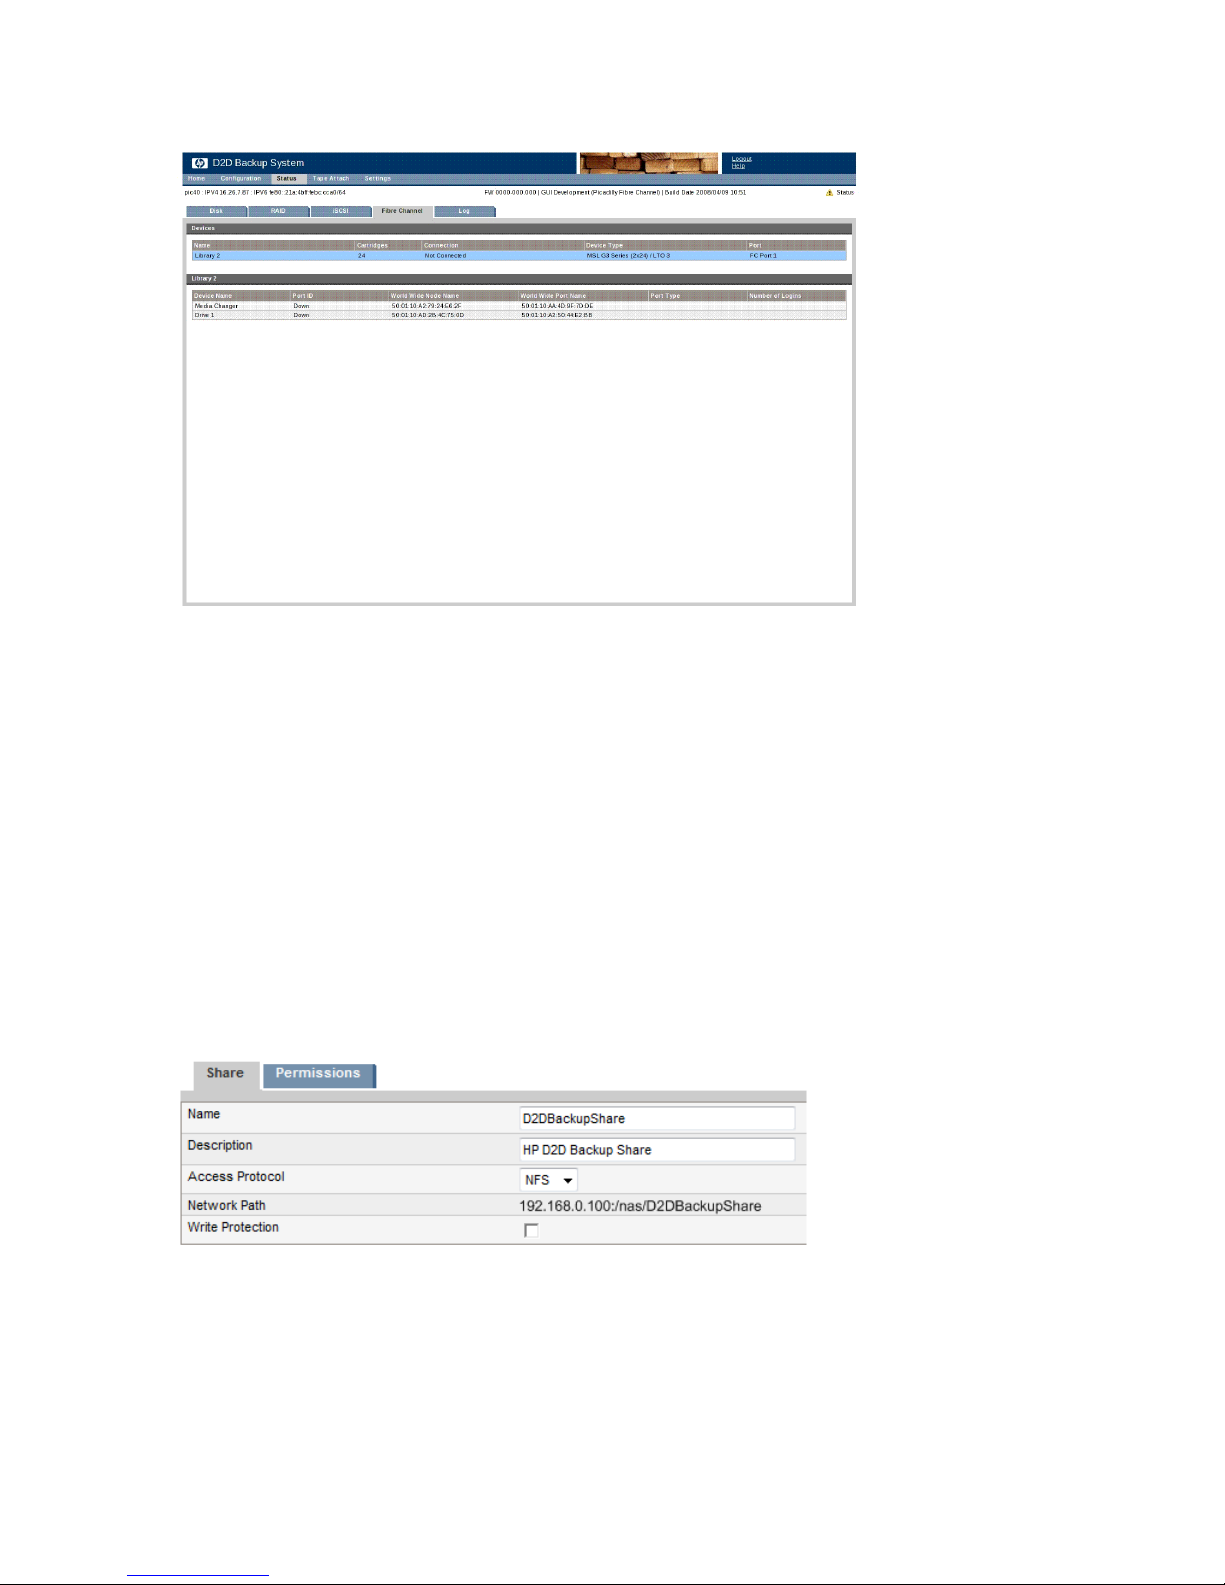
An example of a GUI is shown below; for details of the GUI specific to your product, please refer
to the product's User Guide.
To verify that the Linux machine now has access to the target device, use the following command:
localhost:~ $ cat /proc/scsi/scsi
The output of this command will be a list of all the configured SCSI devices on the system, including
the HP StoreOnce Backup System. An example output would be:
Attached devices:
Host: scsi4 Channel: 00 Id: 00 Lun: 00
Vendor: HP Model: MSL G3 Series Rev: pc81
Type: Medium Changer ANSI SCSI revision: 03
Host: scsi5 Channel: 00 Id: 00 Lun: 00
Vendor: HP Model: Ultrium 3-SCSI Rev: pc81
Type: Sequential-Access ANSI SCSI revision: 03
Configuring the HP StoreOnce Backup System for NAS (NFS)
The StoreOnce Backup System NAS interface should be configured to use NFS as the Access
Protocol when backing up data using Linux.
The NFS share can then be mounted in Linux using the mount command. For example:
localhost:~ $ mount 192.168.0.100:/nas/D2DBackupShare /mnt/D2DBackupShare
The StoreOnce Backup System supports NFSv3. To explicitly mount the StoreOnce Backup System
using NFSv3, the following syntax should be used:
localhost:~ $ mount –t nfs –o nfsvers=3 x.x.x.x:/<name of share> <local mount>
12 Linux (x86, x64 and IA64)
Page 13

Controlling an HP StoreOnce Backup System using Linux
The HP StoreOnce Backup System appears to the Linux operating system as a 1x8 G2 autoloader
and Ultrium tape drive. The robotics within the autoloader can be controlled from the console using
a command called MTX. If the MTX utility is not installed, it can be added using the package
manager. The complete MTX manual can also be accessed from any Linux console using the
command man mtx.
The following examples illustrate how to complete common tasks with the HP StoreOnce Backup
System.
• Verify you are controlling the correct library
• Review the media
• Load a cartridge into the tape drive
• Unload a cartridge from the tape drive
• Move a cartridge to the mail slot
• Move a cartridge from the mail slot
Verify you are controlling the correct library
The robotics of the library will be assigned a generic SCSI device file. To discover the device file
assigned, use the following command:
localhost:~ $ dmesg | grep -A2 —e "1x8 G2 AUTOLDR" –e "MSL G3 Series"
For an MSL 2024 library the output will be similar to this:
Vendor: HP Model: MSL G3 Series Rev: pc81
Type: Medium Changer ANSI SCSI revision: 03
1:0:0:0: Attached scsi generic sg2 type 8
In this example the device file that has been assigned is sg2. Therefore, the library can be controlled
using the device file /dev/sg2.
To verify the device file for the robotics of the library
To verify the correct device file has been determined, the following command should be used:
localhost:~ $ mtx –f /dev/sg2 inquiry
The output for an MSL 2024 library should be:
Product Type: Medium Changer
Vendor ID: ‘HP ‘
Product ID: ‘MSL G3 Series ‘
Revision: ‘pc81’
Attached Changer: No
To verify the tape device file for the tape drive
The tape drive(s) of the library will also be assigned a generic SCSI device file(s), along with SCSI
tape device file(s). To discover the SCSI tape device file(s) assigned, use the following command:
localhost:~ $ dmesg | grep -A 4 "Ultrium"
The output will be similar to this:
Vendor: HP Model: Ultrium 3-SCSI Rev: pc81
Type: Sequential-Access ANSI SCSI revision: 03
2:0:0:0: Attached scsi generic sg3 type 1
st: version 20050830, fixed bufsize 32768, s/g segs 256
st 2:0:0:0: Attached scsi tape st0
In this example the SCSI tape device file that has been assigned is st0. To verify the tape device
file for the tape drive, the MT command should be used:
localhost:~ $ mt -f /dev/st0 status
Controlling an HP StoreOnce Backup System using Linux 13
Page 14

The output should be:
mt: /dev/st0 : No medium found
This indicates that the tape drive files are valid but no media is loaded into the drive.
Reviewing the media in a library
To verify the contents of the media slots within a library, the following command should be used:
localhost:~ $ mtx –f /dev/sg2 status
The output for a MSL 2024 library with 1 tape drive and 24 cartridges configured would look
similar to this:
Storage Changer /dev/sg2:1 Drives, 24 Slots
( 1 Import/Export )
Data Transfer Element 0:Empty
Storage Element 1:Full :VolumeTag=72255101
Storage Element 2:Full :VolumeTag=72255102
Storage Element 3:Full :VolumeTag=72255103
Storage Element 4:Full :VolumeTag=72255104
Storage Element 5:Full :VolumeTag=72255105
Storage Element 6:Full :VolumeTag=72255106
Storage Element 7:Full :VolumeTag=72255107
Storage Element 8:Full :VolumeTag=72255108
Storage Element 9:Full :VolumeTag=72255109
Storage Element 10:Full :VolumeTag=72255110A
Storage Element 11:Full :VolumeTag=72255110B
Storage Element 12:Full :VolumeTag=72255110C
Storage Element 13:Full :VolumeTag=72255110D
Storage Element 14:Full :VolumeTag=72255110E
Storage Element 15:Full :VolumeTag=72255110F
Storage Element 16:Full :VolumeTag=722551110
Storage Element 17:Full :VolumeTag=722551111
Storage Element 18:Full :VolumeTag=722551112
Storage Element 19:Full :VolumeTag=722551113
Storage Element 20:Full :VolumeTag=722551114
Storage Element 21:Full :VolumeTag=722551115
Storage Element 22:Full :VolumeTag=722551116
Storage Element 23:Full :VolumeTag=722551117
Storage Element 24:Full :VolumeTag=722551118
Storage Element 25 IMPORT/EXPORT:Empty
Each data transfer element represents an Ultrium tape drive within the library. Storage elements 1
to 24 represent the 24 configured slots within the library. Storage element 25 represents the
import/export slot of the library, also known as the Mail Slot in the HP StoreOnce Backup System
Web Management Interface.
Loading a cartridge into a library tape drive
To load a cartridge into the tape drive, the mtx load command should be used. For example,
to move a cartridge from slot 2 to the first tape drive the command would be:
localhost:~ $ mtx –f /dev/sg2 load 2 0
Unloading a cartridge from a library tape drive
To unload a cartridge and place it in a storage slot, the mtx unload command should be used.
For example, to unload a cartridge from the first tape drive and place it in to storage slot 2, the
command would be:
localhost:~ $ mtx –f /dev/sg2 unload 2 0
14 Linux (x86, x64 and IA64)
Page 15

Moving a cartridge to the library Mail Slot
To move a cartridge to the mail slot for exporting to an attached tape drive, the mtx transfer
command should be used. For example, to move the cartridge in slot 1 to the mail slot 25, the
following command should be used:
localhost:~ $ mtx –f /dev/sg2 transfer 1 25
Moving a cartridge from the library Mail Slot
To move a cartridge from the mail slot following an import from an attached tape drive, the mtx
transfer command should be:
localhost:~ $ mtx –f /dev/sg2 transfer 25 1
Backup and restore files using TAR in Linux
This section describes how to perform a simple backup and recovery of files to an HP StoreOnce
Backup System using the console applications; MTX and TAR. In the examples, the autoloader
robotics is controlled using generic SCSI device file sg2 and the autoloader tape drive uses tape
device file st0. The file to be backed up and restored is the Linux kernel.
Back up the Linux kernel
1. Check to see what media is available.
localhost:~ $ mtx –f /dev/sg2 status
Storage Changer /dev/sg2:1 Drives, 24 Slots
( 1 Import/Export )
Data Transfer Element 0:Empty
Storage Element 1:Full :VolumeTag=72255101
Storage Element 2:Full :VolumeTag=72255102
Storage Element 3:Full :VolumeTag=72255103
Storage Element 4:Full :VolumeTag=72255104
Storage Element 5:Full :VolumeTag=72255105
Storage Element 6:Full :VolumeTag=72255106
Storage Element 7:Full :VolumeTag=72255107
Storage Element 8:Full :VolumeTag=72255108
Storage Element 9:Full :VolumeTag=72255109
Storage Element 10:Full :VolumeTag=72255110A
Storage Element 11:Full :VolumeTag=72255110B
Storage Element 12:Full :VolumeTag=72255110C
Storage Element 13:Full :VolumeTag=72255110D
Storage Element 14:Full :VolumeTag=72255110E
Storage Element 15:Full :VolumeTag=72255110F
Storage Element 16:Full :VolumeTag=722551110
Storage Element 17:Full :VolumeTag=722551111
Storage Element 18:Full :VolumeTag=722551112
Storage Element 19:Full :VolumeTag=722551113
Storage Element 20:Full :VolumeTag=722551114
Storage Element 21:Full :VolumeTag=722551115
Storage Element 22:Full :VolumeTag=722551116
Storage Element 23:Full :VolumeTag=722551117
Storage Element 24:Full :VolumeTag=722551118
Storage Element 25 IMPORT/EXPORT:Empty
2. Move the cartridge from slot 1 to the tape drive.
localhost:~ $ mtx –f /dev/sg2 load 1 0
3. Ensure you are in the root directory.
localhost:~ $ cd /
4. Back up the Linux kernel using tar.
localhost:~ $ tar cvf /dev/st2 ./boot/vmlinux*
Backup and restore files using TAR in Linux 15
Page 16

5. Move the cartridge back to slot 1.
localhost:~ $ mtx –f /dev/sg2 unload 1 0
Restore the Linux kernel
1. Move the cartridge from slot 1 to the first tape drive.
localhost:~ $ mtx –f /dev/sg2 load 1 0
2. Create a temporary folder to restore the backup into.
localhost:~ $ mkdir temp
localhost:~ $ cd /temp
3. Restore the Linux kernel to the temporary folder.
localhost:~ $ tar xvf /dev/st0
4. Move the cartridge back to slot 1.
localhost:~ $ mtx –f /dev/sg2 unload 1 0
5. Compare the original Linux kernel with the restored Linux kernel.
localhost:~ $ cmp /boot/vmlinux* /temp/boot/vmlinux*
If no differences are found between the two files, no message will be displayed.
16 Linux (x86, x64 and IA64)
Page 17

4 HP-UX 11i V2/V3 (PA-RISC & IA64)
Overview
This chapter describes how to configure the HP StoreOnce Backup System for use with the following
HP-UX operating systems:
• HP-UX 11i V2 (PA-RISC and IA64)
• HP-UX 11i V3 (PA-RISC and IA64)
NOTE: A block size no larger than 256 KB is strongly recommended when working with HP-UX
11i V2. See Using large block sizes with HP-UX 11i V2 (page 24).
Configuring the HP StoreOnce Backup System for iSCSI
If your product supports iSCSI use the information in this section to configure it.
If your product does not support iSCSI, go to Configuring the HP Backup System for Fibre
Channel (page 21).
How to install the iSCSI software initiator
The iSCSI Software Initiator is located at the HP Software Depot.
1. Go to http://www.software.hp.com.
2. Enter iSCSI Software Initiator in the search box.
3. When the search results show iSCSI Software Initiator, click on Receive for Free.
4. In the Software Specification window, highlight the HP-UX version on which you want to install
the HP-UX iSCSI Software Initiatot.Then complete the required fields and click on Next >>
5. Look for Download Software, then click on the iSCSI Software Initiator version that you would
like to download.
6. In the Document column (next to the Download Software column), click on Installation Instruction
to download instructions for using the Software Distributor tool to install the iSCSI Software
Initiator.
NOTE: The Software Distributor is used for software installations on HP-UX systems. It also
provides an interface for removing software from HP-UX systems.
7. After the system reboots, verify that the installation was successful by issuing the swlist
command as follows:
swlist iSCSI-00
If the HP-UX iSCSI Software Initiator is installed correctly, the output will be:
HP-UX 11i V2
# Initializing...
# Contacting target "localhost"...
#
# Target: localhost:/
#
# iSCSI-00 B.11.23.03e HP-UX iSCSI Software Initiator
iSCSI-00.ISCSI-SWD B.11.23.03e HP-UX iSCSI Software Initiator
HP-UX 11i V3
# Initializing...
# Contacting target "localhost"...
#
# Target: localhost:/
#
Overview 17
Page 18

# iSCSI-00 B.11.31.01 HP-UX iSCSI Software Initiator
iSCSI-00.ISCSI-SWD B.11.31.01 HP-UX iSCSI Software Initiator
8. Issue the ioscan command as follows:
HP-UX 11i V2
# ioscan -fnC iscsi
HP-UX 11i V3
# ioscan -fnNC iscsi
If the software is installed correctly, the generated output will look similar to this:
Class I H/W Path Driver S/W State H/W Type Description
=====================================================================
iscsi 0 255/0 iscsi CLAIMED VIRTBUS iSCSI Virtual Node
How to configure the iSCSI software initiator using the D2Dsetup script
Use the D2Dsetup script to configure the iSCSI software initiator automatically. You must provide
the IP address as a parameter to the script.
# D2Dsetup <IP_address>
If you wish to configure CHAP authentication, you should also provide the user name and password
for the initiator and the target, if required.
# D2Dsetup <Initiator_CHAP_Username> <Initiator_CHAP_Password>
<Target_CHAP_Username> <Target_CHAP_Password> <IP_address>
The response from the HP StoreOnce Backup System will be similar to the following:
HP StoreOnce Backup System Linux and UNIX iSCSI Configuration Tool
Detecting OS...................................done
Checking iSCSI package.........................done
Contacting HP StoreOnce Backup System...done
Discovering available targets..................done
Configuring drivers............................done
Configuring CHAP authentication................done
The following library devices are configured:
tape 1 255/0/2.0.0.0 stape CLAIMED DEVICE HP Ultrium 3-SCSI
/dev/rmt/1m /dev/rmt/c6t0d0BEST
/dev/rmt/1mb /dev/rmt/c6t0d0BESTb
/dev/rmt/1mn /dev/rmt/c6t0d0BESTn
/dev/rmt/1mnb /dev/rmt/c6t0d0BESTnb
autoch 0 255/0/3.0.0.0 schgr CLAIMED DEVICE HP 1x8 G2 AUTOLDR
/dev/rac/c7t0d0
How to manually configure the iSCSI software initiator using the command line
The command line tool for configuring the HP-UX iSCSI software initiator is iscsiutil. Detailed
instructions for iscsiutil can be found in the iscsiutil(1M) man documents. The following
instructions provide the minimum steps required to connect an HP-UX host to an HP StoreOnce
Backup System.
1. Add the path for iscsiutil and other iSCSI executables to the root path:
# PATH=$PATH:/opt/iscsi/bin
2. Find the iSCSI initiator node for the HP-UX host:
# iscsiutil -l
Initiator Name : iqn.1986-03.com.hp:mantis.ef28ceae-7203-11dc-82a4
-bf88291ef301
This initiator node name is required by the HP StoreOnce Backup System web management
interface when manually configuring library devices.
3. To discover available iSCSI target devices on a HP StoreOnce Backup System and add them
to iSCSI persistent information type the following, where x.x.x.x is the IP address of the HP
StoreOnce Backup System:
# iscsiutil –aI x.x.x.x
18 HP-UX 11i V2/V3 (PA-RISC & IA64)
Page 19

The response will be:
Target address “x.x.x.x:3260,1” has been successfully added.
4. To display the discovery target that has been configured, type the following:
# iscsiutil –pD
The output will be similar to this:
Discovery Target Information
---------------------------Target # 1
-----------
IP Address : x.x.x.x
iSCSI TCP Port : 3260
iSCSI Portal Group Tag : 1
User Configured:
----------------
Authenticaton Method :
CHAP Method : CHAP_UNI
Initiator CHAP Name :
CHAP Secret :
Header Digest : None,CRC32C (default)
Data Digest : None,CRC32C (default)
5. To discover operational target devices, type the following:
# ioscan -H 255
The output will be similar to this:
H/W Path Class Description
==================================================
255/0 iscsi iSCSI Virtual Node
255/0/0.0 ext_bus iSCSI-SCSI Protocol Interface
255/0/0.0.0 target
255/0/0.0.0.0 tape HP Ultrium 3-SCSI
255/0/2.0 ext_bus iSCSI-SCSI Protocol Interface
255/0/2.0.0 target
255/0/2.0.0.0 autoch HP MSL G3 Series
6. To display operational target devices, type:
# iscsiutil –pO
The output will be similar to this:
Operational Target Information
-----------------------------Target # 1
---------- Target Name : iqn.1986-
03.com.hp:storage.d2d.cr209107ff.500110a6656e596f.library1
.drive1
Target Alias :
No. of Target Addresses : 1
Target Address # 1
------------------ IP Address : x.x.x.x
iSCSI TCP Port : 3260
iSCSI Portal Group Tag : 1
User Configured:
--------------- Authenticaton Method :
CHAP Method : CHAP_UNI
Initiator CHAP Name :
CHAP Secret :
Header Digest : None,CRC32C (default)
Data Digest : None,CRC32C (default)
Target # 2
-----------
Configuring the HP StoreOnce Backup System for iSCSI 19
Page 20

Target Name : iqn.1986-
03.com.hp:storage.d2d.cr209107ff.500110ad6bd1034b.library
1 .robotics
Target Alias :
No. of Target Addresses : 1
Target Address # 1
-------------------
IP Address : x.x.x.x
iSCSI TCP Port : 3260
iSCSI Portal Group Tag : 1
User Configured:
--------------- Authenticaton Method :
CHAP Method : CHAP_UNI
Initiator CHAP Name :
CHAP Secret :
Header Digest : None,CRC32C (default)
Data Digest : None,CRC32C (default)
7. To optionally configure uni-directional CHAP authentication you should update the iSCSI
Authentication details in the Web Management Interface, as shown below.
NOTE: In the following commands, items in parentheses are user-defined strings. Substitute
the appropriate information for <iqn...>, <chap_password> and <chap_username>.
Once the HP StoreOnce Backup System has been modified, the operating system should be
modified as follows:
# iscsiutil –t authmethod CHAP None
# iscsiutil –u –H CHAP_UNI
# iscsiutil –u –N <chap_username> –T <iqn...> –I x.x.x.x
# iscsiutil –u –W <chap_password> –T <iqn...> –I x.x.x.x
8. If CHAP authentication has been enabled, rediscover operational target devices by typing the
following:
# ioscan -H 255
The output will be similar to this:
H/W Path Class Description
==================================================
255/0 iscsi iSCSI Virtual Node
255/0/0.0 ext_bus iSCSI-SCSI Protocol Interface
255/0/0.0.0 target
255/0/0.0.0.0 tape HP Ultrium 3-SCSI
255/0/2.0 ext_bus iSCSI-SCSI Protocol Interface
255/0/2.0.0 target
255/0/2.0.0.0 autoch HP MSL G3 Series
9. If the device type shown above is UNKNOWN instead of TAPE or AUTOCH then you must
configure the stape and schgr modules for the HP-UX kernel. This can be done as follows:
HP-UX 11i V2
20 HP-UX 11i V2/V3 (PA-RISC & IA64)
Page 21

# kcmodule –B stape=static schgr=static
* The automatic 'backup' configuration has been updated.
Module State Cause
schgr (now) static best
(next boot) static explicit
stape (now) static best
(next boot) static explicit
HP-UX 11i V3
# kcmodule –h –B stape=static estape=static schgr=static eschgr=static
* The automatic 'backup' configuration has been updated.
Module State Cause
schgr (now) static best
(next boot) static explicit
stape (now) static best
(next boot) static explicit
eschgr (now) static best
(next boot) static explicit
estape (now) static best
(next boot) static explicit
10. To create device files for the target devices, type the following:
# insf –H 255
11. To display the device files associated with the operational target devices, type:
# ioscan –fnH 255
Class I H/W Path Driver S/W State H/W Type Description
==========================================================================
iscsi 0 255/0 iscsi CLAIMED VIRTBUS iSCSI Virtual Node
ext_bus 8 255/0/0.0 iscsial CLAIMED INTERFACE iSCSI-SCSI Protocol
Interface
target 10 255/0/0.0.0 tgt CLAIMED DEVICE
tape 1 255/0/0.0.0.0 stape CLAIMED DEVICE HP Ultrium 3-SCSI
/dev/rmt/1m /dev/rmt/1mn
/dev/rmt/c8t0d0BEST /dev/rmt/c8t0d0BESTn
/dev/rmt/1mb /dev/rmt/1mnb
/dev/rmt/c8t0d0BESTb /dev/rmt/c8t0d0BESTnb
ext_bus 9 255/0/2.0 iscsial CLAIMED INTERFACE iSCSI-SCSI Protocol
Interface
target 11 255/0/2.0.0 tgt CLAIMED DEVICE
autoch 0 255/0/2.0.0.0 schgr CLAIMED DEVICE HP MSL G3 Series
/dev/rac/c9t0d0
In this example the tape drives device files are:
AT&T, best density available/dev/rmt/1m
Berkeley, best density available/dev/rmt/1mb
AT&T, no rewind, best density available/dev/rmt/1mn
Berkeley, no rewind, best density available/dev/rmt/1mnb
AT&T, best density available/dev/rmt/c8t0d0BEST
Berkeley, best density available/dev/rmt/c8t0d0BESTb
AT&T, best density available/dev/rmt/c8t0d0BESTn
Berkeley, no rewind, best density available/dev/rmt/c8t0d0BESTnb
And the autochanger device file is:
/dev/rac/c9t0d0
Configuring the HP StoreOnce Backup System for Fibre Channel
For a Switched Fabric Configuration, zone the individual devices to the host concerned using the
virtual device WWNs shown on the product's GUI.
Configuring the HP StoreOnce Backup System for Fibre Channel 21
Page 22

An example of a GUI is shown below; for details of the GUI specific to your product, please refer
to the product's User Guide.
Output needs checking.
1. To discover operational target devices, type the following:
# ioscan
The output will be similar to this:
H/W Path Class Description
================================================================
0/5 ba Local PCI-X Bus Adapter (783)
0/5/1/0 fc HP AB379-60001 4Gb Dual Port
PCI/PCI-X Fibre Channel Adapter (FC Port 1)
0/5/1/0.166 fcp FCP Domain
0/5/1/0.166.0.255.0 t_bus FCP Device Interface
0/5/1/0.166.0.255.0.1 target
0/5/1/0.166.0.255.0.1.0 autoch HP MSL G3 Series
0/5/1/0.166.0.255.0.2 target
0/5/1/0.166.0.255.0.2.0 tape HP Ultrium 3-SCSI
2. If the device type shown above is UNKNOWN instead of TAPE or AUTOCH then you must
configure the stape and schgr modules for the HP-UX kernel. This can be done as follows:
HP-UX 11i V2
# kcmodule –B stape=static schgr=static
*The automatic 'backup' configuration has been updated.
Module State Cause
schgr (now) static best
(next boot) static explicit
stape (now) static best
(next boot) static explicit
HP-UX 11i V3
# kcmodule –h –B stape=static estape=static schgr=static eschgr=static
* The automatic 'backup' configuration has been updated.
Module State Cause
schgr (now) static best
(next boot) static explicit
stape (now) static best
(next boot) static explicit
eschgr (now) static best
(next boot) static explicit
22 HP-UX 11i V2/V3 (PA-RISC & IA64)
Page 23

estape (now) static best
(next boot) static explicit
3. To create device files for the target devices, type the following:
# insf
4. To display the device files associated with the operational target devices, type:
# ioscan –fn
Class I H/W Path Driver S/W State H/W Type Description
==========================================================================
ba 4 0/5 lba CLAIMED BUS_NEXUS Local PCI-X Bus Adapter (783)
fc 5 0/5/1/0 fcd CLAIMED INTERFACE HP AB379-60001 4Gb Dual Port
PCI/PCI-X Fibre Channel Adapter (FC Port 1)
/dev/fcd5
fcp 11 0/5/1/0.166 fcd_fcp CLAIMED INTERFACE FCP Domain
ext_bus 33 0/5/1/0.166.0.255.0 fcd_vbus CLAIMED INTERFACE FCP Device Interface
target 8 0/5/1/0.166.0.255.0.1 tgt CLAIMED DEVICE
autoch 1 0/5/1/0.166.0.255.0.1.0 schgr CLAIMED DEVICE HP MSL G3 Series
/dev/rac/c33t1d0
target 9 0/5/1/0.166.0.255.0.2 tgt CLAIMED DEVICE
tape 23 0/5/1/0.166.0.255.0.2.0 stape CLAIMED DEVICE HP Ultrium 3-SCSI
/dev/rmt/1m /dev/rmt/1mn /dev/rmt/c33t2d0BEST /dev/rmt/c33t2d0BESTn
/dev/rmt/1mb /dev/rmt/1mnb /dev/rmt/c33t2d0BESTb /dev/rmt/c33t2d0BESTnb
In this example the tape drives device files are:
AT&T, best density available/dev/rmt/1m
Berkeley, best density available/dev/rmt/1mb
AT&T, no rewind, best density available/dev/rmt/1mn
Berkeley, no rewind, best density available/dev/rmt/1mnb
AT&T, best density available/dev/rmt/c33t2d0BEST
Berkeley, best density available/dev/rmt/c33t2d0BESTb
AT&T, best density available/dev/rmt/c33t2d0BESTn
Berkeley, no rewind, best density available/dev/rmt/c33t2d0BESTnb
And the autochanger device file is:
/dev/rac/c33t1d0
Configuring the HP StoreOnce Backup System for NAS (NFS)
The StoreOnce Backup System NAS interface should be configured to use NFS as the Access
Protocol when backing up data using HP-UX.
The NFS share can then be mounted in HP-UX using the mount command. For example:
# mount 192.168.0.100:/nas/D2DBackupShare /mnt/D2DBackupShare
The StoreOnce Backup System supports NFSv3. To explicitly mount the StoreOnce Backup System
using NFSv3, the following syntax should be used:
# mount –t nfs –o nfsvers=3 x.x.x.x:/<name of share> <local mount>
Configuring the HP StoreOnce Backup System for NAS (NFS) 23
Page 24

Controlling an HP StoreOnce Backup System using HP-UX
The HP StoreOnce Backup System appears to the HP-UX operating system as a changer device
and Ultrium tape drive. The changer device represents the robotics within the library and can be
controlled from the console using a command called MC. The complete MC manual can also be
accessed using the command man mc.
The following examples illustrate how to complete common tasks with the HP StoreOnce Backup
System.
• Review the media
• Load a cartridge into the tape drive
• Unload a cartridge from the tape drive
• Move a cartridge to the mail slot
• Move a cartridge from the mail slot
Using large block sizes with HP-UX 11i V2
A block size no larger than 256 KB (262144 bytes) is strongly recommended when working with
HP-UX 11i V2 and tape or VTL devices. Backup applications should be configured to work with
I/O block sizes that are no larger than 256 KB. Please check your application documentation to
find out how to check or configure block sizes used for transfers to and from tape or VTLdevices.
Block sizes no larger than 256 KB (262144 bytes) are recommended with HP-UX 11i V2 because,
by default, the HP-UX stape driver processes a block size larger than 256 KB by subdividing it
into 256 KB blocks for writing to tape (giving a net effect of 256 KB I/O transfers). During restore,
stape attempts to reconstruct the original block size that was larger than 256 KB with the 256
KB blocks from tape. This subdivision and subsequent reconstruction process of block sizes larger
than 256 KB adds unnecessary complexity and risk to tape positioning and restore operations and
offers no net gain in terms of increased block size. It should, therefore, be avoided.
Reviewing the media in a library
To verify the contents of the media slots within a library, the following command should be used:
# mc –p /dev/rac/c9t0d0 –rDSI
DT_slot_1 EMPTY
ST_slot_1:Full 72255101
ST_slot_2:Full 72255102
ST_slot_3:Full 72255103
ST_slot_4:Full 72255104
ST_slot_5:Full 72255105
ST_slot_6:Full 72255106
ST_slot_7:Full 72255107
ST_slot_8:Full 72255108
ST_slot_9:Full 72255109
ST_slot_10:Full 72255110A
ST_slot_11:Full 72255110B
ST_slot_12:Full 72255110C
ST_slot_13:Full 72255110D
ST_slot_14:Full 72255110E
ST_slot_15:Full 72255110F
ST_slot_16:Full 722551110
ST_slot_17:Full 722551111
ST_slot_18:Full 722551112
ST_slot_19:Full 722551113
ST_slot_20:Full 722551114
ST_slot_21:Full 722551115
ST_slot_22:Full 722551116
ST_slot_23:Full 722551117
24 HP-UX 11i V2/V3 (PA-RISC & IA64)
Page 25

ST_slot_24:Full 722551118
IE_slot_25:Empty
The DT_slot 1 represent Ultrium tape drives within the library. The ST_slots 1 to 24 represent the
24 configured slots within the library. The IE_slot_1 represents the import/export slot of the library,
also known as the Mail Slot in the HP StoreOnce Backup System Web Management Interface.
Loading a cartridge into a library tape drive
To load a cartridge into the tape drive, the mc —s —d command should be used. For example,
to move a cartridge from slot 2 to the drive the command would be:
# mc –p /dev/rac/c9t0d0 –s S2 –d D1
Unloading a cartridge from a library tape drive
To unload a cartridge from the first tape drive and return it to storage slot 2, the command should
be:
# mc –p /dev/rac/c9t0d0 –s D1 –d S2
Moving a cartridge to the library Mail Slot
To move a cartridge from storage slot 3 to the mail slot for exporting to an attached tape drive,
the command will be:
# mc –p /dev/rac/c9t0d0 –s S3 –d I1
Moving a cartridge from the library Mail Slot
To move a cartridge from the Import/Export slot to Storage slot 4, following an import from an
attached tape drive, the command will be:
# mc –p /dev/rac/c9t0d0 –s I1 –d S4
Backup and restore files using TAR in HP-UX
This section describes how to perform a simple backup and recovery of files to an HP StoreOnce
Backup System using the console applications; MC and TAR. In the examples, the library robotics
is controlled using generic SCSI device file /dev/rac/c9t0d0 and the autoloader tape drive
uses tape device file /dev/rmt/1mnb. The file to be backed up and restored is the HP-UX kernel.
Backup and restore files using TAR in HP-UX 25
Page 26

Back up the HP-UX kernel
1. Check to see what media is available.
# mc –p /dev/rac/c9t0d0 –rDSI
DT_slot_1 EMPTY
ST_slot_1:Full 72255101
ST_slot_2:Full 72255102
ST_slot_3:Full 72255103
ST_slot_4:Full 72255104
ST_slot_5:Full 72255105
ST_slot_6:Full 72255106
ST_slot_7:Full 72255107
ST_slot_8:Full 72255108
ST_slot_9:Full 72255109
ST_slot_10:Full 72255110A
ST_slot_11:Full 72255110B
ST_slot_12:Full 72255110C
ST_slot_13:Full 72255110D
ST_slot_14:Full 72255110E
ST_slot_15:Full 72255110F
ST_slot_16:Full 722551110
ST_slot_17:Full 722551111
ST_slot_18:Full 722551112
ST_slot_19:Full 722551113
ST_slot_20:Full 722551114
ST_slot_21:Full 722551115
ST_slot_22:Full 722551116
ST_slot_23:Full 722551117
ST_slot_24:Full 722551118
IE_slot_25:Empty
2. Move the cartridge from slot 1 to the first tape drive.
# mc –p /dev/rac/c9t0d0 –s S1 –d D1
3. Ensure you are in the root directory.
# cd /
4. Back up the HP-UX kernel using tar.
# tar cvf /dev/rmt/1mnb ./stand/vmunix
5. Move the cartridge back to slot 1.
# mc –p /dev/rac/c9t0d0 –s D1 –d S1
Restore the HP-UX kernel
1. Move the cartridge from slot 1 to the first tape drive.
# mc –p /dev/rac/c9t0d0 –s S1 –d D1
2. Create a temporary folder to restore the backup into.
# mkdir temp
# cd /temp
3. Restore the HP-UX kernel to the temporary folder.
# tar xvf /dev/rmt/1mnb
4. Move the cartridge back to slot 1.
# mc –p /dev/rac/c9t0d0 –s D1 –d S1
5. Compare the original HP-UX kernel with the restored HP-UX kernel.
# cmp /stand/vmunix /temp/stand/vmunix
If no differences are found between the two files, no message will be displayed.
26 HP-UX 11i V2/V3 (PA-RISC & IA64)
Page 27

5 Solaris (x86 and SPARC)
Overview
This chapter describes how to configure the HP StoreOnce Backup System for use with the following
Solaris operating systems:
• Solaris 9 (SPARC)
• Solaris 10 (x86 and SPARC)
NOTE: HP StoreOnce Backup Systems with iSCSI interfaces are only supported with Solaris 10u4
or greater.
Configuring the HP StoreOnce Backup System for iSCSI
If your product supports iSCSI use the information in this section to configure it.
If your product does not support iSCSI, go to Configuring the HP Backup System for Fibre
Channel (page 30).
How to enable the iSCSI software initiator
1. Enable the iSCSI services using the command:
# svcadm –v enable iscsi_initiator
svc:/network/iscsi_initiator:default enabled
2. Verify the iSCSI services are running:
# svcs –a | grep iscsi_initiator
Online 10:10:28 svc: /network/iscsi_initiator:default
How to configure the iSCSI software initiator using the D2Dsetup script
Use the D2Dsetup script to configure the iSCSI software initiator automatically. You must provide
the IP address as a parameter to the script.
# D2Dsetup <IP_address>
If you wish to configure CHAP authentication, you should also provide the user name and password
for the initiator and the target, if required.
# D2Dsetup <Initiator_CHAP_Username> <Initiator_CHAP_Password>
<Target_CHAP_Username> <Target_CHAP_Password> <IP_address>
The response from the HP StoreOnce Backup System will be similar to the following:
HP StoreOnce Backup System Linux and UNIX iSCSI Configuration Tool
Detecting OS...................................done
Checking iSCSI package.........................done
Contacting HP StoreOnce Backup System...done
Discovering available targets..................done
Configuring persistant logins..................done
Configuring drivers............................done
Configuring CHAP authentication................done
The following library devices are configured:
Target: iqn.1986-03.com.hp:storage.d2d.cr2070143b.500110a125810bbf.library1
.robotics
Alias: D2D.CR2070143B.Library1.Robotics
TPGT: 1
ISID: 4000002a0000
Connections: 1
LUN: 0
Vendor: HP
Product: 1x8 G2 AUTOLDR
OS Device Name:
Target: iqn.1986-03.com.hp:storage.d2d.cr2070143b.500110a250017b86.library1.drive
Alias: D2D.CR2070143B.Library1.Drive1
Overview 27
Page 28

TPGT: 1
ISID: 4000002a0000
Connections: 1
LUN: 0
Vendor: HP
Product: Ultrium 3-SCSI
OS Device Name: /dev/rmt/1
total 2
lrwxrwxrwx 1 root root 136 Nov 3 18:00 c7t1d0 -> ../../../devices
/iscsi/medium-changer@0000iqn.1986-03.com.hp%3Astorage.d2d.cr2070143b
.500110a125810bbf.library1.roboticsFFFF,0:changer
lrwxrwxrwx 1 root root 115 Nov 3 18:00 /dev/rmt/1cb -> ../../devices
/iscsi/tape@0000iqn.1986-03.com.hp%3Astorage.d2d.cr2070143b
.500110a250017b86.library1.drive0001,0:cb
How to manually configure the iSCSI software initiator using the command line
The command line tool for configuring the iSCSI is iscsiadm. Detailed instructions for iscsiadm
can be found in the iscsiadm man documents. The following instructions provide the minimum
steps to connect a Solaris host to an HP StoreOnce Backup System.
1. Find the iSCSI initiator node for the Solaris host:
# iscsiadm list initiator-node
Initiator node name: iqn.1986-03.com.sun:01:00144f1d9196.4715d8a3
Initiator node alias: Login Parameters (Default/Configured):
Header Digest: NONE/Data Digest: NONE/Authentication Type: NONE
RADIUS Server: NONE
RADIUS access: unknown
Configured Sessions: 1
In this example the initiator node name is
iqn.1986-03.com.sun:01:00144f1d9196.4715d8a3 This initiator node name is
required by the HP StoreOnce Backup System web management interface when manually
configuring library devices.
2. Configure the Solaris host to discover available iSCSI targets as follows, where x.x.x.x is
the IP address of the HP StoreOnce Backup System:
# iscsiadm add discovery-address x.x.x.x:3260
# iscsiadm list discovery-address
Discovery Address: x.x.x.x:3260
# iscsiadm modify discovery -t enable
# iscsiadm list discovery
Discovery:
Static: disabled
Send Targets: enabled
iSNS: disabled
3. List the configured iSCSI target devices as follows:
# iscsiadm list target
Target: iqn.1986-
03.com.hp:storage.d2d.cr203f18f4.01a9754150ae013a.library1.robotics
Alias: D2D.CR203F18F4.Library1.Robotics
TPGT: 1
ISID: 4000002a0000
Connections: 1
Target: iqn.1986-03.com.hp:storage.d2d.cr203f18f4.7e0cdac23ab4eab1
.library1.drive1
Alias: D2D.CR203F18F4.Library1.Drive1
TPGT: 1
ISID: 4000002a0000
Connections: 1
In this example the two target iSCSI Qualified Names are:
28 Solaris (x86 and SPARC)
Page 29

iqn.1986-03.com.hp:storage.d2d.cr203f18f4.01a9754150ae013a
.library1.robotics
iqn.1986-03.com.hp:storage.d2d.cr203f18f4.7e0cdac23ab4eab1
.library1.drive1
NOTE: In the following commands, items in parentheses are user-defined strings. Substitute
the appropriate information for <iqn...>, <chap_password> and <chap_username>.
4. To optionally configure CHAP authentication you should update the iSCSI Authentication
details in the web management GUI, as shown below.
Once the HP StoreOnce Backup System has been modified, the operating system should be
modified as follows:
# iscsiadm modify initiator-node --authentication CHAP
# iscsiadm modify initiator-node --CHAP-name <chap_username>
# iscsiadm modify initiator-node --CHAP-secret
Enter the CHAP password when prompted.
If bi-directional CHAP authentication is required, also perform the following steps:
# iscsiadm modify target-param --bi-directional-authentication enable
<iqn...>
# iscsiadm modify target-param --authentication CHAP <iqn...>
# iscsiadm modify target-param --CHAP-name <chap_username>
# iscsiadm modify target-param --CHAP-secret <iqn...>
Enter the CHAP password when prompted.
5. To configure the iSCSI target devices as static devices, use the following commands:
# iscsiadm add static-config <iqn...>,x.x.x.x
# iscsiadm modify discovery -s enable
# iscsiadm list discovery
Discovery:
Static: enabled
Send Targets: enabled
iSNS: disabled
6. To verify the static configuration, use the following commands:
# iscsiadm list static-config
Static Configuration Target: iqn.1986-
03.com.hp:storage.d2d.cr203f18f4.01a9754150ae013a.library1
.robotics,x.x.x.x:3260
Static Configuration Target: iqn.1986-
03.com.hp:storage.d2d.cr203f18f4.7e0cdac23ab4eab1.library1
.drive,x.x.x.x:3260
# iscsiadm list target
Target: iqn.1986-03.com.hp:storage.d2d.cr203f18f4.7e0cdac23ab4eab1
.library1.drive1
Alias: -
ISID: 4000002a0000
Connections: 1
Target: iqn.1986-
03.com.hp:storage.d2d.cr203f18f4.01a9754150ae013a.library1.robotics
Configuring the HP StoreOnce Backup System for iSCSI 29
Page 30

Alias: -
ISID: 4000002a0000
Connections: 1
7. To create generic devices drivers for the iSCSI target devices, using the following commands:
# update_drv -ai '"scsiclass,08"' sgen
# devfsadm -i iscsi
8. To verify devices files for the iSCSI target device have been created, use these commands:
# ls –l /dev/scsi/changer
lrwxrwxrwx 1 root root 139 Jan 2 09:51 c3t1d0 ->
../../../devices/iscsi/medium-changer@0000iqn.1986-
03.com.hp%3Astorage.d2d.cr203f18f4.19f71d0c4c694ca8.library1
.robotics0001,0:changer
Here you can see device file c3t1d0 has been created for the changer element.
# ls -l /dev/rmt/*cb
lrwxrwxrwx 1 root root 116 Apr 18 14:51
/dev/rmt/2cb -> ../../devices/iscsi/tape@0000iqn.1986-03.com.hp%3Astorage
.d2d.cr203f18f4.01a9754150ae013a.library1.drive10001,0:cb
Configuring the HP StoreOnce Backup System for Fibre Channel
For a Switched Fabric Configuration, zone the individual devices to the host concerned using the
virtual device WWNs shown on the product's GUI.
An example of a GUI is shown below; for details of the GUI specific to your product, please refer
to the product's User Guide.
1. To create generic devices drivers for the iSCSI target devices, using the following commands:
# update_drv -ai '"scsiclass,08"' sgen
# cfgadm -al
30 Solaris (x86 and SPARC)
Page 31

2. To verify devices files for the iSCSI target device have been created, use these commands:
lrwxrwxrwx 1 root root 87 Apr 21 16:33
c2t500110AE1443192Ed0 -> ../../../devices/pci@7c0/pci@0/pci@9/SUNW,qlc@0/
fp@0,0/sgen@w500110ae1443192e,0:changer
Here you can see device file c2t500110AE1443192Ed0 has been created for the changer
element.
# ls -l /dev/rmt/*cb
lrwxrwxrwx 1 root root 77 Apr 21 16:33
/dev/rmt/2cb -> ../../devices/pci@7c0/pci@0/pci@9/SUNW,qlc@0/fp@0,0/
st@w500110a057bb1b32,0:cb
Configuring the HP StoreOnce Backup System for NAS (NFS)
The StoreOnce Backup System NAS interface should be configured to use NFS as the Access
Protocol when backing up data using Solaris.
The NFS share can then be mounted in Solaris using the mount command. For example:
# mount –F nfs –o vers=3 192.168.0.100:/nas/D2DBackupShare /mnt/D2DBackupShare
The HP StoreOnce Backup System supports NFSv3. To explicitly mount the StoreOnce Backup
System using NFSv3, the following syntax should be used:
# mount –F nfs –o vers=3 x.x.x.x:/<name of share> <local mount>
Controlling an HP StoreOnce Backup System using Solaris
The HP StoreOnce Backup System appears to the Solaris operating system as a changer device
and Ultrium tape drive. The changer device represents the robotics within the library and can be
controlled from the console using a command called mtx. mtx is not installed with Solaris by
default but it can be downloaded and installed from sourceforge.net
The following examples illustrate how to complete common tasks with the HP StoreOnce Backup
System.
• Verify you are controlling the correct library
• Review the media
• Load a cartridge into the tape drive
• Unload a cartridge from the tape drive
• Move a cartridge to the mail slot
• Move a cartridge from the mail slot
Verify you are controlling the correct library
The robotics of the library will be assigned a SCSI device file. To discover the device file assigned,
use the following command:
# ls /dev/scsi/changer
The response will the name of the device file. e.g. c3t1d0.Therefore, the library can be controlled
using the device file /dev/scsi/changer/c3t1d0.
Configuring the HP StoreOnce Backup System for NAS (NFS) 31
Page 32

To verify the device file for the robotics of the library
To verify the correct device file has been determined, the following command should be used:
# mtx –f /dev/scsi/changer/c3t1d0 inquiry
The output for an MSL 2024 library should be:
Product Type: Medium Changer
Vendor ID: ‘HP ‘
Product ID: ‘MSL G3 Series ‘
Revision: ‘pc81’
Attached Changer: No
To verify the tape device file for the tape drive
The tape drive(s) of the library will be assigned SCSI tape device files. To discover the SCSI tape
device files assigned, use the following command:
ls /dev/rmt/*cb
The output will be a list of device files for each configured tape drive. e.g. /dev/rmt/2cb.
In this example the SCSI tape device file that has been assigned is 2cb. To verify the tape device
file for the tape drive, the MT command should be used:
# mt -f /dev/rmt/2cb status
The output should be:
HP Ultrium LTO 3 tape drive:
sense key(0x6)= Unit Attention residual= 0 retries= 0
file no= 0 block no= 0
This indicates that the tape drive files are valid but no media is loaded into the drive.
Reviewing the media in a library
To verify the contents of the media slots within a library, the following command should be used:
# mtx –f /dev/scsi/changer/c3t1d0 status
The output for a MSL 2024 library with 1 tape drive and 24 cartridges configured would look
similar to this:
Storage Changer /dev/scsi/changer/c3t1d0:1 Drives, 24 Slots
( 1 Import/Export )
Data Transfer Element 0:Empty
Storage Element 1:Full :VolumeTag=72255101
Storage Element 2:Full :VolumeTag=72255102
Storage Element 3:Full :VolumeTag=72255103
Storage Element 4:Full :VolumeTag=72255104
Storage Element 5:Full :VolumeTag=72255105
Storage Element 6:Full :VolumeTag=72255106
Storage Element 7:Full :VolumeTag=72255107
Storage Element 8:Full :VolumeTag=72255108
Storage Element 9:Full :VolumeTag=72255109
Storage Element 10:Full :VolumeTag=72255110A
Storage Element 11:Full :VolumeTag=72255110B
Storage Element 12:Full :VolumeTag=72255110C
Storage Element 13:Full :VolumeTag=72255110D
Storage Element 14:Full :VolumeTag=72255110E
Storage Element 15:Full :VolumeTag=72255110F
Storage Element 16:Full :VolumeTag=722551110
Storage Element 17:Full :VolumeTag=722551111
Storage Element 18:Full :VolumeTag=722551112
Storage Element 19:Full :VolumeTag=722551113
Storage Element 20:Full :VolumeTag=722551114
Storage Element 21:Full :VolumeTag=722551115
Storage Element 22:Full :VolumeTag=722551116
Storage Element 23:Full :VolumeTag=722551117
32 Solaris (x86 and SPARC)
Page 33

Storage Element 24:Full :VolumeTag=722551118
Storage Element 25 IMPORT/EXPORT:Empty
Each data transfer element represents an Ultrium tape drive within the library. Storage elements 1
to 24 represent the 24 configured slots within the library. Storage element 25 represents the
import/export slot of the library, also known as the Mail Slot in the HP StoreOnce Backup System
Web Management Interface.
Loading a cartridge into a library tape drive
To load a cartridge into the tape drive, the mtx load command should be used. For example,
to move a cartridge from slot 2 to the first tape drive the command would be:
# mtx –f /dev/scsi/changer/c3t1d0 load 2 0
Unloading a cartridge from a library tape drive
To unload a cartridge and place it in a storage slot, the mtx unload command should be used.
For example, to unload a cartridge from the first tape drive and place it in to storage slot 2, the
command would be:
# mtx –f /dev/scsi/changer/c3t1d0 unload 2 0
Backup and restore files using TAR
This section describes how to perform a simple backup and recovery of files to an HP StoreOnce
Backup System using the console applications; MTX and TAR. In the examples, the autoloader
robotics is controlled using SCSI device file /dev/scsi/changer/c3t1d0 and the library drive
uses tape device file /dev/rmt/2cb. The file to be backed up and restored is the kernel.
Back up the kernel
1. Check to see what media is available.
# mtx –f /dev/scsi/changer/c3t1d0 status
Storage Changer /dev/scsi/changer/c3t1d0:1 Drives, 24 Slots
( 1 Import/Export )
Data Transfer Element 0:Empty
Storage Element 1:Full :VolumeTag=72255101
Storage Element 2:Full :VolumeTag=72255102
Storage Element 3:Full :VolumeTag=72255103
Storage Element 4:Full :VolumeTag=72255104
Storage Element 5:Full :VolumeTag=72255105
Storage Element 6:Full :VolumeTag=72255106
Storage Element 7:Full :VolumeTag=72255107
Storage Element 8:Full :VolumeTag=72255108
Storage Element 9:Full :VolumeTag=72255109
Storage Element 10:Full :VolumeTag=72255110A
Storage Element 11:Full :VolumeTag=72255110B
Storage Element 12:Full :VolumeTag=72255110C
Storage Element 13:Full :VolumeTag=72255110D
Storage Element 14:Full :VolumeTag=72255110E
Storage Element 15:Full :VolumeTag=72255110F
Storage Element 16:Full :VolumeTag=722551110
Storage Element 17:Full :VolumeTag=722551111
Storage Element 18:Full :VolumeTag=722551112
Storage Element 19:Full :VolumeTag=722551113
Storage Element 20:Full :VolumeTag=722551114
Storage Element 21:Full :VolumeTag=722551115
Storage Element 22:Full :VolumeTag=722551116
Storage Element 23:Full :VolumeTag=722551117
Storage Element 24:Full :VolumeTag=722551118
Storage Element 25 IMPORT/EXPORT:Empty
Backup and restore files using TAR 33
Page 34

2. Move the cartridge from slot 1 to the tape drive.
# mtx –f /dev/scsi/changer/c3t1d0 load 1 0
3. Ensure you are in the root directory.
# cd /
4. Back up the kernel using tar.
# tar cvf /dev/rmt/2cb ./platform/`arch -k`/kernel/sparcv9/unix
5. Move the cartridge back to slot 1.
# mtx –f /dev/scsi/changer/c3t1d0 unload 1 0
Restore the kernel
1. Move the cartridge from slot 1 to the first tape drive.
# mtx –f /dev/scsi/changer/c3t1d0 load 1 0
2. Create a temporary folder to restore the backup into.
# mkdir temp
# cd /temp
3. Restore the kernel to the temporary folder.
# tar xvf /dev/rmt/2cb
4. Move the cartridge back to slot 1.
# mtx –f /dev/scsi/changer/c3t1d0 unload 1 0
5. Compare the original kernel with the restored kernel.
# cmp /platform/`arch -k`/kernel/sparcv9/unix /temp/platform/`arch
-k`/kernel/sparcv9/unix
If no differences are found between the two files, no message will be displayed.
34 Solaris (x86 and SPARC)
Page 35

About this guide
This guide provides information about:
• Configuring UNIX™ and Linux for use with the HP StoreOnce Backup System
• Controlling an HP StoreOnce Backup System
Intended audience
This guide is intended for network administrators and users with knowledge of:
• Ethernet networks
• UNIX
• Linux
Related documentation
The following documents [and websites] provide related information:
• HP StoreOnce Backup System user guide (HP B6000 Series))
• HP StoreOnce Backup System CLI reference guide (HP B6000 Series)
• HP StoreOnce Backup System user guide (G1 and G2 products)
• HP StoreOnce Backup System installation poster (not available for HP B6000 Series)
You can find these documents from the Manuals page of the HP Business Support Center website:
http://www.hp.com/support/manuals
Search on the product name.
Document conventions and symbols
Table 1 Document conventions
ElementConvention
Cross-reference links and e-mail addressesBlue text: Table 1 (page 35)
website addressesBlue, underlined text: http://www.hp.com
Bold text
• Keys that are pressed
• Text typed into a GUI element, such as a box
• GUI elements that are clicked or selected, such as menu
and list items, buttons, tabs, and check boxes
Text emphasisItalic text
Monospace text
• File and directory names
• System output
• Code
• Commands, their arguments, and argument values
Monospace, italic text
• Code variables
• Command variables
Emphasized monospace textMonospace, bold text
Intended audience 35
Page 36

CAUTION: Indicates that failure to follow directions could result in damage to equipment or data.
IMPORTANT: Provides clarifying information or specific instructions.
NOTE: Provides additional information.
TIP: Provides helpful hints and shortcuts.
HP technical support
For worldwide technical support information, see the HP support website:
http://www.hp.com/support
Before contacting HP, collect the following information:
• Product model names and numbers
• Technical support registration number (if applicable)
• Product serial numbers
• Error messages
• Operating system type and revision level
• Detailed questions
Customer self repair
HP customer self repair (CSR) programs allow you to repair your Storage products. If a CSR part
needs replacing, HP ships the part directly to you so that you can install it at your convenience.
Some parts do not qualify for CSR. Your HP-authorized service provider will determine whether a
repair can be accomplished by CSR.
For more information about CSR, contact your local service provider. For North America, see the
CSR website:
http://www.hp.com/go/selfrepair
Product warranties
For information about HP StorageWorks product warranties, see the warranty information website:
http://www.hp.com/go/storagewarranty
Subscription service
HP recommends that you register your product at the Subscriber's Choice for Business website:
http://www.hp.com/go/e-updates
After registering, you will receive e-mail notification of product enhancements, new driver versions,
firmware updates, and other product resources.
HP websites
For additional information, see the following HP websites:
• http://www.hp.com
• http://www.hp.com/go/storage
• http://www.hp.com/go/connect
36
Page 37

• http://www.hp.com/go/ebs
• http://www.hp.com/service_locator
• http://www.hp.com/support/manuals
• http://www.hp.com/support/downloads
Documentation feedback
HP welcomes your feedback.
To make comments and suggestions about product documentation, please send a message to
storagedocs.feedback@hp.com. All submissions become the property of HP.
Documentation feedback 37
 Loading...