

Page 1

HP StorageWorks MSL Library Extender user guide
This document provides information about installing, configuring, operating, troubleshooting, and servicing an
HP StorageWorks MSL Library Extender. This document is intended for system administrators who plan to install,
operate, or service a Library Extender. It is helpful to have experience administering an HP StorageWorks
MSL2024, MSL4048, or MSL8096 Tape Library. This document is a supplement to the HP StorageWorks
MSL2024, MSL4048, and MSL8096 Tape Libraries user and service guide.
Part number: AQ746-96005
Second edition: September 2009
Page 2

Legal and notice information
© Copyright 2009 Hewlett-Packard Development Company, L.P.
The information contained herein is subject to change without notice. The only warranties for HP products and services are set
forth in the express warranty statements accompanying such products and services. Nothing herein should be construed as
constituting an additional warranty. HP shall not be liable for technical or editorial errors or omissions contained herein.
WARRANTY STATEMENT: To obtain a copy of the warranty for this product, see the warranty information website:
http://www.hp.com/go/storagewarranty
Intel, Itanium, Pentium, Intel Inside, and the Intel Inside logo are trademarks or registered trademarks of Intel Corporation or
its subsidiaries in the United States and other countries.
Microsoft, Windows, Windows XP, and Windows NT are U.S. registered trademarks of Microsoft Corporation.
Page 3

Contents
1 Features and overview ...................................................................... 11
Slot numbering and mailslot configurations .................................................................................. 12
Tape drives .............................................................................................................................. 12
Power supply redundancy .......................................................................................................... 12
Using the Extender with the Encryption Kit .................................................................................... 13
Extended libraries and logical libraries ........................................................................................ 13
Installation overview .................................................................................................................. 13
Rack stability ............................................................................................................................ 14
2 Configuring and operating an extended library ................................... 15
Powering on the extended library ................................................................................................ 15
Powering off the extended library ................................................................................................ 16
Viewing identity information ....................................................................................................... 17
Viewing Library status ................................................................................................................ 18
Configuring the extended library ................................................................................................ 21
Default settings for the extended library ................................................................................. 25
Updating firmware .................................................................................................................... 25
Running diagnostic tests ............................................................................................................. 26
3 Installing the Library Extender ............................................................ 27
Identifying product components .................................................................................................. 28
Downloading product documentation .......................................................................................... 28
Determining the master and lower Library .................................................................................... 29
Saving the Library configurations ................................................................................................ 29
Upgrading the Library firmware .................................................................................................. 29
Enabling extended mode ........................................................................................................... 30
Removing the cartridges from the Libraries .................................................................................... 30
Powering off the Libraries ........................................................................................................... 31
Positioning the Libraries in a rack ................................................................................................ 31
Removing a Library from a rack or tabletop conversion cover ................................................... 32
Moving the rack rails and clip nuts ....................................................................................... 33
Moving the clip nuts ........................................................................................................... 34
Installing the Library in the rack rails ..................................................................................... 34
Relocating tape drives ............................................................................................................... 35
Removing and replacing drive bay covers .................................................................................... 36
Removing the USB device and Ethernet cable from the lower Library ................................................ 37
Extending the pull-out tab .......................................................................................................... 37
Aligning the Libraries ................................................................................................................ 38
Installing the Extender ............................................................................................................... 39
Powering on the extended library ................................................................................................ 40
Checking the Extender LEDs ................................................................................................ 41
Verifying the installation ............................................................................................................. 42
4 Using diagnostic tools and troubleshooting .......................................... 43
HP StorageWorks MSL Library Extender user guide 3
Page 4

Extender status LEDs .................................................................................................................. 43
The Library Extender cycle test .................................................................................................... 44
The wellness test ....................................................................................................................... 44
Using HP Library & Tape Tools ................................................................................................... 48
Library Extender error codes ...................................................................................................... 48
Additional robotic error sub-codes .............................................................................................. 53
5 Servicing the Library Extender ............................................................ 55
Replacing the Library Extender ................................................................................................... 55
Powering off the Libraries .................................................................................................... 55
Removing the Library Extender ............................................................................................. 56
Installing the new Extender .................................................................................................. 56
Removing the Library Extender .................................................................................................... 56
Disabling extended mode and powering off the Libraries ......................................................... 56
Removing the Library Extender ............................................................................................. 57
Preparing the Libraries to operate as separate Libraries ........................................................... 57
Replacing drive bay covers .................................................................................................. 58
Connecting the Ethernet cable ............................................................................................. 58
Powering on the Libraries ..................................................................................................... 58
Copying the key server token ............................................................................................... 58
Reconfiguring the Libraries ................................................................................................... 59
Settings retained from the extended library ...................................................................... 59
Settings that are set to default values .............................................................................. 59
Settings where the lower Library reverts to earlier values ................................................... 59
Special cases .............................................................................................................. 60
Removing a cartridge from the Extender ....................................................................................... 60
Repackaging the Library Extender ............................................................................................... 61
Releasing the magazines manually ............................................................................................. 64
6 Support and other resources .............................................................. 67
Contacting HP .......................................................................................................................... 67
Before you contact HP ......................................................................................................... 67
HP contact information ........................................................................................................ 67
Subscription service ............................................................................................................ 67
Documentation feedback ..................................................................................................... 67
Related information ................................................................................................................... 67
Documents ........................................................................................................................ 67
Websites ........................................................................................................................... 68
Document conventions and symbols ............................................................................................. 68
Customer self repair .................................................................................................................. 69
A Technical specifications .................................................................... 71
B Electrostatic discharge ...................................................................... 73
Preventing electrostatic damage .................................................................................................. 73
Grounding methods .................................................................................................................. 73
C Regulatory compliance notices .......................................................... 75
Regulatory compliance identification numbers .............................................................................. 75
Federal Communications Commission notice ................................................................................ 75
FCC rating label ................................................................................................................ 75
Class A equipment ....................................................................................................... 75
4
Page 5

Class B equipment ....................................................................................................... 76
Declaration of Conformity for products marked with the FCC logo, United States only ................. 76
Modification ...................................................................................................................... 76
Cables .............................................................................................................................. 76
Canadian notice (Avis Canadien) ............................................................................................... 76
Class A equipment ............................................................................................................. 76
Class B equipment .............................................................................................................. 77
European Union notice .............................................................................................................. 77
Japanese notices ...................................................................................................................... 77
Japanese VCCI-A notice ...................................................................................................... 77
Japanese VCCI-B notice ...................................................................................................... 77
Japanese power cord statement ............................................................................................ 77
Korean notices ......................................................................................................................... 78
Class A equipment ............................................................................................................. 78
Class B equipment .............................................................................................................. 78
Taiwanese notices ..................................................................................................................... 78
BSMI Class A notice ........................................................................................................... 78
Taiwan battery recycle statement .......................................................................................... 78
Laser compliance notices ........................................................................................................... 79
English laser notice ............................................................................................................. 79
Dutch laser notice ............................................................................................................... 79
French laser notice ............................................................................................................. 80
German laser notice ........................................................................................................... 80
Italian laser notice .............................................................................................................. 80
Japanese laser notice .......................................................................................................... 81
Spanish laser notice ........................................................................................................... 81
Recycling notices ...................................................................................................................... 81
English notice .................................................................................................................... 81
Bulgarian notice ................................................................................................................. 82
Czech notice ..................................................................................................................... 82
Danish notice .................................................................................................................... 82
Dutch notice ...................................................................................................................... 82
Estonian notice .................................................................................................................. 83
Finnish notice ..................................................................................................................... 83
French notice ..................................................................................................................... 83
German notice ................................................................................................................... 83
Greek notice ...................................................................................................................... 84
Hungarian notice ............................................................................................................... 84
Italian notice ...................................................................................................................... 84
Latvian notice .................................................................................................................... 84
Lithuanian notice ................................................................................................................ 85
Polish notice ...................................................................................................................... 85
Portuguese notice ............................................................................................................... 85
Romanian notice ................................................................................................................ 85
Slovak notice ..................................................................................................................... 86
Spanish notice ................................................................................................................... 86
Swedish notice ................................................................................................................... 86
Turkish notice ..................................................................................................................... 86
Battery replacement notices ........................................................................................................ 87
Dutch battery notice ............................................................................................................ 87
French battery notice .......................................................................................................... 88
German battery notice ........................................................................................................ 88
Italian battery notice ........................................................................................................... 89
Japanese battery notice ...................................................................................................... 89
Spanish battery notice ........................................................................................................ 90
HP StorageWorks MSL Library Extender user guide 5
Page 6

Glossary ............................................................................................ 91
Index ................................................................................................. 93
6
Page 7

Figures
6
7
8
12
Library Extender installed with two MSL4048 Tape Libraries ......................................... 111
Help available from the RMI ..................................................................................... 152
Press the power buttons on both Libraries to power on the extended library .................... 163
Press the power button on the master Library to power off the extended library ............... 164
Identity > Library page ............................................................................................ 175
Example of the System Status pane from an extended library with an MSL8096 master
Library and MSL4048 lower Library .......................................................................... 19
Status > Library RMI page for an extended library with an MSL4048 master Library and
an MSL2024 lower Library ....................................................................................... 20
Configuration > System RMI page for an extended library with an MSL8096 master Library
and an MSL4048 lower Library ................................................................................ 22
Library Extender product contents .............................................................................. 289
Library Extender installed with two MSL4048 Tape Libraries ......................................... 2910
Library power button ............................................................................................... 3111
Two MSL4048 Tape Libraries installed in a rack in the rack rails supplied with the Libraries
in adjacent rack locations ........................................................................................ 31
Removing an MSL4048 from a rack .......................................................................... 3213
Installing the MSL2024 and MSL4048 rack rails ......................................................... 3314
Clip nut locations .................................................................................................... 3415
Installing an MSL4048 and tightening the captive screws ............................................. 3516
Tape drive thumbscrew locations ............................................................................... 3517
Removing a tape drive ............................................................................................. 3618
Removing drive bay covers to create space for the Extender ......................................... 3619
Installing covers on unused drive bays ....................................................................... 3720
Removing the USB device and Ethernet cable from the lower Library .............................. 3721
Trimming the pull-out tab .......................................................................................... 3822
Captive screw locations ........................................................................................... 3823
Aligning the Libraries with the alignment gauge .......................................................... 3924
Aligning the Extender with the upper drive bay ........................................................... 3925
Sliding the pull-out tab into the Library ....................................................................... 4026
Tightening the Extender thumbscrews ......................................................................... 4027
Extended library power buttons ................................................................................ 4128
Library Extender LEDs .............................................................................................. 4129
HP StorageWorks MSL Library Extender user guide 7
Page 8

Library Extender status LEDs ..................................................................................... 4330
Aligning the Extender tab in the Library slot ................................................................ 4431
Extended Library power off button ............................................................................. 5532
Removing the Extender ............................................................................................ 5633
Removing the Extender ............................................................................................ 5734
Removing the Extender ............................................................................................ 6035
Access to release lever for the right magazines in the master Library .............................. 6536
Access to release lever for the left magazines in the master Library ................................ 6537
Access holes for the right and left magazines in the lower Library .................................. 6538
Releasing the magazine .......................................................................................... 6639
8
Page 9

Tables
Supported configurations ......................................................................................... 111
Storage slot numbering ............................................................................................ 122
Mailslot numbering ................................................................................................. 123
Top-row corner slot positions .................................................................................... 454
Error codes ............................................................................................................ 495
Sub-codes for error B8 ............................................................................................. 506
Sub-codes for error B9 ............................................................................................. 507
Sub-codes for error BD ............................................................................................ 508
Sub-codes for error BE ............................................................................................. 529
Sub-codes related to Library robotics errors during movement to extender position ........... 5310
Document conventions ............................................................................................. 6811
Physical specifications ............................................................................................. 7112
Environmental specifications ..................................................................................... 7113
HP StorageWorks MSL Library Extender user guide 9
Page 10

10
Page 11
1 Features and overview
The Library Extender combines two HP StorageWorks MSL Tape Libraries to create a single extended
library. Before installing the Extender, the Libraries must be installed in the rack rails supplied with
the Libraries in adjacent rack locations, one Library above the other. See the example shown in Figure
1.
Figure 1 Library Extender installed with two MSL4048 Tape Libraries
.
The Extender occupies the lower half-height drive bay of the upper Library and the top half-height
drive bay of the lower Library.
The upper Library controls the extended library and is called the master Library. The extended library
uses only the master Library OCP, USB port, and Ethernet connection.
The lower Library is controlled by the master Library. The lower Library OCP, USB port, and Ethernet
connection are not used by the extended library.
Table 1 Supported configurations
Total slotsLower LibraryMaster Library
Total half-height drive
bays
Total full-height drive
bays
1+03+172MSL2024MSL4048
1+13+396MSL4048MSL4048
3+03+1120MSL2024MSL8096
3+13+3144MSL4048MSL8096
HP StorageWorks MSL Library Extender user guide 11
Page 12

Slot numbering and mailslot configurations
Magazine and mailslot numbering begins with the lower Library and continues with the master Library.
For storage slot numbering, see Table 2.
Table 2 Storage slot numbering
Slot numbers (without mailslots enabled)Extended library configuration
The mailslots in both Libraries can be configured for use in the extended library. For mailslot numbering,
see Table 3.
Table 3 Mailslot numbering
Mailslot numbers (with all mailslots enabled)Extended library configuration
Master LibraryLower LibraryMaster LibraryLower Library
25–721–24MSL4048MSL2024
49–961–48MSL4048MSL4048
25–1201–24MSL8096MSL2024
49–1441–48MSL8096MSL4048
Master LibraryLower LibraryMaster LibraryLower Library
Tape drives
Tape drives are numbered starting with the lower Library and continuing with the master Library.
Any tape drive in the extended library can host the SCSI Library interface. The default is the lowest
tape drive in the lower Library.
Power supply redundancy
Both Libraries must have a working power supply for the extended library to operate. To have total
power supply redundancy, both Libraries must have working redundant power supplies. In an extended
library, if only one Library has redundant power supplies installed, the extended library will continue
to operate in case of a power supply failure in that Library. An extended library containing an
MSL2024 cannot have total power supply redundancy because the MSL2024 only has one power
supply.
M2–M4M1MSL4048MSL2024
M4–M6M1–M3MSL4048MSL4048
M2–M16M1MSL8096MSL2024
M4–M19M1–M3MSL8096MSL4048
Features and overview12
Page 13

Using the Extender with the Encryption Kit
The HP StorageWorks 1/8 G2 & MSL LTO-4 Encryption Kit provides secure generation and storage
of encryption keys.
An extended library will only access the key server token in the master Library.
NOTE:
The USB port in the lower Library is not active.
The extended library must contain at least one LTO-4 tape drive to use the Encryption Kit. LTO-4 tape
drives can be in any valid drive location in the extended library.
If combining two Libraries that were both using the Encryption Kit, you can copy the keys from one
of the tokens onto the other so the token that will be used in the extended library has the keys to read
tapes from both Libraries. See the section on combining keys from multiple key server tokens in the
HP StorageWorks 1/8 G2 and MSL Encryption Kit user guide for instructions. To download the user
guide from the HP website, see Related documentation, page 67.
If you separate an extended library that uses the Encryption Kit and will have at least one LTO-4 tape
drive in each of the Libraries, you can copy the encryption keys on the token from the extended library
to a new token so both Libraries have access to all of the keys. See the HP StorageWorks 1/8 G2
and MSL Encryption Kit user guide for instructions. To download the user guide from the HP website,
see Related documentation, page 67.
Extended libraries and logical libraries
When the Extender is installed, the extended library is configured as a single logical library. An
extended library cannot be partitioned into multiple logical libraries.
If the Libraries are ever separated, each individual Library will become a single logical library until
reconfigured.
Installation overview
Successful installation of the Extender requires performing key steps in the order specified in Chapter
3, page 27.
1. Obtain the latest firmware for each Library from the HP website and download it into each Library
separately.
2. Enable extended mode on each Library.
3. Power off both Libraries.
4. Position the Libraries in the rack on their own rack rails.
5. Align the two Libraries using the alignment gauge.
HP StorageWorks MSL Library Extender user guide 13
Page 14

6. Move the tape drives, if necessary, to open the drive bays that will be used by the Extender.
NOTE:
In an MSL4048, a full-height tape drive will only operate in the two upper or two lower
half-height drive locations. Do not install a full height tape drive in the middle half-height
drive bays of an MSL4048 Tape Library.
7. Install the Extender.
8. Tighten the captive rack attachment screws on the front of the Libraries.
9. Power on both Libraries and verify that the three Extender LEDs are illuminated.
Rack stability
Rack stability protects personnel and equipment.
WARNING!
To reduce the risk of personal injury or damage to equipment:
• Extend leveling jacks to the floor.
• Ensure that the full weight of the rack rests on the leveling jacks.
• Install stabilizing feet on the rack.
• In multiple-rack installations, fasten racks together securely.
• Extend only one rack component at a time. Racks can become unstable if more than one component
is extended.
Features and overview14
Page 15
2 Configuring and operating an extended library
This chapter provides information about extended library configuration and operation tasks that are
different from a single Tape Library.
If you are installing the Extender for the first time, read this chapter for reference after installing the
Extender following the instructions in Chapter 3, page 27.
TIP:
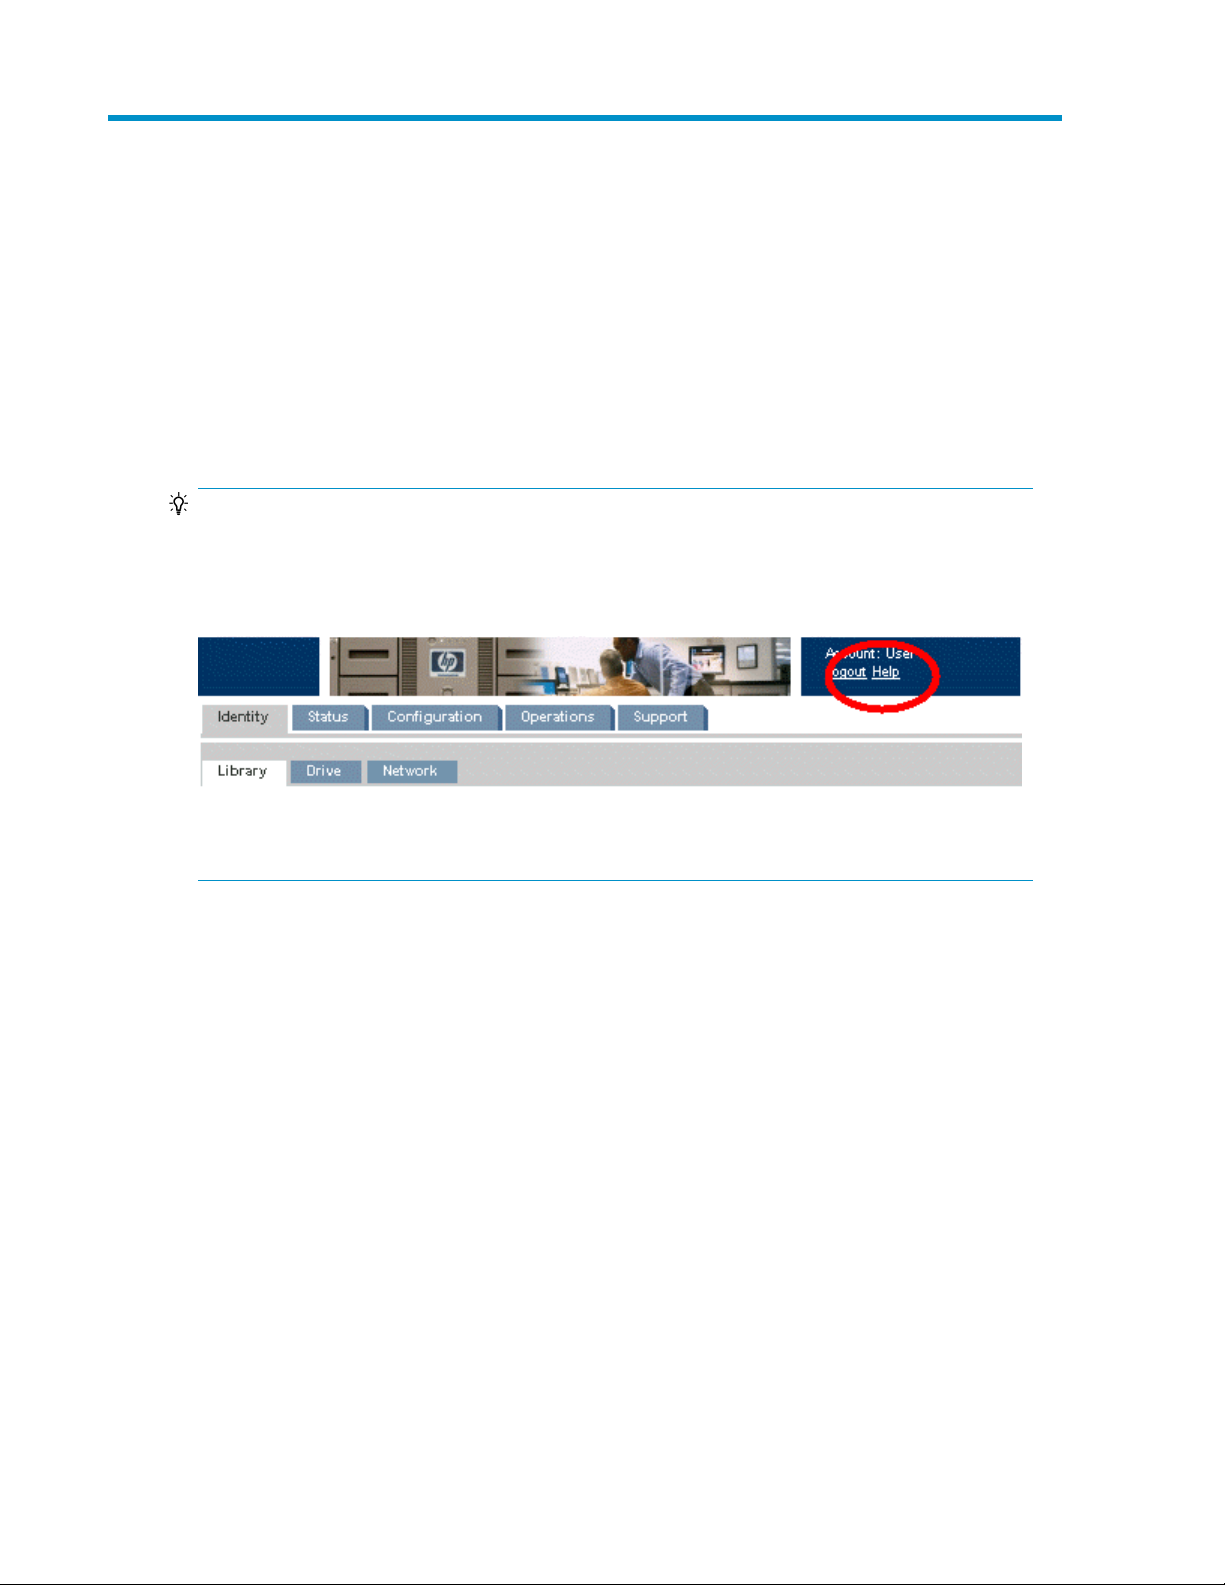
Check the Help screens in the RMI for additional information. The help pages are updated with most
firmware updates and often contain technical details that are not contained in this document. To
access RMI help, click Help on the right side of the Web page banner, as shown in Figure
2 on page 15.
Figure 2 Help available from the RMI
.
Powering on the extended library
To power on the extended library, power on each of the Tape Libraries from their OCPs. The Libraries
can be powered on in either order. The initialization sequence is faster if the lower Library is powered
on first.
HP StorageWorks MSL Library Extender user guide 15
Page 16
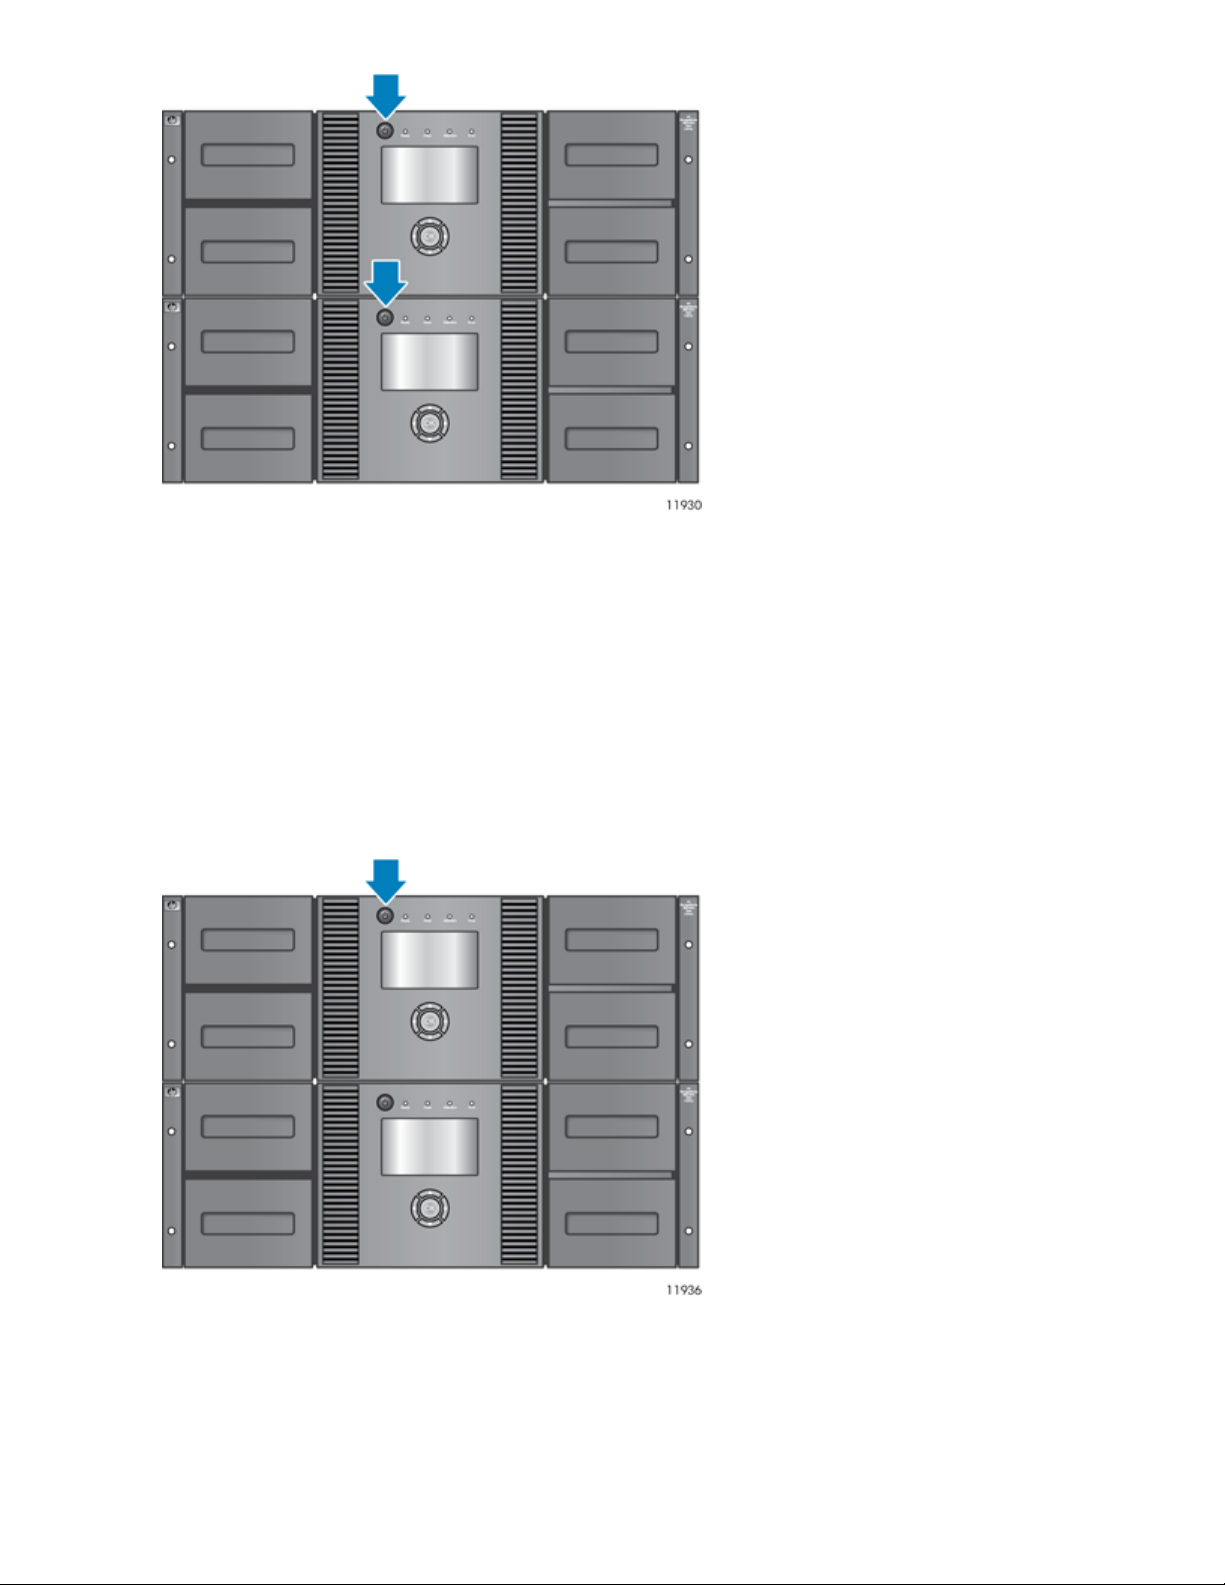
Figure 3 Press the power buttons on both Libraries to power on the extended library
.
If the master Library is powered on first, it will prompt the user to power on the lower Library. If the
lower Library is powered on first, it will remain in an uninitialized state until it receives an initialization
command from the master Library.
Powering off the extended library
To power off the extended library, power off the master Library. The master Library will power the
lower Library off. If the master Library is powered off with the emergency power off procedure or the
power cord is removed, the lower Library will lose communication with the master Library and must
be powered off by depressing its power button and holding it for at least 10 seconds.
Figure 4 Press the power button on the master Library to power off the extended library
.
Configuring and operating an extended library16
Page 17

Viewing identity information
To view detailed information about both Tape Libraries and the Extender, use the RMI Identity >
Library page or the master Library Info > Identity OCP screen.
Figure 5 Identity > Library page
.
The Library Information pane displays information about the master Library and the extended library.
• Serial Number — the electronic serial number for the master Library. The part of the serial number
before the '_' character, should match the serial number printed on the Library label, located on
the pull out tab on the back of the Library. The part of serial number after the '_' character encodes
the extended library components as follows:
• X — signifies that the master Library is in extended mode
• ml — shows the height of the master and lower Libraries, respectively
• 2 is an MSL2024
• 4 is an MSL4048
• 8 is an MSL8096
In the example shown in Figure 5, page 17, with the serial number DEC716067E_X84, the master
Library serial number is DEC716067E, the master Library is an MSL8096 and the lower Library
is an MSL4048.
• Product ID — how the device identifies itself to the host computer. This will always be MSL G3
Series.
• Currently Installed Library Firmware x.xx / y.yy.
• x.xx is the version of the Library controller firmware. This number is used to reference firmware
versions when downloading new firmware from the HP website.
• y.yy is the version of the robotics firmware.
HP StorageWorks MSL Library Extender user guide 17
Page 18

• Bootcode Firmware Revision.
• Library Mode.
• Automatic — the device will switch from Sequential to Random mode if it receives media
changer SCSI commands.
• Manual — the device will stay in the current mode until another mode is configured by a user.
• Random — the device will not automatically load and unload tapes. Instead, it will wait for
commands from the backup software or the OCP to load and unload tapes.
• Sequential — the device will automatically unload the tape in the drive when the host software
sends an unload command to the drive and then automatically load the tape from the next
highest sequentially numbered full slot.
• Loop — in Loop mode, the Library will load the tape from the lowest numbered full slot after
the tape from the highest numbered full slot is unloaded. If Loop is not listed, the Library will
stop automatically loading and unloading tapes after the tape from the last full slot is unloaded.
CAUTION:
Since loop mode will endlessly cycle through the tapes, it is possible to overwrite old data.
Make sure that there are enough tapes in the Library or that the tapes are regularly rotated
in and out to ensure that data you want to save is not overwritten.
• Autoload — the device will automatically load the tape from the lowest numbered full slot on
power up.
• WWide Node Name — a world wide unique identifier that the Library reports over SCSI and
may be used by operating systems or software applications to identify and track the Library.
The Library Extender pane displays information about the Library Extender.
• Firmware revision — the version of Library Extender firmware.
• Serial Number — the electronic serial number for the Library Extender.
The Lower Library Information pane displays information about the lower Library.
• Serial Number — the electronic serial number for the lower Library. This serial number should
match the serial number printed on the Library label, located on the pull out tab under the drive
or lowest drive bay cover on the back of the Library.
• Product ID — how the device identifies itself to the host computer. This will always be MSL G3
Series.
• Currently Installed Library Firmware x.xx / y.yy
• x.xx is the version of the Library controller firmware. This number is used to reference firmware
versions when downloading new firmware from the HP website.
• y.yy is the version of the robotics firmware.
• Library Height
• 2U is an MSL2024
• 4U is an MSL4048
Viewing Library status
To view a summary of the extended library status, use the RMI System Status pane.
Configuring and operating an extended library18
Page 19
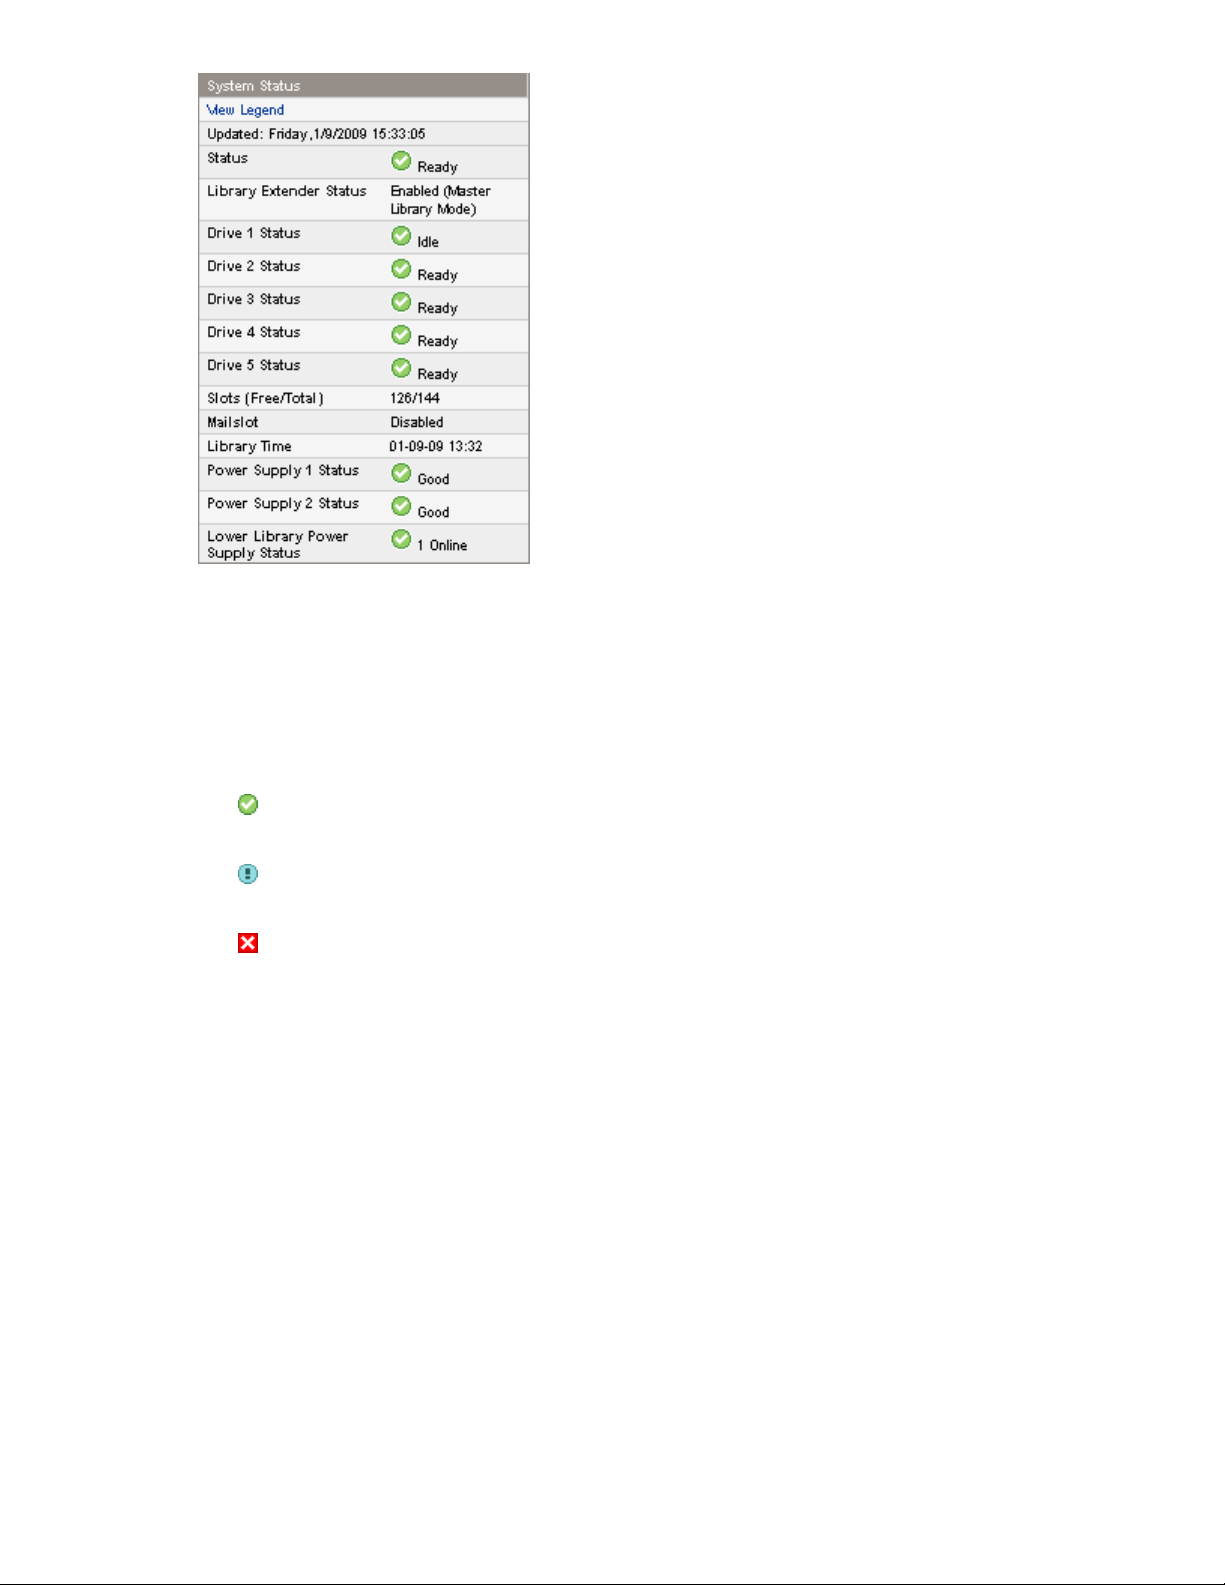
Figure 6 Example of the System Status pane from an extended library with an MSL8096 master Library
and MSL4048 lower Library
.
• Updated — the day, date, and time of the most recent status view. This timestamp comes from
your computer and may be different from the Library time lower in the pane. Click your browser's
refresh button to update the system status.
• Status of the Library and tape drives
The green Status Ok icon indicates that the device is fully operational and that no user intervention
is required.
The blue exclamation point Status Warning icon indicates that user intervention is necessary, but
that the device can still perform most operations.
The red X Status Error icon indicates that user intervention is required and that the device is not
capable of performing some operations.
• Slots (Free/Total) — The number of free and total storage slots.
• Free is the number of empty storage slots.
• Total is the number of storage slots available to the host software, which does NOT include
reserved slots.
• Mailslot — shows whether the mailslot is open, closed, or disabled.
• Library Time — the date and time from the Library, which can be set from the OCP or RMI. The
Library Time is updated when the system status is refreshed. The time of the most recent refresh is
the Updated time at the top of the pane. If you call HP Service and are requested to provide the
Library time, refresh the system status with your browser refresh button and then give the service
engineer this Library Time.
• Power Supply Status (MSL4048 and MSL8096)
• MSL4048 — Online — The power supply is installed.
• MSL8096 — Good — The power supply is functioning correctly.
HP StorageWorks MSL Library Extender user guide 19
Page 20
• MSL8096 — Functional, fan failure — The power supply is supplying power to the Library,
but the fan has failed so the power supply could fail soon. The power supply should be replaced.
• Installed, failed — The power supply installed in the unit is not working and the Library no
longer has redundant power. The power supply should be replaced.
NOTE:
If the MSL4048 has two power supplies and one fails, after a power cycle the Library will not
recognize the failed power supply as installed in the Library.
The number of power supplies installed in the Library is displayed next to the icon.
• MSL8096 — Removed — A power supply was installed in this location before but has been
removed. Power Supply 1 will always show Removed when it is missing. Power Supply 2 will
show Removed until the Library is rebooted.
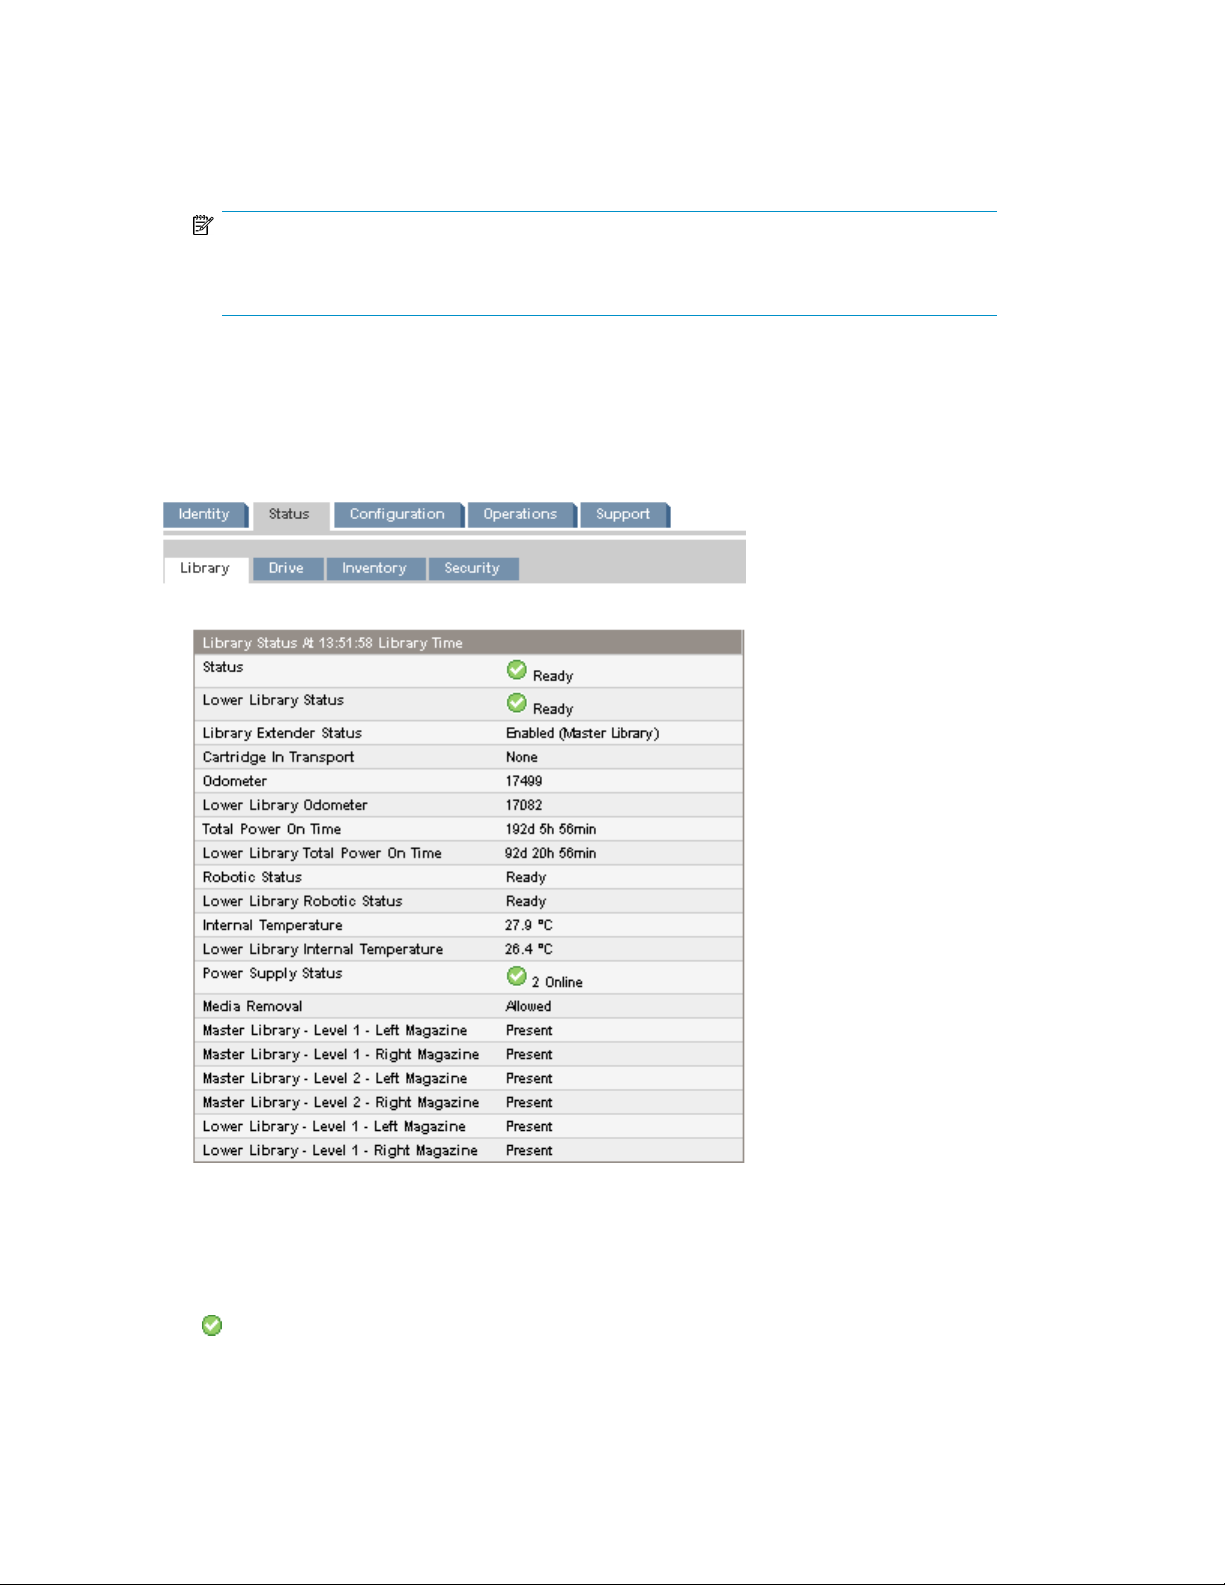
For detailed status information, use the RMI Status > Library page or OCP Info > Status screen.
Figure 7 Status > Library RMI page for an extended library with an MSL4048 master Library and an
MSL2024 lower Library
.
• Status, Lower Library Status — The status of the master and lower Libraries.
The green Status Ok icon indicates that the device is fully operational and that no user intervention
is required.
Configuring and operating an extended library20
Page 21

The blue exclamation point Status Warning icon indicates that user intervention is necessary, but
that the device can still perform most operations.
The red X Status Error icon indicates that user intervention is required and that the device is not
capable of performing some operations.
• Library Extender Status — The status of the Library Extender and extended mode. If the Extender
is installed but extended mode not enabled or if extended mode is enabled but the Extender is
not enabled, the Library Extender Status will include instructions for addressing the inconsistency.
• Cartridge in Transport — The slot number where the tape currently in the robot originated. None
if there is not a tape in the robotic.
• Odometer, Lower Library Odometer — The total number of moves the master Library and lower
Library have performed since their manufacture. A cartridge transfer between Libraries will increment
both odometers. A cartridge move within a single Library will only increment the odometer in that
Library.
• Total Power On Time, Lower Library Total Power On Time— The number of days, hours, and
minutes master Library and lower Library have been powered on since their manufacture.
• Robotic Status, Lower Library Robotic Status — The current status of the master Library and lower
Library robotics, and a description of the operation the robots are currently performing.
• Internal Temperature, Lower Library Internal Temperature — The internal temperature reported by
the master Library and lower Library.
• Power Supply Status — The current status of each of the installed power supplies. (MSL4048 and
MSL8096). See Power Supply Status values, page 19.
• Media Removal — Prevented, if the backup software is preventing media removal from the Library.
When media removal is prevented, mailslot user access and magazine removal are disabled.
• Level n. Left Magazine — The state of the left magazine at level n. The magazine levels are
numbered from the bottom of the Library to the top. For example, Level 1. Left Magazine is the
bottom magazine on the left side looking at the Library from the front.
• Present, if the Library senses the presence of a fully inserted magazine.
• Removed, if the magazine is not fully inserted into the Library.
• Level n. Right Magazine — the state of the right magazine at level n.
• Present, if the Library senses the presence of a fully inserted magazine.
• Removed, if the magazine is not fully inserted into the Library.
Configuring the extended library
Configure the extended library from the RMI Configuration > System page or from the master Library
OCP Configuration menu.
NOTE:
In extended mode, the only functions available through the lower Library OCP are disabling extended
mode and adjusting the display contrast (MSL4048 or MSL8096 only).
HP StorageWorks MSL Library Extender user guide 21
Page 22
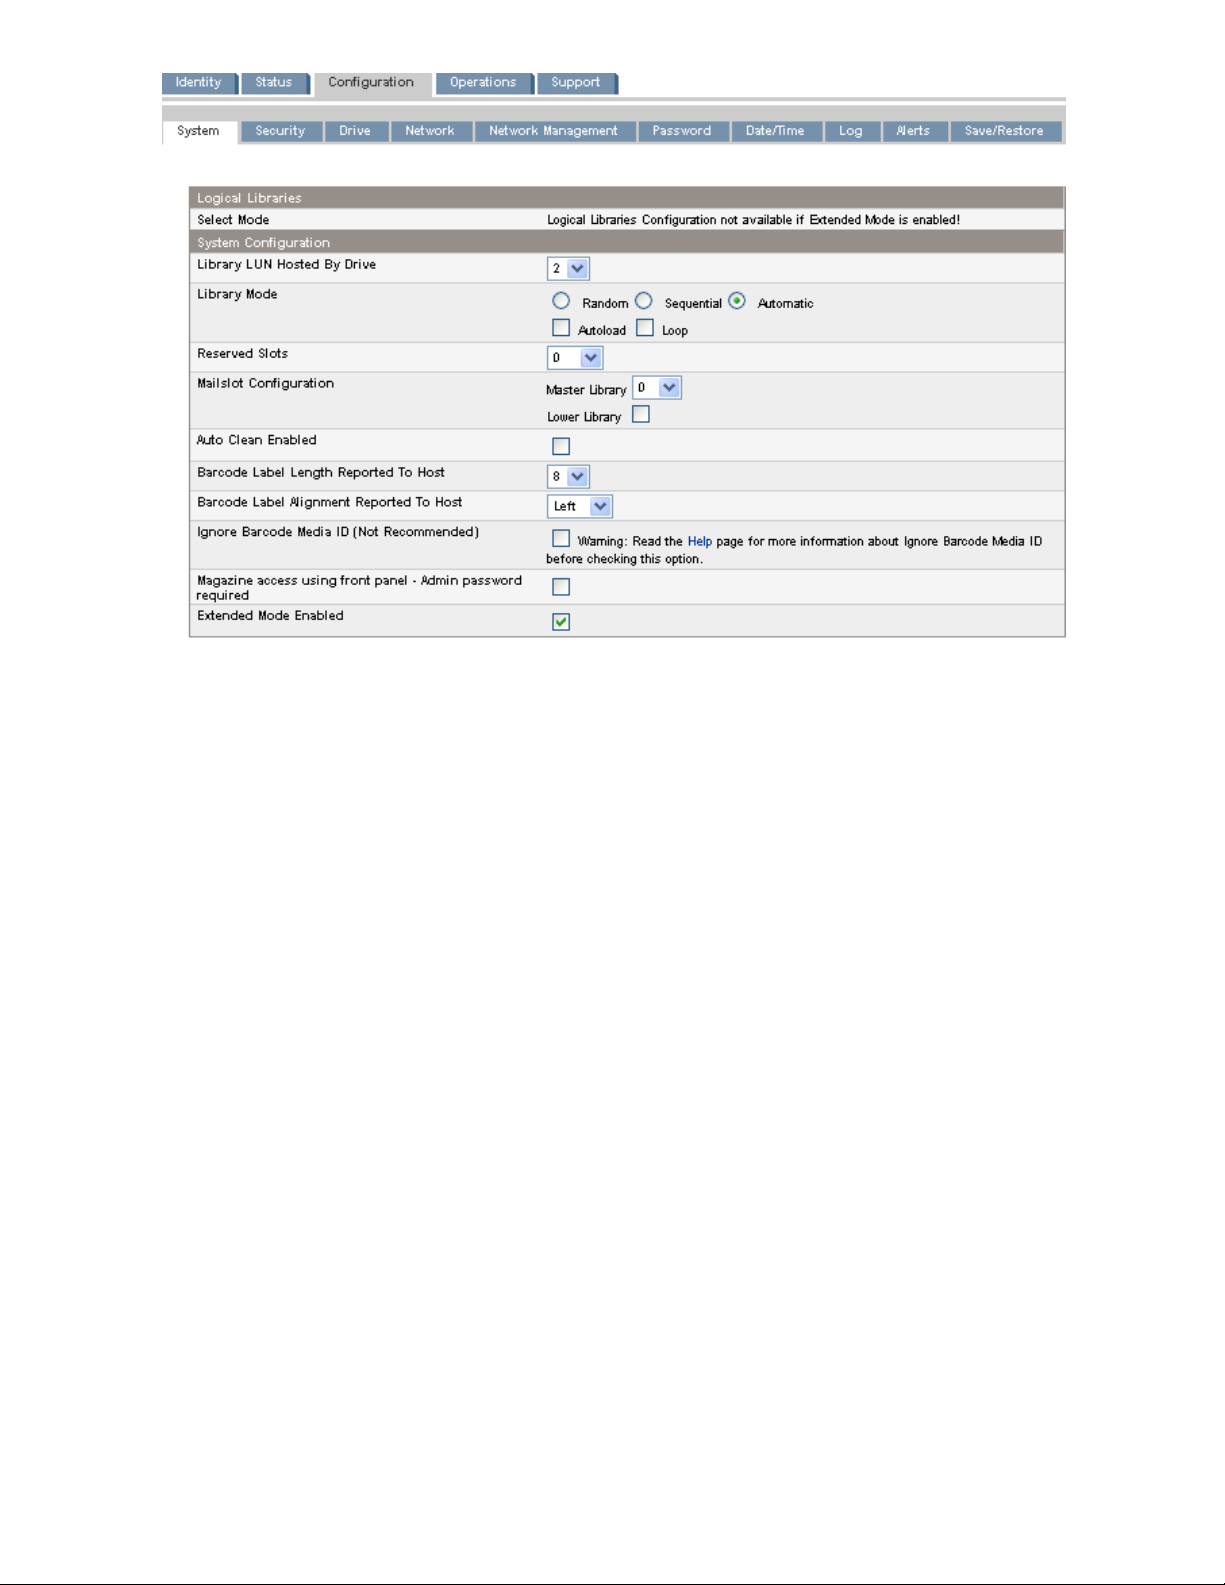
Figure 8 Configuration > System RMI page for an extended library with an MSL8096 master Library
and an MSL4048 lower Library
.
• Library LUN Hosted By Drive — Specifies the master tape drive for the extended library through
which the host system controls the extended library. The default is the lowest numbered tape drive
in the extended library. If an extended library has only one tape drive, it is the master drive for
the extended library. If an extended library has more than one tape drive, you may specify the
master. The number is the physical drive number.
• Library Mode — Specifies the library mode for the extended library. The default mode is Automatic.
The extended library supports three behavior modes: Random, Sequential, and Automatic. The
extended library automatically detects the required mode from the series of SCSI commands it
receives; however, you can also change the mode. Select the operating mode based on the capabilities of the software controlling the tape cartridges.
Random mode — In Random mode, the device does not automatically load tapes into the tape
drives; it waits for commands from the software or operator to load and unload tapes. Random
mode is used with a full featured or a robotics-aware backup application and is the most common
mode of operation. Your backup software must support robotics, which may require an additional
software module.
Sequential mode — In Sequential mode, the device automatically loads and unloads tapes from
the drive. Sequential mode is used when the backup software is NOT robotics-aware or was designed for standalone drives only.
When Extended mode is enabled, the extended library will only use the lowest-numbered tape
drive in the extended library.
The operator begins the sequence by loading the desired tape into the tape drive. When a tape
is unloaded, the device automatically removes the tape from the drive, returns it to its original slot,
then loads the tape from the next available higher numbered slot.
To further determine how tapes are loaded into the tape drive while in Sequential mode, you can
set the Loop and Autoload options.
Configuring and operating an extended library22
Page 23
• When Autoload mode is set, the device automatically loads the cartridge from the lowest-
numbered full slot into the tape drive. It then follows standard sequential operation.
• When Loop mode is on, the original first cartridge in the sequence is reloaded after the device
has cycled through all available cartridges. If Loop mode is off and the last cartridge has been
unloaded, the device stops loading cartridges until you load another manually.
CAUTION:
Use caution when choosing Loop mode because it makes it possible to overwrite data on
previously written cartridges.
Automatic mode: In Automatic mode, the device switches from Sequential mode into Random
mode when it receives certain SCSI commands. Automatic mode is the default setting.
• Reserved Slots — The number of slots in the extended library that are not available to the backup
software. You can store cleaning cartridges in reserved slots, or leave reserved slots empty. The
slots are reserved from the highest slot number down. The default is 0 reserved slots so the maximum
number of slots are available to the host. The extended library must have at least two slots that
are not reserved.
• Mailslot Configuration for the master Library and lower Library
• MSL2024 and MSL4048 — configures the mailslot in the lower left magazine as a mailslot
or storage slots. The MSL2024 mailslot has one slot; the MSL4048 mailslot has three slots.
Enabling the mailslot will reduce the total number of storage slots. The default is disabled.
• MSL8096 — configures the mailslot in the lower-left magazine and upper-right magazine as
mailslots or storage slots. Enabling a mailslot will reduce the number of storage slots. The default
is 0 mailslots enabled.
You can enable either or both of the mailslots by selecting the number of mailslot slots in the
Mailslot Configuration drop down list.
• 0 disables both mailslots.
• 3 enables the lower-left mailslot only.
• 12 enables the upper-right mailslot only.
• 15 enables both mailslots.
CAUTION:
Enabling or disabling a mailslot will re-number the storage slots in one or both of the Libraries.
After enabling or disabling any mailslots, update the backup software inventory. You may also
need to re-configure the backup software to adjust the number of storage slots and presence of
the mailslot.
• Auto Clean Enabled — When auto clean is enabled, the device automatically loads a cleaning
cartridge when a tape drive needs to be cleaned. The device identifies a tape cartridge as a
cleaning cartridge if it has a bar code label that starts with CLN or after an unlabeled cleaning
tape has been loaded into the tape drive.
The Library can use a cleaning cartridge from any slot, even if the slot is reserved. The Library
keeps track of the usage count for each of the cleaning cartridges. When multiple cleaning cartridges are available, the Library will first select a cleaning cartridge with an unknown usage count
so the Library can start tracking the cartridge's usage count. If the Library knows the usage count
for all of the cleaning cartridges, the Library will select the one with the highest usage count.
HP StorageWorks MSL Library Extender user guide 23
Page 24

Auto cleaning is disabled by default. You can enable automatic cleaning even if there are no
cleaning cartridges in the device. In this case, the device will display a warning message.
CAUTION:
Only enable automatic cleaning in either the backup application or the Library, not both.
• Barcode Label Length Reported to Host — the number of bar code characters reported to the host
application. This option provides compatibility with libraries and software with more limited bar
code reading capabilities. The default is 8.
• Barcode Label Alignment Reported to Host — configures the end of the bar code label characters
to report to the host application when reporting fewer than the maximum number of characters.
For example, when reporting only six characters of the bar code label 12345678, if the alignment
is left, the Library will report 123456. If the alignment is right, the Library will report 345678. The
default is left, which is used by most software applications.
• Ignore Barcode Media ID — when disabled (default), the barcode Media ID on the tape cartridges
will be checked by the Library. The Library will only allow appropriate tape cartridges to be loaded
into tape drives. The barcode Media ID is the last two characters of the barcode. For example,
an LTO-4 labeled cartridge will not be allowed to move into an LTO-3 tape drive. When Ignore
Barcode Media ID is enabled, the Library will move any tape to any tape drive. If the cartridge
is incompatible with the tape drive, a message will be displayed. HP strongly recommends that
all tape cartridges have barcodes with the correct Media ID.
• Magazine access using front panel - Admin password required — when enabled (default), the
Administrator password is required to remove the magazines from the OCP. When disabled, the
magazines may be removed using the OCP without entering a password. Robotic motion is prevented when magazines are removed. Allowing unauthorized removal of magazines can leave
the Library in a state where backup operations cannot continue if all magazines are not properly
replaced in the Library. The default is to require the Administrator password.
• Extended mode enabled — select the box to enable extended mode; clear the box to disable ex-
tended mode. The configuration will take effect when the Library power is cycled. Extended mode
must be enabled or disabled in both Libraries.
Extended mode can only by disabled in the lower Library from the OCP.
System configuration changes are only applied after the Apply Selections or the Submit button is
selected. After making the selection, a warning page informs you of the impact of the proposed
change. In some cases a pop-up screen asks you to confirm the change. Many changes also require
the device to reboot. You may need to click Refresh to see the changes.
Configuring and operating an extended library24
Page 25
Default settings for the extended library
Default for the extended librarySetting
Retained from the master LibraryAdministrator password
All mailslots are disabledMailslot configuration
Retained from the master LibraryNetwork settings
Retained from the master LibraryBarcode format reporting
Reserved slots are set to 0Reserved slots
Lowest physical drive in the master LibrarySCSI master drive
Retained by both Libraries.SCSI tape drive addresses
Retained by both Libraries.Contrast setting (MSL4048 and MSL8096)
AutomaticLibrary mode
NoAutoload
NoLoop
Date and time
SNMP
Encryption
Updating firmware
Both Libraries must have a firmware version that supports the Library Extender and the firmware
versions must be compatible with each other for the extended library to operate. When installing and
configuring the extended library the first time, you must update both Libraries to the most recent
available firmware versions to ensure that the firmware versions are compatible. For instructions on
installing firmware, see Upgrading the Library firmware, page 29.
Retained from the master Library. The lower Library is synchronized with the master Library with every command in the extended
library.
All tape drives are powered on.Drive power
Retained from master LibraryAuto clean
Retained from the master Library. If SNMP is not configured for
the master Library but is configured for the lower Library, the
extended library takes the settings from the lower Library.
Retained from the master LibraryAllow magazine access without a password
Retained from the master LibraryIgnore barcode media ID
Enabled if encryption is enabled in either Library otherwise disabled.
DisabledLogical libraries (partitioning)
To find Library firmware that supports the Library Extender:
HP StorageWorks MSL Library Extender user guide 25
Page 26

1. Browse to http://www.hp.com/support/msl_extender.
2. Select and download the newest firmware version for your Library without _LX_ in the filename.
NOTE:
The first time you install the Extender you must update the firmware in each Library individually. For
future firmware updates, when extended mode is enabled you can update the firmware for both
Libraries at the same time with the Extender firmware package. Updating with the firmware package
is not only faster and easier, but ensures that the Libraries have compatible firmware versions. When
updating firmware for the extended library, select the file with _LX_ in the filename.
The library extender firmware package can be installed from the RMI Support > Firmware page, from
the OCP Support > FW Upgrade > By USB screen, or by using HP Library & Tape Tools version 4.8
or newer.
Tape drive firmware is updated through the master Library for all tape drives in the extended library.
See the HP StorageWorks MSL2024, MSL4048, and MSL8096 Tape Libraries user and service guide
for instructions on updating tape drive firmware.
NOTE:
Before downgrading the Library firmware to a version that does not support the Extender, disable
extended mode in both Libraries and remove the Extender.
Running diagnostic tests
Diagnostic tests for the extended library
• Demo — moves cartridges from the slots to the drives and back. At the end of the test the cartridges
are returned to their original slots. The demo is executed from the RMI or OCP.
• Slot to slot — shuffles the cartridges between slots to exercise the robot. At the end of the test the
cartridges are NOT returned to their original slots. The slot test is executed from the RMI or OCP.
• Library Extender cycle test — moves the first available cartridge in the master Library to the lower
Library and back, exercising the robotics in both Libraries and the Extender, with cartridge exchanges in both directions. At the end of the test the cartridge is returned to its original slot. The
Library Extender cycle test is executed from the RMI or OCP.
• Wellness test — exercises all extended library functionality except the external interfaces. The
wellness test is executed from the OCP. For instructions on setting and running the wellness test,
see The wellness test, page 44.
The demo and slot to slot tests are intended to show the device operating. For Library Extender service
and diagnostics, execute the Library Extender cycle test. To verify installation and repairs, execute
the wellness test.
Configuring and operating an extended library26
Page 27
3 Installing the Library Extender
This chapter provides instructions for installing the Library Extender.
WARNING!
The MSL2024 Tape Library weighs up to 15.6 kg (34.3 lb) without media and up to 20.4 kg (44.9
lb) with media (24 cartridges). The MSL4048 Tape Library weighs up to 24.6 kg (54.1 lb) without
media and up to 34.2 kg (75.2 lb) with media (48 cartridges). The MSL8096 Tape Library weighs
up to 46.6 kg (102.7 lb) without media and up to 68.8 kg (151.7 lb) with media (96 cartridges).
• Observe local health and safety requirements and guidelines for manual material handling.
• Remove all tapes to reduce the overall weight of the device and prevent cartridges from falling
into the robotic path and damaging the Library.
• Obtain adequate assistance to lift and stabilize the device during installation or removal.
WARNING!
When placing the Library into or removing the Library from a rack, to reduce the risk of personal
injury or damage to equipment:
• Extend the rack's leveling jacks to the floor.
• Ensure that the full weight of the rack rests on the leveling jacks.
• Install stabilizing feet on the rack.
• Extend only one rack component at a time. Racks may become unstable if more than one component
is extended.
HP StorageWorks MSL Library Extender user guide 27
Page 28
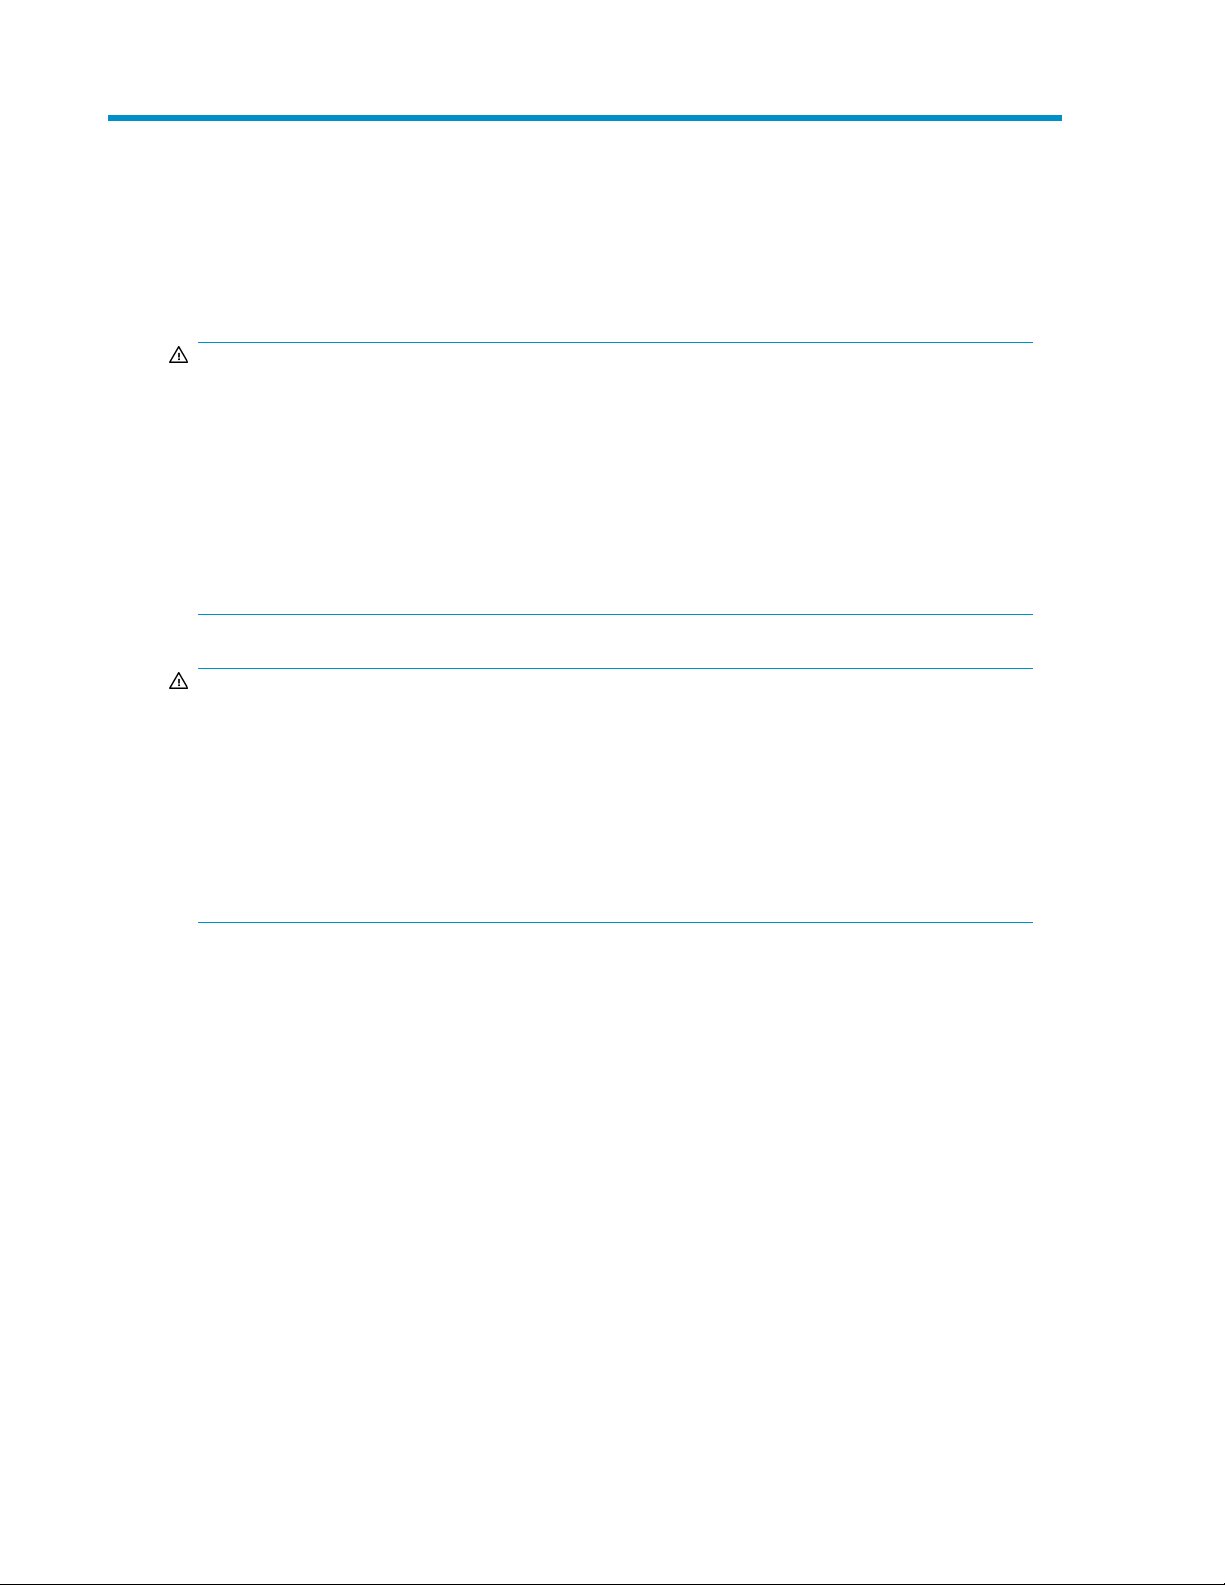
Identifying product components
Figure 9 Library Extender product contents
.
Verify that you received the following:
1. Library Extender
2. Packet containing two half-height drive bay covers, four screws, and the alignment gauge.
3. Getting started guide
Downloading product documentation
This document contains information about configuring and operating the extended library. For
information about and instructions for installing, configuring, and operating the Tape Libraries,
download the HP StorageWorks MSL2024, MSL4048, and MSL8096 user and service guide from
the HP website:
1. Browse to
nl
http://www.hp.com/support/tape.
2. In the Tape Storage and Media section, select Tape Libraries.
3. Select HP StorageWorks MSL4048 Tape Library.
NOTE:
The same user guide is used for the MSL2024, MSL4048, and MSL8096 Tape Libraries.
4. In the Resources for HP StorageWorks MSL4048 Tape Library section, select Manuals.
5. In the User guide section, download the following documents:
• HP StorageWorks MSL2024, MSL4048, and MSL8096 user and service guide
• HP StorageWorks 1/8 G2 and MSL Encryption Kit user guide, if the Libraries use the Encryp-
tion Kit
Installing the Library Extender28
Page 29
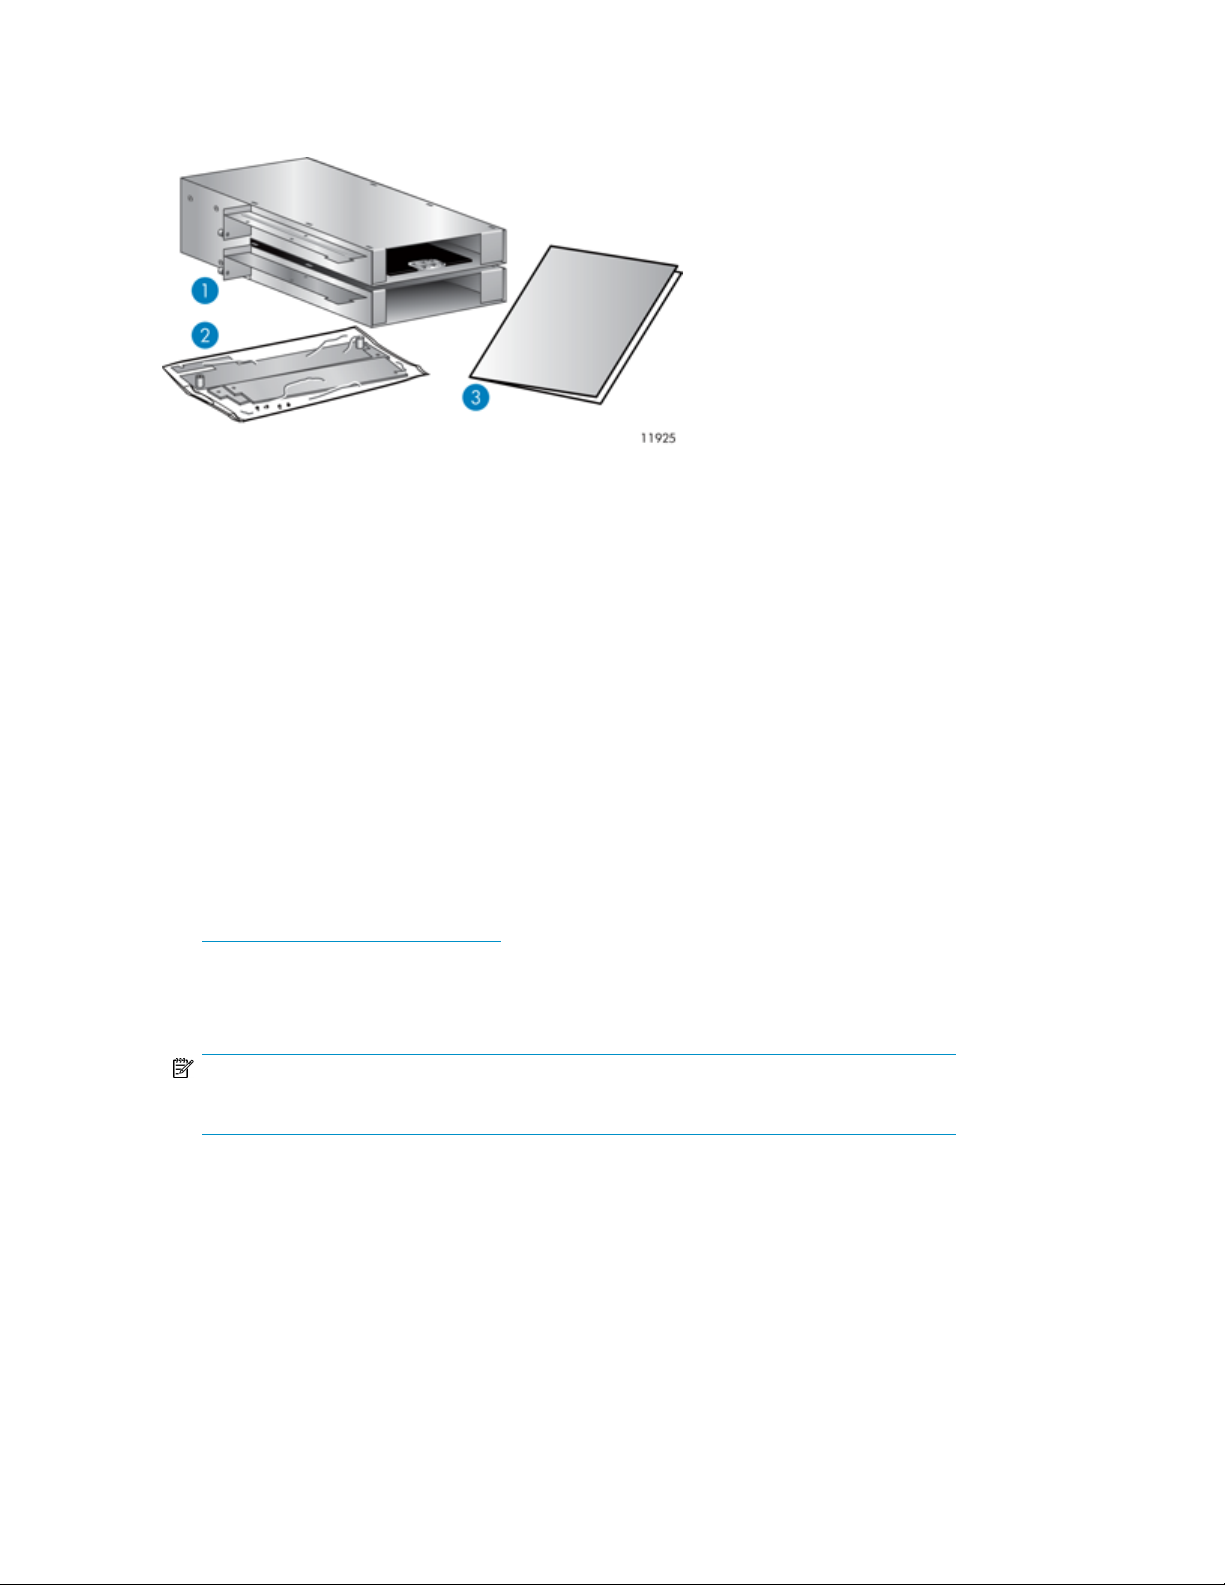
Determining the master and lower Library
The Library Extender is installed with two HP StorageWorks MSL Tape Libraries to combine the
cartridge and tape drive slots into a single extended library, as shown in the example in Figure
10, page 29.
Figure 10 Library Extender installed with two MSL4048 Tape Libraries
.
The upper Library controls the extended library and is called the master Library. The extended library
uses the master Library OCP, USB port, and Ethernet connection.
The lower Library is operated by the master Library. Its OCP, USB port, and Ethernet connection are
not used in the extended library configuration.
The upper Library must be an MSL4048 or MSL8096. The lower Library can be an MSL2024 or
MSL4048.
Saving the Library configurations
When the extended Library is configured, many of the individual Library configuration settings are
not retained. If you might ever want to recover their individual configurations, for example to separate
the Libraries in the future, save the Library configuration for each Library to a file. See the HP
StorageWorks MSL2024, MSL4048, and MSL8096 user and service guide for instructions on saving
the Library configuration.
LowerMaster (upper)
MSL2024 or MSL4048MSL4048 or MSL8096
Upgrading the Library firmware
Each Library must have a firmware version that supports the Library Extender, and the firmware versions
for the two Libraries must be compatible with each other for the extended library to operate.
HP StorageWorks MSL Library Extender user guide 29
Page 30
Verify that each Library has the latest released version of firmware. Update to the latest firmware if
necessary.
To find the version of firmware installed on the Library, see the RMI Support: Firmware screen.
From the MSL4048 or MSL8096 operator control panel (OCP), navigate to the Info > Identity > Library
screen. The Library Controller FW Revision field shows the Library firmware revision.
From the MSL2024 OCP:
1. From the Home screen, press Next until the display shows Status/Information. Press Enter.
2. Press Next until the display shows Library Information. Press Enter.
3. Press Next until the display shows the Firmware Rev.
To download Library firmware that supports the Library Extender from the HP website:
1. Browse to http://www.hp.com/support/msl_extender.
2. Select and download the newest firmware version for your Library without _LX_ in the filename.
NOTE:
The first time you install the Extender you must update the firmware in each Library individually. For
future firmware updates, when extended mode is enabled you can update the firmware for both
Libraries at the same time with the Extender firmware package. Updating with the firmware package
is not only faster and easier, but ensures that the Libraries have compatible firmware versions. When
updating firmware for the extended library, select the file with _LX_ in the filename.
Enabling extended mode
Enable Extended Mode from the RMI Configuration > System screen or OCP Configuration > Library
menu in both Libraries before installing the Library Extender.
NOTE:
Extended mode will be enabled but not active until the Library is powered off and then powered on.
Removing the cartridges from the Libraries
Before installing the Extender, the Libraries must be installed in the rack rails supplied with the Libraries
in adjacent rack locations, one Library directly above the other.
Skip this section if you do not need to move a Library.
WARNING!
When the Library is moved, any cartridges in the Library can become dislodged from the magazines
and damage the cartridges and Library robotics. To avoid damaging the Library, remove the cartridges
before moving the Library.
Installing the Library Extender30
Page 31
Use the OCP or RMI to open the magazines and remove the tapes from the Library. The magazines
with the tapes in them may also be removed from the Library.
See the HP StorageWorks MSL2024, MSL4048, and MSL8096 user and service guide for instructions
on opening or removing the magazines.
Powering off the Libraries
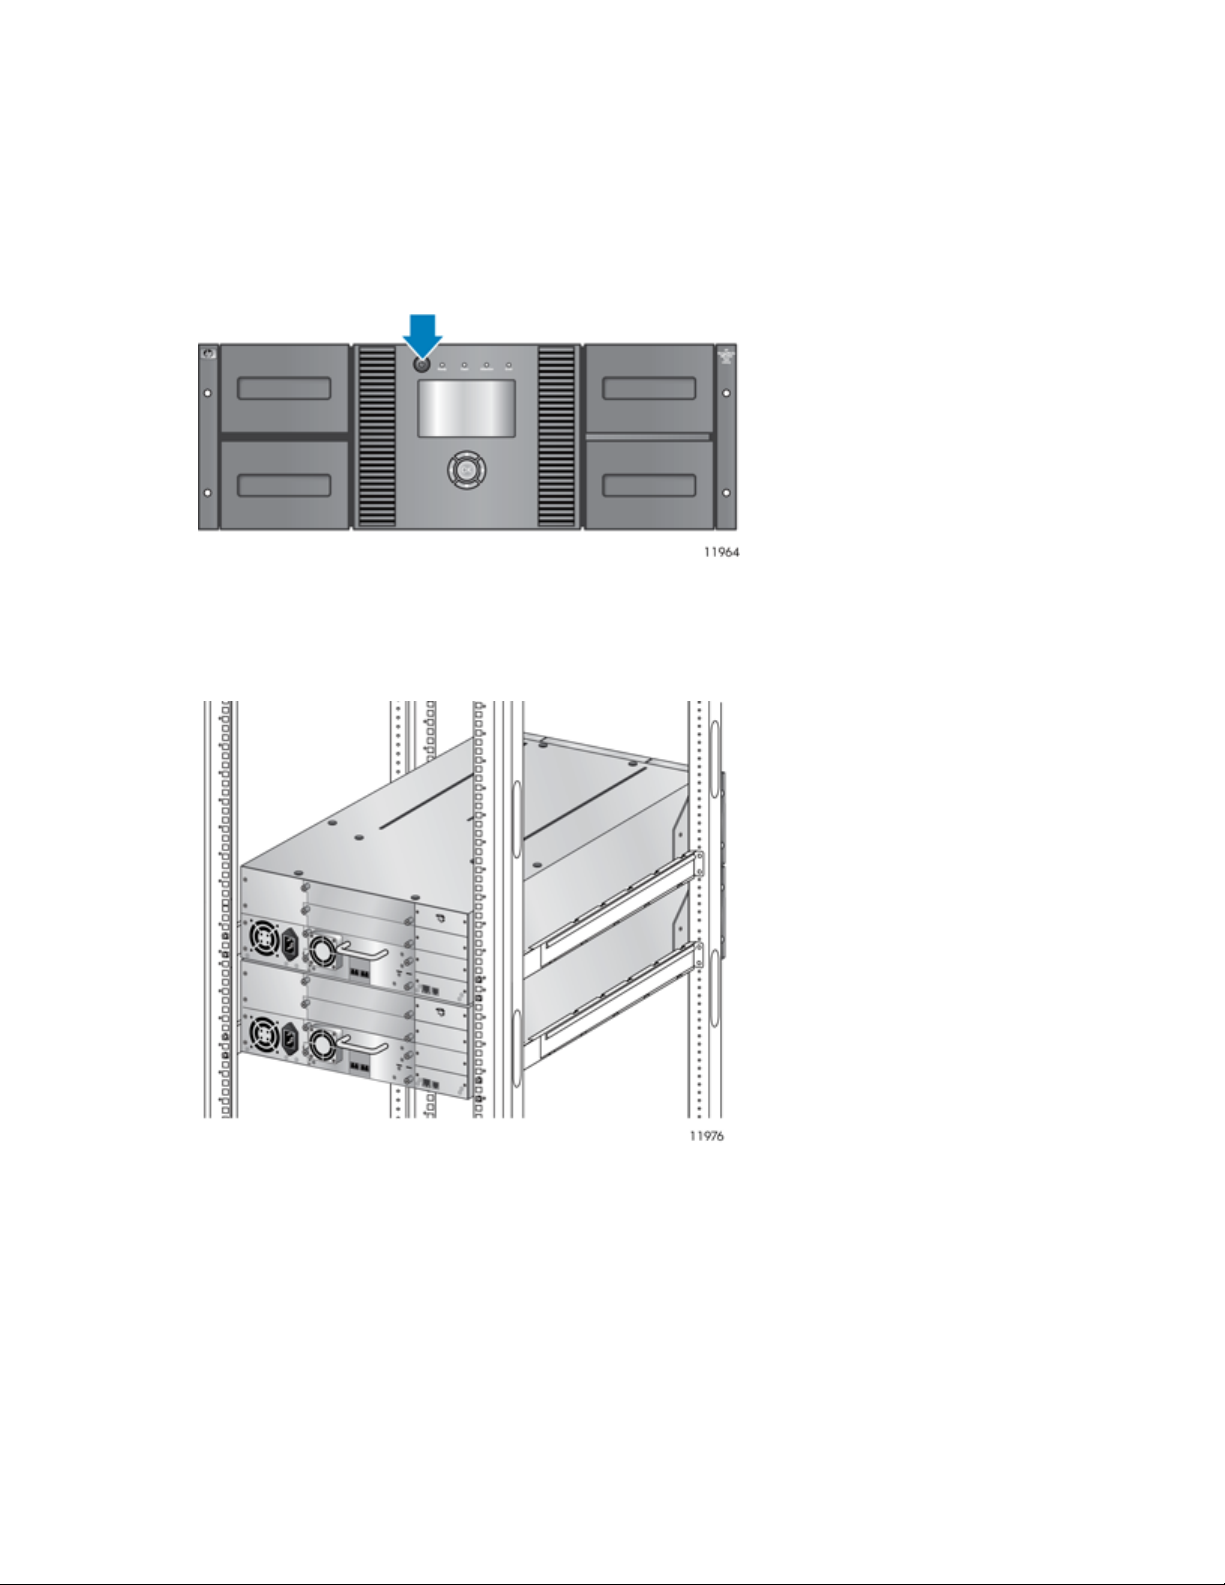
Press the power button on the front panel to power off each Library as shown in Figure 11, page 31.
Figure 11 Library power button
.
Positioning the Libraries in a rack
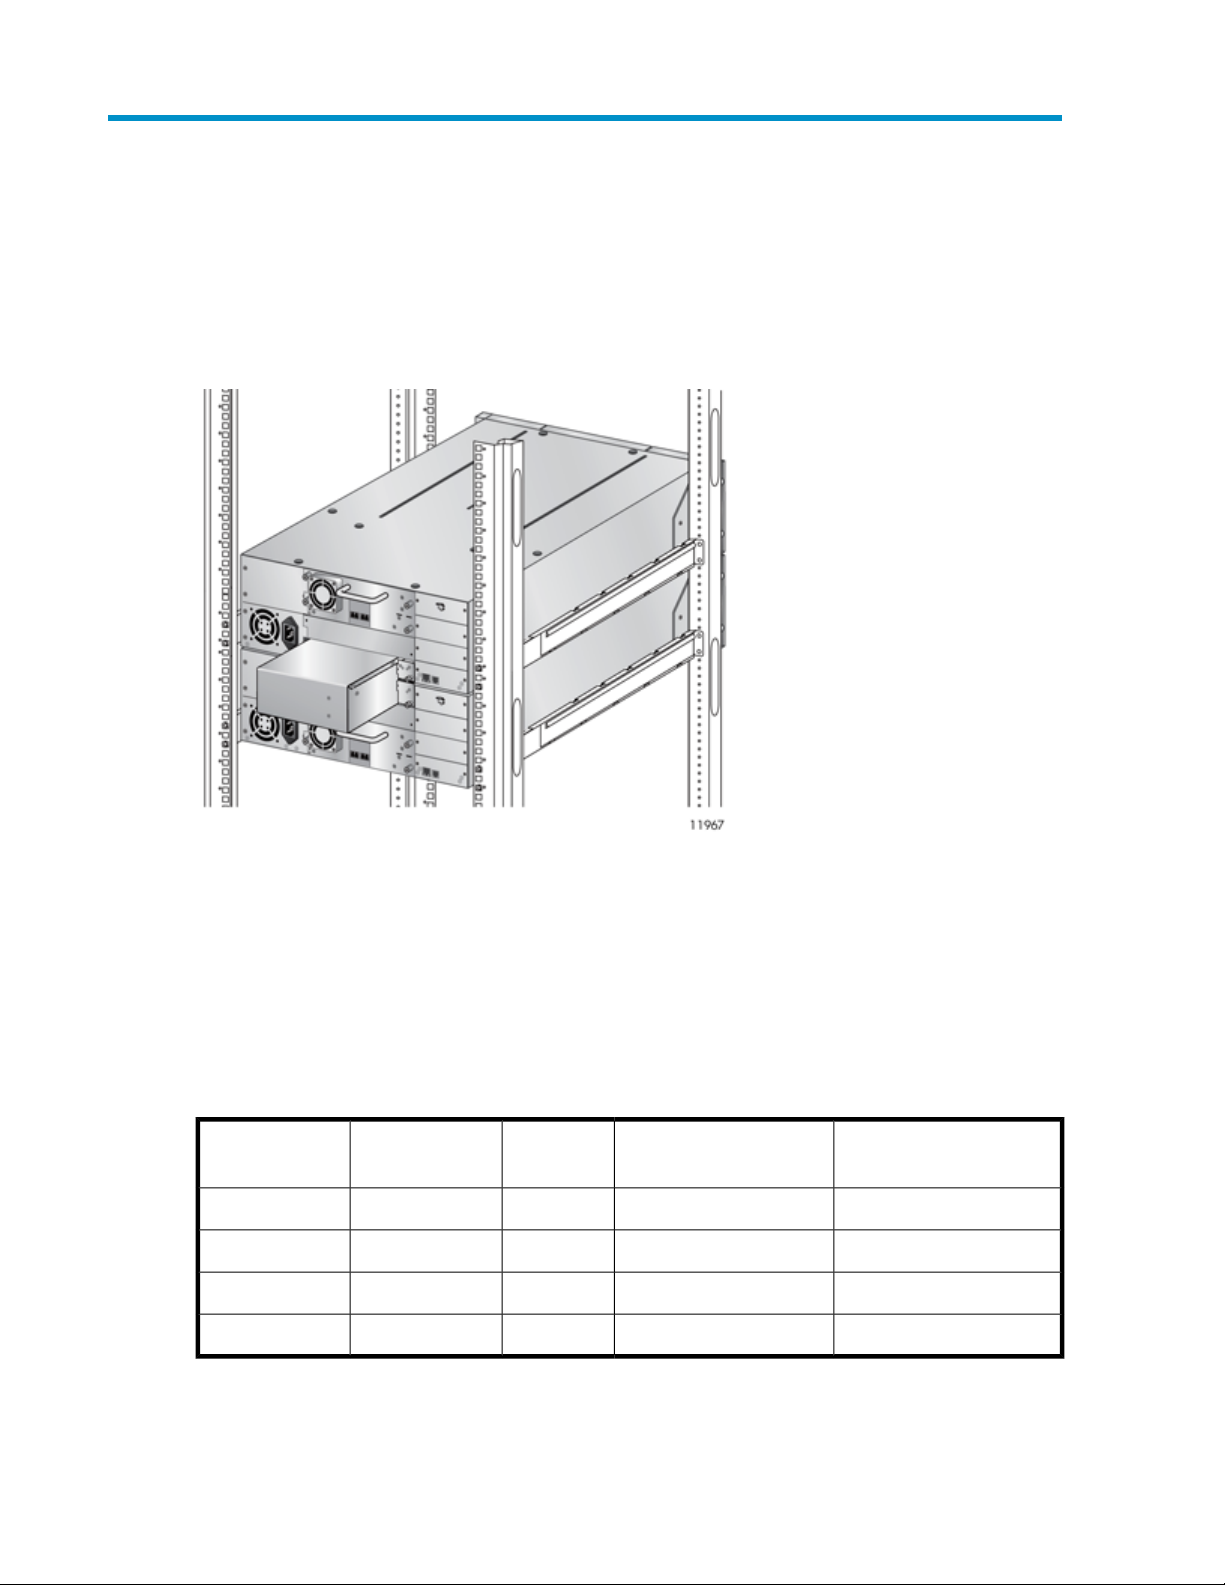
Figure 12 Two MSL4048 Tape Libraries installed in a rack in the rack rails supplied with the Libraries
in adjacent rack locations
.
Before installing the Library Extender, the two Libraries must be installed in a rack in the rack rails
supplied with the Library and the master Library must be installed directly above the lower Library in
the adjacent rack location as shown in Figure 12, page 31.
If you do not need to move either of the Libraries, skip to Relocating tape drives, page 35.
HP StorageWorks MSL Library Extender user guide 31
Page 32

If either Library is mounted in a tabletop conversion cover, remove the cover and install the Library
in the rack in the rack rails supplied with the Library. If either Library needs to be moved, remove the
Library and its rack rails from the rack and install the rails and Library in the necessary rack location.
NOTE:
If the Library Extender is near the rear rack door latch, you might need to move the Libraries to a
different rack location to close and latch the rack doors.
Removing a Library from a rack or tabletop conversion cover
Unplug the power cord from the wall outlet. Remove the power cord from the Library.
Remove all other cables from the Library.
Obtain adequate assistance to lift and stabilize the Library during removal and replacement.
From the front of the Library 1) completely loosen the screws inside the left and right front bezel (these
are captive screws and cannot be removed), then 2) slide the Library out of the rack or cover using
assistance as shown in Figure 13, page 32.
Figure 13 Removing an MSL4048 from a rack
.
CAUTION:
Always lift the Library from the side edges. Lifting the Library from the magazine or drive openings,
or from the drive handles can damage the Library.
Installing the Library Extender32
Page 33

Moving the rack rails and clip nuts
Using a #3 Phillips screwdriver, remove the rails from the rack. For an MSL4048 or MSL8096 also
remove the clip nuts.
Secure one rail to each side of the rack in the new location. Secure the front and the back of each
rail to the rack. The front of the rails is straight and the back is angled as shown in Figure 14.
Figure 14 Installing the MSL2024 and MSL4048 rack rails
.
HP StorageWorks MSL Library Extender user guide 33
Page 34

Moving the clip nuts
For the MSL4048 and MSL8096, replace the clip nuts in the locations shown in Figure 15, page 34.
MSL8096MSL4048
Figure 15 Clip nut locations
.
2. Rail screw location1. Clip nut location
4. U marker3. Library bottom
Installing the Library in the rack rails
With assistance, slide the Library onto the metal rails as shown in Figure 16, page 35. Secure the
front bezel to the rack using a #2 Phillips screwdriver placed through the small holes in the mounting
bracket to tighten the captive screws on each side of the Library.
CAUTION:
To avoid personal injury and damage to equipment, obtain adequate assistance to set the Library on
the rails.
Installing the Library Extender34
Page 35

Figure 16 Installing an MSL4048 and tightening the captive screws
.
Replace tape cartridges and magazines in the Library.
Relocating tape drives
The Extender is installed in the bottom half-height drive bay of the upper Library and the top half-height
drive bay in the lower Library. If a tape drive is installed in either of these drive bays, relocate the
tape drive to another drive bay.
1. Verify that the Library is powered off.
2. Loosen the blue captive thumbscrews on the tape drive as shown in Figure 17, page 35.
Figure 17 Tape drive thumbscrew locations
.
HP StorageWorks MSL Library Extender user guide 35
Page 36

3. Pull straight back on the tape drive handle while supporting the bottom of the tape drive to remove
it from the Library as shown in Figure 18, page 36.
Figure 18 Removing a tape drive
.
4. If necessary, remove one or two drive bay covers from the destination drive bay.
5. Slide the tape drive into its new drive bay. Tighten the blue thumbscrews with your fingers to
secure the tape drive in the Library.
If you removed a tape drive and are not reinstalling it in a Library, store it in an anti-static bag.
Removing and replacing drive bay covers
If necessary, use a #1 Phillips screwdriver to remove the bottom half-height drive bay cover from the
upper Library and the top half-height drive bay cover from the lower Library to create a space for the
Library Extender as shown in Figure 19.
Figure 19 Removing drive bay covers to create space for the Extender
.
Install drive bay covers over any drive bays that are not used by a tape drive or the Library Extender
as shown in Figure 20, page 37. Two half-height drive bay covers are supplied with the Library
Extender for this purpose if needed.
Installing the Library Extender36
Page 37

Figure 20 Installing covers on unused drive bays
.
Removing the USB device and Ethernet cable from the lower Library
Remove the Ethernet cable and USB device from the lower Library as shown in Figure 21, page 37.
When the Library Extender is installed, only the Ethernet and USB ports in the upper Library are active.
Figure 21 Removing the USB device and Ethernet cable from the lower Library
.
Extending the pull-out tab
On the upper Library, fully extend the pull-out tab containing product information.
If the tab has a plastic extension on both sides, clip the left extension, as shown in Figure 22, page 38,
without removing the product information. Leave the tab pulled out while installing the Extender.
HP StorageWorks MSL Library Extender user guide 37
Page 38

Figure 22 Trimming the pull-out tab
.
Aligning the Libraries
Before installing the Extender, the Libraries must be aligned horizontally.
Loosen each of the captive screws inside the left and right front bezels in the locations shown in Figure
23, page 38 that attach the Libraries to the front of the rack 1/2 turn. Loosening the screws in this
manner allows the Libraries to be aligned horizontally while retaining the necessary reference to the
front of the rack. (These screws will be retightened later in the procedure.)
Figure 23 Captive screw locations
.
Secure the alignment gauge to the top half-height drive bay in the lower Library by tightening the two
thumbscrews with your fingers.
Adjust the horizontal alignment of one or both Libraries until the edge of the chassis tab is aligned
with the center of the V in the notch of the alignment gauge as shown in Figure 24, page 39.
Installing the Library Extender38
Page 39

Figure 24 Aligning the Libraries with the alignment gauge
.
Gently remove the alignment gauge without moving either of the Libraries. Save the alignment gauge
for future use if the Libraries are moved or the Extender is installed with other Libraries.
Installing the Extender
WARNING!
To avoid damage to the Libraries and Extender, verify that both Libraries are powered off before
installing the Extender.
To install the Extender:
1. Align the upper tab on the side of the Extender with the slot in the upper drive bay and slide the
Extender into the Libraries as shown in Figure 25, page 39.
Figure 25 Aligning the Extender with the upper drive bay
.
HP StorageWorks MSL Library Extender user guide 39
Page 40

2. When the Extender reaches the pull-out tab, thread the pull-out tab through the slit in the Extender
attachment plate so the plastic extension of the pull-out tab is outside of the Extender. This will
allow the Extender to seat completely and allow the information on the tab to be viewed after
the Extender is installed. Slide the Extender the rest of the way into the Libraries and then slide
the pull-out tab into the Library as shown in Figure 26, page 40.
Figure 26 Sliding the pull-out tab into the Library
.
3. Tighten the two thumbscrews on each side of the Extender with your fingers or a #1 Phillips
screwdriver to secure the Extender to the Libraries as shown in Figure 27.
Figure 27 Tightening the Extender thumbscrews
.
4. From the front of the Libraries, tighten the captive screws inside the right and left front bezels that
were loosened earlier in the procedure.
5. Connect an Ethernet cable to a working LAN connection and to the Ethernet connector on the
back of the master Library.
6. Attach a power cable to each power connector on the back panels of the Libraries. Plug the
power cables into the nearest properly grounded power outlet.
Powering on the extended library
Power on both Libraries with the power buttons on the front panel as shown in Figure 28, page 41.
The Libraries can be powered on in either order. The initialization sequence is faster when the lower
Library is powered on first.
Installing the Library Extender40
Page 41

Figure 28 Extended library power buttons
.
NOTE:
The Library Extender receives power from the Libraries; it does not have its own power cord or power
button.
Allow the extended library to come to the Ready state. This may take several minutes.
Checking the Extender LEDs
All three Extender LEDs will be green when the Extender is installed correctly and functional. Check
the LEDs on the Extender in the locations shown in Figure 29, page 41 to verify that the Extender is
operating correctly.
Figure 29 Library Extender LEDs
.
1. Master Library connection status
Green when the master Library is powered on and the Extender is installed correctly.
HP StorageWorks MSL Library Extender user guide 41
Page 42

2. Library Extender status
Green when the Extender is operating correctly. Flashing when the
Extender is initializing or has failed with a hard error and is no longer
functional. Initialization can take up to 15 minutes.
3. Lower Library connection status
Verifying the installation
To verify the installation, run the wellness test from the OCP Support > Run Tests screen. The wellness
test will exercise all Library and drive functionality for the extended library. Access to this test requires
the administrator password and will request mailslot interaction. For instructions on running the wellness
test, see The wellness test, page 44
Green when the lower library is powered on and the Extender is installed correctly.
Installing the Library Extender42
Page 43
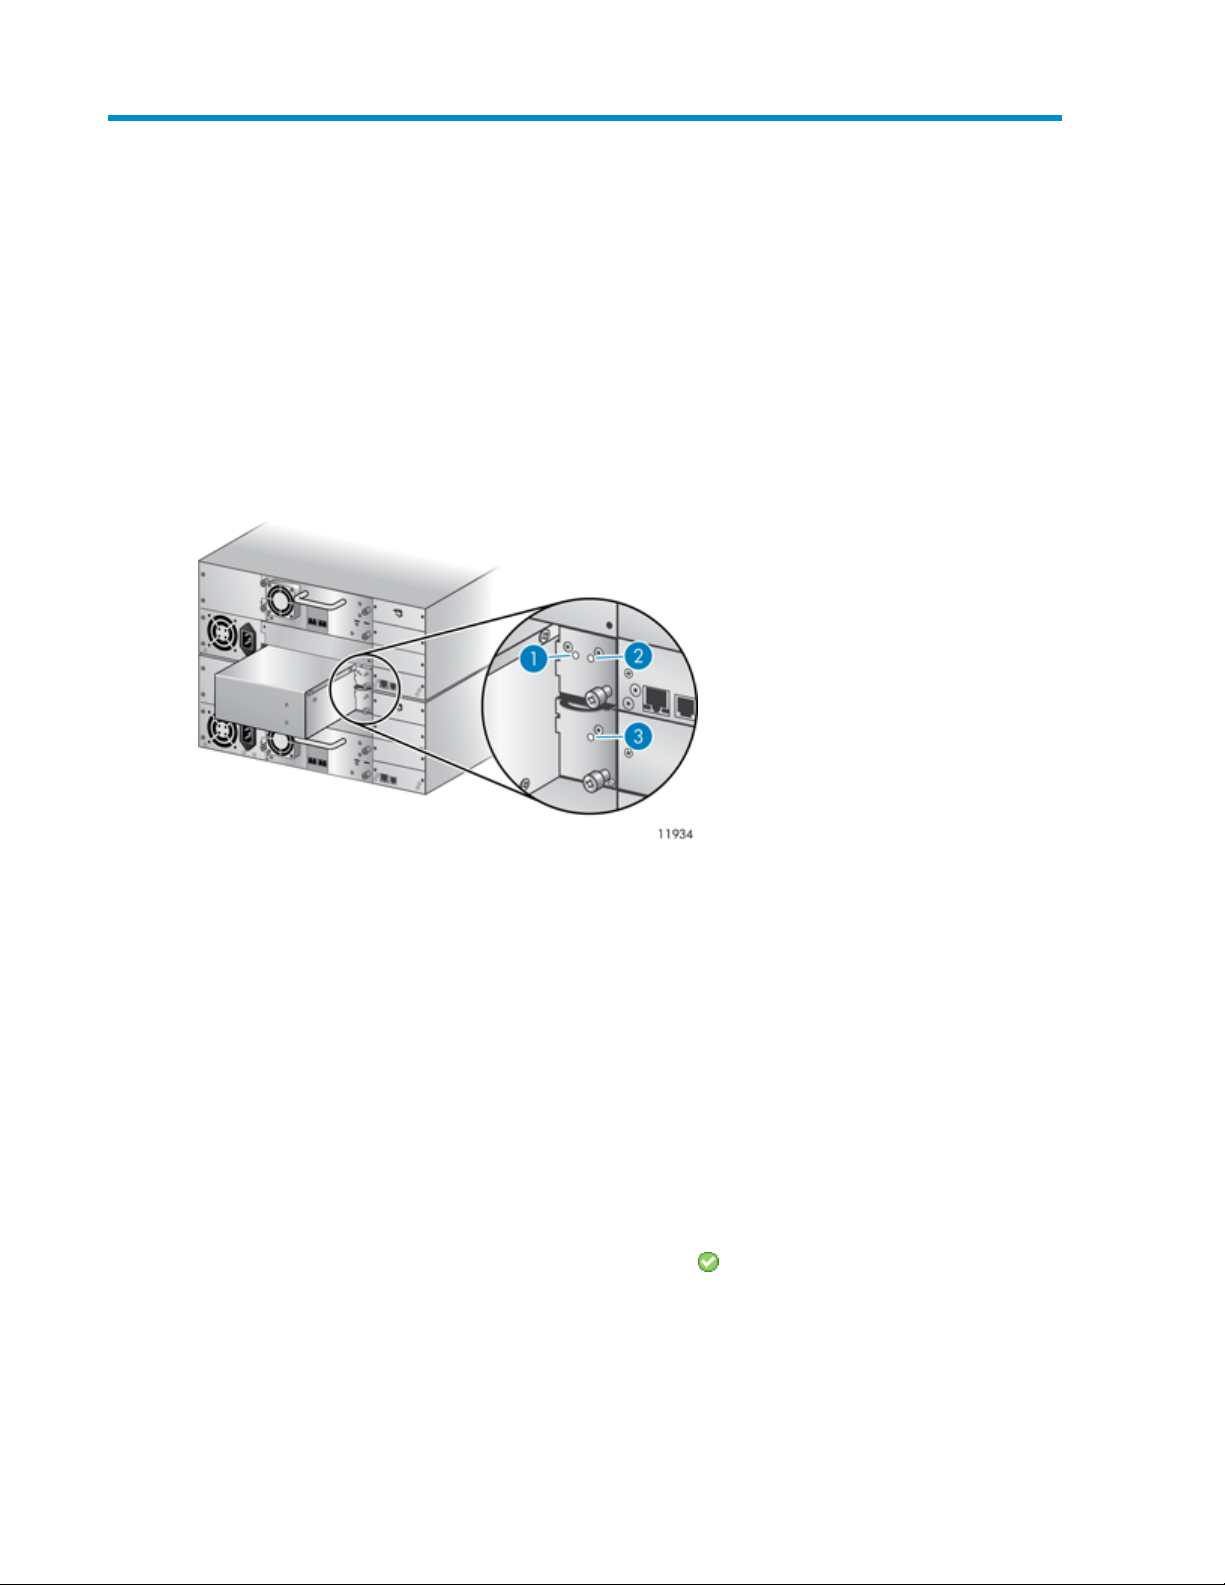
4 Using diagnostic tools and troubleshooting
This chapter provides information for verifying that the Extender is properly installed and troubleshooting
the Library Extender.
If you are installing the Extender for the first time, read this chapter for reference after installing the
Extender following the instructions in Chapter 3, page 27.
Extender status LEDs
The Library Extender has three LEDs that display the Extender's connection and power status.
Figure 30 Library Extender status LEDs
.
1. Master Library connection
status
2. Library Extender status
3. Lower Library connection status
All three LEDs will be green when the Extender is installed correctly and functional.
If the master Library connection status LED (1) is not green, verify the following:
• The master Library is powered on.
•
The power supply status in the master Library is Good .
• Extended mode is enabled in the master Library.
• The two Libraries are properly aligned as described in Aligning the Libraries, page 38.
Green when the master Library is powered on and the Extender is installed
correctly.
Green when the Extender is operating correctly. Flashing when the Extender
is initializing or has failed with a hard error and is no longer functional.
Initialization can take up to 15 minutes.
Green when the lower library is powered on and the Extender is installed
correctly.
HP StorageWorks MSL Library Extender user guide 43
Page 44
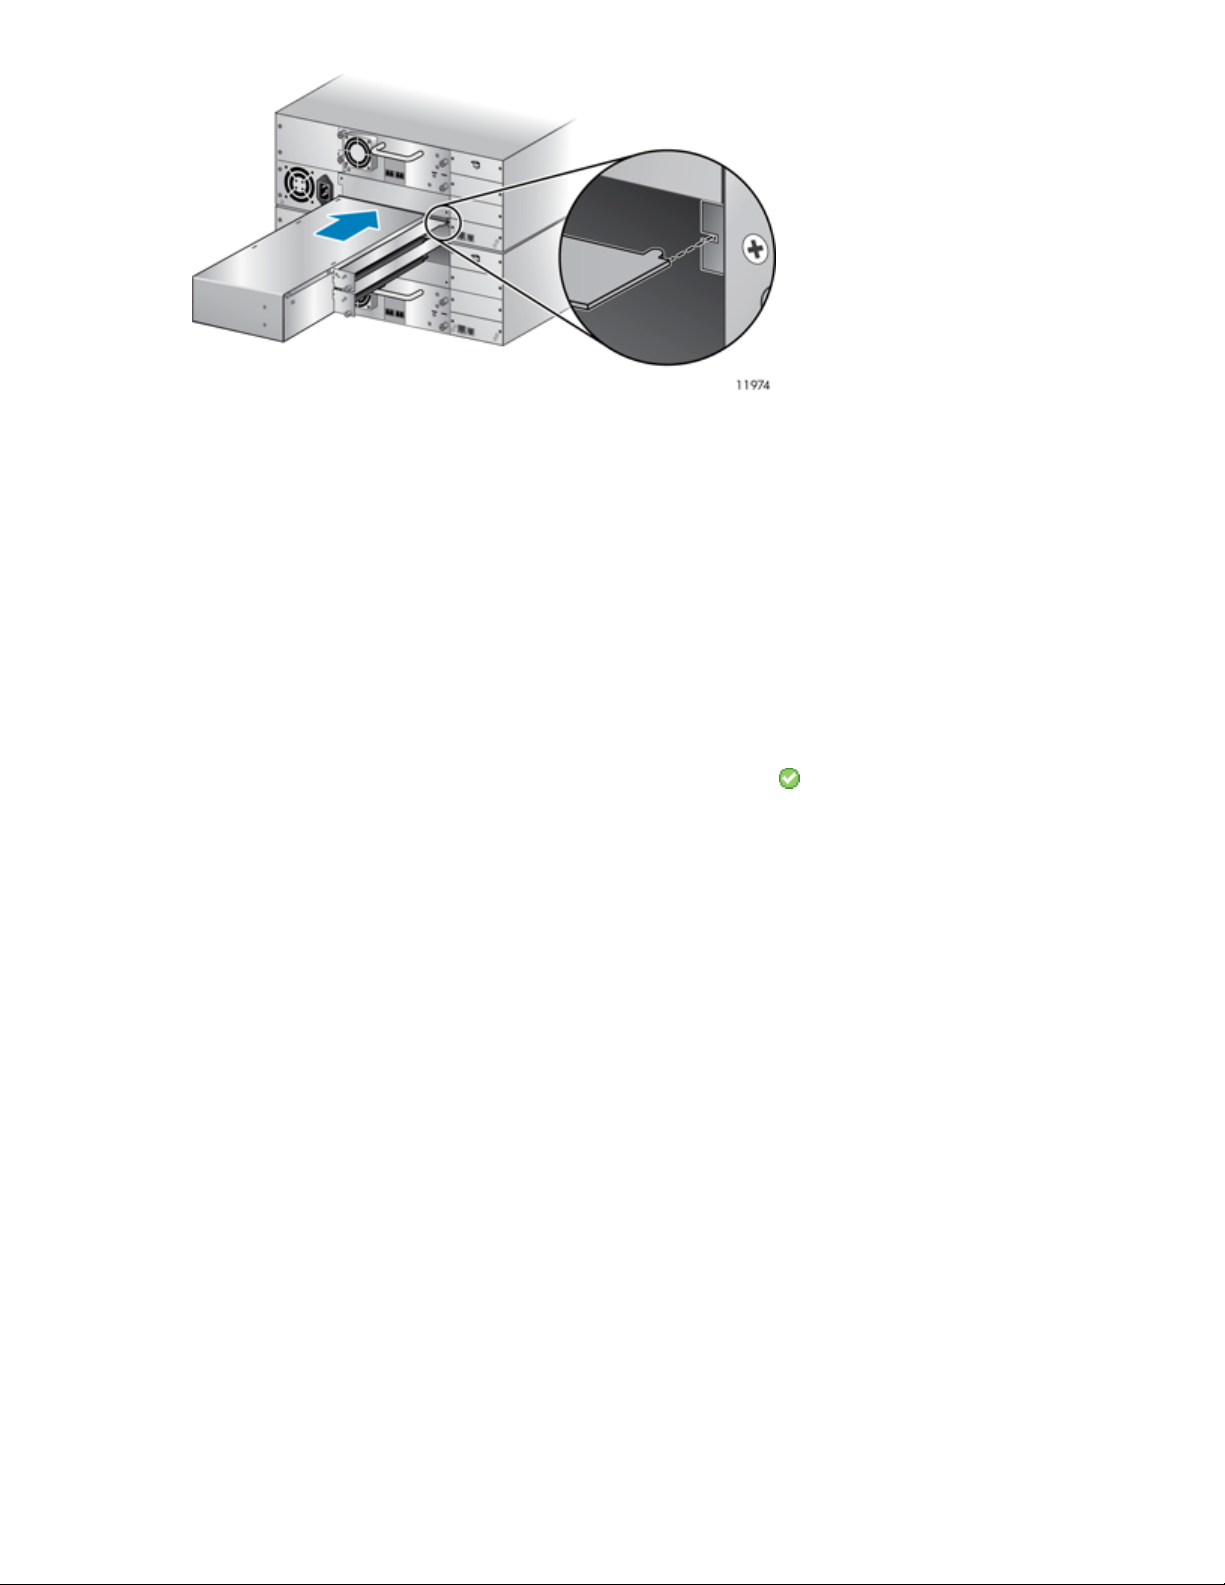
Figure 31 Aligning the Extender tab in the Library slot
.
The tab on the Extender must be inserted in the slot on the master Library, as shown in Figure 31,
for the Extender to seat properly in the connector in the master Library. If the tab is under or to the
left of the bracket, the electrical connection will not be completed.
• The master and lower Libraries have the current firmware versions.
If Library Extender status LED (2), is flashing:
• The Library Extender may be initializing. Check the OCP for status messages and wait a few
minutes for the initialization process to complete. Initialization can take up to 15 minutes.
• The Library Extender has failed with a hard error. See the master Library log to find the error code.
If the lower Library connection status LED (3), is not green, verify the following:
• The lower Library is powered on.
•
If the lower Library is an MSL4048, its power supply status is Good .
• Extended mode is enabled in the lower Library.
• The rack rails are straight and the front bezel screws attaching both Libraries to the rack are secure.
The back planes of the two Libraries should be aligned in the same plane. If the master Library is
set further back the plug on the Extender might not reach the connector on the lower Library.
• The master and lower Libraries have the current firmware versions.
The Library Extender cycle test
The Library Extender cycle test verifies that the Library Extender can transfer cartridges between
Libraries. The Library Extender cycle test moves the first available cartridge in the master Library to
the lower Library and back, exercising the robotics in both Libraries and the Extender, with cartridge
exchanges in both directions. When the test is complete, the cartridge is returned to its original slot.
The Library Extender cycle test is executed from the RMI or OCP.
The wellness test
The wellness test exercises all Library and tape drive hardware, except the external connections, and
is useful for verifying that a device is working correctly. The wellness test requires operator interaction
with the mailslot so cannot be initiated from the RMI.
Using diagnostic tools and troubleshooting44
Page 45
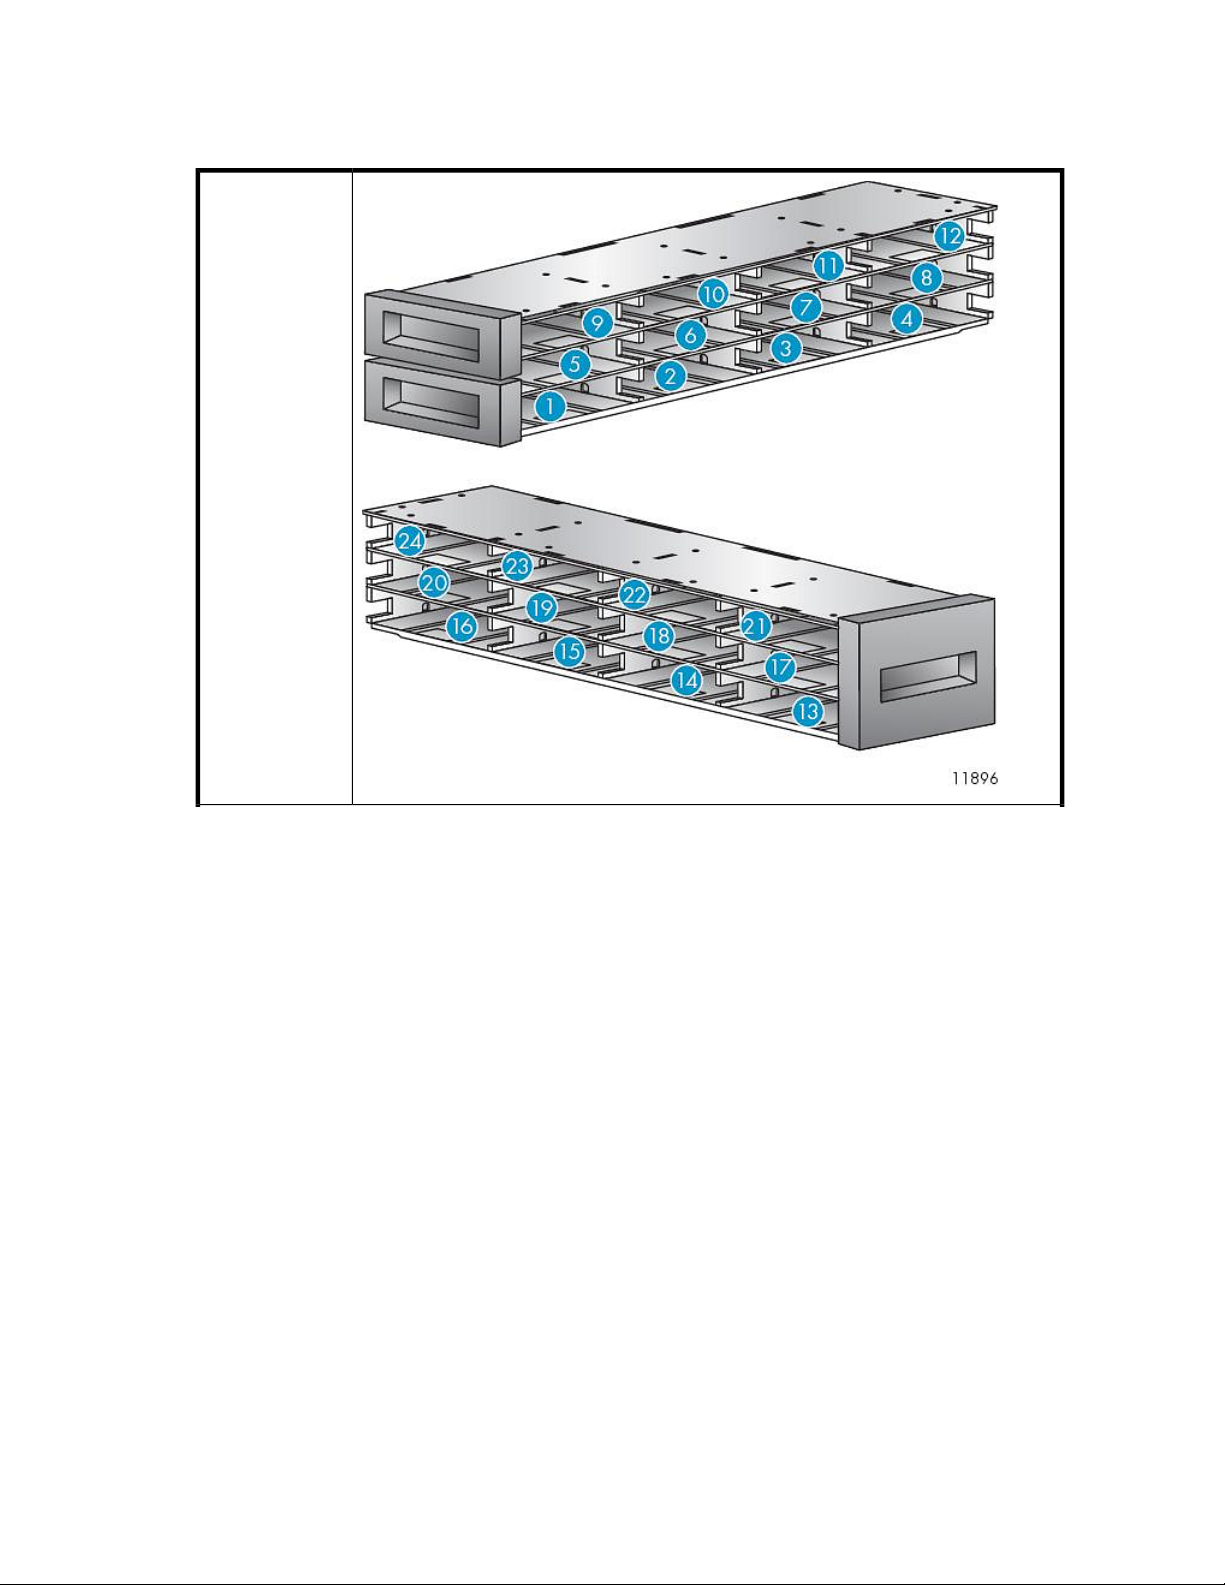
For complete testing, enable a mailslot and ensure that at least one of the top-row corner slots in one
of the Libraries contains a tape cartridge.
Table 4 Top-row corner slot positions
MSL2024 toprow corner slots
with mailslot disabled: 9, 12, 21,
24
HP StorageWorks MSL Library Extender user guide 45
Page 46
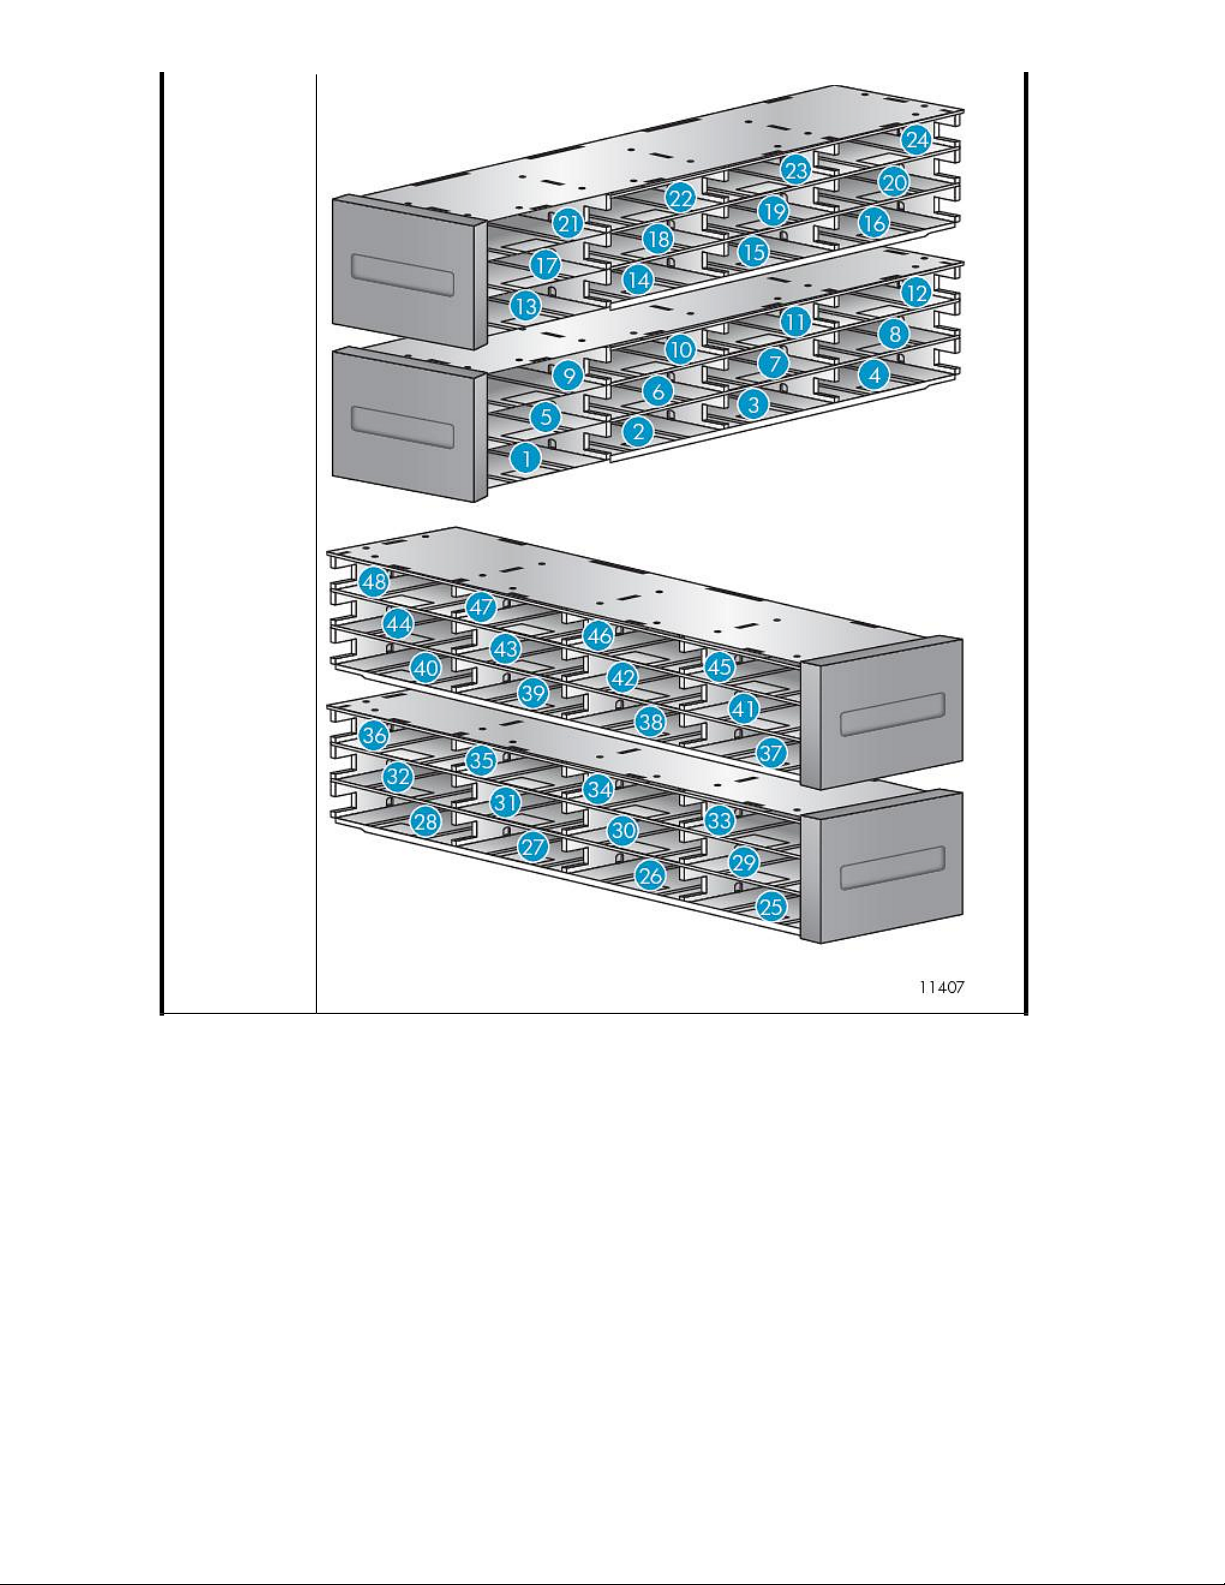
MSL4048 toprow corner slots
with mailslot disabled: 21, 24,
45, 48
Using diagnostic tools and troubleshooting46
Page 47
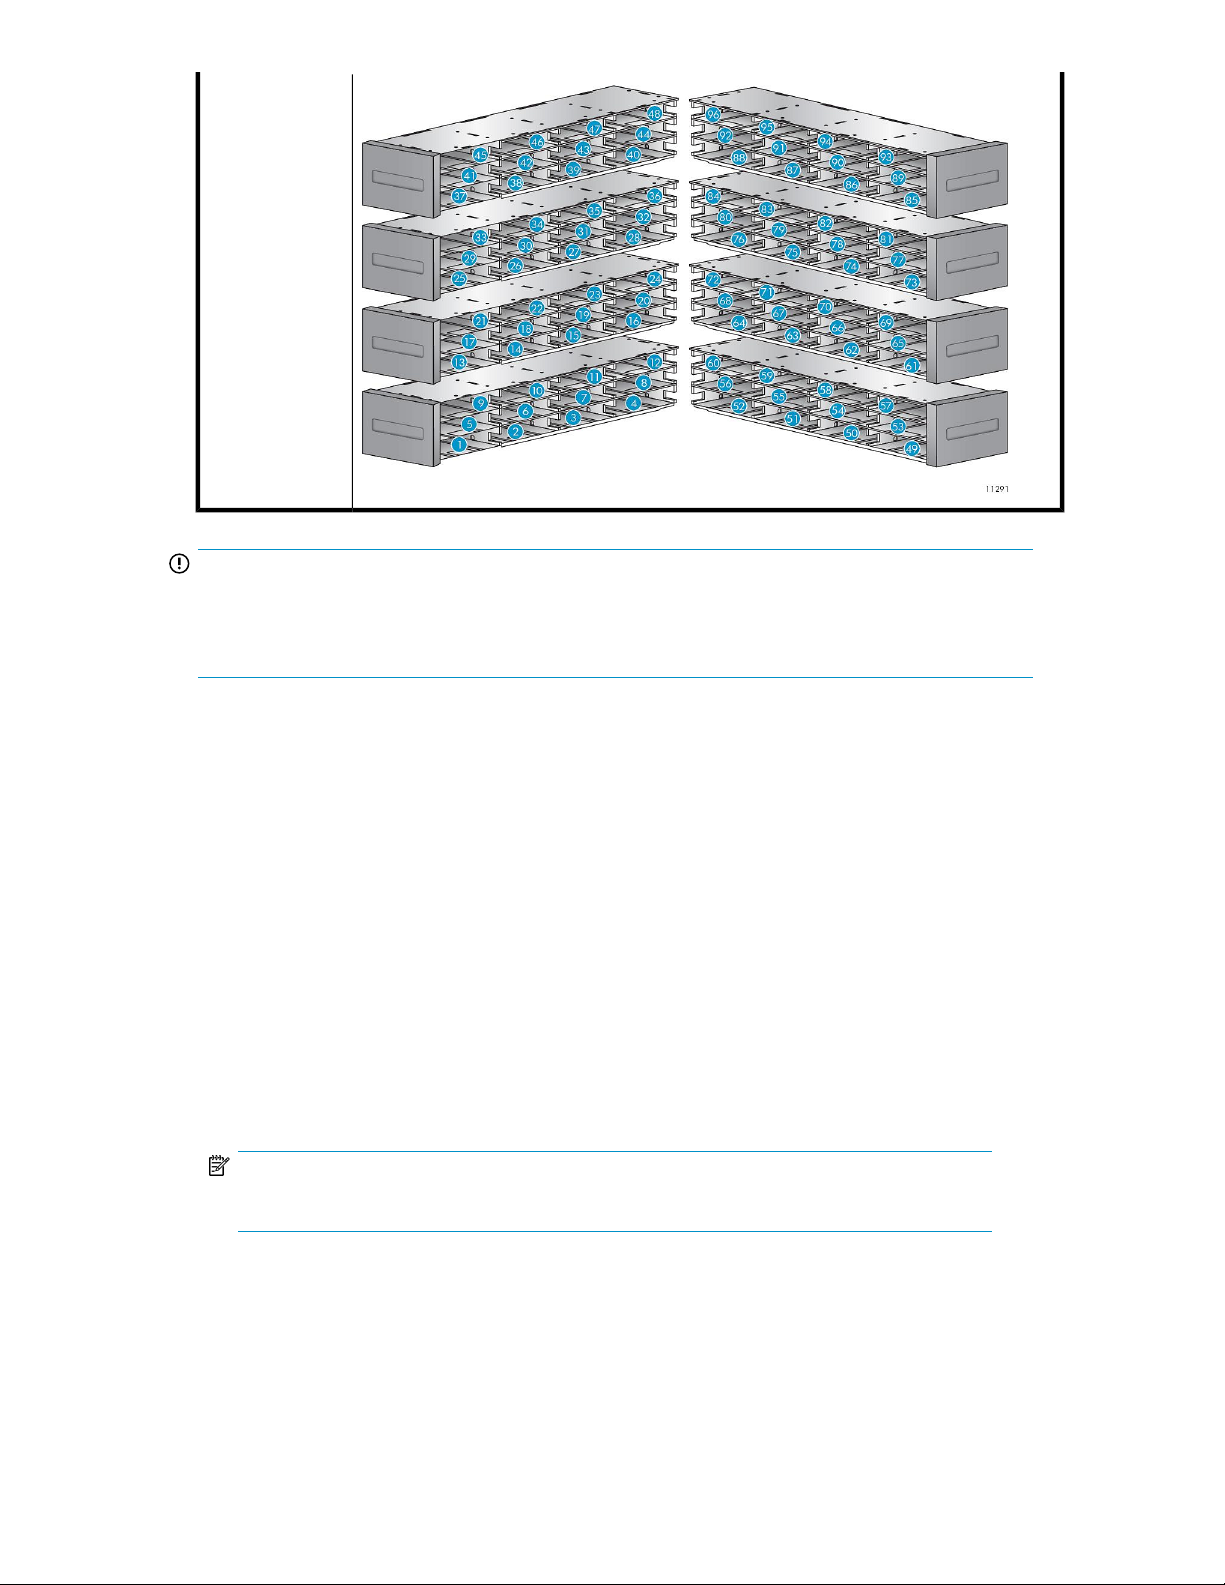
MSL8096 toprow corner slots
with mailslot disabled: 45, 48,
93, 96
IMPORTANT:
The Library will remove any tape cartridges from the tape drives and go offline when running the
wellness test. Verify that any applications using the Library have completed before starting the wellness
test.
You can have the Library run up to 10 cycles of the wellness test. The wellness test exercises all enabled
tape drives in the extended library.
The wellness test requires operator interaction and can only be run from the OCP. During the wellness
test:
1. The operator starts the wellness test from the master Library OCP. The administrator password is
required.
2. The master Library performs a self test, verifies that it can communicate with the tape drives and
the Extender, and then the lower Library performs a self test.
3. The Library returns any tape cartridges from the tape drives to their home slots. If the home slot
for a cartridge is not known, the Library will move the cartridge to the mailslot and prompt the
operator to remove it.
4. The Library prompts the operator to enter the number of cycles to run the test.
5. The Library opens the lowest-numbered mailslot in the extended library, which will generally be
in the lower Library, and prompts the operator to insert a scratch cartridge.
NOTE:
In the MSL8096, the 12-slot mailslot does not pop out; the operator must open it.
6. The operator inserts a scratch cartridge into the lowest-numbered mailslot. If no mailslots are
enabled or the operator closes the mailslot without inserting a cartridge into the lowest-numbered
mailslot, the Library will perform a shortened version of the wellness test, skipping Step 7.
HP StorageWorks MSL Library Extender user guide 47
Page 48

7. The Library loads the scratch cartridge into the first tape drive, unloads the scratch cartridge from
the tape drive, and returns the scratch cartridge to the mailslot. If the operator selected to test all
of the tape drives, the Library will load the scratch cartridge into each tape drive before returning
it to the mailslot.
8. The Library moves the tape cartridge from the four top-row corner slots of both Libraries to the
tape drive load point and then returns the tape cartridge to its slot. If none of the top-row corner
slot positions of either Library contains a tape cartridge, the test stops and the Library displays
an error message.
9. If additional cycles remain to be run, the test will return to Step 7 if there is a tape cartridge in
the mailslot or Step 8 if there is not a cartridge in the mailslot.
10. At the conclusion of the test, the Library pops open the mailslot and waits for the operator to
remove the scratch tape. In the MSL8096, if only the 12-slot mailslot is configured, the Library
will prompt the operator to open the mailslot and remove the scratch tape cartridge.
11. The Library displays the test completion status, including any recoveries or errors that may have
occurred.
Using HP Library & Tape Tools
With HP Library & Tape Tools installed on the host server you can:
• Identify all Fibre Channel, SAS, and parallel SCSI devices connected to your system.
• View detailed configuration, identification, inventory, and drive information for the device.
• Easily update device and drive firmware, including the Library Extender firmware bundles, which
include firmware for both Libraries.
• Run advanced diagnostic tests, including connectivity, read/write, media validation, and testing
the functionality of the device.
• View device and drive error logs.
• Generate a detailed support ticket that can be emailed or faxed to your HP support representative
for analysis.
The HP Library & Tape Tools diagnostic provides an intuitive GUI with integrated context-sensitive
help. It can be downloaded free of charge from
nl
http://www.hp.com/support/TapeTools.
To diagnose problems with L&TT:
1. Run L&TT on the host server. You can install L&TT on the host server, or run it from a CD-ROM or
USB flash drive on the host server.
2. Pull a support ticket for the device.
3. Look at the device analysis results for additional information about the device's operation.
Library Extender error codes
The error code and sub-error code tables include a list of possible solutions, starting with the most
likely. After performing the solution, retry the operation to see whether the problem continues or the
error code changes.
Using diagnostic tools and troubleshooting48
Page 49

NOTE:
See the
HP StorageWorks MSL2024, MSL4048, and MSL8096 Tape Libraries user and service guide
for additional Library error codes.
Table 5 Error codes
Library Extender missing.B8
Communication error on the
B9
BA
I²C bus between the master
Library and the Extender.
Communication error on the
serial connection between the
master and lower Libraries.
See Table 6, page 50 for details.
See Table 7, page 50 for details.
The master Library cannot
communicate with the lower
Library.
SolutionCauseMessageCode
• If this is a new installation,
verify that the Extender is
installed properly and that
both Libraries are powered
on.
• Power cycle both Libraries.
• If this is a new installation,
verify that the Extender is
installed properly and that
both Libraries are powered
on.
• Power cycle both Libraries.
• If this is a new installation,
verify that the Extender is
installed properly and that
both Libraries are powered
on.
• Power cycle both Libraries.
BB
BC
Stack link not established due
to communication issues
between the master and lower
Libraries.
Power of lower Library not detected in time.
The master Library has some
communication with the lower
Library, but not enough to
function.
The lower Library did not respond to the master Library
within the specified time.
• If this is a new installation,
verify that the Extender is
installed properly and that
both Libraries are powered
on.
• Power cycle both Libraries.
• Verify that the lower Lib-
rary is powered on.
• Verify that extended mode
is enabled in the lower
Library.
• Power cycle both Libraries.
• If the lower Library is an
MSL4048, verify that its
power supply status is
Good .
• Verify that the master and
lower Libraries have the
most recent firmware versions.
HP StorageWorks MSL Library Extender user guide 49
Page 50

SolutionCauseMessageCode
BD
BE
Library Extender has reported
an error condition.
Extender or library stack incompatibility.
Table 6 Sub-codes for error B8
MessageSub-code
Library Extender expected40
Lower Library expected41
Master Library expected42
Table 7 Sub-codes for error B9
MessageSub-code
No device present31
See Table 8, page 50.
The Extender is incompatible
with the Libraries, or the firmware versions on the Libraries
and Extender are incompatible
with each other. See Table
9, page 52.
• Power cycle both Libraries.
• Run the Library Extender
cycle test.
• Download the current lib-
rary extender firmware
bundle to update the Libraries to compatible firmware
versions.
• Retry the operation.
I²C write error32
I²C read error33
Table 8 Sub-codes for error BD
Sensor master home not found.01
Sensor lower home not found.02
The Extender robotic cannot
locate its home position within
the master Library.
The Extender robotic cannot
locate its home position within
the lower Library.
SolutionCauseMessageSub-code
• Power cycle the master
Library.
• Run the Library Extender
cycle test.
• Retry the operation.
• Power cycle the lower Lib-
rary.
• Run the Library Extender
cycle test.
• Retry the operation.
Using diagnostic tools and troubleshooting50
Page 51
03
04
Motor blocked in master home
position.
Motor blocked in lower home
position.
The Extender robotic is stuck
in its home position within the
master Library.
The Extender robotic is stuck
in its home position within the
lower Library.
SolutionCauseMessageSub-code
• Power cycle the master
Library and run the Library
Extender cycle test.
• Retry the operation. If the
motor is still blocked, remove the Extender from the
Libraries, and then inspect
the Extender and master
Library for a physical
blockage. Re-install the Extender.
• Power cycle the lower Lib-
rary and run the Library
Extender cycle test.
• Retry the operation. If the
motor is still blocked, remove the Extender from the
Libraries, and then inspect
the Extender and lower
Library for a physical
blockage. Re-install the Extender.
• Retry the operation.
05
Motor blocked between master
and lower home position.
Motor blocked and hot.06
The Extender robotic is stuck
between its two home positions.
The Extender robotic is stuck
and the motor is hot.
• Power cycle both Libraries
and run the Library Extender cycle test.
• Retry the operation. If the
motor is still blocked, remove the Extender from the
Libraries, and inspect the
Extender and master Library for a physical blockage. Re-install the Extender.
• Retry the operation.
• Power cycle the both Librar-
ies and run the Library Extender cycle test.
• Retry the operation. If the
motor is still blocked, remove the Extender from the
Libraries, and then inspect
the Extender and master
Library for a physical
blockage. Re-install the Extender.
HP StorageWorks MSL Library Extender user guide 51
Page 52
SolutionCauseMessageSub-code
• Power cycle both Libraries.
• If this is a new installation
The library controller could not
Motor error.10
Motor block in extender path.11
Motor position not valid.12
start the motor in the Extender
robot.
Debris is keeping the Extender
robotic from moving.
The Extender robotic does not
know where it is positioned.
or the Libraries have been
moved, verify that the Extender is installed properly
and that both Libraries are
powered on.
• Power cycle both Libraries
and run the Library Extender cycle test.
• Retry the operation. If the
motor is still blocked, remove the Extender from the
Libraries, and then inspect
the Extender and master
Library for a physical
blockage. Re-install the Extender.
• Power cycle both Libraries
and run the Library Extender cycle test.
• Retry the operation.
13
21
Extender has not been initialized yet.
Motor is hot.14
Timeout while waiting for extender becoming ready.
Table 9 Sub-codes for error BE
51
Extender personality not
matching.
The library controller issued a
move command to the Extender, but the Extender was
not initialized.
The motor that moves the Extender robotic has exceeded
its thermal limit.
The Extender did not respond
to the master Library within the
specified time.
The Extender is not an HP
StorageWorks MSL Library
Extender.
• Power cycle both Libraries
and run the Library Extender cycle test.
• If this is a new installation
or the Libraries have been
moved, verify that the Extender is installed properly
and that both Libraries are
powered on.
• Verify that airflow to the
Extender has not been
blocked.
• Verify that the Extender is
installed properly and that
both Libraries are powered
on.
SolutionCauseMessageSub-code
• Verify that the Extender is
an HP StorageWorks MSL
Library Extender.
Using diagnostic tools and troubleshooting52
Page 53

SolutionCauseMessageSub-code
52
53
54
55
56
Lower Library personality not
matching.
Extender firmware not matching.
Lower Library firmware level
not matching.
Incompatible height form factor
for master Library.
Incompatible height form factor
for lower Library.
The lower Library is not an HP
StorageWorks MSL2024 or
MSL4048 Tape Library.
The firmware version of the
Extender is not compatible
with the firmware version of
the master Library.
The firmware versions of the
master Library and lower Library are not compatible with
each other.
The master Library is not an
MSL4048 or MSL8096.
The lower Library is not an
MSL2024 or MSL4048.
• Verify that the lower Lib-
rary is an HP StorageWorks MSL2024 or
MSL4048 Tape Library.
• Update the extended lib-
rary firmware with the current firmware bundle,
which will update both Libraries and the Extender
with compatible firmware
versions.
• Disable extended mode,
update both Libraries to the
most recent released versions, and then re-enable
extended mode.
• Verify that the master (top)
Library is an MSL4048 or
MSL8096.
• Verify that the lower Lib-
rary is an MSL2024 or
MSL4048.
The firmware upgrade failed,
Extender firmware corrupted57
possibly because of a power
failure during the upgrade
operation.
Additional robotic error sub-codes
The following sub-codes are associated with robotics errors (error 0x80 to 0xA6), which are described
in the HP StorageWorks MSL2024, MSL4048, and MSL8096 Tape Libraries user and service guide.
See Table 10.
Table 10 Sub-codes related to Library robotics errors during movement to extender position
MessageSub-code
F0
Invalid stack configuration (1/8 G2 Tape Autoloader cannot be part of an extended
library.)
Error during elevator home movementF1
Error during sled movement to home sensorF2
• Power cycle the master
Library. (The master Library
will attempt to download
the Extender firmware to
the Extender when the
master Library is powered
on.)
Error during sled movement to extender positionF3
Error during rotation movement to extender positionF4
HP StorageWorks MSL Library Extender user guide 53
Page 54

MessageSub-code
Error during elevator movement to extender positionF5
Error during sled movement to rotate positionF6
Error during rotational movementF7
F8
FA
Error cartridge present sensor during cartridge transfer from robotics to extender
carrier (and reverse)
Cartridge present sensor deviates from expected parameterF9
Error during first slider movement (movement with opened gripper) from/to extender
position
Error during first gripper movement (open gripper) from/to extender positionFB
Error during second gripper movement (close gripper) from/to extender positionFC
Error during third slider movement (move to block) from/to extender positionFD
Error during third gripper movement (close gripper) from extender positionFE
Error during fourth slider movement (pull back) from/to extender positionFF
Using diagnostic tools and troubleshooting54
Page 55

5 Servicing the Library Extender
This chapter provides instructions for servicing the Library Extender, including replacing the Extender,
removing the Extender, removing a cartridge from the Extender, and releasing magazines manually.
Replacing the Library Extender
Use this procedure to replace the Library Extender with another Library Extender.
Powering off the Libraries
Press the power button on the master Library to power off the extended library as shown in Figure
32, page 55. The master Library will park the Extender robotic and power off the lower Library.
Figure 32 Extended Library power off button
.
If the lower Library does not power off after five minutes, depress the power button on the lower
Library and hold it for at least 10 seconds.
HP StorageWorks MSL Library Extender user guide 55
Page 56

Removing the Library Extender
To remove the Library Extender:
1. Using a #1 Phillips screwdriver, 1) loosen the four screws that secure the Extender to the Tape
Libraries, as shown in Figure 33, page 56.
Figure 33 Removing the Extender
.
2. Pull the Extender straight out of the Libraries.
To store or ship the Library Extender, repackage it in the original packaging materials as shown in
Repackaging the Library Extender, page 61.
Installing the new Extender
To install the new Extender, follow the instructions starting with Aligning the Libraries, page 38.
Removing the Library Extender
Use this procedure if you are removing the Library Extender to reconfigure the two Libraries as
independent Libraries.
Disabling extended mode and powering off the Libraries
The procedure for disabling extended mode and powering off the Libraries varies depending on
whether the extended library is operational or not. Select the procedure that fits your situation.
If the extended library is operational:
1. Disable extended mode from the master Library Configuration > System menu.
2. Press the power button on the master Library to power off the extended library.
If the extended library is in an error condition or the Extender has been removed:
1. Disable extended mode from the master Library Configuration > System menu.
Servicing the Library Extender56
Page 57

2. Press the power button on the master Library to power off the master Library. If the Library does
not respond to the power button, depress the power button and hold it for at least 10 seconds.
3. Disable extended mode from the lower Library Configuration > System menu.
4. Press the power button on the lower Library to power off the lower Library. If the Library does
not respond to the power button, depress the power button and hold it for at least 10 seconds.
Removing the Library Extender
To remove the Library Extender:
1. Using a #1 Phillips screwdriver, 1) loosen the four screws that secure the Extender to the Tape
Libraries, as shown in Figure 34, page 57.
Figure 34 Removing the Extender
.
2. Pull the Extender straight out of the Libraries.
To store or ship the Library Extender, repackage it in the original packaging materials as shown in
Repackaging the Library Extender, page 61.
Preparing the Libraries to operate as separate Libraries
Each Library must have at least one tape drive. Skip this procedure if you do not need to relocate a
tape drive from one Library to the other.
IMPORTANT:
To avoid damage to the Library, ensure that the tape drive is powered off before removing it from a
Library.
HP StorageWorks MSL Library Extender user guide 57
Page 58

1. To remove a tape drive from its current location, loosen the blue captive thumbscrews on the tape
drive.
2. Pull straight back on the tape drive handle while supporting the bottom of the tape drive to remove
it from the Library.
3. If necessary, remove one or two drive bay covers.
4. Slide the tape drive into its new drive bay. Tighten the blue thumbscrews with your fingers to
secure the tape drive in the Library.
Replacing drive bay covers
Use a #1 Phillips screwdriver to secure drive bay covers over any open tape drive bays.
Connecting the Ethernet cable
To use the RMI with the lower Library, insert one end of an Ethernet cable into the Ethernet port on
the back of the Library. Plug the other end into an Ethernet LAN port.
Powering on the Libraries
Power on each Library from its OCP. They no longer communicate with each other and must be
configured and operated separately.
Copying the key server token
Skip this section if the extended library is not using the HP StorageWorks 1/8 G2 and MSL Encryption
Kit.
The encryption keys used to read and write encrypted data are stored on a USB key server token. In
the extended library, encryption keys are stored in the key server token installed in the master Library.
Servicing the Library Extender58
Page 59

When the Libraries are separated, each Library will need its own key server token with the keys to
read tapes that were written by the extended Library.
To create a second key server token with the keys used by the extended library, follow the instructions
for backing up the key server token data in the HP StorageWorks 1/8 G2 and MSL Encryption Kit
user guide.
Insert the key server token into the USB port on the master Library.
Reconfiguring the Libraries
When extended mode is disabled, each Library will have a mix of settings from the extended library,
default values, previous values, and new values. Use the OCP or RMI to check the settings for each
Library and reconfigure them if necessary. See the HP StorageWorks MSL2024, MSL4048, and
MSL8096 Tape Libraries user and service guide for more information about the settings and configuring
the Libraries.
Settings retained from the extended library
The following settings are retained by both Libraries from the extended library:
• Administrator password
• SCSI tape drive addresses
• Fibre Channel drive settings
• Date and time
• Email notification
• Encryption — remains On if LTO3 or LTO4 tape drives are installed
Settings that are set to default values
The following settings are set to default values:
• Mailslot configuration — all mailslots disabled
• Reserved slots — no reserved slots
• Library mode — Automatic
• Autoload — No
• Loop — No
• Logical libraries (partitioning) — Off
• SCSI master drive — the lowest tape drive in each Library
Settings where the lower Library reverts to earlier values
For the following settings, the upper Library retains the settings from the extended Library and the
lower Library reverts to the settings it had before extended mode was enabled:
• Network settings
• Barcode format reporting
• Auto clean
• SNMP
• Log tracing configuration
• Allow magazine access without the Administrator password
• Ignore barcode media ID
HP StorageWorks MSL Library Extender user guide 59
Page 60

Special cases
• OCP contrast setting (MSL4048 and MSL8096) — each Library retains the setting it had before
extended mode was enabled.
• Drive power — In the extended library, one of the tape drives is configured as the SCSI master
drive. The SCSI master drive can be in either Library.
When extended mode is disabled, the Library that hosts the tape drive that was configured as the
SCSI master drive in the extended library retains the drive power settings from the extended library.
Thus, if any tape drives in this Library were powered off, they will continue to be powered off.
In the other Library, all tape drives are powered on.
Removing a cartridge from the Extender
If the extended library cannot return a tape to one of the Tape Libraries, you may need to remove it
manually.
1. Remove the Extender from the tape Libraries.
a. Using a #1 Phillips screwdriver, loosen the four thumbscrews that secure the Extender to the
Tape Libraries.
b. Pull the Extender straight out of the Libraries as shown in Figure 35, page 60.
Figure 35 Removing the Extender
.
2. If the tape cartridge is near the front of the Extender, grasp the cartridge with your hand and
pull it straight out of the Extender.
Servicing the Library Extender60
Page 61

3.
CAUTION:
Removing the top of the Extender will require its replacement. Only remove the top of the
Extender to retrieve a cartridge when all other removal attempts have failed.
To remove a cartridge that is stuck in the back of the Extender:
a. Using a #2 Phillips screwdriver, loosen the six screws marked with arrows on the sheet metal
on top of the Extender.
b. Remove the top sheet metal.
c. Remove the cartridge.
d. Replace the sheet metal and tighten the screws.
Repackaging the Library Extender
IMPORTANT:
Shipping the Extender without properly repackaging it can damage the Extender.
Follow these steps to package the removed Library Extender for storage or shipment.
To package the removed Library Extender for storage or shipment:
1. Insert the cardboard support in the space between the top and bottom of the extender.
2. Place the extender on the base position of the cardboard wrapper.
HP StorageWorks MSL Library Extender user guide 61
Page 62

3. Fold the tab on the cardboard support piece down, and then fold the ends of the wrapper over
the front and back of the Extender.
4. Wrap the sides of the wrapper around the sides of the Extender.
5. Secure the wrapper with packaging tape.
6. Place the foam caps around the front and back of the Extender.
Servicing the Library Extender62
Page 63
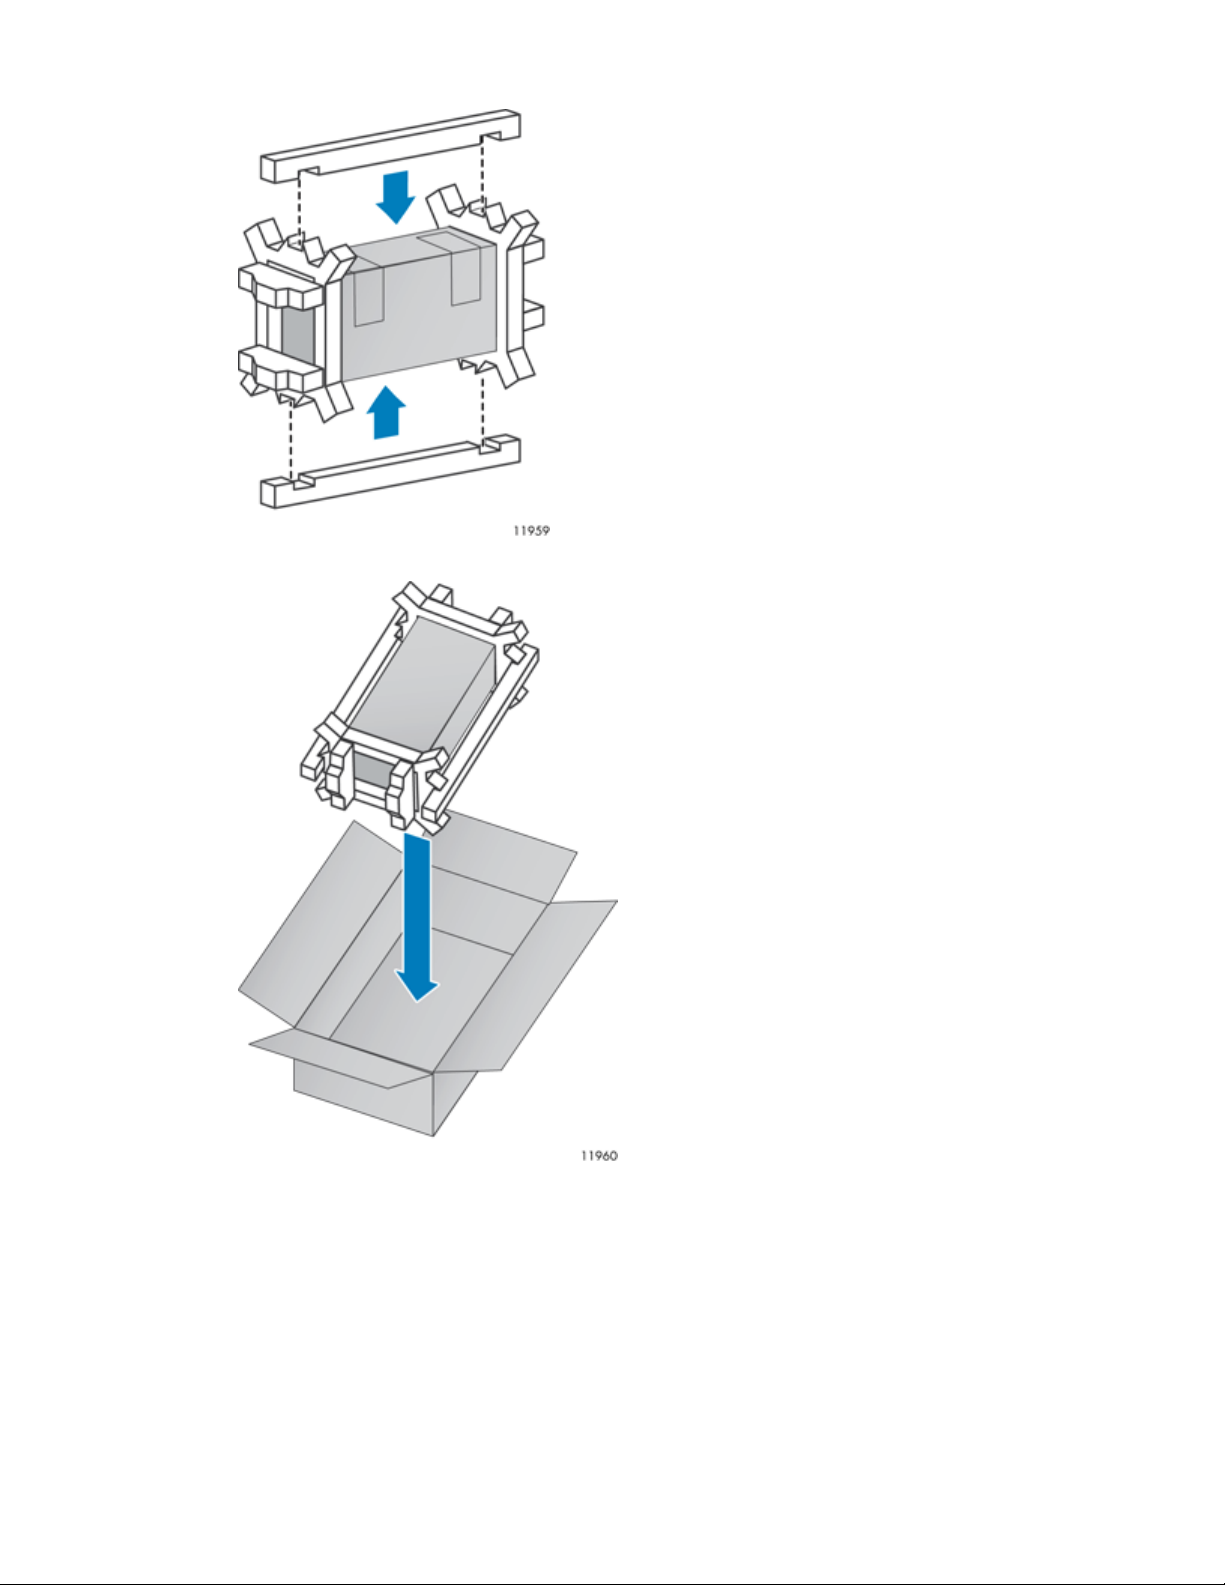
7. Attach a foam side support on each side of the Extender.
8. Place the protected Extender in the shipping box.
HP StorageWorks MSL Library Extender user guide 63
Page 64
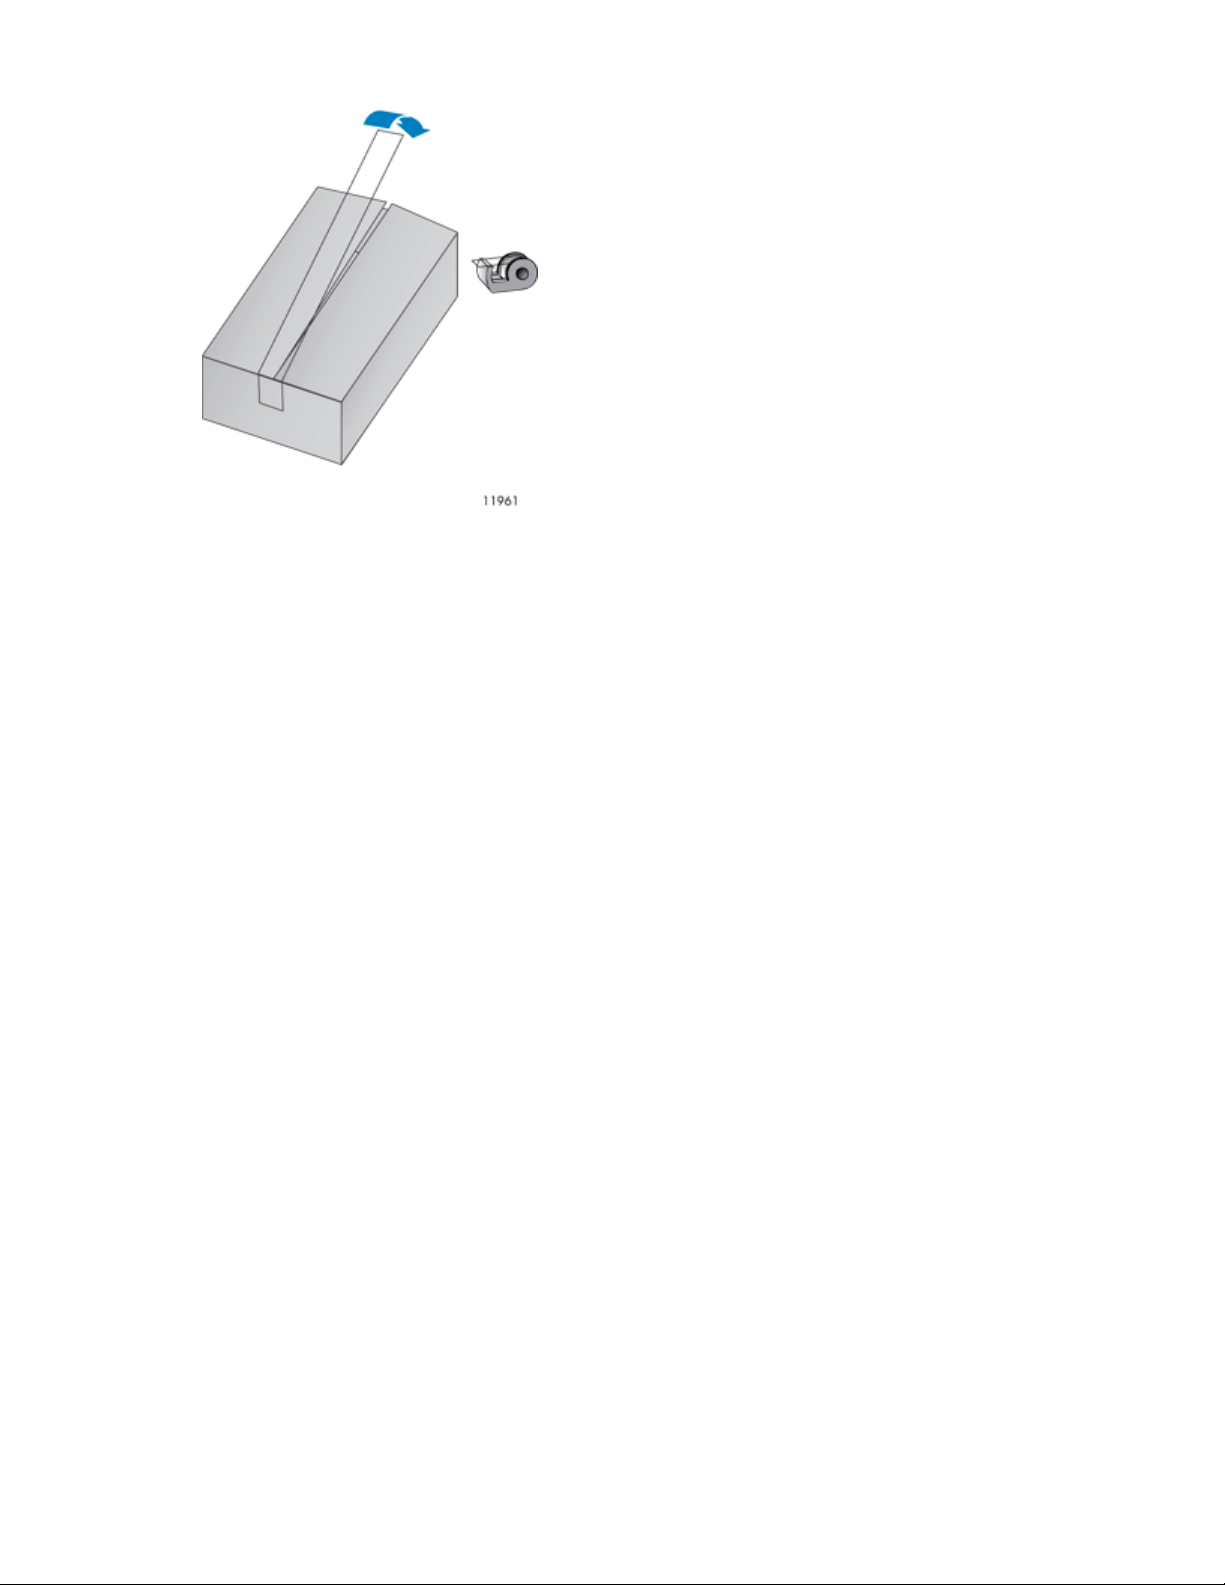
9. Secure the box with packaging tape.
Releasing the magazines manually
If you cannot remove the magazines via the OCP or RMI, do the following:
1. Power off both Libraries.
2. Unplug the power cord from the Library with the magazines to be removed.
Servicing the Library Extender64
Page 65

3. From the back of the device, find the access hole for the magazine to be released. See Figure
36, Figure 37, and Figure 38.
Figure 36 Access to release lever for the right magazines in the master Library
.
Figure 37 Access to release lever for the left magazines in the master Library
.
Figure 38 Access holes for the right and left magazines in the lower Library
.
HP StorageWorks MSL Library Extender user guide 65
Page 66

4. To manually release a magazine, push the end of a small metal pin or straightened paper clip
until you feel some resistance, about 1.5 cm (0.6 inch), into the magazine access hole to depress
the magazine release tab. While holding in the release tab, have a second person attempt to
pull the magazine out of the front of the unit. For the MSL4048 and MSL8096, all magazines
on a side are released and may be removed at the same time. See Figure 39.
Figure 39 Releasing the magazine
.
Push a metal pin or paper clip into the access hole.1.
Pull the magazine out of the front of the unit.2.
IMPORTANT:
Do not force the pin once you encounter resistance. Doing so can damage the Library.
5. Repeat Step 4 for the other magazine if necessary.
6. If other tapes are still in the device, or if you were unable to manually remove the magazines,
contact HP customer service for assistance.
Servicing the Library Extender66
Page 67

6 Support and other resources
Contacting HP
Before you contact HP
Be sure to have the following information available before you contact HP:
• Product model names and numbers
• Technical support registration number (if applicable)
• Product serial numbers
• Error messages
• Operating system type and revision level
• Detailed questions
HP contact information
For worldwide technical support information, see the HP support website:
http://www.hp.com/support
Subscription service
HP recommends that you register your product at the Subscriber's Choice for Business website:
http://www.hp.com/go/e-updates
After registering, you will receive e-mail notification of product enhancements, new driver versions,
firmware updates, and other product resources.
Documentation feedback
HP welcomes your feedback.
To make comments and suggestions about product documentation, please send a message to
storagedocsFeedback@hp.com. All submissions become the property of HP.
Related information
Documents
• HP StorageWorks MSL2024, MSL4048, and MSL8096 Tape Libraries user and service guide
• HP StorageWorks MSL Library Extender getting started guide and replacement instructions
• HP StorageWorks 1/8 G2 and MSL Encryption Kit user guide
HP StorageWorks MSL Library Extender user guide 67
Page 68

You can find these documents from the Manuals page of the HP Business Support Center website:
http://www.hp.com/support/manuals
In the Storage section, click Tape Storage and Media and then select your product.
Websites
• http://www.hp.com
• http://www.hp.com/go/storage
• http://www.hp.com/support/manuals
• http://www.hp.com/support/downloads
• http://www.hp.com/support/mslg3stree — Troubleshooting tree.
• http://www.hp.com/support/msl_extender
• http://www.hp.com/go/tapetools — HP Library and Tape Tools
Document conventions and symbols
Table 11 Document conventions
ElementConvention
Cross-reference links and e-mail addressesBlue text: Table 11
Website addressesBlue, underlined text: http://www.hp.com
• Keys that are pressed
Bold text
Monospace text
Monospace, italic text
Monospace, bold text
• Text typed into a GUI element, such as a box
• GUI elements that are clicked or selected, such as menu
and list items, buttons, tabs, and check boxes
Text emphasisItalic text
• File and directory names
• System output
• Code
• Commands, their arguments, and argument values
• Code variables
• Command variables
Emphasized monospace text
WARNING!
Indicates that failure to follow directions could result in bodily harm or death.
CAUTION:
Indicates that failure to follow directions could result in damage to equipment or data.
Support and other resources68
Page 69

IMPORTANT:
Provides clarifying information or specific instructions.
NOTE:
Provides additional information.
TIP:
Provides helpful hints and shortcuts.
Customer self repair
HP CSR programs allow you to repair your StorageWorks product. If a CSR part needs replacing,
HP ships the part directly to you so that you can install it at your convenience. Some parts do not
qualify for CSR. Your HP-authorized service provider will determine whether a repair can be
accomplished by CSR.
For more information about CSR, contact your local service provider, or see the CSR website:
http://www.hp.com/go/selfrepair
HP StorageWorks MSL Library Extender user guide 69
Page 70

Support and other resources70
Page 71

A Technical specifications
Table 12 Physical specifications
PackagedProduct aloneCharacteristic
290 mm (11.42 inch)88 mm (3.46 inch)Height
410 mm (16.14 inch)225 mm (8.86 inch)Width
560 mm (22.05 inch)375 mm (14.76 inch)Extender depth
N/A908 mm (35.75 inch)Library depth with Extender installed
Extender overhang beyond drive fan
and handle
Table 13 Environmental specifications
Temperature
Temperature shock immunity - maximum
rate of change
Altitude
Humidity
N/A103 mm (4.06 inch)
4.5 kg (9.92 lb)2.7 kg (5.95 lb)Weight
SpecificationCharacteristic
10º to 35º C operating
nl
-40º to 60º C non-operating
10º to 35º CRecommended operating temperature
10º C per hour operating
nl
20º C per hour non-operating
less than 200 microgram/cubic meterDust concentration
0 to 4,200 m (13,000 ft) at 25º C ambient operating
nl
-7 m to 10,668 m (-22 to 35,000 ft) non-operating
15% to 80% RH non-condensing operating
nl
5% to 90% RH non-condensing non-operating
HP StorageWorks MSL Library Extender user guide 71
Page 72

Technical specifications72
Page 73

B Electrostatic discharge
To prevent damaging the system, be aware of the precautions you need to follow when setting up
the system or handling parts. A discharge of static electricity from a finger or other conductor may
damage system boards or other static-sensitive devices. This type of damage may reduce the life
expectancy of the device.
Preventing electrostatic damage
To prevent electrostatic damage, observe the following precautions:
• Avoid hand contact by transporting and storing products in static-safe containers.
• Keep electrostatic-sensitive parts in their containers until they arrive at static-free workstations.
• Place parts on a grounded surface before removing them from their containers.
• Avoid touching pins, leads, or circuitry.
• Always be properly grounded when touching a static-sensitive component or assembly. See
Grounding methods.
Grounding methods
Use one or more of the following methods when handling or installing electrostatic-sensitive parts:
• Use a wrist strap connected by a ground cord to a grounded workstation or computer chassis.
Wrist straps are flexible straps with a minimum of 1 megohm (±10 percent) resistance in the
ground cords. To provide proper ground, wear the strap snug against the skin.
• Use heel straps, toe straps, or boot straps at standing workstations. Wear the straps on both feet
when standing on conductive floors or dissipating floor mats.
• Use conductive field service tools.
• Use a portable field service kit with a folding static-dissipating work mat.
If you do not have any of the suggested equipment for proper grounding, have an HP authorized
reseller install the part.
NOTE:
For more information on static electricity, or assistance with product installation, contact your HP
authorized reseller.
HP StorageWorks MSL Library Extender user guide 73
Page 74

Electrostatic discharge74
Page 75

C Regulatory compliance notices
This section contains regulatory notices for the HP StorageWorks MSL Library Extender.
Regulatory compliance identification numbers
For the purpose of regulatory compliance certifications and identification, this product has been
assigned a unique regulatory model number. The regulatory model number can be found on the
product nameplate label, along with all required approval markings and information. When requesting
compliance information for this product, always refer to this regulatory model number. The regulatory
model number is not the marketing name or model number of the product.
Product specific information:
HP StorageWorks MSL Library Extender
Regulatory model number: LVLDC-0501
FCC and CISPR classification: Class A
These products contain laser components. See Class 1 laser statement in the Laser compliance notices
section.
Federal Communications Commission notice
Part 15 of the Federal Communications Commission (FCC) Rules and Regulations has established
Radio Frequency (RF) emission limits to provide an interference-free radio frequency spectrum. Many
electronic devices, including computers, generate RF energy incidental to their intended function and
are, therefore, covered by these rules. These rules place computers and related peripheral devices
into two classes, A and B, depending upon their intended installation. Class A devices are those that
may reasonably be expected to be installed in a business or commercial environment. Class B devices
are those that may reasonably be expected to be installed in a residential environment (for example,
personal computers). The FCC requires devices in both classes to bear a label indicating the interference
potential of the device as well as additional operating instructions for the user.
FCC rating label
The FCC rating label on the device shows the classification (A or B) of the equipment. Class B devices
have an FCC logo or ID on the label. Class A devices do not have an FCC logo or ID on the label.
After you determine the class of the device, refer to the corresponding statement.
Class A equipment
This equipment has been tested and found to comply with the limits for a Class A digital device,
pursuant to Part 15 of the FCC rules. These limits are designed to provide reasonable protection
against harmful interference when the equipment is operated in a commercial environment. This
equipment generates, uses, and can radiate radio frequency energy and, if not installed and used in
accordance with the instructions, may cause harmful interference to radio communications. Operation
HP StorageWorks MSL Library Extender user guide 75
Page 76

of this equipment in a residential area is likely to cause harmful interference, in which case the user
will be required to correct the interference at personal expense.
Class B equipment
This equipment has been tested and found to comply with the limits for a Class B digital device,
pursuant to Part 15 of the FCC Rules. These limits are designed to provide reasonable protection
against harmful interference in a residential installation. This equipment generates, uses, and can
radiate radio frequency energy and, if not installed and used in accordance with the instructions,
may cause harmful interference to radio communications. However, there is no guarantee that
interference will not occur in a particular installation. If this equipment does cause harmful interference
to radio or television reception, which can be determined by turning the equipment off and on, the
user is encouraged to try to correct the interference by one or more of the following measures:
• Reorient or relocate the receiving antenna.
• Increase the separation between the equipment and receiver.
• Connect the equipment into an outlet on a circuit that is different from that to which the receiver
is connected.
• Consult the dealer or an experienced radio or television technician for help.
Declaration of Conformity for products marked with the FCC logo, United States only
This device complies with Part 15 of the FCC Rules. Operation is subject to the following two conditions:
(1) this device may not cause harmful interference, and (2) this device must accept any interference
received, including interference that may cause undesired operation.
For questions regarding this FCC declaration, contact us by mail or telephone:
• Hewlett-Packard Company P.O. Box 692000, Mail Stop 510101 Houston, Texas 77269-2000
• Or call 1-281-514-3333
Modification
The FCC requires the user to be notified that any changes or modifications made to this device that
are not expressly approved by Hewlett-Packard Company may void the user's authority to operate
the equipment.
Cables
When provided, connections to this device must be made with shielded cables with metallic RFI/EMI
connector hoods in order to maintain compliance with FCC Rules and Regulations.
Canadian notice (Avis Canadien)
Class A equipment
This Class A digital apparatus meets all requirements of the Canadian Interference-Causing Equipment
Regulations.
Cet appareil numérique de la class A respecte toutes les exigences du Règlement sur le matériel
brouilleur du Canada.
Regulatory compliance notices76
Page 77
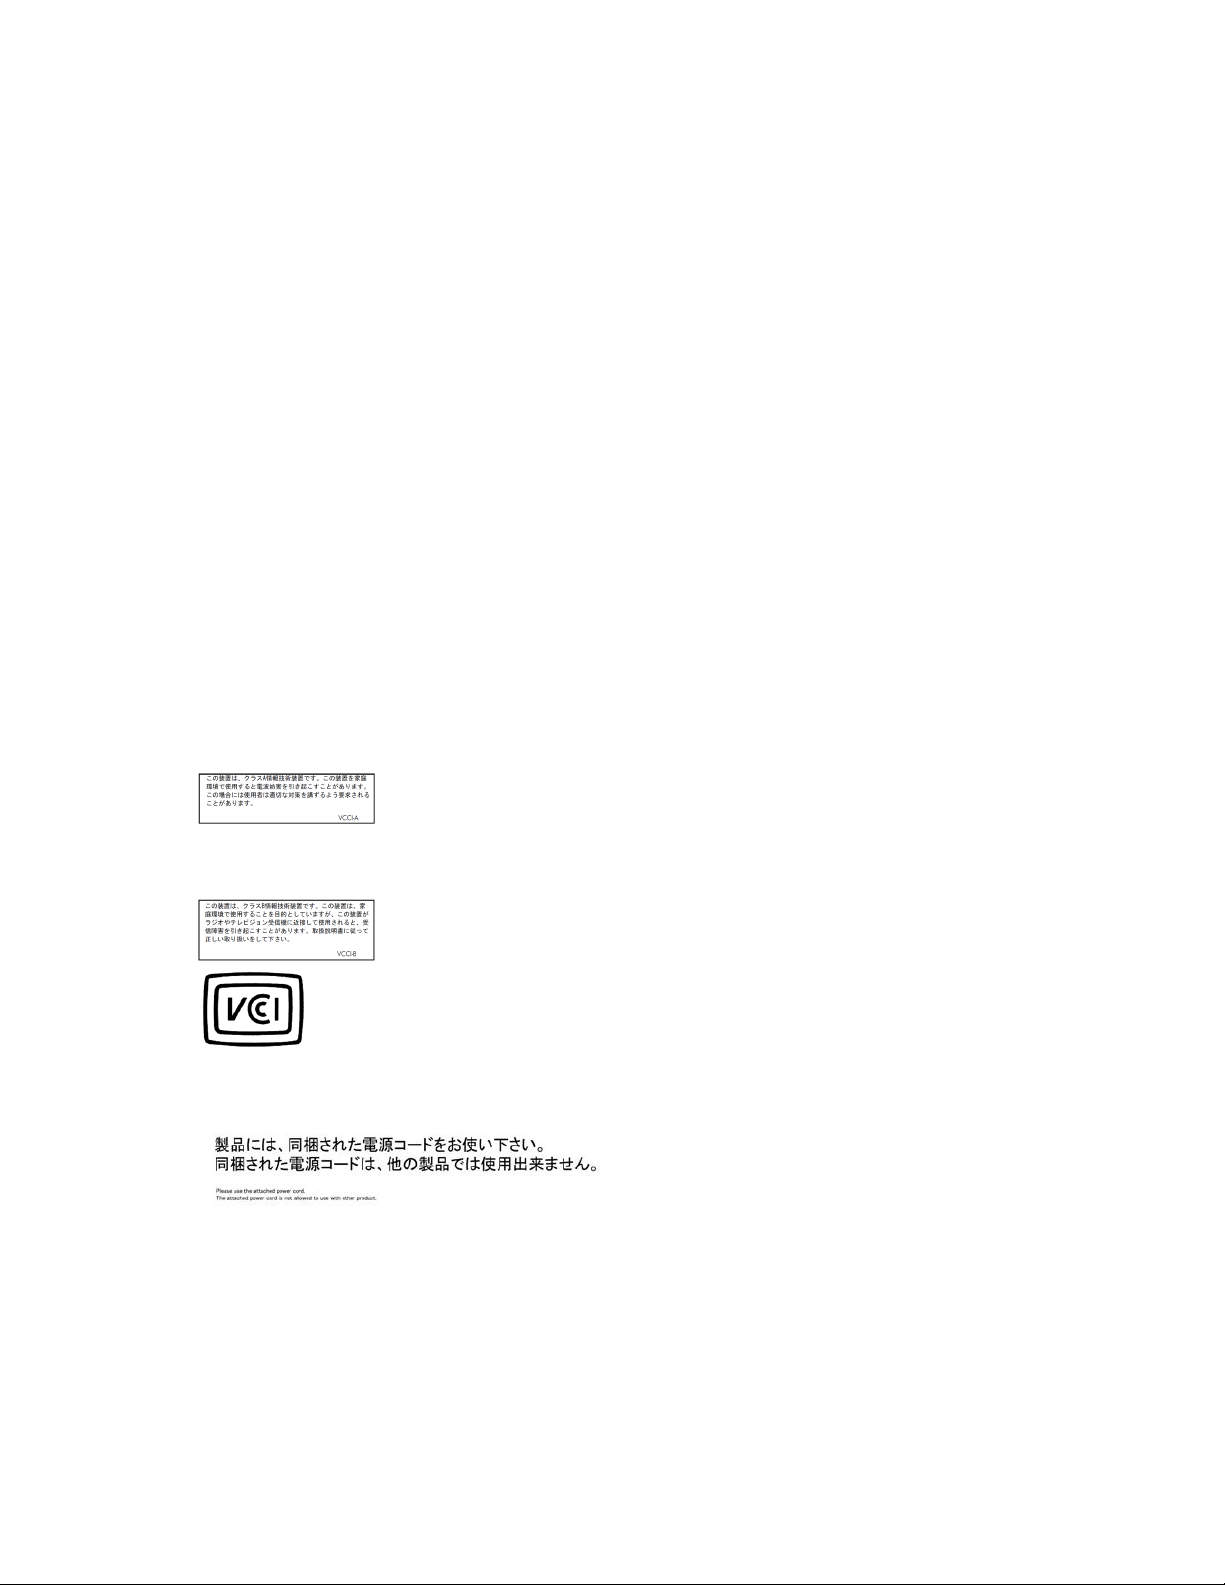
Class B equipment
This Class B digital apparatus meets all requirements of the Canadian Interference-Causing Equipment
Regulations.
Cet appareil numérique de la class B respecte toutes les exigences du Règlement sur le matériel
brouilleur du Canada.
European Union notice
Products bearing the CE marking comply with the EMC Directive (89/336/EEC) and the Low Voltage
Directive (73/23/EEC) issued by the Commission of the European Community.
Compliance with these directives implies conformity to the following European Norms (in parentheses
are the equivalent international standards and regulations):
• EN 55022 (CISPR 22)—Electromagnetic Interference
• EN55024 (IEC61000-4-2, 3, 4, 5, 6, 8, 11)—Electromagnetic Immunity
• EN61000-3-2 (IEC61000-3-2)—Power Line Harmonics
• EN61000-3-3 (IEC61000-3-3)—Power Line Flicker
• EN 60950 (IEC60950)—Product Safety
Japanese notices
Japanese VCCI-A notice
Japanese VCCI-B notice
Japanese power cord statement
HP StorageWorks MSL Library Extender user guide 77
Page 78
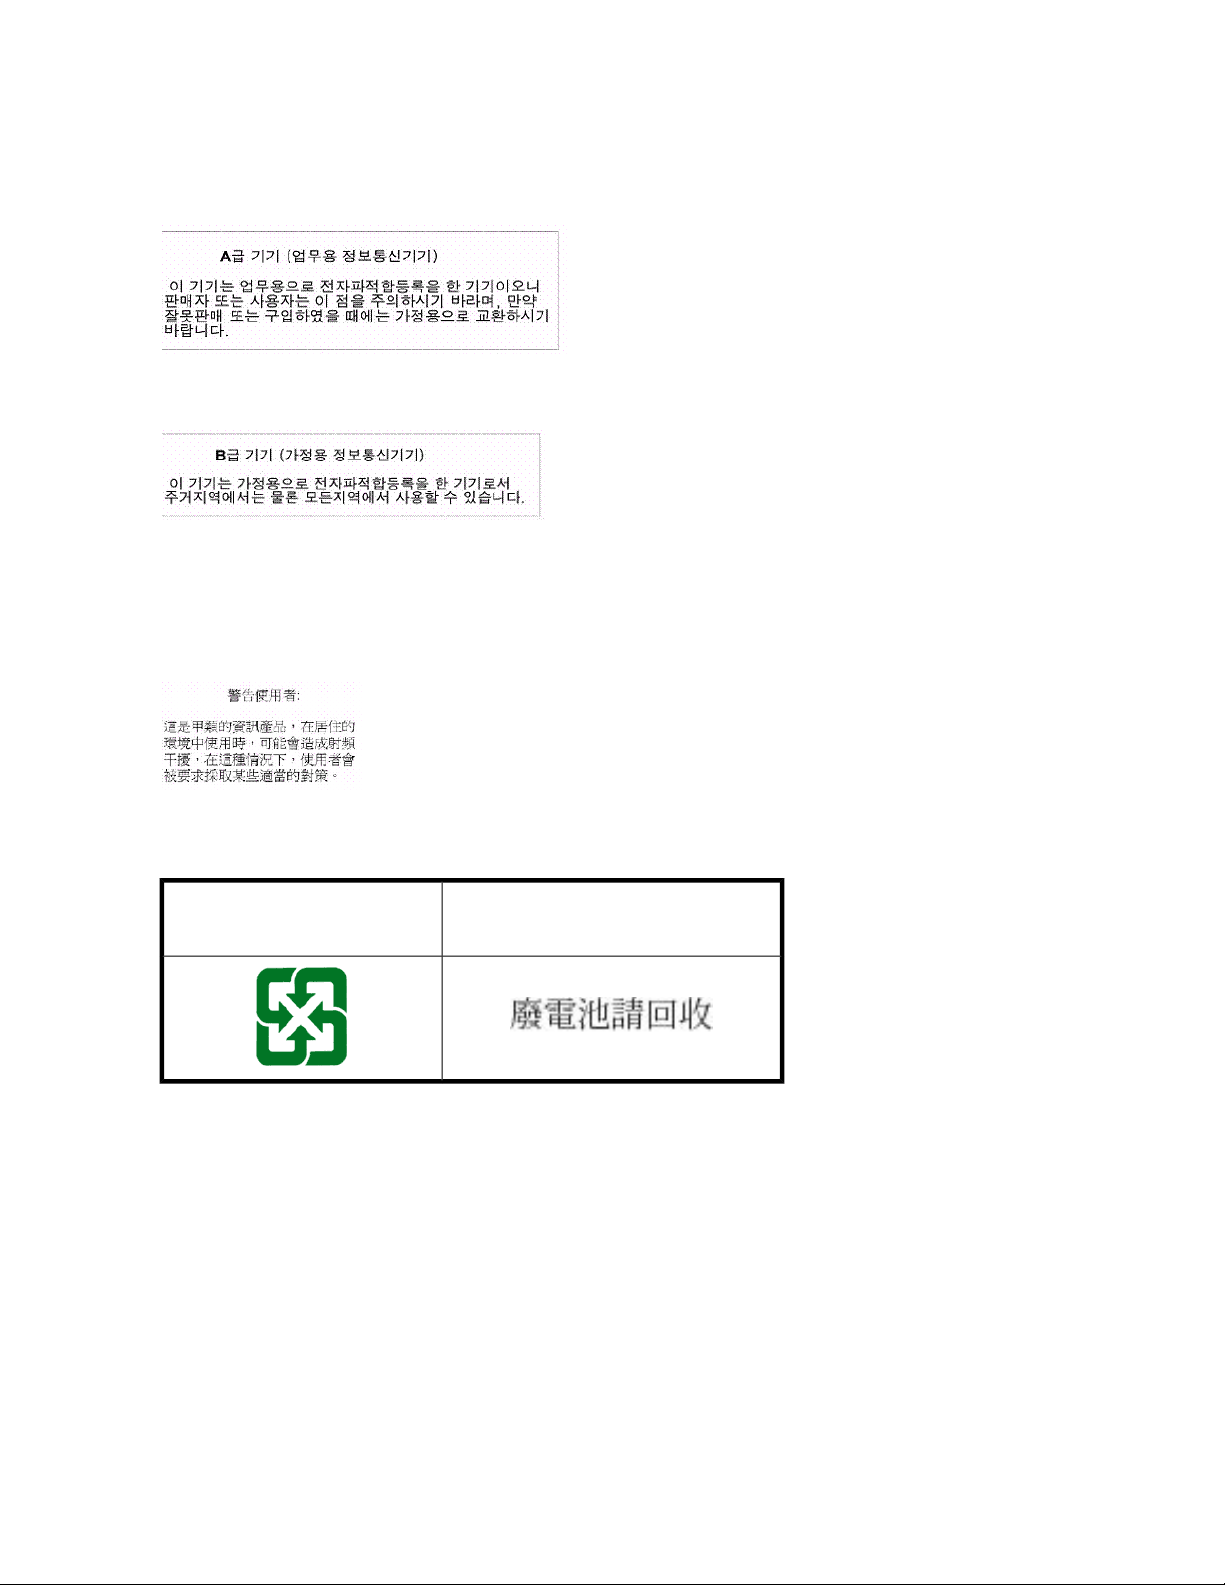
Korean notices
Class A equipment
Class B equipment
Taiwanese notices
BSMI Class A notice
Taiwan battery recycle statement
Recovery mark:
• Four-in-one recycling symbol
Recovery text:
• “Please recycle waste batteries”
Regulatory compliance notices78
Page 79
Laser compliance notices
English laser notice
This device may contain a laser that is classified as a Class 1 Laser Product in accordance with U.S.
FDA regulations and the IEC 60825-1. The product does not emit hazardous laser radiation.
WARNING!
Use of controls or adjustments or performance of procedures other than those specified herein or in
the laser product's installation guide may result in hazardous radiation exposure. To reduce the risk
of exposure to hazardous radiation:
• Do not try to open the module enclosure. There are no user-serviceable components inside.
• Do not operate controls, make adjustments, or perform procedures to the laser device other than
those specified herein.
• Allow only HP Authorized Service technicians to repair the unit.
The Center for Devices and Radiological Health (CDRH) of the U.S. Food and Drug Administration
implemented regulations for laser products on August 2, 1976. These regulations apply to laser
products manufactured from August 1, 1976. Compliance is mandatory for products marketed in the
United States.
Dutch laser notice
HP StorageWorks MSL Library Extender user guide 79
Page 80

French laser notice
German laser notice
Italian laser notice
Regulatory compliance notices80
Page 81

Japanese laser notice
Spanish laser notice
Recycling notices
English notice
HP StorageWorks MSL Library Extender user guide 81
Page 82

Bulgarian notice
Czech notice
Danish notice
Dutch notice
Regulatory compliance notices82
Page 83

Estonian notice
Finnish notice
French notice
German notice
HP StorageWorks MSL Library Extender user guide 83
Page 84

Greek notice
Hungarian notice
Italian notice
Latvian notice
Regulatory compliance notices84
Page 85

Lithuanian notice
Polish notice
Portuguese notice
Romanian notice
HP StorageWorks MSL Library Extender user guide 85
Page 86

Slovak notice
Spanish notice
Swedish notice
Turkish notice
Türkiye Cumhuriyeti: EEE Yönetmeli ine Uygundur
Regulatory compliance notices86
Page 87
Battery replacement notices
Dutch battery notice
HP StorageWorks MSL Library Extender user guide 87
Page 88
French battery notice
German battery notice
Regulatory compliance notices88
Page 89
Italian battery notice
Japanese battery notice
HP StorageWorks MSL Library Extender user guide 89
Page 90
Spanish battery notice
Regulatory compliance notices90
Page 91

Glossary
CSR Customer self repair. An HP program that allows you to repair your StorageWorks
GUI Graphical user interface.
I²C The internal communication bus used by the Library to communicate with the
L&TT HP StorageWorks Library and Tape Tools. A set of diagnostic tools for HP
OCP Operator control panel. The LCD panel and buttons on the front panel of the
RMI Remote Management Interface. A web-based interface used to monitor and
product by shipping the repair part directly to you.
tape drives
StorageWorks tape libraries and tape drives, including the MSL2024, MSL4048,
and MSL8096 Tape Libraries. L&TT can be downloaded free of charge from
http://www.hp.com/support/TapeTools.
Tape Library.
control the Library.
HP StorageWorks MSL Library Extender user guide 91
Page 92

92
Page 93

Index
B
battery replacement notices, 87
boot straps, using, 73
C
Canadian notice, 76
configuring, 15
library, 21
conventions
document, 68
text symbols, 68
customer self repair, 69
D
Declaration of Conformity, 76
default settings, 25
diagnostic tests
demo, 26
Library Extender cycle test, 26
running, 26
slot to slot, 26
wellness test, 26
diagnostic tools, 43
Extender status LEDs, 43
Library & Tape Tools, 48
Library Extender cycle test, 44
wellness test, 44
dissipating floor mats, 73
document
conventions, 68
related documentation, 67
documentation
HP website, 68
providing feedback, 67
ESD (electrostatic discharge)
obtaining additional information, 73
prevention measures, 73
storing products, 73
transporting products, 73
European Union notice, 77
F
features, 11
Federal Communications Commission notice,
75
firmware
updating, 25
floor mats, dissipating, 73
G
ground strap specifications, 73
grounding
methods, 73
straps, wearing, 73
suggested equipment for, 73
H
heel straps, using, 73
help, 15
obtaining, 67
HP
technical support, 67
E
electrostatic damage prevention, 73
Encryption Kit
using with the Extender, 13
error codes, 48
HP StorageWorks MSL Library Extender user guide 93
Page 94

I
installation
aligning the Libraries, 38
checking the Extender LEDs, 41
determining the master and lower Library, 29
downloading product documentation, 28
enabling extended mode, 30
extending the pull-out tab, 37
identifying product components, 28
installing the Extender, 39
installing the Library in the rack rails, 34
moving the clip nuts, 34
moving the rack rails and clip nuts, 33
overview, 13
positioning the Libraries in a rack, 31
powering off the Libraries, 31
powering on the extended library, 40
relocating tape drives, 35
removing a Library from a rack or tabletop
conversion cover, 32
removing and replacing drive bay covers, 36
removing the cartridges from the Libraries,
30
removing the USB device and Ethernet cable
from the lower Library, 37
saving the Library configuration, 29
upgrading the Library firmware, 29
verifying the installation, 42
J
Japanese notices, 77
P
partitioning, 13
parts
proper handling, 73
storing, 73
transporting, 73
power off, 16
power on, 15
power supply redundancy, 12
preventing electrostatic damage, 73
product information tab, 37
R
rack stability
warning, 14
regulatory compliance
Canadian notice, 76
European Union notice, 77
identification numbers, 75
Japanese notices, 77
Korean notices, 78
laser, 79
Taiwanese notices, 78
related documentation, 67
releasing the magazines manually, 64
removing a cartridge from the Extender, 60
removing the Library Extender, 56
repackaging the Extender, 61
replacing the Library Extender, 55
RMI
help, 15
K
Korean notices, 78
L
laser compliance notices, 79
library
configuring, 21
Library & Tape Tools, 48
library identity
viewing, 17
library status
viewing, 18
logical libraries, 13
lower Library, 11
M
mailslot configurations, 12
master Library, 11
94
S
service procedures
releasing the magazines manually, 64
removing a cartridge from the Extender, 60
removing the Extender, 56
repackaging the Extender, 61
replacing the Extender, 55
settings
default, 25
slot numbering, 12
specifications
environmental, 71
physical, 71
static-dissipating work mat, 73
static-safe containers
storing products, 73
transporting products, 73
status LEDs, 43
Page 95

straps, ground
boot, 73
heel, 73
toe, 73
Subscriber's Choice, HP, 67
supported configurations, 11
symbols in text, 68
T
Taiwanese notices, 78
tape drive numbering, 12
technical support
HP, 67
service locator website, 68
text symbols, 68
toe straps, using, 73
tools, conductive type, 73
troubleshooting, 43
troubleshootings
error codes, 48
U
updating firmware, 25
V
viewing
library identity, 17
library status, 18
W
warning
rack stability, 14
websites
customer self repair, 69
HP ,
HP Subscriber's Choice for Business, 67
product manuals, 68
work mat, static-dissipating, 73
wrist straps
specifications, 73
using, 73
HP StorageWorks MSL Library Extender user guide 95
Page 96

96
 Loading...