

HP StoreEver MSL2024, StoreEver MSL4048 Getting Started Manual

HPE StoreEver MSL2024 Tape Library
Getting Started Guide
Abstract
This guide provides information necessary to install the HPE StoreEver MSL2024 Tape
Library. This guide is intended for system administrators and other users who need physical
knowledge of the library.
*Q6Q62-00004*
Part Number: Q6Q62-00004
Published: December 2017
Edition: 7

©
Copyright 2006 - 2008, 2010, 2012, 2015, 2017 Hewlett Packard Enterprise Development LP
Notices
The information contained herein is subject to change without notice. The only warranties for Hewlett
Packard Enterprise products and services are set forth in the express warranty statements accompanying
such products and services. Nothing herein should be construed as constituting an additional warranty.
Hewlett Packard Enterprise shall not be liable for technical or editorial errors or omissions contained
herein.
Confidential computer software. Valid license from Hewlett Packard Enterprise required for possession,
use, or copying. Consistent with FAR 12.211 and 12.212, Commercial Computer Software, Computer
Software Documentation, and Technical Data for Commercial Items are licensed to the U.S. Government
under vendor's standard commercial license.
Links to third-party websites take you outside the Hewlett Packard Enterprise website. Hewlett Packard
Enterprise has no control over and is not responsible for information outside the Hewlett Packard
Enterprise website.
Acknowledgments
Intel®, Itanium®, Pentium®, Intel Inside®, and the Intel Inside logo are trademarks of Intel Corporation in
the United States and other countries.
Microsoft® and Windows® are either registered trademarks or trademarks of Microsoft Corporation in the
United States and/or other countries.
Adobe® and Acrobat® are trademarks of Adobe Systems Incorporated.
Java® and Oracle® are registered trademarks of Oracle and/or its affiliates.
UNIX® is a registered trademark of The Open Group.
Warranty information
To view the warranty for your product or to view the Safety and Compliance Information for Server,
Storage, Power, Networking, and Rack Products reference document, go to the Enterprise Safety and
Compliance website:
www.hpe.com/support/Safety-Compliance-EnterpriseProducts
Additional warranty information
HPE ProLiant and x86 Servers and Options
www.hpe.com/support/ProLiantServers-Warranties
HPE Enterprise Servers
www.hpe.com/support/EnterpriseServers-Warranties
HPE Storage Products
www.hpe.com/support/Storage-Warranties
HPE Networking Products
www.hpe.com/support/Networking-Warranties

Contents
Overview.................................................................................................. 4
Planning the installation.........................................................................9
Installing the library ............................................................................. 12
Front panel ...................................................................................................................................4
MSL2024 back panel.................................................................................................................... 4
Tape drive back panels................................................................................................................. 5
Library user interfaces ..................................................................................................................6
Location requirements.................................................................................................................. 9
FC connection information.......................................................................................................... 10
SAS connection information........................................................................................................10
Preparing the host.......................................................................................................................12
Unpacking the shipping container...............................................................................................13
Removing the shipping lock ....................................................................................................... 13
Installing the library in a rack ..................................................................................................... 14
Installing tape drives................................................................................................................... 15
Connecting the FC cable............................................................................................................ 16
Connecting the SAS cable.......................................................................................................... 16
Powering on the library .............................................................................................................. 17
Configuring the library network .................................................................................................. 18
Setting the date and time............................................................................................................ 19
Setting the administrator password.............................................................................................20
Configuring the FC interface....................................................................................................... 20
Labeling the tape cartridges........................................................................................................20
Loading the tape cartridges........................................................................................................ 21
Verifying the connection..............................................................................................................22
Verifying the installation.............................................................................................................. 22
Configuring additional features................................................................................................... 23
Supported media...................................................................................25
Related information.............................................................................. 26
Product documentation............................................................................................................... 26
Websites..................................................................................................................................... 26
OCP menu..............................................................................................27
Contents 3
Overview
The tape library provides a compact, high-capacity, low-cost solution for simple, unattended data backup.
This unique design houses up to 12 tape cartridges for each U of height, with easy access to tape
cartridges through removable magazines and a mailslot. Each magazine can hold up to 12 tape
cartridges. The library is customer expandable with exchangeable LTO Ultrium full-height and half height
tape drives.
http://www.hpe.com/storage/tape
The library is compatible with most operating systems. However, it requires either direct support from the
operating system or a compatible backup application to take advantage of its many features.
To verify compatibility, see the HPE Data Availability, Protection, and Retention Compatibility Matrix at:
http://hpe.com/storage/DAPRcompatibility
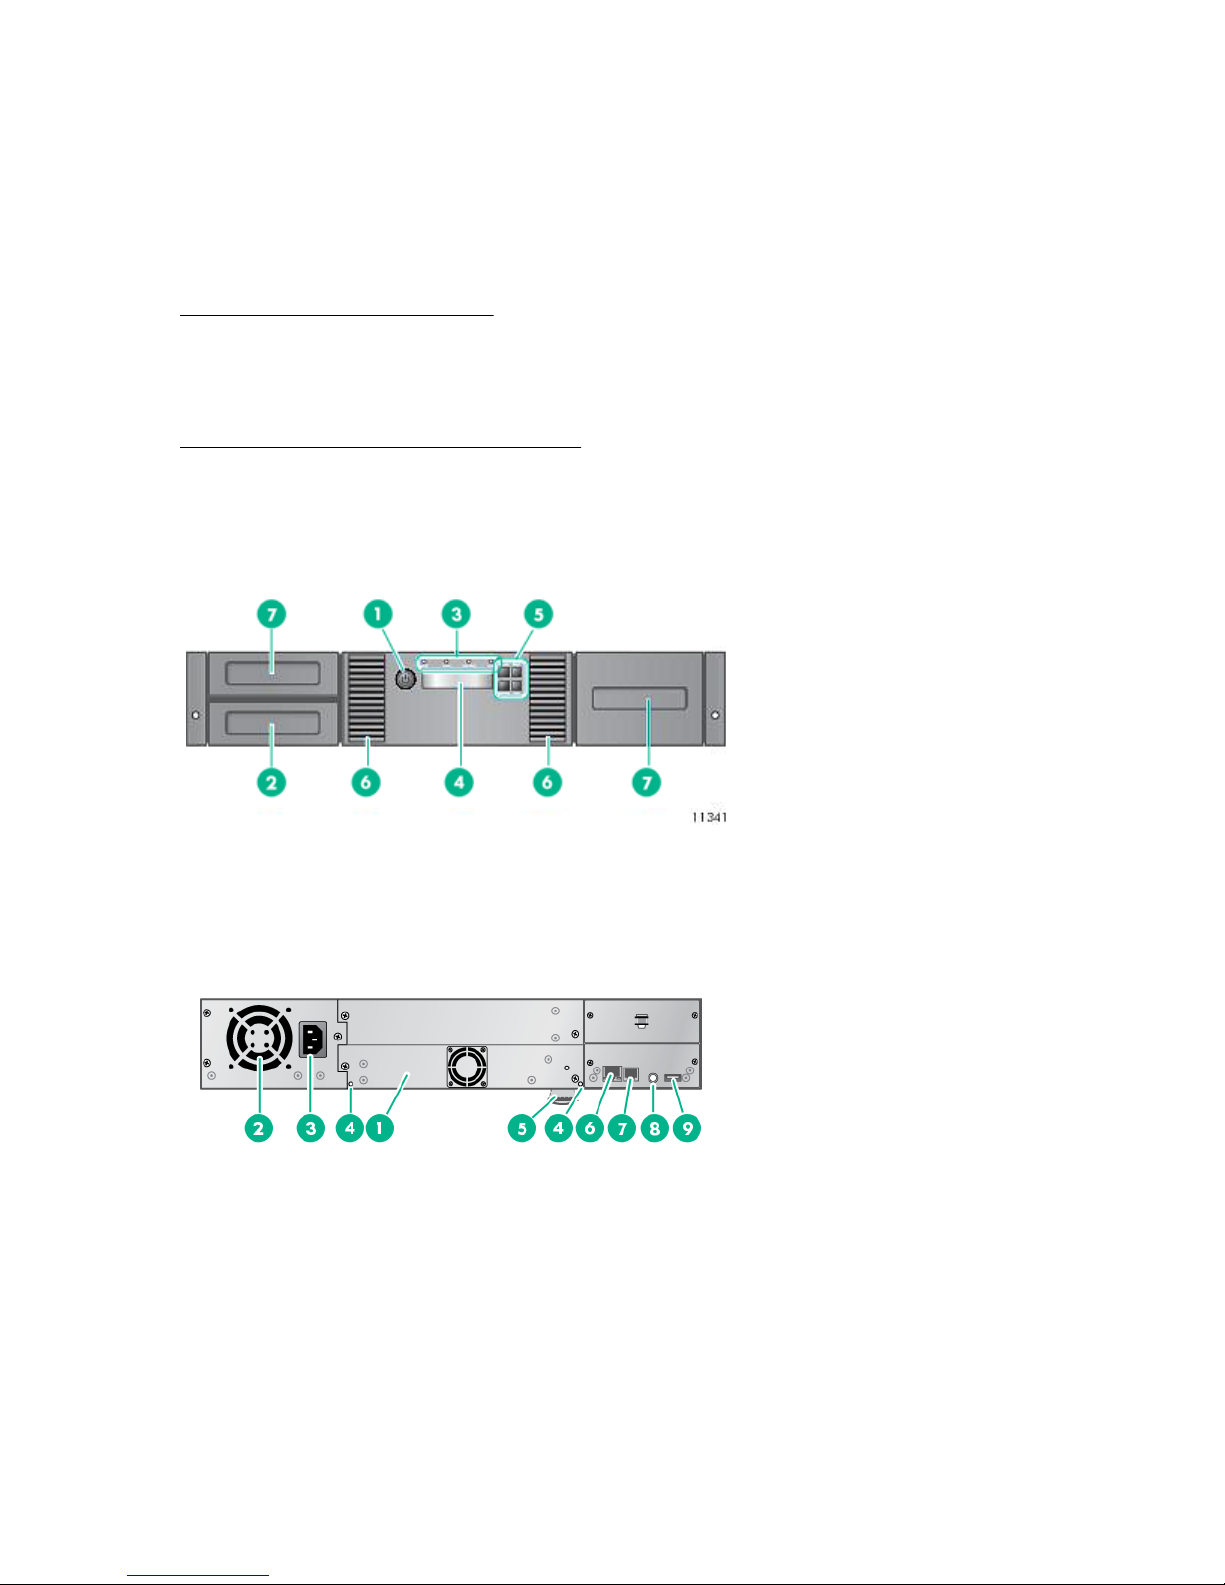
Front panel
The front panel provides access to the power button, operator control panel, left and right magazines,
LEDs, and the mailslot.
1. Power button
2. Mailslot
MSL2024 back panel
1. Tape drive assembly 2. Fan
3. Power connector 4. Magazine release hole
3. LEDs
4. LCD screen
5. Control keys
6. Air vents
7. Magazine
5. Pull-out tab containing the serial number and
other product information
4 Overview
6. Ethernet port
Table Continued
7. Serial port (Factory use only) 8. Controller health status indicator
1 2 3 4
1 2 3 4
9. USB port
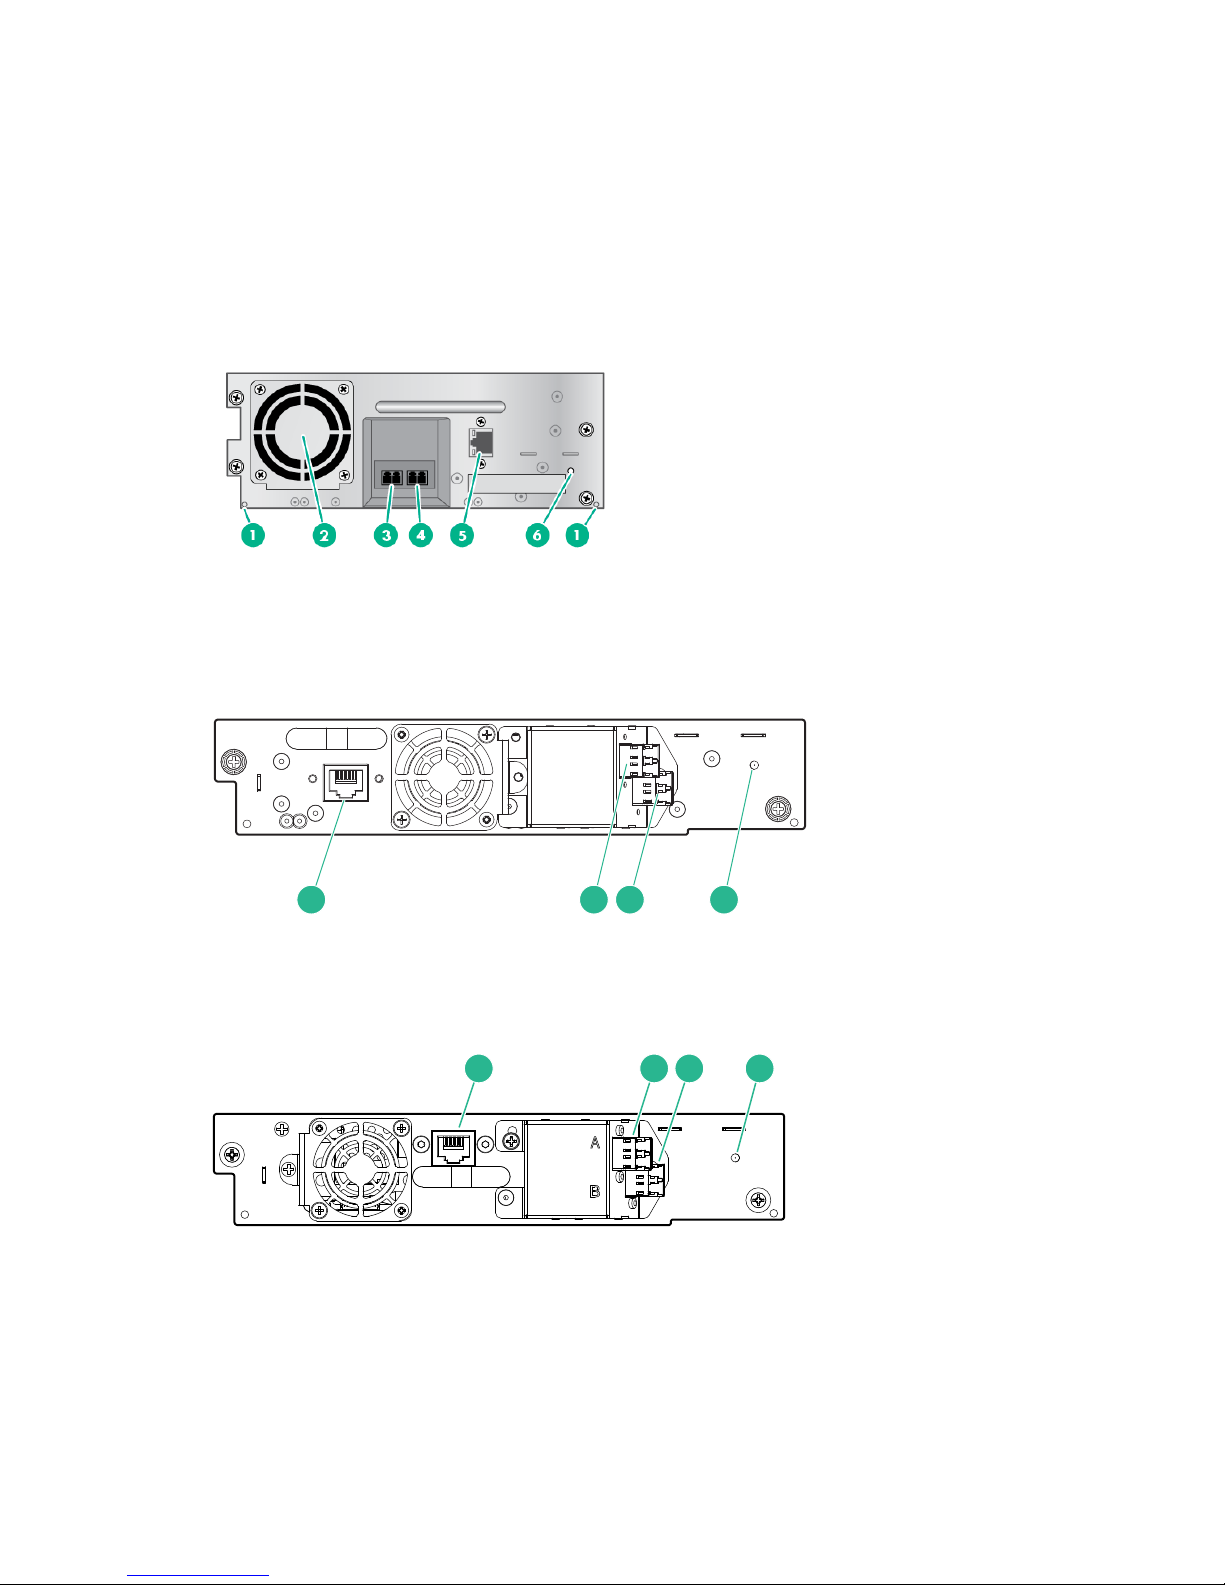
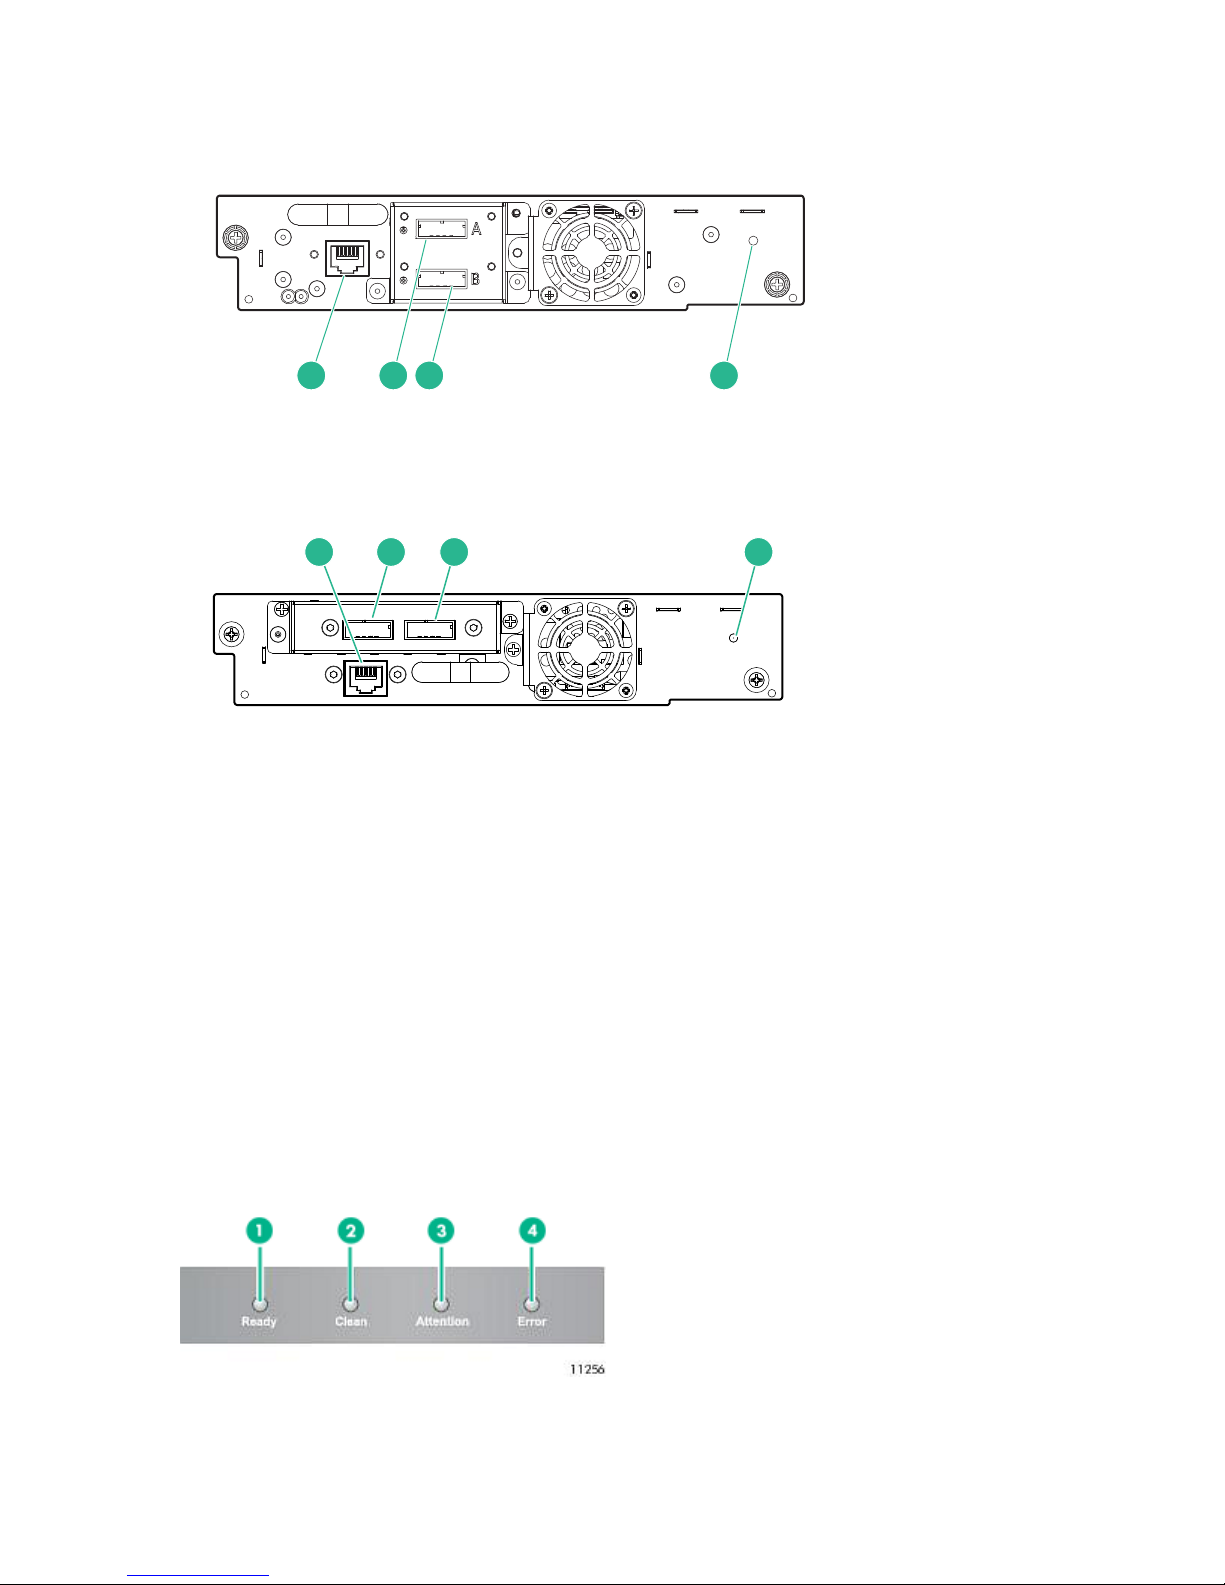
Tape drive back panels
Fibre Channel
Table 1: LTO-4 and LTO-5 full-height FC tape drive back panels
Table 2: LTO-5 half-height and LTO-6 FC tape drive back panels
1. Magazine release hole
2. Fan
3. FC port A
4. FC port B (when present)
5. Tape drive Ethernet port (when present)
6. Tape drive power indicator
Table 3: LTO-7 and LTO-8 FC tape drive back panels
1. Tape drive Ethernet port
2. FC port A
3. FC port B (LTO-6)
4. Tape drive power LED,
green
1. Tape drive Ethernet port
2. FC port A
3. FC port B
4. Tape drive power LED,
green
Tape drive back panels 5
SAS
1 2 3 4
1 2 3 4
Table 4: LTO-4, LTO-5, and LTO-6 SAS tape drive back panels
1. Tape drive Ethernet port
2. SAS port A
3. SAS port B (LTO-6)
4. Tape drive power LED,
green
Table 5: LTO-7 and LTO-8 SAS tape drive back panels
1. Tape drive Ethernet port
2. SAS port A
3. SAS port B
4. Tape drive power LED,
green
Library user interfaces
The library has two user interfaces:
• Operator control panel (OCP). From the OCP you can operate the library from the front panel.
• Remote management interface (RMI). From the RMI you can monitor and control the library from a
web browser. You can access most library functions from the RMI.
The OCP
The OCP has a power button, four LEDs, four control keys, and a 2-line by 16-character LCD screen.
With the OCP, you can monitor, configure, and operate most library functions from the front panel.
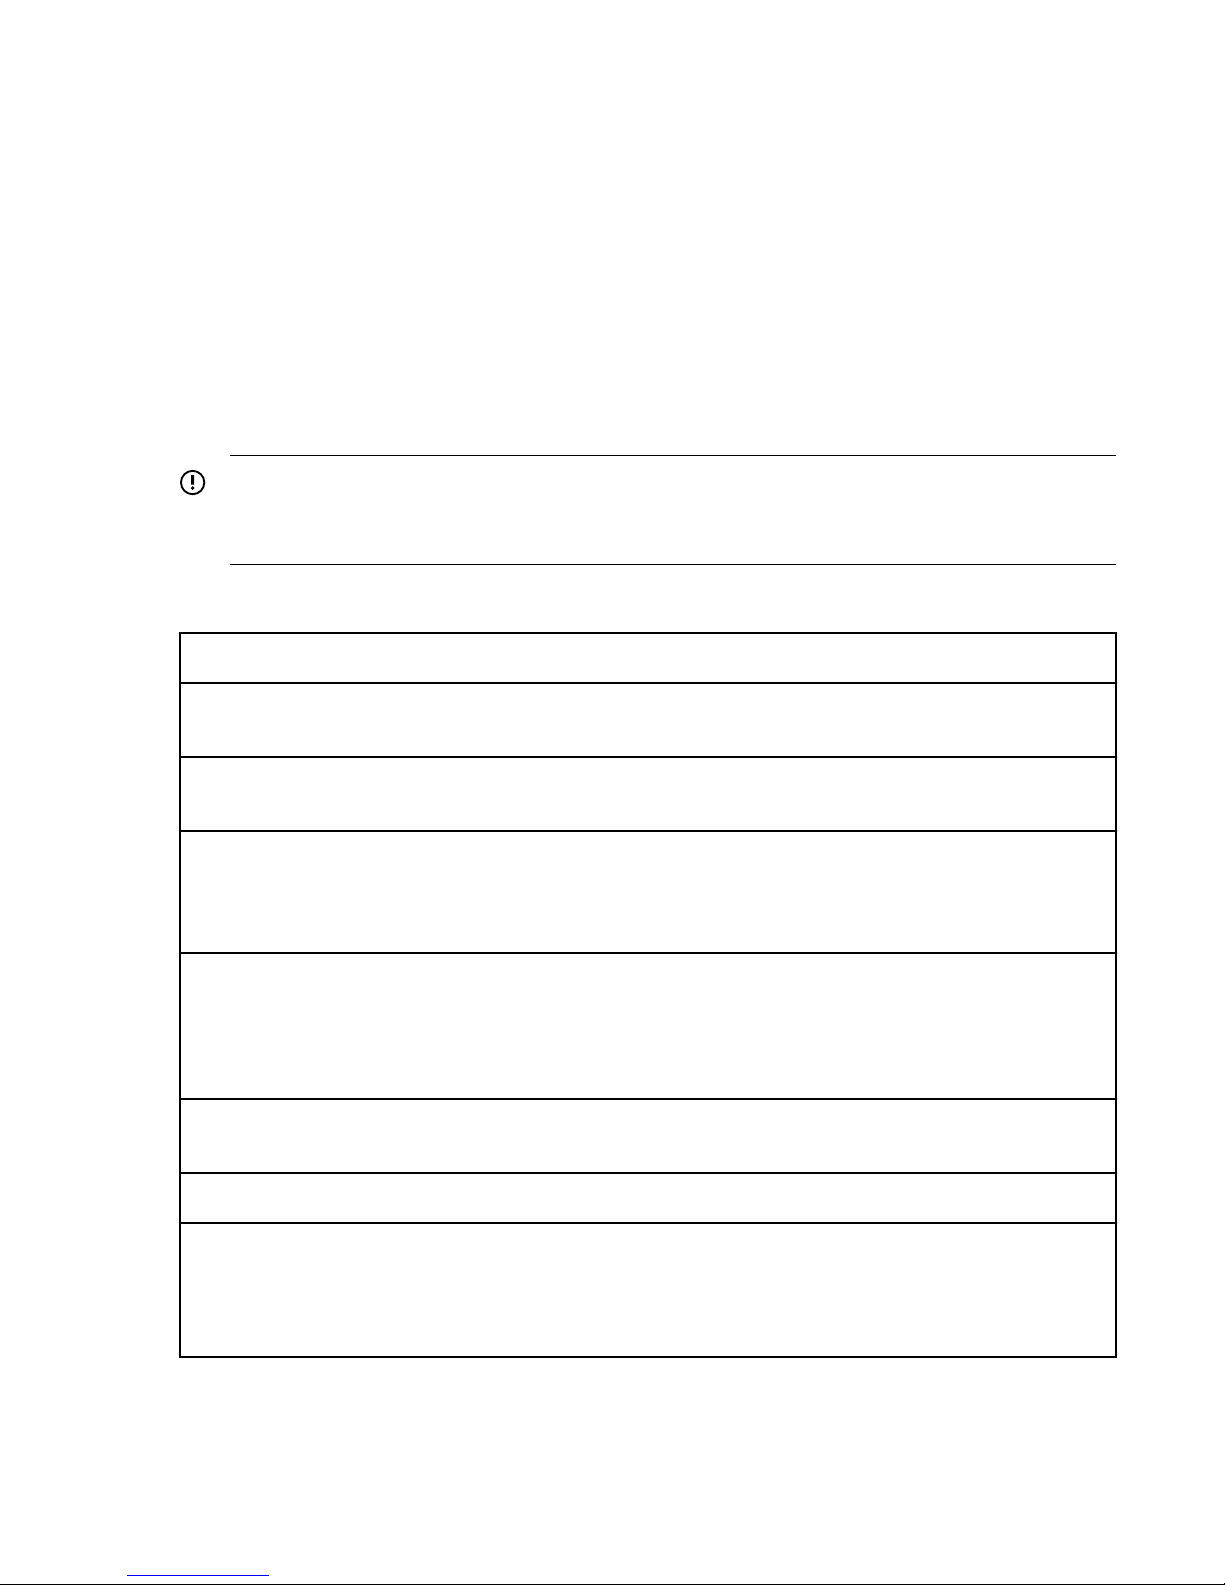
OCP LED indicators
The OCP has four LEDs that provide information.
6 Library user interfaces

Ready
1
Clean
2
Attention
3
Error
4
OCP control keys
Green, steady when power is on, blinking with tape drive or library robotics activity.
Amber when a tape drive cleaning operation is recommended.
Amber if the library has detected a condition that user attention is necessary, but that
the library can still perform most operations.
Amber if an unrecoverable tape drive or library error occurs. A corresponding error
message displays on the LCD screen. User intervention is required; the library is not
capable of performing some operations.
The RMI
With the RMI, you can monitor, configure, and operate most library functions from a web browser.
When possible, use the RMI as the primary library interface because it provides access to additional
features, includes online help, and is easier to use. However, the RMI is not required to use the library,
except to configure advanced features, such as SNMP, IPv6, encryption, LTFS, HPE TapeAssure, logical
libraries, and path failover.
The only tasks you cannot do from the RMI are:
• Open the mailslots.
• Initiate the Wellness test.
• Use a USB flash drive to save configuration files and support tickets, and download firmware.
Cancel
Enter
Previous
Next
Cancels the current menu option, returns to the previous menu level,
or returns to the Home screen.
Initiates the current menu or selects the current option displayed on
the LCD screen.
Selects the previous item or value in the currently displayed menu.
Selects the next item or value in the currently displayed menu.
To enable the library RMI, follow the instructions in this document to:
• Connect the library to the local area network with an Ethernet cable.
• Configure the library addressing.
• If you intend to use the administrative functions of the RMI, set the administrator password using the
OCP.
NOTE:
The library is shipped without an administrator password. The administrator password must be set
from the OCP before you can use the RMI administrator functions. Once the administrator password
is set, you can access the RMI by providing the administrator password on the login screen.
The RMI 7

Logging in
Using the OCP, find the library IP address from the Info > Network screen. Open any HTML web browser
and enter the library IP address. Select the account type. For the administrator account, you must also
enter the administrator password. Click Sign In.
Once signed in, click Help in the upper right-hand corner for more information about the fields and
information in the RMI.
Status icons
The green check mark Status OK icon indicates that the library is fully operational and that
no user interaction is required.
The blue exclamation point Status Warning icon indicates that user attention is necessary,
but that the library can still perform most operations.
The red X Status Error icon indicates that user intervention is required and that the library is
not capable of performing some operations.
8 Overview
Planning the installation
Procedure
1. Choose a location for the library.
2. Plan the SAS or Fibre Channel configuration and obtain the necessary cables.
Location requirements
Select an open rack location with access to the host server and a power outlet. If possible, install the
library in the middle or higher part of the rack to avoid dust from the floor and to allow easy access to the
mailslot and magazines.
IMPORTANT:
The library must be mounted on the enclosed rack rails. Placing the library on a surface, such as a
table top or rack shelf, could result in library errors.
Table 6: Location criteria
Criteria Definition
Rack requirements HPE G2 Enterprise Series, Enterprise Series, G2 Advanced Series, Advanced
Series, Standard Series and other HPE square-hole or round-hole racks
Rack space
requirements
Room temperature 10-35º C (50-95º F) ) for the tape library. Some tape drives have a more limited
Power source AC power voltage: 100-127 VAC; 200-240 VAC
Weight without
media
Weight with media MSL2024: 18.4 kg (40.5 lb) - 20.4 kg (44.9 lb)
Air quality Place the library in an area with minimal sources of particulate contamination.
MSL2024: 2U
temperature range when operating at high altitudes. Verify the tape drive
operating requirements before installing a tape drive in a high altitude
environment
Line frequency: 50-60 Hz
Place the library near an AC outlet. The AC power cord is the main AC disconnect
device for the library and must be easily accessible at all times.
MSL2024: 13.6 kg (29.9 lb) - 15.6 kg (34.3 lb)
Avoid areas near frequently used doors and walkways, stacks of supplies that
collect dust, printers, and smoke-filled rooms.
Excessive dust and debris can damage tapes and tape drives.
Table Continued
Planning the installation 9
 Loading...