

Page 1

HPE StoreEver LTO-8 Ultrium 30750 SAS Tape Drive User Guide
Abstract
This document provides information about installing, operating, and troubleshooting an HPE
StoreEver LTO-8 Ultrium 30750 Tape Drive. This guide is intended for system administrators
and other users who need physical and functional knowledge of the tape drive. Installing an
internal tape drive requires experience with installing server components.
Part Number: BC023-60004a
Published: February 2018
Edition: 2
Page 2

©
Copyright 2018 Hewlett Packard Enterprise Development LP
Notices
The information contained herein is subject to change without notice. The only warranties for Hewlett
Packard Enterprise products and services are set forth in the express warranty statements accompanying
such products and services. Nothing herein should be construed as constituting an additional warranty.
Hewlett Packard Enterprise shall not be liable for technical or editorial errors or omissions contained
herein.
Confidential computer software. Valid license from Hewlett Packard Enterprise required for possession,
use, or copying. Consistent with FAR 12.211 and 12.212, Commercial Computer Software, Computer
Software Documentation, and Technical Data for Commercial Items are licensed to the U.S. Government
under vendor's standard commercial license.
Links to third-party websites take you outside the Hewlett Packard Enterprise website. Hewlett Packard
Enterprise has no control over and is not responsible for information outside the Hewlett Packard
Enterprise website.
Acknowledgments
Intel®, Itanium®, Pentium®, Intel Inside®, and the Intel Inside logo are trademarks of Intel Corporation in
the United States and other countries.
Microsoft® and Windows® are either registered trademarks or trademarks of Microsoft Corporation in the
United States and/or other countries.
Adobe® and Acrobat® are trademarks of Adobe Systems Incorporated.
Java® and Oracle® are registered trademarks of Oracle and/or its affiliates.
UNIX® is a registered trademark of The Open Group.
Page 3

Contents
Overview.................................................................................................. 5
Installing drivers and backup software.................................................9
Installation requirements...............................................................................................................5
Rackmount drives...............................................................................................................5
Server requirements......................................................................................................................5
Cable requirements.......................................................................................................................5
About using hardware encryption................................................................................................. 7
When to use encryption..................................................................................................... 7
About managing encryption keys....................................................................................... 7
About enabling encryption..................................................................................................8
Diagnostic, management, and support tools.................................................................................8
Tape drivers...................................................................................................................................9
For Windows...................................................................................................................... 9
For Linux and UNIX............................................................................................................9
For IA64..............................................................................................................................9
Backup software requirements..................................................................................................... 9
Installing an internal tape drive........................................................... 10
Verifying the server SAS connector type.................................................................................... 10
Installing the tape drive............................................................................................................... 10
Connecting the cable ..................................................................................................................11
Securing the drive....................................................................................................................... 12
Installing an external tape drive.......................................................... 13
Connecting to an external SAS port............................................................................................13
Verifying the installation.......................................................................15
Powering on the drive and the server ........................................................................................ 15
Completing the installation..........................................................................................................15
Operating the tape drive.......................................................................17
Front panel overview...................................................................................................................17
Understanding the LEDs.................................................................................................. 17
Data and cleaning cartridges...................................................................................................... 18
Loading a cartridge..................................................................................................................... 21
Unloading a cartridge..................................................................................................................21
Cleaning the tape drive............................................................................................................... 21
Troubleshooting.................................................................................... 23
General troubleshooting procedure............................................................................................ 23
LED sequences...........................................................................................................................24
Problems with cartridges.............................................................................................................28
Contents 3
Page 4

The cartridge is jammed...................................................................................................28
The drive will not accept the cartridge (or ejects it immediately)......................................30
Methods for troubleshooting encryption......................................................................................30
Replacing a tape drive.......................................................................... 31
Disconnecting the tape drive.......................................................................................................31
Replacing an existing SAS hard drive cable...................................... 32
Support and other resources...............................................................35
Accessing Hewlett Packard Enterprise Support......................................................................... 35
Accessing updates......................................................................................................................35
Customer self repair....................................................................................................................36
Remote support.......................................................................................................................... 36
Warranty information...................................................................................................................36
Regulatory information................................................................................................................37
Documentation feedback............................................................................................................ 37
Warranty and regulatory information..................................................38
4 Contents
Page 5

Overview
Installation requirements
The server must have a SAS Smart Array controller or SAS HBA that supports tape devices.
NOTE:
All non Hewlett Packard Enterprise servers require an additional HBA.
Hewlett Packard Enterprise recommends purchasing and installing one of the supported HBAs to connect
the tape drive to the server. For compatibility information, see the HPE Data Availability, Protection, and
Retention Compatibility Matrix at: http://hpe.com/storage/DAPRcompatibility.
Rackmount drives
Specific installation instructions for rackmount drives are not included in this guide. For information, see
the rackmount enclosure website:
http://www.hpe.com/storage/rackmount.
Server requirements
Internal tape drives
The tape drive is installed into a spare drive bay in the server and is attached to the host server’s internal
SAS controller or HBA.
The server will need one industry-standard 5¼-inch, half-height bay for the tape drive. Different server
models have different mounting methods. For server-specific information, see the server documentation.
For general installation instructions, see Installing an internal tape drive on page 10.
The tape drive connects to a SAS Smart Array controller or SAS HBA that supports tape devices.
• If the host does NOT have a spare SAS port, install a new SAS HBA and any required HBA drivers.
• If the server does not have a PCI slot available for a new HBA, see Replacing an existing SAS hard
drive cable on page 32 for additional options.
External tape drives
External tape drives connect to a SAS Smart Array controller or SAS HBA that supports tape devices and
has an external SAS connector. If the server does not have an active external SAS port, install an
additional HBA with an external SAS connector.
For current information about supported SAS HBAs, see the HPE Data Availability, Protection, and
Retention Compatibility Matrix at: http://hpe.com/storage/DAPRcompatibility
Cable requirements
Internal tape drives
The cable supplied with the tape drive is suitable for connecting to a mini-SAS (SFF-8086/8087)
connector on a dedicated HBA or on the server's SAS controller. If your server has a SAS 4i connector
(SFF-8484), a suitable cable is available, and must be purchased separately.
Overview 5
Page 6
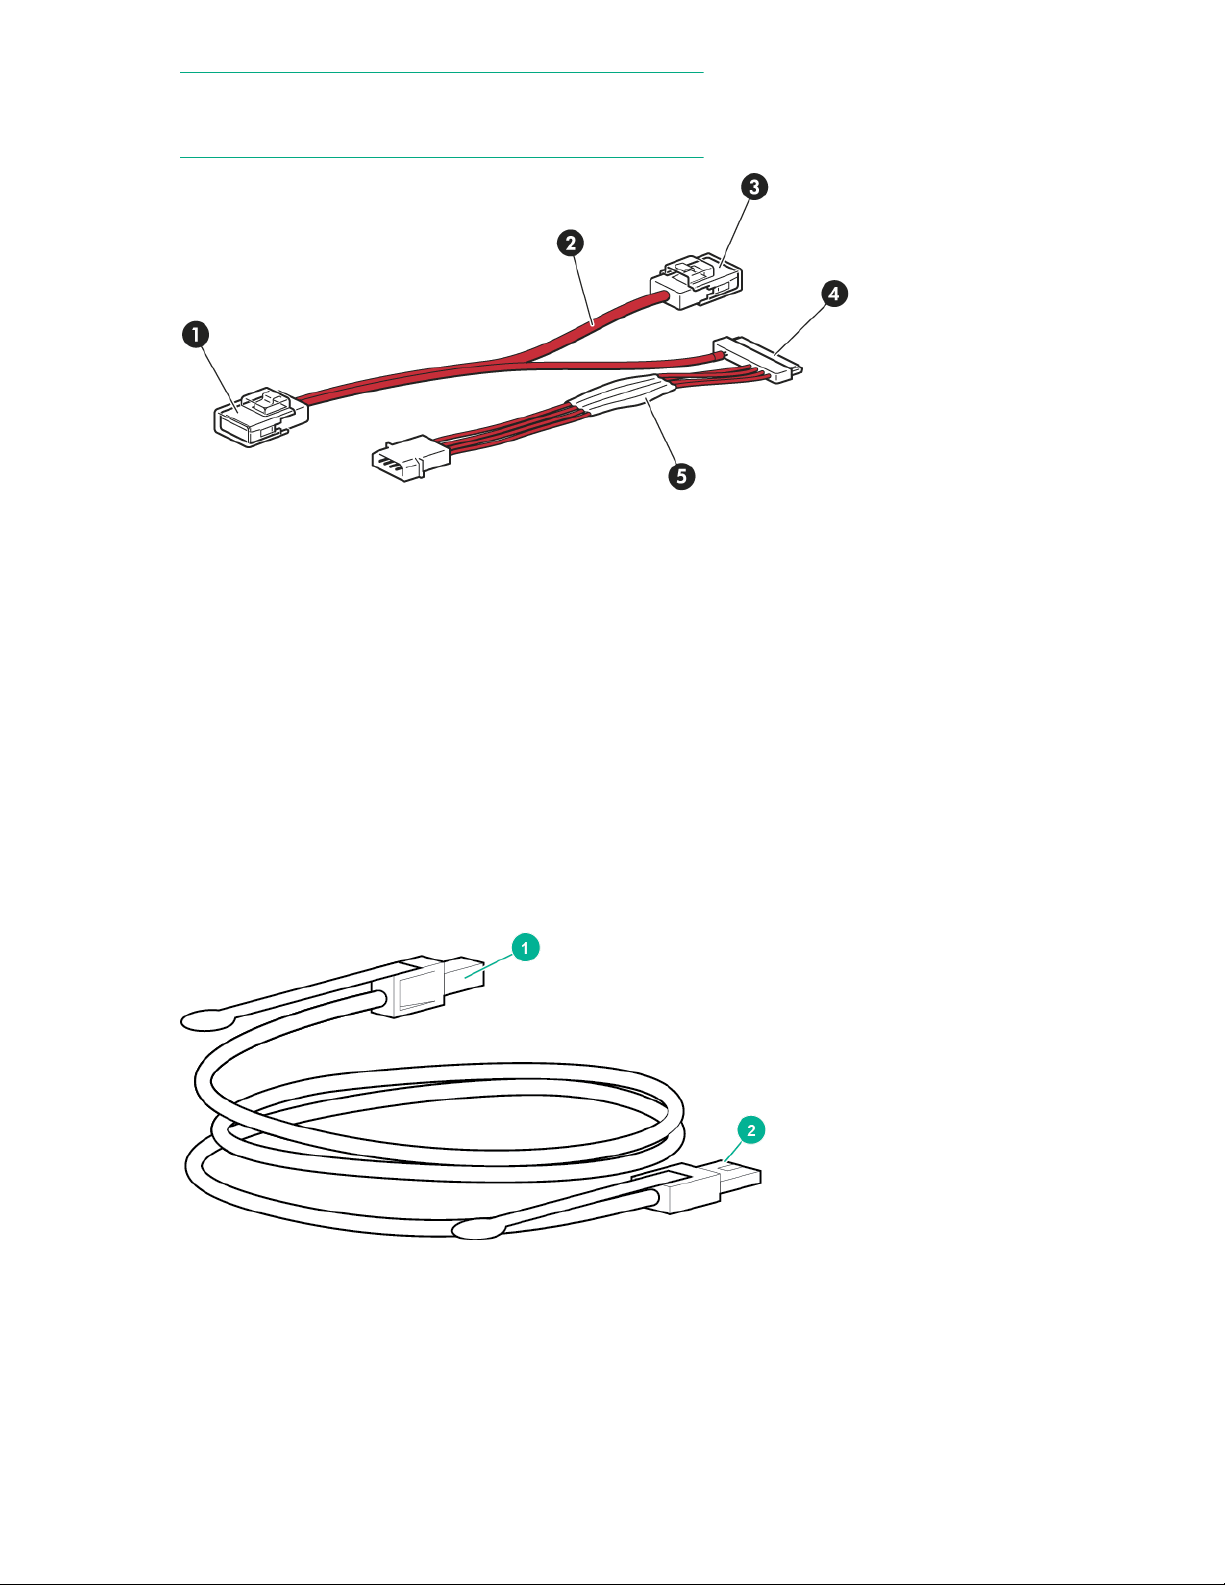
NOTE:
Power for the tape drive is supplied through the SAS cable.
Figure 1: SAS cable supplied with the internal tape drive
1. Mini SAS connector to server (remove cover) 2. Unused second branch on supplied cable
3. Mini SAS connector on second branch (unused,
do not remove cover)
5. Power cable and connector to server's power
supply
External tape drives
External tape drives must be connected to an external port. The cable supplied with the tape drive is
suitable for connecting to an External Mini SAS High Density (SFF-8644) port on a dedicated HBA
(recommended) or the host SAS Smart Array controller. If your server has an external mini SAS
(SFF-8088) or Infiniband (SFF-8470) connector, a suitable cable is available, and must be purchased
separately.
4. SAS connector to tape drive
Figure 2: SAS cable supplied with the external tape drive
1. High-Density Mini SAS connector for the server
2. Mini SAS connector for the tape drive
6 Overview
Page 7

If the server has a different type of SAS port, either purchase the appropriate cable, or purchase and
install a recommended HBA and associated drivers before installing the tape drive. For current
information about supported cables and HBAs, see the HPE Data Availability, Protection, and Retention
Compatibility Matrix at: http://hpe.com/storage/DAPRcompatibility.
About using hardware encryption
Encryption protects data from unauthorized access and use by changing it into a form that cannot be read
until it is deciphered with the encryption key.
LTO-4 and later generation tape drives include hardware capable of encrypting data while writing, and
decrypting data when reading. Hardware encryption can be used with or without compression while
maintaining the full speed and capacity of the tape drive and media.
LTO tape drives use the 256-bit version of the industry-standard AES encryption algorithm to protect data.
IMPORTANT:
Hardware encryption is a powerful feature and must be used with care. If you need to import media
onto another machine or to recover after disaster, you will be required to enter the encryption key
used to write the tape. A lost encryption key cannot be recovered by you or a service engineer.
Without the key, an encrypted tape is unreadable.
To use hardware encryption, you need:
• A backup application that supports hardware encryption.
• LTO-7 or LTO-8 media.
For additional cartridge compatibility information, see Data and cleaning cartridges on page 18.
When to use encryption
Your company policy determines when you need to use encryption. For example, encryption might be
mandatory for company confidential and financial data, but not for personal files. Company policy will also
define how encryption keys will be generated and managed. Backup applications that support encryption
generate a key for you or allow you to enter a key manually.
NOTE:
Encryption with keys that are generated directly from passwords or passphrases might be less secure
than encryption using truly random keys. The backup application will explain the available options and
methods. For more information, see the application user documentation.
About managing encryption keys
Encryption is primarily designed to protect the media content once the media is offline and to prevent it
from being accessed from another machine. If the encryption keys are managed by an application,
typically the application loads the necessary encryption key automatically when it is needed for reading or
writing, provided that the application is the one that was used to encrypt the data.
There are two main instances when you will need to know the key:
• If you try to import the media to another system, such as another instance of the backup application or
a different backup application
• If you are recovering your system after a disaster
About using hardware encryption 7
Page 8

If you are unable to supply the key when requested to do so, you or a support engineer will not be able to
access the encrypted data.
It guarantees the security of the data, but also means that you must manage the encryption keys
carefully.
WARNING:
Keep a record or backup of the encryption keys and store it in a secure place separate from the
computer running the backup software.
About enabling encryption
If you wish to use the encryption capability, you must enable this feature through the backup software
application. See the application documentation for information and instructions on enabling encryption.
For a list of applications that support hardware encryption, see the HPE Data Availability, Protection, and
Retention Compatibility Matrix at: http://hpe.com/storage/DAPRcompatibility.
Diagnostic, management, and support tools
The following utilities are available from Hewlett Packard Enterprise, free of charge, and are highly
recommended:
• HPE Library & Tape Tools (L&TT) is the recommended diagnostic and support tool for Hewlett Packard
Enterprise tape drives. You can use L&TT to confirm proper installation, test performance, and retrieve
information for troubleshooting and support. L&TT is available free at:
tapetools
http://www.hpe.com/support/
• HPE Tape Smart Components provide easy-to-use driver and firmware updates.
◦ HPE Storage Tape Drivers (Windows)
◦ HPE Storage Tape Firmware (Windows)
◦ HPE Storage Tape Firmware (Linux)
These components are available for download without cost at: http://www.hpe.com/storage/
buracompatibility
8 About enabling encryption
Page 9

Installing drivers and backup software
Tape drivers
For Windows
Hewlett Packard Enterprise recommends installing the drivers on the server before connecting the tape
drive. The driver available from Microsoft Update is acceptable. However, the HPE Tape driver provides
better support for all the features of your new tape drive.
NOTE:
The HPE Tape driver is suitable for use in most applications. To ensure that you are using the
recommended driver, refer also to the documentation of your software application.
Use the HPE Tape driver with the Windows operating systems unless the software application requires a
different driver.
For driver, firmware, and software updates, see Drivers & Downloads on the Hewlett Packard Enterprise
Support website:
http://www.hpe.com/support/storage
For Linux and UNIX
The recommended backup applications use the OS standard, built-in device drivers. To upgrade drivers,
patch the operating system to the latest version or configure device files, as described in the HPE
StoreEver LTO-8 UNIX, Linux, and OpenVMS Configuration Guide at: http://www.hpe.com/info/
enterprise/docs
For IA64
For the latest information on backup application upgrades and drivers for IA64 system, such as an HPE
Integrity server, see the HPE Data Availability, Protection, and Retention Compatibility Matrix at: http://
hpe.com/storage/DAPRcompatibility
Backup software requirements
Verify that you have a backup application that supports the HPE LTO-8 Ultrium 30750 tape drive.
Download and install any upgrades or patches if required.
For optimum performance, use a backup application that is appropriate for your system configuration. In a
direct attach configuration, where the tape drive is attached to a standalone server, use backup software
that is designed for a single-server environment. In network configurations, you will need backup software
that supports enterprise environments. Hewlett Packard Enterprise, Veritas, EMC, Yosemite, and
Computer Associates all provide suitable products. Further details about these and other products that
may be appropriate can be found on the HPE Data Availability, Protection, and Retention Compatibility
Matrix at: http://hpe.com/storage/DAPRcompatibility
Installing drivers and backup software 9
Page 10
Installing an internal tape drive
2
2
2
2
1
1
Verifying the server SAS connector type
The cable supplied with the product connects to a Mini SAS (SFF-8087) connector on a dedicated HBA or
host SAS controller. This is a split cable, but the second branch is not normally required. Do not remove
the plastic cover on the spare connector.
NOTE:
To connect the tape drive to a SAS 4i (SFF-8484) or other type of SAS port, you must supply the
appropriate cable.
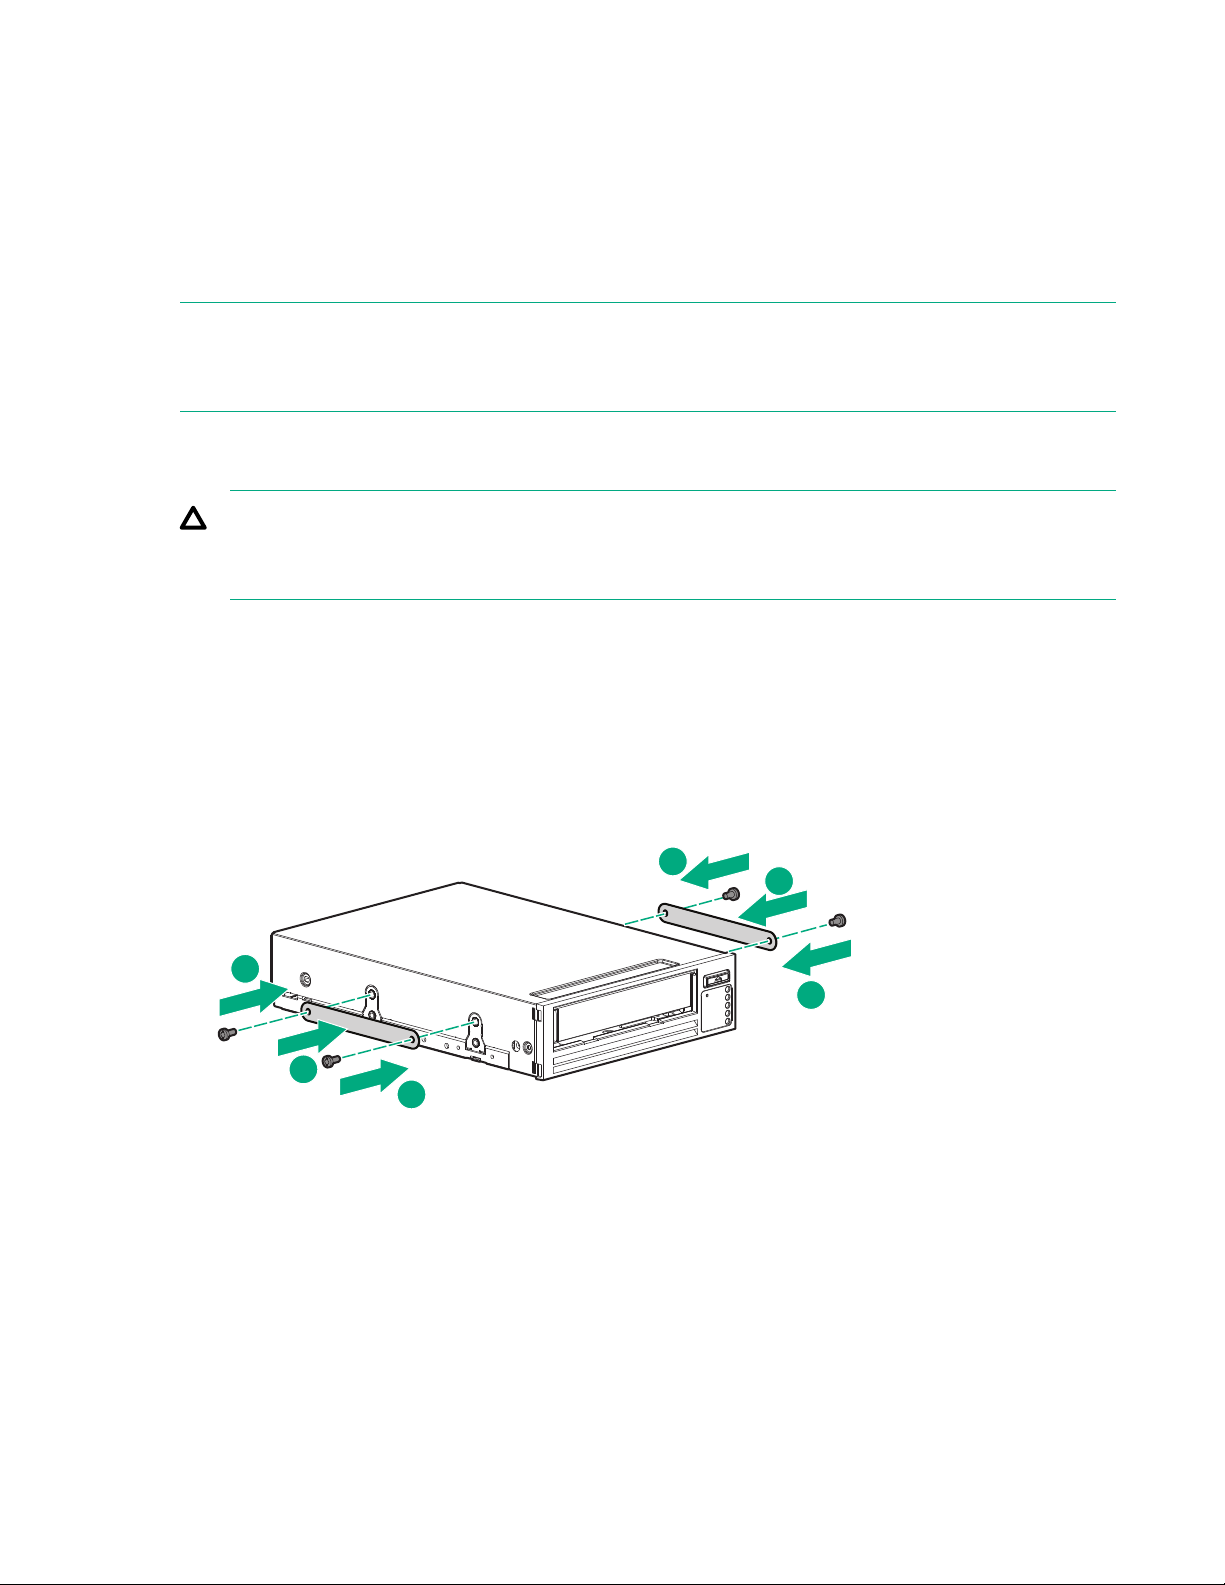
Installing the tape drive
CAUTION:
The tape drive is installed in one industry-standard, 5¼-inch half-height bay. For specific information
about mounting methods and requirements, see the server documentation.
Attach the alignment screws or mounting hardware
Procedure
1. If the server or enclosure requires alignment screws, special rails, or other hardware, attach them to
the tape drive with the screws supplied with the tape drive. See the instructions with the screw kit for
required washers or shims.
Example: Attaching a metal shim and alignment screws
10 Installing an internal tape drive
Page 11
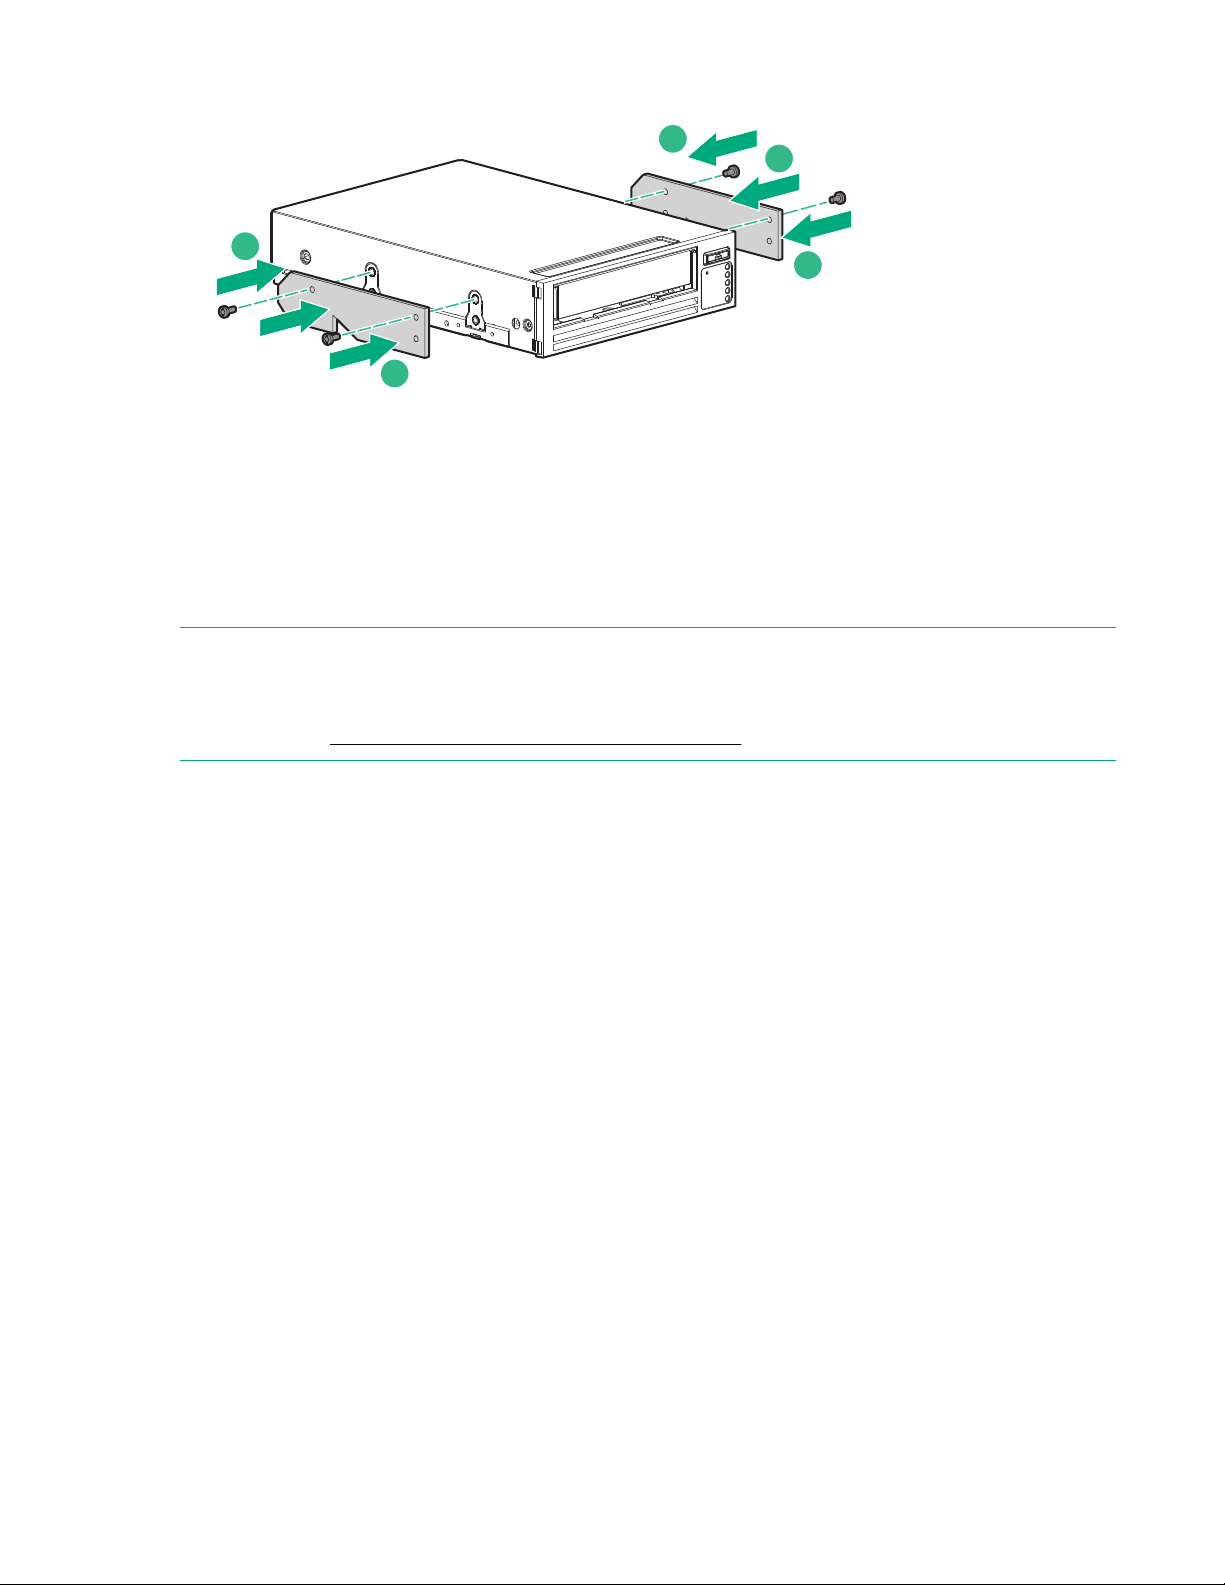
Example: Attaching server rails
2
2
2
2
1
1
2. If the server or enclosure rails are less than 1.5 mm thick, use the washers from the GENERAL
MOUNTING SCREWS screw pack for a proper fit.
Connecting the cable
If you are installing the tape drive in an enclosure using the cable that came with the enclosure, skip this
section. Follow the instructions included with the enclosure to cable the drive.
NOTE:
If both ports on the host controller are in use, in some server models you can replace one of the existing
cables with the supplied SAS cable. (This option is not recommended; use this option with care.) For
instructions, see Replacing an existing SAS hard drive cable on page 32.
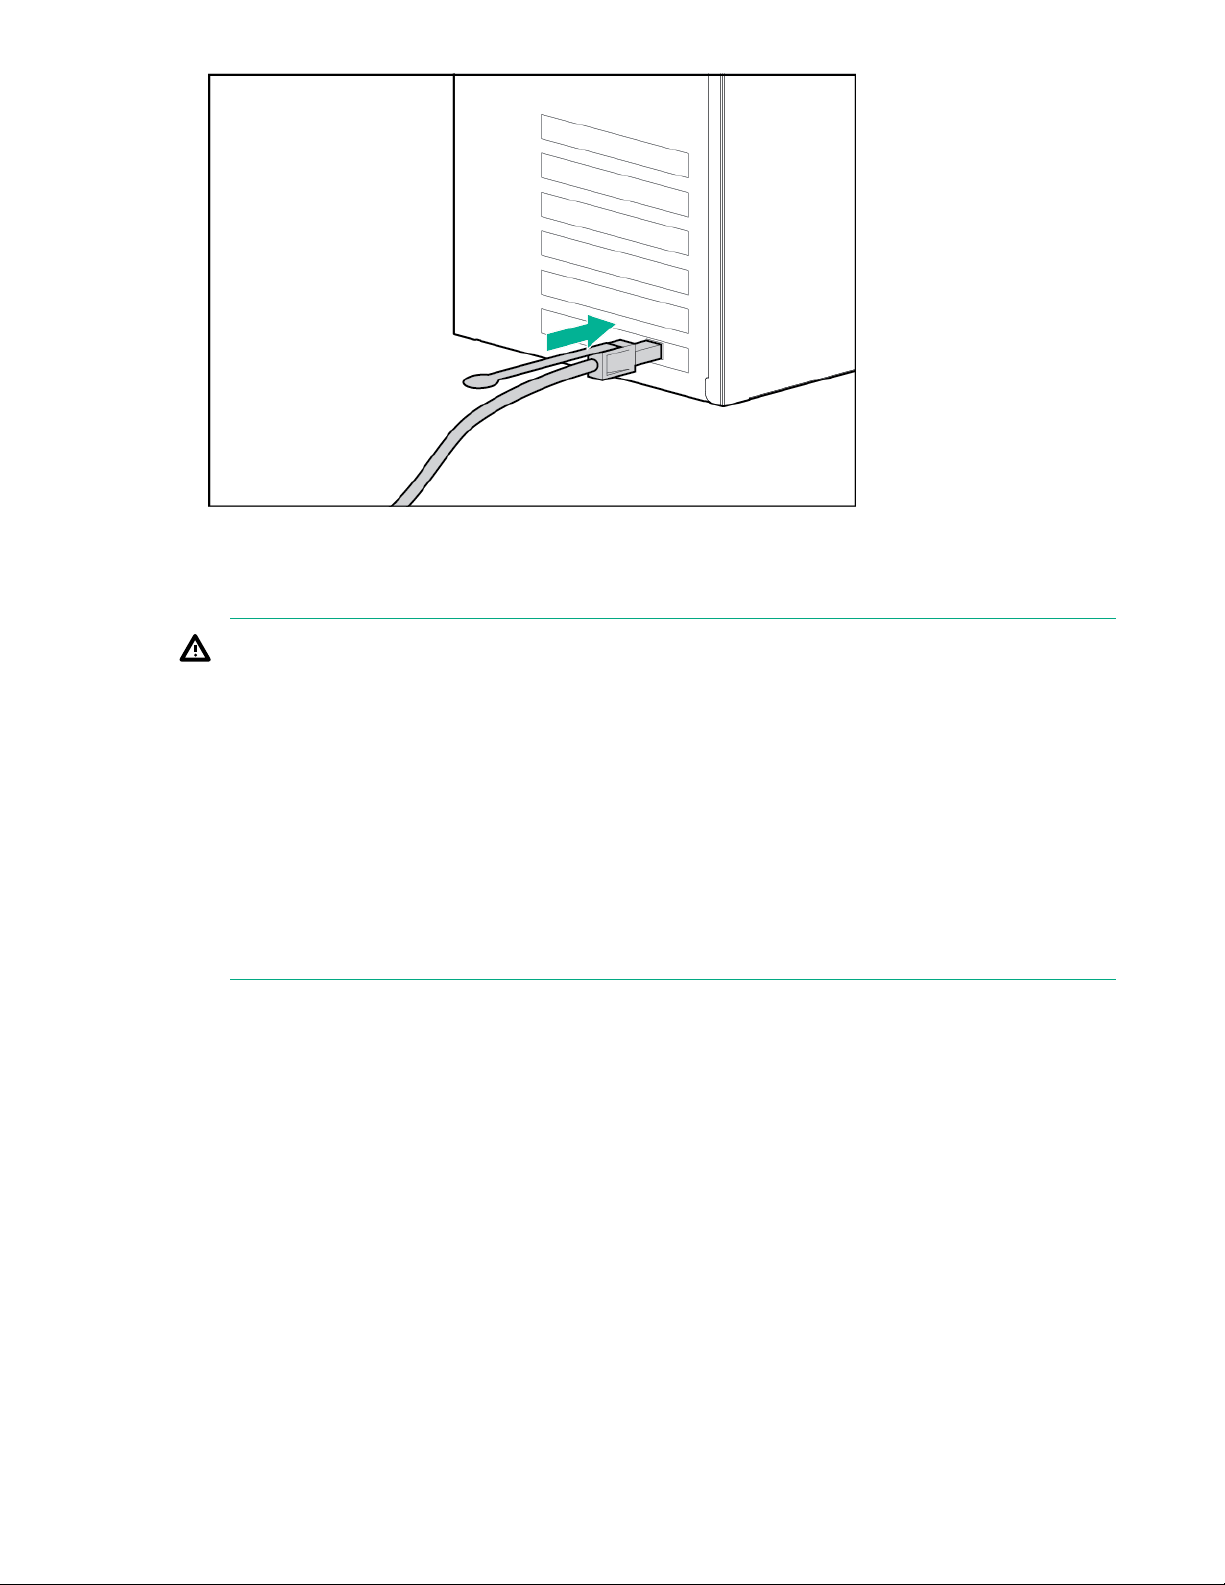
Procedure
1. Connect the combined SAS and power connector to the tape drive port.
2. Connect the SAS connector without the cover to the host port, which could be on an HBA or on the
controller board.
Leave the cover on the unused SAS connector.
3. Plug the power connector into the power supply cabling.
Connecting the cable 11
Page 12
Securing the drive
Procedure
1. Slide the tape drive fully into the drive bay.
2. If the drive is secured with clips, verify that they are engaged and that the drive is secure.
If the drive is secured with fasteners, use a PoziDrive #1 screwdriver to secure the 4mm M3 screws
provided with the tape drive.
If the server sheet metal is less than 1.5mm thick, use the screws and washers provided in the
GENERAL MOUNTING SCREWS screw pack so the screws can be tightened without damaging the
drive. (The washers are not needed if the server sheet metal is at least 1.5mm thick.)
3. Cover any empty bays with blanking plates and then replace the cover on the server.
12 Securing the drive
Page 13

Installing an external tape drive
Connecting to an external SAS port
The product includes a cable to connect the tape drive to an External Mini SAS High Density (SFF-8644)
port.
If the server has a different type of SAS port, either purchase the appropriate cable, or purchase and
install a recommended HBA and associated drivers before installing the tape drive. For current
information about supported cables and HBAs, see the HPE Data Availability, Protection, and Retention
Compatibility Matrix at:
Procedure
1. Power off the server.
2. If the server does not have an active external SAS port, install the new HBA.
3. Plug the SAS cable Mini SAS connector into the Mini SAS port on the tape drive.
http://hpe.com/storage/DAPRcompatibility.
4. Plug the connector on the other end of the SAS cable into the SAS port on the server.
Installing an external tape drive 13
Page 14
5. Connect the power cord to the tape drive.
6. Connect the other end of the power cord to a grounded power outlet.
WARNING:
The supplied power cord is approved for your specific geographic region. Use of a non Hewlett
Packard Enterprise approved power cord can result in:
• not meeting individual country-specific safety requirements
• insufficient conductor ampacity that could result in overheating with potential personal injury
and/or property damage
• an unapproved power cord could fracture resulting in the internal contacts being exposed which
potentially could subject the user to a shock hazard.
Hewlett Packard Enterprise disclaims all liability in the event a non-Hewlett Packard Enterprise
approved power cord is used.
14 Installing an external tape drive
Page 15

Verifying the installation
Powering on the drive and the server
Procedure
1. For an external drive, power on the tape drive by pressing the power button on the front panel.
2. Power on the server.
3. If the BIOS for the controller in your server displays connected devices, watch the server boot screen
to verify that the new SAS tape drive is listed in the boot sequence.
If you see any error or unexpected messages, verify that the SAS cables are connected correctly. If
this does not resolve the problem, see the user guide for further troubleshooting information.
NOTE:
If you use a recommended cable to attach an external tape drive directly to the external SAS port and
the tape drive does not function, the port might be inactive or not supported for external tape devices.
When power is applied, the tape drive runs a hardware self-test, which takes up to 60 seconds.
If the self-test passes, the green Ready LED flashes and then all LEDs illuminate for a few seconds,
and finally the Ready LED remains illuminated.
If the test fails, the Drive Error and Tape Error LEDs flash, while the Ready LED remains illuminated.
This continues until the drive is reset.
Completing the installation
Verify that the correct drivers and versions of backup software are installed and that the tape drive is
functioning properly before storing data.
Procedure
1. If you have not already installed the tape drivers, install them now.
a. If you installed tape drivers before connecting the tape drive (Windows only)
The tape drive will be detected automatically and the correct drivers used.
If the Windows Found New Hardware wizard runs, cancel it and then use Device Manager to
verify that the driver is installed.
b. If tape drivers are not installed (Windows only)
If you have not already installed drivers, the Windows Found New Hardware wizard will run when
you power on the server and tape drive. Follow the on-screen instructions to search for the required
driver on the server. If necessary, download the driver from the support website: http://
www.hpe.com/support/hpesc
c. If tape drivers are not installed (other operating systems)
Drivers are included with the operating system and will be loaded automatically. To upgrade drivers,
Hewlett Packard Enterprise recommends upgrading to the latest version of the operating system.
Verifying the installation 15
Page 16

NOTE:
Certain backup applications require their own Tape driver instead of the Tape driver included with the
operating system.
2. Install Library & Tape Tools (L&TT) and then use it to verify that the tape drive installation was
successful.
L&TT is designed to diagnose any issues when using tape drives. Use it to confirm that the tape drive
is installed and functioning correctly before you use the tape drive for backup. L&TT is available
without charge at:
http://www.hpe.com/support/tapetools
3. Download and install any operating system upgrades necessary for the backup application.
4. Conduct a backup and restore test to verify that the drive can write data to tape. Use a blank cartridge.
For operating systems that contain a native backup application that supports tape devices, you can
use the native backup application to test basic tape drive operation. Native backup applications do not
support all the advanced features of the tape drive so you will need to test the advanced features with
your backup application. When testing with a third-party application, upgrade the application before
running this test.
5. If the server is using StoreOpen with LTFS, verify that the server has the latest LTFS software. If
necessary, download the latest version at:
http://www.hpe.com/storage/StoreOpen
16 Verifying the installation
Page 17

Operating the tape drive
2
1
7
3
4
5
6
1
2
3
4
5
Front panel overview
Figure 3: Tape drive front panel (external drive)
1. Eject button 2. Ready LED
3. Drive LED 4. Tape LED
5. Clean LED 6. Encryption LED
7. Power button (external drives only)
Understanding the LEDs
Figure 4: Tape drive front panel (internal drive)
1. Ready — green
• On: the drive is ready for use or there was a failure during self-test
• Off: the drive power is off
• Flashing: the drive is reading/writing data or rewinding/loading/unloading a cartridge
2. Drive — amber
Operating the tape drive 17
Page 18

• Off: no fault has been detected
• Flashing: the drive mechanism has detected a hardware error
3. Tape — amber
• Off: no fault has been detected
• Flashing: The cartridge currently in the drive is faulty (damaged or unsupported) or an attempt was
made to write to a write-protected tape. To determine if the tape is a supported generation, writeprotected, or has physical damage, inspect the cartridge. If physical damage is noted, discard the
cartridge.
4. Clean — amber
• On: cleaning cartridge in use
• Off: the drive does not require cleaning
• Flashing: the drive needs cleaning
5. Encryption — blue
• On: at power-on
• Off: some or all the data on the tape is not encrypted
• On: all data on the tape is encrypted
• On with Ready LED flashing: drive is reading/writing encrypted data and all data on the cartridge is
encrypted
• Flashing: encryption or decryption error
Data and cleaning cartridges
Always use Hewlett Packard Enterprise storage media to prolong the life of the tape drive. To learn more
about, or to purchase media, visit the storage media website: http://www.hpe.com/storage/
storagemedia
Tape drive
model
LTO-8
Ultrium
30750
LTO-3
800 GB
1
cartridge
not
supported
LTO-4
1.6 TB
1
cartridge
not
supported
LTO-5
1
3 TB
cartridge
not
supported
LTO-6
6.25 TB
2
cartridge
not
supported
LTO-7
2
15 TB
cartridge
read/write,
WORM
LTO-7
Type M
22.5 TB2,
cartridge
read/write
(C7977A)
LTO-8
30 TB
3
cartridge
read/write
4
(Q2078A),
WORM
(Q2078W)
2
LTO-7
Ultrium
not
supported
15000
18 Data and cleaning cartridges
not
supported
read only read/write,
WORM
read/write
(C7977A),
WORM
(C7977W)
not
supported
not
supported
Table Continued
Page 19

Tape drive
model
LTO-3
800 GB
1
cartridge
LTO-4
1.6 TB
1
cartridge
LTO-5
1
3 TB
cartridge
LTO-6
6.25 TB
cartridge
2
LTO-7
2
15 TB
cartridge
LTO-7
Type M
22.5 TB2,
cartridge
LTO-8
30 TB
3
cartridge
2
LTO-6
Ultrium
6250
not
supported
read only read/write,
WORM
read/write
(C7976A,
C7976B),
not
supported
not
supported
not
supported
WORM
(C7976W)
LTO-5
Ultrium
3000
read only read/write,
WORM
read/write
(C7975A),
WORM
not
supported
not
supported
not
supported
not
supported
(C7975W)
LTO-4
Ultrium
1760
read/write,
WORM
read/write
(C7974A),
WORM
not
supported
not
supported
not
supported
not
supported
not
supported
(C7974W)
LTO-3
Ultrium 920
read/write
(C7973A),
not
supported
not
supported
not
supported
not
supported
not
supported
not
supported
WORM
(C7973W)
1
Capacity assumes 2:1 compression
2
Capacity assumes 2.5:1 compression
3
LTO-7 Type M requires unused LTO-7 media which is initialized to allow data to be written at a higher track density.
4
LTO-7 cartridges used for LTO-7 Type M must have a M8 bar code label applied. Prelabeled M8 cartridges are also
available (Q2078MC, Q2078ML, Q2078MN)
LTO-7 cartridges initialized as Type M media
LTO-8 tape drive has a feature which allows 9 TB to be stored on an LTO-7 cartridge instead of 6 TB.
Such a cartridge is referred to as LTO-7 cartridge initialized as Type M media. When used in automation,
LTO-7 cartridges initialized as Type M media use barcode labels whose last two characters are ‘M8’. Only
new, unused LTO-7 cartridges may be initialized as LTO-7 Type M and once initialized, cannot be
changed back to a normal 6TB LTO-7 cartridge. In addition, an initialized LTO-7 Type M cartridge can only
be written and read in an LTO-8 drive; LTO-7 drives are not capable of reading LTO-7 cartridges initialized
as Type M media. LTO-7 Type M cartridges must be initialized in a library that supports the format and
this is determined by the number on the cartridge barcode label. As stated above, if the barcode ends in
‘M8’ it will be initialized as LTO-7 Type M media, otherwise it will be initialized as a normal LTO-7. To
avoid the confusion of labels not matching the cartridge format, LTO-7 Type M cartridges can only be
initialized in libraries or autoloaders. Although standalone LTO-8 drives cannot initialize LTO-7 Type M
cartridges, they are fully compatible and able to read and write any LTO-7 Type M cartridges which have
been previously initialized in a library. LTO-7 Type M media media is only available as Read/Write
cartridges, not as WORM.
WORM data cartridges
The LTO-8 tape drive includes support for both rewritable and WORM (Write Once, Read Many) data
cartridges. WORM cartridges provide an enhanced level of data security against accidental or malicious
alteration of data on the tape cartridge. Data can be appended to the WORM data cartridge to maximize
its full capacity, but data cannot be erased or overwritten. Any attempt to modify a WORM cartridge to
Operating the tape drive 19
Page 20
enable writing over existing data will result in the media becoming permanently write protected. It will still
be readable in a WORM drive, depending upon the severity of the tampering, but no further data can be
appended to the cartridge.
WORM data cartridges are clearly identified by their distinctive, two-tone cartridge color. They can only be
used with LTO Ultrium tape drives that support the WORM feature.
To verify that your backup or archive software application supports WORM cartridges, see the HPE Data
Availability, Protection, and Retention Compatibility Matrix at: http://hpe.com/storage/
DAPRcompatibility
For information on how your Hewlett Packard Enterprise LTO Ultrium tape drive and WORM cartridge can
help your business meet Information Lifecycle Management and regulatory compliance requirements, see
the Hewlett Packard Enterprise Business Support Center at: http://www.hpe.com/storage
Caring for media
Many tape drive and backup failures are caused by damaged or improperly handled tape cartridges.
• Keep the cartridge in the case provided.
• Store and transport cartridges in the vertical orientation.
• Follow the temperature, humidity, and acclimatization guidelines on the cartridge packaging.
• Avoid dropping the cartridge or handling it roughly because doing so is likely to damage the cartridge.
• Inspect cartridges regularly for damage.
• Do not exceed the normal cartridge life.
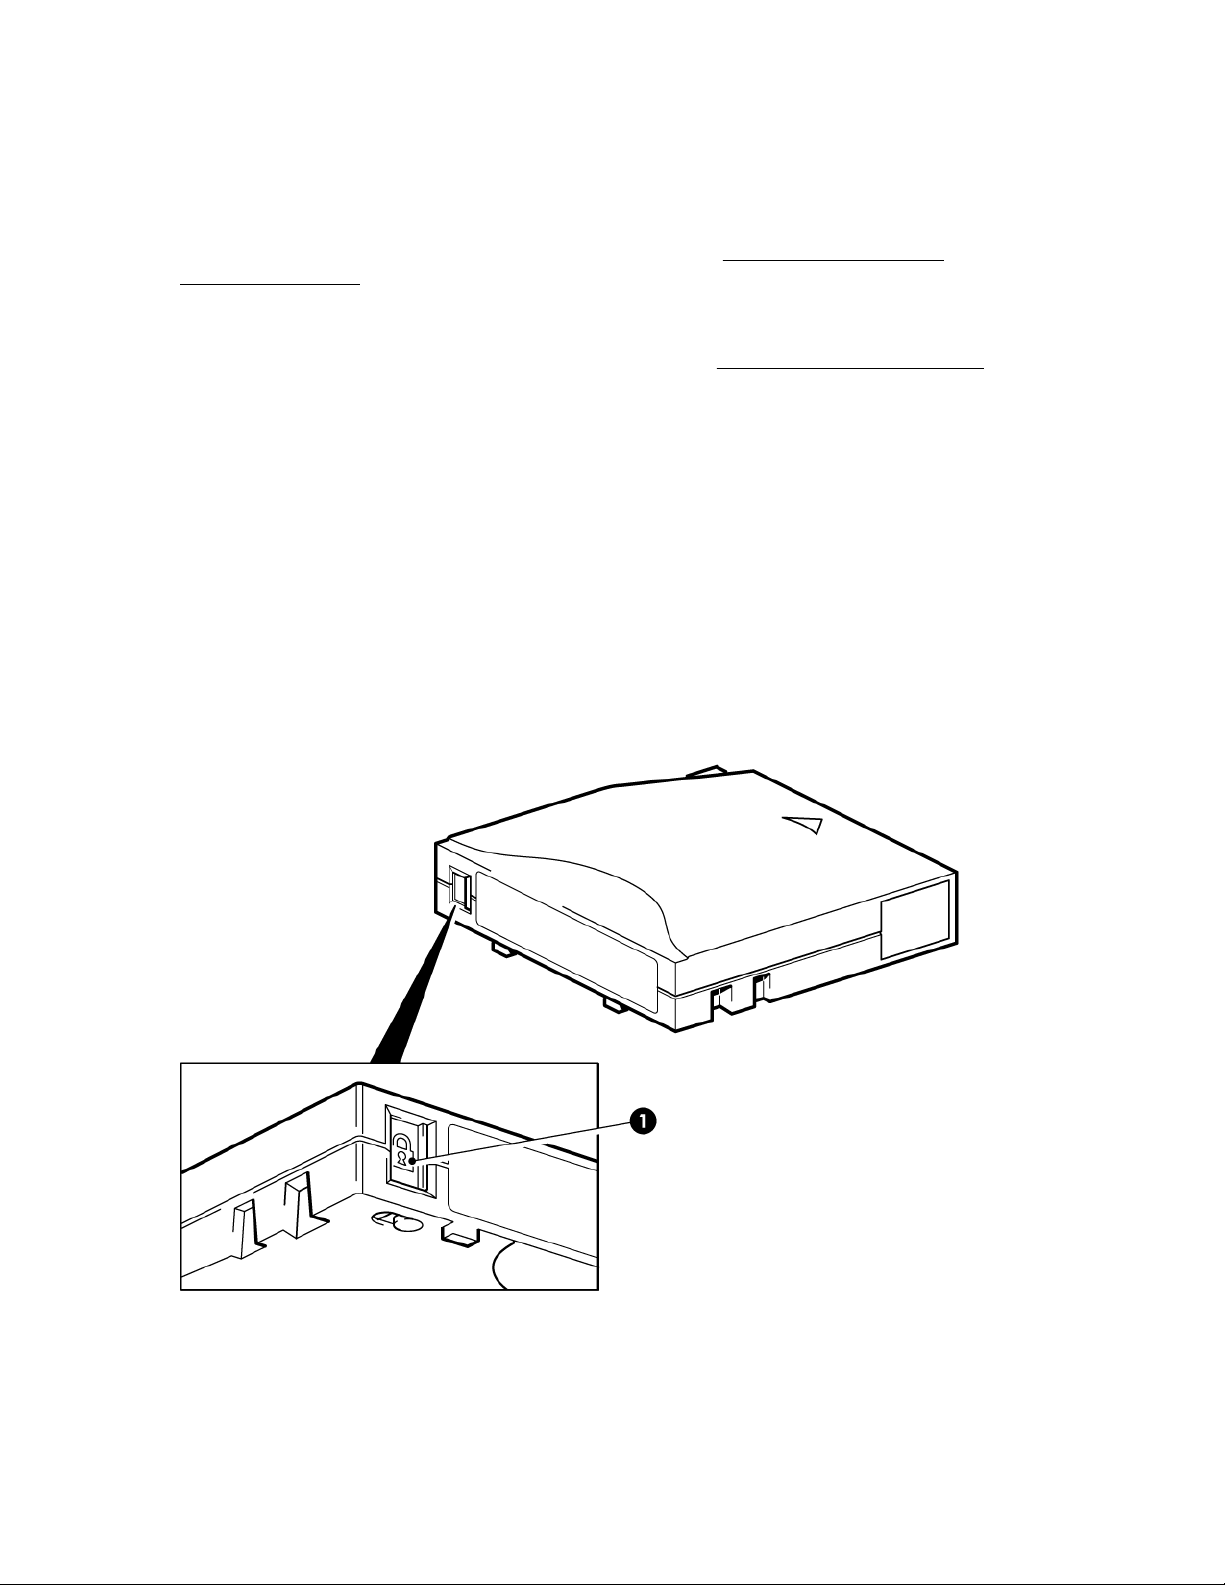
Using the cartridge write-protect switch
1. Write-protect switch
Close the write protect switch (1) to protect the data on the tape. When locked, a padlock will be visible
on the switch.
20 Operating the tape drive
Page 21
Loading a cartridge
1
3
2
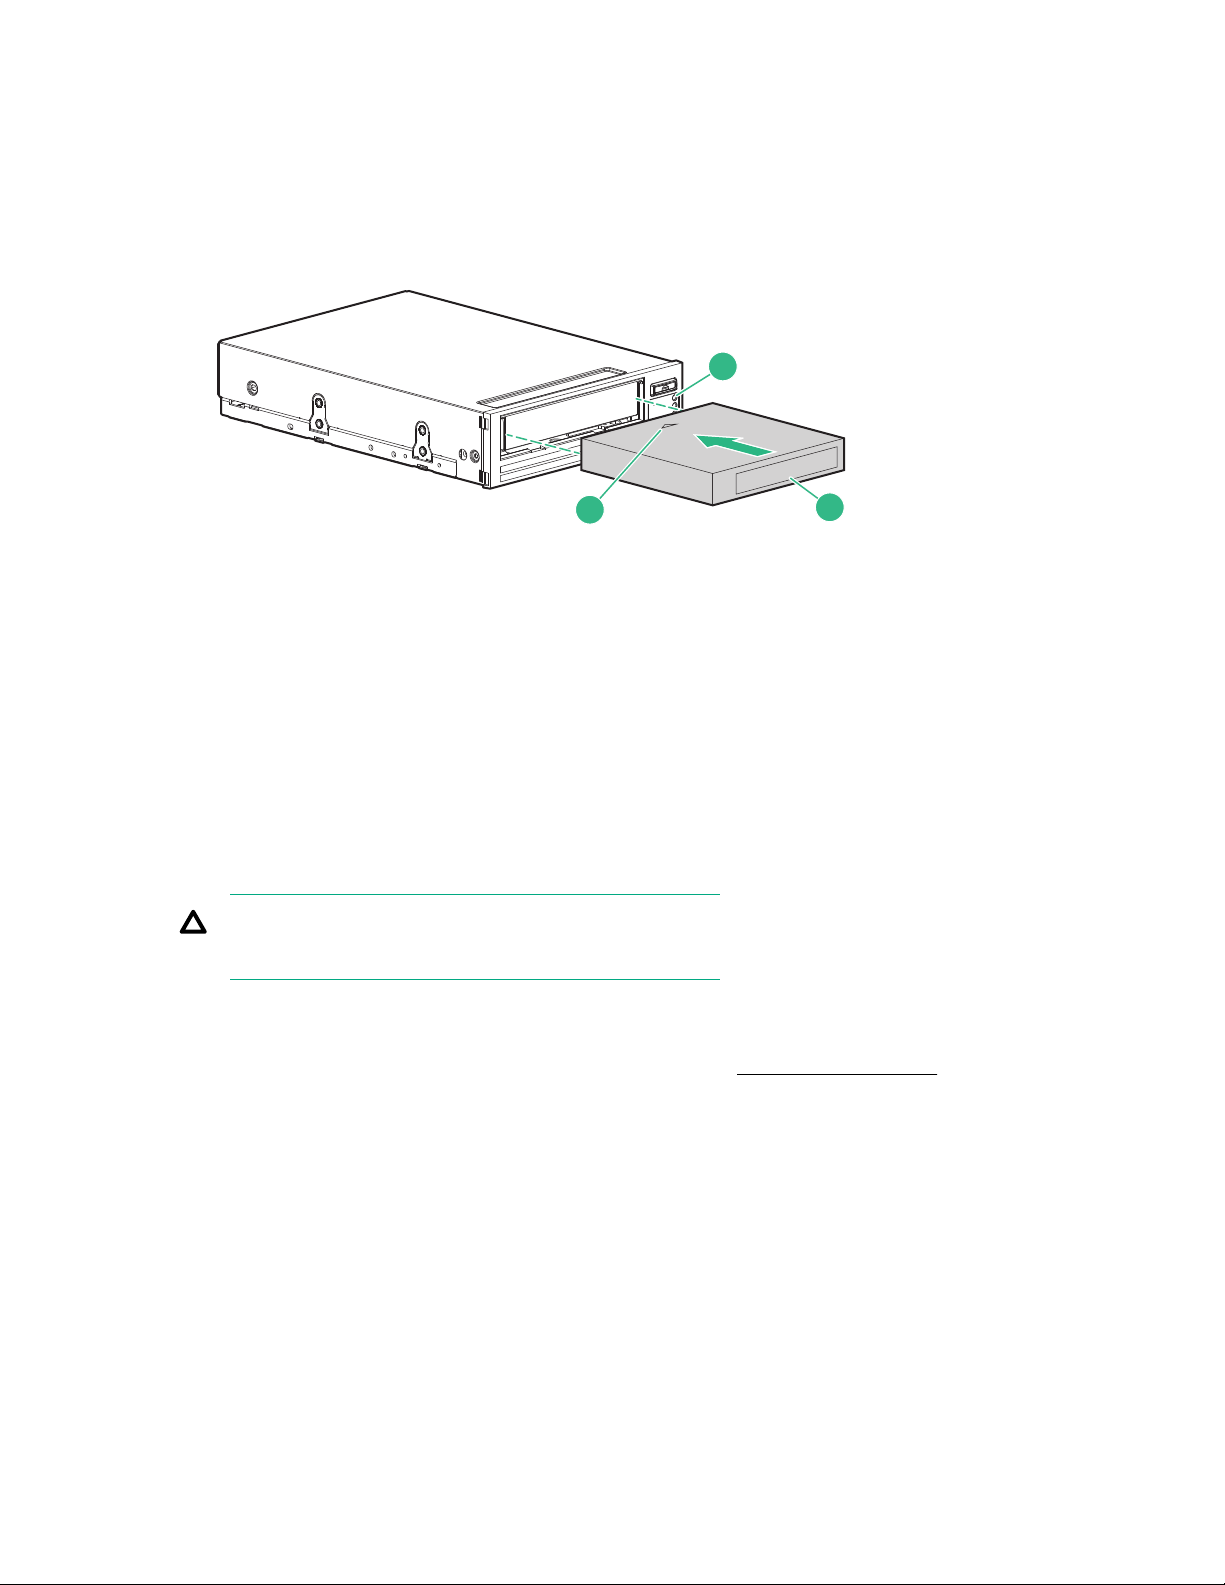
Procedure
1. Insert the cartridge into the slot in the front of the drive with the arrow uppermost and facing the front
of the tape drive.
1. Ready light 2. Arrow indicates leading direction
3. Label area
Figure 5: Inserting a cartridge
2. Apply gentle pressure until the drive takes the cartridge and loads it.
3. The Ready light (3) flashes green while the drive performs its load sequence. When the cartridge is
loaded, the Ready light shows steady green.
Unloading a cartridge
CAUTION:
Never try to remove a cartridge before it is fully ejected.
Procedure
Press the Eject button on the front panel above the LEDs. See Front panel overview on page 17.
The drive will complete its current task, rewind the tape to the beginning, and then eject the cartridge. The
rewind process can take up to 10 minutes. The Ready light will flash to indicate the unload is still in
progress.
Cleaning the tape drive
LTO Ultrium tape drives do not require regular cleaning. An Ultrium universal cleaning cartridge should
only be used when the orange Clean LED is flashing.
You must use the Ultrium Universal Cleaning cartridge, (C7978A), with HPE LTO Ultrium tape drives, as
other cleaning cartridges will not load and run.
Each Ultrium universal cleaning cartridge (C7978A) can be used up to 50 times with LTO Ultrium tape
drives.
Loading a cartridge 21
Page 22

Procedure
1. Insert the Ultrium Universal Cleaning cartridge.
NOTE:
If the drive ejects the cleaning cartridge immediately with the Tape LED on, the cleaning cartridge has
expired.
The drive performs its cleaning cycle, which can take up to 5 minutes. During the cleaning cycle, the
orange Clean LED will be on solidly and the green Ready LED will flash.
The drive ejects the cleaning cartridge when the cleaning cycle is complete.
2. Remove the cleaning cartridge from the drive.
22 Operating the tape drive
Page 23

Troubleshooting
NOTE:
HPE Library & Tape Tools can be used to help diagnose many problems, see Diagnostic, management,
and support tools on page 8. For comprehensive troubleshooting information, see the detailed
troubleshooting guide at: http://www.hpe.com/support/storage
General troubleshooting procedure
If a problem occurs, the first step is to try to establish whether the problem lies with the cartridge, the
drive, the host computer and connections, or the way the system is being operated.
Has the system just been installed?
There could be an installation problem:
Procedure
1. Review the relevant installation chapters of this guide.
2. Has the system booted?
If not, verify that all hard disks are correctly seated in the hard disk bays and then verify the cabling
between the disks and the SAS controller.
3. Does an error appear during the boot sequence about a change to the RAID configuration?
This error only appears if you used the supplied cable to replace an existing SAS cable. Verify that of
the SAS cables between the disks and the SAS controller are properly seated. If the problem persists,
you probably disconnected a hard disk drive bay that was in use. For more information, see
Replacing an existing SAS hard drive cable on page 32.
4. Has the system booted but the operating system has not seen the tape drive?
Verify that the drive has power. The tape drive READY LED should be illuminated. If it is not, verify
that the power cord is connected correctly to the tape drive. If the READY LED is illuminated, inspect
the cabling between the tape drive and the SAS controller. Ensure that the HBA port to which the drive
is connected is enabled. If an external drive was powered on after the server, power cycle the server.
5. Are appropriate Tape drivers and HBA drivers, as well as supported application software, installed on
the host?
6. Verify that the environmental conditions are within the specified limits.
Table 1: Environmental specifications for LTO-8 Ultrium 30750 tape drives
Temperature range Non-condensing humidity range
Operating
10° to 40° C up to 3000m with 3 CFM airflow
10° to 30° C up to 4000m with 3 CFM or
greater airflow
20% to 80% RH (non-condensing)
Storage
-40° to 60° C 10% to 90% RH (non-condensing)
Troubleshooting 23
Page 24

Are you using new cartridges or a different brand of cartridge? Have you been using the particular
cartridge for a long time?
The problem could lie with the cartridge:
1. Review the media information in Data and cleaning cartridges on page 18.
2. Check that you are using an Ultrium cartridge. Compatible media can be recognized by the Ultrium
logo, which is the same as the logo on the front of your drive.
3. Use the correct media type. For media compatibility, see Data and cleaning cartridges on page 18.
4. Verify that the cartridge is not write-protected. See Data and cleaning cartridges on page 18
5. Clean the tape heads with the cleaning cartridge, see Cleaning the tape drive on page 21.
Verify that you are using the HPE Ultrium Universal cleaning cartridge, C7978A.
6. If the Tape LED is flashing, the cartridge is probably faulty. Try using a different cartridge.
7. Try the operation again.
8. If the problem still occurs and you have not yet replaced the cartridge, try using a different cartridge.
9. If the problem is still there, the problem probably lies with the drive or the host computer.
For additional troubleshooting help with cartridges, see Problems with cartridges on page 28.
Has the drive been moved recently? Have any cables been disconnected and reconnected? Has
the environment changed—unusually hot, cold, damp, or dry? Has there been dust or dirt near the
drive. Have reasonable precautions against static been taken?
The problem could lie with the drive:
1. Inspect the cables and connectors.
2. Clean the tape heads with the cleaning cartridge.
3. If the problem persists, verify that the environmental conditions are within the specified limits, see the
previous table. Consider moving the drive to a more suitable site.
Has a new operating system been installed in the host computer? Has new backup software been
installed?
The problem could lie with the host or the software. Consult the host computer’s operating system
documentation, the software documentation, or seek help from a service engineer.
LED sequences
For basic LED operation during normal operation, see Understanding the LEDs on page 17.
24 LED sequences
Page 25

1
2
3
4
5
The following table shows the meaning of different LED patterns.
1
2
3
4
5
1
2
3
4
5
Table 2: LED troubleshooting
1. Ready: green
2. Drive: amber
3. Tape: amber
4. Clean: amber
5. Encryption: blue
LED Sequence
All LEDs OFF.
Cause Action required
Drive might not have
power, may be faulty, or
may have been power
cycled or reset during a
firmware upgrade.
Make sure that the drive is powered on. The
power on/off switch on an external drive
incorporates a green LED.
Check the power cable connection and replace
the cable if necessary. On external drives, you
can use the power cable from your monitor or
another device to check that the connection is
working.
If the power supply is present and all LEDs
remain off, power cycle or reset the drive (see
Problems with cartridges on page 28). If it
still fails, call for service.
The drive has failed the
power-on self-test
(POST).
Power cycle or reset the drive (see Problems
with cartridges on page 28).
If the error condition reappears, call for service.
Ready is ON, Drive and
Tape FLASH.
Table Continued
Troubleshooting 25
Page 26

LED Sequence
1
2
3
4
5
1
2
3
4
5
1
2
3
4
5
1
2
3
4
5
Cause Action required
Ready is ON.
Ready FLASHES.
The drive is ready for
operation.
The drive is carrying out a
normal activity (read,
write).
The drive is reading or
writing encrypted data
and all data on the
cartridge is encrypted.
None. This is normal.
None.
If the drive is upgrading firmware, do not reset or
power cycle it.
None. This is normal.
Ready FLASHES and
Encryption is ON.
Ready FLASHES fast.
26 Troubleshooting
The drive is downloading
firmware.
None.
Do not reset or power cycle the drive.
Table Continued
Page 27

LED Sequence
1
2
3
4
5
1
2
3
4
5
1
2
3
4
5
1
2
3
4
5
Cause Action required
Ready is OFF, others
are ON.
Clean FLASHES.
Firmware is being
reprogrammed.
The drive requires
cleaning.
None.
Do not reset or power cycle the drive.
Load the Ultrium cleaning cartridge. For
supported cartridges and instructions, see Data
and cleaning cartridges on page 18.
If the Clean LED is still flashing when you load a
new or known good data cartridge after cleaning,
call for service.
Ready FLASHES and
Clean is ON.
Tape FLASHES.
Cleaning is in progress. None. The cleaning cartridge will eject on
completion.
The cleaning cycle can take up to 5 minutes to
complete.
The drive believes the
current tape or the tape
just ejected is write
protected, unsupported,
or faulty.
Unload the tape cartridge. Verify that you are
using the correct format cartridge; an Ultrium
data cartridge or Ultrium universal cleaning
cartridge. For supported cartridges and
instructions, see Data and cleaning cartridges
on page 18.
Reload the cartridge. If the Tape LED still flashes
or starts flashing during the next backup, load a
new or known good cartridge.
If the Tape LED is now off, discard the 'suspect'
tape cartridge. If it is still on, call for service.
Table Continued
Troubleshooting 27
Page 28

LED Sequence
1
2
3
4
5
1
2
3
4
5
Cause Action required
The drive mechanism has
detected an error or there
is a firmware error.
Drive FLASHES.
The drive has an
encryption error.
Problems with cartridges
Load a new cartridge. If the error persists, power
cycle or reset the drive.
If the error persists, upgrade the drive firmware
to the most recent version.
If the Drive LED remains on, call for service.
For troubleshooting information, see Methods
for troubleshooting encryption on page 30.
If you experience any problems using Hewlett Packard Enterprise branded cartridges, verify the following:
• The cartridge case is intact and that it contains no splits, cracks, or damage.
• The cartridge has been stored at the correct temperature and humidity. It prevents condensation. See
the insert included with the tape cartridge for storage conditions.
• The write-protect switch is fully operational. It will move from side to side with a positive click.
• The support website for additional troubleshooting information:
http://www.hpe.com/support/storage
The cartridge is jammed
If the cartridge is jammed or the backup application is unable to eject it, you can force eject the cartridge.
Once the cartridge is successfully ejected, it is good practice to run Library & Tape Tools to diagnose the
problem and to upgrade the firmware. If the failure occurs regularly, contact customer service:
http://www.hpe.com/support/storage
Procedure
1. Attempt a drive unload/eject operation from the backup software.
Many backup applications will issue a Prevent Media Removal (PMR) command to the drive in an
attempt to prevent human interference during a backup job. If this command occurs, the software
that issued the PMR must be used to load and unload tapes.
2. Shut down backup software and, if in a Windows environment, stop removable storage services.
28 Problems with cartridges
Page 29

3. Press the Eject button on the front of the tape drive.
Sometimes it is necessary to use the Eject button instead of software to unload a tape because
software can lose communication with the product or a rogue application can prevent the software
from unloading the tape.
IMPORTANT:
This can take several minutes in many cases. Ensure that drive activity has stopped before
continuing on (waiting 10 minutes is a good rule of thumb). It is important that you allow
sufficient time for the drive to complete rewinding the cartridge. If you interrupt it, you may
damage the media or the tape drive.
4. Initiate a force eject or emergency unload operation by pressing and holding the Eject button for 10
seconds. This step causes the drive to try everything possible to unload the tape.
CAUTION:
You may lose data if you force eject a cartridge that is in the middle of a backup. The tape may
also become unreadable because an EOD (End of Data) mark may not be properly written.
5. Run the L&TT Stuck Tape test.
Run L&TT on a host connected to the product, select the drive, select the tests, and run the Stuck
Tape test.
NOTE:
it is good practice to obtain a Support Ticket to capture all the logs in case they are needed by
Hewlett Packard Enterprise Support.
• This test can overcome many nonphysical causes of a stuck tape.
• Follow the instructions in L&TT. It may take several minutes and may not appear to be doing
anything. Allow the test to complete on its own.
• Check the results when the test is complete for additional information and suggestions.
6. If the cartridge could be ejected prior to this step, there is no problem with the drive or media and the
following steps are not required. If it could not be ejected using the preceding steps, there may be a
problem with the cartridge or drive.
Power down the drive.
7. Disconnect the data cable.
8. After at least 15 seconds, power the drive back up and wait until the drive is idle/ready.
CAUTION:
Use care when disconnecting data cables.
IMPORTANT:
Powering up with a cartridge in the drive can take several minutes. It is important that you allow
sufficient time for the drive to complete rewinding the cartridge. If you interrupt it, you may
damage the media or the tape drive.
Troubleshooting 29
Page 30

9. Ensure that drive activity has stopped (waiting 10 minutes after power-up is a good rule of thumb).
Push the Eject button.
This step attempts to overcome unload issues due to the drive being in an abnormal state or
because Prevent Media Removal has been incorrectly left on after being set by a rogue application.
10. If the cartridge is still jammed, the tape drive has failed. Contact customer support at:
http://www.hpe.com/support/storage
Once the cartridge is successfully ejected, it is good practice to run Library & Tape Tools to diagnose the
problem and upgrade the firmware. If the failure occurs regularly on multiple cartridges, contact customer
support at:
http://www.hpe.com/support/storage
The drive will not accept the cartridge (or ejects it immediately)
The cartridge might be unsupported, have been damaged (for example, dropped), or the drive might have
a fault. If it is a cleaning cartridge, it has probably expired and must be discarded immediately. For data
cartridges:
Procedure
1. Verify that the drive has power (the power cord is properly connected and the Ready LED is on).
2. Verify that the drive has the correct media. Use only Ultrium media. For supported cartridges, see
Data and cleaning cartridges on page 18.
3. Make sure that you have loaded the cartridge with the correct orientation (see Loading a cartridge on
page 21).
4. Inspect the cartridge for damage and discard it, if it is damaged.
5. Use a new or known good piece of media and see if it loads. If it does, the original cartridge is faulty
and must be discarded.
6. See if another LTO Ultrium drive of the same model will accept the cartridge. If it does, the original
drive might be faulty. Before calling customer service, verify that the tape drive is responding.
Methods for troubleshooting encryption
• Ensure that you are using an LTO-8 tape drive and an HPE LTO-7 or LTO-8 data cartridge.
• Verify that your application software supports the LTO-8 tape drive. If not, update the application
software.
• Verify that your software supports hardware encryption. Update the firmware if necessary. For more
information consult your software vendor or see the HPE Data Availability, Protection, and Retention
Compatibility Matrix at: http://hpe.com/storage/DAPRcompatibility
• Ensure that the correct key or passphrase has been entered.
30 The drive will not accept the cartridge (or ejects it immediately)
Page 31

Replacing a tape drive
If a tape drive proves to be faulty, cannot be repaired, and is still covered by the original warranty, it will be
replaced under warranty. Based on availability and where geography permits, the replacement tape drive
will be shipped for next business day delivery. Same day or four-hour delivery may be offered at an
additional charge where geography permits. If you request Hewlett Packard Enterprise to install the
replacement tape drive, you will be charged for the travel and labor costs of this service.
NOTE:
If you are not replacing an internal tape drive immediately, insert a blanking plate into the empty bay.
Replace the cover on the server and secure with screws, as appropriate.
See the complete Hewlett Packard Enterprise limited warranty statement at:
http://www.hpe.com/support/Storage-Warranties
Disconnecting the tape drive
Procedure
1. Unpack the replacement drive, and retain the packaging.
2. Power off the server and disconnect from the mains power supply.
3. Internal drives only: Remove the cover from the server. Observing normal anti-static precautions
remove any screws that are holding the tape drive in place.
4. Disconnect the drive's power and SAS cables. Slide internal drives carefully out of the mounting bay.
5. Put the drive into the packaging that contained the replacement drive.
6. Return the faulty drive to your local Hewlett Packard Enterprise Service Center. Instructions on where
to return faulty drives will be shipped with the replacement drive. You must ship the defective drive
back to Hewlett Packard Enterprise within a defined period, normally five (5) business days. The
defective part must be returned with the associated documentation in the provided shipping material.
Failure to return the defective part may result in Hewlett Packard Enterprise billing you for the
replacement. Hewlett Packard Enterprise will pay all shipping and part return costs and determine the
courier/carrier to be used.
To install the replacement drive, follow the instructions in Installing an internal tape drive on page 10 or
Installing an external tape drive on page 13
Replacing a tape drive 31
Page 32
Replacing an existing SAS hard drive cable
The following instructions are valid for some HPE ProLiant servers.
This installation uses the HPE SAS split cable to replace one of the existing SAS cables from the host
SAS controller to the server's SAS hard disk drive bays. The SAS data cable has four datapaths; this
configuration diverts the wiring from one of the hard disk drive bays to the tape drive. You might lose the
use of a hard disk drive bay with this cabling solution.
CAUTION:
Do NOT use this option with RAID configurations.
Procedure
1. Remove the plastic covers from both connectors on the supplied mini-SAS cable. You will need to use
the SAS connector on the second branch of the cable for this installation.
2. Hewlett Packard Enterprise strongly recommends that the tape drive is connected to the second SAS
port on the host controller (this is the port that connects to the hard disk drive bays with the highest
numbers). Look at the front of the server and establish which SAS cable is connected to the hard disk
drive bays with the highest numbers.
Cable routing varies from one server to another. You may need to remove other components, such as
fan banks, while you work with the cable. Always refer to your server documentation for server-specific
cabling instructions.
CAUTION:
It is not possible to identify which disk drive bay will be lost for all servers (it is normally the
highest-numbered disk bay). The only way to be sure, is to check the disk LEDs after installing
the tape drive. For this reason, you should never attempt this installation if you have a disk RAID
configuration.
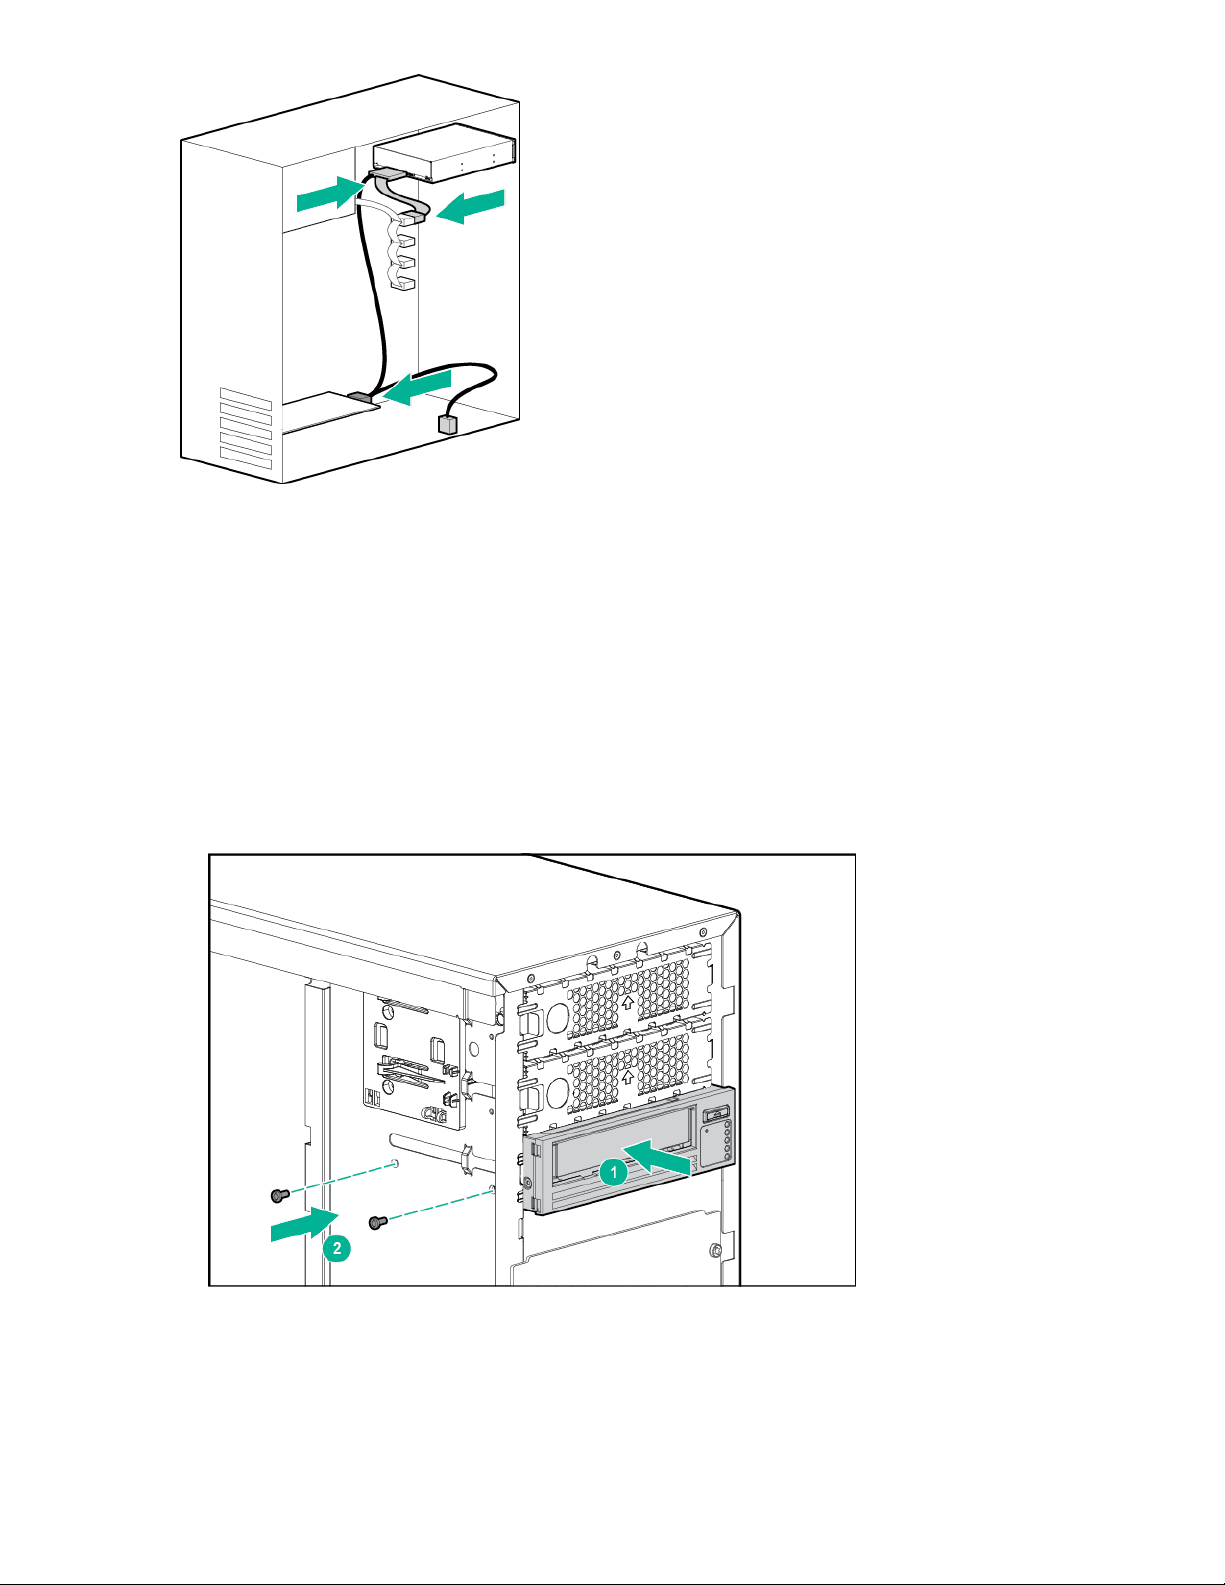
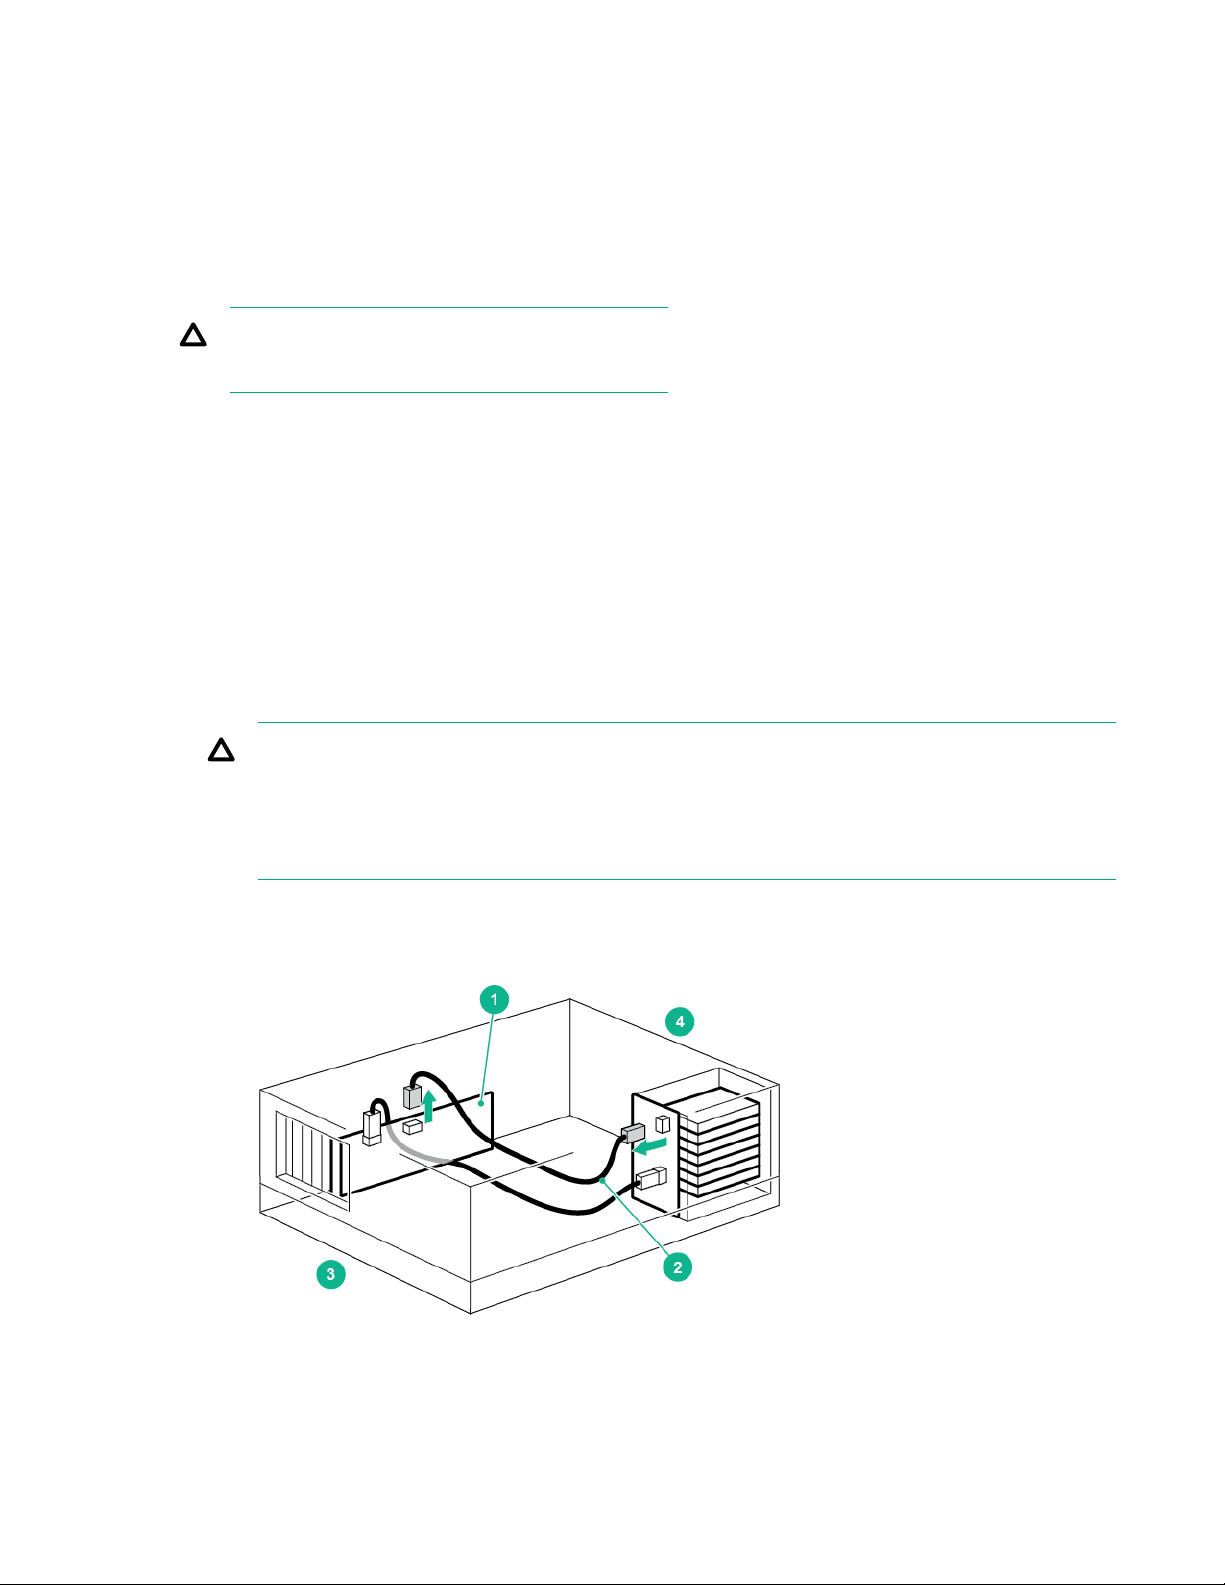
3. Remove the existing SAS cable.
Figure 6: Removing the existing SAS cable
32 Replacing an existing SAS hard drive cable
Page 33

1. Host SAS controller (HBA) 3. Rear of server
2. Cable to be removed 4. Front of server
4. Connect the replacement cable supplied with the tape drive to the host SAS controller, as illustrated in
the following diagram.
Figure 7: Cable routing with replacement SAS cable
1. Replacement SAS cable 3. Connect replacement SAS cable to disk bay
2. Connect replacement SAS cable to host SAS
HBA
5. Power connector to server
5. Attach the SAS cable to the SAS connector on the tape drive.
4. SAS connector to tape drive
Replacing an existing SAS hard drive cable 33
Page 34

Connect a spare power cable from the server's internal power supply to the power connector on the
SAS data cable.
6. If the server lost the use of a disk bay, apply the supplied sticker to the blanking plate of the disk bay to
show that it is disconnected.
NOTE:
If you subsequently install a hard disk in this bay, it will not work. This does not mean that there is a
fault with either the disk or the server.
7. To continue the installation procedure, see Securing the drive on page 12.
34 Replacing an existing SAS hard drive cable
Page 35

Support and other resources
Accessing Hewlett Packard Enterprise Support
• For live assistance, go to the Contact Hewlett Packard Enterprise Worldwide website:
http://www.hpe.com/assistance
• To access documentation and support services, go to the Hewlett Packard Enterprise Support Center
website:
http://www.hpe.com/support/hpesc
Information to collect
• Technical support registration number (if applicable)
• Product name, model or version, and serial number
• Operating system name and version
• Firmware version
• Error messages
• Product-specific reports and logs
• Add-on products or components
• Third-party products or components
Accessing updates
• Some software products provide a mechanism for accessing software updates through the product
interface. Review your product documentation to identify the recommended software update method.
• To download product updates:
Hewlett Packard Enterprise Support Center
www.hpe.com/support/hpesc
Hewlett Packard Enterprise Support Center: Software downloads
www.hpe.com/support/downloads
Software Depot
www.hpe.com/support/softwaredepot
• To subscribe to eNewsletters and alerts:
www.hpe.com/support/e-updates
• To view and update your entitlements, and to link your contracts and warranties with your profile, go to
the Hewlett Packard Enterprise Support Center More Information on Access to Support Materials
page:
Support and other resources 35
Page 36

www.hpe.com/support/AccessToSupportMaterials
IMPORTANT:
Access to some updates might require product entitlement when accessed through the Hewlett
Packard Enterprise Support Center. You must have an HPE Passport set up with relevant
entitlements.
Customer self repair
Hewlett Packard Enterprise customer self repair (CSR) programs allow you to repair your product. If a
CSR part needs to be replaced, it will be shipped directly to you so that you can install it at your
convenience. Some parts do not qualify for CSR. Your Hewlett Packard Enterprise authorized service
provider will determine whether a repair can be accomplished by CSR.
For more information about CSR, contact your local service provider or go to the CSR website:
http://www.hpe.com/support/selfrepair
Remote support
Remote support is available with supported devices as part of your warranty or contractual support
agreement. It provides intelligent event diagnosis, and automatic, secure submission of hardware event
notifications to Hewlett Packard Enterprise, which will initiate a fast and accurate resolution based on your
product's service level. Hewlett Packard Enterprise strongly recommends that you register your device for
remote support.
If your product includes additional remote support details, use search to locate that information.
Remote support and Proactive Care information
HPE Get Connected
www.hpe.com/services/getconnected
HPE Proactive Care services
www.hpe.com/services/proactivecare
HPE Proactive Care service: Supported products list
www.hpe.com/services/proactivecaresupportedproducts
HPE Proactive Care advanced service: Supported products list
www.hpe.com/services/proactivecareadvancedsupportedproducts
Proactive Care customer information
Proactive Care central
www.hpe.com/services/proactivecarecentral
Proactive Care service activation
www.hpe.com/services/proactivecarecentralgetstarted
Warranty information
To view the warranty for your product or to view the Safety and Compliance Information for Server,
Storage, Power, Networking, and Rack Products reference document, go to the Enterprise Safety and
Compliance website:
www.hpe.com/support/Safety-Compliance-EnterpriseProducts
36 Customer self repair
Page 37

Additional warranty information
HPE ProLiant and x86 Servers and Options
www.hpe.com/support/ProLiantServers-Warranties
HPE Enterprise Servers
www.hpe.com/support/EnterpriseServers-Warranties
HPE Storage Products
www.hpe.com/support/Storage-Warranties
HPE Networking Products
www.hpe.com/support/Networking-Warranties
Regulatory information
To view the regulatory information for your product, view the Safety and Compliance Information for
Server, Storage, Power, Networking, and Rack Products, available at the Hewlett Packard Enterprise
Support Center:
www.hpe.com/support/Safety-Compliance-EnterpriseProducts
Additional regulatory information
Hewlett Packard Enterprise is committed to providing our customers with information about the chemical
substances in our products as needed to comply with legal requirements such as REACH (Regulation EC
No 1907/2006 of the European Parliament and the Council). A chemical information report for this product
can be found at:
www.hpe.com/info/reach
For Hewlett Packard Enterprise product environmental and safety information and compliance data,
including RoHS and REACH, see:
www.hpe.com/info/ecodata
For Hewlett Packard Enterprise environmental information, including company programs, product
recycling, and energy efficiency, see:
www.hpe.com/info/environment
Documentation feedback
Hewlett Packard Enterprise is committed to providing documentation that meets your needs. To help us
improve the documentation, send any errors, suggestions, or comments to Documentation Feedback
(docsfeedback@hpe.com). When submitting your feedback, include the document title, part number,
edition, and publication date located on the front cover of the document. For online help content, include
the product name, product version, help edition, and publication date located on the legal notices page.
Regulatory information 37
Page 38

Warranty and regulatory information
For important safety, environmental, and regulatory information, see Safety and Compliance Information
for Server, Storage, Power, Networking, and Rack Products. The information is available at
www.hpe.com/support/Safety-Compliance-EnterpriseProducts.
Table 3: Regulatory model numbers
Product Regulatory Model Number FCC and CISPR classification
LTO-8 Ultrium HH SAS BRSLA-7HSS-AC Class A
LTO-7 Ultrium HH SAS BRSLA-7HSS-AC Class A
LTO-6 Ultrium HH SAS BRSLA-1204-AC Class A
LTO-5 Ultrium HH SAS BRSLA-0904-AC Class A
LTO-4 Ultrium HH SAS BRSLA-0703-AC Class A
LTO-4 Ultrium HH SCSI BRSLA-0704-AC Class A
LTO-3 Ultrium HH SAS BRSLA-0705-AC Class B
http://
LTO-3 Ultrium HH SCSI BRSLA-0605-AC Class B
For important safety, environmental, and regulatory information, see Safety and Compliance Information
for Server, Storage, Power, Networking, and Rack Products. The information is available at http://
www.hpe.com/support/Safety-Compliance-EnterpriseProducts.
Manufacturer: Hewlett Packard Enterprise Company, Palo Alto, California
Manufacturer’s representative: ZAO Hewlett Packard Enterprise A.O.
38 Warranty and regulatory information
 Loading...