

Page 1
HPE StoreEasy 1X60 Storage Quick Start
Guide
Abstract
This document provides system administrators step-by-step instructions for setting up an HPE
StoreEasy 1X60 Storage system for the first time. After deployment of the system, HPE
recommends you to read the StoreEasy 1X60 Administration Guide to learn how to configure and
maintain all models of HPE StoreEasy 1X60 Storage.
*P05633-001*
Part Number: P05633-001
Published: March 2018
Edition: 1
Page 2

©
Copyright 2018 Hewlett Packard Enterprise Development LP
Notices
The information contained herein is subject to change without notice. The only warranties for Hewlett Packard
Enterprise products and services are set forth in the express warranty statements accompanying such
products and services. Nothing herein should be construed as constituting an additional warranty. Hewlett
Packard Enterprise shall not be liable for technical or editorial errors or omissions contained herein.
Links to third-party websites take you outside the Hewlett Packard Enterprise website. Hewlett Packard
Enterprise has no control over and is not responsible for information outside the Hewlett Packard Enterprise
website.
Acknowledgments
Microsoft® and Windows® are either registered trademarks or trademarks of Microsoft Corporation in the
United States and/or other countries.
Page 3
Product Models
The installation instructions provided in this document apply to the StoreEasy 1X60 Storage system which
covers the following HPE StoreEasy 1000 Storage models:
• HPE StoreEasy 1660 Storage
• HPE StoreEasy 1860 Storage
• HPE StoreEasy 1460 Storage
• HPE StoreEasy 1560 Storage
1. Unpack the HPE StoreEasy 1X60 Storage system
Before you begin, ensure that you have the following items in the shipping box:
• Hardware Components
◦ HPE StoreEasy 1X60 Storage system
◦ Power cords
◦ Rail kit for installing the system in a rack
◦ Any other hardware options purchased
• Documentation and Media
◦ HPE StoreEasy 1X60 Read This First document
◦ HPE StoreEasy 1X60 Storage Quick Start Guide
◦ Windows Storage Server 2016 (WSS2016) Certificate of Authenticity (COA) label (affixed to the
product)
◦ An envelope containing HPE Integrated Lights-Out (iLO) Advanced Security license key and document
◦ HPE StoreEasy 1X60 System Recovery DVD (if ordered)
If any of the above-mentioned items are missing, contact Hewlett Packard Enterprise
(https://www.hpe.com/us/en/contact-hpe.html) for assistance.
IMPORTANT:
For support purposes, you must know how to locate or have a copy of the StoreEasy 1X60 Storage
system serial number, the Product ID key from WSS2016 COA, and the iLO Advanced Security license
key.
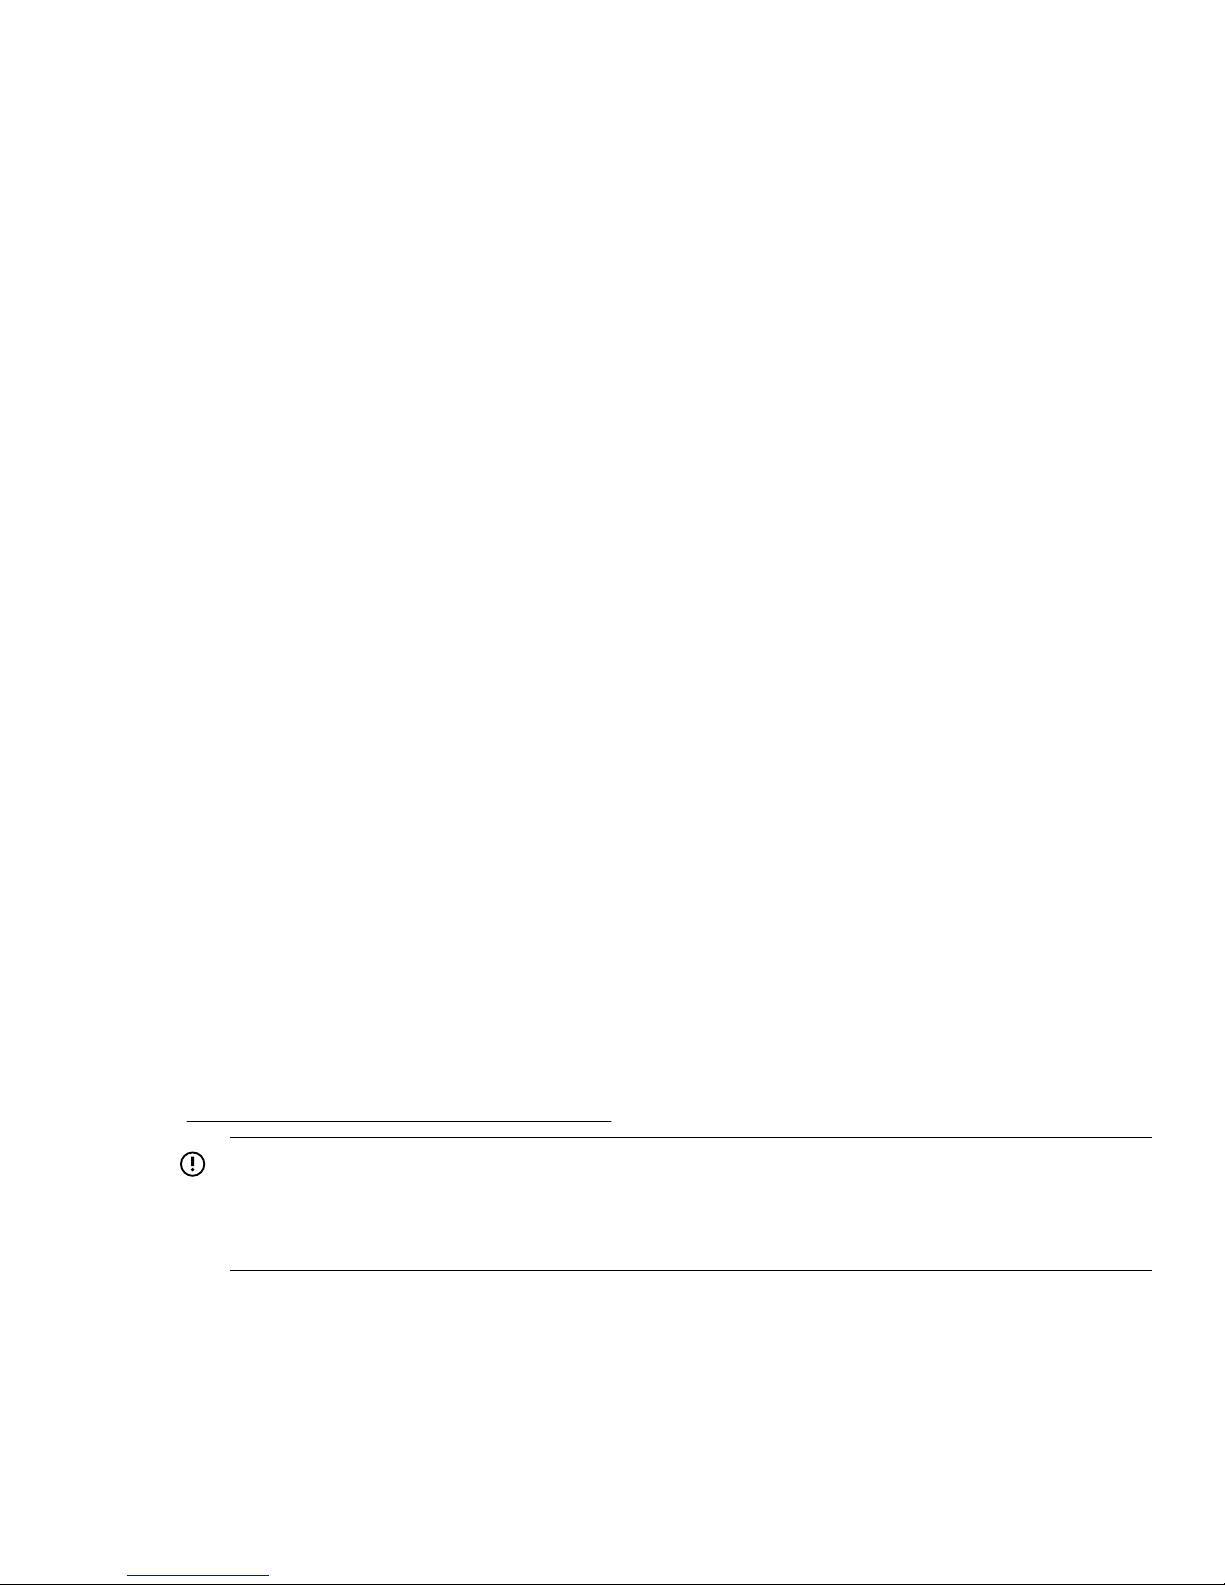
HPE personnel uses the system serial number to verify the StoreEasy model and warranty information. It is
located in the following places on the system:
3
Page 4
• On a label (1) affixed outside the HPE StoreEasy 1X60 Storage shipping box
1
1
• Top (1) of the HPE StoreEasy 1X60 Storage chassis (some models)
• Inside (1) of the HPE StoreEasy 1X60 Storage chassis (some models)
4
Page 5
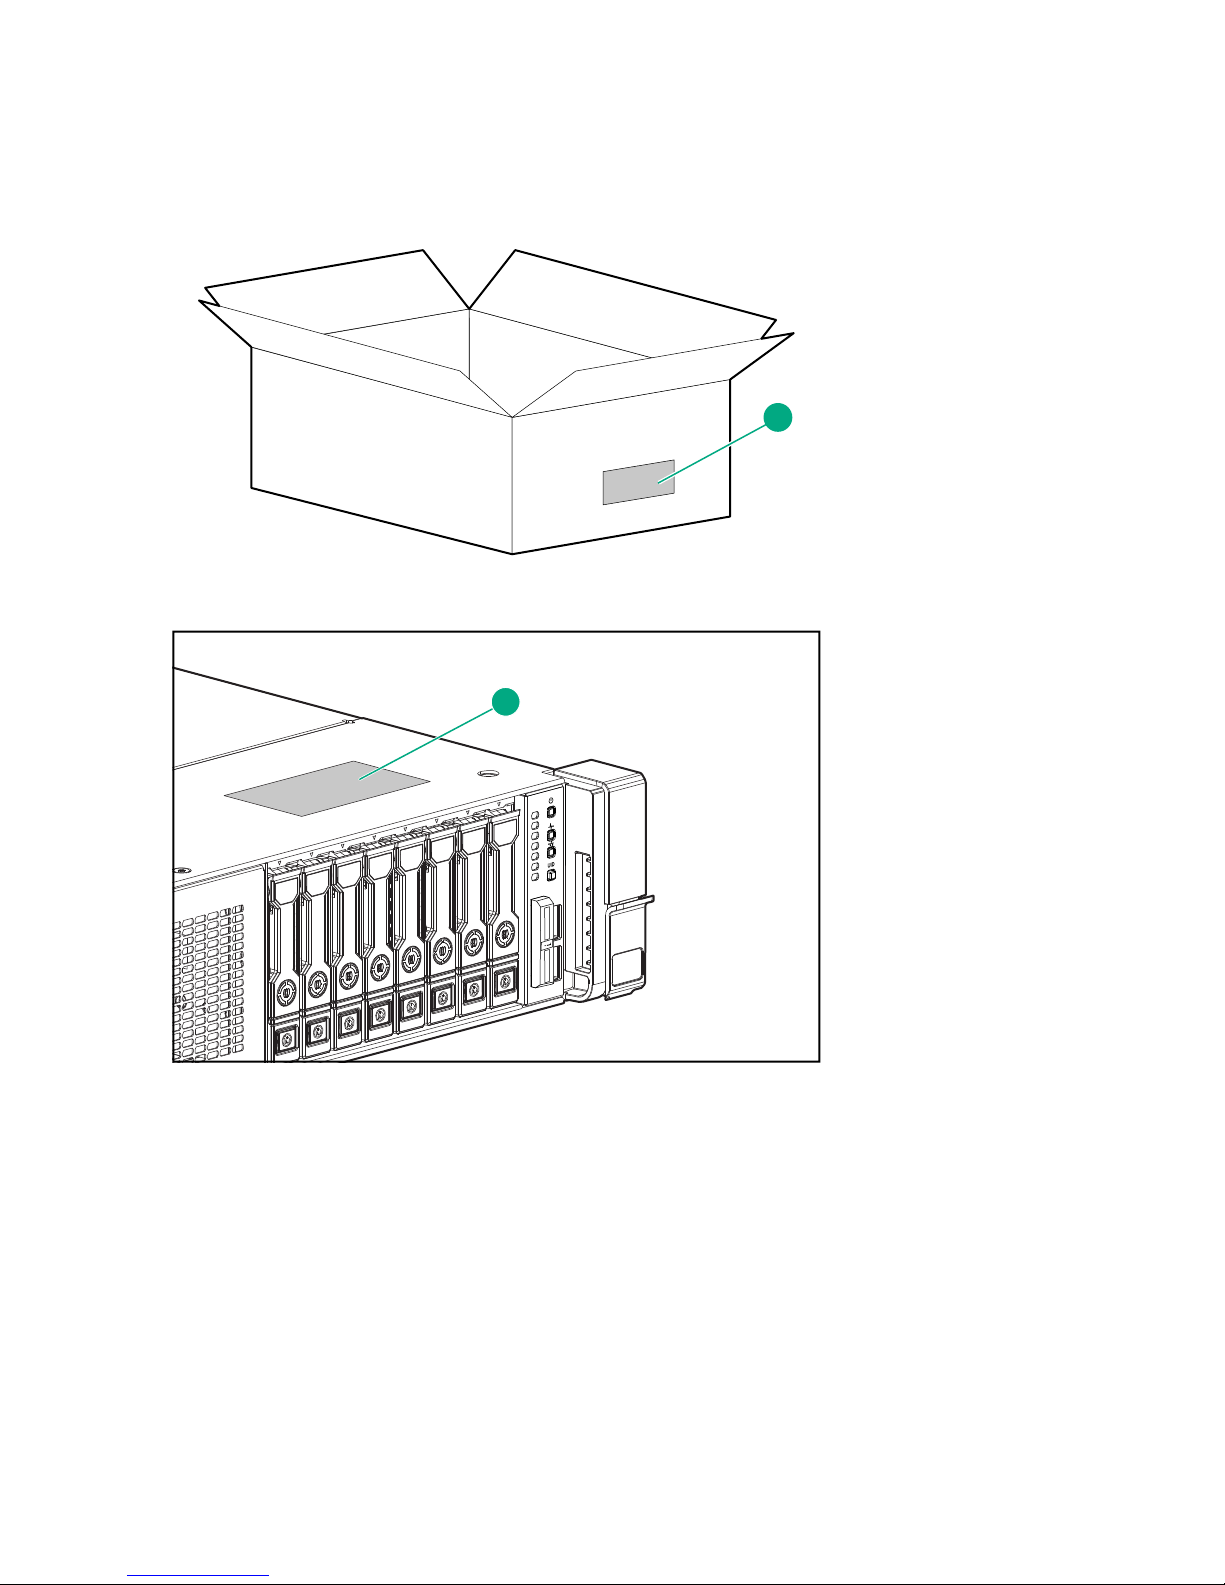
1
• Pull out serial number tab (1) on the product
1
5
Page 6

1
The COA label Product ID key is required when:
• The WSS2016 operating system has been reinstalled.
• The motherboard of StoreEasy 1X60 product is replaced.
• The original factory-installed operating system is upgraded to a newer version of WSS operating system.
The iLO Advanced Security license key is required when:
• The motherboard of StoreEasy 1X60 product is replaced.
• The iLO license key must be reinstalled.
2. Installing the rail kits and mounting the system in a rack
Important safety information
CAUTION:
Electrostatic Discharge (ESD) can damage the electronic components. Ensure that you are properly
grounded (earthed) before beginning any installation procedure.
Installation Guidelines
This installation must be performed by qualified individuals having knowledge of the procedures, precautions,
and equipment hazards that contains hazardous electrical circuits.
6 2. Installing the rail kits and mounting the system in a rack
Page 7

WARNING:
• The rail kits, when installed, form only a shelf for the StoreEasy 1X60 to rest on. The StoreEasy
1X60 is not attached to the rail by any other means. Use extreme caution when pulling the
StoreEasy 1X60 out from the rack. The storage system can slip and fall, which may cause damage
or injury to the StoreEasy 1X60 Storage. HPE is not responsible for any damage or injury caused by
mishandling of StoreEasy 1X60.
• Ensure that the rack is leveled and stable before working on the rack. The leveling jacks (feet) must
extend to the floor and the full weight of the rack must rest firmly on the floor.
• Ensure that the rack has anti-tip measures such as, floor-bolting, anti-tip feet, ballast, or a
combination of the measures, as specified by the rack manufacturer and applicable codes in place.
• Ensure that sufficient personnel are available to support one or more products during the installation
process. HPE recommends you to use an appropriate lifting device as an installation aid.
• Ensure that the rack is loaded from bottom to top, with the heaviest appliances at the bottom to make
the rack steady.
• Avoid overloading the branch circuit that provides power to the rack. The total rack load must not
exceed 80 percent of the branch circuit rating.
Installation
1. Install the rail kits.
For detailed instructions on installing the HPE rack rails into square and round hole racks for HPE 2U
Storage system, refer HPE Rack Rail Kit installation instructions document, that is part of the shipped rail
kit.
2. Slide the StoreEasy 1X60 into the position on the rails as shown in Figure 1.
Figure 1: StoreEasy 1X60 insertion into the rack
7
Page 8

3. To secure the StoreEasy 1X60 to the rails, the Configure-to-Order (CTO) bracket at the rear ends of the
1
2
1
2
rails must overlap the chassis tab as shown in Figure 2.
Figure 2: CTO bracket location
4. Secure the StoreEasy 1X60 to the rack rails using thumbscrews on the front bezel as shown in Figure 3.
Figure 3: Secure StoreEasy 1X60 to the rack
5. Using the holes provided in the rear rack rails, install the tie wraps and route external cables as required
as shown in Figure 4.
8
Page 9

Figure 4: Cable management with tie wraps
12
6. Connect all power cords to the facility power source.
3. Cabling the StoreEasy system to the network
The iLO network port is used to remotely manage the StoreEasy 1X60 hardware and allows administrators to
launch a remote console session to the system. HPE recommends that you connect the iLO port to your
management network. The iLO port is preconfigured to obtain an IP address through DHCP. If your
environment does not support DHCP, use a KVM and configure iLO to use a static IP address. For
instructions, see HPE StoreEasy 1X60 Storage System Administrator Guide available at
https://support.hpe.com/hpesc/public/home/documentHome?sp4ts.oid=1008632547.
The 4 x 1GbE network ports are used for the storage network and to connect the system to infrastructure
services such as, Active Directory, DNS, NTP, etc. The ports can be configured as segregated network ports
or a network team. Ensure that your switch is prepared for either configuration.
Figure 5: Rear view of the StoreEasy 1660 and StoreEasy 1860 Storage system
1 Network Ports
2 iLO Port
If you have purchased additional interface cards for your StoreEasy 1X60, the following table guides you on
where to install them. The numerical values indicate the order of installation.
3. Cabling the StoreEasy system to the network 9
Page 10

Description
2 1
PCIe Slot 1
(x8)
PCIe Slot 2
(x16)
PCIe Slot 3
(x8)
FlexLOM
Slot
PCIe Slot
1
4 (x8)
PCIe Slot
5 (x16)
Primary Riser Secondary Riser
1
PCIe Slot
1
6 (x8)
1
HPE M.2 Kit
with 2 x M.2
Slot Not
Available
Slot Not
Available
X Slot Not
Available
Slot Not
Available
Slot Not
Available
Slot Not
Available
SSDs
FlexLOM Slot Not
PCIe x16
2
1 Slot Not
Available
PCIe x8 or less 1 2 1 2 3
1
Slots for Secondary Riser require that the second processor is installed before they are available for use. PCIe Slot 4 and
PCIe Slot 5 are not available when using the riser with the 2 x SFF cage.
2
PCIe x16 on Primary Riser is only available on the StoreEasy 1660 system. The StoreEasy 1860 system uses this slot for
the SAS expander card.
1
1
Available
Figure 6: Rear view of the StoreEasy 1460 Storage system
1
Network Ports
2 iLO Port
Description PCIe Slot 1 (x16) PCIe Slot 2 (x8) PCIe Slot 3 (x16) FlexLOM Slot
Primary Riser Secondary Riser
PCIe x8
PCIe x16
2 1 3
1 2
FlexLOM
1
Slot for Secondary Riser requires the second processor to be installed.
1
X
10
Page 11

1
2
Figure 7: Rear view of the StoreEasy 1560 Storage system
1
1
2 iLO Port
Description
P408i-p
PCIe x8
PCIe x16
4. Power Up
Power up the storage system using power button on the front panel as shown in Figure 6.
Network Ports
PCIe Slot 1
(x16)
3 1 Not available 2
1 2
PCIe Slot 2
(x8)
PCIe Slot 3
(x8)
X
PCIe Slot 4
(x16)
PCIe Slot 5 (x8)
Figure 8: HPE StoreEasy 1X60 Storage
1 Power button
4. Power Up 11
Page 12

IMPORTANT:
If the StoreEasy 1X60 Storage system is attached to an external storage, including JBODs, power on
the external storage system before you power on the StoreEasy 1X60 Storage system.
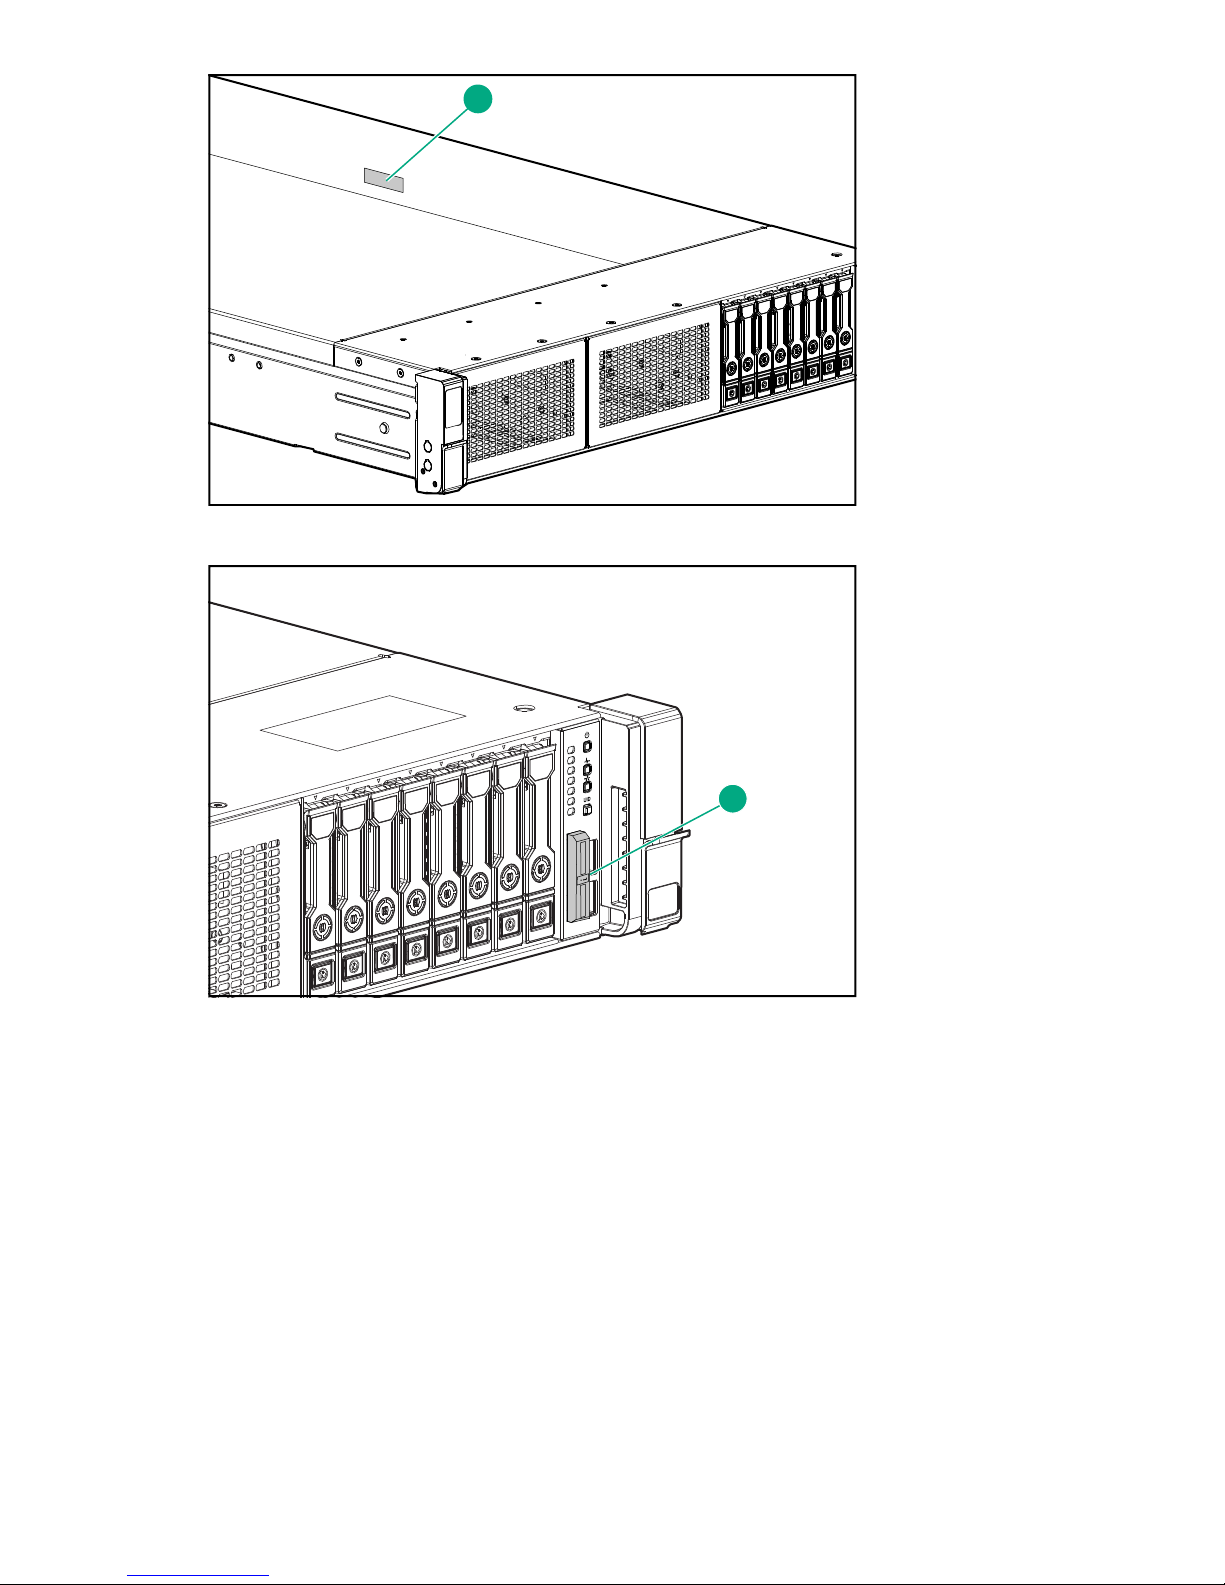
5. Power On Initial Startup Sequence
Before using the HPE StoreEasy Management Console (SEMC) as the primary management tool, complete
the initial startup sequence. You can complete the initial startup sequence by connecting to the StoreEasy
1X60 using a KVM to configure a static IP or to gather the DHCP address from the boot screen.
Alternatively, you can complete the initial startup sequence by connecting to the StoreEasy 1X60 using iLO
Integrated Remote Console (IRC) remotely. If the iLO port is connected to a network segment with DHCP
enabled and automatic DNS registration, use the DNS name. The DNS name, iLO initial login, and iLO initial
password are available on the information tag attached to the front of the system on the right-hand side.
For more information on DHCP configuration and DNS registration, see HPE StoreEasy 1X60 Storage
System Administrator Guide available at
https://support.hpe.com/hpesc/public/home/documentHome?sp4ts.oid=1008632547.
Once StoreEasy 1X60 is booted, the language selection screen is displayed.
NOTE:
If the language selection screen does not display, contact Hewlett Packard Enterprise support center (https://
www.hpe.com/us/en/contact-hpe.html).
Follow the instructions of the on-screen wizard and:
12 5. Power On Initial Startup Sequence
Page 13

1. Select your preferred language.
2. Read and accept the license terms.
3. Set the local Administrator password.
Once these steps are complete, log in with the previously set administrator credentials. A post-installation
process automatically starts and takes approximately 10-15 minutes. The system reboots at the end of the
post installation.
4. After the reboot, log in with the Administrator account and password set in Step 3.
The system launches the Initial Configuration Tasks (ICT) application.
13
Page 14

Figure 9: Initial Configuration Tasks
If ICT does not launch automatically, press Windows + R on your keyboard, type OEMOOBE and click OK.
Next Steps
You can perform the following tasks using the ICT:
• Update the system settings such as, changing the local Administrator password and time zone.
• Launch the Network Configuration wizard to configure and validate the network configuration, configure
email alerts, and register the product.
• Create Storage Pools and Virtual Disks.
• Enable software updates and enhancements directly from Windows Update.
• Set up optional data protection solutions on StoreEasy 1X60 with cloud-based data backup, by replicating
data using Carbonite Double-Take Availability. The data protection solutions require separate licensing.
You can also use a free trial license for a limited time.
• Download the HPE StoreEasy Management Console (SEMC) to provision storage, file shares, and quotas
more easily.
For further instructions on using the Initial Configuration Tasks, for additional configuration, and setup
information, see HPE StoreEasy 1X60 Administrator Guide available at
https://support.hpe.com/hpesc/public/home/documentHome?sp4ts.oid=1008632547.
14 Next Steps
Page 15

Warranty information
To view the warranty for your product or to view the Safety and Compliance Information for Server, Storage,
Power, Networking, and Rack Products reference document, go to the Enterprise Safety and Compliance
website:
www.hpe.com/support/Safety-Compliance-EnterpriseProducts
Additional warranty information
HPE ProLiant and x86 Servers and Options
www.hpe.com/support/ProLiantServers-Warranties
HPE Enterprise Servers
www.hpe.com/support/EnterpriseServers-Warranties
HPE Storage Products
www.hpe.com/support/Storage-Warranties
HPE Networking Products
www.hpe.com/support/Networking-Warranties
Warranty and regulatory information
For important safety, environmental, and regulatory information, see Safety and Compliance Information for
Server, Storage, Power, Networking, and Rack Products, available at
Compliance-EnterpriseProducts.
www.hpe.com/support/Safety-
Belarus Kazakhstan Russia marking
Manufacturer and Local Representative Information
Manufacturer information:
Hewlett Packard Enterprise Company, 3000 Hanover Street, Palo Alto, CA 94304 U.S.
Local representative information Russian:
• Russia:
• Belarus:
• Kazakhstan:
Warranty information 15
Page 16

Local representative information Kazakh:
• Russia:
• Belarus:
• Kazakhstan:
Manufacturing date:
The manufacturing date is defined by the serial number.
CCSYWWZZZZ (serial number format for this product)
Valid date formats include:
• YWW, where Y indicates the year counting from within each new decade, with 2000 as the starting point;
for example, 238: 2 for 2002 and 38 for the week of September 9. In addition, 2010 is indicated by 0, 2011
by 1, 2012 by 2, 2013 by 3, and so forth.
• YYWW, where YY indicates the year, using a base year of 2000; for example, 0238: 02 for 2002 and 38 for
the week of September 9.
Turkey RoHS material content declaration
Ukraine RoHS material content declaration
16 Turkey RoHS material content declaration
 Loading...