

Page 1

HP IBRIX 9000 Storage File System User Guide
Abstract
This guide describes how to configure and manage IBRIX software file systems and how to use NFS, SMB, FTP, and HTTP to
access file system data. The guide also describes the following file system features: quotas, remote replication, snapshots, data
retention and validation, data tiering, and file allocation. The guide is intended for system administrators managing 9300
Storage Gateway, 9320 Storage, 9720 Storage, and 9730 Storage. For the latest IBRIX guides, browse to
nl
http://www.hp.com/support/IBRIXManuals.
HP Part Number: TA768-96076
Published: December 2012
Edition: 9
Page 2

© Copyright 2009, 2012 Hewlett-Packard Development Company, L.P.
Confidential computer software. Valid license from HP required for possession, use or copying. Consistent with FAR 12.211 and 12.212, Commercial
Computer Software, Computer Software Documentation, and Technical Data for Commercial Items are licensed to the U.S. Government under
vendor's standard commercial license.
The information contained herein is subject to change without notice. The only warranties for HP products and services are set forth in the express
warranty statements accompanying such products and services. Nothing herein should be construed as constituting an additional warranty. HP shall
not be liable for technical or editorial errors or omissions contained herein.
Acknowledgments
Microsoft® and Windows® are U.S. registered trademarks of Microsoft Corporation.
UNIX® is a registered trademark of The Open Group.
Revision History
DateEdition
DescriptionSoftware
Version
Initial release of HP 9000 File Serving Software5.3.1November 20091
Updated license and quotas information5.3.2December 20092
5.4.0April 20103
Added information about file cloning, CIFS, directory tree quotas, the Statistics tool,
and GUI procedures
Removed information about the Statistics tool5.4.1July 20104
5.5.0December 20105
Added information about authentication, CIFS, FTP, HTTP, SSL certificates, and remote
replication
Updated CIFS, FTP, HTTP, and snapshot information5.6April 20116
6.0September 20117
Added or updated information about data retention and validation, software snapshots,
block snapshots, remote replication, HTTP, case insensitivity, quotas
6.1June 20128
Added or updated information about file systems, file share creation, rebalancing
segments, remote replication, user authentication, CIFS, LDAP, data retention, data
tiering, file allocation, quotas, Antivirus software
6.2December 20129
Added or updated information about file systems, physical volumes, segment
rebalancing, remote replication, Antivirus scans, REST API, Express Query, auditing,
HTTP, quotas, data tiering, renamed CIFS to SMB
Page 3

Contents
1 Using IBRIX software file systems...................................................................9
File system operations................................................................................................................9
File system building blocks.......................................................................................................11
Configuring file systems...........................................................................................................11
Accessing file systems.............................................................................................................12
2 Creating and mounting file systems.............................................................13
Creating a file system..............................................................................................................13
Using the New Filesystem Wizard........................................................................................13
Configuring additional file system options.............................................................................17
Creating a file system using the CLI......................................................................................18
File limit for directories............................................................................................................19
Managing mountpoints and mount/unmount operations..............................................................19
GUI procedures.................................................................................................................19
CLI procedures..................................................................................................................21
Mounting and unmounting file systems locally on IBRIX 9000 clients.........................................22
Limiting file system access for IBRIX 9000 clients.........................................................................23
Using Export Control...............................................................................................................24
3 Configuring quotas...................................................................................25
How quotas work...................................................................................................................25
Enabling quotas on a file system and setting grace periods..........................................................25
Setting quotas for users, groups, and directories.........................................................................26
Using a quotas file..................................................................................................................29
Importing quotas from a file................................................................................................29
Exporting quotas to a file....................................................................................................30
Format of the quotas file.....................................................................................................30
Using online quota check........................................................................................................31
Configuring email notifications for quota events..........................................................................32
Deleting quotas......................................................................................................................32
Troubleshooting quotas............................................................................................................33
4 Maintaining file systems............................................................................34
Best practices for file system performance...................................................................................34
Viewing information about file systems and components...............................................................34
Viewing physical volume information....................................................................................35
Viewing volume group information.......................................................................................35
Viewing logical volume information......................................................................................36
Viewing file system information............................................................................................36
Viewing disk space information from a Linux 9000 client........................................................39
Extending a file system............................................................................................................39
Rebalancing segments in a file system.......................................................................................40
How rebalancing works......................................................................................................40
Rebalancing segments on the GUI........................................................................................41
Rebalancing segments from the CLI......................................................................................43
Tracking the progress of a rebalance task.............................................................................43
Viewing the status of rebalance tasks....................................................................................44
Stopping rebalance tasks....................................................................................................44
Deleting file systems and file system components.........................................................................44
Deleting a file system..........................................................................................................44
Deleting segments, volume groups, and physical volumes........................................................44
Deleting file serving nodes and IBRIX 9000 clients.................................................................45
Checking and repairing file systems..........................................................................................45
Contents 3
Page 4

Analyzing the integrity of a file system on all segments...........................................................46
Clearing the INFSCK flag on a file system.............................................................................46
Troubleshooting file systems......................................................................................................46
Segment of a file system is accidently deleted........................................................................46
ibrix_pv -a discovers too many or too few devices..................................................................47
Cannot mount on an IBRIX 9000 client.................................................................................47
NFS clients cannot access an exported file system..................................................................48
User quota usage data is not being updated.........................................................................48
File system alert is displayed after a segment is evacuated.......................................................48
SegmentNotAvailable is reported.........................................................................................48
SegmentRejected is reported...............................................................................................48
ibrix_fs -c failed with "Bad magic number in super-block"........................................................50
5 Using NFS...............................................................................................51
Exporting a file system............................................................................................................51
Unexporting a file system....................................................................................................54
Using case-insensitive file systems ............................................................................................54
Setting case insensitivity for all users (NFS/Linux/Windows)....................................................55
Viewing the current setting for case insensitivity......................................................................55
Clearing case insensitivity (setting to case sensitive) for all users (NFS/Linux/Windows)..............55
Log files............................................................................................................................56
Case insensitivity and operations affecting directories.............................................................56
6 Configuring authentication for SMB, FTP, and HTTP.......................................58
Using Active Directory with LDAP ID mapping............................................................................58
Using LDAP as the primary authentication method.......................................................................59
Requirements for LDAP users and groups...............................................................................59
Configuring LDAP for IBRIX software.....................................................................................59
Configuring authentication from the GUI....................................................................................60
Viewing or changing authentication settings...............................................................................68
Configuring authentication from the CLI.....................................................................................69
Configuring Active Directory ...............................................................................................69
Configuring LDAP..............................................................................................................69
Configuring LDAP ID mapping.............................................................................................70
Configuring Local Users and Groups authentication................................................................71
7 Using SMB..............................................................................................73
Configuring file serving nodes for SMB......................................................................................73
Starting or stopping the SMB service and viewing SMB statistics...................................................73
Monitoring SMB services.........................................................................................................74
SMB shares...........................................................................................................................75
Configuring SMB shares with the GUI...................................................................................76
Configuring SMB signing ...................................................................................................80
Managing SMB shares with the GUI....................................................................................81
Configuring and managing SMB shares with the CLI..............................................................82
Managing SMB shares with Microsoft Management Console...................................................83
Linux static user mapping with Active Directory...........................................................................87
Configuring Active Directory................................................................................................88
Assigning attributes............................................................................................................89
Synchronizing Active Directory 2008 with the NTP server used by the cluster.............................90
Consolidating SMB servers with common share names................................................................90
SMB clients............................................................................................................................92
Viewing quota information..................................................................................................92
Differences in locking behavior............................................................................................92
SMB shadow copy.............................................................................................................92
Permissions in a cross-protocol SMB environment.........................................................................94
4 Contents
Page 5

How the SMB server handles UIDs and GIDs.........................................................................94
Permissions, UIDs/GIDs, and ACLs.......................................................................................95
Changing the way SMB inherits permissions on files accessed from Linux applications................96
Troubleshooting SMB..............................................................................................................96
8 Using FTP................................................................................................98
Best practices for configuring FTP..............................................................................................98
Managing FTP from the GUI....................................................................................................98
Configuring FTP ................................................................................................................98
Managing the FTP configuration........................................................................................102
Managing FTP from the CLI....................................................................................................103
Configuring FTP ..............................................................................................................103
Managing the FTP configuration........................................................................................103
The vsftpd service.................................................................................................................104
Starting or stopping the FTP service manually...........................................................................104
Accessing shares..................................................................................................................105
FTP and FTPS commands for anonymous shares...................................................................105
FTP and FTPS commands for non-anonymous shares.............................................................106
FTP and FTPS commands for Fusion Manager......................................................................107
9 Using HTTP............................................................................................108
HTTP share types..................................................................................................................108
Process checklist for creating HTTP shares................................................................................108
Best practices for configuring HTTP.........................................................................................109
Managing HTTP from the GUI................................................................................................109
Configuring HTTP shares...................................................................................................109
Managing the HTTP configuration......................................................................................116
Tuning the socket read block size and file write block size .........................................................116
Managing HTTP from the CLI.................................................................................................117
Configuring HTTP.............................................................................................................117
Managing the HTTP configuration......................................................................................118
Starting or stopping the HTTP service manually.........................................................................118
Accessing shares..................................................................................................................119
Configuring Windows clients to access HTTP WebDAV shares....................................................120
Troubleshooting HTTP............................................................................................................121
10 Managing SSL certificates......................................................................123
Creating an SSL certificate.....................................................................................................123
Adding a certificate to the cluster............................................................................................125
Exporting a certificate...........................................................................................................126
Deleting a certificate.............................................................................................................126
11 Using remote replication........................................................................127
Overview............................................................................................................................127
Continuous or run-once replication modes...........................................................................127
Using intercluster replications.............................................................................................128
Using intracluster replications............................................................................................129
File system snapshot replication..........................................................................................129
Configuring the target export for replication to a remote cluster...................................................129
GUI procedure................................................................................................................130
CLI procedure..................................................................................................................131
Configuring and managing replication tasks on the GUI............................................................133
Viewing replication tasks...................................................................................................133
Starting a replication task ................................................................................................135
Pausing or resuming a replication task................................................................................138
Stopping a replication task................................................................................................138
Configuring and managing replication tasks from the CLI...........................................................139
Contents 5
Page 6

Starting a remote replication task to a remote cluster............................................................139
Starting an intracluster remote replication task.....................................................................140
Starting a run-once directory replication task.......................................................................140
Stopping a remote replication task.....................................................................................140
Pausing a remote replication task.......................................................................................140
Resuming a remote replication task....................................................................................140
Querying remote replication tasks......................................................................................140
Replicating WORM/retained files...........................................................................................141
Configuring remote failover/failback.......................................................................................141
Troubleshooting remote replication..........................................................................................142
12 Managing data retention.......................................................................143
Overview............................................................................................................................143
Data retention.................................................................................................................143
Data validation scans.......................................................................................................144
Enabling file systems for data retention....................................................................................145
Viewing the retention profile for a file system.......................................................................148
Changing the retention profile for a file system.....................................................................149
Managing WORM and retained files......................................................................................149
Creating WORM and WORM-retained files........................................................................149
Viewing the retention information for a file..........................................................................150
File administration............................................................................................................150
Running data validation scans................................................................................................153
Scheduling a validation scan.............................................................................................153
Starting an on-demand validation scan...............................................................................154
Viewing, stopping, or pausing a scan.................................................................................155
Viewing validation scan results..........................................................................................155
Viewing and comparing hash sums for a file.......................................................................156
Handling validation scan errors.........................................................................................156
Creating data retention reports...............................................................................................157
Generating and managing data retention reports.................................................................158
Generating data retention reports from the CLI.....................................................................159
Using hard links with WORM files..........................................................................................160
Using remote replication........................................................................................................160
Backup support for data retention...........................................................................................160
Troubleshooting data retention................................................................................................160
13 Express Query......................................................................................162
Managing the metadata service.............................................................................................162
Backing up and restoring file systems with Express Query data..............................................163
Saving and importing file system metadata..........................................................................164
Metadata and continuous remote replication.......................................................................166
Metadata and synchronized server times.................................................................................166
Managing auditing...............................................................................................................167
Audit log........................................................................................................................167
Audit log reports..............................................................................................................168
StoreAll REST API..................................................................................................................170
Dual nature of REST API shares..........................................................................................170
Component overview........................................................................................................171
File content transfer..........................................................................................................175
Custom metadata assignment............................................................................................177
Metadata queries............................................................................................................179
Retention properties assignment.........................................................................................189
HTTP Status Codes...........................................................................................................191
6 Contents
Page 7

14 Configuring Antivirus support..................................................................192
Adding or removing external virus scan engines.......................................................................193
Enabling or disabling Antivirus on IBRIX file systems..................................................................194
Updating Antivirus definitions.................................................................................................194
Configuring Antivirus settings.................................................................................................195
Managing Antivirus scans......................................................................................................199
Starting or scheduling Antivirus scans.................................................................................199
Viewing, pausing, resuming, or stopping Antivirus scan tasks ................................................201
Viewing Antivirus statistics......................................................................................................202
Antivirus quarantines and software snapshots...........................................................................202
15 Creating IBRIX software snapshots...........................................................204
File system limits for snap trees and snapshots..........................................................................204
Configuring snapshot directory trees and schedules...................................................................204
Modifying a snapshot schedule.........................................................................................206
Managing software snapshots................................................................................................206
Taking an on-demand snapshot.........................................................................................206
Determining space used by snapshots................................................................................207
Accessing snapshot directories...........................................................................................207
Restoring files from snapshots............................................................................................208
Deleting snapshots...........................................................................................................209
Moving files between snap trees.............................................................................................212
Backing up snapshots............................................................................................................212
16 Creating block snapshots.......................................................................213
Setting up snapshots.............................................................................................................213
Preparing the snapshot partition........................................................................................213
Registering for snapshots..................................................................................................214
Discovering LUNs in the array............................................................................................214
Reviewing snapshot storage allocation................................................................................214
Automated block snapshots....................................................................................................214
Creating automated snapshots using the GUI......................................................................215
Creating an automated snapshot scheme from the CLI..........................................................218
Other automated snapshot procedures................................................................................219
Managing block snapshots....................................................................................................220
Creating an on-demand snapshot......................................................................................220
Mounting or unmounting a snapshot..................................................................................220
Recovering system resources on snapshot failure...................................................................220
Deleting snapshots...........................................................................................................220
Viewing snapshot information............................................................................................221
Accessing snapshot file systems..............................................................................................222
Troubleshooting block snapshots.............................................................................................224
17 Using data tiering.................................................................................225
Creating and managing data tiers..........................................................................................225
Viewing tier assignments and managing segments....................................................................230
Viewing data tiering rules......................................................................................................231
Running a migration task.......................................................................................................232
Configuring tiers and migrating data using the CLI....................................................................233
Changing the tiering configuration with the CLI.........................................................................236
Writing tiering rules..............................................................................................................236
Rule attributes..................................................................................................................236
Operators and date/time qualifiers....................................................................................237
Rule keywords.................................................................................................................238
Migration rule examples...................................................................................................238
Ambiguous rules..............................................................................................................239
Contents 7
Page 8

18 Using file allocation..............................................................................240
Overview............................................................................................................................240
File allocation policies......................................................................................................240
How file allocation settings are evaluated...........................................................................241
When file allocation settings take effect on the 9000 client....................................................242
Using CLI commands for file allocation...............................................................................242
Setting file and directory allocation policies.............................................................................242
Setting file and directory allocation policies from the CLI.......................................................243
Setting segment preferences...................................................................................................243
Creating a pool of preferred segments from the CLI..............................................................244
Restoring the default segment preference.............................................................................244
Tuning allocation policy settings.............................................................................................245
Listing allocation policies.......................................................................................................245
19 Support and other resources...................................................................247
Contacting HP......................................................................................................................247
Related information...............................................................................................................247
HP websites.........................................................................................................................247
Subscription service..............................................................................................................247
20 Documentation feedback.......................................................................248
Glossary..................................................................................................249
Index.......................................................................................................251
8 Contents
Page 9
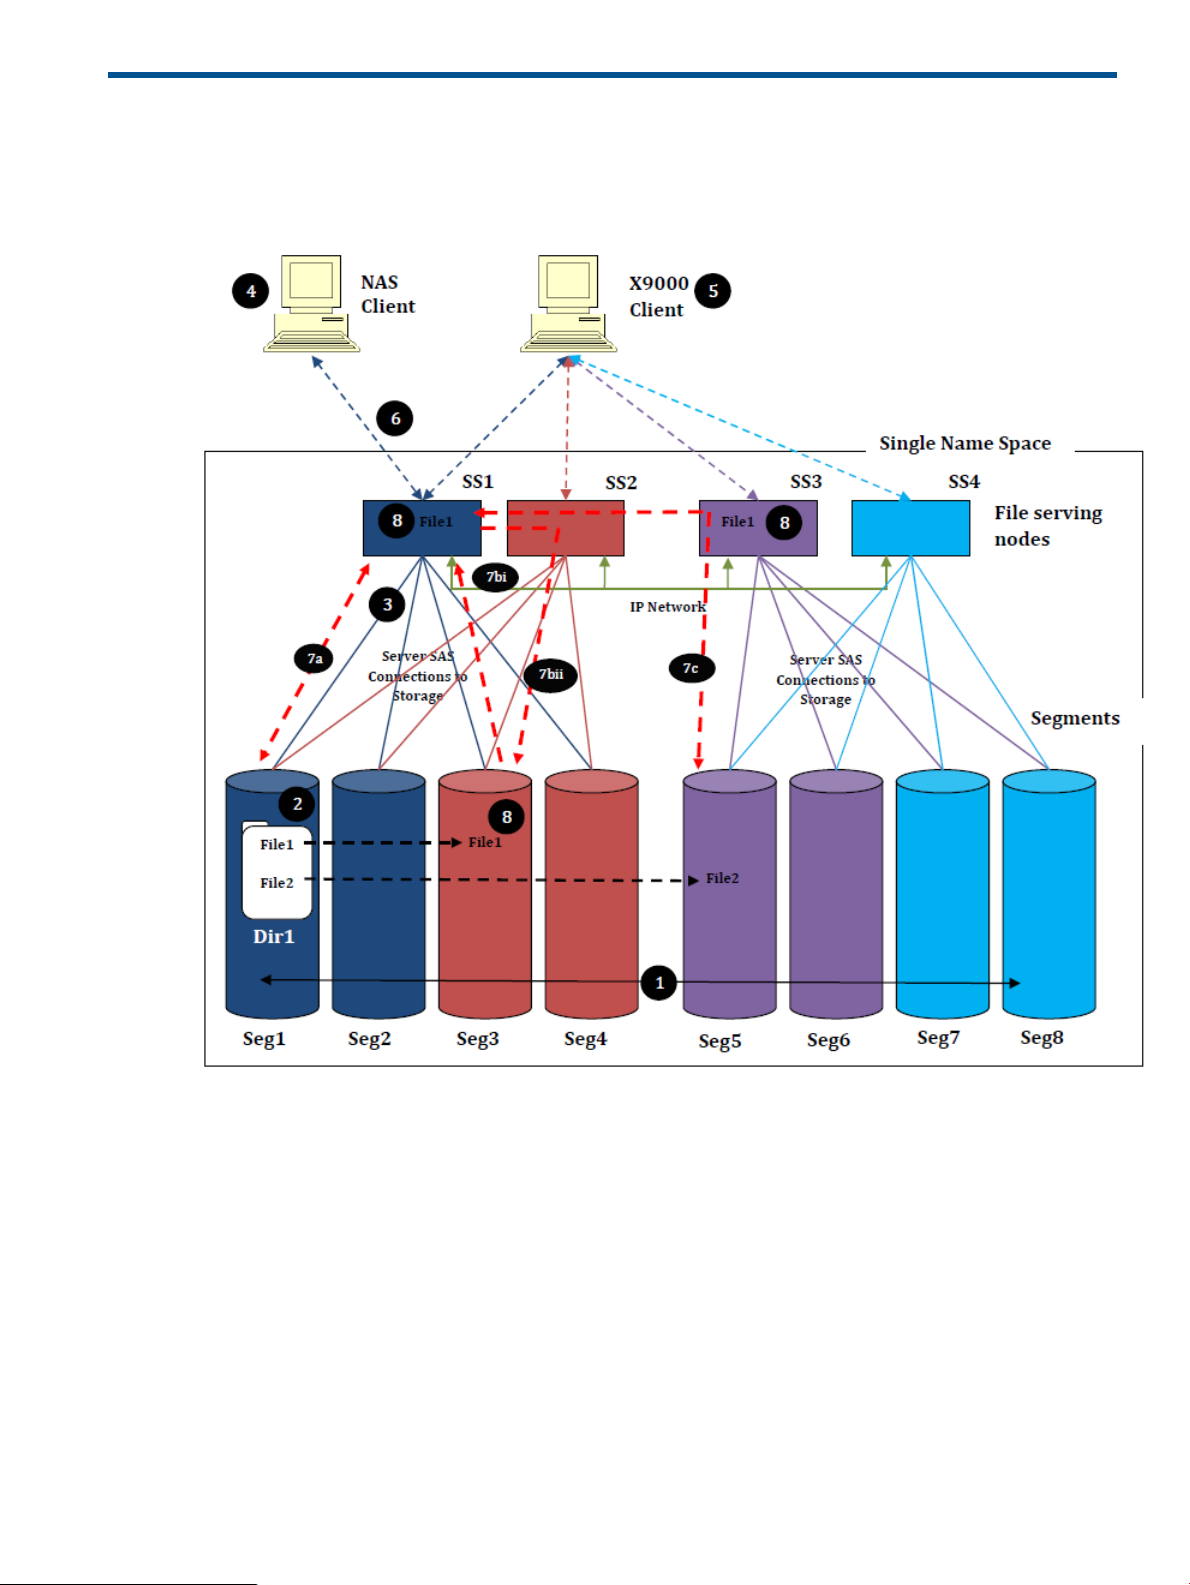
1 Using IBRIX software file systems
File system operations
The following diagram highlights the operating principles of the IBRIX file system.
The topology in the diagram reflects the architecture of the HP 9320, which uses a building block
of server pairs (known as couplets) with SAS attached storage. In the diagram:
• There are four file serving nodes, SS1–SS4. These nodes are also called segment servers.
• SS1 and SS2 share access to segments 1–4 through SAS connections to a shared storage
array.
• SS3 and SS4 share access to segments 5-8 through SAS connections to a shared storage
array.
• One client is accessing the name space using NAS protocols.
• One client is using the proprietary IBRIX client.
The following steps correspond to the numbering in the diagram:
1. The “namespace” of the file system is a collection of segments. Each segment is simply a
repository for files and directories with no implicit namespace relationships among them.
File system operations 9
Page 10

(Specifically, a segment need not be a complete, rooted directory tree). Segments can be any
size and different segments can be different sizes.
2. The location of files and directories within particular segments in the file space is independent
of their respective and relative locations in the namespace. For example, a directory (Dir1)
can be located on one segment, while the files contained in that directory (File1 and File2)
are resident on other segments. The selection of segments for placing files and directories is
done dynamically when the file/directory is created, as determined by an allocation policy.
The allocation policy is set by the system administrator in accordance with the anticipated
access patterns and specific criteria relevant to the installation (such as performance and
manageability). The allocation policy can be changed at any time, even when the file system
is mounted and in use. Files can be redistributed across segments using a rebalancing utility.
For example, rebalancing can be used when some segments are too full while other have free
capacity, or when files need to be distributed across new segments.
3. Segment servers are responsible for managing individual segments of the file system. Each
segment is assigned to one segment server and each server may own multiple segments, as
shown by the color coding in the diagram. Segment ownership can be migrated between
servers with direct access to the storage volume while the file system is mounted. For example,
Seg1 can be migrated between SS1 and SS2 but not to SS3 or SS4.
Additional servers can be added to the system dynamically to meet growing performance
needs, without adding more capacity, by distributing the ownership of existing segments for
proper load balancing and utilization of all servers. Conversely, additional capacity can be
added to the file system while in active use without adding more servers—ownership of the
new segments is distributed among existing servers. Servers can be configured with failover
protection, with other servers being designated as standby servers that automatically take
control of a server’s segments if a failure occurs.
4. Clients run the applications that use the file system. Clients can access the file system either
as a locally mounted cluster file system using the IBRIX Client or using standard network
attached storage (NAS) protocols such as NFS and Server Message Block (SMB).
5. Use of the IBRIX Client on a client system has some significant advantages over the NAS
approach—specifically, the IBRIX Client driver is aware of the segmented architecture of the
file system and, based on the file/directory being accessed, can route requests directly to the
correct segment server, yielding balanced resource utilization and high performance. However,
the IBRIX Client is available only for a limited range of operating systems.
6. NAS protocols such as NFS and SMB offer the benefits of multi-platform support and low cost
of administration of client software, as the client drivers for these protocols are generally
available with the base operating system. When using NAS protocols, a client must mount
the file system from one (or more) of the segment servers. As shown in the diagram, all requests
are sent to the server from which the share is mounted, which then performs the required
routing.
7. Any segment server in the namespace can access any segment. There are three cases:
a. Selected segment is owned by the segment server initiating the operation (for example,
SS1 accessing Seg1).
b. Selected segment is owned by another segment server but is directly accessible at the
block level by the segment server initiating the operation (for example, SS1 accessing
Seg3).
c. Selected segment is owned by another segment server and is not directly accessible by
the segment server initiating the operation (for example, SS1 accessing Seg5).
Each case is handled differently. The data paths are shown in heavy red broken lines in the
diagram:
a. The segment server initiating the operation services the read or write request to the local
segment.
b. In this case, reads and writes take different routes:
10 Using IBRIX software file systems
Page 11

1) The segment server initiating the operation can read files directly from the segment
across the SAN; this is called a SAN READ.
2) The segment server initiating the operation routes writes over the IP network to the
segment server owning the segment. That server then writes data to the segment.
c. All reads and writes must be routed over the IP network between the segment servers.
8. Step 7 assumed that the server had to go to a segment to read a file. However, every segment
server that reads a file keeps a copy of it cached in its memory regardless of which segment
it was read from (in the diagram, two servers have cached copies of File 1). The cached
copies are used to service local read requests for the file until the copy is made invalid, for
example, because the original file has been changed. The file system keeps track of which
servers have cached copies of a file and manages cache coherency using delegations, which
are IBRIX file system metadata structures used to track cached copies of data and metadata.
File system building blocks
A file system is created from building blocks. The first block comprises the underlying physical
volumes, which are combined in volume groups. Segments (logical volumes) are created from the
volume groups. The built-in volume manager handles all space allocation considerations involved
in file system creation.
Configuring file systems
You can configure your file systems to use the following features:
• Quotas. This feature allows you to assign quotas to individual users or groups, or to a directory
tree. Individual quotas limit the amount of storage or the number of files that a user or group
can use in a file system. Directory tree quotas limit the amount of storage and the number of
files that can be created on a file system located at a specific directory tree. See “Configuring
quotas” (page 25).
• Remote replication. This feature provides a method to replicate changes in a source file system
on one cluster to a target file system on either the same cluster or a second cluster. See “Using
remote replication” (page 127).
File system building blocks 11
Page 12

• Data retention and validation. Data retention ensures that files cannot be modified or deleted
for a specific retention period. Data validation scans can be used to ensure that files remain
unchanged. See “Managing data retention” (page 143).
• Antivirus support. This feature is used with supported Antivirus software, allowing you to scan
files on an IBRIX file system. See “Configuring Antivirus support” (page 192).
• IBRIX software snapshots. This feature allows you to capture a point-in-time copy of a file
system or directory for online backup purposes and to simplify recovery of files from accidental
deletion. Users can access the file system or directory as it appeared at the instant of the
snapshot. See “Creating IBRIX software snapshots” (page 204).
• Block Snapshots. This feature uses the array capabilities to capture a point-in-time copy of a
file system for online backup purposes and to simplify recovery of files from accidental deletion.
The snapshot replicates all file system entities at the time of capture and is managed exactly
like any other file system. See “Creating block snapshots” (page 213).
• Data tiering. This feature allows you to set a preferred tier where newly created files will be
stored. You can then create a tiering policy to move files from initial storage, based on file
attributes such as such as modification time, access time, file size, or file type. See “Using
data tiering” (page 225).
• File allocation. This feature allocates new files and directories to segments according to the
allocation policy and segment preferences that are in effect for a client. An allocation policy
is an algorithm that determines the segments that are selected when clients write to a file
system. See “Using file allocation” (page 240).
Accessing file systems
Clients can use the following standard NAS protocols to access file system data:
• NFS. See “Using NFS” (page 51) or more information.
• SMB. See “Using SMB” (page 73) for more information.
• FTP. See “Using FTP” (page 98) for more information.
• HTTP. See “Using HTTP” (page 108) for more information.
You can also use IBRIX 9000 clients to access file systems. Typically, these clients are installed
during the initial system setup. See the HP IBRIX 9000 Storage Installation Guide for more
information.
12 Using IBRIX software file systems
Page 13

2 Creating and mounting file systems
This chapter describes how to create file systems and mount or unmount them.
Creating a file system
You can create a file system using the New Filesystem Wizard provided with the GUI, or you can
use CLI commands. The New Filesystem Wizard also allows you to create an NFS export or an
SMB share for the file system.
Using the New Filesystem Wizard
To start the wizard, click New on the Filesystems top panel. The wizard includes several steps and
a summary, starting with selecting the storage for the file system.
NOTE: For details about the prompts for each step of the wizard, see the GUI online help.
On the Select Storage dialog box, select the storage that will be used for the file system.
Configure Options dialog box. Enter a name for the file system, and specify the appropriate
configuration options.
Creating a file system 13
Page 14
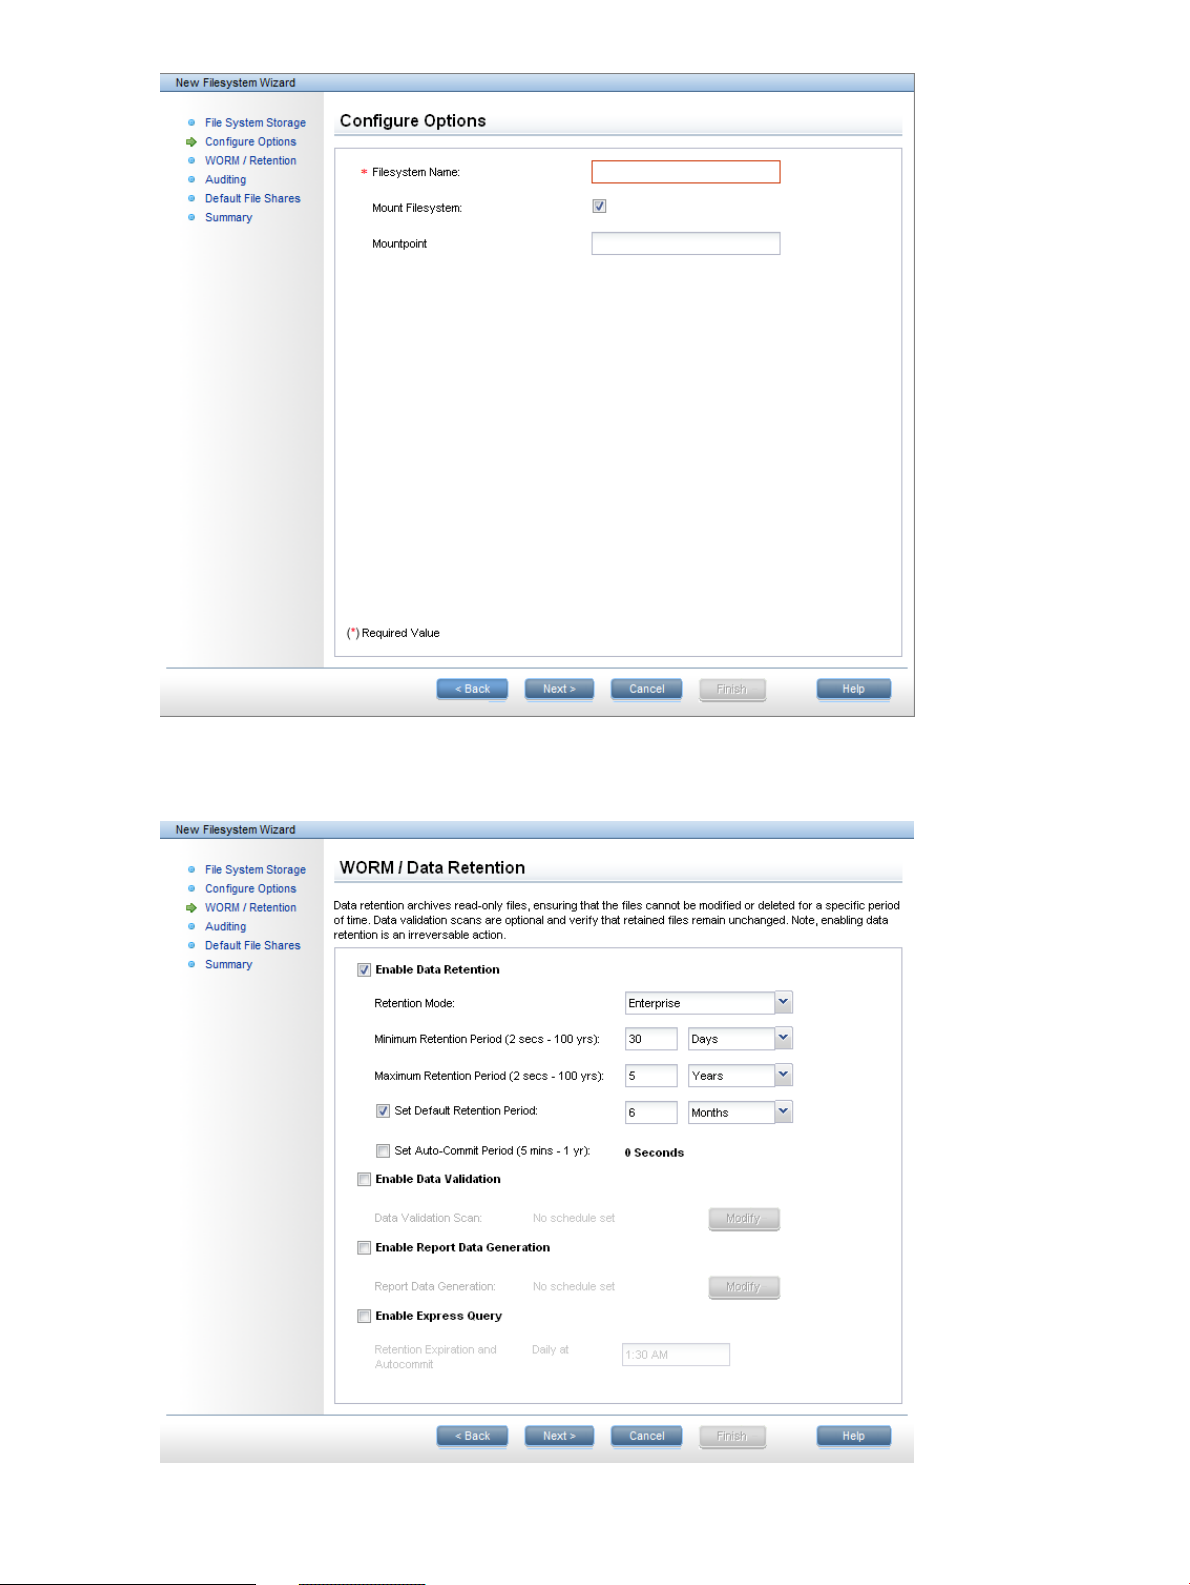
WORM/Data Retention dialog box. If data retention will be used on the file system, enable it and
set the retention policy. See “Managing data retention” (page 143) for more information.
14 Creating and mounting file systems
Page 15
You can configure the following:
• Default retention period. This period determines whether you can manage WORM
(non-retained) files as well as WORM-retained files. (WORM (non-retained) files can be deleted
at any time; WORM-retained files can be deleted only after the file's retention period has
expired.)
To manage only WORM-retained files, set the default retention period to a non-zero value.
WORM-retained files then use this period by default; however, you can assign a different
retention period if desired.
To manage both WORM (non-retained) and WORM-retained files, uncheck Set Default Retention
Period. The default retention period is then set to 0 seconds. When you make a WORM file
retained, you will need to assign a retention period to the file.
• Autocommit period. When the autocommit period is set, files become WORM or
WORM-retained if they are not changed during the period. (If the default retention period is
set to zero, the files become WORM. If the default retention period is set to a value greater
than zero, the files become WORM-retained.) To use this feature, check Set Auto-Commit
Period and specify the time period. The minimum value for the autocommit period is five
minutes, and the maximum value is one year. If you plan to keep normal files on the file system,
do not set the autocommit period.
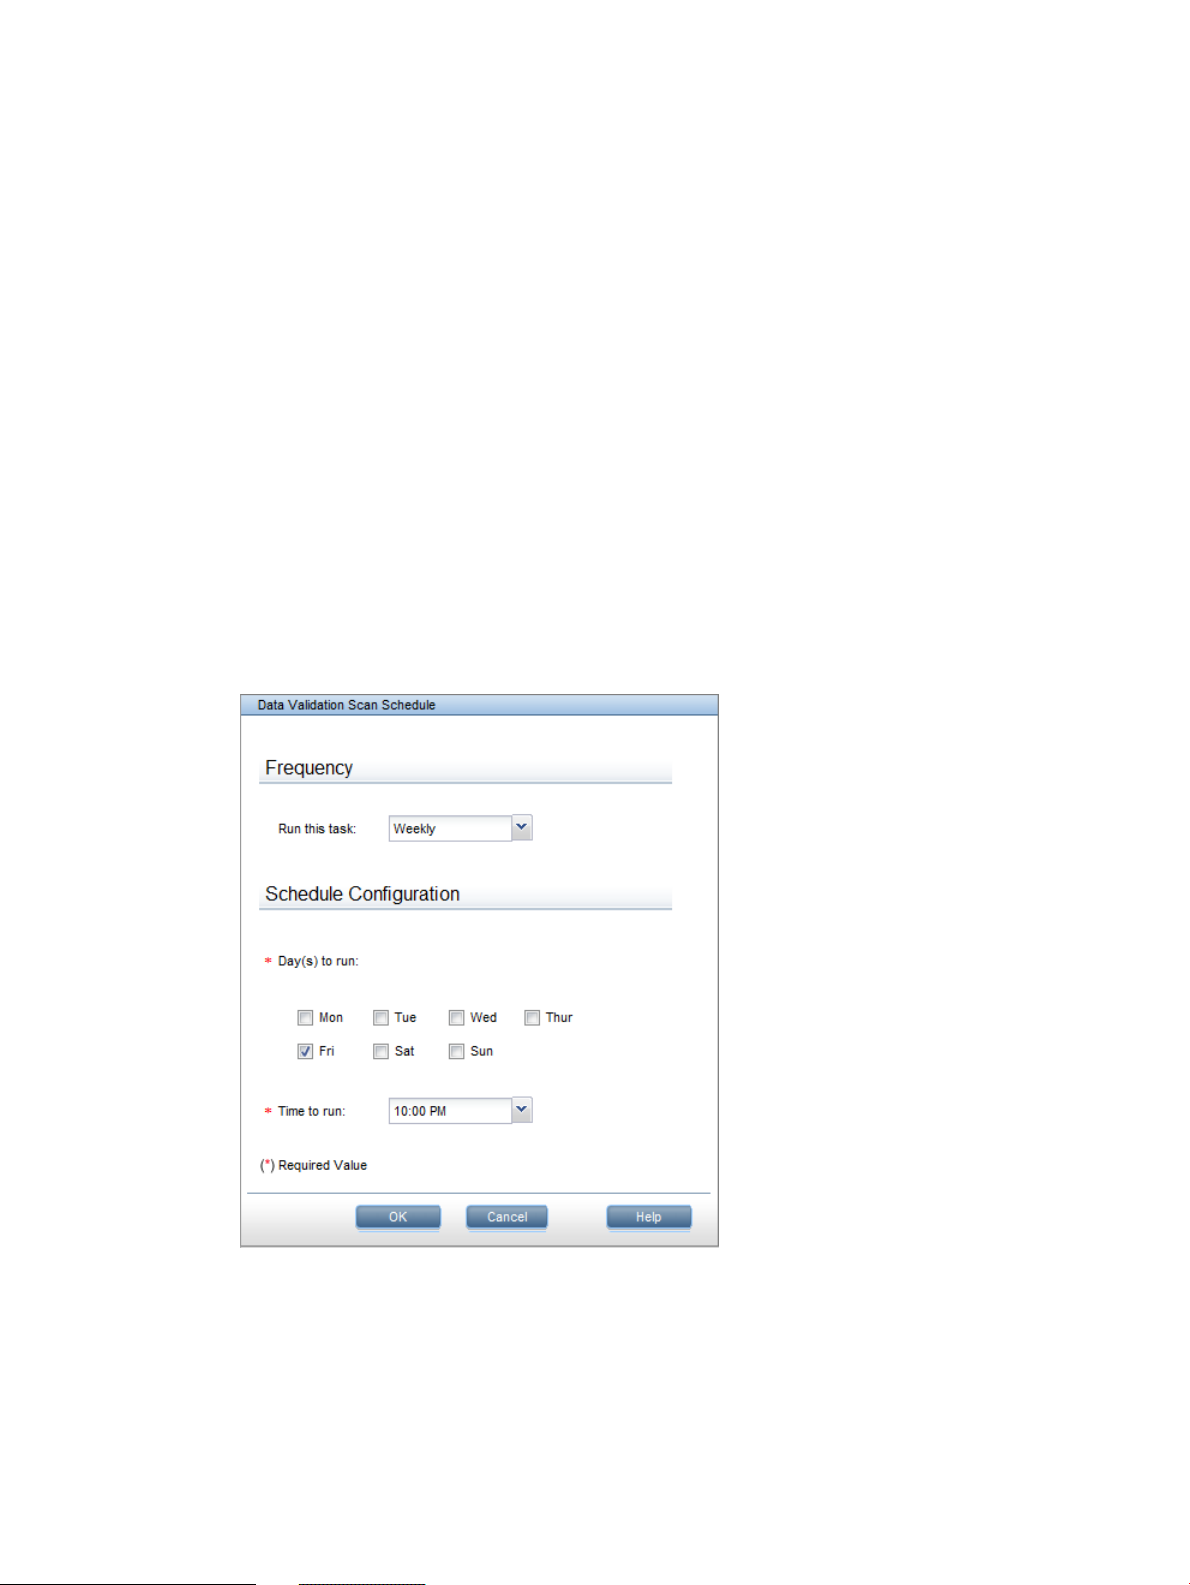
• Data validation. Select this option to schedule periodic scans on the file system. Use the default
schedule, or click Modify to open the Data Validation Scan Schedule dialog box and configure
your own schedule.
• Report Data Generation. Select this option if you want to create data retention reports. Use
the default schedule, or click Modify to open the Report Data Generation Schedule dialog
box and configure your own schedule.
Creating a file system 15
Page 16
• Express Query. Check this option to enable StoreAll Express Query on the file system. Express
Query is a database used to record metadata state changes occurring on the file system.
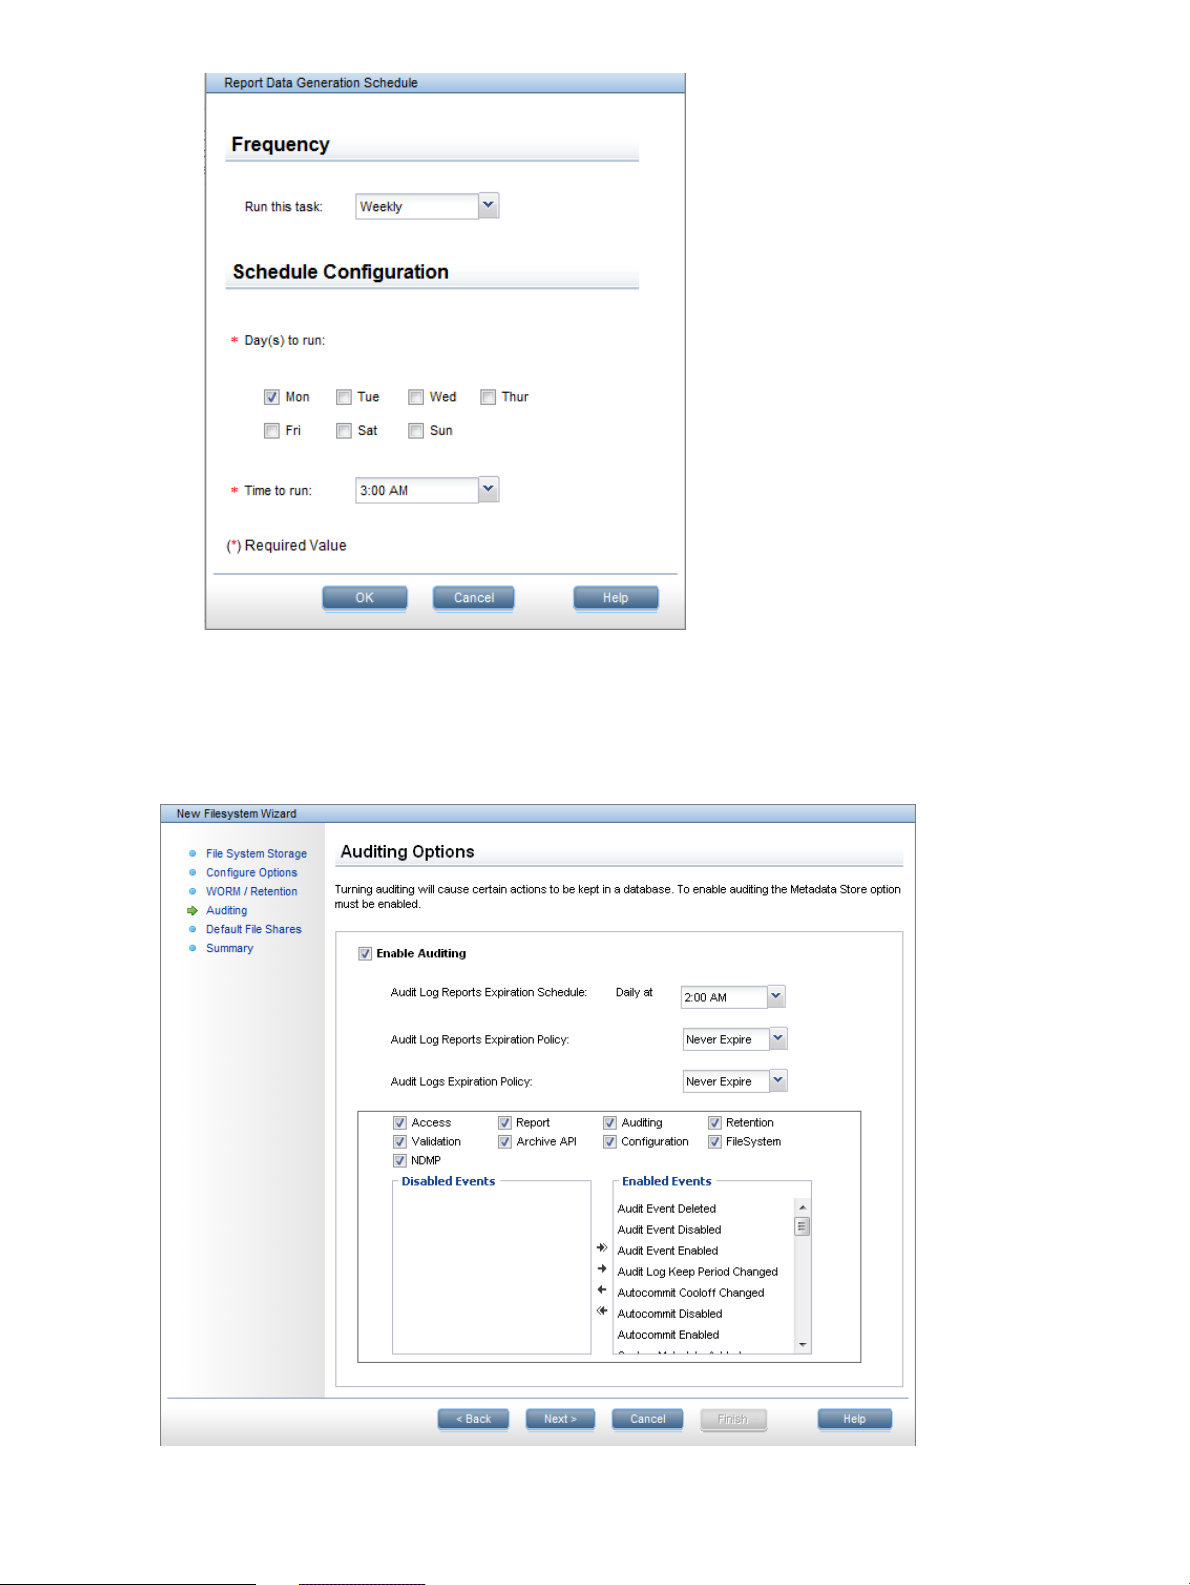
Auditing Options dialog box. If you enabled Express Query on the WORM/Data Retention dialog
box, you can also enable auditing and select the events that you want to log.
16 Creating and mounting file systems
Page 17

Default File Shares dialog box. Use this dialog box to create an NFS export and/or an SMB share
at the root of the file system. The default settings are used. See “Using NFS” (page 51) and “Using
SMB” (page 73) for more information.
Review the Summary to ensure that the file system is configured properly. If necessary, you can
return to a dialog box and make any corrections.
Configuring additional file system options
The New Filesystem wizard creates the file system with the default settings for several options. You
can change these settings on the Modify Filesystem Properties dialog box, and can also configure
data retention, data tiering, and file allocation. To open the dialog box, select the file system on
the Filesystems panel. Select Summary from the lower Navigator, and then click Modify on the
Summary panel.
The General tab allows you to enable or disable quotas, Export Control, and 32-bit compatibility
mode on the file system.
When Export Control is enabled on a file system, by default, IBRIX 9000 clients have no access
to the file system. Instead, the system administrator grants the clients access by executing the
ibrix_mount command. Export Control affects only for NFS access for IBRIX 9000 clients.
Enabling Export Control does not affect access from a file serving node to a file system. File serving
nodes always have RW access.
By default, file systems are created in 64-bit mode. If clients need to run a 32-bit application, you
can enable 32-bit compatibility mode. This option is applied to the file system at mount time and
can be enabled or disabled as necessary.
Creating a file system 17
Page 18

The Data Retention tab allows you to change the data retention configuration. The file system must
be unmounted. See “Configuring data retention on existing file systems” (page 147) for more
information.
NOTE: Data retention cannot be enabled on a file system created on IBRIX software 5.6 or earlier
versions until the file system is upgraded.
The Allocation, Segment Preference, and Host Allocation tabs are used to modify file allocation
policies and to specify segment preferences for file serving nodes and IBRIX 9000 clients. See
“Using file allocation” (page 240) for more information.
Creating a file system using the CLI
The ibrix_fs command is used to create a file system. It can be used in the following ways:
• Create a file system with the specified segments (segments are logical volumes):
ibrix_fs -c -f FSNAME -s LVLIST [-t TIERNAME] [-a] [-q] [-o
OPTION1=VALUE1,OPTION2=VALUE2,...] [-t TIERNAME] [-F
FMIN:FMAX:FTOTAL] [-D DMIN:DMAX:DTOTAL]
• Create a file system and assign specify segments to specific file serving nodes:
ibrix_fs -c -f FSNAME -S LV1:HOSTNAME1,LV2:HOSTNAME2,... [-a] [-q]
[-o OPTION1=VALUE1,OPTION2=VALUE2,...] [-t TIERNAME] [-F
FMIN:FMAX:FTOTAL] [-D DMIN:DMAX:DTOTAL]
• Create a file system from physical volumes in a single step:
ibrix_fs -c -f FSNAME -p PVLIST [-a] [-q] [-o
OPTION1=VALUE1,OPTION2=VALUE2,...] [-t TIERNAME] [-F
FMIN:FMAX:FTOTAL] [-D DMIN:DMAX:DTOTAL]
18 Creating and mounting file systems
Page 19

In the commands, the –t option specifies a tier. TIERNAME can be any alphanumeric, case-sensitive,
text string. Tier assignment is not affected by other options that can be set with the ibrix_fs
command.
NOTE: A tier is created whenever a segment is assigned to it. Be careful to spell the name of the
tier correctly when you add segments to an existing tier. If you make an error in the name, a new
tier is created with the incorrect tier name, and no error is recognized.
Options for data retention
OptionFeature
Data
retention
Query
The following example enables data retention, Express Query, and auditing, with all events being
audited:
ibrix_fs -o "retenMode=Enterprise,retenDefPeriod=5m,retenMinPeriod=2,
retenMaxPeriod=30y,retenAutoCommitPeriod=1d" –T –E -A –oa
audit_mode=on,all=on c -f ifs1 -s ilv_[1-4] -a
–o "retenMode=<mode>,retenDefPeriod=<period>,retenMinPeriod=<period>,
retenMaxPeriod=<period>,retenAutoCommitPeriod=<period>"
-T -EExpress
-A -oa OPTION1=VALUE1[,OPTION2=VALUE2,...]Auditing
Creating a file system manually from physical volumes
This procedure is equivalent to using ibrix_fs to create a file system from physical volumes in
a single step. Instead of a single command, you build the file system components individually:
1. Discover the physical volumes in the system. Use the ibrix_pv command.
2. Create volume groups from the discovered physical volumes. Use the ibrix_vg command.
3. Create logical volumes (also called segments) from volume groups. Use the ibrix_lv
command.
4. Create the file system from the new logical volumes. Use the ibrix_fs command.
See the HP IBRIX 9000 Storage CLI Reference Guide for details about these commands.
File limit for directories
The maximum number of files in a directory depends on the length of the file names, and also the
names themselves. The maximum size of a directory is approximately 4 GB (double indirect blocks).
An average file name length of eight characters allows about 12 million entries. However, because
directories are hashed, it is unlikely that a directory can contain this number of entries. Files with
a similar naming pattern are hashed into the same bucket. If that bucket fills up, another file cannot
be created there, even if free space is available elsewhere in the directory. If you try to create
another file with a different name, it may succeed, but randomly.
Managing mountpoints and mount/unmount operations
GUI procedures
When you use the New Filesystem Wizard to create a file system, you can specify a name for the
mountpoint and indicate whether the file system should be mounted after it is created. The wizard
will create the mountpoint if necessary. The Filesystems panel shows the file systems created on
the cluster.
To view the mountpoint information for a file system, select the file system on the Filesystems panel,
and click Mountpoints in the lower Navigator. The Mountpoints panel shows the hosts that have
File limit for directories 19
Page 20
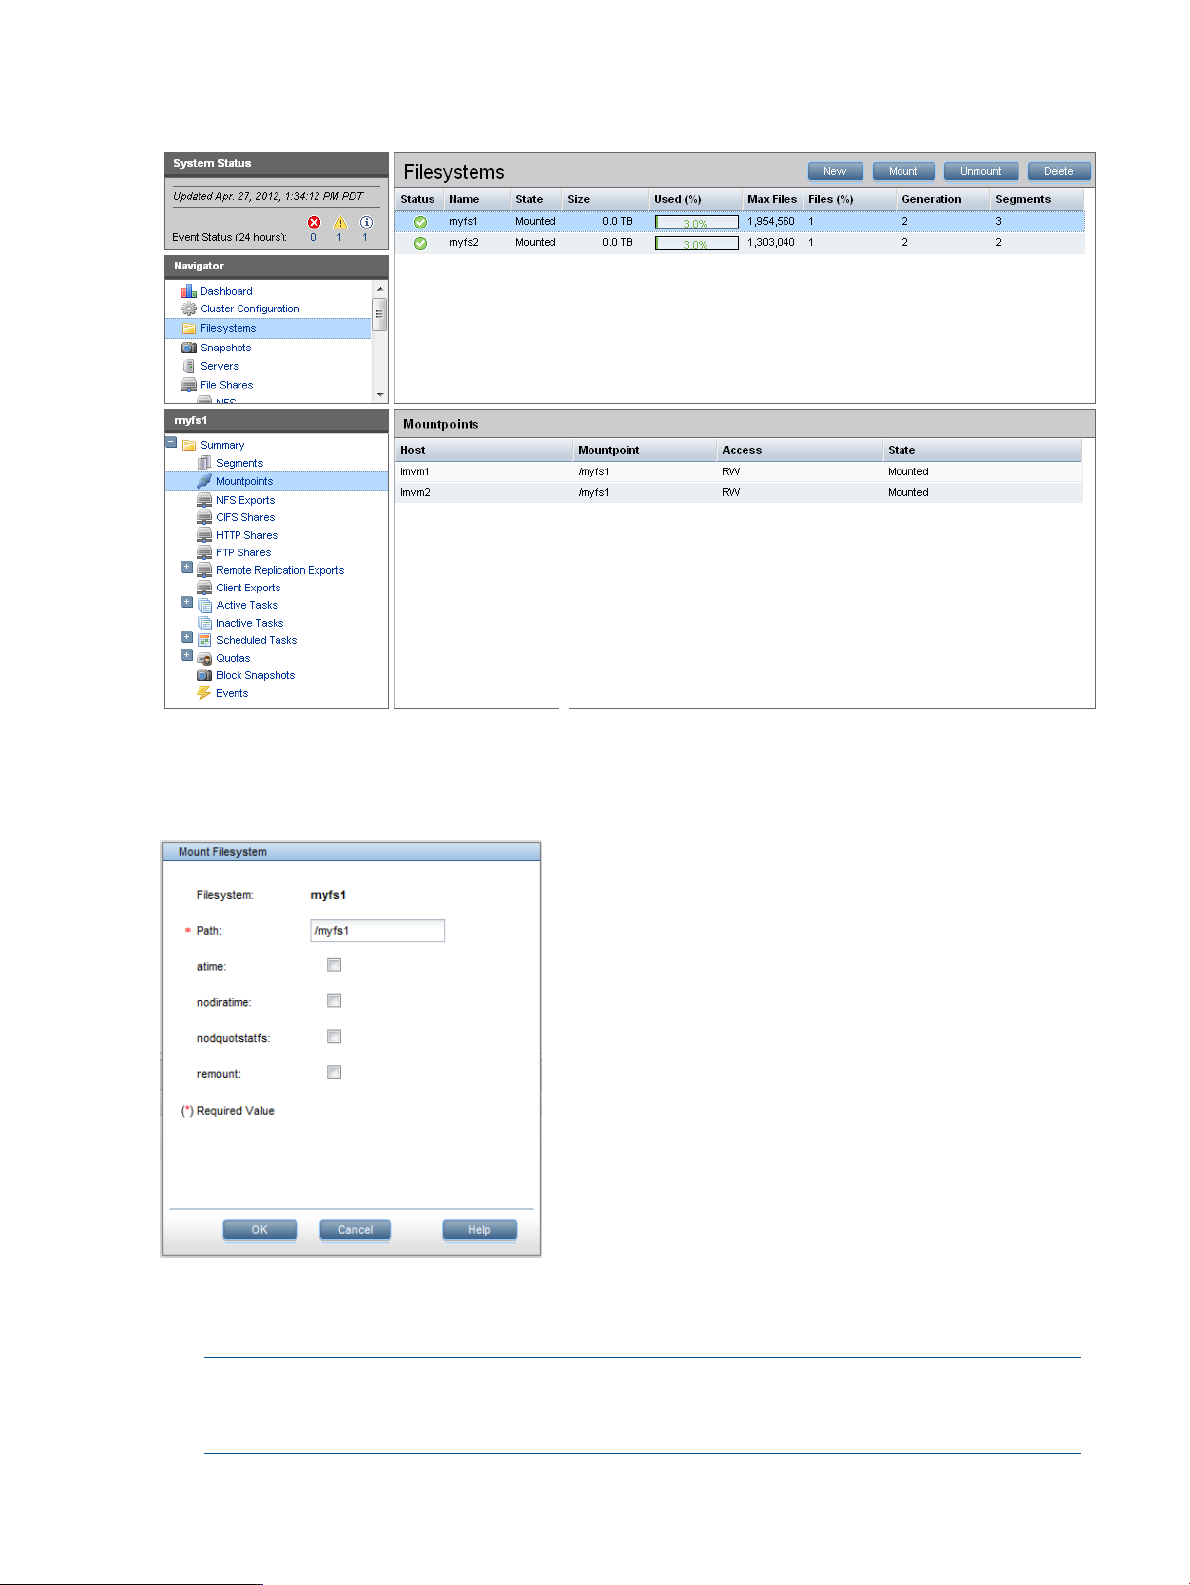
mounted the file system, the name of the mountpoint, the access (RW or RO) allowed to the host,
and whether the file system is mounted.
To mount or remount a file system, select it on the Filesystems panel and click Mount. You can
select several mount options on the Mount Filesystem dialog box. To remount the file system, click
remount.
The available mount options are:
• atime: Update the inode access time when a file is accessed
NOTE: If you do not specifically set atime as an option, noatime is set instead and the
inode access time is not updated when the file is accessed. There is not an option to specifically
set noatime as an option.
• nodiratime: Do not update the directory inode access time when the directory is accessed
20 Creating and mounting file systems
Page 21
• nodquotstatfs: Disable file system reporting based on directory tree quota limits
• path: For IBRIX 9000 clients only, mount on the specified subdirectory path of the file system
instead of the root.
• remount: Remounts a file system without taking it offline. Use this option to change the current
mount options on a file system.
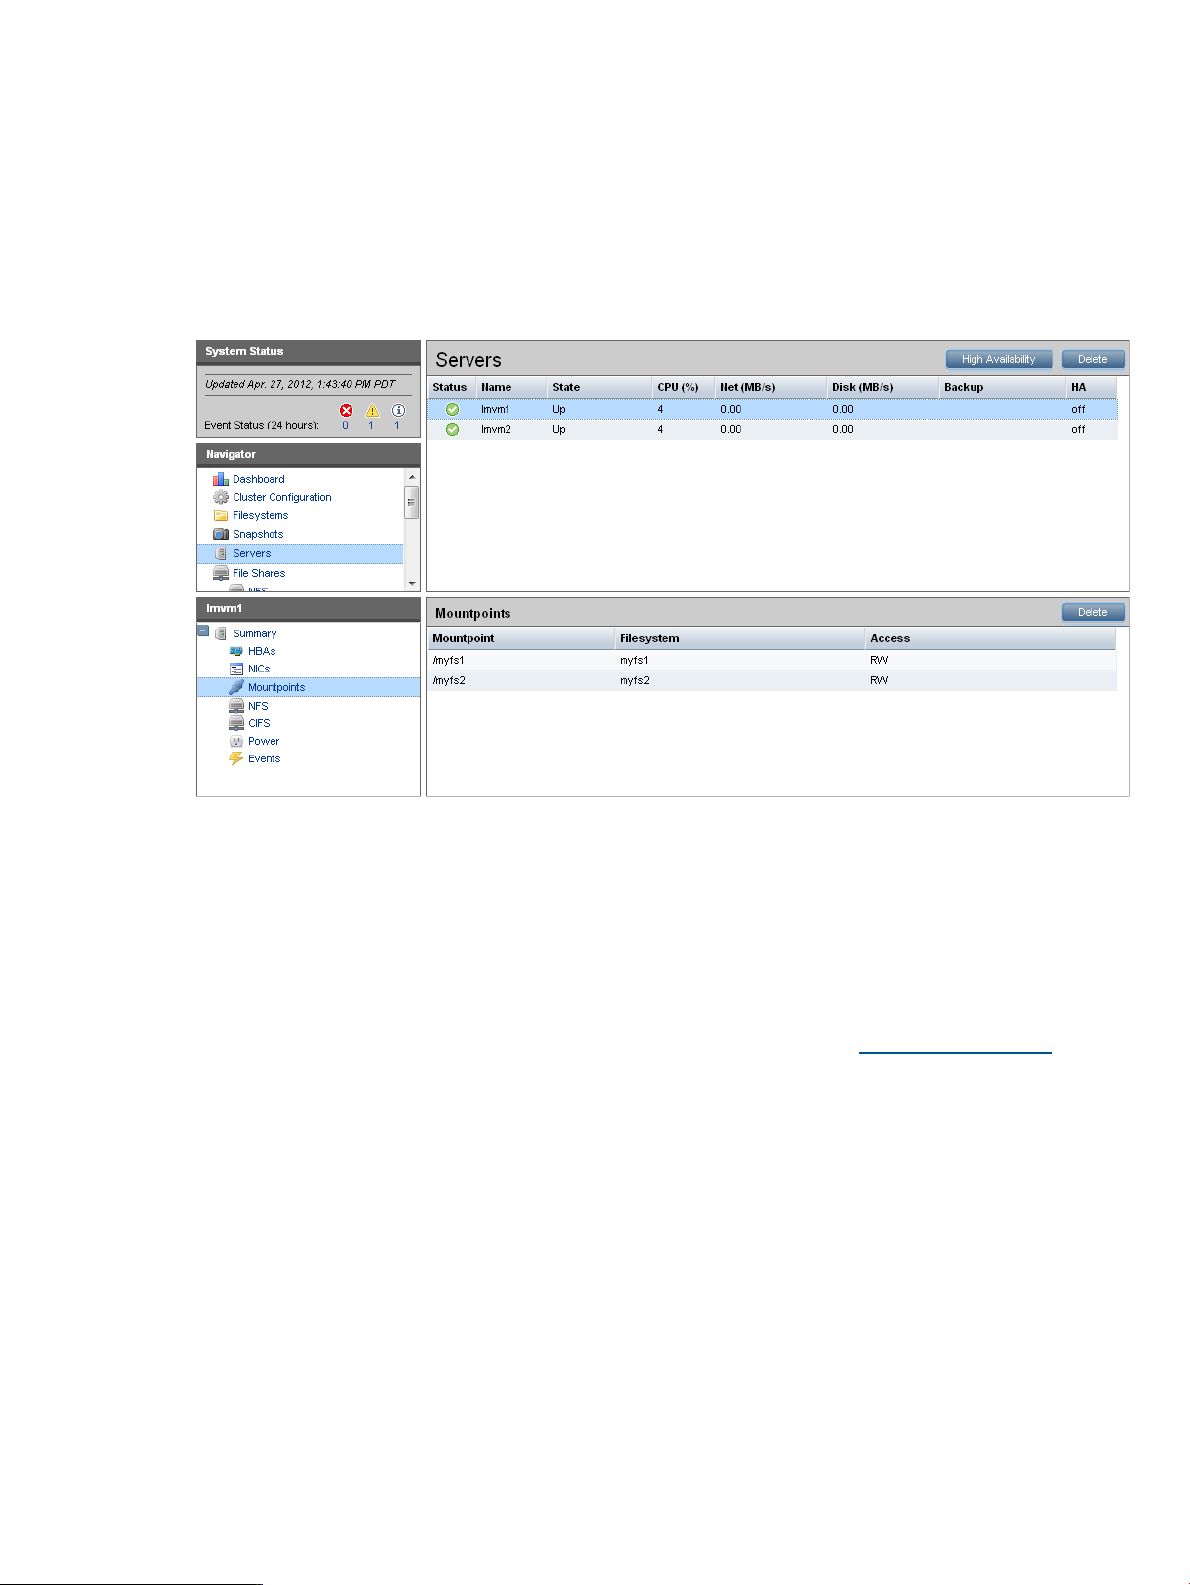
You can also view mountpoint information for a particular server. Select that server on the Servers
panel, and select Mountpointsfrom the lower Navigator. To delete a mountpoint, select that
mountpoint and click Delete.
CLI procedures
The CLI commands are executed immediately on file serving nodes. For IBRIX 9000 clients, the
command intention is stored in the active Fusion Manager. When IBRIX software services start on
a client, the client queries the active Fusion Manager for any commands. If the services are already
running, you can force the client to query the Fusion Manager by executing either ibrix_client
or ibrix_lwmount -a on the client, or by rebooting the client.
If you have configured hostgroups for your IBRIX 9000 clients, you can apply a command to a
specific hostgroup. For information about creating hostgroups, see the administration guide for
your system.
Creating mountpoints
Mountpoints must exist before a file system can be mounted. To create a mountpoint on file serving
nodes and IBRIX 9000 clients, enter the following command:
ibrix_mountpoint -c [-h HOSTLIST] -m MOUNTPOINT
To create a mountpoint on a hostgroup , enter the following command:
ibrix_mountpoint -c -g GROUPLIST -m MOUNTPOINT
For information about mountpoint options, see the "ibrix_mountpoint" section in the HP IBRIX 9000
CLI Reference Guide.
Deleting mountpoints
Before deleting mountpoints, verify that no file systems are mounted on them. To delete a mountpoint
from file serving nodes and IBRIX 9000 clients, use the following command:
ibrix_mountpoint -d [-h HOSTLIST] -m MOUNTPOINT
Managing mountpoints and mount/unmount operations 21
Page 22

To delete a mountpoint from specific hostgroups, use the following command:
ibrix_mountpoint -d -g GROUPLIST -m MOUNTPOINT
Viewing mountpoint information
To view mounted file systems and their mountpoints on all nodes, use the following command:
ibrix_mountpoint -l
Mounting a file system
File system mounts are managed with the ibrix_mount command. The command options and
the default file system access allowed for IBRIX 9000 clients depend on whether the optional Export
Control feature has been enabled on the file system (see “Using Export Control” (page 24) for
more information). This section assumes that Export Control is not enabled, which is the default.
NOTE: A file system must be mounted on the file serving node that owns the root segment (that
is, segment 1) before it can be mounted on any other host. IBRIX software automatically mounts a
file system on the root segment when you mount it on all file serving nodes in the cluster. The
mountpoints must already exist.
Mount a file system on file serving nodes and IBRIX 9000 clients:
ibrix_mount -f FSNAME [-o {RW|RO}] [-O MOUNTOPTIONS] -h HOSTLIST -m MOUNTPOINT
Mount a file system on a hostgroup:
ibrix_mount -f FSNAME [-o {RW|RO}] -g GROUP -m MOUNTPOINT
NOTE: If you do not include the -o parameter, the default access option for the mounted file
system is Read Write.
Unmounting a file system
Use the following commands to unmount a file system.
NOTE: Be sure to unmount the root segment last. Attempting to unmount it while other segments
are still mounted will result in failure. If the file system was exported using NFS, you must unexport
it before you can unmount it (see “Exporting a file system” (page 51)).
To unmount a file system from one or more file serving nodes, IBRIX 9000 clients, or hostgroups:
ibrix_umount -f FSNAME [-h HOSTLIST | -g GROUPLIST]
To unmount a file system from a specific mountpoint on a file serving node, IBRIX 9000 client, or
hostgroup:
ibrix_umount -m MOUNTPOINT [-h HOSTLIST | -g GROUPLIST]
Enabling or disabling 32-bit compatibility mode
If clients are running 32-bit applications, you can enable 32-bit compatibility mode. This mode is
applied to the file system at mount time. You can enable or disable 32-bit compatibility on the
Modify Filesystems Properties dialog box, and can also use the following commands.
Enable 32-bit compatibility mode:
ibrix_fs_tune -c -e -f FSNAME
Disable 32-bit compatibility mode:
ibrix_fs_tune -c -d -f FSNAME
Mounting and unmounting file systems locally on IBRIX 9000 clients
On both Linux and Windows IBRIX 9000 clients, you can locally override a mount. For example,
if the Fusion Manager configuration database has a file system marked as mounted for a particular
client, that client can locally unmount the file system.
22 Creating and mounting file systems
Page 23
Linux IBRIX 9000 clients
To mount a file system locally, use the following command on the Linux 9000 client. A Fusion
Manager name (fmname) is required only if this 9000 client is registered with multiple Fusion
Managers.
ibrix_lwmount -f [fmname:]fsname -m mountpoint [-o options]
To unmount a file system locally, use one of the following commands on the Linux 9000 client. The
first command detaches the specified file system from the client. The second command detaches
the file system that is mounted on the specified mountpoint.
ibrix_lwumount -f [fmname:]FSNAME
ibrix_lwumount -m MOUNTPOINT
Windows IBRIX 9000 clients
Use the Windows 9000 client GUI to mount file systems locally. Click the Mount tab on the GUI
and select the cluster name from the list (the cluster name is the Fusion Manager name). Then, enter
the name of the file system, select a drive, and click Mount.
If you are using Remote Desktop to access the client and the drive letter is not displayed, log out
and log back in. This is a known limitation of Windows Terminal Services when exposing new
drives.
To unmount a file system on the Windows 9000 client GUI, click the Umount tab, select the file
system, and then click Umount.
Limiting file system access for IBRIX 9000 clients
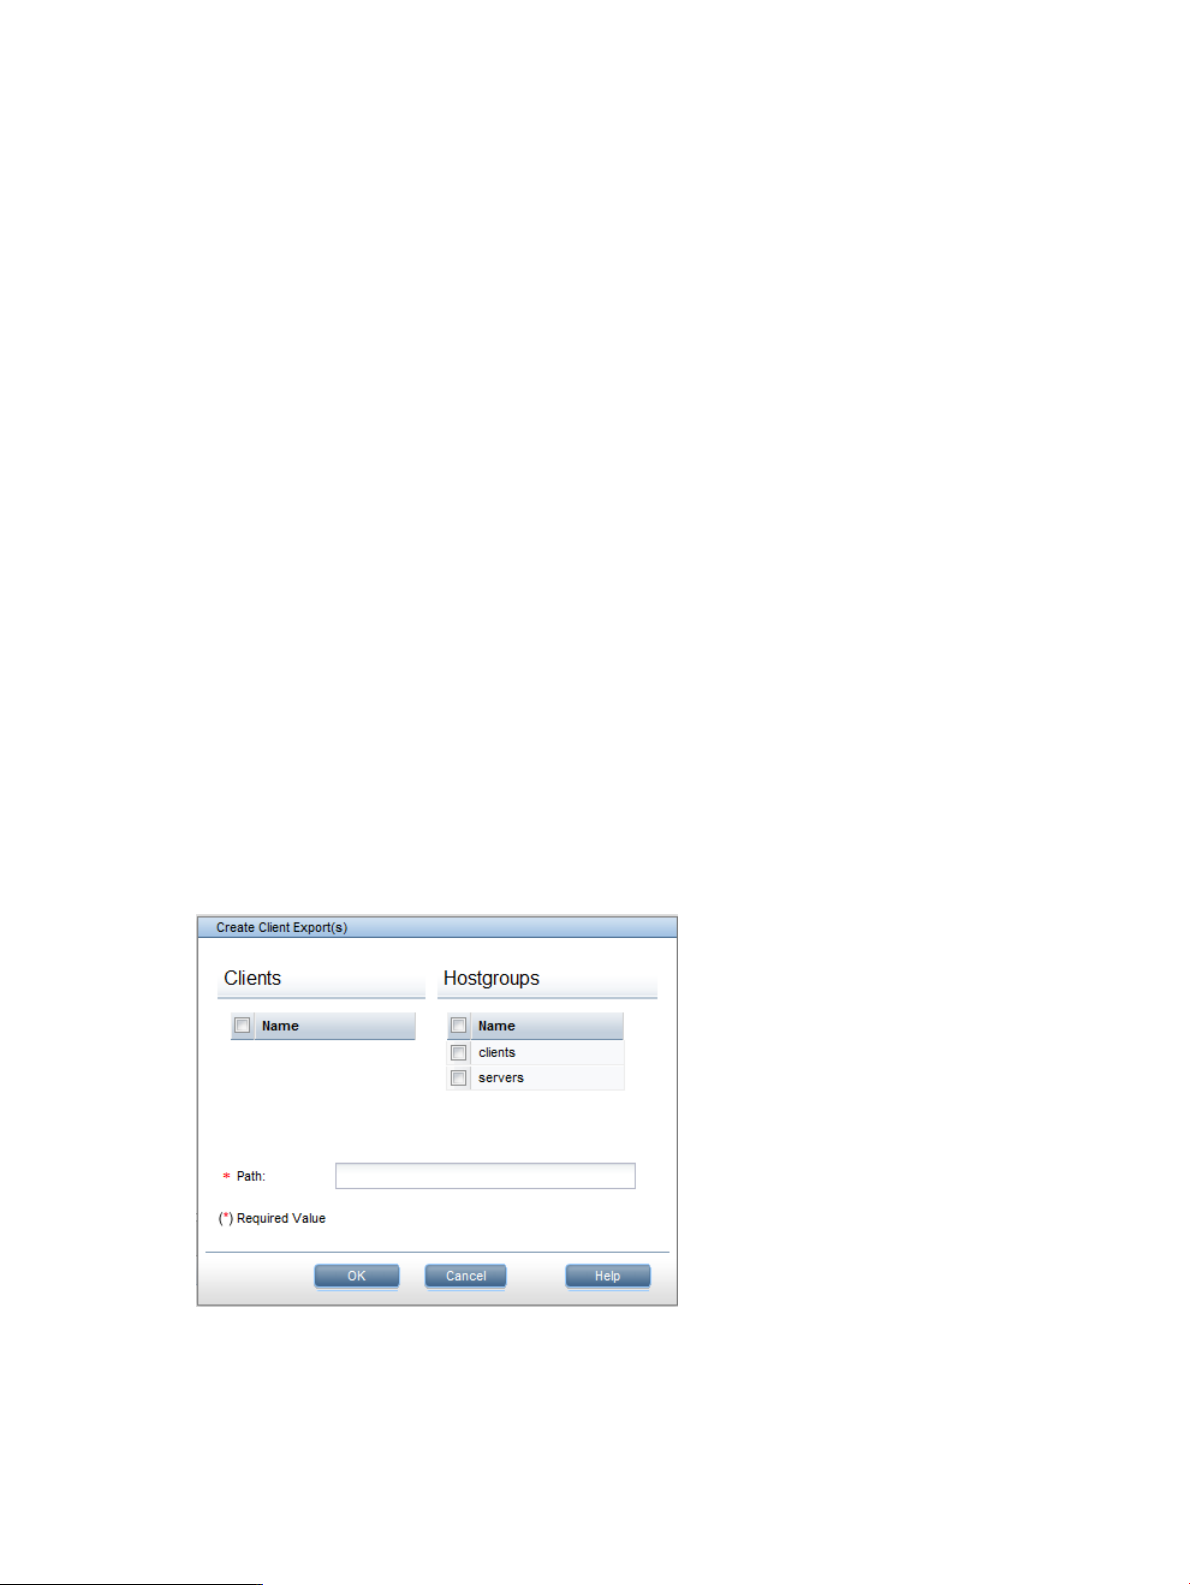
By default, all IBRIX 9000 clients can mount a file system after a mountpoint has been created. To
limit access to specific IBRIX 9000 clients, create an access entry. When an access entry is in place
for a file system (or a subdirectory of the file system), it enters secure mode, and mount access is
restricted to clients specified in the access entry. All other clients are denied mount access.
Select the file system on the Filesystems top panel, and then select Client Exports in the lower
navigator. On the Create Client Export(s) dialog box, select the clients or hostgroups that will be
allowed access to the file system or a subdirectory of the file system.
To remove a client access entry, select the affected file system on the GUI, and then select Client
Exports from the lower Navigator. Select the access entry from the Client Exports display, and click
Delete.
On the CLI, use the ibrix_exportfs command to create an access entry:
ibrix_exportfs –c –f FSNAME –p CLIENT:/PATHNAME,CLIENT2:/PATHNAME,...
Limiting file system access for IBRIX 9000 clients 23
Page 24

To see all access entries that have been created, use the following command:
ibrix_exportfs –c –l
To remove an access entry, use the following command:
ibrix_exportfs –c —U –f FSNAME –p CLIENT:/PATHNAME,
CLIENT2:/PATHNAME,...
Using Export Control
When Export Control is enabled on a file system, by default, IBRIX 9000 clients have no access
to the file system. Instead, the system administrator grants the clients access by executing the
ibrix_mount command. Export Control affects only NFS access for IBRIX 9000 clients. Enabling
Export Control does not affect access from a file serving node to a file system. File serving nodes
always have RW access.
To determine whether Export Control is enabled, run ibrix_fs -i or ibrix_fs -l. The output
indicates whether Export Control is enabled.
To enable Export Control, include the -C option in the ibrix_fs command:
ibrix_fs -C -E -f FSNAME
To disable Export Control, execute the ibrix_fs command with the -C and -D options:
ibrix_fs -C -D -f FSNAME
To mount a file system that has Export Control enabled, include the ibrix_mount -o {RW|RO}
option to specify that all clients have either RO or RW access to the file system. The default is RO.
In addition, when specifying a hostgroup, the root user can be limited to RO access by adding
the root_ro parameter.
24 Creating and mounting file systems
Page 25

3 Configuring quotas
Quotas can be assigned to individual users or groups, or to a directory tree. Individual quotas
limit the amount of storage or the number of files that a user or group can use in a file system.
Directory tree quotas limit the amount of storage and the number of files that can be created on a
file system located at a specific directory tree. Note the following:
• You can assign quotas to a user, group, or directory on the GUI or from the CLI. You can also
import quota information from a file.
• If a user has a user quota and a group quota for the same file system, the first quota reached
takes precedence.
• Nested directory quotas are not supported. You cannot configure quotas on a subdirectory
differently than the parent directory.
• The existing quota configuration can be exported to a file at any time.
NOTE: HP recommends that you export the quota configuration and save the resulting file
whenever you update quotas on your cluster.
How quotas work
Quotas can be set for users, groups, or directories in a file system. A quota is specified by hard
and soft storage limits for both the megabytes of storage and the number of files allotted to the
user, group, or directory. The hard limit is the maximum storage (in terms of file size and number
of files) allotted to the user, group, or directory. The soft limit specifies the number of megabytes
or files that, when reached, starts a countdown timer.
If the megabytes of storage or number of files are not reduced below the soft limit, the timer runs
until either the hard storage limit is reached or the grace period for the timer elapses. (The default
grace period is seven days.) When the timer stops, the user, group, or directory for which the
quota was set cannot store any more data, and the system issues quota exceeded messages at
each write attempt.
NOTE: Quota statistics are updated on a regular basis (at one-minute intervals). At each update,
the file and storage usage for each quota-enabled user, group, or directory tree is queried, and
the result is distributed to all file serving nodes. Users or groups can temporarily exceed their quota
if the allocation policy in effect for a file system causes their data to be written to different file
serving nodes during the statistics update interval. In this situation, it is possible for the storage
usage visible to each file serving node to be below or at the quota limit while the aggregate storage
use exceeds the limit.
There is a delay of several minutes between the time a command to update quotas is executed
and when the results are displayed by the ibrix_edquota -l command. This is normal behavior.
Enabling quotas on a file system and setting grace periods
Before you can set quota limits, quotas must be enabled on the file system. You can enable quotas
on a file system at any time.
To view the current quotas configuration on the GUI, select the file system and then select Quotas
from the lower Navigator. The Quotas Summary panel specifies whether quotas are enabled and
lists the grace periods for blocks and inodes.
How quotas work 25
Page 26
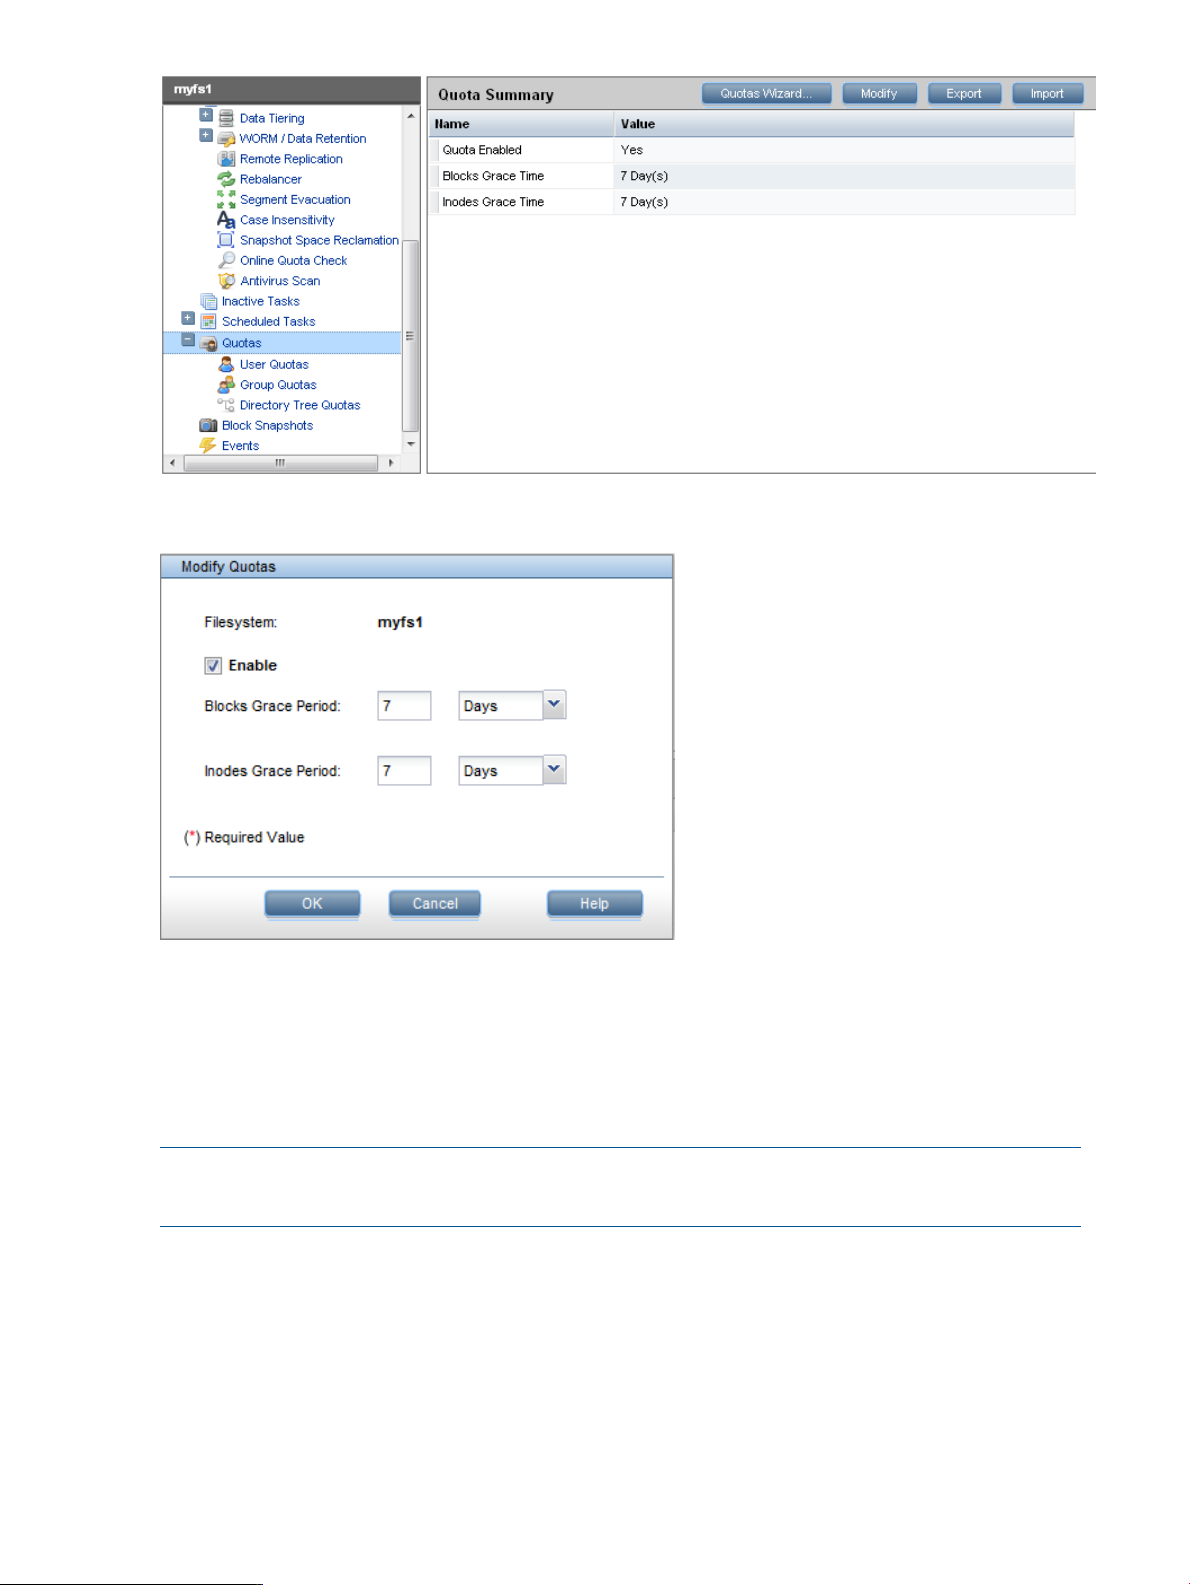
To change the quotas configuration, click Modify on the Quota Summary panel.
On the CLI, run the following command to enable quotas on an existing file system:
ibrix_fs -q -E -f FSNAME
Setting quotas for users, groups, and directories
Before configuring quotas, the quota feature must be enabled on the file system and the file system
must be mounted.
NOTE: For the purpose of setting quotas, no UID or GID can exceed 2,147,483,647.
Setting user quotas to zero removes the quotas.
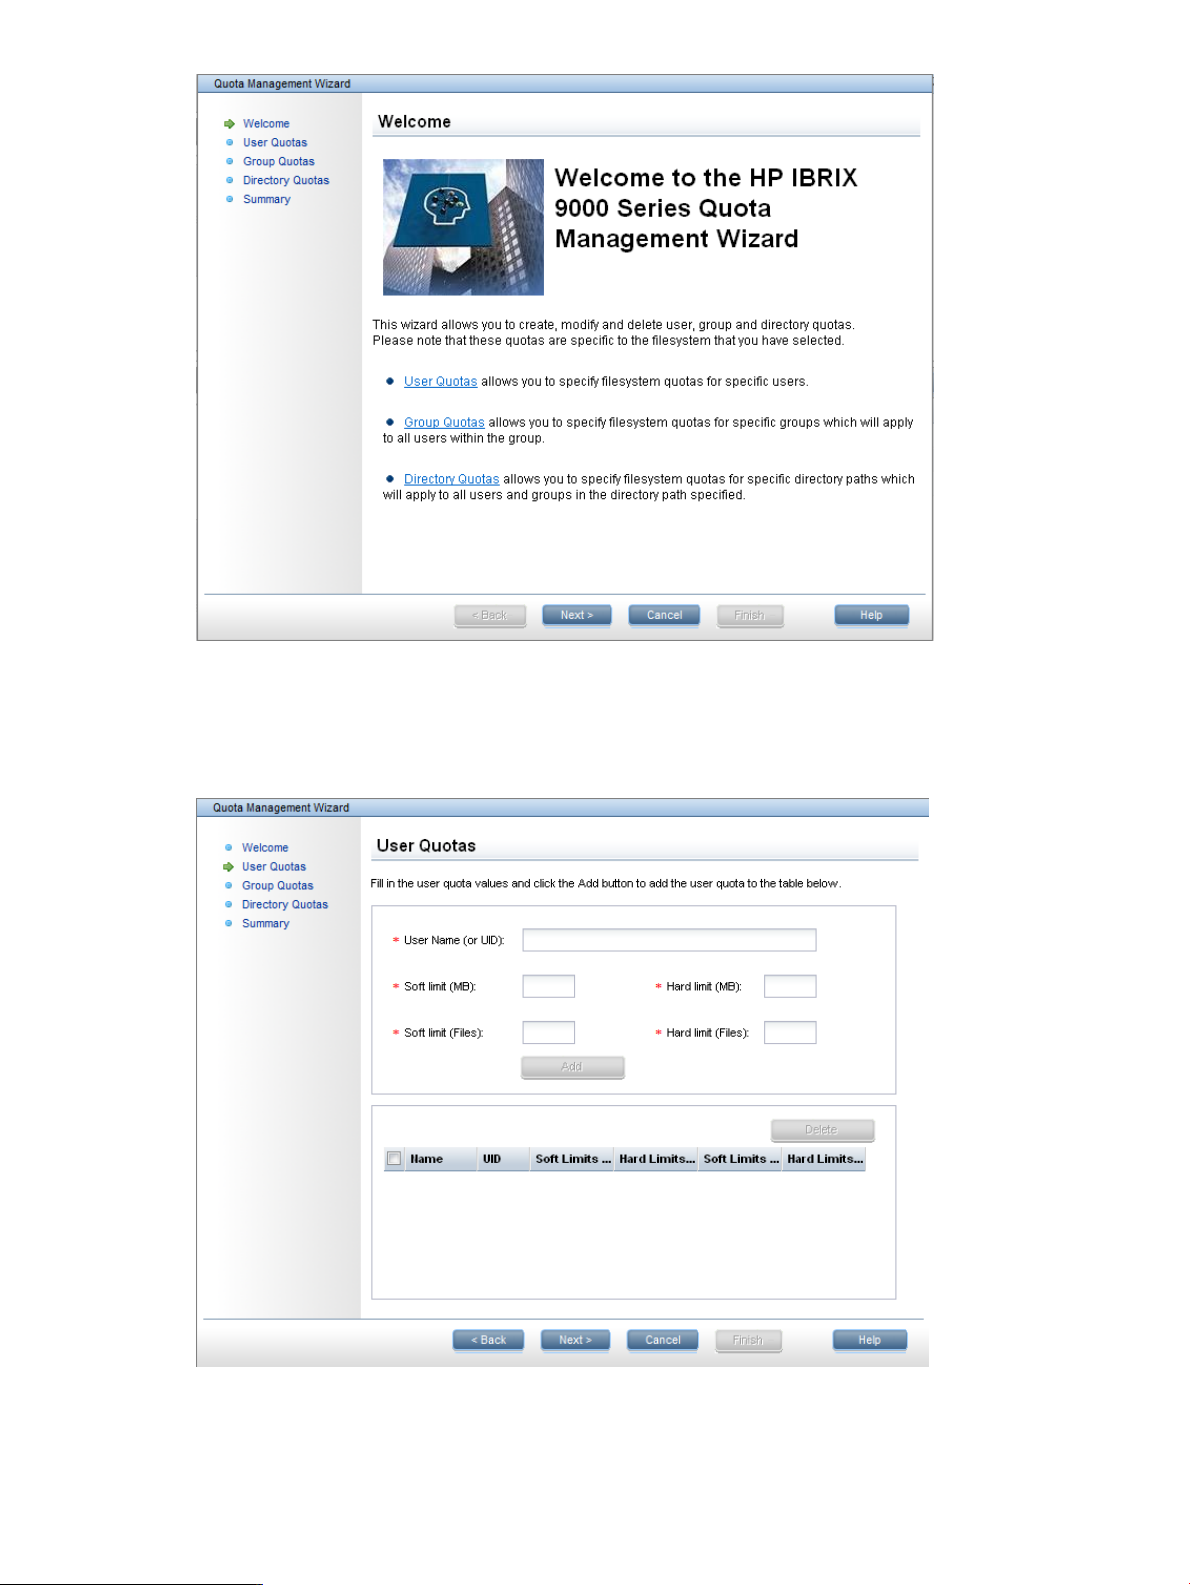
The Quota Management Wizard can be used to create, modify, or delete quotas for users, groups,
and directories in the selected file system. Click Quotas Wizard on the Quota Summary panel to
open the wizard. The Welcome dialog box describes the options available in the wizard.
26 Configuring quotas
Page 27
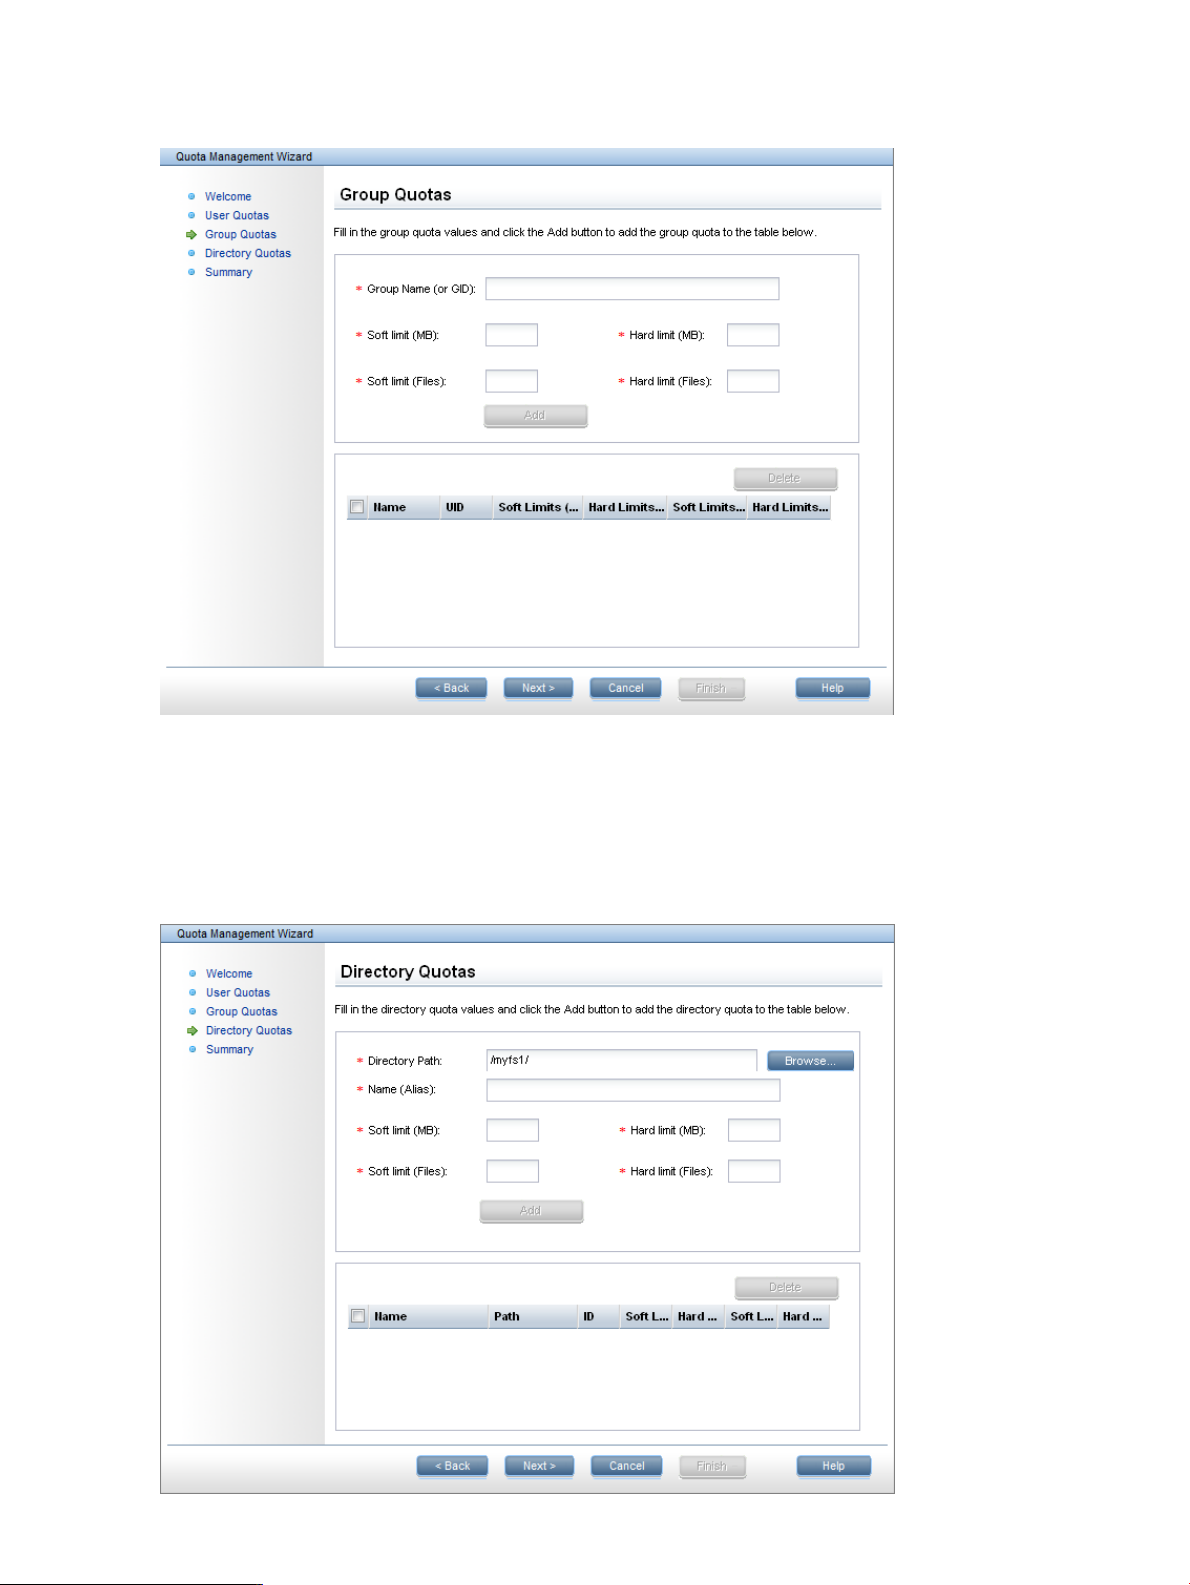
The User Quotas dialog box is used to create, modify, or delete quotas for users. To add a user
quota, enter the required information and click Add. Users having quotas are listed in the table at
the bottom of the dialog box. To modify quotas for a user, check the box preceding that user. You
can then adjust the quotas as needed. To delete quotas for a user, check the box and click Delete.
The Group Quotas dialog box is used to create, modify, or delete quotas for groups. To add a
group quota, enter the required information and click Add. The new quota applies to all users in
the group. Groups having quotas are listed in the table at the bottom of the dialog box. To modify
Setting quotas for users, groups, and directories 27
Page 28
quotas for a group, check the box preceding that group. You can then adjust the quotas as needed.
To delete quotas for a group, check the box and click Delete. group
The Directory Quotas dialog box is used to create, modify, or delete quotas for directories. To add
a directory quota, enter the required information and click Add. The Name (Alias) is a unique
identifier for the quota, and cannot include commas. The new quota applies to all users and groups
storing data in the directory. Directories having quotas are listed in the table at the bottom of the
dialog box. To modify quotas for a directory, check the box preceding that directory. You can
then adjust the quotas as needed. To delete quotas for a directory, check the box and click Delete.
28 Configuring quotas
Page 29
summary
Configuring quotas from the CLI
In the commands, use -M SOFT_MEGABYTES and -m HARD_MEGABYTES to specify soft and hard
limits for the megabytes of storage. Use -I SOFT_FILES and -i HARD_FILES to specify soft
and hard limits for the number of files allowed.
Create a user or group quota:
User quota:
ibrix_edquota -s -u “USER” -f FSNAME [-M SOFT_MEGABYTES] [-m
HARD_MEGABYTES] [-I SOFT_FILES] [-i HARD_FILES]
Group quota:
ibrix_edquota -s -g “GROUP” -f FSNAME [-M SOFT_MEGABYTES] [-m
HARD_MEGABYTES] [-I SOFT_FILES] [-i HARD_FILES]
Enclose the user or group name in single or double quotation marks.
Create a directory quota:
ibrix_edquota -s -d NAME -p PATH -f FSNAME -M SOFT_MEGABYTES -m
HARD_MEGABYTES -I SOFT_FILES -i HARD_FILES
The -p PATH option specifies the pathname of the directory tree. If the pathname includes a space,
enclose the portion of the pathname that includes the space in single quotation marks, and enclose
the entire pathname in double quotation marks. For example:
-p "/fs48/data/'QUOTA 4'"
The -n NAME option specifies a unique name for the directory tree quota. The name cannot contain
a comma (,) or colon (:) character.
NOTE: When you create a directory quota, the system also runs ibrix_onlinequotacheck
command in DTREE_CREATE mode. If you are creating multiple directory quotas, you can import
the quotas from a file. The system then uses batch processing to create the quotas. If you add the
quotas individually, you will need to wait for ibrix_onlinequotacheck to finish after creating
each quota.
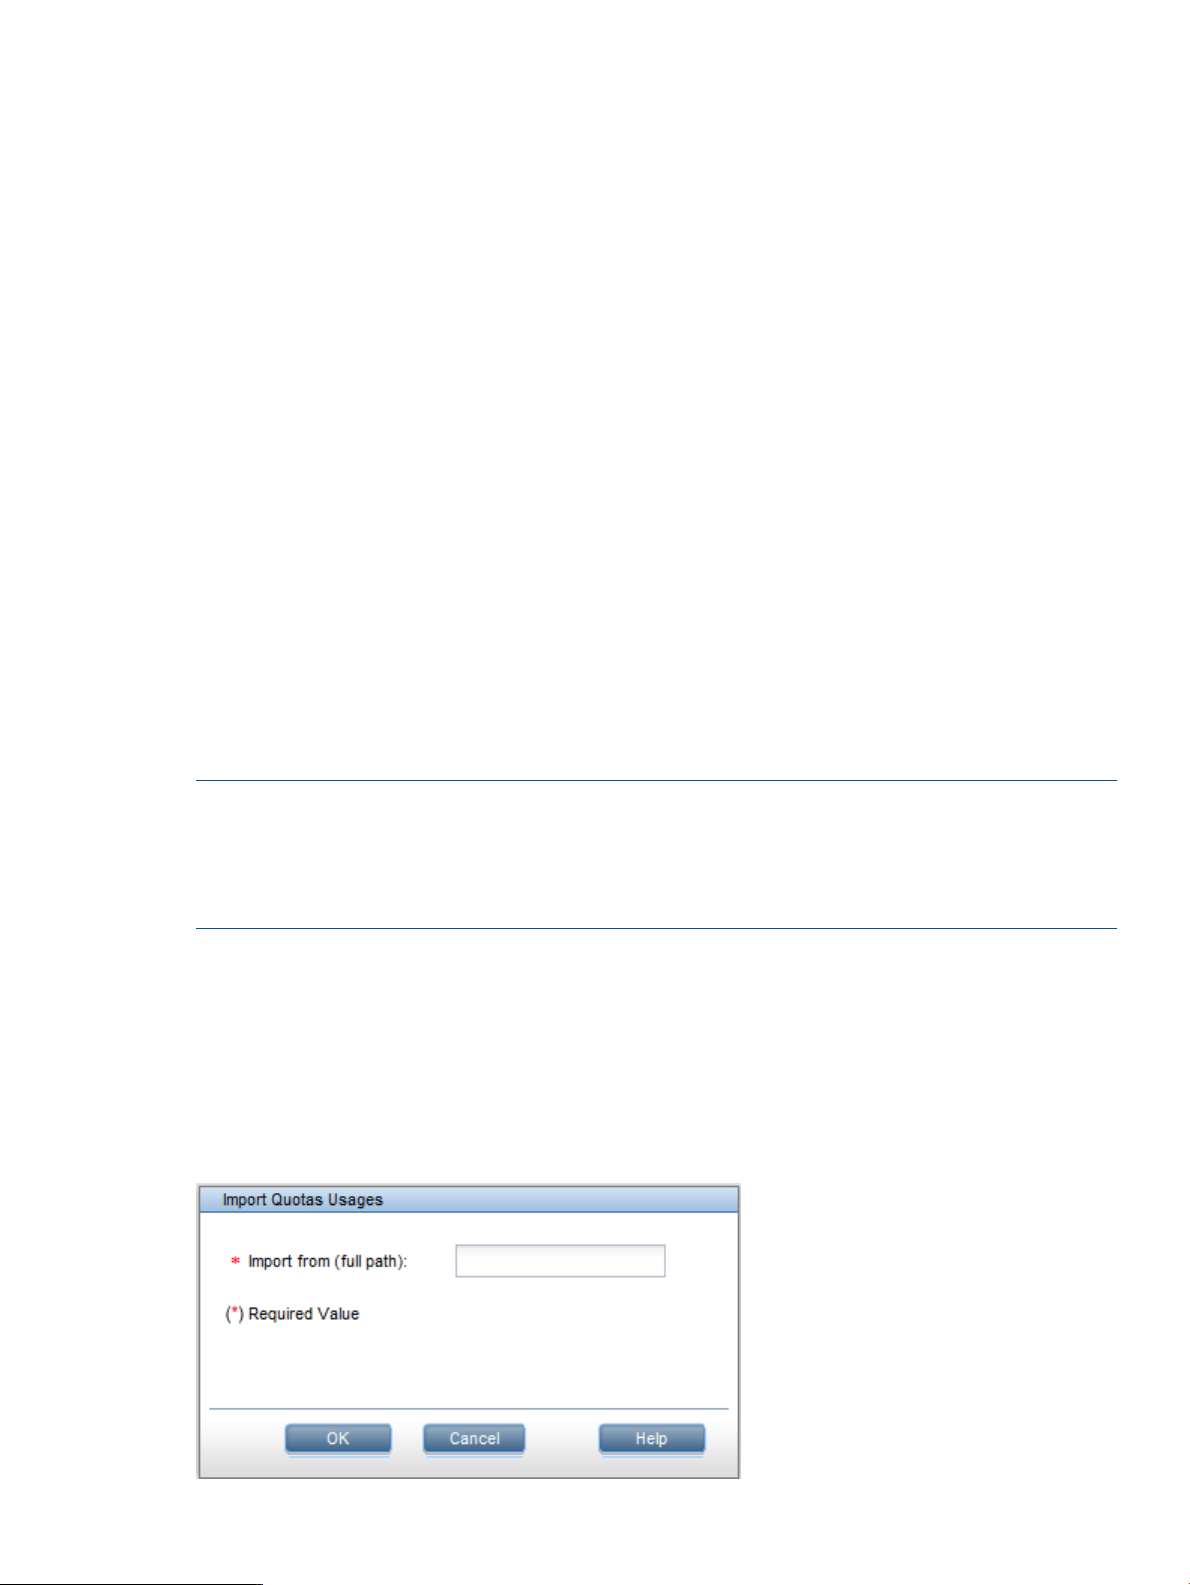
Using a quotas file
Quota limits can be imported into the cluster from the quotas file, and existing quotas can be
exported to the file. See “Format of the quotas file” (page 30) for the format of the file.
Importing quotas from a file
From the GUI, select the file system, select Quotas from the lower Navigator, and then click Import
on the Quota Summary panel.
Using a quotas file 29
Page 30
From the CLI, use the following command to import quotas from a file, where PATH is the path to
the quotas file:
ibrix_edquota -t -p PATH -f FSNAME
See “Format of the quotas file” (page 30) for information about the format of quota file.
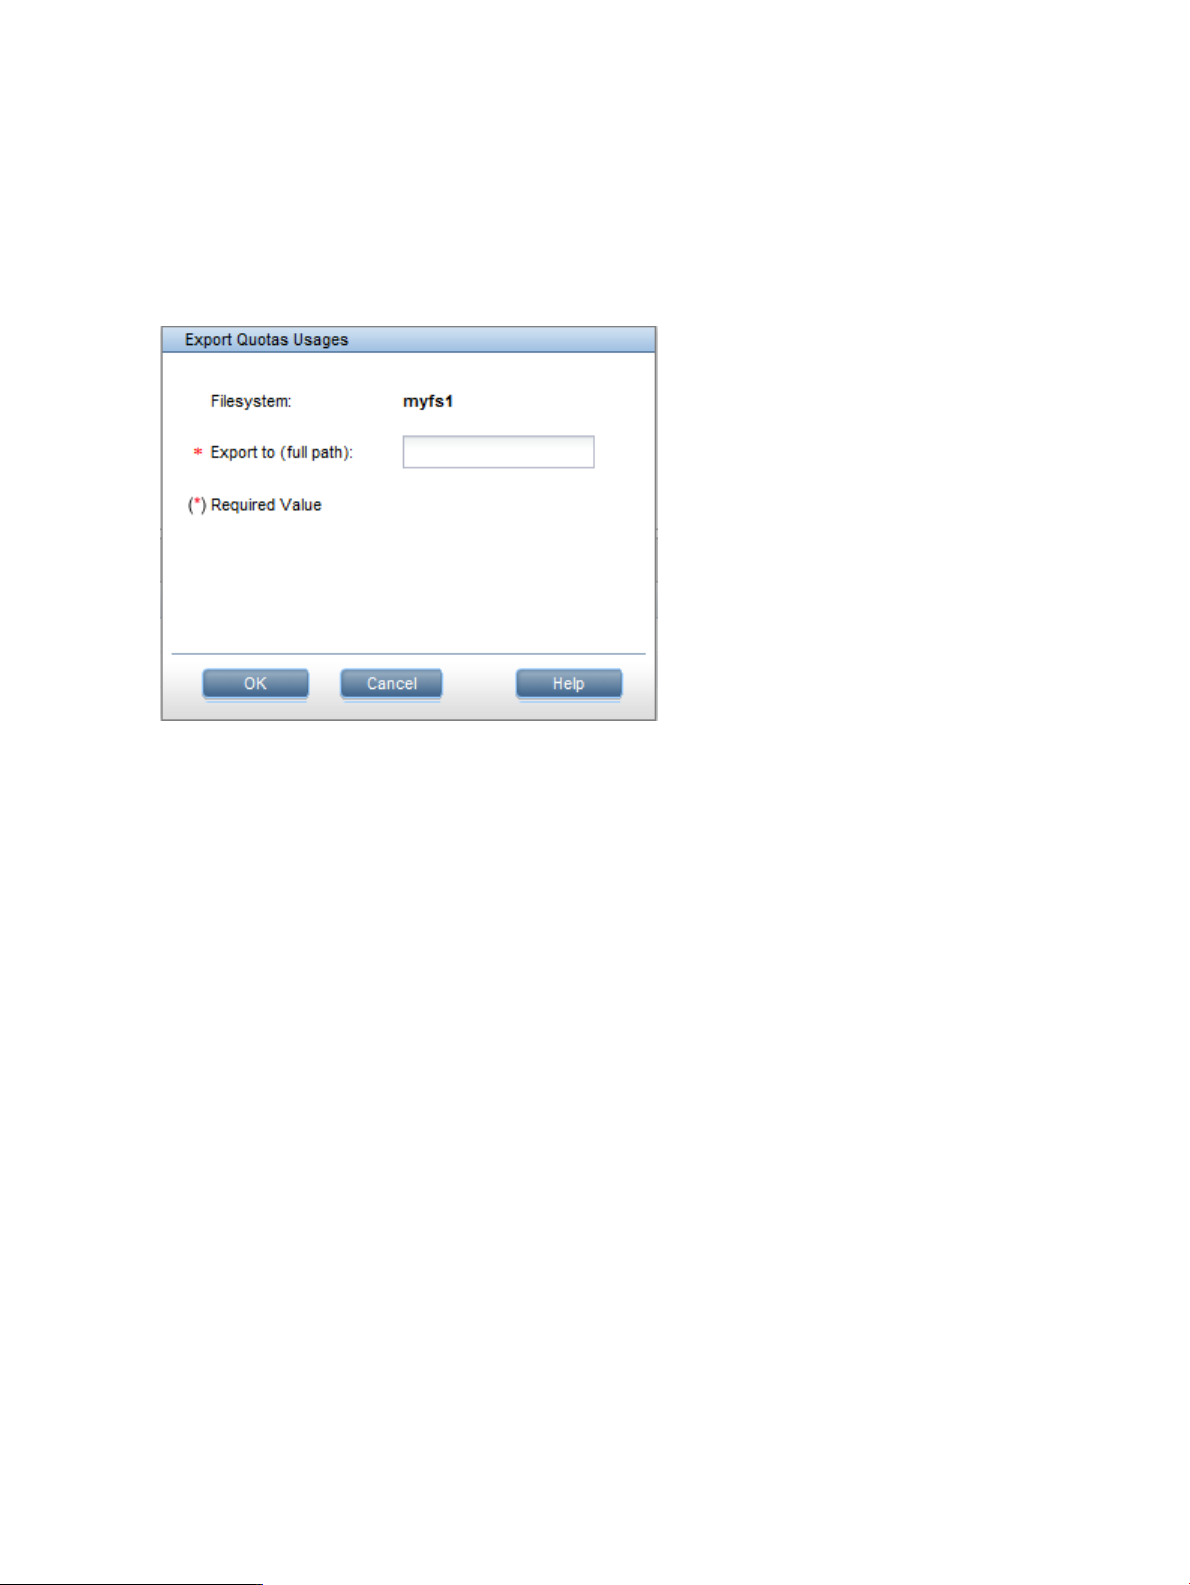
Exporting quotas to a file
From the GUI, select the file system, select Quotas from the lower Navigator, and then click Export
on the Quota Summary panel.
From the CLI, use the following command to export the existing quotas information to a file, where
PATH is the pathname of the quotas file:
ibrix_edquota -e -p PATH -f FSNAME
Format of the quotas file
The quotas file contains a line for each user, group, or directory tree assigned a quota. When you
add quota entries, the lines must use one of the following formats. The “A” format specifies a user
or group ID. The “B” format specifies a user or group name, or a directory tree that has already
been assigned an identifier name. The “C” format specifies a directory tree, where the path exists,
but the identifier name for the directory tree will not be created until the quotas are imported.
A,{type},{block_hardlimit},{block_soft-limit},{inode_hardlimit},{inode_softlimit},{id}
B,{type},{block_hardlimit},{block_soft-limit},{inode_hardlimit},{inode_softlimit},"{name}"
C,{type},{block_hardlimit},{block_soft-limit},{inode_hardlimit},{inode_softlimit},
"{name}","{path}"
The fields in each line are:
{type}
Either 0 for a user quota; 1 for a group quota; 2 for a directory tree quota.
{block_hardlimit}
The maximum number of 1K blocks allowed for the user, group, or directory tree. (1 MB =
1024 blocks).
{block_soft-limit}
The number of 1K blocks that, when reached, starts the countdown timer.
{inode_hardlimit}
The maximum number of files allowed for the user, group, or directory tree.
{inode_softlimit}
The number of files that, when reached, starts the countdown timer.
30 Configuring quotas
Page 31

{id}
The UID for a user quota or the GID for a group quota.
{name}
A user name, group name, or directory tree identifier.
{path}
The full path to the directory tree. The path must already exist.
NOTE: When a quotas file is imported, the quotas are stored in a different, internal format.
When a quotas file is exported, it contains lines using the internal format. However, when adding
entries, you must use the A, B, or C format.
The following is an example of the syntax for a file to import a directory tree quota (2048=2 MB):
C,2,2048,1024,0,0,"ba","/fs1/a/aa"
C,2,2048,1024,0,0,"bb","/fs1/a/ab"
C,2,2048,1024,0,0,"bc","/fs1/a/ac"
Using online quota check
Online quota checks are used to rescan quota usage, initialize directory tree quotas, and remove
directory tree quotas. There are three modes:
• FILESYSTEM_SCAN mode. Use this mode in the following scenarios:
You turned quotas off for a user, the user continued to store data in a file system, and
◦
you now want to turn quotas back on for this user.
◦ You are setting up quotas for the first time for a user who has previously stored data in
a file system.
◦ You renamed a directory on which quotas are set.
◦ You moved a subdirectory into another parent directory that is outside of the directory
having the directory tree quota.
• DTREE_CREATE mode. After setting quotas on a directory tree, use this mode to take into
account the data used under the directory tree.
• DTREE_DELETE mode. After deleting a directory tree quota, use this mode to unset quota IDs
on all files and folders in that directory.
CAUTION: When ibrix_onlinequotacheck is started in DTREE_DELETE mode, it removes
quotas for the specified directory. Be sure not to use this mode on directories that should retain
quota information.
To run an online quota check from the GUI, select the file system and then select Online quota
check from the lower Navigator.
On the Task Summary panel, select Start to open the Start Online quota check dialog box and
select the appropriate mode.
Using online quota check 31
Page 32

The Task Summary panel displays the progress of the scan. If necessary, select Stop to stop the
scan.
To run an online quota check in FILESYSTEM_SCAN mode from the CLI, use the following command:
ibrix_onlinequotacheck –s –S -f FSNAME
To run an online quota check in DTREE_CREATE mode, use this command:
ibrix_onlinequotacheck -s -c -f FSNAME -p PATH
To run an online quota check in DTREE_DELETE mode, use this command:
ibrix_onlinequotacheck -s -d -f FSNAME -p PATH
The command must be run from a file serving node that has the file system mounted.
Configuring email notifications for quota events
If you would like to be notified when certain quota events occur, you can set up email notification
for those events. On the GUI, select Email Configuration. On the Events Notified by Email panel,
select the appropriate events and specify the email addresses to be notified.
Deleting quotas
To delete quotas from the GUI, select the quota from the appropriate Quota Usage Limits panel
and then click Delete. To delete quotas from the CLI, use the following commands.
To delete quotas for a user, use the following command:
ibrix_edquota -D -u UID [-f FSNAME]
To delete quotas for a group, use the following command:
ibrix_edquota -D -g GID [-f FSNAME]
To delete the entry and quota limits for a directory tree quota, use the following command:
ibrix_edquota -D -d NAME -f FSNAME
The -d NAME option specifies the name of the directory tree quota.
32 Configuring quotas
Page 33

Troubleshooting quotas
Recreated directory does not appear in directory tree quota
If you create a directory tree quota on a specific directory and delete the directory (for example,
with rmdir/rm -rf) and then recreate it on the same path, the directory does not count as part
of the directory tree, even though the path is the same. Consequently, the
ibrix_onlinequotacheck command does not report on the directory.
Moving directories
After moving a directory into or out of a directory containing quotas, run the
ibrix_onlinequotacheck command as follows:
• After moving a directory from a directory tree with quotas (the source) to a directory without
quotas (the destination), take these steps:
1. Run ibrix_onlinequotacheck in DTREE_CREATE mode on the source directory tree
to remove the usage information for the moved directory.
2. Run ibrix_onlinequotacheck in DTREE_DELETE mode on the directory that was
moved to delete residual quota information.
• After moving a directory from a directory without quotas (the source) to a directory tree with
quotas (the destination), take this step:
1. Run ibrix_onlinequotacheck in DTREE_CREATE mode on the destination directory
tree to add the usage for the moved directory.
• After moving a directory from one directory tree with quotas (the source) to another directory
tree with quotas (the destination), take these steps:
1. Run ibrix_onlinequotacheck in DTREE_CREATE mode on the source directory tree
to remove the usage information for the moved directory.
2. Run ibrix_onlinequotacheck in DTREE_CREATE mode on the destination directory
tree to add the usage for the moved directory.
Troubleshooting quotas 33
Page 34

4 Maintaining file systems
This chapter describes how to extend a file system, rebalance segments, delete a file system or file
system component, and check or repair a file system. The chapter also includes file system
troubleshooting information.
Best practices for file system performance
It is important to monitor the space used in the segments making up the file system. If segments are
filled to 90% or greater and the segments are actively being used based on the file system allocation
policy, performance degradation is likely because of extra housekeeping tasks incurred in the file
system. Also, at this point, automatic write behavior changes can cause all new creates to go to
the segment with the most available capacity, causing a slowdown.
To maintain file system performance, follow these recommendations:
• If segments are approaching 85% full, either expand the file system with new segments or
clean up the file system.
• If only a few segments are between 85% and 90% and other segments are much lower, run
a rebalance task. However, if those few segments are at 90% or higher, it is best to adjust
the file system allocation policy to exclude the full segments from being used. Then initiate a
rebalance task to balance the full segments out onto other segments with more available space.
When the rebalance task is complete and all segments are below the 85% threshold, you can
reapply the original file system allocation policy.
The GUI displays the space used in each segment. Select the file system, and then select Segments
from the lower Navigator.
Viewing information about file systems and components
The Filesystems top panel on the GUI displays comprehensive information about a file system and
its components. This section describes how to view the same information from the command line.
34 Maintaining file systems
Page 35

Viewing physical volume information
The following command lists detailed information about physical volumes:
ibrix_pv -i
For each physical volume, the output includes the following information:
# ibrix_pv -i
PV_NAME SIZE(MB) VG_NAME LUN_GROUP LV_NAME FILESYSTEM SEGNUM USED% SEGOWNER DEVICE ON SEGOWNER
------- -------- ------- --------- ------- ---------- ------ ----- -------- --------- --------
d1 3,072 ivg1 ilv1 ifs1 1 99 vm3 /dev/sdb
d2 3,072 ivg2 ilv2 ifs1 2 99 vm2 /dev/sdc
The following command provides host-specific information about physical volumes:
ibrix_pv -l [-h HOSTLIST]
The following table lists fields included in the -i and -l commands.
DescriptionField
PV_NAME
Physical volume name. Regular physical volume names begin with the letter d. The names of physical
volumes that are part of a mirror device begin with the letter m. Both are numbered sequentially.
Physical volume size, in MB.SIZE (MB)
Name of volume group created on this physical volume, if any.VG_NAME
The LUN group, if any.LUN_GROUP
Logical volume name.LV_NAME
File system to which the logical volume belongs.FILESYSTEM
Number of this segment (logical volume) in the file system.SEGNUM
Percentage of total space in the volume group allocated to logical volumes.USED%
The owner of the segment.SEGOWNER
The device on which this physical volume is located.DEVICE ON
Not applicable for this release.RAID type
Not applicable for this release.RAID host
Not applicable for this release.RAID device
Not applicable for this release.Network host
Not applicable for this release.Network port
Viewing volume group information
To display summary information about all volume groups, use the ibrix_vg -l command:
ibrix_vg -l
The VG_FREE field indicates the amount of group space that is not allocated to any logical volume.
The VG_USED field reports the percentage of available space that is allocated to a logical volume.
To display detailed information about volume groups, use the ibrix_vg -i command. The -g
VGLIST option restricts the output to the specified volume groups.
ibrix_vg -i [-g VGLIST]
The following table lists the output fields for ibrix_vg -i.
DescriptionField
Volume group name.VG_NAME
Volume group size in MB.SIZE(MB)
Viewing information about file systems and components 35
Page 36

DescriptionField
Free (unallocated) space, in MB, available on this volume group.FREE(MB)
Percentage of total space in the volume group allocated to logical volumes.USED%
File system to which this logical volume belongs.FS_NAME
Name of the physical volume used to create this volume group.PV_NAME
Size, in MB, of the physical volume used to create this volume group.SIZE (MB)
Names of logical volumes created from this volume group.LV_NAME
Size, in MB, of each logical volume created from this volume group.LV_SIZE
GEN
STATE
Number of times the structure of the file system has changed (for example, new segments
were added).
Number of this segment (logical volume) in the file system.SEGNUM
File serving node that owns this logical volume.HOSTNAME
Operational state of the file serving node. See the administration guide for your system for
a list of the states.
Viewing logical volume information
To view information about logical volumes, use the ibrix_lv -l command. The following table
lists the output fields for this command.
DescriptionField
Logical volume name.LV_NAME
Logical volume size, in MB.LV_SIZE
File system to which this logical volume belongs.FS_NAME
Number of this segment (logical volume) in the file system.SEG_NUM
Name of the volume group created on this physical volume, if any.VG_NAME
Linux lvcreate options that have been set on the volume group.OPTIONS
Viewing file system information
To view information about all file systems, use the ibrix_fs -l command. This command also
displays information about any file system snapshots.
The following table lists the output fields for ibrix_fs -l.
DescriptionField
File system name.FS_NAME
State of the file system (for example, Mounted).STATE
Total space available in the file system, in GB.CAPACITY (GB)
Amount of space used in the file system.USED%
Number of files that can be created in this file system.Files
Percentage of total storage used by files and directories.FilesUsed%
36 Maintaining file systems
Page 37

DescriptionField
GEN
Number of times the structure of the file system has changed (for example, new segments
were added).
Number of file system segments.NUM_SEGS
To view detailed information about file systems, use the ibrix_fs -i command. To view
information for all file systems, omit the -f FSLIST argument.
ibrix_fs -i [-f FSLIST]
The following table lists the file system output fields reported by ibrix_fs -i.
DescriptionField
Number of segments.Total Segments
State of the file system (for example, Mounted).STATE
Not applicable for this release.Mirrored?
Compatible?
Generation
Yes indicates that the file system is 32-bit compatible; the maximum number of segments
(maxsegs) allowed in the file system is also specified. No indicates a 64-bit file system.
Number of times the structure of the file system has changed (for example, new segments
were added).
File system ID for NFS access.FS_ID
Unique IBRIX software internal file system identifier.FS_NUM
Default policy
Default start segment
Yes if enabled; No if not.EXPORT_CONTROL_ENABLED
Yes if enabled; No if not.QUOTA_ENABLED
If data retention is enabled, the retention policy is displayed.RETENTION
Default block size, in KB.DEFAULT_BLOCKSIZE
Capacity of the file system.CAPACITY
Amount of free space on the file system.FREE
Space available for user files.AVAIL
Percentage of total storage occupied by user files.USED PERCENT
Number of files that can be created in this file system.FILES
Number of unused file inodes available in this file system.FFREE
Number of KB a file system preallocates to a file; default: 1,024 KB.Prealloc
Number of KB that IBRIX software will pre-fetch; default: 512 KB.Readahead
Number of KB that IBRIX software pre-fetches under NFS; default: 256 KB.NFS Readahead
Allocation policy assigned on this file system. Defined policies are: ROUNDROBIN,
STICKY, DIRECTORY, LOCAL, RANDOM, and NONE. See “File allocation policies”
(page 240) for information on these policies.
The first segment to which an allocation policy is applied in a file system. If a segment
is not specified, allocation starts on the segment with the most storage space available.
NA.File replicas
NA.Dir replicas
Possible root segment inodes. This value is used internally.Mount Options
Current root segment number, if known. This value is used internally.Root Segment Hint
Viewing information about file systems and components 37
Page 38

DescriptionField
Possible segment numbers for root segment replicas. This value is used internally.Root Segment Replica(s) Hint
Snapshot strategy, if defined.Snap FileSystem Policy
The following table lists the per-segment output fields reported by ibrix_fs -i.
DescriptionField
Number of segments.SEGMENT
The host that owns the segment.OWNER
Logical volume name.LV_NAME
The current state of the segment (for example, OK or UsageStale).STATE
Default block size, in KB.BLOCK_SIZE
Size of the segment, in GB.CAPACITY (GB)
Free space on this segment, in GB.FREE (GB)
Space available for user files, in GB.AVAIL (GB)
Inodes available on this segment.FILES
Free inodes available on this segment.FFREE
Lost+found directory
When browsing the contents of IBRIX software file systems, you will see a directory named
lost+found. This directory is required for file system integrity and should not be deleted. The
lost+found directory only exists at the top-level directory of a file system, which is also the
mountpoint. Additionally, there are several directories the you can see, at the top-level (mount
point) of a file system, that are "internal use only" and should not be deleted or edited. They are:
• lost+found
• .archiving
Percentage of total storage occupied by user files.USED%
Backup host name.BACKUP
Segment type. MIXED means the segment can contain both files and directories.TYPE
Tier to which the segment was assigned.TIER
Last time the segment state was reported.LAST_REPORTED
Host on which the file system is mounted.HOST_NAME
Host mountpoint.MOUNTPOINT
File system access privileges: RO or RW.PERMISSION
Specifies whether the root user is limited to read-only access, regardless of the access setting.Root_RO
1
• .audit
• .webdav
1
There are a few exceptions in the .archiving directory. Some files in this directory are created
for user consumption in certain subdirectories of .archiving (described in various places in this
user guide, for example validation summary outputs 1–0.sum, and audit log reports), and those
specific files can be deleted if desired, but other files should not be deleted.
38 Maintaining file systems
Page 39

Viewing disk space information from a Linux 9000 client
Because file systems are distributed among segments on many file serving nodes, disk space utilities
such as df must be provided with collated disk space information about those nodes. The Fusion
Manager collects this information periodically and collates it for df.
IBRIX software includes a disk space utility, ibrix_df, that enables Linux IBRIX 9000 clients to
obtain utilization data for a file system. Execute the following command on any Linux 9000 client:
ibrix_df
The following table lists the output fields for ibrix_df.
DescriptionField
File system name.Name
Number of blocks in the file system.CAPACITY
Number of unused blocks of storage.FREE
Number of blocks available for user files.AVAIL
Percentage of total storage occupied by user files.USED PERCENT
Number of files that can be created in the file system.FILES
Number of unused file inodes in the file system.FFREE
Extending a file system
You can extend a file system from the GUI or the CLI.
NOTE: If a continuous remote replication (CRR) task is running on a file system, the file system
cannot be extended until the CRR task is complete.
If the file system uses tiers, verify that no tiering task is running before executing the file system
expansion commands. If a tiering task is running, the expansion takes priority and the tiering task
is terminated.
Select the file system on the Filesystems top panel, and then select Extend on the Summary bottom
panel. The Extend Filesystem dialog box allows you to select the storage to be added to the file
system. If data tiering is used on the file system, you can also enter the name of the appropriate
tier.
Extending a file system 39
Page 40

On the CLI, use the ibrix_fs command to extend a file system. Segments are added to the file
serving nodes in a round-robin manner. If tiering rules are defined for the file system, the -t option
is required. Avoid expanding a file system while a tiering job is running. The expansion takes
priority and the tiering job is terminated.
Extend a file system with the logical volumes (segments) specified in LVLIST:
ibrix_fs -e -f FSNAME -s LVLIST [-t TIERNAME]
Extend a file system with segments created from the physical volumes in PVLIST:
ibrix_fs -e -f FSNAME -p PVLIST [-t TIERNAME]
Extend a file system with specific logical volumes on specific file serving nodes:
ibrix_fs -e -f FSNAME -S LV1:HOSTNAME1,LV2:HOSTNAME2...
Extend a file system with the listed tiered segment/owner pairs:
ibrix_fs -e -f FSNAME -S LV1:HOSTNAME1,LV2:HOSTNAME2,... -t TIERNAME
Rebalancing segments in a file system
Segment rebalancing involves redistributing files among segments in a file system to balance
segment utilization and server workload. For example, after adding new segments to a file system,
you can rebalance all segments to redistribute files evenly among the segments. Usually, you will
want to rebalance all segments, possibly as a cron job. In special situations, you might want to
rebalance specific segments. Segments marked as bad (that is, segments that cannot be activated
for some reason) are not candidates for rebalancing.
A file system must be mounted when you rebalance its segments.
If necessary, you can evacuate segments (or logical volumes) located on storage that will be
removed from the cluster, moving the data on the segments to other segments in the file system.
You can evacuate a segment with the GUI or the ibrix_evacuate command. For more
information, see the HP IBRIX Storage CLI Reference Guide or the administrator guide for your
system.
How rebalancing works
During a rebalance operation on a file system, files are moved from source segments to destination
segments. IBRIX software calculates the average aggregate utilization of the selected source
40 Maintaining file systems
Page 41

segments, and then moves files from sources to destinations to bring each candidate source segment
as close as possible to the calculated utilization threshold. The final absolute percent usage in the
segments depends on the average file size for the target file system. If you do not specify any
sources or destinations for a rebalance task, candidate segments are sorted into sources and
destinations and then rebalanced as evenly as possible.
If you specify sources, all other candidate segments in the file system are tagged as destinations,
and vice versa if you specify destinations. Following the general rule, IBRIX software will calculate
the utilization threshold from the sources, and then bring the sources as close as possible to this
value by evenly distributing their excess files among all destinations. If you specify sources, only
those segments are rebalanced, and the overflow is distributed among all remaining candidate
segments. If you specify destinations, all segments except the specified destinations are rebalanced,
and the overflow is distributed only to the destinations. If you specify both sources and destinations,
only the specified sources are rebalanced, and the overflow is distributed only among the specified
destinations.
If there is not enough aggregate room in destination segments to hold the files that must be moved
from source segments in order to balance the sources, IBRIX software issues an error message and
does not move any files. The more restricted the number of destinations, the higher the likelihood
of this error.
When rebalancing segments, note the following:
• To move files out of certain overused segments, specify source segments.
• To move files into certain underused segments, specify destination segments.
• To move files out of certain segments and place them in certain destinations, specify both
source and destination segments.
Rebalancing segments on the GUI
Select the file system on the GUI and then select Segments from the lower Navigator. The Segments
panel shows information for all segments in the file system.
Click Rebalance/Evacuate on the Segments panel to open the Segment Rebalance and Evacuation
Wizard. The wizard can rebalance all files in the selected tier or in the file system, or you can
select the segments for the operation. Chose the appropriate rebalance option on the Select Mode
dialog box.
Rebalancing segments in a file system 41
Page 42

The Rebalance All dialog box allows you to rebalance all segments in the file system or in the
selected tier.
The Rebalance Advanced dialog box allows you to select the source and destination segments for
the rebalance operation.
42 Maintaining file systems
Page 43

Rebalancing segments from the CLI
To rebalance all segments, use the following command. Include the -a option to run the rebalance
operation in analytical mode.
ibrix_rebalance -r -f FSNAME
To rebalance by specifying specific source segments, use the following command:
ibrix_rebalance -r -f FSNAME [[-s SRCSEGMENTLIST] [-S SRCLVLIST]]
For example, to rebalance segments 2 and 3 only and to specify them by segment name:
ibrix_rebalance -r -f ifs1 -s 2,3
To rebalance segments 1 and 2 only and to specify them by their logical volume names:
ibrix_rebalance -r -f ifs1 -S ilv1,ilv2
To rebalance by specifying specific destination segments, use the following command:
ibrix_rebalance -r -f FSNAME [[-d DESTSEGMENTLIST] [-D DESTLVLIST]]
For example, to rebalance segments 3 and 4 only and to specify them by segment name:
ibrix_rebalance -r -f ifs1 -d 3,4
To rebalance segments 3 and 4 only and to specify them by their logical volume names:
ibrix_rebalance -r -f ifs1 -D ilv3,ilv4
Tracking the progress of a rebalance task
You can use the GUI or CLI to track the progress of a rebalance task. As a rebalance task
progresses, usage approaches an average value across segments, excluding bad segments that
are not candidates for rebalancing or segments containing files that are in heavy use during the
operation.
To track the progress of a rebalance task on the GUI, select the file system, and then select
Rebalancer from the lower Navigator. The Task Summary displays details about the rebalance
task. Also examine Used (%) on the Segments panel for the file system.
To track rebalance job progress from the CLI, use the ibrix_fs -i command. The output lists
detailed information about the file system. The USED% field shows usage per segments.
Rebalancing segments in a file system 43
Page 44

Viewing the status of rebalance tasks
Use the following commands to view status for jobs on all file systems or only on the file systems
specified in FSLIST:
ibrix_rebalance -l [-f FSLIST]
ibrix_rebalance -i [-f FSLIST]
The first command reports summary information. The second command lists jobs by task ID and
file system and indicates whether the job is running or stopped. Jobs that are in the analysis
(Coordinator) phase are listed separately from those in the implementation (Worker) phase.
Stopping rebalance tasks
You can stop running or stalled rebalance tasks. If Fusion Manager cannot stop the task for some
reason, you can force the task to stop. Stopping a task poses no risks for the file system. The system
completes any file migrations that are in process when you issue the stop command. Depending
on when you stop a task, segments might contain more or fewer files than before the operation
started.
To stop a rebalance task on the GUI, select the file system, and then select Rebalancer from the
lower Navigator. Click Stop on the Task Summary to stop the task.
To stop a task from the CLI, first execute ibrix_rebalance -i to obtain the TASKID, and then
execute the following command:
ibrix_rebalance -k -t TASKID [-F]
To force the task to stop, include the -F option.
Deleting file systems and file system components
Deleting a file system
Before deleting a file system, unmount it from all file serving nodes and clients. (See “Unmounting
a file system” (page 22).) Also delete any exports.
CAUTION: When a file system is deleted from the configuration database, its data becomes
inaccessible. To avoid unintended service interruptions, be sure you have specified the correct file
system.
To delete a file system, use the following command:
ibrix_fs -d [—R] f FSLIST
For example, to delete file systems ifs1 and ifs2:
ibrix_fs -d -f ifs1,ifs2
If data retention is enabled on the file system, include the -R option in the command. For example:
ibrix_fs -d -R -f ifs2
Deleting segments, volume groups, and physical volumes
When deleting segments, volume groups, or physical volumes, you should be aware of the following:
• A segment cannot be deleted until the file system to which it belongs is deleted.
• A volume group cannot be deleted until all segments that were created on it are deleted.
• A physical volume cannot be deleted until all volume groups created on it are deleted.
If you delete physical volumes but do not remove the physical storage from the network, the volumes
might be rediscovered when you next perform a discovery scan on the cluster.
To delete segments:
ibrix_lv -d -s LVLIST
44 Maintaining file systems
Page 45

For example, to delete segments ilv1 and ilv2:
ibrix_lv -d -s ilv1,ilv2
To delete volume groups:
bin/ibrix_vg -d -g VGLIST
For example, to delete volume groups ivg1 and ivg2:
ibrix_vg -d -g ivg1,ivg2
To delete physical volumes:
ibrix_pv -d -p PVLIST [-h HOSTLIST]
For example, to delete physical volumes d1, d2, and d3:
ibrix_pv -d -p d[1-3]
Deleting file serving nodes and IBRIX 9000 clients
Before deleting a file serving node, unmount all file systems from it and migrate any segments that
it owns to a different server. Ensure that the file serving node is not serving as a failover standby
and is not involved in network interface monitoring. To delete a file serving node, use the following
command:
ibrix_server -d -h HOSTLIST
For example, to delete file serving nodes s1.hp.com and s2.hp.com:
ibrix_server -d -h s1.hp.com,s2.hp.com
To delete IBRIX 9000 clients, use the following command:
ibrix_client -d -h HOSTLIST
Checking and repairing file systems
The ibrix_fsck command analyzes inconsistencies in a file system.
CAUTION: Do not run ibrix_fsck in corrective mode without the direct guidance of HP Support.
If run improperly, the command can cause data loss and file system damage.
CAUTION: Do not run e2fsck (or any other off-the-shelf fsck program) on any part of a file
system. Doing this can damage the file system.
The ibrix_fsck command can detect and repair file system inconsistencies. File system
inconsistencies can occur for many reasons, including hardware failure, power failure, switching
off the system without proper shutdown, and failed migration.
The command runs in four phases and has two running modes: analytical and corrective. You must
run the phases in order and you must run all of them:
• Phase 0 checks host connectivity and the consistency of segment byte blocks and repairs them
in corrective mode.
• Phase 1 checks segments and repairs them in corrective mode. Results are stored locally.
• Phase 2 checks the file system and repairs it in corrective mode. Results are stored locally.
• Phase 3 moves files from lost+found on each segment to the global lost+found directory
on the root segment of the file system.
If a file system shows evidence of inconsistencies, contact HP Support. A representative will ask
you to run ibrix_fsck in analytical mode and, based on the output, will recommend a course
of action and assist in running the command in corrective mode. HP strongly recommends that you
use corrective mode only with the direct guidance of HP Support. Corrective mode is complex and
difficult to run safely. Using it improperly can damage both data and the file system. Analytical
mode is completely safe, by contrast.
Checking and repairing file systems 45
Page 46

NOTE: During an ibrix_fsck run, an INFSCK flag is set on the file system to protect it. If an
error occurs during the job, you must explicitly clear the INFSCK flag (see “Clearing the INFSCK
flag on a file system” (page 46)), or you will be unable to mount the file system.
Analyzing the integrity of a file system on all segments
Observe the following requirements when executing ibrix_fsck:
• Unmount the file system for phases 0 and 1 and mount the file system for phases 2 and 3.
• Turn off automated failover by executing ibrix_host -m -U -h SERVERNAME.
• Unmount all NFS clients and stop NFS on the servers.
Use the following procedure to analyze file system integrity:
Runs phase 0 in analytic mode:
ibrix_fsck -p 0 -f FSNAME [-s LVNAME] [-c]
The command can be run on the specified file system or optionally only on the specified segment
LVNAME.
Run phase 1 in analytic mode:
ibrix_fsck -p 1 -f FSNAME [-s LVNAME] [-c] [-B BLOCKSIZE] [-b
ALTSUPERBLOCK]
The command can be run on file system FSNAME or optionally only on segment LVNAME. This
phase can be run with a specified block size and an alternate superblock number. For example:
ibrix_fsck -p 1 -f ifs1 -B 4096 -b 12250
NOTE: If phase 1 is run in analytic mode on a mounted file system, false errors can be reported.
Run phase 2:
ibrix_fsck -p 2 -f FSNAME [-s LVNAME] [-c] [-o "options"]
The command can be run on the specified file system or optionally only on segment LVNAME. Use
-o to specify any options.
Run phase 3:
ibrix_fsck -p 3 -f FSNAME [-c]
Clearing the INFSCK flag on a file system
To clear the INFSCK flag, use the following command:
ibrix_fsck -f FSNAME -C
Troubleshooting file systems
Segment of a file system is accidently deleted
When a segment of a file system is accidently deleted without evacuating it first, all files on that
segment are gone, including the Express Query metadata database files on that segment even
though they are unrelated to the files on that segment. You must recreate the metadata database.
To recreate the metadata database:
46 Maintaining file systems
Page 47

1. Disable the Express Query and auditing feature for the file system, including the removal of
any StoreAll REST API (also known as IBRIX Object API) shares. Disable the auditing feature
before you disable the Express Query feature.
a. To disable auditing, enter the following command:
ibrix_fs -A [-f FSNAME] -oa audit_mode=off
b. Remove all StoreAll REST API shares created in the file system by entering the following
command:
ibrix_httpshare -d -f <fs_name>
c. To disable the Express Query settings on a file system, enter the following command:
ibrix_fs -T -D -f FSNAME
2. To re-enable the Express Query settings on a file system , enter the following command:
ibrix_fs -T -E -f FSNAME
3. (Optional) To re-enable auditing, enter the following command:
ibrix_fs -A [-f FSNAME] -oa audit_mode=on
4. To recreate your REST API HTTP shares, enter the ibrix_httpshare -a command with the
appropriate parameters. See “Using HTTP” (page 108).
Express Query re-synchronizes the file system and the database by using the restored database
information. This process might take some time.
5. Wait for the metadata resync process to finish. Enter the following command to monitor the
resync process for a file system:
ibrix_archiving —l
The status should be at OK for the file system before you proceed. Refer to the ibrix_archiving
section in the HP IBRIX 9000 Storage CLI Reference Guide for information about the other
states.
6. Import your previously exported custom metadata and audit logs according to “Importing
metadata to a file system” (page 165).
ibrix_pv -a discovers too many or too few devices
This situation occurs when file serving nodes see devices multiple times. To prevent this, modify
the LVM2 filter in /etc/lvm/lvm.conf to filter only on devices used by IBRIX software. This will
change the output of lvmdiskscan.
By default, the following filter finds all devices:
filter = [ "a/.*/" ]
The following filter finds all sd devices:
filter = [ "a|^/dev/sd.*|", "r|^.*|" ]
Contact HP Support if you need assistance.
Cannot mount on an IBRIX 9000 client
Verify the following:
• The file system is mounted and functioning on the file serving nodes.
• The mountpoint exists on the 9000 client. If not, create the mountpoint locally on the client.
• Software management services have been started on the 9000 client (see “Starting and
stopping processes” in the administrator guide for your system).
Troubleshooting file systems 47
Page 48

NFS clients cannot access an exported file system
An exported file system has been unmounted from one or more file serving nodes, causing IBRIX
software to automatically disable NFS on those servers. Fix the issue causing the unmount and
then remount the file system.
User quota usage data is not being updated
Restart the quota monitor service to force a read of all quota usage data and update usage counts
to the file serving nodes in your cluster. Use the following command:
ibrix_qm restart
File system alert is displayed after a segment is evacuated
When a segment is successfully evacuated, a segment unavailable alert is displayed in the GUI
and attempts to mount the file system will fail. There are several options at this point:
• Mark the evacuated segment as bad (retired), using the following command. The file system
state changes to okay and the file system can now be mounted. However, the operation
marking the segment as bad cannot be reversed.
ibrix_fs -B -f FSNAME {-n RETIRED_SEGNUMLIST | -s RETIRED_LVLIST}
• Keep the evacuated segment in the file system. Take one of the following steps to enable
mounting the file system:
◦ Use the force option (-X) when mounting the file system:
ibrix_mount –f myFilesystem –m /myMountpoint –X
◦ Clear the “unavailable segment” flag on the file system with the ibrix_fsck command
and then mount the file system normally:
ibrix_fsck -f FSNAME -C -s LVNAME_OF_EVACUATED_SEG
SegmentNotAvailable is reported
When writes to a segment do not succeed, the segment status may change to
SegmentNotAvailable on the GUI and an alert message may be generated. To correct this
situation, take the following steps:
1. Identify the file serving node that owns the segment. This information is reported on the
Filesystem Segments panel on the GUI.
2. Fail over the file serving node to its standby. See the administration guide for your system for
more information about this procedure.
3. Reboot the file serving node.
4. When the file serving node is up, verify that the segment, or LUN, is available.
If the segment is still not available, contact HP Support.
SegmentRejected is reported
This alert is generated by a client call for a segment that is no longer accessible by the segment
owner or file serving node specified in the client's segment map. The alert is logged to the Iad.log
and messages files. It is usually an indication of an out-of-date or stale segment map for the affected
file system and is caused by a network condition. Other possible causes are rebooting the node,
unmounting the file system on the node, segment migrations, and, in a failover scenario, stale IAD,
an unresponsive kernel, or a network RPC condition.
To troubleshoot this alert, check network connectivity among the nodes, ensuring that the network
is optimal and any recent network conditions have been resolved. From the file system perspective,
48 Maintaining file systems
Page 49

verify segment maps by comparing the file system generation numbers and the ownership for those
segments being rejected by the clients.
Use the following commands to compare the file system generation number on the local file serving
nodes and the clients logging the error.
/usr/local/ibrix/bin/rtool enumseg <FSNAME> <SEGNUMBER>
For example:
rtool enumseg ibfs1 3
segnum=3 of 4 -----------
fsid ........................... 7b3ea891-5518-4a5e-9b08-daf9f9f4c027
fsname ......................... ibfs1
device_name .................... /dev/ivg3/ilv3
host_id ........................ 1e9e3a6e-74e4-4509-a843-c0abb6fec3a6
host_name ...................... ib50-87 <-- Verify owner of segment
ref_counter .................... 1038
state_flags .................... SEGMENT_LOCAL SEGMENT_PREFERED SEGMENT_DHB <SEGMENT_
ORPHAN_LIST_CREATED (0x00100061)
write_WM ....................... 99129 4K-blocks (387 Mbytes)
create_WM ...................... 793033 4K-blocks (3097 Mbytes)
spillover_WM ................... 892162 4K-blocks (3485 Mbytes)
generation ..................... 26
quota .......................... usr,grp,dir
f_blocks ....................... 0011895510 4K-blocks (==0047582040 1K-blocks, 46466 M)
f_bfree ........................ 0011785098 4K-blocks (==0047140392 1K-blocks, 46035 M)
f_bused ........................ 0000110412 4K-blocks (==0000441648 1K-blocks, 431 M)
f_bavail ....................... 0011753237 4K-blocks (==0047012948 1K-blocks, 45911 M)
f_files ........................ 6553600
f_ffree ........................ 6552536
used files (f_files - f_ffree).. 1064
Segment statistics for 690812.89 seconds :
n_reads=0, kb_read=0, n_writes=0, kb_written=0, n_creates=2, n_removes=0
Also run the following command:
/usr/local/ibrix/bin/rtool enumfs <FSNAME>
For example:
rtool enumfs ibfs1
1:----------------
fsname ......................... ibfs1
fsid ........................... 7b3ea891-5518-4a5e-9b08-daf9f9f4c027
fsnum .......................... 1
fs_flags........................ operational
total_number_of_segments ....... 4
mounted ........................ TRUE
ref_counter .................... 6
generation ..................... 26 <–– FS generation number for comparison
alloc_policy.................... RANDOM
dir_alloc_policy................ NONE
cur_segment..................... 0
sup_ap_on....................... NONE
local_segments ................. 3
quota .......................... usr,grp,dir
f_blocks ....................... 0047582040 4K-blocks (==0190328160 1K-blocks)
f_bfree ........................ 0044000311 4K-blocks (==0176001244 1K-blocks)
f_bused ........................ 0003581729 4K-blocks (==0014326916 1K-blocks)
f_bavail ....................... 0043872867 4K-blocks (==0175491468 1K-blocks)
f_files ........................ 26214400
f_ffree ........................ 26212193
used files (f_files - f_free)... 2207
FS statistics for 0.0 seconds :
n_reads=0, kb_read=0, n_writes=0, kb_written=0, n_creates=0, n_removes=0
Use the output to determine whether the FS generation number is in sync and whether the file
serving nodes agree on the ownership of the rejected segments. In the rtool enumseg output,
check the state_flags field for SEGMENT_IN_MIGRATION, which indicates that the segment
is stuck in migration because of a failover.
Typically, if the segment has a healthy state flag on the file serving node that owns the segment
and all file serving nodes agree on the owner of the segment, this is not a file system or file serving
Troubleshooting file systems 49
Page 50

node issue. If a state flag is stale or indicates that a segment is in migration, call HP Support for
a recovery procedure.
Otherwise, the alert indicates a file system generation mismatch. Take the following steps to resolve
this situation:
1. From the active Fusion Manager, run the following command to propagate a new file system
segment map throughout the cluster. This step takes a few minutes.
ibrix_dbck -I -f <FSNAME>
2. If problems persist, try restarting the client's IAD:
/usr/local/ibrix/init/ibrix_iad restart
ibrix_fs -c failed with "Bad magic number in super-block"
If a file system creation command fails with an error such as the following, the command may have
failed to preformat the LUN.
# ibrix_fs -c -f fs1 -s seg1_4
Calculated owner for seg1_4 : glory22
failed command (/usr/local/ibrix/bin/tuneibfs -F
3e2a9657-fc8b-46b2-96b0-1dc27e8002f3 -H glory2 -G 1 -N 1 -S fs1 -R 1
/dev/vg1_4/seg1_4 2>&1) status (1) output: (/usr/local/ibrix/bin/tuneibfs: Bad
magic number in super-block while trying to open /dev/vg1_4/seg1_4 Couldn't
find valid filesystem superblock. /usr/local/ibrix/bin/tuneibfs 5.3.461 Rpc
Version:5 Rpc Ports base=IBRIX_PORTS_BASE (Using EXT2FS Library version 1.32.1)
[ipfs1_open] reading superblock from blk 1 )
Iad error on host glory2
To work around the problem, recreate the segment on the failing LUN. To identify the LUN associated
with the failure, run a command such as the following on the first server in the system:
# ibrix_pv -l -h glory2
PV_NAME SIZE(MB) VG_NAME DEVICE RAIDTYPE RAIDHOST RAIDDEVICE
------- -------- ------- --------------- -------- -------- ---------d1 131070 vg1_1 /dev/mxso/dev4a
d2 131070 vg1_2 /dev/mxso/dev5a
d3 131070 vg1_3 /dev/mxso/dev6a
d5 23551 vg1_5 /dev/mxso/dev8a
d6 131070 vg1_4 /dev/mxso/dev7a
The Device column identifies the LUN number. In this example, the volume group vg1_4 is created
from LUN 7. Recreate the segment and then run the file system creation command again.
50 Maintaining file systems
Page 51

5 Using NFS
To allow NFS clients to access an IBRIX file system, the file system must be exported. You can
export a file system using the GUI or CLI. By default, IBRIX file systems and directories follow POSIX
semantics and file names are case-sensitive for Linux/NFS users. If you prefer to use Windows
semantics for Linux/NFS users, you can make a file system or subdirectory case-insensitive.
Exporting a file system
Exporting a file system makes local directories available for NFS clients to mount. The Fusion
Manager manages the table of exported file systems and distributes the information to the /etc/
exports files on the file serving nodes. All entries are automatically re-exported to NFS clients
and to the file serving node standbys unless you specify otherwise.
On the exporting file serving node, configure the number of NFS server threads based on the
expected workload. The default is 8 threads. If the node will service many clients, you can increase
the value to 16 or 64. To configure server threads, use the following command to change the
default value of RPCNFSDCOUNT in the /etc/sysconfig/nfs file from 8 to 16 or 64.
ibrix_host_tune –C –h HOSTS –o nfsdCount=64
A file system must be mounted before it can be exported.
NOTE: When configuring options for an NFS export, do not use the no_subtree_check
option. This option is not compatible with the IBRIX software.
Export a file system using the GUI
Use the Add a New File Share Wizard to export a file system. Select File Shares from the Navigator,
and click Add on the File Shares panel to open the wizard. (You can also open the wizard by first
selecting a file system on the Filesystems panel, selecting NFS Exports from the lower Navigator,
and then clicking Add on the NFS Exports panel.)
On the File Share window, select the file system to be exported, select NFS as the file sharing
protocol, and enter the export path.
Exporting a file system 51
Page 52

Use the Settings window to specify the clients allowed to access the share. Also select the permission
and privilege levels for the clients, and specify whether the export should be available from a
backup server.
The Advanced Settings window allows you to set NFS options on the share.
52 Using NFS
Page 53

On the Host Servers window, select the servers that will host the NFS share. By default, the share
is hosted by all servers that have mounted the file system.
The Summary window shows the configuration of the share. You can go back and revise the
configuration if necessary. When you click Finish, the export is created and appears on the File
Shares panel.
Exporting a file system 53
Page 54

Export a file system using the CLI
To export a file system from the CLI, use the ibrix_exportfs command:
ibrix_exportfs -f FSNAME -h HOSTNAME -p CLIENT1:PATHNAME1,CLIENT2:PATHNAME2,..
[-o "OPTIONS"] [-b]
The options are as follows:
DescriptionOption
The file system to be exported.–f FSNAME
The file serving node containing the file system to be exported.-h HOSTNAME
-p CLIENT1:PATHNAME1,
CLIENT2:PATHNAME2,..
-o "OPTIONS"
-b
For example, to provide NFS clients *.hp.com with read-only access to file system ifs1 at the
directory /usr/src on file serving node s1.hp.com:
ibrix_exportfs -f ifs1 -h s1.hp.com -p *.hp.com:/usr/src -o "ro"
To provide world read-only access to file system ifs1 located at /usr/src on file serving node
s1.hp.com:
ibrix_exportfs -f ifs1 -h s1.hp.com -p :/usr/src -o "ro"
The clients that will access the file system can be a single file serving node, file
serving nodes represented by a wildcard, or the world (:/PATHNAME). Note that
world access omits the client specification but not the colon (for example, :/usr/
src).
The default Linux exportfs mount options are used unless specific options are
provided. The standard NFS export options are supported. Options must be enclosed
in double quotation marks (for example, -o "ro"). Do not enter an FSID= or
sync option; they are provided automatically.
By default, the file system is exported to the NFS client’s standby. This option
excludes the standby for the file serving node from the export.
Unexporting a file system
A file system should be unexported before it is unmounted.
To unexport a file system:
• On the GUI, select the file system, select NFS Exports from the lower Navigator, and then
select Unexport.
• On the CLI, enter the following command:
ibrix_exportfs -U -h HOSTNAME -p CLIENT:PATHNAME [-b]
Using case-insensitive file systems
By default, IBRIX file systems and directories follow POSIX semantics and file names are case-sensitive
for Linux/NFS users. (File names are always case-insensitive for Windows clients.)
If you prefer to use Windows semantics for Linux/NFS users, you can make a file system or
subdirectory case-insensitive. Doing this prevents a Linux/NFS user from creating two files that
differ only in case (such as foo and FOO). If Windows users are accessing the directory, two files
with the same name but different case might be confusing, and the Windows users may be able
to access only one of the files.
CAUTION: Caution is advised when using this feature. It breaks POSIX semantics and can cause
problems for Linux utilities and applications.
54 Using NFS
Page 55

Before enabling the case-insensitive feature, be sure the following requirements are met:
• The file system or directory must be created under the IBRIX File Serving Software 6.0 or later
release.
• The file system must be mounted.
Setting case insensitivity for all users (NFS/Linux/Windows)
The case-insensitive setting applies to all users of the file system or directory.
Select the file system on the GUI, expand Active Tasks in the lower Navigator, and select Case
Insensitivity On the Task Summary bottom panel, click New to open the New Case Insensitivity
Task dialog box. Select the appropriate action to change case insensitivity.
NOTE: When specifying a directory path, the best practice is to change case insensitivity at the
root of an SMB share and to avoid mixed case insensitivity in a given share.
To set case insensitivity from the CLI, use the following command:
ibrix_caseinsensitive -s -f FSNAME -c [ON|OFF] -p PATH
Viewing the current setting for case insensitivity
Select Report Current Case Insensitivity Setting on the New Case Insensitivity Task dialog box to
view the current setting for a file system or directory.
Click Perform Recursively to see the status for all descendent directories of the specified file system
or directory.
From the CLI, use the following command to determine whether case-insensitivity is set on a file
system or directory:
ibrix_caseinsensitive -i -f FSNAME -p PATH [-r]
The -r option includes all descendent directories of the specified path.
Clearing case insensitivity (setting to case sensitive) for all users (NFS/Linux/Windows)
When you set the directory tree to be case insensitive OFF, the directory and all recursive
subdirectories are again case sensitive, restoring the POSIX semantics for Linux users.
Using case-insensitive file systems 55
Page 56

Log files
A new task is created when you change case insensitivity or query its status recursively. A log file
is created for each task and an ID is assigned to the task. The log file is placed in the directory
/usr/local/ibrix/log/case_insensitive on the server specified as the coordinating
server for the task. Check that server for the log file.
NOTE: To verify the coordinating server, select File System > Inactive Tasks. Then select the task
ID from the display and select Details.
The log file names have the format IDtask.log, such as ID26.log.
The following sample log file is for a query reporting case insensitivity:
0:0:26275:Reporting Case Insensitive status for the following directories
1:0:/fs_test1/samename-T: TRUE
2:0:/fs_test1/samename-T/samename: TRUE
2:0:DONE
The next sample log file is for a change in case insensitivity:
0:0:31849:Case Insensitivity is turned ON for the following directories
1:0:/fs_test2/samename-true
2:0:/fs_test2/samename-true/samename
3:0:/fs_test2/samename-true/samename/samename-snap
3:0:DONE
The first line of the output contains the PID for the process and reports the action taken. The first
column specifies the number of directories visited. The second column specifies the number of errors
found. The third column reports either the results of the query or the directories where case
insensitivity was turned on or off.
Displaying and terminating a case insensitivity task
To display a task, use the following command:
# ibrix_task -l
For example:
# ibrix_task -l
TASK ID TYPE FILE SYSTEM SUBMITTED BY TASK STATUS IS COMPLETED? EXIT STATUS STARTED AT
ENDED AT
----------- ------- ----------- -------------------- ----------- ------------- ----------- --------------
------- -------caseins_237 caseins fs_test1 root from Local Host STARTING No Jun 17, 2011
11:31:38
To terminate a task, run the following command and specify the task ID:
# ibrix_task -k -n <task ID>
For example:
# ibrix_task -k -n caseins_237
Case insensitivity and operations affecting directories
A newly created directory retains the case-insensitive setting of its parent directory. When you use
commands and utilities that create a new directory, that directory has the case-insensitive setting
of its parent. This situation applies to the following:
• Windows or Mac copy and paste
• tar/untar
• compress/uncompress
• cp -R
• rsync
56 Using NFS
Page 57

• Remote replication
• xcopy
• robocopy
• Restoring directories and folders from snapshots
The case-insensitive setting of the source directories is not retained on the destination directories.
Instead, the setting for the destination file system is applied. However, if you use a command such
as the Linux mv command, a Windows drag and drop operation, or a Mac uncompress operation,
a new directory is not created, and the affected directory retains its original case-insensitive setting.
Using case-insensitive file systems 57
Page 58

6 Configuring authentication for SMB, FTP, and HTTP
IBRIX software supports several services for authenticating users accessing shares on IBRIX file
systems:
• Active Directory (supported for SMB, FTP, and HTTP)
• Active Directory with LDAP ID mapping as a secondary lookup source (supported for SMB)
• LDAP (supported for SMB)
• Local Users and Groups (supported for SMB, FTP, and HTTP)
Local Users and Groups can be used with Active Directory or LDAP.
NOTE: Active Directory and LDAP cannot be used together.
You can configure authentication from the GUI or CLI. When you configure authentication with
the GUI, the selected authentication services are configured on all servers. The CLI commands
allow you to configure authentication differently on different servers.
Using Active Directory with LDAP ID mapping
When LDAP ID mapping is a secondary lookup method, the system reads SMB client UIDs and
GIDs from LDAP if it cannot locate the needed ID in an AD entry. The name in LDAP must match
the name in AD without respect for case or pre-appended domain.
If the user configuration differs in LDAP and Windows AD, the LDAP ID mapping feature uses the
AD configuration. For example, the following AD configuration specifies that the primary group
for user1 is Domain Users, but in LDAP, the primary group is group1.
LDAP ConfigurationAD configuration
user1uid:user1user:
1010uidNumber:Domain Usersprimary group:
1001 (group1)gidNumber:not specifiedUNIX uid:
Domain Userscn:not specifiedUNIX gid:
1111gidNumber:
The Linux id command returns the primary group specified in LDAP:
user: user1
primary group: group1 (1001)
LDAP ID mapping uses AD as the primary source for identifying the primary group and all
supplemental groups. If AD does not specify a UNIX GID for a user, LDAP ID mapping looks up
the GID for the primary group assigned in AD. In the example, the primary group assigned in AD
is Domain Users, and LDAP ID mapping looks up the GID of that group in LDAP. The lookup
operation returns:
user: user1
primary group: Domain Users (1111)
AD does not force the supplied primary group to match the supplied UNIX GID.
The supplemental groups assigned in AD do not need to match the members assigned in LDAP.
LDAP ID mapping uses the members list assigned in AD and ignores the members list configured
in LDAP.
58 Configuring authentication for SMB, FTP, and HTTP
Page 59

Using LDAP as the primary authentication method
Requirements for LDAP users and groups
IBRIX supports only OpenLDAP.
Configuring LDAP for IBRIX software
To configure LDAP, complete the following steps:
1. Update a configuration file template that ships as part of the IBRIX LDAP software.
This updated configuration file is then passed to a configuration utility, which uses LDAP
commands to modify the remote enterprise's OpenLDAP server.
2. Configure LDAP authentication on all the cluster nodes by using Fusion Manager.
3. Update the appropriate configuration template with information specific to the OpenLDAP
server being configured.
Update the template on the remote LDAP server
The IBRIX LDAP client ships with three configuration templates, each corresponding to a supported
OpenLDAP server schema:
• customized-schema-template.conf
• samba-schema-template.conf
• posix-schema-template.conf
Pick the schema your server supports. If your server supports both Posix and Samba schemas, pick
the schema most appropriate for your environment. Choose any one of the three supported schema
templates to proceed.
Make a copy of the template corresponding to the schema your LDAP server supports, and update
the copy with your configuration information.
Customized template. If the OpenLDAP server has a customized or a special schema, you must
provide information to help map between the standard schema attribute and class names to the
new names that are extant on the OpenLDAP server. This situation is not a common one. Use this
template only if your OpenLDAP server has overridden the standardized Posix or Samba schema
with customized extensions. Provide values (equivalent names) for all virtual attributes in the
configuration. For example:
mandatory; virtual; uid; your-schema-equivalent-of-uid
optional; virtual; homeDirectory; your-schema-equivalent-of-homeDirectory
Samba template. Enter the required attributes for Samba/POSIX templates. You can use the default
values specified in the “Map (mandatory) variables” and “Map (Optional) variables” sections of
the template.
POSIX template. Enter the required attributes for Samba/POSIX templates. Also remove or comment
out the following virtual attributes:
# mandatory; virtual; SID;sambaSID
# mandatory; virtual; PrimaryGroupSID;sambaPrimaryGroupSID
# mandatory; virtual; sambaGroupMapping;sambaGroupMapping
Using LDAP as the primary authentication method 59
Page 60

Required attributes for Samba/POSIX templates
DescriptionValueNonvirtual attribute
name
Any arbitrary stringVERSION
IP Address stringLDAPServerHost
Writable OU name stringLdapConfigurationOU
DN name stringLdapWriteDN
LDAPWritePassword
LDAP encrypts the string on
storage.
schematype
schema
Helps identify the configuration version uploaded. Potentially
used for reports, audit history, and troubleshooting.
A FQDN or IP. Typically, it is a front-ended switch or an IP
LDAP proxy/balancer name/address for multiple backend
high-availability LDAP servers.
The LDAP OU (organizational unit) to which configuration
entries can be written. This OU must exist on the server and
must be readable and writable using LDAPWriteDN.
Limited write DN credentials. HP recommends that you do not
use cn=Manager credentials. Instead, use an account DN with
very restricted write permissions to the LdapConfigurationOU
and beneath.
Password for the LdapWriteDN account.Unencrypted password string.
Supported schema for the OpenLDAP server.Samba, posix, or user defined
Run the configuration script on the remote LDAP server
The IBRIX gen_ldap-lwtools.sh script performs the configuration based on the copy of the
chosen schema template (UserConf.conf in the examples). Run the following command to
validate your changes:
sh /opt/likewise/bin/gen_ldap-lwtools.sh UserConf.conf –v
If the configuration looks okay, run the command with added security by removing all temporary
files:
sh /opt/likewise/bin/gen_ldap-lwtools.sh UserConf.conf -rm
If you need to troubleshoot the configuration, run the command as follows:
sh /opt/likewise/bin/gen_ldap-lwtools.sh UserConf.conf
Configure LDAP authentication on the cluster nodes
You can configure LDAP authentication from the GUI, as described in “Configuring authentication
from the GUI” (page 60) (recommended), or by using the ibrix_ldapconfig command (see
“Configuring LDAP” (page 69).
Configuring authentication from the GUI
Use the Authentication Wizard to perform the initial configuration or to modify it at a later time.
Select Cluster Configuration > File Sharing Authentication from the Navigator to open the File
Sharing Authentication Settings panel. This panel shows the current authentication configuration
on each server.
60 Configuring authentication for SMB, FTP, and HTTP
Page 61

Click Authentication Wizard to start the wizard. On the Configure Options page, select the
authentication service to be applied to the servers in the cluster.
NOTE: SMB in the GUI has not been rebranded to SMB yet. CIFS is just a different name for
SMB.
The wizard displays the configuration pages corresponding to the option you selected.
• Active Directory. See “Active Directory” (page 62).
• LDAP. See “LDAP” (page 63).
• LDAP ID Mapping. See “LDAP ID mapping” (page 62).
• Local Groups. See “Local Groups” (page 65).
Configuring authentication from the GUI 61
Page 62

• Local Users. See “Local Users” (page 66).
• Share Administrators. See “Windows Share Administrators” (page 68).
• Summary. See “Summary” (page 68).
Active Directory
Enter your domain name, the Auth Proxy username (an AD domain user with privileges to join the
specified domain; typically a Domain Administrator), and the password for that user. These
credentials are used only to join the domain and do not persist on the cluster nodes. Optionally,
you can enable Linux static user mapping; for more information see “Linux static user mapping
with Active Directory” (page 87).
NOTE: When you successfully configure Active Directory authentication, the machine is part of
the domain until you remove it from the domain, either with the ibrix_auth -n command or
with Windows tools. Because Active Directory authentication is a one-time event, it is not necessary
to update authentication if you change the proxy user information.
If you want to use LDAP ID mapping as a secondary lookup for Active Directory, select Enabled
with LDAP ID Mapping and AD in the Linux Static User Mapping field. When you click Next, the
LDAP ID Mapping dialog box appears.
LDAP ID mapping
If the system cannot locate a UID/GID in Active Directory, it searches for the UID/GID in LDAP.
On the LDAP ID Mapping dialog box, specify the appropriate search parameters.
62 Configuring authentication for SMB, FTP, and HTTP
Page 63

Enter the following information on the dialog box:
Enter the server name or IP address of the LDAP server host.LDAP Server Host
Enter the LDAP server port (TCP port 389 for unencrypted or TLS encrypted; 636 for SSL encrypted).Port
Base of Search
Bind DN
Max Entries
Max Wait Time
Sensitivity
Enter the LDAP base for searches. This is normally the root suffix of the directory, but you can
provide a base lower down the tree for business rules enforcement, ACLs, or performance reasons.
For example, ou=people,cd=enx,dc=net.
Enter the LDAP user account used to authenticate to the LDAP server to read data. This account
must have privileges to read the entire directory. Write credentials are not required. For example,
scn=hp9000-readonly-user,dc=entx,dc=net.
Enter the password for the LDAP user account.Password
Enter the maximum number of entries to return from the search (the default is 10). Enter 0 (zero)
for no limit.
Enter the local maximum search time-out value in seconds. This value determines how long the
client will wait for search results.
Select the level of entries to search:LDAP Scope
• base: search the base level entry only
• sub: search the base level entry and all entries in sub-levels below the base entry
• one: search all entries in the first level below the base entry, excluding the base entry
If LDAP searches should be case sensitive, check this box.Namesearch Case
LDAP
Enter the server name or IP address of the LDAP server host and the password for the LDAP user
account.
NOTE: LDAP cannot be used with Active Directory.
Configuring authentication from the GUI 63
Page 64

Enter the following information in the remaining fields:
Bind DN
Write OU
Base of Search
Enter the LDAP user account used to authenticate to the LDAP server to read data, such as
cn=hp9000-readonly-user,dc=entx,dc=net. This account must have privileges to read the
entire directory. Write credentials are not required.
Enter the OU (organizational unit) on the LDAP server to which configuration entries can be written.
This OU must be pre-provisioned on the remote LDAP server. The previous schema configuration
step would have seeded this OU with values that will now be read. The LDAPBindDN credentials
must be able to read (but not write) from the LDAPWriteOU. For example,
ou=9000Config,ou=configuration,dc=entx,dc=net.
This is normally the root suffix of the directory, but you can provide a base lower down the tree for
business rules enforcement, ACLs, or performance reasons. For example,
ou=people,cd=enx,dc=net.
Enter any string that identifies the IBRIX host, such as IBRIX.NetBIOS Name
If your LDAP configuration requires a certificate for secure access, click Edit to open the LDAP
dialog box. You can enter a TLS or SSL certificate. When no certificate is used, the Enable SSL
field shows Neither TLS or SSL.
64 Configuring authentication for SMB, FTP, and HTTP
Page 65

NOTE: If LDAP is the primary authentication service, Windows clients such as Explorer or MMC
plug-ins cannot be used to add new users.
Local Groups
Specify local groups allowed to access shares. On the Local Groups page, enter the group name
and, optionally, the GID and RID. If you do not assign a GID and RID, they are generated
automatically. Click Add to add the group to the list of local groups. Repeat this process to add
other local groups.
When naming local groups, you should be aware of the following:
• Group names must be unique. The new name cannot already be used by another user or
group.
• The following names cannot be used: administrator, guest, root.
Configuring authentication from the GUI 65
Page 66

NOTE: If Local Users and Groups is the primary authentication service, Windows clients such as
Explorer or MMC plug-ins cannot be used to add new users.
Local Users
Specify local users allowed to access shares. On the Local Users page, enter a user name and
password. Click Add to add the user to the Local Users list.
When naming local users, you should be aware of the following:
• User names must be unique. The new name cannot already be used by another user or group.
• The following names cannot be used: administrator, guest, root.
66 Configuring authentication for SMB, FTP, and HTTP
Page 67

To provide account information for the user, click Advanced. The default home directory is /home/
<username> and the default shell program is /bin/false.
Configuring authentication from the GUI 67
Page 68

NOTE: If Local Users and Groups is the primary authentication service, Windows clients such as
Explorer or MMC plug-ins cannot be used to add new users.
Windows Share Administrators
If you will be using the Windows Share Management MMC plug-in to manage SMB shares, enter
your share administrators on this page. You can skip this page if you will be managing shares
entirely from the IBRIX Management Console.
To add an Active Directory or LDAP share administrator, enter the administrator name (such as
domain\user1 or domain\group1) and click Add to add the administrator to the Windows
Share Administrators list.
To add an existing Local User as a share administrator, select the user and click Add.
Summary
The Summary page shows the authentication configuration. You can go back and revise the
configuration if necessary. When you click Finish, authentication is configured, and the details
appear on the File Sharing Authentication panel.
Viewing or changing authentication settings
Expand File Sharing Authentication in the lower Navigator, and then select an authentication
service to display the current configuration for that service. On each panel, you can start the
Authentication Wizard and modify the configuration if necessary.
68 Configuring authentication for SMB, FTP, and HTTP
Page 69

You cannot change the UID or RID for a Local User account. If it is necessary to change a UID or
RID, first delete the account and then recreate it with the new UID or RID. The Local Users and
Local Groups panels allow you to delete the selected user or group.
Configuring authentication from the CLI
You can configure Active Directory, LDAP, LDAP ID mapping, or Local Users and Groups.
Configuring Active Directory
To configure Active Directory authentication, use the following command:
ibrix_auth -n DOMAIN_NAME –A AUTH_PROXY_USER_NAME@domain_name [-P AUTH_PROXY_PASSWORD]
[-S SETTINGLIST] [-h HOSTLIST]
RFC2307 is the protocol that enables Linux static user mapping with Active Directory. To enable
RFC2307 support, use the following command:
ibrix_cifsconfig -t [-S SETTINGLIST] [-h HOSTLIST]
Enable RFC2307 in the SETTINGLIST as follows:
rfc2307_support=rfc2307
For example:
ibrix_cifsconfig -t -S "rfc2307_support=rfc2307"
To disable RFC2307, set rfc2307_support to unprovisioned. For example:
ibrix_cifsconfig -t -S "rfc2307_support=unprovisioned"
IMPORTANT: After making configuration changes with the ibrix_cifsconfig -t -S
command, use the following command to restart the SMB services on all nodes affected by the
change.
ibrix_server –s –t cifs –c restart [–h SERVERLIST]
Clients will experience a temporary interruption in service during the restart.
Configuring LDAP
Use the ibrix_ldapconfig command to configure LDAP as the authentication service for SMB
shares.
IMPORTANT: Before using ibrix_ldapconfig to configure LDAP on the cluster nodes, you
must configure the remote LDAP server. For more information, see “Configuring LDAP for IBRIX
software” (page 59).
Add an LDAP configuration and enable LDAP:
Configuring authentication from the CLI 69
Page 70

ibrix_ldapconfig -a -h LDAPSERVERHOST [-P LDAPSERVERPORT] -b LDAPBINDDN
-p LDAPBINDDNPASSWORD -w LDAPWRITEOU -B LDAPBASEOFSEARCH -n NETBIOS -E
ENABLESSL [-f CERTFILEPATH] [-c CERTFILECONTENTS]
The options are:
The LDAP server host (server name or IP address).-h LDAPSERVERHOST
The LDAP server port.-P LDAPSERVERPORT
-b LDAPBINDDN
-w LDAPWRITEOU
-f CERTFILEPATH
The LDAP bind Distinguished Name. For example:
cn=hp9000-readonly-user,dc=entx,dc=net.
The LDAP bind password.-p LDAPBINDDNPASSWORD
The LDAP write Organizational Unit, or OU (for example,
ou=9000Config,,ou=configuration,dc=entx,dc=net).
The LDAP base for searches (for example, ou=people,cd=enx,dc=net).-B LDAPBASEOFSEARCH
The NetBIOS name, such as IBRIX.-n NETBIOS
The type of certificate required. Enter 0 for no certificate, 1 for TLS, or 2 for SSL.-E ENABLESSL
The path to the TLS or SSL certificate file, such as /usr/local/ibrix/ldap/
key.pem.
The contents of the certificate file. Copy the contents and paste them between quotes.-c CERTFILECONTENTS
Modify an LDAP configuration:
ibrix_ldapconfig -m -h LDAPSERVERHOST [-P LDAPSERVERPORT] [e|D] [-b
LDAPBINDDN] [-p LDAPBINDDNPASSWORD] [-w LDAPWRITEOU] [-B
LDAPBASEOFSEARCH] [-n NETBIOS] [-E ENABLESSL] [-f CERTFILEPATH]|[-c
CERTFILECONTENTS]
The -f and -c arguments are mutually exclusive. Provide one or the other but not both.
View the LDAP configuration:
ibrix_ldapconfig -i
Delete LDAP settings for an LDAP server host:
ibrix_ldapconfig -d -h LDAPSERVERHOST
Enable LDAP:
ibrix_ldapconfig -e -h LDAPSERVERHOST
Disable LDAP:
ibrix_ldapconfig -D -h LDAPSERVERHOST
Configuring LDAP ID mapping
Use the ibrix_ldapidmapping command to configure LDAP ID mapping as a secondary lookup
source for Active Directory. LDAP ID mapping can be used only for SMB shares.
Add an LDAP ID mapping:
ibrix_ldapidmapping -a -h LDAPSERVERHOST -B LDAPBASEOFSEARCH [-P
LDAPSERVERPORT] [-b LDAPBINDDN] [-p LDAPBINDDNPASSWORD] [-m MAXWAITTIME]
[-M MAXENTRIES] [-n] [-s] [-o] [-u]
This command automatically enables LDAP RFC 2307 ID Mapping. The options are:
The LDAP server host (server name or IP address).-h LDAPSERVERHOST
The LDAP base for searches (for example, ou=people,cd=enx,dc=net).-B LDAPBASEOFSEARCH
The LDAP server port (TCP port 389).-P LDAPSERVERPORT
70 Configuring authentication for SMB, FTP, and HTTP
Page 71

-b LDAPBINDDN
-o
The LDAP bind Distinguished Name (the default is anonymous). For example:
cn=hp9000-readonly-user,dc=entx,dc=net.
The LDAP bind password.-p LDAPBINDDNPASSWORD
The maximum amount of time to allow the search to run.-m MAXWAITTIME
The maximum number of entries (the default is 10).-M MAXENTRIES
Case sensitivity for name searches (the default is false, or case-insensitive).-n
Search the LDAP scope base (search the base level entry only).-s
LDAP scope one (search all entries in the first level below the base entry, excluding
the base entry).
LDAP scope sub (search the base-level entries and all entries below the base level).-u
Display information for LDAP ID mapping:
ibrix_ldapidmapping -i
Enable an existing LDAP ID mapping:
ibrix_ldapidmapping -e -h LDAPSERVERHOST
Disable an existing LDAP ID mapping:
ibrix_ldapidmapping -d -h LDAPSERVERHOST
Configuring Local Users and Groups authentication
Use ibrix_auth to configure Local Users authentication. Use ibrix_localusers and
ibrix_localgroups to manage user and group accounts.
Configure Local Users authentication:
ibrix_auth -N [-h HOSTLIST]
Be sure to create a local user account for each user that will be accessing SMB, FTP, or HTTP
shares, and create at least one local group account for the users. The account information is stored
internally in the cluster.
Add a Local User account:
ibrix_localusers -a -u USERNAME -g DEFAULTGROUP -p PASSWORD [-h HOMEDIR]
[-s SHELL] [-i USERINFO] [-U USERID] [-S RID] [-G GROUPLIST]
Modify a Local User account:
ibrix_localusers -m -u USERNAME [-g DEFAULTGROUP] [-p PASSWORD] [-h
HOMEDIR] [-s SHELL] [-i USERINFO] [-G GROUPLIST]
View information for all Local User accounts:
ibrix_localusers -L
View information for a specific Local User account:
ibrix_localusers -l -u USERNAME
Delete a Local User account:
ibrix_localusers -d -u USERNAME
Add a Local Group account:
ibrix_localgroups -a -g GROUPNAME [-G GROUPID] [-S RID]
Modify a Local Group account:
ibrix_localgroups -m -g GROUPNAME [-G GROUPID] [-S RID]
View information about all Local Group accounts:
ibrix_localgroups -L
View information for a specific Local Group account:
Configuring authentication from the CLI 71
Page 72

ibrix_localgroups -l -g GROUPNAME
Delete a Local Group account:
ibrix_localgroups -d -g GROUPNAME
72 Configuring authentication for SMB, FTP, and HTTP
Page 73

7 Using SMB
The SMB server implementation allows you to create file shares for data stored on the cluster. The
SMB server provides a true Windows experience for Windows clients. A user accessing a file
share on an IBRIX system will see the same behavior as on a Windows server.
IMPORTANT: SMB and IBRIX Windows clients cannot be used together because of incompatible
AD user to UID mapping. You can use either SMB or IBRIX Windows clients, but not both at the
same time.
IMPORTANT: Before configuring SMB, select an authentication method. See “Configuring
authentication for SMB, FTP, and HTTP” (page 58) for more information.
Configuring file serving nodes for SMB
To enable file serving nodes to provide SMB services, you will need to configure the resolv.conf
file. On each node, the /etc/resolv.conf file must include a DNS server that can resolve SRV
records for your domain. For example:
# cat /etc/resolv.conf
search mycompany.com
nameserver 192.168.100.132
To verify that a file serving node can resolve SRV records for your AD domain, run the Linux dig
command. (In the following example, the Active Directory domain name is mydomain.com.)
% dig SRV _ldap._tcp.mydomain.com
In the output, verify that the ANSWER SECTION contains a line with the name of a domain controller
in the Active Directory domain. Following is some sample output:
; <<>> DiG 9.3.4-P1 <<>> SRV _ldap._tcp.mydomain.com
;; global options: printcmd
;; Got answer:
;; ->>HEADER<<- opcode: QUERY, status: NOERROR, id: 56968
;; flags: qr aa rd ra; QUERY: 1, ANSWER: 1, AUTHORITY: 0, ADDITIONAL: 2
;; QUESTION SECTION:
;_ldap._tcp.mydomain.com. IN SRV
;; ANSWER SECTION:
_ldap._tcp.mydomain.com. 600 IN SRV 0 100 389 adctrlr.mydomain.com.
;; ADDITIONAL SECTION:
adctrlr.mydomain.com. 3600 IN A 192.168.11.11
;; Query time: 0 msec
;; SERVER: 192.168.100.132 #53(192.168.100.132)
;; WHEN: Tue Mar 16 09:56:02 2010
;; MSG SIZE rcvd: 113
For more information, see the Linux resolv.conf(5) man page.
Starting or stopping the SMB service and viewing SMB statistics
IMPORTANT: You will need to start the SMB service initially on the file serving nodes.
Subsequently, the service is started automatically when a node is rebooted.
NOTE: CIFS in the GUI has not been rebranded to SMB yet. CIFS is just a different name for
SMB.
Use the SMB panel on the GUI to start, stop, or restart the SMB service on a particular server, or
to view SMB activity statistics for the server. Select Servers from the Navigator and then select the
Configuring file serving nodes for SMB 73
Page 74

appropriate server. Select CIFS in the lower Navigator to display the CIFS panel, which shows
SMB activity statistics on the server. You can start, stop, or restart the SMB service by clicking the
appropriate button.
NOTE: Click CIFS Settings to configure SMB signing on this server. See “Configuring SMB signing
” (page 80) for more information.
To start, stop, or restart the SMB service from the CLI, use the following command:
ibrix_server –s –t cifs –c {start|stop|restart}
Monitoring SMB services
The ibrix_cifsmonitor command configures monitoring for the following SMB services:
• lwreg
• dcerpc
• eventlog
• lsass
• lwio
• netlogin
• srvsvc
If the monitor finds that a service is not running, it attempts to restart the service. If the service
cannot be restarted, that particular service is not monitored.
The command can be used for the following tasks.
Start the SMB monitoring daemon and enable monitoring:
ibrix_cifsmonitor –m [–h HOSTLIST]
Display the health status of the SMB services:
ibrix_cifsmonitor –l
74 Using SMB
Page 75

The command output reports status as follows:
Disable monitoring and stop the SMB monitoring daemon:
ibrix_cifsmonitor –u [–h HOSTLIST]
Restart SMB service monitoring:
ibrix_cifsmonitor –c [–h HOSTLIST]
SMB shares
Windows clients access file systems through SMB shares. You can use the IBRIX GUI or CLI to
manage shares, or you can use the Microsoft Management Console interface. The SMB service
must be running when you add shares.
When working with SMB shares, you should be aware of the following:
ConditionHealth Status
All monitored SMB services are up and runningUp
The lwio service is running but one or more of the other services are downDegraded
The lwio service is down and one or more of the other services are downDown
Monitoring is disabledNot Monitored
The active Fusion Manager could not communicate with other file serving nodes in the clusterN/A
• The permissions on the directory exporting an SMB share govern the access rights that are
given to the Everyone user as well as to the owner and group of the share. Consequently, the
Everyone user may have more access rights than necessary. The administrator should set ACLs
on the SMB share to ensure that users have only the appropriate access rights. Alternatively,
permissions can be set more restrictively on the directory exporting the SMB share.
• When the cluster and Windows clients are not joined in a domain, local users are not visible
when you attempt to add ACLs on files and folders in an SMB share.
• A directory tree on an SMB share cannot be copied if there are more than 50 ACLs on the
share. Also, because of technical constraints in the SMB service, you cannot create subfolders
in a directory on an SMB share having more than 50 ACLs.
• When configuring an SMB share, you can specify IP addresses or ranges that should be
allowed or denied access to the share. However, if your network includes packet filters, a
NAT gateway, or routers, this feature cannot be used because the client IP addresses are
modified while in transit.
• You can use an SMB share as a DFS target. However, the SMB share does not support DFS
load balancing or DFS replication.
• With the release of version 6.2, SMB shares support Large MTU, which provides a 1 MB
buffer for reads and writes. On the client, you must enable Large MTU in the registry to enable
support for Large MTU on the SMB server.
• SMB shares support Alternate Data Streams. SMB clients with files containing the Alternate
Data Streams type '$DATA' can be written to SMB shares. The files are stored on the X9000
file system in a special format and should only be handled by SMB clients. If files are handled
over a different protocol or directly on the X9000 server via PowerShell, the Alternate Data
Streams could be lost.
• HP-SMB supports the following subset of Windows LSASS Local Authentication Provider
Privileges:
◦ SE_BACKUP_PRIVILEGE
◦ SE_CHANGE_NOTIFY_PRIVILEGE (Bypass traverse checking)
SMB shares 75
Page 76

◦ SE_MACHINE_ACCOUNT_PRIVILEGE
◦ SE_MACHINE_VOLUME_PRIVILEGE
◦ SE_RESTORE_PRIVILEGE
◦ SE_TAKE_OWNERSHIP_PRIVILEGE
See the Microsoft documentation for more information about these privileges.
Configuring SMB shares with the GUI
Use the Add New File Share Wizard to configure SMB shares. You can then view or modify the
configuration as necessary.
On the GUI, select File Shares from the Navigator to open the File Shares panel, and then click
Add to start the Add New File Share Wizard.
On the File Share page, select CIFS as the File Sharing Protocol. Select the file system, which must
be mounted, and enter a name, directory path, and description for the share. Note the following:
• Do not include any of the following special characters in a share name. If the name contains
any of these special characters, the share might not be set up properly on all nodes in the
cluster.
' & ( [ { $ ` , / \
• Do not include any of the following special characters in the share description. If a description
contains any of these special characters, the description might not propagate correctly to all
nodes in the cluster.
* % + & `
On the Permissions page, specify permissions for users and groups allowed to access the share.
76 Using SMB
Page 77

Click Add to open the New User/Group Permission Entry dialog box, where you can configure
permissions for a specific user or group. The completed entries appear in the User/Group Entries
list on the Permissions page.
On the Client Filtering page, specify IP addresses or ranges that should be allowed or denied
access to the share.
NOTE: This feature cannot be used if your network includes packet filters, a NAT gateway, or
routers.
SMB shares 77
Page 78

Click Add to open the New Client UP Address Entry dialog box, where you can allow or deny
access to a specific IP address or a range of addresses. Enter a single IP address, or include a
bitmask to specify entire subnets of IP addresses, such as 10.10.3.2/25. The valid range for the
bitmask is 1–32. The completed entry appears on the Client IP Filters list on the Client Filtering
page.
On the Advanced Settings page, enable or disable Access Based Enumeration and specify the
default create mode for files and directories created in the share. The Access Based Enumeration
option allows users to see only the files and folders to which they have access on the file share.
78 Using SMB
Page 79

On the Host Servers page, select the servers that will host the share.
SMB shares 79
Page 80

Configuring SMB signing
The SMB signing feature specifies whether clients must support SMB signing to access SMB shares.
You can apply the setting to all servers, or to a specific server. To apply the same setting to all
server, select File Shares from the Navigator and click Settings on the File Shares panel. To apply
a setting to a specific server, select that server on the GUI, select CIFS from the lower Navigator,
and click Settings. The dialog is the same for both selection methods.
When configuring SMB signing, note the following:
• SMB2 is always enabled.
• Use the Required check box to specify whether SMB signing (with either SMB1 or SMB2) is
required.
• The Disabled check box applies only to SMB1. Use this check box to enable or disable SMB
signing with SMB1.
You should also be aware of the following:
• The File Share Settings dialog box does not display whether SMB signing is currently enabled
or disabled. Use the following command to view the current setting for SMB signing:
ibrix_cifsconfig -i
• SMB signing must not be required to support connections from 10.5 and 10.6 Mac clients.
• It is possible to configure SMB signing differently on individual servers. Backup SMB servers
should have the same settings to ensure that clients can connect after a failover.
• The SMB signing settings specified here are not affected by Windows domain group policy
settings when joined to a Windows domain.
Configuring SMB signing from the CLI
To configure SMB signing from the command line, use the following command:
ibrix_cifsconfig -t -S SETTINGLIST
You can specify the following values in the SETTINGLIST:
smb signing enabled
smb signing required
Use commas to separate the settings, and enclose the list in quotation marks. For example, the
following command sets SMB signing to enabled and required:
ibrix_cifsconfig –t –S “smb signing enabled=1,smb signing required=1"
80 Using SMB
Page 81

To disable SMB signing, enter settingname= with no value. For example:
ibrix_cifsconfig –t –S “smb signing enabled=,smb signing required="
IMPORTANT: After making configuration changes with the ibrix_cifsconfig -t -S
command, use the following command to restart the SMB services on all nodes affected by the
change.
ibrix_server –s –t cifs –c restart [–h SERVERLIST]
Clients will experience a temporary interruption in service during the restart.
Managing SMB shares with the GUI
To view existing SMB shares on the GUI, select File Shares > CIFS from the Navigator. The CIFS
Shares panel shows the file system being shared, the hosts (or servers) providing access, the name
of the share, the export path, and the options applied to the share.
NOTE: When externally managed appears in the option list for a share, that share is being
managed with the Microsoft Management Console interface. The GUI or CLI cannot be used to
change the permissions for the share.
On the CIFS Shares panel, click Add or Modify to open the File Shares wizard, where you can
create a new share or modify the selected share. Click Delete to remove the selected share. Click
CIFS Settings to configure global file share settings; see “Configuring SMB signing ” (page 80))
for more information.
You can also view SMB shares for a specific file system. Select that file system on the GUI, and
then select CIFS Shares from the lower Navigator.
SMB shares 81
Page 82

Configuring and managing SMB shares with the CLI
Adding, modifying, or deleting shares
Use the ibrix_cifs command to add, modify, or delete shares. For detailed information, see
the HP IBRIX 9000 Storage CLI Reference Guide.
NOTE: Be sure to use the ibrix_cifs command located in <installdirectory>/bin.
The ibrix_cifs command located in /usr/local/bin/init is used internally by IBRIX
software and should not be run directly.
Add a share:
ibrix_cifs -a –f FSNAME –s SHARENAME -p SHAREPATH [-D SHAREDESCRIPTION]
[-S SETTINGLIST] [-A ALLOWCLIENTIPSLIST] [-E DENYCLIENTIPSLIST] [-F
FILEMODE] [-M DIRMODE] [-h HOSTLIST]
Use the -A ALLOWCLIENTIPSLIST or –E DENYCLIENTIPSLIST options to list client IP addresses
allowed or denied access to the share. Use commas to separate the IP addresses, and enclose the
list in quotes. You can include an optional bitmask to specify entire subnets of IP addresses (for
example, ibrix_cifs -A “192.186.0.1,102.186.0.2/16”). The default is "", which
allows (or denies) all IP addresses.
The -F FILEMODE and -M DIRMODE options specify the default mode for newly created files or
directories, in the same manner as the Linux chmod command. The range of values is 0000–0777.
The default is 0700.
To see the valid settings for the -S option, use the following command:
ibrix_cifs -L
View share information:
ibrix_cifs -i [-h HOSTLIST]
Modify a share:
ibrix_cifs -m -s SHARENAME [-D SHAREDESCRIPTION] [-S SETTINGLIST] [-A
ALLOWCLIENTIPSLIST] [-E DENYCLIENTIPSLIST] [-F FILEMODE] [-M DIRMODE]
[-h HOSTLIST]
Delete a share:
ibrix_cifs –d -s SHARENAME [-h HOSTLIST]
82 Using SMB
Page 83

Managing user and group permissions
Use the ibrix_cifsperms command to manage share-level permissions for users and groups.
Add a user or group to a share and assign share-level permissions:
ibrix_cifsperms -a -s SHARENAME -u USERNAME -t TYPE -p PERMISSION [-h
HOSTLIST]
For -t TYPE, specify either allow or deny.
For -p PERMISSION, specify one of the following:
• fullcontrol
• change
• read
For example, the following command gives everyone read permission on share1:
ibrix_cifsperms -a -s share1 -u Everyone -t allow -p read
Modify share-level permissions for a user or group:
ibrix_cifsperms -m -s SHARENAME -u USERNAME -t TYPE -p PERMISSION [-h
HOSTLIST]
Delete share-level permissions for a user or group:
ibrix_cifsperms -d -s SHARENAME [-u USERNAME] [-t TYPE] [-h HOSTLIST]
Display share-level permissions:
ibrix_cifsperms -i -s SHARENAME [-t TYPE] [-h HOSTLIST]
Managing SMB shares with Microsoft Management Console
The Microsoft Management Console (MMC) can be used to add, view, or delete SMB shares.
Administrators running MMC must have IBRIX software share management privileges.
NOTE: To use MMC to manage SMB shares, you must be authenticated as a user with share
modification permissions.
NOTE: If you will be adding users with the MMC, the primary authentication method must be
Active Directory.
NOTE: The permissions for SMB shares managed with the MMC cannot be changed with the
IBRIX Management Console GUI or CLI.
Connecting to cluster nodes
When connecting to cluster nodes, use the procedure corresponding to the Windows operating
system on your machine.
Windows XP, Windows 2003 R2:
Complete the following steps:
1. Open the Start menu, select Run, and specify mmc as the program to open.
2. On the Console Root window, select File > Add/Remove Snap-in.
3. On the Add/Remove Snap-in window, click Add.
4. On the Add Standalone Snap-in window, select Shared Folders and click Add.
5. On the Shared Folders window, select Another computer as the computer to be managed,
enter or browse to the computer name, and click Finish.
SMB shares 83
Page 84

6. Click Close > OK to exit the dialogs.
7. Expand Shared Folders (\\<address>).
8. Select Shares and manage the shares as needed.
Windows Vista, Windows 2008, Windows 7:
Complete the following steps:
1. Open the Start menu and enter mmc in the Start Search box. You can also enter mmc in a
DOS cmd window.
2. On the User Account Control window, click Continue.
3. On the Console 1 window, select File > Add/Remove Snap-in.
4. On the Add or Remove Snap-ins window, select Shared Folders and click Add.
5. On the Shared Folders window, select Another computer as the computer to be managed,
enter or browse to the computer name, and click Finish.
84 Using SMB
Page 85

6. Click OK to exit the Add or Remove Snap-ins window.
7. Expand Shared Folders (\\<address>).
8. Select Shares and manage the shares as needed.
Saving MMC settings
You can save your MMC settings to use when managing shares on this server in later sessions.
Complete these steps:
1. On the MMC, select File > Save As.
2. Enter a name for the file. The name must have the suffix .msc.
3. Select Desktop as the location to save the file, and click Save.
4. Select File > Exit.
Granting share management privileges
Use the following command to grant administrators IBRIX software share management privileges.
The users you specify must already exist. Be sure to enclose the user names in square brackets.
ibrix_auth -t -S 'share admins=[domainname\username,domainname\username]'
The following example gives share management privileges to a single user:
ibrix_auth -t -S 'share admins=[domain\user1]'
If you specify multiple administrators, use commas to separate the users. For example:
ibrix_auth -t -S 'share admins=[domain\user1, domain\user2,
domain\user3]'
Adding SMB shares
SMB shares can be added with the MMC, using the share management plug-in. When adding
shares, you should be aware of the following:
• The share path must include the IBRIX file system name. For example, if the file system is named
data, you could specify C:\data1\folder1.
SMB shares 85
Page 86

NOTE: The Browse button cannot be used to locate the file system.
• The directory to be shared will be created if it does not already exist.
• The permissions on the shared directory will be set to 777. It is not possible to change the
permissions on the share.
• Do not include any of the following special characters in a share name. If the name contains
any of these special characters, the share might not be set up properly on all nodes in the
cluster.
' & ( [ { $ ` , / \
• Do not include any of the following special characters in the share description. If a description
contains any of these special characters, the description might not propagate correctly to all
nodes in the cluster.
* % + & `
• The management console GUI or CLI cannot be used to alter the permissions for shares created
or managed with Windows Share Management. The permissions for these shares are marked
as “externally managed” on the GUI and CLI.
Open the MMC with the Shared Folders snap-in that you created earlier. On the Select Computer
dialog box, enter the IP address of a server that will host the share.
The Computer Management window shows the shares currently available from server.
86 Using SMB
Page 87

To add a new share, select Shares > New Share and run the Create A Shared Folder Wizard. On
the Folder Path panel, enter the path to the share, being sure to include the file system name.
When you complete the wizard, the new share appears on the Computer Management window.
Deleting SMB shares
To delete an SMB share, select the share on the Computer Management window, right-click, and
select Delete.
Linux static user mapping with Active Directory
Linux static user mapping (also called UID/GID mapping or RFC2307 support) allows you to use
LDAP as a Network Information Service.
Linux static user mapping must be enabled when you configure Active Directory for user
authentication (see “Configuring authentication for SMB, FTP, and HTTP” (page 58)).
If you configure LDAP ID mapping as the secondary authentication service, authentication uses the
IDs assigned in AD if they exist. If an ID is not found in an AD entry, authentication looks in LDAP
for a user or group of the same name and uses the corresponding ID assigned in LDAP. The primary
group and all supplemental groups are still determined by the AD configuration.
Linux static user mapping with Active Directory 87
Page 88

You can also assign UIDs, GIDs, and other POSIX attributes such as the home directory, primary
group and shell to users and groups in Active Directory. To add static entries to Active Directory,
complete these steps:
• Configure Active Directory.
• Assign POSIX attributes to users and groups in Active Directory.
NOTE: Mapping UID 0 and GID 0 to any AD user or group is not compatible with SMB static
mapping.
Configuring Active Directory
Your Windows Domain Controller machines must be running Windows Server 2003 R2 or Windows
Server 2008 R2. Configure the Active Directory domain as follows:
• Install Identity Management for UNIX.
• Activate the Active Directory Schema MMC snap-in.
• Add the uidNumber and gidNumber attributes to the partial-attribute-set of the AD global
catalog.
You can perform these procedures from any domain controller. However, the account used to add
attributes to the partial-attribute-set must be a member of the Schema Admins group.
Installing Identity Management for UNIX
To install Identity Management for UNIX on a domain controller running Windows Server 2003
R2, see the following Microsoft TechNet Article:
http://technet.microsoft.com/en-us/library/cc778455(WS.10).aspx
To install Identity Management for UNIX on a domain controller running Windows Server 2008
R2, see the following Microsoft TechNet article:
http://technet.microsoft.com/en-us/library/cc731178.aspx
Activating the Active Directory Schema MMC snap-in
Use the Active Directory Schema MMC snap-in to add the attributes. To activate the snap-in,
complete the following steps:
1. Click Start, click Run, type mmc, and then click OK.
2. On the MMC Console menu, click Add/Remove Snap-in.
3. Click Add, and then click Active Directory Schema.
4. Click Add, click Close, and then click OK.
Adding uidNumber and gidNumber attributes to the partial-attribute-set
To make modifications using the Active Directory Schema MMC snap-in, complete these steps:
1. Click the Attributes folder in the snap-in.
2. In the right panel, scroll to the desired attribute, right-click the attribute, and then click Properties.
Select Replicate this attribute to the Global Catalog, and click OK.
The following dialog box shows the properties for the uidNumber attribute:
88 Using SMB
Page 89

The next dialog box shows the properties for the gidNumber attribute.
The following article provides more information about modifying attributes in the Active Directory
global catalog:
http://support.microsoft.com/kb/248717
Assigning attributes
To set POSIX attributes for users and groups, start the Active Directory Users and Computers GUI
on the Domain Controller. Open the Administrator Properties dialog box, and go to the UNIX
Linux static user mapping with Active Directory 89
Page 90

Attributes tab. For users, you can set the UID, login shell, home directory, and primary group. For
groups, set the GID.
Synchronizing Active Directory 2008 with the NTP server used by the cluster
It is important to synchronize Active Directory with the NTP server used by the IBRIX cluster. Run
the following commands on the PDC:
net stop w32time
w32tm /config /syncfromflags:manual /manualpeerlist:"<NTP server>"
w32tm /config /reliable:yes
net start w32time
To check the configuration, run the following command:
w32tm /query /configuration
Consolidating SMB servers with common share names
If your SMB servers previously used the same share names, you can consolidate the servers without
changing the share name requested on the client side. For example, you might have three SMB
servers, SRV1, SRV2, and SRV3, that each have a share named DATA. SRV3 points to a shared
drive that has the same path as \\SRV1\DATA; however, users accessing SRV3 have different
permissions on the share.
To consolidate the three servers, we will take these steps:
1. Assign Vhost names SRV1, SRV2, and SRV3.
2. Create virtual interfaces (VIF) for the IP addresses used by the servers. For example, Vhost
SRV1 has VIF 99.10.10.101 and Vhost SRV2 has VIF 99.10.10.102.
3. Map the old share names to new share names. For example, map \\SRV1\DATA to new
share srv1-DATA, map \\SRV2\DATA to new share srv2-DATA, and map \\SRV3\DATA
to srv3-DATA.
90 Using SMB
Page 91

4. Create the new shares on the cluster storage and assign each share the appropriate path. For
example, assign srv1-DATA to /srv1/data, and assign srv2-DATA to /srv2/data.
Because SRV3 originally pointed to the same share as SRV1, we will assign the share
srv3-DATA the same path as srv1-DATA, but set the permissions differently.
5. Optionally, create a share having the original share name, DATA in our example. Assign a
path such as /ERROR/DATA and place a file in it named SHARE_MAP_FAILED. Doing this
ensures that if a user configuration error occurs or the map fails, clients will not gain access
to the wrong shares. The file name notifies the user that their access has failed.
When this configuration is in place, a client request to access share \\srv1\data will be translated
to share srv1-DATA at /srv1/data on the file system. Client requests for \\srv3\data will
also be translated to /srv1/data, but the clients will have different permissions. The client requests
for \\srv2\data will be translated to share srv2-DATA at /srv2/data.
Client utilities such as net use will report the requested share name, not the new share name.
Mapping old share names to new share names
Mappings are defined in the /etc/likewise/vhostmap file. Use a text editor to create and
update the file. Each line in the file contains a mapping in the following format:
VIF (or VhostName)|oldShareName|newShareName
If you enter a VhostName, it will be changed to a VIF internally.
The oldShareName is the user-requested share name from the client that needs to be translated
into a unique name. This unique name (the newShareName) is used when establishing a mount
point for the share.
Following are some entries from a vhostmap file:
99.30.8.23|salesd|q1salesd
99.30.8.24|salesd|q2salesd
salesSrv|salesq|q3salesd
When editing the /etc/likewise/vhostmap file, note the following:
• All VIF|oldShareName pairs must be unique.
• The following characters cannot be used in a share name: “ / \ | [ ] < > + : ; ,
? * =
• Share names are case insensitive, and must be unique with respect to case.
• The oldShareName and newShareName do not need to exist when creating the file; however,
they must exist for a connection to be established to the share.
• If a client specifies a share name that is not in the file, the share name will not be translated.
• Care should be used when assigning share names longer than 12 characters. Some clients
impose a limit of 12 characters for a share name.
• Verify that the IP addresses specified in the file are legal and that Vhost names can be resolved
to an IP address. IP addresses must be IP4 format, which limits the addresses to 15 characters.
IMPORTANT: When you update the vhostmap file, the changes take effect a few minutes after
the map is saved. If a client attempts a connection before the changes are in effect, the previous
map settings will be used. To avoid any delays, make your changes to the file when the SMB
service is down.
After creating or updating the vhostmap file, copy the file manually to the other servers in the
cluster.
Consolidating SMB servers with common share names 91
Page 92

SMB clients
SMB clients access shares on the IBRIX software cluster in the same way they access shares on a
Windows server.
Viewing quota information
When user or group quotas are set on a file system exported as an SMB share, users accessing
the share can see the quota information on the Quotas tab of the Properties dialog box. Users
cannot modify quota settings from the client end.
SMB users cannot view directory tree quotas.
Differences in locking behavior
When SMB clients access a share from different servers, as in the IBRIX software environment, the
behavior of byte-range locks differs from the standard Windows behavior, where clients access a
share from the same server. You should be aware of the following:
• Zero-length byte-range locks acquired on one file serving node are not observed on other file
serving nodes.
• Byte-range locks acquired on one file serving node are not enforced as mandatory on other
file serving nodes.
• If a shared byte-range lock is acquired on a file opened with write-only access on one file
serving node, that byte-range lock will not be observed on other file serving nodes. ("Write-only
access" means the file was opened with GENERIC_WRITE but not GENERIC_READ access.)
• If an exclusive byte-range lock is acquired on a file opened with read-only access on one file
serving node, that byte-range lock will not be observed on other file serving nodes. ("Read-only
access" means the file was opened with GENERIC_READ but not GENERIC_WRITE access.)
SMB shadow copy
Users who have accidently lost or changed a file can use the SMB shadow copy feature to retrieve
or copy the previous version of the file from a file system snapshot. IBRIX software supports SMB
shadow copy operations as follows.
92 Using SMB
Page 93

Access Control Lists (ACLs)
IBRIX SMB shadow copy behaves in the same manner as Windows shadow copy with respect to
ACL restoration. When a user restores a deleted file or folder using SMB shadow copy, the ACLs
applied on the individual files or folders are not restored. Instead, the files and folders inherit the
permissions from the root of the share or from the parent directory where they were restored.
When a user restores on an existing file or folder by restoring it with SMB shadow copy, the ACLs
applied on the individual file or folder are not restored. The ACLS applied on the individual file
or folder remain as they were before the restore.
Restore operations
If a file has been deleted from a directory that has Previous Versions, the user can recover a previous
version of the file by performing a Restore of the parent directory. However, the Properties of the
restored file will no longer list those Previous Versions. This condition is due to the IBRIX snapshot
infrastructure; after a file is deleted, a new file in the same location is a new inode and will not
have snapshots until a new snapshot is subsequently created. However, all pre-existing previous
versions of the file continue to be available from the Previous Versions of the parent directory.
For example, folder Fold1 contains files f1 and f2. There are two snapshots of the folder at
timestamps T1 and T2, and the Properties of Fold1 show Previous Versions T1 and T2. The
Properties of files f1 and f2 also show Previous Versions T1 and T2 as long as these files have
never been deleted.
If the file f1 is now deleted, you can restore its latest saved version from Previous Version T2 on
Fold1.
From that point on, the Previous Versions of \Fold1\f1 no longer show timestamps T1 and T2.
However, the Previous Versions of \Fold1 continue to show T1 and T2, and the T1 and T2 versions
of file f1 continue to be available from the folder.
Windows Clients Behavior
Users should have full access on files and folders to restore them with SMB shadow copy. If the
user does not have adequate permission, an error appears and the user is prompted to skip that
file or folder when the failover is complete.
After the user skips the file or folder, the restore operation may or may not continue depending on
the Windows client being used. For Windows Vista, the restore operation continues by skipping
the folder or file. For other Windows clients (Windows 2003, XP, 2008), the operation stops
abruptly or gives an error message. Testing has shown that Windows Vista is an ideal client for
SMB clients 93
Page 94

SMB shadow copy support. IBRIX software does not have any control over the behavior of other
clients.
NOTE: HP recommends that the share root is not at the same level as the file system root, and is
instead a subdirectory of the file system root. This configuration reduces access and other
permissions-related issues, as there are many system files (such as lost+found, quota subsystem
files, and so on) at the root of the file system.
SMB shadow copy restore during node failover
If a node fails over while an SMB shadow copy restore is in progress, the user may see a disruption
in the restore operation.
After the failover is complete, the user must skip the file that could not be accessed. The restore
operation then proceeds. The file will not be restored and can be manually copied later, or the
user can cancel the restore operation and then restart it.
Permissions in a cross-protocol SMB environment
The manner in which the SMB server handles permissions affects the use of files by both Windows
and Linux clients. Following are some considerations.
How the SMB server handles UIDs and GIDs
The SMB server provides a true Windows experience for Windows users. Consequently, it must
be closely aligned with Windows in the way it handles permissions and ownership on files.
Windows uses ACLs to control permissions on files. The SMB server puts a bit-for-bit copy of the
ACLs on the Linux server (in the files on the IBRIX file system), and validates file access through
these permissions.
ACLs are tied to Security Identifiers (SIDs) that uniquely identify users in the Windows environment,
and which are also stored on the file in the Linux server as a part of the ACLs. SIDs are obtained
from the authenticating authority for the Windows client (in IBRIX software, an Active Directory
server). However, Linux does not understand Windows-style SIDs; instead, it has its own permissions
control scheme based on UID/GID and permissions bits (mode bits, sticky bits). Since this is the
native permissions scheme for Linux, the SMB server must make use of it to access files on behalf
of a Windows client; it does this by mapping the SID to a UID/GID and impersonating that UID/GID
when accessing files on the Linux file system.
From a Windows standpoint, all of the security for the IBRIX software-resident files is self-consistent;
Windows clients understand ACLs and SIDs, and understand how they work together to control
94 Using SMB
Page 95

access to and security for Windows clients. The SMB server maintains the ACLs as requested by
the Windows clients, and emulates the inheritance of ACLs identically to the way Windows servers
maintain inheritance. This creates a true Windows experience around accessing files from a
Windows client.
This mechanism works well for pure Linux environments, but (like the SMB server) Linux applications
do not understand any permissions mechanisms other than their own. Note that a Linux application
can also use POSIX ACLs to control access to a file; POSIX ACLs are honored by the SMB server,
but will not be inherited or propagated. The SMB server also does not map POSIX ACLs to be
compatible with Windows ACLs on a file.
These permission mechanisms have some ramifications for setting up shares, and for cross-protocol
access to files on an IBRIX system. The details of these ramifications follow.
Permissions, UIDs/GIDs, and ACLs
The SMB server does not attempt to maintain two permission/access schemes on the same file.
The SMB server is concerned with maintaining ACLs, so performs ACL inheritance and honors
ACLS. The UID/GIDs and permission bits for files on a directory tree are peripheral to this activity,
and are used only as much as necessary to obtain access to files on behalf of a Windows client.
The various cases the SMB server can encounter while accessing files and directories, and what
it does with UID/GID and permission bits in that access, are considered in the following sections.
Pre-existing directories and files
A pre-existing Linux directory will not have ACLs associated with it. In this case, the SMB server
will use the permission bits and the mapped UID/GID of the SMB user to determine whether it has
access to the directory contents. If the directory is written by the SMB server, the inherited ACLS
from the directory tree above that directory (if there are any) will be written into the directory so
future SMB access will have the ACLs to guide it.
Pre-existing files are treated like pre-existing directories. The SMB server uses the UID/GID of the
SMB user and the permission bits to determine the access to the file. If the file is written to, the
ACLs inherited from the containing directory for the file are applied to the file using the standard
Windows ACL inheritance rules.
Working with pre-existing files and directories
Pre-existing file treatment has ramifications for cross-protocol environments. If, for example, files
are deposited into a directory tree using NFS and then accessed using SMB clients, the directory
tree will not have ACLs associated with it, and access to the files will be moderated by the NFS
UID/GID and permissions bits. If those files are then modified by an SMB client, they will take on
the UID/GID of the SMB client (the new owner) and the NFS clients may lose access to those files.
New directories and files
New directories created in a tree by the Windows client inherit the ACLs of the parent directory.
They ACLs are created with the UID/GID of the Windows user (the UID/GID that the SID for the
Windows user is mapped to) and they have a Linux permission bit mask of 700. This translates to
Linux applications (which do not understand the Windows ACL) having owner and group (users
with the same group ID) with read, write, execute permissions, and everyone else having just read
and execute permissions.
New files are handled the same way as directories. The files inherit the ACLs of the parent directory
according to the Windows rules for ACL inheritance, and they are created with a UID/GID of the
Windows user as mapped from the SID. They are assigned a permissions mask of 700.
Permissions in a cross-protocol SMB environment 95
Page 96

Working with new files and directories
The inheritance rules of Windows assume that all directories are created on a Windows machine,
where they inherit ACLs from their parent; the top level of a directory tree (the root of the file system)
is assigned ACLs by the file system formatting process from the defaults for the system.
This process is not in place on file serving nodes. Instead, when you create a share on a node,
the share does not have any inherited ACLs from the root of the file system in which it is created.
This leads to strange behavior when a Windows client attempts to use permissions to control access
to a file in such a directory. The usual CREATOR/OWNER and EVERYBODY ACLs (which are a
part of the typical Windows ACLS inheritance ACL set) do not exist on the containing directory for
the share, and are not inherited downward into the share directory tree. For true Windows-like
behavior, the creator of a share must access the root of the share and set the desired ACLs on it
manually (using Windows Explorer or a command line tool such as ICACLS). This process is
somewhat unnatural for Linux administrators, but should be fairly normal for Windows administrators.
Generally, the administrator will need to create a CREATOR/OWNER ACL that is inheritable on
the share directory, and then create an inheritable ACL that controls default access to the files in
the directory tree.
Changing the way SMB inherits permissions on files accessed from Linux applications
To prevent the SMB server from modifying file permissions on directory trees that a user wants to
access from Linux applications (so keeping permissions other than 700 on a file in the directory
tree), a user can set the setgid bit in the Linux permissions mask on the directory tree. When the
setgid bit is set, the SMB server honors that bit, and any new files in the directory inherit the
parent directory permission bits and group that created the directory. This maintains group access
for new files created in that directory tree until setgid is turned off in the tree. That is, Linux-style
permissions semantics are kept on the files in that tree, allowing SMB users to modify files in the
directory while NFS users maintain their access though their normal group permissions.
For example, if a user wants all files in a particular tree to be accessible by a set of Linux users
(say, through NFS), the user should set the setgid bit (through local Linux mechanisms) on the
top level directory for a share (in addition to setting the desired group permissions, for example
770). Once that is done, new files in the directory will be accessible to the group that creates the
directory and the permission bits on files in that directory tree will not be modified by the SMB
server. Files that existed in the directory before the setgid bit was set are not affected by the
change in the containing directory; the user must manually set the group and permissions on files
that already existed in the directory tree.
This capability can be used to facilitate cross-protocol sharing of files. Note that this does not affect
the permissions inheritance and settings on the SMB client side. Using this mechanism, a Windows
user can set the files to be inaccessible to the SMB users of the directory tree while opening them
up to the Linux users of the directory tree.
Troubleshooting SMB
Changes to user permissions do not take effect immediately
The SMB implementation maintains an authentication cache that is set to four hours. If a user is
authenticated to a share, and the user's permissions are then changed, the old permissions will
remain in effect until the cache expires, at four hours after the authentication. The next time the
user is encountered, the new, correct value will be read and written to the cache for the next four
hours.
This is not a common occurrence. However, to avoid the situation, use the following guidelines
when changing user permissions:
• After a user is authenticated to a share, wait four hours before modifying the user's permissions.
• Conversely, it is safe to modify the permissions of a user who has not been authenticated in
the previous four hours.
96 Using SMB
Page 97

Robocopy errors occur during node failover or failback
If Robocopy is in use on a client while a file serving node is failed over or failed back, the
application repeatedly retries to access the file and reports the error The process cannot
access the file because it is being used by another process. These errors
occur for 15 to 20 minutes. The client's copy will then continue without error if the retry timeout
has not expired. To work around this situation, take one of these steps:
• Stop and restart processes on the affected file serving node:
# /opt/likewise/bin/lwsm stop lwreg && /etc/init.d/lwsmd stop
# /etc/init.d/lwsmd start && /opt/likewise/bin/lwsm start srvsvc
• Power down the file serving node before failing it over, and do failback operations only during
off hours.
The following xcopy and robocopy options are recommended for copying files from a client to
a highly available SMB server:
xcopy: include the option /C; in general, /S /I /Y /C are good baseline options.
robocopy: include the option /ZB; in general, /S /E /COPYALL /ZB are good baseline
options.
Copy operations interrupted by node failback
If a node failback occurs while xcopy or robocopy is copying files to an SMB share, the copy
operation might be interrupted and need to be restarted.
Active Directory users cannot access SMB shares
If any AD user is set to UID 0 in Active Directory, you will not be able to connect to SMB shares
and errors will be reported. Be sure to assign a UID other than 0 to your AD users.
UID for SMB Guest account conflicts with another user
If the UID for the Guest account conflicts with another user, you can delete the Guest account and
recreate it with another UID.
Use the following command to delete the Guest account, and enter yes when you are prompted
to confirm the operation:
/opt/likewise/bin/lw-del-user Guest
Recreate the Guest account, specifying a new UID:
/opt/likewise/bin/lw-add-user –-force --uid <UID_number> Guest
To have the system generate the UID, omit the --uid <UID_number> option.
Troubleshooting SMB 97
Page 98

8 Using FTP
The FTP feature allows you to create FTP file shares for data stored on the cluster. Clients access
the FTP shares using standard FTP and FTPS protocol services.
IMPORTANT: Before configuring FTP, select an authentication method (either Local Users or Active
Directory). See “Configuring authentication for SMB, FTP, and HTTP” (page 58) for more information.
An FTP configuration consists of one or more configuration profiles and one or more FTP shares.
A configuration profile defines global FTP parameters and specifies the file serving nodes on which
the parameters are applied. The vsftpd service starts on these nodes when the cluster services
start. Only one configuration profile can be in effect on a particular node.
An FTP share defines parameters such as access permissions and lists the file system to be accessed
through the share. Each share is associated with a specific configuration profile. The share
parameters are added to the profile's global parameters on the file serving nodes specified in the
configuration profile.
You can create multiple shares having the same physical path, but with different sets of properties,
and then assign users to the appropriate share. Be sure to use a different IP address or port for
each share.
You can configure and manage FTP from the GUI or CLI.
Best practices for configuring FTP
When configuring FTP, follow these best practices:
• If an SSL certificate will be required for FTPS access, add the SSL certificate to the cluster
before creating the shares. See “Managing SSL certificates” (page 123) for information about
creating certificates in the format required by IBRIX software and then adding them to the
cluster.
• When configuring a share on a file system, the file system must be mounted.
• If the directory path to the share includes a subdirectory, be sure to create the subdirectory
on the file system and assign read/write/execute permissions to it. (IBRIX software does not
create the subdirectory if it does not exist, and instead adds a /pub/ directory to the share
path.)
• For High Availability, when specifying IP addresses for accessing a share, use IP addresses
for VIFs having VIF backups. See the administrator guide for your system for information about
creating VIFs.
• The allowed ports are 21 (FTP) and 990 (FTPS).
• Uploads and downloads to an anonymous share (anonymous=true) can only be done by
nonusers or by ftp user, which is the default user of an anonymous share. For information
about commands for anonymous shares, see “FTP and FTPS commands for anonymous shares”
(page 105).
Managing FTP from the GUI
Use the Add New File Share Wizard to configure FTP. You can then view or modify the configuration
as necessary.
Configuring FTP
On the GUI, select File Shares from the Navigator to open the File Shares panel, and then click
Add to start the Add New File Share Wizard.
98 Using FTP
Page 99

On the File Share page, select FTP as the File Sharing Protocol. Select the file system, which must
be mounted, and enter the default directory path for the share. If the directory path includes a
subdirectory, be sure to create the subdirectory on the file system and assign read/write/execute
permissions to it.
NOTE: IBRIX software does not create the subdirectory if it does not exist, and for anonymous
shares only, adds a /pub/ directory to the share path instead. All files uploaded through the
anonymous user will then be placed in that directory. The /pub/ directory is not created for a
non-anonymous share.
On the Config Profile page, select an existing configuration profile or create a new profile,
specifying a name and defining the appropriate parameters.
Managing FTP from the GUI 99
Page 100

On the Host Servers page, select the servers that will host the configuration profile.
100 Using FTP
 Loading...