

HP StorageWorks X5000, NSA Security Compliancy, C2 Security Compliancy, E3-FC2 Security Compliancy, CC Security Compliancy Technical Manual
Page 1

NAS Security:
A technical guide to NSA, C2, E3-FC2, and CC Security
Compliancy
1 Introduction ................................................................................................................................. 3
1.1 NSA Security Compliancy Overview ....................................................................................... 3
1.2 C2/CC Security Compliancy Overview ................................................................................... 4
1.3 E3/F-C2 Security Compliancy Overview.................................................................................. 4
2 NSA Security Compliancy ............................................................................................................. 4
2.1 Domain Model Design: Windows NT 4.0, Windows 2000, and Windows 2003 ....................... 5
2.2 Time Synchronization ............................................................................................................6
2.3 Organizational Unit (OU) and Group Policy Objects (GPOs) Design........................................... 7
2.4 Domain Level: Hardening the Domain Infrastructure Password Policy .......................................... 9
2.5 Domain Level: Hardening the Domain Infrastructure Account Lockout Policy .............................. 13
2.6 Domain Level: Hardening the Domain Infrastructure Kerberos Policy......................................... 15
2.7 Domain Level: Hardening the Domain Infrastructure Security Options ....................................... 15
2.8 Baseline Level ..................................................................................................................... 17
2.8.1 Audit Policy .................................................................................................................. 17
2.8.2 User Rights Assignments ................................................................................................. 27
2.8.3 Security Options............................................................................................................ 37
2.8.4 Event Log...................................................................................................................... 55
2.8.5 System Services............................................................................................................. 58
2.8.6 Additional Security Settings ............................................................................................ 91
2.8.7 Additional Security Settings (Manual Hardening Procedures) ............................................ 107
2.9 Hardening File Servers....................................................................................................... 111
2.9.1 Audit Policy Settings .................................................................................................... 112
2.9.2 2.9.2 User Rights Assignments ..................................................................................... 112
2.9.3 Security Options.......................................................................................................... 113
2.9.4 Event Log Settings........................................................................................................ 117
2.9.5 System Services........................................................................................................... 117
2.9.6 Additional Security Settings .......................................................................................... 125
2.9.7 HP NAS Specific Security Settings ................................................................................. 128
2.10 Hardening Print Servers .................................................................................................. 130
2.10.1 Audit Policy Settings ................................................................................................. 130
2.10.2 User Rights Assignments ............................................................................................ 130
2.10.3 Security Options....................................................................................................... 131
2.10.4 Event Log Settings..................................................................................................... 131
2.10.5 System Services........................................................................................................ 131
Page 2

2.10.6 Additional Security Settings ....................................................................................... 132
2.10.7 HP NAS Specific Security Settings .............................................................................. 134
2.11 Hardening IIS Servers ..................................................................................................... 135
2.11.1 Audit Policy Settings ................................................................................................. 135
2.11.2 User Rights Assignments ............................................................................................ 135
2.11.3 Security Options....................................................................................................... 136
2.11.4 Event Log Settings..................................................................................................... 136
2.11.5 System Services........................................................................................................ 136
2.11.6 Additional Security Settings ....................................................................................... 139
2.11.7 HP NAS Specific Security Settings .............................................................................. 148
3 C2 / CC Security Compliancy ................................................................................................... 148
3.1 Security Policy Modifications .............................................................................................. 149
3.2 Registry Modifications........................................................................................................ 153
4 E3/F-C2 Security Compliancy.................................................................................................... 156
5 For more information ................................................................................................................ 156
2
Page 3

1 Introduction
This document provides detailed steps and information on how customers can modify and integrate
their HP Windows StorageServer 2003 NAS products into their existing NSA or C2 / CC
v2.1security compliant environments. HP Windows StorageServer 2003 NAS NSA security
compliancy are based on Microsoft’s “Windows Server 2003 Security Guide: Patterns and
Practices” security paper at
4D89-B655-521EA6C7B4DB&displaylang=en which is recommended by National Security Agency (NSA)
of the United States to meet NSA security compliancy. Similarly, HP Windows StorageServer 2003
NAS C2 /CC v2.1 (ISO/ IEC15408) security compliancy is based on the US Department of Defense
(DoD) “Trusted Computer System Evaluation Criteria (TCSEC)” security paper, a.k.a. the “Orange
book”, at
Partnership (NIAP) Common Criteria Evaluation and Validation Scheme (CCEVS) and the Common
Criteria Recognition Arrangement (CCRA) documents located at
scheme/defining-ccevs.html. All E3/F-C2 system modifications within this document are based upon the
Information Technology Evaluation Manual (ITSEM) at
Information Technology Security Evaluation Criteria (ITSEC) security requirements within the United
Kingdom, Germany, France, and the Netherlands.
http://www.fas.org/irp/nsa/rainbow/tg003.htm and on the National Information Assurance
1.1 NSA Security Compliancy Overview
This document mainly focuses on NAS system modifications needed to meet NSA security
compliancy. To meet NSA security requirements, the NAS system’s network infrastructure must be
NSA security compliant as well. As such, the following modifications are required for full NSA
security compliancy:
http://www.microsoft.com/downloads/details.aspx?FamilyId=8A2643C1-0685-
http://www.niap.nist.gov/cc-
http://www.boran.com/security/itsem.html to meet
• Hardening the Domain Infrastructure
• Creating a NSA Security Compliant Member Server Baseline Policy (MSBP)
• Hardening File Servers
• Hardening Print Servers
• Hardening IIS Servers
Depending upon the NAS appliance’s server roles, administrators may need to consolidate the
security lockdown information within the later sections. For example, administrators who have NAS
appliances that function as file servers, and IIS servers but not print servers need to only merge the
security modifications for file and IIS server roles.
All NSA security information and recommendations within this guide are either summaries or direct
content quotes from Microsoft’s “Windows Server 2003 Security Guide: Patterns and Practices”
security paper at
521EA6C7B4DB&displaylang=en and from Microsoft’s “Windows Solution for Security: Threats and
Countermeasures: Security Settings in Windows Server 2003 and Windows XP” at
http://www.microsoft.com/downloads/details.aspx?FamilyId=1B6ACF93-147A-4481-9346F93A4081EEA8&displaylang=en.
http://www.microsoft.com/downloads/details.aspx?FamilyId=8A2643C1-0685-4D89-B655-
3
Page 4

1.2 C2/CC Security Compliancy Overview
This document also describes network and server system modification steps required for
Administrators to meet C2 / CC v2.1(ISO/ IEC15408) security requirements. C2 security
requirements are based upon the US Department of Defense (DoD) “Trusted Computer System
Evaluation Criteria” security paper, a.k.a. the “Orange book”, at
http://www.fas.org/irp/nsa/rainbow/tg003.htm . The Common Criteria (CC) v2.1) security
requirements are updated version requirements of the C2 security requirements. CC security
requirements listed below are based upon the National Information Assurance Partnership (NIAP)
Common Criteria Evaluation and Validation Scheme (CCEVS) secuirty documents located at
http://www.niap.nist.gov/cc-scheme/defining-ccevs.html. The CC modification steps described below
within Chapter 3, “C2 / CC Security Compliancy”, should achieve an NIAP Evaluation Assurance
Level (EAL) 4 augmented with ALC_FLR.3 and a TOE minimum function strength of SOF-medium.
1.3 E3/F-C2 Security Compliancy Overview
This document also depicts the modification steps necessary for Administrators to meet E3/F-C2
security requirements. All E3/F-C2 system modifications within this document are based upon the
Information Technology Evaluation Manual (ITSEM) at
Information Technology Security Evaluation Criteria (ITSEC) security requirements within the United
Kingdom, Germany, France, and the Netherlands.
http://www.boran.com/security/itsem.html to meet
2 NSA Security Compliancy
This section provides detail steps in modifying the NAS system and other systems within the network
to meet NSA security compliancy based on Microsoft’s “Windows Server 2003 Security Guide:
Patterns and Practices”.
Not all network environments are the same. As such, NSA security requirements vary depending
upon the network environment. These network infrastructures have been separated into 3 category
levels:
Legacy Client
The Legacy Client level is specific to environments with legacy clients which includes Microsoft
Windows® 98, Microsoft Windows NT® version 4.0 Workstation, Window 2000 Professional, and
Windows XP Professional workstations. Since Windows NT 4.0 domain controllers do have certain
required NSA security feature sets, this environment can only contain Windows 2000 or later domain
controllers. Although there are no Windows NT 4.0 domain controllers in this environment, Windows
NT member servers may exist. This environment is the lowest NSA lockdown level. Customers are
recommended to start at this level first to meet minimal NSA security requirements and increase
security level modifications as they see fit to meet their company security requirements.
Enterprise Client
This business environment includes clients running Windows 2000 Professional and Windows XP
Professional. All domain controllers and member servers in this environment are Windows 2000
Server or later.
4
Page 5
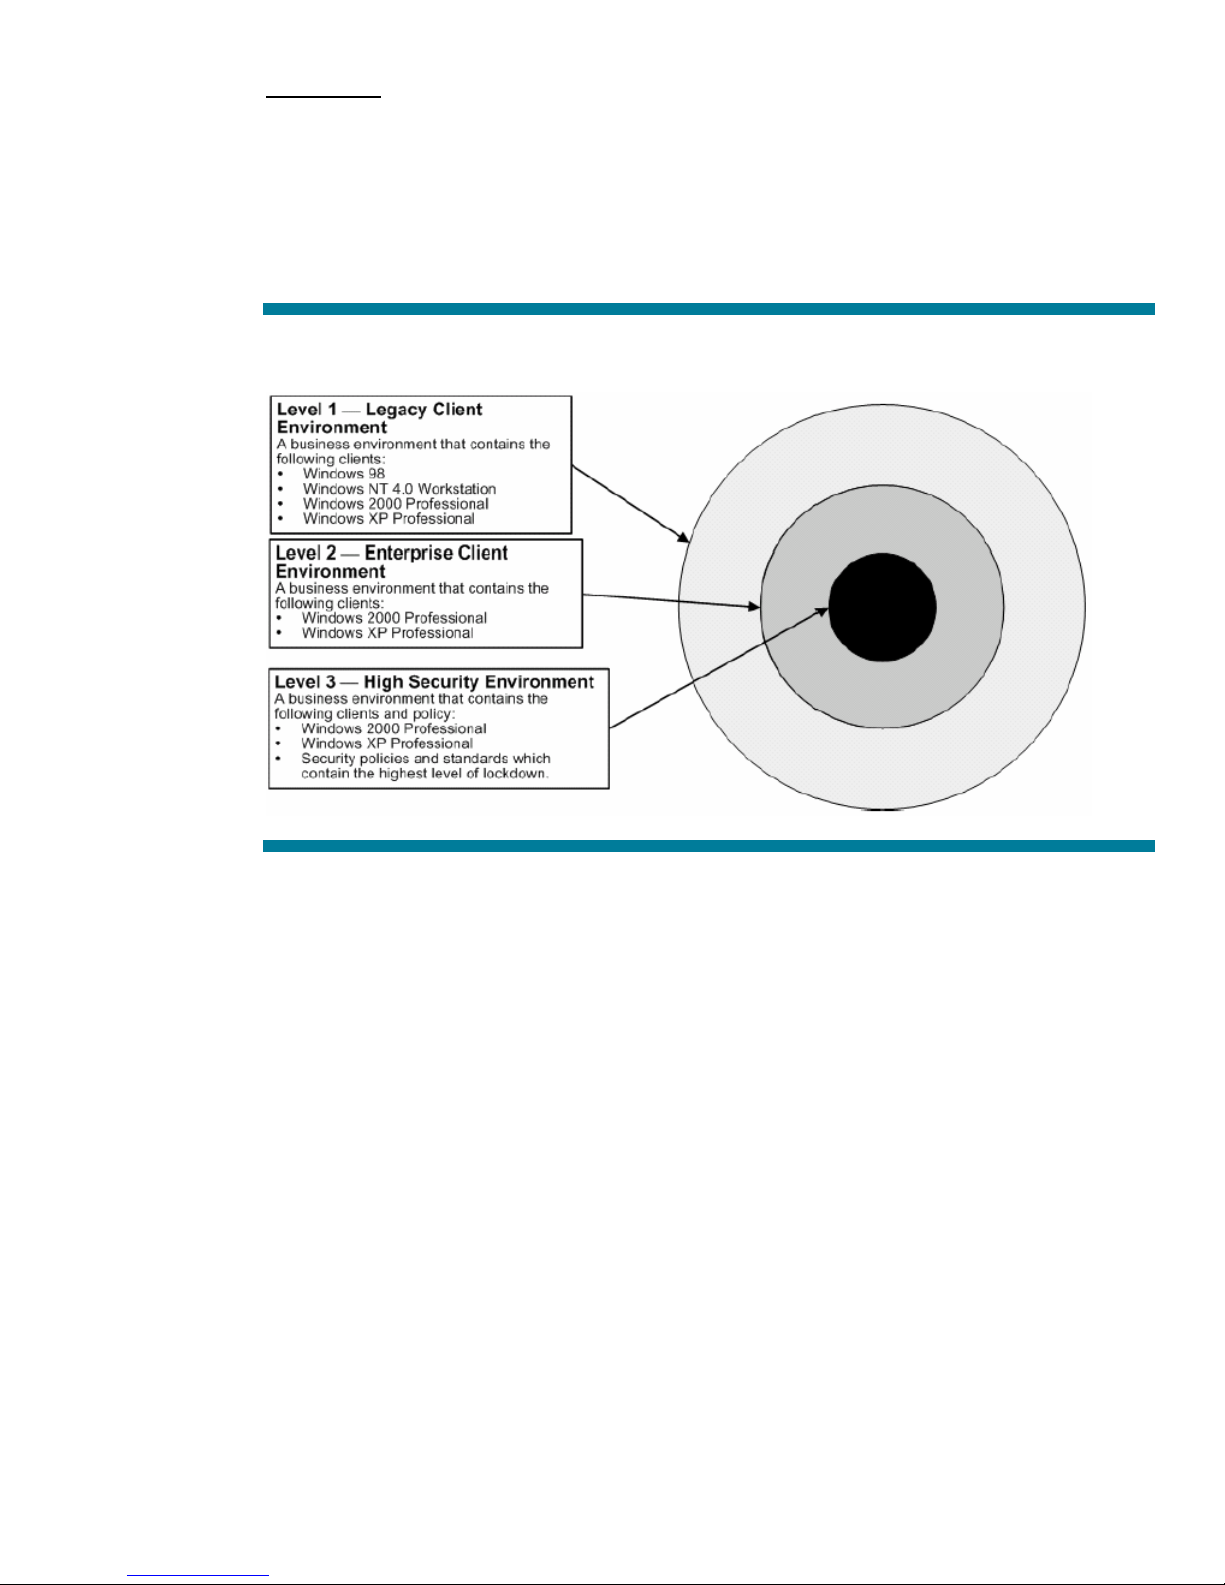
High Security
Moving from the Enterprise Client level to the High Security level requires conforming to stringent
security policies for both clients and servers. This environment contains clients running Windows 2000
Professional and Windows XP Professional. Domain controllers and members servers are running
Windows 2000 Server or later. In the High Security environment, concern about security is so great
that significant loss of functionality and manageability is considered to be an acceptable tradeoff in
order to achieve the highest level of security.
Figure 1. This figure shows the three layers of security and the clients supported in each.
Organizations that want to provide a phased approach to securing their environments may choose to
start at the Legacy Client environment level and then gradually move to the higher security levels as
their applications and client computers are upgraded and tested with tightened security settings.
2.1 Domain Model Design: Windows NT 4.0, Windows 2000, and
Windows 2003
Before locking down the company’s domain infrastructure, one must understand the domain model
differences between Windows NT 4.0, Windows 2000 Active Directory, and Windows 2003 Active
Directory. The Windows NT 4.0 domain was a very good organizational and hierarchical model.
However, it had poor communication feature sets with other domains. This issue prevented NT 4.0 to
scale well within larger enterprise environments. As such, Windows 2000 Active Directory (AD)
model was created. Windows 2000 AD enabled domains to communicate and trust each other in a
peer-to-peer trust relationship. Domains could be grouped together in structures called forest which
simplified and centralized domain management. Although Windows 2000 AD enabled the
incorporation of various domains into a single tree, it opened up a security flaw in which all domains
within a forest have full administrative access rights to all other domains within that forest. Similarly,
Windows 2000 forests which have inter-forest trusts relationships with other forests have full
administrative privileges within the other forests. The inter-domain trust relationship security flaw is the
same within Windows 2003 AD. However, administrators within Windows 2003 can now control
inter-forest relationships better using Windows 2003 cross forest authentications and cross forest
5
Page 6

authorization feature sets. Companies implementing Windows 2003 AD must determine whether to
create a single forest or multiple forest domain infrastructures depending upon manageability, security
requirements between domains and forests, and administrative costs. A single forest is easier to
manage and is ideal for workgroup and departmental environments. However, enterprise
environments may require more administrative control between domains and forests and may need a
multiple forest domain model even though such a model may increase administrative costs within each
domain. Creating separate forests keep environments secure from rogue administrators within the
company.
2.2 Time Synchronization
Administrators should also ensure that system time is accurate and that all servers in the organization
are using the same time source. The Windows Server 2003 W32Time service provides time
synchronization for Windows Server 2003 and Microsoft Windows XP-based computers running in
an Active Directory domain. The W32Time service synchronizes the client clocks of Windows Server
2003-based computers with the domain controllers in a domain. This is necessary for the Kerberos v5
authentication protocol to work properly, as well as NTLMv2. To function correctly, a number of
Windows Server family components rely on accurate and synchronized time. If the clocks are not
synchronized on the clients, the Kerberos v5 authentication protocol might falsely interpret logon
requests as intrusion attempts and deny access to users.
To ensure that the time is accurate, the PDC emulator in the forest root domain can be synchronized to
an external NTP time server. However, doing so may result in a requirement to open ports on the
firewall. NTP uses UDP port 123. Before doing this, weigh the benefits against the potential security
risk of making these configuration changes. Complete the following task to synchronize Windows
2003, and Windows XP systems with an external time source:
1. Open a DOS Command Prompt.
2. Type the following, where PeerList is a comma-separated list of DNS names or Internet protocol (IP)
addresses for the desired time sources:
w32tm /config /syncfromflags:manual /manualpeerlist:PeerList
3. To update type:
w32tm /config /update
4. Check the Event Log. If the computer cannot reach the servers, the procedure fails and an entry is
written to the Event Log.
Computer systems running Windows 98, Windows NT 4.0, or Windows 2000 can synchronize their
clocks using the following command in a logon script where <timecomputer> is a Windows 2000 or
Windows 2003 domain controller on the network:
net time \\<timecomputer> /set /yes
Running this command will synchronize the time clocks in these computers with the time clocks in the
other computers throughout the domain.
6
Page 7
2.3 Organizational Unit (OU) and Group Policy Objects (GPOs) Design
An organizational unit (OU) is a container within a domain which contain specific access control list
(ACL) permissions to devices and items that it can access and /or control. OUs provide
administrators an easy way to group users and other security principals together while effectively
creating segment administrative boundaries within their domains and forests. Administrators can then
use group policy and delegate administration by applying specific settings, rights, and behaviors to
all servers, devices, users, and groups within an OU. By using group policy rather than manual
steps, it is simple to update a number of servers with any additional changes required in the future.
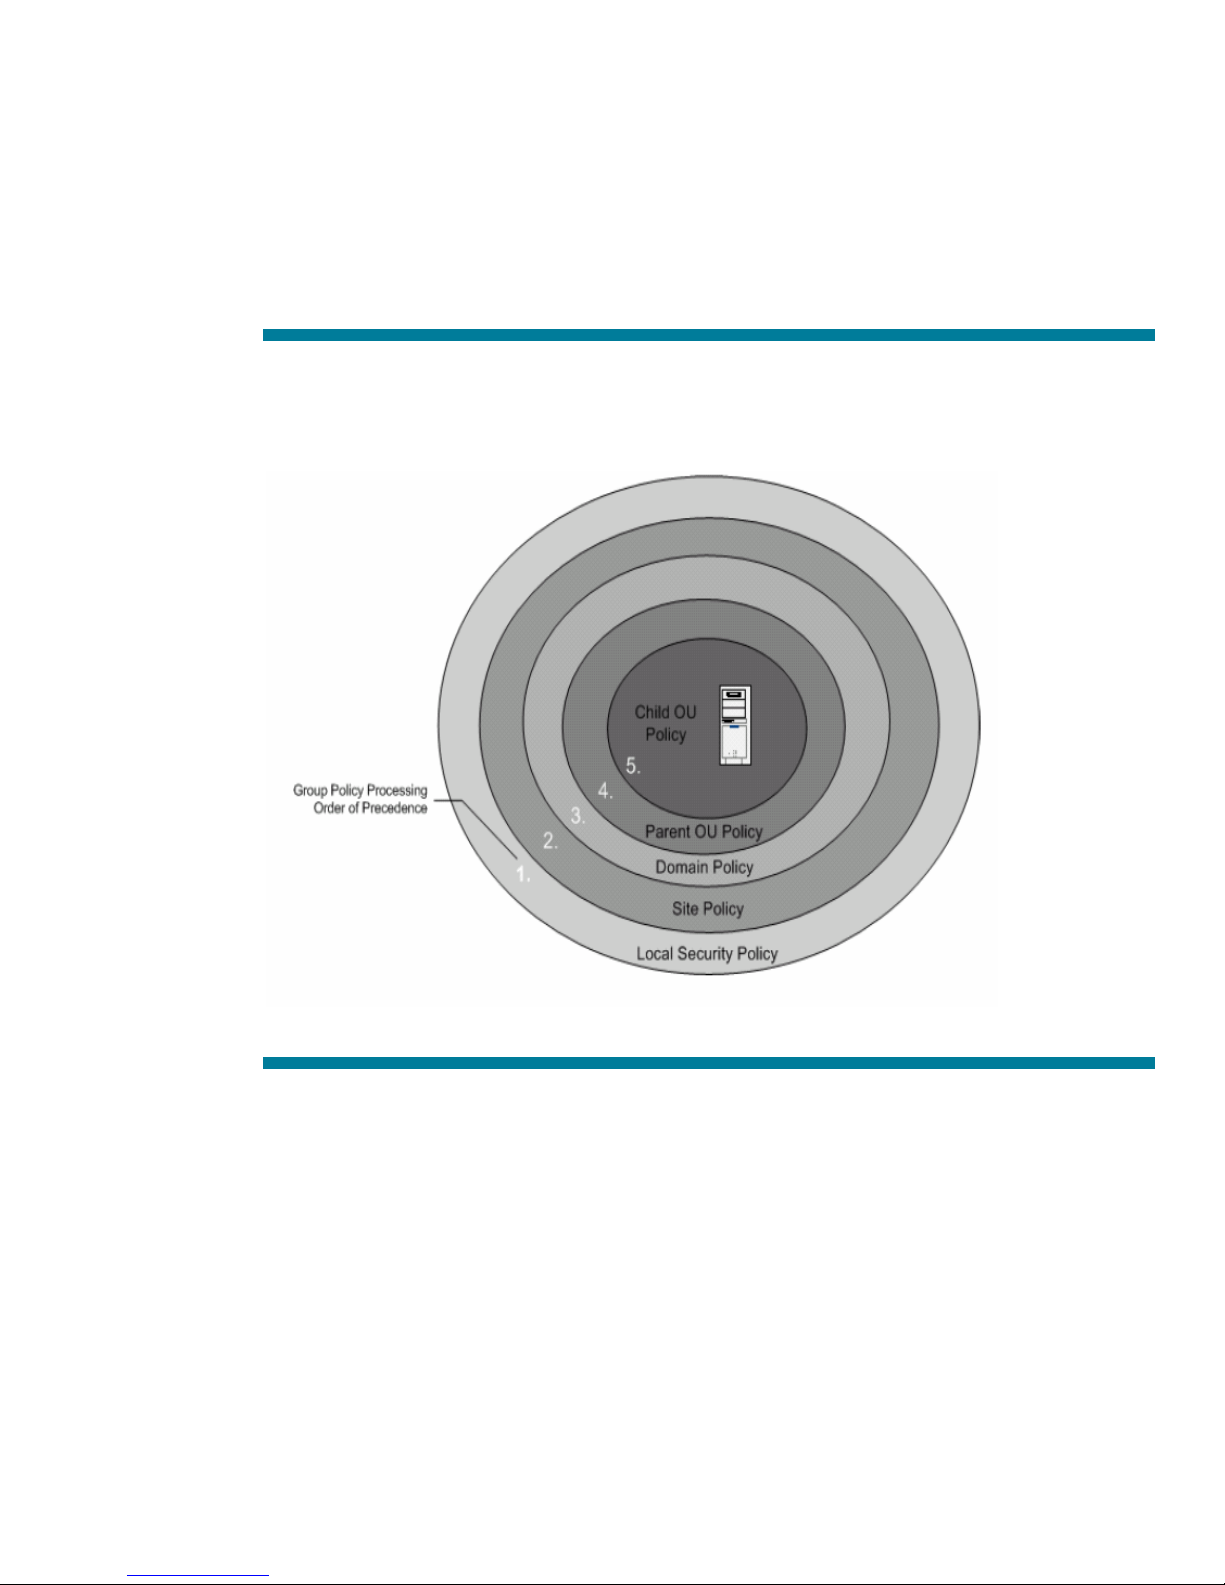
Figure 2. Group policies are accumulated and applied in the order shown in the illustration below.
As seen above, policies are applied first from the local machine policy level of the computer. After
that, any GPOs are applied at the site level, and then at the domain level. If the server is nested in
several OUs, GPOs existing at the highest level OU are applied first. The process of applying GPOs
continues down the OU hierarchy. The final GPO to be applied is at the child OU level containing the
server object. The order of precedence for processing Group Policy extends from the highest OU
(farthest from the user or computer account) to the lowest OU (that actually contains the user or
computer account).
The following rules must be observed when applying Group Policy:
• GPO application ordering for group policy levels must be set within multiple GPOs. If
multiple policies specify the same option, the last one applied will take precedence.
• Configuring a Group Policy with the No Override option prevents other GPOs from overriding
it.
7
Page 8

Group Policies are implemented using security templates. These text based *.inf files can be
accessed and applied using the Security Template snap-in found within Microsoft Management
Console (MMC). All computers running Windows 2003 and Windows Storage Server 2003 store
their security templates in the %SystemRoot%\security\template folder.
Administrators can implement NSA compliant security templates by downloading the Microsoft
Windows Server 2003 Security Guide from
http://www.microsoft.com/downloads/details.aspx?FamilyId=8A2643C1-0685-4D89-B655521EA6C7B4DB&displaylang=en and extracting the security templates found within the guide.
Warning
: Although the security templates within the Microsoft guide does increase network security,
some applicational and operating system functionality may be lost due to its implementation. It is
essential to thoroughly test these templates before deploying them in a production environment. Back
up each domain controller and server before applying any new security settings. Ensure the system
state is included in the backup to enable registry settings or Active Directory objects to be restored.
Complete the following tasks to import the Microsoft Domain Policy security template into the domain
server systems:
1. In Active Directory Users and Computers, right-click the Domain, and then select Properties.
2. On the Group Policy tab, click New to add a new GPO.
3. Depending upon the company’s network infrastructure, type Legacy Client - Domain Policy,
Enterprise Client - Domain Policy, or High Security Client - Domain Policy and then press
Enter.
4. Right-click on the new domain policy and then select No Override.
5. Select on the new domain policy and then click Edit.
6. In the Group Policy window, click Computer Configuration\Windows Settings. Right-click
Security Settings, and then select Import Policy.
7. In the Import Policy From dialog box, navigate to \Security Guide\Job Aids, and then double-
click on the corresponding Legacy Client - Domain.inf, Enterprise Client - Domain.inf, or High
Security Client - Domain.inf.
8. Close the Group Policy that has been modified.
9. Close the Domain Properties window.
10. Force replication between the domain controllers so that all have the policy applied to them
by typing the following command text within a DOS command prompt window:
gpupdate /Force.
For Windows 2000 Active Directory domains: Administrators should use the
/refreshpolicy
command-line from the DOS prompt instead to force domain policy replication.
secedit.exe
11. Verify in the Event Log that the Group Policy downloaded successfully and that the server can
communicate with the other domain controllers in the domain.
Warning
: When creating the company’s domain policy, ensure that the No Override option is
enabled to enforce this policy throughout the domain. This is the only Group Policy in which the No
Override option must be enabled. Administrators should not enable this option in any of the other
group policies specified within this guide nor should they modify the Windows Server 2003 Default
Domain Policy. To ensure that this new policy has precedence over the default policy, position it to
have the highest priority among the GPO links.
8
Page 9

Important
it is not uncommon to find environments where the root domain password policy is much stricter than
any of the other domains. Care should also be taken to ensure that any other domains that will use
this same policy have the same business requirements. Because the password policy can only be set
at the domain level, there may be business or legal requirements that segment some users into a
separate domain simply to enforce the use of a stricter password policy on that group.
Once the domain policy has been downloaded successfully to each of the servers, an event in the
Application Event Log should appear specifying its completion in the form of the following Event ID
number:
If the above message does not appear within a few minutes after applying the domain policy, rerun
the Gpupdate.exe command-line tool to apply the domain policy, and then restart the server to force
the domain policy download. By default, security settings are refreshed every 90 minutes on a
workstation or server and every 5 minutes on a domain controller.
For Windows 2000 Active Directory domains: Administrators should use the
/refreshpolicy
Group Policy security settings are applied at several different levels within the network organizational
hierarchy which have been broken down to the following three levels in the domain infrastructure:
• Domain Level-To address common security requirements, such as account and password policies
that must be enforced for all servers in the domain.
• Baseline Level-To address specific server security requirements that are common to all servers in the
domain infrastructure.
• Role Specific Level-To address security requirements for specific server roles. For example, the
security requirements for infrastructure servers differ from those for servers running HP NAS.
: This policy should be imported into any additional domains in the organization. However,
Type: Information
Source ID: SceCli
Event ID: 1704
Description: Security policy in the Group policy objects has been applied successfully.
For more information, see Help and Support Center at
<http://go.microsoft.com/fwlink/events.asp>
.
secedit.exe
” command-line from the DOS prompt instead to force domain policy replication.
2.4 Domain Level: Hardening the Domain Infrastructure Password
Policy
The easiest and most important task in securing one’s network environment at the domain level is by
implementing policies that force users to create complex passwords and requires them to change their
passwords on a regular basis. Administrators should apply the following password guidelines:
• Avoid using words from a dictionary, common or clever misspellings of words, and foreign
words.
• Avoid using incrementing passwords with a digit.
• Avoid preceding or appending passwords with a number.
• Avoid using passwords that others can easily guess.
• Avoid using words from popular culture.
• Avoid thinking of passwords as just full words.
9
Page 10

• Enforce using passwords that require users to type with both hands on the keyboard.
• Enforce using uppercase and lowercase letters, numbers, and symbols in all passwords.
• Enforce using space characters and characters that can be produced only by pressing the Alt
key.
These guidelines should also be used for all service account passwords in the organization.
The following sections include the Password Policy recommendations for the three security
environments defined in this guide. These values are set at:
Computer Configuration\Windows Settings\Security Settings\Account Policies\Password Policy
Enforce Password History
Domain Member
Default
24 passwords
remembered
The Enforce password history setting determines the number of unique new passwords that have to be
associated with a user account before it is possible to reuse an old password. The value must be set
between 0 and 24 passwords. The default value for Windows Server 2003 is the maximum, 24
passwords. This policy setting enables administrators to enhance security by ensuring that old
passwords are not continually reused. To maintain the effectiveness of the password history, also
configure the Minimum password age to prevent passwords from being changed immediately. This
combination makes it difficult for users to reuse passwords, either accidentally or on purpose. Since
there are common vulnerabilities associated with reusing passwords, and specifying a low number for
this setting will allow users to continually recycle a small number of passwords repeatedly, this setting
recommendation is consistent across all environments defined within this guide. Also, there are no
known issues related to setting this value at the maximum number for environments containing legacy
clients.
Legacy Client Enterprise Client High Security Client
24 passwords
remembered
24 passwords
remembered
24 passwords
remembered
Maximum Password Usage
Domain Member
Default
42 days 42 days 42 days 42 days
The Maximum password age can be set so that passwords expire as often as necessary. The default
values for this setting range from 1 to 999 days. This policy setting defines the period in which an
attacker who has cracked a password may use it to access a computer on the network before the
password expires. Changing passwords regularly is one way to prevent passwords from being
compromised. The default value for this setting is 42 days. Most passwords can be cracked given
enough time and computing power; the more frequently the password changes, the less time an
attacker has to crack a password before a new one is created to invalidate his efforts at cracking the
old password. However, the lower this value is set, the higher the potential for an increase in calls to
help desk support. In order to balance the needs of security and usability in corporate environments,
administrators can increase this setting in the Legacy Clients and Enterprise Clients. These
recommended values increase password security by ensuring passwords are cycled periodically. In
addition, the recommended values prevent users from having to change their password so often that
they cannot remember what it is.
Legacy Client Enterprise Client High Security Client
10
Page 11

Minimum Password Age
Domain Member
Legacy Client Enterprise Client High Security Client
Default
1 day 2 days 2 days 2 days
The Minimum password age setting determines the number of days that a password must be used
before a user changes it. The range of values for this setting is between 0 and 999 days. Setting this
to 0 allows users to change the password immediately. The default value for the setting is 1 day. The
Minimum password age setting must be less than the Maximum password age setting, unless the
Maximum password age setting is set to 0, indicating that passwords will never expire. In this case,
the Minimum password age can be set to any value between 0 and 999. The Minimum password
age must be greater than 0 for the Enforce password history to be effective. Without a minimum
password age, users can cycle through passwords repeatedly until they get to an old favorite.
Change this setting from the default to 2 days because when the setting is used in conjunction with a
similar low value in the Enforce password history setting, the restriction discourages users from
recycling the same password again and again. If Minimum password age is left at 1 day, and the
Enforce password history is set to 2 passwords, users would only have to wait 2 days before arriving
at an old favorite password. This setting value ensures that users must wait a full two days to change
passwords. The default setting does not follow this recommendation, so that an administrator can
specify a password for a user and then require the user to change the administrator-defined password
when the user logs on. If the password history is set to 0, the user does not have to choose a new
password. For this reason, Enforce password history is set to 1 by default. It also prevents users from
circumventing the Password history setting restriction by rapidly setting 24 new passwords.
Minimum Password Length
Domain Member
Legacy Client Enterprise Client High Security Client
Default
7 characters 8 characters 8 characters 12 characters
The Minimum password length setting ensures passwords have at least a specified number of
characters. Long passwords, which are eight or more characters, are usually stronger than short ones.
With this policy setting, users cannot use blank passwords, and they must create passwords that are a
certain number of characters long. The default value for this setting is 7 characters, but an eightcharacter password is recommended as it is long enough to provide some level of security, but still
short enough for users to easily remember. This setting will provide a great deal of defense against
the commonly used dictionary and brute force attacks. A dictionary attack is a method of obtaining a
password through trial and error in which an attacker uses all items in a word list. A brute force
attack is a method of obtaining a password or other encrypted text by trying every possible value.
The feasibility of a brute force password attack depends on the length of the password, the size of the
potential character set, and the computational power available to the attacker. This guide
recommends setting the value for password length in the High Security environment to 12 characters.
Passwords are stored in the Security Accounts Manager (SAM) database or Active Directory after
being passed through a one way hash algorithm. This type of algorithm is not reversible. Therefore,
the only way to verify that a password is correct is to run it through the same one way hash algorithm
and compare the results. Dictionary attacks run entire dictionaries through the encryption process,
looking for matches. They are a simplistic, yet very effective, approach to finding out who has used
common words like "password" or "guest" as their account passwords. If a password is seven
characters or less, the second half of the LM Hash resolves to a specific value that can inform a
cracker that the password is shorter than eight characters. Requiring passwords with at least eight
characters strengthens even the weaker LMHash because the longer passwords require crackers to
decrypt two portions of each password instead of only one. Since hackers can attack both halves of
11
Page 12

the LM hash in parallel, the second half of the LM hash is only 1 character long; it will succumb to a
rute-force attack in milliseconds. Also, each additional character in a password increases its
complexity exponentially. For instance: A seven-digit password would have 267, or 1 x 10⁷, possible
combinations. A seven character alphabetic password with case sensitivity has 527 combinations. A
seven haracter case-sensitive alphanumeric password without punctuation has 627combinations. At
1,000,000 attempts per second, it would only take 48 minutes to crack. An eight-character
password has 268, or 2 x 10¹¹, possible combinations. On the surface, this might seem a mindboggling number. However, at 1,000,000 attempts per second, a capability of many passwordcracking utilities, it would take only 59 hours to try all possible passwords. Remember these times will
greatly increase with passwords that use ALT characters and other special keyboard characters, for
example ! or @. For these reasons, using shorter passwords in place of longer ones is not
recommended. However, requiring passwords that are too long may generate a high number of
mistyped passwords, resulting in an increase in locked out accounts and help desk calls.
Furthermore, requiring extremely long passwords can actually decrease the security of an
organization because users may be more likely to write their passwords down in fear of forgetting
them.
Password Must Meet Complexity Requirements
Domain Member
Legacy Client Enterprise Client High Security Client
Default
Enabled Enabled Enabled Enabled
The Password must meet complexity requirements policy option checks all new passwords to ensure
that they meet basic requirements for strong passwords. Complexity requirements are enforced when
passwords are created. The Windows Server 2003 policy rules cannot be directly modified.
However, a new version of the passfilt.dll file can be applied with a different set of rules. For the
source code for passfilt.dll, see the Microsoft Knowledge Base article 151082 at
http://support.microsoft.com/default.aspx?kbid=151082 labelled "HOW TO: Password Change Filtering &
Notification in Windows NT." A password of 20 or more characters can actually be set so that it is
easier for a user to remember and be more secure than an eight-character password. The following
27-character password: I love cheap tacos for $.99, for example. This type of password, really a
pass-phrase, might be simpler for a user to remember than a shorter password such as P@55w0rd.
This recommended value, combined with a Minimum password length set to 8, includes upper and
lowercase letters and numbers in the keyspace, which increases it from 26 to 62 characters. An eight-
14
character password then has 2.18 x 10
possible combinations. At 1,000,000 attempts per second,
it would take 6.9 years to cycle through all possible permutations. Using these settings in conjunction
makes it very difficult to mount a brute force attack. For these reasons, this is the recommendation the
three environments defined in this guide.
12
Page 13

Store Password Using Reversible Encryption
Domain Member
Default
Disabled Disabled Disabled Disabled
The security setting for Store password using reversible encryption determines whether the operating
system stores passwords using reversible encryption or not. This policy supports applications using
protocols requiring the user’s password for authentication purposes. Passwords stored using reversible
encryption can be retrieved more easily than passwords stored without this option, increasing
vulnerability. For this reason, never enable this policy unless application requirements outweigh the
need to protect password information. Challenge-Handshake Authentication Protocol (CHAP) through
remote access or IAS and Digest Authentication in IIS both require this policy.
Legacy Client Enterprise Client High Security Client
2.5 Domain Level: Hardening the Domain Infrastructure Account
Lockout Policy
The Account lockout policy is a Windows Server 2003 security feature that locks a user account after
a number of failed logon attempts occur within a specified time period. The number of attempts
allowed and the time period are based on the values configured for the security policy lockout
settings. A user cannot log on to a locked account. Windows Server 2003 tracks logon attempts, and
the server software can be configured to respond to this type of potential attack by disabling the
account for a preset number of failed logins. These security policy settings help prevent attackers from
guessing user passwords, and they decrease the likelihood of successful attacks on the network. The
values in the following sections can be configured in the Domain Group Policy at the following
location:
Computer Configuration\Windows Settings\Security Settings\Account Policies\Account
Lockout Policy
Account Lockout Duration
Domain Member
Default
Not defined 30 minutes 30 minutes 15 minutes
The Account lockout duration setting determines the length of time before an account is unlocked and
a user can try to log on again. The setting does this by specifying the number of minutes a locked out
account will remain unavailable. Setting the value for the Account lockout duration setting to 0, keeps
the accounts locked out until an administrator unlocks them. The Windows Server 2003 default value
for this setting is Not Defined. While configuring the value for this setting to never automatically
unlock may seem like a good idea, doing so may increase the number of calls the company help desk
receives to unlock accounts that were locked by mistake. Setting the value for this setting to 30
minutes for the Legacy and Enterprise Client environments and 15 minutes for High Security level
decreases the amount of operation overhead during a denial of service (DoS) attack. In a DoS attack,
the attacker maliciously performs a number of failed logon attempts on all users in the organization,
locking out their accounts. This setting value also gives locked out users the chance to log on again in
30 minutes, a period of time they are more likely to accept without resorting to the help desk. This
guide recommends setting the value to 15 minutes in the High Security environment.
Legacy Client Enterprise Client High Security Client
13
Page 14

Domain Member
Default
Account Lockout Threshold
Legacy Client Enterprise Client High Security Client
0 invalid login attempts 50 invalid login
attempts
50 invalid login
attempts
10 invalid login
attempts
The Account lockout threshold setting determines the number of attempts that a user can make to log
on to an account before it is locked. Authorized users can lock themselves out of an account by
incorrectly entering their password, or by changing their password on one computer while logged on
to another computer. The computer with the incorrect password may continuously try to authenticate
the user, and because the password it is using to authenticate is incorrect, the user account is
eventually locked out. To avoid locking out authorized users, set the account lockout threshold to a
high number. Because vulnerabilities can exist both for when the value for this setting is configured
and when and it is not, distinct countermeasures for each of these possibilities are defined. Company
organizations should weigh the choice between the two based on the identified threats and the risks
they are trying to mitigate.
• To prevent account lock outs, set the value for Account lockout threshold setting to 0. Setting
the Account Lockout Threshold setting to 0 helps reduce help desk calls because users can not
accidentally lock themselves out of their accounts and it will prevent a DoS attack aimed at
intentionally locking out accounts within the company. Because it will not prevent a brute
force attack, choose this setting only if both of the following criteria are explicitly met:
o The password policy forces all users to have complex passwords made up of eight or
more characters.
o A robust auditing mechanism is in place to alert administrators when a series of
account lockouts are occurring in the environment. For example, the auditing solution
should monitor for security event 539 which is, "Logon failure.The account was
locked out at the time the logon attempt was made". This event means that the
account was locked out at the time the logon attempt threshold was made. However,
event 539 only shows an account lockout, not a failed password attempt. Therefore,
administrators should also monitor for a series of bad password attempts.
• If these criteria are not met, the second option is to configure the Account lockout threshold
setting to a high enough value to provide users with the ability to accidentally mistype their
password several times without locking themselves out of their accounts, while ensuring that a
brute force password attack will still lock out the account. In this case, setting the invalid
logon attempts to a high number such as 50 ensures adequate security and acceptable
usability. This setting value will prevent accidental account lockouts and reduce help desk
calls, but will not prevent a DoS attack as mentioned above. This guide recommends setting
the value to 10 invalid login attempts in the High Security environment.
14
Page 15

Reset Account Lockout Counter After
Domain Member
Default
Not Defined 30 minutes 30 minutes 15 minutes
The Reset account lockout counter after setting determines the length of time before the Account
lockout threshold resets to 0 and the account is unlocked. If the Account lockout threshold setting is
defined, then the reset time must be less than or equal to the value for the Account lockout duration
setting. In coordination with the other values configured as part of this guide, leaving this setting at its
default value, or configuring the value at an interval that is too long, could make the network domain
environment vulnerable to an account lockout DoS attack. Without a policy to reset the account
lockout, administrators would have to manually unlock all accounts. Conversely, if there is a
reasonable time value for this setting, users would be locked out for a set period until all of the
accounts are unlocked automatically. The recommended setting value of 30 minutes defines a time
period users are more likely to accept without resorting to the help desk. Leaving this setting at its
default only opens the network domain up to an account lockout DoS. This guide recommends setting
the value to 15 minutes in the High Security environment.
Legacy Client Enterprise Client High Security Client
2.6 Domain Level: Hardening the Domain Infrastructure Kerberos Policy
Kerberos policies are used for domain user accounts. These policies determine Kerberosv5 protocolrelated settings, such as ticket lifetimes and enforcement. Kerberos policies do not exist in the local
computer policy. Reducing the lifetime of Kerberos tickets decreases the risk of an attacker stealing
passwords and then impersonating legitimate user accounts. However, maintaining these policies
increases the authorization overhead. In most environments the default values for these policies should
not be changed. The Kerberos settings are include in the Default Domain Policy and enforced there.
2.7 Domain Level: Hardening the Domain Infrastructure Security
Options
There are two policies in Security Options that behave like account policies and should be considered
at the domain level. These security options can be configured within the Domain Group Policy at the
following location:
Computer Configuration\Windows Settings\Security Settings\Local Policies\Security Options
Microsoft Network Server: Disconnect Clients When Logon Hours Expire
Domain Member
Default
Not defined Enabled Enabled Enabled
Legacy Client Enterprise Client High Security Client
The Microsoft network server: Disconnect clients when logon hours expire security setting determines
whether to disconnect users who are connected to the local computer outside their user account’s
valid logon hours. This setting affects the server message block (SMB) component. When this policy is
enabled, it causes client sessions with the SMB service to be forcibly disconnected when the client’s
logon hours expire. If this policy is disabled, an established client session is allowed to be maintained
15
Page 16

after the client’s logon hours have expired. When enabling this setting, the Network security: Force
logoff when logon hours expire setting should be enabled. If the company has configured logon
hours for users, then it makes sense to enable this policy. Otherwise, users who are assumed to be
unable to access network resources outside of their logon hours may actually be able to continue to
use those resources with sessions that were established during allowed hours. If logon hours are not
used, enabling this setting will have no impact. If logon hours are used, then existing user sessions
will be forcibly terminated when their logon hours expire.
Network Access: Allow Anonymous SID/ NAME translation
Domain Member
Legacy Client Enterprise Client High Security Client
Default
Not defined Disabled Disabled Disabled
Important: For NAS environments that require anonymous multi-protocol communications to cross
platform systems, this guide recommends setting this security option to Enabled.
The Network Access: Allow anonymous SID/NAME translation setting determines if an anonymous
user can request the SID for another user. If this policy is enabled on a domain controller, a user who
knows an administrator’s SID attributes could contact a computer that also has this policy enabled
and use the SID to obtain the administrator’s name. That person could then use the account name to
initiate a password guessing attack. Disabled is the default setting on member computers; therefore it
will have no impact on them. However, the default setting for domain controllers is Enabled.
Warning
: Disabling this setting may cause legacy systems to be unable to communicate with
Windows Server 2003 based domains such as:
• Windows NT 4.0-based Remote Access Service servers.
• When a Web application on IIS is configured to allow basic authentication and at the same
time has Anonymous access disabled, the built-in Guest user account cannot access the Web
application. Also, if the built-in Guest user account was renamed to another name, the new
name cannot be used to access the Web application.
• Remote Access Service servers running on Windows 2000-based computers that are located
in Windows NT 3.x domains or Windows NT 4.0 domains.
• Multi-protocol applications such as Microsoft Services For Unix (SFU) and Microsoft Services
For Netware (SFN) which require anonymous access for client systems may not function.
Network Security: Force Logoff When Logon Hours Expire
Domain Member
Legacy Client Enterprise Client High Security Client
Default
Disabled Enabled Enabled Enabled
The Network Security: Force Logoff when Logon Hours expire setting determines whether to disconnect
users who are connected to a local computer outside their user account’s valid logon hours. This
setting affects the SMB component. Enabling this policy forcibly disconnects client sessions with the
SMB server when the client’s logon hours expire and the user will be unable to log on to the system
until his or her next scheduled access time. Disabling this policy maintains an established client
session after the client’s logon hours expire. To affect domain accounts, this setting must be defined in
the Default Domain Policy.
16
Page 17

2.8 Baseline Level
The settings at the Member Server OU level define the common settings for all member servers in the
domain. This is done by creating a GPO that is linked to the Member Server OU, known as a
baseline policy. The GPO automates the process of configuring specific security settings on each
server. Administrators should use the member server baseline policy (MSBP) security template
supplied within the Microsoft “Windows Server 2003 Security Guide” that is most appropriate to their
corresponding network environment. The following table displays the security template used within
each appropriate network environment.
Baseline Security Template
Member Server
Default
None Legacy client-
The following settings are described as they appear in the user interface (UI) of the Security
Configuration Editor (SCE) snap-in.
2.8.1 Audit Policy
Administrators should set up an audit policy. An audit policy determines the security events to report
to the network administrators so that user or system activity in specified event categories is recorded.
The administrator can monitor security-related activity, such as who accesses an object, if a user logs
on to or off from a computer, or if changes are made to an auditing policy setting. Before
implementing audit policies, one must decide which event categories need to be audited for the
corporate environment. The auditing settings that an administrator chooses for the event categories
define the corporate auditing policy. By defining audit settings for specific event categories,
administrators can create an audit policy that suits the security needs of the organization. Audit
policy values can be configured in the Domain Group Policy section of Windows Server 2003 at the
following location:
Legacy Client Enterprise Client High Security Client
member server
baseline.inf
Enterprise client-
member server
baseline.inf
High Security-
Member server
baseline.inf
Computer Configuration\Windows Settings\Security Settings\Local Policies\Audit Policy
Audit Account Logon Events
Member Server Default Legacy Client Enterprise Client High Security Client
Success Success Failure Success Failure Success Failure
The Audit account logon events setting determines whether to audit each instance of a user logging
on to or off another computer that validates the account. Authenticating a domain user account on a
domain controller generates an account logon event. The event is logged in the domain controller’s
security log. Authenticating a local user on a local computer generates a logon event. The event is
logged in the local security log. There are no Account logoff events logged. The following table
includes some of the important security events that this setting logs in the Security Event Log.
17
Page 18

Event ID Event Description
672 An authentication service (AS) ticket was successfully issued and validated.
673 A ticket granting service (TGS) ticket was granted. A TGS is a ticket issued by the
Kerberos v5 ticket-granting service TGS that allows a user to authenticate to a specific
service in the domain.
674 A security principal renewed an AS ticket or TGS ticket.
675 Pre- authentication failed. This event is generated on a Key Distribution Center (KDC)
when a user types in an incorrect password.
676 Authentication ticket request failed. This event is not generated in Windows XP
Professional or in members of the Windows Server family.
677 A TGS ticket was not granted. This event is not generated in Windows XP Professional or
in the members of the Windows Server family.
678 An account was successfully mapped to a domain account.
681 Logon failure. A domain account logon was attempted. This event is not generated in
Windows XP Professional or in members of the Windows Server family.
682 A user has reconnected to a disconnected terminal server session.
683 A user disconnected a terminal server session without logging off.
The event IDs above can be useful when creating custom alerts to monitor any software suite, for
example, Microsoft Operations Manager (MOM).
Audit Account Management
Member Server Default Legacy Client Enterprise Client High Security Client
No auditing Success Failure Success Failure Success Failure
The Audit account management setting determines whether to audit each account management event
on a computer. Examples of account management events include:
• A user account or group is created, changed, or deleted.
• A user account is renamed, disabled, or enabled.
• A password is set or changed.
Organizations need to be able to determine who has created, modified, or deleted both domain and
local accounts. Unauthorized changes could indicate mistaken changes made by an administrator
who does not understand how to follow corporate policies or a deliberate attack. The following table
includes some of the important security events that this setting records in the Security Event Log.
18
Page 19

Event ID Event Description
624 A user account was created.
627 A user password was changed.
628 A user password was set.
630 A user account was deleted.
631 A global group was created.
632 A member was added to a global group.
633 A member was removed from a global group.
634 A global group was deleted.
635 A new local group was created.
636 A member was added to a local group.
637 A member was removed from a local group.
638 A local group was deleted.
639 A local group account was changed.
641 A global group account was changed.
642 A user account was changed.
643 A domain policy was modified.
644 A user account was automatically locked.
645 A computer account was created.
646 A computer account was changed.
647 A computer account was deleted.
648 A local security group with security disabled was created.
Note: SECURITY_DISABLED in the formal name means that this group cannot be used
to grant permissions in access checks.
649 A local security group with security disabled was changed.
650 A member was added to a security-disabled local security group.
651 A member was removed from a security-disabled local security group.
652 A security-disabled local group was deleted.
653 A security-disabled global group was created.
654 A security-disabled global group was changed.
655 A member was added to a security-disabled global group.
656 A member was removed from a security-disabled global group.
657 A security-disabled global group was deleted.
658 A security-enabled universal group was created.
659 A security-enabled universal group was changed.
19
Page 20

660 A member was added to a security-enabled universal group.
661 A member was removed from a security-enabled universal group.
662 A security-enabled universal group was deleted.
663 A security-disabled universal group was created.
664 A security-disabled universal group was changed.
665 A member was added to a security-disabled universal group.
666 A member was removed from a security-disabled universal group.
667 A security-disabled universal group was deleted.
668 A group type was changed.
684 The security descriptor of administrative group members was set.
Note: Every 60 minutes on a domain controller, a background thread searches all
members of administrative groups (such as domain, enterprise, and schema
administrators) and applies a fixed security descriptor on them. This event is logged.
685 Name of an account was changed.
The event IDs above can be useful when creating custom alerts to monitor any software suite, for
example, MOM. Most operational management software can be customized with scripts in order to
capture or flag events based on the event IDs above.
Audit Directory Service Access
Member Server Default Legacy Client Enterprise Client High Security Client
No auditing Success Failure Success Failure Success Failure
The Audit directory service access setting determines whether to audit the event of a user accessing a
Microsoft Active Directory® directory service object that has its own system access control list (SACL)
specified. Setting Audit directory service access to No Auditing makes it difficult or impossible to
determine what Active Directory objects may have been compromised during a security incident.
There will be no audit record evidence available for analysis after a security incident if the values for
this setting are not set to Success and Failure. Configuring Audit directory service access to Success
generates an audit entry each time that a user successfully accesses an Active Directory object with a
specified SACL. Configuring this setting to Failure generates an audit entry each time that a user
unsuccessfully attempts to access an Active Directory object with a specified SACL.
Event ID Event Description
566 A generic object operation took place.
20
Page 21

Audit Logon Events
Member Server Default Legacy Client Enterprise Client High Security Client
Success Success Failure Success Failure Success Failure
The Audit logon events setting determines whether to audit each instance of a user logging on to or
off of a computer. Records are generated from the Account logon events setting on domain controllers
to monitor domain account activity and on local computers to monitor local account activity.
Configuring the Audit logon events setting to No auditing makes it difficult or impossible to determine
which user has either logged on or attempted to log on to computers in the enterprise. Enabling the
Success value for the Auditing logon events setting on a domain member will generate an event
each time that someone logs on to the system regardless of where the accounts reside on the system.
If the user logs on to a local account, and the Audit account logon events setting is Enabled, the user
logon will generate two events. There will be no audit record evidence available for analysis after a
security incident takes place if the values for this setting are not configured to Success and Failure for
all three security environments defined in this guide.
Event ID Audit Logon Events
528 A user successfully logged on to a computer.
529 Logon failure. A logon attempt was made with an unknown user name or a known user
name with a bad password.
530 Logon failure. A logon attempt was made outside the allowed time.
531 Logon failure. A logon attempt was made using a disabled account.
532 Logon failure. A logon attempt was made using an expired account.
533 Logon failure. A logon attempt was made by a user who is not allowed to log on at the
specified computer.
534 Logon failure. The user attempted to log on with a password type that is not allowed.
535 Logon failure. The password for the specified account has expired.
536 Logon failure. The Net Logon service is not active.
537 Logon failure. The logon attempt failed for other reasons.
Note: In some cases, the reason for the logon failure may not be known.
538 The logoff process was completed for a user.
539 Logon failure. The account was locked out at the time the logon attempt was made.
540 A user successfully logged on to a network.
541 Main mode Internet Key Exchange (IKE) authentication was completed between the local
computer and the listed peer identity (establishing a security association), or quick mode
has established a data channel.
542 A data channel was terminated.
543 Main mode was terminated.
Note: This might occur as a result of the time limit on the security association expiring (the
default is eight hours), policy changes, or peer termination.
544 Main mode authentication failed because the peer did not provide a valid certificate or
the signature was not validated.
21
Page 22

545 Main mode authentication failed because of a Kerberos failure or a password that is not
valid.
546 IKE security association establishment failed because the peer sent a proposal that is not
valid. A packet was received that contained data that is not valid.
547 A failure occurred during an IKE handshake.
548 Logon failure. The security identifier (SID) from a trusted domain does not match the
account domain SID of the client.
549 Logon failure. All SIDs corresponding to untrusted namespaces were filtered out during an
authentication across forests.
550 Notification message that could indicate a possible denial-of-service (DoS) attack.
551 A user initiated the logoff process.
552 A user successfully logged on to a computer using explicit credentials while already
logged on as a different user.
682 A user has reconnected to a disconnected terminal server session.
683 A user disconnected a terminal server session without logging off.
Note: This event is generated when a user is connected to a terminal server session over
the network. It appears on the terminal server.
Audit Object Access
Member Server Default Legacy Client Enterprise Client High Security Client
No Auditing Success Failure Success Failure Success Failure
By itself, this setting will not cause any events to be audited. The Audit object access setting
determines whether to audit the event of a user accessing an object-for example, a file, folder, registry
key, printer, and so forth- that has a specified SACL. A SACL is comprised of access control entries
(ACEs). Each ACE contains three pieces of information:
• The security principal (user, computer, or group) to be audited.
• The specific access type to be audited, called an access mask.
• A flag to indicate whether to audit failed access events, successful access events, or both.
Configuring this setting to Success generates an audit entry each time that a user successfully
accesses an object with a specified SACL. Configuring this setting to Failure generates an audit entry
each time that a user unsuccessfully attempts to access an object with a specified SACL. Corporations
should define only the actions they want enabled when configuring SACLs. For example,
administrators may want to enable the Write and Append Data auditing setting on executable files
to track the replacement or changes to those files, which computer viruses, worms, and Trojan horses
will commonly cause. Similarly, administrators might want to track changes to or even the reading of
sensitive documents. Therefore, this guide recommends enabling both the Success and Failure
auditing values for this setting in all three environments defined in this guide.
22
Page 23

Event ID Event Description
560 Access was granted to an already existing object.
562 A handle to an object was closed.
563 An attempt was made to open an object with the intent to delete it. Note: This is used by
file systems when the FILE_DELETE_ON_CLOSE flag is specified in Createfile().
564 A protected object was deleted.
565 Access was granted to an already existing object type.
567 A permission associated with a handle was used. Note: A handle is created with certain
granted permissions (Read, Write, and so on). When the handle is used, up to one audit
is generated for each of the permissions that were used.
568 An attempt was made to create a hard link to a file that is being audited.
569 The resource manager in Authorization Manager attempted to create a client context.
570 A client attempted to access an object. Note: An event will be generated for every
attempted operation on the object.
571 The client context was deleted by the Authorization Manager application.
572 The Administrator Manager initialized the application.
772 The Certificate Manager denied a pending certificate request.
773 Certificate Services received a resubmitted certificate request.
774 Certificate Services revoked a certificate.
775 Certificate Services received a request to publish the certificate revocation list (CRL).
776 Certificate Services published the CRL.
777 A certificate request extension was made.
778 One or more certificate request attributes changed.
779 Certificate Services received a request to shut down.
780 Certificate Services backup started.
781 Certificate Services backup completed.
782 Certificate Services restore started.
783 Certificate Services restore completed.
784 Certificate Services started.
785 Certificate Services stopped.
786 The security permissions for Certificate Services changed.
787 Certificate Services retrieved an archived key.
788 Certificate Services imported a certificate into its database.
789 The audit filter for Certificate Services changed.
790 Certificate Services received a certificate request.
791 Certificate Services approved a certificate request and issued a certificate.
23
Page 24
792 Certificate Services denied a certificate request.
793 Certificate Services set the status of a certificate request to pending.
794 The certificate manager settings for Certificate Services changed.
795 A configuration entry changed in Certificate Services.
796 A property of Certificate Services changed.
797 Certificate Services archived a key.
798 Certificate Services imported and archived a key.
799 Certificate Services published the certificate authority (CA) certificate to Active Directory.
800 One or more rows have been deleted from the certificate database.
801 Role separation enabled.
Audit Policy Change
Member Server Default Legacy Client Enterprise Client High Security Client
No Auditing Success Success Success
The Audit policy change setting determines whether to audit every incident of a change to user rights
assignment policies, audit policies, or trust policies. This includes making changes to the audit policy
itself. Configuring this setting to Success generates an audit entry for each successful change to user
rights assignment policies, audit policies, or trust policies. Configuring this setting to Failure generates
an audit entry for each failed change to user rights assignment policies, audit policies, or trust
policies. The recommended settings would let administrators see any account privileges that an
attacker attempts to. Policy change auditing also includes making changes to the audit policy itself as
well as to trust relationships.
: This guide recommends configuring the value for this setting to Success only because including
Note
the setting value for Failure will not provide meaningful access information. Currently, setting this
value to Failure does not capture meaningful events.
Event ID Event Description
608 A user right was assigned.
609 A user right was removed.
610 A trust relationship with another domain was created.
611 A trust relationship with another domain was removed.
612 An audit policy was changed.
613 An Internet Protocol security (IPSec) policy agent started.
614 An IPSec policy agent was disabled.
615 An IPSec policy agent changed.
616 An IPSec policy agent encountered a potentially serious failure.
617 A Kerberos version 5 policy changed.
618 Encrypted Data Recovery policy changed.
620 A trust relationship with another domain was modified.
24
Page 25

621 System access was granted to an account.
622 System access was removed from an account.
623 Auditing policy was set on a per-user basis
625 Auditing policy was refreshed on a per-user basis.
768 A collision was detected between a namespace element in one forest and a
namespace element in another forest. Note: When a namespace element in one forest
overlaps a namespace element in another forest, it can lead to ambiguity in resolving
a name belonging to one of the namespace elements. This overlap is also called a
collision. Not all parameters are valid for each entry type. For example, fields such as
DNS name, NetBIOS name, and SID are not valid for an entry of type
’TopLevelName.’
769 Trusted forest information was added.
Note: This event message is generated when forest trust information is updated and
one or more entries are added. One event message is generated for each added,
deleted, or modified entry. If multiple entries are added, deleted, or modified in a
single update of the forest trust information, all the generated event messages are
assigned a single unique identifier called an operation ID. This allows administrators
to determine if the multiple generated event messages are the result of a single
operation. Not all parameters are valid for each entry type. For example, parameters
such as DNS name, NetBIOS name and SID are not valid for an entry of type
“TopLevelName.”
770 Trusted forest information was deleted.
Note: See event description for event 769.
771 Trusted forest information was modified.
Note: See event description for event 769.
805 The event log service read the security log configuration for a session.
Audit Privilege Use
Member Server Default Legacy Client Enterprise Client High Security Client
No Auditing No Auditing Failure Success Failure
The Audit privilege use setting determines whether to audit each instance of a user exercising a user
right. Configuring this value to Success generates an audit entry each time that a user right is
exercised successfully. Configuring this value to Failure generates an audit entry each time that a user
right is exercised unsuccessfully. Audits are not generated when the following user rights are
exercised, even if the Audit privilege use settings is configured to Success or Failure. This is because
auditing these user rights generates many events in the security log, which may constrain the
performance of the NAS and other server systems. To audit the following excluded rights,
administrators must enable the Audit: Audit the use of Backup and Restore privilege security option in
Group Policy:
• Bypass traverse checking
• Debug programs
• Create a token object
• Replace process level token
25
Page 26
• Generate security audits
• Back up files and directories
• Restore files and directories
Warning
reason, each security environment defined in this guide has unique recommendations for these
settings. Failed use of a user right is an indicator of a general network problem and often can be a
sign of an attempted security breach. Corporations should set the Audit privilege use setting to Enable
only if there is a specific business reason to do so.
Event ID Event Description
576 Specified privileges were added to a user’s access token. Note: This event is generated
577 A user attempted to perform a privileged system service operation.
578 Privileges were used on an already open handle to a protected object.
: Enabling privilege auditing generates a very large number of event records. For this
when the user logs on.
Audit Process Tracking
Member Server Default Legacy Client Enterprise Client High Security Client
No Auditing No Auditing No Auditing No Auditing
The Audit process tracking setting determines whether to audit detailed tracking information for events
such as program activation, process exit, handle duplication, and indirect object access. Configuring
this setting to Success generates an audit entry each time the process being tracked succeeds.
Configuring this setting to Failure generates an audit entry each time the process being tracked fails.
Enabling Audit process tracking will generate a large number of events, so typically it is set to No
Auditing. However, these settings can provide a great benefit during an incident response from the
detailed log of the processes started and the time when they were launched.
Event ID Event Description
592 A new process was created.
593 A process exited.
594 A handle to an object was duplicated.
595 Indirect access to an object was obtained.
596 A data protection master key was backed up.
Note: The master key is used by the CryptProtectData and CryptUnprotectData routines,
and Encrypting File System (EFS). The master key is backed up each time a new one is
created. (The default setting is 90 days.) The key is usually backed up by a domain
controller.
597 A data protection master key was recovered from a recovery server.
598 Auditable data was protected.
599 Auditable data was unprotected.
600 A process was assigned a primary token.
601 A user attempted to install a service.
602 A scheduler job was created.
26
Page 27

Audit System Events
Member Server Default Legacy Client Enterprise Client High Security Client
No Auditing Success Success Success
The Audit system events setting determines whether to audit when a user restarts or shuts down a
computer or when an event occurs that affects either the system security or the security log.
Configuring this setting to Success generates an audit entry when a system event is executed
successfully. Configuring this setting to Failure generates an audit entry when a system event is
attempted unsuccessfully. The table below includes some of the most useful successful events for this
category.
Event ID Event Description
512 Windows is starting up.
513 Windows is shutting down.
514 An authentication package was loaded by the Local Security Authority.
515 A trusted logon process has registered with the Local Security Authority.
516 Internal resources allocated for the queuing of security event messages have been
exhausted, leading to the loss of some security event messages.
517 The audit log was cleared.
518 A notification package was loaded by the Security Accounts Manager.
519 A process is using an invalid local procedure call (LPC) port in an attempt to impersonate
a client and reply or read from or write to a client address space.
520 The system time was changed. Note: This audit normally appears twice.
2.8.2 User Rights Assignments
User Rights Assignments determine which users or groups have logon rights or privileges on the
computers on the network. Logon rights and privileges govern the rights that users have on the target
system. They are used to grant the right to perform certain actions, such as logging on from the
network or locally, as well as administrative tasks, such as generating new logon tokens. User rights
assignment settings can be configured in Windows Server 2003 in the following location within the
Group Policy Object Editor:
Computer Configuration\Windows Settings\Security Settings\Local Policies\User Rights Assignment
The default User Rights Assignments are different between the various types of servers in the network.
For example, Windows Server 2003 contains the following differences in User Rights Assignments
with built-in groups between member servers and domain controllers. Similar built-in groups between
member servers and domain controllers are not documented in the list that follows.
27
Page 28

Member Servers
• Power Users
Power Users possess most administrative powers with some restrictions. Thus, Power Users can
run legacy applications in addition to certified applications.
• Help Services Group
This is the group for the Help and Support Center. Support_388945a0 is a member of this group
by default.
• Telnet Clients
Members of this group have access to Telnet Server on the system.
Domain Controllers
• Server Operators
Members of this group can administer domain servers.
• Terminal Server License Services
Members of this group have access to Terminal Server License Servers on the system.
• Windows Authorization Access Group
Members of this group have access to the computed tokenGroupsGlobalAndUniversal attribute on
user objects.
The group Guests and the user accounts Guest and Support_388945a0 have unique SIDs between
different domains. Therefore, this Group Policy for user right assignments may need to be modified on
a system where only the specific target group exists. Alternatively, the policy templates can be edited
individually to include the appropriate groups within the .inf files.
This section provides details on the prescribed user rights assignments for the three environments
defined in this guide for the MSBP. For a summary of the prescribed settings in this section, see the
Windows Server 2003 Security Guide Settings Excel spreadsheet. For information on the default
settings and a detailed explanation of each of the settings discussed in this section, go and review
Microsoft’s Threats and Countermeasures: Security Settings in Windows Server 2003 and Windows
XP, available at:
http://go.microsoft.com/fwlink/?LinkId=15159.
: Throughout the following section, User Rights Assignments, "Not defined" means Administrators
Note
still have the privilege for every right not defined. Local administrators can make changes, but any
domain-based Group Policy settings will override them the next time that the Group Policies are
refreshed or reapplied.
28
Page 29

Access This Computer From The Network
Member Server Default Legacy Client Enterprise Client High Security Client
Administrators, Backup
Operators, Everyone,
Not Defined Not Defined Administrators,
Authenticated Users
Power Users, and Users
Important: Although in Windows Server 2003 permissions granted to the Everyone security group no
longer grant access to anonymous users, guest groups and accounts can still be granted access
through the Everyone security group. For this reason, this guide recommends removing the Everyone
security group from the Access this computer from the network user right in the High Security
environment to further guard from attacks targeting guest access to the domain. However,
administrators still need to check and verify that existing 3rd party applications within their network
environment are functioning properly once this policy is set, especially with their NAS multi-protocol
applications.
The Access this computer from the network user right determines which users and groups are allowed
to connect to the computer over the network. This user right is required by a number of network
protocols including server message block (SMB)-based protocols, network basic input/output system
(NetBIOS), Common Internet File System (CIFS), Hypertext Transfer Protocol (HTTP).and Component
Object Model Plus (COM+).
Act As Part Of The Operating System
Member Server Default Legacy Client Enterprise Client High Security Client
Not Defined Not Defined Not Defined Revoke all security
groups and accounts
Important: Since various 3rd party applications require and impersonate user and group accounts,
administrators should verify that these applications within their NAS system are still functioning
properly once this policy is set.
The Act as part of the operating system user right allows a process to assume the identity of any user
and thus gain access to the resources that the user is authorized to access. Typically, only low-level
authentication services require this privilege. There are no security groups defined by default;
therefore, this user right is sufficient for the Legacy Client and Enterprise Client environments.
However, in the High Security environment, configure this setting to Revoke all security groups and
accounts.
Add Workstation To Domain
Member Server Default Legacy Client Enterprise Client High Security Client
Not Defined Not Defined Not Defined Administrators
The Add workstations to domain user right allows the user to add a computer to a specific domain.
For the privilege to take effect, it must be assigned to the user as part of the Default Domain
Controllers Policy for the domain. There are no security groups defined by default; therefore, this user
right is sufficient for the Legacy Client and Enterprise Client environments. However, this setting is
configured to grant only the Administrators group this user right in the High Security environment.
29
Page 30

Adjust Memory Quotas For A Process
Member Server Default Legacy Client Enterprise Client High Security Client
Administrators,
NETWORK SERVICE,
LOCAL SERVICE
The Adjust memory quotas for a process user right allows a user to adjust the maximum memory that
is available to a process. This privilege is useful for system tuning, but it can be abused. In the wrong
hands, this user right can be used to launch a DoS attack. The default security groups for this user
right are sufficient for the Legacy Client and Enterprise Client environments. However, this user right is
configured to enforce Administrators, NETWORK SERVICE, LOCAL SERVICE value only in the High
Security environment.
Member Server Default Legacy Client Enterprise Client High Security Client
Administrators, Backup
Operators, Power
Users, and Users
Not Defined Not Defined Administrators,
NETWORK SERVICE,
LOCAL SERVICE
Allow Log On Locally
Administrators, Backup
Operators, Power
Users
Administrators, Backup
Operators, Power
Users
Administrators, Backup
Operators, Power
Users
The Allow log on locally user right determines which users can interactively log on to the specified
computer. Logons initiated by pressing the CTRL+ALT+DEL key-combination on the keyboard require
the user to have this logon right. Any account with this user right could be used to log on to the local
console of the computer. Restricting this privilege to legitimate users who need to be able to log on to
the system prevents unauthorized users from elevating their privileges or from introducing viruses into
the computing environment.
Allow Log On Through Terminal Services
Member Server Default Legacy Client Enterprise Client High Security Client
Administrators and
Remote Desktop Users
The Allow log on through Terminal Services user right determines which users or groups have
permission to log on as a Terminal Services client. The default security groups for this user right are
sufficient for the Legacy Client and Enterprise Client environments. However, in the High Security
environment, only Administrators should have the ability to log on as a Terminal Services client.
Member Server Default Legacy Client Enterprise Client High Security Client
Administrators and
Power Users
Administrators and
Remote Desktop Users
Change The System Time
Not Defined Not Defined Administrators
Administrators and
Remote Desktop Users
Administrators
The Change the system time user right determines which users and groups can change the time and
date on the internal clock of the computer. Users with this user right can affect the appearance of
event logs because event logs will reflect the new time, not the actual time that the events occurred.
Limit the Change the system time privilege to users with a legitimate need to be able to change the
time, such as members of the IT department. Discrepancies between the time on the local computer
and on the domain controllers may cause problems for the Kerberos authentication protocol, which
30
Page 31

could make it impossible for users to log on to the domain or to get authorization for accessing
domain resources after logging on.
Debug Programs
Member Server Default Legacy Client Enterprise Client High Security Client
Administrators Revoke all security
groups and accounts
Revoke all security
groups and accounts
Revoke all security
groups and accounts
The Debug programs user right determines which users can attach a debugger to any process or to
the kernel. This user right provides complete access to sensitive and critical operating system
components. Program debugging should not take place in production environments except in extreme
circumstances, such as troubleshooting a business-critical application that cannot be effectively
assessed in the test environment.
: On Windows Server 2003, removing the debug programs right may result in an inability to use
Note
the Windows Update service. However, patches can still be manually downloaded and installed or
applied through other means.
Deny access to this computer from the network
Member Server Default Legacy Client Enterprise Client High Security Client
SUPPORT_388945a0 ANONOYMOUS
LOGON; Built-in
Administrator, Guests;
Support_388945a0;
Guest; all
NONOperating System
service accounts
ANONOYMOUS
LOGON; Built-in
Administrator, Guests;
Support_388945a0;
Guest; all
NONOperating System
service accounts
ANONOYMOUS
LOGON; Built-in
Administrator, Guests;
Support_388945a0;
Guest; all
NONOperating System
service accounts
Important: For all HP NAS server systems, administrators should only deny the Support_388945a0
account.
: ANONOYMOUS LOGON, Built-in Administrator, Support_388945a0; Guest; and all NON-
Note
operating system service accounts are not included in the .inf security template. These accounts and
groups have unique SIDs for each domain in the network. Therefore, they must be added manually.
For further information, see the Manual Hardening Procedures in section 2.8.7.
The Deny access to this computer from the network user right determines which users are prevented
from accessing a computer over the network. This user right will deny a number of network protocols
including SMB-based protocols, NetBIOS, CIFS, HTTP. and COM+. This policy setting supersedes the
Access this computer from the network user right when a user account is subject to both policies.
Configuring this logon right for other groups could limit the abilities of users assigned to specific
administrative roles within the network. Verify that delegated tasks will not be negatively impacted.
31
Page 32

Deny log on as a batch job
Member Server
Default
Not Defined Guests;
: ANONOYMOUS LOGON, Built-in Administrator, Support_388945a0; Guest; and all NON-
Note
operating system service accounts are not included in the .inf security template. These accounts and
groups have unique SIDs for each domain in the network. Therefore, they must be added manually.
For further information, see the Manual Hardening Procedures in section 2.8.7.
The Deny log on as a batch job user right determines which accounts are prevented from logging on
to the system as a batch job. A batch job is not a batch file (bat)-but rather a batch-queue facility.
Accounts used for scheduling jobs via the Task Scheduler need this right. This Deny log on as a batch
job user right setting overrides the Log on as a batch job user right setting. Accounts with this logon
right could be used to schedule jobs that could consume excessive system resources leading to a DoS
condition. For this reason, not assigning the Deny log on as a batch job user right to the
recommended accounts can be a security risk.
Legacy Client Enterprise Client High Security Client
Support_388945a0;
Guest
Guests;
Support_388945a0;
Guest
Guests;
Support_388945a0;
Guest
Deny log on through Terminal Services
Member Server
Default
Not Defined Built-in Administrator;
Important: For all HP NAS server systems, administrators should only deny Guests,
Support_388945a0, Guest, and all NON-operating system service accounts
: ANONOYMOUS LOGON, Built-in Administrator, Support_388945a0; Guest; and all NON-
Note
operating system service accounts are not included in the .inf security template. These accounts and
groups have unique SIDs for each domain in the network. Therefore, they must be added manually.
For further information, see the Manual Hardening Procedures in section 2.8.7.
The Deny log on through Terminal Services user right determines which users and groups are
prohibited from logging on as a Terminal Services client. After joining the baseline member server to
a domain environment, there is no need to use local accounts to access the server from the network.
Domain accounts can access the server for administration and end-user processing. Remember, the
MSBP will not receive this Group Policy until the server is joined to the domain and restarted twice.
Therefore, the use of the local Administrator accounts is prohibited.
Legacy Client Enterprise Client
Built-in Administrator;
Guests;
Support_388945a0;
Guest ;all NON-
operating system
service accounts
Guests;
Support_388945a0;
Guest ;all NON-
operating system
service accounts
High Security Client
Built-in Administrator;
Guests;
Support_388945a0;
Guest ;all NON-
operating system
service accounts
32
Page 33

Enable computer and user accounts to be trusted for delegation
Member Server Default Legacy Client Enterprise Client High Security Client
Not Defined Not Defined Not Defined Revoke all security
groups and accounts
The Enable computer and user accounts to be trusted for delegation privilege allows the user to
change the Trusted for Delegation setting on a user or computer object in Active Directory. The user or
computer that is granted this privilege must also have write access to the account control flags on the
object. Misuse of this privilege could lead to unauthorized users impersonating other users on the
network.
Force shutdown from a remote system
Member Server Default Legacy Client Enterprise Client High Security Client
Administrators Not Defined Not Defined Administrators
The Force shutdown from a remote system user privilege allows a user to shut down a computer from
a remote location on the network. Any user who can shut down a computer can cause a DoS
condition; therefore, this privilege should be tightly restricted.
Generate security audits
Member Server Default Legacy Client Enterprise Client High Security Client
NETWORK SERVICE,
LOCAL SERVICE
The Generate security audits user privilege allows a process to generate audit records in the security
log. The security log can be used to trace unauthorized system access. Accounts that are able to
write to the security log could be used by an attacker to fill that log with meaningless events. If the
computer is configured to overwrite events as needed, the attacker could use this method to remove
evidence of his or her unauthorized activities. If the computer is configured to shut down when it is
unable to write to the security log, this method could be used to create a DoS condition.
Member Server Default Legacy Client Enterprise Client High Security Client
SERVICE, Administrators Not Defined Not Defined Local Service; Network
Assigning the Impersonate a client after authentication privilege allows applications running on behalf
of that user to impersonate a client. Requiring this user right for this kind of impersonation prevents an
unauthorized user from convincing a client to connect -- for example, by remote procedure call (RPC)
or named pipes -- to a service that he or she has created and then impersonating that client, which
can elevate the unauthorized user’s permissions to administrative or system levels. The default security
groups for this user right are sufficient for the Legacy Client and Enterprise Client environments.
However, this user right is configured to Local Service, NETWORK SERVICE in the High Security
environment.
Not Defined Not Defined NETWORK SERVICE,
LOCAL SERVICE
Impersonate a client after authentication
Service
33
Page 34

Increase scheduling priority
Member Server Default Legacy Client Enterprise Client High Security Client
Administrators Not Defined Not Defined Administrators
The Increase scheduling priority privilege allows a user to increase the base priority class of a
process. Increasing relative priority within a priority class is not a privileged operation. This privilege
is not required by administrative tools supplied with the operating system but might be required by
software development tools. A user with this privilege can increase the scheduling priority of a
process to Real-Time, leaving little processing time for all other processes, which could lead to a DoS
condition. The default security groups for this user right are sufficient for the Legacy Client and
Enterprise Client environments. However, this user right is configured to enforce the default
Administrators group in the High Security environment.
Load and unload device drivers
Member Server Default Legacy Client Enterprise Client High Security Client
Administrators Not Defined Not Defined Administrators
The Load and unload device drivers privilege determines which users can dynamically load and
unload device drivers. This privilege is not required if a signed driver for the new hardware already
exists in the Driver.cab file on the computer. Device drivers run as highly privileged code. A user
granted the Load and unload device drivers privilege can unintentionally install malicious code
masquerading as a device driver. It is assumed that administrators will exercise greater care and
install only drivers with verified digital signatures. The default user groups for this right are sufficient
for the Legacy Client and Enterprise Client environments. However, this right is configured to enforce
the default Administrators group in the High Security environment.
Lock pages in memory
Member Server Default Legacy Client Enterprise Client High Security Client
Not Defined Not Defined Not Defined Administrators
The Lock pages in memory user right allows a process to keep data in physical memory, which
prevents the system from paging the data to virtual memory on disk. Enabling this user right can
result in significant degradation of system performance. Users with this privilege can assign physical
memory to several processes, leaving little or no random access memory (RAM) for other processes.
This could lead to a DoS condition. The default security groups for this user right are sufficient for the
Legacy Client and Enterprise Client environments. However, this user right is configured to enforce the
default Administrators in the High Security environment.
Log on as a batch job
Member Server Default Legacy Client Enterprise Client High Security Client
SUPPORT_388945a0 ,
LOCAL SERVICE
Not Defined Not Defined Revoke all security
groups and accounts
The Log on as a batch job user right allows a user to log on by using a batch-queue facility such as
the Task Scheduler service. This is a low-risk vulnerability so the default settings for this user right are
sufficient for most organizations. The default security groups for this user right are sufficient for the
Legacy Client and Enterprise Client environments. However, this user right is configured to Revoke all
security groups and accounts in the High Security environment.
34
Page 35

Manage auditing and security log
Member Server Default Legacy Client Enterprise Client High Security Client
Administrators Not Defined Not Defined Administrators
The Manage auditing and security log privilege allows a user to specify object access auditing options
for individual resources such as files, Active Directory objects, and registry keys. The right to manage
the security event log is a powerful user privilege that should be closely guarded. Anyone with this
user right can clear the security log, possibly erasing important evidence of unauthorized activity. The
default security groups for this user right are sufficient for the Legacy Client and Enterprise Client
environments. However, this user right is configured to enforce the default Administrators in the High
Security environment.
Modify firmware environment values
Member Server Default Legacy Client Enterprise Client High Security Client
Administrators Not Defined Not Defined Administrators
The Modify firmware environment values user right allows modification of system environment
variables either by a process through an API, or by a user through System Properties. Anyone with
this privilege could configure the settings of a hardware component to cause it to fail, which could
lead to data corruption or a DoS condition. The default security groups for this user right are sufficient
for the Legacy Client and Enterprise Client environments. However, this user right is configured to
enforce the default Administrators group in the High Security environment.
Perform volume maintenance tasks
Member Server Default Legacy Client Enterprise Client High Security Client
Administrators Not Defined Not Defined Administrators
The Perform volume maintenance tasks user right allows a non-administrative or remote user to
manage volumes or disks. A user with this privilege could delete a volume, leading to the loss of data
or a DoS condition. The default security groups for this user right are sufficient for the Legacy Client
and Enterprise Client environments. However, this user right is configured to enforce the default
Administrators group in the High Security environment.
Profile single process
Member Server Default Legacy Client Enterprise Client High Security Client
Administrators and
Power
Users
The Profile single process user right determines which users can use performance monitoring tools to
monitor the performance of non-system processes. This is a moderate vulnerability; an attacker with
this privilege could monitor a computer’s performance to help identify critical processes that he or she
might want to attack directly. The attacker may also be able to determine what processes are running
on the system so that he or she could identify countermeasures to avoid-such as antivirus software, an
intrusion-detection system, or other users logged onto a system. To better secure an environment,
remove Power Users from this user right in the High Security environment.
Not Defined Not Defined Administrators
35
Page 36

Profile system performance
Member Server Default Legacy Client Enterprise Client High Security Client
Administrators Not Defined Not Defined Administrators
The Profile system performance user right allows a user to monitor the performance of system
processes. Not restricting this user right presents a moderate vulnerability; an attacker with this
privilege could monitor a computer’s performance to help identify critical processes that he or she
might want to attack directly. The attacker could also determine what processes are running on the
system to identify countermeasures to avoid, such as antivirus software or an intrusion-detection
system. The default security groups for this user right are sufficient for the Legacy Client and Enterprise
Client environments. However, this user right is configured to enforce the default Administrators
group in the High Security environment.
Replace a process level token
Member Server Default Legacy Client Enterprise Client High Security Client
LOCAL SERVICE,
NETWORK SERVICE
Not Defined Not Defined LOCAL SERVICE,
NETWORK SERVICE
The Replace a process level token user right allows a parent process to replace the access token that is
associated with a child process. The default security groups for this user right are sufficient for the
Legacy Client and Enterprise Client environments. However, this user right is configured to enforce
the default LOCAL SERVICE and NETWORK SERVICE groups in the High Security environment.
Restore files and directories
Member Server Default Legacy Client Enterprise Client High Security Client
Administrators and
Not Defined Administrators Administrators
Backup
Operators
The Restore files and directories user right determines which users can bypass file, directory, registry,
and other persistent objects permissions when restoring backed up files and directories. It also
determines which users can set any valid security principal as the owner of an object. In an Enterprise
or High Security environment, only Administrators should have the right to restore files and
directories. The job of restoring files is usually carried out by administrators or another specifically
delegated security group, especially for highly sensitive servers and domain controllers.
The Shut down the system user right determines which locally logged on users can shut down the
operating system using the Shut Down command. Misuse of this user right can result in a DoS attack.
The ability to shut down domain controllers should be limited to a very small number of trusted
administrators. Even though a system shutdown requires the ability to log on to the server,
administrators should be very careful about the accounts and groups that they allow to shut down a
domain controller. In the High Security environment, only Administrators should be granted the Shut
down the system user right.
Member Server Default Legacy Client Enterprise Client High Security Client
Not Defined
Synchronize directory service data
Not Defined Not Defined Revoke all security
groups
and accounts
36
Page 37

The Synchronize directory service data user right allows a process to read all objects and properties
in the directory, regardless of the protection on the objects and properties. This privilege is required
in order to use LDAP directory synchronization (Dirsync) services. The default setting specifies no
accounts; however, this user right is configured to Revoke all security groups and accounts in the High
Security environment
Take ownership of files or other objects
Member Server Default Legacy Client Enterprise Client High Security Client
Administrators
Not Defined Not Defined Administrators
The Take ownership of files or other objects user right allows a user to take ownership of any
securable object in the system, including Active Directory objects, NTFS file system (NTFS) files, and
folders, printers, registry keys, services, processes, and threads. Ensure that only the local
Administrators group has the Take ownership of files or other objects user right.
2.8.3 Security Options
The Security Options section of Group Policy is used to configure security settings for computers, such
as digital signing of data, administrator and guest account names, floppy disk drive and CD-ROM
drive access, driver installation behavior, and logon prompts. The Security Options settings can be
configured in Windows Server 2003 at the following location within the Group Policy Object Editor:
Computer Configuration\Windows Settings\Security Settings\Local Policies\Security Options
Not all security groups exist on all types of systems. Also, many security group SIDs are unique
among the domains within the company network. Therefore, the Security Options portion ofGroup
Policy may need to be manually modified on a system where the target group exists. This section
provides details on the prescribed security options for the three environments defined in this guide for
the MSBP.
37
Page 38

Accounts: Guest account status
Member Server Default Legacy Client Enterprise Client High Security Client
Disabled
Important: Administrators need to check if any of their 3rd party applications use and require the
Guest account for communication or functionality purpose. If so, administrators may need to set this
security policy to Enabled.
The Accounts: Guest account status security option setting determines whether the Guest account is
enabled or disabled. This account allows unauthenticated network users to gain access to the system
by logging in as Guest. Therefore, this security option setting is configured to Disabled in all three
environments.
Accounts: Limit local account use of blank passwords to console logon only
Member Server Default Legacy Client Enterprise Client High Security Client
Enabled
The Accounts: Limit local account use of blank passwords to console logon only security option setting
determines whether local accounts that are not password protected can be used to log on from
locations other than the physical computer console. Enabling this setting prevents a local account with
a nonblank password from logging on to a network from a remote client, and local accounts that are
not password protected will only be able to log on physically via the keyboard of the computer.
Therefore, enforce the default value for this countermeasure across all three environments.
Disabled
Enabled
Disabled
Enabled
Disabled
Enabled
Audit: Audit the access of global system objects
Member Server Default Legacy Client Enterprise Client High Security Client
Disabled
The Audit: Audit the access of global system objects security option setting audits the access of global
system objects when it is in effect. If both the Audit: Audit the access of global system objects and the
Audit object access audit policy settings are enabled, a large number of audit events will be
generated. This setting is configured to the default in all three environments defined in this guide.
: Changes to the configuration of this security option setting will not take effect until Windows
Note
Server 2003 is restarted.
Disabled
Disabled
Disabled
Audit: Audit the use of Backup and Restore privilege
Member Server Default Legacy Client Enterprise Client High Security Client
Disabled
The Audit: Audit the use of Backup and Restore privilege security option setting determines whether
to audit the use of all user privileges, including Backup and Restore, when the Audit privilege use
policy setting is in effect. Enabling this policy could generate a large number of security events,
causing servers to respond slowly and forcing the security event log to record numerous events of
little significance. Therefore, this setting is configured to the default across all three environments.
Disabled
Disabled
Disabled
38
Page 39

Note
: Changes to the configuration of this security option setting will not take effect until Windows
Server 2003 is restarted
Audit: Shut down system immediately if unable to log security audits
Member Server Default Legacy Client Enterprise Client High Security Client
Disabled
The Audit: Shut down system immediately if unable to log security audits security option setting
determines whether the system shuts down immediately if it is unable to log security events. The
administrative overhead required to enable this setting in the Legacy Client and Enterprise Client
environments was determined to be too high; therefore, Group Policy configures the Shut down
system immediately if unable to log security audits setting to Disabled. However, this setting is
enabled in High Security environments because the burden of this additional administrative overhead
is acceptable in order to prevent deleting events from the security event log unless an administrator
specifically chooses to do so.
Devices: Allowed to format and eject removable media
Member Server Default Legacy Client Enterprise Client High Security Client
Administrators Administrators Administrators Administrators
Disabled
Disabled
Enabled
The Devices: Allowed to format and eject removable media security option setting determines who can
format and eject removable media. Only administrators should be able to eject removable media on
servers. Therefore, the countermeasure for this setting is the default for all three of the environments
defined in this guide.
Devices: Prevent users from installing printer drivers
Member Server Default Legacy Client Enterprise Client High Security Client
Enabled Enabled Enabled Enabled
For a computer to print to a network printer, it must have the driver for that network printer installed.
Enabling the Devices: Prevent users from installing printer drivers security option setting allows only
those in the Administrators or Power Users groups, or those with Server Operator privileges to install
a printer driver as part of adding a network printer. Disabling this setting allows any user to install a
printer driver as part of adding a network printer. The countermeasure for this setting is the default for
all three of the environments defined in this guide.
Devices: Restrict CD-ROM access to locally logged-on user only
Member Server Default Legacy Client Enterprise Client High Security Client
Disabled Not Defined Not Defined Enabled
The Devices: Restrict CD-ROM access to locally logged-on user only security option setting determines
whether a CD-ROM is accessible to both local and remote users simultaneously. Enabling this setting
allows only the interactively logged-on user to access removable CD-ROM media. If this policy is
enabled, and no one is logged on interactively, the CD-ROM is accessible over the network. In the
Legacy Client and Enterprise Client environments, this value is set to Not Defined. In the High Security
environment, the value is set to Enabled.
Member Server Default Legacy Client Enterprise Client High Security Client
Devices: Restrict floppy access to locally logged
39
Page 40

Disabled Not Defined Not Defined Enabled
The Devices: Restrict floppy access to locally logged-on user only security option setting determines
whether removable floppy media are accessible to both local and remote users simultaneously.
Enabling this setting allows only the interactively logged-on user to access removable floppy media. If
this policy is enabled, and no one is logged on interactively, the floppy media is accessible over the
network. In the Legacy Client and Enterprise Client environments, this value is set to Disabled. In the
High Security environment, the value is set to Enabled.
Devices: Unsigned driver installation behavior
Member Server Default Legacy Client Enterprise Client High Security Client
Warn but allow
installation
The Devices: Unsigned driver installation behavior security option setting determines what happens
when an attempt is made to install a device driver (by means of Setup API) that has not been
approved and signed by the Windows Hardware Quality Lab (WHQL). This option prevents the
installation of unsigned drivers or warns the administrator that an unsigned driver is about to be
installed. This can prevent installing drivers that have not been certified to run on Windows Server
2003. One potential problem with configuring this setting to the Warn but allow installation value is
that unattended installation scripts will fail when installing unsigned drivers.
Member Server Default Legacy Client Enterprise Client High Security Client
Not Defined Disabled Disabled Disabled
The Domain controller: Allow server operators to schedule tasks security option setting determines
whether Server Operators are allowed to submit jobs by means of the AT schedule facility. This setting
is disabled in all three environments defined in this guide. The impact of disabling this setting should
be small for most organizations. Users, including those in the Server Operators group, will still be
able to create jobs via the Task Scheduler Wizard, but those jobs will run in the context of the
account with which the user authenticates when they set up the job.
Warn but allow
installation
Domain controller: Allow server operators to schedule
Warn but allow
installation
Warn but allow
installation
: AT Service Account can be modified in order to select a different account rather than the LOCAL
Note
SYSTEM account. To change the account, open System Tools, click Scheduled Tasks, and then click
Accessories folder. Then click AT Service Account on the Advanced menu.
40
Page 41

Domain controller: LDAP server signing requirements
Member Server Default Legacy Client Enterprise Client High Security Client
Not Defined Not Defined Not Defined Require Signing
Important: If all domain controllers are running Windows 2000 or later, set this security option to
Require signing. Otherwise, leave this setting as Not Defined. Since all computers in the High Security
environment are running either Windows 2000 or Windows Server 2003, this setting is configured to
require signing for this environment.
The Domain controller: LDAP server signing requirements security option setting determines whether
the LDAP server requires signing to negotiate with LDAP clients. Network traffic that is neither signed
nor encrypted is susceptible to man-in-the-middle attacks in which an intruder captures packets
between the server and the client and modifies them before forwarding them to the client. In the case
of an LDAP server, this means that an attacker could cause a client to make decisions based on false
records from the LDAP directory.
Domain controller: Refuse machine account password changes
Member Server Default Legacy Client Enterprise Client High Security Client
Not Defined Disabled Disabled Disabled
The Domain controller: Refuse machine account password changes security option setting determines
whether domain controllers will refuse requests from member computers to change computer account
passwords. Enabling this setting on all domain controllers in a domain prevents computer account
passwords on domain members from changing, leaving them susceptible to attack. Therefore, the
value for this security option is set to Disabled in the three environments defined in this guide.
Domain member: Digitally encrypt or sign secure channel data (always)
Member Server Default Legacy Client Enterprise Client High Security Client
Enabled Disabled Disabled Enabled
Important: In order to take advantage of this security option setting on member workstations and
servers, all domain controllers that constitute the member’s domain must be running Windows NT 4.0
with Service Pack 6a or later; this is not supported in Windows 98 Second Edition clients (unless they
have the dsclient installed). This setting must be set to Disabled for HP NAS server systems within
multi-protocol network environments involving NFS, AFTP, or NCP.
The Domain member: Digitally encrypt or sign secure channel data (always) security option setting
determines whether all secure channel traffic initiated by the domain member must be signed or
encrypted. If a system is set to always encrypt or sign secure channel data, then it cannot establish a
secure channel with a domain controller that is not capable of signing or encrypting all secure
channel traffic, because all secure channel data is signed and encrypted. This security option to
Disabled in the Legacy Client and Enterprise Client environments and it is configured to Enabled in the
High Security environment.
41
Page 42

Domain member: Digitally encrypt secure channel data (when possible)
Member Server Default Legacy Client Enterprise Client High Security Client
Enabled Enabled Enabled Enabled
The Domain member: Digitally encrypt secure channel data (when possible) security option setting
determines whether a domain member may attempt to negotiate encryption for all secure channel
traffic that it initiates. Enabling this setting causes the domain member to request encryption of all
secure channel traffic. Disabling this setting prevents the domain member from negotiating secure
channel encryption. Therefore, this setting is configured to Enabled in all three environments defined
in this guide.
Domain member: Digitally sign secure channel data (when possible)
Member Server Default Legacy Client Enterprise Client High Security Client
Enabled Enabled Enabled Enabled
The Domain member: Digitally sign secure channel data (when possible) security option setting
determines whether a domain member may attempt to negotiate signing for all secure channel traffic
that it initiates. Signing protects the traffic from being modified by anyone who captures the data en
route. This setting is configured to Enabled in all three environments defined in this guide.
Domain member: Disable machine account password changes
Member Server Default Legacy Client Enterprise Client High Security Client
Disabled Disabled Disabled Disabled
The Domain member: Disable machine account password changes security option setting determines
whether a domain member may periodically change its computer account password. Enabling this
setting prevents the domain member from changing its computer account password. Disabling this
setting allows the domain member to change its computer account password as specified by the
Domain Member: Maximum age for machine account password setting, which by default is every
30days. Computers that are no longer able to automatically change their account passwords are in
risk of an attacker determining the password for the system’s domain account. Therefore, set this
countermeasure to Disabled across the three environments defined in this guide.
Member Server Default Legacy Client Enterprise Client High Security Client
30 days 30 days 30 days 30 days
The Domain member: Maximum machine account password age security option setting determines the
maximum allowable age for a computer account password. This setting also applies to computers
running Windows 2000, but it is not available through the Security Configuration Manager tools on
these computers. By default, the domain members automatically change their domain passwords
every 30 days. Increasing this interval significantly, or setting it to 0 so that the computers no longer
change their passwords, gives an attacker more time to undertake a brute force password guessing
attack against one of the computer accounts. Therefore, this setting is configured to the 30 days in all
three environments defined in this guide.
Domain member: Maximum machine account password age
42
Page 43

Domain member: Require strong (Windows 2000 or later) session key
Member Server
Legacy Client Enterprise Client
High Security Client
Default
Disabled Enabled Enabled Enabled
Important: Administrators will be unable to join computers running Windows 2000 with this setting
enabled to Windows NT 4.0 domains.
The Domain member: Require strong (Windows 2000 or later) session key security option setting
determines whether 128-bit key strength is required for encrypted secure channel data. Enabling this
setting prevents establishing a secure channel without 128-bit encryption. Disabling this setting
requires the domain member to negotiate key strength with the domain controller. Session keys used
to establish secure channel communications between domain controllers and member computers are
much stronger in Windows 2000 than they were in previous Microsoft operating systems. Therefore,
since the three security environments described in this guide contain Windows 2000 domain
controllers or later, this setting is configured to Enabled in all three environments.
Interactive logon: Do not display last user name
Member Server Default Legacy Client Enterprise Client High Security Client
Disabled Enabled Enabled Enabled
The Interactive logon: Do not display last user name security option setting determines whether the
name of the last user to log on to the computer is displayed in the Windows logon screen. Enabling
this setting prevents displaying the last logged on user’s name in the Log On to Windows dialog box.
The Interactive logon: Do not display last user name setting is enabled in the baseline server policy in
the three environments defined in this guide.
Interactive logon: Do not require CTRL+ALT+DEL
Member Server Default Legacy Client Enterprise Client High Security Client
Disabled Disabled Disabled Disabled
The Interactive logon: Do not require CTRL+ALT+DEL security option setting determines whether
pressing CTRL+ALT+DEL is required before a user can log on. Disabling this setting requires all users
to press CTRL+ALT+DEL before logging on to Windows (unless they are using a smart card for
Windows logon). This setting is set to Disabled in all three environments defined in this guide to
decrease the chance of an attacker being able to intercept user passwords via a Trojan horse
program.
Interactive logon: Message text for users attempting to log on
Member Server
Legacy Client Enterprise Client High Security Client
Default
Not Defined This system is restricted
to authorized users.
Individuals attempting
unauthorized access
will be prosecuted. If
unauthorized, terminate
access now! Clicking
on OK indicates the
administrator’s
acceptance of the
information in the
background.
This system is restricted
to authorized users.
Individuals attempting
unauthorized access
will be prosecuted. If
unauthorized, terminate
access now! Clicking
on OK indicates the
administrator’s
acceptance of the
information in the
background.
This system is restricted
to authorized users.
Individuals attempting
unauthorized access
will be prosecuted. If
unauthorized, terminate
access now! Clicking
on OK indicates the
administrator’s
acceptance of the
information in the
background.
43
Page 44

The Interactive logon: Message text for users attempting to log on security option setting specifies a
text message that is displayed to users when they log on. This text is often used for legal reasons, for
example, to warn users about the ramifications of misusing company information or to warn them that
their actions may be audited. The message text setting is recommended for all three environments.
: Any warning that gets displayed should first be approved by the company’s legal and human
Note
resources representatives. In addition, both the Interactive logon: Message text for users attempting to
log on and the Interactive logon: Message title for users attempting to log on settings must both be
enabled in order for either one to work properly.
Interactive logon: Message title for users attempting to log on
Member Server
Default
Not Defined IT IS AN OFFENSE TO
The Interactive logon: Message title for users attempting to log on security option setting allows a title
to be specified in the title bar of the window that contains the Interactive logon users see when they
log on to the system. The reasoning behind this setting is the same as that for the Message text for
user attempting to log on setting. Organizations that do not utilize this setting are more legally
vulnerable to trespassers who attack the network surface. Therefore, this setting is enabled in the three
environments defined in this guide.
Legacy Client Enterprise Client High Security Client
CONTINUE WITHOUT
PROPER
AUTHORIZATION
IT IS AN OFFENSE TO
CONTINUE WITHOUT
PROPER
AUTHORIZATION
IT IS AN OFFENSE TO
CONTINUE WITHOUT
PROPER
AUTHORIZATION
: Any warning that gets displayed should first be approved by the company’s legal and human
Note
resources representatives. In addition, both the Interactive logon: Message text for users attempting to
log on and Interactive logon: Message title for users attempting to log on settings must both be
enabled in order for either one to work properly.
Interactive logon: Number of previous logons to cache
(in case domain controller is not available)
Member Server Default Legacy Client Enterprise Client High Security Client
10 1 0 0
The Interactive logon: Number of previous logons to cache (in case domain controller is not available)
security option setting determines whether a user can log on to a Windows domain using cached
account information. Logon information for domain accounts can be cached locally so that in the
event that a domain controller cannot be contacted on subsequent logons, a user can still log on. This
setting determines the number of unique users for whom logon information is cached locally.
Configuring this value to 0 disables logon caching, which is the recommended setting for all three
environments.
44
Page 45

Interactive logon: Prompt user to change password before expiration
Member Server Default Legacy Client Enterprise Client High Security Client
14 days 14 days 14 days 14 days
The Interactive logon: Prompt user to change password before expiration security option setting
determines how many days in advance users are warned that their passwords are about to expire.
The Account Policies section of this guide recommends configuring user passwords to expire
periodically. If users are not notified when their passwords are about to expire, they may not realize it
until the passwords have already expired. This could lead to confusion for users accessing the
network locally, or make it impossible for users who are accessing the company’s network via dial-up
or virtual private networking (VPN) connections. Therefore, this setting is configured to the default
setting value 14 days in the three environments defined in this guide.
Interactive logon:
Require Domain Controller authentication to unlock workstation
Member Server Default Legacy Client Enterprise Client High Security Client
Disabled Enabled Enabled Enabled
Important: This setting applies to computers running Windows 2000 or later, but it is not available
through the Security Configuration Manager tools on computers running Windows 2000-only
Windows Server 2003.
For domain accounts, the Interactive logon: Require Domain Controller authentication to unlock
workstation security option setting determines whether a domain controller must be contacted to
unlock a computer. This setting addresses a vulnerability similar to the Interactive logon: Number of
previous logons to cache (in case domain controller is not available) setting. A user could disconnect
the network cable of the server and unlock the server using an old password without authenticating to
unlock the server. To prevent this, this setting is configured to Enabled in the three environments
defined in this guide.
Microsoft network client: Digitally sign communications (always)
Member Server Default Legacy Client Enterprise Client High Security Client
Disabled Disabled Enabled Enabled
Important: In mixed environments with legacy clients, set this option to Disabled as these clients will
not be able to authenticate or gain access to domain controllers. However, this setting should be
Enabled within Windows 2000 or later environments. The Enterprise Client and High Security
environments defined in this guide only contain systems running Windows 2000 or later, which
support signing digital communications. Therefore, to increase communications security between
systems in this environment, this setting is configured to Enabled in the Enterprise Client and High
Security environments. This setting must be set to Disabled for HP NAS server systems within multiprotocol network environments involving NFS, AFTP, or NCP.
The Microsoft network client: Digitally sign communications (always) security option setting determines
whether packet signing is required by the SMB client component. Enabling this setting prevents the
Microsoft network client from communicating with a Microsoft network server unless that server agrees
to perform SMB packet signing.
45
Page 46

Microsoft network client: Digitally sign communications (if server agrees)
Member Server Default Legacy Client Enterprise Client High Security Client
Enabled Enabled Enabled Enabled
The Microsoft network client: Digitally sign communications (if server agrees) security option setting
determines whether the SMB client will attempt to negotiate SMB packet signing. Implementing digital
signing in Windows networks helps to prevent session hijacking. By enabling this setting, the
Microsoft network client on member servers will request signing only if the servers with which it is
communicating accept digitally signed communication. This setting is configured to Enabled in the
three environments defined in this guide.
Microsoft network client:
Send unencrypted password to third-party SMB servers
Member Server Default Legacy Client Enterprise Client High Security Client
Disabled Disabled Disabled Disabled
If the Microsoft network client: Send unencrypted password to third-party SMB servers security option
setting is enabled, the SMB redirector is allowed to send plaintext passwords to non-Microsoft SMB
servers that do not support password encryption during authentication. This setting is configured to the
default value Disabled in the three environments defined in this guide, unless application requirements
supersede the need to maintain secret passwords.
Microsoft network server:
Amount of idle time required before suspending session
Member Server Default Legacy Client Enterprise Client High Security Client
15 minutes 15 minutes 15 minutes 15 minutes
The Microsoft network server: Amount of idle time required before suspending session security option
setting determines the amount of continuous idle time that must pass in an SMB session before the
session is suspended due to inactivity. Administrators can use this policy to control when a computer
suspends an inactive SMB session. If client activity resumes, the session is automatically reestablished.
This setting is configured to 15 minutes in the three environments defined in this guide.
Microsoft network server: Digitally sign communications (always)
Member Server Default Legacy Client Enterprise Client High Security Client
Disabled Disabled Enabled Enabled
Important: Administrators within multi-protocol heterogeneous environments should set this setting to
Disabled or at least verify that their 3rd party application (i.e. Server for NFS, Services for UNIX,
Services for Netware, etc…) have packet signing support.
The Microsoft network server: Digitally sign communications (always) security option setting
determines whether packet signing is required by the SMB server component before further
communication with an SMB client is permitted. Windows 2000 Server, Windows 2000 Professional,
Windows Server 2003, and Windows XP Professional include versions of SMB that support mutual
authentication, which closes session hijacking attacks and supports message authentication (thus
preventing man-in-the-middle attacks). SMB signing provides this authentication by placing a digital
signature into each SMB packet, which is then verified by both the client and the server. When
computers are configured to ignore all unsigned SMB communications, legacy applications and
operating systems will be unable to connect. Completely disabling all SMB signing leaves the
computers vulnerable to session hijacking attacks.
46
Page 47

Microsoft network server: Digitally sign communications (if client agrees)
Member Server Default Legacy Client Enterprise Client High Security Client
Disabled Enabled Enabled Enabled
The Microsoft network server: Digitally sign communications (if client agrees) security option setting
determines whether the SMB server will negotiate SMB packet signing with clients that request it.
Windows 2000 Server, Windows 2000 Professional, Windows Server 2003, and Windows XP
Professional include versions of SMB that support mutual authentication, which closes session
hijacking attacks and supports message authentication (thus preventing man-in-the-middle attacks).
SMB signing provides this authentication by placing a digital signature into each SMB packet, which
is then verified by both the client and the server. When computers are configured to ignore all
unsigned SMB communications, legacy applications and operating systems will be unable to connect.
Completely disabling all SMB signing leaves the computers vulnerable to session hijacking attacks.
Microsoft network server: Disconnect clients when logon hours expire
Member Server Default Legacy Client Enterprise Client High Security Client
Enabled Enabled Enabled Enabled
The Microsoft network server: Disconnect clients when logon hours expire security option setting
determines whether to disconnect users who are connected to a network computer outside of their
user account’s valid logon hours. This setting affects the SMB component. If the company has
configured logon hours for users, then it makes sense to enable this setting; otherwise, users should
not be able to access network resources outside of their logon hours or they may be able to continue
to use those resources with sessions established during allowed hours. Therefore, this setting is
configured to Enabled in the three environments defined in this guide.
Network access: Do not allow anonymous enumeration of SAM accounts
Member Server Default Legacy Client Enterprise Client High Security Client
Enabled Enabled Enabled Enabled
The Network access: Do not allow anonymous enumeration of SAM accounts security option setting
determines what additional permissions will be granted for anonymous connections to the computer.
This setting is configured to Enabled in the three environments defined in this guide.
Network access: Do not allow anonymous enumeration of SAM accounts and shares
Member Server Default Legacy Client Enterprise Client High Security Client
Disabled Enabled Enabled Enabled
The Network access: Do not allow anonymous enumeration of SAM accounts and shares security
option setting determines whether anonymous enumeration of SAM accounts and shares is allowed.
This setting is configured to Enabled in the three environments defined in this guide.
Network access: Do not allow storage of credentials or .NET Passports for network authentication
Member Server Default Legacy Client Enterprise Client High Security Client
Disabled Enabled Enabled Enabled
The Network access: Do not allow storage of credentials or .NET Passports for network authentication
security option setting determines whether settings for Stored User Names and Passwords will save
47
Page 48

passwords, credentials, or Microsoft .NET Passports for later use after gaining domain authentication.
This setting is configured to Enabled in the three security environments defined in this guide.
: When configuring this security setting, changes will not take effect until Windows is restarted.
Note
Network access: Let Everyone permissions apply to anonymous users
Member Server Default Legacy Client Enterprise Client High Security Client
Disabled Disabled Disabled Disabled
Important: Domains with this setting will be unable to establish or maintain trusts with Windows NT
4.0 domains or domain controllers. This setting should be set to Enabled for all HP NAS server
systems requiring anonymous user access within multi-protocol network environments.
The Network access: Let Everyone permissions apply to anonymous users security option setting
determines what additional permissions are granted for anonymous connections to the computer.
Enabling this setting allows anonymous Windows users to perform certain activities, such as
enumerating the names of domain accounts and network shares. An unauthorized user could
anonymously list account names and shared resources and use the information to guess passwords or
perform social engineering attacks. Therefore, this setting is configured to Disabled in the three
environments defined in this guide.
Network access: Named Pipes that can be accessed anonymously
Member Server Default Legacy Client Enterprise Client High Security Client
Not Defined None None None
Important: If this setting is enabled, only add the named pipes that are needed to support the
applications within the company’s network environment. As with all recommended settings in this
guide, this setting should be carefully tested in production environments.
The Network access: Named Pipes that can be accessed anonymously security option setting
determines which communication sessions (named pipes) will have attributes and permissions that
allow anonymous access. The value for the Network access: Named Pipes that can be accessed
anonymously setting should be configured to None in Enterprise Client and High Security
environments.
48
Page 49

Network access: Remotely accessible registry paths
Member Server Default Legacy Client Enterprise Client High Security Client
System\CurrentControl
Set\ Control\Product
Options;
System\CurrentControl
Set\
System\CurrentControl
Set\ Control\Product
Options;
System\CurrentControl
Set\
System\CurrentControl
Set\ Control\Product
Options;
System\CurrentControl
Set\
System\CurrentControl
Set\ Control\Product
Options;
System\CurrentControl
Set\
Contro\Server
Applications;
Software\Microsoft\
Windows NT\Current
Version
Contro\Server
Applications;
Software\Microsoft\
Windows NT\Current
Version
Contro\Server
Applications;
Software\Microsoft\
Windows NT\Current
Version
Contro\Server
Applications;
Software\Microsoft\
Windows NT\Current
Version
The Network access: Remotely accessible registry paths security option setting determines which
registry paths can be accessed over the network. It is recommended to enforce the default setting in
the baseline security templates for all three security environments defined in this guide.
: Even if this security option is set, administrators should also start the Remote Registry system
Note
service if authorized users are going to be able to access the registry over the network.
Network access: Remotely accessible registry paths and sub
Member Server
Legacy Client Enterprise Client High Security Client
Default
System\CurrentControl
Set\
Control\Print\;
System\CurrentControl
Set\
System\CurrentControl
Set\
Control\Print\;
System\CurrentControl
Set\
System\CurrentControl
Set\
Control\Print\;
System\CurrentControl
Set\
System\CurrentControl
Set\
Control\Print\;
System\CurrentControl
Set\
Services\Eventlog;
Software\Microsoft\OL
AP Server;
Software\Microsoft\W
indows
NT\CurrentVersion\Pri
nt;
Software\Microsoft\W
indows
NT\CurrentVersion\Wi
ndows;
System\CurrentControl
Set\
Control\ContentIndex;
System\CurrentControl
Set\
Services\Eventlog;
Software\Microsoft\OL
AP Server;
Software\Microsoft\W
indows
NT\CurrentVersion\Pri
nt;
Software\Microsoft\W
indows
NT\CurrentVersion\Wi
ndows;
System\CurrentControl
Set\
Control\ContentIndex;
System\CurrentControl
Set\
Services\Eventlog;
Software\Microsoft\OL
AP Server;
Software\Microsoft\W
indows
NT\CurrentVersion\Pri
nt;
Software\Microsoft\W
indows
NT\CurrentVersion\Wi
ndows;
System\CurrentControl
Set\
Control\ContentIndex;
System\CurrentControl
Set\
Services\Eventlog;
Software\Microsoft\OL
AP Server;
Software\Microsoft\W
indows
NT\CurrentVersion\Pri
nt;
Software\Microsoft\W
indows
NT\CurrentVersion\Wi
ndows;
System\CurrentControl
Set\
Control\ContentIndex;
System\CurrentControl
Set\
49
Page 50

Control\Terminal
Server;
System\CurrentControl
Set\
Control\Terminal
Server\ UserConfig;
System\CurrentControl
Set\
Control\Terminal
Server\
DefaultUserConfigurati
on;
Software\Microsoft\W
indows
NT\CurrentVersion\Per
flib;
System\CurrentControl
Set\ Services\
SysmonLog
Control\Terminal
Server;
System\CurrentControl
Set\
Control\Terminal
Server\ UserConfig;
System\CurrentControl
Set\
Control\Terminal
Server\
DefaultUserConfigurati
on;
Software\Microsoft\W
indows
NT\CurrentVersion\Per
flib;
System\CurrentControl
Set\ Services\
SysmonLog
Control\Terminal
Server;
System\CurrentControl
Set\
Control\Terminal
Server\ UserConfig;
System\CurrentControl
Set\
Control\Terminal
Server\
DefaultUserConfigurati
on;
Software\Microsoft\W
indows
NT\CurrentVersion\Per
flib;
System\CurrentControl
Set\ Services\
SysmonLog
Control\Terminal
Server;
System\CurrentControl
Set\
Control\Terminal
Server\ UserConfig;
System\CurrentControl
Set\
Control\Terminal
Server\
DefaultUserConfigurati
on;
Software\Microsoft\W
indows
NT\CurrentVersion\Per
flib;
System\CurrentControl
Set\ Services\
SysmonLog
The Network access: Remotely accessible registry paths and sub-paths security option setting
determines which registry paths and sub-paths can be accessed over the network. It is recommended
to enforce the default setting in the baseline security templates for all three security environments
defined in this guide.
Network access: Restrict anonymous access to Named Pipes and Shares
Member Server Default Legacy Client Enterprise Client High Security Client
Enabled Enabled Enabled Enabled
The Network access: Restrict anonymous access to Named Pipes and Shares security option setting
restricts anonymous access to shares and named pipes when it is enabled to the settings for:
• Network access: Named pipes that can be accessed anonymously
• Network access: Shares that can be accessed anonymously
This setting is configured to the default for the three environments defined in this guide.
Member Server Default Legacy Client Enterprise Client High Security Client
COMCFG,DFS$ None None None
Important: Enabling this Group Policy setting is very dangerous; any shares that are listed can be
accessed by any network user. This could lead to the exposure or corruption of sensitive corporate
data. However, administrators within multi-protocol heterogeneous environments may need to check
Network access: Shares that can be accessed anonymously
50
Page 51

their 3rd party applications within their NAS box, as well as other server systems within the network,
and verify that they are still functioning properly.
The Network access: Shares that can be accessed anonymously security option setting determines
which network shares can be accessed by anonymous users. The default for this setting has little
impact as all users have to be authenticated before they can access shared resources on the server.
Therefore, ensure that this setting is configured to None in the three environments defined in this
guide.
Network access: Sharing and security model for local accounts
Member Server Default Legacy Client Enterprise Client High Security Client
Classic-local users
authenticate as
themselves
Classic-local users
authenticate as
themselves
Classic-local users
authenticate as
themselves
Classic-local users
authenticate as
themselves
The Network access: Sharing and security model for local accounts security option setting determines
how network logons using local accounts are authenticated. The Classic setting allows fine control
over access to resources. Using the Classic setting allows administrators to grant different types of
access to different users for the same resource. Using the Guest only setting allows administrators to
treat all users equally. In this context, all users authenticate as Guest only to receive the same access
level to a given resource. Therefore, the Classic default setting option is used for the three
environments defined in this guide.
Network security: Do not store LAN Manager hash value on next password change
Table Legacy Client
Enterprise Client High Security Client
Disabled Enabled Enabled Enabled
Important: Very old legacy operating systems and some third-party applications may fail when this
setting is enabled. Also administrators will need to change the password on all accounts after
enabling this setting. Administrators within multi-protocol heterogeneous environments may want to
verify all applications and protocol communications are working properly within their environment
once this setting is set. This setting must be set to Disabled for HP NAS server systems within multiprotocol network environments involving NFS, AFTP, or NCP.
The Network security: Do not store LAN Manager hash value on next password change security
option setting determines whether the LAN Manager (LM) hash value for the new password is stored
when the password is changed. The LM hash is relatively weak and prone to attack, as compared
with the cryptographically stronger Windows NT hash. For this reason, this setting is configured to
Enabled in the security environments defined in this guide.
Network security: LAN Manager authentication level
Member Server Default Legacy Client Enterprise Client High Security Client
Send NTLM response
only
Send NTLM response
only
Send NTLM response
only
Send NTLMv2 response
only\ refuse LM &
NTLM
Important: Administrators within multi-protocol heterogeneous environments may want to verify all
applications and protocol communications are working properly within their NAS box, and other
servers within their network, once this setting is set. If administrators find applications that break
when this setting is enabled, roll it back one step at a time to discover what breaks. At a minimum,
this setting should be set to Send LM & NTLM-use NTLMv2 session security if negotiated on all
computers and can typically be set to Send NTLMv2 responses only on all computers in the
51
Page 52

environment.
The Network security: LAN Manager Authentication level security option setting determines which
challenge/response authentication protocol is used for network logons. This choice affects the level of
authentication protocol used by clients, the level of security negotiated, and the level of authentication
accepted by servers as follows. The following numbers in parentheses below are the actual settings
for the LM Compatibility Level registry value. This setting should be configured to the highest level that
the company network environment allows according to the following guidelines:
In a pure Windows NT 4.0 SP4 or later environment-including Windows 2000 and Windows XP
Professional-configure this setting to Send NTLMv2 response only\refuse LM & NTLM on all clients,
and then to Send NTLMv2 response only\refuse LM & NTLM on all servers once all clients are
configured. The exception to this recommendation is Windows 2003 Routing and Remote Access
servers, which will not function properly if this setting is set higher than Send NTLMv2 response
only\refuse LM.
The Enterprise Client environment contains Routing and Remote Access servers. For this reason, the
setting for this environment is configured to Send NTLMv2 response only\refuse LM. The High Security
environment does not contain Routing and Remote Access servers, so the setting for this environment is
configured to Send NTLMv2 response only\refuse LM & NTLM.
If Windows 9x clients exists within the company network and administrators can install the DSClient
on all such clients, Administrators can configure this setting to Send NTLMv2 response only\refuse
LM & NTLM on computers running Windows NT (Widows NT, Windows 2000, and Windows XP
Professional). Otherwise, administrators must leave this setting configured at no higher than Send
NTLMv2 responses only on computers not running Windows 9x.
Network security: LDAP client signing requirements
Member Server Default Legacy Client Enterprise Client High Security Client
Negotiate signing Negotiate signing Negotiate signing Negotiate signing
The Network security: LDAP client signing requirements security option setting determines the level of
data signing that is requested on behalf of clients issuing LDAP BIND requests. Unsigned network
traffic is susceptible to man-in-the-middle attacks. In the case of an LDAP server, this means that an
attacker could cause a server to make decisions based on false queries from the LDAP client.
Therefore, the value for this setting is configured to Negotiate signing in the three environments
defined in this guide.
Network security:
Minimum session security for NTLM SSP based (including secure RPC) clients
Member Server Default Legacy Client Enterprise Client High Security Client
No minimum No minimum Enabled all settings Enabled all settings
Important: Administrators within multi-protocol heterogeneous environments may want to verify all
applications and protocol communications are working properly within their NAS box, and other
servers within the network, once this setting is set.
The Network security: Minimum session security for NTLM SSP based (including secure RPC) clients
security option setting allows a client to require the negotiation of message confidentiality
(encryption), message signing, 128-bit encryption, or NTLM version 2 (NTLMv2) session security.
Configure this setting as high as possible while still allowing the applications on the network to
function fully to ensure that network traffic from NTLM SSP based servers is protected from man-in-themiddle attacks and data exposure.
52
Page 53

Network security: Minimum session security for NTLM SSP based (including secure RPC) servers
Member Server Default Legacy Client Enterprise Client High Security Client
No minimum No minimum Enabled all settings Enabled all settings
Important: Administrators within multi-protocol heterogeneous environments may want to verify all
applications and protocol communications are working properly within their NAS box, and other
servers within the network, once this setting is set.
The Network security: Minimum session security for NTLM SSP based (including secure RPC) servers
security option setting allows a server to require the negotiation of message confidentiality
(encryption), message integrity, 128-bit encryption, or NTLMv2 session security. Configure this setting
as high as possible while still allowing the applications on the network to function fully to ensure that
network traffic from NTLM SSP based clients is protected from man-in-the-middle attacks and data
exposure.
Recovery console: Allow automatic administrative logon
Member Server Default Legacy Client Enterprise Client High Security Client
Disabled Disabled Disabled Disabled
The Recovery console: Allow automatic administrative logon security option setting determines
whether the password for the Administrator account must be given before access to the system is
granted. If this option is enabled, the Recovery Console does not require users to provide a password,
and it automatically logs on to the system. The
Recovery Console can be very useful when troubleshooting and repairing systems that cannot be
restarted normally. However, enabling this setting can be detrimental because anyone can then walk
up to the server, shut it down by disconnecting the power, restart it, select Recover Console from the
Restart menu, and then assume full control of the server. Therefore, this setting is configured to the
default for the three environments defined in this guide. To use the Recovery Console when this setting
is disabled, the user will have to enter a user name and password to access the Recovery Console
account.
Recovery console: Allow floppy copy and access to all drives and all folders
Member Server Default Legacy Client Enterprise Client High Security Client
Disabled Enabled Enabled Disabled
Enabling the Recovery console: Allow floppy copy and access to all drives and all folders security
option setting makes the Recovery Console SET command available, which allows users to set the
following Recovery Console environment variables:
• AllowWildCards: Enables wildcard support for some commands (such as the DEL command)
• AllowAllPaths: Allows access to all files and folders on the computer
• AllowRemovableMedia: Allows files to be copied to removable media, such as a floppy disk
• NoCopyPrompt: Does not prompt when overwriting an existing file
For maximum security, this setting is configured to Disabled in the High Security environment.
Shutdown: Allow system to be shut down without having to log on
Member Server Default Legacy Client Enterprise Client High Security Client
Disabled Disabled Disabled Disabled
The Shutdown: Allow system to be shut down without having to log on security option setting
determines whether a computer can be shut down without having to log on to the Windows operating
53
Page 54

system. Users who can access the console could shut the system down. An attacker or misguided user
could connect to the server via Terminal Services and shut it down or restart it without having to
identify him or herself. Therefore, this countermeasure should be set to the default across all three
environments.
Shutdown: Clear virtual memory page file
Member Server Default Legacy Client Enterprise Client High Security Client
Disabled Disabled Disabled Enabled
The Shutdown: Clear virtual memory page file security option setting determines whether the virtual
memory pagefile is cleared when the system is shut down. When this setting is enabled, it causes the
system pagefile to be cleared each time that the system shuts down gracefully. If this security setting is
enabled, the hibernation file (hiberfil.sys) is also zeroed out when hibernation is disabled on a
portable computer system. Shutting down and restarting the server will take longer and will be
especially noticeable on servers with large paging files. For these reasons, this setting is configured to
Enabled in the High Security environment but set to Disabled in the Legacy Client and Enterprise
Client environments.
: An attacker who has physical access to the server could bypass this countermeasure by simply
Note
unplugging the server from its power source.
System cryptography: Force strong key protection for user keys stored on the computer
Member Server Default Legacy Client Enterprise Client High Security Client
Not Defined User is prompted when
the key is first used
User is prompted when
the key is first used
User must enter a
password each time
they use a key
The System cryptography: Force strong key protection for user keys stored on the computer security
option setting determines whether users’ private keys, such as their SMIME keys, require a password
to be used. If this policy is configured so that users must provide a password-distinct from their domain
password-every time that they use a key, then even if an attacker takes control of their computer and
determines what their logon password is, accessing locally stored user keys will be more difficult. For
usability requirements in the Legacy Client and Enterprise Client environments, the value for this
setting is configured to the User is prompted when the key is first used setting option. To further
secure the environment, in the High Security environment this setting value is configured to User must
enter a password each time they use a key.
System cryptography: Use FIPS compliant algorithms for encryption, hashing, and signing
Member Server Default Legacy Client Enterprise Client High Security Client
Disabled Disabled Disabled Disabled
The System cryptography: Use FIPS compliant algorithms for encryption, hashing, and signing security
option setting determines whether the Transport Layer Security/Secure Sockets Layer (TL/SS) Security
Provider supports only the TLS_RSA_WITH_3DES_EDE_CBC_SHA cipher suite. Enabling this policy
ensures that computers in the company’s network environment will use the most powerful algorithms
available for digital encryption, hashing, and signing. This will minimize the risk of an unauthorized
user compromising digitally encrypted or signed data. For these reasons, this setting is configured to
Disabled in the three environments defined in this guide.
System objects: Default owner for objects created by members of the Administrators group
Member Server Default Legacy Client Enterprise Client High Security Client
Administrators group Object creator Object creator Object creator
54
Page 55

The System objects: Default owner for objects created by members of the Administrators group
security option setting determines whether the Administrators group or an object creator is the default
owner of any system objects that are created. When system objects are created, the ownership will
reflect which account created the object rather than the more generic Administrators group.
System objects: Require case insensitivity for non-Windows subsystems
Member Server Default Member Server Default Enterprise Client High Security Client
Enabled Enabled Enabled all settings Enabled all settings
Important: Administrators within multi-protocol heterogeneous environments, especially within Unix
and Linux, may want to set this setting to Disabled for the NAS and server systems.
The System objects: Require case insensitivity for non-Windows subsystems security option setting
determines whether case insensitivity is enforced for all subsystems. The Microsoft Win32® subsystem
is case insensitive. However, the kernel supports case sensitivity for other subsystems, such as the
Portable Operating System Interface for UNIX (POSIX). Since Windows is case insensitive (but the
POSIX subsystem will support case sensitivity), not enforcing this setting makes it possible for a user of
this subsystem to create a file with the same name as another file by using mixed case to label it.
Doing this may block another user accessing these files with normal Win32 tools, because only one
of the files will be available. To ensure consistency of file names, this setting is set to Enabled in the
three environments defined in this guide.
System objects: Strengthen default permissions of internal system objects (e.g. Symbolic Links)
Member Server Default Legacy Client Enterprise Client High Security Client
Enabled Enabled Enabled Enabled
The System objects: Strengthen default permissions of internal system objects (e.g. Symbolic Links)
security option setting determines the strength of the default discretionary access control list (DACL) for
objects. The setting helps secure objects that can be located and shared among processes. Ensuring
that this setting is set to the default strengthens the DACL, allowing users who are not administrators to
read shared objects but not to modify any that they did not create. Therefore, this setting is configured
to the default Enabled in the three environments defined in this guide.
System settings: Optional subsystems
Member Server Default Member Server Default Enterprise Client High Security Client
POSIX None None None
Important: Administrators within multi-protocol heterogeneous environments, especially within Unix
and Linux, may want to set this setting back to POSIX for the NAS and server systems.
The System settings: Optional subsystems security option setting determines which subsystems are
used to support applications within the network. The default value for this setting in Windows Server
2003 is POSIX. In order to disable the POSIX subsystem, this setting is configured to None in the three
environments defined in this guide.
2.8.4 Event Log
The event logs records events on the system. The security log records audit events. The event log
container of Group Policy is used to define attributes related to the application, security, and system
event logs, such as maximum log size, access rights for each log, and retention settings and methods.
The settings for the application, security, and system event logs are configured in the MSBP and
55
Page 56

applied to all member servers in the domain. The Event Log settings can be configured in Windows
Server 2003 at the following location within the Group Policy Object Editor:
Computer Configuration\Windows Settings\Security Settings\Event Log
This section provides details on the prescribed security options for the three environments defined in
this guide for the MSBP.
Maximum application log size
Member Server Default Legacy Client Enterprise Client High Security Client
16,384 KB 16,384 KB 16,384 KB 16,384 KB
The Maximum application log size security setting specifies the maximum size of the application event
log, which has a maximum capacity of 4 gigabytes (GB), although this is not recommended because
of the risk of memory fragmentation leading to slow performance and unreliable event logging.
Requirements for the application log size vary depending on the function of the platform and the need
for historical records of application related events. The default value of 16,384 kilobytes (KB) is
enforced in all three environments.
Maximum security log size
Member Server Default Legacy Client Enterprise Client High Security Client
16,384 KB 81,920 KB 81,920 KB 81,920 KB
The Maximum security log size security setting specifies the maximum size of the security event log,
which has a maximum capacity of 4 GB. Configuring the security log to at least 80 MB on domain
controllers and stand-alone servers should adequately store enough information to conduct audits.
Configuring this log for other systems to an adequate size is based on factors that include how
frequently the log will be reviewed, available disk space, and so on.
Maximum system log size
Member Server Default Legacy Client Enterprise Client High Security Client
16,384 KB 16,384 KB 16,384 KB 16,384 KB
The Maximum system log size security setting specifies the maximum size of the application event log,
which has a maximum capacity of 4 GB-although this is not recommended because of the risk of
memory fragmentation leading to slow performance and unreliable event logging. Requirements for
the application log size vary depending on the function of the platform and the need for historical
records of application related events. The default value of 16,384 KB is enforced in all three
environments.
Prevent local guests group from accessing application log
Member Server Default Legacy Client Enterprise Client High Security Client
Enabled Enabled Enabled Enabled
The Prevent local guests group from accessing application log security setting determines whether
guests are prevented from accessing the application event log. By default in Windows Server 2003,
guest access is prohibited on all systems. Therefore, this setting has no real effect on default systems.
However, this is considered a defense-in-depth setting with no side effects.
: This setting does not appear in the Local Computer Policy object.
Note
Prevent local guests group from accessing security log
Member Server Default Legacy Client Enterprise Client High Security Client
56
Page 57

Enabled Enabled Enabled Enabled
The Prevent local guests group from accessing security log security setting determines whether guests
are prevented from accessing the security event log. A user must possess the Manage auditing and
security log user right that is not defined in this guidance to access the security log. Therefore, this
setting has no real effect on default systems. However, this setting is considered a defense-in-depth
setting with no side effects.
: This setting does not appear in the Local Computer Policy object.
Note
Prevent local guests group from accessing system log
Member Server Default Legacy Client Enterprise Client High Security Client
Enabled Enabled Enabled Enabled
The Prevent local guests group from accessing system log security setting determines whether guests
are prevented from accessing the system event log. By default in Windows Server 2003, guest access
is prohibited on all systems. Therefore, this setting has no real effect on default systems. However, this
is considered a defense-in-depth setting with no side effects.
: This setting does not appear in the Local Computer Policy object.
Note
57
Page 58

Retention method for application log
Member Server Default Legacy Client Enterprise Client High Security Client
As needed As needed As needed As needed
The Retention method for application log security setting determines the "wrapping" method for the
application log. It is imperative that the application log is archived regularly if historical events are
desirable for either forensics or troubleshooting purposes. Overwriting events as needed ensures that
the log always stores the most recent events, although this could result in a loss of historical data.
Retention method for security log
Member Server Default Legacy Client Enterprise Client High Security Client
As needed As needed As needed As needed
The Retention method for security log security setting determines the "wrapping" method for the
security log. It is imperative that the security log is archived regularly if historical events are desirable
for either forensics or troubleshooting purposes. Overwriting events as needed ensures that the log
always stores the most recent events, although this could result in a loss of historical data.
Retention method for system log
Member Server Default Legacy Client Enterprise Client High Security Client
As needed As needed As needed As needed
The Retention method for system log security setting determines the "wrapping" method for the system
log. It is imperative that the logs are archived regularly if historical events are desirable for either
forensics or troubleshooting purposes. Overwriting events as needed ensures that the log always
stores the most recent events, although this could result in a loss of historical data.
2.8.5 System Services
When Windows Server 2003 and Windows Storage Server 2003 are first installed, default system
services are created and are configured to run when the system starts. Many of these system services
do not need to run in the three environments defined in this guide. There are additional optional
services available with Windows 2003, such as Certificate Services, that are not installed during the
default installation of Windows Server 2003. The optional services can be added to an existing
system by using Add/Remove Programs, or the Windows Server 2003 Configure Your Server
Wizard, or by creating a customized automated installation of Windows Server 2003. Any service
or application is a potential point of attack. Therefore, any unneeded services or executable files are
disabled or removed in the target environment. The MSBP only enables the services required for a
Windows Server 2003 member server to participate in a Windows Server 2003 domain to provide
basic management services. Specific services required for each server role are also enabled. Specific
group policies will be described in other sections of this guide, which will detail the specific steps
required to harden each server role. Depending upon the NAS appliance’s server roles,
administrators may need to consolidate the security lockdown information within the later sections.
For example, administrators who have NAS appliances that function as file servers, printer servers,
and IIS servers need to merge the security templates for each of the corresponding server roles as well
as consolidate and complete the security lockdown steps within each server role.
Specific services required for each server role are enabled on a per server role basis-the specific
Group Policies for these server roles as described in the sections to follow this one. If additional server
roles were needed in the environments detailed in this guide, it would have been necessary to enable
additional services for them. For example, if Microsoft SQL Server was going to be used for storing
customer data on the back end of a Web application, then SQL Server would need to be installed. A
58
Page 59

Group Policy that applies to that new server role in this case would also need to be created that sets
the SQL Services service to Automatic.
: If additional services are enabled, they may in turn have dependencies that require further
Note
services. All of the services needed for a specific server role are added in the policy for the server role
that it performs within the network.
The system services settings can be configured in Windows Server 2003 at the following location
within the Group Policy Object Editor:
Computer Configuration\Windows Settings\Security Settings\System Services\
This section provides details on the prescribed security options for the three environments defined in
this guide for the MSBP.
Alerter
Service
Name
Member Server
Default
Legacy Client Enterprise Client High Security Client
Alerter Disabled Disabled Disabled Disabled
The Alerter system service notifies selected users and computers of administrative alerts. Use the
Alerter service to send alert messages to specified users that are connected on the network. To ensure
greater security in the three environments defined in this guide, disable this service. If the service is
stopped, programs that use administrative alerts will not receive them.
: Disabling this service can break functionality in uninterruptible power supply
Note
(UPS) alert messages systems.
Application Layer Gateway Service
Service
Name
Member Server
Default
Legacy Client Enterprise Client High Security Client
ALG Manual Disabled Disabled Disabled
The Application Layer Gateway Service system service is a subcomponent of the Internet Connection
Sharing (ICS) / Internet Connection Firewall (ICF) service that provides support for independent
software vendors (ISVs) to write protocol plug-ins that allow their proprietary network protocols to pass
through the firewall and work behind ICS. To ensure greater security in the three environments
defined in this guide and to prevent unauthorized computers from acting as Internet gateways,
disable this system service.
Application Management
Service
Name
Member Server
Default
Legacy Client Enterprise Client High Security Client
AppMgmt Manual Disabled Disabled Disabled
The Application Management system service provides software installation services, such as Assign,
Publish, and Remove. This service processes requests to enumerate, install, and remove programs
deployed via a corporate network. When Add/Remove Programs is clicked on a computer joined to
a domain, the program calls this service to retrieve the list deployed programs. Most corporations do
not use this system service on servers; instead, they use automated software delivery applications to
distribute software packages. For these reasons, disable this service on the baseline server policy.
ASP .NET State Service
59
Page 60

Service
Name
Member Server
Default
Legacy Client Enterprise Client High Security Client
aspnet_state Not installed Disabled Disabled Disabled
The ASP .NET State Service system service provides support for out-of-process session states for
ASP.NET. This service is set to Disabled in the baseline policy.
Automatic Updates
Service
Name
Member Server
Default
Legacy Client Enterprise Client High Security Client
wuauserv Automatic Automatic Automatic Automatic
The Automatic Updates system service enables the download and installation of critical Windows
updates. To ensure greater control over the installation of software updates in the three environments
defined in this guide, disable this service. Searching for, downloading, and installing applicable
critical fixes will have to be done by going to the Windows Update Web site at
http://v4.windowsupdate.microsoft.com/en/default.asp.
Background Intelligent Transfer Service
Service
Name
BITS Manual-Automatic if
Member Server
Default
Legacy Client Enterprise Client High Security Client
Manual Manual Manual
BITS
jobs are pending
The Background Intelligent Transfer Service (BITS) system service is a background file-transfer
mechanism and queue manager. BITS is used to transfer files asynchronously between a client and an
HTTP server. Requests to the BITS service are submitted and the files are transferred using otherwise
idle network bandwidth so that other network related activities, such as browsing, are not affected.
This service is configured to Manual in the three environments defined in this guide.
Certificate Services
Service
Name
Member Server
Default
Legacy Client Enterprise Client High Security Client
CertSvc Not installed Disabled Disabled Disabled
The Certificate Services system service is part of the core operating system that enables a business to
act as its own certification authority (CA) and issue and manage digital certificates. This is a service
for a specific server role. Therefore, disable this setting in the baseline server policies for the three
environments defined in this guide.
60
Page 61

Client Service for Netware
Service Name Member Server
Legacy Client Enterprise Client High Security Client
Default
NWCWorkstation Not installed Disabled Disabled Disabled
Important: Client Service for Netware must be set to Automatic for all HP NAS server systems that use
Services For Netware (SFN)
The Client Service for Netware system service provides access to file and print resources on NetWare
networks to users interactively logged on to servers on which the service is installed. With Client
Service for Netware, administrators can access file and print resources on Netware Servers that are
running Novell Directory Services (NDS) or bindery security (NetWare versions 3.x or 4.x) from their
computer. To ensure greater security in the three environments defined in this guide, disable this
service.
ClipBook
Service
Name
Member Server
Default
Legacy Client Enterprise Client High Security Client
ClipSrv Disabled Disabled Disabled Disabled
The ClipBook system service enables the Clipbook Viewer to create and share “pages” of data that
may be viewed by remote computers. This service depends on the Network Dynamic Data Exchange
(NetDDE) service to create the actual file shares that other computers can connect to, while the
Clipbook application and service allow administrators to create the pages of data to share. To
ensure greater security in the three environments defined in this guide, disable this service. Any
services that explicitly depend on this service will fail to start. Clipbrd.exe can still be used to view the
local Clipboard-where data is stored when a user selects text and then clicks Copy on the Edit menu,
or presses CTRL+C.
Cluster Services
Service Name Member Server
Legacy Client Enterprise Client High Security Client
Default
ClusSvc Not installed Disabled Disabled Disabled
Important: Cluster Service must be set to Automatic for all HP NAS server systems running Microsoft
Clustering.
The Cluster Service system service controls server cluster operations and manages the cluster
database. A cluster is a collection of independent computers that is as easy to use as a single
computer, but it can be very difficult to manage. Managers see it as a single system, and
programmers and users see it as a single system. The Cluster Service spreads data and computation
among the nodes of the cluster. When a node fails, other nodes provide the services and data
formerly provided by the missing node. When a node is added or repaired, the Cluster Service
software migrates some data and computation to that node. To ensure greater security in the three
environments defined in this guide, disable this service.
61
Page 62

COM+ Event System
Service
Name
Member Server
Default
Legacy Client Enterprise Client High Security Client
COMSysApp Manual Manual Manual Manual
The COM+ Event System service provides automatic distribution of events to subscribing COM
components. The COM+ Events service extends the COM+ programming model to support late-bound
events or method calls between the publisher or subscriber and the event system. Instead of
repeatedly polling the server, the event system notifies the administrator as information becomes
available. To ensure usability and greater security in the three environments defined in this guide, this
service is set to Manual.
COM+ System Application
Service Name Member Server
Legacy Client Enterprise Client High Security Client
Default
EventSystem Manual Disabled Disabled Disabled
Important: COM+ System Application should be set to Manual for HP NAS server systems that have
3rd party applications requiring COM+ functionality.
The COM+ System Application system service manages the configuration and tracking of components
based on COM+. This service is not a requirement for the baseline server policy. Therefore, this
service is configured to Disabled in the three environments defined in this guide.
Computer Browser
Service
Name
Member Server
Default
Legacy Client Enterprise Client High Security Client
Browser Automatic Automatic Automatic Automatic
The Computer Browser system service maintains an up-to-date list of computers on the network and
supplies the list to programs that request it. The Computer Browser service is used by Windows-based
computers that need to view network domains and resources. To ensure greater security in the three
environments defined in this guide, set this service to Automatic.
Cryptographic Services
Service
Name
Member Server
Default
Legacy Client Enterprise Client High Security Client
CryptSvc Automatic Automatic Automatic Automatic
The Cyrptographic Services system service provides key management services for the computer. To
ensure greater security in the three environments defined in this guide, this system service is set this
service to Automatic. If this service is stopped, the management services mentioned above will not
function properly.
62
Page 63

DHCP Client
Service
Name
Member Server
Default
Legacy Client Enterprise Client High Security Client
Dhcp Automatic Automatic Automatic Automatic
The DHCP Client system service manages network configuration by registering and updating IP
addresses and updating Dynamic Domain Naming Service (DDNS) entries for the computer with DNS
servers. Administrators do not have to manually change the IP settings when a client, such as a
roaming user, wanders throughout the network. The client is automatically given a new IP address
regardless of the subnet it reconnects to as long as a DHCP server is accessible from each of those
subnets. To ensure greater security in the three environments defined in this guide, configure this
setting to Automatic. If this service is stopped, the computer will not receive dynamic IP addresses and
DNS updates. Also be aware that disabling the DHCP Client will prevent servers from registering in
DNS through DDNS.
DHCP Server
Service
Name
Member Server
Default
Legacy Client Enterprise Client High Security Client
DHCPServer Not installed Disabled Disabled Disabled
The DHCP Server system service allocates IP addresses and enables advanced configuration of
network settings such as DNS servers and WINS servers to DHCP clients automatically. The DHCP
Server service is not needed on member servers in the three environments defined in this guide.
However, this setting is required and is set to Automatic for the DHCP servers in all three
environments.
Distributed File System
Service Name Member Server
Legacy Client Enterprise Client High Security Client
Default
Dfs Automatic Disabled Disabled Disabled
Important: Distributed File System (DFS) must be set to Automatic for all HP NAS server systems
running DFS.
The Distributed File System (DFS) service manages logical volumes distributed across a local or wide
area network. DFS is a distributed service that integrates disparate file shares into a single logical
namespace. DFS is not needed on member servers in the three environments defined in this guide.
However, this setting is required and is set to Automatic for the domain controllers in all three
environments.
Distributed Link Tracking Client
Service Name Member Server
Legacy Client Enterprise Client High Security Client
Default
TrkWks Automatic Disabled Disabled Disabled
Important: Distributed Link Tracking Client must be set to Automatic for all HP NAS server systems.
The Distributed Link Tracking Client system service maintains links between the NTFS files within the
computer or across computers in the network domain. The Distributed Link Tracking (DLT) Client
service ensures that shortcuts and Object Linking and Embedding (OLE) links continue to work after
the target file is renamed or moved. To ensure greater security in the three environments defined in
this guide, disable the Distributed Link Tracking Client service. If this service is stopped, the links on
the computer will not be maintained or tracked.
63
Page 64

Distributed Link Tracking Server
Service
Name
Member Server
Default
Legacy Client Enterprise Client High Security Client
TrkSvr Manual Disabled Disabled Disabled
The Distributed Link Tracking Server system service stores information so that files moved between
volumes can be tracked for each volume in the domain. When enabled, the Distributed Link Tracking
Server service runs on domain controllers. Therefore, this service is only set to Automatic in the
domain controller’s policy.
Distributed Transaction Coordinator
Service
Name
Member Server
Default
Legacy Client Enterprise Client High Security Client
MSDTC Automatic Disabled Disabled Disabled
The Distributed Transaction Coordinator system service is responsible for coordinating transactions
that are distributed across multiple computer systems or resource managers, such as databases,
message queues, file systems, or other transaction-protected resource managers. This service is
configured to Disabled in the three environments defined in this guide.
DNS Client
Service
Name
Member Server
Default
Legacy Client Enterprise Client High Security Client
Dnscache Automatic Automatic Automatic Automatic
The DNS Client system service resolves and caches DNS names for the computer. The DNS client
service must be running on every computer that performs DNS name resolution. Resolving DNS names
is essential for locating domain controllers in ActiveDirectory domains. Running the DNS client service
is also critical for locating devices identified using DNS name resolution. Therefore, this service setting
is configured to Automatic in the three environments defined in this guide.
DNS Server
Service
Name
Member Server
Default
Legacy Client Enterprise Client High Security Client
DNS Not installed Disabled Disabled Disabled
The DNS Server system service enables DNS name resolution by answering queries and update
requests for DNS names. The presence of a DNS server is crucial for locating devices identified using
DNS names and domain controllers in Active Directory. These functions are not needed on the
baseline server; they are only required on domain controllers. Therefore, this setting is disabled in the
baseline policy for the three environments defined in this guide. This value for this system service is set
to Automatic only on DNS servers in the three environments.
64
Page 65

Error Reporting Service
Service
Name
Member Server
Default
Legacy Client Enterprise Client High Security Client
ERSvc Automatic Disabled Disabled Disabled
The Error Reporting Service system service collects, stores, and reports unexpected application
closures to Microsoft and authorizes error reporting for services and applications running in nonstandard environments. This service provides Microsoft product groups with efficient and effective
information to debug driver and application faults. If the Display Error Notification service is enabled,
users will still get a message indicating that a problem occurred, but they will not have the option to
report this information to Microsoft or a local network error reporting server. For these reasons, this
service is disabled in the three environments defined in this guide.
Event Log
Service
Name
Member Server
Default
Legacy Client Enterprise Client High Security Client
Eventlog Automatic Automatic Automatic Automatic
The Event Log system service enables event log messages issued by Windows-based programs and
components to be viewed in Event Viewer. Event Log reports contain information that can be useful in
diagnosing problems. If the Event Log is disabled, administrators will be unable to track events, which
will significantly reduce the ability to successfully diagnose system problems. Therefore, this service
sets the value of Automatic in the three environments defined in this guide.
Fax Service
Service
Name
Member Server
Default
Legacy Client Enterprise Client High Security Client
Fax Not installed Disabled Disabled Disabled
The Fax Service system service, a Telephony API (TAPI)-compliant service, provides fax capabilities
from the computer. The Fax Service allows users to send and receive faxes from their desktop
applications by using either a local fax device or a shared network fax device. On a baseline server,
this service is disabled, so the computer will not be able to send or receive faxes.
File Replication
Service Name Member Server
Legacy Client Enterprise Client High Security Client
Default
NtFrs Manual Disabled Disabled Disabled
Important: File Replication Service (FRS) must be set Manual for HP NAS server systems using DFS and
FRS services.
The File Replication Service (FRS) enables files to be automatically copied and maintained
simultaneously on multiple servers. If the File Replication Service is disabled, file replication will not
occur, and server data will not synchronize. In the case of a domain controller, stopping the FRS
service might have a serious impact on the domain controller’s ability to function. Therefore, the value
for this service is set to Disabled in the baseline policy. However, this setting is set to Automatic in the
domain controller baseline policy for the three environments defined in this guide.
65
Page 66

File Server for Macintosh
Service Name Member Server
Legacy Client Enterprise Client High Security Client
Default
MacFile Not installed Disabled Disabled Disabled
Important: File Server for Macintosh must be set to Automatic for HP NAS server systems using multi-
protocol communication support, such as Appletalk (AFTP), for Apple systems.
The File Server for Macintosh system service enables Macintosh users to store and access files on a
local Windows server computer. This is not a requirement for a standard server environment.
Therefore, this service is configured to Disabled in the threeenvironments defined in this guide.
FTP Publishing Service
Service Name Member Server
Legacy Client Enterprise Client High Security Client
Default
MSFtpsvc Not installed Disabled Disabled Disabled
Important: FTP Publishing Service must be set to Automatic for HP NAS server systems using FTP.
The FTP Publishing Service provides connectivity and administration through the IIS snap-in. The FTP
Publishing Service is not a requirement for a standard server environment. Therefore, this service is
configured to Disabled in the three environments defined in this guide.
Help and Support
Service Name Member Server
Legacy Client Enterprise Client High Security Client
Default
helpsvc Automatic Disabled Disabled Disabled
Important: Help and Support should be set to Automatic within HP NAS server systems only if
Administrators require the Help and Support Center service.
The Help and Support system service enables the Help and Support Center to run on the computer.
The service supports the Help and Support Center application and enables communication between
the client application and the help data. If this system service is disabled, the Help and Support
Center will be unavailable. This service is configured to Disabled in the three environments defined
in this guide.
HTTP SSL
Service Name Member Server
Legacy Client Enterprise Client High Security Client
Default
HTTPFilter Manual Disabled Disabled Disabled
Important: HTTP SSL must be set to Automatic for HP NAS server systems in which the HP NAS WEB
GUI interface is used, HP Insight Manager is used, HP’s Array Configuration Utility (ACU) is used,
HTTP file shares are created, or FTP file shares are created.
The HTTP SSL system service enables IIS to perform SSL functions. HTTP SSL service enables secure
electronic transactions; however, in order to reduce the attack surface, it is recommended to configure
the service to Disabled in the baseline policy. This service should only be set to Automatic in the IIS
server role policy.
66
Page 67

Human Interface Device Access
Service
Name
Member Server
Default
Legacy Client Enterprise Client High Security Client
HidServ Disabled Disabled Disabled Disabled
The Human Interface Device Access system service enables generic input access to Human Interface
Devices (HID), which activate and maintain the use of predefined hot buttons on keyboards, remote
controls, and other multimedia devices. These features are not needed in the baseline server
environment. For this reason, set the value for this service to Disabled.
IAS Jet Database Access
Service
Name
Member Server
Default
Legacy Client Enterprise Client High Security Client
IASJet Not installed Disabled Disabled Disabled
The IAS Jet Database Access system service is only available on 64-bit versions of Windows Server
2003. The service uses the Remote Authentication Dial-in User Service (RADIUS) protocol to provide
authentication, authorization, and accounting services. This service is configured to Disabled.
IIS Admin Service
Service Name Member Server
Legacy Client Enterprise Client High Security Client
Default
IISADMIN Not installed Disabled Disabled Disabled
Important: IIS Admin Service must be set to Automatic for HP NAS server systems in which the HP
NAS WEB GUI interface is used, HP Insight Manager is used, HP’s Array Configuration Utility (ACU)
is used, HTTP file shares are created, FTP file shares are created, or SMTP mail notification are used.
The IIS Admin Service allows administration of IIS components such as FTP, Applications Pools, Web
sites, Web service extensions, and both Network News Transfer Protocol (NNTP) and Simple Mail
Transfer Protocol (SMTP) virtual servers. If this service is disabled, administrators cannot run Web,
FTP, NNTP, or SMTP sites. For this reason, set this service to Automatic in the IIS server policy. These
features are not needed in the baseline server environment. Therefore, this service is configured to
Disabled. However, this service is set to Automatic in the IIS role policy.
IMAPI CD
Service
Name
Member Server
Default
Legacy Client Enterprise Client High Security Client
ImapiService Disabled Disabled Disabled Disabled
The IMAPI CD-Burning COM Service manages CD burning through the Image Mastering Applications
Programming Interface (IMAPI) COM interface and performs CD-R writes when requested by the user
through Windows Explorer, Windows Media Player, (WMP) or third-party applications that use this
API. These features are not required in the baseline server environment. Therefore, this service is
configured to Disabled.
67
Page 68

Indexing Service
Service Name Member Server
Legacy Client Enterprise Client High Security Client
Default
cisvc Disabled Disabled Disabled Disabled
Important: Although not required, Indexing Service can be set to Automatic within HP NAS server
systems depending upon company requirements.
The Indexing Service indexes contents and properties of files on local and remote computers and
provides rapid access to files through a flexible querying language. The Indexing Service also
enables quick searching of documents on local and remote computers and a search index for content
shared on the Web. These features are not required in the baseline server environment. Therefore, this
service is configured to Disabled.
Infrared Monitor
Service
Name
Member Server
Default
Legacy Client Enterprise Client High Security Client
Irmon Not installed Disabled Disabled Disabled
The Infrared Monitor system service enables file and image sharing using infrared. This service is
installed by default only if an infrared device is detected during operating system installation of
Windows Server 2003. This service is not available on Windows Server 2003 Web, Enterprise, or
Datacenter Server. If this service is disabled, files and images cannot be shared using infrared. These
features are not needed in the baseline server environment. Therefore, this service is configured to
Disabled.
Internet Authentication Service
Service
Name
Member Server
Default
Legacy Client Enterprise Client High Security Client
IAS Not installed Disabled Disabled Disabled
The Internet Authentication Service (IAS) centrally manages network access authentication,
authorization, auditing, and accounting. IAS is for virtual private network (VPN), dial-up, 802.1X
wireless or Ethernet switch connection attempts sent by access servers that are compatible with the
IETF RADIUS protocol. These features are not required in the baseline server environment. Therefore,
this service is configured to Disabled.
Internet Connection Firewall (ICF)/Internet Connection Sharing (ICS)
Service
Name
Member Server
Default
Legacy Client Enterprise Client High Security Client
SharedAccess Disabled Disabled Disabled Disabled
The Internet Connection Firewall (ICF)/Internet Connection Sharing (ICS) system service provides
network address translation (NAT), addressing and name resolution, and intrusion prevention services
for all computers on the network
through a dial-up or broadband connection. These features are not required in the baseline server
environment. Therefore, this service is configured to Disabled.
68
Page 69

Intersite Messaging
Service
Name
IsmServ Disabled (Started for
Member Server
Default
Legacy Client Enterprise Client High Security Client
Disabled Disabled Disabled
a domain controller)
The Intersite Messaging system service enables messages to be exchanged between computers
running Windows Server sites. This service is used for mail-based replication between sites. Active
Directory includes support for replication between sites by using SMTP over IP transport. These
features are not required in the baseline server environment. Therefore, this service is configured to
Disabled. This service is, however, required on domain controllers. For this reason, the Intersite
Messaging service is set to Automatic on the domain controllers in the three environments defined in
this guide.
IP Version 6 Helper Service
Service Name Member Server
Legacy Client Enterprise Client High Security Client
Default
6to4 Not installed Disabled Disabled Disabled
Important: IP Version 6 Helper Service must be set to Automatic for HP NAS server systems requiring
IPv6 support.
The IP Version 6 Helper Service system service offers IPv6 connectivity over an existing IPv4 network.
These features are not required in the baseline server environment. Therefore, this service is
configured to Disabled.
IPSEC Policy Agent (IPSec Service)
Service
Name
Member Server
Default
Legacy Client Enterprise Client High Security Client
PolicyAgent Automatic Automatic Automatic Automatic
The IPSEC Policy Agent service provides end-to-end security between clients and servers on TCP/IP
networks. It also manages IP security (IPSec) policy, starts the Internet Key Exchange (IKE), and
coordinates IPSec policy settings with the IP security driver. This service is enabled in the three
environments defined in this guide.
Kerberos Key Distribution Center
Service
Name
Member Server
Default
Legacy Client Enterprise Client High Security Client
Kdc Disabled Disabled Disabled Disabled
The Kerberos Key Distribution Center system service enables users to log on to the network by using
the Kerberos v5 authentication protocol. For these reasons, set the value for this service to Automatic
in the domain controllers’ policy.
69
Page 70

License Logging Service
Service Name Member Server
Legacy Client Enterprise Client High Security Client
Default
LicenseService Disabled Disabled Disabled Disabled
The License Logging Service monitors and records client access licensing for portions of the operating
system. These include IIS, Terminal Server, and File/Print, as well as products that are not a part of
the operating system, such as SQL Server and Microsoft Exchange Server. This service is configured
to Disabled in the three environments defined in this guide.
Logical Disk Manager
Service
Name
Member Server
Default
Legacy Client Enterprise Client High Security Client
dmserver Automatic Manual Manual Manual
The Logical Disk Manager system service detects and monitors new hard disk drives and sends disk
volume information to Logical Disk Manager Administrative Service for configuration. This service
watches Plug and Play events for new drives that are detected and passes volume and disk
information to the Logical Disk Manager Administrative Service to be configured. Therefore, this
service is configured to Manual in the three environments defined in this guide.
Logical Disk Manager Administrative Service
Service
Name
Member Server
Default
Legacy Client Enterprise Client High Security Client
dmadmin Manual Manual Manual Manual
The Logical Disk Manager Administrative Service performs administrative service for disk management
requests and configures hard disk drives and volumes. The Logical Disk Manager Administrative
Service is started only when a drive or partition is configured or when a new drive is detected.
Therefore, this service is configured to Manual in the three environments defined in this guide.
Message Queuing
Service
Name
Member Server
Default
Legacy Client Enterprise Client High Security Client
msmq Not installed Disabled Disabled Disabled
The Message Queuing system service is a messaging infrastructure and development tool for creating
distributed messaging applications for Windows. This service is not a requirement for the baseline
server policy. Therefore, this service is configured to Disabled in the three environments defined in this
guide.
Message Queuing Down Level Clients
Service
Name
Member Server
Default
Legacy Client Enterprise Client High Security Client
mqds Not installed Disabled Disabled Disabled
The Message Queuing Down Level Clients system service provides Active Directory access for
Message Queuing clients (Windows 9x, Windows NT 4.0, and Windows 2000) on domain
controllers. This service is not a requirement for the baseline server policy. Therefore, this service is
configured to Disabled in the three environments defined in this guide.
Message Queuing Triggers
70
Page 71

Service
Name
Member Server
Default
Legacy Client Enterprise Client High Security Client
Mqtgsvc Not installed Disabled Disabled Disabled
The Message Queuing Triggers system service provides rule-based monitoring of messages arriving in
a Message Queuing queue and, when the conditions of a rule are satisfied, invokes a COM
component or a stand-alone executable program to process the message. This service is not a
requirement for the baseline server policy. Therefore, this service is configured to Disabled in the three
environments defined in this guide.
Messenger
Service Name Member Server
Legacy Client Enterprise Client High Security Client
Default
Messenger Disabled Disabled Disabled Disabled
Important: The Messenger service may need to be set to Manual or Automatic within an HP NAS
server environment depending upon whether there are any 3rd party applications, especially server
monitoring applications, that require the messenger service.
The Messenger system service transmits and sends Alerter service messages between clients and
servers. This service is not related to Windows Messenger. This service is not a requirement for the
baseline server policy. Therefore, this service is configured to Disabled in the three environments
defined in this guide.
Microsoft POP3 Service
Service
Name
Member Server
Default
Legacy Client Enterprise Client High Security Client
POP3SVC Not installed Disabled Disabled Disabled
The Microsoft POP3 Service provides e-mail transfer and retrieval services. Administrators can use the
POP3 service to store and manage e-mail accounts on the mail server. This service is not a
requirement for the baseline server policy. Therefore, this service is configured to Disabled in the three
environments defined in this guide.
MSSQL$UDDI
Service
Name
Member Server
Default
Legacy Client Enterprise Client High Security Client
MSSQL$UDDI Not installed Disabled Disabled Disabled
The MSSQL$UDDI system service-Universal Description Discovery and Integration (UDDI)-is an industry
specification for publishing and locating information about Web services. The Windows Server 2003
family includes UDDI Services, a Web service that provides UDDI capabilities for use within an
enterprise or across organizations. This service is not a requirement for the baseline server policy.
Therefore, this service is configured to Disabled in the three environments defined in this guide.
71
Page 72

MSSQLServerADHelper
Service Name Member Server
Default
Legacy Client Enterprise Client High Security
Client
MSSQLServerADHelper Not installed Disabled Disabled Disabled
The MSSQLServerADHelper system service enables SQL Server and SQL Server Analysis Services to
publish information in Active Directory when the services are not running under the LocalSystem
account. This service is not a requirement for the baseline server policy. Therefore, this service is
configured to Disabled in the three environments defined in this guide.
MS Software Shadow Copy Provider
Service
Name
Member Server
Default
Legacy Client Enterprise Client High Security Client
SwPrv Manual Manual Manual Manual
The MS Software Shadow Copy Provider system service manages software for file shadow copies
taken by the Volume Shadow Copy service. A shadow copy enables administrators to create a copy
of a disk volume (or apparent copy) that represents a consistent read-only point in time, for that
volume. This point in time then stays constant and allows an application, like Ntbackup, to copy data
from the shadow copy to tape. If this service is disabled, software-based volume shadow copies
cannot be managed.
.NET Framework Support Service
Service Name Member Server
Legacy Client Enterprise Client High Security Client
Default
CORRTSvc Not installed Disabled Disabled Disabled
Important: The .NET Framework Support Service may need to be set to Manual or Automatic within an
HP NAS server environment depending upon whether there are any 3rd party applications that require
the .NET Framework support.
The .NET Framework Support Service system service notifies a subscribing client when a specified
process is initializing the Client Runtime Service. The .NET Framework Support Service provides a runtime environment called the Common Language Runtime, which manages the execution of code and
provides services that make the development process easier. This service is not a requirement for the
baseline server policy. Therefore, this service is configured to Disabled in the three environments
defined in this guide.
Netlogon
Service
Name
Member Server
Default
Legacy Client Enterprise Client High Security Client
Netlogon Automatic Automatic Automatic Automatic
The Netlogon system service maintains a secure channel between the computer and the domain
controller for authenticating users and services. If this service is disabled, computers on the system
network may not authenticate users and services, and the domain controller will not register DNS
records. Specifically, disabling this service could deny NTLM authentication requests, and, in case of
domain controllers, they will not be discoverable by client computers. For these reasons, set the value
for this service to Automatic.
72
Page 73

NetMeeting Remote Desktop Sharing
Service
Name
Member Server
Default
Legacy Client Enterprise Client High Security Client
mnmsrvc Disabled Disabled Disabled Disabled
The NetMeeting Remote Desktop Sharing system service enables an authorized user to access this
computer remotely by using Microsoft NetMeeting® over a corporate intranet. The service must be
explicitly enabled by NetMeeting and can be disabled in NetMeeting or shut down via a Windows
tray icon. This service is not a requirement for the baseline server policy. Therefore, this service is
configured to Disabled in the three environments defined in this guide.
Network Connections
Service
Name
Member Server
Default
Legacy Client Enterprise Client High Security Client
Netman Manual Manual Manual Manual
The Network Connections service manages objects in the Network Connections folder, in which
administrators can view both network and remote connections. This service will start automatically
when the start up type is Manual and the Network Connections interface is invoked. This service is
configured to Manual in the three environments defined in this guide.
Network DDE
Service
Name
Member Server
Default
Legacy Client Enterprise Client High Security Client
NetDDE Disabled Disabled Disabled Disabled
The Network DDE system service provides network transport and security for Dynamic Data Exchange
(DDE) for programs running on the same computer or on different computers. This service is not a
requirement for the baseline server policy. Therefore, this service is configured to Disabled in the
three environments defined in this guide.
Network DDE DSDM
Service
Name
Member Server
Default
Legacy Client Enterprise Client High Security Client
NetDDEdsdm Disabled Disabled Disabled Disabled
The Network DDE DSDM system service manages DDE network shares. This service is used only by the
Network DDE service to manage shared DDE conversations. This service is not a requirement for the
baseline server policy. Therefore, this service is configured to Disabled in the three environments
defined in this guide.
Network Location Awareness (NLA)
Service
Name
Member Server
Default
Legacy Client Enterprise Client High Security Client
NLA Manual Manual Manual Manual
The Network Location Awareness (NLA) system service collects and stores network configuration
information such as IP address and domain name changes, as well as location change information,
and then notifies programs when this information changes. Disabling this service prevents it from
locating networks, and any services that explicitly depend on it will fail to start. These features may be
needed in the baseline server environment. Therefore, this service is configured to Manual in the three
environments defined in this guide.
73
Page 74

Network News Transport Protocol (NNTP)
Service
Name
Member Server
Default
Legacy Client Enterprise Client High Security Client
NntpSvc Not installed Disabled Disabled Disabled
The Network News Transport Protocol (NNTP) system service allows computers running Windows
Server 2003 to act as a news server. This service is not a requirement for the baseline server policy.
Therefore, this service is configured to Disabled in the three environments defined in this guide.
NTLM Security Support Provider
Service
Name
Member Server
Default
Legacy Client Enterprise Client High Security Client
NtLmSsp Not installed Automatic Automatic Automatic
The NTLM Security Support Provider system service provides security to RPC programs that use
transports other than named pipes and enables users to log on to the network using the NTLM
authentication protocol. The NTLM protocol authenticates clients that do not use Kerberos v5
authentication. If this service is disabled, users cannot log on to clients by using the NTLM
authentication protocol or access network resources. Therefore, this service is configured to
Automatic in the three environments defined in this guide.
Performance Logs and Alerts
Service
Name
Member Server
Default
Legacy Client Enterprise Client High Security Client
SysmonLog Manual Manual Manual Manual
The Performance Logs and Alerts system service collects performance data from local or remote
computers based on preconfigured schedule parameters; it then writes the data to a log or triggers an
alert. These features are needed in the baseline server environment. Therefore, this service is
configured to Manual in the three environments defined in this guide.
Plug and Play
Service
Name
Member Server
Default
Legacy Client Enterprise Client High Security Client
PlugPlay Automatic Automatic Automatic Automatic
The Plug and Play system service enables a computer to recognize and adapt to hardware changes
with little or no user input. If this service is stopped by using the MSCONFIG troubleshooting tool, the
Device Manager interface will appear blank, and no hardware devices will be displayed. Therefore,
this service is configured to Automatic in the three environments defined in this guide.
74
Page 75

Portable Media Serial Number
Service
Name
Member Server
Default
Legacy Client Enterprise Client High Security Client
WmdmPmSN Manual Disabled Disabled Disabled
The Portable Media Serial Number system service retrieves the serial number of any portable music
player connected to the computer. These features are not required in the baseline server environment.
Therefore, this service is configured to Disabled in the three environments defined in this guide.
Print Server for Macintosh
Service Name Member Server
Legacy Client Enterprise Client High Security Client
Default
MacPrint Not installed Disabled Disabled Disabled
Important: The Print Server for Macintosh system service must be set to Automatic within HP NAS
server systems that require print server capabilities for their Apple client systems.
The Print Server for Macintosh system service enables Macintosh clients to route printing to a print
spooler located on a computer running Windows Server 2003 Enterprise Server. These features are
not required in the baseline server environment. Therefore, this service is configured to Disabled in
the three environments defined in this guide.
Print Spooler
Service Name Member Server
Legacy Client Enterprise Client High Security Client
Default
Spooler Automatic Disabled Disabled Disabled
Important: The Print Spooler system service must be set to Automatic for HP NAS server systems
requiring print server support.
The Print Spooler manages all local and network print queues and controls all print jobs. These
features are not required in the baseline server environment. Therefore, this service is configured to.
However, this service is set to Automatic for the Print server role.
Protected Storage
Service Name Member Server
Legacy Client Enterprise Client High Security Client
Default
ProtectedStorage Automatic Automatic Automatic Automatic
The Protected Storage system service protects storage of sensitive information, such as private keys,
and prevents access by unauthorized services, processes, or users. If this service is disabled, private
keys will be inaccessible, certificate server will not operate, S/MIME and SSL will not work, and smart
card logon will fail. For these reasons, set the value for this service to Automatic.
75
Page 76

Remote Access Auto Connection Manager
Service
Name
Member Server
Default
Legacy Client Enterprise Client High Security Client
RasAuto Manual Disabled Disabled Disabled
The Remote Access Auto Connection Manager system service detects unsuccessful attempts to connect
to a remote network or computer and then provides alternative methods for connection. The Remote
Access Auto Connection Manager service offers to establish a dial-up or virtual private network (VPN)
connection to a remote network whenever a program fails in an attempt to reference a remote DNS or
NetBIOS name or address. These features are not required in the baseline server environment.
Therefore, this service is configured to Disabled in the three environments defined in this guide.
Remote Access Connection Manager
Service
Name
Member Server
Default
Legacy Client Enterprise Client High Security Client
RasMan Manual Disabled Disabled Disabled
The Remote Access Connection Manager system service manages dial-up and VPN connections from
the computer to the Internet or other remote networks. These features are not required in the baseline
server environment. Therefore, this service is configured to Disabled in the three environments defined
in this guide.
Remote Administration Service
Service
Name
Member Server
Default
Legacy Client Enterprise Client High Security Client
SrvcSurg Not installed Manual Manual Manual
The Remote Administration Service system service is responsible for running the following Remote
Administration tasks when the server restarts:
● Increments the server boot count
● Raises an alert if the date and time has not been set on the server
● Raises an alert if the event e-mail notification functionality has not been configured
This service is configured to Manual in the three environments defined in this guide.
Remote Desktop Help Session Manager
Service
Name
Member Server
Default
Legacy Client Enterprise Client High Security Client
RDSessMgr Manual Disabled Disabled Disabled
The Remote Desktop Help Session Manager system service manages and controls the Remote
Assistance feature in the Help and Support Center application (helpctr.exe). This service is not a
requirement for the baseline server policy. Therefore, this service is configured to Disabled in the three
environments defined in this guide.
76
Page 77

Remote Installation
Service
Name
Member Server
Default
Legacy Client Enterprise Client High Security Client
BINLSVC Not installed Disabled Disabled Disabled
The Remote Installation Services (RIS) system service is a Windows deployment feature included in
members of the Windows Server family. This service is not a requirement for the baseline server
policy. Therefore, this service is configured to Disabled in the three environments defined in this guide.
Remote Procedure Call (RPC)
Service
Name
Member Server
Default
Legacy Client Enterprise Client High Security Client
RpcSs Automatic Automatic Automatic Automatic
The Remote Procedure Call (RPC) system service is a secure inter-process communication (IPC)
mechanism that enables data exchange and invocation of functionality residing in a different process.
Different processes can take place on the same computer, the local area network (LAN), or across the
Internet. This service should not be disabled. Disabling the Remote Procedure Call (RPC) service will
result in the operating system not loading numerous services that are dependent on it. Therefore, this
service is configured to Automatic in the three environments defined in this guide.
Remote Procedure Call (RPC) Locator
Service
Name
RpcLocator Manual (Automatic
Member Server
Default
Legacy Client Enterprise Client High Security Client
Disabled Disabled Disabled
on a domain
controller)
The Remote Procedure Call (RPC) Locator system service enables RPC clients using the RpcNs* family
of APIs to locate RPC servers and manages the RPC name service database. These features are not
required in the baseline server environment. Therefore, this service is configured to Disabled.
However, this system service is required for domain controllers and is set to Automatic.
Remote Registry Service
Service Name Member Server
Legacy Client Enterprise Client High Security Client
Default
RemoteRegistry Automatic Automatic Automatic Automatic
The Remote Registry Service system service enables remote users to modify registry settings on the
computer-provided remote users have the required permissions. The service is primarily used by
remote administrators and performance counters. If Remote Registry Service is disabled, modifying the
registry will only be allowed on the local computer, and any services that explicitly depend on this
service will fail to start. Therefore, this service is configured to Automatic in the three environments
defined in this guide.
77
Page 78

Remote Server Manager
Service Name Member Server
Legacy Client Enterprise Client High Security Client
Default
AppMgr Not installed Disabled Disabled Disabled
Important: The Remote Server Manager may be set to Manual or Automatic on HP NAS server systems
that require remote administration.
The Remote Server Manager acts as a Windows Management Instrumentation (WMI) instance
provider for Remote Administration Alert Objects and a WMI method provider for Remote
Administration Tasks. This service is not a requirement for the baseline server policy. Therefore, this
service is configured to Disabled in the three environments defined in this guide.
Remote Server Monitor
Service Name Member Server
Legacy Client Enterprise Client High Security Client
Default
Appmon Disabled Disabled Disabled Disabled
Important: The Remote Server Monitor may be set to Manual or Automatic on HP NAS server systems
that have 3rd party applications requiring watchdog timer hardware management support.
The Remote Server Monitor system service provides monitoring of critical system resources and
manages optional watchdog timer hardware on remotely managed servers. These features are not
required in the baseline server environment. Therefore, this service is configured to Disabled in the
three environments defined in this guide.
Remote Storage Notification
Service Name Member Server
Legacy Client Enterprise Client High Security Client
Default
Remote_Storage
Not installed Disabled Disabled Disabled
_User_Link
The Remote Storage Notification system service notifies administrators when users read or write to files
that are only available from a secondary storage media. These features are not required in the
baseline server environment. Therefore, this service is configured to Disabled in the three environments
defined in this guide.
Remote Storage Server
Service Name Member Server
Legacy Client Enterprise Client High Security Client
Default
Remote_Storage
Not installed Disabled Disabled Disabled
_Server
Important: The Remote Storage Server system service must be set to Manual on HP NAS server
systems using remote storage.
The Remote Storage Server system service stores infrequently used files in secondary storage media.
This service allows Remote Storage Notification to notify the user when an offline file has been
accessed. These features are not required in the baseline server environment. Therefore, this service is
configured to Disabled in the three environments defined in this guide.
78
Page 79

Removable Storage
Service Name Member Server
Legacy Client Enterprise Client High Security Client
Default
NtmsSvc Manual Disabled Disabled Disabled
Important: This service is required for system backups using Ntbackup.exe. If Ntbackup.exe is used,
set this service to Manual. This service should also be set to Manual on HP NAS server systems using
removable storage.
The Removable Storage system service manages and catalogs removable media and operates
automated removable media devices. This service maintains a catalog of identifying information for
removable media used by the computer, including tapes and CDs. These features are not required in
the baseline server environment. Therefore, this service is configured to Disabled in the three
environments defined in this guide.
Resultant Set of Policy Provider
Service
Name
Member Server
Default
Legacy Client Enterprise Client High Security Client
RSoPProv Manual Disabled Disabled Disabled
The Resultant Set of Policy Provider system service enables administrators to connect to a Windows
Server 2003 domain controller, access the WMI database for that computer, and simulate Resultant
Set of Policy (RSoP) for Group Policy settings that would be applied to a user or computer located in
Active Directory on a Windows 2000 or later domain. This is commonly referred to as planning
mode. These features are not required in the baseline server environment. Therefore, this service is
configured to Disabled in the three environments defined in this guide.
Routing and Remote Access
Service Name Member Server
Legacy Client Enterprise Client High Security Client
Default
RemoteAccess Disabled Disabled Disabled Disabled
Important: The Routing and Remote Access system service must be set to Manual on HP NAS server
systems for routing and remote access support.
The Routing and Remote Access system service provides multi-protocol LAN-to-LAN, LAN-to-WAN,
VPN, and NAT routing services. In addition, this service also provides dial-up and VPN remote access
services. These features are not required in the baseline server environment. Therefore, this service is
configured to Disabled in the three environments defined in this guide.
SAP Agent
Service
Name
Member Server
Default
Legacy Client Enterprise Client High Security Client
nwsapagent Not installed Disabled Disabled Disabled
Important: The SAP Agent service must be set to Manual on HP NAS server systems using multi-
protocol communication support requiring access and communication to Novell Netware systems via
NCP.
The SAP Agent system service advertises network services on an IPX network by using the IPX Service
Advertising Protocol (IPX SAP) protocol. These features are not required in the baseline server
environment. Therefore, this service is configured to Disabled in the three environments defined in this
guide.
79
Page 80

Secondary Logon
Service Name Member Server
Legacy Client Enterprise Client High Security Client
Default
seclogon Automatic Disabled Disabled Disabled
Important: The Secondary Logon system service should be set to Automatic on HP NAS server systems
having 3rd party applications that execute functions using a secondary user or group account.
The Secondary Logon system service allows the user to create processes in the context of different
security principals. Restricted users commonly use this service to log on as a user with elevated
privileges for temporarily running administrative programs. This service enables users to start
processes under alternate credentials. These features are not required in the baseline server
environment. While this service is beneficial on client computers, it is not appropriate on most servers
because users logging onto them interactively will be members of the IT team performing some sort of
maintenance tasks that typically require administrative privileges. Therefore, this service is configured
to Disabled in the three environments defined in this guide.
Security Accounts Manager
Service
Name
Member Server
Default
Legacy Client Enterprise Client High Security Client
SamSs Automatic Automatic Automatic Automatic
The Security Accounts Manager (SAM) system service is a protected subsystem that manages user and
group account information. In Windows 2000 and the Windows Server 2003 family, the SAM in the
local computer registry stores workstation security accounts and domain controller accounts are stored
in Active Directory. This service should not be disabled.
Server
Service
Name
Member Server
Default
Legacy Client Enterprise Client High Security Client
lanmanserver Automatic Automatic Automatic Automatic
The Server system service provides RPC support, file, print, and named pipe sharing over the network.
For these reasons, it is recommended to set the value for this service to Automatic in the three
environments defined in this guide.
Shell Hardware Detection
Service Name Member Server
Legacy Client Enterprise Client High Security Client
Default
ShellHWDetection Automatic Disabled Disabled Disabled
The Shell Hardware Detection system service monitors and provides notification for AutoPlay
hardware events. This service is not a requirement for the baseline server policy. Therefore, this
service is configured to Disabled in the three environments defined in this guide.
80
Page 81

Simple Mail Transport Protocol (SMTP)
Service Name Member Server
Legacy Client Enterprise Client High Security Client
Default
SMTPSVC Not installed Disabled Disabled Disabled
Important: The Simple Mail Transport Protocol (SMTP) system service must be set to Automatic on HP
NAS server systems requiring mail notifications of NAS system failures.
The Simple Mail Transport Protocol (SMTP) system service transports electronic mail across the
network. This service is not a requirement for the baseline server policy. Therefore, this service is
configured to Disabled in the three environments defined in this guide.
Simple TCP/IP Services
Service Name Member Server
Legacy Client Enterprise Client High Security Client
Default
SimpTcp Not installed Disabled Disabled Disabled
Important: The Simple TCP/IP Services may be set to Automatic on HP NAS server systems requiring
the following TCP/IP feature sets.
The Simple TCP/IP Services system service supports the following TCP/IP protocols:
● Echo (port 7, RFC 862)
● Discard (port 9, RFC 863)
● Character Generator (port 19, RFC 864)
● Daytime (port 13, RFC 867)
● Quote of the Day (port 17, RFC 865)
These features are not required in the baseline server environment. Therefore, this service is
configured to Disabled in the three environments defined in this guide.
Single Instance Storage Groveler
Service
Name
Member Server
Default
Legacy Client Enterprise Client High Security Client
Groveler Not installed Disabled Disabled Disabled
The Single Instance Storage Groveler (SIS) system service is an integral component of the Remote
Installation Service (RIS) that reduces the overall storage required on the RIS volume. This service is not
a requirement for the baseline server policy. Therefore, this service is configured to Disabled in the
three environments defined in this guide.
Smart Card
Service
Name
Member Server
Default
Legacy Client Enterprise Client High Security Client
SCardSvr Manual Disabled Disabled Disabled
The Smart Card system service manages and controls access to a smart card inserted into a smart
card reader attached to the computer. If this service is disabled, computers on the network will be
unable to read smart cards. Also, any services that explicitly depend on it will fail to start. These
features are not required in the baseline server environment. Therefore, this service is configured to
Disabled in the three environments defined in this guide.
: A form of authentication in which the principal wanting to be authenticated verifies its identity
Note
by demonstrating two factors of identification. Often this involves showing something that
administrators know with something that they have, for example, inserting a smart card into a
computer and entering the PIN for that card. A third factor commonly used for proving one’s identity
81
Page 82

is by providing specific administrator information; an example of a two-factor authentication including
this type would be requiring users to submit to a retina scanner followed by entering their passwords
before granting them access to restricted resources. Using smart cards to implement multifactor
authentication is a best practice and is employed for all administrator accounts. If the company
organization utilizes smart card authentication, this service needs to be set to Manual.
SNMP Service
Service Name Member Server
Legacy Client Enterprise Client High Security Client
Default
SNMP Not installed Disabled Disabled Disabled
Important: The SNMP Service must be set to Automatic on HP NAS server systems requiring SNMP
support. For example, HP Insight Manager software uses and requires SNMP. Customers using HP
Insight Manager software within their HP NAS systems should set this setting to Automatic.
The SNMP Service allows incoming SNMP requests to be serviced by the local computer. The SNMP
Service includes agents that monitor activity in network devices and report to the network console
workstation. There are no requirements or dependencies in the three environments for the SNMP
Server. Therefore, this service is configured to Disabled in the three environments defined in this
guide.
SNMP Trap Service
Service Name Member Server
Legacy Client Enterprise Client High Security Client
Default
SNMPTRAP Not installed Disabled Disabled Disabled
Important: The SNMP Trap Service must be set to Automatic on HP NAS server systems requiring
SNMP trap support. For example, HP Insight Manager software uses and requires SNMP trap
support. Customers using HP Insight Manager software within their HP NAS systems should set this
setting to Automatic.
The SNMP Trap Service receives trap messages generated by local or remote SNMP agents and
forwards the messages to SNMP management programs running on the computer. This service is not
a requirement for the baseline server policy. Therefore, this service is configured to Disabled in the
three environments defined in this guide.
Special Administration Console Helper
Service
Name
Member Server
Default
Legacy Client Enterprise Client High Security Client
Sacsvr Manual Disabled Disabled Disabled
The Special Administration Console Helper system service (SAC) performs remote management tasks if
any of the Windows Server 2003 family of operating systems stops functioning due to a Stop error
message. This service is not a requirement for the baseline server policy. Therefore, this service is
configured to Disabled in the three environments defined in this guide.
82
Page 83

SQLAgent$* (*UDDI or WebDB)
Service Name Member Server
Legacy Client Enterprise Client High Security Client
Default
SQLAgent$WEB
Not installed Disabled Disabled Disabled
DB
SQLAgent$* (* UDDI or WebDB) is a job scheduler and monitoring service. It also moves information
between computers running SQL Server and is used heavily for backups and replication. If the
SQLAgent$* (* UDDI or WebDB) service is stopped, SQL replication will not occur. In addition, there
will be a disruption of all scheduled jobs and alert/event monitoring and auto restart of the SQL
Server service. If this service is disabled, any services that explicitly depend on this service will fail to
start. This service is not a requirement for the baseline server policy. Therefore, this service is
configured to Disabled in the three environments defined in this guide.
System Event Notification
Service
Name
Member Server
Default
Legacy Client Enterprise Client High Security Client
SENS Automatic Automatic Automatic Automatic
The System Event Notification system service monitors and tracks system events such as Windows
logon network and power events and then notifies COM+ Event System subscribers of these events.
This service is configured to Automatic in the three environments defined in this guide.
Task Scheduler
Service Name Member Server
Legacy Client Enterprise Client High Security Client
Default
Schedule Automatic Disabled Disabled Disabled
Important: This service must be set to Automatic if administrators are using Ntbackup.exe for
scheduled backups. This service must be set to Automatic on HP NAS server systems using
applications or services requiring task scheduler functionality. For example, various snapshot
applications, such as Microsoft Shadow Copy, use the task scheduler service to take snapshots of a
volume or volumes at a particular time, especially within cluster environments.
The Task Scheduler system service enables administrators to configure and schedule automated tasks
on the computer. The Task Scheduler service monitors whatever criteria administrators choose and
carry out the task when the criteria have been met. This service is not a requirement for the baseline
server policy. Therefore, this service is configured to
Disabled in the three environments defined in this guide.
TCP/IP NetBIOS Helper Service
Service
Name
Member Server
Default
Legacy Client Enterprise Client High Security Client
LMHosts Automatic Automatic Automatic Automatic
The TCP/IP NetBIOS Helper Service system service provides support for NetBIOS over the TCP/IP
(NetBT) service and NetBIOS name resolution for clients on the network, thus enabling users to share
files, print, and log on to the network. This service is configured to Automatic in the three
environments defined in this guide.
83
Page 84

TCP/IP Print Server
Service Name Member Server
Legacy Client Enterprise Client High Security Client
Default
LPDSVC Not installed Disabled Disabled Disabled
Important: This service must be set to Automatic on HP NAS server systems using the Line Printer
Daemon protocol.
The TCP/IP Print Server system service enables TCP/IP-based printing using the Line Printer Daemon
protocol. This feature is not required in the baseline server environment. Therefore, this service is
configured to Disabled in the three environments defined in this guide.
Telephony
Service
Name
Member Server
Default
Legacy Client Enterprise Client High Security Client
TapiSrv Manual Disabled Disabled Disabled
The Telephony service provides API (TAPI) support for programs that control telephony devices, as
well as IP-based voice connections on the local computer and through the LANs on servers also
running the service. This service is not a requirement for the baseline server policy. Therefore, this
service is configured to Disabled in the three environments defined in this guide.
Telnet
Service Name Member Server
Legacy Client Enterprise Client High Security Client
Default
TlntSvr Disabled Disabled Disabled Disabled
Important: This service must be set to Manual or Automatic on HP NAS server systems using telnet.
The Telnet system service for Windows provides ASCII terminal sessions to Telnet clients. This service
supports two types of authentication and four types of terminals: ANSI, VT-100, VT-52, and VTNT.
This service is not a requirement for the baseline server policy. Therefore, this service is configured to
Disabled in the three environments defined in this guide.
Terminal Services
Service Name Member Server
Legacy Client Enterprise Client High Security Client
Default
TermService Manual Automatic Automatic Automatic
Important: This service must be set to Manual on HP NAS server systems using terminal services
The Terminal Services system service provides a multi-session environment that allows client devices to
access a virtual Windows desktop session and Windows-based programs running on the server.
Terminal Services allows multiple users to be connected interactively to a computer and to display
desktops and applications on remote computers. By default, the Terminal Services system service is
installed in remote Administration mode. To install Terminal Services in Application Mode, use
Configure Your Server or Add/Remove Windows Components to change the Terminal Services mode.
Because this service is such a powerful tool for remote administration of servers, it is configured to
Automatic in the three environments defined in this guide.
: To prevent remote use of computers on the network, clear the Allow Remote Assistance and
Note
Allow Remote Desktop check boxes on the Remote tab of the System properties dialog box.
84
Page 85

Terminal Services Licensing
Service Name Member Server
Legacy Client Enterprise Client High Security Client
Default
TermServLicensing Not installed Disabled Disabled Disabled
The Terminal Services Licensing system service installs a licensed server and provides registered client
licenses when connecting to a Terminal Server. This service is not a requirement for the baseline
server policy. Therefore, this service is configured to Disabled in the three environments defined in this
guide.
Terminal Services Session Directory
Service
Name
Member Server
Default
Legacy Client Enterprise Client High Security Client
Tssdis Disabled Disabled Disabled Disabled
The Terminal Services Session Directory system service provides a multi-session environment that
allows client devices to access a virtual Windows desktop session and Windows-based programs
running on Windows Server 2003. This service is not a requirement for the baseline server policy.
Therefore, this service is configured to Disabled in the three environments defined in this guide.
Themes
Service
Name
Member Server
Default
Legacy Client Enterprise Client High Security Client
Themes Disabled Disabled Disabled Disabled
The Themes system service provides user experience theme management services. The Themes service
provides rendering support for the new Windows XP Professional graphic user interface (GUI). This
service is not a requirement for the baseline server policy. Therefore, this service is configured to
Disabled in the three environments defined in this guide.
Trivial FTP Daemon
Service Name Member Server
Legacy Client Enterprise Client High Security Client
Default
tftpd Not installed Disabled Disabled Disabled
Important: This service must be set to Automatic on HP NAS server systems requiring TFTP support.
The Trivial FTP Daemon (TFTP) system service does not require a user name or password and is an
integral part of RIS. The Trivial FTP Daemon service implements support for the TFTP protocol defined
by the following RFCs:
● RFC 1350 - TFTP
● RFC 2347 - Option extension
● RFC 2348 - Block size option
● RFC 2349 - Timeout interval and transfer size options
Client computers requesting RIS from this server will fail to install if this service is disabled. However,
this feature is not required in the baseline server environment. Therefore, this service is configured to
Disabled in the three environments defined in this guide.
85
Page 86

Uninterruptible Power Supply
Service Name Member Server
Default
UPS Manual Disabled Disabled Disabled
Important: This service must be set to Manual on HP NAS server systems requiring UPS support.
The Uninterruptible Power Supply system service manages an uninterruptible power supply (UPS)
connected to the computer by a serial port. This service is not a requirement for the baseline server
policy. Therefore, this service is configured to Disabled in the three environments defined in this guide.
Service
Name
Uploadmgr Manual Disabled Disabled Disabled
The Upload Manager system service manages the synchronous and asynchronous file transfers
between clients and servers on the network. Driver data is anonymously uploaded from customer
computers to Microsoft and then used to help users find the drivers required for their systems. This
service is not a requirement for the baseline server policy. Therefore, this service is configured to
Disabled in the three environments defined in this guide.
Service Name Member Server
VDS Manual Disabled Disabled Disabled
Important: This service must be set to Manual on HP NAS server systems requiring VDS support.
The Virtual Disk Service (VDS) system service provides a single interface for managing block storage
virtualization whether done in operating system software, redundant array of independent disks
(RAID) storage hardware subsystems, or other virtualization engines. These features are not required
in the baseline server environment. Therefore, this service is configured to Disabled in the three
environments defined in this guide.
Service
Name
VSS Manual Manual Manual Manual
The Volume Shadow Copy system service manages and implements Volume Shadow copies used for
backup and other purposes. This service is a core requirement for the baseline server policy.
Therefore, this service is configured to Manual in the three environments defined in this guide.
Member Server
Default
Default
Member Server
Default
Legacy Client Enterprise Client High Security Client
Upload Manager
Legacy Client Enterprise Client High Security Client
Virtual Disk Service
Legacy Client Enterprise Client High Security Client
Volume Shadow Copy
Legacy Client Enterprise Client High Security Client
86
Page 87

WebClient
Service Name Member Server
Legacy Client Enterprise Client High Security Client
Default
WebClient Disabled Disabled Disabled Disabled
Important: The WebClient system service must be set to Automatic for HP NAS server systems requiring
access to the Internet.
The WebClient system service allows Win32 applications to access documents on the Internet. This
service is not a requirement for the baseline server policy. Therefore, this service is configured to
Disabled in the three environments defined in this guide.
Web Element Manager
Service Name Member Server
Legacy Client Enterprise Client High Security Client
Default
elementmgr Not installed Disabled Disabled Disabled
Important: The Web Element Manager system service must be set to Automatic for HP NAS server
systems in which the HP NAS WEB GUI interface is used, HP Insight Manager is used, HP’s Array
Configuration Utility (ACU) is used, or any 3rd party management application having a WEB GUI
interface.
The Web Element Manager system service is responsible for serving Web user interface elements for
the Administration Web site at port 8098. This feature is not needed in the baseline server
environment. Therefore, this service is configured to Disabled in the three environments defined in this
guide.
Windows Audio
Service
Name
Member Server
Default
Legacy Client Enterprise Client High Security Client
AudioSrv Disabled Disabled Disabled Disabled
The Windows Audio system service provides support for sound and related Windows Audio event
functions. This feature is not required in the baseline server environment. Therefore, this service is
configured to Disabled in the three environments defined in this guide.
Windows Image Acquisition (WIA)
Service
Name
Member Server
Default
Legacy Client Enterprise Client High Security Client
StiSvc Disabled Disabled Disabled Disabled
The Windows Image Acquisition (WIA) system service provides image acquisition services for
scanners and cameras. This service is not a requirement for the baseline server policy. Therefore, this
service is configured to Disabled in the three environments defined in this guide.
87
Page 88

Windows Installer
Service
Name
Member Server
Default
Legacy Client Enterprise Client High Security Client
MSIServer Manual Automatic Automatic Automatic
The Windows Installer system service manages the installation and removal of applications by
applying a set of centrally-defined setup rules during the installation process. This service is required
in the baseline server environment; therefore, it is configured to Automatic in the three environments
defined in this guide.
Windows Internet Name Service (WINS)
Service
Name
Member Server
Default
Legacy Client Enterprise Client High Security Client
WINS Not installed Disabled Disabled Disabled
The Windows Internet Name Service (WINS) system service enables NetBIOS name resolution.
Presence of the WINS server(s) is crucial for locating the network resources identified by using
NetBIOS names. WINS servers are required unless all domains have been upgraded to Active
Directory and all computers on the network are running Windows Server 2003. These features are
not required in the baseline server environment. Therefore, it is recommended to set the value for this
service to Disabled. This service also is set to Automatic in the Infrastructure Server role policy.
Windows Management Instrumentation
Service
Name
Member Server
Default
Legacy Client Enterprise Client High Security Client
winmgmt Automatic Automatic Automatic Automatic
The Windows Management Instrumentation system service provides a common interface and object
model to access management information about operating systems, devices, applications, and
services. WMI is an infrastructure for building management applications and instrumentation shipped
as part of the current generation of Microsoft operating systems. If this service is disabled, most
Windows-based software will not function properly, and any services that explicitly depend on it will
fail to start. Therefore, this service is configured to Automatic in the three environments defined in this
guide.
Windows Management Instrumentation Driver Extensions
Service
Name
Member Server
Default
Legacy Client Enterprise Client High Security Client
Wmi Manual Manual Manual Manual
The Windows Management Instrumentation Driver Extensions system service monitors all drivers and
event trace providers that are configured to publish WMI or event trace information. This service is
configured to Manual in the three environments defined in this guide.
88
Page 89

Windows Media Services
Service
Name
Member Server
Default
Legacy Client Enterprise Client High Security Client
WMServer Not installed Disabled Disabled Disabled
Important
: The Windows Media Services system service must be set to Automatic for HP NAS server
systems requiring Windows streaming media services.
The Windows Media Services system service provides streaming media services over IP-based
networks. This service replaces the four separate services that comprised Windows Media Services
versions 4.0 and 4.1: Windows Media Monitor Service, Windows Media Program Service,
Windows Media Station Service, and Windows Media Unicast Service. This service is not needed in
the baseline server environment. Therefore, this service is configured to Disabled in the three
environments defined in this guide.
Windows System Resource Manager
Service Name Member Server
Legacy Client Enterprise Client High Security Client
Default
WindowsSystem
Not installed Disabled Disabled Disabled
ResourceManager
Important: The Windows System Resource Manager (WSRM) system service must be set to Automatic
for HP NAS server systems that are used to deploy applications.
The Windows System Resource Manager (WSRM) system service is a tool to help customers deploy
applications into consolidation scenarios. This feature is not required in the baseline server
environment. Therefore, this service is configured to Disabled in the three environments defined in this
guide.
Windows Time
Service
Name
Member Server
Default
Legacy Client Enterprise Client High Security Client
W32Time Automatic Automatic Automatic Automatic
The Windows Time system service maintains date and time synchronization on all computers running
on a Windows network. It uses the Network Time Protocol (NTP) to synchronize computer clocks so
that an accurate clock value, or timestamp, can be assigned to network validation and resource
access requests. It is a core requirement for reliable Kerberos authentication in Active Directory
domains Therefore, this service is configured to Automatic in the three environments defined in this
guide.
89
Page 90

WinHTTP Web Proxy Auto
Service Name Member Server
Default
WinHttpAutoProxySvc
Manual Disabled Disabled Disabled
Legacy Client Enterprise Client High Security
Client
Important: The WinHTTP Web Proxy Auto-Discovery Service system service must be set to Manual for
HP NAS server systems using and requiring WinHTTP or HTTP WebProxy support.
The WinHTTP Web Proxy Auto-Discovery Service system service implements the Web Proxy AutoDiscovery (WPAD) protocol for Windows HTTP Services (WinHTTP). WPAD is a protocol to enable
an HTTP client to automatically discover a proxy configuration. This feature is not required in the
baseline server environment. Therefore, this service is configured to Disabled in the three environments
defined in this guide.
Wireless Configuration
Service
Name
WZCSVC Automatic on
Member Server
Default
Legacy Client Enterprise Client High Security Client
Disabled Disabled Disabled
Standard,
Enterprise, and
Datacenter Server.
Manual on Web
Server
The Wireless Zero Configuration system service enables automatic configuration for IEEE 802.11
wireless adapters for wireless communications. This service is not a requirement for the baseline
server policy. Therefore, this service is configured to Disabled in the three environments defined in this
guide.
WMI Performance Adapter
Service
Name
Member Server
Default
Legacy Client Enterprise Client High Security Client
WmiApSrv Manual Manual Manual Manual
The WMI Performance Adapter system service provides performance library information from WMI
HiPerf providers. The service is a manual service and is not running by default. It runs on demand
when a performance client (for example, Sysmon) uses Performance Data Helper (PDH) to query
performance data. Once the client disconnects, the service stops. If this service is disabled, WMI
performance counters will be unavailable. Therefore, this service is configured to Manual in the three
environments defined in this guide.
Workstation
Service Name Member Server
Default
Legacy Client Enterprise Client High Security
Client
lanmanworkstation Automatic Automatic Automatic Automatic
The Workstation system resource creates and maintains client network connections and
communications. If this service is disabled, administrators cannot establish connections to remote
servers and access files through named pipes. Therefore, this service is configured to Automatic in the
three environments defined in this guide.
90
Page 91

World Wide Web Publishing Service
Service Name Member Server
Legacy Client Enterprise Client High Security Client
Default
W3SVC Not installed Disabled Disabled Disabled
Important: The World Wide Web Publishing Service system service must be set to Automatic for HP
NAS server systems in which the HP NAS WEB GUI interface is used, HP Insight Manager is used,
HP’s Array Configuration Utility (ACU) is used, HTTP file shares are created, or FTP file shares are
created.
The World Wide Web Publishing Service system service provides Web connectivity and administration
through the Internet Information Service snap-in. This service is not a requirement for the baseline
server policy. Therefore, this service is configured to Disabled in the three environments defined in this
guide.
2.8.6 Additional Security Settings
Additional registry value entries were created for the baseline security template files that are not
defined within the Administrative Template (.adm) file for the three security environments defined in
this guide. The .adm file defines the system policies and restrictions for the desktop, shell, and security
for Windows Server 2003 and Windows Storage Server 2003 systems. These settings are
embedded within the security templates, in the Security Options section, to automate the changes. If
the policy is removed, these settings are not automatically removed with it and must be manually
changed by using a registry editing tool such as Regedt32.exe. The same registry values are applied
across all three environments.
This guide includes additional settings added to the Security Configuration Editor (SCE) by modifying
the sceregvl.inf file, located in the %windir%\inf folder, and re-registering scecli.dll. The original
security settings, as well as the additional ones, appear under Local Policies\Security in the snap-ins
and tools listed previously in this section. The customization to sceregvl.inf provided below uses
features only available on Microsoft Windows® XP Professional with Service Pack 1 and Windows
Server 2003. Administrators should not try to install it on older versions of Windows.
Once the Sceregvl.inf file has been modified and registered, the custom registry values are exposed
in the SCE user interfaces on that computer. Administrators will see the new settings at the bottom of
the list of items in the SCE which are all preceded by the text "MSS." MSS stands for Microsoft
Solutions for Security, the name of the group that created this guide. Administrators can then create
security templates or policies that define these new registry values. These templates or policies can
then be applied to any computer regardless of whether Sceregvl.inf has been modified on the target
computer or not. Subsequent launches of the SCE UI’s exposes any custom registry values.
Administrators must complete the following procedural steps to update the sceregvl.inf file:
1. Open the %systemroot%\inf\sceregvl.inf file in a text editor such as Notepad.
2. Navigate to the bottom of the [Register Registry Values] section and copy the following text into
the file:
;================================ MSS Values ================================
MACHINE\System\CurrentControlSet\Services\Tcpip\Parameters\EnableICMPRedirect,4,%EnableICMPRedirect%,0
MACHINE\System\CurrentControlSet\Services\Tcpip\Parameters\SynAttackProtect,4,%SynAttackProtect%,3,0|%SynAttackPr
otect0%,1|%SynAttackProtect1%
MACHINE\System\CurrentControlSet\Services\Tcpip\Parameters\EnableDeadGWDetect, 4,%EnableDeadGWDetect%,0
MACHINE\System\CurrentControlSet\Services\Tcpip\Parameters\EnablePMTUDiscovery,4,%EnablePMTUDiscovery%,0
91
Page 92

MACHINE\System\CurrentControlSet\Services\Tcpip\Parameters\KeepAliveTime,4,%KeepAliveTime%,3,150000|%KeepAliv
eTime0%,300000|%KeepAliveTime1%,600000|%KeepAliveTime2%,1200000|%KeepAliveTime3%,2400000|%KeepAliveTi
me4%,3600000|%KeepAliveTime5%,7200000|%KeepAliveTime6%
MACHINE\System\CurrentControlSet\Services\Tcpip\Parameters\DisableIPSourceRouting,4,%DisableIPSourceRouting%,3,0|
%DisableIPSourceRouting0%,1|%DisableIPSourceRouting1%,2|%DisableIPSourceRouting2%
MACHINE\System\CurrentControlSet\Services\Tcpip\Parameters\TcpMaxConnectResponseRetransmissions,4,%TcpMaxConn
ectResponseRetransmissions%,3,0|%TcpMaxConnectResponseRetransmissions0%,1|%TcpMaxConnectResponseRetransmission
s1%,2|%TcpMaxConnectResponseRetransmissions2%,3|%TcpMaxConnectResponseRetransmissions3%
MACHINE\System\CurrentControlSet\Services\Tcpip\Parameters\TcpMaxDataRetransmissions,4,%TcpMaxDataRetransmissio
ns%,1
MACHINE\System\CurrentControlSet\Services\Tcpip\Parameters\PerformRouterDiscovery,4,%PerformRouterDiscovery%,0
MACHINE\System\CurrentControlSet\Services\Tcpip\Parameters\TCPMaxPortsExhausted,4,%TCPMaxPortsExhausted%,1
MACHINE\System\CurrentControlSet\Services\Netbt\Parameters\NoNameReleaseOnDemand,4,%NoNameReleaseOnDema
nd%,0
MACHINE\System\CurrentControlSet\Control\FileSystem\NtfsDisable8dot3NameCreation,4,%NtfsDisable8dot3NameCreati
on%,0
MACHINE\SOFTWARE\Microsoft\Windows\CurrentVersion\Policies\Explorer\NoDriveTypeAutoRun,4,%NoDriveTypeAutoR
un%,3,0|%NoDriveTypeAutoRun0%,255|%NoDriveTypeAutoRun1%
MACHINE\SYSTEM\CurrentControlSet\Services\Eventlog\Security\WarningLevel,4,%WarningLevel%,3,50|%WarningLevel0
%,60|%WarningLevel1%,70|%WarningLevel2%,80|%WarningLevel3%,90|%WarningLevel4%
MACHINE\SYSTEM\Software\Microsoft\WindowsNT\CurrentVersion\Winlogon\ScreenSaverGracePeriod,4,%ScreenSaver
GracePeriod%,1
MACHINE\System\CurrentControlSet\Services\AFD\Parameters\DynamicBacklogGrowthDelta,4,%DynamicBacklogGrowthDe
lta%,1
MACHINE\System\CurrentControlSet\Services\AFD\Parameters\EnableDynamicBacklog,4,%EnableDynamicBacklog%,0
MACHINE\System\CurrentControlSet\Services\AFD\Parameters\MinimumDynamicBacklog,4,%MinimumDynamicBacklog%,1
MACHINE\System\CurrentControlSet\Services\AFD\Parameters\MaximumDynamicBacklog,4,%MaximumDynamicBacklog%,
3,10000|%MaximumDynamicBacklog0%,15000|%MaximumDynamicBacklog1%,20000|%MaximumDynamicBacklog2%,40
000|%MaximumDynamicBacklog3%,80000|%MaximumDynamicBacklog4%,160000|%MaximumDynamicBacklog5%
MACHINE\SYSTEM\CurrentControlSet\Control\SessionManager\SafeDllSearchMode,4,%SafeDllSearchMode%,0
3. Navigate to the bottom of the [Strings] section and copy the following text into the file:
;================================ MSS Settings================================
EnableICMPRedirect = "MSS: (EnableICMPRedirect) Allow ICMP redirects to override OSPF generated routes"
SynAttackProtect = "MSS: (SynAttackProtect) Syn attack protection level (protects against DoS)"
SynAttackProtect0 = "No additional protection, use default settings"
SynAttackProtect1 = "Connections time out sooner if a SYN attack is detected"
EnableDeadGWDetect = "MSS: (EnableDeadGWDetect) Allow automatic detection of dead network gateways (could lead to
DoS)"
EnablePMTUDiscovery = "MSS: (EnablePMTUDiscovery ) Allow automatic detection of MTU size (possible DoS by an attacker
using a small MTU)"
KeepAliveTime = "MSS: How often keep-alive packets are sent in milliseconds"
KeepAliveTime0 ="150000 or 2.5 minutes"
KeepAliveTime1 ="300000 or 5 minutes (recommended)"
KeepAliveTime2 ="600000 or 10 minutes"
KeepAliveTime3 ="1200000 or 20 minutes"
KeepAliveTime4 ="2400000 or 40 minutes"
KeepAliveTime5 ="3600000 or 1 hour"
KeepAliveTime6 ="7200000 or 2 hours (default value)"
DisableIPSourceRouting = "MSS: (DisableIPSourceRouting) IP source routing protection level (protects against packet spoofing)"
DisableIPSourceRouting0 = "No additional protection, source routed packets are allowed"
DisableIPSourceRouting1 = "Medium, source routed packets ignored when IP forwarding is enabled"
DisableIPSourceRouting2 = "Highest protection, source routing is completely disabled"
TcpMaxConnectResponseRetransmissions = "MSS: (TcpMaxConnectResponseRetransmissions) SYN-ACK retransmissions when
a connection request is not acknowledged"
TcpMaxConnectResponseRetransmissions0 = "No retransmission, half-open connections dropped after 3 seconds"
TcpMaxConnectResponseRetransmissions1 = "3 seconds, half-open connections dropped after 9 seconds"
TcpMaxConnectResponseRetransmissions2 = "3 & 6 seconds, half-open connections dropped after 21 seconds"
TcpMaxConnectResponseRetransmissions3 = "3, 6, & 9 seconds, half-open connections dropped after 45 seconds"
TcpMaxDataRetransmissions = "MSS: (TcpMaxDataRetransmissions) How many times unacknowledged data is retransmitted (3
recommended, 5 is default)"
PerformRouterDiscovery = "MSS: (PerformRouterDiscovery) Allow IRDP to detect and configure Default Gateway addresses
(could lead to DoS)"
TCPMaxPortsExhausted = "MSS: (TCPMaxPortsExhausted) How many dropped connect requests to initiate SYN attack
protection (5 is recommended)"
92
Page 93

NoNameReleaseOnDemand = "MSS: (NoNameReleaseOnDemand) Allow the computer to ignore NetBIOS name release
requests except from WINS servers"
NtfsDisable8dot3NameCreation = "MSS: Enable the computer to stop generating 8.3 style filenames"
NoDriveTypeAutoRun = "MSS: Disable Autorun for all drives"
NoDriveTypeAutoRun0 = "Null, allow Autorun"
NoDriveTypeAutoRun1 = "255, disable Autorun for all drives"
WarningLevel = "MSS: Percentage threshold for the security event log at which the system will generate a warning"
WarningLevel0 = "50%"
WarningLevel1 = "60%"
WarningLevel2 = "70%"
WarningLevel3 = "80%"
WarningLevel4 = "90%"
ScreenSaverGracePeriod = "MSS: The time in seconds before the screen saver grace period expires (0 recommended)"
DynamicBacklogGrowthDelta = "MSS: (AFD DynamicBacklogGrowthDelta) Number of connections to create when additional
connections are necessary for Winsock applications (10 recommended)"
EnableDynamicBacklog = "MSS: (AFD EnableDynamicBacklog) Enable dynamic backlog for Winsock applications
(recommended)"
MinimumDynamicBacklog = "MSS: (AFD MinimumDynamicBacklog) Minimum number of free connections for Winsock
applications (20 recommended for systems under attack, 10 otherwise)"
MaximumDynamicBacklog = "MSS: (AFD MaximumDynamicBacklog) Maximum number of 'quasi-free' connections for
Winsock applications"
MaximumDynamicBacklog0 = "10000"
MaximumDynamicBacklog1 = "15000"
MaximumDynamicBacklog2 = "20000 (recommended)"
MaximumDynamicBacklog3 = "40000"
MaximumDynamicBacklog4 = "80000"
MaximumDynamicBacklog5 = "160000"
SafeDllSearchMode = "MSS: Enable Safe DLL search mode (recommended)"
4. Save the file and close the text editor.
5. Open a command prompt window and type the command regsvr32 scecli.dll to re-register the
SCE DLL.
6. Subsequent launches of the SCE will display these custom registry values.
Important
: All modifications within this section apply to all three environments defined within this
guide for MSBP.
2.8.6.1 Security Consideration for Network Attacks
To help prevent denial of service (DoS) attacks, administrators should keep their computer updated
with the latest security fixes and harden the Transmission Control Protocol/Internet Protocol (TCP/IP)
protocol stack on Windows Server 2003 computer systems that are exposed to potential attackers.
The default TCP/IP stack configuration is tuned to handle standard Intranet traffic. If administrators
connect a computer directly to the Internet, Microsoft recommends that they harden the TCP/IP stack
to protect against DoS attacks. DoS attacks directed at the TCP/IP stack tend to be of two classes:
attacks that use an excessive number of system resources, for example, by opening numerous TCP
connections; or attacks that send specially crafted packets that cause the network stack or the entire
operating system to fail. These registry settings help to protect against the attacks directed at the
TCP/IP stack. DoS attacks include those that flood a Web server with communication to keep it busy,
and others that flood a remote network with an enormous amount of packets. Routers and servers
become overloaded by attempting to route or handle each packet. DoS attacks can be difficult to
defend against. To help prevent them, the TCP/IP protocol stack can be hardened. The following
registry value entries have been added to the template file in the following registry key location:
HKEY_LOCAL_MACHINE\System\CurrentControlSet\Services\Tcpip\Parameters\
93
Page 94

Subkey Registry Value Entry Format Recommended Value (Decimal)
EnableICMPRedirect DWORD 0
SynAttackProtect DWORD 1
EnableDeadGWDetect DWORD 0
EnablePMTUDiscovery DWORD 0
KeepAliveTime DWORD 300,000
DisableIPSourceRouting DWORD 2
TcpMaxConnectResponseRetransmissions DWORD 2
TcpMaxDataRetransmissions DWORD 3
PerformRouterDiscovery DWORD 0
TCPMaxPortsExhausted DWORD 5
EnableICMPRedirect: Allow ICMP redirects to override OSPF generated
routes
This entry appears as MSS: Allow ICMP redirects to override OSPF generated routes in the SCE.
Internet Control Message Protocol (ICMP) redirects cause the stack to plumb host routes. These routes
override the Open Shortest Path First (OSPF)-generated routes.
Vulnerability: This behavior is expected; the problem is that the 10 minute time-out period for the
ICMP redirect-plumbed routes temporarily creates a black hole for the network where traffic will no
longer be routed properly for the affected host.
Countermeasure: Configure MSS: Allow ICMP redirects to override OSPF generated routes to a
value of Disabled. The possible values for this Registry value are:
• 1 or 0; default is 1 (enabled)
In the SCE UI, these options appear as:
• Enabled
• Disabled
• Not Defined
Potential Impact: When Routing and Remote Access Service (RRAS) is configured as an
autonomous system boundary router (ASBR), it does not correctly import connected interface subnet
routes. Instead, this router injects host routes into the OSPF routes. Because the OSPF router can not
be used as an ASBR router, importing connected interface subnet routes into OSPF results in confusing
routing tables with strange routing paths.
SynAttackProtect: Syn attack protection level (protects against DoS
This entry appears as MSS: Syn attack protection level (protects against DoS) in the SCE. This registry
value causes TCP to adjust retransmission of SYN-ACKs. When administrators configure this value, the
connection responses time-out more quickly in the event of a connect request (SYN) attack.
Vulnerability: In a SYN flood attack, the attacker sends a continuous stream of SYN packets to a
server, and the server leaves the half-open connections open until it is overwhelmed and is no longer
able to respond to legitimate requests
94
Page 95

Countermeasure: Configure MSS: Syn attack protection level (protects against DoS) to a value of
Connections time out sooner if a SYN attack is detected. The possible values for this Registry value
are:
• 1 or 0; default is 0 (disabled)
In the SCE UI, these options appear as:
• Connections time-out more quickly if a SYN attack is detected
• No additional protection, use default settings
• Not Defined
Potential Impact: This value adds additional delays to connection indications, and TCP connection
requests quickly time-out when a SYN attack is in progress. Configuring this setting causes the
scalable windows and TCP parameters that are configured on each adapter-including Initial Round
Trip Time (RTT) and window size socket options no longer work.
EnableDeadGWDetect: Allow automatic detection of dead network
gateways (could lead to DoS)
This entry appears as MSS: Allow automatic detection of dead network gateways (could lead to DoS)
in the SCE. When dead-gateway detection is enabled, TCP may ask the IP to change to a backup
gateway if a number of connections are experiencing difficulty.
Vulnerability: An attacker could force the server to switch gateways, potentially to an unintended
one.
Countermeasure: Configure MSS: Allow automatic detection of dead network gateways (could
lead to DoS) to a value of Disabled. The possible values for this Registry value are:
• 1 or 0; default is 0 (disabled)
In the SCE UI, these options appear as:
• Enabled
• Disabled
• Not Defined
Potential Impact:
and automatically switching to an alternate.
Configuring this setting to 0 prevents Windows from detecting dead gateways
EnablePMTUDiscovery: Allow automatic detection of MTU size (possible
DoS by an attacker using a small MTU)
This entry appears as MSS: Allow automatic detection of MTU size (possible DoS by an attacker using
a small MTU) in the SCE. When this value is enabled, the default setting, the TCP stack tries to
automatically determine either the maximum transmission unit (MTU) or the largest packet size over
the path to a remote host.
Vulnerability: If administrators do not set this value to 0, an attacker could force the MTU to a very
small value and overwork the stack by forcing the server to fragment a large number of packets.
Countermeasure: Configure MSS: Allow automatic detection of MTU size (possible DoS by an
attacker using a small MTU) to a value of Disabled. The possible values for this Registry value are:
95
Page 96

• 1 or 0; default is 1 (enabled)
In the SCE UI, these options appear as:
• Enabled
• Disabled
• Not Defined
Potential Impact:
MTU or the largest packet size over the path to a remote host. TCP can eliminate fragmentation at
routers along the path that connect networks with different MTUs by discovering the path MTU and
limiting TCP segments to this size. Fragmentation adversely affects TCP throughput. When this value
is set to 0, an MTU of 576 bytes is used for all connections that are not hosts on the local subnet.
Setting EnablePMTUDiscovery to 1 causes TCP to attempt to discover either the
KeepAliveTime: How often keep-alive packets are sent in milliseconds
(300,000 is recommended)
This entry appears as MSS: How often keep-alive packets are sent in milliseconds (300,000 is
recommended) in the SCE. This value controls how often TCP attempts to verify that an idle connection
is still intact by sending a keep-alive packet. If the remote computer is still reachable, it acknowledges
the keep-alive packet.
Vulnerability: An attacker who is able to connect to network applications could cause a DoS
condition by establishing numerous connections.
Countermeasure: Configure MSS: How often keep-alive packets are sent in milliseconds (300,000
is recommended) to a value of 300000 or 5 minutes. The possible values for this Registry value are:
• 1 through 0xFFFFFFFF; default is 7,200,000 (two hours)
In the SCE UI, the following list of options appears:
• 150000 or 2.5 minutes
• 300000 or 5 minutes (recommended)
• 600000 or 10 minutes
• 1200000 or 20 minutes
• 2400000 or 40 minutes
• 3600000 or 1 hour
• 7200000 or 2 hours (default value)
• Not Defined
Potential Impact: Keep-alive packets are not sent by default. Administrators can use a program to
configure this value on a connection basis. Lowering this from the default value of 2 hours to 5
minutes means that inactive sessions will be disconnected more quickly.
96
Page 97

DisableIPSourceRouting: IP source routing protection level (protects
against packet spoofing)
This entry appears as MSS: IP source routing protection level (protects against packet spoofing) in the
SCE. IP source routing is a mechanism allowing the sender to determine the IP route that a datagram
should take through the network.
Vulnerability: An attacker could use source routed packets to obscure their identity and location.
Source routing allows a computer sending a packet to specify the route it takes.
Countermeasure: Configure MSS: IP source routing protection level (protects against packet
spoofing) to a value of Highest protection, source routing is completely disabled. The possible values
for this Registry value are:
• 0, 1, or 2; default is 0 (source routed packets are acknowledged)
In the SCE UI, the following list of options appears:
• No additional protection, source routed packets are allowed
• Medium, source routed packets ignored when IP forwarding is enabled.
• Highest protection, source routing is completely disabled
• Not Defined
Potential Impact: Setting this value to 2 will cause all incoming source routed packets to be
dropped.
TcpMaxConnectResponseRetransmissions: SYN-ACK retransmissions
when a connection request is not acknowledged
This entry appears as MSS: SYN-ACK retransmissions when a connection request is not acknowledged
in the SCE. This parameter determines the number of times that TCP retransmits a SYN before
aborting the attempt. The retransmission time-out is doubled with each successive retransmission in a
given connect attempt. The initial time-out value is three seconds.
Vulnerability: In a SYN flood attack, the attacker sends a continuous stream of SYN packets to a
server, and the server leaves the half-open connections open until it is overwhelmed and no longer is
able to respond to legitimate requests.
Countermeasure: Configure MSS: SYN-ACK retransmissions when a connection request is not
acknowledged to a value of 3 seconds, half-open connections dropped after nine seconds. The
possible values for this Registry value are:
• 0-0xFFFFFFFF; default is 2
In the SCE UI, the following list of options appears, corresponding to a value of 0, 1, 2, and 3
respectively:
• No retransmission, half-open connections dropped after 3 seconds
• 3 seconds, half-open connections dropped after 9 seconds
• 3 & 6 seconds, half-open connections dropped after 21 seconds
• 3, 6, & 9 seconds, half-open connections dropped after 45 seconds
• Not Defined
97
Page 98

Potential Impact: Setting this value to greater than or equal to 2 causes the stack to employ SYN-
ATTACK protection internally. Setting this value is to less than 2 prevents the stack from reading the
registry values at all for SYN-ATTACK protection. This parameter shortens the default time that it takes
to clean up a half-open TCP connection. A site that is under heavy attack might set the value as low as
1. A value of 0 is also valid. However, if this parameter is set to 0, SYN-ACKs will not be
retransmitted at all and will time-out in 3 seconds. With the value this low, legitimate connection
attempts from distant clients may fail.
TcpMaxDataRetransmissions: How many times unacknowledged data is
retransmitted (3 recommended, 5is default)
This entry appears as MSS: How many times unacknowledged data is retransmitted (3 recommended,
5 is default) in the SCE. This parameter controls the number of times that TCP retransmits an individual
data segment (non-connect segment) before aborting the connection. The retransmission time-out is
doubled with each successive retransmission on a connection. It is reset when responses resume. The
base time-out value is dynamically determined by the measured round-trip time on the connection.
Vulnerability: In a SYN flood attack, the attacker sends a continuous stream of SYN packets to a
server, and the server leaves the half-open connections open until it is overwhelmed and no longer is
able to respond to legitimate requests.
Countermeasure: Configure MSS: How many times unacknowledged data is retransmitted (3
recommended, 5 is default) to a value of 3. The possible values for this Registry value are:
• 0 to 0xFFFFFFFF; default is 5.
In the SCE UI, this appears as a text entry box:
• A user defined number
• Not Defined
Potential Impact: TCP starts a retransmission timer when each outbound segment is handed down
to the IP. If no acknowledgment has been received for the data in a given segment before the timer
expires, then the segment is retransmitted up to three times.
PerformRouterDiscovery: Allow IRDP to detect and configure Default
Gateway addresses (could lead to DoS)
This entry appears as MSS: Allow IRDP to detect and configure Default Gateway addresses (could lead
to DoS) in the SCE. This setting is used to enable or disabled the Internet Router Discovery Protocol
(IRDP). IRDP allows the system to detect and configure Default Gateway addresses automatically.
Vulnerability: An attacker who has gained control of a system on the same network segment could
configure a computer on the network to impersonate a router. Other computers with IRDP enabled
would then attempt to route their traffic through the already compromised system.
Countermeasure: Configure MSS: Allow IRDP to detect and configure Default Gateway addresses
(could lead to DoS) to a value of Disabled. The possible values for this Registry value are:
• 1 or 0; the default is 0 (disabled)
98
Page 99

In the SCE UI, these options appear as:
• Enabled
• Disabled
• Not Defined
Potential Impact: Disabling this setting prevents Windows Server 2003, which supports the IRDP,
from automatically detecting and configuring Default Gateway addresses on the computer.
TCPMaxPortsExhausted: How many dropped connect requests to initiate
SYN attack protection (5 is recommended)
This entry appears as MSS: How many dropped connect requests to initiate SYN attack protection (5 is
recommended) in the SCE. This parameter controls the point at which SYN-ATTACK protection starts
to operate. SYN-ATTACK protection begins to operate when TcpMaxPortsExhausted connect requests
have been refused by the system because the available backlog for connections is set at 0.
Vulnerability: In a SYN flood attack, the attacker sends a continuous stream of SYN packets to a
server, and the server leaves the half-open connections open until it is overwhelmed and no longer is
able to respond to legitimate requests.
Countermeasure: Configure MSS: How many dropped connect requests to initiate SYN attack
protection (5 is recommended) to a value of 5. The possible values for this Registry value are:
• 0 to 0xFFFF; default is 5
In the SCE UI, this appears as a text entry box:
• A user defined number
• Not Defined
Potential Impact: This parameter controls the point at which SYN-ATTACK protection starts to
operate. SYN-ATTACK protection begins to operate when TCPMaxPortsExhausted connect requests
have been refused by the system because the available backlog for connections is set at 0. This
should have little impact on the server or systems attempting to use it in a legitimate manner.
2.8.6.2 AFD.SYS settings
Windows Sockets applications such as File Transfer Protocol (FTP) servers and Web servers have their
connection attempts handled by Afd.sys. Afd.sys has been modified to support large numbers of
connections in the half-open state without denying access to legitimate clients. This is accomplished by
allowing the administrator to configure a dynamic backlog. The version of Afd.sys included with
Windows Server 2003 supports four registry parameters that can be used to control the dynamic
backlog behavior. The following registry value entries have been added to the template file in the
following registry key:
HKEY_LOCAL_MACHINE\System\CurrentControlSet\Services\AFD\Parameters\
99
Page 100

Subkey Registry Value Entry Format Recommended Value (Decimal)
DynamicBacklogGrowthDelta DWORD 10
EnableDynamicBacklog DWORD 1
MinimumDynamicBacklog DWORD 20
MaximumDynamicBacklog DWORD 20000
DynamicBacklogGrowthDelta: (AFD DynamicBacklogGrowthDelta)
Number of connections to create when additional connections are
necessary for Winsock applications (10 recommended)
This entry appears as MSS: (AFD DynamicBacklogGrowthDelta) Number of connections to create when
additional connections are necessary for Winsock applications (10 recommended) in the SCE. This
setting controls the number of free connections to create when additional connections are necessary.
Be careful with this value, as a large value could lead to explosive free connection allocations.
Vulnerability: In a SYN flood attack, the attacker sends a continuous stream of SYN packets to a
server, and the server leaves the half-open connections open until it is overwhelmed and no longer is
able to respond to legitimate requests.
Countermeasure: Configure MSS: (AFD DynamicBacklogGrowthDelta) Number of connections to
create when additional connections are necessary for Winsock applications (10 recommended) to a
value of 10. The possible values for this Registry value are:
• 0 to 0xFFFFFFFF; default is 0
In the SCE UI, this appears as a text entry box:
• A user defined number
• Not Defined
Potential Impact: Setting this value to too large a number could cause a large amount of system
resources to be assigned to allocating additional free connections that may not actually be needed.
This could lead to poor performance or a DoS condition.
EnableDynamicBacklog: (AFD EnableDynamicBacklog) Enable dynamic
backlog for Winsock applications (recommended)
This entry appears as MSS: (AFD EnableDynamicBacklog) Enable dynamic backlog for Winsock
applications (recommended) in the SCE. This is a global switch to enable or disable dynamic backlog.
It defaults to 0 (off), setting it to 1 enables the new dynamic backlog feature.
Vulnerability: Socket applications may be susceptible to DoS attacks.
Countermeasure: Configure MSS: (AFD EnableDynamicBacklog) Enable dynamic backlog for
Winsock applications (recommended) to a value of Enabled. The possible values for this Registry
value are:
• 1 or 0; default is 0 (disabled)
100
 Loading...