

Page 1
1
11
10
Windows Users START HERE
Pengguna Windows MULAI DARI SINI
Windows Users START HERE Windows Users START HERE
Pengguna Windows MULAI DARI SINI Pengguna Windows MULAI DARI SINI
2
Turn your computer on
Nyalakan komputer Anda
Begin software installation
3
Mulai instalasi perangkat lunak
Q3083-90205
*Q3083-90205*
*Q3083-90205*
Attach front panel cover
4
Pasang tutup panel depan
Remove any packaging material.
a
This side of the poster is for
Windows users. Make sure
you are using the CD and side
of the poster that matches your
operating system.
Bagian poster ini adalah untuk
pengguna Windows. Pastikan
Anda menggunakan CD dan
bagian poster yang sesuai
dengan sistem operasi Anda.
a
a
Turn on your computer and wait for
the Windows desktop to appear.
b
Close any open programs.
Nyalakan komputer Anda dan
a
tunggu sampai desktop Windows
muncul.
Tutup setiap program yang terbuka.
b
Lepaskan semua bahan pembungkus.
5
Insert the HP PSC
a
Windows CD.
Follow the onscreen
b
instructions.
Masukkan CD Windows
a
HP PSC.
Ikuti instruksi pada layar.
b
Load paper
Muatkan kertas
Use plain white paper to
prepare for print alignment.
If the software does not appear on
your computer screen after inserting
the CD, see the Troubleshooting
Information chapter in the Reference
Guide.
Bila perangkat lunak tidak muncul
pada layar komputer Anda setelah
memasukkan CD, baca bab
Informasi Pemecahan Masalah
dalam Buku Petunjuk.
Gunakan kertas putih biasa
untuk mempersiapkan
Do not connect the USB
c
cable yet. When you see the
Setup your Device Now
dialog box, continue to step 4.
Jangan menyambungkan kabel
c
USB saat ini. Saat Anda melihat
kotak dialog Setup your Device
Now [Pasang Perangkat Anda
Sekarang] , lanjutkan ke langkah 4.
Connect power cords
6
Sambungkan kabel listrik
Place the front panel cover over the
b
buttons. Firmly press on the sides to
snap the cover in place. Make sure all
the buttons are visible.
c
Lift the display.
Connect phone cord
7
Sambungkan kabel telepon
You must connect the supplied phone
a
cord to the phone jack on the left
(1-LINE).
To connect an answering machine or
b
use your own phone cord, see the Fax
Setup chapter in the Reference Guide.
Letakkan tutup panel depan di atas
b
tombol. Tekan pinggirannya dengan
kuat untuk memasukkan tutup. Pastikan
semua tombol terlihat.
c
Angkat tampilan.
Anda harus menyambungkan kabel
a
telepon yang disediakan ke lubang di
bagian kiri (1-LINE). (Jangan gunakan
kabel telepon dari produk lain.)
Untuk menyambungkan mesin penjawab
b
telepon atau menggunakan kabel telepon
Anda sendiri, baca bab Pemasangan
Faksimile dalam Buku Petunjuk.
1-LINE
/1-LINE
a b
Connect USB cable
8
Sambungkan kabel USB
Make sure that you see the
screen in step 3 before plugging
in your USB cable. Do not
connect the USB cable to a
keyboard.
Pastikan Anda melihat layar
dalam langkah 3 sebelum
menyambungkan kabel USB
Anda. Jangan sambungkan
kabel USB kd keyboard.
c d
a
b
Turn HP device on
9
Nyalakan perangkat HP
a
Turn power on.
Select your language, and then press
b
OK. Select your country/region (if not
listed, select Singapore) , then press OK.
a
Nyalakan perangkat.
Pilih bahasa Anda, lalu tekan OK.
b
Pilih negara/wilayah Anda, lalu
tekan OK.
c
www.hp.com/support Copyright Hewlett-Packard Company 2003
Dicetak di Singapura.
/poster pemasangan
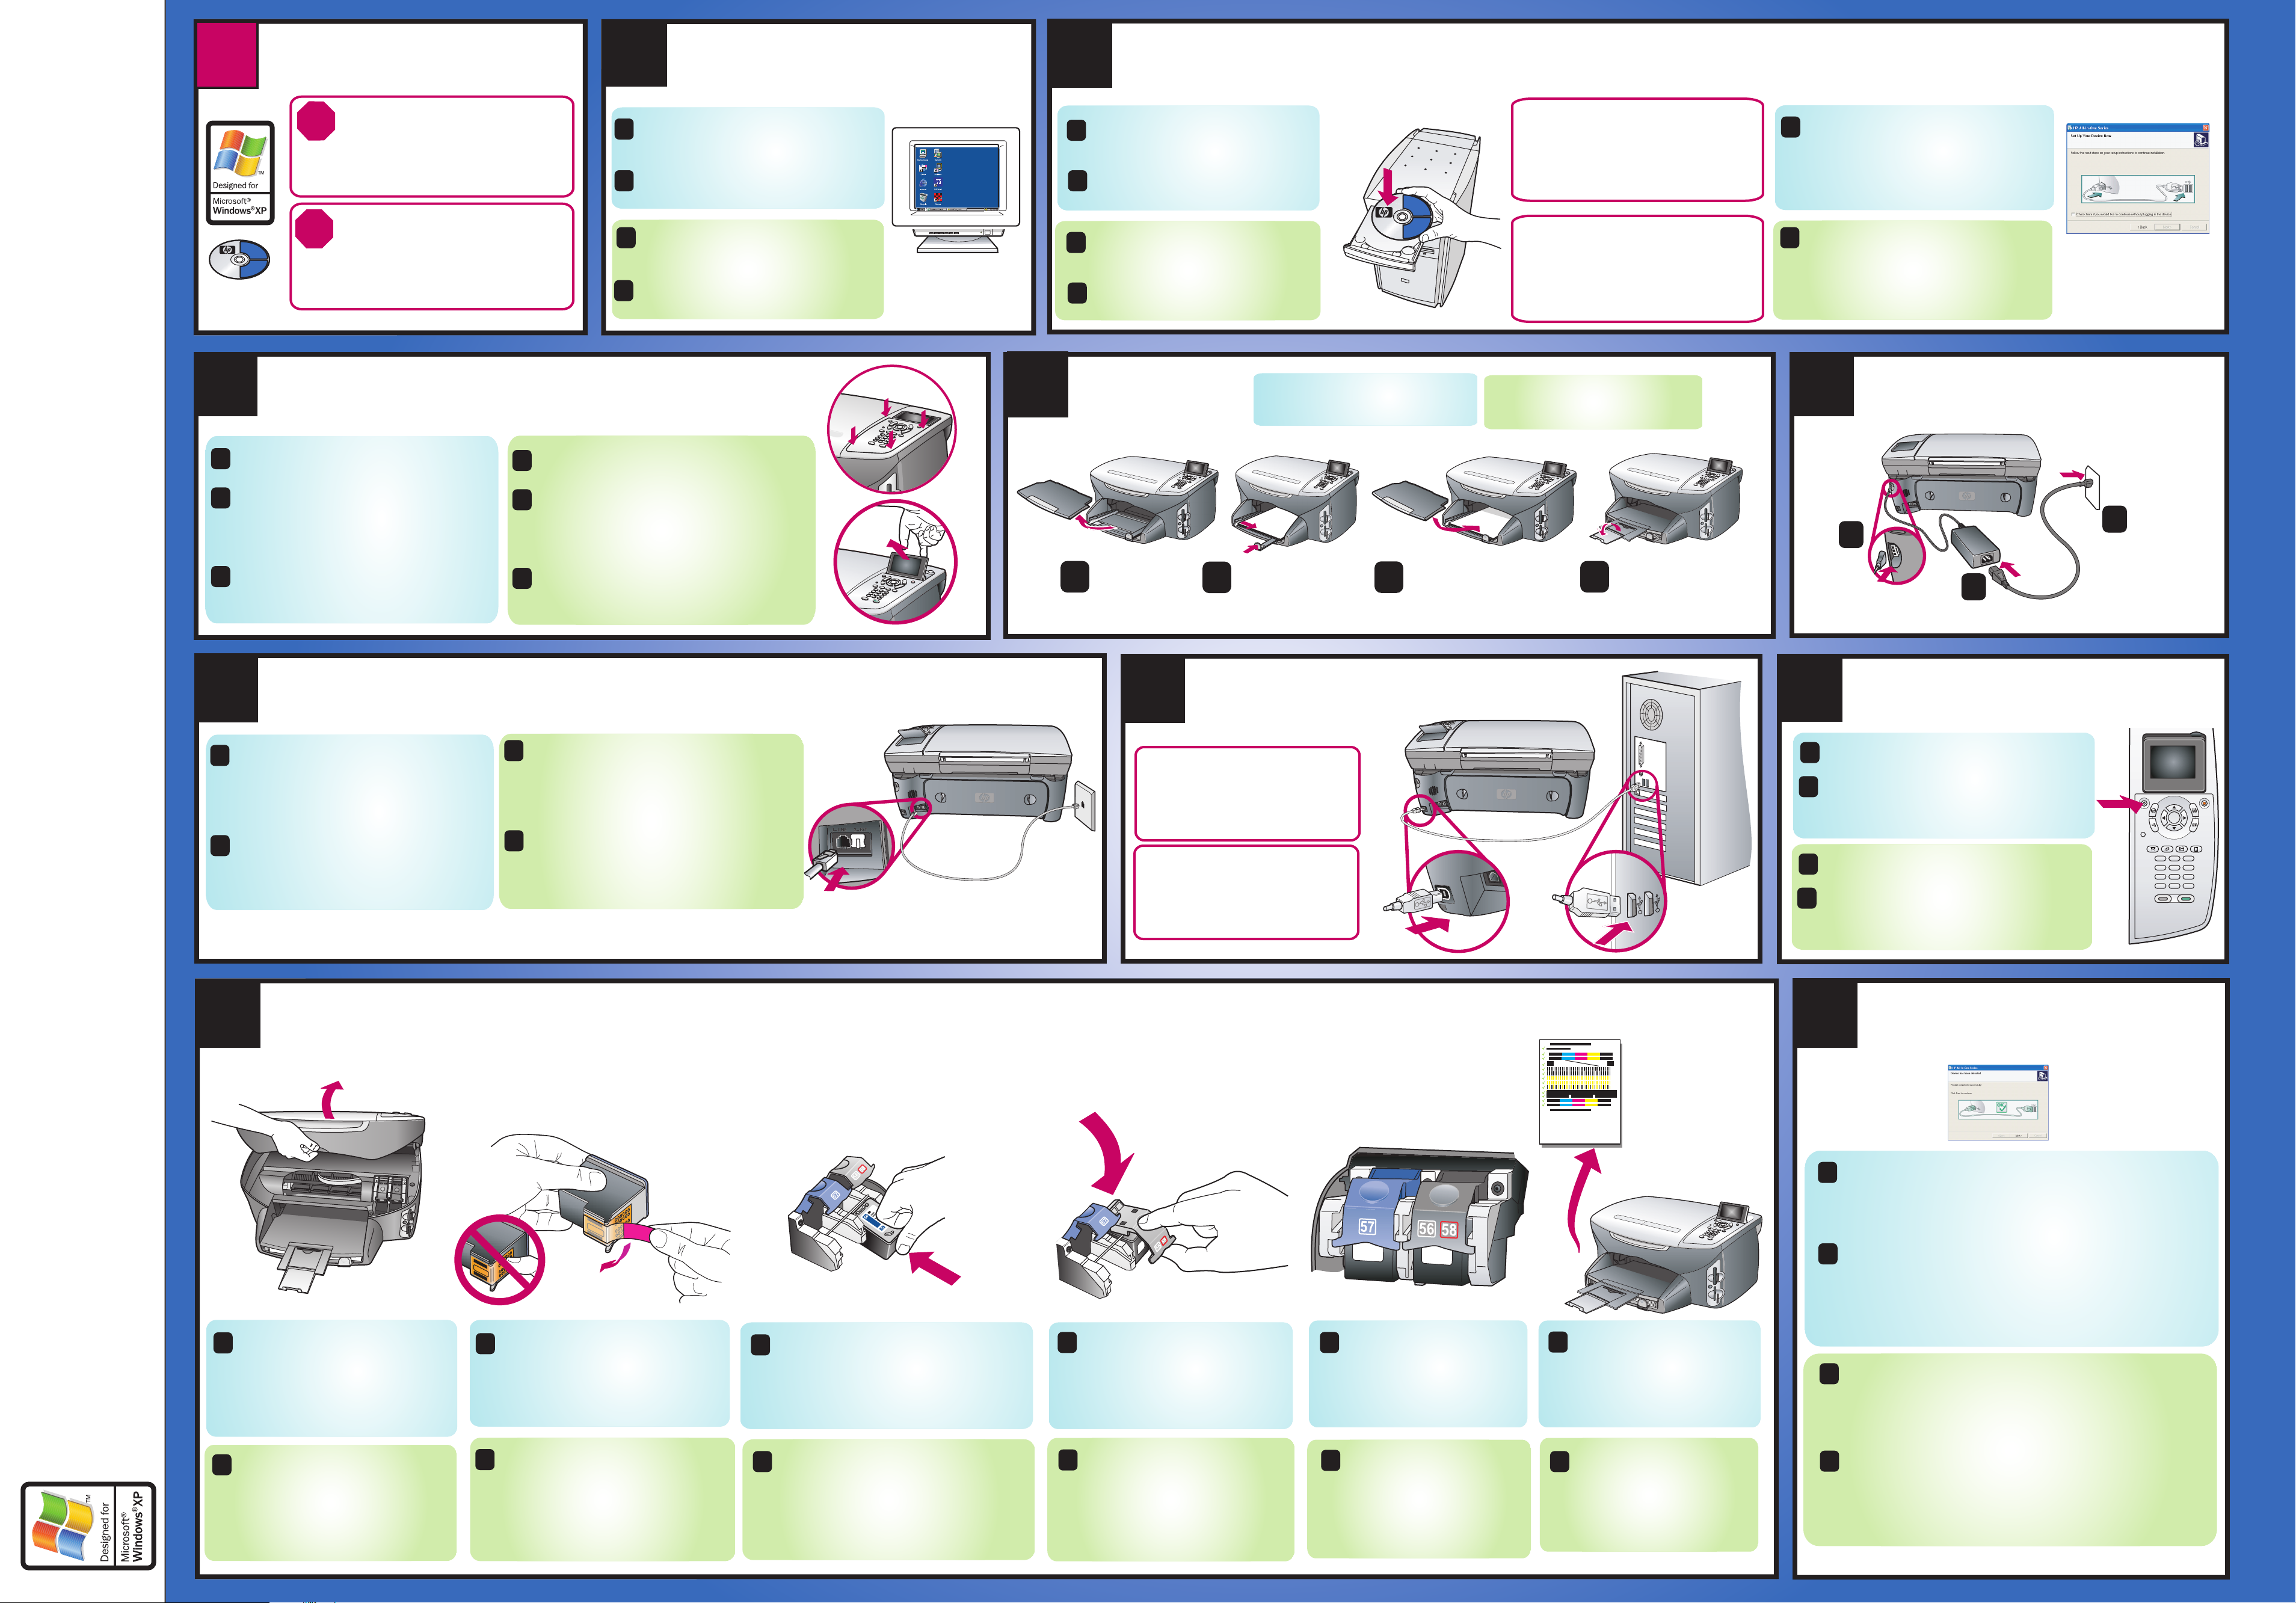
10
Insert and align print cartridges
Masukkan dan selaraskan print cartridge
Make sure the power is on. Lift
a
the print carriage door up until
it catches. Wait for the print
carriage to move to the right.
Lift the blue and gray latches.
Windows setup poster
hp psc 2400 photosmart series all-in-one
Remove the bright pink tape
b
from both print cartridges. Do
not touch the gold-colored
contacts or retape the
cartridges.
Hold the black print cartridge with the
c
HP label on top. Slide the cartridge
into the right (gray latch) side of the
print carriage.
Press down on the gray latch
until it locks into place. Insert
the color cartridge on the left
side, and lock into place.
Make sure both latches are
ed
locked into position. Close
the door.
Press OK on the front panel
f
to begin alignment. After a
page prints, alignment is
complete. Discard or
recycle this page.
11
a
b
a
Finish software installation
Selesaikan instalasi perangkat lunak
Hardware setup is complete. Return to your computer. On
the dialog box with the green checkmark, click Next.
Depending on your system, it may take 20 minutes or
more to finish installing the software.
After you restart your computer, the Fax Setup
Wizard appears. Follow the onscreen instructions.
When you see the Congratulations! dialog box,
you are ready to use your HP PSC. If you encounter
any problems during setup, see the Reference Guide.
Pemasangan perangkat keras telah selesai. kembali ke komputer
Anda. Pada kotak dialog dengan tanda periksa hijau, klik Next
[Berikutnya]. Tergantung pada sistem Anda, hal ini dapat
memakan waktu 20 menit atau lebih untuk menyelesaikan
penginstalan perangkat lunak.
Pastikan perangkat telah
a
dinyalakan. Angkat pintu print
carriage sampai terkunci.
Tunggu sampai print carriage
bergerak ke kanan. Angkat
pengunci biru dan abu-abu.
b
Lepaskan pita merah muda dari
ke dua print cartridge. Jangan
menyentuh kontak berwarna
emas atau memasang kembali
pita.
Pegang print cartridge hitam dengan
c
label HP menghadap ke atas. Geser
masuk cartridge ke sebelah kanan
(pengunci abu-abu) print carriage.
Tekan pengunci abu-abu sampai
d
terkunci ke dalam tempatnya.
Masukkan cartridge warna di
sebelah kiri dan kunci.
Pastikan ke dua pengunci
e
terkunci. Tutup pintunya.
Tekan OK pada panel depan
f
untuk memulai penyelarasan.
Setelah halaman dicetak,
penyelarasan selesai. Buang
atau daur ulang halaman
tersebut.
Setelah Anda menyalakan kembali komputer Anda, Wizard
b
Pemasangan Faksimile muncul. Ikuti instruksi pada layar. Saat
Anda melihat kotak dialog Congratulations [Selamat]!,
Anda siap menggunakan HP PSC Anda. Bila Anda mengalami
masalah selama pemasangan, baca Buku Petunjuk.
www.hp.com/support Copyright Hewlett-Packard Company 2003
Printed in Singapore.
Page 2
1
4
8
5
7
3
1010
2
9
1111
6
a
b
c
d
a
b
c
Macintosh setup poster
Macintosh Users START HEREMacintosh Users START HERE
This side of the poster is for Macintosh users. Make sure
you are using the correct side of the poster and CD for
your operating system.
Attach front panel cover
Load paper
Connect phone cord
Turn HP device on
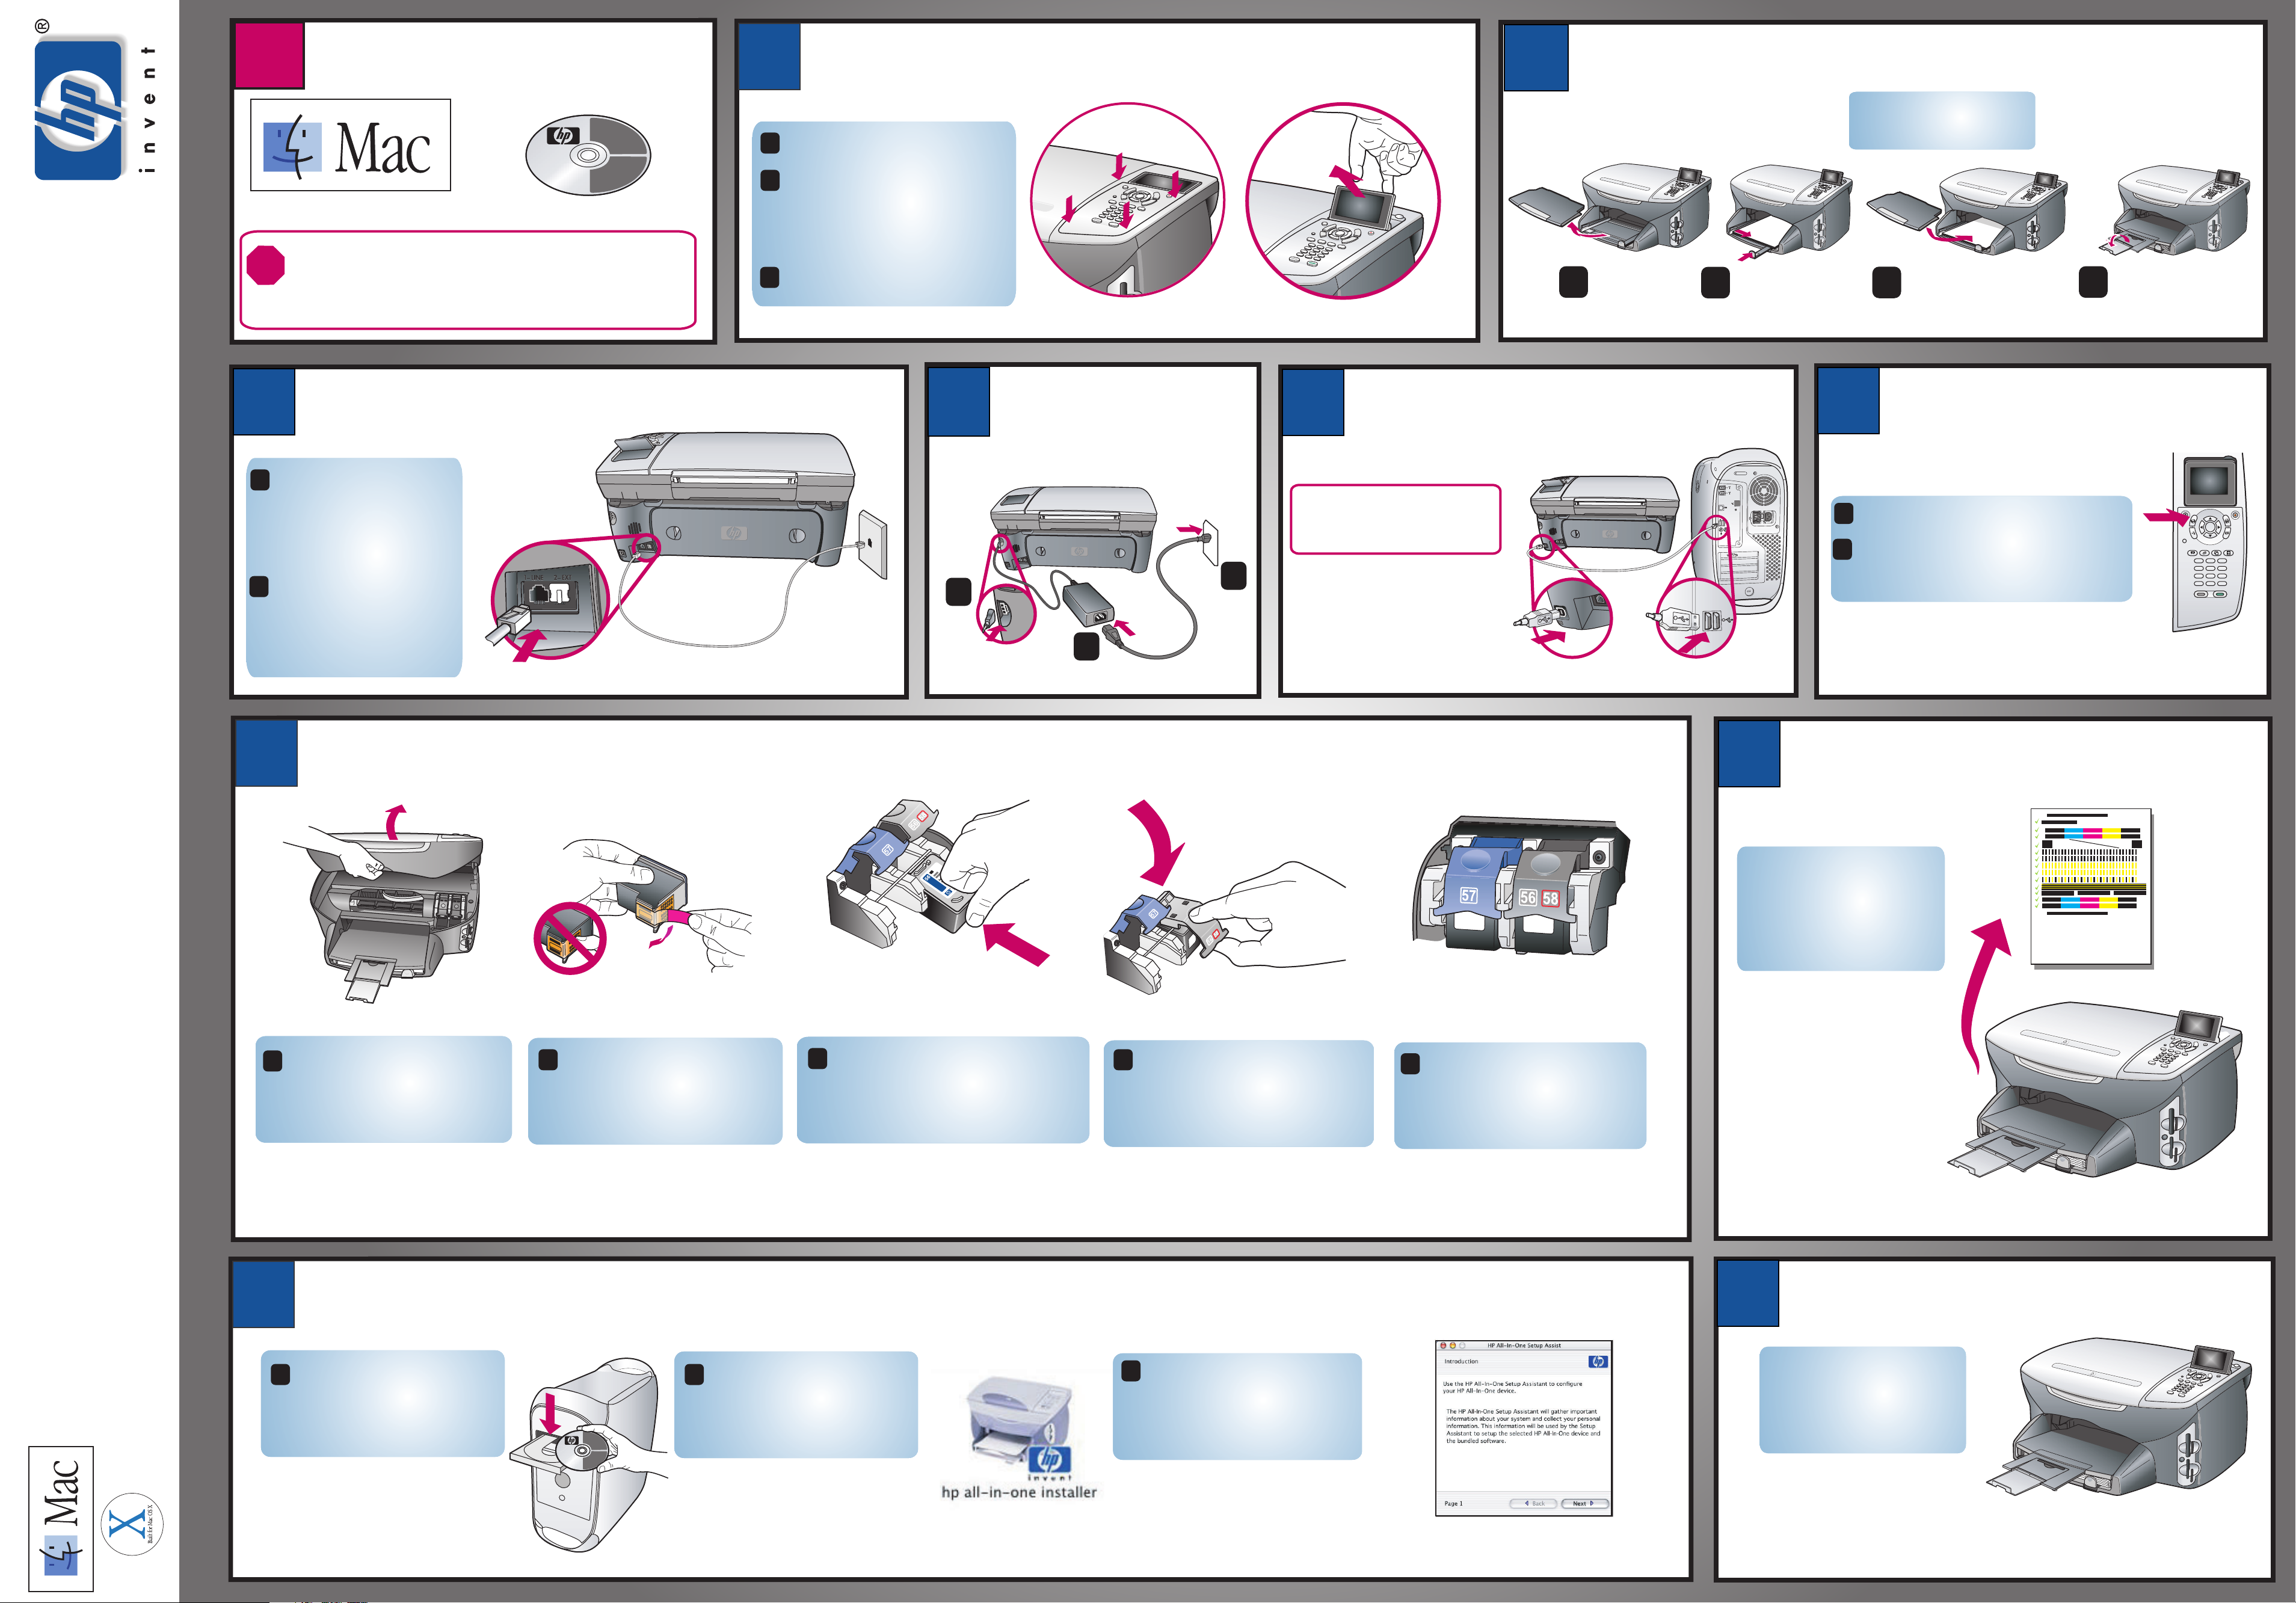
Insert print cartridges
Connect power cords
Install software
Align print cartridges
Congratulations!
Lift the print carriage door up
until it catches. Wait for the
print carriage to move to the
right. Lift the blue and gray
latches.
Remove the bright pink tape
from both print cartridges. Do
not touch the gold-colored
contacts or retape the
cartridges.
Press OK on the front
panel to begin alignment.
After a page prints,
alignment is complete.
Make sure both latches are
locked into position. Close
the door.
Turn on your Macintosh wait
for it to finish starting up.
Insert the
HP PSC Macintosh CD.
Double-click the HP All-
In-One Installer icon on
your desktop.
Follow the onscreen
instruction. Make sure you
complete the Setup
Assistant.
Use blank white paper to
prepare for print alignment.
You are ready to begin
using your HP device. See
the Reference Guide to get
started.
Remove any packaging material.
Place the front panel cover over
the buttons. Firmly press on the
sides to snap the cover in place.
Make sure all the buttons are
visible.
Lift the display.
a b
c
a
b
c
d
e
a
b
c
a
Connect USB cable
Press down on the gray latch
until it locks into place. Insert
the color cartridge on the left
side, and lock into place.
Hold the black print cartridge with the
HP logo on top. Slide the cartridge
into the right (gray latch) side of the
print carriage.
Turn power on.
Select your language, and then press
OK. Select your country/region (if not
listed, select Singapore) , then press OK.
a
b
Do not connect the USB cable
to a keyboard.
You must connect the
supplied phone cord to the
phone jack on the left
(1- LINE).
To connect an answering
machine or use your own
phone cord, see the Fax
Setup chapter in the
Reference Guide.
b
1-LINE
hp psc 2400 photosmart series all-in-one
 Loading...