

Page 1

HP ProBook Notebook PC
User Guide
Page 2

© Copyright 2010 Hewlett-Packard
Development Company, L.P.
Bluetooth is a trademark owned by its
proprietor and used by Hewlett-Packard
Company under license. Intel is a registered
trademark of Intel Corporation in the U.S.
and other countries. Microsoft and Windows
are U.S. registered trademarks of Microsoft
Corporation. SD Logo is a trademark of its
proprietor.
The information contained herein is subject
to change without notice. The only
warranties for HP products and services are
set forth in the express warranty statements
accompanying such products and services.
Nothing herein should be construed as
constituting an additional warranty. HP shall
not be liable for technical or editorial errors
or omissions contained herein.
First Edition: May 2010
Document Part Number: 600138-001
Product notice
This user guide describes features that are
common to most models. Some features
may not be available on your computer.
Page 3

Safety warning notice
WARNING! To reduce the possibility of heat-related injuries or of overheating the computer, do not
place the computer directly on your lap or obstruct the computer air vents. Use the computer only on a
hard, flat surface. Do not allow another hard surface, such as an adjoining optional printer, or a soft
surface, such as pillows or rugs or clothing, to block airflow. Also, do not allow the AC adapter to contact
the skin or a soft surface, such as pillows or rugs or clothing, during operation. The computer and the
AC adapter comply with the user-accessible surface temperature limits defined by the International
Standard for Safety of Information Technology Equipment (IEC 60950).
iii
Page 4

iv Safety warning notice
Page 5

Table of contents
1 Features ........................................................................................................................................................... 1
Identifying hardware ............................................................................................................................. 1
Top components .................................................................................................................. 1
TouchPad ............................................................................................................ 1
Lights ................................................................................................................... 2
Power button and fingerprint reader .................................................................... 3
Keys .................................................................................................................... 4
Front components ................................................................................................................ 5
Right-side components ........................................................................................................ 6
Left-side components .......................................................................................................... 7
Bottom components ............................................................................................................. 8
Display components ........................................................................................................... 9
Wireless antennas ............................................................................................................... 9
Additional hardware components ...................................................................................... 11
Identifying the labels ........................................................................................................................... 11
2 Wireless, local area network, and modem .................................................................................................. 13
Using wireless devices ....................................................................................................................... 13
Identifying wireless and network icons .............................................................................. 14
Using the wireless controls ................................................................................................ 14
Using the wireless hotkey .................................................................................................. 15
Using HP Wireless Assistant software (select models only) .............................................. 15
Using HP Connection Manager (select models only) ........................................................ 15
Using operating system controls ........................................................................................................ 16
Using a WLAN device ........................................................................................................................ 16
Setting up a WLAN ............................................................................................................ 16
Protecting your WLAN ....................................................................................................... 17
Connecting to a WLAN ...................................................................................................... 18
Roaming to another network .............................................................................................. 18
Using HP Mobile Broadband (select models only) ............................................................................. 18
Inserting a SIM ................................................................................................................... 19
Removing a SIM ................................................................................................................ 20
Using a Bluetooth wireless device ...................................................................................................... 22
Bluetooth and Internet Connection Sharing (ICS) ............................................................. 22
v
Page 6

Troubleshooting wireless connection problems ................................................................................. 22
Cannot create a WLAN connection ................................................................................... 22
Cannot connect to a preferred network ............................................................................. 23
Network icon is not displayed ............................................................................................ 23
Current network security codes are unavailable ................................................................ 23
WLAN connection is very weak ......................................................................................... 24
Cannot connect to the wireless router ............................................................................... 24
Connecting to a local area network (LAN) .......................................................................................... 25
Using the modem ............................................................................................................................... 25
Connecting a modem cable ............................................................................................... 26
Connecting a country- or region-specific modem cable adapter ....................................... 26
Selecting a location setting ................................................................................................ 27
Viewing the current location selection ............................................................... 27
Adding new locations when traveling ................................................................ 27
Solving travel connection problems .................................................................. 28
3 Pointing devices and keyboard ................................................................................................................... 30
Using pointing devices ....................................................................................................................... 30
Setting pointing device preferences ................................................................................... 30
Using the TouchPad .......................................................................................................... 31
Turning the TouchPad on and off ...................................................................... 31
Navigating ......................................................................................................... 31
Selecting ........................................................................................................... 32
Using TouchPad gestures ................................................................................. 32
Scrolling ............................................................................................ 33
Pinching/Zooming ............................................................................. 33
Rotating ............................................................................................ 34
Three-finger flick ............................................................................... 34
Connecting an external mouse .......................................................................................... 35
Using the keyboard ............................................................................................................................ 35
Using hotkeys .................................................................................................................... 35
Displaying system information .......................................................................... 36
Initiating Sleep ................................................................................................... 36
Opening the Print Options window .................................................................... 37
Displaying battery status ................................................................................... 37
Switching the screen image .............................................................................. 37
Opening FastLook or Outlook ........................................................................... 37
Opening QuickWeb ........................................................................................... 37
Decreasing screen brightness ........................................................................... 38
Increasing screen brightness ............................................................................ 38
Turning wireless features on and off ................................................................. 38
Muting and restoring speaker sound ................................................................. 38
Decreasing speaker volume .............................................................................. 38
vi
Page 7

Increasing speaker volume ............................................................................... 38
Using HP FastLook ............................................................................................................................ 39
Using keypads .................................................................................................................................... 39
Using the embedded numeric keypad ............................................................................... 39
Enabling and disabling the embedded numeric keypad .................................... 39
Switching key functions on the embedded numeric keypad ............................. 40
Using an optional external numeric keypad ....................................................................... 40
Cleaning the TouchPad and keyboard ............................................................................................... 41
4 Multimedia ..................................................................................................................................................... 42
Multimedia features ............................................................................................................................ 42
Identifying your multimedia components ........................................................................... 42
Adjusting the volume ......................................................................................................... 43
Multimedia software ........................................................................................................................... 44
Accessing your preinstalled multimedia software .............................................................. 45
Installing multimedia software from a disc ......................................................................... 45
Audio .................................................................................................................................................. 45
Connecting external audio devices .................................................................................... 45
Checking your audio functions ........................................................................................... 46
Connecting an HDMI device ............................................................................................................... 46
Configuring audio for HDMI ............................................................................................... 47
Video .................................................................................................................................................. 47
Connecting an external monitor or projector ...................................................................... 48
External optical drive (purchased separately) .................................................................................... 48
Identifying an external optical drive ................................................................................... 48
Playing music ..................................................................................................................... 48
Watching a movie .............................................................................................................. 49
Changing DVD region settings .......................................................................................... 50
Creating (burning) a CD or DVD ........................................................................................ 51
Removing an optical disc (CD or DVD) ............................................................................. 51
Webcam (select models only) ............................................................................................................ 52
Webcam tips ...................................................................................................................... 53
Adjusting webcam properties ............................................................................................. 53
5 Power management ...................................................................................................................................... 54
Setting power options ......................................................................................................................... 54
Using power-saving states ................................................................................................. 54
Initiating and exiting Sleep ................................................................................ 54
Initiating and exiting Hibernation ....................................................................... 55
Using battery meter ........................................................................................................... 55
Using power plans ............................................................................................................. 55
Viewing the current power plan ......................................................................... 56
Selecting a different power plan ........................................................................ 56
vii
Page 8

Customizing power plans .................................................................................. 56
Setting password protection on wakeup ............................................................................ 56
Using HP Power Assistant ................................................................................................................. 57
Starting HP Power Assistant .............................................................................................. 57
Using external AC power .................................................................................................................... 58
Connecting the AC adapter ............................................................................................... 58
Using battery power ........................................................................................................................... 59
Finding battery information in Help and Support ............................................................... 59
Displaying the remaining battery charge ........................................................................... 60
Inserting or removing the battery ....................................................................................... 60
Charging a battery ............................................................................................................. 61
Managing low battery levels .............................................................................................. 62
Identifying low battery levels ............................................................................. 62
Resolving a low battery level ............................................................................. 62
Resolving a low battery level when external power is available ....... 62
Resolving a low battery level when a charged battery is
available ........................................................................................... 62
Resolving a low battery level when no power source is
available ........................................................................................... 62
Resolving a low battery level when the computer cannot exit
Hibernation ....................................................................................... 63
Calibrating a battery ........................................................................................................... 63
Step 1: Fully charge the battery ........................................................................ 63
Step 2: Disable Hibernation and Sleep ............................................................. 63
Step 3: Discharge the battery ............................................................................ 64
Step 4: Fully recharge the battery ..................................................................... 64
Step 5: Reenable Hibernation and Sleep .......................................................... 64
Conserving battery power .................................................................................................. 65
Storing a battery ................................................................................................................ 65
Disposing of a used battery ............................................................................................... 65
Testing an AC adapter ....................................................................................................................... 66
Shutting down the computer ............................................................................................................... 66
6 Drives ............................................................................................................................................................. 68
Identifying installed drives .................................................................................................................. 68
Handling drives ................................................................................................................................... 68
Improving hard drive performance ..................................................................................................... 70
Using Disk Defragmenter ................................................................................................... 70
Using Disk Cleanup ........................................................................................................... 70
Using HP 3D DriveGuard ................................................................................................................... 71
Identifying HP 3D DriveGuard status ................................................................................. 71
Using HP 3D DriveGuard software .................................................................................... 72
Replacing a hard drive ....................................................................................................................... 73
viii
Page 9

7 External devices ............................................................................................................................................ 76
Using a USB device ........................................................................................................................... 76
Connecting a USB device .................................................................................................. 76
Removing a USB device .................................................................................................... 77
Using USB legacy support ................................................................................................. 77
Using an eSATA device ..................................................................................................................... 78
Connecting an eSATA device ............................................................................................ 78
Removing an eSATA device .............................................................................................. 79
Using optional external drives ............................................................................................................ 80
Using an optional external optical drive ............................................................................. 80
Inserting an optical disc (CD or DVD) ............................................................... 80
Removing an optical disc (CD or DVD) ............................................................. 81
When the disc tray opens ................................................................. 81
When the disc tray does not open .................................................... 82
8 External media cards .................................................................................................................................... 84
Using Media Card Reader cards ........................................................................................................ 84
Inserting a digital card ........................................................................................................ 84
Removing a digital card ..................................................................................................... 85
9 Memory modules .......................................................................................................................................... 86
10 Security ........................................................................................................................................................ 90
Protecting the computer ..................................................................................................................... 90
Using passwords ................................................................................................................................ 91
Setting passwords in Windows .......................................................................................... 91
Setting passwords in Computer Setup .............................................................................. 91
BIOS administrator password ............................................................................................ 92
Managing a BIOS administrator password ........................................................ 92
Entering a BIOS administrator password .......................................................... 93
Using Computer Setup DriveLock ..................................................................................... 94
Setting a DriveLock password ........................................................................... 94
Entering a DriveLock password ........................................................................ 95
Changing a DriveLock password ...................................................................... 95
Removing DriveLock protection ........................................................................ 96
Using Computer Setup Auto DriveLock ............................................................................. 96
Entering an Automatic DriveLock password ..................................................... 96
Removing Automatic DriveLock protection ....................................................... 97
Using Computer Setup security features ............................................................................................ 98
Securing system devices ................................................................................................... 98
Viewing Computer Setup System Information ................................................................... 99
Using Computer Setup System IDs ................................................................................... 99
Using antivirus software ................................................................................................................... 100
ix
Page 10

Using firewall software ..................................................................................................................... 100
Installing critical security updates ..................................................................................................... 100
Using HP ProtectTools Security Manager (select models only) ....................................................... 101
Installing a security cable ................................................................................................................. 101
Using the fingerprint reader .............................................................................................................. 102
Locating the fingerprint reader ......................................................................................... 102
Enrolling your fingerprints ................................................................................................ 103
Using your registered fingerprint to log on to Windows ................................................... 103
11 Software Updates ...................................................................................................................................... 104
Updating software ............................................................................................................................ 104
Updating the BIOS ........................................................................................................... 105
Determining the BIOS version ......................................................................... 105
Downloading a BIOS update ........................................................................... 106
Updating programs and drivers ....................................................................................... 107
Using SoftPaq Download Manager .................................................................................. 107
12 Backup and recovery ................................................................................................................................ 109
Backing up your information ............................................................................................................. 110
Performing a recovery ...................................................................................................................... 112
Using the Windows recovery tools ................................................................................... 112
Using f11 .......................................................................................................................... 113
Using a Windows 7 operating system DVD (purchased separately) ............................... 113
13 Computer Setup ........................................................................................................................................ 115
Starting Computer Setup .................................................................................................................. 115
Using Computer Setup ..................................................................................................................... 115
Navigating and selecting in Computer Setup ................................................................... 115
Restoring factory settings in Computer Setup ................................................................. 116
Computer Setup menus ................................................................................................................... 116
File menu ......................................................................................................................... 117
Security menu .................................................................................................................. 117
System Configuration menu ............................................................................................ 118
14 MultiBoot ................................................................................................................................................... 123
About the boot device order ............................................................................................................. 123
Enabling boot devices in Computer Setup ....................................................................................... 124
Considering boot order changes ...................................................................................................... 125
Choosing MultiBoot preferences ...................................................................................................... 126
Setting a new boot order in Computer Setup ................................................................... 126
Dynamically choosing a boot device using the F9 prompt ............................................... 126
Setting a MultiBoot Express prompt ................................................................................ 127
Entering MultiBoot Express preferences ......................................................................... 127
x
Page 11

15 Management and Printing ........................................................................................................................ 128
Using Client Management Solutions ................................................................................................ 128
Configuring and deploying a software image ................................................................... 128
Managing and updating software ..................................................................................... 129
HP SSM (System Software Manager) ............................................................. 129
Using the HP Universal Print Driver (select models only) ................................................................ 129
Index ................................................................................................................................................................. 130
xi
Page 12

xii
Page 13
1 Features
Identifying hardware
Components included with the computer may vary by region and model. The illustrations in this chapter
identify the standard features on most computer models.
To see a list of hardware installed in the computer, follow these steps:
Select Start > Control Panel > System and Security > System.> Device Manager.
▲
You can also add hardware or modify device configurations using Device Manager.
NOTE: Windows® includes the User Account Control feature to improve the security of your computer.
You may be prompted for your permission or password for tasks such as installing software, running
utilities, or changing Windows settings. Refer to Help and Support for more information.
Top components
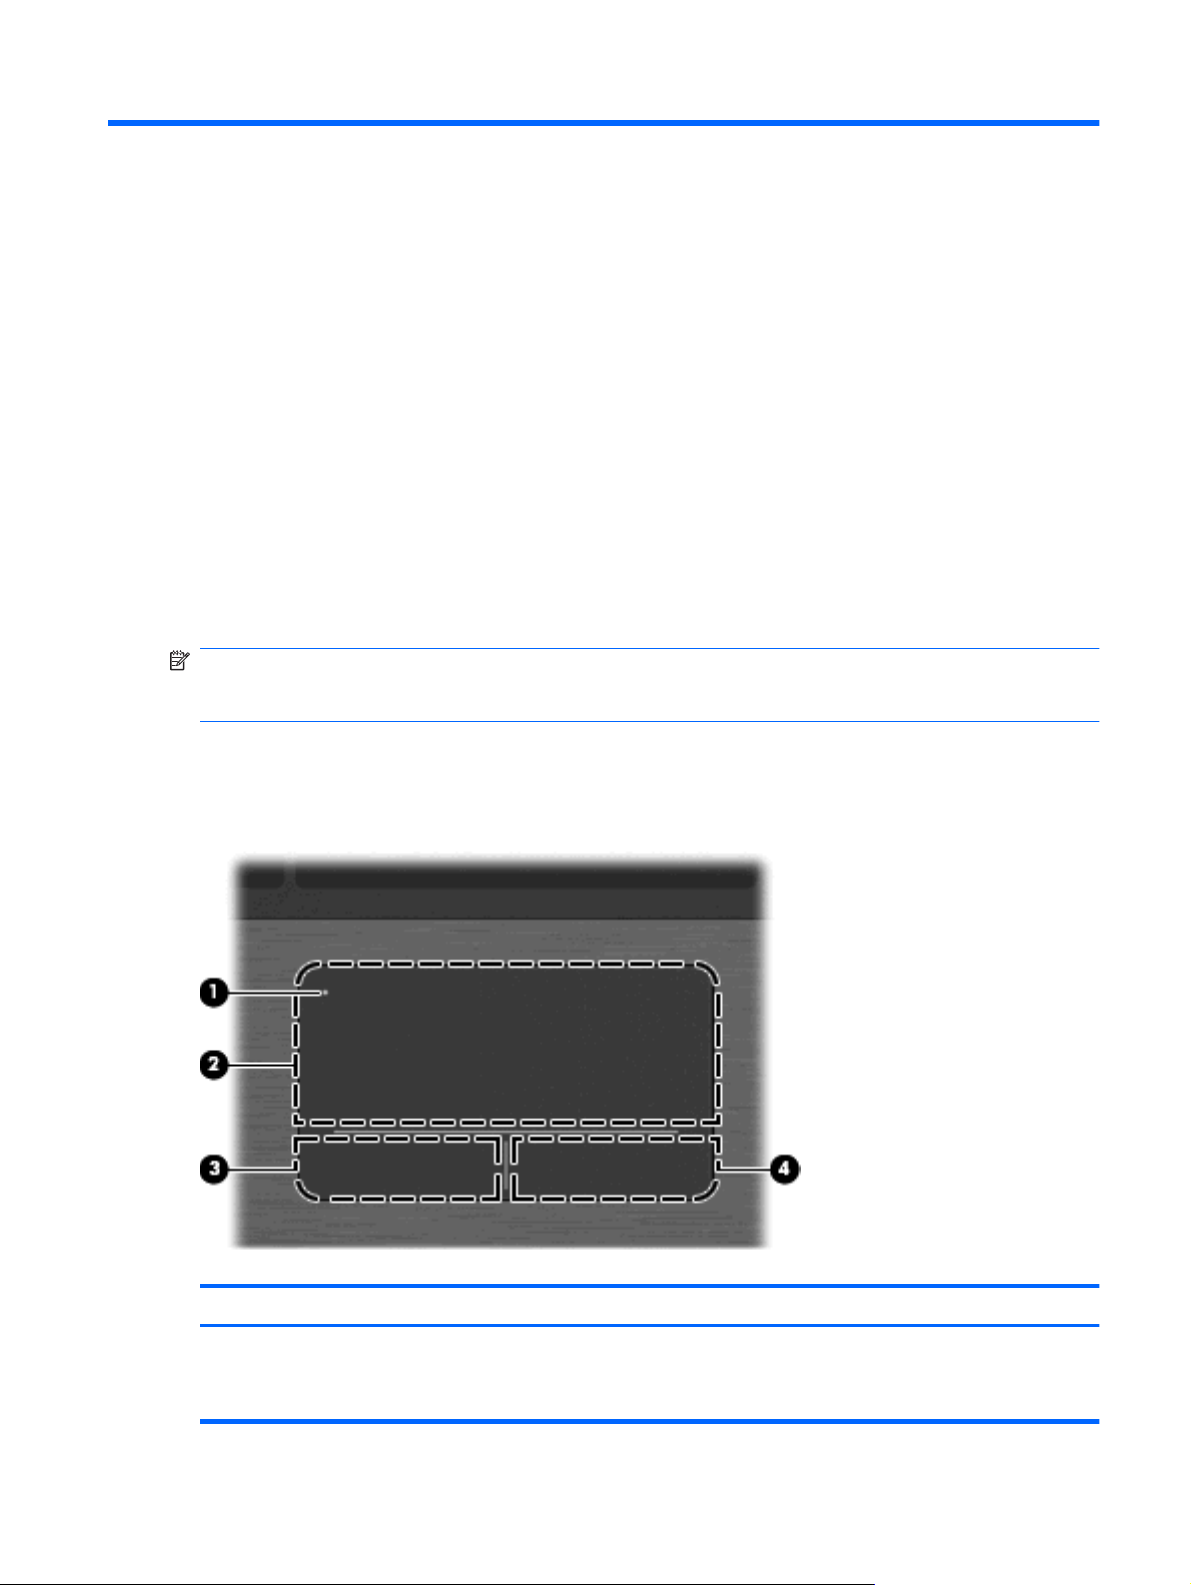
TouchPad
Component Description
(1) TouchPad off indicator To turn the TouchPad on and off, quickly double-tap the TouchPad
off indicator.
NOTE: When the TouchPad is active, the light is off.
Identifying hardware 1
Page 14
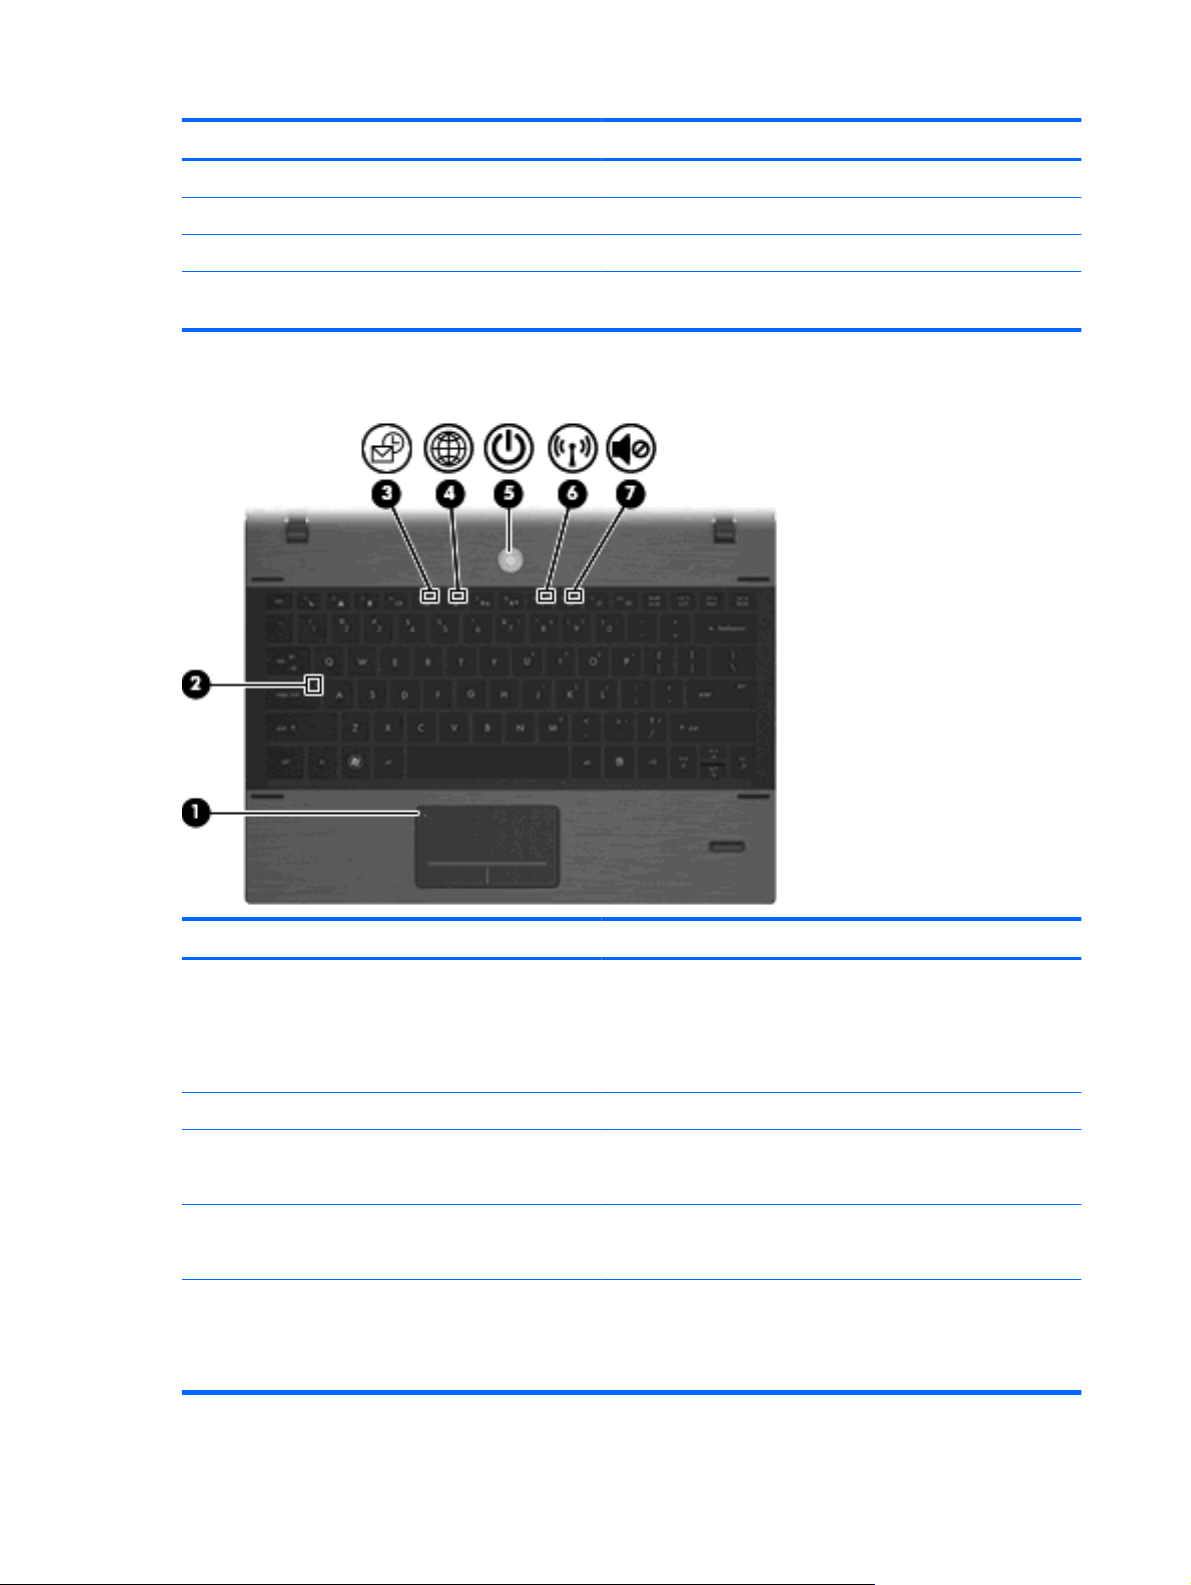
Lights
Component Description
(2) TouchPad* Moves the pointer and selects or activates items on the screen.
(3) Left TouchPad control* Functions like the left button on an external mouse.
(4) Right TouchPad control* Functions like the right button on an external mouse.
*This table describes factory settings. To view or change pointing device preferences, select Start > Devices and Printers.
Then, right-click the device representing your computer, and select > Mouse settings.
Component Description
(1) TouchPad off indicator
(2) Caps lock light On: Caps lock is on.
(3) FastLook light
(4) QuickWeb light
(5) Power light
2 Chapter 1 Features
Off: the TouchPad is on.
●
Amber: the TouchPad is off.
●
To switch between active and inactive, quickly double-tap the
TouchPad off indicator.
On: FastLook is on.
●
Off: FastLook is off.
●
On: QuickWeb is on.
●
Off: QuickWeb is off.
●
On: The computer is on.
●
Blinking: The computer is in the Sleep state.
●
Off: The computer is off or in Hibernation.
●
Page 15
Component Description
(6) Wireless light
(7) Sound mute light
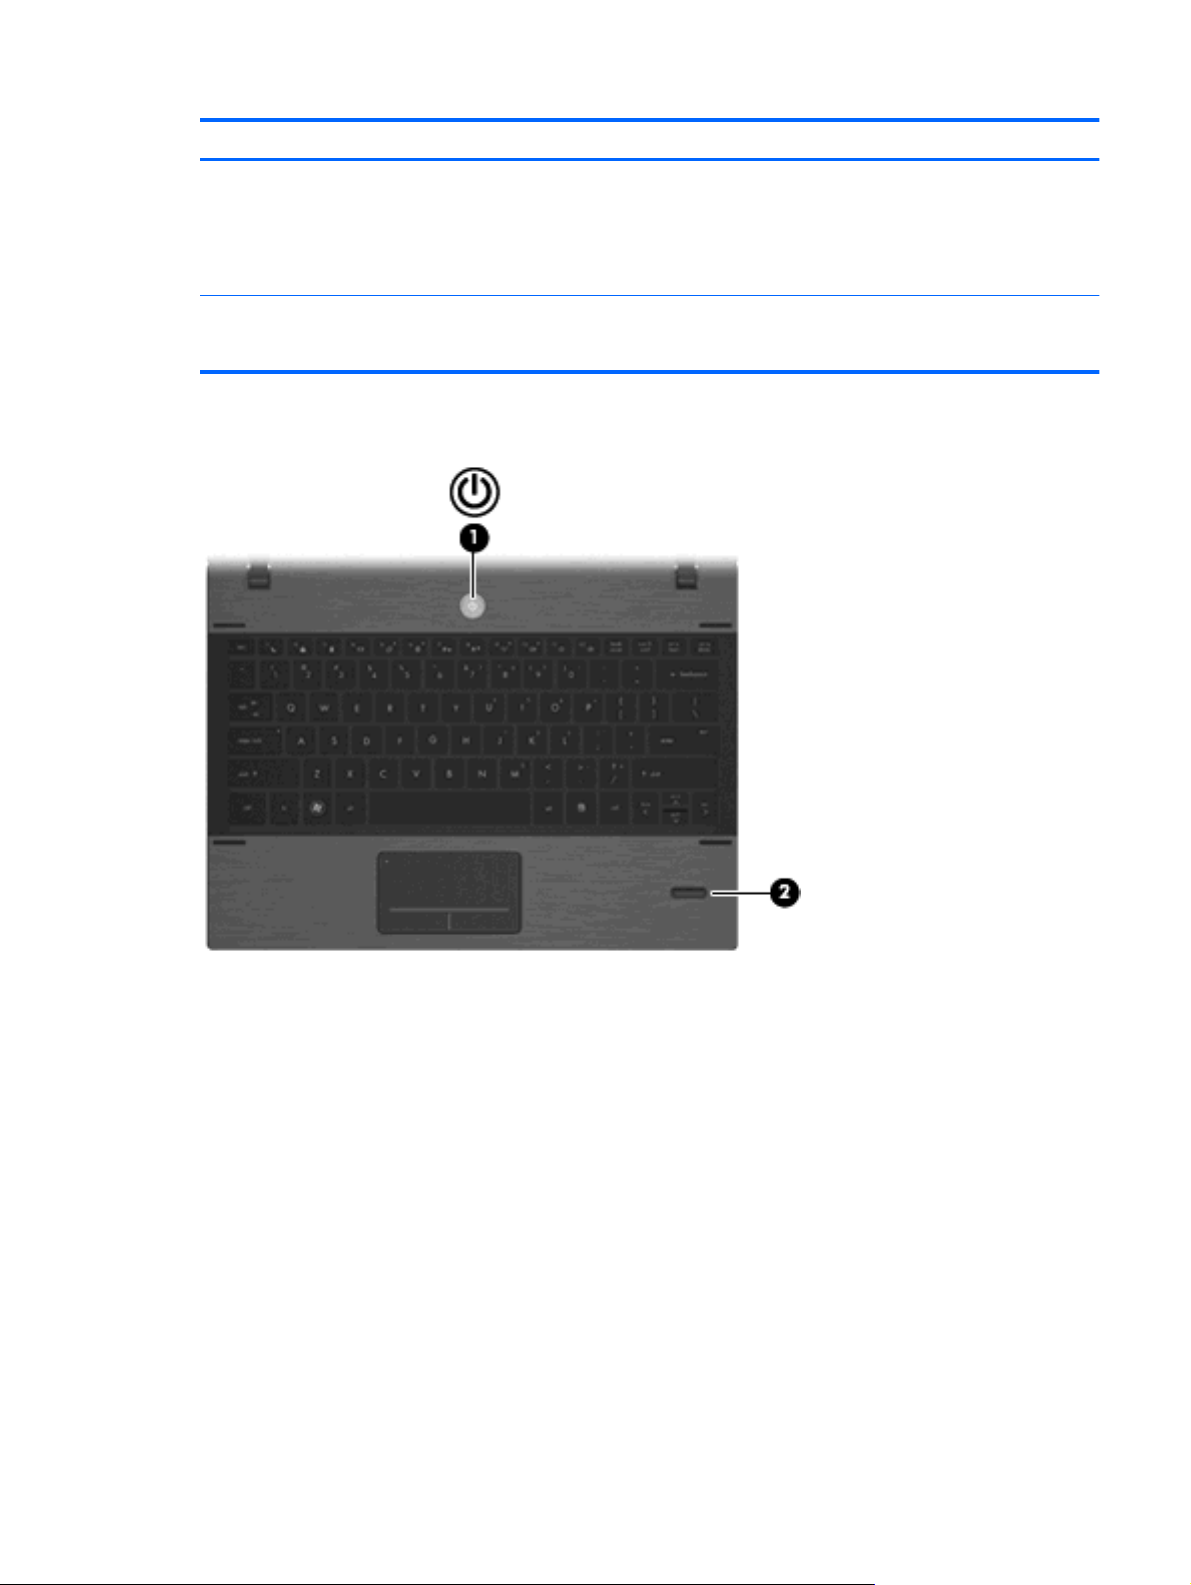
Power button and fingerprint reader
White: An integrated wireless device, such as a wireless local
●
area network (WLAN) device, HP Mobile Broadband Module
(select models only), and/or a Bluetooth® device (select
models only), is on.
Amber: All wireless devices are off.
●
On: The speaker sound is muted.
●
Off: The speaker sound is not muted.
●
Identifying hardware 3
Page 16
Component Description
(1) Power button
(2) Fingerprint reader (select models only) Allows a fingerprint logon to Windows, instead of a
When the computer is off, press the button to turn on
●
the computer.
When the computer is on, press the button to shut
●
down the computer.
NOTE: Although you can shut down the computer
with the power button, the recommended procedure
is to use the Windows Shut Down command.
When the computer is in the Sleep state, press the
●
button briefly to exit Sleep.
When the computer is in Hibernation, press the
●
button briefly to exit Hibernation.
If the computer has stopped responding and Windows
shutdown procedures are ineffective, press and hold the
power button for at least 5 seconds to turn off the
computer.
To learn more about your power settings, select Start >
Control Panel > System and Security > Power
Options.
password logon.
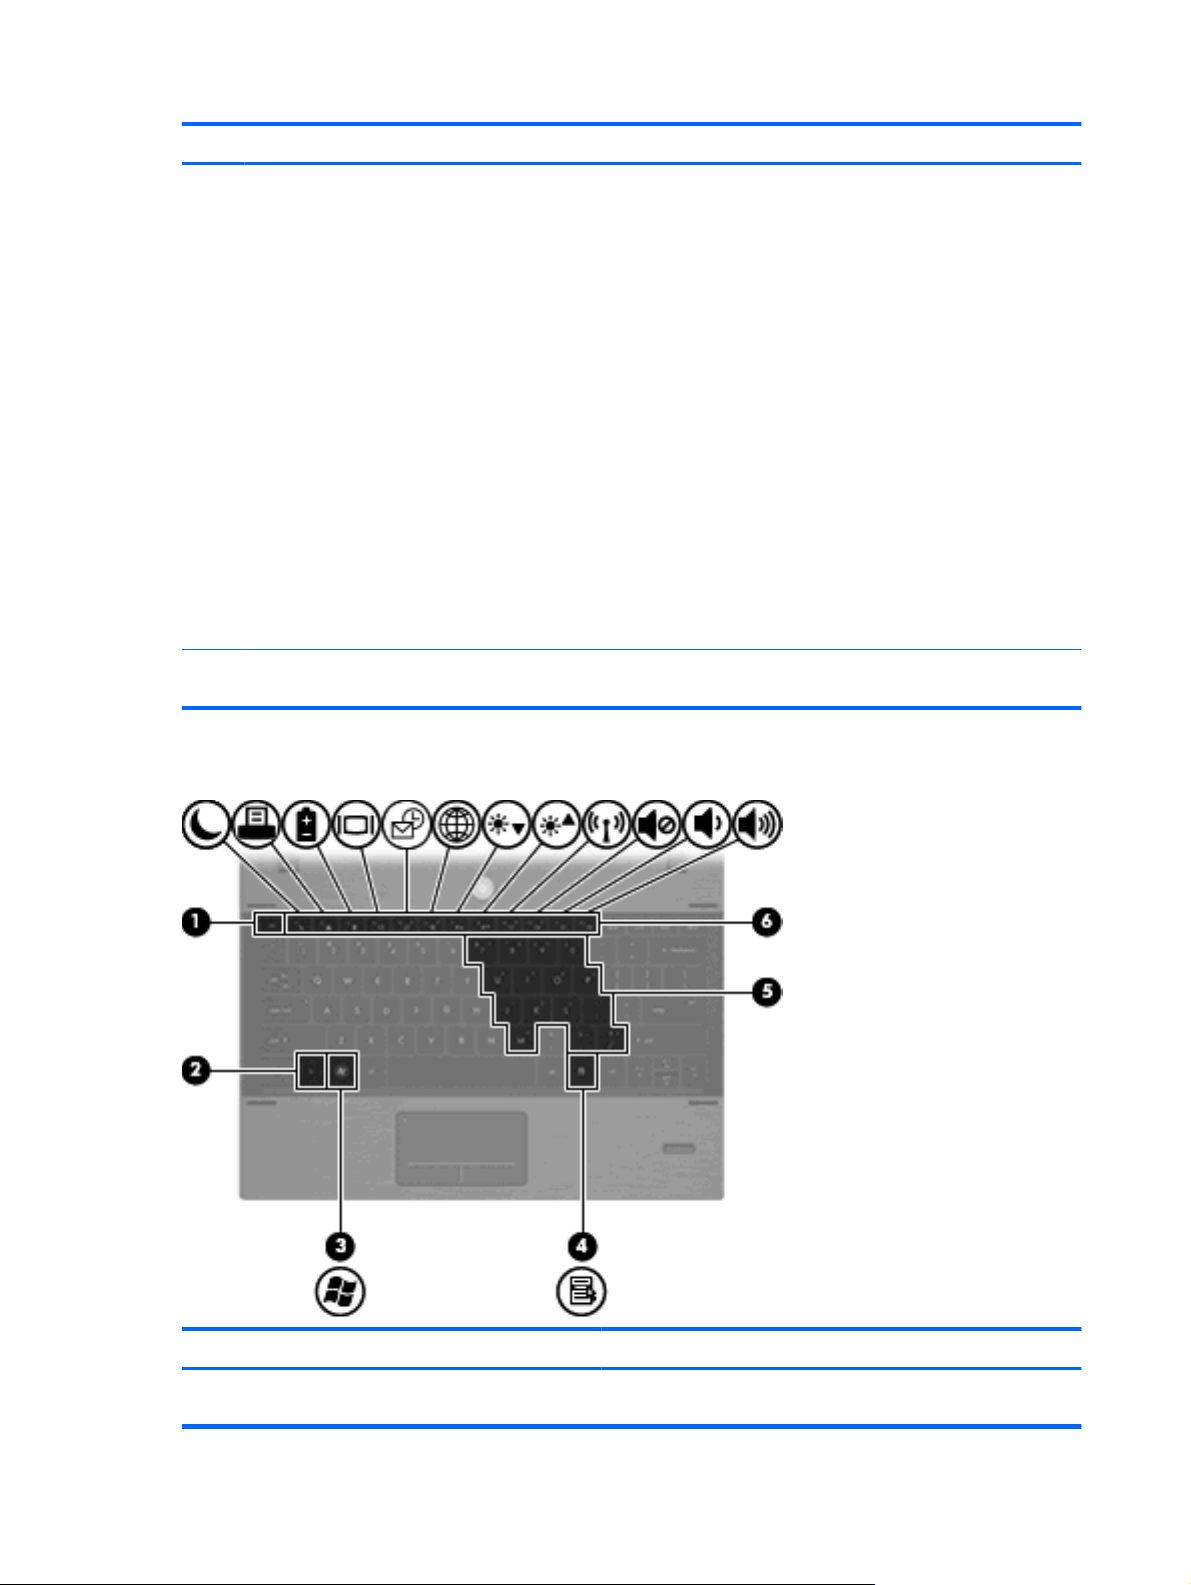
Keys
Component Description
(1) esc key Displays system information when pressed in combination with the
4 Chapter 1 Features
fn key.
Page 17
Component Description
(2) fn key Executes frequently used system functions when pressed in
(3) Windows logo key Displays the Windows Start menu.
(4) Windows applications key Displays a shortcut menu for items beneath the pointer.
(5) Embedded numeric keypad keys When the keypad has been enabled, it can be used like the keys
(6) Function keys Execute frequently used system functions when pressed in
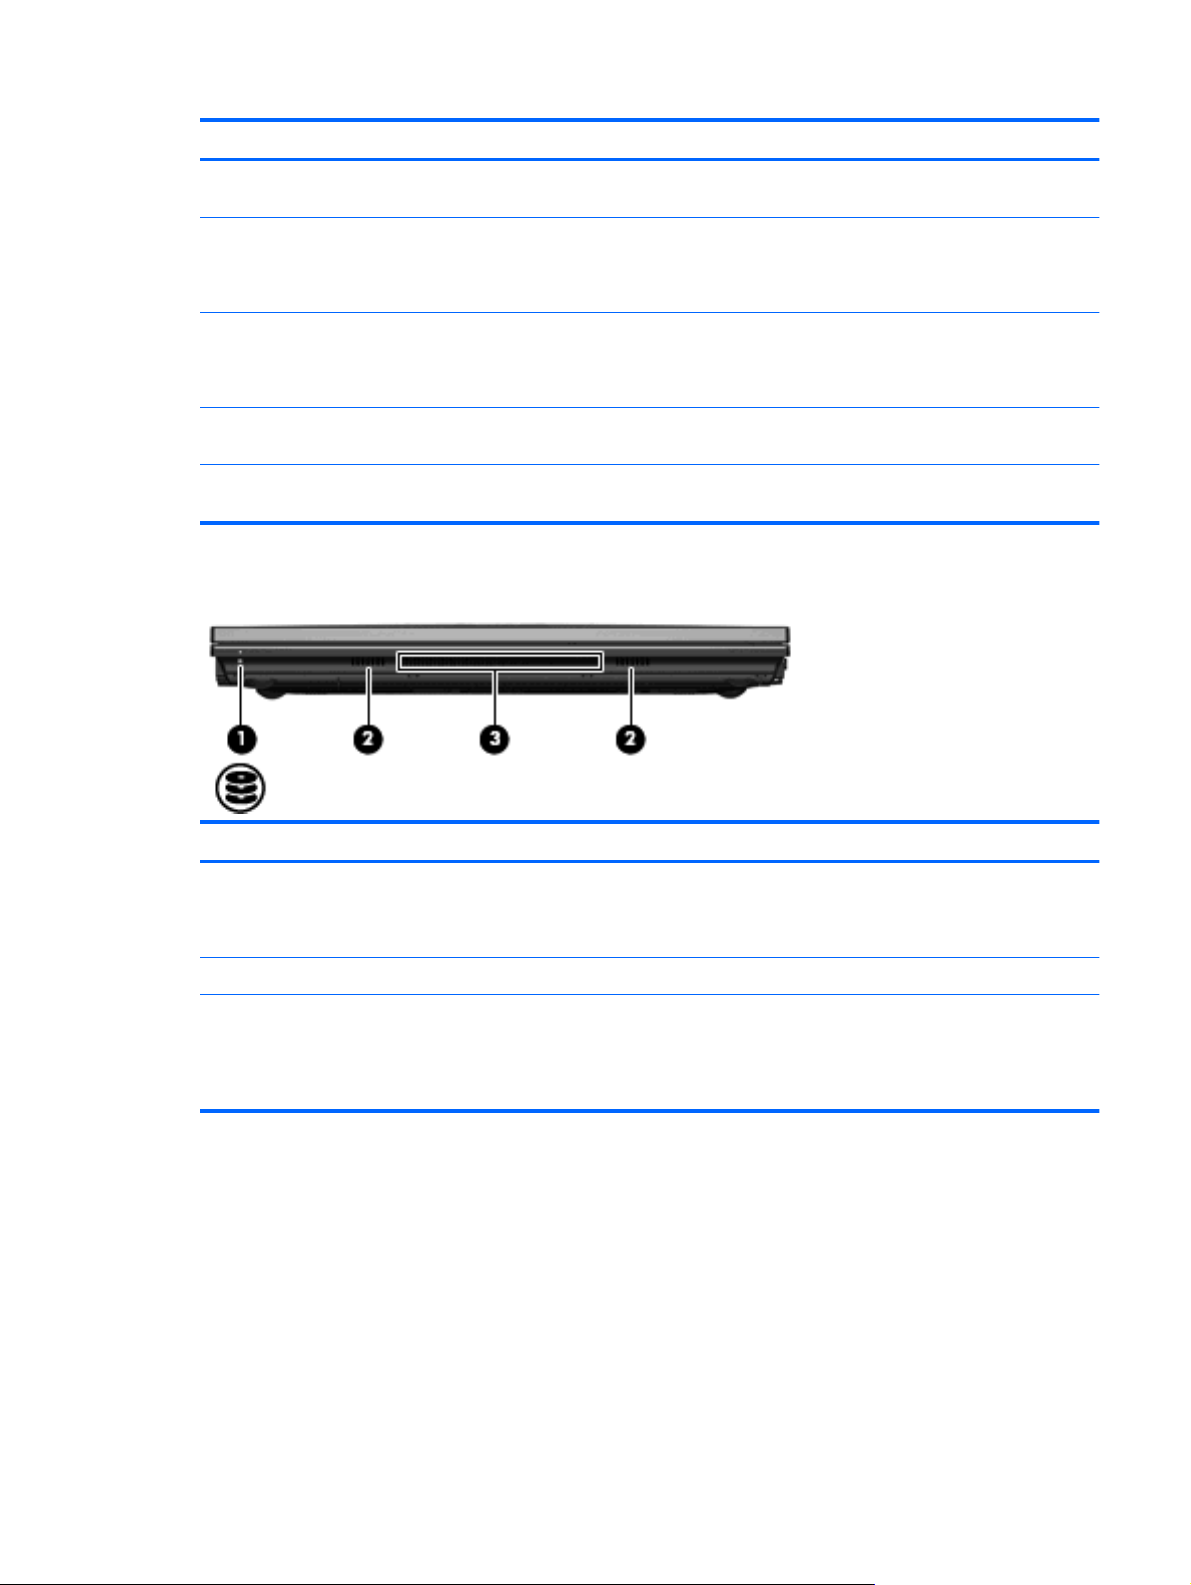
Front components
combination with a function key or the esc key.
NOTE: This feature does not exist if you are using the Linux
operating system.
NOTE: This feature does not exist if you are using the Linux
operating system.
on an external numeric keypad.
combination with the fn key.
Component Description
(1) Drive light
(2) Speakers (2) Produce sound.
(3) Vent Enables airflow to cool internal components.
White: The hard drive is being accessed.
●
Amber: HP 3D DriveGuard has temporarily parked the hard
●
drive.
NOTE: The computer fan starts up automatically to cool internal
components and prevent overheating. It is normal for the internal
fan to cycle on and off during routine operation.
Identifying hardware 5
Page 18
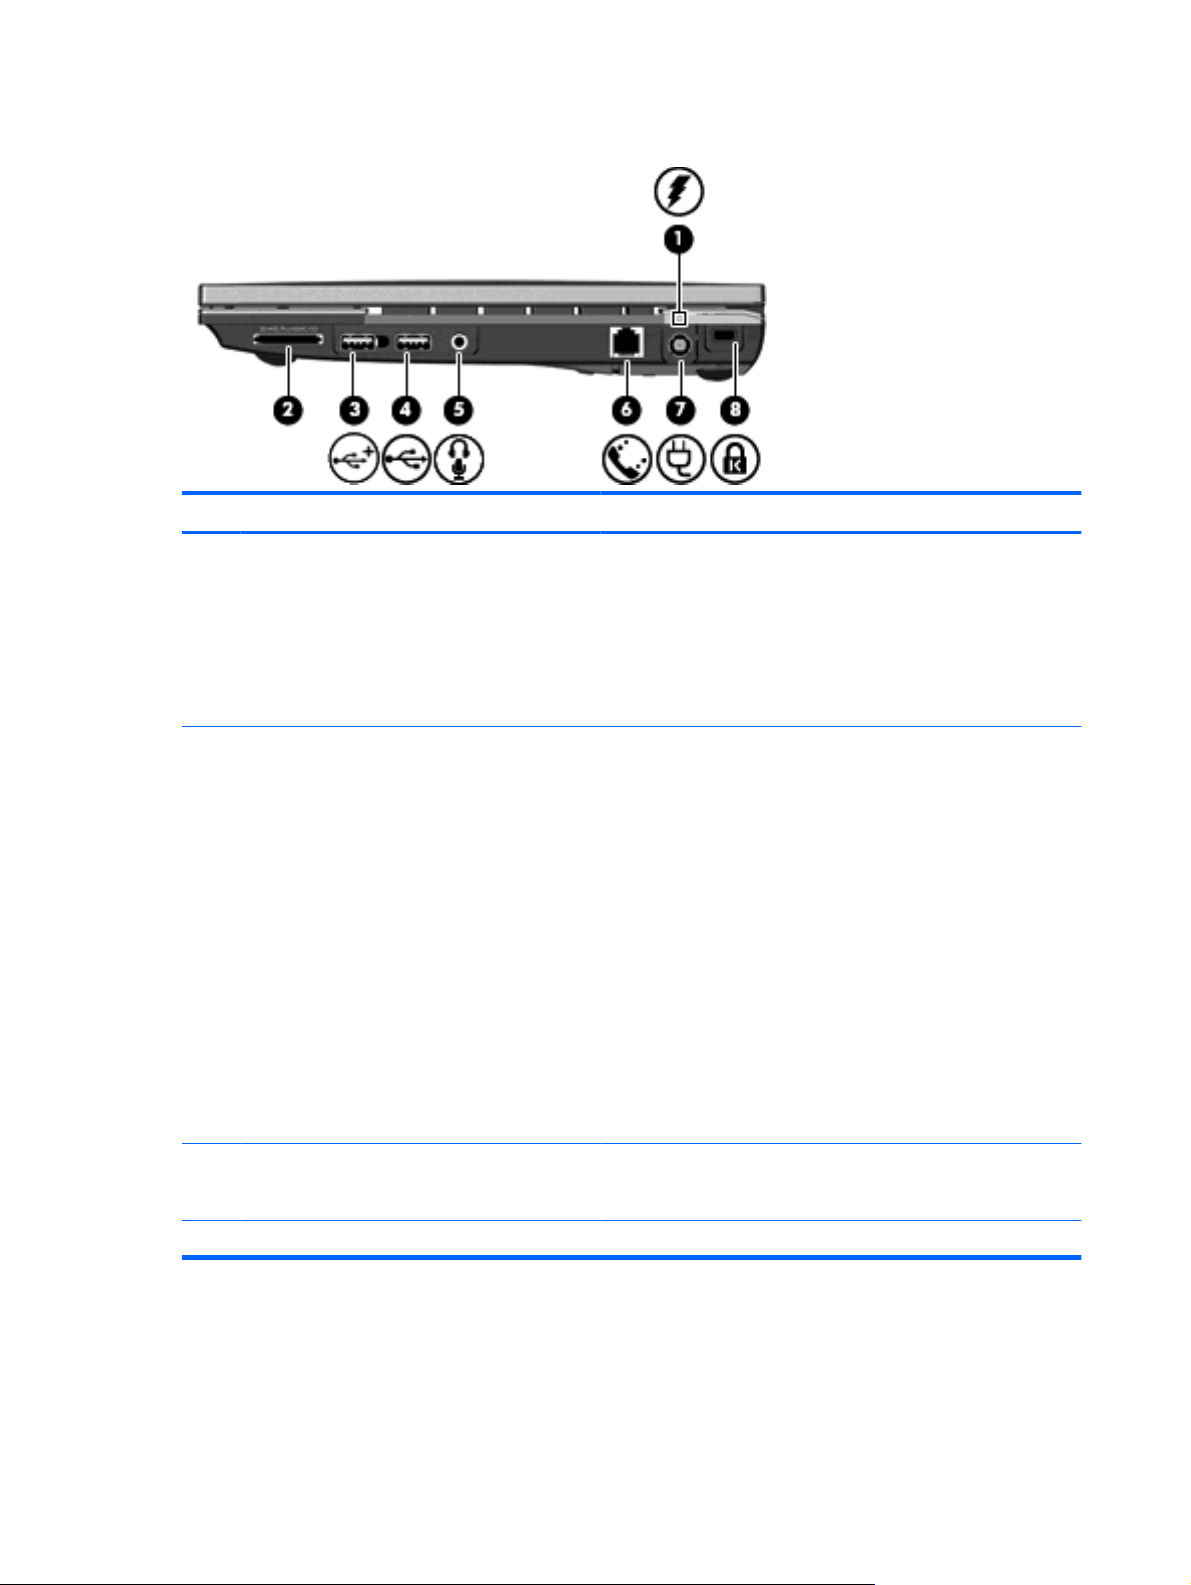
Right-side components
Component Description
(1) Battery light
(2) Media Card Reader Supports the following optional digital card formats:
Amber: A battery is charging.
●
White: A battery is close to full charge capacity.
●
Off: If the computer is plugged into an external power source,
●
the light turns off when all batteries in the computer are fully
charged. If the computer is not plugged into an external power
source, the light stays off until the battery reaches a low
battery level.
Memory Stick (MS)
●
Memory Stick Pro (MSP)
●
Memory Stick Duo (adapter required)
●
Memory Stick Duo Pro (adapter required)
●
MultiMediaCard (MMC)
●
MultiMediaCard Plus
●
Secure Digital (SD) Memory Card
●
SD High Capacity (HC) Memory Card
●
microSD Memory Card (adapter required)
●
xD-Picture Card (XD)
●
(3) Powered USB port Provides power to a USB device, such as an optional external
(4) USB port Connects optional USB devices.
6 Chapter 1 Features
MultiBay or an optional external optical drive, if used with a powered
USB cable.
Page 19

Component Description
(5) Audio-out (headphone)/Audio-in (microphone)
jack
(6) RJ-11 (modem) jack Connects a modem cable.
(7) Power connector Connects an AC adapter.
(8) Security cable slot Attaches an optional security cable to the computer.
Left-side components
Produces sound when connected to optional powered stereo
speakers, headphones, ear buds, a headset, or television audio.
Also connects an optional headset microphone.
NOTE: When a device is connected to the headphone jack, the
computer speakers are disabled.
WARNING! To reduce the risk of personal injury, adjust the
volume before putting on headphones, earbuds, or a headset. For
additional safety information, refer to the Regulatory, Safety, and
Environmental Notices.
NOTE: The security cable is designed to act as a deterrent, but
it may not prevent the computer from being mishandled or stolen.
Component Description
(1) External monitor port Connects an external VGA monitor or projector.
(2) Vent Enables airflow to cool internal components.
NOTE: The computer fan starts up automatically to cool internal
components and prevent overheating. It is normal for the internal
fan to cycle on and off during routine operation.
(3) Network activity light Amber: Data is being transmitted over the network.
(4) RJ-45 (network) jack Connects a network cable.
(5) Network connection light Green: The computer is connected to the network.
(6) USB/eSATA port Connects a high-performance eSATA component, such as an
eSATA external hard drive, or connects an optional USB device.
(7) HDMI port Connects an optional video or audio device, such as a high
definition television, or any compatible digital or audio component.
Identifying hardware 7
Page 20
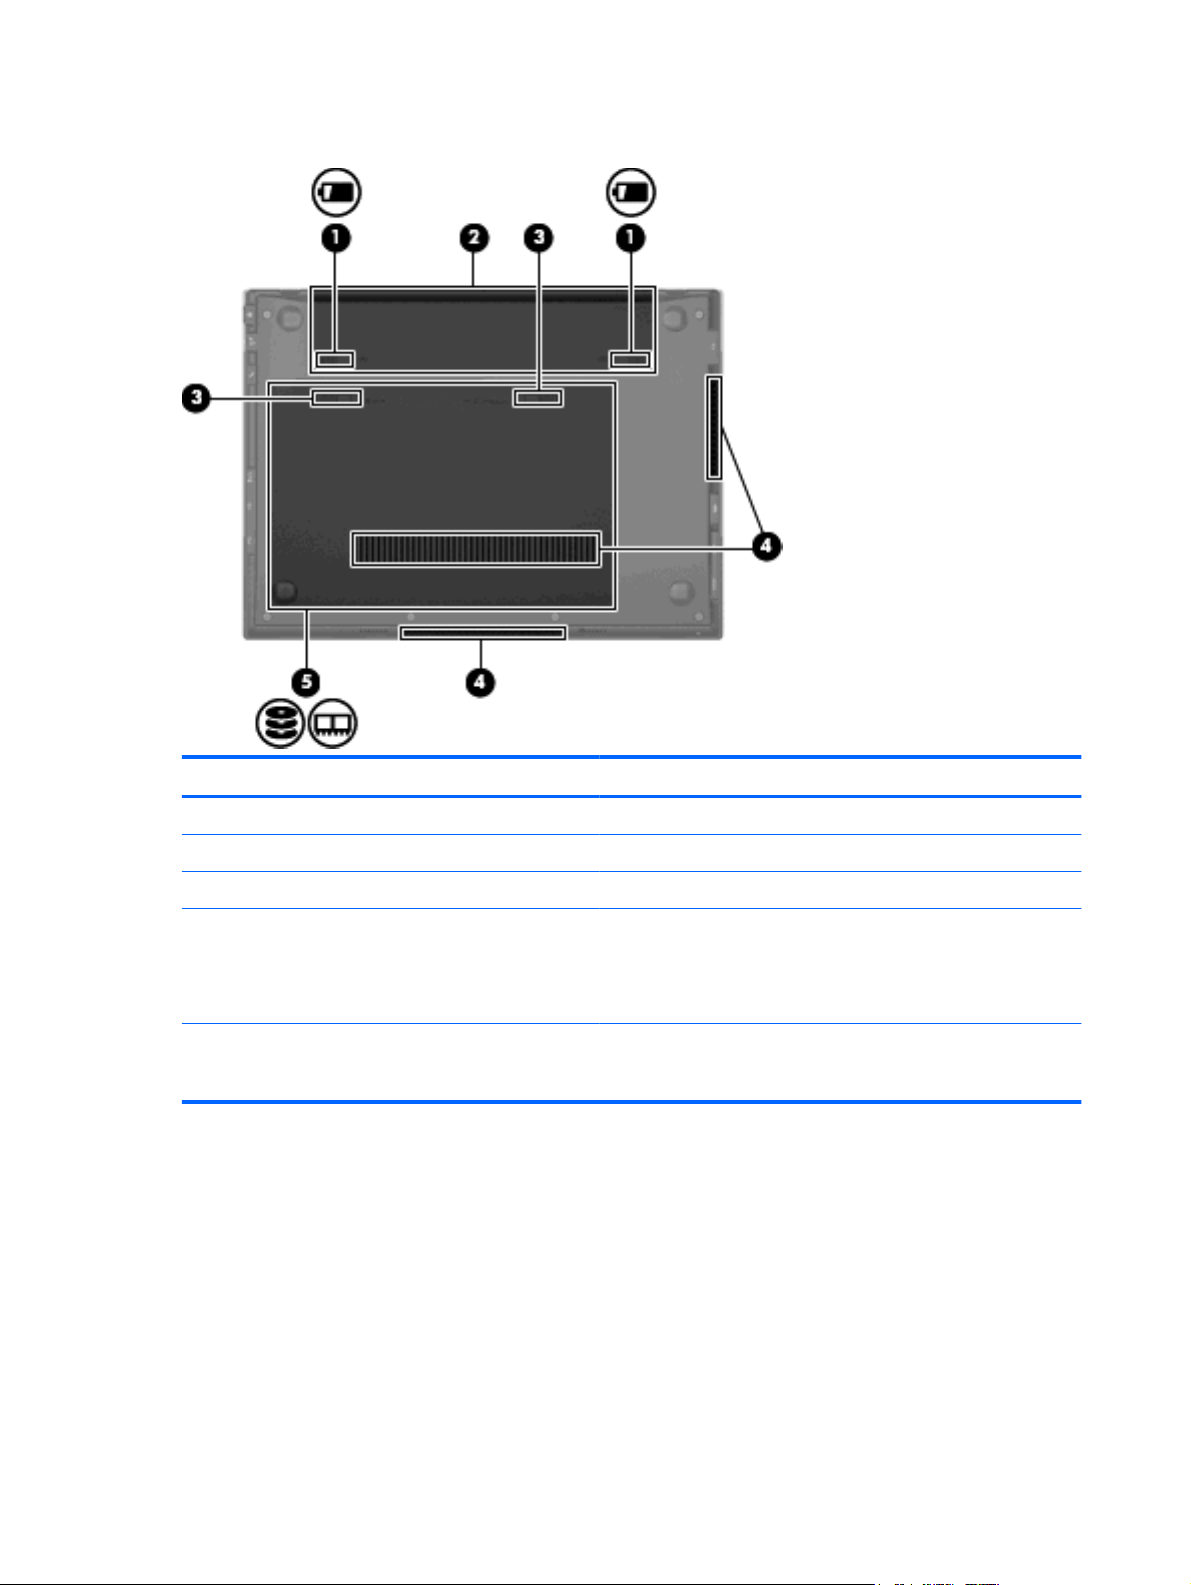
Bottom components
Component Description
(1) Battery release latches (2) Release the battery from the battery bay.
(2) Battery bay Holds the battery and the subscriber identity module (SIM).
(3) Service access door release latches (2). Release the service access door.
(4) Vents (3) Enable airflow to cool internal components.
NOTE: The computer fan starts up automatically to cool internal
components and prevent overheating. It is normal for the internal
fan to cycle on and off during routine operation.
(5) Service access bay Provides access to the hard drive, 2 memory module slots, the
wireless local area network (WLAN) module, and the HP Mobile
Broadband Module (not supported by the Linux operating system).
8 Chapter 1 Features
Page 21
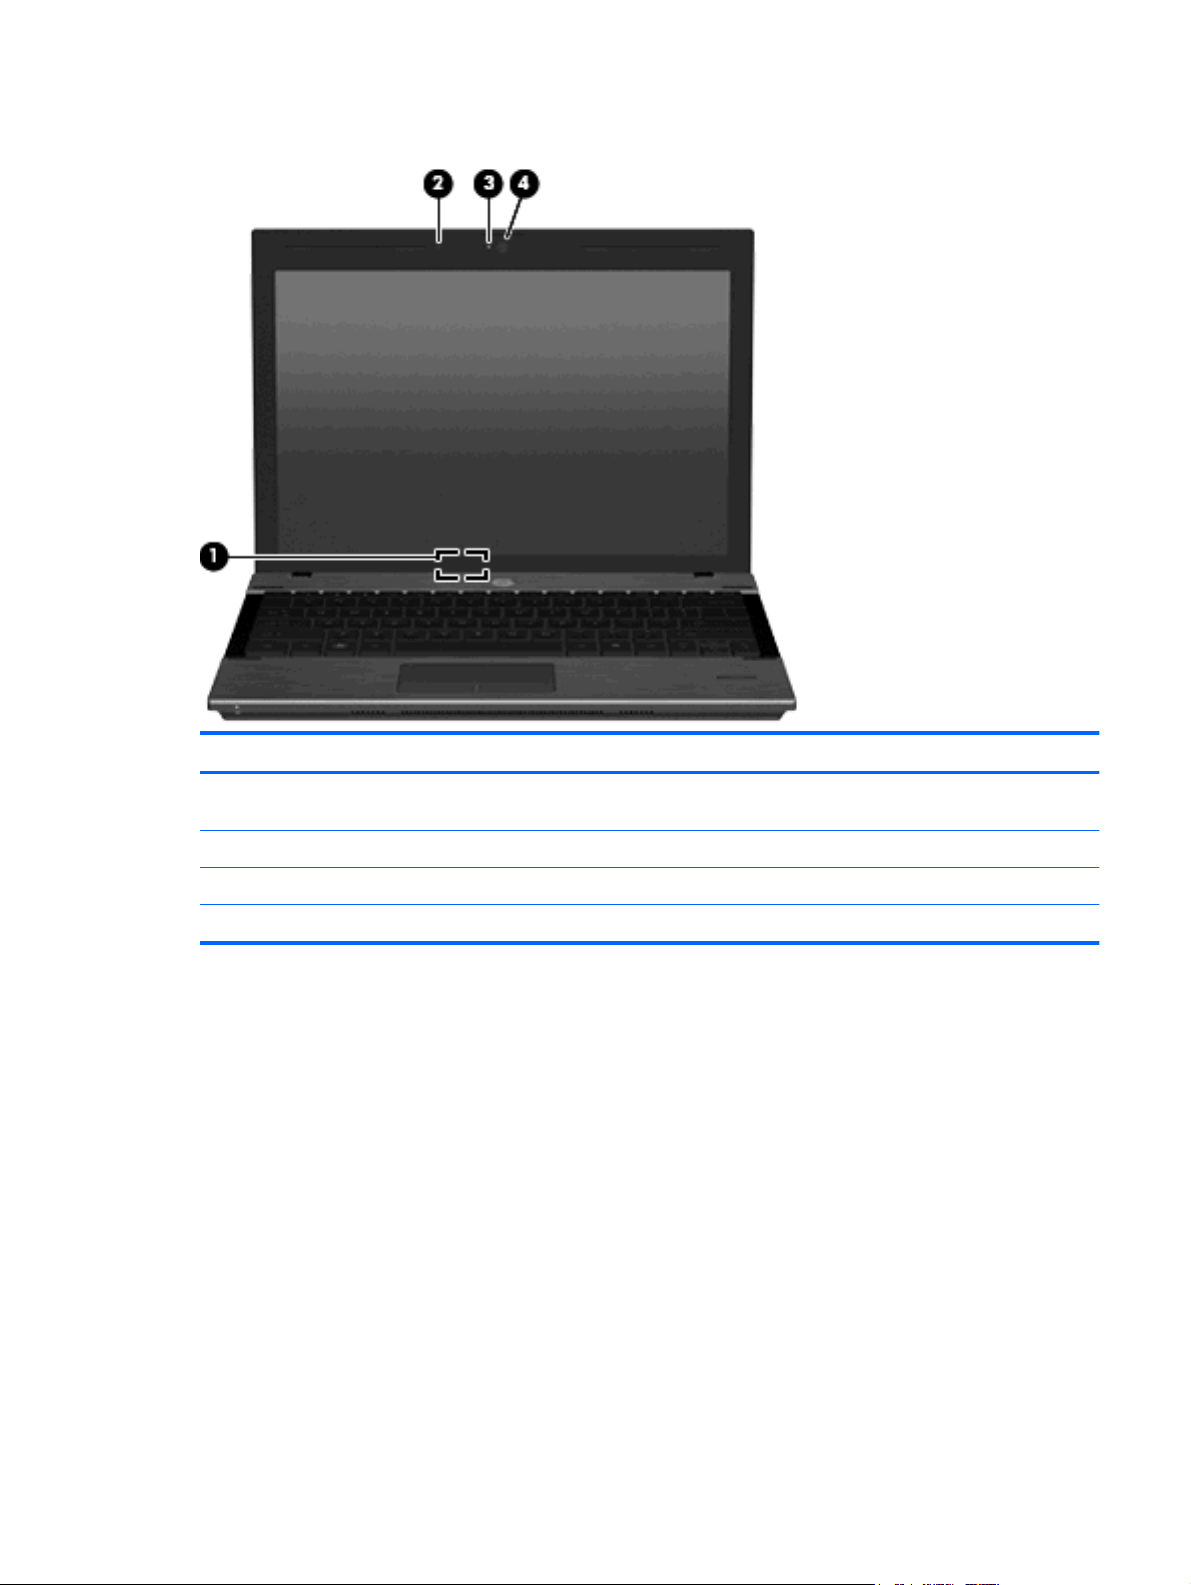
Display components
Component Description
(1) Internal display switch Turns off the display and initiates Sleep if the display is closed while
(2) Internal microphone Records sound.
(3) Webcam light (select models only) On: The webcam is in use.
(4) Webcam (select models only) Records audio and video and captures still photographs.
Wireless antennas
Your computer has at least two antennas that send and receive signals from one or more wireless
devices.
the power is on.
Identifying hardware 9
Page 22
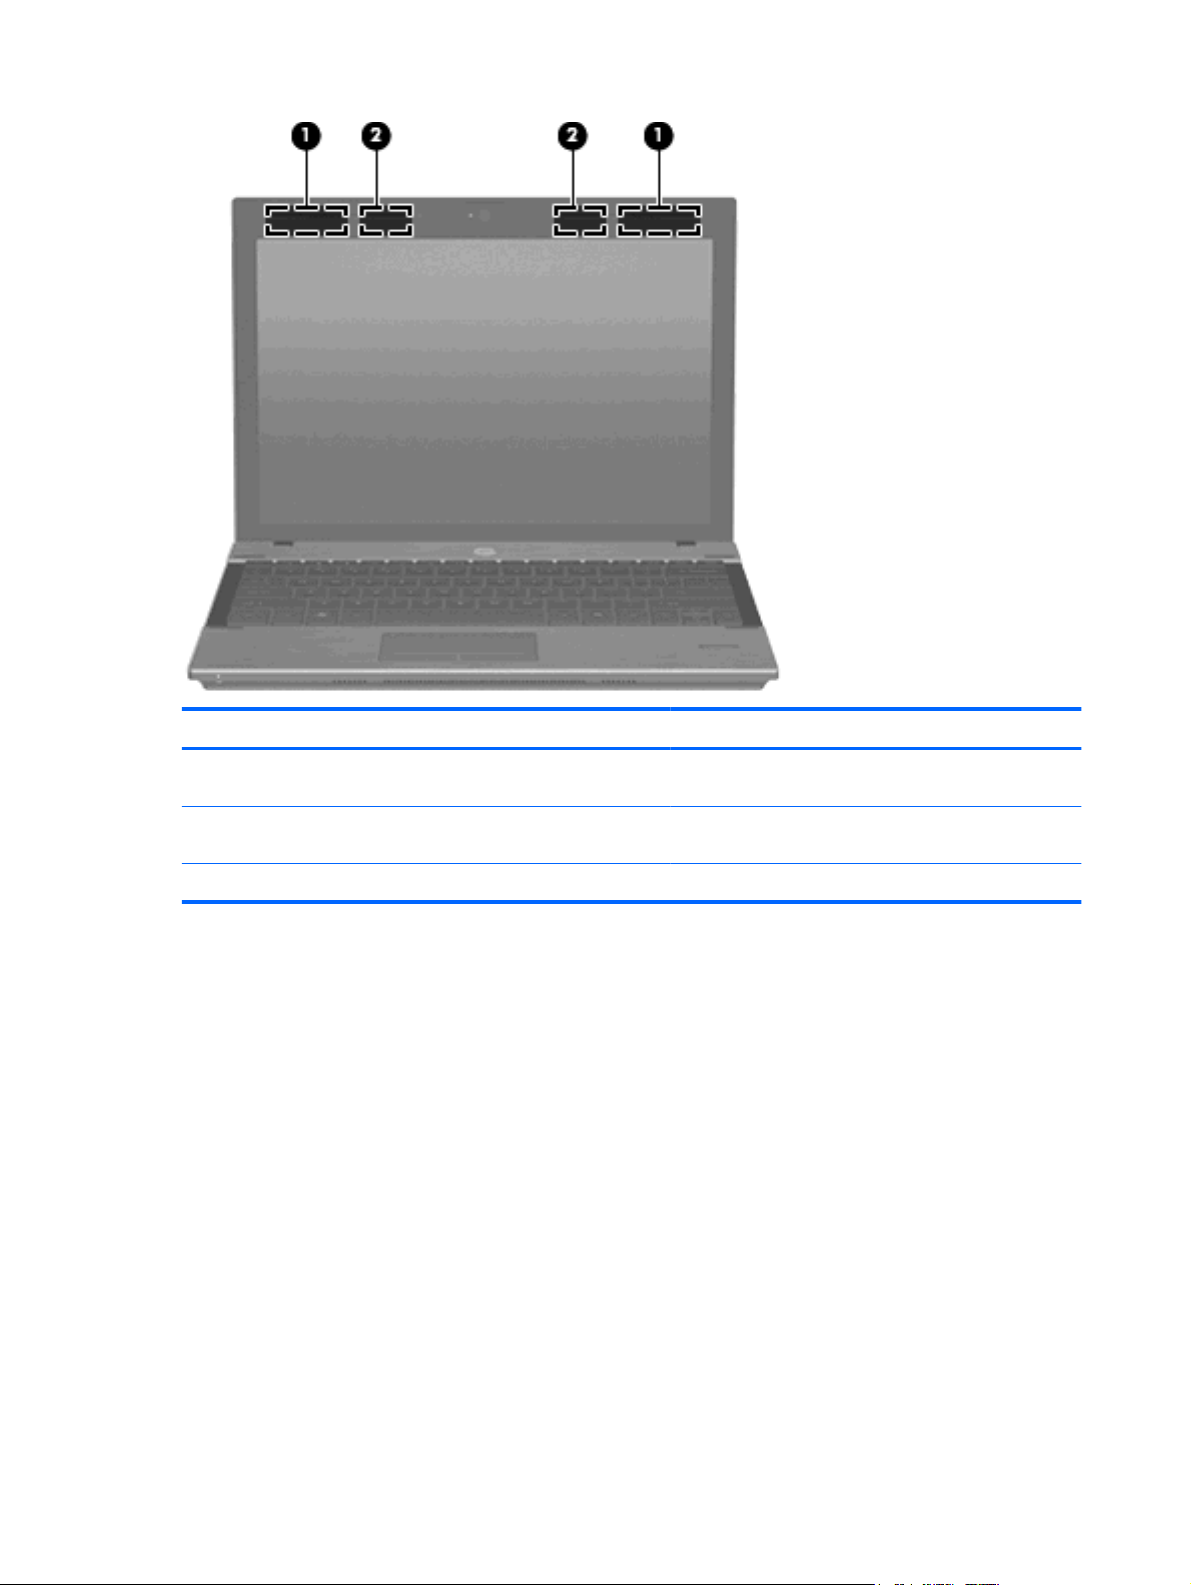
Component Description
(1) WWAN antennas (2)* (select models only) Send and receive wireless signals to communicate with
(2) WLAN antennas (2)* Send and receive wireless signals to communicate with
* For optimal transmission, keep the area immediately around the antennas free from obstructions.
wireless wide-area networks (WWANs).
wireless local area networks (WLANs).
To see wireless regulatory notices, refer to the section of the Regulatory, Safety, and Environmental
Notices that applies to your country or region. These notices are located in Help and Support.
10 Chapter 1 Features
Page 23
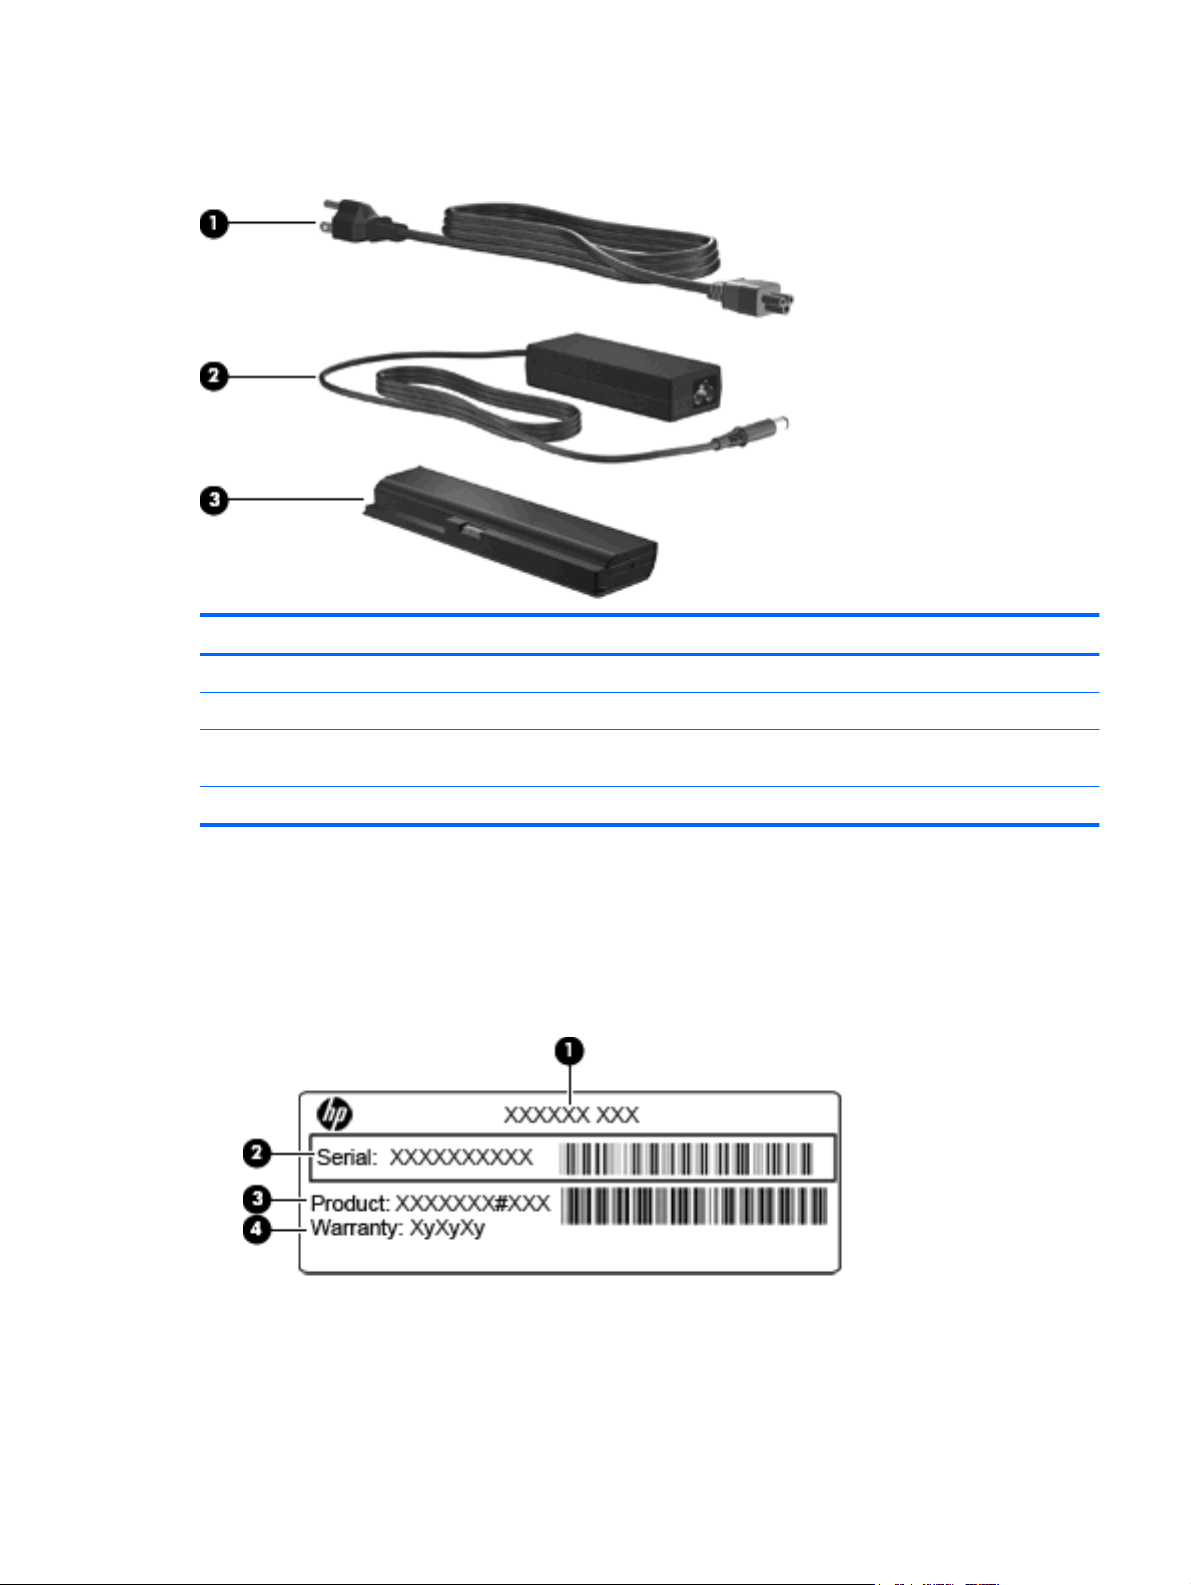
Additional hardware components
Component Description
(1) Power cord* Connects an AC adapter to an AC outlet.
(2) AC adapter Converts AC power to DC power.
(3) Battery Powers the computer when the computer is not plugged into
*Power cords vary in appearance by country or region.
Identifying the labels
The labels affixed to the computer provide information you may need when you troubleshoot system
problems or travel internationally with the computer:
Service tag—Provides important information, including the following:
●
Product name (1). This is the product name affixed to the front of the computer.
◦
external power.
Serial number (s/n) (2). This is an alphanumeric identifier that is unique to each product.
◦
Identifying the labels 11
Page 24

Part number/Product number (p/n) (3). This number provides specific information about the
◦
product's hardware components. The part number helps a service technician to determine
what components and parts are needed.
Warranty period (4). This number describes the duration of the warranty period for the
◦
computer.
Have this information available when you contact technical support. The service tag label is affixed
inside the battery bay.
Microsoft® Certificate of Authenticity—Contains the Windows Product Key. You may need the
●
Product Key to update or troubleshoot the operating system. This certificate is affixed inside the
battery bay.
Regulatory label—Provides regulatory information about the computer. The regulatory label is
●
affixed inside the battery bay.
Modem approval label—Provides regulatory information about the modem and lists the agency
●
approval markings required by some of the countries in which the modem has been approved for
use. You may need this information when traveling internationally. The modem approval label is
affixed under the service access door.
Wireless certification label(s)—Provide information about optional wireless devices and the
●
approval markings of some of the countries or regions in which the devices have been approved
for use. An optional device may be a wireless local area network (WLAN) device, the HP Mobile
Broadband Module (select models only), or an optional Bluetooth® device (select models only). If
your computer model includes one or more wireless devices, one or more certification labels are
included with your computer. You may need this information when traveling internationally.
Wireless certification labels are affixed inside the battery bay.
SIM label (select models only)—Provides the ICCID (Integrated Circuit Card Identifier) of your SIM.
●
This label is affixed under the service access door.
HP Mobile Broadband Module serial number label (select models only)—Provides the serial
●
number of your HP Mobile Broadband Module. This label is affixed under the service access door.
12 Chapter 1 Features
Page 25

2 Wireless, local area network, and
modem
Using wireless devices
Wireless technology transfers data across radio waves instead of wires. Your computer is equipped with
one or more of the following wireless devices:
Wireless local area network (WLAN) device—Connects the computer to wireless local area
●
networks (commonly referred to as Wi-Fi networks, wireless LANs, or WLANs) in corporate offices,
your home, and public places such as airports, restaurants, coffee shops, hotels, and universities.
In a WLAN, each mobile wireless device communicates with a wireless router or a wireless access
point.
HP Broadband Wireless Module—A wireless wide area network (WWAN) device that provides
●
access to information wherever mobile network operator service is available. In a WWAN, each
mobile device communicates to a mobile network operator’s base station. Mobile network operators
install networks of base stations (similar to cell phone towers) throughout large geographic areas,
effectively providing coverage across entire states, regions, or even countries.
Bluetooth® device—Creates a personal area network (PAN) to connect to other Bluetooth-enabled
●
devices such as computers, phones, printers, headsets, speakers, and cameras. In a PAN, each
device communicates directly with other devices, and devices must be relatively close together—
typically within 10 meters (approximately 33 feet) of each other.
Computers with WLAN devices support one or more of the following IEEE industry standards:
802.11b, the first popular standard, supports data rates of up to 11 Mbps and operates at a
●
frequency of 2.4 GHz.
802.11g supports data rates of up to 54 Mbps and operates at a frequency of 2.4 GHz. An 802.11g
●
WLAN device is backward compatible with 802.11b devices, so they can operate on the same
network.
802.11a supports data rates of up to 54 Mbps and operates at a frequency of 5 GHz.
●
NOTE: 802.11a is not compatible with 802.11b and 802.11g.
802.11n supports data rates of up to 450 Mbps and may operate at 2.4 GHz or 5 GHz, making it
●
backward compatible with 802.11a, b, and g.
For more information on wireless technology, refer to the information and Web site links provided in
Help and Support.
Using wireless devices 13
Page 26
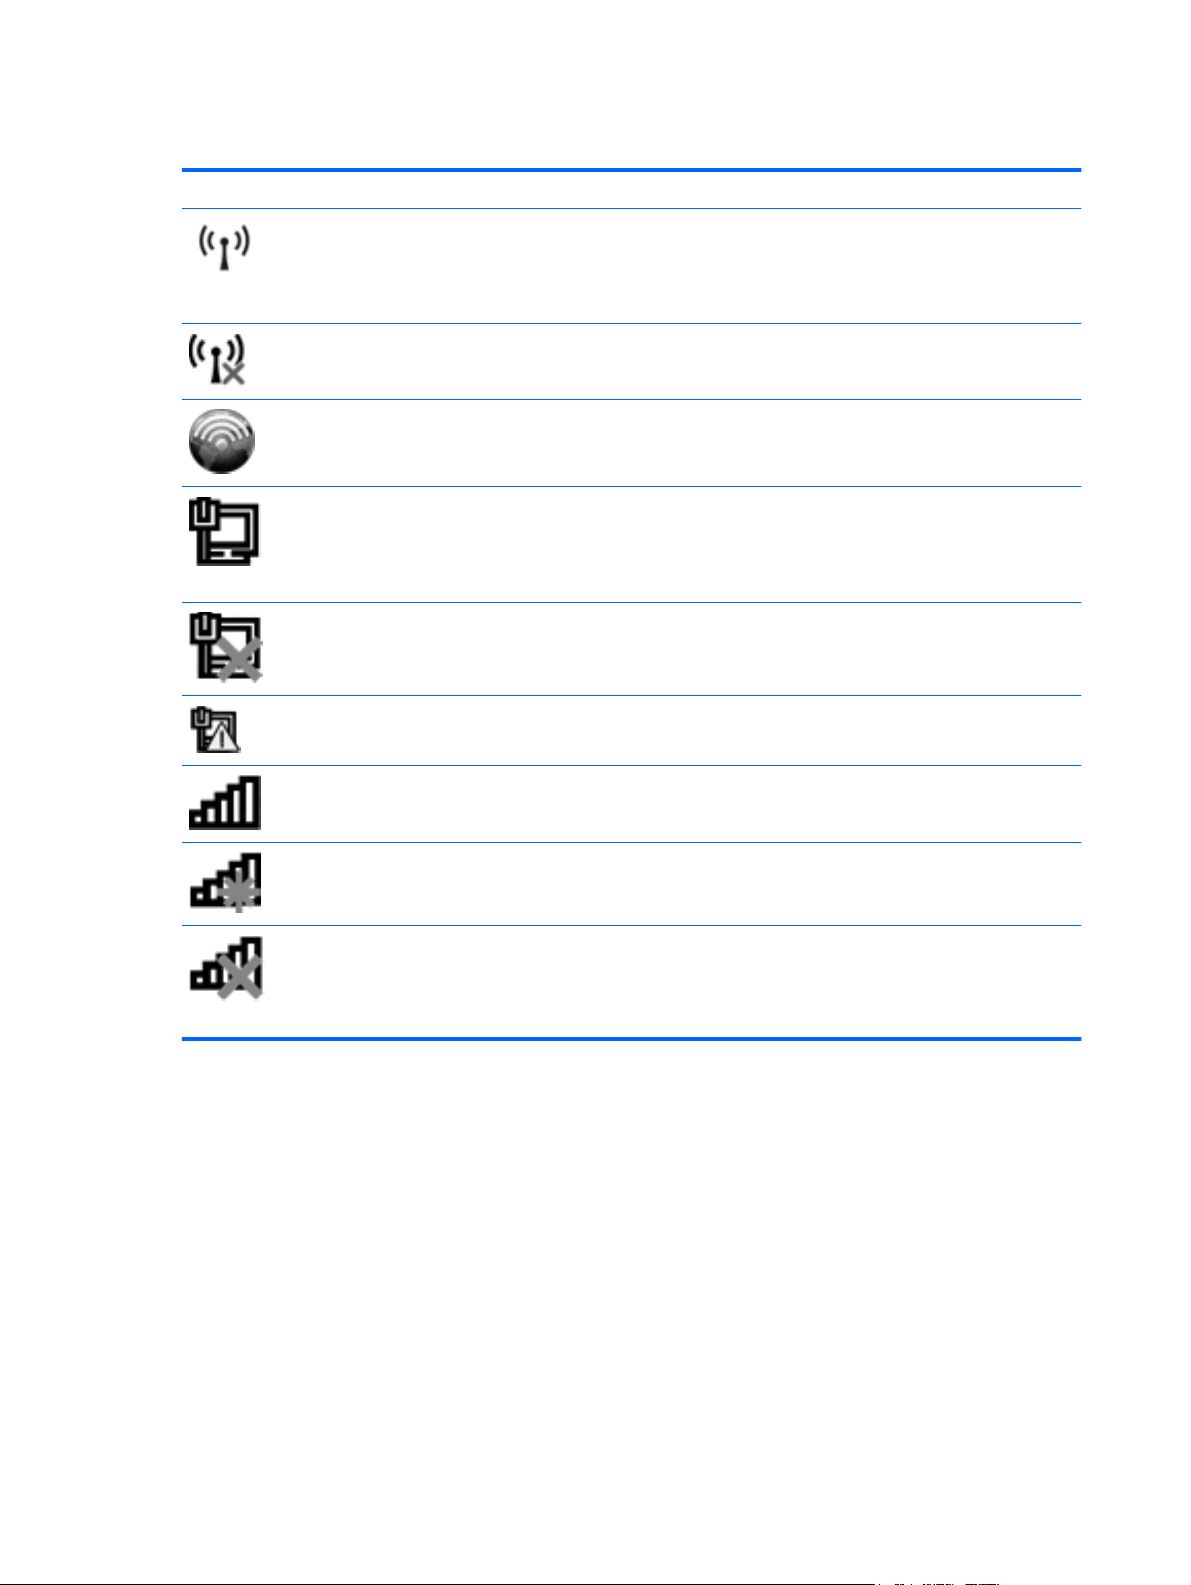
Identifying wireless and network icons
Icon Name Description
Wireless (connected) Identifies the location of the wireless light and the wireless hotkey on
the computer. Also indicates that one or more of the wireless devices
are on. This icon appears in the system tray when a device is enabled
or on.
Wireless
(disconnected)
HP Connection
Manager
Wired network
(connected)
Wired network
(disabled/
disconnected)
Wireless network
(disabled)
Network (connected) Indicates that one or more of your network drivers are installed, one or
Network
(disconnected)
Indicates that all of the wireless devices are off. This icon appears when
HP Wireless Assistant shows that all devices are disabled or off.
Opens HP Connection Manager, which enables you to create a
connection with an HP Mobile Broadband device.
Indicates that one or more of your network drivers are installed and one
or more network devices are connected to the network.
Indicates that one or more of your network drivers are installed, all
network devices or all wireless devices are disabled in Windows Control
Panel, and no network devices are connected to a wired network.
Indicates connectivity to the WLAN but no connection to the Internet.
more network devices are connected to a wireless network, and one or
more network devices may be connected to a wired network.
Indicates that one or more of your network drivers are installed and
wireless connections are available, but no network devices are
connected to a wired or wireless network.
Network (disabled/
disconnected)
Using the wireless controls
You can control the wireless devices in your computer using these features:
Wireless hotkey
●
HP Wireless Assistant software (select models only)
●
HP Connection Manager software (select models only)
●
Operating system controls
●
14 Chapter 2 Wireless, local area network, and modem
Indicates that one or more of your network drivers are installed, no
wireless connections are available or all wireless network devices are
disabled by the wireless hotkey or HP Wireless Assistant, and no
network devices are connected to a wired network.
Page 27

Using the wireless hotkey
The computer has a wireless hotkey (fn+f9), one or more wireless devices, and one or two wireless
lights, depending on the model. All of the wireless devices on your computer are enabled at the factory,
so the wireless light is on (white) when you turn on the computer.
The wireless light indicates the overall power state of your wireless devices, not the status of individual
devices. If the wireless light is white, at least one wireless device is on. If the wireless light is amber, all
wireless devices are off.
Because the wireless devices are enabled at the factory, you can use the wireless hotkey (fn+f9) to turn
on or turn off the wireless devices simultaneously. Individual wireless devices can be controlled through
Computer Setup.
NOTE: If the wireless devices are disabled by Computer Setup, the wireless hotkey will not work until
you reenable your devices.
Using HP Wireless Assistant software (select models only)
A wireless device can be turned on or off using the HP Wireless Assistant software. If a wireless device
is disabled by Computer Setup, it must be reenabled by Computer Setup before it can be turned on or
off using HP Wireless Assistant.
NOTE: Enabling or turning on a wireless device does not automatically connect the computer to a
network or a Bluetooth-enabled device.
To view the state of the wireless devices, click the Show hidden icons icon, the arrow at the left of the
notification area, and position the cursor over the wireless icon.
If the wireless icon is not displayed in the notification area, complete the following steps to change the
HP Wireless Assistant properties:
1. Select Start > Control Panel > Hardware and Sound > Windows Mobility Center.
2. Click the wireless icon in the HP Wireless Assistant tile, which is located in the bottom row of
Windows® Mobility Center.
3. Click Properties.
4. Select the check box next to HP Wireless Assistant icon in notification area.
5. Click Apply.
6. Click Close.
For more information, refer to the HP Wireless Assistant software Help:
1. Open HP Wireless Assistant by clicking the wireless icon in Windows Mobility Center.
2. Click the Help button.
Using HP Connection Manager (select models only)
You can use HP Connection Manager to connect to WWANs using the HP Mobile Broadband device in
your computer (select models only).
To start HP Connection Manager, click the HP Connection Manager icon in the notification area, at
the far right of the taskbar.
Using wireless devices 15
Page 28

– or –
Select Start > All Programs > HP > HP Connection Manager.
For more details about using HP Connection Manager, refer to the HP Connection Manager software
Help.
Using operating system controls
Some operating systems also offer a way to manage integrated wireless devices and the wireless
connection. For example, Windows provides the Network and Sharing Center that allows you to set up
a connection or network, connect to a network, manage wireless networks, and diagnose and repair
network problems.
To access the Network and Sharing Center, click Start > Control Panel > Network and Internet >
Network and Sharing Center.
For more information, refer to Windows Help and Support. Click Start > Help and Support.
Using a WLAN device
With a WLAN device, you can access a wireless local area network (WLAN), which is composed of other
computers and accessories that are linked by a wireless router or a wireless access point.
NOTE: The terms wireless router and wireless access point are often used interchangeably.
A large-scale WLAN, such as a corporate or public WLAN, typically uses wireless access points
●
that can accommodate a large number of computers and accessories and can separate critical
network functions.
A home or small office WLAN typically uses a wireless router, which allows several wireless and
●
wired computers to share an Internet connection, a printer, and files without requiring additional
pieces of hardware or software.
NOTE: To use the WLAN device in your computer, you must connect to a WLAN infrastructure
(provided through a service provider or a public or corporate network).
Setting up a WLAN
To set up a WLAN and connect to the Internet, you need the following equipment:
A broadband modem (either DSL or cable) (1) and high-speed Internet service purchased from an
●
Internet service provider (ISP)
A wireless router (purchased separately) (2)
●
The wireless computer (3)
●
The illustration below shows an example of a wireless network installation that is connected to the
Internet.
16 Chapter 2 Wireless, local area network, and modem
Page 29

As your network grows, additional wireless and wired computers can be connected to the network to
access the Internet.
For help in setting up your WLAN, refer to the information provided by your router manufacturer or your
ISP.
Protecting your WLAN
Because the WLAN standard was designed with only limited security capabilities—basically to foil casual
eavesdropping rather than more powerful forms of attack—it is essential to understand that WLANs are
vulnerable to well-known and well-documented security weaknesses.
WLANs in public areas, or “hotspots,” like coffee shops and airports may not provide any security. New
technologies are being developed by wireless manufacturers and hotspot service providers that make
the public environment more secure and anonymous. If you are concerned about the security of your
computer in a hotspot, limit your network activities to noncritical e-mail and basic Internet surfing.
When you set up a WLAN or access an existing WLAN, always enable security features to protect your
network from unauthorized access. The common security levels are Wi-Fi Protected Access (WPA) and
Wired Equivalent Privacy (WEP). Because wireless radio signals travel outside the network, other WLAN
devices can pick up unprotected signals and either connect to your network (uninvited) or capture
information being sent across it. However, you can take precautions to protect your WLAN:
Use a wireless transmitter with built-in security
●
Many wireless base stations, gateways, and routers provide built-in security features such as
wireless security protocols and firewalls. With the correct wireless transmitter, you can protect your
network from the most common wireless security risks.
Work behind a firewall
●
A firewall is a barrier that checks both data and requests for data that are sent to your network and
then discards any suspicious items. Firewalls are available in many varieties, both software and
hardware. Some networks use a combination of both types.
Use wireless encryption
●
A variety of sophisticated encryption protocols is available for your WLAN. Find the solution that
works best for your network security:
Wired Equivalent Privacy (WEP) is a wireless security protocol that uses a WEP key to
◦
encode or encrypt all network data before it is transmitted. Usually, you can allow the network
to assign the WEP key. Alternatively, you can set up your own key, generate a different key,
or choose other advanced options. Without the correct key, others will not be able to use the
WLAN.
WPA (Wi-Fi Protected Access), like WEP, uses security settings to encrypt and decrypt data
◦
that is transmitted over the network. However, instead of using one static security key for
encryptions as WEP does, WPA uses temporal key integrity protocol (TKIP) to dynamically
Using a WLAN device 17
Page 30

generate a new key for every packet. It also generates different sets of keys for each computer
on the network.
Connecting to a WLAN
To connect to the WLAN, follow these steps:
1. Be sure that the WLAN device is on. If it is on, the wireless light is white. If the wireless light is
amber, press the wireless hotkey.
2. Click the network icon in the notification area, at the far right of the taskbar.
3. Select your WLAN from the list.
4. Click Connect.
If the network is a security-enabled WLAN, you are prompted to enter a network security key, which
is a security code. Type the code, and then click OK to complete the connection.
NOTE: If no WLANs are listed, you are out of range of a wireless router or access point.
NOTE: If you do not see the network you want to connect to, click Open Network and Sharing
Center, and then click Set up a new connection or network. A list of options is displayed. You
can choose to manually search for and connect to a network or to create a new network connection.
After the connection is made, place the mouse pointer over the network icon in the notification area, at
the far right of the taskbar, to verify the name and status of the connection.
NOTE: The functional range (how far your wireless signals travel) depends on WLAN implementation,
router manufacturer, and interference from other electronic devices or structural barriers such as walls
and floors.
More information about using a WLAN is available through the following resources:
Information from your ISP and the manufacturer's instructions included with your wireless router
●
and other WLAN equipment
Information and Web site links provided in Help and Support
●
For a list of public WLANs near you, contact your ISP or search the Web. Web sites that list public
WLANs include Cisco Internet Mobile Office Wireless Locations, Hotspotlist, and Geektools. Check with
each public WLAN location for cost and connection requirements.
For additional information on connecting your computer to a corporate WLAN, contact your network
administrator or IT department.
Roaming to another network
When you move your computer within range of another WLAN, Windows attempts to connect to that
network. If the attempt is successful, your computer is automatically connected to the new network. If
Windows does not recognize the new network, follow the same procedure you used initially to connect
to your WLAN.
Using HP Mobile Broadband (select models only)
HP Mobile Broadband enables your computer to use wireless wide area networks (WWANs) to access
the Internet from more places and over larger areas than it can by using WLANs. Using HP Mobile
18 Chapter 2 Wireless, local area network, and modem
Page 31

Broadband requires a network service provider (called a mobile network operator), which in most cases
is a mobile phone network operator. Coverage for HP Mobile Broadband is similar to mobile phone voice
coverage.
When used with mobile network operator service, HP Mobile Broadband gives you the freedom to stay
connected to the Internet, send e-mail, or connect to your corporate network whether you are on the
road or outside the range of Wi-Fi hotspots.
HP supports the following technologies:
HSPA (High Speed Packet Access), which provides access to networks based on the Global
●
System for Mobile Communications (GSM) telecommunications standard.
EV-DO (Evolution Data Optimized), which provides access to networks based on the code division
●
multiple access (CDMA) telecommunications standard.
You may need the HP Mobile Broadband Module serial number to activate mobile broadband service.
The serial number is printed on a label inside the battery bay of your computer.
Some mobile network operators require the use of a subscriber identity module (SIM). A SIM contains
basic information about you, such as a PIN (personal identification number), as well as network
information. Some computers include a SIM that is preinstalled in the battery bay. If the SIM is not
preinstalled, it may be provided in the HP Mobile Broadband information provided with your computer
or the mobile network operator may provide it separately from the computer.
For information on inserting and removing the SIM, refer to the “Inserting a SIM” and “Removing a SIM”
sections in this chapter.
For information on HP Mobile Broadband and how to activate service with a preferred mobile network
operator, refer to the mobile broadband information included with your computer. For additional
information, see the HP Web site at
Inserting a SIM
CAUTION: To prevent damage to the connectors, use minimal force when inserting a SIM.
To insert a SIM:
1. Shut down the computer. If you are not sure whether the computer is off or in Hibernation, turn the
computer on by pressing the power button. Then shut down the computer through the operating
system.
2. Close the display.
3. Disconnect all external devices connected to the computer.
4. Unplug the power cord from the AC outlet.
5. Turn the computer upside down on a flat surface, with the battery bay toward you.
6. Remove the battery.
http://www.hp.com/go/mobilebroadband (US only).
Using HP Mobile Broadband (select models only) 19
Page 32

7. Insert the SIM into the SIM slot, and gently slide the SIM into the slot until it is firmly seated.
8. Replace the battery.
NOTE: HP Mobile Broadband will be disabled if the battery is not replaced.
9. Turn the computer right-side up.
10. Reconnect external power.
11. Reconnect external devices.
12. Turn on the computer.
Removing a SIM
To remove a SIM:
1. Shut down the computer. If you are not sure whether the computer is off or in Hibernation, turn the
computer on by pressing the power button. Then shut down the computer through the operating
system.
2. Close the display.
3. Disconnect all external devices connected to the computer.
4. Unplug the power cord from the AC outlet.
5. Turn the computer upside down on a flat surface, with the battery bay toward you.
6. Remove the battery.
20 Chapter 2 Wireless, local area network, and modem
Page 33
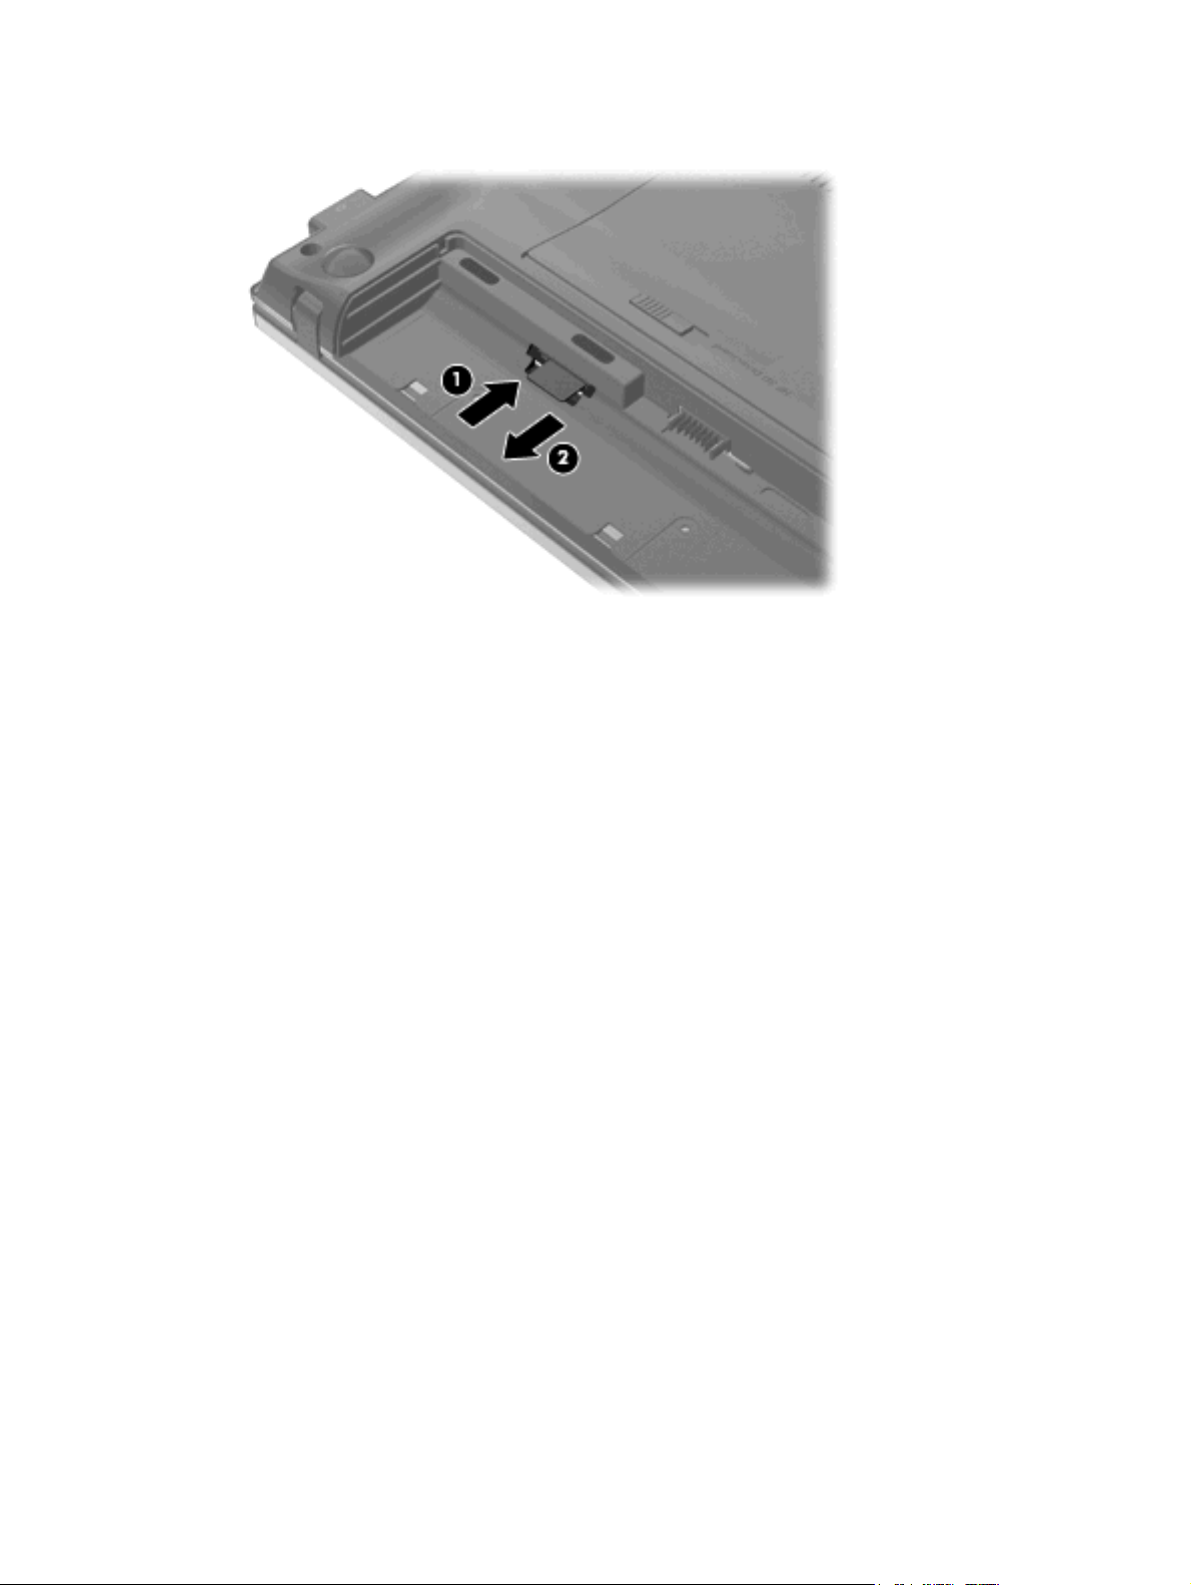
7. Press in on the SIM (1), and then remove it from the slot (2).
8. Replace the battery.
9. Turn the computer right-side up.
10. Reconnect external power.
11. Reconnect external devices.
12. Turn on the computer.
Using HP Mobile Broadband (select models only) 21
Page 34

Using a Bluetooth wireless device
A Bluetooth device provides short-range wireless communications that replace the physical cable
connections that traditionally link electronic devices such as the following:
Computers (desktop, notebook, PDA)
●
Phones (cellular, cordless, smart phone)
●
Imaging devices (printer, camera)
●
Audio devices (headset, speakers)
●
Bluetooth devices provide peer-to-peer capability that allows you to set up a personal area network
(PAN) of Bluetooth devices. For information on configuring and using Bluetooth devices, refer to the
Bluetooth software Help.
Bluetooth and Internet Connection Sharing (ICS)
HP does not recommend setting up one computer with Bluetooth as a host and using it as a gateway
through which other computers may connect to the Internet. When two or more computers are connected
using Bluetooth, and Internet Connection Sharing (ICS) is enabled on one of the computers, the other
computers may not be able to connect to the Internet using the Bluetooth network.
The strength of Bluetooth is in synchronizing information transfers between your computer and wireless
devices including cellular phones, printers, cameras, and PDAs. The inability to consistently connect
two or more computers to share the Internet through Bluetooth is a limitation of Bluetooth and the
Windows operating system.
Troubleshooting wireless connection problems
Some possible causes for wireless connection problems include the following:
Network configuration (SSID or security) has been changed.
●
Wireless device is not installed correctly or has been disabled.
●
Wireless device or router hardware has failed.
●
Wireless device encountered interference from other devices.
●
NOTE: Wireless networking devices are included with select computer models only. If wireless
networking is not listed in the feature list on the side of the original computer package, you may add
wireless networking capability to the computer by purchasing a wireless networking device.
Before working your way through the sequence of possible solutions to your network connection
problem, be sure that device drivers are installed for all wireless devices.
Use the procedures in this chapter to diagnose and repair a computer that does not connect to the
network you want to use.
Cannot create a WLAN connection
If you have a problem connecting to a WLAN, confirm that the integrated WLAN device is properly
installed on your computer:
22 Chapter 2 Wireless, local area network, and modem
Page 35

NOTE: Windows includes the User Account Control feature to improve the security of your computer.
You may be prompted for your permission or password for tasks such as installing software, running
utilities, or changing Windows settings. Refer to Windows Help and Support for more information.
1. Select Start > Computer > System and Security. Then in the System area, click Device
Manager.
2. Click the arrow next to Network adapters to expand the list to show all of the installed adapters.
3. Identify the WLAN device from the Network adapters list. The listing for a WLAN device may include
the term wireless, wireless LAN, WLAN, Wi-Fi or 802.11.
If no WLAN device is listed, either your computer does not have an integrated WLAN device, or
the driver for the WLAN device is not properly installed.
For more information on troubleshooting WLANs, refer to the Web site links provided in Help and
Support.
Cannot connect to a preferred network
Windows can automatically repair a corrupted WLAN connection:
If there is a network icon in the notification area, at the far right of the taskbar, right-click the icon,
●
and then click Troubleshoot problems.
Windows resets your network device and attempts to reconnect to one of the preferred networks.
If there is no network status icon in the notification area, follow these steps:
●
1. Select Start > Control Panel > Network and Internet > Network and Sharing Center.
2. Click Troubleshoot problems and select the network you wish to repair.
Network icon is not displayed
If the network icon is not displayed in the notification area after you configure the WLAN, the software
driver is either missing or corrupted. A Windows “Device not Found” error message may also be
displayed. The driver must be reinstalled.
To get the latest version of the WLAN device software for your computer, follow these steps:
1. Open your Internet browser and go to
2. Select your country or region.
3. Click the option for software and driver downloads, and then type your computer model number in
the search box.
4. Press enter, and then follow the on-screen instructions.
NOTE: If the WLAN device you are using was purchased separately, consult the manufacturer's Web
site for the latest software.
http://www.hp.com/support.
Current network security codes are unavailable
If you are prompted for a network key or a name (SSID) when connecting to a WLAN, the network is
protected by security. You must have the current codes to make a connection on a secure network. The
Troubleshooting wireless connection problems 23
Page 36

SSID and network key are alphanumeric codes that you enter into your computer to identify your
computer to the network.
For a network connected to your personal wireless router, review the router user guide for
●
instructions on setting up the same codes on both the router and the WLAN device.
For a private network, such as a network in an office or at a public Internet chat room, contact the
●
network administrator to obtain the codes, and then enter the codes when prompted to do so.
Some networks change the SSID or network keys used in their routers or access points on a regular
basis to improve security. You must change the corresponding code in your computer accordingly.
If you are provided with new wireless network keys and SSID for a network, and if you have previously
connected to that network, follow the steps below to connect to the network:
1. Click Start > Control Panel > Network and Internet > Network and Sharing Center.
2. Click Manage wireless networks in the left panel.
A list showing the available WLANs is displayed. If you are in a hotspot where several WLANs are
active, several will be displayed.
3. Select the network in the list, right-click the network, and then click Properties.
NOTE: If the network you want is not listed, check with the network administrator to be sure that
the router or access point is operating.
4. Click the Security tab, and then enter the correct wireless encryption data into the Network
security key field.
5. Click OK to save these settings.
WLAN connection is very weak
If the connection is very weak, or if your computer cannot make a connection to a WLAN, minimize
interference from other devices, as follows:
Move your computer closer to the wireless router or access point.
●
Temporarily disconnect other wireless devices such as a microwave, cordless phone, or cellular
●
phone to be sure that they are not interfering.
If the connection does not improve, try forcing the device to reestablish all connection values:
1. Click Start > Control Panel > Network and Internet > Network and Sharing Center.
2. Click Manage wireless networks in the left panel.
A list showing the available WLANs is displayed. If you are in a hotspot where several WLANs are
active, several will be displayed.
3. Click a network, and then click Remove.
Cannot connect to the wireless router
If you are trying to connect to the wireless router and are unsuccessful, reset the wireless router by
removing power from the router for 10 to 15 seconds.
24 Chapter 2 Wireless, local area network, and modem
Page 37
If the computer still cannot make a connection to a WLAN, restart the wireless router. For details, refer
to the router manufacturer's instructions.
Connecting to a local area network (LAN)
Connecting to a local area network (LAN) requires an 8-pin, RJ-45 network cable (not included). If the
network cable contains noise suppression circuitry (1), which prevents interference from TV and radio
reception, orient the circuitry end of the cable (2) toward the computer.
To connect the network cable:
1. Plug the network cable into the network jack (1) on the computer.
2. Plug the other end of the cable into a network wall jack (2).
WARNING! To reduce the risk of electric shock, fire, or damage to the equipment, do not plug a modem
or telephone cable into the RJ-45 (network) jack.
Using the modem
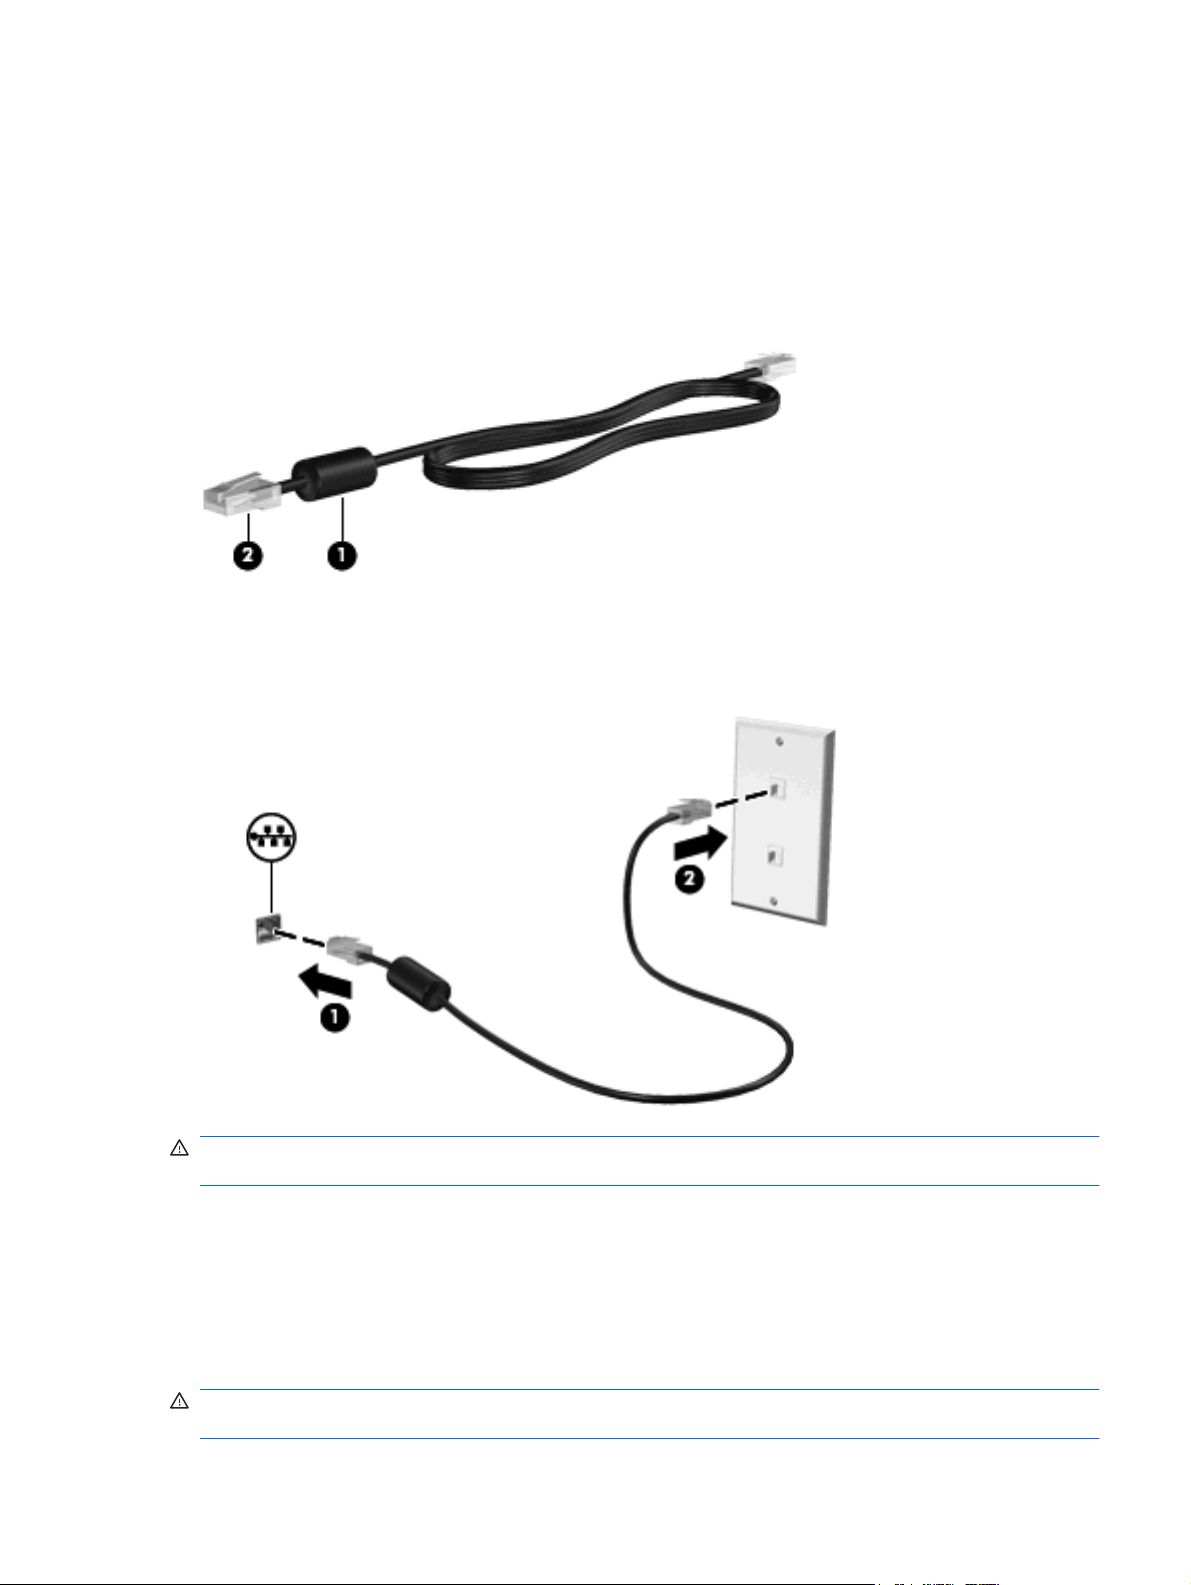
The modem must be connected to an analog telephone line using a 6-pin, RJ-11 modem cable
(purchased separately). In some countries or regions, a country- or region-specific modem cable adapter
(purchased separately) is also required. Jacks for digital PBX systems may resemble analog telephone
jacks, but they are not compatible with the modem.
WARNING! Connecting the internal analog modem to a digital line can permanently damage the
modem. Immediately disconnect the modem cable if you accidentally connect it to a digital line.
Connecting to a local area network (LAN) 25
Page 38

If the modem cable contains noise suppression circuitry (1), which prevents interference from TV and
radio reception, orient the circuitry end (2) of the cable toward the computer.
Connecting a modem cable
WARNING! To reduce the risk of electric shock, fire, or damage to the equipment, do not plug a modem
cable (purchased separately) or telephone cable into the RJ-45 (network) jack.
To connect a modem cable:
1. Plug the modem cable into the modem jack (1) on the computer.
2. Plug the modem cable into the RJ-11 telephone wall jack (2).
Connecting a country- or region-specific modem cable adapter
Telephone jacks vary by country or region. To use the modem and the modem cable (purchased
separately) outside the country or region in which you purchased the computer, you must obtain a
country- or region-specific modem cable adapter (purchased separately).
To connect the modem to an analog telephone line that does not have an RJ-11 telephone jack, follow
these steps:
1. Plug the modem cable into the modem jack (1) on the computer.
2. Plug the modem cable into the country- or region-specific modem cable adapter (2).
26 Chapter 2 Wireless, local area network, and modem
Page 39

3. Plug the country- or region-specific modem cable adapter (3) into the telephone wall jack.
Selecting a location setting
Viewing the current location selection
To view the current location setting for the modem, follow these steps:
1. Select Start > Control Panel.
2. Click Clock, Language, and Region.
3. Click Region and Language.
4. Click the Location tab to display your location.
Adding new locations when traveling
By default, the only location setting available to the modem is a location setting for the country or region
in which you purchased the computer. As you travel to different countries or regions, set the internal
modem to a location setting that meets the operating standards of the country or region in which you
are using the modem.
As you add new location settings, they are saved by the computer so that you can switch among settings
at any time. You can add multiple location settings for any country or region.
CAUTION: To prevent losing your home country or region settings, do not delete your current modem
country or region settings. To enable modem use in other countries or regions while preserving your
home country or region configuration, add a new configuration for each location in which you will use
the modem.
CAUTION: To prevent configuring the modem in a way that violates the telecommunications
regulations and laws of the country or region you are visiting, select the country or region in which the
computer is located. The modem may not function properly if the correct country or region selection is
not made.
Using the modem 27
Page 40

To add a location setting for the modem, follow these steps:
1. Select Start > Devices and Printers.
2. Right-click the device that represents your computer, and click Modem settings.
NOTE: You must set up an initial (current) location area code before you can view the Dialing
Rules tab. If you do not have a location set up, you will be prompted to enter the location when you
click Modem settings.
3. Click the Dialing Rules tab.
4. Click New. (The New Location window is displayed.)
5. In the Location name box, type a name (such as “home” or “work”) for the new location setting.
6. Select a country or region from the Country/region drop-down list. (If you select a country or region
that is not supported by the modem, the Country/region selection for USA or UK is displayed by
default.)
7. Enter the area code, a carrier code (if necessary), and the number to access an outside line (if
necessary).
8. Next to Dial using, click Tone or Pulse.
9. Click OK to save your new location setting. (The Phone and Modem window is displayed.)
10. Do one of the following:
To set your new location setting as the current location, click OK.
●
To select another location setting as the current location setting, select your preference from
●
the settings in the Location list, and then click OK.
NOTE: You can use the preceding procedure to add location settings for places within your own
country or region as well as in other countries or regions. For example, you could add a setting
named “Work” that includes dialing rules for accessing an outside line.
Solving travel connection problems
If you experience modem connection problems when using the computer outside of the country or region
in which you purchased it, try the following suggestions.
Check the telephone line type.
●
The modem requires an analog, not a digital, telephone line. A line described as a PBX line is
usually a digital line. A telephone line described as a data line, fax machine line, modem line, or
standard telephone line is usually an analog line.
Check for pulse or tone dialing.
●
An analog telephone line supports one of 2 dialing modes: pulse dialing or tone dialing. These
dialing mode options are selected in the Phone and Modem settings. The dialing mode option
selected must match the dialing mode supported by the telephone line in your location.
To determine the dialing mode supported by a telephone line, dial a few digits on the telephone,
and then listen for clicks (pulses) or tones. Clicks indicate that the telephone line supports pulse
dialing. Tones indicate that the telephone line supports tone dialing.
28 Chapter 2 Wireless, local area network, and modem
Page 41

To change the dialing mode in your current modem location setting, follow these steps:
1. Select Start > Devices and Printers.
2. Right-click the device that represents your computer, and click Modem settings.
3. Click the Dialing Rules tab.
4. Select your modem location setting.
5. Click Edit.
6. Click either Tone or Pulse.
7. Click OK twice.
Check the telephone number you are dialing and the response of the remote modem.
●
Dial a telephone number, make sure there is a response from the remote modem, and then hang
up.
Set the modem to ignore dial tones.
●
If the modem receives a dial tone it does not recognize, it does not dial and displays a “No Dial
Tone” error message.
To set the modem to ignore all dial tones before dialing, follow these steps:
1. Select Start > Devices and Printers.
2. Right-click the device that represents your computer, and click Modem settings.
3. Click the Modems tab.
4. Click the listing for the modem.
5. Click Properties.
6. Click Modem.
7. Clear the check box for Wait for dial tone before dialing.
8. Click OK twice.
Using the modem 29
Page 42

3 Pointing devices and keyboard
Component Description
(1) TouchPad off indicator
(2) TouchPad Moves the pointer and selects or activates items on the screen.
(3) Left TouchPad control Use the left side of the TouchPad control like the left button on an
(4) Right TouchPad control Use the right side of the TouchPad control like the right button on
Using pointing devices
Setting pointing device preferences
Use Mouse Properties in Windows to customize settings for pointing devices, such as button
configuration, click speed, and pointer options.
To access Mouse Properties, select Start > Devices and Printers. Then, right-click the device
representing your computer, and select Mouse settings.
When the TouchPad is active, the light is off.
●
When the TouchPad is inactive, the light is amber.
●
To switch between active and inactive, quickly double-tap the
TouchPad off indicator.
external mouse.
an external mouse.
30 Chapter 3 Pointing devices and keyboard
Page 43

Using the TouchPad
Turning the TouchPad on and off
The TouchPad is turned on at the factory. When the TouchPad is active, the light is off.
To turn the TouchPad on or off, quickly double-tap the TouchPad off indicator.
Navigating
To move the pointer, touch and slide your finger across the TouchPad surface in the direction you want
the pointer to go. Use the left and right TouchPad controls like the corresponding controls on an external
mouse. The scroll zone is the area above the TouchPad controls. To scroll up and down using the
TouchPad, touch and slide one or two fingers up or down over the scroll zone.
NOTE: If you are using the TouchPad to move the pointer, you must lift your finger off the TouchPad
before starting to scroll.
Using pointing devices 31
Page 44

Selecting
Use the left and right TouchPad controls like the corresponding controls on an external mouse.
Using TouchPad gestures
The TouchPad supports a variety of TouchPad gestures. To activate the TouchPad gestures, place two
or three fingers on the TouchPad at the same time as described in the following sections.
32 Chapter 3 Pointing devices and keyboard
Page 45
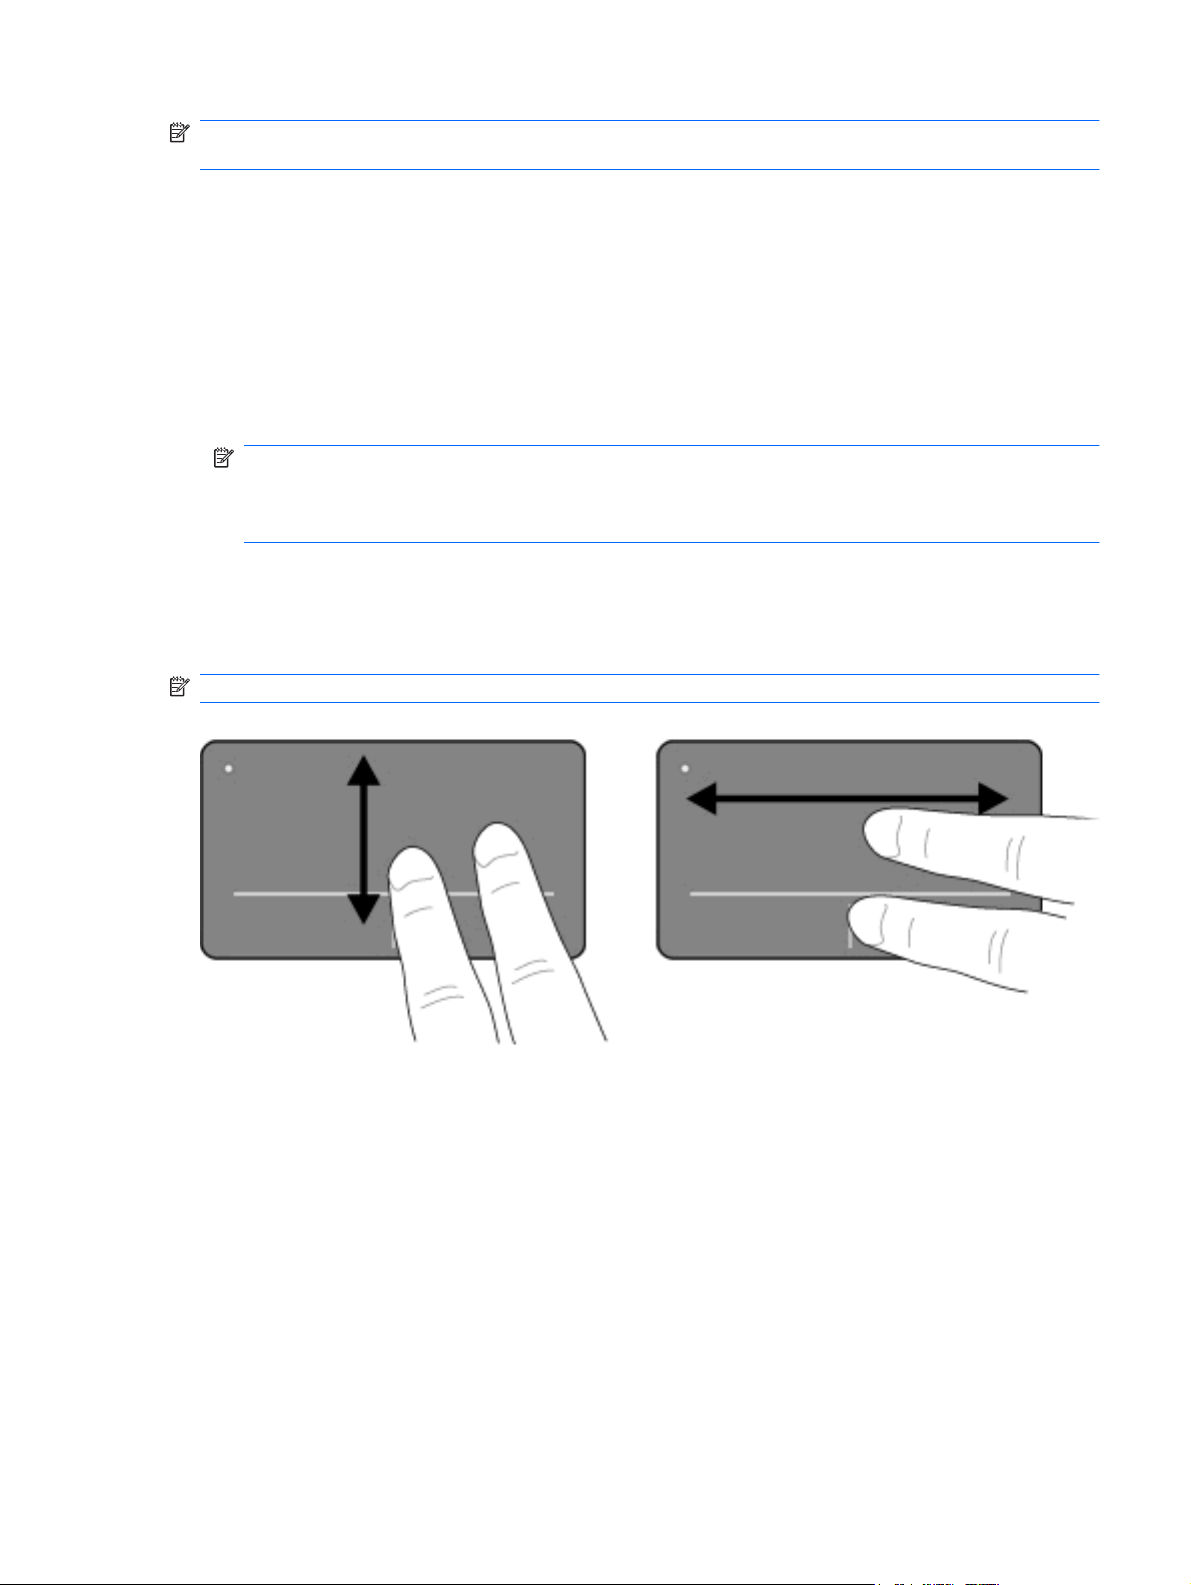
Scrolling
NOTE: You can scroll and pinch anywhere on the TouchPad surface, including the control area.
However, the rotate gesture can be done only on the TouchPad.
The TouchPad gestures described in this section are enabled at the factory. To disable or reenable
these gestures:
1. Double-click the Synaptics icon in the notification area, at the far right of the taskbar, and then
click the Device Settings tab.
2. Select the device, and then click Settings.
3. Select the gesture that you want to disable or reenable.
4. Click Apply, and then click OK.
NOTE: Your computer also supports additional TouchPad features that are disabled at the
factory. To view and enable these features, click the Synaptics icon in the notification area, at the
far right of the taskbar, and then click the Device Settings tab. Select the device, and then click
Settings.
Scrolling is useful for moving up or down on a page or image. To scroll, place two fingers slightly apart
on the TouchPad and drag them across the TouchPad in an up, down, left, or right motion.
NOTE: Scrolling speed is controlled by finger speed.
Pinching/Zooming
Pinching allows you to zoom in or out on items such as PDFs, images, and photos.
To pinch:
Zoom in by placing two fingers together on the TouchPad, and then moving them apart to gradually
●
increase the object’s size.
Zoom out by placing two fingers apart on the TouchPad, and then moving them together to
●
gradually decrease the object’s size.
Using pointing devices 33
Page 46

Rotating
Rotating allows you to rotate items such as photos and pages. To rotate these items, anchor your left
forefinger on the TouchPad. Move the right forefinger around the anchored finger in a sweeping motion,
moving from twelve o’clock to three o’clock. To reverse the rotation, move your right forefinger from
three o’clock to twelve o’clock.
NOTE: Rotating must be done on the TouchPad itself, not on the control area.
Three-finger flick
Three-finger flicking allows you to enhance navigation and application control for rapidly paging through
documents, photos, presentations, and other files.
Place three fingers slightly separated on the TouchPad. Flick your three fingers across the TouchPad
in a linear, continuous motion (right for next, left for previous, up to start or play a presentation, or down
to stop or end a presentation).
34 Chapter 3 Pointing devices and keyboard
Page 47
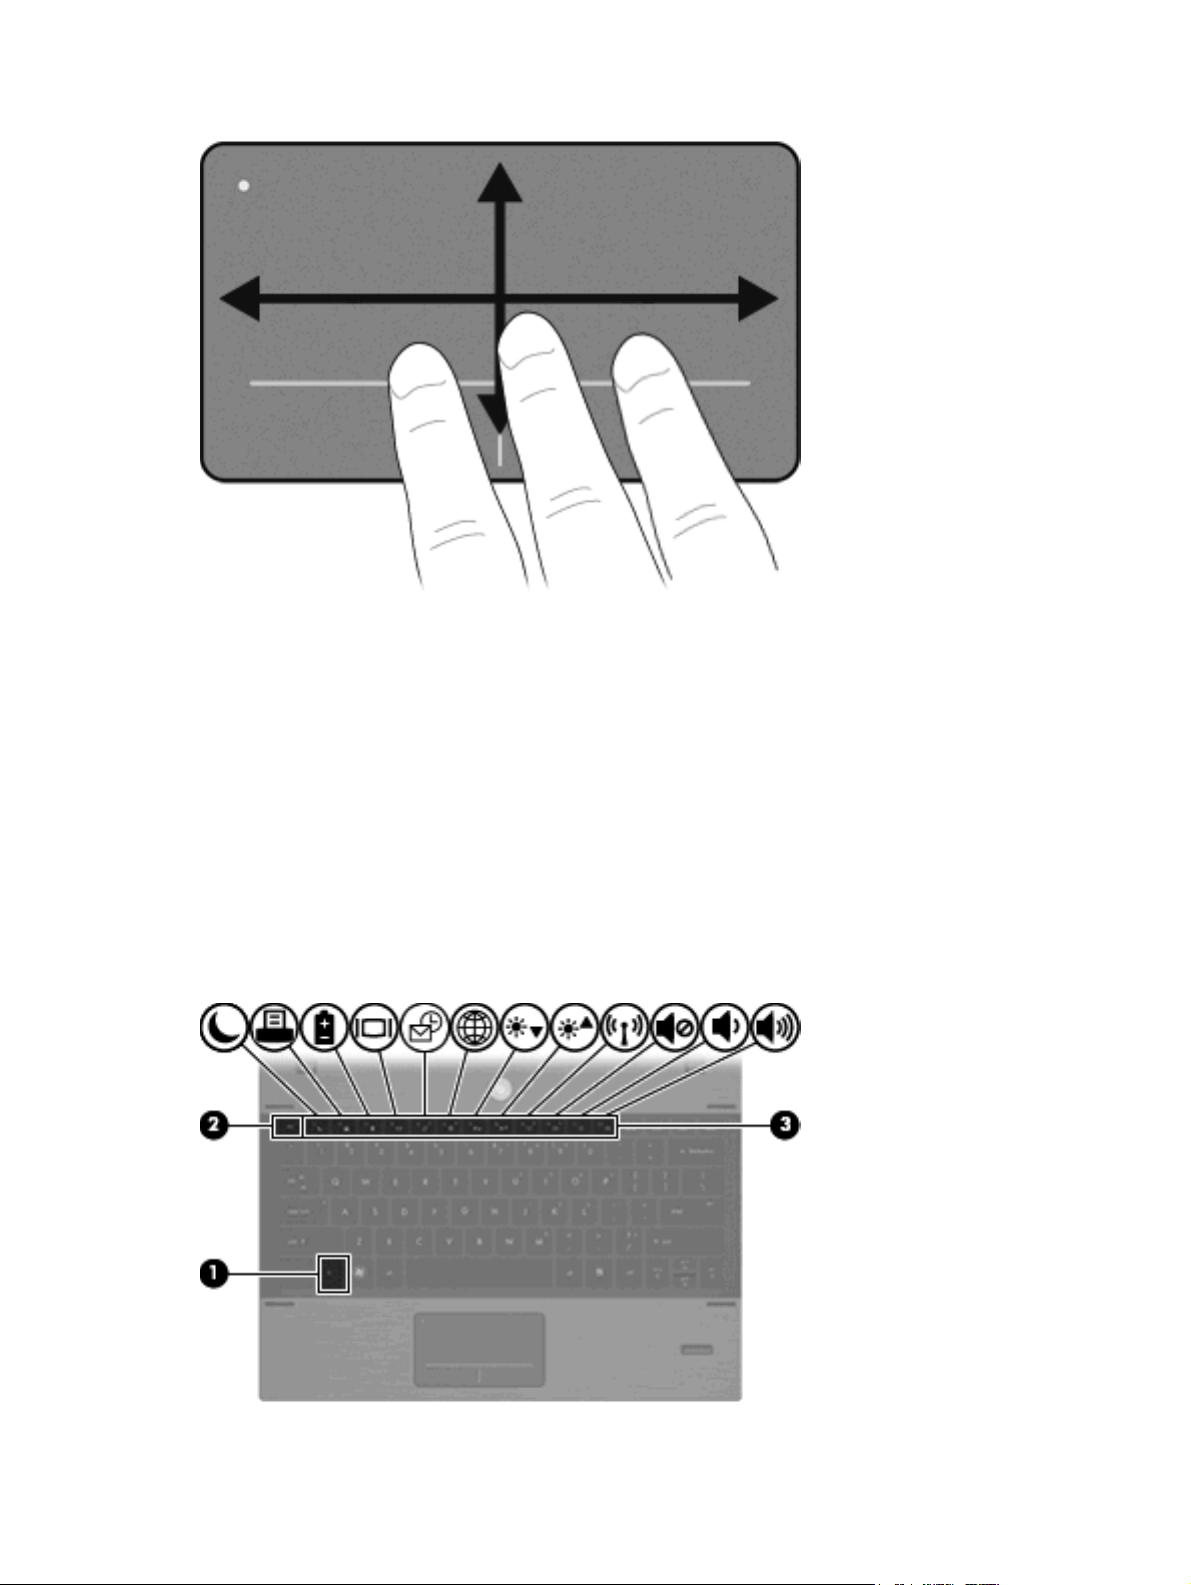
Connecting an external mouse
You can connect an external USB mouse to the computer using one of the USB ports on the computer.
A USB mouse can also be connected to the system using the ports on an optional docking device or
expansion product.
Using the keyboard
Using hotkeys
Hotkeys are combinations of the fn key (1) and either the esc key (2) or one of the function keys (3).
The icons on the f1 through f12 keys represent the hotkey functions. Hotkey functions and procedures
are discussed in the following sections.
Using the keyboard 35
Page 48

Function Hotkey
Display system information fn+esc
Initiate Sleep fn+f1
Open the Print Options window fn+f2
Open HP Power Assistant fn+f3
Switch the screen image fn+f4
Open FastLook fn+f5
Open the Web browser fn+f6
Decrease screen brightness fn+f7
Increase screen brightness fn+f8
Turn wireless features on and off fn+f9
Mute or restore speaker sound fn+f10
Decrease speaker volume fn+f11
Increase speaker volume fn+f12
To use a hotkey command on the computer keyboard, follow either of these steps:
Briefly press the fn key, and then briefly press the second key of the hotkey command.
●
– or –
Press and hold down the fn key, briefly press the second key of the hotkey command, and then
●
release both keys at the same time.
Displaying system information
Press fn+esc to display information about system hardware components and the system BIOS version
number.
In the Windows fn+esc display, the version of the system BIOS (basic input-output system) is displayed
as the BIOS date. On some computer models, the BIOS date is displayed in decimal format. The BIOS
date is sometimes called the system ROM version number.
Initiating Sleep
CAUTION: To reduce the risk of information loss, save your work before initiating Sleep.
Press fn+f1 to initiate Sleep.
When Sleep is initiated, your information is stored in system memory, the screen is cleared, and power
is conserved. While the computer is in the Sleep state, the power lights blink.
The computer must be on before you can initiate Sleep.
NOTE: If a critical battery level occurs while the computer is in the Sleep state, the computer initiates
Hibernation and the information stored in memory is saved to the hard drive. The factory setting for
critical battery action is Hibernate, but this setting can be changed using Power Options in Windows
Control Panel.
36 Chapter 3 Pointing devices and keyboard
Page 49

To exit Sleep, briefly press the power button or press any key on the keyboard.
The function of the fn+f1 hotkey can be changed. For example, you can set the fn+f1 hotkey to initiate
Hibernation instead of Sleep.
NOTE: In all Windows operating system windows, references to the sleep button apply to the fn+f1
hotkey.
Opening the Print Options window
Press fn+f2 to open the Print Options window of the active Windows application.
Displaying battery status
Press fn+f3 to display the battery status.
Switching the screen image
Press fn+f4 to switch the screen image among display devices connected to the system. For example,
if a monitor is connected to the computer, pressing fn+f4 alternates the screen image from computer
display to monitor display to simultaneous display on both the computer and the monitor.
Most external monitors receive video information from the computer using the external VGA video
standard. The fn+f4 hotkey can also alternate images among other devices receiving video information
from the computer.
The following video transmission types, with examples of devices that use them, are supported by the
fn+f4 hotkey:
LCD (computer display)
●
External VGA (most external monitors)
●
S-Video (televisions, camcorders, DVD players, VCRs, and video capture cards with S-Video-in
●
jacks)
HDMI (televisions, camcorders, DVD players, VCRs, and video capture cards with HDMI ports)
●
Composite video (televisions, camcorders, DVD players, VCRs, and video capture cards with
●
composite-video-in jacks)
NOTE: Composite video devices can be connected to the system only by using an optional
docking device.
Opening FastLook or Outlook
When the computer is off, press f5 to open HP FastLook.
●
When the computer is on, press fn+f5 to open Outlook.
●
Opening QuickWeb
When the computer is off, press f6 to open HP QuickWeb.
●
When the computer is on, press fn+f6 to open the Web browser.
●
QuickWeb allows you to quickly browse the Internet, view digital photos, listen to music, or keep in touch
using e-mail, instant messages, without having to start your operating system.
Using the keyboard 37
Page 50

Decreasing screen brightness
Press fn+f7 to decrease screen brightness. Hold down the hotkey to decrease the brightness level
incrementally.
Increasing screen brightness
Press fn+f8 to increase screen brightness. Hold down the hotkey to increase the brightness level
incrementally.
Turning wireless features on and off
Press fn+f9 to turn the wireless feature on or off. Note that this hotkey cannot be used to establish a
wireless connection.
Muting and restoring speaker sound
Press fn+f10 to mute speaker sound. Press the hotkey again to restore speaker sound.
Decreasing speaker volume
Press fn+f11 to decrease speaker volume. Hold down the hotkey to decrease speaker volume
incrementally.
Increasing speaker volume
Press fn+f12 to increase speaker volume. Hold down the hotkey to increase speaker volume
incrementally.
38 Chapter 3 Pointing devices and keyboard
Page 51
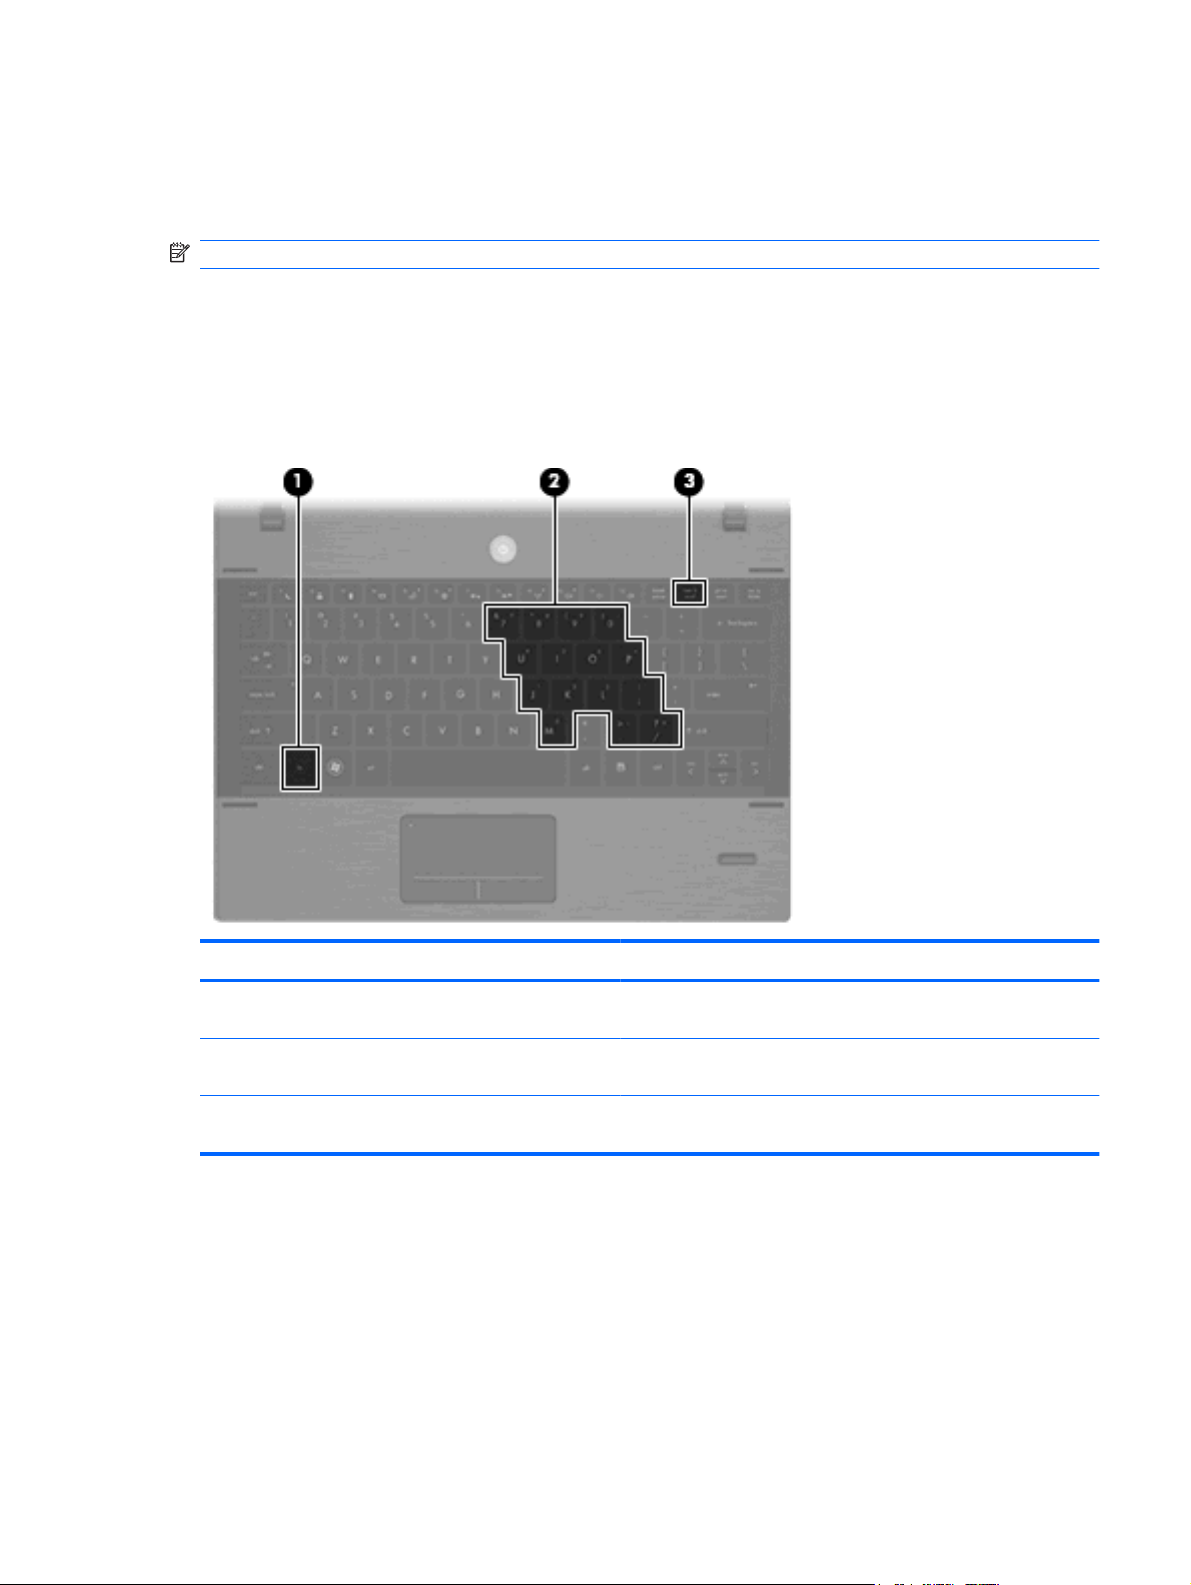
Using HP FastLook
FastLook allows you to view and manage calendar, contact, inbox, and task information from Microsoft
Outlook, even when the computer is off. Press f5 to initiate FastLook.
NOTE: FastLook does not support the Sleep state or Hibernation in Windows.
For more information about setting up and using FastLook, refer to the FastLook software Help.
Using keypads
The computer has an embedded numeric keypad and also supports an optional external numeric keypad
or an optional external keyboard that includes a numeric keypad.
Component Description
(1) fn key Enables/disables the embedded numeric keypad when pressed in
combination with the num lk key.
(2) Embedded numeric keypad When the keypad has been enabled, it can be used like an external
numeric keypad.
(3) num lk key Enables/disables the embedded numeric keypad when pressed in
combination with the fn key.
Using the embedded numeric keypad
The 15 keys of the embedded numeric keypad can be used like the keys on an external keypad. When
the embedded numeric keypad is turned on, each key on the keypad performs the function indicated by
the icon in the upper-right corner of the key.
Enabling and disabling the embedded numeric keypad
Press fn+num lk to enable the embedded numeric keypad. Press fn+num lk again to return the keys to
their standard keyboard functions.
Using HP FastLook 39
Page 52

NOTE: The embedded numeric keypad will not function while an external keyboard or numeric keypad
is connected to the computer, an optional docking device, or an optional expansion product.
Switching key functions on the embedded numeric keypad
You can temporarily alternate the functions of keys on the embedded numeric keypad between their
standard keyboard functions and their keypad functions by using the fn key or the fn+shift key
combination.
To change the function of a keypad key to keypad functions while the keypad is off, press and hold
●
the fn key while pressing the keypad key.
To use the keypad keys temporarily as standard keys while the keypad is on:
●
Press and hold the fn key to type in lowercase.
◦
Press and hold fn+shift to type in uppercase.
◦
Using an optional external numeric keypad
Keys on most external numeric keypads function differently according to whether num lock is on or off.
(Num lock is turned off at the factory.) For example:
When num lock is on, most keypad keys type numbers.
●
When num lock is off, most keypad keys function like the arrow, page up, or page down keys.
●
To turn num lock on or off on an external keypad as you work:
Press the num lk key on the external keypad, not on the computer.
▲
40 Chapter 3 Pointing devices and keyboard
Page 53

Cleaning the TouchPad and keyboard
Dirt and grease on the TouchPad can cause the pointer to jump around on the screen. To avoid this,
clean the TouchPad with a damp cloth, and wash your hands frequently when using the computer.
WARNING! To reduce the risk of electric shock or damage to internal components, do not use a
vacuum cleaner attachment to clean the keyboard. A vacuum cleaner can deposit household debris on
the keyboard surface.
Clean the keyboard regularly to prevent keys from sticking and to remove dust, lint, and particles that
can become trapped beneath the keys. A can of compressed air with a straw extension can be used to
blow air around and under the keys to loosen and remove debris.
Cleaning the TouchPad and keyboard 41
Page 54

4 Multimedia
Multimedia features
Your computer includes multimedia features that allow you to listen to music and view pictures. Your
computer may include the following multimedia components:
Integrated speakers for listening to music
●
Integrated microphone for recording your own audio
●
Integrated webcam that allows you to capture and share video
●
Preinstalled multimedia software that allows you to play and manage your music and pictures
●
Hotkeys that provide fast access to volume control
●
NOTE: Your computer may not include all of the components listed.
The following sections explain how to identify and use the multimedia components included with your
computer.
Identifying your multimedia components
The following illustration and table describe the multimedia features of the computer.
42 Chapter 4 Multimedia
Page 55

Component Description
(1) Internal microphone Records sound.
(2) Webcam (select models only) Records audio and video and captures still photographs.
(3) Audio-out (headphone) jack/Audio-in
(microphone) jack
(4) Speakers (2) Produce sound.
Adjusting the volume
You can adjust the volume using the following controls:
A computer volume hotkey—A combination of the fn key (1) and either the f10 (2), f11 (3), or f12
●
(4) function key:
To mute or restore volume, press fn+f10.
◦
To decrease volume, press fn+f11.
◦
Produces sound when connected to optional powered stereo
speakers, headphones, ear buds, or a headset. Also connects an
optional headset microphone.
WARNING! To reduce the risk of personal injury, adjust the
volume before putting on headphones, earbuds, or a headset. For
additional safety information, refer to the Regulatory, Safety, and
Environmental Notices.
NOTE: When a device is connected to the headphone jack, the
computer speakers are disabled.
Multimedia features 43
Page 56

To increase volume, press fn+f12.
◦
Windows volume control:
●
a. Click the Speakers icon in the notification area, at the far right of the taskbar.
b. Increase or decrease the volume by moving the slider up or down. Click the Mute
Speakers icon to mute the volume.
– or –
a. Right-click the Speakers icon in the notification area, and then click Open Volume Mixer.
b. In the Speakers column, you can increase or decrease the volume by moving the slider up or
down. You can also mute the volume by clicking the Mute Speakers icon.
If the Speakers icon is not displayed in the notification area, follow these steps to add it:
a. Right-click the Show hidden icons icon (the arrow at the left side of the notification area.
b. Click Customize notification icons.
c. Under Behaviors, select Show icon and notifications for the Volume icon.
d. Click OK.
Program volume control:
●
Volume can also be adjusted within some programs.
Multimedia software
Your computer includes preinstalled multimedia software that allows you to play music and view pictures.
The following sections provide details about preinstalled multimedia software and installing multimedia
software from a disc.
44 Chapter 4 Multimedia
Page 57

Accessing your preinstalled multimedia software
To access your preinstalled multimedia software:
Select Start > All Programs, and then open the multimedia program you want to use.
▲
NOTE: Some programs may be located in subfolders.
NOTE: For details about using software included with the computer, refer to the software
manufacturer’s instructions. These instructions may be provided with the software, on disc, or on the
manufacturer’s Web site.
Installing multimedia software from a disc
NOTE: To install multimedia software from a disc, you must connect an external optical drive
(purchased separately) to the computer. The computer provides one powered USB port on the right side
of the computer. This port provides power to an external optical drive when used with a powered USB
cable. An external optical drive connected to the other USB port on the computer must be connected to
AC power.
To install any multimedia software from a CD or DVD, follow these steps:
1. Insert the disc into a connected external optical drive.
2. When the installation wizard opens, follow the on-screen instructions.
3. Restart the computer if you are prompted to do so.
Audio
Your computer enables you to use a variety of audio features:
Play music using your computer speakers and/or connected external speakers
●
Record sound using the internal microphone or connect an external microphone
●
Download music from the Internet
●
Create multimedia presentations using audio and images
●
Transmit sound and images with instant messaging programs
●
Stream radio programs (select models only) or receive FM radio signals
●
Create or “burn” audio CDs using an external optical drive
●
Connecting external audio devices
WARNING! To reduce the risk of personal injury, adjust the volume before putting on headphones,
earbuds, or a headset. For additional safety information, refer to the Regulatory, Safety, and
Environmental Notices.
Audio 45
Page 58

To connect external devices such as external speakers, headphones, or a microphone, refer to the
information provided with the device. For best results, remember the following tips:
Be sure that the device cable is securely connected to the correct jack on your computer. (Cable
●
connectors are normally color-coded to match the corresponding jacks on the computer.)
Be sure to install any drivers required by the external device.
●
NOTE: A driver is a required program that acts like a translator between the device and the
programs that use the device.
Checking your audio functions
To check the system sound on your computer, follow these steps:
1. Select Start > Control Panel.
2. Click Hardware and Sound.
3. Click Sound.
4. When the Sound window opens, click the Sounds tab. Under Program Events, select any sound
event, such as a beep or alarm, and click the Test button.
You should hear sound through the speakers or through connected headphones.
To check the record functions of the computer, follow these steps:
1. Select Start > All Programs > Accessories > Sound Recorder.
2. Click Start Recording and speak into the microphone. Save the file to the desktop.
3. Open Windows Media Player and play back the sound.
NOTE: For best results when recording, speak directly into the microphone and record sound in a
setting free of background noise.
To confirm or change the audio settings on your computer, select Start > Control Panel > Hardware
and Sound > Sound.
Connecting an HDMI device
Select computer models include an HDMI (High Definition Multimedia Interface) port. The HDMI port
connects the computer to an optional video or audio device, such as a high-definition television, or any
compatible digital or audio component.
The computer can support one HDMI device connected to the HDMI port, while simultaneously
supporting an image on the computer display or any other supported external display.
NOTE: To transmit video signals through the HDMI port, you need an HDMI cable (purchased
separately), available from most electronics retailers.
46 Chapter 4 Multimedia
Page 59

To connect a video or audio device to the HDMI port:
1. Connect one end of the HDMI cable to the HDMI port on the computer.
2. Connect the other end of the cable to the video device, according to the device manufacturer’s
instructions.
3. Press f4 on the computer to switch the image between the display devices connected to the
computer.
Configuring audio for HDMI
To configure HDMI audio, first connect an audio or video device, such as a high-definition TV, to the
HDMI port on your computer. Then configure the default audio playback device as follows:
1. Right-click the Speakers icon in the notification area, at the far right of the taskbar, and then click
Playback devices.
2. On the Playback tab, click either Digital Output or Digital Output Device (HDMI).
3. Click Set Default, and then click OK.
To return audio to the computer speakers, follow these steps:
1. Right-click the Speakers icon in the notification area, at the far right of the taskbar, and then click
Playback devices.
2. On the Playback tab, click Speakers.
3. Click Set Default, and then click OK.
Video
Your computer enables you to use a variety of video features:
Play games over the Internet
●
Edit pictures and video to create presentations
●
Connect external video devices
●
Video 47
Page 60

Connecting an external monitor or projector
The external monitor port connects an external display device such as an external monitor or a projector
to the computer.
To connect a display device, connect the device cable to the external monitor port.
▲
NOTE: If a properly connected external display device does not display an image, press fn+f4 to
transfer the image to the device. Repeatedly pressing fn+f4 alternates the screen image between the
computer display and the device.
External optical drive (purchased separately)
An external optical drive (purchased separately) expands the functionality of the computer. An external
optical drive allows you to read data discs, play music, and watch movies.
Identifying an external optical drive
Select Start > Computer.
▲
You will see a list of all the devices installed on your computer, including a connected external optical
drive.
Playing music
NOTE: Be sure that the external optical drive is connected to your computer before beginning these
steps.
1. Turn on the computer.
2. Press the release button (1) on the external optical drive bezel to release the disc tray.
3. Pull out the tray (2).
4. Hold the disc by the edges and position the disc label-side up over the tray spindle.
NOTE: If the tray is not fully accessible, tilt the disc carefully to position it over the spindle.
48 Chapter 4 Multimedia
Page 61

5. Gently press the disc (3) down onto the tray spindle until the disc snaps into place.
6. Close the disc tray.
7. If you have not selected a media player, the AutoPlay dialog box opens and asks how you want to
use the media content. Choose Windows Media Player, which is preinstalled on your computer.
NOTE: After you insert a disc, a short pause is normal.
If Sleep or Hibernation is accidentally initiated during playback of a disc:
Your playback may be interrupted.
●
You may see a warning message asking if you want to continue. If this message is displayed, click
●
No.
You may need to restart the CD or DVD to resume playback.
●
Watching a movie
An external optical drive allows you to watch movies from a disc.
NOTE: Be sure that the external optical drive is connected to your computer before beginning these
steps.
1. Turn on the computer.
2. Press the release button (1) on the external optical drive bezel to release the disc tray.
3. Pull out the tray (2).
4. Hold the disc by the edges and position the disc label-side up over the tray spindle.
NOTE: If the tray is not fully accessible, tilt the disc carefully to position it over the spindle.
External optical drive (purchased separately) 49
Page 62

5. Gently press the disc (3) down onto the tray spindle until the disc snaps into place.
6. Close the disc tray.
NOTE: After you insert a disc, a short pause is normal. If you have not selected a media player, an
AutoPlay dialog box opens. It prompts you to select how you want to use the media content.
Changing DVD region settings
Most DVDs that contain copyrighted files also contain region codes. The region codes help protect
copyrights internationally.
You can play a DVD containing a region code only if the region code on the DVD matches the region
setting on your DVD drive.
To play a DVD, connect an optional external optical drive to the computer.
CAUTION: The region settings on your DVD drive can be changed only 5 times.
The region setting you select the fifth time becomes the permanent region setting on the DVD drive.
The number of region changes remaining is displayed on the DVD Region tab.
To change settings through the operating system:
1. Select Start > Control Panel > System and Security > System > Device Manager.
NOTE: Windows includes the User Account Control feature to improve the security of your
computer. You may be prompted for your permission or password for tasks such as installing
software, running utilities, or changing Windows settings. Refer to Help and Support for more
information.
2. Click the "+" sign next to DVD/CD-ROM drives.
3. Right-click the DVD drive for which you want to change region settings, and then click
Properties.
4. Click the DVD Region tab, and change settings.
5. Click OK.
50 Chapter 4 Multimedia
Page 63

Creating (burning) a CD or DVD
CAUTION: Observe the copyright warning. It is a criminal offense, under applicable copyright laws,
to make unauthorized copies of copyright-protected material, including computer programs, films,
broadcasts, and sound recordings. Do not use this computer for such purposes.
If your external optical drive is a CD-RW, DVD-RW, or DVD±RW optical drive, you can use software
such as Windows Media Player to burn data and audio files, including MP3 and WAV music files.
Observe the following guidelines when burning a CD or DVD:
Before burning a disc, save and close any open files and close all programs.
●
A CD-R or DVD-R is usually best for burning audio files because after the information is copied, it
●
cannot be changed.
Because some home and car stereos will not play CD-RWs, use CD-Rs to burn music CDs.
●
A CD-RW or DVD-RW is generally best for burning data files or for testing audio or video recordings
●
before you burn them to a CD or DVD that cannot be changed.
DVD players used in home systems usually do not support all DVD formats. Refer to the user guide
●
that came with your DVD player for a list of supported formats.
An MP3 file uses less space than other music file formats, and the process for creating an MP3
●
disc is the same as the process for creating a data file. MP3 files can be played only on MP3 players
or on computers with MP3 software installed.
To burn a CD or DVD, follow these steps:
1. Download or copy the source files into a folder on your hard drive.
2. Insert a blank CD or DVD into the external optical drive.
3. Select Start > All Programs and the name of the software you want to use.
4. Select the kind of CD or DVD you want to create—data, audio, or video.
5. Right-click Start, click Open Windows Explorer, and then navigate to the folder where the source
files are stored.
6. Open the folder, and then drag the files to the drive that contains the blank disc.
7. Initiate the burning process as directed by the program you have selected.
For specific instructions, refer to the software manufacturer's instructions. These instructions may be
provided with the software, on disc, or on the manufacturer's Web site.
Removing an optical disc (CD or DVD)
1. Press the release button (1) on the drive bezel to release the disc tray, and then gently pull out the
tray (2) until it stops.
External optical drive (purchased separately) 51
Page 64

2. Remove the disc (3) from the tray by gently pressing down on the spindle while lifting the outer
edges of the disc. Hold the disc by the edges and avoid touching the flat surfaces.
NOTE: If the tray is not fully accessible, tilt the disc carefully as you remove it.
3. Close the disc tray and place the disc in a protective case.
Webcam (select models only)
NOTE: This section describes features that are common to most models. Some features may not be
available on your computer.
Your computer may include an integrated webcam, located at the top of the display. With the preinstalled
software, you can use the webcam to take a photo, record a video, or make an audio recording. You
can preview the photo, video recording, or audio recording, and save it on your computer hard drive.
To access the webcam and software, select Start > All Programs > ArcSoft Camera Suite > WebCam
Companion
The webcam software enables you to experiment with the following features:
Video—Record and play back webcam video.
●
Audio—Record and play back audio.
●
Streaming video—Use with instant message software solutions that support UVC (Universal Video
●
Class) cameras.
Snapshots—Take still photos.
●
52 Chapter 4 Multimedia
Page 65

Webcam tips
For optimum performance, observe the following guidelines while using the webcam:
Be sure that you have the latest version of an instant message program before starting a video
●
conversation.
The webcam may not work properly across some network firewalls.
●
NOTE: If you are having trouble viewing or sending multimedia files to someone on another LAN
or outside your network firewall, temporarily disable the firewall, perform the task you want to
perform, and then reenable the firewall. To permanently resolve the problem, reconfigure the
firewall as necessary, and adjust the policies and settings of other intrusion detection systems. For
additional information, contact your network administrator or IT department.
Whenever possible, place bright light sources behind the webcam and out of the picture area.
●
NOTE: For details about using your webcam, click the Help menu in the webcam software Help.
Adjusting webcam properties
You can adjust webcam properties using the Properties dialog box, which is accessible from various
programs that use the integrated webcam, usually from a configuration, settings, or properties menu:
Brightness—Controls the amount of light that is incorporated into the image. A higher brightness
●
setting creates a brighter image; a lower brightness setting creates a darker image.
Contrast—Controls the difference between lighter and darker areas on the image. A higher
●
contrast setting intensifies the image; a lower contrast setting maintains more of the original
information’s dynamic range, but leads to a flatter image.
Hue—Controls the aspect of color that distinguishes it from another color (what makes a color red,
●
green, or blue). Hue is distinct from saturation, which measures the intensity of the hue.
Saturation—Controls the strength of color in the final image. A higher saturation setting creates a
●
bolder image; a lower saturation setting creates a more subtle image.
Sharpness—Controls the definition of edges in an image. A higher sharpness setting creates a
●
more defined image; a lower sharpness setting creates a softer image.
Gamma—Controls the contrast affecting the mid-level grays or midtones of an image. Adjusting
●
the gamma of an image allows you to change the brightness values of the middle range of gray
tones without dramatically altering the shadows and highlights. A lower gamma setting makes
grays look black, and makes dark colors even darker.
For information about using the webcam, select Start > Help and Support.
Webcam (select models only) 53
Page 66

5 Power management
Setting power options
Using power-saving states
The computer has two power-saving states enabled at the factory: Sleep and Hibernation.
When Sleep is initiated, the power light blinks and the screen clears. Your work is saved to memory.
Exiting Sleep is faster than exiting Hibernation. If the computer is in the Sleep state for an extended
period or if the battery reaches a critical battery level while in the Sleep state, the computer initiates
Hibernation.
When Hibernation is initiated, your work is saved to a hibernation file on the hard drive and the computer
turns off.
CAUTION: To prevent possible audio and video degradation, loss of audio or video playback
functionality, or loss of information, do not initiate Sleep or Hibernation while reading from or writing to
a disc or an external media card.
NOTE: You cannot initiate any type of networking connection or perform any computer functions while
the computer is in the Sleep state or in Hibernation.
NOTE: When HP 3D DriveGuard has parked a drive, the computer will not initiate Sleep or Hibernation,
and the display will be turned off.
Initiating and exiting Sleep
The system is set at the factory to initiate Sleep after 15 minutes of inactivity when running on battery
power and 30 minutes of inactivity when running on external power.
Power settings and timeouts can be changed using Power Options in Windows® Control Panel.
With the computer on, you can initiate Sleep in either of the following ways:
Press fn+f1.
●
Click Start, click the arrow next to the Shut Down button, and then click Sleep.
●
To exit Sleep:
Press the power button.
▲
When the computer exits Sleep, the power lights turn on and your work returns to the screen where
you stopped working.
54 Chapter 5 Power management
Page 67

NOTE: If you have set a password to be required when the computer exits Sleep, you must enter your
Windows password before your work will return to the screen.
Initiating and exiting Hibernation
The system is set at the factory to initiate Hibernation after 1,080 minutes (18 hours) of inactivity when
running on battery power, 1,080 minutes (18 hours) of inactivity when running on external power, or
when the battery reaches a critical battery level.
Power settings and timeouts can be changed using Power Options in Windows Control Panel.
To initiate Hibernation:
1. Click Start, and then click the arrow next to the Shut Down button.
2. Click Hibernate.
To exit Hibernation:
Press the power button.
▲
The power lights turn on and your work returns to the screen where you stopped working.
NOTE: If you have set a password to be required when the computer exits Hibernation, you must enter
your Windows password before your work will return to the screen.
Using battery meter
The battery meter icon is located in the notification area, at the far right of the taskbar. The battery meter
allows you to quickly access power settings, view remaining battery charge, and select a different power
plan.
To display the percentage of remaining battery charge and the current power plan, move the pointer
●
over the battery meter icon.
To access Power Options, or to change the power plan, click the battery meter icon and select an
●
item from the list.
Different battery meter icons indicate whether the computer is running on battery or external power. The
icon also displays a message if the battery has reached a low battery level, critical battery level, or
reserve battery level.
To hide or display the battery meter icon:
1. Right-click the Show hidden icons icon (the arrow at the left side of the notification area).
2. Click Customize notification icons.
3. Under Behaviors, select Show icon and notifications for the Power icon.
4. Click OK.
Using power plans
A power plan is a collection of system settings that manages how the computer uses power. Power
plans can help you conserve power or maximize performance.
You can change power plan settings or create your own power plan.
Setting power options 55
Page 68

Viewing the current power plan
Click the battery meter icon in the notification area, at the far right of the taskbar.
▲
– or –
Select Start > Control Panel > System and Security > Power Options.
Selecting a different power plan
Click the batter meter icon in the notification area, and then select a power plan from the list.
▲
– or –
Select Start > Control Panel > System and Security > Power Options, and then select a power
plan from the list.
Customizing power plans
1. Click the battery meter icon in the notification area, and then click More power options.
– or –
Select Start > Control Panel > System and Security > Power Options.
2. Select a power plan, and then click Change plan settings.
3. Change the settings as needed.
4. To change additional settings, click Change advanced power settings and make your changes.
Setting password protection on wakeup
To set the computer to prompt for a password when the computer exits Sleep or Hibernation, follow
these steps:
1. Select Start > Control Panel > System and Security > Power Options.
2. In the left pane, click Require a password on wakeup.
3. Click Change Settings that are currently unavailable.
4. Click Require a password (recommended).
NOTE: If you need to create a user account password or change your current user account
password, click Create or change your user account password, and then follow the on-screen
instructions. If not, go to step 5.
5. Click Save changes.
56 Chapter 5 Power management
Page 69

Using HP Power Assistant
HP Power Assistant allows you to configure system settings to optimize your computer's power
consumption and battery charge. HP Power Assistant provides tools and information to help you make
informed decisions on power management:
Power consumption predictions in hypothetical system configurations
●
Predefined power profiles
●
Usage details and graphs showing power consumption trends over time
●
Starting HP Power Assistant
To start HP Power Assistant when Windows is running:
Select Start > All Programs > HP > HP Power Assistant.
– or –
Press fn+f3.
– or –
Click the HP Power Assistant icon located in the notification area, at the right of the taskbar.
HP Power Assistant opens, and the following tabs are displayed:
Settings—Displays the opening page, which shows battery charge and power consumption
●
information.
Preferences—Enables you to set device preferences.
●
Usage Details—Enables you to enter information about computer use.
●
Charts—Displays charts and graphs of power consumption.
●
About—Displays HP Power Assistant Help and version information.
●
For more information about using, configuring, and managing HP Power Assistant, refer to the HP Power
Assistant software Help.
Using HP Power Assistant 57
Page 70

Using external AC power
External AC power is supplied through one of the following devices:
WARNING! To reduce potential safety issues, use only the AC adapter provided with the computer,
a replacement AC adapter provided by HP, or a compatible AC adapter purchased from HP.
Approved AC adapter
●
Optional docking device or optional expansion product
●
Connect the computer to external AC power under any of the following conditions:
WARNING! Do not charge the computer battery while you are onboard aircraft.
When you are charging or calibrating a battery
●
When you are installing or modifying system software
●
When you are writing information to a CD or DVD
●
When you connect the computer to external AC power, the following events occur:
The battery begins to charge.
●
If the computer is turned on, the battery meter icon in the notification area changes appearance.
●
When you disconnect external AC power, the following events occur:
The computer switches to battery power.
●
The display brightness is automatically decreased to save battery life. To increase display
●
brightness, press the fn+f8 hotkey or reconnect the AC adapter.
Connecting the AC adapter
WARNING! To reduce the risk of electric shock or damage to the equipment:
Plug the power cord into an AC outlet that is easily accessible at all times.
Disconnect power from the computer by unplugging the power cord from the AC outlet (not by
unplugging the power cord from the computer).
If provided with a 3-pin attachment plug on the power cord, plug the cord into a grounded (earthed) 3pin outlet. Do not disable the power cord grounding pin, for example, by attaching a 2-pin adapter. The
grounding pin is an important safety feature.
To connect the computer to external AC power, follow these steps:
1. Plug the AC adapter into the power connector (1) on the computer.
2. Plug the power cord into the AC adapter (2).
58 Chapter 5 Power management
Page 71

3. Plug the other end of the power cord into an AC outlet (3).
Using battery power
When a charged battery is in the computer and the computer is not plugged into external power, the
computer runs on battery power. When the computer is plugged into external AC power, the computer
runs on AC power.
If the computer contains a charged battery and is running on external AC power supplied through the
AC adapter, the computer switches to battery power if the AC adapter is disconnected from the
computer.
NOTE: The display brightness is decreased to save battery life when you disconnect AC power. To
increase display brightness, use the fn+f8 hotkey or reconnect the AC adapter.
You can keep a battery in the computer or in storage, depending on how you work. Keeping the battery
in the computer whenever the computer is plugged into AC power charges the battery and also protects
your work in case of a power outage. However, a battery in the computer slowly discharges when the
computer is off and unplugged from external power.
WARNING! To reduce potential safety issues, use only the battery provided with the computer, a
replacement battery provided by HP, or a compatible battery purchased from HP.
Computer battery life varies, depending on power management settings, programs running on the
computer, display brightness, external devices connected to the computer, and other factors.
Finding battery information in Help and Support
Help and Support provides the following tools and information about the battery:
Battery Check tool to test battery performance
●
Information on calibration, power management, and proper care and storage to maximize battery
●
life
Information on battery types, specifications, life cycles, and capacity
●
To access battery information:
Select Start > Help and Support > Learn > Power Plans: Frequently Asked Questions.
▲
Using battery power 59
Page 72

NOTE: You can also find battery information by clicking the battery meter icon, located in the
notification area, at the far right of the taskbar.
Displaying the remaining battery charge
Move the pointer over the battery meter icon in the notification area, at the far right of the taskbar.
Inserting or removing the battery
CAUTION: Removing a battery that is the sole power source can cause loss of information. To prevent
loss of information, save your work and initiate Hibernation, or shut down the computer through Windows
before removing the battery.
To insert the battery:
1. Turn the computer upside down on a flat surface, with the battery bay toward you.
2. Slide the battery into the battery bay (1) until the battery release latch (2) clicks.
3. Slide the battery lock (3) to the right to lock the battery into place.
To remove the battery:
1. Turn the computer upside down on a flat surface, with the battery bay toward you.
2. Slide the battery lock latch inward. Then slide the battery release latch on the left inward (1) to
release the battery.
NOTE: You can identify the lock latch by the red marking on the latch.
60 Chapter 5 Power management
Page 73

3. Slide the battery (2) out of the battery bay.
Charging a battery
WARNING! Do not charge the computer battery while you are onboard aircraft.
The battery charges whenever the computer is plugged into external power through an AC adapter, an
optional power adapter, an optional expansion product, or an optional docking device.
The battery charges whether the computer is off or in use, but it charges faster when the computer is
off.
Charging may take longer if a battery is new, has been unused for 2 weeks or more, or is much warmer
or cooler than room temperature.
To prolong battery life and optimize the accuracy of battery charge displays, follow these
recommendations:
If you are charging a new battery, charge it fully before turning on the computer.
●
Charge the battery until the battery light turns off.
●
NOTE: If the computer is on while the battery is charging, the battery meter in the notification
area may show 100 percent charge before the battery is fully charged.
Allow the battery to discharge below 5 percent of a full charge through normal use before charging
●
it.
If the battery has been unused for one month or more, calibrate the battery instead of simply
●
charging it.
Using battery power 61
Page 74

The battery light displays charge status:
On: The battery is charging.
●
Blinking: The battery has reached a low battery level or critical battery level and is not charging.
●
Off: The battery is fully charged, in use, or not installed.
●
Managing low battery levels
The information in this section describes the alerts and system responses set at the factory. Some lowbattery alerts and system responses can be changed using Power Options in Windows Control Panel
(Start > Control Panel > System and Security > Power Options). Preferences set using Power
Options do not affect lights.
Identifying low battery levels
When a battery that is the sole power source for the computer reaches a low battery level, the battery
light blinks.
If a low battery level is not resolved, the computer enters a critical battery level, and the battery light
blinks rapidly.
The computer takes the following actions for a critical battery level:
If Hibernation is enabled and the computer is on or in the Sleep state, the computer initiates
●
Hibernation.
If Hibernation is disabled and the computer is on or in the Sleep state, the computer remains briefly
●
in the Sleep state, and then shuts down and loses any unsaved information.
Resolving a low battery level
CAUTION: To reduce the risk of losing information when the computer reaches a critical battery level
and has initiated Hibernation, do not restore power until the power lights turn off.
Resolving a low battery level when external power is available
Connect one of the following devices:
▲
AC adapter
●
Optional expansion product or optional docking device
●
Optional power adapter
●
Resolving a low battery level when a charged battery is available
1. Turn off the computer or initiate Hibernation.
2. Remove the discharged battery, and then insert a charged battery.
3. Turn on the computer.
Resolving a low battery level when no power source is available
Initiate Hibernation.
▲
– or –
62 Chapter 5 Power management
Page 75

Save your work and shut down the computer.
Resolving a low battery level when the computer cannot exit Hibernation
When the computer lacks sufficient power to exit Hibernation, follow these steps:
1. Insert a charged battery or plug the computer into external power.
2. Exit Hibernation by briefly pressing the power button.
Calibrating a battery
Calibrate a battery under the following conditions:
When battery charge displays seem inaccurate
●
When you observe a significant change in battery run time
●
Even if a battery is heavily used, it should not need to be calibrated more than once a month. It is also
not necessary to calibrate a new battery.
Step 1: Fully charge the battery
WARNING! Do not charge the computer battery while you are onboard aircraft.
NOTE: The battery charges whether the computer is off or in use, but it charges faster when the
computer is off.
To fully charge the battery:
1. Insert the battery into the computer.
2. Connect the computer to an AC adapter, optional power adapter, optional expansion product, or
optional docking device, and then plug the adapter or device into external power.
The battery light on the computer turns on.
3. Leave the computer plugged into external power until the battery is fully charged.
The battery light on the computer turns off.
Step 2: Disable Hibernation and Sleep
1. Click the battery meter icon in the notification area, and then click More power options.
– or –
Select Start > Control Panel > System and Security > Power Options.
2. Under the current power plan, click Change plan settings.
3. Record the Turn off the display and Put the computer to sleep settings listed in the On
battery column so that you can reset them after the calibration.
4. Change the Turn off the display and Put the computer to sleep settings to Never.
5. Click Change advanced power settings.
6. Click the plus sign next to Sleep, and then click the plus sign next to Hibernate after.
Using battery power 63
Page 76

7. Record the On battery setting under Hibernate after so that you can reset it after the calibration.
8. Change the On battery setting to Never.
9. Click OK.
10. Click Save changes.
Step 3: Discharge the battery
The computer must remain on while the battery is being discharged. The battery can discharge whether
or not you are using the computer, but the battery will discharge faster while you are using it.
If you plan to leave the computer unattended during the discharge, save your information before
●
beginning the discharge procedure.
If you use the computer occasionally during the discharge procedure and have set energy-saving
●
timeouts, expect the following performance from the system during the discharge process:
The monitor will not turn off automatically.
◦
Hard drive speed will not decrease automatically when the computer is idle.
◦
System-initiated Hibernation will not occur.
◦
To discharge a battery:
1. Unplug the computer from its external power source, but do not turn off the computer.
2. Run the computer on battery power until the battery is discharged. The battery light begins to blink
when the battery has discharged to a low battery level. When the battery is discharged, the battery
light turns off and the computer shuts down.
Step 4: Fully recharge the battery
To recharge the battery:
1. Plug the computer into external power and maintain external power until the battery is fully
recharged. When the battery is recharged, the battery light on the computer turns off.
You can use the computer while the battery is recharging, but the battery will charge faster if the
computer is off.
2. If the computer is off, turn it on when the battery is fully charged and the battery light has turned
off.
Step 5: Reenable Hibernation and Sleep
CAUTION: Failure to reenable Hibernation after calibration may result in a full battery discharge and
information loss if the computer reaches a critical battery level.
1. Click the battery meter icon in the notification area, and then click More power options.
– or –
Select Start > Control Panel > System and Security > Power Options.
2. Under the current power plan, click Change plan settings.
64 Chapter 5 Power management
Page 77

3. Reenter the settings that you recorded for the items in the On battery column.
– or –
Click Restore default settings for this plan, and then follow the on-screen instructions.
NOTE: If you restore default settings, omit steps 4 through 8.
4. Click Change advanced power settings.
5. Click the plus sign next to Sleep, and then click the plus sign next to Hibernate after.
6. Reenter the setting that you recorded for On battery.
7. Click OK.
8. Click Save changes.
Conserving battery power
Select the Power saver power plan through Power Options under System and Security in
●
Windows Control Panel.
Turn off wireless and local area network (LAN) connections and exit modem applications when you
●
are not using them.
Disconnect external devices that are not plugged into an external power source, when you are not
●
using them.
Stop, disable, or remove any external media cards that you are not using.
●
Use the fn+f7 and fn+f8 hotkeys to adjust screen brightness as needed.
●
If you leave your work, initiate Sleep or Hibernation, or shut down the computer.
●
Storing a battery
CAUTION: To prevent damage to a battery, do not expose it to high temperatures for extended periods
of time.
If a computer will be unused and unplugged from external power for more than 2 weeks, remove the
battery and store it separately.
To prolong the charge of a stored battery, place it in a cool, dry place.
NOTE: A stored battery should be checked every 6 months. If the capacity is less than 50 percent,
recharge the battery before returning it to storage.
Calibrate a battery before using it if it has been stored for one month or more.
Disposing of a used battery
WARNING! To reduce the risk of fire or burns, do not disassemble, crush, or puncture; do not short
external contacts; do not dispose of in fire or water.
Refer to the Regulatory, Safety, and Environmental Notices for battery disposal information.
Using battery power 65
Page 78

Testing an AC adapter
Test the AC adapter if the computer exhibits any of the following symptoms:
The computer will not turn on when it is connected to the AC adapter and external power.
●
The display does not turn on when the computer is connected to the AC adapter and external
●
power.
The power light is off when the computer is connected to the AC adapter and external power.
●
To test the AC adapter:
1. Remove the battery from the computer.
2. Connect the AC adapter to the computer and an AC outlet.
3. Turn on the computer.
If the power light turns on, the AC adapter is functioning properly.
●
If the power light remains off, the AC adapter is not functioning and should be replaced.
●
Contact technical support for information on obtaining a replacement AC power adapter. Select
Start > Help and Support > Get assistance.
Shutting down the computer
CAUTION: Unsaved information will be lost when the computer is shut down.
The Shut Down command closes all open programs, including the operating system, and then turns off
the display and computer.
Shut down the computer under any of the following conditions:
When you need to replace the battery or access components inside the computer
●
When you are connecting an external hardware device that does not connect to a USB port
●
When the computer will be unused and disconnected from external power for an extended period
●
Although you can shut down the computer with the power button, the recommended procedure is to use
the Windows Shut Down command.
To shut down the computer, follow these steps:
NOTE: If the computer is in the Sleep state or in Hibernation, you must first exit Sleep or Hibernation
before shutdown is possible.
1. Save your work and close all open programs.
2. Click Start.
3. Click Shut Down.
66 Chapter 5 Power management
Page 79

If the computer is unresponsive and you are unable to use the preceding shutdown procedures, try the
following emergency procedures in the sequence provided:
Press and hold the power button for at least 5 seconds.
●
Disconnect the computer from external power and remove the battery.
●
Shutting down the computer 67
Page 80

6Drives
Identifying installed drives
Your computer includes a hard drive (with a rotating disc) or a solid-state drive (SSD) with solid-state
memory. Because an SSD has no moving parts, it generates less heat than a hard drive. To view the
drives installed on the computer, select Start > Computer.
NOTE: Windows includes the User Account Control feature to improve the security of your computer.
You may be prompted for your permission or password for tasks such as installing software, running
utilities, or changing Windows settings. Refer to Help and Support for more information.
Handling drives
Drives are fragile computer components that must be handled with care. Refer to the following cautions
before handling drives. Additional cautions are included with the procedures to which they apply.
68 Chapter 6 Drives
Page 81

CAUTION: To reduce the risk of damage to the computer, damage to a drive, or loss of information,
observe these precautions:
Before you move a computer that is connected to an external hard drive, initiate Sleep and allow the
screen to clear, or properly disconnect the external hard drive.
Before handling a drive, discharge static electricity by touching the unpainted metal surface of the drive.
Do not touch the connector pins on a removable drive or on the computer.
Handle a drive carefully; do not drop a drive or place items on it.
Before removing or inserting a drive, shut down the computer. If you are unsure whether the computer
is off, in the Sleep state, or in Hibernation, turn the computer on, and then shut it down through the
operating system.
Do not use excessive force when inserting a drive into a drive bay.
Do not type on the keyboard or move the computer while an optional external optical drive is writing to
a disc. The write process is sensitive to vibration.
When the battery is the only source of power, be sure that the battery is sufficiently charged before
writing to media.
Avoid exposing a drive to temperature or humidity extremes.
Avoid exposing a drive to liquids. Do not spray the drive with cleaning products.
Remove media from a drive before removing the drive from the drive bay, or traveling with, shipping, or
storing a drive.
If a drive must be mailed, place the drive in a bubble-pack mailer or other suitable protective packaging
and label the package “FRAGILE.”
Avoid exposing a drive to magnetic fields. Security devices with magnetic fields include airport walkthrough devices and security wands. The airport security devices that check carry-on luggage, such as
conveyor belts, use X-rays instead of magnetism and will not damage a drive.
Handling drives 69
Page 82

Improving hard drive performance
Using Disk Defragmenter
As you use the computer, files on the hard drive become fragmented. Disk Defragmenter consolidates
the fragmented files and folders on the hard drive so that the system can run more efficiently.
After you start Disk Defragmenter, it works without supervision. Depending on the size of your hard drive
and the number of fragmented files, Disk Defragmenter may take more than an hour to complete. You
may want to set it to run during the night or another time when you do not need access to your computer.
HP recommends defragmenting your hard drive at least once a month. You may set Disk Defragmenter
to run on a monthly schedule, but you can defragment your computer manually at any time.
To run Disk Defragmenter:
1. Select Start > All Programs > Accessories > System Tools > Disk Defragmenter.
2. Click Defragment disk.
NOTE: Windows includes the User Account Control feature to improve the security of your
computer. You may be prompted for your permission or password for tasks such as installing
software, running utilities, or changing Windows settings. Refer to Help and Support for more
information.
For additional information, access the Disk Defragmenter software Help.
Using Disk Cleanup
Disk Cleanup searches the hard drive for unnecessary files that you can safely delete to free up disk
space and help the computer to run more efficiently.
To run Disk Cleanup:
1. Select Start > All Programs > Accessories > System Tools > Disk Cleanup.
2. Follow the on-screen instructions.
70 Chapter 6 Drives
Page 83

Using HP 3D DriveGuard
HP 3D DriveGuard protects the hard drive by parking the drive and halting I/O requests under either of
the following conditions:
You drop the computer.
●
You move the computer with the display closed while the computer is running on battery power.
●
A short time after the end of one of these events, HP 3D DriveGuard returns the hard drive to normal
operation.
NOTE: Because the solid-state drive (SSD) has no moving parts, it does not need 3D DriveGuard
protection.
NOTE: Hard drives installed in optional docking devices or connected to USB ports are not protected
by HP 3D DriveGuard.
For more information, refer to the HP 3D DriveGuard software Help.
Identifying HP 3D DriveGuard status
The drive light on the computer changes to an amber color to show that the drive is parked. To determine
whether drives are currently protected or whether a drive is parked, select Start > Control Panel >
Hardware and Sound > Windows Mobility Center:
If the software is enabled, a green check mark is superimposed over the hard drive icon.
●
If the software is disabled, a red X is superimposed over the hard drive icon.
●
If the drives are parked, a yellow moon is superimposed over the hard drive icon.
●
NOTE: The icon in the Mobility Center may not show the most up-to-date status for the drive. For
immediate updates after a change in status, you need to enable the notification area icon.
To enable the notification area icon:
1. Select Start > Control Panel > Hardware and Sound > HP 3D DriveGuard.
NOTE: If prompted by User Account Control, click Yes.
2. On the Icon in system tray row, click Show.
3. Click OK.
If HP 3D DriveGuard has parked the drive, the computer will behave in the following ways:
The computer will not shut down.
●
The computer will not initiate Sleep or Hibernation, except as described in the following Note.
●
NOTE: If the computer is running on battery power and reaches a critical battery level, HP 3D
DriveGuard allows the computer to initiate Hibernation.
Before you move the computer, HP recommends that you either shut it down or initiate Sleep or
Hibernation.
Using HP 3D DriveGuard 71
Page 84

Using HP 3D DriveGuard software
The HP 3D DriveGuard software enables you to perform the following tasks:
Enable and disable HP 3D DriveGuard.
●
NOTE: Permission to enable or disable HP 3D DriveGuard is dependent on certain user
privileges. Members of an Administrator group can change privileges for non-Administrator users.
Determine whether a drive in the system is supported.
●
To open the software and change settings, follow these steps:
1. In Mobility Center, click the hard drive icon to open the HP 3D DriveGuard window.
– or –
Select Start > Control Panel > Hardware and Sound > HP 3D DriveGuard.
NOTE: If prompted by User Account Control, click Yes.
2. Click the appropriate button to change settings.
3. Click OK.
72 Chapter 6 Drives
Page 85

Replacing a hard drive
CAUTION: To prevent information loss or an unresponsive system:
Shut down the computer before removing the hard drive from the service access bay. Do not remove
the hard drive while the computer is on, in the Sleep state, or in Hibernation.
If you are not sure whether the computer is off or in Hibernation, turn the computer on by briefly pressing
the power button. Then shut down the computer through the operating system.
To remove a hard drive:
1. Save your work.
2. Shut down the computer and close the display.
3. Disconnect all external hardware devices connected to the computer.
4. Unplug the power cord from the AC outlet.
5. Turn the computer upside down on a flat surface, with the battery bay toward you.
6. Remove the battery.
7. Slide the service access door latches (1) inward. Slide the service access door toward the battery
bay. Then lift up the forward edge of the service access door and remove the door (2).
8. Disconnect the hard drive connector cable (1).
9. Remove the 3 hard drive screws (2).
Replacing a hard drive 73
Page 86

10. Pull up the hard drive tab (3), and then lift the hard drive out of the service access bay.
To install a hard drive:
1. Pull up the hard drive tab (1) and insert the hard drive into the service access bay.
2. Tighten the 3 hard drive screws (2).
3. Connect the hard drive connector cable (3).
4. Align the tabs on the service access door (1) with the notches in the service access bay, and replace
the door.
74 Chapter 6 Drives
Page 87

5. Press down on the door (2) until the until the release latch (3) clicks.
6. Slide the lock latch (4) to the right to lock the door into place.
NOTE: You can identify the lock latch by the red marking on the latch.
7. Replace the battery.
8. Turn the computer right-side up.
Replacing a hard drive 75
Page 88

7 External devices
Using a USB device
Universal Serial Bus (USB) is a hardware interface that can be used to connect an optional external
device, such as a USB keyboard, mouse, drive, printer, scanner, or hub.
Some USB devices may require additional support software, which is usually included with the device.
For more information about device-specific software, refer to the manufacturer's instructions. These
instructions may be provided with the software, on disc, or on the manufacturer’s Web site.
Your computer has 3 USB ports that support USB 1.0, USB 1.1, and USB 2.0 devices. You can also
add an optional docking device or USB hub to provide additional USB ports for use with your computer.
One of the USB ports is a powered port, located on the right side of the computer. This port provides
power to a USB device, such as an optional external MultiBay or an optional external optical drive.
Connecting a USB device
CAUTION: To prevent damage to a USB connector, use minimal force to connect a USB device.
To connect a USB device to the computer, connect the USB cable for the device to the USB
▲
port.
You will hear a sound when the device has been detected.
NOTE: The first time you connect a USB device, a message is displayed in the notification area to let
you know the device is recognized by the computer.
76 Chapter 7 External devices
Page 89

Removing a USB device
CAUTION: To prevent loss of information or an unresponsive system, use the following procedure to
safely remove the USB device.
CAUTION: To prevent damage to a USB connector, do not pull on the cable to remove the USB device.
To remove a USB device:
1. Click the Safely Remove Hardware and Eject Media icon in the notification area, at the far right
of the taskbar.
NOTE: To display the Safely Remove Hardware and Eject Media icon, click the Show hidden
icons icon (the arrow at the left side of the notification area).
2. Click the name of the device in the list.
NOTE: You are prompted that it is safe to remove the hardware device.
3. Remove the device.
Using USB legacy support
USB legacy support (enabled by default) permits the following actions:
Using a USB keyboard, mouse, or hub connected to a USB port on the computer during startup or
●
in an MS-DOS-based program or utility
Starting or restarting from an optional external MultiBay or an optional USB bootable device
●
USB legacy support is enabled at the factory. To disable or enable USB legacy support:
1. Open Computer Setup by turning on or restarting the computer, and then pressing esc while the
“Press the ESC key for Startup Menu ” message is displayed at the bottom of the screen.
2. Press f10 to enter BIOS Setup.
3. Select System Configuration > Device configurations, and then press enter.
4. Use the arrow keys to enable or disable USB legacy support, and then press f10.
5. To save your preferences and exit Computer Setup, click Save in the lower-left corner of the screen,
and then follow the on-screen instructions.
– or –
Use the arrow keys to select File > Save changes and exit, and then follow the on-screen
instructions.
Your preferences go into effect when the computer restarts.
Using a USB device 77
Page 90

Using an eSATA device
NOTE: The eSATA port also supports an optional USB device.
An eSATA port connects an optional high-performance eSATA component, such as an eSATA external
hard drive.
Some eSATA devices may require additional support software, which is usually included with the device.
For more information about device-specific software, refer to the manufacturer's instructions.
Connecting an eSATA device
CAUTION: To prevent damage to an eSATA port connector, use minimal force to connect an eSATA
device.
To connect an eSATA device to the computer, connect the eSATA cable for the device to the
▲
eSATA port.
You will hear a sound when the device has been detected.
78 Chapter 7 External devices
Page 91

Removing an eSATA device
CAUTION: To prevent loss of information or an unresponsive system, use the following procedure to
safely remove an eSATA device.
CAUTION: To prevent damage to an eSATA connector, do not pull on the cable to remove the eSATA
device.
To remove an eSATA device:
1. Click the Safely Remove Hardware and Eject Media icon in the notification area, at the far right
of the taskbar.
NOTE: To display the Safely Remove Hardware and Eject Media icon, click the Show hidden
icons icon (the arrow at the left of the notification area).
2. Click the name of the device in the list.
NOTE: You are prompted that it is safe to remove the device.
3. Remove the device.
Using an eSATA device 79
Page 92

Using optional external drives
Removable external drives expand your options for storing and accessing information. A USB drive can
be added by connecting the drive to a USB port on the computer.
NOTE: HP external USB optical drives should be connected to the powered USB port.
USB drives include the following types:
1.44–megabyte diskette drive
●
Hard drive module (a hard drive with an adapter attached)
●
External optical drive
●
MultiBay device
●
NOTE: For information about required software and drivers, or to learn which computer port to use,
refer to the manufacturer's instructions.
To connect an external drive to the computer:
CAUTION: To reduce the risk of damage to the equipment when connecting a powered drive, be sure
that the drive is turned off and the AC power cord is unplugged.
1. Connect the drive to the computer.
2. If you are connecting a powered drive, plug the drive power cord into a grounded AC outlet.
3. Turn on the drive.
To disconnect an nonpowered external drive, turn off the drive, and then disconnect it from the computer.
To disconnect a powered external drive, turn off the drive, disconnect it from the computer, and then
unplug the AC power cord.
When a powered drive is connected to the powered USB port, its power cord is not required.
Using an optional external optical drive
An external optical drive connects to a USB port on the computer and enables you to use optical discs
(CDs and DVDs).
If Sleep or Hibernation is initiated during playback of a disc, you may experience the following behaviors:
Your playback may be interrupted.
●
You may see a warning message asking if you want to continue. If this message is displayed, click
●
No.
You may need to restart the CD or DVD to resume audio and video playback.
●
Inserting an optical disc (CD or DVD)
1. Turn on the computer.
2. Press the release button (1) on the drive bezel to release the disc tray.
3. Pull out the tray (2).
80 Chapter 7 External devices
Page 93

4. Hold the disc by the edges to avoid touching the flat surfaces and position the disc label-side up
over the tray spindle.
NOTE: If the tray is not fully accessible, tilt the disc carefully to position it over the spindle.
5. Gently press the disc (3) down onto the tray spindle until the disc snaps into place.
6. Close the disc tray.
Removing an optical disc (CD or DVD)
There are 2 ways to remove a disc, depending on whether the disc tray opens normally or not.
When the disc tray opens
1. Press the release button (1) on the drive bezel to release the disc tray, and then gently pull out the
tray (2) until it stops.
Using optional external drives 81
Page 94

2. Remove the disc (3) from the tray by gently pressing down on the spindle while lifting the outer
edges of the disc. Hold the disc by the edges and avoid touching the flat surfaces.
NOTE: If the tray is not fully accessible, tilt the disc carefully as you remove it.
3. Close the disc tray and place the disc in a protective case.
When the disc tray does not open
1. Insert the end of a paper clip (1) into the release access in the front bezel of the drive.
2. Press in gently on the paper clip until the tray is released, and then pull out the tray (2) until it stops.
82 Chapter 7 External devices
Page 95

3. Remove the disc (3) from the tray by gently pressing down on the spindle while lifting the outer
edges of the disc. Hold the disc by the edges and avoid touching the flat surfaces.
NOTE: If the tray is not fully accessible, tilt the disc carefully as you remove it.
4. Close the disc tray and place the disc in a protective case.
Using optional external drives 83
Page 96

8 External media cards
Using Media Card Reader cards
Optional digital cards provide secure data storage and convenient data sharing. These cards are often
used with digital media–equipped cameras and PDAs as well as with other computers.
The Media Card Reader supports the following formats:
Memory Stick
●
Memory Stick Pro
●
Memory Stick Duo (adapter required)
●
Memory Stick Duo Pro (adapter required)
●
MultiMediaCard
●
MultiMediaCard Plus
●
Secure Digital (SD) Memory Card
●
Secure Digital (SD) High Capacity Memory Card
●
Micro Secure Digital (SD) Memory Card (adapter required)
●
xD-Picture Card
●
Inserting a digital card
CAUTION: To prevent damage to the digital card connectors, use minimal force to insert a digital card.
1. Hold the digital card label-side up, with the connectors facing the computer.
84 Chapter 8 External media cards
Page 97

2. Insert the card into the Media Card Reader, and then push in on the card until it is firmly seated.
You will hear a sound when the device has been detected, and a menu of available options may
be displayed.
Removing a digital card
CAUTION: To prevent loss of data or an unresponsive system, use the following procedure to safely
remove the digital card.
1. Save your information and close all programs associated with the digital card.
NOTE: To stop a data transfer, click Cancel in the operating system Copying window.
2. To remove a digital card:
a. Click the Safely Remove Hardware and Eject Media icon in the notification area, at the far
right of the taskbar.
NOTE: To display the Safely Remove Hardware and Eject Media icon, click the Show
hidden icons icon (the arrow at the left side of the notification area).
b. Click the name of the digital card in the list.
NOTE: You are prompted that it is safe to remove the hardware device.
3. To eject the digital card, press in on the card (1) to release it, and then remove it from the slot
(2).
Using Media Card Reader cards 85
Page 98

9 Memory modules
The computer has two memory module slots, which are located on the bottom of the computer, inside
the service access door. The memory capacity of the computer can be upgraded by replacing the
existing memory module or adding a second memory module.
WARNING! To reduce the risk of electric shock and damage to the equipment, unplug the power cord
and remove all batteries before installing a memory module.
CAUTION: Electrostatic discharge (ESD) can damage electronic components. Before beginning any
procedure, touch a grounded metal object to be sure that you are discharged of static electricity.
To add or replace a memory module:
1. Save your work.
2. Shut down the computer and close the display.
If you are not sure whether the computer is off or in Hibernation, turn the computer on by briefly
pressing the power button. Then shut down the computer through the operating system.
3. Disconnect all external devices connected to the computer.
4. Unplug the power cord from the AC outlet.
5. Turn the computer upside down on a flat surface.
6. Remove the battery.
86 Chapter 9 Memory modules
Page 99

7. Slide the service access door latches (1) inward. Slide the service access door toward the battery
bay. Then lift up the forward edge of the service access door and remove the door (2).
8. Remove the existing memory module:
a. Pull apart the retention clips (1) at the sides of the memory module.
The memory module tilts up.
CAUTION: To prevent damage to the memory module, hold the memory module by the
edges only. Do not touch the components on the memory module.
b. Grasp the edge of the memory module (2), and gently pull the module out of the memory
module slot.
To protect a memory module after removal, place it in an electrostatic-safe container.
87
Page 100

9. Insert a new memory module:
a. Align the notched edge (1) of the memory module with the tab in the memory module slot.
CAUTION: To prevent damage to the memory module, hold the memory module by the
edges only. Do not touch the components on the memory module.
b. With the memory module at a 45-degree angle from the surface of the memory module
compartment, press the module (2) into the memory module slot until it is seated.
c. Gently press the memory module (3) down, applying pressure to both the left and right edges
of the memory module, until the retention clips snap into place.
10. Align the tabs on the service access door (1) with the notches in the service access bay.
11. Slide the service access door down (2) until the release latch (3) clicks.
88 Chapter 9 Memory modules
 Loading...