

Page 1

HP Photosmart A610 series
๑ᆩ֩
User Guide
ٺҢޱࡾࠒ
Page 2
Page 3

HP Photosmart A610 series 使用手册
简体中文
Page 4

版权和商标
© 2006 Hewlett-Packard Development
Company, L.P.
Hewlett-Packard 公司通告
本文档包含的信息如有更改,恕不另行
通知。
保留所有权利。除版权法允许之外,未
经惠普公司事先书面许可,不得对本手
册进行复制、改编或翻译。
HP 产品与服务的唯一担保已在这些产
品与服务随附的书面担保声明中阐明。
此处的任何信息将不会构成额外担保的
制定。HP 将不会对本文包含的技术或
编辑错误或者疏忽负责。
商标
HP、HP 标志和 Photosmart 为
Hewlett-Packard Development
Company,L.P.所有。
Secure Digital 标志是 SD Association
的商标。
Microsoft 和 Windows 是 Microsoft
Corporation 的注册商标。
CompactFlash、CF 和 CF 标志是
CompactFlash Association (CFA) 的商
标。
Memory Stick、Memory Stick Duo、
Memory Stick PRO 和 Memory Stick
PRO Duo 是 Sony Corporation 的商标
或注册商标。
Microdrive 是 Hitachi Global Storage
Technologies 的商标。
MultiMediaCard 是德国 Infineon
Technologies AG 的商标并许可 MMCA
(MultiMediaCard Association)使用。
xD-Picture Card 是 Fuji Photo Film
Co.,Ltd.、Toshiba Corporation 和
Olympus Optical Co.,Ltd.的商标。
Mac、Mac 标志和 Macintosh 是 Apple
Computer,Inc.的注册商标。
Bluetooth 字样和标志由 Bluetooth
SIG,Inc.拥有,Hewlett-Packard 使用这
些标记得到了该公司的许可。
PictBridge 和 PictBridge 标志是
Camera & Imaging Products
Association (CIPA) 的商标。
其他品牌及其产品均为其各自拥有者的
商标或注册商标。
规格型号识别码 VCVRA-0608/
VCVRA-0601
为了便于管理识别,已给该产品分配了
规格型号编码。本产品的规格型号编码
为 VCVRA-0608/VCVRA-0601。不要
将此规格编码与产品的销售名称
(HP Photosmart A610 series) 或产品编
号 (Q7110A) 相混淆。
环保声明
有关“环保服务计划”的信息,请参阅
电子版帮助。
Page 5

目录
1
欢迎............................................................................................................5
查找更多信息..............................................................................................6
打印机部件.................................................................................................6
可选附件.....................................................................................................9
使用打印机菜单........................................................................................10
2
照片打印概述............................................................................................13
完整的打印过程........................................................................................13
3
纸张要点...................................................................................................15
选择并装入纸张........................................................................................15
选择正确的纸张..................................................................................15
放入纸张.............................................................................................15
4
从存储卡打印............................................................................................17
从存储卡获取照片.....................................................................................17
插入存储卡.........................................................................................17
取出存储卡.........................................................................................19
浏览和查看照片........................................................................................19
选择多张照片............................................................................................20
选择照片布局............................................................................................20
打印照片...................................................................................................21
5
创意项目...................................................................................................23
打印全景照片............................................................................................23
打印照片不干胶贴纸.................................................................................24
打印护照照片............................................................................................25
打印 CD/DVD 标签...................................................................................25
打印视频剪辑中的帧.................................................................................25
提高照片质量............................................................................................26
使用“照片修补”自动完善照片.........................................................26
提高视频剪辑的质量...........................................................................26
裁剪照片...................................................................................................27
添加照片边框............................................................................................27
在照片上应用颜色效果.............................................................................27
在照片上添加日期和时间..........................................................................28
设置打印质量............................................................................................28
使用 HP Photosmart 共享通过电子邮件发送或上载照片..........................28
观看幻灯片演示........................................................................................29
6
从其他设备打印........................................................................................31
从数码相机打印照片.................................................................................31
从 Bluetooth 设备打印照片.......................................................................32
从计算机打印照片.....................................................................................32
从 iPod 打印照片......................................................................................33
HP Photosmart A610 series 使用手册
3
Page 6

7
维护和运送打印机.....................................................................................35
更换墨盒...................................................................................................35
清洁和维护打印机.....................................................................................36
清洁打印机外部..................................................................................36
自动清洁墨盒.....................................................................................37
手动清洁墨盒触点..............................................................................37
打印测试页.........................................................................................38
校准墨盒.............................................................................................38
储存打印机和墨盒.....................................................................................39
储存打印机.........................................................................................39
存储墨盒.............................................................................................39
维护照片纸质量........................................................................................40
运送打印机...............................................................................................40
8
疑难排解...................................................................................................43
打印机硬件问题........................................................................................43
打印问题...................................................................................................45
Bluetooth 打印问题...................................................................................48
错误信息...................................................................................................49
9
技术规格...................................................................................................53
系统要求...................................................................................................53
打印机技术规格........................................................................................54
10
HP 支持....................................................................................................57
支持程序...................................................................................................57
HP 电话支持.............................................................................................57
电话支持期.........................................................................................57
致电....................................................................................................57
电话支持期过后..................................................................................58
额外保修选项............................................................................................58
HP 保修条款.............................................................................................59
A
安装软件...................................................................................................61
B
打印机菜单...............................................................................................63
打印机菜单...............................................................................................63
索引.................................................................................................................67
4 HP Photosmart A610 series
Page 7
1
欢迎
感谢您购买 HP Photosmart A610 series 打印机!本款打印机使得家庭中的照片
打印简单、方便并富于乐趣,它可以生成您非常乐于与亲朋好友共享的高质量的
彩色打印件。有了本打印机,您可以:
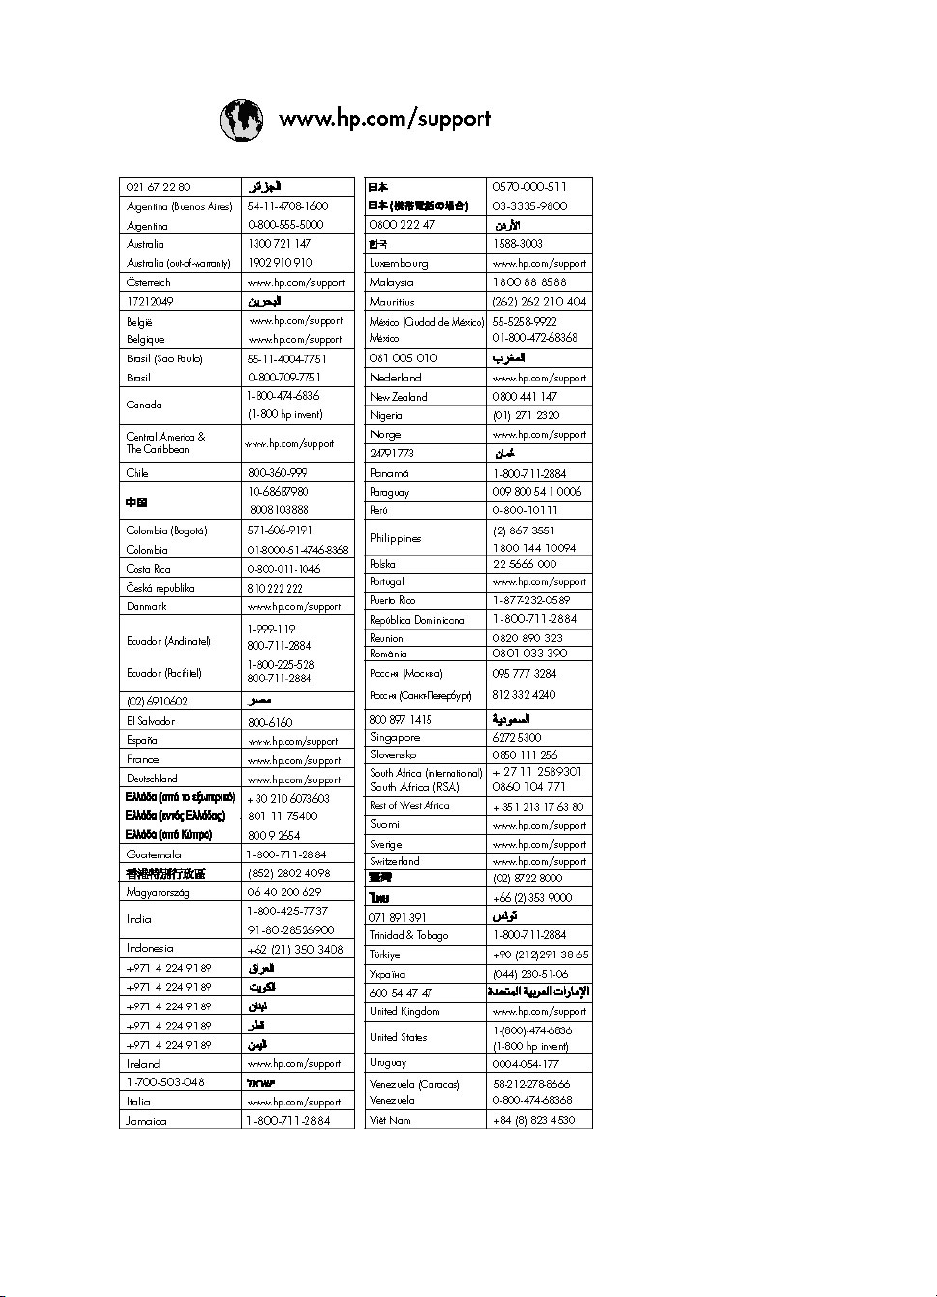
添加装饰框
应用“照片修补”技术
请参阅添加照片边框。边框
请参阅使用“照片修补”自动完善照片。
只适用于型号
HP Photosmart A612、
A614、A616、A617 和
A618。
打印全景图像
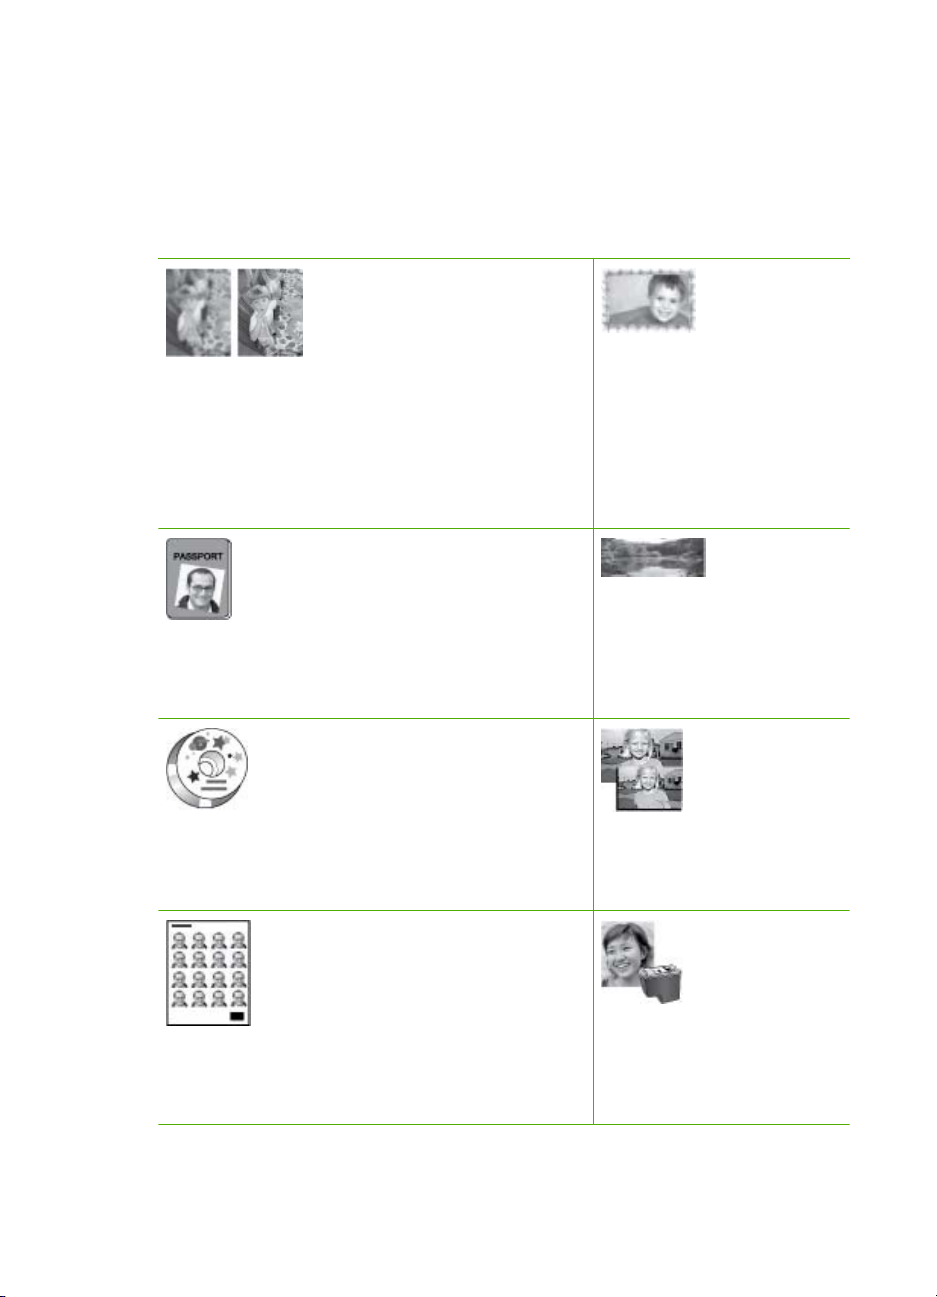
打印护照照片
请参阅打印护照照片。
打印 CD/DVD 标签
请参阅打印 CD/DVD 标签
打印照片不干胶贴纸
请参阅打印照片不干胶贴纸。
请参阅打印全景照片。
打印其他尺寸照片
请参阅选择正确的纸张。
打印无边界照片
HP Photosmart A610 series 使用手册
5
Page 8
第 1 章
查找更多信息
本打印机随附下列文档:
●
安装手册:请首先阅读该手册!它说明了如何安装打印机以及进行首次照片
打印。
●
使用手册:它就是您正在阅读的这本手册。本手册说明了此款打印机的基本
功能,以及如何在不连接计算机的情况下使用打印机,并包含硬件疑难排解
信息。附录 A 中是打印机软件的安装信息。
●
打印机帮助菜单:通过打印机上的帮助菜单,您可以在打印机屏幕上的右侧
阅读有用的打印提示以及打印机基本功能的相关信息。有关查看帮助菜单的
信息,请参阅使用打印机菜单。
●
电子版帮助:电子版帮助说明如何与计算机一起使用打印机,并包含软件疑
难排解信息。
在计算机上安装了打印机软件后,就可以查看该电子版帮助:
●
Windows:在 Windows 的“开始”菜单中,单击“程序” 或 “所有程
序”,指向“HP”、“HP Photosmart A610 series”,然后单
击“Photosmart 帮助”。
●
Mac:在“Finder”中选择“帮助”、“Mac 帮助”,然后选
择“库”、“HP Photosmart 打印机帮助”。
打印机部件
本节简要介绍了打印机各个部件,并提供了包括部件和功能详细信息的参考章
节。您的型号可能会与图示中的型号略有不同。
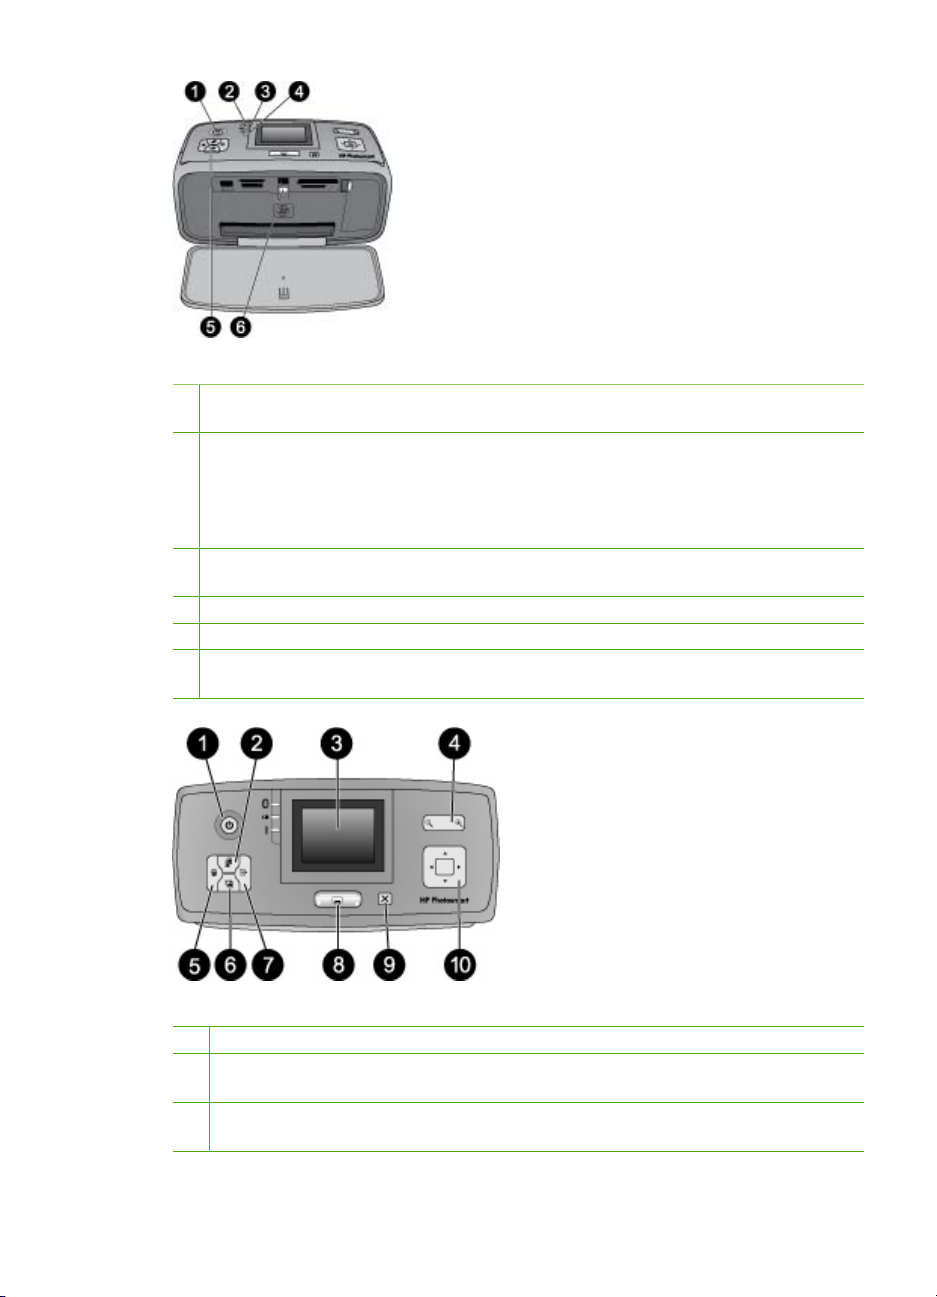
打印机前部
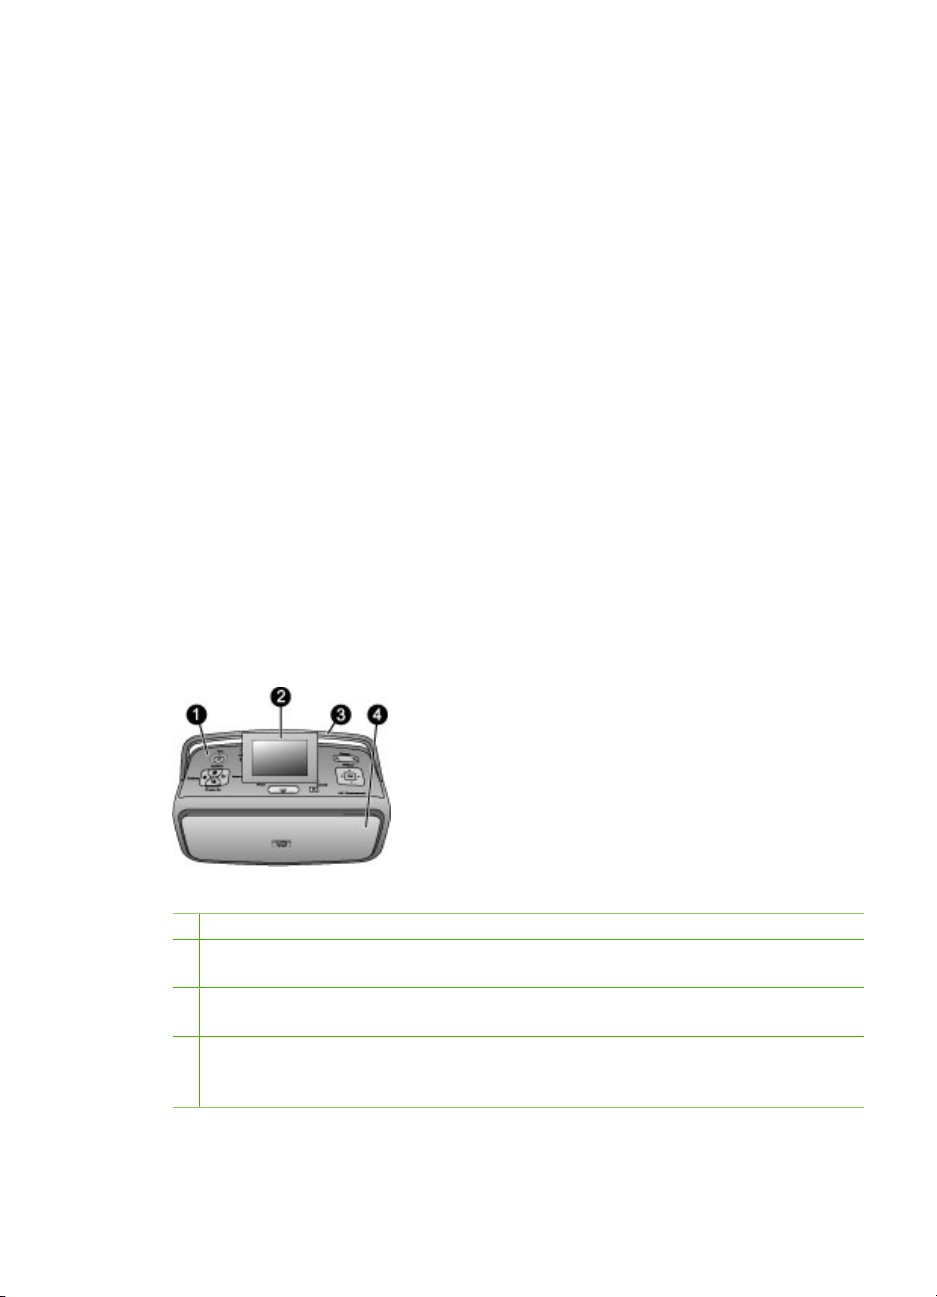
1
控制面板:在这里管理打印机的基本功能。
2
打印机屏幕:在这里查看照片和菜单。当打开出纸盒时会自动弹出打印机屏幕。向
上倾斜屏幕以调整视角。存放或运送打印机时将屏幕折回到水平位置。
3
打印机手柄:确保打印机屏幕处于水平(闭合)位置,然后从后面拉起打印机手柄
以便竖立着携带打印机。
4
出纸盒(闭合):打开它可进行打印、插入存储卡、连接兼容的数码相机、连接
iPod,或者进入墨盒区域。当打开出纸盒时,进纸盒会自动打开,而且屏幕也会弹
出。
6 HP Photosmart A610 series
Page 9
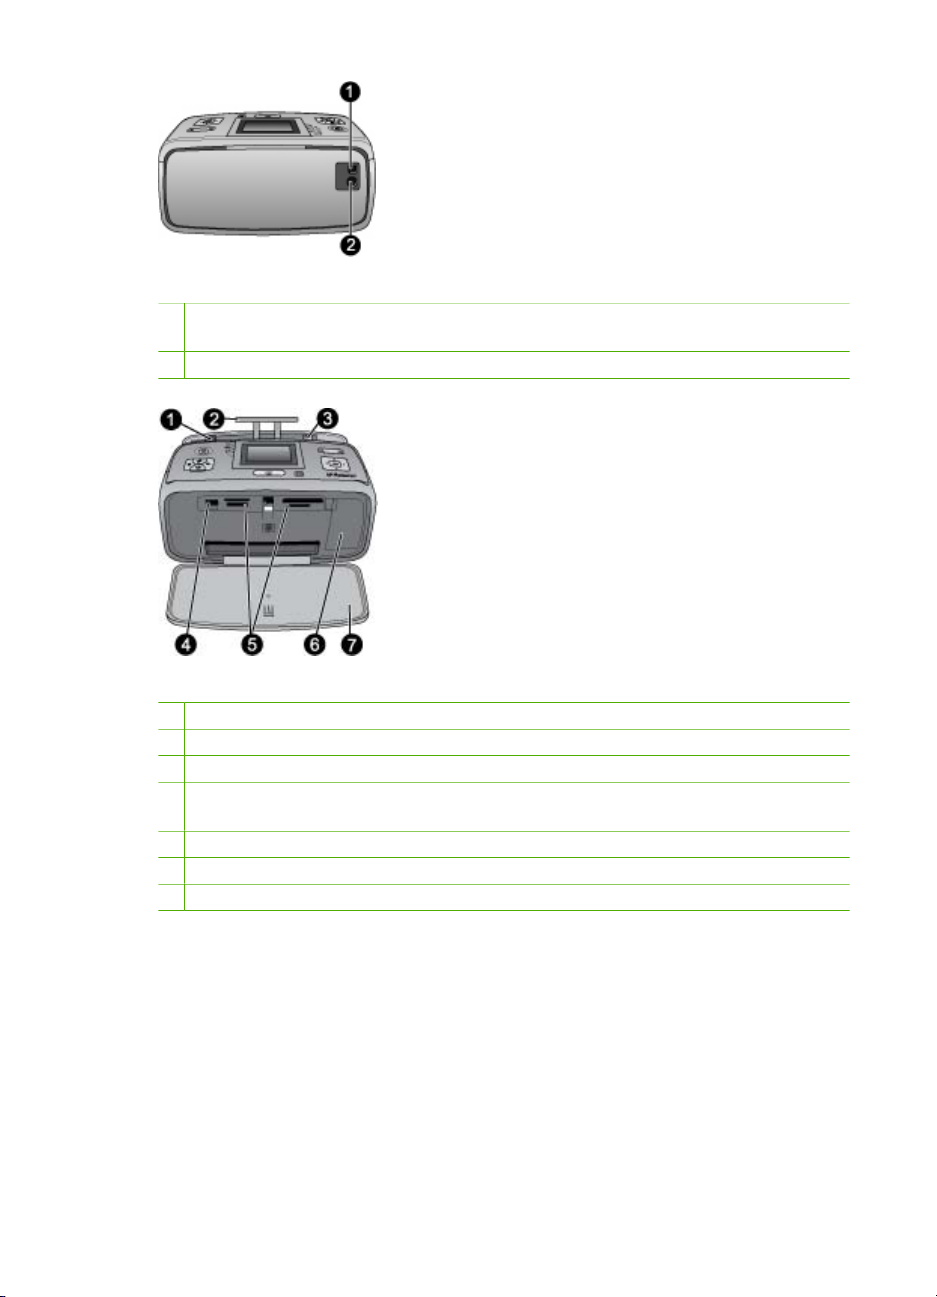
打印机后部
1
USB 端口:可以通过该端口用 USB 电缆将打印机与计算机或 HP 直接打印数码相
机相连。
2
电源线接口:在这里连接电源线。
进纸盒和打印机内侧前部
1
进纸盒:在此处装入纸张。当打开出纸盒时,进纸盒回自动打开。
2
进纸盒延长板:向外拉出以托住纸张。
3
纸张宽度导轨:移动到纸张侧边以正确定位纸张。
4
相机端口:在此处连接 PictBridge 数码相机、可选的 HP Bluetooth 无线打印机适
配器或 iPod。
5
存储卡插槽:将存储卡插入这些插槽中。请参阅从存储卡获取照片。
6
墨盒门:打开此盖可插入或取出墨盒。请参阅更换墨盒。
7
出纸盒(打开):打印机在这里存放打印出的照片。
HP Photosmart A610 series 使用手册
7
Page 10
第 1 章
指示灯
1
“开/关机”指示灯:该灯位于“电源”按钮旁边,打印机打开时持续显示为绿色。
打印机忙时此灯呈绿色闪烁,而在打印机需要维护时呈红色闪烁。
2
Bluetooth 指示灯(仅限型号 HP Photosmart A618):该指示灯表示打印机与启
用 Bluetooth 的设备之间为无线连接。如果打印机未集成 Bluetooth,则可以购买可
选的 Bluetooth 无线打印机适配器。适配器可以插入打印机前部的相机端口,并具
有自己的状态指示灯。有关 Bluetooth 无线连接的详细信息,请参阅从 Bluetooth
设备打印照片。
3
电池指示灯:用于标示电池的状态:正在充电或充电完成。有关可选电池的详细信
息,请参阅电池随附的说明。
4
警示灯:出现错误或打印机需要维护时警示灯闪烁。
5
“照片修补”指示灯:“照片修补”功能启用或工作时此灯点亮。
6
存储卡指示灯:正确插入存储卡后此灯持续显示为绿色。读取存储卡时此灯呈绿色
闪烁。请参阅从存储卡获取照片。
控制面板
1
开/关机:按此按钮可以打开或关闭打印机。
2
布局:按此按钮选择打印布局。使用 4 向箭头按钮可以滚动浏览布局选项。按
OK 以选择布局。
3
打印机屏幕:在这里查看照片和菜单。当打开出纸盒时会自动弹出打印机屏幕。
向上倾斜屏幕以调整视角。存放或运送打印机时可将屏幕折回到水平位置。
8 HP Photosmart A610 series
Page 11
4
缩放:重复按“缩放 +”或“缩放 -”按钮可以增加或减少缩放比例,缩放到 9 张
视图或从 9 张视图返回到 1 张视图。
5
删除:此按钮用于从存储卡上删除显示的或所有选定的照片。有关选择和删除照
片的详细信息,请参阅选择多张照片。
6
照片修补:按此按钮可以关闭和启用“照片修补”功能。通过调整焦聚、灯光、
亮度以及消除红眼,“照片修补”功能能够自动提高照片质量。此功能的默认设
置为启用。请参阅使用“照片修补”自动完善照片。
7
菜单:按下此按钮可以打开打印机菜单。
8
打印:按下此按钮可以从存储卡打印突出显示或选定的照片。请参阅打印照片。
9
取消:按下该按钮可以取消选择照片、退出菜单或终止操作。
10
4 向箭头按钮:使用箭头按钮可以滚动查看存储卡上的照片、菜单或布局选项。
按 OK 可以选择照片、菜单、菜单选项和打印布局。
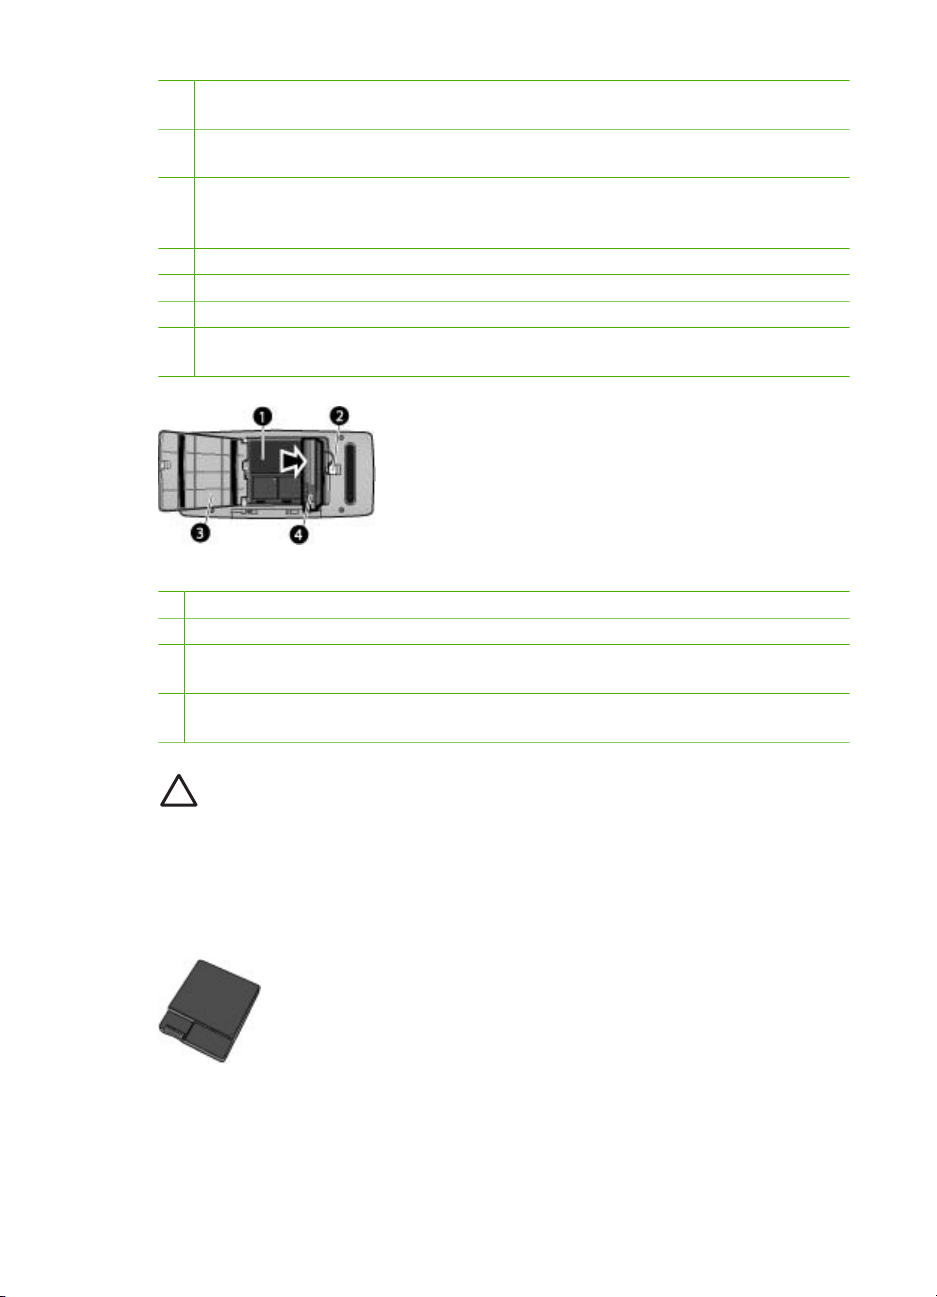
内置电池槽
1
内置电池槽:在此处插入可选的 HP Photosmart 内置电池。
2
电池槽按钮:滑动该按钮以松开电池槽盖。
3
电池槽盖:此盖位于打印机底部,打开它可以插入可选的 HP Photosmart 内置电
池。
4
可选的 HP Photosmart 内置电池:充满电的电池大概可以打印 75 张照片。电池必
须单独购买。
小心 始终确保先拔出打印机电源线,然后打开电池槽盖。请勿触摸电池
的铜色触点或电池槽内的触点。
可选附件
有几种可选附件可增加打印机的便携性,以便您随时随地进行打印。这些附件的
外观可能与手册中的图示有所不同。
可选的 HP Photosmart 内置电池
HP Photosmart A610 series 使用手册
9
Page 12
第 1 章
装上 HP Photosmart 内置电池,您就可以携带打印机到任何地方。
HP Bluetooth 无线打印机适配器
HP Bluetooth 无线打印机适配器可插入打印机前面的相机端口中,您可以使用
Bluetooth 无线技术进行打印。要建立连接,请按照 HP Bluetooth 无线打印机适
配器随附的说明进行操作。该可选的适配器只适用于型号 HP Photosmart
A610、A612、A614、A616 和 A617。
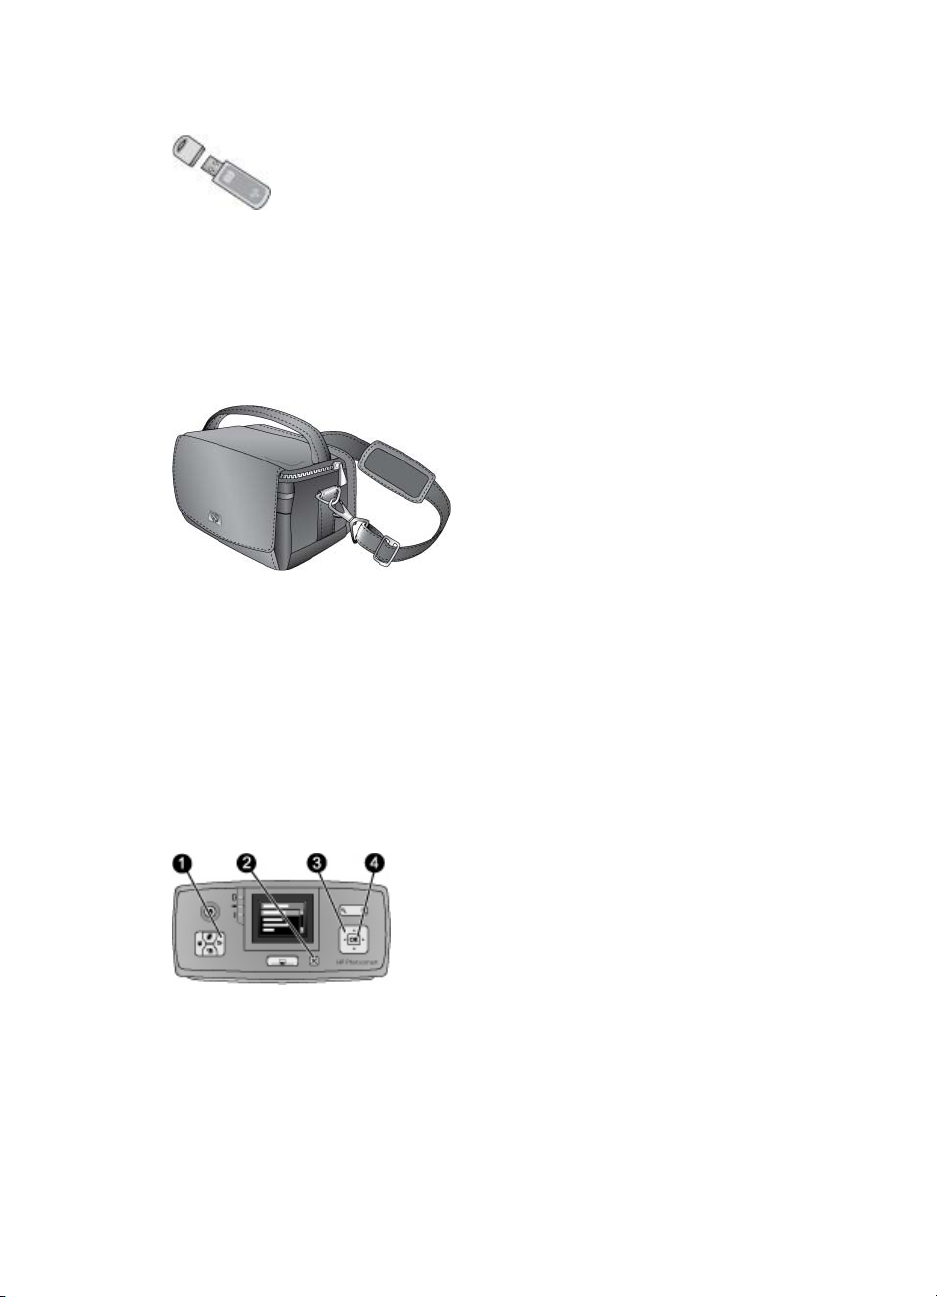
HP Photosmart 便携包
HP Photosmart 便携包轻巧、耐用,可以盛装和保护用于轻松的移动打印所需的
任何物品。
使用打印机菜单
打印机菜单包括许多打印选项,可以用于更改打印机默认设置,它还提供了维护
与疑难排解工具和进行普通打印任务的指导信息。有关所有菜单及其选项的说
明,请参阅打印机菜单。
®
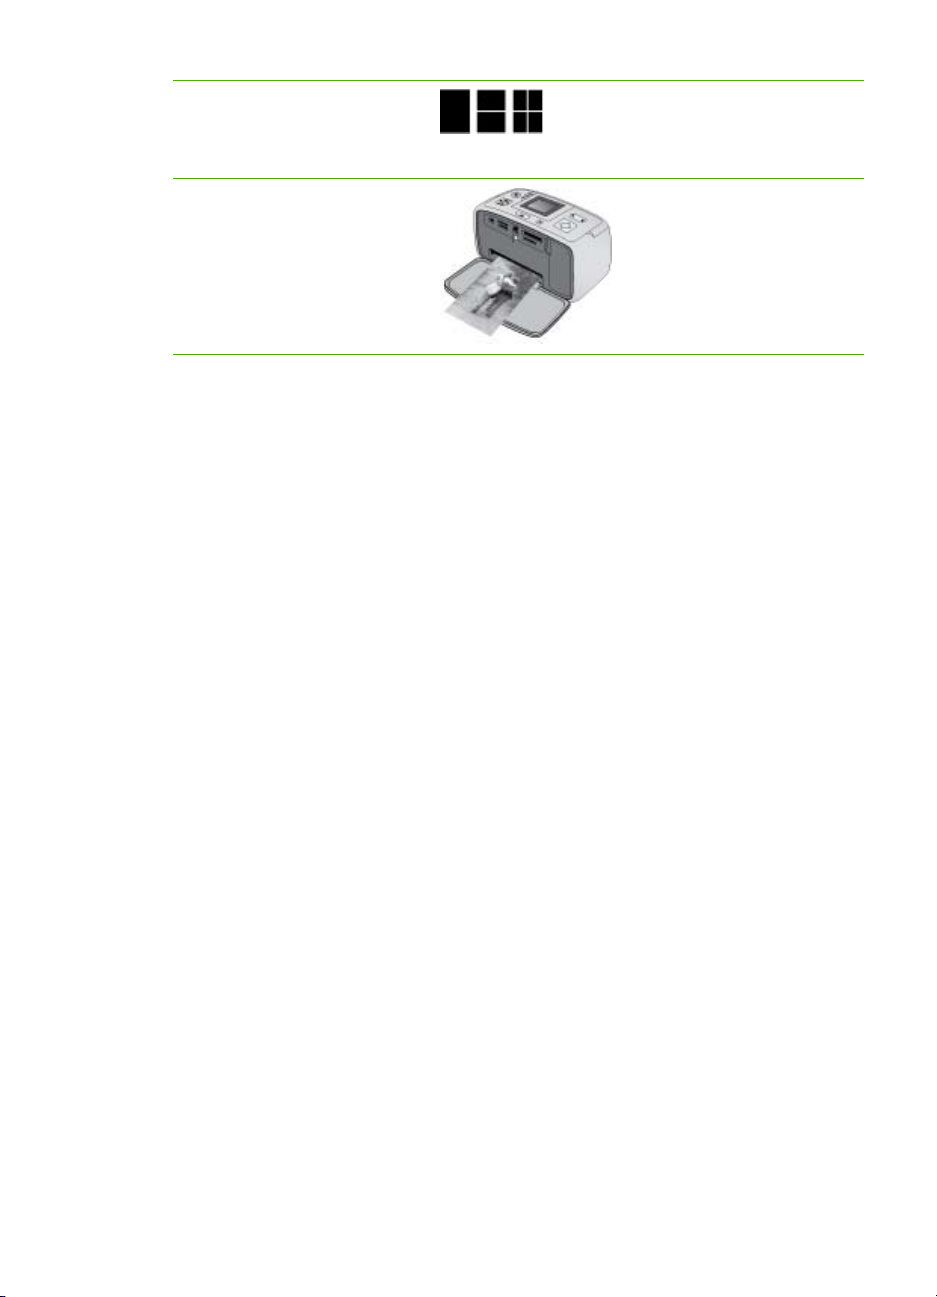
使用打印机菜单
按打印机控制面板上的菜单 (1) 打开打印机菜单。
➔
–
按取消 (2) 可退出当前菜单。
–
使用 4 向箭头按钮浏览打印机屏幕上显示的菜单选项。不可访问的菜单
选项显示为灰色。
–
按 OK (4) 可打开菜单或选择选项。
10 HP Photosmart A610 series
Page 13

注意 有关打印机的所有菜单选项列表,请参阅打印机菜单。
HP Photosmart A610 series 使用手册
11
Page 14

第 1 章
12 HP Photosmart A610 series
Page 15

2
照片打印概述
完整的打印过程
本节提供了涉及到照片打印步骤的深入概述。后面各节将详细描述每个步骤。
步骤 1
选择并装入纸张
请参阅选择并装入纸张。
步骤 2
获取照片
您可以将打印机连接到各种
设备,并从这些设备进行打
印。请参阅从存储卡获取照
片和从其他设备打印。
步骤 3
浏览和查看照片
请参阅浏览和查看照片。
步骤 4
选择要打印的照片
请参阅选择多张照片。
HP Photosmart A610 series 使用手册
索引页
13
Page 16
第 2 章
(续)
步骤 5
选择照片布局
请参阅选择照片布局。
步骤 6
打印照片
请参阅打印照片。
14 HP Photosmart A610 series
Page 17
3
纸张要点
选择并装入纸张
了解如何为打印作业选择正确的纸张,以及如何将其放入进纸盒以备打印。
选择正确的纸张
使用 HP 高级照片纸。它专门用于打印机上的墨水,可以生成优美的照片。而其
他照片纸的打印效果会不尽人意。
要获得可用的 HP 设计的照片纸列表,或是要购买耗材,请访问:
●
www.hpshopping.com(美国)
●
www.hp.com/eur/hpoptions(欧洲)
●
www.hp.com/jp/supply_inkjet(日本)
●
www.hp.com/paper(亚太地区)
打印机的默认设置为在 HP 高级照片纸上打印最佳质量的照片。如果用其他类型
的纸张打印,请确保在打印机菜单中更改纸张类型。请参阅更改纸张类型。
放入纸张
一些支持的纸张尺寸:
●
10 x 15 厘米照片纸
●
13 x 18 厘米照片纸
●
索引卡
●
L 尺寸卡
●
Hagaki 卡
HP Photosmart A610 series 使用手册
15
Page 18

第 3 章
有关支持的纸张尺寸的完整列表,请参阅技术规格。
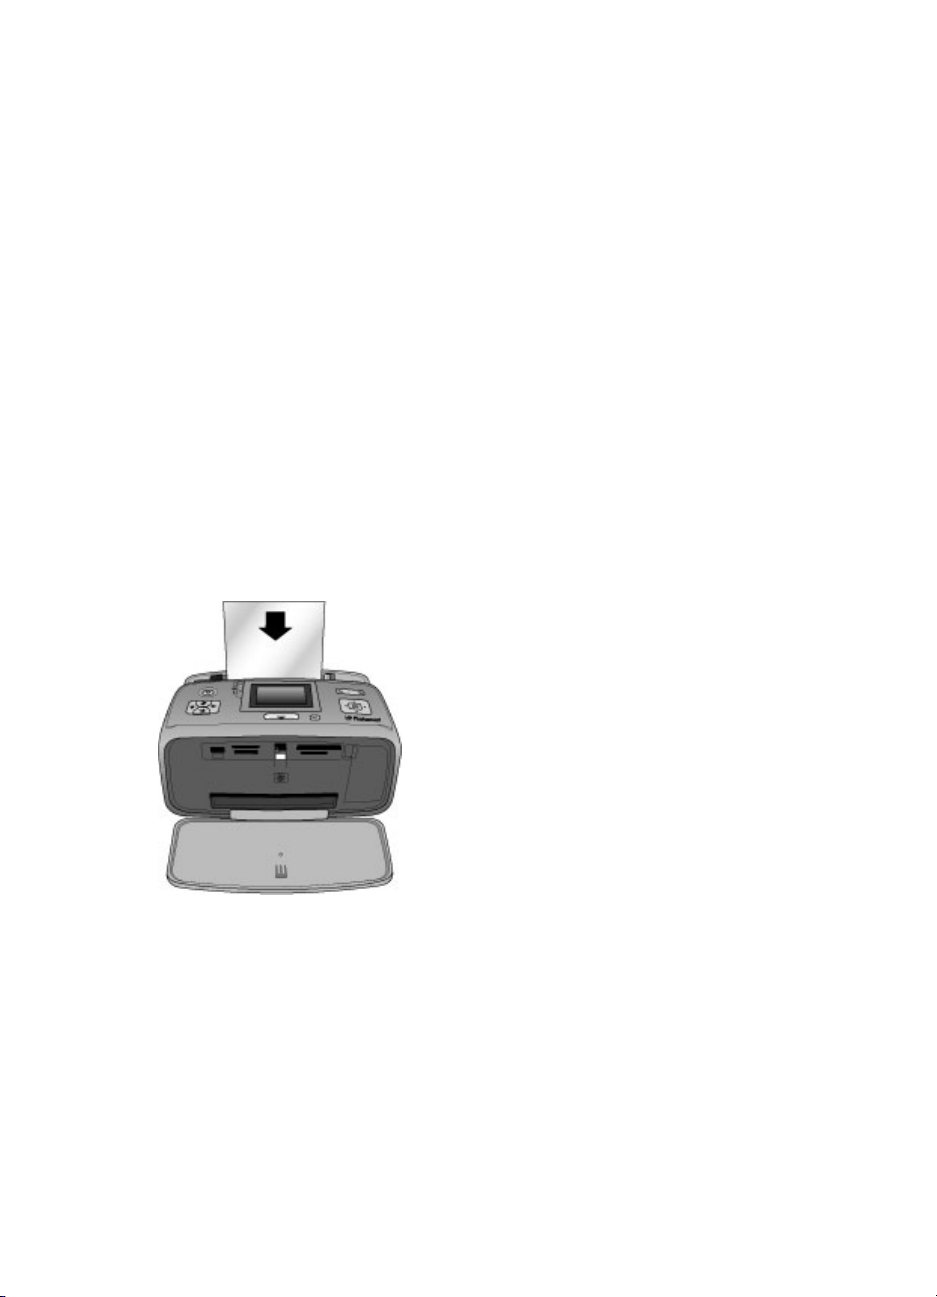
装入纸张
1. 打开出纸盒和进纸盒,并拉出进纸盒延长板。
2. 最多装入 20 页张纸,并使打印面或光面朝向打印机前部。在装入纸张时,
将纸张滑入进纸盒左侧,并向下推直到停稳。
注意 如果使用全景照片纸,最多只能装入 10 页。如果使用照片不
干胶贴纸,请一次只装入一页。
3. 将纸张宽度导轨移向左边,使其紧靠纸张边缘,同时使纸张保持平整。
更改纸张类型
1. 按菜单。
2. 按
3. 按
4. 按
选择“首选项”,然后按 OK。
选择“纸张类型”,然后按 OK。
选择下列一种纸张类型:
–
“HP 高级照片纸”(默认)
–
“HP 优质照片纸”
–
“其他照片纸”
–
“其他普通纸”
5. 按 OK。
16 HP Photosmart A610 series
Page 19

4
从存储卡打印
本节描述了打印保存在存储卡上照片的操作步骤。本节包含以下主题:
●
从存储卡获取照片
●
浏览和查看照片
●
选择多张照片
●
选择照片布局
●
打印照片
从存储卡获取照片
使用数码相机拍完照片后,可以从相机中取出存储卡并将其插入打印机中,以查
看并打印照片。打印机可读取下列类型的存储卡:CompactFlash
Sticks、Microdrive、MultiMediaCard
小心 使用任何其他类型的存储卡都可能会损坏存储卡和打印机。
要想了解将照片从数码相机传输到打印机的其他方法,请参阅从数码相机打印照
片。
插入存储卡
在下表中找到您的存储卡,并按照说明将其插入打印机中。
原则:
●
一次只插入一张存储卡。
●
将存储卡轻轻推入打印机,直到其停止不动。存储卡不会完全插入打印机;
不要过于用力。
●
正确插入存储卡后,存储卡指示灯闪烁,然后持续显示为绿色。
™
™
、Secure Digital 和 xD-Picture Card 。
™
、Memory
™
小心 1 以其他方式插入存储卡可能会损坏存储卡和打印机。
小心 2 存储卡指示灯正在闪烁时请不要将其抽出。有关详细信息,请参
阅取出存储卡。
HP Photosmart A610 series 使用手册
17
Page 20
第 4 章
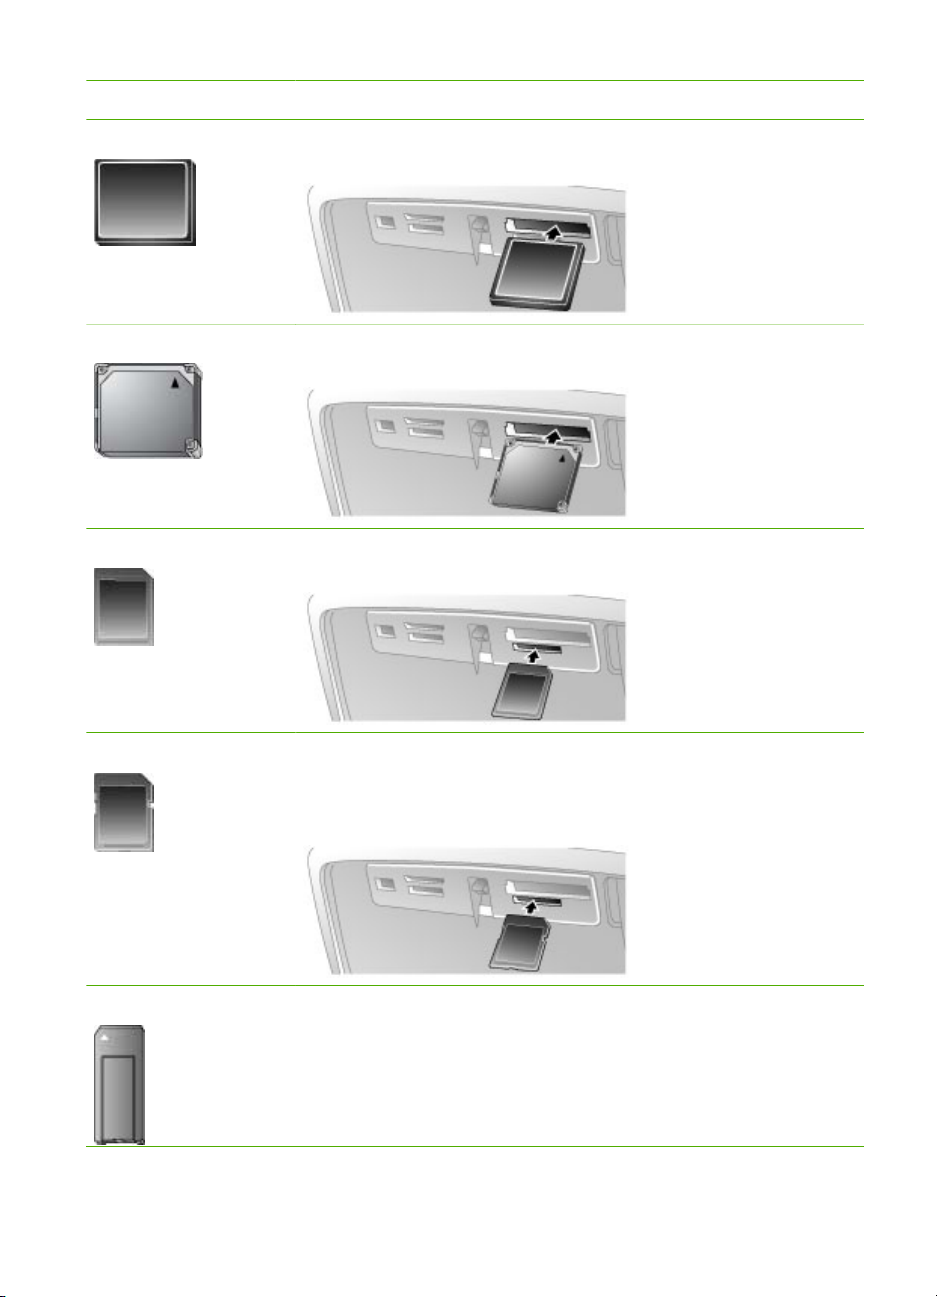
存储卡 如何插入存储卡
CompactFlash ●
Microdrive ●
MultiMediaCard ●
正面标签朝上,如果标签上有箭头,箭头应指向打印机
●
将具有金属针孔的一端先插入打印机
正面标签朝上,如果标签上有箭头,箭头应指向打印机
●
将具有金属针孔的一端先插入打印机
斜角位于右侧
●
金属触点朝下
Secure Digital ●
斜角位于右侧
●
金属触点朝下
●
如果您使用的是 miniSD 卡,请先连接存储卡随附的适配
器,然后再将卡插入打印机
Memory Stick ●
斜角位于左侧
●
金属触点朝下
●
如果使用 Memory Stick Duo
™
Duo
存储卡,请在将卡插入打印机前先连接存储卡随附的
™
或 Memory Stick PRO
适配器。
18 HP Photosmart A610 series
Page 21
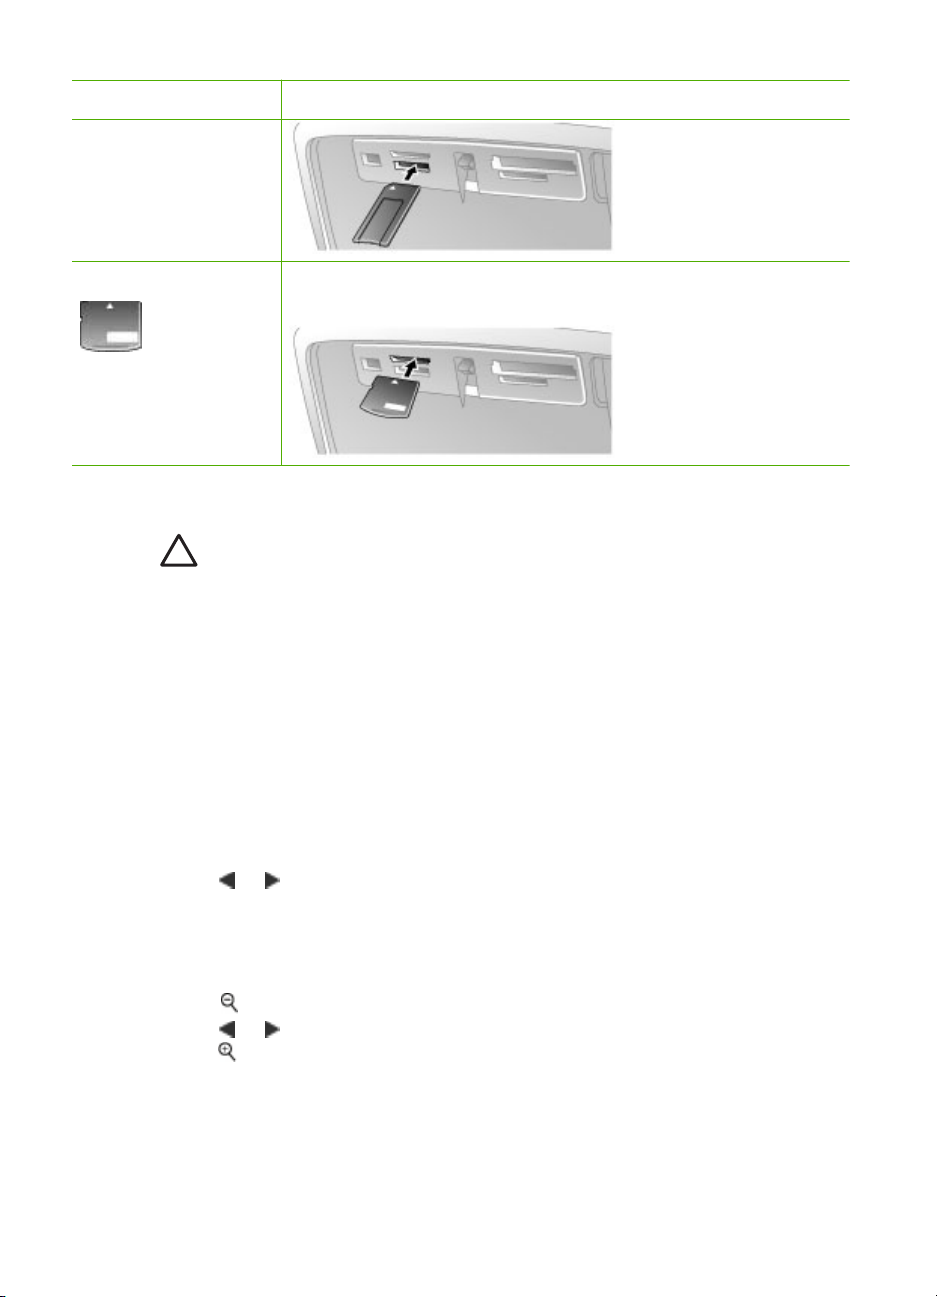
(续)
存储卡 如何插入存储卡
xD-Picture Card ●
取出存储卡
小心 不要在存储卡的指示灯正在闪烁时抽出存储卡。指示灯闪烁表示打
印机或计算机正在访问存储卡。等待直到指示灯持续亮起。在存储卡被访
问时将其取出将会破坏卡上的信息,或损坏打印机和存储卡。
取出存储卡
当打印机上的存储卡指示灯持续亮起时,您即可安全将存储卡从插槽拔出。
➔
浏览和查看照片
本节说明了如何在打印机屏幕上浏览并查看照片。当您使用 4 向箭头按钮浏览
照片时,每张照片的边框都会高亮显示。
逐张查看照片
1. 插入存储卡。
2. 按
或 逐张查看照片。按住按钮可快速查看照片。到达任意一端的最后
一张照片后,将返回到第一张或最后一张照片并继续查看。
将存储卡呈弧形的一端向外
●
金属触点朝下
一次查看 9 张照片
1. 插入存储卡。
2. 按
3. 按
4. 按
HP Photosmart A610 series 使用手册
一次查看 9 张照片。
或 突出显示 9 张照片中的某一张。
返回到逐张查看模式。
19
Page 22

第 4 章
选择多张照片
如果您要打印多张照片,或者一次删除一组照片,则需要选择这些照片。当选择
一张照片后,屏幕上的照片左下角会显示一个复选标记。
选择几张照片
1. 插入存储卡并查看照片。
2. 按 OK 选择要打印的每张照片。
取消选择照片
突出显示要取消选择的照片,然后按取消。照片左下角的复选标记将会消
➔
失。
选择连续的一系列照片
1. 插入存储卡。
2. 按菜单。
3. 选择“打印选项”,然后按 OK。
4. 选择“打印范围”,然后按 OK。
5. 按
6. 按
选择一张照片的多个副本
1. 插入存储卡并查看照片。
2. 按一次 OK 可打印一张当前照片。按取消可将份数减少一份。
或 直到显示要打印的第一张照片,然后按 OK。
或 直到显示要打印的最后一张照片,然后按 OK。
选择照片布局
插入存储卡后,通过按布局,可以在几种布局中进行选择。打印机的默认设置为
每页打印一张照片。
选择照片布局
1. 插入存储卡。
2. 按布局。
3. 使用 4 向箭头按钮可以选择布局:
–
每页打印一张照片
–
每页打印两张照片
–
每页打印四张照片
4. 按 OK。
打印机可能会旋转照片以适合该布局。
注意 默认设置为无边界打印。如果您要在照片周围添加白色窄边,则可
以关闭无边界设置。要关闭无边界打印,请参阅打印机菜单。
20 HP Photosmart A610 series
Page 23

打印照片
本节说明了如何打印保存在存储卡上的数字照片。当存储卡在相机(数字打印指
令格式,或 DPOF)或打印机中时,您可以选择照片。从存储卡打印不需要使用
计算机,也不会消耗数码相机电池的电量。请参阅从存储卡获取照片。
照片会很快变干,您可以在打印后立刻对其进行处理。然而,HP 建议将照片的
打印面放在空气中 5-10 分钟,以使颜色完全显现出来,然后再与其他照片堆叠
在一起或放入像册中。
打印单张照片
1. 浏览插入的存储卡上的照片。
2. 显示您要打印的照片。
3. 按打印。
打印一组选定的照片
1. 浏览插入的存储卡上的照片。
2. 选择您要打印的照片。请参阅选择多张照片。
3. 按打印。
打印照片索引
1. 按菜单。
2. 选择“打印选项”,然后按 OK。
3. 选择“打印索引页”,然后按 OK。
照片索引页可以显示存储卡上多达 2000 张照片的缩略视图和索引编号。可以使
用索引编号打印特定照片或一系列照片。打印索引页时使用索引卡代替照片纸可
以降低成本。
按打印之后,将会显示完成打印所需的估计时间,并在打印过程中进行倒计
时。
按打印之后,将会显示完成打印所需的估计时间,并在打印过程中进行倒计
时。
打印相机选定的照片
1. 插入存有相机选定 (DPOF) 照片的存储卡。
2. 当打印机询问是否打印相机选定的照片时,选择“是”,然后按 OK。
HP Photosmart A610 series 使用手册
21
Page 24

第 4 章
22 HP Photosmart A610 series
Page 25

5
创意项目
一旦您能够进行基本的照片打印后,请尝试打印机提供的其他一些主要功能。本
节包含以下主题:
●
打印全景照片
●
打印照片不干胶贴纸
●
打印护照照片
●
打印 CD/DVD 标签
●
打印视频剪辑中的帧
●
提高照片质量
●
裁剪照片
●
添加照片边框
●
在照片上应用颜色效果
●
在照片上添加日期和时间
●
设置打印质量
●
使用 HP Photosmart 共享通过电子邮件发送或上载照片
●
观看幻灯片演示
打印全景照片
注意 1 从用 USB 电缆连接到打印机前面相机端口的数码相机打印时,不
支持全景模式。
注意 2 如果已经在装有 Windows 2000 或 XP 的计算机上安装了
HP Photosmart Premier 软件,则可以创建拼接的全景照片。
HP Photosmart Premier 只适用于有些型号。有关打印机可用的软件选项
的详细信息,请参阅安装软件。
创建全景照片
将几张照片拼接在一起
使用图像编辑软件(例如 HP Photosmart Premier)将重叠的照片拼接
➔
在一起形成一张 10 x 30 厘米的照片。(另外,有些数码相机可以在将
照片保存到存储卡前,先将几张照片拼接在一起。)然后将照片保存到
存储卡,并按下列步骤打开全景模式,或者直接从计算机打印。全景模
式使用 3:1 宽高比打印选定的照片。有关从计算机打印的详细信息,请
参阅电子版帮助。
选择任何照片
HP Photosmart A610 series 使用手册
23
Page 26

第 5 章
选择存储卡上的一张或多张照片并按下列步骤打开全景模式。全景模式
➔
使用 3:1 宽高比打印选定的照片。
打印全景照片
1. 插入存储卡。
2. 按菜单可打开打印机菜单。
3. 选择“打印选项”,然后按 OK。
4. 选择“全景照片”,然后按 OK。
5. 选择“打开”,然后按 OK。
6. 装入 10 x 30 厘米的纸张。
7. 选择要打印的一张或多张照片。
打印机屏幕上的裁剪框显示照片的要打印部分(3:1 宽高比)。显示照片的
原始分辨率越高,在全景模式中打印的效果越好。
8. 按打印。
9. 打印完全景照片后,关闭全景模式继续以正常的 3:2 宽高比打印。要关闭全
景模式,重复步骤 1 至 4,然后选择“关闭”并按 OK。
打印照片不干胶贴纸
要打印 16 张的照片不干胶贴纸,请使用照片不干胶介质和打印机的照片不干胶
贴纸功能。请执行下列步骤:
1. 插入存储卡并显示要打印的照片。
2. 按菜单可打开打印机菜单。
3. 选择“打印选项”,然后按 OK。
4. 选择“照片不干胶贴纸”,然后按 OK。
5. 选择“打开”,然后按 OK。
6. 装入照片不干胶贴纸介质。
7. 选择一张或多张照片。
8. 按打印。
每张打印页包含同一照片的 16 份副本。
9. 打印完不干胶贴纸后,关闭“照片不干胶贴纸”模式。要关闭“照片不干胶
贴纸”模式,重复步骤 1 至 4,选择“关闭”,然后按 OK。
注意 您也可以使用 HP 自粘照片纸打印 10 x 15 厘米的照片不干胶贴
纸。对于这个项目,请参阅基本的打印说明,就像打印标准的 10 x 15 厘
米的照片一样
24 HP Photosmart A610 series
Page 27

打印护照照片
打印护照照片
1. 插入存储卡。
2. 按菜单。
3. 选择“打印选项”,然后按 OK。
4. 选择“护照照片模式”,然后按 OK。
5. 选择“打开”,然后按 OK。
6. 选择护照照片尺寸,然后按 OK。
7. 装入照片纸。
8. 选择一张或多张照片。
9. 按打印。每张打印页将容纳尽可能多的照片份数,视所选择的护照照片尺寸
而定。
打印 CD/DVD 标签
打印 CD/DVD 标签
1. 插入存储卡。
2. 按菜单。
3. 选择“打印选项”,然后按 OK。
4. 选择“打印 CD 盘面”,然后按 OK。
5. 选择“打开”,然后按 OK。
6. 装入 CD/DVD 标签介质。
7. 选择照片。
8. 按打印。
将一张照片打印到每页 CD/DVD 标签纸上。
打印视频剪辑中的帧
从视频剪辑打印选定的一幅帧
1. 插入包含视频剪辑的存储卡。
2. 按
3. 按 OK 选择视频剪辑。视频将按帧缓慢载入,以便您挑选帧进行打印。
4. 当要打印的帧出现时,按 OK,然后按打印。
HP Photosmart A610 series 使用手册
或 滚动视频剪辑。将显示剪辑的第一幅帧。视频剪辑图标出现在打
印机屏幕的底部。
注意 1 视频剪辑中图像的分辨率明显低于数字照片的分辨率;因此,可
以看到视频剪辑帧的打印质量低于照片的打印质量。
注意 2 并非所有的视频文件格式本打印机都能够支持。要查看支持的视
频文件格式的列表,请参阅打印机技术规格。
25
Page 28

第 5 章
打印视频剪辑中的 9 幅帧
1. 插入包含视频剪辑的存储卡。
2. 按菜单,选择“打印选项”,然后选择“视频剪辑打印”。将显示存储卡上
所有视频剪辑的预览。
3. 使用 4 向箭头按钮滚动到要打印的视频剪辑,然后按 OK 将其选定。
4. 按打印。打印件在一页中包含了自动从视频剪辑选择的 9 幅帧。
注意 1 视频剪辑中图像的分辨率明显低于数字照片的分辨率;因此,可
以看到视频剪辑帧的打印质量低于照片的打印质量。
注意 2 并非所有的视频文件格式本打印机都能够支持。要查看支持的视
频文件格式的列表,请参阅打印机技术规格。
提高照片质量
打印机提供了可以提高打印的照片质量的多种首选项和效果。这些设置不会改变
您的原始照片。它们只会影响打印。
使用“照片修补”自动完善照片
“照片修补”将使用下列“HP Real Life 技术”自动增强照片:
●
将模糊的照片变清晰。
●
增强图像的暗色区而不影响其浅色区。
●
减少使用闪光灯拍照时出现的红眼。
●
改善照片的整体亮度、色彩和对比度。
打开打印机时,“照片修补”的默认设置为启用。启用“照片修补”时,打印机
控制面板上的“照片修补”指示灯将点亮。
HP 建议保持“照片修补”的启用状态,但如果照片打印不正确,或者要不使
用“照片修补”改进功能打印照片,则可关闭“照片修补”。
关闭“照片修补”
按照片修补。
➔
打印机屏幕上将出现提示信息,““照片修补”功能已关闭。所有图像都将
按原样打印”。
除非再次按下照片修补按钮,或者关闭打印机又重新打开,“照片修补”功能将
保持其关闭状态。如果启用“照片修补”,则打印机屏幕上会出现提示信
息,““照片修补”功能已打开。所有图像打印出来的效果会更好”。
提高视频剪辑的质量
提高视频剪辑的质量
1. 按菜单。
2. 选择“首选项”,然后按 OK。
3. 选择“视频增强”,然后按 OK。
4. 用 4 向箭头按钮突出显示“打开”,然后按 OK。
26 HP Photosmart A610 series
Page 29

注意 当使用该首选项提高视频剪辑的打印质量时,打印速度要比该首选
项关闭时低。
裁剪照片
要只打印照片的一部分,您可以裁剪掉不需要的部分。裁剪操作不会改变原始照
片。它只会影响打印。
裁剪照片
1. 浏览到想要更改的照片,然后按 OK 将其选定。
2. 按
3. 再次按
4. 使用 4 向箭头按钮移动裁剪框。
5. 当照片的要打印部分位于裁剪框中时,按 OK。
6. 按打印开始打印。
添加照片边框
从多种图案和颜色中进行选择,使边框更加突出。边框不会改变原始照片。它只
会影响打印。
注意 边框只适用于型号 HP Photosmart A612、A614、A616、A617 和
A618。
添加装饰框
1. 浏览到想要更改的照片,然后按 OK 将其选定。
2. 按菜单。
3. 选择“编辑”,然后按 OK。
4. 选择“添加边框”,然后按 OK。
5. 使用 4 向箭头突出显示您想要使用的边框图案,然后按 OK。
6. 使用 4 向箭头突出显示您想要使用的边框颜色,然后按 OK。
带有边框的照片会显示在打印机屏幕上。
放大当前照片。
查看四个白色箭头。
在照片上应用颜色效果
设置打印机,将打印件的色彩效果更改为“黑白”、“棕褐色”、“古董
色”或“无”(默认)。
添加颜色效果
1. 浏览到想要更改的照片,然后按 OK 将其选定。
2. 按菜单。
3. 选择“编辑”,然后按 OK。
4. 选择“添加颜色效果”,然后按 OK。
5. 使用 4 向箭头按钮突出显示您想要使用的颜色效果,然后按 OK。
带有所选颜色效果的照片显示在打印机屏幕上。这种效果不会改变原始照
片。它只会影响打印。
HP Photosmart A610 series 使用手册
27
Page 30

第 5 章
在照片上添加日期和时间
可以在照片正面打印表明照片拍摄时间的标记。此首选项将影响所有打印件。
添加日期和时间
1. 按菜单。
2. 选择“首选项”,然后按 OK。
3. 选择“日期/时间”,然后按 OK。
4. 使用 4 向箭头按钮突出显示日期/时间标记选项:
–
“日期/时间”
–
“仅日期”
–
“关闭”
5. 按 OK。
设置打印质量
您可以将打印机设置为打印高质量或低质量的照片。要获得最佳的照片质量,请
选择“最佳”。该模式生成最高质量的照片,但打印速度略慢。如果您要快速地
打印照片,而又不关心是否为最高质量,请选择较低的质量设置。
更改打印质量
1. 按菜单。
2. 选择“工具”,然后按 OK。
3. 选择“打印质量”,然后按 OK。
当前的打印质量设置旁边有一个复选标记。
4. 选择打印质量,然后按 OK。
使用 HP Photosmart 共享通过电子邮件发送或上载照片
使用 HP Photosmart 共享,通过电子邮件、在线相册或在线照片处理服务与您
的亲朋好友共享照片。您必须通过 USB 电缆将打印机连接到计算机,该计算机
必须可以访问 Internet 并且上面已经安装了全部 HP 软件。如果尝试使用 HP
Photosmart 共享,但没有安装或配置全部所需软件,则会出现一条信息,提示
您完成所需步骤。请参阅安装软件。
使用 HP Photosmart 共享发送照片
1. 插入保存有要共享的照片的存储卡。
2. 按照计算机上的提示将照片保存到计算机。
3. 使用 HP Photosmart Premier 或 HP Photosmart Studio 软件的 HP
Photosmart 共享功功能与其他人共享照片。
有关使用 HP Photosmart 共享的信息,请参阅 HP Photosmart Premier、
HP Photosmart Essential 或 HP Photosmart Studio 中的电子版帮助。
28 HP Photosmart A610 series
Page 31

观看幻灯片演示
在连续的幻灯片演示中查看照片
1. 按菜单。
2. 选择“工具”,然后按 OK。
3. 选择“幻灯片演示”,然后按 OK。
按 OK 暂停或恢复幻灯片演示。按取消停止幻灯片演示。
HP Photosmart A610 series 使用手册
29
Page 32

第 5 章
30 HP Photosmart A610 series
Page 33

6
从其他设备打印
该打印机可以打印保存在几种类型的设备上的照片,包括计算机、数码相机和
iPod。您可以通过不同类型的连接完成不同的工作。
●
从数码相机打印照片
●
从 Bluetooth 设备打印照片
●
从计算机打印照片
●
从 iPod 打印照片
从数码相机打印照片
不使用计算机而从 PictBridge 数码相机或 HP 直接打印数码相机打印精美的照
片。
直接从数码相机打印时,打印机将使用已经在相机上选择的设置。有关使用相机
选定照片的详细信息,请参阅相机随附的文档。
开始前的准备
要从数码相机打印,您需要以下物件:
●
PictBridge 兼容型数码相机或 HP 直接打印数码相机。
●
用以连接相机和打印机的 USB 电缆。
●
(可选)存储卡。
从 PictBridge 相机打印
1. 开启 PictBridge 数码相机并选择要打印的照片。
2. 确保相机处于 PictBridge 模式,然后用相机随附的 USB 电缆将它连接到打
印机前面的相机端口。
打印机识别出 PictBridge 相机后,就会打印选定的照片。
从 HP 直接打印相机打印
1. 开启 HP 直接打印数码相机并选择要打印的照片。
2. 用相机随附的 USB 电缆将相机连接到打印机后面的 USB 端口。
3. 按照相机屏幕上的说明进行操作。
HP Photosmart A610 series 使用手册
31
Page 34

第 6 章
从 Bluetooth 设备打印照片
从具有 Bluetooth 无线技术的设备打印到打印机。
开始前的准备
要从启用 Bluetooth 的设备打印,您需要以下物件:
●
要从启用 Bluetooth 的设备打印到 HP Photosmart A610、A612、A616 或
A617 型号的打印机,您需要有 HP Bluetooth 无线打印机适配器(单独销
售)。 HP Photosmart A618 已经集成了 Bluetooth。
●
启用 Bluetooth 的设备
在将 Bluetooth 设备与打印机连接之前,确保根据需要设置 Bluetooth 打印机菜
单选项。请参阅打印机菜单。
从 Bluetooth 设备打印照片
有关 Bluetooth 无线技术和 HP 的详细信息,请访问
➔
www.hp.com/go/bluetooth
从计算机打印照片
您需要先将照片传输到计算机,然后再将 HP Photosmart 软件用于这些照片,
该软件可以使您从计算机进行打印。有关详细信息,请参阅将照片从存储卡保存
到计算机。
有关安装 HP Photosmart 软件的信息,请参阅安装软件。HP Photosmart 软件
包含每次从计算机进行打印时会出现的界面。
。
注意 电子版帮助提供了有关从计算机打印时可用的众多打印设置的详细
信息。要了解如何访问电子版帮助,请参阅查找更多信息。
开始前的准备
要从计算机打印,您需要以下物件:
●
长度不超过 3 米(10 英尺)的通用串行总线 (USB) 2.0 全速兼容电缆。有
关使用 USB 电缆连接打印机的说明,请参阅电子版帮助。
●
可以访问 Internet 的计算机(使用 HP Photosmart 共享)。
将照片从存储卡保存到计算机
1. 使用 USB 电缆将打印机连接到计算机。
2. 启动 HP Photosmart Premier、HP Photosmart Essential 或 HP Photosmart
Studio 软件。
3. 插入存储卡并选择要传输的照片。有关查看和选择照片的信息,请参阅选择
多张照片。
4. 在 HP Photosmart 屏幕中,单击“开始使用设备”。
32 HP Photosmart A610 series
Page 35

5. 为 HP Photosmart A610 series 打印机选择驱动器,然后选择照片要保存的
位置。
6. 单击“传输”。
从计算机打印照片 (Windows)
1. 在软件程序的“文件”菜单中,单击“打印”。
2. 选择 HP Photosmart A610 series 作为打印机。如果已经将 HP Photosmart
A610 series 设置为默认打印机,则可跳过这一步。已经选择了
HP Photosmart A610 series。
3. 单击“打印”或“确定”开始打印。
从计算机打印照片 (Mac)
1. 在软件程序的“文件”菜单中,点按“页面设置”。
2. 选择 HP Photosmart A610 series 作为打印机。如果已经将 HP Photosmart
A610 series 设置成默认的打印机,则可以跳过这一步。已经选择了
HP Photosmart A610 series。
3. 在软件程序的“文件”菜单中,点按“打印”。
4. 点按“打印”以开始打印。
从 iPod 打印照片
如果您有可以存储照片的 iPod,则可以将 iPod 连接到打印机并打印照片。
开始前的准备
检查拷贝到 iPod 的图像是否为 JPEG 格式。
注意 iPod 在您所在的国家/地区可能不可用。
将照片导入 iPod
1. 使用 iPod 的专用 Belkin 媒体阅读器,将照片从存储卡拷贝到 iPod。
2. 在 iPod 菜单上选择“照片导入”,以确定 iPod 上是否有照片。照片将显示
为“卷”。
从 iPod 打印照片
1. 用 iPod 随附的 USB 电缆将 iPod 连接到打印机前部的相机端口。在读取照
片时,打印机屏幕将会显示“正在读取设备”几分钟。然后打印机屏幕上将
显示照片。
2. 选择要打印的照片然后按打印。有关选择和打印照片的详细信息,请参阅选
择多张照片。
HP Photosmart A610 series 使用手册
33
Page 36

第 6 章
34 HP Photosmart A610 series
Page 37

7
维护和运送打印机
本款打印机很少需要维护。遵照本节所述的指导原则,可延长打印机及打印耗材
的使用寿命,并确保您总是能够打印出高质量的照片。
●
●
●
●
●
更换墨盒
使用 HP 110 Tri-color Inkjet 墨盒打印黑白和彩色照片。
HP Vivera 墨水提供逼真的照片质量和出色的防褪色功能,使鲜明色彩更持久。
HP Vivera 墨水经特别配方研制,并使用科学方式对质量、纯度和防褪色功能进
行了测试。
为获得最佳打印效果,HP 建议只使用 HP 墨盒。插入不正确的墨盒所导致的打
印机损坏不在保修范围之内。
为获得最佳打印质量,HP 建议在盒上标记的日期之前安装所有零售墨盒。
更换墨盒
清洁和维护打印机
储存打印机和墨盒
维护照片纸质量
运送打印机
小心 检查所使用的墨盒是否正确。另外请注意,HP 建议不要改装或重
新灌装 HP 墨盒。改装或重新灌装 HP 墨盒所导致的损坏不在 HP 保修范
围之内。
准备打印机和墨盒
1. 确保打印机已经启动。
2. 打开打印机的墨盒门。
3. 撕掉墨盒上光亮的粉色胶带。
撕掉粉色胶带
请勿触摸此处
HP Photosmart A610 series 使用手册
35
Page 38

第 7 章
插入墨盒
1. 下压的同时向外拉出墨盒,将旧墨盒从底座中取出。
警告 请勿触摸墨盒槽内或墨盒上的铜色触点。
2. 标签朝上拿着替换墨盒。将墨盒略微向上倾斜滑入底座中,使铜色触点先进
去。推动墨盒,直至其卡入到位。
3. 关闭墨盒门。
打印机的闲置屏幕上出现一个显示已安装墨盒的大概墨水量的图标(100%、
75%、50%、25% 和接近用尽)。如果不是原装 HP 墨盒,就不会出现墨水量
图标。
每次安装或更换墨盒时,打印机屏幕上会出现一条信息,要求您装入纸张以便打
印机校准墨盒。这可以确保高质量的打印件。
将照片纸装入进纸盒,按 OK,然后按照屏幕说明校准墨盒。
清洁和维护打印机
使用本节所述的简易方法,保持打印机和墨盒的清洁并进行良好的维护。
清洁打印机外部
清洁打印机的外部
1. 关闭打印机,然后从打印机背面断开电源线。
2. 如果您在打印机中安装了可选的 HP Photosmart 内置电池,请将其取出并
将电池槽盖装上。
3. 用蘸有少量清水的软布擦拭打印机的外部。
小心 1 请勿使用任何种类的清洁液。家用清洁剂和洗涤剂会损坏打印机
的表面涂层。
小心 2 请勿清洁打印机内部。防止任何液体进入打印机内部。
36 HP Photosmart A610 series
Page 39

自动清洁墨盒
如果在打印出的照片上发现白线或单色条纹,则可能需要清洁墨盒。清洁墨盒会
耗费墨水,因此请只在必要时进行清洁。
自动清洁墨盒
1. 按菜单。
2. 选择“工具”,然后按 OK。
3. 选择“清洁墨盒”,然后按 OK。
4. 按照打印机屏幕上的指示进行操作,装入纸张以便墨盒清洁完毕后打印机可
以打印测试页。使用普通纸或索引卡以节省照片纸。
5. 按 OK 开始清洁墨盒。
6. 打印机清洁完墨盒并打印测试页后,会询问是否要“继续进行二级清洁”。
检查测试页并从下列选项中进行选择:
–
–
最多可以清洁墨盒三次。清洁次数越多就越彻底,使用的墨水也就越多。
如果已经使用这一步骤完成了三级清洁,但测试页仍有白色条纹或颜色缺失,则
可能需要更换墨盒。
手动清洁墨盒触点
如果在有很多灰尘的环境中使用打印机,则污垢会在铜色触点上积聚并导致打印
问题。
如果测试页有白色条纹或颜色缺失,则需要再次清洁墨盒。选
择“是”,然后按 OK。
如果测试页的打印质量看起来良好,选择“否”,然后按 OK。
注意 如果墨盒或打印机最近被摔过,可能也会在打印结果中发现白色条
纹或颜色缺失。此问题是暂时性的,在 24 小时之内即可消除。
清洁墨盒触点
1. 准备好清洁触点所需的以下物品:
–
蒸馏水(自来水中包含的杂质可能会损坏墨盒)
–
棉签或其他不会粘到墨盒上的无绒毛软布
2. 打开墨盒门。
3. 取出墨盒,放在纸上,墨水喷嘴板朝上。注意,不要用手指接触铜色触点或
墨水喷嘴板。
小心 请勿将墨盒放在打印机外面超过 30 分钟。墨水喷嘴暴露于空
气中超过上述时间就会变干并导致打印问题。
4. 用蒸馏水轻轻润湿棉签,并挤掉棉签上多余的水分。
5. 轻轻地用棉签擦拭铜色触点。
小心 请勿触碰墨水喷嘴板。触碰墨水喷嘴板将导致喷嘴堵塞、墨水
故障以及电气接触不良。
6. 重复步骤 4 和 5,直到干净的棉签上没有墨迹或灰尘。
7. 将墨盒装入打印机,然后合上墨盒门。
HP Photosmart A610 series 使用手册
37
Page 40

第 7 章
打印测试页
联系 HP 支持前,请打印一张测试页。测试页包含与 HP 支持协作解决打印问题
时所需的诊断信息。查看测试页上的墨水喷嘴图案来检查墨盒的墨水量和状况。
如果图案中有任何线条或颜色缺失,请尝试清洁墨盒。有关详细信息,请参阅自
动清洁墨盒。
打印测试页
1. 按菜单。
2. 选择“工具”,然后按 OK。
3. 选择“打印测试页”,然后按 OK。
4. 按照打印机屏幕上的指示进行操作,装入纸张以便打印机打印测试页。使用
普通纸或索引卡以节省照片纸。
5. 按 OK 开始打印测试页。
测试页包含下列信息:
校准墨盒
首次在打印机中安装墨盒时,打印机会自动校准墨盒。但是,如果打印输出的颜
色不正确,或者安装了新墨盒后校准页打印不正确,请按照下列步骤校准墨盒。
校准墨盒
1. 将 HP 高级照片纸装入进纸盒中。
2. 按菜单。
3. 选择“工具”,然后按 OK。
4. 选择“校准墨盒”,然后按 OK。
38 HP Photosmart A610 series
Page 41

5. 打印机屏幕上会出现一条信息,提示您装入普通纸。装入 HP 高级照片纸以
便打印机打印校准页。
6. 按 OK 开始校准墨盒。
打印机完成墨盒校准后,它将打印校准页以确认校准是否成功。
–
复选标记表示墨盒安装正确且工作正常。
–
如果任何打印条的左侧出现“x”,请再次校准墨盒。如果仍然出
现“x”,请更换墨盒。
储存打印机和墨盒
为了保护打印机和墨盒,在不使用时应将它们妥善储存。
储存打印机
打印机在设计上可耐受长期或短期闲置状态。
●
打印机不用时,请合上进纸盒和出纸盒盖,并将打印机屏幕向下推至水平位
置。
●
将打印机储存在户内无阳光直射并且不会出现过高或过低温度的地方。
●
如果在一个月或更长时间内没有使用打印机和墨盒,在打印之前,请先清洁
墨盒。有关详细信息,请参阅自动清洁墨盒。
●
如果您要长期储存打印机,而打印机安装了可选的 HP Photosmart 内置电
池,请先从打印机中取出电池。
存储墨盒
当储存或运送打印机时,请始终将正在使用的墨盒留在打印机中。在关机断电期
间,打印机会将墨盒储存在保护罩中。
小心 在拔下电源线或取出内置电池之前,请确保打印机完成了断电操作
过程。此过程可使打印机能够正确地储存墨盒。
HP Photosmart A610 series 使用手册
39
Page 42

第 7 章
按照下列提示进行操作有助于维护 HP 墨盒并确保稳定的打印质量:
●
将所有不使用的墨盒保存在其原始密封包装中,直到需要时再取出来。在室
温下储存墨盒(15°- 35°C 或 59°- 95°F)。
●
准备将墨盒安装在打印机中之前,不要取下覆盖在墨水喷嘴上的塑料带。如
果从墨盒上取下了胶带,请勿试图再将其贴上。重新贴上胶带会损坏墨盒。
维护照片纸质量
要获得照片纸的最佳打印效果,请遵循本节的指导原则。
存放照片纸
●
将照片纸存放在原始包装中,或放入可重新封装的塑料袋中。
●
将包好的照片纸存放在平坦、凉爽、干燥的平面上。
●
将不使用的照片纸放回塑料袋中,纸张留在打印机内或暴露于外界环境中会
发生卷曲。
使用照片纸
●
请始终拿取照片纸的边缘以免留下指纹。
●
如果照片纸边缘卷曲,将纸张放在塑料储存袋中并轻轻地朝卷曲的相反方向
弯曲,直到纸张恢复平整。
运送打印机
本款打印机易于运送并且几乎可以安装在任何地方。在度假时、家庭聚会或社交
活动中,带上打印机,可以立即打印并与亲朋好友共享照片。
要更轻易的实现移动打印,可购买以下附件:
●
可选的 HP Photosmart 内置电池:通过可充电的可选 HP Photosmart 内置
电池为打印机供电,您可以在任何地方打印。
●
便携包:可将打印机和打印耗材放在方便的 HP Photosmart 便携包中携带。
运送打印机
1. 关闭打印机。
2. 取出存储卡插槽中的存储卡。
注意 运送打印机时,请不要取出墨盒。
3. 取出进纸盒和出纸盒中的所有纸张,然后合上进纸盒和出纸盒。
4. 将打印机屏幕向下推至水平位置。
注意 在拔下电源线之前,请确保打印机完成了断电操作过程。此过
程可使打印机能够正确地储存墨盒。
5. 拔下电源线。
40 HP Photosmart A610 series
Page 43

6. 如果打印机连接在计算机上,请从计算机上断开 USB 电缆。
7. 携带打印机时,确保其总是竖直向上放置。
提示 打印机具有便利的内置手柄,使其易于携带。请确保在抬起手
柄前,将打印机屏幕向下推到水平位置。在使用手柄携带时,请勿摇
晃打印机。
确保携带下列物品:
●
纸张
●
电源线
●
数码相机或存有照片的存储卡
●
备用的 HP 110 Tri-color Inkjet 墨盒(如果要打印很多照片)
●
要使用的可选打印机附件,例如电池或 HP Bluetooth 无线打印机适配器
●
如果要将打印机连接到计算机,请携带 USB 电缆和 HP Photosmart 打印机
软件 CD
●
打印机“使用手册”(您正在阅读的这本手册)
注意 如果不带打印机“使用手册”,请确保在出发前记下正确的墨
盒编号,或者购买足够的 HP 110 Tri-color Inkjet 墨盒。
HP Photosmart A610 series 使用手册
41
Page 44

第 7 章
42 HP Photosmart A610 series
Page 45

8
疑难排解
HP Photosmart 打印机在设计上具有可靠易用的特点,本章回答了有关使用打印
机以及不用计算机进行打印的常见问题,其中包含有关下列主题的信息:
●
打印机硬件问题
●
打印问题
●
Bluetooth 打印问题
●
错误信息
有关使用打印机软件以及从计算机打印的疑难排解信息,请参阅电子版帮助。有
关查看电子版帮助的信息,请参阅查找更多信息。
打印机硬件问题
在联系 HP 支持之前,请阅读本节的疑难排解提示或访问网站 www.hp.com/support
的在线支持服务。
注意 如果要用 USB 电缆将打印机连接到计算机,HP 建议使用长度不超
过 3 米(10 英寸)的 2.0 高速兼容电缆。
“开/关机”指示灯呈绿色闪烁,但打印机不打印。
解决方法
●
如果打印机已开启,则它正在进行初始化。请等待完成。
●
如果打印机已关闭,并安装了可选的 HP Photosmart 内置电池,则电池
正在充电。
警示灯呈红色闪烁。
原因 打印机需要维护。请尝试下列解决方法。
解决方法
●
查看打印机屏幕上的说明。如果打印机上连有数码相机,请查看相机屏
幕上的说明。如果打印机上连有计算机,请查看计算机显示器上的说
明。
●
关闭打印机。
如果打印机内未安装可选的 HP Photosmart 内置电池,则拔掉打印机的
电源线。等待大约 10 秒钟,然后插上电源线。开启打印机。
如果打印机安装了可选的 HP Photosmart 内置电池,则拔掉打印机电源
线(如果已插入)。打开电池槽盖并取出电池。请注意不要触摸打印机
内或电池上的触点。等待大约 10 秒钟,然后重新装入电池。插上电源
线(可选)。打开打印机电源。
●
如果警示灯仍然呈红色闪烁,请访问 www.hp.com/support 或与 HP 支
持联系。
HP Photosmart A610 series 使用手册
43
Page 46

第 8 章
控制面板上的按钮不响应。
原因 打印机出错。等待大约 1 分钟,看打印机是否复位。如果没有复位,
请尝试以下解决方案。
解决方法
●
关闭打印机。
如果打印机内未安装可选的 HP Photosmart 内置电池,则拔掉打印机的
电源线。等待大约 10 秒钟,然后插上电源线。开启打印机。
如果打印机安装了可选的 HP Photosmart 内置电池,则拔掉打印机电源
线(如果已插入)。打开电池槽盖并取出电池。请注意不要触摸打印机
内或电池上的触点。等待大约 10 秒钟,然后重新装入电池。插上电源
线(可选)。打开打印机电源。
●
如果打印机没有复位, 且控制面板按钮仍不响应 ,请访问
www.hp.com/support
打印机未找到并且未显示存储卡上的照片。
解决方法
或与 HP 支持联系。
存储卡可能包含打印机无法直接从存储卡读取的文件类型。
– 将照片保存到计算机,然后从计算机进行打印。有关详细信息,请参阅
相机文档或电子版帮助。
– 下次拍照时,将数码相机设置为以打印机可直接从存储卡读取的文件类
型保存照片。有关支持的文件格式的列表,请参阅技术规格。有关将数
码相机设置为以特定文件格式保存照片的说明,请参阅相机随附的文
档。
打印机已连接电源,但无法开启。
解决方法
●
打印机可能消耗的功率太多。
如果打印机内未安装可选的 HP Photosmart 内置电池,则拔掉打印机的
电源线。等待大约 10 秒钟,然后插上电源线。开启打印机。
如果打印机安装了可选的 HP Photosmart 内置电池,则拔掉打印机电源
线(如果已插入)。打开电池槽盖并取出电池。请注意不要触摸打印机
内或电池上的触点。等待大约 10 秒钟,然后重新装入电池。插上电源
线(可选)。打开打印机电源。
●
确保打印机插入了已连通的电源插坐。
打印机安装了可选的 HP Photosmart 内置电池,但打印机无法使用电池电源开启。
原因 电池可能需要充电。
44 HP Photosmart A610 series
Page 47

解决方法
●
插入打印机电源线给电池充电。“开/关机”指示灯呈绿色闪烁表示电池
正在充电。
●
如果电池已充电,尝试取出并重新装入电池。
打印机安装了可选的 HP Photosmart 内置电池,但无法充电。
解决方法
●
关闭打印机并拔下电源线。打开电池槽盖。取出电池并重新安装。请注
意不要触摸电池槽内或电池上的触点。有关如何安装电池的详细信息,
请参阅电池随附的文档。
●
检查打印机电源线是否已牢固连接到打印机和电源。打印机关闭
后,“开/关机”指示灯呈绿色闪烁表示电池正在充电。
●
打开打印机电源。电池充电图标(闪电形状)在打印机屏幕上的电池图
标上方闪烁表示电池正在充电。
●
打印机不使用时,电量耗尽的电池应在约 4 个小时内充满电。如果电池
仍无法充电,请将其更换。
打开打印机时发出噪音,或打印机一段时间不使用后发出噪音。
解决方法 打印机长时间不用后(约 2 周)或其电源中断然后恢复时, 可
能发出噪音。这是正常现象。打印机正在执行自动维护程序以确保生成最佳
质量的输出。
打印问题
在联系 HP 支持之前,请阅读本节的疑难排解提示或访问网站 www.hp.com/support
的在线支持服务。
当从控制面板打印时,打印机无法打印无边界照片。
原因 无边界打印选项可能已经关闭。
解决方法 要启用无边界打印选项,请按以下步骤操作:
1. 按菜单。
2. 选择“首选项”,然后按 OK。
3. 选择“无边界”,然后按 OK。
4. 选择“打开”,然后按 OK。
纸张未正确送入打印机。
解决方法
●
确保纸张宽度导轨紧靠纸张的边缘,同时保持纸张平整。
●
纸盒中可能装入了太多的纸张。取出一些纸张并尝试再次打印。
HP Photosmart A610 series 使用手册
45
Page 48

第 8 章
●
如果照片纸粘在一起,尝试一次装入一张。
●
如果在湿度很高或很低的环境中使用打印机,请将纸张尽可能深地插入
进纸盒,并一次装入一张照片纸。
●
如果使用的照片纸卷曲,请将纸张放在塑料袋中并轻轻地朝卷曲的相反
方向弯曲,直到纸张恢复平整。如果问题仍然存在,请使用不卷曲的照
片纸。有关正确保存和处理照片纸的信息,请参阅维护照片纸质量。
●
纸张可能太薄或太厚。尝试使用 HP 设计的照片纸。有关详细信息,请
参阅选择正确的纸张。
打印出的照片是斜的或者不居中。
解决方法
●
可能没有正确装入纸张。重新装入纸张,确保纸张在进纸盒中方向正确
且纸张宽度导轨紧靠纸张的边缘。有关装入纸张的说明,请参阅选择并
装入纸张。
●
墨盒可能需要校准。有关详细信息,请参阅校准墨盒。
打印机不出纸。
解决方法
●
打印机可能需要维护。阅读打印机屏幕上的说明。
●
电源可能已关闭,或者连接松动。确保电源已开启且电源线连接牢固。
如果使用的是电池电源,确保电池安装正确。
●
进纸盒中可能缺纸。检查纸张是否正确装入进纸盒。有关装入纸张的说
明,请参阅选择并装入纸张。
●
打印时纸张可能被卡住。有关清除卡纸的说明,请参阅下节。
打印时卡纸。
解决方法 查看打印机屏幕上的说明。要清除卡纸,请尝试以下解决方法:
●
如果纸张从打印机前面送出,请向外轻拉纸张以将其取出。
●
如果纸张未从打印机前面送出,尝试从打印机后面将其取出:
– 从进纸盒取出纸张,然后向下拉进纸盒以将其完全打开到水平位置。
– 轻拉被卡住的纸张以将其从打印机后面取出。
– 将进纸盒向上抬,直到其卡入到纸张装入位置。
●
如果无法抓住被卡纸张的边缘将其取出,请尝试以下操作:
– 关闭打印机。
– 如果打印机内未安装可选的 HP Photosmart 内置电池,则拔掉打印
机的电源线。等待大约 10 秒钟,然后再插上电源线。
46 HP Photosmart A610 series
Page 49

– 如果打印机安装了可选的 HP Photosmart 内置电池,则拔掉打印机
电源线(如果已插入)。打开电池槽盖并取出电池。请注意不要触
摸打印机内或电池上的触点。等待大约 10 秒钟,然后重新装入电
池。插上电源线(可选)。
– 开启打印机。打印机检查纸路中的纸张并自动退出被卡住的纸张。
●
按 OK 以继续。
提示 如果打印时遇到卡纸,请尝试一次装入一张照片纸。将纸张尽
可能深地插入进纸盒。
打印机输出的是空白页。
解决方法
●
检查打印机屏幕上的墨水量图标。如果墨盒的墨水用完,请将其更换。
有关详细信息,请参阅更换墨盒。
●
您可能已经开始打印,然后又取消了打印进程。如果在照片开始打印前
取消了进程,打印机可能已经装入纸张准备打印。下次打印时,打印机
会在开始新的打印作业前先退出空白页。
无法使用打印机默认的打印设置打印照片。
解决方法 您可能已经更改了选定照片的打印设置。应用于个别照片的打印
设置将取代打印机的默认打印设置。通过取消选择个别照片,可以取消应用
于该照片的所有打印设置。有关详细信息,请参阅选择多张照片。
准备打印时打印机弹出纸张。
原因 打印机可能直接暴露在日光中,这将影响自动纸张传感器正常工作。
解决方法 将打印机从直射日光下移开。
打印质量差。
解决方法
●
确保已经选择正确的纸张类型。请参阅更改纸张类型。
●
确保打印质量设置为“最佳”。请参阅设置打印质量。
●
打开或关闭“照片修补”功能。请参阅使用“照片修补”自动完善照
片。
●
墨盒中的墨水可能不足。检查打印机屏幕上的墨水量图标,并在必要时
更换墨盒。有关详细信息,请参阅更换墨盒。
●
拍照时,您可能在数码相机上选择了低分辨率设置。为了在以后获得更
好的效果,请将数码相机设为较高分辨率。
HP Photosmart A610 series 使用手册
47
Page 50

第 8 章
●
确保使用适合于项目的正确的照片纸类型。为了获得最佳效果,请使
用 HP 高级照片纸。有关详细信息,请参阅选择正确的纸张。
●
您可能在纸张错误的一面进行打印。确保装入的纸张打印面朝向打印机
前部。
●
墨盒可能需要清洁。有关详细信息,请参阅自动清洁墨盒。
●
墨盒可能需要校准。有关详细信息,请参阅校准墨盒。
●
照片可能堆积在出纸盒中。打印完后,照片的打印面需要放在空气中不
少于 5 分钟。在完全处理完之前,请勿将照片装入相册中。
未打印在数码相机中选择要打印的照片。
解决方法 某些数码相机既可在相机的内部存储器也可在相机的存储卡上标
记要打印的照片。如果您在内部存储器中标记了照片,然后又将照片从相机
内部存储器转移到存储卡上,标记不会随之转移。请将照片从数码相机内部
存储器转移到存储卡后,再标记要打印的照片。
无法从 iPod 打印照片。
原因 您可能以低分辩率将照片保存到了 iPod。
解决方法 照片必须以高分辩率保存以便打印机能够识别它们。查看 iPod
文档以获取更改分辩率设置的信息。
Bluetooth 打印问题
联系 HP 支持之前,请阅读本节的疑难排解提示,或访问 www.hp.com/support
以获取在线支持服务。还要确保阅读 HP Bluetooth 无线打印机适配器(如果正
在使用)和具有 Bluetooth 无线技术的设备随附的文档。
Bluetooth 设备无法找到打印机。
解决方法
●
如果使用可选的 HP Bluetooth 无线打印机适配器,请确保适配器插入了
打印机前面的相机端口中。当适配器准备好接收数据时,适配器上的指
示灯会闪烁。
如果打印机集成了 Bluetooth 无线技术,请检查打印机上的 Bluetooth
指示灯。当打印机准备接收数据时该指示灯闪烁。
●
Bluetooth 的 “可见性”可能被设置为“看不到”。按照下列方法将此
设置更改为“任何人都可看到”:
–按菜单。
–选择 “Bluetooth”,然后按 OK。
– 选择“可见性”,然后按 OK。
– 选择“任何人都可看到”,然后按 OK。
48 HP Photosmart A610 series
Page 51

●
Bluetooth 的 “安全等级”可能被设置为“高”。按照下列方法将此设
置更改为“低”:
–按菜单。
–选择 “Bluetooth”,然后按 OK。
– 选择“安全等级”,然后按 OK。
– 选择“低”,然后按 OK。
●
具有 Bluetooth 无线技术的设备所使用的打印机密钥 (PIN) 可能不正
确。确保在具有 Bluetooth 无线技术的设备中输入正确的打印机密钥。
●
可能距离打印机太远。将具有 Bluetooth 无线技术的设备移动到靠近打
印机处。具有 Bluetooth 无线技术的设备与打印机之间建议的最大距离
为 10 米(30 英尺)。
打印机不出纸。
解决方法 打印机可能无法识别具有 Bluetooth 无线技术的设备所发送的文
件类型。有关打印机支持的文件格式的列表,请参阅技术规格。
打印质量差。
解决方法 打印的照片可能分辨率较低。为了获得更佳效果,请将数码相机
设为较高分辨率。用 VGA 分辨率的相机拍摄的照片(例如,无线电话中的
照片)的分辨率可能不足以生成高质量的打印件。
打印的照片有边界。
解决方法 具有 Bluetooth 无线技术的设备上安装的打印程序可能不支持无
边界打印。联系设备供应商或访问其支持网站以获得最新的打印程序更新。
计算机无法使用 Bluetooth 无线连接设置设备名称。
解决方法 使用 USB 电缆将计算机连接到打印机,以使用打印机“工具
箱”来设置打印机 Bluetooth 设备名称。计算机上必须已安装打印机软件。
请参阅安装软件和电子版帮助。
使用下列说明进入打印机“工具箱”。
仅限 Windows 用户:右键单击 Windows 任务栏最右侧的小显示器图标,
选择出现的“启动/显示 HP 解决方案中心”或“启动/显示 Director”。单
击“设置”,选择“打印设置”,然后选择“打印机工具箱”。单击“配
置 Bluetooth 设置”选项卡并在“设备名称”框中输入 Bluetooth 设备名称。
错误信息
在联系 HP 支持之前,请阅读本节的疑难排解提示或访问网站 www.hp.com/support
的在线支持服务。
打印机屏幕上可能出现以下错误信息。请按照说明解决问题。
HP Photosmart A610 series 使用手册
49
Page 52

第 8 章
错误信息:卡纸。清除卡纸,然后按“OK”。
解决方法 尝试下列操作以清除卡纸:
●
如果纸张从打印机前面送出,请向外轻拉纸张以将其取出。
●
如果纸张未从打印机前面送出,尝试从打印机后面将其取出:
– 从进纸盒取出纸张,然后向下拉进纸盒以将其完全打开到水平位置。
– 轻拉被卡住的纸张以将其从打印机后面取出。
– 将进纸盒向上抬,直到其卡入到纸张装入位置。
●
如果无法抓住被卡纸张的边缘将其取出,请尝试以下操作:
– 关闭打印机。
– 如果打印机内未安装可选的 HP Photosmart 内置电池,则拔掉打印
机的电源线。等待大约 10 秒钟,然后再插上电源线。
– 如果打印机安装了可选的 HP Photosmart 内置电池,则拔掉打印机
电源线(如果已插入)。打开电池槽盖并取出电池。等待大约 10
秒钟,然后重新装入电池。插上电源线。
– 打开打印机电源。打印机检查卡纸并自动退出发现的卡纸。
●
按 OK 以继续。
错误信息:自动纸张传感器故障。
解决方法 自动纸张传感器被挡住或已损坏。尝试将打印机移开阳光直射的
位置,然后按 OK 并尝试再次打印。如果这样做不起作用,请访问
www.hp.com/support
或与 HP 支持联系。
错误信息:墨盒不兼容。请使用正确的 HP 墨盒。
解决方法 用与打印机兼容的墨盒更换该墨盒。有关详细信息,请参阅更换
墨盒。
警告 请勿触摸墨盒槽内或墨盒上的铜色触点。
错误信息:墨盒底座被卡住。清除卡纸然后按“OK”。
解决方法 按照以下步骤清除墨盒底座通路中的任何阻塞物:
1. 从进纸盒或出纸盒取出卡纸。
2. 关闭打印机,然后重新打开。
错误信息:墨盒支架被卡住。
解决方法 墨盒支架是位于墨盒底座下方的组件,它可以擦拭并罩住墨盒以
便储存。按照以下步骤清除墨盒支架的阻塞物:
1. 从进纸盒和出纸盒取出卡纸。
2. 关闭打印机,然后重新打开。
50 HP Photosmart A610 series
Page 53

错误信息:照片已损坏
原因 打印机从存储卡打印时,打印机中插入了其他存储卡,或者有 USB
设备连接到了打印机前面的相机端口。
解决方法 一次只插入一张存储卡。打印机从存储卡打印时,不要插入 USB
设备。照片不会被损坏。
原因 已插入存储卡上的指定照片被损坏。
解决方法 选择并打印其他照片,或插入其他存储卡。
错误信息:读取存储卡时出错。请参阅用户手册。
原因 读取存储卡时出错可能表示 xD-Picture Card 存储卡处于写保护状
态。xD-Picture Card 存储卡具有特殊的保护功能,以确保图片安全保存。
注意 在此状态下,仍可以使用打印机从 xD-Picture Card 打印照片
并将照片保存到安全的位置,例如计算机硬盘。
解决方法
●
重新将 xD-Picture Card 存储卡插入到相机并开启相机。在大多数情况
下,相机自动进行必要的更改。
●
重新格式化 xD-Picture Card 存储卡。有关重新格式化存储卡的说明,
请参阅相机随附的文档。请注意此过程将删除当前保存在您存储卡上的
照片。要保存这些照片,请在重新格式化存储卡之前将它们传输到计算
机。在重新格式化存储卡之后,可以使用计算机将这些照片传回到存储
卡。
●
关闭打印机,将 xD-Picture Card 存储卡插入打印机,然后重新开启打
印机。
HP Photosmart A610 series 使用手册
51
Page 54

第 8 章
52 HP Photosmart A610 series
Page 55

9
技术规格
本节包括以下主题:
●
●
系统要求
组件 Windows 最低系统要求 Mac 最低系统要求
操作系统 Microsoft Windows 98
处理器 Intel Pentium II(或等
系统要求
打印机技术规格
®
SE、Me、2000
Professional、
XP Home、
XP Professional、XP
Starter Edition 和 XP
Professional x64
®
同处理器)或更快
®
®
Mac OS X 10.3.x 和
10.4.x
G3 或更快
RAM
可用磁盘空间
视频显示器 800 x 600,16 位或更高 800 x 600,16 位或更高
CD-ROM 驱动器
64 MB(建议使用 256
MB)
500 MB 500 MB
4x 4x
128 MB
HP Photosmart A610 series 使用手册
53
Page 56

第 9 章
(续)
组件 Windows 最低系统要求 Mac 最低系统要求
连接 USB 2.0 高速:
浏览器
打印机技术规格
类别 技术规格
连接 USB 2.0 高速:Microsoft Windows 98 SE、
USB:Mac OS X
Microsoft Windows 98
SE、Me、2000
Professional、
10.3.x 和 10.4.x
PictBridge:使用前面
的相机端口
XP Home、
XP Professional、XP
Starter Edition 和 XP
Professional x64
PictBridge:使用前面
的相机端口
Bluetooth:使用集成
Bluetooth 的打印机或可
选的 HP Bluetooth 无线
打印机适配器
Microsoft Internet
—
Explorer 5.5 或更高版本
Me、2000 Professional、XP Home、
XP Professional、XP Starter Edition 和 XP
Professional x64;Mac OS X 10.3.x 和 10.4.x
PictBridge:Microsoft Windows 98 SE、Me、
2000 Professional、XP Home、
XP Professional、XP Starter Edition 和 XP
Professional x64;Mac OS X 10.3.x 和 10.4.x
Bluetooth:Microsoft Windows 98 SE、Me、
2000 Professional、XP Home、
XP Professional、XP Starter Edition 和 XP
Professional x64
环境技术指标 操作时的最大值:5-40°C (41-104°F),
5-90% 相对湿度
操作时的建议值:15-35°C (59-95°F),
20-80% 相对湿度
图像文件格式 JPEG 基线
TIFF 24 位 RGB 未压缩隔行扫描
TIFF 24 位 YCbCr 未压缩隔行扫描
54 HP Photosmart A610 series
Page 57

(续)
类别 技术规格
TIFF 24 位 RGB Packbits 隔行扫描
TIFF 8 位灰色未压缩/Packbits
TIFF 8 位彩色未压缩/Packbits
TIFF 1 位未压缩/Packbits/1D Huffman
页边距 无边界打印:上 0.0 毫米 ;下 12.5 毫米 ;左/
右 0.0 毫米
有边界打印:上 3 毫米 ;下 12.5 毫米 ;左/右
3 毫米
介质尺寸 照片纸 10 x 15 厘米 或 13 x 18 厘米
带裁边的照片纸,10 x 15 厘米带 1.25 厘米裁
边
照片不干胶贴纸 10 x 15 厘米 ,每页 16 张方形
或椭圆形的不干胶贴纸
全景照片纸(用于预拼接图像)10 x 30 厘米
索引卡:10 x 15 厘米
Hagaki 卡:100 x 148 毫米
A6 卡:105 x 148 毫米
L 尺寸卡,90 x 127 毫米
带裁边的 L 尺寸卡,90 x 127 毫米带 12.5 毫米
裁边
介质类型 HP 高级照片纸
存储卡 CompactFlash I 型和 II 型
存储卡支持的文件格式 打印:所有支持的图像和视频文件格式
纸盒 一个 13 x 18 厘米的照片纸盒
HP Photosmart A610 series 使用手册
卡:索引卡、Hagaki 卡、A6、L 尺寸、2L 尺寸
照片不干胶贴纸
HP CD/DVD 盘面标签
HP 自粘照片纸
MultiMediaCard
Secure Digital
Memory Stick
Microdrive
xD-Picture Card
保存:所有文件格式
55
Page 58

第 9 章
(续)
类别 技术规格
纸盒容量 20 张照片纸,每张最大厚度为 292 微米(11.5
密耳)
耗电量 美国
打印:15.14 W
闲置:8.61 W
关机:6.66 W
国际
打印:14.04 W
闲置:8.58 W
关机:7.06 W
电源型号 HP 部件号 0957–2121(北美),100-240
V AC(± 10%)50/60 Hz(±3 Hz)
HP 部件号 0957–2120(世界其他地区),
100-240 V AC(± 10%)50/60 Hz(±3 Hz)
墨盒 HP 110 Tri-color Inkjet 墨盒
USB 2.0 高速支持 Microsoft Windows 98 SE、Me、2000
Professional、XP Home、XP Professional、
XP Starter Edition 和 XP Professional x64
Mac OS X 10.3.x 和 10.4.x
HP 建议 USB 电缆长度不超过 3 米(10 英尺)
视频文件格式
Motion JPEG AVI
Motion-JPEG QuickTime
MPEG-1
56 HP Photosmart A610 series
Page 59

10
HP 支持
●
●
●
●
支持程序
如果遇到问题,请按以下步骤操作:
1. 查阅 HP Photosmart 打印机随附的文档。
2. 访问 HP 在线支持网站:www.hp.com/support。所有 HP 客户都可以访问
3. 仅限于欧洲:与当地的经销商联系。如果 HP Photosmart 打印机出现硬件
4. 联系 HP 支持。可选择的支持种类和可用性随设备、国家/地区以及语言而
支持程序
HP 电话支持
额外保修选项
HP 保修条款
HP 在线支持。在这里可以最快速地获取最新设备信息和专家帮助,并包含
以下功能:
–
快速访问有资质的在线支持专家
–
HP Photosmart 打印机软件和驱动程序的更新
–
为常见问题提供有用的 HP Photosmart 打印机和疑难排解信息
–
注册 HP Photosmart 打印机后可提供主动设备更新、支持提醒以及 HP
新闻简报
故障,需要将其送回到当地的购买点。(此服务将在打印机的保修期限内免
费提供。保修期过后,将收取服务费。)
异。
HP 电话支持
要获取支持电话号码的列表,请参阅前盖内的电话号码表。
电话支持期
北美、亚太地区和拉丁美洲(包括墨西哥)可享有一年电话支持服务。要确定欧
洲、中东和非洲的电话支持期,请访问 www.hp.com/support。您需要支付电话
公司的标准电话费。
致电
请在计算机和 HP Photosmart 打印机前致电 HP 支持。准备提供以下信息:
●
设备型号(在设备前面的标签上)
●
设备序列号(在设备后部或底部)
●
发生故障时显示的信息
●
回答下列问题:
– 以前出现过这种情况吗?
– 能否使之再现?
HP Photosmart A610 series 使用手册
57
Page 60

第 10 章
– 在出现这种情况前,是否在计算机上添加了新硬件或软件?
– 在出现这种情况前,是否出现其他情况(例如,发生雷电和移动设备
电话支持期过后
电话支持期过后,仍可获得 HP 的支持,但需要支付一定的费用。也可以在 HP
在线支持网站获取支持:www.hp.com/support。请与 HP 经销商联系或拨打所
在国家/地区的支持电话号码,以了解支持选项详细信息。
额外保修选项
打印机的延长服务计划可以付费取得。请访问 www.hp.com/support,选择您的
国家/地区和语言,然后浏览关于延长服务计划的服务和保修信息。
等)?
58 HP Photosmart A610 series
Page 61

HP 保修条款
HP Photosmart A610 series 使用手册
59
Page 62

第 10 章
60 HP Photosmart A610 series
Page 63

A
安装软件
打印机随附有可在计算机上安装的可选软件。
使用打印机盒中随附的安装说明安装打印机硬件后,使用本节中的说明安装软件。
Windows 用户
重要事项:请勿在没有提示的情况下连接
USB 电缆。
1. 将 HP Photosmart CD 插入计算机的
CD-ROM 驱动器。如果未出现安装向
导,在 CD-ROM 驱动器上找到
Setup.exe 文件并双击。下载文件需
要不到一分钟时间。
2. 单击“下一步”并按照屏幕上的说明
操作。
3. 出现提示时,请接受“推荐”选项或
选择“自定义”选项。如果选择“自
定义”,请取消选择不想安装的软件
程序。如果您不确定,则可以突出显
示列表中每个程序的名称以阅读其简
要说明。
4. 出现提示时,将 USB 电缆的一端连接
到打印机后面的 USB 端口,另一端连
接到计算机上的 USB 端口。
5. 按照屏幕说明完成安装。如果提示您
重新启动计算机,请继续并重启。
注意 Windows 用户:HP Photosmart Essential 软件包括在推荐的安装选项
中。如果使用 Windows 2000 或 XP,则可以选择 HP Photosmart Premier 为自
定义安装选项,HP Photosmart A610 型号上没有 HP Photosmart Premier。
Mac 用户
1. 将 USB 电缆的一端连接到打印机后面
的 USB 端口,另一端连接到计算机上
的 USB 端口。
2. 将 HP Photosmart CD 插入计算机的
CD-ROM 驱动器。
3. 连按桌面上的“HP Photosmart
CD”图标。
4. 连按“HP 安装程序”图标,然后按照
每个安装屏幕上的说明安装打印机软
件。
5. 出现“恭喜”对话框时,点按“确
定”。
HP Photosmart A610 series 使用手册
61
Page 64

附录 A
62 HP Photosmart A610 series
Page 65

B
打印机菜单
打印机菜单包含供查看及打印照片、获取帮助等的多项功能。
打印机菜单
打印机菜单结构
●
●
●
打印选项
–“全部打印”:选择此项可以打印插入打印机中的存储卡上的全部照片。
–“视频剪辑打印”:选择此项可以打印视频剪辑中的 9 幅帧. 有关如何从视频剪
辑打印的说明,请参阅选择多张照片。
–“打印范围”:选择此项可以打印一系列照片。当前打印设置(包括份数)应用
于该系列所有照片。
–“打印索引页”:选择此项可以打印插入打印机中的存储卡上全部照片的索引
页。
–“全景照片”:选择此项可以“打开”或“关闭”(默认)全景打印。选择“打
开”可以使用 3:1 宽高比打印所有选定的照片;请在打印前装入 10 x 30 厘米
的纸张。选择照片后,绿色的裁剪框显示要打印的区域。打开此选项后,将禁
用“打印选项”菜单中的其他选项。选择“关闭”以正常 3:2 的宽高比打印。
使用 USB 电缆直接从数码相机打印时,不支持全景打印。
–“照片不干胶贴纸”:选择此项可以“打开”或“关闭”(默认)不干胶贴纸打
印。选择“打开”可以每页打印 16 张照片,并装入专用不干胶贴纸介质。打开
此选项后,将禁用“打印选项”菜单中其他选项。选择“关闭”可以使用一种
正常的布局选项进行打印。
–“CD/DVD 盘面”:选择此项可以“打开”或“关闭”(默认)CD/DVD 标签打
印。
–“护照照片”:选择此项可以“打开”或“关闭”(默认)护照打印。护照打印
指定打印机将所有选定的照片按照选定的护照照片尺寸进行打印。每个选定的
照片打印在单独的纸张上。每张打印页上按照选定的尺寸打印尽可能多的照
片。打开此选项后,将禁用“打印选项”菜单中其他选项。
编辑
–“旋转照片”:按
–“添加边框”:从“选择图案”和“选择颜色”选项中选择。
–“添加颜色效果”:从下列颜色效果中选择:“黑白”、“棕色”、“古董
色”或“无效果”(默认)。
工具
–“Photosmart 共享”(即时共享):选择此项可以与家人和朋友共享插入的存
储卡上的照片。必须将打印机连接到与 Internet 相连并安装有打印机软件的计
算机。
–“9 张视图”:选择此项可以每次查看插入的存储卡上的 9 张照片。
–“幻灯片演示”:选择此项可以在幻灯片演示中查看插入的存储卡上的照片。
按取消停止幻灯片演示。
–“打印样本页”:选择此项可以打印样本页,这对于检查打印机的打印质量很有
用。
–“打印测试页”:选择此项可以打印测试页,其中包含有助于疑难排解的打印机
相关信息。
将照片顺时针旋转 90 度,按 将照片逆时针旋转 90 度。
HP Photosmart A610 series 使用手册
63
Page 66

附录 B
–“清洁墨盒”:选择此项可以清洁墨盒。清洁后,将询问是否要继续进行二级清
洁(选择“是”或“否”)。如果选择“是”,将完成另一个清洁循环。接下
来将询问是否要继续进行三级清洁(选择“是”或“否”)。
–“校准墨盒”:选择此项可以校准墨盒。
● Bluetooth
–“设备地址”:有些具有 Bluetooth 无线技术的设备,需要您输入它们要寻找的
设备地址。此菜单选项会显示设备地址。
–“设备名称”:您可以选择一个打印机名称,以便在其他具有 Bluetooth 无线技
术的设备寻找打印机时显示。
–“密钥”:当打印机的 Bluetooth “安全等级”设置为“高”时,您必须输入密
钥才可让其他 Bluetooth 设备使用该打印机。默认密钥为 0000。
–“可见性”:选择“全部可见”(默认)或“不可见”。将“可见性”设置
为“不可见”时,只有那些知道打印机地址的设备才可以在该打印机上打印。
–“安全等级”:选择“低”(默认)或“高”。如果设置为“低”,则具备
Bluetooth 无线技术的其他设备用户无需输入打印机密钥。设置为“高”则需要
具备 Bluetooth 无线技术的其他设备用户输入打印机密钥。
–“重置 Bluetooth 选项”:选择此项可以将 Bluetooth 菜单中的所有项目重置为
默认值。
●
帮助
–“打印提示 I”:选择此项可以阅读打印机自动图像增强功能的信息。
–“打印提示 II”:选择此项可以阅读有助于获得最佳打印效果的提示。
–“全景照片”:选择此项可以阅读有关打印全景照片的信息。
–“照片不干胶贴纸”:选择此项可以阅读有关打印照片不干胶贴纸的信息。
–“存储卡”:选择此项可以阅读有关使用存储卡的信息。
–“墨盒”:选择此项可以阅读有关使用墨盒的信息。
–“装入纸张”:选择此项可以阅读有关装入纸张的信息。
–“卡纸”:选择此项可以阅读有关取出卡纸的信息。
–“相机连接”:选择此项可以阅读有关将 PictBridge 相机连接到打印机的信息。
–“携带打印机旅行”:选择此项可以阅读有关旅途携带打印机的提示。
–“获得帮助”:选择此项可以阅读有关如何获得打印机帮助的信息。
●
首选项
–“打印质量”:选择此项可以更改打印质量。从三个选项中选择,“最佳”(默
认)生成最高的打印质量,“正常”使用的墨水比“最佳”少,而且打印速度
快,“快速一般”的打印速度高,打印质量中等。
–“纸张类型”:选择此项可以更改要用于打印的纸张类型。在 “HP 高级” 或
“HP 优质” 照片纸之间进行选择。为了获得最佳效果,HP 建议使用 HP 高级
照片纸。
–“日期/时间”:选择此项可以在打印的照片上显示日期/时间标记。选择“日期/
时间”、“仅日期”或“关闭”(默认)。
–“彩色空间”:选择此项可以选择彩色空间,这是一个用于组织颜色的三维数字
模型。选择 “Adobe RGB”、“sRGB” 或“自动选择”(默认)。默认
的“自动选择”选项指定打印机使用 Adobe RGB 彩色空间(如果有)。如果没
有 Adobe RGB,则打印机默认设置为 sRGB。
–“无边界”:选择此项可以“打开”(默认)或“关闭”无边界打印。关闭无边
界打印后,将在所有纸张外缘打印一个白色窄边。
–“打印之后”:选择此项可以更改打印之后是否取消选择选定的照片:“始
终”(默认)、“从不”或“询问”。
–“预览动画”:选择此项可以“打开”(默认)或“关闭”预览动画。选择“关
闭”可略过打印机屏幕动画。
–“视频增强”:选择此项可以“打开”或“关闭”(默认)视频增强。
64 HP Photosmart A610 series
Page 67

–“恢复默认值”:选择此项可以恢复打印机默认值:“是”或“否”。选
择“是”可恢复原始的厂家首选项。
–“语言”:选择此项可以更改语言或国家/地区设置,从“选择语言”和“选择国
家/地区”中选择。
HP Photosmart A610 series 使用手册
65
Page 68

附录 B
66 HP Photosmart A610 series
Page 69

索引
符号/编号
“存储卡”图标 19
A
按钮 8
B
Bluetooth
无线打印机适配器 10
疑难排解 48
帮助 43
保修条款 59
便携包
型号 10
运送打印机 40
布局和照片尺寸 20
C
CD/DVD 标签 25
CompactFlash 17
裁剪照片 23
菜单, 打印机 63
菜单,打印机 10
测试页 38
插入存储卡 17
查看照片 19
常见问题 43
储存
打印机 39
存储
墨盒 39
存储卡
插入 17
取出 19
支持的类型 17
存放
照片纸 40
错误信息 49
D
打印
CD/DVD 盘面 63
帮助 64
不使用计算机 17
测试页 38
多份 20
多张照片 20
护照照片 25, 63
全景模式 20
全景照片 63
缩略图 19
索引页 19
在全景模式中 23
照片 21
照片不干胶贴纸 24, 63
打印机
部件 6
菜单 10, 63
储存 39
错误信息 49
附件 9, 40
技术规格 54
清洁 36
文档 5
运送 40
电池
槽 9
充电指示器 0
型号 9
电话支持 57
电话支持期
支持期 57
F
放入纸张 15
附件 9, 40
G
古董色 23
H
Hewlett-Packard 公司通告 2
HP Photosmart 共享 28
HP 支持 57
护照照片 25
获得帮助 43
J
计算机
安装软件 61
系统要求 53
技术规格 53
校准墨盒 38
校准页 38
K
控制面板 8
L
联系 HP 支持 57
M
Memory Stick 17
Microdrive 17
MultiMediaCard 17
墨盒
测试 38
存储 39
校准 38
清洁 37
清洁触点 37
墨水量, 检查 38, 0
Q
汽车适配器 40
清洁
打印机 36
墨盒 37
取出存储卡 19
全景模式 23
R
日期和时间标记 23
软件,安装 61
S
Secure Digital 17
SmartFocus 26
Sony Memory Stick.
Memory Stick
摄像机
打印机屏幕上的图标 0
视频剪辑
打印 9 幅帧自 25, 26
打印单独的帧自 25
支持的文件格式 56
适应性照明 26
首选项 64
参阅
数码相机.
缩放和裁剪 23
缩略图,打印 19
相机
参阅
HP Photosmart A610 series 使用手册
67
Page 70

T
添加照片边框 23
通过电子邮件发送照片 28
U
USB
端口 6
技术规格 54
W
文档, 打印机 5
文件格式, 支持 54
问题和回答 43
X
xD-Picture Card 17
系统要求 53
相机
端口 6
照片未打印 48
相机类型 31
消除红眼 26
Y
疑难排解
Bluetooth 48
HP 支持 57
错误信息 49
纸张问题 45
指示灯闪烁 43
质量问题 47
运输打印机 9
运送打印机 40
纸盒,纸张 6
纸张
放入 15
购买和选择 15
技术规格 54
卡住 46
维护 15, 40
疑难排解 45
纸盒 6
质量
打印 28
打印测试页 38
疑难排解 47
照片 26
照片纸 40
致电 57
棕褐色调 23
Z
照片
裁剪 23
查看 19
打印 21
古董色 23
日期和时间标记 23
缩放 23
索引 19
提高质量 26
添加边框 23
通过电子邮件发送 28
消除红眼 26
选择进行打印 20
棕褐色调 23
照片不干胶贴纸 24
照片修补 26
支持程序 57
支持期过后 58
68 HP Photosmart A610 series
Page 71

HP Photosmart A610 series User Guide
English
Page 72

Copyrights and trademarks
© 2006 Hewlett-Packard Development
Company, L.P.
Hewlett-Packard Company
notices
The information contained in this
document is subject to change without
notice.
All rights reserved. Reproduction,
adaptation, or translation of this
material is prohibited without prior
written permission of Hewlett-Packard,
except as allowed under copyright
laws.
The only warranties for HP products
and services are set forth in the express
warranty statements accompanying
such products and services. Nothing
herein should be construed as
constituting an additional warranty. HP
shall not be liable for technical or
editorial errors or omissions contained
herein.
Trademarks
HP, the HP logo, and Photosmart are
property of Hewlett-Packard
Development Company, L.P.
The Secure Digital logo is a trademark
of the SD Association.
Microsoft and Windows are registered
trademarks of Microsoft Corporation.
CompactFlash, CF, and the CF logo are
trademarks of the CompactFlash
Association (CFA).
Memory Stick, Memory Stick Duo,
Memory Stick PRO, and Memory Stick
PRO Duo are trademarks or registered
trademarks of Sony Corporation.
Microdrive is a trademark of Hitachi
Global Storage Technologies.
MultiMediaCard is a trademark of
Infineon Technologies AG of Germany,
and is licensed to the MMCA
(MultiMediaCard Association).
xD-Picture Card is a trademark of Fuji
Photo Film Co., Ltd., Toshiba
Corporation, and Olympus Optical Co.,
Ltd.
Mac, the Mac logo, and Macintosh are
registered trademarks of Apple
Computer, Inc.
The Bluetooth word mark and logos are
owned by the Bluetooth SIG, Inc. and
any use of such marks by HewlettPackard Company is under license.
PictBridge and the PictBridge logo are
trademarks of the Camera & Imaging
Products Association (CIPA).
Other brands and their products are
trademarks or registered trademarks of
their respective holders.
Regulatory model
identification number
VCVRA-0608/VCVRA-0601
For regulatory identification purposes,
the product is assigned a Regulatory
Model Number. The Regulatory Model
Number for the product is
VCVRA-0608/VCVRA-0601. This
regulatory number should not be
confused with the marketing name
(HP Photosmart A610 series) or
product number (Q7110A).
Environmental statements
For Environmental Stewardship
information, see the electronic Help.
Page 73

Contents
1Welcome.................................................................................................................5
Find more information..............................................................................................6
Printer parts.............................................................................................................6
Optional accessories...............................................................................................9
Use the printer menus...........................................................................................10
2 Photo printing overview......................................................................................13
Start-to-finish printing............................................................................................13
3 Paper basics........................................................................................................15
Choose and load paper.........................................................................................15
Choose the right paper...................................................................................15
Load your paper.............................................................................................15
4 Print from a memory card...................................................................................17
Get photos from a memory card............................................................................17
Insert a memory card.....................................................................................17
Remove a memory card.................................................................................19
Navigate through and view your photos................................................................19
Select multiple photos...........................................................................................20
Choose a photo layout..........................................................................................20
Print your photos...................................................................................................21
5 Creative projects.................................................................................................23
Print panoramic photos.........................................................................................23
Print photo stickers................................................................................................24
Print passport photos............................................................................................25
Print CD/DVD labels..............................................................................................25
Print frames from a video clip................................................................................25
Improve the quality of your photos........................................................................26
Perfect photos automatically using Photo Fix................................................26
Improve the quality of your video clips...........................................................26
Crop a photo..........................................................................................................27
Add frames to your photos....................................................................................27
Apply color effects to your photos.........................................................................27
Add the date and time to your photos...................................................................28
Set print quality......................................................................................................28
E-mail or upload photos using HP Photosmart Share...........................................28
View a slide show..................................................................................................29
6 Print from other devices.....................................................................................31
Print photos from a digital camera.........................................................................31
Print photos from a Bluetooth device....................................................................32
Print photos from a computer................................................................................32
Print photos from an iPod......................................................................................33
7 Maintain and transport the printer.....................................................................35
Replace the print cartridge....................................................................................35
Clean and maintain the printer..............................................................................36
Clean the outside of the printer......................................................................36
Automatically clean the print cartridge...........................................................37
HP Photosmart A610 series User Guide 3
Page 74

Manually clean the print cartridge contacts....................................................37
Print a test page.............................................................................................38
Align the print cartridge..................................................................................38
Store the printer and print cartridge.......................................................................39
Store the printer..............................................................................................39
Store the print cartridge..................................................................................40
Maintain the quality of photo paper.......................................................................40
Transport the printer..............................................................................................40
8 Troubleshooting..................................................................................................43
Printer hardware problems....................................................................................43
Printing problems...................................................................................................46
Bluetooth printing problems...................................................................................49
Error messages.....................................................................................................50
9 Specifications......................................................................................................53
System requirements.............................................................................................53
Printer specifications.............................................................................................54
10 HP support...........................................................................................................57
Support process....................................................................................................57
HP support by phone.............................................................................................57
Phone support period.....................................................................................57
Placing a call..................................................................................................57
After the phone support period.......................................................................58
Additional warranty options...................................................................................58
HP Warranty..........................................................................................................59
A Install the software..............................................................................................61
BPrinter menus......................................................................................................63
Printer menu..........................................................................................................63
Index............................................................................................................................67
4 HP Photosmart A610 series
Page 75

1
Welcome
Thank you for purchasing an HP Photosmart A610 series printer! This printer makes
home photo printing simple, convenient, and fun, and it produces high-quality color prints
you will be pleased to share with family and friends. With your printer, you can:
Add a decorative frame
Apply Photo Fix techniques
See Add frames to your
See Perfect photos automatically using Photo Fix.
photos. Frames are only
available on the
HP Photosmart A612, A614,
A616, A617, and A618
models.
Print panoramas
Print passport photos
See Print passport photos.
Print CD/DVD labels
See Print CD/DVD labels
Print photo stickers
See Print photo stickers.
See Print panoramic photos.
Print different photo sizes
See Choose the right paper.
Print borderless photos
HP Photosmart A610 series User Guide 5
Page 76

Chapter 1
Find more information
The printer comes with the following documentation:
● Setup Guide: Read this guide first! It explains how to set up the printer and print
your first photo.
● User Guide: This is the book you are reading. This book describes the basic features
of the printer, explains how to use the printer without connecting it to a computer,
and contains hardware troubleshooting information. Appendix A contains
information on installing the printer software.
● Printer Help Menu: The Help menu on the printer lets you read helpful printing tips
and information about basic printer features right on the printer screen. For
information on viewing the Help menu, see Use the printer menus.
● Electronic Help: The electronic Help describes how to use the printer with a
computer and contains software troubleshooting information.
After you have installed the printer software on your computer, you can view the
electronic Help:
● Windows: From the Windows Start menu, click Programs or All Programs, point
to HP, HP Photosmart A610 series, and then click Photosmart Help.
● Mac: Choose Help, Mac Help in the Finder, and then choose Library, HP
Photosmart Printer Help.
Printer parts
This section gives an overview of the parts of your printer, and provides references to
sections where the parts and functions are described in more detail. Your model may
vary slightly from the model shown in the illustrations.
Front of printer
1 Control panel: Control the basic functions of the printer from here.
2 Printer screen: View photos and menus here. The printer screen pops up automatically when
you open the output tray. Tilt the screen up to adjust the viewing angle. Fold the screen flat
to store or transport the printer.
3 Printer handle: Make sure the printer screen is in the flat (closed) position, and then pull up
the printer handle from the back to carry the printer upright.
4 Output tray (closed): Open this to print, insert a memory card, connect a compatible digital
camera, connect an iPod, or open the print cartridge area. When you open the output tray,
the input tray opens automatically, and the screen pops up.
6 HP Photosmart A610 series
Page 77

Rear of printer
1 USB port: Use this port to connect the printer to a computer or to an HP direct-printing digital
camera using a USB cable.
2 Power cord connection: Connect the power cord here.
Input tray and inside front of printer
1 Input tray: Load paper here. The input tray opens automatically when you open the output
tray.
2 Input tray extension: Pull out to support paper.
3 Paper-width guide: Move to the width of the current paper to position the paper properly.
4 Camera port: Connect a digital camera, the optional HP Bluetooth wireless printer adapter,
or an iPod here.
5 Memory card slots: Insert memory cards into these slots. See Get photos from a memory
card.
6 Print cartridge door: Open to insert or remove a print cartridge. See Replace the print
cartridge.
7 Output tray (open): The printer deposits printed photos here.
HP Photosmart A610 series User Guide 7
Page 78

Chapter 1
Indicator lights
1 On light: This light, surrounding the Power button, is solid green when the printer is on. It is
green and flashing when the printer is busy, and it is red and flashing when the printer requires
attention.
2 Bluetooth light (HP Photosmart A618 models only): This light indicates wireless activity
between the printer and a Bluetooth-enabled device. If your printer does not have integrated
Bluetooth, you can purchase the optional Bluetooth wireless printer adapter. The adapter
plugs into the camera port on the front of the printer and has its own activity light. For more
information on Bluetooth wireless connectivity, see Print photos from a Bluetooth device.
3 Battery light: This light indicates the battery state: charging or fully charged. For more
information about the optional battery, refer to the instructions that came with the battery.
4 Attention light : This light flashes red when an error occurs or the printer needs attention.
5 Photo Fix light: This light is on when the Photo Fix feature is on and working.
6 Memory card light: This light turns solid green after a memory card is correctly inserted. It
flashes green when the memory card is being accessed. See Get photos from a memory
card.
Control panel
1 On: Press this button to turn the printer on or off.
2 Layout: Press this button to select a print layout. Use the 4-way arrow button to scroll through
layout selections. Press OK to select a layout.
3 Printer screen: View photos and menus here. The screen pops up automatically when you
open the output tray. Tilt the screen up to adjust the viewing angle. Fold the screen flat to
store or transport the printer using the handle.
8 HP Photosmart A610 series
Page 79

4 Zoom: Press the Zoom + or Zoom - buttons repeatedly to increase or decrease the zoom
level, to change to 9-up view, or from 9-up back to 1-up view.
5 Delete: Press this button to delete the displayed photo or all selected photos from a memory
card. For more information on selecting and deleting photos, see Select multiple photos.
6 Photo Fix: Press this button to toggle the Photo Fix feature off and on. Photo Fix
automatically improves your photos by adjusting the focus, lighting, brightening, and by
removing red-eye. This feature is on by default. See Perfect photos automatically using Photo
Fix.
7 Menu: Press this button to open the printer menu.
8 Print: Press this button to print highlighted or selected photos from a memory card. See Print
your photos.
9 Cancel: Press this button to deselect photos, exit a menu, or stop an action.
10 4–way arrow button: Use the arrows to scroll through photos on a memory card, navigate
menus, or scroll through layout selections. Press OK to select a photo, menu, menu option,
print layout.
Internal battery compartment
1 Internal battery compartment: Insert the optional HP Photosmart Internal Battery here.
2 Battery compartment button: Slide this button to release the compartment cover.
3 Battery compartment cover: Open this cover on the bottom of the printer to insert the
optional HP Photosmart Internal Battery.
4 Optional HP Photosmart Internal Battery: A fully-charged battery has sufficient charge to
print approximately 75 photos. You must purchase the battery separately.
Caution Always make sure to unplug the printer power cord before opening the
battery compartment cover. Do not touch the copper-colored contacts on the
battery or the contacts inside the battery compartment.
Optional accessories
There are several optional accessories available for the printer that enhance its portability
for printing anywhere, anytime. The appearance of the accessories may vary from what
is shown.
Optional HP Photosmart Internal Battery
HP Photosmart A610 series User Guide 9
Page 80

Chapter 1
The HP Photosmart Internal Battery lets you take the printer with you wherever you go.
HP Bluetooth® wireless printer adapter
The HP Bluetooth wireless printer adapter goes into the camera port on the front of the
printer and lets you use Bluetooth wireless technology for printing. To establish the
connection, follow the instructions that came with your HP Bluetooth wireless printer
adapter. This optional adapter is only used with the HP Photosmart A610, A612, A614,
A616, and A617 models.
HP Photosmart Carrying Case
The lightweight, durable HP Photosmart Carrying Case holds and protects everything
needed for hassle-free printing on the go.
Use the printer menus
The printer menu gives you many print options, allows you to change the printer defaults,
provides maintenance and troubleshooting tools, and provides how-to information for
common printing tasks. For descriptions of all the menus and their options, see Printer
menus.
To use the printer menus
Press Menu (1) on the printer control panel to open the printer menu.
➔
– Press Cancel (2) to exit the current menu.
– Use the 4–way arrow button (3) to navigate through the menu options displayed
on the printer screen. Menu items that are unavailable are grayed out.
– Press OK (4) to open a menu or select an option.
10 HP Photosmart A610 series
Page 81

Note For a list of all the printer menu options, see Printer menus.
HP Photosmart A610 series User Guide 11
Page 82

Chapter 1
12 HP Photosmart A610 series
Page 83

2
Photo printing overview
Start-to-finish printing
This sections gives you a high-level overview of the steps involved in printing your photos.
Subsequent sections describe each step in more detail.
Step 1
Choose and load paper
See Choose and load paper.
Step 2
Get photos
You can connect the printer to
various devices from which you
can print. See Get photos from
a memory card and Print from
other devices.
Step 3
Navigate through and view
your photos
See Navigate through and
view your photos.
Index page
Step 4
Select photos to print
See Select multiple photos.
HP Photosmart A610 series User Guide 13
Page 84

Chapter 2
(continued)
Step 5
Choose a photo layout
See Choose a photo layout.
Step 6
Print photos
See Print your photos.
14 HP Photosmart A610 series
Page 85

3
Paper basics
Choose and load paper
Learn how to choose the right paper for your print job and how to load it into the input
tray for printing.
Choose the right paper
Use HP Advanced Photo Paper. It is especially designed to work with the inks in your
printer to create beautiful photos. Other photo papers will produce inferior results.
For a list of available HP-designed photo paper, or to purchase supplies, go to:
● www.hpshopping.com (U.S.)
● www.hp.com/eur/hpoptions (Europe)
● www.hp.com/jp/supply_inkjet (Japan)
● www.hp.com/paper (Asia/Pacific)
The printer is set by default to print the best quality photos on HP Advanced Photo Paper.
If you print on a different type of paper, be sure to change the paper type from the printer
menu. See To change the paper type.
Load your paper
Some supported paper sizes:
● 10 x 15 cm (4 x 6 inch) photo paper
● 13 x 18 cm (5 x 7 inch) photo paper
● Index cards
● L-size cards
● Hagaki cards
HP Photosmart A610 series User Guide 15
Page 86

Chapter 3
For a full list of supported paper sizes, see Specifications.
To load paper
1. Open the output and input trays, and pull out the input tray extension.
2. Load up to 20 sheets of paper with the print side or glossy side facing the front of
the printer. When loading, slide the paper to the left side of the input tray and push
the paper down firmly until it stops.
Note If you are using panorama photo paper, only load up to 10 sheets. If
you are using photo sticker paper, only load a single sheet at a time.
3. Move the paper-width guide to the left to fit close to the edge of the paper without
bending the paper.
To change the paper type
1. Press Menu.
2. Press
3. Press
4. Press
to select Preferences, and then press OK.
to select Paper type, and then press OK.
to select one of the following paper types:
– HP Advanced Photo Paper (default)
– HP Premium Photo Paper
– Other Photo
– Other Plain
5. Press OK.
16 HP Photosmart A610 series
Page 87

4
Print from a memory card
This section describes the steps for printing photos that are stored on a memory card.
This section contains the following topics:
● Get photos from a memory card
● Navigate through and view your photos
● Select multiple photos
● Choose a photo layout
● Print your photos
Get photos from a memory card
After you have taken pictures with a digital camera, you can remove the memory card
from the camera and insert it into the printer to view and print your photos. The printer
can read the following types of memory cards: CompactFlash
Microdrive, MultiMediaCard
Caution Using any other type of memory card may damage the memory card
and the printer.
To learn about other ways of transferring photos from a digital camera to the printer,
see Print photos from a digital camera.
Insert a memory card
Find your memory card in the following table and use the instructions to insert the card
into the printer.
Guidelines:
● Insert only one memory card at a time.
● Gently push the memory card into the printer until it stops. The memory card does
not insert all the way into the printer; do not try to force it.
● When the memory card is inserted correctly, the memory card light flashes and then
remains solid green.
™
, Secure Digital™, and xD-Picture Card™.
™
, Memory Sticks,
Caution 1 Inserting the memory card any other way may damage the card and
the printer.
Caution 2 Do not pull out a memory card while the memory card light is flashing.
For more information, see Remove a memory card.
Memory card
CompactFlash ● Front label faces up, and if the label has an arrow, the arrow points
HP Photosmart A610 series User Guide 17
How to insert the memory card
toward the printer
● Edge with metal pinholes goes into the printer first
Page 88

Chapter 4
(continued)
Memory card How to insert the memory card
Microdrive ● Front label faces up, and if the label has an arrow, the arrow points
toward the printer
● Edge with metal pinholes goes into the printer first
MultiMediaCard ● Angled corner is on the right
● Metal contacts face down
Secure Digital ● Angled corner is on the right
● Metal contacts face down
● If you are using a miniSD card, attach the adapter that came with
the card before you insert the card into the printer
18 HP Photosmart A610 series
Page 89

(continued)
Memory card How to insert the memory card
Memory Stick ● Angled corner is on the left
● Metal contacts face down
● If you are using a Memory Stick Duo
™
Duo
card, attach the adapter that came with the card before you
™
insert the card into the printer
xD-Picture Card ● Curved side of the card points toward you
● Metal contacts face down
Remove a memory card
or Memory Stick PRO
Caution Do not pull out the memory card while the memory card light is flashing.
A flashing light means the printer or computer is accessing the memory card. Wait
until the light remains solid. Removing a memory card while it is being accessed
may corrupt information on the card or damage the printer and card.
To remove a memory card
When the memory card light on the printer is solid, it is safe to pull the card out of
➔
the slot.
Navigate through and view your photos
This section explains how to navigate through and view your photos on the printer screen.
As you navigate through the photos using the 4–way arrow button, each photo is framed
by a highlighted border.
To view photos one by one
1. Insert a memory card.
2. Press
photos rapidly. When you reach the last photo in either direction, the display returns
to the first or last photo and continues.
or to view the photos one by one. Press and hold the button to view the
HP Photosmart A610 series User Guide 19
Page 90

Chapter 4
To view photos nine at a time
1. Insert a memory card.
2.
Press
3. Press
4.
Press
to view nine photos at a time.
or to highlight one of the nine photos.
to change back to viewing one by one.
Select multiple photos
If you want to print more than one photo, or delete a group of photos all at once, you
need to select the photos. When you select a photo, a check mark appears in the lower
left corner of the photo on the screen.
To select several photos
1. Insert a memory card and view photos.
2. Press OK to select each photo you want to print.
To deselect photos
Highlight the photo you want to deselect, and then press Cancel. The check mark
➔
disappears from the lower left corner of the photo.
To select a continuous range of photos
1. Insert a memory card.
2. Press Menu.
3. Select Print Options, and then press OK.
4. Select Print Range, and then press OK.
5. Press
6. Press
or until the first photo you want to print appears, and then press OK.
or until the last photo you want to print appears, and then press OK.
To select more than one copy of a photo
1. Insert a memory card and view photos.
2. Press OK once for each copy of the current photo you want to print. Press Cancel
to decrease the number of copies by one.
Choose a photo layout
You can choose from several print layouts by pressing Layout after you insert a memory
card. By default the printer prints one photo per page.
To choose a photo layout
1. Insert a memory card.
2. Press Layout.
3. Use the 4–way arrow button to select a layout:
– Print one photo per sheet
– Print two photos per sheet
– Print four photos per sheet
20 HP Photosmart A610 series
Page 91

4. Press OK.
The printer may rotate your photos to fit the layout.
Note Borderless printing is the default. If you want a narrow white border around
a photo, you can turn the borderless setting off. To turn off borderless printing,
see Printer menu.
Print your photos
This section explains how to print digital photos that are stored on a memory card. You
can select photos while the memory card is in the camera (Digital Print Order Format, or
DPOF) or while the memory card is in the printer. Printing from a memory card requires
no computer and does not drain your digital camera's batteries. See Get photos from a
memory card.
Your photos are instantly dry, and can be handled immediately after they are printed.
However, HP recommends that you leave the printed surface of your photos exposed to
the air for 5-10 minutes, to allow the colors to fully develop before you stack them with
other photos or place them in albums.
To print a single photo
1. Navigate through the photos on the inserted memory card.
2. Display the photo you want to print.
3. Press Print.
After you press Print, the estimated time until print completion appears, and will
count down during printing.
To print a group of selected photos
1. Navigate through the photos on the inserted memory card.
2. Select the photos you want to print. See Select multiple photos.
3. Press Print.
After you press Print, the estimated time until print completion appears, and will
count down during printing.
To print a photo index
1. Press Menu.
2. Select Print Options, and then press OK.
3. Select Print Index Page, and then press OK.
A photo index shows thumbnail views and index numbers for up to 2000 photos on a
memory card. You can use the index numbers to print specific photos or a range of
photos. Use an index card instead of photo paper to cut costs when printing index pages.
To print camera-selected photos
1. Insert a memory card that contains camera-selected (DPOF) photos.
2. Select Yes when the printer asks you whether you want to print the camera-selected
photos, and then press OK.
HP Photosmart A610 series User Guide 21
Page 92

Chapter 4
22 HP Photosmart A610 series
Page 93

5
Creative projects
Once you have mastered basic photo printing, experiment with some of the other great
features the printer has to offer. This section contains the following topics:
● Print panoramic photos
● Print photo stickers
● Print passport photos
● Print CD/DVD labels
● Print frames from a video clip
● Improve the quality of your photos
● Crop a photo
● Add frames to your photos
● Apply color effects to your photos
● Add the date and time to your photos
● Set print quality
● E-mail or upload photos using HP Photosmart Share
● View a slide show
Print panoramic photos
Note 1 Panoramic mode is not supported when printing from a digital camera
connected to the camera port on the front of the printer with a USB cable.
Note 2 If you have installed the HP Photosmart Premier software on your
Windows 2000 or XP computer, you can create stitched panoramic photos.
HP Photosmart Premier is only available on some models. For more information
about the software options available with the printer, see Install the software.
To create panoramic photos
Stitch several photos together
Use image editing software, such as HP Photosmart Premier, to stitch
➔
overlapping photos together to form a 10 x 30 cm (4 x 12 inch) photo.
(Alternatively, some digital cameras can stitch several shots together into one
photo before saving the photo to a memory card.) Then save the photo to a
memory card and use the steps below to turn on panoramic mode, or print
directly from the computer. Panoramic mode prints the selected photo with a
3:1 aspect ratio. For more information about printing from the computer, see
the electronic Help.
Select any photo
HP Photosmart A610 series User Guide 23
Page 94

Chapter 5
Select one or more photos on a memory card and use the steps below to turn
➔
on panoramic mode. Panoramic mode prints the selected photos with a 3:1
aspect ratio.
To print panoramic photos
1. Insert a memory card.
2. Press Menu to open the printer menu.
3. Select Print options, and then press OK.
4. Select Panoramic photos, and then press OK.
5. Select On, and then press OK.
6. Load 10 x 30 cm (4 x 12 inch) paper.
7. Select one or more photos to print.
A crop box appears on the printer screen to show the portion of the displayed photo
to be printed (3:1 aspect ratio). The higher the original resolution of the displayed
photo, the better it will look when printed in panoramic mode.
8. Press Print.
9. When you have finished printing panoramic photos, turn off panoramic mode to
continue printing with a normal 3:2 aspect ratio. To turn off panoramic mode, repeat
steps 1 through 4, and then select Off and press OK.
Print photo stickers
To print 16–up photo stickers, use photo sticker media and the Photo stickers feature on
the printer. Follow these steps:
1. Insert a memory card and display the photo you want to print.
2. Press Menu to open the printer menu.
3. Select Print options, and then press OK.
4. Select Photo stickers, and then press OK.
5. Select On, and then press OK.
6. Load photo sticker media.
7. Select one or more photos.
8. Press Print.
Each printed sheet contains 16 copies of a single photo.
9. When you have finished printing stickers, turn off Photo stickers mode. To turn
off Photo stickers mode, repeat steps 1 through 4, select Off, and then press
OK.
Note You can also print 10 x 15 cm (4 x 6 inch) photo stickers using HP Self-
Adhesive Photo Paper. For this project, use the basic printing instructions as if
you were printing standard 10 x 15 cm (4 x 6 inch) photos.
24 HP Photosmart A610 series
Page 95

Print passport photos
To print passport photos
1. Insert a memory card.
2. Press Menu.
3. Select Print options, and then press OK.
4. Select Passport photo mode, and then press OK.
5. Select On, and then press OK.
6. Select a passport photo size, and then press OK.
7. Load photo paper.
8. Select one or more photos.
9. Press Print. Each printed sheet contains as many copies of a photo as will fit on the
page, depending on the passport photo size selected.
Print CD/DVD labels
To print CD/DVD labels
1. Insert a memory card.
2. Press Menu.
3. Select Print options, and then press OK.
4. Select Print CD Tattoo, and then press OK.
5. Select On, and then press OK.
6. Load CD/DVD label media.
7. Select a photo.
8. Press Print.
One photo prints on each sheet of CD/DVD label paper.
Print frames from a video clip
To print one selected frame from a video clip
1. Insert a memory card that contains a video clip.
2. Press
clip icon appears at the bottom of the printer screen.
3. Press OK to select the video clip. The video will load slowly, frame by frame, to allow
you to pick a frame to print.
4. When the frame you want to print appears, press OK, and then press Print.
To print nine frames from a video clip
1. Insert a memory card that contains a video clip.
2. Press Menu, select Print Options, and then select Video action prints. A preview
of all video clips on the memory card appears.
HP Photosmart A610 series User Guide 25
or to scroll to the video clip. The first frame in the clip appears. The video
Note 1 The image resolution in video clips is typically lower than that of digital
photos; therefore, you may notice that the print quality of your video clip frames
is lower than the print quality of your photos.
Note 2 This printer does not support all video file formats. For a list of supported
video file formats, see Printer specifications.
Page 96

Chapter 5
3. Use the 4–way arrow button to scroll to the video clip you want to print, and then
press OK to select it.
4. Press Print. The printout contains one page of nine frames automatically selected
from the video clip.
Note 1 The image resolution in video clips is typically lower than that of digital
photos; therefore, you may notice that the print quality of your video clip frames
is lower than the print quality of your photos.
Note 2 This printer does not support all video file formats. For a list of supported
video file formats, see Printer specifications.
Improve the quality of your photos
The printer provides a variety of preferences and effects that can improve the quality of
your printed photos. The settings do not change your original photo. They only affect
printing.
Perfect photos automatically using Photo Fix
Photo Fix automatically enhances your photos using the following HP Real Life
Technologies:
● Sharpen blurred photos.
● Improve dark areas of an image without affecting the light areas of an image.
● Reduce red-eye that can occur in photos taken with a flash.
● Improve the overall brightness, color, and contrast of photos.
Photo Fix is on by default when you turn on the printer. The Photo Fix light on the printer
control panel is on when Photo Fix is on.
HP recommends leaving Photo Fix on, but if your photos do not print correctly, or if you
want to print a photo without using the Photo Fix improvements, turn off Photo Fix.
To turn off Photo Fix
Press Photo Fix.
➔
A message on the printer screen tells you, Photo Fix has been turned Off. All
images will be printed without any changes.
Photo Fix remains off until you press the Photo Fix button again, or turn the printer off
and on again. If you have turned on Photo Fix, a message on the printer screen tells
you, Photo Fix has been turned On. All images will be printed with
improvements.
Improve the quality of your video clips
To improve the quality of your video clips
1. Press Menu.
2. Select Preferences, and then press OK.
3. Select Video Enhancement, and then press OK.
4. Use the 4–way arrow button to highlight On, and then press OK.
Note When you improve the quality of printed video clips using this preference,
print times may be slower than when this preference is turned off.
26 HP Photosmart A610 series
Page 97

Crop a photo
To print only a portion of a photo, you can crop out unwanted detail. Cropping does not
change your original photo. It only affects printing.
To crop a photo
1. Navigate to the photo you want to change, and then press OK to select it.
2.
Press
3.
Press
4. Use the 4–way arrow button to move the crop box.
5. Press OK when the portion of the photo you want to print is in the crop box.
6. Press Print to begin printing.
to zoom in on the current photo.
again to see the four white arrows.
Add frames to your photos
Choose from a palette of various patterns and colors to make the frame stand out. The
frame does not change your original photo. It only affects printing.
Note Frames are only available on the HP Photosmart A612, A614, A616, A617,
and A618 models.
To add a decorative frame
1. Navigate to the photo you want to change, and then press OK to select it.
2. Press Menu.
3. Select Edit, and then press OK.
4. Select Add Frame, and then press OK.
5. Use the 4–way arrow button to highlight the frame pattern you want to use, and then
press OK.
6. Use the 4–way arrow button to highlight the frame color you want to use, and then
press OK.
The photo appears on the printer screen with the frame.
Apply color effects to your photos
Set the printer to change the color effect of your prints to Black and White, Sepia,
Antique, or None (default).
To add a color effect
1. Navigate to the photo you want to change, and then press OK to select it.
2. Press Menu.
3. Select Edit, and then press OK.
4. Select Add Color Effect, and then press OK.
5. Use the 4–way arrow button to highlight the color effect you want to use, and then
press OK.
The photo appears on the printer screen with the selected color effect applied. The
effect does not change your original photo. It only affects printing.
HP Photosmart A610 series User Guide 27
Page 98

Chapter 5
Add the date and time to your photos
You can print a stamp on the front of your photos that shows when the photo was taken.
This preference affects all prints.
To add the date and time
1. Press Menu.
2. Select Preferences, and then press OK.
3. Select Date/time, and then press OK.
4. Use the 4–way arrow button to highlight a date/time stamp option:
– Date/time
– Date only
– Off
5. Press OK.
Set print quality
You can set the printer to print photos at a higher or lower level of quality. For the best
quality photos, choose Best. This mode produces the highest quality photos, but is also
a slightly slower print mode. If you want to print a photo quickly, and are not concerned
with obtaining the highest quality, choose a lower quality setting.
To change the print quality
1. Press Menu.
2. Select Tools, and then press OK.
3. Select Print Quality, and then press OK.
The current print quality setting has a check mark next to it.
4. Select a print quality, and then press OK.
E-mail or upload photos using HP Photosmart Share
Use HP Photosmart Share to share photos with friends and relatives using e-mail, online
albums, or an online photo finishing service. The printer must be connected through a
USB cable to a computer with Internet access and have all the HP software installed. If
you try to use HP Photosmart Share and do not have all the required software installed
or configured, a message prompts you through the required steps. See Install the
software.
To use HP Photosmart Share to send photos
1. Insert a memory card that contains the photos you want to share.
2. Follow the prompts on your computer to save the photos to the computer.
3. Use the HP Photosmart Share features of the HP Photosmart Premier or HP
Photosmart Studio software to share your photos with others.
For information about using HP Photosmart Share, see the electronic Help in
HP Photosmart Premier, HP Photosmart Essential, or HP Photosmart Studio.
28 HP Photosmart A610 series
Page 99

View a slide show
To view photos in a continuous slide show
1. Press Menu.
2. Select Tools, and then press OK.
3. Select Slide Show, and then press OK.
Press OK to pause or resume a slide show. Press Cancel to stop the slide show.
HP Photosmart A610 series User Guide 29
Page 100

Chapter 5
30 HP Photosmart A610 series
 Loading...