

Page 1
hp officejet
d series
networking tips
Page 2

© Copyright Hewlett-Packard Company
2001
All rights are reserved. No part of the
document may be photocopied,
reproduced, or translated to another
language without the prior written
consent of Hewlett-Packard Company.
Portions Copyright © 1989-2001
Palomar Software Inc. The HP OfficeJet
D Series includes printer driver
technology licensed from Palomar
Software, Inc. www.palomar.com
Copyright © 1999-2001 Apple
Computer, Inc.
Apple, the Apple logo, Mac, Mac
logo, Macintosh, and Mac OS are
trademarks of Apple Computer, Inc.,
registered in the U.S. and other
countries.
Publication number: C7296-90329
First edition: September 2001
Printed in U.S.A., Mexico, Germany,
Singapore, or China
®
Windows
ME
2000
of Microsoft Corporation.
Intel® and Pentium® are registered
trademarks of Intel Corporation.
, Windows NT®, Windows
®
, Windows XP®, and Windows
®
are U.S.-registered trademarks
notice
The information contained in this
document is subject to change without
notice and should not be construed as
a commitment by the Hewlett-Packard
Company.
Hewlett-Packard assumes no
responsibility for any errors
that may appear in this
document, nor does it make
expressed or implied warranty
of any kind with regard to this
material, including, but not
limited to, the implied
warranties of merchantability
and fitness for a particular
purpose.
The Hewlett-Packard Company shall
not be liable for incidental or
consequential damages in connection
with, or arising out of the furnishing,
performance, or use of this document
and the program material which it
describes.
Note: Regulatory information can be
found in the “Technical information”
section of the Support and
Specifications Booklet.
It is not lawful in many places to make
copies of the fol lowing items. When in
doubt, check with a legal
representative first.
• Governmental paper or
documents:
-Passports
- Immigration papers
- Selective service papers
- Identification badges, cards, or
insignias
• Governmental stamps:
- Postage stamps
- Food stamps
• Checks or drafts drawn on
Governmental agencies
• Paper currency, traveler’s checks,
or money orders
• Certificates of deposit
•Copyrighted works
safety information
Warning! To
prevent fire or shock
hazard, do not
expose this product
to ra in or any type of
moisture.
Always follow basic safety precautions
when using this product to reduce risk
of injury from fire or electric shock.
WARNING: potential shock
hazard
1 Read and understand all
instructions in the setup poster.
2 Use only a grounded electrical
outlet when connecting the unit to
a power source. If you do not
know whether the outlet is
grounded, check with a qualified
electrician.
3 Observe all warnings and
instructions marked on the
product.
4 Unplug this product from wall
outlets before cleaning.
5 Do not install or use this product
near water or when you are wet.
6 Install the product securely on a
stable surface.
7 Install the product in a protected
location where no one can step on
or trip over the line cord, and
where the line cord will not be
damaged.
8 If the product does not operate
normally, see the online
Troubl es hooting help.
9 No operator-serviceable parts
inside. Refer servicing to qualified
service personnel.
10 Use in a well-ventilated area.
Page 3

contents
1 setup . . . . . . . . . . . . . . . . . . . . . . . . . . . . . . . . . . . . . . . . . 1
set up your officejet for network use . . . . . . . . . . . . . . . . . . . . . . . . . . 1
connect your hp jetdirect to your computer . . . . . . . . . . . . . . . . . . . 1
install your hp officejet software on a windows computer . . . . . . . . . 2
select a networked computer from the front panel . . . . . . . . . . . . . . 3
set up for the hp jetdirect on windows and macintosh computers . . . . 3
print a configuration page . . . . . . . . . . . . . . . . . . . . . . . . . . . . . . 6
2 printer sharing . . . . . . . . . . . . . . . . . . . . . . . . . . . . . . . . . . 7
set up for simple sharing. . . . . . . . . . . . . . . . . . . . . . . . . . . . . . . . . . 7
set up for printer sharing on a network . . . . . . . . . . . . . . . . . . . . . . . . 8
understand printer sharing on networks . . . . . . . . . . . . . . . . . . . . . 8
set up the host . . . . . . . . . . . . . . . . . . . . . . . . . . . . . . . . . . . . . . 9
set up a point-and-print client . . . . . . . . . . . . . . . . . . . . . . . . . . . 10
set up a peer-to-peer client . . . . . . . . . . . . . . . . . . . . . . . . . . . . . 10
3 troubleshooting. . . . . . . . . . . . . . . . . . . . . . . . . . . . . . . . . 13
troubleshooting scenarios . . . . . . . . . . . . . . . . . . . . . . . . . . . . . . . . 14
dhcp overview. . . . . . . . . . . . . . . . . . . . . . . . . . . . . . . . . . . . . . . . 16
dynamic allocation of ip addresses . . . . . . . . . . . . . . . . . . . . . . . 16
effects of dynamic ip addresses and the hp officejet. . . . . . . . . . . . 17
assign a static ip address for windows computers. . . . . . . . . . . . . . . . 17
automatic assignment of a static IP . . . . . . . . . . . . . . . . . . . . . . . 17
other sources for help. . . . . . . . . . . . . . . . . . . . . . . . . . . . . . . . . . . 19
glossary of terms . . . . . . . . . . . . . . . . . . . . . . . . . . . . . . . . . . . . . . 19
contents
i
Page 4

hp officejet d series
ii
contents
Page 5
setup
The HP JetDirect 200m print server connector (HP JetDirect) comes as
standard equipment with the HP OfficeJet D Series d155xi (HP OfficeJet)
model and can be purchased as an accessory for all other models. See the
Support and Specifications booklet for accessory information. The
HP JetDirect allows all functions to be shared across the network: printing,
scanning, photo upload, faxing and copying.
There are two parts to setting up your HP OfficeJet for use on a network.
First, connect your HP OfficeJet to your computer with the print server
connector. Second, install the HP OfficeJet software.
If you previously set up your HP OfficeJet for local
use, you will need to uninstall the software before
proceeding.
set up your officejet for network use
Your HP OfficeJet can be connected to your network with your network
cable and a HP JetDirect 200m print server connector.
1
connect your
hp jetdirect to
your computer
set up your officejet for network use
1
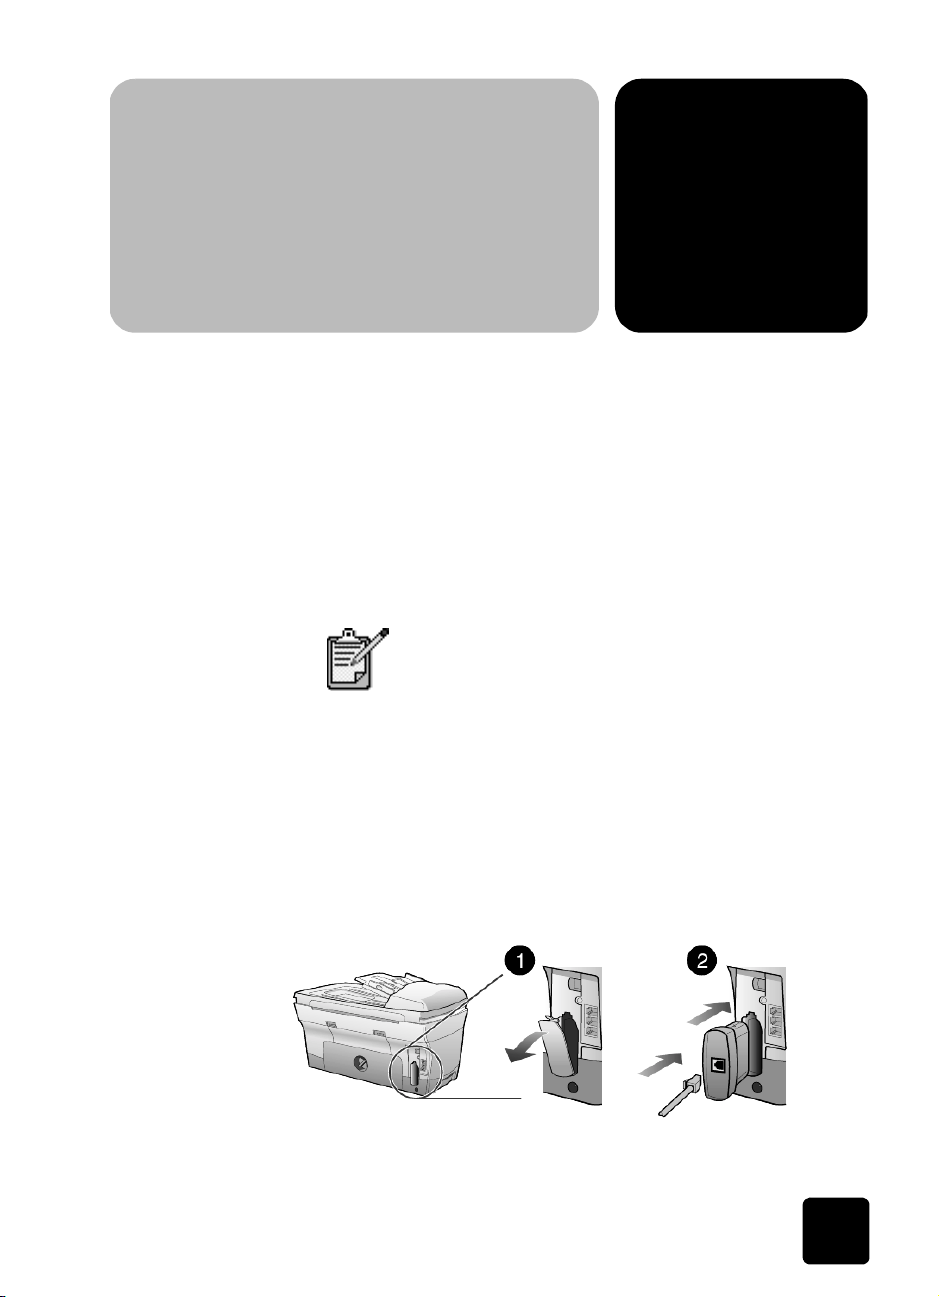
Remove the cover from the port on the back of your HP OfficeJet.
2
Attach your network cable to your HP JetDirect and plug the
HP JetDirect into the port on the back of your HP OfficeJet.
connect the hp jetdirect 200m print server connector to your computer
1
Page 6
hp officejet d series
install your
hp officejet
software on a
windows
computer
When the connector status light is lit in a solid green state it is on and
ready.
It may take a few moments for your HP OfficeJet
network settings to become active and available for
use.
3
Attach the HP JetDirect cable to your network hub, tap, or outlet.
Your HP JetDirect and network cable must be
attached to your HP OfficeJet before proceeding to
front panel setup. The Network Setup menu option
will be available only after the HP JetDirect is
attached.
Should you need to disconnect your HP JetDirect
from the HP OfficeJet, depress the buttons found on
the top and bottom of the connector and pull the
connector straight out. You may need to disconnect
the power cord to access the lower button on the
connector.
These instructions are for Windows computers only.
If you have an HP OfficeJet D 155xi refer to your Setup poster for
instructions on installing the HP OfficeJet software. For all other models for
network installation it is recommended you make the following selections
during the software installation:
• Search the network for devices and choose from a list of discovered
devices, then press Next.
• Select the HP OfficeJet from the device list, then press Next.
• Do network settings for me, then press Next.
• Follow the instructions on the remaining install screens.
2
setup
Page 7

hp officejet d series
select a networked computer from the front panel
set up for the
hp jetdirect on
windows and
macintosh
computers
The HP OfficeJet allows you to send information to any computer on the
network that has the HP OfficeJet software installed when using the Scan To
and Photo Card, Save to PC features. Use the following steps before turning
on the networked computers to ensure that they appear on the HP OfficeJet
front panel:
These steps must be followed before turning on the
networked computers.
1
Confirm that the HP OfficeJet is turned on.
2
Confirm that your HP OfficeJet is attached to the network.
3
Confirm that your HP OfficeJet and your computer can communicate
over the network.
If your HP OfficeJet is not turned on prior to
powering on your computer, you may not be abl e to
select your computer from the front panel.
It is recommended that steps 1, 2 & 3 be in place
when you shut down your computer.
These instructions Windows and Macintosh
computers. For Windows computers it is
recommended that you let the software installation
automatically make these settings for you. For
Macintosh computers, use the steps that follow to set
up a static IP address.
Caution! These instructions are for advances users, such as
Network Administrators only.
front panel ip address assignment using non-dhcp
For best performance, use non-DHCP as the setup method. Using DHCP can
reduce the performance of your HP OfficeJet and make it difficult for the
computers on your network to find the HP OfficeJet. This is because the IP
Address of the HP OfficeJet may change from day to day with the DHCP
configuration.
1
Press Menu, and then press 8.
This selects the Network Setup menu.
2
Wait until the JETDIRECT MENU appears and press Enter.
3
CFG NETWORK: 1=YES, 2=NO appears, press 1.
set up your officejet for network use
3
Page 8

hp officejet d series
If you press 2 for NO, a message indicating Settings Saved will
appear and the Network Setup menu will be exited.
IPX ON/OFF appears.
4
Press to select OFF and then press Enter.
IPX is not supported and should not be selected.
TCP/IP ON/OFF appears.
5
Press to select ON and then press Enter.
TCP/IP is the only supported protocol for Windows
computers and must be selected.
ATALK ON/OFF appears. This setting only applies to Macintosh
computers.
6
Press to select ON and then press Enter.
ON is the recommended setting for Macintosh computers.
CONFIG TCP/IP: 1=YES, 2= NO appears.
7
Do one of the following:
– press 1 if you wish to configure TCP/IP.
BOOTP ON/OFF appears. Go to step 8.
– press 2 for if you do not wish to configure TCP/IP. Go to step 15.
8
Press to select OFF for BOOTP, then press Enter.
Caution! It is recommended that you not use BOOTP.
DHCP ON/OFF appears.
9
Press to select OFF for DHCP then press Enter
Caution! It is recommended that you not use DHCP. The
dynamic assignment of IP addresses may result in other
computers on the network being unable to find the
HP OfficeJet. A static IP address assignment is preferred.
IP:0.0.0.0 or the current value appears. If this is not a valid IP address
for your network, go to step 10.
10
Enter your IP address using the numeric keypad and then press Enter.
SUBNET MASK: 255.0.0.0 or the current value appears. This may not
be a valid Subnet Mask for your network. If this is not a valid Subnet
Mask, go to step 11.
11
Enter your Subnet Mask value using the numeric keypad and then
press Enter.
DEFAULT GATEWAY appears.
4
setup
Page 9

hp officejet d series
12
Enter your Gateway value using the numeric keypad and then press
Enter.
SYSLOG appears.
13
Enter your SysLog Server value using the numeric keypad and then
press Enter.
TIMEOUT 270 appears
14
Press to delete the default the idle time-out period value. Use the
numeric keypad to enter a new value. Press Enter.
CFG LINK 1=YES, 2=NO appears
15
Press 1 to configure the 10/100 Link speed.
If you select 2 for NO, the Settings Saved message will appear and
the Network Setup Menu will be exited.
If you select 1 for YES, the following options will appear:
LINK:
AUTO
10T HALF
10T FULL
100TX HALF
100TX FULL
16
Press to select the setting which is appropriate for your network
and then press Enter.
Settings Saved will appear and the Network Setup menu will be
exited.
set up your officejet for network use
5
Page 10

hp officejet d series
print a configuration page
Your HP JetDirect prints a configuration page when you press the report
button on the HP JetDirect. The configuration page provides useful
information regarding the print server configuration, network statistics, and
other important network setting information.
to print a configuration page.
1
Press the report button on the HP JetDirect.
print report button on the hp jetdirect
6
setup
Page 11

printer sharing
set up for simple sharing
Your HP OfficeJet D Series (HP OfficeJet) can be shared by two different
computers by havi ng both computers connected directly to the HP Offic eJet.
Both co m p uters must have th e H P O f fi c eJet soft wa r e i nstall e d. Th e s up port e d
communication configurations are listed below. For more information on
parallel and USB communication refer to the Additional Setup section of the
HP OfficeJet D Series Onscreen User’s Guide.
Communication Configuration
hp jetdirect 200m print server
connector(HP JetDirect) and USB cable
parallel cable adapter and USB
(Windows only)
Caution! A single computer cannot be connected to a
specific HP OfficeJet with more than one communication type
simultaneously. For example you cannot be connected to the
HP OfficeJet with a USB and a Network cable from the same
computer.
2
set up for simple sharing
There can be up to 10 client computers on the
network portion of the HP JetDirect.
Simple Sharing is supported by connecting to the HP OfficeJet in one of the
following configurations: HP OfficeJet to two Windows computers or
HP OfficeJet to two Macintosh computers. You cannot mix platforms, i.e.
having the HP OfficeJet connected to a Windows computer and a
Macintosh.
7
Page 12

hp officejet d series
simple sharing with the hp jetdirect and usb
set up for printer sharing on a network
If your computer is on a net work, and another computer on the network has
an HP OfficeJet D Series (HP OfficeJet) connected to it via USB or Parallel,
you can use that unit as your printer using Windows sharing. The only
function you can perform from clients is printing, all other functions must be
done at the host.
USB cable
hp jetdirect
understand printer sharing on networks
8
printer sharing on a network
A point-and-print network refers to an environment where two or more
computers (Windows 98/2000 or ME) equally share a single resource such
as your HP OfficeJet, and the client computer automatically downloads the
required software from the host computer. If your network uses a
Windows 98 computer as the host and you have Windows 2000 or
Windows ME clients, you must use a peer-to-peer network configuration
instead. A peer-to-peer network is the same as a point-and-print network,
except that the software must be manually installed on each Windows 2000
client.
printer sharing
Page 13

hp officejet d series
Before you can set up printer sharing, a local area network (LAN) must
already exist, and each computer must meet the minimum system
requirements for connection to a LAN:
• Have a properly configured network card
• Be a client or host for Microsoft networks
• Have basic network services and protocols
• Have the proper network adapter
• Have LAN access
Setup the host first, then follow the steps in set up a point-and-print client on
page 10 or set up a peer-to-peer client on page 10.
set up the host If you are using Windows 2000, you must have administrative rights to your
computer to set up a Windows 2000 host for network printing. For more
information, see your Windows 2000 documentation or your system
administrator.
1
Install the HP OfficeJet software on the host, as described in the setup
poster.
2
If you are using Windows 98 as your host, perform the following steps
before continuing.
3
On the Windows desktop, right-click Network Neighborhood, and
then choose Properties.
4
On the Configuration tab, click File and Print Sharing.
5
Select the check boxes for the sharing options you want.
6
Click OK to store your changes, and then click OK again to exit the
File and Print Sharing dialog box.
7
Restart the computer.
8
On the Windows taskbar, click Start, point to Settings, and choose
Printers.
9
Right-click the HP OfficeJet icon, and choose Sharing.
10
The Properties dialog box appears, with the Sharing tab visible.
11
Click the Sharing option.
12
In the Share Name field, type a name for the HP OfficeJet if you do
not want to use the default name.
13
Note the share name. You will need it to set up client computers.
14
If you are setting up a Windows 2000 or ME host that supports
Windows 98 clients, complete the following steps before continuing.
15
Click Additional drivers, and then click Windows 98.
16
After the message instructing you to insert the floppy disk appears,
click OK, and insert the HP OfficeJet CD into your computer’s
CD-ROM drive.
set up for printer sharing on a network
9
Page 14

hp officejet d series
17
In the Printer Drivers for Windows 98 dialog box, click Browse, open
the drivers folder, open the Win98 folder, open the appropriate
language folder, and then double-click the hpop9804.inf file. This
allows the Windows 2000 host to load the correct driver to a
Windows 98 client.
18
Click OK to close the dialog box and store your changes.
set up a pointand-print client
Follow these steps to install the printing software on each client for following
configurations:
• Windows 98 host with only Windows 98 clients.
• Windows 98 host with only Windows ME clients.
• Windows 2000 host with Windows 98 and/or 2000 clients.
• Windows 2000 host with Windows ME, 98 and/or 2000 clients.
To setup a Windows 2000 client
Windows 98 host you must set up a peer to peer client configuration. For instructions on this set up see, set up a peer-to-peer client
1
Set up the host using the steps in set up the host on page 9.
2
On the Windows desktop, double-click Network Neighborhood.
3
Find the name of the host that the HP OfficeJet is directly connected to,
and double-click its icon.
The host window appears showing shared devices, including the
HP OfficeJet’s share name.
on page 10
set up a peer-topeer client
10
4
Double click the HP OfficeJet’s share name.
5
After the setup message Before you can use the printer... appears,
click Yes, and then wait several moments while the client computer
establishes a connection to the unit.
After connecting to the shared unit, the HP OfficeJet window appears.
If you are using a configuration that includes a Windows 98 host with a
Windows 2000, follow these steps to install the printing software on each
Windows 2000 client.
printer sharing
Page 15

hp officejet d series
1
Set up the host by following the steps outlined earlier in set up the host
on page 9.
2
On the client, in the first Add Printer Wizard dialog box, click Next,
and then choose Local Printer.
3
In the next dialog box, click Create a new port (Windows 2000).
4
In the Printer Ports dialog box, choose Local Port, and click New Port.
5
In the Port Name dialog box, type in the name of the host to which
your unit is connected and the share name assigned to the printer.
6
Click OK to store your changes, and then click Close on the Printer
Por ts dialog box.
7
Click Have Disk and insert the HP OfficeJet CD into your computer’s
CD drive.
8
If the software installation menu appears, click Quit.
9
Change the name of the drive letter to point to your CD drive, and
then click Browse.
10
In the Locate File dialog box, open the drivers folder, and then open
the Win2000 folder, and double-click the hpop2k04.inf file.
11
In the Install From Disk dialog box, click OK.
12
If another message appears, point to the same location on the
CD-ROM, and then click OK.
13
Select hp officejet d series, click Next, and then click Next again.
14
Select Not shared and then click Next.
15
Select Yes to print a test page, and then click Finish.
16
If your test page printed correctly, click Yes.
set up for printer sharing on a network
11
Page 16

hp officejet d series
12
printer sharing
Page 17

troubleshooting
This section contains troubleshooting tips for some of the most common
issues associated with networking and your HP OfficeJet D Series
(HP OfficeJet) unit.
It is strongly recommended that a static IP address
be used when installing your HP OfficeJet for
network use. DHCP allocation of IP addresses for the
HP OfficeJet can cause computers on the network to
be unable to locate the HP Officejet and can cause
inconsistent performance of the HP OfficeJet
program. For more information on DHCP see dhcp
overview on page 16.
For more information on troubleshooting, see other sources for help on
page 19.
3
13
Page 18

hp officejet d series
troubleshooting scenarios
Symptom Possible Cause/Resolutions
Nothing shows in the
status dialog box
Message appears on
the Director screen,
stating that your
computer cannot find
the HP OfficeJet
• Network may be down.
• The OfficeJet is not turned on. Ensure that the power is on.
• The OfficeJet was configured with DHCP addressing and
a new IP address was assigned. See assign a static ip
address for windows computers on page 17 for
information on resolving DHCP issues.
• Original IP address lease may have expired and a new IP
address has been assigned to the HP OfficeJet. See your
network administrator for a new IP address assignment.
• The network cable may not be properly connected to the
HP JetDirect. Ensure that the network cable is securely
connected to the HP JetDirect.
• The HP JetDirect may not be properly connected to the
HP OfficeJet. Ensure that the HP JetDirect is securely
attached to the port on your HP OfficeJet.
• The network cable may have become unplugged from the
wall or hub. Ensure that your network cable is securely
connected into your network jack.
• The OfficeJet is not powered on. Ensure that the OfficeJet
is turned on and that the power cord is plugged in
securely to the back of the unit and to your power source.
When you press the
Scan To button on the
HP OfficeJet, the
name of a computer
you wish to scan to
does not appear
14
Your HP OfficeJet may have been powered off when your
computer was turned on. Your HP OfficeJet should be
powered on, connected to the network and able to
communicate with the computer when the computer is
powered on.
• Restart the HP OfficeJet software on your computer by
right clicking the HP OfficeJet icon in the system tray and
selecting Close. Double click the HP OfficeJet icon on the
desktop to restart the software. When the HP OfficeJet
icon appears in the system tray, retry your task.
• If restarting is unsuccessful, then shut down your computer
and turn it off. Turn off your HP OfficeJet. Turn on your
HP OfficeJet and ensure that it is fully initialized and
communicating to the network before restarting your
computer. When the HP OfficeJet icon appears in the
system tray of your computer, retry your task.
troubleshooting
Page 19

Symptom Possible Cause/Resolutions
hp officejet d series
When you press the
Scan To button on the
HP OfficeJet, the
name of a computer
you wish to scan to
does not appear and
you see one of the
following on the front
panel:
• HP software on
computer needed
to setup Scan To.
Press Enter to
continue.
• Applications for
the computer
conn ected via USB
to your
HP OfficeJet.
Your HP OfficeJet may have been powered off when your
computer was turned on. Your HP OfficeJet should be
powered on, connected to the network and able to
communicate with the computer when the computer is
powered on.
• Restart the HP OfficeJet software on your computer by
right clicking the HP OfficeJet icon in the system tray and
selecting Close. Double click the HP OfficeJet icon on the
desktop to restart the software. When the HP OfficeJet
icon appears in the system tray, retry your task.
• If restarting is unsuccessful, then shut down your computer
and turn it off. Turn off your HP OfficeJet. Turn on your
HP OfficeJet and ensure that it is fully initialized and
communicating to the network before restarting your
computer. When the HP OfficeJet icon appears in the
system tray of your computer, retry your task.
troubleshooting scenarios
15
Page 20

hp officejet d series
Symptom Possible Cause/Resolutions
When initiating a
Scan To or Photo
Upload, the front
panel displays a
message indicating
“No connection.
Connect the
computer, turn on the
computer or install HP
Software. Press Enter
to continue.”
• The Network may be down.
• The OfficeJet was configured with DHCP addressing and
a new IP address was assigned. See assign a static ip
address for windows computers on page 17 for
information on resolving DHCP issues.
• Original IP address lease may have expired and a new IP
address has been assigned to the HP OfficeJet. See your
network administrator for a new IP address assignment.
• The network cable may not be properly connected to the
HP JetDirect. Ensure that the network cable is securely
connected to the HP JetDirect.
• The network cable may have become unplugged from the
wall or hub. Ensure that your network cable is securely
connected into your network jack.
Your HP OfficeJet may have been powered off when your
computer was turned on. Your HP OfficeJet should be
powered on, connected to the network and able to
communicate with the computer when the computer is
powered on.
• Restart the HP OfficeJet software on your computer by
right clicking the HP OfficeJet icon in the system tray and
selecting Close. Double click the HP OfficeJet icon on the
desktop to restart the software. When the HP OfficeJet
icon appears in the system tray, retry your task.
• If restarting is unsuccessful, then shut down your computer
and turn it off. Turn off your HP OfficeJet. Turn on your
HP OfficeJet and ensure that it is fully initialized and
communicating to the network before restarting your
computer. When the HP OfficeJet icon appears in the
system tray of your computer, retry your task.
dhcp overview
dynamic allocation of ip addresses
16
In dynamic address allocation, IP addresses are monitored with a computer
called a DHCP (dynamic host configuration protocol) server. This server
keeps the IP addresses in a pool and, when a user requests a connection to
the network, the DHCP server provides an IP address from the pool. This IP
address is a temporary assignment. As long as only a portion of the
network’s users are connected to the network at the same time, the DHCP
server can make its allocation of IP addresses serve a greater number of
users than it could otherwise. (This effect is limited by the tendency for users
troubleshooting
Page 21

hp officejet d series
to stay connected to the network all the time. Nonetheless, dynamic address
allocation allows the network to get greater use out of its IP address
allocation.)
effects of
dynamic ip
addresses and
the hp officejet
Dynamic IP addresses change. If you turn off your computers and
HP OfficeJet at the end of the day and turn them back again at the start of
the next day, the DHCP server may assign them different IP addresses.
However, the printer configurations in the computers are static – the
computers expect the HP OfficeJet to be at the same address that worked
previously. If the HP OfficeJet has a new IP address of 10.1.1.2 and the
computer still thinks the HP OfficeJet is at 10.1.1.3, the computer cannot
find the HP OfficeJet when it sends out a print job.
assign a static ip address for windows computers
automatic assignment of a static IP
The installation software for the HP JetDirect can automatically assign a
static IP address as long as the HP JetDirect does not obtain an dynamic
(DHCP) address.
to assign a static ip address.
1
Boot up the computers in the normal way, so that they acquire IP
addresses as usual from the DHCP server.
2
Turn off the DHCP server so that the HP JetDirect cannot get an IP
address via DHCP by disconnecting your cable/DSL modem or DHCP
from the network
3
Reset the HP JetDirect to set its factory default configuration (with no
DHCP address).
– Unplug the power cord to HP OfficeJet.
– Plug the power cord back in while holding in the HP JetDirect’s
report button.
The HP JetDirect will try to find a DHCP server; after about three
minutes of no DHCP response, the HP JetDirect will default to a static
IP address of 192.0.0.192.
4
Print a Configuration Page to confirm the IP address is set to the
default of 192.0.0.192.
– Press the report button on the HP JetDirect. For more information
see print a configuration page on page 6
Be sure to wait until IP address is 192.0.0.192
before proceeding. If it remains set to 0.0.0.0,
check the network cable connection to the JetDirect
and to the network is secure. If some other address
appears repeat steps 3 and 4 until the default
address appears.
5
Start the software installation using the OfficeJet D CD.
assign a static ip address for windows computers
17
Page 22

hp officejet d series
During the installation be sure to select the following options:
– Search the network for devices and choose from a list of
discovered devices, then press Next.
– Select the HP OfficeJet from the device list, then press Next
– Do network settings for me, then press Next.
Follow the instructions on the remaining install screens.
The software will pick an IP address in the private 169.254.x.x range
(not available on the open Internet) and permanently assign it to the
HP JetDirect. It will also set up a static route to that address in the
computer’s printer configuration.
6
Turn the DHCP server back on by turning on the DHCP server by
connecting your cable/DSL modem or DHCP to the network
Because the HP JetDirect now has a permanent static IP address, it will
no longer try to use DHCP server to get an address.
7
Install the HP OfficeJet software on the other computers on the network
who will be using the HP OfficeJet.
The installation software will discover the HP JetDirect at the
169.254.x.x address, and will add the static IP address in each
computer’s printer configuration.
18
troubleshooting
Page 23

other sources for help
help description
Troubleshooting help To access troubleshooting information, go to the Director,
click Help, then choose Troubleshooting. Troubleshooting is
also available via the Help button that appears on some error
messages.
Onscreen User’s
Guide
To access the Onscreen Users’s Guide go to the Director, click
Help, then choose User’s Guide.
hp officejet d series
Internet help and
technical support
HP JetDirect User’s
Guide
HP JetDirect
Troubleshooting
Networking Basics See your HP JetDirect CD.
If you have Internet access, you can get help from the
HP website at:
www.officejetsupport.com
The website also provides answers to frequently-asked
questions.
See your HP JetDirect CD.
See your HP JetDirect CD.
glossary of terms
term definition
ATALK ATALK is an acronym for AppleTalk which is a Local Area
Network architecture that is used by all Macintosh computers.
BOOTP Is a bootstrap protocol used to automatically download IP
address and other TCP/IP parameters from a network server.
DHCP Server DHCP is an acronym for dynamic host configuration protocol.
This is a server that dynamically manages a pool of IP
addresses for use on a network or the internet. When a user
logs into the network they are loaned an IP address for the
time they are attached to the network. When a user logs off,
the IP address is returned to the pool for use by another
device.
Gateway
other sources for help
A router or computer that connects two dissimilar networks.
When networks are divided into subnets, gateways are often
used to isolate one subnet from another to control network
traffic.
19
Page 24

hp officejet d series
IP Ad dress Ea ch co m puter tha t co nnect s to a net work or t he i nterne t, must
have a unique address. A connection to the internet provided
by an Internet Service Provider (ISP) uses a standard protocol
called Internet Protocol (IP), this protocol is also used on
internal networks. IP address numbers are in the form x.x.x.x
- for example, 169.254.100.2
LAN A Loca l Area Network (LAN) is a group of computers th a t are
connected via network cable, telephone lines and radio
waves in order to share resources such printers and data.
Peer-to-Peer Printing Each computer is set up to print directly to a printer. A
dedicated Server computer is not used to control print jobs to
the printer.
Protocol
Server
Subnet mask
TCP/IP TCP/IP is an acronym for Transmission Control Protocol/
A protocol is a predefined set of rules and conventions for
handling data.
A computer on a network that manages network resources. A
network may have a number of different server types. For
example a print server manages one or more printers, a file
server is a storage device dedicated to storing and
managing files, network server manages network traffic a
A subnet is a mechanism used to divide a TCP/IP network
into subnets. Subnetting allows more efficient use of a large
network. The subnet mask identifies a segment within a
network.
Internet Protocol. This is a communication protocol that
defines the way data is passed to network devices.
20
troubleshooting
Page 25

index
A
assign a static ip address on
windows computers 17
C
cannot find hp officejet 14
communication problem 14
configuration page 6
connect the JetDirect to the
computer 1
D
DHCP Overview 16
dynamic allocation of IP
addresses 16
E
effects of dynamic IP
addresses 17
G
glossary of terms 19
H
help 19
M
Macintosh computer ip address
assignment 3
Manual assignment of a static IP
address 19
N
non-dhcp set up for ip address 3
P
peer to peer client 10
Peer to Peer net working 8
point and print client 10
Point and Print Networking 8
printer sharing setup 8
S
select a networked printer 3
set up the host 9
setup 1
software installation 2
T
Troubleshooting scenarios 14
index
21
Page 26

hp officejet d series
22
index
Page 27

Page 28

Visit the hp officejet information center
It has everything you need to get the most value from your HP OfficeJet.
• Technical Support
• Supplies and Ordering Information
•Project Tips
• Ways to Enhance Your Product
www.officejetsupport.com
© 2001 Hewlett-Packard Company
Printed in the U.S.A., Mexico, Germany, Singapore, or China.
*C7296-90329*
*C7296-90329*
C7296-90329
 Loading...