

Page 1

Page 2

Page 3

HP Officejet 9100 series all-in-one
User’s Guide
Page 4

Copyright information
© 2004 Copyright Hewlett-Packard
Development Company, L.P.
Edition 1, 3/2004
Reproduction, adaptations, or translation
without prior written permission is
prohibited except as allowed under
copyright laws.
The information contained herein is subject
to change without notice.
The only warranties for HP products and
services are set forth in the express
warranty statements accompanying such
products and services. Nothing herein
should be construed as constituting an
additional warranty. HP shall not be liable
for technical or editorial errors or omissions
contained herein.
Copyright (C) 1991-2, RSA Data Security,
Inc. Created 1991. All rights reserved.
License to copy and use this software is
granted provided that it is identified as the
"RSA Data Secu ri ty, Inc. MD4
Message-Digest Algorithm" in all material
mentioning or referencing this software or
this functio n .
License is also granted to make and use
derivative works provided that such works
are identified as "derived from the RSA
Data Security, Inc. MD4 Message-Digest
Algorithm" in all material mentioning or
referencing the derived work.
RSA Data Security, Inc. makes no
representations concerning either the
merchantability of this software or the
suitability of this software for any particular
purpose. It is provided "as is" without
express or implied warranty of any kind.
These notices must be retained in any
copies of any part of this documentation
and/or software.
Copy limitations
It is not lawful in many places to make
copies of the following items. When in
doubt, check with a legal representative
first.
• Governmental paper or documents:
- Passports
- Immigration papers
- Selective service papers
- Identification badges, cards, or
insignias
• Governmental stamps:
- Postage stamps
- Food stamps
• Checks or drafts drawn on
governmental agencies
• Paper currency, traveler’s checks, or
money orders
• Certificates of deposit
• Copyrighted works
Product restricted material
This HP product contains the following
material that might require special handling
at end-of-life:
• mercury in the fluorescent lamp in the
scanner (< 1.5 mg)
For recycling information, contact
http://www.hp.com/go/recycle, local
authorities, or the Electronics Industries
Alliance at http://www.eiae.org.
See Environmental sustainability program
for information about the HP environmental
sustainability program.
Trademark credits
®
Adobe
, Adobe PostScript®3™, and
®
Acrobat
are trademarks of Adobe
Systems Incorporated.
E
NERGY STAR
®
logo
®
and the ENERGY STAR
are U.S. registered marks of the
United States Environmental Protection
Agency.
HP-UX Release 10.20 and later and
HP-UX Release 11.00 and later (in both
32- and 64-bit configurations) on all
HP 9000 computers are Open Group UNIX
95 branded products.
Microsoft
®
, MS-DOS®, Windows
Windows NT
®
are U.S. registered
®,
and
trademarks of Microsoft Corporation.
Netscape and Netscape Navigator are U.S.
trademarks of the Netscape
Communications Corporation.
PANTONE
®
is Pantone, Inc.'s
check-standard trademark for color.
®
Pentium
is a U.S. registered trademark of
Intel Corporation.
Secure Digital memory
card is supported by the
product. SD Logo is a
trademark.
TrueType™ is a U.S. trademark of Apple
Computer, Inc.
®
UNIX
is a registered trademark of the
Open Group
Safety information
Always follow basic safety precautions
when using this product to reduce risk of
injury from fire or electric shock.
1 Read and understand all of the
instructions in the documentation that
comes with the product.
2 Use only a grounded electrical outlet
when connecting this product to a
power source. If you do not know
whether the outlet is grounded, check
with a qualified electrician.
3 Observe all warnings and instructions
that are marked on the product.
4 Before cleaning this product, unplug
the product from the wall outlets.
5 Do not install or use this product near
water, or when you are wet.
6 Install the product securely on a
stable surface.
7 Install the product in a protected
location where no one can step on or
trip over the line cord, and the line
cord cannot be damaged.
8 See Maintaining and troubleshooting
if the product does not operate
normally.
9 There are no user-serviceable parts
inside. Contact qualified service
personnel if service is required.
Page 5

Contents
1 Getting starte d
Additional resources. . . . . . . . . . . . . . . . . . . . . . . . . . . . . . . . . . . . . . . . . . . . . . . . . . . . . . . 9
Learning about the features and configurations. . . . . . . . . . . . . . . . . . . . . . . . . . . . . . . . . 11
Features . . . . . . . . . . . . . . . . . . . . . . . . . . . . . . . . . . . . . . . . . . . . . . . . . . . . . . . . . . . 11
Configurations . . . . . . . . . . . . . . . . . . . . . . . . . . . . . . . . . . . . . . . . . . . . . . . . . . . . . . . 12
Understanding the all-in-one parts. . . . . . . . . . . . . . . . . . . . . . . . . . . . . . . . . . . . . . . . . . . 14
Front view . . . . . . . . . . . . . . . . . . . . . . . . . . . . . . . . . . . . . . . . . . . . . . . . . . . . . . . . . . 14
Control panel . . . . . . . . . . . . . . . . . . . . . . . . . . . . . . . . . . . . . . . . . . . . . . . . . . . . . . . . 15
Printing supplies area . . . . . . . . . . . . . . . . . . . . . . . . . . . . . . . . . . . . . . . . . . . . . . . . . 18
Back view . . . . . . . . . . . . . . . . . . . . . . . . . . . . . . . . . . . . . . . . . . . . . . . . . . . . . . . . . . 18
2 Installing accessories
Installing the auto-duplex unit . . . . . . . . . . . . . . . . . . . . . . . . . . . . . . . . . . . . . . . . . . . . . . 19
Installing the HP Jetdirect print server . . . . . . . . . . . . . . . . . . . . . . . . . . . . . . . . . . . . . . . . 20
HP Jetdirect print server capabilities . . . . . . . . . . . . . . . . . . . . . . . . . . . . . . . . . . . . . . 20
Installing the internal print server. . . . . . . . . . . . . . . . . . . . . . . . . . . . . . . . . . . . . . . . . 21
Obtaining more information . . . . . . . . . . . . . . . . . . . . . . . . . . . . . . . . . . . . . . . . . . . . . 22
Installing memory modules . . . . . . . . . . . . . . . . . . . . . . . . . . . . . . . . . . . . . . . . . . . . . . . . 23
Installing tray 2. . . . . . . . . . . . . . . . . . . . . . . . . . . . . . . . . . . . . . . . . . . . . . . . . . . . . . . . . . 26
Installing the keyboard . . . . . . . . . . . . . . . . . . . . . . . . . . . . . . . . . . . . . . . . . . . . . . . . . . . . 27
Turning on accessories in the printer driver. . . . . . . . . . . . . . . . . . . . . . . . . . . . . . . . . . . . 29
3 Using the all-in-one
Using the all-in-one modes . . . . . . . . . . . . . . . . . . . . . . . . . . . . . . . . . . . . . . . . . . . . . . . . 31
Changing settings for the all-in-one . . . . . . . . . . . . . . . . . . . . . . . . . . . . . . . . . . . . . . . . . . 33
Canceling jobs from the control panel . . . . . . . . . . . . . . . . . . . . . . . . . . . . . . . . . . . . . . . . 34
Using the HP photo and imaging software. . . . . . . . . . . . . . . . . . . . . . . . . . . . . . . . . . . . . 35
Differences in the software for the HP Officejet 9100 series all-in-one . . . . . . . . . . . . 35
Opening the HP photo and imaging software . . . . . . . . . . . . . . . . . . . . . . . . . . . . . . . 35
Typing numbers and text on the control-panel keypad . . . . . . . . . . . . . . . . . . . . . . . . . . . 36
Loading the originals . . . . . . . . . . . . . . . . . . . . . . . . . . . . . . . . . . . . . . . . . . . . . . . . . . . . . 37
Loading an original in the automatic document feeder (ADF) . . . . . . . . . . . . . . . . . . . 37
Loading an original on the scanner glass . . . . . . . . . . . . . . . . . . . . . . . . . . . . . . . . . . 38
Loading the print media . . . . . . . . . . . . . . . . . . . . . . . . . . . . . . . . . . . . . . . . . . . . . . . . . . . 39
Tips for loading the media . . . . . . . . . . . . . . . . . . . . . . . . . . . . . . . . . . . . . . . . . . . . . . 39
Loading the media in tray 1 or tray 2. . . . . . . . . . . . . . . . . . . . . . . . . . . . . . . . . . . . . . 39
Selecting the trays . . . . . . . . . . . . . . . . . . . . . . . . . . . . . . . . . . . . . . . . . . . . . . . . . . . . 41
Choosing the print media . . . . . . . . . . . . . . . . . . . . . . . . . . . . . . . . . . . . . . . . . . . . . . . . . . 42
Supported media sizes . . . . . . . . . . . . . . . . . . . . . . . . . . . . . . . . . . . . . . . . . . . . . . . . 42
Supported media types and weights . . . . . . . . . . . . . . . . . . . . . . . . . . . . . . . . . . . . . . 44
Recommended HP media . . . . . . . . . . . . . . . . . . . . . . . . . . . . . . . . . . . . . . . . . . . . . . 45
Minimum margins . . . . . . . . . . . . . . . . . . . . . . . . . . . . . . . . . . . . . . . . . . . . . . . . . . . . 46
Guidelines for storing media . . . . . . . . . . . . . . . . . . . . . . . . . . . . . . . . . . . . . . . . . . . . 47
Using special media. . . . . . . . . . . . . . . . . . . . . . . . . . . . . . . . . . . . . . . . . . . . . . . . . . . . . . 48
Using cards and envelopes . . . . . . . . . . . . . . . . . . . . . . . . . . . . . . . . . . . . . . . . . . . . 48
Using transparencies . . . . . . . . . . . . . . . . . . . . . . . . . . . . . . . . . . . . . . . . . . . . . . . . . 49
Using custom-size media . . . . . . . . . . . . . . . . . . . . . . . . . . . . . . . . . . . . . . . . . . . . . . 49
Using photo paper . . . . . . . . . . . . . . . . . . . . . . . . . . . . . . . . . . . . . . . . . . . . . . . . . . . . 50
Printing on both sides of the page . . . . . . . . . . . . . . . . . . . . . . . . . . . . . . . . . . . . . . . . . . . 51
Setting up speed-dial entries . . . . . . . . . . . . . . . . . . . . . . . . . . . . . . . . . . . . . . . . . . . . . . . 52
Setting up fax numbers as speed-dial entries or groups . . . . . . . . . . . . . . . . . . . . . . . 52
ENWW Contents 3
Page 6

Setting up e-mail addresses as speed-dial entries or groups . . . . . . . . . . . . . . . . . . . 53
Setting up network folders as speed-dial entries. . . . . . . . . . . . . . . . . . . . . . . . . . . . . 55
Printing and viewing a list of speed-dial entries. . . . . . . . . . . . . . . . . . . . . . . . . . . . . . 56
Printing a speed-dial template for the control panel . . . . . . . . . . . . . . . . . . . . . . . . . . 56
4Printing
Printing through the printer drivers. . . . . . . . . . . . . . . . . . . . . . . . . . . . . . . . . . . . . . . . . . . 57
Changing common settings for a job . . . . . . . . . . . . . . . . . . . . . . . . . . . . . . . . . . . . . . . . . 57
Setting defaults for all print jobs. . . . . . . . . . . . . . . . . . . . . . . . . . . . . . . . . . . . . . . . . . . . . 59
Performing duplexing . . . . . . . . . . . . . . . . . . . . . . . . . . . . . . . . . . . . . . . . . . . . . . . . . . . . . 61
Performing automatic duplexing . . . . . . . . . . . . . . . . . . . . . . . . . . . . . . . . . . . . . . . . . 61
Performing manual duplexing . . . . . . . . . . . . . . . . . . . . . . . . . . . . . . . . . . . . . . . . . . . 62
5 Copying
Making copies . . . . . . . . . . . . . . . . . . . . . . . . . . . . . . . . . . . . . . . . . . . . . . . . . . . . . . . . . . 63
Changing common settings for a job . . . . . . . . . . . . . . . . . . . . . . . . . . . . . . . . . . . . . . . . . 64
Setting defaults for all copy jobs . . . . . . . . . . . . . . . . . . . . . . . . . . . . . . . . . . . . . . . . . . . . 65
Restoring copy settings . . . . . . . . . . . . . . . . . . . . . . . . . . . . . . . . . . . . . . . . . . . . . . . . . . . 65
Using special copy features. . . . . . . . . . . . . . . . . . . . . . . . . . . . . . . . . . . . . . . . . . . . . . . . 66
Copying more than one original onto one page. . . . . . . . . . . . . . . . . . . . . . . . . . . . . . 66
Shifting the image to increase the margin for binding . . . . . . . . . . . . . . . . . . . . . . . . . 67
Making a poster. . . . . . . . . . . . . . . . . . . . . . . . . . . . . . . . . . . . . . . . . . . . . . . . . . . . . . 67
Cloning several copies of an image on a page . . . . . . . . . . . . . . . . . . . . . . . . . . . . . . 68
Creating a mirror image of an original . . . . . . . . . . . . . . . . . . . . . . . . . . . . . . . . . . . . . 69
Using presets . . . . . . . . . . . . . . . . . . . . . . . . . . . . . . . . . . . . . . . . . . . . . . . . . . . . . . . . . . . 70
6 Sending scans
Sending scans . . . . . . . . . . . . . . . . . . . . . . . . . . . . . . . . . . . . . . . . . . . . . . . . . . . . . . . . . . 71
Sending scans to a network folder (network connection) . . . . . . . . . . . . . . . . . . . . . . 71
Sending scans to a program on a computer (direct connection) . . . . . . . . . . . . . . . . . 72
Sending scans as e-mail attachments. . . . . . . . . . . . . . . . . . . . . . . . . . . . . . . . . . . . . 73
Sending a scan from a TWAIN-compliant or a WIA-compliant program to a computer on the
network . . . . . . . . . . . . . . . . . . . . . . . . . . . . . . . . . . . . . . . . . . . . . . . . . . . . . . . . . 74
Changing common settings for a job . . . . . . . . . . . . . . . . . . . . . . . . . . . . . . . . . . . . . . . . . 75
Setting defaults for all scan jobs . . . . . . . . . . . . . . . . . . . . . . . . . . . . . . . . . . . . . . . . . . . . 76
Using optical character recognition (OCR) software . . . . . . . . . . . . . . . . . . . . . . . . . . . . . 76
7 Using me mo ry car d s
Inserting and removing a memory card . . . . . . . . . . . . . . . . . . . . . . . . . . . . . . . . . . . . . . . 77
Saving photos . . . . . . . . . . . . . . . . . . . . . . . . . . . . . . . . . . . . . . . . . . . . . . . . . . . . . . . . . . 79
Saving photos to a network folder (network connection). . . . . . . . . . . . . . . . . . . . . . . 79
Saving photos to a computer (direct connection) . . . . . . . . . . . . . . . . . . . . . . . . . . . . 79
Viewing and editing image files . . . . . . . . . . . . . . . . . . . . . . . . . . . . . . . . . . . . . . . . . . . . . 80
Sending photos as e-mail attachments . . . . . . . . . . . . . . . . . . . . . . . . . . . . . . . . . . . . . . . 80
Printing from a memory card . . . . . . . . . . . . . . . . . . . . . . . . . . . . . . . . . . . . . . . . . . . . . . . 81
Printing a proof sheet . . . . . . . . . . . . . . . . . . . . . . . . . . . . . . . . . . . . . . . . . . . . . . . . . 81
Printing photos from the control panel. . . . . . . . . . . . . . . . . . . . . . . . . . . . . . . . . . . . . 82
Printing photos by using DPOF . . . . . . . . . . . . . . . . . . . . . . . . . . . . . . . . . . . . . . . . . . 82
Using a proof sheet . . . . . . . . . . . . . . . . . . . . . . . . . . . . . . . . . . . . . . . . . . . . . . . . . . . . . . 83
Filling out a proof sheet . . . . . . . . . . . . . . . . . . . . . . . . . . . . . . . . . . . . . . . . . . . . . . . . 83
Printing photos or sending photos as e-mail attachments. . . . . . . . . . . . . . . . . . . . . . 83
4 Contents ENWW
Page 7

8Faxing
Sending faxes . . . . . . . . . . . . . . . . . . . . . . . . . . . . . . . . . . . . . . . . . . . . . . . . . . . . . . . . . . 85
Sending a fax from the control panel. . . . . . . . . . . . . . . . . . . . . . . . . . . . . . . . . . . . . . 86
Sending a fax from the computer with the HP photo and
imaging software (direct connection) . . . . . . . . . . . . . . . . . . . . . . . . . . . . . . . . . . 87
Sending a fax from a third-party software program . . . . . . . . . . . . . . . . . . . . . . . . . . . 87
Inserting a dial prefix . . . . . . . . . . . . . . . . . . . . . . . . . . . . . . . . . . . . . . . . . . . . . . . . . . 87
Monitoring the dialing . . . . . . . . . . . . . . . . . . . . . . . . . . . . . . . . . . . . . . . . . . . . . . . . . 88
Scheduling a fax . . . . . . . . . . . . . . . . . . . . . . . . . . . . . . . . . . . . . . . . . . . . . . . . . . . . . 88
Changing common settings for a job . . . . . . . . . . . . . . . . . . . . . . . . . . . . . . . . . . . . . . . . . 89
Setting advanced options. . . . . . . . . . . . . . . . . . . . . . . . . . . . . . . . . . . . . . . . . . . . . . . . . . 90
Automatically forwarding incoming faxes to another fax number . . . . . . . . . . . . . . . . 90
Automatically archiving incoming faxes. . . . . . . . . . . . . . . . . . . . . . . . . . . . . . . . . . . . 91
Automatically reducing incoming faxes . . . . . . . . . . . . . . . . . . . . . . . . . . . . . . . . . . . . 92
Blocking and unblocking fax numbers . . . . . . . . . . . . . . . . . . . . . . . . . . . . . . . . . . . . . 92
Receiving faxes . . . . . . . . . . . . . . . . . . . . . . . . . . . . . . . . . . . . . . . . . . . . . . . . . . . . . . . . . 94
Receiving a fax automatically or manually . . . . . . . . . . . . . . . . . . . . . . . . . . . . . . . . . 94
Reprinting received faxes that are stored in memory . . . . . . . . . . . . . . . . . . . . . . . . . 94
Using reports . . . . . . . . . . . . . . . . . . . . . . . . . . . . . . . . . . . . . . . . . . . . . . . . . . . . . . . . . . . 95
Printing and viewing the fax log. . . . . . . . . . . . . . . . . . . . . . . . . . . . . . . . . . . . . . . . . . 95
Viewing a list of blocked fax numbers . . . . . . . . . . . . . . . . . . . . . . . . . . . . . . . . . . . . . 96
9 Managing the administrator functions
Administrator functions and tools. . . . . . . . . . . . . . . . . . . . . . . . . . . . . . . . . . . . . . . . . . . . 97
Overview of the administrator functions and tools. . . . . . . . . . . . . . . . . . . . . . . . . . . . 97
Embedded Web server (EWS) (network connection) . . . . . . . . . . . . . . . . . . . . . . . . 100
HP Web Jetadmin software. . . . . . . . . . . . . . . . . . . . . . . . . . . . . . . . . . . . . . . . . . . . 102
Toolbox (direct connection) . . . . . . . . . . . . . . . . . . . . . . . . . . . . . . . . . . . . . . . . . . . . 102
HP Instant Support . . . . . . . . . . . . . . . . . . . . . . . . . . . . . . . . . . . . . . . . . . . . . . . . . . 104
myPrintMileage . . . . . . . . . . . . . . . . . . . . . . . . . . . . . . . . . . . . . . . . . . . . . . . . . . . . . 106
Monitoring the all-in-one. . . . . . . . . . . . . . . . . . . . . . . . . . . . . . . . . . . . . . . . . . . . . . . . . . 107
Monitoring the operation and status . . . . . . . . . . . . . . . . . . . . . . . . . . . . . . . . . . . . . 107
Monitoring the media and supplies . . . . . . . . . . . . . . . . . . . . . . . . . . . . . . . . . . . . . . 109
Monitoring use by authorized users and resetting the usage counters . . . . . . . . . . . 110
Monitoring jobs . . . . . . . . . . . . . . . . . . . . . . . . . . . . . . . . . . . . . . . . . . . . . . . . . . . . . 110
Administering the all-in-one . . . . . . . . . . . . . . . . . . . . . . . . . . . . . . . . . . . . . . . . . . . . . . . 111
Changing the administrator PIN . . . . . . . . . . . . . . . . . . . . . . . . . . . . . . . . . . . . . . . . 111
Configuring authorized users. . . . . . . . . . . . . . . . . . . . . . . . . . . . . . . . . . . . . . . . . . . 111
Configuring job-accounting options . . . . . . . . . . . . . . . . . . . . . . . . . . . . . . . . . . . . . . 112
Managing security . . . . . . . . . . . . . . . . . . . . . . . . . . . . . . . . . . . . . . . . . . . . . . . . . . . 113
Setting up alerts and notifications . . . . . . . . . . . . . . . . . . . . . . . . . . . . . . . . . . . . . . . 113
Resetting the HP Jetdirect print server . . . . . . . . . . . . . . . . . . . . . . . . . . . . . . . . . . . 114
Upgrading the firmware in the all-in-one . . . . . . . . . . . . . . . . . . . . . . . . . . . . . . . . . . 114
Configuring system options . . . . . . . . . . . . . . . . . . . . . . . . . . . . . . . . . . . . . . . . . . . . . . . 115
Setting the language and country/region. . . . . . . . . . . . . . . . . . . . . . . . . . . . . . . . . . 115
Setting the PowerSave mode time . . . . . . . . . . . . . . . . . . . . . . . . . . . . . . . . . . . . . . 116
Setting the ring and beep volumes . . . . . . . . . . . . . . . . . . . . . . . . . . . . . . . . . . . . . . 116
Setting the automatic paper-type sensor. . . . . . . . . . . . . . . . . . . . . . . . . . . . . . . . . . 117
Configuring network options. . . . . . . . . . . . . . . . . . . . . . . . . . . . . . . . . . . . . . . . . . . . . . . 117
Configuring the I/O timeout . . . . . . . . . . . . . . . . . . . . . . . . . . . . . . . . . . . . . . . . . . . . 117
Configuring the network parameters . . . . . . . . . . . . . . . . . . . . . . . . . . . . . . . . . . . . . 117
Configuring print options . . . . . . . . . . . . . . . . . . . . . . . . . . . . . . . . . . . . . . . . . . . . . . . . . 119
Setting the print defaults . . . . . . . . . . . . . . . . . . . . . . . . . . . . . . . . . . . . . . . . . . . . . . 119
Configuring copy options . . . . . . . . . . . . . . . . . . . . . . . . . . . . . . . . . . . . . . . . . . . . . . . . . 120
Allowing and restricting color copying . . . . . . . . . . . . . . . . . . . . . . . . . . . . . . . . . . . . 120
ENWW Contents 5
Page 8

Configuring scan options . . . . . . . . . . . . . . . . . . . . . . . . . . . . . . . . . . . . . . . . . . . . . . . . . 120
Configuring the network settings for scanning. . . . . . . . . . . . . . . . . . . . . . . . . . . . . . 120
Customizing the scan feature in the HP photo and
imaging software (direct connection) . . . . . . . . . . . . . . . . . . . . . . . . . . . . . . . . . 121
Configuring photo (memory card) options . . . . . . . . . . . . . . . . . . . . . . . . . . . . . . . . . . . . 121
Allowing and restricting the photo (memory card) feature . . . . . . . . . . . . . . . . . . . . . 121
Configuring e-mail options (network connection). . . . . . . . . . . . . . . . . . . . . . . . . . . . . . . 122
Configuring the defaults for e-mail message format (network connection) . . . . . . . . 122
Configuring automatic blind copy (BCC) . . . . . . . . . . . . . . . . . . . . . . . . . . . . . . . . . . 123
Configuring SMTP . . . . . . . . . . . . . . . . . . . . . . . . . . . . . . . . . . . . . . . . . . . . . . . . . . . 123
Configuring LDAP . . . . . . . . . . . . . . . . . . . . . . . . . . . . . . . . . . . . . . . . . . . . . . . . . . . 123
Configuring fax options . . . . . . . . . . . . . . . . . . . . . . . . . . . . . . . . . . . . . . . . . . . . . . . . . . 124
Setting the automatic printing of fax reports . . . . . . . . . . . . . . . . . . . . . . . . . . . . . . . 124
Allowing and restricting color faxing . . . . . . . . . . . . . . . . . . . . . . . . . . . . . . . . . . . . . 124
Setting the fax error-correction mode . . . . . . . . . . . . . . . . . . . . . . . . . . . . . . . . . . . . 125
Setting silent detection on older-model fax machines . . . . . . . . . . . . . . . . . . . . . . . . 125
Setting the dial type . . . . . . . . . . . . . . . . . . . . . . . . . . . . . . . . . . . . . . . . . . . . . . . . . . 125
Setting the redial options. . . . . . . . . . . . . . . . . . . . . . . . . . . . . . . . . . . . . . . . . . . . . . 126
Setting up faxing for the all-in-one . . . . . . . . . . . . . . . . . . . . . . . . . . . . . . . . . . . . . . . . . . 126
Connecting the all-in-one to a phone line . . . . . . . . . . . . . . . . . . . . . . . . . . . . . . . . . 126
Connecting an additional telephone device. . . . . . . . . . . . . . . . . . . . . . . . . . . . . . . . 127
Configuring the time, date, and fax header . . . . . . . . . . . . . . . . . . . . . . . . . . . . . . . . 128
Setting the answer mode (autoanswer). . . . . . . . . . . . . . . . . . . . . . . . . . . . . . . . . . . 129
Setting the answering ring pattern (if needed). . . . . . . . . . . . . . . . . . . . . . . . . . . . . . 129
Installing the all-in-one software and configuring the all-in-one for operating environments130
Types of connections that are supported . . . . . . . . . . . . . . . . . . . . . . . . . . . . . . . . . 130
Setup that is required for all-in-one functionality . . . . . . . . . . . . . . . . . . . . . . . . . . . . 131
All-in-one software components . . . . . . . . . . . . . . . . . . . . . . . . . . . . . . . . . . . . . . . . 134
Installing the software for Windows computers . . . . . . . . . . . . . . . . . . . . . . . . . . . . . 137
Installing the software for Macintosh computers . . . . . . . . . . . . . . . . . . . . . . . . . . . . 141
Using the Customization Utility . . . . . . . . . . . . . . . . . . . . . . . . . . . . . . . . . . . . . . . . . 143
Uninstalling the all-in-one software . . . . . . . . . . . . . . . . . . . . . . . . . . . . . . . . . . . . . . . . . 143
Uninstalling the software for Windows computers. . . . . . . . . . . . . . . . . . . . . . . . . . . 143
Uninstalling the software for Macintosh computers (all versions) . . . . . . . . . . . . . . . 144
10 Maintaining and troubleshooting
Gaining access to the supplies area . . . . . . . . . . . . . . . . . . . . . . . . . . . . . . . . . . . . . . . . 146
Maintaining the printheads. . . . . . . . . . . . . . . . . . . . . . . . . . . . . . . . . . . . . . . . . . . . . . . . 146
Cleaning the printheads. . . . . . . . . . . . . . . . . . . . . . . . . . . . . . . . . . . . . . . . . . . . . . . 146
Cleaning the printhead contacts . . . . . . . . . . . . . . . . . . . . . . . . . . . . . . . . . . . . . . . . 147
Aligning the printheads . . . . . . . . . . . . . . . . . . . . . . . . . . . . . . . . . . . . . . . . . . . . . . . 148
Replacing the ink cartridges. . . . . . . . . . . . . . . . . . . . . . . . . . . . . . . . . . . . . . . . . . . . . . . 149
Replacing the printheads . . . . . . . . . . . . . . . . . . . . . . . . . . . . . . . . . . . . . . . . . . . . . . . . . 149
Calibrating the color . . . . . . . . . . . . . . . . . . . . . . . . . . . . . . . . . . . . . . . . . . . . . . . . . . . . . 150
Calibrating the linefeed . . . . . . . . . . . . . . . . . . . . . . . . . . . . . . . . . . . . . . . . . . . . . . . . . . 150
Cleaning the all-in-one. . . . . . . . . . . . . . . . . . . . . . . . . . . . . . . . . . . . . . . . . . . . . . . . . . . 151
Cleaning the scanner glass, ADF lid backing, and ADF window. . . . . . . . . . . . . . . . 151
Cleaning the exterior . . . . . . . . . . . . . . . . . . . . . . . . . . . . . . . . . . . . . . . . . . . . . . . . . 152
Troubleshooting tips and resources. . . . . . . . . . . . . . . . . . . . . . . . . . . . . . . . . . . . . . . . . 152
Solving all-in-one problems . . . . . . . . . . . . . . . . . . . . . . . . . . . . . . . . . . . . . . . . . . . . . . . 154
Solving copy problems. . . . . . . . . . . . . . . . . . . . . . . . . . . . . . . . . . . . . . . . . . . . . . . . . . . 156
Solving problems with sending scans . . . . . . . . . . . . . . . . . . . . . . . . . . . . . . . . . . . . . . . 159
Solving print problems . . . . . . . . . . . . . . . . . . . . . . . . . . . . . . . . . . . . . . . . . . . . . . . . . . . 161
Solving scan problems. . . . . . . . . . . . . . . . . . . . . . . . . . . . . . . . . . . . . . . . . . . . . . . . . . . 170
Solving fax problems . . . . . . . . . . . . . . . . . . . . . . . . . . . . . . . . . . . . . . . . . . . . . . . . . . . . 175
Solving photo (memory card) problems . . . . . . . . . . . . . . . . . . . . . . . . . . . . . . . . . . . . . . 179
Solving color problems. . . . . . . . . . . . . . . . . . . . . . . . . . . . . . . . . . . . . . . . . . . . . . . . . . . 180
Solving media-handling problems . . . . . . . . . . . . . . . . . . . . . . . . . . . . . . . . . . . . . . . . . . 183
6 Contents ENWW
Page 9

Clearing jams . . . . . . . . . . . . . . . . . . . . . . . . . . . . . . . . . . . . . . . . . . . . . . . . . . . . . . . . . . 18 5
Clearing jams in the all-in-one. . . . . . . . . . . . . . . . . . . . . . . . . . . . . . . . . . . . . . . . . . 185
Clearing jams in the ADF. . . . . . . . . . . . . . . . . . . . . . . . . . . . . . . . . . . . . . . . . . . . . . 187
Tips for avoiding jams . . . . . . . . . . . . . . . . . . . . . . . . . . . . . . . . . . . . . . . . . . . . . . . . 188
11 Ordering HP accessories and supplies
Accessories . . . . . . . . . . . . . . . . . . . . . . . . . . . . . . . . . . . . . . . . . . . . . . . . . . . . . . . . . . . 189
Trays . . . . . . . . . . . . . . . . . . . . . . . . . . . . . . . . . . . . . . . . . . . . . . . . . . . . . . . . . . . . . 189
Keyboards . . . . . . . . . . . . . . . . . . . . . . . . . . . . . . . . . . . . . . . . . . . . . . . . . . . . . . . . . 189
Dual inline memory modules (DIMMs). . . . . . . . . . . . . . . . . . . . . . . . . . . . . . . . . . . . 190
Parallel cables . . . . . . . . . . . . . . . . . . . . . . . . . . . . . . . . . . . . . . . . . . . . . . . . . . . . . . 190
USB cable . . . . . . . . . . . . . . . . . . . . . . . . . . . . . . . . . . . . . . . . . . . . . . . . . . . . . . . . . 190
Supplies . . . . . . . . . . . . . . . . . . . . . . . . . . . . . . . . . . . . . . . . . . . . . . . . . . . . . . . . . . . . . . 191
Ink cartridges . . . . . . . . . . . . . . . . . . . . . . . . . . . . . . . . . . . . . . . . . . . . . . . . . . . . . . 191
Printheads . . . . . . . . . . . . . . . . . . . . . . . . . . . . . . . . . . . . . . . . . . . . . . . . . . . . . . . . 191
HP media. . . . . . . . . . . . . . . . . . . . . . . . . . . . . . . . . . . . . . . . . . . . . . . . . . . . . . . . . . 191
12 Customer support and warranty
Contacting customer support. . . . . . . . . . . . . . . . . . . . . . . . . . . . . . . . . . . . . . . . . . . . . . 195
Hewlett-Packard limited warranty statement . . . . . . . . . . . . . . . . . . . . . . . . . . . . . . . . . . 197
13 Specifications and regulatory information
Specifications. . . . . . . . . . . . . . . . . . . . . . . . . . . . . . . . . . . . . . . . . . . . . . . . . . . . . . . . . . 199
Regulatory information. . . . . . . . . . . . . . . . . . . . . . . . . . . . . . . . . . . . . . . . . . . . . . . . . . . 219
Environmental sustainability program . . . . . . . . . . . . . . . . . . . . . . . . . . . . . . . . . . . . . . . 226
Reduction and elimination . . . . . . . . . . . . . . . . . . . . . . . . . . . . . . . . . . . . . . . . . . . . . 226
Power consumption . . . . . . . . . . . . . . . . . . . . . . . . . . . . . . . . . . . . . . . . . . . . . . . . . . 226
Hazardous materials . . . . . . . . . . . . . . . . . . . . . . . . . . . . . . . . . . . . . . . . . . . . . . . . . 227
Recycling. . . . . . . . . . . . . . . . . . . . . . . . . . . . . . . . . . . . . . . . . . . . . . . . . . . . . . . . . . 227
Material safety data sheets . . . . . . . . . . . . . . . . . . . . . . . . . . . . . . . . . . . . . . . . . . . . 227
End-of-life returns . . . . . . . . . . . . . . . . . . . . . . . . . . . . . . . . . . . . . . . . . . . . . . . . . . . 228
A Control-panel mode and setup menus
Mode menus . . . . . . . . . . . . . . . . . . . . . . . . . . . . . . . . . . . . . . . . . . . . . . . . . . . . . . . . . . 230
Reaching and using a mode menu . . . . . . . . . . . . . . . . . . . . . . . . . . . . . . . . . . . . . . 230
Copy mode menu . . . . . . . . . . . . . . . . . . . . . . . . . . . . . . . . . . . . . . . . . . . . . . . . . . . 231
Scan mode menu . . . . . . . . . . . . . . . . . . . . . . . . . . . . . . . . . . . . . . . . . . . . . . . . . . . 233
Photo mode menu . . . . . . . . . . . . . . . . . . . . . . . . . . . . . . . . . . . . . . . . . . . . . . . . . . . 234
E-mail mode menu . . . . . . . . . . . . . . . . . . . . . . . . . . . . . . . . . . . . . . . . . . . . . . . . . . 235
Fax mode menu. . . . . . . . . . . . . . . . . . . . . . . . . . . . . . . . . . . . . . . . . . . . . . . . . . . . . 236
Setup menus . . . . . . . . . . . . . . . . . . . . . . . . . . . . . . . . . . . . . . . . . . . . . . . . . . . . . . . . . . 238
Reaching and using a setup menu . . . . . . . . . . . . . . . . . . . . . . . . . . . . . . . . . . . . . . 238
Printing a setup menu map . . . . . . . . . . . . . . . . . . . . . . . . . . . . . . . . . . . . . . . . . . . . 238
PRINT REPORT menu . . . . . . . . . . . . . . . . . . . . . . . . . . . . . . . . . . . . . . . . . . . . . . . 239
COPY SETUP menu . . . . . . . . . . . . . . . . . . . . . . . . . . . . . . . . . . . . . . . . . . . . . . . . . 240
FAX SETUP menu. . . . . . . . . . . . . . . . . . . . . . . . . . . . . . . . . . . . . . . . . . . . . . . . . . . 241
ADV FAX SETUP menu . . . . . . . . . . . . . . . . . . . . . . . . . . . . . . . . . . . . . . . . . . . . . . 242
SCAN SETUP menu . . . . . . . . . . . . . . . . . . . . . . . . . . . . . . . . . . . . . . . . . . . . . . . . . 243
E-MAIL SETUP menu . . . . . . . . . . . . . . . . . . . . . . . . . . . . . . . . . . . . . . . . . . . . . . . . 243
PHOTO menu . . . . . . . . . . . . . . . . . . . . . . . . . . . . . . . . . . . . . . . . . . . . . . . . . . . . . . 243
PRINTER menu. . . . . . . . . . . . . . . . . . . . . . . . . . . . . . . . . . . . . . . . . . . . . . . . . . . . . 244
NETWORK & I/O menu . . . . . . . . . . . . . . . . . . . . . . . . . . . . . . . . . . . . . . . . . . . . . . . 245
ADMIN menu. . . . . . . . . . . . . . . . . . . . . . . . . . . . . . . . . . . . . . . . . . . . . . . . . . . . . . . 246
MAINTENANCE menu . . . . . . . . . . . . . . . . . . . . . . . . . . . . . . . . . . . . . . . . . . . . . . . 248
ENWW Contents 7
Page 10

B Control-panel messages
Control-panel message types . . . . . . . . . . . . . . . . . . . . . . . . . . . . . . . . . . . . . . . . . . . . . 249
Control-panel messages . . . . . . . . . . . . . . . . . . . . . . . . . . . . . . . . . . . . . . . . . . . . . . . . . 250
C Printing by using PostScript emulation
Installation notes . . . . . . . . . . . . . . . . . . . . . . . . . . . . . . . . . . . . . . . . . . . . . . . . . . . . . . . 255
Upgrading from an older version of Windows . . . . . . . . . . . . . . . . . . . . . . . . . . . . . . 255
Identifying different printer drivers in Windows NT 4.0 . . . . . . . . . . . . . . . . . . . . . . . 256
Installing the printer driver only . . . . . . . . . . . . . . . . . . . . . . . . . . . . . . . . . . . . . . . . . 256
Current HP Officejet users. . . . . . . . . . . . . . . . . . . . . . . . . . . . . . . . . . . . . . . . . . . . . 256
Specific printing features and issues . . . . . . . . . . . . . . . . . . . . . . . . . . . . . . . . . . . . . . . . 257
Printing properties . . . . . . . . . . . . . . . . . . . . . . . . . . . . . . . . . . . . . . . . . . . . . . . . . . . 257
Printing features . . . . . . . . . . . . . . . . . . . . . . . . . . . . . . . . . . . . . . . . . . . . . . . . . . . . 257
Index
8 Contents ENWW
Page 11

Getting started
1
The following topics explain how to use the all-in-one, and list the resources that are available
for additional information.
z Additional resources
z Learning about the features and confi gurati on s
z Understanding the all-in-on e parts
Additional resources
The following resources provide additional information about the all-in-one.
Resource Description Location
Getting started
guide
Product tour Provides a brief, animated introduction to the
Embedded Web
server (network
connection)
Toolbox
(Microsoft
Windows
connection)
Printer-driver
onscreen Help
(Windows)
®
®
direct
Provides instructions for setting up the
all-in-one, and information about the warranty
and safety issues.
all-in-one and its capabilities. You can take the
tour at any time.
A Web-based tool that can be used to view
status information, change settings, and
manage the all-in-one from any computer on the
network. It includes links to HP Instant Support
and myPrintMileage, which are additional
Web-based tools for troubleshooting all-in-one
problems and for managing all-in-one activities
and supplies more effectively.
See Embedded Web server (EWS) (network
connection), HPInstant Support, and
myPrintMileage for more information.
Provides status, maintenance, and
job-accounting information (such as all the jobs
submitted by each user and statistics about
those jobs) for the all-in-one. It also provides
steps for performing many of the tasks that are
described in this guide and for setting all-in-one
options.
See Toolbox (direct connection) f or mo re
information.
Provides information about using the printer
driver.
Included as a printed guide in the
box with the all-in-one.
Included on Starter CD 1. Insert
Starter CD 1 in your CD-ROM
drive and click the link for the
product tour.
Available through any standard
Web browser.
Open the browser, type the
Internet protocol (IP) address for
the all-in-one, and then press
Enter on the keyboard.
Available at the computer while
you are using the Toolbox.
On the Start menu at your
computer, point to Programs,
point to HP Officejet 9100
series, and then click
HP Officejet 9100 series
Toolbox.
Available at the computer while
you are using the printer driver.
ENWW Additional resources 9
Page 12

Resource Description Location
HP photo and
imaging software
onscreen Help
(direct connection)
HP Jetdirect
Administrator’s
Guide
HP Instant
Support
HP websites on
the World Wide
Web
Provides onscreen help for using the HPPhoto
& Imaging software (Windows) or HP Image
Zone software (Mac intosh) that is install ed when
an all-in-one is connected directl y to a
computer.
See Using the HP photo and imaging software
for more information.
Provides information for network connections
about configuring and trouble sh oot ing the
HP Jetdirect print server used with the
all-in-one.
A suite of Web-based troubleshooting tools to
help you quickly identify, diagnose, and resolve
computing and printing problems.
See HP Instant Support for more information.
Provide the latest printer software, product
information, and support information that are
available for the all-in-one.
Available at the computer while
you are using the HP photo and
imaging software.
Included on Starter CD 1 as a
PDF file (all languages) and CHM
(English only). Insert Start er CD 1
in your CD-ROM drive and click
the link for documentation.
Available through any standard
Web browser.
Open the browser, type the IP
address for the all-in-one, and
then press Enter on the keyboard.
When the embedded Web server
appears, click HP Instant
Support in the left pane.
http://www.hp.com/support/
officejet9100
http://www.hp.com
10 1 - Getting started ENWW
Page 13

Learning about the features and configurations
This section describes the features and configurations for the three models.
z Features
z Configurations
Features
The HP Officejet 9100 series all-in-one is a powerful business tool with the capabilities of a full
range of office equipment. You can use the all-in-one for black-and-white, grayscale, or color
printing, copying, scanning, and faxing, and for printing, e-mailing, and saving photos from a
digital camera memory card. With the appropriate network connections, you can scan a
document and then send it to one or more e-mail addresses or save it to a network folder, and
you can archive incoming faxes to a network folder.
The all-in-one includes the following specific features:
z Cost-effective printing with four high-capacity individual ink cartridges, long-life printheads,
and a robust print duty cycle of up to 10,000 pages per month.
z Auto-duplex unit for copying and printing on both sides or media.
z Automatic document feeder (ADF) and flatbed scanner for versatile scanning capabilities.
z High-quality scans with a 2,400 by 2,400-dots per inch (dpi), legal-sized optical scanner,
with a resolution of up to 4,800 dpi on HP Premium Photo papers.
z Several high-productivity features:
• Scan ahead for multitasking
A job can be scanned into memory while the all-in-one is busy with another job, for
immediate continuation when the current job has completed. For copy jobs, you can
scan ahead up to 30 pages.
• Scan-once-print-many
When copying multiple pages, the all-in-one scans each page into memory and prints
the multiple copies based on this single scan, instead of scanning each page for each
each copy.
z Full-featured 33.6 kilobyte-per-second (kbps) faxing with 4 megabytes (MB) available for
incoming faxes.
z Localized keyboard for ease-of-use in typing e-mail addresses and network folder
destinations from the control panel.
z Connectivity options that include wired or wireless workgroup connection through a
network, and direct connection to a computer by means of a USB or parallel cable.
z Expandable memory of up to 25 MB by means two dual inline memory module (DIMM)
slots, and expandable paper input capacity for handling up to 650 sheets of paper.
z Tools for configuring, monitoring, and troubleshooting the all-in-one, either from the device
or from any location on a network. Additional tools for managing printing cost with built-in
job-accounting features and the ability to control the use of color.
ENWW Learning about the features and configurations 11
Page 14
Configurations
The following sections include information about the features and accessories that come with
each configuration of the HP Officejet 9100 series all-in-one. Although some accessories are
associated with a specific configuration, you can order these accessories separately to modify
your all-in-one. See Ordering HP accessories and supplies for information about ordering
accessories.
HP Officejet 9110 all-in-one
z Trays. The all-in-one comes with an input tray (tray 1) that holds up to 150 sheets of
paper or up to 30 transparencies, and an output tray that holds up to 100 sheets of paper.
z Connectivity. The all-in-one provides a standard bidirectional parallel port (IEEE-1284
compliant) and a USB port. The all-in-one also contains an enhanced input/output (EIO)
slot to support a network card.
z Memory. The all-in-one contains 128 MB of memory. To allow for memory expansion, the
all-in-one provides two DIMM slots that accept 64 MB or 128 MB of random-access
memory (RAM). The all-in-one can support a total of 384 MB of memory (including the
128 MB in the all-in-one).
z Automatic document feeder (ADF) and flatbed scanner. The ADF can hold up to
50 sheets of paper, and the flatbed scanner can be used for originals that cannot be fed
through the ADF.
z Auto-duplex unit. The all-in-one comes with an auto-duplex unit for printing two-sided
documents, which saves money and paper.
HP Officejet 9120 all-in-one
This model includes the features of the HP Officejet 9110 all-in-one, plus an HP Jetdirect print
server that gives you the ability to share the all-in-one in a network environment and scan from
the all-in-one to e-mail addresses and to destinations anywhere on the network (this capability
is often called “digital sending”). The all-in-one also comes with tray 2, which holds up to
250 sheets of paper.
12 1 - Getting started ENWW
Page 15

HP Officejet 9130 all-in-one
This model includes the features of the HP Officejet 9120 all-in-one, and also includes a
keyboard for easier typing of network folder destinations and e-mail addresses from the
control panel.
ENWW Learning about the features and configurations 13
Page 16
Understanding the all-in-one parts
This section contains information about the following topics.
z Front view
z Control panel
z Printing supplies area
z Back view
Front view
1
13
12
1 Automatic document feeder (ADF)
2 ADF width adju ste rs
3 ADF input tray
4 ADF output tray
11
2
3
4
5
6
With tray 2 and the
7
8
9
keyboard installed, and
showing the flatbed
scanner glass
10
5 Control panel (see Control panel for details)
6 Keyboard tray
7 Print-carriage access-door handle
8 Output tray
9 Paper-level indicator
10 Tray 1
11 Print-carriage access door
12 Memory card slots for supported memory cards
13 DIMM access side cover
14 1 - Getting started ENWW
Page 17
Control panel
Left side of the control panel
1
2
4
3
1 Speed-dial buttons
Use to select from a preconfigured list of speed-dial entries. The six buttons correspond to
the first six entries in the list. An entry might be a fax number or a group of fax numbers,
an e-mail address or group of e-mail addresses, or a folder on the network.
2 Option buttons
Use the R
buttons to change the settings for jobs. The M
EDUCE/ENLARGE, LIGHTER/DARKER, 2-SIDED OPTIONS, QUALITY, and TRAY/TYPE
ENU button displays the control-panel menus
that can be used to set the defaults for settings. See Control-panel mode and setup
menus for more information.
3 C
ONTACTS button
Provides quick access to preconfigured lists of fax numbers and e-mail addresses. See
Setting up speed-dial entries for more information.
4 List of speed-dial entries
Use these areas to identify the speed-dial entries that correspond to the six speed-dial
buttons. You can write the entries on the lined paper that is provided, or print lists to insert.
See Printing a speed-dial template for the control panel for more information.
ENWW Understanding the all-in-one parts 15
Page 18
Center of the control panel
1
8
2
3
4567
1 Mode buttons
Use the C
OPY, SCAN, PHOTO, E-MAIL, and FAX mode buttons to begin these types of jobs.
The mode button lights when a job in that mode is being actively processed. If you press a
mode button, the light blinks if a job in that mode is being processed in the background
2 (help) button
Provides additional information about messages or menus that appear on the
control-panel display. For hardware problems, displays a message that explains the
problem.
3 Attention light
Blinks when there is a hardware problem that requires attention. Press (help) to display
a message about the problem.
4 - and + buttons
• Cycle through the values that are available for an option.
• In text input fields, move the text cursor left and right.
5 (select) button
Selects or saves the setting that appears on the control-panel display.
6 (up) and (down) buttons
Move up and down a list of options or entries.
7 (back) button
Returns to the previous level.
8 Control-panel display
Shows status and error messages, mode and setup menus and their options, help
information, and ink cartridge levels. See Contr ol -pan el mes sa ges and Control-panel
mode and setup menus for more information.
16 1 - Getting started ENWW
Page 19
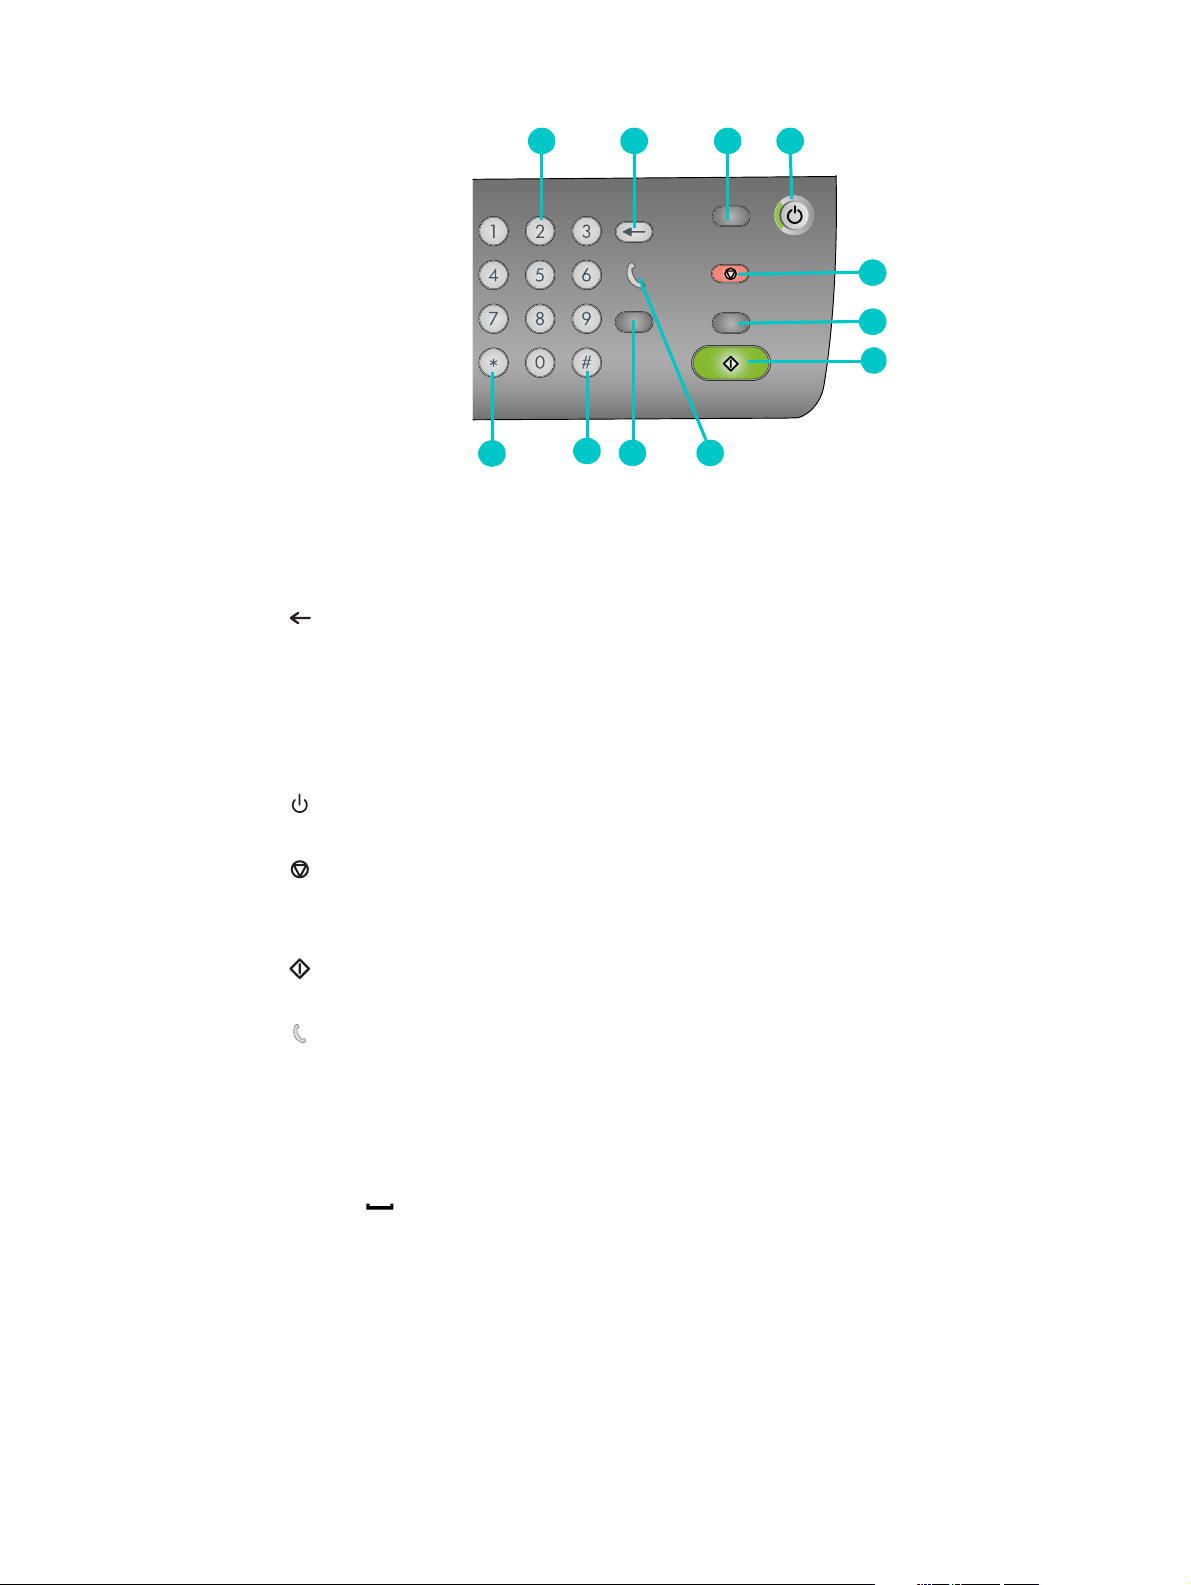
Right side of the control panel
1 2 3 4
5
6
7
11
10
89
1 Keypad
Use to dial fax numbers or type text. The text that you type is inserted (it does not
overwrite characters that are to the right of the cursor). See Typing numbers and text on
the control-panel keypad for more information.
2 (backspace) button
3 R
ESET/HOLD FOR PIN button
Returns the all-in-one to the READY state; this resets all modes to their default values.
If the administrator has configured the all-in-one for users, holding the button down for
2 seconds or more locks the all-in-one. A personal identification number (PIN) is then
required to resume operation.
4 P
OWER button and Ready light
The Ready light is green when the all-in-one is on.
5 S
6 B
TOP button
LACK/COLOR button
Switches between black-and-white and color.
7 S
TART button
Starts a job in a mode after you have configured settings.
8 (off-hook) light
Lights when the fax line is in use, and blinks when the fax line is ringing.
9 R
EDIAL/ANSWER button
• Redials the most recently dialed fax number when the all-in-one is in the READY state.
• Answers the phone manually for an incoming fax.
10 P
AUSE / (space) button
11 S
YMBOLS button
ENWW Understanding the all-in-one parts 17
Page 20

Printing supplies area
1
1
2
3
4
5
6
1 Print-carriage access door
2 Print-carriage access-door handle
3 Printhead latch (provides access for installing or removing printheads)
4 Metal catch bar (catches on the hook of the printhead latch and engages the latch)
5 Printheads
6 Ink cartridges
7 Scanner lock
Note The scanner lock must be unlocked in order for the scanner to operate. Make sure to lock it
whenever you transport the all-in-one and unlock it before you use it.
7
Back view
1 Fax (phone) and (line-in) ports
2 EIO slot for an HP Jetdirect print server
3 Parall el por t
4 USB port
5 Power input
6 Auto-duplex unit
1
2
3
4
5
6
18 1 - Getting started ENWW
Page 21
Installing accessories
2
This section contains information about the following topics.
z Installing the auto-duplex unit
z Installing the HP Jet dir ect pri nt server
z Installing memory module s
z Installing tray 2
z Installing the keyboard
z Turning on accessories in the printer driver
See Ordering HP accessories and supplies for information about ordering accessories.
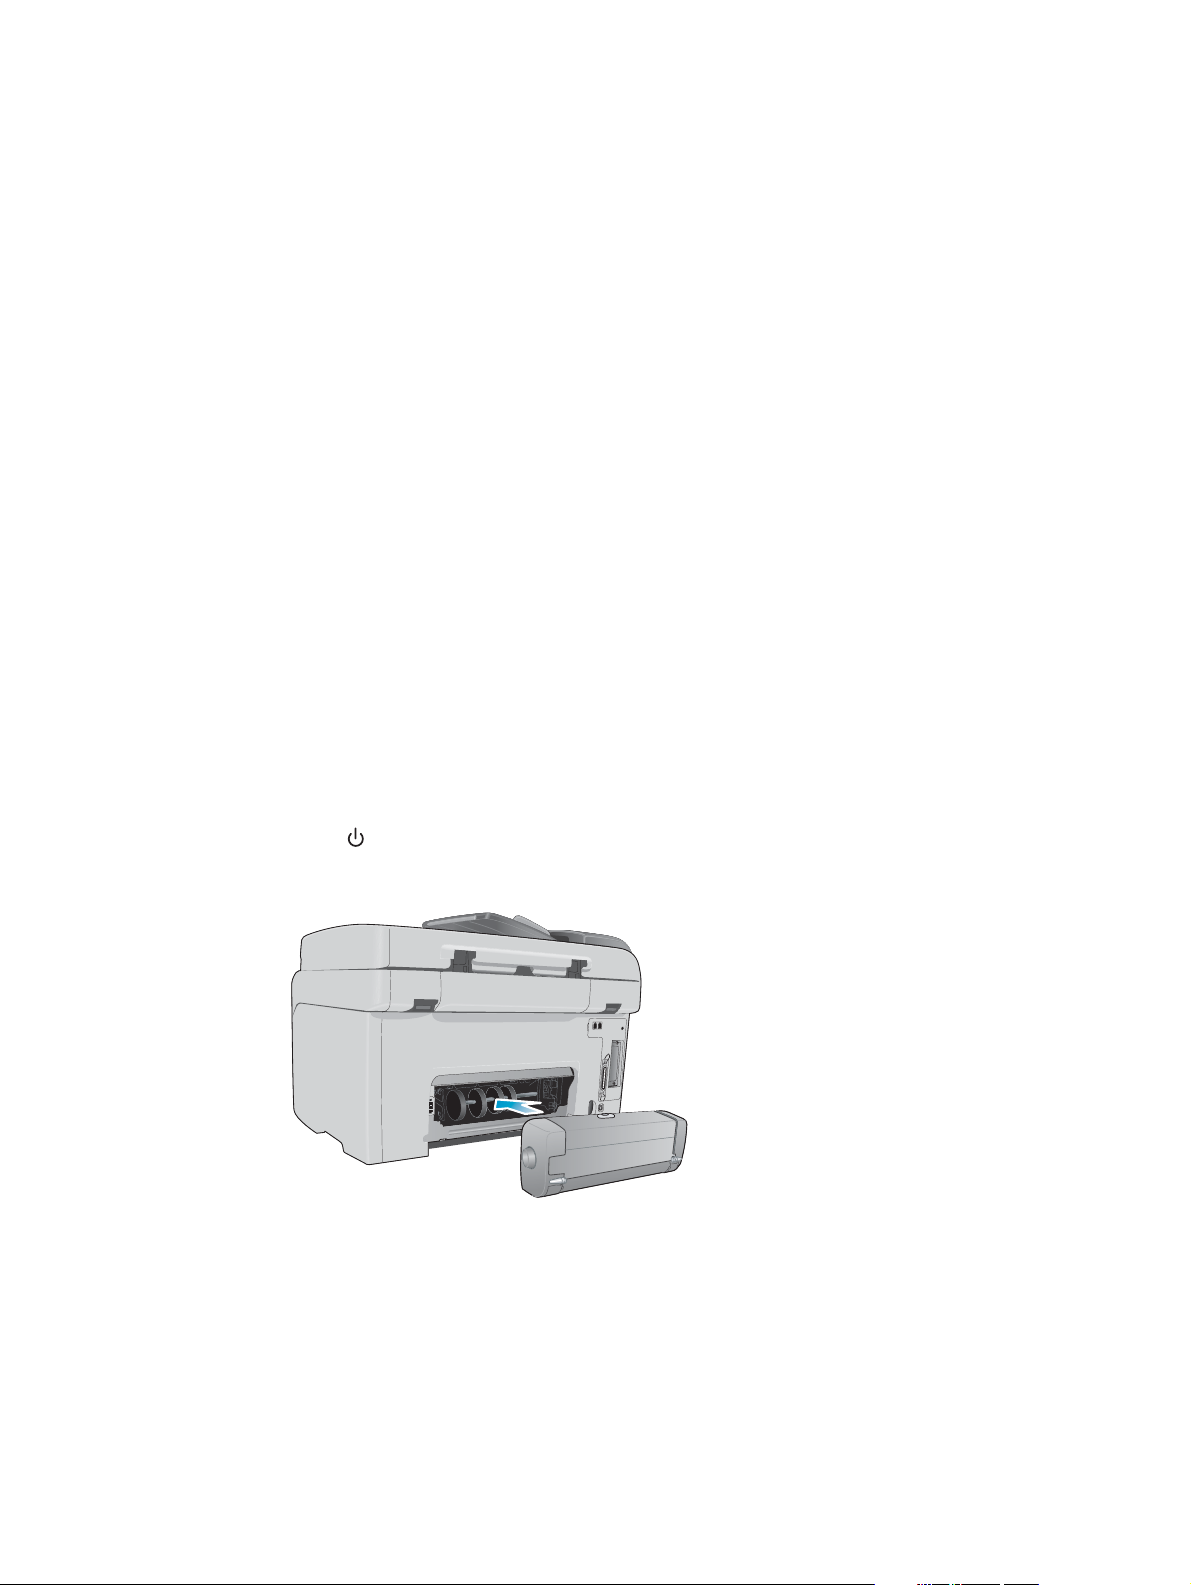
Installing the auto-duplex unit
The all-in-one can automatically print on both sides of the paper with the auto-duplex unit. See
Printing on both sides of the page and Performing duplexing for information about using the
auto-duplex unit after it has been installed.
To install an auto-duplex unit
1 Press (POWER) to turn off the all-in-one.
2 Slide the auto-duplex unit into the all-in-one until the unit locks into place.
ENWW Installing the auto-duplex unit 19
Page 22

Installing the HP Jetdirect print server
The all-in-one can be shared in a network environment when an HP Jetdirect print server has
been installed. The HP Jetdirect print server can be used in both client-server and
peer-to-peer printing configurations. Some all-in-one models come with an HP Jetdirect print
server already installed.
This section contains information about the following topics.
z HP Jetdirect print server capabilities
z Installing the internal print ser ver
z Obtaining more information
HP Jetdirect print server capabilities
The HP Officejet 9120 all-in-one and the HP Officejet 9130 all-in-one come with an
HP Jetdirect 620n print server installed. If you purchased an HP Officejet 9110 all-in-one and
want to connect the all-in-one to a network, you must use a supported HP Jetdirect print
server. Your choice of print server depends on the functions that you want to perform, the type
of network connection that you have, and the number of devices that you want to connect to
the print server.
The following table shows the capabilities of the print servers that are supported for the
all-in-one. See HP Jetdirect print servers for information about ordering HP Jetdirect print
servers.
Print server
Print Scan E-mail Photo Fax EWS**
Functionality*
Internal (EIO) print servers
z HPJetdirect 620n (recommended)
(Fast Ethernet 10/100Base-TX)
z HPJetdirect 615n
(Fast Ethernet, 10/100Base-TX)
z HPJetdirect 680n
(802.11b Wireless Ethernet)
External (EX) print servers***
* All internal and external print servers support copy functionality.
** Indicates the abi lity t o gain a ccess t o the Em bedded web serve r. See Emb edded Web se rver (EWS) (networ k conn ectio n)
for a description of this Web-based tool.
*** External print servers support copy and print functionality only. The HP Officejet 9100 series all-in-one supports the
following external print servers:
z HPJetdirect 380x (802.11b Wireless Ethernet, USB 1.1)
z HPJetdirect 170x (10Base-T, 1 port—parallel)
z HP Jetdirect 175x (10/100Base-TX, 1 port—USB 1.1)
z HPJetdirect 300x (10/100Base-TX, 1 port—parallel)
z HPJetdirect 500x (10/100Base-TX, 10Base2, 3ports—
parallel)
z HPJetdirect en3700 (Ethernet 10/100Base-TX,
1 port—USB 2.0)
20 2 - Installing accessories ENWW
Page 23

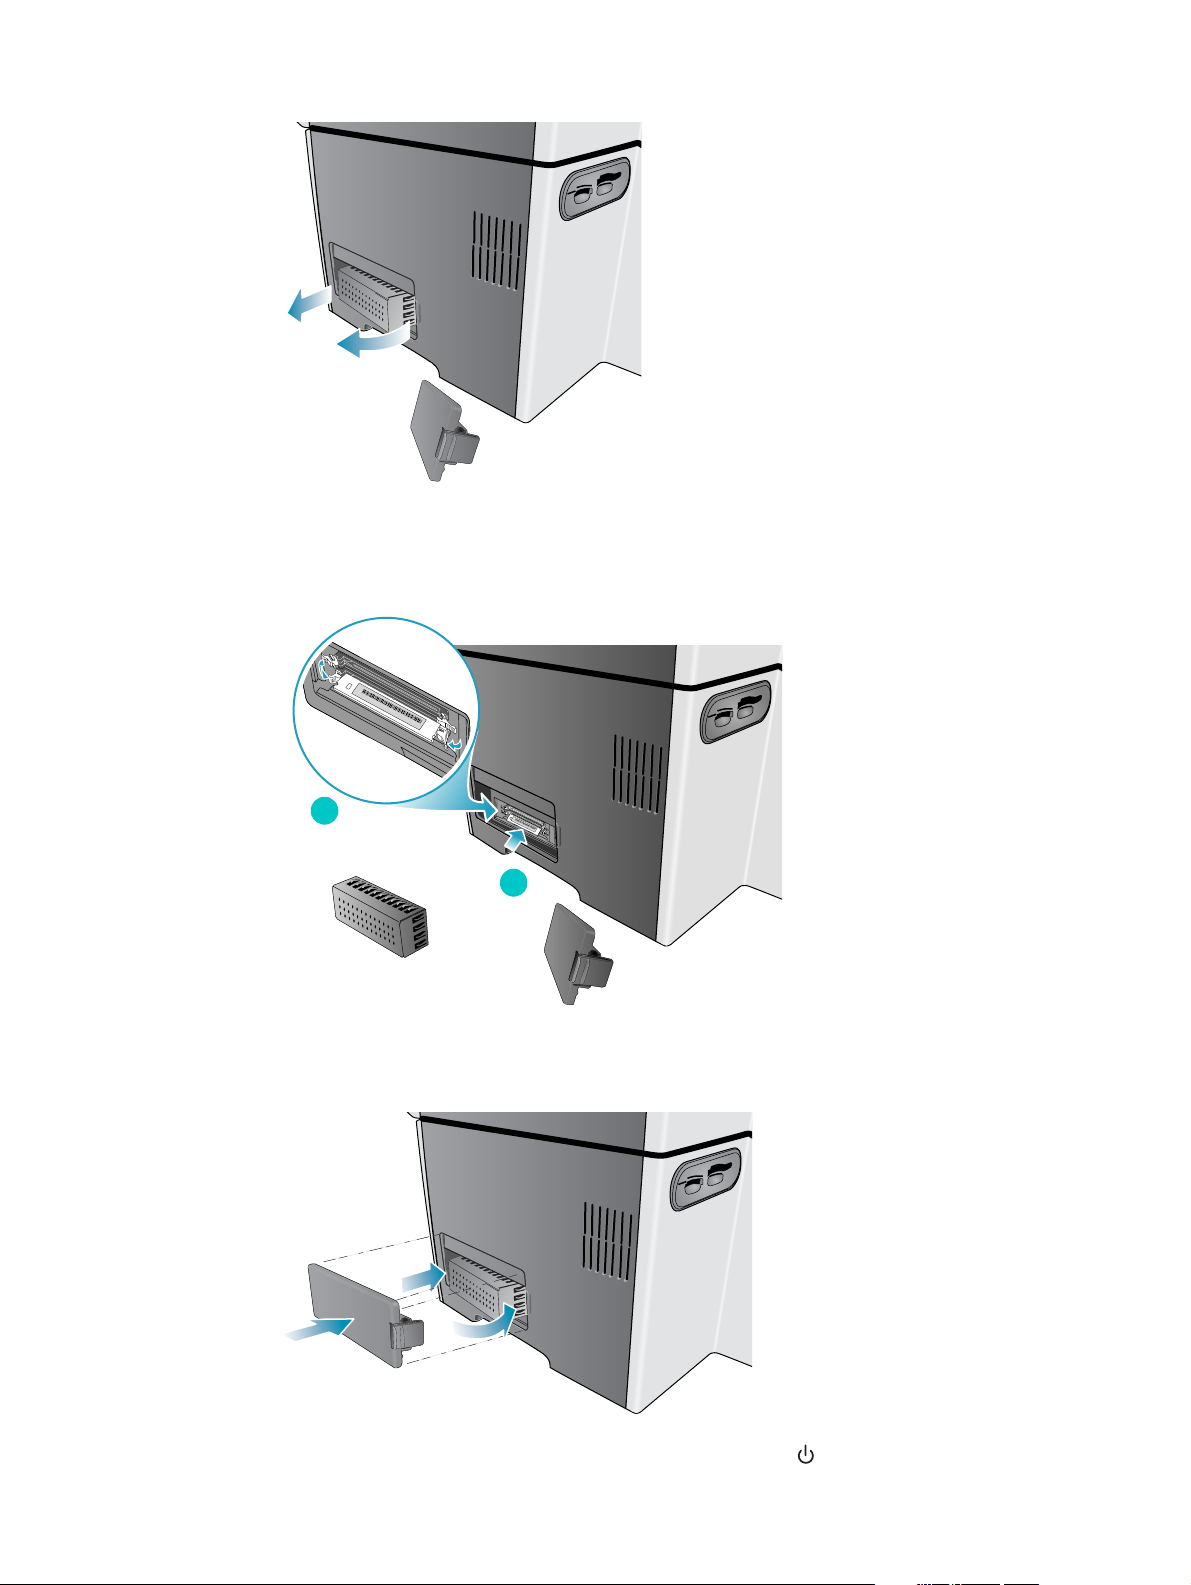
Installing the internal print server
CAUTION The HP Jetdirect print server card contains electronic components that can be damaged by
static electricity. To prevent the buildup of static electricity, maintain frequent contact with any
bare sheet-metal surface on the all-in-one. If possible, wear a grounding wrist strap (or similar
device). Handle the print server card carefully at all times. Avoid touching electronic
components or circuit paths. Failure to follow these recommendations could result in damage
to the parts.
To install the internal print server
1 Press (POWER) to turn off the all-in-one.
2 Unplug the power cord and disconnect any cables.
3 Use a Phillips screwdriver to loosen and remove the two retaining screws that hold the
cover for the empty EIO slot. Remove the cover.
4 Firmly insert the HP Jetdirect print server card into the EIO slot.
5 Insert and tighten the retaining screws that came with the HP Jetdirect print server card.
6 Connect a network cable between the HP Jetdirect print server card and the network.
To verify that the print server has been installed correctly
1 Connect the power cord and press (POWER) to turn on the all-in-one.
2 Print a Configuration page (see Configuration page).
Two pages should print. The second page is the HP Jetdirect Configuration page, which
contains setup information (for example, LAN HW ADDRESS) that might be needed when
you set up the all-in-one on the network computers.
If the HP Jetdirect Configuration page does not print, uninstall and reinstall the print server
card to ensure that it is completely seated in the slot.
ENWW Installing the HP Jetdirect print server 21
Page 24

Obtaining more inf or mation
If you encounter any problems or difficulty printing over a network, see the following
resources.
Document Description
HP Jetdirect Administrator’s
Guide
Documentation for the
operating system and
network operating system
This guide, which is included on Starter CD 1, provides detailed
information about setting up and using an HP Jetdirect print server.
The guide also provides information about the following topics:
z HPsoftware solutions for HP Jetdirect print servers
z TCP/IP configurations
z L ine Printer Da emo n (L PD) ) services o n th e HP Jetdirect print server
z File Transfer Protocol (FTP) printing
z Configuration page messages and troubleshooting
z Embedded Web server, a Web-based tool for configuring and
managing network devices
This documentation came with your computer or your network operating
system and provid es bas ic in form ati on abo ut n etw ork pri nti ng iss ue s th at
are common to all network printers and all-i n-o nes .
In addition to these resources, all-in-one information and configuration features are available
through HP Web Jetadmin. See HP Web Jetadmin software for more information.
For more information about HP Web Jetadmin and other HP network printer and all-in-one
software, visit http://www.hp.com/support/officejet9100.
22 2 - Installing accessories ENWW
Page 25

Installing memory modules
If you often print complex graphics or PostScript® (PS) documents, or if you print with the
auto-duplex unit, you might want to add more memory to the all-in-one. Adding memory gives
the all-in-one the ability to process these more complex print jobs, but might not increase
processing speed.
The all-in-one contains 128 MB of memory. It has two DIMM slots that accept 64 MB or
128 MB of RAM. The all-in-one can support up to 384 MB of memory (including the 128 MB in
the all-in-one). You can find out how much memory is installed by printing a Configuration
page (see Configuration page). Additional memory is available for purchase as an accessory
(see Ordering HP accessories and supplies for information about ordering).
CAUTION The DIMMs contain electronic components that can be damaged by static electricity. To
prevent the buildup of static electricity, maintain frequent contact with any bare sheet metal
surface on the all-in-one. If possible, wear a grounding wrist strap (or similar device). Handle
the DIMMs carefully at all times. Avoid touching electronic components or circuit paths. Failure
to follow these recommendations could result in damage to the parts.
To install a DIMM
1 If you have not already done so, print a Configuration page to find out how much memory
is available in the all-in-one before adding more memory (see Configuration page).
2 Press (P
3 Unplug the power cord and disconnect any cables.
4 On the left side of the all-in-one, unlatch and remove the side cover.
OWER) to turn off the all-in-one.
ENWW Installing memory modules 23
Page 26
5 Remove the DIMM cover.
6 Remove the DIMM from the antistatic package.
7 Align the DIMM so that the notches on the lower edge line up with the raised marks in the
DIMM slot. You can use any empty slot.
8
7
8 Insert and press the DIMM into the slot until the DIMM snaps into place.
9 Replace the DIMM cover, and then replace the side cover.
10 Reattach the power cord and any cables, and then press (P
OWER) to turn on the
all-in-one.
24 2 - Installing accessories ENWW
Page 27

11 See Turning on accessories in the printer driver for information about turning on DIMMs in
the printer driver.
To verify that the DIMM is installed correctly
1 Make sure that the power cord and any cables are plugged in and that the power is turned
on.
2 Make sure that
a DIMM might have been installed incorrectly.
3 Print a Configuration page (see Configuration page). In the memory section, compare the
memory amount to the memory amount on the Configuration page that you printed before
installing the DIMM. If the amount of memory has not increased, one of the following
problems might have occurred:
• The DIMM might not be installed correctly. Remove the DIMM and repeat the
installation procedure.
• The DIMM might be defective. Try a new DIMM.
READY appears on the control-panel display. If an error message appears,
ENWW Installing memory modules 25
Page 28
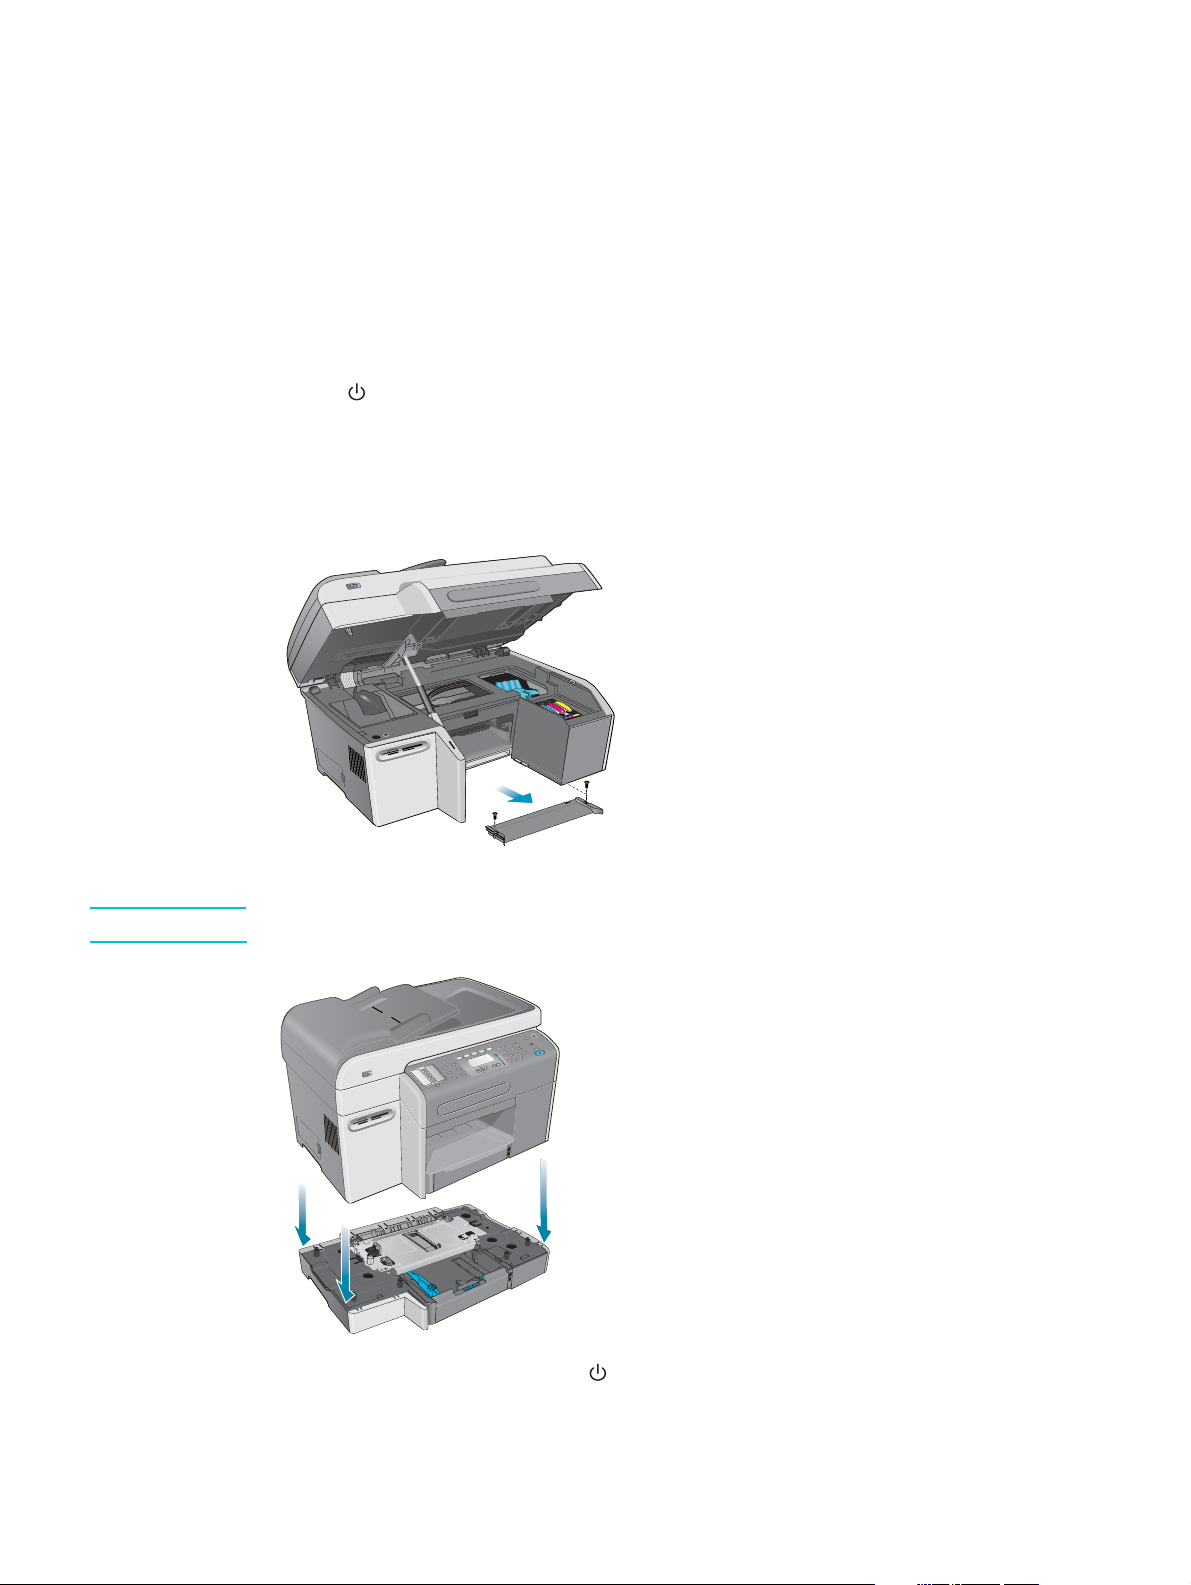
Installing tray 2
Tray 2 comes with the HP Officejet 9120 all-in-one and HP Officejet 9130 all-in-one. It is an
optional accessory for the HP Officejet 9110 all-in-one. Tray 2 holds up to 250 sheets of plain
paper. You can replace the tray with a 500-sheet tray. See Ordering HP accessories and
supplies for information about ordering accessories.
To install tray 2
1 Unpack the tray, remove the packing tape and materials, and move the tray to the
prepared location.
2 Press (P
3 Unplug the power cord.
4 If you are installing the tray on an HP Officejet 9110 all-in-one, remove the tray ramp.
Open the print-carriage access door, use a Phillips screwdriver to remove the two screws
that hold the tray ramp in place, and then slide the tray ramp out of the all-in-one.
5 Set the all-in-one on top of the tray.
WARNING! Be careful to keep your fingers and hands clear of the bottom of the all-in-one.
OWER) to turn off the all-in-one.
6 Plug the power cord in and press (P
7 See Turning on accessories in the printer driver for information about turning on tray 2 in
the printer driver.
26 2 - Installing accessories ENWW
OWER) to turn on the all-in-one.
Page 29
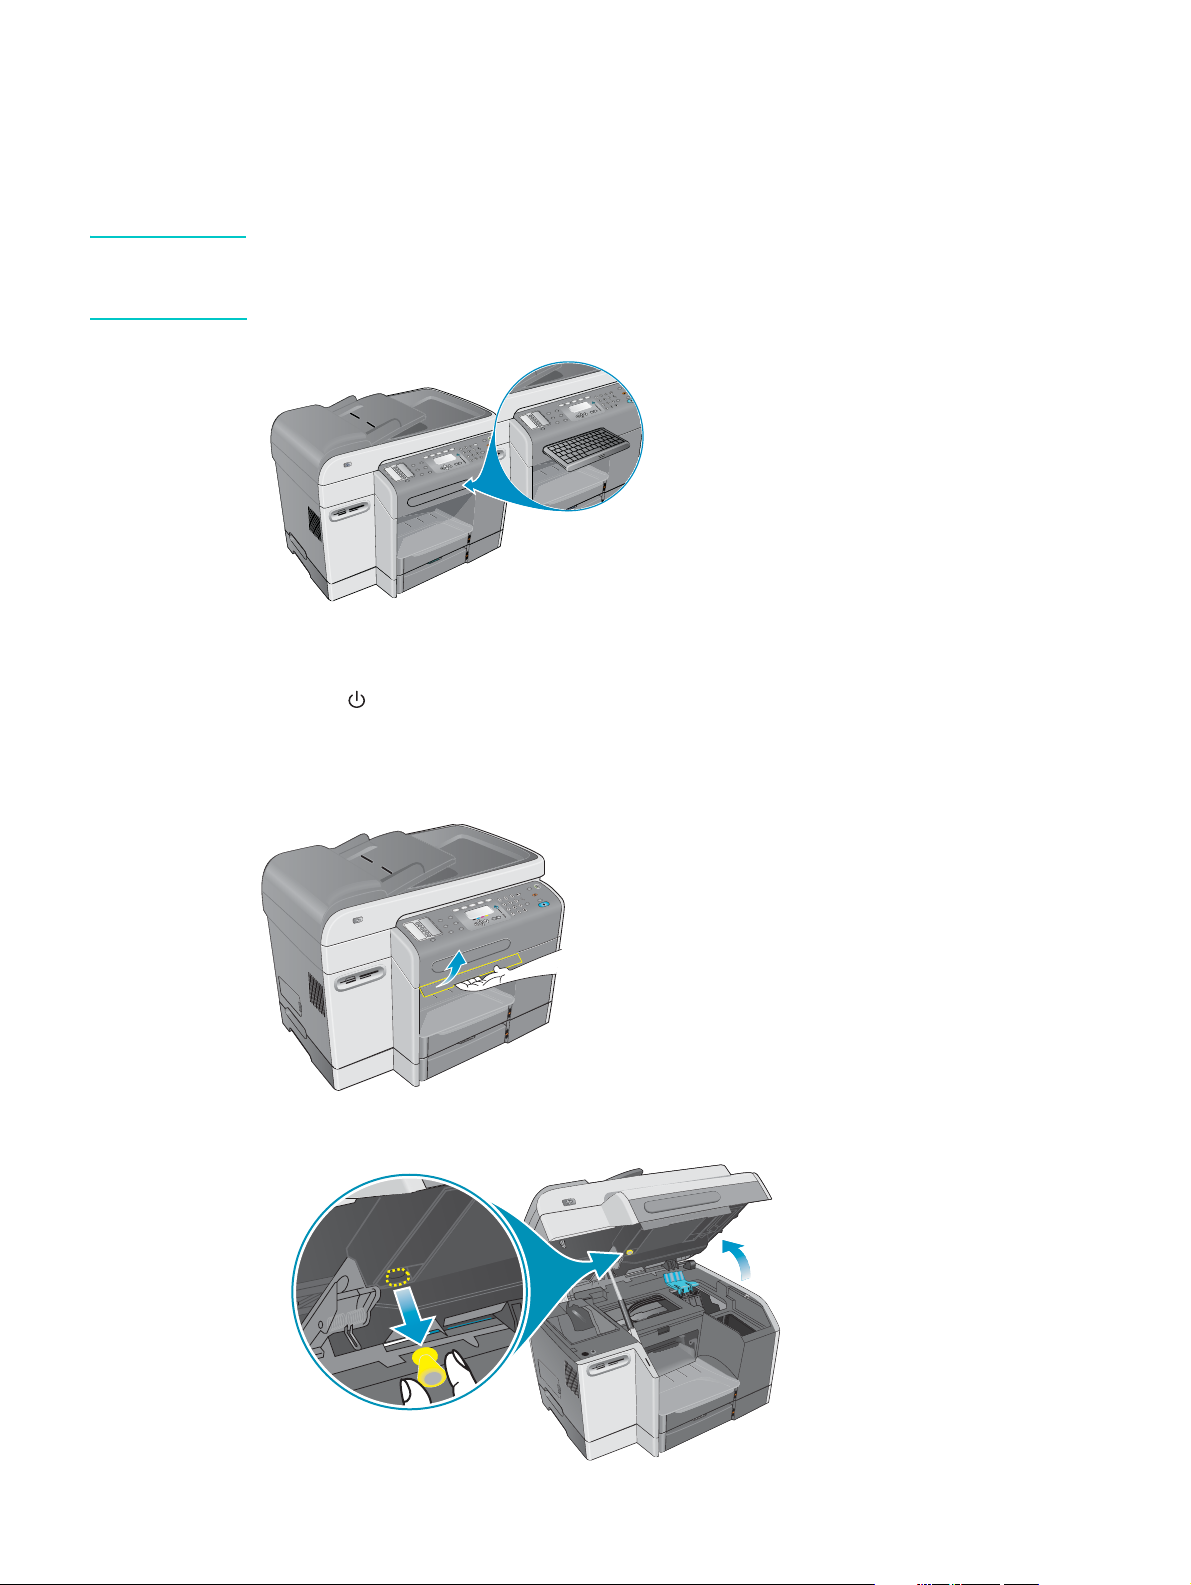
Installing the keyboard
The keyboard comes with the HP Officejet 9130 all-in-one. It is an optional accessory for the
HP Officejet 9110 all-in-one and HP Officejet 9120 all-in-one. See Ordering HP a ccess orie s
and supplies for information about ordering accessories.
Note When sending scans to a network folder or as e-mail attachments from an all-in-one that is
connected to a network, you must type any required information (such as user information or
e-mail addresses) using the all-in-one keyboard.
To install the keyboard
1 Press (POWER) to turn off the all-in-one.
2 Unplug the power cord.
3 Open the print-carriage access door by pulling up on the door handle.
4 Remove the keyboard tray lock from the underside of the print-carriage access door.
ENWW Installing the keyboard 27
Page 30
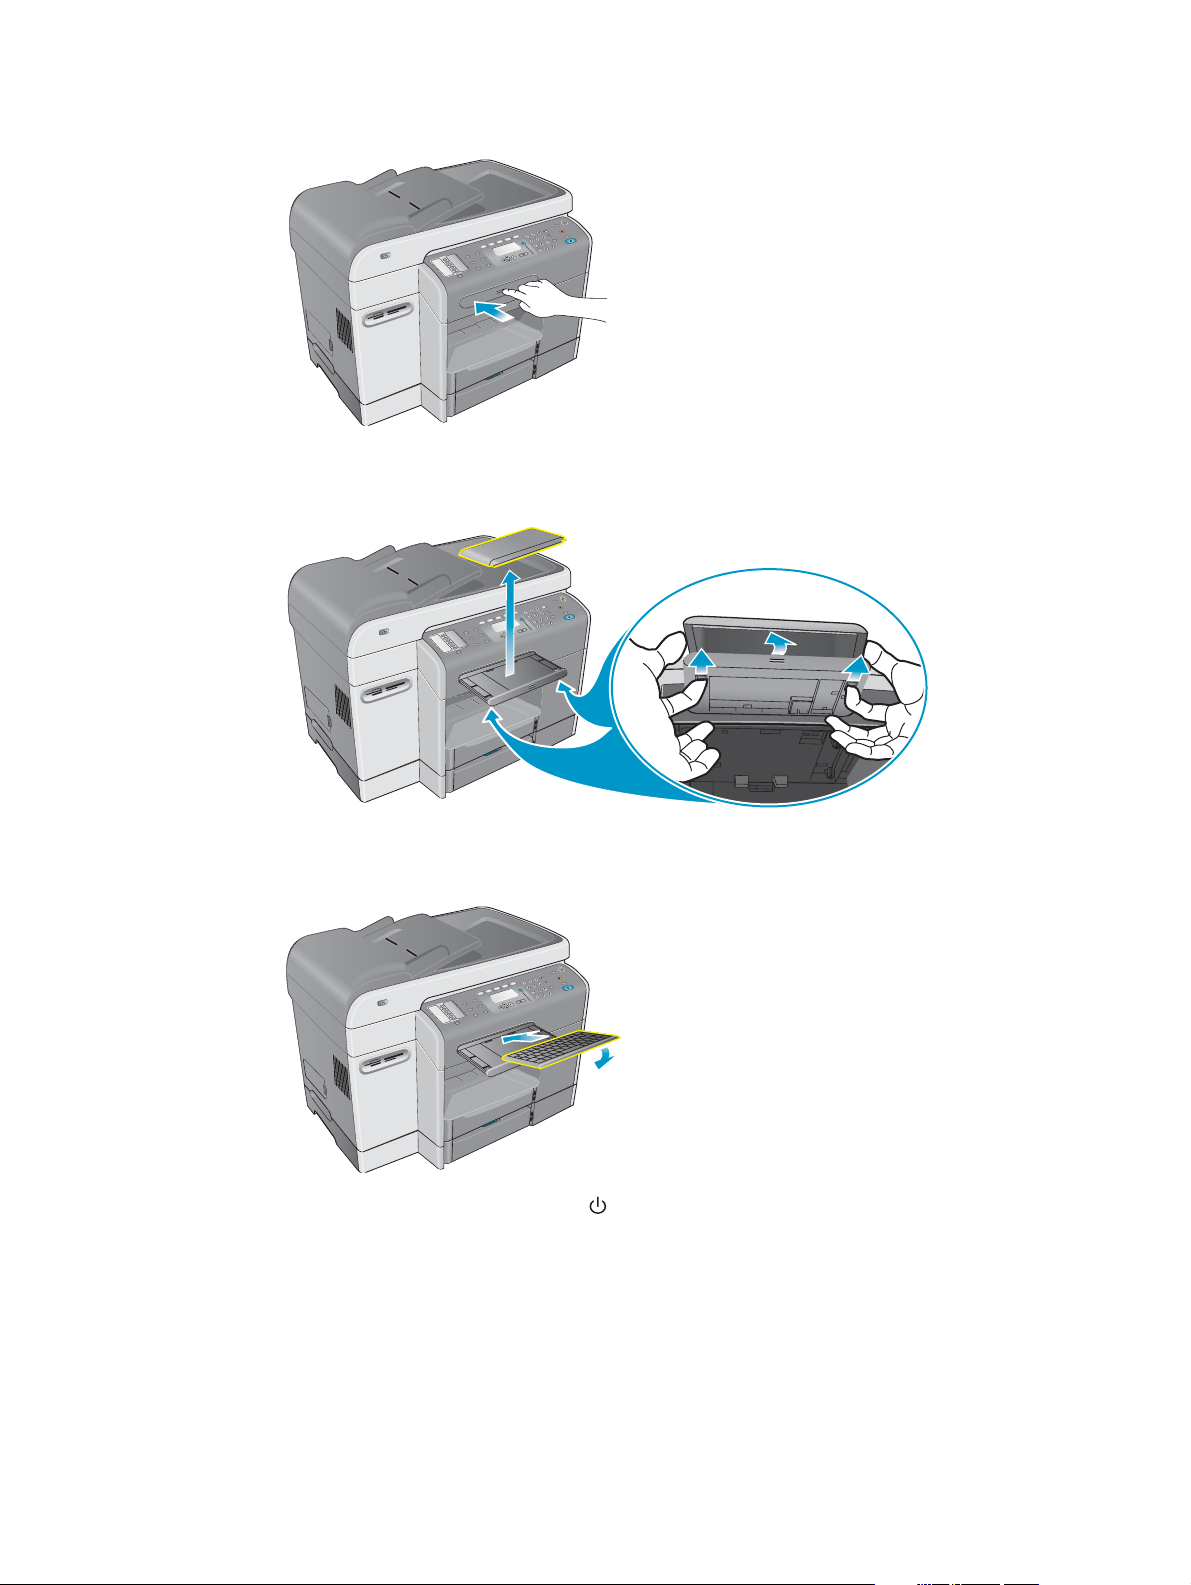
5 Close the print-carriage access door.
6 Press and release the front of the keyboard tray to open the tray.
7 If there is a cover over the keyboard tray, remove the cover by pressing the two release
latches on the underside of the tray.
8 Insert the back edge of the keyboard into the tray, and then press the keyboard down until
it snaps into place.
9 Plug the power cord in and press (P
OWER) to turn on the all-in-one.
To verify that the keyboard is installed correctly
1 Make sure that the power cord is plugged in and that the power is turned on.
2 Make sure that READY appears on the control-panel display. If an error message appears,
the keyboard might have been installed incorrectly.
3 Print a Configuration page (see Configuration page). If the keyboard is not listed, one of
the following problems might have occurred:
28 2 - Installing accessories ENWW
Page 31

• The keyboard might not be installed correctly. Remove the keyboard and repeat the
installation procedure.
• The keyboard might be defective.
Turning on accessories in the printer dr iver
To turn on accessories on Windows computers
After you install the all-in-one software on Windows computers, tray 2 and the DIMMs must be
turned on in the printer driver in order for them to work with the all-in-one. (The auto-duplex
unit and keyboard do not need to be turned on.)
1 Use one of the following methods to open the printer driver:
• Windows 98, Windows Millennium Edition (Me), Windows NT 4.0
Click Start, point to Settings, and then click Printers.
• Windows XP:
Click Start, and then click Printers and Faxes.
Or, click Start, click Control Panel, and then click Printers and Faxes.
2 Right-click the icon for the preferred printer driver, and then click Properties.
3 Select one of these tabs: Configure, Device Settings, or Device Options. (The name of
the tab depends on the printer driver and the operating system.) On the selected tab, click
the accessory that you want to turn on, click Installed from the drop-down menu, and then
click OK.
®
, and Windows 2000:
To turn on accessories on Macintosh computers
The Mac OS automatically turns on all accessories in the printer driver when you install the
all-in-one software.
1 Click the desktop all-in-one icon.
2 On the Printing menu, click Change Setup.
3 On the Change pop-up menu, click the accessory that you want to turn on.
4 On the To pop-up menu, click Installed.
5 Click OK.
ENWW Turning on a ccessories in the printer dr iver 29
Page 32

30 2 - Installing accessories ENWW
Page 33

3
Using the all-in-one
This section contains the following basic information about using the all-in-one.
z Using the all-in-one modes
z Changing settings for the all-in-one
z Canceling jobs from the control panel
z Using the HP photo and imaging software
z Typing numbers and text on the control-panel keypad
z Loading the originals
z Loading the print media
z Choosing the print media
z Using special media
z Printing on both sides of the page
z Setting up speed-dial entries
Using the all-in-one modes
The five modes for the all-in-one correspond to the five mode buttons on the control panel.
Mode buttons
Control-panel
display
Viewing status and
obtaining help
The control-panel display continually shows messages that provide
information about the status of the all-in-one.
Press (help) anytime that you want additional information about
status.
If the Attention light blinks, press (help) for a message that explains
the problem.
Copy Scan Photo E -mail
Fax
Help button
Attention light
See Control-panel messages for a list and explanation of messages.
ENWW Using the all-in-one modes 31
Page 34

Entering a mode You enter a mode by pressing the button for that mode on the control
panel. Two things happen:
z The mode button lights and remains lit while you are in the mode.
z Messages and options for the mode appear on the control-panel
display.
You might need to type a personal identification number (PIN) in order
to continue, if the administrator has set up the all-in-one to require a
PIN.
Exiting a mode To exit a mode, press the R
panel. The mode lights turn off and the all-in-one returns to the ready
state.
Changing the
settings for a
mode
You can change the settings for a mode in two ways:
z Use the option buttons on the control panel. See Control panel for
more information about the buttons.
z Use the options in the control-panel display.
See Changing settings for the all-in-one for more information.
Understanding job
priorities
The all-in-one can process jobs in different modes at the same time. For
example, it can be processing a copy job at the same time that it is
scanning an original for a fax job.
Reports that the all-in-one produces (such as automatic fax reports)
take priority over other jobs that you start at the control panel.
Jobs that you start at the control panel take priority over jobs submitted
from a computer on the network. However, a currently printing job must
finish before any new printing job can begin.
After you exit a mode and return the all-in-one to the ready state, an
asterisk (*) appears beside READY on the control panel display for a
short time. During this time, the all-in-one is reserved for walk-up use.
Any print jobs sent during this time print only after the asterisk
disappears.
ESET/HOLD FOR PIN button on the control
Understanding the
interaction of jobs
with other jobs
If a computer is writing onto a memory card, all photo operations are
blocked until the computer job has finished.
Jobs submitted from the computer using a TWAIN-compliant or
WIA-compliant program take priority over jobs started at the control
panel.
Jobs that involve only scanning can take place at the same time as
printing jobs. (Scanning jobs and printing jobs use different parts of the
all-in-one.)
Some jobs scan originals into memory first (such as copy jobs and
non-realtime fax jobs). When the scanning part of the job has finished,
the all-in-one is free to accept a new job.
32 3 - Using the all-in-one ENWW
Page 35

Changing settings for the all-in-one
You can change the settings for the all-in-one in two places:
z From the control panel (network connection and direct connection)
z From the HP Photo & Imaging software (Windows direct connection) or HP Image Zone
software (Macintosh direct connection) (see Using the HP photo and imaging software for
more information)
Note When you are configuring settings in the HP Photo & Imaging software or the HP Image Zone
software, you cannot see the settings that have been configured from the control panel (such
as the scan settings).
To change settings from the control panel for the current job
1 At the control panel, press a mode button (for example, COPY).
2 To reach the option that you want to change, use one of the following methods:
• Press a control panel button (for example, L
• Select the option from the control-panel display, and then press (select).
3 Press - or + to select the value that you want, and then press (select).
IGHTER/DARKER).
To change default settings from the control panel for future jobs
1 At the control panel, press a mode button (for example, COPY).
2 Change the settings to the settings that you want for the defaults. See the previous
section, To change settings from the control panel for the current job.
3 Press (down) to move to
4 Press (up) or (down) to move to the option that you want to change, and then press
(select).
5 Press - or + to select the value that you want, and then press (select).
Setup, and then press (select).
To change settings from the HP photo and imaging software on Mac OS
X (10.1.x and 10.2.x) computers (direct connection)
1 Click the HP Director icon in the Doc k.
2 On the HP Director menu, click Preferences.
3 Click the item that you want to change.
To change settings from the HP photo and imaging software on
Windows and Mac OS 9.2
1 Open the HP photo and imaging software. See Opening the HP photo and imaging
software for more information.
2 Click the Select Device drop-down list and click the all-in-one.
3 Click the Settings drop-down list.
4 Click the item that you want to change.
ENWW Changing settings for the all-in-one 33
.x computers (direct connection)
Page 36

Canceling jobs from the control panel
From the control panel, you can cancel most types of jobs that are currently being processed.
The following jobs cannot be cancelled. When you try to cancel one of these types of jobs, the
control-panel display informs you with an appropriate message.
z An e-mail transmission that is in progress
z An incoming fax that is being archived in a network folder
More than one job could actually be taking place at the same time. For example, the all-in-one
might be printing a document at the same time that it is receiving a fax (see the table under
Using the all-in-one modes for more information). When this is the case, note the following
conditions:
z The control-panel display shows information about the job that is currently being
processed in the foreground. This is the job that will be cancelled when you press S
z If other jobs are being processed simultaneously in the background, the control-panel
display shows a list of all jobs when you press S
cancel from the list.
The time that it takes to cancel depends on the size of the job. Also, a job might continue for a
short while after you have cancelled it. For example, if the original has fed only half-way into
the ADF, the job continues until the original has been fully fed and ejected.
TOP.
TOP. You select the job that you want to
To cancel a job from the control panel
1 For a print job: Press STOP.
For any other type of job: Press the mode button for the type of job (for example, press
C
OPY for a copy job), and then press STOP.
Note You only need to press STOP once.
2 If more than one job is being processed, a list of the jobs appears on the control-panel
display. Press (up) or (down) to move to the job that you want to cancel, and then
press (select).
34 3 - Using the all-in-one ENWW
Page 37

Using the HP photo and imaging software
When you install the all-in-one software for direct connection, the installation procedure
installs photo and imaging software that provides a common interface for HP devices, such as
all-in-ones, scanners, photo printers, and digital cameras.
z HP Photo & Imaging software (Windows)
z HP Image Zone software (Macintosh)
The software gives these devices the ability to work together, and can be used to scan
originals, to send images by e-mail or fax, and to view, edit, and print images. Most all-in-one
procedures that you perform at the control panel can also be submitted from a computer with
the HP Photo & Imaging software or the HP Image Zone software.
The software includes several components, such as the HP Director and the Memories Disc
Creator.
Note For Windows computers, the Typical installation is required in order for the HP Photo &
Imaging software to be installed. Also, it is recommended that you use a USB connection to
ensure optimal scanning performance.
See the onscreen Help for more information about the HP Photo & Imaging software or the
HP Image Zone software and its capabilities.
This section contains information about the following topics.
z Differences in the software for the HP Officejet 9100 series all-in-one
z Opening the HP photo and imaging software
Differences in the software for the HP Officejet 9100 series
all-in-one
Note the following differences in the the HP Photo & Imaging software or HP Image Zone
software that is installed for the all-in-one:
z The Make Copies feature in the software is not supported by the all-in-one. When you
want to make copies, use the control panel on the all-in-one.
z The Scan Slides/Negatives feature that is supported in the software is not supported by
the all-in-one.
z The way that you configure group speed-dial entries for the all-in-one is different from the
way that this feature is implemented in the software. See Setting up speed-dial entr ies for
the procedures to use for the all-in-one.
z The borderless printing feature that is supported in the software is not supported by the
all-in-one.
Opening the HP photo and imaging software
To open the software on Windows computers
1 Use one of the following methods:
• Double-click the HP Director icon on the desktop.
ENWW Using the HP photo and imaging software 35
Page 38

• On the Windows taskbar, click Start, point to Programs or All Programs, point to HP,
and then click HP Director.
2 In the Select Device dialog box, click to see a list of installed HP devices.
3 Click the all-in-one.
To open the software on Macintosh computers
On Mac OS X (10.1.x and 10.2.x) comput ers, cl ic k the HP Director icon in the Dock.
On Mac OS 9.2.x computers, use one of the following methods:
z Double-click the HP Director shortcut on the desktop.
z Double-click the HP Director shortcut in the Applications:Hewlett-Packard:HP Photo and
Imaging Software folder.
Typing numbers and text on the control-panel keypad
The following list provides tips for typing text on the control-panel keypad.
z Press the keypad numbers that correspond to the letters of a name.
ABC
These letters correspond to this number, and so on.
2
z Press a button multiple times to see a letter first in lowercase and then in uppercase. The
first letter of a word is set to uppercase automatically.
JKL
To get this character:
5
Press the 5 button this
j1k2l3J4K5L65
7
many times:
z After the correct letter appears, press the number that corresponds to the next letter in the
name. Again, press the button multiple times until the correct letter appears.
z The cursor automatically advances to the right 1.5 seconds after you pressed the last
button.
z To insert a space, press the pound sign (#) or PAUSE/ (space ) button.
z To enter a symbol, such as @, press the asterisk (*) or SYMBOLS button repeatedly to
scroll through the list of available symbols.
The backslash character (\) is not available because it is required for network pathnames.
z If you make a mistake, press (backspace) on the control panel to clear it, and then type
the correct entry.
z After you have finished typing the numbers and text, press (select) to accept the
entries.
Note Localized special characters are not supported on the keypad. However, they are supported
on the localized keyboards, which are optional accessories for the all-in-one. See Keyboards
for information about localized keyboards.
When sending scans to a network folder or as e-mail attachments from an all-in-one that is
connected to a network, you must type any required information (such as user information or
e-mail addresses) using the all-in-one keyboard.
36 3 - Using the all-in-one ENWW
Page 39

Loading the originals
You can load originals in two places:
z Automatic document feeder (ADF)
z Flatbed scanner
If originals are present both in the ADF and on the flatbed scanner glass, the ADF takes
priority. For the best quality scans, use the flatbed scanner.
This section contains information about the following topics.
z Loading an original in the automatic document feeder (ADF)
z Loading an original on the scanner glass
Loading an original in the automatic document feeder (ADF)
The all-in-one has an ADF, which you can use to load up to 50 originals. See Loading the print
media for information about media sizes, types, and weights that are supported and for
recommendations about media to use in the ADF.
To load an original in the ADF
1 Place all originals in the ADF input tray with the print-side up and with the first page to be
scanned, copied, or faxed on top of the stack.
Note If the originals are printed on both sides, select the appropriate duplex option using the 2-SIDED
OPTIONS button on the control panel.
When you scan for photos or JPEG files, the all-in-one supports only single-sided scanning.
The control panel prompts you to place the original on the scanner glass.
2 Adjust the ADF width adjustors to fit the size of the originals.
ENWW Loading the originals 37
Page 40

Loading an original on the scanner glass
You can copy or scan any original by placing it on the scanner glass.
Note Some all-in-one options will not work correctly if the scanner glass an ADF lid backing are not
clean. See Cleaning the all-in-one for more information.
To load a document on the scanner glass
1 Make sure that no originals are loaded in the ADF.
2 Lift the ADF.
3 Place the original face-down on the scanner glass in the corner shown in the following
illustration. The sides of the original should touch the right and front edges.
It is impor tant to place the original as shown. Otherwise, part of the original might be
clipped in the resulting scan.
Note If you are copying from a transparency (that is, your original is printed on transparency film),
place a blank piece of paper between the transparency and the flatbed scanner lid.
4 Close the ADF.
CAUTION To prevent damaging the all-in-one, do not allow the scanner lid to fall onto the flatbed scanner
surface.
Always close the ADF when the all-in-one is not in use.
38 3 - Using the all-in-one ENWW
Page 41

Loading the print media
This section contains information about the following topics.
z Tips for loading the media
z Loading the media in tray 1 or tray 2
z Selecting the trays
Tips for loading the media
You can load up to 150 sheets of paper in tray 1 and up to 250 sheets of paper in tray 2.
z Use tray 1 for media types such as envelopes, cards, transparencies, and photo paper.
z Always use media that conforms to the specifications. See Choosing the print media for
more information.
z When you are loading a tray, position the media print-side-down with the right edge of the
media against the right edge and front guide of the tray. For preprinted forms and
letterhead, load the media with the top edge feeding into the all-in-one first.
z To prevent jams, load only one type of media at a time into a tray.
z When adding media, always remove the existing media and realign the media width and
length adjustors to fit the new media.
See Tips for avoiding jams for more information abo ut avoi ding jam s.
Loading the media in tray 1 or tray 2
1 Pull the tray out of the all-in-one.
2 If you are loading tray 1, raise and remove the output tray.
ENWW Loading the print media 39
Page 42

3 If you are loading paper that is between 279 mm and 356 mm long (11 inches and 14
inches long) (such as legal-size paper), move the latch on the tray to the right as shown in
the following illustration, and then lower the front of the tray.
Note You do not need to lower the front of the tray when loading A4-size or letter-size or smaller
media.
4 Place the media with the print-side down in the tray and slide the media width and length
adjustors to the edges of the media.
A4/letter
Legal
5 If you are loading tray 1, reattach and close the output tray.
6 Slide the tray into the all-in-one.
CAUTION Do not raise the front of the tray if legal-size media is loaded, or damage to the media or
all-in-one can result.
40 3 - Using the all-in-one ENWW
Page 43

7 Pull out the extension on the output tray.
8 When printing, select the appropriate media type and size in your program or printer
driver.
Selecting the trays
When you copy or print a document, you can allow the all-in-one to select the tray for the job,
or you can select a specific tray.
If you do not select a tray, the all-in-one automatically selects a tray. By default, the all-in-one
draws paper from tray 2 first. However, the all-in-one draws media from tray 1 under the
following conditions:
z Tray 2 is not installed.
z Tray 2 does not have media loaded.
z Tray 2 does not support the media type or size for the job.
To select a tray from the pr inter driver on your computer
The settings are available in the Source is or Paper Source drop-down menu in Windows
printer drivers, and in the All pages from pop-up menu in the Mac OS printer driver.
To select a default tray from the control panel
1 On the control panel, press MENU.
2 Press
3 Press (down) to move to Configure tray, and then press (se lect).
4 Press (down) to move to Default tray, and then press (select).
5 Press - or + to select the tray, and then press (select).
(up) or (down) to move to PRINTER, and then press (select).
ENWW Loading the print media 41
Page 44

Choosing the print media
The all-in-one is designed to work well with most types of office paper and with 25-percent
cotton bond paper. It is best to test a variety of print media types before buying large
quantities. Find a media type that works well and is easy to purchase.
This section contains information about the following topics.
z Supported media sizes
z Supported media types and weights
z Recommended HP media
z Minimum margins
z Guidelines for storing media
Supported media sizes
The following table lists the sizes of media that are compatible with the all-in-one and shows
which sizes can be used with which devices.
Media Tray 1 Tray 2
Standard paper sizes
z U.S. letter (216 by 279mm; 8.5 by 11 inches)
z U.S. legal (216 by 356 mm; 8.5 by 14 inches)
z A4 (210 by 297 mm; 8.3 by 11.7 inches)
z U.S. executive (184 by 267 mm; 7.25 by
10.5 inches)
z U.S. statement (140 by 216 mm; 5.5 by
8.5 inches)
z A5 (148 by 210 mm; 5.8 by 8.3 inches)
z ISO B5 (176 by 250 mm; 6.9 by 9.8 inches)
z JIS B5 (182 by 257 mm; 7.2 by 10.1 inches)
Envelopes
z U.S. #10 (105 by 241 mm; 4.125 by 9.5 inches)
z A2 (111 by 146 mm; 4.375 by 5.75 inches)
z Monarch (98 by 191 mm; 3.88 by 7.5 inches)
z HP Greeting Card (111 by 152 mm;
4.375 by 6 inches)
z DL (110 by 220 mm; 4.3 by 8.7 inches)
z C5 (162 by 229 mm; 6.4 by 9 inches)
z C6 (114 by 162 mm; 4.5 by 6.4 inches)
z Japanese Chou #3 (120 x 235 mm; 4.7 by
9.3 inches)
z Japanese Chou #4 (90 x 205 mm; 3.5 by
8.1 inches)
Auto-duplex
unit*
ADF
(single-sided
operation)
ADF
(double-sided
operation)
42 3 - Using the all-in-one ENWW
Page 45

Media Tray 1 Tray 2
Cards
z Index card (76 by 127 mm; 3 by 5 inches)
z Index card (102 by 152 mm; 4 by 6 inches)
z Index card (127 by 203 mm; 5 by 8 inches)
z Ha gak i (100 by 148mm; 3.9 by 5.8 inches)
z Ofuku Hagaki (148 by 200 mm; 5.8 by
7.9 inches)
z A6 (105 by 148 mm; 4.1 by 5.8 inches)
Custom-size media (tray 1)
Between 76.2 to 216 mm wide and 127 to 356mm
long (3 to 8.5 inches wide and 5 to 14 inches long)
Custom-size media (tray 2)
Between 182 to 216mm wide and 257 to 356 mm
long (7.2 to 8.5 inches wide and 10.1 to 14 inches
long)
Custom-size media (auto-duplex unit)
Between 76.2 to 216 mm wide and 127 to 297mm
long (3 to 8.5 inches wide and 5 to 11.7 inches
long)
Auto-duplex
unit*
ADF
(single-sided
operation)
ADF
(double-sided
operation)
Custom-size media (ADF)
Between 127 to 216mm wide and 241 to 305 mm
long (5 to 8.5 inches wide and 9.5 to 12inches
long)
Custom-size media (ADF)
Between 127 to 216mm wide and 178 to 305 mm
long (5 to 8. 5 inches wide and 7 to 1 2 inches long)
* Use the auto-duplex unit for automatic printing on both sides of the paper.
ENWW Choosing the print media 43
Page 46

Supported media types and weights
CAUTION Some media, such as envelopes, cards, transparencies, and photo paper, can only be used
with tray 1. Using unsupported media in tray 2, the auto-duplex unit, or the ADF can cause
jams and damage to the equipment.
Tray Media type Weight Capacity
Tray 1 Paper 60 to 90 g/m
(16- to 24-lb bond)
Transparencies
(for example,
60 to 90 g/m
(16- to 24-lb bond)
HP Premium Inkjet
Transparency Film)
Envelopes 75 to 90 g/m
(20- to 24-lb bond)
Cards Up to 200 g/m
(110-lb index)
Tray 2 Paper
(Ofuku Hagaki only)
Auto-duplex
Paper 60 to 90 g/m
unit
Cards
(Ofuku Hagaki only)
60 to 90 g/m
(16- to 24-lb bond)
(16- to 24-lb bond)
Up to 160 g/m
(90-lb index)
ADF Paper 60 to 90 g/m
(16- to 24-lb bond)
Special HP paper
(for example,
60 to 90 g/m
(16- to 24-lb bond)
HP Premium Inkjet
paper, HP Bright
White Inkjet paper)
Transparencies
(for example,
60 to 90 g/m
(16- to 24-lb bond)
HP Premium Inkjet
Transparency Film)
Photos
(special photo paper,
60 to 90 g/m
(16- to 24-lb bond)
such as
HP Premium Photo
Paper)
Real-estate forms One at a time
2
2
2
2
2
2
2
2
2
2
2
Up to 150 sheets (15 mm or 0.6 inch
stacked)
Up to 30
(8 mm or 0.3 inch stacked)
Up to 22
(15 mm or 0.6 inch stacked)
Up to 60
(15 mm or 0.6 inch stacked)
Up to 250 sheets (25 mm or 1 inch stacked)
One at a time
One at a time
Up to 50 sheets
Up to 50 sheets
One at a time
Advisable to use the flatbed scanner
One at a time
Advisable to use the flatbed scanner
Output tray All supported media Up to 100 sheets of plain paper (text
printing)
44 3 - Using the all-in-one ENWW
Page 47

Recommended HP media
The following table shows which media can be used with the trays, auto-duplex unit, and ADF.
See Ordering HP accessories and supplies for information about ordering HP media.
Media Tray 1 Tray 2
Plain paper:
z HPBright White Inkjet Paper
z HPOffice Paper
z HPOffice Recycled Paper
z HPMultipurpose Paper
z HPPrinting Paper
z HPEveryday Paper
z HP Everyday Copy & Print Paper
HP Premium Paper
HP Premium Inkjet Heavyweight Paper
Transparencies:
z HP Premium Inkjet Transparency Film
z HPPremium Plus Inkjet Transparency Film
HP Everyday Photo Paper
High-quality photo paper:
z HPColorfast Photo Paper
z HP Premium Plus Photo Paper
z HP Premium Photo Paper
z HP Photo Paper
HP Brochure and Flyer Paper
Auto-duplex
unit
ADF
ENWW Choosing the print media 45
Page 48

Minimum margins
The document margins must match or exceed these minimum settings in portrait orientation.
The following illustration shows which side of the paper and envelope corresponds to each
margin.
Top
Top
Bottom
RightLeft
Bottom
RightLeft
Media Left margin Right margin Top margin Bottom margin
Letter, legal,
executive, statement
A4, A5, ISO B5, JIS
B5, and cards
Envelopes 3.4 mm
Custom-size media
(tray 1, tray 2)
Custom-size media
(auto-duplex unit)
6.4 mm
(0.25 inch)
3.4 mm
(0.13 inch)
(0.13 inch)
3.4 mm
(0.13 inch)
5.1 mm
(0.20 inch)
6.4 mm
(0.25 inch)
3.4 mm
(0.13 inch)
3.4 mm
(0.13 inch)
3.4 mm
(0.13 inch)
5.1 mm
(0.20 inch)
3.0 mm
(0.12 inch)
3.0 mm
(0.12 inch)
12.7 mm
(0.50 inch)
3.0 mm
(0.12 inch)
12.7 mm
(0.50 inch)
12.7 mm
(0.50 inch)
12.7 mm
(0.50 inch)
12.7 mm
(0.50 inch)
12.7 mm
(0.50 inch)
12.7 mm
(0.50 inch)
Custom-size media
(ADF)
Custom-size media
(flatbed scanner)
1.0 mm
(0.04 inch)
1.0 mm
(0.04 inch)
1.0 mm
(0.04 inch)
Not applicable (th e
all-in-one detects
the size and cr ops
at the right and
bottom margins)
2.0 mm
(0.08 inch)
1.0 mm
(0.04 inch)
3.0 mm
(0.12 inch)
Not applicable (the
all-in-one detects
the size and crops
at the right and
bottom margins)
Note When you are using the auto-duplex unit, the top and bottom margins must be at least 12.7 mm
(0.5 inch).
46 3 - Using the all-in-one ENWW
Page 49

Guidelines for storing media
Use the following guidelines to ensure optimum all-in-one performance and to avoid problems
that are caused by improperly stored media (such as jams and poor-quality printing).
z Store media in an environment that is at or near room temperature. The air should not be
too dry or too humid.
• An improper environment can cause media to distort, resulting in jams in the all-in-one.
The required condition is 20 to 24 degrees C (68 to 75 degrees F), with a relative
humidity of 45 percent to 55 percent.
• Heat causes the moisture in media to evaporate, while cold causes moisture to
condense on the sheets. Heating systems and air conditioners remove most of the
humidity from a room. Humid weather and water coolers can cause the humidity to
increase in a room.
z Do not purchase more media than can be easily used in a short time (about three
months).
• Media stored for long periods might experience heat and moisture extremes, which can
cause damage.
z Do not open packages of media until the media is needed.
• As media is opened and used, it loses or absorbs moisture, depending on the
environment. This can cause such things as streaks, smudging, and light characters
during printing.
• Unopened media in sealed reams can remain stable for several months before use.
• The best way to store an opened package of media is to rewrap it tightly in its
moisture-proof wrapping. If the environment is subject to extremes, unwrap only the
amount of media to be used during the operation of a day to prevent unwanted
moisture changes.
ENWW Choosing the print media 47
Page 50

Using special media
This section contains information about the following special media types that you can use
with the all-in-one.
z Using cards and envelopes
z Using transparencies
z Using custom-size media
z Using photo paper
See Choosing the print media for information about supported media types and sizes.
Note Always load special media in tray 1, and select the correct media type, the print quality, and
the media source for the job.
Using cards and envelopes
If your software program supports printing on cards or envelopes, follow the instructions for
the program to use them.
Always use tray 1 to print cards and envelopes.
To use cards and envelopes
1 Remove tray 1 from the printer.
2 Remove the output tray, and then remove all media from tray 1.
3 Insert the cards or envelopes into the tray (envelopes should be loaded with the flaps
facing up and to the right).
4 Slide the media width and length adjustors to the edges of the cards or envelopes.
5 Replace the output tray and insert tray 1 into the printer.
6 Start the job from your program, making sure that you select the correct media size and
type.
See Changing settings for the all-in-one for more information about setting the printing
options.
48 3 - Using the all-in-one ENWW
Page 51

Using transparencies
When printing on transparencies, follow these guidelines:
z Use tray 1 to print on transparencies. Load a maximum of 30 transparencies in the tray.
z Handle transparencies by the edges. Oils from your fingers can cause print-quality
problems.
z Use HP Premium Inkjet Transparency Film or HP Premium Plus Inkjet Transparency Film,
which is specifically designed to work with the all-in-one, or use other transparencies that
are designed to work with HP Inkjet printers. See Ordering HP accessories and supplies
for information about ordering transparencies.
To use transparencies
1 Remove tray 1 from the printer.
2 Remove the output tray, and then remove all media from tray 1.
3 Insert the transparencies into the tray, with the rough side down and the adhesive strip
feeding into the all-in-one first.
4 Slide the media width and length adjustors to the edges of the transparencies.
5 Replace the output tray and insert tray 1 into the printer.
6 Start the job from your program, making sure that you select the correct media size and
type.
See Changing settings for the all-in-one for more information about setting options.
7 Remove each transparency as it prints and set it aside to dry. Allowing wet transparencies
to stack up might cause smearing.
Using custom-size media
Use tray 1 when printing on media that is 76.2 to 216 mm wide and 127 to 356 mm long (3 to
8.5 inches wide and 5 to 14 inches long).
If your program supports custom-size media, set the media size in the program before creating
and printing the document. If your program does not support custom-size media, set the size
in the printer driver, create the document, and then print it. (You might need to reformat
existing documents to print them correctly on custom paper sizes.)
To use custom-size media
1 Remove tray 1 from the printer.
2 Remove the output tray, and then remove all media from tray 1.
3 Insert the custom-size media into the tray.
4 Slide the media width and length adjustors to the edges of the media.
5 Replace the output tray and insert tray 1 into the printer.
6 Start the job from the program, making sure that you select the correct media size and
type.
See Changing settings for the all-in-one for more information about setting the printing
options.
ENWW Using special media 49
Page 52

Using photo paper
You can print the photographs that you take with your digital camera, either directly from a
memory card that you insert in the all-in-one or from a software program such as the HP photo
and imaging software. See Printing from a memory card for more information.
Use Best print quality to print photographs. However, with this setting, printing takes longer
and more memory is required from your computer.
The all-in-one can produce 4,800 by 1,200-optimized dpi resolution (up to 4,800 by
1,200-optimized dpi color printing on premium photo papers, from 1,200 by 1,200-input dpi)
when using the following printer drivers:
z PCL 6
Windows 98, Windows Me, Windows 2000, and Windows XP
z PS
Windows 2000, Windows XP, Mac OS 9.2.x, and Mac OS X (10.1.x and 10.2.x)
To print digital photographs
1 Load the appropriate media in tray 1. See Loading the print media for more information.
1 If you want to print photographs from a memory card, insert the memory card into the
appropriate memory card slot on the all-in-one. See Inserting and removing a memory
card for more information.
2 Start the job from your program or from the control panel (see Printing from a memory
card for more information). Make sure that you select the correct print-quality setting,
media size, and media type.
See Changing settings for the all-in-one for more information about setting options.
3 Remove each sheet of media as it prints and set it aside to dry. Allowing wet media to
stack up might cause smearing.
50 3 - Using the all-in-one ENWW
Page 53

Printing on both sides of the page
The all-in-one can automatically print on both sides of media with the auto-duplex unit. See
Performing duplexing for more information about how to duplex automatically.
When printing on both sides of the page, follow these guidelines.
z The auto-duplex unit supports the following media sizes: letter, ex ecutive, A4, A5, ISO B5,
JIS B5, index cards (3 by 5 inches, 4 by 6 inches, and 5 by 8 inches), Hagaki, Ofuku
Hagaki, and A6 card. It can also be used for custom-size media that is between 76.2 by
216 mm wide and 127 by 297 mm long (3 by 8.5 inches wide and 5 by 11.7 inches long).
z Do not print on both sides of transparencies, envelopes, photo paper, brochure paper,
glossy media, or paper lighter than 60 g/m
2
(16-lb bond) or heavier than 90 g/m2 (24-lb
bond). Jams might occur with these types of media. However, special double-sided
HP media can be used with the auto-duplex unit.
z To print on both sides of a page, make the selection from the software program or printer
driver (see Performing duplexing).
If you are using operating systems other than Windows or the Mac OS, turn on the
Duplex setting in the control panel. See PRINTER menu for more information.
z The recommended minimum for top and bottom margins is 12.7 mm (0.5 inch).
z When using media such as letterhead, preprinted media, and media with watermarks and
prepunched holes, make sure that you load the media in the tray with the front-side facing
down.
z When automatically printing on both sides of a page, one side of the page is printed first,
and the printer pauses while the ink dries. T o print the second side, the page must partially
exit the printer to be flipped. When printing is complete, the paper is dropped onto the
output tray. Do not attempt to remove the page from the printer until both sides have
finished printing.
ENWW Printing on both sides of the page 51
Page 54

Setting up speed-dial entries
You can set up frequently used fax numbers, e-mail addresses, and network folders as
speed-dial entries. The first six entries for each of these kinds of destinations are associated
with the six speed-dial buttons on the control panel.
This section contains information about the following topics.
z Setting up fax numbers as speed-dial entries or groups
z Setting up e-mail addresses as speed-dial entries or groups
z Setting up network folders as speed-dial entries
z Printing and viewing a list of speed-dial entries
z Printing a speed-dial template for the control panel
Setting up fax numbers as speed-dial entries or groups
You can store up to 99 fax numbers or groups of fax numbers as speed-dial entries.
Speed-dial entries 1 through 6 are associated with the corresponding six speed-dial buttons
on the control panel.
See Printing and viewing a list of speed-dial entries for information about printing a list of the
speed-dial entries that have been set up.
To set up speed-dial entries
z Embedded Web server (network connection)
Open the embedded Web server, click the Settings tab, and then click Fax Speed-dial in
the left pane. Click the tab that contains the number for the entry (for example, Speed-dial
26-50).
• To add or change an entry: Add or change information in the fields.
• To delete an entry: Use the Delete check box on the right side.
•Click Apply when you are finished.
z HP photo and imaging software (direct connection)
Open the HP photo and imaging software and follow the instructions in the onscreen Help.
z Control panel
Press M
• To add or change an entry: Press - or + to move to an unused entry number, or type a
• To delete one entry or all entries: Press (up) or (down) to move to the speed-dial
ENU, open the FAX SETUP menu, and then use the Fax speed-dial option.
number on the keypad or keyboard. Type the fax number, and then press (select).
Include any pauses or other needed numbers, such as an area code, an access code
for numbers outside a PBX system (usually a 9 or 0), or a long-distance prefix. Type the
name, and then press (select).
entry that you want to delete, or type a number on the keypad or keyboard. Press - or +
to select DELETE or DELETE ALL, and then press (select).
To set up a speed-dial group
If you send information to the same group of fax numbers on a regular basis, you can set up a
speed-dial entry for a group in order to simplify the task. The speed-dial entry for a group can
be associated with a speed-dial button on the control panel.
52 3 - Using the all-in-one ENWW
Page 55

A group member must be a member of the speed-dial list before you can add the member to a
speed-dial group. You can add up to 20 fax numbers to each group (with up to 50 characters
allowed for each fax number).
z Embedded Web server (network connection)
Open the embedded Web server, click the Settings tab, and then click Fax Speed-dial in
the left pane. Click the tab that contains the number for the entry (for example, Speed-dial
26-50).
• To add a group, click Edit Group for an unused line, and then add entries to the group.
The first six entries in the list (which can be groups) are the entries that are associated
with the speed-dial buttons on the control panel.
• To add, change, or delete entries in a group: Click Edit Group for the group, and then
add, change, or delete the entries.
• To delete a group: Use the Delete check box on the right side.
•Click Apply when you are finished.
z HP photo and imaging software (direct connection)
Open the HP photo and imaging software and follow the instructions in the onscreen Help.
z Control panel
Press M
ENU, open the FAX SETUP menu, and then use the Fax speed-dial option.
• To add a group: Press - or + to move to an unused speed-dial number, or type a
number on the keypad or keyboard. Then add entries to the group.
• To add entries to a group: Press - or + to move to Edit Group, and then press
(select). Type the fax number that you want in the group, and then press
(select). Include any pauses or other needed numbers, such as an area code, an
access code for numbers outside a PBX system (usually a 9 or 0), or a long-distance
prefix. Press (down) to move to the next slot to type another fax number, and then
press (select). Repeat for each fax number that you want to add to the group. When
finished, press (select). Type a name for the group, and then press (select).
You can include an existing speed-dial entry in a group. Click C
ONTACTS on the control
panel to show a list of available speed-dial entries. Move to the speed-dial entry that
you want to add, and then press (select).
• To delete an entry from a group: Press - or + to move to Edit Group, and then press
(select). Select the entry that you want to delete, select Delete, and then press
(select).
• To delete a group: Press - or + to move to Edit Group, and then press (select).
Select the group that you want to delete, select Delete, and then press (select).
Setting up e-mail addresses as speed-dial entries or groups
You can store up to 99 e-mail addresses or groups of e-mail addresses as speed-dial entries.
Speed-dial entries 1 through 6 are associated with the corresponding six speed-dial buttons
on the control panel.
See Printing and viewing a list of speed-dial entries for information about printing a list of the
speed-dial entries that have been set up.
To set up speed-dial entries
z Embedded Web server (network connection)
Open the embedded Web server, click the Settings tab, and then click E-mail Speed-dial
in the left pane. Click the tab that contains the number for the entry (for example,
Speed-dial 26-50).
ENWW Setting up speed-dial entries 53
Page 56

• To add or change an entry: Add or change information in the fields.
• To delete an entry: Use the Delete check box on the right side.
•Click Apply when you are finished.
z HP photo and imaging software (direct connection)
Open the HP photo and imaging software and follow the instructions in the onscreen Help.
z Control panel
Press M
ENU, open the E-MAIL menu, and then use the E-maiil speed-dial option. To
add a group: Press - or + to move to an unused speed-dial number, or type a number on
the keypad or keyboard. Then add entries to the group.
• To add entries to a group: Press - or + to move to Edit Group, and then press
(select). Type the e-mail address that you want in the group, and then press
(select). Press (down) to move to the next slot to type another e-mail address,
and then press (select). Repeat for each e-mail address that you want to add to the
group. When finished, press (select). Type a name for the group, and then press
(select).
You can include an existing speed-dial entry in a group. Click C
ONTACTS on the control
panel to show a list of available speed-dial entries. Move to the speed-dial entry that
you want to add, and then press (select).
• To delete an entry from a group: Press - or + to move to Edit Group, and then press
(select). Select the entry that you want to delete, select Delete, and then press
(select).
• To delete a group: Press - or + to move to Edit Group, and then press (select).
Select the group that you want to delete, select Delete, and then press (select).
To set up a speed-dial group
If you send information to the same group of e-mail addresses on a regular basis, you can set
up a speed-dial entry for a group in order to simplify the task. The speed-dial entry for a group
can be associated with a speed-dial button on the control panel.
A group member must be a member of the speed-dial list before you can add the member to a
speed-dial group. You can add up to 20 e-mail addresses to each group.
z Embedded Web server (network connection)
Open the embedded Web server, click the Settings tab, and then click E-mail Speed-dial
in the left pane. Click the tab that contains the number for the entry (for example,
Speed-dial 26-50).
• To add a group, click Edit Group for an unused line, and then add entries to the group.
The first six entries in the list (which can be groups) are the entries that are associated
with the speed-dial buttons on the control panel.
• To add, change, or delete entries in a group: Click Edit Group for the group, and then
add, change, or delete the entries.
• To delete a group: Use the Delete check box on the right side.
•Click Apply when you are finished.
z HP photo and imaging software (direct connection)
Open the HP photo and imaging software and follow the instructions in the onscreen Help.
z Control panel
Press M
ENU, open the E-MAIL SETUP menu, and then use the E-mail speed-dial option.
• To add a group: Press - or + to move to an unused speed-dial number, or type a
number on the keypad or keyboard. Then add entries to the group.
54 3 - Using the all-in-one ENWW
Page 57

• To add entries to a group: Press - or + to move to Edit Group, and then press
(select). Type the e-mail address that you want in the group, and then press
(select). Press (down) to move to the next slot to type another e-mail address,
and then press (select). Repeat for each e-mail address that you want to add to the
group. When finished, press (select). Type a name for the group, and then press
(select).
You can include an existing speed-dial entry in a group. Click C
ONTACTS on the control
panel to show a list of available speed-dial entries. Move to the speed-dial entry that
you want to add, and then press (select).
• To delete an entry from a group: Press - or + to move to Edit Group, and then press
(select). Select the entry that you want to delete, select Delete, and then press
(select).
• To delete a group: Press - or + to move to Edit Group, and then press (select).
Select the group that you want to delete, select Delete, and then press (select).
Setting up network folders as speed-dial entries
You can store up to six network folders as speed-dial entries. The six entries are associated
with the corresponding six speed-dial buttons on the control panel.
See Printing and viewing a list of speed-dial entries for information about printing a list of the
speed-dial entries that have been set up.
To set up speed-dial entries
z Embedded Web server (network connection)
Open the embedded Web server, click the Settings tab, and then click Network
Speed-dial in the left pane.
• To add or change an entry: Add or change information in the fields.
• To delete an entry: Use the Delete check box on the right side.
•Click Apply when you are finished.
z HP photo and imaging software (direct connection)
Open the HP photo and imaging software and follow the instructions in the onscreen Help.
z Control panel
Press M
ENU, open the SCAN SETUP menu, and then use the Folder speed-dial option.
• To add or change an entry: Press - or + to specify an unused entry number, or type a
number on the keypad or keyboard. Add or change the network folder information, and
then press (select).
• To delete an entry: Press (up) or (down) to move to the speed-dial entry that you
want to delete, or type a number on the keypad or keyboard. Press - or + to select
DELETE, and then press (select).
ENWW Setting up speed-dial entries 55
Page 58

Printing and viewing a list of speed-dial entries
You can print or view a list of all of the speed-dial entries that have been set up. Each entry in
the list contains the following information:
z Speed-dial number (the first six entries correspond to the six speed-dial buttons on the
control panel)
z Name associated with the fax number or group of fax numbers
z For the fax speed-dial list, the fax number (or all of the fax numbers for a group)
z For the e-mail speed-dial list, the e-mail address (or all of the e-mail addresses for a
group)
z For the network folder list, the folder pathname
To print a list of speed-dial entries
z Control panel
Press M
To view a list of speed-dial entries
z Embedded Web server (network connection)
Open the embedded Web server, click the Settings tab, and then click Fax Speed-dial,
E-mail Speed-dial, or Network Speed-dial in the left pane.
ENU, open the PRINT REPORT menu, and then use the Speed-dial list option.
z HP photo and imaging software (direct connection)
Open the HP photo and imaging software and follow the instructions in the onscreen Help.
Printing a speed-dial template for the control panel
You can print a template for the control panel that lists the six speed-dial entries that have
been configured for fax numbers, e-mail addresses, and network folders. Cut the lists to size,
and insert them under the overlays next to the six speed-dial buttons on the control panel.
To print a speed-dial template
z Control panel
Press M
ENU, open the PRINT REPORT menu, and use the Speed-dial template option.
56 3 - Using the all-in-one ENWW
Page 59

Printing
4
Most print settings are automatically handled by the software program that you are printing
from. You need to change the settings manually only when you change print quality, print on
specific types of media, or use special features.
This section contains information about the following topics.
z Printing through the printer drivers
z Changing common settings for a job
z Setting defaults for all print jobs
z Performing duplexing
Printing through the printer drivers
In most situations, you will probably print documents from your computer through the printer
driver. Although specific options vary depending on the software program that you are using,
you can usually gain access to the printer driver by clicking File and then clicking Print in the
software program.
For more information about printer driver features and procedures, see the printer-driver
onscreen Help. For more information about printing from a specific software program, see the
documentation for the software progr am .
Note See To change settings on a Macintosh computer for information about printing from a
Macintosh computer.
See Printing by using PostScript emulation for information about printing with PS printer drivers
for Windows 98, Windows Me, and Windows NT 4.0. For other Windows operating systems,
see the online Help for the printer driver.
Changing common settings for a job
Change the settings for a job when you want to use something other than the defaults that
have been set up or when you want to use an optional feature such as printing on both sides
of the paper. Any changes that you make apply only to the current job.
You can change the settings from the control panel, a software program, and the printer driver.
Note Settings in a software program (for example, media size) always take precedence over settings
in the printer driver or the control panel.
If you want to set printing options only for the documents that you are printing from a particular
program, change the settings from the program. After you close the program, the printer
settings return to the defaults that are configured in the printer driver.
If you want to set printing options for all of the software programs that you use on the
computer, change the default settings either from the control panel or the printer driver.
ENWW Printing through the printer drivers 57
Page 60

This section contains information about the following topics.
z To change settings from the control panel
z To change settings on a Windows computer
z To change settings on a Macintosh computer
To change settings from the control panel
Use the option buttons on the control panel to change common settings for a print job.
To change settings on a Windows computer
1 Open the document in the software program.
2 On the File menu of the program, click Print.
3 Select the printer driver (PCL 5c, PCL 6, or PS), and then click Setup or Properties. (The
options might be different for your program.)
4 Change the settings, and then click OK.
5 Click Print or OK to print the document.
To change settings on a Macintosh computer
You can change settings from the Page Setup and Print dialog boxes in the Mac OS.
You can also select the default device. The default device is the one that is used if you choose
the Print command without first specifying which device you want to use with a program. The
default device should be the device that you use most often.
Use the following steps to change the page setup settings.
1 Open the document in the software program.
2 On the File menu of the program, click Page Setup.
3 From the F o rm at for pop-up menu, select the device for which you want to format the
document, and then change the preferred settings (such as the page size).
4 On the Paper Size pop-up menu (Mac OS X, 10.1.x and 10.2.x) or the Paper pop-up
menu (MacOS 9.2.x), select the media size on which you want to print.
5 Click OK to print the document.
Use the following steps to change the print settings.
1 Open the document in the software program.
2 On the File menu of the program, click Print.
3 Select the location of the media or the type of media on which you want to print:
• Mac OS X (10.1.x and 10.2.x): On the pop-up menu, click Paper Feed, click All pages
from, and then select the media source. Click Printer Features to change the media
type.
• Mac OS 9.2.x: On the pop-up menu, click All pages from, and then select the media
source or the media type.
4 Change any other settings (such as the print quality).
5 Click Print to print the document.
58 4 - Printing ENWW
Page 61

Select the correct print queue
Make sure that the print queue settings are correct for your operating system and connection
type.
z For Macintosh computers connected directly to a computer with a USB cable using
CommApp, use the Officejet 9100 series Printer print queue for Mac OS 9. For Mac OS
10, use the Officejet 9100 series (Printer) print queue.
z For Macintosh computers connected to a network (IP printing only) using CommApp, use
the xxx.xxx.xxx.xxx OJ9100 print queue. For Mac OS 10, use the Officejet 9100
series@macaddress print queue.
z For Macintosh computers connected to a network (IP printing), without using CommApp,
use the xxx.xxx.xxx.xxx OJ9100 - NET print queue. For Mac OS 10, use the Officejet
9100 series@macaddress - NET print queue.
Setting defaults for all print jobs
You can set defaults for the all-in-one that will apply to all print jobs. For example, you can set
the default number of copies that print and the default tray that is used.
See PRINTER menu for an explanation of the options.
Note Settings in a software program and in the printer driver (for example, media size) always take
precedence over settings made from the control panel.
To set defaults from the printer driver (Windows computers)
1 From the Windows desktop, use one of the following methods to open the printer driver.
• Windows 98, Windows Me, Windows NT 4.0, and Windows 2000:
Click Start, point to Settings, and then click Printers.
• Windows XP:
Click Start, and then click Printers and Faxes.
Or, click Start, click Control Panel, and then click Printers and Faxes.
2 Right-click the all-in-one icon, and then click the option for your operating system:
• Windows 98 and Windo ws Me: Click Properties.
• Windows NT 4.0: Click Document Defaults or Properties.
• Windows 2000 and Windows XP: Click Printing Preferences or Properties.
3 Change the settings, and then click OK.
ENWW Setting defaults for all print jobs 59
Page 62

To set defaults from the control panel
Use the control panel to set defaults only when you cannot set them from a software program
or a printer driver. For example, use the control panel for operating systems other than
Windows or the Mac OS.
MENU
7: PRINTER
Configure printing
Configure tray
Configure PCL
Print PostScript errors OFF
Unattended printing OFF
Personality AUTO
[PRINTING
Copies 1
Default paper size LTR
Default paper type PLAIN
Default print quality DRAFT
Duplex OFF
Override A4 or Letter NO
1 On the control panel, press M
2 Pr
ess (up) or (down) to move to PRINTER, and
ENU.
then press (select).
3 Press (down) to move to the option that you
want, and then press (select).
• Selecting the Configure printing option
opens the PRINTING submenu.
• Selecting Configure tray opens the TRAY
submenu.
• In a submenu, press (down) to move to the
option that you want, and then press
(select).
4 Press - or + to select the value that you want, and
then press (select).
If there is no - or + around the setting, the setting
cannot be changed.
[TRAY]
Tray 1 size LTR
Tray 1 paper type PLAIN
Tray 2 size LTR
Tray 2 paper type PLAIN
Default tray 1
Automatic media-
type sense OFF
60 4 - Printing ENWW
Page 63

Performing duplexing
You can use the all-in-one to perform automatic or manual duplexing.
This section contains information about the following topics.
z Performing automatic duplexing
z Performing manual duplexing
Performing automatic duplexing
The all-in-one includes an auto-duplex unit for performing automatic duplexing.
The auto-duplex feature is turned off if you select a media type that is not supported by the
auto-duplex unit. See Supported media types and weights for more info r mation.
To perform automatic duplexing on Windows computers
1 Load the appropriate paper in tray 1 or tray 2. Be sure to load the paper with the front side
facing down. See Loading the print media for more information.
2 On the File menu of the program, click Print, and then click Properties. (The options
might be different for your program.)
3 On the Finishing tab, click the Print on Both Sides check box.
4 When you are duplexing, you might need to increase the top margin slightly to make sure
that the pages align. This might cause the contents of a page to overflow to the next page.
Make sure that the Preserve Layout check box is selected in order to reduce the page
contents so that your page layout is not affected.
5 Select or clear the Flip Pages Up check box depending on which way you want the
binding. See the graphics in the printer driver for examples.
6 Click OK to close the dialog box.
7 Click OK to print the document.
To perform automatic duplexing on Mac OS X (10.1.x and 10.2.x)
computers
1 Load the appropriate paper in tray 1 or tray 2. Be sure to load the paper with the front side
facing down. See Loading the print media for more information.
2 On the File menu of the program, click Print.
3 On the Duplex panel, cl ic k the Print on Both Sides check box and select the binding
orientation that you want (select the correct icon).
4 Click Print to print the document.
To perform automatic duplexing on Mac OS 9.2.x computers
1 Load the appropriate paper in tray 1 or tray 2. Be sure to load the paper with the front side
facing down. See Loading the print media for more information.
2 On the File menu of the program, click Print.
3 On the Layout panel, click the Print on Both Sides check box and select the binding
orientation that you want (select the correct icon).
4 Click Print to print the document.
ENWW Performing duplexing 61
Page 64

Performing manual duplexing
You can use the following printer drivers to perform manual duplexing:
z PCL 5 and PCL 6 printer drivers: Windows 2000 and Windows XP
z PS printer driver: Windows XP only
If the selected media size is not supported by the auto-duplex unit, the all-in-one prints on only
one side of the paper.
Before beginning, make sure that manual duplexing has been turned on in the printer driver.
To turn on manual duplexing in the printer driver
1 To open the printer driver, use one of the following methods:
• Windows 2000
Click Start, point to Settings, and then click Printers.
• Windows XP
Click Start, and then click Printers and Faxes.
Or, click Start, click Control Panel, and then click Printers a nd Faxes.
2 Right-click the icon for the printer driver that you want, and then click Properties.
3 Click one of these tabs: Configure, Device Settings, or Device Options. (The name of
the tab depends on the printer driver and operating system.) On the selected tab, click
Allow Manual Duplexing, click Enabled from the drop-down menu, and then click OK.
To perform manual duplexing
1 Load the appropriate paper in tray 1 or tray 2. Be sure to load the paper with the front side
facing down. See Loading the print media for more information.
2 On the File menu of the program, select the printer driver, click Print, and then click
Properties. (The options might be different for your program.)
3 On the Advanced tab, click Front to Back under Page Order.
4 On the Finishing tab, select the Print on Both Sides (Manually) check box.
5 Select or clear the Flip Pages Up check box depending on which way that you want the
binding. See the graphics in the printer driver for examples.
6 Click OK to close the dialog box.
7 Click OK to print.
8 After the first side prints, follow the instructions on the screen to reload the printed pages
and continue the job.
62 4 - Printing ENWW
Page 65

Copying
5
The all-in-one can be used to produce high-quality color and grayscale copies on a variety of
paper types and sizes.
This section contains information about the following topics.
z Making copies
z Changing common settings for a job
z Setting defaults for all copy jobs
z Restoring copy settings
z Using special copy features
z Using presets
Making copies
You can make copies directly from the control panel.
Note All copy settings that you select on the control panel are reset one minute after the all-in-one
completes the copy, unless you save the settings as the default settings. See Setting defaults
for all copy jobs for more information.
Color copying might be restricted. See Allowing and restricting color copying for more
information.
To make copies from the control panel
1 Load the original on the scanner glass or in the ADF. See Loading the originals for more
information.
2 If required, type your PIN on the keypad or keyboard.
3 Press C
4 To make colo r co pies, press B
5 To set copy options, use one of the following methods:
• Press a control-panel option button (for example, L
• Select an option from the control-panel display (for example, Lighter/Darker), select
OPY.
LACK/COLOR to turn the color setting on.
IGHTER/DARKER), select the value,
and then press (select).
the value, and then press (select).
6 Press S
ENWW Making copies 63
TART.
Page 66

Changing common settings for a job
Change the settings for a job when you want to use something other than the defaults that
have been set up or when when you want to use an optional feature such as collation or
double-sided printing. Any changes that you make apply only to the current job.
You can change settings by using two methods:
z Use an option button on the control panel (for example, QUALITY).
z Open the copy mode menu and select the option that you want to change (for example,
Quality).
See the following topics for more information.
z See Setting defaults for all copy jobs for information about changing defaults.
z See Using presets for information about storing settings that you use frequently as a
preset, which then makes these settings available for future copy jobs.
z See Using special cop y feat ur es for an explanation of special copy features.
See Copy mode menu for an explanation of the options.
To change common settings in the copy mode menu
1 On the control panel, press COPY.
COPY
2 Press (down) to move to the option that you
want, and then press (select).
XXXX COPIES
Normal copy
Glass 1+1 SIDED
Red./enlarge 100%
Collation OFF
Quality NORMAL
Lighter/darker 0
Tray 1/PLAIN
Paper size LETTER
Preset NONE
Setup
Special copy features
z COPY FULL PAGE
z LEGAL->LETTER
z A4->LETTER
Selecting Normal copy leads to the special
copy features listed below.
3 Press - or + to select the value that you want,
and then press (select).
z COPY 2 ON 1
z FIT TO PAGE
z MARGIN SHIFT
z POSTER
z CLONE
z MIRROR COPY
64 5 - Copying ENWW
Page 67

Setting defaults for all copy jobs
You can set defaults for the all-in-one that will apply to all copy jobs. For example, you can set
the intensity of color or set copying so that it enhances photos.
See COPY SETUP menu for an explanation of the options.
To set defaults
MENU
2: COPY SETUP
Set copy defaults
Set copy presets
Color intensity
Enhancement
Resore copy factory settings
1 On the control panel, press M
2 Press
and then press (select).
3 Press (down) to move to the option that you
want, and then press (select).
4 Press - or + to select the value that you want, and
then press (select).
If there is no - or + around the setting, the setting
cannot be changed.
(up) or (down) to move to COPY SETUP,
ENU.
To save the current settings as the defaults
1 On the control panel, press COPY.
2 Change the copy settings to those that you want to save as the defaults.
3 Press (down) to move to Setup, and then press (select).
4 With the cursor next to Set copy defaults, press (select).
5 Press - or + to select SAVE, and then press (select).
Restoring copy settings
You can restore copy settings to the factory settings that were set when the all-in-one was
received.
CAUTION When you restore settings, the default settings that you have configured (such as presets) are
lost.
To restore factory defaults
1 On the control panel, press MENU.
2 Press (up) or (down) to move to COPY SETUP, and then press (select).
3 Press (down) to move to Restore copy factory settings, and then press (select).
4 Press - or + to select RESTORE, and then press (select).
ENWW Setting defaults f or all copy jobs 65
Page 68

Using special copy features
This section contains information about the following topics.
z Copying more than one original onto one page
z Shifting the image to increase the margin for binding
z Making a poster
z Cloning several copies of an image on a page
z Creating a mirror image of an original
Copying more than one original onto one page
You can copy two or more different letter-size or A4-size originals onto one page (called
2-on-1 copying). The copied images appear side by side on the page in a landscape format.
This feature can be used with double-sided copying options to create double-sided copies with
two or more originals on each page.
Note the following points about this feature:
z If you have only one original and perform 2-on-1 copying, a second scan occurs without
any document in order for the all-in-one to complete the job.
z You cannot collate when using this feature.
z The copy image will be clipped if you select letter-size for the page size and the original
that you are copying is legal-size.
z You can copy only two originals onto one page with the scanner glass. You can copy more
than two originals onto one page with the ADF.
To copy more than one original onto one page
1 If you are using the scanner glass, place the first original on the scanner glass. If you are
using the ADF, load all of the originals in the ADF input tray. See Loading the originals for
more information.
2 If required, type your PIN on the keypad or keyboard.
3 Press C
OPY.
4 With the cursor next to Normal copy, press (select).
5 Press - or + to select the copy option that you want, and then press (select).
6 Press S
TART.
7 If you are using the scanner glass, place the second original on the scanner glass when
prompted. Then press (select).
66 5 - Copying ENWW
Page 69

Shifting the image to increase the margin for binding
Use the margin shift feature to shift the image to the left or right to increase the margin for
binding.
Note You can also adjust the reduction/enlargement percentage in this mode by typing a number
on the keypad or keyboard. Each unit of adjustment is 6.35 mm (0.25 inch). Therefore, the
adjustable range is -12.7 to 12.7 mm (-0.5 to 0.5 inch).
To shift the image to increase the margin for binding
1 Load the original on the scanner glass or in the ADF. See Loading the originals for more
information.
2 If required, type your PIN on the keypad or keyboard.
3 Press C
4 With the cursor next to Normal copy, press (select).
5 Press - or + to select Margin Shift, and then press (select).
6 Press - or + to shift the margin, and then press (select).
7 Press S
OPY.
TART.
Making a poster
When you use the poster feature, the all-in-one divides your original into sections and then
enlarges the sections onto letter or A4 paper so that you can assemble them into a poster.
Note Only the scanner glass can be used to make a poster.
ENWW Using special copy features 67
Page 70

To make a poster
1 Place the original on the scanner glass. See Loading the originals for more information.
2 If required, type your PIN on the keypad or keyboard.
3 Press C
OPY.
4 With the cursor next to Normal copy, press (select).
5 Press (down) to move to Poster, and then press (select).
6 Press - or + to select how wide the poster is to be (in pages, from 1 to 4), and then press
(select).
7 Press S
TART.
Cloning several copies of an image on a page
You can place multiple copies of an original on one page by selecting a size and then
selecting the number of copie s that yo u want.
Note Only the scanner glass can be used to clone an image.
To clone several copies of an image on one page
1 Place the original on the scanner glass. See Loading the originals for more information.
2 If required, type your PIN on the keypad or keyboard.
3 Press C
4 With the cursor next to Normal copy, press (select).
5 Press (down) to move to Clone, and then press (select).
6 Press - or + to select the size, and then press (select).
7 Press - or + to select how many copies of the image that you want on the page, and then
press (select).
You can select either 1 copy or the maximum number of copies that can fit on the page.
The maximum varies depending on media size and image size.
8 Press S
OPY.
TART.
68 5 - Copying ENWW
Page 71

Creating a mirror image of an original
Use the mirror image option to flip an image left-to-right. When printed, the text and pictures
are reversed from what you see on the computer screen.
Use this feature if you write on transparencies during presentations. The print side faces down
when you project the transparency on the projector. You can write on the back of the
transparency and then clean the transparency off without damaging the printed side.
To create a mirror image of an original
1 Load the original on the scanner glass or in the ADF. See Loading the originals for more
information.
2 If required, type your PIN on the keypad or keyboard.
3 Press C
OPY.
4 Use the up and down arrow buttons to scroll to Normal copy.
5 Press - or + to select the Mirror copy, and then press (select).
6 Press S
TART.
ENWW Using special copy features 69
Page 72

Using presets
If you frequently use the same set of copy options for a particular kind of job, you can save the
options as a preset. You can then apply the preset to future copy jobs.
You can create up to three presets.
To store copy settings into a preset
1 On the control panel, press COPY.
2 Change the copy settings to those that you want to save as a preset.
3 Press M
4 Press (down) to move to Set Copy presets.
5 Press - or + to select the preset that you want to save the settings into, and then press
6 Use the keypad or keyboard to type a name for the preset, or accept the default name.
Then press (select).
A name is optional. If you do not provide one, a default name is used (Preset 1, Preset 2,
or Preset 3).
ENU.
(select).
To apply a preset to a copy job
1 Load the original on the scanner glass or in the ADF. See Loading the originals for more
information.
2 If required, type your PIN on the keypad or keyboard.
3 Press C
4 Press (down) to move to Preset.
5 Press - or + to select the preset that you want, and then press (select).
6 Press S
OPY.
TART.
70 5 - Copying ENWW
Page 73

Sending scans
6
Using the all-in-one, you can scan black-and-white and color originals and send them to a
variety of destinations, such as one or more e-mail addresses, a folder on the network, or a
program on a computer. You can use the control panel, the HP photo and imaging software,
and TWAIN-compliant or WIA-compliant programs on a computer.
Note Before you can use the HP photo and imaging software for scanning, you must customize the
scan featur e in th e soft war e. Se e Customizing the scan feature in the HP photo and imaging
software (direct connection) for more information.
If your all-in-one is connected directly to a computer running Windows, it is recommended that
you use a USB connection to ensure optimal scanning performance.
When sending scans to a network folder or as e-mail attachments from an all-in-one that is
connected to a network, you must type any required information (such as user information or
e-mail addresses) using the all-in-one keyboard.
This section contains information about the following topics.
z Sending scans
z Changing common settings for a job
z Setting defaults for all scan jobs
z Using optical character recognition (OCR) software
Sending scans
This section contains information about the following topics.
z Sending scans to a network folder (network connection)
z Sending scans to a program on a computer (direct connection)
z Sending scans as e-mail attachments
z Sending a scan from a TWAIN-compliant or a WIA-compliant program to a computer on
the network
Sending scans to a network folder (network connection)
You can scan originals directly from the all-in-one into a network folder without any
computer-based software. The shared folder can reside on a file server or on any computer on
your network.
The all-in-one assigns a file name to the file that you create, composed of the following parts:
z 10-character prefix that is based on the name of the all-in-one device can be set by the
user
z 4-digit sequential number that increments with each file that is created
z an “.ext” file extension
ENWW Sending scans 71
Page 74

The file name might be preconfigured. To temporarily change the file name, use the control
panel or keyboard. To restore the default setting, press R
the default settings, see Setting defaults for all scan jobs.
ESET. For information about setting
To send a scan to a network folder
1 Load the original on the scanner glass or in the ADF. See Loading the originals for more
information.
2 If required, type your PIN on the keypad or keyboard.
3 Press S
4 With the cursor next to <HOST\Sharename>, press (select).
5 Specify the destinati on by doing one of the following:
• Type the pathname for a network folder on the keypad or keyboard.
• Press a speed-dial button, if speed-dial entries have been set up for network folders.
6 To set scan options, use one of the following methods:
• Press a control-panel option button (for example, Q
• Select an option from the control-panel display (for example, Lighter/darker), select
7 Press S
The connection might take some time.
8 If prompted, type your user name, and then press (select).
9 If prompted, type your password, and then press (select).
CAN.
UALITY), select the value, and then
press (select).
the value, and then press (select).
TART.
Sending scans to a program on a computer (direct connection)
Use the following steps if your all-in-one is directly connected to a computer by means of a
USB or parallel cable.
When the scan is complete, the program that you have selected opens and displays the
document that you have scanned.
The scan procedure saves the document in a folder named My Scans.
To send a scan to a program on a computer from the HP photo and
imaging software
1 At the computer, open the HP photo and imaging software. See Using the HP photo and
imaging software for more information.
2 See the onscreen Help for further instructions.
To send a scan to a program on a computer from the control panel
1 Load the original on the scanner glass or in the ADF. See Loading the originals for more
information.
2 If required, type your PIN on the keypad or keyboard.
3 Press S
CAN.
72 6 - Sending scans ENWW
Page 75

4 Press (select).
5 Press - or + to select either Scan to USB or Scan to Parallel.
6 Select App, and then press (select).
7 Press - or + to select the program that you want to use (such as the HP photo and imaging
software), and then press (select).
8 To set scan options, use one of the following methods:
• Press a control-panel option button (for example, Q
UALITY), select the value, and then
press (select).
• Select an option from the control-panel display (for example, Resolution), select the
value, and then press (select).
9 Press S
TART.
Sending scans as e-mail attachments
You can scan an original and send it to one or more e-mail addresses as an attachment.
Note the following points about this feature:
z The FROM and SUBJECT might be preconfigured. However, you can change the text
(unless the all-in-one has been set up so that the FROM cannot be changed).
z If the e-mail attachment that you create is too large, the all-in-one splits the scan and
sends it as attachments to multiple e-mail messages.
Note When sending scans as e-mail attachments from an all-in-one that is connected to a network,
you must type any required information using the all-in-one keyboard.
To send a scan as an e-mail attachment from the HP photo and imaging
software
1 At the computer, open the HP photo and imaging software. See Using the HP photo and
imaging software for more information.
2 See the onscreen Help for further instructions.
To send a scan as an e-mail attachment from the control panel (network
connection)
1 Load the original on the scanner glass or in the ADF. See Loading the originals for more
information.
2 If required, type your PIN on the keypad or keyboard.
3 Press E-
4 To specify the destination or destinations, use one of the following methods:
• Type the e-mail address on the keypad or keyboard.
• Press a speed-dial dial button for an e-mail address or e-mail address group, if
• Press C
• Press C
MAIL.
speed-dial entries have been set up.
ONTACTS and select an e-mail address or e-mail address group from the
control-panel display (up to 99 entries might be configured).
ONTACTS, press - or + to select SENT MAIL, and then select from the list of e-mail
addresses to which e-mail messages have been sent.
ENWW Sending scans 73
Page 76

• Press CONTACTS, press - or + to move to the option allowing you to search your
company address book (LDAP), if an address book has been configured (the number
of address book entries is unlimited).
5 To set scan options, use one of the following methods:
• Press a control-panel option button (for example, Q
press (select).
• Select an option from the control-panel display (for example, Lighter/darker), select
the value, and then press (select).
6 Press S
TART.
UALITY), select the value, and then
Sending a scan from a TWAIN-compliant or a WIA-compliant program to a computer on the network
The all-in-one is TWAIN-complaint and WIA-compliant and works with programs that support
TWAIN-compliant and WIA-compliant scanning devices. While you are in a TWAIN-compliant
or WIA-compliant program, you can gain access to the scanning feature and scan an image
directly into the program.
TWAIN is supported for all Windows and Macintosh operating systems, for both network
connections and direct connections.
For Windows operating systems, WIA is supported only for Windows XP direct connections. It
is not supported for the Mac OS.
To send a scan from a TWAIN-compliant program
Generally, a software program is TWAIN-compliant if it has a command such as Acquire, File
Acquire, Scan, Import New Object, Insert from, or Scanner. If you are unsure whether the
program is compliant or you do not know what the command is called, see the software
program Help or documentation.
Start the scan from within the TWAIN-compliant program. See the software program Help or
documentation for information about the commands and steps to use.
To send a scan from a WIA-compliant program
Generally, a software program is WIA-compliant if it has a command such as Picture/From
Scanner or Camera in the Insert or File menu. If you are unsure whether the program is
compliant or you do not know what the command is called, see the software program Help or
documentation.
Start the scan from within the WIA-compliant program. See the software program Help or
documentation for information about the commands and steps to use.
74 6 - Sending scans ENWW
Page 77

Changing common settings for a job
Change the settings for a job when you want to use something other than the defaults that
have been set up or when you want to use an optional feature such as collation or
double-sided printing. Any changes that you make apply only to the current job.
You can change settings using two methods:
z Use an option button on the control panel (for example, QUALITY).
z Open the scan mode menu and select the option that you want to change (for example,
Resolution).
See Setting defaults for all scan jobs for information about changing defaults.
See Scan mode menu for an explanation of the options.
To change common settings in the scan mode menu
1 On the control panel, press SCA N.
SCAN
2 Press (down) to move to the option that you
want, and then press (select).
<HOST\NAME?
Glass 1-SIDED
Type MIXED
Paper size LETTER
Resolution 300DPI
Lighter/darker 0
Prefix
Setup
3 Press - or + to select the value that you want, and
then press (select).
ENWW Changing common settings for a job 75
Page 78

Setting defaults for all scan jobs
You can set defaults for the all-in-one that will apply to all scan jobs. For example, you can set
the resolution or contrast.
To save the current settings as the defaults
MENU
5: SCAN SETUP
Folder speed-dial
Scan defaults
1 On the control panel, press S
2 Change the scan settings to those that you want to save
as the defaults.
3 P
RESS MENU.
4 Press (up) or (down) to move to SCAN SETUP, and
then press (select).
5 Press (down) to move to Scan defaults, and then
press (select).
6 Press - or + to select SAVE, and then press (select).
If there is no - or + around the setting, the setting cannot
be changed.
CAN.
Using optical character recognition (OCR) software
You can use OCR software to import scanned text into your preferred word-processing
program for editing. This lets you edit faxes, letters, newspaper clippings, and many other
documents.
OCR software is included in the installation software for the all-in-one.
z Network connection
Install the optional ReadIris software from Starter CD 2.
z Direct connection
The OCR software is installed when you install the all-in-one software for direct
connection, and is an integrated part of the HP photo and imaging software component.
(For Windows computers, you must use the Typical installation procedure. The Lite
installation procedure does not include the OCR software.)
For direct connection, you can specify the word-processing program that you want to use for
editing. If the word-processing icon is not present or active, either you do not have
word-processing software installed on your computer, or the scanner software did not
recognize the program during the installation. See the onscreen Help for the HP photo and
imaging software for information about how to create a link to the word-processing program.
The OCR software does not support scanning colored text. Colored text is always converted to
black-and-white text before being sent to OCR. Thus, all text in the final document is in black
and white, regardless of the original color.
Because of the complexity of some word- pr oce ssi ng progr am s and thei r in terac tio n with the
all-in-one, it is sometimes preferable to scan to Wordpad (a Windows accessory), and then cut
and paste the text into the preferred word-processing program.
76 6 - Sending scans ENWW
Page 79

Using memory cards
7
The all-in-one comes with a memory card reader that can read several types of digital camera
memory cards. You can use the all-in-one to save, print, or e-mail photos from these memory
cards. You can also print a proof sheet, which shows thumbnail views of photos that are stored
on a memory card.
The network administrator can choose to restrict photo mode use. When the feature is
restricted, inserting a memory card or pressing P
message appears: Photo card has been disabled. Check with administrator.
Note On Macintosh compute rs, the Photo Save button still appears in the HP photo and imaging
software when photo mode use has been restricted. However, clicking the button causes the
all-in-one to stop operating. If this happens, quit the program.
This section contains information about the following topics.
z Inserting and removing a memory card
z Saving photos
z Viewing and editing image files
HOTO sounds a beep, and the following
z Sending photos as e-mail attachments
z Printing from a memory card
z Using a proof sheet
Inserting and removing a memory card
You can use only one memory card in the all-in-one at a time. The all-in-one does not operate
if you insert more than one memory card in the slots.
CAUTION Do not insert or remove memory cards when the light on the memory card reader is blinking.
Doing so can damage the all-in-one, the memory card, or the information on the memory card.
You can safely remove the card when the light next to the slots remains on or is not blinking.
To insert a memory card
Insert the memory card into the appropriate slot so that the edge with the connectors (holes)
goes inside the all-in-one. Inserting the card incorrectly can bend the pins inside the slots or
otherwise damage the mechanism that reads the memory cards.
ENWW Inserting and removing a memory card 77
Page 80

The all-in-one features four slots, one slot for each type of memory card that is supported.
1
4
1 SmartMedia memory card
2 CompactFlash (CF) memory card
3 Secure Digital or MultiMedia Card (MMC) memory card
4 Memory Stick memory card
After you insert the memory card, three things happen:
z READING MEMORY CARD... appears on the control panel-display.
z The light next to the card slot blinks green while the card is being read.
z The PHOTO button on the control panel blinks.
2
3
If you insert a memory card backwards, the light next to the card slot blinks amber, and a
message such as Card is in backwards or Card is not fully inserted appears on the
control-panel display.
When the all-in-one is finished reading the card, another message appears that shows the
number of photos that were found on the memory card.
To remove a memory card
To remove a memory card, simply pull the memory card out of the slot.
78 7 - Using memory cards ENWW
Page 81

Saving photos
You can save photos directly from a memory card to a folder on the network (network
connection) or to a computer (direct connection). You can then view and edit the photos in a
photo-editing program of your choice (such as the HP photo and imaging software).
This section contains information about the following topics:
z Saving photos to a network folder (network connection)
z Saving photos to a computer (direct connection)
Saving photos to a network folder (network connection)
Use this procedure to save photos on a memory card to a folder on the network.
To save photos to a network folder
1 Insert the memory card into the appropriate memory card slot on the all-in-one. See
Inserting and removing a memory card for more information.
2 Press P
3 Press (down) to move to Save to network, and then press (se lec t).
4 To specify the path name for the network folder, use one of the following methods:
• Type the pathname for a network folder on the keyboard, and then press (select)
• Press the speed-dial button for the network folder that you want, if speed-dial entries
The connection might take some time.
5 If prompted, type your user name, and then press (select).
6 If prompted, type your password, and then press (select).
HOTO.
have been created for network folders. Then press (select).
Saving photos to a computer (direct connection)
To save photos to a computer from the control panel (direct connection)
By default, the procedure saves the photos in the following locations:
• Windows 2000: C:\Documents and Settings\<username>\My Documents\
My Pictures\<day-month-year>
• Other Windows versions: C:\My Documents\My Pictures\<day-month-year>
• Macintosh: HD:users:<username>:Documents:HP All-in One Data Folder:
Pictures:<day-month-year>
You can select a different destination during the procedure. The folder that you select must
already exist and it must already be shared. When you select such a folder, the all-in-one
creates a <day-month-year> folder within the folder in which to store the photos.
1 Insert the memory card into the appropriate slot on the all-in-one. See Inserting and
removing a memory card for more information.
2 If required, type your PIN on the keypad or keyboard.
3 Press P
ENWW Saving photos 79
HOTO. The control-panel display shows the number of photos on the memory card.
Page 82

4 Press (down) to move to Save photos to computer, and then press (select).
5 Select the destination and (select).
To save photos to a computer from Windows Explorer (Windows
computers)
The computer considers the memory card reader to be a drive, just like a disk drive, CD-ROM
drive, or hard drive. A drive letter is assigned to it (such as G). You can use the memory card
drive as you would use any other drive on the computer.
1 Start Windows Explorer.
2 Browse to the memory card reader drive.
3 Double-click the drive to see a list of the photo files that are on the memory card.
4 Copy the files that you want to save from the memory card reader drive to the location of
your choice.
To save photos to a computer from the HP photo and imaging software
(direct connection)
1 Open the HP photo and imaging software. See Using the HP photo and imaging software
for more information.
2 See the onscreen Help for the software for further instructions.
Viewing and editing image files
To view and edit image files, move them from the digital camera to your computer. Then use a
photo editing program of your choice, such as the HP photo and imaging software.
Sending photos as e-mail attachments
You can e-mail photos directly from a memory card to one or more e-mail addresses. You can
choose to e-mail all the photos on the memory card or select individual photos.
If you do not know the photo number for individual photos, print a proof sheet to help you
select individual photos to print. See Printing a proof sheet for more information.
To send photos as e-mail attachments from the HP photo and imaging
software
1 Open the HP photo and imaging software. See Using the HP photo and imaging software
for more information.
2 See the onscreen Help for the HP photo and imaging software for further instructions.
To send photos as e-mail attachments from the control panel
Note When sending scans as e-mail attachments from an all-in-one that is connected to a network,
you must type any required information using the all-in-one keyboard.
1 Insert the memory card into the appropriate slot on the all-in-one. See Inserting and
removing a memory card for more information.
2 If required, type your PIN on the keyboard.
80 7 - Using memory cards ENWW
Page 83

3 Press P
HOTO. The control-panel display shows the number of photos on the memory card.
4 Press (down) to move to E-mail photos,, and then press (select) .
5 Press - or + to select one of the following options:
• DPOF (to select all photos that the camera has already selected)
See Printing photos by using DPOF for information about DPOF.
• ALL (to select all photos on the memory card)
• CUSTOM (to select the photos that you want manually
6 If you selected CUSTOM, type the numbers of the photos that you want, and then press
(select).
7 Type one or more e-mail addresses on the keyboard, and then press (select).
8 Type the SUBJECT information, and then press (select).
9 Type the FROM information, and then press (select).
10 Press S
TART.
Printing from a memory card
You can use the control panel to print photos from a memory card, even if the all-in-one is not
connected to a computer. You can print a proof sheet, all of the photos that are on a memory
card, or selected photos. You can also print photos by using the Digital Print Order Format
(DPOF), if your digital camera supports DPOF.
You can do more than simply print your digital photos if you use the HP photo and imaging
software. For example, you can use digital photos for printing posters, banners, stickers, and
other creative projects.
This section contains information about the following topics.
z Printing a proof sheet
z Printing photos from the control panel
z Printing photos by using DPOF
Printing a proof sheet
A proof sheet is a simple and convenient way to select photos and make prints directly from a
memory card without the need for a computer. A proof sheet, which might be several pages
long, shows thumbnail views of the photos that are stored on the memory card. The file name,
index number, and date appear under each thumbnail. Proof sheets are also a quick way to
create a printed catalog of your digital photos.
You can use the proof sheet photo number to select which photos to print. This number might
be different from the number that is associated with the photo on your digital camera. If you
add photos to or delete photos from your memory card, you will need to reprint the proof sheet
to see the new photo numbers.
Depending on how many photos are on the memory card, the time it takes to print a proof
sheet can vary greatly.
To print a proof sheet
1 Insert the memory card into the appropriate slot on the all-in-one. See Inserting and
removing a memory card for more information.
ENWW Printing from a memory card 81
Page 84

2 If required, type your PIN on the keypad or keyboard.
3 Press P
4 Press (down) to move to Print thumbnails, and then press (select).
5 Press (down) to move to select ALL, LAST 20, or DPOF, and then press (select).
HOTO.
Printing photos from the control panel
Use the following procedure to print individual photos or all photos from the memory card.
If you do not know the photo number for individual photos, print a proof sheet to help you
select individual photos to print (see Printing a proof sheet for more information).
To print individual or all photos
1 Insert the memory card into the appropriate slot on the all-in-one. See Inserting and
removing a memory card for more information.
2 If required, type your PIN on the keypad or keyboard.
3 Press P
4 Press (down) to move to Print photos, and then press (select).
5 To print all photos: Press - or + to select ALL, and then press (select).
HOTO.
To print individual photos: Press - or + to select CUSTOM, press (select), type the
numbers of the photos that you want to print, and then press (select).
6 Press S
TART. The photos are printed.
Printing photos by using DPOF
The Digital Print Order Format (DPOF) is an industry-standard print-file request that can be
created by some digital cameras. Camera-selected photos are photos that you marked for
printing with the camera. When you select photos with your camera, the camera creates a
DPOF file that identifies which photos have been tagged for printing. The all-in-one can read
the DPOF file from the memory card so that you do not have to reselect the photos to print.
Not all digital cameras can tag photos for printing. See your digital camera documentation to
see if your camera supports DPOF.
The DPOF file is stored by the digital camera on a memory card and specifies which photos to
print and the quantity of each photo to be printed.
When you print camera-selected photos, the all-in-one print settings do not apply. The settings
in the DPOF file for photo layout and number of copies override the all-in-one settings.
82 7 - Using memory cards ENWW
Page 85

To print photos by using DPOF file
1 Insert the memory card into the appropriate slot on the all-in-one. See Inserting and
removing a memory card for more information.
2 If required, type your PIN on the keypad or keyboard.
3 Press P
4 Press (down) to move to Print photos, and then press (select).
5 Press - or + to select DPOF, and then press (select).
6 Press S
HOTO.
TART. The DPOF-selected photos are printed.
Using a proof sheet
After printing a proof sheet (see Printing a proof sheet), fill in the circles that correspond to the
photos that you want to print, and then place the proof sheet on the scanner glass. The proof
sheet is scanned and photo prints are generated.
This section contains information about the following topics.
z Filling out a proof sheet
z Printing photos or sending photos as e-mail attachments
Filling out a proof sheet
Fill out the proof sheet to select the photos that you want to print, as well as the number of
prints, the photo size, and the paper type to use.
To fill out a proof sheet
1 Use step 1 on the proof sheet to select the photos that you want to print. With a dark pen,
fill in the circles located undern eath each phot o.
2 Use step 2 on the proof sheet to select the number of prints that you want, the paper and
image size, and the paper type.
Note If you need more control over print settings than the proof sheet provides, you can print photos
directly from the control panel. See Printing photos from the control panel for more information.
Printing photos or sending photos as e-mail attachments
After you print a proof sheet and fill it out, you can use the proof sheet to select photos to print
or to send as e-mail attachments.
Make sure that the scanner glass is completely clean, or the proof sheet might not scan
properly. See Cleaning the scanner glass, ADF lid backing, and ADF window for more
information.
To scan a proof sheet to print or e-mail
1 Load the type of paper that you want to use (for example, photo paper). Make sure that
you load the same paper type that you marked on the proof sheet.
ENWW Using a proof sheet 83
Page 86

2 Insert the memory card into the appropriate slot on the all-in-one. See Inserting and
removing a memory card for more information.
3 Open the flatbed scanner lid, place the top of the completed proof sheet face-down on the
scanner glass, and then close the flatbed scanner lid.
4 If required, type your PIN on the keypad or keyboard.
5 Press P
HOTO.
6 Press (down) to move to Scan thumbnails.
7 Press S
TART. The all-in-one scans the proof sheet.
8 Press - or + to select either E-MAIL (network connection) or PRINT, and then press
(select).
9 If you selected E-MAIL, use the following steps:
a Type one or more e-mail addresses on the keypad or keyboard, and then press
(select).
b Type the SUBJECT information, and then press (select).
c Type the FROM information, and then press (select).
The proof sheet is scanned and the all-in-one either prints the photos or sends them as
attachments to an e-mail message.
84 7 - Using memory cards ENWW
Page 87

8
Faxing
Using the all-in-one, you can send and receive black-and-white or color faxes. You can
schedule faxes to be sent at a later time, and set up speed-dials to send faxes quickly and
easily to frequently used numbers.
If the all-in-one is directly connected to a computer, you can use the HP photo and imaging
software to perform fax procedures that are not available from the all-in-one control panel. See
Using the HP photo and imaging software for information about using the HP photo and
imaging software.
This section contains information about the following topics.
z Sending faxes
z Changing common settings for a job
z Setting advanced options
z Receiving faxes
z Using reports
Sending faxes
A confirmation message indicating that a fax was successfully sent appears briefly on the
control-panel display after each transaction. By default, the all-in-one prints a report only when
a problem occurs. See Setting the automatic printing of fax reports if you want the all-in-one to
print a report after each fax that you send.
Note the following points about sending color faxes:
z To ensure the best quality when sending faxes in color, HP recommends that you use a
color original rather than a color copy, if possible.
z If you try to send a color fax to a black-and-white fax machine, the all-in-one sends the fax
in black and white.
z You cannot send a color fax to a group by using the speed-dial buttons on the control
panel. To fax in color to a group, send the fax from the computer. See Sending a fax from
the computer with the HP photo and imaging software (direct connection) for more
information.
z Color faxing can be restricted. See Allowing and restricting color faxing for more
information.
z Color faxing can be performed only on one-sided originals. Therefore, the only available
double-sided option for color faxes is 1-SIDED.
z The sending (transmission) options are not available for color faxing because color faxing
requires real-time transmission (that is, the faxes cannot be prescanned).
This section contains information about the following topics.
z Sending a fax from the control panel
z Sending a fax from the computer with the HP photo and imaging software (direct
connection)
z Sending a fax from a third-party software program
z Inserting a dial prefix
ENWW Sending faxes 85
Page 88

Monitoring the dialing
z
z Scheduling a fax
Sending a fax from the control panel
This section explains how to send a basic black-and-white or color fax to one or more
recipients.
To send a fax from the control panel
1 Load the original on the scanner glass or in the ADF. See Loading the originals for more
information.
If you are scanning more than one page from the scanner glass, the all-in-one displays a
prompt when you need to load the next page.
2 If required, type your PIN on the keypad or keyboard.
3 Press F
AX.
4 To send the fax to one recipient, use one of the following methods:
• Type the number on the keypad or keyboard.
• Press a speed-dial button, if speed-dial entries have been set up.
• Press C
ONTACTS and select an address from the list that appears on the control-panel
display, if an address list has been set up for fax numbers.
To send the fax to multiple recipients, use one of the following methods:
• Press a speed-dial button for a group, if group speed-dial entries has been set up.
• Press C
ONTACTS and select a group from the list that appears on the control-panel
display, if groups have been set up for fax numbers.
See Typing numbers and text on the control-panel keypad for information about using the
keypad to type numbers and text.
5 To send a color fax, press B
LACK/COLOR to turn the color setting on.
6 To set fax options, use one of the following methods:
• Press a control-panel option button (for example, Q
UALITY), select the value, and then
press (select).
• Select an option from the control-panel display (for example, Lighter/darker), select
the value, and then press (select).
7 Press S
TART.
8 If you are scanning more than one page from the scanner glass, place the next page on
the scanner glass when prompted, and then press (select). Repeat this step until all
pages are scanned, and then press S
TART.
86 8 - Faxing ENWW
Page 89

Sending a fax from the computer with the HP photo and
imaging software (direct connection)
If the all-in-one is connected to your computer, you can use the HP photo and imaging
software to send faxes.
To send a fax from the computer
1 Load the original on the scanner glass or in the ADF. See Loading the originals for more
information.
2 At the computer, open the HP photo and imaging software. See Using the HP photo and
imaging software for more information.
3 See the onscreen Help for the HP photo and imaging software for further instructions.
Sending a fax from a third-party software program
You can send a fax from a third-party software program, such as Microsoft Word.
To send a fax from a third-party program
1 Open a document in a third-party program.
2 Click the File menu, and then click Print.
3 Select the fax print driver from the printer drop-down list. The fax software appears.
4 Type the fax number of one or more recipients.
5 Include a cover page (optional).
6 Click Send Now.
Note Make sure that the fax queue settings are correct for your operating system and connection
type.
For Macintosh computers connected directly to a computer with a USB cable using CommApp,
use the Officejet 9100 series Fax fax queue for Mac OS 9. For Mac OS 10, use the Officejet
9100 series (Fax) fax queue.
Inserting a dial prefix
A dial prefix is a number or group of numbers that are automatically added to the beginning of
every fax number that you specify at the control panel or from the software. The maximum
number of characters for a dial prefix is 50.
The default setting is off. You might want to turn this setting on and type a prefix if, for
example, you have to dial a number such as 9 to get a phone line outside of your company
phone system.
While this setting is on, you can still dial a fax number without the dial prefix. See Monitoring
the dialing for more information.
ENWW Sending faxes 87
Page 90

Monitoring the dialing
In some phone systems, it might be important to be able to verify that you are dialing
successfully. Normally, the all-in-one dials after you press S
might want the all-in-one to dial each number as you press it. For example, if you are charging
your fax call to a calling card, you might need to dial the fax number, wait for the acceptance
tone of the phone company, and then dial the calling card number. Whe n dial in g
internationally, you might need to dial part of the number and then listen for dial tones before
continuing to dial.
You can monitor the dialing only for single fax numbers (that is, you cannot monitor the dialing
for groups).
To monitor the dialing
See Sending a fax from the control panel if you need additional information about any of the
steps.
1 Load the original on the scanner glass or in the ADF.
2 Type your PIN, if required.
TART. At times, however, you
3 Press F
4 Set fax options.
5 Press S
6 Begin dialing by using either the keypad or the keyboard. The all-in-one dials as you press
each digit and a tone accompanies each key that you press. This allows you to wait for
pauses, dial tones, international access tones, or calling card acceptance tones before
continuing to dial.
7 Set fax options.
AX.
TART. The (off-hook) light turns on.
Scheduling a fax
You can schedule a black-and-white fax to be sent automatically at a future time to one or
more recipients. When you complete this procedure, the all-in-one scans the document into
memory and returns to the READY state so that you can perform other all-in-one tasks.
You can schedule a fax only from the control panel.
To schedule a fax
Follow the basic steps under Sending a fax from the control panel (see those steps for details),
but include the additional steps that are highlighted in bold.
1 Load the original.
2 Type your PIN, if required.
3 Press F
4 Specify the fax number or group that is to receive the fax.
5 Set fax options.
6 Press - or + to select Send Non-realtime, and then press (select).
88 8 - Faxing ENWW
AX.
Page 91

7 To specify the time after the delay, use one of the following methods:
• Press - or + to specify the time (the time increments in 15-minute steps), and then press
(select).
• Use the keypad or keyboard to type the time, and then press (select).
8 Press START.
Changing common settings for a job
Change the settings for a job when you want to use something other than the defaults that
have been set up or when when you want to use an optional feature such as collation or
double-sided printing. Any changes that you make apply only to the current job.
You can change settings by using two methods:
z Use an option button on the control panel (for example, QUALITY).
z Open the fax mode menu and select the option that you want to change (for example
Resolution).
See Fax mode menu for an explanation of the options.
To change common settings in the fax mode menu
FAX
<FAX? =GROUP>
Send black fax
Resolution STD
Lighter/darker 0
Send non-realtime OFF
Paper size LETTER
Setup
1 On the control panel, press FAX.
2 Press (down) to move to the option that you
want, and then press (select).
3 Press - or + to select the value that you want,
and then press (select).
ENWW Changing common settings for a job 89
Page 92

Setting advanced options
This section contains information about the following topics.
z Automatically forwarding incoming faxes to another fax number
z Automatically archiving incoming faxes
z Automatically reducing incoming faxes
z Blocking and unblocking fax numbers
Automatically forwarding incoming faxes to another fax number
You can set the all-in-one to automatically forward incoming faxes to another fax number.
When a fax arrives at the all-in-one, it is stored in the memory. The all-in-one then dials the fax
number that you have specified for forwarding and sends the fax to that number. If the
all-in-one cannot forward a fax because of an error (for example, the number is busy), and
repeated redial attempts are unsuccessful, the all-in-one prints the fax.
If the all-in-one runs out of memory while receiving a fax, it stops the incoming fax and
forwards only the pages and partial pages that have been stored in the memory.
When it is using the forwarding feature, the all-in-one (rather than the computer) must be
receiving the faxes, and the autoanswer option must be set to on (see Setting the answer
mode (autoanswer) for mo re information).
You set the time and date when forwarding is to stop. When the ending time and date are
reached, automatic forwarding is automatically turned off.
To automatically forward incoming faxes from the embedded Web s erver
(network connection)
1 Open the embedded Web server. See Opening the embedded Web server for more
information.
2 Click the Settings tab.
3 Click Fax in the left pane.
4 Click the Forward/Archive tab.
5 Complete the fields under Fax Forwarding.
6 Click Apply.
To automatically forward incoming faxes from the control panel
1 On the control panel, press MENU.
2 Press (up) or (down) to move to ADV FAX SETUP, and then press (select).
3 Press (down) to move to Automatic fax forwarding, and then press (select).
4 Press - or + to select either ON or OFF, and then press (select).
90 8 - Faxing ENWW
Page 93

5 If you selected OFF, go to the next step.
If you selected ON, use the following steps:
a Use the keypad or keyboard to type the fax number to which you want to forward
incoming faxes.
a Type an ending time and date.
b Press (select).
Automatically archiving incoming faxes
You can set the all-in-one to automatically archive incoming faxes in two ways:
z To an e-mail address
The incoming fax is converted to a file, which is then attached to an e-mail message that is
sent to the e-mail address that you specify.
z In a network folder
The incoming fax is converted to a file, which is then placed in the folder that you specify.
Note the following points about this feature:
z Only black-and-white faxes can be archived.
z The all-in-one prints a copy of the fax before archiving it.
z The file name is comprised of a three-digit code for the all-in-one, an eight-digit fax
number, and a five-digit sequence number.
To automatically archiv e incoming f axes f rom the embedded Web server
(network connection)
1 Open the embedded Web server. See Opening the embedded Web server for more
information.
2 Click the Settings tab.
3 Click Fax in the left pane.
4 Click Forward/Archive.
5 Under Fax Archiving, complete the fields for either Archive fax to e-mail or Archive fax
to network folder.
6 Click Apply.
To automatically archive incoming faxes from the control panel
1 On the control panel, press MENU.
2 Press
3 Press (down) to move to Fax archive, and then press (select).
(up) or (down) to move to ADMIN, and then press (select).
4 Press - or + to select either E-MAIL or Network, and then press (select).
5 Specify the e-mail address or network folder, and then press (select).
ENWW Setting advanced options 91
Page 94

Automatically reducing incoming faxes
The auto-reduction option determines how the all-in-one handles long faxes:
z Auto-reduction turned on
The all-in-one automatically reduces long faxes by as much as 75 percent to fit the
information on the default paper size (for example, the fax is reduced from legal-size to
letter-size).
z Auto-reduction turned off
The all-in-one prints long faxes at full size on multiple pages.
Make sure that the paper-size setting matches the size of the paper that is loaded in the input
tray.
To automatically reduce incoming faxes from the embedded Web server
(network connection)
1 Open the embedded Web server. See Opening the embedded Web server for more
information.
2 Click the Settings tab.
3 Click Fax in the left pane.
4 Click the Advanced tab.
5 For Automatic reduction, select On.
6 Click Apply.
To automatically reduce incoming faxes from the HP ph oto and imaging
software (direct conn ection)
1 At the computer, open the HP photo and imaging software. See Opening the HP photo
and imaging software for more information.
2 See the onscreen Help for the HP photo and imaging software for further instructions.
To automatically reduce incoming faxes from the con trol panel
1 On the control panel, press MENU.
2 Press (up) or (down) to move to ADV FAX SETUP, and then press (select).
3 Press (down) to move to Automatic reduction, and then press (select).
4 Press - or + to select either ON or OFF, and then press (select).
Blocking and unblocking fax numbers
If you do not want to receive faxes from specific people or businesses, you can block as many
as 20 fax numbers. When you block a fax number and someone from that number sends you
a fax, the control-panel display indicates that the number is blocked, the fax does not print,
and the fax is not saved in memory. Faxes from blocked fax numbers appear in the fax log
with a “discarded” designation. You can unblock blocked fax numbers at any time.
Information about faxes that have been received from blocked numbers appears in the fax log.
92 8 - Faxing ENWW
Page 95

To block and unblock a fax number from the embedded Web server
1 Open the embedded Web server. See Opening the embedded Web server for more
information.
2 Click the Settings tab.
3 Click Fax in the left pane.
4 Click the Blocked Fax tab.
5 To block a fax number, type the number in the list.
To unblock a fax number, clear the number from the list.
6 Click Apply.
To block and unblock a fax number from the HP photo and imaging
software
1 At the computer, open the HP photo and imaging software. See Opening the HP photo
and imaging software for more information.
2 See the onscreen Help for the HP photo and imaging software for further instructions.
To block a fax number from the control panel
1 On the control panel, press MENU.
2 Press (up) or (down) to move to ADV FAX SETUP, and then press (select).
3 Press (down) to move to Blocked numbers, and then press (se lec t).
4 To specify the fax number that you want to block, use one of the following methods:
• Type the number on the keypad or keyboard, and then press (select).
• Press C
block the number for the last fax that was sent or the last fax that was received, or you
can block a number that is in the speed-dial list). Then press (select).
ONTACTS, and use one of the choices in the resulting list (for example, you can
ENWW Setting advanced options 93
Page 96

Receiving faxes
Depending on how you set up the all-in-one, you can receive faxes automatically or manually
(see Setting the answer mode (autoanswer) for more information).
z Automatic answer mode (autoanswer on)
The all-in-one answers incoming calls after a specified number of rings or upon
recognition of special fax tones.
z Manual answer mode (autoanswer off)
The all-in-one never answers calls. You must start the receiving process yourself.
If you receive a legal-size fax and the all-in-one is not currently loaded with legal-size paper,
the all-in-one automatically reduces the fax so that it fits on the paper that is loaded, unless
you have turning off the auto-reduction feature. See Automatically re ducing in coming faxes for
more information.
This section contains information about the following topics.
z Receiving a fax automatically or manually
z Reprinting received faxes that are stored in memory
Receiving a fax automatically or manually
To receive a fax automatically
The setting for autoanswer must be set to on in order for you to receive faxes automatically.
See Setting the answer mode (autoanswer) for information about how verify the setting and
change the setting, if needed.
To receive a fax manually
The setting for autoanswer must be set to off in order for you to receive faxes manually. See
Setting the answer mode (autoanswer) for information about how to verify the setting and
change the setting, if needed.
When receiving faxes manually, you must be available to respond in person to the incoming
fax call, or your all-in-one cannot receive faxes.
When the all-in-one rings, press R
EDIAL/ANSWER on the control panel.
Reprinting received faxes that are stored in memory
You might occasionally want to print another copy of a fax that has been received (for
example, if the print quality of the original fax was poor). The all-in-one stores as many
received faxes as can be held in its memory. The maximum number is about 50 (representing
about 250 pages). When the memory capacity is reached, the oldest faxes are removed to
make room for the newer faxes.
You can choose to print the last fax that has been received, that last five faxes that have been
received, or all of the faxes that are stored in memory.
94 8 - Faxing ENWW
Page 97

To reprint faxes that are stored in memory
1 On the control panel, press MENU.
2 Press (up) or (down) to move to PRINT REPORT.
3 Press (down) to move to Reprint faxes in memory, and then press (select).
4 Press - or + to select the last fax, the last five faxes, or all faxes.
5 Press (select) again to print the faxes.
Using reports
This section contains information about the following topics.
z Printing and viewing the fax log
z Viewing a list of blocked fax numbers
Printing and viewing the fax log
You can print a log of faxes that have been received and sent by the all-in-one. Each entry in
the log contains the following information:
z Transmiss i on date and tim e
z Type (whether received or sent)
z Fax number
z Duration
z Number of pages
z Result (status) of transmission
To view the fax log from the embedded Web server (network connection)
The logs list faxes that have been sent from the control panel and all faxes that have been
received.
1 Open the embedded Web server. See Opening the embedded Web server for more
information.
2 On the Information tab, click Log.
3 Click the Incoming Fax or Outgoing Fax tab.
To view the fax log from the HP photo and imaging software (direct
connection)
The log lists faxes that have been sent from the HP photo and imaging software and all faxes
that have been received.
1 At the computer, open the HP photo and imaging software. See Opening the HP photo
and imaging software for more information.
2 See the onscreen Help for the HP photo and imaging software for further instructions.
ENWW Using reports 95
Page 98

To print the fax log from the control panel
The log lists faxes that have been sent from the control panel and the HP photo and imaging
software and all faxes that have been received.
1 On the control panel, press M
2 Press (down) to move to PRINT REPORT, and then press (select).
3 Press (down) to move to Fax log, and then press (select).
4 Press (select) again to print the log.
ENU.
Viewing a list of blocked fax numbers
You can view a list of blocked fax numbers only from the embedded Web server, which
requires a network connection.
To view a list of blocked numbers
1 Open the embedded Web server. See Opening the embedded Web server for more
information.
2 Click the Settings tab.
3 Click Fax in the left pane.
4 Click the Blocked Fax tab.
96 8 - Faxing ENWW
Page 99

9
Managing the administrator functions
This section is intended for the all-in-one administrator or individual who is responsible for
managing the all-in-one. This section contains information about the following topics.
z Administrator functions and tools
z Administering the all-in-one
z Monitoring the all-in-one
z Configuring system options
z Configuring network options
z Configuring print options
z Configuring copy options
z Configuring scan options
z Configuring photo (memory card) options
z Configuring e-mail options (network connection)
z Configuring fax options
z Setting up faxing for the all-in-one
z Installing the all-in-one software and configuring the all-in-one for operating environments
z Uninstalling the all-in-one software
Administrator functions and tools
Overview of the administrator functions and tools
The following table lists administrator functions and the tools that can be used to perform
them. See the following sections for information about the administrator tools that are listed in
the table.
z Control panel
z Embedded Web server (EWS) (network connection)
z Toolbox (direct connection)
z HP Web Jetadmin software
z myPrintMileage
Note The table lists the most common tools that are used for administrator functions. Specific
procedures might include other methods.
ENWW Administrator functions and tools 97
Page 100

Function
Monitoring operation and status
Monitoring media and supplies
Monitoring use
Monitoring jobs
Changing the administrator PIN
Configuring authorized users
Configuring job-accounting options
Managing security
Setting up alerts and notifications
Saving and restoring settings
Resetting the HP Jetdirect print server
Upgrading firmware on the all-in-one
Administrator tool
Control
panel
EWS
(network)
Monitoring the all-in-one
Administering the all-in-one
Configuring system options
Toolbox
(direct)
HP Web
Jetadmin
myPrint
Mileage
Setting language and
country/region
Setting PowerSave mode time
Setting ring and beep volumes
Setting the automatic paper-type sensor
Configuring network options
Configuring I/O timeout
Configuring network parameters
Configuring print options
Setting print defaults
Setting tray defaults
Setting PCL font defaults
Turning on and turning off the printing of
PostScript errors
Turning on and turning off unattended printing
Setting personalit y
Configuring copy options
Allowing and restricting color copying
98 9 - Managing the administrator functions ENWW
 Loading...