

Page 1
HP Officejet 9100
All-In-One
Digital Send Authentication Solution
Getting Started Guide
数字发送验证解决方案
使用入门指南
디지털 전송 인증 솔루션
시작 안내서
Solusi Autentikasi Pengiriman Digital
Panduan Untuk Mulai
數位傳輸認證解決方案
使用入門指南
Page 2

Copyright Information
© 2004 Copyright Hewlett-Packard Development Company, L.P.
Edition 1, 11/2004
Reproduction, adaptation or translation without prior written permission is prohibited, except as allowed under the
copyright laws.
The information contained herein is subject to change without notice.
The only warranties for HP products and services are set forth in the express warranty statements accompanying
such products and services. Nothing herein should be construed as constituting an additional warranty. HP shall not
be liable for technical or editorial errors or omissions contained herein.
Trademark Credits
Microsoft, MS Windows, Windows, and Windows NT are either registered trademarks or trademarks of
Microsoft Corporation in the United States and/or other countries/regions.
Page 3

Contents
Setting up
Setting up the digital send authentication solution 4
Troubleshooting
Solving firmware upgrade problems 10
Solving DIMM installation problems 10
Solving network problems 10
Specifications
Digital send authentication solution specifications 12
Customer support and warranty
Contacting customer support 14
Hewlett-Packard limited warranty statement 14
English
Contents
3
Page 4
1Setting up
The digital send authentication solution allows you to enable greater security settings for the
HP Officejet 9100 series all-in-one when connected to Microsoft
• User authentication through Windows NT
perform digital send activities or all activities from the control panel.
• Through Windows NT domain login, the all-in-one determines the e-mail address of the
current user and adds this address automatically to any e-mail messages sent.
• Administrator menus and settings can be locked to prevent unauthorized modification.
NOTE: The digital send authentication solution enables the same level of security as existing
Windows security protocols. It might not support all non-default Active Directory security settings.
To use the digital send authentication solution, the all-in-one must have a keyboard and a
supported HP Jetdirect print server installed. For more information, see “Specifications” on
page 12.
®
domain login can be required before users
®
Windows® networks:
LDAP settings and the digital send authentication solution
With the digital send authentication solution, you can use either the LDAP server included in
Active Directory or a separate, “external” LDAP server for LDAP searches.
To use the LDAP server in Active Directory, be sure to leave the LDAP server address in the
all-in-one configuration blank when you set up the digital send authentication solution. The LDAP
server automatically detects the address from the network and uses the login user’s credentials
with Kerberos authentication.
To use an “external” LDAP server for e-mail searches, be sure that all LDAP server settings for the
all-in-one are configured. The LDAP server uses the username and password specified in these
settings with simple (plain text) authentication.
NOTE: The LDAP server in Active Directory is used when logging in to the all-in-one—even if an
external LDAP server is set up. However, the external LDAP server is still used for LDAP searches
for e-mail.
Setting up the digital send authentication solution
To install the digital send authentication solution, complete the following tasks:
1. Back up your all-in-one settings
2. Upgrade the firmware
3. Install the digital send authentication DIMM
4. Configure the security settings
Setting up4
Page 5

Step 1: Back up your all-in-one settings
Before setting up the digital send authentication solution, use the EWS to back up the all-in-one
settings. After you install the digital send authentication solution, use the EWS and restore
these settings.
1. Open the EWS.
In a supported Web browser, type the IP address that has been assigned to the all-in-one.
For example, if the IP address for the all-in-one is 123.123.123.123, you would type the
following address into your Web browser: http://123.123.123.123.
2. Click the Settings tab, and then click Backup in the left pane.
3. Configure the settings for the backup, and then click Apply.
Step 2: Upgrade the firmware
Check the version of the firmware installed in the all-in-one. If necessary, use the CD included
with the digital send authentication solution to upgrade the firmware.
NOTE: Only upgrade the firmware if the version number is lower than SMR3xxxx. If the
firmware version is higher than SMR3xxxx, go to “Install the digital send authentication DIMM”
on page 6.
To check the firmware version
NOTE: You can also check the firmware version using the EWS. Click the Information tab,
and then click Device in the left pane.
English
1. At the control panel, press the M
2. Press (down) to move to Print report, and then press (select).
3. Press (down) to move to Device config., and then press (select).
The all-in-one prints the configuration page. The firmware version is listed in the
Device Information section of the page.
ENU button.
To upgrade the firmware using the CD
Select one of the following methods to upgrade the firmware.
NOTE: Before starting to upgrade the firmware, make sure the all-in-one is in the Ready state.
In addition to the methods listed below, you can use other methods to upgrade the all-in-one
firmware. For more information, visit http://www.hp.com/support/officejet9100.
1. Insert the CD into the CD-ROM drive.
2. Upgrade the firmware using one of the following options.
CAUTION: Do not attempt to print or turn off the printer until the process is completed.
Setting up the digital send authentication solution 5
Page 6
Firmware Download Utility (FDU)
a. Double-click the Firmware Download Utility on the CD.
b. Select the FMW file, and then follow the onscreen instructions.
FTP
a. At the command prompt, type FTP (IP address) and press the Enter key.
b. At the User ID and password fields, press the Enter key. Both fields are blank by default.
c. At the ftp> prompt, type put D:/SMR30XXX.FMW (or applicable drive letter for your
CD-ROM drive and firmware file name). Be sure to type in the full path to the file and
be sure to insert the correct file name. The information is case-sensitive.
d. Press the Enter key.
The progress of the process is displayed at the command prompt and also on the
control panel of the printer.
e. After the process shows completed, type either bye or quit depending on the
operating system.
HP Web Jetadmin
NOTE: The HP Web Jetadmin software can be used to upgrade the firmware in one or several
all-in-ones simultaneously.
Instructions for upgrading firmware using the HP Web Jetadmin software might vary depending
on the version of the software you are using. For more information about upgrading firmware
using the HP Web Jetadmin software, see the online help available with the software.
a. Open the Web JetAdmin software and select Update from the drop-down list.
The Update Options are displayed.
b. Ensure that the Update Printer Firmware option is selected, and then click Next.
c. Select the version to flash from the Select New Firmware Version list, and then
click Update Firmware.
NOTE: For more information about the HP Web Jetadmin software and to download
the software, go to http://www.hp.com/go/webjetadmin.
3. Print a configuration page and verify that the firmware version is SMR3xxxx or higher.
If the firmware version on the configuration page is unchanged, see “Solving firmware
upgrade problems” on page 10.
Step 3: Install the digital send authentication DIMM
After upgrading the firmware, install the digital send authentication DIMM.
CAUTION: The DIMMs contain electronic components that can be damaged by static electricity.
To prevent the buildup of static electricity, maintain frequent contact with any bare sheet metal
surface on the all-in-one. If possible, wear a grounding wrist strap (or similar device). Handle the
DIMMs carefully at all times. Avoid touching electronic components or circuit paths. Failure to
follow these recommendations could result in damage to the parts.
Setting up6
Page 7
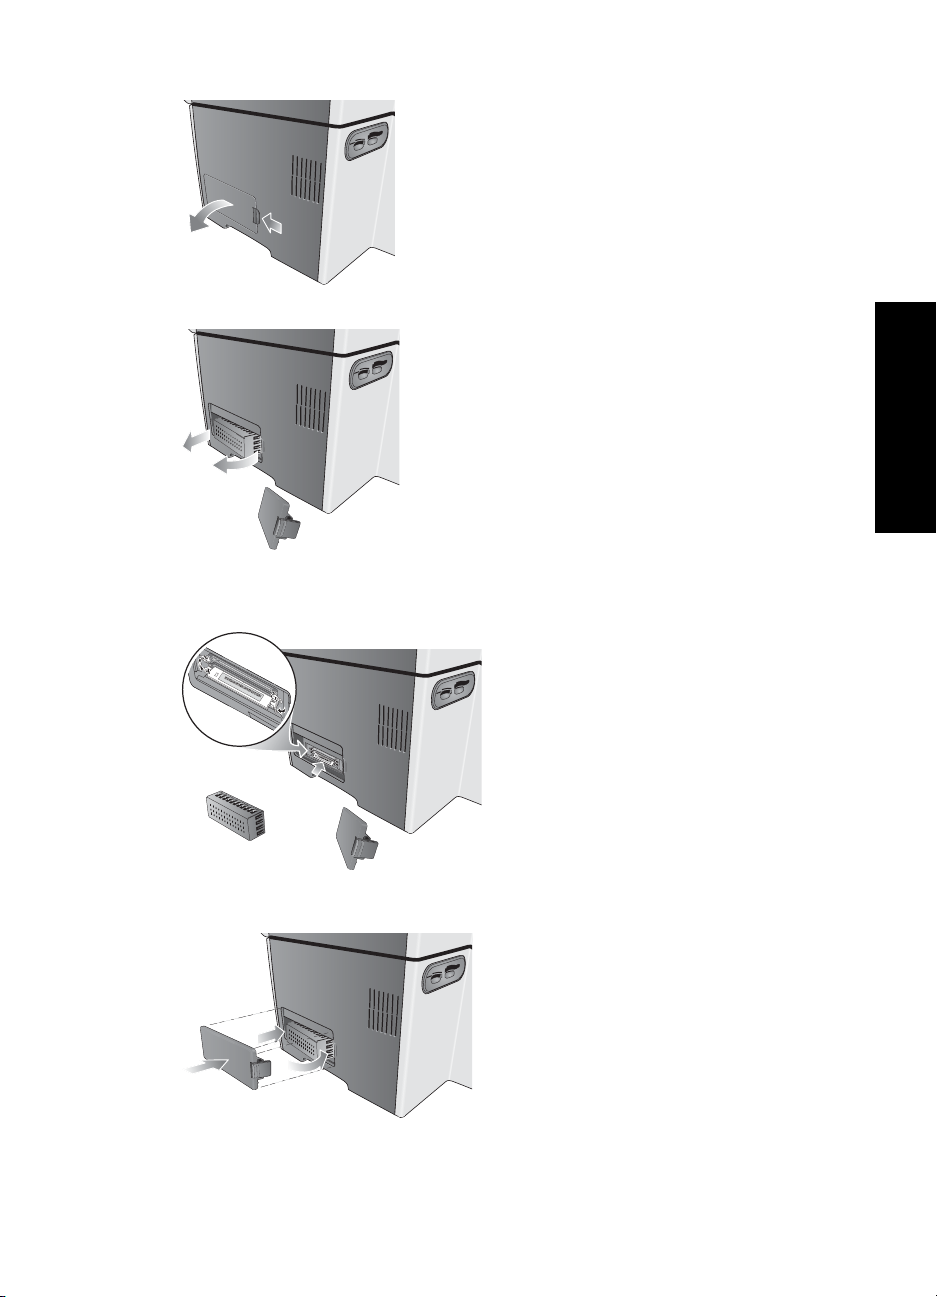
To install the digital send authentication DIMM
1. Press (Power) to turn off the all-in-one.
2. Unplug the power cord and disconnect any cables.
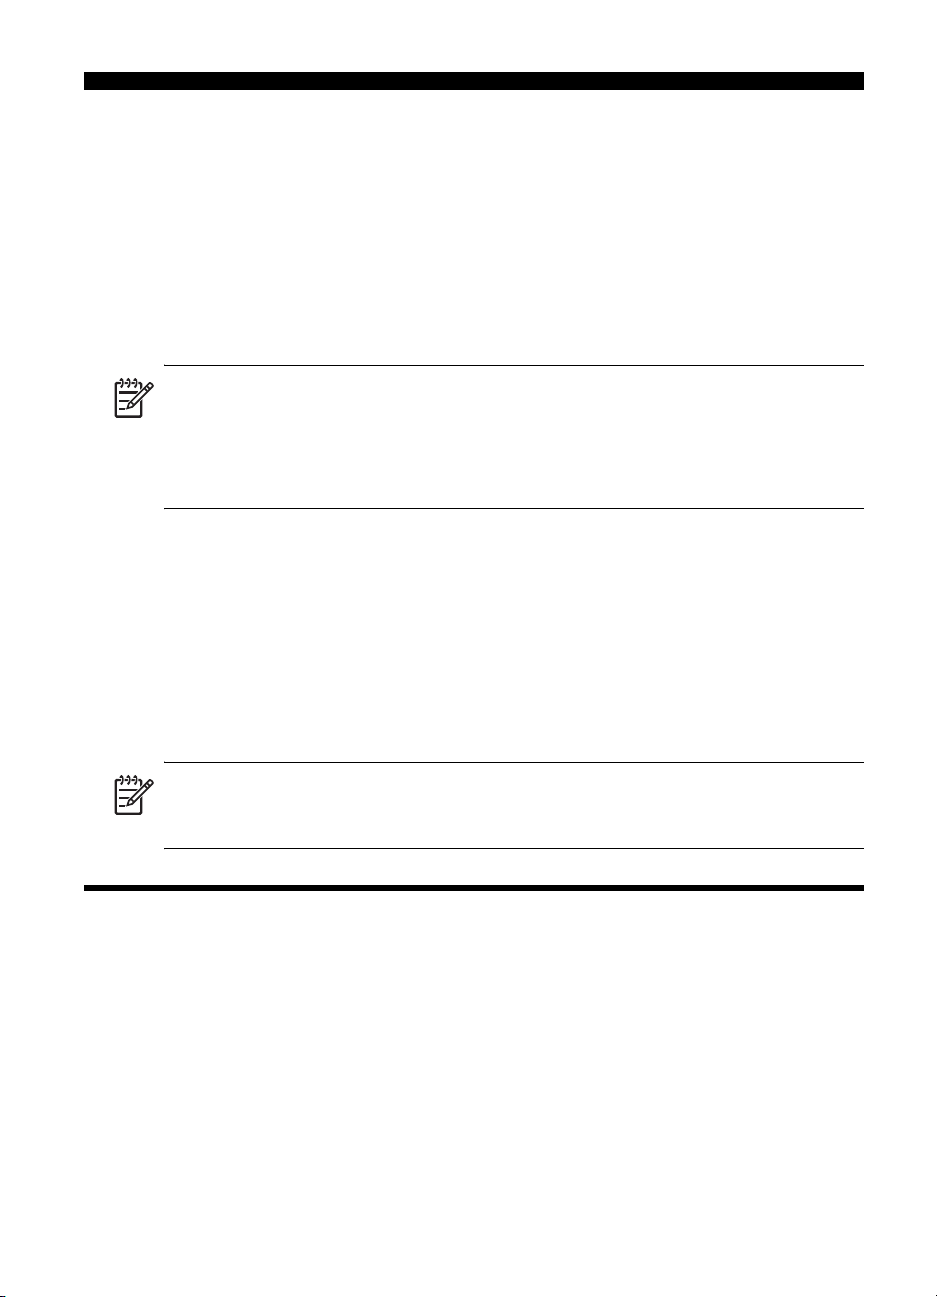
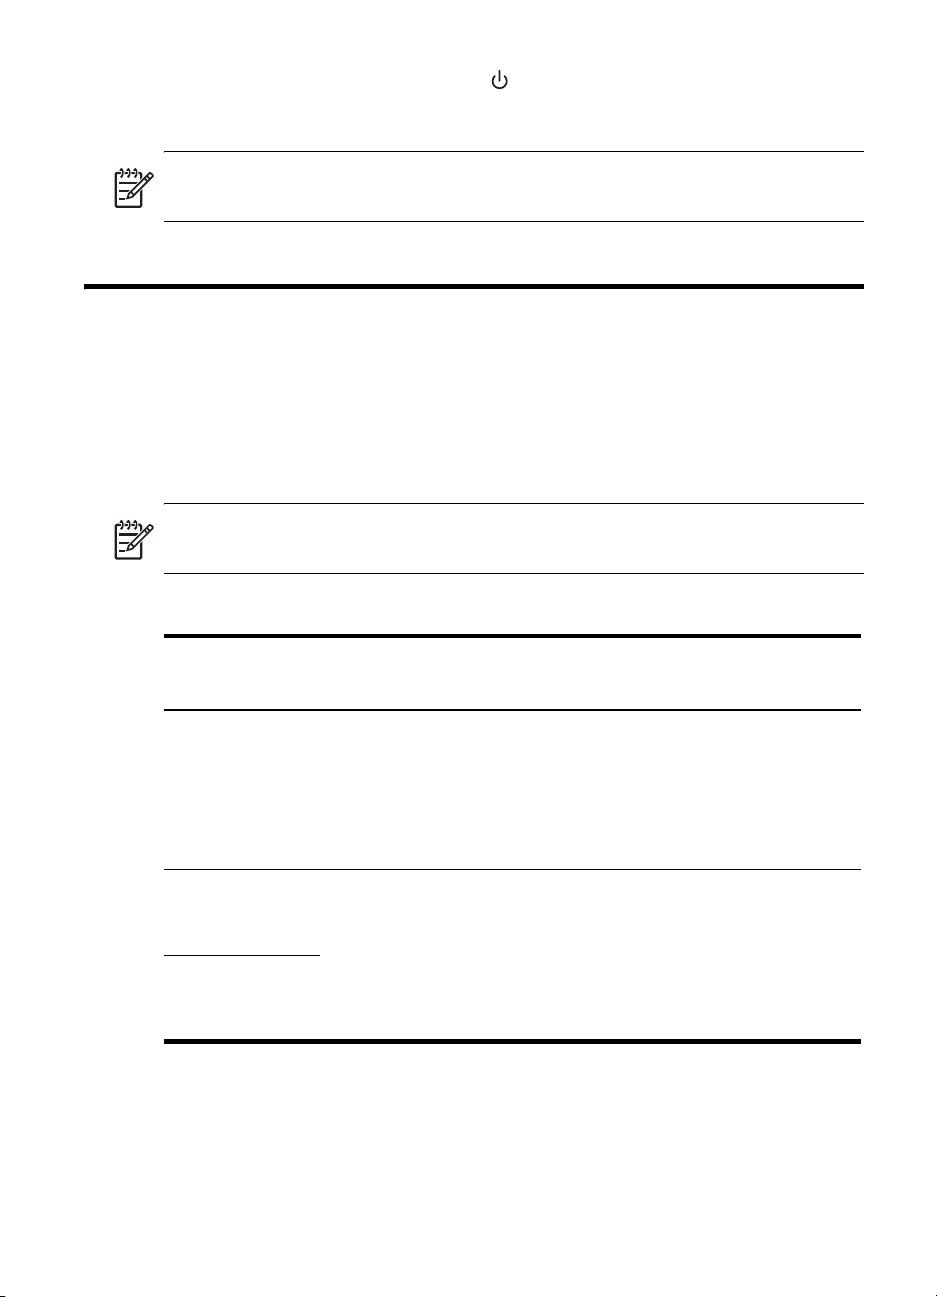
3. On the left side of the all-in-one, unlatch and remove the side cover.
4. Remove the DIMM cover.
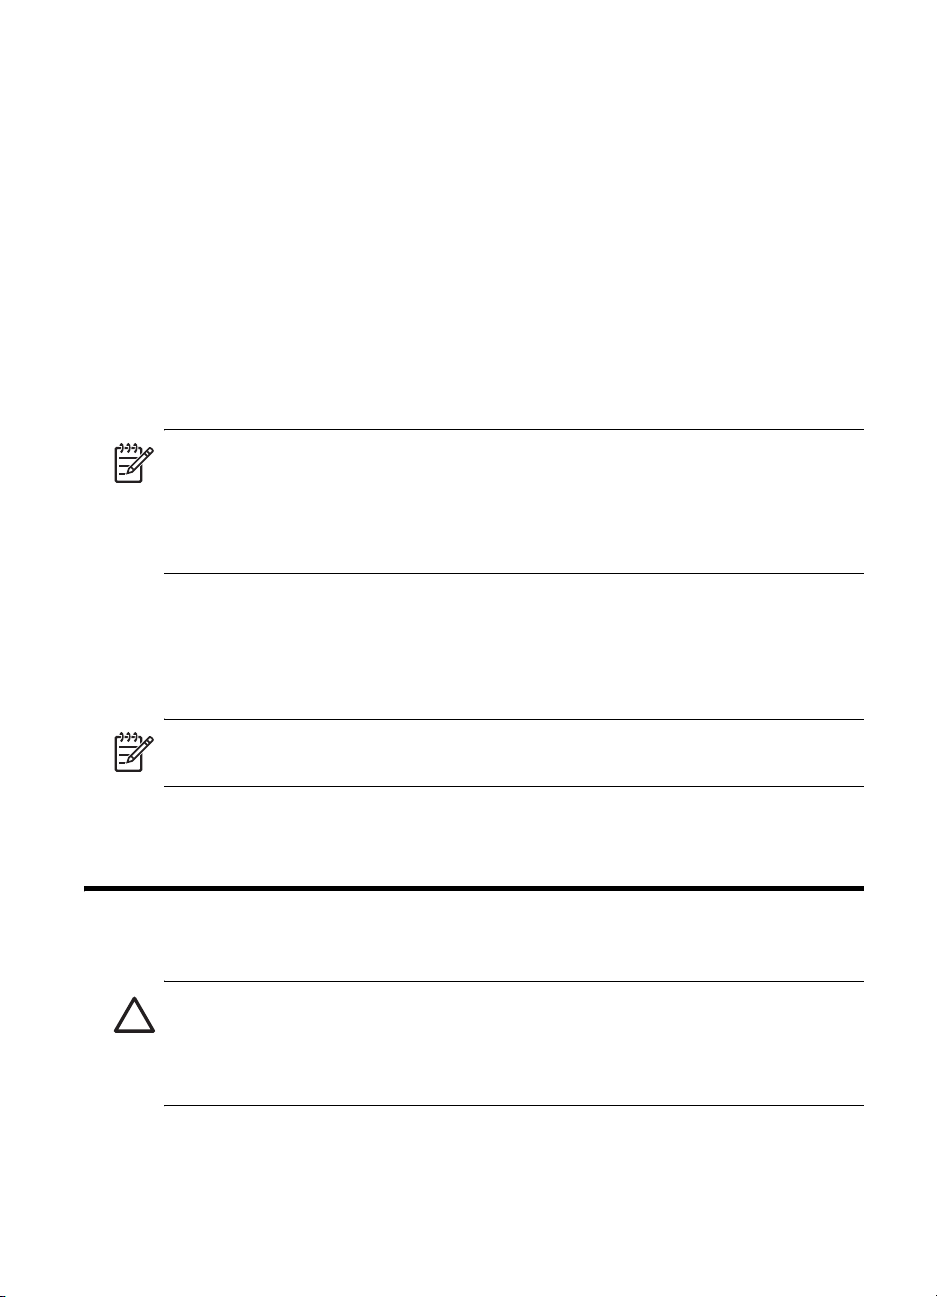
5. Remove the DIMM from the antistatic package.
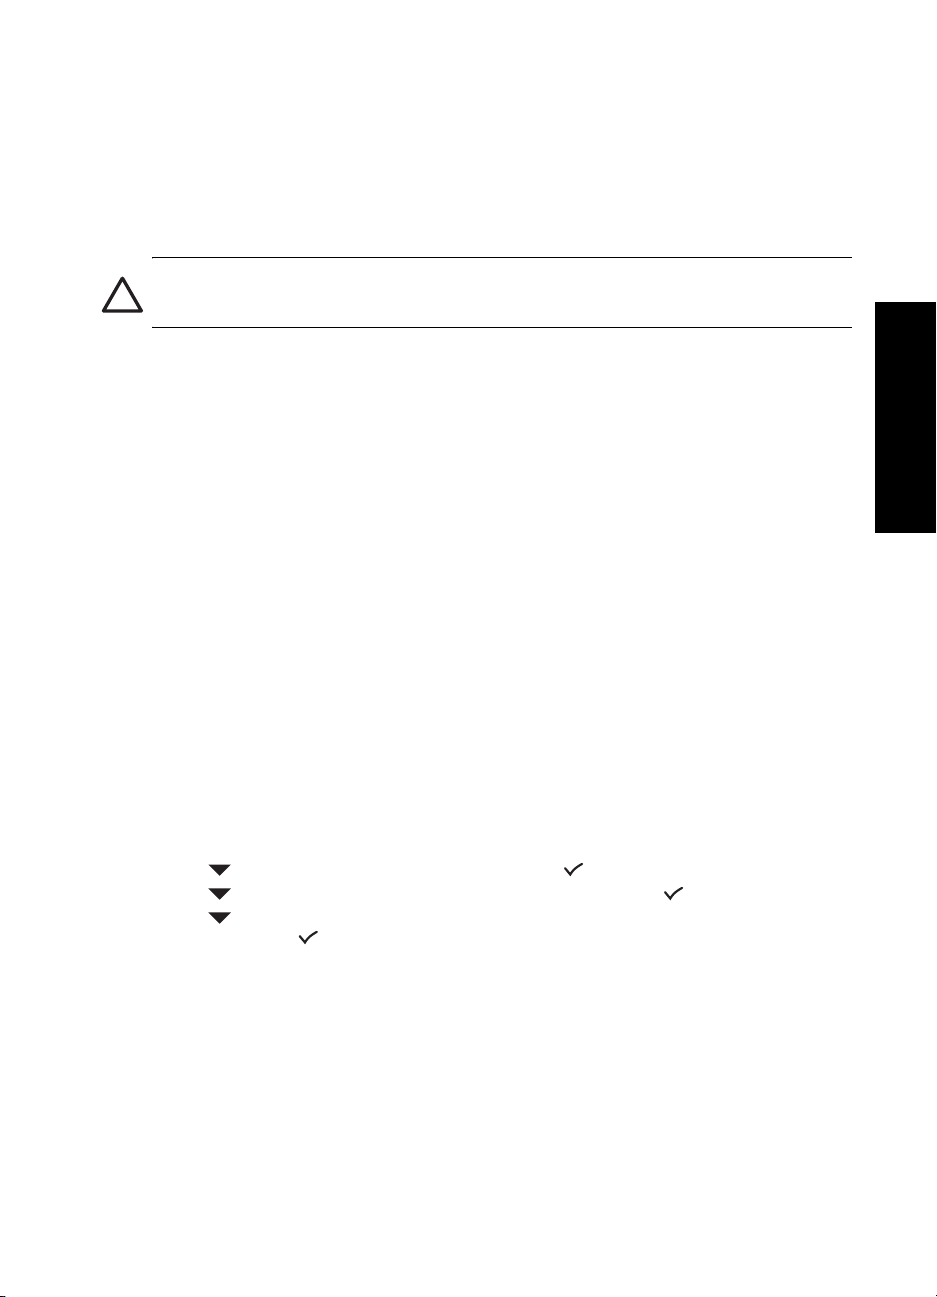
6. Align the DIMM so that the notches on the lower edge line up with the raised marks in the
DIMM slot. You can use any empty slot.
English
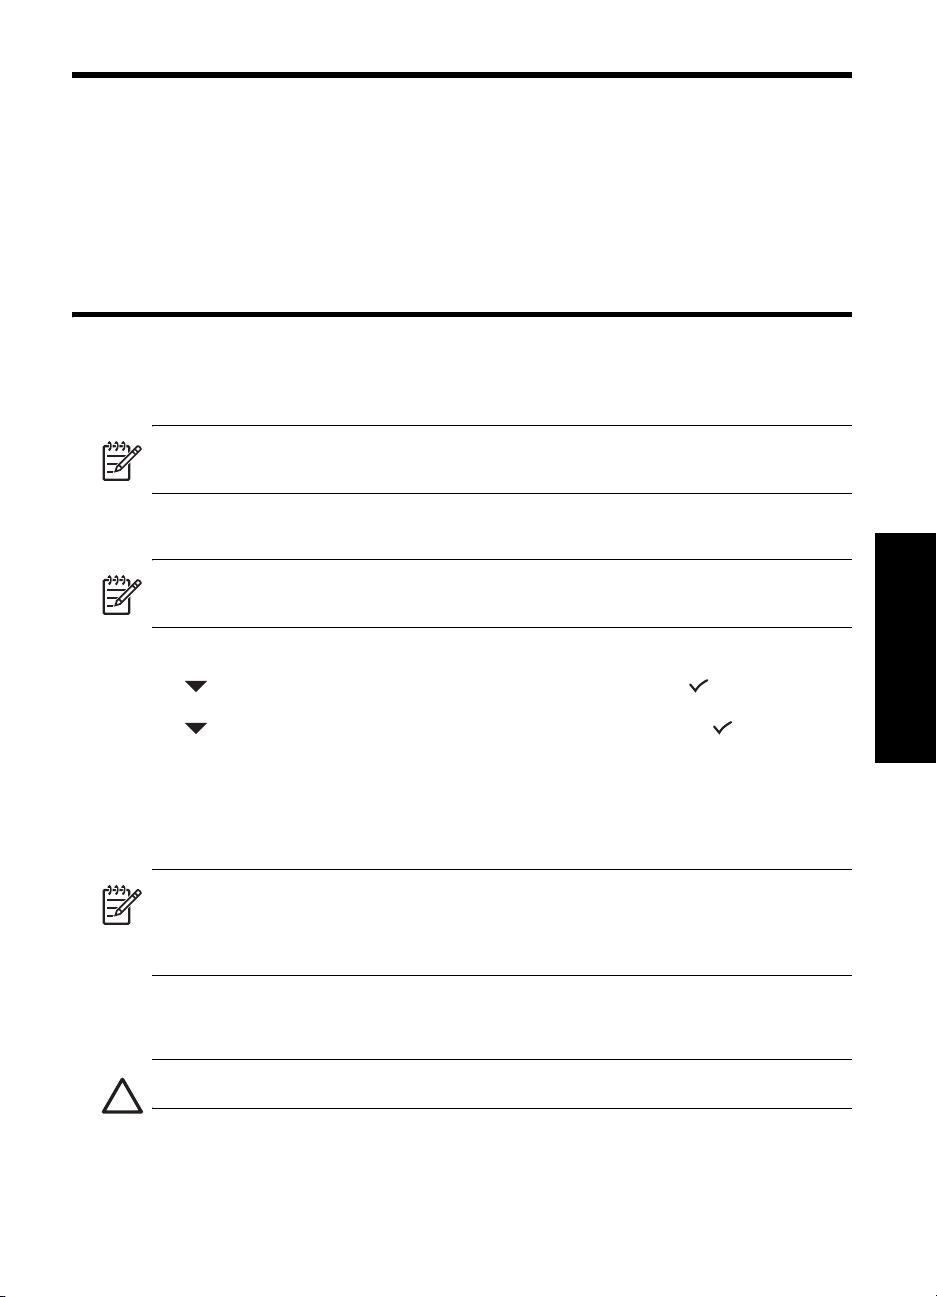
7. Insert and press the DIMM into the slot until the DIMM snaps into place.
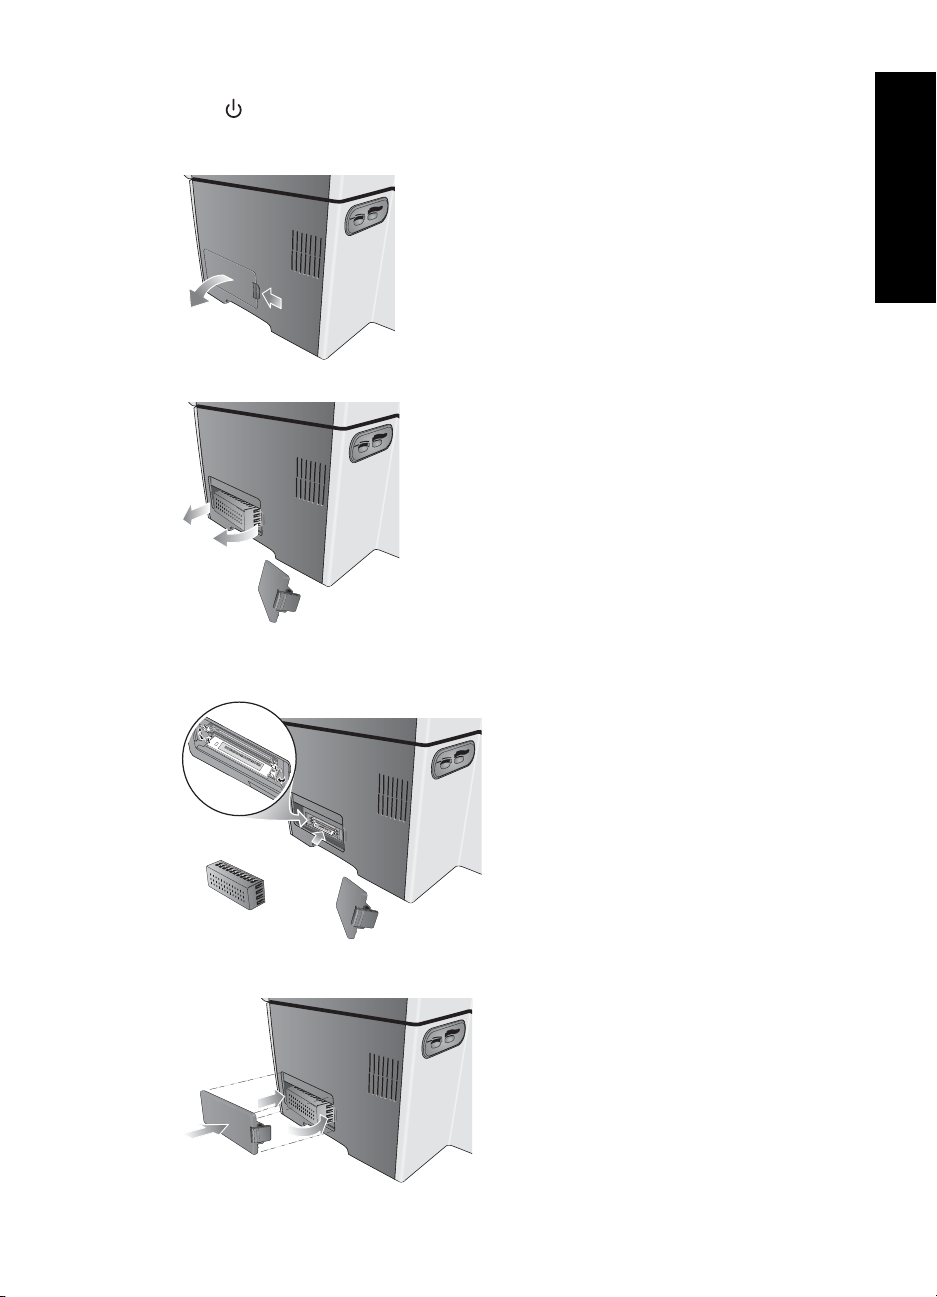
8. Replace the DIMM cover, and then replace the side cover.
Setting up the digital send authentication solution 7
Page 8
9. Reattach the power cord and any cables, and then press (Power) to turn on the all-in-one.
10. Print a configuration page and check the DIMM slot entries in the Device Information section
to verify that the DIMM is installed. If installed properly, the DIMM should be listed as
“Digital Send Authentication Solution”.
NOTE: You can also verify that the DIMM is installed using the EWS. Click the Information tab,
and then click Device in the left pane.
If the DIMM is not listed on the configuration page, see “Solving DIMM installation
problems” on page 10.
Step 4: Configure the security settings
After the DIMM is installed, set the security level for the all-in-one. You can enter these settings
using either the EWS (recommended) or the control panel.
Types of security
The digital send authentication solution offers two types of security: PIN and Windows NT.
These security settings require all-in-one users to log in for some or all control panel activities and
restrict access to the ADMIN and NETWORK & I/O menus in the control panel.
NOTE: Windows NT security supports Windows NT 4.0, Windows 2000, Windows XP, and
Windows 2003 environments.
Table 1-1 Description of security settings
Access point Security type
PIN security Windows NT security
Control panel
activities
LCD ADMIN
menu access
NETWORK &
I/O menu access
a.With the Windows NT security option, the administrator can designate additional all-in-one
administrators.
Users must enter their PINs for all
control panel activities (such as
copy, fax, and e-mail activities).
Access to these menus is restricted.
An administrator PIN is required.
Users must perform Windows NT
login for:
• Only e-mail and network folder
activities.
-OR-
• All control panel activities.
Access to these menus is restricted.
Only the administrator or
designated all-in-one
administrators
a
can gain access.
Setting up8
Page 9

Before you begin
1. Before setting security options, obtain the following information:
• DNS and NetBIOS domain names
For example, if you are using Active Directory 2003 and the domain is set to
“sales.mycompany.com”, then the full DNS domain name would be
“sales.mycompany.com” and the NetBIOS domain name would be “sales”.
• LM authentication settings (if the default settings on the server or domain have
been modified)
CAUTION: If the LM authentication setting on the all-in-one does not match the setting on the
server, activities that require login (such as network folder activities) might not function.
2. If you have recently changed the DNS or WINS settings, turn off and then turn on
the all-in-one.
To set the security level
EWS (recommended)
1. Open the EWS.
2. Click the Settings tab, and then click Security in the left pane.
3. Select the desired security setting from the Device access level list.
PIN
a. Select PIN, and then set a PIN number.
b. Click the Users PIN tab and configure the appropriate settings, as needed.
Windows NT
a. Select Windows NT, and then enter the Windows NT domain (both DNS and NetBIOS
domains) and password information.
b. Click the Administrators and Windows NT Login Access tabs and configure the
appropriate settings, as needed.
c. If LM authentication is enabled in the server, select Network Folder in the left pane,
and then configure the LM authentication setting to match the setting used on the server.
4. Click Apply.
All-in-one control panel
1. At the control panel, press the MENU button.
2. Press (down) to move to Admin, and then press (select).
3. Press (down) to move to ADMIN SETUP, and then press (select).
4. Press (down) to move to Device access, use the – or + to select the desired
security setting, and then press (select).
PIN
a. Select PIN, and then follow the instructions on the display to set a PIN number.
b. M
ove to Registered users and configure the appropriate settings, as needed.
Windows NT
a. Select WinNT, and then enter the Windows NT domain (both DNS and NetBIOS
domains) and password information.
b. Select Administrators and WinNT login access and configure the appropriate
settings, as needed.
c. If LM authentication is enabled in the server, select LM authentication, and then
configure the LM authentication setting to match the setting used on the server.
5. Once these settings are configured, the all-in-one returns to the Ready state.
English
Setting up the digital send authentication solution 9
Page 10

2 Troubleshooting
This section provides troubleshooting suggestions for some of the most common issues associated
with installing the digital send authentication solution.
For more all-in-one troubleshooting tips, see the onscreen user’s guide.
Solving firmware upgrade problems
The firmware upgrade was not successful.
Print a configuration page and verify that the firmware version is SMR3xxxx or higher. If the
firmware version is not higher than SMR3xxxx, try upgrading the firmware again.
The all-in-one was active when the firmware was being upgraded.
Before starting to upgrade the firmware, make sure that Ready appears on the all-in-one
control panel.
Solving DIMM installation problems
The DIMM might not be properly seated.
Remove the DIMM and then reinsert it into the slot until it snaps into place.
The DIMM slot might be defective.
Try inserting the DIMM into the other DIMM slot, and then print a configuration page and
check the DIMM slot entries in the Device Information section to verify that the DIMM is installed.
If installed properly, the DIMM should be listed as “Enhanced Digital Send Solution”.
The DIMM might be defective.
If you suspect that the DIMM is defective, contact HP support.
Solving network problems
The all-in-one is not set up correctly on the network.
Make sure that the all-in-one is set up properly and connected to the network. PING the device
and make sure that it is responding.
The print server installed in the all-in-one does not support digital
send features.
The print server shipped with the HP Officejet 9130 all-in-one supports digital send features.
However, other print servers might not support these features. For a list of print servers that
support digital send features, see “Specifications” on page 12 and the onscreen user’s guide.
Security settings of the Windows network might be incompatible.
The digital send authentication solution supports the default security settings for Windows
networks. However, it might not support all non-default security settings (for example,
enabling Server Message Block (SMB) signing as well as only accepting NTLMv2).
Troubleshooting10
Page 11

The domain name or server name cannot be resolved.
Login or sending to network folder might fail if the domain name or the server name provided
during setup cannot be resolved to specific IP addresses. When setting up the digital send
authentication solution, be sure to do the following:
• Try to use fully qualified DNS names.
• Make sure the appropriate name servers (DNS, WINS, or both) are set up correctly on
the device.
• If you have recently changed the DNS or WINS settings, turn off and then turn on the
all-in-one.
The all-in-one does not use the login user’s e-mail address.
After a user logs in to the all-in-one, the all-in-one attempts to find the login user’s e-mail address
using LDAP search. If the LDAP search fails to locate the user’s e-mail address, the default
From: e-mail address will be used instead.
To enable the all-in-one to use user e-mail addresses instead of the default, verify the following:
• The user information is set up correctly in the LDAP server. If you are using an external LDAP
server for LDAP searches, make sure the user information is set up correctly in both the LDAP
server for Active Directory and the external LDAP server.
• The LDAP server contains the “sAMAccountName” and “mail” attributes. These attributes are
used in the LDAP search and must be defined.
English
Solving network problems 11
Page 12

3Specifications
This section provides technical specifications for the digital send authentication solution.
For all-in-one specifications, see the onscreen user’s guide.
Digital send authentication solution specifications
Physical specifications
Dimensions
(W x D x H)
Weight 10 g (0.35 oz)
Product features and capacities
Compatibility Only compatible with the HP Officejet 9100 series
Component
requirements
Connectivity Server operating system
requirements
29.36 x 90.34 x 3.18 mm
(1.16 x 3.56 x 0.13 inches)
all-in-one
• HP Digital Send Keyboard (C8240A)
• One of the following HP Jetdirect print servers:
• HP Jetdirect 620n Fast Ethernet print server
(J7934A)
• HP Jetdirect 680n 802.11b Wireless
print server (J6058A)
• HP Jetdirect 615n print server for Fast Ethernet
(J6057A)
• Microsoft Windows Server 2003
(with Service Pack 1)
• Microsoft Windows 2000 Server
(with Service Pack 4)
• Microsoft Windows NT Server 4.0
(with Service Pack 6a)
Specifications12
Page 13

Directory service system
requirements
SMTP server requirements • Microsoft Windows Exchange 5.5
• Microsoft Active Directory in the following network
operating systems:
• Microsoft Windows Server 2003
• Microsoft Windows 2000 Server
• LDAP server 3.0 (basic features)
• Microsoft Windows 2000 Active Directory
• Microsoft Windows 2003 Active Directory
• Novell eDir
• Sun ONE
• Critical Path
(with Service Pack 4)
• Microsoft Windows Exchange 2000
(with Service Pack 4)
• Microsoft Windows Exchange 2003
(with Service Pack 1)
• Lotus Domino 6.5
• Novell Groupwise
Memory specifications
Memory 64 MB
(with Service Pack 1)
(with Service Pack 4)
English
Form factor DIMM 100-pin
Technology SDRAM
Data rate 100 MHz/PC100
Environmental specifications
Operating
environment
Storage
environment
Operating temperature 0° to 65° C (0° to 149° F)
Recommended operating
temperature
Recommended relative
humidity
Storage temperature -55° to 150° C (-67 to 302° F)
Storage relative humidity Less than or equal to 80% noncondensing
15° to 35° C (59° to 95° F)
15% to 80% noncondensing
Digital send authentication solution specifications 13
Page 14

A Customer support and warranty
Contacting customer support
Visit http://www.hp.com/support/officejet9100 to find information for the all-in-one.
You will be able to view information about setting up and using the all-in-one,
downloading printer drivers, solving a problem, ordering supplies and accessories,
and viewing the all-in-one warranty.
Hewlett-Packard limited warranty statement
HP product Duration of Limited Warranty
Software 1 year
Accessories 1 year
Extent of limited warranty
1. Hewlett-Packard warrants to the end-user customer that the HP products specified
above will be free from defects in materials and workmanship for the duration
specified above, which duration begins on the date of purchase by the customer.
2. For software products, HP’s limited warranty applies only to a failure to execute
programming instructions. HP does not warrant that the operation of any product
will be uninterrupted or error free.
3. HP’s limited warranty covers only those defects that arise as a result of normal use
of the product, and does not cover any other problems, including those that arise
as a result of:
a. Improper maintenance or modification;
b. Software, media, parts, or supplies not provided or supported by HP; or
c. Operation outside the product’s specifications.
d. Unauthorized modification or misuse.
4. For HP printer products, the use of a non-HP ink cartridge or a refilled ink cartridge
does not affect either the warranty to the customer or any HP support contract with
the customer. However, if printer failure or damage is attributable to the use of a
non-HP or refilled ink cartridge, HP will charge its standard time and materials
charges to service the printer for the particular failure or damage.
5. If HP receives, during the applicable warranty period, notice of a defect in any
product which is covered by HP’s warranty, HP shall either repair or replace the
product, at HP’s option.
6. If HP is unable to repair or replace, as applicable, a defective product which is
covered by HP’s warranty, HP shall, within a reasonable time after being notified
of the defect, refund the purchase price for the product.
7. HP shall have no obligation to repair, replace, or refund until the customer returns
the defective product to HP.
ENWW
Page 15

8. Any replacement product may be either new or like new, provided that it has
functionality at least equal to that of the product being replaced.
9. HP products may contain remanufactured parts, components, or materials
equivalent to new in performance.
10. HP’s Limited Warranty Statement is valid in any country/region where the covered
HP product is distributed by HP. Contracts for additional warranty services, such as
on-site service, are available from any authorized HP service facility in countries/
regions where the product is distributed by HP or by an authorized importer.
Limitations of warranty
TO THE EXTENT ALLOWED BY LOCAL LAW, NEITHER HP NOR ITS THIRD PARTY
SUPPLIERS MAKES ANY OTHER WARRANTY OR CONDITION OF ANY KIND,
WHETHER EXPRESS OR IMPLIED WARRANTIES OR CONDITIONS OF
MERCHANTABILITY, SATISFACTORY QUALITY, AND FITNESS FOR A PARTICULAR
PURPOSE.
Limitations of liability
1. To the extent allowed by local law, the remedies provided in this Warranty
Statement are the customer’s sole and exclusive remedies.
2. TO THE EXTENT ALLOWED BY LOCAL LAW, EXCEPT FOR THE OBLIGATIONS
SPECIFICALLY SET FORTH IN THIS WARRANTY STATEMENT, IN NO EVENT
SHALL HP OR ITS THIRD PARTY SUPPLIERS BE LIABLE FOR DIRECT, INDIRECT,
SPECIAL, INCIDENTAL, OR CONSEQUENTIAL DAMAGES, WHETHER BASED
ON CONTRACT, TORT, OR ANY OTHER LEGAL THEORY AND WHETHER
ADVISED OF THE POSSIBILITY OF SUCH DAMAGES.
Local law
1. This Warranty Statement gives the customer specific legal rights. The customer
may also have other rights which vary from state to state in the United States,
from province to province in Canada, and from country/region to country/region
elsewhere in the world.
2. To the extent that this Warranty Statement is inconsistent with local law, this
Warranty Statement shall be deemed modified to be consistent with such local
law. Under such local law, certain disclaimers and limitations of this Warranty
Statement may not apply to the customer. For example, some states in the United
States, as well as some governments outside the United States (including provinces
in Canada), may:
a. Preclude the disclaimers and limitations in this Warranty Statement from
limiting the statutory rights of a customer (e.g. the United Kingdom);
b. Otherwise restrict the ability of a manufacturer to enforce such disclaimers or
limitations; or
c. Grant the customer additional warranty rights, specify the duration of implied
warranties which the manufacturer cannot disclaim, or allow limitations on the
duration of implied warranties.
3. FOR CONSUMER TRANSACTIONS IN AUSTRALIA AND NEW ZEALAND,
THE TERMS IN THIS WARRANTY STATEMENT, EXCEPT TO THE EXTENT
LAWFULLY PERMITTED, DO NOT EXCLUDE, RESTRICT, OR MODIFY, AND ARE
IN ADDITION TO, THE MANDATORY STATUTORY RIGHTS APPLICABLE TO
THE SALE OF THE HP PRODUCTS TO SUCH CUSTOMERS.
English
ENWW
Page 16

版权信息
© 2004
版本 1,
除版权法允许之外,未经事先书面许可,不得对本文档进行复制、改编或翻译。
本文档包含的信息如有更改,恕不另行通知。
此类产品和服务随附的担保声明中明确规定了
释为构成了附加担保。
商标公告
Microsoft、MS Windows、Windows 和 Windows NT 是 Microsoft Corporation
地区的注册商标或商标。
版权所有
2004 年 11
Hewlett-Packard Development Company, L.P.
月
产品和服务的唯一担保。本文档的任何内容都不应被解
HP
不对本文档中的技术错误、编辑错误或遗漏承担责任。
HP
在美国和/或其他国家
/
Page 17

目录
设置
设置数字发送验证解决方案
故障排除
排除固件升级故障
排除
DIMM
排除网络故障
规格
数字发送验证解决方案规格
客户支持与保修
联系客户支持
Hewlett-Packard
24
安装故障
24
28
有限保修声明
24
18
26
简 体 中 文
28
17
Page 18
1
设置
连接到
Microsoft® Windows®
HP Officejet 9100 系列 all-in-one
用户执行数字发送操作或控制面板中的所有操作前,可以要求通过
•
登录进行用户验证。
通过
•
•
注:数字发送验证解决方案会启用与现有
支持所有非默认的
要使用数字发送验证解决方案,
服务器。有关详细信息,请参阅 “规格”第
LDAP
利用数字发送验证解决方案,您可以使用包含在 “活动目录”中的
也可以使用单独的 “外部”
要使用 “活动目录”中的
将
并使用登录用户的证书进行
要使用 “外部”
LDAP
(纯文本)验证。
注:登录
LDAP
Windows NT
自动添加到所发送的任何电子邮件中
可以锁定管理员菜单和设置,以防止未授权修改。
Active Directory
设置和数字发送验证解决方案
all-in-one
配置中的
服务器设置。
all-in-one
服务器。但此时仍使用外部
LDAP
LDAP
LDAP
时会使用 “活动目录”中的
网络时,数字发送验证解决方案允许您对
启用更高的安全设置:
域登录,
服务器进行电子邮件搜索,请确保已为
all-in-one
all-in-one
LDAP
服务器,请务必在设置数字发送验证解决方案时,
LDAP
服务器地址留白。
Kerberos
服务器会使用在这些设置中指定的用户名和密码进行简单
LDAP
可确定当前用户的电子邮件地址并将此地址
。
Windows
安全设置。
必须具有键盘并安装了支持的
服务器进行
验证。
服务器进行电子邮件搜索。
安全协议相同的安全级别。它可能不
页。
26
搜索。
LDAP
LDAP
LDAP
服务器会自动从网络检测地址,
all-in-one
服务器 - 即使已经设置了外部
Windows NT®
HP Jetdirect
服务器,
LDAP
配置了所有的
域
打印
设置数字发送验证解决方案
要安装数字发送验证解决方案,请完成以下任务:
18
备份
1.
2.
3.
4.
all-in-one
升级固件
安装数字发送验证
配置安全设置
设置
DIMM
Page 19
步骤1: 备份
设置数字发送验证解决方案之前,使用
决方案之后,使用
打开
1.
在支持的
all-in-one 的 IP
http://123.123.123.123
单击
2.
配置备份的设置,然后单击
3.
all-in-one
EWS
。
EWS
Web
地址为
Settings
(设置)标签,然后单击左侧窗格中的
浏览器中,键入已经指定给
步骤2: 升级固件
检查
的
CD
all-in-one
来升级固件。
中安装的固件的版本。如果需要,可以使用数字发送验证解决方案中包含
设置
并恢复这些设置。
123.123.123.123
。
Apply
EWS 备份 all-in-one
(应用)。
all-in-one 的 IP
,则在
WEB
设置。安装数字发送验证解
地址。例如,如果
浏览器中输入以下地址:
Backup
(备份)
。
注:只有版本号低于
请转到 “安装数字发送验证
SMR3xxxx
时,才需要升级固件。如果固件版本高于
DIMM
”第
20
页。
检查固件版本
注:您也可以使用
窗格中的
在控制面板上,按
1.
按 (向下)移动到
2.
按 (向下)移动到
3.
all-in-one
使用
CD
选择以下方法之一升级固件。
注:开始升级固件之前,确保
除下面列出的方法外,还可以使用其他方法升级
http://www.hp.com/support/officejet9100。
将
CD 插入 CD-ROM
1.
使用以下选项之一升级固件。
2.
Device
将打印配置页
升级固件
(设备)。
检查固件版本。单击
EWS
(菜单)按钮。
Menu
Print report
Device config.
。固件版本列在该页的 “设备信息”部分。
all-in-one
驱动器。
Information
(打印报告),然后按 (选择)。
(设备配置),然后按 (选择)。
处于 “就绪”状态。
all-in-one
SMR3xxxx
(信息)标签,然后单击左侧
固件。有关详细信息,请访问
,
简
体
中
文
注意:完成升级过程前,不要尝试打印或关闭打印机。
19
Page 20
固件下载实用程序
双击
选择
CD
FMW
a.
b.
(FDU)
上的 “固件下载实用程序”。
文件,然后按照联机说明操作。
FTP
在命令提示符下,输入 FTP (IP 地址),然后按
a.
在 “用户
b.
c.
d.
e.
。
空白
在
ftp>
盘符和固件文件名称)
该信息区分大小写。
按
Enter
升级过程的进度将显示在命令提示符下和打印机的控制面板上。
完成升级过程后,根据操作系统键入 bye 或 quit
”和 “密码”字段处,按
ID
提示符下,键入 put D:/SMR30XXX.FMW (或可用的
。确保键入文件的完整路径,并确保插入正确的文件名。
键。
Enter
Enter
键。默认情况下,两个字段都是
。
HP Web Jetadmin
键。
CD-ROM
驱动器
注:
HP Web Jetadmin
使用
HP Web Jetadmin
有关使用
注:有关
http://www.hp.com/go/webjetadmin。
3.
HP Web Jetadmin
打开
a.
b.
c.
打印配置页并验证固件版本是否为
如果配置页上的固件版本未更改,请参阅 “排除固件升级故障”第
Web JetAdmin
将显示 更新选项
确保选中更新打印机固件
单击下一步
从选择新固件版本
然后单击更新固件
HP Web Jetadmin
软件可用于同时升级一个或几个
软件升级固件的说明可能因所使用软件版本的不同而有所变化。
软件升级固件的详细信息,请参阅此软件的联机帮助。
软件,然后从下拉列表中选择更新
(Update Options)
。
(Next)
(Select New Firmware Version)
(Update Firmware)
(Update Printer Firmware
软件的详细信息或要下载该软件,请转到
SMR3xxxx
步骤3: 安装数字发送验证
升级固件后,可安装数字发送验证
注意:
任何裸露的金属板表面。如果可能,请佩戴接地腕带 (或类似设备)。操作
请始终小心谨慎。请避免触摸电子组件或电路通道。如果未能按照这些建议进行操作,
可能会导致部件损坏。
包含易受静电损坏的电子组件。为防止静电聚积,请常触及
DIMM
DIMM
。
。
或更高版。
DIMM
。
all-in-one
列表中选择闪存版本,
中的固件。
(Update)
选项,然后
)
。
24
all-in-one
页。
DIMM
上
时,
20
安装数字发送验证
按 (电源)关闭
1.
拔下电源线并将所有电缆断开。
2.
DIMM
all-in-one
。
Page 21
3.
在
all-in-one
左侧,拉开侧盖板并将其取下。
取下
4.
5.
6.
DIMM
从抗静电包装中取出
对齐
DIMM
任何空槽。
盖板。
。
DIMM
,以使下部边缘上的槽口与
DIMM
简
体
中
文
槽中凸起的标记成一直线。可使用
将
7.
将
8.
插入并按入槽中,直到
DIMM
盖板放回原位,然后将侧盖板也放回原位。
DIMM
DIMM
啪地一声到达适当位置为止。
21
Page 22
重新连接电源线和所有电缆,然后按 (电源)打开
9.
打印配置页并检查 “设备信息”部分中的
10.
如果已正确安装,则
应显示为 “数字发送验证解决方案”。
DIMM
DIMM
all-in-one
插槽项,以验证是否已安装
。
DIMM
。
注:还可以使用
单击左侧窗格中的
如果
DIMM
验证是否已安装
EWS
未列在配置页上,请参阅 “排除
Device
(设备)。
步骤4: 配置安全设置
安装
这些设置
安全类型
数字发送验证解决方案提供两种安全类型:
all-in-one
(管理)”和 “
注:
Windows 2003
表
1-1
接入点 安全类型
控制面板操作 对于所有控制面板操作 (例如复
后,设置
DIMM
。
用户登录一些或全部控制面板操作,并限制访问控制面板中的 “
Windows NT
all-in-one
NETWORK & I/O
安全性支持
环境。
Windows NT 4.0、 Windows 2000、 Windows XP 和
安全设置的说明
安全性
PIN
制、传真和发送电子邮件操作),
用户必须输入他们的
。单击
DIMM
的安全级别。可以使用
PIN 和 Windows NT
(网络和
I/O
PIN
DIMM
)”菜单。
。
Information
安装故障”第
EWS
Windows NT
对于以下操作,用户必须执行
Windows NT
•
- 或-
•
(信息)标签,然后
页。
24
(推荐)或控制面板输入
。这些安全设置要求
ADMIN
安全性
登录:
仅发送电子邮件和网络文件
夹操作
所有控制面板操作。
22
LCD“ADMIN
(管理)”菜单访
问
“
NETWORK &
(网络和
I/O
)”菜单访问
I/O
a.通过 Windows NT
将限制对这些菜单的访问。
需要管理员
安全性选项,管理员可以指定额外的
PIN
。
将限制对这些菜单的访问
只有管理员或指定的
a
管理员
all-in-one
可以访问。
管理员
。
。
all-in-one
Page 23
用前须知
设置安全选项之前,应获取以下信息:
1.
• DNS 和 NetBIOS
例如,如果您使用的是
“
sales.mycompany.com
而
NetBIOS
验证设置 (如果服务器或域上的默认设置已经修改)
• LM
域名
域名为 “
Active Directory 2003
”,则完整的
sales
”
。
DNS
并且域设置为
域名为 “
sales.mycompany.com
”,
注意:如果
(如网络文件夹操作)可能不起作用。
如果最近更改了
2.
all-in-one 上的 LM
DNS 或 WINS
验证设置与服务器上的设置不匹配,则要求登录的操作
设置,请关闭
设置安全级别
(推荐)
EWS
打开
1.
单击
2.
从
3.
PIN
a.
b.
Windows NT
a.
b.
c.
单击
4.
All-in-one
在控制面板上,按
1.
按 (向下)移动到
2.
按 (向下)移动到
3.
按 (向下)移动到
4.
设置,然后按 (选择)。
PIN
a.
b.
Windows NT
a.
b.
c.
配置完这些设置后,
5.
。
EWS
Settings
Device access level
选择
单击
选择
信息。
单击
访问)标签,并根据需要配置相应设置。
如果在服务器中启用了
文件夹),然后配置
Apply
(设置)标签,然后单击左侧窗格中的
(设备访问级别)列表中选择所需的安全设置。
,然后设置
PIN
Users PIN
Windows NT
Administrators
(用户
(应用)。
号。
PIN
)标签,并根据需要配置相应设置。
PIN
,然后输入
(管理员)和
验证,请选择左侧窗格中的
LM
验证设置以匹配服务器上使用的设置。
LM
控制面板
(菜单)按钮。
Menu
(管理),然后按 (选择)。
Admin
ADMIN SETUP
Device access
选择
移动到
选择
选择
并根据需要配置相应设置
如果在服务器中启用了
配置
,然后按照显示的说明设置
PIN
Registered users
WinNT
Administrators
LM
,然后输入
验证设置以匹配服务器上使用的设置。
(已注册用户),并根据需要配置相应设置。
Windows NT
(管理员)和
。
验证,请选择
LM
all-in-one
会返回 “就绪”状态。
all-in-one
Windows NT
Windows NT Login Access(Windows NT
(管理设置),然后按 (选择)。
(设备访问),使用 – 或
WinNT login access(WinNT
域(
号。
PIN
域(
DNS 和 NetBIOS
LM authentication(LM
,然后再打开。
Security
DNS 和 NetBIOS
(安全性)。
Network Folder
选择所需的安全
+
域)和密码信息。
简
体
中
文
域)和密码
登录
(网络
登录访问),
验证),然后
23
Page 24

2
故障排除
本节介绍与安装数字发送验证解决方案有关的一些最常见问题的故障排除建议。
有关更多
all-in-one
故障排除提示,请参阅联机用户指南。
排除固件升级故障
固件升级失败。
打印配置页并验证固件版本是否为
请尝试再次升级固件。
SMR3xxxx
或更高。如果固件版本低于
SMR3xxxx
,
固件升级过程中,
开始升级固件前,请确保
排除
DIMM
DIMM
卸下
DIMM
DIMM
尝试将
DIMM
发送解决方案”。
DIMM
如果怀疑
安装故障
可能没有正确安装。
,然后将其重新插入插槽,直到卡入到位。
插槽可能有缺陷。
插入其他
DIMM
插槽项以验证是否已安装
可能有缺陷。
DIMM
排除网络故障
all-in-one
确保
all-in-one
all-in-one
HP Officejet 9130 all-in-one
器可能不支持这些功能。有关支持数字发送功能的打印服务器列表,请参阅 “规格”
第
26
的网络设置不正确。
设置正确并已连接到网络。对设备执行
中安装的打印服务器不支持数字发送功能。
页和联机用户指南。
all-in-one
Ready
DIMM
有缺陷,请与
附带的打印服务器支持数字发送功能。但是,其他打印服务
处于活动状态。
(就绪)出现在
插槽,然后打印配置页并检查 “设备信息”部分的
HP
。如果安装正确,则
DIMM
技术支持部门联系。
all-in-one
控制面板上。
DIMM
命令并确保其响应。
PING
应显示为“增强数字
24
Windows
数字发送验证解决方案支持默认的
认的安全设置 (例如 “启用服务器消息块
网络的安全设置可能不兼容。
Windows
网络安全设置。但是,它并非支持所有非默
签名”以及 “仅接受
(SMB)
NTLMv2
”)。
Page 25

无法解析域名或服务器名。
如果设置期间提供的域名或服务器名无法解析为特定
夹操作可能失败。设置数字发送验证解决方案时,确保执行以下操作:
尝试使用完全限定的
•
确保正确设置设备上的相应名称服务器 (
•
如果最近更改了
•
DNS 或 WINS
DNS
名称。
DNS、 WINS
设置,请关闭
地址,则登录或发送到网络文件
IP
或二者)。
all-in-one
,然后再打开。
all-in-one
用户登录到
址。如果
邮件地址。
要使
all-in-one
在
•
搜索时,请确保正确设置 “活动目录”的
信息。
LDAP
•
中使用,因此必须定义它们。
没有使用登录用户的电子邮件地址。
all-in-one 后, all-in-one
搜索未能找到该用户的电子邮件地址,则将使用默认的 “收件人”电子
LDAP
能够使用用户的电子邮件地址而不是默认地址,请验证以下条件:
服务器中设置的用户信息是否正确。如果使用外部
LDAP
服务器包含 “
sAMAccountName”
会尝试使用
LDAP
LDAP
和“
搜索查找登录用户的电子邮件地
服务器进行
服务器和外部
”属性。这些属性将在
mail
LDAP
LDAP
服务器中的用户
LDAP
LDAP
搜索
简
体
中
文
25
Page 26

3
规格
本节提供了数字发送验证解决方案的技术规格。
有关
all-in-one
规格,请参阅联机用户指南。
数字发送验证解决方案规格
物理规格
尺寸
(W x D x H)
重量
产品功能和特性
兼容性 只兼容
组件要求
连接性 服务器操作系统要求
29.36 x 90.34 x 3.18 mm
(
1.16 x 3.56 x 0.13
克 (
10
HP
•
下列一种
•
• HP Jetdirect 620n
• HP Jetdirect 680n 802.11b
• HP Jetdirect 615n
Microsoft Windows Server 2003
•
(带有
Microsoft Windows 2000 Server
•
(带有
Microsoft Windows NT Server 4.0
•
(带有
英寸)
盎司)
0.35
HP Officejet 9100 系列 all-in-one
数字发送键盘
HP Jetdirect
(J7934A)
服务器
(J6057A)
Service Pack 1
Service Pack 4
Service Pack 6a
(C8240A)
打印服务器:
快速以太网打印服务器
无线打印
(J6058A)
快速以太网打印服务器
)
)
)
26
Page 27

内存规格
目录服务系统要求
服务器要求
SMTP
Microsoft Active Directory
•
系统上运行:
• Microsoft Windows Server 2003
(带有
Service Pack 1
• Microsoft Windows 2000 Server
(带有
Service Pack 4
LDAP server 3.0
•
• Microsoft Windows 2000 Active Directory
• Microsoft Windows 2003 Active Directory
• Novell eDir
• Sun ONE
• Critical Path
Microsoft Windows Exchange 5.5
•
(带有
Service Pack 4
Microsoft Windows Exchange 2000
•
(带有
Service Pack 4)
Microsoft Windows Exchange 2003
•
(带有
Service Pack 1
Lotus Domino 6.5
•
Novell Groupwise
•
(基本功能)
在以下网络操作
)
)
)
)
简
体
中
文
内存
封装形式
技术
数据速率
环境规格
操作环境 工作温度
推荐工作温度
推荐的相对湿度
存放环境 存放温度
存放相对湿度 小于或等于
64 MB
DIMM 100
SDRAM
100 MHz/PC100
0° 至 65° C(0° 至 149° F
15° 至 35° C(59° 至 95° F
15% 至 80%
-55° 至 150° C(-67° 至 302° F
针
,无冷凝
,无冷凝
80%
)
)
)
27
Page 28

A
客户支持与保修
联系客户支持
要查找
all-in-one
可查看有关设置及使用
及附件的信息,并查看
的信息,请访问
all-in-one
all-in-one
http://www.hp.com/support/officejet9100。
、下载打印机驱动程序、排除故障、订购配件
的保修。
Hewlett-Packard
产品 有限保修期
HP
软件
附件
有限保修范围
Hewlett-Packard
1.
期限内没有材料和工艺上的缺陷,该期限自客户购买之日算起。
对于软件产品,
2.
证任何产品的运行无中断或没有错误。
有限保修仅适用于因产品的正常使用产生的缺陷,不适用于任何其它
HP
3.
问题,包括因以下原因产生的缺陷:
维护或改动不当;
a.
使用不是由
b.
操作条件超出了产品的规格;
c.
未经授权地改动或误用。
d.
对于
4.
修或任何
用非HP的墨盒或重注的墨盒,
损坏,按照标准的时间和材料费用收费。
如果在适用的保修期内,
5.
HP
如果
6.
通知存在缺陷后合理的时间内返还本产品的购买价格。
只有客户将存在缺陷的产品返还给
7.
退款。
任何更换的产品可能是新的或类似新的,不过其功能要至少与被更换的
8.
产品的功能相同。
HP
9.
HP
10.
保修服务的合同 (例如上门服务)可以从HP或授权进口商销售相应产品的
国家/地区的任何授权HP服务机构获得。
打印机产品,使用非
HP
HP
将自行选择修理或更换产品。
无法对
HP
产品可能包含性能上与新的相当的再制造零件、原件或材料。
有限保修声明在
有限保修声明
年
1
年
1
向最终用户客户保证,上文指定的HP产品在上文指定的
有限保修仅适用于无法执行程序指令的情况。
HP
提供的或
HP
与客户的支持合同。不过,如果打印机的故障或损坏是因为使
HP 收到 HP
保修所适用的缺陷产品进行修理或更换,
HP
销售相关
HP
不支持的软件、介质、部件或耗材;
HP
的墨盒或重注的墨盒不会影响对客户的保
HP
在维修打印机时,将根据具体的故障或
HP
提供保修的产品存在缺陷的通知,
HP
HP, HP
HP
才有义务进行修理、更换或
产品的任何国家/地区生效。其它
不保
HP
将在被
ZHCN
Page 29

保修的限制
只要当地法律允许,
无论是明示或暗示的对适销性、满意的质量以及针对特定用途的适用性的
担保或规定。
或其第三方供应商不得做出任何其它担保或规定,
HP
责任限制
本保修声明为客户提供特定的法律权利。根据在美国所处的州的不同、
1.
在加拿大所处的省的不同以及在世界其它地方所处的国家/地区的不同,
客户可能还拥有其它权利。
只要当地法律允许,除了本保修声明中明确提出的责任,
2.
供应商对直接、间接、特殊、偶发或既发损失概不负责,无论根据合同、
侵权还是任何其它法律原理,即使已被告知可能造成上述损失。
或其第三方
HP
当地法律
本保修声明为客户提供特定的法律权利。根据在美国所处的州的不同、
1.
在加拿大所处的省的不同以及在世界其它地方所处的国家/地区的不同,
客户可能还拥有其它权利。
只要本保修声明与当地法律不一致,应修改本保修声明,以便与当地法律
2.
一致。根据此类当地法律,本保修声明中的某些免责声明和限制可能对
客户不适用。例如,在美国的某些州以及美国以外的某些政府 (包括
加拿大的省)可能会:
禁止本保修声明中的免责声明和限制对客户的法定权利进行限制
a.
(例如英国);
或禁止生产商强行执行此类免责声明或限制;或者
b.
授予客户其它保修权利,指定生产商无法免责的暗示保修期,
c.
或允许限制暗示保修期。
对于澳大利亚和新西兰的客户交易,本保修声明中包含的条款若非法律
3.
允许,不得排除、限制或修改,并且受适用于向此类客户销售HP产品的
强制法定权利的限制。
简
体
中
文
ZHCN
Page 30

저작권 정보
© 2004 Copyright Hewlett-Packard Development Company, L.P.
초판, 2004년 11월
저작권법에 의해 허용되는 경우를 제외하고는 사전 서면 허가 없이 복사, 각색 또는 번역하는 행위는 금지되어
있습니다.
여기에 포함된 정보는 별도의 통보 없이 변경될 수 있습니다.
HP 제품 및 서비스에 대한 보증은 해당 제품 및 서비스에 포함된 보증 조항에 명시된 내용만 보증합니다.
여기의 어떠한 사항도 추가적인 보증 조건으로 해석되지 않아야 합니다. HP는 여기에 포함된 기술적 또는
편집상의 오류나 생략에 대해 책임을 지지 않습니다.
상표 크레딧
Microsoft, MS Windows, Windows 및 Windows NT는 미국 및/또는 기타 국가에서의 Microsoft Corporation 등록
상표 또는 상표입니다.
Page 31

목차
설정
디지털 전송 인증 솔루션 설정 32
문제 해결
펌웨어 업그레이드 문제 해결 38
DIMM 설치 문제 해결 38
네트워크 문제 해결 38
사양
디지털 전송 인증 솔루션 사양 40
고객 지원 및 보증
고객 지원 연락처 42
Hewlett-Packard 제한 보증 규정 42
한
국
어
31
Page 32

1 설정
디지털 전송 인증 솔루션을 사용하면 Microsoft® Windows® 네트워크에 연결할 때
HP Officejet 9100 시리즈 복합기의 보안 설정을 강화할 수 있습니다.
• 사용자가 제어판에서 디지털 전송 작업이나 기타 다른 작업을 수행하기 위해서는
Windows
• Windows NT 도메인 로그인을 통해 복합기는 현재 사용자의 전자 메일 주소를
결정하고 보낸 전자 메일 메시지에 이 주소를 자동으로 추가합니다.
• 무단으로 수정하지 못하도록 관리자 메뉴와 설정을 잠글 수 있습니다.
주: 디지털 전송 인증 솔루션은 기존 Windows 보안 프로토콜과 동일한 수준의 보안을
가능하게 합니다. 기본이 아닌 Active Directory 보안 설정은 일부만 지원할 수 있습니다.
디지털 전송 인증 솔루션을 사용하려면 복합기에 키보드가 있어야 하며 지원되는 HP Jetdirect
프린트 서버가 설치되어 있어야 합니다. 자세한 내용은 40페이지의 "사양"을 참조하십시오.
LDAP 설정 및 디지털 전송 인증 솔루션
디지털 전송 인증 솔루션을 사용하면 Active Directory에 포함된 LDAP 서버를 사용하거나
LDAP 검색을 위한 별도의 "외부" LDAP 서버를 사용할 수 있습니다.
Active Directory의 LDAP 서버를 사용하려면 디지털 전송 인증 솔루션을 설정할 때 복합기
구성에서 LDAP 서버 주소를 비워 두십시오. LDAP 서버가 네트워크에서 이 주소를 자동으로
감지하고 Kerberos 인증으로 로그인 사용자의 자격 증명을 사용합니다.
전자메일 검색을 위해 "외부" LDAP 서버를 사용할 경우 복합기의 모든 LDAP 서버 설정을
구성하도록 하십시오. LDAP 서버는 단순(일반 텍스트) 인증으로 이 설정에 지정된 사용자
이름 및 암호를 사용합니다.
®
NT 도메인 로그인을 통한 사용자 인증이 필요할 수 있습니다.
주: Active Directory의 LDAP 서버는 외부 LDAP 서버가 설정된 경우라도 복합기에 로그인할 때
사용됩니다. 그러나 외부 LDAP 서버는 전자메일에 대한 LDAP 검색에 여전히 사용됩니다.
디지털 전송 인증 솔루션 설정
디지털 전송 인증 솔루션을 설치하려면 다음 작업을 완료하십시오.
1. 복합기 설정 백업
2. 펌웨어 업그레이드
3. 디지털 전송 인증 DIMM 설치
4. 보안 설정 구성
32
설정
Page 33
단계 1: 복합기 설정 백업
디지털 전송 인증 솔루션을 설정하기 전에 EWS를 사용하여 복합기 설정을 백업합니다.
디지털 전송 인증 솔루션을 설치한 후에 EWS를 사용하여 이 설정을 복원합니다.
1. EWS를 엽니다.
지원되는 웹 브라우저에서 복합기에 할당된 IP 주소를 입력합니다. 예를 들어 복합기의
IP 주소가 123.123.123.123이면 웹 브라우저에 다음 주소를 입력합니다.
http://123.123.123.123.
2. Settings(설정) 탭을 누른 다음 왼쪽 창에서 Backup(백업)을 누릅니다.
3. 백업 설정을 구성한 다음 Apply(적용)를 누릅니다.
단계 2: 펌웨어 업그레이드
복합기에 설치된 펌웨어의 버전을 확인합니다. 필요하면 디지털 전송 인증 솔루션과 함께
제공되는 CD를 사용하여 펌웨어를 업그레이드합니다.
주: 버전이 SMR3xxxx 이하인 펌웨어만 업그레이드하십시오. 펌웨어 버전이 SMR3xxxx
이상이면 34페이지의 "디지털 전송 인증 DIMM 설치"로 이동합니다.
펌웨어 버전을 확인하는 방법
주: EWS를 사용해 펌웨어 버전을 확인할 수도 있습니다. Information(정보) 탭을 누른 다음
왼쪽 창에서 Device(장치)를 누릅니다.
1. 제어판에서 M
2. (아래쪽 화살표)를 눌러 Print report(보고서 인쇄)로 이동한 다음 (선택)을
누릅니다.
3. (아래쪽 화살표)를 눌러 Device config.(장치 구성)으로 이동한 다음 (선택)을
누릅니다.
구성 페이지가 인쇄됩니다. 펌웨어 버전이 페이지의 Device Information(장치 정보) 섹션에
나열됩니다.
ENU(메뉴)를 누릅니다.
CD를 사용하여 펌웨어 업그레이드하는 방법
다음 방법 중 하나를 선택하여 펌웨어를 업그레이드합니다.
주: 펌웨어를 업그레이드하기 전에 복합기가 Ready(준비) 상태인지 확인하십시오.
아래 나열된 방법 외에 다른 방법으로 복합기 펌웨어를 업그레이드할 수 있습니다. 자세한
내용을 보려면 http://www.hp.com/support/officejet9100 웹 사이트를 방문하십시오.
1. CD-ROM 드라이브에 CD를 넣습니다.
2. 다음 옵션 중 하나를 사용하여 펌웨어를 업그레이드합니다.
주의: 과정이 완료될 때까지 인쇄하거나 프린터를 끄지 마십시오.
디지털 전송 인증 솔루션 설정
한
국
어
33
Page 34

펌웨어 다운로드 유틸리티(FDU)
a. CD에 수록된 펌웨어 다운로드 유틸리티를 두 번 누릅니다.
b. FMW 파일을 선택한 다음 화면 지시를 따릅니다.
FTP
a. 명령 프롬프트에 FTP(IP address)(IP 주소)를 입력한 후 Enter 키를 누릅니다.
b. 사용자 ID 및 암호 필드를 채우고 Enter 키를 누릅니다. 두 필드는 기본적으로 비어
있습니다.
c. ftp> 프롬프트 다음에 put D:/SMR30XXX.FMW를 입력합니다. 입력하는 내용은
사용자의 CD-ROM 드라이브와 펌웨어 파일 이름입니다. 파일에 대한 전체 경로를
입력해야 하며 파일 이름을 정확히 입력해야 합니다. 또한 대소문자를 구분하여
입력해야 합니다.
d. Enter 키를 누릅니다.
명령 프롬프트에 진행률이 표시되며 또한 프린터의 제어판에도 표시됩니다.
e. 진행이 완료된 후에 운영 체제의 종류에 따라 bye 또는 quit를 입력합니다.
HP Web Jetadmin
주: 하나 이상의 복합기에서 동시에 펌웨어를 업그레이드하는 경우에는 HP Web Jetadmin
소프트웨어를 사용할 수 있습니다.
HP Web Jetadmin 소프트웨어를 사용하여 펌웨어를 업그레이드하는 방법은 사용 중인
소프트웨어 버전에 따라 다릅니다. HP Web Jetadmin 소프트웨어를 사용하여 펌웨어를
업그레이드하는 방법은 소프트웨어의 온라인 도움말을 참조하십시오.
a. Web JetAdmin 소프트웨어를 열고 드롭다운 목록에서 업데이트(Update)를
선택합니다. 그러면 업데이트 옵션(Update Options)이 표시됩니다.
b. 프린터 펌웨어 업데이트(Update Printer Firmware) 옵션이 선택되었는지 확인하고
Next(다음)를 누릅니다.
c. 새 펌웨어 버전 선택(Select New Firmware Version) 목록에서 플래시할 버전을
선택한 후 펌웨어 업데이트(Update Firmware)를 누릅니다.
주: HP Web Jetadmin 소프트웨어에 대한 자세한 내용을 보거나 소프트웨어를
다운로드하려면 http://www.hp.com/go/webjetadmin으로 이동하십시오.
3. 구성 페이지를 인쇄하고 펌웨어 버전이 SMR3xxxx 이상인지 확인합니다.
구성 페이지에 표시되는 펌웨어 버전이 변경되지 않으면 38페이지의 "펌웨어 업그레이드
문제 해결"을 참조하십시오.
단계 3: 디지털 전송 인증 DIMM 설치
펌웨어를 업그레이드한 후 디지털 전송 인증 DIMM을 설치합니다.
주의: DIMM에는 정전기에 의해 손상을 입을 수 있는 전자 부품이 포함되어 있습니다.
정전기 발생을 방지하려면 복합기의 노출된 금속 표면에 먼저 접촉해야 합니다.
가능하면 손목 접지대(또는 유사 장치)를 착용하십시오. DIMM은 항상 조심스럽게 다룹니다.
전자 부품 또는 회로 경로를 만지지 마십시오. 이러한 권장 사항을 준수하지 않을 경우 부품에
손상을 줄 수 있습니다.
34
설정
Page 35

디지털 전송 인증 DIMM을 설치하는 방법
1. (전원)을 눌러 복합기를 끕니다.
2. 전원 코드를 뽑고 모든 케이블을 분리합니다.
3. 복합기 왼쪽에 있는 측면 덮개를 열어 탈거합니다.
4. DIMM 덮개를 탈거합니다.
5. 정전기 방지 패키지에서 DIMM을 탈거합니다.
6. 하단 모서리의 노치가 DIMM 슬롯에서 표시된 화살표 방향과 같이 되도록 DIMM 슬롯을
정렬합니다. 이제 빈 슬롯을 사용할 수 있습니다.
한
국
어
7. DIMM을 딸깍 소리가 날 때까지 DIMM 슬롯에 밀어 넣습니다.
8. DIMM 덮개를 교환한 다음 측면 덮개를 교환합니다.
디지털 전송 인증 솔루션 설정
35
Page 36

9. 전원 코드 및 모든 케이블을 다시 연결한 다음 (전원)을 눌러 복합기를 켭니다.
10. 구성 페이지를 인쇄한 후 Device Information(장치 정보) 섹션의 DIMM 슬롯 항목에서
DIMM이 설치되었는지 확인합니다. 올바로 설치되었다면 DIMM이 "디지털 전송 인증
솔루션"으로 나열되어야 합니다.
주: EWS를 사용해 DIMM이 설치되었는지 확인할 수도 있습니다. Information(정보) 탭을 누른
다음 왼쪽 창에서 Device(장치)를 누릅니다.
DIMM이 구성 페이지에 나열되지 않으면 38페이지의 "DIMM 설치 문제 해결"을
참조하십시오.
단계 4: 보안 설정 구성
DIMM이 설치된 후 복합기에 대한 보안 수준을 설정합니다. EWS(권장)나 제어판을 사용해
이러한 설정에 들어갈 수 있습니다.
보안 종류
디지털 전송 인증 솔루션에는 PIN과 Windows NT라는 두 가지 보안 종류가 있습니다.
보안 설정을 구성하면 제어판 작업을 하기 위해서는 모든 복합기 사용자가 로그인해야
하며 제어판의 ADMIN 및 NETWORK & I/O 메뉴에 대한 액세스가 제한됩니다.
주: Windows NT 보안은 Windows NT 4.0, Windows 2000, Windows XP 및 Windows 2003
환경을 지원합니다.
표 1-1 보안 설정 설명
36
액세스 포인트 보안 종류
PIN 보안 Windows NT 보안
제어판 작업 모든 제어판 작업(복사, 팩스, 전자
LCD ADMIN
메뉴 액세스
NETWORK & I/O
메뉴 액세스
a.Windows NT 보안 옵션을 사용할 경우 관리자는 복합기 관리자를 추가로 지정할 수 있습니다.
메일 작업 등)에 대해 사용자는
자신의 PIN을 입력해야 합니다.
이 메뉴에 대한 액세스는
제한됩니다.
관리자 PIN이 필요합니다.
다음 작업을 하기 위해서는
Windows NT 로그인을 해야
합니다.
• 전자 메일 및 네트워크 폴더
작업
-또는-
• 모든 제어판 작업
이 메뉴에 대한 액세스는
제한됩니다.
관리자 또는 지정된 복합기
관리자만
a
액세스할 수 있습니다.
설정
Page 37

시작하기 전에
1. 보안 옵션을 설정하기 전에 다음 정보가 필요합니다.
• DNS 및 NetBIOS 도메인 이름
예를 들어 Active Directory 2003을 사용하고 있고 도메인을 "sales.mycompany.com"
으로 설정한 경우 전체 DNS 도메인 이름은 "sales.mycompany.com"이 되고 NetBIOS
도메인 이름은 "sales"가 됩니다.
• LM 인증 설정(서버 또는 도메인의 기본 설정이 수정된 경우)
주의: 복합기의 LM 인증 설정이 서버와 일치하지 않으면 로그인을 필요로 하는
작업(예: 네트워크 폴더 작업)은 수행할 수 없습니다.
2. 최근에 DNS 또는 WINS 설정을 변경한 경우라면 복합기를 끄고 다시 켜십시오.
보안 레벨을 설정하는 방법
EWS(권장)
1. EWS를 엽니다.
2. 설정(Settings) 탭을 누른 다음 왼쪽 창에서 Security(보안)를 누릅니다.
3. Device access level(장치 액세스 수준) 목록에서 원하는 보안 설정을 선택합니다.
PIN
a. PIN을 선택한 후 PIN 번호를 설정합니다.
b. Users PIN(사용자 PIN)을 누르고 필요한 옵션을 설정합니다.
Windows NT
a. Windows NT를 선택한 후 Windows NT 도메인(DNS 및 NetBIOS 도메인 둘 다)과
암호를 입력합니다.
b. Administrators(관리자) 및 Windows NT Login Access(Windows NT 로그인 액세스)
탭을 누르고 필요한 옵션을 설정합니다.
c. LM 인증이 서버에서 활성화된 경우 왼쪽 창에서 Network Folder(네트워크 폴더)를
선택한 후 서버에 사용된 설정과 일치하도록 LM 인증 설정을 구성합니다.
4. 적용(Apply)을 누릅니다.
복합기 제어판
1. 제어판에서 MENU(메뉴)를 누릅니다.
2. (아래쪽 화살표)를 눌러 Admin(관리자)으로 이동한 다음 (선택)을 누릅니다.
3. (아래쪽 화살표)를 눌러 ADMIN SETUP(관리자 설정)으로 이동한 다음 (선택)을
누릅니다.
4. (아래쪽 화살표)를 눌러 Device access(장치 액세스)로 이동한 다음 – 또는 +를 사용해
원하는 보안 설정을 선택한 후 (선택)을 누릅니다.
PIN
a. PIN을 선택한 후 디스플레이에 표시되는 지시에 따라 PIN 번호를 설정합니다.
b. Registered users(등록된 사용자)로 이동한 후 필요한 옵션을 설정합니다.
Windows NT
a. WinNT를 선택한 후 Windows NT 도메인(DNS 및 NetBIOS 도메인 둘 다)과 암호를
입력합니다.
b. Administrators(관리자) 및 WinNT Login Access(WinNT 로그인 액세스)를 선택하고
필요한 옵션을 설정합니다.
c. LM 인증이 서버에서 활성화된 경우 LM authentication(LM 인증)을 선택한 후 서버에
사용된 설정과 일치하도록 LM 인증 설정을 구성합니다.
5. 설정이 끝나면 복합기는 Ready(준비) 상태로 복귀됩니다.
한
국
어
디지털 전송 인증 솔루션 설정
37
Page 38

2 문제 해결
이 단원에서는 디지털 전송 인증 솔루션 설치시 흔히 겪는 문제에 대한 해결 방법을
제시합니다.
자세한 복합기 문제 해결 팁은 온라인 사용 설명서를 참조하십시오.
펌웨어 업그레이드 문제 해결
펌웨어가 성공적으로 업그레이드되지 않은 경우
구성 페이지를 인쇄한 후 펌웨어 버전이 SMR3xxxx 이상인지 확인하십시오. 펌웨어 버전이
SMR3xxxx보다 낮으면 다시 펌웨어 업그레이드를 시도해 보십시오.
펌웨어를 업그레이드할 때 복합기를 사용하고 있었던 경우
펌웨어 업그레이드를 시작하기 전에 복합기의 제어판에 Ready(준비)가 표시되는지
확인하십시오.
DIMM 설치 문제 해결
DIMM이 올바로 설치되지 않는 경우
DIMM을 빼낸 후 결합음이 들릴 때까지 슬롯에 다시 끼우십시오.
DIMM 슬롯에 결함이 있는 경우
다른 DIMM 슬롯에 DIMM을 끼워본 후 구성 페이지를 인쇄해 보십시오. 그런 후
Device Information(장치 정보) 섹션의 DIMM 슬롯 항목을 통해 DIMM이 설치되었는지
확인하십시오. 올바로 설치되었다면 DIMM이 "고급 디지털 전송 솔루션"으로 나열되어야
합니다.
DIMM에 결함이 있는 경우
DIMM에 결함이 있다고 판단되면 HP 지원 센터로 문의하십시오.
네트워크 문제 해결
네트워크에서 복합기를 올바로 설정하지 않은 경우
네트워크에서 복합기를 올바로 설정했는지와 네트워크에 복합기가 연결되어 있는지
확인하십시오. 복합기에 PING 테스트를 시도하여 응답이 있는지 확인해 보십시오.
복합기에 설치된 프린트 서버가 디지털 전송 기능을 지원하지 않는 경우
HP Officejet 9130 복합기와 함께 제공되는 프린트 서버는 디지털 전송 기능을 지원합니다.
그러나 다른 프린트 서버는 이 기능을 지원하지 않을 수 있습니다. 디지털 전송 기능을
지원하는 프린트 서버 목록을 보려면 40페이지의 "사양" 및 온라인 사용 설명서를
참조하십시오.
38
문제 해결
Page 39

Windows 네트워크의 보안 설정과 호환되지 않는 경우
디지털 전송 인증 솔루션은 Windows 네트워크용 기본 보안 설정을 지원합니다. 그러나
기본이 아닌 일부 보안 설정(예:SMB(서버 메시지 블록) 사이닝을 사용하거나 NTLMv2만
허용하는 경우)은 지원하지 않을 수 있습니다.
도메인 이름 또는 서버 이름을 확인할 수 없는 경우
설정하는 동안 입력한 도메인 이름 또는 서버 이름이 특정 IP 주소로 확인되지 않는 경우
네트워크 폴더로의 로그인이나 전송에 실패할 수 있습니다. 디지털 전송 인증 솔루션을
설정할 때 다음을 확인하십시오.
• 정규화된 DNS 이름을 사용하는지 여부.
• 복합기에 이름 서버(DNS, WINS 또는 둘 다)가 올바로 설정되었는지 여부.
• 최근에 DNS 또는 WINS 설정을 변경한 경우라면 복합기를 끄고 다시 켜십시오.
복합기가 로그인 사용자의 전자 메일 주소를 사용하지 않는 경우
사용자가 복합기에 로그인하게 되면 복합기는 LDAP 검색을 통해 로그인 사용자의 전자 메일
주소를 찾으려 시도합니다. LDAP 검색을 통해 사용자의 전자 메일 주소를 찾는 데 실패하면
기본 보낸 사람: 전자 메일 주소가 대신 사용됩니다.
복합기에서 기본 전자 메일 대신 사용자 전자 메일 주소를 사용할 수 있도록 하려면 다음을
확인하십시오.
• 사용자 정보가 LDAP 서버에 정확히 설정되었습니다. LDAP 검색을 위해 외장 LDAP 서버를
사용할 경우에는 Active Directory용 LDAP 서버와 외장 LDAP 서버 모두에서 사용자 정보가
정확히 설정되어야 합니다.
• LDAP 서버가 "sAMAccountName"과 "mail" 특성을 포함합니다. LDAP 검색에 사용되는
이들 특성은 정의되어 있어야 합니다.
네트워크 문제 해결
한
국
어
39
Page 40

3 사양
이 단원에서는 디지털 전송 인증 솔루션에 대한 기술 사양을 설명합니다.
자세한 복합기 사양은 온라인 사용 설명서를 참조하십시오.
디지털 전송 인증 솔루션 사양
사양
크기
(W x D x H)
무게
제품 기능 및 용량
호환성 HP Officejet 9100 시리즈 복합기만 호환
구성요소 요구사항 • HP 디지털 전송 키보드(C8240A)
29.36 x 90.34 x 3.18 mm
(1.16 x 3.56 x 0.13 인치)
10 g(0.35 oz)
• 다음 HP Jetdirect 프린트 서버 중 하나:
• HP Jetdirect 620n 고속 Ethernet
프린트 서버(J7934A)
• HP Jetdirect 680n 802.11b 무선
프린트 서버(J6058A)
• 고속 Ethernet용 HP Jetdirect 615n
프린트 서버(J6057A)
40
사양
Page 41

연결 서버 운영 체제 요구사항 • Microsoft Windows Server 2003(서비스 팩
1 이상)
• Microsoft Windows 2000 Server(서비스 팩
4 이상)
• Microsoft Windows NT Server(서비스 팩
6a 이상)
메모리 사양
메모리
폼 팩터
디렉토리 서비스 시스템
요구사항
SMTP 서버 요구사항 • Microsoft Windows Exchange 5.5(서비스 팩
• 다음 네트워크 운영 체제의 Microsoft Active
Directory:
• Microsoft Windows Server 2003(서비스
팩 1 이상)
• Microsoft Windows 2000 Server(서비스
팩 4 이상)
• LDAP 서버 3.0(기본 기능)
• Microsoft Windows 2000 Active Directory
• Microsoft Windows 2003 Active Directory
• Novell eDir
• Sun ONE
• Critical Path
4 이상)
• Microsoft Windows Exchange 2000(서비스 팩
4 이상)
• Microsoft Windows Exchange 2003(서비스 팩
1 이상)
• Lotus Domino 6.5
• Novell Groupwise
64 MB
DIMM 100-pin
한
국
어
기술
데이터 속도
환경 사양
작동 환경작동 온도
권장 작동 온도
권장 상대 습도 15% – 80% 비응축
보관 환경보관 온도
보관 상대 습도 비응축 80% 이하
SDRAM
100 MHz/PC100
0° – 65°C(0° – 149°F)
15° – 35°C(59° – 95°F)
-55° – 150°C(-67° – 302°F)
디지털 전송 인증 솔루션 사양
41
Page 42

A 고객 지원 및 보증
고객 지원 연락처
복합기에 대한 정보를 보려면 http://www.hp.com/support/officejet9100 웹
사이트를 방문하십시오. 복합기 설치 및 사용, 프린터 드라이버 다운로드, 문제
해결, 소모품 및 액세서리 주문 및 복합기 보증 사항에 대한 정보를 볼 수 있습니다.
Hewlett-Packard 제한 보증 규정
HP 제품 제한 보증 기간
소프트웨어 1 년
부속품 1 년
제한 보증 범위
1. Hewlett-Packard는 일반 사용자가 제품을 구입한 날로부터 정해진 기간 동안 상기
HP 제품이 재료와 기술에 있어 결함이 없음을 보증합니다.
2. 소프트웨어 제품의 경우, HP의 제한 보증은 프로그램이 제대로 실행되지 않는
경우에만 적용됩니다. HP는 제품의 작동이 중단되지 않거나 오류가 발생하지
않는다는 보증은 하지 않습니다.
3. HP의 제한 보증은 제품을 정상적으로 사용하여 발생한 결함에만 적용되며
다음의 결과로 발생한 결함을 포함하여 다른 문제에 대해서는 적용되지
않습니다.
a. 부적절한 유지보수 또는 개조;
b. HP가 제공 또는 지원하지 않는 소프트웨어, 용지, 부품 또는 소모품
c. 제품 사양을 벗어난 작동.
d. 비승인 개조 또는 남용.
4. HP 프린터 제품의 경우, HP 제품이 아닌 잉크 카트리지나 잉크를 리필한 잉크
카트리지를 사용한 경우에도 고객에 대한 보증이나 고객과의 기타 HP 지원
계약이 유효합니다. 하지만 프린터의 고장이나 손상이 HP 제품이 아닌 잉크
카트리지나 잉크를 리필한 카트리지의 사용으로 인해 발생한 경우에는 HP에서
프린터의 특정 고장이나 손상을 수리하는 데 소요된 표준 시간 및 재료에 대해
비용을 청구합니다.
5. 보증 기간 중에 HP가 보증 범위에 해당되는 제품에 결함이 있음을 통지 받는
경우, HP는 결함 제품을 수리하거나 교환해 주어야 합니다.
6. HP의 보증 범위에 해당되는 결함 있는 제품을 HP에서 수리할 수 없거나 교환해
줄 수 없는 경우, HP는 결함을 통지 받은 후 합당한 기간 내에 제품의 구입가를
환불해 드립니다.
7. 고객이 결함 있는 제품을 HP에 반품하기 전에는 HP에서 해당 제품을 수리,
교체 또는 환불해야 할 의무가 없습니다.
KOWW
Page 43

8. 교환 제품은 신품이거나 적어도 교체할 제품과 동일한 기능을 가진 신품과
동등한 제품입니다.
9. HP 제품에는 성능에 있어서 신품에 준하는 제조 부품, 구성 요소 또는 재료가
포함됩니다.
10. HP 제한 보증은 HP에서 HP 제품을 판매하는 모든 국가 및 지역에서 유효합니다.
방문 서비스와 같은 추가 보증 서비스에 대한 계약은 HP나 공인 수입업체에서
제품을 공급하는 공인된 HP 서비스 센터를 통해서만 이루어질 수 있습니다.
보증 제한
지역법이 허용하는 범위에서, HP 또는 협력업체는 상업성, 품질 만족 및 특정
목적에의 적합성에 대한 명시적이거나 묵시적인 어떠한 다른 보증도 하지
않습니다.
책임 제한
1. 지역법이 허용하는 범위에서 본 보증 조항에 명시된 배상은 고객에게 제공되는
유일하고도 독점적인 배상입니다.
2. 지역법이 허용하는 범위에서 HP 또는 협력업체는 본 보증 조항에 특별히 명시한
책임을 제외하고 어떠한 계약이나 불법 행위 또는 다른 어떤 법적 이론 근거에
관계없이 직접적, 간접적, 특별적, 우발적 또는 결과적인 손해에 대해서 책임을
지지 않습니다.
지역법
1. 본 보증 조항은 고객에게 특정한 법적 권리를 부여합니다. 고객은 미국,
캐나다에서는 주마다, 그리고 전세계 국가마다 다른 권리를 가질 수 있습니다.
2. 본 보증 조항이 지역법과 일치하지 않는 부분에 대해서는 본 보증 조항을 해당
지역법과 일관되게 수정해야 합니다. 이러한 지역법에 따라 본 제한 보증 조항이
고객에게 적용되지 않을 수도 있습니다. 예를 들어, 미국 내의 일부 주와 미국
이외의 일부 국가(캐나다 주 포함)에서는 다음 사항이 적용됩니다.
a. 본 보증 조항의 부인 및 제한으로 인해 고객의 법적 권리를 제한하지
못합니다(예: 영국).
b. 그렇지 않으면, 그러한 부인 및 제한을 시행하는 제조업체의 자격을
제한합니다.
c. 고객에게 추가 보증 권한을 부여하거나, 제조업체에서 부인할 수 없는
묵시적 보증 기간을 지정하거나 그렇지 않으면 묵시적 보증 기간에 대한
제한을 허용하지 않습니다.
3. 주나 뉴질랜드 거래 고객의 경우, 법적으로 허용되는 범위를 제외하고 본
보증 조항은 이 고객에 대해 HP 제품 판매에 적용할 수 있는 의무적인 법적
권리를 배제, 제한 또는 수정하지 못합니다.
한
국
어
KOWW
Page 44

Informasi Hak Cipta
© 2004 Hak Cipta Hewlett-Packard Development Company, L.P.
Edisi 1, 11/2004
Dilarang mereproduksi, mengadaptasi atau menerjemahkan tanpa izin tertulis terlebih dahulu, kecuali yang
diperbolehkan oleh undang-undang hak cipta.
Informasi dalam dokumen ini dapat berubah tanpa pemberitahuan.
Satu-satunya jaminan untuk produk dan layanan HP dicantumkan dalam pernyataan jaminan yang menyertai
produk dan layanan tersebut. Dokumen ini tidak memberikan jaminan tambahan apapun. HP tidak bertanggung
jawab atas kesalahan teknis atau redaksional atau kelalaian yang terdapat dalam dokumen ini.
Informasi Merek Dagang
Microsoft, MS Windows, Windows, dan Windows NT adalah merek dagang terdaftar atau merek dagang
Microsoft Corporation di Amerika Serikat dan/atau di beberapa negara/wilayah lain.
Page 45

Daftar Isi
Melakukan pengaturan
Mengatur digital send authentication solution 46
Mengatasi masalah
Mengatasi masalah-masalah yang berhubungan dengan peningkatan
(upgrade) firmware 53
Mengatasi masalah instalasi DIMM 53
Mengatasi masalah jaringan 53
Data teknis
Spesifikasi digital send authentication solution 55
Dukungan pelanggan dan garansi
Menghubungi dukungan pelanggan 57
Pernyataan Garansi Terbatas Hewlett-Packard 57
45
Bahasa Indonesia
Page 46

1 Melakukan pengaturan
Dengan digital send authentication solution (solusi autentikasi pengiriman digital), Anda dapat
mengatur setelan keamanan yang lebih canggih untuk seri HP Officejet 9100 all-in-one saat
dihubungkan dengan jaringan Microsoft
• Pengecekan keabsahan pengguna melalui login domain Windows NT
dipersyaratkan sebelum pengguna melaksanakan aktivitas pengiriman digital atau semua
aktivitas dari panel kontrol.
• Melalui login domain Windows NT, all-in-one mengenali alamat email pengguna yang
login dan menambahkan alamat ini secara otomatis ke pesan email yang dikirimkan.
• Menu administrator dan setelan-setelan dapat dikunci sehingga pengguna yang tidak
berwenang tidak dapat melakukan perubahan-perubahan.
CATATAN: Digital send authentication solution memungkinkan keamanan yang setingkat
dengan protokol keamanan Windows yang telah ada. Solusi ini mungkin tidak mendukung
setiap setelan keamanan Active Directory yang tidak baku (non-default).
Untuk menggunakan digital send authentication solution, all-in-one harus dilengkapi dengan
keyboard serta diinstal dengan print server HP Jetdirect yang terdukung. Untuk informasi lebih
lanjut, lihat “Data teknis” di halaman 55.
Setelan LDAP dan digital send authentication solution
Dengan digital send authentication solution (solusi autentikasi kirim digital), Anda dapat
menggunakan server LDAP yang termasuk dalam Active Directory atau server LDAP "ekternal"
terpisah untuk pencarian LDAP.
Untuk menggunakan server LDAP dalam Active Directory, pastikan alamat server LDAP di
konfigurasi all-in-one dikosongkan saat Anda mengatur digital send authentication solution.
Server LDAP secara otomatis akan mendeteksi alamat jaringan dan menggunakan definisi login
(user credential) dengan autentikasi Kerberos.
Untuk menggunakan server LDAP "eksternal" untuk pencarian email, pastikan bahwa semua
setelan untuk server LDAP all-in-one telah diatur. Server LDAP menggunakan nama pengguna
dan kata sandi yang ditelah dispesifikasikan di dalam setelan-setelan ini dengan autentikasi
sederhana (plain text).
®
Windows®:
®
dapat
CATATAN: Server LDAP dalam Active Directory digunakan saat masuk (log in) ke all-in-one meskipun server LDAP eksternal telah disetup. Namun server eksternal LDAP masih tetap
digunakan untuk pencarian email oleh LDAP.
Mengatur digital send authentication solution
Untuk menginstal digital send authentication solution, lengkapi hal-hal berikut:
1. Buat salinan pengaman (backup) untuk setelan all-in-one
2. Meningkatkan firmware
3. Menginstal DIMM digital send authentication
4. Konfigurasikan setelan keamanan
46
Page 47

Langkah 1: Buat salinan pengaman (backup) untuk
setelan all-in-one
Sebelum mengatur setelan digital send authentication solution, gunakan EWS untuk melalukan
backup setelan all-in-one. Setelah Anda menginstal digital send authentication solution,
gunakan EWS untuk memulihkan (restore) setelan ini
1. Buka EWS.
Dengan browser Web yang terdukung, masukkan alamat IP untuk all-in-one. Misalnya,
bila alamat IP untuk all-in-one adalah 123.123.123.123, Anda harus memasukkan alamat
yang berikut ke dalam browser Web: http://123.123.123.123.
2. Klik pada tab Settings (setelan), dan kemudian klik pada Backup di panel sebelah kiri.
3. Atur setelan untuk backup, dan klik pada Apply (Berlakukan).
Langkah 2: Meningkatkan firmware
Periksa versi firmware yang diinstal di dalam all-in-one. Bila perlu, gunakan CD yang disertakan
dengan Digital Send Authentication Solution untuk meningkatkan firmware.
CATATAN: Tingkatkan firmware hanya kalau nomor versi lebih rendah dari SMR3xxxx.
Apabila versi firmware lebih tinggi dari SMR3xxxx, pergi ke “Menginstal DIMM digital send
authentication” di halaman 49.
Untuk memeriksa versi firmware
CATATAN: Anda juga dapat memeriksa versi firmware menggunakan EWS. Klik pada
tab Information, dan kemudian klik pada Device (alat) di panel sebelah kiri.
1. Pada panel kontrol, tekan tombol Menu.
2. Tekan (down/ke bawah) untuk pindah ke Print report (cetak laporan), dan kemudian
tekan (select/pilih).
3. Tekan (down/ke bawah) untuk pindah ke Device config.(konfigurasi alat),
dan tekan (select/pilih)
All-in-one akan mencetak halaman konfigurasi. Versi firmware dicetak di halaman ini di
bagian Informasi Alat (Device Information).
Untuk meningkatkan firmware menggunakan CD
Pilih salah satu cara berikut untuk meningkatkan firmware.
CATATAN: Sebelum memulai meningkatkan firmware, pastikan bahwa all-in-one dalam
keadaan Siap (Ready).
Selain cara yang dijelaskan di bawah, Anda dapat menggunakan cara lain
untuk meningkatkan firmware all-in-one. Untuk informasi lebih lanjut,
kunjungi http://www.hp.com/support/officejet9100.
47
Bahasa Indonesia
Page 48
1. Masukkan CD ke dalam drive CD-ROM.
2. Tingkatkan firmware menggunakan salah satu opsi berikut.
PERHATIAN: Jangan mencetak atau mematikan printer sebelum proses peningkatan selesai.
Firmware Download Utility (FDU = sarana untuk mendownload firmware)
a. Klik ganda pada Firmware Download Utility di CD.
b. Pilih file FMW, dan kemudian ikuti instruksi yang tampil di layar.
FTP
a. Pada command prompt (misalnya d:), ketikkan FTP (alamat IP) dan tekan
tombol Enter.
b. Pada kotak User ID (ID pengguna) dan password (kata sandi), tekan tombol Enter.
Dalam keadaan biasa kedua kotak tersebut kosong.
c. Pada prompt ftp>, ketikkan put D:/SMR30XXX.FMW (atau huruf drive yang berlaku
untuk drive CD-ROM Anda dan nama file firmware). Pastikan Anda telah memasukkan
path (jalan) lengkap yang menunjukkan letak file dan pastikan nama file sudah diketik
dengan benar. Untuk informasi ini, huruf besar dibedakan dengan huruf kecil
(case-sensitive).
d. Tekan tombol Enter.
Jalannya proses ini tampak pada command prompt dan juga di panel kontrol printer.
e. Setelah proses selesai sebagaimana ditunjukkan di layar, ketik bye atau quit
tergantung pada sistem operasi yang digunakan.
HP Web Jetadmin
CATATAN: Perangkat lunak HP Web Jetadmin dapat digunakan untuk meningkatkan firmware
untuk satu atau beberapa all-in-one sekaligus.
48
Instruksi untuk meningkatkan firmware dengan menggunakan perangkat lunak HP Web
Jetadmin bisa berbeda-beda tergantung pada versi perangkat lunak yang digunakan.
Untuk informasi lebih lanjut tentang penggunaan perangkat lunak HP Web Jetadmin untuk
meningkatkan firmware, lihat petunjuk online yang tersedia dalam perangkat lunak itu.
a. Buka perangkat lunak Web JetAdmin dan pilih Update (perbarui) dari daftar
drop-down. Update Options (opsi update) tampil.
b. Pastikan bahwa opsi Update Printer Firmware dipilih, dan kemudian
klik Next (selanjutnya).
c. Pilih versi untuk ditampilkan dari daftar Select New Firmware Version (pilih versi
firmware baru), dan kemudian klik Update Firmware (perbarui firmware).
CATATAN: Untuk informasi lebih lanjut mengenai perangkat lunak HP Web Jetadmin dan untuk
mendownload perangkat lunak itu, kunjungi http://www.hp.com/go/webjetadmin.
3. Cetak halaman konfigurasi dan periksa apakah versi perangkat lunak sama atau lebih
tinggi dari SMR3xxxx.
Apabila versi firmware pada halaman konfigurasi tidak berubah, lihat “Mengatasi masalahmasalah yang berhubungan dengan peningkatan (upgrade) firmware” di halaman 53.
Page 49

Langkah 3: Menginstal DIMM digital send
authentication
Setelah melakukan peningkatan pada firmware, instal DIMM digital send authentication.
PERHATIAN: DIMM berisi komponen elektronik yang dapat rusak bila terkena listrik statis.
Untuk menghindarkan penumpukkan listrik statis, Anda harus sering menghubungkannya
dengan permukaan dari lembaran logam pada all-in-one. Bila dimungkinkan, pakailah gelang
penyalur listrik statis (atau alat sejenis). Perlakukan DIMM dengan hati-hati setiap saat. Jangan
menyentuh komponen elektronik atau jalur sirkuit. Apabila nasihat dan anjuran di atas tidak
diindahkan, mungkin akan terjadi kerusakan pada bagian-bagiannya.
Untuk memasang DIMM digital send authentication
1. Tekan (Power/Daya) untuk mematikan all-in-one.
2. Lepaskan kabel daya dan semua kabel lain.
3. Di sebelah kiri all-in-one, lepaskan pengancing dan singkirkan penutup sisi.
4. Lepaskan penutup DIMM.
5. Keluarkan DIMM dari kemasan antistatik.
Bahasa Indonesia
49
Page 50

6. Luruskan DIMM sehingga guratan di tepi bawah lurus dengan tanda timbul di selot DIMM.
Anda dapat menggunakan salah satu selot kosong.
7. Sisipkan dan tekan DIMM ke dalam selot hingga masuk dengan aman ke
dalam dudukannya.
8. Pasang kembali penutup DIMM, dan kemudian pasang penutup sisinya.
9. Hubungkan kembali kabel daya dan kabel lain, dan kemudian tekan (Power/Daya)
untuk menghidupkan all-in-one.
10. Cetak halaman konfigurasi dan periksa entri selot DIMM di bagian informasi alat (Device
Information) untuk memastikan apakah DIMM sudah terpasang. Bila telah dipasang
dengan benar, DIMM akan tercetak sebagai “Digital Send Authentication Solution”.
50
CATATAN: Anda juga dapat memeriksa apakah DIMM sudah terpasang dengan
menggunakan EWS. Klik pada tab Information, dan kemudian klik pada Device (alat)
di panel di sebelah kiri.
Jika DIMM tidak terdaftar di halaman konfigurasi, lihat “Mengatasi masalah instalasi
DIMM” di halaman 53.
Page 51
Langkah 4: Konfigurasikan setelan keamanan
Setelah DIMM dipasang, atur tingkat keamanan all-in-one. Anda dapat memasukkan
setelan-setelan ini dengan menggunakan EWS (dianjurkan) atau dengan panel kontrol.
Jenis keamanan
Digital send authentication solution menyediakan dua jenis keamanan: PIN dan Windows NT.
Setelan keamanan ini mengharuskan pengguna all-in-one untuk log in ke beberapa atau semua
aktivitas panel kontrol dan membatasi akses ke menu ADMIN dan NETWORK & I/O pada
panel kontrol.
CATATAN: Keamanan Windows NT mendukung lingkungan sistem operasi Windows NT 4.0,
Windows 2000, Windows XP, dan Windows 2003.
Table 1-1 Deskripsi setelan keamanan
Access point Jenis keamanan
Keamanan PIN Keamanan Windows NT
Activitas panel
kontrol
Pengguna harus memasukkan PIN
untuk setiap aktivitas panel kontrol
(misalnya, aktivitas copy, fax,
dan email).
Pengguna harus melakukan logon
Windows NT untuk:
• Hanya aktivitas email dan
folder jaringan.
-ATAU-
• Semua aktivitas panel kontrol.
Akses menu
LCD ADMIN
Akses menu
NETWORK & I/O
a.Dengan opsi keamanan Windows NT, administrator dapat menunjuk pengguna lain sebagai
administrator all-in-one tambahan.
Akses ke menu-menu ini dibatasi.
PIN administrator dibutuhkan.
Akses ke menu-menu ini dibatasi.
Hanya administrator atau
pengguna-pengguna yang ditunjuk
sebagai administrator all-in-one
dapat mengakses.
a
Sebelum Anda mulai
1. Sebelum mengatur setelan opsi keamanan, dapatkan dahulu informasi berikut:
• Nama domain DNS dan NetBIOS
Misalnya, bila Anda menggunakan Active Directory 2003 dan domain diset ke
“sales.mycompany.com”, maka nama penuh domain DNS adalah
“sales.mycompany.com” dan nama domain NetBIOS adalah “sales”.
• Setelan autentikasi LM (bila setelan default pada server atau domain telah di ubah)
PERHATIAN: Bila setelan autentikasi LM di all-in-one tidak cocok dengan setelan di server,
aktivitas yang memerlukan logon (misalnya aktivitas folder jaringan) mungkin tidak berfungsi.
Bahasa Indonesia
2. Bila akhir-akhir ini Anda telah mengubah setelan DNS atau WINS, matikan all-in-one dan
kemudian hidupkan lagi.
51
Page 52

Untuk mengatur tingkat keamanan
EWS (dianjurkan)
1. Buka EWS.
2. Klik pada tab Settings (setelan), dan kemudian klik pada Security (keamanan) di panel
sebelah kiri.
3. Pilih setelan keamanan yang diinginkan dari daftar Device access level (tingkat akses alat).
PIN
a. Pilih PIN, dan kemudian tetapkan nomor PIN.
b. Klik tab Users PIN (PIN Pengguna) dan atur setelan yang sesuai dan yang diperlukan.
Windows NT
a. Pilih Windows NT, dan kemudian masukkan domain Windows NT (baik domain DNS
mau pun NetBIOS) dan informasi kata sandi.
b. Klik pada tab Administrators dan Windows NT Login Access (Akses Login Windows NT)
dan atur setelan yang sesuai dan yang diperlukan.
c. Apabila autentikasi LM diaktifkan di dalam server, pilih Network Folder di panel
sebelah kiri, dan kemudian atur setelan autentikasi LM untuk disesuaikan dengan
setelan yang digunakan di server.
4. Klik Apply (berlakukan).
Panel kontrol all-in-one
1. Pada panel kontrol, tekan tombol Menu.
2. Tekan (down/ke bawah) untuk pindah ke Admin, dan kemudian tekan (select/
pilih).
3. Tekan (down/ke bawah) untuk pindah ke ADMIN SETUP, dan kemudian tekan
(select/pilih).
4. Tekan (down/ke bawah) untuk pindah ke Device access (akses Alat), gunakan – atau
+ untuk memilih setelan keamanan yang diinginkan, dan kemudian tekan (select/pilih).
PIN
a. Pilih PIN, dan kemudian ikuti instruksi yang tampil di layar untuk menetapkan
nomor PIN.
indah ke Registered users (pengguna terdaftar) dan atur setelan yang sesuai
b. P
dan diperlukan.
Windows NT
a. Pilih WinNT, dan kemudian masukkan domain Windows NT (baik domain DNS mau
pun NetBIOS) dan informasi kata sandi.
b. Pilih Administrators dan WinNT login access (akses login WinNT) dan atur setelan
yang sesuai dan diperlukan.
c. Apabila autentikasi LM diaktifkan di server, pilih LM authentication (autentikasi LM),
dan kemudian atur setelan autentikasi LM untuk disesuaikan dengan setelan yang
digunakan di server.
5. Setelah setelan-setelan ini diatur, all-in-one kembali ke keadaan Siap/Ready.
52
Page 53

2 Mengatasi masalah
Di dalam bagian ini diberikan saran-saran mengenai cara mengatasi masalah-masalah paling
umum yang berkaitan dengan digital send authentication solution.
Untuk mendapatkan kiat lebih lanjut mengenai cara mengatasi masalah-masalah berkenaan
dengan all-in-one, harap lihat panduan pengguna onscreen.
Mengatasi masalah-masalah yang berhubungan dengan peningkatan (upgrade) firmware
Peningkatan firmware tidak berhasil.
Cetak halaman konfigurasi dan pastikan bahwa versi firmware adalah SMR3xxxx atau yang
lebih baru. Apabila versi firmware lebih lama dari SMR3xxxx, coba upgrade firmware lagi.
All-in-one aktif saat firmware ditingkatkan.
Sebelum mulai meningkatkan firmware, yakinkan bahwa Ready (Siap) tampil di panel kontrol
all-in-one.
Mengatasi masalah instalasi DIMM
DIMM mungkin tidak dipasang dengan benar.
Lepaskan DIMM dan sisipkan kembali hingga terpasang ke dalam selot dengan mantap.
Selot DIMM mungkin cacat.
Coba pasang DIMM ke dalam selot lain, setelah itu cetak halaman konfigurasi dan kemudian
periksa keterangan mengenai isi slot DIMM di bagian Informasi Alat-Alat (Device Information)
untuk memastikan bahwa DIMM telah dipasang. Bila DIMM telah dipasang dengan benar,
DIMM ini akan tercetak sebagai “Enhanced Digital Send Solution”.
DIMM mungkin cacat.
Apabila Anda merasa curiga bahwa DIMM mungkin cacat, harap menghubungi dukungan HP.
Mengatasi masalah jaringan
All-in-one tidak disetel atau diatur dengan benar di dalam jaringan.
Pastikan bahwa all-in-one diatur dengan benar dan dihubungkan ke jaringan. PING alat itu dan
pastikan ada respons dari alat itu.
Print server (server cetak) yang diinstal di all-in-one tidak mendukung
fitur digital send.
Print server yang disertakan dengan pembelian HP Officejet 9130 all-in-one mendukung fitur
digital send. Namun, print server lain mungkin tidak mendukung fitur ini. Untuk mendapatkan
daftar print server yang mendukung fitur digital send, lihat “Data teknis” di halaman 55 dan
panduan pendukung onscreen.
Mengatasi masalah-masalah yang berhubungan dengan peningkatan (upgrade) firmware 53
Bahasa Indonesia
Page 54

Setelan keamanan untuk jaringan Windows mungkin tidak kompatibel.
Digital Send Authentication Solution mendukung setelan keamanan default untuk jaringan
Windows. Namun, tidak semua setelan keamanan yang bukan default didukung (sebagai
contoh, mengaktifkan Server Message Block (SMB) signing dan hanya menerima NTLMv2).
Nama domain atau nama server tidak dapat dipecahkan (resolve).
Login (masuk) atau kirim ke folder jaringan tidak akan berhasil bila nama domain atau
server yang diberikan selama setup tidak dapat dipecahkan (resolve) menjadi alamat IP.
Ketika menyetel digital send authentication solution, yakinkan yang berikut:
• Gunakan nama DNS yang sepenuhnya telah teruji.
• Pastikan bahwa nama server (DNS, WINS, atau keduanya) di dalam alat ini diatur
dengan benar.
• Bila akhir-akhir ini Anda telah mengubah setelan DNS atau WINS, matikan all-in-one dan
kemudian hidupkan lagi.
All-in-one tidak menggunakan alamat email pengguna yang login.
Setelah pengguna login (masuk) ke all-in-one, all-in-one akan mencoba menemukan alamat
email pengguna dengan menggunakan pencarian LDAP. Apabila LDAP gagal menemukan
alamat email pengguna, alamat email baku From: (Dari:) akan digunakan.
Agar all-in-one menggunakan alamat email pengguna dan bukannya alamat email default,
pastikan yang berikut:
• nformasi pengguna telah diatur dengan benar di server LDAP. Jika Anda menggunakan
server LDAP eksternal untuk pencarian LDAP, pastikan informasi pengguna diatur dengan
benar baik di server LDAP untuk Active Directory maupun di server LDAP eksternal.
• Server LDAP mengandung atribut “sAMAccountName” dan “mail”. Atribut ini digunakan di
dalam pencarian LDAP dan harus didefinisikan.
Mengatasi masalah54
Page 55

3Data teknis
Di dalam bagian ini diuraikan spesifikasi teknis untuk digital send authentication solution.
Untuk spesifikasi all-in-one, lihat panduan pengguna onscreen.
Spesifikasi digital send authentication solution
Data fisik
Dimensi
(L x D x T)
Berat 10 g (0.35 oz)
Fitur dan kapasitas produk
Kompatibilitas Hanya kompatibel dengan seri HP Officejet 9100
Komponen yang
dibutuhkan
Konektivitas Persyaratan sistem
operasi server
29.36 x 90.34 x 3.18 mm
(1.16 x 3.56 x 0.13 inci)
all-in-one
• Keyboard Digital Send HP (C8240A)
• Salah satu server cetak (print server) HP Jetdirect
berikut:
• Print server HP Jetdirect 620n Fast Ethernet
(J7934A)
• Print server Wireless HP Jetdirect 680n
802.11b (J6058A)
• Print server HP Jetdirect 615n untuk
Fast Ethernet (J6057A)
• Microsoft Windows Server 2003
(dengan Service Pack 1)
• Microsoft Windows 2000 Server
(dengan Service Pack 4)
• Microsoft Windows NT Server 4.0
(dengan Service Pack 6a)
Spesifikasi digital send authentication solution 55
Bahasa Indonesia
Page 56

Persyaratan directory service
system (sistem layanan
direktori)
• Microsoft Active Directory di dalam sistem operasi
jaringan berikut:
• Microsoft Windows Server 2003 (dengan
Service Pack 1)
• Microsoft Windows 2000 Server (dengan
Service Pack 4)
• LDAP server 3.0 (fitur dasar / basic features)
• Microsoft Windows 2000 Active Directory
• Microsoft Windows 2003 Active Directory
• Novell eDir
• Sun ONE
• Critical Path
Persyaratan server SMTP • Microsoft Windows Exchange 5.5
(dengan Service Pack 4)
• Microsoft Windows Exchange 2000
(dengan Service Pack 4)
• Microsoft Windows Exchange 2003
(dengan Service Pack 1)
• Lotus Domino 6.5
• Novell Groupwise
Persyaratan memori
Memori 64 MB
Form factor
(bentuk fisik)
Teknologi SDRAM
Kecepatan data 100 MHz/PC100
DIMM 100-pin
Spesifikasi lingkungan
Lingkungan
operasional
Suhu operasional 0° sampai 65° C (0° sampai 149° F)
Suhu operasional yang
dianjurkan
15° sampai 35° C (59° sampai 95° F)
Lingkungan
penyimpanan
Data teknis56
Kelembaban relatif (nisbi)
yang dianjurkan
Suhu penyimpanan -55° sampai 150° C (-67 sampai 302° F)
Kelembaban relatif (nisbi)
penyimpanan
15% sampai 80% nonkondensasi (noncondensing)
Kurang atau sama dengan 80% nonkondensasi
Page 57

A Dukungan pelanggan dan garansi
Menghubungi dukungan pelanggan
Kunjungi http://www.hp.com/support/officejet9100 untuk memperoleh informasi
mengenai all-in-one. Anda bisa memperoleh informasi tentang cara mengatur dan
menggunakan all-in-one, mendownload berbagai driver printer, mengatasi masalah,
memesan suplai dan aksesori, dan Anda bisa membaca garansi all-in-one.
Pernyataan Garansi Terbatas Hewlett-Packard
Produk Hewlett-Packard Masa Garansi Terbatas
Perangkat lunak 1 tahun
Aksesori 1 tahun
Cakupan Garansi Terbatas
1. Hewlett-Packard (“HP”) memberikan garansi kepada pelanggan akhir (end-user
costumer) bahwa semua produk HP yang dicantumkan di atas akan bebas dari
kerusakan bahan maupun pengerjaan selama masa yang ditentukan di atas,
sejak tanggal pembeliannya oleh pelanggan.
2. Untuk perangkat-lunak, garansi terbatas HP hanya berlaku jika perangkat lunak
gagal melaksanakan berbagai pertunjuk pemrograman. HP tidak memberikan
garansi bahwa pengoperasian produk akan bebas gangguan atau kesalahan.
3. Garansi terbatas HP hanya mencakup cacat yang diakibatkan oleh penggunaan
produk dengan normal, dan tidak mencakup masalah lain, termasuk yang
diakibatkan oleh:
a. Perawatan dan modifikasai yang tidak benar;
b. Perangkat lunak, media, suku cadang, atau pasokan yang tidak disediakan
atau didukung oleh HP;
c. Pengoperasian yang tidak sesuai dengan spesifikasi produk;
d. Modifikasi yang tidak resmi atau penyalahgunaan.
4. Untuk produk printer HP, penggunaan tabung tinta non HP atau tabung tinta
isi ulang tidak mempengaruhi garansi ataupun kontrak bantuan HP untuk
pelanggan. Tetapi, jika gangguan atau kerusakan printer disebabkan oleh
penggunaan tabung tinta non HP atau isi ulang, HP akan membebankan biaya
sesuai dengan waktu standar dan bahan yang digunakan untuk memperbaiki
gangguan atau kerusakan tertentu pada printer.
5. Jika selama masa garansi yang berlaku HP menerima pemberitahuan mengenai
cacat pada produk yang dicakup oleh garansi HP, HP akan memperbaiki atau
mengganti produk itu, menurut pilihan HP.
Bahasa Indonesia
IDWW
Page 58

6. Jika HP tidak bisa memperbaiki atau mengganti produk cacat yang tercakup
oleh garansi HP sebagaimana mestinya, maka dalam kurun waktu yang wajar
setelah diberitahu tentang adanya cacat itu, HP akan menggembalikan uang
pembelian produk.
7. HP tidak berkewajiban memperbaiki, mengganti, atau mengembalikan uang
pembelian sebelum pelanggan mengembalikan produk cacat itu ke HP.
8. Produk pengganti bisa berupa produk baru atau seperti baru, dengan ketentuan
bahwa kegunaannya minimal setara dengan produk yang diganti.
9. Produk HP dapat mengandung suku-cadang, komponen, atau bahan hasil
daur-ulang yang kinerjanya setara dengan yang baru.
10. Pernyataan Garansi Terbatas HP berlaku di setiap negara/wilayah di mana
produk HP yang dijamin garansi didistribusikan oleh HP. Kontrak untuk layanan
garansi tambahan, seperti layanan di tempat, dapat diperoleh dari setiap fasilitas
layanan HP resmi di negara/wilayah di mana produk itu didistribusikan oleh HP
atau oleh importir resmi.
Batasan Garansi
SESUAI DENGAN YANG DIIZINKAN OLEH HUKUM SETEMPAT, BAIK HP
MAUPUN PEMASOK PIHAK KETIGANYA TIDAK MENYEDIAKAN GARANSI
ATAU PERSYARATAN LAIN APAPUN, BAIK GARANSI ATAUPUN PERSYARATAN
YANG DINYATAKAN SECARA TERSURAT ATAUPUN TERSIRAT YANG
MENYANGKUT DATA JUAL, MUTU YANG MEMUASKAN, DAN KESESUAIAN
UNTUK TUJUAN TERTENTU.
Batasan Tanggung Jawab
1. Sesuai dengan yang diizinkan oleh hukum setempat, ganti-rugi yang tercantum
dalam Pernyataan Garansi ini adalah ganti-rugi satu-satunya dan menyeluruh
bagi pelanggan.
2. SESUAI DENGAN YANG DIIZINKAN OLEH HUKUM SETEMPAT, KECUALI
UNTUK KEWAJIBAN YANG SECARA SPESIFIK DITETAPKAN DALAM
PERNYATAAN GARANSI INI, DALAM PERISTIWA APA PUN HP ATAU PEMASOK
PIHAK KETIGA TIDAK BERTANGGUNG JAWAB ATAS KERUSAKAN LANSUNG,
TIDAK LANGSUNG, KHUSUS, INSIDENTAL, ATAU KERUGIAN SEBAGAI AKIBAT,
BAIK BERDASARKAN KONTRAK, KELALAIAN, ATAU TEORI HUKUM LAINNYA,
DAN BAIK DIBERITAHUKAN TENTANG KEMUNGKINAN TERJADINYA
KERUSAKAN TERSEBUT.
Hukum Setempat
1. Pernyataan Garansi ini memberikan hak khusus kepada pelanggan. Pelanggan
dapat juga memiliki hak-hak lain yang bisa berbeda-beda di berbagai negara
bagian di Amerika Serikat, di berbagai provinsi di Kanada, dan di berbagai
nergara/wilayah lain di dunia.
2. Jika Pernyataan Garansi ini tidak sesuai dengan hukum setempat, Penyataan
Garansi ini akan dianggap telah dimodifikasi agar sesuai dengan hukum
setempat. Menurut hukum setempat tersebut, pengesampingan dan pembatasan
tertentu dari Pernyataan Garansi ini mungkin tidak berlaku untuk pelanggan.
Misalnya, beberapa negara bagian di Amerika Serikat, dan juga beberapa
pemerintahan di luar Amerika Serikat, dan juga beberapa negara di luar Amerika
Serikat (termasuk provinsi-provinsi di Kanada), dapat:
a. mengecualikan pengesampingan dan pembatasan Pernyataan Garansi
ini sehingga tidak membatasi hak yang wajib dimiliki pelanggan
(misalnya Inggris);
IDWW
Page 59

b. membatasi kemampuan pabrik pembuat untuk melaksanakan
pengesampingan atau pembatasan seperti itu; atau
c. memberikan hak tambahan kepada pelanggan, menentukan kurun waktu
masa garansi tersirat yang tidak bisa dikesampingkan oleh pabrik pembuat,
atau mengizinkan batas kurun waktu masa garansi tersirat.
3. UNTUK TRANSAKSI PELANGGAN DI AUSTARALIA DAN SELANDIA BARU,
KETENTUAN DALAM PERNYATAAN GARANSI INI, KECUALI SEJAUH YANG
DIIZINKAN OLEH HUKUM, TIDAK MENGECUALIKAN, MEMBATASI, ATAU
MENGUBAH, DAN MERUPAKAN TAMBAHAN ATAS HAK YANG WAJIB
MENURUT UNDANG-UNDANG YANG BERLAKU UNTUK PENJUALAN PRODUK
HP KEPADA PELANGGAN.
IDWW
Bahasa Indonesia
Page 60

版權資訊
© 2004 Copyright Hewlett-Packard Development Company, L.P.
第一版,
除版權法律許可外,非經事先書面許可,嚴禁複製、改寫或翻譯本文件。
如有更動,恕不另行通知。
HP
其他型式之保固。
商標聲明
Microsoft、MS Windows、Windows、及 Windows NT 是 Microsoft Corporation
地區的商標或註冊商標。
2004 年 11
產品及服務唯一的保固,均明載於各該產品及服務隨附的保固書內。本文之任何內容均不得解釋為
月
不對本文內之任何技術或文字錯誤或疏漏,負任何責任。
HP
在美國及/或其他國家
/
Page 61

目錄
設定
設定數位傳輸認證解決方案
疑難排解
解決韌體更新方面的問題
解決
DIMM
解決網路問題
安裝問題
68
規格
數位傳輸認證解決方案的技術規格
客戶支援及保固
如何連繫客戶支援人員
惠普科技有限保固聲明
68
68
72
72
62
70
61
繁 體 中 文
Page 62

1
設定
數位傳輸認證解決方案,為連結在
all-in-one
•
•
•
注意: 數位傳輸認證解決方案提供與
支援各項非預設的
all-in-one
方案。 詳細說明請參閱 「規格」於頁70。
LDAP
經由數位傳送認證,您可用
進行
若要使用
配置中的
登入之使用者的資格。
若要用外接
LDAP
注意: 即使安裝了外接
伺服器
,提供更高的安全設定:
透過
Windows NT
控制面板行動時進行。
經
Windows NT
入任何送出的電子郵件。
管理員功能表及設定可被鎖住,以防止未經授權的修改。
須配備鍵盤且安裝好被支援的
®
網域登錄的使用者認證,可於使用者進行數位傳送活動前或執行任何
網域登入後,
Active Directory
設定及數位傳輸認證解決方案
搜尋。
LDAP
Active Directory
伺服器位址。
LDAP
伺服器搜尋電子郵件,務請先設定
LDAP
伺服器會用這些設定所指定的使用者名稱及密碼,進行簡單 (純文字)認證。
內含的
LDAP
Microsoft
all-in-one
(主動目錄)安全設定。
Active Directory
LDAP
伺服器會自動從網路偵測位址,並經
LDAP
伺服器,登入
®
Windows®
能找出目前使用者的電子郵件位址,並將其自動加
Windows
HP Jetdirect
伺服器,請在安裝數位傳送認證時,略過
安全協定相同等級的安全保護, 但可能無法
內含的
all-in-one
網路上的
列印伺服器,才能使用數位傳輸認證解決
伺服器或獨立的外接
LDAP
all-in-one
時仍會使用
HP Officejet 9100 系列
的各項
LDAP
Active Directory 中的 LDAP
LDAP
Kerberos
伺服器設定。
伺服器,
all-in-one
認證使用
設定數位傳輸認證解決方案
安裝數位傳輸認證解決方案的步驟如下:
備份
1.
2.
3.
4.
all-in-one
更新韌體
安裝數位傳輸認證解決方案
配置安全設定
步驟1: 備份
設定數位傳輸認證解決方案之前,請先用
案安裝完成後,再用
開啟
EWS。
從任何被支援的網路瀏覽器,輸入指定給
若為
123.123.123.123
按一下設定選項標籤,再按一下左側的備份。
進行備份的設定,然後按一下套用。
62
1.
2.
3.
設定
設定值
DIMM
all-in-one
將原設定值還原。
EWS
,則請在
設定值
EWS 備份 all-in-one
all-in-one 的 IP
瀏覽器內輸入
Web
設定值。 數位傳輸認證解決方
位址。例如,
http://123.123.123.123
all-in-one 的 IP
的位址。
位址
Page 63

步驟 2: 更新韌體
請查出
韌體。
all-in-one
中韌體的版本。 如有必要,請用數位傳輸認證解決方案隨附的光碟更新
注意: 只有在韌體版本早於
認證解決方案
DIMM
」於頁64。
SMR3xxxx
時才需要更新韌體, 否則請逕自執行 「安裝數位傳輸
檢查韌體版本
注意: 您可用
在控制面板上,按一下
1.
按 (下)移動到
2.
按 (下)移動到
3.
all-in-one
檢查韌體版本。 按一下資訊選項標籤,再按一下左側視框中的裝置選項。
EWS
(功能表)鈕。
Menu
Print report
Device config.
會列印一份配置頁, 韌體版本會顯示於本頁 「裝置資訊」段。
(列印報表),再按一下 (選擇)。
(裝置設定),再按一下 (選擇)。
用光碟更新韌體
選用下列方式更新韌體。
注意: 開始更新韌體前,
除上述方法外,您亦可用其他方式更新
http://www.hp.com/support/officejet9100 網站上的說明。
將光碟插入光碟機中。
1.
以下列選項更新韌體。
2.
注意: 更新步驟完成前,切勿用印表機列印或將印表機關機。
all-in-one
必須處於 「就緒」狀態。
all-in-one
韌體。進一步的資訊請參閱
Firmware Download Utility
按兩下光碟上的
a.
選擇
b.
FMW
Firmware Download Utility
檔案,再按線上說明進行。
(韌體下載公用程式)
(韌體下載公用程式)。
(FDU)
FTP
出現指令提示後,輸入 FTP (IP 位址),按
a.
在
User ID
b.
出現
c.
檔案名稱)。 務請輸入檔案的完整路徑並插入正確的檔案名稱。 輸入資料時,
須注意大小寫。
按
Enter 鍵。
d.
下載進度會顯示在指令提示列及印表機的控制面板上。
下載完成後,視作業系統不同輸入 bye (結束)或 quit (退出)。
e.
(使用者名稱)及密碼欄位,按
提示後,輸入 put D:/SMR30XXX.FMW (或適當的光碟機代號及韌體
ftp>
Enter 鍵。
Enter 鍵。
兩個欄位的預設值為空白。
設定數位傳輸認證解決方案
繁
體
中
文
63
Page 64
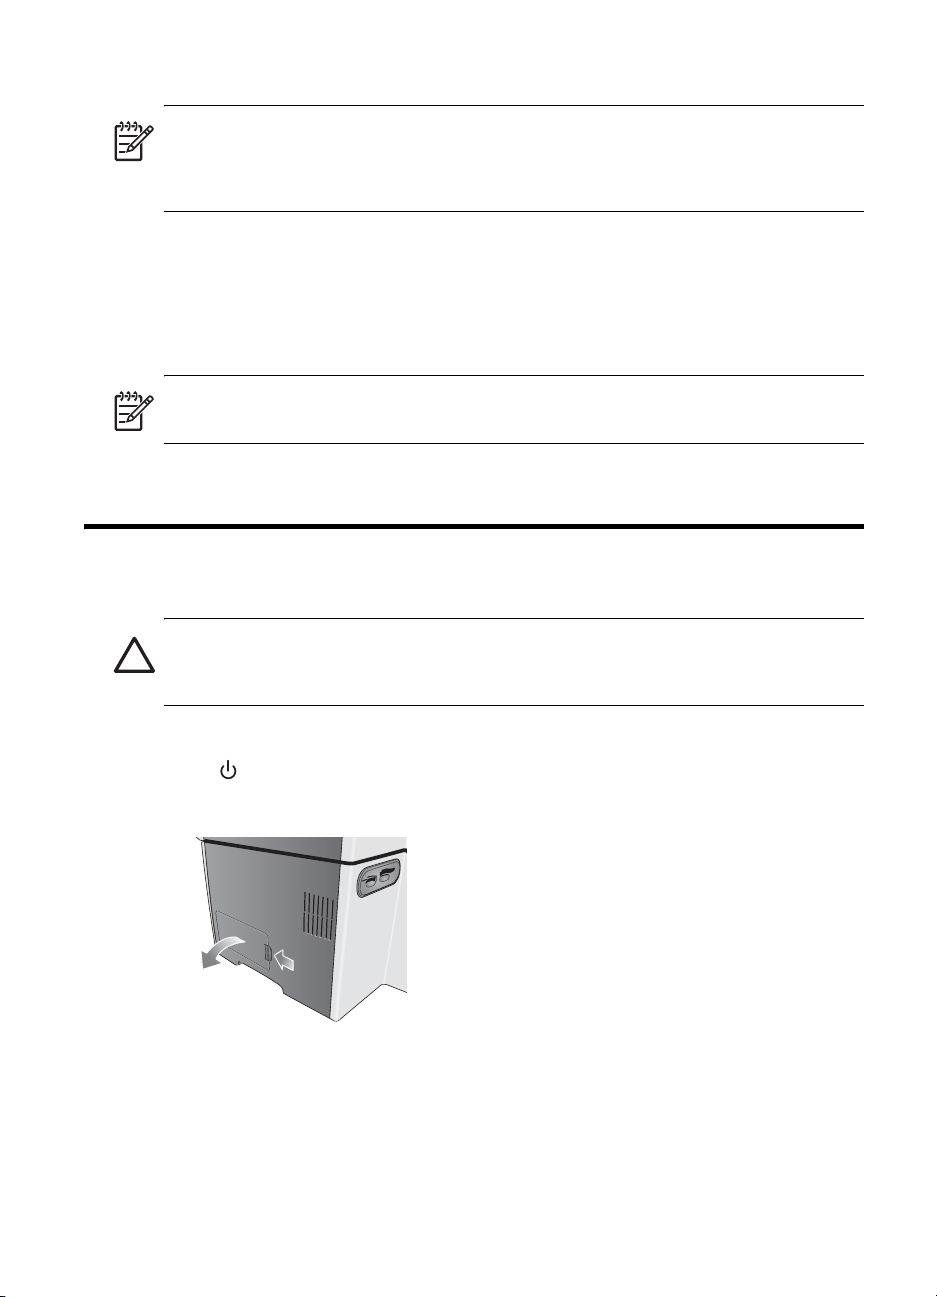
HP Web Jetadmin
注意:
HP Web Jetadmin
用
HP Web Jetadmin
更新韌體的詳細步驟,請參閱軟體本身的線上說明。
開啟
a.
b.
c.
注意: 有關
http://www.hp.com/go/webjetadmin 網站查詢。
列印配置頁並確認韌體版本為
3.
配置頁所示的韌體版本若未改變,請參閱 「解決韌體更新方面的問題」於頁68。
Web JetAdmin
更新選項
務請先選擇更新印表機韌體
下一步
自選擇新韌體版本
按一下更新韌體
(Update Options)
(Next)
HP Web Jetadmin
軟體可同時更新一台或多台
軟體更新韌體的步驟視所用的軟體版本而異。 用
軟體,並自下拉清單中選擇更新
即顯現出來。
。
(Select New Firmware Version)
(Update Firmware)
(Update Printer Firmware)
。
軟體的進一步資訊及下載,請上
SMR3xxxx
all-in-ones
清單選擇所要的版本後,
以上。
步驟 3: 安裝數位傳輸認證解決方案
更新韌體後,請安裝數位傳輸認證解決方案。
注意:
上的金屬板接觸。可能的話,請佩戴接地腕帶等類似的裝置。務請隨時注意
切勿碰觸卡上的電子零組件或印刷電路,否則可能損壞本
內含可能因靜電而受損的電子零組件,為防靜電累積,請隨時保持與
DIMM
DIMM
的韌體。
HP Web Jetadmin
(Update)
。
選項,再按一下
DIMM
裝置。
DIMM
軟體
all-in-one
的取放,
64
安裝數位傳輸認證解決方案
設定
按 (
1.
取下電源線及各纜線。
2.
鬆開並取下
3.
Power
all-in-one
/電源)將
DIMM
all-in-one
左側的蓋板。
關機。
Page 65

取下
4.
DIMM
蓋板。
從防靜電包裝袋中取出
5.
將
6.
將
7.
蓋好
8.
插入電源線及各纜線後,再按 (
9.
列印配置頁,檢查其中 「裝置資訊」段
10.
DIMM
下端的凹槽對準
DIMM
插入插槽並壓緊直到定位為止。
DIMM
蓋板,再將側板蓋回。
DIMM
若已安裝正確,此處應顯示 「數位傳輸認證解決方案解決方案」。
DIMM
DIMM
。
插槽的凸起的標示。任何空的插槽均可使用。
/電源)按鍵,將
Power
插槽紀錄中是否顯示已安裝
DIMM
all-in-one
開機。
DIMM,
注意: 您亦可用
再按一下左側視框中的
配置頁中若未顯示
EWS 檢查 DIMM
Device
,請參閱 「解決
DIMM
是否已安裝。 按一下
(裝置)選項。
Information
安裝問題」於頁68。
DIMM
(資訊)選項標籤,
設定數位傳輸認證解決方案
繁
體
中
文
65
Page 66
步驟 4: 配置安全設定
安裝
各項設定值。
安全類型
數位傳輸認證解決方案提供
all-in-one
ADMIN
後,請設定
DIMM
使用者登入後,才能使用某些或全部控制面板動作,並限制對控制面板之
(管理員)及
all-in-one
PIN 及 Windows NT
NETWORK & I/O
的安全等級。 您可用
兩種安全保護。 這些安全設定會要求
(網路及輸入/輸出)功能表的使用。
(建議使用)或控制面板輸入
EWS
注意:
Windows NT
Windows 2003
表
1-1
安全設定說明
安全支援
作業系統。
Windows NT 4.0、Windows 2000、Windows XP、及
接入點 安全類型
安全
PIN
控制面板動作 使用者必須輸入
使用
LCD ADMIN
(
管理員)
LCD
功能表。
NETWORK & I/O
(網路及輸入
輸出)功能表的
使用
a.經由 Windows NT
複製、傳真及電子郵件等各項控制
面板動作。
對本功能表使用的限制。
須有管理員
/
安全設定,管理員可指定別的
PIN
開始前
請先取得下列資訊後,再設定安全選項:
1.
• DNS 及 NetBIOS
例如,在
時,完整的
為「
• LM
Active Directory 2003
sales」。
認證設定 (伺服器或網域預設設定被修改後)
網域名稱
網域名稱應為「
DNS
Windows NT
後才能執行
PIN
才能使用。
all-in-one
環境下且網域名稱設定為 「
sales.mycompany.com
進行下列動作前,使用者必須先
登入
•
-或-
•
對本功能表使用的限制。
只有管理員或指定的
管理員
管理員。
安全
Windows NT
電子郵件及網路磁碟機
兩項活動。
各項控制面板活動。
a
才能使用本功能表。
」同時
,以便進行:
all-in-one
sales.mycompany.com
NetBIOS
網域名稱應
」
66
注意:
all-in-one 上的 LM
業的動作可能無法進行。
修改
2.
DNS 或WINS
設定
認證設定若與伺服器上的設定不相符合,網路磁碟機等需要認證作
設定後,請將
all-in-one
重新開關機一次。
Page 67

設定安全等級
(建議使用)
EWS
開啟
1.
2.
3.自Device access level
4.
All-in-one
1.
2.
3.
4.
5.
EWS。
按一下
Settings
(設定)選項標籤,再按一下左側視框的
(裝置使用等級)清單中選擇所要的安全設定。
PIN
a.
b.
選擇
按一下
,再設定
PIN
Users PIN
PIN
(使用者
WindowsNT
選擇
a.
b.
c.
按一下套用。
Windows NT
資訊。
按一下
Administrators
登入控制)選項標籤,再按實際需要配置適合的設定。
若已啟動伺服器的
伺服器上的設定配置
,再輸入
LM
控制面板
在控制面板上,按一下功能表鈕。
按 (下)移動到
按 (下)移動到
按 (下)移動到
再按 (選擇)。
Admin
ADMIN SETUP
Device access
PIN
選擇
a.
移動
b.
,再按線上說明設定
PIN
到
Registered users
Windows NT
選擇
a.
選擇
b.
再按實際需要配置適當的設定。
若已啟動伺服器的
c.
服器上的設定配置
上述設定均完成後,
,再輸 入
WinNT
Administrators
all-in-one
(管理員)及
LM
LM
Security
碼。
)選項標籤,再按實際需要配置適當的設定。
PIN
Windows NT
(管理員)及
認證,請自左側視框選擇
認證。
LM
Windows NT
認證,請自左側視框選擇
認證。
(管理員),再按一下 (選擇)。
(管理員設定),再按一下 (選擇)。
(裝置控制),用 –或+ 選擇所要的安全設定,
PIN 碼。
(註冊的使用者),再按實際需要配置適當的設定。
即返回
Ready
網域 (包括
Windows NT Login Access(Windows NT
網域(包括
WinNT login access(Windows NT
(就緒)狀態。
DNS 及 NetBIOS
Network Folder
DNS 及 NetBIOS
LM authentication(LM
(安全)。
(網路磁碟機)再按
網域)及密碼資訊。
網域)及密碼
登入控制),
認證)再按伺
設定數位傳輸認證解決方案
繁
體
中
文
67
Page 68

2
疑難排解
本節提供安裝數位傳輸認證解決方案過程中,某些常見問題的排解建議。
All-in-one
疑難排解的詳細說明,請參閱線上說明手冊。
解決韌體更新方面的問題
韌體更新失敗。
列印配置頁並檢查韌體版本是否為
韌體更新時,
開始更新韌體前,請確認
all-in-one
Ready
SMR3xxxx
在使用中。
(就緒)燈號已顯示於
或以上, 否則請再更新韌體一次。
all-in-one
控制面板中。
解決
DIMM
DIMM
取出
DIMM
DIMM
請將
DIMM
中是否顯示已安裝
DIMM
若覺得
DIMM
安裝問題
可能為插入定位。
後再將
插槽可能有瑕疵。
插入其他
本身可能有瑕疵。
本身可能有問題,請洽
解決網路問題
All-in-one
請檢查
All-in-one
HP Officejet 9130 all-in-one
不一定支援本功能。 支援數位傳送功能的列印伺服器清單,請參閱 「規格」於頁70及
線上說明手冊。
Windows
數位傳輸認證解決方案支援
設定,例如啟用
的網路設定有誤。
all-in-one
所安裝的列印伺服器不支援數位傳送功能。
網路的安全設定可能不相容。
SMB
插入定位。
DIMM
插槽,並列印配置頁,檢查 「裝置資訊」段內
DIMM
DIMM。 DIMM
的網路設定確實正確並已連上網路。
(伺服器訊息阻絕)簽名以及限制只接受
若安裝正確,此處應顯示出 「數位傳輸認證解決方案」。
客服中心。
HP
隨附的列印伺服器支援數位傳送功能。 但其他列印伺服器則
Windows
網路的預設安全設定, 但不一定支援各項非預設安全
PING all in one
NTLMv2
插槽紀錄
DIMM
,檢查是否有回應。
等)。
68
疑難排解
Page 69

無法解析網域名稱及伺服器名稱。
設定過程中所提供的網域名稱及伺服器名稱,若無法解析為特定的
網路磁碟機的作業即無法完成。 設定數位傳輸認證解決方案時務請執行下列動作:
務請使用完全有效的
•
DNS、WINS
•
修改
•
all-in-one
使用者登入
無法找到時,
若要使
•
•
DNS 或WINS
不使用登入之使用者的電子郵件位址。
all-in-one 後,all-in-one 會以 LDAP
all-in-one
all-in-one
伺服器上的使用者資料是否設定正確。使用外部
LDAP
務請正確設定用於
伺服器是否已含「
LDAP
搜尋,因此必須加以定義。
LDAP
或兩者的伺服器名稱在
改用使用者的電子郵件位址,請確認下列事項:
Active Directory
名稱。
DNS
all in one
設定後,請將
會改用預設的寄件人:電子郵件位址。
sAMAccountName
all-in-one
(主動式目錄)及
上均正確設定。
重新開關機一次。
找出登入使用者的電子郵件位址。
LDAP
LDAP
」及 「
」兩個屬性。這兩個屬性會用於
mail
位址,登入或傳送到
IP
伺服器進行
伺服器的使用者資料。
LDAP
搜尋時,
解決網路問題
繁
體
中
文
69
Page 70

3
規格
本節說明數位傳輸認證解決方案的技術規格,
all-in-one
的規格請參閱線上使用手冊。
數位傳輸認證解決方案的技術規格
硬體規格
材積
(W x D x H)
重量
產品性能及容量
相容性 僅與
零組件需求
29.36 x 90.34 x 3.18 公厘
(
1.16 x 3.56 x 0.13
10
•
•
英吋)
克 (
HP Officejet 9100 系列 all-in-one
HP Digital Send Keyboard(C8240A
下列
• HP Jetdirect 620n Fast Ethernet
• HP Jetdirect 680n 802.11b
• HP Jetdirect 615n Fast Ethernet
盎司)
0.35
HP Jetdirect
(
J7934A
(
J6058A
(
J6057A
列印伺服器之一:
)
無線列印伺服器
)
)
相容
)
列印伺服器
列印伺服器
70
規格
Page 71

連結 伺服器作業系統需求
Microsoft Windows Server 2003
•
(安裝
Service Pack 1
Microsoft Windows 2000 Server
•
(安裝
Service Pack 4
Microsoft Windows NT Server 4.0
•
(安裝
Service Pack 6a
)
)
)
記憶體規格
記憶體
.
實體外觀
技術
目錄伺服器系統需求
伺服器需求
SMTP
下列網路作業系統中的
•
Directory
• Microsoft Windows Server 2003 SP1
• Microsoft Windows 2000 Server SP4
LDAP server 3.0
•
• Microsoft Windows 2000 Active Directory
• Microsoft Windows 2003 Active Directory
• Novell eDir
• Sun ONE
• Critical Path
Microsoft Windows Exchange 5.5
•
(安裝
Microsoft Windows Exchange 2000
•
(安裝
Microsoft Windows Exchange 2003
•
(安裝
Lotus Domino 6.5
•
Novell Groupwise
•
64 MB
DIMM 100-pin
SDRAM
:
Service Pack 4)
Service Pack 4
Service Pack 1
Microsoft Active
(基本功能)
)
)
速率
100 MHz/PC100
環境規範
作業環境
存放環境 存放溫度 -55° 到
作業溫度
建議的作業溫度
建議的相對溼度
存放相對溼度 小於或等於
0° 到 65° C(0° 到 149° F
° 到
15
15% 到 80%
)
35° C(59° 到 95° F)
,無冷凝
150° C(-67 到 302° F
,無冷凝
80%
)
數位傳輸認證解決方案的技術規格
繁
體
中
文
71
Page 72

A
客戶支援及保固
如何連繫客戶支援人員
請上 http://www.hp.com/support/officejet9100 網站獲得下列有關
資訊:設定及使用、印表機驅動程式下載、問題解決、耗材及配件訂購,以及
all-in-one
的保固聲明。
惠普科技有限保固聲明
產品 有限保固的有效時間
HP
軟體一年
附件 一年
有限保固範圍
惠普科技向一般使用者保證,以上指定的
1.
的保固期限內,沒有材料及製作上的瑕疵。
若是軟體產品,則
2.
證任何產品的操作都不會中斷或不發生錯誤。
的有限保固僅涵蓋因正常使用本產品所造成的瑕疵,而不涵蓋其他任何問題,
HP
3.
包括因下列情事所導致的瑕疵:
不適當的維護或修改;
a.
軟體、紙材、零件或非由
b.
產品規格外的操作;
c.
未獲授權的修改或不當使用。
d.
對於
4.
保固,或任何
非
工時與材料費。
若
5.
擇維修或更換該產品。
如果
6.
後的合理的時間內,退還產品的售價。
在客戶將瑕疵品退還
7.
更換品可以是全新或幾乎全新,且更換品的功能至少需與被更換品相當。
8.
HP
9.
HP
10.
府服務之保固服務合約,可從
任何授權
印表機產品,使用非
HP
HP
HP
HP
產品可能包含效能相當於新品之再製零件、元件或材料。
有限保固聲明適用於
HP
或重新填充的墨水匣,
在保固適用期限內,接獲
無法適當地維修或更換
服務機構取得。
HP
的有限保固僅適用於執行程式指令所發生的失敗。
HP
與客戶訂定之合約。然而,若印表機故障或損壞可歸責於使用
之前,
HP
HP
all-in-one
產品自客戶購買日起,在上述指定
HP
提供或支援的耗材;
HP
墨水匣或重新填充的墨水匣並不會影響客戶的
HP
將針對此類故障或損壞,收取標準的印表機修理
HP
保固所涵蓋之任何產品瑕疵的通知,
HP
保固所涵蓋之瑕疵品,
HP
不負維修、更換或退款之責任。
HP
配銷之
HP
產品所在的任何國家/地區。其他諸如到
HP
或授權進口商所配銷之產品所在國家/地區的
應在接獲瑕疵通知
HP
的
HP
HP
不保
可選
ZHTW
Page 73

保固限制
在當地法律所允許之最大範圍內,
特定用途的適用性,不承擔任何其他擔保,不論其為明示或默示。
及其協力供應商,對商品性、滿意程度、以及
HP
責任限制
在當地法律所允許之最大範圍內,本保固聲明提供之救濟權為客戶獨有且排他之
1.
救濟權。
在當地法律所允許之最大範圍內,除非本保固聲明特別陳述之責任,否則
2.
其協力供應商不承擔直接、間接、特殊、附隨性或衍生性損害之任何責任,不論
其為基於合約、侵權行為或任何法律理論,以及是否已被告知此類損害之可能性
皆然。
當地法律
此保固聲明授與客戶特定之法律權利。根據美國各州、加拿大各省,以及全球各
1.
個國家/地區之規定,客戶可能另享其他權利。
當此保固聲明與當地法律相抵觸時,此保固聲明應對牴觸的範圍進行修改以符合
2.
該當地法律。依據當地法律之效力,本保固聲明之某些免責聲明及限制可能不適
用於客戶。例如,在美國的某些州,以及美國境外的某些政府 (包括加拿大的
各省)可能:
排除本保固聲明中有關限制客戶之法定權利的免責聲明及限制(如英國);
a.
或是限制製造商實行此類免責聲明或限制之能力;或
b.
授與客戶其他保固權利、指定製造商無法免責之隱含保固期限,或允許限制
c.
隱含保固之期限。
對於澳洲及紐西蘭之消費者交易,除非法律許可,否則
3.
銷售,在本保固聲明之條款中不得排除、限制或修改、增添強制性的法律權利。
對此類客戶的產品
HP
HP
及
ZHTW
繁
體
中
文
Page 74

Page 75

Page 76

© 2004 Hewlett-Packard Development Company, L.P.
Printed in Singapore
新加坡印刷
www.hp.com/support/officejet9100
*C8268-90001*
*C8268-90001*
C8268-90001
 Loading...