

Page 1

HP NonStop SSL
Reference Manual
HP Part Number: 628203-007
Published: February 2013
Edition: HP NonStop SSL Reference Manual 1.6
H06.07 and subsequent H-series RVUs
J06.01 and subsequent J-series RVUs
Hewlett Packard Company
3000 Hanover Street
Palo Alto, CA 94304-1185
© 2013 HP
All rights reserved
Page 2

© Copyright 2013 Hewlett-Packard Development Company, L.P.
Confidential computer software. Valid license from HP required for possession, use or copying.
Consistent with FAR 12.211 and 12.212, Commercial Computer Software, Computer Software
Documentation, and Technical Data for Commercial Items are licensed to the U.S. Government under
vendor’s standard commercial license.
The information contained herein is subject to change without notice. The only warranties for HP
products and services are set forth in the express warranty statements accompanying such products
and services. Nothing herein should be construed as constituting an additional warranty. HP shall
not be liable for technical or editorial errors or omissions contained herein.
Export of the information contained in this publication may require authorization from the U.S.
Department of Commerce.
Microsoft, Windows, and Windows NT are U.S. registered trademarks of Microsoft Corporation.
Intel, Pentium, and Celeron are trademarks or registered trademarks of Intel Corporation or its
subsidiaries in the United States and other countries.
Java is a U.S. trademark of Sun Microsystems, Inc.
Motif, OSF/1, UNIX, X/Open, and the "X" device are registered trademarks, and IT DialTone and The
Open Group are trademarks of The Open Group in the U.S. and other countries.
Open Software Foundation, OSF, the OSF logo, OSF/1, OSF/Motif, and Motif are trademarks of the
Open Software Foundation, Inc. OSF MAKES NO WARRANTY OF ANY KIND WITH REGARD TO THE OSF MATERIAL
PROVIDED HEREIN, INCLUDING, BUT NOT LIMITED TO, THE IMPLIED WARRANTIES OF MERCHANTABILITY AND
FITNESS FOR A PARTICULAR PURPOSE. OSF shall not be liable for errors contained herein or for
incidental consequential damages in connection with the furnishing, performance, or use of this
material.
© 1990, 1991, 1992, 1993 Open Software Foundation, Inc. The OSF documentation and the OSF
software to which it relates are derived in part from materials supplied by the following:© 1987,
1988, 1989 Carnegie-Mellon University. © 1989, 1990, 1991 Digital Equipment Corporation. ©
1985, 1988, 1989, 1990 Encore Computer Corporation. © 1988 Free Software Foundation, Inc. © 1987,
1988, 1989, 1990, 1991 Hewlett-Packard Company. © 1985, 1987, 1988, 1989, 1990, 1991, 1992
International Business Machines Corporation. © 1988, 1989 Massachusetts Institute of Technology.
© 1988, 1989, 1990 Mentat Inc. © 1988 Microsoft Corporation. © 1987, 1988, 1989, 1990, 1991, 1992
SecureWare, Inc. © 1990, 1991 Siemens Nixdorf Informationssysteme AG. © 1986, 1989, 1996, 1997
Sun Microsystems, Inc. © 1989, 1990, 1991 Transarc Corporation.OSF software and documentation are
based in part on the Fourth Berkeley Software Distribution under license from The Regents of the
University of California.
OSF acknowledges the following individuals and institutions for their role in its development:
Kenneth C.R.C. Arnold, Gregory S. Couch, Conrad C. Huang, Ed James, Symmetric Computer Systems,
Robert Elz. © 1980, 1981, 1982, 1983, 1985, 1986, 1987, 1988, 1989 Regents of the University of
California.
Page 3

Contents
Preface 7
Who Should Read This Gui de ................................................................................................... 7
Document History ...................................................................................................................... 7
Introduction 9
What is the Purpose of HP NonStop SSL? ................................................................................ 9
HP NonStop SSL Features ....................................................................................................... 10
Installation 15
Support of SSL and TLS Protocol Standards ............................................................ 10
Fault-Tolerance ......................................................................................................... 10
SSL-enabling for HP Client Components Running on Microsoft Windows Systems
................................................................................................................................... 10
IPv6 Support .............................................................................................................. 10
Secure Proxy for Telnet Access ................................................................................. 10
Secure Proxy for Generic TCP/IP Client/Server Protocols ....................................... 11
Secure FTP Proxy ...................................................................................................... 12
Secure Proxy for EXPAND-over-IP .......................................................................... 13
Secure Proxy for ODBC Drivers ............................................................................... 13
Limiting Remote IP Addresses .................................................................................. 14
General Considerations ............................................................................................................ 15
IPv6 Considerations ................................................................................................................. 16
Starting an HP NonStop SSL Process ...................................................................................... 17
Installing a Secure Telnet Server Proxy ................................................................................... 17
Installing a Secure FTP Server Proxy ...................................................................................... 18
Installing a Secure FTP Client Proxy ....................................................................................... 19
Installing a Secure Tunnel for RSC ......................................................................................... 21
Installing a Secure Tunnel for ODBC/MP ............................................................................... 23
Installing a Secure Tunnel for ODBC/MX .............................................................................. 26
Installing an SSL Tunnel for EXPAND-over-IP L ines ............................................................ 29
Configuration 31
Configuration Overview .......................................................................................................... 31
The Configuration Fil e .............................................................................................. 32
PARAM commands................................................................................................... 32
Startup Line Parameters ............................................................................................ 33
Parameter Reference ................................................................................................................ 33
Parameter Overview .................................................................................................. 33
ALLOWCERTERRORS ........................................................................................... 35
ALLOWIP ................................................................................................................. 37
AUDITASCIIONLY ................................................................................................. 38
AUDITASCIIDUMPLENIN ..................................................................................... 38
AUDITASCIIDUMPLENOUT ................................................................................. 38
AUDITCONSOLE .................................................................................................... 39
HP NonStop SSL Reference Manual Contents • iii
Page 4

AUDITFILE .............................................................................................................. 39
AUDITFILERETENTION ........................................................................................ 40
AUDITFORMAT ...................................................................................................... 40
AUDITLEVEL .......................................................................................................... 41
AUDITMAXFILELENGTH ..................................................................................... 42
CACERTS ................................................................................................................. 42
CIPHERSUITES ....................................................................................................... 43
CLIENTAUTH .......................................................................................................... 47
CLIENTCERT ........................................................................................................... 47
CLIENTKEY ............................................................................................................. 48
CLIENTKEYPASS ................................................................................................... 49
CONFIG .................................................................................................................... 49
CONFIG2 .................................................................................................................. 50
CONNECTIONINFOFORMAT ............................................................................... 50
CONNECTIONINFOFORMATDETAILED ............................................................ 51
CONTENTFILTER ................................................................................................... 51
DENYIP .................................................................................................................... 53
DESTIPADDR, DESTIPPORT ................................................................................. 54
DONOTWARNONERROR ...................................................................................... 54
DYNAMICROUTINGENABLEIPV6 ...................................................................... 55
FTPALLOWPLAIN .................................................................................................. 55
FTPCALLOW200REPLY ........................................................................................ 55
FTPLOCALDATAPORT .......................................................................................... 56
FTPMAXPORT ......................................................................................................... 56
FTPMINPORT .......................................................................................................... 57
INTERFACE ............................................................................................................. 57
HASHALGORITHMS .............................................................................................. 58
KEEPALIVE ............................................................................................................. 59
LOGCONSOLE ........................................................................................................ 59
LOGEMS .................................................................................................................. 60
LOGFILE .................................................................................................................. 60
LOGFILERETENTION ............................................................................................ 61
LOGFORMAT .......................................................................................................... 61
LOGFORMATCONSOLE ........................................................................................ 62
LOGFORMATEMS .................................................................................................. 62
LOGFORMATFILE .................................................................................................. 63
LOGLEVEL .............................................................................................................. 64
LOGLEVELCONSOLE ............................................................................................ 64
LOGLEVELEMS ...................................................................................................... 65
LOGLEVELFILE ...................................................................................................... 65
LOGMAXFILELENGTH ......................................................................................... 65
LOGMEMORY ......................................................................................................... 66
MAXSESSIONS ....................................................................................................... 66
MAXVERSION ........................................................................................................ 67
MINVERSION .......................................................................................................... 67
PASSIVE ................................................................................................................... 68
PEERCERTCOMMONNAME ................................................................................. 68
PEERCERTFINGERPRINT ..................................................................................... 69
PORT ......................................................................................................................... 69
PTCPIPFILTERKEY ................................................................................................ 70
ROUTINGMODE ..................................................................................................... 70
SERVCERT............................................................................................................... 71
SERVKEY ................................................................................................................ 72
SERVKEYPASS ....................................................................................................... 72
SLOWDOWN ........................................................................................................... 73
SOCKSHOST, SOCKSPORT, SOCKSUSER .......................................................... 73
iv • Contents HP NonStop SSL Reference Manual
Page 5

SRCIPADDR, SRCIPPORT ..................................................................................... 74
SUBNET ................................................................................................................... 75
SSLCOMSECURITY................................................................................................ 75
TARGETINTERFACE ............................................................................................. 76
TARGETHOST ......................................................................................................... 76
TARGETHOSTFORCE ............................................................................................ 77
TARGETPORT ......................................................................................................... 77
TARGETPORTFORCE ............................................................................................ 78
TARGETSUBNET .................................................................................................... 78
TCPIPHOSTFILE ..................................................................................................... 79
TCPIPNODEFILE ..................................................................................................... 79
TCPIPRESOLVERNAME ........................................................................................ 79
TCPNODELAY ........................................................................................................ 80
TRUST ...................................................................................................................... 80
Advanced Configuration Topics .............................................................................................. 82
Multiple SSL Tunnels in a Single Process ................................................................ 82
Fault-tolerant Configuration ...................................................................................... 82
Load Balancing and Fault-Tolerance of EXPAND over SSL ................................... 82
Monitoring 85
Overview ................................................................................................................................. 85
Log and Audit Level Recommendations ................................................................................. 86
Customizing the Log and Audit Format .................................................................................. 86
Using SHOWLOG to View a Log File .................................................................................... 86
Viewing File Contents from OSS ............................................................................................ 89
Logfile/Auditfile Rollover ....................................................................................................... 89
SSLCOM Command Interface 91
Usage of SSLCOM: a Sample Session .................................................................................... 92
Supported Commands .............................................................................................................. 93
The CONNECTION Commands ............................................................................................. 94
CONNECTIONS ....................................................................................................... 94
CONNECTIONS, DETAIL ...................................................................................... 95
INFO CONNECTION ............................................................................................... 96
RENEGOTIATE CONNECTION ............................................................................ 96
SSLINFO Command ............................................................................................................... 97
RELOAD CERTIFICATES Command ................................................................................... 97
SSL Reference 99
Secure Sockets Layer ............................................................................................................... 99
SSL Features .............................................................................................................. 99
Further References..................................................................................................... 99
Implementation Ove r view ..................................................................................................... 100
Cipher Suites ........................................................................................................... 100
Auditing ................................................................................................................... 100
X.509 Certificates .................................................................................................... 100
Configuring SSL for Production as SSL Server .................................................................... 101
Using Your Own Server Key and Certificate Files ................................................. 101
The Public/Private Key Pair .................................................................................... 102
The Certificate Signing Request .............................................................................. 102
Obtaining a Certificate from a Third Party CA ....................................................... 102
Acting As Your Own CA ........................................................................................ 102
Example: How to Generate SSL Certificates Using OpenSSL................................ 103
Requesting the SSL Client to Present a Client Certificate ....................................... 107
HP NonStop SSL Reference Manual Contents • v
Page 6

Configuring SSL for Production as SSL Client ..................................................................... 107
Presenting a Client Certificate to the SSL server .................................................... 107
Security Considerations ......................................................................................................... 108
Protecting Against the Man-in-the-Middle Attack .................................................. 108
Protecting the Private Key File ................................................................................ 108
If the Private Key is Compromised ......................................................................... 108
TLS Alerts ............................................................................................................................. 109
Remote SSL Proxy 111
The RemoteProxy Component ............................................................................................... 111
RemoteProxy Installation ...................................................................................................... 111
To install RemoteProxy on a Client Workstation .................................................... 111
RemoteProxy Configuration .................................................................................................. 112
General Configuration Considerations .................................................................... 112
The Main Configuration Screen .............................................................................. 112
The Session Propertie s Window .............................................................................. 113
Session Parameter List ............................................................................................ 114
Copying a Configuration to Other Workstations ..................................................... 115
Appendix 117
Log Messages and Warnings ................................................................................................. 117
Startup messages ..................................................................................................... 117
Warning messages ................................................................................................... 119
Informational messages ........................................................................................... 123
Fatal Errors .............................................................................................................. 124
Troubleshooting of Typical Errors ......................................................................................... 126
Address already in use ............................................................................................. 126
Could not open xxx file ........................................................................................... 126
Decode Error ........................................................................................................... 126
Handshake Error ...................................................................................................... 126
Invalid address ......................................................................................................... 127
Security violation (error 4013) ................................................................................ 127
vi • Contents HP NonStop SSL Reference Manual
Page 7

Preface
Who Should Read This Guide
This document is for system administrators who are responsible for configuring HP NonStop SSL to secure Telnet, FTP
or middleware communication for ODBC, RSC and other protocols use d by HP products.
Document History
Version 1.6
• Added explicit warnings for usage of unsecure CIPHERSUITES.
• Added description of paramete r DY NAMICROUTINGENABLEIPV 6.
Version 1.5
• This version document s the newly introduced IPv6 s upport and the corresponding parameters.
Version 1.4
• This version clarifies the role of the remote proxy (RemoteProxy) in NonStop SSL. It is only supported for
selected HP NonStop pr oducts.
Version 1.3
• This version documents the support for configuring all available CIPHERSUITES. This feature is implemented
starting with HP NonStop SSL version AAD.
• The new parameter HASHALGORITHMS has been documented.
• The changes in the TRUST parameter have been documented
Version 1.2
• The section about SSL Certificate Generation with OpenSSL was updated.
• The ODBC/MX install section was updated.
Version 1.1
• This version documents the change in the CIPHERSUITES parameter. Preliminary support for additional
ciphers was added and doc umented.
Version 1.0
HP NonStop SSL Reference Manual Preface • 7
Page 8

• This is the initial version of this manual.
8 • Preface HP NonStop SSL Reference Manual
Page 9

Introduction
What is the Purpose of HP NonStop SS L?
HP NonStop SSL provides encryption of data which is sent or received by programs on HP NonStop servers over
TCP/IP. It adds transport layer security to TCP/IP protocols without built-in support of SSL/TLS on HP NonStop, such
as Telnet, FTP or ODBC.
HP NonStop SSL will run as a proxy server supporting the fo llowing modes of operation:
• [TELNETS] Acting as a secure proxy server for the NonStop TELSERV, to secure the communication between
the NonStop system and a telnet client with built-in SSL, such as comForte's MR-Win6530, Crystal Point's
OutsideView or Cail CTT.
• [PROXYS] Acting as a secure proxy server for plain TCP/IP servers acting as Server Gateways for
Client/Server-Middleware, such as the HP N o nS top RSC product, to secure the communication between the HP
NonStop system and a client in conjunction with the RemoteProxy component included with HP NonStop SSL.
Note: The usage of the NonStop SSL Re moteProxy component is supported for select e d HP N onStop products
only, including HP NonStop Remote Server Call (RSC/MP) and HP NonStop ODBC/MX.
Further note that the NonStop RemoteProxy component does not support being run as a Microsoft Windows
service.
• [PROXYC] Acting as a client proxy for plain TCP/IP client programs, to secure the communication between
the NonStop Server and remote SSL-enabled server programs.
• [FTPS] Acting as a secure proxy server for plain FTP servers, such as the NonStop FTPSERV, to secure the
communication between the NonStop system and a secure FTP client, such as MR-Win6530 or WS_FTP.
• [FTPC] Acting as a client proxy for the NonStop FTP client program, to secure the communication between the
NonStop system and a SSL-enabled FTP server, such as the WS_FTP Server.
• [EXPANDS] Creating an SSL tunnel to secure EXPAND over IP lines.
• [ODBCMXS] Acting as a secure server proxy for the ODBC/MX protocol.
To support the above functions, HP NonStop SSL proxy processes can be started in different modes. These so-called
"run modes" of a HP NonStop SSL proxy are listed in square brackets in the list above. Multiple HP NonStop SSL proxy
processes can co-exist on a single NonStop system to support concurrent proxy services, as well as multiple TCP/IP
processes.
The following table lists all run modes of a HP NonStop SSL proxy:
HP NonStop SSL Reference Manual Introduction • 9
Page 10

Run Mode Usage
FTPC FTP client proxy
FTPS FTP server proxy
PROXYC Generic SSL client proxy
PROXYS Generic SSL server proxy
TELNETS Secure Telnet proxy
EXPANDS Secure EXPAND proxy
ODBCMXS Secure ODBC/MX proxy
HP NonStop SSL Features
Support of SSL and TLS Protocol Standards
HP NonStop SSL uses SSL (Secure Socket Layer) in the TLS (Transport Layer Security) variant as standardized by the
IETF in RFC 2246, to secure an application on the transport layer. SSL 2.0, SSL 3.0 and TLS 1.0 (SSL 3.1) are
supported. It offers multiple configurable cipher suites with RSA key exchange with public key lengths up to 8192 bit
(client authentication with max. 4096 bit RSA) and up to 256 bit AES for bulk encryption. Additionally Elliptic Curve
Cryptography (ECC) with various available curves is supported.
Fault-Tolerance
HP NonStop SSL proxies can be configured as persistent processes, enabling automatic recovery from failures, such as
CPU outages.
SSL-enabling for HP Client Components Running on Microsoft
Windows Systems
The RemoteProxy component included with HP NonStop SSL is used to enable SSL encryption for HP client
components running on Microsoft Windows systems. Usage of the RemoteProxy component is supported for selected
HP NonStop products only, including HP NonStop Remote Server Call (RSC/MP) and HP NonStop ODBC/MX.
Additionally, the RemoteProxy can act as an SSL enabling LPD server proxy in order to secure LPD printing off the HP
NonStop platform. Usage of the LPDS server mode is supported in combination with the Microsoft Windows platform
only. Further note that the HP NonStop SSL RemoteProxy does not support being installed as a Windows service.
IPv6 Support
With HP NonStop SSL AAE, IPv6 support was introduced for the run mode s w ho s e plai n c ou nterpart protocols d o
support IPv6, in particular the PROXY and the FTP run modes. Please see section "IPv6 considerations" for details.
Secure Proxy for Telnet Access
HP NonStop SSL can be run as a proxy process to front-end TCP/IP servers accepting plain TCP connections, such as
the NonStop TELSERV process, enabling secure communication to clients, which also support the SSL protocol. SSL
capable clients are, for example, comForte's MR-Win6530 and J6530, Crystal Point's OutsideView and Cail's CTT.
10 • Introduction HP NonStop SSL Reference Manual
Page 11
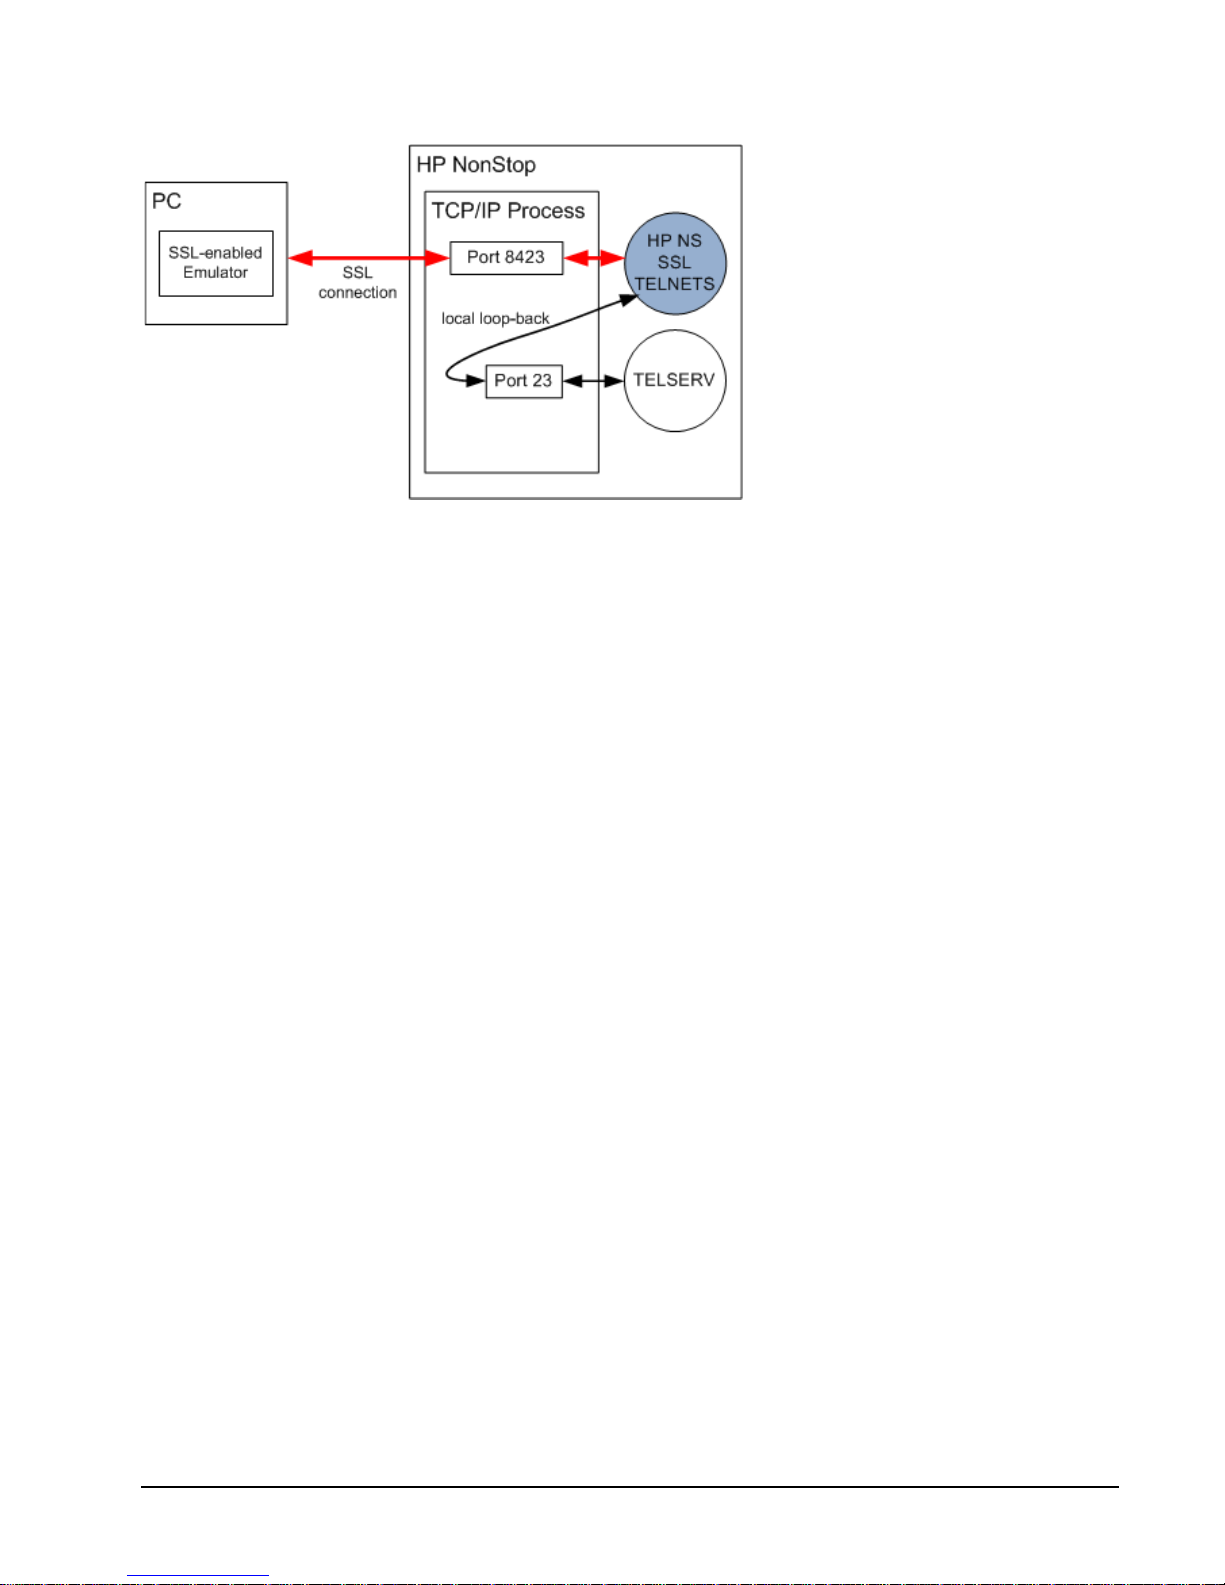
HP NonStop SSL proxy front-ending the NonStop TELVERV process
The HP NonStop SSL proxy will accept SSL connections from the network and "tunnel" them to a plain TCP server.
Encrypted data received from the SSL client will be decrypted and forwarded to the server. Plain data received from
plain TCP server will be encrypted and sent to the SSL client. For example, from the Telnet server's point of view, the
proxy acts as a normal Telnet client, while from an SSL telnet client the HP NonStop SSL proxy authenticates the Telnet
server and encrypts/decrypts the session's payload.
Typically, a HP NonStop SSL proxy will reside on the same IP process on the same system as the TCP server it tunnels
the session to, which allows to create a "local loopback" session (a connection to "127.0.0.1" for IPv4, respectively "::1"
for IPv6) for the unencrypted data. This avoids that any unencrypted data has to traverse the network. For a local
loopback, the data is only being passed within the local TCP/IP stack.
One instance of a HP NonStop SSL proxy handles multiple SSL connections received on a single IP process and port
number and tunnels them to a single target port. If multiple plain ports need to be secured, such as multiple Telnet
Servers, a HP NonStop SSL process can be started for each plain TCP port.
Secure Proxy for Generic TCP/IP Client/Server Protocols
HP NonStop SSL adds encryption not only for Telnet but for any Client/Server protocol facilitating TCP sockets
communicating over a single IP port. HP NonStop SSL can act as a secure proxy for the server or client side of the
client/server communication. If required, the RemoteProxy c omponent included wit h HP N o nS top SSL can be used to
enable SSL encryption for HP client components running on Microsoft Windows systems. Usage of the RemoteProxy
component is supported for selected HP NonStop products only, including HP NonStop Remote Server Call (RSC/MP)
and HP NonStop ODBC/MX. Additionally, the RemoteProxy can act as an SSL enabling LPD server proxy in order to
secure LPD printing off the HP NonStop platform. Usage of the LPDS server mode is supported in combination with the
Microsoft Windows pla t form only. Further note that the HP NonStop SSL RemoteProxy does not s u pport being installed
as a Windows service. For details regarding the differences between the HP NonStop SSL and comForte SecurCS please
see HP SAW document "Differences between HP NonStop SSL (T0910) and SecurCS. " (mmr_ns-0102006).
HP NonStop SSL Reference Manual Introduction • 11
Page 12

HP NonStop SSL securing Remote Server Call (RSC) communication
Secure FTP Proxy
HP NonStop SSL can be run as a proxy process to front-end the No nSto p FTPSERV or FTP process. With its SSL
support, HP NonStop SSL will enable secure communication to FTP clients or servers, which support FTP over
SSL/TLS according to RFC-2228. SSL capable FTP clients are, for example, MR-Win6530 or WS_FTP Pr o from
http://www.ipswitch.com/.
HP NonStop SSL secure FTP proxies front-ending standard FTP and FTPSERV
Acting as a proxy server, HP NonStop SSL will use secure FTP connections with the FTP partner and "tunnel" them to a
plain FTP client or server.
The HP NonStop SSL FTPS proxy will intercept the communication on the FTP command socket to add encryption for
both the command and data sockets. From the FTP server's or client's point of view the proxy acts as a normal FTP
12 • Introduction HP NonStop SSL Reference Manual
Page 13

partner, while for the remote SSL FTP partner the HP NonStop SSL proxy acts as a RFC-2228 compliant secure FTP
server or client.
Secure Proxy for EXPAND-over-IP
HP NonStop SSL running in EXPANDS mode encrypts EXPAND over IP traffic between two NonStop systems. It does
so by creating a secure SSL session between the two systems as depicted in the following diagram:
HP NonStop SSL as a proxy for EXPAND over IP traffic
The EXPAND line handler will exchange UDP traffic with an instance of HP NonStop SSL running on the same
NonStop system; the two HP NonStop SSL processes create an SSL TCP session between the two systems to forward
the traffic.
Secure Proxy for ODBC Drivers
HP NonStop SSL can encrypt traffic between an ODBC driver (ODBC/MP, OBDC/MX, JDBC/MP and JDBC/MX) on
client workstations and NonStop systems.
Since ODBC/MP only uses a single TCPIP session, it can be enabled for SSL as described under "Secure Proxy for
Generic TCP/IP Client/Server Protocols".
In contrast, ODBC/MX, JDBC/MP and JDBC/MX use multiple TCP/IP sessions with different port numbers between a
single client and the NonStop system. However in conjunction with the RemoteProxy component on the Windows client,
HP NonStop SSL "tunnels" multiple sessions over a sing le on e as shown in the following diagram:
HP NonStop SSL as a proxy for ODBC/MX traffic
HP NonStop SSL Reference Manual Introduction • 13
Page 14

The "tunneling" appr oa ch has the following benefits:
• It is firewall-friendly, as only a single port needs to be opened between the workstations and the clients.
• The configuration both of the HP NonStop SSL ODBCMXS process and the RemoteProxy is independent of
the number of ports used by ODBC/MX.
Note: The ODBC/MX protocol supports IPv6 starting with release H06.26/J06.15, but running HP NonStop SSL in
ODBCMXS mode is currently only valid with IPMODE IPv4.
Limiting Remote IP Addresses
HP NonStop SSL can be configured to allow only certain remote IP addresses. By default, HP NonStop SSL will allow
connections from any IP address; this behavior can be changed by
1. Setting a "black list" of forbidden IP addresses or subnets using the DENYIP parameter.
2. Setting a "white list" of allowed IP addresses or subnets using the ALLOWIP parameter.
Note: the black list will take precedence over the white list: if an IP address is matching both lists, it will NOT be
allowed.
For details, please refer to parameters "DENYIP" and "ALLOWIP" in the "Parameter Reference".
14 • Introduction HP NonStop SSL Reference Manual
Page 15

Installation
General Considerations
HP NonStop SSL is made available by HP with the purchase of the NonStop Operating System kernel for H Series and J
Series NonStop platforms. The files of the package are located on $SYSTEM.ZNSSSL.
HP NonStop SSL is not pre-installed or pre-configured. You have to install it depending on your requirements.
The main executable file is named SSLOBJ, which can be run to create an SSL proxy process running in a specific run
mode. While you can manually create SSL proxy processes with the TACL run command, it is recommended to create a
persistent process under control of the Kernel subsystem.
For convenience, HP NonStop SSL includes a SETUP macro, which helps you create an initial configuration for a
persistent proxy process in one of the available run modes. You may fine tune the configuration by editing the
configuration files created by the SETUP macro.
Note: Specific attention needs to be paid to a proper SSL configuration. HP NonStop SSL is delivered with a set of
sample SSL certificate and key files which are used by default. For a production installation, you should use your own
SSL server certificate. Please refer to the "SSL Reference" chapter for details.
When replacing the certificate files delivered in $system.znsssl with production certificates they may be overwritten by
DSM/SCM and restored to the original ones. Therefore it is recommended to place the production certificates in a
separate volume and point to those files in a CONFIG2 configuration file.
The installation subvolume znsssl also contains a Tacl macro named CFWSADDR. This macro provides the real client
IP address of a Visual Inspect session when connected to a NonStop SSL TELNETS process. The best way to install the
CFWSADDR macro is to include it in the TACLLOCL file so it gets executed for every new TACL session started:
LOAD/KEEP 1/$SYSTEM.ZNSSSL.CFWSADDR
WSADDR
Note that the invocation of this macro is WSADDR, not CFWSADDR. The macro searches all process occurrences of
the SSLOBJ file (NonStop SSL) and also the SWAP file (comForte SecurCS).
For securing some protocols, such as ODBC or RSC, you will also need to install the HP NonStop SSL RemoteProxy,
which will enable SSL for the HP components running on a remote user workstation.
Note that usage of the RemoteProxy component is supported for selected HP NonStop products only, including HP
NonStop Remote Server Call (RSC/MP) and HP NonStop ODBC/MX. Additionally, the RemoteProxy can act as an SSL
enabling LPD server proxy in order to secure LPD printing off the HP NonStop platform. Usage of the LPDS server
mode is supported in combination with the Microsoft Windows platform only. Further note that the HP NonStop SSL
RemoteProxy does not support being installed as a Windows service.
HP NonStop SSL Reference Manual Installation • 15
Page 16

IPv6 Considerations
With HP NonStop AAE, IPv6 support was introduced. The new parameter IPMODE was introduced for this purpose:
IPMODE {IPv4|IPv6|DUAL}
If not specified, the IPMODE parameter will default to IPv4. When IPMODE DUAL is specified, SSLOBJ will listen to
both IPv4 and IPv6 with one s i ngle dual mode socket. In I P M O D E DUAL, IPv4 addresses will be shown as mapped IP
addresses with the corresponding prefix "::ffff :" for this purpose, e.g. "::ffff:10.10.10.110".
Note the following considerations in respect to IPv6 support:
• The ODBC/MX protocol supports IPv6 starting with release H06.26/J06.15, but running HP NonStop SSL in
ODBCMXS mode is currently only valid with IPMODE IPv4.
• The SOCKS4 protocol does not support IPv6 by des ign, thus specifying SOCKS4 protocol parameter
(SOCKSHOST, SOCKSPORT, SOCKSUSER) is only valid in IPMODE IPv4.
• Following recommendation of the IETF, IPv6 support for FTP was implemented according to RFC 2428
(EPSV, EPRT). The FOOBAR protocol (LPSV, LPRT) is not supported.
• IPMODE DUAL is not supported by design in runmode EXPANDS (use either IPMODE IPv4 or IPMODE
IPv6 instead)
• By design when SSLOBJ is run in IPMODE DUAL, the TCP/IP stack must also support and be configured in
DUAL mode.
• Setting INTERFACE or TARGETINTERFACE is not valid in IPMODE DUAL, since no bind address except
the IPv6 ANY address '::' can handle both IPv4 and IP v6.
• IP version transition (4to6 or 6to4) is *not* one of the main intended application areas of SSLOBJ. Although IP
version transition is partially possible with IPMODE DUAL, support for it is limited. Contact HP support for
further information on supported setups.
• When specifying an IP address in IPv6 representation followed by a port number, the IPv6 address must be
embraced by square brackets to avoid ambiguity. E.g. in FTPC mode the user name has to be specified as
follows:
john@[2001:db9::1421:51ab]:11013
• Same requirement for enclosing the IPv6 address with square brackets applies to specification of DENYIP and
ALLOWIP values in CIDR format in order to avoid ambiguity with the potentially leading direction character
(See parameter description of ALLOWIP/DENYIP for more details)
16 • Installation HP NonStop SSL Reference Manual
Page 17

Starting an HP NonStop SSL Process
You can start a HP NonStop SSL process by issuing a TACL RUN command using the following syntax:
RUN SSLOBJ / runoptions / mode [ ; paramname paramvalue; ... ]
where
• runoptions are the standard Guardian RU N o ptions, such as IN, CPU or T ERM
• mode defines the run mode of the HP NonStop SSL process wit h the fol lowing valid keywords :
FTPC FTP client proxy
FTPS FTP server proxy
PROXYS Generic SSL server proxy
PROXYC Generic SSL client proxy
TELNETS Secure Telnet proxy
EXPANDS Secure EXPAND over IP proxy
ODBCMXS Secure Proxy for ODBC/MX
• paramname paramvalue; ...
is a list of HP NonStop SSL configuration parameter settings as described in the "Parameter Reference".
Note: When you start a HP NonStop SSL process in NOWAIT mode, make sure you have disabled logging to the home
terminal. To do so, set the parameter LOGCONSOLE to *.
Installing a Secure Telnet Server Proxy
To encrypt Telnet sessions with the standard NonStop TELSERV process and an SSL-enabled Telnet client, you will
need to perform the following steps:
1. On the NonStop server, start a HP NonStop SSL telnet server (TELNETS) proxy for the target TELSERV
process.
2. On the workstation si de , re-configure your telnet client to connect via SSL to the port number that the
TELNETS proxy is listening on.
To install an HP NonStop SSL TELNETS proxy
1. Determine the Telnet server you want to install the secure proxy for and find out the TCP/IP process and port
number it is listening on (usually 23).
2. Select a port number that will be used for SSL telnet connections (e.g. 8423).
3. At your TACL prompt, run the HP NonStop SSL SETUP macro:
> VOLUME $SYSTEM.ZNSSSL
> RUN SETUP
Select "TELNET SERVER" as run mode and follow the installation instructions. Enter the port number of the
TELSERV listening port as target port (e.g. 23) and the selected SSL telnet port as listening port (e.g. 8423).
The SETUP macro will create a configuration file (e.g. TLNSCF0) and an SCF IN file for the installation as
persistent process (e.g. TLNSIN0).
4. Edit the HP NonStop SSL TELNETS configuration file (e.g. TLNSCF0) to configure any additional
parameters, if desired.
HP NonStop SSL Reference Manual Installation • 17
Page 18

5. Install the TELNETS proxy persistent process, e.g.
> SCF /IN TLNSIN0/
6. Start the TELNETS proxy persistent process, e.g.
> SCF START PROCESS $ZZKRN.#SSL-TELNETS-0
7. Check the log file (configured in the configuration file) to verify the TELNETS proxy has started correctly, e.g.
> SHOWLOG TLNSLOG *
Verify that the log contains a message of the following pattern:
$TLNS0|06Jun10 21:42:15.82|20|secure-to-plain proxy started on target host 127.0.0.1,
target port 23, source port 8423
When logging with default log level 50, the last message of the log should then be similar to the following:
$ZTLNS0|29Jul12 16:31:29.37|30|-- PROXYS setup completed, starting to listen... --
To create a secure connection with a secure Telnet client
1. Configure your SSL Telnet client to connect to the address and port number the HP NonStop SSL secure telnet
proxy listens for incoming connections. Make sure that the client has the SSL protocol enabled for the session.
Installing a Secure FTP Server Proxy
To encrypt FTP sessions with the standard NonStop FTP server and an FTP client with FTP-TLS (SSL) support, you will
need to perform the following steps:
1. On the NonStop server, st a rt an HP NonStop SSL ftp server (FTPS) proxy for the t a r ge t FTP server.
2. On the remote system, configure your FTP client to connect via SSL to the port number that the FTPS proxy is
listening on.
To install an HP NonStop SSL FTPS proxy
1. Determine the TCP/IP process and port number the NonStop LISTNER process it is listening for FTP sessions
(usually 21).
2. Select a port number that will be used for FTP-TLS connections (e.g. 8421).
3. At your TACL prompt, run the HP NonStop SSL SETUP macro:
> VOLUME $SYSTEM.ZNSSSL
> RUN SETUP
Select "FTP SERVER" as run mode and follow the installation instructions. Enter the port number of the FTP
listening port as target port (e.g. 21) and the selected FTP-TLS port as listening port (e.g. 8421).
The SETUP macro will create a configuration file (e.g. FTPSCF0) and an SCF IN file for the installation as
persistent process (e.g. FTPSIN0).
4. Edit the HP NonStop SSL FTPS configuration file (e.g. FTPSCF0) to configure any additional parameters, if
desired.
5. Install the FTPS proxy persistent process, e.g.
> SCF /IN FTPSIN0/
6. Start the FTPS proxy persistent process, e.g.
> SCF START PROCESS $ZZKRN.#SSL-FTPS-0
7. Check the log file (configured in the configuration file) to verify the FTPS proxy has started correctly, e.g.
> SHOWLOG FTPSLOG *
18 • Installation HP NonStop SSL Reference Manual
Page 19

Verify that the log contains a message of the following pattern:
$FTPS0|18May10 20:22:51.63|20|FTP server proxy started on target host 127.0.0.1, target
port 21, source port 8421
When logging with default log level 50, the last message of the log should then be similar to the following:
$FTPS0|27Jul12 16:14:55.41|30|-- FTPS setup completed, starting to listen... --
To create a secure connection with an FTP-TLS enabled FTP client
1. Configure your FTP client to connect to the address and port number the HP NonStop SSL secure FTPS proxy
listens for incoming connections. Make sure that the client has the FTP-TLS protocol enabled for the session.
Installing a Secure FTP Client Proxy
To encrypt FTP sessions with the standard NonStop FTP client and a FTP server, you will need to perform the following
steps:
1. On the NonStop server, start a HP NonStop SSL ftp client (FTPC) proxy.
2. On the partner system, use a "FTP-TLS" compliant server to receive connections from the FTPC proxy, such as
the WS-FTP Server from Ipswitch, Inc.
To send or receive files securely to/from the remote system, you will use the standard NonStop FTP client. You may also
use an application that uses the NonStop FTP client API. Instead of connecting directly to the remote system, you will
first connect to the HP NonStop SSL FTPC proxy. Using an extended user id that includes information on the host
address and port number of the remote FTP system you will ins tru ct th e FTPC prox y to connect securely to the remote
FTP server. From there on, you may proceed as with normal plain FTP to list directories, as well as to send or receive
files.
To install an HP NonStop SSL FTPC proxy
1. Select a port number that the HP NonStop SSL FTPC proxy will use for plain connections from local FTP
clients (e.g. 8021).
2. At your TACL prompt, run the HP NonStop SSL SETUP macro:
> VOLUME $SYSTEM.ZNSSSL
> RUN SETUP
Select "FTP CLIENT" as run mode and follow the installation instructions. Enter the selected port number as
listening port (e.g. 84 21).
The SETUP macro will create a configuration file (e.g. FTPCCF0) and an SCF IN file for the installation as
persistent process (e.g. FTPCIN0).
3. Edit the HP NonStop SSL FTPC configuration file (e.g. FTPCCF0) to configure any additional parameters, if
desired.
4. Install the FTPC proxy persistent process, e.g.
> SCF /IN FTPCIN0/
5. Start the FTPC proxy persistent process, e.g.
> SCF START PROCESS $ZZKRN.#SSL-FTPC-0
6. Check the log file (configured in the configuration file) to verify the FTPC proxy has star ted correc tly, e.g .
> SHOWLOG FTPCLOG *
Verify that the log contains a message of the following pattern:
$FTPC0|18May10 20:22:51.63|20|FTP client proxy started on source port 8021
When logging with default log level 50, the last message of the log should then be similar to the following:
HP NonStop SSL Reference Manual Installation • 19
Page 20

$FTPC0|29Jul12 16:38:40.45|30|-- FTPC setup completed, starting to listen... --
To create a secure FTP connection to a remote FTP-TLS server
1. Issue the following command at the command prompt:
> FTP localhost 8021
where
• the first parameter denotes the local loopback address
• the second parameter specifies the port number the HP NonStop SSL FTPC proxy is listening on
The HP NonStop SSL FTP client mode welcome message will now be displayed. You will be prompted for
user-id and password:
FTP Client - T9552H02 - (10JUL2009) - COPYRIGHT TANDEM COMPUTERS INCORPORATED 20
09
Connecting to 127.0.0.1.........Established.
220 HP NonStop SSL version T0910H01_19JUL2010 running in encrypting FTP client m
ode
Name (127.0.0.1:user):
2. At the user id prompt, enter the following data:
<user id>@<remote address>[:<port>]
where
• <user id> is the user name valid to login to the remote secure FTP server.
• <remote address> is the IP address or DNS name of the remote system where the secure FTP server is
running on.
Note: if the remote address is an IPv6 address it has to be surrounded by square brackets. (E.g.
john@[fe80:aa::bb42]:12345)
• <port> is the port number the remote FTP server is listening on. If omitted, 21 is used as a default.
The connection should now be established, allowing you to list directories and transfer files securely:
Name (127.0.0.1:user): tb@172.24.91.233
331- original FTP server Welcome follows
331- 220 NOTEBOOK_TB X2 WS_FTP Server 3.1.4 (3995038631)
331- original FTP server reply to USER command follows
331 Password required
Password:*****
230 user logged in
ftp> dir
200 command successful
150 Opening ASCII data connection for directory listing
drwxr-x--- 2 tb System 0 Oct 1 19:17 .
drwxr-x--- 2 tb System 0 Oct 1 19:17 ..
-rwxr-x--- 1 tb System 161 Dec 12 12:17 l1
-rwxr-x--- 1 tb System 161 Dec 12 12:17 l2
-rwxr-x--- 1 tb System 161 Dec 12 12:17 l3
-rwxr-x--- 1 tb System 1447718 Dec 12 12:20 testfile
226 transfer complete
496 bytes received in 0.07 seconds ( 6.92 Kbytes/s)
ftp>
Note: Starting HP NonStop SSL vers ion AAE, an FTPC defaul t hos t and FTPC default port can be specified by using
the parameters TARGETHOST and TARGETPORT. The respective parameter values will be taken into account if the
user does not specify the corresponding value - or - if HP NonStop SSL was configured to always use the values of
TARGETHOST respectively TARGETPORT due to the additional parameter TARGETHOSTFORCE or
TARGETPORTFORCE. Please see corresponding parameter description for details.
20 • Installation HP NonStop SSL Reference Manual
Page 21

Installing a Secure Tunnel for RSC
To install an SSL tunnel for Remote Server Call (RSC) communication, you will need to perform the following steps:
1. On the NonStop server, install an HP NonStop SSL generic server proxy (PROXYS) process for the target TDP
server process.
2. On the workstation, install the HP NonStop SSL RemoteProxy and configure it to route plain connections to the
PROXYS process on the NonStop server.
3. Re-configure RSC to connect to the local RemoteProxy.
The following implementation instructions assume that you have RSC installed on your target NonStop system and
workstation.
To install a HP NonStop SSL PROXYS process for RSC
1. Determine the RSC Transaction Delivery Process (TDP) you want to install the secure proxy for and find out
the TCP/IP process and port number it is listening on. You may do this by examining the TDPCFG file for SET
TCPIPPORT PROCESSNAME and ADD TCPIPPORT commands. You may also check the TCPIPPORT
object with RSCCOM as in the following example:
53> RSCCOM
RSCCOM - TDP Configuration Manager - T9711D43 - (05NOV96) – System \SUPPORT
Tandem TM Remote Server Call using technology from Cornerstone Software, Inc.
Copyright (c) Cornerstone Software, Inc. 1991 - 1995. All rights reserved.
1 (( open $zrsc
Current TDP is \SUPPORT.$ZRSC - T9711D430 - (05NOV96)
2 (( status tcpipport *
Service (Port) Status Sessions Last Event
------------------------------------------------------------------RSCTEST1 (2001) Started 0 TCPIPPORT started. [ 6502 ]
2. Select a port number that will be used for SSL RSC connections (e.g. 7502)
3. At your TACL prompt, run the HP NonStop SSL SETUP macro:
> VOLUME $SYSTEM.ZNSSSL
> RUN SETUP
Select "GENERIC SERVER" as run mode and follow the installation instructions. Enter the port number of the
TDP server as target port (e.g. 6502) and the selected SSL RSC port as SSL listening port (e.g. 7502).
The SETUP macro will create a configuration file (e.g. PXYSCF0) and an SCF IN file for the installation as
persistent process (e.g. PXYSIN0).
4. Edit the HP NonStop SSL PROXYS configuration file (e.g. PXYSCF0) to configure any additional parameters,
if desired.
5. Install the PROXYS proxy persistent process, e.g.
> SCF /IN PXYSIN0/
6. Start the HP NonStop SSL PROXYS persistent process, e.g.
> SCF START PROCESS $ZZKRN.#SSL-PROXYS-0
7. Check the log file (configured in the configuration file) to verify the PROXYS process has started correctly, e.g.
> SHOWLOG PXYSLOG *
Verify that the log contains a message of the following pattern:
$PXYS0|06Jun10 21:42:15.82|20|secure-to-plain proxy started on target host 127.0.0.1,
target port 6502, source port 7502
When logging with default log level 50, the last message of the log should then be similar to the following:
$PXYS0|29Jul12 16:31:29.37|30|-- PROXYS setup completed, starting to listen... --
HP NonStop SSL Reference Manual Installation • 21
Page 22

To install and configure RemoteProxy for RSC
1. Download $SYSTEM.ZNSSSL.PROXYEXE in binary format to your RSC workstation, renaming it to
PROXY.EXE.
2. On the RSC workstation, run PROXY.EXE to start the RemoteProxy installation program and follow the
installation instructions.
3. Double-click on HP NonStop SSL Rem oteProxy icon in your system tray. The "RemoteProxy"
configuration window will be displayed.
4. Select "New" from the "Session" menu. The "Session Properties" dialog will be displayed.
5. In the "Protocol" field, select "Generic TCP/IP".
6. In the "Target Host" field, enter the IP address or host name where your PROXYS process is listening on your
NonStop server.
7. In the "Target Port" field, enter the port number, you have specified as the listen port of your PROXYS process
on the NonStop server.
8. In the "Local (Accepting) Port" field, enter the port number that RemoteProxy will use to listen for connections
from your RSC client. The port number must not be in use by any other program or service on your client PC.
For simplicity, you may want to use the same port number that the plain TDP server process is using on the
NonStop server side, e.g. "6502" in the example above.
9. Start the RemoteProxy session by clicking on the "Start" button
10. If the start is successful, check the startup messages with the "View Log" command.
To configure RSC to connect via the RemoteProxy
1. On the RSC workstation, locate the PIPE.INI file that is used by HP Piccolo.
2. In the PIPE.INI file, add an entry for your relevant RemoteProxy session in the [Resolver] section. The entry
itself assigns an alias host name (1st argument) for a connection over a specified protocol (2nd argument) to a
given peer. To communicate with RemoteProxy "ip" has to be used as the protocol (2nd argument), followed by
the local host name and the value you specified as "Local Port" in the "Session Properties" of the relevant
RemoteProxy Session. For example, a valid entry (with local port = 6502) could be:
[Resolver]
myhost=ip:127.0.0.1.6502
3. To prevent that both RemoteProxy and Piccolo are using the same port (configured in step 2), add an additional
entry in PIPE.INI in which you specify an unused port (e.g. 1277) to be used by Piccolo on the client. For
instance, as follows:
[NIF-mynifsock]
ProgramFile=nifsock
ServicePort=1277
4. On the RSC workstation, locate the RSC.INI file that is used by the RSC transport process.
5. Edit the RSC.INI file, add a "host_pipename" entry referring to the alias host name you chose in PIPE.INI in
step 2. For example, a valid entry could be:
host_pipename = RSC@myhost
6. Restart the RSC Transport Process.
7. You may use the RSCTEST program to test the secure RSC connection to the NonStop system.
8. You may check the successful creation of the session through the proxy by examining the messages with the
"View Log" command in the "Session Properties" screen of the RemoteProxy.
22 • Installation HP NonStop SSL Reference Manual
Page 23

To connect securely with your RSC client
1. After you have correctly configured the RSC.INI file and started the RemoteProxy session for RSC, use your
RSC client like you did before to connect to the NonStop system.
2. You may check the successful creation of the session through the proxy by examining the messages with the
"View Log" command in the "Session Properties" screen of RemoteProxy.
Installing a Secure Tunnel for ODB C/ MP
Note: The configuration of HP NonStop SSL for ODBC/MX differs from the configuration for ODBC/MP. This section
describes the configuration of HP NonStop SSL for ODBC/MP; please see the next section for the ODBC/MX
configuration.
To implement HP NonStop SSL to encrypt an Open Database Connectivity ODBC/MP connection, you will need to
perform the following steps:
1. On the NonStop server, install an HP NonStop SSL generic server proxy (PROXYS) process for the target
ODBC server process.
2. On the workstation, install RemoteProxy and configure it to route plain ODBC/MP connections to the HP
NonStop SSL PROXYS process.
3. Re-configure the ODBC/MP driver o n your workstation to connect to RemoteProxy.
To install an HP NonStop SSL PROXYS process for ODBC/MP
1. Determine the ODBC/MP server process you want to install the secure proxy for and find out the TCP/IP
process and port number it is listening on. We assume 8889 as port number here.
2. Select a port number that will be used for SSL ODBC/MP connections (e.g. 9889).
3. At your TACL prompt, run the HP NonStop SSL SETUP macro:
> VOLUME $SYSTEM.ZNSSSL
> RUN SETUP
Select "GENERIC SERVER" as run mode and follow the installation instructions. Enter the port number of the
ODBC/MP server as target port (e.g. 8889) and the selected SSL ODBC/MP port as SSL listening port (e.g.
9889).
The SETUP macro will create a configuration file (e.g. PXYSCF0) and an SCF IN file for the installation as
persistent process (e.g. PXYSIN0).
4. Edit the HP NonStop SSL PROXYS configuration file (e.g. PXYSCF0) to configure any additional parameters,
if desired.
5. Install the PROXYS proxy persistent process, e.g.
> SCF /IN PXYSIN0/
6. Start the HP NonStop SSL PROXYS persistent process, e.g.
> SCF START PROCESS $ZZKRN.#SSL-PROXYS-0
7. Check the log file (configured in the configuration file) to verify the PROXYS process has started correctly, e.g.
> SHOWLOG PXYSLOG *
Verify that the log contains a message of the following pattern:
$PXYS0|06Jun10 21:42:15.82|20|secure-to-plain proxy started on target host 127.0.0.1,
target port 8889, source port 9889
When logging with default log level 50, the last message of the log should then be similar to the following:
HP NonStop SSL Reference Manual Installation • 23
Page 24

$PXYS0|29Jul12 16:31:29.37|30|-- PROXYS setup completed, starting to listen... --
To install and configure RemoteProxy for ODBC/MP
1. Download $SYSTEM.ZNSSSL.PROXYEXE in binary format to your OCBC/MP client workstation, renaming
it to PROXY.EXE.
2. On the OCBC/MP client workstation, run PROXY.EXE to start the RemoteProxy installation program and
follow the installation instructions.
3. Double-click on HP NonStop SSL Rem oteProxy icon in your system tray. The "RemoteProxy"
configuration window will be displayed.
4. Select "New" from the "Session" menu. The "Session Properties" dialog will be displayed.
5. In the "Protocol" field, select "Generic TCP/IP".
6. In the "Target Host" field, enter the IP address or host name where your PROXYS process is listening on the
NonStop server.
7. In the "Target Port" field, enter the port number you have specified as the listen port of your PROXYS process
on the NonStop server.
8. In the "Local (Accepting) Port" field, enter the port number that RemoteProxy will use to listen for connections
from your ODBC/MP driver. The port number must not be in use by any other program or service on your
client PC. For simplicity, you may want to use the same port number that the ODBC/MP server process is using
on the NonStop server side, e.g. "8889" in this example.
9. Start the RemoteProxy session by clicking on the "Start" button.
10. If the start is successful, check the startup messages with the "View Log" command.
To configure the ODBC/MP driver to connec t via the RemoteProxy
1. Navigate to the ODBC driver configuration dialog.
2. Reconfigure the Host Name to the local host address, e.g. "localhost", or "127.0.0.1"
3. Reconfigure the "Port" field to the port number you specified as "Local Port" in the "Session Properties" of the
relevant RemoteProxy Session.
4. Assuming you used "8889" as "Local (Accepting) Port" in the RemoteProxy session configuration, your ODBC
driver configuration dialog should look as follows:
24 • Installation HP NonStop SSL Reference Manual
Page 25
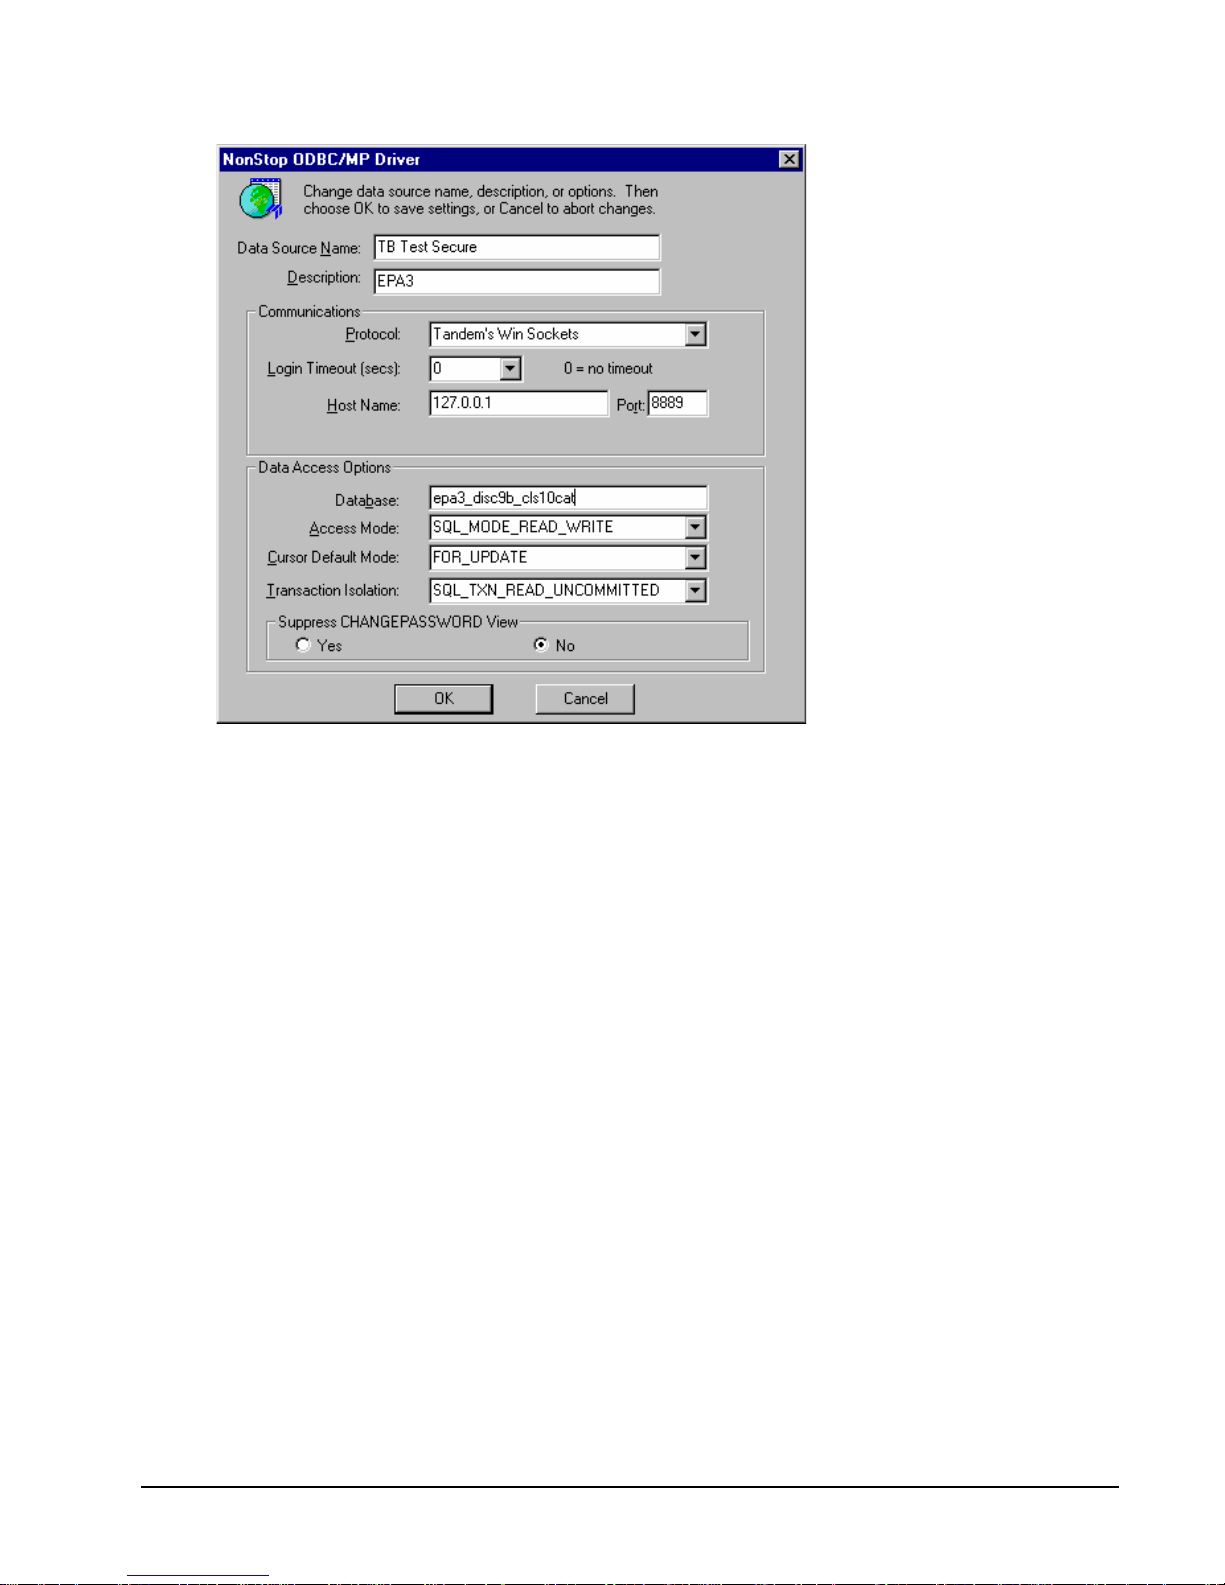
Confirm the changes by clicking "OK".
5. You may use the NonStop Connectivity Tool to test the secure ODBC connection to the NonStop system.
6. You may check the successful creation of the session through the proxy by examining the messages with the
"View Log" command in the "Session Properties" screen of the RemoteProxy.
To connect securely with your ODBC/MP c lient
1. After you have correctly configured your ODBC driver, use your ODBC client like you did before to connect to
the NonStop system.
2. You may check the successful creation of the session through the proxy by examining the messages with the
"View Log" command in the "Session Properties" screen of the RemoteProxy.
HP NonStop SSL Reference Manual Installation • 25
Page 26

Installing a Secure Tunnel for ODB C/ MX
Note 1: The configuration for ODBC/MX differs from the configuration for ODBC/MP. This section describes the
configuration for ODBC/MX; please see the prior section for the configuration for ODB C/MP.
Note 2: NonStop ODBC/MX uses multiple port numbers to create connections between the ODBC/MX clients and the
NonStop server. HP NonStop SSL is aware of that and "multiplexes" many connections over a single IP connection
between the clients and the NonStop server. That has two benefits:
- only a single port needs to be open at the firewall.
- the configuration of HP NonStop SSL becomes easier.
To install HP NonStop SSL to encrypt an Open Database Connectivity ODBC/MX connection, you will need to perform
the following steps:
1. On the NonStop server, install an HP NonStop SSL ODBC/MX server proxy (ODBCMXS) process for the
target ODBC/MX server proce s s.
2. On the workstation, install RemoteProxy and configure it to route plain ODBC/MX connections to the HP
NonStop SSL ODBCMXS process.
3. Re-configure the ODBC/MX driver on your workstat ion to connect to Rem ot e P roxy.
To Install an HP NonStop SSL ODBCMXS process for ODBC/MX
1. Determine the ODBC/MX server process you want to install the secure proxy for and find out the TCP/IP
process and port number it is listening on. Note that ODBC/MX consists of multiple server processes; you
should look for the port number of the ODBC/MX Association server. This is the MXCS port number you
configure in the ODBC/MX client configuration (only!). We will assume a value of 18888 here.
2. Select a port number that will be used for SSL ODBC/MX connections, e.g. 28888
3. At your TACL prompt, run the HP NonStop SSL SETUP macro:
> VOLUME $SYSTEM.ZNSSSL
> RUN SETUP
4. Select "ODBC/MX SERVER" as run mode and follow the installation instructions.
Enter the TCPIP process name for the subnet the ODBC/MX Association server runs on. Note that the
SUBNET and TARGETSUBNET parameters will be set to the process name you provided here. Next, e nter the
listening port num be r as de t e rmined in (2) above for incoming SSL-encrypted ODBC/MX client connections.
Note that you will not be prompted for a TARGETPORT because it will be determined automatically based on
the client side configuration.
Finally the SETUP macro will create a configuration file (e.g. ODBSCF0) and an SCF IN file for the
installation as persistent process (e.g. ODBSIN0).
5. Edit the HP NonStop SSL ODBCMXS configuration file (e.g. ODBSCF0) to configure any additional
parameters, if desired. Be careful with the additional parameter "TARGETHOST" that can be used to route
outgoing traffic to another host.
For security reasons, you should specify the "local loopback address" (127.0.0.1) as TARGETHOST since this
avoids that unencrypted data traverses the network. The TARGETHOST parameter will default to "127.0.0.1" if
omitted. In some cases it might be desired to handle incoming connections (originating e.g. from RemoteProxy)
on a specific subnet and route the outgoing connections (to the ODBC/MX Association server) to another
subnet. In that case you can set the SUBNET (incoming) and TARGETSUBNET (outgoing) parameter value to
the respective process name. If TARGETSUBNET is omitted it defaults to the value of SUBNET.
6. Install the ODBCMXS proxy persistent process, e.g.
> SCF /IN ODBSIN0/
7. Start the HP NonStop SSL ODBCMXS persistent process, e.g.
26 • Installation HP NonStop SSL Reference Manual
Page 27

> SCF START PROCESS $ZZKRN.#SSL-ODBCMXS-0
8. Check the log file (configured in the configuration file) to verify the ODBCMXS process has started correctly,
e.g.
> SHOWLOG ODBSLOG *
Verify that the log contains a message of the following pattern:
$ODBS0|01Sep11 09:48:04.64|20|ODBC/MX server proxy started on target host 127.0.0.1,
source port 28888, target port will be passed dynamically within client request.
When logging with default log level 50, the last message of the log should then be similar to the following:
$ODBS0|29Jul12 16:31:29.37|30|-- ODBCMXS setup completed, starting to listen... --
Note: Earlier versions of HP NonStop SSL might write out a "target port" with the above log message though it is not
relevant for the setup.
To install and configure the RemotePr oxy for ODBC/MX
1. Download $SYSTEM.ZN S SSL.PROXYEXE in bina ry format to your OCBC/MX client workstation, renaming
it to PROXY.EXE.
2. On the OCBC/MX client workstation, run PROXY.EXE to start the RemoteProxy installation program and
follow the installation instructions.
3. Double-click on HP NonStop SSL Rem oteProxy icon in your system tray. The "RemoteProxy"
configuration window will be displayed.
4. Select "New" from the "Session" menu. The "Session Properties" dialog will be displayed.
5. In the "Protocol" field, select "ODBC/MX Client".
6. In the "Target Host" field, enter the IP address or host name where your ODBCMXS process is listening on
your NonStop server.
7. In the "Target Port" field, enter the port number that you have specified as the listen port of your ODBCMXS
process on the NonStop server, (e.g. 28888).
8. In the "Local (Accepting) Port" field, enter the port number that RemoteProxy will use to listen for connections
from your ODBC/MX driver. The port number must not be in use by any other program or service on your
client PC. It must be the same port that the ODBC/MX server process is using on the NonStop server side, e.g.
"18888" in this example.
9. Start the RemoteProxy session by clicking on the "Start" button
10. If the start is successful, check the startup messages with the "View Log" command.
To configure the ODBC/MX driver to connect via the RemoteProxy
1. Navigate to the ODBC/MX driver configuration dialog.
2. Navigate to the "Network" Tab within the dialog
3. Reconfigure the MXCS IP Address to the local host address, e.g. "localhost", or "127.0.0.1"
4. Reconfigure the "Port" field to the port number you specified as "Local Port" in the "Session Properties" of the
relevant RemoteProxy Session.
5. Assuming you used "18888" as "Accepting Port" in the RemoteProxy session configuration, your ODBC driver
configuration dialog should look as follows:
HP NonStop SSL Reference Manual Installation • 27
Page 28
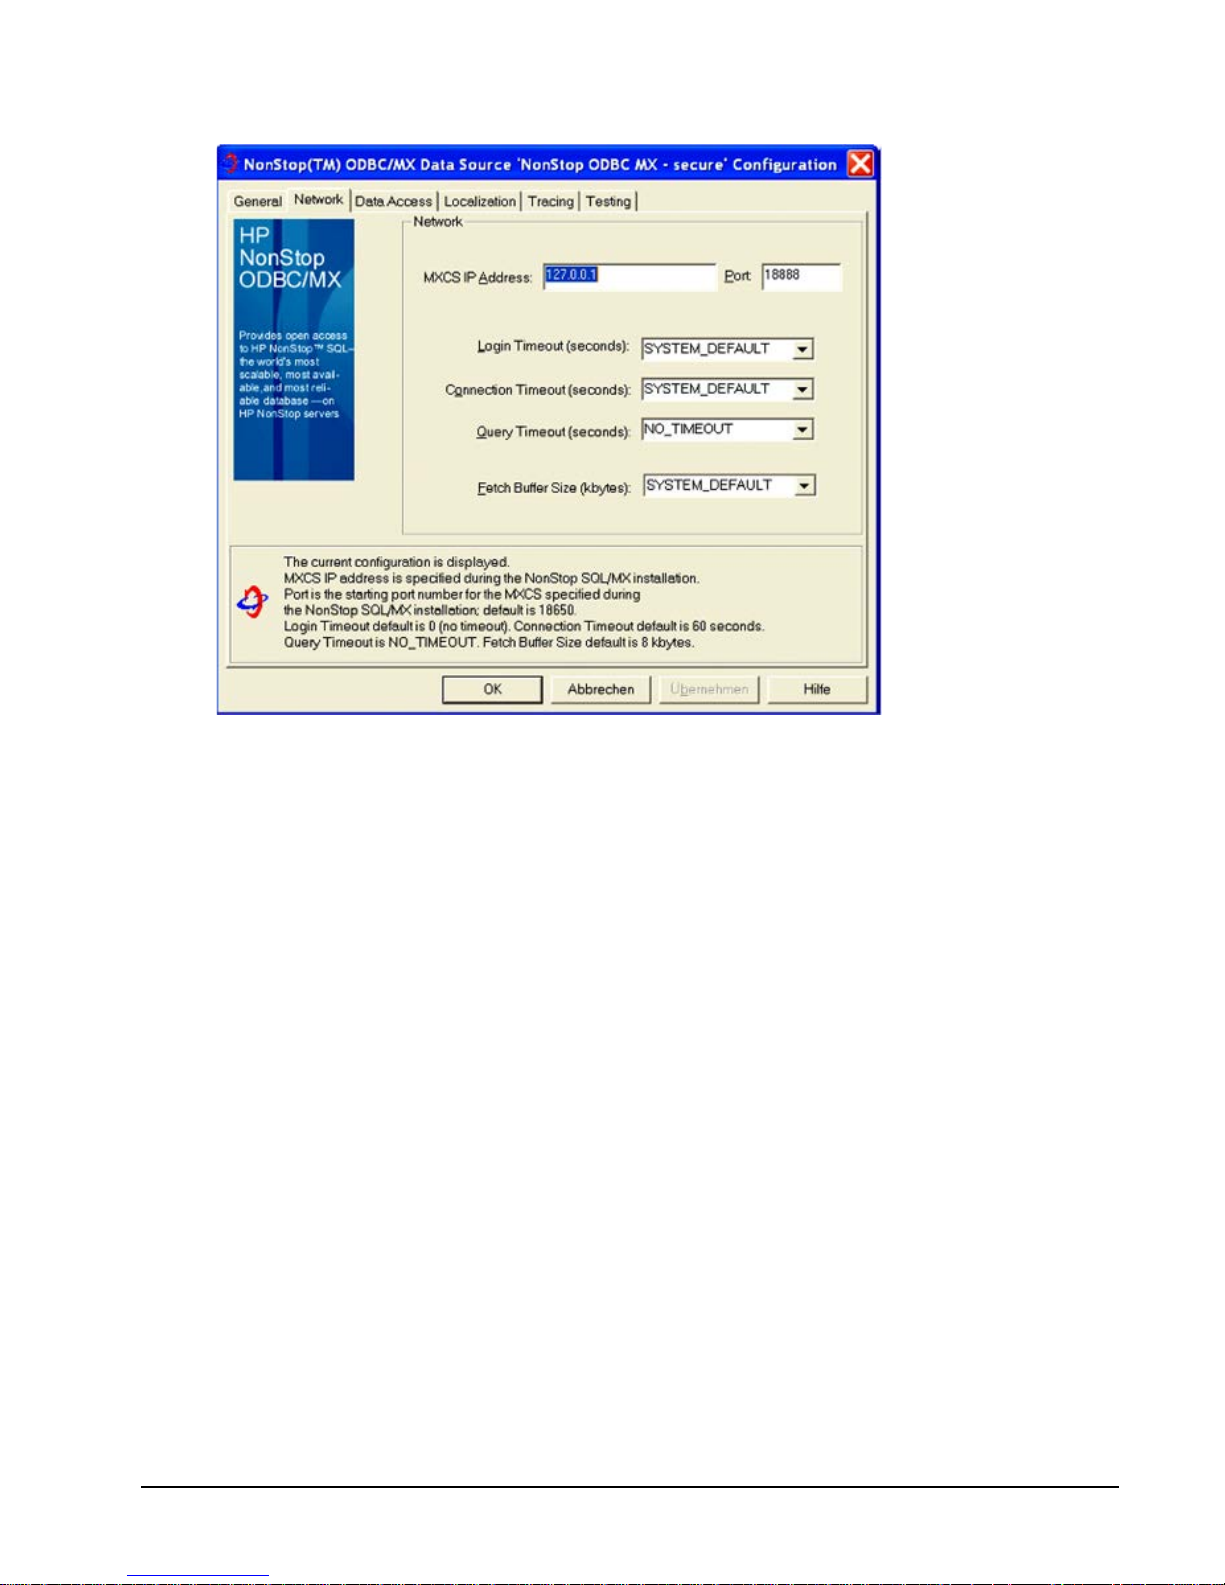
Confirm the changes by clicking "OK".
6. You may use the NonStop Connectivity Tool to test the secure ODBC connection to the NonStop system.
7. You may check the successful creation of the session through the proxy by examining the messages with the
"View Log" command in the "Session Properties" screen of the RemoteProxy.
To connect securely with your ODBC/MX c lient
1. After you have correctly configured your ODBC/MX driver, use your ODBC client like you did before to
connect to the NonStop system.
2. You may check the successful creation of the session through the proxy by examining the messages with the
"View Log" command in the "Session Properties" screen of the RemoteProxy.
28 • Installation HP NonStop SSL Reference Manual
Page 29

Installing an SSL Tunnel for EXPAND-over-IP Lines
Creating an SSL tunnel for an EXPAND-over-IP line requires running a HP NonStop SSL process in EXPANDS mode
for the line handler on both sides of the connection. The configuration of the HP NonStop SSL processes can be easily
derived from the existing line handler configuration of E XPAND-over-IP line. To enable the tunneling, only a single line
handler attribute needs to be changed.
To install an SSL tunnel process for an EXPAND-over-IP line handler, you will need to perform the following steps on
both NonStop servers c o nnected by the line:
1. Install a HP NonStop SSL EXPAND proxy (EXPANDS) proxy process for the EXPAND line.
2. Reconfigure your EXPAND line configuration to activate the SSL tunnel for the EXPAND line.
Note: This section lists the basic installation instructions. For a production installation, please refer to "Load Balancing
and Fault-Tolerance of EXPAND over SSL" in chapter "Configuration".
To install the HP NonStop SSL EXPANDS pr oxy
1. Determine the name of the EXPAND-over-IP line handler you want to secure .
2. At your TACL prompt, run the HP NonStop SSL SETUP macro:
> VOLUME $SYSTEM.ZNSSSL
> RUN SETUP
Enter the name of the line handler when requested.
The SETUP macro will create a configuration file (e.g. EXPSCF0) and an SCF IN file for the installation as
persistent process (e.g. EXPSIN0).
3. Start the HP NonStop SSL EXPANDS persistent process, e.g.
> SCF START PROCESS $ZZKRN.#SSL-EXPANDS-0
4. Check the log file (configured in the configuration file) to verify the EXPANDS process has started correctly,
e.g.
> SHOWLOG EXPSLOG *
Verify that the log contains a message of the following pattern:
$EXPS1|19May10 17:48:47.04|20|EXPAND proxy started (10.0.0.196:1280 <- 10.0.0.198:1280)
Note: These steps need to be performed on both systems connected over the EXPAND-over-IP line.
To activate the SSL tunnel for the EXPAND line
5. Using SCF, alter the configuration of the EXPAND line as follows:
> ASSUME LINE <line>
> ABORT
> ALTER, DESTIPADDR 127.0.0.1
> START
6. After the tunnel is properly configured on both sides, the HP NonStop SSL log file should contain messages of
the following pattern:
$EXPS |27Apr05 12:31:41.01|50|E1| tunnel connect succeeded, tunnel ready
or
$EXPS |27Apr05 12:37:26.78|50|E1| accepted tunnel connection, tunnel ready
The EXPAND line should then show the "READY" state.
Note: Again, that change in the SCF configuration has to be done on both systems.
HP NonStop SSL Reference Manual Installation • 29
Page 30

30 • Installation HP NonStop SSL Reference Manual
Page 31

Configuration
Configuration Overview
HP NonStop SSL processes can be flexibly configured by a set of configuration parameters which can be specified by
the following means:
• A configuration file
• PARAM commands
• startup command line parameters
• SSLCOM commands
The different options to specify a configuration for HP NonStop SSL allow system administrators to easily manage
installations with multiple HP NonStop SSL processes running on multiple TCP/IP processes and ports as well as in
different modes. For example, multiple HP NonStop SSL secure proxy processes with a an identical SSL configuration
can share the same configuration file, while process-unique parameters such as proxy port, target host and port can be
specified on the command line.
On startup, HP NonStop SSL parses the given configuration parameters sources. A single parameter may be specified in
multiple sources, e.g. in the configuration file and on the startup command line. In this case, HP NonStop SSL will
process parameters with the following precedence (highest to lowest):
1. PARAM parameter
2. Configuration file parameter
3. Startup line parameter
This means that a parameter given in the configuration file will override the value given for the same parameter on the
startup line. Likewise, a parameter value given as PARAM command will override any value specified in the
configuration file.
All parameters can be specified in any of the configuration parameter sources, with the following exceptions:
• The run mode of a HP NonStop SSL process is specified explicitly on the command line as first startup line
parameter. This parameter defines if HP NonStop SSL acts as a secure Telnet server proxy, a secure FTP server
proxy, or in any other supported mode of operation (see "Starting an HP NonStop SSL Process" for a complete
list of run modes).
• The configuration file to be used as a parameter source can only be specified as a PARAM or startup line
parameter, as it is meaningless in a configuration file itself.
Regardless which way they are specified, parameter names are case insensitive.
Additionally, a subset of configuration parameters can be changed at run time using SSLCOM commands (see chapter
"SSLCOM Command Interface" for details).
HP NonStop SSL Reference Manual Configuration • 31
Page 32

The Configuration File
The configuration file is an edit type file which can be created and modified with a standard NonStop editor such as
TEDIT. The name of the file that a HP NonStop SSL process should use as configuration source is passed to the program
during startup.
The file contains entries of the form
parameter-name parameter-value
Like in the standard TCP/IP configuration files, any lines starting with a "#" character are interpreted as comments. The
following printout is the contents of the sample configuration file for running HP NonStop SSL telnet proxy:
# sample configuration file for a HP NonStop SSL secure telnet server proxy
#---------------------------------------------------------------------------------
# general settings
# TCP/IP process the web server runs on
SUBNET $ZTC0
# SSL port telnet which HP NonStop SSL listens for incoming SSL emulator connections
PORT 4023
# TELSERV listening port the connections will be forwarded to
TARGETPORT 23
#---------------------------------------------------------------------------------
# log configuration
# set the level
LOGLEVEL 50
# enable console logging to $0
LOGCONSOLE $0
# additionally log to file
LOGFILE $DATA1.SSL.LOGTELS
#---------------------------------------------------------------------------------
# SSL configuration
# our server certificate and private key
SERVCERT $DATA1.SSL.MYCERT
SERVKEY $DATA1. SSL.PRIVKEY
SERVKEYPASS myprivatepassword
# our server cert was issued by verisign
CACERTS $DATA1. SSL.VERISIGN
# we only accept the strongest cipher suites with AES256
CIPHERSUITES 0.53,0.56,0.57
PARAM commands
HP NonStop SSL configuration parameters can be specified as PARAM commands as follows:
PARAM <parameter name> <parameter value>
All available HP NonStop SSL parameters can be specified as PARAM commands.
The following example demonstrates how to start a HP NonStop SSL telnet proxy listening on $ZTC03, port 8023, using
PARAM commands:
> PARAM PORT 8023
> PARAM TARGETPORT 23
> PARAM SUBNET $ZTC03
> PARAM LOGFILE $DATA1.SSL.LOGTELS
> PARAM LOGCONSOLE *
> RUN SSLOBJ/ NAME $TELS, NOWAIT/ TELNETS
32 • Configuration HP NonStop SSL Reference Manual
Page 33

Startup Line Parameters
HP NonStop SSL configuration parameters can be passed on the startup line as follows (for a complete description of the
RUN SSLOBJ see section "Starting an HP NonStop SSL Pro c e s s"):
<parameter name> <parameter value>; <parameter name> <parameter value>; ...
The following example demonstrates how to start a multiple HP NonStop SSL proxies sharing the same SSLCONF
configuration file:
> PARAM CONFIG SSLCONF
> RUN SSLOBJ /NAME $STN0, CPU 0, NOWAIT/ TELNETS; SUBNET $ZTC0; PORT 8023
> RUN SSLOBJ /NAME $STN1, CPU 1, NOWAIT/ TELNETS; SUBNET $ZTC1; PORT 8023
> RUN SSLOBJ /NAME $STN2, CPU 2, NOWAIT/ TELNETS; SUBNET $ZTC2; PORT 8023
> RUN SSLOBJ /NAME $STN3, CPU 3, NOWAIT/ TELNETS; SUBNET $ZTC3; PORT 8023
Parameter Reference
This section describes all available HP NonStop SSL parameters in alphabetical order. Note, that parameter names are
case insensitive independently of the source.
Parameter Overview
The following table lists all available HP NonStop SSL parameters and their meanings:
Parameter Meaning
ALLOWCERTERRORS Allows selective overriding of certificate validation errors.
ALLOWIP Limits allowed remote IP addresses.
AUDITASCIIONLY
AUDITASCIIDUMPLENIN
AUDITASCIIDUMPLENOUT
AUDITCONSOLE
AUDITLEVEL
AUDITFILE
AUDITFILERETENTION
AUDITFORMAT
AUDITMAXFILELENGTH
CACERTS
CIPHERSUITES
CLIENTAUTH
CLIENTCERT File name of a DER encoded X.509 client certificate.
CLIENTKEY The private key to be used for the client certificate.
CLIENTKEYPASS Password for reading the (encrypted) private key file.
CONFIG File name of a HP NonStop SSL configuration file.
CONFIG2 Allows the usage of a second configuration file with different security settings.
CONNECTIONINFOFORMAT
CONNECTIONINFOFORMATDETAILED
CONTENTFILTER Activates content-filtering in run modes TELNETS, PROXYS and PROXYC.
Control the creation of an audit file containing the remote FTP commands in run
mode FTPS or the socket activities in run modes PROXYS, PROXYC,
ODBCMXS.
File names of a DER encoded X.509 CA certificates representing a certificate
chain signing the certificate configured with the CLIENTCERT or SERVCERT
parameter.
List of cipher suites that will be accepted by a secure HP NonStop SSL process.
If omitted, default openssl cipher suites will be used.
Enforced client authentication when running as SSL server: a certificate signing
the certificates the client is using for SSL client authentication
Specifies the default format for the output of the SSLCOM command
"connections".
Specifies the default format for the output of the SSLCOM command
"connections, detail".
HP NonStop SSL Reference Manual Configuration • 33
Page 34

Parameter Meaning
DENYIP Limits allowed remote IP addresses.
DESTIPADDR
Sets the destination IP address and port for an EXPANDS tunnel.
DESTIPPORT
DONOTWARNONERROR Log selected errors with LOGLEVEL 20 rather than as WARNING.
DYNAMICROUTINGENABLEIPV6
Causes the expected separator between the target host IP address and the target
port to be a pipe symbol ('|') instead of a colon (':'). To be used only with
ROUTINGMODE D (dynamic).
FTPALLOWPLAIN Allows plain FTP traffic when HP NonStop SSL is run in FTPS mode.
FTPCALLOW200REPLY Sets compatibility for older FTP/TLS servers when run in FTPC mode.
FTPLOCALDATAPORT
Controls the value of the local port on the NonStop system of the data connection
in FTPC mode with PASSIVE set to TRUE.
FTPMAXPORT The maximum port number HP NonStop SSL will use for FTP data connections.
FTPMINPORT The minimum port number HP NonStop SSL will use for FTP data connections.
INTERFACE
Controls the IP address HP NonStop SSL will bind to for connections made to
HP NonStop SSL.
IPMODE Specifies the TCP/IP mode (IPv4/IPv6/Dual) HP NonStop SSL will run in.
KEEPALIVE Specifies if keep alive messages are sent to TCP/IP sockets.
LOGCONSOLE Determines if log messages are written to a console.
LOGEMS Determines if log messages are written to EMS.
LOGFILE Determines if log messages are written to a file.
LOGFILERETENTION Controls the number of log files kept after rollover occurs.
LOGFORMAT Controls the format of the log messages that are written to the console or log file.
LOGFORMATCONSOLE Controls the format of the log messages that are written to the console.
LOGFORMATEMS Controls the format of the log messages that are written to EMS.
LOGFORMATFILE Controls the format of the log messages that are written to a log file.
LOGLEVEL Determines which messages will be written the log file.
LOGLEVELCONSOLE Allows setting a different log level for LOGCONSOLE output.
LOGLEVELEMS Allows setting a different log level for LOGEMS output.
LOGLEVELFILE Allows setting a different log level for LOGFILE output.
LOGMEMORY Allows regular logging of HP NonStop SSL’s memory usage to the log output.
LOGMAXFILELENGTH Controls the maximum size of the log file.
MAXSESSIONS
Limits the number of parallel connections in run modes PROXYS, PROXYC,
TELNETS.
MAXVERSION Maximum admissible SSL/TLS protocol version.
MINVERSION Minimum admissible SSL/TLS protocol version.
PASSIVE Set s the direction of the data socket connections in FTPC mode.
PEERCERTCOMMONNAME For veri fication of remote certificates.
PEERCERTFINGERPRINT For verification of remote certificates.
PORT The port the HP NonStop SSL server listens on for incoming connections.
PTCPIPFILTERKEY Sets the filter key to enable round robin filtering.
ROUTINGMODE
Controls how SSLOBJ routes traffic to the target, either static (default) or
dynamic (usually not needed).
SERVCERT File name of a DER encoded X.509 server certificate.
SERVKEY The private key to be used for the server certificate.
34 • Configuration HP NonStop SSL Reference Manual
Page 35

Parameter Meaning
SERVKEYPASS Password for reading the (encrypted) private key file.
SLOWDOWN
SOCKSHOST
SOCKSPORT
SOCKSUSER
SRCIPADDR
SRCIPPORT
SUBNET
SSLCOMSECURITY Restricts the execution of SSLCOM commands.
TARGETHOST The IP address or name of the host that connections should be routed to.
TARGETINTERFACE Controls the IP address HP NonStop SSL binds to for outgoing connections.
TARGETPORT The port number that connections should route routed to.
TARGETSUBNET
TCPIPHOSTFILE Sets the DEFINE = TCPIP^HOST^FILE.
TCPIPNODEFILE Sets the DEFINE = TCPIP^NODE^FILE.
TCPIPRESOLVERNAME Sets the DEFINE = TCPIP^RESOLVER^NAME.
TCPNODELAY Activates RFC1323 on all sockets.
TRUST
Adds delay to processing resulting in slower encryption/decryption with less
CPU usage.
Configure HP NonStop SSL as SOCKS Version 4 client in run modes FTPC or
PROXYC.
Sets the source IP address and port for an EXPANDS tunnel.
The name of the TCP/IP process HP NonStop SSL should listen on for
connections.
The name of the TCP/IP process HP NonStop SSL should use for outgoing
connections.
When running as SSL client: list of trusted CA or server certificate files or
fingerprints.
ALLOWCERTERRORS
Use this parameter to allow selective overriding of certificate validation errors.
Parameter Syntax
ALLOWCERTERRORS number1 [, number2, ...]
Arguments
number
comma-separated list of certificate errors which HP NonStop SSL should ignore. The error numbers are defined in
the OpenSSL sources used for HP NonStop SSL (see Considerations).
Considerations
• Warning: The usage of this parameter may compromise the security of your configuration. Use only as
workaround and with care.
• The parameter can be changed at run time using SSLCOM, please see chapter "SSLCOM Command Interface"
for details.
The following table lists error numbers and names as defined in the OpenSSL sources:
Error Name Error number
X509_V_ERR_UNABLE_TO_GET_ISSUER_CERT 2
X509_V_ERR_UNABLE_TO_GET_CRL 3
X509_V_ERR_UNABLE_TO_DECRYPT_CERT_SIGNATURE 4
X509_V_ERR_UNABLE_TO_DECRYPT_CRL_SIGNATURE 5
HP NonStop SSL Reference Manual Configuration • 35
Page 36

Error Name Error number
X509_V_ERR_UNABLE_TO_DECODE_ISSUER_PUBLIC_KEY 6
X509_V_ERR_CERT_SIGNATURE_FAILURE 7
X509_V_ERR_CRL_SIGNATURE_FAILURE 8
X509_V_ERR_CERT_NOT_YET_VALID 9
X509_V_ERR_CERT_HAS_EXPIRED 10
X509_V_ERR_CRL_NOT_YET_VALID 11
X509_V_ERR_CRL_HAS_EXPIRED 12
X509_V_ERR_ERROR_IN_CERT_NOT_BEFORE_FIELD 13
X509_V_ERR_ERROR_IN_CERT_NOT_AFTER_FIELD 14
X509_V_ERR_ERROR_IN_CRL_LAST_UPDATE_FIELD 15
X509_V_ERR_ERROR_IN_CRL_NEXT_UPDATE_FIELD 16
X509_V_ERR_OUT_OF_MEM 17
X509_V_ERR_DEPTH_ZERO_SELF_SIGNED_CERT 18
X509_V_ERR_SELF_SIGNED_CERT_IN_CHAIN 19
X509_V_ERR_UNABLE_TO_GET_ISSUER_CERT_LOCALLY 20
X509_V_ERR_UNABLE_TO_VERIFY_LEAF_SIGNATURE 21
X509_V_ERR_CERT_CHAIN_TOO_LONG 22
X509_V_ERR_CERT_REVOKED 23
X509_V_ERR_INVALID_CA 24
X509_V_ERR_PATH_LENGTH_EXCEEDED 25
X509_V_ERR_INVALID_PURPOSE 26
X509_V_ERR_CERT_UNTRUSTED 27
X509_V_ERR_CERT_REJECTED 28
X509_V_ERR_SUBJECT_ISSUER_MISMATCH 29
X509_V_ERR_AKID_SKID_MISMATCH 30
X509_V_ERR_AKID_ISSUER_SERIAL_MISMATCH 31
X509_V_ERR_KEYUSAGE_NO_CERTSIGN 32
X509_V_ERR_UNABLE_TO_GET_CRL_ISSUER 33
X509_V_ERR_UNHANDLED_CRITICAL_EXTENSION 34
X509_V_ERR_KEYUSAGE_NO_CRL_SIGN 35
X509_V_ERR_UNHANDLED_CRITICAL_CRL_EXTENSION 36
X509_V_ERR_APPLICATION_VERIFICATION 50
Default
If omitted, HP NonStop SSL will work normally (all certificate validation errors are treated as such and connection
attempts will fail)
Example
ALLOWCERTERRORS 10
This will temporarily allow expired certificates.
36 • Configuration HP NonStop SSL Reference Manual
Page 37

ALLOWIP
Use this parameter to specify which remote IP addresses are to be allowed to establish sessions ("white list").
Note: With HP NonStop SSL AAE, the parameter syntax for specifying subnets has been changed to using Classless
Interdomain Routing (CIDR) format in order to prevent ambiguous subnet specification and simplify usage, especially
with IPv6 entries.
Parameter Syntax
ALLOWIP [direction]range
Arguments
direction
Optional character specifying realm on which rules shall be applied
o A = Apply rules on incom i ng c onnections only
o C = Apply rules on outgoing connections only
o B = Apply rules on all connections only (*default*)
range
One or more Classless Interdomain Routing (CIDR) format entries specifying an IP subnet or a single host IP
address. Entries have to be separated by comma. The network suffix can be left out for host entries (/32 or /128 will
be assumed then). IPv6/DUAL entries have to be specified in square brackets. Entry types and the corresponding
CIDR format:
o IPv4 address: 10.1.2.196 ( /32 is assumed)
o IPv4 subnet : 10.2.0.0/16
o IPv6 address: [abcd:1111::ab00] ( /128 is assumed)
o IPv6 subnet : [abcd::ef00/120]
o DUAL address: [::ffff:172.0.0.28] ( /128 is assumed)
o DUAL subnet : [::ffff:172.1.1.0/104]
Considerations
• See section "Limiting Remote IP Addresses" for the concept of remote IP filtering.
• The parameter can be changed at run time using SSLCOM, please see chapter "SSLCOM Command Interface"
for details.
• Backwards compatibility to the former syntax is preserved, however in the mid-term ALLOWIP and DENYIP
should be changed to using CIDR format.
Default
If omitted, HP NonStop SSL will use * to allow all remote IP addresses.
Example
ALLOWIP 10.0.1.0/24, 10.0.2.0/24, 172.22.22.42
ALLOWIP A[abcd::ef00/120] , [abcd:1111::ab00] , [::ffff:172.1.1.0/104]
HP NonStop SSL Reference Manual Configuration • 37
Page 38

AUDITASCIIONLY
Use this parameter to define how HP NonStop SSL writes raw data to the audit log.
Parameter Syntax
AUDITASCIIONLY TRUE | FALSE
Arguments
TRUE
Data will be dumped in ASCII format; binary values with coded character will be represented as <hh> where hh is
the hexadecimal repre s entation of the binary va l ue .
FALSE
Data will be dumped as full hex dump. This consumes a lot of resources but provides the most complete view.
Default
By default, a value of TRUE will be used
Considerations
• Audit messages will depend on the run mode – see parameter AUDITLEVEL for details
• See also parameters AUDITASCIIDUMPLENIN and AUDITASCIIDUMPLE NO UT to control how much data
is dumped.
AUDITASCIIDUMPLENIN
Use this parameter to define how many bytes of the incoming messages are written to the audit log when
AUDITASCIIONLY is set to TRUE.
Parameter Syntax
AUDITASCIIDUMPLENIN -1 | n
Arguments
-1
means that each incoming message will be fully dumped.
n
means that only the first n bytes of each incoming message will be dumped.
Default
By default, a value of -1 will be used
See also
AUDITASCIIONLY, AUDITASCIIDUMPLENOUT
AUDITASCIIDUMPLENOUT
Use this parameter to define how many bytes of outgoing messages are written to the audit log when
AUDITASCIIONLY is set to TRUE.
Parameter Syntax
AUDITASCIIDUMPLENIN -1 | n
38 • Configuration HP NonStop SSL Reference Manual
Page 39

Arguments
-1
means that each outgoing message will be fully dumped.
n
means that only the first n bytes of each outgoing message will be dumped
Default
By default, a value of -1 will be used
See also
AUDITASCIIONLY
AUDITCONSOLE
Use this parameter to define if and to what console device HP NonStop SSL audit messages are written to.
Parameter Syntax
AUDITCONSOLE * | % | $0 | auditdevice
Arguments
*
means that no audit messages are written to a console
%
means that audit messages are written to the home terminal of the HP NonStop SSL process
$0
audit messages are written to $0
auditdevice
audit messages are written the given device.
Default
By default, audit messages will be not be written to a device ("*")
Example
AUDITCONSOLE $DEV.#SUBDEV
Considerations
• Audit messages will depend on the run mode – see parameter AUDITLEVEL for details.
See also
AUDITFILE, AUDITLEVEL, AU DITFORMAT
AUDITFILE
Use this parameter to define if and to what file HP NonStop SSL audit messages are written to.
Parameter Syntax
AUDITFILE * | filenameprefix
HP NonStop SSL Reference Manual Configuration • 39
Page 40

Arguments
*
means that no audit messages are written to a file
filenameprefix
the prefix of the audit message file set. The actual audit file names are constructed from filenameprefix appended by
a number controlled by the AUDITFILERETENTION parameter.
Default
By default, no audit messages are written to a file ("*")
Considerations
• Audit messages will depend on the run mode – see parameter AUDITLEVEL for details
See also
AUDITCONSOLE, AUDITLEVEL, AUDITFORMAT
AUDITFILERETENTION
Use this parameter to control how many audit files HP NonStop SSL keeps when audit file rollover occurs.
Parameter Syntax
AUDITFILERETENTION n
Arguments
n
number of audit files to keep
Default
By default, 10 files are kept.
Considerations
• a minimum of 10 is enforced for that parameter
• See "Logfile/Auditfile Rollover" in chapter "Monitoring" for details on logfile rollover.
See also
AUDITMAXFILELENGTH, AUDITFILE
AUDITFORMAT
Use this parameter to control the format of audit messages that are written to the console or audit file.
Parameter Syntax
AUDITFORMAT format
Arguments
format
a number representing a bit mask controlling the format options. Please see parameter LOGFORMAT for the bit
mask.
40 • Configuration HP NonStop SSL Reference Manual
Page 41

Default
The default log format is 93 (date, time, milliseconds, process ID and log level)
Example
Display date, time, and milliseconds only:
AUDITFORMAT 13
Display date, time only:
AUDITFORMAT 5
Considerations
• Audit messages will depend on the run mode – see parameter AUDITLEVEL for details
See also
AUDITCONSOLE, AUDITFILE, AUDITLEVEL
AUDITLEVEL
Use this parameter to control what audit messages are written to the audit console or file.
Parameter Syntax
AUDITLEVEL detail
Arguments
detail
a number representing the detail level.
Default
The default audit level is 50.
Considerations
• Audit messages are written only for the following run modes: PROXYS, PROXYC, ODBCMXS, FTPS.
• The following table describes how to set AUDITLEVEL for the various run modes.
Audit
Level
10 Startup of HP NonStop SSL Startup of HP NonStop SSL
30 Logon of user
50 Network events (connect, disconnect) FTP operations
60 Network events (connect, disconnect)
80 Data flowing through HP NonStop SSL: byte count only
90
Run Modes
TELNETS,PROXYS,PROXYC,ODBCMXS
Data flowing through HP NonStop SSL: full byte dump
(see parameter AUDITASCIIONLY for details)
Run Mode FTPS
• For PROXYS, PROXYC and ODBCMXS, we rec ommend 50 for basic auditing and 99 for extended auditing
including full traffic log.
HP NonStop SSL Reference Manual Configuration • 41
Page 42

Note: If set to 99, all data flowing through the network is dumped to the audit log. This could include
confidential data or passwords so make sure to properly secure the audit log files.
• For FTPS mode, we recommend 50 for normal auditing
See also
AUDITCONSOLE, AUDITFILE, AUDITFORMAT
AUDITMAXFILELENGTH
Use this parameter to control the maximum size of the audit file.
Parameter Syntax
AUDITMAXFILELENGTH length
Arguments
length
a number representing the maximum audit file length in kilobytes.
Max. 40.000 (~40 MB)
Min 100
Default
The default length is 20 0 00 KB.
Considerations
• After the current audit file reaches the maximum size, a log rollover will occur. Please see section
"Logfile/Auditfile Rollover" in chapter "Monitoring" for details on logfile rollover.
See also
AUDITFILE, AUDITLEVEL
CACERTS
Use this parameter to specify a certificate chain validating the server or client certificate given by the SERVCERT or
CLIENTCERT parameter.
Parameter Syntax
CACERTS file1 [, file2, ...]
Arguments
file1, file2, ...
the designated files are DER encoded X.509 CA certificates.
Default
If omitted, HP NonStop SSL will search for a single "CACERT" file on the default subvolume.
Example
CACERTS $DATA1.SSL.MYCA, $DATA1.SSL.MYROOTCA
Considerations
42 • Configuration HP NonStop SSL Reference Manual
Page 43

• The first file on the list must contain a certificate signing the given server certificate. Subsequent files must
contain certificates that sign the previous certificate in the list.
• During SSL handshake, the certificate chain will be sent along with the client or server certificate to the SSL
communication partner
• If a value of * is used for CACERTS, it will be assumed that the client or server certificate is self-signed.
• A CA certificate for testing purposes is delivered as CACERT file on the HP NonStop SSL installation
subvolume to enable quick start installation. This test CA certificate signs the test server certificate contained in
SERVCERT or CLIENTCERT.
See also
SERVCERT, CLIENTCERT, SSLCOM SSLINFO, SSLCOM RELOAD CERTIFICATES
CIPHERSUITES
Use this parameter to specify which cipher suites are admissible for a HP NonStop SSL process.
Parameter Syntax
CIPHERSUITES suite [, suite, ...]
Arguments
suite
specifies a cipher suite. Currently the following cipher suites can be explicitly configured:
Specifier
0.1 TLS_RSA_WITH_NULL_MD5 NULL-MD5 RSA NULL MD5
0.2 TLS_RSA_WITH_NULL_SHA NULL-SHA RSA NULL SHA
0.3
0.4
0.5
0.6
0.7
0.8
0.9
0.10
0.17
0.18
0.19
0.20
RFC Algo Name OpenSSL Nam e KEX Enc Mac
TLS_RSA_EXPORT_WITH_RC
4_40_MD5
TLS_RSA_WITH_RC4_128_M
D5
TLS_RSA_WITH_RC4_128_SH
A
TLS_RSA_EXPORT_WITH_RC
2_CBC_40_MD5
TLS_RSA_WITH_IDEA_CBC_
SHA
TLS_RSA_EXPORT_WITH_DE
S40_CBC_SHA
TLS_RSA_WITH_DES_CBC_S
HA
TLS_RSA_WITH_3DES_EDE_
CBC_SHA
TLS_DHE_DSS_EXPORT_WIT
H_DES40_CBC_SHA
TLS_DHE_DSS_WITH_DES_C
BC_SHA
TLS_DHE_DSS_WITH_3DES_
EDE_CBC_SHA
TLS_DHE_RSA_EXPORT_WIT EXP-EDH-RSA- DHE_RSA_EXP
EXP-RC4-MD5 RSA_EXPORT RC4_40 MD5
RC4-MD5 RSA RC4_128 MD5
RC4-SHA RSA RC4_128 SHA
EXP-RC2-CBC-MD5 RSA_EXPORT RC2_CBC_40 MD5
IDEA-CBC-SHA RSA IDEA_CBC SHA
EXP-DES-CBC-SHA RSA_EXPORT DES40_CBC SHA
DES-CBC-SHA RSA DES_CBC SHA
DES-CBC3-SHA RSA
EXP-EDH-DSS-DESCBC-SHA
EDH-DSS-DESCBC-SHA
EDH-DSS-DESCBC3-SHA
DHE_DSS_EXP
ORT
DHE_DSS DES_CBC SHA
DHE_DSS
3DES_EDE_CB
C
DES40_CBC SHA
3DES_EDE_CB
C
DES40_CBC SHA
SHA
SHA
HP NonStop SSL Reference Manual Configuration • 43
Page 44

Speci-
H_DES40_CBC_SHA
DES-CBC-SHA
ORT
fier
RFC Algo Name OpenSSL Nam e KEX Enc Mac
0.21
0.22
0.23
0.24
0.25
0.26
0.27
0.47
0.50
0.51
0.52
0.53
0.56
0.57
0.58
0.65
0.68
0.69
0.70
0.132
0.135
0.136
0.137
0.98
TLS_DHE_RSA_WITH_DES_C
BC_SHA
TLS_DHE_RSA_WITH_3DES_
EDE_CBC_SHA
TLS_DH_anon_EXPORT_WITH
_RC4_40_MD5
TLS_DH_anon_WITH_RC4_128
_MD5
TLS_DH_anon_EXPORT_WITH
_DES40_CBC_SHA
TLS_DH_anon_WITH_DES_CB
C_SHA
TLS_DH_anon_WITH_3DES_E
DE_CBC_SHA
TLS_RSA_WITH_AES_128_CB
C_SHA
TLS_DHE_DSS_WITH_AES_12
8_CBC_SHA
TLS_DHE_RSA_WITH_AES_1
28_CBC_SHA
TLS_DH_anon_WITH_AES_128
_CBC_SHA
TLS_RSA_WITH_AES_256_CB
C_SHA
TLS_DHE_DSS_WITH_AES_25
6_CBC_SHA
TLS_DHE_RSA_WITH_AES_2
56_CBC_SHA
TLS_DH_anon_WITH_AES_256
_CBC_SHA
TLS_RSA_WITH_CAMELLIA_
128_CBC_SHA
TLS_DHE_DSS_WITH_CAME
LLIA_128_CBC_SHA
TLS_DHE_RSA_WITH_CAME
LLIA_128_CBC_SHA
TLS_DH_anon_WITH_CAMEL
LIA_128_CBC_SHA
TLS_RSA_WITH_CAMELLIA_
256_CBC_SHA
TLS_DHE_DSS_WITH_CAME
LLIA_256_CBC_SHA
TLS_DHE_RSA_WITH_CAME
LLIA_256_CBC_SHA
TLS_DH_anon_WITH_CAMEL
LIA_256_CBC_SHA
TLS_RSA_EXPORT1024_WITH
_DES_CBC_SHA
EDH-RSA-DES-
DHE_RSA DES_CBC SHA
CBC-SHA
EDH-RSA-DES-
CBC3-SHA
EXP-ADH-RC4-MD5
DHE_RSA
DH_anon_EXPO
3DES_EDE_CB
SHA
C
RC4_40 MD5
RT
ADH-RC4-MD5 DH_anon RC4_128 MD5
EXP-ADH-DESCBC-SHA
ADH-DES-CBC-
DH_anon_EXPO
DES40_CBC SHA
RT
DH_anon DES_CBC SHA
SHA
ADH-DES-CBC3-
SHA
DH_anon
3DES_EDE_CB
C
SHA
AES128-SHA RSA AES_128_CBC SHA
DHE-DSS-AES128-
DHE_DSS AES_128_CBC SHA
SHA
DHE-RSA-AES128-
DHE_RSA AES_128_CBC SHA
SHA
ADH-AES128-SHA DH_anon AES_128_CBC SHA
AES256-SHA RSA AES_256_CBC SHA
DHE-DSS-AES256-
DHE_DSS AES_256_CBC SHA
SHA
DHE-RSA-AES256-
DHE_RSA AES_256_CBC SHA
SHA
ADH-AES256-SHA DH_anon AES_256_CBC SHA
CAMELLIA128-SHA RSA
CAMELLIA_12
SHA
8_CBC
DHE-DSS-
DHE_DSS
CAMELLIA128-SHA
DHE-RSA-
DHE_RSA
CAMELLIA128-SHA
ADH-
DH_anon
CAMELLIA128-SHA
CAMELLIA256-SHA RSA
CAMELLIA_12
8_CBC
CAMELLIA_12
8_CBC
CAMELLIA_12
8_CBC
CAMELLIA_25
SHA
SHA
SHA
SHA
6_CBC
DHE-DSSCAMELLIA256-SHA
DHE-RSACAMELLIA256-SHA
ADHCAMELLIA256-SHA
EXP1024-DES-CBCSHA
DHE_DSS
DHE_RSA
DH_anon
RSA_EXPORT10
24
CAMELLIA_25
SHA
6_CBC
CAMELLIA_25
SHA
6_CBC
CAMELLIA_25
SHA
6_CBC
DES_CBC SHA
44 • Configuration HP NonStop SSL Reference Manual
Page 45

Specifier
0.99
0.100
0.101
0.102
0.128
0.129
0.130
0.131
0.150
0.153
0.154
0.155
192.1
192.2
192.3
192.4
192.5
192.6
192.7
192.8
192.9
192.10
192.11
192.12
RFC Algo Name OpenSSL Nam e KEX Enc Mac
TLS_DHE_DSS_EXPORT1024_
WITH_DES_CBC_SHA
TLS_RSA_EXPORT1024_WITH
_RC4_56_SHA
TLS_DHE_DSS_EXPORT1024_
WITH_RC4_56_SHA
TLS_DHE_DSS_WITH_RC4_12
EXP1024-DHE-DSSDES-CBC-SHA
EXP1024-RC4-SHA
DHE_DSS_EXP
ORT1024
RSA_EXPORT10
DES_CBC SHA
RC4_56 SHA
24
EXP1024-DHE-DSSRC4-SHA
DHE_DSS_EXP
ORT1024
RC4_56 SHA
DHE-DSS-RC4-SHA DHE_DSS RC4_128 SHA
8_SHA
TLS_GOSTR341094_WITH_281
47_CNT_IMIT
TLS_GOSTR341001_WITH_281
47_CNT_IMIT
TLS_GOSTR341094_WITH_NU
LL_GOSTR3411
TLS_GOSTR341001_WITH_NU
LL_GOSTR3411
TLS_RSA_WITH_SEED_CBC_
GOST94-GOST89-
GOSTR341094 28147_CNT IMIT
GOST89
GOST2001-GOST89-
GOSTR341001 28147_CNT IMIT
GOST89
GOST94-NULL-
GOST94
GOST2001-NULL-
GOST94
GOSTR341094 NULL
GOSTR341001 NULL
GOST
R3411
GOST
R3411
SEED-SHA RSA SEED_CBC SHA
SHA
TLS_DHE_DSS_WITH_SEED_
CBC_SHA
TLS_DHE_RSA_WITH_SEED_
CBC_SHA
TLS_DH_anon_WITH_SEED_C
DHE-DSS-SEED-
DHE_DSS SEED_CBC SHA
SHA
DHE-RSA-SEED-
DHE_RSA SEED_CBC SHA
SHA
ADH-SEED-SHA DH_anon SEED_CBC SHA
BC_SHA
TLS_ECDH_ECDSA_WITH_N
ULL_SHA
TLS_ECDH_ECDSA_WITH_RC
4_128_SHA
TLS_ECDH_ECDSA_WITH_3D
ES_EDE_CBC_SHA
TLS_ECDH_ECDSA_WITH_AE
S_128_CBC_SHA
TLS_ECDH_ECDSA_WITH_AE
S_256_CBC_SHA
TLS_ECDHE_ECDSA_WITH_N
ULL_SHA
TLS_ECDHE_ECDSA_WITH_R
C4_128_SHA
TLS_ECDHE_ECDSA_WITH_3
DES_EDE_CBC_SHA
TLS_ECDHE_ECDSA_WITH_A
ES_128_CBC_SHA
TLS_ECDHE_ECDSA_WITH_A
ES_256_CBC_SHA
TLS_ECDH_RSA_WITH_NULL
_SHA
TLS_ECDH_RSA_WITH_RC4_
128_SHA
ECDH-ECDSANULL-SHA
ECDH-ECDSA-RC4SHA
ECDH-ECDSA-DESCBC3-SHA
ECDH-ECDSAAES128-SHA
ECDH-ECDSAAES256-SHA
ECDHE-ECDSANULL-SHA
ECDHE-ECDSARC4-SHA
ECDHE-ECDSADES-CBC3-SHA
ECDHE-ECDSAAES128-SHA
ECDHE-ECDSAAES256-SHA
ECDH-RSA-NULLSHA
ECDH-RSA-RC4SHA
ECDH_ECDSA NULL SHA
ECDH_ECDSA RC4_128 SHA
ECDH_ECDSA
3DES_EDE_CB
SHA
C
ECDH_ECDSA AES_128_CBC SHA
ECDH_ECDSA AES_256_CBC SHA
ECDHE_ECDSA NULL SHA
ECDHE_ECDSA RC4_128 SHA
ECDHE_ECDSA
3DES_EDE_CB
SHA
C
ECDHE_ECDSA AES_128_CBC SHA
ECDHE_ECDSA AES_256_CBC SHA
ECDH_RSA NULL SHA
ECDH_RSA RC4_128 SHA
HP NonStop SSL Reference Manual Configuration • 45
Page 46

Specifier
192.13
192.14
192.15
192.16
192.17
192.18
192.19
192.20
192.21
192.22
192.23
192.24
192.25
RFC Algo Name OpenSSL Nam e KEX Enc Mac
TLS_ECDH_RSA_WITH_3DES
_EDE_CBC_SHA
TLS_ECDH_RSA_WITH_AES_
128_CBC_SHA
TLS_ECDH_RSA_WITH_AES_
256_CBC_SHA
TLS_ECDHE_RSA_WITH_NUL
L_SHA
TLS_ECDHE_RSA_WITH_RC4
_128_SHA
TLS_ECDHE_RSA_WITH_3DE
S_EDE_CBC_SHA
TLS_ECDHE_RSA_WITH_AES
_128_CBC_SHA
TLS_ECDHE_RSA_WITH_AES
_256_CBC_SHA
TLS_ECDH_anon_WITH_NULL
_SHA
TLS_ECDH_anon_WITH_RC4_
128_SHA
TLS_ECDH_anon_WITH_3DES
_EDE_CBC_SHA
TLS_ECDH_anon_WITH_AES_
128_CBC_SHA
TLS_ECDH_anon_WITH_AES_
256_CBC_SHA
ECDH-RSA-DESCBC3-SHA
ECDH-RSAAES128-SHA
ECDH-RSAAES256-SHA
ECDHE-RSA-NULLSHA
ECDHE-RSA-RC4SHA
ECDHE-RSA-DESCBC3-SHA
ECDHE-RSAAES128-SHA
ECDHE-RSAAES256-SHA
AECDH-NULL-SHA ECDH_anon NULL SHA
AECDH-RC4-SHA ECDH_anon RC4_128 SHA
AECDH-DES-CBC3SHA
AECDH-AES128SHA
AECDH-AES256SHA
ECDH_RSA
ECDH_RSA AES_128_CBC SHA
ECDH_RSA AES_256_CBC SHA
ECDHE_RSA NULL SHA
ECDHE_RSA RC4_128 SHA
ECDHE_RSA
ECDHE_RSA AES_128_CBC SHA
ECDHE_RSA AES_256_CBC SHA
ECDH_anon
ECDH_anon AES_128_CBC SHA
ECDH_anon AES_256_CBC SHA
3DES_EDE_CB
C
3DES_EDE_CB
C
3DES_EDE_CB
C
SHA
SHA
SHA
Default
If omitted, NonStop SSL will use the high security ciphers and the RC4 ciphers, i.e. currently:
ECDHE-RSA-AES256-SHA:ECDHE-ECDSA-AES256-SHA:DHE-RSA-AES256-SHA:DHE-DSS-AES256-
SHA:DHE-RSA-CAMELLIA256-SHA:DHE-DSS-CAMELLIA256-SHA:AECDH-AES256-SHA:ECDH-RSAAES256-SHA:ECDH-ECDSA-AES256-SHA:AES256-SHA:CAMELLIA256-SHA:ECDHE-RSA-DES-CBC3SHA:ECDHE-ECDSA-DES-CBC3-SHA:EDH-RSA-DES-CBC3-SHA:EDH-DSS-DES-CBC3-SHA:AECDH-DESCBC3-SHA:ECDH-RSA-DES-CBC3-SHA:ECDH-ECDSA-DES-CBC3-SHA:DES-CBC3-SHA:DES-CBC3MD5:ECDHE-RSA-AES128-SHA:ECDHE-ECDSA-AES128-SHA:DHE-RSA-AES128-SHA:DHE-DSS-AES128SHA:DHE-RSA-CAMELLIA128-SHA:DHE-DSS-CAMELLIA128-SHA:AECDH-AES128-SHA:ECDH-RSAAES128-SHA:ECDH-ECDSA-AES128-SHA:AES128-SHA:CAMELLIA128-SHA:ECDHE-RSA-RC4-SHA:ECDHEECDSA-RC4-SHA:AECDH-RC4-SHA:ECDH-RSA-RC4-SHA:ECDH-ECDSA-RC4-SHA:RC4-SHA:RC4-MD5:RC4MD5:EXP-RC4-MD5:EXP-RC4-MD5
Example
CIPHERSUITES 0.53,0.47
Considerations
• Please note that the default CIPHERSUITES are subject to change in order to make sure that only the most
secure ciphers are used by default.
• When running as an SSL client, CIPHERSUITES specifies the cipher suites that should be allowed in order of
preference (favorit e c hoi c e fi rst). During the SSL ha ndshake, HP NonStop SSL wi l l present the list of cipher
46 • Configuration HP NonStop SSL Reference Manual
Page 47

suites to the SSL server. The server will then select a cipher suite from the list, or, if no acceptable choices are
presented, return a handshake failure alert and close the connection.
• When running as an SSL server, HP NonStop SSL will select the first cipher from the list presented by the
client during the handshake that matches a cipher from CIPHERSUITES.
Notes:
• If you trace the client handshake with a tool like wireshark, you will see one additional cipher with hex
representation 0x00FF. This is not an actual cipher but a hint for the server that the client supports secure
renegotiation. Please see section 4 of http://tools.ietf.org/html/draft-ietf-tls-renegotiation-01 in case you like
more details on that.
WARNINGS!
• Do NOT use ADH ciphers unless you know exactly what you are doing! ADH ciphers DO NOT include
authentication, thus they are vulnerable to Man-in-the-Middle att a c ks! Strongly not recomme nde d !
• The cipher suites 0.1 and 0.2 will NOT encrypt the traffic, they will only authenticate the partners and provide
message integrity checking. Please only use if encryption is not required.
CLIENTAUTH
Use this parameter to enforce SSL client authentication when running as SSL server. The CLIENTAUTH parameter
specifies a file (or a set of files) containing certificates. The certificate(s) will be sent to the client during connection
setup. The client will reply with its own client certificate which must be signed by one of the certificates configured with
the CLIENTAUTH parameter.
Parameter Syntax
CLIENTAUTH * | file1 [, file2, ...]
Arguments
*
No certificate request will be sent to the client
file1, file2, ...
DER encoded X.509 CA certificate(s) which sign the certificate to be sent by the SSL client to HP NonStop SSL. If
the SSL client cannot send such a certificate, the connection setup will fail.
Default
If omitted, '*' is used and HP NonStop SSL will not enforce SSL client authentication when running as SSL server.
Example
CLIENTAUTH $DATA1.SSL.CACERT
CLIENTCERT
Use this parameter to specify the client certificate that HP NonStop SSL should use to authenticate itself to an SSL
server.
Parameter Syntax
CLIENTCERT * | file
Arguments
*
HP NonStop SSL Reference Manual Configuration • 47
Page 48

SSL client authentication is deactivated.
file
Guardian file name of a DER encoded X.509 client certificate.
Default
If omitted or set to *, HP NonStop SSL will not authenticate itself to the SSL server.
Example
CLIENTCERT $DATA1.SSL.CLNTCERT
Considerations
• This parameter only applies to the run modes PROXYC and FTPC, it will be ignored in other run modes
• A client certificate for testing purposes is delivered as CLNTCERT file on the HP NonStop SSL installation
subvolume to enable quick start installation.
• Client certificates received by a CA such as VeriSign or Thawte in BASE64 format must be converted to DER
format (e.g. with the O pe nSSL tools) before the y ca n be used with HP NonSto p S SL.
• The client certificate must match the private key file specified by CLIENTKEY.
See also
CLIENTKEY, CLIENTKEYPASS , "Requesting the SSL Client to Present a Client Certificate" in chapter "SSL
Reference"
CLIENTKEY
Use this parameter to specify the file containing the private key associated with the public key contained in the client
certificate configured by CLIENTCERT.
Parameter Syntax
CLIENTKEY file
Arguments
file
file name of a DER encoded PKCS-8 encrypted private key file with PKCS-5 algorithm identifiers.
Default
If omitted, HP NonStop SSL will sea rc h for a "CLIENTKEY" file on the default subvolume.
Example
CLIENTKEY $DATA1.SSL.MYKEY
Considerations
• This parameter only applies to the run modes PROXYC and FTPC, it will be ignored in other run modes
• The private key data in the file is password encrypted. For HP NonStop SSL to be able to decrypt the file, the
correct password must be specified by the CLIENTKEYPASS parameter.
• A private key file for testing purposes is delivered as "CLNTKEY" file on the HP NonStop SSL installation
subvolume to enable quick start installation. This private key file matches the test client certificate delivered as
"CLNTCERT". The password for the CLNTKEY file is "test".
See also
48 • Configuration HP NonStop SSL Reference Manual
Page 49

CLIENTCERT, CLIENTKEYPASS
CLIENTKEYPASS
Use this parameter to specify the password for the file containing the private key associated with the public key given in
the client certificate.
Parameter Syntax
CLIENTKEYPASS password
Arguments
password
the password or pass phras e to decrypt the private ke y fi l e . T he pa s sword string may cont a i n spa c e s. However,
leading or trailing spaces will be ignored.
Default
If omitted, HP NonStop SSL will try "test" as password.
Example
CLIENTKEYPASS my private passphrase
Considerations
• This parameter only applies to the run modes PROXYC and FTPC, it will be ignored in other run modes
• The default password ("test") enables quick start installation with the "CLIENTKEY" public key file delivered
with HP NonStop SSL.
See also
CLIENTCERT, CLIENTKEY
CONFIG
Use this parameter to specify a configuration file for a HP NonStop SSL process.
Parameter Syntax
CONFIG file
Arguments
file
the name of the configuration file.
Default
If omitted, HP NonStop SSL will not use a configuration file.
Example
CONFIG $DATA1.SSL.SSLCONF
Considerations
• This parameter can only be specified as PARAM or on the startup line. It is not valid within a configuration file.
• Parameters specified in the configuration file can be overwritten by PARAM or startup line settings.
HP NonStop SSL Reference Manual Configuration • 49
Page 50

CONFIG2
Use this parameter to specify a second configuration file for a HP NonStop SSL process.
Parameter Syntax
CONFIG2 file2
Arguments
file2
the name of the second configuration file.
Default
If omitted, HP NonStop SSL will not use a second configuration file.
Example
CONFIG2 $DATA1.HP SSL.SSLCONF2
Considerations
• Having a second configuration file allows to store the pass phrase s in a separate file with higher security
settings
• The second configuration file has precedence over the first one
• This parameter can only be specified as PARAM or on the startup line. It is not valid within a configuration file.
• Parameters specified in the configuration file can be overwritten by PARAM or startup line settings.
CONNECTIONINFOFORMAT
Use this parameter to specify the output format for the SSLCOM command "connections".
Parameter Syntax
CONNECTIONINFOFORMAT format
Arguments
format
specifies the format to be used. Valid values are:
o EXTENDED : designates the new default output format introduced with H P N o nS t op SSL AAE for
connection info not exceeding 80 characters and consistency between IPv4 and IPv6
o ORIGINAL : designates the format as use d be fore which, for longe r I Pv4 and especially fo r IP v 6 a ddresses
exceeds the usually available window width
o CSV : designates output as comma-separated values, primarily targeted to simplify automated parsing of
the output.
Default
Starting with HP NonStop SSL AAE, the default format will be EXTENDED. Prior to that it was ORIGINAL, but not
configurable.
EXAMPLE
CONNECTIONINFOFORMAT ORIGINAL
Considerations
50 • Configuration HP NonStop SSL Reference Manual
Page 51

• Both the ORIGINAL and the EXTENDED format are primarily targeted for human readers and are subject to
change. Please do not use these when intending to parse the output programmatically but use format CSV for
that instead.
CONNECTIONINFOFORMATDETAILED
Use this parameter to specify the output format for the SSLCOM command "connections, detail"
Parameter Syntax
CONNECTIONINFOFORMATDETAILED format
Arguments
format
specifies the format to be used. Valid values are:
o EXTENDED : designate s t h e ne w default output format introduced with H P N o nS t op SSL AAE for
connection info not exceeding 80 characters and consistency between IPv4 and IPv6.
o ORIGINAL : designates the format as used before which, for longer IP v4 and especially for IP v 6 a ddresses
exceeds the usually available window width.
o CSV : designates output as comma-separated values, primarily targeted to simplify automated parsing of
the output.
Default
Starting with HP NonStop SSL AAE, the default format will be EXTENDED. Prior to that it was ORIGINAL, but not
configurable.
EXAMPLE
CONNECTIONINFOFORMAT ORIGINAL
Considerations
• Both the ORIGINAL and the EXTENDED format are primarily targeted for human readers and are subject to
change. Please do not use these when intending to parse the output programmatically but use format CSV for
that instead.
CONTENTFILTER
Use this parameter to configure a text file with rules which will be applied to all incoming messages in run modes
TELNETS, PROXYS and PROXYC. If a message does not match the rule set, the connection will be terminated and the
message will be discarded.
Parameter Syntax
CONTENTFILETER * | file
Arguments
*
no filtering.
file
The filename of the rule set file.
Default
If omitted, HP NonStop SSL will use a value of * (no filtering).
HP NonStop SSL Reference Manual Configuration • 51
Page 52

Example
CONTENTFILTER CFILTER
Considerations
• The value of the parameter can be changed without stopping HP NonStop SSL using the SSLCOM command
SET CONTENTFILTER file.
• The following example shows the syntax of the filter rules. This example will only allow messages starting with
"<A" or "<B" and ending with ">" to pass the filter.
#################################################################################
# file to define content filter rules
# empty lines or lines starting with '#' are ignored
#################################################################################
#################################################################################
# example file based on the following requirements:
#
# the following two are valid messages (double quotes are *not* part of msg)
# "<ABC>"
# "<BBC>"
#
# the following two are *not* valid messages
# "<CCC>" - does not start with "<A" or "<B"
# "text" - does not start with "<"
#################################################################################
#################################################################################
# msg delimiters (required)
# used to define a "message" as part of the byte stream
# all bytes are ASCII values represented as decimal numbers
#################################################################################
# start with < sign = 3C hex = 60 dec
msgstartbyte 60
# end with > sign = 3E hex = 62 dec
msgendbyte 62
#################################################################################
# list of regular expressions, in double quotes
# (at least one required)
#
# note that the engine implements "traditional unix regular expressions"
# see
# en.wikipedia.org/wiki/Regular_expression#Traditional_Unix_regular_expressions
# for details
#
# regular expressions are combined using an implicit "logical or"
# a message matching any single regular expression will pass
# a message matching no regular expression will fail
# at least one regular expression must be present
#################################################################################
# allow any message starting with "<A"
regexp "^<A."
# allow any message starting with "<B"
regexp "^<B."
52 • Configuration HP NonStop SSL Reference Manual
Page 53

DENYIP
Use this parameter to specify which remote IP addresses are to be forbidden to establish sessions ("black list").
Parameter Syntax
DENYIP [direction]range
Arguments
direction
Optional character specifying realm on which rules shall be applied
o A = Apply rules on incom i ng c onnections only
o C = Apply rules on outgoing connections only
o B = Apply rules on all connections only (*default*)
range
One or more Classless Interdomain Routing (CIDR) format entries specifying an IP subnet or a single host IP
address. Entries have to be separated by comma. The network suffix can be left out for host entries (/32 or /128 will
be assumed then). IPv6/DUAL entries have to be specified in square brackets. Entry types and the corresponding
CIDR format:
o IPv4 address: 10.1.2.196 ( /32 is assumed)
o IPv4 subnet : 10.2.0.0/16
o IPv6 address: [abcd:1111::ab00] ( /128 is assumed)
o IPv6 subnet : [abcd::ef00/120]
o DUAL address: [::ffff:172.0.0.28] ( /128 is assumed)
o DUAL subnet : [::ffff:172.1.1.0/104]
Considerations
• See section "Limiting Remote IP Addresses" (in chapter "Introduction") for the concept of remote IP filtering
• The parameter can be changed at run time using SSLCOM, please see chapter "SSLCOM Command Interface"
for details.
• Backwards compatibility to the former syntax is preserved, however in the mid-term ALLOWIP and DENYIP
should be changed to using CIDR format.
Default
If omitted, HP NonStop SSL will use an empty entry, respectively *DEFAULT* to not forbid any remote IP addresses.
Example
DENYIP 10.0.1.0/24, 10.0.2.0/24, 172.22.22.42
DENYIP A[abcd::ef00/120] , [abcd:1111::ab00] , [::ffff:172.1.1.0/104]
HP NonStop SSL Reference Manual Configuration • 53
Page 54

DESTIPADDR, DESTIPPORT
Use these parameters to for the configuration of an HP NonStop SSL EXPANDS process.
Parameter Syntax
DESTIPADDR ip-address
DESTIPPORT port
Arguments
ip-address
specifies the IP address of the remote end of the EXPAND line.
port
specifies the port number of the remote end of the EXPAND line.
Example
DESTIPADDR 10.0.0.13; DESTIPPORT 1202
DESTIPADDR fe80:aa::eeff:1023 ; DESTIPPORT 1202
Considerations
• The parameters should be set exactly to the original equivalent parameter values of the EXPAND line handler,
as shown by the SCF INFO LINE DETAIL command.
• The parameters are ignored with any run mode other than EXPANDS.
See also
SRCIPADDR, SRCIPPORT
DONOTWARNONERROR
Use this parameter to log selected errors with LOGLEVEL 20 rather than as WARNING. By default, all errors on
sockets result in a WARNING being displayed in the HP NonStop SSL log. Using this parameter, a log message with
LOGLEVEL 20 will be issued instead for the configured error numbers.
Parameter Syntax
DONOTWARNONERROR ErrorList
Arguments
ErrorList
specifies a list of comma-separated error numbers
Default
If omitted, HP NonStop SSL will use an empty entry.
Example
DONOTWARNONERROR 4120
Considerations
• The example shown will yield in error 4120 ("Connection reset by remote") generating a log message with
LOGLEVEL 20 rather than a WARNI NG.
54 • Configuration HP NonStop SSL Reference Manual
Page 55

DYNAMICROUTINGENABLEIPV6
This parameter is only valid in ROUTINGMODE D (dynamic routing) and must be used when IPv6 addresses are to be
used as the dynamic targets. The parameter will cause the expected separator between the target host IP address and the
target port to be a pipe symbol ('|') instead of a colon (':'). Please see parameter ROUTINGMODE for more details.
Parameter Syntax
DYNAMICROUTINGENABLEIPV6 {TRUE|FALSE}
Default
FALSE
Example
DYNAMICROUTINGENABLEIPV6 TRUE
See Also
ROUTINGMODE
FTPALLOWPLAIN
Use this parameter to specify whether HP NonStop SSL will allow unencrypted FTP sessions when running in FTPS
mode.
Parameter Syntax
FTPALLOWPLAIN boolean
Arguments
boolean
If set to TRUE or 1 or Yes, HP NonStop SSL will allow unencrypted traffic.
Default
If omitted, HP NonStop SSL will *not* allow unencrypted traffic
Example
FTPALLOWPLAIN TRUE
Considerations
• This parameter is relevant only if HP NonStop SSL is running in the FTPS mode.
FTPCALLOW200REPLY
Use this parameter to specify whether HP NonStop SSL will allow an illegal "200" response to the AUTH TLS
command sent to the remote FTP/TLS server.
Parameter Syntax
FTPCALLOW200REPLY boolean
Arguments
boolean
if set to TRUE or 1 or Yes, HP NonStop SSL will allow the illegal response.
Default
HP NonStop SSL Reference Manual Configuration • 55
Page 56

If omitted, HP NonStop SSL will *not* allow the illegal 200 response.
Example
FTPCALLOW200REPLY TRUE
Considerations
• This parameter is relevant only if HP NonStop SSL is running in the FTPC mode.
• The FTP/TLS specification requires a "234" reply code to the AUTH TLS command. This parameter has been
added to support some older FTP/TLS server with HP NonStop SSL in FTPC mode.
FTPLOCALDATAPORT
Use this parameter to specify how HP NonStop SSL will pick the local data port for the data connection in FTPC mode
with PASSIVE set to true.
Parameter Syntax
FTPLOCALDATAPORT number
Arguments
number
0 for “pick a random port” or any specific port number
Default
If omitted, a value of 0 wi l l be used.
Example
FTPLOCALDATAPORT 20
Considerations
• This parameter is relevant only if HP NonStop SSL is running in the FTPC mode with PASSIVE set to TRUE
• Choosing a value other than zero will be firewall-friendly. However, this can result in errors if the remote FTP
server does not choose random data ports itself.
FTPMAXPORT
Use this parameter to specify the maximum port number HP NonStop SSL will use for FTP data connections
Parameter Syntax
FTPMAXPORT number
Arguments
number
The maximum port number HP NonStop SSL will use for FTP data connections
Default
If omitted, HP NonStop SSL will use a value of 41000
Example
FTPMAXPORT 22000
Considerations
56 • Configuration HP NonStop SSL Reference Manual
Page 57

• This parameter is relevant only if HP NonStop SSL is running in the FTPS or FTPC mode.
• Together with the parameter FTPMINPORT it controls the values HP NonStop SSL assigns for the FTP data
sockets. You can change this value to make sure that the FTP data connections will not interfere with other
TCP/IP services on your system.
FTPMINPORT
Use this parameter to specify the minimum port number HP NonStop SSL will use for FTP data connections
Parameter Syntax
FTPMINPORT number
Arguments
number
the minimum port number HP NonStop SSL will use for FTP data connections
Default
If omitted, HP NonStop SSL will use a value of 40000
Example
FTPMINPORT 20000
Considerations
• This parameter is relevant only if HP NonStop SSL is running in the FTPS or FTPC mode.
• Together with the parameter FPTMAXPORT it controls the values HP NonStop SSL assigns for the FTP data
sockets. You can change this value to make sure that the FTP data connections will not interfere with other
TCP/IP services on your system.
INTERFACE
Use this parameter to specify the IP address HP NonStop SSL should use for local binding on incoming connections.
Parameter Syntax
INTERFACE ip-address
Arguments
ip-address
the IP address to bind to or “*” for none
Default
If omitted, HP NonStop SSL will use the value of “*” and bind to no specific IP address
Example
INTERFACE 10.0.0.197
INTERFACE [2001:db9::1421:51ab]
Considerations
HP NonStop SSL Reference Manual Configuration • 57
Page 58

• The parameter is relevant for the following run modes: PROXYS (incoming socket), PROXYC (incoming
socket), FTPS (contr ol listening socket being c onnected to from remote FTP client), FTPC (control listening
socket being connected to from local NonStop FTP client)
• Use this parameter to control which IP address HP NonStop SSL binds to for incoming connections.
• If a host name rather than an IP address is used to configure INTERFACE, name resolution will take place only
once during startup. If name resolution fails, HP NonStop SSL will terminate during startup.
• The parameter is invalid in IPMODE DUAL since no bind address except the IPv6 ANY address '::' can handle
both IPv4 and IPv6.
See also
TARGETINTERFACE
HASHALGORITHMS
Use this parameter to define which hash algorithms are used when verifying the SSL server side based on its fingerprint.
Parameter Syntax
HASHALGORITHMS hashAlgorithm [, hashAlgorithm , ...]
Arguments
hashAlgorithm
Name of hash algorithm that should be used. If the parameter is explicitly set, at least one hash algorithm has to be
given.
Valid hash algorithms names are:
• MD5 *
• SHA1 *
• RIPEMD160
• SHA256
• SHA384 **
• SHA512 **
• WHIRLPOOL
* You should not use this algorithm since it was cryptographically broken.
** Hash Algorithm not available on S-Series system
Default
By default, WHIRLPOOL as one of the two most secure algorithms is used (the other one is SHA512)
Example
HASHALGORITHMS WHIRLPOOL,SHA256
Considerations
• Cryptographic operations, such as hashing operations, do cost CPU cycles. When e.g. running as an FTP client
proxy, fingerprint validation with hashing will be involved in every initial connection establishment process.
Therefore consider choosing only one or two algorithms out of the list.
• Make sure to activate the algorithms actually used in the fingerprints specified in the TRUST parameter.
58 • Configuration HP NonStop SSL Reference Manual
Page 59

• Do not use MD5 or SHA1 anymore! These algorithms are cryptographically broken.
See also
TRUST
KEEPALIVE
Use this parameter to specify if TCP keep alive messages should be activated for established connections.
Parameter Syntax
KEEPALIVE mode
Arguments
mode
• 1 (on) for sending keep ali ve messages
• 0 (off) no messages are sent
Default
By default, keep alive messages are sent (1).
LOGCONSOLE
Use this parameter to define if and to what console device HP NonStop SSL log messages are written to.
Parameter Syntax
LOGCONSOLE * | % | $0 | logdevice
Arguments
*
means that no log messages are written to a console
%
means that log messages are written to the home terminal of the HP NonStop SSL process
$0
log messages are written to $0
logdevice
log messages are written the given device (e.g. $DEV.#SUBDEV)
Considerations
• The LOGLEVEL parameter controls what messages are produced by HP NonStop SSL.
• The parameter can be changed at run time using SSLCOM, please see chapter "SSLCOM Command Interface"
for details.
Default
By default, log messages will be written to the home terminal ("%")
See also
LOGEMS, LOGFILE, LOGLEVEL
HP NonStop SSL Reference Manual Configuration • 59
Page 60

LOGEMS
Use this parameter to define if HP NonStop SSL log messages are written to EMS.
Parameter Syntax
LOGEMS collector | *
Arguments
*
means that no log messages are written to EMS.
collector
means that log messages are written to the collector with that name.
Default
By default, no log messages are written to EMS ("*").
Example
LOGEMS $0
Considerations
• The LOGLEVEEMS parameter controls what messages are produced by HP NonStop SSL.
• The LOGFORMATEMS parameter controls the log message format.
• The parameter can be changed at run time using SSLCOM, please see chapter "SSLCOM Command Interface"
for details.
• If the EMS collector cannot be opened during startup, HP NonStop SSL will terminate. If the EMS collector
cannot be opened after changing it through SSLCOM, the old collector will stay active
See also
LOGLEVELEMS, LOGFORMATEMS, LOGMAXFILELENGTH, LOGFILERETENTION
LOGFILE
Use this parameter to define if and to what file HP NonStop SSL log messages are written.
Parameter Syntax
LOGFILE * | filenameprefix
Arguments
*
means that no log messages are written to a file
filenameprefix
the prefix of the log file set. The actual log file names are constructed from filenameprefix appended by a number
controlled by the LOGFILERETENTION parameter.
Default
By default, no log messages are written to a file ("*")
Considerations
• The LOGLEVELFILE parameter controls what messages are produced by HP NonStop SSL.
60 • Configuration HP NonStop SSL Reference Manual
Page 61

• The LOGFORMATFILE parameter controls the log message format.
• The parameter can be changed at run time using SSLCOM, please see chapter "SSLCOM Command Interface"
for details.
• See section "Logfile/Auditfile Rollover" in chapter "Monitoring" for details on logfile rollover.
See also
LOGLEVELFILE, LOGFORMATFILE, LOGMAXFILELENGTH, LOGFILERETENTION
LOGFILERETENTION
Use this parameter to control how many log files HP NonStop SSL keeps when logfile rollover occurs
Parameter Syntax
LOGFILERETENTION n
Arguments
n
number of log files to keep
Default
By default, 10 files are kept.
Considerations
• a minimum of 10 is enforced for that parameter
• See section "Logfile/Auditfile Rollover" in chapter "Monitoring" for details on logfile rollover.
See also
LOGMAXFILELENGTH, LOGFIL E
LOGFORMAT
Use this parameter to control the default format the log messages.
Parameter Syntax
LOGFORMAT format
Arguments
format
a number representing a bit mask controlling the following format options:
bit 1 (decimal 1) Date
bit 2 (decimal 2) header (log messages a pre-fixed with "[log]")
bit 3 (decimal 4) Time
bit 4 (decimal 8) Milliseconds
bit 5 (decimal 16) Process ID (name or PIN)
bit 7 (decimal 64) Log Level of Message
Default
If omitted, 93 is used as format (date, time, milliseconds, process ID and log level).
HP NonStop SSL Reference Manual Configuration • 61
Page 62

Considerations
• If no value is set for the parameters LOGFORMATCONSOLE or LOGFORMATFILE, they will inherit their
value from the parameter LOGFORMAT.
• If LOGFORMATCONSOLE, LOGFORMATFILE, LOGFORMATEMS are set with a value, the parameter of
LOGFORMAT becomes meaningless.
See also
LOGFORMATCONSOLE, LOGFORMATEMS, LOGFORMATFILE
LOGFORMATCONSOLE
Use this parameter to control the format of the log messages that are written to the console.
Parameter Syntax
LOGFORMATCONSOLE format
Arguments
format
a number representing a bit mask controlling the following format options:
bit 1 (decimal 1) Date
bit 2 (decimal 2) header (log messages a pre-fixed with "[log]")
bit 3 (decimal 4) Time
bit 4 (decimal 8) Milliseconds
bit 5 (decimal 16) Process ID (name or PIN)
bit 7 (decimal 64) Log Level of Message
Default
If omitted, the console log format is derived from LOGFORMAT.
Example
Display date, time, and milliseconds only:
LOGFORMATCONSOLE 13
Display date, time only:
LOGFORMATCONSOLE 5
See also
LOGFORMAT, LOGFORMATEMS, LOGFORMATFILE
LOGFORMATEMS
Use this parameter to control the format of the log messages that are written to EMS.
Parameter Syntax
LOGFORMATEMS format
Arguments
format
62 • Configuration HP NonStop SSL Reference Manual
Page 63

a number representing a bit mask controlling the following format options:
bit 1 (decimal 1) Date
bit 2 (decimal 2) header (log messages a pre-fixed with "[log]")
bit 3 (decimal 4) Time
bit 4 (decimal 8) Milliseconds
bit 5 (decimal 16) Process ID (name or PIN)
bit 7 (decimal 64) Log Level of Message
Default
If omitted, the EMS log format is derived from LOGFORMAT.
Example
Display date, time, and milliseconds only:
LOGFORMATEMS 13
Display date, time only:
LOGFORMATEMS 5
See also
LOGFORMAT, LOGFORMATCONSOLE, LOGFORMATFILE
LOGFORMATFILE
Use this parameter to control the format of the log messages that are written to the log file.
Parameter Syntax
LOGFORMATFILE format
Arguments
format
a number representing a bit mask controlling the following format options:
bit 1 (decimal 1) Date
bit 2 (decimal 2) header (log messages a pre-fixed with "[log]")
bit 3 (decimal 4) Time
bit 4 (decimal 8) Milliseconds
bit 5 (decimal 16) Process ID (name or PIN)
bit 7 (decimal 64) Log Level of Message
Default
If omitted, the file log format is derived from LOGFORMAT.
Example
Display date, time, and milliseconds only:
LOGFORMATFILE 13
Display date, time only:
LOGFORMATFILE 5
HP NonStop SSL Reference Manual Configuration • 63
Page 64

See also
LOGFORMAT, LOGFORMATCONSOLE, LOGFORMATEMS, LOGFILE
LOGLEVEL
Use this parameter to control the default logging level.
Parameter Syntax
LOGLEVELCONSOLE detail
Arguments
detail
a number representing the detail level
Default
If omitted, a level of 50 is used.
Considerations
• If no value is set for the parameters LOGLEVELCONSOLE, LOGLEVELEMS, or LOGLEVELFILE, they will
inherit their value from the parameter LOGLEVEL.
• If LOGLEVELCONSOLE, LOFLEVELEMS, and LOGLEVELFILE are all set with a value, the parameter of
LOGLEVEL becomes meaningless.
See also
LOGLEVELCONSOLE, LOGLEVELEMS, LOGLEVELFILE
LOGLEVELCONSOLE
Use this parameter to control what messages are written to the log console.
Parameter Syntax
LOGLEVELCONSOLE detail
Arguments
detail
a number representing the detail level
Default
If omitted, the console log level is derived from LOGLEVEL.
Considerations
• Different log levels can be used for the outputs to LOGCONSOLE, LOGLEVELEMS, and LOGFILE.
• The parameter can be changed at run time using SSLCOM, please see chapter "SSLCOM Command Interface"
for details.
See also
LOGCONSOLE, LOGLEVEL, LOGFORMATCONSOLE
64 • Configuration HP NonStop SSL Reference Manual
Page 65

LOGLEVELEMS
Use this parameter to control what messages are written to EMS.
Parameter Syntax
LOGLEVELEMS detail
Arguments
detail
a number representing the detail level
Default
If omitted, the EMS log level is derived from LOGLEVEL.
Considerations
• Different log levels can be used for the outputs to LOGCONSOLE, LOGLEVELEMS, and LOGFILE.
• The parameter can be changed at run time using SSLCOM, please see chapter "SSLCOM Command Interface"
for details.
See also
LOGEMS, LOGLEVEL, LOGFORMATEMS
LOGLEVELFILE
Use this parameter to control what messages are written to the log file.
Parameter Syntax
LOGLEVELFILE detail
Arguments
detail
a number representing the detail level
Default
If omitted, the console file level is derived from LOGLEVEL.
Considerations
• Different log levels can be used for the outputs to LOGCONSOLE, LOGLEVELEMS, and LOGFILE.
• The parameter can be changed at run time using SSLCOM, please see chapter "SSLCOM Command Interface"
for details.
See also
LOGFILE, LOGLEVEL, LOGMAXFILELENGTH, LOGFORMATFILE, LOGFILERETENTION
LOGMAXFILELENGTH
Use this parameter to control the maximum size of a log file.
Parameter Syntax
LOGMAXFILELENGTH length
HP NonStop SSL Reference Manual Configuration • 65
Page 66

Arguments
length
a number representing the maximum log file length in kilobytes in the range of 100 to 40000 (~40MB).
Default
The default length is 20000.
Considerations
• After the current file reaches the maximum size a log rollover will occur. Please see section "Logfile/Auditfile
Rollover" in chapter "Monitoring" for details on logfile rollover.
See also
LOGFILE, LOGFILERETENTION
LOGMEMORY
Use this parameter to have HP NonStop SSL log memory usage information output in regular intervals.
Parameter Syntax
LOGMEMORY number_of_io’s
Arguments
number_of_io’s
a number representing after how many I/O operations HP NonStop SSL will send its memory usage to the log output
Default
The default is 0 meaning that memory usage will not be logged
Considerations
• Use to have an easy correlation between memory usage of HP NonStop SSL and events in the log output. Do
not use if memory usage of HP NonStop SSL is not of interest for you.
• The parameter can be changed at run time using SSLCOM, please see chapter "SSLCOM Command Interface"
for details.
MAXSESSIONS
Use this parameter to limit the number of concurrent connections in run modes TELNETS, PROXYS, PROXYC and
PROXY.
Parameter Syntax
MAXSESSIONS max
Arguments
max
the number of allowed concurrent sessions or 0 for unlimited.
Default
If omitted, HP NonStop SSL will use a value of 0 (no limits).
Example
66 • Configuration HP NonStop SSL Reference Manual
Page 67

MAXSESSIONS 100
Considerations
• If the number of allowed sessions is reached, any further connection request will be rejected and a warning will
be written to the log file.
• The current number of connections is displayed in the STATUS command of SSLCOM.
MAXVERSION
Use this parameter to define the maximum admissible SSL/TLS protocol version.
Parameter Syntax
MAXVERSION version
Arguments
version
an SSL/TLS version number. Currently, the supported values are:
• 2.0: SSL 2.0
• 3.0: SSL 3.0
• 3.1: SSL 3.1 / TLS 1.0
Default
The default for this parameter is "3.1" (i.e. SSL 3.1 / TLS 1.0).
See also
MINVERSION
MINVERSION
Use this parameter to define the minimum admissible SSL/TLS protocol version.
Parameter Syntax
MINVERSION version
Arguments
version
an SSL/TLS version number. Currently supported values are:
• 2.0: SSL 2.0
• 3.0: SSL 3.0
• 3.1: SSL 3.1 / TLS 1.0
Default
The default for this parameter is "3.1"
Considerations
• For security reasons, it is recommended to use the latest version of the TLS protocol as standardized by the
IETF (3.1). This requires setting MINVERSION to "3.1".
HP NonStop SSL Reference Manual Configuration • 67
Page 68

See also
MAXVERSION
PASSIVE
Use this parameter to define the direction of the data socket connection in FTPC mode
Parameter Syntax
PASSIVE mode
Arguments
mode
1 for passive mode, 0 for act ive mode.
Default
The default for this parameter is 1 (passive mode enabled).
Considerations
• This parameter is only relevant in the FTPC run mode of HP NonStop SSL
• In FTP, the data socket connection request can be made by the FTP client ("passive mode") or by the FTP
server ("active mode"). The best choice for your environment depends on the capabilities of the FTP server you
are communicating with and on your firewall settings.
• HP NonStop SSL in FTPS mode currently only supports passive mode, therefore to interact with HP NonStop
SSL in FTPS mode, make sure to set the PASSIVE parameter to 1 for HP NonStop SSL running in FTPC mode.
PEERCERTCOMMONNAME
Use this parameter to enforce verification of the content of remote certificates presented to HP NonStop SSL.
Parameter Syntax
PEERCERTCOMMONNAME commonname
Arguments
commonname
the expected common name of the remote certificate.
Default
The default for this parameter is '*' which means the content will not be verified.
Examples
PEERCERTCOMMONNAME tandem1.mycompany.com
Considerations
• This parameter should not be used together with the parameter PEERCERTFINGERPRINT as behavior may be
unpredictable then.
• If other than '*', the actual common name of the remote certificate will be compared against the content of the
parameter.
• If the actual value of the common name in the remote certificate is part of the value configured in the parameter,
it will be accepted. This allows configuring a list of common names.
68 • Configuration HP NonStop SSL Reference Manual
Page 69

• If the matching fails, the connection will be rejected.
PEERCERTFINGERPRINT
Use this parameter to enforce verification of the leaf certificate of the remote peer. In server runmodes this parameter is
used to verify the fingerprint of the client certificate, in client runmodes it is used to verify the fingerprint of the server
certificate.
Parameter Syntax
PEERCERTFINGERPRINT * | sha1-fingerprint
Arguments
*
No fingerprint verification.
sha1-fingerprint
the expected sha1 fingerprint of the remote certificate.
Default
The default for this parameter is '*' which means the fingerprint of the remote leaf certificate (i.e. client or server cert,
depending on runmode) will not be verified.
Examples
PEERCERTFINGERPRINT da39a3ee5e6b4b0d3255bfef95601890afd80709
Considerations
• This parameter does not adhere to the HASHALGORITHMS parameter (yet), instead fingerprints should be
given in SHA1 format.
• This parameter shoul d not be used together with the parameter PEERCERTCOMMONNAME as behavior may
be unpredictable then.
• If other than '*', the actual fingerprint of the remote server certificate will be compared against the value of the
parameter.
• If the actual value in the certificate is part of the value configured in the parameter, it will be accepted. This
allows configuring a list of fingerprints or common names.
• Fingerprints will be compared both as MD5 and SHA1 hashes, however for security reasons you should not use
MD5 anymore.
• If the matching fails, the session will be rejected.
PORT
Use this parameter to specify the port number a HP NonStop SSL server should listen for incoming connections.
Parameter Syntax
PORT number
Arguments
number
the decimal number of a TCP/IP port.
Default
HP NonStop SSL Reference Manual Configuration • 69
Page 70

The default for this parameter depends on the HP NonStop SSL run mode:
TELNETS 11011 (*)
PROXYS 11011 (*)
PROXYC 11012 (*)
FTPS 11013 (*)
FTPC 11014 (*)
Considerations
• If operating as a secure server, HP NonStop SSL will only accept SSL connections on the specified port.
• Starting HP NonStop SSL to listen on a port number <=1024 requires SUPER group access.
• The ICANN manages a list of "well-known" port numbe rs for various protocols (see
http://www.iana.org/assignments/port-numbers). Most run modes of HP NonSt op SSL can not be mapped
against this list with certainty, those run modes are marked with an asterisk (*). The default ports for those run
modes were chosen from an "unassigned" port range (11002-11110)
• The choice for the PORT value in your environment will depend on the applications already running on your
NonStop systems and the ports they use as well as your firewall configuration.
• You can specify a comma-separated list of multiple ports; see section "Multiple SSL Tunnels in a Single
Process" for details.
PTCPIPFILTERKEY
Use this parameter to specify a filter key to enable round robin filtering with Parallel Library TCP/IP or TCP/IPV6.
Parameter Syntax
PTCPIPFILTERKEY password | *
Arguments
password
a password serving as a key to enable round robin filtering for multiple instances of HP NonStop SSL servers
listening on the same port. The password will override the value of the DEFINE =PTCPIP^FILTER^KEY, which
may have been passed to HP NonStop SSL at startup.
*
No filter key will be set. However, any DEFINE =PTCPIP^FILTER^KEY passed to HP NonStop SSL at startup
will remain in effect.
Default
The default for this parameter is *.
Considerations
• Use this parameter to enable round robin filtering for multiple HP NonStop SSL servers configured as persistent
processes with older release of the Kernel subsystem which did not support configuring DEFINEs.
ROUTINGMODE
The ROUTINGMODE parameter can be used in run modes PROXYC and PROXYS and is used to define in what way
incoming connections shall be forwarded. By default this happens statically (the "S" stands for static), i.e. you have to
specify the target to which connections are forwarded at the moment HP NonStop SSL is started.
70 • Configuration HP NonStop SSL Reference Manual
Page 71

The second possible value for ROUTINGMODE is "D" which stands for dynamic routing. In that case the first network
packet sent to HP NonStop SSL needs to contain the destination IP address and port on the NonStop system in dotted
decimal notation, preceded by a "D" and followed by a binary zero.
For IPv6 the additional parameter DYNAMICROUTINGENABLEIPV6 has to be set to TRUE. This will change the
expected separator between the IP address and the port to be a pipe symbol ( '|' ) which then has to be used for both IPv 4
and IPv6 connections.
Example:
D10.0.0.198:8888<binary zero>
or, if DYNAMICROUTINGENABLEIPV6 is set to TRUE:
D10.0.0.198|8888<binary zero>
respectively
Dfe80:abcd::4711|8888<binary zero>
In this case the address will be taken as the target to which the connection shall be forwarded. This dynamic routing
feature is only needed in really rare cases, so usually there is no need to touch this parameter.
Parameter Syntax
ROUTINGMODE S | D
Arguments:
S
Static routing is used
D
Dynamic routing is used
Default
If omitted, "S" is used and HP NonStop SSL will use static routing.
Example
ROUTINGMODE D
SERVCERT
Use this parameter to specify the server certificate HP NonStop SSL should use to authenticate itself to an SSL client.
Parameter Syntax
SERVCERT file
Arguments
file
Guardian file name of a DER encoded X.509 server certificate.
Default
If omitted, HP NonStop SSL will search for a file "SERVCERT" on the default subvolume.
Example
SERVCERT $DATA1.SSL.MYCERT
Considerations
HP NonStop SSL Reference Manual Configuration • 71
Page 72

• A server certificate for testing purposes is delivered as SERVCERT file on the HP NonStop SSL installation
subvolume to enable a quick start installation.
• The server certificate must match the private key file specified by SERVKEY.
See also
SERVCERT, SERVKEY, SSLCOM SSLINFO, SSLCOM RELOAD CERTIFICATES
SERVKEY
Use this parameter to specify the private key file for an HP NonStop SSL server.
Parameter Syntax
SERVKEY file
Arguments
file
the file name of a DER encoded PKCS-8 encrypted private key file with PKCS-5 algorithm identifiers.
Default
If omitted, HP NonStop SSL will search for a "SERVKEY" file on the default subvolume.
Example
SERVKEY $DATA1.SSL.MYKEY
Considerations
• The private key data in the file is password encrypted. For HP NonStop SSL to be able to decrypt the file, the
correct password must be specified by the SERVKEYPASS parameter.
• A private key file for testing purposes is delivered as "SERVKEY" file on the HP NonStop SSL installation
subvolume to enable q ui c k s tart installation. This private key file matches the test server certificate delivered as
"SERVCERT". The password for the SERVKEY file is "test".
See also
SERVCERT, SERVKEYPASS, SSLCOM SSLINFO, SSLCOM RELOAD CERTIFICATES
SERVKEYPASS
Use this parameter to specify the password for the private key file.
Parameter Syntax
SERVKEYPASS password
Arguments
password
the password or pass phras e to decrypt the private ke y fi l e . T he pa s sword string may cont a i n spa c e s. However,
leading or trailing spaces will be ignored.
Default
If omitted, HP NonStop SSL will try "test" as password.
Example
72 • Configuration HP NonStop SSL Reference Manual
Page 73

SERVKEYPASS my private passphrase
Considerations
• The default password ("test") enables a quick start installation with the "SERVKEY" public key file delivered
with HP NonStop SSL.
See also
SERVCERT, SERVKEYPASS, SSLCOM SSLINFO, SSLCOM RELOAD CERTIFICATES
SLOWDOWN
Use this parameter to make HP NonStop SSL use less CPU cycles for encryption. This will result in a decrease of
possible throughput.
Parameter Syntax
SLOWDOWN <ticks>
Arguments
ticks
After each I/O operation, HP NonStop SSL will call the Guardian System Procedure DELAY with the value of
<ticks>. A higher value w i ll decrease both thro ug hput and CPU usage of HP NonStop SSL.
Default
If omitted, SLOWDOWN will be 0 and HP NonStop SSL will consume all available CPU resources.
Example
SLOWDOWN 1
Considerations
• In most installations, the default value of 0 should be acceptable
• The parameter is mostly intended for use with the FTPC or FTPS modes of HP NonStop SSL. Setting
SLOWDOWN to values between 1 and 5 will significantly reduce CPU usage but will also make the time a file
transfer will take higher.
• The impact of HP NonSto p S S L hi gh volume data encrypt i on/decryption can also be influenced by the priority
of the HP NonStop SSL process. However, if it is desirable to run HP NonStop SSL at a higher priority than the
target plain servers/clients, the SLOWDOWN can be used to limit the impact of the cryptographic operations.
• The best value for your environment will depend both on your hardware and requirements.
SOCKSHOST, SOCKSPORT, SOCKS USER
Use these three parameters to make HP NonStop SSL act as a SOCKS Version 4 client in the run modes FTPC or
PROXYC.
Note: SOCKS4 by design does not support IPv6, i.e. SOCKSHOST, SOCKSPORT and SOCKSUSER are only valid in
IPMODE IPV4. SOCKS is a protocol that relays TCP sessions at a firewall host to allow application users transparent
access across the firewall. For more information about SOCKS, please see http://en.wikipedia.org/wiki/SOCKS.
Parameter Syntax
SOCKSHOST sockshost
SOCKSPORT socksport
HP NonStop SSL Reference Manual Configuration • 73
Page 74

SOCKSUSER socksuser
Arguments
sockshost
the hostname or IP address of the host running the SOCKS-Version 4 enabled firewall. A value of * indicates that
the SOCKS protocol will not be used.
socksport
the listening port of the host running the SOCKS-Version 4 enabled firewall.
socksuser
the SOCKS user name to be used to authenticate against the SOCKS server.
Default
If omitted, HP NonStop SSL will use a value of * for SOCKSHOST meaning the SOCKS protocol will not be used.
Example
SOCKSHOST 172.3.5.99
SOCKSPORT 1911
SOCKSUSER sockstest
Considerations
• In run mode PROXYC the value of TARGETPORT will still be required to determine the final host to connect
to.
• In run modes FTPC the final host to connect to will be configured by adding it to the user name just as when not
using SOCKS.
SRCIPADDR, SRCIPPORT
Use these parameters to for the configuration of an HP NonStop SSL EXPANDS process.
Parameter Syntax
SRCIPADDR ip-address
SRCIPPORT port
Arguments
ip-address
specifies the IP address of the local end of the EXPAND line.
port
specifies the port number of the local end of the EXPAND line.
Example
SRCIPADDR 10.0.0.12; SRCIPPORT 1202
SRCIPADDR 2001:db9::1421:51ab ; SRCIPPORT 1202
Considerations
• The parameters should be set exactly to the original equivalent parameter values of the EXPAND line handler,
as shown by the SCF INFO LINE DETAIL command.
• The parameters are ignored with any run mode other than EXPANDS.
74 • Configuration HP NonStop SSL Reference Manual
Page 75

See also
DESTIPADDR, DESTIPPORT
SUBNET
Use this parameter to specify the TCP/IP process HP NonStop SSL should listen on for incoming connections.
Parameter Syntax
SUBNET tcpip-process-name
Arguments
tcpip-process-name
the name of an existing TCP/IP process on your system.
Default
If omitted, the HP NonStop SSL process will be bound to "$ZTC0".
Example
SUBNET $ZTC03
Considerations
• If you added a DEFINE =TCPIP^PROCESS^NAME to the TACL environment you use to start SSLOBJ, this
setting will override the SUBNET parameter.
• If you use TCPIPV6 and want to share identical ports across multiple HP NonStop SSL processes, you need to
add an identical DEFINE to all instances sharing that port as in the following example (please refer to the HP
NonStop manual " TCP/IPv6 Configuration and Management Manual ", section 3, subsection "Monolithic
Listening Model" for more details):
ADD DEFINE =PTCPIP^FILTER^KEY, class map, file A1234
• If running in IPMODE DUAL, the specified subnet must support both IPv4 and IPv6.
SSLCOMSECURITY
Use this parameter to restrict the execution of SSLCOM commands.
Parameter Syntax
SSLCOMSECURITY boolean
Arguments
boolean
if set to TRUE, "sensitive" SSLCOM commands can only be executed by
a) a member of the SUPER group
b) the user under which the SSLOBJ process in running
Default
The default for this parameter is FALSE.
Example
SSLCOMSECURITY TRUE
Considerations
HP NonStop SSL Reference Manual Configuration • 75
Page 76

• The following comma nds are considered sensi t ive:
o all SET commands
o LOGMESSAGE, ROLLOVER LOGFILE and RELOAD CERTIFICATES
TARGETINTERFACE
Use this parameter to specify the IP address HP NonStop SSL should use for local binding of outgoing connections.
Parameter Syntax
TARGETINTERFACE ip-address
Arguments
ip-address
the IP address to bind to or “*” for none.
Default
If omitted, HP NonStop SSL will use the value of “*” and bind to no specific IP address
Example
TARGETINTERFACE 10.0.0.197
TARGETINTERFACE 2001:db9::1421:51ab
Considerations
• The parameter is relevant for the following run modes: PROXYS (outgoing socket), PROXYC (outgoing
socket), FTPS (control socket connecting to FTPSERV), FTPC (control socket connecting to remote FTP
server)
• Use this parameter to control which IP address HP NonStop SSL binds to for outgoing connections.
• If a host name rather than an IP address is used to configure TARGETINTERFACE, name resolution will take
place only once during startup. If name resolution fails, HP NonStop SSL will terminate during startup.
• The parameter is invalid in IPMODE DUAL since no bind address except the IPv6 ANY address '::' can handle
both IPv4 and IPv6.
See also
INTERFACE
TARGETHOST
Use this parameter to specify the IP host a HP NonStop SSL proxy server should route connections to.
Parameter Syntax
TARGETHOST ip-address
Arguments
Ip-address
the IP address of the target host.
Default
76 • Configuration HP NonStop SSL Reference Manual
Page 77

If omitted, the HP NonStop SSL proxy route connections to the "local loopback address" ("127.0.0.1").
Example
TARGETHOST 192.45.23.3
Considerations
• If the target server process runs on the same TCP/IP process (SUBNET) you should use the "local loopback
address" ("127.0.0.1"). This is recommended for proxy servers, as it avoids that unencrypted data has to traverse
the network.
• Starting with HP NonStop SSL AAE this parameter is not ignored anymore in run mode FTPC but can be used
to specify the default target host in case none is given in the FTPC user command.
• You can specify a comma-separated list of multiple target hosts; see section "Multiple SSL Tunnels in a Single
Process" for details.
See also
TARGETHOSTFORCE
TARGETHOSTFORCE
This FTPC only parameter can be used in combination with TARGETHOST to force the override of the targethost in the
FTPC user command. HP NonStop SSL will use the TARGETHOST (if set) in FTPC to default to a certain host if none
is given in the actual user command. If TARGETHOSTFORCE is specified in addition, the value of TARGETHOST
will always be taken as host to connect to, no matter what the user actually specifies in the FTPC user command.
Parameter Syntax
TARGETHOSTFORCE {TRUE|FALSE}
Default
FALSE
Example
TARGETHOSTFORCE TRUE
See also
TARGETHOST, TARGETPORTFORCE
TARGETPORT
Use this parameter to specify the port number an HP NonStop SSL process should route connections to.
Parameter Syntax
TARGETPORT number
Arguments
number
the decimal number of the target TCP/IP port.
Default
If omitted, the HP NonStop SSL proxy will try route connections to the well known telnet port (23).
Example
HP NonStop SSL Reference Manual Configuration • 77
Page 78

TARGETPORT 1023
Considerations
• Starting with HP NonStop SSL AAE this parameter is not ignored anymore in run mode FTPC but can be used
to specify the default port number in case none is given in the FTPC user command.
• You can specify a comma-separated list of multiple target ports; see section "Multiple SSL Tunnels in a Single
Process" for details.
See also
TARGETPORTFORCE
TARGETPORTFORCE
This FTPC only parameter can be used in combination with TARGETPORT to force the override of the target port in the
FTPC user command. HP NonStop SSL will use the TARGETPORT (if set) in FTPC to default to a certain port if none
is given in the actual user command. If TARGETPORTFORCE is specified in addition, the value of TARGETPORT
will always be taken as port to connect to, no matter what the user actually specifies in the FTPC user command.
Parameter Syntax
TARGETPORTFORCE {TRUE|FALSE}
Default
FALSE
Example
TARGETPORTFORCE TRUE
See also
TARGETPORT, TARGETHOSTFORCE
TARGETSUBNET
Use this parameter to specify the TCP/IP process a HP NonStop SSL process should use for outgoing connections.
Parameter Syntax
TARGETSUBNET tcpip-process-name
Arguments
tcpip-process-name
the name of an existing TCP/IP process on your system.
Default
If omitted, the HP NonStop SSL process will use same TCP/IP process which is configured for incoming connections
(SUBNET parameter).
Example
TARGETSUBNET $ZTC03
Considerations
• If you added a DEFINE =TCPIP^PROCESS^NAME to the TACL environment you use to start SSLOBJ, this
setting will override the TARGETSUBNET parameter.
78 • Configuration HP NonStop SSL Reference Manual
Page 79

• If running in IPMODE DUAL the TARGETSUBNET must support both IPv4 and IPv6 (even for IPv4
connections).
TCPIPHOSTFILE
Use this parameter to specify the value of the DEFINE=TCPIP^HOST^FILE value.
Parameter Syntax
TCPIPHOSTFILE hostfile | *
Arguments
hostfile
a hostfile to be used for DNS name resolution. The hostfile will override the value of the DEFINE
=TCPIP^HOST^FILE, which may have been passed to HP NonStop SSL at startup.
*
No hostfile will be set. However, any DEFINE =TCPIP^HOST^FILE passed to HP NonStop SSL at startup will
remain in effect.
Default
The default for this parameter is *.
Considerations
• See the HP NonStop manual for details of the usage of the DEFINE =TCPIP^HOST^FILE.
TCPIPNODEFILE
Use this parameter to specify the value of the DEFINE=TCPIP^NODE^FILE value.
Parameter Syntax
TCPIPNODEFILE nodefile | *
Arguments
nodefile
a node file to be used for DNS name resolution. The node file will override the value of the DEFINE
=TCPIP^NODE^FILE, which may have been passed to HP NonStop SSL at startup.
*
No node file will be set. However, any DEFINE =TCPIP^NODE^FILE passed to HP NonStop SSL at startup will
remain in effect.
Default
The default for this parameter is *.
Considerations
• See the HP NonStop manual for details of the usage of the DEFINE =TCPIP^NODE^FILE.
TCPIPRESOLVERNAME
Use this parameter to specify the value of the DEFINE =TCPIP^RESOLVER^NAME value.
Parameter Syntax
HP NonStop SSL Reference Manual Configuration • 79
Page 80

TCPIPRESOLVERNAME resolver | *
Arguments
resolver
a resolver to be used for DNS name resolution. The resolver will override the value of the DEFINE
=TCPIP^RESOLVER^NAME, which may have been passed to HP NonStop SSL at startup.
*
No resolver will be set. However, any DEFINE =TCPIP^RESOLVER^NAME passed to HP NonStop SSL at startup
will remain in effect.
Default
The default for this parameter is *.
Considerations
• See the HP NonStop manual for details of the usage of the DEFINE =TCPIP^RESOLVER^NAME.
TCPNODELAY
Use this parameter to specify whether RFC1323 will be activated on all sockets which HP NonStop SSL controls.
Parameter Syntax
TCPNODELAY boolean
Arguments
boolean
If set to TRUE or 1 or Yes, HP NonStop SSL will activate RFC1323.
Default
If omitted, HP NonStop SSL will *not* activate RFC1323.
Example
TCPNODELAY TRUE
Considerations
• If this parameter is set to true, HP NonStop SSL sets a socket option TCP_NODELAY when initializing
sockets. This can help spe ed up throughput – please see RFC1323 and the HP NonStop "TCP/IP pr ogramming
manual" for details.
TRUST
Use this parameter to specify a list of trusted CAs when running as SSL client.
Parameter Syntax
TRUST hashalgorithm:fingerprint [,hashalgorithm:fingerprint, ...]
or
TRUST certificate [, certificate, ...]
Arguments
hashalgorithm:fingerprint
the trusted CA certificate’s fingerprint generated with the hash algorithm 'hashalgorithm'.
80 • Configuration HP NonStop SSL Reference Manual
Page 81

certificate
the trusted CA certificate in PKCS-8 DER encoded format
Default
If omitted, HP NonStop SSL will not check the TLS/SSL partner’s certificate chain.
Examples
TRUST
WHIRLPOOL:85A8DAF0D76139154335C46E5E53C5A175CC1BDB8B7D80716CF19A93EDB75046F4BDD9BCDC005DAA5433D2D
BCE47AF0D4A2C9EB6DDBD1F94EF166308EA47FE73,
SHA256:1F4F7E0A6E1E92DDD6D5411C371C100B74DD7D32EAE7F447486AA4DAC5F43056
TRUST rootcert
Considerations
• The TRUST parameter can be specified in two ways: either by specifying the fingerprints of the CA certificates
or by specifying a filename containing the full certificate in DER encoding. The two formats can not be mixed.
• By default, the WHIRLPOOL hash algorithm - one of the currently strongest ha s h algorithms - is used.
Therefore you should also specify fingerprints with their WHIRLPOOL hash. If you do want to use other hash
algorithms, you have to use the HASHALGORITHM S parameter. Note that only fingerprints will be used for
which the respective hashalgorithm is marked as active (by including it in the HASHALGORITHMS
parameter).
• If the remote SSL server is sending the complete certificate chain, the two forms of specifying the trusted CAs
do not differ in functionality. Some SSL servers do not send the complete certificate chain during the
handshake; for those servers the missing signing certificate(s) should be specified with the "certificate" syntax
of the parameter.
• The parameter can be changed at run time using SSLCOM, please see chapter "SSLCOM Command Interface"
for details.
• Due to the edit file length restriction of 255 characters, there are certain limitations for the number of
fingerprints you can use in the configuration file. The following shows a table for the assumption that all
fingerprints use the same algorithm. In general 5 characters of the line are required for the "TRUST". In
addition to the actual fingerprint length the characters required for the <FingerprintName:> and the separator
have to be considered ("add on"). Numbers in round brackets represent the number in case the old fingerprint
format which is only available for SHA1 and MD5 is used.
Algorithm Fingerprint Length Add On Max Fingerprints in Config
MD5* 32 5(0) 6 (7)
SHA1* 40 6(0) 5 (6)
RIPEMD160 40 11 4
SHA256 64 8 3
SHA384 96 8 2
SHA512 128 8 1
WHIRLPOOL 128 11 1
Of course you can mix fingerprints, thus if you have a WHIRLPOOL fingerprint specified, one SHA384 or one
SHA256, or two RIPEMD160 fingerprints still fit within the given 255 characters.
See also
HASHALGORITHMS
HP NonStop SSL Reference Manual Configuration • 81
Page 82

Advanced Configuration Topi c s
Multiple SSL Tunnels in a Single Process
A single HP NonStop SSL process can listen on multiple ports at once and forward them to different IP addresses/port
numbers. The following parameters are global to a single HP NonStop SSL instance:
• SUBNET
• TARGETSUBNET
• run mode
The following three parameters can be supplied as comma-separated lists:
• PORT
• TARGETPORT
• TARGETHOST
In case a comma-separated list is found, HP NonStop SSL will match the individual entries to create tuples (PORT,
TARGETPORT, and TARGETHOST). Incoming connections on each PORT will then be forwarded to the matching
TARGETPORT and TARGETHOST.
As an example, if you want to forward
• connections coming in on port 1023 to port 1023 on host Host23
• connections coming in on port 1024 to port 1024 on host Host24
you would start HP NonStop SSL as follows:
RUN HP NonStop SSL PROXYS; PORT 1023,1024; TARGETPORT 23,24; TARGETHOST Host23,Host24
Fault-tolerant Configuration
HP NonStop SSL services can be configured as persistent processes under control of the kernel subsystem, enabling
automatic recovery from failures, such as CPU outages. The SETUP macro included with the package will guide you
through the process of creating a persistent process (see chapter "Installation" for details).
Note: HP NonStop SSL cannot be run as a non-stop process. However, this is not required to achieve non-stop
availability. Running as a non-stop process would not add value, as TCP sessions are reset upon CPU takeover. Non-stop
availability is achieved with HP NonStop SSL as a persistent process which is auto matically restarted upon failures.
Load Balancing and Fault-Tolerance of EXPAND over SSL
Using the EXPAND multi-line or multi-CPU path feature, it is possible to distribute the CPU load generated by the SSL
encryption of the EXPAND traffic across multiple CPUs. Having multiple EXPAND SSL lines connecting systems will
also provide fault-tolerance against CPU and other failures. If an EXPAND line goes down due to a HP NonStop SSL
EXPANDS process terminating for any reason, the traffic will be redirected over the remaining lines.
EXPAND Multi-Line versus Multi-CPU Paths
The choice between Multi-Line or Multi-CPU paths (SUPERPATH) is influenced by the nature of the traffic between
the systems, as well as the load-balancing and fault-tolerance goals to be achieved.
Multi-Line and Multi-CPU paths over SSL differ in the following aspects:
82 • Configuration HP NonStop SSL Reference Manual
Page 83

• CPU consumption
Since Multi-CPU paths have a separate LH process for each line, the HP NonStop SSL processes can be
configured to use the same CPU, reducing message-system hops between CPUs for the Loopback
communication, resulting in a lower CPU consumption.
• Load-balancing
A Multi-CPU path will assign a particular line to any pair of communicating processes. Hence, if a single pair
of communicating process is generating a high traffic load, such as a FUP DUP or an RDF Extractor/Replicator,
this traffic will burden a single CPU.
Multi-Line paths will distribute traffic evenly across all available lines, independently of the number and CPUs
of the processes communicating over EXPAND. Load will also be re-distributed dynamically and transparently,
if a CPU of a HP NonStop SSL EXPANDS process is heavily loaded by processes with a higher priority.
Hence, bandwidth can be preserved, even if the HP NonStop SSL processes run at a low priority to avoid
impact on critical application processes.
• Fault-Tolerance
With Multi-CPU paths, a single line is assigned to a communication link between a requestor and a server. If
this line goes down, a communication error will be reported to the requestor, and the communication link will
have to be re-established.
A failure of a single line with a Multi-line path will be completely transparent to the application and the traffic
will be re-routed automatically.
• Throughput
The highest maximum throughput can be achieved with Multi-CPU paths. Measurements showed a throughput
of up to 1,5 MB/s per CPU for FESA/100Mbit connected systems, with a linear scalability for multiple
requestor/server pairs running in different CPUs (e .g. 6MB/s 1with 4 pairs).
Multi-line paths have a lesser maximum throughput, as all traffic is handled by a single LH process.
Measurements have shown a throughput of 1,4 MB/s for FESA/100Mbit connected systems with a single
requestor server pair and a total maximum throughput of about 3 MB/s with multiple pairs.
Optimizing Throughput
The following configuration properties & setup can impact the overall throughput over an EXPAND over SSL path:
• LIF DataForwardCount (DFC ) an d Da t a F orwardTime (DFT)
Reducing the values DFC and DFT can increase the throughput for an EXPAND over SSL line. Setting DFT
and DFC to the smallest possible values will minimize response time.
• CPU selection of HP NonStop SSL EXPANDS processes with multi-line paths
Starting a HP NonStop SSL EXPANDS line process in primary CPU of a EXPAND line handler process
handling multi-line path can severely decrease the overall throughput. For an optimal performance even in case
of a takeover of the line handler backup, it is recommended to run the HP NonStop SSL EXPANDS processes
in CPUs not used by the LH proc e ss.
Multi-Line Path Installation Sample
The following sample configuration illustrates how to optimize throughput, distribute CPU load and achieve faulttolerance.
Assumptions:
• \SYSA and \SYSB to be connected over EXPAND SSL
• Systems have 8 CPUs each
• TCPIPv6
Configuration:
The following figure shows a complete setup:
HP NonStop SSL Reference Manual Configuration • 83
Page 84

The following steps have been performed for the above setup:
1. An Expand Multi-Line path was created on each system.
• 2 CPUs were selected for the LH primary and backup.
• To distribute SSL CPU load over the remaining CPUs, 6 lines were created for the path.
• A unique port number was s elected for each li ne (SRCIPPOR T and DESTIPPORT can be identical).
• DESTIPADDR of all lines was set to the loopback address (127.0.0.1).
2. Six HP NonStop SSL EXPANDS persistent processes were created on both systems.
• A different CPU was selected for each SSL process.
• The SSL tunnel was associated to the line using the same SRCIPPORT and DESTIPPOR T parameters as in
the line configuration.
• The DESTIPADDR parameter of the HP NonStop SSL EXPANDS processes was set to the remote
system's IP address.
84 • Configuration HP NonStop SSL Reference Manual
Page 85

Monitoring
Overview
HP NonStop SSL writes log and audit messages to a terminal, to a file, or to EMS. This is controlled by the parameters
LOGCONSOLE, LOGFILE and LOGEMS for log messages and AUDITCONSOLE, AUDITFILE and AUDITEMS for
audit messages. Messages can be written to any combination of those three “targets” (i.e. a single one, two of them, all of
them, none of them). By default, log and audit messages are neither written to EMS nor to a log file.
Most parameters mentioned in this chapter can be configured both during startup as well as once HP NonStop SSL is
running already. In the latter case, the parameters can be changed by using SSLCOM (see chapter "SSLCOM Command
Interface" for details).
What is a log message?
A log message is issued by HP NonStop SSL for informational purposes, as a warning, or to indicate a fatal condition,
which cannot be corrected automatically.
What is an audit message?
A audit message is issued by HP NonStop SSL for security-relevant events, such as network event (connect, disconnect),
or FTP operations
Why are there three different target devices?
There are three different devices which to messages can be logged, i.e. a terminal, a file, or EMS. Operators may choose
their favorite location for being alerted.
For productive installation, it is recommended to either have HP NonStop SSL log events to a file (LOGFILE,
LOGFORMATFILE, LOGLEVELFILE) or to EMS (LOGEMS, LOGFORMATEMS, LOGLEVELEMS).
Log levels of these three devices can be different, i.e. can be written independently from each other.
What is a log/audit level?
A log or audit level is a number assigned to a every message in order to indicate its importance or grade of detail
information. In general, a higher log or audit level for a given message indicates less importance or detail. While log or
audit levels of individual messages cannot be changed, it can be controlled which levels will be displayed at all through
the LOGLEVELxxx or AUDITLEVELx x x p a ra meters.
HP NonStop SSL Reference Manual Monitoring • 85
Page 86

Log and Audit Level Recommen da tions
The log level can be chosen individually for each log device through the parameters LOGLEVELFILE,
LOGLEVELEMS and LOGCONSOLE. Depending on the device, it may be desirable to see different kind of log
messages. The following table gives an indication of what “severity” individual log levels relate to:
Log Lever Meaning
Level 0 fatal errors.
Up to level 10 only warnings.
Up to level 30
Up to level 50 normal log messages like “close by remote client”, etc.
Up to level 89 messages only needed for trouble-shooting.
Starting from level 90 only messages to analyze extreme problems.
On Startup, HP NonStop SSL issues a whole set of log messages. Those will document the current
version and the settings which were used to start the HP NonStop SSL process. The messages only
occur once at startup.
See the appendix for a detailed list of log messages and warnings issued by HP NonStop SSL.
Please refer to the AUDITLEVEL parameter description for recommendations and considerations for setting the audit
level.
Customizing the Log and Audit Fo r ma t
HP NonStop SSL allows customizing the appearance of the log or audit messages to a certain extent. For example, you
may add the current date to the log message header. Please refer to the AUDITFORMATEMS,
AUDITFORMATCONSOLE, AUDITFORMATFILE, LOGFORMATCONSOLE, LOGFORMATEMS, and
LOGFORMATFILE parameter descriptions for details.
Using SHOWLOG to View a Log File
HP NonStop SSL processes may be configured to write log files to disk (see parameter LOGFILE). For performance
reasons, those log files are created as unstructured files. While the program is running, the log file is kept open.
However, it may be concurrently opened for viewing. To convert the unstructured file into a readable format, the
SHOWLOG tool is supplied. Invoking SHOWLOG without arguments will display a brief syntax summary:
20> showlog
comForte SHOWLOG log file converter Version T9999A05_16Apr2009_comForte_SHOWLOG_
0022
usage: SHOWLOG <log file> [<process_one_line file>] [<start>] [<end>]
<log file> | the input log file to be converted
<process_one_line file> | file to write to, default is '*' meaning the home
terminal
<start> | either byte offset from beginning OR
timestamp in format "ddmmmyy HH:MM:SS.TT" (example 30Jan07 2
1:01:59.07)
<end> | either number of bytes after beginning OR
timestamp in format "ddmmmyy HH:MM:SS.TT" (example 30Jan07 2
1:01:59.07)
---examples--SHOWLOG logfile whole log file written to home
terminal
SHOWLOG logfile logedit 10000 1000 1000 bytes starting at offset
10000
written to EDIT file logedit
86 • Monitoring HP NonStop SSL Reference Manual
Page 87

SHOWLOG logfile * "30Jan07 20:00" "30Jan07 21:00" messages in timeframe to home
terminal
4>
If SHOWLOG is run with only the name of the log file as first runtime argument, it will dump the complete log file to
the home terminal. The byte offset within the log file will be displayed regularly; this allows you to limit the output of
SHOWLOG to certain sections of the log file as shown below.
3> SHOWLOG FTPCLOG
comForte SHOWLOG log file converter Version T9999A05_16Apr2009_comForte_SHOWLOG_0022
starting at binary offset 0
---processing in-file 'ftpclog'
$FCMH |23Jun10 12:43:09.91| 5|HP SSLOBJ version T0910H01_15Jun2010_HP_1059
$FCMH |23Jun10 12:43:09.92|10|using OpenSSL 1.0.0 29 Mar 2010 - see http://www.o
penssl.org
$FCMH |23Jun10 12:43:09.92|10|config file: '$DATA1.T0910.FCMHCF'
$FCMH |23Jun10 12:43:09.92|10|runtime args: 'FTPC; SUBNET $ZSAM1; PORT 4021; CON
FIG $DATA1.T0910.FCMHCF'
$FCMH |23Jun10 12:43:09.93|20|--------- start settings for Logging ----------$FCMH |23Jun10 12:43:09.93|20| process name is $FCMH
$FCMH |23Jun10 12:43:09.94|20| trace file is '$DATA1.T0910.FTPClog' ('*' means n
one)
$FCMH |23Jun10 12:43:09.94|20| max file length 20480000 bytes, length-check ever
y 0 writes
$FCMH |23Jun10 12:43:09.94|20| console is '*' ('*' means none, '%' means home te
rminal)
$FCMH |23Jun10 12:43:09.95|20| global maximum level is 50, maximum dump length i
s 112
$FCMH |23Jun10 12:43:09.95|20|--------- end settings for Logging ------------$FCMH |23Jun10 12:43:09.96|10|log level for console is 50
$FCMH |23Jun10 12:43:09.96|10|log level for logfile is 50
$FCMH |23Jun10 12:43:09.96|10|log level for EMS is 10
$FCMH |23Jun10 12:43:09.97|10|global log max level is 50
$FCMH |23Jun10 12:43:09.97|10|global trace max level is -1
$FCMH |23Jun10 12:43:09.98|30|starting collecting of random data
$FCMH |23Jun10 12:43:13.12|10|collection of 64 bytes random data finished
$FCMH |23Jun10 12:43:13.14|30|dumping configuration:
[def ] ALLOWCERTERRORS <none>
[def ] ALLOWIP <*>
...
[def ] TRUST <*>
$FCMH |23Jun10 12:43:13.15|50|TCP_NODELAY is off
$FCMH |23Jun10 12:43:13.15|30|--- creating new SSL client context --$FCMH |23Jun10 12:43:14.78|50|minv=30, maxv=31, meth=SSLv23_client_method(), ssl
_options=0x81010fff
$FCMH |23Jun10 12:43:14.78|50|OpenSSL cipherstring 'RC4-MD5:DES-CBC3-SHA:RC4-SHA
:'
$FCMH |23Jun10 12:43:14.79|30|no client certificates are configured
$FCMH |23Jun10 12:43:14.79|30|trusted fingerprints are <*>
$FCMH |23Jun10 12:43:14.80|30|--- new SSL client context built
$FCMH |23Jun10 12:43:14.80|20|parameter SUBNET was evaluated
$FCMH |23Jun10 12:43:14.80|20|TCP/IP process is $ZSAM1
$FCMH |23Jun10 12:43:14.81|20|SSL buffer size is: SSLBUF= 13000
$FCMH |23Jun10 12:43:14.81|20|Socket buffer sizes are: SOCKETSNDBUF= 0, SOCK
ETRCVBUF= 0
$FCMH |23Jun10 12:43:14.82|20|TCP buffer sizes are: TCPSNDBUF= 16384, TCPR
CVBUF= 16384
$FCMH |23Jun10 12:43:14.82|20|FTP client proxy started on source port 4021
$FCMH |23Jun10 12:45:21.51|50|F1|--> connection from client established
$FCMH |23Jun10 12:45:21.52|50|F1|<-- sending proxy FTP Welcome
$FCMH |23Jun10 13:05:00.64|50|P1|> client 127.0.0.1:4021<--127.0.0.1:4890 closed
connection
$FCMH |23Jun10 13:05:00.65|50|P1|> closing server :<?>:
---
---Byte offset is 24144
---
HP NonStop SSL Reference Manual Monitoring • 87
Page 88

---
--- EOF reached, done
---
The second runtime argument can be used to create a new EDIT file containing the log file contents. The following
example shows how to convert the whole log file into an edit file (note that this can take some time for large files):
42> showlog pxyslog logedit
comForte SHOWLOG log file converter Version T9999A05_16Apr2009_comForte_SHOWLOG_
0022
starting at binary offset 0
starting at offset 0
writing out-file 'logedit'
---processing in-file 'pxyslog'
---
--- EOF reached, done
--43> fi logedit
$data1.ssl
CODE EOF LAST MODIFIED OWNER RWEP PExt SExt
logedit 101 5506688 23Jun2010 13:05 110,110 aaaa 4 16
44>
The third and last runtime arguments can be used to limit the part of the file which is converted. This is helpful for the
viewing large log files. The following example shows dumping a large log file. Only a limited number of log messages
(totaling 10000 bytes) after a given offset (5000000) are shown:
33> run showlog telslog * 5000000 10000
comForte SHOWLOG log file converter Version T9999A05_16Apr2009_comForte_SHOWLOG_
0022
dumping at most 10000 bytes
---processing in-file 'telslog'
(output not shown here)
---
---finishing dump of file before end-of-file
---
---done 34>
Rather than using byte offsets, SHOWLOG can also use timestamp as filters for which parts of the log file to display.
The command
SHOWLOG logfile * "30Jan07 20:00" "30Jan07 21:00"
will only display log messages between the two given timestamps.
Note: By using '*' as the second runtime argument the output is written to the home terminal. When using the byte offset
parameter or the byte offset parameter and length parameter, the out file parameter must be entered as well.
88 • Monitoring HP NonStop SSL Reference Manual
Page 89

Viewing File Contents from OSS
The log or audit files created by SSH2 are unstructured files and can be viewed from OSS with standard OSS tools such
as more or tail. Standard OSS filter tools such as grep, awk, or wc can also be applied. This allows users to make use of
the powerful Unix synta x for doing text proces s i ng.
Logfile/Auditfile Rollover
When logging to a file, HP NonStop SSL uses round-robin to switch to a new file. Logfile rollover applies both to
auditing (to the file configured with the AUDITFILE parameter) as logging (to the file configured with the LOGFILE
parameter).
A logfile rollover occurs when the logfile is greater than the size configured in the parameter LOGMAXFILELENGTH
or when the audit file is greater than the size configured in the parameter AUDITMAXFILELENGTH.
HP NonStop SSL will round-robin over at least 10 files. The number of files can be configured using the
LOGFILERETENTION (or AUDITFILERETENTION) param e t e r.
Archive files created during rollover will be created by appending a number to the log file name. The number of digits of
the number appended will be calculated depending on the number of files to keep.
With LOGFILERETENTION set to 10 (the default value), the archive files for a LOGFILE of SSLLOG will be called
SSLLOG0, SSLLOG1, ... SSLLOG9. With LOGFILERETENTION set to 1000, the archive files for a LOGFILE of
SLOG will be called SLOG000, SLO G0 0 1, ... SLOG999.
HP NonStop SSL Reference Manual Monitoring • 89
Page 90

90 • Monitoring HP NonStop SSL Reference Manual
Page 91

SSLCOM Command Interface
Using SSLCOM, you can:
• get an overview of the status of a HP NonStop SSL process
• list sessions which are currently open and obtain detailed information about single sessions (limited to certain
run modes)
• view and change the following parameters (please refer to the "Parameter Reference" for the meaning of the
parameters):
o ALLOWCERTERRORS
o ALLOWIP
o CONTENTFILTER
o DENYIP
o LOGCONSOLE
o LOGEMS
o LOGFILE
o LOGFORMATCONSOLE
o LOGFORMATFILE
o LOGFORMATEMS
o LOGLEVELFILE
o LOGLEVELCONSOLE
o LOGLEVELEMS
o LOGMEMORY
o MAXSESSIONS
(only in applicable run modes)
o TRUST
(only in run modes ending with a "C" and in run mode EXPANDS)
• execute the following additional commands
o LOGMESSAGE
o RELOAD CERTIFICATES
o SSLINFO
HP NonStop SSL Reference Manual SSLCOM Command Interface • 91
Page 92

Usage of SSLCOM: a Sample Session
The usage of SSLCOM is similar to the HP PATHCOM program. You connect to an existing HP NonStop SSL instance
using the OPEN command, then you issue commands against that instance of HP NonStop SSL. The HELP command
will give you a brief overview of the supported commands.
The following example session illustrates how to:
3. Start SSLCOM and connect to a HP NonStop SSL instance running with the process name "$TELS"
4. Use the STATUS command to view the current status of HP NonStop SSL
5. Use the SHOW command to view the current settings of LOGLEVEL, LOGCONSOLE, LOGFILE and
LOGMEMORY
6. Use the SET command to change the value of the LOGLEVEL parameter.
15> SSLCOM $TELS
GFTCOM^H16^06FEB03
OPEN $ TELS
% status
status
----------------------------------------------------------HP NonStop SSLOBJ version T9999G06_15Sep2003_comForte_SSLD_S40_1031
----------------------------------------------------------Startup configuration:
[def ] ALLOWIP <*>
[def ] CACERTS <CACERT>
[def ] CIPHERSUITES <0.4,0.10,0.5>
[def ] DELAYRECEIVE <0>
[def ] DENYIP <>
[def ] LICENSE <LICENSE>
[par ] LOGCONSOLE <*>
[run ] LOGFILE <lproxysl>
[def ] LOGFORMAT <76>
[def ] LOGLEVEL <50>
[def ] LOGMAXDUMP <100>
[def ] LOGMAXFILELENGTH <20000>
[def ] LOGMEMORY <0>
[def ] MAXVERSION <3.1>
[def ] MINVERSION <3.0>
[run ] PORT <32005>
[def ] RANDOMFEED <64>
[def ] SERVCERT <SERVCERT>
[def ] SERVKEY <SERVKEY>
[def ] SERVKEYPASS <??11??>
[def ] SLOWDOWN <0>
[def ] SUBNET <$ZTC0>
[def ] TARGETHOST <127.0.0.1>
[run ] TARGETPORT <65023>
[def ] TARGETSUBNET <$ZTC0>
[def ] TESTWRONGDATASOCKET <0>
----------------------------------------------------------PROXYS mode
active sessions right now: 3
maximum number of active sessions: 25
----------------------------------------------------------current heap size: 2506752
current mem pages: 115
-----------------------------------------------------------
----------------------------------------------------------Root Certificate Info:
MD5 fingerprint <4DFF502FD33EB41911ACE1943DB3DCCA>
SHA-1 fingerprint <A71418323DDCD3140460125D3321503EB2356FE9>
----------------------------------------------------------% show
92 • SSLCOM Command Interface HP NonStop SSL Reference Manual
Page 93

show
LOGLEVEL 50
LOGFILE lproxysl
LOGCONSOLE *
LOGMEMORY 0
% set loglevel 30
set loglevel 30
log level was set to 30
% exit
exit
16>
Supported Commands
The following comma nds are supported:
• OPEN <processname>: connects to an instance of HP NonStop SSL running. The process name may also be
supplied as runtime parameter as shown in the example above.
• HELP: lists supported commands.
• STATUS: shows current status. This includes the display of the following information:
o The startup configuration of HP NonStop SSL.
o The current configuration of HP NonStop SSL. The current configuration will differ from the startup
configuration when SET commands have been used from within SSLCOM to change values.
o In run modes ending with an "S", the fingerprint of the root certificate will be displayed.
o The number of sockets as well as the CPU ms used by HP NonStop SSL will be displayed.
• SHOW: shows current values of parameters which can be altered using SSLCOM.
• SET <parameter> <value>: changes a parameter.
• SSLINFO: displays the local certificate chain when HP NonStop SSL is running as SSL server.
• RELOAD CERTIFICATES: changes the server certificate chain at run time.
• CONNECTIONS [, DETAIL]: display on overvie w of the current open con ne c tions of HP NonStop SSL.
• CONNECTIONS, STATS: displays an extended usage statistics for the run modes PROXYS and PROXYC.
This statistic will yield information on how many different remote IP addresses are connecting to HP NonStop
SSL.
• INFO CONNECTION: displays detailed information about a single connection.
• RENEGOTIATE CONNECTION: fo rc e s SS L ke y renegotiation for a si ngl e c onnection.
• LOGMESSAGE <level> <text>: a log message with the level and text specified will be generated. This allows
testing the current log settings.
• ROLLOVER LOGFILE: a log file rollover will be enforced regardless of the current size of the log file.
Multiple commands can be concatenated with semicolons in-between.
HP NonStop SSL Reference Manual SSLCOM Command Interface • 93
Page 94

The CONNECTION Commands
In the run modes TELNETS, PROXYS, PR OX YC , FTPS and FTPC, HP NonStop SSL will have a set of TCP/IP
connections open duri ng normal operation. T he number of open connect i ons can vary between zer o and several hundred.
With the commands described in the following sections, HP NonStop SSL can display information about the
connections.
CONNECTIONS
The CONNECTIONS command displays an overview of all currently open connections handled by HP NonStop SSL.
The following exampl e sho w s the output of HP NonSto p S SL running in TELNETS mode wi th three proxy connections
handled by HP NonStop SSL:
CONNECTIONINFOFORMAT EXTENDED (default startin g HP NonStop SSL AAE):
% connections
connections
+-----+-----------------------------------------------------------------------+
| Port| Connection Information |
+-----+-----------------------------------------------------------------------+
| 6828| Incoming peer : 192.168.113.4:37638 |
| | Incoming local : 10.0.0.194:11011 |
| | Outgoing local : 127.0.0.1:6828 |
| | Outgoing peer : 127.0.0.1:23 |
+-----+-----------------------------------------------------------------------+
| 6829| Incoming peer : 192.168.113.4:37640 |
| | Incoming local : 10.0.0.194:11011 |
| | Outgoing local : 127.0.0.1:6829 |
| | Outgoing peer : 127.0.0.1:23 |
+-----+-----------------------------------------------------------------------+
| 6830| Incoming peer : 192.168.113.4:37641 |
| | Incoming local : 10.0.0.194:11011 |
| | Outgoing local : 127.0.0.1:6830 |
| | Outgoing peer : 127.0.0.1:23 |
+-----+-----------------------------------------------------------------------+
+--------------------------------- END ---------------------------------------+
%
CONNECTIONINFOFORMAT ORIGINAL (default before HP NonStop SSL AAE):
% connections
connections
| Port|--------remote connection----------|----------local connection---------|
| 6831|10.0.0.194:11011<--192.168.113.4:37706|127.0.0.1:6831-->127.0.0.1:23 |
| 6832|10.0.0.194:11011<--192.168.113.4:37707|127.0.0.1:6832-->127.0.0.1:23 |
| 6833|10.0.0.194:11011<--192.168.113.4:37708|127.0.0.1:6833-->127.0.0.1:23 |
%
CONNECTIONINFOFORMAT CS V:
% connections
connections
Port,Local Conn. Local IP, Local Conn. Local Port,Direction,Local Conn. Remote IP,
Local Conn. Remote Port, Direction, Remote Conn. Local IP, Remote Conn. Local Port,
Remote Conn. Remote IP, Remote Conn. Remote Port
6837,10.0.0.194,11011,<--,192.168.113.4,37814,127.0.0.1,6837,-->,127.0.0.1,23
6838,10.0.0.194,11011,<--,192.168.113.4,37815,127.0.0.1,6838,-->,127.0.0.1,23
6839,10.0.0.194,11011,<--,192.168.113.4,37817,127.0.0.1,6839,-->,127.0.0.1,23
%
94 • SSLCOM Command Interface HP NonStop SSL Reference Manual
Page 95

Note: The first column contains the local port of the connection. This number is used to access an individual session with
the INFO CONNECTION or RENEGOTIATE CONNECTION commands.
CONNECTIONS, DETAIL
The CONNECTIONS, DETAIL command displays the list of connection with some additional information to each line.
CONNECTIONINFOFORMATDETAILED EXTENDED (default since HP NonStop SSL AAE):
% connections, detail
connections, detail
+-----+-----------------------------------------------------------------------+
| Port| Connection Information |
+-----+-----------------------------------------------------------------------+
| 6837| Incoming peer : 192.168.113.4:37814 |
| | Incoming local : 10.0.0.194:11011 |
| | Outgoing local : 127.0.0.1:6837 |
| | Outgoing peer : 127.0.0.1:23 |
| | Handshake(s) : 1 |
| | First Handshake: 30Jul12-11:25:09 |
| | Last Handshake : 30Jul12-11:25:09 |
+-----+-----------------------------------------------------------------------+
| 6838| Incoming peer : 192.168.113.4:37815 |
| | Incoming local : 10.0.0.194:11011 |
| | Outgoing local : 127.0.0.1:6838 |
| | Outgoing peer : 127.0.0.1:23 |
| | Handshake(s) : 1 |
| | First Handshake: 30Jul12-11:25:12 |
| | Last Handshake : 30Jul12-11:25:12 |
+-----+-----------------------------------------------------------------------+
| 6839| Incoming peer : 192.168.113.4:37817 |
| | Incoming local : 10.0.0.194:11011 |
| | Outgoing local : 127.0.0.1:6839 |
| | Outgoing peer : 127.0.0.1:23 |
| | Handshake(s) : 1 |
| | First Handshake: 30Jul12-11:25:14 |
| | Last Handshake : 30Jul12-11:25:14 |
+-----+-----------------------------------------------------------------------+
+--------------------------------- END ---------------------------------------+
%
Note: The EXTENDED format can be viewed with the common width of 80 characters on the terminal emulator
CONNECTIONINFOFORMATDETAILED ORIGINAL (def a u lt before HP NonStop SSL AAE ):
Note: The output of the command is best viewed with a terminal emulator displaying 132 characters per line.
% connections, detail
connections, detail
| Port|--------remote connection----------|----------local connection---------|#HS|First-Handshake-|Last--Handshake-|
| 6843|10.0.0.194:11011<--192.168.113.4:38002|127.0.0.1:6843-->127.0.0.1:23 | 1|30Jul12-11:39:39|30Jul12-11:39:39|
| 6844|10.0.0.194:11011<--192.168.113.4:38003|127.0.0.1:6844-->127.0.0.1:23 | 1|30Jul12-11:39:41|30Jul12-11:39:41|
| 6845|10.0.0.194:11011<--192.168.113.4:38004|127.0.0.1:6845-->127.0.0.1:23 | 1|30Jul12-11:39:43|30Jul12-11:39:43|
%
CONNECTIONINFOFORMATDETAILED CSV:
% connections, detail
connections, detail
Port,Local Conn. Local IP, Local Conn. Local Port,Direction,Local Conn. Remote IP, Local Conn. Remote Port, Direction, Remote Conn. Local
IP, Remote Conn. Local Port, Remote Conn. Remote IP, Remote Conn. Remote Port,Handshake(s),First Handshake,Last Handshake
6840,10.0.0.194,11011,<--,192.168.113.4,37950,127.0.0.1,6840,-->,127.0.0.1,23,1,30Jul12-11:36:15,30Jul12-11:36:15
6841,10.0.0.194,11011,<--,192.168.113.4,37951,127.0.0.1,6841,-->,127.0.0.1,23,1,30Jul12-11:36:17,30Jul12-11:36:17
6842,10.0.0.194,11011,<--,192.168.113.4,37952,127.0.0.1,6842,-->,127.0.0.1,23,1,30Jul12-11:36:19,30Jul12-11:36:19
%
HP NonStop SSL Reference Manual SSLCOM Command Interface • 95
Page 96

Note: The content at the right end of the display is the abbreviated content of the section "SSL handshake information"
in the result of the INFO CONNECTION command covered in the next paragraph.
INFO CONNECTION
The INFO CONNECTION command displays detailed information about a single session as in the following example:
% info connection 3625
info connection 3625
accepting socket:
=================
<Sec rem acc PROXY>[TLS_SERVER](0/1): 10.0.0.198:8989<--10.0.1.24:2000
connecting socket:
==================
<Pln loc conn PROXY>: 127.0.0.1:3625-->127.0.0.1:23
peer certificate information:
=============================
issuer=/O=VeriSign, Inc./OU=VeriSign Trust Network/OU=www.verisign.com/repository/RPA Incorp. By Ref.,LIAB.LTD(c)98/CN=VeriSign C
lass 1 CA Individual Subscriber-Persona Not Validated
subject=/O=VeriSign, Inc./OU=VeriSign Trust Network/OU=www.verisign.com/repository/RPA Incorp. by Ref.,LIAB.LTD(c)98/OU=Persona Not
Validated/OU=Digital ID Class 1 - Microsoft Full Service/CN=Thomas R. Burg/emailAddress=thomasburg@web.de
not_valid_before=Feb 20 00:00:00 2004 GMT
not_valid_after=Feb 19 23:59:59 2005 GMT
md5=C7D442A51F7790721E3F36C383E58DF5
SSL handshake information:
==========================
1 SSL handshakes; First at 05Aug04,21:26:23, Last at 05Aug04,21:26:23
%
The command displays details about:
• Accepting socket: the socket of the application which connects to HP NonStop SSL. For instance in TELNETS
mode, that is the connection to the remote client using SSL
• Connecting socket: the socket on which HP NonStop SSL connects to the target application. In TELNETS
mode, that is the connection to TELSERV
• Peer certificate information: if the accepting socket in TELNETS or PROXYS mode has sent a client certificate,
the contents are displayed here. See section "Requesting the SSL Client to Present a Client Certificate" for
details on enforcing client authentication.
• SSL handshake information: displays the number of SSL handshakes on the accepting socket and the timestamp
of the first and last handshake.
RENEGOTIATE CONNECTION
The SSL protocol allows both parties to initiate a new SSL handshake to refresh the session keys. The RENEGOTIATE
CONNECTION command lets HP NonStop SSL do that from the server side. The following two log messages show that
a renegotiation has been successful.
22:34:08.19|50|T3|session 10.0.0.198:8989<--10.0.1.24:2002: SSL renegotiation starting
22:34:10.35|50|T3|session 10.0.0.198:8989<--10.0.1.24:2002: cipher suite TLSv1/RC4-MD5 negotiated
The output of the INFO CONNECTION command will display the fact that a new handshake has happened as well:
%info connection 3625
info connection 3625
accepting socket:
=================
<Sec rem acc PROXY>[TLS_SERVER](0/1): 10.0.0.198:8989<--10.0.1.24:2000
connecting socket:
==================
<Pln loc conn PROXY>: 127.0.0.1:3625-->127.0.0.1:23
peer certificate information:
=============================
issuer=/O=VeriSign, Inc./OU=VeriSign Trust Network/OU=www.verisign.com/repository/RPA Incorp. By Ref.,LIAB.LTD(c)98/CN=VeriSign C
lass 1 CA Individual Subscriber-Persona Not Validated
subject=/O=VeriSign, Inc./OU=VeriSign Trust Network/OU=www.verisign.com/repository/RPA Incorp. by Ref.,LIAB.LTD(c)98/OU=Persona Not
Validated/OU=Digital ID Class 1 - Microsoft Full Service/CN=Thomas R. Burg/emailAddress=thomasburg@web.de
96 • SSLCOM Command Interface HP NonStop SSL Reference Manual
Page 97

not_valid_before=Feb 20 00:00:00 2004 GMT
not_valid_after=Feb 19 23:59:59 2005 GMT
md5=C7D442A51F7790721E3F36C383E58DF5
SSL handshake information:
==========================
2 SSL handshakes; First at 05Aug04,21:26:23, Last at 05Aug04,22:38:07
%
SSLINFO Command
The SSLCOM command SSLINFO will display the local certificate chain configured through the parameters
SERVCERT and CACERTS when HP NonStop SSL is running as an SSL server.
RELOAD CERTIFICATES Command
The SSLCOM command RELOAD CERTIFICATES allows the changing of the server certificate chain without having
to restart HP NonStop SSL. The command has two possible syntaxes:
1. If used without an additional parameter, the command assumes the configuration parameters for the new
certificate chain (SERVCERT, SERVKEY, SERVKEYPASS, CACERTS) are present in the currently
configured CONFIG2 file. If no CONFIG2 file has been configured for startup, the command will fail.
2. If used with an additional parameter containing the filename of a configuration file in double quotes, the new
values will be loaded from that file.
Some considerations for the command:
• The success or failure of the command will be returned to SSLCOM. If the command fails, the prior certificate
chain will remain active.
• HP NonStop SSL does some limited tests on the new certificate chain. However, some errors in the certificate
chain cannot be detected by merely loading the certificates. It is thus recommended to immediately check the
new certificate chain with the SSLINFO command as well as with creating a new client connection.
• If the syntax 2 of the command is used and if the name of the config file in the command differs from the
startup CONFIG2 file, the changes will *not* be permanent unless the startup configuration of HP NonStop
SSL is updated with the changes. It is highly recommended to always keep the certificate chain information in a
CONFIG2 and to use syntax a) as in that case the changes *will* be permanent without further action.
HP NonStop SSL Reference Manual SSLCOM Command Interface • 97
Page 98

98 • SSLCOM Command Interface HP NonStop SSL Reference Manual
Page 99

SSL Reference
Secure Sockets Layer
The SSL (secure sockets layer) protocol is an open, non-proprietary protocol originally designed by Netscape. It has
been standardized by the IETF as Transport Layer Security (TLS) protocol. SSL has been universally accepted on the
Internet for authenticated and encrypted communication between clients and servers and is used in millions of browsers
around the world.
HP NonStop SSL implements SSL using OpenSSL (© acknowledged).
SSL Features
The SSL protocol has the following basic properties:
• Privacy
After an initial handshake, client and server agree on a session key whi ch is used for a symmet ri c cipher
algorithm to encrypt the session's payload. Example ciphers are RC4, 3-DES or AES.
• Mutual Authenticity
Using a public-key cryptography and digital signatures, the SSL protocol allows to authenticate the server or
client before exchanging confidential data.
• Session Integrity
SSL ensures the integrity of the messages exchanged allowing client and server to verify if it has been modified
by an attacker, using a Message Authentication Code (MAC). Example MAC algorithms are MD5 or SHA.
Further References
For more information on SSL we recommend the following reading:
• Eric Rescorla, "SSL and TLS: Designing and Building Secure Systems", Addison-Wesley Professional 2000
• Stephen Thomas, "SSL and TLS essentials", Wiley Publishing 2000
• http://en.wikipedia.org/wiki/Transport_Layer_Security
For information on public key cryptography and digital signatures on relation to SSL please read:
• Russ Housley: "Planning for PKI: Best Practices Guide for Deploying Public Key Infrastructure", Wiley
Publishing 2001
• SSL Certificates and PKI in the NonStop World - and Other Worlds, The Connecti on May/June 2004.
• http://en.wikipedia.org/wiki/Pki
HP NonStop SSL Reference Manual SSL Reference • 99
Page 100

Implementation Overvie w
Cipher Suites
HP NonStop SSL uses the SSL protocol - as used in standard browsers and servers - for session security. It supports SSL
2.0, SSL 3.0 and the lates t version SSL 3.1, whic h ha s been standardized by the IETF as Transport Layer Security (TLS)
protocol. This protocol allows for negotiating cipher suites for secure exchange of data as well as exchanging the
necessary secrets at the beginning of each session in a way which is particularly strengthened against replay, insertion
and man-in-the-middle attacks.
Note: Usage of SSL 2.0 is not recommended as it has some serious design flaws.
The selection of cipher suites is configurable, in order to make our solution tolerable to the needs of individual security
requirements:
• RSA certificate-based key-exchange, where the server certificate is validated in the SSL client.
• Either of 3-DES, RC4 or AES as bulk-ciphers.
• Either of HMAC-SHA or HMAC-MD5 as message authentication codes.
• The actual choice of the cipher suite is at the discretion of the server and configurable.
The key lengths for symmetric encryption are:
• (Triple-DES) 3x56 = 168 bits.
• RC4 = 128 bits
• AES = 128 or 256 bits
The key lengths for message authentication are:
• (HMAC-MD5)= 128 bit
• (HMAC-SHA)= 160 bit
The cipher block chaining mode (CBC) in 3-DES guarantees the utmost security against replay/insertion as well as
brute force attacks. At the current state of computer technology triple encryption is no longer a (speed) obstacle.
The authenticity of messages is granted by the 160 bit SHA hash algorithm. (HMAC-SHA) or by the 128 bit MD5
hash algorithm (HMAC-MD5).
Modulus lengths of up to 81 92 bits are supported for public key values.
Auditing
An indispensable part of every security strategy is Securi t y Auditing. The TLS prot ocol defines 23 Alert Messages,
which may be sent or received. All these alerts are handled by HP NonStop SSL; most of them are fatal for the
connection. HP NonStop SSL logs these alerts to the configured log targets e.g. on the console.
X.509 Certificates
Certificates are a form of digital id issued by a certificate authority. A certificate authority signs a certificate with its
private key, vouching for the correctness of the certificate contents. Certificates used with SSL are standardized by the
X.509 specification. It is possible to built hierarchies of certification authorities, where the top level authority is called
the root CA. The root CA's certificate is issued by the root CA itself; it is a so called self-signed certificate.
For SSL, the certificates are used to provide mutual authenticity. Before establishing a session, clients can authenticate a
server to ensure it is connecting to a trusted site (SSL server authentication). In this case the server presents its "server
100 • SSL Reference HP NonStop SSL Reference Manual
 Loading...