

Page 1
User Guide
HP Neverstop Laser 1000 series
Page 2

Copyright and License
Trademark Credits
© Copyright 2020 HP Development Company,
L.P.
Reproduction, adaptation, or translation
without prior written permission is prohibited,
except as allowed under the copyright laws.
The information contained herein is subject to
change without notice.
The only warranties for HP products and
services are set forth in the express warranty
statements accompanying such products and
services. Nothing herein should be construed
as constituting an additional warranty. HP shall
not be liable for technical or editorial errors or
omissions contained herein.
Apple and the Apple logo are trademarks of
Apple Inc., registered in the U.S. and other
countries.
OS X is a trademark of Apple Inc., registered in
the U.S. and other countries.
AirPrint is a trademark of Apple Inc., registered
in the U.S. and other countries.
iPhone is a trademark of Apple Inc., registered
in the U.S. and other countries.
Microsoft® and Windows® are U.S. registered
trademarks of Microsoft Corporation.
Amazon, Kindle, and all related logos are
trademarks of Amazon.com, Inc. or its
ailiates.
Wi-Fi and Wi-Fi Direct are registered
trademarks of the Wi-Fi Alliance. (See
https://www.wi-.org/who-we-are/our-brands
for more details.)
Page 3

Table of contents
1 Get started ................................................................................................................................................... 1
Printer views .......................................................................................................................................................... 2
Printer front view ................................................................................................................................ 2
Printer back view ................................................................................................................................. 2
Control panel features ........................................................................................................................................... 3
Base models ........................................................................................................................................ 3
Wireless models .................................................................................................................................. 4
Use the HP Smart app to print, copy, scan, and troubleshoot .............................................................................. 6
2 Connect your printer ...................................................................................................................................... 7
Connect to a wireless network with a router ......................................................................................................... 8
Connect your printer to a wireless network using Wi-Fi Protected Setup (WPS) ............................... 8
Connect your printer to a wireless network using HP printer software ............................................. 8
Connect wirelessly without a router ................................................................................................... 9
Wireless settings ................................................................................................................................................. 12
Connect to a wired (Ethernet) network ............................................................................................................... 13
3 Congure your printer .................................................................................................................................. 15
Congure the printer using the HP Embedded Web Server (EWS) and HP Device Toolbox (Windows) .............. 16
Accessing and Using the Embedded Web Server (EWS) ................................................................... 16
Opening the HP Embedded Web Server (EWS) from the software (Windows 7) ........... 16
Opening the HP Embedded Web Server (EWS) from a web browser ............................. 16
Opening the HP Embedded Web Server (EWS) when using a Wi-Fi Direct connection .. 17
Navigating the HP Embedded Web Server ..................................................................... 17
Congure IP network settings ........................................................................................................... 19
View or change network settings ................................................................................... 19
Rename the printer on a network ................................................................................... 19
Manually congure IPv4 TCP/IP parameters .................................................................. 19
Assign or change the system password using the HP Embedded Web Server ................................ 19
Change energy-conservation settings ............................................................................................. 20
Set the Sleep/Auto O After Inactivity setting ............................................................... 20
ENWW iii
Page 4

Set the Shut Down After Inactivity delay and congure the printer to use 1 watt or
less of power ................................................................................................................... 20
Set the Delay Shut Down setting .................................................................................... 21
Update the rmware ............................................................................................................................................ 22
Update the rmware using the Firmware Update Utility .................................................................. 22
Change the printer connection type (Windows 7) ............................................................................................... 23
4 Load media ................................................................................................................................................. 25
Congure the input tray for dierent paper sizes ............................................................................................... 25
Load paper ........................................................................................................................................................... 27
Load and print envelopes .................................................................................................................................... 30
Load and print labels ........................................................................................................................................... 32
5 Print ........................................................................................................................................................... 35
Print using a Windows computer ......................................................................................................................... 36
Select the paper type (Windows) ...................................................................................................... 36
Manually print on both sides (Windows) ........................................................................................... 37
Print multiple pages per sheet (Windows) ........................................................................................ 37
Print using a Mac computer ................................................................................................................................. 38
Print with mobile devices .................................................................................................................................... 39
6 Manage toner, media, and parts .................................................................................................................... 41
Check the toner level ........................................................................................................................................... 42
Reload toner ........................................................................................................................................................ 43
Replace the imaging drum ................................................................................................................................... 46
Order supplies, media, and parts ........................................................................................................................ 48
7 Solve problems ............................................................................................................................................ 49
HP support ........................................................................................................................................................... 50
Contact HP ......................................................................................................................................... 50
Register printer ................................................................................................................................. 50
Additional warranty options ............................................................................................................. 50
Additional information ...................................................................................................................... 51
Interpret control-panel light patterns ................................................................................................................. 52
Restore the factory-set defaults ......................................................................................................................... 55
Printer does not pick up paper or misfeeds ........................................................................................................ 56
Introduction ....................................................................................................................................... 56
The product does not pick up paper ................................................................................................. 56
The product picks up multiple sheets of paper ................................................................................ 56
Clear paper jams .................................................................................................................................................. 57
iv ENWW
Page 5

Introduction ....................................................................................................................................... 57
Jam locations ..................................................................................................................................... 57
Frequent or recurring paper jams ..................................................................................................... 58
Clear jams from the input tray .......................................................................................................... 59
Clear jams from inside the product ................................................................................................... 61
Clear jams from the output areas ..................................................................................................... 62
Improve print quality ........................................................................................................................................... 63
Introduction ....................................................................................................................................... 63
Reprint the document ....................................................................................................................... 63
Check the toner level ......................................................................................................................... 63
Update the printer rmware ............................................................................................................. 63
Print from a dierent software program .......................................................................................... 63
Check the paper type and print quality settings for the print job .................................................... 63
Check the paper type loaded in the printer .................................................................... 64
Check the paper type and print quality settings (Windows) .......................................... 64
Check the paper type and print quality settings (OS X) ................................................. 64
Visually inspect the imaging drum .................................................................................................... 65
Check paper and the printing environment ...................................................................................... 65
Step one: Use paper that meets HP specications ........................................................ 65
Step two: Check the environment .................................................................................. 65
Adjust Print Density ........................................................................................................................... 66
Resolving print quality problems ........................................................................................................................ 67
Solve wireless network problems ....................................................................................................................... 72
Introduction ....................................................................................................................................... 72
Wireless connectivity checklist ......................................................................................................... 72
Perform a wireless network diagnostic test ..................................................................................... 73
The printer does not print after the wireless conguration completes ........................................... 73
The printer does not print, and the computer has a third-party rewall installed .......................... 74
The wireless connection does not work after moving the wireless router or printer ...................... 74
Cannot connect more devices to the wireless printer (Wi-Fi Direct) ................................................ 74
The wireless printer loses communication when connected to a VPN ............................................. 74
The network does not appear in the wireless networks list ............................................................ 75
The wireless network is not functioning ........................................................................................... 75
Reduce interference on a wireless network ...................................................................................... 75
Solve Ethernet connection problems .................................................................................................................. 77
Appendix A Printer specications .................................................................................................................... 79
Technical specications ....................................................................................................................................... 79
Supported operating systems ............................................................................................................................. 79
Printer dimensions .............................................................................................................................................. 81
Power consumption, electrical specications, and acoustic emissions ............................................................. 81
ENWW v
Page 6

Operating-environment range ............................................................................................................................ 81
Warning icons ....................................................................................................................................................... 82
Laser Warning ...................................................................................................................................................... 83
Appendix B Service and support ...................................................................................................................... 85
HP limited warranty statement ........................................................................................................................... 86
UK, Ireland, and Malta ....................................................................................................................... 88
Austria, Belgium, Germany, and Luxemburg .................................................................................... 88
Belgium, France, and Luxemburg ..................................................................................................... 89
Italy .................................................................................................................................................... 90
Spain .................................................................................................................................................. 90
Denmark ............................................................................................................................................ 91
Norway .............................................................................................................................................. 91
Sweden .............................................................................................................................................. 91
Portugal ............................................................................................................................................. 92
Greece and Cyprus ............................................................................................................................. 92
Hungary ............................................................................................................................................. 92
Czech Republic ................................................................................................................................... 93
Slovakia ............................................................................................................................................. 93
Poland ................................................................................................................................................ 93
Bulgaria ............................................................................................................................................. 94
Romania ............................................................................................................................................. 94
Belgium and the Netherlands ........................................................................................................... 94
Finland ............................................................................................................................................... 95
Slovenia ............................................................................................................................................. 95
Croatia ............................................................................................................................................... 95
Latvia ................................................................................................................................................. 95
Lithuania ............................................................................................................................................ 96
Estonia ............................................................................................................................................... 96
Russia ................................................................................................................................................ 96
HP's Premium Protection Warranty: Neverstop Toner Reload Kit and HP Laser Imaging Drum limited
warranty statement ............................................................................................................................................. 97
HP policy on non-HP supplies ............................................................................................................................. 98
HP anticounterfeit Web site ................................................................................................................................. 98
Data stored on the HP Toner Reload Kit and the HP Laser Imaging Drum ......................................................... 99
End User License Agreement ............................................................................................................................. 100
Customer self-repair warranty service ............................................................................................................. 105
Customer support .............................................................................................................................................. 106
Appendix C Environmental product stewardship program ................................................................................ 107
Protecting the environment .............................................................................................................................. 108
vi ENWW
Page 7

Ozone production .............................................................................................................................................. 108
Power consumption ........................................................................................................................................... 108
Paper use ........................................................................................................................................................... 109
Plastics ............................................................................................................................................................... 109
HP Neverstop printing supplies ......................................................................................................................... 109
Paper .................................................................................................................................................................. 109
Material restrictions .......................................................................................................................................... 109
Battery information ........................................................................................................................................... 110
Disposal of waste equipment by users (EU and India) ...................................................................................... 111
Electronic hardware recycling ........................................................................................................................... 111
Hardware recycling information (Brazil) ........................................................................................................... 112
Chemical substances ......................................................................................................................................... 112
Product Power Data per European Union Commission Regulation 1275/2008 ............................................... 112
SEPA Ecolabel User Information (China) ........................................................................................................... 113
The regulation of the implementation on China energy label for printer, fax, and copier .............................. 113
Restriction of Hazardous Substances statement (India) .................................................................................. 113
WEEE (Turkey) .................................................................................................................................................... 113
The Table of Hazardous Substances/Elements and their Content (China) ....................................................... 114
Material Safety Data Sheet (MSDS) ................................................................................................................... 114
EPEAT ................................................................................................................................................................. 115
Declaration of the Presence Condition of the Restricted Substances Marking (Taiwan) ................................. 116
For more information ........................................................................................................................................ 118
Appendix D Regulatory information ............................................................................................................... 119
Regulatory statements ..................................................................................................................................... 120
European Union Regulatory Notice ................................................................................................. 120
Regulatory model identication numbers ...................................................................................... 120
FCC regulations ................................................................................................................................ 120
Canada - Industry Canada ICES-003 Compliance Statement ......................................................... 120
Power cord instructions .................................................................................................................. 121
Laser safety ..................................................................................................................................... 121
Laser statement for Finland ........................................................................................................... 122
Nordic Statements (Denmark, Finland, Norway, Sweden) ............................................................. 122
Eurasian Conformity (Armenia, Belarus, Kazakhstan, Kirgizstan, Russia) .................................... 123
Производитель и дата производства ....................................................................... 123
Өндіруші жəне өндіру мерзімі ................................................................................... 123
Местные представители ............................................................................................ 123
Жергілікті өкілдіктері ................................................................................................. 123
Wireless statements .......................................................................................................................................... 124
FCC compliance statement—United States .................................................................................... 124
Brazil ANATEL statement ................................................................................................................ 124
ENWW vii
Page 8

Canadian statements ...................................................................................................................... 124
Products with 5 GHz Operation Industry of Canada ....................................................................... 124
Exposure to Radio Frequency Radiation (Canada) ......................................................................... 124
European Union regulatory notice .................................................................................................. 125
Notice for use in Russia ................................................................................................................... 125
Mexico statement ............................................................................................................................ 125
Vietnam Telecom wired/wireless marking for ICTQC Type approved products ............................. 125
Index ........................................................................................................................................................... 127
viii ENWW
Page 9

1 Get started
●
Printer views
●
Control panel features
●
Use the HP Smart app to print, copy, scan, and troubleshoot
ENWW 1
Page 10
Printer views
●
Printer front view
●
Printer back view
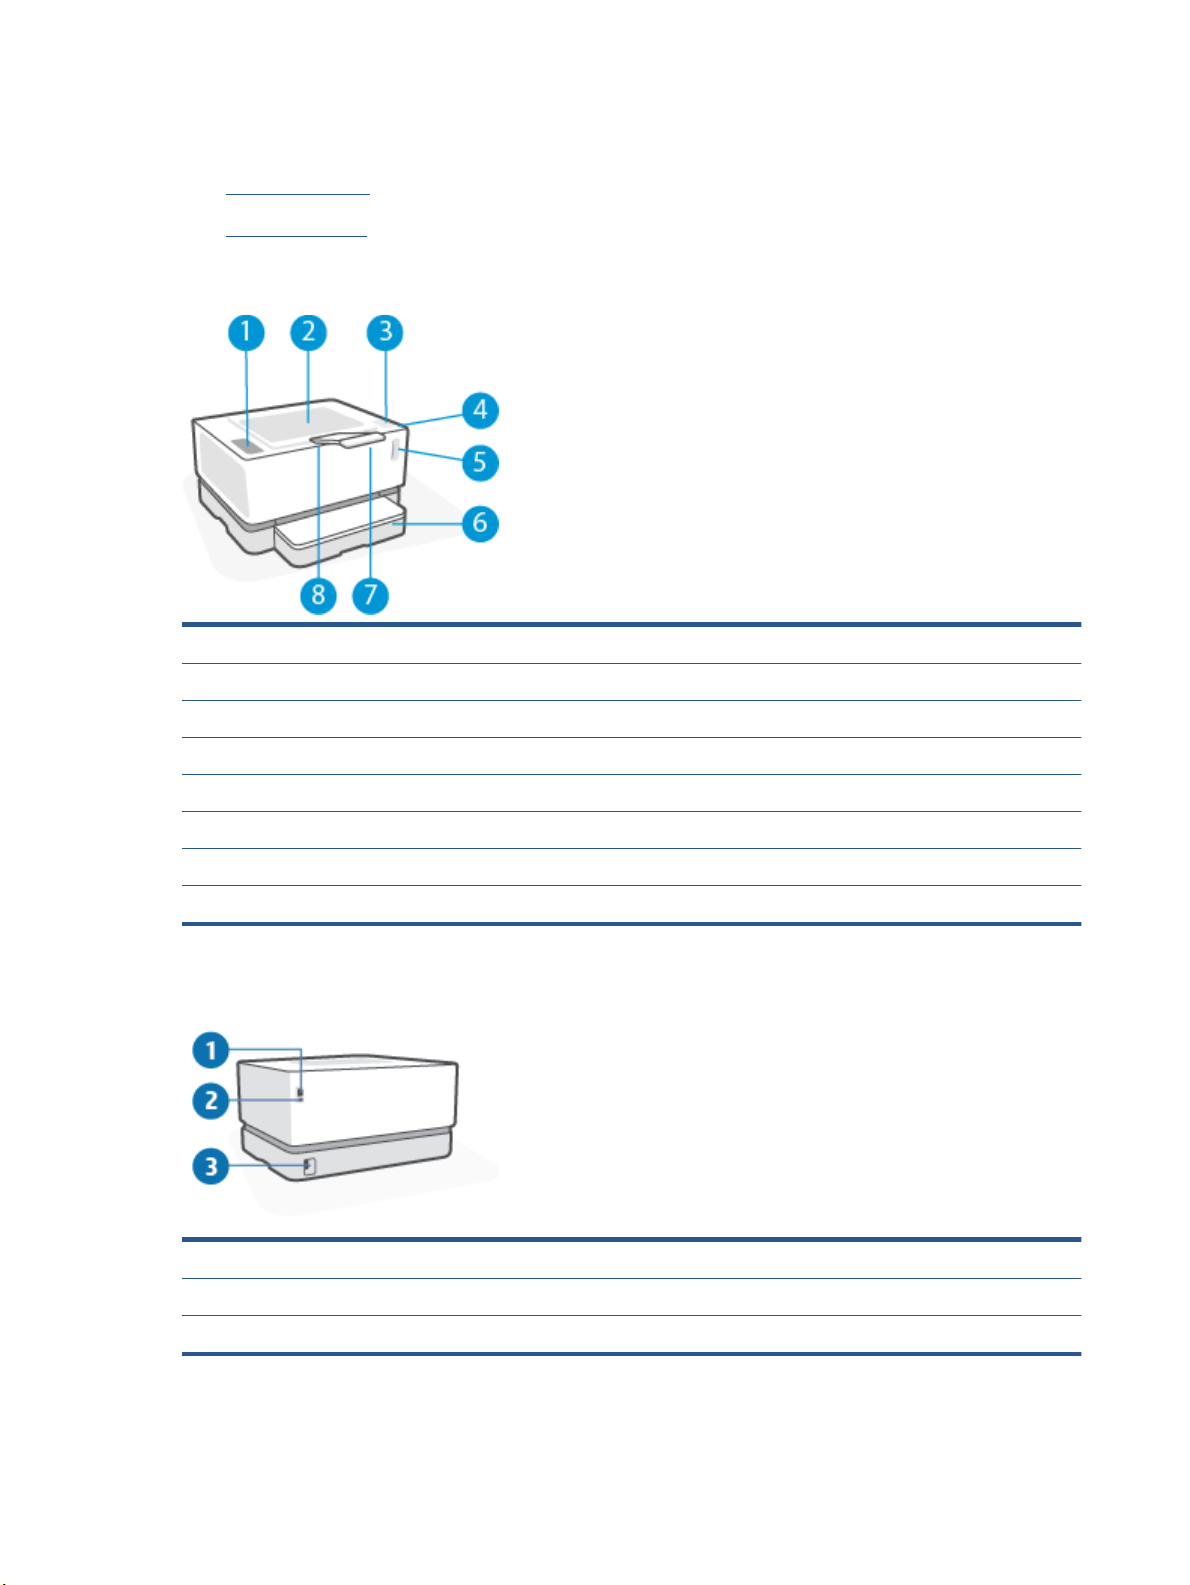
Printer front view
1 Control panel
2 Output bin
3 Reload port
4 Reload Status light
5 Toner level indicator
6 Input tray
7 Output bin extension
8 Finger recess
Printer back view
1 Ethernet network port (Ethernet models only)
2 USB port
3 Power connection
2 Chapter 1 Get started ENWW
Page 11
Control panel features
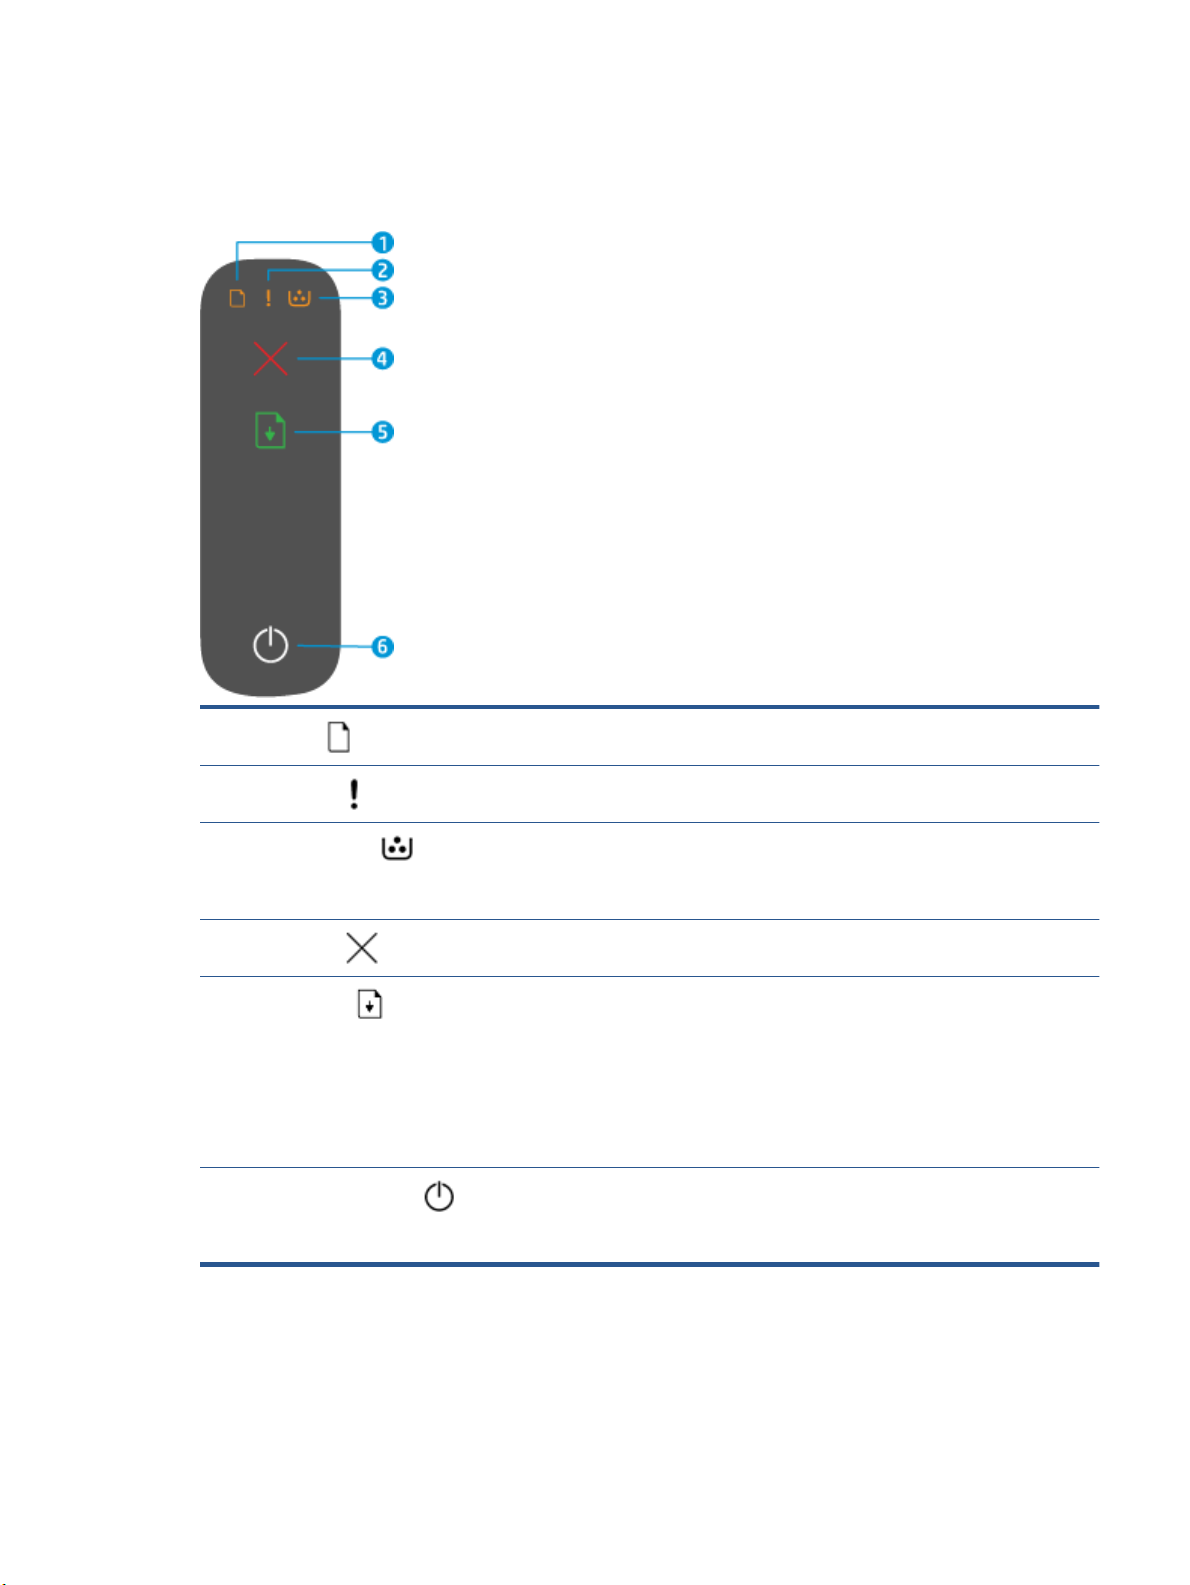
Base models
1
Paper light
2
Attention light
3
Imaging Drum light
4
Cancel button
5
Resume button
6
Power button/Ready light
When you start a print or copy job, the Paper light blinks if the input tray is out of paper.
The light turns on (solid) when there is a paper error.
The Attention light blinks when the printer requires user attention. If the Attention light
is on solid, there is a service error.
When this light is on (solid), it indicates that the imaging drum is nearing the end of its
useful life, or, if the Attention light is blinking at the same time, that there is a problem
with the imaging drum. If the Imaging Drum light blinks, you must replace the imaging
drum to continue printing.
Press this button to cancel a job.
Press this button for the following actions:
● If the printer is in a error or prompt state, with the Resume light on, press the
button to clear the error and resume printing.
● In manual duplex mode, press this button to print the second side of the
document.
● Press and hold this button for 3 seconds to print a conguration page.
Use this button to turn the printer on or o.
The Ready light is on when the printer is ready to print. It blinks when the printer is
receiving print data and dims when the printer is in Sleep mode.
ENWW Control panel features 3
Page 12
Wireless models
1
Paper light
2
Attention light
3
Imaging Drum light
4
Cancel button
5
Resume button
6
Wireless button and light
The Paper light blinks when the input tray is out of paper, and is on (solid) when there is
a paper error.
The Attention light blinks when the printer requires user attention. If the Attention light
is on solid, there is a service error.
When this light is on (solid), it indicates that the imaging drum is nearing the end of its
useful life, or, if the Attention light is blinking at the same time, that there is a problem
with the imaging drum. If the Imaging Drum light blinks, you must replace the imaging
drum to continue printing.
Press this button to cancel a job.
Press this button for the following actions:
● If the printer is in a error or prompt state, with the Resume light on, press the
button to clear the error and resume printing.
● In manual duplex mode, press this button to print the second side of the
document.
● Press and hold this button for 3 seconds to print a conguration page.
Press this button to turn the wireless feature on or o.
Press and hold this button to congure a WPS connection.
If the Wireless button light glows steady blue, there is a stable wireless connection. If it
is blinking blue, the printer is in wireless connection setup mode or WPS conguration is
in progress. If the light glows amber, the printer cannot connect to the wireless network,
or there is a WPS error.
4 Chapter 1 Get started ENWW
Page 13

7
Wi-Fi Direct button
Press this button to turn Wi-Fi Direct on or o. Press this button to complete a Wi-Fi
Direct connection if it is blinking.
8
Power button/Ready light
Use this button to turn the printer on or o.
The Ready light is on when the printer is ready to print. It blinks when the printer is
receiving print data and dims when the printer is in Sleep mode.
ENWW Control panel features 5
Page 14

Use the HP Smart app to print, copy, scan, and troubleshoot
HP Smart helps you to set up, copy, scan, print, share, and manage your HP printer. You can share documents
and images through email, text messages, and popular cloud and social media services (such as iCloud,
Google Drive, Dropbox, and Facebook). You can also set up new HP printers, as well as monitor and order
supplies.
The HP Smart app is compatible with the following mobile device and computer operating systems:
● iOS
● Android
● Windows 10
● Mac OS X 10.11 and later
NOTE: The HP Smart app might not be available in all languages. Some features might not be available with
all printer models.
To install the HP Smart app
▲ To install the app on your device, go to 123.hp.com and follow the onscreen instructions to access your
device’s app store.
To open the HP Smart app on a Windows 10 computer
▲ After installing the HP Smart app, from the device desktop, click Start, and then select HP Smart from
the app list.
Connect to your printer
▲ Make sure that your device is connected to the same network as the printer. Then HP Smart will
automatically detect the printer.
Get more information about the HP Smart app
For more information about using HP Smart for printing, accessing printer features, and troubleshooting
issues, go to:
● iOS/Android: www.hp.com/go/hpsmart-help
● Windows 10: www.hp.com/go/hpsmartwin-help
● Mac: http://www.hp.com/go/hpsmartmac-help
6 Chapter 1 Get started ENWW
Page 15

2 Connect your printer
●
Connect to a wireless network with a router
●
Wireless settings
●
Connect to a wired (Ethernet) network
The most up-to-date information for connecting your printer, and troubleshooting connection issues is
available online from the HP Support sites. For example, the following topics can be found there:
● Learn more about conguring your network and the printer for wireless printing.
Click here for more information.
● Learn how to nd your network security settings. Click here to go online for more information.
● Learn about the HP Print and Scan Doctor. Click here for more information.
NOTE: This utility is only available for Windows operating system.
● Use the HP online rewall troubleshooter to determine if a rewall or antivirus program is preventing
your computer from connecting to the printer and nd resolutions.
ENWW 7
Page 16

Connect to a wireless network with a router
NOTE: This section is applicable to wireless printer models only.
NOTE: Before proceeding with this section, check that your printer is not connected to your computer with a
USB or Ethernet cable. NO
Connect your printer to a wireless network using Wi-Fi Protected Setup (WPS)
Before you can connect your printer to a wireless network using WPS, make sure you have the following:
● A wireless 802.11b/g/n network that includes a WPS-enabled wireless router or access point.
NOTE: The printer only supports connections using 2.4 GHz.
● A computer connected to the wireless network that you intend to connect the printer to. Be sure you
have installed the HP printer software on the computer.
If you have a WPS router with a WPS push button, follow the Push Button method.
To use the Push Button Conguration (PBC) method
1. Press and hold the Wireless button for at least three seconds to start WPS Push Button method.
2. Press the WPS button on your router.
NOTE: The product begins a timer for approximately two minutes while a wireless connection is established.
Connect your printer to a wireless network using HP printer software
To connect the printer to an integrated wireless WLAN 802.11 network, you will need the following:
● A wireless 802.11b/g/n network that includes a wireless router or access point.
NOTE: The printer only supports connections using 2.4 GHz.
● A computer connected to the wireless network that you intend to connect the printer to.
● Network name (SSID).
● WEP key or WPA Passphrase (if needed).
To connect your printer using HP printer software
1. Depending on whether you have installed the HP printer software or not, do one of the following:
If you have not installed the HP printer software on your computer
a. Visit www.support.hp.com to download and install the printer software.
b. Follow the onscreen instructions.
If you have the HP printer software installed on your computer
a. Open the printer software.
b. In the printer software, click Tools.
8 Chapter 2 Connect your printer ENWW
Page 17

c. Click Device Setup & Software.
d. Click Connect a new device, and then follow the onscreen instructions.
2. After the printer connects successfully, the Wireless button glows blue.
Connect wirelessly without a router
NOTE: This section is applicable to wireless printer models only.
NOTE: Before proceeding with this section, check that your printer is not connected to your computer with a
USB or Ethernet cable.
With Wi-Fi Direct, you can print wirelessly from a computer, smart phone, tablet, or other wireless-capable
device—without connecting to an existing wireless network.
Guidelines for using Wi-Fi Direct
● Make sure your computer or mobile device has the necessary software.
– If you are using a computer, make sure you have installed the HP printer software.
If you have not installed the HP printer software on the computer, connect to Wi-Fi Direct rst and
then install the printer software. Select Wireless when prompted by the printer software for a
connection type.
– If you are using a mobile device, make sure you have installed a compatible printing app. For more
information, visit the HP Mobile Printing website at www.hp.com/go/mobileprinting. If a local
version of this website is not available in your country/region or language, you might be directed to
the HP Mobile Printing website in another country/region or language.
● Make sure Wi-Fi Direct for your printer is turned on.
● Up to ve computers and mobile devices can use the same Wi-Fi Direct connection.
● Wi-Fi Direct can be used regardless of whether the printer is connected to a network using a wireless
connection or not.
● Wi-Fi Direct cannot be used to connect a computer, mobile device, or printer to the Internet.
● To learn more about setting up a Wi-Fi Direct connection, visit www.hp.com/go/wpc-wirelessdirect .
To turn Wi-Fi Direct on or o from the control panel
▲ On the printer control panel, press the Wi-Fi Direct button .
When Wi-Fi Direct is turned on, the Wi-Fi Direct button glows steady white.
Wi-Fi Direct connection security setting
● If the Wi-Fi Direct connection security for the printer is Automatic, the Wi-Fi Direct password is set to
12345678 and cannot be changed.
● If the Wi-Fi Direct connection security for the printer is set to Manual, you need to do one of the
following to connect to the printer on your mobile device or compter.
ENWW Connect to a wireless network with a router 9
Page 18

– If the Wi-Fi Direct button is blinking, press it.
– If the printer prints out a page with a PIN code, use the PIN to complete the connection to the
device.
TIP:
● You can also turn on Wi-Fi Direct or change the Wi-Fi Direct connection security setting from the EWS.
● To nd the Wi-Fi Direct name and password, press and hold the Resume button on the printer for 3
seconds to print a Conguration Report.
To print from a wireless-capable mobile device that supports Wi-Fi Direct
NOTE: Available wireless connection methods vary depending on the operating system of your mobile
device. For more information, visit www.hp.com/go/wpc-wirelessdirect .
Make sure you have installed the latest version of HP Print Service Plugin on your mobile device (if using an
Android device). You can download this plugin from the Google Play application store.
1. Make sure you have turned on Wi-Fi Direct on the printer.
2. Turn on Wi-Fi Direct on your mobile device. For more information, see the documentation provided with
the mobile device.
3. From your mobile device, select a document from a print enabled application, and then select the option
to print the document.
The list of available printers appears.
4. From the list of available printers, choose the Wi-Fi Direct name.
5. Print your document.
To print from a wireless-capable mobile device that does not support Wi-Fi Direct
NOTE: Available wireless connection methods vary depending on the operating system of your mobile
device. For more information, visit www.hp.com/go/wpc-wirelessdirect .
Make sure you have installed a compatible printing app on your mobile device. For more information, visit the
HP Mobile Printing website at www.hp.com/go/mobileprinting. If a local version of this website is not
available in your country/region or language, you might be directed to the HP Mobile Printing website in
another country/region or language.
1. Make sure you have turned on Wi-Fi Direct on the printer.
2. Turn on the Wi-Fi connection on your mobile device. For more information, see the documentation
provided with the mobile device.
NOTE: If your mobile device does not support Wi-Fi, you are not able to use Wi-Fi Direct.
10 Chapter 2 Connect your printer ENWW
Page 19

3. From the mobile device, connect to a new network. Use the process you normally use to connect to a
new wireless network or hotspot. Choose the Wi-Fi Direct name from the list of wireless networks
shown. The network name is based on the name of your printer.
Enter the Wi-Fi Direct password when prompted.
4. Print your document.
To print from a wireless-capable computer
1. Make sure you have turned on Wi-Fi Direct on the printer.
2. Turn on the computer's Wi-Fi connection. For more information, see the documentation provided with
the computer.
NOTE: If your computer does not support Wi-Fi, you are not able to use Wi-Fi Direct.
3. From the computer, connect to a new network. Use the process you normally use to connect to a new
wireless network or hotspot. Choose the Wi-Fi Direct name from the list of wireless networks shown.
The network name is based on the name of your printer.
Enter the Wi-Fi Direct password when prompted.
4. Print your document.
ENWW Connect to a wireless network with a router 11
Page 20

Wireless settings
NOTE: This section is applicable to wireless printer models only.
NOTE: Before proceeding with this section, check that your printer is not connected to your computer with a
USB or Ethernet cable.
To turn on or o the wireless capability of the printer
Press the Wireless button to turn on or o the printer wireless capabilities.
● If the printer has an active connection to a wireless network, the Wireless button is blue.
● If wireless is turned o, the Wireless button will not be lit.
To restore network settings to default settings
● Press and hold the Wireless button and the Cancel button at the same time for at least three
seconds. The printer restarts and then the Wireless light
is in Auto Wireless Connect (AWC) setup mode. You can now set up a wireless connection between the
printer and your device.
starts blinking blue, indicating the printer
12 Chapter 2 Connect your printer ENWW
Page 21

Connect to a wired (Ethernet) network
NOTE: This section is applicable to Ethernet printer models only.
1. Make sure you have a network router with available Ethernet ports.
2. Make sure your computer is connected to the router.
3. Connect an Ethernet cable to the Ethernet port on the back of the printer.
4. Connect the other end of the Ethernet cable to an available port on the router.
5. Go to 123.hp.com to download the printer software.
6. Run the software to complete the setup.
ENWW Connect to a wired (Ethernet) network 13
Page 22

14 Chapter 2 Connect your printer ENWW
Page 23

3 Congure your printer
●
Congure the printer using the HP Embedded Web Server (EWS) and HP Device Toolbox (Windows)
●
Update the rmware
●
Change the printer connection type (Windows 7)
ENWW 15
Page 24

Congure the printer using the HP Embedded Web Server (EWS)
and HP Device Toolbox (Windows)
Use the HP Embedded Web Server to manage printing functions from your computer.
● View printer status information
● Determine the remaining life for all supplies and order new ones
● Receive notication of printer and supplies events
● View and change network conguration
The HP Embedded Web Server works when the printer is connected to your computer via an IP-based network
or USB. The HP Embedded Web Server does not support IPX-based printer connections. You do not have to
have Internet access to open and use the HP Embedded Web Server.
When the printer is connected to the network, you can connect to the HP Embedded Web Server directly, and
it is automatically available.
When the printer is connected via USB (not connected to the network) you use the HP Device Toolbox
software to connect to the HP Embedded Web Server.
NOTE: If the printer is connected to a Windows computer via USB, you must use the HP Device Toolbox
software application to connect to the HP Embedded Web Server (EWS). HP Device Toolbox is available only if
you installed the full printer software. Depending on how the printer is connected, some features might not
be available. If the printer is connected to a Windows computer via a network, or to a Mac computer,
additional software is not needed to connect to the EWS.
NOTE: The HP Embedded Web Server is not accessible beyond the network rewall.
Accessing and Using the Embedded Web Server (EWS)
The following sections provide instructions for accessing and navigating the HP Embedded Web Server.
Opening the HP Embedded Web Server (EWS) from the software (Windows 7)
NOTE: HP Printer Assistant is part of the HP printer software for Windows 7 operating systems. Visit the
product support site to nd the software available for your printer and operating system.
1. Open the HP Printer Assistant.
From the computer desktop, click Start, select All Programs, click HP, click the folder for the printer, and
then select the printer name.
2. In the HP Printer Assistant, select Print, and then select HP Device Toolbox.
Opening the HP Embedded Web Server (EWS) from a web browser
The following requires a network connection.
1. Print a conguration page to determine the IP address or host name.
16 Chapter 3 Congure your printer ENWW
Page 25

a. Press and hold the Resume button for three seconds.
b. Release the Resume button .
2. Open a web browser, and in the address line, type the IP address or host name exactly as it displays on
the printer conguration page. Press the Enter key on the computer keyboard. The EWS opens.
NOTE: If the web browser displays a message indicating that accessing the website might not be safe,
select the option to continue to the website. Accessing this website will not harm the computer.
Opening the HP Embedded Web Server (EWS) when using a Wi-Fi Direct connection
1. Set up a Wi-Fi Direct connection between your device and the printer.
2. Open a web browser, type the IP address 192.168.223.1 in the address line, and press the Enter key.
The EWS opens.
NOTE: If the web browser displays a message indicating that accessing the website might not be safe,
select the option to continue to the website. Accessing this website will not harm the computer.
Navigating the HP Embedded Web Server
The table below provides a summary of the features available through the HP Embedded Web Server.
Table
3-1 HP Embedded Web Server Options
Tab or section Description
Home tab
Provides printer, status, and
conguration information.
● Device Status: Shows the printer status and shows the approximate percent life
remaining of HP supplies.
● Supplies Status: Shows the approximate percent life remaining of HP supplies. Actual
supply life remaining can vary. Consider having a replacement supply available to install
when print quality is no longer acceptable. The supply does not need to be replaced
unless the print quality is no longer acceptable.
● Device Conguration: Shows the information found on the printer conguration page
and other device conguration settings.
● Network Summary: Shows the information found on the printer network conguration
page and other network conguration settings.
● Event Log: Shows a list of all printer events and errors.
● Open Source Licenses: Shows a summary of the licenses for open source software
programs that can be used with the printer.
ENWW Congure the printer using the HP Embedded Web Server (EWS) and HP Device Toolbox (Windows) 17
Page 26

Table 3-1 HP Embedded Web Server Options (continued)
Tab or section Description
System tab
Provides the ability to congure the
printer from your computer.
Networking tab
(Network printer models only)
Provides the ability to change
network settings from your
computer or mobile device.
● Device Information: Provides basic printer and company information.
● Paper Setup: Change the default paper-handling settings for the printer.
● Energy Settings: Change the default times for entering Sleep/Auto O mode or
automatic shut down.
● System Setup: Change the system defaults for the printer.
● Service: Make adjustments for environmental factors such as humidity and altitude,
control archive print mode, change the USB speed, and restore factory default settings.
● Administration: Set or change the printer password, enable or disable PJL device access
commands, specify signature check preference for rmware updates.
NOTE: The System tab can be password-protected. If this printer is on a network, always
consult with the administrator before changing settings on this tab.
Network administrators can use this tab to control network-related settings for the printer
when it is connected to an IP-based network. It also allows the network administrator to set up
Wireless Direct and Google Cloud Print functionality.
NOTE: The Network tab can be password-protected. If this printer is on a network, always
consult with the administrator before changing settings on this tab.
18 Chapter 3 Congure your printer ENWW
Page 27

Congure IP network settings
Use the following sections to congure the printer network settings.
View or change network settings
Use the HP Embedded Web Server to view or change IP conguration settings.
1. Open the HP Embedded Web Server (EWS).
2. Click the Networking tab to obtain network information. Change settings as needed.
Rename the printer on a network
To rename the printer on a network so that it can be uniquely identied, use the HP Embedded Web Server.
1. Open the HP Embedded Web Server (EWS).
2. Open the System tab.
3. On the Device Information page, the default printer name is in the Device Description eld. You can
change this name to uniquely identify this printer.
NOTE: Completing the other elds on this page is optional.
4. Click the Apply button to save the changes.
Manually congure IPv4 TCP/IP parameters
Use the EWS to manually set an IPv4 address, subnet mask, and default gateway.
1. Open the HP Embedded Web Server (EWS).
2. On the Networking tab, click IPv4 Conguration in the left navigation pane.
3. From the IP Preferred Address Method drop-down, select Manual, and then edit the IPv4 conguration
settings.
4. Click the Apply button.
Assign or change the system password using the HP Embedded Web Server
Assign an administrator password for access to the printer and the HP Embedded Web Server so that
unauthorized users cannot change the printer settings.
1. Open the HP Embedded Web Server (EWS).
2. On the System tab, click the Administration link in the left navigation pane.
3. In the area labeled Product Security, enter the password in the Password eld.
4. Re-enter the password in the Conrm Password eld.
5. Click the Apply button.
NOTE: Make note of the password and store it in a safe place.
ENWW Congure the printer using the HP Embedded Web Server (EWS) and HP Device Toolbox (Windows) 19
Page 28

Change energy-conservation settings
The printer includes several economy features to conserve energy and supplies.
Set the Sleep/Auto O After Inactivity setting
Use the EWS to set the amount of idle time before the printer enters sleep mode.
Complete the following procedure to change the Sleep/Auto O After Inactivity setting:
1. Open the HP Embedded Web Server (EWS).
● Use the HP Smart app to access the EWS, if available.
● Use the HP Printer Assistant for Windows 7 systems.
● Press and hold the Resume button to print a conguration page, then navigate to the IP
address shown on the printer
NOTE: If you receive a message indicating that accessing the website might not be safe, select
the option to continue to the website. Accessing this website will not harm the computer.
2. Click the System tab, and then select Energy Settings.
3. From the Sleep/Auto O After Inactivity drop-down, select the time for the delay.
conguration page.
4. Click the Apply button.
Set the Shut Down After Inactivity delay and congure the printer to use 1 watt or less of power
Use the EWS to set the amount of time before the printer shuts down.
NOTE: After the printer shuts down, the power consumption is 1 watt or less.
Complete the following procedure to change the Shut Down After Inactivity setting:
1. Open the HP Embedded Web Server (EWS).
● Use the HP Smart app to access the EWS, if available.
● Use the HP Printer Assistant for Windows 7 systems.
● Press and hold the Resume button to print a conguration page, then navigate to the IP
address shown on the printer conguration page.
NOTE: If you receive a message indicating that accessing the website might not be safe, select
the option to continue to the website. Accessing this website will not harm the computer.
2. Click the System tab, and then select Energy Settings.
3. From the Shut Down After Inactivity drop-down, select the time for the delay.
NOTE: The default value is 4 hours.
4. Click the Apply button.
20 Chapter 3 Congure your printer ENWW
Page 29

Set the Delay Shut Down setting
Use the EWS to select whether or not the printer delays shutting down after the Power button is pressed.
Complete the following procedure to change the Delay Shut Down setting:
1. Open the HP Embedded Web Server (EWS).
● Use the HP Smart app to access the EWS, if available.
● Use the HP Printer Assistant for Windows 7 systems.
● Press and hold the Resume button to print a conguration page, then navigate to the IP
address shown on the printer conguration page.
NOTE: If you receive a message indicating that accessing the website might not be safe, select
the option to continue to the website. Accessing this website will not harm the computer.
2. Click the System tab, and then select Energy Settings.
3. Select or clear the Delay when ports are active option.
NOTE: When this option is selected the printer will not shut down unless all ports are inactive. An
active network link will prevent the printer from shutting down.
ENWW Congure the printer using the HP Embedded Web Server (EWS) and HP Device Toolbox (Windows) 21
Page 30

Update the rmware
HP oers periodic printer updates. Follow these steps to update the printer rmware for a single printer.
Update the rmware using the Firmware Update Utility
Use these steps to manually download and install the Firmware Update Utility from HP.com.
NOTE: This method is the only rmware update option available for printers connected to the computer via
a USB cable. It also works for printers connected to a network.
NOTE: You must have a print driver installed in order to use this method.
1. Go to www.hp.com/go/support, select your country/region or language, and then click the Software and
Drivers link.
2. Type the printer name in the search eld, press the Enter button, and then select the printer from the list
of search results.
3. Select the operating system.
4. Under the Firmware section, locate the Firmware Update Utility.
5. Click Download, click Run, and then click Run again.
6. When the utility launches, select the printer from the drop-down list, and then click Send Firmware.
NOTE: To print a conguration page to verify the installed rmware version before or after the update
process, click Print Cong.
7. Follow the on-screen instructions to complete the installation, and then click the Exit button to close
the utility.
22 Chapter 3 Congure your printer ENWW
Page 31

Change the printer connection type (Windows 7)
If you previously set up a USB, Ethernet, or wireless connection and now want to change the connection type,
you can do so using the HP Printer Assistant software.
NOTE: To set up an Ethernet connection, you must have an Ethernet-capable printer model. To set up a
wireless connection, you must have a wireless-capable printer model.
NOTE: HP Printer Assistant is part of the HP printer software for Windows 7 operating systems. Visit the
product support site to nd the software available for your printer and operating system.
1. Open the HP Printer Assistant.
● From the computer desktop, click Start, select All Programs, click HP, click the folder for the
printer, and then select the printer name.
2. In the HP Printer Assistant, select Tools from the navigation bar, and then select Device Setup &
Software. Follow the on-screen instructions to set up the printer on your wireless network.
3. Follow the on-screen instructions for the type of connection you are setting up.
ENWW Change the printer connection type (Windows 7) 23
Page 32

24 Chapter 3 Congure your printer ENWW
Page 33

4 Load media
●
Congure the input tray for dierent paper sizes
●
Load paper
●
Load and print envelopes
●
Load and print labels
Congure the input tray for dierent paper sizes
NOTE: This section is applicable only to printer models that support Legal and Ocio paper sizes.
Some printer models support Legal and Ocio paper sizes. If your printer model supports these paper sizes,
you will need to change the orientation of the paper-length guide when you switch between large and small
paper sizes.
To determine if your printer supports Legal/Ocio paper, compare the paper-length guide on your printer to
the following images.
1 Printer does not support Legal/ Ocio paper.
2 Printer supports Legal/ Ocio paper.
ENWW Congure the input tray for dierent paper sizes 25
Page 34

Paper-guide orientation
● To load A4/Letter or larger paper, envelopes or labels, the paper-length guide must be in this
orientation:
● To load paper smaller than A4/Letter, the paper-length guide must be in this orientation:
To turn the paper-length guide
1. Remove the input tray cover, if needed.
2. Remove all paper from the input tray.
3. Slide the paper-length guide to the outside edge of the input tray.
NOTE: The guide is shown here in the correct orientation for A4/Letter or larger paper.
26 Chapter 4 Load media ENWW
Page 35

4. Tilt up the input tray slightly and pull it o the printer.
5. Slide the paper-length guide o the input tray, turn it around, and then slide it back onto the track in the
tray.
NOTE: The guide is shown being turned for loading paper smaller than A4/Letter. To load larger paper,
turn the guide in the opposite direction.
6. Reinstall the input tray.
Load paper
The following information describes how to load paper into the input tray.
NOTE: To avoid paper jams:
● Never add or remove paper from the input tray during printing.
● Before loading the input tray, remove all of the paper from the input tray and straighten the stack.
● Use paper that is not wrinkled, folded, or damaged.
To load paper
1. Remove the input tray cover.
ENWW Load paper 27
Page 36

2. Remove paper from the input tray, if any.
3. Check that the paper-length guide is in the proper orientation for the paper size you are loading. For
more information, see Congure the input tray for dierent paper sizes on page 25.
4. Slide the paper guides outward to make room for the paper.
NOTE: For Legal size paper, extend the paper-length guide o the edge of the tray and check that
“LGL” shows in the window.
NOTE: The paper-length guide is shown here in the proper orientation for A4/Letter or larger paper. To
load smaller paper, the guide must be turned in the opposite direction. For more information, see
Congure the input tray for dierent paper sizes on page 25.
5. Flex or fan the edge of the paper stack to separate the pages before loading.
28 Chapter 4 Load media ENWW
Page 37

6. Insert the stack of paper into the input tray with the top forward and the side to be printed on facing up.
Push the paper all the way in until it contacts the rear stop.
7. Slide the paper guides to the edges of the paper stack until they stop.
8. Reinstall the input tray cover.
NOTE: The cover cannot be used when paper larger than A4/Letter is loaded.
ENWW Load paper 29
Page 38

Load and print envelopes
To load envelopes
1. Remove the input tray cover.
2. Slide the paper guides to the edges of the input tray.
3. Remove all paper from the input tray.
4. Check that the paper-length guide is in the proper orientation for loading envelopes. For more
information, see Congure the input tray for dierent paper sizes on page 25.
5. Insert the envelope into the middle of the input tray, with the short, postage end toward the back of the
tray. The side to be printed on should face up.
6. Slide the paper guides to the edges of the envelope until they stop.
30 Chapter 4 Load media ENWW
Page 39

7. Reinstall the input tray cover.
To print envelopes
1. From the software program, select the Print option.
2. Select the printer from the list of printers.
3. Click the button that opens the Properties dialog box. Depending on your software application, this
button might be called Properties, Preferences, Options, Printer Setup, Printer Properties, or Printer.
4. Click or tap the Paper/Quality tab.
5. In the Media drop-down list, select Envelope.
6. Click the OK button to close the Document Properties dialog box.
7. In the Print dialog box, click the OK button to print the job.
ENWW Load and print envelopes 31
Page 40

Load and print labels
To load labels
1. Remove the input tray cover.
2. Slide the paper guides to the edges of the input tray.
3. Remove all paper from the input tray.
4. Check that the paper-length guide is in the proper orientation for loading labels. For more information,
see Congure the input tray for dierent paper sizes on page 25.
5. Insert the sheet of labels into the middle of the input tray, with the top edge of the sheet toward the
back of the tray. The side to be printed on should face up.
6. Slide the paper guides to the edges of the sheet until they stop.
32 Chapter 4 Load media ENWW
Page 41

7. Reinstall the input tray cover.
To print labels
1. From the software program, select the Print option.
2. Select the printer from the list of printers.
3. Click the button that opens the Properties dialog box. Depending on your software application, this
4. Click the Paper/Quality tab.
5. In the Media drop-down list, select Labels.
6. Click the OK button to close the Document Properties dialog box.
button might be called Properties, Preferences, Options, Printer Setup, Printer Properties, or Printer.
7. In the Print dialog box, click the OK button to print the job.
ENWW Load and print labels 33
Page 42

34 Chapter 4 Load media ENWW
Page 43

5 Print
●
Print using a Windows computer
●
Print using a Mac computer
●
Print with mobile devices
NOTE:
initializing, cooling down, performing automatic cleaning routines, or shutting down. When the printer is
cooling down, print jobs might pause. Print jobs will continue when the engine is ready. This might take
several minutes.
To provide productive printing, this printer may automatically enter cool down mode under certain
environmental conditions when required.
When the Power light is blinking and all other control panel lights are o, the printer is
ENWW 35
Page 44

Print using a Windows computer
The following procedure describes the basic printing process for Windows.
1. For wireless printing, make sure your printer is connected to the same network as your computer or
device. If you want to print without connecting to a router, use Wi-Fi Direct.
2. From the software program, select the Print option.
3. Select the printer from the list of printers.
4. Click the button that opens the Properties dialog box.
Depending on your software application, this button might be called Properties, Options, Printer Setup,
Printer Properties, Printer, or Preferences.
5. Click or tap the tabs in the print driver to congure the available options.
6. Click or tap the OK button to return to the Print dialog box. Select the number of copies to print from
this screen.
7. Click or tap the OK button to print the job.
Select the paper type (Windows)
1. From the software program, select the Print option.
2. Select the printer from the list of printers.
3. Click the button that opens the Properties dialog box.
Depending on your software application, this button might be called Properties, Options, Printer Setup,
Printer Properties, Printer, or Preferences.
4. Click or tap the Printing Shortcuts tab.
5. From the Paper Type drop-down list, select the correct paper type, and then click or tap the OK button
to close the Properties or Preferences dialog box.
6. In the Print dialog box, click the OK button to print the job.
36 Chapter 5 Print ENWW
Page 45

Manually print on both sides (Windows)
1. From the software program, select the Print option.
2. Select the printer from the list of printers.
3. Click the button that opens the Properties dialog box.
Depending on your software application, this button might be called Properties, Options, Printer Setup,
Printer Properties, Printer, or Preferences.
4. Click the Layout tab.
5. Select the appropriate duplex option from the Print on Both Sides Manually drop-down list, and then
click the OK button.
6. In the Print dialog box, click the OK button to print the job. The printer will print the rst side of all the
pages in the document rst.
7. Retrieve the printed stack from the output bin, and place it with the printed-side facing down, top edge
rst in the input tray.
8. At the computer, click the OK button to print the second side of the job.
9. If prompted, select the appropriate control panel button to continue.
Print multiple pages per sheet (Windows)
1. From the software program, select the Print option.
2. Select the printer from the list of printers.
3. Click the button that opens the Properties dialog box.
Depending on your software application, this button might be called Properties, Options, Printer Setup,
Printer Properties, Printer, or Preferences.
4. Click or tap the Layout tab.
5. Select the correct Orientation option.
6. Select the number of pages you want to print on each sheet from the Pages per Sheet option.
7. Windows 7 only: Click or tap the Advanced button.
8. Select how you want the pages to be arranged on each sheet from the Pages per Sheet Layout option.
9. Windows 7 only: Click or tap the OK button to close the Advanced Options dialog box.
10. Click or tap the OK button to close the Properties or Preferences dialog box.
ENWW Print using a Windows computer 37
Page 46

Print using a Mac computer
Instructions for HP AirPrint-compatible printers and Mac computers with macOS and OS X 10.7 (Lion) and
later.
You can print from a Mac computer that is running AirPrint as long as the printer is connected to the computer
through a Wi-Fi network connection. When you use AirPrint, you do not need to download a driver to your
computer.
To connect the printer
1. Connect the printer and the computer:
● For wireless printing, verify that the printer has a good wireless connection and is connected to the
same network as the computer.
● For USB-connected printers, connect the printer to the computer via USB cable.
2. Open System Preferences on the computer, and select Printers and Scanners.
3. Click (+) and choose the printer from the displayed list of printers, and then click Add.
To print
▲ Once connected, use the Print command from your application or program to display the printing
options. Select your printer from the list of printers available for your computer and applications. Refer
to the documentation or help provided with your application for additional information.
38 Chapter 5 Print ENWW
Page 47

Print with mobile devices
NOTE: This section is applicable to wireless printer models only.
You can print documents and photos directly from your mobile devices, including iOS, Android, Windows
Mobile, Chromebook and Amazon Kindle.
NOTE: You can also use the HP Smart app to print from mobile devices.
1. Make sure your printer is connected to the same network as your mobile device. If you want to print
without connecting to a router, use Wi-Fi Direct to print from a mobile device.
2. Enable printing on your mobile device:
● iOS: Use the Print option from the Share menu.
NOTE: Devices running iOS 4.2 or later have AirPrint preinstalled.
● Android: Download the HP Print Service Plugin (supported by most Android devices) from the
Google Play Store and enable it on your device.
● Windows Mobile: Tap Print from the Device menu.
NOTE: If your printer is not listed, you might need to do a one-time setup of the printer using the
Add Printer wizard.
● Chromebook: Download and install the HP Print for Chrome app from the Chrome Web Store to
enable Wi-Fi printing.
● Amazon Kindle Fire HD9 and HDX: The rst time you select Print on your device, the HP Print
Service Plugin is automatically downloaded to enable mobile printing.
NOTE: For detailed information about enabling printing from your mobile devices, visit the HP Mobile
Printing website ( www.hp.com/go/mobileprinting ). If a local version of this website is not available in
your country/region or language, you might be directed to the HP Mobile Printing website in another
country/region or language.
3. Make sure the loaded paper matches the paper settings of the printer. Accurately setting the paper size
for the paper that is loaded enables your mobile device to know what paper size it is printing.
ENWW Print with mobile devices 39
Page 48

40 Chapter 5 Print ENWW
Page 49

6 Manage toner, media, and parts
●
Check the toner level
●
Reload toner
●
Replace the imaging drum
●
Order supplies, media, and parts
ENWW 41
Page 50

Check the toner level
When the toner in the printer runs low, you will need one or two HP Toner Reload Kits to add toner. You can
purchase original HP Toner Reload Kits from www.hp.com/go/suresupply or your local HP reseller.
Check the toner level indicator on the front of the printer to determine when to add toner.
NOTE: Always check the Reload Status light next to the reload port to determine whether or not toner
can be added.
Toner can be added when the Reload Status light next to the reload port glows white. Toner cannot be
added when the light is o. If the light is o, there may still be too much toner to accept a full reload, or the
imaging drum may need to be replaced soon.
Full: Toner level is high and more toner cannot be added at this time.
Fill: Toner level is low. “+1” means one Toner Reload Kit can be added.
Low: Toner level is low. “+2” means two Toner Reload Kits can be added.
Very Low: Toner is depleted. Printer will not print until toner is added.
42 Chapter 6 Manage toner, media, and parts ENWW
Page 51

Reload toner
Use the Reload Status light (near the reload port) and the toner level indicator (on the front of the
printer) to determine when to add toner.
To reload toner
1.
Make sure the printer is powered on and the Reload Status light is glowing steady white. Toner
cannot be added when the light is o.
2. Shake the Toner Reload Kit for at least 10 seconds. You should hear the ball inside mixing the toner.
3. Remove the ring and the cap.
4. Uncover the reload port.
ENWW Reload toner 43
Page 52

5. Insert the Toner Reload Kit into the reload port and rotate it clockwise 180° until it stops.
6. Push the plunger down completely until you hear a click.
IMPORTANT: If the white label at the top of the plunger is still visible, the plunge is incomplete. Pull up
the plunger and push it down again until the white label disappears.
7. Rotate the Toner Reload Kit counterclockwise 180° to disengage it from the port. Remove the kit from
the port and recycle it.
NOTE: If you are unable to rotate the kit, the plunger is not all the way down. Repeat steps 6 and 7. If
you still cannot undock the kit, press the Cancel button on the control panel, remove and
thoroughly shake the kit, and then try again.
44 Chapter 6 Manage toner, media, and parts ENWW
Page 53

8. Cover the reload port.
ENWW Reload toner 45
Page 54

Replace the imaging drum
To replace the imaging drum
1. Lift the top cover.
2. Remove and recycle the used imaging drum.
3. Remove the orange cover from the new imaging drum, while carefully pulling the two tabs out of the
imaging drum as you remove the cover.
4. Shake the new imaging drum.
46 Chapter 6 Manage toner, media, and parts ENWW
Page 55

5. Insert the new imaging drum in the printer.
6. Lower the top cover.
ENWW Replace the imaging drum 47
Page 56

Order supplies, media, and parts
Table 6-1 Ordering information
Order supplies and paper www.hp.com/go/suresupply
Order genuine HP parts or accessories https://parts.hp.com
Order through service or support providers Contact an HP-authorized service or support provider.
General information www.hp.com/support
Order using the HP Embedded Web Server (EWS) To access, in a supported Web browser on the computer, enter the
Table 6-2 Supplies
Item Description
HP 103A/143A Black Original Neverstop Laser Toner Reload Kit One toner reload kit
printer IP address or host name in the address/URL eld. The EWS
contains a link to the HP SureSupply Web site, which provides
options for purchasing Original HP supplies.
HP 103AD/143AD Dual Pack Black Original Neverstop Laser Toner
Reload Kit
HP 104A/144A Black Original Laser Imaging Drum Replacement imaging drum
Package of two toner reload kits.
48 Chapter 6 Manage toner, media, and parts ENWW
Page 57

7 Solve problems
●
HP support
●
Interpret control-panel light patterns
●
Restore the factory-set defaults
●
Printer does not pick up paper or misfeeds
●
Clear paper jams
●
Improve print quality
●
Resolving print quality problems
●
Solve wireless network problems
●
Solve Ethernet connection problems
ENWW 49
Page 58

HP support
For the latest product updates and support information, visit the product support website at
www.support.hp.com. HP online support provides a variety of options for help with your printer:
Contact HP
If you need help from an HP technical support representative to solve a problem, visit the Contact Support
website. The following contact options are available at no cost for in-warranty customers (HP agent-assisted
support for out-of warranty customers may require a fee):
Get software and drivers: Download software, drivers, and rmware you need for the printer.
Ask the community: Join the community forums to nd solutions, ask questions, and share tips.
HP Diagnostic Tools: Use HP online tools to detect your printer and nd recommended solutions.
Chat with an HP support agent or the HP Virtual Agent online.
Call an HP support agent.
When contacting HP support, be prepared to provide the following information:
● Product name (located on the printer)
● Product number (located on the label on the back of the printer)
● Serial number (located on the back or bottom of the printer)
Register printer
By taking just a few minutes to register, you can enjoy quicker service, more eicient support, and product
support alerts. If you did not register your printer while installing the software, you can register now at
http://www.register.hp.com.
Additional warranty options
Extended service plans are available for the printer at additional costs. Go to www.support.hp.com, select
your country/region and language, then explore the extended warranty options available for your printer.
50 Chapter 7 Solve problems ENWW
Page 59

Additional information
Go to www.hp.com/support . Select your country/region. Enter the product name, and then select Search
Instructions are available for performing various tasks, such as the following:
● Troubleshooting your printer
● Printing from various applications, and from various devices
● Obtaining support
You will nd documents, videos, and many other resources to help you get the most from your printer.
ENWW HP support 51
Page 60

Interpret control-panel light patterns
Table 7-1 Status-light legend
Example symbol for "light blinking"
Example symbol for "light on"
Table 7-2 Control-panel light patterns
Light status State of the printer Action
Resume light and Cancel light are
on.
Attention light is blinking. Paper
light, Resume light, and Cancel
light are on.
Wi-Fi Direct light is blinking. Cancel
light is on.
The printer is in manual-feed mode
for printing envelopes or labels.
The printer is processing a manual
duplex job.
The printer received a request for
Google Cloud Print registration.
The paper type or size loaded in the
input tray is dierent than the paper
type or size specied in the print job
settings.
The printer has received a request to
connect to this printer using Wi-Fi
Direct.
Load an envelope or sheet of labels into the input tray,
and then press the Resume button to continue. Or
press the Cancel button to cancel the current job.
Load the pages into the input tray to print the second
sides, and then press the Resume button to
continue. Or press the Cancel button to cancel the
current job.
Press the Resume button to continue or press the
Cancel button to stop.
Load the paper type and size that matches the print job
settings into the input tray, or press the Resume button
to continue with the currently loaded paper.
Alternately, you can press the Cancel button to
cancel the current job.
Press the Wi-Fi Direct button to connect or press
the Cancel button to stop.
Attention light and Paper light are
blinking.
Attention light is blinking. A door is open. Verify that the top cover is fully closed.
Attention light is blinking. Paper
light, Resume light, and Cancel
light are on.
The input tray is empty. Load the input tray.
Paper is jammed in the input tray. Clear the jam.
Press the Resume button to continue.
52 Chapter 7 Solve problems ENWW
Page 61

Table 7-2 Control-panel light patterns (continued)
Light status State of the printer Action
Attention light is blinking. Paper
light and Cancel light are on.
Toner Warning light (on the toner
level indicator) is blinking (amber).
Reload Status light (next to the
reload port) is on (white).
Attention light and Imaging Drum
light are blinking.
Reload Status light (next to the
reload port) is amber and blinking
rapidly.
Attention light is blinking and
Imaging Drum Light is on.
Paper is jammed in the imaging drum
area.
The toner level is too low for printing. Add toner using a Toner Reload Kit.
The imaging drum has reached the
end of its service life and must be
replaced.
There is a problem with the Toner
Reload Kit.
The imaging drum is missing or
incorrectly installed.
Clear the jam.
Replace the imaging drum.
Use a dierent Toner Reload Kit. You must wait until the
Reload Status light turns white before attempting
to reload toner.
Install or reinstall the imaging drum.
There is a problem with the imaging
drum.
There is a problem reading the toner
level.
Imaging drum seal in place. Remove the seal on the imaging drum.
Attention light is on. There is a problem detected by the
imaging drum sensor.
There is an issue with the atbed
scanner.
Paper wrap jam. Contact HP support. A service call is required to clear
There is an issue with the print
engine.
There is a problem with the wireless
hardware.
Reload Status light is amber and
blinking rapidly.
The toner level is full and the printer
cannot accept additional toner at this
time.
The printer cannot accept additional
toner at this time either because it is
busy, or the imaging drum is too
close to the end of its useful life.
Use a dierent imaging drum.
Remove and shake the imaging drum, and then reinstall
it.
Turn o the device and then turn it on. If the problem
persists, contact HP support.
the jam without damaging the print engine.
Turn o the device and then turn it on. If the problem
persists, contact HP support.
Turn o the device and then turn it on. If the problem
persists, contact HP support.
Remove the Toner Reload Kit and wait until the Reload
Status light turns white before attempting to
reload toner.
Remove the Toner Reload Kit and wait until the Reload
Status light turns white before attempting to
reload toner.
ENWW Interpret control-panel light patterns 53
Page 62

Table 7-2 Control-panel light patterns (continued)
Light status State of the printer Action
Toner Warning light (on the toner
level indicator) and Reload Status
light (next to the reload port) are
blinking amber.
Wireless light is on (amber) and the
Cancel light is blinking.
Attention light is blinking and
Resume light is on.
The previous Toner Reload Kit was
not completely emptied into the
printer.
There is a problem with the Toner
Reload Kit in the reload port.
There is a problem with the Toner
Reload Kit docking motor.
An error occurred when attempting a
wireless WPS connection.
The wireless hardware is not
detected.
Incorrect rmware has been loaded.
Remove the current Toner Reload Kit, reinstall the
previous Toner Reload Kit, and make sure that the toner
is dispensed completely into the printer.
Use a dierent Toner Reload Kit to add toner. You must
wait until the Reload Status light turns white
before attempting to reload toner.
Clear any debris from the reload port.
Press the Cancel button to continue.
Press the Resume button to continue without the
wireless hardware.
Press the Resume button to continue. Load the
correct rmware.
54 Chapter 7 Solve problems ENWW
Page 63

Restore the factory-set defaults
Restoring the factory-set defaults returns all of the printer and network settings to the factory defaults. It
will not reset the page count. To restore the printer to the factory-default settings, follow these steps.
CAUTION: Restoring the factory-set defaults returns all of the settings to the factory defaults.
1. Open the HP Embedded Web Server (EWS). For more information, see the Accessing and Using the
Embedded Web Server (EWS) section of this User Guide.
2. On the System tab, click Service.
3. In the Restore Defaults area, click the Restore defaults button.
The printer automatically restarts.
ENWW Restore the factory-set defaults 55
Page 64

Printer does not pick up paper or misfeeds
Introduction
The following solutions can help solve problems if the printer is not picking up paper from the input tray or is
picking up multiple sheets of paper at one time. Either of these situations can result in paper jams.
●
The product does not pick up paper
●
The product picks up multiple sheets of paper
The product does not pick up paper
If the product does not pick up paper from the input tray, try these solutions.
1. Open the product and remove any jammed sheets of paper.
2. Load the correct size of paper for your job.
3. Make sure you select the correct paper size and type when setting up the print job.
4. Make sure the paper guides in the input tray are adjusted correctly for the size of paper.
5. The rollers above the input tray might be contaminated. Clean the rollers with a lint-free cloth
dampened with warm water.
The product picks up multiple sheets of paper
If the product picks up multiple sheets of paper from the input tray, try these solutions.
1. Remove the stack of paper from the input tray and ex it, rotate it 180 degrees, and ip it over. Return
the stack of paper to the input tray.
2. Use only paper that meets HP specications for this product.
3. Use paper that is not wrinkled, folded, or damaged. If necessary, use paper from a dierent package.
4. Make sure the input tray is not overlled. If it is, remove the entire stack of paper from the tray,
straighten the stack, and then return some of the paper to the input tray.
5. Make sure the paper guides in the tray are adjusted correctly for the size of paper.
6. Make sure the printing environment is within recommended specications.
56 Chapter 7 Solve problems ENWW
Page 65

Clear paper jams
Introduction
The following information includes instructions for clearing paper jams from the printer.
●
Jam locations
●
Frequent or recurring paper jams
●
Clear jams from the input tray
●
Clear jams from inside the product
●
Clear jams from the output areas
Jam locations
Jams can occur at the following locations in the product.
1 Internal areas
2 Output bin
3 Input tray
NOTE: Jams can occur in more than one location.
ENWW Clear paper jams 57
Page 66

Frequent or recurring paper jams
Follow these steps to solve problems with frequent paper jams. If the rst step does not resolve the problem
continue with the next step until you have resolved the problem.
1. If paper has jammed in the printer, clear the jam and then print a conguration page to test the printer.
2. Check that the input tray is congured for the correct paper size and type. Adjust paper settings if
necessary.
a. Print a conguration page to determine the IP address or host name.
Press and hold the Resume button for three seconds.
i.
ii. Release the Resume button.
b. Open a web browser, and in the address line, type the IP address or host name exactly as it displays
on the printer conguration page. Press the Enter key on the computer keyboard. The EWS opens.
NOTE: If the web browser displays a message indicating that accessing the website might not be
safe, select the option to continue to the website. Accessing this website will not harm the
computer.
c. Click the System tab, and then click the Paper Setup page.
d. From the Tray 1 Type drop-down list, select the type of paper that is in the input tray.
e. From the Tray 1 Size drop-down list, select the size of paper that is in the input tray.
NOTE: You can also use the Default Paper Type and Default Paper Size options to change the
default settings to match the paper you use most frequently.
3. Turn the printer o, wait 30 seconds, and then turn it on again.
4. Print a conguration page to test the printer.
a. Press and hold the Resume button for three seconds.
b. Release the Resume button.
If none of these steps resolves the problem, the printer might need service. Contact HP customer support.
58 Chapter 7 Solve problems ENWW
Page 67

Clear jams from the input tray
CAUTION: Do not use sharp objects, such as tweezers or needle-nose pliers, to remove jams. Damage
caused by sharp objects will not be covered by the warranty.
When removing jammed media, pull the jammed media straight away from the product. Pulling jammed
media out of the product at an angle can damage the product.
NOTE: Depending on where the jam is located, some of the following steps might not be necessary.
1. Lift the top cover, and then remove the imaging drum.
CAUTION: To prevent damage, do not expose the imaging drum to light. Cover it with a piece of paper.
2. Remove the media stack from the input tray.
3. With both hands, grasp the side of the jammed media that is most visible (this includes the middle), and
carefully pull it free from the product.
ENWW Clear paper jams 59
Page 68

4. Reinstall the imaging drum, and then lower the top cover.
60 Chapter 7 Solve problems ENWW
Page 69

Clear jams from inside the product
CAUTION: Do not use sharp objects, such as tweezers or needle-nose pliers, to remove jams. Damage
caused by sharp objects will not be covered by the warranty.
When removing jammed media, pull the jammed media straight away from the product. Pulling jammed
media out of the product at an angle can damage the product.
1. Lift the top cover, and then remove the imaging drum.
CAUTION: To prevent damage, do not expose the imaging drum to light. Cover it with a piece of paper.
2. If you can see the jammed paper, carefully grasp the jammed paper, and slowly pull it out of the product.
3. Reinstall the imaging drum, and then lower the top cover.
ENWW Clear paper jams 61
Page 70

Clear jams from the output areas
CAUTION: Do not use sharp objects, such as tweezers or needle-nose pliers, to remove jams. Damage
caused by sharp objects will not be covered by the warranty.
▲ Carefully grasp the jammed paper in the output bin area, and slowly pull it out of the product.
62 Chapter 7 Solve problems ENWW
Page 71

Improve print quality
●
Introduction
●
Reprint the document
●
Check the toner level
●
Update the printer rmware
●
Print from a dierent software program
●
Check the paper type and print quality settings for the print job
●
Visually inspect the imaging drum
●
Check paper and the printing environment
●
Adjust Print Density
Introduction
Print-quality problems, such as smears, streaks, missing toner, and so on, can often be resolved using the
same steps, no matter the specic symptoms. Try the following steps in the order presented as a starting
point for resolving print quality issues.
For information about resolving specic image defects, see the Resolving print quality problems section of
this User Guide.
Reprint the document
Reprint the document. Print quality defects can be intermittent in nature or can go away completely with
continued printing.
Check the toner level
If the toner level is low, reload toner. For more information, see the Check the toner level section of this User
Guide.
Update the printer rmware
Try upgrading the printer rmware. For more information, see the Update the rmware section of this User
Guide.
Print from a dierent software program
Try printing from a dierent software program. If the page prints correctly, the problem is with the software
program from which you were printing.
Check the paper type and print quality settings for the print job
Check the paper type and print quality settings when printing from a software program and the printed pages
have smears, fuzzy or dark print, curled paper, scattered dots of toner, loose toner, or small areas of missing
toner. Make sure the paper type setting matches the type of paper loaded in the printer.
ENWW Improve print quality 63
Page 72

Check the paper type loaded in the printer
1. Remove the input tray cover.
2. Verify that the input tray is loaded with the correct type of paper.
3. Reinstall the input tray cover.
Check the paper type and print quality settings (Windows)
1. From the software program, select the Print option.
2. Select the printer, and then click the Properties or Preferences button.
3. Click the Paper/Quality tab.
4. Expand the Paper Type option to see the paper types that are available.
5. Select the option for the type of paper you are using.
6. From the Print Quality drop-down list, select an option. Select lower quality to print faster and save ink,
or higher quality to obtain sharper prints.
7. Click the OK button to close the Document Properties dialog box. In the Print dialog box, click the OK
button to print the job.
Check the paper type and print quality settings (OS X)
1. Click the File menu, and then click the Print option.
2. In the Printer menu, select the printer.
3. Choose paper type from the Media & Quality option..
64 Chapter 7 Solve problems ENWW
Page 73

4. Select a print quality option. Select lower quality to print faster and save ink, or higher quality to obtain
sharper prints.
5. Click the Print button.
Visually inspect the imaging drum
Follow these steps to inspect the imaging drum.
1. Remove the imaging drum from the printer, and verify that the sealing tape has been removed.
2. Check the memory chip for damage (for example, broken edges or a scratched surface). The memory
chip is located on the part of the imaging drum that is closest to the reload port when the drum is
installed.
3. Examine the surface of the green roller on the imaging drum.
CAUTION: Do not touch the green roller on the imaging drum. Fingerprints on this surface can cause
print-quality problems.
4. If you see any scratches, ngerprints, or other damage on the imaging drum, replace the imaging drum.
5. Reinstall the imaging drum, and print a few pages to see if the problem has resolved.
Check paper and the printing environment
Step one: Use paper that meets HP specications
Some print-quality problems arise from using paper that does not meet HP specications.
● Make sure that the paper type, size, and weight are supported by the printer.
● Use paper that is of good quality and free of cuts, nicks, tears, spots, loose particles, dust, wrinkles,
voids, staples, and curled or bent edges.
● Use paper that has not been previously printed on.
● Use paper that does not contain metallic material, such as glitter.
● Use paper that is designed for use in laser printers. Do not use paper that is designed only for use in
Inkjet printers.
● Use paper that is not too rough. Using smoother paper generally results in better print quality.
If print quality issues persist on good quality paper that is within the HP specications, and you have also
tried the other recommended solutions, try using paper from a dierent package.
Step two: Check the environment
The environment can directly aect print quality and is a common cause for print-quality or paper-feeding
issues. Try the following solutions:
● Move the printer away from drafty locations, such as open windows or doors, or air-conditioning vents.
● Make sure the printer is not exposed to temperatures or humidity outside of printer specications.
● Do not place the printer in a conned space, such as a cabinet.
ENWW Improve print quality 65
Page 74

● Place the printer on a sturdy, level surface.
● Remove anything that is blocking the vents on the printer. The printer requires good air ow on all sides,
including the top.
● Protect the printer from airborne debris, dust, steam, grease, or other elements that can leave residue
inside the printer.
Adjust Print Density
Complete the following steps to adjust the print density.
1. Open the HP Embedded Web Server (EWS).
● Use the HP Smart app to access the EWS, if available.
● Use the HP Printer Assistant for Windows 7 systems.
● Press and hold the Resume button to print a conguration page, then navigate to the IP
address shown on the printer conguration page.
NOTE: If you receive a message indicating that accessing the website might not be safe, select
the option to continue to the website. Accessing this website will not harm the computer.
2. Click the System tab, and then select System Setup from the left navigation pane.
3. Select the correct density settings.
4. Click Apply to save the changes.
66 Chapter 7 Solve problems ENWW
Page 75

Resolving print quality problems
The following information provides troubleshooting steps for solving specic image defect issues, including
the following defects:
● Light print
● Gray background or dark print
● Blank pages
●
Black pages
● Dark or light bands
● Dark or light streaks
● Missing toner
● Skewed images
● Curled paper
Find the example in this section that matches the print quality issue you are experiencing and follow the
provided solution steps.
The following examples depict letter-size paper that has passed through the printer short-edge rst.
NOTE: The term “fusing” refers to the part of the printing process where toner is aixed to paper.
Table 7-3 Light print
Description Sample Possible solutions
Light print:
The printed content on the entire page is
light or faded.
1. Reprint the document.
2. Remove the imaging drum, and then
shake it to redistribute the toner.
3. Make sure that the imaging drum is
installed correctly.
4. Print a conguration report and check
for life and usage of the imaging
drum.
5. If the toner is low, reload toner.
6. If the problem persists, go to
support.hp.com.
ENWW Resolving print quality problems 67
Page 76

Table 7-4 Gray background or dark print
Description Sample Possible solutions
Gray background or dark print:
The image or text is darker than expected.
1. Make sure that the paper in the input
tray has not already been run
through the printer.
2. Use a dierent paper type.
3. Reprint the document.
4. From the printer EWS, go to the
Adjust Toner Density menu, and then
adjust the toner density to a lower
level.
5. Make sure that the printer is in within
the supported operating temperature
and humidity range.
6. If the toner is low, reload toner.
7. If the problem persists, go to
support.hp.com.
Table 7-5 Blank page — No print
Description Sample Possible solutions
Blank page — No print:
The page is completely blank and contains
no printed content.
1. Make sure that the imaging drum is
installed correctly.
2. Check the paper type in the input tray
and adjust the printer settings to
match. If necessary, select a lighter
paper type.
3. If the problem persists, go to
support.hp.com.
Table 7-6 Black page
Description Sample Possible solutions
Black page:
The entire printed page is black.
1. Visually inspect the imaging drum to
check for damage.
2. Make sure that the imaging drum is
installed correctly.
3. Replace the imaging drum.
4. If the problem persists, go to
support.hp.com.
68 Chapter 7 Solve problems ENWW
Page 77

Table 7-7 Banding defects
Description Sample Possible solutions
Repetitive wide-pitch banding and
Impulse bands:
Dark or light lines which repeat down the
length of the page. They might be sharp or
soft in nature. The defect displays only in
areas of ll, not in text or sections with no
printed content.
1. Reprint the document.
2. If the toner is low, reload toner.
3. Use a dierent paper type.
4. If the problem persists, go to
support.hp.com.
Table 7-8 Streak defects
Description Sample Possible solutions
Light vertical streaks:
Light streaks that usually span the length
of the page. The defect displays only in
areas of ll, not in text or sections with no
printed content.
1. Reprint the document.
2. Remove the imaging drum, and then
shake it to redistribute the toner.
3. If the problem persists, go to
support.hp.com.
NOTE: Both light and dark vertical
streaks can occur when the printing
environment is outside the specied range
for temperature or humidity. Refer to your
printer's environmental specications for
allowable temperature and humidity
levels.
Dark vertical streaks:
Dark lines which occur down the length of
the page. The defect might occur anywhere
on the page, in areas of ll or in sections
with no printed content.
1. Reprint the document.
2. Remove the imaging drum, and then
shake it to redistribute the toner.
3. If the toner level is low, reload toner.
4. If the problem persists, go to
support.hp.com.
ENWW Resolving print quality problems 69
Page 78

Table 7-9 Fixing/fuser defects
Description Fixing/fuser Possible solutions
Hot fuser oset (shadow):
Slight shadows, or osets, of the image
repeated down the page. The repeated
image might fade with each recurrence.
Poor fusing:
Toner rubs o along either edge of page.
This defect is more common at the edges
of high-coverage jobs and on light media
types but can occur anywhere on the page.
1. Reprint the document.
2. Check the paper type in the input tray
and adjust the printer settings to
match. If necessary, select a lighter
paper type.
3. If the problem persists, go to
support.hp.com.
1. Reprint the document.
2. Check the paper type in the input tray
and adjust the printer settings to
match. If necessary, select a heavier
paper type.
3. If the problem persists, go to
support.hp.com.
Table 7-10 Image placement defects
Description Sample Possible solutions
Margins and skew:
The image is not centered, or is skewed on
the page. The defect occurs when the
paper is not positioned properly as it is
pulled from the input tray and moves
through the paper path.
1. Reprint the document.
2. Remove the paper and then reload
the input tray. Make sure that all the
paper edges are even on all sides.
3. Make sure that the top of the paper
stack is below the input tray full
indicator. Do not overll the input
tray.
4. Make sure that the paper guides are
adjusted to the correct size for the
paper. Do not adjust the paper guides
tightly against the paper stack.
5. If the problem persists, go to
support.hp.com.
70 Chapter 7 Solve problems ENWW
Page 79

Table 7-11 Output defects
Description Sample Possible solutions
Output curl:
Printed paper has curled edges. The curled
edge can be along the short or long side of
the paper. Two types of curl are possible:
● Positive curl: The paper curls toward
the printed side. The defect occurs in
dry environments or when printing
high coverage pages.
● Negative curl: The paper curls away
from the printed side. The defect
occurs in high-humidity
environments or when printing low
coverage pages.
Output stacking:
The paper does not stack well in the output
tray. The stack might be uneven, skewed,
or the pages might be pushed out of the
tray and onto the oor. Any of the
following conditions can cause this defect:
● Extreme paper curl
● The paper in the tray is wrinkled or
deformed
1. Reprint the document.
2. Positive curl: From the printer EWS,
select a heavier paper type. The
heavier paper type creates a higher
temperature for printing.
Negative curl: From the printer EWS,
select a lighter paper type. The
lighter paper type creates a lower
temperature for printing. Try storing
the paper in a dry environment prior
or use freshly opened paper.
3. From the printer EWS, turn on the
Less Paper Curl option. (Click the
System tab, select Service, and then
select Less Paper Curl.)
4. If the problem persists, go to
support.hp.com.
1. Reprint the document.
2. Extend the output bin extension.
3. If the defect is caused by extreme
paper curl, complete the
troubleshooting steps for Output
curl.
4. Use a dierent paper type.
5. Use freshly opened paper.
● The paper is a non-standard paper
type, such as envelopes
● The output tray is too full
6. Remove the paper from the output
tray before the tray gets too full.
7. If the problem persists, go to
support.hp.com.
ENWW Resolving print quality problems 71
Page 80

Solve wireless network problems
●
Introduction
●
Wireless connectivity checklist
●
Perform a wireless network diagnostic test
●
The printer does not print after the wireless conguration completes
●
The printer does not print, and the computer has a third-party rewall installed
●
The wireless connection does not work after moving the wireless router or printer
●
Cannot connect more devices to the wireless printer (Wi-Fi Direct)
●
The wireless printer loses communication when connected to a VPN
●
The network does not appear in the wireless networks list
●
The wireless network is not functioning
●
Reduce interference on a wireless network
Introduction
Use the troubleshooting information to help resolve issues.
Wireless connectivity checklist
● Verify that the printer and the wireless router are turned on and have power. Also make sure that the
wireless radio in the printer is turned on. The Wireless light should be blue to indicate that the
printer is connected. (If the light is blinking, the printer is in setup mode or attempting to connect.)
● Verify that the network name (service set identier, or SSID) is correct. Print a conguration page to
determine the SSID.
a. Press and hold the Resume button for three seconds.
b. Release the Resume button.
If you are not sure the SSID is correct, run the wireless setup again.
● With secured networks, verify that the security information is correct. If the security information is
incorrect, run the wireless setup again.
● Verify that the encryption method (AES or TKIP) is the same for the printer as it is for the wireless access
point (on networks using WPA security).
● Check the Wi-Fi Signal Strength indicator ( or ) on the control panel. If only one or two bars or dots
are showing, the wireless signal is weak. Verify that the printer is within the range of the wireless
network. For most networks, the printer must be within 30 m (100 ft) of the wireless access point
(wireless router).
72 Chapter 7 Solve problems ENWW
Page 81

● Verify that obstacles do not block the wireless signal. Remove any large metal objects between the
access point and the printer. Make sure poles, walls, or support columns containing metal or concrete do
not separate the printer and wireless access point.
● Verify that the printer is located away from electronic devices that might interfere with the wireless
signal. Many devices can interfere with the wireless signal including motors, cordless phones, security
system cameras, other wireless networks, and some Bluetooth devices.
● Verify that your router is set for 2.4 GHz operation. The printer only supports connections using this
frequency.
● Verify that the print driver is installed on the computer.
● Verify that you have selected the correct printer port.
● Verify that the computer and printer connect to the same wireless network.
● For OS X, verify that the wireless router supports Bonjour.
Perform a wireless network diagnostic test
A wireless network diagnostic test can be performed using the printer control panel or the Embedded Web
Server (EWS). The wireless network diagnostic test provides information about the wireless network settings.
Method one: Perform a wireless network diagnostic test using the printer control panel
▲ From the printer control panel, press and hold the Wireless button for 10 seconds.
Method two: Perform wireless network diagnostic test using the EWS
1. Open the HP Embedded Web Server (EWS).
● Use the HP Smart app to access the EWS, if available.
● Use the HP Printer Assistant for Windows 7 systems.
● Press and hold the Resume button to print a conguration page, then navigate to the IP
address shown on the printer conguration page.
NOTE: If you receive a message indicating that accessing the website might not be safe, select
the option to continue to the website. Accessing this website will not harm the computer.
2. Select the Networking tab.
3. On the Wireless Conguration page, verify that the On option is selected.
4. Click the Print Test Report button to print a test page that shows test results.
The printer does not print after the wireless conguration completes
1. Make sure that the printer is turned on and in the ready state.
2. Make sure that the wireless network is working correctly.
3. Make sure that your computer or mobile device is working correctly. If necessary, restart your computer
or mobile device.
ENWW Solve wireless network problems 73
Page 82

4. Make sure that the correct printer driver is installed (Windows).
5. Verify that you can open the printer HP Embedded Web Server from a computer or mobile device on the
network.
6. Print a conguration page to verify the printer successfully connected to the wireless network and is
assigned an IP address.
The printer does not print, and the computer has a third-party rewall installed
1. Update the rewall with the most recent update available from the manufacturer.
2. If programs request rewall access when you install the printer or try to print, make sure you allow the
programs to run.
3. Temporarily turn o the rewall, and then install the wireless printer on the computer. Enable the
rewall when you have completed the wireless installation.
The wireless connection does not work after moving the wireless router or printer
1. Check the Wi-Fi Signal Strength indicator ( or ) on the printer control panel. If only one or two bars
or dots are showing, the wireless signal is weak. Verify that the printer is within the range of the wireless
network. For most networks, the printer must be within 30 m (100 ft) of the wireless access point
(wireless router). Also, make sure there are no large obstacles between the printer and the network
router that could be blocking the signal and remove any electronic devices near the printer that could be
interfering with the wireless signal.
2. Print a conguration page.
3. Compare the network name (SSID) on the conguration report to the SSID of the network the computer
is on.
If the SSIDs are not the same, the devices are not connecting to the same network. Recongure the
wireless setup for the printer.
Cannot connect more devices to the wireless printer (Wi-Fi Direct)
1. Make sure that each device is within the wireless range and that no obstacles block the signal. (For Wi-Fi
Direct printing, the device must be within wireless range of the printer.)
2. Make sure that the printer is turned on and in the ready state.
3. Make sure that Wi-Fi Direct light on the printer control panel is on. If it is o, press the Wi-Fi Direct
button .
4. Make sure that you have turned on Wi-Fi Direct or Wi-Fi on your device. If your device supports neither,
you cannot set up a Wi-Fi Direct connection with that device.
5. Make sure there are not more than 5 concurrent Wi-Fi Direct users.
The wireless printer loses communication when connected to a VPN
● Typically, you cannot connect to a VPN and other networks at the same time.
74 Chapter 7 Solve problems ENWW
Page 83

The network does not appear in the wireless networks list
● Make sure the wireless router is turned on and has power.
● The network might be hidden.
● Make sure that the printer is within wireless range of the wireless router, and that there are no obstacles
blocking the signal.
● The printer operates on the 2.4 GHz wireless band. Any 5 GHz networks will not show up in the list.
●
Refresh the wireless networks list.
● Try restarting the printer.
The wireless network is not functioning
1. To verify if the network has lost communication, try connecting other devices to the network.
2. Test network communication by pinging the network.
a. Open a command-line prompt on your computer.
● For Windows, click Start, click Run, type cmd, and then press Enter.
● For OS X, go to Applications, then Utilities, and open Terminal.
b. Type ping followed by the router IP address.
c. If the window displays round-trip times, the network is working.
3. Make sure that the router or printer connects to the same network that the computer connects to.
a. Print a conguration page.
i. Press and hold the Resume button for three seconds.
ii. Release the Resume button.
b. Compare the network name (SSID) on the conguration report to the SSID of the network the
computer is on.
If the SSIDs are not the same, the devices are not connecting to the same network. Recongure the
wireless setup for the printer.
4. Perform a wireless network diagnostic test. For more information, see the Perform a wireless network
diagnostic test section of this User Guide.
Reduce interference on a wireless network
The following tips can reduce interference in a wireless network:
ENWW Solve wireless network problems 75
Page 84

● Keep the wireless devices away from large metal objects, such as ling cabinets, and other
electromagnetic devices, such as microwaves and cordless telephones. These objects can disrupt radio
signals.
● Keep the wireless devices away from large masonry structures and other building structures. These
objects can absorb radio waves and lower signal strength.
● Position the wireless router in a central location in line of sight with the wireless printers on the
network.
76 Chapter 7 Solve problems ENWW
Page 85

Solve Ethernet connection problems
Check the following:
● The network is operational and the network hub, switch, or router is turned on.
● The Ethernet cable is properly connected between the printer and the router. The Ethernet cable is
plugged into the Ethernet port on the printer and the light near the connector lights up when connected.
● Antivirus programs, including spyware protection programs, are not impacting your network connection
to the printer. If you know that antivirus or rewall software is preventing your computer from
connecting to the printer, use the HP online rewall troubleshooter to help solve the problem.
● Run the HP Print and Scan Doctor to troubleshoot the issue automatically. The utility will try to diagnose
and x the issue. The HP Print and Scan Doctor may not be available in all languages.
ENWW Solve Ethernet connection problems 77
Page 86

78 Chapter 7 Solve problems ENWW
Page 87

A Printer specications
IMPORTANT: The following specications are correct at the time of publication, but they are subject to
change. For current information, see www.hp.com/support .
●
Technical specications
●
Supported operating systems
●
Printer dimensions
●
Power consumption, electrical specications, and acoustic emissions
●
Operating-environment range
●
Warning icons
●
Laser Warning
Technical specications
See www.support.hp.com for current information.
Supported operating systems
The following information applies to the printer-specic Windows PCLmS and OS X print drivers.
Windows: The HP Software Installer installs the PCLmS, or PCLm-S driver depending on the Windows
operating system, along with optional software when using the software installer. For more information, visit
the product support website at www.hp.com/support .
OS X: Mac computers are supported with this printer. Download HP Easy Start either from 123.hp.com or from
the product support website at www.hp.com/support , and then use HP Easy Start to install the HP print
driver. HP Easy Start is not included in the HP Software Installer.
1. Go to 123.hp.com.
2. Follow the steps provided to download the printer software.
Linux: For information and print drivers for Linux, go to www.hp.com/go/linuxprinting.
A-1 Supported operating systems and print drivers
Table
Windows 7, 32-bit and 64-bit The HP PCLmS printer-specic print driver
is installed for this operating system as
part of the software installation.
ENWW Technical specications 79
Page 88

Table A-1 Supported operating systems and print drivers (continued)
Windows 8, 32-bit and 64-bit The HP PCLmS printer-specic print driver
is installed for this operating system as
part of the software installation.
Windows 8.1, 32-bit and 64-bit The HP PCLm-S V4 printer-specic print
driver is installed for this operating system
as part of the software installation.
Windows 10, 32-bit and 64-bit The HP PCLm-S V4 printer-specic print
driver is installed for this operating system
as part of the software installation.
Windows Server 2008 R2, 64-bit The HP PCLm.S printer-specic print driver
is available for download from the printersupport website. Download the driver, and
then use the Microsoft Add Printer tool to
install it.
Windows Server 2008 R2, SP1, 64-bit The HP PCLmS printer-specic print driver
is installed for this operating system as
part of the software installation.
Windows Server 2012 The HP PCLmS printer-specic print driver
is installed for this operating system as
part of the software installation.
Windows Server 2012 R2 The HP PCLm-S printer-specic print driver
is installed for this operating system as
part of the software installation.
Windows Server 2016, 64-bit The HP PCLm-S printer-specic print driver
is installed for this operating system as
part of the software installation.
Windows 8 RT support is provided through
Microsoft IN OS Version 4, 32- bit driver.
Windows 8.1 RT support is provided
through Microsoft IN OS Version 4, 32- bit
driver.
Microsoft retired mainstream support for
Windows Server 2008 in January 2015. HP
will continue to provide best eort support
for the discontinued Server 2008 operating
system.
OS X 10.11 El Capitan and later. To install the print driver, download HP
Easy Start from 123.hp.com. Follow the
steps provided to install the printer
software and print driver.
NOTE: For a current list of supported operating systems, go to www.support.hp.com for HP's all-inclusive
help for the printer.
80 Appendix A Printer specications ENWW
Page 89

Printer dimensions
Figure A-1 Dimensions for the printer
Printer fully open Printer fully closed
1. Height 445 mm (17.5 in) 211 mm (8.3 in)
2. Depth 465 mm (18.3 in) 371.5 mm (14.6 in)
3. Width 380.5 mm (14.9 in) 380.5 mm (14.9 in)
Weight (with imaging
drum)
6.96 kg (15.34 lbs) (base models)
7.01 kg (15.45 lbs) (wireless models)
Power consumption, electrical specications, and acoustic
emissions
See www.support.hp.com for current information.
CAUTION: Power requirements are based on the country/region where the printer is sold. Do not convert
operating voltages. This will damage the printer and void the printer warranty.
Operating-environment range
Environment Recommended Allowed
Temperature 17.5° to 25°C (63.5° to 77°F) 15° to 32°C (59° to 89.6°F)
Relative humidity 20% to 70% relative humidity (RH), non-
condensing
Altitude Not applicable 0 to 5000 m (0 to 16,404 ft)
10% to 80% (RH), non-condensing
ENWW Printer dimensions 81
Page 90

Warning icons
Warning icon denitions: The following warning icons may appear on HP products. Apply appropriate caution
where applicable.
●
Caution: Electric shock
●
Caution: Hot surface
●
Caution: Keep body parts away from moving parts
●
Caution: Sharp edge in close proximity
●
Warning
82 Appendix A Printer specications ENWW
Page 91

Laser Warning
ENWW Laser Warning 83
Page 92

84 Appendix A Printer specications ENWW
Page 93

B Service and support
●
HP limited warranty statement
●
HP's Premium Protection Warranty: Neverstop Toner Reload Kit and HP Laser Imaging Drum limited
warranty statement
●
HP policy on non-HP supplies
●
HP anticounterfeit Web site
●
Data stored on the HP Toner Reload Kit and the HP Laser Imaging Drum
●
End User License Agreement
●
Customer self-repair warranty service
●
Customer support
ENWW 85
Page 94

HP limited warranty statement
HP PRODUCT DURATION OF LIMITED WARRANTY*
HP Neverstop Laser 1000a, 1000w, 1000n, 1001nw One-year limited warranty
NOTE: *Warranty and support options vary by product, country, and local legal requirements. Go to
support.hp.com to learn about HP award-winning service and support options in your region.
This HP Limited Warranty applies only to HP-branded products sold or leased a) from HP Inc., its subsidiaries,
ailiates, authorized resellers, authorized distributors, or country distributors; and, b) with this HP Limited
Warranty.
HP warrants to you, the end-user customer, that the HP hardware and accessories will be free from defects in
materials and workmanship after the date of purchase, for the period specied above. If HP receives notice of
such defects during the warranty period, HP will, at its option, either repair or replace products which prove to
be defective, except as otherwise required by local law. Subject to local law, replacement products may be
either new or equivalent in performance to new.
HP warrants to you that HP software will not fail to execute its programming instructions after the date of
purchase, for the period specied above, due to defects in material and workmanship when properly installed
and used. If HP receives notice of such defects during the warranty period, HP will replace software which
does not execute its programming instructions due to such defects.
HP does not warrant that the operation of HP products will be uninterrupted or error free. If HP is unable,
within a reasonable time, to repair or replace any product to a condition as warranted, you will be entitled to a
refund of the purchase price upon prompt return of the product.
HP products may contain remanufactured parts equivalent to new in performance or may have been subject
to incidental use.
Warranty does not apply to defects resulting from (a) improper or inadequate maintenance or calibration, (b)
software, interfacing, parts or supplies not supplied by HP, (c) unauthorized modication or misuse, (d)
operation outside of the published environmental specications for the product, (e) improper site preparation
or maintenance, or (f) damage to HP product as a result of the use of non-HP Toner Reload Kits, relled HP
Toner Reload Kits, non-HP Toner, non-HP Laser Imaging Drums, non-HP internal product components, or
paper with a high talc or calcium or other easily transferable residue substance.
TO THE EXTENT ALLOWED BY LOCAL LAW, THE ABOVE WARRANTIES ARE EXCLUSIVE AND NO OTHER
WARRANTY OR CONDITION, WHETHER WRITTEN OR ORAL, IS EXPRESSED OR IMPLIED AND HP SPECIFICALLY
DISCLAIMS ANY IMPLIED WARRANTIES OR CONDITIONS OF MERCHANTABILITY, SATISFACTORY QUALITY, AND
FITNESS FOR A PARTICULAR PURPOSE. Some countries/regions, states or provinces do not allow limitations on
the duration of an implied warranty, so the above limitation or exclusion might not apply to you. This
warranty gives you specic legal rights and you might also have other rights that vary from country/region to
country/region, state to state, or province to province.
HP's limited warranty is valid in any country/region or locality where HP has a support presence for this
product and where HP has marketed this product. The level of warranty service you receive may vary
according to local standards. HP will not alter form, t or function of the product to make it operate in a
country/region for which it was never intended to function for legal or regulatory reasons.
TO THE EXTENT ALLOWED BY LOCAL LAW, THE REMEDIES IN THIS WARRANTY STATEMENT ARE YOUR SOLE AND
EXCLUSIVE REMEDIES. EXCEPT AS INDICATED ABOVE, IN NO EVENT WILL HP OR ITS SUPPLIERS BE LIABLE FOR
LOSS OF DATA OR FOR DIRECT, SPECIAL, INCIDENTAL, CONSEQUENTIAL (INCLUDING LOST PROFIT OR DATA), OR
OTHER DAMAGE, WHETHER BASED IN CONTRACT, TORT, OR OTHERWISE. Some countries/regions, states or
86 Appendix B Service and support ENWW
Page 95

provinces do not allow the exclusion or limitation of incidental or consequential damages, so the above
limitation or exclusion may not apply to you.
THE WARRANTY TERMS CONTAINED IN THIS STATEMENT, EXCEPT TO THE EXTENT LAWFULLY PERMITTED, DO
NOT EXCLUDE, RESTRICT OR MODIFY AND ARE IN ADDITION TO THE MANDATORY STATUTORY RIGHTS
APPLICABLE TO THE SALE OF THIS PRODUCT TO YOU.
ENWW HP limited warranty statement 87
Page 96

UK, Ireland, and Malta
The HP Limited Warranty is a commercial guarantee voluntarily provided by HP. The name and address of the
HP entity responsible for the performance of the HP Limited Warranty in your country/region is as follows:
UK: HP Inc UK Limited, Cain Road, Amen Corner, Bracknell, Berkshire, RG12 1HN
Ireland: Hewlett-Packard Ireland Limited, Liey Park Technology Campus, Barnhall Road, Leixlip, Co.Kildare
Malta: Hewlett-Packard Europe B.V., Amsterdam, Meyrin Branch, Route du Nant-d'Avril 150, 1217 Meyrin,
Switzerland
United Kingdom: The HP Limited Warranty benets apply in addition to any legal rights to a guarantee from
seller of nonconformity of goods with the contract of sale. These rights expire six years from delivery of
goods for products purchased in England or Wales and ve years from delivery of goods for products
purchased in Scotland. However various factors may impact your eligibility to receive these rights. For further
information, please consult the following link: Consumer Legal Guarantee (www.hp.com/go/eu-legal) or you
may visit the European Consumer Centers website (http://ec.europa.eu/consumers/
solving_consumer_disputes/non-judicial_redress/ecc-net/index_en.htm). Consumers have the right to
choose whether to claim service under the HP Limited Warranty or against the seller under the legal
guarantee.
Ireland: The HP Limited Warranty benets apply in addition to any statutory rights from seller in relation to
nonconformity of goods with the contract of sale. However various factors may impact your eligibility to
receive these rights. Consumer statutory rights are not limited or aected in any manner by HP Care Pack. For
further information, please consult the following link: Consumer Legal Guarantee (www.hp.com/go/eu-legal)
or you may visit the European Consumer Centers website (http://ec.europa.eu/consumers/
solving_consumer_disputes/non-judicial_redress/ecc-net/index_en.htm). Consumers have the right to
choose whether to claim service under the HP Limited Warranty or against the seller under the legal
guarantee.
Malta: The HP Limited Warranty benets apply in addition to any legal rights to a two-year guarantee from
seller of nonconformity of goods with the contract of sale; however various factors may impact your eligibility
to receive these rights. Consumer statutory rights are not limited or aected in any manner by the HP Limited
Warranty. For further information, please consult the following link: Consumer Legal Guarantee
(www.hp.com/go/eu-legal) or you may visit the European Consumer Centers website (http://ec.europa.eu/
consumers/solving_consumer_disputes/non-judicial_redress/ecc-net/index_en.htm). Consumers have the
right to choose whether to claim service under the HP Limited Warranty or against the seller under two-year
legal guarantee.
Austria, Belgium, Germany, and Luxemburg
Die beschränkte HP Herstellergarantie ist eine von HP auf freiwilliger Basis angebotene kommerzielle
Garantie. Der Name und die Adresse der HP Gesellschaft, die in Ihrem Land für die Gewährung der
beschränkten HP Herstellergarantie verantwortlich ist, sind wie folgt:
Deutschland: HP Deutschland GmbH, Schickardstr. 32, D-71034 Böblingen
Österreich: HP Austria GmbH., Technologiestrasse 5, A-1120 Wien
Luxemburg: Hewlett-Packard Luxembourg S.C.A., 75, Parc d'Activités Capellen, Rue Pafebruc, L-8308
Capellen
Belgien: HP Belgium BVBA, Hermeslaan 1A, B-1831 Diegem
Die Rechte aus der beschränkten HP Herstellergarantie gelten zusätzlich zu den gesetzlichen Ansprüchen
wegen Sachmängeln auf eine zweijährige Gewährleistung ab dem Lieferdatum. Ob Sie Anspruch auf diese
88 Appendix B Service and support ENWW
Page 97

Rechte haben, hängt von zahlreichen Faktoren ab. Die Rechte des Kunden sind in keiner Weise durch die
beschränkte HP Herstellergarantie eingeschränkt bzw. betroen. Weitere Hinweise nden Sie auf der
folgenden Website: Gewährleistungsansprüche für Verbraucher (www.hp.com/go/eu-legal) oder Sie können
die Website des Europäischen Verbraucherzentrums (http://ec.europa.eu/consumers/
solving_consumer_disputes/non-judicial_redress/ecc-net/index_en.htm) besuchen. Verbraucher haben das
Recht zu wählen, ob sie eine Leistung von HP gemäß der beschränkten HP Herstellergarantie in Anspruch
nehmen oder ob sie sich gemäß der gesetzlichen zweijährigen Haftung für Sachmängel (Gewährleistung) sich
an den jeweiligen Verkäufer wenden.
Belgium, France, and Luxemburg
La garantie limitée HP est une garantie commerciale fournie volontairement par HP. Voici les coordonnées de
l'entité HP responsable de l'exécution de la garantie limitée HP dans votre pays:
France: HP France SAS, société par actions simpliée identiée sous le numéro 448 694 133 RCS Evry, 1
Avenue du Canada, 91947, Les Ulis
G.D. Luxembourg: Hewlett-Packard Luxembourg S.C.A., 75, Parc d'Activités Capellen, Rue Pafebruc, L-8308
Capellen
Belgique: HP Belgium BVBA, Hermeslaan 1A, B-1831 Diegem
France: Les avantages de la garantie limitée HP s'appliquent en complément des droits dont vous disposez au
titre des garanties légales applicables dont le bénéce est soumis à des conditions spéciques. Vos droits en
tant que consommateur au titre de la garantie légale de conformité mentionnée aux articles L. 211-4 à L.
211-13 du Code de la Consommation et de celle relatives aux défauts de la chose vendue, dans les conditions
prévues aux articles 1641 à 1648 et 2232 du Code de Commerce ne sont en aucune façon limités ou aectés
par la garantie limitée HP. Pour de plus amples informations, veuillez consulter le lien suivant : Garanties
légales accordées au consommateur (www.hp.com/go/eu-legal). Vous pouvez également consulter le site
Web des Centres européens des consommateurs (http://ec.europa.eu/consumers/
solving_consumer_disputes/non-judicial_redress/ecc-net/index_en.htm). Les consommateurs ont le droit de
choisir d’exercer leurs droits au titre de la garantie limitée HP, ou auprès du vendeur au titre des garanties
légales applicables mentionnées ci-dessus.
POUR RAPPEL:
Garantie Légale de Conformité:
« Le vendeur est tenu de livrer un bien conforme au contrat et répond des défauts de conformité existant lors
de la délivrance.
Il répond également des défauts de conformité résultant de l'emballage, des instructions de montage ou de
l'installation lorsque celle-ci a été mise à sa charge par le contrat ou a été réalisée sous sa responsabilité ».
Article L211-5 du Code de la Consommation:
« Pour être conforme au contrat, le bien doit:
1° Etre propre à l'usage habituellement attendu d'un bien semblable et, le cas échéant:
- correspondre à la description donnée par le vendeur et posséder les qualités que celui-ci a présentées à
l'acheteur sous forme d'échantillon ou de modèle;
- présenter les qualités qu'un acheteur peut légitimement attendre eu égard aux déclarations publiques faites
par le vendeur, par le producteur ou par son représentant, notamment dans la publicité ou l'étiquetage;
2° Ou présenter les caractéristiques dénies d'un commun accord par les parties ou être propre à tout usage
spécial recherché par l'acheteur, porté à la connaissance du vendeur et que ce dernier a accepté ».
ENWW HP limited warranty statement 89
Page 98

Italy
Article L211-12 du Code de la Consommation:
« L'action résultant du défaut de conformité se prescrit par deux ans à compter de la délivrance du bien ».
Garantie des vices cachés
Article 1641 du Code Civil : « Le vendeur est tenu de la garantie à raison des défauts cachés de la chose vendue
qui la rendent impropre à l'usage auquel on la destine, ou qui diminuent tellement cet usage que l'acheteur ne
l'aurait pas acquise, ou n'en aurait donné qu'un moindre prix, s'il les avait connus. »
Article 1648 alinéa 1 du Code Civil:
« L'action résultant des vices rédhibitoires doit être intentée par l'acquéreur dans un délai de deux ans à
compter de la découverte du vice. »
G.D. Luxembourg et Belgique: Les avantages de la garantie limitée HP s'appliquent en complément des
droits dont vous disposez au titre de la garantie de non-conformité des biens avec le contrat de vente.
Cependant, de nombreux facteurs peuvent avoir un impact sur le bénéce de ces droits. Vos droits en tant que
consommateur au titre de ces garanties ne sont en aucune façon limités ou aectés par la garantie limitée
HP. Pour de plus amples informations, veuillez consulter le lien suivant : Garanties légales accordées au
consommateur (www.hp.com/go/eu-legal) ou vous pouvez également consulter le site Web des Centres
européens des consommateurs (http://ec.europa.eu/consumers/solving_consumer_disputes/non-
judicial_redress/ecc-net/index_en.htm). Les consommateurs ont le droit de choisir de réclamer un service
sous la garantie limitée HP ou auprès du vendeur au cours d'une garantie légale de deux ans.
Spain
La Garanzia limitata HP è una garanzia commerciale fornita volontariamente da HP. Di seguito sono indicati
nome e indirizzo della società HP responsabile della fornitura dei servizi coperti dalla Garanzia limitata HP nel
vostro Paese:
Italia: HP Italy S.r.l., Via G. Di Vittorio 9, 20063 Cernusco S/Naviglio
I vantaggi della Garanzia limitata HP vengono concessi ai consumatori in aggiunta ai diritti derivanti dalla
garanzia di due anni fornita dal venditore in caso di non conformità dei beni rispetto al contratto di vendita.
Tuttavia, diversi fattori possono avere un impatto sulla possibilita’ di beneciare di tali diritti. I diritti spettanti
ai consumatori in forza della garanzia legale non sono in alcun modo limitati, né modicati dalla Garanzia
limitata HP. Per ulteriori informazioni, si prega di consultare il seguente link: Garanzia legale per i clienti
(www.hp.com/go/eu-legal), oppure visitare il sito Web dei Centri europei per i consumatori
(http://ec.europa.eu/consumers/solving_consumer_disputes/non-judicial_redress/ecc-net/index_en.htm). I
consumatori hanno il diritto di scegliere se richiedere un servizio usufruendo della Garanzia limitata HP
oppure rivolgendosi al venditore per far valere la garanzia legale di due anni.
Su Garantía limitada de HP es una garantía comercial voluntariamente proporcionada por HP. El nombre y
dirección de las entidades HP que proporcionan la Garantía limitada de HP (garantía comercial adicional del
fabricante) en su país es:
España: Hewlett-Packard Española S.L. Calle Vicente Aleixandre, 1 Parque Empresarial Madrid - Las Rozas,
E-28232 Madrid
Los benecios de la Garantía limitada de HP son adicionales a la garantía legal de 2 años a la que los
consumidores tienen derecho a recibir del vendedor en virtud del contrato de compraventa; sin embargo,
varios factores pueden afectar su derecho a recibir los benecios bajo dicha garantía legal. A este respecto, la
Garantía limitada de HP no limita o afecta en modo alguno los derechos legales del consumidor
(www.hp.com/go/eu-legal). Para más información, consulte el siguiente enlace: Garantía legal del
90 Appendix B Service and support ENWW
Page 99

consumidor o puede visitar el sitio web de los Centros europeos de los consumidores (http://ec.europa.eu/
consumers/solving_consumer_disputes/non-judicial_redress/ecc-net/index_en.htm). Los clientes tienen
derecho a elegir si reclaman un servicio acogiéndose a la Garantía limitada de HP o al vendedor de
conformidad con la garantía legal de dos años.
Denmark
Den begrænsede HP-garanti er en garanti, der ydes frivilligt af HP. Navn og adresse på det HP-selskab, der er
ansvarligt for HP's begrænsede garanti i dit land, er som følger:
Danmark: HP Inc Danmark ApS, Engholm Parkvej 8, 3450, Allerød
Den begrænsede HP-garanti gælder i tillæg til eventuelle juridiske rettigheder, for en toårig garanti fra
sælgeren af varer, der ikke er i overensstemmelse med salgsaftalen, men forskellige faktorer kan dog påvirke
din ret til at opnå disse rettigheder. Forbrugerens lovbestemte rettigheder begrænses eller påvirkes ikke på
nogen måde af den begrænsede HP-garanti. Se nedenstående link for at få yderligere oplysninger:
Forbrugerens juridiske garanti (www.hp.com/go/eu-legal) eller du kan besøge De Europæiske
Forbrugercentres websted (http://ec.europa.eu/consumers/solving_consumer_disputes/non-
judicial_redress/ecc-net/index_en.htm). Forbrugere har ret til at vælge, om de vil gøre krav på service i
henhold til HP's begrænsede garanti eller hos sælger i henhold til en toårig juridisk garanti.
Norway
HPs garanti er en begrenset og kommersiell garanti som HP selv har valgt å tilby. Følgende lokale selskap
innestår for garantien:
Sweden
Norge: HP Norge AS, Rolfbuktveien 4b, 1364 Fornebu
HPs garanti kommer i tillegg til det mangelsansvar HP har i henhold til norsk forbrukerkjøpslovgivning, hvor
reklamasjonsperioden kan være to eller fem år, avhengig av hvor lenge salgsgjenstanden var ment å vare.
Ulike faktorer kan imidlertid ha betydning for om du kvaliserer til å kreve avhjelp iht slikt mangelsansvar.
Forbrukerens lovmessige rettigheter begrenses ikke av HPs garanti. Hvis du vil ha mer informasjon, kan du
klikke på følgende kobling: Juridisk garanti for forbruker (www.hp.com/go/eu-legal) eller du kan besøke
nettstedet til de europeiske forbrukersentrene (http://ec.europa.eu/consumers/solving_consumer_disputes/
non-judicial_redress/ecc-net/index_en.htm). Forbrukere har retten til å velge å kreve service under HPs
garanti eller iht selgerens lovpålagte mangelsansvar.
HP:s begränsade garanti är en kommersiell garanti som tillhandahålls frivilligt av HP. Namn och adress till det
HP-företag som ansvarar för HP:s begränsade garanti i ditt land är som följer:
Sverige: HP PPS Sverige AB, SE-169 73 Stockholm
Fördelarna som ingår i HP:s begränsade garanti gäller utöver de lagstadgade rättigheterna till tre års garanti
från säljaren angående varans bristande överensstämmelse gentemot köpeavtalet, men olika faktorer kan
påverka din rätt att utnyttja dessa rättigheter. Konsumentens lagstadgade rättigheter varken begränsas eller
påverkas på något sätt av HP:s begränsade garanti. Mer information får du om du följer denna länk:
Lagstadgad garanti för konsumenter (www.hp.com/go/eu-legal) eller så kan du gå till European Consumer
Centers webbplats (http://ec.europa.eu/consumers/solving_consumer_disputes/non-judicial_redress/ecc-
net/index_en.htm). Konsumenter har rätt att välja om de vill ställa krav enligt HP:s begränsade garanti eller
på säljaren enligt den lagstadgade treåriga garantin.
ENWW HP limited warranty statement 91
Page 100

Portugal
A Garantia Limitada HP é uma garantia comercial fornecida voluntariamente pela HP. O nome e a morada da
entidade HP responsável pela prestação da Garantia Limitada HP no seu país são os seguintes:
Portugal: HPCP – Computing and Printing Portugal, Unipessoal, Lda., Edicio D. Sancho I, Quinta da Fonte,
Porto Salvo, Lisboa, Oeiras, 2740 244
As vantagens da Garantia Limitada HP aplicam-se cumulativamente com quaisquer direitos decorrentes da
legislação aplicável à garantia de dois anos do vendedor, relativa a defeitos do produto e constante do
contrato de venda. Existem, contudo, vários fatores que poderão afetar a sua elegibilidade para beneciar de
tais direitos. Os direitos legalmente atribuídos aos consumidores não são limitados ou afetados de forma
alguma pela Garantia Limitada HP. Para mais informações, consulte a ligação seguinte: Garantia legal do
consumidor (
(http://ec.europa.eu/consumers/solving_consumer_disputes/non-judicial_redress/ecc-net/index_en.htm).
Os consumidores têm o direito de escolher se pretendem reclamar assistência ao abrigo da Garantia Limitada
HP ou contra o vendedor ao abrigo de uma garantia jurídica de dois anos.
www.hp.com/go/eu-legal) ou visite o Web site da Rede dos Centros Europeus do Consumidor
Greece and Cyprus
Η Περιορισμένη εγγύηση HP είναι μια εμπορική εγγύηση η οποία παρέχεται εθελοντικά από την HP. Η
επωνυμία και η διεύθυνση του νομικού προσώπου ΗΡ που παρέχει την Περιορισμένη εγγύηση ΗΡ στη χώρα
σας είναι η εξής:
Ελλάδα /Κύπρoς: HP Printing and Personal Systems Hellas EPE, Tzavella 1-3, 15232 Chalandri, Attiki
Hungary
Ελλάδα /Κύπρoς: HP Συστήματα Εκτύπωσης και Προσωπικών Υπολογιστών Ελλάς Εταιρεία Περιορισμένης
Ευθύνης, Tzavella 1-3, 15232 Chalandri, Attiki
Τα προνόμια της Περιορισμένης εγγύησης HP ισχύουν επιπλέον των νόμιμων δικαιωμάτων για διετή εγγύηση
έναντι του Πωλητή για τη μη συμμόρφωση των προϊόντων με τις συνομολογημένες συμβατικά ιδιότητες,
ωστόσο η άσκηση των δικαιωμάτων σας αυτών μπορεί να εξαρτάται από διάφορους παράγοντες. Τα νόμιμα
δικαιώματα των καταναλωτών δεν περιορίζονται ούτε επηρεάζονται καθ’ οιονδήποτε τρόπο από την
Περιορισμένη εγγύηση HP. Για περισσότερες πληροφορίες, συμβουλευτείτε την ακόλουθη τοποθεσία web:
Νόμιμη εγγύηση καταναλωτή (www.hp.com/go/eu-legal) ή μπορείτε να επισκεφτείτε την τοποθεσία web των
Ευρωπαϊκών Κέντρων Καταναλωτή (http://ec.europa.eu/consumers/solving_consumer_disputes/non-
judicial_redress/ecc-net/index_en.htm). Οι καταναλωτές έχουν το δικαίωμα να επιλέξουν αν θα αξιώσουν
την υπηρεσία στα πλαίσια της Περιορισμένης εγγύησης ΗΡ ή από τον πωλητή στα πλαίσια της νόμιμης
εγγύησης δύο ετών.
A HP korlátozott jótállás egy olyan kereskedelmi jótállás, amelyet a HP a saját elhatározásából biztosít. Az
egyes országokban a HP mint gyártó által vállalt korlátozott jótállást biztosító HP vállalatok neve és címe:
Magyarország: HP Inc Magyarország Kft., H-1117 Budapest, Alíz utca 1.
A HP korlátozott jótállásban biztosított jogok azokon a jogokon felül illetik meg Önt, amelyek a termékeknek
az adásvételi szerződés szerinti minőségére vonatkozó kétéves, jogszabályban foglalt eladói szavatosságból,
továbbá ha az Ön által vásárolt termékre alkalmazandó, a jogszabályban foglalt kötelező eladói jótállásból
erednek, azonban számos körülmény hatással lehet arra, hogy ezek a jogok Önt megilletik-e. További
információért kérjük, keresse fel a következő webhelyet: Jogi Tájékoztató Fogyasztóknak (www.hp.com/
go/eu-legal) vagy látogassa meg az Európai Fogyasztói Központok webhelyét (http://ec.europa.eu/
consumers/solving_consumer_disputes/non-judicial_redress/ecc-net/index_en.htm). A fogyasztóknak
jogában áll, hogy megválasszák, hogy a jótállással kapcsolatos igényüket a HP korlátozott jótállás alapján
92 Appendix B Service and support ENWW
 Loading...