

HP LaserJet Pro M1132, LaserJet Pro M1136, LaserJet Pro M1212nf, LaserJet Pro M1213nf, LaserJet Pro M1214nfh Reference Guide
...Page 1
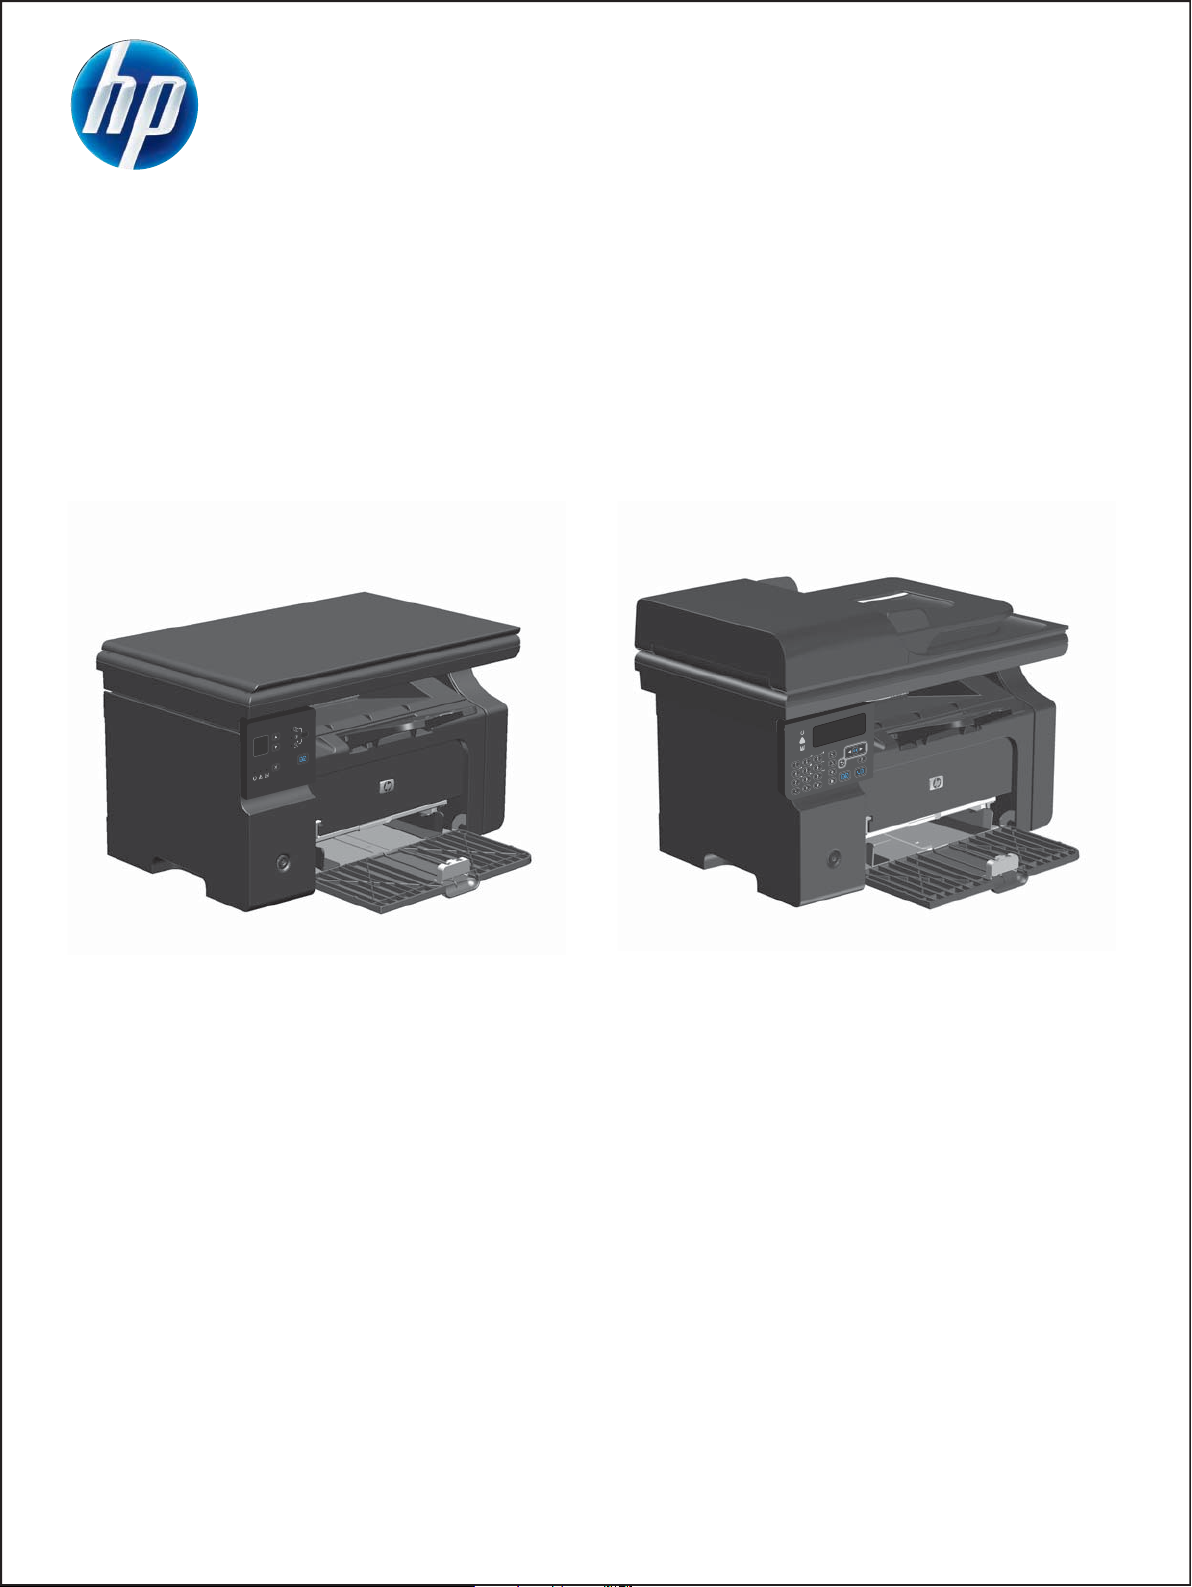
LASERJET PROFESSIONAL M1130/M1210
MFP SERIES
Software Technical Reference
Additional product information:
www.hp.com/support/ljm1130series
www.hp.com/support/ljm1210series
Page 2

Page 3

HP LaserJet Professional M1130/M1210
MFP Series Printers
Software Technical Reference
Page 4

Copyright and license
Trademark Credits
©2010 Copyright Hewlett-Packard
Development Company, L.P.
Reproduction, adaptation or translation
without prior written permission is prohibited,
except as allowed under the copyright laws.
The information contained herein is subject
to change without notice.
The only warranties for HP products and
services are set forth in the express warranty
statements accompanying such products
and services. Nothing herein should be
construed as constituting an additional
warranty. HP shall not be liable for technical
or editorial errors or omissions contained
herein.
Edition 1,
3/2010
Adobe®, Acrobat® and PostScript® are
trademarks of Adobe Systems Incorporated.
Corel® is a trademark or registered
trademark of Corel Corporation or Corel
Corporation Limited.
Microsoft®, Windows® and Windows NT®
are U.S. registered trademarks of Microsoft
Corporation.
Windows Vista™ is either a registered
trademark or trademark of Microsoft
Corporation in the United States and/or other
countries.
UNIX® is a registered of The Open Group.
ENERGY STAR® and the ENERGY STAR
logo® are U.S. registered marks of the
United States Enviromental Protection
Agency.
Page 5

Table of contents
1 Purpose and scope ......................................................................................................................................... 1
Introduction ........................................................................................................................................... 2
Product comparison ............................................................................................................................. 3
Product features ................................................................................................................................... 4
Product views ....................................................................................................................................... 6
Front view ............................................................................................................................ 6
M1130 Series ...................................................................................................... 6
M1210 Series ...................................................................................................... 7
Back view ............................................................................................................................. 8
M1130 Series ...................................................................................................... 8
M1210 Series ...................................................................................................... 9
Serial number and model number location ........................................................................ 10
Control-panel layout ........................................................................................................... 11
M1130 Series .................................................................................................... 11
M1210 Series .................................................................................................... 12
Printing-system software .................................................................................................................... 13
Operating-system support ................................................................................................ 13
Supported operating systems for Windows ....................................................... 13
Supported printer drivers for Windows .............................................................. 14
Supported utilities for Windows ......................................................................... 14
HP Embedded Web Server (M1210 Series only) ............................. 14
HP Toolbox ....................................................................................... 14
Supported operating systems for Macintosh ..................................................... 15
Supported printer drivers for Macintosh ............................................................ 15
Supported utilities for Macintosh ....................................................................... 15
HP LaserJet Utility ............................................................................ 15
Embedded Web Server .................................................................... 16
Availability and localization ............................................................................................... 16
Software component availability for Windows and Macintosh .......................... 16
Printing-system software on the Web ............................................................... 17
In-box printing-system software CD .................................................................. 17
Printing-system software CD ............................................................ 17
CD Versions ..................................................................................... 18
Documentation ................................................................................................................................... 23
ENWW iii
Page 6

Printing-system software CD ............................................................................................. 24
Main CD browser screen ................................................................................... 24
User Documentation ......................................................................................... 25
HP LaserJet Help Navigation ........................................................... 25
User Guide ....................................................................................... 33
More Information .............................................................................. 34
2 Software description .................................................................................................................................... 37
Windows printing-system software ..................................................................................................... 38
Supported operating systems for Windows ....................................................................... 38
Windows system requirements .......................................................................................... 38
Macintosh system requirements ........................................................................................ 39
Printer driver ...................................................................................................................... 39
Select the correct printer driver for Windows ..................................................................... 39
Priority for print settings ..................................................................................................... 39
Change printer-driver settings for Windows ....................................................................... 40
Printing system and installer .............................................................................................. 41
Printing-system software CD for Windows systems .......................................... 41
Installer features ................................................................................................ 42
Driver version numbers for Windows operating systems ................................................... 42
HP Driver Diagnostic Printer Check Tool ........................................................................................... 44
Embedded Web Server M1210 Series only ....................................................................................... 45
HP ToolboxFX .................................................................................................................................... 46
HP ToolboxFX overview .................................................................................................... 46
Starting HP ToolboxFX ..................................................................................... 46
Structure ............................................................................................................ 46
Opening screen ................................................................................................. 47
System requirements ......................................................................................................... 47
HP ToolboxFX folders ........................................................................................................ 47
Device Status .................................................................................................... 48
Help folder ......................................................................................................... 48
User Guide ....................................................................................... 49
Readme ............................................................................................ 49
Fax folder .......................................................................................................... 49
Fax Tasks pane ................................................................................ 50
Fax Phone Book pane ...................................................................... 50
Fax Send Log pane .......................................................................... 52
Fax Receive Log pane ...................................................................... 53
Fax Data Properties pane ................................................................. 55
Other Links ........................................................................................................................ 55
Product Support ................................................................................................ 55
Shop for Supplies .............................................................................................. 55
Product Registration .......................................................................................... 55
iv ENWW
Page 7

3 Install Windows printing-system components .......................................................................................... 57
Supported operating systems for Windows ........................................................................................ 58
Windows operating system requirements .......................................................................................... 58
Install overview ................................................................................................................................... 58
Software installation types for Windows ............................................................................................. 58
Installation options .............................................................................................................................. 59
Microsoft Windows general installation overview ............................................................................... 60
HP LaserJet Professional M1130/M1210 MFP Series printing-system software for
Windows systems .............................................................................................................. 60
USB installation ................................................................................................. 60
CD installation ................................................................................................... 60
Install the print driver using the Microsoft Add Printer Wizard .......................... 61
Use an existing port for a direct connection ..................................... 63
Create a new TCP/IP port for a direct connection ............................ 68
Print server connection ..................................................................... 71
Detailed MS Windows installation instructions ................................................................................... 75
Install the Host-based driver using HP Smart Install ......................................................... 75
Install the print driver for USB and wired network connected products ............. 75
EWS Smart Install (M1210 Series only) ............................................................ 77
Install the Host-based driver from the CD .......................................................................... 81
Install the print driver from the CD for USB connected products ...................... 81
Install the print driver from the CD for wired network connected products ........ 88
Install the HP LaserJet Professional M1130/M1210 MFP Series XPS driver .................... 96
New driver install ............................................................................................... 96
Existing driver install ....................................................................................... 104
Use the Back, Next, Finish, and Cancel buttons ............................................................. 112
Set a default printer ......................................................................................................... 113
Uninstall software ............................................................................................................................. 114
Uninstall the Host based driver ........................................................................................ 114
Use the HP Uninstall utility (recommended) ................................................... 114
Use Windows Add or Remove Programs feature ........................................... 114
Uninstall the XPS driver ................................................................................................... 115
4 HP host based print driver for Windows .................................................................................................. 117
Introduction ....................................................................................................................................... 117
Gain access to print drivers .............................................................................................................. 118
Printing Preferences driver tabs ...................................................................................... 118
Properties driver tabs ....................................................................................................... 119
Help system ...................................................................................................................................... 120
“What's this?” Help ........................................................................................................... 120
Incompatible Print Settings messages ............................................................................. 120
Advanced tab features ..................................................................................................................... 121
Print Tasks Quick Sets .................................................................................................... 121
ENWW v
Page 8

Copies .............................................................................................................................. 122
Copies ............................................................................................................. 122
Printer Features ............................................................................................................... 1 22
Document preview image ................................................................................................ 122
Paper/Quality tab features ................................................................................................................ 124
Print Tasks Quick Sets .................................................................................................... 124
Paper Options .................................................................................................................. 1 25
Size is .............................................................................................................. 125
Custom Paper Size ......................................................................................... 126
Name .............................................................................................. 126
Size ................................................................................................. 127
Units ............................................................................................... 127
Custom width and height control limits ........................................... 127
Use the short media extender tool .................................................. 127
Use Different Paper/Covers ............................................................................ 127
Source is ......................................................................................................... 128
Type Is ............................................................................................................ 129
Document preview image ................................................................................................ 129
Print Quality ..................................................................................................................... 130
Print Quality drop-down menu ......................................................................... 130
EconoMode check box .................................................................................... 130
Effects tab features .......................................................................................................................... 131
Print Tasks Quick Sets .................................................................................................... 131
Resizing Options .............................................................................................................. 132
Actual size ....................................................................................................... 132
Print document on .......................................................................................... 132
Scale to fit ....................................................................................................... 132
% of normal size .............................................................................................. 133
Document preview image ................................................................................................ 133
Watermarks ..................................................................................................................... 134
Watermark Details ........................................................................................... 135
Current Watermarks ....................................................................... 135
Watermark Message ...................................................................... 136
Message Angle ............................................................................... 136
Font Attributes ................................................................................ 136
Default watermark settings ............................................................. 137
Finishing tab features ....................................................................................................................... 138
Print Tasks Quick Sets .................................................................................................... 138
Document Options ........................................................................................................... 139
Print on both sides manually ........................................................................... 139
Flip pages up ................................................................................................... 140
Booklet Printing ............................................................................................... 141
Book and booklet printing ............................................................... 141
Pages per sheet .............................................................................................. 141
vi ENWW
Page 9

Print page borders ........................................................................................... 141
Page order ...................................................................................................... 142
Document preview image ................................................................................................ 142
Orientation ....................................................................................................................... 142
Services tab features ........................................................................................................................ 144
Internet Services .............................................................................................................. 144
Print Information Pages ................................................................................................... 145
Device Settings ................................................................................................................................ 146
Duplex Mode .................................................................................................................... 147
Jam Recovery .................................................................................................................. 147
Status Messages ............................................................................................................. 147
Cleaning Page ................................................................................................................. 148
Print Density .................................................................................................................... 148
Auto-Off Console ............................................................................................................. 148
5 Macintosh software and utilities ............................................................................................................... 149
Supported operating systems for Macintosh .................................................................................... 150
Macintosh system requirements ....................................................................................................... 150
Hardware requirements ................................................................................................... 150
Macintosh printing-system software ................................................................................................. 150
HP LaserJet Professional M1130/M1210 MFP Series PPD ............................................ 150
HP LaserJet Professional M1130/M1210 MFP Series PDE ............................................ 151
HP USB EWS Gateway ................................................................................................... 151
HP LaserJet Utility ........................................................................................................... 151
Supported printer drivers for Macintosh ........................................................................... 151
Priority for print settings for Macintosh ............................................................................ 151
Change printer-driver settings for Macintosh ................................................................... 152
Software for Macintosh computers .................................................................................. 152
HP LaserJet Utility ........................................................................................... 152
Open the HP LaserJet Utility .......................................................... 152
Embedded Web Server ................................................................................... 152
Availability ........................................................................................................................ 152
Printing-system software on the Web ............................................................. 153
In-box printing-system software CD ................................................................ 153
Macintosh partition ......................................................................... 153
Macintosh install and uninstall instructions ...................................................................................... 154
Install the Macintosh printing-system software ................................................................ 154
General installation for Macintosh operating systems ..................................... 154
Detailed Mac OS X installation ........................................................................ 154
Setup instructions ............................................................................................ 164
Setting up a printer with Mac OS X V10.4, V10.5, and V10.6 ........ 165
Troubleshooting the product setup ................................................. 165
Remove the printing-system software from Macintosh operating systems ...................... 166
ENWW vii
Page 10

6 Engineering Details .................................................................................................................................... 167
Introduction ....................................................................................................................................... 167
Firmware update ............................................................................................................................. 168
Determining the current level of firmware ....................................................................... 168
Download the Firmware Update Utility from the HP Web site ......................................... 168
Run the Firmware Update Utility ...................................................................................... 169
Media attributes ................................................................................................................................ 170
Driver-supported paper sizes ........................................................................................... 170
Driver-supported paper types .......................................................................................... 171
Custom paper sizes ......................................................................................................... 172
Index ................................................................................................................................................................. 173
viii ENWW
Page 11

List of tables
Table 1-1 HP LaserJet Utility features .............................................................................................................. 16
Table 1-2 Software component availability ...................................................................................................... 16
Table 1-3 Supported printing-system components (AR-ET) ............................................................................ 19
Table 1-4 Supported printing-system components (FI-LT) ............................................................................... 20
Table 1-5 Supported printing-system components (LV-SL) ............................................................................. 21
Table 1-6 Supported printing-system components (SR-ZHT) .......................................................................... 21
Table 1-7 Status-light legend ........................................................................................................................... 28
Table 1-8 Control-panel light patterns .............................................................................................................. 28
Table 4-1 Host based driver custom paper sizes ........................................................................................... 127
Table 4-2 Font Attribute settings for new and preset watermarks ................................................................ 137
Table 4-3 Page orientation ............................................................................................................................. 140
Table 6-1 Supported paper and print media sizes ......................................................................................... 170
Table 6-2 Supported envelopes and postcards ............................................................................................. 170
Table 6-3 Host-based print driver custom paper sizes ................................................................................... 172
ENWW ix
Page 12

x ENWW
Page 13

List of figures
Figure 1-1 Printing-system software CD – main browser screen ..................................................................... 24
Figure 1-2 View User Guide screen ................................................................................................................ 25
Figure 1-3 More Information screen ............................................................................................................... 34
Figure 2-1 Installation software CD Browser .................................................................................................... 41
Figure 2-2 HP ToolboxFX Status folder – Device Status pane ...................................................................... 48
Figure 2-3 HP ToolboxFX Help folder – Troubleshooting pane (1 of 2) ........................................................ 49
Figure 2-4 HP ToolboxFX Fax folder ............................................................................................................... 50
Figure 2-5 HP Toolbox FX Fax folder – Fax Tasks pane ................................................................................ 50
Figure 2-6 HP Toolbox FX Fax folder – Fax Phone Book pane ..................................................................... 51
Figure 2-7 HP Toolbox FX Fax folder – Fax Send Log pane .......................................................................... 53
Figure 2-8 HP Toolbox FX Fax folder – Fax Receive Log pane ..................................................................... 54
Figure 2-9 HP ToolboxFX Fax folder – Fax Data Properties pane ................................................................ 55
Figure 3-1 CD Browser – Main screen ............................................................................................................. 61
Figure 3-2 Add Printer Wizard – Local or Network Printer screen ................................................................... 62
Figure 3-3 Add Printer Wizard — Select a Printer Port screen ........................................................................ 63
Figure 3-4 Add Printer Wizard — Install Printer Software screen .................................................................... 64
Figure 3-5 Add Printer Wizard — Install from Disk screen ............................................................................... 64
Figure 3-6 Add Printer Wizard — Install Printer Software, screen 2 ................................................................ 65
Figure 3-7 Add Printer Wizard — Name Your Printer screen ........................................................................... 66
Figure 3-8 Add Printer Wizard — Printer Sharing screen ................................................................................ 67
Figure 3-9 Add Printer Wizard — Print Test Page screen ................................................................................ 67
Figure 3-10 Select a Printer Port screen .......................................................................................................... 68
Figure 3-11 Add Advanced TCP/IP Printer Port screen ................................................................................... 69
Figure 3-12 Add Port screen ............................................................................................................................ 70
Figure 3-13 Add Printer Wizard — Local or Network Printer screen ................................................................ 71
Figure 3-14 Add Printer Wizard — Specify A Printer screen ............................................................................ 72
Figure 3-15 Add Printer Wizard — Find Printers screen .................................................................................. 73
Figure 3-16 Add Printer Wizard — Default Printer screen ............................................................................... 73
Figure 3-17 Add Printer Wizard — Browse for Printer screen .......................................................................... 74
Figure 3-18 Welcome to HP Smart Install screen ............................................................................................ 75
Figure 3-19 Printer Connections screen ........................................................................................................... 76
Figure 3-20 Congratulations! Software installation complete ........................................................................... 77
Figure 3-21 Software Installation — Initial screen ....................................................................................... 82
Figure 3-22 Choose Easy Install or Advanced Install screen ........................................................................... 83
ENWW xi
Page 14

Figure 3-23 Select Printer screen ..................................................................................................................... 84
Figure 3-24 Configure to print using USB screen (part 1) ................................................................................ 85
Figure 3-25 Configure to print using USB screen (part 2) ................................................................................ 86
Figure 3-26 Software installation complete screen (part 1) .............................................................................. 87
Figure 3-27 Software installation complete screen (part 2) .............................................................................. 88
Figure 3-28 Software Installation — Initial screen ....................................................................................... 89
Figure 3-29 Choose Easy Install or Advanced Install screen ........................................................................... 90
Figure 3-30 Select Printer screen ..................................................................................................................... 91
Figure 3-31 Identify Printer screen ................................................................................................................... 92
Figure 3-32 Printers Found screen. .................................................................................................................. 93
Figure 3-33 Confirm Settings screen ................................................................................................................ 94
Figure 3-34 Software installation complete screen (part 1) .............................................................................. 95
Figure 3-35 Software installation complete screen (part 2) .............................................................................. 96
Figure 3-36 Welcome to the HP Smart Install Utility screen ............................................................................ 97
Figure 3-37 HP Smart Install Printer Configuration screen .............................................................................. 98
Figure 3-38 HP Smart Install currently Enabled screen ................................................................................... 98
Figure 3-39 HP Smart Install currently Disabled screen .................................................................................. 99
Figure 3-40 Welcome to the Found New Hardware Wizard screen ........................................................... 100
Figure 3-41 Locate File dialog window ........................................................................................................... 103
Figure 3-42 Add Printer Wizard ...................................................................................................................... 105
Figure 3-43 Local or Network Port screen ...................................................................................................... 106
Figure 3-44 Select a Printer Port screen ........................................................................................................ 107
Figure 3-45 Install Printer Software screen .................................................................................................... 108
Figure 3-46 .................................................................................................................................................... 109
Figure 3-47 Use Existing Driver screen .......................................................................................................... 110
Figure 3-48 Name Your Printer screen .......................................................................................................... 111
Figure 3-49 Completing the Add Printer Wizard screen ................................................................................. 112
Figure 3-50 Installation Cancelled dialog box .............................................................................................. 112
Figure 3-51 Uninstall ...................................................................................................................................... 115
Figure 4-1 An Incompatible Print Settings message .................................................................................. 120
Figure 4-2 The default appearance of the Advanced tab ............................................................................. 121
Figure 4-3 Paper/Quality tab ........................................................................................................................ 124
Figure 4-4 Paper Options group box ........................................................................................................... 125
Figure 4-5 Custom Paper Size dialog box ................................................................................................... 126
Figure 4-6 Effects tab ................................................................................................................................... 131
Figure 4-7 Preview images – Legal on Letter; Scale to Fit off (left) and on (right) ........................................ 133
Figure 4-8 Watermark Details dialog box .................................................................................................... 135
Figure 4-9 Finishing tab ............................................................................................................................... 138
Figure 4-10 Print on Both Sides Instructions dialog box ............................................................................ 140
Figure 4-11 Page-order preview images ....................................................................................................... 142
Figure 4-12 Services tab ............................................................................................................................... 144
Figure 4-13 Device Settings tab - M1212nf model shown .........................................................................
gure 5-1 Introduction screen ..................................................................................................................... 155
Fi
Figure 5-2 Software License Agreement screen ......................................................................................... 156
.... 146
xii ENWW
Page 15

Figure 5-3 Agree/Disagree screen ................................................................................................................ 156
Figure 5-4 Product Select screen ................................................................................................................. 157
Figure 5-5 Select a Destination screen ........................................................................................................ 158
Figure 5-6 Select a Destination screen ........................................................................................................ 159
Figure 5-7 Standard Install on “Mac HardDrive” screen ............................................................................ 160
Figure 5-8 HP Setup Assistant screen ........................................................................................................... 160
Figure 5-9 HP Setup Assistant screen ........................................................................................................... 161
Figure 5-10 HP Firmware Upgrade Utility — Introduction screen ................................................................ 161
Figure 5-11 HP Firmware Upgrade Utility — Select Device screen .............................................................. 162
Figure 5-12 HP Firmware Upgrade Utility — Finish-Up screen .................................................................... 163
Figure 5-13 HP Director main screen ............................................................................................................. 163
Figure 5-14 HP Director scan settings ........................................................................................................... 164
Figure 6-1 Firmware Update Utility. List of available printers shown screen. ................................................ 169
Figure 6-2 Firmware update successful screen. ............................................................................................ 169
ENWW xiii
Page 16

xiv ENWW
Page 17

1 Purpose and scope
ENWW 1
Page 18

Introduction
This software technical reference (STR) provides information about and troubleshooting tips for the
printing-system software for the product.
This STR is prepared in an electronic format to serve as a quick-reference tool for Customer Care Center
(CCC) agents, support engineers, system administrators, management information systems (MIS)
personnel, and end users, as appropriate.
NOTE: This STR describes drivers that are available from the product firmware and shipped on the
printing-system software CD that comes with the product. This STR does not describe drivers that will
become available on the Web.
The following information is included in this STR:
Descriptions of drivers, operating systems, and system environments
●
Procedures for installing and uninstalling the printing-system software components
●
For information about the location of information within chapters, see the table of contents. An index is
also provided in this STR.
Additional detailed information about the printing-system software is published in an addendum to this
STR. The following information is available in the addendum:
Lists of installed files
●
System-modification information, such as files added or modified
●
2 Chapter 1 Purpose and scope ENWW
Page 19
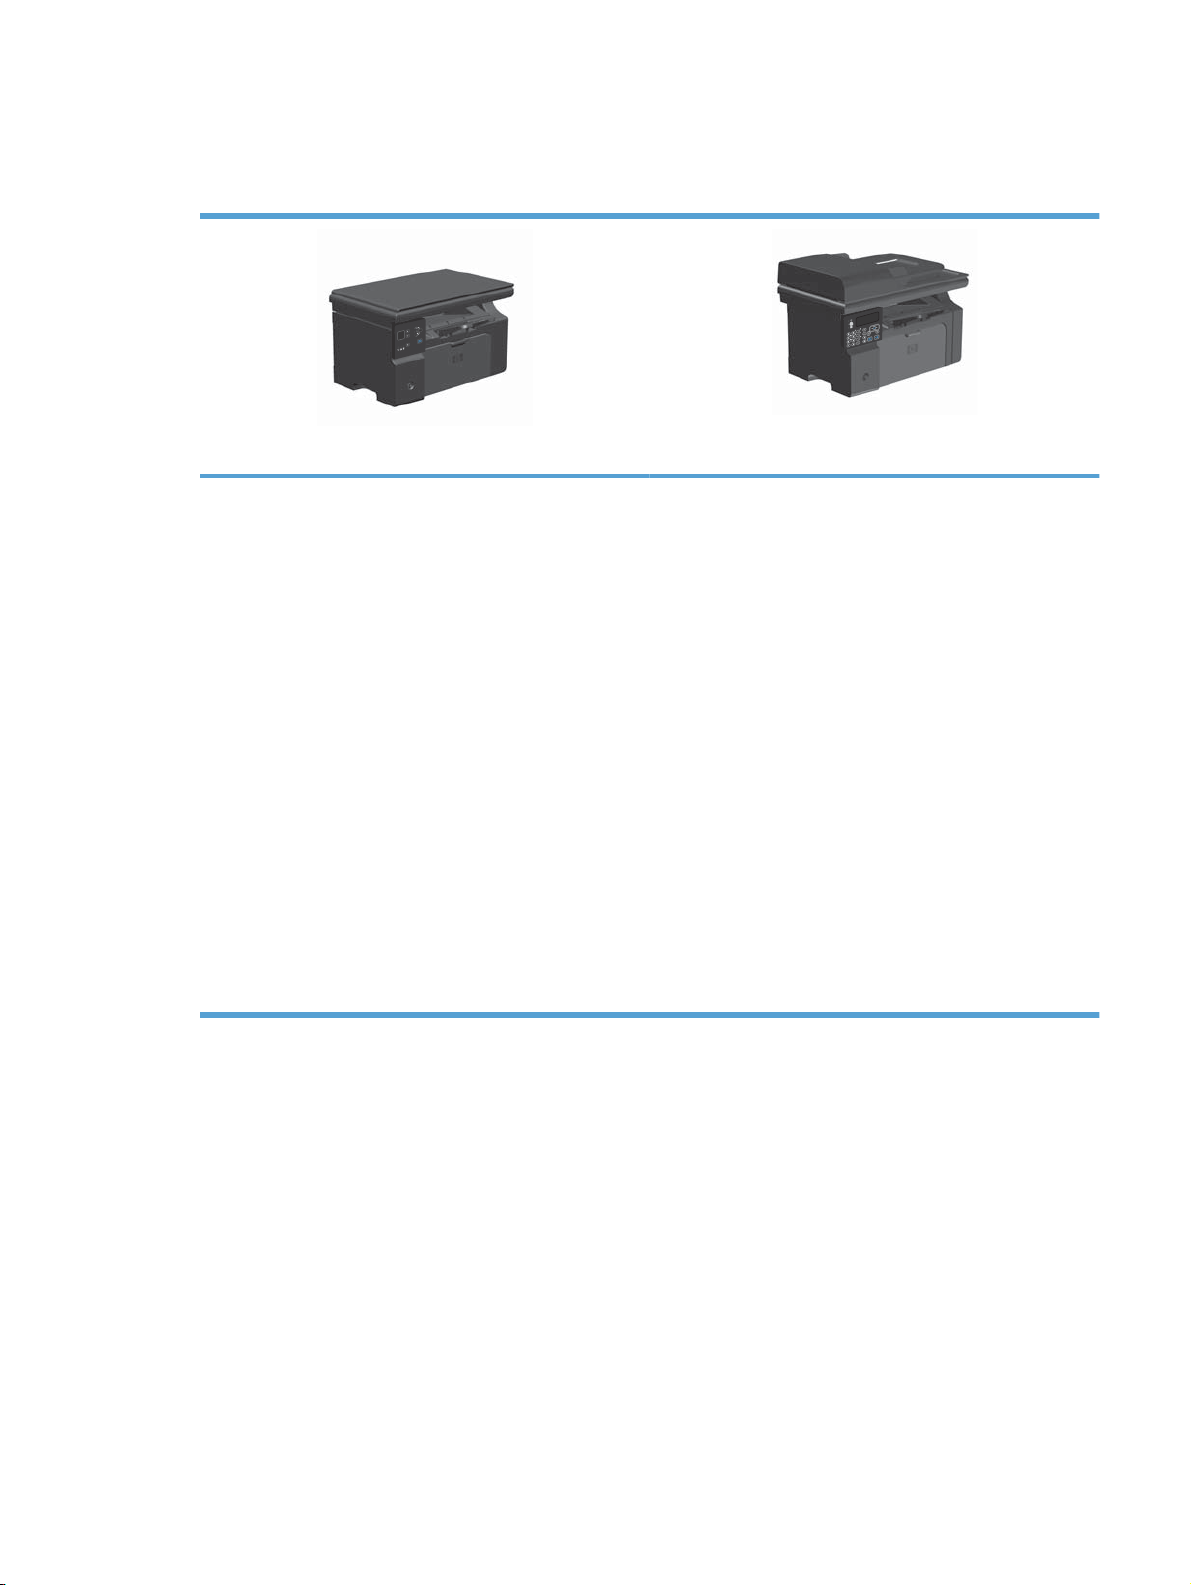
Product comparison
The product is available in the following configurations.
M1130 Series
Prints letter-size pages at speeds up to 19 pages per
●
minute (ppm) and A4-size pages at speeds up to 18 ppm.
The input tray holds up to 150 sheets of print media or up
●
to 10 envelopes.
The output bin holds up to 100 sheets
●
2-digit LED control-panel display
●
Manual two-sided (duplex) printing and copying.
●
Copy from the flatbed scanner
●
Full-color scanning
●
Hi-Speed USB 2.0 port.
●
8-MB random-access memory (RAM).
●
M1210 Series
Prints letter-size pages at speeds up to 19 pages per
●
minute (ppm) and A4-size pages at speeds up to 18 ppm.
The input tray holds up to 150 sheets of print media or up
●
to 10 envelopes.
The output bin holds up to 100 sheets
●
LCD control-panel display
●
Copy from the flatbed scanner or from the document
●
feeder
Full-color scanning
●
Hi-Speed USB 2.0 port.
●
Integrated networking for connecting to a 10/100Base-TX
●
network.
V.34 fax modem and 500 Slerex pages.
●
Two RJ-11 fax/phone cable ports.
●
64-MB random-access memory (RAM).
●
35-page document feeder.
●
ENWW Product comparison 3
Page 20

Product features
Print
Copy
Scan
Fax (M1210 Series only)
Prints letter-size pages at speeds up to 19 ppm and A4-size pages at speeds up to
●
18 ppm.
Prints at 400x600x2 dots per inch (dpi) with FastRes 600 (default). Supports FastRes 1200
●
at 600x600x2 dpi for high-quality printing of text and graphics.
Includes adjustable settings to optimize print quality.
●
Scans at 300 pixels per inch (ppi) and prints with FastRes 600.
●
Easily change the number of copies, adjust the lightness or darkness, or reduce or enlarge
●
the size of copies from the control panel.
ID Copy feature copies both sides of identification cards, or other small-size documents,
●
onto the same side of one sheet of paper. M1210 Series only.
Provides up to 1200 pixels per inch (ppi) full-color scanning from the flatbed scanner.
●
Provides up to 300 ppi full-color scanning from the document feeder.
●
Scan from TWAIN-compliant or Windows Imaging Application (WIA)-compliant software.
●
Scan from a computer by using HP LaserJet Scan software for Windows or by using
●
HP Director software for Mac.
Full-functionality fax capabilities with a V.34 fax; includes a phone book and delayed-fax
●
features.
Stores up to 500 pages in memory.
●
Recovers faxes from memory for up to four days following a power failure.
●
Supported operating
systems
HP Smart Install Allows easy installation of the product printing software from the product firmware via a USB
Memory
Paper handling
Printer driver features
Windows 7 (32-bit and 64-bit)
●
Windows Vista (32-bit and 64-bit)
●
Windows XP (32-bit and 64-bit)
●
Mac OS X 10.4, 10.5, 10.6
●
Windows Server 2003 (32-bit and 64-bit)
●
Windows Server 2008 (32-bit and 64-bit)
●
or network connection.
M1130 Series: Includes 8-megabyte (MB) random-access memory (RAM).
●
M1210 Series: Includes 64-MB RAM.
●
The input tray holds up to 150 sheets of paper or 10 envelopes.
●
The document feeder holds up to 35 sheets of paper.
●
The output bin holds up to 100 sheets of paper.
●
Print multiple pages on one sheet.
●
Print booklets.
●
Scale to fit different paper sizes.
●
Print cover pages on different paper.
●
4 Chapter 1 Purpose and scope ENWW
Page 21

Interface connections
Hi-Speed USB 2.0 port.
●
RJ-45 network port. (M1210 Series only)
●
Two RJ-11 fax/phone cable ports. (M1210 Series only)
●
Economical printing
Archive printing Archive printing feature for printing pages that you plan to store for a long time.
Supplies
Self-help Quick-reference pages available from www.hp.com/support/ljm1130series or www.hp.com/
Accessibility
Security
N-up printing (printing more than one page on a sheet) and the manual two sided printing
●
features save paper.
EconoMode printer driver feature saves toner.
●
Auto-Off mode allows the product to automatically reduce its power consumption after a
●
user-specified time period. The product returns to the ready state when a button is pressed
or a print job is received.
Authentication for genuine HP print cartridges.
●
Easy ordering for replacement supplies.
●
Supplies status page shows estimated toner level in the print cartridge. Not available for
●
non-HP supplies.
support/ljm1210series.
All doors and covers can be opened by using one hand.
●
Receptacle for a cable-type security lock.
●
ENWW Product features 5
Page 22

Product views
Front view
M1130 Series
1
2
3
4
5
8
1 Scanner lid
2 Scanner assembly
3 Output bin with extension for long paper
4 Print-cartridge door lift-tab
5 Input tray
6 Short media extender tool
7 Power button
8 Control panel
7
6
6 Chapter 1 Purpose and scope ENWW
Page 23
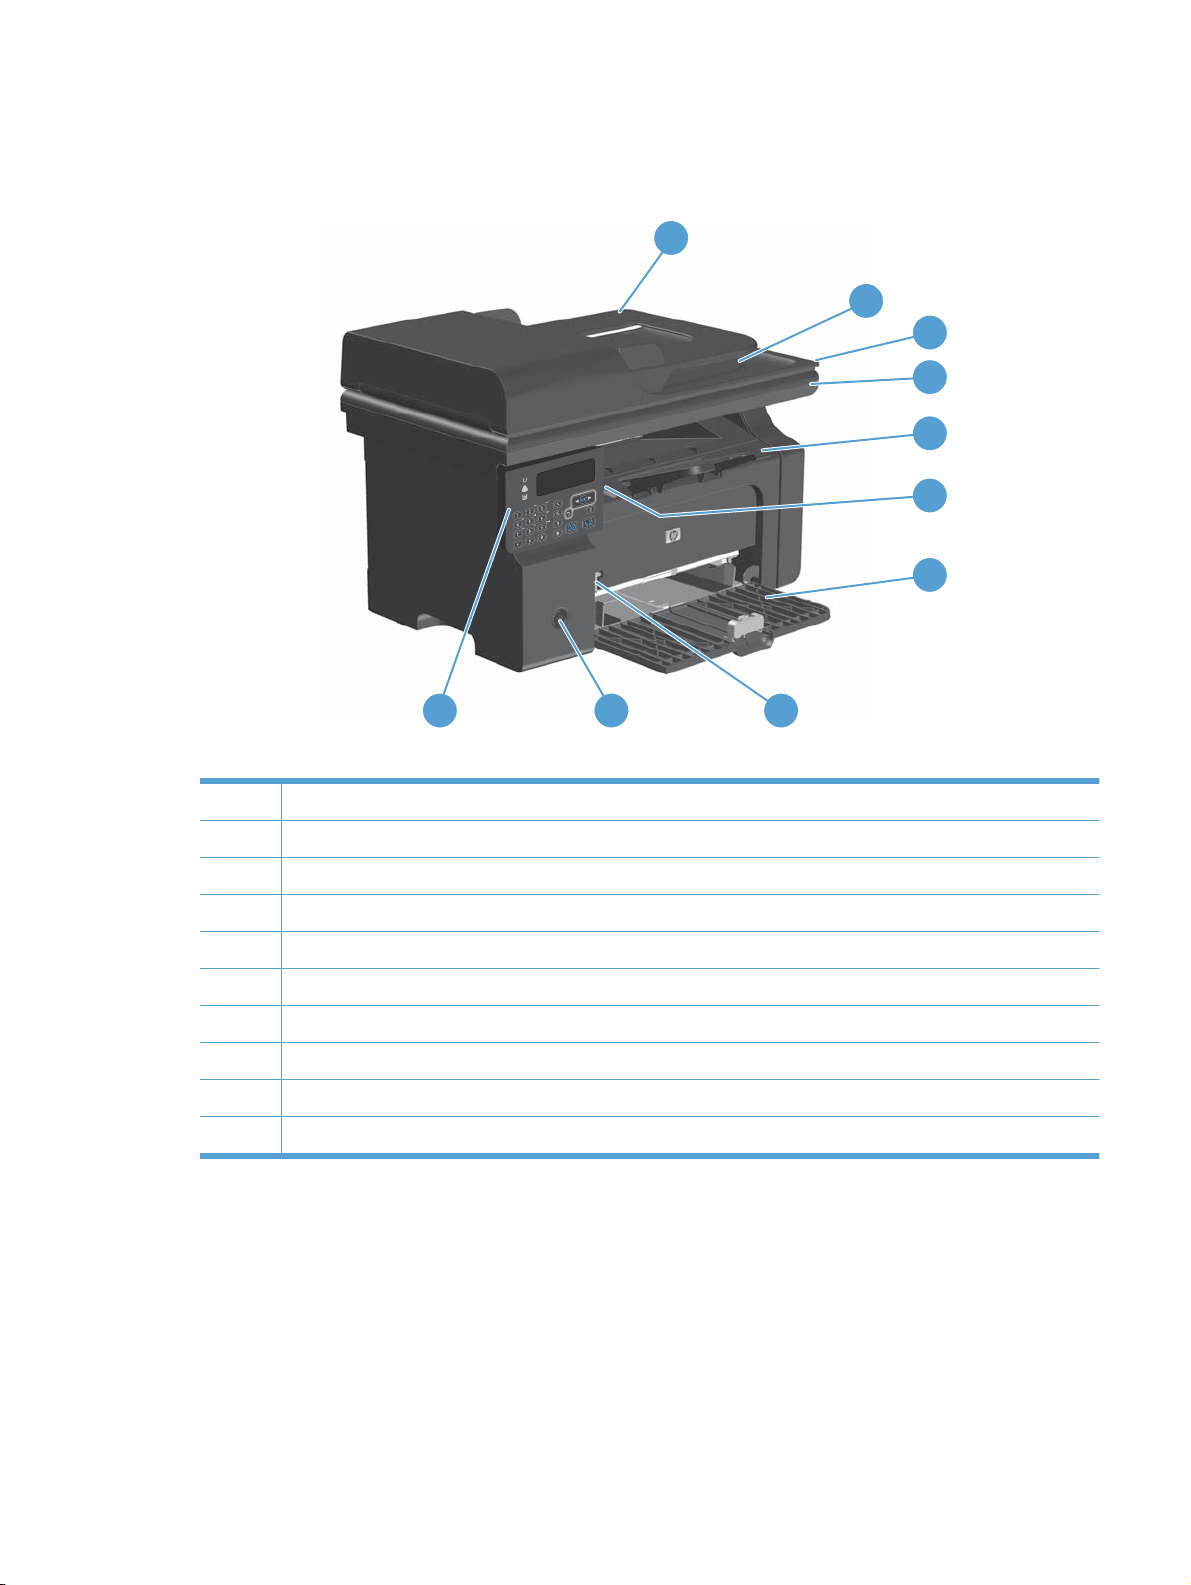
M1210 Series
1
2
3
4
5
6
7
10
1 Document feeder
2 Document feeder output bin
3 Scanner lid
4 Scanner assembly
5 Output bin with extension for long paper
6 Print-cartridge door lift-tab
7 Input tray
8 Short media extender tool
9 Power button
10 Control panel
9
8
ENWW Product views 7
Page 24

Back view
M1130 Series
1 2
3
1 Slot for a cable-type security lock
2 Hi-Speed USB 2.0 port
3 Power connection
8 Chapter 1 Purpose and scope ENWW
Page 25
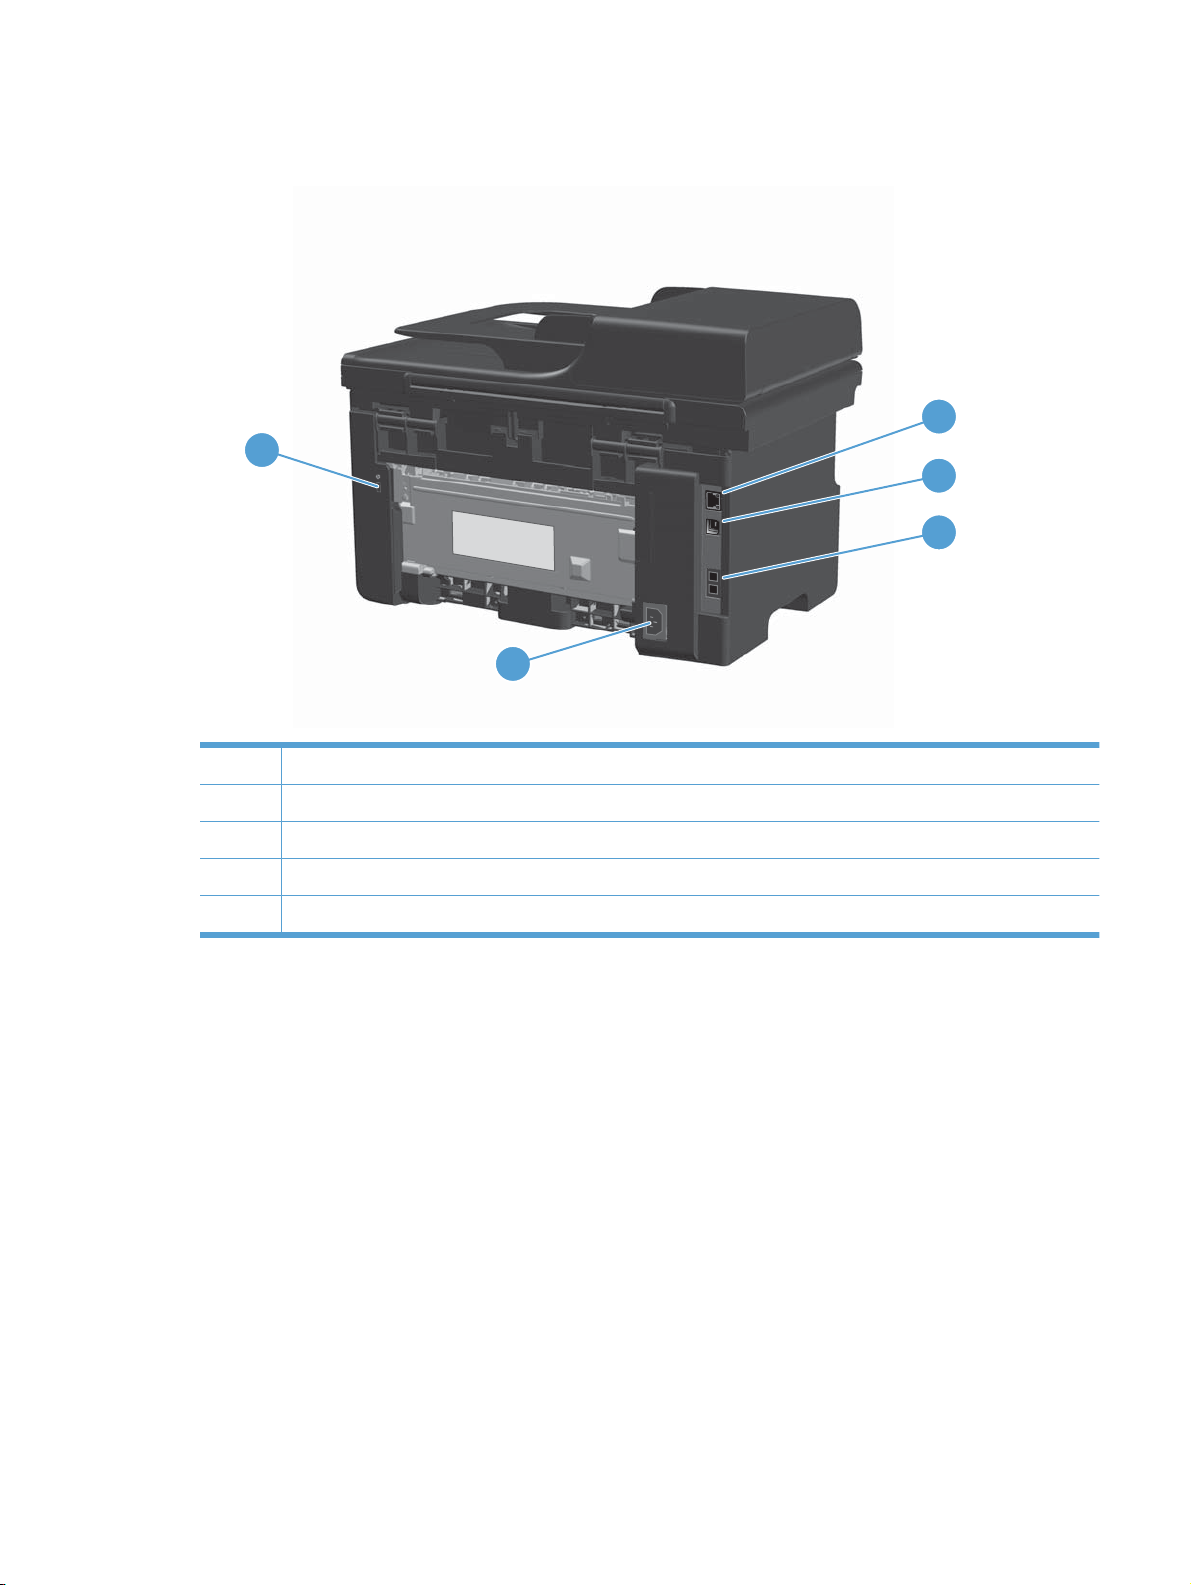
M1210 Series
2
1
3
4
5
1 Slot for a cable-type security lock
2 RJ-45 network port
3 Hi-Speed USB 2.0 port
4 RJ-11 fax ports; the upper port is for a phone line, the lower port is for a telephone handset.
5 Power connection
ENWW Product views 9
Page 26
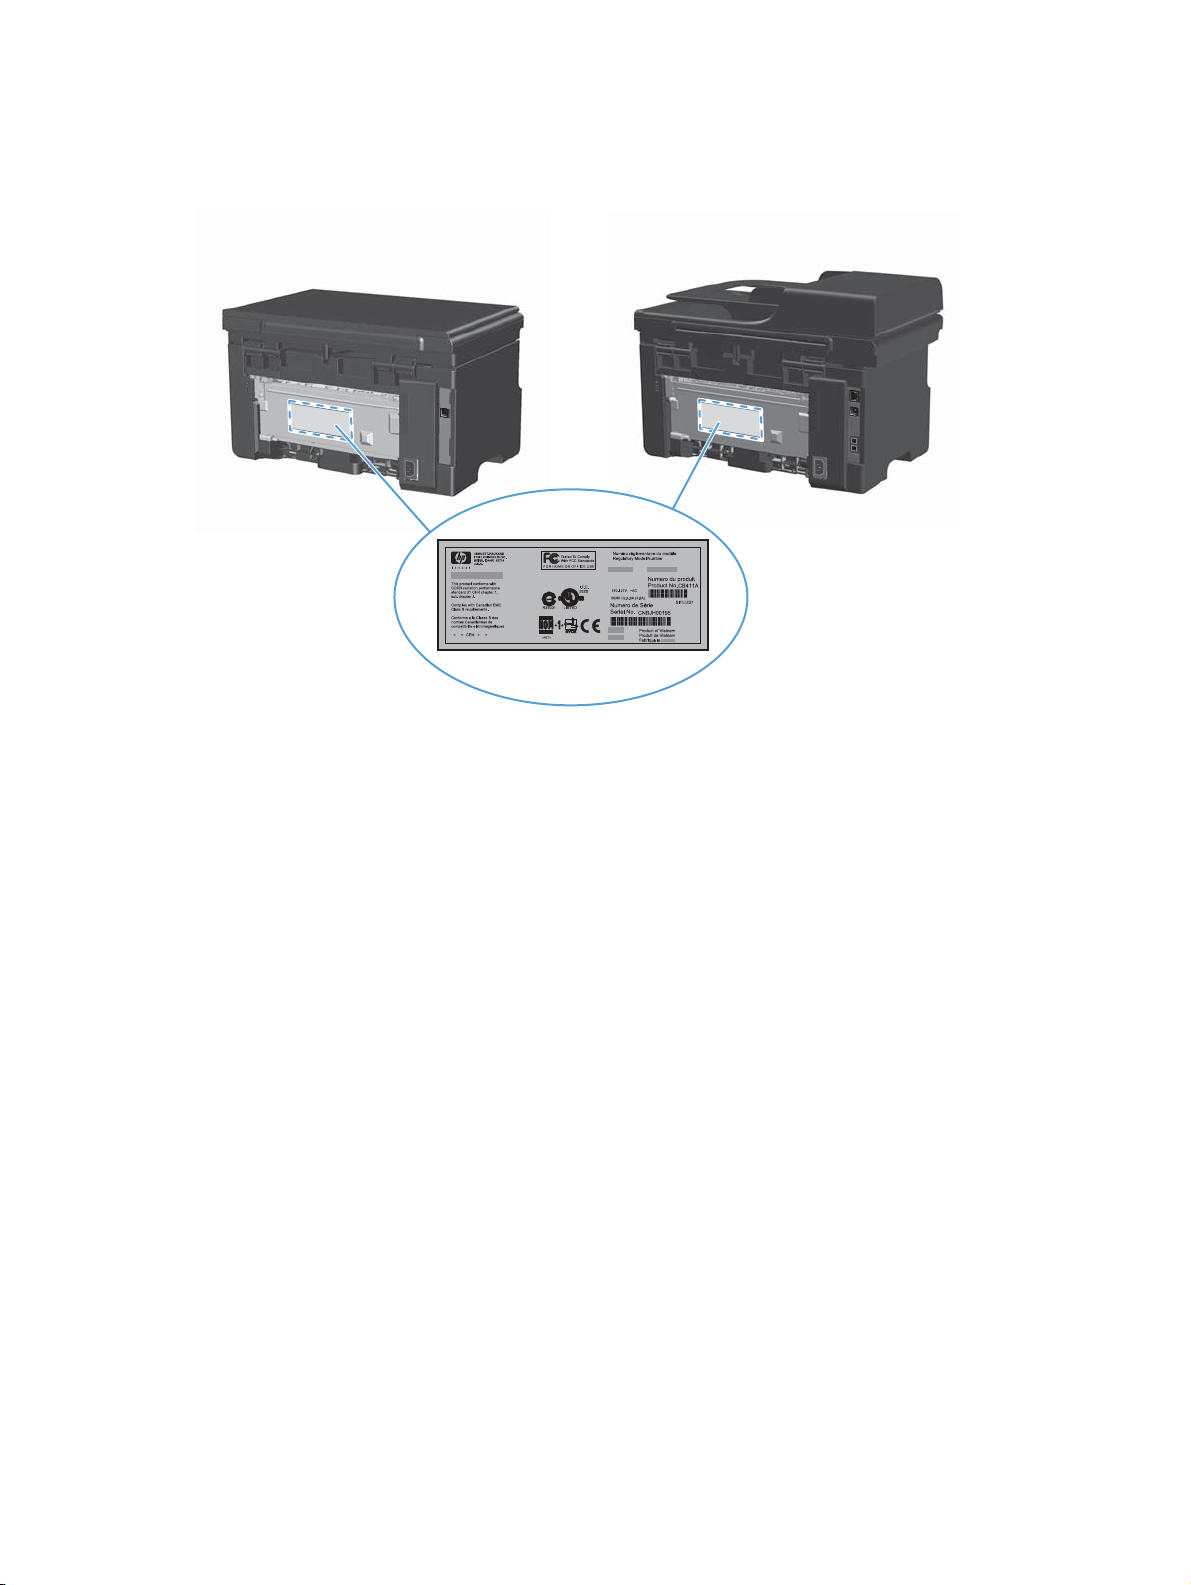
Serial number and model number location
The serial number and product model number label is at the back of the product.
10 Chapter 1 Purpose and scope ENWW
Page 27
Control-panel layout
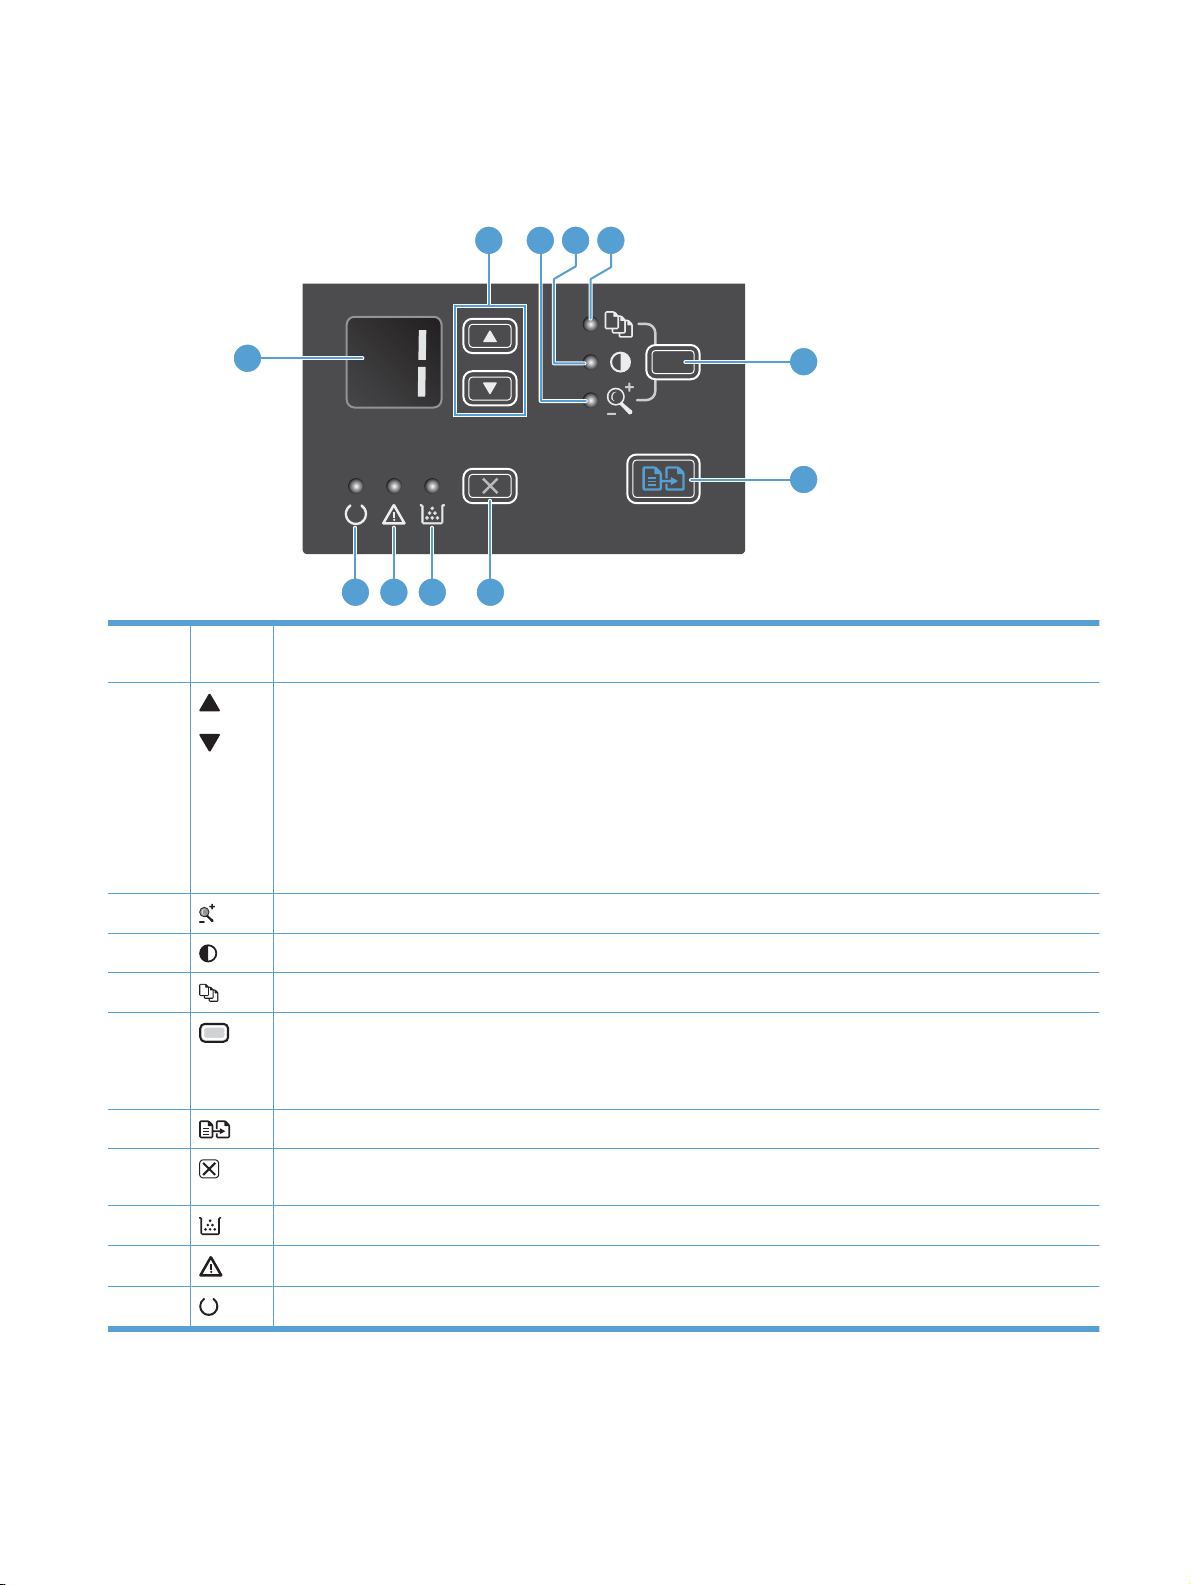
M1130 Series
2 3 4 5
1
6
7
891011
1 LED display screen: Displays the number of copies, the level of darkness for copies, and the percentage of copy-
size reduction or enlargement. It also shows error codes that alert you of problems that require attention.
2 Up and down arrows: Increases or decreases the number of copies, the level of darkness for copies, or the
3 Reduce/Enlarge copy light: Indicates the copy-size reduction or enlargement feature is active.
percentage of copy-size reduction or enlargement.
Press the buttons for less than one second to increase or decrease copy settings by one increment.
●
Press the buttons for one second or longer to increase or decrease the level of darkness to the maximum or
●
minimum value.
Press the buttons for one second or longer to increase or decrease the number of copies or the percentage of
●
copy-size reduction or enlargement by 10 increments.
4 Darker/Lighter copy light: Indicates the copy-darkness feature is active.
5 Number Of Copies light: Indicates the number-of-copies feature is active.
6 Setup button: Scrolls between the copy settings for number of copies, darkness, and copy size for each job. The
default option is the number of copies. To change the default settings for all jobs, scroll to the setting and then press
and hold the button for 3 seconds. When the light is blinking, adjust the setting. Press this button again to save the
setting.
7 Start Copy button: Starts a copy job.
8 Cancel button: Cancels the current job, or clears the last setting you made. When the product is in the Ready state,
press this button to reset the copy settings to the default values.
9 Toner-level status light: Indicates the level of toner in the print cartridge is low.
10 Attention light: Indicates a problem with the product.
11 Ready light: Indicates the product is ready or is processing a job.
ENWW Product views 11
Page 28

M1210 Series
4 5 6
7
3
2
1
8
9
10
15
1 Toner-level status light: Indicates the level of toner in the print cartridge is low.
2 Attention light: Indicates a problem with the product. View the LCD display for a message.
3 Ready light: Indicates the product is ready or is processing a job.
14
13 12 11
4 LCD display screen: Displays status information, menus, and messages.
5 Copy Settings button: Opens the Copy Settings menu.
6 Setup button: Opens the menus.
7 Left and right arrows: Enter and navigate through the menus. Decrease or increase the current value on the screen.
8 OK button: Acknowledges a setting or confirms an action to proceed.
9 Cancel button: Cancels the current job, or clears the last setting you made. When the product is in the Ready state,
10 Start Copy button: Starts a copy job.
11 Back arrow: Returns to the previous level in the menus.
12 Send Fax button: Starts a fax job.
13 Redial button: Recalls the last digits used for the previous fax job.
14 Darker/Lighter copy button: Adjusts the darkness setting for the current copy job.
15 Numeric keypad: Use the keypad to enter fax numbers or to enter data.
Move the screen cursor backward or forward one space.
press this button to reset the copy settings to the default values.
12 Chapter 1 Purpose and scope ENWW
Page 29

Printing-system software
Operating-system support
●
Availability and localization
●
Operating-system support
Windows operating systems provide full-featured support for the product. Operating systems that are
not described in this STR provide varying levels of functionality.
Throughout this document, Windows XP is used to denote Windows XP Home Edition and Windows
XP Professional, unless noted otherwise.
Information relating to networking functions is specific to products that have network capabilities.
The printing-system software has not been tested with and is not supported in the following operating
systems:
Windows 3.1x
●
Windows 95
●
Windows 98
●
Windows 2000
●
Windows Millennium Edition (Me)
●
Windows NT® 4.0
●
IA-64-bit operating systems
●
Printer drivers for these operating systems are not included in the product firmware, on the printingsystem software CD, and are not available on the Web. Other printer drivers might work with the product,
but some print-driver features and functions might not be available.
For more information about the product, go to the following Web sites:
www.hp.com/support/ljm1130series or www.hp.com/support/ljm1210series
Supported operating systems for Windows
●
Supported printer drivers for Windows
●
Supported utilities for Windows
●
Supported operating systems for Macintosh
●
Supported printer drivers for Macintosh
●
Supported utilities for Macintosh
●
Supported operating systems for Windows
The product supports the following Windows operating systems:
Windows XP (32-bit and 64-bit)
●
Windows Server 2003 (32-bit and 64-bit)
●
ENWW Printing-system software 13
Page 30

Windows Vista (32-bit and 64-bit)
●
Windows Server 2008 (32-bit and 64-bit)
●
Windows 7 (32-bit and 64-bit)
●
Supported printer drivers for Windows
HP LaserJet Professional M1130/M1210 MFP Series Host-based print driver
●
HP LaserJet Professional M1130/M1210 MFP Series XPS print driver
●
The printer drivers include online Help that has instructions for common printing tasks and also describes
the buttons, check boxes, and drop-down lists that are in the printer driver.
NOTE: The host-based driver is the only printer driver that is included with this product; it is included
in the product firmware and on the printing-system CD.
The XPS driver is available by Web download only at www.hp.com/go/ljm1130series_software or
www.hp.com/go/ljm1210series_software
NOTE: For more information about the UPD, see www.hp.com/go/upd.
Supported utilities for Windows
The following utilities for Windows are available for the HP LaserJet Professional M1130/M1210 MFP
Series printer.
HP Embedded Web Server (M1210 Series only)
M1210 Series products are equipped with the HP Embedded Web Server (HP EWS), which provides
access to information about product and network activities. This information appears in a Web browser,
such as Microsoft Internet Explorer, Apple® Safari, or Firefox.
The HP EWS resides on the product. It is not loaded on a network server.
The HP EWS provides an interface to the product that anyone who has a network-connected computer
and a standard Web browser can use. No special software is installed or configured, but you must have
a supported Web browser on the computer. To gain access to the HP EWS, type the IP address for the
product in the address line of the browser.
For a complete explanation of the features and functionality of the HP EWS, see the HP LaserJet M1130/
M1210 Series User Guide, which is available on the printing system software CD.
HP Toolbox
HP Toolbox software is a program that you can use for the following tasks:
Check the product status.
●
Check the supplies status and use HP SureSupply to shop online for supplies.
●
Set up alerts.
●
View product usage reports.
●
View product documentation.
●
Gain access to troubleshooting and maintenance tools.
●
14 Chapter 1 Purpose and scope ENWW
Page 31

Configure fax settings
●
View PC fax jobs
●
You can view HP Toolbox software when the product is directly connected to your computer or when it
is connected to a network.
To download HP Toolbox software, use the HP Toolbox link on the printing system software CD that
appears at the end of the driver installation sequence. You can also use your Web browser to go directly
to
www.hp.com/go/easyprintercare. This Web site provides updated information about supported
browsers, a list of HP products that support HP Toolbox software, and the HP LaserJet Professional
M1130/M1210 MFP Series User Guide, which provides more information about using the HP Toolbox
software.
Supported operating systems for Macintosh
The product supports the following Macintosh operating systems:
Mac OS X V10.4, V10.5, and V10.6
●
NOTE: PPC and Intel® Core Processor Macs are supported.
Supported printer drivers for Macintosh
The HP LaserJet software installer provides PostScript® Printer Description (PPD) files, a CUPS driver,
and the HP Printer Utilities for Mac OS X. The HP printer PPD file, in combination with the CUPS driver,
provides full printing functionality and access to specific HP printer features.
Supported utilities for Macintosh
The following additional software is available for Macintosh for use with the HP LaserJet Professional
M1130/M1210 MFP Series printer.
HP LaserJet Utility
Use the HP LaserJet Utility to set up product features that are not available in the printer driver.
You can use the HP LaserJet Utility when the product is connected with a universal serial bus (USB)
cable.
Open the HP LaserJet Utility
From the Printer menu, click Printer Utility, or
●
From the Print Queue, click the Utility icon.
●
HP LaserJet Utility features
The HP Printer Utility consists of pages that you open by clicking in the Configuration Settings list.
The following table describes the tasks that you can perform from these pages.
ENWW Printing-system software 15
Page 32

Table 1-1 HP LaserJet Utility features
Item Description
Print information Pages Allows you to print the following information pages.
Cleaning Page
●
Demo Page
●
Configuration Page
●
Supply Status Page
●
Control-Panel Reference Page
●
Auto-Off Console Auto-Off is an energy-saving feature of this product. After a user-specified time period, the
HTML Config... Open the EWS for the product (M1210 Series only).
product automatically reduces its power consumption (Auto-Off). The product returns to
the ready state when a button is pressed or a print job is received. When the product is in
Auto-Off mode, all of the control-panel LEDs and the power button backlight LED are off.
Although the product lights are off in Auto-Off mode, the product will work normally when
it receives a print job.
Embedded Web Server
The product is equipped with the HP EWS, which provides access to information about product and
network activities.
Availability and localization
Download the printing-system software from the Web, or order it on a CD from HP fulfillment centers.
NOTE: This STR describes drivers that are included in the product firmware and are also shipped with
the printing-system software CD. This document does not describe any drivers that might be released
by support personnel.
Software component availability for Windows and Macintosh
●
Printing-system software on the Web
●
In-box printing-system software CD
●
Software component availability for Windows and Macintosh
The following table lists the availability of printing-system software components for Windows and
Macintosh computers.
Table 1-2 Software component availability
Component Windows Macintosh
HP Smart Install x
Mac Installer x
Windows Host-based Print Driver x
XPS driver x
16 Chapter 1 Purpose and scope ENWW
Page 33

Table 1-2 Software component availability (continued)
Component Windows Macintosh
Mac OS X V10.4, V10.5, V10.6 Print
Driver
Scan to application software x x
Usage tracking software x x
OCR application software x x
WIA and TWAIN driver software x x
Print Dialog Extensions x
User Guide (PDF) x
User Guide (CHM) x
SW Install Notes x
Getting Started Guide x x
HP LaserJet Help Navigation x
CD Browser x
Printing-system software on the Web
All software that is contained in the product firmware and on the installation CD is also available on the
Web.
x
Web deployment is the preferred method for obtaining the latest software. The HP Web site offers an
option for automatic e-mail notification about new software releases.
The printing-system software is available for download at the following Web sites:
www.hp.com/support/ljm1130series or www.hp.com/support/ljm1210series
In-box printing-system software CD
One CD is included in-box with the product. The printing-system software CD contains the following
components:
Software installer
●
User guide
●
Install notes
●
Support information
●
Each CD has two partitions, one each for Windows and Macintosh computers.
The files in each partition of the printing-system software CD include documentation files and files that
are required to install and uninstall the printing-system software components.
Printing-system software CD
The root directory in the Windows partition of the printing-system software CD contains the HpSetup.exe
file, the setup.exe file, support files, and language specific directories.
ENWW Printing-system software 17
Page 34

To view the files, insert the printing-system software CD into the CD-ROM drive, right-click Start, click
Explore, and then select the CD-ROM drive.
CD Versions
The printing-system software CD is available in one version and contains the printing-system software
in all supported languages as follows:
CD – supported languages
AR = Arabic
●
BG = Bulgarian
●
CA = Catalan (Català)
●
CS = Czech (Cesky)
●
DA = Danish (Dansk)
●
DE = German (Deutsch)
●
EL = Greek
●
EN = English
●
ES = Spanish (Español)
●
ET = Estonian (Eesti)
●
FI = Finnish (Suomi)
●
FR = French (Français)
●
HE = Hebrew
●
HR = Croatian (Hrvatski)
●
HU = Hungarian (Magyar)
●
ID = Indonesia (Bahasa)
●
IT = Italian (Italiano)
●
KK = Kazakh
●
KO = Korean
●
LT = Lithuanian
●
LV = Latvian
●
NL = Dutch (Nederland)
●
NO = Norwegian (Norsk)
●
PL = Polish (Polski)
●
PT = Brazilian Portuguese (Português)
●
RO = Romanian
●
18 Chapter 1 Purpose and scope ENWW
Page 35

RU = Russian (Russ)
●
SK = Slovak
●
SL = Slovenian
●
SR = Serbian
●
SV = Swedish (Svenska)
●
TH = Thai
●
TR = Turkish (Turkçe)
●
UK = Ukranian
●
VI = Vietnamese
●
ZHCN = Simplified
●
ZHTW = Traditional Chinese
●
Table 1-3 Supported printing-system components (AR-ET)
Component AR BG CA CS DA DE EL EN ES ET
HP Smart Install x x x x x x x x x x
Mac Installer x x x
Windows Hostbased Print Driver
XPS driver x x x x x x x x x x
Mac OS X V10.4,
V10.5, V10.6 Print
Driver
Scan to application
software (Windows)
Scan to application
software (Mac)
Usage tracking
software
OCR application
software
WIA and TWAIN
driver software
Print Dialog
Extensions
User Guide (PDF) x x x
User Guide (CHM) x x x x x x x
x x x x x x x x x x
x x x
x x x x x x x x x x
x x x
x x x x x x x x x x
x x x x x x x x x x
x x x x x x x x x x
x x x x x x x x x x
SW Install Notes
(Windows)
SW Install Notes
(Mac)
x x x x x x x x x x
xxx
ENWW Printing-system software 19
Page 36

Table 1-3 Supported printing-system components (AR-ET) (continued)
Component AR BG CA CS DA DE EL EN ES ET
HP Smart Install x x x x x x x x x x
Getting Started
Guide
HP LaserJet Help
Navigation
CD Browser xxxxxxxxxx
x x x x x x x x x x
x x x x x x x x x x
Table 1-4 Supported printing-system components (FI-LT)
Component FI FR HE HR HU ID IT KK KO LT
HP Smart Install x x x x x x x x x x
Mac Installer x x
Windows Hostbased Print Driver
XPS driver x x x x x x x x x x
Mac OS X V10.4,
V10.5, V10.6 Print
Driver
Scan to application
software (Windows)
Scan to application
software (Mac)
x x x x x x x x x x
x x
x x x x x x x x x x
x x
Usage tracking
software
OCR application
software
WIA and TWAIN
driver software
Print Dialog
Extensions
User Guide (PDF) x x
User Guide (CHM) x x x x x x x x
SW Install Notes
(Windows)
SW Install Notes
(Mac)
Getting Started
Guide
HP LaserJet Help
Navigation
CD Browser xxxxxxxxxx
x x x x x x x x x x
x x x x x x x x x x
x x x x x x x x x x
x x
x x x x x x x x x x
x x
x x x x x x x x x x
x x x x x x x x x x
20 Chapter 1 Purpose and scope ENWW
Page 37

Table 1-5 Supported printing-system components (LV-SL)
Component LV NL NO PL PT RO RU SK SL
HP Smart Install x x x x x x x x x
Mac Installer x
Windows Hostbased Print Driver
XPS driver x x x x x x x x x
Mac OS X V10.4,
V10.5, V10.6 Print
Driver
Scan to application
software (Windows)
Scan to application
software (Mac)
Usage tracking
software
OCR application
software
WIA and TWAIN
driver software
Print Dialog
Extensions
User Guide (PDF) x
User Guide (CHM) x x x x x x x x
x x x x x x x x x
x
x x x x x x x x x
x
x x x x x x x x x
x x x x x x x x x
x x x x x x x x x
x
SW Install Notes
(Windows)
SW Install Notes
(Mac)
Getting Started
Guide
HP LaserJet Help
Navigation
CD Browser xxxxxxxxx
x x x x x x x x x
x
x x x x x x x x x
x x x x x x x x
Table 1-6 Supported printing-system components (SR-ZHT)
Component SR SV TH TR UK VI ZHC ZHT
HP Smart Install x x x x x x x x
Mac Installer
Windows Hostbased Print Driver
XPS driver xxxxxxxx
x x x x x x x x
ENWW Printing-system software 21
Page 38

Table 1-6 Supported printing-system components (SR-ZHT) (continued)
Component SR SV TH TR UK VI ZHC ZHT
HP Smart Install x x x x x x x x
Mac OS X V10.4,
V10.5, V10.6 Print
Driver
Scan to application
software (Windows)
Scan to application
software (Mac)
Usage tracking
software
OCR application
software
WIA and TWAIN
driver software
Print Dialog
Extensions
User Guide (PDF)
User Guide (CHM) x x x x x x x x
SW Install Notes
(Windows)
SW Install Notes
(Mac)
Getting Started
Guide
x x x x x x x x
x x x x x x x x
x x x x x x x x
x x x x x x x x
x x x x x x x x
x x x x x x x x
HP LaserJet Help
Navigation
CD Browserxxxxxxxx
x x x x x x x x
22 Chapter 1 Purpose and scope ENWW
Page 39

Documentation
The printing-system software CD that is included with the product contains documentation.
Access to the documents depends on the document type and location as follows:
Some documents can be opened from the CD Browser.
●
Some documents appear on the CD and can only be opened by navigating to the folder where they
●
reside.
Some documents are available on the Web through links in the CD Browser or CD folders.
●
Documents are available in the following file formats:
Portable document format (.PDF)
●
Hypertext markup (.HTM). When you click a documentation link to an .HTM document, a Web
●
browser opens the file on the computer screen.
Microsoft Compiled HTML Help (.CHM)
●
ENWW Documentation 23
Page 40

Printing-system software CD
Main CD browser screen
●
User Documentation
●
Main CD browser screen
To view documentation and use links to HP support on the printing-system software CD, insert the CD
into the into the CD-ROM drive. The main screen of the CD Browser opens. Move the cursor over each
option to see a description of the option in the right panel.
Figure 1-1 Printing-system software CD – main browser screen
24 Chapter 1 Purpose and scope ENWW
Page 41

User Documentation
On the main screen of the printing-system software CD Browser, click View User Guide to open the
View User Guide screen. Move the cursor over each option to see a description of the option in the
right panel.
Figure 1-2 View User Guide screen
HP LaserJet Help Navigation
●
User Guide
●
More Information
●
HP LaserJet Help Navigation
General instructions
Click either the M1130 MFP Series button or the M1210 MFP Series button to open the HP LaserJet
Help Navigation application.
The HP LaserJet Help Navigation application provides links to the HP LaserJet Professional M1130/
M1210 MFP Series user guides, shortcuts to frequently used sections of the user guides, links to support
and supplies, and animated help for printer light patterns.
ENWW Documentation 25
Page 42

Click Browse User Guide to gain access to the product user guide.
If the product software is installed by a direct USB connection and not from the CD, the user guide
●
is not installed locally on your computer as part of the installation. Click the Open the latest version
on the web link to download and view the user guide from www.hp.com.
If the product software is installed from the CD, click Open the user guide on my computer to
●
open the locally installed version of the user guide. Click the Open the latest version on the
web link to download and view the user guide from www.hp.com.
NOTE: The product user guide is distributed in .CHM format only for Windows operating system
installations and .PDF format only for Mac OS X operating system installations.
HP LaserJet Help Navigation provides the following links to HP support sites.
Web support — the main support site for your product.
●
HP SureSupply — shop for and purchase genuine HP printing supplies
●
HP.com — HP's main Web site
●
HP LaserJet Help Navigation provides the following shortcut links to commonly used sections of the
user guide.
NOTE: Since HP LaserJet Help Navigation contains many of the same help options for both M1130
and M1210 series products, all of the options are listed below. The specific product series name is listed
after the option if the option appears only for that product in HP LaserJet Help Navigation.
Product specifications
●
Quick reference for control-panel buttons and lights
●
Printer light patterns (M1130 series)
●
Control-panel messages (M1210 series)
●
Replace the print cartridge
●
Clear a paper jam (M1130 series)
●
Load paper trays (M1210 series)
●
Print on heavy paper (M1130 series)
●
Get IP address of a printer in network (M1210 series)
●
Click the Everyday Jobs button to gain quick access to the following sections of the user guide.
Paper and print media (M1130 series)
●
Load paper trays
◦
Print tasks
●
Cancel a print job
◦
Open the printer driver
◦
Select a custom page size (M1130 series)
◦
◦
26 Chapter 1 Purpose and scope ENWW
Page 43

Print on both sides (manual duplex)
◦
Print multiple pages per sheet
◦
Create a booklet (M1130 series)
◦
Print on special paper (M1130 series)
◦
Copy tasks (M1130 series)
●
Make multiple copies
◦
Reduce or enlarge copies
◦
Copy on both sides
◦
Make my copy look better
◦
Scan tasks
●
Scan a document
◦
Make my scan look better
◦
Fax tasks (M1210nf series)
●
Use the phone book
◦
Send a fax
◦
Schedule a fax to be sent later
◦
Print a stored fax
◦
Delete faxes from memory
◦
Click the Manage & Maintain button to gain quick access to the following sections of the user guide.
Print information pages
●
Replace the print cartridge
●
Print a cleaning page
●
Clean the scanner glass
●
Clean the pickup roller
●
Clean the separation pad
●
Change energy settings
●
Click the Solve a Problem button to gain quick access to the following sections of the user guide.
Clear a paper jam
●
Interpret light patterns (M1130 series)
●
Clear jams from the document feeder (M1210 series)
●
Control-panel messages (M1210 series)
●
ENWW Documentation 27
Page 44

Solve image quality problems
●
Solve paper handling problems
●
Solve copy quality problems
●
Solve scan quality problems
●
Solve fax problems (M1210 series)
●
Control panel light patterns
Control panel light patterns communicate different product states.
Interpret control-panel light patterns (M1130 Series only)
If the product requires attention, an error code appears on the control-panel display.
Table 1-7 Status-light legend
Symbol for "light off"
Symbol for "light on"
Symbol for "light blinking"
Table 1-8 Control-panel light patterns
Light status Error code State of the product Action
All lights are off. The product is turned off. Press the power button to turn on the
Ready and attention lights blink. The status lights cycle during the
formatter initialization period or when
the product is processing a cleaning
page.
Ready light is on. The product is in the ready state. No action is required. The product is
product.
No action is required. Wait for the
initialization period to end. The product
should enter the ready state when the
initialization period is finished.
ready to receive a print job.
28 Chapter 1 Purpose and scope ENWW
Page 45

Table 1-8 Control-panel light patterns (continued)
Light status Error code State of the product Action
Ready light is blinking. The product is receiving or processing
data.
Ready light is blinking slowly. The product is in low power mode. No action is required.
Attention light is blinking. E0 Paper is jammed in the product. Clear the jam.
E1 The input tray is empty. Load the tray.
E2 A door is open Verify that the print-cartridge door is
E4 The product memory is full The job is too complex for the product
No action is required. The product is
receiving or processing a print job.
fully closed.
to print. Simplify the job, or divide it into
multiple files.
E5 The product did not pick up paper from
H0 The product is in manual-feed mode. Load the correct paper type and size
H1 The product is processing a manual
The attention and toner lights are
blinking.
The toner light is on. The print cartridge has reached the end
E3 The print cartridge is missing or is not
the tray.
duplex job.
installed correctly.
of its estimated useful life. When the
supply has reached this condition, the
HP Premium Protection warranty for
that supply has ended.
You might need to clean or replace the
pickup roller.
into the input tray.
Load the pages into the input tray to
print the second sides.
Install the print cartridge.
You do not need to replace the print
cartridge at this time unless print
quality is no longer acceptable.
ENWW Documentation 29
Page 46

Table 1-8 Control-panel light patterns (continued)
Light status Error code State of the product Action
Attention light is blinking, and ready
light is on.
The attention and ready lights are on. E6
The product has experienced a
continual error from which it will recover
on its own.
The product has experienced a fatal
error from which it cannot recover.
E7
E8
E9
Interpret control-panel messages (M1210 Series only)
Control-panel message types
If the recovery is successful, the
product continues to the processing
data state and completes the job.
If the recovery is unsuccessful, the
product continues to the continuable
error state. Try removing any media
from the media path and turning the
product power off, and then on again.
1. Turn off the product or disconnect
the power cord from the product.
2. Wait 30 seconds, and then turn
on the product or reconnect the
power cord to the product.
3. Wait for the product to initialize.
If the error persists, contact
HP customer support.
Alert and warning messages appear temporarily and might require you to acknowledge the message
by pressing the OK button to resume or by pressing the Cancel
button to cancel the job. With certain
warnings, the job might not complete or the print quality might be affected. If the alert or warning message
is related to printing and the auto-continue feature is on, the product will attempt to resume the printing
job after the warning has appeared for 10 seconds without acknowledgement.
Critical error messages can indicate some kind of failure. Turning off and then turning on the power
might fix the problem. If a critical error persists, the product might require service.
Control-panel messages
Control panel message Description Recommended action
50.X Fuser Error
Turn off then on
The product has experienced an internal
hardware error.
1. Turn off the power by using the power
switch, and then wait at least 30
seconds.
2. If a surge protector is being used,
remove it. Plug the product directly into
the wall socket.
3. Turn on the power and wait for the
product to initialize.
If the error persists, contact HP. See
www.hp.com/support/ljm1210series or the
support flyer that came in the product box.
30 Chapter 1 Purpose and scope ENWW
Page 47

Control panel message Description Recommended action
52 Scanner Error
Turn off then on
54.1C Error
Turn off then on
Comm. error The product experienced a communication
The product has experienced a scanner
error.
The product has experienced an internal
hardware error.
error while attempting to send or receive a
fax.
Turn off the power by using the power switch,
wait at least 30 seconds, and then turn on the
power and wait for the product to initialize.
If a surge protector is being used, remove it.
Plug the product directly into the wall socket.
Use the power switch to turn the product on.
If the error persists, contact HP. See
www.hp.com/support/ljm1210series or the
support flyer that came in the product box.
Verify that the fax phone line is working
correctly.
Try sending or receiving the fax again.
If the error persists, contact HP. See
www.hp.com/support/ljm1210series or the
support flyer that came in the product box.
Device error
Press [OK]
Door open The cover above the print cartridge is open. Close the cover.
Engine comm. Error The product has experienced an internal
Fax recv. error The product was unable to receive an
The product experienced an internal
communication error.
hardware error.
incoming fax.
This is a warning message only. Job output
might be affected.
1. Turn off the power by using the power
switch, and then wait at least 30
seconds.
2. If a surge protector is being used,
remove it. Plug the product directly into
the wall socket.
3. Turn on the power and wait for the
product to initialize.
If the error persists, contact HP. See
www.hp.com/support/ljm1210series or the
support flyer that came in the product box.
Verify that the fax phone line is working
correctly.
Ask the person who sent the fax to send it
again.
If the error persists, contact HP. See
www.hp.com/support/ljm1210series or the
support flyer that came in the product box.
ENWW Documentation 31
Page 48

Control panel message Description Recommended action
Fax Send error The product was unable to send the fax. Try sending the fax later, or confirm with the
recipient that the receiving fax machine is
ready.
If the error persists, contact HP. See
www.hp.com/support/ljm1210series or the
support flyer that came in the product box.
Jam in <location>
alternates with
Open door and clear jam
Load tray 1 PLAIN <SIZE>
alternates with
Cleaning Mode
Load tray <TYPE>, <SIZE> The tray is empty. Load the tray with the correct type and size of
Manual duplex
alternates with
Load tray1
Press [OK]
Manual feed <SIZE>, <TYPE>
alternates with
Press [OK] for available media
Memory is low
Press [OK]
The product has detected a jam in the
location indicated in the message.
The product is performing a cleaning cycle. Load the tray with plain paper of the size
The product is processing a manual duplex
job.
The product is set for the manual feed mode. Load the tray with the correct size and type of
The product does not have enough memory
to process the job.
Clear the jam from the area indicated in the
message, and then follow the control-panel
instructions. Clearing some jams requires
you to open the top cover and remove the
print cartridge.
indicated. Press the OK button to start the
cleaning cycle.
paper.
To print the second side, place the pages
face down in the tray with the top edge first.
paper, or press the OK button to use the
paper that is in the tray.
If the product is processing other jobs, send
the job again after those jobs have finished.
If the problem continues, turn off the power
by using the power switch, and then wait at
least 30 seconds. Turn on the power and wait
for the product to initialize.
Misprint
Press [OK]
No paper pickup
Press [OK]
Page too complex
Press [OK]
Printer jam clear paper path The product has detected a jam in the input
Settings cleared The product has cleared job settings. Re-enter any appropriate job settings.
The product has experienced an internal
hardware error.
The product has experienced an internal
hardware error.
The product could not print the current page
because of its complexity.
tray.
Press the OK button to continue. Job output
might be affected.
Press the OK button to continue. Job output
might be affected.
Press the OK button to clear the message.
Allow the product to finish the job, or press
the Cancel
Clear the jam from the area indicated in the
message, and then follow the control panel
instructions.
button to cancel the job.
32 Chapter 1 Purpose and scope ENWW
Page 49

User Guide
The HP LaserJet Professional M1130/M1210 MFP Series User Guide describes basic product features.
The user guide is available on the CD in .CHM format only for Windows and .PDF format only for Mac
OS X.
Open the .CHM version of the guide from the printing-system software CD Browser as follows:
1. On the main screen of the printing-system software CD Browser, click User Documentation.
2. Click User Guide (Interactive).
The guide opens as a Windows Help file (.CHM file). This readable, onscreen version of the guide is
provided in accordance with the Americans with Disabilities Act (ADA).
Open the .CHM file (Windows) from the printing-system software CD directory as follows:
1. Insert the printing-system software CD into the CD-ROM drive.
2. Navigate to the Language\<Manuals> folder.
3. Open the following file:
LJM1130-M1210_use_xxww.chm
NOTE: For information about which languages are supported, see Tables 8-11 in this chapter.
NOTE: The "xx" in the file name corresponds to the language. For French, the file name is LJM1130-
M1210_use_frww.chm.
Open the .PDF file (Mac) from the printing-system software CD directory as follows:
1. Insert the printing-system software CD into the CD-ROM drive.
2. Double-click the Documentation folder.
3. Open either of the following files.
LJM1130-M1210_use_xxww.pdf
NOTE: For information about which languages are supported, see Tables 8-11 in this chapter.
NOTE: The "XX" in the file name corresponds to the language. For French, the file name is
LJM1130-M1210_use_frww.pdf.
4. When the file is open, click File, and then click Save As... to save a copy of the file to another
location.
ENWW Documentation 33
Page 50

More Information
Click More Information to view the printing system install notes and to access the product support Web
site.
Figure 1-3 More Information screen
Install Notes
The HP LaserJet Professional M1130/M1210 MFP Series Printing-System Install Notes (.HTM) contains
important information about device features, instructions for installing the printing-system software, and
technical assistance.
Open the install notes from the printing-system software CD Browser as follows:
1. On the main screen of the CD Browser, click More Information.
2. Click Install Notes.
Open the .HTM file directly:
1. Insert the printing-system software CD into the CD-ROM drive.
2. Navigate to the <language>\MANUALS folder.
3. Open the following file:
1130SeriesInstallNotes.htm
34 Chapter 1 Purpose and scope ENWW
Page 51

Product Support Website
Visit the product support Web site to gain quick access to online support pages, software updates, FAQs,
and more.
ENWW Documentation 35
Page 52

36 Chapter 1 Purpose and scope ENWW
Page 53

2 Software description
Windows printing-system software
●
HP Driver Diagnostic Printer Check Tool
●
Embedded Web Server M1210 Series only
●
HP ToolboxFX
●
ENWW 37
Page 54

Windows printing-system software
Supported operating systems for Windows
●
Windows system requirements
●
Macintosh system requirements
●
Printer driver
●
Select the correct printer driver for Windows
●
Priority for print settings
●
Change printer-driver settings for Windows
●
Printing system and installer
●
Driver version numbers for Windows operating systems
●
Supported operating systems for Windows
The product supports the following Windows operating systems:
Windows XP (32-bit and 64-bit)
●
Windows Server 2003 (32-bit and 64-bit)
●
Windows Vista (32-bit and 64-bit)
●
Windows Server 2008 (32-bit and 64-bit)
●
Windows 7 (32-bit and 64-bit)
●
Windows system requirements
The HP printing-system software has the following minimum system requirements for Windows 7,
Windows Vista, Windows XP, and Windows Server 2003.
1 GHz processor
●
1 GB RAM
●
700 MB free hard disk space
●
All Windows operating systems also have the following requirements:
A CD-ROM, DVD drive, or Internet connection with which to install the printing-system software
●
A dedicated USB 1.1 or USB 2.0 connectivity port, or network connection, to communicate with
●
the product
38 Chapter 2 Software description ENWW
Page 55

Macintosh system requirements
The HP printing-system software has the following minimum system requirements for the Mac OS X
V10.4, V10.5, and V10.6 operating systems:
PowerPC G3, G4, G5, or Intel processors
●
1 GB RAM
●
200 MB available hard disk space
●
NOTE: PPC and Intel Core Processor Macs are supported.
All Macintosh operating systems also have the following requirements:
A CD-ROM, DVD drive, or Internet connection with which to install the printing-system software
●
A dedicated USB 1.1 or USB 2.0 connectivity port, or network connection, to communicate with
●
the product
Printer driver
Printer drivers provide access to product features, such as printing on custom-sized paper, resizing
documents, and inserting watermarks.
NOTE: The most recent drivers are available at www.hp.com/support/ljm1130series or www.hp.com/
support/ljm1210series.
Select the correct printer driver for Windows
Printer drivers provide access to the product features and allow the computer to communicate with the
product (by using a printer language). Check the installation notes and readme files on the product CD
for additional software and languages.
HP LaserJet Professional M1130/M1210 Printer series Host-based print driver
The recommended print driver for most Windows applications. The Host-based driver is installed
●
by default and recommended for most users.
HP LaserJet Professional M1130/M1210 Printer series XPS print driver
Recommended for capturing and printing screen output exactly as it is rendered on the screen.
●
Priority for print settings
Changes to print settings are prioritized depending on where the changes are made.
NOTE: The names of commands and dialog boxes might vary depending on your software program.
Page Setup dialog box: Click Page Setup or a similar command on the File menu of the program
●
you are working in to open this dialog box. Settings changed here override settings changed
anywhere else.
Print dialog box: Click Print, Print Setup, or a similar command on the File menu of the program
●
you are working in to open this dialog box. Settings changed in the Print dialog box have a lower
priority and do not override changes made in the Page Setup dialog box.
ENWW Windows printing-system software 39
Page 56

Printer Properties dialog box (printer driver): Click Properties in the Print dialog box to open
●
the printer driver. Settings changed in the Printer Properties dialog box do not override settings
anywhere else in the printing software.
Default printer driver settings: The default printer driver settings determine the settings used in
●
all print jobs, unless settings are changed in the Page Setup, Print or Printer Properties dialog
boxes.
Printer control-panel settings: Settings changed at the printer control panel have a lower priority
●
than changes made anywhere else.
Change printer-driver settings for Windows
Change the settings for all print jobs
until the software program is closed
1. On the File menu in the software
program, click Print.
2. Select the driver, and then click
Properties or Preferences.
The steps can vary; this procedure is
most common.
Change the default settings for all
print jobs
1. Windows Vista and Windows 7:
Click Start, click Control Panel,
and then in the category for
Hardware and Sound click
Printer.
-or-
Windows XP, Windows Server
2003, and Windows Server 2008
(using the default Start menu
view): Click Start, and then click
Printers and Faxes.
-or-
Windows XP, Windows Server
2003, and Windows Server 2008
(using the Classic Start menu
view): Click Start, click Settings,
and then click Printers.
2. Right-click the driver icon, and then
select Printing Preferences.
Change the product configuration
settings
1. Windows Vista and Windows 7:
Click Start, click Control Panel,
and then in the category for
Hardware and Sound click
Printer.
-or-
Windows XP, Windows Server
2003, and Windows Server 2008
(using the default Start menu
view): Click Start, and then click
Printers and Faxes.
-or-
Windows XP, Windows Server
2003, and Windows Server 2008
(using the Classic Start menu
view): Click Start, click Settings,
and then click Printers.
2. Right-click the driver icon, and then
select Properties.
3. Click the Device Settings tab.
40 Chapter 2 Software description ENWW
Page 57

Printing system and installer
The printing-system files and installers come in both the product firmware and on CD. The recommended
installation method for the printing-system files is via a direct USB connection between the product and
computer using HP Smart Install.
Printing-system software CD for Windows systems
●
Installer features
●
Printing-system software CD for Windows systems
The HP LaserJet Professional M1130/M1210 MFP Series products come with a printing-system CD.
The printing-system CD includes product drivers and related components but is not required for the
installation of drivers. The recommended driver installation is via direct USB connection to the product.
In supported Windows operating systems, insert the printing-system CD in the CD-ROM drive to open
an interactive CD Browser. Use the CD Browser to install the drivers and related components and to
gain access to online user documentation, a customization utility, and optional HP software.
Figure 2-1 Installation software CD Browser
If the screen does not appear when you insert the printing-system CD into the CD-ROM drive, follow
these steps to open the CD Browser:
1. Click Start.
2. Click Run.
3. Click Browse… and navigate to the root directory of the software CD.
4. Double-click the SETUP.EXE file to start the installer.
ENWW Windows printing-system software 41
Page 58

The main screen of the CD Browser contains installation and documentation options in the left panel.
Move the cursor over each option to see a description of the option in the right panel.
NOTE: The options available for each product might differ from those in the figure.
Install. Opens the HP Smart Installer. The HP Smart Installer installs the HP LaserJet Professional
M1130/M1210 Printer series Host-based print driver, the recommended driver. To install additional
drivers,
View User Guide. Provides access to the HP laser Jet M1130_M1210 user guide.
More Information. This option provides access to the Install Notes, and to the Product Support Website.
Click Back to return to the main CD Browser screen.
NOTE: To view documentation in .PDF format, Adobe® Acrobat® Reader must be installed on the
computer. Adobe Acrobat Reader is available at the following Web site:
http://www.adobe.com
Installer features
HP Smart Install is designed to provide a simple and consistent installation method for the printingsystem software in supported Windows operating systems.
HP Smart Install offers the following features:
An interactive software interface.
●
Network connection is integrated so that you can install drivers and connect to a networked product
●
in a single process.
The selection dialog box sets the operating-system language as the default language. You can use
●
the installer to select any of the languages on the Admin CD.
All of the printing-system components are installed by using the HP Smart Install installer. The installer
automatically detects the language of choice and the operating system.
Driver version numbers for Windows operating systems
Access to driver version numbers varies, depending on the operating system in which the printing system
is installed.
NOTE: For a list of product drivers, updated HP printing-system software, and product-support
information, go to:
www.hp.com/support/ljm1130series or www.hp.com/support/ljm1210series
42 Chapter 2 Software description ENWW
Page 59

In supported Windows operating systems, follow these steps to find driver-version information:
1. Click Start, and then do one of the following:
Windows XP: Click Control Panel, and then double-click the Printers and Other Hardware icon.
-or-
Windows Server 2003 and Windows XP Professional: Select Settings, and then select Printers
and Faxes.
-or-
Windows Vista: Click Control Panel, click Hardware and Sound, and then click Printers.
-or-
Windows Server 2008: Click Start, click Control Panel, and then open the Printers folder.
-or-
In Windows 7, click the Start button, click Control Panel, and then click Devices and Printers.
2. Right-click the product driver icon.
3. Click Properties.
4. Click the About tab.
ENWW Windows printing-system software 43
Page 60

HP Driver Diagnostic Printer Check Tool
Use the HP Driver Diagnostic Printer Check Tool, a Web-based diagnostic software program, to
determine whether the correct and most current printer driver for the product is in use. Use the following
steps to gain access to the HP Driver Diagnostic Printer Check Tool:
1. Open a Web browser.
2. Go to the following Web site:
www.hp.com/go/drivercheck
When the HP Driver Diagnostic Printer Check Tool runs, the products that are currently installed on the
computer appear in a list. The tool gathers information about the products, drivers, and system setup
in order to diagnose the software driver configuration and check the printer driver.
When the HP Driver Diagnostic Printer Check Tool is open, select the HP product that you want to check.
The tool verifies whether the latest printer driver is being used, provides feedback if an incorrect printer
driver is being used, and indicates whether an updated printer-driver version is available. Click the latest
printer-driver version to download and install it.
The data that the HP Driver Diagnostic Printer Check Tool gathers is stored anonymously so that HP can
analyze and continuously improve its diagnostic tools. No private data is gathered from the computer.
44 Chapter 2 Software description ENWW
Page 61

Embedded Web Server M1210 Series only
The M1210 Series is equipped with the HP Embedded Web Server (HP EWS), which provides access
to information about product and network activities. This information appears in a Web browser, such
as Microsoft Internet Explorer, Apple Safari, or Firefox.
The HP EWS resides on the product. It is not loaded on a network server.
The HP EWS provides an interface to the product that anyone who has a network-connected computer
and a standard Web browser can use. No special software is installed or configured, but you must have
a supported Web browser on the computer. To gain access to the HP EWS, type the IP address for the
product in the address line of the browser.
For a complete explanation of the features and functionality of the HP EWS, see the HP LaserJet M1130/
M1210 Series User Guide, which is available on the Admin CD.
ENWW Embedded Web Server M1210 Series only 45
Page 62

HP ToolboxFX
This section provides information about the following topics:
HP ToolboxFX overview
●
System requirements
●
HP ToolboxFX folders
●
Other Links
●
HP ToolboxFX overview
HP ToolboxFX allows users to communicate with and manage the product. HP ToolboxFX provides the
following capabilities:
A view of the current status of the product
●
A view of the current status of the product consumables
●
Device Alert functionality, notifying the end user when particular events or conditions occur at the
●
product
Access to troubleshooting information
●
Access to some product settings, as an alternative to accessing them through the product control
●
panel
Starting HP ToolboxFX
Start HP ToolboxFX by using any of the following methods:
Double-click the HP ToolboxFX icon in the Windows system tray.
●
Click Start, click Programs, click HP, click HP LaserJet Professional M1130/M1210 MFP
●
Series, and then click HP ToolboxFX.
Right-click the HP ToolboxFX icon in the Windows system tray, and then click Open HP
●
ToolboxFX.
Structure
HP ToolboxFX consists of a single framework divided into several sections.
Heading banner. Each pane that appears in HP ToolboxFX has a heading banner at the top that
●
includes the HP logo.
Devices pane. The Devices pane is visible on the left-hand side of the HP ToolboxFX window.
●
The Devices pane shows the HP products that are available to the host computer system, and
folders for the types of information available about each product.
Main content area. Click any of the products or folders listed in the Devices Pane to see
●
information about that product in the main content area of the HP ToolboxFX window.
46 Chapter 2 Software description ENWW
Page 63

Toolbar. A toolbar appears at the top of the main content area. This toolbar contains controls for
●
printing, refreshing the page, ordering supplies, and getting help.
Other Links pane. The Other Links pane is visible in the lower-left corner of the HP ToolboxFX
●
window. The Other Links pane contains links to the HP Instant Support, Product Support, and
Product Registration pages on the HP Web site.
Opening screen
The opening screen that appears in the HP ToolboxFX section depends on the installed configuration
of HP ToolboxFX. If HP ToolboxFX is installed for a single HP LaserJet product, the Device Status page
for that HP LaserJet product appears when the toolbox is opened. To go to the Device Status page for
a product, double-click the product. If multiple products that are supported by HP ToolboxFX are
installed, they will appear in the left pane.
System requirements
HP ToolboxFX is currently supported on the following operating systems:
Windows XP (32-bit and 64-bit)
●
Windows Server 2003 (32-bit and 64-bit)
●
Windows Vista (32-bit and 64-bit)
●
Windows Server 2008 (32-bit and 64-bit)
●
Windows 7 (32-bit and 64-bit)
●
HP ToolboxFX also requires Microsoft .NET Framework 2.0 on the client computer, which happens
automatically during installation of the product solutions software (if HP ToolboxFX is not already
installed).
HP ToolboxFX folders
The HP ToolboxFX folders section describes the following:
Device Status
●
Help folder
●
Fax folder
●
ENWW HP ToolboxFX 47
Page 64

Device Status
The Device Status pane shows product status messages from the product.
Figure 2-2 HP ToolboxFX Status folder – Device Status pane
NOTE: This product includes a Supplies Status section and a Supplies Information section on the
Device Status screen. These sections provide information about the estimated toner level, the
approximate pages remaining based on the estimated toner level, and the HP part number for easy
reference when ordering new consumables.
Help folder
The Help folder contains the following panes:
●
●
User Guide
Readme
48 Chapter 2 Software description ENWW
Page 65

User Guide
The following options are available in the User Guide pane:
Interactive Version. Click the Interactive User Guide button to open the HP LaserJet Help
●
Navigation application.
Printer-Friendly Version. Click the Printer-Friendly User Guide button to open a version of the
●
user guide optimized for printing.
Figure 2-3 HP ToolboxFX Help folder – Troubleshooting pane (1 of 2)
Readme
Click the Readme folder to open the product Readme file in HP Toolbox.
Fax folder
You can use the panes in the Fax folder to perform fax tasks from your computer.
The Fax folder contains the following panes:
●
●
●
●
Fax Tasks pane
Fax Phone Book pane
Fax Send Log pane
Fax Receive Log pane
ENWW HP ToolboxFX 49
Page 66

Fax Data Properties pane
●
Figure 2-4 HP ToolboxFX Fax folder
Fax Tasks pane
Use the Faxe Tasks pane to set options for received faxes.
NOTE: Click Apply for the changes to take effect.
Figure 2-5 HP Toolbox FX Fax folder – Fax Tasks pane
Fax Phone Book pane
The Fax Phone Book pane shows the product phone book data.
50 Chapter 2 Software description ENWW
Page 67

The maximum number of characters that a name can have in a phone book entry is 16. Only 12 of these
characters are displayed on the product control panel, because four characters are used to display the
phone book entry number (for example, 011:).
The maximum number of characters that a telephone number can have is 50. This includes special
characters that are used to insert pauses into the dial sequence.
Figure 2-6 HP Toolbox FX Fax folder – Fax Phone Book pane
Use the Fax Phone Book page to add or remove individuals or groups on your speed-dial list, import
phone books from a variety of sources, and update and maintain the contact list.
To add an individual contact to the speed-dial list, select the row of the speed-dial number that you
●
want to specify. Type the contact name in the Contact name window. Type the fax number in the
Fax number window. Click Add.
To add a group of contacts to the speed-dial list, select the row of the speed-dial number that you
●
want to specify. Click Add/Group. Double-click a contact name from the list on the left to move it
to the group list on the right, or select a name on the left and then click the appropriate arrow to
move it to the group list on the right. You can also use those two methods to move names from
right to left. When you have created a group, type a name in the Group name window, and then
click Apply.
To edit an existing individual speed-dial entry, click anywhere on the row containing the contact
●
name to select it, and then click Update. Make any required changes, and then click Apply.
To edit an existing group speed-dial entry, click anywhere on the row containing the group name
●
to select it, and then click Update Group. Make any required changes, and then click Apply.
To delete an entry from the speed-dial list, select the item and then click Delete.
●
To move speed-dial entries, select the entry and then click Move, or select Move and then specify
●
the entry in the dialog box. Either select Next empty row or specify the number of the row where
you want to move the entry.
NOTE: If you specify a row that is occupied, then the new entry will overwrite the existing entry.
ENWW HP ToolboxFX 51
Page 68

To import contacts from a phone book that exists in Lotus Notes, Outlook, or Outlook Express, use
●
the following procedure:
1. Click Import/Export Phone Book.
2. Select the Import option, and then click Next.
3. Select the appropriate software program, navigate to the appropriate file, and then click
Finish.
To export contacts from a phone book, use the following procedure:
1. Click Import/Export Phone Book.
2. Select the Export, and then click Next.
3. Enter the file name or browse to the file to which you want to export contacts, and then click
Finish.
You can also select individual entries from the phone book instead of importing the entire phone
book.
To delete all entries, click Delete All, and then click Yes.
●
In addition to numerical digits, the following are valid characters for fax numbers:
(
●
(
●
+
●
-
●
*
●
#
●
R
●
W
●
.
●
,
●
<space>
●
NOTE: Click Apply for the changes to take effect.
Fax Send Log pane
The Fax Send Log pane lists all recently sent faxes and information about them, including the date and
time sent, job number, fax number, page count, and the results.
The Results column provides the fax status. If the fax attempt was unsuccessful, this column provides
a description of why the fax was not sent.
Click any column heading to re-sort the information in that column in ascending or descending order.
52 Chapter 2 Software description ENWW
Page 69

Click the Refresh button to view new fax data. The following information for each fax appears in the
logs:
Date and time
●
Job number
●
Fax number
●
Pages
●
Result
●
NOTE: A maximum of 40 fax log entries are listed.
Figure 2-7 HP Toolbox FX Fax folder – Fax Send Log pane
Fax Receive Log pane
The Fax Receive Log pane provides a list of all recently received faxes and information about them
including the date and time received, job number, fax number, page count, and results.
The Results column provides the fax status. If the fax attempt was unsuccessful, this column provides
a description of why the fax was not sent.
The Fax Receive Log pane can be used to block future faxes. Check the Block Faxes box next to a
received fax listed on the log, or click the Go to Junk Faxes page link to go to that pane, which is
described below.
Click the Refresh button to view new fax data. The following information for each fax appears in the
logs:
Date and time
●
Job number
●
Fax number
●
ENWW HP ToolboxFX 53
Page 70

Pages
●
Result
●
NOTE: A maximum of 40 fax log entries are listed.
NOTE: The Fax Receive Log pane is not self-refreshing. If left open, newly-received faxes will not
appear until the screen is refreshed.
Figure 2-8 HP Toolbox FX Fax folder – Fax Receive Log pane
54 Chapter 2 Software description ENWW
Page 71
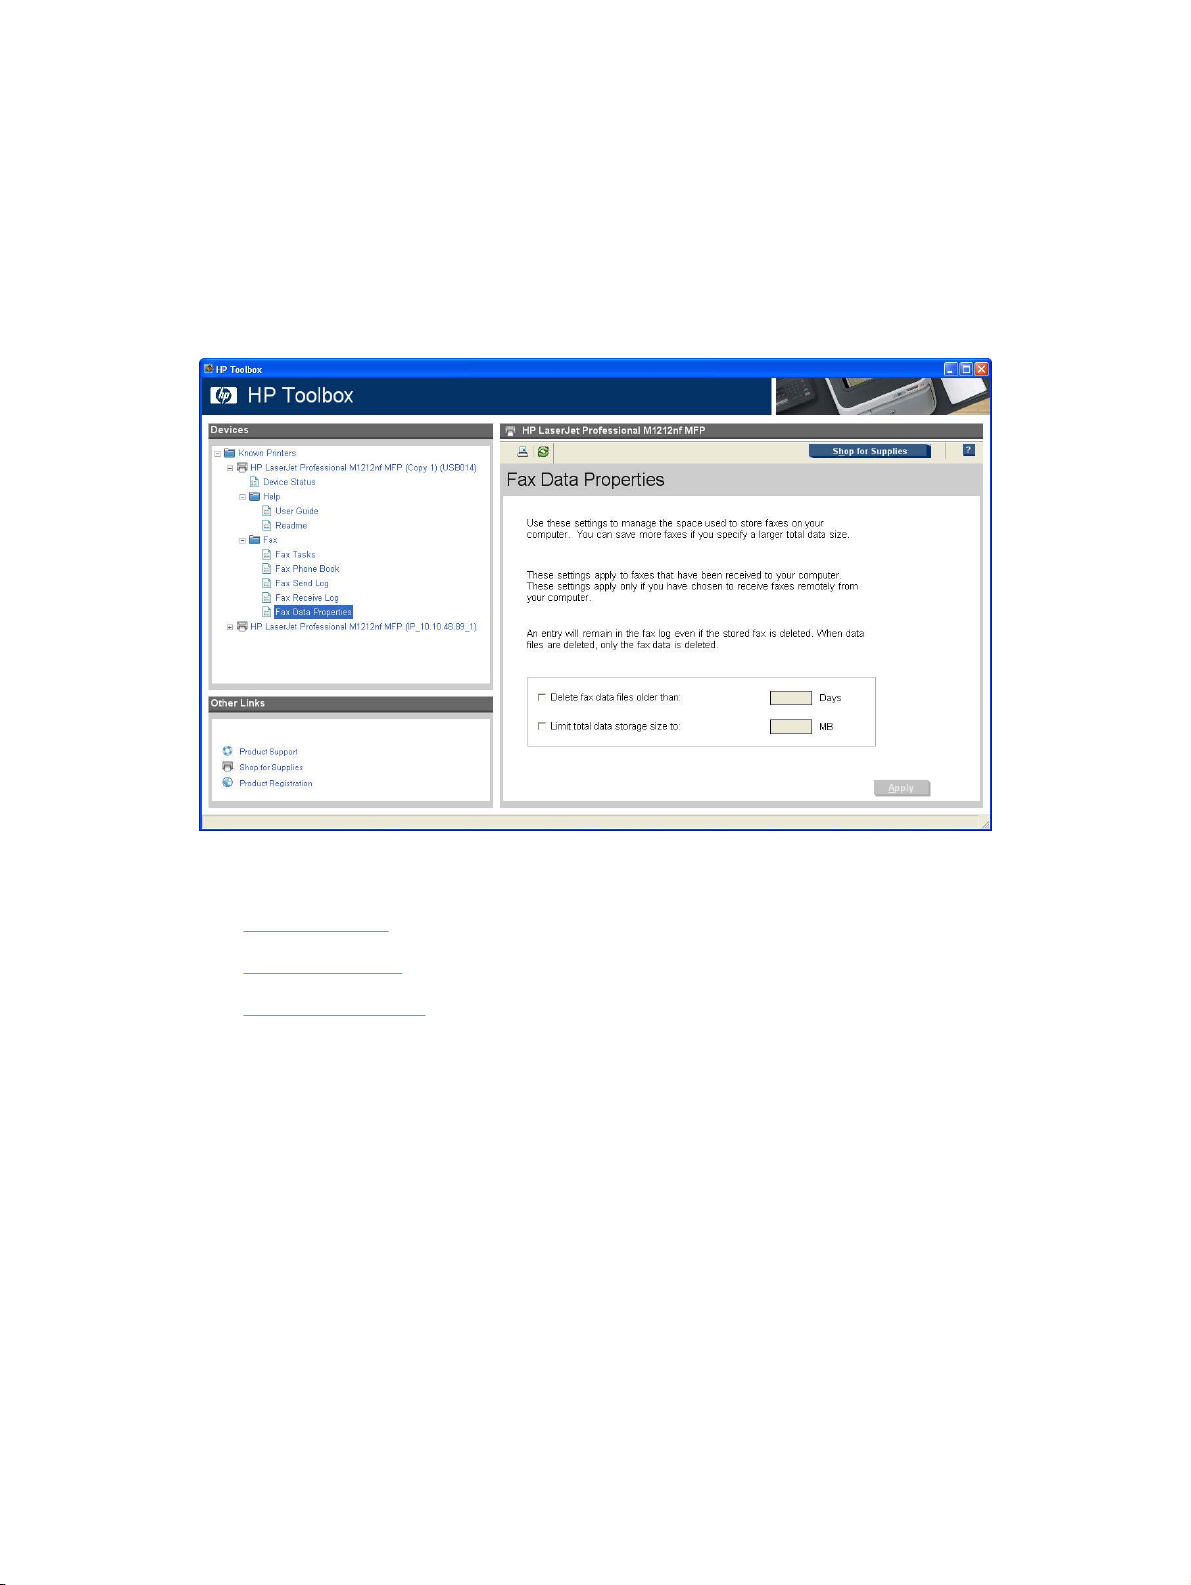
Fax Data Properties pane
Use the Fax Data Properties pane to manage the space used to store faxes on your computer.
Select Delete fax data files older than: to specify the number of days faxes are stored on your
●
computer.
Select Limit total data storage size to: to specify the amount of storage your computer allocates
●
for fax data storage.
Figure 2-9 HP ToolboxFX Fax folder – Fax Data Properties pane
Other Links
Product Support
●
Shop for Supplies
●
Product Registration
●
Product Support
Select Product Support to get to a Web page with links to online support for the product.
Shop for Supplies
The Shop for Supplies link connects to a Web page that can be used to order supplies online. The
supplies come not come from HP but from a choice of resellers. Supplies are preselected. Use the
options on this screen to change quantities or order additional items. The selected items are dropped
into the shopping cart, ready for checkout. This process ensures that the correct supplies are ordered
from the selected reseller.
Product Registration
The Product Registration link connects to a Web page to register the product.
ENWW HP ToolboxFX 55
Page 72

56 Chapter 2 Software description ENWW
Page 73

3 Install Windows printing-system
components
The HP LaserJet Professional M1130/M1210 MFP Series comes with software and installers for
Microsoft Windows and Apple Macintosh systems. For information about Macintosh software, see
Macintosh software and utilities on page 149. Linux and UNIX systems support the HP LaserJet
Professional M1130/M1210 MFP Series, and software is available on the Web. This chapter provides
procedures for installing and uninstalling the HP LaserJet Professional M1130/M1210 MFP Series
printing-system software for Windows operating systems.
Supported operating systems for Windows
●
Windows operating system requirements
●
Install overview
●
Software installation types for Windows
●
Installation options
●
Microsoft Windows general installation overview
●
Detailed MS Windows installation instructions
●
Uninstall software
●
ENWW 57
Page 74

Supported operating systems for Windows
The HP LaserJet Professional M1130/M1210 MFP Series printer supports the following Windows
operating systems:
Windows XP (32-bit and 64-bit)
●
Windows Server 2003 (32-bit and 64-bit)
●
Windows Vista (32-bit and 64-bit)
●
Windows Server 2008 (32-bit and 64-bit)
●
Windows 7 (32-bit and 64-bit)
●
Windows operating system requirements
The HP printing-system software has the following minimum system requirements for Windows 7,
Windows Vista, Windows XP, and Windows Server 2003.
1 GHz processor
●
1 GB RAM
●
700 MB free hard disk space
●
NOTE: Windows 95, Windows 98, Windows Me, and Windows NT are not supported.
All Windows operating systems also have the following requirements:
A CD-ROM, DVD drive, or Internet connection with which to install the printing-system software
●
A dedicated USB 1.1 or USB 2.0 connectivity port, or network connection, to communicate with
●
the product
Install overview
The software for the HP LaserJet Professional M1130/M1210 MFP Series product is available from the
product firmware or from the printing-system software CD. HP Smart Install installs the HP LaserJet
Professional M1130/M1210 MFP Series printing-system software from the product firmware onto the
hard disk and updates Windows files. HP Smart Install is the recommended installation method.
For all supported operating systems, each install option presents a series of screens that guide you
through the installation process.
Software installation types for Windows
The HP LaserJet Professional M1130/M1210 MFP Series printing-system software can be installed in
the following ways:
HP Smart Install: Recommended, included in the product firmware. HP Smart Install starts
●
automatically when the product is connected to a computer by USB. HP Smart Install can also be
started from the product's EWS for M1210 Series products.
CD install: Optional installation method.
●
58 Chapter 3 Install Windows printing-system components ENWW
Page 75

Installation options
The HP LaserJet Professional M1130/M1210 MFP Series printing-system software can be installed
when the product is connected to the computer in the following configurations:
Directly connected via a USB port
●
Connected via a wired network
●
ENWW Installation options 59
Page 76

Microsoft Windows general installation overview
HP LaserJet Professional M1130/M1210 MFP Series printing-system software for Windows systems
HP LaserJet Professional M1130/M1210 MFP Series printing-system software can be installed either
via a direct USB connection to the product or from the printing-system software CD
USB installation
NOTE: This installation type is supported for Windows only.
The HP Smart Install allows you to install the product driver and software by connecting the product to
a computer through a USB cable.
NOTE: The installation CD is not required during a HP Smart Install. Do not insert the software
installation CD into the computer CD drive.
1. Turn the product on.
2. Connect the USB cable.
3. The HP Smart Install program should start automatically. Follow the onscreen instructions to install
the software.
If the HP Smart Install program does not start automatically, AutoPlay might be disabled on
●
the computer. Browse the computer and double-click the HP Smart Install drive to run the
program. If you cannot find the HP Smart Install drive, use the product installation CD to install
the software.
●
CD installation
In supported Windows environments (Windows 7, Windows Server 2003, Windows Server 2008,
Windows XP, and Windows Vista), insert the printing-system software CD in the CD-ROM drive to open
an interactive CD Browser. Use the CD Browser to install the drivers and related components, and to
gain access to online user documentation and optional HP software.
If the installation screen does not appear when you insert the printing-system software CD into the CDROM drive, follow these steps to open the CD Browser:
1. On the Start menu, click the Run option.
2. Type the following: X:\SETUP.EXE (where X is the letter of the CD-ROM drive).
3. Click the OK button.
The main screen of the software CD Browser contains installation and documentation options in the left
panel. Move the cursor over each option to see a description of the option in the right panel. The following
If the program prompts you to select a connection type, select the connection type you will
use to print to the product after installation.
60 Chapter 3 Install Windows printing-system components ENWW
Page 77

figure shows the main screen of the HP LaserJet Professional M1130/M1210 MFP Series printingsystem software CD.
Figure 3-1 CD Browser – Main screen
Click Install to start the CD installer. By default, the CD installer installs the HP LaserJet Professional
M1130/M1210 MFP Series Host-based print driver, the driver recommended for most users.
NOTE: For more information about HP LaserJet Professional M1130/M1210 MFP Series printer
drivers, see
HP host based print driver for Windows on page 117.
Install the print driver using the Microsoft Add Printer Wizard
NOTE: You can return to the previous screen by clicking the < Back button, or exit the Add Printer
Wizard by clicking the Cancel button.
Select one of the following three options to install the print driver using the Microsoft Add Printer Wizard:
Use an existing port for a direct connection: The product is connected to the computer using a
●
USB cable or is connected via the network without using a print server and the printer port already
exists.
ENWW Microsoft Windows general installation overview 61
Page 78

Follow these instructions to select the correct connection option:
1. On the Start menu, click the Settings option, and then perform one of the following:
Windows XP Home: Click the Printers and Other Hardware Devices option.
Windows XP Professional, Windows Server 2003, and Windows 2008: Click the Printers
and Faxes option.
Windows Vista: Under the Hardware and Sound category, click the Printer option.
Windows 7: Click the Devices and Printers option.
2. Click the Add a printer option. The Add Printer Wizard opens.
3. Click the Next button on the Add Printer Wizard welcome dialog box.
4. If the product is connected to the computer using a USB cable or is connected via the network
without using a print server, select the Local printer attached to this computer option, and
then click the Next > button.
NOTE: If you select the Automatically detect an install my Plug and Play printer check
box prior to clicking the Next > button, the computer will automatically install the print driver.
NOTE: If the product is connected via the network using a print server, select the A network
printer, or a printer attached to another computer option (Point and Print installation), and
then click the Next > button. For detailed installation instructions, see
Print server
connection on page 71.
Figure 3-2 Add Printer Wizard – Local or Network Printer screen
Create a new TCP/IP port for a direct connection: The product is connected via the network
●
without using a print server and the printer port does not exist.
Print server connection: The product is connected via the network using a print server.
●
62 Chapter 3 Install Windows printing-system components ENWW
Page 79

Use an existing port for a direct connection
Use these instructions when the product is connected to the computer using a USB cable or when
printing via the network without using a print server.
1. If the product is connected to the computer using a USB cable or is connected via the network
without using a print server and the printer port already exists, select the Use the following port
option, select the product name, print path, or IP address of the product from the Use the following
port drop-down list, and then click the Next > button.
NOTE: If the printer port does not appear in the Use the following port drop-down list, see
Create a new TCP/IP port for a direct connection on page 68. If the product is connected via the
network using a print server, see
Figure 3-3 Add Printer Wizard — Select a Printer Port screen
Print server connection on page 71.
ENWW Microsoft Windows general installation overview 63
Page 80

2. (Optional) Click the Windows Update button to display a list of drivers that can be downloaded
from the Microsoft Windows Update Web site.
If the appropriate model of HP LaserJet Professional M1130/M1210 MFP Series is already listed,
select it and click the Next > button. If the product is not listed, click the Have Disk button to continue
to the Install From Disk screen.
Figure 3-4 Add Printer Wizard — Install Printer Software screen
3. If the correct path to the CD-ROM drive is listed in the Copy manufacturer's files from text box,
click the OK button. If not, click the Browse button to continue to the Locate File screen.
Figure 3-5 Add Printer Wizard — Install from Disk screen
4. Navigate to your CD-ROM drive, and then select the .INF file for your product.
5. Click the OK button to continue to the Install Printer Software screen.
64 Chapter 3 Install Windows printing-system components ENWW
Page 81

6. Select the appropriate model of HP LaserJet Professional M1130/M1210 MFP Series from the list
and click the Next > button to continue to the Name Your Printer screen.
Figure 3-6 Add Printer Wizard — Install Printer Software, screen 2
ENWW Microsoft Windows general installation overview 65
Page 82

7. You can either type a name for the product in the Printer name text box or use the default name
provided.
Select the Yes option to use this printer as the default printer or select the No option to keep the
existing product as the default printer.
Click the Next > button to continue to the Printer Sharing screen.
Figure 3-7 Add Printer Wizard — Name Your Printer screen
66 Chapter 3 Install Windows printing-system components ENWW
Page 83

8. Select either the Do not share this printer option, or select the Share name: option and type
share name, and then click the Next > button to continue to the Print Test Page screen.
Figure 3-8 Add Printer Wizard — Printer Sharing screen
9. Select the Yes option if you want to print a test page after the software is installed. Select the No
option if you do not want to print a test page after the software is installed.
Click the Next > button to continue to the Completing the Add Printer Wizard screen.
Figure 3-9 Add Printer Wizard — Print Test Page screen
10. Review the installation details, and then click the Finish button to complete the Add Printer Wizard.
ENWW Microsoft Windows general installation overview 67
Page 84

Create a new TCP/IP port for a direct connection
Perform the following when the product is connected via the network without using a print server and a
printer port does not exist:
1. If the printer port does not appear in the Use the following port drop-down list, select the Create
a new port option.
If the Advanced TCP/IP Port Monitor option appears in the Type of port drop-down list,
●
select this option, and then click the Next button. The Welcome to the Add Standard TCP/
IP Printer Port Wizard dialog box appears.
If the Advanced TCP/IP Port Monitor option does not appear in the Type of port drop-down
●
list, select the Standard TCP/IP Port option from the Type of port drop-down list, and then
click the Next button. The Welcome to the Add Standard TCP/IP Printer Port Wizard dialog
box appears.
NOTE: If the printer port already appears in the Use the following port drop-down list, see Use
an existing port for a direct connection on page 63. If the product is connected via the network
using a print server, see
Print server connection on page 71.
Figure 3-10 Select a Printer Port screen
68 Chapter 3 Install Windows printing-system components ENWW
Page 85

2. Click the Next > button.
Figure 3-11 Add Advanced TCP/IP Printer Port screen
ENWW Microsoft Windows general installation overview 69
Page 86

3. Type the product's IP address or host name in the Printer Name or IP Address text box, and then
click the Next button.
NOTE: The default port name is the name that you typed in the Printer Name or IP Address
text box. You can change this name by typing a new name in the Port Name text box.
NOTE: The Always print to this device, even if its IP address changes check box is only
available if you select the Advanced TCP/IP Port Monitor option from the Select a Printer Port
dialog box. This feature allows the computer to communicate with the product using the MAC
address of the network card rather than the IP address.
Figure 3-12 Add Port screen
4. Review the installation details, and then click the Finish button to complete the Add Printer Wizard.
70 Chapter 3 Install Windows printing-system components ENWW
Page 87

Print server connection
Perform the following when the product is connected via the network using a print server:
1. If the product is connected via the network using a print server, select the A network printer, or
a printer attached to another computer option, and then click the Next > button.
NOTE: If the product is connected to the computer using a USB cable, or is connected via the
network without using a print server, select the Local printer attached to this computer option,
and then click the Next > button. You can also select the Automatically detect and install my
Plug and Play printer check box prior to clicking the Next > button to have the computer
automatically install the print driver. For detailed installation instructions, see either
port for a direct connection on page 63 or see Create a new TCP/IP port for a direct connection
on page 68.
Figure 3-13 Add Printer Wizard — Local or Network Printer screen
Use an existing
ENWW Microsoft Windows general installation overview 71
Page 88

2. Select either the Find a printer in the directory option, the Connect to this printer (or to browse
for a printer, select this option and click Next) option, or the Connect to a printer on the
Internet or on a home or office network option, and then click the Next > button.
Figure 3-14 Add Printer Wizard — Specify A Printer screen
If you select the Find a printer in the directory option and then click the Next > button, you will
continue to the Find Printers dialog box.
If you select the Connect to this printer (or to browse for a printer, select this option and click
Next) option and then click the Next > button, you will continue to the Browse for Printer dialog
box.
If you select the Connect to a printer on the Internet or on a home or office network option
and then click the Next > button, you will continue to the Completing the Add Printer Wizard
dialog box.
72 Chapter 3 Install Windows printing-system components ENWW
Page 89

Select one of the following options:
a. (Find a printer in the directory option only)
Specify search attributes to find your product on the network, and then click the Find Now
button to search the specified location for your product. Once the search has completed, select
the product, and then click the OK button to continue to the Default Printer dialog box.
Figure 3-15 Add Printer Wizard — Find Printers screen
Select either the Yes option to use this printer as the default printer, or select the No option
to keep the existing product as the default printer, and then click the Next > button to continue
to the Completing the Add Printer Wizard dialog box.
Figure 3-16 Add Printer Wizard — Default Printer screen
ENWW Microsoft Windows general installation overview 73
Page 90

b. (Connect to this printer (or to browse for a printer, select this option and click Next)
option only)
Specify the print path for the product and then click the Next > button. The computer will
search the network for shared products. Select the product from the list and then click the
Next > button to continue to the Completing the Add Printer Wizard dialog box.
Figure 3-17 Add Printer Wizard — Browse for Printer screen
c. (Connect to a printer on the Internet or on a home or office network option only)
Type the URL for the product, and then click the Next > button. Follow the onscreen
instructions to connect to the product, and then you will continue to the Completing the Add
Printer Wizard dialog box.
3. Review the installation details, and then click the Finish button to complete the Add Printer Wizard.
74 Chapter 3 Install Windows printing-system components ENWW
Page 91

Detailed MS Windows installation instructions
The dialog boxes shown here appear in the Windows XP Professional installation sequence. The order
and appearance of dialog boxes can vary among operating systems.
Install the Host-based driver using HP Smart Install
Install the print driver for USB and wired network connected products
●
EWS Smart Install (M1210 Series only)
●
Install the print driver for USB and wired network connected products
1. Connect the product to the computer using a USB cable. The Welcome to HP Smart Install screen
appears. Select whether to accept, or review before accepting, the software End User License
Agreement, and then click the Install button.
Figure 3-18 Welcome to HP Smart Install screen
ENWW Detailed MS Windows installation instructions 75
Page 92

2. On the Printer Connections screen, select Configure to print over the Network or Configure
to print using USB. Click the Next button.
Figure 3-19 Printer Connections screen
For product installations configured to print over the network, follow these steps.
▲
i. Connect your product to the network if not already connected.
ii. The Network Connection Successful screen appears. Click the Next button.
76 Chapter 3 Install Windows printing-system components ENWW
Page 93

3. The Congratulations! Software installation complete screen appears. Click the Next button to
register your product and print a test page. Deselect Register your product to continue without
registering your product.
Figure 3-20 Congratulations! Software installation complete
4. Click the Finish button to complete the installation.
NOTE: For M1210nf models, the fax configuration setup will start.
5. The HP LaserJet Help Navigation application appears after the installation is complete.
EWS Smart Install (M1210 Series only)
1. Connect the product to the network and turn the power on.
2. Obtain the IP address for your product by printing a product configuration page.
a. On the product control panel, press the Setup
b. Use the arrow buttons to select the Reports menu, and then press the OK button.
c. Use the arrow buttons to select the Config report option, and then press the OK button.
3. Locate the IP address on the configuration page. Enter the IP address in the Address field of a
Web browser and navigate to the EWS for the product.
button.
ENWW Detailed MS Windows installation instructions 77
Page 94

4. Click the HP Smart Install tab on the EWS, and then click the Download button.
5. A download dialog window for the setup file opens. Click Save File.
6. Open the downloaded file, and then click the Run button on the dialog window that appears.
78 Chapter 3 Install Windows printing-system components ENWW
Page 95

7. The License Agreement screen appears. Select I accept the terms of the license agreement
and then click the Next button.
ENWW Detailed MS Windows installation instructions 79
Page 96

8. The Congratulations! Software installation complete screen appears upon successful
installation of the driver.
9. Select Register your product and Print Test Page, and then click the Next button. A Web browser
opens to the HP Product Registration page, and a test page prints at the product.
80 Chapter 3 Install Windows printing-system components ENWW
Page 97

10. The Congratulations! Software installation complete screen appears with links to download HP
Smart Web Printing and the XPS driver.
11. Click the Finish button.
NOTE: For M1210nf models, the fax configuration setup will start.
12. The HP LaserJet Help Navigation application opens.
Install the Host-based driver from the CD
Install the print driver from the CD for USB connected products
●
Install the print driver from the CD for wired network connected products
●
Install the print driver from the CD for USB connected products
A series of dialog boxes appear during installation of the HP LaserJet Professional M1130/M1210 MFP
Series printing-system software in Windows environments.
NOTE: You can return to the previous dialog box by clicking Back or exit the HP LaserJet Professional
M1130/M1210 MFP Series printing-system software installation by clicking Cancel wherever these
options appear in the installation sequence.
1. Close all programs.
2. Make sure the USB cable is not connected between the product and the computer. Insert the
HP LaserJet Professional M1130/M1210 MFP Series printing system software CD into the CDROM drive. The software installer detects the language of the operating system, and then displays
the main menu of the CD Browser program in the same language.
ENWW Detailed MS Windows installation instructions 81
Page 98

If the installer program has not started after 30 seconds, complete these steps.
a. On the Start menu, click Run.
b. Type the following: X:\SETUP.EXE (where X is the letter of the CD-ROM drive).
c. Click OK.
Figure 3-21 Software Installation — Initial screen
82 Chapter 3 Install Windows printing-system components ENWW
Page 99

3. Click Install to begin the installation process. The Choose Easy Install or Advanced Install
screen appears.
Figure 3-22 Choose Easy Install or Advanced Install screen
The Choose Easy Install or Advanced Install screen contains links to the following information.
The software End User License Agreement – use this link to view the end user license
●
agreement.
The HP recommended software package – use this link to view information about the
●
HP Customer Participation Program.
Click Here For The HP Privacy Policy – use this link to view the HP Privacy Policy.
●
4. Select Easy Install (recommended). Using Easy Install (recommended) allows the installation
agreements and default settings to be accepted without being prompted for them during the
installation. Advanced Install allows you to read, and manually accept, each of the installation
agreements. Click the Next button to continue the installation.
ENWW Detailed MS Windows installation instructions 83
Page 100

5. Select an appropriate printer model on the Select Printer screen and click the Next button.
Figure 3-23 Select Printer screen
84 Chapter 3 Install Windows printing-system components ENWW
 Loading...