

Page 1

Open Source Java Frameworks on NonStop
User's Guide (Spring 3.1.0, Hibernate
4.1.1, MyFaces 2.0.2, Axis2/Java 1.5.2)
HP Part Number: 698927-002
Published: December 2012
Edition: J06.11 and subsequent J-series RVUs and H06.22 and subsequent H-series RVUs.
Page 2

© Copyright 2012 Hewlett-Packard Development Company, L.P.
Legal Notice
Confidential computer software. Valid license from HP required for possession, use or copying. Consistent with FAR 12.211 and 12.212, Commercial
Computer Software, Computer Software Documentation, and Technical Data for Commercial Items are licensed to the U.S. Government under
vendor’s standard commercial license.
The information contained herein is subject to change without notice. The only warranties for HP products and services are set forth in the express
warranty statements accompanying such products and services. Nothing herein should be construed as constituting an additional warranty. HP shall
not be liable for technical or editorial errors or omissions contained herein.
Export of the information contained in this publication may require authorization from the U.S. Department of Commerce.
Microsoft, Windows, and Windows NT are U.S. registered trademarks of Microsoft Corporation.
Intel, Pentium, and Celeron are trademarks or registered trademarks of Intel Corporation or its subsidiaries in the United States and other countries.
Java is a registered trademark of Oracle and/or its affiliates.
Motif, OSF/1, UNIX, X/Open, and the "X" device are registered trademarks, and IT DialTone and The Open Group are trademarks of The Open
Group in the U.S. and other countries.
Open Software Foundation, OSF, the OSF logo, OSF/1, OSF/Motif, and Motif are trademarks of the Open Software Foundation, Inc. OSF MAKES
NO WARRANTY OF ANY KIND WITH REGARD TO THE OSF MATERIAL PROVIDED HEREIN, INCLUDING, BUT NOT LIMITED TO, THE IMPLIED
WARRANTIES OF MERCHANTABILITY AND FITNESS FOR A PARTICULAR PURPOSE. OSF shall not be liable for errors contained herein or for
incidental consequential damages in connection with the furnishing, performance, or use of this material.
JBoss and Hibernate are registered trademarks and servicemarks of Red Hat, Inc.
Spring Framework is an open source project and is a trademark of Interface 21.
© 1990, 1991, 1992, 1993 Open Software Foundation, Inc. The OSF documentation and the OSF software to which it relates are derived in part
from materials supplied by the following:© 1987, 1988, 1989 Carnegie-Mellon University. © 1989, 1990, 1991 Digital Equipment Corporation.
© 1985, 1988, 1989, 1990 Encore Computer Corporation. © 1988 Free Software Foundation, Inc. © 1987, 1988, 1989, 1990, 1991
Hewlett-Packard Company. © 1985, 1987, 1988, 1989, 1990, 1991, 1992 International Business Machines Corporation. © 1988, 1989
Massachusetts Institute of Technology. © 1988, 1989, 1990 Mentat Inc. © 1988 Microsoft Corporation. © 1987, 1988, 1989, 1990, 1991,
1992 SecureWare, Inc. © 1990, 1991 Siemens Nixdorf Informationssysteme AG. © 1986, 1989, 1996, 1997 Sun Microsystems, Inc. © 1989,
1990, 1991 Transarc Corporation.OSF software and documentation are based in part on the Fourth Berkeley Software Distribution under license
from The Regents of the University of California. OSF acknowledges the following individuals and institutions for their role in its development: Kenneth
C.R.C. Arnold, Gregory S. Couch, Conrad C. Huang, Ed James, Symmetric Computer Systems, Robert Elz. © 1980, 1981, 1982, 1983, 1985,
1986, 1987, 1988, 1989 Regents of the University of California.
Page 3

Contents
About This Document.....................................................................................6
Supported Release Version Updates (RVUs)..................................................................................6
Intended Audience....................................................................................................................6
New and Changed Information in This Edition..............................................................................6
Document Organization............................................................................................................7
Notation Conventions................................................................................................................8
General Syntax Notation......................................................................................................8
Notation for Messages.......................................................................................................10
Notation for Management Programming Interfaces.................................................................11
General Syntax Notation....................................................................................................12
Related Information.................................................................................................................13
Publishing History...................................................................................................................13
HP Encourages Your Comments................................................................................................13
1 Introduction.............................................................................................14
2 Spring Framework....................................................................................16
Spring Overview....................................................................................................................16
Spring Projects..................................................................................................................16
Spring Applications on NonStop..........................................................................................17
Installing the Spring Framework................................................................................................18
Prerequisites......................................................................................................................18
Installing Spring Framework Libraries on a NonStop System.....................................................18
Setting up Sample Spring Applications on NonStop...............................................................20
Integrating Spring with Transaction Management Facility (TMF)....................................................27
What is Spring TMF Adapter?.............................................................................................27
Setting up the Sample SpringTMFAdapter on NonStop...........................................................28
Configuring Spring Applications on NonStop Systems.................................................................34
Spring Framework Configurations.........................................................................................34
Getting Started with Spring......................................................................................................38
Prerequisites......................................................................................................................39
Overview of EmpInfo..........................................................................................................39
3 Hibernate Framework................................................................................90
Hibernate Overview................................................................................................................90
Hibernate Projects..............................................................................................................90
Hibernate Applications on NonStop.....................................................................................91
Installing the Hibernate Framework...........................................................................................92
Prerequisites......................................................................................................................92
Installing Hibernate Framework Libraries on NonStop.............................................................92
Customizing the Hibernate Dialect for NonStop.....................................................................95
Setting up Sample Hibernate Applications on NonStop...........................................................98
Configuring Hibernate Applications on NonStop Systems...........................................................106
Hibernate Framework Configurations for NonStop Systems....................................................106
Enabling Browse Access...................................................................................................115
Getting Started with Hibernate...............................................................................................120
Prerequisites....................................................................................................................120
Overview of EmpIoyeeInfo................................................................................................120
4 MyFaces Framework...............................................................................145
MyFaces Overview...............................................................................................................145
MyFaces Projects.............................................................................................................145
MyFaces Application on NonStop......................................................................................146
Contents 3
Page 4

Installing MyFaces Framework................................................................................................146
Prerequisites....................................................................................................................147
Downloading MyFaces Framework Libraries on Windows......................................................147
Deploying and Running Sample MyFaces Application on NonStop........................................148
Configuring MyFaces Applications on NonStop Systems............................................................150
Getting Started with MyFaces.................................................................................................150
Prerequisites....................................................................................................................150
Overview of SkinSelector..................................................................................................151
5 Axis2/Java Framework...........................................................................181
Axis2/Java Overview............................................................................................................181
Apache Axis2/Java Project...............................................................................................181
Axis2/Java Framework.....................................................................................................181
Axis2/Java Modules........................................................................................................181
Axis2/Java Applications on NonStop.................................................................................181
Installing Axis2/Java Framework............................................................................................183
Prerequisites....................................................................................................................183
Installing Axis2/Java on NonStop......................................................................................184
Installing the Sandesha2 Module.......................................................................................186
Installing the Rampart Module...........................................................................................188
Deploying and Running Axis2/Java Sample Applications on NonStop....................................189
Configuring Axis2/Java Applications on NonStop Systems........................................................195
Axis2/Java Framework Configurations for NonStop Systems..................................................195
Getting Started with Axis2/Java.............................................................................................196
Prerequisites....................................................................................................................196
Overview of TemperatureConverter.....................................................................................196
6 Integrating Frameworks...........................................................................222
Using Spring Transaction Manager.........................................................................................222
Why Transaction Management is required..........................................................................222
Spring Transaction Management........................................................................................222
Example of Using Spring Transaction Manager....................................................................222
Integrating Hibernate into Spring............................................................................................237
Why Integrate Hibernate into Spring..................................................................................237
Example of Integrating Hibernate into Spring.......................................................................238
Developing Spring JPA Applications Using Hibernate................................................................248
Example of Developing Spring JPA Applications Using Hibernate...........................................248
Integrating Axis2/Java into Spring..........................................................................................259
Why Integrate Axis2/Java into Spring................................................................................259
Example of Integrating Axis2/Java with Spring....................................................................259
Integrating MyFaces into Spring.............................................................................................281
Why Integrate MyFaces into Spring....................................................................................281
Example of Integrating MyFaces into Spring........................................................................282
A EmpInfo Database Script.........................................................................319
B NonStop Specific Configurations..............................................................320
NonStop Platform Configurations............................................................................................320
Determining the Application Parameters..............................................................................320
Determining the Maximum Capacity of NSJSP Instance.........................................................320
Configuring iTP WebServer for Spring, Hibernate, MyFaces, and Axis2/Java Applications........321
Configuring NSJSP for Spring, Hibernate, MyFaces, and Axis2/Java Applications...................325
Module File Caching Configurations.......................................................................................330
Recommendations............................................................................................................330
Configuring NonStop SQL/MX DataSource for MFC............................................................330
4 Contents
Page 5

C Deploying Sample Applications on NonStop.............................................331
D Sample JDBC Configuration for Spring......................................................334
E Installing Spring Web Flow......................................................................336
Downloading Spring Web Flow Distribution on Windows..........................................................336
Copying Spring Web Flow Runtime Libraries from Windows to NonStop......................................336
F Sample JDBC Configuration for Hibernate..................................................338
G Hibernate Environment Setup Script..........................................................339
H Installing MyFaces Trinidad/Tomahawk Framework Libraries on NonStop......340
Downloading MyFaces Trinidad/Tomahawk Distribution............................................................340
Copying MyFaces Trinidad Runtime Libraries from Windows to NonStop......................................340
I Frequently Asked Questions......................................................................341
Glossary..................................................................................................344
Index.......................................................................................................347
Contents 5
Page 6
About This Document
This manual provides information on how Spring, Hibernate, MyFaces, and Axis2/Java frameworks,
referred to as SASH, can be used to develop applications that can run on the HP NonStop™
system. The relevant sections contain information on:
• Installing and configuring these frameworks on NonStop
• Developing sample web applications using these frameworks
• Integrating Spring with Hibernate, MyFaces, and Axis2/Java frameworks
For detailed information about a framework, see the links to online and public resources provided
in the relevant sections.
NOTE:
• This manual does not explain the frameworks in detail; however, it provides information to
get you familiarized with these frameworks. The frameworks have not been modified or
customized for use on NonStop.
• This manual includes code snippets and code for sample applications for all frameworks. HP
recommends that you copy the code to a text editor so that unwanted special and ASCII
characters are not copied along with the code you want to use to build and test your
applications.
Supported Release Version Updates (RVUs)
This manual supports J06.11 and all subsequent J-series RVUs, and H06.22 and all subsequent
H-series RVUs, until otherwise indicated by its replacement publications.
Intended Audience
This manual is intended for application programmers who want to develop Java-based web
applications using Spring, Hibernate, MyFaces, or Axis2/Java frameworks.
New and Changed Information in This Edition
Changes to 698927–002 Manual:
• Updated the supported RVU information on the cover page and in the “Supported Release
Version Updates (RVUs)” (page 6) section.
Changes to 698927–001 Manual:
• Updated the Prerequisites in the “Installing the Spring Framework” (page 18) section.
• Updated the Spring distribution version in the “Downloading the Spring Distribution on
Windows” (page 19) section.
• Added the Prerequisites for the Spring sample applications in the “Setting up Sample Spring
Applications on NonStop” (page 20) section.
• Added the “Integrating Spring with Transaction Management Facility (TMF)” (page 27) section.
• Updated “Configurations in the applicationContext.xml File” (page 35) under “Spring
Framework Configurations” (page 34).
• Added “Configuring TmfTransactionManager” (page 36).
• Added a note in “Hibernate Overview” (page 90).
• Updated the Prerequisites in the “Installing the Hibernate Framework” (page 92) section.
6
Page 7
• Updated the Hibernate distribution version in the “Downloading the Hibernate Distribution on
Windows” (page 93) section.
• Added the “Downloading Hibernate Dependency JAR Files using Gradle” (page 93) section.
• Added the “Customizing the Hibernate Dialect for NonStop” (page 95) section.
• Added a note and the Prerequisites for the Hibernate sample applications in the “Setting up
Sample Hibernate Applications on NonStop” (page 98) section.
• Updated “Connection Pooling” (page 112).
• Added recommendations under “Module File Caching Configurations” (page 330).
Document Organization
This manual is organized as follows:
Chapter 1: Introduction
This chapter provides an overview of Java frameworks on
NonStop systems.
This chapter describes the following topics:Chapter 2: Spring Framework
• An overview of Spring
• Installing and configuring Spring Framework
• Developing sample Java applications using Spring
• Integrating Spring with TMF
This chapter describes the following topics:Chapter 3: Hibernate Framework
• An overview of Hibernate
• Installing and configuring Hibernate on NonStop
• Developing sample Java applications using Hibernate
• Customizing Hibernate dialect for NonStop
This chapter describes the following topics:Chapter 4: MyFaces Framework
• An overview of MyFaces
• Installing and configuring MyFaces on a NonStop
system
• Developing sample Java applications using MyFaces
This chapter describes the following topics:Chapter 5: Axis2/Java Framework
• An overview of Axis2/Java
• Installing and configuring Axis2/Java on NonStop
• Developing sample Java applications using Axis2/Java
Appendix B: NonStop Specific Configurations
Appendix C: Deploying Sample Applications on NonStop
This chapter provides you information on how to:Chapter 6: Integrating Frameworks
• Use the Spring Transaction Manager
• Integrate Spring into Hibernate
• Develop Spring JPA applications using Hibernate
• Integrate Axis2/Java into Spring
• Integrate MyFaces into Spring
This appendix contains the EmpInfo database script.Appendix A: EmpInfo Database Script
This appendix provides information on the common
NonStop configuration requirements for the frameworks.
This appendix describes how to deploy sample applications
on NonStop systems.
Document Organization 7
Page 8
Appendix D: Sample JDBC Configuration for Spring
This appendix describes the JDBC configuration for the
Spring framework using NonStop JDBC Type 2 and JDBC
Type 4 drivers.
Appendix E: Installing Spring Web Flow
Appendix F: Sample JDBC Configuration for Hibernate
Appendix H: Installing MyFaces Trinidad/Tomahawk
Framework Libraries on NonStop
Appendix I: Frequently Asked Questions
Notation Conventions
General Syntax Notation
This list summarizes the notation conventions for syntax presentation in this manual.
UPPERCASE LETTERS
Uppercase letters indicate keywords and reserved words. Type these items exactly as shown.
Items not enclosed in brackets are required. For example:
MAXATTACH
Italic Letters
Italic letters, regardless of font, indicate variable items that you supply. Items not enclosed in
brackets are required. For example:
file-name
This appendix describes the steps required to install Spring
Web Flow on your NonStop system.
This appendix describes the JDBC configuration for the
Hibernate framework using NonStop JDBC Type 2 and
JDBC Type 4 drivers.
This appendix contains the ei_setenv script.Appendix G: Hibernate Environment Setup Script
This appendix describes the steps required to install
MyFaces Trinidad and Tomahawk framework libraries on
your NonStop system.
This appendix provides answers to some frequently asked
questions.
Computer Type
Computer type letters indicate:
• C and Open System Services (OSS) keywords, commands, and reserved words. Type
these items exactly as shown. Items not enclosed in brackets are required. For example:
Use the cextdecs.h header file.
• Text displayed by the computer. For example:
Last Logon: 14 May 2006, 08:02:23
• A listing of computer code. For example
if (listen(sock, 1) < 0)
{
perror("Listen Error");
exit(-1);
}
Bold Text
Bold text in an example indicates user input typed at the terminal. For example:
ENTER RUN CODE
?123
CODE RECEIVED: 123.00
The user must press the Return key after typing the input.
8
Page 9

[ ] Brackets
Brackets enclose optional syntax items. For example:
TERM [\system-name.]$terminal-name
INT[ERRUPTS]
A group of items enclosed in brackets is a list from which you can choose one item or none.
The items in the list can be arranged either vertically, with aligned brackets on each side of
the list, or horizontally, enclosed in a pair of brackets and separated by vertical lines. For
example:
FC [ num ]
[ -num ]
[ text ]
K [ X | D ] address
{ } Braces
A group of items enclosed in braces is a list from which you are required to choose one item.
The items in the list can be arranged either vertically, with aligned braces on each side of the
list, or horizontally, enclosed in a pair of braces and separated by vertical lines. For example:
LISTOPENS PROCESS { $appl-mgr-name }
{ $process-name }
ALLOWSU { ON | OFF }
| Vertical Line
A vertical line separates alternatives in a horizontal list that is enclosed in brackets or braces.
For example:
INSPECT { OFF | ON | SAVEABEND }
… Ellipsis
An ellipsis immediately following a pair of brackets or braces indicates that you can repeat
the enclosed sequence of syntax items any number of times. For example:
M address [ , new-value ]…
- ] {0|1|2|3|4|5|6|7|8|9}…
An ellipsis immediately following a single syntax item indicates that you can repeat that syntax
item any number of times. For example:
"s-char…"
Punctuation
Parentheses, commas, semicolons, and other symbols not previously described must be typed
as shown. For example:
error := NEXTFILENAME ( file-name ) ;
LISTOPENS SU $process-name.#su-name
Quotation marks around a symbol such as a bracket or brace indicate the symbol is a required
character that you must type as shown. For example:
"[" repetition-constant-list "]"
Item Spacing
Spaces shown between items are required unless one of the items is a punctuation symbol such
as a parenthesis or a comma. For example:
CALL STEPMOM ( process-id ) ;
If there is no space between two items, spaces are not permitted. In this example, no spaces
are permitted between the period and any other items:
$process-name.#su-name
Notation Conventions 9
Page 10

Line Spacing
If the syntax of a command is too long to fit on a single line, each continuation line is indented
three spaces and is separated from the preceding line by a blank line. This spacing distinguishes
items in a continuation line from items in a vertical list of selections. For example:
ALTER [ / OUT file-spec / ] LINE
[ , attribute-spec ]…
!i and !o
In procedure calls, the !i notation follows an input parameter (one that passes data to the called
procedure); the !o notation follows an output parameter (one that returns data to the calling
program). For example:
CALL CHECKRESIZESEGMENT ( segment-id !i
, error ) ; !o
!i,o
In procedure calls, the !i,o notation follows an input/output parameter (one that both passes
data to the called procedure and returns data to the calling program). For example:
error := COMPRESSEDIT ( filenum ) ; !i,o
!i:i
In procedure calls, the !i:i notation follows an input string parameter that has a corresponding
parameter specifying the length of the string in bytes. For example:
error := FILENAME_COMPARE_ ( filename1:length !i:i
, filename2:length ) ; !i:i
!o:i
In procedure calls, the !o:i notation follows an output buffer parameter that has a corresponding
input parameter specifying the maximum length of the output buffer in bytes. For example:
error := FILE_GETINFO_ ( filenum !i
, [ filename:maxlen ] ) ; !o:i
Notation for Messages
This list summarizes the notation conventions for the presentation of displayed messages in this
manual.
Bold Text
Bold text in an example indicates user input typed at the terminal. For example:
ENTER RUN CODE
?123
CODE RECEIVED: 123.00
The user must press the Return key after typing the input.
Nonitalic Text
Nonitalic letters, numbers, and punctuation indicate text that is displayed or returned exactly
as shown. For example:
Backup Up.
Italic Text
Italic text indicates variable items whose values are displayed or returned. For example:
p-register
process-name
[ ] Brackets
Brackets enclose items that are sometimes, but not always, displayed. For example:
Event number = number [ Subject = first-subject-value ]
10
Page 11

A group of items enclosed in brackets is a list of all possible items that can be displayed, of
which one or none might actually be displayed. The items in the list can be arranged either
vertically, with aligned brackets on each side of the list, or horizontally, enclosed in a pair of
brackets and separated by vertical lines. For example:
proc-name trapped [ in SQL | in SQL file system ]
{ } Braces
A group of items enclosed in braces is a list of all possible items that can be displayed, of
which one is actually displayed. The items in the list can be arranged either vertically, with
aligned braces on each side of the list, or horizontally, enclosed in a pair of braces and
separated by vertical lines. For example:
obj-type obj-name state changed to state, caused by
{ Object | Operator | Service }
process-name State changed from old-objstate to objstate
{ Operator Request. }
{ Unknown. }
| Vertical Line
A vertical line separates alternatives in a horizontal list that is enclosed in brackets or braces.
For example:
Transfer status: { OK | Failed }
% Percent Sign
A percent sign precedes a number that is not in decimal notation. The % notation precedes an
octal number. The %B notation precedes a binary number. The %H notation precedes a
hexadecimal number. For example:
%005400
%B101111
%H2F
P=%p-register E=%e-register
Notation for Management Programming Interfaces
This list summarizes the notation conventions used in the boxed descriptions of programmatic
commands, event messages, and error lists in this manual.
UPPERCASE LETTERS
Uppercase letters indicate names from definition files. Type these names exactly as shown. For
example:
ZCOM-TKN-SUBJ-SERV
lowercase letters
Words in lowercase letters are words that are part of the notation, including Data Definition
Language (DDL) keywords. For example:
token-type
!r
The !r notation following a token or field name indicates that the token or field is required. For
example:
ZCOM-TKN-OBJNAME token-type ZSPI-TYP-STRING. !r
!o
The !o notation following a token or field name indicates that the token or field is optional. For
example:
ZSPI-TKN-MANAGER token-type ZSPI-TYP-FNAME32. !o
Notation Conventions 11
Page 12

General Syntax Notation
This list summarizes the notation conventions for syntax presentation in this manual.
UPPERCASE LETTERS
Uppercase letters indicate keywords and reserved words. Type these items exactly as shown.
Items not enclosed in brackets are required. For example:
SELECT
Italic Letters
Italic letters, regardless of font, indicate variable items that you supply. Items not enclosed in
brackets are required. For example:
file-name
Computer Type
Computer type letters within text indicate case-sensitive keywords and reserved words. Type
these items exactly as shown. Items not enclosed in brackets are required. For example:
myfile.sh
Bold Text
Bold text in an example indicates user input typed at the terminal. For example:
ENTER RUN CODE
?123
CODE RECEIVED: 123.00
The user must press the Return key after typing the input.
[ ] Brackets
Brackets enclose optional syntax items. For example:
DATETIME [start-field TO] end-field
A group of items enclosed in brackets is a list from which you can choose one item or none.
The items in the list can be arranged either vertically, with aligned brackets on each side of
the list, or horizontally, enclosed in a pair of brackets and separated by vertical lines. For
example:
DROP SCHEMA schema [CASCADE]
[RESTRICT]
DROP SCHEMA schema [ CASCADE | RESTRICT ]
{ } Braces
Braces enclose required syntax items. For example:
FROM { grantee[, grantee]...}
A group of items enclosed in braces is a list from which you are required to choose one item.
The items in the list can be arranged either vertically, with aligned braces on each side of the
list, or horizontally, enclosed in a pair of braces and separated by vertical lines. For example:
INTERVAL { start-field TO end-field }
{ single-field }
INTERVAL { start-field TO end-field | single-field }
| Vertical Line
A vertical line separates alternatives in a horizontal list that is enclosed in brackets or braces.
For example:
{expression | NULL}
… Ellipsis
An ellipsis immediately following a pair of brackets or braces indicates that you can repeat
the enclosed sequence of syntax items any number of times. For example:
ATTRIBUTE[S] attribute [, attribute]...
12
Page 13
{, sql-expression}...
An ellipsis immediately following a single syntax item indicates that you can repeat that syntax
item any number of times. For example:
expression-n…
Punctuation
Parentheses, commas, semicolons, and other symbols not previously described must be typed
as shown. For example:
DAY (datetime-expression)
@script-file
Quotation marks around a symbol such as a bracket or brace indicate the symbol is a required
character that you must type as shown. For example:
"{" module-name [, module-name]... "}"
Item Spacing
Spaces shown between items are required unless one of the items is a punctuation symbol such
as a parenthesis or a comma. For example:
DAY (datetime-expression)
DAY(datetime-expression)
If there is no space between two items, spaces are not permitted. In this example, no spaces
are permitted between the period and any other items:
myfile.sh
Line Spacing
If the syntax of a command is too long to fit on a single line, each continuation line is indented
three spaces and is separated from the preceding line by a blank line. This spacing distinguishes
items in a continuation line from items in a vertical list of selections. For example:
match-value [NOT] LIKE pattern
[ESCAPE esc-char-expression]
Related Information
For a better understanding of the frameworks, see the following websites:
• http://www.springsource.org
• http://www.hibernate.org
• http://myfaces.apache.org/
• http://axis.apache.org/axis2/java/core/
Publishing History
HP Encourages Your Comments
HP encourages your comments concerning this document. We are committed to providing
documentation that meets your needs. Send any errors found, suggestions for improvement, or
compliments to docsfeedback@hp.com.
Include the document title, part number, and any comment, error found, or suggestion for
improvement you have concerning this document.
Publication DateProduct VersionPart Number
November 2012698927-001
December 2012698927-002
Related Information 13
Page 14
1 Introduction
Java-based web application development has been inundated by frameworks of every kind. There
is a framework available for almost every application development requirement.
The effort for developing an application using the framework approach is significantly less as
compared to developing an application afresh. The efficiency of Java-based Web development
can be increased by using the appropriate framework.
OpenSource Java frameworks on NonStop systems offer a Java environment on NonStop systems
that enable the development of Enterprise Java applications using standards-based, open source
technologies that are architecturally compatible with NonStop systems.
HP certifies Spring, Hibernate, Apache MyFaces, and Apache Axis2/Java frameworks for use on
NonStop systems.
Some of the advantages of these frameworks are:
• Spring - provides a lightweight framework to implement the business logic.
Spring has a layered architecture and also provides an abstraction layer to integrate with
other frameworks, such as Hibernate. It also provides lightweight remote support.
• Hibernate - is an Object Relational Mapping (ORM) tool for database access.
Hibernate scales well in any environment and is highly extensible and customizable. It also
supports lazy initialization, fetching strategies, and optimistic locking with automatic versioning
and time stamping.
• MyFaces - is a Java Server Faces (JSF) implementation used to design the user interface for
an application.
MyFaces is a component-oriented, event-based framework, which also supports validation of
user inputs. It also provides useful features, such as support for Tiles, use of converters, etc.
• Axis2/Java - is a web services SOAP and WSDL engine.
Axis2/Java is a high speed, flexible framework to develop web services. It provides features
such as hot deployment, scalability, and WSDL support.
Axis2/Java can plug into servlet engines as a server and provides extensive support for the
Web Service Description Language (WSDL). It also includes tools that can be used to create
Java classes from the WSDL and back.
The frameworks are not restricted to these roles and can be customized for specific development
requirements. The following versions of the frameworks are currently certified for use on NonStop:
• Spring 3.0.2 and Spring 3.1.0
• Hibernate 3.2.6, Hibernate 3.5.1, Hibernate 3.6.8, and Hibernate 4.1.1
• MyFaces 1.2.5 and MyFaces 2.0.2
• Axis2/Java 1.4.1 and Axis2/Java 1.5.2
NOTE: The steps to download the frameworks, and build sample applications, are explained
using the Microsoft Windows platform.
Advantages of developing applications using Java frameworks on NonStop
14 Introduction
Page 15

NonStop provides a highly scalable servlet/JSP container to host the web applications developed
using the frameworks. Because the applications are deployed on NSJSP, the Java frameworks can
leverage the following advantages of NonStop:
• Scalability
Scalability in NSJSP refers to its ability to increase its capacity to process a large number of
requests simultaneously, by adding resources, such as additional processes and logical
processors, to a system. Because applications developed using the frameworks are deployed
as a servlet under NSJSP, the applications are able to leverage features of NSJSP. This means
that when the application is heavily loaded and all the static servers are busy, a dynamic
server is created to cater to the excess load. Thus, scalability also promotes need-based
allocation of the system resources.
• Availability
High-availability guarantees continuous availability of services even during a failure of some
system resources, such as processors. The Java frameworks, deployed under NSJSP, use
NonStop TS/MP to ensure high availability and scalability, which enables you to run, as a
server class, several instances of the same process. If any of the application server processes
fail, TS/MP restarts the server process and maintains a minimum number of server application
processes running on the system.
• Load Balancing
With NSJSP, load balancing is achieved through the use of multiple NonStop subsystems,
including NonStop TCP/IPv6, TS/MP, iTP Secure WebServer, and NSJSP. Using NonStop
TCP/IPv6 ensures that the incoming HTTP requests are distributed equally across the HTTPD
processes running on all the processors. Also, because HTTPD communicates with NSJSP using
server class send calls, TS/MP link management can help ensure that HTTPD requests for
NSJSP services are balanced across all the available server class processes of NSJSP.
15
Page 16

2 Spring Framework
Spring Overview
Spring is an open source framework that you can use to develop enterprise applications. Its features
and functions are packaged in different modules. It includes a lightweight container that provides
a centralized, automated configuration and wiring of your application objects.
NOTE: Throughout this document, Spring refers to Spring version 3.1.0.
Spring includes the following:
• A flexible MVC web application framework, built on core Spring functionality. This framework
is highly configurable using strategy interfaces, and accommodates multiple view technologies,
such as JSF.
• Integration with other frameworks, such as Hibernate, with lots of IoC convenience features,
addressing many typical Hibernate integration issues.
• A JDBC abstraction layer that supports exception hierarchy, simplifies error handling, and
reduces the effort in generating code.
• Support for application testability and scalability by allowing software components to be first
developed and tested in isolation, then scaled up for deployment in any environment.
The NonStop system provides a platform comprising the Java Virtual Machine (JVM) and a servlet
container ― NSJSP. On NonStop systems, Java applications (created using Spring libraries) can
be run/deployed as:
• Standalone applications on the JVM
• Web applications under NSJSP
Spring Projects
The Spring community maintains several projects such as Spring Web Flow, Spring framework,
Spring Web Services, and Spring Security. Among these projects, only the Spring framework and
the Spring Web Flow is presently certified for use on the NonStop platform.
Spring Framework
The Spring framework is a layered development platform for developing Java applications in
different environments. Because the framework provides abstraction layers and modules, you can
use the Spring modules selectively based on your requirement.
The basic Spring framework consists of:
• Core Container
• Data Access/Integration layer (For examples on the Data Access/Integration layer, see
“Integrating Frameworks” (page 222).)
• Web layer (For examples on the Web layer, see “Getting Started with Spring” (page 38).)
• AOP and Instrumentation module (For examples on the AOP and Instrumentation layer, see
“Integrating Spring with Transaction Management Facility (TMF)” (page 27).
• Test module
For more information about Spring frameworks, see http://static.springsource.org/spring/docs/
3.1.x/spring-framework-reference/html.
For information on how to use the Spring framework to develop a web application for a NonStop
platform, see “Getting Started with Spring” (page 38).
16 Spring Framework
Page 17
Spring Web Flow
At times, web applications need to execute the same sequence of steps in different contexts. The
Spring Web Flow can be used to implement such repetitive steps or flows because it integrates
with the Spring Web Model View Control (MVC) platform to provide a flow definition language.
For information about downloading and installing the Spring Web Flow, see Appendix E: Installing
Spring Web Flow.
Spring Applications on NonStop
Spring web applications, when deployed on NonStop, can leverage features provided by the
NonStop platform.
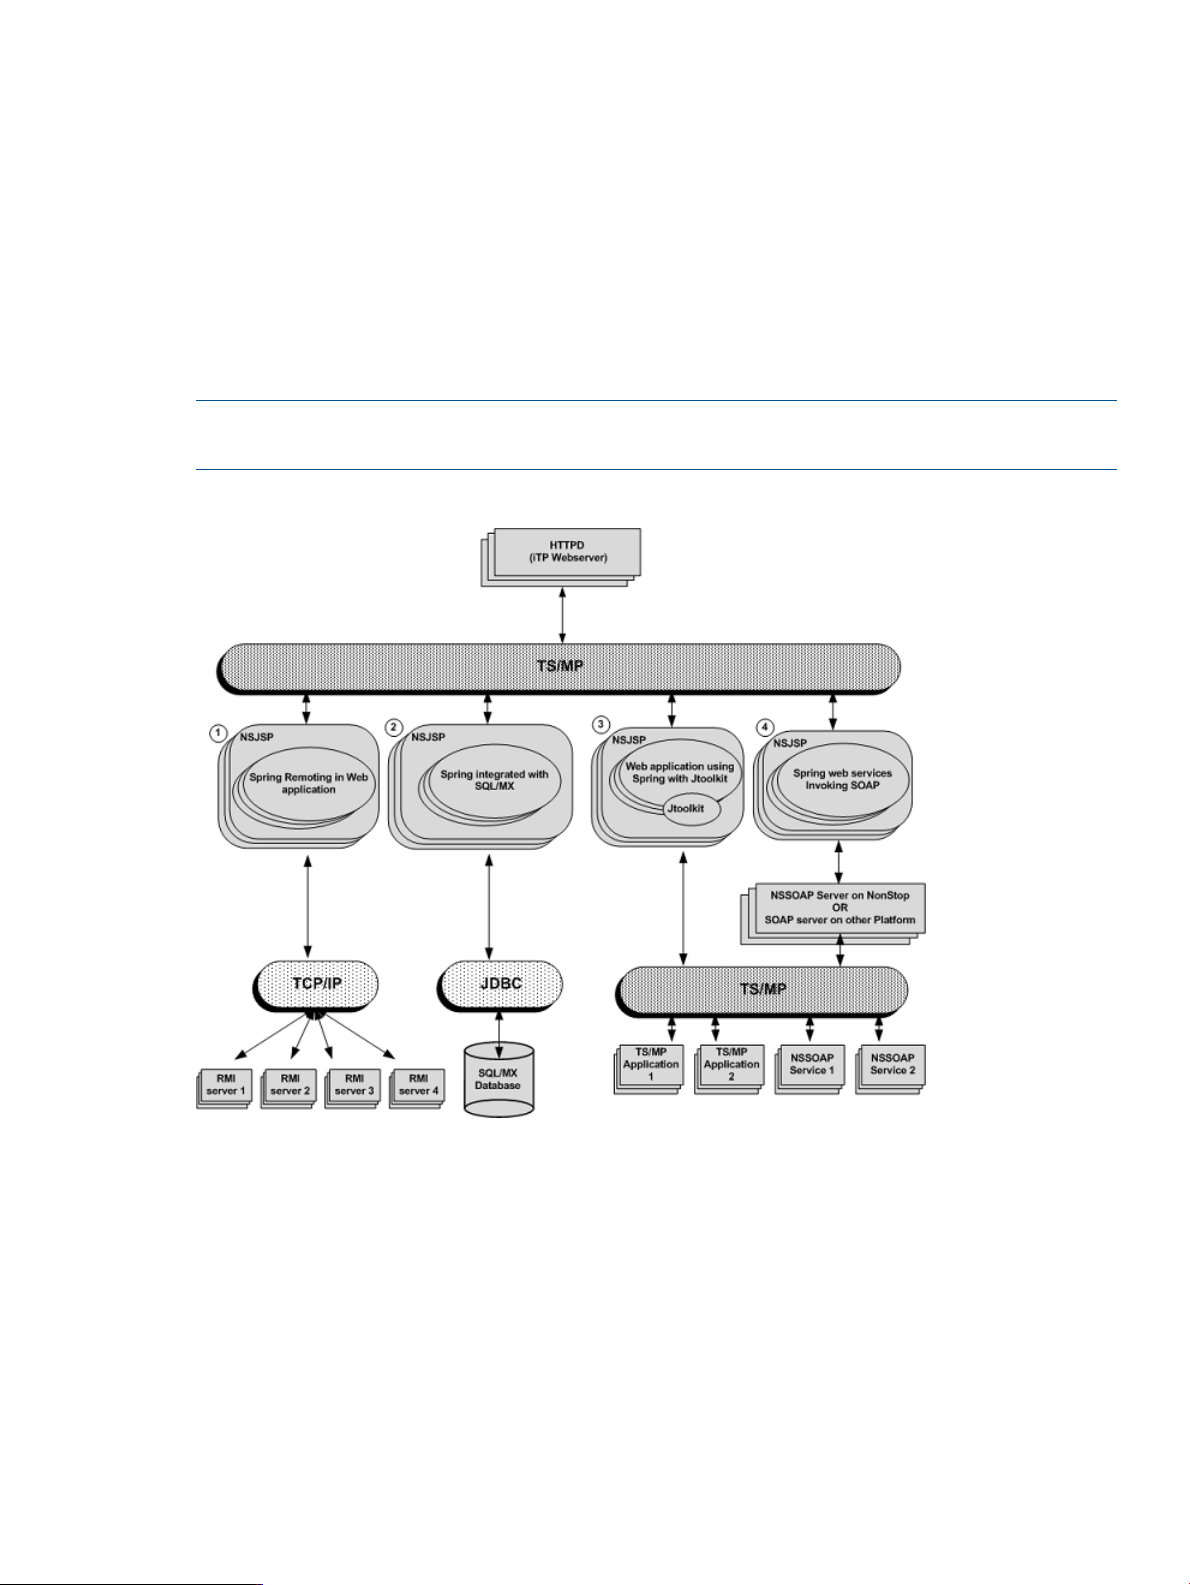
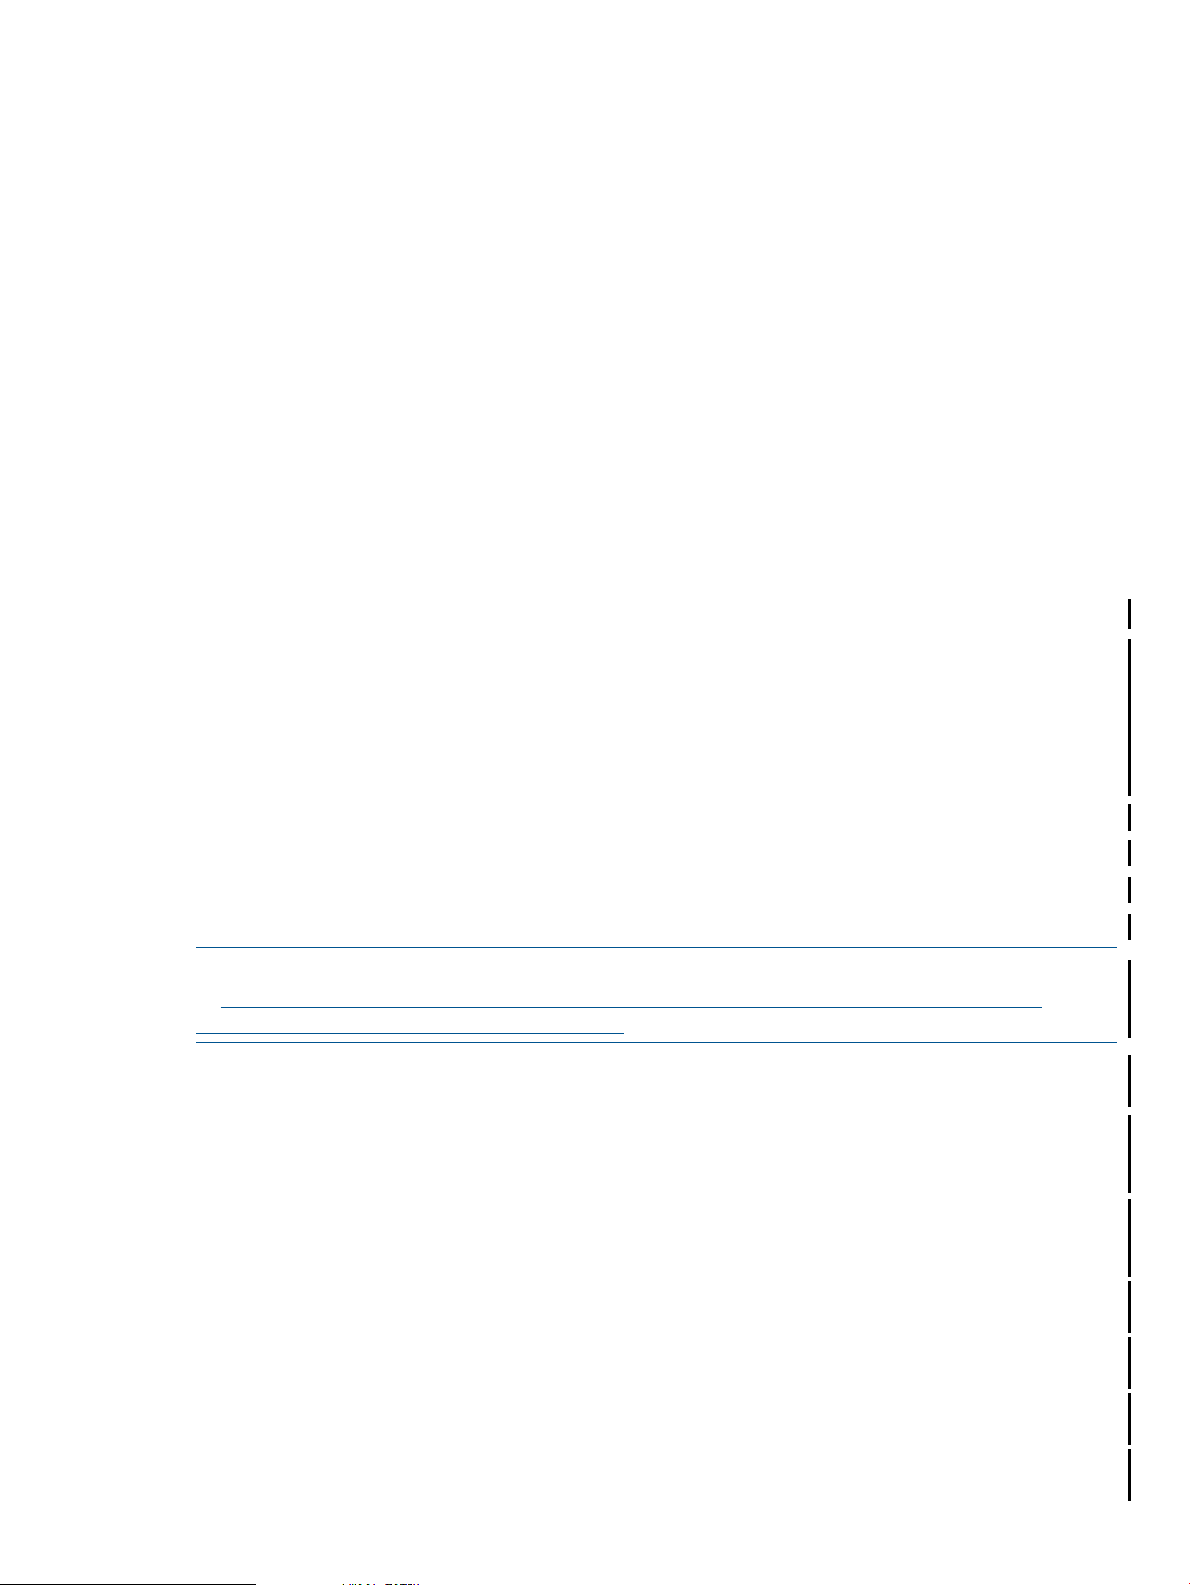
Figure 1 shows how a Spring application can interface with other NonStop products.
NOTE: In Figure 1, the Spring applications are deployed on NSJSP. The same holds true when
running the Spring applications as a standalone application too.
Figure 1 Spring Web Applications
The combinations displayed in Figure 1 are as follows:
1. Spring web applications accessing RMI services (using Spring Remoting).
The Spring framework includes integration classes for remoting support using various
technologies (RMI, http invoker, hessian, burlap, jax-spc, jax-ws, JMS). Using Spring and RMI,
you can expose services through the RMI infrastructure. You must use NonStop TCP/IPv6 or
NonStop IP-CIP as the TCP/IP transport provider because the default RMI implementation uses
TCP/IP as it underlying transport layer.
There can be multiple RMI server instances listening on the same port. When an RMI client
invokes an RMI server, the TCP/IP provider distributes the requests across the RMI server
instances listening on the port in a round-robin manner. If the RMI servers are distributed across
all the processors, RMI calls are distributed across all the processors.
Spring Overview 17
Page 18
NOTE: NonStop TCP/IPv6 limits one process per processor to listen on any given port, while
IP-CIP does not have any such restriction. However, in the RMI Service Exporter configuration
the following property must be defined:
<property name="alwaysCreateRegistry" value="true" />
2. Spring applications accessing an SQL/MX database.
Spring web applications can be configured to access an SQL/MX database through the JDBC
drivers (JDBC Type 2 or JDBC Type 4 drivers).
3. Spring web applications accessing TS/MP applications.
The Spring framework can be integrated with the JToolkit library to expose legacy TS/MP
applications as web applications without major changes to the application.
4. Spring applications accessing SOAP services.
Spring web applications can be configured to access SOAP services hosted on a NonStop
platform or any other platform.
Installing the Spring Framework
This section describes the procedure to install Spring framework libraries on a Nonstop system.
Prerequisites
Before getting started, make sure that you have the following software installed on the NonStop
and Windows systems:
NonStop System
Table 1 Softwares to be installed on the NonStop system
For more information:Software
NSJ version 6.0
For information on installing NSJ on a NonStop system, see the NonStop Server for Java 6.0
Programmer's Reference.
Windows System
Table 2 Softwares to be installed on the Windows system
DownloadSoftware
JDK version 1.6
Download from http://www.oracle.com/technetwork/java/javase/downloads/index.html and
set the PATH and JAVA_HOME environment variables.
Installing Spring Framework Libraries on a NonStop System
Installing Spring framework libraries on a NonStop system requires the following actions:
18 Spring Framework
Page 19
1. “Downloading the Spring Distribution on Windows” (page 19)
2. “Copying Spring Runtime Libraries from Windows to NonStop” (page 19)
NOTE: Throughout the section, references are made to the following directories:
• <Spring Home>: The directory on the Windows system where the Spring distribution
files are extracted.
• <NonStop Spring Home>: The OSS directory on the NonStop system where the Spring
runtime JAR files are located.
• <My SASH Home>: The directory on the Windows system where the contents of the
SAMPLES.zip file (distributed as a part of the NonStop Samples for Java frameworks T0874 and available for download in Scout) is extracted.
• <NSJSP Deployment Directory>: The location of the iTP WebServer deployment
directory (on the NonStop system) in which NSJSP is setup.
Downloading the Spring Distribution on Windows
To download the Spring distribution on the Windows system, complete the following steps:
1. Go to http://www.springsource.com/download/community?project=Spring%20Framework
.
The Spring Community Downloads web page appears.
2. Do one of the following:
1. Register yourself.
2. Click I'd rather not fill in the form. Just take me to the download page.
The Spring frameworks available for download appear.
3. Select 3.1.0.RELEASE and download the spring-framework–3.1.0.RELEASE.zip file.
NOTE: The spring-framework–3.1.0.RELEASE.zip file does not include the Spring
sample applications, the Spring framework libraries, and dependency JAR files that are
required to build the sample applications.
4. Extract the spring-framework–3.1.0.RELEASE.zip file into a directory on the Windows
system.
This directory will be referred as <Spring Home>.
Copying Spring Runtime Libraries from Windows to NonStop
1. Create JAR files in the <Spring Home> directory on the Windows system:
command prompt> cd <Spring Home>
command prompt> jar -cvf spring_dist.jar dist
For example:
command prompt> cd C:\spring-framework-3.1.0.RELEASE
command prompt> jar -cvf spring_dist.jar dist
2. Create the <NonStop Spring Home> directory in the OSS environment on the NonStop
system:
OSS> mkdir -p <NonStop Spring Home>
For example, create a directory structure /usr/tandem/sash/spring_3.1.0.
OSS> mkdir -p /usr/tandem/sash/spring_3.1.0
3. Transfer the spring_dist.jar file from <Spring Home> to <NonStop Spring Home>
and extract it:
OSS> cd <NonStop Spring Home>
Installing the Spring Framework 19
Page 20
OSS> jar -xvf spring_dist.jar
NOTE: The sub-directories on the NonStop system must contain the same list of files as those in
the <Spring Home>\dist directory on the Windows system.
The Spring runtime libraries are installed on the NonStop system. You can use these libraries to
develop and run Spring applications on a NonStop system.
Setting up Sample Spring Applications on NonStop
The sample Spring applications (PetClinic and JPetStore) are included in the SAMPLES.zip file.
This file contains the modifications made to PetClinic and JPetStore to make them compatible with
NonStop systems.
NOTE: The SAMPLES.zip file is distributed as a part of the NonStop Samples for Java frameworks
- T0874.
SAMPLES.zip is present in the T0874AAB.BIN file in Scout. For information on how to install
the T0874AAB.BIN file from Scout, see https://h20453.www2.hp.com/scout/download_help.htm.
Before you deploy the sample applications, complete the following steps:
1. Download the SAMPLES file from Scout.
2. Add the .zip extension to it.
The file is renamed as SAMPLES.zip.
3. Extract the SAMPLES.zip file to a location on the Windows system.
This section describes the steps to build, set up, deploy, and run the PetClinic and JPetStore sample
applications on NonStop systems.
Prerequisites
• For NonStop system:
The NS-Samples-for-Java-Frameworks folder appears.
NOTE: The absolute path of the NS-Samples-for-Java-Frameworks folder is referred
as <My SASH Home>.
Table 3 Softwares to be installed on the NonStop system
For more information:Software
NonStop iTP WebServer version
7.x or later
NSJSP version 6.1
NonStop SQL/MX version 2.3
For information on installing and setting up iTP WebServer (secure and
non-secure) on a NonStop system, see the iTP Secure WebServer System
Administrator's Guide.
For information on installing and setting up NSJSP on a NonStop system, see
the NonStop Servlets for JavaServer Pages (NSJSP) 6.1 System Administrator's
Guide.
For information on installing SQL/MX on a NonStop system, see the SQL/MX
Installation and Upgrade Guide.
JDBC Type 2 driver or JDBC Type
4 driver for the installed SQL/MX
version
NSJ version 6.0
20 Spring Framework
For information on installing JDBC Type 2 driver and JDBC Type 4 driver on
a NonStop system, see JDBC Type 2 Driver Programmer's Reference for
SQL/MX and JDBC Type 4 Driver Programmer's Reference for SQL/MX.
For information on installing NSJ on a NonStop system, see the NonStop
Server for Java 6.0 Programmer's Reference manual.
Page 21
• For Windows system:
Table 4 Softwares to be installed on the Windows system
DownloadSoftware
PetClinic
JDK version 1.6
Maven version
2.2.1
JDBC Type 4 driver
Download from http://www.oracle.com/technetwork/java/javase/downloads/index.html
and set the PATH and JAVA_HOME environment variables.
Download from http://maven.apache.org/download.html and set the PATH and
MAVEN_HOME environment variables.
For information on installing JDBC Type 4 driver on a Windows system, see JDBC Type 4
Driver Programmer's Reference for SQL/MX.
The PetClinic sample application is an information system that is accessible using a web browser.
The intended users of the application are employees of the clinic who need to view and manage
information regarding veterinarians, clients, and their pets.
NOTE: The PetClinic sample application described here uses Spring 3.0.2 version.
To use PetClinic, complete the following steps:
• “Building PetClinic on Windows” (page 21)
• “Setting up PetClinic Database on NonStop” (page 22)
• “Deploying PetClinic on NonStop” (page 23)
• “Running PetClinic on NonStop” (page 23)
Building PetClinic on Windows
1. Go to the <My SASH Home>\spring\samples\petclinic directory on the Windows
system.
2. Configure the JDBC driver settings for the NonStop SQL/MX database.
1. Go to the <My SASH Home>\spring\samples\petclinic\src\main\resources
directory on the Windows system.
2. Modify the jdbc.properties file to update the JDBC configuration. You can use either
the JDBC Type 2 driver or the JDBC Type 4 driver by setting their SQL/MX settings as
follows:
• For JDBC Type 2 driver, uncomment the SQL/MX settings for the JDBC Type 2 driver,
so that it appears as:
# Properties that control the population of schema and data for a new data source
# SQL/MX Settings for JDBC Type 2 Driver
jdbc.driverClassName=com.tandem.sqlmx.SQLMXDriver
jdbc.url=jdbc:sqlmx://
jdbc.username=
jdbc.password=
jdbc.catalog=petcliniccat
jdbc.schema=petclinicsch
hibernate.dialect=org.hibernate.dialect.SqlmxDialect
NOTE: Because the JDBC Type 2 driver is located on the NonStop system, you
need not specify the values for jdbc.username and jdbc.password fields.
• For JDBC Type 4 driver, uncomment the SQL/MX settings for the JDBC Type 4 driver
, and enter the values for the JDBC URL (NonStop system IP Address and port number
of the JDBC data source), NonStop system username, and password so that it appears
as:
Installing the Spring Framework 21
Page 22

#------------------------------------------------------------# Properties that control the population of schema and data for a new data source
# SQL/MX Settings for JDBC Type 4 Driver
jdbc.driverClassName= com.tandem.t4jdbc.SQLMXDriver
jdbc.url= jdbc:t4sqlmx://<HP NonStop System IP Address>:<Port No.>
jdbc.username=<HP NonStop Username>
jdbc.password=<HP NonStop Password>
jdbc.catalog=petcliniccat
jdbc.schema=petclinicsch
hibernate.dialect=org.hibernate.dialect.SqlmxDialect
3. Build the PetClinic web application archive (WAR)file (petclinic.war).
1. Go to the <My SASH Home>\spring\samples\petclinic directory:
command prompt> cd <My SASH Home>\spring\samples\petclinic
2. Build the PetClinic web archive using JDBC Type 2 driver or JDBC Type 4 driver.
1. Enter the following command:
command prompt> mvn clean package
The application WAR file (petclinic.war) is created in the <My SASH
Home>\spring\samples\petclinic\target directory.
2. Create the WEB-INF\lib folder in the <My SASH
Home>\spring\samples\petclinic\target directory and copy the SQL/MX
hibernate dialect JAR file (hibernate35sqlmx.jar) to this directory.
3. Go to <My SASH Home>\spring\samples\petclinic\target and run the
following commands:
command prompt> cd <My SASH Home>\spring\samples\petclinic\target
command prompt> jar uf petclinic.war WEB-INF\lib\hibernate35sqlmx.jar
The hibernate35sqlmx.jar is copied to the <My SASH
Home>\spring\samples\petclinic\target\petclinic.war\WEB-INF\lib
directory.
NOTE: If you are using the JDBC Type 4 driver:
• In step 2, copy the t4sqlmx.jar file also to the \WEB-INF\lib directory in
addition to the hibernate35sqlmx.jar file.
• In step 3, run this jar command:
jar uf petclinic.war
WEB-INF\lib\hibernate35sqlmx.jar WEB-INF\lib\t4sqlmx.jar
Setting up PetClinic Database on NonStop
1. Edit the <My SASH Home>\spring\samples\petclinic\src\main\resources\db\
mxci\petclinic_tables_script.sql file to include the following:
• <$datavol>: specify the Guardian volume for the primary partition of the table. For
example: $data01
• <user>: specify the owner of the schema. For example: super.sashusr
• <node.$vol>: specify the location of the metadata tables for the catalog. For example:
\NSK01.$data01
• <subvol reference>: specify the designated subvolume name for the schema. For
example: SASH1
NOTE: The subvolume name is always prefixed by ZSD and must have eight characters
(including ZSD).
2. Create a directory in OSS to place the database script files, using the command:
22 Spring Framework
Page 23

OSS> mkdir -p <NonStop SASH Home>/spring/samples/petclinic/dbconfig
For example:
OSS> mkdir -p /home/sash_usr/sash/spring/samples/petclinic/dbconfig
NOTE: <NonStop SASH Home> can be any working directory. It is suggested that you
create spring/samples/petclinic/dbconfig directory structure in <NonStop SASH
Home>.
3. Copy the following scripts from the <My SASH
Home>\spring\samples\petclinic\src\main\resources\db\mxci\ Windows
directory to the OSS directory created in Step 2:
• petclinic_tables_script.sql
• petclinic_dataload_script.sql
NOTE:
• The petclinic_tables_script.sql script creates the SQL/MX database catalog,
schema, and tables for PetClinic.
• The petclinic_dataload_script.sql script loads the database with sample data.
4. Go to the OSS directory where the petclinic_tables_script.sql and
petclinic_dataload_script.sql files are copied, and create the PetClinic database
catalog, schema, and tables, using the SQL/MX command:
OSS> obey petclinic_tables_script.sql;
NOTE: By default, the petclinic_tables_script.sql file creates the database catalog
name as petcliniccat and schema name as petclinicsch. If these names conflict with
any of the existing catalog and schema names, modify the database catalog and schema
names in the petclinic_tables_script.sql script file.
If you modify the database catalog and schema names, edit the jdbc.properties file
present in the <My SASH Home>\spring\samples\petclinic\src\main\resources
directory, present in the SAMPLES.zip file.
5. Load the sample data in the PetClinic sample application database tables using the SQL/MX
command:
OSS> obey petclinic_dataload_script.sql;
The PetClinic database is setup on your NonStop system.
Deploying PetClinic on NonStop
For information on how to deploy PetClinic on the NonStop system, see Appendix C: Deploying
Sample Applications on NonStop.
Running PetClinic on NonStop
To run PetClinic on the NonStop system, in the NSJSP Web Application Manager screen, under
Applications, click /<servlet directory>/petclinic.
You can now perform the following actions using PetClinic:
• View a list of veterinarians and their specialties
• View and update information of a pet owner
• Add a new pet owner to the system
• View and update information of a pet
Installing the Spring Framework 23
Page 24

JPetStore
• Add a new pet to the system
• View information about the pet's visit to the clinic
The intended users of the JPetStore sample application are Visitors and Shoppers. A Visitor is
anyone who visits the site. A Shopper is an authenticated visitor who is signed in to the site. Visitors
can browse the site for items of their interest. Shoppers can purchase items of their interest.
NOTE: The JPetStore sample application described here uses Spring 3.0.2 version.
To use JPetStore, complete the following steps:
• “Building JPetStore on Windows” (page 24)
• “Setting up JPetStore Database on NonStop” (page 25)
• “Deploying JPetStore on NonStop” (page 26)
• “Running JPetStore on NonStop” (page 26)
Building JPetStore on Windows
1. Go to the <My SASH Home>\spring\samples\jpetstore directory on the Windows
system.
2. Configure the JDBC driver settings for the NonStop SQL/MX database.
1. Go to the <My SASH
Home>\spring\samples\jpetstore\src\main\webapp\WEB-INF directory on
the Windows system.
2. Modify the jdbc.properties file to update the JDBC configuration. You can use either
the JDBC Type 2 driver or the JDBC Type 4 driver by setting their SQL/MX settings as
follows:
• For JDBC Type 2 driver, uncomment the SQL/MX settings for the JDBC Type 2 driver,
so that it appears as:
#------------------------------------------------------------# SQL/MX Settings for JDBC Type 2 Driver
jdbc.driverClassName=com.tandem.sqlmx.SQLMXDriver
jdbc.url=jdbc:sqlmx://
jdbc.username=
jdbc.password=
jdbc.catalog=jpetstorecat
jdbc.schema=jpetstoresch
NOTE: Because the JDBC Type 2 driver is located on the NonStop system, you
need not specify the values for jdbc.username and jdbc.password fields.
• For JDBC Type 4 driver, uncomment the SQL/MX settings for the JDBC Type 4 driver
, and enter the values for the JDBC URL (NonStop system IP Address and port number
of the JDBC data source), NonStop system username, and password so that it appears
as:
#------------------------------------------------------------# SQL/MX Settings for JDBC Type 4 Driver
jdbc.driverClassName= com.tandem.t4jdbc.SQLMXDriver
jdbc.url= jdbc:t4sqlmx://<HP NonStop System IP Address>:<Port No.>
jdbc.username=<HP NonStop Username>
jdbc.password=<HP NonStop Password>
jdbc.catalog=jpetstorecat
jdbc.schema=jpetstoresch
24 Spring Framework
NOTE: <HP NonStop Username> must have access to the schema created for
JPetstore.
Page 25

3. Build the JPetStore WAR file
(org.springframework.samples.jpetstore-1.0.0-SNAPSHOT.war).
1. Go to the <My SASH Home>\spring\samples\jpetstore directory:
command prompt> cd <My SASH Home>\spring\samples\jpetstore
2. Build the JPetStore web archive using the JDBC Type 2 driver or JDBC Type 4 driver.
1. Enter the following command:
command prompt> mvn clean package
The application WAR file
(org.springframework.samples.jpetstore-1.0.0-SNAPSHOT.war) is
created in the <My SASH Home>\spring\samples\jpetstore\target
directory.
2. Create the WEB-INF\lib folder in the <My SASH
Home>\spring\samples\jpetstore\target directory.
If you are using JDBC Type 4 driver, proceed with Step 3.
3. Copy the JDBC Type 4 driver file (t4sqlmx.jar) to the <My SASH
Home>\spring\samples\jpetstore\target directory.
4. Go to <My SASH Home>\spring\samples\jpetstore\target and run the
following commands:
command prompt> cd <My SASH Home>\spring\samples\jpetstore\target
command prompt> jar uf org.springframework.samples.jpetstore-1.0.0-SNAPSHOT.war
WEB-INF\lib\t4sqlmx.jar
The t4sqlmx.jar file is copied to the <My SASH
Home>\Home>\spring\samples\jpetstore\target\
org.springframework.samples.jpetstore-1.0.0-SNAPSHOT.war\WEB-INF\lib
directory.
Setting up JPetStore Database on NonStop
1. Edit the <My SASH
Home>\spring\samples\jpetstore\db\mxci\jpetstore_tables_script.sql
file to add the following:
• <$datavol>: specify the Guardian volume for the primary partition of the table. For
example: $data01.
• <user>: specify the owner of the schema. For example: super.sashusr.
• <node.$vol>: specify the location of the metadata tables for the catalog. For example:
\NSK01.$data01.
• <subvol reference>: specify the designated subvolume name for the schema. For
example: SASH2.
NOTE: The subvolume name is always prefixed by ZSD and must have eight characters
(including ZSD).
2. Create a directory in OSS to place the database script files:
OSS> mkdir -p <NonStop SASH Home>/spring/samples/jpetstore/dbconfig
For example:
OSS> mkdir -p /home/sash_usr/sash/spring/samples/jpetstore/dbconfig
NOTE: <NonStop SASH Home> can be any working directory. It is suggested that you
create the spring/samples/jpetstore/dbconfig directory structure in <NonStop
SASH Home>.
Installing the Spring Framework 25
Page 26

3. Copy the following scripts from the <My SASH
Home>\spring\samples\jpetstore\db\mxci Windows directory to the OSS directory
created in Step 2:
• jpetstore_tables_script.sql
• jpetstore_dataload_script.sql
NOTE:
• The jpetstore_tables_script.sql script creates the SQL/MX database catalog,
schema, and tables for JPetStore.
• The jpetstore_dataload_script.sql script loads the database with sample data.
4. Go to the OSS directory where the jpetstore_tables_script.sql and
jpetstore_dataload_script.sql files are copied, and create the JPetStore database
catalog, schema, and tables, using the SQL/MX command:
OSS> obey jpetstore_tables_script.sql;
NOTE: By default, the jpetstore_tables_script.sql file creates the database catalog
name as jpetstorecat and schema name as jpetstoresch. If these names conflict with
the existing catalog and schema names, modify the database catalog and schema names in
the jpetstore_tables_script.sql script file.
If you modify the database catalog and schema names, the new names must be updated in
the jdbc.properties file located in the <My SASH
Home>\spring\samples\jpetstore\src\main\webapp\WEB-INF directory, included
in the SAMPLES.zip file.
5. Load the sample data in the JPetStore database tables:
OSS> obey jpetstore_dataload_script.sql;
The JPetStore database is setup on the NonStop system.
Deploying JPetStore on NonStop
For information on how to deploy JPetStore on the NonStop system, see Appendix C: Deploying
Sample Applications on NonStop.
Running JPetStore on NonStop
To run JPetStore on the NonStop system, in the NSJSP Web Application Manager screen, under
Applications, click /<servlet
directory>/org.springframework.samples.jpetstore-1.0.0-SNAPSHOT.
As a visitor, you can now perform the following activities:
• Select a Product Category labeled with words or icons, view the item detail, or access the
MenuBar features.
• Search by entering a keyword or phrase to locate items.
• Add an item to a Cart, either from a summary list or from a detail view.
• Collect items for later purchase.
• Increase or decrease the quantity for any item in a Cart, up to available inventory, or remove
the item from the Cart by changing the quantity to zero.
• Complete an online form to create an Account.
26 Spring Framework
Page 27
As a shopper, you can perform the following activities (including those performed by a visitor):
• Enter a username and password to access your account.
• Store shipping information and preferences for your use at future sessions.
• Purchase the items collected in a Cart.
• Provide payment information.
Integrating Spring with Transaction Management Facility (TMF)
The NonStop Transaction Management Facility (TMF) provides transaction protection, database
consistency, and database recovery, which are critical in high-volume transaction processing.
TMF protects databases in a wide variety of environments such as online transaction processing
(OLTP), online query processing (OLQP), batch processing, and decision support systems.
TMF protects databases by managing database transactions, monitoring database activity through
the use of audit trails, and providing database recovery methods while sustaining high performance
in a high-volume, distributed application environment.
For more information, see the TMF Introduction manual and the TMF Reference Manual.
This section describes how to use a TMF Adapter in Spring application.
What is Spring TMF Adapter?
Spring provides the AbstractPlatformTransactionManager, which can be used to develop
a TMF adapter for Spring. Integration of NonStop TMF with Spring applications is provided by
implementing Spring's AbstractPlatformTransactionManager. The class used for this
implementation is called TmfTransactionManager. When TmfTransactionManager is used
in a Spring application, a transaction is started by using the Spring TMF adapter and creates a
TMF transaction on Nonstop.
TmfTransactionManager exposes the following methods to Spring applications:
• getTransaction
• commit
• rollback
NOTE: For the actual signature of the methods mentioned above, see the Spring documentation
at http://static.springsource.org/spring/docs/3.1.0.RELEASE/api/org/springframework/
transaction/PlatformTransactionManager.html.
For information about TmfTransactionManager configuration, see “Integrating Spring with
Transaction Management Facility (TMF)” (page 27).
The getTransaction method may be invoked with or without TMF transaction context. The behavior
of TmfTransaction will be based on the transaction propagation attribute set on it. The following
are the Propagation behaviors:
1. PROPAGATION_REQUIRED: This is the default setting of a transaction definition, and typically
defines a transaction synchronization scope. If a transaction exists, it supports the current
transaction; otherwise, it creates a new one.
2. PROPAGATION_SUPPORTS: Supports a current transaction; executes non-transactionally if no
transaction exists.
3. PROPAGATION_MANDATORY: Supports a current transaction; if no transaction exists, throws
an exception.
4. PROPAGATION_REQUIRES_NEW: Creates a new transaction; suspends the current transaction
if one exists.
5. PROPAGATION_NOT_SUPPORTED: Does not support a current transaction; always executes
non-transactionally.
Integrating Spring with Transaction Management Facility (TMF) 27
Page 28
6. PROPAGATION_NEVER: Does not support a current transaction; throws an exception if a
current transaction exists.
7. PROPAGATION_NESTED: If a current transaction exists, it executes within a nested transaction:
otherwise, the behavior is similar to PROPAGATION_REQUIRED. This behavior is not supported
on NonStop.
Setting up the Sample SpringTMFAdapter on NonStop
The sample SpringTMFAdapter is included along with the Spring application. springtmf.jar
is the SpringTMFAdapter, which is used by the Spring application to create tmf transactions.
The SpringTMFAdapter is available via the SAMPLES.zip file, which is distributed as a part
of T0937.
To obtain the springtmf.jar and the samples, complete the following steps:
1. Create a directory on your Windows system. This directory is referred as <TMF Adapter
Home>.
For example, C:\TMF
2. Download the ADAPTER and SAMPLES file from Scout. For information on how to download
from Scout, see https://h20453.www2.hp.com/scout/download_help.htm.
3. Add the .zip extensions to both the files. The files will be renamed ADAPTER.zip and
SAMPLES.zip.
4. Extract the ADAPTER.zip file to <TMF Adapter Home>.
5. Extract the SAMPLES.zip file to <TMF Adapter Home> to get the sample application. The
You can now use springtmf.jar in a Spring application to create TMF transactions.
After obtaining the springtmf.jar and samples, you can build, set up, deploy, and run the
sample SpringTMFAdapter application on a NonStop system. The following sections describe
how to build, set up, deploy, and run the application.
Prerequisites
Before getting started, make sure that you have the following software installed on the NonStop
and Windows systems:
• NonStop System
The SpringTMFAdapter folder containing the springtmf.jar file appears. For example,
C:\TMF\SpringTMFAdapter\springtmf.jar
sample application can be found at C:\TMF\Samples
Table 5 Softwares to be installed on the NonStop system
For more information:Software
NonStop SQL/MX version 3.2
JDBC Type 2 driver or JDBC Type
4 driver for the installed SQL/MX
version
For information on installing SQL/MX on a NonStop system, see the SQL/MX
Installation and Upgrade Guide.
For information on installing JDBC Type 2 driver and JDBC Type 4 driver on
a NonStop system, see JDBC Type 2 Driver Programmer's Reference for
SQL/MX and JDBC Type 4 Driver Programmer's Reference for SQL/MX.
NSJ version 6.0
• Windows System
28 Spring Framework
For information on installing NSJ on a NonStop system, see the NonStop
Server for Java 6.0 Programmer's Reference manual.
Page 29
Table 6 Softwares to be installed on the Windows system
DownloadSoftware
JDK version 1.6
JDBC Type 4 driver
version
Ant 1.8.2
Download from http://www.oracle.com/technetwork/java/javase/downloads/index.html
and set the PATH and JAVA_HOME environment variables.
For information on installing JDBC Type 4 driver on a Windows system, see JDBC Type 4
Driver Programmer's Reference for SQL/MX.
Download from http://archive.apache.org/dist/ant/binaries/ and set the PATH and
ANT_HOME environment variables.
Setting up an SQL/MX Database on NonStop
1. Edit the <TMF Adapter Home
>\Samples\TMF_Adapter_Sample\dbconfig\student_script.sql file to include
the following:
• <$datavol>: specify the Guardian volume for the primary partition of the table. For
example: $data01
• <user>: specify the owner of the schema. For example: super.sashusr
• <node.$vol>: specify the location of the metadata tables for the catalog. For example:
\NSK01.$data01
• <subvol reference>: specify the designated subvolume name for the schema. For
example: SASH1
NOTE: The subvolume name is always prefixed by ZSD and must have eight characters
(including ZSD).
2. Create a directory in OSS to place the database script files, using the command:
OSS> mkdir -p <NonStop TMF Adapter Home>/spring/samples/TMFAdapter/dbconfig
For example:
OSS> mkdir -p /home/sash_usr/sash/spring/samples/TMFAdapter/dbconfig
NOTE: HP recommends that you create /spring/samples/TMFAdapter/dbconfig
directory structure under <NonStop TMF Adapter Home>.
3. Copy the student_script.sql from the<TMF Adapter Home
>\Samples\TMF_Adapter_Sample\dbconfig\ Windows directory to the OSS directory
created in Step 2.
4. Go to the OSS directory where the student_script.sql file is copied, and create the
database catalog and schema, using the SQL/MX command:
OSS> obey student_script.sql;
NOTE: By default, the student_script.sql file creates the database catalog name as
simplecat and schema name as simplesch. If these names conflict with any of the existing
catalog and schema names, modify the database catalog and schema names in the
student_script.sql script file.
If you modify the database catalog and schema names, update the
application.properties file present in SAMPLES.zip, available in the <TMF Adapter
Home>\Samples\TMF_Adapter_Sample\src directory.
The SQL/MX database is setup on your NonStop system.
Integrating Spring with Transaction Management Facility (TMF) 29
Page 30

Dependent Libraries for the Sample TMFAdapter
Before executing the sample TMFAdapter application, get the following libraries to the <TMF
Adapter Home>\Samples\TMF_Adapter_Sample\lib directory on Windows. Then transfer
these files (via FTP) to the <NonStop TMF Adapter Home
>/spring/samples/TMFAdapter/lib/ directory on the NonStop system.
Table 7 TMFAdapter Dependent Libraries
Source LocationDependency JAR Files
<Hibernate_3.6.8_Home>\lib\requiredantlr-2.7.6.jar
com.springsource.org.aopalliance-1.0. 0.jar
com.springsource.org.objectweb.asm-3.1.0.jar
com.springsource.org.apache.commons.logging-1.1.1.
jar
com.springsource.org.junit-4.10.0.jar
com.springsource.org.apache.log4j-1.2.16.jar
com.springsource.org.aspectj.weaver-1.5.4.jar
org.springframework.asm-3.1.0.RELEASE.jar
org.springframework.aspects-3.1.0.RELEASE.jar
org.springframework.beans-3.1.0.RELEASE.jar
org.springframework.context-3.1.0.RELEASE.jar
org.springframework.context.support-3.1.0.RELEASE.
jar
org.springframework.core-3.1.0.RELEASE.jar
org.springframework.expression-3.1.0.RELEASE.jar
org.springframework.instrument-3.1.0.RELEASE.jar
org.springframework.instrument.tomcat-3.1.0.RELEASE
.jar
org.springframework.jdbc-3.1.0.RELEASE.jar
org.springframework.jms-3.1.0.RELEASE.jar
org.springframework.orm-3.1.0.RELEASE.jar
org.springframework.oxm-3.1.0.RELEASE.jar
org.springframework.test-3.1.0.RELEASE.jar
org.springframework.transaction-3.1.0.RELEASE.jar
org.springframework.web-3.1.0.RELEASE.jar
org.springframework.web.portlet-3.1.0.RELEASE.jar
org.springframework.web.servlet-3.1.0.RELEASE.jar
org.springframework.web.struts-3.1.0.RELEASE.jar
http://ebr.springsource.com/repository/
app/
<Hibernate_3.6.8_Home>\lib\bytecode\cglibcglib-2.2.jar
<Hibernate_3.6.8_Home>\lib\requiredcommons-collections-3.1.jar
<Hibernate_3.6.8_Home>\lib\requireddom4j-1.6.1.jar
<Hibernate_3.6.8_Home>\lib\jpahibernate-jpa-2.0-api-1.0.1.Final.jar
<Hibernate_3.6.8_Home>hibernate3.jar
<Hibernate_3.6.8_Home>\libhibernate36sqlmx.jar
<Hibernate_3.6.8_Home>\lib\requiredjavassist-3.12.0.GA.jar
<Hibernate_3.6.8_Home>\lib\requiredjta-1.1.jar
<Spring Home>\distorg.springframework.aop-3.1.0.RELEASE.jar
30 Spring Framework
Page 31

Table 7 TMFAdapter Dependent Libraries (continued)
<Hibernate_3.6.8_Home>\lib\requiredslf4j-api-1.6.1.jar
<TMF Adapter Home>\SpringTMFAdapterspringtmf.jar
<JDBC T4 Driver Installation Directory>t4sqlmx.jar
<NonStop Java Home>/jre/lib/exttmf.jar
util.jar
Source LocationDependency JAR Files
jdbcMx.jar
Running TMFAdapter on NonStop
To run the TMFAdapter application, you can use either JDBC Type 2 driver or JDBC Type 4 driver.
When you extract the sample application on a Windows system, the following jar files for
Programmatic, Annotation, and AOP are placed in the <TMF Adapter
Home>\Samples\TMF_Adapter_Sample\jar\t2 location:
• TMFAdapter_Sample_Programmatic.jar
• TMFAdapter_Sample_Annotation.jar
• TMFAdapter_Sample_AOP.jar
Using a JDBC Type 2 driver:
If you use a JDBC Type 2 driver and have not modified the default catalog and schema when
setting up the database, you can use these packaged jar files as is for execution (starting with step
3).
If you modify the default catalog and schema, then update the schema and catalog entries in the
application.properties file and follow these steps to build and deploy the jar files:
1. Go to the location where the samples are extracted using the command line in your Windows
system.
2. Create the jar files by using the following command:
ant -f build.xml jar
<JDBC T2 Driver Installation
Directory>/lib
If the Java files must be compiled, use:
ant -lib <TMF Adapter Home>\Samples\TMF_Adapter_Sample\lib\ -f
build.xml cleanjar
The following jar files are created under <TMF Adapter
Home>\Samples\TMF_Adapter_Sample\jar:
• TMFAdapter_Sample_Programmatic.jar
• TMFAdapter_Sample_Annotation.jar
• TMFAdapter_Sample_AOP.jar
3. Transfer the jar files (via FTP) to <NonStop TMF Adapter
Home>/spring/samples/TMFAdapter/ on the NonStop system.
4. Execute the commands to run the jar files:
Programmatic:
java -cp "<NonStop TMF Adapter
Home>/spring/samples/TMFAdapter/TMFAdapter_Sample_Programmatic.jar:<NonStop
TMF Adapter Home>/spring/samples/TMFAdapter/lib/*"
Integrating Spring with Transaction Management Facility (TMF) 31
Page 32

-Djava.library.path=<JdbcMX lib path>
-Djdbcmx.transactionMode=external
com.hp.programmatic.MainProgrammatic
where <JdbcMX lib path> is the location where the JDBC T2 driver is installed.
For example,
java -cp "/home/sash_usr/spring/samples/TMFAdapter/TMFAdapter_Sample_Programmatic.jar:
/home/sash_usr/spring/samples/TMFAdapter/lib/*"
-Djava.library.path=/usr/tandem/jdbcMx/current/lib
-Djdbcmx.transactionMode=external com.hp.programmatic.MainProgrammatic
Annotation:
java -cp "<NonStop TMF Adapter
Home>/spring/samples/TMFAdapter/TMFAdapter_Sample_Annotation.jar:<NonStop
TMF Adapter Home>/spring/samples/TMFAdapter/lib/*"
-Djava.library.path=<JdbcMX lib path>
-Djdbcmx.transactionMode=external com.hp.annotation.MainAnnotation
AOP:
java -cp "<NonStop TMF Adapter
Home>/spring/samples/TMFAdapter/TMFAdapter_Sample_AOP.jar:<NonStop
TMF Adapter Home>/spring/samples/TMFAdapter/lib/*"
-Djava.library.path=<JdbcMX lib path>
-Djdbcmx.transactionMode=external com.hp.aop.MainAOP
Using a JDBC Type 4 driver:
If you use a JDBC Type 4 driver, you must modify the jdbc.url, jdbc.username, and
jdbc.password entries in application.properties, and then build the jar files. If you
modify the default catalog and schema, then those entries must also be updated in the
application.properties files. Next, follow these steps to build and deploy the jar files:
1. When you extract the sample application on a Windows system, the build files are placed in
the <TMF Adapter Home>\Samples\TMF_Adapter_Sample location.
2. Go to the location using the command line in your Windows system.
3. Create the jar files by using the following command:
ant -f build.xml jar
If the Java files need to be compiled, use:
ant -f build.xml cleanjar
The following jar files are created under <TMF Adapter
Home>\Samples\TMF_Adapter_Sample\jar:
• TMFAdapter_Sample_Programmatic.jar
• TMFAdapter_Sample_Annotation.jar
• TMFAdapter_Sample_AOP.jar
4. Transfer these jar files (via FTP) to <NonStop TMF Adapter
Home>/spring/samples/TMFAdapter/ on the NonStop system.
5. Execute the commands to run the jar files:
Programmatic:
java -cp "<NonStop TMF Adapter
Home>/spring/samples/TMFAdapter/TMFAdapter_Sample_Programmatic.jar:<NonStop
TMF Adapter Home>/spring/samples/TMFAdapter/lib/*"
com.hp.programmatic.MainProgrammatic
32 Spring Framework
Page 33

For example,
java -cp "/home/sash_usr/spring/samples/TMFAdapter/TMFAdapter_Sample_Programmatic.jar:
/home/sash_usr/spring/samples/TMFAdapter/lib/*"
com.hp.programmatic.MainProgrammatic
Annotation:
java -cp "<NonStop TMF Adapter
Home>/spring/samples/TMFAdapter/TMFAdapter_Sample_Annotation.jar:<NonStop
TMF Adapter Home>/spring/samples/TMFAdapter/lib/*"
com.hp.annotation.MainAnnotation
AOP:
java -cp "<NonStop TMF Adapter
Home>/spring/samples/TMFAdapter/TMFAdapter_Sample_AOP.jar:<NonStop
TMF Adapter Home>/spring/samples/TMFAdapter/lib/*" com.hp.aop.MainAOP
When these commands are run, the output appears as follows:
Sample output for Programmatic method:
With TMF transaction manager
log4j:WARN No appenders could be found for logger
(org.springframework.context.support.ClassPathXmlApplicationContext).
log4j:WARN Please initialize the log4j system properly.
begin called
Transaction id created is: -576178764821102591
Check the transaction and press any key to proceed further...
Saving the data: id : 15 name : b weight : 4.4
Hibernate: insert into SIMPLECAT.SIMPLESCH.STUDENTSWEIGHT (NAME, WEIGHT, ID) values (?, ?, ?)
doCommit called
begin called
Getting the specific data with id: 15
Hibernate: select simplebean0_.ID as ID0_, simplebean0_.NAME as NAME0_, simplebean0_.WEIGHT as WEIGHT0_ from
SIMPLECAT.SIMPLESCH.STUDENTSWEIGHT simplebean0_ where simplebean0_.ID=?
There is a Data in the database: id : 15 name : b weight : 4.4
Deleting the data : id : 15 name : b weight : 4.4
Hibernate: delete from SIMPLECAT.SIMPLESCH.STUDENTSWEIGHT where ID=?
doCommit called
Without TMF transaction manager
Saving the data: id : 15 name : b weight : 4.4
Hibernate: insert into SIMPLECAT.SIMPLESCH.STUDENTSWEIGHT (NAME, WEIGHT, ID) values (?, ?, ?)
Getting ALL data
Hibernate: select simplebean0_.ID as ID2_, simplebean0_.NAME as NAME2_, simplebean0_.WEIGHT as WEIGHT2_ from
SIMPLECAT.SIMPLESCH.STUDENTSWEIGHT simplebean0_
There is no data in database with id=15
Sample output for Annotation/AOP method:
With TMF transaction manager
log4j:WARN No appenders could be found for logger
(org.springframework.context.support.ClassPathXmlApplicationContext).
log4j:WARN Please initialize the log4j system properly.
begin called
Saving the data: id : 15 name : b weight : 4.4
Hibernate: insert into SIMPLECAT.SIMPLESCH.STUDENTSWEIGHT (NAME, WEIGHT, ID) values (?, ?, ?)
doCommit called
begin called
Getting the specific data with id: 15
Hibernate: select simplebean0_.ID as ID0_, simplebean0_.NAME as NAME0_, simplebean0_.WEIGHT as WEIGHT0_ from
SIMPLECAT.SIMPLESCH.STUDENTSWEIGHT simplebean0_ where simplebean0_.ID=?
doCommit called
There is a data with id 15 in database
begin called
Deleting the data : id : 15 name : b weight : 4.4
Hibernate: select simplebean_.ID, simplebean_.NAME as NAME0_, simplebean_.WEIGHT as WEIGHT0_ from
SIMPLECAT.SIMPLESCH.STUDENTSWEIGHT simplebean_ where simplebean_.ID=?
Hibernate: delete from SIMPLECAT.SIMPLESCH.STUDENTSWEIGHT where ID=?
doCommit called
Without TMF transaction manager
Saving the data: id : 15 name : b weight : 4.4
Hibernate: insert into SIMPLECAT.SIMPLESCH.STUDENTSWEIGHT (NAME, WEIGHT, ID) values (?, ?, ?)
Getting ALL data
Hibernate: select simplebean0_.ID as ID2_, simplebean0_.NAME as NAME2_, simplebean0_.WEIGHT as WEIGHT2_ from
SIMPLECAT.SIMPLESCH.STUDENTSWEIGHT simplebean0_
There is no data in database with id=15
Integrating Spring with Transaction Management Facility (TMF) 33
Page 34

Configuring Spring Applications on NonStop Systems
This section provides information about configuring Spring applications on NonStop systems. To
configure spring applications, the following configurations are necessary:
• “NonStop Platform Configurations” (page 320)
• “Spring Framework Configurations” (page 34)
• “Module File Caching Configurations” (page 330)
Spring Framework Configurations
This section discusses the following configurations for your Spring applications:
• “Configuring JDBC Driver for SQL/MX Database” (page 34)
• “Configuring TmfTransactionManager” (page 36)
JDBC configurations are done in applicationContext.xml and jdbc.properties files.
All the configurations for Transaction Management are configured in applicationContext.xml.
Configuring JDBC Driver for SQL/MX Database
The JDBC driver to be used when a Spring application (using Spring DAO) connects to the SQL/MX
database must be specified in the applicationContext.xml and jdbc.properties file
provided by the Spring framework. You can configure JDBC Type 2 or JDBC Type 4 Driver. The
following configurations are required:
Configurations in the jdbc.properties File
Defining JDBC Driver Class for SQL/MX Database
For Type 2 Driver:
Specify the JDBC Type 2 driver class com.tandem.sqlmx.SQLMXDriver for the SQL/MX
database.
jdbc.driverClassName=com.tandem.sqlmx.SQLMXDriver
For Type 4 Driver:
Specify the JDBC Type 4 driver class com.tandem.t4jdbc.SQLMXDriver for the SQL/MX
database.
jdbc.driverClassName=com.tandem.t4jdbc.SQLMXDriver
Defining the Connection URL
After you have set the JDBC driver, specify the location of the SQL/MX server. For URLs referring
to SQL/MX database, use the jdbc: protocol embedded within the URL. Specify the connection
URL as follows:
For Type 2 Driver:
jdbc.url=jdbc:sqlmx://
For Type 4 Driver:
jdbc.url=jdbc:t4sqlmx://<HP NonStop System IP Address>:<Port No.>
Establishing the Connection
For Type 2 Driver:
Specify the username and password with no values.
jdbc.username=
jdbc.password=
34 Spring Framework
Page 35

For Type 4 Driver:
Specify the username and password of your NonStop system.
jdbc.username=<HP NonStop Username>
jdbc.password=<HP NonStop Password>
Configurations in the applicationContext.xml File
Defining the Placeholder for JDBC Driver Class
For JDBC Type 2 driver:
HP recommends to use com.tandem.sqlmx.SQLMXDataSource as the datasource class. This
datasource can be configured as follows:
<bean id="dataSource" class="com.tandem.sqlmx.SQLMXDataSource">
<property name="catalog"> value="samplecat"></property>
<property name="schema"> value="samplesch"></property>
</bean>
For JDBC Type 4 driver:
HP recommends to use com.tandem.t4jdbc.SQLMXDataSource as the datasource class for
JDBC Type 4 drivers. This datasource can be configured as follows:
<bean id="dataSource" class="com.tandem.t4jdbc.SQLMXDataSource">
<property name="url"> value="jdbc:t4sqlmx://<HP NonStop System IP Address>
:<Port No.>"></property>
<property name="user"> value="<HP NonStop Username>"></property>
<property name="password"> value="<HP NonStop Password>"></property>
<property name="useExternalTransaction"> value="yes"></property>
<property name="catalog"> value="samplecat"></property>
<property name="schema"> value="samplesch"></property>
</bean>
You can also use the org.apache.commons.dbcp.BasicDataSource provided by Apache
for JDBC Type 4 driver. The configuration is as follows:
<bean id="dataSource" class="org.apache.commons.dbcp.BasicDataSource">
<property name="url"> value="jdbc:t4sqlmx://<HP NonStop System IP Address>
:<Port No.>"></property>
<property name="user"> value="<HP NonStop Username>"></property>
<property name="password"> value="<HP NonStop Password>"></property>
</bean>
Defining the Placeholder for Connection URL
Define a placeholder for the connection URL in the jdbc.properties file as shown below.
<property name="url">
<value>${jdbc.url}</value>
</property>
Defining the Placeholder for Establishing the Connection
Define a placeholder for the username and password in the jdbc.properties file as shown
below.
<property name="username">
<value>${jdbc.user}</value>
</property>
<property name="password">
<value>${jdbc.password}</value>
</property>
Wiring of JDBC Properties
After the database properties are set, wire the jdbc.properties file in the
applicationContext.xml file so that the actual values are available during runtime. The
PropertyPlaceholderConfigurer class provided by the Spring framework substitutes the
Configuring Spring Applications on NonStop Systems 35
Page 36

database properties specified in the applicationContext.xml file with the values specified
in the jdbc.properties file during runtime.
Modify the applicationContext.xml file for wiring the jdbc.properties file as shown
below:
<bean id="propertyConfigurer"
class="org.springframework.beans.factory.config.PropertyPlaceholderConfigurer">
<property name="locations">
<list>
<value>classpath:jdbc.properties</value>
</list>
</property>
</bean>
</beans>
NOTE: For information on the complete configuration snippet of the applicationContext.xml
file and the jdbc.properties file for JDBC Type 2 driver, see “Sample JDBC Configuration for
Spring” (page 334).
Configuring TmfTransactionManager
Spring framework provides the following ways for configuring the TmfTransactionManager:
• Declarative Transaction Management: In this case, the transaction action is defined in an XML
configuration file for each method (or class).
• Programmatic Transaction Management: In this case, the transaction action is hardcoded in
the code. This is similar to the JDBC transaction.
Consider a simple Plain Old Java Object (POJO) having a simple service. Let us see how to
configure the TmfTransactionManager in various ways to execute the POJO service in a TMF
transaction on a Nonstop system.
The POJO class is
public class SimpleService {
public void addRecord(){
//code to insert a record into a database
}
}
The bean definition for the Transaction Manager is as shown:
<bean id="transactionManager"
class="com.hp.nonstop.spring.tmf.TmfTransactionManager">
<property name="defaultTimeOut" value="10000" />
</bean>
Assume that the file containing this definition is txbean.xml.
Declarative Transaction Management
Using declarative transaction management, you can configure the TmfTransactionManager
in the following ways:
• Annotations
• Aspect Oriented Programming (AOP)
Annotations
To configure the TmfTransactionManager using the annotation method, you must configure
the application's XML file. An example of the XML configuration is as shown:
<bean id="simpleservice" class="example.SimpleService">
</bean>
<bean id="transactionManager" class="com.hp.nonstop.spring.tmf.TmfTransactionManager">
<property name="defaultTimeOut" value="300" />
36 Spring Framework
Page 37

</bean>
<tx:annotation-driven transaction-manager="transactionManager" />
The POJO Class SimpleService can use @Transactional annotation on its methods. The
SimpleService class using the @Transactional annotation is as shown:
public class SimpleService {
@Transactional
public void addRecord(SimpleBean b){
//<your code here>
}
public SimpleBean[] getRecords(){
//<your code here>
return null;
}
}
In this case, when the addRecord transaction is invoked, it is invoked under a TMF transaction.
When getRecords is invoked, a TMF transaction is not created.
Aspect Oriented Programming (AOP)
Configuration using AOP involves the following approach:
• Defining a service object to be used as a transactional object.
• Adding the transactional advice to the transactional object. The transaction semantics that
must be applied are encapsulated in the <tx:advice/> definition.
• Defining the transactional execution point to ensure that the transactional advice defined in
the previous step is executed at an appropriate point in the program. This is done using the
<aop:config/> definition.
A sample AOP configuration for configuring TmfTransactionManager is as shown:
<bean id="simpleservice" class="cg.hib001.work.SimpleService">
</bean>
<bean id="transactionManager" class="com.hp.nonstop.spring.tmf.TmfTransactionManager">
<property name="defaultTimeOut" value="300" />
</bean>
<tx:advice id="txAdvice" transaction-manager="transactionManager">
<!-- the transaction semantics... -->
<tx:attributes>
<tx:method name="add*" propagation="PROPAGATION_REQUIRED" />
<tx:method name="*" propagation="PROPAGATION_SUPPORTS" />
</tx:attributes>
</tx:advice>
<aop:config>
<aop:pointcut id="adv"
expression="execution(* cg.hib001.work.SimpleService.*(..))" />
<aop:advisor advice-ref="txAdvice" pointcut-ref="adv" />
</aop:config>
In the above configuration, SimpleService and TmfTransactionManager are beans. An
AOP transaction advice is defined on the method name having a pattern “add*” with propagation
behavior “PROPAGATION_REQUIRED”, and the rest of the methods in the bean to have the
propagation behavior “PROPAGATION_SUPPORTS”.
Programmatic Transaction Management
Using programmatic transaction management, you can configure the TmfTransactionManager
in the following ways:
• Using the Transaction Template
• Using TmfTransactionManager programmatically
Configuring Spring Applications on NonStop Systems 37
Page 38

Configuring Using the Transaction Template
The following configuration shows how TmfTransactionManager can be used in a Spring
Transaction Template:
ClassPathXmlApplicationContext context = new ClassPathXmlApplicationContext(“txbean.xml");
transactionTemplate = new TransactionTemplate(transactionManager);
transactionTemplate.execute(new TransactionCallback()
{
// the code in this method executes in a transactional context
public Object doInTransaction(TransactionStatus status)
{
//code to invoke the POJO Service for example.
//it can be new SimpleService().addRecord();
//then add record will be executed in a TMF Transaction.
}
});
Configuring Using the TmfTransactionManager Programmatically
The following configuration shows how TmfTransactionManager can be created
programmatically and used in a TMF transaction:
public class SimpleService {
public void addRecord(SimpleBean b){
DefaultTransactionDefinition def = new DefaultTransactionDefinition();
/* setting the transaction name explicitly can only be done programmatically*/
def.setPropagationBehavior(TransactionDefinition.PROPAGATION_REQUIRED);
TransactionStatus status = txManager.getTransaction(def);
try {
//code to invoke the POJO Service for example.
//it can be new SimpleService().addRecord();
//then add record will be executed in a TMF Transaction.
txManager.commit(status);
}
catch (MyException ex)
{
txManager.rollback(status);
throw ex;
}
}
}
A sample SpringTMFAdapter is included with Spring 3.1.0 application. For setup information, see
“Setting up the Sample SpringTMFAdapter on NonStop” (page 28).
Getting Started with Spring
This section explains how to develop a web application using Spring. It describes the steps to build
a basic employee management system on the Windows system and deploy it on the NonStop
system.
NOTE: The EmpInfo application described here is certified with Spring 3.0.2 version.
38 Spring Framework
Page 39

Prerequisites
• For NonStop system:
Table 8 Softwares to be installed on the NonStop system
For more information:Software
NonStop iTP WebServer version
7.x or later
NSJSP version 6.1
NonStop SQL/MX version 2.3
JDBC Type 2 driver or JDBC Type
4 driver for the installed SQL/MX
version
NSJ version 6.0
For information on installing and setting up iTP WebServer (secure and
non-secure) on a NonStop system, see the iTP Secure WebServer System
Administrator's Guide.
For information on installing and setting up NSJSP on a NonStop system, see
the NonStop Servlets for JavaServer Pages (NSJSP) 6.1 System Administrator's
Guide.
For information on installing SQL/MX on a NonStop system, see the SQL/MX
Installation and Upgrade Guide.
For information on installing JDBC Type 2 driver and JDBC Type 4 driver on
a NonStop system, see JDBC Type 2 Driver Programmer's Reference for
SQL/MX and JDBC Type 4 Driver Programmer's Reference for SQL/MX.
For information on installing NSJ on a NonStop system, see the NonStop
Server for Java 6.0 Programmer's Reference manual.
• For Windows system:
Table 9 Softwares to be installed on the Windows system
DownloadSoftware
JDK version 1.5
JDBC Type 4 driver
Download from http://www.oracle.com/technetwork/java/javase/downloads/index.html
and set the PATH and JAVA_HOME environment variables.
For information on installing JDBC Type 4 driver on a Windows system, see JDBC Type 4
Driver Programmer's Reference for SQL/MX.
Eclipse Galileo IDE
version 3.5.2 or
later
Overview of EmpInfo
EmpInfo is a basic employee management system developed using Spring. This application enables
you to perform the following tasks:
• Add an employee record.
• Search an employee record using Employee ID.
• Delete an employee record using Employee ID.
In this application:
• The presentation layer is developed using the Spring-MVC framework.
• The business services layer is developed using the Spring framework.
• The persistence services are developed using Spring JDBC API.
• The employee data is stored in the NonStop SQL/MX database.
Download Eclipse IDE for Java EE Developers from http://www.eclipse.org/downloads/
packages/release/galileo/sr2.
Getting Started with Spring 39
Page 40

The following sections describe the steps required to develop, deploy, and run the EmpInfo
application.
• “Developing EmpInfo on Windows using the Eclipse Galileo IDE” (page 40)
• “Deploying EmpInfo on NonStop” (page 87)
• “Running EmpInfo on NonStop” (page 89)
Developing EmpInfo on Windows using the Eclipse Galileo IDE
NOTE:
• It is not mandatory for you to use the Eclipse Galileo IDE. You can use any IDE that supports
Java.
• The screen captures in this section are based on Eclipse Galileo IDE version 3.5.2. The screen
captures may look different if you use a different version of Eclipse Galileo.
The following activities are required to develop the EmpInfo application using the Eclipse Galileo
IDE:
1. “Developing a Basic EmpInfo Application” (page 41)
2. “Developing and Configuring Views and the Controller” (page 57)
3. “Developing Business Logic and Providing the Web Interface” (page 62)
4. “Integrating the Web-tier of EmpInfo with NonStop SQL/MX Database” (page 65)
5. “Enabling EmpInfo to Delete and Retrieve Employee Details” (page 73)
Creating the Eclipse Workspace
1. To open the Eclipse workspace, double-click the eclipse.exe file in <Eclipse IDE
Installation Directory>.
The Workspace Launcher dialog box appears. By default, the workspace is set to the existing
workspace, if already created.
You can use the existing workspace or create a new one by clicking Browse... and selecting
a folder.
Figure 2 Workspace Launcher Dialog Box
40 Spring Framework
Page 41

2. Click OK.
The Eclipse SDK Welcome screen appears.
NOTE: D:\sash_usr\spring is the sample workspace used to develop the EmpInfo
application.
Figure 3 Eclipse SDK Welcome Screen
Developing a Basic EmpInfo Application
Developing the EmpInfo application using Eclipse Galileo IDE involves the following activities:
1. “Creating a Dynamic Web Project” (page 41)
2. “Creating the index.jsp File” (page 43)
3. “Modifying the index.jsp File” (page 46)
4. “Modifying the web.xml File” (page 47)
5. “Creating the EmpInfo-servlet.xml File” (page 48)
6. “Adding Dependency JAR Files in the Project Library Path” (page 52)
7. “Creating the Controller for EmpInfo” (page 54)
8. “Creating the View” (page 57)
Creating a Dynamic Web Project
1. Click File > New > Project.
The New Project dialog box appears.
2. From the list of folders, select Web > Dynamic Web Project and click Next.
Getting Started with Spring 41
Page 42

Figure 4 New Project Wizard Dialog Box
The New Dynamic Web Project dialog box appears.
3. In the Project name field, type EmpInfo and click Finish.
NOTE: The other fields in the New Dynamic Web Project dialog box are selected by default.
Figure 5 New Dynamic Web Project Dialog Box
42 Spring Framework
Page 43

When prompted, change the perspective to Java EE and click Yes to open the new perspective.
NOTE: The perspective must be changed to Java EE because the Dynamic Web Project is
associated with the Java EE perspective.
The Project Structure appears.
4. In the Project Structure, ensure that the JRE System Library is set to JRE version 1.6 or later, as
shown in Figure 6.
If the JRE version is not set to 1.6, right-click JRE System Library to select JRE 1.6.
NOTE: The JRE version used in this example is 1.6.
The EmpInfo project with the project directory structure is created.
Figure 6 Project Explorer View
Creating the index.jsp File
Create the index.jsp file in the EmpInfo/WebContent directory as follows. This JSP page is
the entry point EmpInfo.
1. In the Project Explorer frame, right-click EmpInfo and select New > Other.
The New File dialog box appears.
2. From the list of folders, select Web > JSP and click Next.
Getting Started with Spring 43
Page 44

Figure 7 New File Dialog Box
The New JavaServer Page dialog box appears.
3. In the File name field, type index and ensure that the parent folder is set to
EmpInfo/WebContent. Click Next.
44 Spring Framework
Page 45

Figure 8 New JavaServer Page Dialog Box
The New JavaServer Page: Select JSP Template dialog box appears.
4. From the Select JSP Template dialog box, select New JSP File (html) and click Finish.
NOTE: The Use JSP Template check box is selected by default.
Getting Started with Spring 45
Page 46

Figure 9 New JavaServer Page: JSP Template Dialog Box
The template for the index.jsp file is generated.
Modifying the index.jsp File
Add the header item and body content in the JSP file as shown:
<%@ page language="java" contentType="text/html; charset=ISO-8859-1"
pageEncoding="ISO-8859-1"%>
<!DOCTYPE html PUBLIC "-//W3C//DTD HTML 4.01 Transitional//EN"
"http://www.w3.org/TR/html4/loose.dtd">
<html>
<head>
<meta http-equiv="Content-Type" content="text/html; charset=ISO-8859-1">
<title>Spring Getting Started with EmpInfo Application</title>
</head>
46 Spring Framework
Page 47

<body>
<h2 align="center">Welcome to the EmpInfo Application</h2>
<br>
<p>This is EmpInfo Test Page.</p>
</body>
</html>
The code of the EmpInfo application developed so far is located in <My SASH
Home>\spring\getting-started\EmpInfo-InParts\Part-1.
At this point, you can either deploy and verify the EmpInfo application you have developed so far
on the NonStop system, or you can proceed with the steps for modifying the web.xml file.
For deployment, see the steps described in “Deploying EmpInfo on NonStop” (page 87).
You can verify the EmpInfo application by accessing the following URL:
http://<IP Address of the iTP WebServer>:<port#>/<servlet directory>/EmpInfo.
Modifying the web.xml File
To modify the web.xml file, set the dispatcher servlet and its mapping as follows:
1. Open the EmpInfo/WebContent/WEB-INF/web.xml file by double-clicking it in the Project
Explorer frame.
NOTE: By default, XML files open in the XML Editor. The XML Editor has two views: Design
and Source view. Select the Source view.
The template for the default web.xml file generated during project creation is:
<?xml version="1.0" encoding="UTF-8"?>
<web-app id="WebApp_ID" version="2.4"
xmlns="http://java.sun.com/xml/ns/j2ee"
xmlns:xsi="http://www.w3.org/2001/XMLSchema-instance"
xsi:schemaLocation="http://java.sun.com/xml/ns/j2ee
http://java.sun.com/xml/ns/j2ee/web-app_2_4.xsd">
<display-name>
EmpInfo</display-name>
<welcome-file-list>
<welcome-file>index.html</welcome-file>
<welcome-file>index.htm</welcome-file>
<welcome-file>index.jsp</welcome-file>
<welcome-file>default.html</welcome-file>
<welcome-file>default.htm</welcome-file>
<welcome-file>default.jsp</welcome-file>
</welcome-file-list>
</web-app>
2. Except index.jsp, delete the other files from <welcome-file-list>.
3. Set the class for the DispatcherServlet as shown:
<servlet>
<servlet-name>EmpInfo</servlet-name>
<servlet-class>
org.springframework.web.servlet.DispatcherServlet
</servlet-class>
<load-on-startup>1</load-on-startup>
</servlet>
4. Specify the URL pattern as *.htm in the <servlet-mapping> tag as shown below:
Getting Started with Spring 47
Page 48

<servlet-mapping>
<servlet-name>EmpInfo</servlet-name>
<url-pattern>*.htm</url-pattern>
</servlet-mapping>
NOTE: This servlet definition maps to the application patterns. Any URL with the .htm
extension is routed to the EmpInfo servlet (the DispatcherServlet).
After modification, the web.xml file appears as:
<?xml version="1.0" encoding="UTF-8"?>
<web-app id="WebApp_ID" version="2.4"
xmlns="http://java.sun.com/xml/ns/j2ee"
xmlns:xsi="http://www.w3.org/2001/XMLSchema-instance"
xsi:schemaLocation="http://java.sun.com/xml/ns/j2ee
http://java.sun.com/xml/ns/j2ee/web-app_2_4.xsd">
<display-name>
EmpInfo</display-name>
<welcome-file-list>
<welcome-file>index.jsp</welcome-file>
</welcome-file-list>
<servlet>
<servlet-name>EmpInfo</servlet-name>
<servlet-class>
org.springframework.web.servlet.DispatcherServlet
</servlet-class>
<load-on-startup>1</load-on-startup>
</servlet>
<servlet-mapping>
<servlet-name>EmpInfo</servlet-name>
<url-pattern>*.htm</url-pattern>
</servlet-mapping>
</web-app>
Creating the EmpInfo-servlet.xml File
Create a WebApplicationContext file, which contains references to all the web-related
components. The name of this file is determined by the value of the <servlet-name/> element
in the web.xml file, with -servlet appended to it (hence, EmpInfo-servlet.xml). This is
the standard naming convention used with the Spring Web MVC framework.
The EmpInfo-servlet.xml file contains the bean definitions (plain Java objects) used by the
DispatcherServlet.
To create the EmpInfo-servlet.xml file in the EmpInfo/WebContent/WEB-INF directory:
1. In the Project Explorer frame, right-click EmpInfo and select New > Other.
The New File Wizard dialog box appears.
48 Spring Framework
Page 49

2. From the list of folders, select XML > XML and click Next.
Figure 10 New File Wizard Dialog Box
The New XML File dialog box appears.
3. In the File name field, type EmpInfo-servlet.xml and ensure that the parent folder is set
to EmpInfo/WebContent/WEB-INF. Click Next.
Getting Started with Spring 49
Page 50

Figure 11 New XML File Dialog Box
The New XML File: Options dialog box appears.
4. Select Create XML file from an XML template and click Finish.
50 Spring Framework
Page 51

Figure 12 New XML File: Options Dialog Box
The EmpInfo-servlet.xml file is created in the EmpInfo/WebContent/WEB-INF
directory.
5. Modify the EmpInfo-servlet.xml file by adding a bean entry named insert.htm and
com.hp.empinfo.web.EmployeeController as its class.
NOTE: The com.hp.empinfo.web.EmployeeController class provides controller for
the EmpInfo application to service a request according to its corresponding URL mapping in
/insert.htm. The Spring Web MVC framework uses an interface class called
HandlerMapping to define the mapping between a request URL and the handler object,
which handles the request. The controller ensures that the URL mapping the EmpInfo application
is com.hp.empinfo.web.EmployeeController, instead of DispatcherServlet.
After modification, the EmpInfo-servlet.xml file appears as:
<?xml version="1.0" encoding="UTF-8"?>
<beans xmlns="http://www.springframework.org/schema/beans"
xmlns:xsi="http://www.w3.org/2001/XMLSchema-instance"
xmlns:aop="http://www.springframework.org/schema/aop"
xmlns:p="http://www.springframework.org/schema/p"
xmlns:context="http://www.springframework.org/schema/context"
xmlns:jee="http://www.springframework.org/schema/jee"
xmlns:tx="http://www.springframework.org/schema/tx"
xsi:schemaLocation="
http://www.springframework.org/schema/beans
http://www.springframework.org/schema/beans/spring-beans-2.5.xsd
http://www.springframework.org/schema/context
http://www.springframework.org/schema/context/spring-context-2.5.xsd
http://www.springframework.org/schema/jee
Getting Started with Spring 51
Page 52

http://www.springframework.org/schema/jee/spring-jee-2.5.xsd
http://www.springframework.org/schema/tx
http://www.springframework.org/schema/tx/spring-tx-2.5.xsd">
<bean name="/insert.htm" class="com.hp.empinfo.web.EmployeeController">
</bean>
</beans>
Adding Dependency JAR Files in the Project Library Path
Because the EmpInfo application uses the Spring framework, it requires the following dependency
JAR files.
Table 10 Spring Dependency JAR Files
Dependency JAR Files
com.springsource.org.apache.commons.
logging-1.1.1.jar
com.springsource.javax.servlet-2.5.0.jar
org.springframework.aop-3.0.2.RELEASE.jar
org.springframework.asm-3.0.2.RELEASE.jar
org.springframework.aspects-3.0.2.RELEASE.jar
org.springframework.beans-3.0.2.RELEASE.jar
org.springframework.context-3.0.2.RELEASE.jar
org.springframework.context.support-3.0.2.RELEASE.jar
org.springframework.core-3.0.2.RELEASE.jar
org.springframework.expression-3.0.2.RELEASE.jar
org.springframework.instrument-3.0.2.RELEASE.jar
org.springframework.instrument.tomcat-3.0.2.RELEASE.jar
org.springframework.jdbc-3.0.2.RELEASE.jar
org.springframework.jms-3.0.2.RELEASE.jar
org.springframework.orm-3.0.2.RELEASE.jar
org.springframework.oxm-3.0.2.RELEASE.jar
org.springframework.test-3.0.2.RELEASE.jar
org.springframework.transaction-3.0.2.RELEASE.jar
org.springframework.web-3.0.2.RELEASE.jar
org.springframework.web.portlet-3.0.2.RELEASE.jar
org.springframework.web.servlet-3.0.2.RELEASE.jar
org.springframework.web.struts-3.0.2.RELEASE.jar
NOTE: All the jar files mentioned in the above table can be found in the following spring
repository: http://ebr.springsource.com/repository/app/.
1. In the Project Explorer frame, right-click EmpInfo and select Properties.
The Java Build Path dialog box appears.
2. From the type filter text, select Java Build Path.
3. Click the Libraries tab.
4. Click Add External JARs to add each of the above-mentioned dependency JAR files and then,
browse to specify the location of each of the dependency JAR files.
52 Spring Framework
Page 53

Figure 13 Java Build Path Dialog Box
5. Click OK.
The dependency JAR files are added in the EmpInfo project library path.
To resolve the J2EE module dependency on these JAR files, complete the following steps on the
Eclipse Galileo IDE:
1. In the Project Explorer frame, right-click EmpInfo and select Properties.
The Project Properties dialog box appears.
2. From the type filter text, select J2EE Module dependencies.
3. Select all the dependency JAR files.
Getting Started with Spring 53
Page 54

Figure 14 J2EE Module Dependencies Dialog Box
4. Click OK.
The J2EE module dependency on the JAR files is resolved.
Creating the Controller for EmpInfo
In the Spring Web MVC framework, the controller handles the request and returns a ModelAndView
.
Create the Controller to handle the navigation logic and to interact with the service tier of the
business logic.
To create the Controller, complete the following steps:
1. “Create the Package for the Controller Class” (page 54)
2. “Create the Controller Class” (page 55)
Create the Package for the Controller Class
To create a package com.hp.empinfo.web:
1. In the Project Explorer frame, right-click EmpInfo and select New >Package.
The New Java Package dialog box appears.
2. In the Name field, type com.hp.empinfo.web and ensure that the Source folder is set to
EmpInfo/src.
54 Spring Framework
Page 55

Figure 15 New Java Package Dialog Box
3. Click Finish.
The com.hp.empinfo.web package is created.
Create the Controller Class
1. In the Project Explorer frame, right-click EmpInfo and select New >Class.
2. In the Package field, type com.hp.empinfo.web. In the Name field, type
EmployeeController.
3. In the Superclass field, type
org.springframework.web.servlet.mvc.SimpleFormController and click Finish.
NOTE: The Controller class EmployeeController extends the SimpleFormController
class in the org.springframework.web.servlet.mvc package provided by the Spring
framework.
Getting Started with Spring 55
Page 56

Figure 16 New Java Class Dialog Box
The EmployeeController.java class file is created.
4. Modify the EmployeeController.java class file to create a basic controller.
After modification, the EmployeeController.java file appears as:
package com.hp.empinfo.web;
import org.springframework.web.servlet.mvc.SimpleFormController;
import org.springframework.web.servlet.ModelAndView;
import javax.servlet.ServletException;
import javax.servlet.http.HttpServletRequest;
import javax.servlet.http.HttpServletResponse;
import org.apache.commons.logging.Log;
import org.apache.commons.logging.LogFactory;
import java.io.IOException;
public class EmployeeController extends SimpleFormController{
protected final Log logger = LogFactory.getLog(getClass());
public ModelAndView handleRequest(HttpServletRequest request,
HttpServletResponse response)
throws ServletException, IOException {
56 Spring Framework
Page 57

logger.info("Returning hello view");
return new ModelAndView("insert.jsp");
}
}
Your basic controller implementation is ready. This controller is expanded further to add more
functionality to the EmpInfo application.
Creating the View
After completing the controller implementation for EmpInfo, complete the following steps to create
the first view of the EmpInfo application:
1. Create a new JSP page insert.jsp in EmpInfo/WebContent by completing the steps
explained in “Creating the index.jsp File” (page 43).
2. Add the header and body content as shown:
<%@ page language="java" contentType="text/html; charset=ISO-8859-1"
pageEncoding="ISO-8859-1"%>
<!DOCTYPE html PUBLIC "-//W3C//DTD HTML 4.01 Transitional//EN"
"http://www.w3.org/TR/html4/loose.dtd">
<html>
<head>
<meta http-equiv="Content-Type" content="text/html; charset=ISO-8859-1">
<title>Spring Getting Started with EmpInfo Application</title>
</head>
<body>
<h2 align="center"> Welcome to the EmpInfo Application </h2>
<br>
<p><B><font color = "003399">Enter Employee Details</font></B></p>
</body>
</html>
The code of the EmpInfo application developed so far is located in <My SASH
Home>\spring\getting-started\EmpInfo-InParts\Part-2.
At this point, you can either deploy and verify the EmpInfo application you have developed
so far on the NonStop system, or you can proceed to the “Developing and Configuring Views
and the Controller” (page 57) section.
For deployment, see the steps described in “Deploying EmpInfo on NonStop” (page 87).
You can verify the EmpInfo application by accessing the following URL:
http://<IP Address of the iTP WebServer>:<port#>/<servlet
directory>/EmpInfo/insert.htm
To verify the EmpInfo application, complete the following steps:
1. Deploy the EmpInfo application using the steps described in “Deploying EmpInfo on
NonStop” (page 87).
2. Verify the EmpInfo application by accessing the following URL:
The Welcome screen of the EmpInfo application appears.
Developing and Configuring Views and the Controller
This section describes the process to develop and configure Views and the Controller.
Views are provided by JSP pages and the controller has the intelligence to recognize the business
logic based on the input provided in the JSP pages.
This section describes the following activities:
1. “Configuring the JSP Standard Tag Library (JSTL)” (page 58)
2. “Adding JSTL and JSP Related Dependency JARs” (page 60)
3. “Enhancing the Controller” (page 60)
4. “Decoupling View from the Controller” (page 61)
Getting Started with Spring 57
Page 58

Configuring the JSP Standard Tag Library (JSTL)
This section involves the following activities:
1. “Creating a folder to store JSPs” (page 58)
2. “Creating the include.jsp File” (page 58)
3. “Modifying the index.jsp File” (page 59)
4. “Modifying the insert.jsp File” (page 59)
To configure the JSTL, complete the following steps:
Creating a folder to store JSPs
1. In the Project Explorer frame, right-click EmpInfo and select New > Folder.
A New Folder dialog box appears.
2. In the Folder name field, type jsp and select EmpInfo/WebContent/WEB-INF as the parent
folder.
Figure 17 New Folder Dialog Box
3. Click Finish.
The jsp folder is created.
Creating the include.jsp File
1. Create the include.jsp file in the EmpInfo/WebContent/WEB-INF/jsp directory as
described in “Creating the index.jsp File” (page 43).
58 Spring Framework
Page 59

2. Add the tag extensions (taglibs) to include the.jsp file so that the include.jsp file appears
as:
<%@ page language="java" contentType="text/html; charset=ISO-8859-1"
pageEncoding="ISO-8859-1"%>
<!DOCTYPE html PUBLIC "-//W3C//DTD HTML 4.01 Transitional//EN"
"http://www.w3.org/TR/html4/loose.dtd">
<%@ page session="false"%>
<%@ taglib prefix="c"
uri="http://java.sun.com/jsp/jstl/core" %>
<%@ taglib prefix="fmt"
uri="http://java.sun.com/jsp/jstl/fmt" %>
<%@ taglib prefix="form"
uri="http://www.springframework.org/tags/form" %>
NOTE: The created header file must be included in every JSP page. This ensures that the
same definitions are included in all JSPs. You must add all the JSPs in a subdirectory named
jsp in the WEB-INF directory. This allows views to be accessible via the controller because
these pages cannot be accessed via a URL.
Modifying the index.jsp File
1. Include the include.jsp file:
<%@ include file="/WEB-INF/jsp/include.jsp" %>
2. Provide a link to the insert.jsp page as follows:
<h4><a href=<c:url value="insert.htm"/>>Insert Employee</a></h4>
3. Delete the following line from the <body> tag.
<p>This is EmpInfo Test Page.</p>
After modification, the index.jsp file appears as:
<%@ page language="java" contentType="text/html; charset=ISO-8859-1"
pageEncoding="ISO-8859-1"%>
<!DOCTYPE html PUBLIC "-//W3C//DTD HTML 4.01 Transitional//EN"
"http://www.w3.org/TR/html4/loose.dtd">
<%@ include file="/WEB-INF/jsp/include.jsp" %>
<html>
<head>
<meta http-equiv="Content-Type" content="text/html; charset=ISO-8859-1">
<title>Spring Getting Started with EmpInfo Application</title>
</head>
<body>
<h2 align="center"> Welcome to the EmpInfo Application </h2>
<br>
<h4><a href=<c:url value="insert.htm"/>>Insert Employee</a></h4>
<br>
</body>
</html>
Modifying the insert.jsp File
1. Move the insert.jsp file to the EmpInfo/WebContent/WEB-INF/jsp directory by
dragging and dropping the file on the Eclipse window.
2. Include the include.jsp file in insert.jsp:
<%@ include file="/WEB-INF/jsp/include.jsp" %>
3. Add the <c:out> tag to display the current date and time retrieved from the model passed
to the view, which will be rendered using the JSTL.
For example:
<h3 align="center"><c:out value="${now}"/></h3>
After modification, the insert.jsp file appears as:
Getting Started with Spring 59
Page 60

<%@ page language="java" contentType="text/html; charset=ISO-8859-1"
pageEncoding="ISO-8859-1"%>
<!DOCTYPE html PUBLIC "-//W3C//DTD HTML 4.01 Transitional//EN"
"http://www.w3.org/TR/html4/loose.dtd">
<%@ include file="/WEB-INF/jsp/include.jsp" %>
<html>
<head>
<meta http-equiv="Content-Type" content="text/html; charset=ISO-8859-1">
<title>Spring Getting Started with EmpInfo Application</title>
</head>
<body>
<h2 align="center"> We
lcome to the EmpInfo Application </h2>
<br>
<h3 align="center"><c:out value="${now}"/></h3>
<br>
<p><B><font color = "003399">Enter Employee Details</font></B></p>
</body>
</html>
Adding JSTL and JSP Related Dependency JARs
Add the following JSTL and JSP dependency JAR files to the EmpInfo project in Eclipse:
Table 11 JSTL and JSP Dependency JAR Files
Dependency JAR Files
com.springsource.javax.servlet.jsp.jstl-1.1.2.jar
com.springsource.org.apache.taglibs.standard-1.1.2.jar
NOTE: All the jar files mentioned in the above table can be found in the following spring
repository: http://ebr.springsource.com/repository/app/.
To add the dependency JAR files in the project library path and to resolve the J2EE module
dependency on these JARs, follow the instructions described in “Adding Dependency JAR Files in
the Project Library Path” (page 52).
Enhancing the Controller
To add more functionality to the controller class, complete the following steps:
1. Update the EmployeeController.java by setting the resource reference of the view to
its new location EmpInfo/WebContent/WEB-INF/jsp/insert.jsp. Set the key/value
pair for the current date and time value in the model with the key identifier: "now" and the
string value: 'now' as shown below:
Before modification:
logger.info("Returning hello view");
return new ModelAndView("insert.jsp");
After modification:
String now = (new Date()).toString();
logger.info("Returning view with " + now);
return new ModelAndView("WEB-INF/jsp/insert.jsp", "now", now);
2. Add the following import statement:
import java.util.Date;
After modification, the controller file EmployeeController.java appears as:
package com.hp.empinfo.web;
import org.springframework.web.servlet.mvc.SimpleFormController;
import org.springframework.web.servlet.ModelAndView;
import javax.servlet.ServletException;
import javax.servlet.http.HttpServletRequest;
60 Spring Framework
Page 61

import javax.servlet.http.HttpServletResponse;
import org.apache.commons.logging.Log;
import org.apache.commons.logging.LogFactory;
import java.io.IOException;
import java.util.Date;
public class EmployeeController extends SimpleFormController {
protected final Log logger = LogFactory.getLog(getClass());
public ModelAndView handleRequest(HttpServletRequest request,
HttpServletResponse response)
throws ServletException, IOException {
String now = (new Date()).toString();
logger.info("Returning view with " + now);
return new ModelAndView("WEB-INF/jsp/insert.jsp", "now", now);
}
}
The code of the EmpInfo application developed so far is located in <My SASH
Home>\spring\getting-started\EmpInfo-InParts\Part-3
At this point, you can either deploy and verify the EmpInfo application you have developed so far
on the NonStop system, or you can continue with the steps explained in “Decoupling View from
the Controller” (page 61).
For deployment, see the steps described in “Deploying EmpInfo on NonStop” (page 87).
You can verify the EmpInfo application by accessing the following URL:
http://<IP Address of the iTP WebServer>:<port#>/<servlet directory>/EmpInfo.
Decoupling View from the Controller
So far, the controller is specifying full path of the view, thereby creating unnecessary dependency
between the controller and the view. Ideally, the view must be mapped using a logical name, so
that the view can be switched without changing the controller.
To decouple the view from the controller:
1. Modify the EmpInfo-servlet.xml file in the EmpInfo/WebContent/WEB-INF directory
to add the following bean to declare a new ViewResolver entry.
<bean id="viewResolver"
class="org.springframework.web.servlet.view.InternalResourceViewResolver">
<property name="viewClass"
value="org.springframework.web.servlet.view.JstlView"></property>
<property name="prefix"
value="/WEB-INF/jsp/"></property>
<property name="suffix" value=".jsp"></property>
</bean>
2. Modify the EmployeeController class EmpInfo/com/hp/empinfo/web/
EmployeeController.java to decouple the controller from view using ViewResolver
, as shown:
Before modification:
return new ModelAndView("WEB-INF/jsp/insert.jsp", "now", now);
After modification:
return new ModelAndView("insert", "now", now);
The code of the EmpInfo application developed so far is located in <My SASH
Home>\spring\getting-started\EmpInfo-InParts\Part-4
At this point, you can either deploy and verify the EmpInfo application you have developed so far
on the NonStop system, or you can continue with the steps described in “Developing Business
Logic and Providing the Web Interface” (page 62).
For deployment, see the steps described in “Deploying EmpInfo on NonStop” (page 87).
You can verify the EmpInfo application by accessing the following URL:
Getting Started with Spring 61
Page 62

http://<IP Address of the iTP WebServer>:<port#>/<servlet directory>/EmpInfo.
Developing Business Logic and Providing the Web Interface
This section describes the following tasks:
1. “Creating a Simple POJO” (page 62)
2. “Creating Data Access Object Implementation for JDBC” (page 63)
3. “Creating and Modifying Supporting Views to Display Business Data” (page 63)
4. “Adding Dependency JAR Files” (page 64)
Creating a Simple POJO
1. Create a com.hp.empinfo.domain package and an Employee class in the
com.hp.empinfo.domain package, as described in “Creating the Controller for EmpInfo”
(page 54).
2. Modify the Employee.java class file to add some properties and their getter and setter
methods.
After modification, the Employee.java file must appear as:
package com.hp.empinfo.domain;
public class Employee implements java.io.Serializable {
private int empid;;
private String firstname;
private String lastname;
private int age;
private String email;
public int getEmpid() {
return empid;
}
public void setEmpid(int empid) {
this.empid = empid;
}
public String getFirstname() {
return firstname;
}
public void setFirstname (String firstname) {
this. firstname= firstname;
}
public String getLastname () {
return lastname;
}
public void setLastname (String lastname) {
this. lastname= lastname;
}
public int getAge () {
return age;
}
public void setAge (int age) {
this. age= age;
}
public String getEmail () {
return email;
}
public void setEmail (String email) {
this. email= email;
}
}
62 Spring Framework
Page 63

Creating Data Access Object Implementation for JDBC
1. Create a com.hp.empinfo.service package and an EmployeeDao class under the
com.hp.empinfo.service package, as described in “Creating the Controller for EmpInfo”
(page 54). This will contain the logic for handling Employee Database Transactions.
2. Modify the EmployeeDao.java class file to add the function for inserting employee details.
After modification, the EmployeeDao.java file must appear as:
package com.hp.empinfo.service;
import java.sql.SQLException;
import org.springframework.jdbc.core.support.JdbcDaoSupport;
public class EmployeeDao extends JdbcDaoSupport{
public void insertDetail(int empid, String firstname,
String lastname, int age, String email)
throws SQLException
{
getJdbcTemplate().update("insert into employee values(?,?,?,?,?)",
new Object[] { empid,firstname,lastname,age,email});
}
}
Creating and Modifying Supporting Views to Display Business Data
To create and modify supporting views to display business data, create the JSP files to create the
view by completing the following steps:
1. Create the insertresult.jsp file in the Empinfo/WebContent/Web-INF/jsp directory
as described in “Creating the index.jsp File” (page 43).
2. Modify the insertresult.jsp file to provide a link to the insert.jsp page.
After modification, the insertresult.jsp file must appear as:
<%@ page language="java" contentType="text/html; charset=ISO-8859-1"
pageEncoding="ISO-8859-1"%>
<!DOCTYPE html PUBLIC "-//W3C//DTD HTML 4.01 Transitional//EN"
"http://www.w3.org/TR/html4/loose.dtd">
<%@ include file="/WEB-INF/jsp/include.jsp"%>
<html>
<head>
<meta http-equiv="Content-Type" content="text/html; charset=ISO-8859-1">
<title>Spring Getting Started with EmpInfo Application</title>
</head>
<body>
<h2 align="center"> Insert Operation Successfully Executed </h2>
<br>
${model.add}
<br>
<br>
<br>
<h4><a href=<c:url value="insert.htm"/>>Insert Employee</a></h4>
</body>
</html>
3. Modify the insert.jsp file in the EmpInfo/WebContent/Web-INF/jsp/insert.jsp
directory to receive all the input data required to add a new employee record to the database,
by completing the following steps:
1. Delete the following <c:out> tag from the <body> tag.
<h3 align="center"><c:out value="${now}"/></h3>
2. Add the following lines of code in the body tag to receive all the inputs required to add
a new employee record.
Getting Started with Spring 63
Page 64

<form:form method="post" commandName="emp">
<table width="95%" bgcolor="f8f8ff" border="0" cellspacing="0" cellpadding="5">
<tr>
<td align="left" width="20%">Employee Id :</td>
<td><form:input path="empid"/> </td>
</tr>
<tr>
<td align="left" width="20%">First Name :</td>
<td> <form:input path="firstname"/> </td>
</tr>
<tr>
<td align="left" width="20%">Last Name :</td>
<td> <form:input path="lastname"/> </td>
</tr>
<tr>
<td align="left" width="20%">Age :</td>
<td> <form:input path="age"/> </td>
</tr>
<tr>
<td align="left" width="20%">Email :</td>
<td> <form:input path="email"/> </td>
</tr>
</table>
<br>
<input type="submit" align="left" value="Insert">
</form:form>
After modification, the insert.jsp appears as:
<%@ page language="java" contentType="text/html; charset=ISO-8859-1"
pageEncoding="ISO-8859-1"%>
<!DOCTYPE html PUBLIC "-//W3C//DTD HTML 4.01 Transitional//EN"
"http://www.w3.org/TR/html4/loose.dtd">
<%@ include file="/WEB-INF/jsp/include.jsp" %>
<html>
<head>
<title> Spring Getting Started with EmpInfo Application </title>
</head>
<body>
<br>
<p><B><font color = "003399">Enter Employee Details</font></B></p>
<form:form method="post" commandName="emp">
<table width="95%" bgcolor="f8f8ff" border="0" cellspacing="0" cellpadding="5">
<tr>
<td align="left" width="20%">Employee Id :</td>
<td><form:input path="empid"/> </td>
</tr>
<tr>
<td align="left" width="20%">First Name :</td>
<td> <form:input path="firstname"/> </td>
</tr>
<tr>
<td align="left" width="20%">Last Name :</td>
<td> <form:input path="lastname"/> </td>
</tr>
<tr>
<td align="left" width="20%">Age :</td>
<td> <form:input path="age"/> </td>
</tr>
<tr>
<td align="left" width="20%">Email :</td>
<td> <form:input path="email"/> </td>
</tr>
</table>
<br>
<input type="submit" align="left" value="Insert">
</form:form>
</body>
</html>
Adding Dependency JAR Files
Add the following JAR file required for XML parsing:
Table 12 XML Parser Dependency JAR File
com.springsource.org.dom4j-1.6.1.jar
64 Spring Framework
Dependency JAR Files
Page 65

NOTE: The jar file mentioned in the above table can be found in the following spring repository:
http://ebr.springsource.com/repository/app/.
To add the dependency JAR file in the project library path and to resolve the J2EE module
dependency on it, follow the instructions described in “Adding Dependency JAR Files in the Project
Library Path” (page 52).
NOTE: The code of the EmpInfo application developed so far is located in <My SASH
Home>\spring\getting-started\EmpInfo-InParts\Part-5
The project directory structure for the EmpInfo application must appear as follows:
Figure 18 Project Explorer View
Integrating the Web-tier of EmpInfo with NonStop SQL/MX Database
This section describes the following tasks:
1. “Creating the applicationContext.xml File” (page 66)
2. “Creating the jdbc.properties File” (page 66)
3. “Modifying the EmpInfo-servlet.xml File” (page 68)
4. “Improving the Controller” (page 69)
5. “Modifying the web.xml File” (page 70)
Getting Started with Spring 65
Page 66

6. “Adding Dependency JAR Files” (page 71)
7. “Creating Database Catalog, Schema, and Tables on NonStop” (page 71)
Creating the applicationContext.xml File
1. Create the applicationContext.xml file in the EmpInfo/WebContent/WEB-INF/
directory, as described in “Creating the EmpInfo-servlet.xml File” (page 48).
2. Create a new XML file in the EmpInfo/WebContent/WEB-INF directory and type the name
of the XML file as applicationContext.
3. Modify the applicationContext.xml file to add a bean definition of the EmployeeDao
class. After modification, the applicationContext.xml file must appear as:
<?xml version="1.0" encoding="UTF-8"?>
<beans
xmlns="http://www.springframework.org/schema/beans"
xmlns:xsi="http://www.w3.org/2001/XMLSchema-instance"
xsi:schemaLocation="http://www.springframework.org/schema/beans
http://www.springframework.org/schema/beans/spring-beans-2.0.xsd">
<bean id="dataSource"
class="org.springframework.jdbc.datasource.DriverManagerDataSource"
>
<property name="driverClassName">
<value>${jdbc.driver}</value>
</property>
<property name="url">
<value>${jdbc.url}</value>
</property>
<property name="username">
<value>${jdbc.user}</value>
</property>
<property name="password">
<value>${jdbc.password}</value>
</property>
<property name="connectionProperties">
<props>
<prop key="catalog">
${jdbc.catalog}
</prop>
<prop key="schema">
${jdbc.schema}
</prop>
</props>
</property>
</bean>
<bean id="empdao" class="com.hp.empinfo.service.EmployeeDao">
<property name="dataSource">
<ref bean="dataSource" />
</property>
</bean>
<bean id="propertyConfigurer"
class="org.springframework.beans.factory.config.PropertyPlaceholderConfigurer">
<property name="locations" value="/WEB-INF/jdbc.properties"/>
</bean>
</beans>
Creating the jdbc.properties File
The JdbcDaoSupport feature of Spring framework is used for connecting to the NonStop SQL/MX
database and for carrying out requested database transactions. To fulfill this requirement, the
jdbc.properties file must be created to include all the database related information.
1. In the Project Explorer frame, right-click EmpInfo and select New > File.
The New File dialog box appears.
2. In the File name field, type jdbc.properties and ensure that the parent folder is set to the
EmpInfo/WebContent/WEB-INF directory. Click Finish.
66 Spring Framework
Page 67

Figure 19 New File Dialog Box
The jdbc.properties file is created.
Getting Started with Spring 67
Page 68

3. Modify the jdbc.properties file based on the JDBC driver type you use:
• If you use the JDBC Type 2 driver, the SQL/MX settings for JDBC Type 2 driver in the
jdbc.properties file must appear as:
#---------------------------------------------------------------------------# SQL/MX Settings for JDBC Type 2 Driver
jdbc.url=jdbc:sqlmx://
jdbc.driver=com.tandem.sqlmx.SQLMXDriver
jdbc.user=
jdbc.password=
jdbc.catalog=empinfocat
jdbc.schema=empinfosch
NOTE: Because JDBC Type 2 driver resides on the NonStop system, you need not type
the username and password in the jdbc.username and jdbc.password fields.
• If you use the JDBC Type 4 driver, the SQL/MX settings for JDBC Type 4 driver in the
jdbc.properties file must appear as:
#---------------------------------------------------------------------------# SQL/MX Settings for JDBC Type 4 Driver
jdbc.driver=com.tandem.t4jdbc.SQLMXDriver
jdbc.url=jdbc:t4sqlmx://<HP NonStop System IP Address>:<Port No.>
jdbc.user=<HP NonStop Username>
jdbc.password=<HP NonStop Password>
jdbc.catalog=empinfocat
jdbc.schema=empinfosch
NOTE:
◦ To use the JDBC Type 4 driver, type the JDBC URL (NonStop system IP Address and
Port Number of the JDBC data source), NonStop system username, and password.
◦ The name of the database catalog used in the example is empinfocat and the
schema name is empinfosch. If these database catalog and schema names conflict
with any of the existing catalog and schema names on the NonStop system, modify
the database catalog and schema names in the jdbc.properties file.
Modifying the EmpInfo-servlet.xml File
Modify the EmpInfo-servlet.xml file in the EmpInfo/WebContent/WEB-INF directory to
define the new form and controller as shown below:
<bean name="/insert.htm" class="com.hp.empinfo.web.EmployeeController">
<property name="formView">
<value>insert</value>
</property>
<property name="commandClass">
<value>com.hp.empinfo.domain.Employee</value>
</property>
<property name="commandName">
<value>emp</value>
</property>
</bean>
After modification, the EmpInfo-servlet.xml file appears as:
<?xml version="1.0" encoding="UTF-8"?>
<beans xmlns="http://www.springframework.org/schema/beans"
xmlns:xsi="http://www.w3.org/2001/XMLSchema-instance"
xmlns:aop="http://www.springframework.org/schema/aop"
xmlns:p="http://www.springframework.org/schema/p"
xmlns:context="http://www.springframework.org/schema/context"
xmlns:jee="http://www.springframework.org/schema/jee"
xmlns:tx="http://www.springframework.org/schema/tx"
xsi:schemaLocation="
http://www.springframework.org/schema/beans
http://www.springframework.org/schema/beans/spring-beans-2.5.xsd
68 Spring Framework
Page 69

http://www.springframework.org/schema/context
http://www.springframework.org/schema/context/spring-context-2.5.xsd
http://www.springframework.org/schema/jee
http://www.springframework.org/schema/jee/spring-jee-2.5.xsd
http://www.springframework.org/schema/tx
http://www.springframework.org/schema/tx/spring-tx-2.5.xsd">
<bean name="/insert.htm" class="com.hp.empinfo.web.EmployeeController">
<property name="formView">
<value>insert</value>
</property>
<property name="commandClass">
<value>com.hp.empinfo.domain.Employee</value>
</property>
<property name="commandName">
<value>emp</value>
</property>
</bean>
<bean id="viewResolver"
class="org.springframework.web.servlet.view.InternalResourceViewResolver">
<property name="viewClass" value="org.springframework.web.servlet.view.JstlView"></property>
<property name="prefix" value="/WEB-INF/jsp/"></property>
<property name="suffix" value=".jsp"></property>
</bean>
</beans>
Improving the Controller
Modify the EmployeeController.java file as follows to perform the employee database
transactions.
1. Add a reference to the EmployeeDao.java in the EmployeeController.java controller
class as shown below:
private EmployeeDao empdao;
2. Replace the onSubmit method with the handleRequest method.
This is done to:
1. Recognize the inputs from the View
2. Pass the recognized inputs to the Model
3. Pass the output back to the View
Before modification:
public ModelAndView handleRequest(HttpServletRequest request,
HttpServletResponse response) throws ServletException, IOException {
String now = (new Date()).toString();
logger.info("Returning view with " + now);
return new ModelAndView("insert", "now", now);
}
After modification:
public ModelAndView onSubmit(Object command) throws ServletException,
SQLException {
WebApplicationContext wac = WebApplicationContextUtils
.getRequiredWebApplicationContext(getServletContext());
empdao = (EmployeeDao) wac.getBean("empdao");
int empid = ((Employee) command).getEmpid();
String firstname = ((Employee) command).getFirstname();
String lastname = ((Employee) command).getLastname();
int age = ((Employee) command).getAge();
String email = ((Employee) command).getEmail();
empdao.insertDetail(empid, firstname, lastname, age, email);
Map<String, String> model = new HashMap<String, String>();
model
.put("add",
"Transaction Complete - One Employee Added to Employee Database");
return new ModelAndView("insertresult", "model", model);
}
Getting Started with Spring 69
Page 70

3. Add the following import statements to include the classes used in the controller.
import com.hp.empinfo.domain.Employee;
import com.hp.empinfo.service.EmployeeDao;
import org.springframework.web.context.WebApplicationContext;
import org.springframework.web.context.support.WebApplicationContextUtils;
import java.sql.SQLException;
import java.util.HashMap;
import java.util.Map;
After incorporating the above modifications, the EmployeeController.java controller
class must appear as:
package com.hp.empinfo.web;
import org.springframework.web.servlet.mvc.SimpleFormController;
import org.springframework.web.servlet.ModelAndView;
import javax.servlet.ServletException;
import java.util.Date;
import javax.servlet.http.HttpServletRequest;
import javax.servlet.http.HttpServletResponse;
import org.apache.commons.logging.Log;
import org.apache.commons.logging.LogFactory;
import java.io.IOException;
import com.hp.empinfo.domain.Employee;
import com.hp.empinfo.service.EmployeeDao;
import org.springframework.web.context.WebApplicationContext;
import org.springframework.web.context.support.WebApplicationContextUtils;
import java.sql.SQLException;
import java.util.HashMap;
import java.util.Map;
public class EmployeeController extends SimpleFormController {
private EmployeeDao empdao;
public ModelAndView onSubmit(Object command) throws ServletException,
SQLException {
WebApplicationContext wac = WebApplicationContextUtils
.getRequiredWebApplicationContext(getServletContext());
empdao = (EmployeeDao) wac.getBean("empdao");
int empid = ((Employee) command).getEmpid();
String firstname = ((Employee) command).getFirstname();
String lastname = ((Employee) command).getLastname();
int age = ((Employee) command).getAge();
String email = ((Employee) command).getEmail();
empdao.insertDetail(empid, firstname, lastname, age, email);
Map<String, String> model = new HashMap<String, String>();
model
.put("add",
"Transaction Complete - One Employee Added to Employee Database");
return new ModelAndView("insertresult", "model", model);
}
Modifying the web.xml File
1. Add ContextLoaderListener to load the applicationContext.xml file under the
<web-app> tag.
2. Increase the startup load to 2 after adding the ContextLoaderListener to make
DispatcherServlet as the secondary servlet class. The ContextLoaderListener
servlet class becomes the primary servlet class.
After modification, the web.xml file must appear as:
<?xml version="1.0" encoding="UTF-8"?>
<web-app id="WebApp_ID" version="2.4"
xmlns="http://java.sun.com/xml/ns/j2ee"
70 Spring Framework
Page 71

xmlns:xsi="http://www.w3.org/2001/XMLSchema-instance"
xsi:schemaLocation="http://java.sun.com/xml/ns/j2ee
http://java.sun.com/xml/ns/j2ee/web-app_2_4.xsd">
<display-name>EmpInfo</display-name>
<welcome-file-list>
<welcome-file>index.jsp</welcome-file>
</welcome-file-list>
<servlet>
<servlet-name>EmpInfo</servlet-name>
<servlet-class>
org.springframework.web.servlet.DispatcherServlet
</servlet-class>
<load-on-startup>2</load-on-startup>
</servlet>
<servlet-mapping>
<servlet-name>EmpInfo</servlet-name>
<url-pattern>*.htm</url-pattern>
</servlet-mapping>
<listener>
<listener-class>
org.springframework.web.context.ContextLoaderListener
</listener-class>
</listener>
<context-param>
<param-name>contextConfigLocation</param-name>
<param-value>/WEB-INF/applicationContext.xml</param-value>
</context-param>
</web-app>
Adding Dependency JAR Files
Add the following dependency JAR files to the EmpInfo project library.
Table 13 Jakarta Commons Dependency JAR Files
Dependency JAR Files
com.springsource.org.apache.commons.collections-3.2.1.jar
com.springsource.javax.servlet-2.5.0.jar
NOTE: All the jar files mentioned in the above table can be found in the following spring
repository: http://ebr.springsource.com/repository/app/.
If you plan to use the JDBC Type 4 driver, you must add the JAR file of the JDBC Type 4 driver to
the EmpInfo project library.
Table 14 JDBC Type 4 Dependency JAR File
Source LocationDependency JAR File
<JDBC T4 Installation Directory>\libt4sqlmx.jar
To add the dependency JAR files in the project library path and to resolve the J2EE module
dependency on these JAR files, follow the instructions described in “Adding Dependency JAR Files
in the Project Library Path” (page 52).
Creating Database Catalog, Schema, and Tables on NonStop
This section describes the steps to create the database catalog, schema, and tables on the NonStop
system.
Getting Started with Spring 71
Page 72

NOTE: The database catalog, schema, and table creation script
empinfo_tables_script.sql is included in the SAMPLES.zip file.
For information on the empinfo_tables_script.sql, see “EmpInfo Database Script” (page 319).
To create a database catalog, schema, and table on NonStop, complete the following steps:
1. Copy the empinfo_tables_script.sql script from the <My SASH
Home>\spring\getting-started\dbconfig Windows directory to the <NonStop
SASH Home>/spring/my_samples/empinfo/dbconfig OSS directory.
2. Go to the OSS directory, where the empinfo_tables_script.sql script is copied, using
the OSS command:
OSS> cd <NonStop SASH Home>/spring/my_samples/empinfo/dbconfig
For example:
OSS> cd /home/sash_usr/sash/spring/my_samples/empinfo/dbconfig
3. Create the EmpInfo application database catalog, schema, and tables using the SQL/MX
command:
OSS> obey empinfo_tables_script.sql;
NOTE: By default, the empinfo_tables_script.sql script creates the database
catalog name as empinfocat and the schema name as empinfosch. If these database
catalog and schema names conflict with any of the existing catalog and schema names on
the NonStop system, modify the database catalog and schema in the
empinfo_tables_script.sql script file.
If you modify the database catalog and schema names, the new database catalog names
must be updated in the EmpInfo/WebContent/WEB-INF/jdbc.properties file.
The project directory structure for the EmpInfo application must appear as follows:
72 Spring Framework
Page 73

Figure 20 Project Explorer View
The code of the EmpInfo application developed so far is located in <My SASH
Home>\spring\getting-started\EmpInfo-InParts\Part-6.
At this point, you can either deploy and verify the EmpInfo application you have developed so far
on the NonStop system, or you can proceed to the “Enabling EmpInfo to Delete and Retrieve
Employee Details” (page 73) section.
For deployment, see the steps described in “Deploying EmpInfo on NonStop” (page 87).
You can verify the EmpInfo application by accessing the following URL:
http://<IP Address of the iTP WebServer>:<port#>/<servlet directory>/EmpInfo.
NOTE: The code for the EmpInfo application developed so far is located in <My SASH
Home>\spring\getting-started\EmpInfo-InParts\Part-6
To verify the EmpInfo application developed so far, complete the following steps:
Enabling EmpInfo to Delete and Retrieve Employee Details
This section describes the following activities:
1. “Creating JSPs to Delete and Retrieve Employee Details” (page 74)
2. “Creating the RowMapper Class” (page 75)
3. “Modifying the EmployeeDao.java Class File” (page 75)
4. “Modifying the Employee.java File” (page 76)
5. “Modifying the EmployeeController.java File” (page 77)
Getting Started with Spring 73
Page 74

6. “Modifying the EmpInfo-servlet.xml File” (page 78)
7. “Modifying the index.jsp File” (page 79)
8. “Implementing the RMI Service in EmpInfo” (page 80)
Creating JSPs to Delete and Retrieve Employee Details
To delete or retrieve any employee details in the EmpInfo application, you must create and modify
the following files:
• retrieveordelete.jsp
• retrieveresult.jsp
• deleteresult.jsp
1. Create the files in the EmpInfo/WebContent/WEB-INF/jsp directory, as described in
“Creating the index.jsp File” (page 43).
2. Modify the retrieveordelete.jsp file to retrieve an Employee ID from the JSP page as
follows:
<body>
<h2 align="center">Welcome to the EmpInfo Application</h2>
<br>
<h2>Enter Employee Id</h2>
<form:form method="post" commandName="emprord">
<table width="95%" bgcolor="f8f8ff" border="0" cellspacing="0" cellpadding="5">
<tr>
<td align="left" width="20%">Employee Id :</td>
<td><form:input path="empid"/> </td>
</tr>
<tr>
<td align="left" width="20%">Action to Perform (Retrieve/Delete) :</td>
<td><form:input path="rord"/> </td>
</tr>
</table>
<br>
<input type="submit" align="left" value="Retrieve/Delete">
<h4><a href=<c:url value="/"/>> Home page </a></h4>
</form:form>
</body>
</html>
3. Modify the retrieveresult.jsp file to display the details of an employee record on the
JSP page as follows:
<body>
<table width="95%" bgcolor="f8f8ff" border="0"
cellspacing="0" cellpadding="5">
<tr>
<td align="left" width="20%">Employee Id :</td>
<td><c:out value="${model.empid}"/> </td>
</tr>
<tr>
<td align="left" width="20%">
Employee First Name : </td><td><c:out value="${model.empfn}"/> </td>
</tr>
<tr>
<td align="left" width="20%">
Employee Last Name :</td> <td><c:out value="${model.empln}"/> </td>
</tr>
<tr>
<td align="left" width="20%">
Employee Age : </td><td><c:out value="${model.empage}"/> </td>
</tr>
<tr>
<td align="left" width="20%">
Employee Email Id :</td><td> <c:out value="${model.empemail}"/> </td>
</tr>
</table>
74 Spring Framework
Page 75

<a href="<c:url value="retrieveordelete.htm"/>">Back</a>
</body>
</html>
4. Modify the deleteresult.jsp file to remove the details of an employee record from the
JSP page as follows:
<%@ include file="/WEB-INF/jsp/include.jsp"%>
<%@ taglib prefix="form"
uri="http://www.springframework.org/tags/form"%>
<html>
<head>
<meta http-equiv="Content-Type"
content="text/html; charset=ISO-8859-1">
<title> Spring Getting Started with EmpInfo Application </title>
</head>
<body text="#00008B" >
<h2>Employee Deleted</h2>
<br>
${model.del}
<br>
<a href=<c:url value="retrieveordelete.htm"/>>Back </a>
</body>
</html>
Creating the RowMapper Class
The RowMapper class is used to map the retrieved ResultSet to the POJO class.
1. Create a class EmployeeRowMapper in the com.hp.empinfo.domain package, as
described in “Creating the Controller for EmpInfo” (page 54).
2. Modify the EmployeeRowMapper.java file to map ResultSet to the Employee.java
class.
After modification, the EmployeeRowMapper.java file appears as:
package com.hp.empinfo.domain;
import java.sql.ResultSet;
import java.sql.SQLException;
import org.springframework.jdbc.core.RowMapper;
public class EmployeeRowMapper implements RowMapper {
public Object mapRow(ResultSet rs, int rowcount) throws SQLException {
Employee employee=new Employee();
employee.setEmpid(rs.getInt(1));
employee.setFirstname(rs.getString(2));
employee.setLastname(rs.getString(3));
employee.setAge(rs.getInt(4));
employee.setEmail(rs.getString(5));
return employee;
}
}
Modifying the EmployeeDao.java Class File
1. Add two new methods getDetail and deleteEmployee in the EmployeeDao.java
class file to add the retrieve and delete functionality in the application.
2. Add two import statements that are used in the file:
import com.hp.empinfo.domain.Employee;
import com.hp.empinfo.domain.EmployeeRowMapper;
Getting Started with Spring 75
Page 76

After modification, the EmployeeDao.java file appears as:
package com.hp.empinfo.service;
import java.sql.SQLException;
import org.springframework.jdbc.core.support.JdbcDaoSupport;
import com.hp.empinfo.domain.Employee;
import com.hp.empinfo.domain.EmployeeRowMapper;
public class EmployeeDao extends JdbcDaoSupport {
public Employee getDetail(int empid) throws SQLException {
Employee employee;
employee = (Employee) getJdbcTemplate().queryForObject(
"select * from employee where emp_id =?",
new Object[] { empid }, new EmployeeRowMapper());
return employee;
}
public void insertDetail(int empid, String firstname, String lastname,
int age, String email) throws SQLException {
getJdbcTemplate().update("insert into employee values(?,?,?,?,?)",
new Object[] { empid, firstname, lastname, age, email });
}
public String deleteEmployee(int empid) {
getJdbcTemplate().update("delete from employee where emp_id= ?",
new Object[] { empid });
return "Employee deleted";
}
}
Modifying the Employee.java File
You must modify the Employee.java file in the com.hp.empinfo.domain package to add a
property record, which can be used to distinguish between the retrieve and delete request.
Modify the POJO to add a new property rord and its getter and setters.
After modification, the Employee.java file appears as:
package com.hp.empinfo.domain;
public class Employee implements java.io.Serializable {
private int empid;;
private String firstname;
private String lastname;
private int age;
private String email;
private String rord;
public String getRord() {
return rord;
}
public void setRord(String rord) {
this.rord = rord;
}
public int getEmpid() {
return empid;
}
public void setEmpid(int empid) {
this.empid = empid;
}
public String getFirstname() {
return firstname;
}
public void setFirstname (String firstname) {
this. firstname= firstname;
76 Spring Framework
Page 77

}
public String getLastname () {
return lastname;
}
public void setLastname (String lastname) {
this. lastname= lastname;
}
public int getAge () {
return age;
}
public void setAge (int age) {
this. age= age;
}
public String getEmail () {
return email;
}
public void setEmail (String email) {
this. email= email;
}
}
Modifying the EmployeeController.java File
The EmployeeController.java file in the com.hp.empinfo.web package is modified to
map the retrieve or delete request to the underlying database operations.
After modification, the EmployeeController.java file appears as:
package com.hp.empinfo.web;
import org.springframework.web.servlet.mvc.SimpleFormController;
import org.springframework.web.servlet.ModelAndView;
import javax.servlet.ServletException;
import com.hp.empinfo.domain.Employee;
import com.hp.empinfo.service.EmployeeDao;
import java.sql.SQLException;
import java.util.HashMap;
import java.util.Map;
import org.springframework.web.context.WebApplicationContext;
import org.springframework.web.context.support.WebApplicationContextUtils;
public class EmployeeController extends SimpleFormController {
private EmployeeDao empdao;
public ModelAndView onSubmit(Object command) throws ServletException,
SQLException {
WebApplicationContext wac = WebApplicationContextUtils.
getRequiredWebApplicationContext(getServletContext ());
empdao = (EmployeeDao) wac.getBean("empdao");
int empid = ((Employee) command).getEmpid();
String firstname = ((Employee) command).getFirstname();
String lastname = ((Employee) command).getLastname();
int age = ((Employee) command).getAge();
String email = ((Employee) command).getEmail();
String rord = ((Employee) command).getRord();
if (rord!=null && rord.equalsIgnoreCase("Retrieve")) {
Employee emp1 = empdao.getDetail(empid);
Map<String, String> model = new HashMap<String, String>();
model.put("empid", "" + emp1.getEmpid());
model.put("empfn", emp1.getFirstname());
Getting Started with Spring 77
Page 78

model.put("empln", emp1.getLastname());
model.put("empage", "" + emp1.getAge());
model.put("empemail", emp1.getEmail());
return new ModelAndView("retrieveresult", "model", model);
}
if (rord!=null && rord.equalsIgnoreCase("Delete")) {
String str = empdao.deleteEmployee(empid);
Map<String, String> model = new HashMap<String, String>();
model.put("del", str);
return new ModelAndView("deleteresult", "model", model);
}
else {
empdao.insertDetail(empid, firstname, lastname, age, email);
Map<String, String> model = new HashMap<String, String>();
model
.put("add",
"Transaction Complete - One Employee Added to Employee Database");
return new ModelAndView("insertresult", "model", model);
}
}
}
Modifying the EmpInfo-servlet.xml File
Modify the EmpInfo-servlet.xml file in the EmpInfo/WebContent/WEB-INF directory to
map the command name and its corresponding command class for retrieveordelete.jsp.
After modification, the EmpInfo-servlet.xml file appears as:
<?xml version="1.0" encoding="UTF-8"?>
<beans xmlns="http://www.springframework.org/schema/beans"
xmlns:xsi="http://www.w3.org/2001/XMLSchema-instance"
xmlns:aop="http://www.springframework.org/schema/aop"
xmlns:p="http://www.springframework.org/schema/p"
xmlns:context="http://www.springframework.org/schema/context"
xmlns:jee="http://www.springframework.org/schema/jee"
xmlns:tx="http://www.springframework.org/schema/tx"
xsi:schemaLocation="
http://www.springframework.org/schema/beans
http://www.springframework.org/schema/beans/spring-beans-2.5.xsd
http://www.springframework.org/schema/context
http://www.springframework.org/schema/context/spring-context-2.5.xsd
http://www.springframework.org/schema/jee
http://www.springframework.org/schema/jee/spring-jee-2.5.xsd
http://www.springframework.org/schema/tx
http://www.springframework.org/schema/tx/spring-tx-2.5.xsd">
<bean name="/insert.htm"
class="com.hp.empinfo.web.EmployeeController">
<property name="formView">
<value>insert</value>
</property>
<property name="commandClass">
<value>com.hp.empinfo.domain.Employee</value>
</property>
<property name="commandName">
<value>emp</value>
</property>
78 Spring Framework
Page 79

</bean>
<bean name="/retrieveordelete.htm"
class="com.hp.empinfo.web.EmployeeController">
<property name="formView">
<value>retrieveordelete</value>
</property>
<property name="commandClass">
<value>com.hp.empinfo.domain.Employee</value>
</property>
<property name="commandName">
<value>emprord</value>
</property>
</bean>
<bean id="viewResolver"
class="org.springframework.web.servlet.view.InternalResourceViewResolver">
<property name="viewClass"
value="org.springframework.web.servlet.view.JstlView"></property>
<property name="prefix" value="/WEB-INF/jsp/"></property>
<property name="suffix" value=".jsp"></property>
</bean>
</beans>
Modifying the index.jsp File
Modify the index.jsp file in the EmpInfo/WebContent directory to provide the links to retrieve
or delete a page as shown:
<%@ page language="java" contentType="text/html; charset=ISO-8859-1"
pageEncoding="ISO-8859-1"%>
<!DOCTYPE html PUBLIC "-//W3C//DTD HTML 4.01 Transitional//EN"
"http://www.w3.org/TR/html4/loose.dtd">
<%@ include file="/WEB-INF/jsp/include.jsp" %>
<html>
<head>
<meta http-equiv="Content-Type" content="text/html; charset=ISO-8859-1">
<title>Spring Getting Started with EmpInfo Application</title>
</head>
<body>
<h2 align="center"> Welcome to the EmpInfo Application </h2>
<br>
<h4><a href=<c:url value="insert.htm"/>>Insert Employee</a></h4>
<h4><a href=<c:url value="retrieveordelete.htm"/>> Retrieve or Delete</a></h4>
<br>
</body>
</html>
Figure 21 shows how the EmpInfo application directory structure looks like after creating the
requisite files on the system.
Getting Started with Spring 79
Page 80

Figure 21 Project Explorer View
Implementing the RMI Service in EmpInfo
This contains the following activities:
1. Creating RMI Service Interface
2. Creating Implementation Class of RMI service
3. Modify applicationContext.xml file
4. Creating Test class to Test the RMI service
5. Creating the clientContext.xml file
6. Creating the client.properties file
7. Adding Dependency JARs
Creating RMI Service Interface
1. Create a com.hp.empinfo.service package and an EmployeeInfo class under it, as
described in “Creating the Controller for EmpInfo” (page 54).
80 Spring Framework
Page 81

2. Modify the EmployeeInfo.java file as follows:
package com.hp.empinfo.service;
import com.hp.empinfo.domain.Employee;
public interface EmployeeInfo {
public Employee getEmployee(int empId);
}.
This creates the RMI service interface which you must implement as described in the subsequent
section.
Creating Implementation Class of RMI service Interface
1. Create a com.hp.empinfo.service package and an EmployeeInfoImpl class under
it, as described in “Creating the Controller for EmpInfo” (page 54).
2. Modify the EmployeeInfoImpl.java class as follows:
package com.hp.empinfo.service;
import java.sql.SQLException;
import org.springframework.context.ApplicationContext;
import org.springframework.context.support.ClassPathXmlApplicationContext;
import com.hp.empinfo.domain.Employee;
public class EmployeeInfoImpl implements EmployeeInfo {
private EmployeeDao empdaoBean; ;
public EmployeeDao getEmpdaoBean() {
return empdaoBean;
}
public void setEmpdaoBean(EmployeeDao empdaoBean) {
this.empdaoBean = empdaoBean;
}
public static String [] configFileNames = new String [] {"applicationContext.xml","clientContext.xml"};
private static ApplicationContext applicationContext = null;
public Employee getEmployee(int empId) {
Employee detail = null;
applicationContext = new ClassPathXmlApplicationContext(configFileNames);
EmployeeDao empDao = (EmployeeDao)applicationContext.getBean("empdao");
try {
detail = empDao.getDetail(empId);
} catch (SQLException e) {
e.printStackTrace();
}
return detail;
}
}
Modifying the applicationContext.xml file
You must modify the applicationContext.xml file to add the Spring RMI bean. To achieve
this, add the following code in the file:
<bean id="propertyConfigurer" class="org.springframework.beans.factory.config.PropertyPlaceholderConfigurer">
<property name="location"><value>classpath:jdbc.properties</value></property>
</bean>
<bean id="empinfo" class="com.hp.empinfo.service.EmployeeInfoImpl">
<property name="empdaoBean" ref="empdao"/>
</bean>
<bean id="emp-rmi" class="org.springframework.remoting.rmi.RmiServiceExporter">
<property name="service" ref="empinfo"/>
<property name="serviceInterface" value="com.hp.empinfo.service.EmployeeInfo"/>
<property name="serviceName" value="empDetail"/>
<property name="registryPort" value="1099"/>
</bean>
Getting Started with Spring 81
Page 82

Creating Test class to Test the RMI service
1. Create a com.hp.empinfo.domain package and an RmiClientTest class under it, as
described in “Creating the Controller for EmpInfo” (page 54).
2. Modify the RmiClientTest.java file to invoke the RMI service by adding the following
code:
package com.hp.empinfo.domain;
import org.springframework.context.ApplicationContext;
import org.springframework.context.support.ClassPathXmlApplicationContext;
import com.hp.empinfo.service.EmployeeInfo;
public class RmiClientTest {
public static String [] configFileNames = new String [] {"applicationContext.xml","clientContext.xml"};
private static ApplicationContext applicationContext = null;
public static void main(String[] args) {
applicationContext = new ClassPathXmlApplicationContext(configFileNames);
EmployeeInfo empInfo = (EmployeeInfo)applicationContext.getBean("rmiProxy");
Employee employee = empInfo.getEmployee(2);
System.out.println("Employee First Name : "+employee.getFirstname());
System.out.println("Employee Last Name : "+employee.getLastname());
System.out.println("Employee Email : "+employee.getEmail());
System.out.println("Employee Id : "+employee.getEmpid());
}
}
Creating the clientContext.xml file
1. Create the clientContext.xml file in the EmpInfo/WebContent/WEB-INF/ directory,
as described in “Creating the EmpInfo-servlet.xml File” (page 48).
2. Modify the clientContext.xml file to add the RMI client bean. After modification, the
clientContext.xml file must appear as follows:
<?xml version="1.0" encoding="UTF-8"?>
<!DOCTYPE beans PUBLIC "-//SPRING//DTD BEAN 2.0//EN"
"http://www.springframework.org/dtd/spring-beans-2.0.dtd">
<beans>
<!-- Resolves ${...} placeholders from client.properties -->
<bean id="propertyConfigurer"
class="org.springframework.beans.factory.config.PropertyPlaceholderConfigurer">
<property name="location"><value>classpath:client.properties</value></property>
</bean>
<bean id="rmiProxy" class="org.springframework.remoting.rmi.RmiProxyFactoryBean">
<property name="serviceUrl">
<value>rmi://${serverName}:${rmiPort}/empDetail</value>
</property>
<property name="serviceInterface">
<value>com.hp.empinfo.service.EmployeeInfo</value>
</property>
</bean>
</beans>
Creating the client.properties file
1. Create the client.properties file in the EmpInfo/WebContent/WEB-INF/ directory,
as described in “Creating the jdbc.properties File” (page 66).
2. Modify the client.properties file to add the NonStop System IP address (where your
RMI service is running) and the RMI port number.
serverName= <HP NonStop System IP Address>
rmiPort=<port number>
Adding Dependency JARs
Add the following dependency jars to the EmpInfo project library:
82 Spring Framework
Page 83

Table 15 Aopalliance Dependency JAR Files
Dependency JAR Files
com.springsource.org.aopalliance-1.0.0.jar
NOTE: The jar file mentioned in the above table can be found in the following spring repository:
http://ebr.springsource.com/repository/app/.
To add the dependency JAR files in the project library path and to resolve the J2EE module
dependency on these JAR files, follow the instructions described in “Adding Dependency JAR Files
in the Project Library Path” (page 52).
Figure 22 shows how the EmpInfo application directory structure looks like after creating the
requisite files on the system.
Figure 22 Project Explorer View
The EmpInfo application is complete now. You can now deploy and verify the EmpInfo application
on a NonStop system, by following the steps described in “Deploying EmpInfo on NonStop”
(page 87).
NOTE: The complete code of the EmpInfo application is located in <My SASH
Home>\spring\getting-started\EmpInfo.
You can verify if the application is working by performing the following steps:
Getting Started with Spring 83
Page 84

To insert an employee record:
1. Start the iTP WebServer and access the index page:
http://<IP Address of the Webserver>>:<<port#>/<servlet directory>/EmpInfo.
Figure 23 EmpInfo: Insert, Retrieve or Delete Employee Details
2. Click Insert Employee. The Enter Employee Details screen appears.
3. Type the employee details and click Insert.
Figure 24 EmpInfo: Employee Details Screen
The Insert Operation Successfully Executed message is displayed.
84 Spring Framework
Page 85

Figure 25 EmpInfo: Message Screen
4. To retrieve or delete an employee record:
Click Retrieve or Delete in the index page.
Figure 26 EmpInfo: Retrieve Screen
5. To retrieve an employee record, in the Action to Perform field, type Retrieve. Click
Retrieve/Delete.
The employee record details are displayed.
Getting Started with Spring 85
Page 86

Figure 27 EmpInfo: Employee Details Screen
6. Click Back to return to the EmpInfo: Delete screen.
Figure 28 EmpInfo: Delete Screen
7. To delete an employee record, in the Action to Perform field, type Delete. Click
Retrieve/Delete.
The employee record is deleted.
86 Spring Framework
Page 87

Figure 29 EmpInfo: Deleted Screen
Deploying EmpInfo on NonStop
This section describes the following tasks:
1. “Creating the Application WAR File on Windows” (page 87)
2. “Deploying the EmpInfo WAR File in NSJSP on NonStop” (page 89)
Creating the Application WAR File on Windows
A WAR file is essential to deploy the web application. It contains property and configuration files,
Java class file, and JSPs of the web application.
To create the application WAR file:
1. In the Project Explorer frame, right-click EmpInfo and select Export > Export.
The Export dialog box appears.
2. From the list of folders, select Web > WAR file and click Next.
Getting Started with Spring 87
Page 88

Figure 30 Export Dialog Box
The WAR Export dialog box appears.
3. In the Web project field, type EmpInfo and browse to the destination where you want to save
the WAR file.
88 Spring Framework
Page 89

Figure 31 WAR Export Dialog Box
4. Click Finish. The WAR file is created.
NOTE: If you have specified an existing name for the WAR file, the Finish button is disabled.
In this case, change the name of the WAR file. If you want use the existing name, select the
Overwrite existing file check box.
Deploying the EmpInfo WAR File in NSJSP on NonStop
To deploy the EmpInfo WAR file on the NonStop system, see “Deploying Sample Applications on
NonStop” (page 331).
Running EmpInfo on NonStop
To run EmpInfo on the NonStop system, click the /<servlet directory>/EmpInfo path under
Applications in the NSJSP Web Application Manager screen.
You can now add, search, and delete employee details.
Getting Started with Spring 89
Page 90

3 Hibernate Framework
Hibernate Overview
Hibernate is an object-relational mapping (ORM) tool for Java environments that provides a
framework for mapping a data representation from an object model to a relational data model
with an SQL-based schema.
Hibernate provides configuration files to map Java classes with database tables, and to configure
database connectivity properties, such as the database URL, database credentials, connection
pooling configuration parameters, and so on. It also provides data query and retrieval facilities.
The NonStop system provides a platform comprising of JVM and a servlet container to run
applications that use Hibernate.
NOTE: Any mention of Hibernate in this document implies association with Hibernate versions
3.5.1, 3.6.8, and 4.1.1. The dialects are different for these versions. You must download the
required dialect and integrate it with the appropriate version of Hibernate as necessary. To get
the most recent features, HP recommends you to download the latest dialect and Hibernate versions.
For information on Hibernate, see http://www.hibernate.org.
Backward compatibility of the Hibernate dialect is not supported. For example, Hibernate 3.6.8
dialect is not compatible with Hibernate version 3.5.1.
Spring 3.X does not support HibernateTemplate when integrated with Hibernate 4.
Hibernate Projects
In addition to the Hibernate core framework, the JBoss community maintains other projects, such
as Hibernate EntityManager, Hibernate Annotations, Hibernate Shards, and so on. Among these
projects, only Hibernate EntityManager and Hibernate Annotations are presently certified for use
on the NonStop platform.
Hibernate Annotations
In Hibernate, the application metadata is commonly provided to the Java Virtual Machine (JVM)
through XML files. You can also use Annotations to provide the application metadata.
Annotations enable you to provide the metadata for the Object and Relational Table mapping by
including the metadata information in the Plain Old Java Objects (POJO) file along with the code.
This helps you to understand the table structure and POJO simultaneously during application
development. This also reduces the complexity of the application because you need not maintain
separate files for the metadata.
To leverage the above-mentioned features of Annotations in Hibernate, the Hibernate community
provides the Hibernate Annotations package.
The Hibernate Annotations package includes:
• Standardized Java Persistence and EJB 3.0 (JSR 220) object/relational mapping annotations
• Hibernate-specific extension annotations for performance optimization and special mappings
NOTE: The Annotation feature is supported on Java 5.0 and later versions.
Hibernate EntityManager
Java EE provides EJB3 specifications to standardize the basic APIs and the metadata required for
any object/relational persistence mechanism. The Hibernate community provides the Hibernate
EntityManager project, which implements the programming interfaces and lifecycle rules as defined
by the EJB3 persistence specifications.
90 Hibernate Framework
Page 91

The Hibernate EntityManager implements the following:
• Standard Java Persistence management API
• Standard Java Persistence Query Language
• Standard Java Persistence object lifecycle rules
• Standard Java Persistence configuration and packaging
You can implement a complete EJB3 persistence solution using Hibernate Annotations and the
Hibernate EntityManager with the Hibernate package.
NOTE: The EJB3 specification is supported on Java 5.0 and above versions.
Hibernate Applications on NonStop
Hibernate can be used in a standalone Java application or in a Java web application using servlets
or EJB session beans.
This section describes the message flow when Hibernate is used in a Java web application that
uses the NonStop SQL/MX database and is hosted on NSJSP.
Figure 32 Hibernate Application on NonStop
A Hibernate message flows through all the components in the following sequence:
1. An HTTP request passes through the iTP WebServer and then to the NSJSP web container.
2. The Servlet application, which is deployed under the NSJSP web container, processes the
HTTP request and passes it to the Application layer.
Hibernate Overview 91
Page 92

3. The Application layer passes the request to the persistence layer (that is, Hibernate). Hibernate
establishes connection with the database, performs database operations (such as create,
update, retrieve, and delete), and then returns persistent object to the application.
NOTE: Persistent objects are the Java classes, which are mapped with database tables.
Installing the Hibernate Framework
This section describes the procedure to install Hibernate framework libraries on a Nonstop system.
Prerequisites
Before getting started, ensure that you have the following software installed on the NonStop and
Windows system:
NonStop system
Table 16 Softwares to be installed on the NonStop system
For more information:Software
NSJ version 6.0
For information on installing NSJ on a NonStop system, see the NonStop Server
for Java 6.0 Programmer's Reference Manual.
Windows system
Table 17 Softwares to be installed on the Windows system
DownloadSoftware
JDK version 1.6
Gradle
1.0-milestone-8a
Download from http://www.oracle.com/technetwork/java/javase/downloads/index.html and
set the PATH and JAVA_HOME environment variables.
Download from http://gradle.org/downloads and set the PATH and GRADLE_HOME environment
variables.
Installing Hibernate Framework Libraries on NonStop
1. “Downloading the Hibernate Distribution on Windows” (page 93)
2. “Downloading Hibernate Dependency JAR Files using Gradle” (page 93)
3. “Including the Hibernate Dialect for the SQL/MX database” (page 93)
4. “Copying the Hibernate Distribution from Windows to NonStop” (page 94)
NOTE:
• Before you start installing the Hibernate framework, extract the contents of the SAMPLES.zip
file (containing OpenSource Java frameworks for NonStop) to a directory on the Windows
system.
• Throughout the section, references are made to the following directories:
◦ <Hibernate Home>: The directory on the Windows system where the Hibernate
distribution files are extracted.
◦ <NonStop Hibernate Home>: The OSS directory on the NonStop system where the
Hibernate runtime JAR files are located.
◦ <My SASH Home>: The directory on the Windows system where the contents of the
SAMPLES.zip file (distributed as a part of the NonStop Samples for Java frameworks T0874 and available for download in Scout) is extracted.
92 Hibernate Framework
Page 93

Downloading the Hibernate Distribution on Windows
NOTE: The Hibernate distribution described here is for Hibernate version 4.1.1.
1. Go to http://www.hibernate.org/downloads.html.
2. Click on the release bundles hyperlink under Release bundle section.
A web page from sourceforge.net,showing various Hibernate packages that can be
downloaded, appears.
3. Click hibernate4, and then click on 4.1.1.Final.
The links to the following files appear:
• hibernate-release-4.1.1.Final.zip
• hibernate-release-4.1.1.Final.tgz
4. Download the hibernate-release-4.1.1.Final.zip file.
NOTE:
• The hibernate-release-4.1.1.Final.zip and
hibernate-release-4.1.1.Final.tgz files include the Hibernate sample
application, the Hibernate framework libraries, Hibernate Annotations, and Hibernate
Entity Manager sub-projects. They do not include third party libraries that are required
to build the sample application.
• The difference between hibernate-release-4.1.1.Final.zip and
hibernate-release-4.1.1.Final.tgz files is in their compression format.
• The sample applications, namely Caveat Emptor and Event Manager web application,
discussed in this section have been verified using Hibernate version 3.5.1.
5. Extract the hibernate-release-4.1.1.Final.zip file into a directory on the Windows
system.
This directory will be the <Hibernate Home>.
Downloading Hibernate Dependency JAR Files using Gradle
Because Hibernate 4.1.1 dependency JARs are placed in the Maven repository, you must download
the dependency JAR files using Gradle.
NOTE: If you are downloading the Hibernate 3.5.1 or 3.6.8 dependency JARs, you must
download using Maven.
1. Go to the <Hibernate Home>\project directory on the Windows system.
2. Run the following command to build the Hibernate framework and create the Hibernate
dependency JARs:
command prompt> gradle clean build -x test
The Hibernate framework, Hibernate sub-projects, and dependency JAR files are downloaded
to C:\Documents and Settings\<User name
>\.gradle\caches\artifacts-8\filestore
where,
<User name> is the name of the user account being used on the Windows system.
Including the Hibernate Dialect for the SQL/MX database
The Hibernate dialect for the SQL/MX database is required for running any Hibernate application
on a NonStop system.
Installing the Hibernate Framework 93
Page 94

The DIALECT file (which includes hibernate4sqlmx.jar) is distributed as a part of the SQL/MX
Hibernate Dialect - T0873AAD and can be downloaded from Scout.
To obtain the hibernate4sqlmx.jar file, complete the following steps:
1. Download the DIALECT file from Scout. For information on how to download from Scout, see
https://h20453.www2.hp.com/scout/download_help.htm.
2. Add the .zip extension to it.
3. Extract the DIALECT.zip file to a location on the Windows system.
The SQL/MX-Hibernate-Dialect folder containing the dialects appears.
4. Place hibernate4sqlmx.jar in <Hibernate Home>\lib.
NOTE:
• If you have already extracted the SAMPLES.zip file from Scout, you can find the
hibernate4sqlmx.jar file at <My SASH Home>\hibernate\sqlmxdialect.
• hibernate4sqlmx.jar is the Hibernate dialect file for SQL/MX database that maps
Hibernate Query Language (HQL) to SQL/MX specific queries.
You can now transfer the Hibernate distribution to the NonStop system.
Copying the Hibernate Distribution from Windows to NonStop
1. Go to <Hibernate Home> and create a JAR file of the <Hibernate Home>\lib directory
on the Windows system:
command prompt> cd <Hibernate Home>
command prompt> jar -cvf hibernate_lib.jar lib
For example:
command prompt> cd C:\hibernate-release-4.1.1.Final
command prompt> jar -cvf hibernate_lib.jar lib
2. Create a Hibernate directory <NonStop Hibernate Home> in the OSS environment on
the NonStop system:
OSS> mkdir -p <NonStop Hibernate Home>
For example, create a directory structure/usr/tandem/sash/
hibernate-release-4.1.1.Final as follows:
OSS> mkdir -p /usr/tandem/sash/hibernate-release-4.1.1.Final
3. Copy the hibernate_lib.jar and hibernate4.jar files from <Hibernate Home>
to <NonStop Hibernate Home> and extract hibernate_lib.jar:
OSS> cd <NonStop Hibernate Home>
OSS> jar -xvf hibernate_lib.jar
After extraction, <NonStop Hibernate Home> must include the <NonStop Hibernate
Home>/lib sub-directory.
NOTE: The contents of the <NonStop Hibernate Home>/lib directory on the NonStop
system must be exactly same as the <Hibernate Home>\lib directory on the Windows
system.
4. Go to C:\Documents and Settings\<User name> and create a JAR file of the <User
name>\.gradle directory on the Windows system:
command prompt> cd C:\Documents and Settings\<User name>
command prompt> jar -cvf hibernate_Dependency.jar .gradle
For example:
command prompt> cd C:\Documents and Settings\hpadmin
command prompt> jar -cvf hibernate_Dependency.jar .gradle
94 Hibernate Framework
Page 95

5. Transfer the hibernate_Dependency.jar files from C:\Documents and
Settings\<User name> to the OSS root directory.
6. Extract hibernate_Dependency.jar:
OSS> cd <OSS root directory>
OSS> jar -xvf hibernate_Dependency.jar
The Hibernate framework libraries are installed on the NonStop system. You can use these libraries
to develop and run Hibernate applications on a NonStop system.
Customizing the Hibernate Dialect for NonStop
The Hibernate dialect is customized for NonStop to support new features of Hibernate version
4.1.1. These features are supported by making changes to the Hibernate dialect. This section
describes the changes made to the Hibernate dialect for SQL/MX database. The dialect is the
basic component, which Hibernate uses for query generation and execution process for a specific
database. The basic dialect file developed for NonStop users is used.
Hibernate now supports the following features:
• IDENTITY column
• Error Mapping
IDENTITY Column
Hibernate can leverage the IDENTITY column provided by SQL/MX database. To leverage the
column, in Hibernate, the mapped classes must declare the primary key column of the database
table. Most classes also have a JavaBeans-style property holding the unique identifier of an instance.
The <id> element defines the mapping from that property to the primary key column. You can
declare the mapping as follows:
NOTE: The ID value will be generated by SQL/MX.
<id
name="propertyName"
type="typename"
column="column_name"
unsaved-value="null|any|none|undefined|id_value"
access="field|property|ClassName">
node="element-name|@attribute-name|element/@attribute|."
<generator class="generatorClass"/>
<id/>
where,
• name: Name of the identifier property. This attribute is optional.
• type: A name that indicates the Hibernate type. This attribute is optional.
• column: Name of the primary key column. This attribute is optional and defaults to the property
name.
• unsaved-value: An identifier property value that indicates an instance is newly instantiated
(unsaved), distinguishing it from detached instances that were saved or loaded in a previous
session. This attribute is optional and defaults to a sensible value.
• access: The strategy Hibernate should use for accessing the property value. This attribute is
optional and defaults to property.
The optional <generator> child element defines a Java class used to generate unique identifiers
for instances of the persistent class. If any parameters are required to configure or initialize the
generator instance, they are passed using the <param> element.
Installing the Hibernate Framework 95
Page 96

All generators implement the interface org.hibernate.id.IdentifierGenerator. Some
applications may have their own specialized implementations; however, Hibernate provides a
range of built-in implementations, such as increment, identity, sequence, hilo, Seqhilo, uuid, guid,
native, assigned, select, foreign, and sequence-identity. You can use any of the built-in
implementations except sequence, guid, native, and sequence-identity.
CAUTION: When using any of the Hibernate built-in generators (not dependent on underlying
database), use your judgment to select the correct id generator, since the built-in generators are
not yet certified to generate unique value in all circumstances on NonStop TSMP environment.
You can choose any of the ID generators that leverage the ID generation mechanism provided by
the underlying database.
NOTE:
• IDENTITY column feature is supported from SQL/MX 3.1 version onwards.
• SQL/MX does not support SEQUENCE generators and GUIDs.
In general, hibernate allows mapping of Plain Old Java Objects (POJO) to tables and its attributes
to columns in an xml file. This file also captures the mapping between POJO fields to table column.
When you define this mapping, you can specify a generator class when a column is of type
IDENTITY.
When you define the mapping between the SQL table and POJO in the hbm.xml file, you can
specify a generator for the id column as follows:
<id name="id" type="long" column="person_id">
<generator class="identity"/>
<id/>
OR
<id name="id" type="long" column="person_id">
<generator class=" org.hibernate.dialect.SqlMxIdentityGenerator "/>
<id/>
When the generator class is specified as identity, Hibernate will invoke the dialect methods internally
and treats the mapped table column to person_id field in the POJO as an IDENTITY column.
When the generator class is specified as
org.hibernate.dialect.SqlMxIdentityGenerator, the dialect returns an appropriate
error when it is used with an SQL/MX version that does not support IDENTITY column. It has a
built-in mechanism to detect the SQL/MX version.
NOTE: The org.hibernate.dialect.SqlMxIdentityGenerator generator class supports
only the update operation and not the create operation.
The following use cases show the typical errors that may be returned when this mapping is not
specified.
Use case 1
When a table does not contain identity columns and the hibernate mapping contains the generator
class as “identity” or "org.hibernate.dialect.SqlMxIdentityGenerator “, then the dialect returns the
following errors that are captured in the log:
org.hibernate.exception.GenericJDBCException: could not insert:
Caused by: com.tandem.t4jdbc.SQLMXException: *** ERROR[4024] Column ID has no default
value, so it must be explicitly specified in the insert column list.
Use case 2
96 Hibernate Framework
Page 97

When the SQL/MX table contains the identity column and the mapping does not specify the
generator class as “identity or "org.hibernate.dialect.SqlMxIdentityGenerator “, then the dialect
returns the following errors which are captured in the log:
Exception in thread "main" org.hibernate.exception.GenericJDBCException: could not insert:
Caused by: com.tandem.t4jdbc.SQLMXException: *** ERROR[3428] IDENTITY column ID defined
as GENERATED ALWAYS cannot accept values specified by the user.
Error Mapping
Sometimes when errors occur in Hibernate, the exceptions (such as database connection errors,
SQL errors, etc.) are displayed with error codes which are not very user-friendly in nature. The
HibernateException, which wraps most of the errors that can occur in a Hibernate persistence
layer, is an unchecked exception. Hibernate wraps these SQLExceptions thrown while interacting
with the database in a JDBCException. It attempts to convert the exception into a more meaningful
subclass of JDBCException. For this purpose, custom error mapping is required as it helps in building
recovery mechanisms for custom SQL/MX errors in a standard way.
To achieve error mapping, a new class, SqlMxSQLStateConverter, has been added to the dialect
package to implement error mapping. This class is available by default when the dialect is installed.
SqlMxSQLStateConverter class uses the SqlErrorCodesMapping.properties property file.
This file can be made available to the class in the following methods:
• By placing the SqlErrorCodesMapping.properties file in the application class path.
• By defining a java property sqlmxhibernate.er-map with a value. This value is the path
to the SqlErrorCodesMapping.properties file. You can make this property available
to the application by passing it as a Java application argument line
-Dsqlmxhibernate.er-map=<path>/SqlErrorCodesMapping.properties
NOTE: If the SqlErrorCodesMapping.properties file is not loaded, the following message
is logged into the hibernate log:
“SqlErrorCodesMapping.properties (The system cannot find the file specified)”
The error messages are categorized based on the type of error and each group is assigned to an
exception. Hibernate uses the SQLExceptionConverter to convert an SQLException into an
appropriate JDBCException subclass, provided SQLMXDialect provides a SQLExceptionConverter
implementation so that based on SQL/MX error codes appropriate JDBCException subtype can
be created.
The following exception types are handled:
• JDBCConnectionException: indicates an error with the JDBC communication.
• SQLGrammarException: indicates a grammatical error or a syntax problem with the issued
SQL statement.
• ConstraintViolationException: indicates integrity constraint violation.
• LockAcquisitionException: indicates an error acquiring a lock level necessary to
perform the requested operation.
For example, all SQL grammatical or syntax related error messages are categorized under a
subclass and are mapped to the SQLGrammarException.
The following is a simple hibernate code that queries address table and gets the data in a List. The
method list() on the query object queries the underlying database and returns the result as a List
object.
Currently, without SQLExceptionConverter you must catch HibernateException (which is an
unchecked exception) as follows.
Configuration cfg = new Configuration().configure();
SessionFactory sf = cfg.buildSessionFactory();
Installing the Hibernate Framework 97
Page 98

Session s = sf.openSession();
Query q = s.createSQLQuery("select * frm address");
try {
List s2 = q.list();
} catch (HibernateException e) {
// Customers must get the corresponding SQL Exception using getCause().
If they want to build recovery mechanism, then the Customer must have
SQLMX specific error codes compared with error code in the SQLException
object embedded in HibernateException which will make the hibernate code
SQLMX specific.
}
When the converter is implemented then,
try {
List s2 = q.list();
}
catch (JDBCConnectionException e)
{
//Connection specific recovery code.
//May be a Connection retry
}
catch (ConstraintViolationException e)
{
//Constraints specific recovery
}
catch (GenericJDBCException e)
{
//general jdbc error recovery
}
catch (HibernateException e1) {
//Handle any hibernate exception.
}
Setting up Sample Hibernate Applications on NonStop
The sample applications (Caveat Emptor and the Event Manager Web Application) are included
in the SAMPLES.zip file in the Hibernate distribution, and require modifications to make them
compatible with NonStop systems.
98 Hibernate Framework
Page 99

NOTE: The SAMPLES.zip file is distributed as a part of the NonStop Samples for Java frameworks
- T0874.
SAMPLES.zip is present in the T0874AAB.BIN file in Scout. For information on how to install
the T0874AAB.BIN file from Scout, see https://h20453.www2.hp.com/scout/download_help.htm.
Before you deploy the sample applications, complete the following steps:
1. Download the SAMPLES file from Scout.
2. Add the .zip extension to it.
3. Extract the SAMPLES.zip file to a location on the Windows system.
This section describes the steps required to build, set up, deploy, and run the Caveat Emptor and
Event Manager sample applications on NonStop systems.
NOTE: The sample applications, namely Caveat Emptor and Event Manager web application,
discussed in this section have been verified using Hibernate version 3.5.1.
Prerequisites
The file is renamed as SAMPLES.zip.
The NS-Samples-for-Java-Frameworks folder appears.
NOTE: The absolute path of the NS-Samples-for-Java-Frameworks folder is referred
as <My SASH Home>.
• For NonStop system:
Table 18 Softwares to be installed on the NonStop system
For more information:Software
NonStop iTP WebServer version
7.x or later
NSJSP version 6.1
NonStop SQL/MX version 2.3
JDBC Type 2 driver or JDBC Type
4 driver for the installed SQL/MX
version
NSJ version 5.0
For information on installing and setting up iTP WebServer (secure and
non-secure) on a NonStop system, see the iTP Secure WebServer System
Administrator's Guide.
For information on installing and setting up NSJSP on a NonStop system, see
the NonStop Servlets for JavaServer Pages (NSJSP) 6.1 System Administrator's
Guide.
For information on installing SQL/MX on a NonStop system, see the SQL/MX
Installation and Upgrade Guide.
For information on installing JDBC Type 2 driver and JDBC Type 4 driver on
a NonStop system, see JDBC Type 2 Driver Programmer's Reference for
SQL/MX and JDBC Type 4 Driver Programmer's Reference for SQL/MX.
For information on installing NSJ on a NonStop system, see the NonStop
Server for Java 5.0 Programmer's Reference.
• For Windows system:
Table 19 Softwares to be installed on the Windows system
DownloadSoftware
JDK version 1.5
Maven version
2.2.1
JDBC Type 4 driver
Download from http://www.oracle.com/technetwork/java/javase/downloads/index.html
and set the PATH and JAVA_HOME environment variables.
Download from http://maven.apache.org/download.html and set the PATH and
MAVEN_HOME environment variables.
For information on installing JDBC Type 4 driver on a Windows system, see JDBC Type 4
Driver Programmer's Reference for SQL/MX.
Installing the Hibernate Framework 99
Page 100

Caveat Emptor
The Caveat Emptor sample application is an auction system. The intended users of the application
are bidders and the sellers of various items.
NOTE: The Caveat Emptor sample application described here uses Hibernate 3.5.1 version.
To use Caveat Emptor, the following steps are involved:
• “Building Caveat Emptor on Windows” (page 100)
• “Setting up the Deployment Environment on NonStop” (page 101)
• “Deploying Caveat Emptor on NonStop” (page 103)
• “Running Caveat Emptor on NonStop” (page 103)
Building Caveat Emptor on Windows
1. Go to the <My SASH Home>\hibernate\samples\eg directory on the Windows system.
2. Configure the JDBC driver settings for the NonStop SQL/MX database.
a. Go to the <My SASH HOME>\hibernate\samples\eg\src\main\resources\
b. Modify the hibernate.properties file to update the JDBC configuration. You can
directory on the Windows system.
use either the JDBC Type 2 driver or the JDBC Type 4 driver by setting the SQL/MX
settings as follows:
• For JDBC Type 2 driver, uncomment the SQL/MX settings for the JDBC Type 2 driver
so that it appears as:
#-----------------------------------------------------------------------------# SQL/MX Settings for JDBC Type 2 Driver
hibernate.dialect org.hibernate.dialect.SqlmxDialect
hibernate.connection.driver_class com.tandem.sqlmx.SQLMXDriver
hibernate.connection.url jdbc:sqlmx://
hibernate.connection.username
hibernate.connection.password
hibernate.connection.catalog auctioncat
hibernate.connection.schema auctionsch
NOTE: Because JDBC Type 2 driver is located on the NonStop system, you need
not mention the username and password in the
hibernate.connection.username and the
hibernate.connection.password fields.
• For JDBC Type 4 driver, uncomment the SQL/MX settings for the JDBC Type 4 driver,
and enter the values for the JDBC URL (NonStop system IP Address and port number
of the JDBC data source), NonStop system username, and password so that it appears
as:
#------------------------------------------------------------------------------# SQL/MX Settings for JDBC Type 4 Driver
hibernate.dialect=org.hibernate.dialect.SqlmxDialect
hibernate.connection.driver_class com.tandem.t4jdbc.SQLMXDriver
hibernate.connection.url jdbc:t4sqlmx://<HP NonStop System IP Address>:<Port No.>
hibernate.connection.username <HP NonStop Username>
hibernate.connection.password <HP NonStop Password>
hibernate.connection.catalog auctioncat
hibernate.connection.schema auctionsch
100 Hibernate Framework
 Loading...