

Page 1

HP NonStop Message Queue 1.0 User Guide
HP Part Number: 698926-002
Published: March 2014
Edition: J06.15 and subsequent J-series RVUs and H06.26 and subsequent H-series RVUs.
Page 2

© Copyright 2013, 2014 Hewlett-Packard Development Company, L.P.
Legal Notice
Confidential computer software. Valid license from HP required for possession, use or copying. Consistent with FAR 12.211 and 12.212, Commercial
Computer Software, Computer Software Documentation, and Technical Data for Commercial Items are licensed to the U.S. Government under
vendor's standard commercial license.
The information contained herein is subject to change without notice. The only warranties for HP products and services are set forth in the express
warranty statements accompanying such products and services. Nothing herein should be construed as constituting an additional warranty. HP shall
not be liable for technical or editorial errors or omissions contained herein.
Export of the information contained in this publication may require authorization from the U.S. Department of Commerce.
Microsoft, Windows, and Windows NT are U.S. registered trademarks of Microsoft Corporation.
Intel, Pentium, and Celeron are trademarks or registered trademarks of Intel Corporation or its subsidiaries in the United States and other countries.
Java is a registered trademark of Oracle and/or its affiliates.
Motif, OSF/1, UNIX, X/Open, and the "X" device are registered trademarks, and IT DialTone and The Open Group are trademarks of The Open
Group in the U.S. and other countries.
Open Software Foundation, OSF, the OSF logo, OSF/1, OSF/Motif, and Motif are trademarks of the Open Software Foundation, Inc. OSF MAKES
NO WARRANTY OF ANY KIND WITH REGARD TO THE OSF MATERIAL PROVIDED HEREIN, INCLUDING, BUT NOT LIMITED TO, THE IMPLIED
WARRANTIES OF MERCHANTABILITY AND FITNESS FOR A PARTICULAR PURPOSE. OSF shall not be liable for errors contained herein or for
incidental consequential damages in connection with the furnishing, performance, or use of this material.
JBoss and Hibernate are registered trademarks and servicemarks of Red Hat, Inc.
Spring Framework is an open source project and is a trademark of Interface 21.
© 1990, 1991, 1992, 1993 Open Software Foundation, Inc. The OSF documentation and the OSF software to which it relates are derived in part
from materials supplied by the following:© 1987, 1988, 1989 Carnegie-Mellon University. © 1989, 1990, 1991 Digital Equipment Corporation.
© 1985, 1988, 1989, 1990 Encore Computer Corporation. © 1988 Free Software Foundation, Inc. © 1987, 1988, 1989, 1990, 1991
Hewlett-Packard Company. © 1985, 1987, 1988, 1989, 1990, 1991, 1992 International Business Machines Corporation. © 1988, 1989
Massachusetts Institute of Technology. © 1988, 1989, 1990 Mentat Inc. © 1988 Microsoft Corporation. © 1987, 1988, 1989, 1990, 1991,
1992 SecureWare, Inc. © 1990, 1991 Siemens Nixdorf Informationssysteme AG. © 1986, 1989, 1996, 1997 Sun Microsystems, Inc. © 1989,
1990, 1991 Transarc Corporation.OSF software and documentation are based in part on the Fourth Berkeley Software Distribution under license
from The Regents of the University of California. OSF acknowledges the following individuals and institutions for their role in its development: Kenneth
C.R.C. Arnold, Gregory S. Couch, Conrad C. Huang, Ed James, Symmetric Computer Systems, Robert Elz. © 1980, 1981, 1982, 1983, 1985,
1986, 1987, 1988, 1989 Regents of the University of California.
Page 3

Contents
About This Document.....................................................................................5
Supported Release Version Updates (RVUs)..................................................................................5
Intended Audience....................................................................................................................5
New and Changed Information..................................................................................................5
Changes to the 698926-002 edition......................................................................................5
Document Organization............................................................................................................5
Notation Conventions................................................................................................................6
Related Information...................................................................................................................7
Publishing History.....................................................................................................................7
HP Encourages Your Comments..................................................................................................7
1 Introduction to NSMQ.................................................................................8
JMS and ActiveMQ...................................................................................................................8
NonStop products used by NSMQ.............................................................................................8
Features of NSMQ....................................................................................................................9
Architecture.............................................................................................................................9
High availability.....................................................................................................................11
Scalability using cluster of brokers............................................................................................11
Fault tolerance........................................................................................................................12
Message flow in a cluster........................................................................................................12
2 Installation and configuration.....................................................................14
Pre-requisites..........................................................................................................................14
Installing NSMQ from the CD..................................................................................................14
Running the IPSetup program...............................................................................................14
Running the setup script......................................................................................................24
Customizing NSMQ installation...........................................................................................26
Uninstalling NSMQ............................................................................................................27
Configuring NSMQ................................................................................................................28
Creating a cluster..............................................................................................................28
Adding a broker to a cluster................................................................................................29
Removing a broker.............................................................................................................29
Removing a cluster.............................................................................................................30
3 Managing NSMQ....................................................................................31
Starting/Stopping a cluster/broker...........................................................................................31
Monitoring activities................................................................................................................31
Checking the cluster status..................................................................................................31
Management operations.....................................................................................................32
4 Security...................................................................................................42
Authentication........................................................................................................................42
Authorization.........................................................................................................................43
Secure Socket Layer................................................................................................................44
5 Integration...............................................................................................46
Integrating NSMQ with NSASJ.................................................................................................46
Integrating NSMQ with JTA-TMF application..............................................................................47
Pre-requisites.....................................................................................................................47
JTA-TMF settings.................................................................................................................47
Configuring the JTA-TMF application.....................................................................................48
Running the JTA-TMF application..........................................................................................48
How do local transactions work?..............................................................................................48
Contents 3
Page 4

A Sample applications.................................................................................50
Pre-requisites..........................................................................................................................50
Dependent libraries for the sample applications..........................................................................50
Building the sample applications..............................................................................................50
Running the sample applications...............................................................................................51
B Use cases................................................................................................52
Using JMS from servlets and JSPs..............................................................................................52
Pre-requisites.....................................................................................................................52
Building the application Web Archive (WAR) file...................................................................52
Running the application......................................................................................................53
Using JMS from Pathway Server Classes....................................................................................56
Pre-requisites.....................................................................................................................56
Building the Java Archive (JAR) file.......................................................................................57
Executing the standalone server and client............................................................................57
Executing the TS/MP server and client..................................................................................57
C Configurable elements in NSMQ...............................................................59
D FAQ/Common problems and error conditions..............................................61
E References...............................................................................................64
Glossary....................................................................................................65
4 Contents
Page 5

About This Document
This manual provides information on NonStop Message Queue (NSMQ). It also contains:
• Features of NSMQ
• How to install and configure NSMQ
• How to run the sample application
• Integrating NSMQ with other products
Supported Release Version Updates (RVUs)
This manual supports J06.15 and all subsequent J-series RVUs, and H06.26 and all subsequent
H-series RVUs, until otherwise indicated by its replacement publications.
Intended Audience
This manual is intended for users developing message oriented middleware to manage sending
and receiving messages on NonStop.
To understand NSMQ, it is recommended to have a prior knowledge of the following:
• JMS and ActiveMQ
• NonStop products used by NSMQ — TS/MP, Cluster I/O protocols (CIP), and SQL/MX
database
New and Changed Information
Changes to the 698926-002 edition
• Updated “FAQ/Common problems and error conditions” (page 61)
Document Organization
This manual is organized as follows:
“Introduction to NSMQ” (page 8)
“Managing NSMQ” (page 31)
“Security” (page 42)
“Integration” (page 46)
“Sample applications” (page 50)
This chapter describes the overview and architectural
details of NSMQ.
This chapter describes how to install and configure NSMQ.“Installation and configuration” (page 14)
This chapter describes how to manage NSMQ and setup
and run sample applications.
This chapter describes about the Security methods provided
by NSMQ.
This chapter describes how to integrate NSMQ with NSASJ
and other use case examples.
This appendix describes how to build and run the Spring
sample applications provided with NSMQ for your
reference.
“Use cases” (page 52)
“FAQ/Common problems and error conditions” (page 61)
This appendix describes use case examples of how JMS
is used from servlets and JSPs, and usage of NSMQ in a
Client-Server environment on NonStop from Pathway Server
Classes.
This appendix lists the frequently asked questions and the
common problems and errors faced by users in NSMQ.
Supported Release Version Updates (RVUs) 5
Page 6

Notation Conventions
Bold Type
Bold type within text indicates terms defined in the Glossary. For example:
abstract class
Computer Type
Computer type letters within text indicate keywords, reserved words, command
names, class names, and method names; enter these items exactly as shown. For
example:
myfile.jar
Italic Computer Type
Italic computer type letters in syntax descriptions or text indicate variable
items that you supply. For example:
pathname
General references provided for more useful information.“References” (page 64)
Glossary of terms used in this manual.“Glossary” (page 65)
[ ] Brackets
Brackets enclose optional syntax items. For example:
jdb [options]
A group of items enclosed in brackets is a list from which you can choose one item
or none. Items are separated by vertical lines. For example:
where [threadID|all]
{ } Braces
A group of items enclosed in braces is a list from which you must choose one item.
For example:
-c identity {true|false}
| Vertical Line
A vertical line separates alternatives in a list that is enclosed in brackets or braces.
For example:
where [threadID|all]
... Ellipsis
An ellipsis immediately following a pair of brackets or braces indicates that you
can repeat the enclosed sequence of syntax items any number of times. For example:
print {objectID|objectName} ...
An ellipsis immediately following a single syntax item indicates that you can repeat
that syntax item any number of times. For example:
dump objectID ...
6
Page 7

Punctuation
Parentheses, commas, equal signs, and other symbols not previously described
must be entered as shown. For example:
-D propertyName=newValue
Item Spacing
Spaces shown between items are required unless one of the items is a punctuation
symbol such as a parenthesis or comma. If there is no space between two items,
spaces are not permitted. In the following example, spaces are not permitted before
or after the period:
subvolume-name.filename
Line Spacing
If the syntax of a command is too long to fit on a single line, each line that is to be
continued on the next line ends with a back slash ( \ ) and each continuation line
begins with a greater-than symbol ( > ). For example:
/usr/bin/c89 -c -g -I /usr/tandem/java/include \
> -I /usr/tandem/java/include/oss -I . \
> -Wextensions -D_XOPEN_SOURCE_EXTENDED=1 jnative01.jar
Related Information
For a better understanding of NonStop Message Queue, see the following web sites:
• http://docs.oracle.com/javaee/6/tutorial/doc/bncdq.html
• http://activemq.apache.org/
Publishing History
HP Encourages Your Comments
HP encourages your comments concerning this document. We are committed to providing
documentation that meets your needs. Send any errors found, suggestions for improvement, or
compliments to docsfeedback@hp.com.
Include the document title, part number, and any comment, error found, or suggestion for
improvement you have concerning this document.
Publication DateProduct VersionPart Number
June 20131.0698926-001
March 20141.0698926-002
Related Information 7
Page 8

1 Introduction to NSMQ
This chapter provides an introduction to NonStop Message Queue (NSMQ) 1.0 and discusses its
architecture. It also gives an overview of Java Messaging Service (JMS), ActiveMQ, and the
NonStop products used by NSMQ. To understand NSMQ, it is necessary to have a prior knowledge
of these products.
NonStop Message Queue (NSMQ) 1.0 is a JMS 1.1 compliant messaging system on NonStop.
An NSMQ broker is a messaging agent that manages the exchange of messages between
messaging clients or communication with other brokers. Messaging clients are the applications
that send or receive messages. The broker listens on an IP address and accommodates to the
requests of message producers (that creates and send messages) and consumers (that receive and
process messages).
NSMQ is a port of Apache ActiveMQ 5.6 on NonStop platform. It is implemented using NonStop
platform technologies such as TS/MP, Cluster I/O Protocols (CIP), and SQL/MX database. It can
also be integrated with other Java products like NonStop Application Server for Java (NSASJ).
JMS and ActiveMQ
Enterprise applications provide the business logic for enterprises which are generally centrally
managed and interact with other enterprise software. With Java Enterprise Edition (Java EE)
providing a set of specifications, development of Java enterprise applications are easier and
reduces the development time, application complexity, and improves the overall application runtime.
JMS is one such specification.
The JMS defines a set of Java Application Programming Interfaces (APIs) for sending or receiving
messages between two or more clients. It is a messaging standard that allows application
components based on the Java EE to create, send, receive, and process messages asynchronously.
For more information about JMS, see http://docs.oracle.com/javaee/6/tutorial/doc/bncdq.html.
ActiveMQ is an open source message oriented middleware (MOM) system, and is an implementation
of JMS 1.1 specification. For more information about ActiveMQ, see http://activemq.apache.org/.
NonStop products used by NSMQ
The following products are used by NSMQ:
• NonStop TS/MP products
• NonStop Cluster I/O Protocols
• SQL/MX database
NonStop TS/MP products
NSMQ uses TS/MP for process management only. For example, auto restart of a process if it shuts
down.
The NonStop TS/MP product consists of the PATHMON process, the application cluster services
(ACS) subsystem processes, the PATHCOM process and interface.
A single cluster node of NSMQ is configured to run as two TS/MP server classes with one process
each representing master and slave instances.
For more information about NonStop TS/MP, see the HP NonStop TS/MP 2.5 System Management
Manual and the HP NonStop TS/MP 2.5 Management Programming Manual.
NonStop Cluster I/O Protocols
In NSMQ, the NonStop Cluster I/O Protocols (CIP) subsystem acts as a medium of interface between
the brokers and JMS clients.
8 Introduction to NSMQ
Page 9

For more information about CIP, see the Cluster I/O Protocols (CIP) Configuration and Management
Manual.
SQL/MX database
NSMQ uses SQL/MX database for persisting messages and achieving fault tolerance. For more
information, see “Fault tolerance” (page 12).
For more information, see the NonStop SQL/MX documentation.
Features of NSMQ
The features of NSMQ are as follows:
• Clustering — A mechanism where you configure multiple brokers to form a cluster. In such an
environment, all brokers are networked and if a broker fails, the load is distributed among
the remaining brokers in the cluster. In clustering, multicasting and dynamic discovery is not
supported.
• Client API support — Only JMS clients are supported. C++, .NET clients are not supported.
• Persistence — Messages are stored in SQL/MX database.
• Destinations — Specifies the destinations that must be created when a broker starts. The
following destinations are supported:
◦ Queue — Queues are used for Point-To-Point messaging in first-in first-out order. Messages
are consumed from the queue in the order in which they are received. See http://
docs.oracle.com/javaee/6/tutorial/doc/bncdx.html#bnceb.
◦ Topic — Topics are used for Publish and Subscribe (Pub/Sub) messaging. The message
◦ Composite destinations — Composite destinations provide a mechanism for producers
◦ Virtual destinations — Virtual destinations provide a mechanism for publishers to broadcast
◦ Wildcards — Wildcards provide a mechanism for consumers to subscribe to multiple
Architecture
Although ActiveMQ supports various topologies to configure brokers, NSMQ supports the complete
grid topology on a NonStop system.
In this architecture, you can have multiple brokers on a NonStop node. Multiple brokers can run
on the same or different CPUs. However, HP recommends you to run brokers on different CPUs to
achieve uninterrupted availability.
Figure 1 (page 10) illustrates the architecture of NSMQ.
producer is referred as Publisher and the message consumer is referred as Subscriber.
See http://docs.oracle.com/javaee/6/tutorial/doc/bncdx.html#bnced.
However, the durable subscription of messages for topics is not supported in NSMQ.
to send the same message to multiple destinations at the same time. See http://
activemq.apache.org/composite-destinations.html.
messages through a topic to a pool of receivers subscribing through queues. See http://
activemq.apache.org/virtual-destinations.html.
destinations at the same time. See http://activemq.apache.org/wildcards.html.
Features of NSMQ 9
Page 10
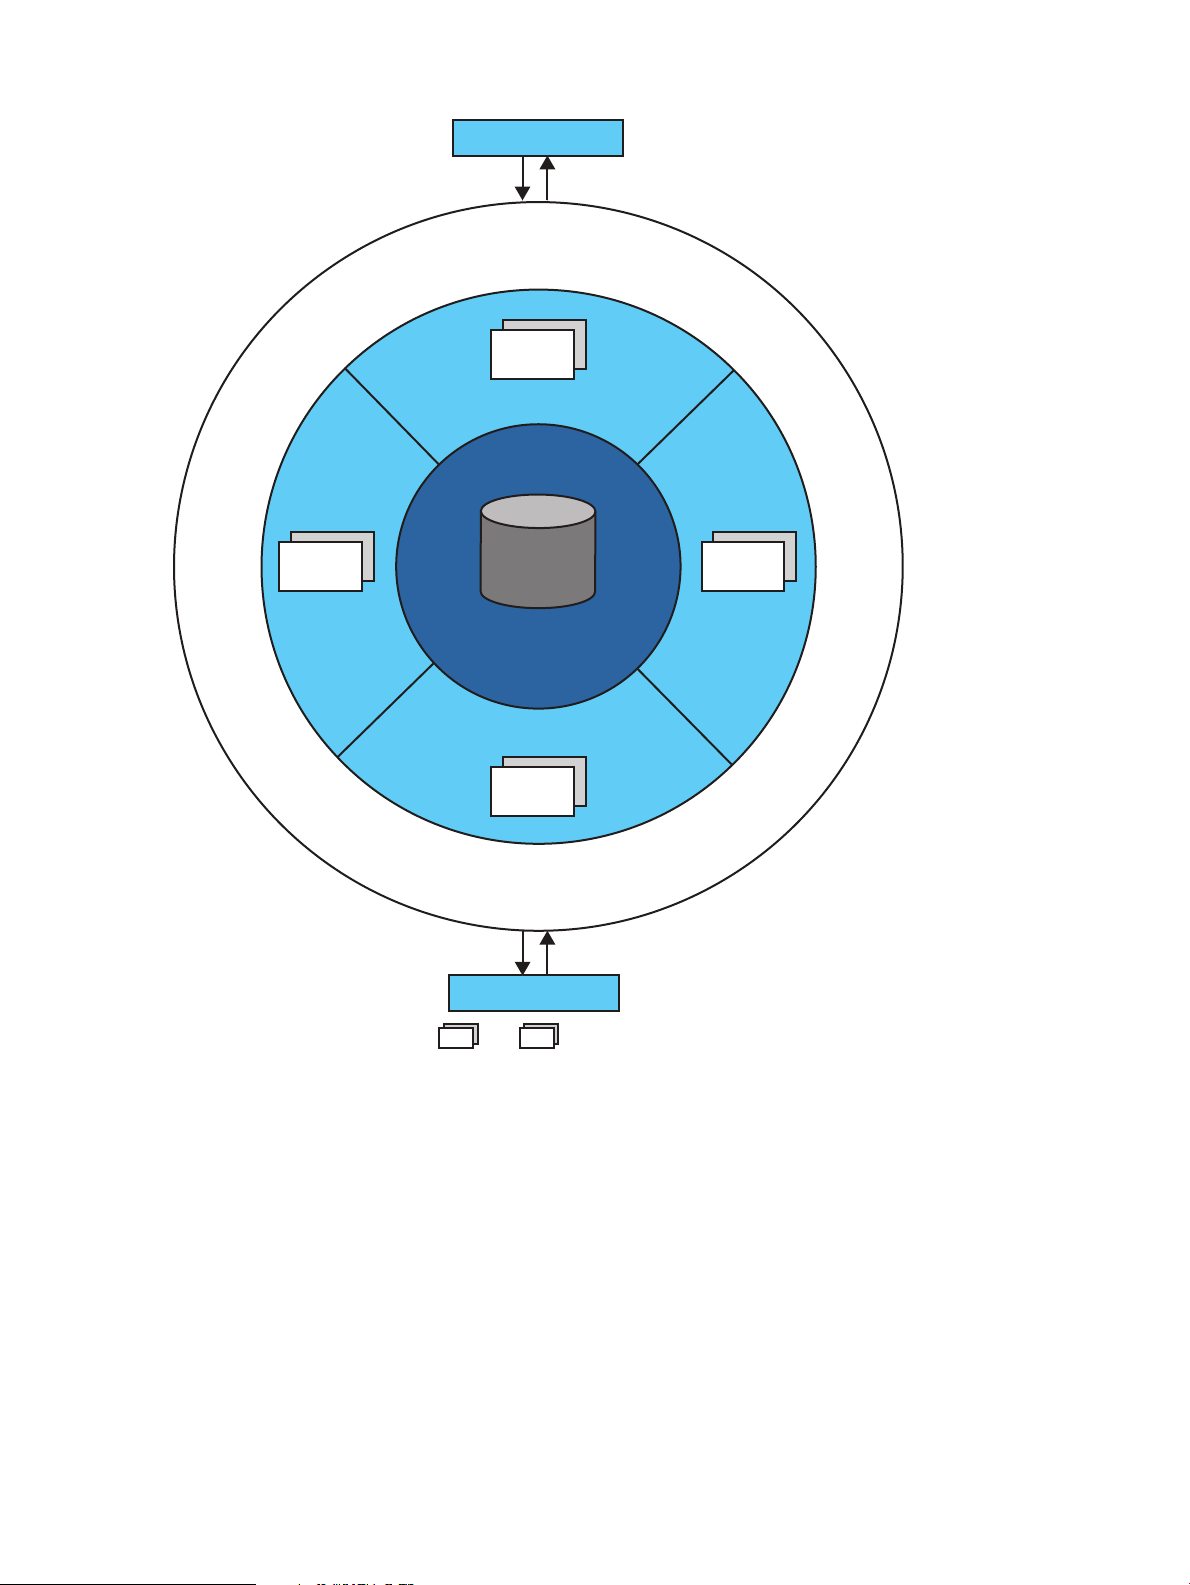
Figure 1 Architecture of NSMQ
N
o
n
S
t
o
p
C
l
u
s
t
e
r
I
/
O
P
r
o
t
o
c
o
l
s
t
c
p
:
/
/
<
H
o
s
t
n
a
m
e
I
P
A
d
d
r
e
s
s
>
:
<
P
o
r
t
N
o
.
>
SQL/MX Database
Producer
Consumer
Bn
B1
B3
B2
Bn
B1
: Brokers
......
SQL/MX database:
SQL/MX database is used as a data store for storing messages. The brokers connect to the database
to store and retrieve messages.
Cluster:
The cluster is made up of network of brokers and is used for handling additional load.
All the brokers are connected to each other using a duplex network connector to exchange
information and states of each broker. These brokers listen on a local loopback address with
different port numbers and are used exclusively for clustering.
In such a cluster, all the messages are accessible to all the brokers. A new broker can be introduced
by adding the broker to the local grid without disturbing the existing cluster, thus achieving scalability
(page 11).
Every broker is a combination of master and slave broker and is configured to run as two TS/MP
server classes — one process each for a master instance and a slave instance. The master instance
10 Introduction to NSMQ
Page 11
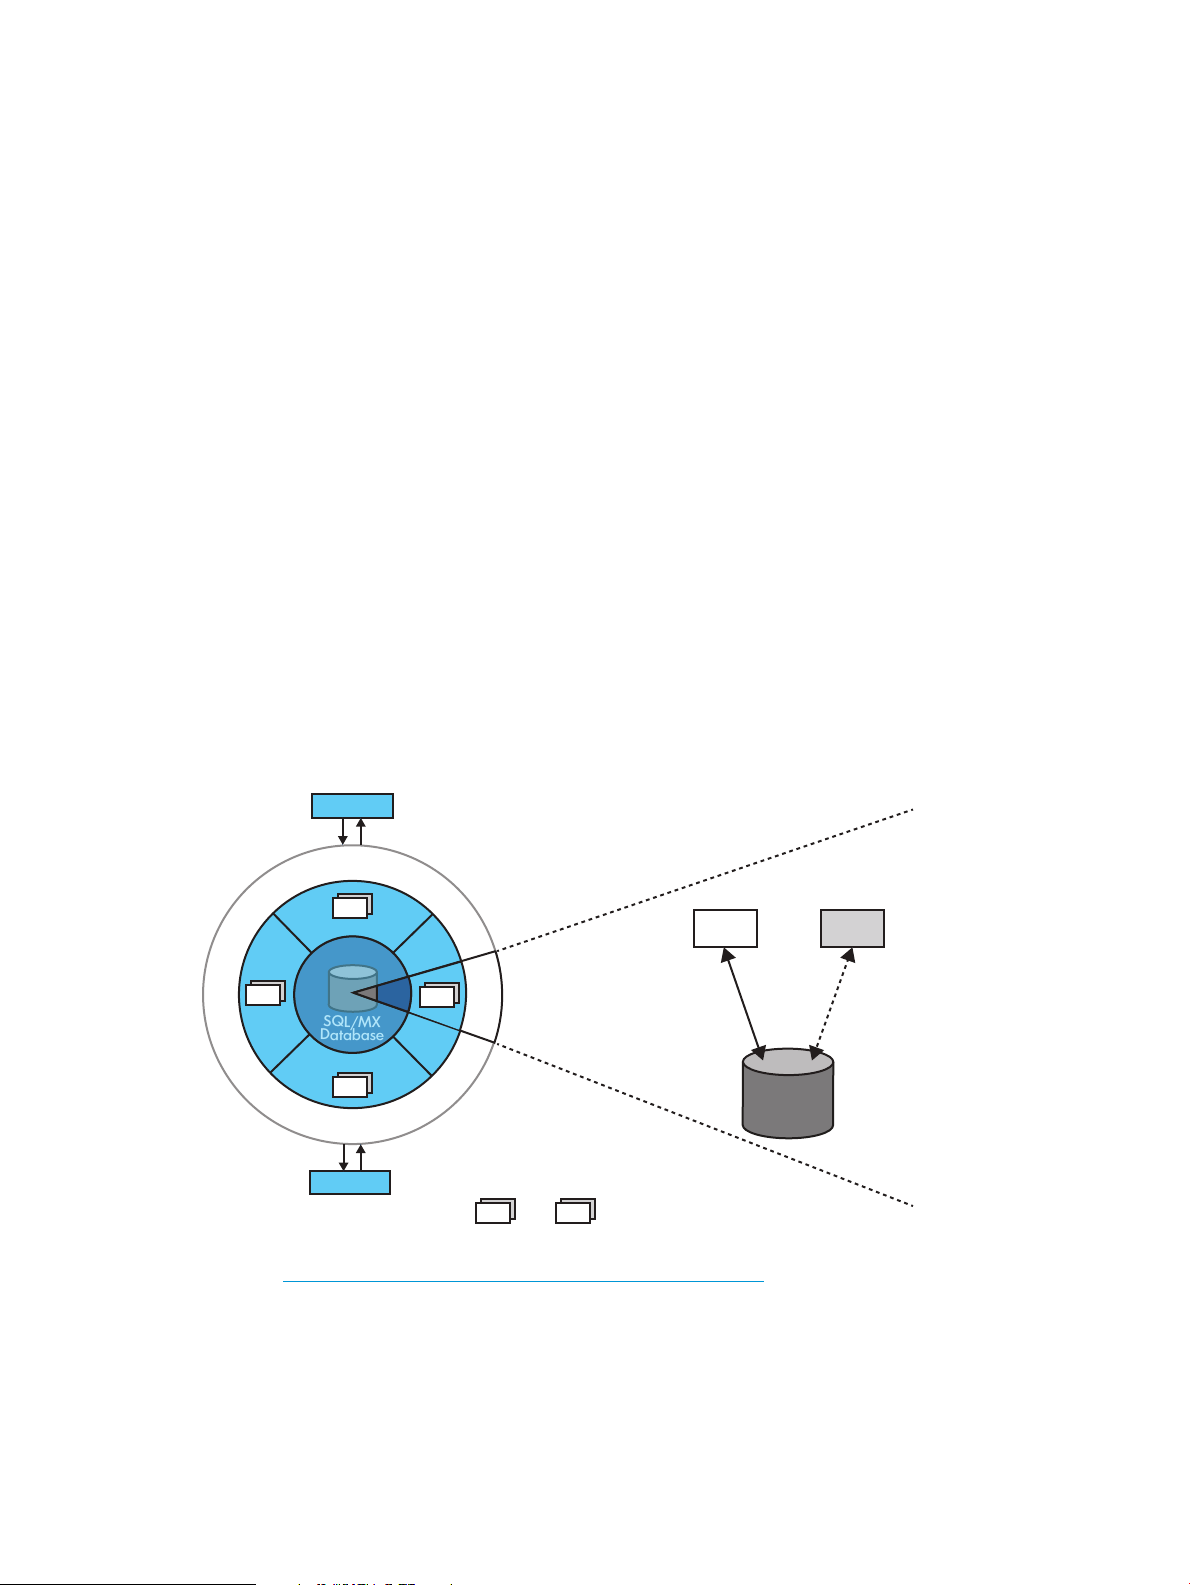
is active and slave instance is on stand by. When the master instance fails, the slave instance takes
N
o
n
S
t
o
p
C
l
u
s
t
e
r
I
/
O
P
r
o
t
o
c
o
l
s
Producer
Consumer
Bn
B1
B3
B2
SQL/MX
Database
t
c
p
:
/
/
<
H
o
s
t
n
a
m
e
I
P
A
d
d
r
e
s
s
>
:
<
P
o
r
t
N
o
.
>
B2 B2’
Master Slave
SQL/MX
Database
B2
Bn
B1
: Brokers
......
over the responsibilities of the master (page 11).
Cluster I/O Protocols (CIP) subsystem:
Every broker in the cluster starts a transport connector configured for parallel I/O using the CIP
subsystem to listen on the same IP address and port. All client applications connect to this port.
This subsystem facilitates load balancing of the connections across all the brokers.
Producer:
Producers are the JMS clients that send messages.
Consumer:
Consumers are the JMS clients that receive messages.
High availability
In NSMQ, high availability is achieved using a master-slave configuration.
All the brokers in the master-slave cluster have the same configuration and compete to acquire the
lock on a data file during startup. The broker acquiring the lock starts all the network and transport
connectors and becomes the master, and the remaining instances become slave brokers. When
the master broker fails or shuts down, one of the slaves acquire the exclusive lock on the data file
and becomes the new master broker. The clients can use the failover protocol for automatic
reconnection to the new master broker.
The auto restart feature of TS/MP ensures that the failed master process is restarted again. The
auto restarted master process becomes the new slave, thus ensuring high availability is achieved.
Figure 2 (page 11) represents a master-slave configuration in NSMQ.
Figure 2 Master-slave configuration
Scalability using cluster of brokers
See also http://activemq.apache.org/jdbc-master-slave.html.
In NSMQ, scalability can be achieved by adding brokers to the cluster to handle additional load.
Any number of brokers can be added or removed from the cluster without affecting the services.
Proper removal of the broker requires the cluster to be brought down. When more brokers are
added, the CIP subsystem facilitates load balancing across all brokers. Since every broker is
connected to every other broker in the cluster, all the messages are accessible to all the brokers.
If a broker shuts down or fails, the load is balanced among the remaining brokers in the cluster.
High availability 11
Page 12
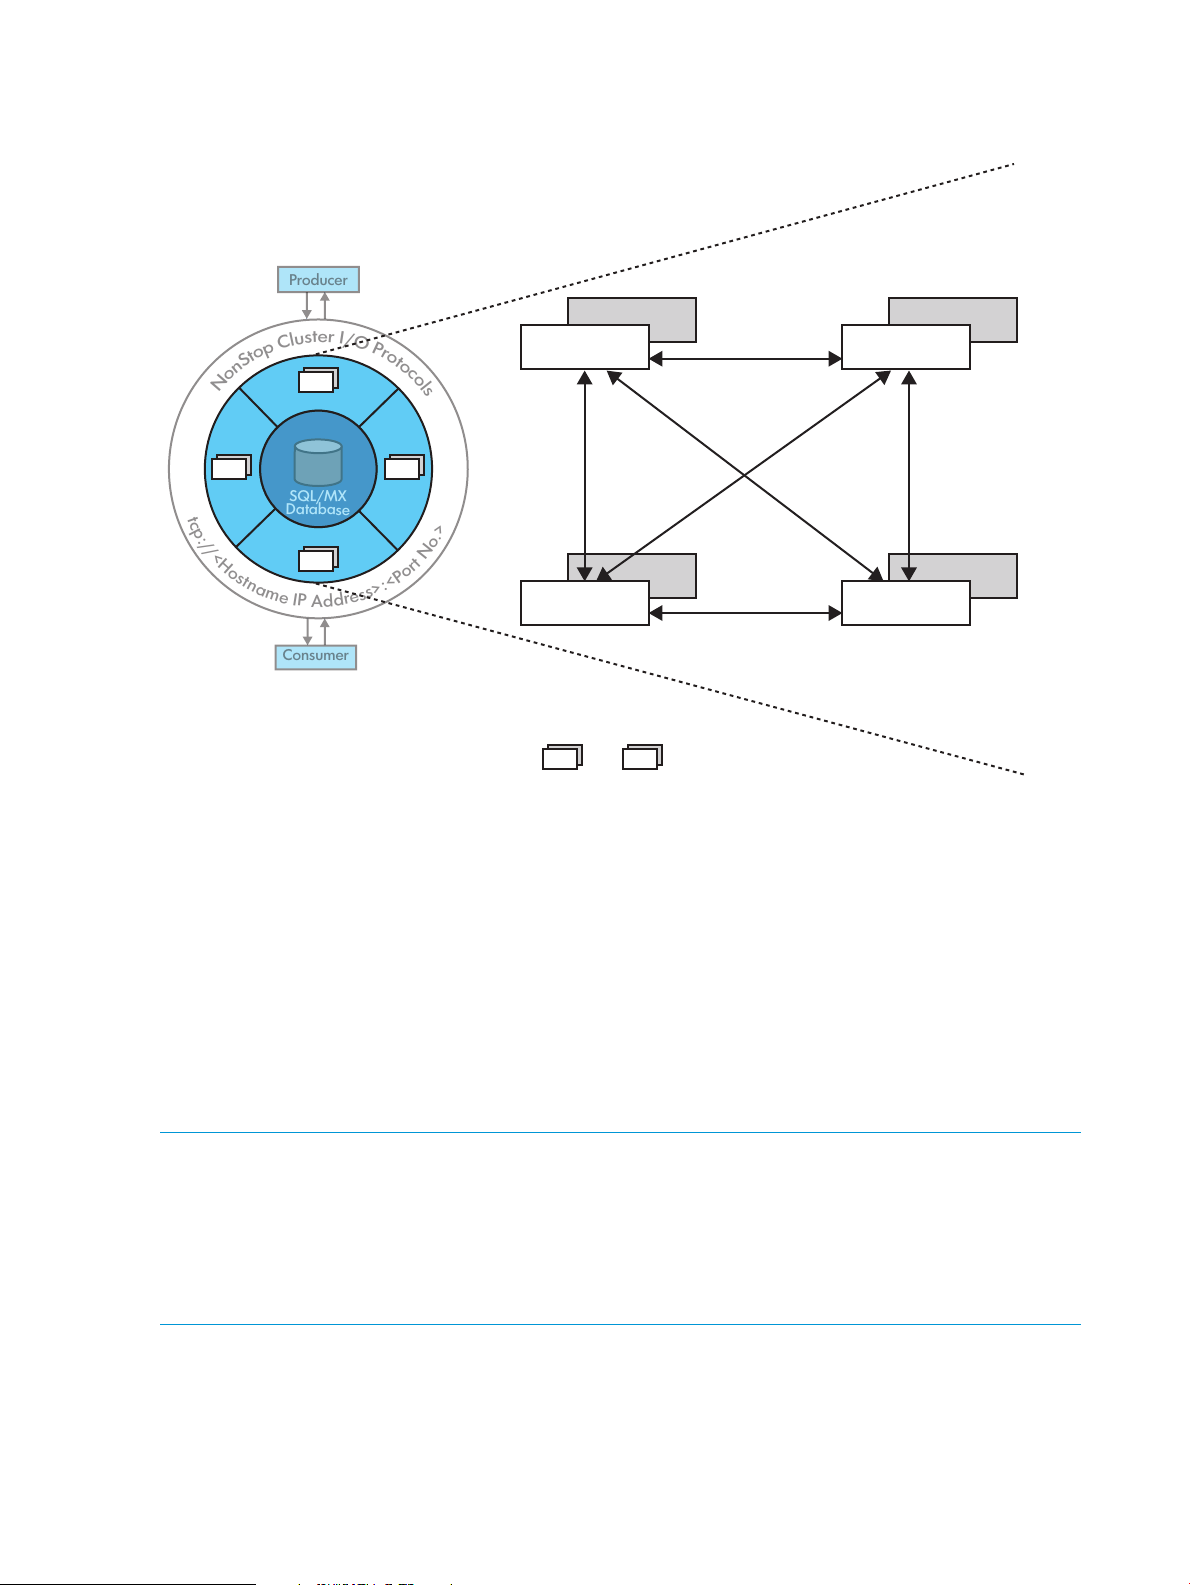
Figure 3 (page 12) represents a cluster of brokers.
N
o
n
S
t
o
p
C
l
u
s
t
e
r
I
/
O
P
r
o
t
o
c
o
l
s
Producer
Consumer
Bn
B1
B3
B2
SQL/MX
Database
B1
Local Host: 6161
B1’
B2
Local Host: 6162
B2’
Bn
Local Host: 616n
Bn’
B3
Local Host: 6163
B3’
t
c
p
:
/
/
<
H
o
s
t
n
a
m
e
I
P
A
d
d
r
e
s
s
>
:
<
P
o
r
t
N
o
.
>
Bn
B1
: Brokers
......
Figure 3 Cluster of brokers
Fault tolerance
Fault tolerance is the ability to prevent a system from failure when an unexpected problem occurs.
In NSMQ, fault tolerance is achieved by enabling persistence.
Persistence is a feature used by applications to achieve fault tolerance irrespective of a cluster
start, stop, or restart. NSMQ provides fault tolerance by persisting messages to the SQL/MX
database. Messages are stored in a database before they are dispatched. If a broker fails, the
undelivered messages are retrieved from the database and rerun when the broker restarts. The
messages are deleted from the database after the message delivery is confirmed.
NSMQ communicates to the database using JDBC T2 driver version 3.2 or later (T1275R32) for
persisting messages to the database. NSMQ requires SQL/MX 3.2 or later versions for providing
this feature.
NOTE:
• By default, ActiveMQ uses a separate database for every broker in a cluster. Managing
multiple databases is complex as each broker has its own database. To overcome this, NSMQ
persists messages from different brokers to a single database (that is, a single set of tables).
Message flow in a cluster
• If persistence is not enabled, then there is no master-slave configuration. Also, NSMQ will not
This section illustrates with an example how a message flows in a cluster of brokers.
In a cluster of brokers, a message produced at any broker is available to any consumer connected
to any other broker.
12 Introduction to NSMQ
be fully JMS 1.1 compliant.
Page 13
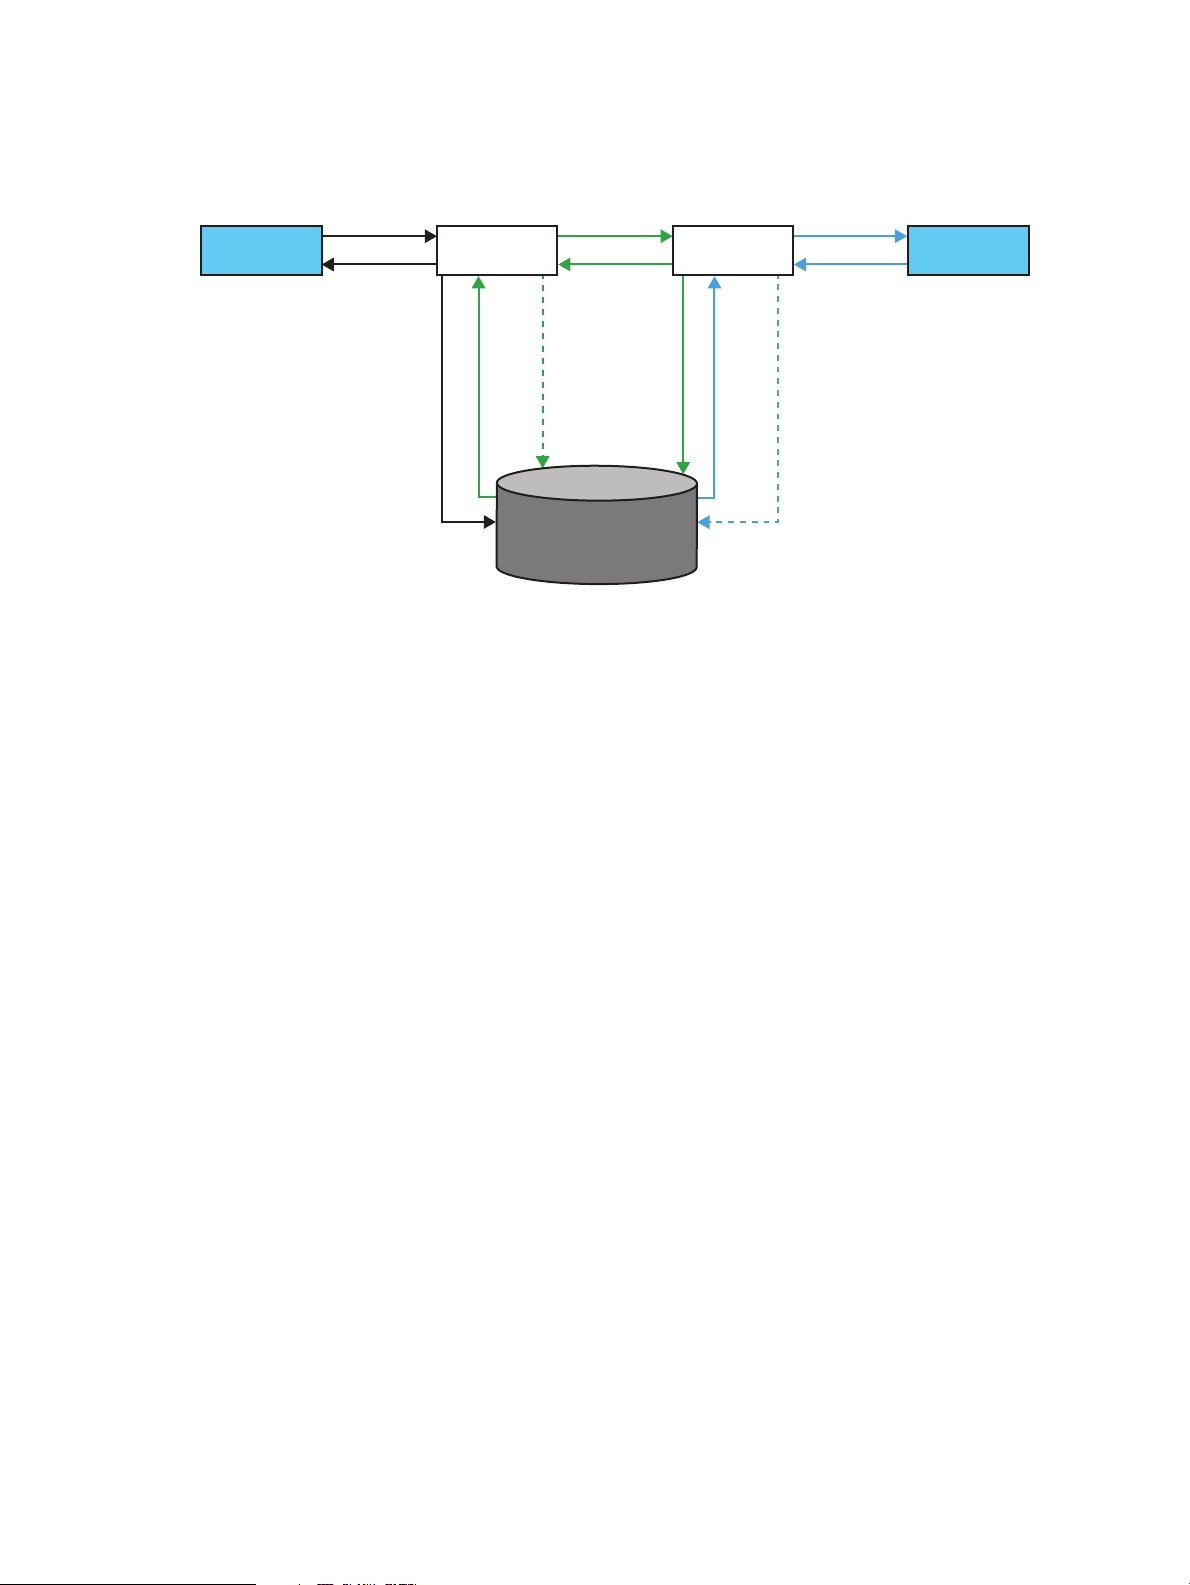
Let us consider two brokers, Broker1 and Broker2, set up to form a cluster. These brokers are
1. Send
3. Acknowledge
5. Send
7. Acknowledge 11. Acknowledge
10. Send
2. Store
4. Fetch
8. Update
6. Store
9. Fetch
12. Update
Producer Broker 1 Broker 2 Consumer
SQL/MX
Database
connected locally by a network connector. The clients (producers and consumers) connect to the
cluster via the CIP subsystem.
Figure 4 Message flow in a cluster
The message flow through the cluster can be explained as follows:
• A producer connects to a queue or topic in a cluster.
• The CIP subsystem forwards the connection to Broker1.
• A consumer connects to the cluster.
• The CIP subsystem forwards the connection to Broker2. The consumer is subscribed to the
same queue or topic to which the producer is connected.
• The producer sends a message (sequence 1 in Figure 4 (page 13)).
• Broker1 stores the message in the database and sends an acknowledgement to the producer
(2 and 3).
• Since Broker2 has a duplex connection with Broker1, Broker2 subscribes to the message.
• Broker1 fetches the message and sends it to Broker2 (4 and 5).
• Broker2 stores the message in the database and sends the acknowledgement to Broker1 (6
and 7).
• Broker1 marks the message as consumed and updates the database (8).
• Broker 2 fetches the message and dispatches it to the consumer through the CIP subsystem (9
and 10).
• Upon receiving the message, the consumer acknowledges the receipt of the message. Broker2
updates the database by marking the message as consumed and deletes it (11 and 12).
Message flow in a cluster 13
Page 14

2 Installation and configuration
This chapter describes the steps to install NSMQ, configure clusters and brokers, and uninstall
NSMQ.
Pre-requisites
Before getting started, ensure that you have the following software installed:
Table 1 Software to be installed on the NonStop system
For more information:Software
See the SQL/MX 3.2.1 Installation and Upgrade Guide.SQL/MX database 3.2.1
See the JDBC Type 2 Driver Programmer's Reference for SQL/MX Release 3.2.JDBC/MX Type 2 driver 3.2 or later
See the NonStop Server for Java 6.0 Programmer's Reference manual.NSJ 6 or later
See the TS/MP 2.5 Management Programming Manual.TS/MP 2.5
Installing NSMQ from the CD
This section includes the following topics:
• Running the IPSetup program
• Running the setup script
Running the IPSetup program
The NSMQ software is available on the NSMQ product CD. Use the IPSetup program to move
the NSMQ software from the product CD to a NonStop system.
To run the IPSetup program, perform the following steps:
1. Double-click the CD drive to open the product CD and then click the Setup.exe file.
The Independent Products Setup screen appears.
2. Click View the Readme File option.
The readme.txt file opens.
3. Review the information provided in the readme.txt file and go back to the Independent
Products Setup screen.
4. Click Run IPSetup option to launch IPSetup.
The Welcome screen appears.
14 Installation and configuration
Page 15
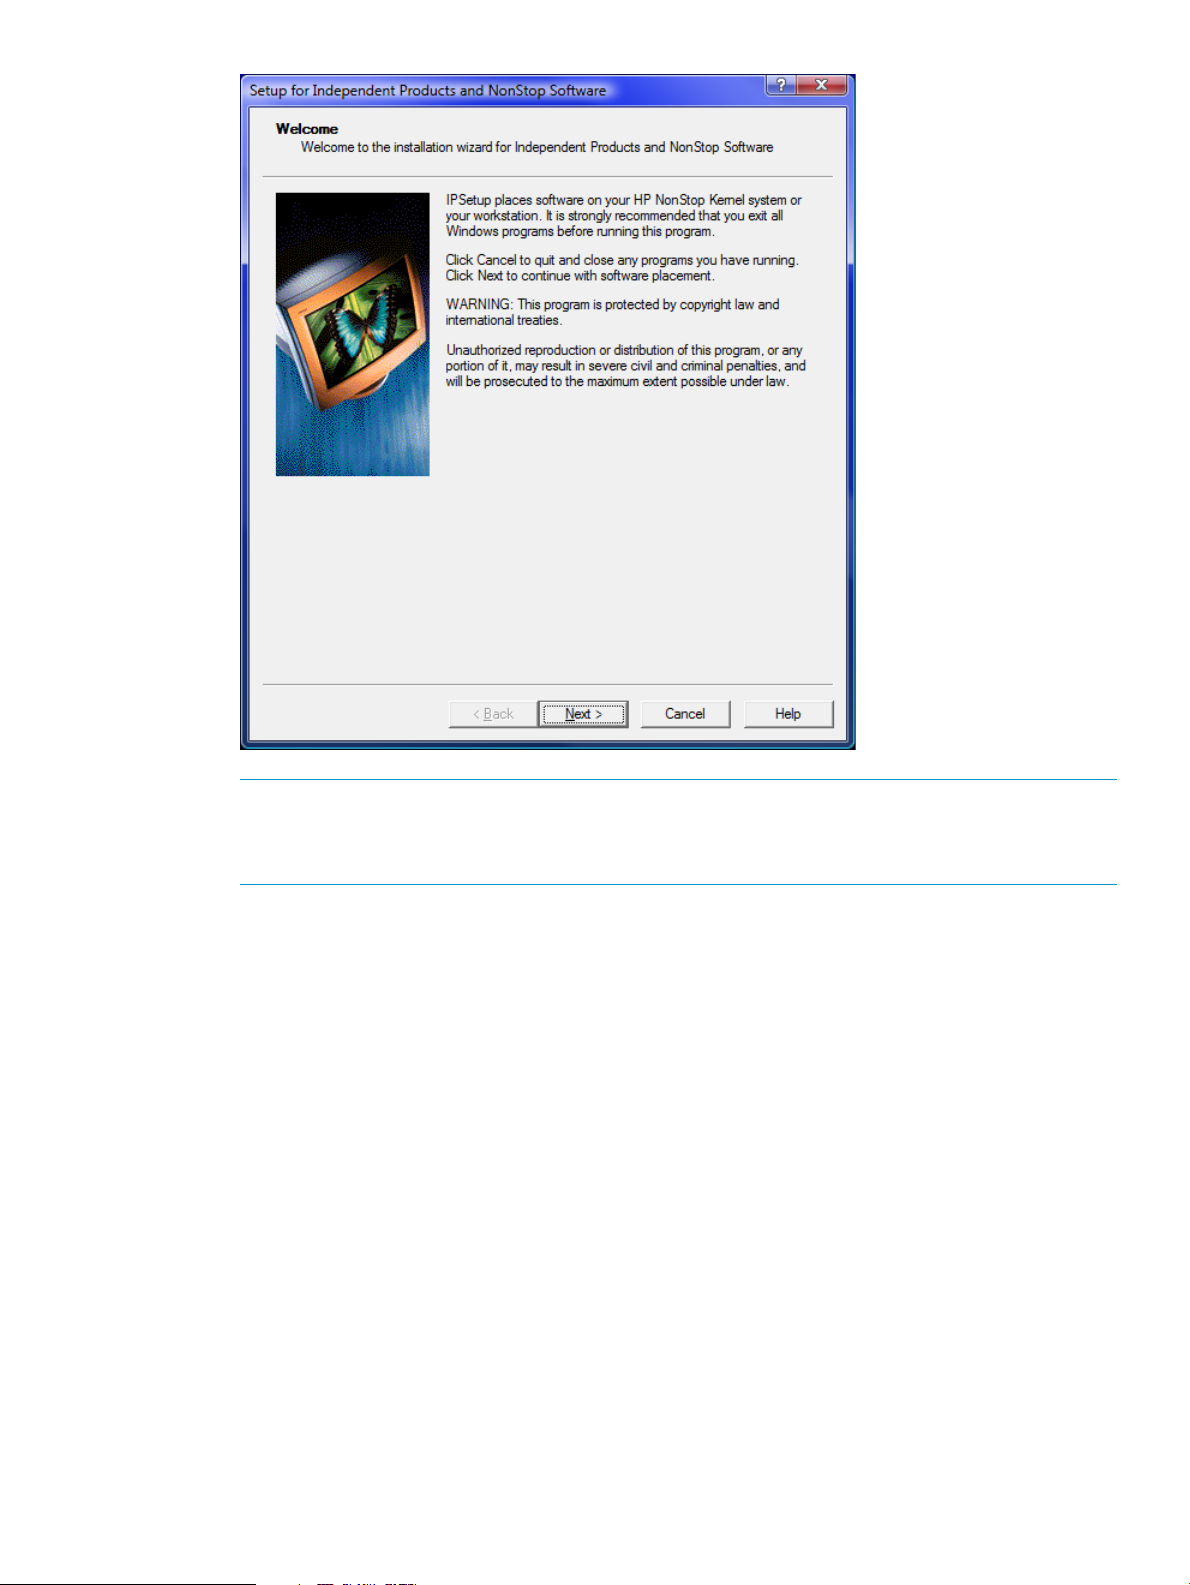
NOTE: HP strongly recommends that you exit all Windows applications before running the
IPSetup program.
You can click Cancel to exit the IPSetup program at anytime during the setup.
5. Click Next.
The Software License Agreement screen appears.
Installing NSMQ from the CD 15
Page 16
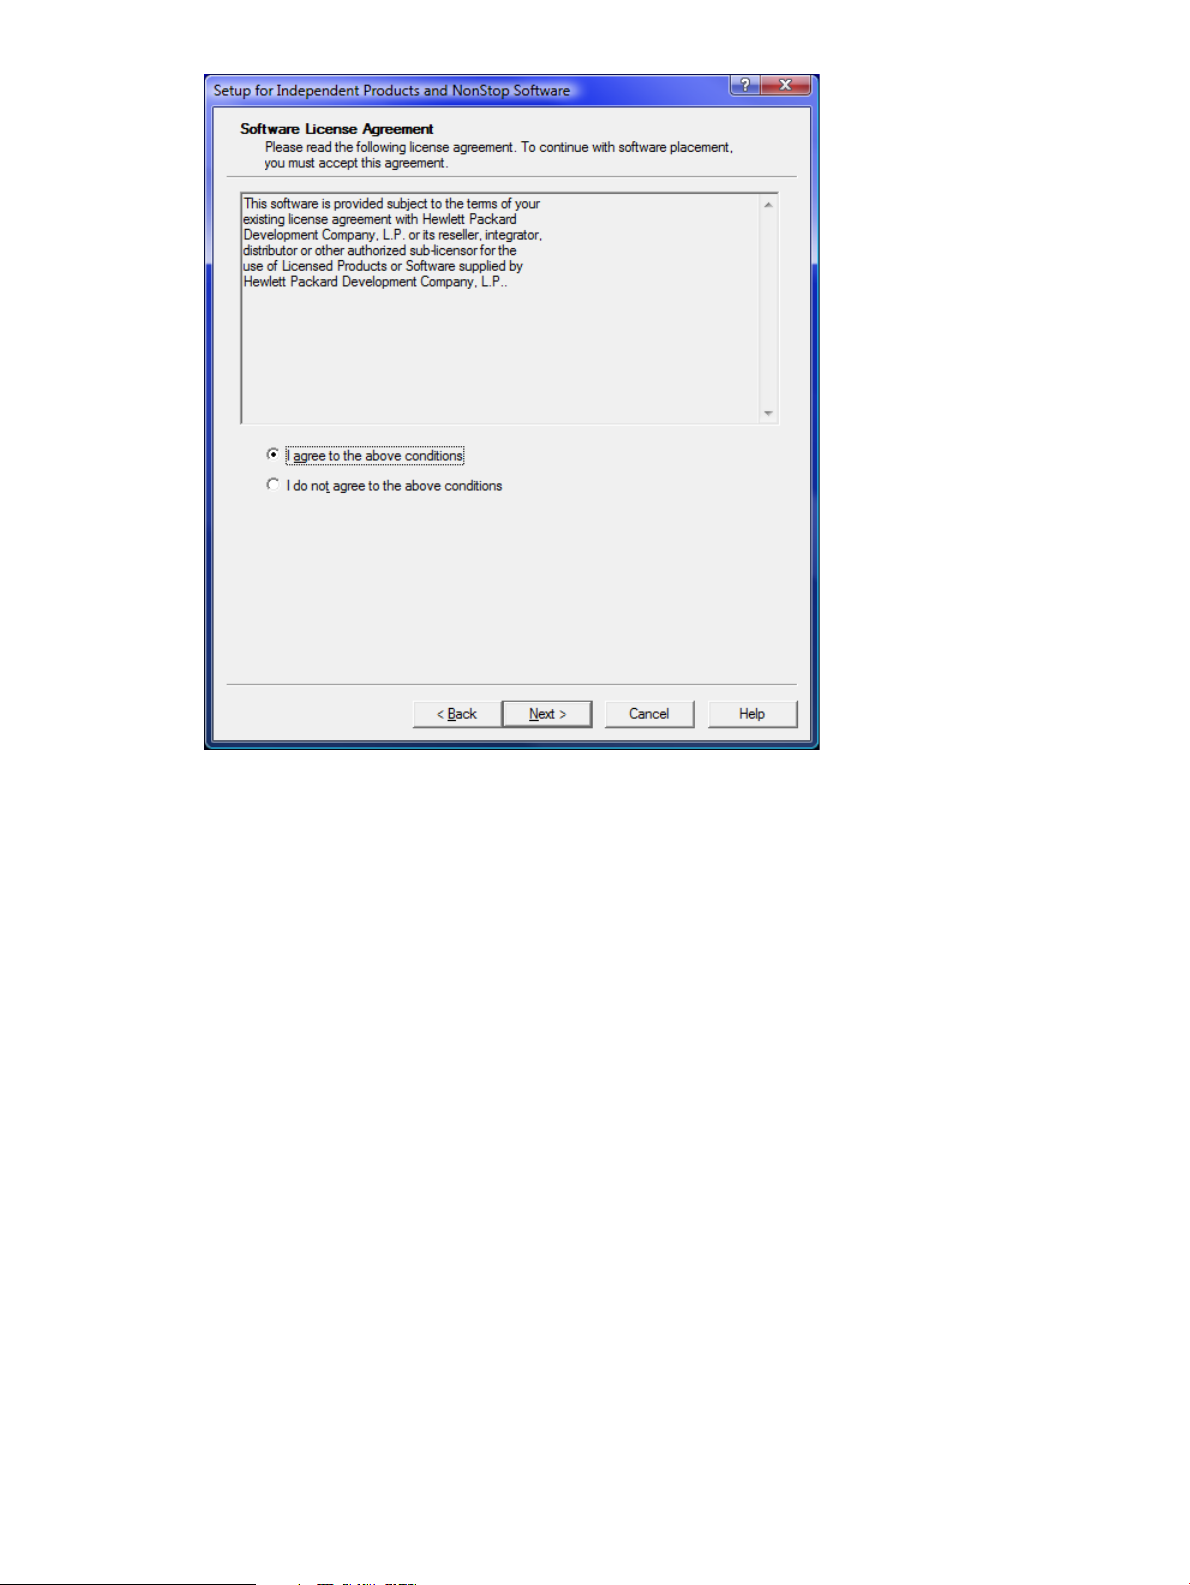
6. Read the License Agreement, accept the terms of the agreement by selecting I agree to the
above conditions, and click Next.
The Placement Options screen appears.
16 Installation and configuration
Page 17
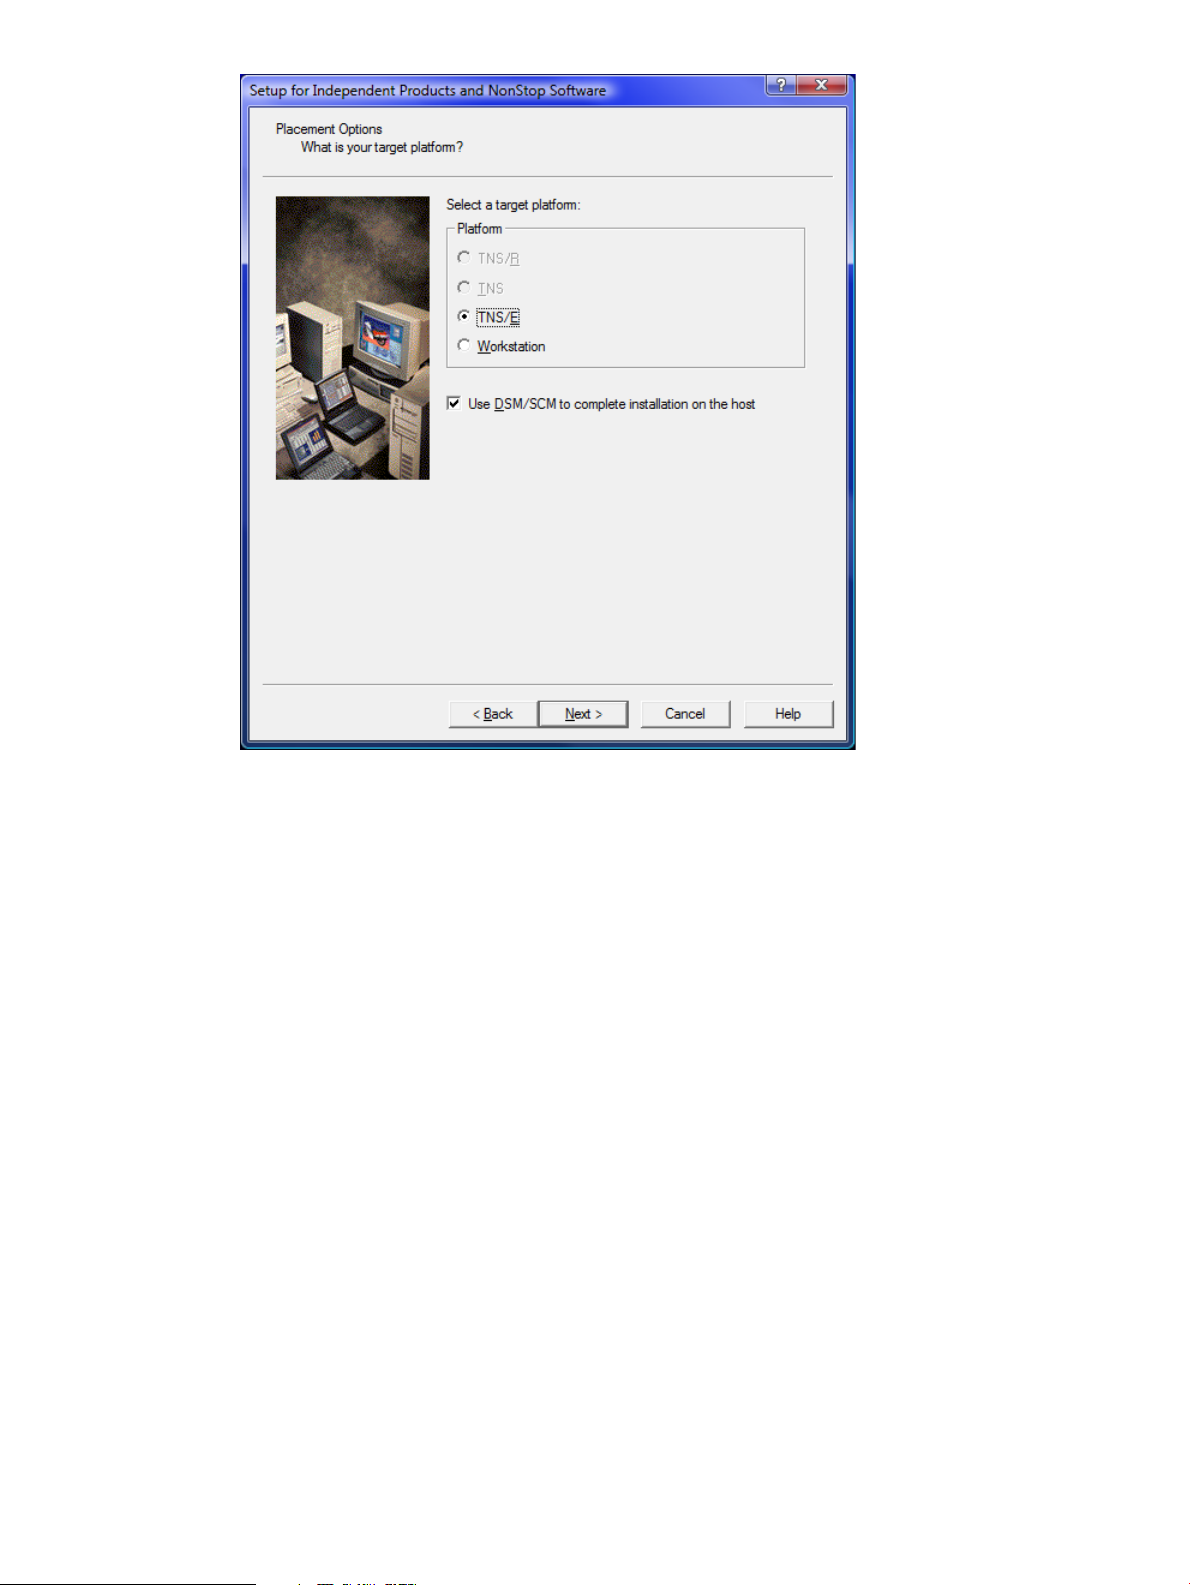
7. Select one of the following as a target platform for your IP software:
a. TNS/E for H-series and J-series.
b. Workstation to install the IP on your workstation.
c. If you want to launch the DSM/SCM planner interface after completing the IPSetup
program, select the Use DSM/SCM to complete installation on the host check box.
8. Click Next.
The Product Selection screen appears.
Installing NSMQ from the CD 17
Page 18
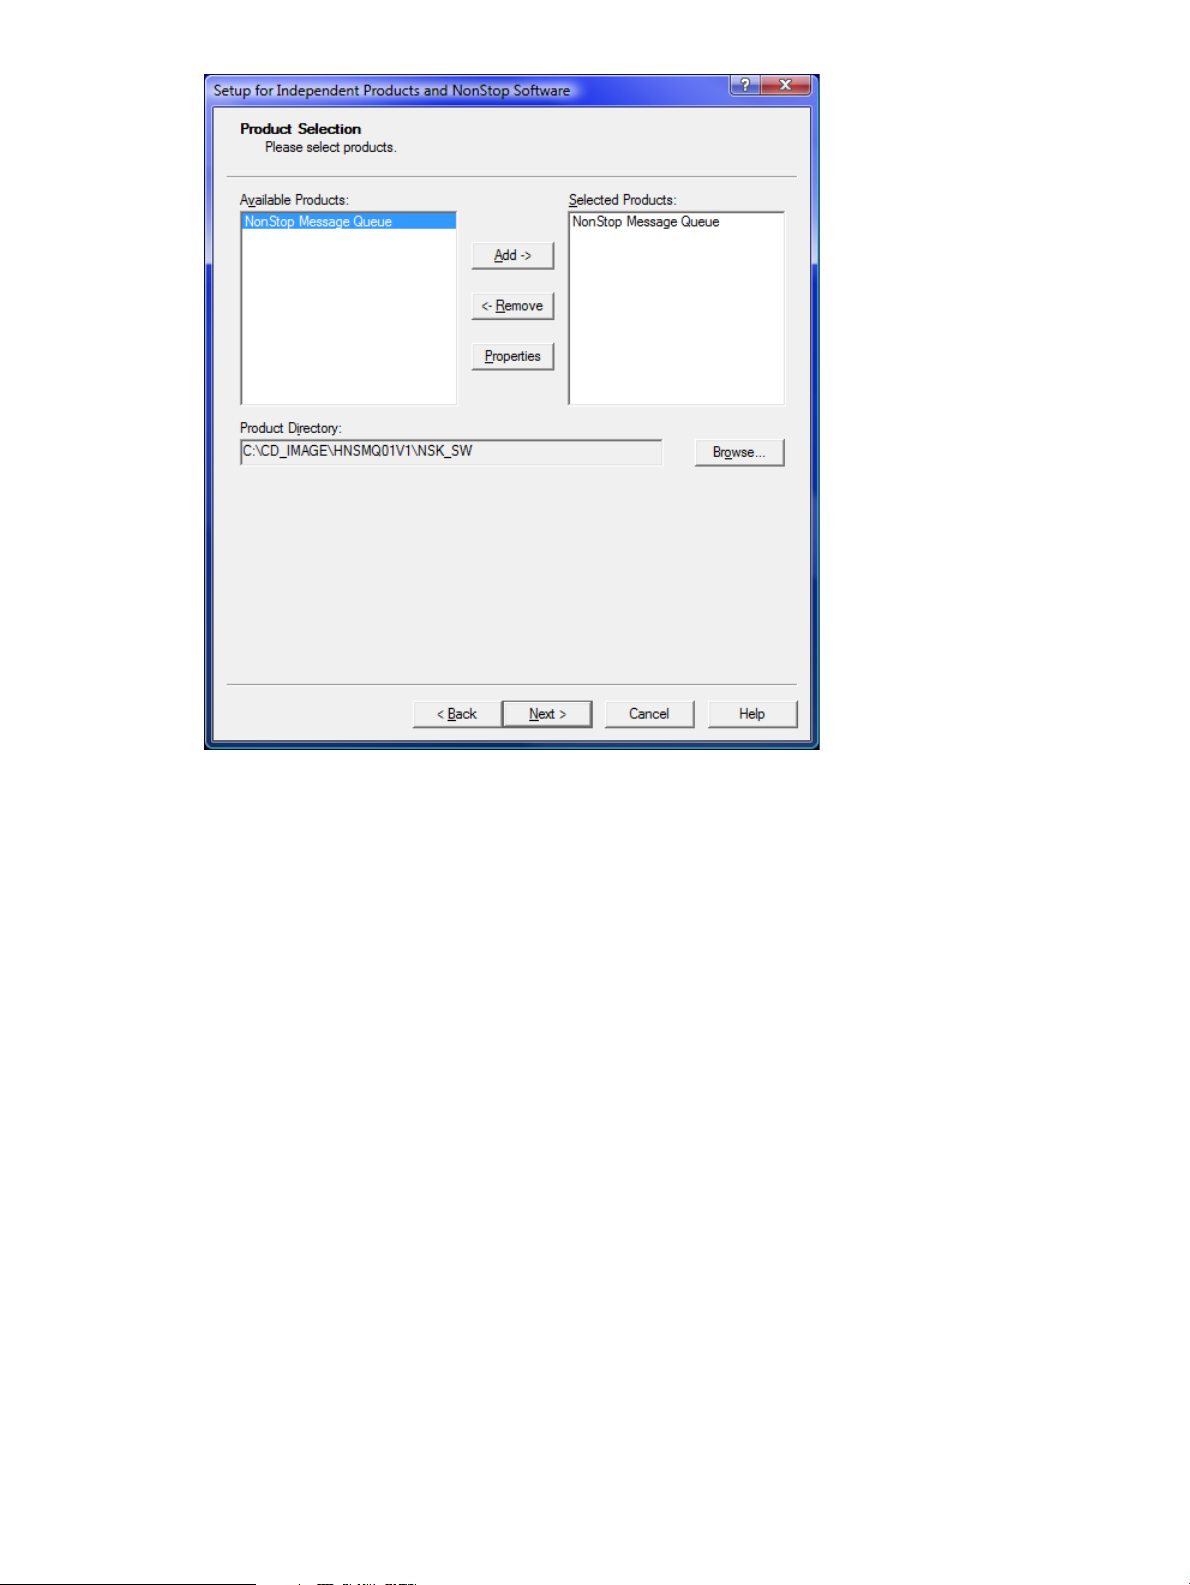
9. From the Available Products list, select NonStop Message Queue and click Add-> to move it
to the Selected Products list.
10. Click Next.
The Host Information screen appears.
18 Installation and configuration
Page 19
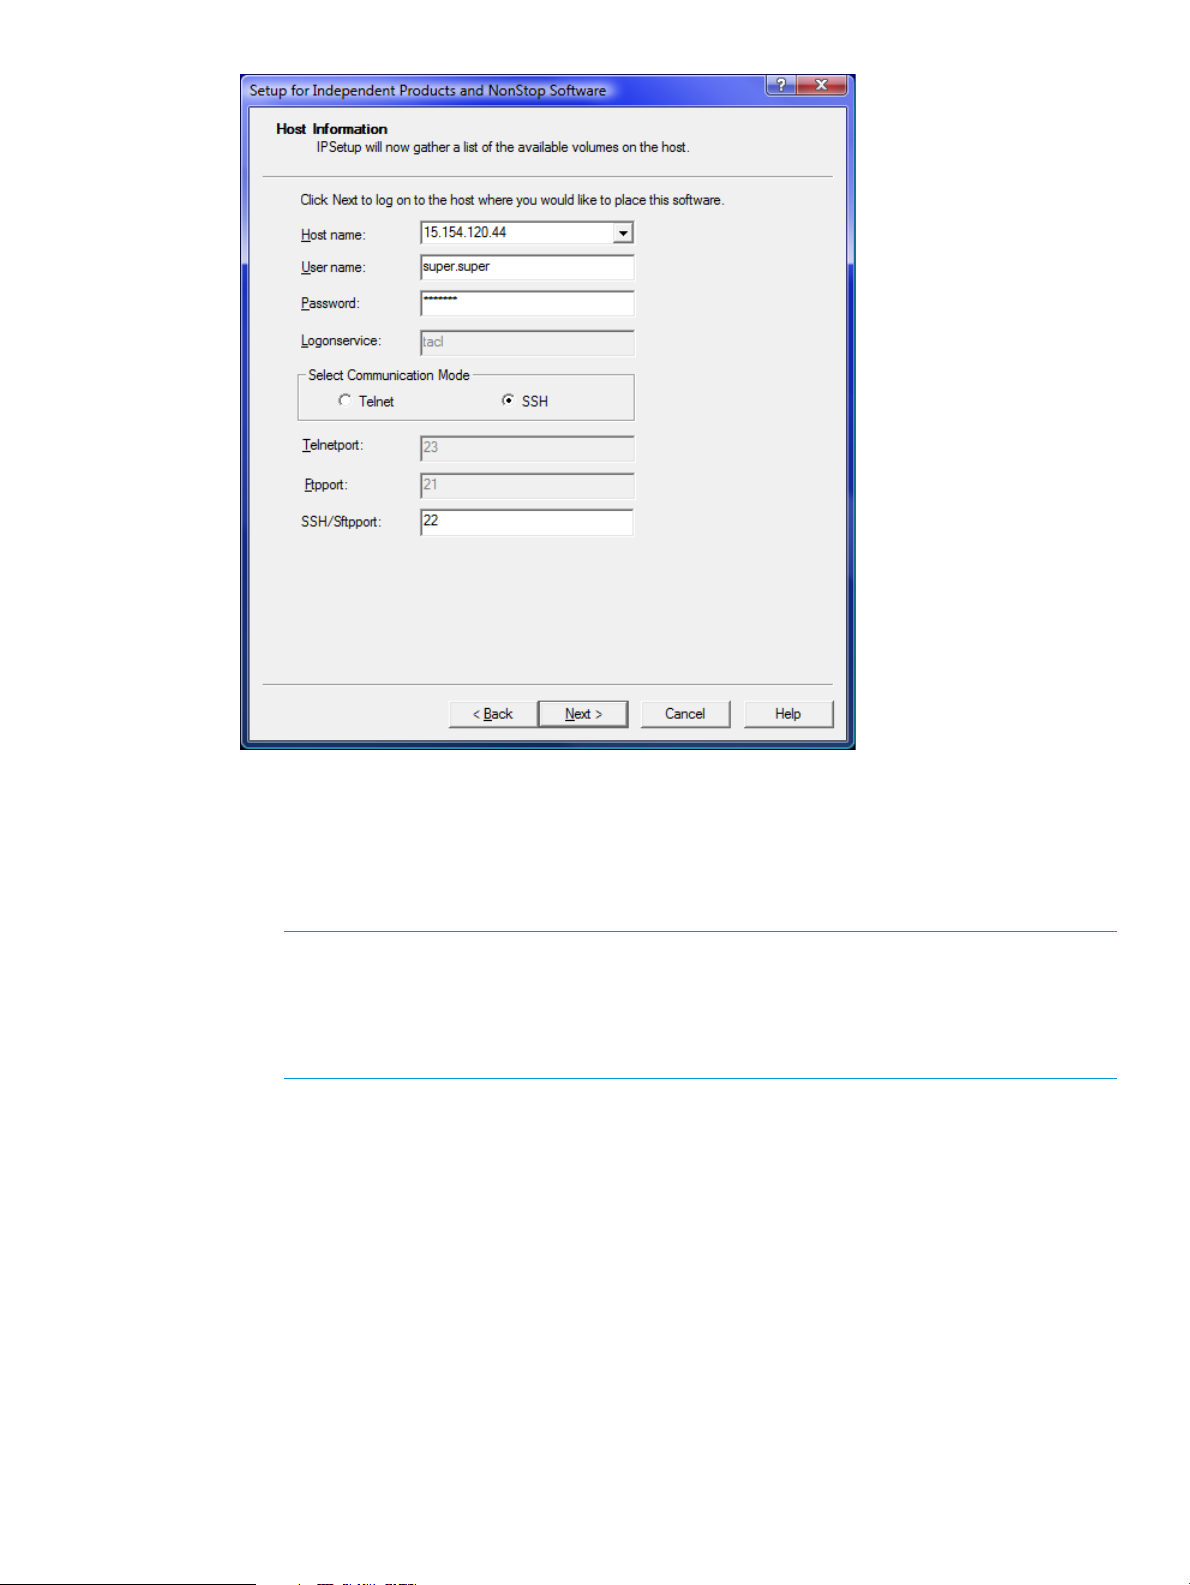
11. Perform the following steps to log on to the host:
a. In the Host name box, select from the list or type the IP address of the host where you
want to place the selected product.
b. Enter the user name and password.
c. Select the communication mode.
NOTE: Starting with T0316H01^AAK (version 4.1.00.0), IPSetup supports two modes
of communication: Telnet and Secure SHell (SSH). To use the SSH mode of communication,
ensure that the SSH server is configured correctly and is running on the NonStop server.
If the SSH server is not configured or not running on the NonStop server, you will not be
allowed to proceed with this mode of communication.
For a secure mode of communication, select SSH. Otherwise, accept the default Telnet,
which sends data in an unsecure mode.
For Telnet mode, enter the logon service that will call the Safeguard prompt. The default
service is TACL.
Installing NSMQ from the CD 19
Page 20
NOTE:
• HP recommends that you do not change the default service value unless it is required.
• The following are the default port numbers:
◦ SSH port — 22
◦ Telnet port — 23
◦ FTP port — 21
For additional port numbers, consult the system administrator.
d. Click Next.
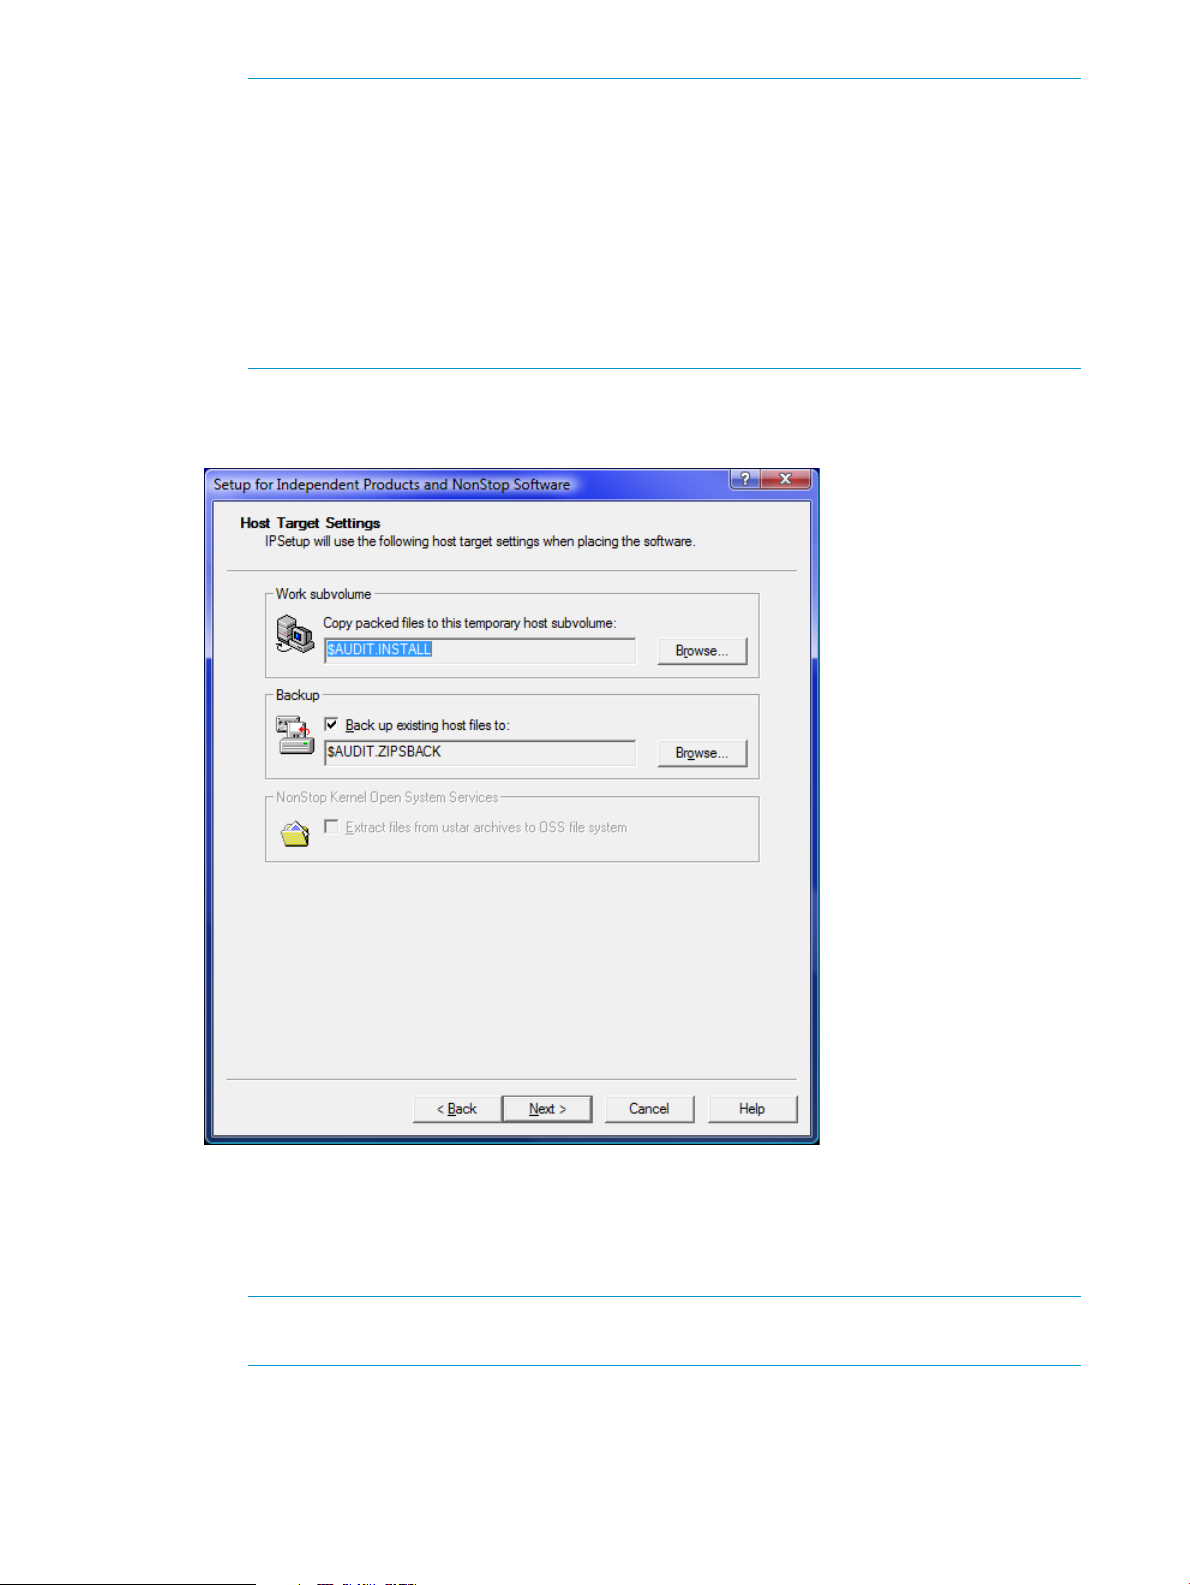
The Host Target Settings screen appears.
12. Perform one of the following:
a. Accept the default location for the work subvolume and the subvolume where the existing
files will be backed up from the work subvolume.
b. Browse to select the location for a work subvolume and backup of your choice.
NOTE: If you want to back up the existing files in the work subvolume to another
subvolume, select the Back up existing host files to check box.
The Host File Placement screen appears.
20 Installation and configuration
Page 21

13. Verify the location where the product files will be placed on the Host system and click Next.
The Placement Manifest screen appears.
Installing NSMQ from the CD 21
Page 22

14. Verify the details displayed on the Placement Manifest screen and click Next.
If you have selected the Back up existing host files to check box in the Host Target Settings
screen, IPSetup backs up any existing files to the backup subvolume. If you do not select this
check box, IPSetup purges any files in the work subvolume or in the distribution subvolume
(DSV) (and installation subvolume (ISV) for IPs) with names identical to files that are about to
be placed.
IPSetup then transfers the installation files to the work subvolume and creates DSVs and ISVs.
It displays the Placement Status screen, which shows the progress throughout the entire
placement process.
22 Installation and configuration
Page 23

After the installation files are transferred, the Placement Complete screen appears.
Installing NSMQ from the CD 23
Page 24

15. Click Finish to complete the IPSetup program.
NOTE: To view the readme on closing the program, select the View the Readme File check
box. The IPSetup program completes and opens the readme.txt file.
The T0975PAX file is located in the volume which is specified during the IPsetup. For example,
the Host File Placement screen shot displays $AUDIT as the volume. So, the IPSetup places the
T0975PAX file in the $AUDIT.E0975H01 location.
You can extract the pax file using the command pax -rvf /G/audit/e0975h01/t0975pax
in OSS. The contents of this pax file get extracted <NSMQ base>/<version>, where <NSMQ
base> is /usr/tandem/nsmq, and version is the VPROC string
(T0975H01_31MAY2013_BASE_V01) .
After the NSMQ files are transferred to a NonStop system using the IPSetup program, complete
the procedure to install NSMQ.
Running the setup script
Run the setup script to complete NSMQ installation. You can find the script in the
<NSMQ-PAX-extracted-folder>/nsmq/T0975H01<build> directory after you unpack the
T0975PAX file. The directory contents are as follows:
README data
VERSION docs
activemq-all-5.6.0.jar example
activemqNonPersistent.template lib
activemqPersistent.template license.txt
bin samples
broker.template setup
cluster.template uninstall
24 Installation and configuration
Page 25

conf versions.txt
contents.txt
To run the setup script, perform the following steps:
1. Log on to the NonStop system.
2. Go to the location where the setup script is located and run the script.
OSS> ./setup
The following menu appears and you are prompted to enter a selection:
Please select one of the following actions:
1) Create an NSMQ installation
2) Create an NSMQ Cluster
3) Add broker to a NSMQ Cluster
4) Remove broker from a NSMQ Cluster
5) Remove a NSMQ Cluster
6) Quit Setup
Enter your selection [1]#
NOTE: You can exit the setup anytime by entering 'Quit' at any of the prompts.
3. Type 1 and press Enter.
4. You are prompted with the following questions. Enter the appropriate values.
NOTE: The prompts display the default values within the square brackets. You can either
choose the default value or enter your own value.
Enter the directory for NSMQ installation [/usr/tandem/nsmq] :
This is the path where NSMQ will be installed.
Do you want to enable the SQL/MX persistence (n or [y]):
If you enter n, persistence will not be enabled for your setup. However, if you want to enable
persistence at a later time, contact the HP Support personnel.
Enter the directory for JDBC/MX jar and library files
[/usr/tandem/jdbcMx/T1275R32/lib/] :
This is the path where the JDBC/MX jar and library files are installed.
Enter the directory for NonStop(tm) Server for Java(tm)
[/usr/tandem/nssjava/jdk160_h60]:
This is the path where the NonStop Server for Java is installed.
Do you want to proceed with the installation (n or [y]):
5. Type y or press Enter. The required files get copied to the system and the following message
is displayed:
Successfully copied the required contents to <installation_directory>,
where <installation_directory> is the location where NSMQ gets installed.
If you do not enable SQL/MX persistence, the installation is complete at this step and you will
see the Installation complete message.
Installing NSMQ from the CD 25
Page 26

6. If you entered y to the Do you want to enable the SQL/MX persistence (n or
[y]): question, the installation continues and you are prompted to enter the schema details.
Enter the catalog name to be used :
This is the catalog where you want to create the schema.
Enter the schema name to be used :
This is the schema to be created for the specified catalog.
Do you want to create the catalog and schema?, Enter (y or [n]):
Type y and press Enter if you want to create the new catalog and schema. If you enter y, you
are prompted to enter the location for the catalog.
Enter the location for catalog. (e.g. $SAS1) :
This is the volume where the catalog gets created.
Enter the location for ACTIVEMQ_MSGS table (e.g. $SAS1) :
This is the volume where ACTIVEMQ_MSGS table gets created.
Enter the location for ACTIVEMQ_ACKS table [$SAS1] :
This is the volume where ACTIVEMQ_ACKS table gets created.
Enter the location for BLOB_DATA table [$SAS1] :
This is the volume where BLOB_DATA table gets created.
After the prompts are entered, if the schema creation is successful, the following message is
displayed:
Created schema in SQL/MX for NSMQ
Installation complete
If the schema creation fails, the following message is displayed:
There was an error while creating NSMQ schema.
Please check /tmp/<install_log>.log for more details.
Do you want to try again?(n or [y]):
If you type y, you will be prompted to re-enter the schema details.
If you type n, the installation will exit.
Customizing NSMQ installation
You can customize NSMQ installation according to your requirements. The following list provides
the various methods of customizing your NSMQ installation:
• “Using 64-bit NSJ7” (page 26)
• “Configuring the JDBC connection pool-size” (page 27)
• “Configuring the JRE heap values” (page 27)
• “Configuring SSL” (page 44)
Using 64-bit NSJ7
Install NSMQ and perform the following steps after adding brokers to a cluster, but before starting
the cluster or brokers:
1. Open a TACL prompt.
2. Use the PATHCOM program to modify the NSMQ brokers as follows:
a. Type PATHCOM $<cluster_name> and press Enter.
b. Change the Java program of the brokers using the ALTER SERVER command.
For example, if you have added two brokers, BRK1 and BRK2, enter the following
commands:
26 Installation and configuration
Page 27

ALTER SERVER BRK1-M, PROGRAM
<NSJ7_installation>/nssjava/jdk170_h70/bin/oss64/java
ALTER SERVER BRK1-S, PROGRAM
<NSJ7_installation>/nssjava/jdk170_h70/bin/oss64/java
The above lines sets the JAVA program of the broker BRK1. Similarly, for changing the
JAVA program for BRK2, enter the following commands:
ALTER SERVER BRK2-M, PROGRAM
<NSJ7_installation>/nssjava/jdk170_h70/bin/oss64/java
ALTER SERVER BRK2-S, PROGRAM
<NSJ7_installation>/nssjava/jdk170_h70/bin/oss64/java
Alternatively, after creating the cluster and before adding brokers to the cluster, you can change
the JAVACMD parameter in the <NSMQ-Installation-folder>/bin/global.rsp file to
point to 64–bit Java.
Configuring the JDBC connection pool-size
In the activemqPersistent.template file, increase the maxPoolSize and minPoolSize
of the "sqlmx-ds" bean definition as required. For optimal performance, ensure the maxpoolsize
value is same as the minpoolsize value.
For example, you can set the values as shown:
<bean id="sqlmx-ds" class="com.tandem.sqlmx.SQLMXDataSource" >
<property name="maxPoolSize" value="50"></property>
<property name="minPoolSize" value="50"></property>
...
</bean>
NOTE: The values cannot be changed dynamically. For changes to take effect, stop all the brokers
and modify their <NSMQ-Installation-folder>/<broker_name>/conf/activemq.xml
files, and then restart the brokers. HP recommends setting the same configuration for all the brokers.
Configuring the JRE heap values
The -Xms and -Xmx values are present in the
<NSMQ-PAX-extracted-folder>/nsmq/T0975H01<build>/bin/nsmq.properties
file. By default, the values are set to 256M and 512M respectively. If you are changing these
values, you must do it before installing NSMQ.
To change the -Xms and -Xmx values, edit the nsmq.properties file by changing the
NSMQ_OPTS values to the required values.
For more information about these values, see the NonStop Server for Java 6.0 Programmer's
Reference and the NonStop Server for Java 7.0 Programmer's Reference manuals.
NOTE: HP recommends that you increase the <memoryUsage> limit in the <systemUsage>
element in the activemqNonPersistent.template and activemqPersistent.template
files. However, you can change the <memoryUsage> even after creating the brokers in the cluster.
If it is changed after installation, the activemq.xml file present in the
<NSMQ-Installation-folder>/<broker_name>/conf/ folder must be changed to tune
the settings. It is mandatory to restart the broker if any changes are made to the activemq.xml
file, else the changes are not reflected.
Uninstalling NSMQ
1. Go to the location where the pax file is extracted.
Installing NSMQ from the CD 27
Page 28

2. Run the command:
OSS> ./uninstall
3. You are prompted with the following question:
Do you want to proceed with the un-installation (n or [y]):
4. Enter y. You are prompted for the directory where NSMQ is installed.
Enter the directory of NSMQ installation:
NOTE: Before you uninstall NSMQ, stop all the running instances of NSMQ and remove all the
clusters (page 30).
The uninstall program may not remove all the files from the installation directory. You must delete
the files and the directory manually.
Configuring NSMQ
Configuring NSMQ involves the following activities:
• Creating clusters
• Adding brokers to a cluster
• Removing brokers from a cluster
• Removing clusters
NOTE: You can exit the setup anytime by entering 'Quit' at any of the prompts.
Creating a cluster
After installing NSMQ, you can create and configure clusters to form a network of brokers. You
can configure any number of clusters in a node.
1. In the main menu, type 2 and press Enter.
2. You are prompted with the following questions. Enter the appropriate values.
Enter the directory of NSMQ installation [/usr/tandem/nsmq] :
This is the path where NSMQ is installed on your NonStop system. If there are any existing
clusters, their names are displayed.
Enter the name of the cluster [NSMQ]. (Maximum 4 alpha-numeric characters) :
Enter a name to uniquely identify the cluster. This name is used as PATHMON name.
Enter the name of the sub volume where PATHMON configuration files have to
be stored (e.g. $SAS1.NSMQ) :
For example, $OSS.NSMQ
Enter the TCP^PROCESS^NAME [$ZTC0]:
The TCP process running on the system
Enter the IP Address on which the NSMQ should listen for connections :
This is the TCP/IP address where the brokers are configured to listen for subscribing to
messages. For example, 15.154.112.85
Enter the port number in the range (1-65534) on which the NSMQ should
listen for connections :
After entering all the values, the cluster is created. To add more clusters, repeat the steps.
NOTE: Cluster names must be unique in a NonStop node. Cluster names can be up to 4 characters
in length.
28 Installation and configuration
Page 29

Adding a broker to a cluster
After creating a cluster, you can add brokers to the cluster. You can configure any number of
brokers within a cluster.
1. In the main menu, type 3 and press Enter.
2. You are prompted with the following questions. Enter the appropriate values.
Enter the directory of NSMQ installation [/usr/tandem/nsmq] :
This is the path where NSMQ is installed on your NonStop system. If there are any existing
clusters, their names are displayed.
Enter the name of the cluster [NSMQ]. (Maximum 4 alpha-numeric characters) :
This is the cluster to which you want to add the broker.
If there are any brokers existing within the cluster, the broker names are displayed.
Enter the name of the broker (Maximum 12 alpha-numeric characters) :
This is the name of the broker which must be unique across clusters. Every broker is a
combination of master and slave broker processes, where the master broker process is identified
as <broker_name>–M and the slave broker process is identified as <broker_name>–S.
Enter the CPU number on which to run the master broker :
This is the processor where the master broker instance must run.
Enter the CPU number on which to run the slave broker :
This is the processor where the slave broker instance is started.
Enter a unique port number for the broker in the range (1-65534):
This port is used for communication among brokers in the cluster.
Enter the JMX management port for the broker in the range (1-65534):
The JMX management features are exposed through this port.
After entering all the values, the broker is added to the specified cluster. To add more brokers,
repeat the steps.
NOTE: Broker names must be unique across all clusters. For example, if you have created a
broker B1 on cluster C1, you cannot have broker name B1 on cluster C2 (or any other cluster).
Broker names can be up to 12 characters in length.
In NSMQ, most of the elements supported by ActiveMQ can be configured in the broker's
configuration file located at <NSMQ-Installation-folder>/<broker_name>/conf folder.
For a list of configurable elements in NSMQ, see the Appendix “Configurable elements in NSMQ”
(page 59).
Removing a broker
1. In the main menu, type 4 and press Enter.
2. You are prompted with the following question:
Do you really want to remove the broker (y or [n]):
Configuring NSMQ 29
Page 30

3. Enter y. You are prompted with the following questions. Enter the appropriate values.
Enter the directory of NSMQ installation [/usr/tandem/nsmq]:
This is the path where NSMQ is installed on your NonStop system.
If there are any existing clusters, their names are displayed.
Enter the name of the cluster [NSMQ]. (Maximum 4 alpha-numeric characters) :
This is the cluster from which you want to remove the broker.
If there are any brokers existing within the cluster, the broker names are displayed.
Enter the name of the broker (Maximum 12 alpha-numeric characters) :
The name of the broker to be removed.
NOTE: If a broker is running, you must stop it before removing it.
Removing a cluster
1. In the main menu, type 5 and press Enter.
2. You are prompted with the following question:
Do you really want to remove the cluster (y or [n]):
3. Enter y. You are prompted with the following questions. Enter the appropriate values.
Enter the directory of NSMQ installation [/usr/tandem/nsmq]:
This is the path where NSMQ is installed on your NonStop system.
If there are any existing clusters, their names will be displayed.
Enter the name of the cluster [NSMQ]. (Maximum 4 alpha-numeric characters) :
Enter the name of the cluster to be removed.
NOTE: If a cluster is running, you must stop it before removing it.
30 Installation and configuration
Page 31

3 Managing NSMQ
This chapter describes how to manage NSMQ. The subsequent sections describe how to start,
stop, check the status of a cluster or a broker, and the management operations and commands
that can be performed in NSMQ.
Starting/Stopping a cluster/broker
You can start or stop a cluster or broker by using the scripts available in NSMQ. NSMQ provides
two scripts in the form <cluster_name>.sh and <broker_name>.sh.
These scripts are available at the following locations:
• <NSMQ-Installation-folder>/bin directory for the cluster
• <NSMQ-Installation-folder>/<broker_name>/bin directory for the broker
where, <NSMQ-Installation-folder> is the location where NSMQ is installed and
<broker_name> is the name of the broker.
To start a cluster:
1. Go to <NSMQ-Installation-folder>/bin directory.
The bin folder contains the script in the form of <cluster_name>.sh.
2. Run the following command:
<cluster_name>.sh start
All the brokers in the cluster are started.
Similarly, to stop the cluster, run <cluster_name>.sh stop.
This command stops all the brokers in the cluster.
To start a broker:
1. Go to <NSMQ-Installation-folder>/<broker_name>/bin directory.
The bin folder contains the script in the form of <broker_name>.sh.
2. Run the following command:
<broker_name>.sh start
Similarly, to stop the broker, run <broker_name>.sh stop.
Monitoring activities
This section describes the various monitoring activities you can perform in NSMQ.
Checking the cluster status
You can monitor the status of a cluster or broker by using the NSMQ cluster or broker scripts.
To check the status of a cluster:
1. Log on to NSMQ.
2. Go to <NSMQ-Installation-folder>/bin directory.
The bin folder contains the script in the form of <cluster_name>.sh.
3. Run the following command:
<cluster_name>.sh status
This displays the status of TS/MP processes of all the brokers running in the cluster.
To check the status of a broker:
Starting/Stopping a cluster/broker 31
Page 32

1. Log on to NSMQ.
2. Go to <NSMQ-Installation-folder>/<broker_name>/bin directory.
The bin folder contains the script in the form of <broker_name>.sh.
3. Run the following command:
<broker_name>.sh status
This displays the status of the broker.
Management operations
Management in NSMQ can be achieved by the following methods:
• By using JMX compliant management consoles like JConsole/JVisualVM
• By using the command line utility to manage a broker for NonStop systems
By default, JMX is enabled in the configuration of all brokers. All management and monitoring
operations can be performed using the service URI mechanism available in JMX as
service:jmx:rmi:///jndi/rmi://<ip-address:port>/jmxrmi, where <ip-address>
is the address on which NSMQ must listen for connections (provided during cluster creation), and
<port> is the management port number provided when a broker is added.
To manage/monitor NSMQ, you must have access privileges defined in the configuration. The
user credentials (username and password combination) are specified in a configuration file
separated by spaces, and the privileges (readonly, readwrite) are specified in the authorization
configuration file as a pair of username and privilege separated by a space.
NOTE: When connecting to JConsole, the username and password is mandatory if JMX security
is enabled.
The following table lists the JMX management operations available in NSMQ:
Table 2 Management operations
NSMQ
Management
Object
(Mbean)
Broker
stop()
removeConnector(String connectorName)
addNetworkConnector(String
discoveryAddress)
removeNetworkConnector(String
connectorName)
components.
broker.
broker.
the broker.
NSMQ SupportDescriptionOperations
YesRuns the Garbage Collector.gc()
YesStops the broker and all its
YesEnables broker statistics.enableStatistics()
NoAdds a connector to the broker.addConnector(String discoveryAddress)
NoRemoves a connector from the
NoAdds a network connector to the
NoRemoves a network connector from
32 Managing NSMQ
stopGracefully(p1,p2,p3,p4)
NoPoll for queues matching
queueName are empty before
stopping.
YesResets all broker statistics.resetStatistics()
YesDisables broker statistics.disableStatistics()
YesShuts down the JVM.terminateJVM(exitCode)
Page 33

Table 2 Management operations (continued)
NSMQ
Management
Object
(Mbean)
NSMQ SupportDescriptionOperations
addTopic(String name)
addQueue(String name)
removeTopic(String name)
removeQueue(String name)
createDurableSubscriber(String
clientID,String subscriberName,String
topicname,String selector)
String subscriberName)
reloadLog4jProperties()
Connection YesStarts the specific connection.start()
YesAdds a topic destination to the
broker.
YesAdds a queue destination to the
broker.
YesRemoves a topic destination from
the broker.
YesRemoves a queue destination from
the broker.
NoCreates a new durable topic
subscriber.
NoDestroys a durable subscriber.destroyDurableSubscriber(String clientId,
YesReloads log4j.properties from
the classpath.
YesStarts the broker.start()
YesResets the statistics.resetStatistics()
YesStops the specific connection.stop()
Connector
Queue
connectionCount()
getMessage(String messageId)
purge()
removeMessage(String messageId)
removeMatchingMessages(String selector,
maximumMessages)
YesDisplays the number of clients
connected to broker through this
connection.
YesEnables statistics gathering.enableStatistics()
YesResets the statistics.resetStatistics()
YesDisables statistics gathering.disableStatistics()
YesStarts the specific connector.start()
YesStops the specific connector.stop()
YesFetches the message with specified
messageId.
YesRemoves all the messages from the
queue.
YesRemoves a message from the
destination by JMS message ID. If
the message is dispatched, it cannot
be deleted and false is returned.
YesRemoves up to a specified number
of messages from the destination
based on an SQL-92 selection on
the message headers or XPATH on
the body.
removeMatchingMessages(String selector)
YesRemoves messages from the
destination based on an SQL-92
selection on the message headers
or XPATH on the body.
Monitoring activities 33
Page 34

Table 2 Management operations (continued)
NSMQ
Management
Object
(Mbean)
NSMQ SupportDescriptionOperations
copyMessageTo(String messageId, String
destinationName)
copyMatchingMessagesTo(String selector,
String destinationName)
copyMatchingMessagesTo(String
selector,String destinationName,
maximumMessages) destination based on an SQL-92
moveMessageTo(String messageId, String
destinationName)
moveMatchingMessagesTo(String selector,
String destinationName,
maximumMessages) destination based on an SQL-92
moveMatchingMessagesTo(String selector,
String destinationName)
JMS message ID, to the specified
destination.
destination based on an SQL-92
selection on the message headers
or XPATH on the body.
messages to the specified
selection on the message headers
or XPATH on the body.
JMS message ID, to the specified
destination.
messages to the specified
selection on the message headers
or XPATH on the body.
destination based on an SQL-92
selection on the message headers
or XPATH on the body.
YesCopies a message, with the given
YesCopies messages to the specified
YesCopies up to a specified number of
YesMoves a message, with the given
YesMoves up to a specified number of
YesMoves messages to the specified
retryMessage(String messageId)
cursorSize()
doesCursorHaveMessagesBuffered()
doesCursorHaveSpace()
browse(String selector)
browse()
browseAsTable()
browseAsTable(String selector)
YesMoves a message, with the given
JMS message ID, to its original
destination.
YesNumber of messages available to
be paged in by the cursor.
NoMessage cursor has buffered
messages to deliver.
YesChecks if the message cursor has
memory space available and returns
true or false.
YesDisplays an array of all messages
in the destination based on an
SQL-92 selection on the message
headers or XPATH on the body.
YesDisplays an array of all messages
in the destination.
YesDisplays a list of all messages in the
destination.
YesDisplays a list of all messages in the
destination based on an SQL-92
selection on the message headers
or XPATH on the body.
34 Managing NSMQ
browseMessages()
YesResets statistics.resetStatistics()
NoA list of all messages in the
destination.
Page 35

Table 2 Management operations (continued)
NSMQ
Management
Object
(Mbean)
NSMQ SupportDescriptionOperations
Subscription
browseMessages(String p1)
sendTextMessage(String body)
sendTextMessage(String body, String user,
String password)
browse()
browseAsTable()
cursorSize()
doesCursorHaveMessagesBuffered()
doesCursorHaveSpace()
isMatchingQueue(String p1)
NoA list of all messages in the
destination based on an SQL-92
selection on the message headers
or XPATH on the body.
YesSends a text message to the
destination.
YesSends a text message to a
password-protected destination.
YesDestroys the specified subscription.destroy()
YesDisplays an array of all messages
in the destination.
YesDisplays a list of all messages in the
destination.
YesNumber of messages available to
be paged in by the cursor.
NoMessage cursor has buffered
messages to deliver.
YesChecks if the message cursor has
memory space available and returns
true or false.
NoReturns true if the subscription
matches the given queue name.
Topic
isMatchingTopic(String p2)
browse(String selector)
browse()
browseAsTable(String selector)
browseMessages()
browseMessages(String p1)
sendTextMessage(String body)
sendTextMessage(String body, String user,
String password)
YesReturns true if the subscription
matches the given topic name.
YesDisplays an array of all messages
in the destination based on an
SQL-92 selection on the message
headers or XPATH on the body.
YesDisplays an array of all messages
in the destination.
YesDisplays a list of all messages in the
destination based on an SQL-92
selection on the message headers
or XPATH on the body.
YesResets statistics.resetStatistics()
NoA list of all messages in the
destination.
NoA list of all messages in the
destination based on an SQL-92
selection on the message headers
or XPATH on the body.
YesSends a text message to the
destination.
YesSends a text message to a
password-protected destination.
Monitoring activities 35
Page 36

In addition to this, you can manage a single instance of broker through command line utility on
NonStop systems for the following tasks:
• Browse
• Query
• Purge
NOTE: To use these commands, JMX must be enabled for the broker. By default, creating a
broker in NSMQ enables JMX. If you have accidentally or intentionally disabled JMX, you must
enable it before using these commands.
Browsing a specified destination
In NSMQ, queues and topics represent destinations. You can browse for messages in a queue or
topic using the browse command.
To browse a specified destination:
1. Log on to NSMQ.
2. Go to the <NSMQ-Installation-folder>/<broker_name>/bin directory.
This folder contains the <broker_name>.sh script.
3. Run the command:
<broker_name>.sh browse <destination>
where <destination> is a queue or a topic name.
This command displays all the messages in the specified destination.
Following is an example of the browse command:
36 Managing NSMQ
Page 37

Figure 5 Browse command
The browse command can also be executed with various options. Each option filters the messages
before displaying them. The options and their descriptions are shown in Table 3:
Table 3 Browse options
Usage: {broker-name}.sh browse <options>
<destination>
{broker-name}.sh browse <destination>
{broker-name}.sh browse -Vheader,body
queue:<destination>
{broker-name}.sh browse -Vheader --view
custom:MyField queue:<destination>
JMSMessageID='*:10',JMSPriority>5
<destination>
Description
Prints the message header, custom message header, and
message body of all messages in the specified queue or topic.
Prints only the message header and message body of all
messages in the specified queue.
Prints the message header and the custom field 'MyField' of
all messages in the specified queue.
Prints all the message fields that has:{broker-name}.sh browse --msgsel
• A JMSMessageID in the header field that matches the
wildcard *:10
• A JMSPriority field > 5 in the specified queue or topic
NOTE: To use wildcard queries, the field must be a string
and the query enclosed in ''.
Monitoring activities 37
Page 38

Table 3 Browse options (continued)
Usage: {broker-name}.sh browse <options>
<destination>
Description
{broker-name}.sh browse --user <Username>
--password <Password> <destination>
{broker-name}.sh browse --user <Username>
--password <Password> --factory
rg.apache.activemq.ActiveMQConnectionFactory
--passwordFactory
org.apache.activemq.AMQPasswordFactory
<destination>
Querying a broker
In NSMQ, you can use the query command to get information about a broker. Querying a broker
displays the broker component's attributes and statistics.
To query a broker:
1. Log on to NSMQ.
2. Go to the <NSMQ-Installation-folder>/<broker_name>/bin directory.
This folder contains the <broker_name>.sh script.
3. Run the command:
<broker_name>.sh query
Prints the message header, custom message header, and
message body of all messages in the queue or topic, using
the user name and password queried.
Prints the message header, custom message header, and
message body of all messages in the queue or topic, using
the specified user name,
org.apache.activemq.AMQFactorySubClass to create
JMS connections, and
org.apache.activemq.console.command.
DefaultPasswordFactory to turn the specified password
into the password to be used.
This command displays the broker component's attributes and statistics.
Following is an example of the query command:
38 Managing NSMQ
Page 39

Figure 6 Query command
The query command can also be executed with various options. Each option filters and displays
the attributes based on the condition. The options and their descriptions are shown in Table 4:
Monitoring activities 39
Page 40

Table 4 Query options
DescriptionUsage: {broker-name}.sh query <options>
{broker-name}.sh query
{broker-name}.sh query -QQueue=QUEUE.IN
{broker-name}.sh query --view
EnqueueCount,DequeueCount
{broker-name}.sh query -QTopic=* --view
EnqueueCount,DequeueCount
{broker-name}.sh query -QTopic=*
-QQueue=* --view
EnqueueCount,DequeueCount
{broker-name}.sh query -QTopic=*
-xQTopic=ActiveMQ.Advisory.*
{broker-name}.sh query --objname
Type=*Connect*,BrokerName=local*
-xQNetworkConnector=*
{broker-name}.sh query -QQueue=*
-xQQueue=????
Purging messages
Prints all the attributes of all registered objects queues, topics,
connections, and so on.
Prints all the attributes of the queue whose destination name
is QUEUE.IN.
Prints all the attributes of all registered topics.{broker-name}.sh query -QTopic=*
Prints the attributes EnqueueCount and DequeueCount of all
registered objects.
Prints the attributes EnqueueCount and DequeueCount of all
registered topics.
Prints the attributes EnqueueCount and DequeueCount of all
registered topics and queues.
Prints all attributes of all topics except those that begins with
"ActiveMQ.Advisory".
Prints all attributes of all connectors and connections excluding
network connectors that belongs to the broker that begins
with local.
Prints all attributes of all queues except those that are 4 letters
long.
You can purge messages from a destination using the purge command. Purging deletes the
selected destination's messages.
To purge messages:
1. Log on to NSMQ.
2. Go to the <NSMQ-Installation-folder>/<broker_name>/bin directory.
This folder contains the <broker_name>.sh script.
3. Run the command:
<broker_name>.sh purge <destination>
where <destination> is a queue or a topic.
This command deletes the selected destination's messages that matches the message selector.
Following is an example of the purge command:
40 Managing NSMQ
Page 41

Figure 7 Purge command
The purge command can also be executed with options to purge messages based on filters. The
options and their descriptions are shown in Table 5:
Table 5 Purge options
DescriptionUsage: {broker-name}.sh purge <options> <destination>
Deletes all the messages in queue FOO.BAR.{broker-name}.sh purge FOO.BAR
Deletes all the messages in the destinations that:{broker-name}.sh purge --msgsel
"JMSMessageID='*:10',JMSPriority>5"
QUEUE.*
• matches QUEUE.*
• has a JMSMessageID in the header field that matches
the wildcard *:10
• has a JMSPriority field > 5 in the queue
NOTE: To use wildcard queries, the field must be a string
and the query must be enclosed in ''. Use double quotes ""
for the entire message selector string.
Monitoring activities 41
Page 42

4 Security
This chapter describes the various security methods implemented in NSMQ.
Security in NSMQ consists of:
• Authentication
• Authorization
• Secure Socket Layer (SSL)
Authentication
The authentication between the brokers and producers and consumers is implemented with the
combination of username and password while creating the connection. The authentication in
NSMQ is implemented using the following methods:
Simple authentication plugin
Using this plugin, you can define users and groups directly by adding a
simpleAuthenticationPlugin element into the broker's XML configuration file. When a client
connects to a broker, it is validated with the username and password combination provided in this
file.
You can also grant anonymous access by adding the anonymousAccessAllowed attribute and
setting it to true in the simpleAuthenticationPlugin element.
To enable simpleAuthenticationPlugin, configure the
activemqNonPersistent.template and activemqPersistent.template files located
at <NSMQ-PAX-extracted-folder>/nsmq/T0975H01<build> folder as follows:
1. Remove the comment for the <plugins> element.
2. Comment out the <authorizationPlugin> and the <jaasAuthenticationPlugin>
within the <plugins> element.
Now, only the <simpleAuthenticationPlugin> is enabled. The default users are as
mentioned in the activemqNonPersistent.template and
activemqPersistent.template files. You must provide the username and password
while creating a JMS connection.
3. By default anonymousAccessAllowed attribute of the <simpleAuthenticationPlugin>
element is set to true. This implies that a valid JMS connection can be acquired even without
user credentials. If you set this attribute to false, then only the users specified in the
<simpleAuthenticationPlugin> element can access JMS.
The following code snippet is an example of the simpleAuthenticationPlugin.
<simpleAuthenticationPlugin anonymousAccessAllowed="true">
<users>
<authenticationUser username="nsmq.sys" password="nsmq1234" groups="users,admins"/>
<authenticationUser username="nsmq.usr" password="nsmq1234" groups="users"/>
<authenticationUser username="nsmq.guest" password="nsmq1234" groups="guests"/>
</users>
</simpleAuthenticationPlugin>
CAUTION: If you enable anonymous access without authorization, any client can access the
broker. HP recommends that you also enable authorization when enabling anonymous access.
Java Authentication and Authorization Service (JAAS) plugin
The JAAS plugin is configured using a login configuration file, login.config. This file is located
by setting the java system property java.security.auth.login.config to point to it. If the
system property is not specified, the broker looks for the login.config file specified by the
42 Security
Page 43

CLASSPATH and uses it. The NSMQ default configuration provides user and group configuration
using plain-text properties file.
For more information on JAAS, see http://docs.oracle.com/javase/7/docs/technotes/guides/
security/jaas/JAASRefGuide.html.
Perform the following steps to configure JAAS, considering you have a custom JAAS implementation
for your Radius or LDAP server:
1. Change the activemqNonPersistent.template and activemqPersistent.template
files prior to installation, or the
<NSMQ-Installation-folder>/<broker_name>/conf/activemq.xml post-installation
as follows:
<plugins>
<jaasAuthenticationPlugin configuration="RadiusConfiguration" />
</plugins>
2. Configure the JAAS login.config, residing in the
<NSMQ-Installation-folder>/conf/ directory, with your custom JAAS implementation
detail:
RadiusConfiguration {
com.<your-company>.<product-name>.jaas.RadiusLoginModule required
initialContextFactory=com.<your-company>.jndi. CtxFactory
connectionURL="<URL>"
connectionUsername="<user_name>"
connectionPassword=<password>
…
…
…
;
};
3. Configure your authentication server.
4. Start NSMQ.
Authorization
Authorization enables you to control access of destinations in the broker. With this, you can restrict
access to specific destinations based on the group membership of a user. The following types of
access are supported:
• READ: Permission to browse and consume messages from destinations.
• WRITE: Permission to publish messages to destinations.
• ADMIN: Permission to create destinations if it does not exist. With this permission, you can
control where and how the new destinations can be dynamically created in the queue or topic
hierarchy.
You can configure authorization by adding an authorizationPlugin element in the broker's
XML configuration file. Within this element, define the authorizationEntries where entries
are added to specific groups on queues or topics.
NOTE: Both queue and topic cannot be defined in the same element.
To control access to temporary destinations, you must add a
<tempDestinationAuthorizationEntry> element to the authorizationMap. A temporary
destination enables you to create a queue for a particular network connection. The destination
exists as long as the network connection is open. You cannot define any queue or topic attributes
for the tempDestinationAuthorizationEntry element, because temporary destinations
have no names.
For a sample usage, see the Controlling Access To Temporary Destinations section in http://
activemq.apache.org/security.html.
Authorization 43
Page 44

Secure Socket Layer
NSMQ broker also provides security using Secure Socket Layer (SSL) protocol. Enabling SSL at
the NSMQ broker level provides:
• Privacy – Messages are encrypted using a secret key, thus preventing it from being hacked
to read messages.
• Message Integrity – Messages are digitally signed, ensuring that they cannot be tampered.
• Authentication – The identity of the broker is authenticated.
The in-built JSSE framework of NSJ is used by NSMQ to provide SSL connectivity between clients
and broker. This framework provides a convenient way to store the private keys in a keystore.
These details must be specified in the broker configuration file
/<broker_name>/conf/activemq.xml as shown:
<sslContext>
<sslContext keyStore="file:${activemq.base}/conf/broker.ks"
keyStorePassword="password"
trustStore="file:${activemq.base}/conf/broker.ts"
trustStorePassword="password"/>
</sslContext>
Configuring SSL
If you are configuring SSL before installing NSMQ, perform the following steps:
1. Edit the
<NSMQ-PAX-extracted-folder>/nsmq/T0975H01<build>/bin/nsmq.properties
file by adding the following JVM properties to the NSMQ_OPTS variable:
-Djavax.net.ssl.keyStore=<full-path>/broker.ks
-Djavax.net.ssl.keyStorePassword=<password>
-Djavax.net.ssl.trustStore=<full-path>/broker.ts
-Djavax.net.ssl.trustStorePassword=<password>
2. Edit the activemqNonPersistent.template and activemqPersistent.template
files by adding the <sslContext> element inside the <broker> element.
<sslContext>
<sslContext keyStore="file:<full-path>/broker.ks"
keyStorePassword="<password>"
trustStore="file:<full-path>/broker.ts"
trustStorePassword="<password>"/>
</sslContext>
where <password> is the user password that you specify.
If you are configuring SSL after installing NSMQ, then in step 2, add the <sslContext> element
inside the <broker> element in broker configuration file (activemq.xml) for every broker.
For CLI commands to work, make similar changes in the activemq.properties file.
44 Security
Page 45

Continue with NSMQ installation.
• Note down the LISTEN_HOST and LISTEN_PORT properties' values from the
<cluster_name>.rsp in the <NSMQ-Installation-folder>/bin folder after cluster
creation where,
◦ LISTEN_HOST is the value entered during cluster creation for the IP address on which
NSMQ must listen for connections.
◦ LISTEN_PORT is the value entered during cluster creation for the port number on which
NSMQ must listen for connections.
• Before starting the brokers, modify the activemq.xml file for all brokers within their
<broker_name>/conf/ folders as follows:
◦ Edit the <transportConnector> element whose name attribute has a value
${nsmq.listenaddr}.
◦ Change the “uri” attribute value to ssl://<LISTEN_HOST>:<LISTEN_PORT>.
◦ Save the file and start the broker.
• Configuring the NSMQ-JMS clients:
◦ Provide the JVM properties to the NSMQ-JMS client
-Djavax.net.ssl.trustStore=<full-path>/client.ts
-Djavax.net.ssl.trustStorePassword=<password>
◦ Change the JMS-URL to ssl://<LISTEN_HOST>:<LISTEN_PORT>.
When the program is run with these options, clients can connect to the NSMQ broker and
perform JMS operations.
Secure Socket Layer 45
Page 46

5 Integration
This chapter describes how NSMQ can be integrated with NSASJ and JTA-TMF applications.
Integrating NSMQ with NSASJ
NSMQ integrates with NSASJ using resource adapters specified as RAR (Resource Adapter Archive
file). This RAR file is located in the <NSMQ-PAX-extracted-folder>/lib directory. The
integration includes inbound messages to be handled by Message Driven Beans (MDB) and
outbound messages published by state less or state full Enterprise Java Beans (EJB). The resource
adapter participates in the following contracts of Java Connector Architecture (JCA):
• Connection Management Contract: Allows applications to connect to NSMQ through the
resource adapter. It also allows the application server to pool connection requests.
• Transaction Management Contract: Allows an application to manage and perform transactional
access for sending and receiving messages.
• Security Contract: Provides support for secure access to NSMQ.
This requires NSASJ to be configured to interact with NSMQ, and NSMQ to be configured to
expose the required functionality. Only TCP protocol based integration is supported from NSMQ.
To integrate NSMQ and NSASJ, both the applications must be installed on the system.
For installation instructions of NSASJ, see the NonStop Application Server for Java (NSASJ) 1.0
User Guide.
For installing NSMQ, see “Installation and configuration” (page 14).
After installation, perform the following steps to configure the NSASJ integration with NSMQ:
1. Create a temporary directory <temp>.
2. Unzip the contents of the archive file
<NSMQ-PAX-extracted-folder>/nsmq-rar-1.0.rar to the <temp> directory.
3. Open the <temp>/META-INF/ra.xml and change the following property in the
<resourceAdapter> element.
• Change the URL to point to the NSMQ listen URL tcp://<ip-address>:<port>
where, <ip-address> is the IP address provided during cluster creation and <port>
is the port provided to listen for connection.
<config-property-name>ServerUrl</config-property-name>
<config-property-type>java.lang.String</config-property-type>
<config-property-value>tcp://localhost:61616</config-property-value>
4. Open the <temp>/META-INF/ironjacamar.xml and change the following property in
the <connection-definition> element.
• Map the JNDI names with the physical names of destinations to be used in the
<admin-objects> element. For example,
<admin-object classname="org.apache.activemq.command.ActiveMQQueue"
jndi-name="java:jboss/activemq/queue/outbound">
<config-property name="PhysicalName">QUEUE.OUTBOUND
</config-property>
</admin-object>
5. Re-create the archive after making changes
$ cd <temp>
$ jar –cvf nsmq-rar-1.0.rar *
6. Deploy this archive using standard NSASJ deployment mechanism.
46 Integration
Page 47

7. Use the following annotations in MDB to use NSMQ as the messaging infrastructure for NSASJ:
• @MessageDriven(name="QueueSampleServiceMDB", activationConfig = {
@ActivationConfigProperty(propertyName = "destinationType",
propertyValue = "javax.jms.Queue"),
@ActivationConfigProperty(propertyName = "destination",
propertyValue = "java:jboss/activemq/queue/outbound"),
@ActivationConfigProperty(propertyName = "acknowledgeMode",
propertyValue = "Auto-acknowledge")})
• @Resource(name="java:activemq/QueueConnectionFactory")
@TransactionManagement(value=TransactionManagementType.CONTAINER)
@TransactionAttribute(value=TransactionAttributeType.REQUIRED)
• @ResourceAdapter("nsmq-rar-1.0.rar")
Integrating NSMQ with JTA-TMF application
This section describes how NSMQ can be integrated with a JTA-TMF sample application for
exchanging messages.
NSMQ is agnostic of TMF. However, it can participate in distributed transactions via the JTA API.
For more information on JTA and ActiveMQ, see http://activemq.apache.org/should-i-use-xa.html.
HP recommends you to use JTA-TMF libraries on NonStop. These libraries are available in
<NSMQ-Installation-folder>/lib/tmf folder.
Pre-requisites
Before getting started, make sure that you have installed the following software:
• Apache ANT
• JDK 1.6 or later version
• Before running this application, you must have the following jar files. These jar files are
referenced from the <NSMQ-Installation-folder>/lib/tmf folder.
◦ XARMWrapper.jar
◦ jboss-logging-3.1.1.GA.jar
◦ jboss-transaction-api_1.1_spec.jar
◦ jboss-transaction-spi-7.0.0.Final.jar
◦ jbossjts-4.16.4.Final.jar
◦ jbossjts-integration-4.16.4.Final.jar
◦ libxarml.so
◦ nsxarm.jar
JTA-TMF settings
The following settings enable you to capture the logs when you run this application:
• The NSXARM<PID>.trc file is created in the default folder.
To change the name of the file or location, specify the name or location in the traceFile
parameter of the default.xarm.properties file.
• XARMWrapper logs can be initiated by setting the environment variable
> export XARMWrapper.log=yes
Integrating NSMQ with JTA-TMF application 47
Page 48

• NSXARM debug can be initiated by setting the environment variable
> export XARMDBG=yes
• Audit option can be enabled by specifying the audit file location in the
default.xarm.properties file.
Configuring the JTA-TMF application
Set the _RLD_LIB_PATH to point to the <NSMQ-Installation-folder>/lib/tmf/ directory
where the libxarml.so file is present. Ensure that the file has execute permission.
For example,
export _RLD_LIB_PATH=<NSMQ_XARM_LICENSES_FOLDER>:/usr/lib
Running the JTA-TMF application
1. Ensure that the $XARMWRAPPER_HOME variable points to the JTA-TMF directory.
2. Execute the following command from the $XARMWRAPPER_HOME/samples directory:
ant NonStopJBossTM -Durl=<brokerUrl> -Dcommit=<true/false>
-Dcatalog.schema=<catalog.schema>
where,
• <brokerUrl> is a running NSMQ broker instance. For example,
tcp://15.154.112.85:61616
• <catalog.schema> is an existing catalog and schema
NOTE: All the parameters are required. If the –Dcommit value is true, the transaction is
committed, else rolled back.
3. Messages are displayed on the console when the program is run.
For example,
[java] Apr 18, 2013 9:59:45 PM NonStopJBossTM <clinit>
[java] WARNING: Table already exists, continuing...
[java] log4j:WARN No appenders could be found for logger(org.apache.activemq.
transport.WireFormatNegotiator).
[java] log4j:WARN Please initialize the log4j system properly.
[java] log4j:WARN See http://logging.apache.org/log4j/1.2/faq.html#noconfig
for more info.
[java] 04-18-2013 21:59:55.128 My thread Thread[main,5,main]NonStopXARM :
NonStopXARM starting
[java] 04-18-2013 21:59:55.140 My thread Thread[main,5,main]NonStopXARM :
NonStopXARM started
[java] Checking, if commit option is true then the row/message count will
be 1 else 0....
[java] commit Option: true
[java] Table row count: 1
[java] Message count: 1
How do local transactions work?
A Session may optionally be specified as transacted. Each transacted session supports a single
series of transactions. Each transaction contains a set of produced and consumed messages grouped
into input message stream and output message stream units. When a transaction commits, unit of
input is acknowledged and its associated unit of output is sent. If a transaction is rolled back, its
produced messages are destroyed and its consumed messages are automatically recovered.
A transaction is completed using its session’s commit() or rollback() method. When a session’s
current transaction completes, it automatically begins the next. This results in always having a
current transaction in a transacted session, within which its work is done.
48 Integration
Page 49

JTS or some other transaction monitor facility may be used to combine a session’s transaction with
transactions on other resources (databases, other JMS sessions, and so on). Since Java distributed
transactions are controlled via the JTA transaction demarcation API, use of the session’s commit
and rollback methods in this context throw a JMS TransactionInProgressException.
How do local transactions work? 49
Page 50

A Sample applications
The NSMQ package contains the following Spring sample applications for your reference and
can help you get started with NSMQ.
• jmsinvoker: This sample demonstrates the usage of Spring's feature of using JMS to host
business logic services.
• jmstemplate: This sample demonstrates the usage of the Spring class
org.springframework.jms.core.JmsTemplate.
• messagelistener: This sample demonstrates the usage of Spring's MessageListener container
feature.
These samples are provided only for reference and help you get started with NSMQ. You can
create your own sample applications and use with NSMQ. The following sections describe the
steps to build and run these sample applications on NonStop systems.
Pre-requisites
Before getting started, make sure that you have the following software installed. These applications
can be run from any platform where Java is supported (Windows, Unix, NonStop, etc.).
• Apache ANT
• JDK 1.6 or later version
Dependent libraries for the sample applications
Before executing the sample applications, you must have the following Spring libraries for compiling
and running the samples provided with NSMQ. These dependent JAR files are available in the
<NSMQ-Installation-folder>/lib and <NSMQ-Installation-folder>/lib/optional
folders. The build.xml automatically picks up these files to form the CLASSPATH.
• activemq-all-5.6.0.jar
• aopalliance.jar
• commons-logging-1.1.1.jar
• geronimo-jms_1.1_spec-1.1.1.jar
• org.springframework.aop-3.0.5.RELEASE.jar
• org.springframework.asm-3.0.5.RELEASE.jar
• org.springframework.aspects-3.0.5.RELEASE.jar
• org.springframework.beans-3.0.5.RELEASE.jar
• org.springframework.context-3.0.5.RELEASE.jar
• org.springframework.context.support-3.0.5.RELEASE.jar
• org.springframework.core-3.0.5.RELEASE.jar
• org.springframework.expression-3.0.5.RELEASE.jar
• org.springframework.jms-3.0.5.RELEASE.jar
• org.springframework.transaction-3.0.5.RELEASE.jar
• slf4j-api-1.6.4.jar
• slf4j-log4j12-1.6.4.jar
Building the sample applications
Go to the <NSMQ-Installation-folder>/samples/spring/<sample_app> directory
and execute the following command:
50 Sample applications
Page 51

$ANT_HOME/bin/ant jar
where $ANT_HOME is the location where Apache ANT is installed.
This command compiles and create the jar file.
Running the sample applications
Before running the samples, modify the brokerURL property of the connectionFactory bean
in the Spring Application Context configuration files to reference to a running NSMQ broker
instance.
Table 6 Configuration property for the samples
1. To run the server, execute the following command in a command window:
$ANT_HOME/bin/ant server
Configuration files to be modifiedSample application
clientApplicationContext.xmljmsinvoker
serverApplicationContext.xml
applicationContext.xmljmstemplate
listenerApplicationContext.xmlmessagelistener
producerApplicationContext.xml
2. To run the client, open another command window and change the current directory to ..\
samples\spring directory.
3. Execute the following command:
$ANT_HOME/bin/ant client
In the jmsinvoker client, the following message appears on the screen:
"Hello NSMQ!"
In the jmstemplate client, the following message appears on the screen:
[java] Received Message (converted): NSMQ
[java] Co-relation id: 12d4f971-1ef3-429a-9f73-fb1737ea697b
In the messagelistener, messages similar to the text shown below are printed on the screen
where the $ANT_HOME/bin/ant server command was executed.
[java] Processed in Thread: dmlc-4, Message text: Message from....
[java] Processed in Thread: dmlc-1, Message text: Message from....
[java] Processed in Thread: dmlc-2, Message text: Message from....
[java] Processed in Thread: dmlc-5, Message text: Message from....
[java] Processed in Thread: dmlc-3, Message text: Message from....
Running the sample applications 51
Page 52

B Use cases
Being JMS compliant, NSMQ can be used from servlets and JSPs, Pathway server classes, and
other Java products like NonStop Server for Java Server Pages (NSJSP). This section describes the
following use case scenarios:
• “Using JMS from servlets and JSPs” (page 52)
• “Using JMS from Pathway Server Classes” (page 56)
Using JMS from servlets and JSPs
This section illustrates with a sample how JMS is used from servlets and JSPs.
Pre-requisites
The following applications must be present on your system before using JMS from JSPs or servlets:
• Apache Tomcat server 6.0 - For more information on setting up Tomcat, see http://
tomcat.apache.org/tomcat-6.0-doc/setup.html.
OR
NSJSP - For more information, see NonStop Servlets for JavaServer Pages (NSJSP) 7.0 System
Administrator's Guide.
• Apache ANT - For more information, see http://ant.apache.org/.
• NSMQ must be installed and running on a HP NonStop system.
The following JAR files are required for compiling and running the samples provided with NSMQ.
These JAR files are available in the <NSMQ-Installation-folder>/lib and
<NSMQ-Installation-folder>/lib/optional folders. The build.xml file automatically
picks up these files to form the CLASSPATH.
• activemq-all-5.6.0.jar
• aopalliance.jar
• commons-logging-1.1.1.jar
• geronimo-jms_1.1_spec-1.1.1.jar
• geronimo-j2ee-management_1.1_spec-1.0.1.jar
• servlet-api-2.5-6.1.14.jar
• log4j-1.2.16.jar
• slf4j-api-1.6.4.jar
• slf4j-log4j12-1.6.4.jar
Building the application Web Archive (WAR) file
1. In META-INF folder, edit the context.xml file.
Locate the Resource element and change the value for the brokerURL attribute to the
corresponding system on which NSMQ is running.
For example, brokerURL="tcp://15.154.112.85:61616"
2. Set the environmental variables JAVA_HOME and ANT_HOME, and add them to the path
variable.
3. Go to the <NSMQ-Installation-folder>/samples/servlets-jsp directory and
execute the following command:
$ ant all
This creates the servlets-jsp.war file in the dist folder.
52 Use cases
Page 53

4. Place the servlets-jsp.war file in the webapps folder of NSJSP or Tomcat installation
directory.
Running the application
1. Start the NSJSP server or Tomcat server.
2. Open the browser and enter the URL “http://localhost:8080/servlets-jsp/index.html”.
The NSMQ servlet/JSP Examples page appears.
3. Click on "servlet samples for NSMQ" or "JSP samples for NSMQ" and follow the onscreen
instructions to send and receive messages.
Figure 8 NSMQ servlet/JSP examples
Using JMS from servlets and JSPs 53
Page 54

Figure 9 NSMQ JSP send messages
54 Use cases
Page 55

Figure 10 NSMQ JSP message status
Using JMS from servlets and JSPs 55
Page 56

Figure 11 NSMQ JSP receive messages
Using JMS from Pathway Server Classes
This example demonstrates the usage of NSMQ in a Client-Server environment on NonStop in the
following scenarios:
• Standalone Java server and its client
• TS/MP server class and its client
NOTE: NSMQ is agnostic of TMF and only supports JTA transactions. Any JMS operation in the
NonStop TS/MP server class or a NonStop standalone server is unaware of the TMF transaction
context present during its execution.
Pre-requisites
The following applications must be installed and configured on the NonStop system:
• TS/MP services
• Apache ANT
• JToolkit
• NSJ 6 or later
• Environment variable ANT_HOME must be set to ANT installation directory
56 Use cases
Page 57

• Environment variable JAVA_HOME must be set to NSJ installation directory
• Modify the jndi.properties file to point the URL to a valid NSMQ broker. The key to
modify is java.naming.provider.url.
Building the Java Archive (JAR) file
To generate the JAR file:
1. Edit the <NSMQ-Installation-folder>/samples/pway-samples/build.xml file.
Change the jtoolkit.dir property to point to a valid JToolkit/lib directory.
2. Run the following command:
$ANT_HOME/bin/ant jar
This command builds the necessary jar file required to run the samples.
Executing the standalone server and client
To execute the standalone server and client:
1. Run the following command:
run -name=/G/SRVR $JAVA_HOME/bin/java -cp
./:./nsmq-pway.jar:../../activemq-all-5.6.0.jar:/usr/tandem/javaexth11/lib/tdmext.jar
-Djava.library.path=/usr/tandem/javaexth11/lib
com.hp.nsmq.sample.NonStopServer
This command starts a standalone server
2. Run the following command from another OSH shell to send requests to this server:
$ANT_HOME/bin/ant ipcClient -Darg1=SRVR -Darg2="Hello NSMQ"
An output similar to the following is displayed:
[Begin-output of Command]
Buildfile: build.xml
ipcClient:
[java] Java Version is : 1.7.0_01
[java] Loading PUT DLL..
[java] Reply from Server: SENT <-- This is the JMS message sent to NSMQ.
[java] Reply from Server: RECEIVED:Hello NSMQ <-- This is the JMS message
received from NSMQ.
BUILD SUCCESSFUL
Total time: 2 seconds
[End-Output of Command]
Executing the TS/MP server and client
To execute the TS/MP server and client:
1. Create a PATHMON process to host the server class.
2. Change to an empty volume in TACL shell, for example, $SAS1.MYPMN.
3. From this subvolume, run the following command:
run $SYSTEM.SYSTEM.PATHMON /name $MYPMN, cpu 2, nowait/3
where, the primary CPU is 2 and the backup CPU is 3.
4. Open a PATHCOM session to this PATHMON process using the following command:
PATHCOM $MYPMN
5. Copy and paste the contents of the PATHMON-SETUP file into this session.
This sets up the PATHMON process started in step 3.
Using JMS from Pathway Server Classes 57
Page 58

6. Modify the SERVERCLASS-SETUP file to change the values of CWD, ARGLIST, JAVA_HOME,
PROGRAM, and VOLUME parameters.
You must change the directory values to properly point to the nsmq-pway.jar directory,
activemq-all-5.6.0.jar, JToolkit jar, jndi.properties, JAVA_HOME and
java program files.
7. Copy and paste these contents to the PATHCOM session you opened in step 4. A server-class
by name NSMQSAMPLE will be setup.
8. Start the server-class using the following command:
START SERVER NSMQSAMPLE
9. Modify the build.xml property pathmon-name if the PATHMON name in step 3 is changed.
10. Run the TS/MP client as follows:
$ANT_HOME/bin/ant tsmpClient -Darg1=NSMQSAMPLE -Darg2="Hello NSMQ"
An output similar to the following is displayed:
[Begin-output of Command]
Buildfile: build.xml
tsmpClient:
[java] [$MYPMN, nsmqsample, Hello NSMQ]
[java] Java Version is : 1.7.0_01
[java] Loading PUT DLL..
[java] Reply from Server: SENT <-- This is the JMS message sent to NSMQ.
[java] Reply from Server: RECEIVED:Hello NSMQ <-- This is the JMS message
received from NSMQ.
BUILD SUCCESSFUL
Total time: 2 seconds
[End-Output of Command]
58 Use cases
Page 59

C Configurable elements in NSMQ
The following table lists the configurable elements supported or unsupported by NSMQ:
Table 7 NSMQ support for configurable elements
NSMQ SupportDescriptionConfiguration Element
adminView
destinationPolicy
ioExceptionHandler
defaultIOExceptionHandler
messageAuthorizationPolicy
YesReturns the administration view of the broker and used
to create and remove resources such as queues and
topics.
NoUsed to create destinationsdestinationFactory
NoSets the destination interceptors to use for messagingdestinationInterceptors
YesDestination specific policies available either for exact
destinations or for wildcard destinations.
If you want to preserve the order of messages, add the
policy entries for the queue or topic in the
/<broker_name>/conf/activemq.xml file within
the destinationPolicy element. For example,
<policyEntry topic="ORDERS.>">
<dispatchPolicy><strictOrderDispatchPolicy
/> </dispatchPolicy>
</policyEntry>
YesOverride the default IOException handler, called when
persistence adapter experiences File or JDBC I/O
exceptions
NoJMS bridging with other JMS providersjmsBridgeConnectors
YesJMX attributes for managementmanagementContext
YesDefines the policy used to decide if the current
connection is authorized to consume a given message
networkConnectors
persistenceAdapter
YesDefines the network connectors which the broker uses
to connect to other brokers in a cluster.
Following network connector is supported:
• networkConnector
Following network connectors are not supported:
• IdapNetworkConnector
• multicaseNetworkConnector
YesDefines the persistence adapter implementation to use
for the broker.
Following persistence adapters are supported:
• nsmqJdbcPersistenceAdapter
• memoryPersistenceAdapter
Following persistence adapters are not supported:
• amqPersistenceAdapter
• journalPersistenceAdapter
• kahaDB
• levelDB
• mKahaDB
NopersistenceFactory
59
Page 60

Table 7 NSMQ support for configurable elements (continued)
NSMQ SupportDescriptionConfiguration Element
plugins
YesThe broker plugins to install for security authentication
and authorization.
Following plugins are supported:
• authorizationPlugin
• destinationPathSeparatorPlugin
• discardingDLQBrokerPlugin
• forcePersistencyModeBrokerPlugin
• jaasAuthenticationPlugin
• jaasCertificateAuthenticationPlugin
• jaasDualAuthenticationPlugin
• simpleAuthenticationPlugin
• statisticsBrokerPlugin
• timeStampingBrokerPlugin
• traceBrokerPathPlugin
Following plugins are not supported:
• connectionDotFilePlugin
• destinationDotFilePlugin
• loggingBrokerPlugin
• multicastTraceBrokerPlugin
• udpTraceBrokerPlugin
• virtualSelectorCacheBrokerPlugin
proxyConnectors
regionBroker
services
shutdownHooks
tempDataStore
transportConnectors
NoSets the network connectors that the broker uses to
connect to other brokers in the cluster.
NoRoutes the broker operations to the correct messaging
regions for processing.
NoSets the services associated with the broker (such as a
{@link MasterConnector})
YesSets the hooks to be executed when a broker shuts
down.
YesConfiguration required for key stores of SSLsslContext
YesConfiguration attributes for memory and disk usagesystemUsage
YesDefines dedicated task runner settingstaskRunnerFactory
NoTemporary data storage used by file based persistence
adapters
YesDefines the transport connectors which the broker will
listen on for new clients.
Following protocols are supported:
• TCP
• UDP
• SSL
Following protocols are not supported:
• New I/O (NIO)
• Peer
• Multicast
• websocket
60 Configurable elements in NSMQ
Page 61

D FAQ/Common problems and error conditions
Listed below are some of the frequently asked questions or common problems and error conditions
faced by users while using NSMQ. This list may contain some of the problems faced in ActiveMQ.
For a complete list of commonly asked questions in ActiveMQ, see the ActiveMQ FAQ.
1. While creating a cluster, the following error displays:
ERROR - *1017* PATHCTL FILE (file-err-num)
The reason can be while creating a cluster, the PATHMON configuration file [PATHCTL] is
created in the sub volume of pathway process. If the volume already has PATHCTL file used
by some other TSMP process, then this error is displayed.
Modify the CLUSTER.rsp and change the sub volume name of the pathway process to point
to another existing volume to which the logged-in user has permission.
2. Unable to create the schema during installation of NSMQ.
• Ensure that the SQL/MX version is >= 3.1
• Ensure that the JDBC/MX T2 or T4 driver version is >= 3.2
• Ensure the SQL/MX catalog and schema exists and are empty (they must not contain any
tables, indexes, etc.)
3. There is no communication between the TCP/IP subsystem and the brokers or
producers/consumers. What could be wrong?
Check the TS/MP, CIP subsystem. It may not be configured properly. For more information,
see the TCP/IP Configuration and Management Manual.
4. The broker log displays “Port already in use/port already bound”.
The following may be possible reasons:
• Another process is listening on the port configured for local clustering.
• The slave broker log may be displaying this message.
• If the master broker log is displaying the message, some other NonStop process is already
listening on that port. JMX consoles may not be able to connect to the broker.
5. NonStop TCP/IP DEFINES not configured properly.
Ensure that all the IP-CIP DEFINES are configured for the user running the NSMQ broker.
a. To verify this, ensure the $JAVA_HOME/install/javachk program runs without errors.
b. The TCP/IP process provided during NSMQ installation is configured for CIPSAM or
TCP6SAM. For more information, see the TCP/IP Configuration and Management Manual.
6. Can I create brokers having same names in two different clusters?
Broker names must be unique across all the clusters. For example, if you create a broker B1
on cluster C1, you cannot have broker name B1 on cluster C2 (or any other cluster).
Also, there must be no PATHMON process name configured with the same cluster name and
no process must be running with the same broker.
NOTE: It is mandatory to have different SQL/MX catalog/schema across different NSMQ
installations.
7. Can I uninstall NSMQ when clusters are running?
The uninstall program requires all clusters to be down. Before you uninstall, stop all the running
instances of NSMQ and remove all the clusters.
The uninstall program may not remove all the files from the installed directory. You must delete
these files/directory manually.
8. Can I remove a broker when the cluster is running?
Yes, but exceptions are thrown when a broker is removed from the running cluster. HP
recommends you to stop the cluster and remove the broker.
61
Page 62

9. What happens if a broker is removed from a cluster?
If a broker is removed, some messages may not be dispatched and these may be lost. The
other brokers, producers, consumers, lose communication with the removed broker.
10. I am having problems sending messages to clients in another time zone.
Time zone between the client and the server must be in sync for proper message delivery. If
there is no synchronization in time zone between client and server, you may face problems
with message delivery.
11. Can I add/remove network connectors from JMX?
It is not supported. Adding/removing network connectors from JMX may disrupt the cluster.
12. The following 'thaw' error displays when I start the cluster for the first time. What should I do?
$Y03C: PATHCOM - T0845H09 - (01JUL12)
(C)2008-2012 Hewlett Packard Development Company, L.P.
=THAW SERVER r1-M
THAW SERVER R1-M
^
$Y03C: ERROR - *1060* SERVER R1-M, NOT FROZEN
$Y03F: PATHCOM - T0845H09 - (01JUL12)
(C)2008-2012 Hewlett Packard Development Company, L.P.
=START SERVER r1-M
$Y03F: SERVER R1-M, STARTED
=EXIT
$Y03J: PATHCOM - T0845H09 - (01JUL12)
(C)2008-2012 Hewlett Packard Development Company, L.P.
=THAW SERVER r2-M
THAW SERVER R2-M
^
$Y03J: ERROR - *1060* SERVER R2-M, NOT FROZEN
$Y03L: PATHCOM - T0845H09 - (01JUL12)
(C)2008-2012 Hewlett Packard Development Company, L.P.
=START SERVER r2-M
$Y03L: SERVER R2-M, STARTED
=EXIT
You may get this error when starting the cluster for the first time as the script first thaws the
server class. You can ignore this error and continue.
13. Can I use plugins in ActiveMQ configuration?
Authentication and Authorization plugins are supported. Enabling other plugins in ActiveMQ
configuration may disrupt the message delivery to the consumers and may impact performance.
See the individual documentations of the plugins before enabling.
14. How many brokers can I configure within a CPU?
You can configure multiple brokers in a CPU. However, HP recommends you to run brokers
on different CPUs for better performance results. If the TCP process is configured for TCP6SAM,
only one broker must be configured per CPU in a cluster.
15. I am getting the following JMS Exception:
javax.jms.JMSException: Wire format negociation timeout: peer did not send his wire format.
at org.apache.activemq.util.JMSExceptionSupport.create(JMSExceptionSupport.java:58)
at org.apache.activemq.ActiveMQConnection.syncSendPacket(ActiveMQConnection.java:1185)
at org.apache.activemq.ActiveMQConnection.ensureConnectionInfoSent(ActiveMQConnection.java:1263)
at org.apache.activemq.ActiveMQConnection.start(ActiveMQConnection.java:449)
The above exception can mean one of the following:
a. You are connecting to the port not used by NSMQ TCP transport
Check and ensure that you are connecting to the appropriate <ipaddress:port>
b. Network connection may be unreliable or the broker may be under heavy load, hence
connection takes a long time
Try to use the failover transport protocol, so that clients can try to reconnect if the first
attempt fails. You may also try extending the wire format negotiation period to allow
62 FAQ/Common problems and error conditions
Page 63

sufficient time for the connection by setting the
wireFormat.maxInactivityDurationInitalDelay property to a longer duration.
16. How can I disable JMX?
You can disable JMX either before or after installing NSMQ. However, HP does not
recommended this as none of the administrative tools will work if JMX is disabled.
To disable JMX prior to installation:
a. Open the activemqNonPersistent.template and
activemqPersistent.template files located at
<NSMQ-PAX-extracted-folder>/nsmq/T0975H01<build>.
b. In the <broker> element, set the value of useJmx attribute to 'false' as shown:
<broker xmlns="http://activemq.apache.org/schema/core" brokerName="${nsmq.instance}"
dataDirectory="${activemq.data}" useJmx="false">
c. Comment the XML element <managementContext>.
After these changes, JMX gets disabled in all the brokers created using the setup script.
To disable JMX post installation, do the following before starting the broker:
a. Open the <NSMQ-Installation-folder>/<broker_name>/conf/activemq.xml
b. In the <broker> element, set the value of useJmx attribute to 'false' as shown:
<broker xmlns="http://activemq.apache.org/schema/core" brokerName="${nsmq.instance}"
dataDirectory="${activemq.data}" useJmx="false">
c. Comment the XML element <managementContext>.
Restart the brokers for changes to take effect.
17. How do I start NSMQ after a forced pathmon shutdown or system cold load?
To start NSMQ, do the following steps:
a. Set up the cluster again using the following command:
<NSMQ-Installation-folder>/bin/<cluster_name>.sh setup
b. Re-create NSMQ brokers again using the Broker scripts.
<NSMQ-Installation-folder>/<broker_name>/bin/<broker_name>.sh
deploy
Repeat this step to set up all the brokers in the cluster.
c. Start the cluster using the cluster script.
<NSMQ-Installation-folder>/bin/<cluster_name>.sh start
NOTE: HP recommends the following steps before performing a cold load:
a. Before shutting down the cluster, stop all the NSMQ brokers using:
<NSMQ-Installation-folder>/bin/<cluster_name>.sh stop
b. Shutdown the NSMQ cluster using:
<NSMQ-Installation-folder>/bin/<cluster_name>.sh shutdown
63
Page 64

E References
The following references are useful for additional information:
• Open Source ActiveMQ - http://activemq.apache.org/
• JMS tutorial - http://docs.oracle.com/javaee/6/tutorial/doc/bncdq.html
• SQL/MX database - NonStop SQL/MX documentation set
• JDBC Type 2 Driver Programmer's Reference for SQL/MX
• NonStop Server for Java 6.0 Programmer's Reference
• NonStop Application Server for Java 1.0 User Guide
• TS/MP 2.5 Management Programming Manual
64 References
Page 65

Glossary
CIP Cluster I/O Protocols
EJB Enterprise Java Beans
JCA Java Connector Architecture
JDBC Java Database Connectivity
JMS Java Messaging System
JMX Java Management Extension
JTA Java Transaction API
JTS Java Transaction Service
JVM Java Virtual Machine
MDB Message Driven Beans
MOM Message Oriented Middleware
NSASJ NonStop Application Server For Java
NSJ NonStop Server for Java
NSMQ NonStop Message Queue. The port of Apache ActiveMQ 5.6 on NonStop.
RAR Resource Adapter Archive
SSL Secure Socket Layer
TCP Transmission Control Protocol
TMF Transaction Management Facility
TS/MP Transaction Service/Massively Parallel
UDP User Datagram Protocol
65
 Loading...