

Page 1

HPE Integrity MC990 X Server System
Software Installation and Configuration
Guide
Abstract
Use the instructions in this guide to install the Oracle Linux 7, RHEL, VMware vSphere, or
SLES operating system and Foundation Software on an HPE Integrity MC990 X Server
system.
Part Number: 855703-003
Published: November 2017
Edition: 3
Page 2

Contents
Introduction............................................................................................. 5
Integrity MC990 X system software installation...................................6
Installing Oracle Linux 7 software on an MC990 X server................ 13
RHEL 7 OS installation on an Integrity MC990 X system.................. 14
About installing the operating system software, Foundation Software, and optional features......5
Gathering installation materials and information...........................................................................6
(Optional) Setting or changing an administrative password on the system console.....................9
Creating an installation environment...........................................................................................11
Initiating RHEL 7 OS installation and partitioning the disk..........................................................14
Configuring the RHEL 7 OS network and rebooting................................................................... 17
Completing the RHEL 7 OS installation...................................................................................... 18
Installing the foundation software on an RHEL 7 platform MC990 X server...............................19
RHEL 6 software installation on an MC990 X server......................... 22
Initiating the RHEL 6 OS installation...........................................................................................22
Specifying the RHEL 6 OS network................................................................................. 23
Completing the RHEL 6 OS installation........................................................................... 24
Installing the foundation software on an RHEL 6 platform MC990 X server...............................25
SLES 12 OS and foundation software installation on an Integrity
MC990 X system....................................................................................28
Initiating the SLES 12 OS installation......................................................................................... 28
SLES 12 disk partition configuration for an MC990 X server......................................................29
Configuring SLES 12 disk partitions for an MC990 X server...................................................... 29
Specifying the SLES 12 network and miscellaneous settings.................................................... 32
Installing the foundation software on a SLES 12 platform MC990 X server............................... 34
SLES 11 platform installation on an Integrity MC990 X system....... 36
Installing the SLES 11 OS software on an MC990 X server....................................................... 36
Initiating the SLES 11 OS installation...............................................................................36
Specifying the SLES 11 network and miscellaneous settings.....................................................37
Completing the SLES 11 installation...........................................................................................39
Installing the foundation software on a SLES 11 platform MC990 X server................................40
Installing VMware vSphere 6.5 on an MC990 X server...................... 42
Introduction................................................................................................................................. 42
VMware vSphere ISO image location......................................................................................... 42
Installing the VMware vSphere image........................................................................................ 42
Adding the boot entry..................................................................................................................45
2 Contents
Page 3

Additional software features for the Integrity MC990 X system....... 52
Remote management through the ipmitool command .......................................................... 52
Security-Enhanced Linux (SELinux) configuration on RHEL platforms...................................... 52
Configuring Security-Enhanced Linux (SELinux) on RHEL platforms........................................ 53
Installation of debuginfo packages ......................................................................................... 54
Installing debuginfo packages on RHEL platforms .................................................................54
Installing debuginfo packages on SLES platforms ................................................................. 56
Creating boot options..................................................................................................................57
Crash dump files on an Integrity MC990 X system server on RHEL 7, SLES 12, and SLES
11 platforms.................................................................................................................................59
Creating a crash dump file on an Integrity MC990 X system server on RHEL 7, SLES 12,
and SLES 11 platforms............................................................................................................... 60
Websites................................................................................................ 62
Support and other resources...............................................................63
Accessing Hewlett Packard Enterprise Support......................................................................... 63
Accessing updates......................................................................................................................63
Customer self repair....................................................................................................................64
Remote support.......................................................................................................................... 64
Warranty information...................................................................................................................64
Regulatory information................................................................................................................65
Documentation feedback............................................................................................................ 65
Connecting to an MC990 X system through a web browser and
launching the JViewer console............................................................66
About JViewer.............................................................................................................................66
Starting JViewer..........................................................................................................................66
Attaching virtual media to the MC990 X system......................................................................... 67
Booting from virtual media.......................................................................................................... 67
Glossary.................................................................................................69
Contents 3
Page 4

©
Copyright 2016, 2017 Hewlett Packard Enterprise Development LP
Notices
The information contained herein is subject to change without notice. The only warranties for Hewlett
Packard Enterprise products and services are set forth in the express warranty statements accompanying
such products and services. Nothing herein should be construed as constituting an additional warranty.
Hewlett Packard Enterprise shall not be liable for technical or editorial errors or omissions contained
herein.
Confidential computer software. Valid license from Hewlett Packard Enterprise required for possession,
use, or copying. Consistent with FAR 12.211 and 12.212, Commercial Computer Software, Computer
Software Documentation, and Technical Data for Commercial Items are licensed to the U.S. Government
under vendor's standard commercial license.
Links to third-party websites take you outside the Hewlett Packard Enterprise website. Hewlett Packard
Enterprise has no control over and is not responsible for information outside the Hewlett Packard
Enterprise website.
Acknowledgements
Java® and Oracle® are registered trademarks of Oracle and/or its affiliates.
Linux® is a registered trademark of Linus Torvalds in the U.S. and other countries.
Red Hat® and Red Hat® Enterprise Linux® are registered trademarks of Red Hat, Inc. in the United States
and other countries.
VMware® and VMware vSphere® are registered trademarks of VMware, Inc. in the United States and
other jurisdictions.
NUMAlink® and NUMAflex® are trademarks or registered trademarks of Silicon Graphics International
Corp. or its subsidiaries in the United States and/or other countries worldwide.
Revision History
HPE Part Number Edition Publication Date
855703-003 Third November 2017
855703-002 Second July 2016
855703-001 First March 2016
Page 5

Introduction
This chapter contains the following topics:
About installing the operating system software, Foundation Software, and optional features on
page 5
About installing the operating system software,
Foundation Software, and optional features
This guide explains how to install the operating system and Foundation Software on an HPE Integrity
MC990 X Server system. You can install the OS and Foundation Software to meet site requirements on a
new system or you can reinstall these in the event of a disaster or a system failure.
HPE Integrity MC990 X Server supports the following operating systems on the MC990 X server chassis:
• RHEL 7.1, 6.7, 6.6
• SLES 12 SP1, 11 SP4, 11 SP3
• Oracle Linux 7.1 or 7.2
• VMware vSphere 6.5
After the OS and Foundation Software are installed on your MC990 X server chassis, you can configure
Foundation Software according to your site needs. For information about Foundation Software
components and features, see the HPE Integrity MC990 X Server User Guide.
NOTE:
HPE recommends that you install new Foundation Software packages as they become available.
HPE requires you to install the Foundation Software on each Integrity MC990 X system. You can install
the Foundation Software on the MC990 X server chassis after you install the operating system software.
Introduction 5
Page 6

Integrity MC990 X system software installation
HPE installs operating system software, the Foundation Software, and any additional customerpurchased software after the Integrity MC990 X system hardware is installed at the customer site. The
operating system can be one of the following:
• RHEL 7.1, 6.7, 6.6
• SLES 12 SP1, 11 SP4, 11 SP3
• Oracle Linux 7.1 or 7.2
• VMware vSphere 6.5
If your site practices require you to reinstall the software, or if a disaster occurs at your site, you can use
the procedures in this guide to reinstall all the factory-installed software. The procedures in this guide
assume the following:
• You are familiar with Linux operating systems, and are familiar with the operating system software
update process. The installation instructions describe how to register the operating system installation
with the operating system software provider to ensure automatic updates. This guide assumes that
your site wants to use the automatic updates. As an alternative, you can use physical media to apply
updates.
• You want to reinstall the factory-installed software on the MC990 X server chassis.
• Your Integrity MC990 X system is cabled correctly and attached to the network in accordance with
your site practices.
There is a specific order in which you need to install software on an Integrity MC990 X system. This order
is as follows:
1. Operating system software, which can be RHEL 7, RHEL 6, SLES 12, SLES 11, VMware vSphere 6.5,
or Oracle Linux 7.
2. Foundation Software
Gathering installation materials and information
Gathering needed information in advance for the MC990 X server operating system installation session
will help you complete the installation more quickly.
Procedure
1. Verify your environment.
Integrity MC990 X system installations require you to have physical access to the MC990 X server
chassis and the RMC.
Depending on your hardware, you might need additional equipment or specific network connections.
Make sure that you have access to the RMC and the DVD drive that is included on the server.
2. Locate the software DVDs or CDs that are provided by HPE, or download and create DVDs or CDs.
This guide assumes that you have DVDs of the operating system and CDs of the software.
You can obtain the operating system software in one of the following ways:
6 Integrity MC990 X system software installation
Page 7

• In a media kit from HPE. HPE distributes DVD copies of the operating system releases.
• As a software download. You can download the OS releases from the Red Hat, SUSE, or Oracle
websites and write the software to a DVD.
You can obtain the Foundation Software from the HPE customer support center. To download the
software, complete the following steps:
a. In a browser window, navigate to the following URL:
www.hpe.com/support/hpesc
b. Select the system (MC990 X) and the OS.
c. View or download the software release notes.
d. Download the software bundle(s) that you need. If you install the OS, also plan to install the
Foundation Software. The HPE support center prompts you for your username and password.
e. Write the ISO file to a CD or DVD.
The instructions in this guide assume that you have hard media. Some procedures explain how to
access the release software if you want to install from a network-resident ISO image, but the
instructions are not comprehensive. If you downloaded the ISO images to a local network but do
not want to copy them to hard media, plan to use your network tools to access the software when
the procedures instruct you to insert a DVD or CD.
3. Plan the order in which to install the software.
Install the OS software first, then install the Foundation Software on the MC990 X server chassis.
4. Gather the information that the installer requires.
The installation requires you to provide information about passwords, your public (or house) network,
and so on. You can complete the installation more quickly if you gather this information before you
begin. Obtain the system configuration information that was used when the Integrity MC990 X system
was originally configured. The following list shows the information you need to collect:
• MC990 X server FQDN __________________________________
• MC990 X server hostname __________________________________
• MC990 X server IP address __________________________________
• MC990 X server subnet mask __________________________________
• Site DNS server IP addresses __________________________________
• Site search domain __________________________________
• Password for the MC990 X server system administrator (root user) login
__________________________________
• FQDN of your site network time protocol (NTP) server __________________________________
• IP address of your primary name server ____________________________
• IP address of your secondary name server ____________________________
• RMC FQDN ________________________________
• For RHEL installations, do the following:
Integrity MC990 X system software installation 7
Page 8
◦ Verify your site Red Hat Networks (RHN) registration status and your Customer Center
registration status.
◦ Obtain your RHN login.
◦ Obtain your RHN password.
• For SLES installations, do the following:
◦ Determine the email address you want to use when you register with the SUSE Customer
Center.
◦ (Optional) Obtain the activation code for SLES components.
◦ (Optional) Determine the system name or description.
5. Familiarize yourself with the hardware components in the rack.
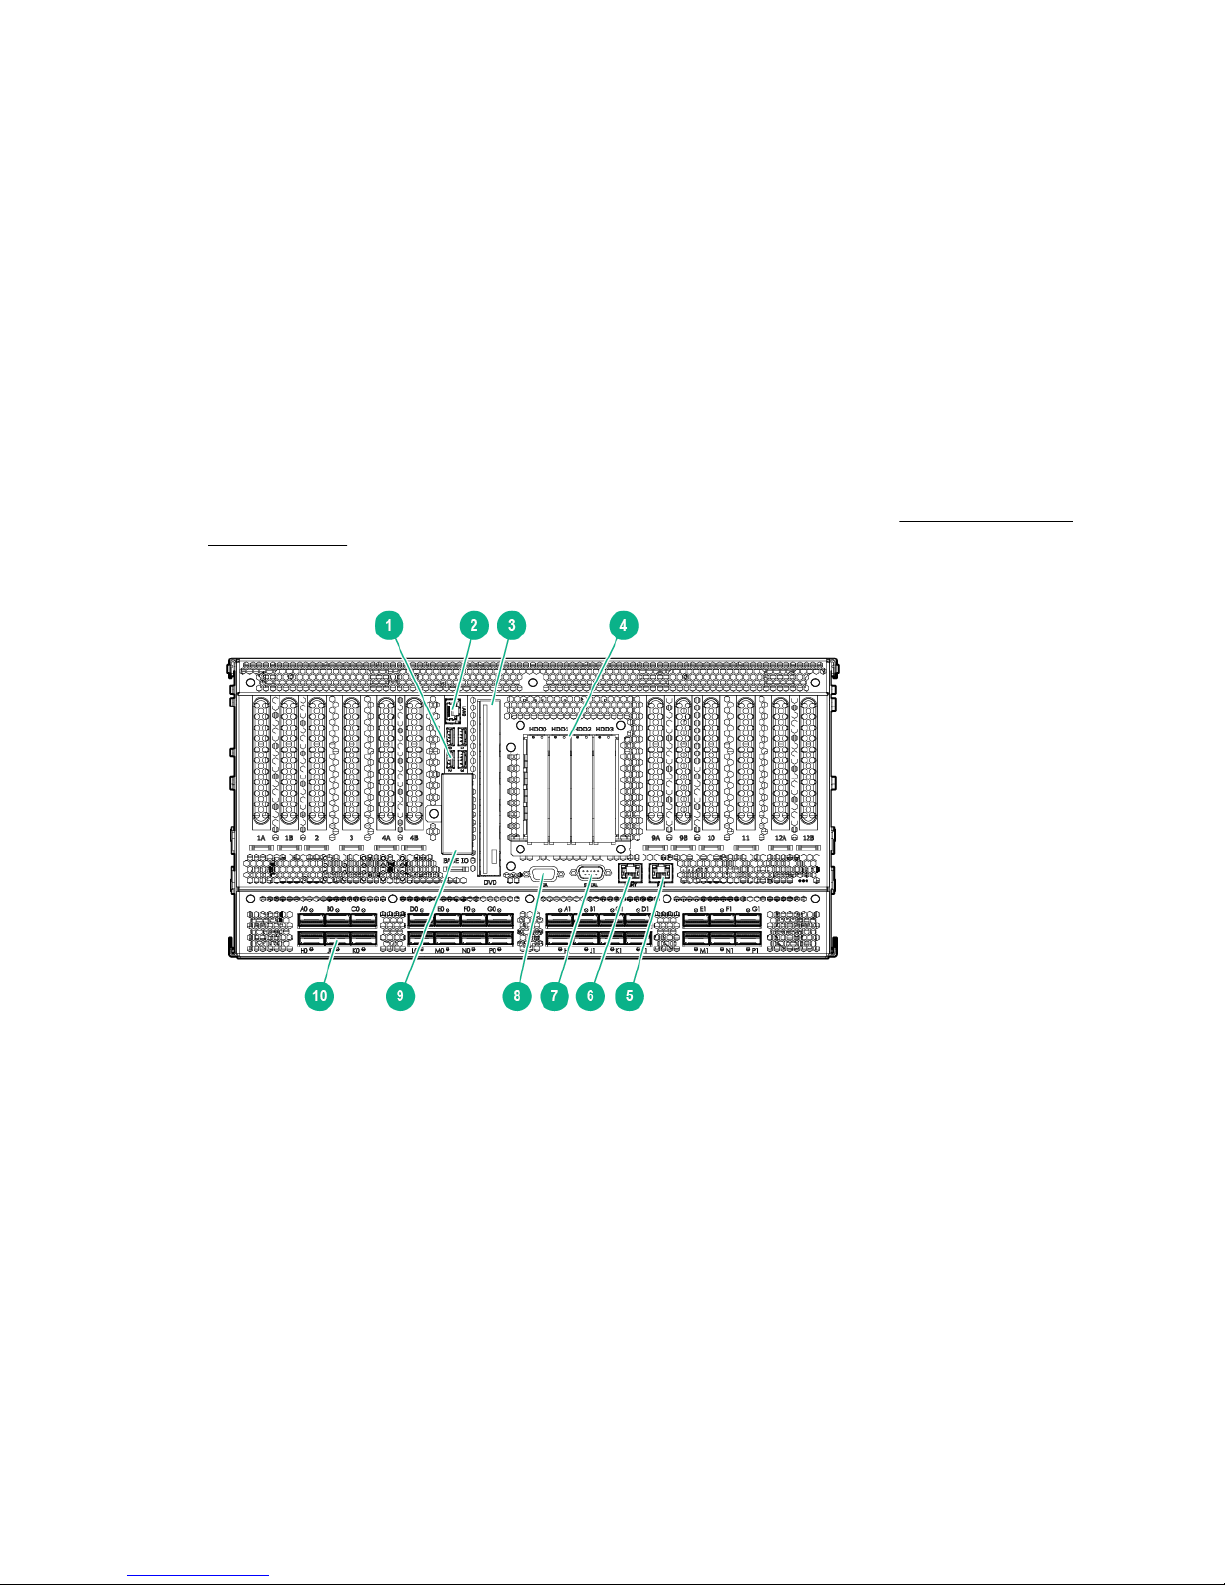
Identify the base server chassis in the rack and the DVD drive on the chassis. Figure 1: MC990 X
server chassis on page 8 shows the location of the DVD drive, along with other components and
ports, on the MC990 X server chassis.
Figure 1: MC990 X server chassis
1. USB ports (4) 2. ETH0
3. DVD drive 4. System drive assembly
5. RMC port 6. MGMT port
7. Serial port 8. VGA port
9. Optional 1.8-inch SSD drive bays 10. NUMAlink ports (28)
6. Proceed to one of the following:
8 Integrity MC990 X system software installation
Page 9

• (Optional) To set an administrative password for the local console, proceed to (Optional) Setting
or changing an administrative password on the system console on page 9.
HPE does not require that you set an administrative password, but you can do so if you are logged
into a direct-attached, local console. After you set this password, you can proceed with the software
installation.
• To install the operating system and Foundation Software on an MC990 X server, proceed to
Creating an installation environment on page 11/
(Optional) Setting or changing an administrative password
on the system console
The procedure in this topic explains how to set, or change, an administrative password on the console
attached to an Integrity MC990 X system. A password is not required.
To delete a console password, enter the following command, which clears the EFI variables:
RMC> power -c reset
If you delete the password with the power -c reset command, you need to go back through the setup
screens to set it again.
To set or change an administrative password on the console:
Procedure
1. log in to the Integrity MC990 X system as the root user.
2. (Conditional) Shut down the system.
Complete this step if the system is running at this time.
Enter the following command:
# shutdown now
3. log in to the RMC as the root user.
4. From the RMC, enter the following command to reset the power:
RMC> power -s reset
5. Wait for the reset to complete and enter the following command to start a console session on the
base I/O BMC:
RMC> uvcon
6. On the Integrity MC990 X system console BIOS main menu, press F2.
This action selects to enter setup and select boot options.
Figure 2: Integrity MC990 X system boot options screen on page 10 shows the Integrity MC990
X system BIOS menu options.
(Optional) Setting or changing an administrative password on the system console 9
Page 10
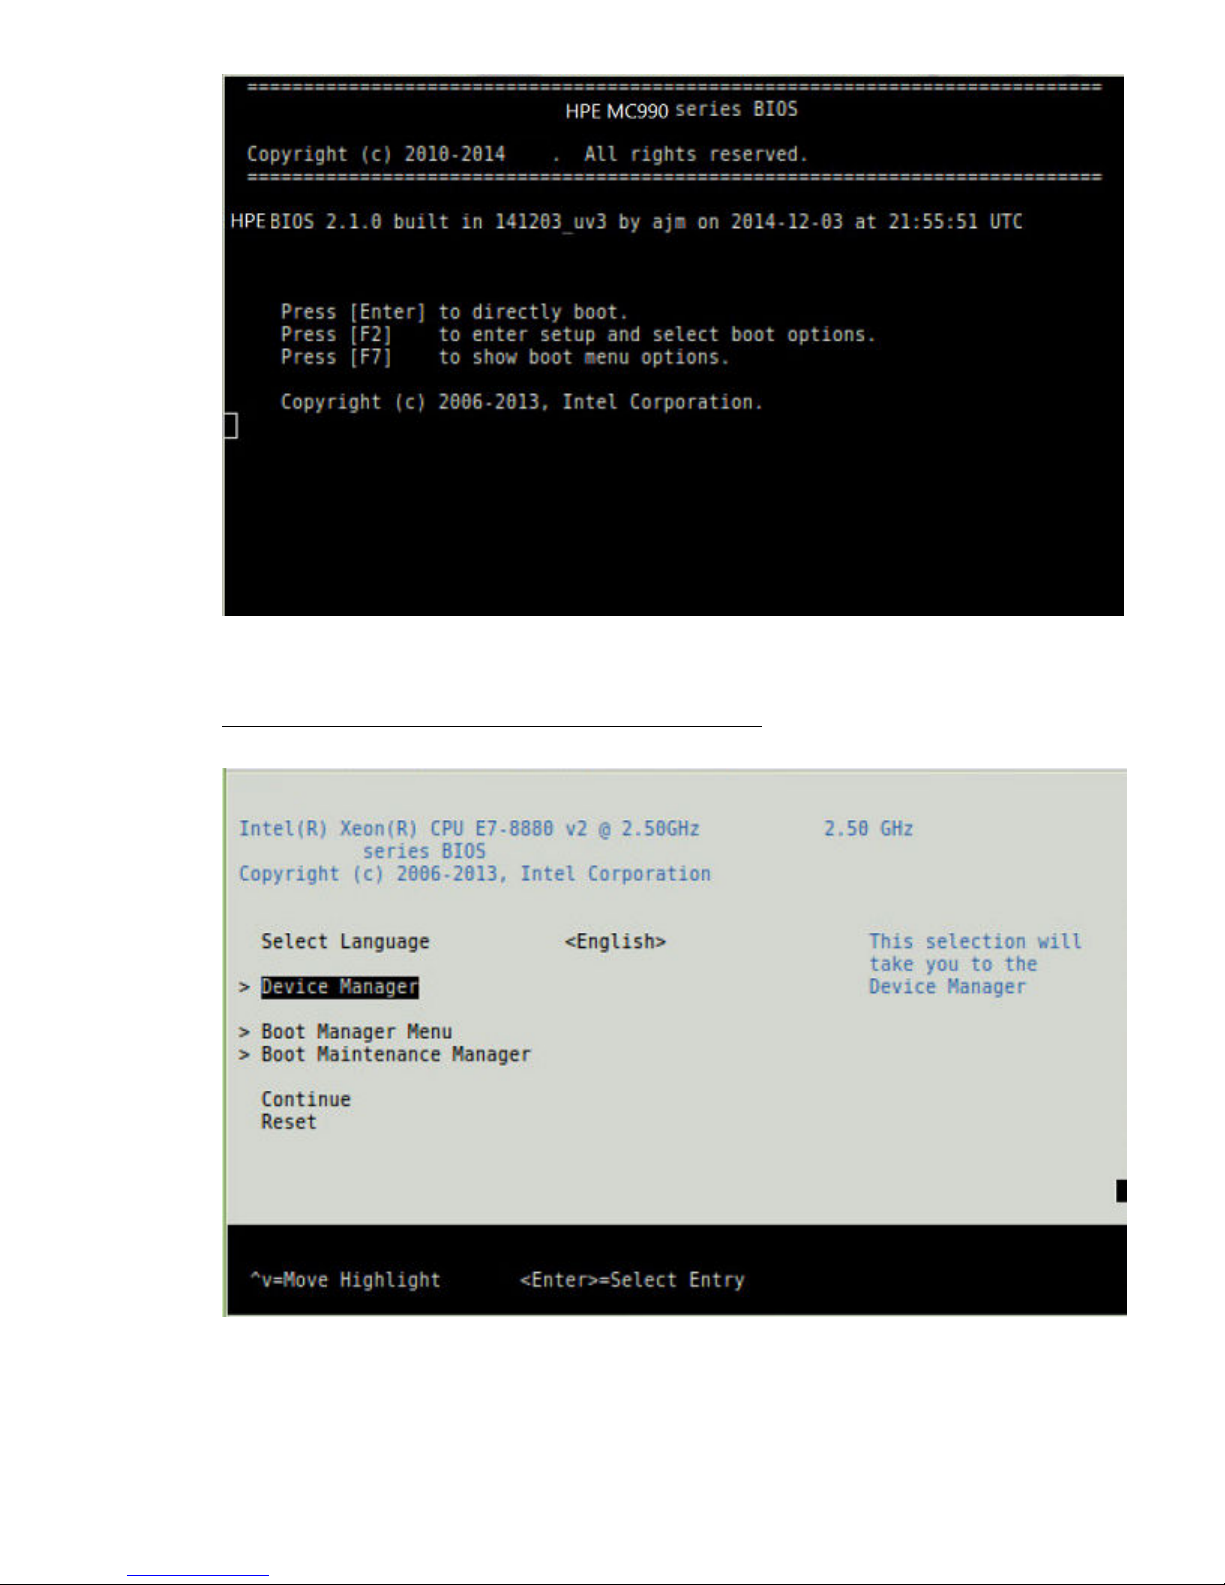
Figure 2: Integrity MC990 X system boot options screen
7. On the Boot Manager screen, select Device Manager and press Enter.
Figure 3: Integrity MC990 X system boot manager screen on page 10 shows the boot manager
screen.
Figure 3: Integrity MC990 X system boot manager screen
8. On the Device Manager screen, select Security and press Enter.
10 Integrity MC990 X system software installation
Page 11

The following list shows how to navigate the device manager:
• F1 scrolls the help.
• Shift+6-(^), v, or arrow keys highlight a selection.
• F9 resets system defaults.
• Enter selects.
• F10 saves.
• Esc exits without saving.
• Plus (+) and minus (-) keys change setting values.
• To exit the console, press CTRL+], and then press q. This sequence drops you to the RMC
console.
9. On the Security screen, select the Admin Password option, and press Enter.
10. In the Please type in your new password field, type the new administrative password, and press
Enter.
The minimum password length is 6 characters and the maximum password length is 30 characters.
The password is case sensitive.
The next time you boot the system, the system will prompt you to type the new password at the end
of the boot sequence. The system issues this prompt before the Shell> prompt appears.
11. Press F10 to save the change.
12. Press Esc twice to return to the boot manager.
13. To return to the RMC console, press CTRL+], and then press q.
14. Proceed to Creating an installation environment on page 11.
Creating an installation environment
You can install the MC990 X server software by making a direct connection to the MC990 X server.
Procedure
1. Log in to the RMC as the root user.
2. From the RMC, power-on the server.
3. Put the DVD in to the DVD drive in the MC990 X server chassis that includes the BaseIO riser.
If you are installing the software on a partitioned Integrity MC990 X system, put the DVD into the
drive in the MC990 X server chassis that includes the BaseIO riser for your partition.
For information about partitioning, see the HPE Foundation Software User Guide.
4. From the RMC, enter the following command to perform a quick reset:
# power -s reset
The quick reset in this step sets the system to its smallest possible configuration. A later procedure
includes a step to reset the whole system.
5. Wait for the system to reset.
Creating an installation environment 11
Page 12

The reset is complete when the RMC> prompt appears.
6. At the RMC> prompt, enter the following command to open a console to the shell:
RMC> uvcon
7. At the MC990 X server chassis BIOS menu, press F2 to enter setup and select boot options.
8. Use the arrow keys to highlight Boot Manager Menu, and press Enter.
9. Use the arrow keys to highlight UEFI JMicron USB to ATA/ATAPI bridge ..., and press Enter.
10. (Conditional -- RHEL 7 or SLES 11 only) Select an installation activity, as follows:
• For an RHEL 7 installation, use the arrow keys to navigate to the Install Red Hat Enterprise
Linux 7.1, and press Enter.
• For a SLES 11 installation, on the SUSE Linux Enterprise Server x screen, press Enterto select
Installation and start the SLES installation.
11. Proceed to one of the following:
• To install an RHEL 7 operating system and the Foundation Software on an MC990 X server,
proceed to
RHEL 7 OS installation on an Integrity MC990 X system on page 14.
• To install an RHEL 6 operating system and the Foundation Software on an MC990 X server
chassis, proceed to RHEL 6 software installation on an MC990 X server on page 22.
• To install an SLES 12 operating system and the Foundation Software on an MC990 X server,
proceed to SLES 12 OS and foundation software installation on an Integrity MC990 X
system on page 28.
• To install an SLES 11 operating system and the Foundation Software on an MC990 X server
chassis, proceed to SLES 11 platform installation on an Integrity MC990 X system on page
36.
• To install a VMware vSphere 6.5 virtualization platform on an MC990 X server, proceed to
Installing VMware vSphere 6.5 on an MC990 X server on page 42.
12 Integrity MC990 X system software installation
Page 13

Installing Oracle Linux 7 software on an
MC990 X server
The instructions for installation of Oracle Linux 7 are nearly identical to those for installing RHEL, with
some minor changes (see
minimum version required is Oracle Linux 7.1.
Oracle Linux 7 comes with two kernels:
• RHEL based kernel
• Oracle Unbreakable Enterprise Kernel (UEK) kernel
Procedure
1. After installing Oracle Linux 7, reboot.
2. From the boot menu, choose the RHEL based kernel
3. Type e to edit the boot line
4. Add the boot option nobau to the boot line
5. Boot the system
RHEL 7 OS installation on an Integrity MC990 X system on page 14. The
6. When the system comes up, install the System Foundation Software as described in the RHEL
instructions (see
page 19).
7. Once the System Foundation Software is installed, run the following:
# modprobe hwperf
# /usr/sbin/x86config
8. If the system will be running with the Oracle Unbreakable Enterprise Kernel (UEK), you must also
install the hwperf kernel module package built for use with the UEK as follows (UEK version of
3.8.13-105 or later is required):
# yum -c /tmp/yum-sgi.conf install kmod-hwperf-uek
# yum update kernel-uek
9. After installing all packages, reboot the system to complete the installation, and boot with optimized
kernel command line parameters.
Installing the foundation software on an RHEL 7 platform MC990 X server on
Installing Oracle Linux 7 software on an MC990 X server 13
Page 14

RHEL 7 OS installation on an Integrity MC990
X system
This chapter explains how to install and configure the following software on an MC990 X server:
• The RHEL 7.1 operating system.
• The Foundation Software. If you install RHEL 7 on the server, HPE requires that you install Foundation
software 2.13 or later.
The following procedures explain how to install the RHEL 7 operating system software:
•
Initiating RHEL 7 OS installation and partitioning the disk on page 14
• Configuring the RHEL 7 OS network and rebooting on page 17
• Completing the RHEL 7 OS installation on page 18
More information
• The Red Hat Enterprise Linux 7 Installation Guide at
Red_Hat_Enterprise_Linux/7/pdf/Installation_Guide/Red_Hat_Enterprise_Linux-7Installation_Guide-en-US.pdf
• The Foundation Software release notes file at www.hpe.com/support/hpesc
http://docs.redhat.com/docs/en-US/
Initiating RHEL 7 OS installation and partitioning the disk
Procedure
1. Make sure you gathered the information that you need for this installation.
For more information, see Gathering installation materials and information on page 6.
2. On the boot loader menu, complete the following steps:
a. Use the arrow keys to select Install Red Hat Enterprise Linux 7.1.
b. Press Enter.
3. Wait a few moments while the software loads.
4. On the splash screen, which asks What language would you like to use during the installation
process?, complete the following steps:
a. Select your language.
b. Click Continue.
5. On the INSTALLATION SUMMARY page, click DATE & TIME.
6. On the DATE & TIME page, complete the following steps:
14 RHEL 7 OS installation on an Integrity MC990 X system
Page 15

a. Select your time zone.
b. Select the date.
c. Click Done.
7. On the INSTALLATION SUMMARY page, click KEYBOARD.
8. On the KEYBOARD LAYOUT page, complete the following steps:
a. Select your keyboard layout.
b. Click Done.
9. On the INSTALLATION SUMMARY page, click SOFTWARE SELECTION.
10. On the SOFTWARE SELECTION page, complete the following steps:
a. Select Server with GUI.
b. Click Done.
11. On the INSTALLATION SUMMARY page, complete the following steps:
a. Click INSTALLATION DESTINATION.
b. Click the disk under Local Standard Disks.
c. Under Other Storage Options, click I will configure partitioning.
d. Click Done.
12. On the MANUAL PARTITIONING page, clean the disk.
The screen's left pane lists the operating system installations that currently reside on the disk. Your
goal is to remove all operating system installations, data, and partitions that reside on the disk. You
can remove one operating system at a time.
To remove one operating system, complete the following steps:
a. Select the operating system name.
b. Click the minus sign (-) at the bottom of the left pane to delete the operating system.
c. On the Are you sure ... popup, complete the following steps:
I. Select Delete all other ....
II. Click Delete it.
d. Repeat the preceding steps, as needed, until all operating systems are removed.
13. In the left pane, select Standard Partition from the drop-down menu.
14. Create new mount points.
Your goal is to configure the disks according to Disk partitions for an MC990 X Server.
RHEL 7 OS installation on an Integrity MC990 X system 15
Page 16

Table 1: Disk partitions for an MC990 X Server
Size Mount Point File System
512 MB /boot/efi FAT16
250 GB (256,000 MB) / XFS
8 GB (8,192 MB) swap swap
rest of disk /data1 XFS
Complete the following steps to create new mount points:
a. In the left pane, click the plus sign (+) to add a new mount point.
b. On the ADD A NEW MOUNT POINT popup, complete the following steps:
I. On the Mount Point drop-down menu, select /boot/efi.
II. On the Desired Capacity drop-down menu, enter 512mb.
III. Click Add mount point.
c. In the left pane, click the plus sign (+) to add a new mount point.
d. On the ADD A NEW MOUNT POINT popup, complete the following steps:
I. On the Mount Point drop-down menu, select /.
II. On the Desired Capacity drop-down menu, enter 256gb.
III. Click Add mount point.
e. In the left pane, click the plus sign (+) to add a new mount point.
f. On the ADD A NEW MOUNT POINT popup, complete the following steps:
I. On the Mount Point drop-down menu, select swap.
II. On the Desired Capacity drop-down menu, enter 8gb.
III. Click Add mount point.
g. In the left pane, click the plus sign (+) to add a new mount point.
h. On the ADD A NEW MOUNT POINT popup, complete the following steps:
I. In the Mount Point field, enter /data1.
II. Leave the Desired Capacity field blank.
III. Click Add mount point.
i. Verify that the Desired Capacity field shows the rest of the disk.
j. Click Done.
16 RHEL 7 OS installation on an Integrity MC990 X system
Page 17

15. On the SUMMARY OF CHANGES popup, click Accept Changes.
16. On the KDUMP page, complete the following steps:
a. Click Manual.
b. In the Memory to be Reserved (MB) field, specify 450 MB.
c. Click Done.
17. Proceed to Configuring the RHEL 7 OS network and rebooting on page 17.
Configuring the RHEL 7 OS network and rebooting
Procedure
1. On the INSTALLATION SUMMARY page, click NETWORK & HOST NAME.
2. On the NETWORK & HOST NAME page, complete the following steps:
a. Select Ethernet enp1s0f0.
b. In the right pane, in the upper-right corner of the screen, find the ON/OFF switch and click the blank
box to set the ON/OFF switch to ON.
c. Click Configure.
d. On the Editing enp1s0f0 popup, select IPv4 Settings.
e. Complete this step according to the following table:
Table 2: Specify dynamic or static addressing
To specify dynamic addressing: To specify static addressing:
1. In the Method: drop-down menu, select
Automatic (DHCP).
2. Click Apply. 2. In the Addresses pane, click Add, and
3. On the Editing pop up, click Save. 3. In the DNS servers: field, enter the IP address
1. In the Method: drop-down menu, select
Manual.
complete the following steps:
• Enter the IP address.
• Enter the netmask.
• Enter the IP address of the default gateway.
of one or more DNS servers. If you specify more
than one, use a comma to separate each IP
address.
Table Continued
Configuring the RHEL 7 OS network and rebooting 17
Page 18

To specify dynamic addressing: To specify static addressing:
4. In the Search domains: field, enter one or
more search domains. If you specify more than
one, use a comma to separate each domain.
5. On the Editing pop up, click Save.
3. On the NETWORK & HOSTNAME page, in the Host name field, complete the following steps:
a. Enter the hostname of the Integrity MC990 X system.
b. Click Done.
4. On the INSTALLATION SUMMARY page, click Begin Installation.
5. On the CONFIGURATION page, click ROOT PASSWORD.
6. On the ROOT PASSWORD page, complete the following steps:
a. In the Root Password field, enter the password you want to use on this Integrity MC990 X system.
b. In the Confirm field, enter the password again.
c. Click Done.
If the password is too weak, either specify a stronger password or click Done twice.
7. On the CONFIGURATION page, complete the following steps:
a. Wait for the configuration to complete.
b. Click Reboot when the configuration completes.
c. Wait for the reboot to finish.
8. Proceed to Completing the RHEL 7 OS installation on page 18.
Completing the RHEL 7 OS installation
To complete the installation:
Procedure
1. On the INITIAL SETUP screen, click LICENSE INFORMATION.
2. On the LICENSE INFORMATION screen, complete the following steps:
a. Click I accept the license agreement.
b. Click Done.
3. Click FINISH CONFIGURATION.
4. On the Subscription Management Registration page, click Forward.
5. On the second Subscription Management Registration page, complete the following steps:
18 Completing the RHEL 7 OS installation
Page 19

a. Complete the fields appropriately for your site.
b. Click Done.
6. On the Welcome page, complete the following steps:
a. Select your language.
b. Click Next.
7. On the Input Sources page, complete the following steps:
a. Select the language you use.
b. Click Next.
8. On the Login page, complete the following steps to create the local user account:
a. Complete all the fields on this page.
b. Click Next.
9. On the Location page, complete the following steps:
a. Select a location.
b. Click Next.
10. On the Thank You screen, click Start using Red Hat Enterprise Linux Server.
11. Click the user account name in the upper right corner of your screen, and select Log Out on the
menu that appears.
This action logs out the local user, which is the account you created in this procedure.
12. Proceed to Installing the foundation software on an RHEL 7 platform MC990 X server on page
19.
Installing the foundation software on an RHEL 7 platform
MC990 X server
Procedure
1. log in to the MC990 X server as the root user.
2. On the login page, complete the following steps:
a. Select Not Listed?.
b. In the Username field, enter root.
c. In the Password field, enter the root user's password.
d. Click Log In.
e. (Conditional) Initialize the root user account.
Installing the foundation software on an RHEL 7 platform MC990 X server 19
Page 20

Complete these steps only if this is the first time you are logging in as the root user.
I. On the Welcome page, complete the following steps:
i. Select your language.
ii. Click Next.
II. On the Input Sources page, complete the following steps:
i. Select the language you use.
ii. Click Next.
III.
On the Thank You screen, click Start using Red Hat Enterprise Linux Server.
3. Access the installation software.
Insert the HPE Foundation Software CD into the DVD drive.
4. Click Applications→System Tools→Terminal to open a terminal window.
5. Enter the following command to create an installation directory for the files from the CD:
# mkdir -p /opt/hpe/Factory-Install/hpe-foundation-2.14/
6. Enter the following command to create a temporary mount directory:
# mkdir /var/sfs2.14
7. Enter the following command to mount the CD in read-only mode (-r), using a loop device:
# mount -t iso9660 -ro loop /dev/cdrom /var/sfs2.14
8. Enter the following command to copy the files from the temporary mount directory to the installation
directory:
# rsync -avHx /var/sfs2.14/ /opt/hpe/Factory-Install/hpe-foundation-2.14/
9. Enter the following command to unmount the CD from the temporary directory:
# umount /var/sfs2.14
10. Run the create-yum-config-file using:
#/opt/hpe/Factory-Install/hpe-foundation-2.14/create-yum-config-file
11. Enter the following command to remove the temporary mount directory:
# rmdir /var/sfs2.14
12. Use a text editor to create the /etc/yum.repos.d/ foundation2.14-local.repo file with the
following contents:
########################################
[foundation2.14-repo]
name=Foundation Software 2.14 - $basearch
baseurl=file:///opt/hpe/Factory-Install/hpe-foundation-2.14/RPMS
20 RHEL 7 OS installation on an Integrity MC990 X system
Page 21

enabled=1
gpgcheck=1
gpgkey=file:///opt/hpe/Factory-Install/hpe-foundation-2.14/RPM-GPG-KEY-sgi
########################################
13. Enter the following command to retrieve the list of software that you can install:
# yum grouplist | grep HPE
14. Enter the following command to install the Foundation Software group:
# yum -c /tmp/yum-sgi.conf groupinstall "System Foundation Software"
15. Enter y at the following prompt to confirm the download size:
Is this ok [y/N]
16. Enter y at the following prompt to accept the GPG license key:
Is this ok [y/N]
17. Open a terminal window on the booted system.
18. In the terminal window, enter the following command to reboot the system:
# reboot
19. After the system reaches the EFI shell, in the RMC command window, enter the following command
to reset the full system:
# power reset
RHEL 7 OS installation on an Integrity MC990 X system 21
Page 22

RHEL 6 software installation on an MC990 X
server
This chapter explains how to install and configure the following software on an MC990 X server chassis:
• The RHEL operating system.
• The Foundation Software.
More information
• The Red Hat Enterprise Linux 6 Installation Guide at
Red_Hat_Enterprise_Linux/6/pdf/Installation_Guide/Red_Hat_Enterprise_Linux-6Installation_Guide-en-US.pdf.
• The Foundation Software release notes file at www.hpe.com/support/hpesc.
http://docs.redhat.com/docs/en-US/
Initiating the RHEL 6 OS installation
Procedure
1. Make sure you gathered the information that you need for this installation.
For more information, see Gathering installation materials and information on page 6.
2. On the Disc Found screen, tab to one of the following, and press Enter:
• Skip. Select this option if you are using the standard DVD you received from HPE.
• OK. Select this option if you downloaded the software and created your own DVD. This option
checks the integrity of the disk.
3. On the Red Hat Enterprise Linux 6 splash screen, click Next.
4. On the What language would you like to use during the installation process? screen, select your
language, and click Next.
5. On the Select the appropriate keyboard for the system screen, select your keyboard, and click
Next.
6. On the What type of devices will your installation involve? screen, select Basic storage devices,
and click Next.
7. (Conditional) Select Fresh Installation, and select Next.
Perform this step if a screen with the following information appears: At least one existing installation
has been detected on your system. What would you like to do?
8. On the Please name this computer screen, enter the fully qualified domain name (FQDN) for the
SMN or server, and click Configure Network.
22 RHEL 6 software installation on an MC990 X server
Page 23

If you are installing the operating system on a partition, make sure to use a different hostname for
each partition you create. For example: system-p1.uv.com. After you complete the installation, if
you need to address a partition, use the hostname or FQDN for the partition.
9. Proceed to Specifying the RHEL 6 OS network on page 23.
Specifying the RHEL 6 OS network
Procedure
1. On the Network Connections popup, select System eth0, and click Edit.
2. On the Editing System eth0 popup, complete the following steps:
a. Select Connect automatically to start the network card.
b. Select the IPv4 Settings tab.
3. Complete the IPv4 Settings tab.
This step differs depending on whether you want to use dynamic or static addressing, as follows:
Table 3: Specify dynamic or static addressing
To specify dynamic addressing: To specify static addressing:
1. Make sure that Automatic (DHCP) is selected. 1. In the Method: field, pull down Manual.
2. Click Apply. 2. In the Addresses pane, click Add, and
complete the following steps:
• Type the IP address.
• Type the netmask.
• Type the IP address of the default gateway.
3. On the Network Connections pop up, click
Close.
3. In the DNS servers: field, type the IP address
of one or more DNS servers. If you specify more
than one, use a comma to separate each IP
address.
4. In the Search domains: field, type one or
more search domains. If you specify more than
one, use a comma to separate each domain.
5. Click Apply.
6. On the Network Connections pop up, click
Close.
4. On the Please name this computer screen, click Next.
5. On the Please select the nearest city in your time zone screen, select a city, and click Next.
Specifying the RHEL 6 OS network 23
Page 24

6. On the The root account is used for administering the system screen, complete the following
steps:
a. In the Root Password field, enter the password you want to use for the root account.
b. In the Confirm field, enter the root password again.
c. Click Next.
7. On the Which type of installation would you like? screen, select Create Custom Layout, and click
Next.
Completing the RHEL 6 OS installation
Procedure
1. On the The default installation of Red Hat Enterprise Linux is a basic server install ... page,
complete the following steps:
a. Select Desktop.
b. Select Next.
Wait for the operating system installation to complete.
2. On the Congratulations, your Red Hat Enterprise Linux installation is complete page, click
Reboot.
3. On the Welcome page, click Forward.
4. On the License Information page, complete the following steps:
a. Click Yes, I agree to the License Agreement.
b. Click Forward.
5. On the Set Up Software Updates page, decide whether to register now or whether to postpone
registration.
If your Integrity MC990 X system is connected to the network correctly, you can register now. The
following information explains how to proceed:
• If the screen contains a message that begins with This assistant will guide you
through the process of registering your system with Red Hat to receive
software updates ..., then the Integrity MC990 X system is connected correctly to the
network. Complete the following steps:
a. Select Yes, I'd like to register now, and click Forward.
b. On the Choose Service page, select Red Hat Subscription Management, and click
Forward.
c. On the Subscription Management Registration page, click Forward.
24 Completing the RHEL 6 OS installation
Page 25

d. On the second Subscription Management Registration page, complete the fields
appropriately for your site, and click Forward.
e. On the third Subscription Management Registration page, click Forward.
• If the screen includes a warning symbol and a message that begins with The network
connection on your system is not active ..., then the Integrity MC990 X system is
not connected correctly to the network. Complete the following steps:
a. Click Forward.
b. Continue on to the next step in this procedure.
You can restart the installer, correct your network configuration, and connect to RHN later.
6. On the Create User page, complete the following steps to create an end-user account:
a. In the Username field, enter the username.
b. In the Full Name field, enter the user's full name.
c. In the Password field, enter the user's password. Passwords must be at least eight characters
long, contain at least one digit, and contain a mixture of uppercase and lowercase letters.
d. In the Confirm Password field, type the user's password again.
e. Click Forward.
7. On the Date and Time screen, configure system clock settings that your site requires and click
Forward.
8. On the Kdump page, specify 450 MB, and click Finish
9. On the Changing Kdump ... pop up, click Yes.
10. On the The system must now reboot ... pop up, click OK to confirm the reboot.
11. Proceed to
Installing the foundation software on an RHEL 6 platform MC990 X server.
Installing the foundation software on an RHEL 6 platform
MC990 X server
Procedure
1. log in to the MC990 X server as the root user.
2. On the login page, complete the following steps:
a. Select Other.
b. In the Username field, enter root.
c. In the Password field, enter the root user's password.
d. Click Log In.
3. On the You are currently trying to run as the root super user ... pop up, click Close.
Installing the foundation software on an RHEL 6 platform MC990 X server 25
Page 26

4. Access the installation software.
Insert the HPE Foundation Software CD into the DVD drive.
5. Click Applications > System Tools > Terminal to open a terminal window.
6. Enter the following command to create an installation directory for the files from the CD:
# mkdir -p /opt/hpe/Factory-Install/hpe-foundation-2.14/
7. Enter the following command to create a temporary mount directory:
# mkdir /var/sfs2.14
8. Enter the following command to mount the CD in read-only mode (-r), using a loop device:
# mount -t iso9660 -ro loop /dev/cdrom /var/sfs2.14
9. Enter the following command to copy the files from the temporary mount directory to the installation
directory:
# rsync -avHx /var/sfs2.14/ /opt/hpe/Factory-Install/hpe-foundation-2.14/
10. Run the create-yum-config-file using: #/opt/hpe/Factory-Install/hpe-
foundation-2.14/create-yum-config-file
11. Enter the following command to unmount the CD from the temporary directory:
# umount /var/sfs2.14
12. Enter the following command to remove the temporary mount directory:
# rmdir /var/sfs2.14
13. Use a text editor to create the /etc/yum.repos.d/foundation2.14-local.repo file with the
following contents:
########################################
[foundation2.14-repo]
name=HPE Foundation Software 2.14 - $basearch
baseurl=file:///opt/hpe/Factory-Install/hpe-foundation-2.14/RPMS
enabled=1
gpgcheck=1
gpgkey=file:///opt/hpe/Factory-Install/hpe-foundation-2.14/RPM-GPG-KEY-SGI
########################################
14. Enter the following command to retrieve the list of software that you can install:
# yum grouplist | grep HPE
15. Enter the following command to install the Foundation Software group:
# yum -c /tmp/yum-sgi.conf groupinstall "System Foundation Software"
16. Enter y at the following prompt to confirm the download size:
26 RHEL 6 software installation on an MC990 X server
Page 27

Is this ok [y/N]
17. Type y at the following prompt to accept the GPG license key:
Is this ok [y/N]
18. Open a terminal window on the booted system.
19. In the terminal window, Enter the following command to reboot the system:
# reboot
20. After the system reaches the EFI shell, in the RMC command window, type the following command
to reset the full system:
# power reset
RHEL 6 software installation on an MC990 X server 27
Page 28

SLES 12 OS and foundation software
installation on an Integrity MC990 X system
This chapter explains how to install the following software on an MC990 X server:
• The SLES 12 operating system.
• The Foundation Software. If you install SLES 12 on the server, HPE requires that you install
Foundation software 2.13 or later.
More information
• The Installation Quick Start and the Deployment Guide at
sles-12/ .
• The Foundation Software release notes file at www.hpe.com/support/hpesc.
https://www.suse.com/documentation/
Initiating the SLES 12 OS installation
Procedure
1. Make sure you have performed the preliminary procedures and satisfied all prerequisites.
For more information, see Gathering installation materials and information on page 6
2. On the boot loader screen, select Installation.
3. On the Language, Keyboard and License Agreement page, complete the following steps:
a. Use the pull-down menu to select your language.
b. Use the pull-down menu to select your keyboard layout.
c. Check I Agree to the License Terms.
d. Click Next.
4. On the System Probing ... screen, monitor the progress.
5. On the Registration screen, complete the following steps:
a. Provide your site credentials.
b. Click Next.
6. On the Add On Product screen, click Next.
7. On the Suggested Partitioning screen, complete the following steps:
a. Click Expert Partitioner.
b. Click Next.
8. Proceed to SLES 12 disk partition configuration for an MC990 X server on page 29.
28 SLES 12 OS and foundation software installation on an Integrity MC990 X system
Page 29

SLES 12 disk partition configuration for an MC990 X
server
Patition disks for Integrity MC990 X system servers according to Disk partitions for an MC990 X server.
Table 4: Disk partitions for an MC990 X server
Size Mount Point File System
512 MB
250 GB (256,000 MB)
8 GB (8,192 MB)
rest of disk
/boot/efi
/
swap
/data1
FAT16
XFS
Swap
XFS
Configuring SLES 12 disk partitions for an MC990 X server
Procedure
1. On the Expert Partitioner screen, complete the following steps to clean the disk:
a. Expand Hard Disks.
b. Select the disk you want to use.
For example, select sda.
c. On the Expert ... drop-down in the lower right part of the screen, select Create New Partition
Table.
d. On the YaST2 pop up with the message Really create a new partition table ...,
click Yes.
e. Proceed to the next step after you have deleted all existing partitions.
2. On the Expert Partitioner screen, complete the following steps:
a. Expand Hard Disks.
b. Select the hard disks you want to use.
c. Click Add.
3. Complete the following steps on the Add Partition on /dev/disk screen to configure the boot
partition:
a. Under New Partition Size, click Custom Size.
b. Type 512 MB in the Size field.
c. Click Next.
d. Under the Role list, complete the following steps:
SLES 12 disk partition configuration for an MC990 X server 29
Page 30

I. Select Operating System.
II. Click Next.
e. Under Formatting Options, select Format partition.
f. Under File system, use the pull-down menu to select FAT16.
g. Under Mounting Options, select Mount Partition.
h. Under Mount point, use the pull-down menu to select /boot/efi.
i. Select Finish.
4. On the Expert Partitioner screen, click Add.
5. Complete the following steps on the Add Partition on /dev/disk screen to configure the root
partition:
a. Under New Partition Size, click Custom Size.
b. Enter 250 GB in the Size field.
c. Click Next.
d. Under the Role list, complete the following steps:
I. Select Operating System.
II. Click Next.
e. Under Formatting Options, select Format partition.
f. Under File system, use the pull-down menu to select XFS.
g. Under Mounting Options, select Mount Partition.
h. Under Mount point, use the pull-down menu to select /.
i. Click Finish.
6. On the Expert Partitioner screen, click Add.
7. Complete the following steps on Add Partition on /dev/disk screen to configure the swap partition:
a. Under New Partition Size, click Custom Size.
b. Specify 8 GB in the Size field.
c. Click Next.
d. Under the Role list, complete the following steps:
I. Select Swap.
II. Click Next.
e. Under Formatting Options, select Format partition.
f. Under File system, use the pull-down menu to select Swap.
g. Under Mounting Options, select Mount Partition.
30 SLES 12 OS and foundation software installation on an Integrity MC990 X system
Page 31

h. Under Mount point, use the pull-down menu to select swap.
i. Select Finish.
8. On the Expert Partitioner screen, click Add.
9. Complete the following steps on the Add Partition on /dev/disk screen to configure the data
partition:
a. Under New Partition Size, click Maximum Size.
b. Click Next.
c. Under the Role list, complete the following steps:
I. Select Data and ISV Applications.
II. Click Next.
d. Under Formatting Options, select Format partition.
e. Under File system, use the pull-down menu to select XFS.
f. Under Mounting Options, select Mount Partition.
g. Under Mount point, enter /data1.
h. Click Finish.
10. On the Expert Partitioner screen, in the Partitions tab, examine the disk partitions.
• If the partitions match those in Disk partitions for an MC990 X server, click Accept.
• If the partitions are incorrect, correct the partition specifications.
11. On the Suggested Partitioning screen, click Next.
12. On the Clock and Time Zone screen, complete the following steps:
a. Select your region.
b. Select your time zone.
c. Check the box next to Hardware Clock Set To UTC.
d. Click Next.
13. On the Create New User screen, create at least one non-root user.
Complete the following steps:
a. Complete the following fields:
• User's Full Name
• Username
SLES 12 OS and foundation software installation on an Integrity MC990 X system 31
Page 32

• Password
• Confirm Password
b. Click Next.
14. On the Password for the System Administrator “root” screen, complete the following steps:
a. In the Password for root User field, enter the root user's password.
b. In the Confirm password field, re-enter the root user's password.
c. Enter a few characters in the Test Keyboard Layout field. For example, if you specified a
language that includes non-English characters and you include these characters in passwords,
enter these characters into this field. This is a plain text field, and you can assure yourself that the
operating system recognizes these characters when you enter them.
d. Click Next.
15. On the Installation Settings screen, click Install.
16. On the Confirm Installation pop up, click Install.
17. Monitor the installation and be prepared to remove the installation software media before the boot.
The installation itself can take several minutes. At the end of the installation, the system boots. The
installation software notifies you of this boot. If possible, remove the installation DVD before the
system boots.
If you fail to remove the installation DVD before the final boot, the machine boots from the DVD. In
this case, complete the following steps:
a. Remove the DVD after the boot.
b. Press CTRL+ALT+ DEL to boot the machine again.
c. Allow the machine to boot from the hard disk to finish the installation.
18. Proceed to Specifying the SLES 12 network and miscellaneous settings on page 32.
Specifying the SLES 12 network and miscellaneous
settings
Procedure
1. log in to the MC990 X server as the root user.
2. Click Applications > System Tools > YaST.
3. On the Administrator Settings screen, click Network Settings.
4. On the Network Configuration screen, click the Network Interfaces link.
5. On the YaST2 -- Network Settings screen, highlight the network card you want to configure, and click
Edit.
6. On the Network Card Setup screen, specify dynamic or static addressing, as follows:
32 Specifying the SLES 12 network and miscellaneous settings
Page 33

Table 5: Specify dynamic or static addressing
To specify dynamic addressing: To specify static addressing:
1. Select the type of dynamic addressing that you
want.
2. Click Next to accept the default of DHCP. 2. Configure the first NIC (eth0) for your house
7. On the Network Settings screen, complete the following steps:
a. Click the Hostname/DNS tab.
b. Enter the hostname.
c. Enter the domain name.
d. Verify that Change Hostname via DHCP is set correctly.
1. Verify that eth0 appears in the Configuration
Name field, and click Statically assigned IP
Address.
(public) network.
On the Address tab, specify the following:
• The IP Address
• The Subnet Mask
• The Hostname
3. Click Next.
To assign a static IP address, clear the Change Hostname via DHCP checkbox. A later step saves
the hostname to the /etc/hosts file. Consult your network administrator if you have questions
regarding the use of DHCP.
NOTE:
This procedure is an example illustrating how to configure a static address on a network card.
If you want a different network configuration, for example if you want to configure DHCP,
ensure that the checkbox in this step is checked before you click Next . You can use this
procedure as a guide and consult the SLES documentation for more specific steps.
e. On the Hostname/DNS tab, specify the following:
• The IP address for Name Server 1.
.
• (Optional) The IP address for
Name Server 2
• (Optional) In the Domain Search field, add additional domains.
SLES 12 OS and foundation software installation on an Integrity MC990 X system 33
Page 34

f. Click the Routing tab.
g. On the Routing tab, enter the Default Gateway, and click OK.
8. Proceed to Installing the foundation software on a SLES 12 platform MC990 X server on page
34.
Installing the foundation software on a SLES 12 platform
MC990 X server
Procedure
1. Access the installation software.
Insert the HPE Foundation Software CD into the DVD drive.
Complete this step in one of the following ways:
2. log in to the MC990 X server as the root user.
3. Click Applications > System Tools > Computer > YaST to start the YaST interface.
4. Under Software, click Software Repositories to start the SLES repository manager.
5. On the Configured Software Repositories screen, click Add.
6. On the Add On Product screen, select DVD, and click Next.
7. On the YaST pop up, click Continue.
8. (Conditional) On the Import Untrusted GnuPG Key, click Trust.
Perform this step if this is the first time through this process and you need to confirm the security of
the digital key.
9. On the Configured Software Repositories screen, click OK.
10. On the YaST Control Center screen, click Software Management.
11. Select View > Patterns.
12. Scroll down to Foundation.
13. Check the box to the left of Foundation Libraries, Software, and Drivers, and click Accept.
14. On the Changed Packages pop up, click Continue.
15. Insert CDs into the DVD drive as directed by the prompts on the Perform Installation screen.
If necessary, click Eject on the YaST2 pop up to open the DVD drive. In the YaST pop up, you might
need to click Retry more than once to read a new disc. You can ignore the graphic representation of
the file system that appears in a new window during this step.
16. On the Installation Report screen, click Finish.
17. Close the YaST session.
18. Open a terminal window on the booted system.
19. In the terminal window, enter the following command to reboot the system:
34 Installing the foundation software on a SLES 12 platform MC990 X server
Page 35

# reboot
20. After the system reaches the EFI shell, in the RMC command window, enter the following command
to reset the full system:
# power reset
SLES 12 OS and foundation software installation on an Integrity MC990 X system 35
Page 36

SLES 11 platform installation on an Integrity
MC990 X system
This chapter explains how to install the following software on an MC990 X server:
• The SLES 11 operating system.
• The Foundation Software.
Installing the SLES 11 OS software on an MC990 X server
Procedure
1. Initiating the SLES 11 OS installation on page 36
2. Specifying the SLES 11 network and miscellaneous settings on page 37
3.
Completing the SLES 11 installation on page 39
NOTE:
If you use the JViewer, the mouse behavior can be unpredictable during the following procedures:
Initiating the SLES 11 OS installation on page 36
After the first boot, the mouse behaves as expected.
Initiating the SLES 11 OS installation
NOTE:
If you use the JViewer, the mouse behavior can be unpredictable during the this procedure. After
the first boot, the mouse behaves as expected.
Procedure
1. Make sure you prepared for the installation and selected Installation on the boot loader screen.
For more information, see Gathering installation materials and information on page 6
2. On the Welcome page, complete the following steps:
a. Select your language.
b. Select your keyboard layout.
c. Click I agree to the license terms.
d. Click Next.
3. On the Media Check page, complete the following steps:
a. (Conditional) Select Start Check.
36 SLES 11 platform installation on an Integrity MC990 X system
Page 37

Select this option if you want to troubleshoot a failed installation. If a previous installation failed, you
can check this option, install the operating system software again, and observe the messages that
the installer issues. It is possible that media problems prevented your previous installation from
completing correctly.
b. Click Next.
If this is your first installation session, you can click Next safely.
4. On the System Probing ... screen, monitor the progress.
5. On the Installation Mode screen, accept the default of New Installation, and click Next.
6. On the Clock and Time Zone screen, complete the following steps:
a. Select your region.
b. Select your time zone.
c. Check the box next to Hardware Clock Set To UTC.
d. Click Next.
7. On the Server Base Scenario screen, accept the default of Physical Machine, and click Next.
Specifying the SLES 11 network and miscellaneous
settings
The following procedure explains how to specify the hostname, networking information, and other
miscellaneous settings.
To specify the hostname, networking, and miscellaneous settings:
Procedure
1. On the Password for the System Administrator root screen, complete the following steps:
a. In the Password for root User field, enter the root user's password.
b. In the Confirm password field, re-enter the root user's password.
c. Enter a few characters in the Test Keyboard Layout field. For example, if you specified a
d. Click Next.
2. On the Hostname and Domain Name screen, complete the following steps:
a. Enter the hostname.
b. Enter the domain name.
language that includes non-English characters and you include these characters in passwords,
type these characters into this field. This is a plain text field, and you can assure yourself that the
operating system recognizes these characters when you type them.
c. Verify that Change Hostname via DHCP is set correctly.
To assign a static IP address, clear the Change Hostname via DHCP checkbox. A later step
saves the hostname to the /etc/hosts file. Consult your network administrator if you have
questions regarding the use of DHCP.
Specifying the SLES 11 network and miscellaneous settings 37
Page 38

NOTE:
This example procedure explains how to configure a static address on a network card. If you
want a different network configuration, for example if you want to configure DHCP, ensure
that the checkbox in this step is checked before you click Next . You can use this procedure
as a guide and consult the SLES documentation for more specific steps.
d. Select Next.
3. On the Network Configuration screen, click the Network Interfaces link.
4. On the Network Settings screen, highlight the network card you want to configure, and click Edit.
5. On the Network Card Setup screen, specify dynamic or static addressing, as follows:
Table 6: Specify dynamic or static addressing
To specify dynamic addressing: To specify static addressing:
1. Select the type of dynamic addressing that
you want.
2. Click Next to accept the default of DHCP. 2. Configure the first NIC (eth0) for your house
6. On the Network Settings screen, complete the following steps:
a. Click the Hostname/DNS tab.
b. On the Hostname/DNS tab, specify the following:
I. The IP address for Name Server 1.
II. (Optional) The IP address for Name Server 2.
1. Verify that eth0 appears in the Configuration
Name field, and click Statically assigned IP
Address.
(public) network.
On the Address tab, specify the following:
• The IP Address
• The Subnet Mask
• The Hostname
3. Click Next.
III. (Optional) In the Domain Search field, add additional domains.
c. Click the Routing tab.
d. On the Routing tab, in the Default Gateway field, complete the following steps:
I. Enter your site's default gateway.
II. Click OK.
38 SLES 11 platform installation on an Integrity MC990 X system
Page 39

7. (Optional) Examine the Network Configuration screen, and supply additional network information as
required by your site.
For example, you might want to change the following settings:
• Firewall settings. If you enable a firewall, make sure to enable the firewall only for the public NIC
(eth0). The firewall is enabled by default.
• VNC Remote Administration. This setting enables remote administration and is disabled by
default.
• By default, the SSH port is closed, and the menu displays SSH port is blocked (open). Click open
to open this port.
8. Click Next to advance from the Network Configuration screen.
Wait for the installer to save the network configuration.
9. On the Test Internet Connection screen, click Next.
Wait for the internet connection test to complete.
10. On the Running Internet Connection test screen, click Next.
11. On the Novell Customer Center Configuration screen, complete the following steps:
a. Select Configure Now (Recommended).
b. Verify that each of the following defaults under Include for Convenience are selected:
• Hardware Profile
• Optional Information
• Regularly Synchronize With the Customer Center
c. Click Next.
For more information about how to register with Novell, see the following website: www.novell.com
12. On the YaST2 Manual Interaction Required pop up, click Continue.
13. On the Novell Customer Center System Registration screen, complete the fields, and click
Submit.
14. On the Novell Customer Center Configuration screen, click Next.
15. On the Network Services Configuration screen, click Next.
16. Proceed to Completing the SLES 11 installation on page 39.
Completing the SLES 11 installation
Procedure
1. On the User Authentication Method screen, select one of the authentication methods, and click
Next.
2. On the New Local User screen, create at least one non-root user.
Completing the SLES 11 installation 39
Page 40

Complete the following steps:
a. Complete the following fields:
• User's Full Name
• Username
• Password
• Confirm Password
b. (Optional) Click User Management to specify another non-root user.
c. Click Next.
3. On the Release Notes screen, click Next.
4. (Conditional) Let the YaST2 popup time out.
Complete this step if the system issues a popup here.
5. On the Hardware Configuration screen, click Next.
6. On the Installation Completed screen, click Finish.
7. Proceed to Installing the foundation software on a SLES 11 platform MC990 X server on page
40.
Installing the foundation software on a SLES 11 platform
MC990 X server
The following procedure explains how to install the Foundation Software on an MC990 X server that hosts
the SLES 11 operating system.
To install the Foundation Software on a SLES platform from the direct-attached console:
Procedure
1. Access the installation software.
Insert the HPE Foundation Software CD into the MC990 X server chassis DVD drive.
2. log in to the computer as the root user.
3. Click Computer > YaST to start the YaST interface.
4. Click Software > Software Repositories to start the SLES repository manager.
5. On the Configured Software Repositories screen, click Add.
6. On the Media Type screen, select DVD, and click Next.
7. On the YaST pop up, click Continue.
8. (Conditional) On the Import Untrusted GnuPG Key, click Import.
Perform this step if this is the first time through this process and you need to confirm the security of
the digital key.
9. On the Configured Software Repositories screen, click OK.
40 Installing the foundation software on a SLES 11 platform MC990 X server
Page 41

10. On the YaST Control Center screen, click Software Management.
11. Select View > Patterns.
12. Scroll down to Foundation.
13. Check the box to the left of Foundation Libraries, Software, and Drivers, and click Accept.
14. On the Changed Packages pop up, click Continue.
15. Insert CDs into the DVD drive as directed by the prompts on the Perform Installation screen.
If necessary, click Eject on the YaST2 pop up to open the DVD drive. In the YaST2 pop up, you
might need to click Retry more than once to read a new disc. You can ignore the graphic
representation of the file system that appears in a new window during this step.
16. Close the YaST session.
17. Open a terminal window on the booted system.
18. In the terminal window, type the following command to reboot the system:
# reboot
19. After the system reaches the EFI shell, in the RMC command window, type the following command
to reset the full system:
# power reset
The MC990 X server installation is finished at this time.
SLES 11 platform installation on an Integrity MC990 X system 41
Page 42

Installing VMware vSphere 6.5 on an MC990 X
server
Introduction
VMware vSphere is a virtualization platform for building cloud infrastructures using existing IT assets and
resources.
This information explains how to install VMware vSphere Software on an MC990 X server chassis.
VMware vSphere ISO image location
The VMware base image includes the base ESXi hypervisor and initial set of drivers. HPE Integrity
MC990 X supports the VMware vSphere 6.5 base image, which is available for download from the
VMware site.
Installing the VMware vSphere image
Prerequisites
• A dedicated LUN is required to install and boot the VMware vSphere. The size of the LUN should be
greater than 10 GB.
• To mount and install the ESXi OS on an MC990 X server, you must use JViewer.
• You must have the fully qualified domain name (FQDN) of the MC990 X server on which you want to
install the vSphere image.
Procedure
1. In JViewer, attach the VMware vSphere installer ISO through Media > Virtual Media > ISO Image.
42 Installing VMware vSphere 6.5 on an MC990 X server
Page 43

2. Power on or reset the server partition.
3. Following the POST, press F2 to enter setup and select the boot options.
4. Select the Boot Manager, and boot from the ISO image.
5. Press Shift+O within 5 seconds after the VMware hypervisor window appears.
6. Enter tty2Port=com1 at the prompt after runweasel, and press Enter to start the installation.
Installing VMware vSphere 6.5 on an MC990 X server 43
Page 44

JViewer freezes and does not take any further input.
7. Using the FQDN of the MC990 X server on which you are installing vSphere, open the RMC console.
Use the secure shell (ssh) command to log into the RMC.
For more information about logging into the RMC, see "Connecting to the RMC" in HPE Integrity
MC990 X Server RMC Software User Guide.
8. Obtain the partition number by entering the config -v command on the RMC console.
9. On the RMC console, enter the uvcon <partition number> command, using the partition
number obtained in the previous step.
10. After the server boots the VMware vSphere Installer, navigate the installation process.
11. On the Select a Disk to Install or Upgrade menu, select the intended LUN on which you want to
install the VMware vSphere software, and then press Enter.
44 Installing VMware vSphere 6.5 on an MC990 X server
Page 45

12. Continue to navigate the rest of the installation steps.
13. When the installation is complete, press Enter to reboot the host.
Adding the boot entry
You can add the boot entry at the boot maintenance manager level and boot the VMware vSphere from
the corresponding boot entry added.
Procedure
1. Following POST, select the EFI shell. Enter the command map fs* and note down the LUN device
name where you installed VMware vSphere (for example, FS0:).
Adding the boot entry 45
Page 46
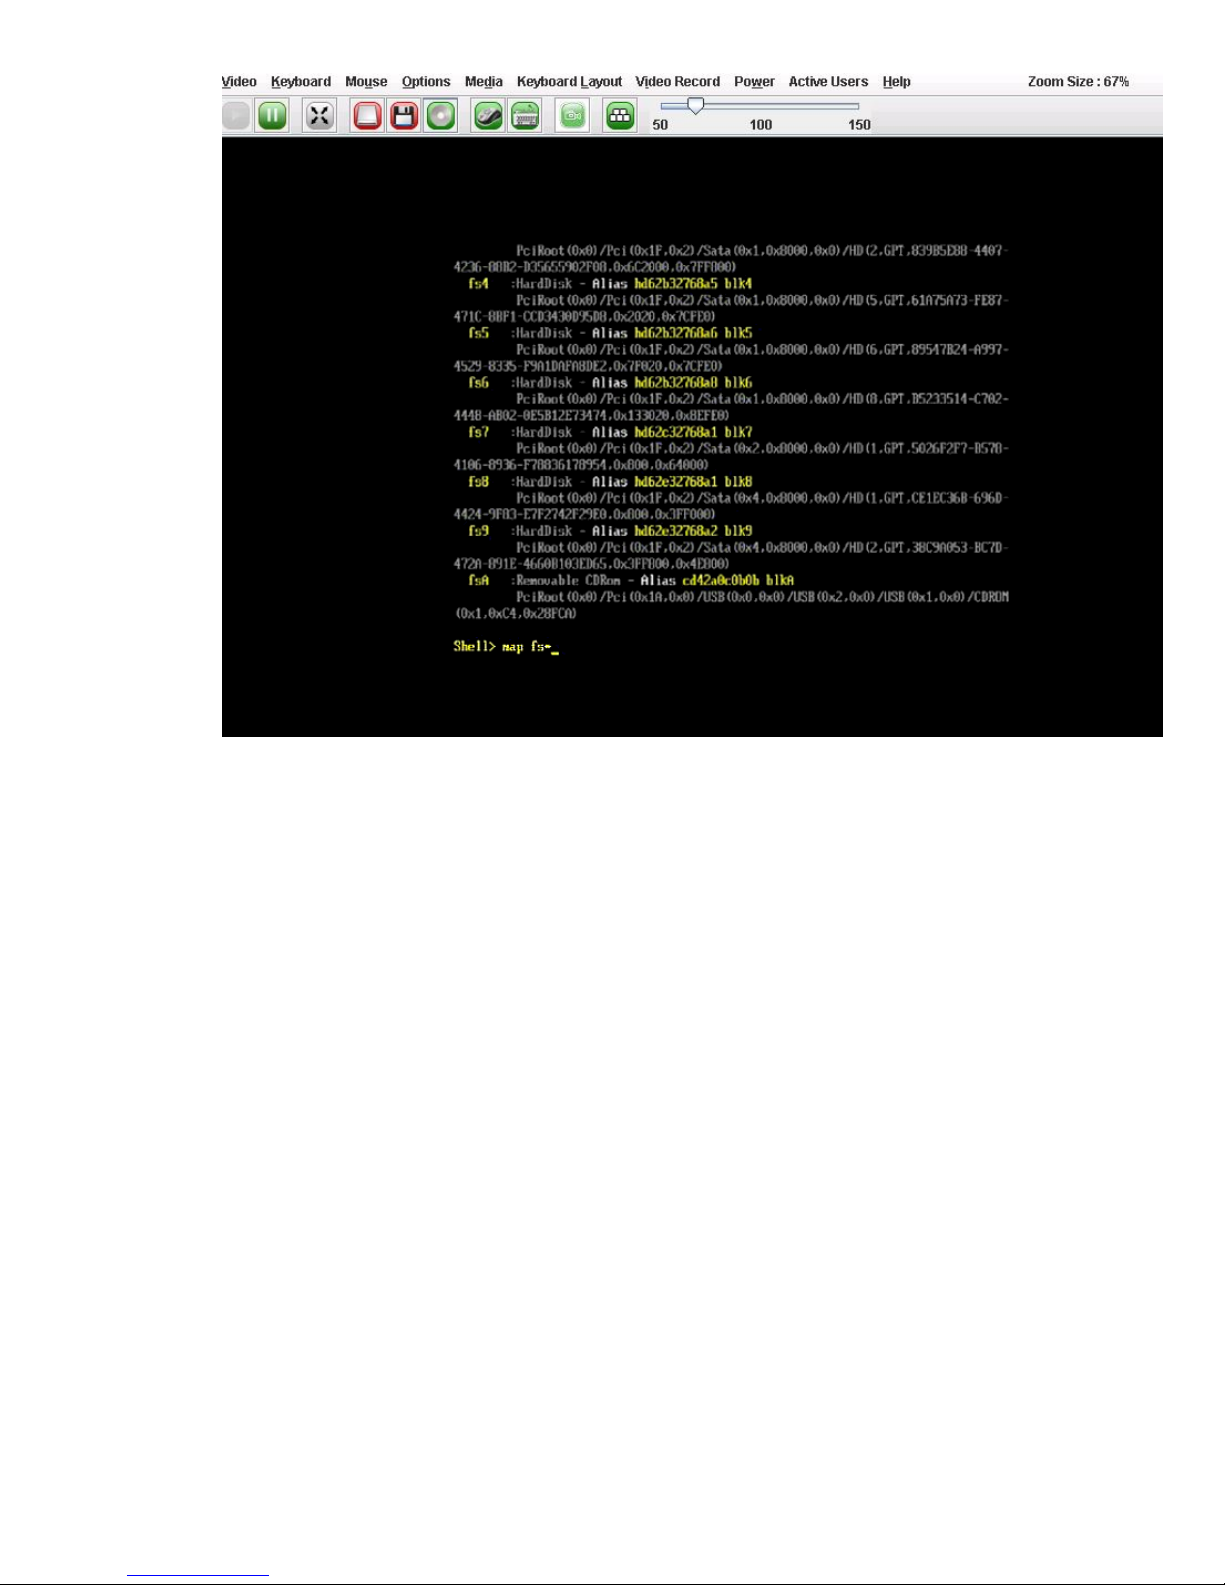
2. Check the LUN device name by listing the contents (for example, >dir fs0:\EFI\BOOT
\BOOTx64.efi).
3. Exit the EFI shell by entering the exit command.
4. Enter the System Utilities, and navigate to Boot Maintenance Manager -> Boot Options Menu.
Select Add Boot Option.
46 Installing VMware vSphere 6.5 on an MC990 X server
Page 47

5. Select the boot entry for VMware vSphere that matches the entry noted in steps 1 and 2), and then
press Enter.
Installing VMware vSphere 6.5 on an MC990 X server 47
Page 48

6. Complete adding the VMware vSphere entry to the boot options. Select <EFI> and press Enter.
7. Select the <BOOT> directory, not the <VMware> directory. Press Enter.
48 Installing VMware vSphere 6.5 on an MC990 X server
Page 49

8. Select BOOTx64.EFI and press Enter.
9. Enter ESXi 6.5 in the Input the description field, and then press Enter.
Installing VMware vSphere 6.5 on an MC990 X server 49
Page 50

10. Navigate to Boot Options Menu > Change Boot Order. Set the boot order so that VMware
vSphere ESXi (VMware vSphere) is the first option or as the next option. Press Enter to commit the
changes.
50 Installing VMware vSphere 6.5 on an MC990 X server
Page 51

11. Reset the server. During the next boot, VMware vSphere boots from the LUN.
12. After VMware vSphere is successfully booted, press F2 to enable ssh and so on through Direct
Console User Interface (DCUI).
Installing VMware vSphere 6.5 on an MC990 X server 51
Page 52

Additional software features for the Integrity
MC990 X system
Additional software features are used to remote manage, configure security, debug and create crash
dumps for the Integrity MC990 X system.
Remote management through the ipmitool command
From a remote console, you can use ipmitool commands to perform typical system operations.
For the ipmitool command to work, the remote console must be on the same local network as the
Integrity MC990 X system. The following shows the ipmitool command format:
ipmitool -I lanplus -H <hostname> -U ADMIN -P <password> <command>
The arguments to the command parameters are as follows:
Parameter
Meaning
<hostname>
The hostname of the Integrity MC990 X system on your network.
<password>
The system administrative password. The factory-shipped, default password is ADMIN.
<command>
One of the ipmitool commands.
There many IPMI commands. The commands that HPE supports for Integrity MC990 X system
remote management are as follows:
• power off
• power reset
• power on
Security-Enhanced Linux (SELinux) configuration on
RHEL platforms
You can configure SELinux on an Integrity MC990 X system computer that runs the RHEL operating
system. SELinux supports Multi-Level Security (MLS) and Multi-Category Security (MCS) modes. When
you configure SELinux, you create an MLS-compliant or MCS-compliant environment on an Integrity
MC990 X system, and you enable MPI programs to take full advantage of all the features that Accelerate
provides on MC990 X hardware. For more information about SELinux, see your RHEL documentation.
52 Additional software features for the Integrity MC990 X system
Page 53

NOTE:
If you are not interested in MLS or MCS, you do not need to configure SELinux. In this case, do not
perform the procedure in this topic.
The SLES operating system does not support SELinux.
To obtain help output for the hpe-selinux-configuration command, type the command name, with
no options. For example:
# hpe-selinux-configuration
hpe-selinux-configuration
Actions
-h|--help Print usage
-s|--status Return module(s) status
-i|--insert Insert policy module
-r|--remove Remove policy module
-l|--label Label policy files
-R|--restart Restart services affected by HPE policies
Select target policy modules (default is all)
-S|--services Perform operation on services
-D|--devices Perform operation on devices
--bigpage
--gru
--mmtimer
--xpmem
--procset
--arraysvcs
Configuring Security-Enhanced Linux (SELinux) on RHEL
platforms
Procedure
1. Log in as root.
2. Type the following commands to load the SELinux software modules from the RHEL distribution:
# yum install policycoreutils-python
# yum install selinux-policy-mls
hpe_bigpage 1.0.0
hpe_gru 1.0.0
hpe_mmtimer 1.0.0
hpe_xpmem 1.0.0
hpe_procset 1.0.0
hpe_arraysvcs 1.0.0
3. Type the following command to ensure that the modules are loaded correctly:
# hpe-selinux-configuration -s
If the SELinux software modules are loaded correctly, the command returns a list of the loaded
modules.
Configuring Security-Enhanced Linux (SELinux) on RHEL platforms 53
Page 54

If the hpe-selinux-configuration -s command returns nothing, then the policy modules did not
load correctly. Type the following command to load all HPE policies:
# hpe-selinux-configuration -i
4. Type the following command to apply security labels to the file system for all kernel modules and
services:
# hpe-selinux-configuration -l
Note that the option to the preceding command is a lowercase L character.
5. Type the following command to restart services:
# hpe-selinux-configuration -R
6. Perform the steps in this procedure again on all other partitions if your Integrity MC990 X system
computer is divided into partitions.
Installation of debuginfo packages
Operating system vendors provide debuginfo packages for each released version. After you install the
debuginfo packages, you can debug crash kernels and use other advanced debugging techniques.
Installing debuginfo packages on RHEL platforms
NOTE:
For general information about RHEL debuginfo, see https://access.redhat.com/solutions/9907.
The examples in this procedure have been modified to fit in this documentation.
Procedure
1. Subscribe to the appropriate debuginfo channel.
This channel differs, depending on your platform, as follows:
• For RHEL 7.1, the channel is Red Hat Enterprise Linux Server Debuginfo (v. 7)
For RHEL 7 debuginfo information, see the following:
https://access.redhat.com/documentation/en-US/Red_Hat_Enterprise_Linux/7/html/Developer_Guide/intro.debuginfo.html
• For RHEL 6.x, the channel is Red Hat Enterprise Linux Server Debuginfo (v. 6)
For RHEL 6.xdebuginfo information, see the following:
documentation/en-US/Red_Hat_Enterprise_Linux/6/html/Developer_Guide/
intro.debuginfo.html
https://access.redhat.com/
2. Enter the following command to retrieve the list of repositories:
# yum repolist
Loaded plugins: langpacks, product-id, subscription-manager
This system is not registered to Red Hat Subscription Management.
54 Installation of debuginfo packages
Page 55

You can use subscription-manager to register.
repo id repo name status
!HPE-Foundation-Software HPE-Foundation-Software 52
!HPE-Foundation-Software-2.14 HPE-Foundation-Software-2.14 52
!base RHEL7 - 4,305
!nightly-hpe-noship hpe-noship 308
!rh7-nightly rh7-nightly 5,224
!rh7.1 rh7.1 4,371
!rh7.1-debug rh7.1-debug 4,194
!rh7.1-source rh7.1-source 0
!rhel7-update RHEL7-updates - 4,390
repolist: 23,105
3. Enter the following command to search for the debuginfo packages:
# yum search tar-debuginfo
Loaded plugins: langpacks, product-id, subscription-manager
This system is not registered to Red Hat Subscription Management.
You can use subscription-manager to register.
================================= N/S matched: tar-debuginfo =================================
libtar-debuginfo.x86_64 : Debug information for package libtar
star-debuginfo.x86_64 : Debug information for package star
tar-debuginfo.x86_64 : Debug information for package tar
Name and summary matches only, use "search all" for everything.
4. Enter the following command to install the debuginfo packages:
# yum install tar-debuginfo.x86_64
Loaded plugins: langpacks, product-id, subscription-manager
This system is not registered to Red Hat Subscription Management.
You can use subscription-manager to register.
HPE-Foundation-Software | 3.6 kB 00:00:00
HPE-Foundation-Software-2.14 | 3.6 kB 00:00:00
base | 2.9 kB 00:00:00
nightly-hpe-noship | 2.9 kB 00:00:00
rh7-nightly | 951 B 00:00:00
rh7.1 | 4.1 kB 00:00:00
rh7.1-debug | 3.8 kB 00:00:00
rh7.1-source | 3.0 kB 00:00:00
rhel7-update | 2.9 kB 00:00:00
(1/7): HPE-Accelerate-1.11/primary_db | 24 kB 00:00:00
(2/7): HPE-Foundation-Software-2.14/primary_db | 34 kB 00:00:00
(3/7): HPE-Foundation-Software/primary_db | 34 kB 00:00:00
(4/7): HPE-REACT-1.11/primary_db | 12 kB 00:00:00
(5/7): HPE-MPI-1.11/primary_db | 25 kB 00:00:00
(6/7): HPE-Management-Center/primary_db | 70 kB 00:00:00
(7/7): nightly-hpe-noship/primary_db | 484 kB 00:00:00
Resolving Dependencies
--> Running transaction check
---> Package tar-debuginfo.x86_64 2:1.26-29.el7 will be installed
--> Finished Dependency Resolution
Dependencies Resolved
=========================================================================================
Package Arch Version Repository Size
=========================================================================================
Installing:
tar-debuginfo x86_64 2:1.26-29.el7 rh7-nightly 693 k
Transaction Summary
=========================================================================================
Install 1 Package
Total download size: 693 k
Installed size: 2.7 M
Is this ok [y/d/N]: y
Downloading packages:
Running transaction check
Running transaction test
Transaction test succeeded
Additional software features for the Integrity MC990 X system 55
Page 56

Running transaction
Installing : 2:tar-debuginfo-1.26-29.el7.x86_64 1/1
Verifying : 2:tar-debuginfo-1.26-29.el7.x86_64 1/1
Installed:
tar-debuginfo.x86_64 2:1.26-29.el7
Complete!
Installing debuginfo packages on SLES platforms
NOTE:
The examples in this procedure have been modified to fit in this documentation.
Procedure
1. Subscribe to the appropriate debuginfo channel.
This channel differs, depending on your platform, as follows:
• For SLES 12 debuginfo information, see the following:
https://www.suse.com/documentation/sles-12/book_sle_deployment/data/sec_update_nmm.html
• For SLES 11 SPxdebuginfo information, see the following:
https://www.novell.com/support/kb/doc.php?id=3074997
2. Enter the following command to retrieve the list of repositories:
# zypper lr
# | Alias | Name |Enabled|Refresh
---+--------------------------------------+--------------------------------+-------+------ 1 | HPE-Foundation-Software-2.14 | HPE-Foundation-Software-2.14 | Yes | No
2 | HPE-noship-stout712 | HPE-noship-stout712 | Yes | No
3 | SLES12-12-0 | SLES12-12-0 | No | No
4 | SLES12-Debuginfo-Pool | SLES12-Debuginfo-Pool | Yes | No
5 | SLES12-Debuginfo-Updates | SLES12-Debuginfo-Updates | Yes | No
6 | SLES12-SDK-Updates | SLES12-SDK-Updates | Yes | No
7 | SLES12-Updates | SLES12-Updates | Yes | No
8 | SUSE-Linux-Enterprise-SDK-12-DVD1 | SUSE-Linux-Enterprise-SDK-12-DVD1 | Yes | No
9 | SUSE-Linux-Enterprise-SDK-12-DVD2 | SUSE-Linux-Enterprise-SDK-12-DVD2 | Yes | No
10 | SUSE-Linux-Enterprise-SDK-12-DVD3 | SUSE-Linux-Enterprise-SDK-12-DVD3 | Yes | No
11 | SUSE-Linux-Enterprise-Server-12-DVD1 | SUSE-Linux-Enterprise-Server-12-DVD1 | Yes | No
12 | SUSE-Linux-Enterprise-Server-12-DVD2 | SUSE-Linux-Enterprise-Server-12-DVD2 | Yes | No
13 | SUSE-Linux-Enterprise-Server-12-DVD3 | SUSE-Linux-Enterprise-Server-12-DVD3 | Yes | No
3. Enter the following command to search for the debuginfo packages:
# zypper search tar*debuginfo Loading repository data...
Reading installed packages...
S | Name | Summary | Type
--+---------------+-----------------------------------+------- | tar-debuginfo | Debug information for package tar | package
4. Enter the following command to install the debuginfo packages:
56 Installing debuginfo packages on SLES platforms
Page 57

# zypper install tar-debuginfo
Loading repository data...
Reading installed packages...
Resolving package dependencies...
The following NEW package is going to be installed:
tar-debuginfo
1 new package to install.
Overall download size: 339.4 KiB. Already cached: 0 B
After the operation, additional 1.2 MiB will be used.
Continue? [y/n/? shows all options] (y): y
Retrieving package tardebuginfo-1.27.1-2.22.x86_64
(1/1), 339.4 KiB ( 1.2 MiB unpacked)
Checking for file conflicts: ..............................................
[done]
(1/1) Installing: tar-debuginfo-1.27.1-2.22 ...............................
[done]
Creating boot options
NOTE:
HPE supports your ability to install more than one operating system, or operating system release
level, on an Integrity MC990 X system. This procedure explains how to create options for nondefault operating system boots so you can boot any operating system.
Procedure
1. Use the procedure shown in the Figure 4: File Explorer screen on page 58 to establish a
connection to the RMC and log in.
2. Type the uvcon command.
The uvcon command opens a console, and you need the console open in order to see the shell
prompt.
3. Monitor the power-on process.
The power-on takes only a few minutes, but it can take 5 to 10 minutes for the uvcon command to
return boot-to-shell progress information.
4. After the power-on process completes, type CTRL+-+]+q to exit the console.
NOTE:
The CTRL+-+]+q key sequence closes the uvcon console session.
5. When the Shell> prompt appears, enter exit to access the BIOS manager.
6. Use the arrow keys to select Boot Maintenance Manager, and press Enter.
7. On the Boot Maintenance Manager screen, use the arrow keys to select Boot Options, and press
Enter.
8. On the Boot Options screen, use the arrow keys to select Add Boot Option, and press Enter.
9. On the File Explorer screen, complete the following steps:
Creating boot options 57
Page 58

a. Use the arrow keys to select the disk from which you want to boot, and press Enter.
For example:
Figure 4: File Explorer screen
b. Peruse the directory system, from the disk you selected, through <efi> or <hpe>, through
<redhat> or SUSE, until you find grub.efi (RHEL) or elilo.efi (SLES).
c. Select grub.efi (RHEL 7), elilo.efi (SLES 11), or grubx64.efi (RHEL 7 or SLES 12).
10. On the Modify Boot Option Description screen, note that the cursor is at the end of the Input
the description field.
Complete the following steps:
a. Press Enter.
b. In the Please type in your data popup, enter a name for this boot option, and press Enter. For
example, RHEL 6.6 or SLES11 SP3.
c. Use the arrow keys to select Commit Changes and Exit.
d. Press Enter.
11. On the Boot Maintenance Manager screen, select Boot Options, and press Enter.
12. On the Boot Options screen, use the arrow keys to select Change Boot Order, and press Enter.
13. On the Change Boot Order screen, complete the following steps:
a. If they are not already selected, select the boot order entries.
For example:
58 Additional software features for the Integrity MC990 X system
Page 59

Figure 5: Change boot order screen
b. Press Enter.
c. On the popup that appears, select the boot option you created earlier in this procedure.
d. Press the + key to move the recently created boot option to the top of the list.
e. Press Enter to commit the changes in this step.
f. Select Commit Changes and Exit.
14. Press the Space bar to return to the BIOS manager.
15. Notify all system administrators of the current boot order.
HPE supports the ability to change the default boot order, but some system administration tasks
might assume that the default boot option is still EFI Internal Shell. You might need to change the
boot order in order to access the EFI shell in the process of performing other tasks that this chapter
describes. If you need to change the boot order, complete this procedure again and select one of the
other boot options.
Crash dump files on an Integrity MC990 X system server
on RHEL 7, SLES 12, and SLES 11 platforms
You can request that the operating system write a crash dump file. The file name includes a timestamp,
and the file location depends on your operating system, as follows:
• For the RHEL 7 operating system, the file is as follows:
/var/crash/127.0.0.1-year.month.day-hour:minutes:seconds
• For SLES 11 and SLES 12 operating systems, the file is as follows:
Crash dump files on an Integrity MC990 X system server on RHEL 7, SLES 12, and SLES 11 platforms 59
Page 60

/var/crash/year-month-day-hour:minutes
NOTE:
This topic does not apply to RHEL 6 platforms. The power nmi and power diag commands send
back traces of CPU tasks to the console but do not create a crash dump file.
Creating a crash dump file on an Integrity MC990 X system
server on RHEL 7, SLES 12, and SLES 11 platforms
Procedure
1. Log in to the MC990 X server as the root user, and type the following commands to enable the kernel
crash dump service, kdump:
On RHEL 7 and SLES 12, enter the following:
# systemctl enable kdump
# systemctl start kdump
On SLES 11, enter the following:
# chkconfig boot.kdump on
# service boot.kdump start
The Foundation Software package installation process enables kdump by default. If you are unsure of
whether kdump is enabled on your MC990 X server, type the preceding commands. You can enable
kdump on your server at any time. kdump must be enabled in order to create a crash dump file.
2. (Conditional) Ensure that the uv_nmi default action is kdump.
Complete this step on RHEL 7 and SLES 12 platforms.
Enter the following command:
# echo kdump > /sys/module/uv_nmi/parameters/action
As an alternative to this command, you could also boot the kernel with the following parameter:
uv_nmi.action=kdump
3. Send a nonmaskable interrupt (NMI) signal to start the dump.
You have the option to send an NMI from a remote connection or when logged in directly to the RMC,
as follows:
• To send the NMI signal from a remote connection, enter the following ipmitool command:
# ipmitool -I lanplus -H uv1-rmc -U ADMIN -P ADMIN chassis power diag
• To send the NMI signal while logged in directly to the RMC, complete the following command
sequence:
60 Creating a crash dump file on an Integrity MC990 X system server on RHEL 7, SLES 12, and SLES 11
platforms
Page 61

a. Enter the ssh command to connect securely. For example:
# ssh root@uv1-rmc
Provide the root user password when prompted. For more information about connecting to the
RMC, see the following:
Figure 4: File Explorer screen on page 58
b. Enter the following command to send the NMI signal:
RMC> power nmi
4. (Conditional) Open a console to the RMC and to initiate a crash dump capture.
Complete this step on SLES 11 platforms.
Enter the following commands:
> uvcon
kdb> kdump
On SLES 11 platforms, you can type additional kdb commands at the kdb> prompt. For information
about kdb commands, see your SLES documentation.
Additional software features for the Integrity MC990 X system 61
Page 62

Websites
General websites
Hewlett Packard Enterprise Information Library
www.hpe.com/info/EIL
Single Point of Connectivity Knowledge (SPOCK) Storage compatibility matrix
www.hpe.com/storage/spock
Storage white papers and analyst reports
www.hpe.com/storage/whitepapers
For additional websites, see Support and other resources.
Configuring SAN Boot on HPE Integrity MC990 X
https://www.hpe.com/h20195/v2/Getdocument.aspx?docname=a00006145enw
62 Websites
Page 63

Support and other resources
Accessing Hewlett Packard Enterprise Support
• For live assistance, go to the Contact Hewlett Packard Enterprise Worldwide website:
http://www.hpe.com/assistance
• To access documentation and support services, go to the Hewlett Packard Enterprise Support Center
website:
http://www.hpe.com/support/hpesc
Information to collect
• Technical support registration number (if applicable)
• Product name, model or version, and serial number
• Operating system name and version
• Firmware version
• Error messages
• Product-specific reports and logs
• Add-on products or components
• Third-party products or components
Accessing updates
• Some software products provide a mechanism for accessing software updates through the product
interface. Review your product documentation to identify the recommended software update method.
• To download product updates:
Hewlett Packard Enterprise Support Center
www.hpe.com/support/hpesc
Hewlett Packard Enterprise Support Center: Software downloads
www.hpe.com/support/downloads
Software Depot
www.hpe.com/support/softwaredepot
• To subscribe to eNewsletters and alerts:
www.hpe.com/support/e-updates
• To view and update your entitlements, and to link your contracts and warranties with your profile, go to
the Hewlett Packard Enterprise Support Center More Information on Access to Support Materials
page:
Support and other resources 63
Page 64

www.hpe.com/support/AccessToSupportMaterials
IMPORTANT:
Access to some updates might require product entitlement when accessed through the Hewlett
Packard Enterprise Support Center. You must have an HPE Passport set up with relevant
entitlements.
Customer self repair
Hewlett Packard Enterprise customer self repair (CSR) programs allow you to repair your product. If a
CSR part needs to be replaced, it will be shipped directly to you so that you can install it at your
convenience. Some parts do not qualify for CSR. Your Hewlett Packard Enterprise authorized service
provider will determine whether a repair can be accomplished by CSR.
For more information about CSR, contact your local service provider or go to the CSR website:
http://www.hpe.com/support/selfrepair
Remote support
Remote support is available with supported devices as part of your warranty or contractual support
agreement. It provides intelligent event diagnosis, and automatic, secure submission of hardware event
notifications to Hewlett Packard Enterprise, which will initiate a fast and accurate resolution based on your
product's service level. Hewlett Packard Enterprise strongly recommends that you register your device for
remote support.
If your product includes additional remote support details, use search to locate that information.
Remote support and Proactive Care information
HPE Get Connected
www.hpe.com/services/getconnected
HPE Proactive Care services
www.hpe.com/services/proactivecare
HPE Proactive Care service: Supported products list
www.hpe.com/services/proactivecaresupportedproducts
HPE Proactive Care advanced service: Supported products list
www.hpe.com/services/proactivecareadvancedsupportedproducts
Proactive Care customer information
Proactive Care central
www.hpe.com/services/proactivecarecentral
Proactive Care service activation
www.hpe.com/services/proactivecarecentralgetstarted
Warranty information
To view the warranty for your product or to view the Safety and Compliance Information for Server,
Storage, Power, Networking, and Rack Products reference document, go to the Enterprise Safety and
Compliance website:
www.hpe.com/support/Safety-Compliance-EnterpriseProducts
64 Customer self repair
Page 65

Additional warranty information
HPE ProLiant and x86 Servers and Options
www.hpe.com/support/ProLiantServers-Warranties
HPE Enterprise Servers
www.hpe.com/support/EnterpriseServers-Warranties
HPE Storage Products
www.hpe.com/support/Storage-Warranties
HPE Networking Products
www.hpe.com/support/Networking-Warranties
Regulatory information
To view the regulatory information for your product, view the Safety and Compliance Information for
Server, Storage, Power, Networking, and Rack Products, available at the Hewlett Packard Enterprise
Support Center:
www.hpe.com/support/Safety-Compliance-EnterpriseProducts
Additional regulatory information
Hewlett Packard Enterprise is committed to providing our customers with information about the chemical
substances in our products as needed to comply with legal requirements such as REACH (Regulation EC
No 1907/2006 of the European Parliament and the Council). A chemical information report for this product
can be found at:
www.hpe.com/info/reach
For Hewlett Packard Enterprise product environmental and safety information and compliance data,
including RoHS and REACH, see:
www.hpe.com/info/ecodata
For Hewlett Packard Enterprise environmental information, including company programs, product
recycling, and energy efficiency, see:
www.hpe.com/info/environment
Documentation feedback
Hewlett Packard Enterprise is committed to providing documentation that meets your needs. To help us
improve the documentation, send any errors, suggestions, or comments to Documentation Feedback
(docsfeedback@hpe.com). When submitting your feedback, include the document title, part number,
edition, and publication date located on the front cover of the document. For online help content, include
the product name, product version, help edition, and publication date located on the legal notices page.
Regulatory information 65
Page 66

Connecting to an MC990 X system through a
web browser and launching the JViewer
console
About JViewer
JViewer is a software interface that you can use on HPE MC990 X systems. The JViewer graphical user
interface can facilitate installation and booting.
Starting JViewer
Procedure
1. Verify that you have Java and an internet browser (Firefox preferred) installed on your local
computer.
2. Attach the Base I/O BMC on the MC990 X system to a network that you can access from the local
computer.
NOTE:
Use the RJ45 connection labeled MGMT on the BMC on which the Base I/O is installed.
3. Log in to the MC990 X system’s RMC.
For example:
ssh root@uv-rmc
Provide the password when prompted.
4. Use the baseiolist command to retrieve the IP address(es) of the MC990 X system’s BMC(s).
For example:
# baseiolist
P000 [r001i01b]: 128.162.243.151 [08:00:69:17:2D:C9]
P000 [r001i06b]: <No IP addr> [08:00:69:17:2D:C0]
Look for the BMC’s IP address in the output. In this example, there is only one BMC connected to the
network, and its IP address is 128.162.243.151.
5. Start the internet browser on your local computer.
6. In the Firefox address bar, type the IP address of the BMC.
For example:
http://128.162.243.151
7. From the login screen, log in to the system.
Type admin as the username and the password, and then press Enter.
8. From the Dashboard screen, click Launch.
66 Connecting to an MC990 X system through a web browser and launching the JViewer console
Page 67

9. (Conditional) If Firefox displays a message indicating pop ups are not enabled, complete the
following steps to enable pop ups.
a. Click Preferences.
b. Click Allow pop ups for ip_address.
c. Click Launch.
10. On the Opening jviewer.jnlp ... screen, click OK.
11. (Conditional) Consent to the security questions.
If the system displays security cautions, indicate that you want to proceed with launching the
application.
Attaching virtual media to the MC990 X system
Procedure
1. Connect to the MC990 X system. See Starting JViewer" on page
2. In the top-most JViewer menu bar, click Media >Virtual Media Wizard ....
3. Access the media.
a. To use physical media, such as a DVD or CD, insert the disk into the drive on your local computer.
On the Virtual Media pop up, under CD/DVD Media 1, select /dev/sr0.
b. To access an ISO on your network, click Browse on the popup, and navigate to the ISO location.
Select the ISO file, and click Open.
4. Click Connect to CD/DVD.
5. On the Information pop up, click OK.
6. On the Virtual Media pop up, click Close.
7. (Optional) Boot the system. See Booting from virtual media on page 67
Booting from virtual media
Procedure
1. Log in to the MC990 X system RMC andprovide the password when prompted.
For example:
ssh root@uv-rmc
2. Enter the uvcon command to access the console.
3. (Conditional) Access the main EFI menu. Complete this step if you are at the EFI shell:
Type exit and press Enter.
Attaching virtual media to the MC990 X system 67
Page 68

4. Use the arrow keys to select Boot Manager, and press Enter.
5. On the Boot Manager screen, use the down-arrow key to select or highlight UEFI American
Megatrends Inc. Virtual Cdrom Device, and press Enter.
68 Connecting to an MC990 X system through a web browser and launching the JViewer console
Page 69

Glossary
ACPI
Advanced Configuration and Power Interface
APPWT
Average Peak Performance in Weighted Teraflops
BMC
Baseboard Management Controller
CLI
Command Line Interface
CNSL
Console abbreviation
CRC
Cyclic Redundancy Check
DSM
Distributed Shared Memory
ECC
Error Checking Code
EFI
Extensible Firmware Interface
FQDN
Fully Qualified Domain Name
GPU
Graphic Processing Unit
IPMI
Intelligent Platform Management Interface
KVM
Keyboard, video, mouse
MCS
Multi-Category Security
MLS
Multi-Level Security
NMI
Nonmaskable Interrupt
NTP
Network Time Protocol
Glossary 69
Page 70

NUMA
Non-Uniform Memory Access
PDU
Power Distribution Unit
QPI
Quick Path Interconnect
RAS
Reliability, Availability, Serviceability
RMC
Rack Management Console
RS
Remote Solutions
SAS
Serial Attached SCSI
SEL
System Error Log
SELinux
Security Enhanced Linux
SID
SAP HANA System Identifier
SMI
Scalable Memory Interconnect
SMN
System Management Node
SMP
Symmetric Multiprocessing
SSD
Solid State Drive
SSI
Single System Image
UID
Unit IDentifier
YaST
Yet another Setup Tool
70 Glossary
 Loading...