

Page 1

HP iLO 3 User Guide
Abstract
This guide provides information about configuring, updating, and operating HP ProLiant servers by using the HP iLO 3 firmware.
This document is intended for system administrators, HP representatives, and HP Authorized Channel Partners who are involved
in configuring and using HP iLO 3 and HP ProLiant servers.
This guide discusses HP iLO for HP ProLiant servers and HP ProLiant BladeSystem server blades. For information about iLO for
Integrity servers and server blades, see the HP website at http://www.hp.com/go/integrityiLO.
HP Part Number: 616301-006
Published: March 2014
Edition: 1
Page 2

© Copyright 2011, 2014 Hewlett-Packard Development Company, L.P
Confidential computer software. Valid license from HP required for possession, use or copying. Consistent with FAR 12.211 and 12.212, Commercial
Computer Software, Computer Software Documentation, and Technical Data for Commercial Items are licensed to the U.S. Government under
vendor's standard commercial license.
The information contained herein is subject to change without notice. The only warranties for HP products and services are set forth in the express
warranty statements accompanying such products and services. Nothing herein should be construed as constituting an additional warranty. HP shall
not be liable for technical or editorial errors or omissions contained herein.
Acknowledgements
Microsoft, Windows, Windows NT, Windows XP, and Windows Vista are U.S. registered trademarks of Microsoft Corporation.
Intel is a trademark of Intel Corporation in the U.S. and other countries.
Java is a registered trademark of Oracle and/or its affiliates.
Page 3

Contents
1 Introduction to iLO....................................................................................12
iLO web interface...................................................................................................................12
iLO RBSU...............................................................................................................................13
iLO mobile app......................................................................................................................13
iLO scripting and command line...............................................................................................13
2 Setting up iLO..........................................................................................14
Preparing to set up iLO............................................................................................................14
Connecting iLO to the network.................................................................................................16
Setting up iLO by using iLO RBSU.............................................................................................16
Configuring a static IP address by using iLO RBSU..................................................................17
Managing iLO users by using iLO RBSU................................................................................18
Adding user accounts....................................................................................................18
Editing user accounts.....................................................................................................20
Removing user accounts.................................................................................................20
Setting up iLO by using the iLO web interface............................................................................21
Logging in to iLO for the first time.............................................................................................21
Activating iLO licensed features................................................................................................22
Installing the iLO drivers...........................................................................................................22
Microsoft device driver support............................................................................................23
Linux device driver support..................................................................................................23
VMware device driver support.............................................................................................24
3 Configuring iLO.......................................................................................25
Updating firmware..................................................................................................................25
Updating firmware by using an online method.......................................................................25
Performing an in-band firmware update............................................................................25
Performing an out-of-band firmware update.......................................................................26
Updating firmware by using an offline method.......................................................................26
Obtaining the iLO firmware image file..................................................................................26
Updating the iLO firmware by using a browser......................................................................27
Using language packs............................................................................................................28
Installing a language pack..................................................................................................28
Selecting a language pack.................................................................................................29
Configuring the default language settings..............................................................................30
Configuring the current language settings..............................................................................30
Uninstalling a language pack..............................................................................................30
iLO licensing..........................................................................................................................31
Free iLO 60-day evaluation license.......................................................................................31
Installing an iLO license by using a browser..........................................................................32
Managing iLO users by using the iLO web interface....................................................................32
Viewing local user accounts................................................................................................33
Viewing directory groups....................................................................................................34
Adding or editing local user accounts...................................................................................34
Password guidelines......................................................................................................36
IPMI/DCMI users..........................................................................................................36
Administering directory groups............................................................................................37
Deleting a user account or a directory group.........................................................................39
Configuring iLO access settings................................................................................................39
Configuring service settings.................................................................................................39
Configuring IPMI/DCMI settings..........................................................................................40
Configuring access options.................................................................................................40
Contents 3
Page 4

Logging in to iLO by using an SSH client...............................................................................43
Configuring iLO security..........................................................................................................43
General security guidelines.................................................................................................43
iLO RBSU security..........................................................................................................44
iLO Security Override Switch administration......................................................................44
TPM support......................................................................................................................45
User accounts and access...................................................................................................46
User privileges..............................................................................................................46
Login security................................................................................................................46
Administering SSH keys......................................................................................................46
About SSH keys............................................................................................................46
Authorizing a new SSH key............................................................................................47
Deleting SSH keys.........................................................................................................48
Authorizing SSH keys from an HP SIM server....................................................................48
Administering SSL certificates..............................................................................................48
Viewing SSL certificate information..................................................................................49
Obtaining and importing an SSL certificate......................................................................49
Configuring directory settings..............................................................................................51
Configuring authentication and directory server settings.....................................................52
Running directory tests...................................................................................................54
Viewing directory test results......................................................................................56
Using the directory test controls .................................................................................58
Using encryption................................................................................................................58
Viewing encryption enforcement settings...........................................................................59
Modifying the AES/DES encryption setting.......................................................................60
Connecting to iLO by using AES or 3DES encryption.....................................................60
Enabling FIPS Mode......................................................................................................60
Disabling FIPS Mode.....................................................................................................61
Configuring iLO for HP SSO................................................................................................61
Configuring iLO for HP SSO...........................................................................................62
Viewing trusted certificates.............................................................................................63
Adding trusted certificates..............................................................................................64
Extracting the HP SIM server certificate........................................................................65
Removing trusted certificates...........................................................................................65
Configuring Remote Console security settings.........................................................................65
Configuring Remote Console Computer Lock settings..........................................................65
Configuring the Integrated Remote Console Trust setting (.NET IRC)......................................67
Configuring the Login Security Banner..................................................................................67
Configuring iLO network settings..............................................................................................69
Viewing network settings.....................................................................................................69
Configuring general network settings....................................................................................72
Configuring IPv4 settings....................................................................................................74
Configuring IPv6 settings....................................................................................................76
Configuring SNTP settings...................................................................................................79
Configuring and using the iLO Shared Network Port....................................................................80
Enabling the iLO Shared Network Port feature.......................................................................81
Enabling the iLO Shared Network Port feature through iLO RBSU.........................................82
Enabling the iLO Shared Network Port feature through the iLO web interface........................82
Re-enabling the iLO Dedicated Network Port.........................................................................83
Enabling the iLO Dedicated Network Port through iLO RBSU...............................................83
Enabling the iLO Dedicated Network Port through the web interface....................................83
Configuring iLO Management settings.......................................................................................84
Installing the Insight Management Agents..............................................................................84
Configuring SNMP alerts....................................................................................................84
SNMP traps..................................................................................................................85
4 Contents
Page 5

Configuring SNMP alert destinations....................................................................................85
Configuring Insight Management integration.........................................................................86
Using the iLO RBSU................................................................................................................87
Accessing the iLO RBSU......................................................................................................87
Configuring NIC and TCP/IP settings....................................................................................87
Configuring DNS/DHCP settings.........................................................................................88
Configuring global settings by using iLO RBSU.......................................................................89
Configuring serial CLI options by using iLO RBSU...................................................................90
4 Using iLO................................................................................................92
Using the iLO web interface.....................................................................................................92
Browser support.................................................................................................................92
Logging in to iLO...............................................................................................................92
Handling an unknown authority...........................................................................................93
Using the iLO controls.........................................................................................................94
Language pack support......................................................................................................94
Viewing iLO overview information.............................................................................................94
Viewing system information.................................................................................................94
Viewing status information...................................................................................................96
Viewing the active iLO sessions............................................................................................96
Viewing iLO system information................................................................................................97
Viewing health summary information....................................................................................97
Viewing fan information......................................................................................................98
Viewing temperature information .......................................................................................100
Viewing temperature sensor data...................................................................................100
Viewing power information...............................................................................................101
Viewing processor information...........................................................................................103
Viewing memory information.............................................................................................104
Viewing network information.............................................................................................104
Viewing drive information.................................................................................................105
Using the iLO Event Log.........................................................................................................106
Viewing the iLO Event Log.................................................................................................106
Saving the iLO Event Log...................................................................................................108
Clearing the iLO Event Log................................................................................................108
Using the Integrated Management Log....................................................................................109
Viewing the IML...............................................................................................................109
Marking a log entry as repaired........................................................................................111
Adding a maintenance note to the IML...............................................................................111
Saving the IML................................................................................................................111
Clearing the IML..............................................................................................................112
Using iLO diagnostics............................................................................................................112
Resetting iLO through the web interface..............................................................................113
Using the HP Insight Management Agents................................................................................114
Using the Integrated Remote Console......................................................................................114
.NET IRC requirements......................................................................................................115
Microsoft .NET Framework............................................................................................115
Microsoft ClickOnce....................................................................................................115
Java IRC requirements......................................................................................................115
Recommended client settings........................................................................................116
Recommended server settings.......................................................................................116
Configuring the Java IRC keyboard layout for Linux systems..........................................116
Starting the Remote Console..............................................................................................116
Acquiring the Remote Console...........................................................................................118
Using the Remote Console power switch.............................................................................119
Using iLO Virtual Media from the Remote Console................................................................119
Contents 5
Page 6

Using Shared Remote Console (.NET IRC only)....................................................................119
Using Console Capture (.NET IRC only)..............................................................................120
Viewing Server Startup and Server Prefailure sequences...................................................121
Saving Server Startup and Server Prefailure video files.....................................................121
Capturing video files...................................................................................................122
Viewing saved video files.............................................................................................122
Using Remote Console hot keys..........................................................................................122
Creating a hot key......................................................................................................122
Resetting hot keys........................................................................................................124
Using the text-based Remote Console......................................................................................124
Using the iLO Virtual Serial Port.........................................................................................124
Configuring the iLO Virtual Serial Port in the host system RBSU..........................................125
Configuring the iLO Virtual Serial Port for Linux...............................................................128
Configuring the iLO Virtual Serial Port for the Windows EMS Console................................129
Using the Text-based Remote Console (Textcons)..................................................................129
Customizing the Text-based Remote Console...................................................................130
Using the Text-based Remote Console............................................................................131
Using Linux with the Text-based Remote Console..............................................................131
Using iLO Virtual Media........................................................................................................131
Virtual Media operating system information.........................................................................133
Operating system USB requirement................................................................................133
Using Virtual Media with Windows 7............................................................................133
Operating system considerations: Virtual Floppy/USB key................................................133
Changing diskettes.................................................................................................133
Operating system considerations: Virtual CD/DVD-ROM..................................................134
Mounting a USB Virtual Media CD/DVD-ROM on Linux systems...................................134
Operating system considerations: Virtual Folder .............................................................134
Using iLO Virtual Media from the iLO web interface.............................................................135
Viewing and modifying the Virtual Media port................................................................135
Viewing and ejecting local media.................................................................................136
Connecting scripted media...........................................................................................136
Viewing and ejecting scripted media.............................................................................136
Using iLO Virtual Media from the Remote Console................................................................137
Using a Virtual Drive...................................................................................................137
Using a physical drive on a client PC........................................................................137
Using an image file................................................................................................137
Using an image file through a URL (IIS/Apache).........................................................137
Using the Create Media Image feature (Java IRC only).....................................................137
Creating an iLO disk image file................................................................................138
Copying data from an image file to a physical disk....................................................138
Using a Virtual Folder (.NET IRC only)............................................................................139
Setting up IIS for scripted Virtual Media..............................................................................139
Configuring IIS............................................................................................................139
Configuring IIS for read/write access.............................................................................140
Inserting Virtual Media with a helper application............................................................141
Sample Virtual Media helper application.......................................................................141
Configuring Virtual Media Boot Order................................................................................142
Changing the server boot order....................................................................................142
Changing the one-time boot status................................................................................143
Using the additional options.........................................................................................143
About server power..............................................................................................................143
Brownout recovery...........................................................................................................143
Graceful shutdown...........................................................................................................144
Power efficiency...............................................................................................................144
Using iLO Power Management...............................................................................................144
6 Contents
Page 7

Managing the server power..............................................................................................144
Configuring the System Power Restore Settings.....................................................................146
Viewing server power usage..............................................................................................146
Viewing the current power state.........................................................................................148
Viewing the server power history........................................................................................149
Configuring power settings................................................................................................149
Configuring Power Regulator settings.............................................................................149
Configuring power capping settings..............................................................................151
Configuring SNMP alert settings...................................................................................151
Configuring the persistent mouse and keyboard..............................................................152
Using iLO with Onboard Administrator....................................................................................152
Using the Active Onboard Administrator.............................................................................152
Starting the Onboard Administrator GUI.............................................................................153
Toggling the enclosure UID light.........................................................................................153
Enclosure bay IP addressing..............................................................................................154
Dynamic Power Capping for server blades..........................................................................154
iLO virtual fan.................................................................................................................154
iLO option.......................................................................................................................154
IPMI server management.......................................................................................................155
Using iLO with HP Insight Control server deployment ................................................................156
5 Integrating HP Systems Insight Manager....................................................157
HP SIM features....................................................................................................................157
Establishing SSO with HP SIM................................................................................................157
iLO identification and association...........................................................................................157
Viewing iLO status in HP SIM.............................................................................................157
iLO links in HP SIM..........................................................................................................158
Viewing iLO in HP SIM System(s) lists..................................................................................158
Receiving SNMP alerts in HP SIM...........................................................................................158
HP SIM port matching...........................................................................................................158
Reviewing iLO license information in HP SIM............................................................................159
6 Directory services...................................................................................160
Directory integration benefits..................................................................................................160
Choosing a directory configuration to use with iLO....................................................................160
Kerberos support..................................................................................................................161
Domain controller preparation...........................................................................................161
Realm names..............................................................................................................161
Computer accounts......................................................................................................161
User accounts.............................................................................................................161
Generating a keytab...................................................................................................162
Key version number................................................................................................162
Windows Vista.......................................................................................................162
Universal and global user groups (for authorization)........................................................163
Configuring iLO for Kerberos login.....................................................................................163
Using the iLO web interface..........................................................................................163
Using XML configuration and control scripts....................................................................164
Using the CLI, CLP, or SSH interface..............................................................................164
Time requirement.............................................................................................................164
Configuring single sign-on................................................................................................164
Internet Explorer..........................................................................................................164
Firefox.......................................................................................................................165
Chrome.....................................................................................................................165
Verifying single sign-on (HP Zero Sign In) configuration.........................................................166
Login by name................................................................................................................166
Schema-free directory integration............................................................................................166
Contents 7
Page 8

Setting up schema-free directory integration.........................................................................167
Active Directory prerequisites........................................................................................167
Introduction to Certificate Services............................................................................167
Installing Certificate Services....................................................................................167
Verifying Certificate Services....................................................................................167
Configuring Automatic Certificate Request.................................................................167
Schema-free setup using the iLO web interface................................................................168
Schema-free setup using scripts.....................................................................................168
Schema-free setup with HP Directories Support for ProLiant Management Processors.............168
Schema-free setup options............................................................................................169
Minimum login flexibility.........................................................................................169
Better login flexibility..............................................................................................169
Maximum login flexibility.........................................................................................169
Schema-free nested groups...........................................................................................169
Setting up HP extended schema directory integration................................................................170
Features supported by HP schema directory integration.........................................................170
Setting up directory services..............................................................................................170
Schema documentation.....................................................................................................171
Directory services support.................................................................................................171
Schema required software.................................................................................................171
Schema Extender........................................................................................................172
Schema Preview window.........................................................................................172
Setup window........................................................................................................173
Results window......................................................................................................173
Management snap-in installer.......................................................................................174
Directory services for Active Directory.................................................................................174
Active Directory installation prerequisites........................................................................174
Installing Active Directory.............................................................................................175
For the schema-free configuration.............................................................................175
For HP extended schema.........................................................................................175
Snap-in installation and initialization for Active Directory..................................................176
Creating and configuring directory objects for use with iLO in Active Directory....................176
Directory services objects.............................................................................................177
Active Directory snap-ins.........................................................................................178
Role Restrictions tab................................................................................................179
Lights Out Management tab.........................................................................................181
Directory services for eDirectory.........................................................................................182
eDirectory installation prerequisites................................................................................182
Snap-in installation and initialization for eDirectory..........................................................182
Example: Creating and configuring directory objects for use with iLO devices in eDirectory...182
Directory services objects for eDirectory.........................................................................186
Role Managed Devices...........................................................................................186
Members tab.........................................................................................................186
Role Restrictions tab.....................................................................................................187
Time restrictions......................................................................................................188
Enforced client IP address or DNS name access.........................................................188
eDirectory Lights-Out Management................................................................................189
User login using directory services..........................................................................................190
Directory-enabled remote management....................................................................................190
Creating roles to follow organizational structure...................................................................191
Using existing groups..................................................................................................191
Using multiple roles.....................................................................................................191
How directory login restrictions are enforced.......................................................................192
Restricting roles...........................................................................................................193
Role time restrictions...............................................................................................193
8 Contents
Page 9

Role address restrictions..........................................................................................193
User restrictions...........................................................................................................193
User address restrictions..........................................................................................193
User time restrictions...............................................................................................194
Creating multiple restrictions and roles...........................................................................195
Using bulk import tools.....................................................................................................196
HP Directories Support for ProLiant Management Processors utility...............................................196
Compatibility..................................................................................................................196
HP Directories Support for ProLiant Management Processors package.....................................197
Using HP Directories Support for ProLiant Management Processors.........................................197
Finding management processors...................................................................................197
Upgrading firmware on management processors.............................................................200
Selecting a directory access method..............................................................................201
Naming management processors..................................................................................202
Configuring directories when HP extended schema is selected...........................................202
Configuring directories when schema-free integration is selected........................................206
Setting up management processors for directories............................................................207
7 Troubleshooting......................................................................................209
iLO 3 POST LED indicators.....................................................................................................209
Kernel debugging.................................................................................................................209
Event log entries...................................................................................................................210
Hardware and software link-related issues................................................................................213
Login issues.........................................................................................................................213
Login name and password not accepted.............................................................................214
Directory user premature logout.........................................................................................214
iLO management port not accessible by name.....................................................................214
iLO RBSU unavailable after iLO and server reset...................................................................214
Unable to access the login page........................................................................................215
Secure Connection Failed error when using Firefox browser...................................................215
Unable to return to login page after an iLO flash or reset......................................................216
Unable to access Virtual Media or graphical Remote Console................................................216
Unable to connect to iLO after changing network settings......................................................216
Unable to connect to iLO processor through NIC..................................................................216
Unable to log in to iLO after installing iLO certificate............................................................216
Unable to connect to iLO IP address...................................................................................216
Blocked iLO ports.............................................................................................................217
Troubleshooting alert and trap issues.......................................................................................217
Unable to receive HP SIM alarms (SNMP traps) from iLO.......................................................217
Incorrect authentication code..................................................................................................217
Using the iLO Security Override Switch for emergency access.....................................................218
Troubleshooting license installation..........................................................................................218
Troubleshooting directory issues .............................................................................................218
User contexts do not appear to work..................................................................................218
Directory user does not log out after directory timeout has expired.........................................218
Problems generating keytab by using ktpass.exe..................................................................218
Directory login fails...............................................................................................................219
Troubleshooting Remote Console issues...................................................................................219
Java IRC applet displays red X when Firefox is used to run Java IRC on Linux client ..................219
Unable to navigate single cursor of Remote Console to corners of Remote Console window.......219
Remote Console text window not updated correctly..............................................................219
Mouse or keyboard not working in .NET IRC or Java IRC......................................................219
.NET IRC sends characters continuously after switching windows ...........................................220
Java IRC does not display correct floppy and USB-key device.................................................220
Caps Lock out of sync between iLO and Java IRC.................................................................221
Contents 9
Page 10

Num Lock out of sync between iLO and Shared Remote Console............................................222
Keystrokes repeat unintentionally during Remote Console session............................................222
Session leader does not receive connection request when .NET IRC is in replay mode...............222
Keyboard LED does not work correctly................................................................................222
Inactive .NET IRC.............................................................................................................222
.NET IRC failed to connect to server...................................................................................223
File not present after copy from .NET IRC virtual drives to USB key..........................................223
.NET IRC takes a long time to verify application requirements................................................223
.NET IRC fails to start.......................................................................................................224
.NET IRC cannot be shared...............................................................................................224
Troubleshooting SSH issues....................................................................................................225
Initial PuTTY input slow.....................................................................................................225
PuTTY client unresponsive..................................................................................................225
SSH text support from text-based Remote Console session......................................................225
Troubleshooting video and monitor issues................................................................................225
User interface does not display correctly.............................................................................225
iLO Virtual Floppy media applet unresponsive..........................................................................225
Troubleshooting text-based Remote Console issues....................................................................225
Unable to view Linux installer in text-based Remote Console...................................................225
Unable to pass data through SSH terminal..........................................................................226
VSP-driven selection during the serial timeout window sends output to BIOS redirect instead of
VSP................................................................................................................................226
Scrolling and text appear irregular during BIOS redirection...................................................226
Troubleshooting miscellaneous issues.......................................................................................226
Cookie sharing between browser instances and iLO.............................................................226
Shared instances.........................................................................................................226
Cookie order..............................................................................................................227
Displaying the current session cookie.............................................................................227
Preventing cookie-related issues....................................................................................227
Unable to get SNMP information from HP SIM.....................................................................228
Unable to upgrade iLO firmware........................................................................................228
Recovering from a failed iLO firmware update......................................................................228
iLO network Failed Flash Recovery.....................................................................................229
Testing SSL......................................................................................................................229
Resetting iLO...................................................................................................................230
Resetting iLO to the factory default settings by using iLO RBSU...............................................230
Server name still present after System Erase Utility is executed................................................231
Certificate error when navigating to iLO web interface..........................................................231
Resolving a browser certificate error: Internet Explorer......................................................232
Resolving a browser certificate error: Firefox...................................................................233
8 Support and other resources....................................................................235
Information to collect before you contact HP.............................................................................235
How to contact HP................................................................................................................235
Registering for Software Technical Support and Update Service..................................................235
How to use Software Technical Support and Update Service..................................................235
HP Support Center................................................................................................................235
HP authorized resellers..........................................................................................................236
Related information...............................................................................................................236
9 Documentation feedback.........................................................................237
A iLO license options.................................................................................238
B Directory services schema........................................................................239
HP Management Core LDAP OID classes and attributes.............................................................239
Core classes....................................................................................................................239
10 Contents
Page 11

Core attributes.................................................................................................................239
Core class definitions.......................................................................................................239
hpqTarget..................................................................................................................239
hpqRole.....................................................................................................................240
hpqPolicy...................................................................................................................240
Core attribute definitions...................................................................................................240
hpqPolicyDN..............................................................................................................240
hpqRoleMembership....................................................................................................240
hpqTargetMembership.................................................................................................241
hpqRoleIPRestrictionDefault...........................................................................................241
hpqRoleIPRestrictions...................................................................................................241
hpqRoleTimeRestriction.................................................................................................242
Lights-Out Management specific LDAP OID classes and attributes................................................242
Lights-Out Management classes.........................................................................................242
Lights-Out Management attributes......................................................................................242
Lights-Out Management class definitions.............................................................................242
hpqLOMv100.............................................................................................................242
Lights-Out Management attribute definitions........................................................................243
hpqLOMRightLogin......................................................................................................243
hpqLOMRightRemoteConsole........................................................................................243
hpqLOMRightVirtualMedia...........................................................................................243
hpqLOMRightServerReset..............................................................................................243
hpqLOMRightLocalUserAdmin.......................................................................................244
hpqLOMRightConfigureSettings.....................................................................................244
C OID support for certificates......................................................................245
Glossary..................................................................................................247
Index.......................................................................................................250
Contents 11
Page 12

1 Introduction to iLO
The iLO software can remotely perform most functions that otherwise require a visit to the servers
at the data center, computer room, or remote location. iLO allows you to do the following:
• Monitor server health. iLO monitors temperatures in the server and sends corrective signals to
the fans to maintain proper server cooling. iLO also monitors firmware versions and the status
of fans, memory, the network, processors, power supplies, and server hard drives.
• Access a high-performance and secure Integrated Remote Console to the server from anywhere
in the world if you have a network connection to the server.
There are two versions of the Integrated Remote Console:
◦ .NET IRC
◦ Java IRC
General references to the Remote Console apply to both the .NET IRC and Java IRC, unless
otherwise specified.
• Use the shared .NET IRC to collaborate with multiple server administrators.
• Remotely mount high-performance Virtual Media devices to the server.
• Use Virtual Power and Virtual Media from the GUI, the CLI, or the iLO scripting toolkit for
many tasks, including the automation of deployment and provisioning.
• Securely and remotely control the power state of the managed server.
• Monitor the power consumption and server power settings.
• Use local or directory-based user accounts to log in to iLO.
• Configure Kerberos authentication, which adds the HP Zero Sign In button to the login screen.
• Use iLO language packs to switch between English and another supported language.
For more information about the iLO 3 features, see http://www.hp.com/go/iLO3.
iLO web interface
The iLO web interface groups similar tasks for easy navigation and workflow. It is organized in a
navigational tree view located on the left side of the page. The top-level branches are Information,
Remote Console, Virtual Media, Power Management, Network, and Administration. If you have
a ProLiant server blade, the BL c-Class branch is included.
When using the iLO web interface, note the following:
• Each high-level iLO branch has a submenu that you can display by clicking the + icon to the
left of that branch. Each menu topic displays a page title that describes the information or
settings available on that page. The page title might not reflect the name that is displayed on
the menu option.
• Assistance for all iLO pages is available from the iLO help pages. To access page-specific
help, click the ? icon on the upper right side of the page.
• Typical administrator tasks are available from the Administration and Network branches of
the iLO web interface. These tasks are described in “Setting up iLO” (page 14) and
“Configuring iLO” (page 25).
• Typical user tasks are available from the Information, Remote Console, Virtual Media, Power
Management, and BL c-Class branches of the iLO web interface. These tasks are described
in “Using iLO” (page 92).
12 Introduction to iLO
Page 13

For more information about iLO functionality and integration, see the following:
• “Integrating HP Systems Insight Manager” (page 157)
• “Directory services” (page 160)
• “Troubleshooting” (page 209)
iLO RBSU
You can use the iLO ROM-based setup utility to configure network parameters, global settings, and
user accounts. iLO RBSU is designed for the initial iLO setup, and is not intended for continued
iLO administration. iLO RBSU is available whenever the server is booted, and can be run remotely
through the Remote Console. Press F8 during POST to enter iLO RBSU.
You can disable iLO RBSU in the iLO RBSU Global Settings preferences or in the iLO web interface.
Disabling iLO RBSU prevents reconfiguration from the host unless the iLO Security Override Switch
is set.
For more information about using iLO RBSU, see the following:
• “Setting up iLO by using iLO RBSU” (page 16)
• “iLO RBSU security” (page 44)
• “Using the iLO RBSU” (page 87)
iLO mobile app
The HP iLO mobile app provides access to the Remote Console of your HP ProLiant server from
your mobile device. The mobile app interacts directly with the iLO processor on HP ProLiant servers,
providing total control of the server at all times as long as the server is plugged in. For example,
you can access the server when it is in a healthy state or when it is powered off with a blank hard
drive. As an IT administrator, you can troubleshoot problems and perform software deployments
from almost anywhere.
For more information about the iLO mobile app, see http://www.hp.com/go/ilo/mobileapp.
iLO scripting and command line
You can use the iLO scripting tools to configure multiple iLO systems, to incorporate a standard
configuration into the deployment process, and to control servers and subsystems.
The HP iLO Scripting and Command Line Guide describes the syntax and tools available to use
iLO 3 through a command line or scripted interface.
iLO RBSU 13
Page 14

2 Setting up iLO
The iLO default settings enable you to use most features without additional configuration. However,
the configuration flexibility of iLO enables customization for multiple enterprise environments. This
chapter discusses the initial iLO setup steps. For information about additional configuration options,
see “Configuring iLO” (page 25).
Complete the initial setup steps:
1. Decide how you want to handle networking and security. For more information, see “Preparing
to set up iLO” (page 14).
2. Connect iLO to the network. For more information, see “Connecting iLO to the network”
(page 16).
3. If you are not using dynamic IP addressing, configure a static IP address by using iLO RBSU.
For more information, see “Setting up iLO by using iLO RBSU” (page 16).
4. If you are using the local accounts feature, set up your user accounts by using iLO RBSU or
the iLO web interface. For more information, see “Setting up iLO by using iLO RBSU” (page 16)
or “Setting up iLO by using the iLO web interface” (page 21).
5. Install an iLO license. For more information, see “Activating iLO licensed features” (page 22).
6. If required, install the iLO drivers. For more information, see “Installing the iLO drivers”
(page 22).
Preparing to set up iLO
Before setting up an iLO management processor, you must decide how to handle networking and
security. The following questions can help you configure iLO:
1. How should iLO connect to the network?
For a graphical representation and explanation of the available connections, see “Connecting
iLO to the network” (page 16).
Typically, iLO is connected to the network through one of the following:
• A corporate network that both the NIC and the iLO port are connected to. This connection
enables access to iLO from anywhere on the network and reduces the amount of
networking hardware and infrastructure required to support iLO. However, on a corporate
network, traffic can hinder iLO performance.
• A dedicated management network with the iLO port on a separate network. A separate
network improves performance and security because you can physically control which
workstations are connected to the network. A separate network also provides redundant
access to the server when a hardware failure occurs on the corporate network. In this
configuration, iLO cannot be accessed directly from the corporate network.
2. How will iLO acquire an IP address?
To access iLO after connecting it to the network, the iLO management processor must acquire
an IP address and subnet mask by using either a dynamic or static process.
• A dynamic IP address is set by default. iLO obtains the IP address and subnet mask from
DNS or DHCP servers. This method is the simplest.
• A static IP address is used if DNS or DHCP servers are not available on the network. A
14 Setting up iLO
static IP address can be configured by using iLO RBSU. For more information, see
“Configuring a static IP address by using iLO RBSU” (page 17).
IMPORTANT: If you plan to use a static IP address, you must have the IP address before
starting the iLO setup process.
Page 15

3. What access security is required, and what user accounts and privileges are needed?
iLO provides several options to control user access. Use one of the following methods to
prevent unauthorized access:
• Local accounts—Up to 12 user names and passwords can be stored in iLO. This is ideal
for small environments such as labs and small-sized or medium-sized businesses.
• Directory services—Use the corporate directory to manage iLO user access. This is ideal
for environments with a large number of users. If you plan to use directory services,
consider enabling at least one local administrator account for alternate access.
For more information about iLO access security, see “Configuring iLO security” (page 43).
4. How do you want to configure iLO?
iLO supports various interfaces for configuration and operation. This guide discusses the
following interfaces:
• Use iLO RBSU when the system environment does not use DHCP, DNS, or WINS. For
more information, see “Setting up iLO by using iLO RBSU” (page 16).
• Use the iLO web interface when you can connect to iLO on the network by using a web
browser. You can also use this method to reconfigure an iLO management processor.
For more information, see “Setting up iLO by using the iLO web interface” (page 21).
Other configuration options not discussed in this guide follow:
• HP Scripting Toolkit—This toolkit is a server deployment product for IT experts that provides
unattended automated installation for high-volume server deployments. For more
information, see the HP Scripting Toolkit for Linux User Guide and the HP Scripting Toolkit
for Windows User Guide.
• Scripting—You can use scripting for advanced setup of multiple iLO management
processors. Scripts are XML files written for a scripting language called RIBCL. You can
use RIBCL scripts to configure iLO on the network during initial deployment or from an
already deployed host.
The following methods are available:
◦ HP Lights-Out Configuration Utility (HPQLOCFG)—The HPQLOCFG.EXE utility replaces
the previously used CPQLOCFG.EXE utility. It is a Windows command line utility that
sends XML configuration and control scripts over the network to iLO.
◦ HP Lights-Out Online Configuration Utility (HPONCFG)—A local online scripted setup
utility that runs on the host and passes RIBCL scripts to the local iLO. HPONCFG
requires the HP iLO Channel Interface Driver.
◦ Custom scripting environments—The iLO scripting samples include a Perl sample that
can be used to send RIBCL scripts to iLO over the network.
◦ SMASH CLP—A command-line protocol that can be used when a command line is
accessible through SSH or the physical serial port.
For more information about these methods, see the HP iLO 3 Scripting and Command
Line Guide.
iLO sample scripts are available at the following website: http://www.hp.com/support/
iLO3.
Preparing to set up iLO 15
Page 16
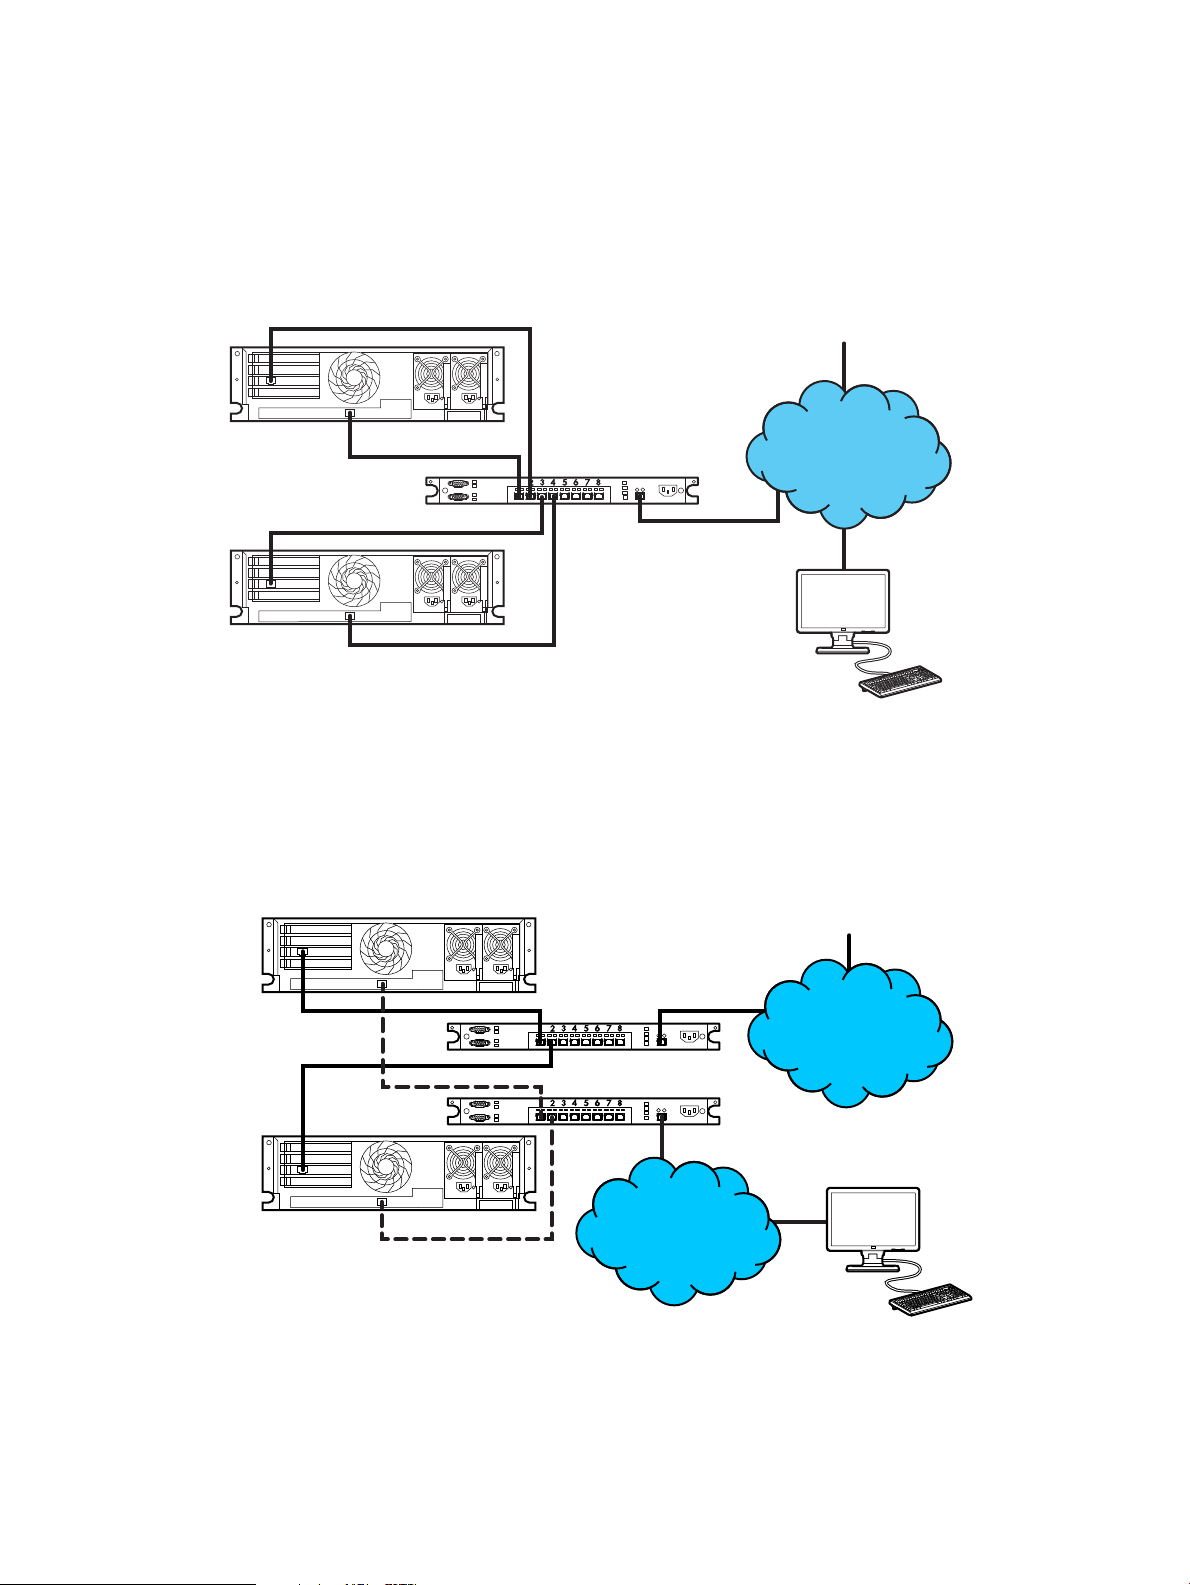
Connecting iLO to the network
Main NIC
iLO
Main NIC
Hub/Switch
Client PCs
Corporate
Network
Management Client
iLO
Hub/Switch
Main NIC
iLO
iLO
Main NIC
Hub/Switch
Client PCs
Corporate
Network
Dedicated
iLO Management
Network
Management Client
You can connect iLO to the network through a corporate network or a dedicated management
network.
• In a corporate network, the server has two network port types (server NICs and one iLO NIC)
connected to the corporate network, as shown in Figure 1 (page 16).
Figure 1 Corporate network diagram
• In a dedicated management network, the iLO port is on a separate network, as shown in
Figure 2 (page 16).
Figure 2 Dedicated management network diagram
Setting up iLO by using iLO RBSU
HP recommends using iLO RBSU to set up iLO for the first time and to configure iLO network
parameters for environments that do not use DHCP, DNS, or WINS.
16 Setting up iLO
Page 17

Configuring a static IP address by using iLO RBSU
This procedure is required only if you are using a static IP address. When you are using dynamic
IP addressing, your DHCP server automatically assigns an IP address for iLO.
NOTE: To simplify installation, HP recommends using DNS or DHCP with iLO.
To configure a static IP address:
1. Optional: If you access the server remotely, start an iLO remote console session.
You can use the .NET IRC or Java IRC.
2. Restart or power on the server.
3. Press F8 in the HP ProLiant POST screen.
The iLO RBSU screen appears.
4. Disable DHCP:
a. Select Network→DNS/DHCP, and then press Enter.
The Network Autoconfiguration window opens.
b. Select DHCP Enable, as shown in Figure 3 (page 17).
Figure 3 iLO RBSU Network Autoconfiguration window
c. Press the spacebar to set DHCP Enable to OFF, and then press F10 to save the changes.
Setting up iLO by using iLO RBSU 17
Page 18
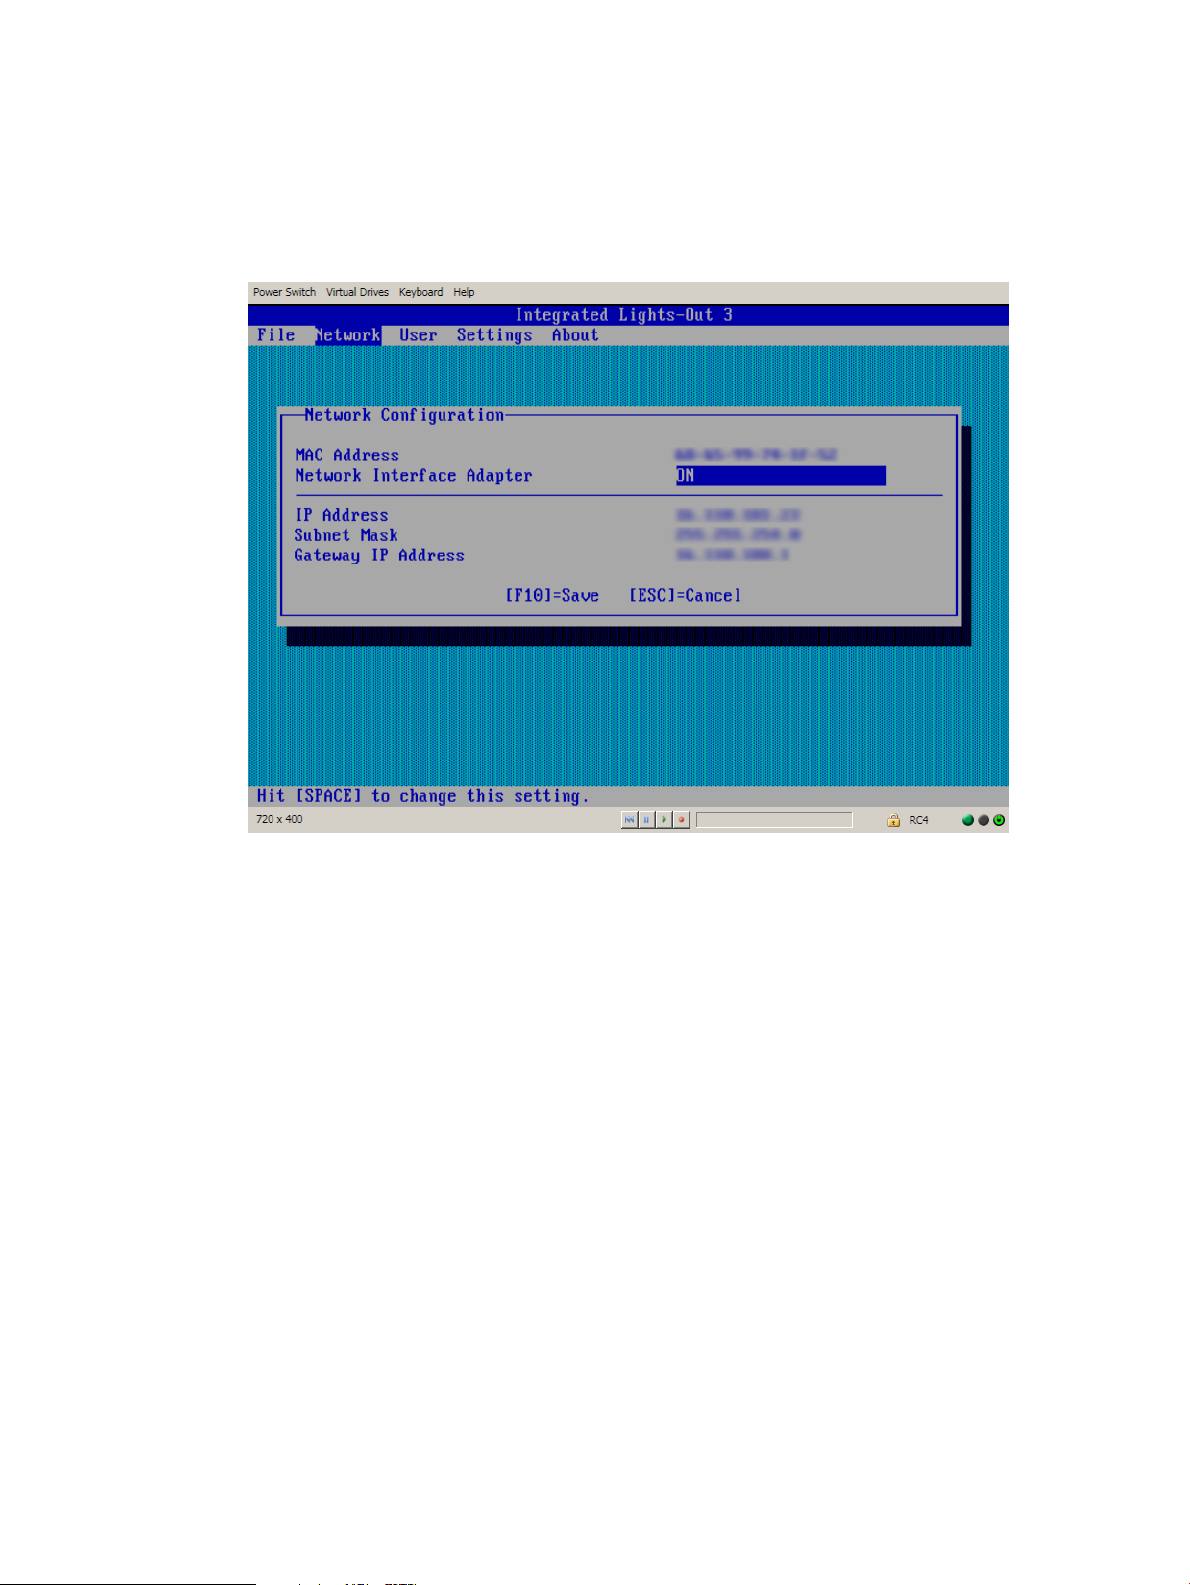
5. Enter the network settings:
a. Select Network→NIC and TCP/IP, and then press Enter.
The Network Configuration window opens.
b. Enter the appropriate information in the IP Address, Subnet Mask, and Gateway IP Address
fields, as shown in Figure 4 (page 18).
Figure 4 iLO RBSU Network Configuration window
c. Press F10 to save the changes.
6. Select File→Exit to exit iLO RBSU.
The changes take effect when you exit iLO RBSU.
Managing iLO users by using iLO RBSU
You can use iLO RBSU to perform the following user management tasks:
• “Adding user accounts” (page 18)
• “Editing user accounts” (page 20)
• “Removing user accounts” (page 20)
Adding user accounts
To add local iLO user accounts:
1. Optional: If you access the server remotely, start an iLO remote console session.
You can use the .NET IRC or Java IRC.
2. Restart or power on the server.
3. Press F8 in the HP ProLiant POST screen.
iLO RBSU starts.
4. Select User→Add, and then press Enter.
The Add User screen appears, as shown in Figure 5 (page 19).
18 Setting up iLO
Page 19
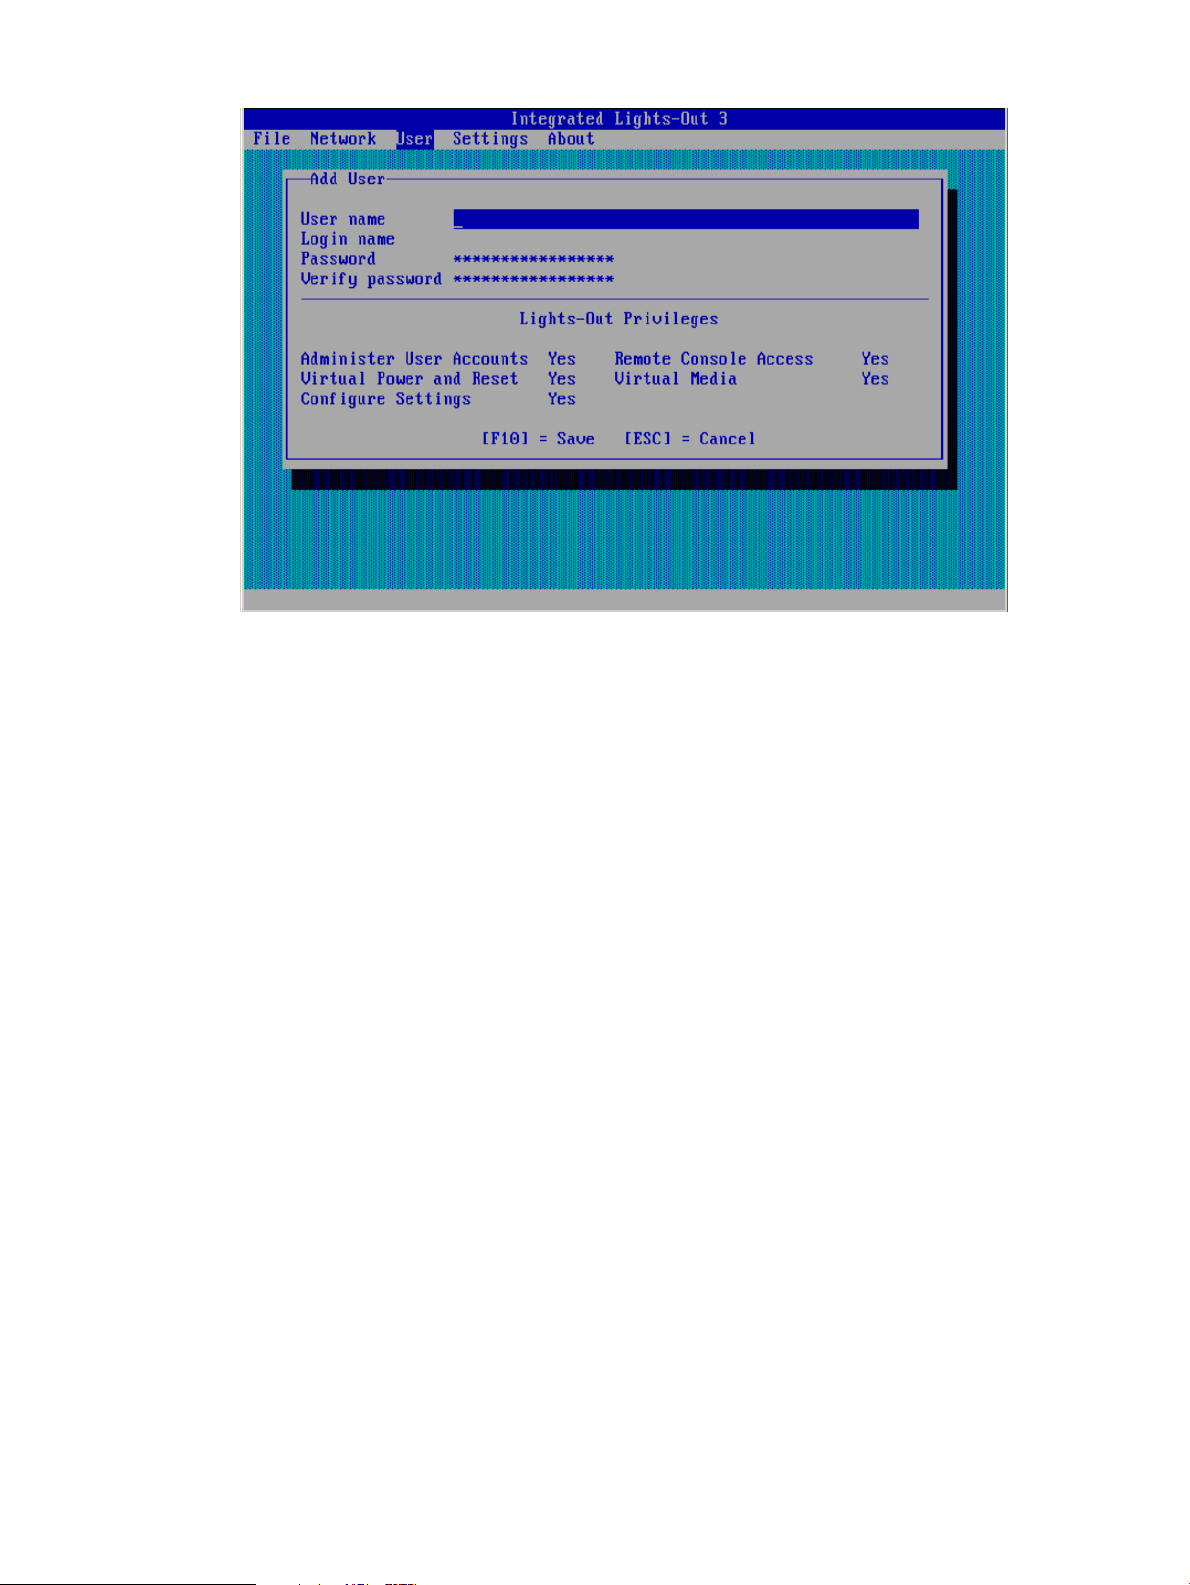
Figure 5 iLO RBSU Add User window
5. Enter the following user account details:
• User name appears in the user list on the User Administration page. It does not have to
be the same as the Login name. The maximum length for a user name is 39 characters.
The user name must use printable characters. Assigning descriptive user names can help
you to easily identify the owner of each login name.
• Login name is the name you must use when logging in to iLO. It appears in the user list
on the User Administration page, on the iLO Overview page, and in iLO logs. The Login
name does not have to be the same as the User name. The maximum length for a login
name is 39 characters. The login name must use printable characters.
• Password and Verify password set and confirm the password that is used for logging in
to iLO. The maximum length for a password is 39 characters. Enter the password twice
for verification.
6. Select from the following iLO privileges. To enable a privilege, set it to Yes. To disable a
privilege, set it to No.
• Administer User Accounts—Enables a user to add, edit, and delete local iLO user accounts.
A user with this privilege can change privileges for all users. If you do not have this
privilege, you can view your own settings and change your own password.
• Remote Console Access—Enables a user to remotely access the host system Remote
Console, including video, keyboard, and mouse control.
• Virtual Power and Reset—Enables a user to power-cycle or reset the host system. These
activities interrupt the system availability. A user with this privilege can diagnose the
system by using the Generate NMI to System button.
• Virtual Media—Enables a user to use the Virtual Media feature on the host system.
• Configure iLO Settings—Enables a user to configure most iLO settings, including security
settings, and to remotely update the iLO firmware. This privilege does not enable local
user account administration.
After iLO is configured, revoking this privilege from all users prevents reconfiguration
using the web interface, HPQLOCFG, or the CLI. Users who have access to iLO RBSU or
Setting up iLO by using iLO RBSU 19
Page 20
HPONCFG can still reconfigure iLO. Only a user who has the Administer User Accounts
privilege can enable or disable this privilege.
7. Press F10 to save the new user account.
8. Repeat step 4 through step 7 until you are done creating user accounts.
9. Select File→Exit to exit iLO RBSU.
Editing user accounts
To edit a local iLO user account:
1. Optional: If you access the server remotely, start an iLO remote console session.
You can use the .NET IRC or Java IRC.
2. Restart or power on the server.
3. Press F8 in the HP ProLiant POST screen.
The iLO RBSU screen appears.
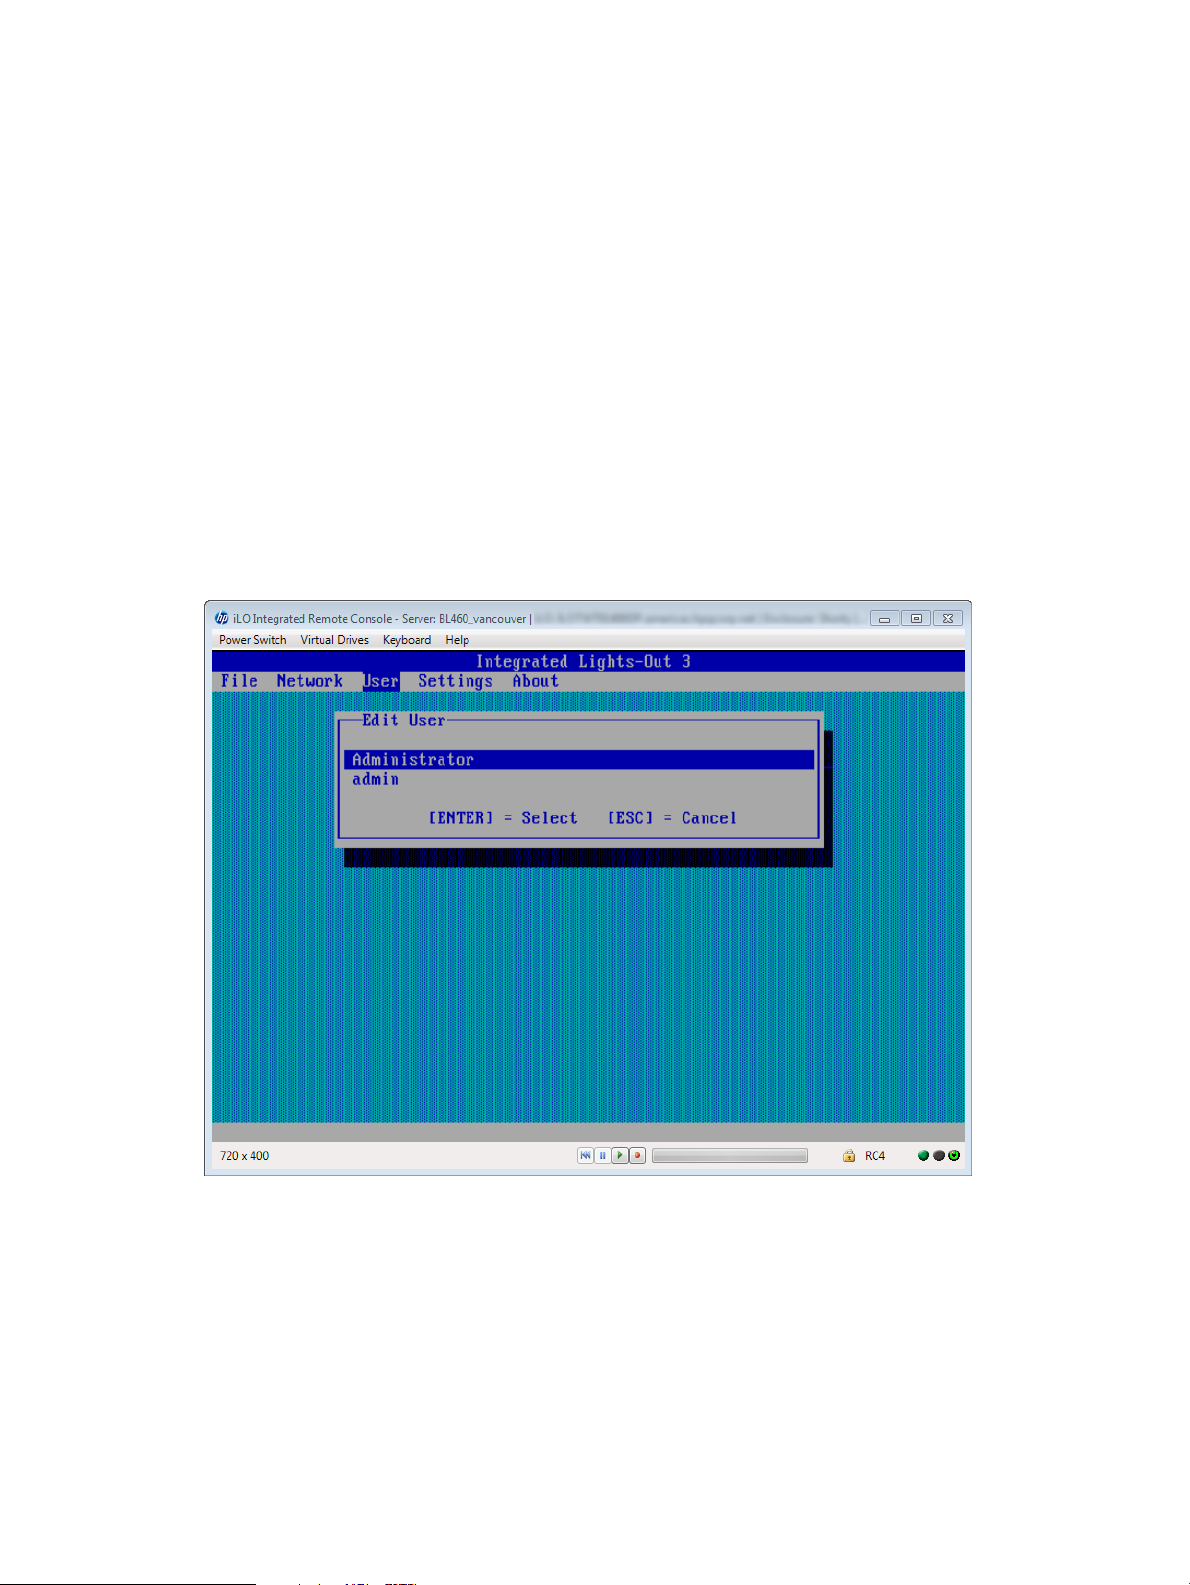
4. Select User→Edit, and then press Enter.
The Edit User screen appears, as shown in Figure 6 (page 20).
Figure 6 Editing user accounts
5. Select the user name that you want to edit, and then press Enter.
6. Update the user name, login name, password, or user privileges, and then press F10 to save
the changes.
7. Select File→Exit to exit iLO RBSU.
Removing user accounts
To remove a local iLO user account:
1. Optional: If you access the server remotely, start an iLO remote console session.
You can use the .NET IRC or Java IRC.
2. Restart or power on the server.
20 Setting up iLO
Page 21
3. Press F8 in the HP ProLiant POST screen.
The iLO RBSU screen appears.
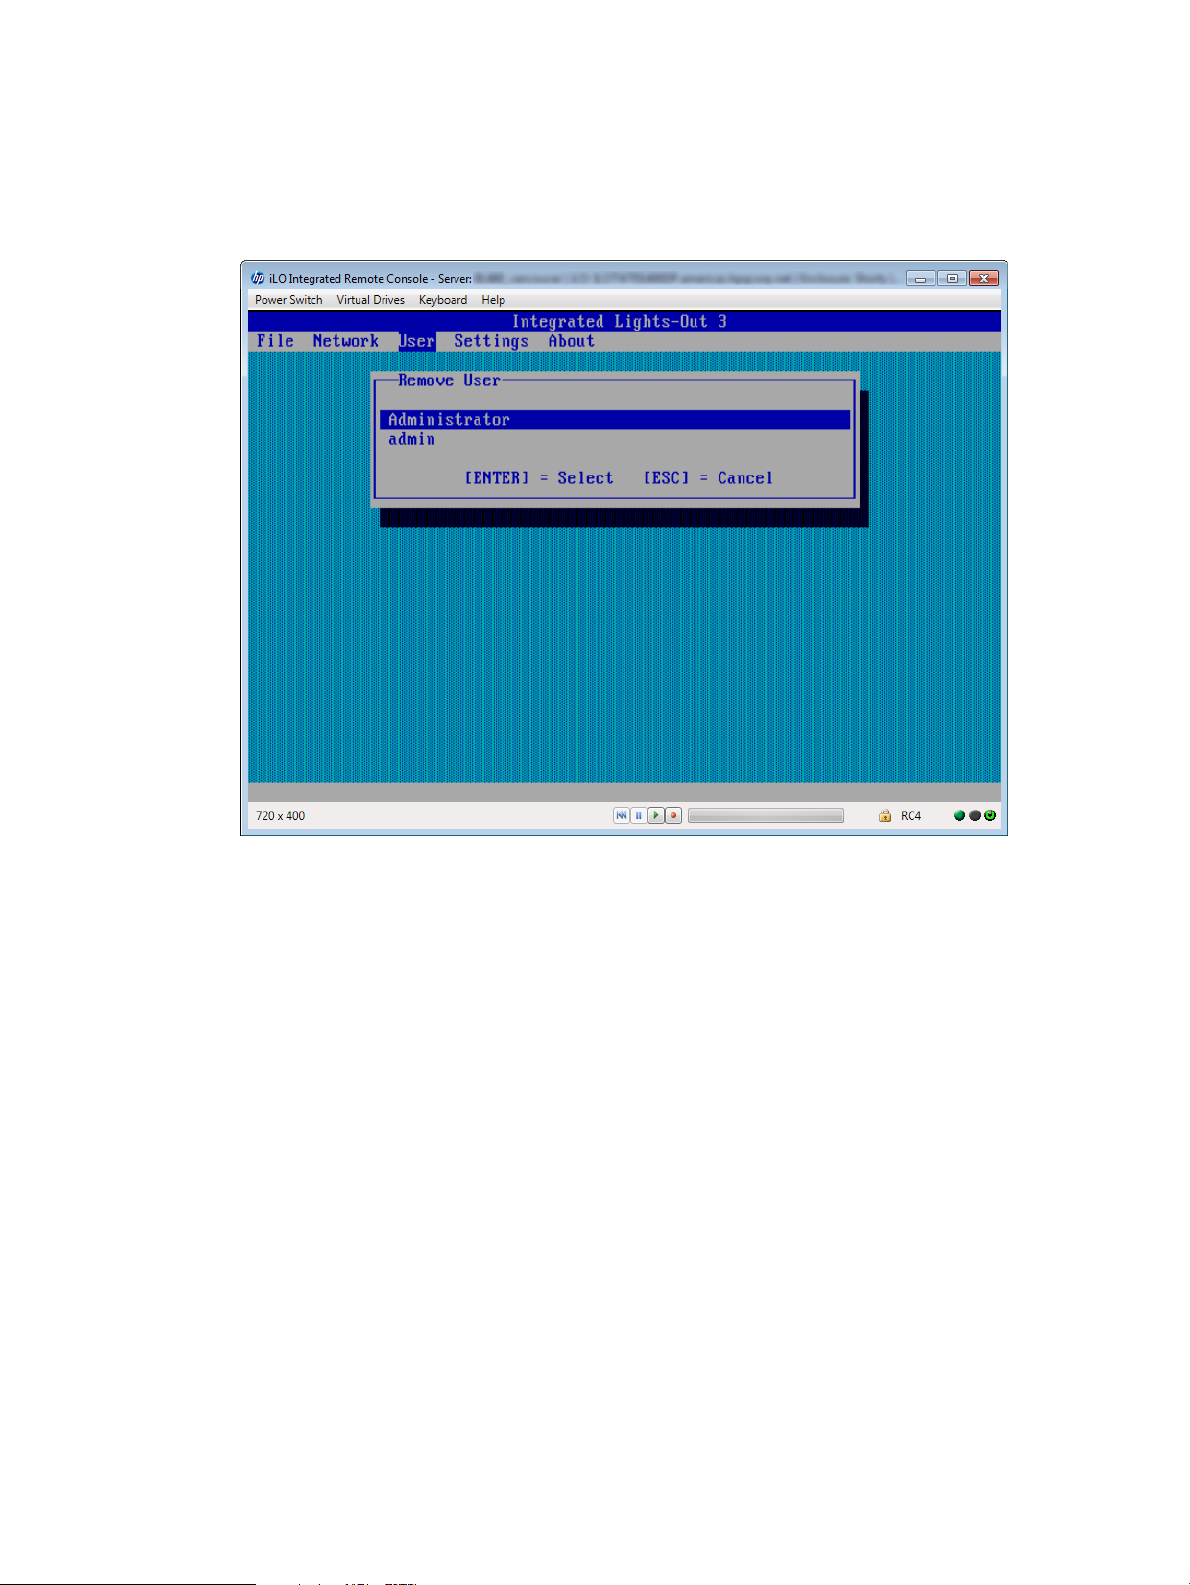
4. Select User→Remove, and then press Enter.
The Remove User screen appears, as shown in Figure 7 (page 21).
Figure 7 Removing user accounts
5. Select the user that you want to remove, and then press Enter.
The iLO RBSU prompts you to confirm the request.
6. Press Enter to confirm the request.
7. Select File→Exit to exit iLO RBSU.
Setting up iLO by using the iLO web interface
You can use the iLO web interface to configure iLO if you can connect to iLO on the network by
using a web browser. You can also use this method to reconfigure an iLO management processor.
Access iLO from a remote network client by using a supported browser and providing the default
DNS name, user name, and password. For information about the DNS name and default user
account credentials, see “Logging in to iLO for the first time” (page 21).
For information about the configuration procedures available in the iLO web interface, see
“Configuring iLO” (page 25).
Logging in to iLO for the first time
The iLO firmware is configured with a default user name, password, and DNS name. Default user
information is located on the serial number/iLO information pull tab attached to the server that
contains the iLO management processor. Use these values to access iLO remotely from a network
client by using a web browser.
Setting up iLO by using the iLO web interface 21
Page 22

NOTE: The serial number/iLO information pull tab is double-sided. One side shows the server
serial number, and the other side shows the default iLO account information. The same information
is printed on a label attached to the chassis.
The default values follow:
• User name—Administrator
• Password—A random eight-character alphanumeric string
• DNS name—ILOXXXXXXXXXXXX, where the Xs represent the serial number of the server
If you enter an incorrect user name and password, or a login attempt fails, iLO imposes a security
delay. For more information about login security, see “Login security” (page 46).
IMPORTANT: HP recommends changing the default values after you log in to iLO for the first
time. For instructions, see “Managing iLO users by using the iLO web interface” (page 32).
Activating iLO licensed features
To activate iLO licensed features, install an HP iLO license. iLO licenses activate functionality such
as graphical Remote Console with multi-user collaboration, video record/playback, and many
more advanced features. For licensing information and installation instructions, see “iLO licensing”
(page 31).
Installing the iLO drivers
iLO is an independent microprocessor running an embedded operating system. The architecture
ensures that the majority of iLO functionality is available, regardless of the host operating system.
The iLO drivers enable software such as HPONCFG and the HP Insight Management Agents to
communicate with iLO. Your OS and system configuration determine the driver requirements.
The iLO drivers are available from the HP Service Pack for ProLiant and the HP website.
• For Windows, Red Hat, and SLES—Download the SPP from http://www.hp.com/go/spp/
download and use it to install the iLO drivers.
For information about using the SPP, see the SPP documentation.
• For Windows, Red Hat, and SLES—Download the iLO drivers from the HP Support Center:
1. Navigate to the technical support page on the HP website: http://www.hp.com/support.
2. Select a country or region and a language.
The HP Support page opens.
3. Click the Drivers & Downloads link.
4. In the search box, enter the server model that you are using (for example, DL360).
A list of servers is displayed.
5. Click the link for your server.
The HP Support Center page for the server opens.
6. Click the link for the server operating system.
7. Download the iLO drivers.
• For VMware—Download the iLO drivers from the vibsdepot section of the Software Delivery
Repository website at http://downloads.linux.hp.com/SDR/index.html.
Follow the installation instructions provided with the downloaded software.
22 Setting up iLO
Page 23

For OS-specific driver information, see the following:
• “Microsoft device driver support” (page 23)
• “Linux device driver support” (page 23)
• “VMware device driver support” (page 24)
Microsoft device driver support
When you are using Windows with iLO, the following drivers are available:
• HP ProLiant iLO 3/4 Channel Interface Driver for Windows—This driver is required for the
operating system to communicate with iLO. Install this driver in all configurations.
• HP ProLiant iLO 3/4 Management Controller Driver Package for Windows—This package
includes the following components:
◦ hpqilo3core provides iLO Management Controller Driver support.
◦ hpqilo3service provides the HP ProLiant Health Monitor Service and HP ProLiant
System Shutdown Service.
◦ hpqilo3whea is a helper service for Windows Hardware Error Architecture, which
passes information between iLO and the operating system in the event of a hardware
fault.
IMPORTANT: The Management Controller Driver Package is required to support Automatic
Server Recovery and the HP Insight Management Agents or HP Insight Management WBEM
Providers (if installed). For more information, see “Configuring iLO Management settings”
(page 84).
Linux device driver support
When you are using Linux with iLO, the following drivers are available:
• HP ProLiant Channel Interface Device Driver (hpilo)—This driver manages agent and tool
application access to iLO.
• HP System Health Application and Command Line Utilities (hp-health)—A collection of
applications and tools that enables monitoring of fans, power supplies, temperature sensors,
and other management events. This RPM contains the hpasmd, hpasmlited, hpasmpld,
and hpasmxld daemons.
IMPORTANT: These drivers are standard for SUSE Linux Enterprise Server 11, Red Hat 5, and
Red Hat 6.
For open-source Linux distributions (Ubuntu, Debian, Fedora, and others), the hpilo driver is part
of the Linux kernel, so the driver is loaded automatically at startup.
Use the following commands to load the iLO drivers:
rpm -ivh hpilo-<d.vv.v-pp.Linux_version.arch>.rpm
rpm -ivh hp-health-<d.vv.v-pp.Linux_version.arch>.rpm
Where <d> is the Linux distribution and version, <vv.v-pp> are version numbers, and <arch>
is the architecture (i386 or x86_64).
Use the following commands to remove the iLO drivers:
rpm -e hpilo
rpm -e hp-health
Installing the iLO drivers 23
Page 24

VMware device driver support
When you are using VMware with iLO, the following driver is available:
HP ProLiant Channel Interface Device Driver (hpilo)—This driver manages agent, WBEM provider,
and tool application access to iLO. It is included in the customized HP VMware images. For raw
VMware images, the driver must be installed manually.
24 Setting up iLO
Page 25

3 Configuring iLO
Typically, an advanced or administrative user who manages users and configures global and
network settings configures iLO. This guide provides information about configuring iLO by using
the iLO web interface and iLO RBSU.
TIP: You can also perform many iLO configuration tasks by using XML configuration and control
scripts or SMASH CLP. For information about using these methods, see the HP iLO 3 Scripting and
Command Line Guide, HP Scripting Toolkit for Linux User Guide, and HP Scripting Toolkit for
Windows User Guide.
Updating firmware
Firmware updates enhance iLO functionality with new features, improvements, and security updates.
You can download the latest firmware from the following website: http://www.hp.com/support/
ilo3.
Users who have the Configure iLO Settings privilege or host operating system Administrator/root
privileges can update iLO firmware. If the iLO Security Override Switch is set, any out-of-band user
can update the firmware.
Due to the security enhancements in iLO 3 1.50 and later, the firmware image file is larger than
previous releases. To accommodate the larger firmware image file, you must have iLO 3 1.20 or
later installed to upgrade to iLO 3 1.50 or later. Upgrading from earlier firmware versions is not
supported.
To downgrade from iLO 3 1.50 or later to an earlier firmware version, you must disable FIPS
Mode. For instructions, see “Using encryption” (page 58).
You can update the iLO firmware by using an online or offline method. For more information, see
“Updating firmware by using an online method” (page 25) or “Updating firmware by using an
offline method” (page 26)
Updating firmware by using an online method
When you use an online method to update the firmware, no server reboot is required. You can
update the firmware and reset iLO without affecting the availability of the server host operating
system. The online update method can be performed in-band or out-of-band.
Performing an in-band firmware update
When you use this method to update the iLO firmware, the iLO firmware is sent to iLO directly
from the server host operating system. The HP ProLiant Channel Interface Driver is required for
host-based iLO firmware updates. During a host-based firmware update, the iLO firmware does
not verify login credentials or user privileges because the host-based utilities require a root login
(Linux and VMware) or Administrator login (Windows).
You can use the following in-band firmware update methods:
• iLO Online ROM Flash Component—Use an executable file to update iLO while the server is
operating. The executable file contains the installer and the firmware package. You can
download an iLO Online ROM Flash Component from the following HP website: http://
www.hp.com/support/ilo3.
• HPONCFG—Use the HP Lights-Out Online Configuration Utility to configure iLO by using XML
scripts. Download the iLO firmware image and the Update_Firmware.xml sample script.
Edit the sample script with your setup details, and then run the script.
Sample scripts are available at http://www.hp.com/support/ilo3. For more information about
scripting, see the HP iLO 3 Scripting and Command Line Guide.
Updating firmware 25
Page 26

For instructions about obtaining the iLO firmware image, see “Obtaining the iLO firmware
image file” (page 26).
Performing an out-of-band firmware update
When you use this method to update the iLO firmware, you use a network connection to
communicate with iLO directly.
You can use the following out-of-band firmware update methods:
• iLO web interface—Download the iLO Online ROM Flash Component and install it by using
the iLO web interface. For instructions, see “Updating the iLO firmware by using a browser”
(page 27).
• HPQLOCFG—Use the HP Lights-Out Configuration Utility to configure iLO by using XML scripts.
Download the iLO firmware image and the Update_Firmware.xml sample script. Edit the
sample script with your setup details, and then run the script.
Sample scripts are available at http://www.hp.com/support/ilo3. For more information about
scripting, see the HP iLO 3 Scripting and Command Line Guide.
For instructions about obtaining the iLO firmware image, see “Obtaining the iLO firmware
image file” (page 26).
• HPLOMIG (also called HP Directories Support for Management Processors)—Download the
HP Directories Support for Management Processors executable file to access the directory
support components. One of the components, HPLOMIG, can be used to discover multiple
iLO processors and update their firmware in one step. You do not need to use directory
integration to take advantage of this feature. For more information, see “Upgrading firmware
on management processors” (page 200).
• SMASH CLP—Access SMASH CLP through the SSH port, and use standard commands to view
firmware information and update the firmware.
For more information about SMASH CLP, see the HP iLO 3 Scripting and Command Line
Guide.
NOTE: The SMASH CLP method for updating firmware is not supported for upgrading to
iLO 3 1.50 or later.
Updating firmware by using an offline method
When you use an offline method to update the firmware, you must reboot the server by using an
offline utility. Examples of offline firmware updates include the following:
• HP Service Pack for ProLiant—Use the HP Service Pack for ProLiant to install the firmware
update. For more information, see the following website: http://www.hp.com/go/spp.
• Windows or Linux Scripting Toolkit—Use the Scripting Toolkit to configure several settings
within the server and update firmware. This method is useful for deploying to multiple servers.
For instructions, see the HP Scripting Toolkit for Linux User Guide or HP Scripting Toolkit for
Windows User Guide.
Obtaining the iLO firmware image file
The .bin file from the iLO Online ROM Flash Component is required for some of the methods you
can use to update the iLO firmware.
To download the iLO Online ROM Flash Component file, and then extract the .bin file:
1. Navigate to the technical support page on the HP website: http://www.hp.com/support.
2. Select a country or region and a language.
The HP Support page opens.
26 Configuring iLO
Page 27
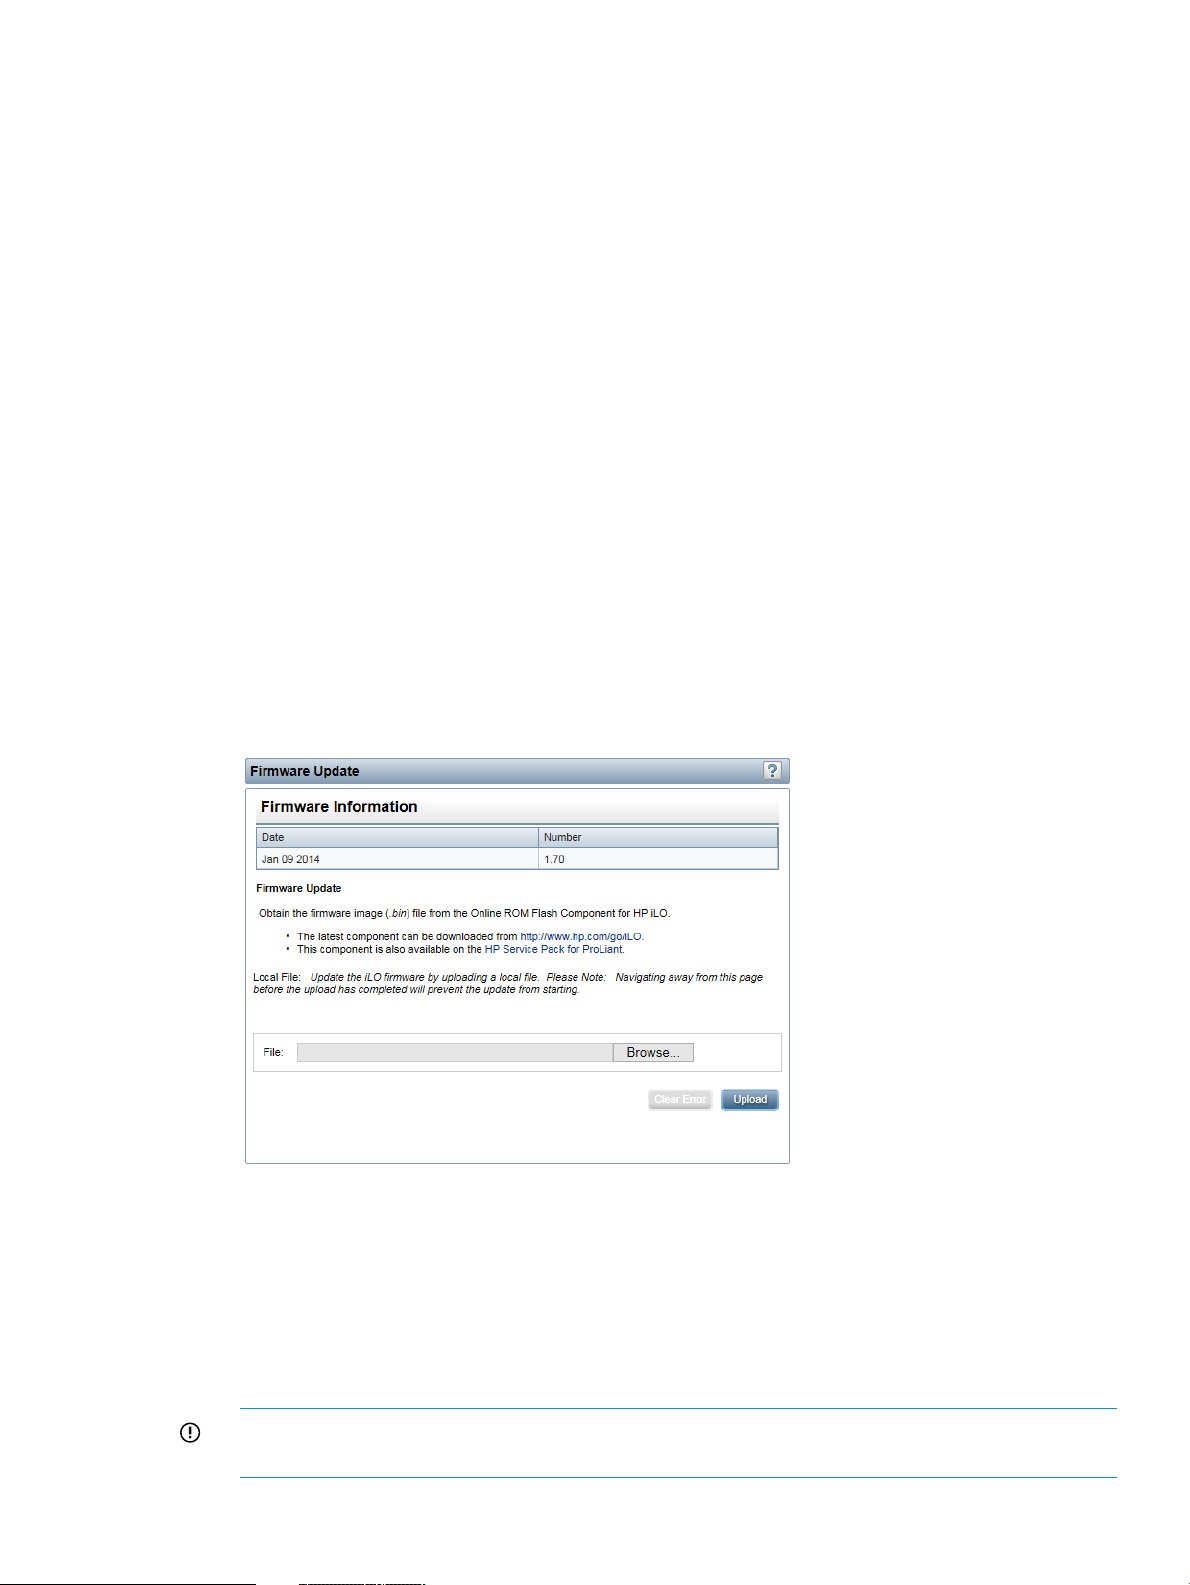
3. Click the Drivers & Downloads link.
4. In the search box, enter the server model that you are using (for example, DL360).
A list of servers is displayed.
5. Click the link for your server.
The HP Support Center page for the server opens.
6. Click the link for your server operating system.
7. Follow the onscreen instructions to download the iLO Online ROM Flash Component file.
8. Double-click the downloaded file, and then click the Extract button.
9. Select a location for the extracted files, and then click OK.
The firmware image is a file similar to ilo3_<yyy>.bin, where <yyy> represents the
firmware version.
Updating the iLO firmware by using a browser
You can update the iLO firmware from any network client by using a supported browser. For a list
of supported browsers, see “Using the iLO web interface” (page 92).
To update the iLO firmware:
1. Obtain the firmware image file. For instructions, see “Obtaining the iLO firmware image file”
(page 26).
2. Navigate to the Administration→iLO Firmware page.
The Firmware Update page opens, as shown in Figure 8 (page 27).
Figure 8 Firmware Update page
3. Click Browse (Internet Explorer or Firefox) or Choose File (Chrome), and then specify the
location of the firmware image file in the File box.
4. Click Upload to start the update process.
The firmware update will not start if you navigate away from the Firmware Update page
before the upload is complete.
The iLO firmware receives, validates, and then flashes the firmware image. After the firmware
flashes and resets, iLO logs you out and the browser reconnects.
IMPORTANT: Do not interrupt a firmware update. If a firmware update is interrupted or fails,
attempt it again immediately. Do not reset iLO before reattempting the update.
Updating firmware 27
Page 28

5. To start working with the updated firmware, clear your browser cache, and then log in to iLO.
If an error occurs during a firmware update, see “Unable to upgrade iLO firmware” (page 228).
If an iLO firmware update is corrupted or canceled, and iLO is corrupted, see “iLO network Failed
Flash Recovery” (page 229).
Using language packs
Language packs enable you to easily switch the iLO web interface from English to a supported
language of your choice. Language packs currently provide translations for the iLO web interface,
.NET IRC, and Java IRC.
Consider the following when using language packs:
• You must have the Configure iLO Settings privilege to install a language pack.
• You can install one additional language pack at a time. Uploading a new language pack
replaces the currently installed language pack, regardless of the language pack version.
• The language pack firmware is independent of the iLO firmware. Setting iLO to the factory
default settings does not remove an installed language pack.
• The Java IRC and .NET IRC use the language of the current iLO session.
• For localization support with the Java IRC on Windows systems, you must select the correct
language in the Regional and Language Options Control Panel.
• For localization support with the Java IRC on Linux systems, make sure that the fonts for the
specified language are installed and available to the JRE.
• If an installed language pack does not include the translation for a text string, the text is
displayed in English.
• When you update the iLO firmware, HP recommends downloading the latest language pack
to ensure that the language pack contents match the iLO web interface.
iLO 3 firmware version 1.50 or later requires version 1.50 or later of the iLO language pack.
• iLO uses the following process to determine the language of your session:
1. If you previously logged in to the iLO web interface on the same computer using the same
browser, and you have not cleared the cookies, the language setting of the last session
with that iLO processor is used.
2. If there is no cookie, the current browser language is used if it is supported by iLO and
the required language pack is installed. The supported languages are English (en),
Japanese (ja), and Simplified Chinese (zh).
3. Internet Explorer only: If the browser language is not supported, the OS language is used
if the language is supported by iLO, and the required language pack is installed.
4. If there is no cookie, and the browser or OS language is not supported, iLO uses the
configured default language. For more information, see “Configuring the default language
settings” (page 30).
Installing a language pack
1. Navigate to the iLO software download website: http://www.hp.com/support/ilo3.
2. Download the language pack to your local computer.
3. Navigate to the Administration→Access Settings→Language page, as shown in Figure 9
(page 29).
28 Configuring iLO
Page 29
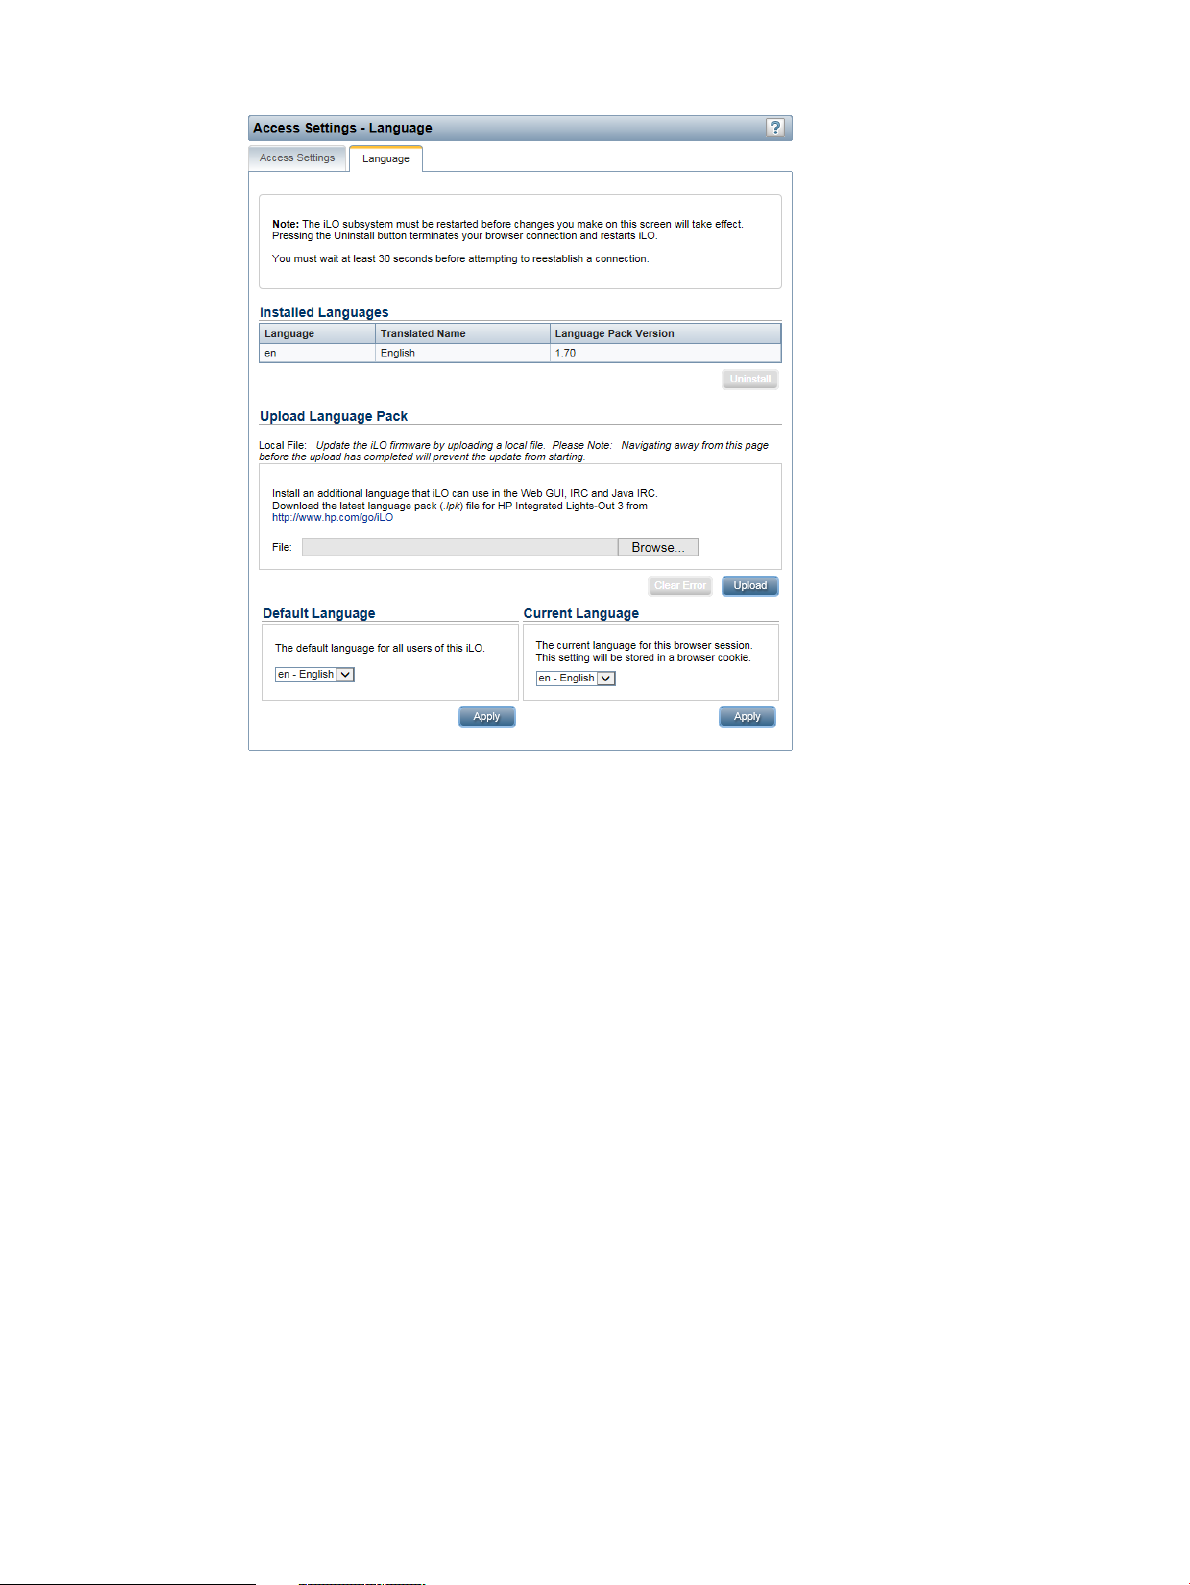
Figure 9 Access Settings – Language page
4. Click Browse (Internet Explorer or Firefox) or Choose File (Chrome) in the Upload Language
Pack section.
5. Select the downloaded language pack, and then click Open.
The following message appears:
Only one language pack is supported at a time. If a language pack
is already installed, it will be replaced with this upload. iLO will
automatically reboot after installing the new language pack. Are
you sure you want to install now?
6. Click OK to continue.
If you have a previously installed language pack, this language pack will replace it.
7. Click Upload.
iLO will automatically reboot after installing a language pack. This will end your browser
connection with iLO.
Wait at least 30 seconds before you attempt to re-establish a connection.
Selecting a language pack
After you have installed a language pack, you can select it in the following ways:
• From the login page, as shown in Figure 10 (page 30).
Using language packs 29
Page 30
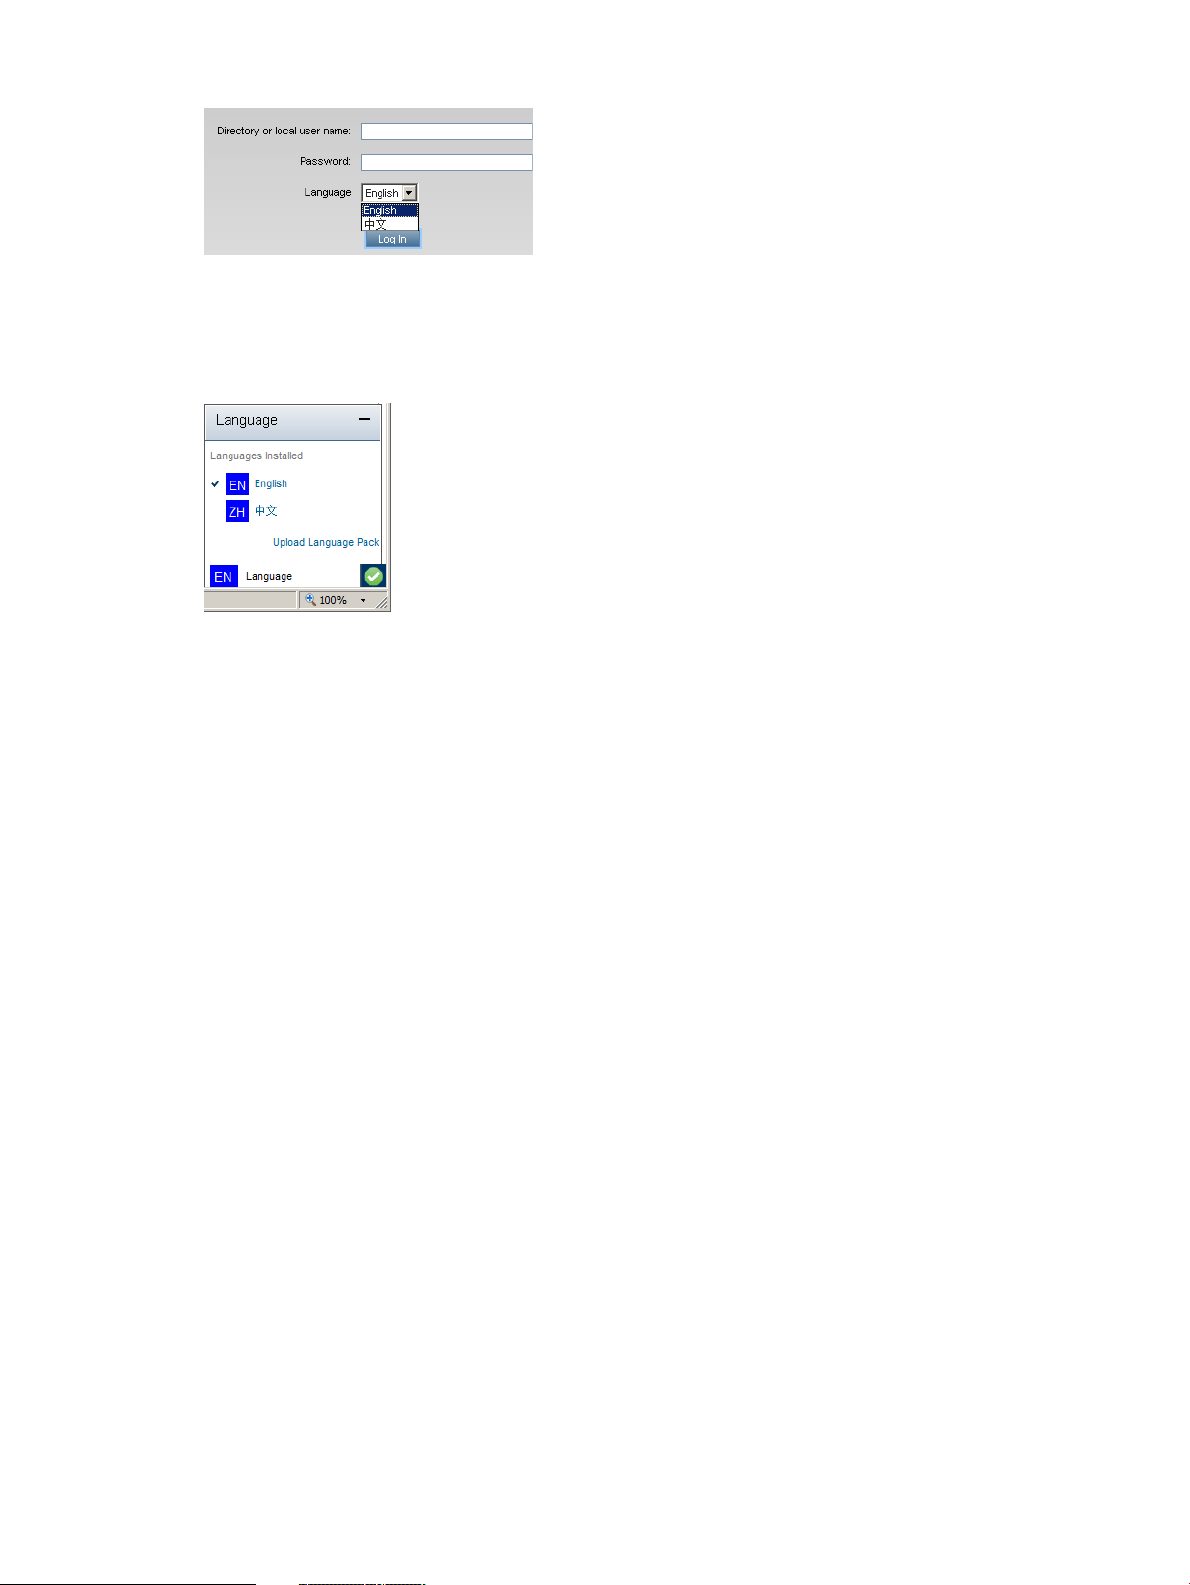
Figure 10 Login page Language menu
• From the toolbar located on the bottom right side of the iLO web interface, as shown in
Figure 11 (page 30).
Figure 11 Toolbar Language menu
• From the Administration→Access Settings→Language page. For instructions, see “Configuring
the current language settings” (page 30).
Configuring the default language settings
To set the default language for the users of this instance of the iLO firmware:
1. Navigate to the Administration→Access Settings→Language page, as shown in Figure 9
(page 29).
2. Select a value in the Default Language menu.
The available languages are English and any other language for which a language pack is
installed.
3. Click Apply.
Configuring the current language settings
To set the current language of this browser session:
1. Navigate to the Administration→Access Settings→Language page, as shown in Figure 9
(page 29).
2. Select a value in the Current Language menu.
The available languages are English and any other language for which a language pack is
installed.
3. Click Apply.
Uninstalling a language pack
1. Navigate to the Administration→Access Settings→Language page, as shown in Figure 9
(page 29).
2. Click the Uninstall button in the Installed Languages section.
The following message appears:
Applying new settings requires an iLO reset.
Would you like to apply the new settings and reset iLO now?
30 Configuring iLO
Page 31

3. Click OK to continue.
iLO resets and closes your browser connection.
Wait at least 30 seconds before you attempt to re-establish a connection.
iLO licensing
HP iLO standard features are included in every HP ProLiant server to simplify server setup, engage
health monitoring, monitor power and thermal control, and promote remote administration.
HP iLO Advanced and HP iLO Advanced for BladeSystem licenses activate functionality such as
graphical Remote Console with multiuser collaboration, video record/playback, and many more
advanced features.
Unlocking iLO licensed features has never been easier. Simply choose and install the license that
best suits your company's infrastructure.
iLO Advanced—Enables the full set of iLO features.
• iLO Advanced Single Server License
• iLO Advanced Electronic License
• iLO Advanced Flexible Quantity License
• iLO Advanced Volume License
For details on purchasing licenses, see the following website: http://www.hp.com/go/ilo/licensing.
For a list of the features that are included with each license, see “iLO license options” (page 238).
Consider the following about iLO licenses:
• iLO licenses are versionless, meaning, regardless of the version of iLO you have enabled (iLO
2, iLO 3, or iLO 4), an iLO license can be applied. For features that are specific to the version
of iLO on your ProLiant server, see “iLO license options” (page 238).
• If you purchase an iLO license with any Insight Control software suite, HP provides the Technical
Support and Update Service. For more information, see “Support and other resources”
(page 235).
• If you purchase an iLO license as a one-time activation of licensed features, you must purchase
future functional upgrades.
• One iLO license is required for each server on which the product is installed and used. Licenses
are not transferable. You cannot license an HP ProLiant SL/ML/DL server by using a
BladeSystem license.
• HP will continue to provide maintenance releases with fixes, as well as iLO standard feature
enhancements, at no extra charge.
Free iLO 60-day evaluation license
A free iLO evaluation license is available for download from the following HP website: http://
www.hp.com/go/tryinsightcontrol .
When using an evaluation license, note the following:
• The evaluation license activates and enables access to iLO licensed features.
• The evaluation license key is a 10-seat key, meaning it can be used on 10 different servers.
• When the evaluation period has expired, your iLO system will return to the standard
functionality.
iLO licensing 31
Page 32
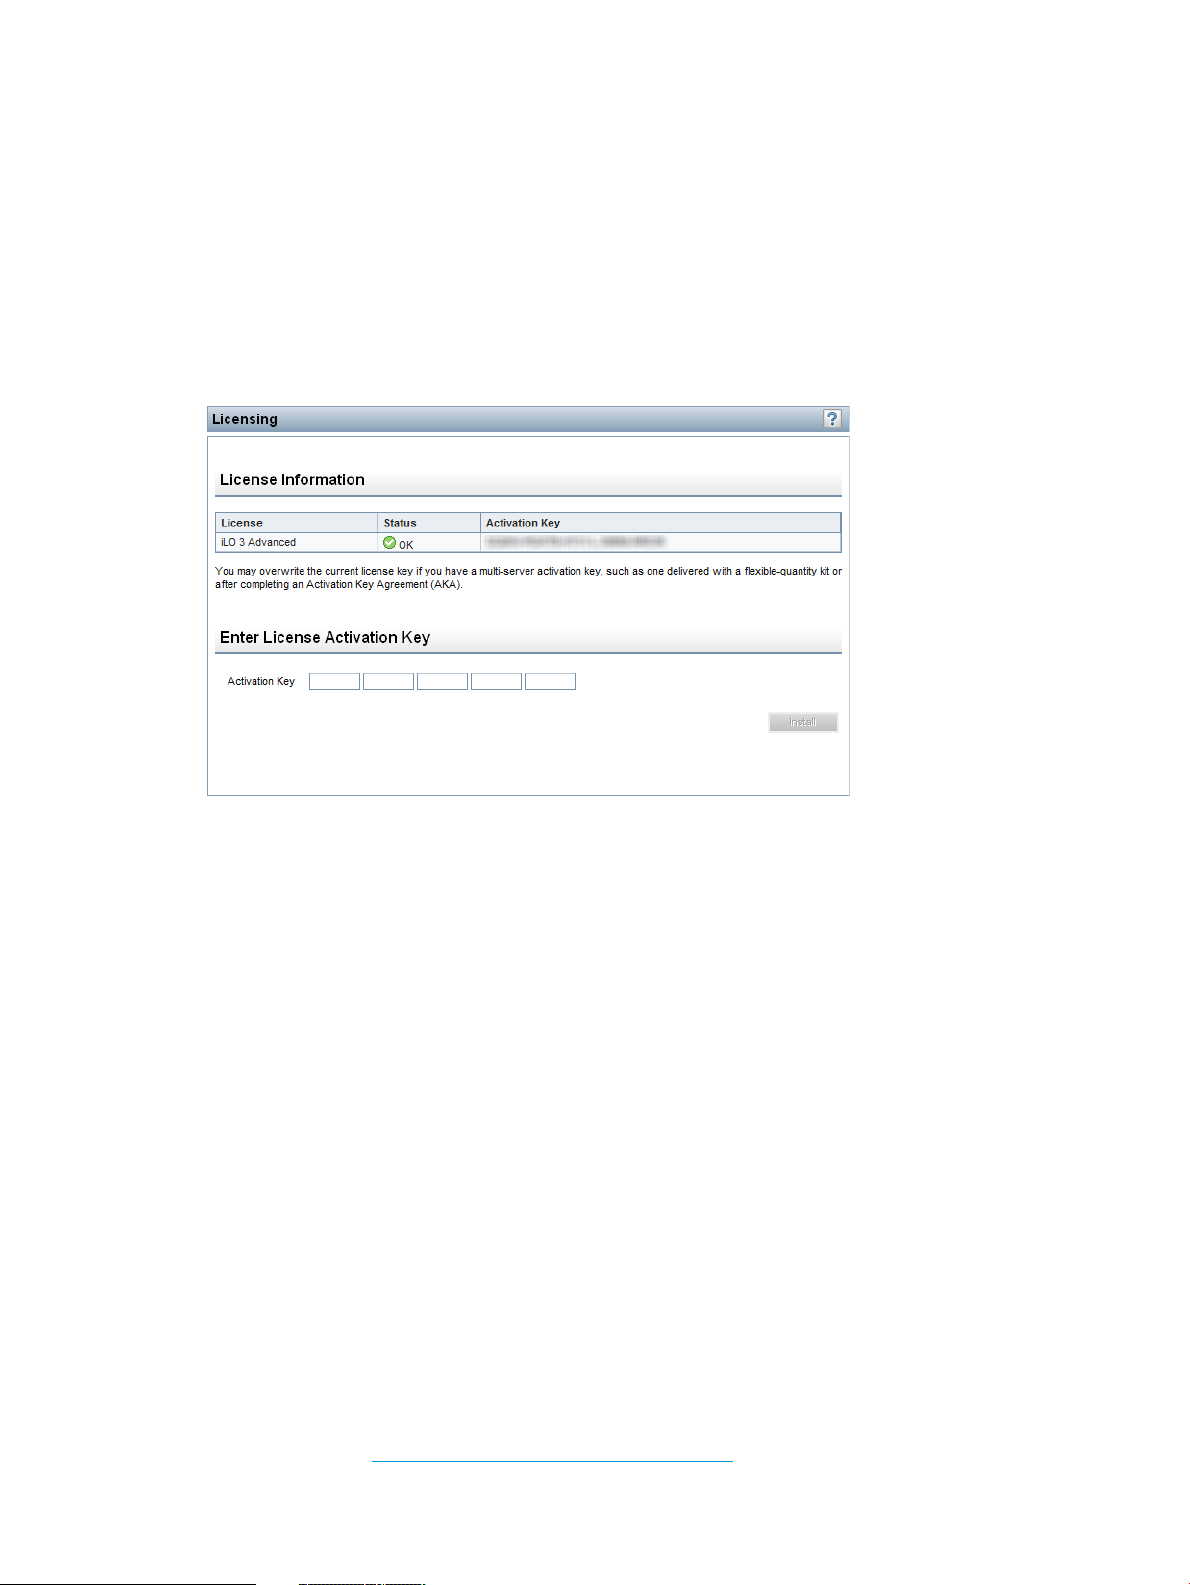
• Only one evaluation license can be installed for each iLO system. The iLO firmware will not
accept the reapplication of an evaluation license.
• The evaluation license expires 60 days after the installation date. HP will notify you by email
when your license is about to expire.
Installing an iLO license by using a browser
You must have the Configure iLO Settings privilege to install a license.
1. Navigate to the Administration→Licensing page in the iLO web interface.
The Licensing page opens, as shown in Figure 12 (page 32).
Figure 12 Licensing page
2. Review the license agreement provided with your HP License Pack option kit.
3. Enter the license key in the Activation Key boxes.
Press the Tab key or click inside a box to move between boxes. The cursor advances
automatically when you enter the license key in the Activation Key boxes.
4. Click Install.
The EULA confirmation opens. The EULA details are available in the HP License Pack option
kit.
5. Click OK.
The license key is now enabled.
For tips on troubleshooting license installation, see “Troubleshooting license installation” (page
218).
Managing iLO users by using the iLO web interface
The iLO firmware enables you to manage user accounts stored locally in the secure iLO memory
and directory group accounts. Use MMC or ConsoleOne to manage directory-based user accounts.
iLO supports up to 12 users with customizable access rights, login names, and advanced password
encryption. Privileges control individual user settings, and can be customized to meet user access
requirements.
To support more than 12 users, you must have an iLO license, which enables integration with an
unlimited number of directory-based user accounts. For more information about iLO licensing, see
the following website: http://www.hp.com/go/ilo/licensing.
32 Configuring iLO
Page 33
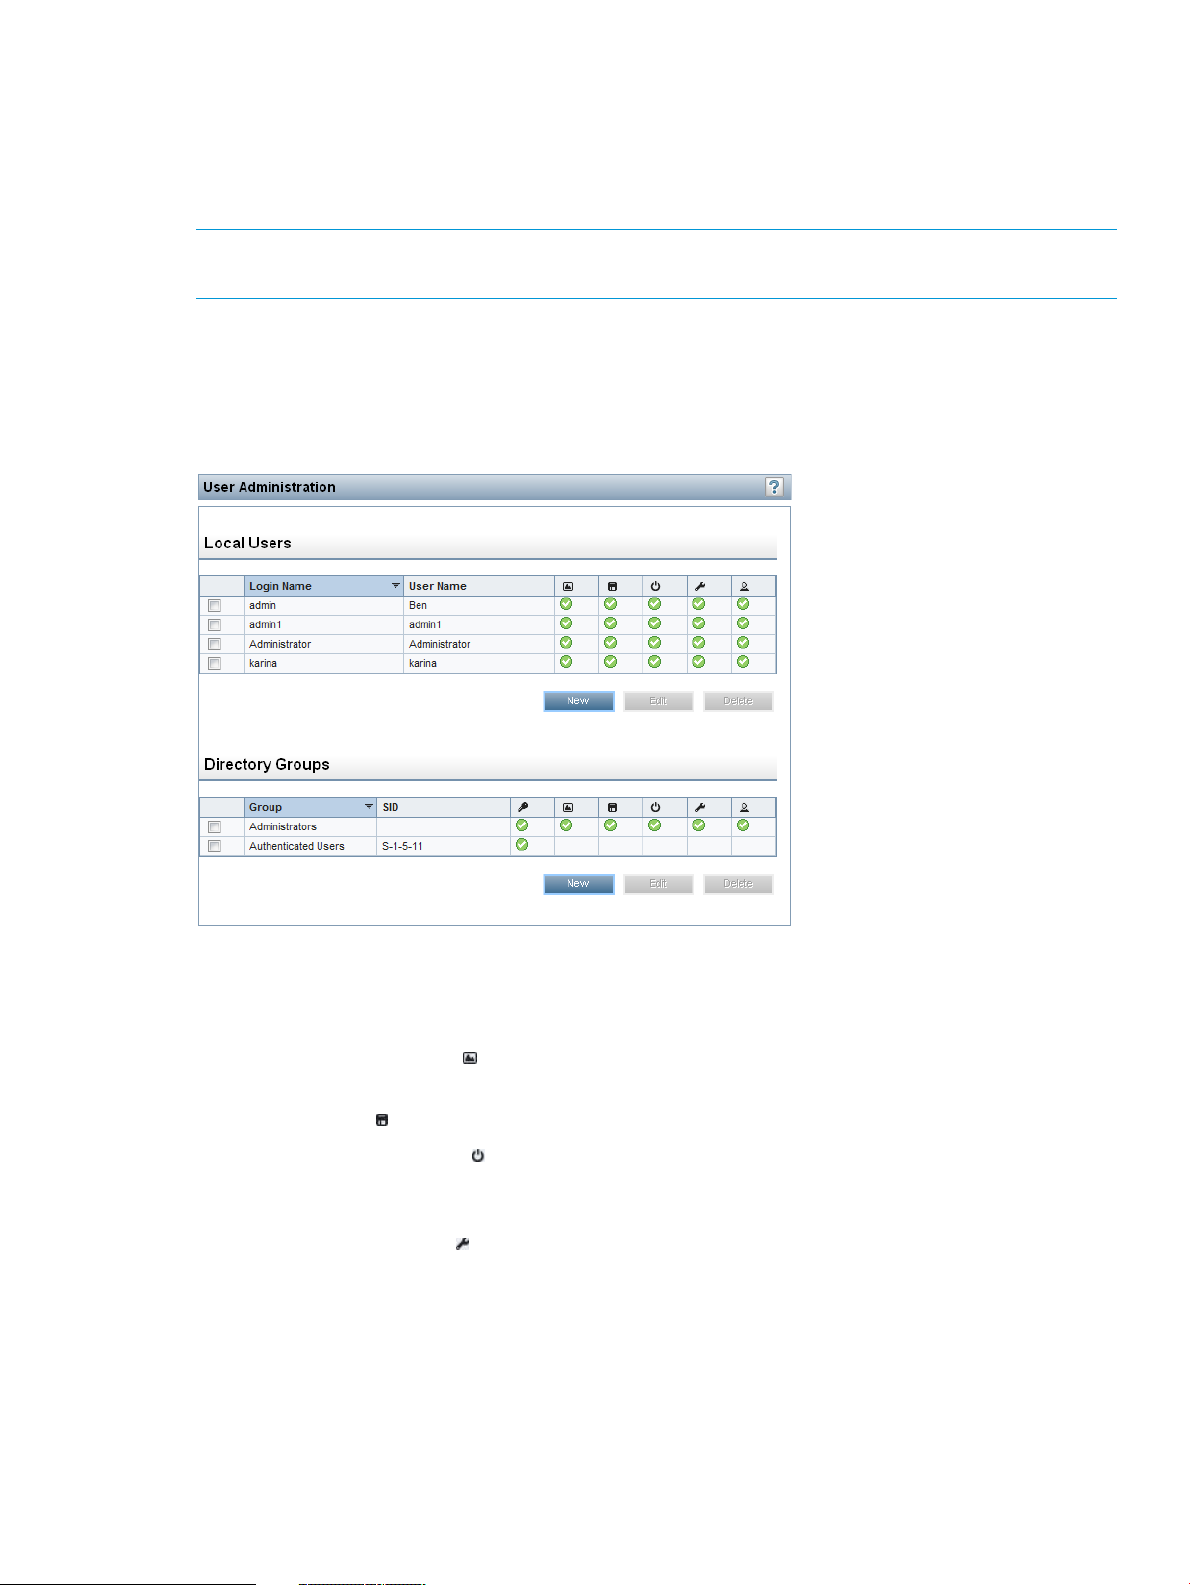
The following privileges are required for user and directory group administration:
• Administer User Accounts—Required for adding, modifying, and deleting users. If you do not
have this privilege, you can view your own settings and change your password.
• Configure iLO Settings—Required for adding, modifying, and deleting directory groups. If you
do not have this privilege, you can view directory groups.
NOTE: You can also manage users with the iLO RBSU. For more information, see “Managing
iLO users by using iLO RBSU” (page 18).
Viewing local user accounts
To view local users, navigate to the Administration→User Administration page, as shown in
Figure 13 (page 33).
Figure 13 User Administration page
The Local Users table shows the login names, user names, and assigned privileges of each
configured user. Move the cursor over an icon to see the privilege name. The available privileges
follow:
• Remote Console Access —Enables a user to remotely access the host system Remote Console,
including video, keyboard, and mouse control.
• Virtual Media —Enables a user to use the Virtual Media feature on the host system.
• Virtual Power and Reset —Enables a user to power-cycle or reset the host system. These
activities interrupt the system availability. A user with this privilege can diagnose the system
by using the Generate NMI to System button.
• Configure iLO Settings —Enables a user to configure most iLO settings, including security
settings, and to remotely update the iLO firmware. This privilege does not enable local user
account administration.
After iLO is configured, revoking this privilege from all users prevents reconfiguration using
the web interface, HPQLOCFG, or the CLI. Users who have access to iLO RBSU and HPONCFG
Managing iLO users by using the iLO web interface 33
Page 34

can still reconfigure iLO. Only a user who has the Administer User Accounts privilege can
enable or disable this privilege.
• Administer User Accounts —Enables a user to add, edit, and delete local iLO user accounts.
A user with this privilege can change privileges for all users. If you do not have this privilege,
you can view your own settings and change your own password.
Viewing directory groups
To view directory groups, navigate to the Administration→User Administration page, as shown in
Figure 13 (page 33).
The Directory Groups table shows the group DN, group SID, and the assigned privileges for the
configured groups. Move the cursor over an icon to see the privilege name. The available privileges
follow:
• Login Privilege —Enables members of a group to log in to iLO.
• Remote Console Access —Enables users to remotely access the host system Remote Console,
including video, keyboard, and mouse control.
• Virtual Media —Enables users to use the Virtual Media feature on the host system.
• Virtual Power and Reset —Enables users to power-cycle or reset the host system. These
activities interrupt the system availability. Users with this privilege can diagnose the system
by using the Generate NMI to System button.
• Configure iLO Settings —Enables users to configure most iLO settings, including security
settings, and to remotely update iLO firmware.
After iLO is configured, revoking this privilege from all users prevents reconfiguration using
the web interface, HPQLOCFG, or the CLI. Users who have access to iLO RBSU and HPONCFG
can still reconfigure iLO. Only a user who has the Administer User Accounts privilege can
enable or disable this privilege.
• Administer User Accounts —Enables users to add, edit, and delete local iLO user accounts.
Adding or editing local user accounts
Users who have the Administer User Accounts privilege can add or edit iLO users.
To add or edit a local user:
1. Navigate to the Administration→User Administration page, as shown in Figure 13 (page 33).
2. Do one of the following:
• Click New in the Local Users section.
• Select a user in the Local Users section, and then click Edit.
The Add/Edit Local User page opens, as shown in Figure 14 (page 35).
34 Configuring iLO
Page 35
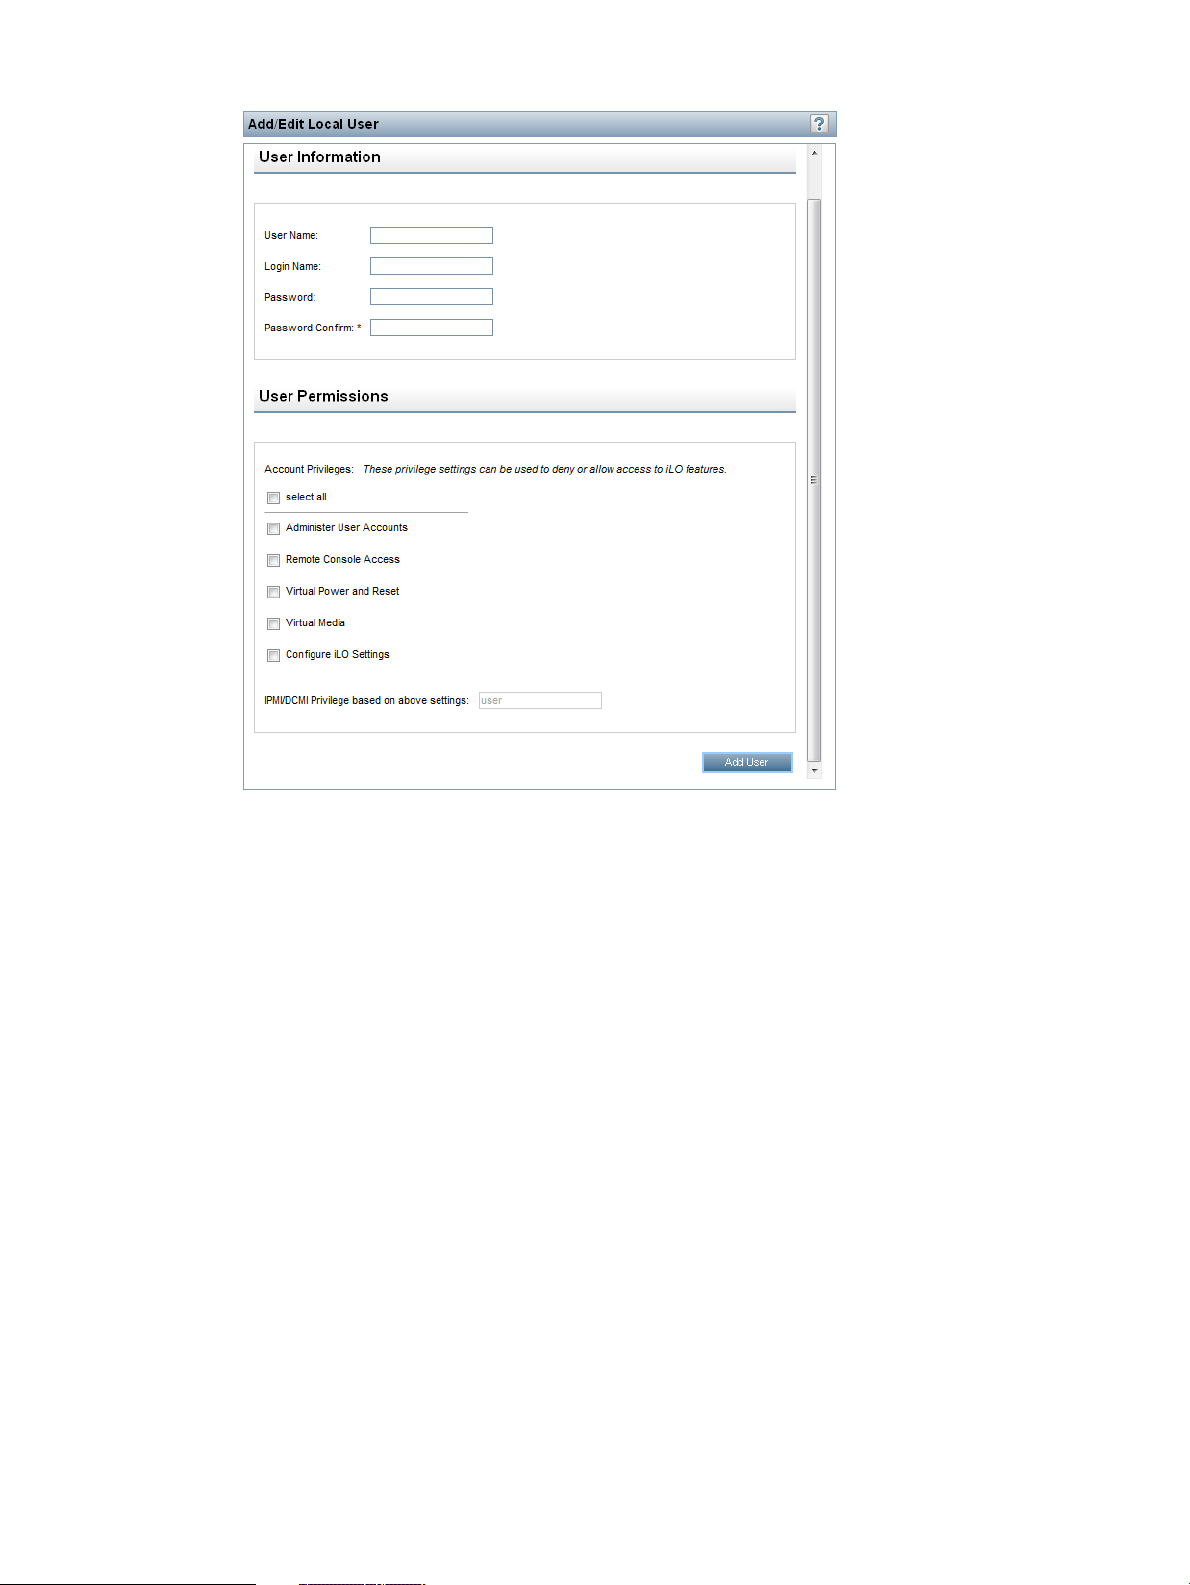
Figure 14 Add/Edit Local User page
3. Provide the following details in the User Information section:
• User Name appears in the user list on the User Administration page. It does not have to
be the same as the Login Name. The maximum length for a user name is 39 characters.
The user name must use printable characters. Assigning descriptive user names can help
you to easily identify the owner of each login name.
• Login Name is the name you use when logging in to iLO. It appears in the user list on the
User Administration page, on the iLO Overview page, and in iLO logs. The Login Name
does not have to be the same as the User Name. The maximum length for a login name
is 39 characters. The login name must use printable characters.
• Password and Password Confirm set and confirm the password that is used for logging
in to iLO. The minimum length for a password is set on the Access Settings page
(Figure 16). The maximum length for a password is 39 characters. Enter the password
twice for verification.
For more information about passwords, see “Password guidelines” (page 36).
4. Select from the following privileges.
• Remote Console Access
• Virtual Media
• Virtual Power and Reset
• Configure iLO Settings
• Administer User Accounts
Managing iLO users by using the iLO web interface 35
Page 36

TIP: Click the select all check box to select all of the available user privileges.
For more information about each privilege, see “Viewing local user accounts” (page 33).
5. Do one of the following:
• Click Add User to save the new user.
• Click Update User to save the user account changes.
Password guidelines
HP recommends that you follow these password guidelines:
• Passwords should:
Never be written down or recorded◦
◦ Never be shared with others
◦ Not be words found in a dictionary
◦ Not be obvious words, such as the company name, product name, user name, or login
name
• Passwords should have at least three of the following characteristics:
One numeric character◦
◦ One special character
◦ One lowercase character
◦ One uppercase character
Depending on the Minimum Password Length setting on the Access Settings page, the password
can have a minimum of zero characters (no password) and a maximum of 39 characters. The
default Minimum Password Length is eight characters.
IMPORTANT: HP does not recommend setting the Minimum Password Length to fewer than eight
characters unless you have a physically secure management network that does not extend outside
the secure data center. For information about setting the Minimum Password Length, see
“Configuring access options” (page 40).
IPMI/DCMI users
The iLO firmware follows the IPMI 2.0 specification. When you are adding IPMI/DCMI users, the
login name must be a maximum of 16 characters, and the password must be a maximum of 20
characters.
36 Configuring iLO
Page 37

When you select iLO user privileges, the equivalent IPMI/DCMI user privilege is displayed in the
IPMI/DCMI Privilege based on above settings box.
• User—A user has read-only access. A user cannot configure or write to iLO, or perform system
actions.
For IPMI User privileges: Disable all privileges. Any combination of privileges that does not
meet the Operator level is an IPMI User.
• Operator—An operator can perform system actions, but cannot configure iLO or manage user
accounts.
For IPMI Operator privileges: Enable Remote Console Access, Virtual Power and Reset, and
Virtual Media. Any combination of privileges greater than Operator that does not meet the
Administrator level is an IPMI Operator.
• Administrator—An administrator has read and write access to all features.
For IPMI Administrator privileges: Enable all privileges.
Administering directory groups
iLO enables you to view iLO groups and modify settings for those groups. You must have the
Configure iLO Settings privilege to add or edit directory groups. Use the Add/Edit Directory Group
page to add or edit iLO directory groups.
To add or edit a directory group:
1. Navigate to the Administration→User Administration page, as shown in Figure 13 (page 33).
2. Do one of the following:
• Click New in the Directory Groups section.
• Select a group in the Directory Groups section, and then click Edit.
The Add/Edit Directory Group page opens, as shown in Figure 15 (page 38).
Managing iLO users by using the iLO web interface 37
Page 38
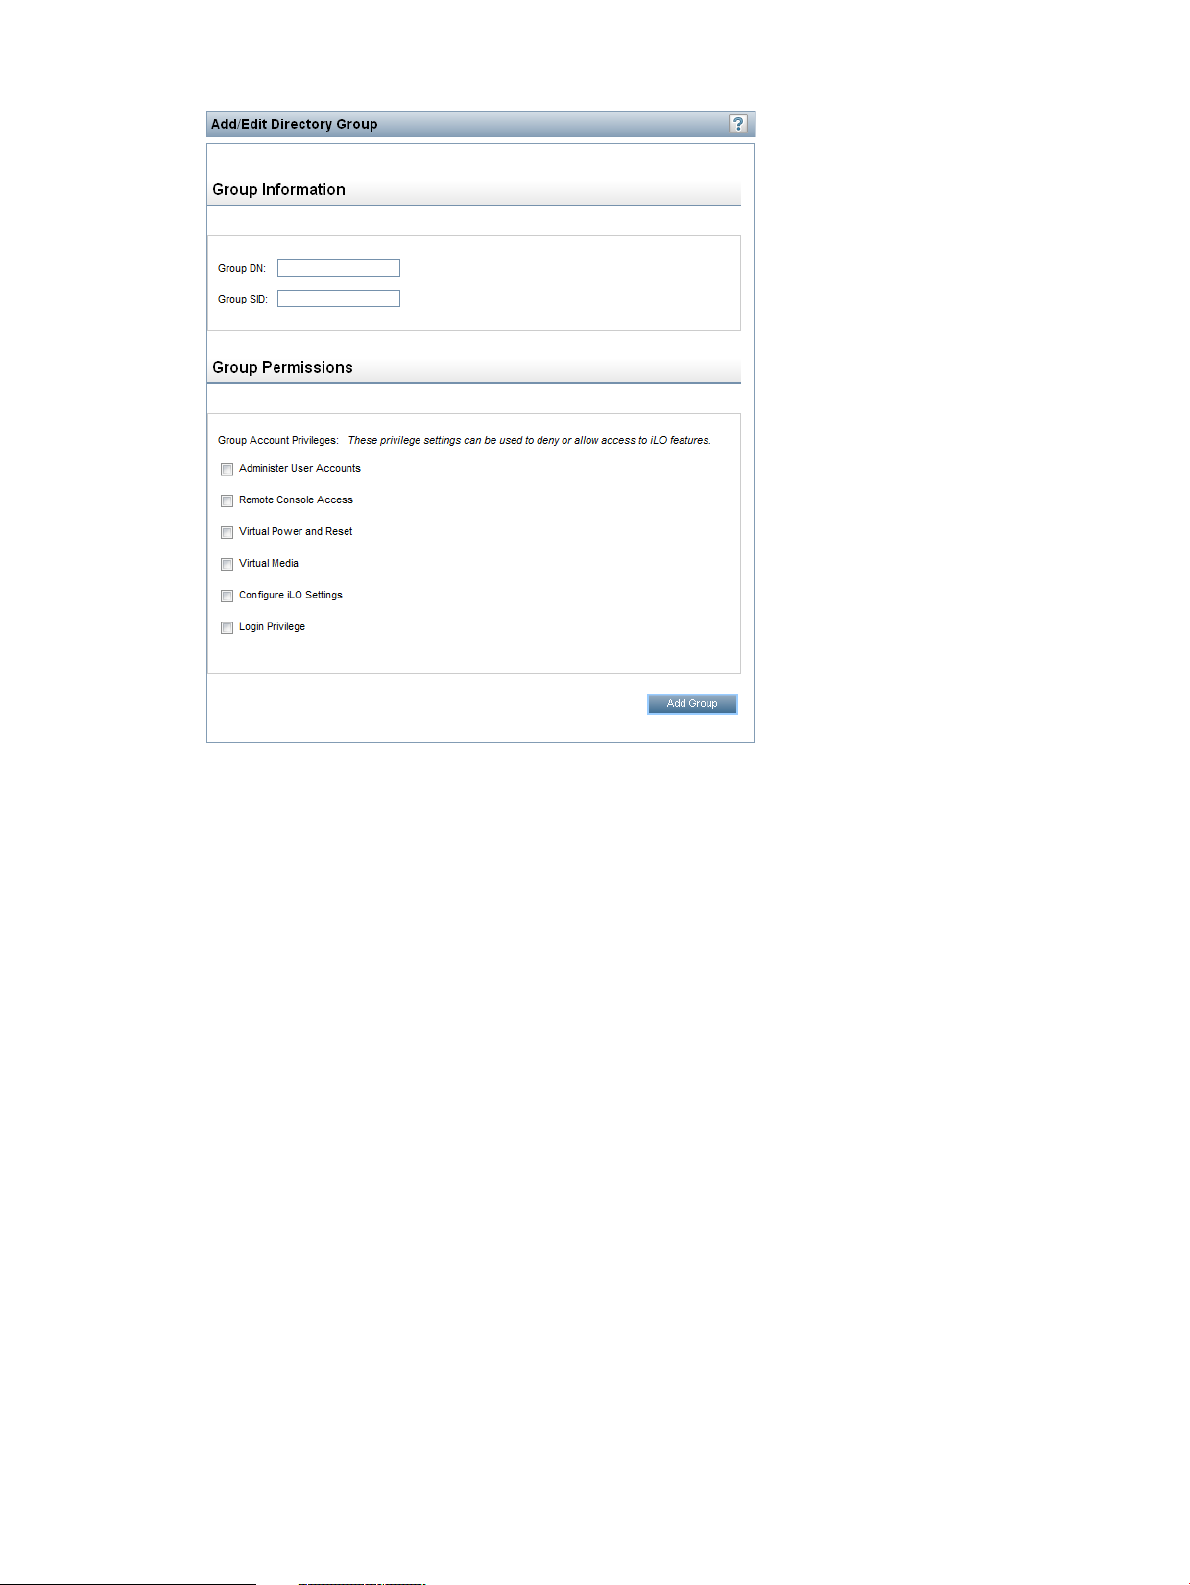
Figure 15 Add/Edit Directory Group page
3. Provide the following details in the Group Information section:
• Group DN (Security Group DN)—DN of a group in the directory. Members of this group
are granted the privileges set for the group. The specified group must exist in the directory,
and users who need access to iLO must be members of this group. Enter a DN from the
directory (for example, CN=Group1, OU=Managed Groups, DC=domain, DC=extension).
Shortened DNs are also supported (for example, Group1). The shortened DN is not a
unique match. Any group named Group1 is displayed. HP recommends using the fully
qualified DN.
• Group SID (Security ID)—Microsoft Security ID is used for Kerberos and LDAP group
authorization. This is required for Kerberos. The format is S-1-5-2039349.
4. Select from the following privileges when you are adding or editing a group account:
• Login Privilege
• Remote Console Access
• Virtual Media
• Virtual Power and Reset
• Configure iLO Settings
• Administer User Accounts
For more information about each privilege, see “Viewing directory groups” (page 34).
5. Do one of the following:
• Click Add Group to save the new directory group.
• Click Update Group to save the directory group changes.
38 Configuring iLO
Page 39

Deleting a user account or a directory group
The privilege required for this procedure depends on the user account type.
• To delete a local user account, the Administer User Accounts privilege is required.
• To delete a directory group, the Configure iLO Settings privilege is required.
To delete an existing user account or directory group:
1. Navigate to the Administration→User Administration page, as shown in Figure 13 (page 33).
2. Select the check box next to the user or group that you want to delete.
3. Click Delete.
A pop-up window opens with one of the following messages:
• Local user: Are you sure you want to delete the selected user(s)?
Warning: Always leave at least one administrator.
• Directory group: Are you sure you want to delete the selected
group(s)?
4. Click OK.
Configuring iLO access settings
You can modify iLO access settings, including service, IPMI/DCMI, and access options. The values
that you enter on the Access Settings page apply to all iLO users. You must have the Configure iLO
Settings privilege to modify access settings.
The default configuration is suitable for most operating environments. The values that you can
modify on the Access Settings page allow complete customization of the iLO external access methods
for specialized environments.
Configuring service settings
The Service section shows the SSH Access setting and the TCP/IP port values.
The TCP/IP ports used by iLO are configurable, which enables compliance with any site requirements
or security initiatives for port settings. These settings do not affect the host system.
Changing these settings usually requires configuration of the web browser used for standard and
SSL communication. When these settings are changed, iLO initiates a reset to activate the changes.
To configure Service settings:
Configuring iLO access settings 39
Page 40
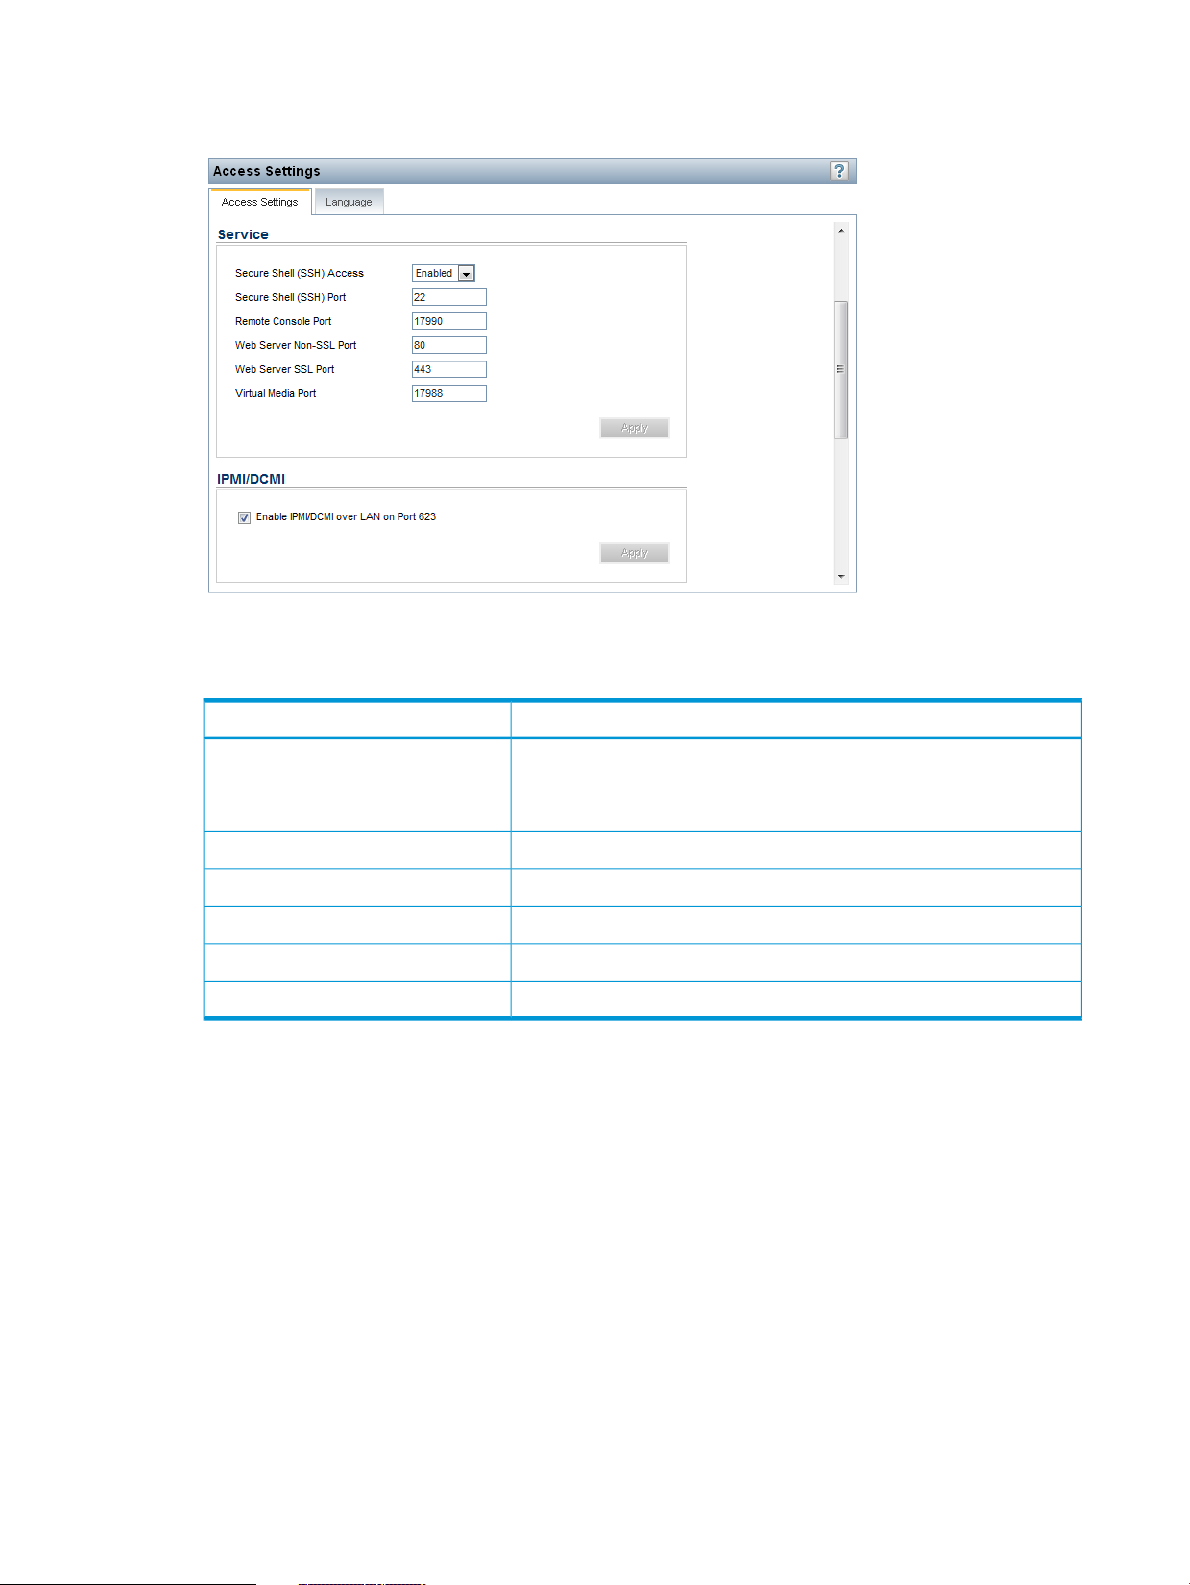
1. Navigate to the Administration→Access Settings page, as shown in Figure 16 (page 40)
Figure 16 Access Settings page
2. Update the following settings as needed:
Table 1 Service settings
Secure Shell (SSH) Access
3. Click Apply to end your browser connection and restart iLO.
Wait at least 30 seconds before you attempt to re-establish a connection.
Configuring IPMI/DCMI settings
iLO enables you to send industry-standard IPMI and DCMI commands over the LAN. The IPMI/DCMI
port is set to 623 and is not configurable.
To enable or disable IPMI/DCMI, select or clear the Enable IPMI/DCMI over LAN on Port 623
check box, and then click Apply.
Default valueService setting
Enables you to specify whether the SSH feature on iLO is enabled or
disabled.
SSH provides encrypted access to the iLO CLP. The default is Enabled.
22Secure Shell (SSH) Port
17990Remote Console Port
80Web Server Non-SSL Port (HTTP)
443Web Server SSL Port (HTTPS)
17988Virtual Media Port
• Enabled (default)—Enables you to send IPMI/DCMI commands over the LAN by using a
client-side application.
• Disabled—Disables IPMI/DCMI over the LAN. Server-side IPMI/DCMI applications are still
functional when IPMI/DCMI over LAN is disabled.
Configuring access options
The Access Options section enables you to modify settings that affect all iLO users.
40 Configuring iLO
Page 41

NOTE: You can configure some of these settings by using iLO RBSU. For instructions, see “Using
the iLO RBSU” (page 87).
To view or modify iLO access options:
1. Navigate to the Administration→Access Settings page.
2. Click the Access Settings tab and scroll to the Access Options section of the Access Settings
page, as shown in Figure 17 (page 41).
Figure 17 Access Options
3. Update the following settings as needed:
Table 2 Access options
30Idle Connection Timeout
(minutes)
EnablediLO Functionality
DescriptionDefault valueOption
This setting specifies how long a user can be inactive, in
minutes, before the iLO web interface and Remote Console
session end automatically. The following settings are valid:
15, 30, 60, or 120 minutes, or Infinite. Inactive users are not
logged out when this option is set to Infinite.
Failure to log out of iLO by either browsing to a different site
or closing the browser also results in an idle connection. The
iLO firmware supports a finite number of iLO connections.
Misuse of the Infinite timeout option might make iLO
inaccessible to other users. Idle connections are recycled after
they time out.
This setting applies to local and directory users. Directory
server timeouts might preempt the iLO setting.
Changes to the setting might not take effect immediately in
current user sessions, but will be enforced immediately in all
new sessions.
The iLO network and communications with operating system
drivers are terminated when iLO functionality is disabled.
If iLO functionality is disabled (including the iLO Diagnostic
Port), you must use the server Security Override Switch to
enable iLO. See the server documentation to locate the
Security Override Switch, and then set it to Override. Power
up the server, and then use the iLO RBSU to set iLO
Functionality to Enabled.
NOTE: The iLO functionality cannot be disabled on blade
servers.
Configuring iLO access settings 41
Page 42

Table 2 Access options (continued)
DescriptionDefault valueOption
Utility
RBSU
Serial Command Line
Interface Status
Interface Speed
EnablediLO ROM-Based Setup
DisabledRequire Login for iLO
EnabledShow iLO IP during POST
Enabled-Authentication
Required
9600Serial Command Line
This setting enables or disables iLO RBSU. The iLO Option
ROM prompts you to press F8 to start iLO RBSU, but if iLO is
disabled or iLO RBSU is disabled, this prompt is not displayed.
This setting determines whether a user-credential prompt is
displayed when a user accesses iLO RBSU. If this setting is
Enabled, a login dialog box opens when you access the iLO
RBSU.
This setting enables the display of the iLO network IP address
during host server POST.
This setting enables you to change the login model of the CLI
feature through the serial port. The following settings are valid:
• Enabled-Authentication Required—Enables access to the
iLO CLP from a terminal connected to the host serial port.
Valid iLO user credentials are required.
• Enabled-No Authentication—Enables access to the iLO CLP
from a terminal connected to the host serial port. iLO user
credentials are not required.
• Disabled—Disables access to the iLO CLP from the host
serial port. Use this option if you are planning to use
physical serial devices.
This setting enables you to change the speed of the serial port
for the CLI feature. The following speeds (in bits per second)
are valid: 9600, 19200, 57600, and 115200. The serial port
configuration must be set to no parity, 8 data bits, and 1 stop
bit (N/8/1) for correct operation.
Length
Authentication Failure
Logging
8Minimum Password
—Server Name
Enabled-Every 3rd
Failure
This setting specifies the minimum number of characters
allowed when a user password is set or changed. The
character length must be a value from 0 to 39.
This setting enables you to specify the host server name. You
can assign this value manually, but it might be overwritten by
the host software when the operating system loads.
You can enter a server name that is up to 49 bytes.
To force the browser to refresh, save this setting, and then
press F5.
This setting enables you to configure logging criteria for failed
authentications. All login types are supported; each login type
works independently. The following are valid settings:
• Enabled-Every Failure—A failed login log entry is recorded
after every failed login attempt.
• Enabled-Every 2nd Failure—A failed login log entry is
recorded after every second failed login attempt.
• Enabled-Every 3rd Failure—A failed login log entry is
recorded after every third failed login attempt.
• Enabled-Every 5th Failure—A failed login log entry is
recorded after every fifth failed login attempt.
• Disabled—No failed login log entry is recorded.
For information about using this setting with SSH clients, see
“Logging in to iLO by using an SSH client” (page 43).
4. Click Apply to end your browser connection and restart iLO.
Wait at least 30 seconds before you attempt to re-establish a connection.
42 Configuring iLO
Page 43

Logging in to iLO by using an SSH client
When a user logs in to iLO by using an SSH client, the number of login name and password
prompts displayed by iLO matches the value of the Authentication Failure Logging option (3 if it is
disabled). The number of prompts might also be affected by your SSH client configuration. SSH
clients also implement delays after login failure.
For example, to generate an SSH authentication failure log with the default value (Enabled-Every
3rd Failure), assuming that the SSH client is configured with the number of password prompts set
to 3, three consecutive login failures occur as follows:
1. Run the SSH client and log in with an incorrect login name and password.
You receive three password prompts. After the third incorrect password, the connection ends
and the first login failure is recorded. The SSH login failure counter is set to 1.
2. Run the SSH client and log in with an incorrect login name and password.
You receive three password prompts. After the third incorrect password, the connection ends
and the second login failure is recorded. The SSH login failure counter is set to 2.
3. Run the SSH client and log in with an incorrect login name and password.
You receive three password prompts. After the third incorrect password, the connection ends
and the third login failure is recorded. The SSH login failure counter is set to 3.
The iLO firmware records an SSH failed login log entry, and sets the SSH login failure counter to
0.
Configuring iLO security
iLO provides the following security features:
• User-defined TCP/IP ports. For more information, see “Configuring iLO access settings”
(page 39).
• User actions logged in the iLO Event Log. For more information, see “Using the iLO Event Log”
(page 106).
• Progressive delays for failed login attempts. For more information, see “Login security”
(page 46).
• Support for X.509 CA signed certificates. For more information, see “Administering SSL
certificates” (page 48).
• Support for securing iLO RBSU. For more information, see “iLO RBSU security” (page 44).
• Encrypted communication that uses SSL certificate administration. For more information, see
“Administering SSL certificates” (page 48).
• Support for optional LDAP-based directory services. For more information, see “Directory
services” (page 160).
Some of these options are licensed features. For more information, see “iLO licensing” (page 31).
General security guidelines
General security guidelines for iLO follow:
• For maximum security, configure iLO on a separate management network. For more information,
see “Connecting iLO to the network” (page 16).
• Do not connect iLO directly to the Internet.
• Use a browser that has a 128-bit cipher strength.
Configuring iLO security 43
Page 44

iLO RBSU security
iLO RBSU enables you to view and modify the iLO configuration. You can configure iLO RBSU
access settings by using iLO RBSU, a web browser, RIBCL scripts, or the iLO Security Override
Switch.
• For information about using a web browser to configure iLO RBSU access settings, see
“Configuring access options” (page 40).
• For information about using iLO RBSU to configure iLO RBSU access settings, see “Using the
iLO RBSU” (page 87).
• For information about using RIBCL scripts to configure iLO RBSU, see the HP iLO 3 Scripting
and Command Line Guide.
• For information about using the iLO Security Override Switch to access iLO RBSU , see “iLO
Security Override Switch administration” (page 44).
iLO RBSU has the following security levels:
• Login Not Required (default)
Anyone who has access to the host during POST can enter iLO RBSU to view and modify
configuration settings. This is an acceptable setting if host access is controlled. If host access
is not controlled, any user can make changes by using the active configuration menus.
• Login Required (more secure)
If iLO RBSU login is required, the active configuration menus are controlled by the authenticated
user access rights.
• Disabled (most secure)
If iLO RBSU is disabled, user access is prohibited. This prevents modification by using the iLO
RBSU .
To change the login requirement:
• Use the iLO web interface to edit the Require Login for iLO RBSU setting. For instructions, see
“Configuring access options” (page 40).
• Use the iLO RBSU to edit the Require iLO 3 RBSU Login setting. For instructions, see “Using
the iLO RBSU” (page 87).
To enable or disable access to iLO RBSU:
• Use the iLO web interface to edit the iLO ROM-Based Setup Utility setting. For instructions, see
“Configuring access options” (page 40).
• Use the iLO RBSU to edit the iLO 3 ROM-Based Setup Utility setting. For instructions, see “Using
the iLO RBSU” (page 87).
iLO Security Override Switch administration
The iLO Security Override Switch grants the administrator full access to the iLO processor. This
access might be necessary for any of the following conditions:
• iLO has been disabled and must be re-enabled.
• All user accounts that have the Administer User Accounts privilege are locked out.
• An invalid configuration prevents iLO from being displayed on the network, and iLO RBSU is
disabled.
• The boot block must be flashed.
• The iLO NIC is turned off, and running iLO RBSU to turn it back on is not possible or convenient.
• Only one user name is configured, and the password is forgotten.
44 Configuring iLO
Page 45

Ramifications of setting the iLO Security Override Switch include the following:
• All security authorization verifications are disabled when the switch is set.
• iLO RBSU runs if the host server is reset.
• iLO is not disabled and might be displayed on the network as configured.
• iLO, if disabled when the switch is set, does not log out the user and complete the disable
process until the power is cycled on the server.
• The boot block is exposed for programming.
• A warning message is displayed on iLO web interface pages, indicating that the switch is
currently in use.
• An iLO log entry records the use of the switch.
When iLO boots after you set or clear the iLO Security Override Switch, an SNMP alert is sent if
an SNMP Alert Destination is configured.
Setting the iLO Security Override Switch enables you to flash the iLO boot block. HP does not
anticipate that you will need to update the boot block. However, if an update is required, you must
be physically present at the server to reprogram the boot block and reset iLO. The boot block is
exposed until iLO is reset. For maximum security, HP recommends disconnecting iLO from the
network until the reset is complete. You must open the server enclosure to access the iLO Security
Override Switch.
To set the iLO Security Override Switch:
1. Power off the server.
2. Set the switch.
3. Power on the server.
Reverse this procedure to clear the iLO Security Override Switch.
Depending on the server, the iLO Security Override Switch might be a single jumper or a specific
switch position on a DIP switch panel. For information about accessing the iLO Security Override
Switch, see the server documentation or use the diagrams on the server access panel.
TPM support
A TPM is a computer chip that securely stores artifacts used to authenticate the platform. These
artifacts can include passwords, certificates, or encryption keys. You can also use a TPM to store
platform measurements to make sure that the platform remains trustworthy.
On a supported system, iLO decodes the TPM record and passes the configuration status to iLO,
the CLP, and the XML interface. The iLO Overview page displays the following TPM status
information:
• Not Supported—A TPM is not supported.
• Not Present—A TPM is not installed.
• Present—This indicates one of the following statuses:
◦ A TPM is installed and enabled.
◦ A TPM is installed and enabled, and Expansion ROM measuring is enabled. If Expansion
A TPM is installed but is disabled.◦
ROM measuring is enabled, the Update Firmware page displays a legal warning message
when you click Upload.
Configuring iLO security 45
Page 46

User accounts and access
iLO supports the configuration of up to 12 local user accounts. Each account can be managed
through the following features:
• Privileges
• Login security
You can configure iLO to use a directory to authenticate and authorize its users. This configuration
enables an unlimited number of users and easily scales to the number of iLO devices in an enterprise.
The directory also provides a central point of administration for iLO devices and users, and the
directory can enforce a stronger password policy. iLO enables you to use local users, directory
users, or both.
The following directory configuration options are available:
• A directory extended with HP schema
• The directory default schema
For more information about using directory authentication, see “Directory services” (page 160).
User privileges
iLO allows you to control user account access to iLO features through the use of privileges. When
a user attempts to use a feature, iLO verifies that the user has the proper privilege to use that
feature.
For information about the available user account and directory group privileges, see “Managing
iLO users by using the iLO web interface” (page 32).
Login security
iLO provides several login security features. After an initial failed login attempt, iLO imposes a
delay of ten seconds. Each subsequent failed attempt increases the delay by ten seconds. An
information page is displayed during each delay; this continues until a valid login occurs. This
feature helps to prevent dictionary attacks against the browser login port.
iLO saves a detailed log entry for failed login attempts. You can configure the Authentication Failure
Logging frequency on the Administration→Access Settings page. For more information, see
“Configuring access options” (page 40).
Administering SSH keys
The Secure Shell Key page displays the hash of the SSH public key associated with each user.
Each user can have only one key assigned. Use this page to view, add, or delete SSH keys.
You must have the Administer User Accounts privilege to add and delete SSH keys.
About SSH keys
When you add an SSH key to iLO, you paste the SSH key file into iLO as described in “Authorizing
a new SSH key” (page 47). The file must contain the user-generated public key. The iLO firmware
associates each key with the selected local user account. If a user is removed after an SSH key is
authorized for that user, the SSH key is removed.
A sample SSH key file follows:
ssh-dss AAAAB3......wHM Administrator
In this sample, ssh-dss AAAAB3.....wHM is the public key, and Administrator is a local
iLO user account.
46 Configuring iLO
Page 47

Note the following when working with SSH keys:
• Any SSH connection authenticated through the corresponding private key is authenticated as
the owner of the key and has the same privileges.
• The iLO firmware provides storage to accommodate SSH keys that have a length of 639 bytes
or less. If the key is larger than 639 bytes, the authorization might fail. If this occurs, use the
SSH client software to generate a shorter key.
• If you use the iLO web interface to enter the public key, you select the user associated with
the public key. If you use the CLI to enter the public key, the public key is linked to the user
name that you entered to log in to iLO. If you use HPQLOCFG to enter the public key, you
append the iLO user name to the public key data. The public key is stored with that user name.
Authorizing a new SSH key
1. Generate a 1,024-bit DSA SSH key by using ssh-keygen, puttygen.exe, or another
SSH key utility.
2. Create the key.pub file.
3. Navigate to the Administration→Security page.
4. Click the Secure Shell Key tab, as shown in Figure 18 (page 47).
Figure 18 Security–Secure Shell Key page
5. Select the check box to the left of the user to which you want to add an SSH key.
6. Click Authorize New Key.
7. Copy and paste the public key into the DSA Public Key Import Data box as shown in
Figure 19 (page 48).
Configuring iLO security 47
Page 48
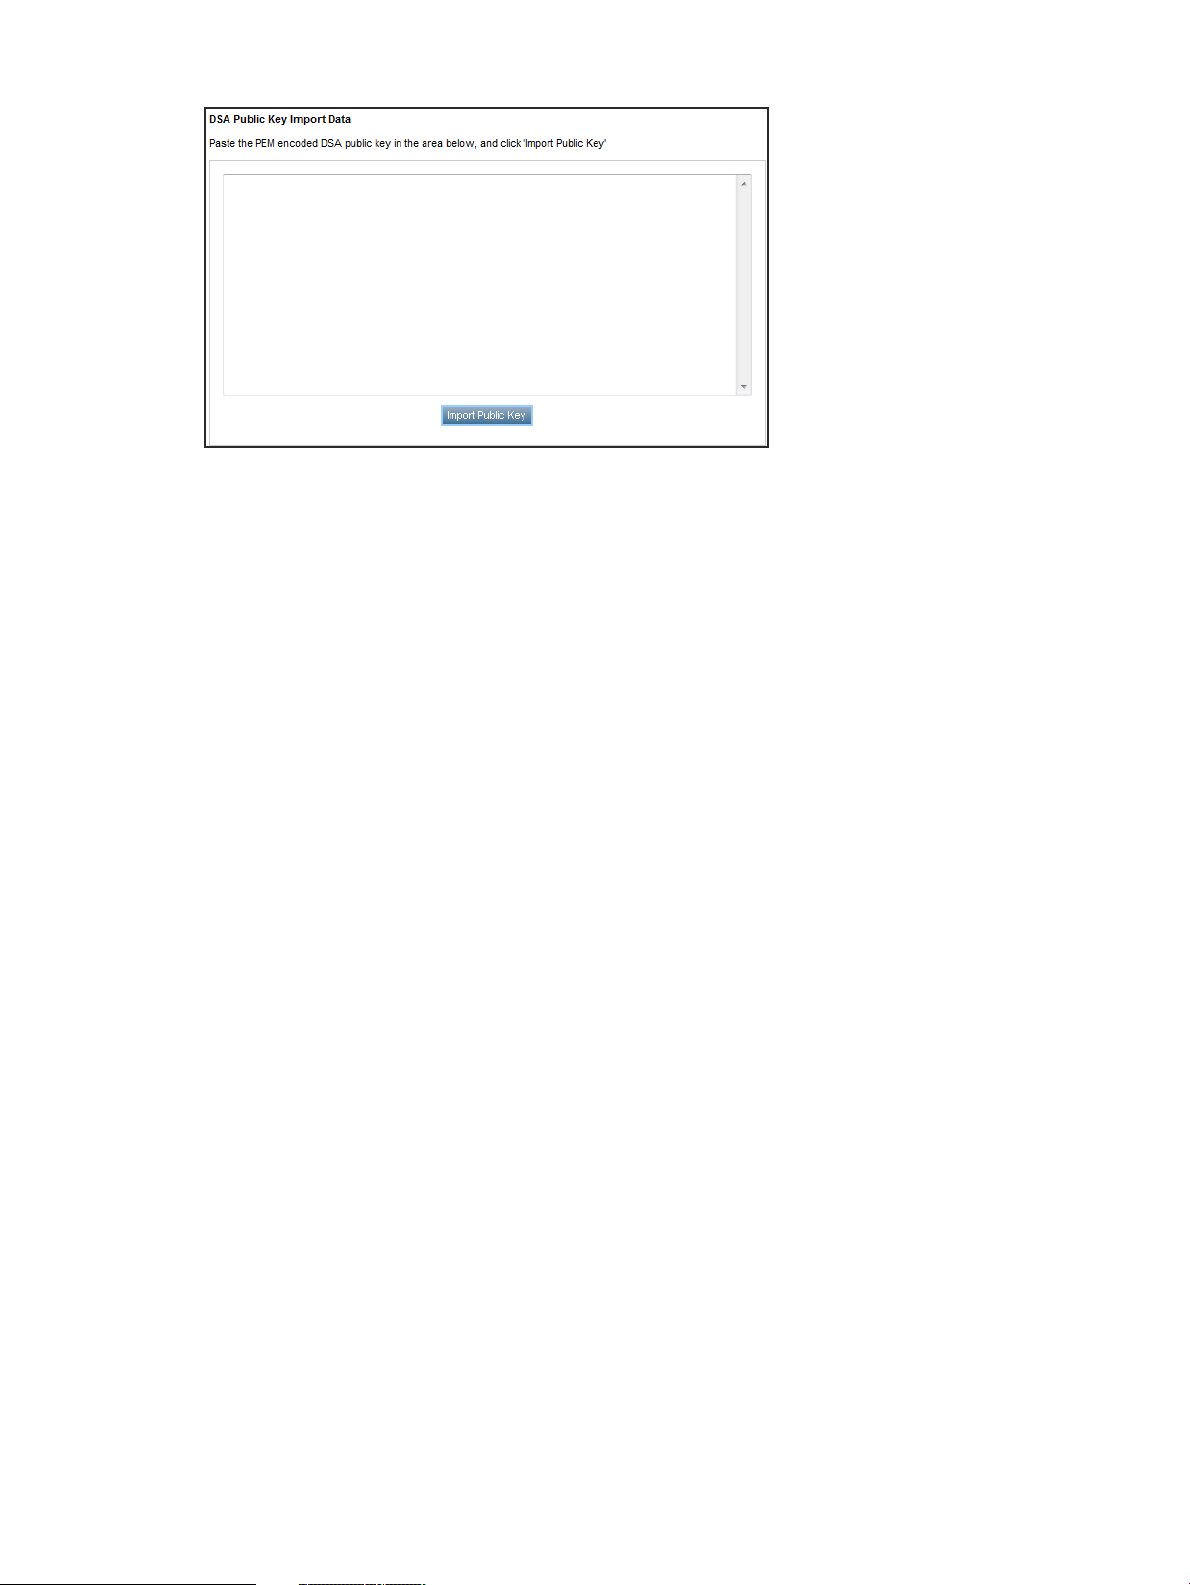
Figure 19 DSA Public Key Import Data box
The key must be a 1,024-bit DSA key.
8. Click Import Public Key.
Deleting SSH keys
1. Navigate to the Administration→Security page.
2. Click the Secure Shell Key tab, as shown in Figure 18 (page 47).
3. Select the check box to the left of the user for which you want to delete an SSH key.
4. Click Delete Selected Key(s).
The selected SSH key is removed from iLO. When an SSH key is deleted from iLO, an SSH
client cannot authenticate to iLO by using the corresponding private key.
Authorizing SSH keys from an HP SIM server
The mxagentconfig utility enables you to authorize SSH keys from an HP SIM server.
• SSH must be enabled on iLO before you use mxagentconfig to authorize a key.
• The user name and password entered in mxagentconfig must correspond to an iLO user
who has the Configure iLO Settings privilege. The user can be a directory user or a local user.
• The key is authorized on iLO and corresponds to the user name specified in the
mxagentconfig command.
For more information about mxagentconfig, see the HP iLO 3 Scripting and Command Line
Guide.
Administering SSL certificates
SSL is a standard for encrypting data so that it cannot be viewed or modified while in transit on
the network. SSL uses a key to encrypt and decrypt the data. The longer the key, the better the
encryption.
A certificate is a public document that describes the server. It contains the name of the server and
the server's public key. Because only the server has the corresponding private key, this is how the
server is authenticated.
A certificate must be signed to be valid. If it is signed by a CA, and that CA is trusted, all certificates
signed by the CA are also trusted. A self-signed certificate is one in which the owner of the certificate
acts as its own CA. Self-signed certificates are the default for HP management products, though
they do support certificates signed by certifying authorities.
48 Configuring iLO
Page 49
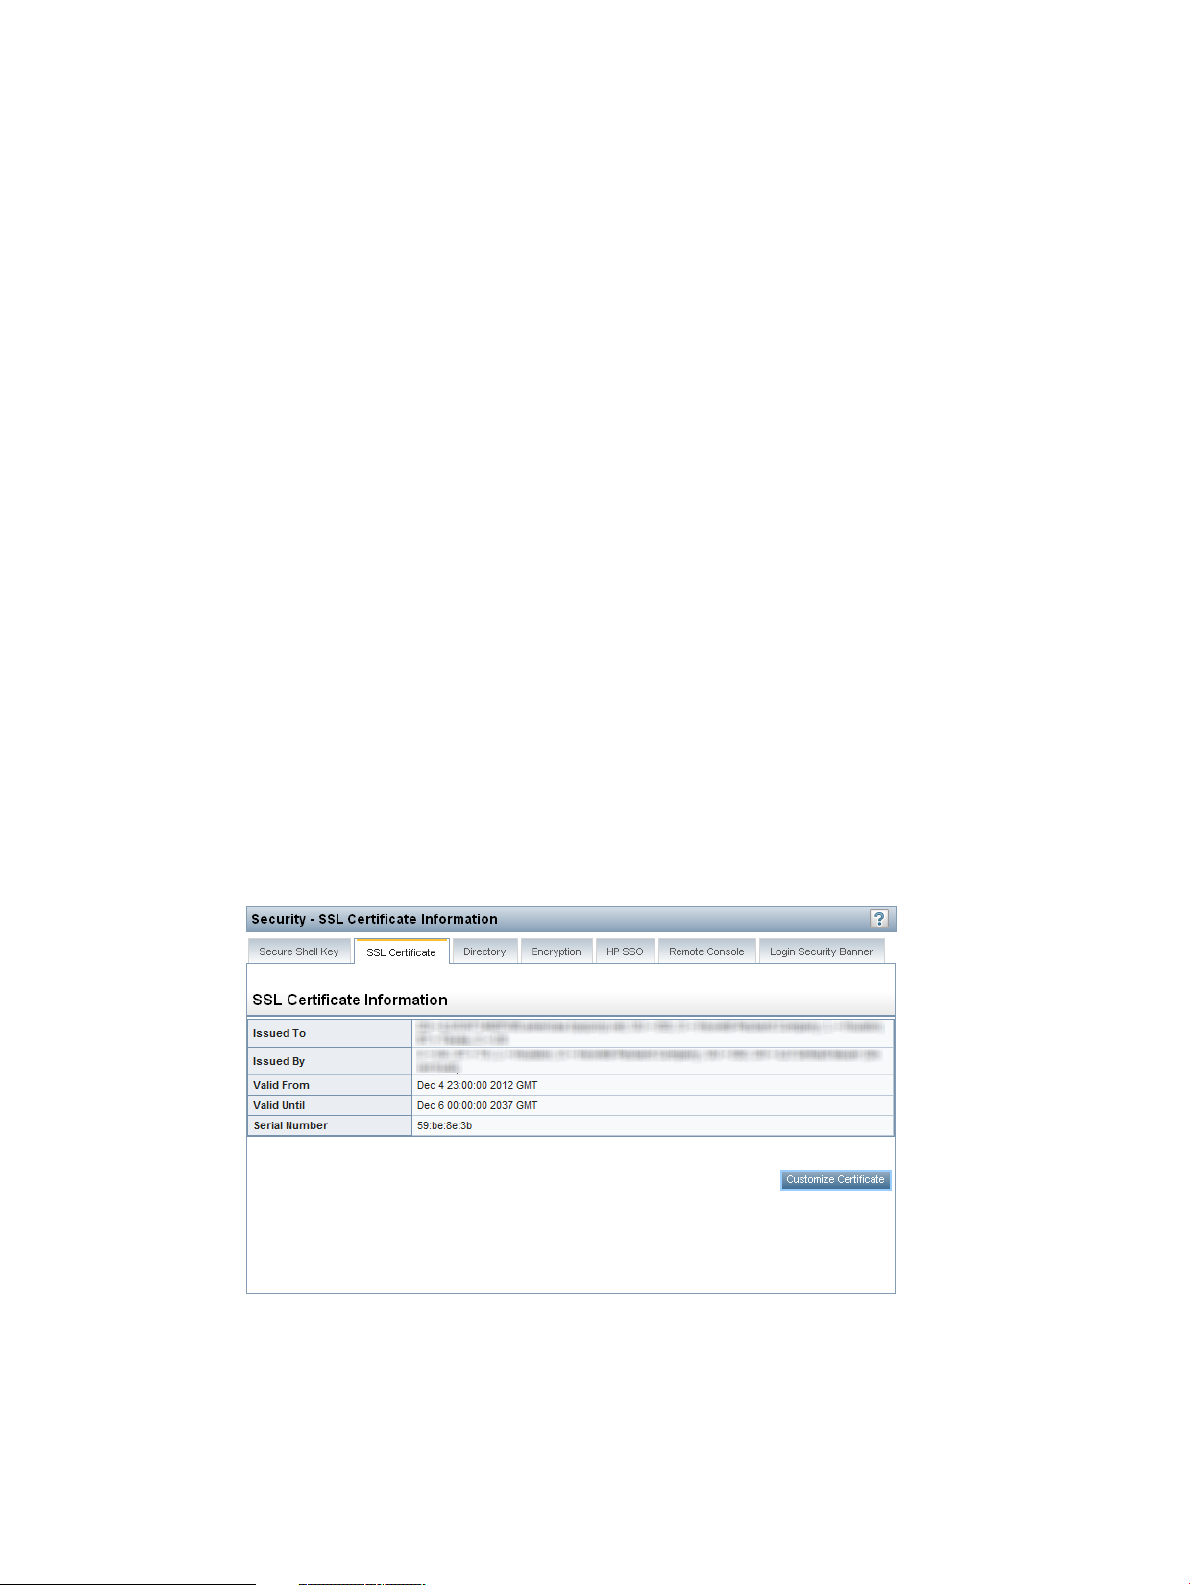
The iLO firmware enables you to create a certificate request, import a certificate, and view
information associated with a stored certificate. Certificate information is encoded in the certificate
by the CA and is extracted by iLO.
By default, iLO creates a self-signed certificate for use in SSL connections. This certificate enables
iLO to work without additional configuration steps. Importing a trusted certificate can enhance the
iLO security features. Users who have the Configure iLO Settings privilege can customize and
import a trusted certificate.
Viewing SSL certificate information
To view certificate information, navigate to the Administration→Security→SSL Certificate page.
The following certificate details are displayed:
• Issued To—The entity to which the certificate was issued
• Issued By—The CA that issued the certificate
• Valid From—The first date that the certificate is valid
• Valid Until—The date that the certificate expires
• Serial Number—The serial number that the CA assigned to the certificate
Obtaining and importing an SSL certificate
Users who have the Configure iLO Settings privilege can customize and import a trusted certificate.
A certificate works only with the keys generated with its corresponding CSR. If iLO is reset to factory
defaults, or another CSR is generated before the certificate that corresponds to the previous CSR
is imported, the certificate does not work. In that case, a new CSR must be generated and used
to obtain a new certificate from the CA.
To obtain and import a certificate:
1. Navigate to the Administration→Security→SSL Certificate page, as shown in Figure 20
(page 49).
Figure 20 Security–SSL Certificate Information page
2. Click Customize Certificate.
The SSL Certificate Customization page opens, as shown in Figure 21 (page 50).
Configuring iLO security 49
Page 50
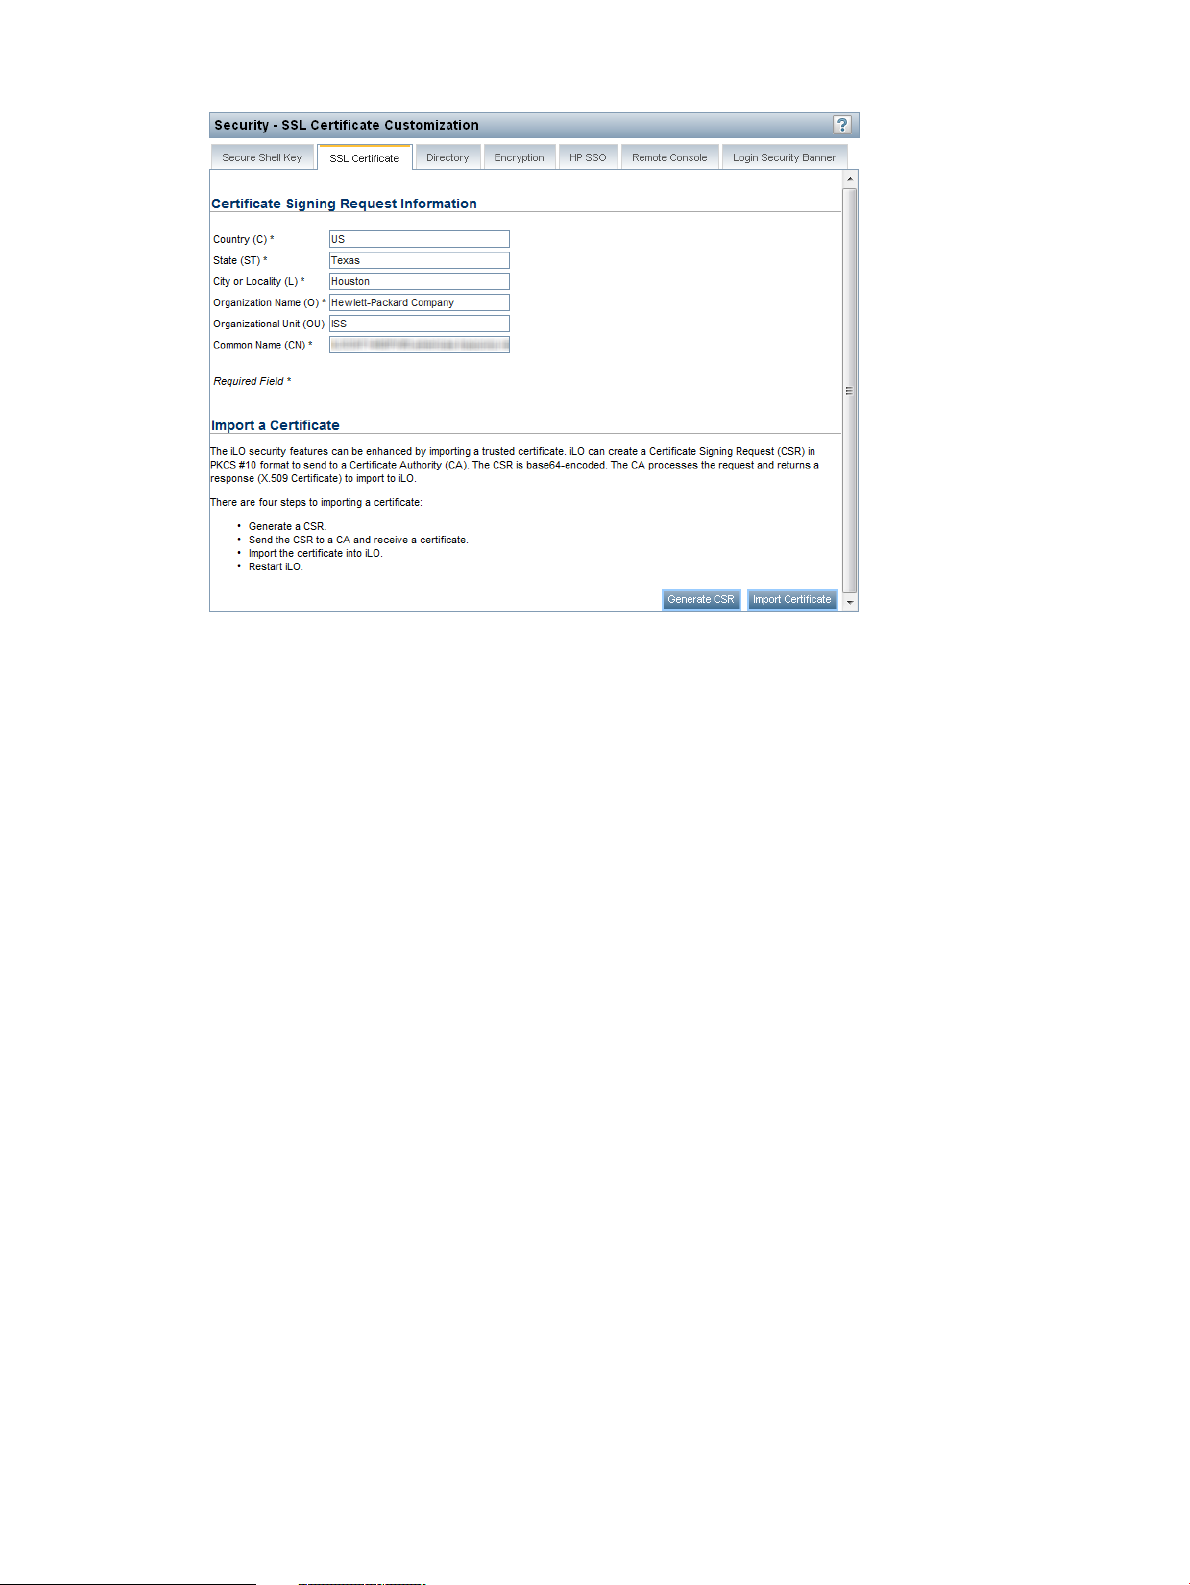
Figure 21 Security–SSL Certificate Customization page
3. Enter the following information in the Certificate Signing Request Information section. The
required boxes are marked with an asterisk (*) in the iLO web interface.
• Country (C)—The two-character country code that identifies the country where the company
or organization that owns this iLO subsystem is located
• State (ST)—The state where the company or organization that owns this iLO subsystem is
located
• City or Locality (L)—The city or locality where the company or organization that owns this
iLO subsystem is located
• Organization Name (O)—The name of the company or organization that owns this iLO
subsystem
• Organizational Unit (OU)—(Optional) The unit within the company or organization that
owns this iLO subsystem
• Common Name (CN)—The FQDN of this iLO subsystem
4. Click Generate CSR.
The following message appears:
The iLO subsystem is currently generating a Certificate Signing
Request (CSR). This may take 10 minutes or more. In order to view
the CSR, wait 10 minutes or more, and then click the Generate CSR
button again.
5. After 10 minutes or more, click the Generate CSR button again.
A new window displays the CSR.
The CSR contains a public and private key pair that validates communications between the
client browser and iLO. iLO supports key sizes up to 2,048 bits. The generated CSR is held
in memory until a new CSR is generated, iLO is reset, or a certificate is imported.
6. Select and copy the CSR text.
7. Open a browser window and navigate to a third-party CA.
50 Configuring iLO
Page 51
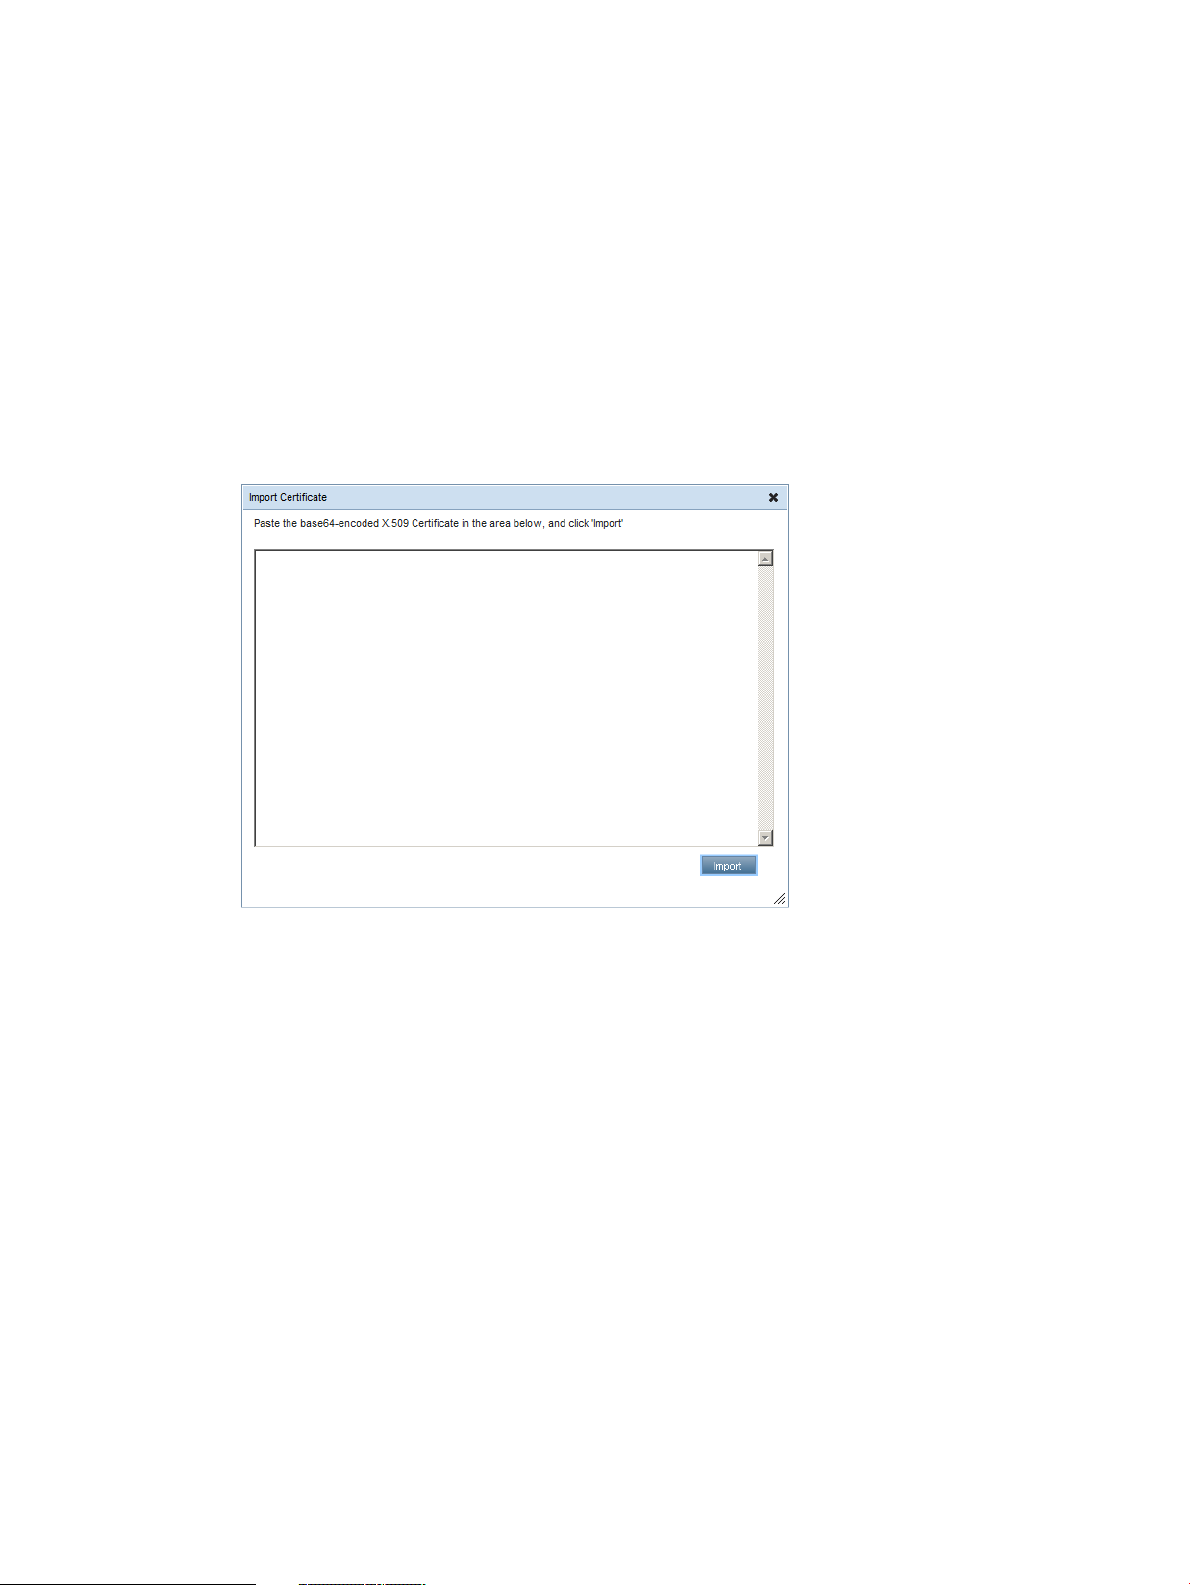
8. Follow the onscreen instructions and submit the CSR to the CA.
The CA will generate a certificate in the PKCS #10 format.
9. After you obtain the certificate, make sure that:
• The CN matches the iLO FQDN. This is listed as the iLO Hostname on the
Information→Overview page.
• The certificate is generated as a Base64-encoded X.509 certificate, and is in the RAW
format.
• The first and last lines are included in the certificate.
10. Return to the SSL Certificate Customization page (Figure 21) in the iLO user interface.
11. Click the Import Certificate button.
The Import Certificate window opens, as shown in Figure 22 (page 51).
Figure 22 Import Certificate window
12. Paste the certificate into the text box, and then click the Import button.
iLO supports DER-encoded SSL certificates that are up to 3 KB in size (including the 609 or
1,187 bytes used by the private key, for 1,024-bit and 2,048-bit certificates, respectively).
13. Restart iLO.
Configuring directory settings
The iLO firmware connects to Microsoft Active Directory, Novell e-Directory, and other LDAP
3.0-compliant directory services for user authentication and authorization. You can configure iLO
to authenticate and authorize users by using the HP Extended Schema directory integration or the
schema-free directory integration. The HP Extended Schema works only with Microsoft Windows.
The iLO firmware connects to directory services by using SSL connections to the directory server
LDAP port. The default secure LDAP port is 636.
For more information about using directory authentication with iLO, see “Directory services”
(page 160).
Locally stored user accounts (listed on the User Administration page) can be active when iLO
directory support is enabled. This enables both local-based and directory-based user access.
Typically, you can delete local user accounts (with the possible exception of an emergency access
account) after iLO is configured to access the directory service. You can also disable access to
these accounts when directory support is enabled.
Configuring iLO security 51
Page 52
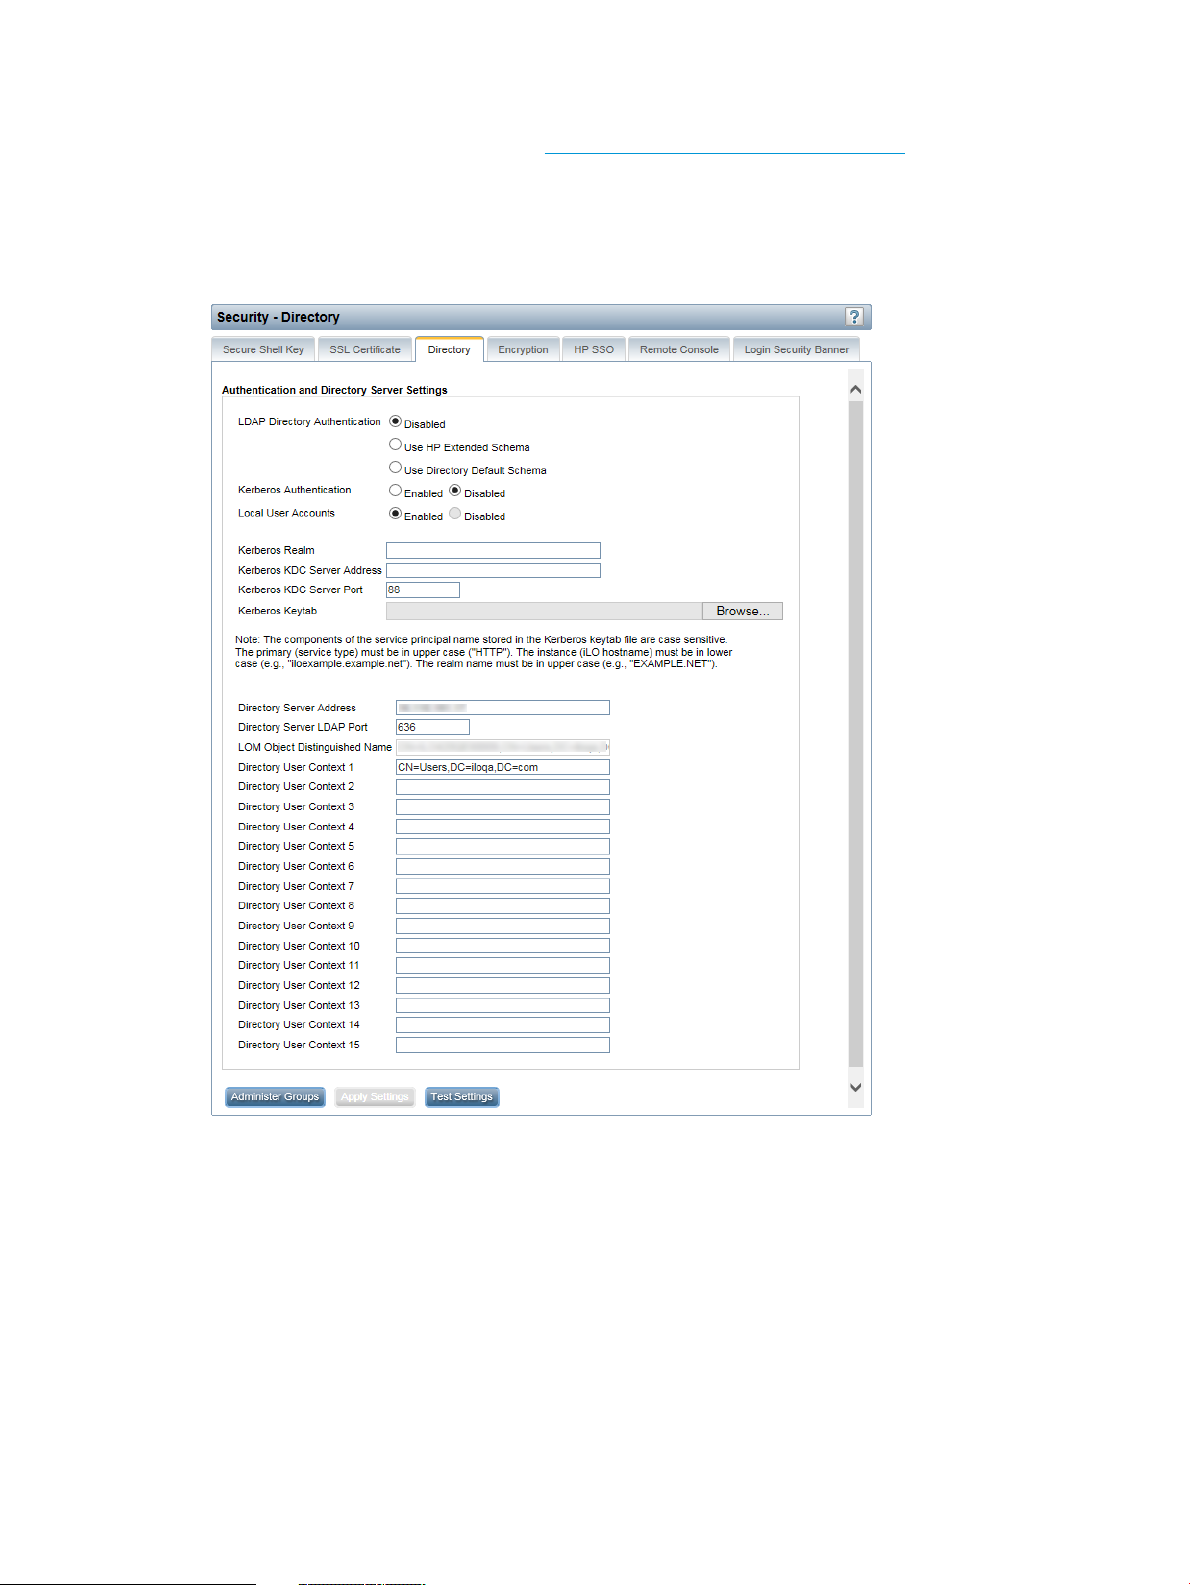
You must have the Configure iLO Settings privilege to change directory settings.
This feature and many others are part of an iLO licensing package. For more information about
iLO licensing, see the following website: http://www.hp.com/go/ilo/licensing.
Configuring authentication and directory server settings
1. Navigate to the Administration→Security→Directory page, as shown in Figure 23 (page 52).
Figure 23 Security - Directory page
2. Configure the following options:
• LDAP Directory Authentication—Enables or disables directory authentication. If directory
52 Configuring iLO
authentication is enabled and configured correctly, users can log in by using directory
credentials.
Choose from the following options:
◦ Disabled—User credentials are not validated by using a directory.
◦ Use HP Extended Schema—Selects directory authentication and authorization by
using directory objects created with the HP Extended Schema. Select this option
when the directory has been extended with the HP Extended Schema.
◦ Use Directory Default Schema—Selects directory authentication and authorization
by using user accounts in the directory. Select this option when the directory is not
Page 53

extended with the HP Extended Schema. User accounts and group memberships are
used to authenticate and authorize users. After you enter and save the directory
network information, click Administer Groups, and then enter one or more valid
directory DNs and privileges to grant users access to iLO.
• Kerberos Authentication—Enables Kerberos login. If Kerberos login is enabled and
configured correctly, the HP Zero Sign In button appears on the login page.
• Local User Accounts—Enables or disables local user account access.
Enabled—A user can log in by using locally stored user credentials. HP recommends
◦
enabling this option and configuring a user account with administrator privileges.
This account can be used if iLO cannot communicate with the directory server.
◦ Disabled—User access is limited to valid directory credentials.
Access through local user accounts is enabled when directory support is disabled or an
iLO license is revoked. You cannot disable local user access when you are logged in
through a local user account.
• Kerberos Realm—The name of the Kerberos realm in which the iLO processor is operating.
This string can be up to 128 characters. A realm name is usually the DNS name converted
to uppercase. Realm names are case sensitive.
• Kerberos KDC Server Address—The IP address or DNS name of the KDC server. This
string can be up to 128 characters. Each realm must have at least one KDC that contains
an authentication server and a ticket grant server. These servers can be combined.
• Kerberos KDC Server Port—The TCP or UDP port number on which the KDC is listening.
The default KDC port is 88.
• Kerberos Keytab—A binary file that contains pairs of service principal names and
encrypted passwords. In the Windows environment, the keytab file is generated by the
ktpass utility. Click Browse (Internet Explorer or Firefox) or Choose File (Chrome), and
then follow the onscreen instructions to select a file.
IMPORTANT: The components of the service principal name stored in the Kerberos
keytab file are case sensitive. The primary (service type) must be in uppercase letters, for
example, (HTTP). The instance (iLO host name) must be in lowercase letters, for example,
iloexample.example.net. The realm name must be in uppercase, for example,
EXAMPLE.NET.
3. Enter the directory server settings.
iLO directory server settings enable you to identify the directory server address and LDAP port.
• Directory Server Address—Specifies the network DNS name or IP address of the directory
server. The directory server address can be up to 127 characters.
IMPORTANT: HP recommends using DNS round-robin when you are defining the
directory server.
• Directory Server LDAP Port—Specifies the port number for the secure LDAP service on the
server. The default value is 636. You can specify a different value if your directory service
is configured to use a different port.
Configuring iLO security 53
Page 54

• LOM Object Distinguished Name—Specifies where this iLO instance is listed in the directory
tree (for example, cn=iLO Mail Server,ou=Management Devices,o=hp). This
option is available when Use HP Extended Schema is selected.
User search contexts are not applied to the LOM object DN when iLO accesses the
directory server.
• Directory User Contexts—These boxes enable you to specify common directory subcontexts
so that users do not need to enter their full DNs at login. Directory user contexts can be
up to 128 characters.
You can identify the objects listed in a directory by using unique DNs. However, DNs
can be long, and users might not know their DNs or might have accounts in different
directory contexts. iLO attempts to contact the directory service by DN, and then applies
the search contexts in order until successful.
◦ Example 1—If you enter the search context ou=engineering,o=hp, you can log
in as user instead of logging in as cn=user,ou=engineering,o=hp.
◦ Example 2—If a system is managed by Information Management, Services, and
Training, search contexts such as the following enable users in any of these
organizations to log in by using their common names:
Directory User Context 1:ou=IM,o=hp
Directory User Context 2:ou=Services,o=hp
Directory User Context 3:ou=Training,o=hp
If a user exists in both the IM organizational unit and the Training organizational
unit, login is first attempted as cn=user,ou=IM,o=hp.
◦ Example 3 (Active Directory only)—Microsoft Active Directory allows an alternate
4. Click Apply Settings.
5. To test the communication between the directory server and iLO, click Test Settings.
For more information, see “Running directory tests” (page 54).
6. Optional: Click Administer Groups to navigate to the User Administration page.
For information about group administration, see “Administering directory groups” (page 37).
Running directory tests
Directory tests enable you to validate the configured directory settings. The directory test results
are reset when directory settings are saved, or when the directory tests are started.
To validate the configured directory settings:
user credential format. A user can log in as user@domain.example.com, in which
case a search context of @domain.example.com allows the user to log in as user.
Only a successful login attempt can test search contexts in this format.
54 Configuring iLO
Page 55

1. Click Test Settings on the Security→Directory page.
The Directory Tests page opens, as shown in Figure 24 (page 55).
Figure 24 Directory Tests page
This page displays the results of a series of simple tests designed to validate the current directory
settings. Also, it includes a test log that shows test results and any detected issues. After your
directory settings are configured correctly, you do not need to rerun these tests. The Directory
Tests page does not require that you be logged in as a directory user.
2. In the Directory Test Controls section, enter the DN and password of a directory administrator.
• Directory Administrator Distinguished Name—Searches the directory for iLO objects,
roles, and search contexts. This user must have rights to read the directory.
• Directory Administrator Password—Authenticates the directory administrator.
HP recommends that you use the same credentials that you used when creating the iLO objects
in the directory. These credentials are not stored by iLO; they are used to verify the iLO object
and user search contexts.
3. In the Directory Test Controls section, enter a test user name and password.
• Test User Name—Tests login and access rights to iLO. The name does not have to be
fully distinguished because user search contexts can be applied. This user must be
associated with a role for this iLO.
• Test User Password—Authenticates the test user.
Typically, this account is used to access the iLO processor being tested. It can be the directory
administrator account, but the tests cannot verify user authentication with a superuser account.
These credentials are not stored by iLO.
Configuring iLO security 55
Page 56

4. Click Start Test.
Several tests begin in the background, starting with a network ping of the directory user by
establishing an SSL connection to the server and evaluating user privileges.
While the tests are running, the page refreshes periodically. You can stop the tests or manually
refresh the page at any time.
Viewing directory test results
The Directory Test Results section shows the directory test status with the date and time of the last
update.
• Overall Status—Summarizes the results of the tests.
Not Run—No tests were run.◦
◦ Inconclusive—No results were reported.
◦ Passed—No failures were reported.
◦ Problem Detected—A problem was reported.
◦ Failed—A specific subtest failed. Check the onscreen log to identify the problem.
◦ Warning—One or more of the directory tests reported a Warning status.
• Test—The name of each test.
Table 3 (page 56) provides details about each directory test.
Table 3 Directory tests
DescriptionTest
Directory Server DNS
Name
If the directory server is defined in FQDN format (directory.company.com), iLO
resolves the name from FQDN format to IP format, and queries the configured DNS
server.
If the test is successful, iLO obtained an IP address for the configured directory server. If
iLO cannot obtain an IP address for the directory server, this test and all subsequent tests
fail.
If the directory server is configured with an IP address, iLO skips this test.
If a failure occurs:
1. Verify that the DNS server configured in iLO is correct.
2. Verify that the directory server FQDN is correct.
3. As a troubleshooting tool, use an IP address instead of the FQDN.
4. If the problem persists, check the DNS server records and network routing.
iLO initiates a ping to the configured directory server.Ping Directory Server
The test is successful if iLO receives the ping response; it is unsuccessful if the directory
server does not reply to iLO.
If the test fails, iLO will continue with the subsequent tests.
If a failure occurs:
1. Check to see if a firewall is active on the directory server.
2. Check for network routing issues.
Server
56 Configuring iLO
iLO attempts to negotiate an LDAP connection with the directory server.Connect to Directory
If the test is successful, iLO was able to initiate the connection.
If the test fails, iLO was not able to initiate an LDAP connection with the specified directory
server. Subsequent tests will stop.
If a failure occurs:
Page 57

Table 3 Directory tests (continued)
DescriptionTest
1. Verify that the configured directory server is the correct host.
2. Verify that iLO has a clear communication path to the directory server through port
636 (consider any routers or firewalls between iLO and the directory server).
3. Verify that any local firewall on the directory server is enabled to allow communications
through port 636.
Connect using SSL
Bind to Directory
Server
Directory
Administrator Login
iLO initiates SSL handshake and negotiation and LDAP communications with the directory
server through port 636.
If the test is successful, the SSL handshake and negotiation between iLO and the directory
server were successful.
If a failure occurs, the directory server is not enabled for SSL negotiations.
If you are using Microsoft Active Directory, verify that Active Directory Certificate Services
(Windows Server 2008) are installed.
This test binds the connection with the user name specified in the test boxes. If no user is
specified, iLO will do an anonymous bind.
If the test is successful, the directory server accepted the binding.
If a failure occurs:
1. Verify that the directory server allows anonymous binding.
2. If you entered a user name in the test boxes, verify that the credentials are correct.
3. If you verified that the user name is correct, try using other user-name formats; for
example, user@domain.com, DOMAIN\username, username (called Display
Name in Active Directory), or userlogin.
4. Verify that the specified user is allowed to log in and is enabled.
If Directory Administrator Distinguished Name and Directory Administrator Password
were specified, iLO uses these values to log in to the directory server as an administrator.
These boxes are optional.
iLO authenticates to the directory server with the specified user name and password.User Authentication
If the test is successful, the supplied user credentials are correct.
If the test fails, the user name and/or password is incorrect.
If a failure occurs:
1. If you verified that the user name is correct, try using other user-name formats; for
example, user@domain.com, DOMAIN\username, username (called Display
Name in Active Directory), or userlogin.
2. Verify that the specified user is allowed to log in and is enabled.
3. Check to see if the specified user name is restricted by logon hours or IP-based logging.
User Authorization
Directory User
Contexts
LOM Object Exists
This test verifies that the specified user name is part of the specified directory group, and
is part of the directory search context specified during directory services configuration.
If a failure occurs:
1. Verify that the specified user name is part of the specified directory group.
2. Check to see if the specified user name is restricted by logon hours or IP-based logging.
If Directory Administrator Distinguished Name was specified, iLO tries to search the
specified context.
If the test is successful, iLO found the context by using the administrator credentials to
search for the container in the directory.
Contexts that begin with "@" can be tested only by user login.
A failure indicates that the container could not be located.
This test searches for the iLO object in the directory server by using the LOM Object
Distinguished Name configured on the Security→Directory page.
Configuring iLO security 57
Page 58

Table 3 Directory tests (continued)
DescriptionTest
NOTE: You can enter a LOM Object Distinguished Name on the Security→Directory
page only when Use HP Extended Schema is selected. This test is run even if LDAP Directory
Authentication is disabled.
If the tests is successful, iLO found the object that represents itself.
If a failure occurs:
1. Verify that the LDAP FQDN of the LOM object is correct.
2. Try to update the HP Extended Schema and snap-ins in the directory server by updating
the HP Directories Support for ProLiant Management Processors software.
• Result—Reports status for a specific directory setting or an operation that uses one or more
directory settings. These results are generated when a sequence of tests is run. The results stop
when the tests run to completion, when a test failure prevents further progress, or when the
tests are stopped. Test results follow:
◦ Passed—The test ran successfully. If more than one directory server was tested, all servers
that ran this test were successful.
◦ Not Run—The test was not run.
◦ Failed—The test was unsuccessful on one or more of the directory servers. Directory
support might not be available on those servers.
◦ Warning—The test ran and reported a warning condition, for example, a certificate error.
Check the Notes column for suggested actions to correct the warning condition.
• Notes—Indicates the results of various phases of the directory tests. The data is updated with
failure details and information that is not readily available, like the directory server certificate
subject and which roles were evaluated successfully.
Using the directory test controls
The Directory Test Controls section enables you to view the current state of the directory tests, adjust
the test parameters, start and stop the tests, and refresh the page contents.
• In Progress—Indicates that directory tests are currently being performed in the background.
Click the Stop Test button to cancel the current tests, or click the Refresh button to update the
contents of the page with the latest results. Using the Stop Test button might not stop the tests
immediately.
• Not Running—Indicates that directory tests are current, and that you can supply new parameters
to run the tests again. Use the Start Test button to start the tests and use the current test control
values. Directory tests cannot be started after they are already in progress.
• Stopping—Indicates that directory tests have not yet reached a point where they can stop.
You cannot restart tests until the status changes to Not Running. Use the Refresh button to
determine whether the tests are complete.
For information about the parameters you can enter, see “Running directory tests” (page 54).
Using encryption
iLO provides enhanced security for remote management in distributed IT environments. SSL
encryption protects web browser data. SSL encryption of HTTP data ensures that the data is secure
as it is transmitted across the network. iLO supports the following cipher strengths:
• 256-bit AES with RSA, DHE, and a SHA1 MAC
• 256-bit AES with RSA, and a SHA1 MAC
58 Configuring iLO
Page 59

• 128-bit AES with RSA, DHE, and a SHA1 MAC
• 128-bit AES with RSA, and a SHA1 MAC
• 168-bit 3DES with RSA, and a SHA1 MAC
• 168-bit 3DES with RSA, DHE, and a SHA1 MAC
iLO also provides enhanced encryption through the SSH port for secure CLP transactions. iLO
supports AES128-CBC and 3DESCBC cipher strengths through the SSH port.
If enabled, iLO enforces the use of these enhanced ciphers (both AES and 3DES) over the secure
channels, including secure HTTP transmissions through the browser, SSH port, and XML port. When
AES/3DES encryption is enabled, you must use a cipher strength equal to or greater than AES/3DES
to connect to iLO through these secure channels. The AES/3DES encryption enforcement setting
does not affect communications and connections over less-secure channels.
By default, Remote Console data uses 128-bit RC4 bidirectional encryption. The HPQLOCFG utility
uses 128-bit RC4 with 160-bit SHA1 and 2048-bit RSAKeyX encryption to securely send RIBCL
scripts to iLO over the network.
Version 1.50 and later of the iLO 3 firmware supports FIPS Mode.
NOTE: The term FIPS Mode is used in this document and in iLO to describe the feature, not its
validation status.
• FIPS is a set of standards mandated for use by United States government agencies and
contractors.
• FIPS Mode in iLO 3 1.50 and later is intended to meet the requirements of FIPS 140-2 level
1. This version or any other version of the iLO firmware might have this feature but might or
might not be FIPS validated. The FIPS validation process is lengthy, so not all iLO firmware
versions will be validated. For information about the current FIPS status of this or any other
version of the iLO firmware, see the following document: http://csrc.nist.gov/groups/STM/
cmvp/documents/140-1/140InProcess.pdf.
Viewing encryption enforcement settings
Navigate to the Administration→Security→Encryption page, as shown in Figure 25 (page 59).
Figure 25 Security–Encryption Settings page
Configuring iLO security 59
Page 60

The Encryption Settings page displays the current encryption settings for iLO.
• Current Negotiated Cipher—The cipher in use for the current browser session. After you log
in to iLO through the browser, the browser and iLO negotiate a cipher setting to use during
the session.
• Encryption Enforcement Settings—The current encryption settings for iLO:
FIPS Mode—Indicates whether FIPS Mode is enabled or disabled for this iLO system.◦
◦ Enforce AES/3DES Encryption—Indicates whether AES/3DES encryption is enforced for
this iLO.
When enabled, iLO accepts only those connections through the browser and SSH interface
that meet the minimum cipher strength. A cipher strength of at least AES or 3DES must
be used to connect to iLO when this setting is enabled.
Modifying the AES/DES encryption setting
You must have the Configure iLO Settings privilege to change the encryption settings.
To modify the AES/DES encryption setting:
1. Navigate to the Administration→Security→Encryption page, as shown in Figure 25 (page 59).
2. Change the Enforce AES/3DES Encryption setting to Enabled or Disabled.
3. Click Apply to end your browser connection and restart iLO.
Wait at least 30 seconds before you attempt to re-establish a connection.
When changing the Enforce AES/3DES Encryption setting to Enabled, close all open browsers
after clicking Apply. Any browsers that remain open might continue to use a non-AES/3DES
cipher.
Connecting to iLO by using AES or 3DES encryption
After you enable the Enforce AES/3DES Encryption setting, iLO requires that you connect through
secure channels (web browser, SSH connection, or XML channel) by using a cipher strength of at
least AES or 3DES.
• Web browser—You must configure the browser with a cipher strength of at least AES or 3DES.
If the browser is not using AES or 3DES ciphers, iLO displays an error message. The error text
varies depending on the installed browser.
Different browsers use different methods for selecting a negotiated cipher. For more information,
see your browser documentation. You must log out of iLO through the current browser before
changing the browser cipher setting. Any changes made to the browser cipher setting while
you are logged in to iLO might enable the browser to continue using a non-AES/3DES cipher.
• SSH connection—For instructions on setting the cipher strength, see the SSH utility
documentation.
• XML channel—HPQLOCFG uses a secure 3DES cipher by default. For example, HPQLOCFG
displays the following cipher strength in the XML output:
Connecting to Server...
Negotiated cipher: 128–bit Rc4 with 160–bit SHA1 and 2048–bit RsaKeyx
Enabling FIPS Mode
You must have the Configure iLO Settings privilege to change the encryption settings.
To enable FIPS Mode for iLO:
1. Optional: Capture the current iLO configuration by using HPONCFG.
For more information, see the HP iLO 3 Scripting and Command Line Guide.
60 Configuring iLO
Page 61

2. Verify that a trusted certificate is installed.
Using iLO in FIPS Mode with the default self-signed certificate is not FIPS compliant. For
instructions, see “Obtaining and importing an SSL certificate” (page 49).
IMPORTANT: Some interfaces to iLO, such as supported versions of IPMI and SNMP, are
not FIPS compliant and cannot be made FIPS compliant. For information about the iLO firmware
versions that are FIPS validated, see the following document: http://csrc.nist.gov/groups/
STM/cmvp/documents/140-1/140-1val.zip
3. Power off the server.
4. Navigate to the Administration→Security→Encryption page, as shown in Figure 25 (page 59).
5. Set FIPS Mode to Enabled.
CAUTION: Enabling FIPS Mode resets iLO to the factory default settings, and clears all user
and license data.
6. Click Apply.
iLO reboots in FIPS Mode. Wait at least 90 seconds before attempting to re-establish a
connection.
7. Optional: Restore the iLO configuration by using HPONCFG.
For more information, see the HP iLO 3 Scripting and Command Line Guide.
TIP: You can use the Login Security Banner feature to notify iLO users that a system is using FIPS
Mode. For more information, see “Configuring the Login Security Banner” (page 67).
You can also use XML configuration and control scripts to enable FIPS mode. For more information,
see the HP iLO 3 Scripting and Command Line Guide.
Disabling FIPS Mode
If you want to disable FIPS Mode for iLO (for example, if a server is decommissioned), you must
set iLO to the factory default settings. You can perform this task by using RIBCL scripts or iLO RBSU.
For instructions, see “Resetting iLO to the factory default settings by using iLO RBSU” (page 230) or
the HP iLO 3 Scripting and Command Line Guide.
When you disable FIPS Mode, all potentially sensitive data is erased, including all logs and settings.
Configuring iLO for HP SSO
HP SSO enables you to browse directly from an HP SSO-compliant application (such as HP SIM)
to iLO, bypassing an intermediate login step. To use SSO, you must have a supported version of
an HP SSO-compliant application, and you must configure the iLO processor to trust the
SSO-compliant application.
This feature and many others are part of an iLO licensing package. For more information about
iLO licensing, see the following website: http://www.hp.com/go/ilo/licensing.
Some HP SSO-compliant applications automatically import trust certificates when they connect to
iLO. For applications that do not do this automatically, use the HP SSO page to configure the SSO
settings through the iLO web interface. You must have the Configure iLO Settings privilege to
change these settings.
Configuring iLO security 61
Page 62

Configuring iLO for HP SSO
1. Navigate to the Administration→Security→HP SSO page, as shown in Figure 26 (page 62).
Figure 26 Security–Single Sign-On Settings page
2. Make sure you have an iLO license key installed.
3. Enable Single Sign-On Trust Mode by selecting Trust by Certificate, Trust by Name, or Trust
All.
The iLO firmware supports configurable trust modes, which enables you to meet your security
requirements. The trust mode affects how iLO responds to HP SSO requests. If you enable
support for HP SSO, HP recommends using the Trust by Certificate mode. The available modes
follow:
• Trust None (SSO disabled) (default)—Rejects all SSO connection requests
• Trust by Certificate (most secure)—Enables SSO connections from an HP SSO-compliant
• Trust by Name—Enables SSO connections from an HP SSO-compliant application by
• Trust All (least secure)—Accepts any SSO connection initiated from any HP SSO-compliant
62 Configuring iLO
application by matching a certificate previously imported to iLO
matching an IP address or DNS name imported directly, or an IP address or DNS name
included in a certificate imported to iLO
application.
Page 63

4. Configure iLO privileges for each role in the Single Sign-On Settings section.
When you log in to an HP SSO-compliant application, you are authorized based on your HP
SSO-compliant application role assignment. The role assignment is passed to iLO when SSO
is attempted. For more information about each privilege, see “Managing iLO users by using
the iLO web interface” (page 32).
SSO attempts to receive only the privileges assigned in this section. iLO directory settings do
not apply. Default privilege assignments are as follows:
• User—Login only
• Operator—Login, Remote Console, Power and Reset, and Virtual Media
• Administrator—Login, Remote Console, Power and Reset, Virtual Media, Configure iLO,
and Administer Users
5. Click Apply to save the SSO settings.
6. If you selected Trust by Certificate or Trust by Name, add the trusted certificate or DNS name
to iLO.
For more information about adding certificates and DNS names, see “Adding trusted
certificates” (page 64).
The certificate repository can hold five typical certificates. However, if typical certificates are
not issued, certificate sizes might vary. When all of the allocated storage is used, no more
imports are accepted.
7. After you configure SSO in iLO, log in to an HP SSO-compliant application and browse to
iLO. For example, log in to HP SIM, navigate to the System page for the iLO processor, and
then click the iLO link in the More Information section.
NOTE: Although a system might be registered as a trusted server, SSO might be refused
because of the current trust mode or certificate status. For example, if an HP SIM server name
is registered, and the trust mode is Trust by Certificate, but the certificate is not imported, SSO
is not allowed from that server. Likewise, if an HP SIM server certificate is imported, but the
certificate has expired, SSO is not allowed from that server. The list of trusted servers is not
used when SSO is disabled. iLO does not enforce SSO server certificate revocation.
Viewing trusted certificates
The Manage Trusted Certificates table on the Single Sign-On Settings page displays the status of
the trusted certificates configured to use SSO with the current iLO management processor.
• Status—The status of the record (if any are installed).
Configuring iLO security 63
Page 64

Table 4 HP trusted certificate status
DescriptionIcon
The record is valid.
There is a problem with the trust settings or the iLO license. Possible reasons follow:
◦ This record contains a DNS name, and the trust mode is set to Trust by Certificate (only
certificates are valid).
◦ Trust None (SSO disabled) is selected.
◦ A valid license key is not installed.
The record is not valid. Possible reasons follow:
◦ An out-of-date certificate is stored in this record. Check the certificate details for more
information.
◦ The iLO clock is not set or is set incorrectly.
◦ The iLO clock must be in the Valid from and Valid until range.
• Certificate—Indicates that the record contains a stored certificate. Move the cursor over the
icon to view the certificate details, including subject, issuer, and dates.
• Description—The server name (or certificate subject).
Adding trusted certificates
iLO users who have the Configure iLO Settings privilege can install trusted certificates or add direct
DNS names.
The Base64-encoded X.509 certificate data resembles the following:
-----BEGIN CERTIFICATE-----
. . . several lines of encoded data . . .
-----END CERTIFICATE-----
To add trusted HP SSO records by using the iLO web interface:
1. Navigate to the Administration→Security→HP SSO page, as shown in Figure 26 (page 62).
2. Use one of the following methods to add a trusted certificate:
• To directly import a trusted certificate, copy the Base64-encoded certificate X.509 data,
paste it into the text box above the Import Certificate button, and then click the button.
• To indirectly import a trusted certificate, type the DNS name or IP address in the text box
above the Import Certificate from URL button, and then click the button. iLO contacts the
HP SSO-compliant application over the network, retrieves the certificate, and then saves
it.
• To import the direct DNS name, enter the DNS name in the text box above the Import
Direct DNS Name button, and then click the button.
For information about how to extract an HP SIM certificate, see “Extracting the HP SIM server
certificate” (page 65).
For information about how to extract certificates from other HP SSO-compliant applications, see
your HP SSO-compliant application documentation.
64 Configuring iLO
Page 65

Extracting the HP SIM server certificate
You can use the following methods to extract HP SIM certificates.
• Enter one of the following links in a web browser:
For HP SIM versions earlier than 7.0:
◦
http://<HP SIM name or network address>:280/GetCertificate
https://<HP SIM name or network address>:50000/GetCertificate
◦ For HP SIM 7.0 or later:
http://<HP SIM name or network
address>:280/GetCertificate?certtype=sso
https://<HP SIM name or network
address>:50000/GetCertificate?certtype=sso
NOTE: All request parameters are case-sensitive. If you capitalize the lowercase
certtype parameter, the parameter will not be read, and HP SIM will return the default
HP SIM server certificate instead of a trust certificate.
• Export the certificate from HP SIM:
For HP SIM versions earlier than 7.0:
◦
Select Options→Security→Certificates→Server Certificate.
◦ For HP SIM 7.0 or later:
Select Options→Security→HP Systems Insight Manager Server Certificate, and then click
Export.
• Use the HP SIM command-line tools. For example, using the alias tomcat for the HP SIM
certificate, enter mxcert -l tomcat.
For more information, see the HP SIM documentation.
Removing trusted certificates
1. Navigate to the Administration→Security→HP SSO page, as shown in Figure 26 (page 62).
2. Select one or more records in the Manage Trusted Certificates table.
3. Click Delete.
The following message appears:
Are you sure you want to remove the selected certificates?
4. Click Yes.
Configuring Remote Console security settings
Use the Remote Console security settings to control the Remote Console Computer Lock settings
and the Integrated Remote Console Trust setting. You must have the Configure iLO Settings privilege
to change these settings.
Configuring Remote Console Computer Lock settings
Remote Console Computer Lock enhances the security of an iLO-managed server by automatically
locking an operating system or logging out a user when a Remote Console session ends or the
network link to iLO is lost. This feature is standard and does not require an additional license. As
a result, if you open a .NET IRC or Java IRC window and this feature is already configured, the
operating system will be locked when you close the window, even if an iLO license is not installed.
The Remote Console Computer Lock feature is set to Disabled by default.
Configuring iLO security 65
Page 66

To change the Remote Console Computer Lock settings:
1. Navigate to the Administration→Security→Remote Console page, as shown in Figure 27 (page
66).
Figure 27 Remote Console Computer Lock Settings
2. Modify the Remote Console Computer Lock settings as required:
• Windows—Use this option to configure iLO to lock a managed server running a Windows
operating system. The server automatically displays the Computer Locked dialog box
when a Remote Console session ends or the iLO network link is lost.
• Custom—Use this option to configure iLO to use a custom key sequence to lock a managed
server or log out a user on that server. You can select up to five keys from the list. The
selected key sequence is sent automatically to the server operating system when a Remote
Console session ends or the iLO network link is lost.
• Disabled (default)—Use this option to disable the Remote Console Computer Lock feature.
Terminating a Remote Console session or losing an iLO network link will not lock the
operating system on the managed server.
You can create a Remote Console Computer Lock key sequence by using the keys listed in
Table 5 (page 66):
Table 5 Remote Console Computer Lock keys
g1SCRL LCKESC
h2SYS RQL_ALT
i3F1R_ALT
j4F2L_SHIFT
k5F3R_SHIFT
l6F4L_CTRL
m7F5R_CTRL
n8F6L_GUI
o9F7R_GUI
p;F8INS
q=F9DEL
66 Configuring iLO
r[F10HOME
s\F11END
t]F12PG_UP
u'" " (space)PG_DN
va'ENTER
wb,TAB
Page 67

Table 5 Remote Console Computer Lock keys (continued)
f0NUM MINUS
3. Click Apply to save the changes.
Configuring the Integrated Remote Console Trust setting (.NET IRC)
The .NET IRC is launched through Microsoft ClickOnce, which is part of the Microsoft .NET
Framework. ClickOnce requires that any application installed from an SSL connection be from a
trusted source. If a browser is not configured to trust an iLO processor, and the Integrated Remote
Console Trust setting is set to Enabled, ClickOnce displays the following error message:
Cannot Start Application – Application download did not succeed...
To specify whether all clients that browse to this iLO require a trusted iLO certificate to run the .NET
IRC:
1. Navigate to the Administration→Security→Remote Console page, as shown in Figure 28 (page
67).
Figure 28 Remote Console Trust Settings
xc-BREAK
yd.BACKSPACE
ze/NUM PLUS
2. Select one of the following in the Integrated Remote Console Trust Setting section:
• Enabled—The .NET IRC is installed and runs only if this iLO certificate and the issuer
certificate have been imported and are trusted.
• Disabled (default)—When you launch the .NET IRC, the browser installs the application
from a non-SSL connection. SSL is still used after the .NET IRC starts to exchange encryption
keys.
3. Click Apply.
Configuring the Login Security Banner
The Login Security Banner feature allows you to configure the security banner displayed on the
iLO login page. For example, you could enter a message indicating that an iLO system uses FIPS
Mode.
You must have the Configure iLO Settings privilege to make changes on the Login Security Banner
page.
To enable the Login Security Banner:
Configuring iLO security 67
Page 68
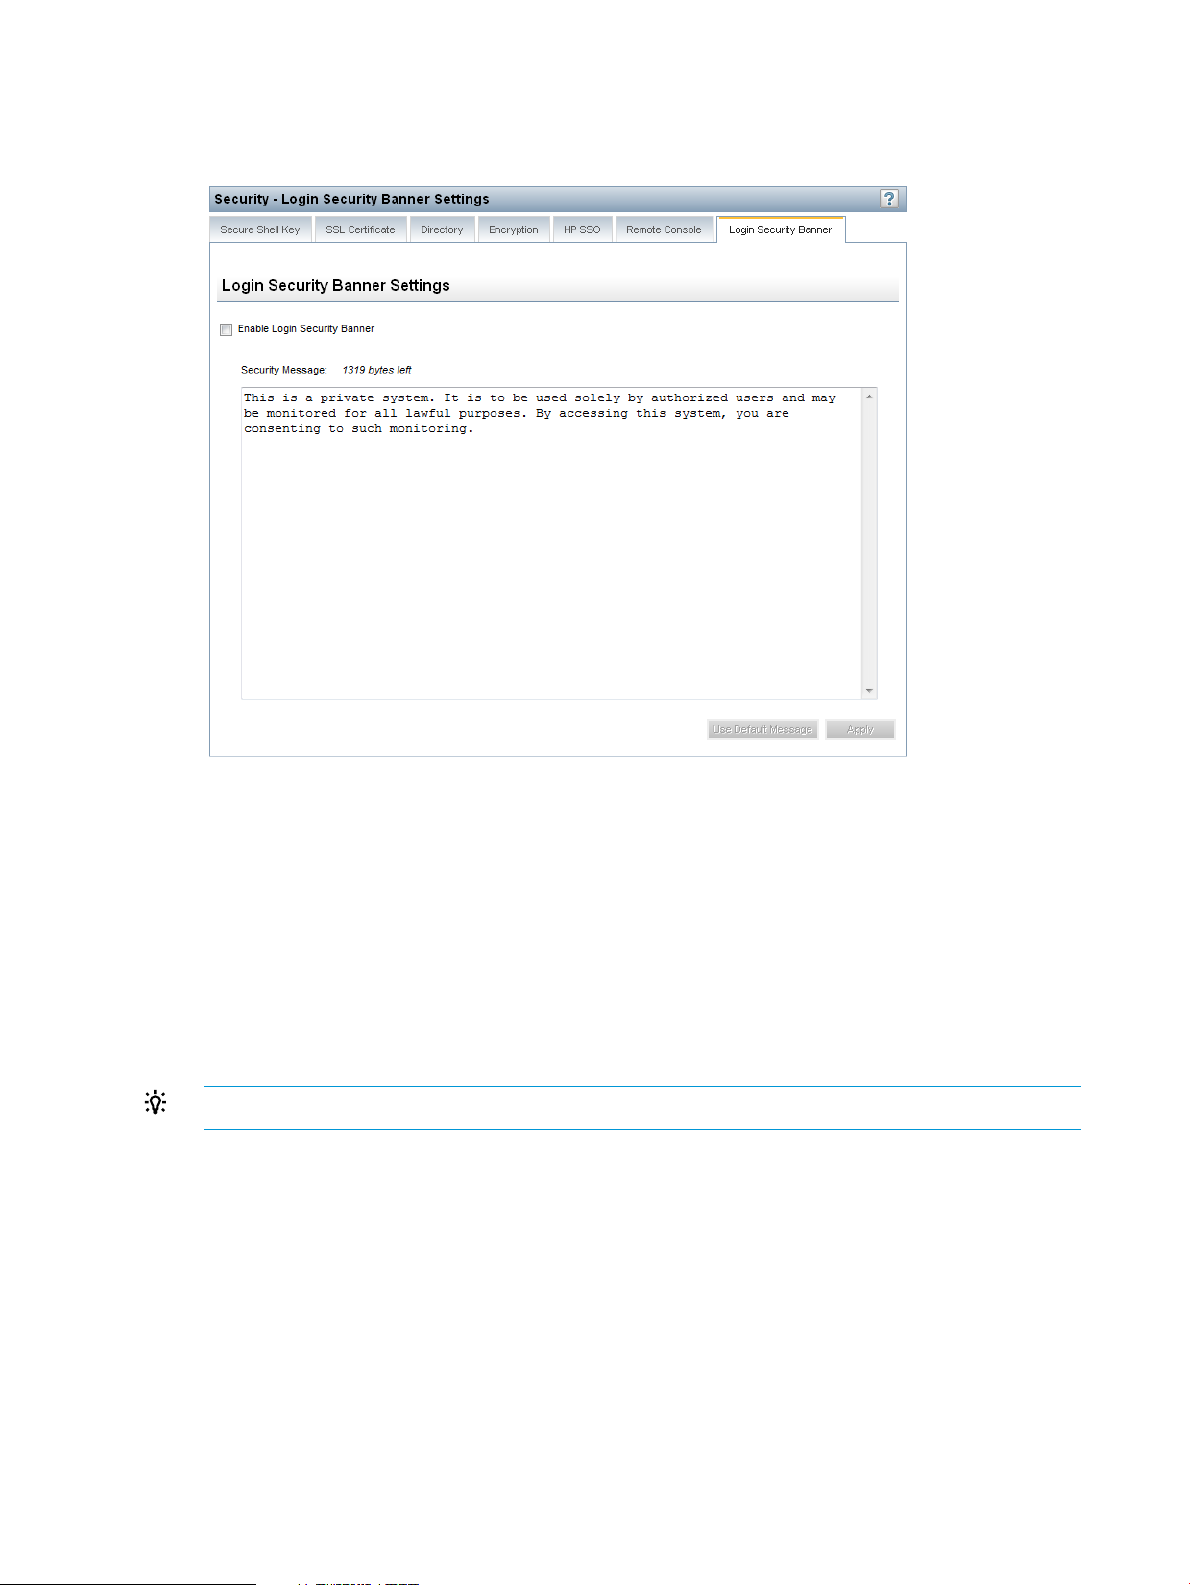
1. Navigate to the Administration→Security→Login Security Banner page, as shown in Figure 29
(page 68).
Figure 29 Security–Login Security Banner Settings page
2. Select the Enable Login Security Banner check box.
iLO uses the following default text for the Login Security Banner:
This is a private system. It is to be used solely by authorized
users and may be monitored for all lawful purposes. By accessing
this system, you are consenting to such monitoring.
3. Optional: To customize the security message, enter a custom message in the Security Message
text box.
The byte counter above the text box indicates the remaining number of bytes allowed for the
message. The maximum is 1,500 bytes.
TIP: Click Use Default Message to restore the default text for the Login Security Banner.
68 Configuring iLO
Page 69
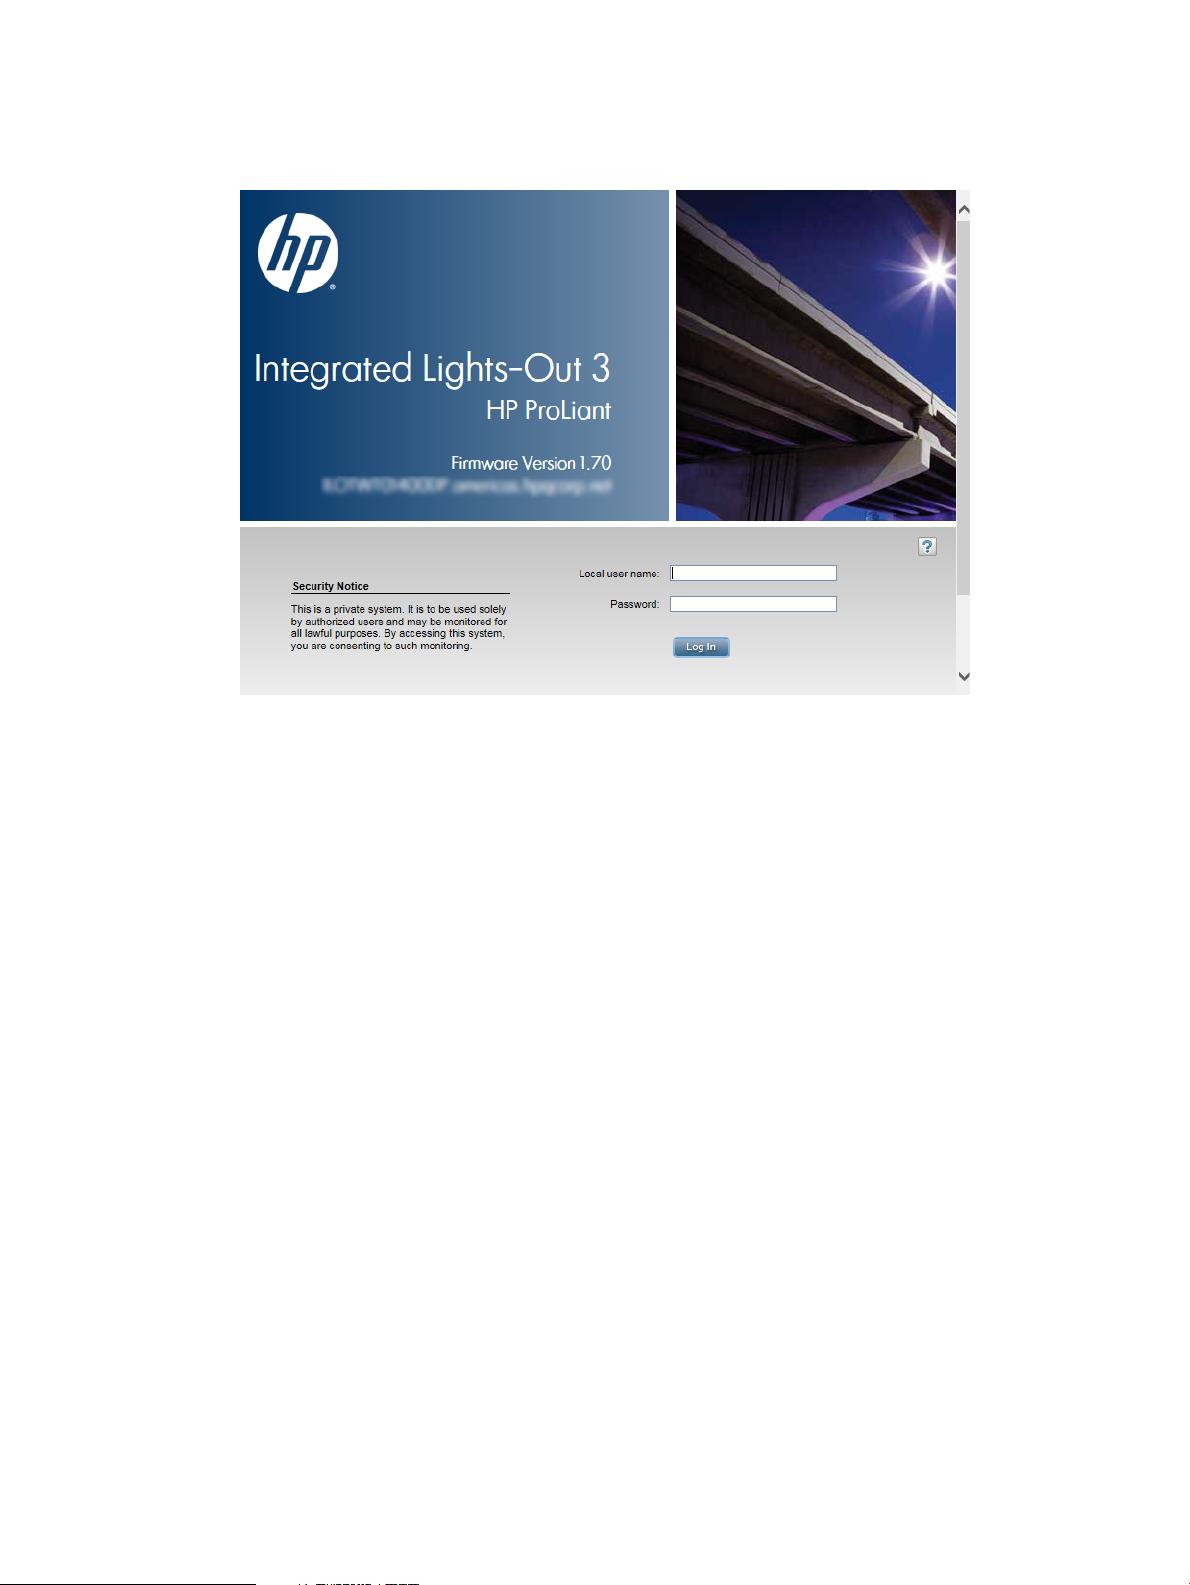
4. Click Apply.
The security message is displayed at the next login, as shown in Figure 30 (page 69).
Figure 30 Security message example
Configuring iLO network settings
Use the tabs on the Network page to view and configure the iLO network settings.
You must have the Configure iLO Settings privilege to view and change these settings.
Viewing network settings
To view a summary of the configured network settings, select Network→iLO Dedicated Network
Port or Network→Shared Network Port to navigate to the Network Summary page. See Figure 31
(page 70).
Configuring iLO network settings 69
Page 70

Figure 31 Network Summary page (iLO Dedicated Network Port)
The iLO Shared Network Port and the iLO Dedicated Network Port cannot operate simultaneously.
If you enable the iLO Dedicated Network Port, you will disable the iLO Shared Network Port. If
you enable the iLO Shared Network Port, you will disable the iLO Dedicated Network Port.
The Network Summary page for the inactive port displays the message iLO is not configured
to use this NIC.
The summary information follows:
• NIC in Use—The name of the selected iLO network interface (iLO Dedicated Network Port or
Shared Network Port).
• iLO Host Name—The fully qualified network name assigned to the iLO subsystem. By default,
the iLO host name is ILO followed by the system serial number and the current domain name.
This value is used for the iLO network name and must be unique.
• MAC Address—The MAC address of the selected iLO network interface.
• Link State—The current link speed of the selected iLO network interface. The default value is
Auto-Negotiate.
• Duplex Option—The current link duplex selection for the selected iLO network interface. The
default value is Auto-Negotiate.
You can configure the iLO host name and NIC settings on the Network General Settings page. For
instructions, see “Configuring general network settings” (page 72).
IPv6 is supported by iLO 3 1.50 and later in the iLO Dedicated Network Port configuration. The
IPv6 protocol was introduced by the IETF in response to the ongoing depletion of the IPv4 address
pool. In IPv6, addresses are increased to 128 bits in length, to avoid an address shortage problem.
iLO supports the simultaneous use of both protocols through a dual-stack implementation. All
previously available iLO features are still supported in IPv4.
NOTE: IPv6 is not supported in the Shared Network Port configuration.
70 Configuring iLO
Page 71

The following features support the use of IPv6:
• IPv6 Static Address Assignment
• IPv6 SLAAC Address Assignment
• IPv6 Static Route Assignment
• Integrated Remote Console
• OA Single Sign-On
• Web Server
• SSH Server
• SNTP Client
• DDNS Client
• DHCPv6 Address Assignment
• DHCPv6 DNS and NTP Configuration
• RIBCL over an IPv6 connection
• HP SIM SSO
• WinDBG Support
• HPQLOCFG and HPLOMIG over an IPv6 connection
• Scriptable Virtual Media
• CLI/RIBCL key import over an IPv6 connection
IPv6 support for the iLO scripting interfaces requires the following versions of the iLO utilities:
• HPQLOCFG 1.0 or later
• HP Lights-Out XML Scripting Sample bundle 4.2.0 or later
• HPONCFG 4.2.0 or later
• LOCFG.PL 4.20 or later
• HPLOMIG 4.20 or later
The IPv4 Summary section displays the following information:
• DHCPv4 Status—Indicates whether DHCP is enabled for IPv4.
• Address—The IPv4 address currently in use. If the value is 0.0.0.0, the IPv4 address is not
configured.
• Subnet Mask—The subnet mask of the IPv4 address currently in use. If the value is 0.0.0.0,
no address is configured.
• Default Gateway—The default gateway address in use for the IPv4 protocol. If the value is
0.0.0.0, the gateway is not configured.
The IPv6 Summary section displays the following information:
• DHCPv6 Status—Indicates whether DHCP is enabled for IPv6. The following values are possible:
Enabled—Stateless and Stateful DHCPv6 are enabled.◦
◦ Enabled (Stateless)—Only Stateless DHCPv6 is enabled.
◦ Disabled—DHCPv6 is disabled.
• IPv6 Stateless Address Auto-Configuration (SLAAC)—Indicates whether SLAAC is enabled for
IPv6. When SLAAC is disabled, the SLAAC link-local address for iLO is still configured because
it is required.
Configuring iLO network settings 71
Page 72
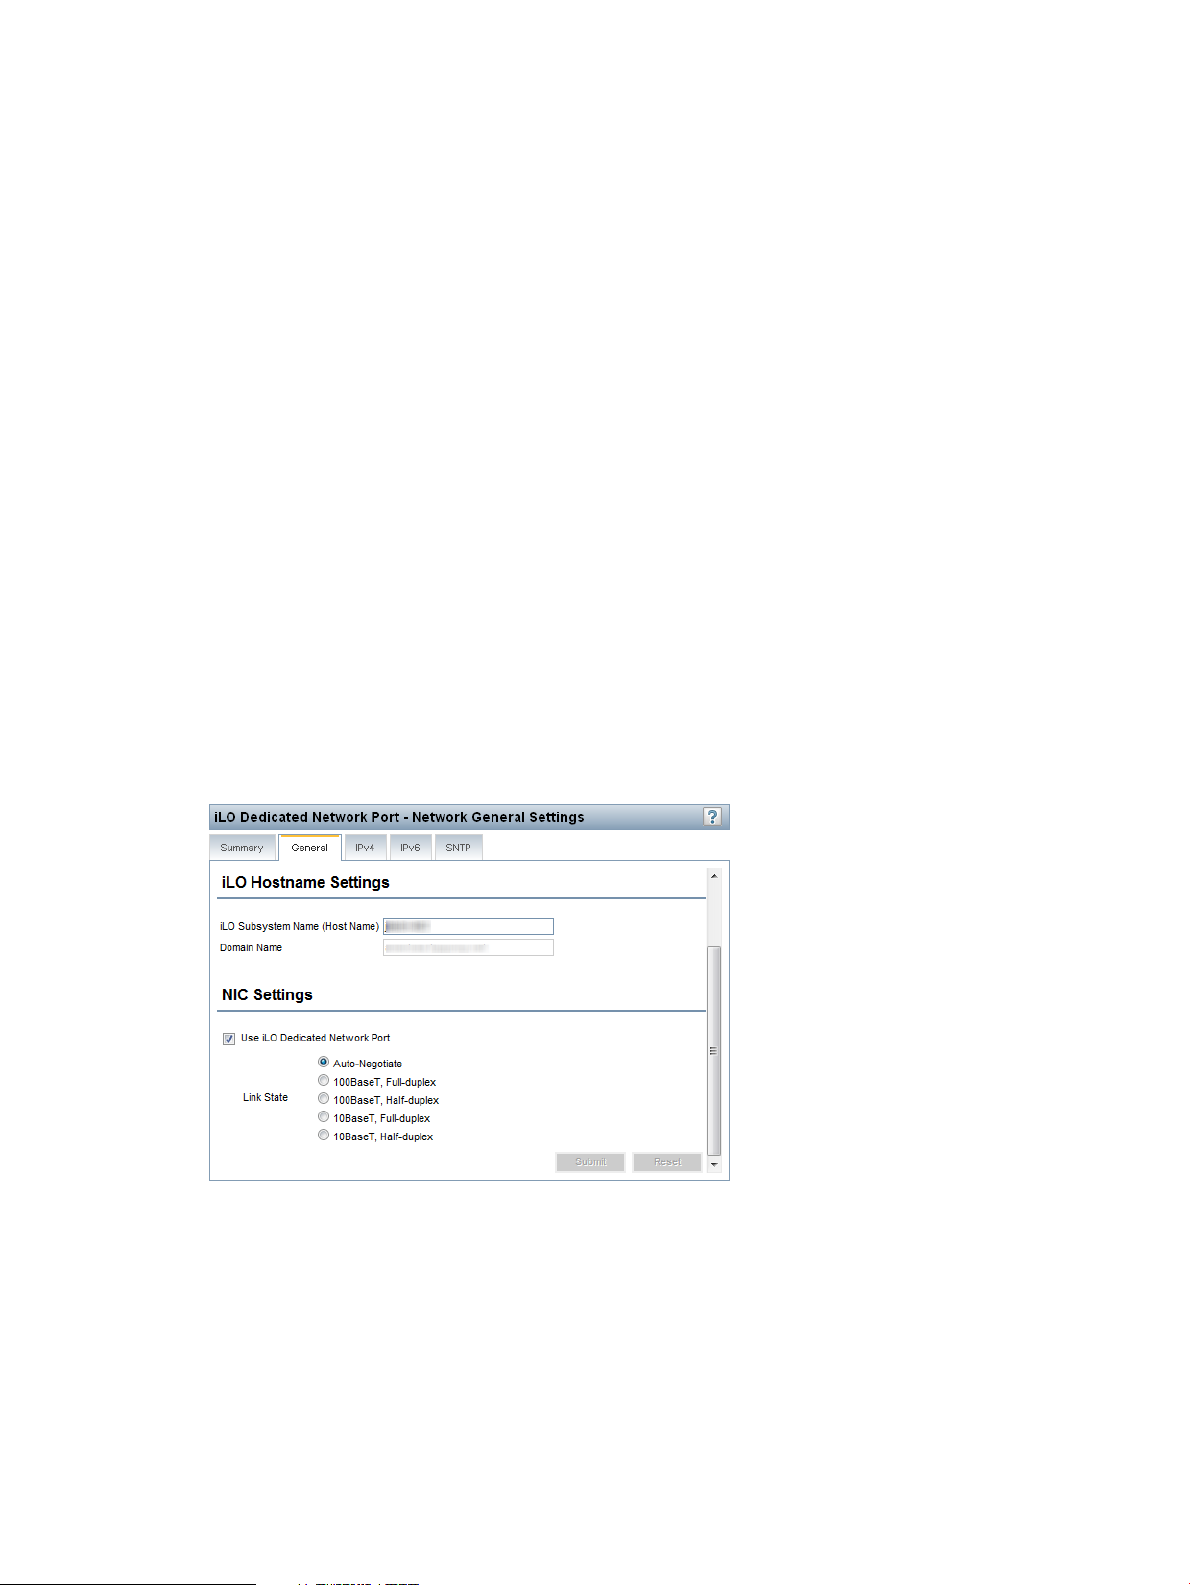
• Address list—This table shows the currently configured IPv6 addresses for iLO. It provides the
following information:
◦ Source—Indicates whether the address is a static or SLAAC address.
◦ IPv6—The IPv6 address.
◦ Prefix Length—The address prefix length.
◦ Status—The address status: Active (the address is in use by iLO), Pending (Duplicate
Address Detection is in progress for this address), or Failed (Duplicate Address Detection
failed and the address is not in use by iLO).
• Default Gateway—The default IPv6 gateway address that is currently in use. For IPv6, iLO
keeps a list of possible default gateway addresses. The addresses in this list originate from
router advertisement messages and the IPv6 Static Default Gateway setting.
The Static Default Gateway setting is configured on the IPv6 page. For more information, see
“Configuring IPv6 settings” (page 76).
Configuring general network settings
Use the iLO Dedicated Network Port or Shared Network Port Network General Settings page to
configure general network settings. You must have the Configure iLO Settings privilege to make
changes on this page.
1. Navigate to the Network→iLO Dedicated Network Port or Network→Shared Network Port
page.
2. Click the General tab, as shown in Figure 32 (page 72).
Figure 32 Network General Settings page (iLO Dedicated Network Port)
72 Configuring iLO
Page 73

3. Enter the following information in the iLO Hostname Settings section:
• iLO Subsystem Name (Host Name)—The DNS name of the iLO subsystem (for example,
ilo instead of ilo.example.com). This name can be used only if DHCP and DNS
are configured to connect to the iLO subsystem name instead of the IP address.
iLO subsystem-name limitations follow:
◦ Name service limitations—The subsystem name is used as part of the DNS name.
DNS allows alphanumeric characters and hyphens.–
– Name service limitations also apply to the Domain Name.
◦ Namespace issues—To avoid these issues:
– Do not use the underscore character.
– Limit subsystem names to 15 characters.
– Verify that you can ping iLO by IP address and by DNS/WINS name.
– Verify that NSLOOKUP resolves the iLO network address correctly and that no
namespace conflicts exist.
– If you are using both DNS and WINS, verify that they resolve the iLO network
address correctly.
– Flush the DNS name if you make any namespace changes.
• Domain Name—The iLO domain name. If DHCP is not used, enter a domain name.
4. Enter the following information in the NIC Settings section:
• Select the Use iLO Dedicated Network Port or Use Shared Network Port check box to
enable or disable the iLO Dedicated Network Port or Shared Network Port.
◦ Use iLO Dedicated Network Port—Uses a NIC with a jack on the back of the server.
The NIC handles iLO traffic only.
◦ Shared Network Port – LOM—Uses a NIC that is built into the server. The NIC handles
server network traffic and can, if iLO is configured to do so, handle iLO traffic at the
same time.
◦ Shared Network Port Enabled Standup NIC—An optional NIC that plugs into a PCI
slot on the server and requires a special cable to connect it to the server motherboard.
The NIC handles server network traffic and can, if iLO is configured to do so, handle
iLO traffic at the same time.
On systems that have more than one Shared Network Port option, select the check box,
and then select a Shared Network Port option.
• Select a Link State (iLO Dedicated Network Port only).
The link setting controls the speed and duplex settings of the iLO network transceiver.
NOTE: This setting is not available on blade servers.
The available settings follow:
◦ Auto-Negotiate (default)—Enables iLO to negotiate the highest supported link speed
and duplex settings when connected to the network
◦ 100BaseT, Full-duplex—Forces a 100 Mb connection using full duplex
◦ 100BaseT, Half-duplex—Forces a 100 Mb connection using half duplex
Configuring iLO network settings 73
Page 74

◦ 10BaseT, Full-duplex—Forces a 10 Mb connection using full duplex
◦ 10BaseT, Half-duplex—Forces a 10 Mb connection using half duplex
If the Shared Network Port is enabled, you cannot modify the link state or duplex option.
In Shared Network Port configurations, link settings must be managed in the operating
system.
• Select or clear the Enable VLAN check box to enable or disable VLAN (Shared Network
Port only).
When the Shared Network Port is active and VLAN is enabled, the iLO Shared Network
Port becomes part of a VLAN. All network devices with different VLAN tags will appear
to be on separate LANs, even if they are physically connected to the same LAN.
• If you enabled VLAN, enter a VLAN Tag (Shared Network Port only). All network devices
that you want to communicate with each other must have the same VLAN tag. The VLAN
tag can be any number between 1 and 4094.
5. Click Submit to save the changes.
6. If you are finished configuring the iLO network settings on the General, IPv4, IPv6, and SNTP
tabs, click Reset to restart iLO.
Wait at least 30 seconds before you attempt to re-establish a connection.
Configuring IPv4 settings
Use the iLO Dedicated Network Port or Shared Network Port IPv4 Settings page to configure IPv4
settings for iLO. You must have the Configure iLO Settings privilege to make changes on this page.
1. Navigate to the Network→iLO Dedicated Network Port or Network→Shared Network Port
page.
2. Click the IPv4 tab, as shown in Figure 33 (page 75).
74 Configuring iLO
Page 75

Figure 33 IPv4 Settings page (iLO Dedicated Network Port)
3. Configure the following settings:
• Enable DHCPv4—Enables iLO to obtain its IP address (and many other settings) from a
DHCP server.
◦ Use DHCPv4 Supplied Gateway—Specifies whether iLO uses the DHCP server-supplied
gateway. If DHCP is not used, enter a gateway address in the Gateway IPv4 Address
box.
◦ Use DHCPv4 Supplied Static Routes—Specifies whether iLO uses the DHCP
server-supplied static routes. If not, enter the static route destination, mask, and
gateway addresses in the Static Route #1, Static Route #2, and Static Route #3 boxes.
◦ Use DHCPv4 Supplied Domain Name—Specifies whether iLO uses the DHCP
server-supplied domain name. If DHCP is not used, enter a domain name in the
Domain Name box on the Network General Settings page. For more information,
see “Configuring general network settings” (page 72).
◦ Use DHCPv4 Supplied DNS Servers—Specifies whether iLO uses the DHCP
server-supplied DNS server list. If not, enter the DNS server addresses in the Primary
DNS Server, Secondary DNS Server, and Tertiary DNS Server boxes.
Configuring iLO network settings 75
Page 76

◦ Use DHCPv4 Supplied Time Settings—Specifies whether iLO uses the DHCPv4-supplied
NTP service locations.
◦ Use DHCPv4 Supplied WINS Servers—Specifies whether iLO uses the DHCP
server-supplied WINS server list. If not, enter the WINS server addresses in the
Primary WINS Server and Secondary WINS Server boxes.
• IPv4 Address—The iLO IP address. If DHCP is used, the iLO IP address is supplied
automatically. If DHCP is not used, enter a static IP address.
• Subnet Mask—The subnet mask of the iLO IP network. If DHCP is used, the subnet mask
is supplied automatically. If DHCP is not used, enter a subnet mask for the network.
• Gateway IPv4 Address—The iLO gateway IP address. If DHCP is used, the iLO gateway
IP address is supplied automatically. If DHCP is not used, enter the iLO gateway IP address.
• Static Route #1, Static Route #2, and Static Route #3—The iLO static route destination,
mask, and gateway addresses. If Use DHCPv4 Supplied Static Routes is used, these values
are supplied automatically. If not, enter the static route values.
• DNS server information—Enter the following information:
Primary DNS Server—If Use DHCPv4 Supplied DNS Servers is enabled, this value is
◦
supplied automatically. If not, enter the Primary DNS Server address.
◦ Secondary DNS Server—If Use DHCPv4 Supplied DNS Servers is enabled, this value
is supplied automatically. If not, enter the Secondary DNS Server address.
◦ Tertiary DNS Server—If Use DHCPv4 Supplied DNS Servers is enabled, this value is
supplied automatically. If not, enter the Tertiary DNS Server address.
◦ Enable DDNS Server Registration—Select or clear this check box to specify whether
iLO registers its IPv4 address and name with a DNS server.
• WINS server information—Enter the following information:
Primary WINS Server—If Use DHCPv4 Supplied WINS Servers is enabled, this value
◦
is supplied automatically. If not, enter the Primary WINS Server address.
◦ Secondary WINS Server—If Use DHCPv4 Supplied WINS Servers is enabled, this
value is supplied automatically. If not, enter the Secondary WINS Server address.
◦ Enable WINS Server Registration—Specifies whether iLO registers its name with a
WINS server.
• Ping Gateway on Startup—Causes iLO to send four ICMP echo request packets to the
gateway when iLO initializes. This ensures that the ARP cache entry for iLO is up-to-date
on the router responsible for routing packets to and from iLO.
4. Click Submit to save the changes you made on the IPv4 Settings page.
5. If you are finished configuring the iLO network settings on the General, IPv4, IPv6, and SNTP
tabs, click Reset to restart iLO.
Wait at least 30 seconds before you attempt to re-establish a connection.
Configuring IPv6 settings
Use the iLO Dedicated Network Port IPv6 Settings page to configure IPv6 settings for iLO. You
must have the Configure iLO Settings privilege to make changes on this page.
76 Configuring iLO
Page 77

When using IPv6, note the following:
• IPv6 is not supported in the Shared Network Port configuration.
• If you downgrade the iLO firmware from version 1.6x or later to version 1.5x, the IPv6 settings
will be reset to the default values.
To configure the IPv6 settings:
1. Navigate to the Network→iLO Dedicated Network Port page.
2. Click the IPv6 tab, as shown in Figure 34 (page 77).
Figure 34 IPv6 Settings page (iLO Dedicated Network Port)
3. Configure the following settings:
• iLO Client Applications use IPv6 first—When both IPv4 and IPv6 service addresses are
configured for iLO client applications, this option specifies which protocol iLO tries first
when accessing a client application. This setting also applies to lists of addresses received
from the name resolver when using FQDNs to configure NTP.
◦ Select this check box if you want iLO to use IPv6 first.
◦ Clear this check box if you want iLO to use IPv4 first.
Configuring iLO network settings 77
Page 78

If communication fails using the first protocol, iLO automatically tries the second protocol.
• Enable Stateless Address Auto Configuration (SLAAC)—Select this check box to enable
iLO to create IPv6 addresses for itself from router advertisement messages.
NOTE: iLO will create its own link-local address even when this option is not selected.
• Enable DHCPv6 in Stateful Mode (Address)—Select this check box to allow iLO to request
and configure IPv6 addresses provided by a DHCPv6 server.
◦ Use DHCPv6 Rapid Commit—Select this check box to instruct iLO to use the Rapid
Commit messaging mode with the DHCPv6 server. This mode reduces DHCPv6
network traffic, but might cause problems if it is used in networks where more than
one DHCPv6 server can respond and provide addresses.
• Enable DHCPv6 in Stateless Mode (Other)—Select this check box to enable iLO to request
settings for NTP and DNS service location from the DHCPv6 server.
◦ Use DHCPv6 Supplied DNS Servers—Select this check box to use IPv6 addresses
provided by the DHCPv6 server for DNS server locations. This setting can be enabled
in addition to the IPv4 DNS server location options.
◦ Use DHCPv6 Supplied NTP Servers—Select this check box to use IPv6 addresses
provided by the DHCPv6 server for NTP server locations. This setting can be enabled
in addition to the IPv4 NTP server location options.
NOTE: When Enable DHCPv6 in Stateful Mode (Address) is selected, Enable DHCPv6
in Stateless Mode (Other) is always selected by default, because it is implicit in the DHCPv6
Stateful messages required between iLO and the DHCPv6 server.
• Primary DNS Server, Secondary DNS Server, and Tertiary DNS Server—Enter the IPv6
addresses for the DNS service.
When DNS server locations are configured in both IPv4 and IPv6, both sources are used,
with preference given according to the iLO Client Applications use IPv6 first configuration
option, primary sources, then secondary, and then tertiary.
• Enable DDNS Server Registration—Specify whether iLO registers its IPv6 address and
name with a DNS server.
• Static IPv6 Address 1, Static IPv6 Address 2, Static IPv6 Address 3, and Static IPv6 Address
4—Enter up to four static IPv6 addresses and prefix lengths for iLO. Do not enter link-local
addresses.
• Static Default Gateway—Enter a default IPv6 gateway address for cases in which no
router advertisement messages are present in the network.
• Static Route #1, Static Route #2, and Static Route #3—Enter static IPv6 route destination
prefix and gateway address pairs. You must specify the prefix length for the destination.
Link-local addresses are not allowed for the destination, but are allowed for the gateway.
4. Click Submit to save the changes you made on the IPv6 Settings page.
5. If you are finished configuring the iLO network settings on the General, IPv4, IPv6, and SNTP
tabs, click Reset to restart iLO.
Wait at least 30 seconds before you attempt to re-establish a connection.
78 Configuring iLO
Page 79

Configuring SNTP settings
SNTP allows iLO to synchronize its clock with an external time source. Configuring SNTP is optional
because the iLO date and time can also be synchronized from the following sources:
• System ROM (during POST only)
• Insight Management Agents (in the OS)
• Onboard Administrator (blade servers only)
To use iLO SNTP, you must have at least one NTP server available on your management network.
Primary and secondary NTP server addresses can be configured manually or via DHCP servers.
If the primary server address cannot be contacted, the secondary address is used. You must have
the Configure iLO Settings privilege to change these settings.
NOTE: IPv6 is not supported in the Shared Network Port configuration.
To configure the SNTP settings:
1. Navigate to the Network→iLO Dedicated Network Port or Network→Shared Network Port
page.
2. Click the SNTP tab, as shown in Figure 35 (page 79).
Figure 35 SNTP Settings page (iLO Dedicated Network Port)
3. Do one of the following:
• Select the Use DHCPv4 Supplied Time Settings check box, the Use DHCPv6 Supplied Time
Settings check box, or both check boxes to use DHCP-provided NTP server addresses.
Note the following configuration prerequisites:
◦ To configure a DHCPv4-provided NTP service configuration, you must first enable
DHCPv4 on the IPv4 tab.
◦ To configure a DHCPv6-provided NTP service configuration, DHCPv6 Stateless Mode
must be enabled on the IPv6 tab.
When you use DHCP servers to provide NTP server addresses, the iLO Client Applications
use IPv6 first setting controls the selection of the primary and secondary NTP values.
When iLO Client Applications use IPv6 first is selected on the IPv6 tab, a DHCPv6-provided
NTP service address (if available) is used for the primary time server and a
DHCPv4-provided address (if available) is used for the secondary time server.
To change the protocol-based priority behavior to use DHCPv4 first, clear the iLO Client
Applications use IPv6 first check box.
Configuring iLO network settings 79
Page 80

If a DHCPv6 address is not available for the primary or secondary address, a DHCPv4
address (if available) is used.
• Enter NTP server addresses in the Primary Time Server and Secondary Time Server boxes.
You can enter the server addresses by using the server FQDN, IPv4 address, or IPv6
address.
4. If you selected only Use DHCPv6 Supplied Time Settings, or if you entered a primary and
secondary time server, select the server time zone from the Time Zone list.
This setting determines how iLO adjusts UTC time to obtain the local time, and how it adjusts
for Daylight Savings Time (Summer Time). In order for the entries in the iLO Event Log and
IML to display the correct local time, you must specify the time zone in which the server is
located.
If you want iLO to use the time the SNTP server provides, without adjustment, configure iLO
to use a time zone that does not apply an adjustment to UTC time. In addition, that time zone
must not apply a Daylight Savings Time (Summer Time) adjustment. There are several time
zones that fit this requirement. One example is the Atlantic/Reykjavik time zone, which is
neither east or west of the Prime Meridian, and in which the time does not change in the
spring or fall. If you select the Atlantic/Reykjavik time zone, iLO web pages and log entries
will display the exact time provided by the SNTP server.
NOTE: Configure the NTP servers to use Coordinated Universal Time (GMT).
5. Configure the NTP time propagation setting by selecting or clearing the Propagate NTP Time
to Host check box (ML, DL, and SL servers) or the Propagate NTP or OA Time to Host check
box (BL servers).
These settings are enabled by default, and they determine whether the server time is
synchronized with the iLO time during the first POST after AC power is applied, a blade is
inserted, or iLO is reset to the default settings.
For BladeSystems only: When Propagate NTP or OA Time to Host is enabled, and NTP is not
configured or functional, the server time is synchronized with the OA time.
6. Click Submit to save the changes you made on the SNTP Settings page.
7. If you are finished configuring the iLO network settings on the General, IPv4, IPv6, and SNTP
tabs, click Reset to restart iLO.
Wait at least 30 seconds before you attempt to re-establish a connection.
TIP: If you notice that iLO Event Log entries have an incorrect date or time, make sure that the
NTP server addresses and time zone are correct. The iLO Event Log includes entries that indicate
success or failure when contacting the NTP server(s).
Configuring and using the iLO Shared Network Port
The iLO Shared Network Port feature enables you to choose between the Shared Network Port
LOM, Shared Network Port Enabled Standup NIC, and the iLO Dedicated Network Port for server
management. When you enable the iLO Shared Network Port, regular network traffic and iLO
network traffic pass through the selected Shared Network Port NIC.
If you install a Shared Network Port Enabled Standup NIC, the Shared Network Port LOM is no
longer available to send and receive iLO network traffic. That traffic will go through the iLO
Dedicated Network Port or the Shared Network Port Enabled Standup NIC, depending on the iLO
configuration.
If you install a Shared Network Port Enabled Standup NIC, you do not need to change the iLO
configuration to use that NIC. The first time that the server is plugged in with a correctly installed
Shared Network Port Enabled Standup NIC, iLO will detect the NIC and automatically begin using
80 Configuring iLO
Page 81

it. If you later decide to switch back to the iLO Dedicated Network Port, you can do this using any
of the standard iLO interfaces.
On servers that do not have an iLO Dedicated Network Port, the standard hardware configuration
provides iLO network connectivity only through the iLO Shared Network Port connection. The iLO
firmware automatically defaults to the Shared Network Port.
The iLO Shared Network Port uses the network port labeled NIC 1 on the rear panel of the server
when Shared Network Port – LOM is selected, and the network port labeled 1 on the Shared
Network Port Enabled Standup NIC adapter if Shared Network Port Enabled Standup NIC is
selected. NIC numbering in the operating system can be different from system numbering. The iLO
Shared Network Port does not incur an iLO performance penalty. Peak iLO traffic is less than 2
Mb/s (on a NIC capable of 1 GB/s or 10 GB/s speeds), and iLO traffic volume is low unless the
Virtual Media or Remote Console feature is in use.
When using the iLO Shared Network Port, observe the following:
• The iLO Shared Network Port is supported on all nonblade servers.
• You can use the iLO Shared Network Port and the iLO Dedicated Network Port only for iLO
server management.
• The iLO Shared Network Port is not an availability feature. Its purpose is to allow managed
network port consolidation.
• Due to server auxiliary-power budget limitations, some 1Gb/s copper network adapters used
for iLO Shared Network Port functionality might run at 10/100 speed when the server is
powered off. To avoid this issue, HP recommends configuring the switch the iLO Shared
Network Port is connected to for autonegotiation.
If you want to configure the iLO switch for a speed of 1Gb/s, be aware that some copper
iLO Shared Network Port adapters might lose connectivity when the server is powered off.
Connectivity will return when the server is powered back on.
• The iLO Shared Network Port and iLO Dedicated Network Port cannot operate simultaneously.
If you enable the iLO Dedicated Network Port, you will disable the iLO Shared Network Port.
If you enable the iLO Shared Network Port, you will disable the iLO Dedicated Network Port.
• Disabling the iLO Shared Network Port does not completely disable the system NIC—network
traffic still passes through the NIC. When the iLO Shared Network Port is disabled, any traffic
going to or originating from iLO will not pass through the iLO Shared Network Port because
that port is no longer shared with iLO.
• Using the iLO Shared Network Port can create a single failure point. If the port fails or is
unplugged, both the host and iLO become unavailable to the network.
Enabling the iLO Shared Network Port feature
The iLO Shared Network Port feature is disabled by default on servers that are shipped with a
Dedicated iLO Management NIC. You can enable it by using the following methods:
• iLO RBSU—For more information, see “Enabling the iLO Shared Network Port feature through
iLO RBSU” (page 82).
• iLO web interface—For more information, see “Enabling the iLO Shared Network Port feature
through the iLO web interface” (page 82).
• XML configuration and control scripts—For more information, see the HP iLO 3 Scripting and
Command Line Guide.
• SMASH CLP—For more information, see the HP iLO 3 Scripting and Command Line Guide.
Configuring and using the iLO Shared Network Port 81
Page 82
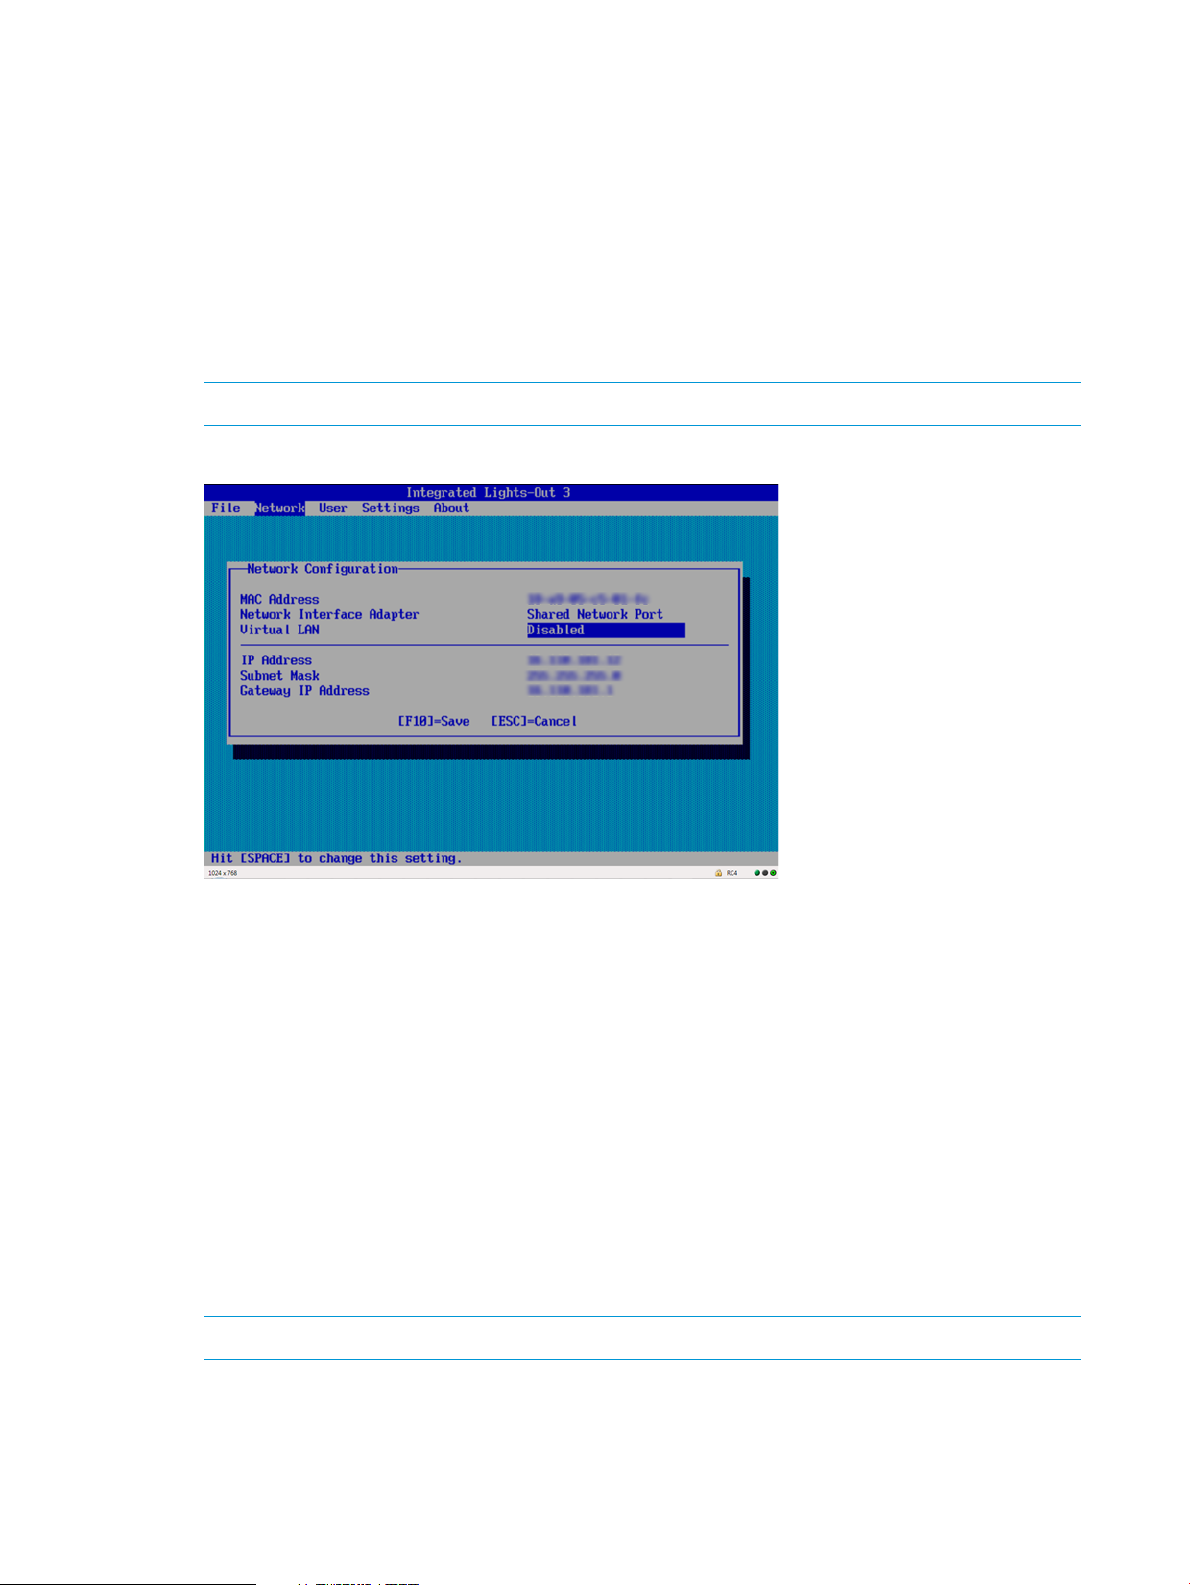
Enabling the iLO Shared Network Port feature through iLO RBSU
1. Connect the Shared Network Port LOM or Shared Network Port Enabled Standup NIC port
1 to a LAN.
2. Optional: If you will access the server remotely, start an iLO remote console session.
You can use the .NET IRC or Java IRC.
3. Restart or power on the server.
4. Press F8 in the HP ProLiant POST screen.
5. Select Network→NIC and TCP/IP, and then press Enter.
6. On the Network Configuration menu, press the spacebar to toggle the Network Interface
Adapter setting to Shared Network Port, as shown in Figure 36 (page 82).
NOTE: The Shared Network Port option is available only on supported servers.
Figure 36 iLO RBSU Network Configuration window
7. Press F10 to save the configuration.
8. Select File→Exit, and then press Enter.
After iLO resets, the Shared Network Port feature is active. Any network traffic going to or originating
from iLO is directed through the Shared Network Port LOM or Shared Network Port Enabled
Standup NIC port 1.
Enabling the iLO Shared Network Port feature through the iLO web interface
1. Connect the Shared Network Port LOM or Shared Network Port Enabled Standup NIC port
1 to a LAN.
2. Log in to the iLO web interface.
3. Navigate to the Network→Shared Network Port page.
4. Click the General tab.
5. Depending on your configuration, select the Shared Network Port Enabled Standup NIC or
Use Shared Network Port check box.
NOTE: The Shared Network Port option is available only on supported servers.
6. To use a VLAN, select the Enable VLAN check box.
VLAN is only available for the Shared Network Port. When the Shared Network Port is activated
and VLAN is enabled, the iLO Shared Network Port becomes part of a VLAN. All network
82 Configuring iLO
Page 83

devices with different VLAN tags will appear to be on separate LANs, even if they are physically
connected to the same LAN.
7. If you enabled VLAN, enter a VLAN tag (Shared Network Port only). All network devices that
you want to communicate with each other must have the same VLAN tag. The VLAN tag can
be any number between 1 and 4,094.
8. Click Apply.
Your changes are applied to the iLO network configuration, your browser connection ends,
and iLO restarts. You must wait at least 30 seconds before you attempt to re-establish a
connection.
After iLO resets, the Shared Network Port feature is active. Any network traffic going to or originating
from iLO is directed through the Shared Network Port LOM or Shared Network Port Enabled
Standup NIC port 1.
Re-enabling the iLO Dedicated Network Port
Only the Shared Network Port or the iLO Dedicated Network Port is active for server management.
They cannot be enabled at the same time. If you enabled the Shared Network Port, use one of the
following methods if you want to re-enable the iLO Dedicated Network Port:
• iLO RBSU (on servers that support iLO RBSU)—For more information, see “Enabling the iLO
Dedicated Network Port through iLO RBSU” (page 83).
• iLO web interface—For more information, see “Enabling the iLO Dedicated Network Port
through the web interface” (page 83).
• XML scripting—For more information, see the HP iLO 3 Scripting and Command Line Guide.
• SMASH CLP—For more information, see the HP iLO 3 Scripting and Command Line Guide.
Enabling the iLO Dedicated Network Port through iLO RBSU
1. Connect the iLO Dedicated Network Port to a LAN from which the server is managed.
2. Optional: If you access the server remotely, start an iLO remote console session.
You can use the .NET IRC or Java IRC.
3. Restart or power on the server.
4. Press F8 in the HP ProLiant POST screen.
5. Select Network→NIC and TCP/IP, and then press Enter.
6. On the Network Configuration menu, press the spacebar to toggle the Network Interface
Adapter setting to On.
7. Press F10 to save the configuration.
8. Select File→Exit, and then press Enter.
After iLO resets, the iLO Dedicated Network Port is active.
Enabling the iLO Dedicated Network Port through the web interface
1. Connect the iLO Dedicated Network Port to a LAN from which the server is managed.
2. Log in to the iLO web interface.
3. Navigate to the Network→iLO Dedicated Network Port page.
4. Click the General tab.
5. Select the Use iLO Dedicated Network Port check box.
6. Select a Link State.
For more information, see “Configuring general network settings” (page 72).
Configuring and using the iLO Shared Network Port 83
Page 84

7. Click Apply.
Your changes are applied to the iLO network configuration, your browser connection ends,
and iLO restarts. You must wait at least 30 seconds before you attempt to re-establish a
connection.
Configuring iLO Management settings
The Administration→Management page allows you to configure the iLO settings for SNMP alerts
and Insight Manager integration.
You must have the Configure iLO Settings privilege to change these settings.
Depending on your configuration, you might need to install additional software. See “Installing
the Insight Management Agents” (page 84).
Installing the Insight Management Agents
The Insight Management Agents are available from the HP Service Pack for ProLiant and the HP
website. For instructions about using the HP Service Pack for ProLiant to install the Insight
Management Agents, see the Service Pack for ProLiant documentation.
To download the Insight Management Agents from the HP website:
1. Navigate to the technical support page on the HP website: http://www.hp.com/support.
2. Select a country or region and a language.
The HP Support page opens.
3. Click the Drivers & Downloads link.
In the search box, enter the server model that you are using (for example, DL360p).
A list of servers is displayed.
4. Click the link for your server.
The HP Support Center page for the server opens.
5. Click the link for the server operating system.
6. Download the software.
7. Follow the installation instructions provided with the downloaded software.
Configuring SNMP alerts
You can enable or disable iLO SNMP alerts, forwarding of Insight Management Agent SNMP
alerts, and SNMP Pass-thru.
To configure SNMP alerts:
1. Navigate to the Administration→Management page.
2. Click the SNMP Settings tab and scroll to the SNMP Alerts section, as shown in Figure 37).
Figure 37 Editing the SNMP alerts
84 Configuring iLO
Page 85

3. Enable or disable the following alert types:
• iLO SNMP Alerts—Alert conditions that iLO detects independently of the host operating
system can be sent to specified SNMP alert destinations, such as HP SIM.
• Forward Insight Manager Agent SNMP Alerts—Alert conditions detected by the host
management agents can be forwarded to SNMP alert destinations through iLO. These
alerts are generated by the Insight Management Agents, which are available for each
supported operating system. Insight Management Agents must be installed on the host
server to receive these alerts.
• SNMP Pass-thru—Use SNMP agents running on the host operating system to manage the
server. SNMP requests sent by the client to iLO over the network are passed to the host
operating system. The responses are then passed to iLO and returned to the client over
the network. Alerts are not affected by this setting.
4. Optional: Click Send Test Alert to generate a test alert and send it to the TCP/IP addresses in
the SNMP Alert Destination(s) boxes.
Test alerts include an Insight Management SNMP trap, and are used to verify the network
connectivity of iLO in HP SIM. Only users with the Configure iLO Settings privilege can send
test alerts.
After the alert is generated, a confirmation dialog box opens. Check the HP SIM console for
receipt of the alert.
5. Click Apply to save the configuration.
SNMP traps
You can generate the following SNMP traps with iLO 3:
• ALERT_TEST is used to verify that the SNMP configuration, client SNMP console, and network
• ALERT_SERVER_POWER occurs when the iLO management processor detects an unexpected
• ALERT_SERVER_RESET occurs when the iLO management processor is used to perform a cold
• ALERT_SELFTEST_FAILURE is an SNMP alert transmitted when iLO detects an error in any of
• ALERT_THRESHOLD_BREACH alert is transmitted when the iLO management processor detects
are operating correctly. You can use the iLO web interface to generate this alert to verify
receipt of the alert at the SNMP console. You can also generate this alert using the iLO Option
ROM to verify SNMP configuration settings.
transition of the host system power, either from ON to OFF, or OFF to ON. Transitions of the
host system power are unexpected when the change takes place because of events unknown
to the management processor. This alert is not generated when the system is powered up or
down using the iLO web interface, CLI, RIBCL or other management feature. If the server is
powered down because of the operating system, physical power button presses, or other
methods, the alert is generated and sent.
boot or warm boot of the host system. This alert is also sent when the iLO management
processor detects the host system is in reset because of events unknown to the management
processor. Certain operating system behavior or actions can cause this type of event to be
detected, and the alert transmitted.
the monitored internal components. If an error is detected an SNMP alert is transmitted.
host system power to be above a user configurable power threshold, over a user configurable
period of time.
Configuring SNMP alert destinations
iLO 3 supports up to three IP addresses to receive SNMP alerts.
Configuring iLO Management settings 85
Page 86
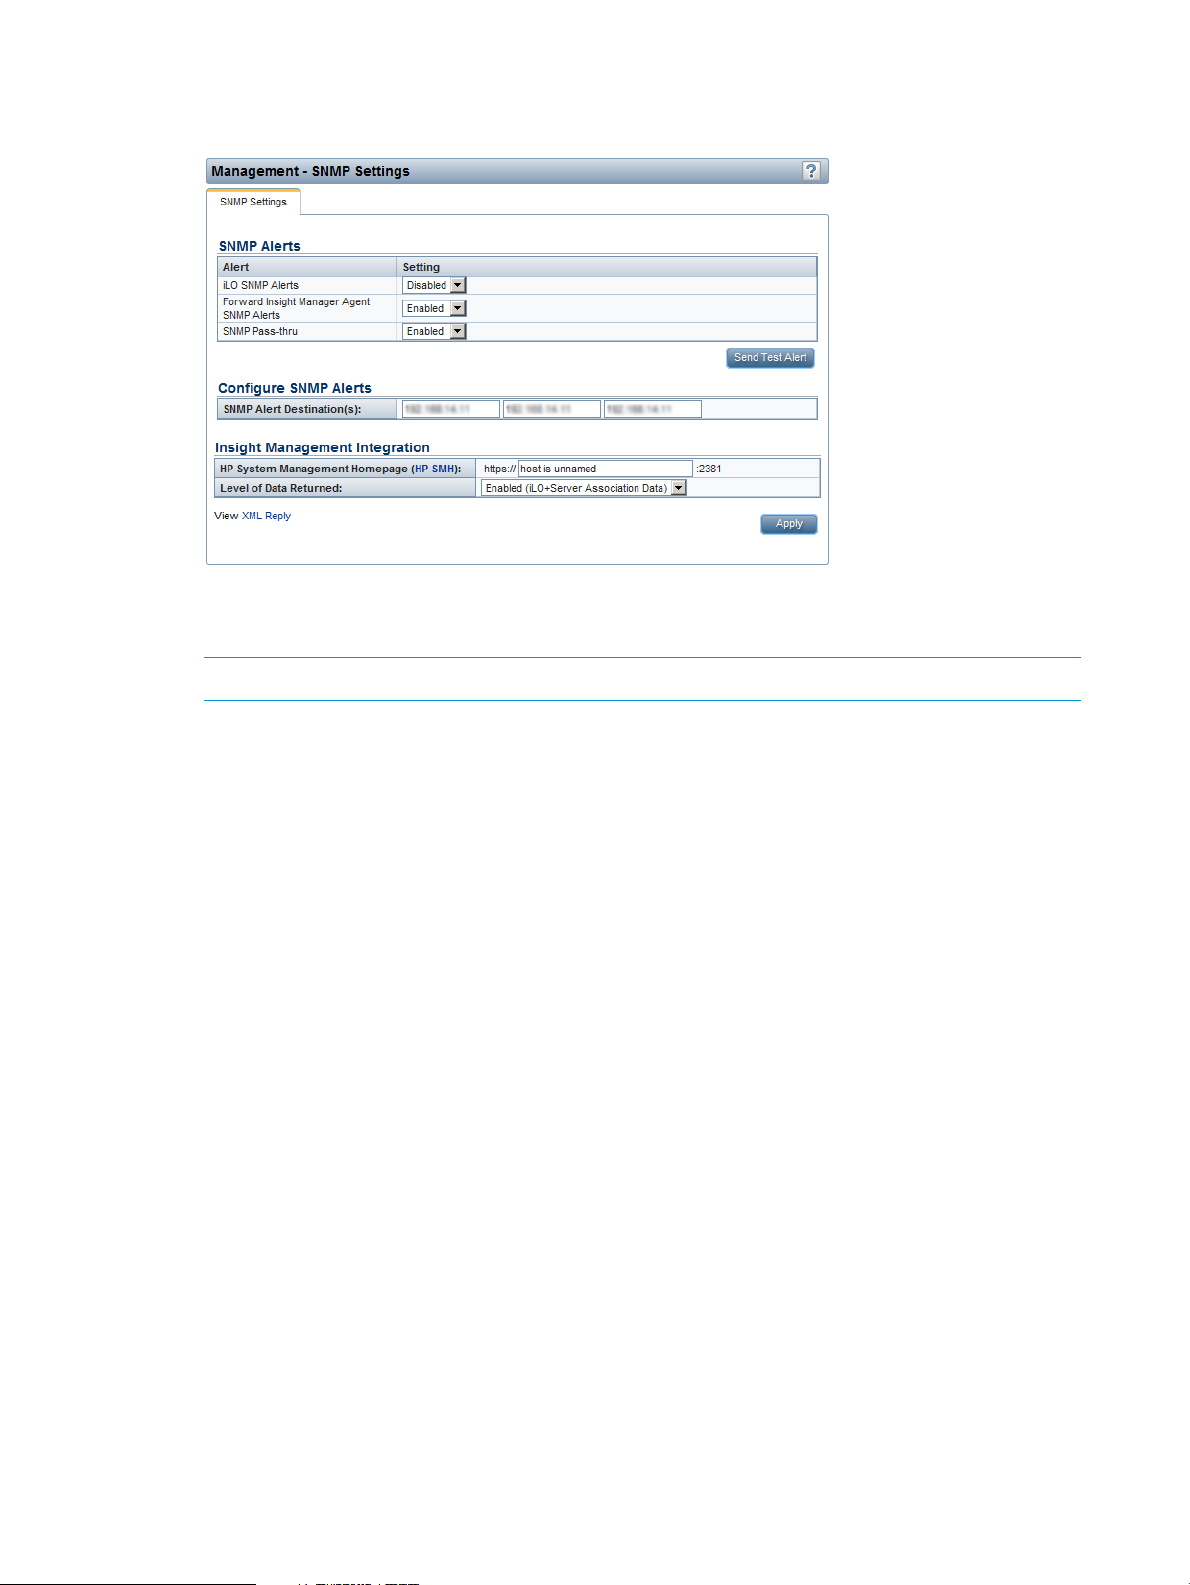
1. Navigate to the Administration→Management page, as shown in Figure 38 (page 86).
Figure 38 iLO Management – SNMP Settings page
2. Enter the SNMP Alert Destinations in the Configure SNMP Alerts section. You can provide the
IP addresses of up to three remote management systems to receive SNMP alerts from iLO.
NOTE: Typically, you enter the HP SIM server console IP address in this section.
3. Click Apply.
Configuring Insight Management integration
1. Navigate to the Administration→Management page.
2. Configure the HP System Management Homepage (HP SMH).
This value sets the browser destination of the Insight Agent link on iLO pages.
Enter the IP address or DNS name of the host server. The protocol (https://) and port
number (:2381) are added automatically to the IP address or DNS name to allow access
from iLO. If the URL is set through another method (for example, HPQLOCFG), click the browser
refresh button to display the updated URL.
3. Select the Level of Data Returned.
This setting controls the content of an anonymous discovery message received by iLO. The
information returned is used for HP SIM HTTP identification requests. The following options
are available:
• Enabled (iLO+Server Association Data) (default)—Enables HP SIM to associate the
management processor with the host server, and provides sufficient data to enable
integration with HP SIM.
• Disabled (No Response to Request)—Prevents iLO from responding to HP SIM requests.
4. Optional: Click View XML Reply to view the response that is returned to HP SIM when it
requests iLO management processor identification using the provided address.
5. Click Apply to save the changes.
For more information about the Insight Management Agents, navigate to the Information→Insight
Agent page.
86 Configuring iLO
Page 87

Using the iLO RBSU
Accessing the iLO RBSU
You can access the iLO RBSU from the physical system console, or by using an iLO remote console
session.
To access iLO RBSU:
1. Optional: If you access the server remotely, start an iLO remote console session.
You can use the .NET IRC or Java IRC.
2. Restart or power on the server.
3. Press F8 in the HP ProLiant POST screen.
The iLO RBSU screen appears.
4. Select an option, and then press Enter.
You can use iLO RBSU to perform the following tasks:
• “Configuring NIC and TCP/IP settings” (page 87)
• “Configuring DNS/DHCP settings” (page 88)
• “Configuring global settings by using iLO RBSU” (page 89)
• “Configuring serial CLI options by using iLO RBSU” (page 90)
• “Resetting iLO to the factory default settings by using iLO RBSU” (page 230)
• “Managing iLO users by using iLO RBSU” (page 18)
Configuring NIC and TCP/IP settings
You can use the iLO RBSU Network menu to configure basic iLO network options, including NIC
and TCP/IP settings.
To configure NIC and TCP/IP settings:
1. Optional: If you access the server remotely, start an iLO remote console session.
You can use the .NET IRC or Java IRC.
2. Restart or power on the server.
3. Press F8 in the HP ProLiant POST screen.
The iLO RBSU screen appears.
4. Select Network→NIC and TCP/IP.
The Network Configuration screen appears, as shown in Figure 39 (page 88).
Using the iLO RBSU 87
Page 88
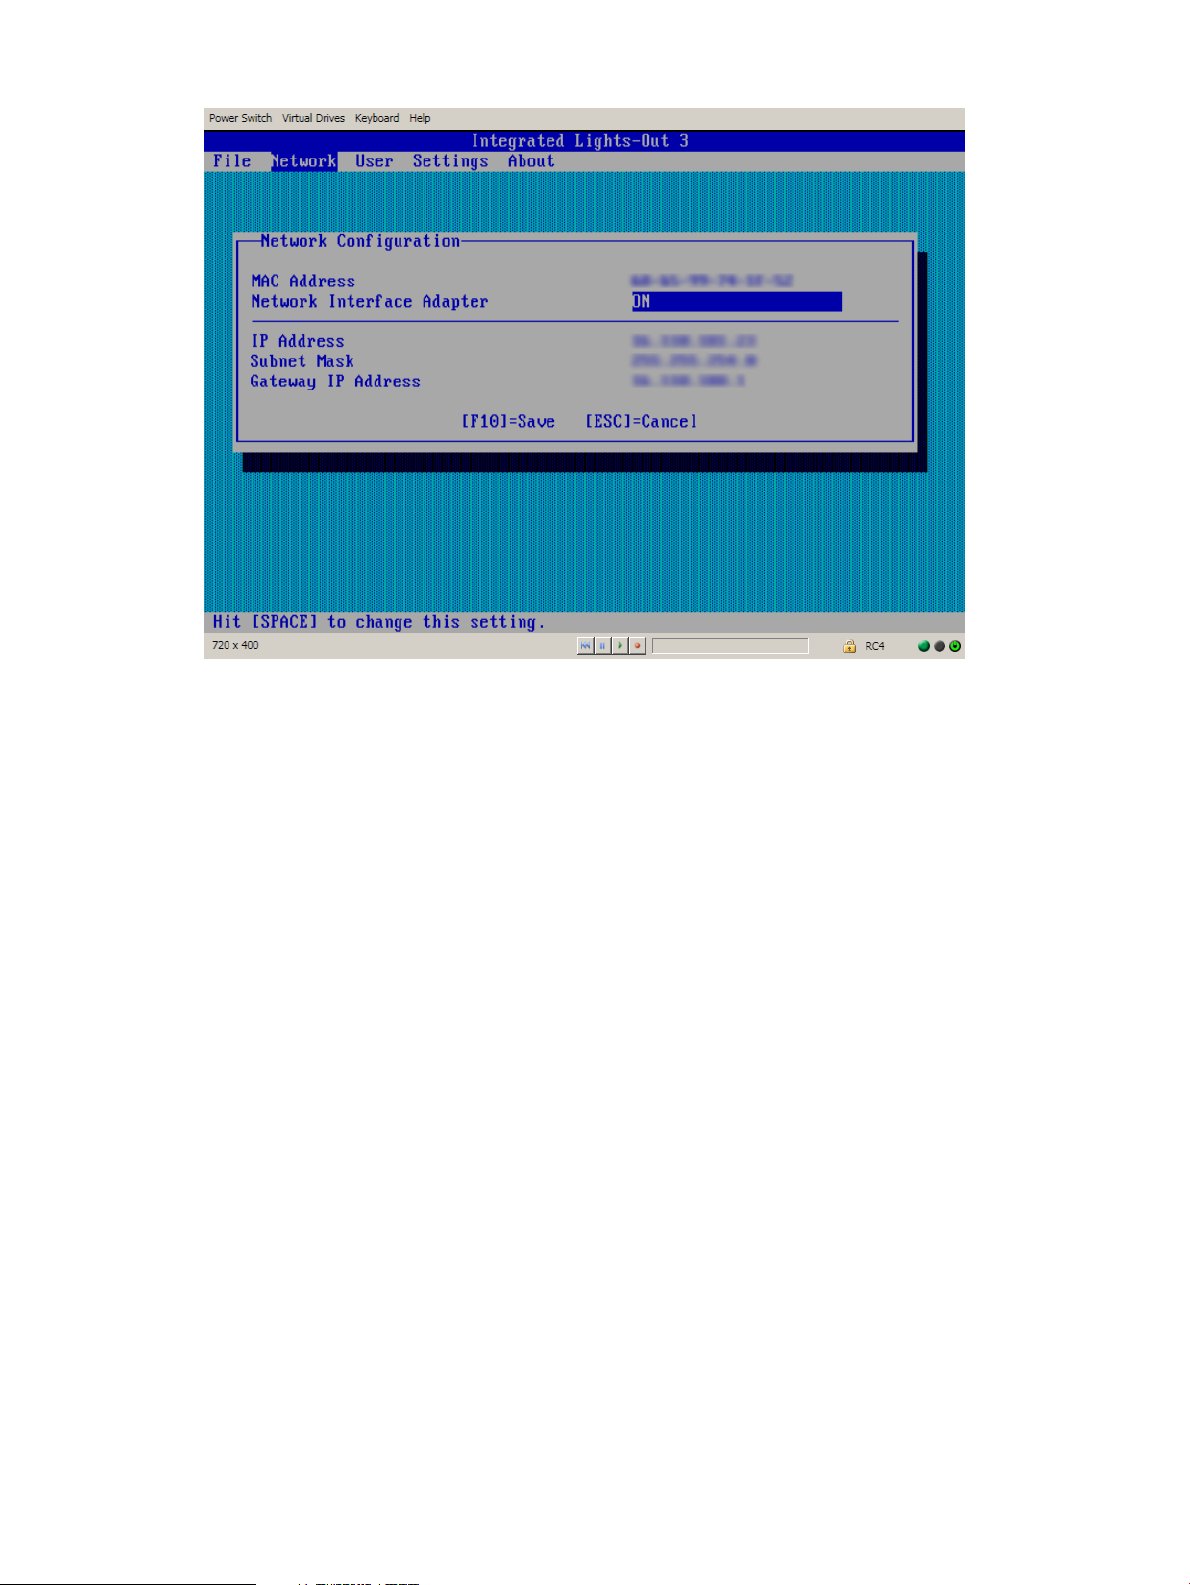
Figure 39 Network Configuration screen
5. View or update the following values, as needed:
• MAC Address (read-only)—The MAC address of the selected iLO network interface.
• Network Interface Adapter—Specifies the iLO network interface adapter to use. Select
ON or OFF to enable or disable the iLO Dedicated Network Port. Select Shared Network
Port to use the Shared Network Port.
The Shared Network Port option is available only on supported servers.
• Transceiver Speed Autoselect (iLO Dedicated Network port only)—Enables iLO to negotiate
the highest supported link speed and duplex settings when connected to the network.
• IP Address—The iLO IP address. If DHCP is used, the iLO IP address is supplied
automatically. If DHCP is not used, enter a static IP address.
• Subnet Mask—The subnet mask of the iLO IP network. If DHCP is used, the subnet mask
is supplied automatically. If DHCP is not used, enter a subnet mask for the network.
• Gateway IP Address—The iLO gateway IP address. If DHCP is used, the iLO gateway IP
address is supplied automatically. If DHCP is not used, enter the iLO gateway IP address.
6. Press F10 to save your changes.
7. Select File→Exit to exit iLO RBSU.
Configuring DNS/DHCP settings
You can use the iLO RBSU Network menu to configure basic iLO network options, including DNS
and DHCP settings.
To configure DNS and DHCP settings:
1. Optional: If you access the server remotely, start an iLO remote console session.
You can use the .NET IRC or Java IRC.
2. Restart or power on the server.
3. Press F8 in the HP ProLiant POST screen.
The iLO RBSU screen appears.
88 Configuring iLO
Page 89
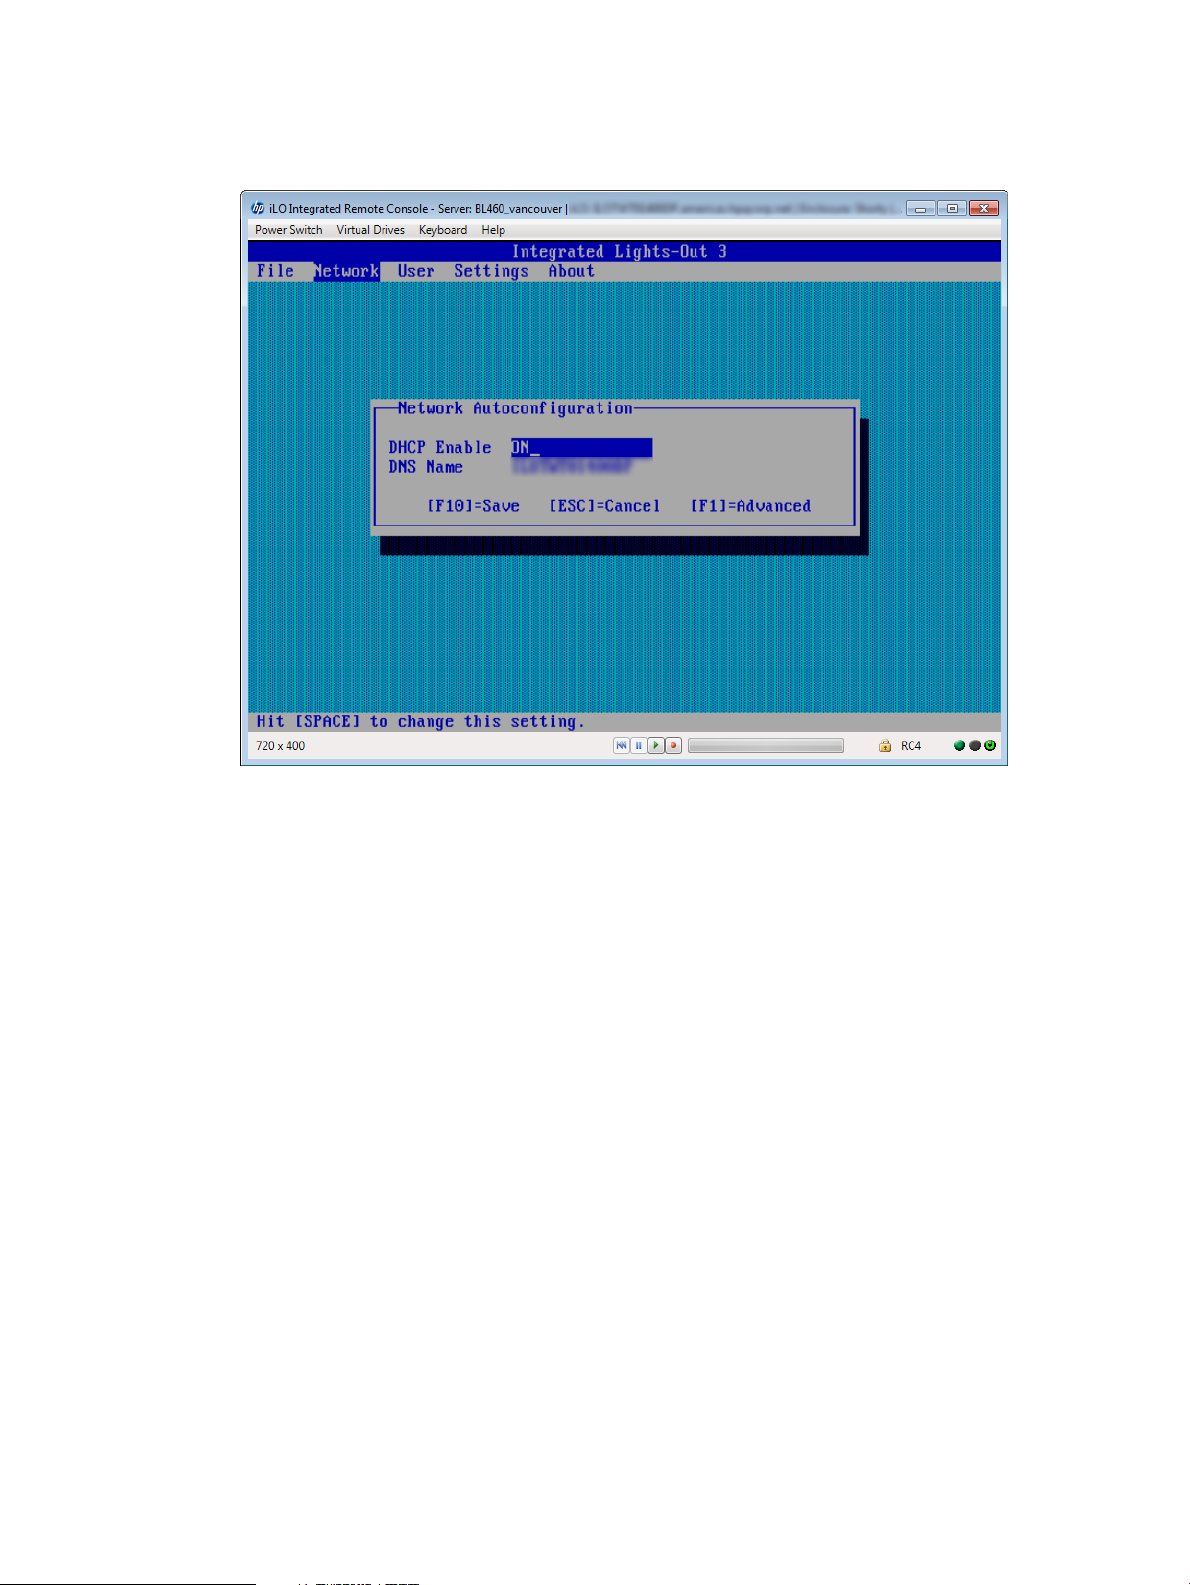
4. Select Network→DNS/DHCP.
The Network Autoconfiguration screen appears, as shown in Figure 40 (page 89).
Figure 40 Network Autoconfiguration screen
5. View or update the following values, as needed:
• DHCP Enable—Configures iLO to obtain its IP address (and many other settings) from a
DHCP server.
• DNS Name—The DNS name of the iLO subsystem (for example, ilo instead of
ilo.example.com).
This name can be used only if DHCP and DNS are configured to connect to the iLO
subsystem name instead of the IP address.
6. Press F10 to save your changes.
7. Select File→Exit to exit iLO RBSU.
Configuring global settings by using iLO RBSU
1. Optional: If you will access the server remotely, start an iLO remote console session.
You can use the .NET IRC or Java IRC.
2. Restart or power on the server.
3. Press F8 during POST to enter iLO RBSU.
4. Select Settings→Configure, and then press Enter.
The Global iLO 3 Settings menu opens, as shown in Figure 41 (page 90).
Using the iLO RBSU 89
Page 90

Figure 41 Global iLO 3 Settings window
5. For each option that you want to change, select the option, and press the spacebar to toggle
the setting to ENABLED or DISABLED. You can change the following settings:
• iLO 3 ROM-Based Setup Utility
• Require iLO 3 RBSU Login
• iLO 3 ROM-Based Setup Utility
• Local Users
For more information about the first four options in the list, see Table 2 (page 41).
For more information about the last option in the list, see “Configuring authentication and
directory server settings” (page 52).
6. Press F10 to save the settings.
7. Select File→Exit to close iLO RBSU.
Configuring serial CLI options by using iLO RBSU
1. Optional: If you access the server remotely, start an iLO remote console session.
You can use the .NET IRC or Java IRC.
2. Restart or power on the server.
3. Press F8 in the HP ProLiant POST screen.
4. Select Settings→CLI, and then press Enter.
5. The Configure iLO Command-Line Interface menu opens, as shown in Figure 42 (page 91).
90 Configuring iLO
Page 91
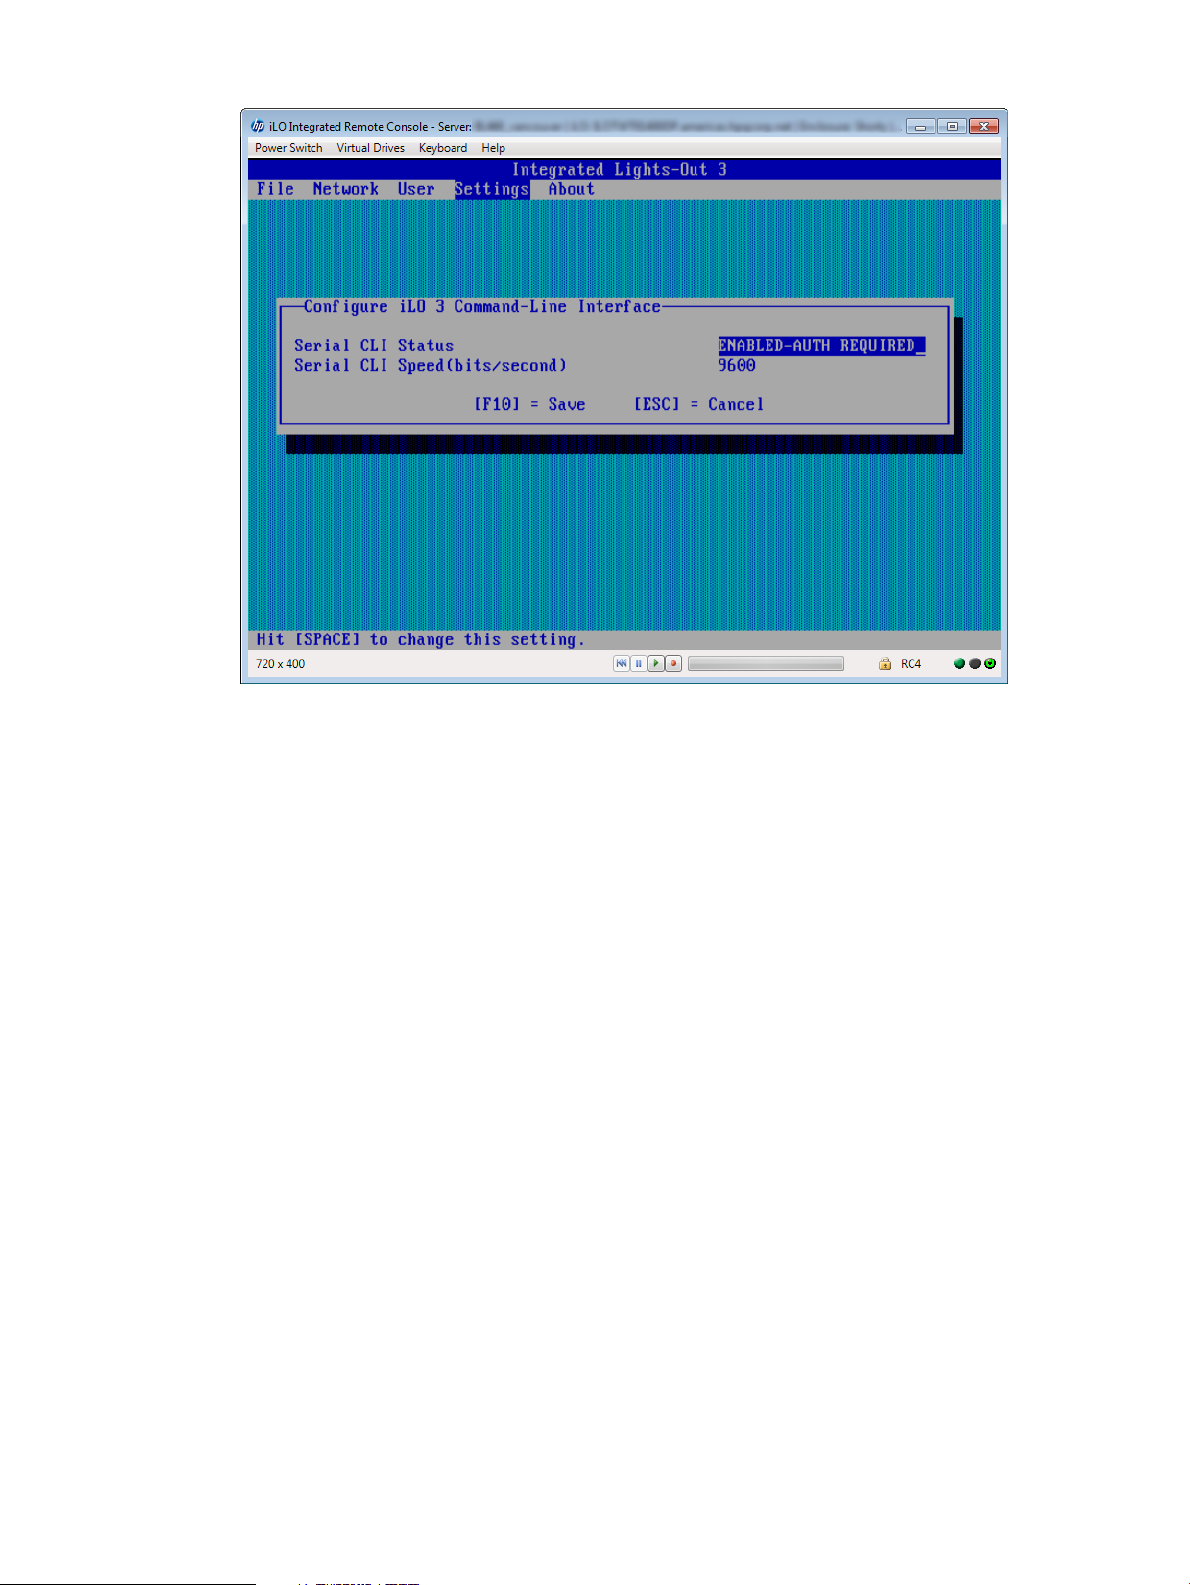
Figure 42 iLO RBSU Configure iLO Command-Line Interface window
6. For each option that you want to change, select the option, and press the spacebar to toggle
through the available settings. You can change the following settings:
• Serial CLI Status
• Serial CLI Speed (bits/second)
For more information about these options, see Table 2 (page 41).
7. Press F10 to save the settings.
8. Select File→Exit to close iLO RBSU.
Using the iLO RBSU 91
Page 92

4 Using iLO
The main iLO features for a nonadministrative user are located in the Information, Remote Console,
Virtual Media, Power Management, and BL c-Class sections of the navigation pane. This guide
provides information about using iLO with the iLO web interface.
TIP: You can also perform many iLO tasks by using XML configuration and control scripts or
SMASH CLP. For information about using these methods, see the HP iLO 3 Scripting and Command
Line Guide, HP Scripting Toolkit for Linux User Guide, and HP Scripting Toolkit for Windows User
Guide.
Using the iLO web interface
You can use the iLO web interface to access iLO. You can also use a Remote Console, scripting,
or the CLP.
For Technical Support information, see the HP iLO 3 User Guide.
Browser support
The iLO web interface requires a browser that supports JavaScript. For a list of supported browsers,
see Table 6 (page 92).
Table 6 Supported browsers
If you receive a notice that your browser does not have the required functionality, verify that your
browser settings meet the following requirements, or contact your administrator.
The following settings must be enabled:
• JavaScript—The iLO web interface uses client-side JavaScript extensively.
• Cookies—Cookies must be enabled for certain features to function correctly.
• Pop-up windows—Pop-up windows must be enabled for certain features to function correctly.
Verify that pop-up blockers are disabled.
Logging in to iLO
You must access the iLO web interface through HTTPS (HTTP exchanged over an SSL encrypted
session).
To log in to iLO:
1. Enter https://<iLO host name or IP address>.
ChromeFirefoxInternet ExploreriLO version
Chrome (latest version)ESR 107, 8, 9iLO 3 1.50
Chrome (latest version)ESR 107, 8, 9iLO 3 1.55
Chrome (latest version)ESR 107, 8, 9iLO 3 1.57
Chrome (latest version)ESR 178, 9, 10iLO 3 1.61
Chrome (latest version)ESR 248, 10iLO 3 1.70
92 Using iLO
The iLO login page opens.
If iLO is configured to use the Login Security Banner feature, a security message is displayed
on the login page.
For information about configuring the Login Security Banner, see “Configuring the Login
Security Banner” (page 67).
Page 93

2. Enter an HP iLO user name and password, and then click Log In.
Login problems might occur for the following reasons:
• You have recently upgraded the iLO firmware. You might need to clear your browser cache
before attempting to log in again.
• You are not entering the login information correctly.
Passwords are case sensitive.◦
◦ User names are not case sensitive. Uppercase and lowercase characters are treated the
same (for example, Administrator is treated as the same user as administrator).
• The account you are entering is not a valid iLO account.
• The account you are entering has been deleted, disabled, or locked out.
• The password for the account must be changed.
• You are attempting to sign in from an IP address that is not valid for the specified account.
Contact the administrator if you continue to have problems.
If iLO is configured for Kerberos network authentication, the HP Zero Sign In button is displayed
below the Log In button. Clicking the HP Zero Sign In button logs the user in to iLO without requiring
the user to enter a user name and password. If the Kerberos login fails, the user can log in by
using a user name and password.
A failed Kerberos login might be due to one of the following reasons:
• The client does not have a ticket or has an invalid ticket. Press Ctrl+Alt+Del to lock the client
PC and get a new ticket.
• The browser is not configured correctly. The browser might display a dialog box requesting
credentials.
• The Kerberos realm that the client PC is logged in to does not match the Kerberos realm for
which iLO is configured.
• The computer account in Active Directory for iLO does not exist or is disabled.
• The user logged in to the client PC is not a member of a universal or global directory group
authorized to access iLO.
• The key in the Kerberos keytab stored in iLO does not match the key in Active Directory.
• The KDC server address for which iLO is configured is incorrect.
• The date and time do not match between the client PC, the KDC server, and iLO. To log in to
Kerberos successfully, ensure that the date and time of the following are set to within 5 minutes
of one another:
◦ The iLO server
◦ The client running the web browser
◦ The servers performing the authentication
• The DNS server is not working correctly. iLO requires a functioning DNS server for Kerberos
support.
Handling an unknown authority
If the message Website Certified by an Unknown Authority is displayed, take the
following action:
Using the iLO web interface 93
Page 94

1. View the certificate to ensure that you are browsing to the correct management server (not an
imposter).
• Verify that the Issued To name is your management server. Perform any other steps you
feel necessary to verify the identity of the management server.
• If you are not sure that this is the correct management server, do not proceed. You might
be browsing to an imposter and giving your sign-in credentials to that imposter when you
sign in. Contact the administrator. Exit the certificate window, and then click No or Cancel
to cancel the connection.
2. After verifying the items in Step 1, you have the following options:
• Accept the certificate temporarily for this session.
• Accept the certificate permanently.
• Stop now and import the certificate into your browser from a file provided by your
administrator.
Using the iLO controls
When you log in to the iLO web interface, the controls at the bottom of the browser window are
available from any iLO page.
• POWER—Use this menu to access the iLO Virtual Power features.
• UID—Use this button to turn the UID on and off.
• Language—Use this menu to select a language or to navigate to the Access Settings→Language
page, where you can install a language pack and configure other language-related settings.
• Health icon—Use this icon to view the overall health status for the server fans, temperature
sensors, and other monitored subsystems. Click the icon to view the status of the monitored
components. Select a component to view more information about the component status.
Language pack support
If a language pack is currently installed in iLO, a language menu is available on the login screen
for you to select the language for the iLO session. This selection is saved in a browser cookie for
future use.
Viewing iLO overview information
The iLO Overview page displays high-level details about the server and iLO subsystem, as well as
links to commonly used features.
Viewing system information
To view iLO overview information, navigate to the Information→Overview page, as shown in
Figure 43 (page 95).
94 Using iLO
Page 95

Figure 43 iLO Overview page
The Information section displays the following information:
• Server Name—The server name defined by the host operating system. Click the Server Name
link to navigate to the Administration→Access Settings page.
• Product Name—The product with which this iLO processor is integrated.
• UUID—The universally unique identifier that software (for example, HP SIM) uses to uniquely
identify this host. This value is assigned when the system is manufactured.
• UUID (Logical)—The system UUID that is presented to host applications. This value is displayed
only when it has been set by other HP software, such as HP Virtual Connect Manager. This
value might affect operating system and application licensing. The UUID (Logical) value is set
as part of the logical server profile that is assigned to the system. If the logical server profile
is removed, the system UUID value reverts from the UUID (Logical) value to the UUID value. If
no UUID (Logical) value is set, this item is not displayed on the iLO Overview page.
• Server Serial Number—The server serial number, which is assigned when the system is
manufactured. You can change this value by using the system RBSU during POST.
• Serial Number (Logical)—The system serial number that is presented to host applications. This
value is displayed only when it has been set by other HP software, such as HP Virtual Connect
Manager. This value might affect operating system and application licensing. The Serial
Number (Logical) value is set as part of the logical server profile that is assigned to the system.
If the logical server profile is removed, the serial number value reverts from the Serial Number
(Logical) value to the Server Serial Number value. If no Serial Number (Logical) value is set,
this item is not displayed on the iLO Overview page.
• Product ID—This value distinguishes between different systems with similar serial numbers.
The product ID is assigned when the system is manufactured. You can change this value by
using the system RBSU during POST.
• System ROM—The family and version of the active system ROM.
• Backup System ROM—The date of the backup system ROM. The backup system ROM is used
if a system ROM update fails or is rolled back. This value is displayed only if the system
supports a backup system ROM. For information about using the backup system ROM, see
“Using iLO diagnostics” (page 112).
• Integrated Remote Console—Provides links to start the .NET IRC or Java IRC application for
remote, out-of-band communication with the server console. For information about Remote
Console requirements and features, see “Using the Integrated Remote Console” (page 114).
Viewing iLO overview information 95
Page 96

• License Type—The level of licensed iLO functionality.
• iLO Firmware Version—The version and date of the installed iLO firmware. Click the iLO
Firmware Version link to navigate to the Administration→iLO Firmware page. For more
information about firmware, see “Updating firmware” (page 25).
• IP Address—The network IP address of the iLO subsystem.
• Link-Local IPv6 Address—The SLAAC link-local address for iLO, followed by the address prefix
length. Click the Link-Local IPv6 Address link to navigate to the Network Summary page.
• iLO Hostname—The fully qualified network name assigned to the iLO subsystem. By default,
the iLO host name is ILO, followed by the system serial number and the current domain name.
This value is used for the network name and must be unique. You can change this name on
the Network General Settings page for the iLO Dedicated Network Port or Shared Network
Port.
Viewing status information
To view general status information, navigate to the Information→Overview page, as shown in
Figure 43 (page 95).
The Status section displays the following information:
• System Health—The server health indicator. This value summarizes the condition of the
monitored subsystems, including overall status and redundancy (ability to handle a failure).
Click the System Health link to navigate to the System Information→Health Summary page.
For more information about viewing system health information, see “Viewing health summary
information” (page 97).
• Server Power—The server power state (ON or OFF).
• UID Indicator—The state of the UID. The UID helps you identify and locate a system, especially
in high-density rack environments. The possible states are UID ON, UID OFF, and UID BLINK.
You can change the UID state to UID ON or UID OFF by using the UID buttons on the server
chassis or the UID control at the bottom of the browser window.
CAUTION: The UID blinks automatically to indicate that a critical operation is underway on
the host, such as Remote Console access or a firmware update. Do not remove power from
a server when the UID is blinking.
When the UID is blinking, the UID Indicator displays the status UID BLINK. When the UID stops
blinking, the status reverts to the previous value (UID ON or UID OFF). If a new state is selected
while the UID is blinking, that state takes effect when the UID stops blinking.
• TPM Status—The current status of the TPM. If the host system or system ROM does not support
TPM, the value Not Supported is displayed.
• iLO Date/Time—The internal clock of the iLO subsystem. The iLO clock can be synchronized
automatically with the network.
Viewing the active iLO sessions
To view the active iLO sessions, navigate to the Information→Overview page, as shown in Figure 43
(page 95).
The Active Sessions section displays the following information for all users logged in to iLO:
• Login name
• IP address
• Source (for example, iLO web interface, Remote Console, or SSH)
96 Using iLO
Page 97
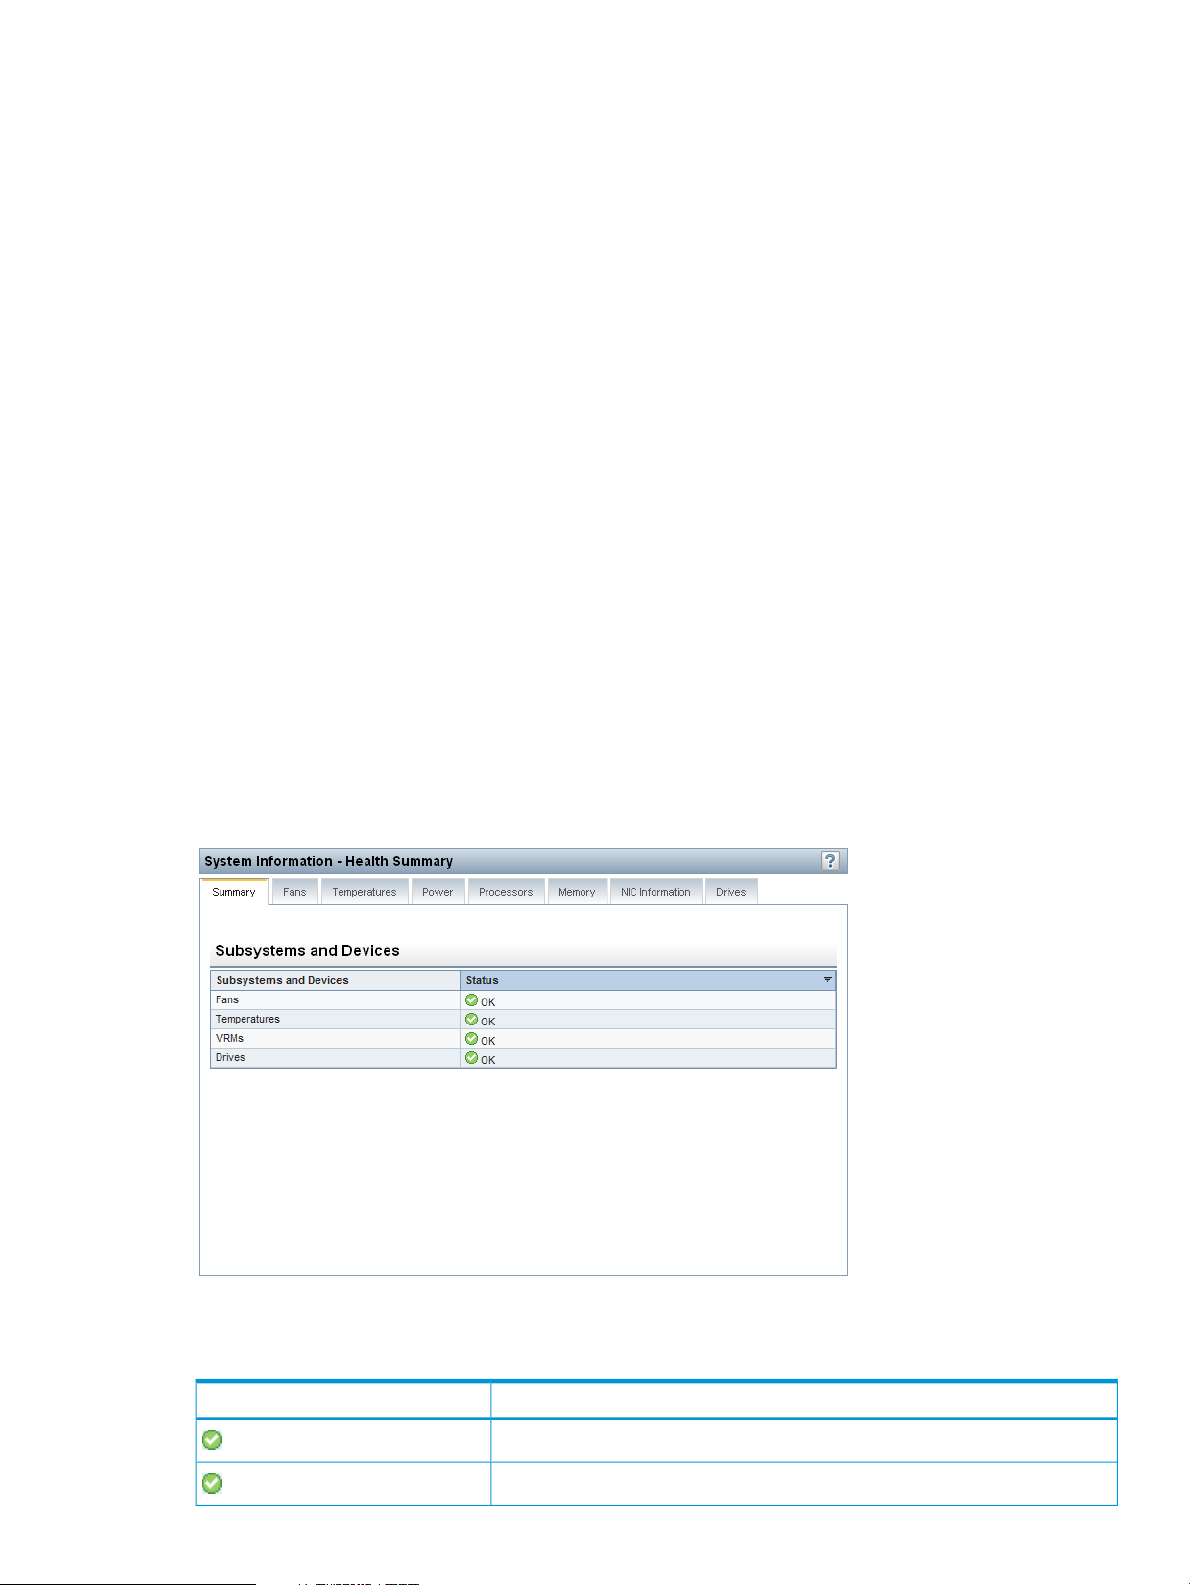
Viewing iLO system information
The iLO System Information page displays the health of the monitored subsystems and devices.
The System Information page includes the following embedded health tabs: Summary, Fans,
Temperatures, Power, Processors, Memory, NIC Information, and Drives.
Viewing health summary information
The Health Summary page displays the status of monitored subsystems and devices. Depending
on the server type, the information on this page varies.
If the server is powered off, the system health information on this page is current as of the last
power off. Health information is updated only when the server is powered on and POST is complete.
To view health summary information, navigate to the Information→System Information page, and
then click the Summary tab to view the list of monitored subsystems and devices, as shown in
Figure 44 (page 97).
Redundancy information is available for the following items in the list:
• Fan Redundancy
• Power Supply Redundancy
Summarized status information is available for the following items in the list:
• Fans
• Power Supplies
• Drives
• Temperatures
• VRMs
Figure 44 System Information – Health Summary page
Table 7 (page 97) lists the displayed health status values.
Table 7 Health status values
DescriptionValue
Redundant
OK
There is a backup component for the device or subsystem.
The device or subsystem is working correctly.
Viewing iLO system information 97
Page 98

Table 7 Health status values (continued)
DescriptionValue
Not Redundant
Failed Redundant
Failed
Other
Viewing fan information
The iLO firmware, in conjunction with the hardware, controls the operation and speed of the fans.
Fans provide essential cooling of components to ensure reliability and continued operation. The
fans react to the temperatures monitored throughout the system to provide sufficient cooling with
minimal noise.
Fan operation policies might differ from server to server based on fan configuration and cooling
demands. Fan control takes into account the internal temperature of the system, increasing the fan
speed to provide more cooling, and decreasing the fan speed if cooling is sufficient. In the event
of a fan failure, some fan operation policies might increase the speed of the other fans, record the
event in the IML, or turn LED indicators on.
Monitoring the fan subsystem includes the sufficient, redundant, and nonredundant fan
configurations. If one or more fans fail, the server still provides sufficient cooling to continue
operation.
In nonredundant configurations, or redundant configurations where multiple fan failures occur, the
system might be incapable of providing sufficient cooling to protect the system from damage and
to ensure data integrity. In this case, in addition to the cooling policies, the system might start a
graceful shutdown of the operating system and server.
To view fan information, navigate to the Information→System Information page, and then click
the Fans tab.
The information displayed on this page varies depending on the server type.
If the server is powered off, the system health information on this page is current as of the last
power off. Health information is updated only when the server is powered on and POST is complete.
The following information is displayed:
There is no backup component for the device or subsystem.
The device or subsystem is in a nonoperational state.
One or more components of the device or subsystem are nonoperational.
Navigate to the System Information page of the component that is reporting this
status for more information.
• Rack servers—The following information is displayed for each fan in the server chassis:
98 Using iLO
Location◦
◦ Status
◦ Speed
Figure 45 (page 99) shows the Fan Information page for a rack server.
Page 99
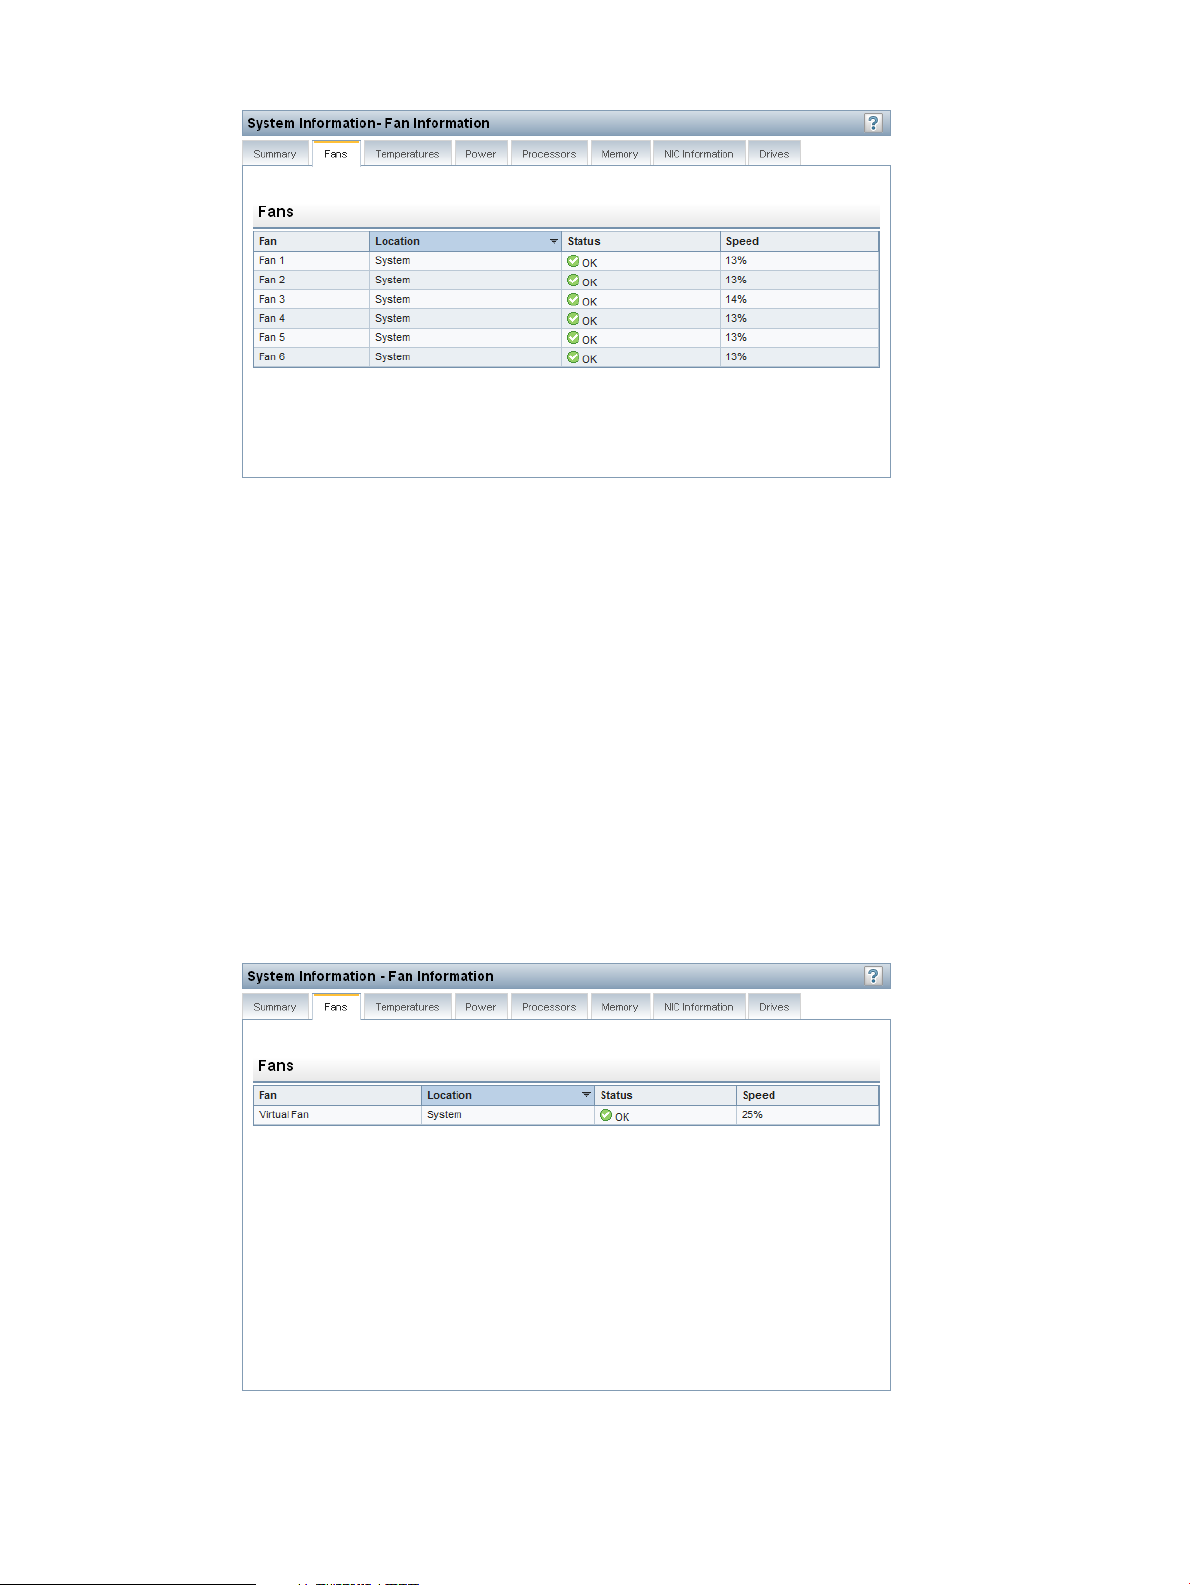
Figure 45 System Information – Fan Information page for rack servers
• Blade servers—ProLiant c-Class server blades use the enclosure fans to provide cooling because
they do not have internal fans. The enclosure fans are called “virtual fans” on this page. The
virtual-fan reading represents the cooling amount that a server blade is requesting from the
enclosure. The server blade calculates the amount of cooling required by examining various
temperature sensors and calculating an appropriate fan speed. The enclosure uses information
from all of the installed server and nonserver blades to adjust the fans to provide the appropriate
enclosure cooling.
The following information is displayed for virtual fans:
◦ Location
◦ Status
◦ Speed
Figure 46 (page 99) shows the Fan Information page for a blade server.
Figure 46 System Information – Fan Information page for blade servers
Viewing iLO system information 99
Page 100
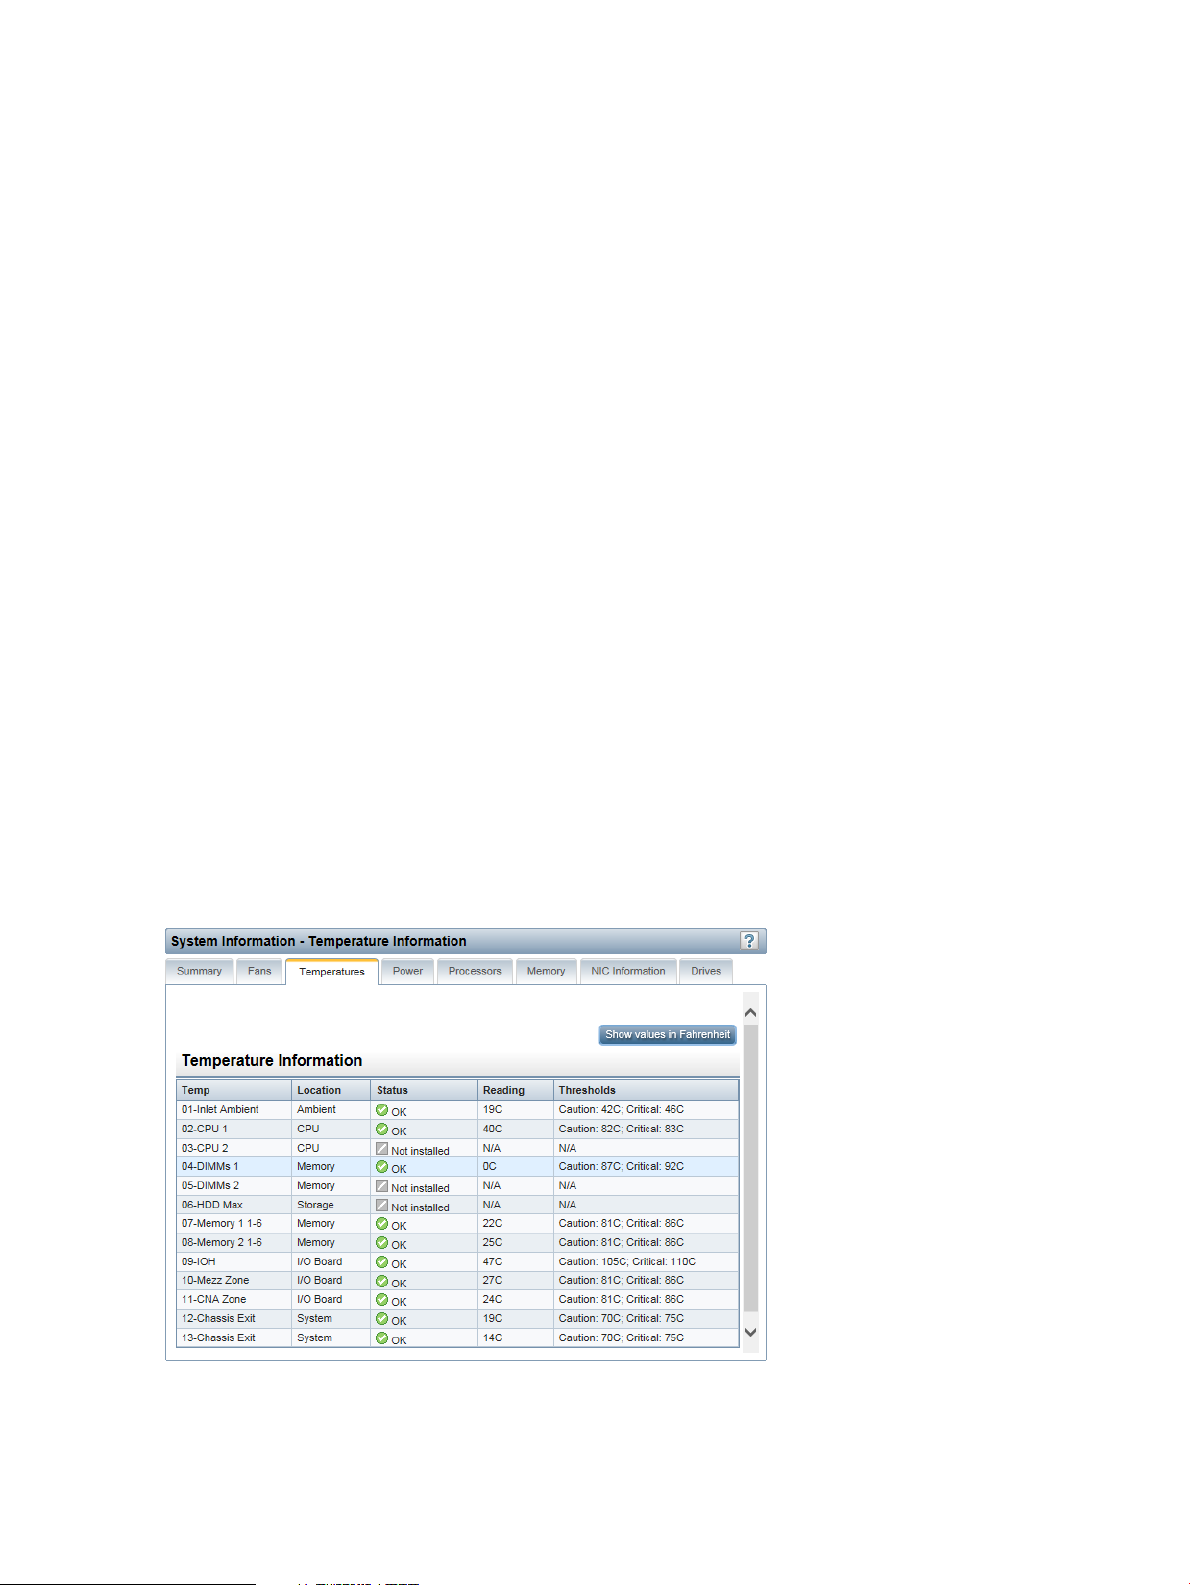
Viewing temperature information
The Temperature Information page displays the location, status, temperature, and threshold settings
of temperature sensors in the server chassis.
If the server is powered off, the system health information on this page is current as of the last
power off. Health information is updated only when the server is powered on and POST is complete.
The temperature is monitored to maintain the sensor location temperature below the caution
threshold. If one or more sensors exceed this threshold, iLO implements a recovery policy to prevent
damage to server components.
• If the temperature exceeds the caution threshold, the fan speed is increased to maximum.
• If the temperature exceeds the caution threshold for 60 seconds, a graceful server shutdown
is attempted.
• If the temperature exceeds the critical threshold, the server is shut down immediately to prevent
permanent damage.
Monitoring policies differ depending on the server requirements. Policies usually include increasing
fan speeds to maximum cooling, logging temperature events in the IML, providing a visual indication
of events by using LED indicators, and starting a graceful shutdown of the operating system to
avoid data corruption.
Additional policies are implemented after an excessive temperature condition is corrected, including
returning the fan speed to normal, recording the event in the IML, turning off the LED indicators,
and canceling shutdowns in progress (if applicable).
Viewing temperature sensor data
To view temperature sensor data, navigate to the Information→System Information page, and then
click the Temperatures tab, as shown in Figure 47 (page 100).
When temperatures are displayed in Celsius, click the Show values in Fahrenheit button to change
the display to Fahrenheit. When temperatures are displayed in Fahrenheit, click the Show values
in Celsius button to change the display to Celsius.
Figure 47 Viewing temperature sensor data
100 Using iLO
 Loading...