

Page 1

hp deskjet 900c series Printer Network Guide for Windows
English
Page 2

Acknowledgments
Microsoft, MS, MS-DOS, and Windows are registered trademarks of Microsoft Corporation (U.S. patent numbers 4955066 and
4974159).
MMX and Pentium are U.S. registered trademarks of Intel Corporation.
Novell and NetWare are registered trademarks of Novell, Inc.
TrueType is a U.S. trademark of Apple Computer, Inc.
Notice
The information contained in this document is subject to change without notice.
Hewlett-Packard Company makes no warranty of any kind with regard to this material, including, but not limited to, the implied
warranties of merchantability and fitness for a particular purpose.
Hewlett-Packard shall not be liable for any errors or for incidental or consequential damages in connection with the furnishing,
performance, or use of this material.
All rights reserved. Reproduction, adaptation, or translation of this manual is prohibited without prior written permission of
Hewlett-Packard Company, except as allowed under the copyright laws.
No part of this document may be photocopied, reproduced, or translated to another language without the prior written consent of
Hewlett-Packard Company.
Edition 1, July, 2000
© Copyright Hewlett-Packard Company 2000
Page 3

Table of Contents
1 Using Your Printer on a Network
Setting Up Your Printer . . . . . . . . . . . . . . . . . . . . . . . . . . . . . . . . . . . . . . . . . . . . . . . . . . . . . . . . . . . . . . . . . . . . 2
2 Locally Shared Printer Connection
Setting Up a Locally Shared Printer . . . . . . . . . . . . . . . . . . . . . . . . . . . . . . . . . . . . . . . . . . . . . . . . . . . . . . . . 5
Operating Systems for the Locally Shared Connection. . . . . . . . . . . . . . . . . . . . . . . . . . . . . . . . . . . . . . 6
Setting Up Windows 95 and 98 Hosts . . . . . . . . . . . . . . . . . . . . . . . . . . . . . . . . . . . . . . . . . . . . . . . . . . . . . . 6
Setting Up Windows 2000 Hosts. . . . . . . . . . . . . . . . . . . . . . . . . . . . . . . . . . . . . . . . . . . . . . . . . . . . . . . . . . . 8
Setting Up Windows NT 4.0 Hosts. . . . . . . . . . . . . . . . . . . . . . . . . . . . . . . . . . . . . . . . . . . . . . . . . . . . . . . . . 10
Setting Up Windows for Workgroups 3.11 Hosts. . . . . . . . . . . . . . . . . . . . . . . . . . . . . . . . . . . . . . . . . . . . . 12
Installing Printer Software on Each Client Computer . . . . . . . . . . . . . . . . . . . . . . . . . . . . . . . . . . . . . . . 13
Option 1: Point and Print Installation . . . . . . . . . . . . . . . . . . . . . . . . . . . . . . . . . . . . . . . . . . . . . . . . 13
Option 2: Add Printer Installation . . . . . . . . . . . . . . . . . . . . . . . . . . . . . . . . . . . . . . . . . . . . . . . . . . 14
Option 3: Windows for Workgroups 3.11 Installation . . . . . . . . . . . . . . . . . . . . . . . . . . . . . . . . . . 16
3 Peer-to-Peer Connection
Setting Up a Peer-to-Peer Printer Connection . . . . . . . . . . . . . . . . . . . . . . . . . . . . . . . . . . . . . . . . . . . . . . 17
Operating Systems for the Peer-to-Peer Connection . . . . . . . . . . . . . . . . . . . . . . . . . . . . . . . . . . . . . . . 18
Installing Printer Software on Each of the Clients . . . . . . . . . . . . . . . . . . . . . . . . . . . . . . . . . . . . . . . . . . 18
Windows 95 and 98 Client Computers . . . . . . . . . . . . . . . . . . . . . . . . . . . . . . . . . . . . . . . . . . . . . . 18
Windows 2000 Client Computers . . . . . . . . . . . . . . . . . . . . . . . . . . . . . . . . . . . . . . . . . . . . . . . . . . 19
Windows NT 4.0 Client Computers . . . . . . . . . . . . . . . . . . . . . . . . . . . . . . . . . . . . . . . . . . . . . . . . .20
4 Client Server Network Connection
Operating Systems for the Client Server Connection . . . . . . . . . . . . . . . . . . . . . . . . . . . . . . . . . . . . . . . 21
Windows Terminal Server . . . . . . . . . . . . . . . . . . . . . . . . . . . . . . . . . . . . . . . . . . . . . . . . . . . . . . . . . . . . . . . . . 21
Setting Up a Client Server in Windows 2000 or NT 4.0 . . . . . . . . . . . . . . . . . . . . . . . . . . . . . . . . . . . . .22
Setting Up a Client Server in NetWare . . . . . . . . . . . . . . . . . . . . . . . . . . . . . . . . . . . . . . . . . . . . . . . . . . . . . 23
5 Using Your Printer Software
Finding the HP Printer Properties in Windows 95, 98, 2000 or NT 4.0 . . . . . . . . . . . . . . . . . . . . . . . 25
HP Printer Properties . . . . . . . . . . . . . . . . . . . . . . . . . . . . . . . . . . . . . . . . . . . . . . . . . . . . . . . . . . . . . . 25
HP DeskJet Toolbox . . . . . . . . . . . . . . . . . . . . . . . . . . . . . . . . . . . . . . . . . . . . . . . . . . . . . . . . . . . . . . . 26
Windows for Workgroups 3.11 . . . . . . . . . . . . . . . . . . . . . . . . . . . . . . . . . . . . . . . . . . . . . . . . . . . . . . . . . . . . .26
Appendix
Language Codes . . . . . . . . . . . . . . . . . . . . . . . . . . . . . . . . . . . . . . . . . . . . . . . . . . . . . . . . . . . . . . . . . . . . . . . . . 27
Windows 95, 98, 2000, and NT 4.0 . . . . . . . . . . . . . . . . . . . . . . . . . . . . . . . . . . . . . . . . . . . . . . . . . 27
Windows for Workgroups 3.11 Clients . . . . . . . . . . . . . . . . . . . . . . . . . . . . . . . . . . . . . . . . . . . . . . . 27
i
Page 4

Page 5
Using Your Printer on a Network
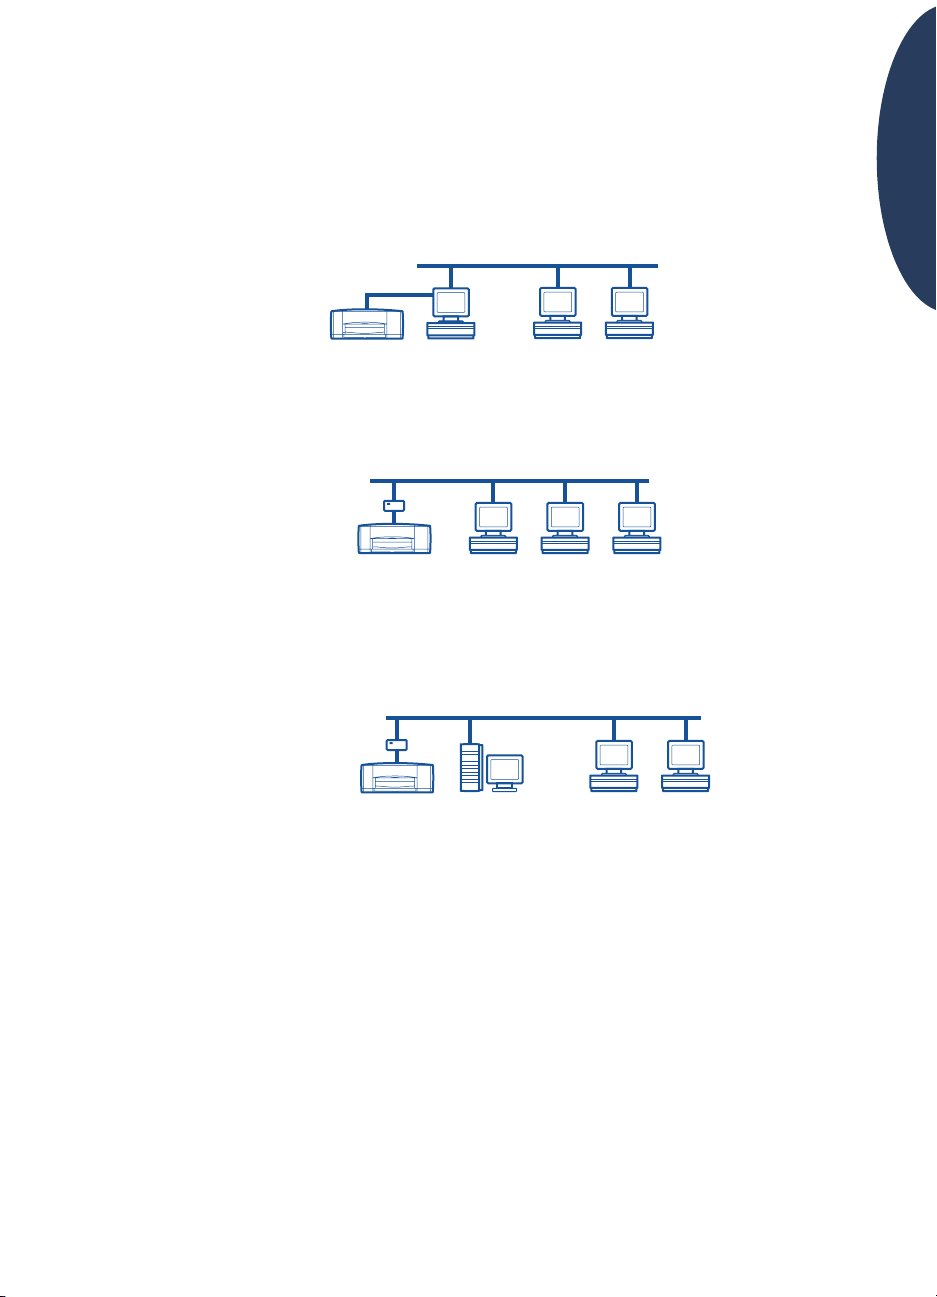
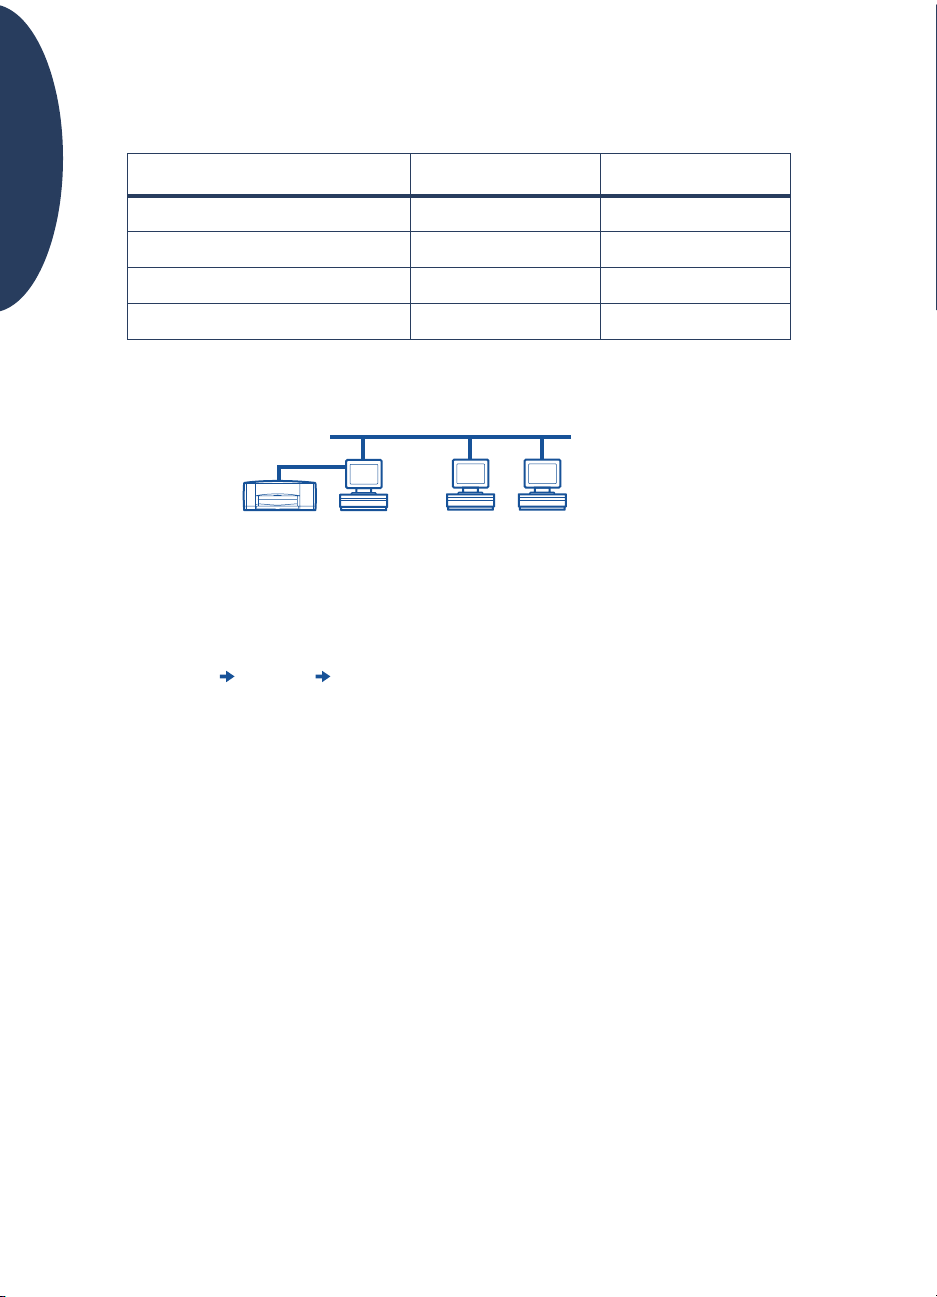
Your HP DeskJet Printer can be shared over a network in three different ways:
•
Locally Shared: Share your printer from a network-connected computer by enabling
printer sharing on your computer. See “Locally Shared Printer Connection” on page 5.
Printer Host Clients
•
Peer-to-Peer: Connect your printer to a network via an HP JetDirect External Print
Server. See “Peer-to-Peer Connection” on page 17.
Print Server
Printer Clients
•
Client Server Network Connection: Connect your printer to a network via an HP
JetDirect External Print Server. Clients print through a Windows NT, Windows 2000 or
NetWare server. See “Client Server Network Connection” on page 21.
English
Print Server
Printer ClientsServer
1
Page 6
Setting Up Your Printer
To share your printer on a network, you must connect the printer to your network using
one of the methods listed on page 1. Before you set up your printer, check that your
English
computer is fully set up, operational, and meets the minimum system requirements listed
in “System Requirements” in your electronic User’s Guide. To set up your printer:
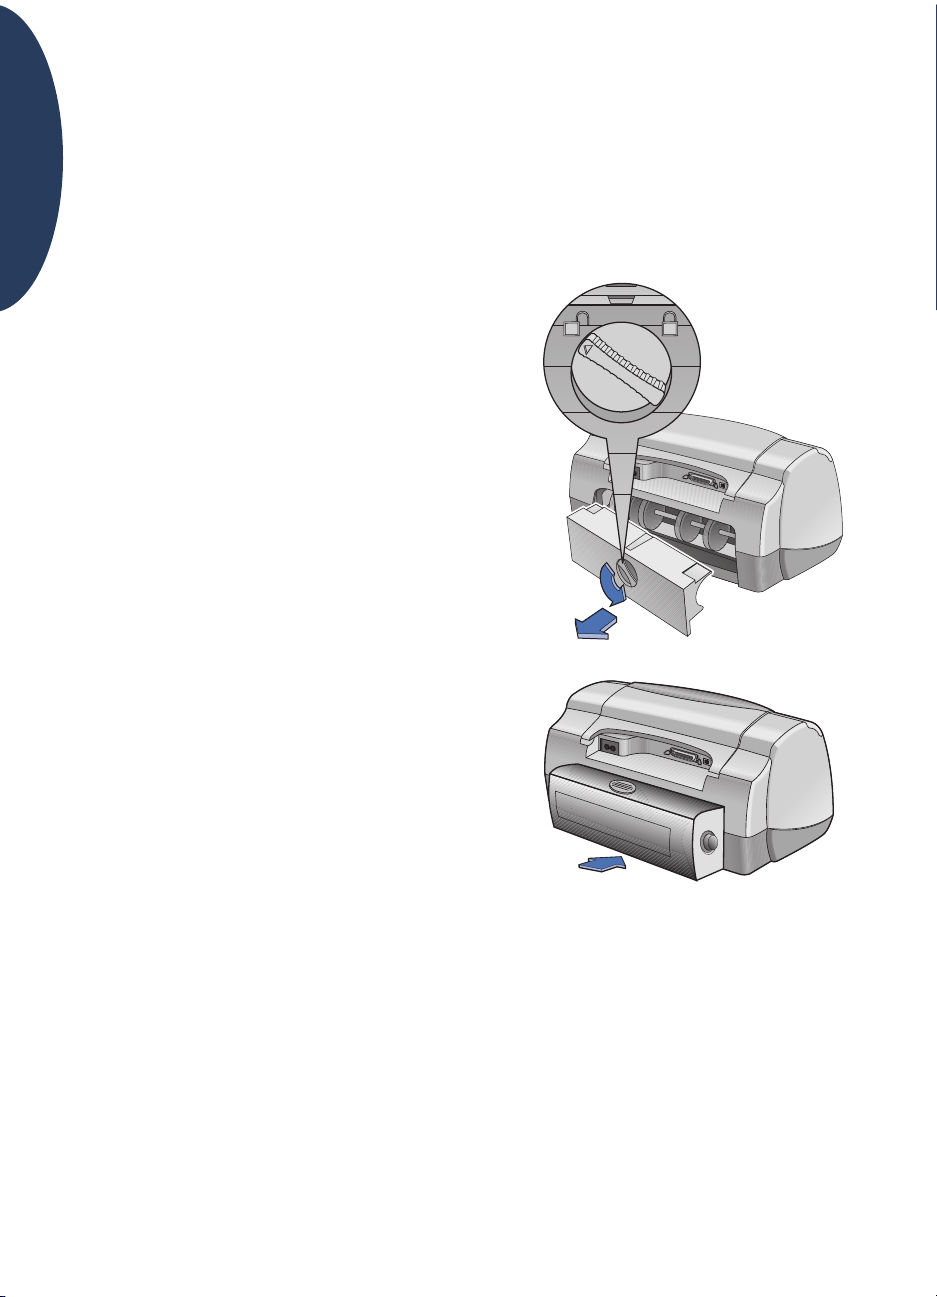
1 Attach Automatic Two-Sided Printing Module.
a Turn knob on printer’s Rear Access Door
counter-clockwise and remove door.
b Insert module into back of printer.
2
Page 7

2 Connect Parallel Cable to Host Computer or an HP JetDirect External Print Server.
•
Locally Shared: Connect your printer to the parallel port of the host computer. See
“Locally Shared Printer Connection” on page 5 for details.
•
Peer-to-Peer: Connect your printer to the parallel port of an HP JetDirect External
Print Server on your network. See “Peer-to-Peer Connection” on page 17 for details,
and consult your print server documentation for help setting up the print server.
•
Client Server Network Connection: Connect your printer to the parallel port of
an HP JetDirect External Print Server, and share the printer from a Windows NT,
Windows 2000 or NetWare server on your network. See “Client Server Network
Connection” on page 21 for details.
English
3 Plug in Electrical Power Cord.
3
Page 8
English
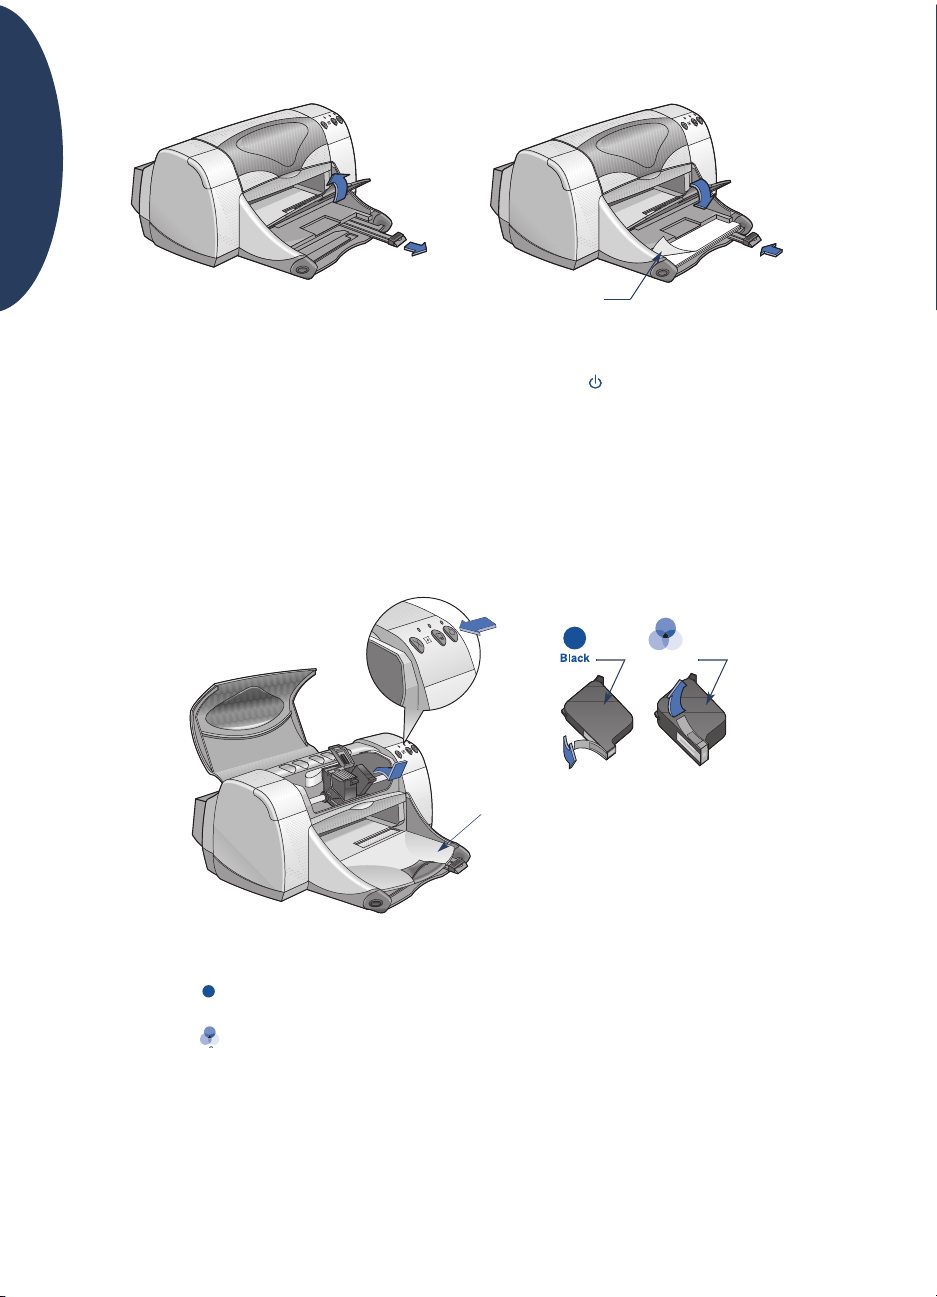
4 Load White Paper.
Printable side
5 Insert Print Cartridges.
a Make sure OUT tray is down and press Power Button to turn printer on.
b Open top cover and raise cradle latch.
c Remove vinyl tape from print cartridges.
Do NOT touch or remove copper strip on print cartridges.
d Push print cartridge straight down into print cartridge cradle.
e Close latch and then close top cover.
A calibration page will print.
Tri-Color
OUT tray down
Note: The part numbers for your two print cartridges are:
Black HP 51645 Series or HP No. 45
Tri-Color HP C6578 Series or HP No. 78
4
Page 9
Locally Shared Printer Connection
In the locally shared configuration, the printer is connected directly to the parallel or USB
port of a selected computer that functions as a host to other computers on the network. To
locally share your printer, the printer software must be installed on the host computer
and on each client computer.
Note: USB is only supported in Windows 98 and 2000.
Printer Host Clients
Setting Up a Locally Shared Printer
1 Set up the printer. See “Setting Up Your Printer” on page 2.
English
Printer Host
Note: For best results, do not install any parallel connected devices, such as a scanner
or tape backup system, between the printer and computer.
2 Install the printer software on the host computer, and share your printer on the network.
See the section “Operating Systems for the Locally Shared Connection” on page 6 to find
instructions for your operating system.
3 Install the printer software on each of the client computers. See the section “Operating
Systems for the Locally Shared Connection” on page 6 to find instructions for your
operating system.
5
Page 10
Operating Systems for the Locally Shared Connection
Installation instructions for the supported operating systems can be found on:
English
Windows 95 and 98 See page 6 See page 13
Windows 2000 See page 8 See page 13
Windows NT 4.0 See page 10 See page 13
Windows for Workgroups 3.11 See page 12 See page 16
Operating System Host Client
Setting Up Windows 95 and 98 Hosts
Host
Preparing Your Computer to Share Your Printer on the Network
Turn on the host computer.
1
2 Click Start Settings Control Panel.
3 In the Control Panel, double-click Network.
4 Click the File and Print Sharing button.
5 Click to select I want to be able to allow others to print to my printer(s).
6 Click OK, and then click OK to close the Network dialog box. If prompted, restart
Windows.
6
Page 11

Installing Printer Software on a Windows 95 or 98 Host
Click Start Settings Printers.
1
2 Double-click Add Printer, and then click Next.
3 Choose Local Printer as the printer connection, and then click Next.
4 Click the Have Disk button, and insert the hp deskjet 900c series printer software CD into
your CD-ROM drive.
5 In the Install From Disk dialog box, click Browse, then move to the hpf9x01.inf file in the
folder for your language and the Windows 95/98 operating system. See the language
code chart on page 27.
Example: To select the hpf9x01.inf file for the English language and the Windows 95
or 98 operating system, move to enu\driver\win9x_me\hpf9x01.inf.
6 Click OK, and then click OK to close the Install From Disk dialog box.
7 Click Next.
8 Select the printer port from the Available ports list (LPT1 is recommended), and then
click Next.
9 Accept the default name for your printer (recommended) or enter a new name.
To use this printer as your default printer, click Yes; otherwise click No.
English
10 Click Finish.
Sharing Your Printer on the Network
Select Start Settings Printers from the Taskbar.
1
2 Right-click the hp deskjet 900c series printer icon and choose Sharing from the shortcut
menu.
3 Select Shared As and enter the name you want to use for your printer on the network. If
you want to restrict access to your printer, enter a password in the Password box; users will
need to enter this password in order to use your printer.
Note: See your Windows 95 or 98 documentation for more information about sharing
your printer.
4 Click OK.
5 If a password was set, retype it and click OK.
7
Page 12

Setting Up Windows 2000 Hosts
English
Host
Installing Printer Software on a Windows 2000 Host
Turn on the host computer.
1
2 Click Start Settings Printers.
3 Double-click Add Printer, and then click Next.
4 Choose Local printer as the printer connection, and then click Next.
5 Select a printer port in the Use the following port list (LPT1 is recommended), and then
click Next.
6 Click the Have disk button.
7 Insert the hp deskjet 900c series printer software CD into your CD-ROM drive.
8 Click Browse.
9 Move to the hpf2k01.inf file in the folder for your language and the Windows 2000
operating system. See the language code chart on page 27.
Example: To select the hpf2k01.inf file for the English language and the Windows
2000 operating system, move to enu\driver\win_2k\hpf2k01.inf.
10 Click Open, and then click OK to close the Install From Disk dialog box.
11 Click Next.
12 Accept the default name for your printer (recommended) or enter a new name. To use this
printer as your default printer, click Yes; otherwise click No.
13 Click Next.
8
Page 13

14 Click Share as and type the name you want to use for your printer on the network.
15 Click Next.
16 Type the location of your printer and any additional comments (optional), and then
click Next.
17 To print a test page, click Yes; otherwise click No. Click Next.
18 Click Finish.
Note: You can copy Windows 95 or 98 printer software to your host to allow for a Point
and Print installation of printer software on Windows 95 and 98 client computers. Click
Start Settings Printers. Right-click the printer icon and choose Properties. Click the
Sharing tab, and then click Shared as. Click Additional Drivers. In the Additional
Drivers list, click a driver. Click OK and then follow the instructions that appear on your
screen.
An alternate driver is not needed for a Point and Print installation on a Windows NT 4.0
client.
English
9
Page 14

Setting Up Windows NT 4.0 Hosts
English
Host
Installing Printer Software on a Windows NT 4.0 Host
Note: To install the printer software on a Windows NT 4.0 system, you must have
administrator privileges to the host computer.
1 Turn on the host computer.
2 Click Start Settings Printers.
3 Double-click Add Printer.
4 Choose My Computer as the printer connection, and then click Next.
5 Select a printer port from the Available ports list (LPT1 is recommended), then click Next.
6 Click the Have Disk button, and insert the hp deskjet 900c series printer software CD into
your CD-ROM drive.
7 In the Install From Disk dialog box, click Browse, then move to the hpfnt01.inf file in the
folder for your language and the Windows NT 4.0 operating system. See the language
code chart on page 27.
Example: To select the hpfnt01.inf file for the English language and the Windows NT
4.0 operating system, move to enu\driver\win_nt\hpfnt01.inf.
8 Click Open, and then click OK.
9 Click Next.
10 Accept the default name for your printer (recommended) or enter a new name, and then
click Next.
10
Page 15

11 Click Shared and enter a share name for the printer.
12 To print a test page, click Yes ; otherwise click No. Click Finish.
Note: You can copy Windows 95 or 98 printer software to your host to allow for a Point
and Print installation of printer software on Windows 95 or 98 client computers. Click
Start Settings Printers. Right-click the printer icon and choose Properties. Click the
Sharing tab, and then click Shared. In the Alternate Drivers list, click a driver. Click OK
and then follow the instructions that appear on your screen.
An alternate driver is not needed for a Point and Print installation on a Windows 2000
client.
English
11
Page 16

Setting Up Windows for Workgroups 3.11 Hosts
English
Host
Installing Printer Software on the Windows for Workgroups 3.11 Host
Turn on the host computer.
1
2 Close any virus protection programs or other software programs that are running on the
computer.
3 Insert the hp deskjet 900c series printer software CD into your CD-ROM drive, and select
File Run in the File Manager.
4 If your CD-ROM drive is drive D, enter D:\setup.exe. Otherwise, enter [Your drive
letter]:\setup.exe.
5 Click OK.
6 Follow the on-screen instructions to install your printer software.
Sharing Your Printer on the Network
Go to the Main Program Group, and double-click Print Manager.
1
2 Select the hp deskjet 900c series printer icon, and choose Share This Printer As from the
Printer menu.
3 Choose your printer from the Printer pop-up menu.
4 Enter a Share Name for your printer.
12
Page 17

Installing Printer Software on Each Client Computer
Client Computers
on Network
English
Important
When you are installing the software for a locally shared printer on a client computer, you
have three options:
•
Point and Print Installation (see page 13): This option is quicker than the
Add Printer Installation. It is supported by Windows 95, 98, 2000, and NT.
•
Add Printer Installation (see page 14): This option takes more time than the Point and
Print installation. It is supported by Windows 95, 98, 2000, and NT.
•
Windows for Workgroups 3.11 Installation (see page 16): This option installs printer
software using the setup.exe file.
Make sure you have installed printer software on the host and shared the printer
before you install printer software on a client computer.
Option 1: Point and Print Installation
Note: If your host computer is a Windows NT 4.0 or 2000 server, and you installed
printer software for other Windows operating systems on it (see the note on pages 9
and 11), you can use Point and Print to install printer software on client computers running
Windows 95, 98, 2000, or NT 4.0, directly from the host.
1 Go to the Windows desktop.
2 Double-click the Network Neighborhood icon.
3 Double-click the icon for the computer on which the printer is installed.
4 Right-click the printer icon and choose Install. The Add Printer Wizard dialog box
appears.
5 If you want to print from MS-DOS based programs, click Yes .
6 Click Next.
7 Accept the default printer name (recommended) or type a new name.
8 To use this printer as your default printer, click Yes ; otherwise click No.
9 Click Next.
13
Page 18

10 To print a test page, click Yes ; otherwise click No.
11 Click Finish.
Note: For additional Point and Print installation options, see your Windows 95, 98,
English
2000, or Windows NT 4.0 documentation.
Option 2: Add Printer Installation
Installing Printer Software on Windows 95 or 98 Clients
1 Click Start Settings Printers.
2 Double-click Add Printer, then click Next.
3 Choose Network printer as the printer connection, then click Next.
4 Click Browse. Double-click the host computer on which the printer is installed, and then
click the printer. Click OK, and then click Next.
or
Enter the path or queue name of the printer, and then click Next. For example, type:
\\HostComputerName\PrinterName or \\ServerName\QueueName.
5 Click the Have Disk button, and insert the hp deskjet 900c series printer software CD into
your CD-ROM drive.
6 In the Install From Disk dialog box, click Browse, then move to the hpf9x01.inf file in the
folder for your language and the Windows 95/98 operating system. See the language
code chart on page 27.
Example: To select the hpf9x01.inf file for the English language and the Windows 95
or 98 operating system, move to enu\driver\win9x_me\hpf9x01.inf.
7 Click OK, and then click OK to close the Install From Disk dialog box.
8 Click Next.
9 Accept the default name for your printer (recommended) or type a new name.
10 Click Finish.
14
Page 19

Installing Printer Software on Windows 2000 Clients
1 Click Start Settings Printers.
2 Double-click Add Printer.
3 Click Next.
4 Choose Network printer as the printer connection, and then click Next.
5 Click Type the printer name, or click Next to browse for a printer.
Note: You can also locate a printer by searching in the Directory or connecting to a
printer on the Internet or your intranet. For more information on these options, see the
Microsoft documentation for Windows 2000.
6 Click Next to browse for the printer.
7 In the Shared printers box, double-click the host computer on which the printer is
installed, and then click the printer. Click Next.
8 To use this printer as your default printer, click Yes ; otherwise click No.
9 Click Next.
10 Click Finish.
English
Installing Printer Software on Windows NT 4.0 Clients
Note: To install the printer software on a Windows NT 4.0 system, you must have
administrator privileges for the host computer.
1 Click Start Settings Printers.
2 Double-click Add Printer, then click Next.
3 Choose Network printer server as the printer connection, then click Next.
4 Browse the Shared Printers list box to locate the host computer and printer.
or
Enter the path or queue name of the printer. For example, type:
\\HostComputerName\PrinterName or \\ServerName\QueueName
Note: If the host computer is a Windows 95 or 98 computer, you will need to install the
printer software from the printer software CD.
15
Page 20

5 To use this printer as your default printer, click Yes; otherwise click No.
6 Click Next, and then click Finish.
7 If prompted, restart Windows.
English
Option 3: Windows for Workgroups 3.11 Installation
1
Insert the hp deskjet 900c series printer software CD into your CD-ROM drive and select
Run from the Program Manager File menu.
2 If your CD-ROM drive is drive D, enter D:\setup.exe, and click OK. Otherwise, enter [Your
drive letter]:\setup.exe, and click OK.
3 When prompted for the printer name and port, select the LPT1 port.
4 Click OK and complete the installation.
5 If prompted, restart Windows.
6 Double-click Printers from the Control Panel.
7 Select the hp deskjet 900c series printer and click Connect.
8 Choose the port to which the printer is connected.
9 Click Network, then browse to the queue name or share name of the server. To set up the
printer as a permanent network printer on your system, check the Permanent box.
10 Click Connect.
16
Page 21

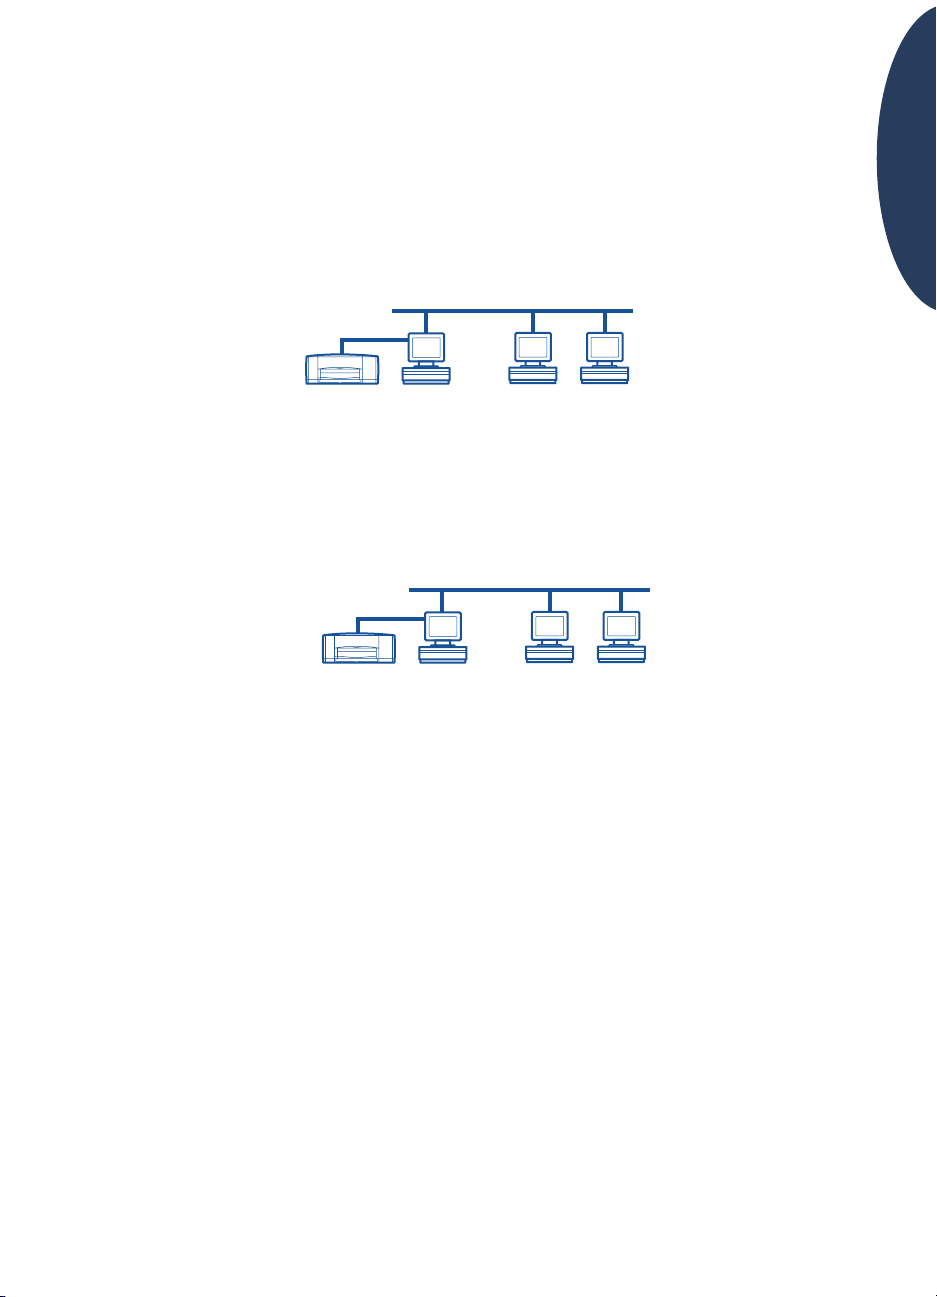
Peer-to-Peer Connection
In a peer-to-peer direct network configuration, the printer is directly connected to the
network via an HP JetDirect External Print Server, and each computer on the network
sends print jobs directly to the HP JetDirect External Print Server.
Setting Up a Peer-to-Peer Printer Connection
1 Set up the printer.
See “Setting Up Your Printer” on page 2. In step 2, connect the printer to the HP JetDirect
External Print Server with a parallel cable.
Print Server
Printer
English
2 Set up the HP JetDirect External Print Server.
Install and configure the HP JetDirect External Print Server according to the instructions
provided with the print server.
3 Install the hp deskjet 900c series printer software on each client computer. See the section
“Operating Systems for the Peer-to-Peer Connection” on page 18 to find instructions for
your operating system.
17
Page 22

Operating Systems for the Peer-to-Peer Connection
Installation instructions for the supported operating systems can be found on:
English
Operating System Page
Windows 95 and 98 18
Windows 2000 19
Windows NT 4.0 20
Note: If the Add Printer Installation starts up automatically, begin with step 4 of the
appropriate section.
Installing Printer Software on Each of the Clients
Clients
Windows 95 and 98 Client Computers
Install the HP JetDirect port software on each client according to the instructions included
1
with the print server.
2 Click Start Settings Printers.
3 Double-click Add Printer.
4 Click Next.
5 Choose Local Printer as the printer connection, and then click Next.
6 Click the Have Disk button, and insert the hp deskjet 900c series printer software CD into
your CD-ROM drive.
7 In the Install From Disk dialog box, click Browse, then move to the hpf9x01.inf file in the
folder for your language and the Windows 95/98 operating system. See the language
code chart on page 27.
Example: To select the hpf9x01.inf file for the English language and the Windows 95
or 98 operating system, move to enu\driver\win9x_me\hpf9x01.inf.
8 Click OK, and then click OK to close the Install From Disk dialog box.
9 Click Next.
18
Page 23

10 Select the printer port, from the Available ports list, that you configured when you set up
the HP JetDirect External Print Server, and then click Next.
11 Accept the default name for your printer (recommended) or enter a new name. To use this
printer as your default printer, click Yes; otherwise click No.
12 Click Finish to complete the installation of the hp deskjet printer software.
Windows 2000 Client Computers
Install the HP JetDirect port software on each client according to the instructions included
1
with the print server.
2 Click Start Settings Printers.
3 Double-click Add Printer.
4 Click Next.
5 Choose Local printer as the printer connection, and then click Next.
6 Select the printer port, from the Use the following port list, that you configured when
you set up the HP JetDirect External Print Server, and then click Next.
7 Click the Have disk button.
English
8 Insert the hp deskjet 900c series printer software CD into your CD-ROM drive.
9 Click Browse.
10 Move to the hpf2k01.inf file in the folder for your language and the Windows 2000
operating system. See the language code chart on page 27.
Example: To select the hpf2k01.inf file for the English language and the Windows
2000 operating system, move to enu\driver\win_2k\hpf2k01.inf.
11 Click Open, and then click OK to close the Install From Disk dialog box.
12 Click Next.
13 Accept the default name for your printer (recommended) or enter a new name. To use this
printer as your default printer, click Yes; otherwise click No.
14 Click Next.
19
Page 24

15 Click Next.
16 Type the location of your printer and any additional comments (optional), and then
click Next.
English
17 To print a test page, click Yes; otherwise click No. Click Next.
18 Click Finish.
Windows NT 4.0 Client Computers
Install the HP JetDirect port software on each client according to the instructions included
1
with the print server.
2 Click Start Settings Printers.
3 Double-click Add Printer.
4 Choose My Computer as the printer connection, and then click Next.
5 Select the printer port, from the Available ports list, that you configured when you set up
the HP JetDirect External Print Server, and then click Next.
6 Click the Have Disk button, and insert the hp deskjet 900c series printer software CD into
your CD-ROM drive.
7 In the Install From Disk dialog box, click Browse, then move to the hpfnt01.inf file in the
folder for your language and the Windows NT 4.0 operating system. See the language
code chart on page 27.
Example: To select the hpfnt01.inf file for the English language and the Windows NT
4.0 operating system, move to enu\driver\win_nt\hpfnt01.inf.
8 Click Open, and then click OK.
9 Click Next.
10 Accept the default name for your printer (recommended) or enter a new name, and then
click Next.
11 To print a test page, click Yes; otherwise click No.
12 Click
20
Finish
.
Page 25

Client Server Network Connection
In the client server connection, you connect your hp deskjet 900c series printer to the
network with an HP JetDirect External Print Server. Clients print to the Windows 2000, NT,
or NetWare server that is serviced by the HP JetDirect External Print Server.
Print Server
Printer Server Clients
Operating Systems for the Client Server Connection
Installation instructions for the supported operating systems can be found on:
Server Operating System Page Client Operating System Page
Windows 2000 22 Windows 95 or 98 13
Windows NT 4.0 22 Windows 2000 13
NetWare 23 Windows NT 4.0 13
Windows for Workgroups 3.11 16
English
Windows Terminal Server
Windows Terminal Server is supported in Windows 2000 on the hp deskjet 990c series
printer through the Add Printer installation path for printer software. For the latest version
of the printer software, go to the HP web site at http://www.hp.com. For more infor-
mation, see the Microsoft documentation for Windows Terminal Server.
21
Page 26

Setting Up a Client Server in Windows 2000 or NT 4.0
1 Set up the printer.
English
See “Setting Up Your Printer” on page 2. In step 2, connect the printer to the HP JetDirect
External Print Server with a parallel cable.
Print Server
Printer
2 Set up the HP JetDirect External Print Server.
Install and configure the HP JetDirect External Print Server according to the instructions
provided with the print server.
3 Windows 2000 Server: Install the printer software on the Windows 2000 server and
share your printer on the network. See “Installing Printer Software on a Windows 2000
Host” on page 8. In step 5, select the port you configured when you set up the HP
JetDirect External Print Server.
Windows NT 4.0 Server: Install the printer software on the Windows NT 4.0 server and
share your printer on the network. See “Installing Printer Software on a Windows NT 4.0
Host” on page 10. In step 5, select the port you configured when you set up the HP
JetDirect External Print Server.
Windows 2000
or NT Server
4 Install the printer software on each of the client computers. See “Installing Printer
Software on Each Client Computer” on page 13.
Clients
22
Page 27

Setting Up a Client Server in NetWare
•
Refer to the Novell documentation or web site for NetWare printer installation methods
and NetWare client software.
•
See the documentation that came with your HP JetDirect External Print Server.
•
Go to the HP web site at http://www.hp.com, and navigate to the network printing site,
for information on setting up an HP JetDirect External Print Server in a NetWare
environment and for additional network printing information.
•
You can copy your hp deskjet 900c series printer software to a NetWare drive. See the
language code table on page 27 to help you select which languages and operating
systems you should copy.
English
23
Page 28

English
This page left intentionally blank.
24
Page 29

Using Your Printer Software
Use your printer software to control how and what you print through the HP Printer
Properties dialog box. In addition, using the HP DeskJet Toolbox, you can maintain your
printer and access an electronic copy of the User’s Guide.
Finding the HP Printer Properties in Windows 95, 98, 2000 or NT 4.0
1 From your software program, click File Print. Your software program opens a Print
dialog box.
2 From the Print dialog box, click Properties. The HP Printer Properties dialog box opens.
HP Printer Properties
In the HP Printer Properties dialog box, print quality, paper size and type are just a few of
the options available to you at the click of your mouse.
You can right-click any item in the HP Printer Properties dialog box to view help
information related to that item.
English
25
Page 30

HP DeskJet Toolbox
When you install your printer on a network, your HP Printer Properties dialog box has a
Services tab that enables you to access your HP DeskJet Toolbox.
English
Click the Services tab, and then click the Open the HP DeskJet Toolbox button to
display the HP Toolbox.
In the Printer Services tab of the Toolbox, you can perform printer maintenance services.
You can right-click any item in the Toolbox to view help information related to that item.
Windows for Workgroups 3.11
See “How to Print in Windows 3.1x” in your electronic User’s Guide for information on
printer software in the Windows 3.1x and Windows for Workgroups 3.11 environments.
26
Page 31

Appendix
Language Codes
Windows 95, 98, 2000, and NT 4.0
If you are doing an “add printer” installation, you need to navigate to the INF file in the
folder for your language and computer's operating system.
•
Windows 95, 98:
[CD drive letter]:\[language code]\driver\win9x_me\hpf9x01.inf
•
Windows 2000:
[CD drive letter]:\[language code]\driver\win_2k\hpf2k01.inf
•
Windows NT:
[CD drive letter]:\[language code]\driver\win_nt\hpfnt01.inf
Windows for Workgroups 3.11 Clients
If you want to copy the Windows for Workgroups 3.11 printer software to a shared network
resource for later installation from the network to the client, copy the following files:
[CD Drive Letter]:\[language code]\31\*.*.
Find the language code for your operating system’s language in the table below.
English
Language
Bahasa Indonesia bin Italian ita
Bulgaria bul Japanese jpn
Chinese, Simplified chs Kazakh kzh
Chinese, Traditional cht Korean kor
Czech csy Norwegian non
Danish dan Polish plk
Dutch nld Portuguese ptb
English enu Russian rus
Finnish fin Spanish esm
French fra Swedish svc
German deu Thai tha
Hungarian hun
Language
code
Language
Language
code
27
Page 32

Index
A
English
Add Printer Installation 13
Windows 2000 15
Windows 95/98 14
Windows for Workgroups 3.11 16
Windows NT 4.0 15
Automatic Two-Sided Printing
Module
2
C
Cartridges 4
Client Server Connection 21
NetWare 23
Operating Systems 21
Windows 2000/NT 4.0 22
Clients
Locally Shared
NetWare Client Server 23
Peer-to-Peer 18
Windows 2000 Client Server 22
Windows NT 4.0 Client Server 22
H
HP DeskJet Toolbox 25, 26
HP JetDirect Print Server 1, 17, 22
hpf2k01.inf
Windows 2000
hpf9x01.inf
Windows 95/98
hpfnt01.inf
Windows NT 4.0
I
Inserting Print Cartridges 4
Installing
Automatic Two-Sided Printing
Module
Your Printer 2
Installing Printer Software
NetWare Server
Windows 2000 Client 13, 15, 19
Windows 2000 Host 8
Windows 2000 Server 22
Windows 95/98 Client 13, 14, 18
Windows 95/98 Host 6
Windows for Workgroups 3.11
Client
Windows for Workgroups 3.11
Host
Windows NT 4.0 Client 13, 15,
20
Windows NT 4.0 Host 10
Windows NT 4.0 Server 22
16
12
13
8, 19
7, 14, 18
10, 20
2
23
L
Language Codes 7, 8, 10, 14, 18, 19,
20, 27
Locally Shared Printer Connection 5
Client Software 13
Operating Systems 6
Setting Up 5
Windows 2000 Hosts 8
Windows 95/98 Hosts 6
Windows for Workgroups 3.11
Windows NT 4.0 Hosts 10
LPT1
Windows 2000
Windows 95/98 7
Windows NT 10
Hosts
12
8
N
Network Connection 1
Client Server 1, 21
Local 1, 5
Peer-to-Peer 1, 17
Novell Netware 1, 21, 23
O
Operating Systems
Client Server Connection
Local Printer Connection 6
Peer-to-Peer Connection 18
21
P
Paper, loading 4
Parallel Cable, connecting 2
Peer-to-Peer Connection 17
Client Software 18
Operating Systems 18
Setting Up 17
Point and Print Installation
Windows 95/98/2000
Windows NT 4.0 13
Print Cartridges 4
Print Server, see HP JetDirect Print
Server
Printer
Properties
Setup Tab 25
Software, using 25
Printer Software, see Installing Printer
Software
Properties, Printer
25
13
25
S
Setting Up Your Printer 2
Locally Shared 5
Netware Client Server 23
Peer-to-Peer 17
Windows 2000/NT 4.0 Client
Server
Host
22
12
Sharing Your Printer 1
Locally 1, 5
Windows 2000 Host 9
Windows 95/98 Host 6, 7
Windows for Workgroups 3.11
Windows NT 4.0 Host 10
T
Toolbox 25, 26
W
Windows 2000
Installing Client Software
19
Installing Host Software 8
Installing Server Software 22
Windows 95/98
Installing Client Software
18
Installing Host Software 7
Preparing Your Computer to
Share Your Printer
Sharing Your Printer 7
Windows for Workgroups 3.11
Installing Client Software
Installing Host Software 12
Sharing Your Printer 12
Windows NT 4.0
Installing Client Software
20
Installing Host Software 10
Installing Server Software 22
Windows Terminal Server 21
13, 15,
13, 14,
6
16
13, 15,
28
 Loading...