

Page 1

User’s Guide
Table of Contents
Navigating the User’s Guide . . . . . . . . . . . . . . . . . . . . . . . . . . . . . . . . . . . . . . . . . .2
Setting Up Your Printer. . . . . . . . . . . . . . . . . . . . . . . . . . . 3
Connecting your printer with a parallel printer cable. . . . . . . . . . . . . . . . . . . 3
Setting up your printer with a USB Cable . . . . . . . . . . . . . . . . . . . . . . . . . . . . .14
More information about your printer software . . . . . . . . . . . . . . . . . . . . . . . 26
Printing Basics . . . . . . . . . . . . . . . . . . . . . . . . . . . . . . . . . 28
How to choose paper. . . . . . . . . . . . . . . . . . . . . . . . . . . . . . . . . . . . . . . . . . . . . . . 28
Finding the HP print settings box. . . . . . . . . . . . . . . . . . . . . . . . . . . . . . . . . . . . 30
How to print on standard paper sizes. . . . . . . . . . . . . . . . . . . . . . . . . . . . . . . . .32
How to print on different paper sizes . . . . . . . . . . . . . . . . . . . . . . . . . . . . . . . . 34
How to print on both sides of the paper . . . . . . . . . . . . . . . . . . . . . . . . . . . . . .35
How to create a mirror image of your document. . . . . . . . . . . . . . . . . . . . . 36
About color. . . . . . . . . . . . . . . . . . . . . . . . . . . . . . . . . . . . . . . . . . . . . . . . . . . . . . . . .38
About pictures . . . . . . . . . . . . . . . . . . . . . . . . . . . . . . . . . . . . . . . . . . . . . . . . . . . . . 39
Beyond the Basics . . . . . . . . . . . . . . . . . . . . . . . . . . . . . . 41
Printing Cards . . . . . . . . . . . . . . . . . . . . . . . . . . . . . . . . . . . . . . . . . . . . . . . . . . . . . 42
Printing Banners . . . . . . . . . . . . . . . . . . . . . . . . . . . . . . . . . . . . . . . . . . . . . . . . . . . .43
Printing Photographs. . . . . . . . . . . . . . . . . . . . . . . . . . . . . . . . . . . . . . . . . . . . . . . 45
Printing Labels. . . . . . . . . . . . . . . . . . . . . . . . . . . . . . . . . . . . . . . . . . . . . . . . . . . . . 46
Printing Envelopes . . . . . . . . . . . . . . . . . . . . . . . . . . . . . . . . . . . . . . . . . . . . . . . . . .47
Printing Transparencies. . . . . . . . . . . . . . . . . . . . . . . . . . . . . . . . . . . . . . . . . . . . . 49
Printing Iron-On Transfers . . . . . . . . . . . . . . . . . . . . . . . . . . . . . . . . . . . . . . . . . . . 51
Getting Help . . . . . . . . . . . . . . . . . . . . . . . . . . . . . . . . . . . 52
HP Customer Care . . . . . . . . . . . . . . . . . . . . . . . . . . . . . . . . . . . . . . . . . . . . . . . . . .52
Appendices . . . . . . . . . . . . . . . . . . . . . . . . . . . . . . . . . . . . 58
The HP DeskJet Toolbox. . . . . . . . . . . . . . . . . . . . . . . . . . . . . . . . . . . . . . . . . . . . .58
Print cartridges . . . . . . . . . . . . . . . . . . . . . . . . . . . . . . . . . . . . . . . . . . . . . . . . . . . . 59
Maintaining your printer . . . . . . . . . . . . . . . . . . . . . . . . . . . . . . . . . . . . . . . . . . . .67
Increasing printer performance . . . . . . . . . . . . . . . . . . . . . . . . . . . . . . . . . . . . . 68
Minimum printing margins . . . . . . . . . . . . . . . . . . . . . . . . . . . . . . . . . . . . . . . . . 69
System Requirements . . . . . . . . . . . . . . . . . . . . . . . . . . . . . . . . . . . . . . . . . . . . . . 69
Supplies and accessories . . . . . . . . . . . . . . . . . . . . . . . . . . . . . . . . . . . . . . . . . . . 70
Ordering Information . . . . . . . . . . . . . . . . . . . . . . . . . . . . . . . . . . . . . . . . . . . . . . . 71
Language Codes. . . . . . . . . . . . . . . . . . . . . . . . . . . . . . . . . . . . . . . . . . . . . . . . . . . . 73
Environmental Attributes of the DeskJet Printer. . . . . . . . . . . . . . . . . . . . . . .74
1
Page 2
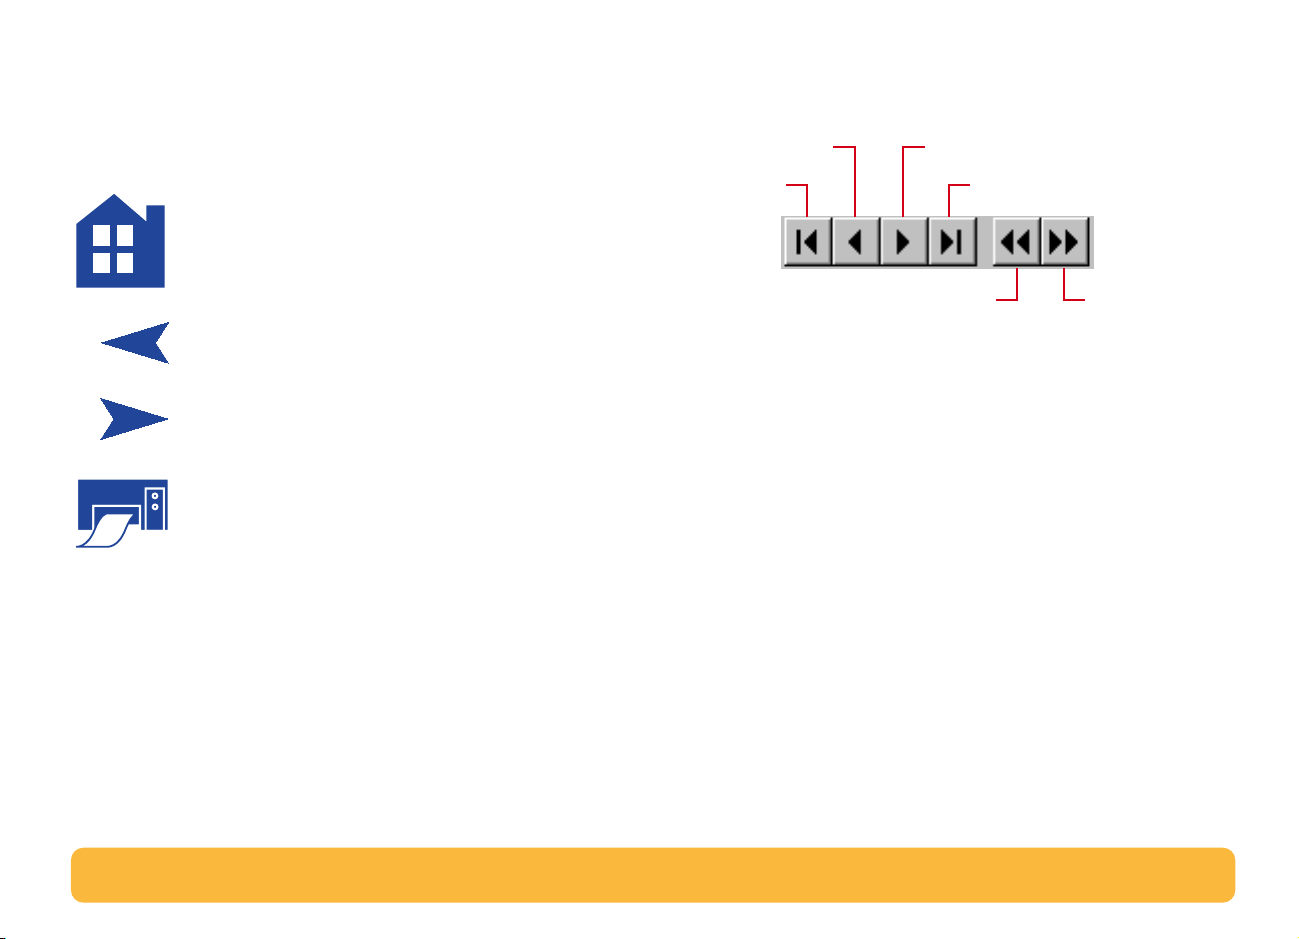
Navigating the User’s Guide
Use the navigation controls at the bottom of each page to
move through the guide:
Go to the Table of Contents
Go to previous page
Go to next page
Print this page
Acrobat® Reader provides a number of ways to page through a
document. You may use the navigation buttons in the toolbar.
Previous Page
First Page
Goes to previous view Goes to next view
Next Page
Last Page
You may also press the arrow keys or choose an action from the
View menu. Refer to the
Acrobat Reader Online Guide
for more
information.
2
Page 3

Setting Up Your Printer
Your HP DeskJet printer is designed for connection to your
computer using either of the following cables:
Parallel printer cable
computer is running either Windows 3.1x, 95, 98, or NT 4.0.
See “Connecting your printer with a parallel printer cable” on
page 3 for instructions.
Universal Serial Bus (USB) cable
supported if you are running Windows 98 on your computer.
See “Setting up your printer with a USB Cable” on page 14 for
instructions.
The printer cable is not supplied with the printer.
purchase the printer cable separately. See page 70 for ordering
information.
– You can use this method when your
– This method is only
You must
Connecting your printer with a parallel printer cable
Note: If you are using a USB cable for communications
between your printer and your computer, see page 14.
3
Page 4
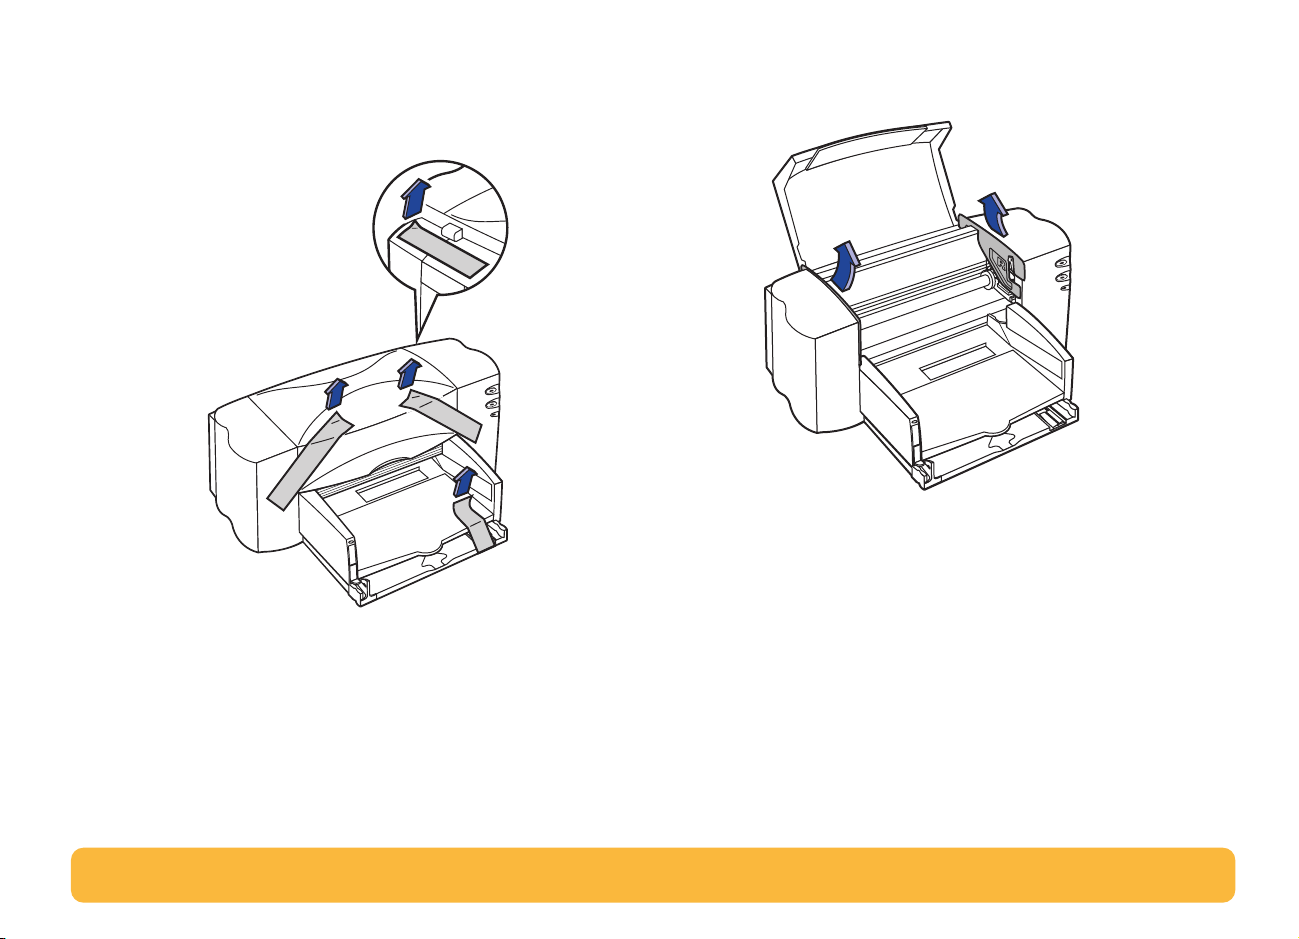
Step 1: Unpack your printer
1
Remove the packing material and the packing tape from the
outside of the printer.
2
Open the top cover. Remove both pieces of plastic packing
material from the inside of the printer.
3
Close the top cover.
4
Page 5
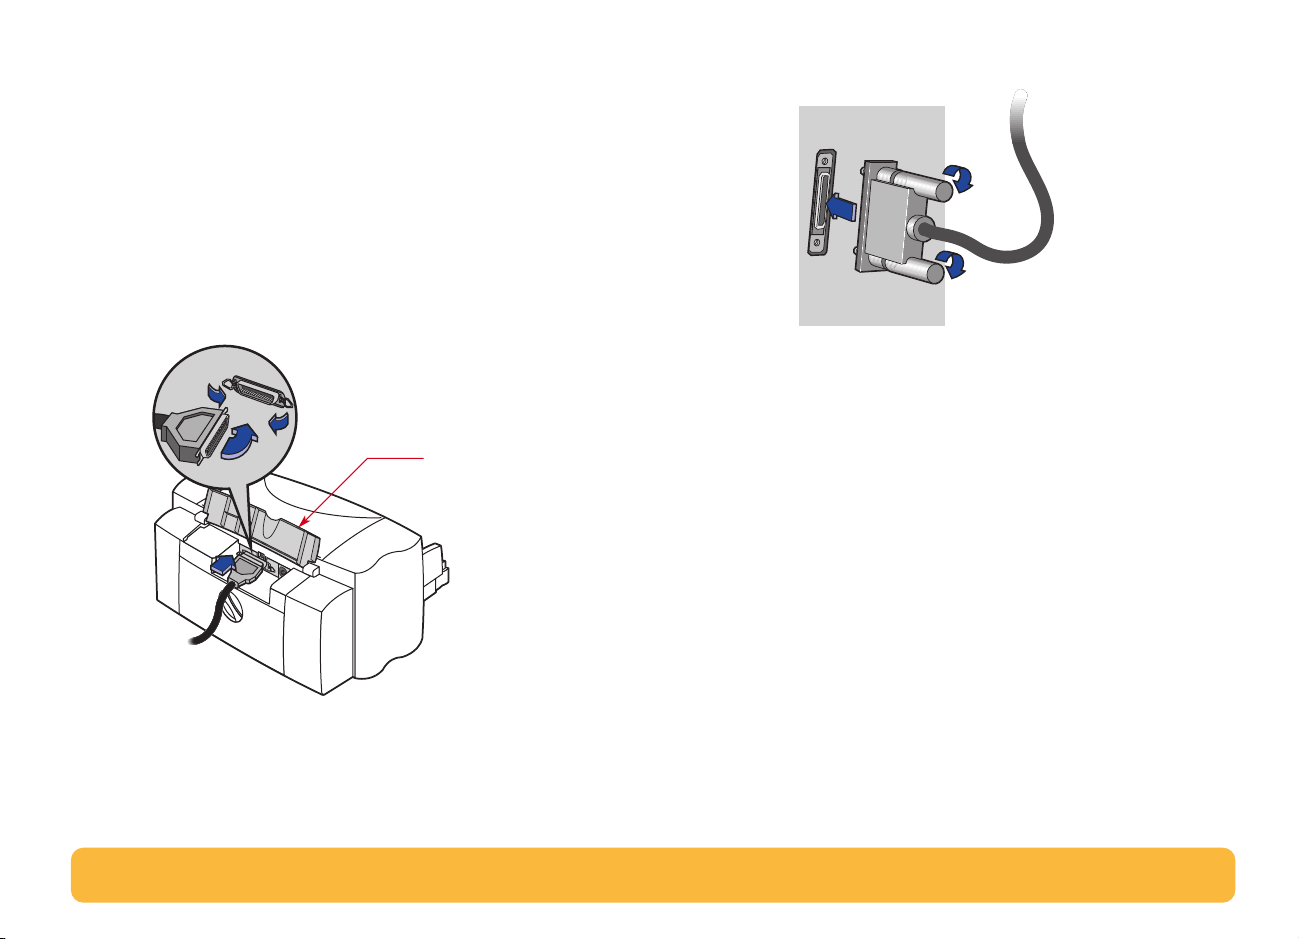
Step 2: Connect parallel cable
You’ll need to buy a printer cable that supports bi-directional
communication (IEEE 1284-compliant), such as HP part number
C2950A.
1
Make sure both the printer and the computer are turned off.
2
Lift the cable access door on the back of the printer.
3
Plug the end of the cable that does not have screws attached
into the printer. Snap both clips into the notches.
Cable access door
4
Plug the other end into the computer, and tighten the screws.
5
Page 6
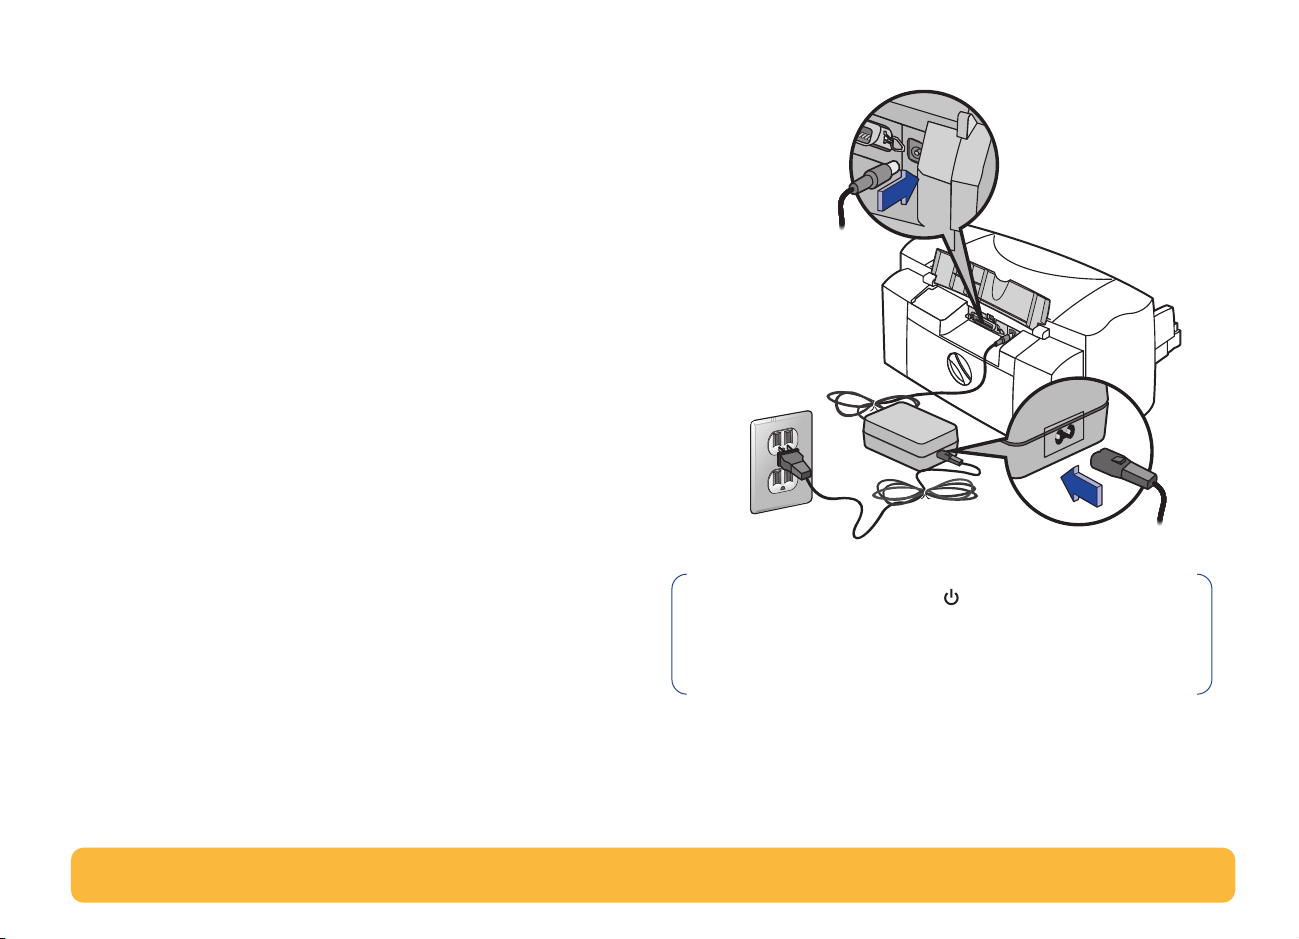
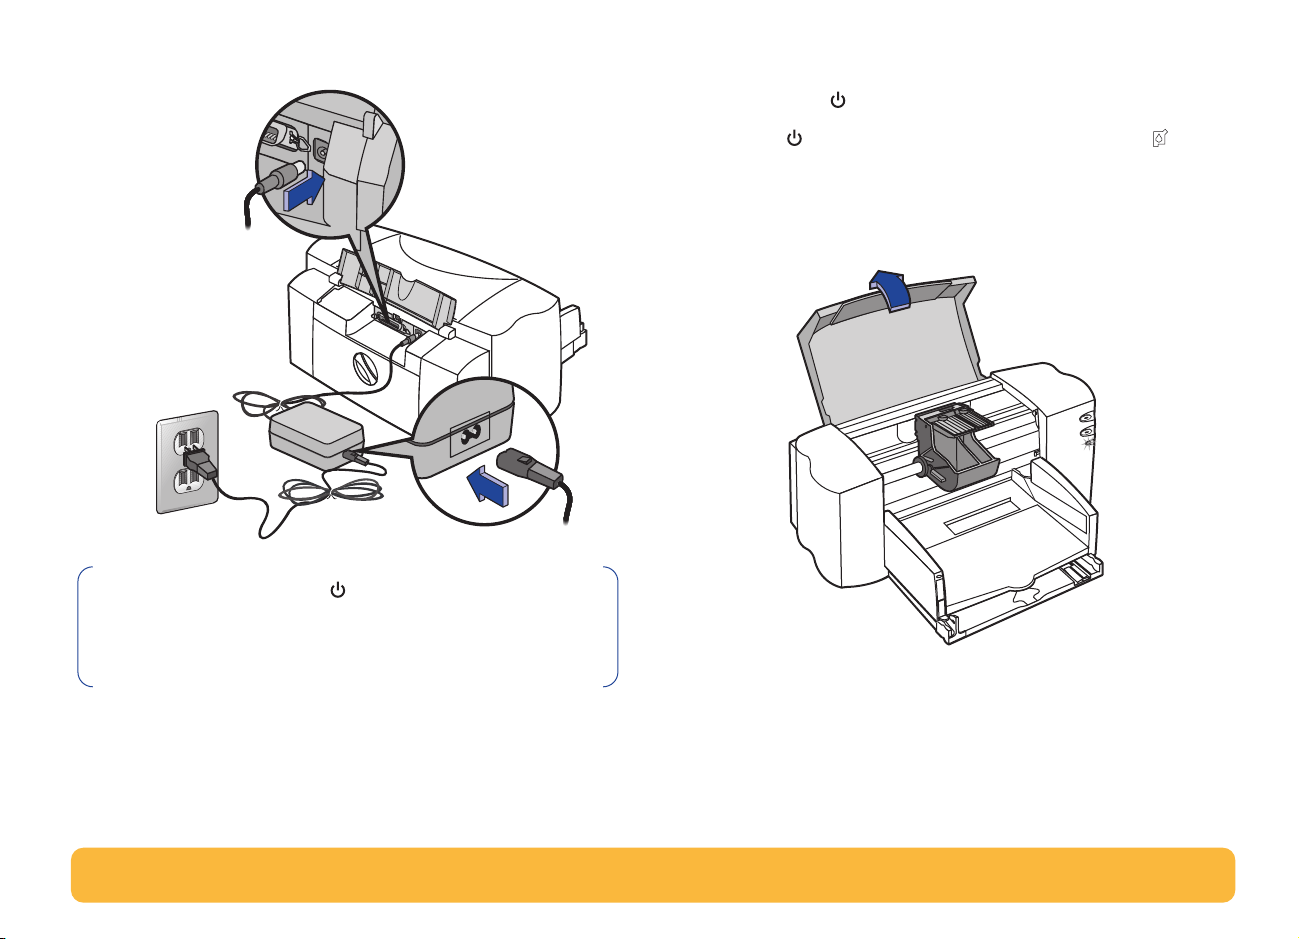
Step 3: Plug in the power
1
Leave the computer and the printer turned off.
2
Lift the cable access door on the back of the printer.
3
Plug the power adapter cord firmly into the connector on the
back of the printer.
4
Plug the appropriate end of the power cord into the power
adapter.
5
Plug the other end of the power cord into an electrical outlet.
3
5
4
Note:Always use the Power button on the front of the
printer to turn the printer on and off. Using a power strip,
surge protector or a wall outlet switch to turn the printer on
and off may cause premature failure.
6
Page 7
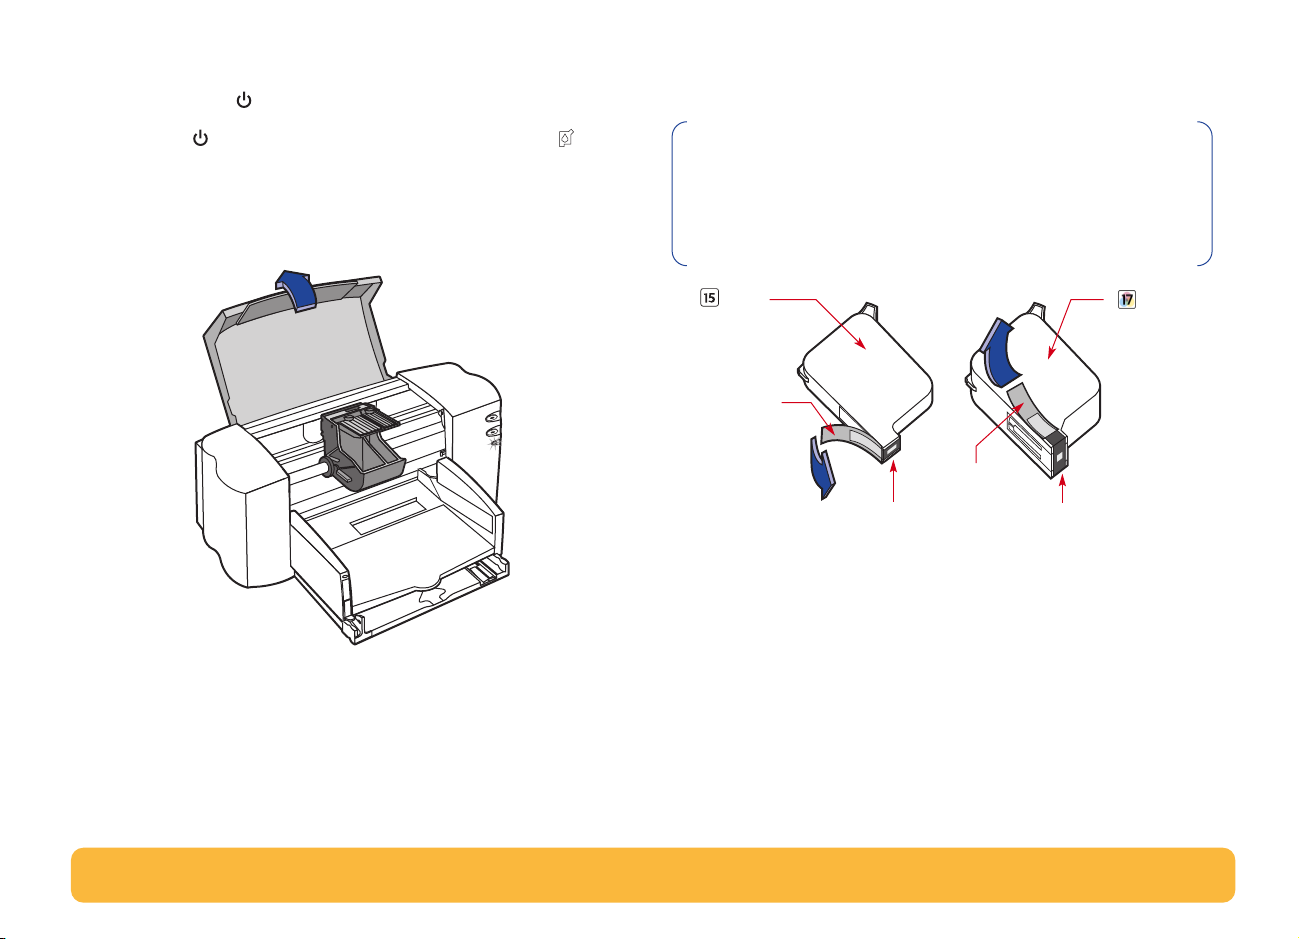
Step 4: Insert print cartridges
1
Press the Power button to turn on the printer.
4
Carefully remove the protective vinyl tape from the tri-color
and black print cartridges.
The Power light comes on and the Print Cartridge light
blinks.
2
Open the top cover.
The cartridge cradle moves to the center of the printer.
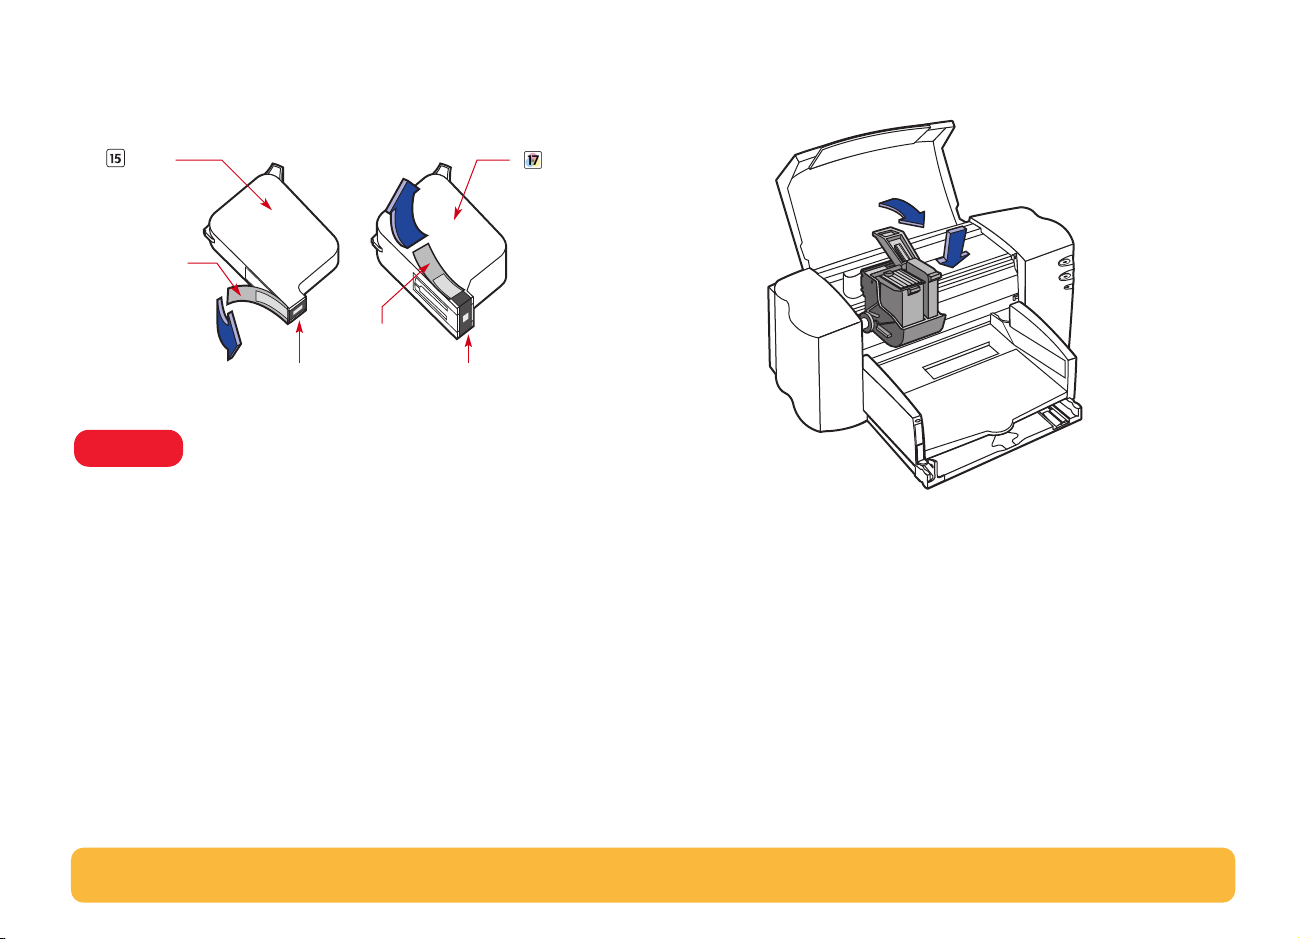
3
Remove the print cartridges from their individual packages.
Note:Be sure not to touch the ink nozzles or the copper
electrical contacts. Also, do NOT remove the copper strip;
these are electrical contacts required for proper operation
of the print cartridges.
Black
Print
Cartridge
Vinyl Tape
Vinyl Tape
Ink Nozzles Ink Nozzles
5
For each print cartridge, lift the cradle latch inside the printer.
With the copper electrical contacts toward the rear of the
printer and the print cartridge held vertically, push the print
cartridge firmly down into the appropriate cradle.
Tri-color
Print
Cartridge
7
Page 8

Insert the black print cartridge in the right cradle, and insert
the tri-color print cartridge in the left cradle. You must insert
both print cartridges for the printer to operate.
6
Close the latch.
You will hear a click and feel resistance when the latch is
pushed down.
Note:If the Print Cartridge light continues to blink or
if the cradle doesn’t move to the right side of the printer,
take out both cartridges and reinsert them.
When a print cartridge starts to run out of ink, replace it. If
you do not have a replacement, leave the empty print
cartridge in the cradle of the printer. The printer will not
print with only one print cartridge installed.
We recommend you keep spare print cartridges on hand.
When buying print cartridges, check the part numbers
referenced below carefully to make sure you are buying
the right print cartridges for your printer. These print
cartridges have been specifically designed to work with
your printer to produce results that are always clear,
always sharp.
840C, 842C, and 843C require:
HP No. [15] (equivalent to C6615 Series)
Black
Tri-Color HP No. [17] (equivalent to C6625 Series)
7
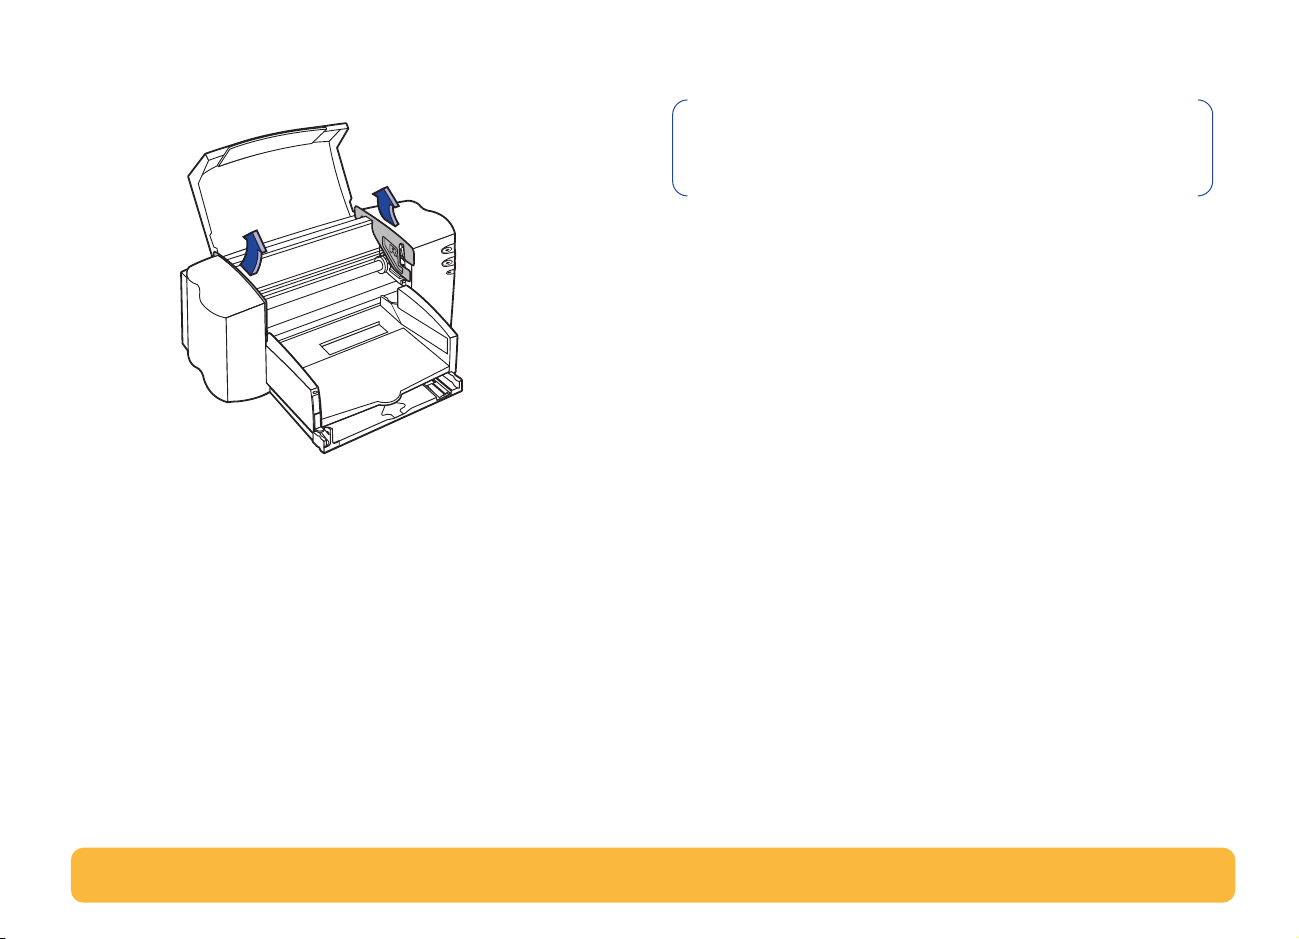
Close the top cover.
The Print Cartridge light continues to blink for awhile
and then goes off. (You’ll hear the cartridge cradle return to
its home position on the right side of the printer.)
8
Page 9

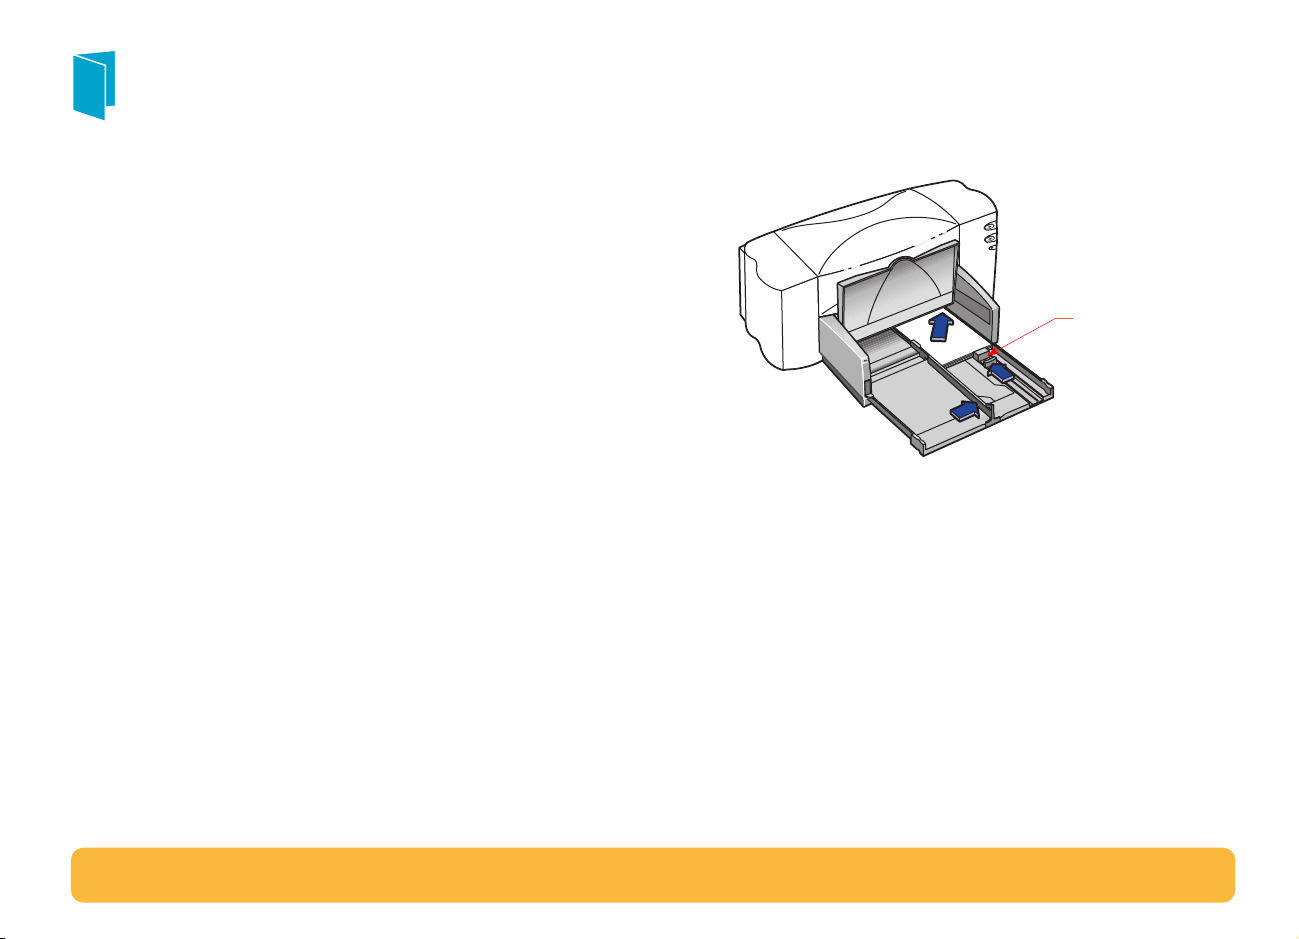
Step 5: Load paper in your printer
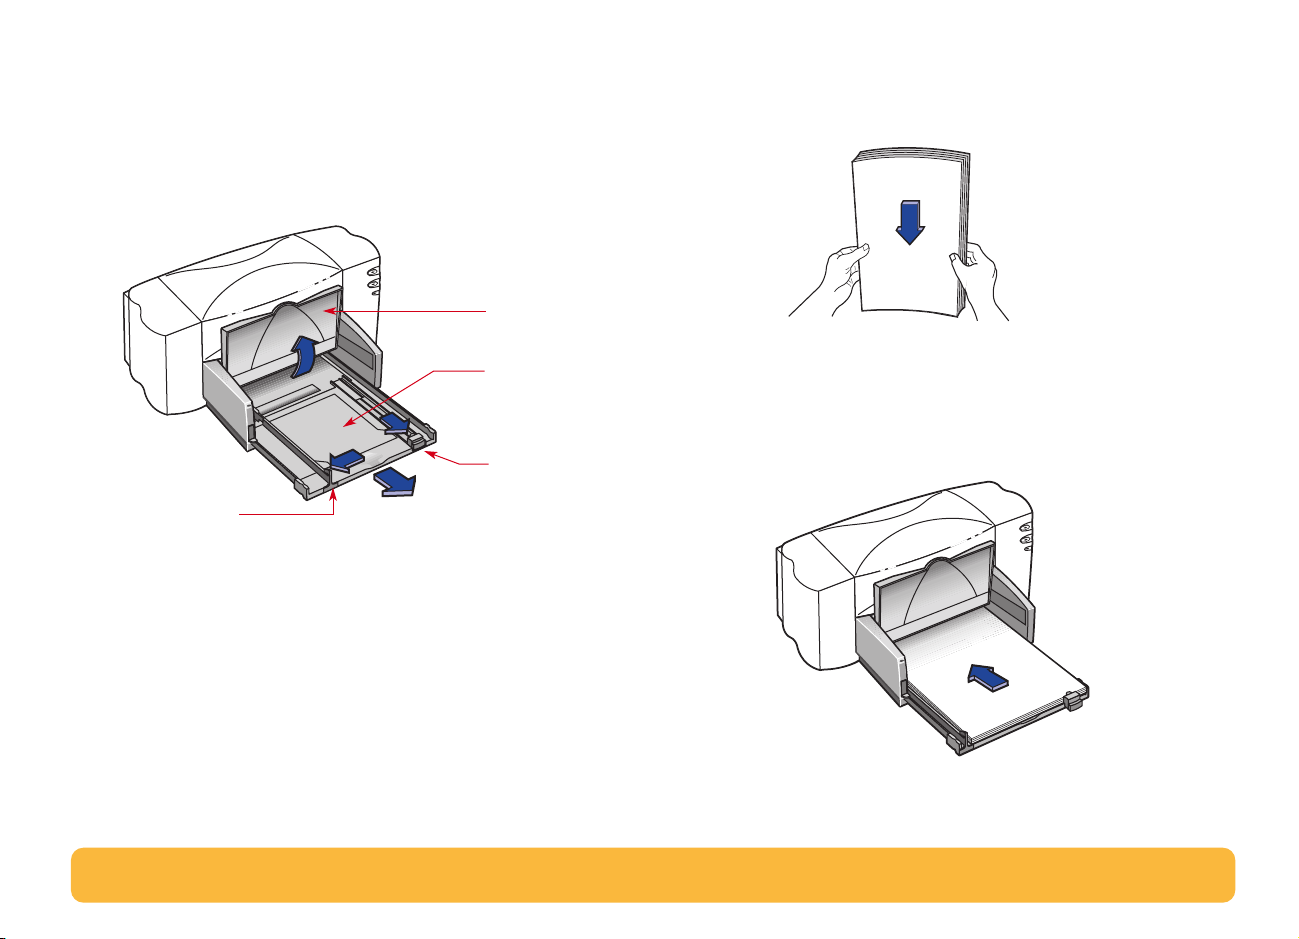
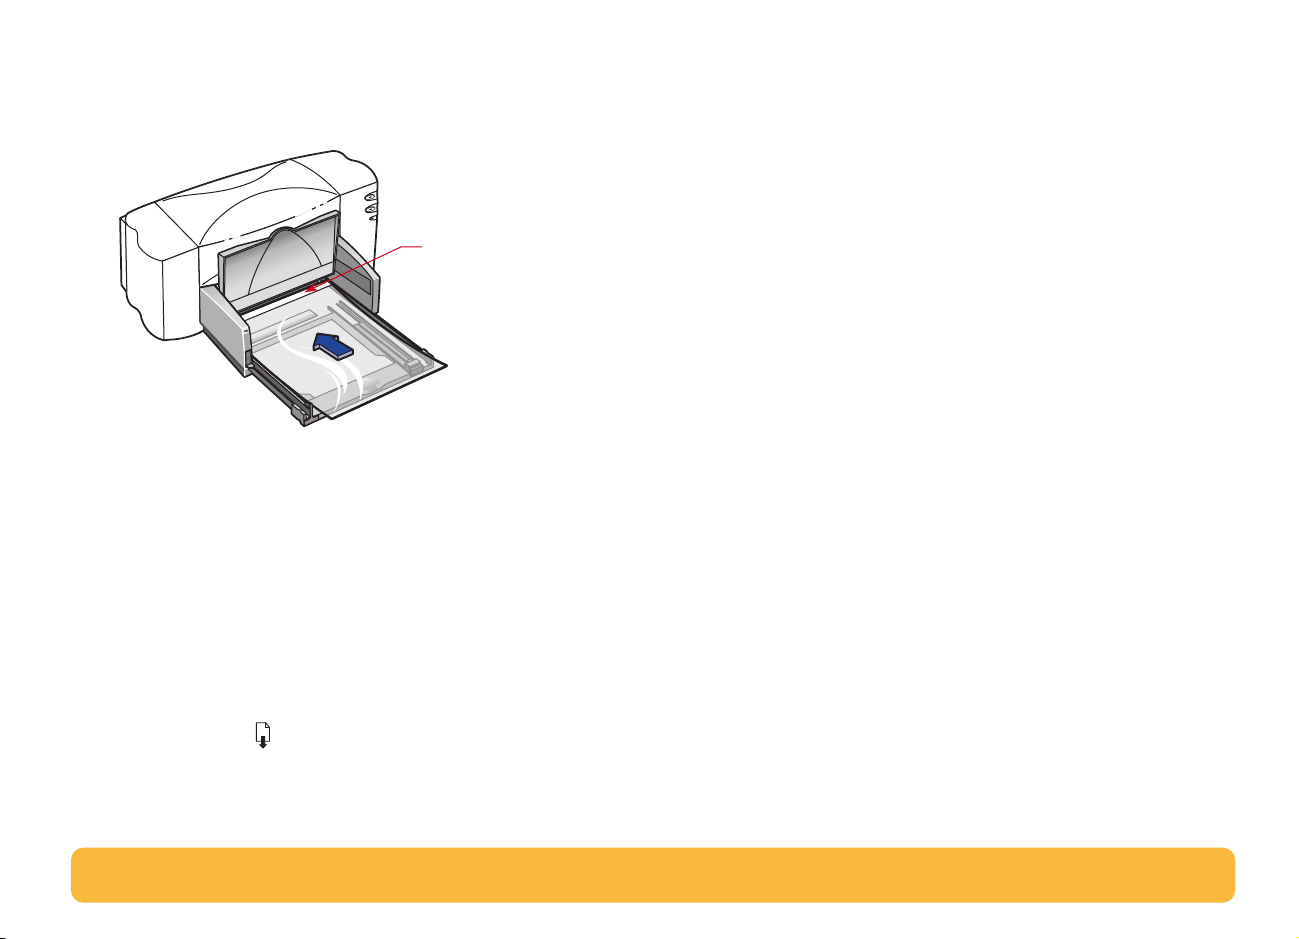
1
Pull out the IN tray and slide the paper-width and paper-
length adjusters out as far as possible to make room for the
paper.
Flip up the OUT tray for a better view of the IN tray.
OUT Tray
IN Tray
Paper-length
adjuster
Paper-width
adjuster
2
Remove a stack of paper from its packaging. (Make sure all
the paper in the stack is the same size and type.) Tap the
stack on a flat surface to even it up.
3
Load the paper into the IN tray,
printable side down
. The IN
tray holds up to 10 mm or 3/8 inch at a time.
4
Push the paper toward the back of the paper tray until it
stops.
9
Page 10

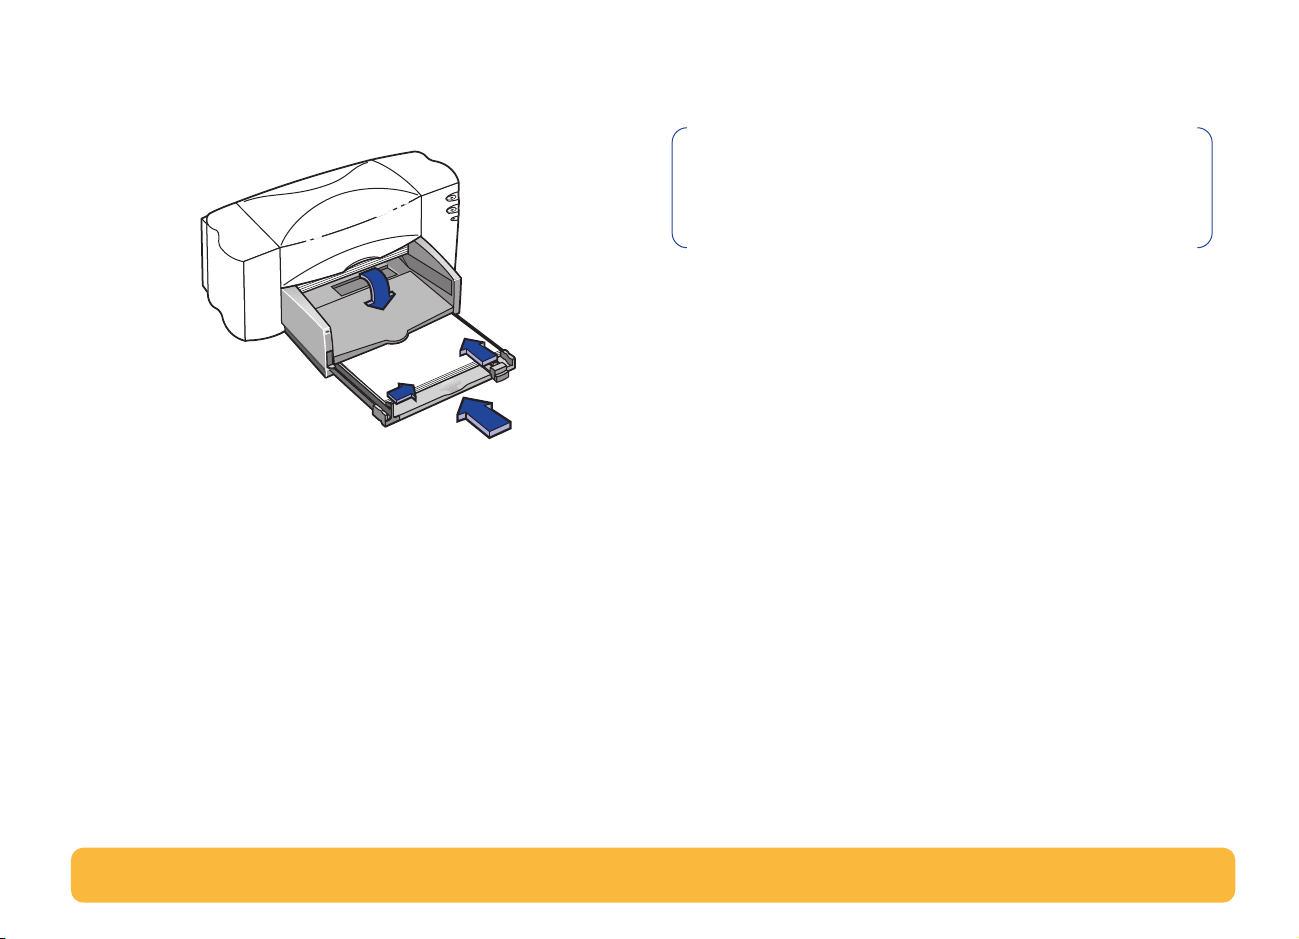
5
Slide both paper adjusters to fit snugly against the paper’s
edges. Make sure the paper lies flat in the tray and that the
paper fits under the tab of the paper-length adjuster.
6
Slide the IN tray all the way back in.
Flip the OUT tray back down if it’s up.
Step 6: Install the printer software
Before you can use your new HP DeskJet printer, you must
install the printer software on the computer from which you will
print. Your printer software is located on the CD included with
your printer.
From time to time, Hewlett-Packard provides updated printer
software. Go to “Printer Software” on page 54 for information
on obtaining updated printer software.
Before You Begin
1
Make sure the computer is fully set up and operational.
2
Make sure that the printer is properly set up and ready to
print using the instructions provided earlier.
3
Make sure that the printer is connected to the computer with
a parallel printer cable and that no peripheral devices (such
as scanners, backup units, and switch boxes) are installed
between the printer and the computer.
4
Make sure both the printer and the computer are turned on.
10
Page 11

5
Close any software programs that are open and running on
the computer, except the HP DeskJet installer, Windows
Explorer, or Program Manager. See page 26 for instructions
on how to close software programs.
6
Follow the installation instructions for your computer’s
operating system.
Installing the printer software from the CD
Note:If the New Hardware Found box appears during the
installation procedure, click the “X” in the upper-right corner
of the box, or click Cancel.
1
Insert the HP printer software CD into your CD-ROM drive.
For
Windows 95, 98
, and
NT 4.0
, do the following:
a. From the taskbar, select
b. Type the identifier of your computer’s CD-ROM drive,
then type
c. Click OK.
For
Windows 3.1x, do the following:
a. In the Program Manger, select
b. Type the identifier of your computer’s CD-ROM drive,
then type
c. Click OK.
setup.exe
setup.exe
Start
➙
. For example,
File
. For example,
Run
.
D:\setup.exe
Run
➙
D:\setup.exe
.
.
.
Note: If you don’t know which drive letter is for
your CD-ROM player, open Windows Explorer or
File Manager and look for the letter next to the
CD-ROM icon.
11
Page 12

2
When the opening screen appears, click
840C Series Printer Software.
will be on the install button.)
3
When the HP License Agreement box appears, read the
agreement and click
4
Do one of the following:
• If the printer is turned on and is connected to the computer
with the parallel printer cable, the setup program
automatically detects the printer and the port to which it
is connected. Then, proceed to step 5.
OR
• If the printer is turned off or if the connection to the
computer has not yet been made with the parallel printer
cable, the setup program asks you to specify which port to
use for the printer. Select an LPT-type port; the default
setting of
Next
LPT1
and proceed to step 5.
Accept
is appropriate for most computers. Click
(Your printer model number
.
Install HP DeskJet
5
Follow the instructions on the screen.
If something goes wrong, go to “If you have problems
installing” on page 13.
Note:The HP DeskJet 840C Series printer is
automatically set as the default Windows printer. If you
find that it is not the default Windows printer, go to
“Setting the HP DeskJet Printer as the Default” on page 26.
Note:If you need the printer software on floppy disks:
• Contact your local HP Customer Care Center, listed on
page 55.
OR
• If you have access to a computer with a CD-ROM drive,
insert the printer software CD in this computer’s CD-ROM
drive and begin the software installation. When the
opening screen appears, select Make diskettes of your
printer software.
12
Page 13

If you have problems installing
• Make sure your printer is on and all connections are firm.
• Exit your software programs. Then turn off the computer and
the printer. Turn on the printer, then turn on the computer.
• Close any virus protection programs that are running on your
computer. Either right-click the virus protection program’s
icon on the taskbar and select
upper-right corner of the virus protection program’s open
window.
• Uninstall the printer software using the instructions on
page 27 then repeat the installation procedure.
• If you’re still having problems with the installation, call an
authorized HP dealer or HP Customer Care representative.
For the phone number of the support center nearest you,
see
HP Customer Care by Phone
Disable
on page 55.
, or click the “x” in the
13
Page 14

Setting up your printer with a USB Cable
Note: The USB cable set up requires Windows 98. If you
are using a parallel cable for communications between
your printer and your computer, see page 3.
What is USB?
Universal Serial Bus (USB) makes it easy to connect devices to
your computer without having to open your PC. USB uses a
standard port and plug combination for connecting devices like
printers, modems, scanners, and digital cameras. It also offers
the benefit of being able to easily add, remove, and move
devices.
USB is an option to customers who want to print from Windows
98 across the USB cable. If your computer’s USB port is enabled
and properly set up, you can connect your HP DeskJet printer
to it or to a chain of USB devices via a USB cable.
USB Step 1: Unpack your printer
1
Remove the packing material and the packing tape from the
outside of the printer.
14
Page 15
2
Open the top cover. Remove both pieces of plastic packing
material from the inside of the printer.
3
Close the top cover.
USB Step 2: Plug in the power
Note: Do NOT connect your USB cable between the printer
and the computer. Make sure that the USB cable is NOT
plugged into the computer at this point in the setup.
1
Leave the computer and the printer turned off.
2
Lift the cable access door on the back of the printer.
3
Plug the power adapter cord firmly into the connector on the
back of the printer.
4
Plug the appropriate end of the power cord into the power
adapter.
15
Page 16
5
Plug the other end of the power cord into an electrical outlet.
USB Step 3: Insert print cartridges
1
Press the Power button to turn on the printer.
3
5
4
Note:Use only the Power button on the front of the
printer to turn the printer on and off. Using a power strip,
surge protector or a call outlet switch to turn the printer on
and off may cause premature failure.
The Power light comes on and the Print Cartridge light
blinks.
2
Open the top cover.
The cartridge cradle moves to the center of the printer.
16
Page 17
3
Remove the print cartridges from their individual packages.
4
Carefully remove the protective vinyl tape from the tri-color
and black print cartridges.
Note:Be sure not to touch the ink nozzles or the copper
electrical contacts. Also, do NOT remove the copper strip;
these are electrical contacts required for proper operation
of the print cartridges.
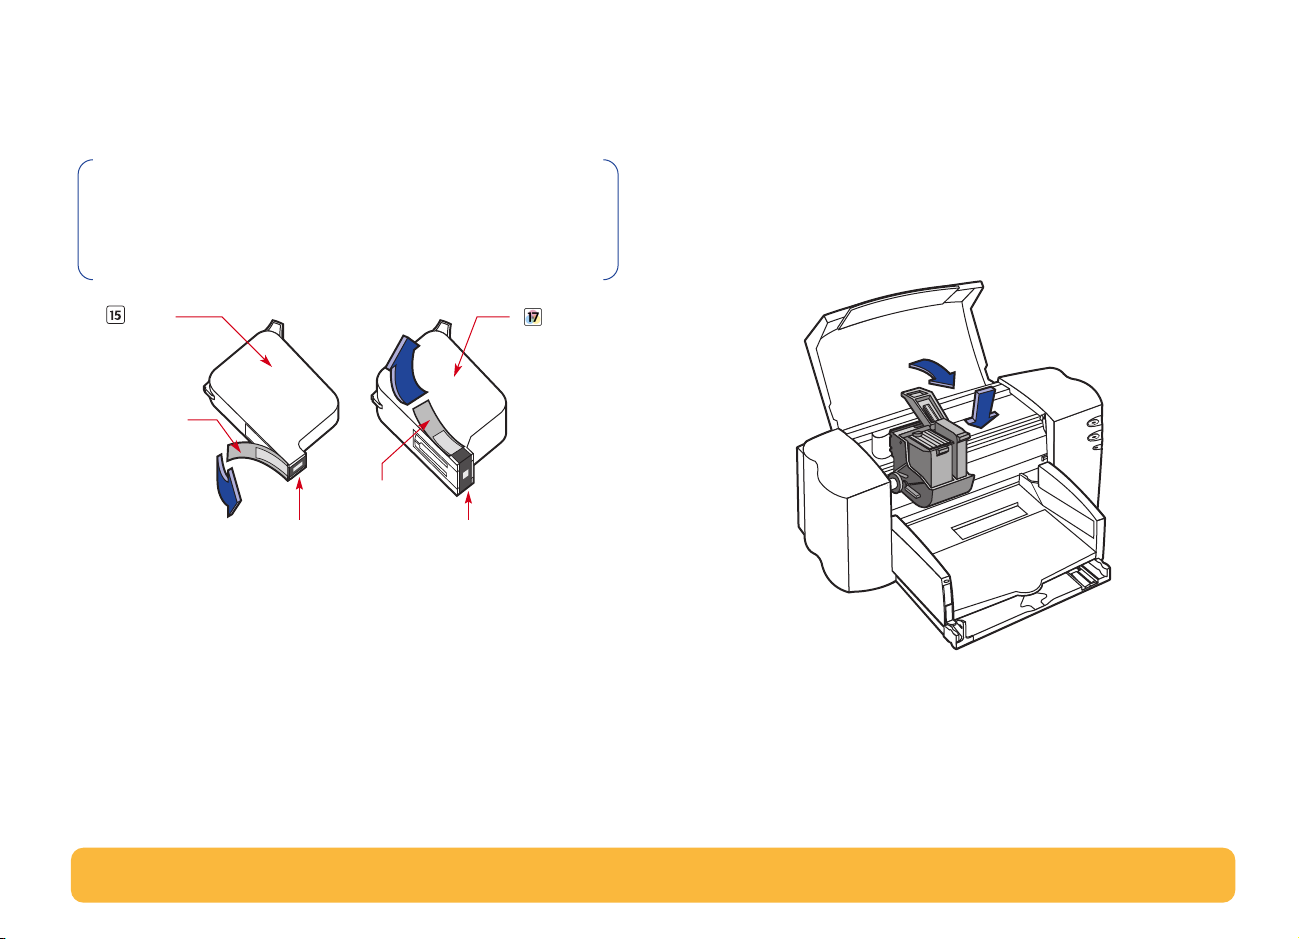
5
For each print cartridge, lift the cradle latch inside the printer.
With the copper electrical contacts toward the rear of the
printer and the print cartridge held vertically, push the print
cartridge firmly down into the cradle.
Insert the black print cartridge in the right cradle, and insert
the tri-color print cartridge in the left cradle. You must insert
both print cartridges for the printer to operate.
Black
Print
Cartridge
Vinyl Tape
Tri-color
Print
Cartridge
Vinyl Tape
Ink Nozzles Ink Nozzles
17
Page 18
6
Close the latch.
You will hear a click and feel resistance when the latch is
pushed down.
7
Close the top cover.
The Print Cartridge light continues to blink for awhile
and then goes off. (You’ll hear the cartridge cradle return to
its home position on the right side of the printer.)
Note:If the Print Cartridge light continues to blink or
if the cradle doesn’t move to the right side of the printer,
take out both cartridges and reinsert them.
When a print cartridge starts to run out of ink, replace it. If
you do not have a replacement, leave the empty print
cartridge in the cradle of the printer. The printer will not
print with only one print cartridge installed.
We recommend you keep spare print cartridges on hand.
When buying print cartridges, check the part numbers
referenced below carefully to make sure you are buying
the right print cartridges for your printer. These print
cartridges have been specifically designed to work with
your printer to produce results that are always clear,
always sharp.
840C, 842C, and 843C require:
HP No. [15] (equivalent to C6615 Series)
Black
Tri-Color HP No. [17] (equivalent to C6625 Series)
18
Page 19
USB Step 4: Load paper in your printer
1 Pull out the IN tray and slide the paper-width and
paper-length adjusters out as far as possible to make room
for the paper.
Flip up the OUT tray for a better view of the IN tray.
OUT Tray
2 Remove a stack of paper from its packaging. (Make sure all
the paper in the stack is the same size and type.) Tap the
stack on a flat surface to even it up.
Paper-width
adjuster
IN Tray
Paper-length
adjuster
3 Load the paper into the IN tray, printable side down. The IN
tray holds up to 10 mm or 3/8 inch at a time.
4 Push the paper toward the back of the paper tray until it
stops.
19
Page 20
5 Slide both paper adjusters to fit snugly against the paper’s
edges. Make sure the paper lies flat in the tray and that the
paper fits under the tab of the paper-length adjuster.
6 Slide the IN tray all the way back in.
Flip the OUT tray back down if it’s up.
USB Step 5: Insert printer software CD in the computer
Note:Make sure the computer is operational, meets the
minimum system requirements and that its USB port is
enabled and properly configured. See “Problems with your
USB installation?” on page 24 for more information.
1 Turn on the computer and wait for Windows 98 to start.
2 Insert the HP printer software CD into your CD-ROM drive.
20
Page 21
USB Step 6: Connect USB cable
USB Step 7: Install USB and printer software
1 Lift the cable access door on the back of the printer.
2 Plug one end of the USB cable into the USB port on the
printer.
3 Plug the other end into any USB port on the computer.
Note:You can also refer to steps 8a through 8h on the
USB Cable Setup Quick Start Poster
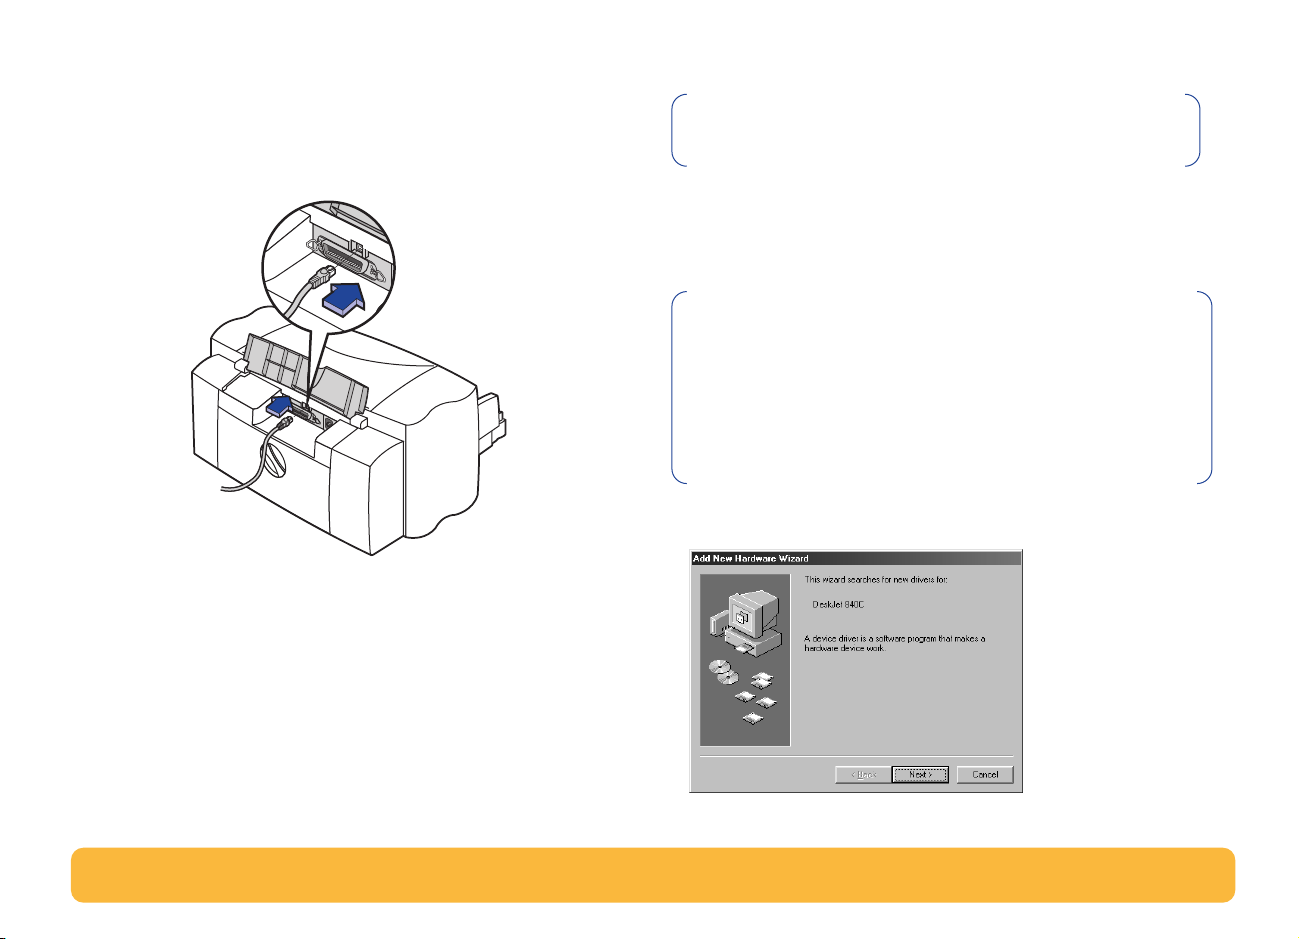
1 After a few seconds, the Add New Hardware Wizard screen
appears.
Note:If the Add New Hardware Wizard screen does not
appear, your computer may not be USB-enabled. You can
still enjoy the full capabilities of your HP DeskJet 840C
Series printer by connecting the printer to the computer with
a parallel cable. Go to “Connecting your printer with a
parallel printer cable” on page 3 for setup instructions.
2 Click Next.
21
Page 22
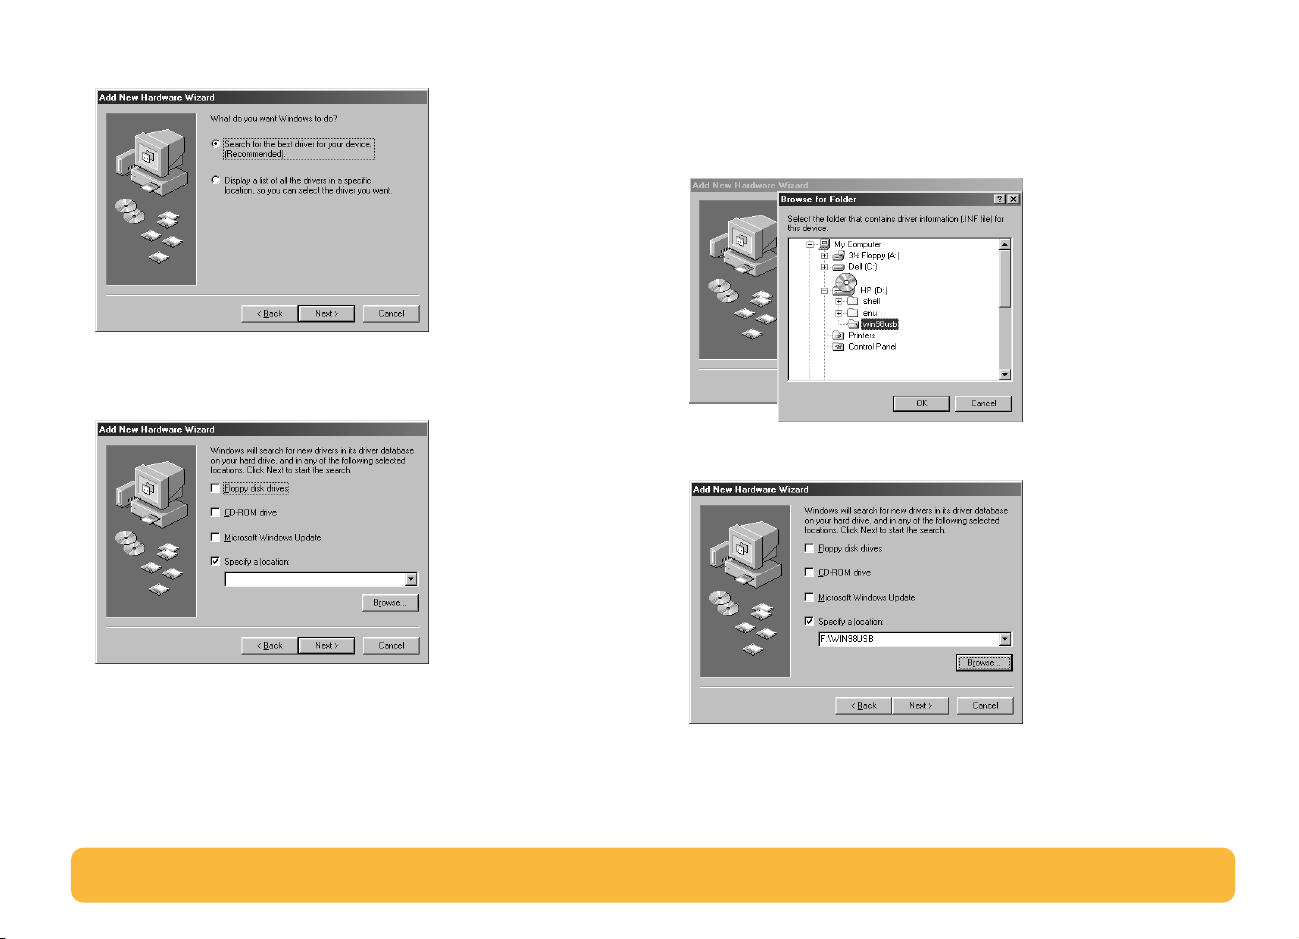
3 Click Next in this screen, too.
4 Select Specify a location and then click the Browse button.
Do NOT click Next.
5 Double-click the CD or disk drive icon, which ever is
appropriate for the type of media you are installing from.
Click on the win98usb folder then click OK to close the
Browse screen and return to the Wizard.
6 Click Next.
The Add New Hardware Wizard searches for the win98usb
driver. If Windows is unable to find a driver, click Back to
return to Step 4.
22
Page 23
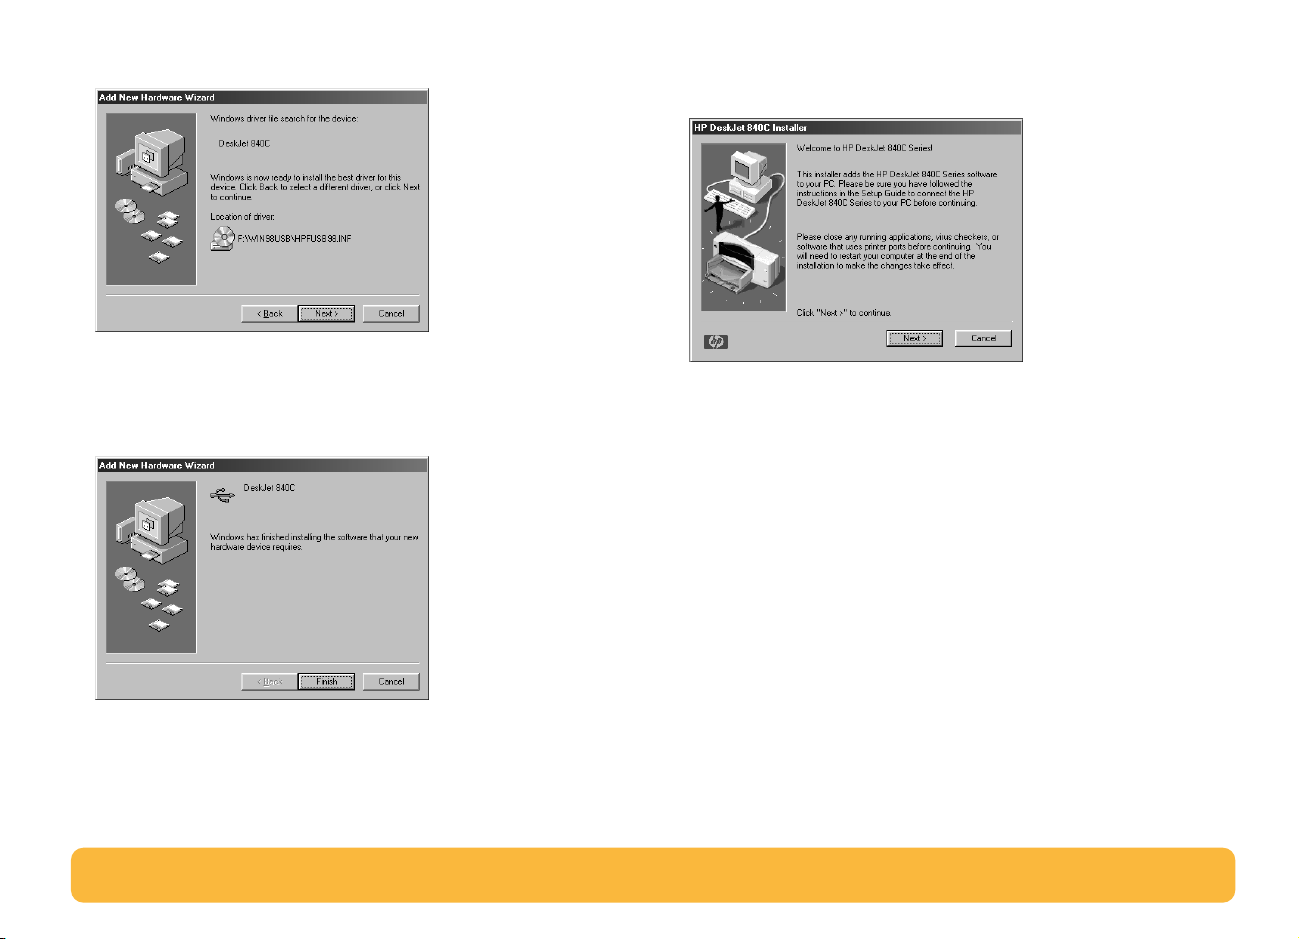
7 When the driver file is located, click Next.
The driver file is installed on your computer.
8 When you are notified that installation of the USB software is
completed, click Finish.
9 Soon the opening screen for installing the HP DeskJet
printer software appears. Click Next.
10When the HP License Agreement box appears, read the
agreement, then click Accept.
If something goes wrong with the USB software installation,
go to “Problems with your USB installation?” on page 24.
23
Page 24

11 If you are notified that the HP DeskJet printer port could not
be located, select the USB port. Then click Next.
12 Follow the on-screen instructions.
If something goes wrong with the printer software
installation, go to “If you have problems installing” on
page 13.
Problems with your USB installation?
How can I determine if my computer’s USB port
is enabled?
First, follow the installation instructions beginning on page 14.
If you don’t see the Add New Hardware Wizard screen after
connecting your printer to your computer, perform these steps:
Note: The HP DeskJet 840C Series printer is automatically
set as the default Windows printer. If you find that it is not the
default Windows printer, go to “Setting the HP DeskJet Printer
as the Default” on page 26.
1 In Windows 98, select Start ➙ Settings ➙ Control Panel.
2 Double-click the System icon.
3 Click the Device Manager tab.
4 Click the plus (+) icon before the Universal Serial Bus
Controller item.
If you see a USB host controller and a USB root hub listed,
USB is probably enabled. If your printer is connected through
another USB device or hub, connect your printer directly to
the USB port on the computer. Also, make sure the cable
connections are firm. (USB hubs are hardware devices into
which you can plug multiple USB cables.)
If you do not see these devices listed, refer to your computer’s
documentation or contact the manufacturer for more
information on enabling and setting up USB. Remember, you
can always use a parallel cable to connect your printer’s
parallel port to your computer.
24
Page 25

I accidentally cancelled the USB installation the
first time I connected my HP DeskJet printer to my
computer. How do I get it to appear again?
To redisplay the USB installation screens:
1 Disconnect the USB cable from your printer.
2 Insert the printer software CD (or Disk 1 if you have diskettes)
into your computer.
3 Click Start
4 Browse to your disk drive and select Setup, then click Open.
5 The setup.exe file will appear in the dialog box. Click OK.
6 Select the Remove HP DeskJet 840C Series Software
option.
➙ Run.
When I install the USB software, I get an “Unknown
device is found” message.
Disconnect the USB cable, remove the printer software, and turn
off the computer and printer. Unplug the electrical power to the
printer, then reconnect your printer and restart the USB
software installation.
After I installed my printer, why isn’t my HP
DeskJet printer assigned to an LPT printer port in
the Print dialog box of my software application?
USB uses a different naming convention for USB devices. After
the printer has been installed, you see USB/DeskJet 840C/
(serial number of your printer).
7 Connect the USB cable to your printer again. The USB
installation screen should appear again.
8 Continue with the first step of “USB Step 7: Install USB and
printer software” on page 21.
How can I increase printing speed?
When operated on a USB chain, your printer may become
slower if other USB devices or software applications are being
used while you’re printing. For optimal print performance, avoid
using other devices in the USB chain while printing.
25
Page 26

More information about your
Setting the HP DeskJet Printer as the Default
printer software
Closing Software Programs
Before installing the printer software on a computer, close any
virus protection programs or other software programs that are
open and running on the computer, except the HP DeskJet
installer, Windows Explorer, or Program Manager.
For Windows 95, 98 or NT 4.0:
• Right-click on the software program’s name or icon on the
taskbar. Select Close. Repeat these steps for each open
software program except Windows Explorer.
For Windows 3.1x:
1 While holding down the Alt key, press the Tab key to locate
an open software program.
2 When you locate an open software program, release both
keys.
3 Select File
➙ Exit.
For Windows 95, 98 or NT 4.0:
1 From the taskbar select Start ➙ Settings ➙ Printers.
2 Right-click the HP DeskJet 840C Series Printer icon and
choose Set As Default.
For Windows 3.1x:
1 In the Program Manager, open the Main program group.
2 Double-click Control Panel to open it, then double-click
Printers.
3 Select the HP DeskJet 840C Series Printer from the
Installed Printers list, and then click Set As Default Printer.
4 Click Close and exit the Control Panel.
4 Repeat these steps for each open software program, except
Program Manager.
26
Page 27

Uninstalling the printer software
For Windows 3.1x:
If you need to uninstall the printer driver for your HP DeskJet
printer for any reason, perform one of the steps listed below for
your operating system. If something unexpected happened
during installation, the safest method is to run the uninstall
utility directly from the CD or disks, rather than from the
uninstall program that was placed on your hard drive.
For Windows 95, 98 and NT 4.0:
Perform one of the following:
• Insert the printer software disk (either Disk 1 or your CD) into
your computer and run Setup.exe. Select the option to
Remove HP DeskJet 840C Series Software.
OR
• From the taskbar, select Start ➙ Programs ➙ HP DeskJet
840C Series ➙ HP DeskJet 840C Series Uninstall.
OR
• From the taskbar, select Start ➙ Settings ➙ Control Panel.
Then click Add/Remove Programs and select HP DeskJet
840C Series (Remove only).
Perform one of the following:
• Insert the printer software disk (either Disk 1 or your CD) into
your computer and run Setup.exe. Select the option to
Remove HP DeskJet 840C Series Software.
OR
• In the Program Manager, locate your HP DeskJet Series
group. Double-click the Uninstall icon to uninstall your
printer software.
Printing from DOS
If you are using DOS, information can be found in a text
document (dosread.txt). This document is on the printer
software CD in the \<language code>\djcp\ directory. For
example, “enu” is the language code for English, so dosread.txt
is located in the \enu\djcp directory. For a list of language
codes, see page 73. If you have diskettes, the file is located on
the HP DeskJet Control Panel for DOS Diskette.
27
Page 28

Printing Basics
How to choose paper
Most plain photocopy paper, postcards, index cards,
transparencies, envelopes and labels work fine in your printer,
particularly paper that is marked for use in inkjet printers. To
get the best results, use one of the Hewlett-Packard papers,
which were developed especially for HP inks and your printer.
What to consider:
• Size. You can use any size paper that fits easily within the
paper adjusters of the printer.
width = 3 to 8.5 inches
(77 to 216 mm)
length = 5 to 14 inches
(127 to 356 mm)
• Weight. You can choose from a wide range of paper weights.
Use 20-24 lb or 75-90 g/m
everyday use.
• Brightness. Some papers are whiter than others and produce
sharper, more vibrant colors. Use HP Premium Photo Paper,
Glossy or HP Premium Plus Photo Paper, Glossy or Matte for
printing documents with photographs. Use HP Bright White
Inkjet Paper or HP Premium Inkjet Paper for documents with
any other pictures.
• Surface smoothness. The smoothness of the paper affects
how crisp the printing looks on the paper. Glossy, coated
paper works well for pictures and charts (where you want
crisp lines with intense, high-quality colors).
• Opacity. Opacity refers to the degree to which printing on
one side of the paper shows through to the other side. Use
paper high in opacity (or thicker paper) for two-sided
printing. HP Premium Brochure and Flyer Paper is ideal for
two-sided projects.
2
plain paper for multipurpose,
28
Page 29

Get the Right Paper
Your HP DeskJet printer is designed to work well on most
common office paper types and with quality 25% cotton bond
paper. Because your printer uses ink to produce an image,
paper that accepts ink well produces the best results. Be sure to
test a variety of paper types before buying large quantities.
HP papers are available at most computer supply stores. See
“Supplies and accessories” on page 70 for paper ordering
information.
Paper that Might Not Work
• Highly textured stock, such as linen, might not print evenly;
the ink could bleed into these papers.
• Extremely smooth, shiny, or coated papers not specifically
designed for inkjet printers could jam the printer and might
actually repel ink.
• Multi-part forms (such as duplicate or triplicate forms) could
wrinkle in the printer or get stuck; the ink is also more likely
to smear. In addition, only the top page is printed.
• Paper in poor condition—with tears, dust, wrinkles, curled or
bent edges, or paper that doesn’t lie flat—could jam the
printer.
• Envelopes with thick or crooked edges; envelopes that are
damaged, curled, wrinkled, or irregularly shaped; envelopes
that are shiny or embossed; or envelopes with clasps or
windows.
29
Page 30
Finding the HP print settings box
After you lay out the page and choose the text, pictures, fonts,
and colors from your software program, you need to select
settings such as paper type, paper size, orientation, and print
quality in the HP print settings box. Where is it?
The way you get there varies depending on the software
program and the operating system you’re using. Try these
strategies from the File menu of your document, and you’re
sure to get there.
Try This...
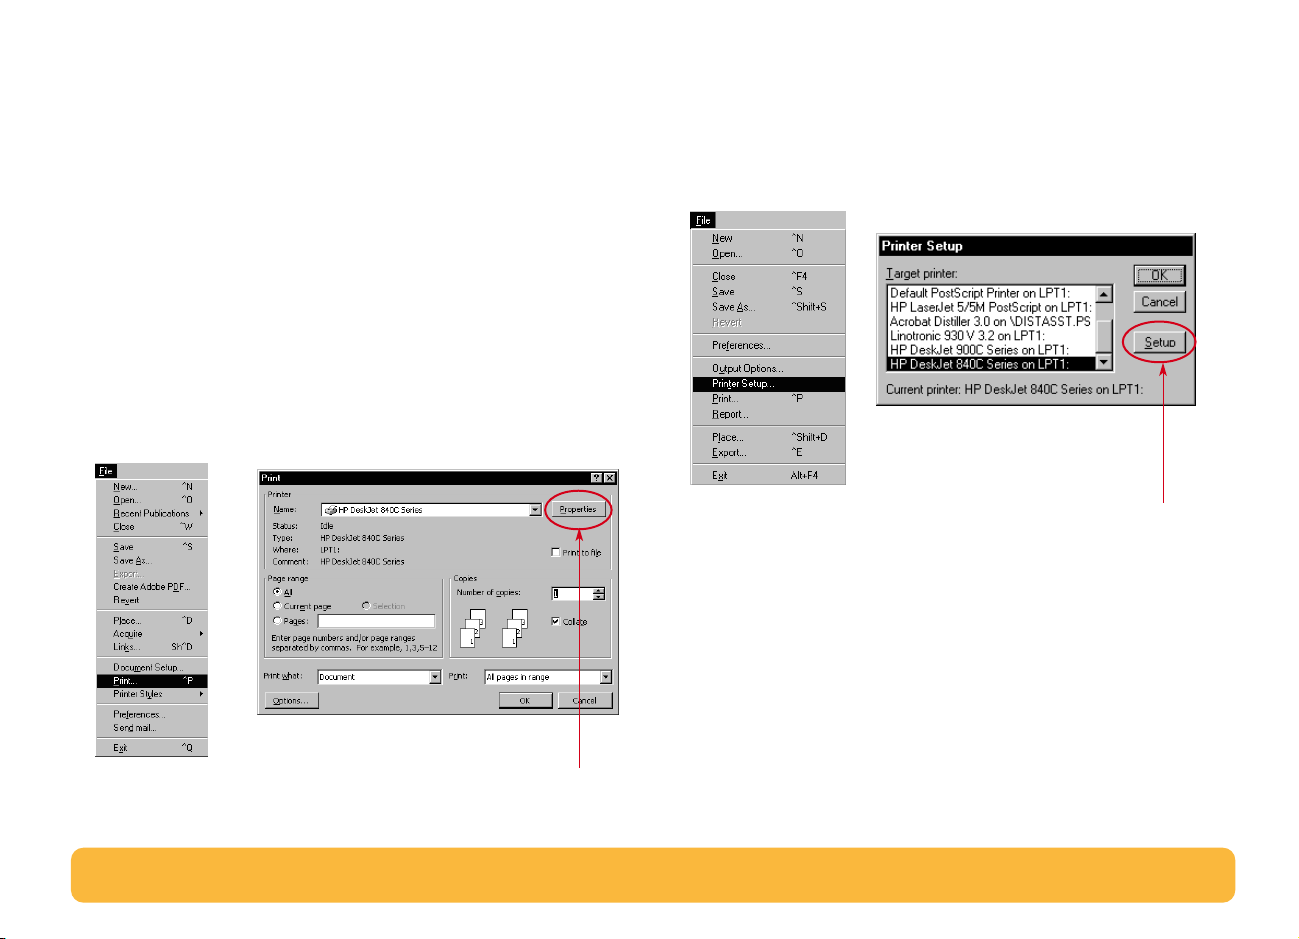
1 Click File and then click Print.
3 If you still don’t see the box, click Setup, Options, or
Properties.
...Or Try This
1 If Print isn’t there, click Printer Setup or Print Setup.
2 Then click whichever button you see—Setup or Options.
2 Then click whichever button you see—Properties, Setup, or
Printer.
30
Page 31

...then click a tab, and then click a setting.
Show your finished work at its best.
Click Best print quality. Best is
recommended for photographs
Save time and ink.
Click Draft mode. Draft is
recommended for
printing test pages and
proofing drafts.
Select the appropriate settings.
Choose the correct paper size and type for the job.
printed on photo paper.
Note:Features and wording on the HP print settings box
tabs may differ from that shown here depending on your
printer model.
Save money and trees.
Print on both sides of the paper.
Flip the image.
Click Mirror Image.
This is great for
iron-on transfers.
Save time and color ink.
Click here to print drafts of
color documents in
shades of gray
Manage your ink and
drying time.
Use sliders to adjust the
amount of ink on the
page, and to allow for
extra drying time.
31
Page 32

How to print on standard paper sizes
1 Check your print settings.
Choose orientation, two-sided printing, multiple page
printing, mirror image, and poster printing options on the
Features tab.
Choose your print settings in the HP print settings box. (See
“Finding the HP print settings box” on page 30.)
Choose print quality, paper size, and paper type on the
Setup tab.
Click the Setup tab.
First click the down
arrow, and then click
your selection.
Click the Features tab.
Choose color options on the Advanced tab.
Click the Advanced tab.
Click OK to save.
32
Page 33

2 Click OK in the Print box of your software program to save
your settings and start printing.
The next time you want to print this document, you can use
the Print button at the top of the screen in your software
program — simply click it to print one copy using the same
print settings.
That’s all there is to it. The printer prints one page at a time until
it finishes, delivering each printed page neatly into the printer’s
OUT tray.
While you’re printing
It takes a few moments for the printing to start, because the
printer is receiving information from the computer. During
printing, the printer might pause occasionally to receive more
information. (Don’t worry, it’s normal.)
If you run out of paper before you’re finished
The printer prompts you to add more paper. Load the paper in
the IN tray and press Resume .
If something goes wrong
Sometimes, in spite of your best efforts, something goes wrong
during printing. Maybe a sheet of paper jams in the printer or
nothing happens at all. See “Solving Common Problems” in
your Reference Manual.
33
Page 34
How to print on different paper sizes
Most of the time, when you print on plain paper, cards, labels,
and envelopes, you select one of the standard sizes in the
Paper Size box on the Setup tab of the HP print settings box.
However, you’re not limited to the sizes listed. Just make sure
that the size of the paper falls within the following dimensions
(so both of the printer rollers can pick up the paper):
Width: 3 to 8.5 inches (77 to 215 mm)
Length:5 to 14 inches (127 to 356 mm)
Then follow these steps:
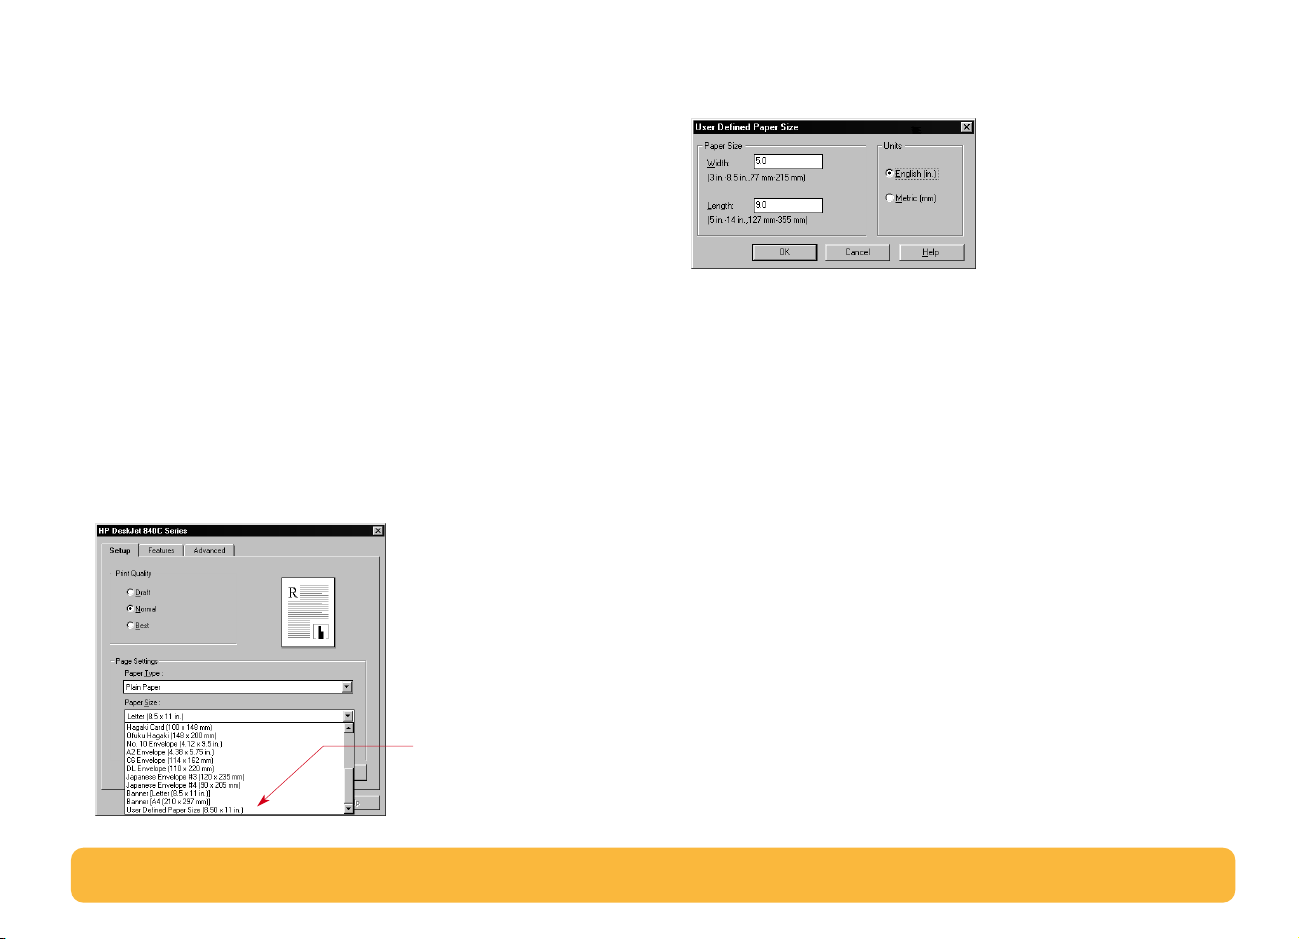
1 In the HP print settings box, click the Setup tab, and then
select User Defined Paper Size in the Paper Size list. (See
“Finding the HP print settings box” on page 30.)
2 Type the dimensions of the paper in the User Defined Paper
Size dialog box, and click OK.
3 Load the paper in the printer, and print as you would for
normal paper sizes.
4 For small paper sizes, be sure to push the small slider snugly
against the paper as described in “Printing Cards” on
page 42.
Remember to reset the software for the paper in the IN tray after
printing completes.
Click User Defined
Paper Size.
34
Page 35
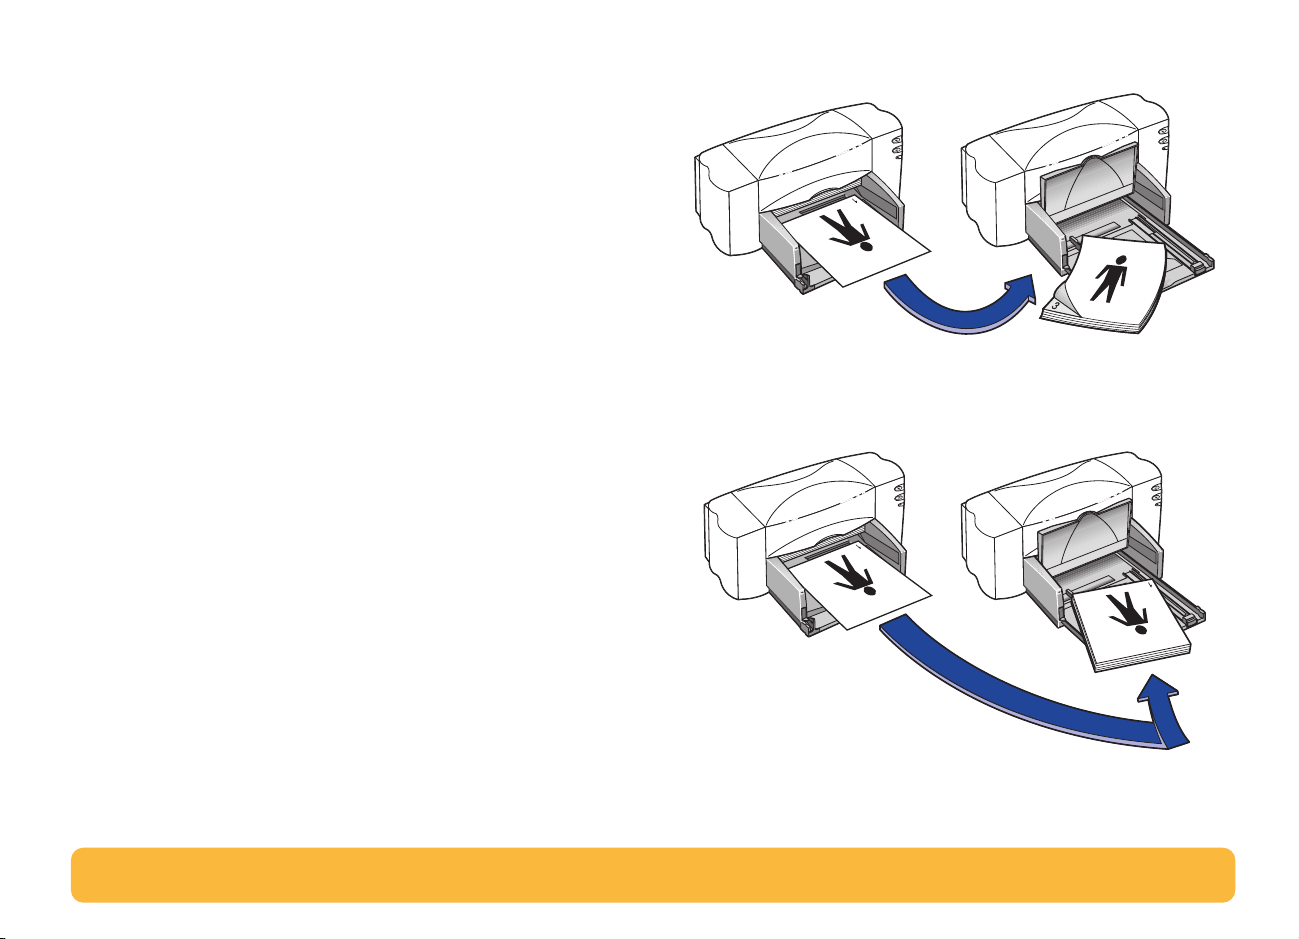
How to print on both sides of the paper
The easiest way to save paper is to print on both sides. Just put
the paper through the printer twice: the first time through it
prints the odd-numbered pages and the second time through it
prints the even.
1 Load the paper in the IN tray.
Book option
Make sure that there’s no paper in the OUT tray.
2 In the HP print settings box, click the Features tab. (See
“Finding the HP print settings box” on page 30.)
3 Then click Book or Tablet. Use Tablet when the sheets of
your document will be bound at the top edge. Use Book
when the sheets of your document will be bound on the left.
4 Print your document.
The printer automatically prints only the odd-numbered
pages. The printer then displays a message on your
computer screen, telling you how to reload the paper.
5 Load the printed pages back in the IN tray of the printer.
The following illustrations show how to Load the paper back
in the printer for the Book option and the Tablet option.
Odd-numbered pages
print first.
Tablet option
Odd-numbered pages
print first.
Reload to print the evennumbered pages.
Reload to print the evennumbered pages.
35
Page 36
6 When the paper is properly loaded into the IN tray, flip the
OUT tray down and click Continue.
The printer prints the even-numbered pages on the reverse
side of the odd-numbered pages.
After printing, remember to uncheck the Two-Sided Printing
option on the Features tab.
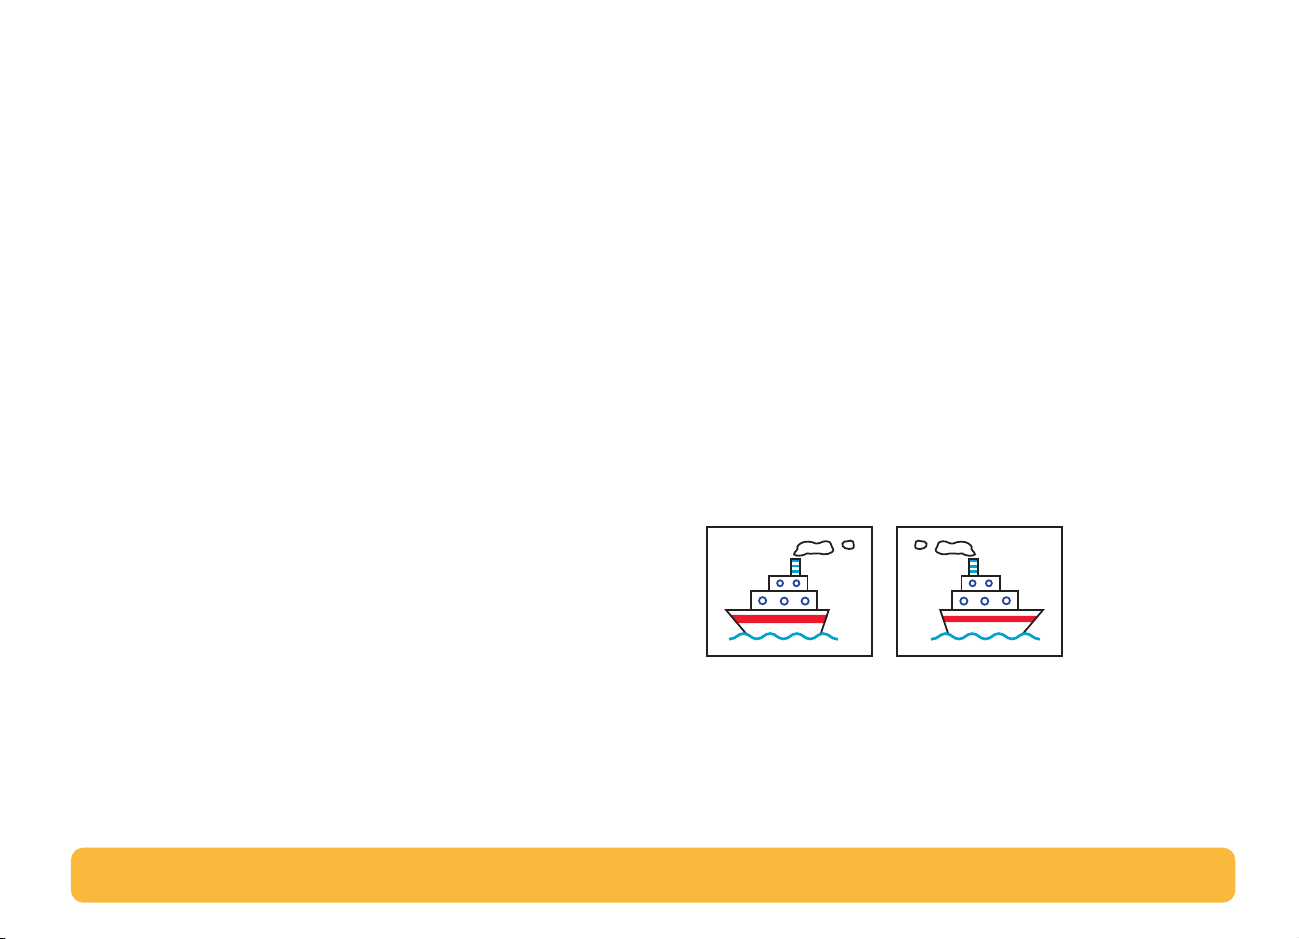
How to create a mirror image of your document
When you print a mirror image, the text and pictures are
reversed (mirrored), from what you see on your computer
screen.
Print a mirror image when you use an iron-on transfer. The
image you print on the transfer paper is flipped back to its
original orientation when you iron it onto the cloth. This is
especially important if your transfer contains text.
You might want to flip a document before printing it on a
transparency: then you can make notes on the back of the
transparency and easily wipe them off without scratching the
transparency.
The original The flipped document
36
Page 37

1 Load the paper in the IN tray, printable side down.
If you’re printing transparencies, go to “Printing
Transparencies” on page 49. If you’re printing iron-on
transfers, go to “Printing Iron-On Transfers” on page 51.
2 In the HP print settings box, click the Features tab, and then
click Mirror Image. (See “Finding the HP print settings box”
on page 30.)
3 Print your document.
The text and pictures are reversed. Hold the printout up to a
mirror to see how the final product will look.
After printing, remember to:
• Click the Mirror Image box again to clear it.
• If you used transparencies or iron-on transfer paper, replace
it with whatever type of paper you’ll be using next.
37
Page 38
About color
How to turn off color
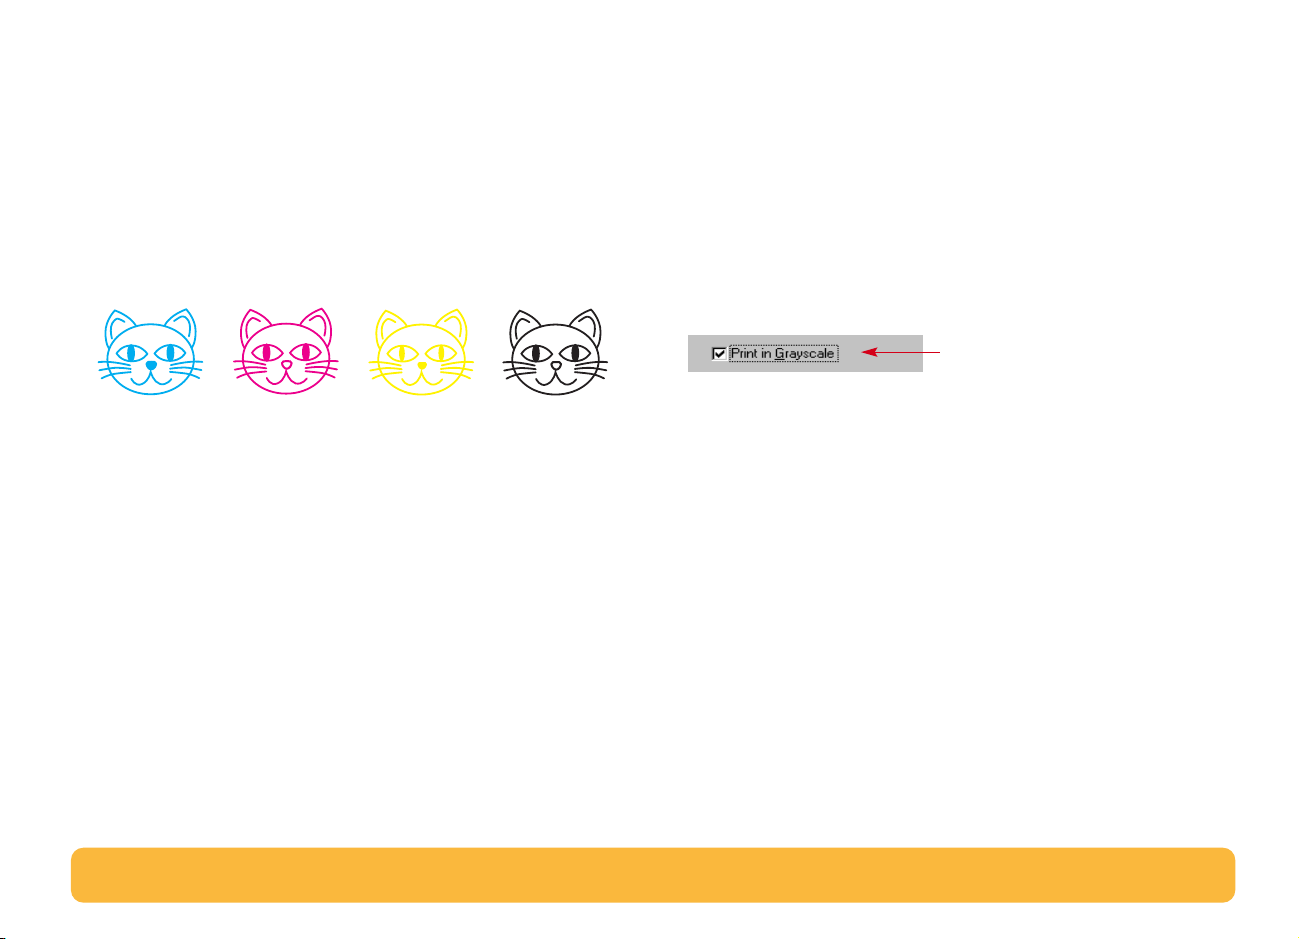
Your HP DeskJet printer prints in color when a color-capable
software program is used with the printing software. Believe it or
not, your color printer prints with only four colors—cyan,
magenta, yellow, and black. By printing overlapping dots of
different intensity and color, it creates practically any color you
can imagine.
BlackCyan YellowMagenta
Your printer is especially smart about printing color. It uses
HP’s exclusive technology called PhotoREt™! When you print a
document in color, the printer marks each element in your
document—text, full-color photographs, and graphics (such as
pie charts with solid blocks of color)—and renders each at its
vivid best. (If you use the photo cartridge when you print color
photographs, you’ll get photo-quality images!) Not only is the
color quality high, for whatever you’re printing, but it’s also less
expensive than making color copies at a copy shop.
The color text and pictures that you create in your documents
automatically print in color. You can print drafts of your
documents in grayscale if you’re going to photocopy them in
black and white, or if you want to save time and ink.
• In the HP print settings box, click the Advanced tab, and then
click Print in Grayscale. (See “Finding the HP print settings
box” on page 30.)
A “✓” means that color is
turned off.
Now your color documents print in shades of gray until you
clear this setting.
38
Page 39

About pictures
Pictures (also called graphics) include photographs,
illustrations, charts, and decorative elements.
Photographs Charts and
Graphs
100,000
80,000
60,000
40,000
20,000
0
1992 1994 1996 2000
Decorative
elements
Illustrations
• Use ready-made clip art. You can purchase libraries of clip art
from a variety of sources or browse the Internet for what’s
available there. Look through computer magazines for the
names of companies that sell clip art. They’ll be happy to
send you full-color pictures of their extensive offerings.
Or browse in the art sections of bookstores for books of
copyright-free pictures.
How to get a picture on your computer
To put a picture in a computer document, you first need to
convert it into an electronic form (a computer file). Then it’s
simple to copy it into a document—the guide for the
application you’re using tells you how. Here are some
possibilities for getting your pictures into an electronic form:
• Draw the pictures, using the drawing tools in a software
application.
Remember that it is against the law to copy any photograph
unless you have been given specific permission to do so by
the person or company who owns the original.
• Scan the pictures yourself. Use your own scanner and its
instructions. Save the files onto a hard disk, floppy disk or
CD. Open your software program and follow its instructions
to import the file into your document.
39
Page 40

• Get your photos scanned at your local camera shop. For a
small fee, you can have an entire roll of photos put on a CD
or floppy disk. Be sure to ask your camera shop to also put a
CD-viewing program on the CD with your photos. Open your
software program and follow its instructions to import the file
from floppy disk or CD into your document.
• Take a digital photo. A digital camera bypasses film entirely
and turns the photo into a computer file.
40
Page 41

Beyond the Basics
With the printing basics down, you’re ready for some results.
Here are some ideas for printing on different paper types.
Greeting cards, business cards, recipe cards, or
invitations to opening night.
Banners—welcome back the home team, or
announce a new addition to the family.
Photographs—make personalized buttons, name
tags, or photographic calendars.
Labels—scan your logo in full color, and add it to
your company address to print distinctive labels for
packages and manila envelopes.
Envelopes—either one at a time or as a stack.
Transparencies for that important overhead
presentation.
Iron-on transfers on t-shirts printed with your
company logo.
41
Page 42
Printing Cards
Use your printer to print on index cards, recipe cards,
greeting cards, business cards, or postcards—or any card size
included in the Paper Size list on the Setup tab. You can print
on other sized cards, too. If the dimensions of your card aren’t
the same as those shown in the Paper Size list, see “How to print
on different paper sizes” on page 34.
4 Slide the paper-width adjuster to the right until it fits snugly
against the cards. If the cards are too small to be held
securely by the paper-length adjuster, push the small slider
until it fits snugly against the edge of the stack.
1 In the HP print settings box, click the Setup tab, and then
select a card in the Paper Size drop-down box. (See “Finding
the HP print settings box” on page 30.)
2 Slide out the IN tray, slide out the paper adjusters, and flip
up the OUT tray.
3 Load a stack of up to 30 cards ( 6 mm or 1/4 inch) in the IN
tray.
Make sure the orientation of the cards matches the
orientation you’ve selected in your software program.
Small
slider
5 Push in the IN tray and flip down the OUT tray.
6 Print the cards.
After printing, remember to:
• Change the Paper Type and Paper Size in the HP print
settings box to match whatever you’ll be printing on next.
• Remove any cards from the IN tray and replace them with
whatever paper you’ll be printing on next.
42
Page 43

Printing Banners
We encourage you to use HP Banner Paper for
the very best results. When you use HP Banner Paper, your
banners print with brighter color and denser blacks than if you
use other banner paper. It’s easy to use, too—you don’t have to
tear off those pesky perforated strips! Look for it at a large
office supply store.
However, if you use computer or z-fold paper for your banners,
we recommend that you use 20-pound or 75-g/m2 paper.
Always fan the paper to fluff it before loading it.
Note:You must select the Banner setting on the Setup
tab of the HP print settings box, and flip the banner switch
to the up position, when printing an banner paper.
Follow your software instructions:
The software program you’re using might require special
settings before it prints banners correctly on your printer.
Check the HP DeskJet 840C Series Printer Release Notes (which
were installed on your computer with the printer software) for
information regarding your specific software program.
1 In the HP print settings box, click the Setup tab and then click
Banner Printing.
2 Make sure that HP Banner Paper is selected as the Paper
Type. When you click Banner Printing, HP Banner Paper is
automatically selected.
3 Select Banner [(Letter (8.5 x 11 in.)] or Banner [(A4 (210 x
297 mm)] as the Paper Size. (Go to “Finding the HP print
settings box” on page 30.)
4 Flip the banner switch up.
The OUT tray lifts slightly, enabling the printer to pick up the
banner paper.
Flip the banner
switch up
5 Remove all paper from the IN tray.
43
Page 44

6 Get the banner paper ready for the printer:
a. From the stack of banner paper, tear off the number of
sheets you need to print the banner. (You must have at
least five sheets in the stack.)
b. Tear off and discard the perforated strips, if there are any.
c. Fan the stack so that the pages don’t stick together in the
printer.
8 Slide the paper adjusters so that they fit snugly against the
edges of the paper stack.
9 Push the IN tray back in.
10Print the banner.
You’ll notice that the printer goes through some start-up
movements before it starts printing. Also, banner printing
takes a while; it might be several minutes before you see the
results.
11 After your banner is printed, if the Resume light is
blinking, press the Resume button as many times as
needed until all the banner paper is out of the printer.
7 Put the paper into the lower IN tray so that the unattached
edge is at the top of the stack. Insert the stack’s top edge first
into the IN tray until it stops.
Unattached edge
After printing, remember to:
• Click Banner Printing in the HP print settings box to clear it.
• Change the Paper Type to match whatever you will be
printing on next.
• Flip the banner switch down.
• Put paper into the IN tray.
44
Page 45
Printing Photographs
Printing photographs is similar to printing any other
color image. The main differences are paper and print quality
selections. For best results when printing photographs, use one
of HP’s photo papers. For a list of available photo paper
products and ordering information, see page 71.
1 In the Setup tab of the HP print settings box, select a photo
paper for the Paper Type. (See “Finding the HP print settings
box” on page 30.)
2 Make sure Best print quality is selected. When you select an
HP photo paper, this option is automatically selected.
3 Load the paper as you would for normal printing.
Make sure you insert the paper printable side down.
Printable side
down
PhotoREt also becomes available. This feature can only be
disabled (unchecked) when an HP photo paper is selected.
Note:PhotoREt automatically sets the best print speed
and quality for your image. If this feature is disabled
(unchecked), the image is printed at the highest available
resolution compatible with your settings (up to 600 x 1200
dpi); however, the image will print significantly slower and
will temporarily require a large amount of hard disk space.
4 Print the document.
For the best results, remove each sheet promptly after
printing, and allow it to dry printable side up. (The drying
time will vary depending on the humidity.)
After printing, remember to:
• Remove any special paper you’ve used from the IN tray and
replace it with whatever you’ll be printing on next.
• Reset the Paper Size and Paper Type on the Setup tab of the
HP print settings box to whatever you’ll be printing on next.
45
Page 46
Printing Labels
You can use your HP DeskJet printer to print sheets of labels.
Use only A4 or U.S. letter-sized sheets of labels. It’s particularly
important to pick labels that are made especially for inkjet
printers.
4 Slide the paper adjusters to fit snugly against the stack.
5 Push the IN tray back in and flip the OUT tray down. Make
sure the sheets do not bend in the IN tray.
6 Print the labels.
After printing:
Sheets of labels that are folded, curled, wrinkled, or partially
used can get stuck in the printer.
1 Click the Setup tab in the HP print settings box. Select Plain
Paper as the Paper Type. (See “Finding the HP print settings
box” on page 30.)
2 Then select Normal as the Print Quality.
3 Remove all paper from the IN tray and insert up to 20 label
sheets. Flip up the OUT tray for a better view of the IN tray.
Label sheets; label
side down
• You can leave the settings as they are if you’re going to be
printing on plain paper.
• Remove the label sheets from the IN tray and replace them
with whatever paper you’ll be printing on next.
46
Page 47
Printing Envelopes
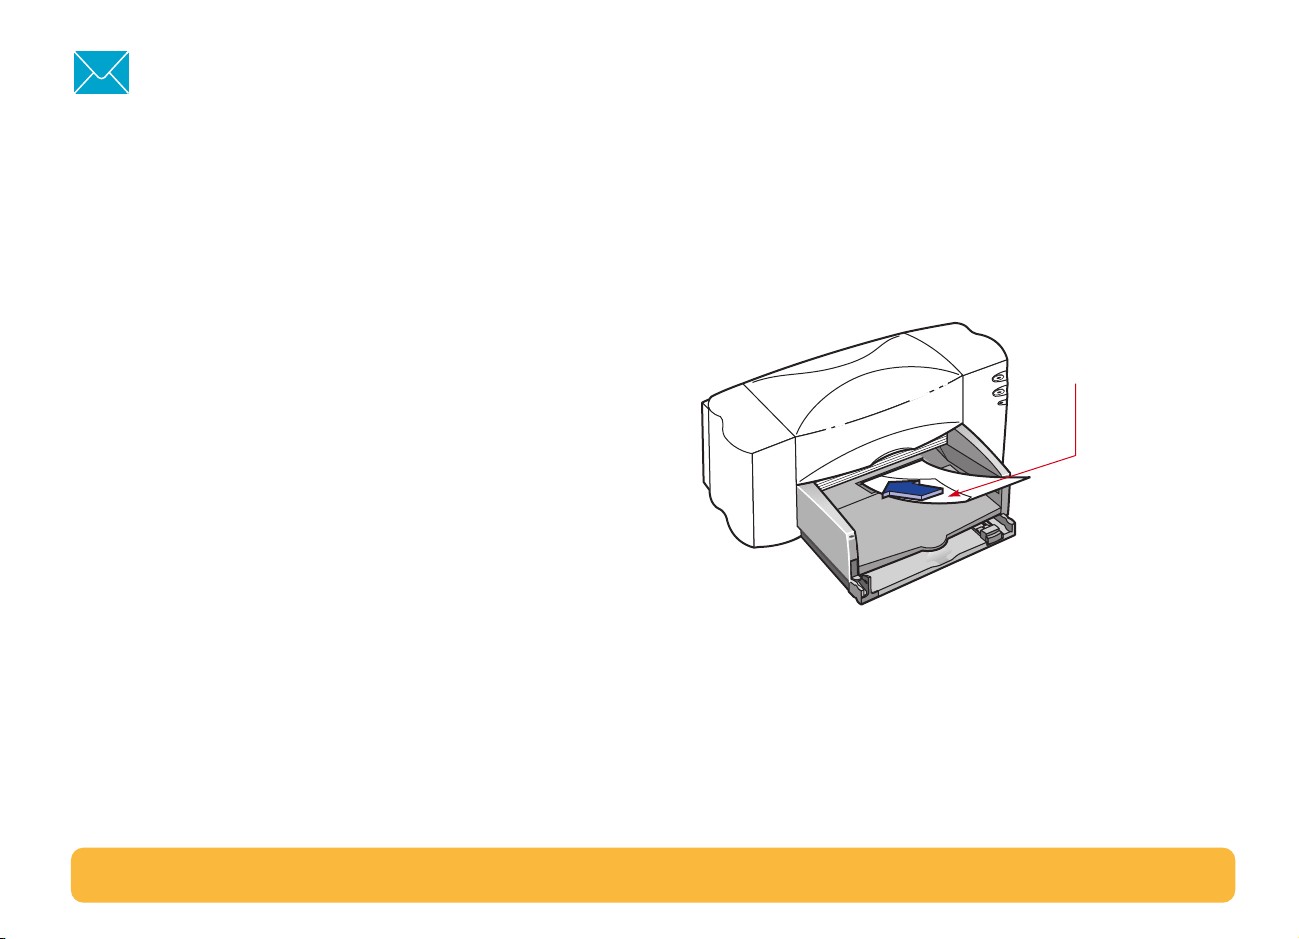
Your printer provides two methods for printing envelopes:
• If you’re printing a single envelope, you can use the singleenvelope slot and leave your paper in the IN tray. This allows
you to print the envelope and then a letter.
• If you’re printing a stack of envelopes, use the IN tray.
Avoid shiny or embossed envelopes, or those that have clasps
or windows. (Use transparent labels instead for these sorts of
envelopes.) Also, envelopes with thick, irregular, or curled
edges or with areas that are wrinkled, torn, or otherwise
damaged could get stuck in the printer.
Many programs include a feature for printing envelopes. In that
case, follow the program’s instructions for setup and for placing
the envelopes in the printer.
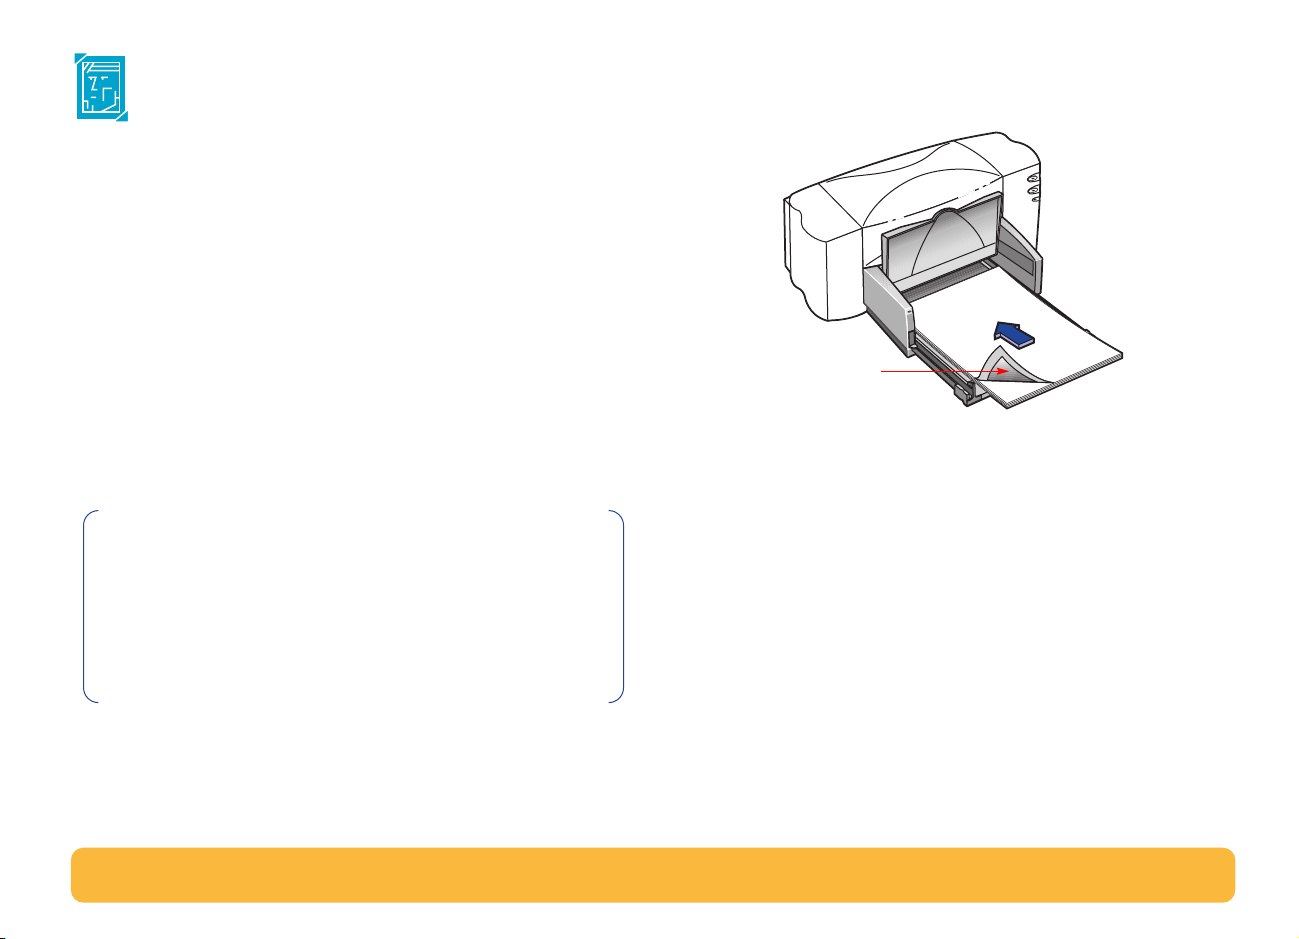
How to print a single envelope
1 In the HP print settings box, click the Setup tab, and then
select an envelope size in the Paper Size box. (See “Finding
the HP print settings box” on page 30.)
2 Slide the envelope into the single-envelope slot, as shown
here, until it stops. Make sure there’s paper in the IN tray.
Make sure the edge of the envelope aligns with the right side
of the single envelope slot.
Flap side up and flap
to the left
3 Print the envelope.
After printing, remember to:
• Reset the Paper Size and Paper Type on the Setup tab of the
HP print settings box to whatever you’ll be printing on next.
47
Page 48

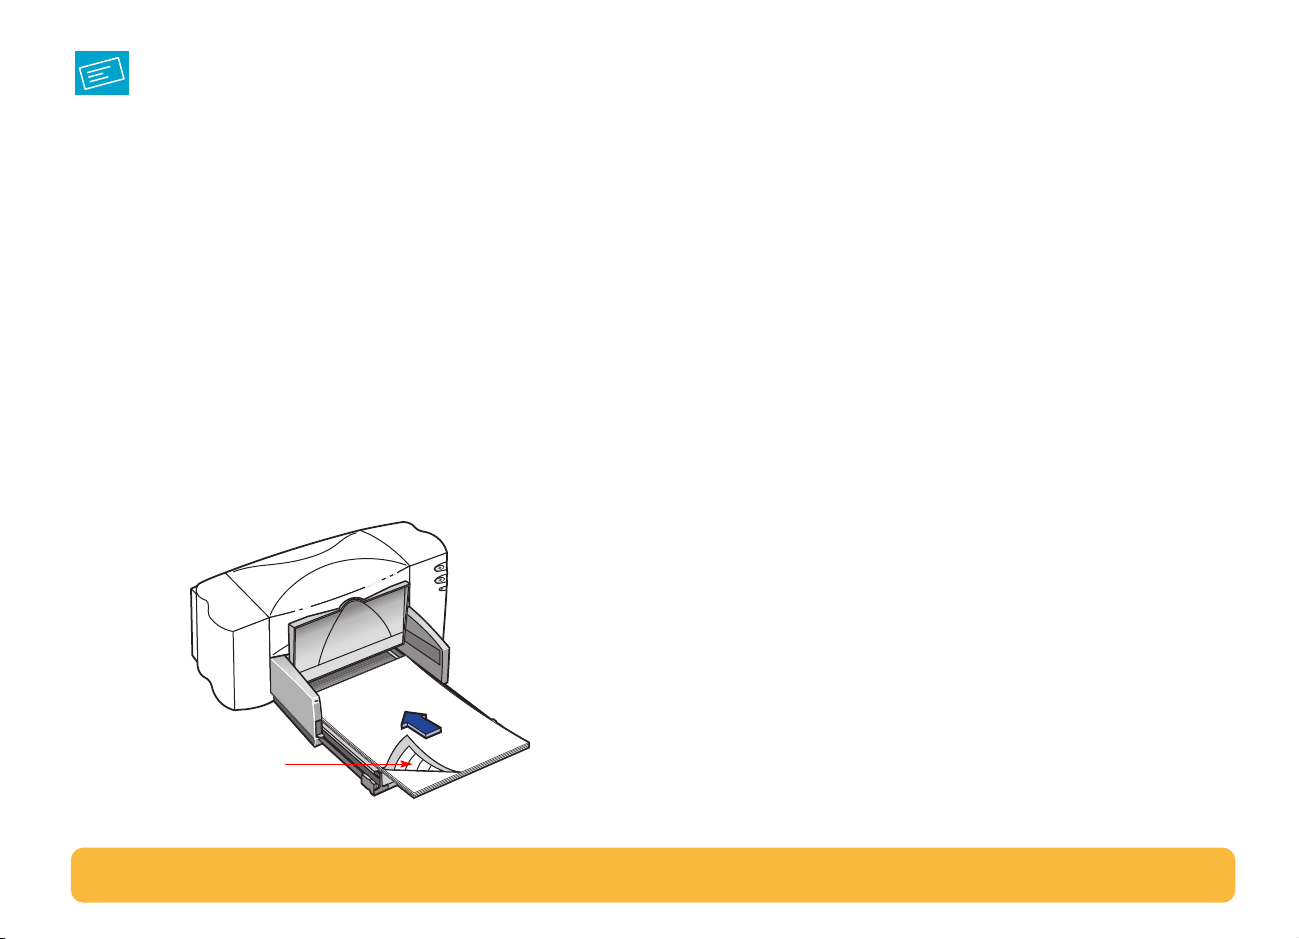
How to print a stack of envelopes
1 In the HP print settings box, click the Setup tab, and then
select the envelope you’re printing on as the Paper Size. (See
“Finding the HP print settings box” on page 30.)
3 Load a stack of up to 15 envelopes in the printer, as shown on
this page. (If you’re using thick envelopes, you might need to
reduce the quantity.)
2 Slide both paper adjusters out.
Make sure the IN tray is empty. Flip up the OUT tray for a
better view of the IN tray.
OUT tray
IN tray
Make sure the edges of the envelopes align with the right
side of the IN tray.
Flap side up and flap
to the left.
4 Slide the paper adjusters so that they fit snugly against the
edges of the envelopes.
48
Page 49
5 Push the IN tray back in and flip the OUT tray down.
6 Print the envelopes.
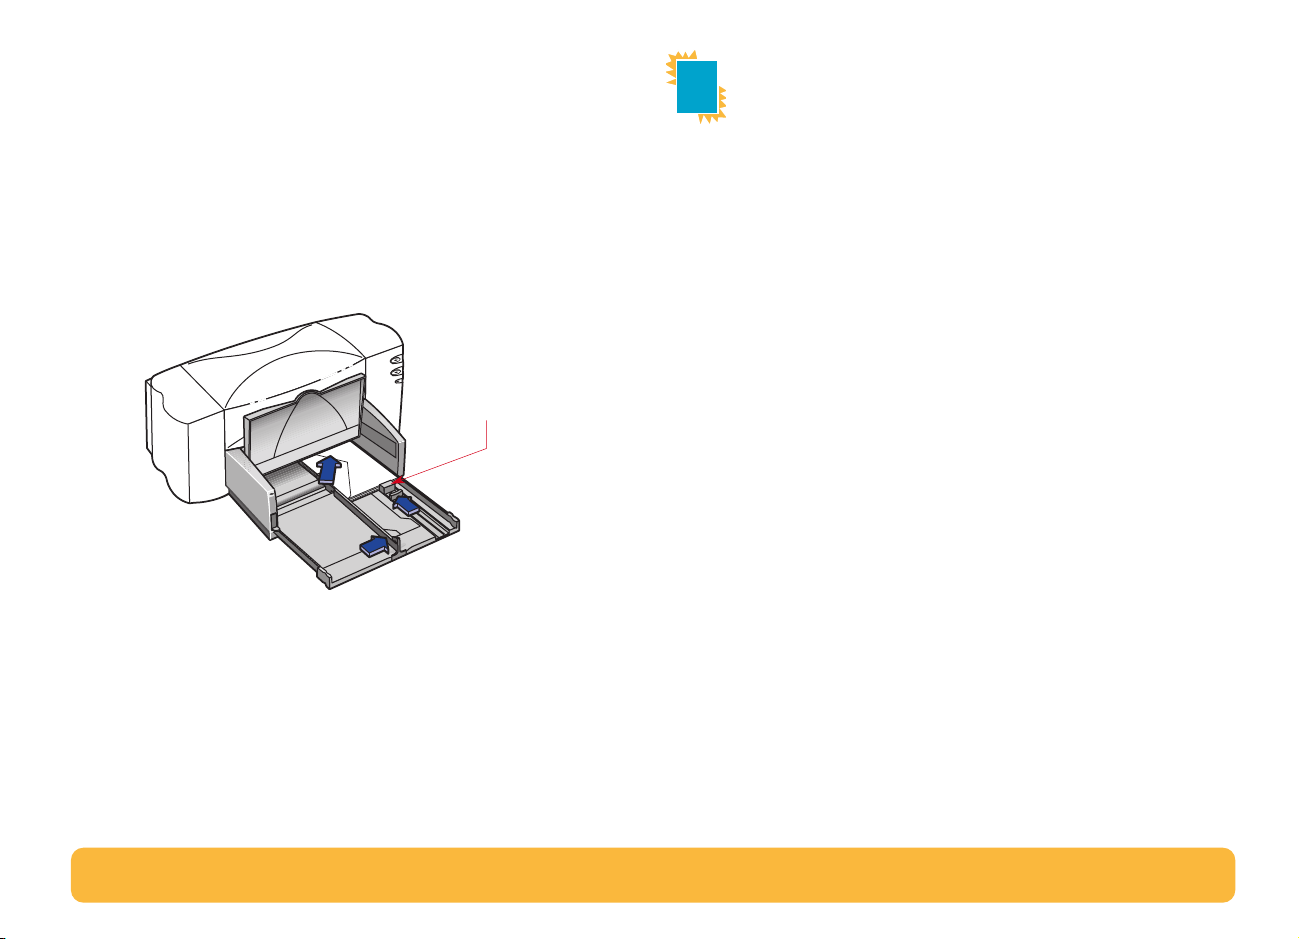
About small envelopes
If you’re printing on small envelopes such as Invitation A2
or C6, you’ll need to push the small slider in until it fits
snugly against the short edge of the envelopes.
Make sure the envelopes do not bend in the IN tray.
Small slider
After printing, remember to:
Printing Transparencies
For best results, use HP Premium Inkjet Rapid-Dry
Transparencies. The film coating on HP Premium Inkjet RapidDry Transparencies has been especially developed to work with
HP inks, giving you crisp images and text, and the fastest drying
times. They won’t jam your printer, either.
1 In the HP print settings box, click the Setup tab, then select
HP Premium Inkjet Transparency Film, HP Premium Inkjet
Rapid-Dry Transparency, or Other Transparency Films as
the Paper Type. (See “Finding the HP print settings box” on
page 30.)
2 Make sure Best is selected as the Print Quality.
It isn’t absolutely necessary to use the Best Print Quality, but
it’ll give you the best results. If you’re in a hurry, use Normal
Print Quality.
3 If you plan to make notes on your transparencies during
your presentation, click the Features tab, then select Mirror
Image.
• Reset the Paper Size and Paper Type on the Setup tab of the
HP print settings box to whatever you’ll be printing on next.
• Remove any remaining envelopes from the IN tray and
replace them with whatever paper you’ll be printing on next.
4 Flip up the OUT tray for a better view of the IN tray.
49
Page 50
5 Put the transparencies in your printer with the rough side
down and the adhesive strip forward. (You can peel off the
adhesive strip after printing.)
After printing, remember to:
• Change the Paper Type in the HP print settings box to match
whatever you’ll be printing on next.
• Change the Print Quality to match whatever is appropriate
for what you’ll be printing next.
Adhesive strip
forward; tape side up
6 Slide in the paper adjusters, just as you would for plain
paper. Push the IN tray back in and flip the OUT tray down.
7 Print the transparency.
8 Be patient.
Because the printer uses more ink, lays the colors down
more slowly, and allows for a longer drying time between
sheets, transparencies take awhile to print.
The printer dries them automatically before it releases them.
Press the Resume button to continue printing.
• In the Features tab, click Mirror Image to clear it.
• Remove any remaining transparencies from the IN tray and
replace them with whatever paper you’ll be printing on next.
50
Page 51
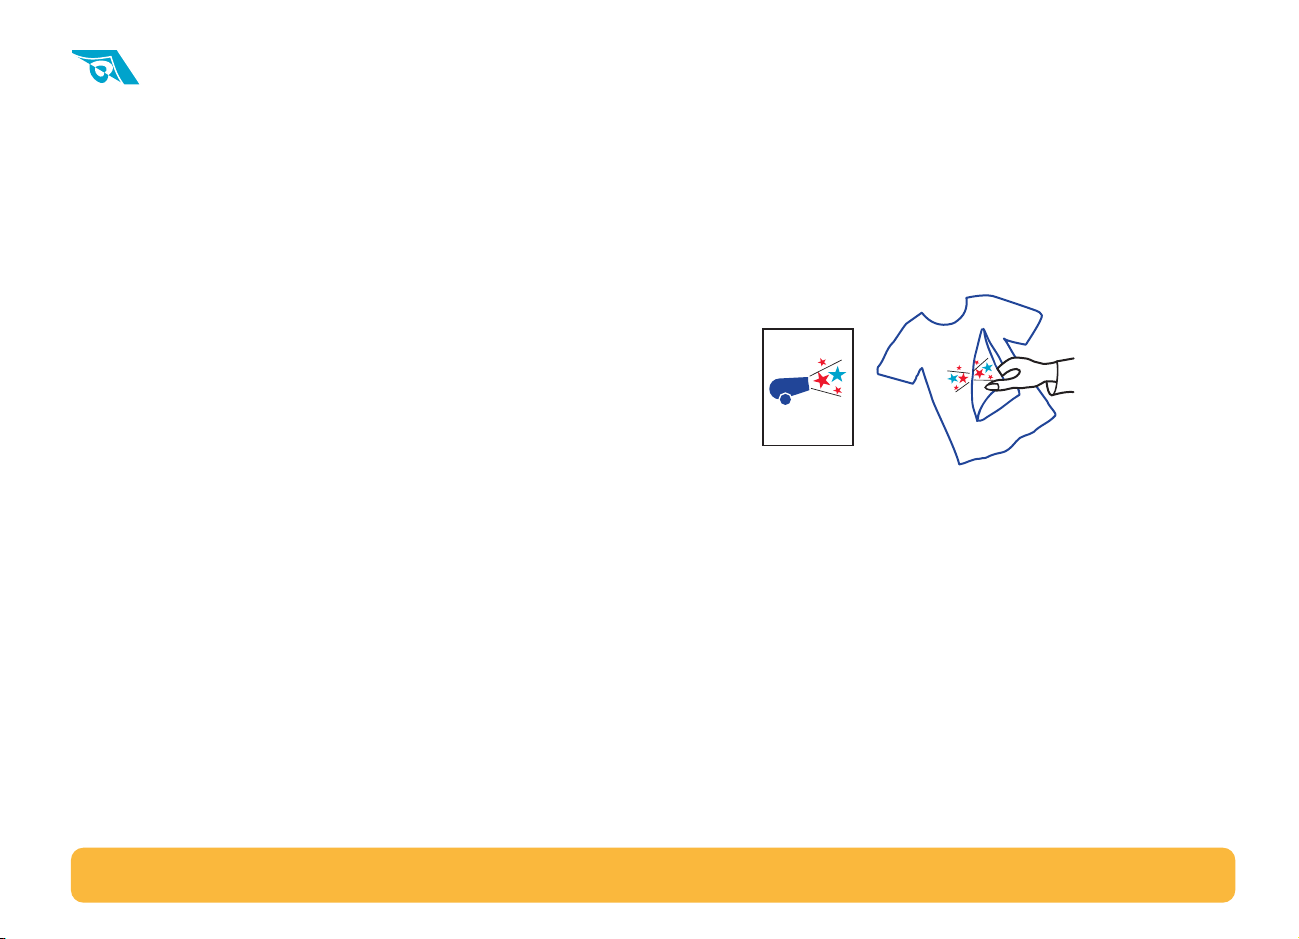
Printing Iron-On Transfers
When it comes to printing images, you don’t need to stop with
paper. Use transfer paper to get the images from the computer
document onto cloth. HP Iron-On T-Shirt Transfers are
designed to work with your printer and HP ink to give you a
professional silk screen look.
Although 100% cotton t-shirts are a popular choice for iron-on
transfers, you need not stop there. Transfer a photo onto an
apron, or add the company logo to baseball caps, sun visors,
and tote bags for the company picnic.
You’ll need:
• the t-shirt or other cloth you want to transfer an image onto
3 If you want the text or picture on your t-shirt as you see it on
the screen, flip the document by clicking Mirror Image on
the Features tab.
4 Put the transfer paper transparent-side down in the printer.
5 Print the transfer.
6 Follow the instructions included with the iron-on transfer
paper to transfer the image onto the fabric.
• the document containing the picture or text you want to print
• iron-on transfer paper
Here’s how you do it:
1 On your computer, open the document containing the text or
picture you want to transfer to the fabric.
2 In the HP print settings box, click the Setup tab. Select
HP Iron-on T-Shirt Transfers as the paper type. (See
“Finding the HP print settings box” on page 30.)
After printing, remember to:
• Click Mirror Image in the HP print settings box to clear it.
• Change the Paper Type to match whatever you’ll be printing
on next.
• Replace the transfer paper with whatever paper you’ll be
printing on next.
51
Page 52

HP Customer Care
Getting Help
HP DeskJet printers set the standard for quality and reliability,
so you have made an excellent choice. Should you need help,
however, HP Customer Care’s award-winning service and
support is nearby to provide expert advice on using your HP
printer or to answer specific questions about a problem you are
having. Whether online or by phone, you’ll find the support
you need—and you’ll find it fast.
HP Customer Care Online
Click your way to a quick solution! HP Customer
Care Online is a great place to go for answers to questions
about your HP products. You’ll get instant access to everything
from helpful printing tips to the latest product and software
updates—24 hours a day, seven days a week, all at no charge
to you.
52
Page 53

If you have a modem connected to your computer and
subscribe to an online service or have direct access to the
Internet, you can obtain a wide variety of information about
your printer at the following web sites:
English: http://www.hp.com/support/home_products
French: http://www.hp.com/cposupport/fr
German: http://www.hp.com/cposupport/de
Japanese: http://www.jpn.hp.com/CPO_TC/eschome.htm
Korean: http://www.hp.co.kr/go/support
Portuguese: http://www.hp.com/cposupport/pt
Simplified Chinese: http://www.hp.com.cn/go/support
Spanish: http://www.hp.com/cposupport/es
Traditional Chinese: http://support.hp.com.tw/psd
From HP Customer Care Online you can link to HP Customer
Care User Forums and HP Customer Care Email.
HP Customer Care User Forums
They’re friendly. They’re informative. Check out our online user
forums. Simply review existing messages left by other HP users
to find the answers you’re looking for. You can also post your
questions, then check back later for ideas and suggestions from
knowledgeable users and system operators.
HP Customer Care by Email
Connect with HP via email and receive a personal reply from an
HP Customer Care service technician. Responses are normally
provided within 24 hours of receipt (excluding holidays). A
great option for those non-urgent questions.
53
Page 54

Printer Software
Printer software (also referred to as a printer driver) allows your
printer to talk with your computer. HP provides printer software
and software updates for Windows 3.1x, 95, 98, NT 4.0, and
In the U.S. and Canada Elsewhere in the world
First time setup?
• Download the printer software by accessing the
HP Customer Care Online web site. See page 53
for HP web site addresses.
• Create diskettes by using another computer with
a CD-ROM drive. To create the diskettes, begin the
printer software installation. When the opening
screen appears, select
printer software
instructions.
Make diskettes of your
and follow the on-screen
• Call (661) 257-5565 to order 3.5-inch diskettes.
Nominal shipping and handling charge may apply.
Bonus software that may be provided on the CD will
not be provided on disks.
•
Need software update?
Download the printer software from the HP
Customer Care Online web site. See page 53 for HP
web site addresses.
• Call (661) 257-5565 to order 3.5-inch diskettes.
Software updates are available for the cost of the
CDs or diskettes plus shipping.
Windows 2000. For MS-DOS printer software, contact the
manufacturer of your software program. You have several
options for getting printer software:
• Download the printer software by accessing the
HP Customer Care Online web site. See
page 53 for HP web site addresses.
• Create diskettes by using another computer with
a CD-ROM drive. To create the diskettes, begin
the printer software installation. When the
opening screen appears, select
of your printer software
screen instructions.
Make diskettes
and follow the on-
• Download the printer software from the HP
Customer Care Online web site. See page 53 for
HP web site addresses.
• Call the HP Customer Care Center nearest you.
See page 55 for phone numbers.
54
Page 55

HP Customer Care by Phone
Region
DeskJet 840C Series North America
(including Canada)
Phone Support
Fee based
If you cannot solve your problem using the above, then call
3
an HP service technician while you’re in front of your
computer and printer. Before you call, be sure you have the
*
following information:
- Your printer’s serial number (the label is on the printer’s
bottom).
Asia Pacific 90 days
Europe 6 months
Latin America 1 year
*Long distance charges may apply in different regions.
Before placing a call for help, please make sure that:
1 You have checked your Quick Start Poster , this User’s Guide,
and the Reference Manual for installation and
troubleshooting tips.
2 You have checked HP Customer Care Online for product
help. See page 53 for HP web site addresses.
________________________________________
- Your printer’s model number (the label is on the front of
the printer).
________________________________________
- The model of the computer.
________________________________________
- The version of the printer and software program (if
applicable).
________________________________________
Then we can help you with your questions immediately!
55
Page 56

See the list below for your region’s HP Customer Care Center
phone number:
•
Africa/Middle East 41 22/780 41 11
• Argentina (541) 778-8380
• Australia +61 3 8877 8000
• Austria 43 (0) 660 6386
• Belgium (Dutch) 32 (0)2 62688 06
• Belgium (French) 32 (0)2 62688 07
• Brazil 011 829-6612
• Canada (905) 206-4663
• Chile 800 36 0999
• China 8610-65645959
• Czech Republic 42 (2) 471 7321
• Denmark 45 (0) 39 294099
• Finland 358 (9) 2034 7288
• France 33 (0) 143623434
• Germany 49 (0) 180 532 6222
• Greece 30 1 689 64 11
• Hong Kong (800) 96 7729
• Hungary 36 (1) 252 4505
• India 91 11 682 60 35
• Indonesia 6221 350 3408
• Ireland 353 (0) 1662 5525
• Israel 972-9-9524848
• Italy 39 (0) 2 264 10350
• Japan, Tokyo 81 3 3335-8333
• Japan, Osaka 81 6 6838 1155
• Korea 02 3270 0700
• Malaysia 03 2952566
• Mexico D.F. 258 9922
• Mexico, Guadalajara 01 800 472 6684
• Middle East/Africa 41 22/780 41 11
• Netherlands 31 (0) 20 606 8751
• New Zealand (09) 356-6640
• Norway 47 (0) 22 116299
• Philippines 65 272 5300
• Poland (+48) 22 519 06 00
• Portugal 351 (0) 1 318 00 65
• Russia 7095 923 50 01
• Singapore 65 272 5300
• Spain 34 (9) 02321 123
• Sweden 46 (0) 8 6192170
• Switzerland 41 (0) 84 8801111
• Taiwan 886 2-2717-0055
• Thailand (66-2) 661 4011
• Turkey 90 1 224 59 25
• United Kingdom 44 (0) 171 512 5202
• U.S. (208) 344-4131
• Venezuela 800 47 888
• Venezuela, Caracas 207 8488
56
Page 57

After the Free Phone Support Period
Extended Warranty Options
You can still get help from HP for a fee. Prices are subject to
change without notice. (HP Customer Care Online help
(page 53) on the internet is still available for free!)
• For quick questions in the United States only, call (900)
555-1500. The charges are $2.50 per minute and begin when
you connect with a service technician.
• For calls from Canada, or for calls in the U.S. that you
anticipate might be longer than ten minutes in length, call
(800) 999-1148. The fee is US $25 per call, charged to your
Visa or MasterCard.
• If, during your phone call, it is determined that your printer
requires repair and you are within your printer’s Limited
Warranty period (see the “Limited Warranty Statement” in
your Reference Manual), you will not be charged for the
phone support service. However, for countries where the
above toll-free phone numbers are not available, the regular
long-distance charges may apply.
• If you are outside the U.S. and Canada, call the HP Customer
Care Center nearest you.
If you would like to extend your printer coverage beyond the
limited warranty period, you have the following options:
• Consult your reseller to get extended coverage.
• If your reseller does not offer service contracts, please call
HP directly and ask about our HP Service Agreements. In the
U.S., call (800) 446-0522; in Canada, call (800) 268-1221. For
HP Service Agreements outside the U.S. and Canada, contact
your local HP Sales Office.
HP Customer Care Repair
If your HP printer is ever in need of repair, simply
call the HP Customer Care Center. A trained service technician
will diagnose the problem and coordinate the repair process for
you. This service is free during your printer’s limited warranty
period. Beyond the warranty period, repairs are charged on a
time and materials basis.
57
Page 58

Appendices
Until now, we’ve been talking about the what, where, and how of
your printer. If you’re ready for some simple facts about the
printer and printer supplies, here they are.
The HP DeskJet Toolbox
Use the HP DeskJet Toolbox for cleaning your printer, finding
information, and printing a test page. To find the HP Toolbox,
follow the instructions for your Windows system.
For Windows 95, 98, and Windows NT 4.0
Click Start ➔ Programs ➔ HP DeskJet 840C Series ➔ HP
DeskJet 840C Series Toolbox.
Click the HP Toolbox button that appears on the Taskbar at the
bottom of the screen when the HP Toolbox is open.
Click an option, then follow on-screen instructions.
You may be able to increase photo printing speed by enabling
Hardware ECP. Click the Configuration tab and check Attempt to
Use Hardware ECP. Apply your changes and print your photo.
Click here to open the
User’s Guide.
Click here to align the
print cartridges.
Click here to clean the
print cartridges.
Click here to print a test
page.
58
Page 59

Print cartridges
Each HP print cartridge is a self-contained, plug-in ink supply.
The printer operates with two print cartridges installed: one
black and one tri-color. The HP printers and print cartridges are
designed to work together to deliver outstanding print quality
for results that are always clear, always sharp.
Replacing print cartridges
Note: When buying replacement print cartridges, check
the part numbers carefully so that you buy the correct
cartridges for your printer:
840C, 842C, and 843C require:
HP No. [15] (equivalent to C6615 Series)
Black
Tri-Color HP No. [17] (equivalent to C6625 Series)
Note: When a print cartridge runs out of ink, leave the
empty cartridge in the cradle until you can replace it.
The printer cannot print with only one print cartridge
installed.
To replace a print cartridge:
1 To access the print cartridge cradle, press the Power Button
to turn on the printer.
2 Open the top cover. The cradle moves to an accessible
position and the Print Cartridge light flashes.
3 Raise the cradle latch.
4 Lift the cartridge out of the cradle and discard it.
Warning
Keep new and used print cartridges out of the
reach of children.
59
Page 60
5 Remove the replacement print cartridge from its packaging
and carefully remove the protective vinyl tape from the
replacement cartridge.
6 Push the print cartridge firmly, straight down into the print
cartridge cradle.
Black
Print
Cartridge
Vinyl Tape
Warning
Vinyl Tape
Ink Nozzles Ink Nozzles
Do NOT touch the print cartridge ink nozzles or
Tri-color
Print
Cartridge
copper contacts. Touching these part will result
in clogs, ink failure, and bad electrical connections. Also, do
NOT remove the copper strips; these are required electrical
contacts.
7 Close the cradle latch. You will notice some resistance when
closing the latch. When the latch is fully closed, you will hear
a click.
60
Page 61

8 Close the top cover.
You’ll hear the cradle mechanism move, returning to the
home position on the right side of the printer.
9 If the Print Cartridge light continues to blink after you
install new print cartridges, check the part numbers on the
cartridges to ensure you installed the correct ones. See
page 59 for part numbers.
Storing print cartridges
To maintain excellent print quality from your print cartridges:
• Keep all print cartridges in their sealed packages, at room
temperature (60-78 degrees F or 15.6-26.6 degrees C), until
you are ready to use them.
• Once installed, leave the print cartridges in their cradle at all
times to keep them from drying out or becoming clogged.
• Store unsealed print cartridges in an airtight plastic container.
• Do not unplug the printer until printing is complete and the
print cartridge cradle has returned to its home position on the
right side of the printer. The print cartridges will dry out if not
stored in their home position.
• Turn off the printer and allow the print cartridges to return to
the right side of the printer for proper capping of the nozzles
before unplugging the power cord or turning off any
attached power strip.
61
Page 62

Cleaning the print cartridges
Cleaning your print cartridges can improve the quality of
printing.
If your printed page is missing lines or dots, perform Procedure
1 below. If your printed page contains streaked ink, perform
Procedure 2.
To clean the print cartridges from the HP Toolbox:
1 Open the HP DeskJet Toolbox. See “The HP DeskJet
Toolbox” on page 58 for instructions on how to find it.
2 Click the Printer Services tab.
3 Click Clean the Print Cartridges and follow the directions
on the screen.
Procedure 1: Correcting missing lines
or dots
Clean the print cartridges when you notice that the
lines or dots are missing from your printed text
and graphics, as shown here. The print cartridges
can be cleaned from the HP Toolbox.
Note: Do not clean the print cartridges unnecessarily, as
this wastes ink and shortens the life of the print cartridge.
If print quality improves by going through this sequence once,
but the quality is still not quite good enough, repeat the
procedure. Click the Clean Again button on the last cleaning
screen.
If the preceding procedure does not improve the print quality,
your print cartridges might be low on ink. Replace the print
cartridges (see page 59). If problems persist, continue with
Procedure 2.
62
Page 63

Procedure 2: Eliminating ink streaks
Materials you will need
Customers using HP DeskJet printers in dusty
environments might occasionally experience ink
streaks or smearing because of a small
accumulation of debris inside the printer. This debris can
include dust, hair, carpet, or clothing fibers. Ink streaking is
easily prevented or corrected by doing scheduled cleaning to
two areas of the printer: the print cartridges, and the print
cartridge cradle.
Before you begin, make sure you have the following materials
available:
• Cotton swabs or any soft material that will not come apart or
leave fibers (for example, a piece of clean cotton cloth).
• Distilled, filtered, or bottled water (tap water might contain
contaminants that can damage the print cartridges).
• Scrap paper or paper towel on which to set the print
cartridges while you are working.
Caution
Be careful not to get ink on your hands
or clothing.
63
Page 64

Steps to manually clean your print cartridges and print
cartridge cradle:
d. Remove the print cartridges and place them on their sides
on a scrap piece of paper.
1 Remove the print cartridges
a. Turn the printer on and lift the printer’s top cover.
b. The print cartridge cradle moves to the center of the
printer.
c. After the cradle has moved to the center of the printer,
unplug the black power cord from the back of the printer.
Warning
Caution
Keep new and used print cartridges out of the
reach of children.
Once you’ve removed the print cartridges, make
sure that they are not outside of the printer for
more than 30 minutes.
Note: Be careful not to touch the ink nozzles or the
copper contacts. Touching these parts of the print
cartridge can result in clogs, ink failure, or bad electrical
connections.
64
Page 65

2 Clean the print cartridges
3 Clean the print cartridge cradle
a. Dip a clean cotton swab into distilled water and squeeze
any excess water from the swab.
b. Grasp the black print cartridge by the colored cap.
c. Clean the face and edges of the print cartridge as shown.
DO NOT wipe the nozzle plate.
DO NOT clean
nozzle plate.
Clean here.
d. Hold the print cartridge up to the light to inspect for fibers
on the face and edges. If fibers are still present, repeat
steps 2a through 2c.
e. Repeat steps 2a through 2d with the tri-color print
cartridge using a clean, moistened cotton swab to avoid
any contamination.
a. Position yourself at eye level with the printer.
b. Locate the cradle that holds the print cartridges, then
locate the three black, hook-shaped arms on the bottom
of the cradle.
c. Using clean, moistened swabs, wipe the flat surfaces
(shaded area) on the undersides of each arm from back to
front. Repeat until no ink residue is seen on a clean swab.
65
Page 66

4 Reinstall the print cartridges
Damage resulting from refilling the print cartridges
a. Reinstall the print cartridges and close the printer’s top
cover.
b. Reinsert the power cord into the back of the printer.
c. Print a test page. On the Printer Services tab of the
HP Toolbox, click Print a Test Page.
d. Examine the printout for ink streaking.
Note: This procedure should remove all fibers that
would cause ink to streak on a printout. However, fibers
can be missed. If the printout still shows streaking, repeat
the procedure until the test printout is clear and sharp.
This procedure and additional maintenance tips are
located on the HP Customer Care Web site at:
http://www.hp.com/support/home_products.
To get the best performance from your printer, Hewlett-Packard
recommends using only genuine HP supplies for HP inkjet
printers, including genuine factory-filled HP print cartridges.
Caution
Damage resulting from the modification or
refilling of HP print cartridges is specifically
excluded from the coverage of HP printer
warranties.
Note: When buying replacement print cartridges, check
the part numbers carefully so that you buy the right
cartridges for your printer (see page 59).
66
Page 67

Aligning the print cartridges
Maintaining your printer
You must use the printer software to calibrate the black and
tri-color print cartridges each time you replace or reinstall an
print cartridge. This ensures that the black and tri-color inks are
aligned when used together on the same line of text or within
the same picture.
1 Make sure the printer is on and the Power light is lit.
2 Be sure the printer’s IN tray contains plain paper.
3 Open the HP DeskJet Toolbox. (Go to “The HP DeskJet
Toolbox” on page 58.)
4 Click the Printer Services tab. Then click Align the Print
Cartridges. Follow the directions on the computer screen.
• Use a soft cloth moistened with water to wipe off dust,
smudges, and stains.
• The interior of the printer does not require cleaning. Keep
fluids away from the interior of the printer.
• Do not lubricate the rod on which the print cartridge cradles
move. Noise is normal when the cradle is moving back and
forth within the printer, when the printer is new. With use, the
printer will become quieter.
67
Page 68

Increasing printer performance
The print speed and overall performance of your printer can be
affected by several things:
• The amount of RAM in your computer can determine how
fast your documents are sent to the printer. Increasing the
amount of RAM in your computer can speed up this process
as well as make your computer work more efficiently when
you are doing something besides printing.
• The printer driver that you are using to print your documents
can make a significant difference in the quality of your
printed output. Make sure you are using an up-to-date
version of an HP printer driver designed specifically for your
printer model. Go to “Printer Software” on page 54 for
information on how to get an updated printer driver.
• The size and complexity of the documents you print can
make a difference in your printer’s performance. Graphics
and photographs are usually more complex and print more
slowly than a document that contains only text.
• The processing speed of your computer determines how fast
your document is sent to the printer.
• The amount of free space on your computer’s hard disk
makes a difference in printing speed. If your computer has
less than 100 MB of free space, it can take longer to process
your document for printing.
• Running numerous software programs at one time slows
down printing, because they are using the RAM in your
computer. Therefore, limit the number of programs or
documents you open at one time.
68
Page 69
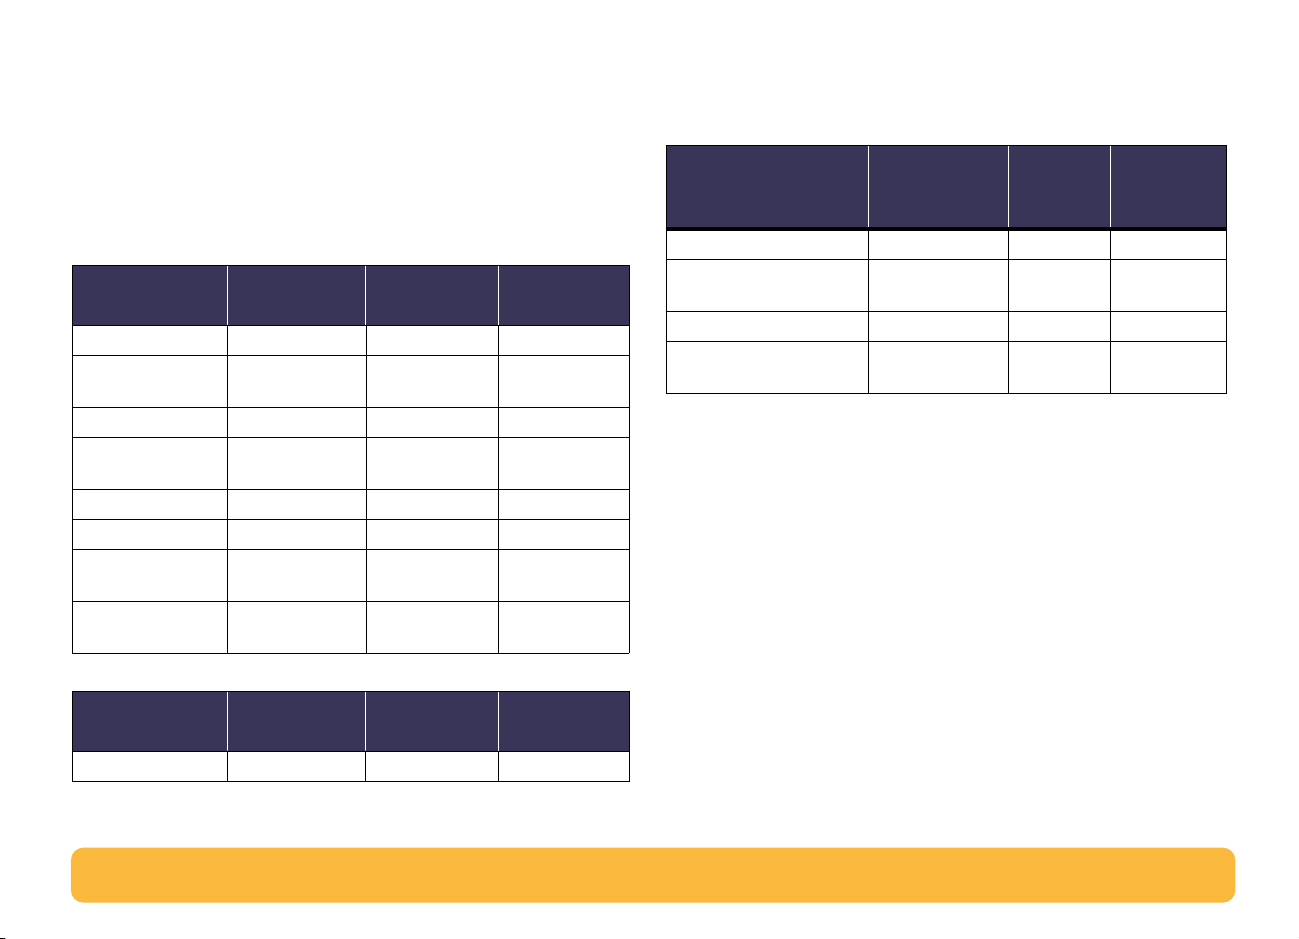
Minimum printing margins
System Requirements
The printer cannot print outside a certain area of the page, so
you must make sure the contents of your document fall within
the printable area—that is, within the top, bottom, left, and
right margins available for the specific size paper on which you
are printing.
Paper Size
A4-sized 3.2 mm 1.0 mm 11.7 mm
Letter-, Legal, and
Executive-sized
A5- and B5-sized 3.2 mm 1.0 mm 11.7 mm
Cards (3x5 in, 4x6,
5x8)
Cards (A6) 3.2 mm 1.0 mm 11.7 mm
Hagaki postcards 3.2 mm 1.0 mm 11.7 mm
Banners: A4-Sized
(8.27 x 11.7 in.)
Banners: Letter-Sized
(8.5 x 11 in.)
Left and Right
Margins
0.25 in. 0.04 in. 0.46 in.
0.125 in. 0.04 in. 0.46 in.
3.2 mm 0.00 mm 0.00 mm
0.125 in. 0.0 in. 0.0 in.
Top
Margin
Bottom
Margin
Be sure your computer meets these system requirements.
Minimum
Operating System
Microsoft Windows NT 4.0 Pentium 66 MHz 32 MB 40 MB
Microsoft Windows 95
or 98
Windows 3.1x Pentium 66 MHz 8 MB 40 MB
MS-DOS Version 3.3 or
greater
Processor
Speed
Pentium 66 MHz 16 MB 40 MB
486 Processor 4 MB 5 MB
Required
RAM
Required
Free Harddisk Space
Left
Margins
Envelopes 1.0mm (0.25 in.) 11.7 mm (0.46 in.) 3.2 mm (0.125 in.)
DOS margins can vary. See the manual for the specific DOS program for information.
Right
Margin
Top & Bottom
Margin
69
Page 70

Supplies and accessories
For ordering information, see page 71.
Parts/Supplies HP Reorder
Accessories Number
Print Cartridges
DeskJet 840C, 842C, 843C
Black print cartridge C6615 Series
Tri-Color print cartridge C6625 Series
✳ When you buy replacement cartridges, check the
part numbers carefully so that you buy the right one.
Cables
HP IEEE-1284-compliant Parallel Interface
Cable (with one 1284-A connector for the
computer port and one 1284-B connector for the
printer port)
2-meter length C2950A
3-meter length C2951A
HP USB-compliant Interface Cable
2-meter length C6518A
Power Adapter (worldwide) C6409-60014
Parts/Supplies HP Reorder
Accessories Number
Power Cords (to be used with worldwide
Power Adapter)
U.S., Canada, Brazil, 8120-8330
Latin America, Saudi Arabia
Japan 8120-8336
U.K. 8120-8341
Singapore, Malaysia,
Middle East, Hong Kong 8120-8719
South Africa 8120-8347
India 8120-8345
Australia 8120-8337
Argentina 8120-8434
China, Taiwan, Philippines 8120-8346
Korea 8120-8339
Europe, Jordan, Lebanon, Israel, 8120-8340
North Africa, Russia
Baltic countries, Thailand,
Indonesia, Caribbean,
Latin America
Other Replaceable Parts
Cable access Door (I/O Cover) C6409-40014
Cleanout Access Door Assembly C4557-60076
Parts/Supplies HP Reorder
Accessories Number
Reference Manuals for Windows
Most HP printer documentation is available for
viewing and printing at
http://www.hp.com/support/home_products
Arabic C6419-90025
Czech C6419-90027
Danish C6419-90026
Dutch C6419-90037
English Request number with order
Finnish C6419-90026
French Request number with order
German C6419-90038
Greek C6419-90028
Hebrew C6419-90028
Hungarian C6419-90027
Italian C6419-90025
Korean C6419-90031
Norwegian C6419-90026
Polish C6419-90027
Portuguese Request number with order
Russian C6419-90028
Simplified Chinese C6419-90031
Slovakian C6419-90027
Slovenian C6419-90027
Spanish Request number with order
Swedish C6419-90026
Thai C6419-90031
Traditional Chinese C6419-90031
Turkish C6419-90027
70
Page 71

Parts/Supplies HP Reorder
Accessories Number
Paper Media
HP Bright White Inkjet Paper
European A4, 500 sheets C1825A
European A4, 200 sheets C5977A
U.S. letter, 200 sheets C5976A
U.S. letter, 500 sheets C1824A
HP Premium Inkjet Paper
European A4, 200 sheets 51634Z
U.S. letter, 50 sheets 51634Y
HP Premium Brochure and Flyer Paper
U.S. letter, 50 sheets C6955A
HP Photo Paper
Asian A4, 20 sheets C6765A
European A4, 20 sheets C1847A
U.S. letter, 20 sheets C1846A
HP Premium Photo Paper
Asian A4, 15 sheets C6043A
European A4, 15 sheets C6040A
U.S. letter, 15 sheets C6039A
HP Premium Inkjet Transparency Film
European A4, 20 sheets C3832A
European A4, 50 sheets C3535A
U.S. letter, 20 sheets C3828A
U.S. letter, 50 sheets C3834A
✳✳
Parts/Supplies HP Reorder
Accessories Number
Paper Media (continued)
HP Premium Inkjet Rapid-Dry Transparencies
European A4, 50 sheets C6053A
U.S. letter, 50 sheets C6051A
HP Banner Paper
European A4, 100 sheets C1821A
U.S. letter, 100 sheets C1820A
HP Greeting Card Paper
(Prescored for quarter-fold)
European A4: 20 sheets, 20 envelopes C6042A
U.S. letter: 20 sheets, 20 envelopes C1812A
HP Greeting Card Paper
(Prescored for half-fold)
European A4: 10 sheets, 10 envelopes C6045A
U.S. letter: 10 sheets, 10 envelopes C6044A
HP Premium Glossy Hagaki Cards
Hagaki card, 20 cards C6575A
HP Iron-On T-Shirt Transfers
European A4, 10 sheets C6050A
Asian A4, 10 sheets C6065A
U.S. letter, 10 sheets C6049A
HP Restickables, Large Round Inkjet Stickers
U.S. letter, 10 sheets (90 stickers) C6822A
HP Restickables, Large Square Inkjet Stickers
U.S. letter, 10 sheets (90 stickers) C6823A
✳✳
Availability of special media varies by country.
Ordering Information
To order printer supplies or accessories,
call your nearest HP dealer or call HP
DIRECT at the following numbers for fast
shipping service.
In the U.S., you can buy supplies and
accessories directly from HP at
www.hpshopping.com, or call the HP
Shopping Village at 1-888-999-4747.
• Argentina: (54 1) 787-7100
Fax: (54 1) 787-7213
Hewlett-Packard Argentina,
Montañeses 2150 1428
Buenos Aires, Argentina
• Australia/New Zealand: (03) 895-2895
China Resources Bldg.
26 Harbour Road
Wanchai, Hong Kong
• Austria-South-East Area: (43-0222) 25 000, ext.
755
Fax: (43-0222) 25 000, ext. 610
Hewlett-Packard Ges.m.b.H.
Ersattzteilverkauf Lieblg. 1
A-1222 Wien
71
Page 72

•
Belgium: 02/778 3092 (or 3090, 3091)
Fax: 02/778 3076
Hewlett-Packard Belgium SA/NV
100 bd. de la Woluwe/Woluwedal
1200 BRUXELLES
• Brazil: Centro de Informacoes HP
Grande São Paulo: 822-5565
Demais Localidades: 0800-157751
Fax: (011) 829-7116
Centro de Informacoes HP
Hewlett Packard Brasil S.A.
Caixa Postal 134, Rua Clodomiro Amazonas, 258
CEP 04534-011, São Paulo - SP
• Canada: (800) 387-3154, (905) 206-4725
Fax: (905) 206-3485/-3739
Hewlett-Packard (Canada) Ltd.
5150 Spectrum Way
Mississauga, Ontario L4W 5G1
Toronto: (416) 671-8383
• Chile: (56 2) 203-3233
Fax: (56 2) 203-3234
Hewlett-Packard de Chile SA
Av. Andres Bello 2777, Oficina 1302
Los Condes, Santiago, Chile
• Denmark: 45 99 14 29
Fax: 42 81 58 10
Hewlett-Packard A/S
Kongevejen 25, 3460 BIRKEROD
• Finland: (90) 8872 2397
Fax: (90) 8872 2620
Hewlett-Packard Oy
Varaosamyynti, Piispankalliontie 17
02200 ESPOO
• France: (1) 40 85 71 12
Fax: (1) 47 98 26 08
EuroParts
77 101 avenue du Vieux Chemin de Saint-Denis
92625 GENNEVILLIERS
• Germany: 07031-145444
Fax: 07031-141395
Hewlett-Packard GmbH, HP Express Support
Ersatzteil-Verkauf, Herrenberger Str. 130
71034 BÖBLINGEN
• International Sales Branch: (41) 22 780 4111
Fax: (41) 22 780-4770
Hewlett-Packard S. A., ISB
39, rue de Veyrot 1217 MEYRIN 1
GENEVE - SUISSE
• Italy: 02/9212.2336/2475
Fax: 02/92101757
Hewlett-Packard Italiana S. P. A.
Ufficio Parti di ricambio
Via G. Di Vittorio, 9
20063 Cernusco s/N (MI)
• Japan: (03) 3335-8333
Hewlett-Packard Japan Ltd.
29-21 Takaido-Higashi 3-chone, sugninami-ku
Tokyo 168-8585
• Latin America Headquarters: (305) 267-4220
Fax: (305) 267-4247
5200 Blue Lagoon Drive, Suite 950
Miami, FL 33126
• Mexico: (52 5) 258-4600
Fax: (54 1) 258-4362
Hewlett-Packard de México, S.A. de C.V
Prolongación Reforma #470
Colonia Lomas de Santa Fe, C.P. 01210 México,
D.F.
• Netherlands: 0 33 450 1808
Fax: 0 33 456 0891
Hewlett-Packard Nederland B. V.
Parts Direct Service
Basicweg 10
3821 BR AMERSFOORT
• Norway: 22735926
Fax: 22735611
Hewlett-Packard Norge A/S, Express Support
Drammensveien 169-171
0212 Oslo
• Spain: 1 6 31 14 81
Fax: 1 6 31 12 74
Hewlett-Packard Espanola S.A.
Departamento de Venta de Piezas
Ctra N-VI, Km. 16,500
28230 LAS ROZAS, Madrid
• Sweden: 8-4442239
Fax: 8-4442116
Hewlett-Packard Sverige AB
Skalholtsgatan 9, Box 19
164 93 KISTA
• Switzerland: 056/279 286
72
Page 73

Fax: 056/279 280
Elbatex Datentechnik AG
Schwimmbadstrasse 45, 5430 WETTINGEN
• United Kingdom:
+44 1765 690061
Fax: +44 1765 690731
Express Terminals, 47 Allhallowgate
Ripon, North Yorkshire
• +44 181 568 7100
Fax: +44 181 568 7044
Parts First, Riverside Works
Isleworth, Middlesex, TW7 7BY
• +44 1734 521587
Fax: +44 1734 521712
Westcoast, 28-30 Richfield Avenue
Reading, Berkshire, RG1 8BJ
• United States: (800) 227-8164
• Venezuela: (58 2) 239-4244/4133
Fax: (58 2) 207-8014
Hewlett-Packard de Venezuela C.A.
Tercera Transversal de Los Ruices Norte
Edificio Segre, Caracas 1071, Venezuela
Apartado Postal 50933, Caracas 1050
Elsewhere in the world
• Hewlett-Packard Company
Intercontinental Headquarters,
3495 Deer Creek Road,
Palo Alto, CA 94304, U.S.A.
Language Codes
The language codes for locating the
dosread.txt file on the printer software
CD are listed below. This text file is in the
\<language code>\djcp\ directory on
the printer software CD.
Language Code
Chinese, Simplified chs
Chinese, Traditional cht
Czech csy
Danish dan
German deu
English enu
Spanish esm
Finnish fin
French fra
Hungarian hun
Italian ita
Korean kor
Dutch nld
Norwegian non
Polish plk
Portuguese ptb
Russian rus
Swedish svc
Thai tha
73
Page 74

Environmental Attributes of the DeskJet Printer
Environmental Statement
Hewlett-Packard continuously improves the design and production
processes of HP DeskJet printers to minimize the negative impact on the
office environment and on the communities where printers are
manufactured, shipped, and used. Hewlett-Packard has also developed
processes to minimize the negative impact of the disposal of the printer at
the end of printing life.
Reduction and Elimination
Ozone: All ozone-depleting chemicals (CFC, for example) have been
eliminated from Hewlett-Packard manufacturing processes.
Number of Parts: Early in design, the total number of parts used by the
printer is reduced when possible to minimize costs during manufacturing
and to reduce handling at end-of-life.
Printer Packaging: The packaging materials for this printer have been
selected to provide maximum protection for the least cost possible, while
attempting to minimize environmental impact and facilitate recycling. The
rugged design of the HP DeskJet printer assists in minimizing both
packaging materials and damage rates.
designed to be accessed quickly for efficient disassembly and repair.
Plastics parts have been primarily designed in no more than two colors to
enhance recycling options.
Plastic Materials: All major manufactured plastics parts are marked as to
the plastic content to facilitate product recycling.
Printers and Print Cartridges: In certain countries, Hewlett-Packard is
conducting pilot programs to take back printers and print cartridges for
material reclamation and environmentally sound disposal. Call your
Hewlett-Packard representative for current status.
Paper: This printer is designed to facilitate the use of recycled paper as
consumer media. Depending on the availability of recycled paper in each
country, all manuals are printed on recycled paper.
Energy Conservation
This printer was designed with energy conservation in mind. This printer
uses less than 5 watts in stand-by mode. As an ENERGY STAR partner,
Hewlett-Packard has determined that this product meets the ENERGY STAR
guidelines for energy efficiency.
Recycling
Design for recycling has been incorporated into this printer. The number of
materials has been kept to a minimum, and dissimilar materials have been
designed to separate easily. Fasteners and connectors are easy to locate,
access, and remove using common tools. High priority parts have been
Off-mode Energy Consumption: When the printer is in off-mode, a
minimal amount of energy is still being consumed. Turning off the printer
and then disconnecting the printer power cord from the electrical source
can prevent energy consumption.
74
 Loading...