

HP Color LaserJet 4550, Color LaserJet 4550DN, Color LaserJet 4550HDN, Color LaserJet 4550N Getting Started Guide
Page 1
hp color LaserJet 4550
4550n • 4550dn • 4550hdn
getting started guide
go
Page 2

Page 3

HP Color LaserJet 4550,
4550N, 4550DN, 4550HDN Printer
Getting Started Guide ________
Page 4

© Copyright Hewlett-Packard
Company, 2002
All Rights Reserved.
Reproduction, adaptation, or
translation without prior written
permission is prohibited, except
as allowed under the copyright
laws.
Publication number
C7085-90948
First Edition, January, 2002
Warranty
The information contained in
this document is subject to
change without notice.
Hewlett-Packard makes no
warranty of any kind with
respect to this information.
HEWLETT-PACKARD
SPECIFICALLY DISCLAIMS
THE IMPLIED WARRANTY OF
MERCHANTABILITY AND
FITNESS FOR A PARTICULAR
PURPOSE.
Hewlett-Packard shall not be
liable for any direct, indirect,
incidental, consequential, or
other damage alleged in
connection with the furnishing or
use of this information.
Trademark Credits
Adobe®, Acrobat®, and
Pos tScr ipt
Adobe Systems Incorporated.
MS-DOS
trademark of Microsoft
Corporation.
UNIX
of the Open Group.
Windows
Windows NT
registered trademarks of
Microsoft Corporation.
®
are trademarks of
®
is a U.S. registered
®
is a registered trademark
®
, MS Windows®, and
®
are U.S.
Hewlett-Packard Company
11311 Chinden Boulevard
Boise, Idaho 83714 U.S.A.
Page 5
Introduction
Congratulations on your purchase of the HP Color LaserJet 4550
printer.
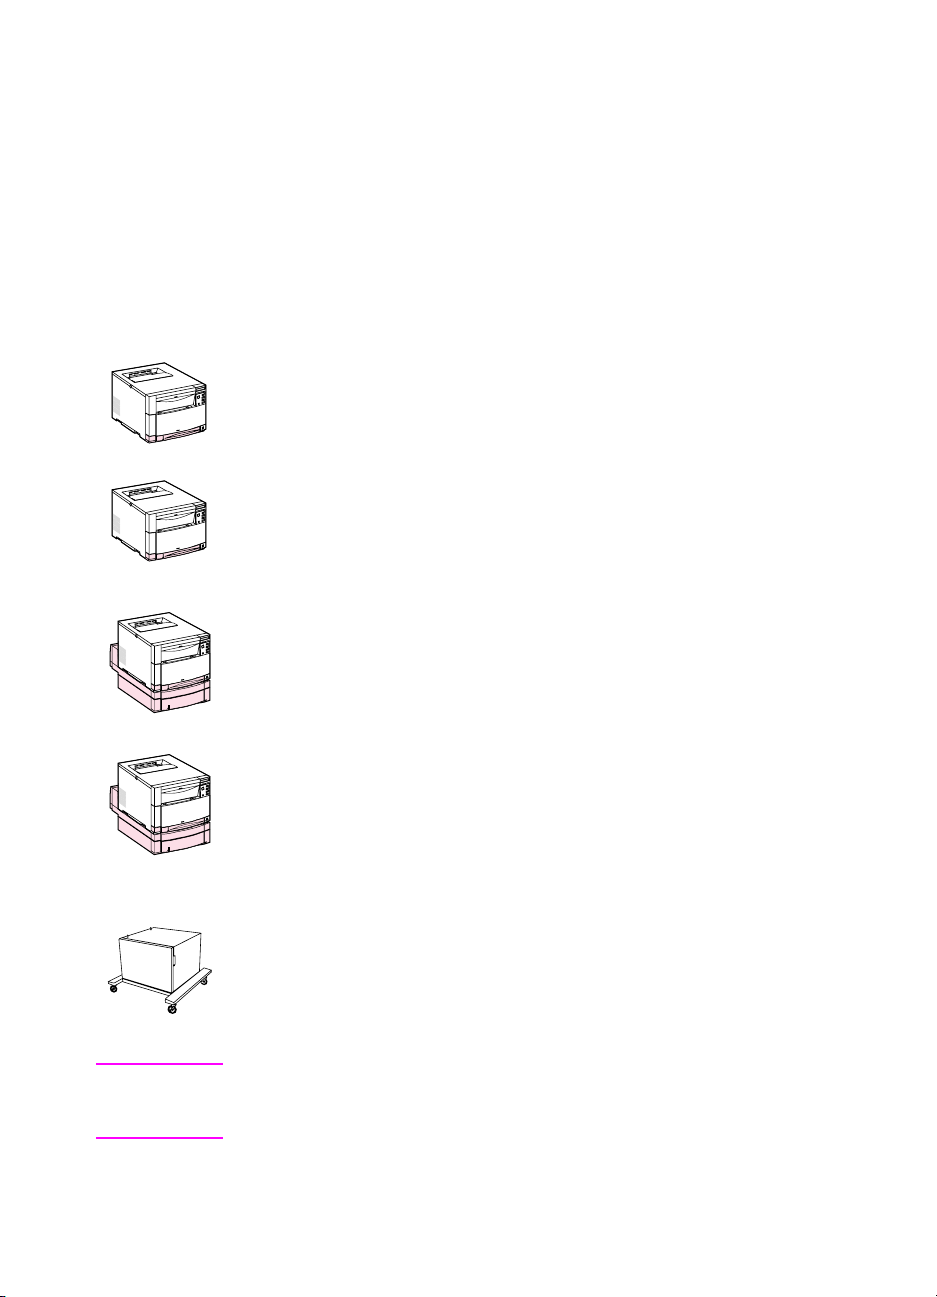
Configurations
This printer is available in four configurations, as described below. An
optional printer cabinet is also available.
HP Color LaserJet 4550
The HP Color LaserJet 4550 is the base model. It comes standard
with64MBRAM.
HP Color LaserJet 4550N
The HP Color LaserJet 4550N comes standard with 64 MB RAM and
an HP JetDirect 610N print server EIO network card for connecting to
anetwork.
HP Color LaserJet 4550DN
The HP Color LaserJet 4550DN comes standard with 128 MB RAM,
an HP JetDirect 610N print server EIO network card for connecting to
a network, a duplex printing accessory, and a 500-sheet paper feeder.
HP Color LaserJet 4550HDN
The HP Color LaserJet 4550HDN comes standard with 128 MB RAM,
an HP JetDirect 610N print server EIO network card for connecting to
a network, a duplex printing accessory, a 500-sheet paper feeder, and
aharddisk.
Printer cabinet
An HP Color LaserJet 4550 series printer cabinet is available for
purchase (product number C4235A).
WWW To order printer accessory products, go to the HP website at
U.S. – http://www.hp.com/go/supplies or
Worldwide – http://www.hp.com/ghp/buyonline.html.
EN
Introduction – 3
Page 6

Installation checklist
This guide will help you set up and configure your new color printer.
Each task below includes easy-to-follow instructions.
❏
Task1 Preparealocationfortheprinter .................. 8
❏
Task2 Unpacktheprinter............................. 10
❏
Task3 Installthepowercord .......................... 17
❏
Task4 Loadmediaintothetrays ....................... 19
❏
Task 5 Set up the printer control panel (optional)* . . . . . . . . . . 26
❏
Task6 Installthetonercartridges ...................... 30
❏
Task7 Installtheimagingdrum........................ 33
❏
Task8 SetPowerSaveandtestprinteroperation........... 34
❏
Task 9 Connect the printer to the network (optional)* . . . . . . . 36
❏
Task 10 Lock the printer control panel (optional)* . . . . . . . . . . 37
❏
Task11 Connectaparallelcable(optional)* .............. 39
❏
Task 12 Printing with the HP Fast InfraRed Receiver
(optional)*..........................................42
❏
Task13 Preparetoinstallthesoftware .................. 43
❏
Task 14 Software installation for individual users with
IBM-compatiblecomputers.............................44
❏
Task 15 Software installation for network administrators . . . . . 46
❏
Task16 SoftwareinstallationforMacintoshusers.......... 49
❏
Task 17 Configure the printer on the network. . . . . . . . . . . . . . 51
❏
Task 18 Distribute the software to network clients (optional)* . 52
❏
Task 19 Install the software for network clients (optional)*. . . . .53
❏
Task20 Connecttotheprinter......................... 55
*You do not need to complete these steps if you do not use these features.
For information on solving problems or obtaining additional software,
see the following pages:
Troubleshootingchecklist ............................. 56
Communicating with an optional HP JetDirect Print Server . . . 58
Supportinformation.................................. 60
4 – Installation checklist
EN
Page 7
Where to look for more information . . .
Several references are available for use with this printer. For
additional copies of the guides below, contact HP Parts Direct
Ordering at (800) 227-8164 (U.S.) or contact your HP-authorized
dealer.
WWW Additional information and select manuals are available at
http://www.hp.com/support/lj4550.
Settinguptheprinter
Getting Started Guide
Step-by-step instructions for
installing and setting up
the printer.
EN
Using the printer
Online User Guide
Detailed information on using and
troubleshooting the printer. Available on
the CD-ROM that came with the printer.
If you would like a hard copy, print the
user guide using your printer.
Where to look for more information . . . – 5
Page 8

Online Help
Information on printer options that are
available from within printer drivers. To
view a Help file, access the online Help
through the printer driver.
HP JetDirect Print Server
Administrator’s Guide*
Step-by-step instructions for configuring
the HP JetDirect print server.
*Accompanies printers that include an HP JetDirect print server (network
card).
WWW You can now register yourself as an HP Color LaserJet printer user
on the HP Web Registration site at:
http://www.hp.com/go/ColorLaserPrinter_register.
6 – Where to look for more information . . .
EN
Page 9

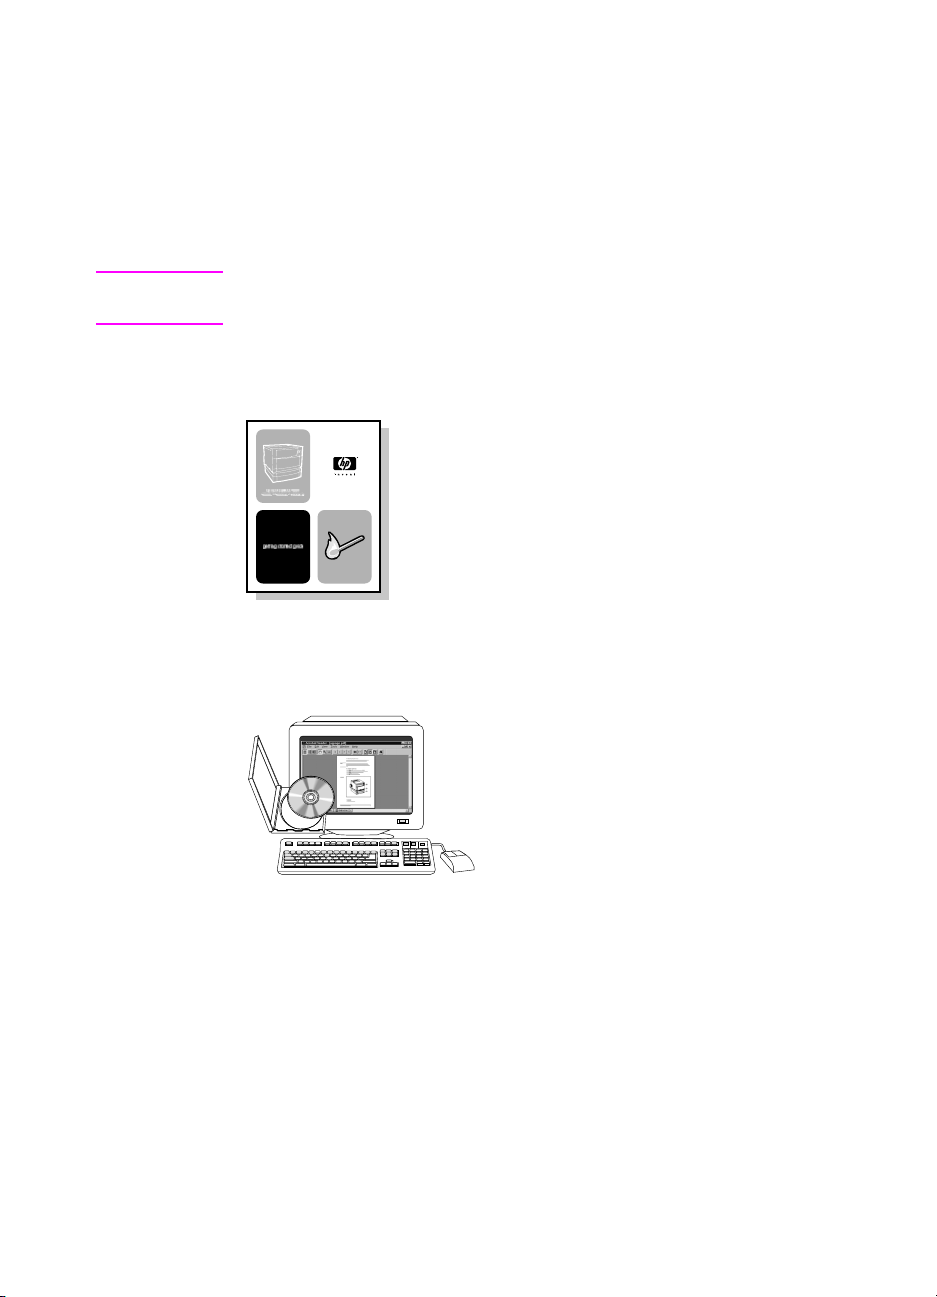
Where’s the user guide?
The user guide for this printer is supplied in online format for viewing
on your computer screen using Adobe
guide and Adobe Acrobat Reader are available on the CD-ROM.
Note Adobe Acrobat Reader is only available for English on the CD-ROM.
Go to http://www.adobe.com for the latest versions and additional
languages.
Screen view of the online user guide in Acrobat Reader
®
Acrobat®Reader. The user
For help on using the online user guide, click on a link in the
bookmark column ( [1] ). Or see page 2 of the user guide for links to
other information.
WWW For more information on buying various types of media to use with this
printergotoU.S.– http://www.hp.com/go/ljsupplies or
Worldwide – http://www.hp.com/ghp/buyonline.html.
EN
Where’s the user guide? – 7
Page 10
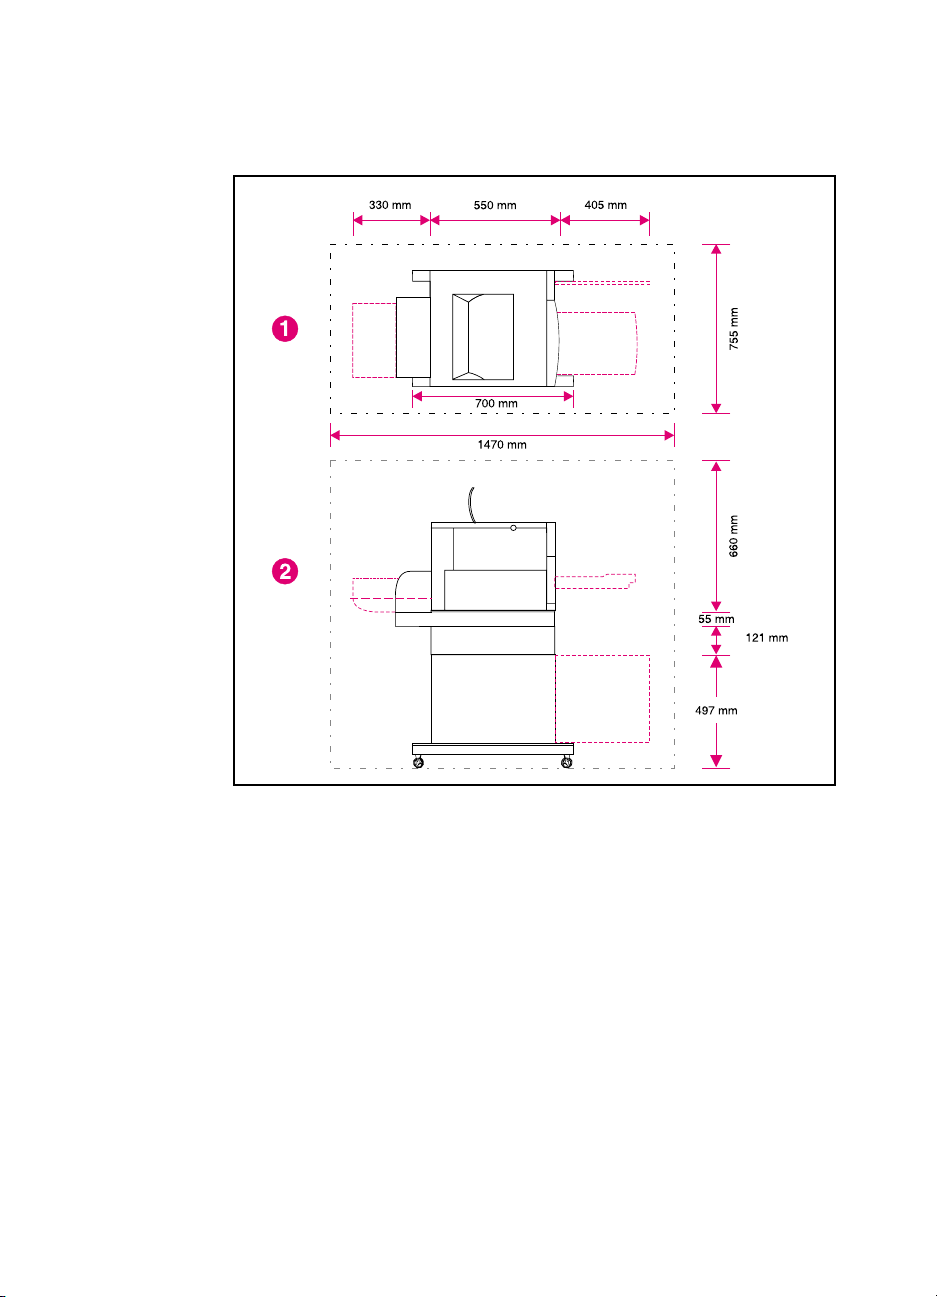
Task 1 Prepare a location for the printer
8 – Task 1
Printer location
1 Top view of the printer
2 Side view of the printer
EN
Page 11

Location requirements
The printer requires the following type of location:
● a sturdy, level surface (do not tilt the printer more than 2°)that is
large enough to accommodate all four corners of the printer
●
space around the printer, as shown in the figure on page 8.
Note The printer shown in the figure has the optional 500-sheet paperfeeder
and the optional duplex printing accessory installed. Prepare your
location for the HP Color LaserJet 4550 series printer according to the
optional accessories you will be installing.
●
a well-ventilated room with no abrupt changes in temperature or
humidity
●
room temperature 15 to 28° C(59to83° F)
●
relative humidity 10% to 70%
●
no exposure to chemicals or direct sunlight
●
line voltage and frequency not varying more than ±10% from the
value stated on the printer nameplate (located on the back of the
printer)
CAUTION The prepared location must be level (not more than a 2° angle), able
to support up to 77 kg (169 lb), and must support all four corners of the
printer, duplex printing accessory, or 500-sheet paper feeder.
EN
Task 1 – 9
Page 12
Task 2 Unpack the printer
1
4
7
8
5
2
K
9
M
C
3
Y
10
6
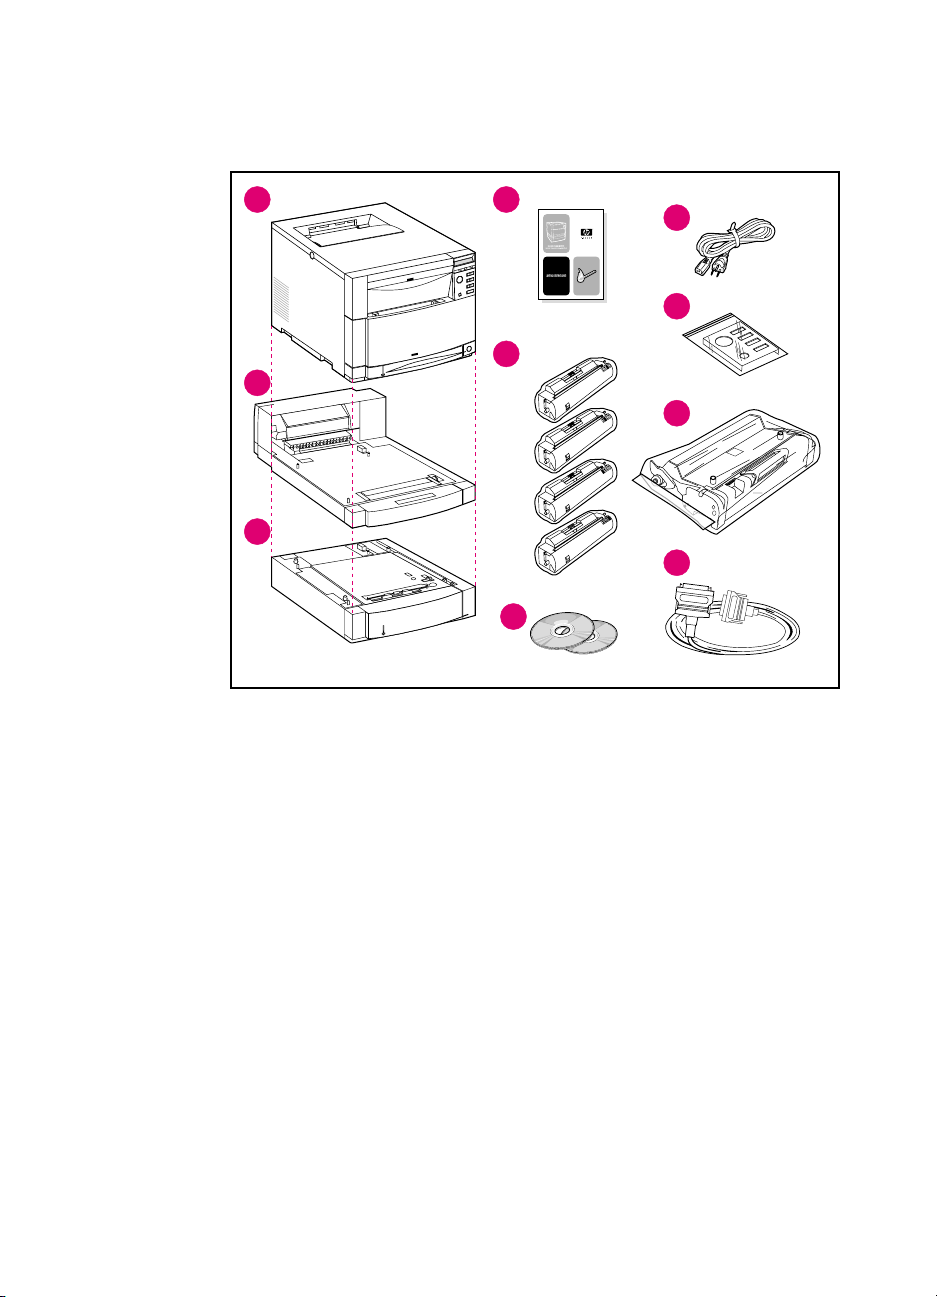
Package contents
The following items are included in the printer box:
1 Printer
• HP JetDirect print server (4550N, 4550DN, and 4550HDN
only)
• Hard disk (4550HDN only)
2 Optional Duplex Printing Accessory (4550DN and 4550HDN
only)
3 Optional Tray 3 (500-sheet paper feeder for the 4550DN and
4550HDN only)
4 Getting started guide
5 Four toner cartridges: black (K), magenta (M), cyan (C), and
yellow (Y)
6 Software CD-ROM: includes printer drivers and software, the
online user guide, and the HP JetDirect Print Server
Administrator’s Guide
10 – Task 2
EN
Page 13

7 Power cord
8 Control panel overlay (for non-English language users)
9 Imaging drum
10 Parallel cable (base model only)
EN
Task 2 – 11
Page 14

Assembling the printer hardware
The following pages provide detailed instructions for installing the
printer and the optional accessories:
● “Installing the optional 500-sheet paper feeder” on page 13
●
“Installing the optional duplex printing accessory” on page 14
●
“Installing the printer” on page 15
WARNING! This printer weighs approximately 57 kg (125 lb). When Tray 3 and the
duplex printing accessory are installed, the printer weighs 77 kg
(169 lb). Take all necessary precautions to move it. Whenever possible,
use professional handlers or material handlers to move the printer.
CAUTION The prepared location must be level (not more than a 2° angle), able
to support up to 77 kg (169 lb), and must support all four corners of the
printer, duplex printing accessory, or 500-sheet paper feeder.
Note Save all of the packing materials in case you need to repack and
transport the printer at a later date.
12 – Task 2
EN
Page 15
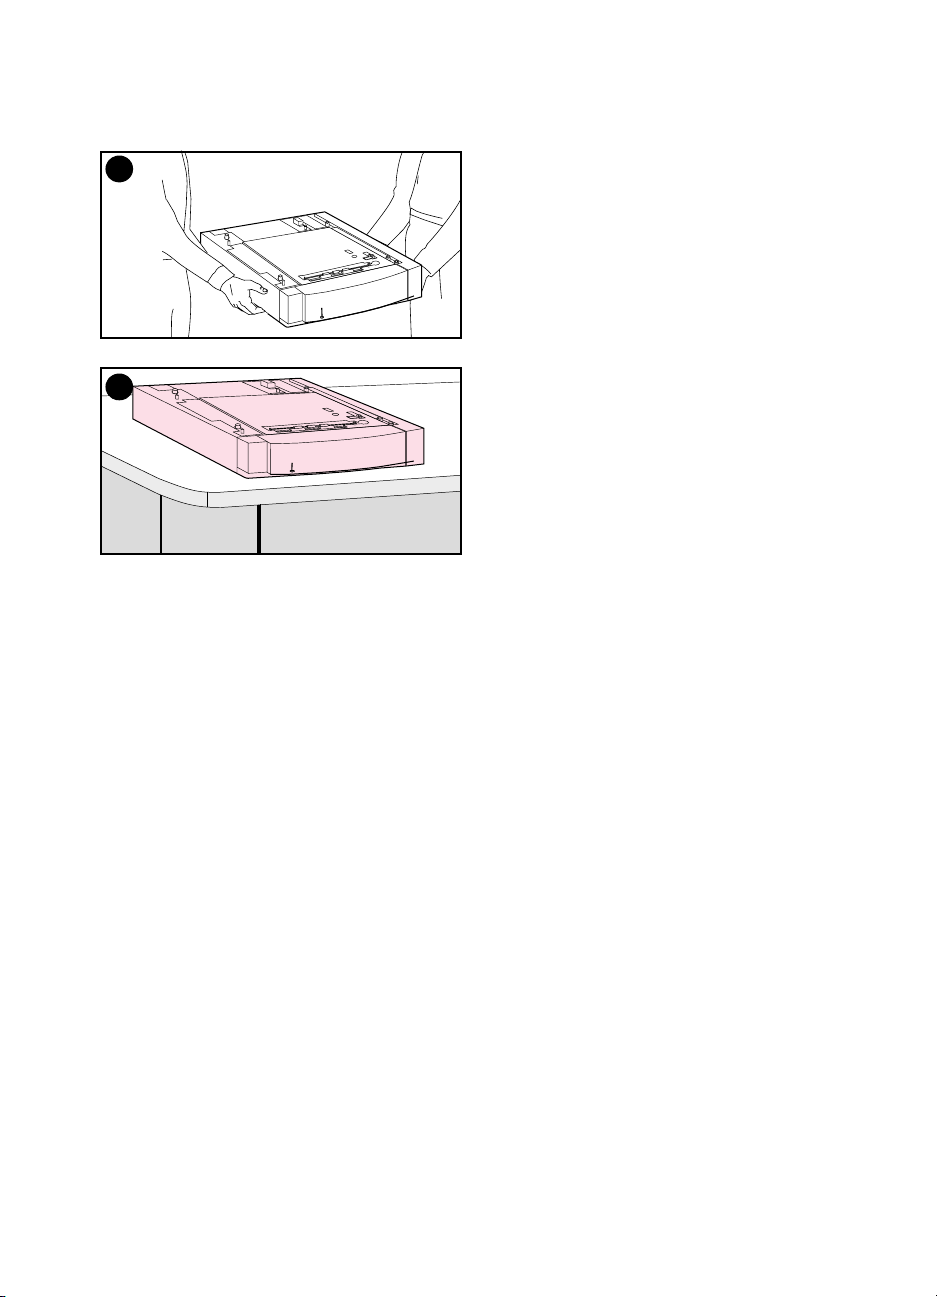
1
Installing the optional
500-sheet paper feeder
1 Using safe lifting techniques, remove
the optional 500-sheet paper feeder
from the box.
2 Place the optional 500-sheet paper
feeder in the prepared location that
is suitable for installing the printer.
2
EN
Task 2 – 13
Page 16
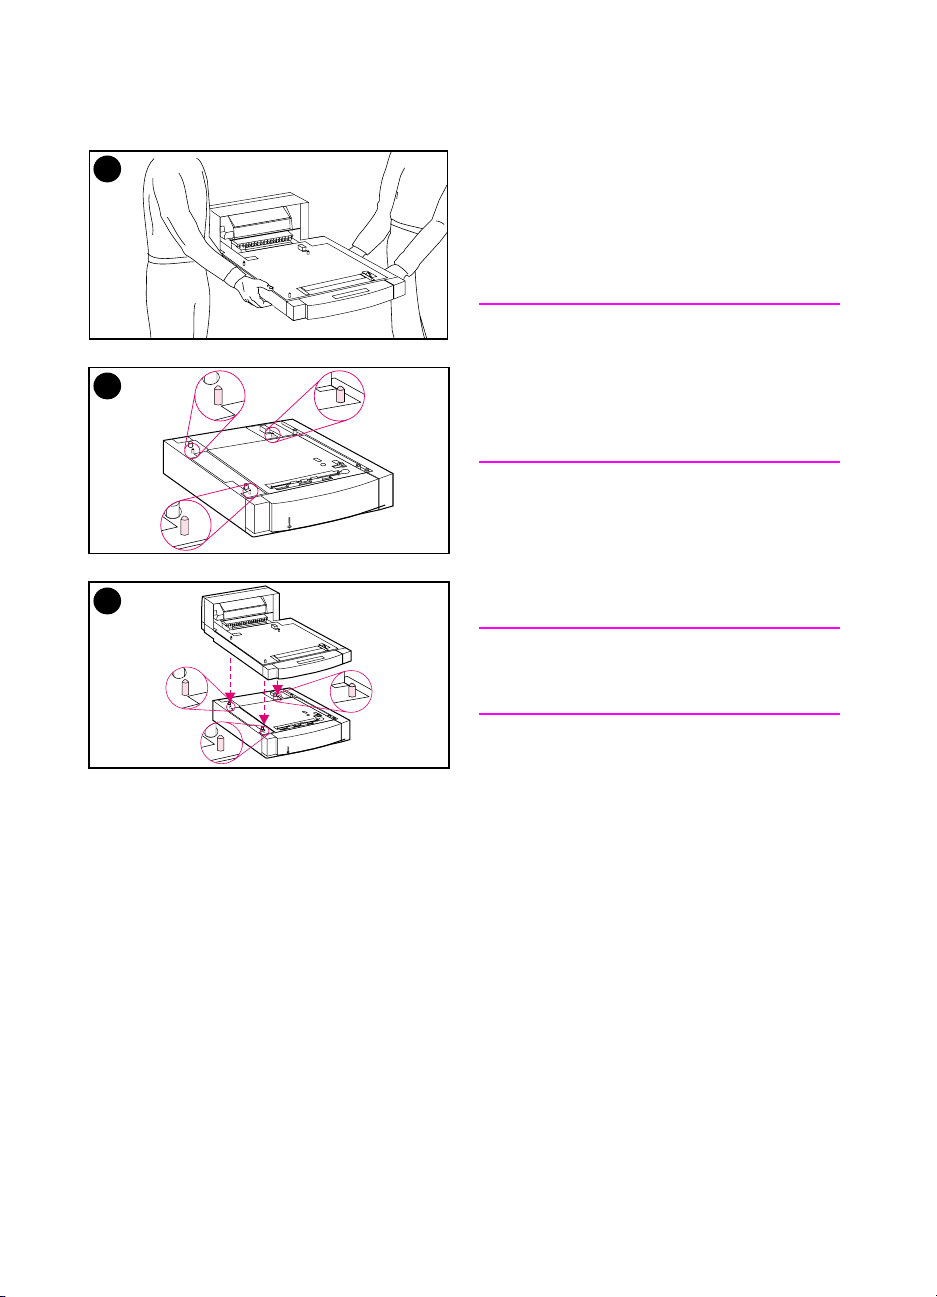
1
Installing the optional duplex
printing accessory
1 Using safe lifting techniques, remove
the optional duplex printing
accessory from the box.
Note
For easier assembly during placement,
2
3
line up the outside, beveled edges of the
optional 500-sheet paper tray, the
optional duplex printing accessory, and
the printer.
2 If you have the optional 500-sheet
paper feeder installed, use the guide
pins on the optional 500-sheet paper
feeder to align the optional duplex
printing accessory.
CAUTION
Avoid bending the guide pins while
lowering the duplex printing accessory.
14 – Task 2
3 Gently lower the optional duplex
printing accessory onto the optional
500-sheet feeder, or onto the
prepared surface.
EN
Page 17
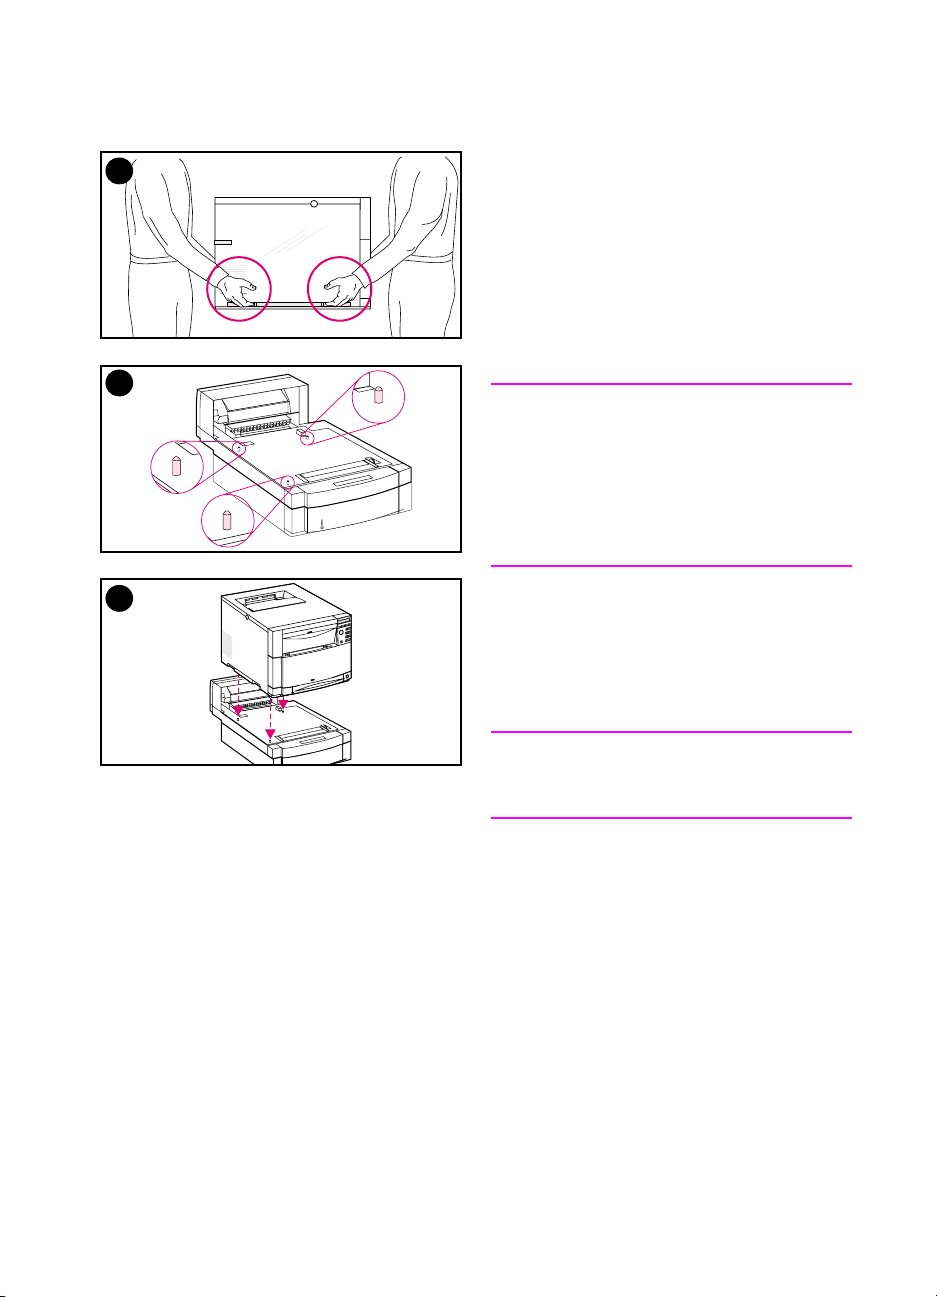
1
Installing the printer
Due to the weight of the printer, carrying
distance should be minimized for
additional safety. Use of a stable cart is
advisable.
1 Using safe lifting techniques, remove
the printer from the box. The printer
weighs approximately 57 kg (125 lb).
2
CAUTION
When removing the printer from the box,
make sure you lift the printer using the
hand holds located on each side of the
printer. Lifting the printer from the front
and rear could seriously damage the
printer.
3
2 If the optional duplex printing
accessory or optional 500-sheet
paper feeder is installed, use the
guide pins on either accessory to
align the printer.
CAUTION
Avoid bending the guide pins while
lowering the printer.
3 If no optional accessories are
installed, place the printer in the
prepared location. If the optional
duplex printing accessory or the
optional 500-sheet paper feeder are
installed, gently lower the printer
onto the accessory.
EN
Task 2 – 15
Page 18
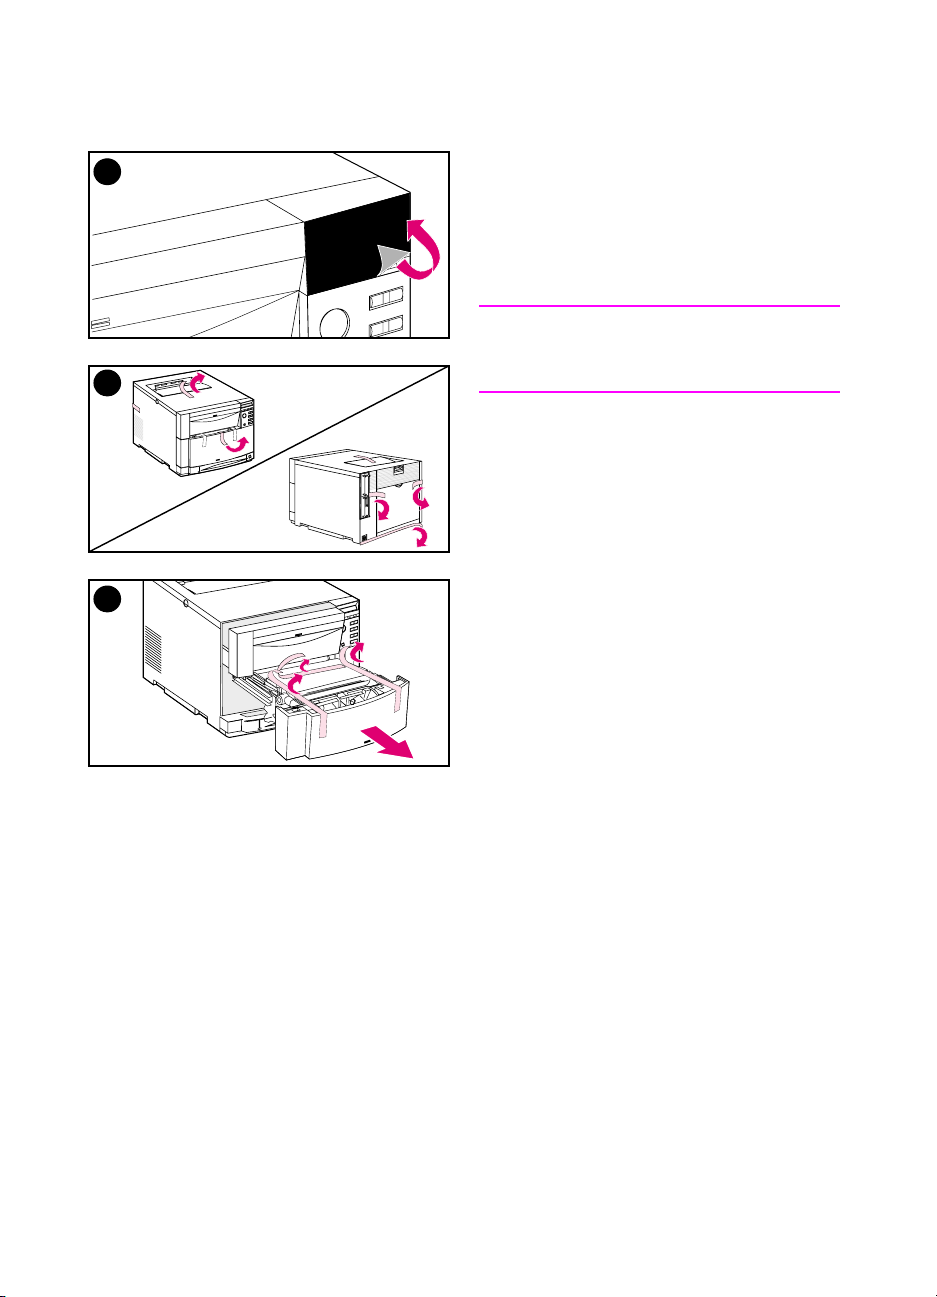
4
4 Remove the protective film from the
printer control panel.
5 Remove all external packing tape
from the printer, Tray 3, and the
optional duplex printing accessory.
Note
Make sure you remove the tape from the
5
back of the printer.
6 Open the middle front drawer and
remove the packing tape. Then close
the drawer.
6
16 – Task 2
EN
Page 19
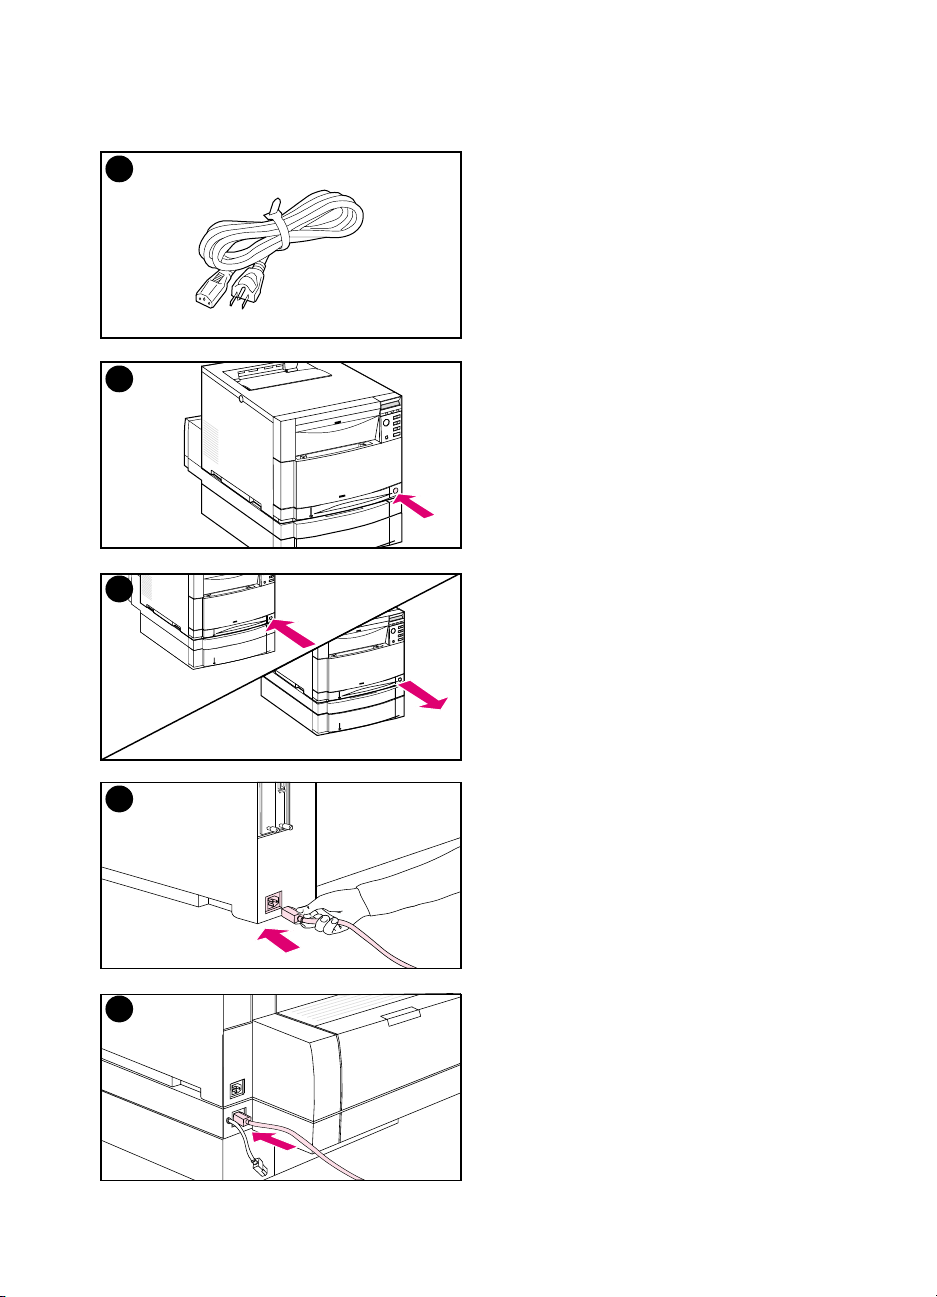
Task 3 Install the power cord
1
2
3
1 Locate the power cord that shipped
with the printer.
2 Locate the standby button (power
switch) on the front of the printer.
3 The standby button has two
positions: in (power on) and out
(standby mode—the fans remain
on). Make sure that the standby
button is out (standby mode).
4 Insert the power cord into the power
receptacle on the back side of the
printer.
– OR –
5 If you are installing an optional
duplex printing accessory, insert the
power cord into the power receptacle
on the back side of the optional
duplex printing accessory.
EN
4
5
Task 3 – 17
Page 20
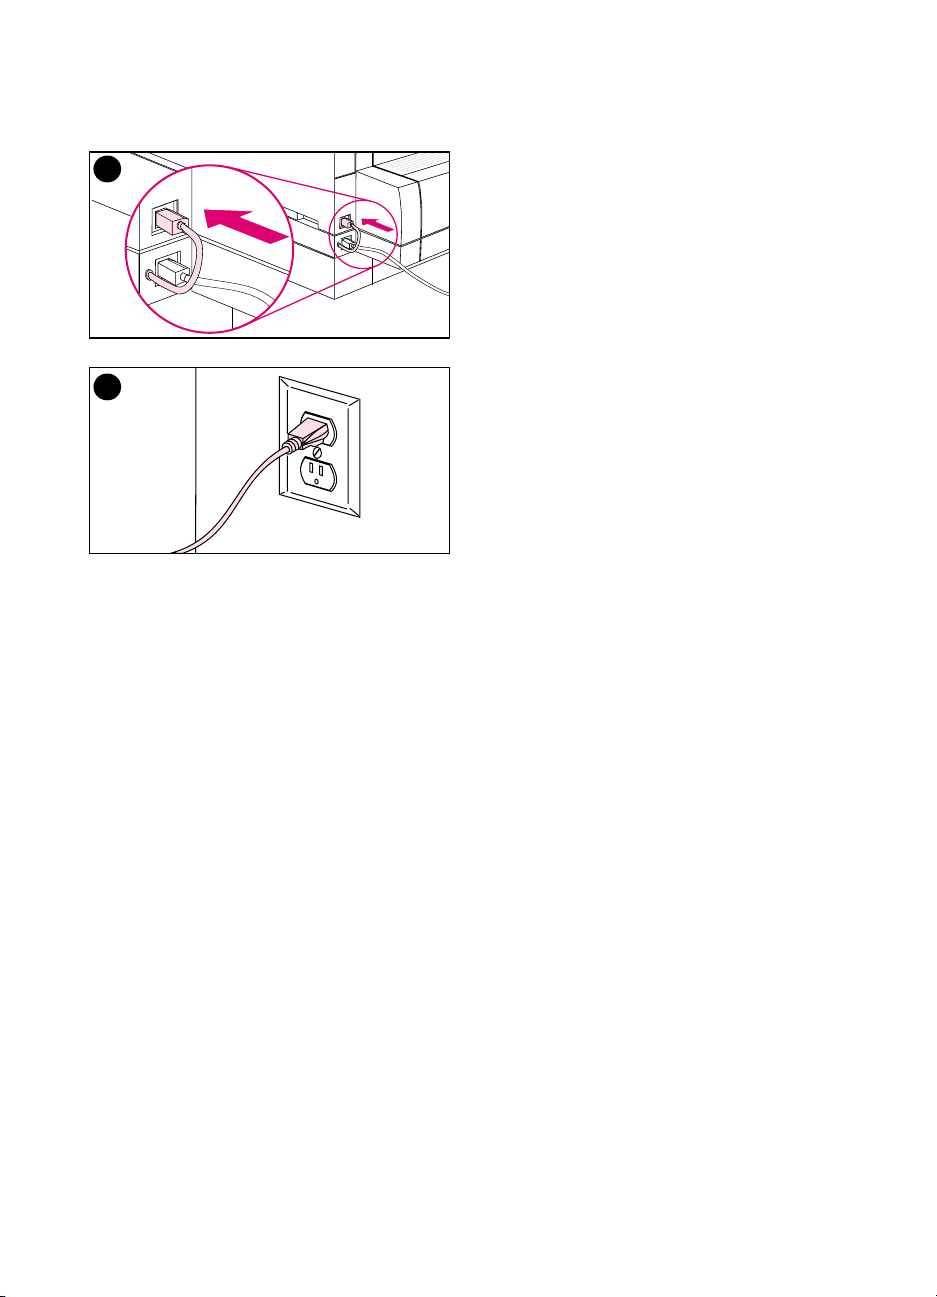
6
6 Insert the short optional duplex
printing accessory power cord on
the back of the optional duplex
printing accessory into the power
receptacle on the back side of the
printer.
7 Connect the power cord to a
grounded power outlet.
7
18 – Task 3
EN
Page 21

Task 4 Load media into the trays
EN
Front view
The printer has the following trays:
1 Tray 1 (multipurpose tray) with extending paper support
2 Tray 2 (250-sheet tray)
3 Optional Tray 3 (500-sheet tray)
Task 4 – 19
Page 22

Using media types
The printer control panel can be configured so that the printer draws
certain media types from specific trays. This enables you, in the
printer driver, to select media by type rather than by tray (source).
Selecting media by type helps prevent accidental printing on special
or expensive media. For example, if a tray is configured for letterhead,
and you specify in the driver to print on plain paper, the printer will not
accidentally print on letterhead from the letterhead tray. For more
information on using the printer control panel to set the size and type
of media for the input trays, see the online user guide.
CAUTION Hewlett-Packard recommends using HP Color LaserJet
Transparencies (C2934A for letter-size and C2936A for A4-size) for
optimum printing results. Do not use DeskJet (inkjet) or
monochrome transparencies in your printer. The transparencies
can become overheated and melt, causing serious damage to your
printer.
WWW For more information on buying various types of media to use with this
printergotoU.S.– http://www.hp.com/go/ljsupplies or
Worldwide – http://www.hp.com/ghp/buyonline.html.
20 – Task 4
EN
Page 23

Loading media
1
2
3
To l oa d Tray 1
1 Pull up the tray extension and slide
the media-width guides all the way
open.
2 Load media with the print side (side
to be printed on) facing the printer.
Load up to 150 sheets of 75 g/m
(20 lb) stock. Slide the media in until
it sits squarely in the bottom of the
tray.
3 Slide the media-width guides in until
they hold the media firmly in place
without bending it.
4 To load letterhead into Tray 1, load
the letterhead with the print side
facing the printer and with the top of
the letterhead sitting in the bottom of
the tray.
For duplex (two-sided) printing, load
letterhead with the print side facing
away from the printer (not shown).
2
EN
Note
For information on loading envelopes,
4
transparencies, or other media types,
see the online user guide that comes
with the printer.
Task 4 – 21
Page 24

1
To l oa d Tray 2
1 Remove Tray 2 from the printer and
place it on a flat surface. Remove
the packing tape from the tray.
2 Slide out the orange packing
spacers from both sides of Tray 2
( [1] ). Then press the bottom plate
and remove the middle packing
2
spacer ( [2] ).
3 Set the rear media-length guide by
squeezing the guide adjustment
latch and sliding the back of the tray
to the length of the media you are
loading.
4 Slide the media-width guides all the
way open.
3
5 Load media into Tray 2 with the print
side facing down. Load up to 250
sheets of 75 g/m
2
(20-lb) stock.
Media capacity may vary with other
media types.
4
5
22 – Task 4
CAUTION
Place the media under the fill tabs.
Do not load paper above the fill tabs.
(Fill tabs are displayed and circled in
illustration 5.)
EN
Page 25

6
6 Make sure that the media is flat in
the tray at all four corners and that
the media fits under the metal corner
tabs in front. Be careful not to bend
the corners of the media. Bent
media will not feed reliably.
7 Slide the media-width guides in until
they hold the media firmly in place
7
without bending it.
8 InsertTray2intotheprinter.
8
EN
Task 4 – 23
Page 26

1
To load optional Tray 3
1 Remove the tray (Tray 3) from the
500-sheet paper feeder and remove
the packing tape.
CAUTION
Remove the two cardboard packing
spacers from the back of Tray 3. If the
packing spacers are not removed, paper
2
jams will occur. (See pictures 1 and 2.)
2 Slide out the rear packing spacers
from both sides of Tray 3 ( [1] ). Next
slide out the front packing spacers
( [2] ). Then press the bottom plate
and remove the middle packing
spacer ( [3] ).
3
3 Squeeze the guide release latch on
the rear media-length guide and
slide the guide to fit the media size
you are loading.
4 Slide the media-width guides all the
way open by squeezing the release
latch.
4
24 – Task 4
EN
Page 27

5
5 Load media into Tray 3. Load up to
500 sheets of 75 g/m
2
(20-lb) stock.
Capacity may vary with other media
types.
CAUTION
Place the media under the fill tabs.
Do not load paper above the fill tabs.
(Fill tabs are displayed and circled in
6
illustration 5.)
6 Slide the media-width guides in until
they hold the media firmly in place
without bending the media.
7 Make sure that the media is flat in
the tray at all four corners and that
the media fits under the metal corner
7
tabs in front. Be careful not to bend
the corners of the media. Bent
media will not feed reliably.
8 Turn the media-size knob on the side
of Tray 3 to the size of the media in
the tray.
EN
9 InsertTray3intotheprinter.
8
9
Task 4 – 25
Page 28
Task 5 Set up the printer control panel
(optional)
1
You might need to install the control
panel overlay or replace the English
overlay with one that displays your
language. You also might need to
configure the control panel to display
messages in your language.
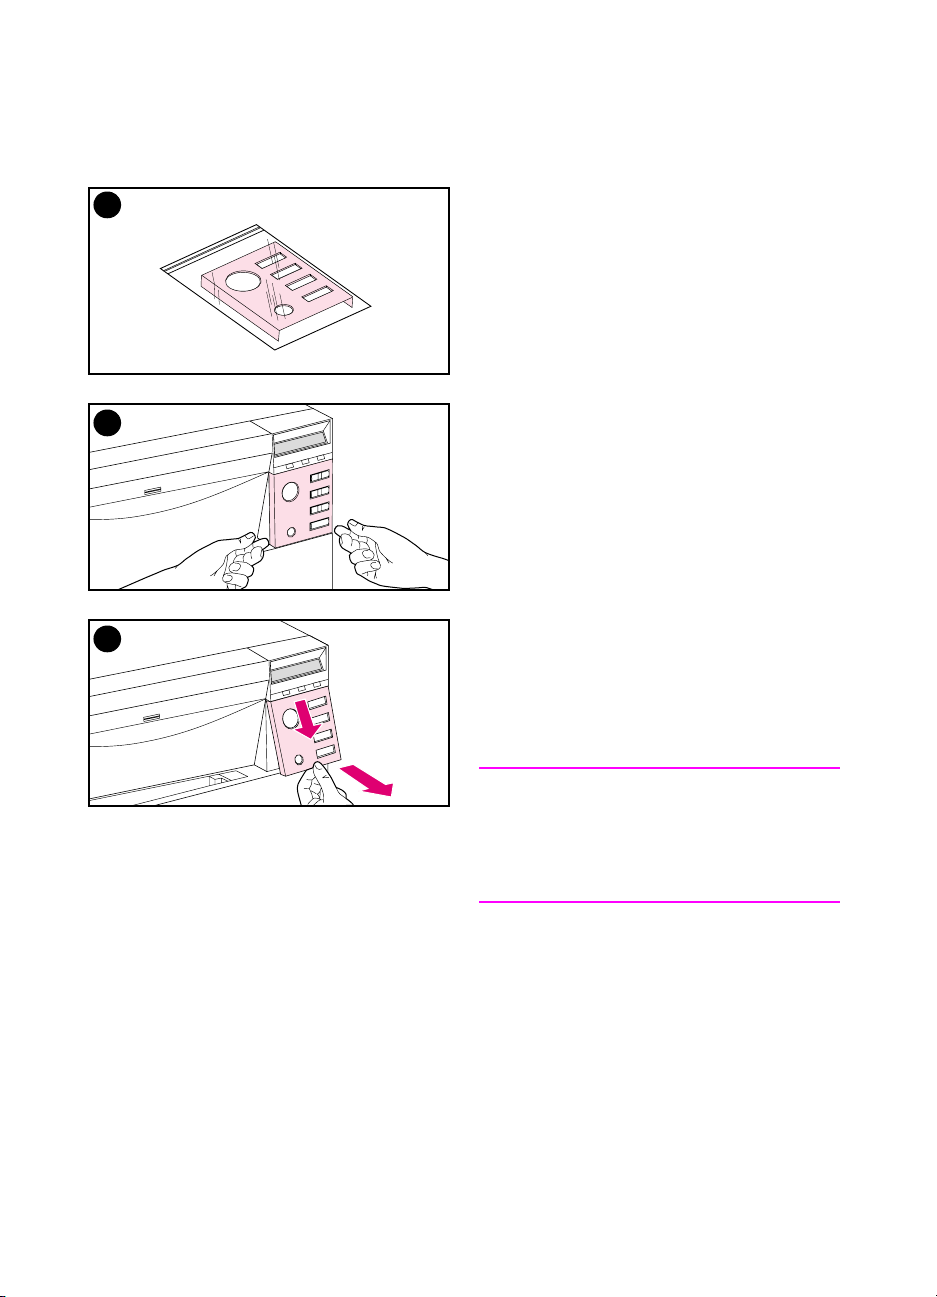
Installing or changing the
2
3
control panel overlay
1 Locate the control panel overlay that
came in the printer box and remove
it from the bag.
If you are installing an overlay, rather
than replacing one, skip to step 4.
Otherwise continue to step 2.
2 Gently lift out on both sides of the
overlay that is currently installed on
the printer.
3 Grasp the bottom of the overlay, pull
it down, and then lift it out.
26 – Task 5
Note
When removing the control panel
overlay, you may want to use a small
flat-blade screw driver to gently pry off
the control panel overlay.
EN
Page 29

4
4 To install the new overlay, position it
over the control panel and install the
topsidefirst.Insertthetoptabson
the overlay into the slots on the
printer face. Then push the overlay
up and push in the bottom.
5 Snap the overlay firmly onto the
control panel.
5
EN
Task 5 – 27
Page 30
1
Changing the display language
key on
.
ELECT
until the
ELECT
SELECT
.Thenpress
) appears
*
1 Press and hold the S
the printer control panel while you
turn the printer on by pressing the
standby button (power switch).
Continue holding S
control panel displays
2
LANGUAGE
release S
(in English), and then
ELECT
2 Wait until the control panel displays
LANGUAGE=ENGLISH *
the V
language choice appears.
3 Press S
choice. An asterisk (
3
next to the language when you
select it.
key repeatedly until your
ALUE
to save your language
ELECT
28 – Task 5
EN
Page 31

.
4
4 Press G
O
5 After the printer warms up, the
control panel displays:
TONER POSITION
BLACK = MISSING
Note
If the control panel does not display the
5
message above in the language you
selected, press the printer standby
button (power switch) to turn the printer
off and then repeat the instructions for
changing the display language.
Leave the printer turned on and
continue to the next task.
EN
Task 5 – 29
Page 32

Task 6 Install the toner cartridges
WWW To see a virtual demonstration for installing the toner cartridges go to
http://www.hp.com/support/lj4550_solve_a_problem and select
replacing consumables.
1
2
1 Locate the toner cartridges
packaged in the printer box. The
printer uses four different toner
colors and has a different toner
cartridge for each color: black (K),
magenta (M), cyan (C), and
yellow (Y).
2 If the printer is not already turned on,
turn it on. After the printer warms up,
the control panel displays:
TONER POSITION
BLACK = MISSING
Note
If the
INSTALL DRUM
wait for the
message, then proceed with the
3
4
following instructions.
3 Push the dark gray release button on
thesideoftheprinter([1] )and
open the printer’stopcover([2] ).
4 The cartridge slot for the black toner
cartridge is visible. Lift up the flap
that partially covers the cartridge
slot. The correct toner color is shown
on top of the flap.
INSTALL TONER CARTRIDGE
message appears,
30 – Task 6
EN
Page 33

5
5 Remove the black toner cartridge
from the bag and locate the orange
tab on the end of the cartridge. Pull
the tab firmly to remove the inside
sealing tape. (If the tab breaks off,
pull on the tape.) Discard the tape.
CAUTION
Do not shake the toner cartridge after
6
you have removed the inside tape. Doing
so could cause toner to spill.
6 Position the toner cartridge over the
cartridge slot so that the blue arrow
on the toner cartridge points to the
blue arrow on the printer. The arrow
on the right end of the cartridge
should point straight down.
7
7 Slidethetonercartridgedowninto
the slot until the cartridge stops.
Note
If the cartridge does not slide easily into
the slot, ensure you have the right color
cartridge for that slot.
EN
8
8 Rotate the toner cartridge toward the
back of the printer (within the
cartridge slot) until the cartridge
clicks into place.
9 Lower the flap to partially cover the
toner cartridge ( [1] ). If the cartridge
was rotated correctly, the flap covers
the cartridge label. Close the top
9
cover ( [2] ) before installing the next
toner cartridge.
Task 6 – 31
Page 34

10
11
10 When the top cover is shut, the
carousel advances to the next toner
cartridge slot. When the printer is
ready, the control panel displays:
TONER POSITION
(COLOR) = MISSING
11 Install the other three toner
cartridges by repeating steps 3
through 10. Install them in the
following order:
1. magenta
2. cyan
3. yellow
Note
You must close the top cover before
installing the next toner cartridge.
12
12 After installing the fourth toner
cartridge, close the top cover.
CAUTION
If you need to ship the printer in the
future, remove the toner cartridges and
imaging drum before shipping.
Leave the printer turned on and
continue to the next task.
32 – Task 6
EN
Page 35

Task 7 Install the imaging drum
1
2
3
4
1 Locate the imaging drum package
that came with the printer. Remove
the imaging drum from the bag.
CAUTION
Avoid exposing the imaging drum to
direct light. Exposure to light for more
than 15 seconds can seriously damage
the imaging drum.
2 On the printer, pull open the front
upper drawer until it stops.
3 Align the imaging drum over the
open drawer so that the arrow on top
points to the rear of the printer, and
theblueendcaponthesideslides
into the slot identified with the blue
arrow.
4 Slide the imaging drum down into
place.
5 Push the front upper drawer shut.
Wait while the printer runs an
internal color calibration. The
calibration takes a few minutes.
When the printer is ready, the control
panel displays
READY
.
EN
CAUTION
If you need to ship the printer in the
future, remove the toner cartridges and
imaging drum before shipping.
5
Task 7 – 33
Page 36

Task 8 Set PowerSave and test printer
operation
1
2
3
PowerSave reduces power consumption
when the printer is not in use. The
factory default setting for PowerSave is
on, and the time setting is 30 minutes.
The instructions below explain how to
change the time setting and how to turn
PowerSave off.
Setting PowerSave
on the control panel
1 Press M
until
on the control panel display.
2 Press I
30 MIN *
3 Press V
other time-setting choices between
30 minutes and 4 hours.
4 Press S
An asterisk (
saved choice.
5 Press G
READY
ENU
CONFIGURATION MENU
until
TEM
ALUE
ELECT
. The control panel displays
O
.
POWERSAVE TIME=
appears.
+ or V
to save your choice.
) appears beside your
*
ALUE
– to display
appears
4
5
34 – Task 8
EN
Page 37

1
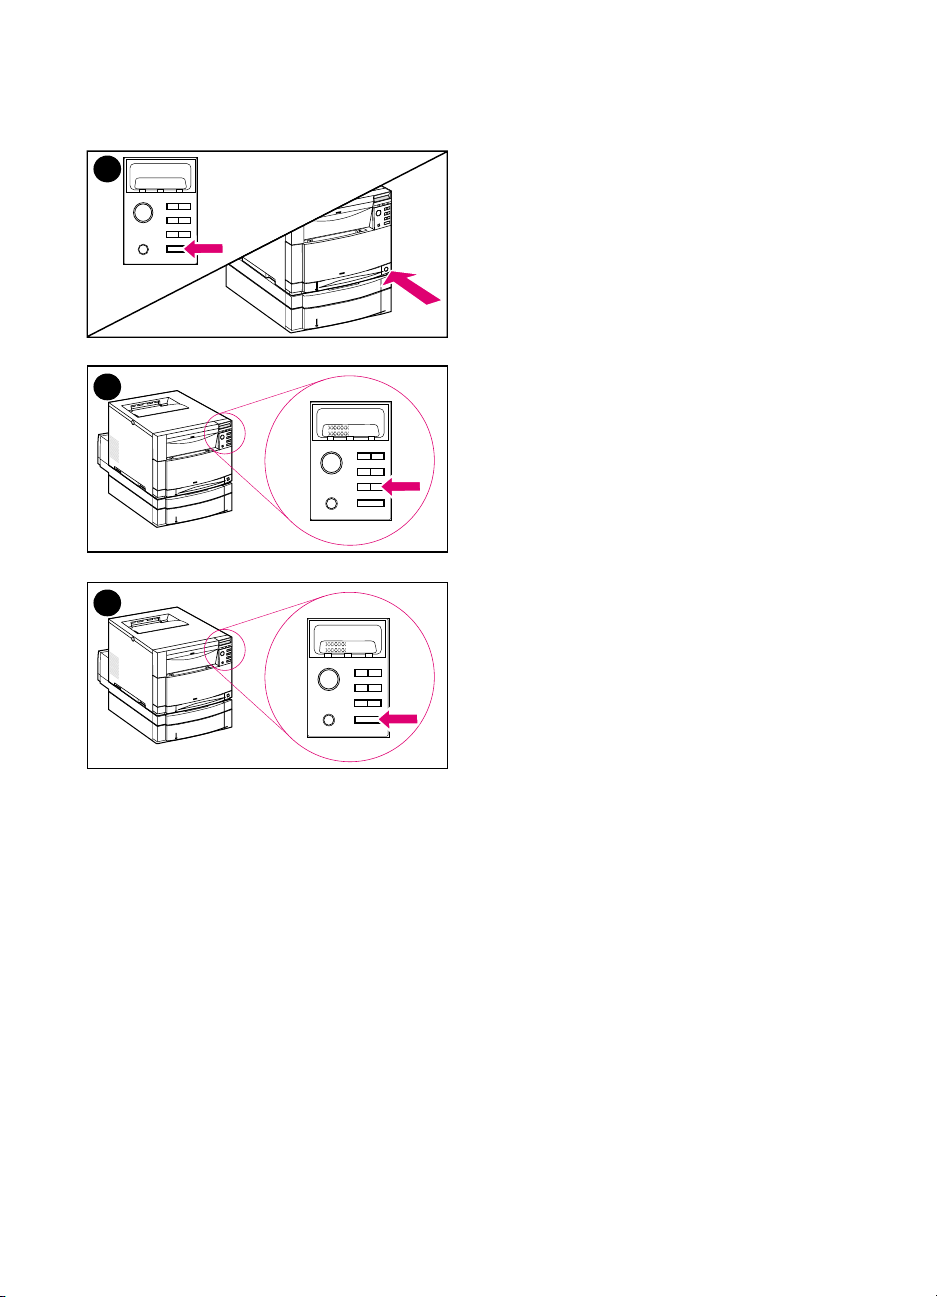
Testing printer operation
Printaconfigurationpagetoensurethat
the printer is working properly.
on the control panel
1 Press M
until
ENU
INFORMATION MENU
appears
on the control panel display.
until
2 Press I
CONFIGURATION
TEM
PRINT
appears.
2
to print a configuration
3 Press S
ELECT
page.
4 After about 30 seconds, the
configuration page prints. If it does
not print, see “Troubleshooting
checklist” on page 56.
3
Leave the printer turned on and
continue to the next task.
4
EN
Task 8 – 35
Page 38

Task 9 Connect the printer to the network
(optional)
The HP Color LaserJet 4550N, 4550DN,
and 4550HDN printers come with the
HP JetDirect 610N print server, which
supports RJ-45 (unshielded twisted pair)
for 10/100Base-TX networks.
Connecting to a 10/100Base-TX network
Plug the connector of your unshielded
twisted-pair cable into the RJ-45 port.
The other end of the cable should be
attached to the network.
RJ-45 (10/100Base-TX) connection
36 – Task 9
EN
Page 39

Task 10 Lock the printer control panel (optional)
You can prevent users from changing printer control panel settings by
establishing a password and locking the printer control panel. The
control panel offers multiple levels of security. You can lock certain
control panel menus, allowing users to change the rest of the menus,
or you can lock all of the menus—andyoucanevenlockthe
C
ANCELJOB
unauthorized users who try to change settings at the control panel
receive the following message:
Levels of security
Lock Setting Control panel items locked
0 = None No items are locked
1 = Minimum Configuration Menu
key. When the printer control panel is locked,
ACCESS DENIED
MENUS LOCKED
I/O Menu
Calibration Menu
Resets Menu
2 = Moderate Configuration Menu
I/O Menu
Calibration Menu
3 = Maximum Configuration Menu
I/O Menu
Calibration Menu
Resets Menu
Resets Menu
Paper Handling Menu
Paper Handling Menu
Information Menu
Printing Menu
C
ANCELJOB
key
Use HP Web JetAdmin software, HP LaserJet Utility for Macintosh, or
an ASCII escape sequence to perform this procedure. HP software is
easier to use than an ASCII escape sequence. For instructions on
locking the control panel by using either HP Web JetAdmin software
or the HP LaserJet Utility for Macintosh, access the online Help for
that software.
WWW HP recommends that network administrators use HP Web JetAdmin to
manage HP printers on a network. HP Web JetAdmin is available from
the web at http://www.hp.com/support/net_printing.
EN
Task 10 – 37
Page 40

Using an ASCII PJL escape sequence
If you decide to use the ASCII escape sequence, you must use an
MS-DOS
®
or Windows ASCII editor to create the commands. The
commandsmustalsobesenttotheprinterbyusingaDOSCOPY
command or an ASCII file downloader utility.
Note In the following examples, EC represents the escape character. For
more information on using escape characters, see the PJL Technical
Reference Manual. For a copy of this manual, contact your
HP-authorized dealer.
●
To lock or unlock the printer control panel if a password has not
been set, send the following ASCII sequence to the printer:
EC%-12345X@PJL JOB
@PJL DEFAULT CPLOCK=NONE (or MINIMUM, MODERATE, or
MAXIMUM)
@PJL EOJ
EC%-12345X
●
To set the password, send the following ASCII sequence to the
printer:
EC%-12345X@PJL JOB
@PJL DEFAULT PASSWORD=[numeric password (0 to
65535)]
@PJL EOJ
EC%-12345X
38 – Task 10
●
To lock or unlock the control panel if the password has been set,
send the following ASCII sequence to the printer:
EC%-12345X@PJL JOB PASSWORD=(numeric password)
@PJL DEFAULT CPLOCK=NONE (or MINIMUM, MODERATE, or
MAXIMUM)
@PJL EOJ
EC%-12345X
EN
Page 41

Task 11 Connect a parallel cable (optional)
You can connect the printer to the computer using a bidirectional
parallel cable (IEEE-1284 compliant) with a “C-size” connector to the
printer and a “B-size” connector to the computer. HP recommends
that the parallel cable length is no longer than 10 meters (30 ft) in
length. The cable (HP part number C2946A) is included with the
HP Color LaserJet 4550 printer. It must be purchased separately for
the HP Color LaserJet 4550N, 4550DN, and 4550HDN printer.
To order the parallel cable directly from HP in the U.S., call
(800) 227-8164. See the online user guide for other in-country/region
HP direct ordering phone number s.
WWW To order online, go to http://www.hp.com/ghp/buyonline.html.
EN
Task 11 – 39
Page 42

1
2
3
Connecting a parallel cable
1 Press the printer standby button
(power switch) to turn the printer to
standby mode, and turn off the
computer to which you are
connecting the parallel cable.
2 Plug the parallel cable into the
printer’s parallel port until it snaps
into place.
3 Plug the other end of the parallel
cable into the computer. Tighten
down the screws on the parallel
cable to secure the cable to the
computer.
4 Turn the computer on and then turn
the printer on.
Note
Your computer will sense the printer if
your computer is Plug and Play
compatible. Follow the directions on your
screen. To install the complete software
package, cancel Plug and Play and
continue to the next task.
4
40 – Task 11
Continue to the next page for
instructions on verifying
communication between the
computer and the printer.
EN
Page 43

To verify communication when using a parallel cable
1 At the computer, go to a DOS prompt (root directory) and type
DIR>LPT1 and press E
Note IfyouareusingaUNIX
commands.
2 At the printer, if the data light on the control panel stays on for
more than a minute, press G
3 If a directory list prints, printer setup is complete. Now you can
install the software to work with the new HP Color LaserJet 4550
printer.
– OR –
If an error message appears in the printer control panel display,
see the “Troubleshooting checklist” on page 56 for more
information.
– OR –
If the printer neither prints the directory list nor displays an error
message on the control panel, check to see that all the power
cables are plugged in and that all the cables connecting the
printer to the computer are securely fastened. Remove any print
sharing device or port security device which may be connected
between the computer and printer.
.
NTER
®
operating system, use the equivalent
. Otherwise, continue to step 3.
O
EN
Task 11 – 41
Page 44

Task 12 Printing with the HP Fast InfraRed
Receiver (optional)
The HP Fast InfraRed Receiver enables cableless printing from any
IrDA-compliant portable device (such as a laptop computer) to the HP
Color LaserJet 4550 printer (when the optional Fast InfraRed
Receiver (FIR) accessory is installed).
The printing connection is maintained by positioning the sending
infrared (FIR) port within operating range. Note that the connection
can be blocked by objects such as a hand, paper, direct sunlight, or
any bright light shining into either the sending or receiving FIR port.
System requirements
In order to print with the HP Fast InfraRed Receiver, you will need:
●
The receiver connected to this printer
●
IrDA-compliant portable or other IR-capable host supporting
IRLPT or JetSend Communications Technology over IR
●
Microsoft Windows 9x, Windows NT 4.0, Windows 2000 or
Mac 8.5 with a LaserWriter 8.6 or higher driver.
Note Older non-IrDA-compliant portable computers may not be compatible
with the HP Fast InfraRed Receiver. If you experience problems when
attempting to print with the HP Fast InfraRed Receiver, contact the
manufacturer or dealer of your portable computer to verify compatibility
with the IrDA standard.
For more information, see the user guide that came with the HP Fast
InfraRed Receiver.
42 – Task 12
EN
Page 45

Task 13 Prepare to install the software
Before the printer can be used, the software (printer drivers and
optional printing utilities) must be installed on each computer printing
to the printer. The software is on the CD-ROM that is included in the
box with the printer. This section provides overviews and installation
procedures for the following types of printer users:
●
individual user with an IBM-compatible computer directly
connected to the printer by a parallel cable
●
network administrator who is installing the printer on a network for
network clients
●
users with Macintosh-compatible computers connected to the
printer by a LocalTalk or EtherNet cable (for EtherNet)
CD-ROM software contents
The CD-ROM includes software designed for users who are operating
in the following environments:
●
Windows 3.x
●
Windows 9x
●
Windows NT 4.0
●
Windows 2000
● Macintosh System 7.5.3 or later
●
Novell NetWare 3.x, 4.x, 5.x
WWW For the latest drivers or for additional drivers, go to http://www.hp.com/
support/lj4550. Once connected, select Downloads and Drivers to
find the driver you wish to download.
EN
Task 13 – 43
Page 46

Task 14 Software installation for individual users
with IBM-compatible computers
Overview
Use this procedure if you use an IBM-compatible computer and it is
the only one connected to the printer, and the computer is connected
to the printer by a parallel cable (IEEE-1284 compliant) with a “C-size”
connector.
44 – Task 14
The procedure consists of the following general steps (detailed
instructions follow):
● Install the software on the computer that is connected to the
printer.
●
If your printer has the optional 500-sheet paper feeder or optional
duplex printing accessory, configure the printer driver to show
that these options are installed (see the printer driver online Help
for instructions).
EN
Page 47

Detailed instructions
These installation instructions are for systems running Windows 9x,
Windows NT 4.0, or Windows 2000.
The setup software detects both the version of Windows that you are
running and the language that is selected in your operating system.
The setup software then installs printer drivers and software that are
appropriate for your system.
1 Log onto the computer that is connected to the printer.
2 Close all applications. Turn off virus checkers and terminate-and-
stay-resident (TSR) programs. After installation, these programs
can be turned back on.
3 Insert the HP Color LaserJet 4550 Printing System and
Documentation CD-ROM into the CD-ROM drive. The CD-ROM
should run automatically.
Note If AutoPlay does not automatically begin the installer program, click
Start and then click Run. Type D:\SETUP.EXE at the prompt. (This
assumes that your CD-ROM drive is the D:\ drive.)
4 A screen appears that allows you to browse the contents of the
CD-ROM or begin installing the printer software. Click Install
Printer and follow the instructions on your screen.
There are two installation options for the printing system software.
The Typ ical installation option will install the following:
• PCL 6 printer driver and online Help
• PCL 5c printer driver and online Help
• PS printer driver and online Help
The Custom installation option allows you to cancel any of the
printing system software options.
WWW To download the latest version of HP Web JetAdmin, visit HP Customer
Care online at http://www.hp.com/support/net_printing.
EN
Task 14 – 45
Page 48

Task 15 Software installation for network
administrators
Overview
Use this procedure if you are a network administrator who is installing
the printer on a network for network clients.
WWW HP recommends that network administrators use HP Web JetAdmin to
manage HP printers on a network. HP Web JetAdmin is available from
the web at http://www.hp.com/support/net_printing.
46 – Task 15
EN
Page 49

This procedure consists of the following general steps (detailed
instructions follow):
● Depending on the network environment, install the software on
either the network administrator workstation or on the network
server.
●
From a Windows 9x, Windows NT 4.0, or Windows 2000 system,
run the printer installation software to set up your printer on a
Microsoft or Novell Netware network. For other networks, refer to
the HP JetDirect Print Server Administrator’sGuide.
●
Distribute the printer driver to each network client. You can pass
around the CD-ROM, or you can place disk images of the driver
onto a network directory or onto diskettes.
●
Install the software onto client workstations.
●
Users may connect their workstations to the printer by using the
Add Printer Wizard (Windows). For specific instructions, see Task
20, “Connect to the printer”.
Note If the printer has the optional 500-sheet paper feeder or optional duplex
printing accessory, configure the printer driver on each computer to
show that these options are installed (see the printer driver online Help
for instructions).
Detailed instructions
These instructions are for network administrators. Procedures for
installing the software vary according to your operating system and
network environment. Use the instructions below that best match your
operating system and network environment.
Windows 9x, Windows NT 4.0, and Windows 2000
The setup software detects both the version of Windows that you are
running and the language that is selected in your operating system.
The setup software then installs printer drivers and software that are
appropriate for your system.
Note For Novell NetWare or Microsoft networks, run the printer installation
software. On NetWare networks, you will be able to set up the
appropriate queues on the NetWare server and HP JetDirect print
server. On Microsoft networks, you can set up IP configuration
parameters and share the printer.
For Windows NT 4.0, and Windows 2000 server networks, install the
softwareontheserver.
EN
Task 15 – 47
Page 50

1 Depending on your environment, log onto the network
administrator workstation or onto the server with Supervisor or
Administrator privileges.
2 Close all applications. Turn off virus checkers and terminate-and-
stay-resident (TSR) programs. After installation, these programs
can be turned back on.
3 Insert the HP Color LaserJet 4550 Printing System and
Documentation CD-ROM into the CD-ROM drive. The CD-ROM
should run automatically.
Note If AutoPlay does not automatically begin the installer program, click
Start andthenclickRun. Type D:\SETUP.EXE at the prompt. (This
assumes that your CD-ROM drive is the D:\ drive.)
4 A screen will appear that will allow you to browse the contents of
the CD-ROM, or begin installing the printer software. Click Install
Printer, and follow the instructions on your screen.
There are two installation options for the printing system software.
The Typ ical installation option will install the following:
• PCL 6 printer driver and online Help
• PCL5eprinterdriverandonlineHelp
• PS printer driver and online Help
The Custom installation option allows you to cancel any of the
printing system software options.
WWW To download the latest version of HP Web JetAdmin, visit HP Customer
Care online at http://www.hp.com/support/net_printing.
You can quickly create a port for the printer as part of the installation
process using the HP Network Printer Wizard.
48 – Task 15
EN
Page 51

Task 16 Software installation for Macintosh
users
Overview
On a Macintosh-compatible computer, the installation procedures are
the same for a network administrator, a network client, and a single
user. Install the software on any computer that will be printing to the
printer. (Individual user connection illustrated below.) In an AppleTalk
environment, you have the option of assigning a name and a network
zone to the printer. Users may connect their workstations to the
printer by configuring a LaserWriter 8 driver with the new PPD in the
Chooser (Macintosh). For specific instructions, see Task 20, “Connect
to the printer”.
EN
Task 16 – 49
Page 52

Detailed instructions
The Macintosh partition on the CD-ROM contains an installer
program for each available language. Find the language that is
appropriate for your operating system, and then use the installer
program for that language.
Note If the computer is connected to the printer by a LocalTalk (Printer Port)
or EtherNet connection, the AppleTalk (or Network) control panel must
be configured for the correct connection to communicate with the
printer.
1 Quit all open applications.
2 Insert the compact disc into the CD-ROM drive.
3 Double-click the Installer icon and follow the instructions on the
screen.
4 Open the Chooser from the Apple menu.
5 Click the Apple LaserWriter 8 icon. If the icon is not there,
contact your Macintosh dealer.
6 If you are on a network with multiple zones, select the zone in the
AppleTalk Zones box where the printer is located. If you do not
know the zone where the printer is located, ask your network
administrator.
7 Double-click the desired printer. A Desktop Printer icon should
appear.
8 Close the Chooser.
50 – Task 16
EN
Page 53

Task 17 Configure the printer on the network
You can use the printer installation software on the CD-ROM to install
and configure the printer on the network. For other options, refer to
the HP JetDirect Print Server Administrator’sGuide.
EN
Task 17 – 51
Page 54

Task 18 Distribute the software to network
clients (optional)
Before a network client can print to the printer, the printing system
software must be installed on the client’s workstation. Rather than
distributing the CD-ROM to each client, you can place disk images of
the installation software onto a public directory. The software’s Disk
Copy option lets you copy disk images only for Windows operating
systems to a designated directory.
Creating disk images with Installer Customization
Utility
1 Insert the HP Color LaserJet 4550 Printing System and
Documentation CD-ROM into the CD-ROM drive. The CD-ROM
will automatically begin.
Note If AutoPlay does not automatically begin the installer program, Click
Start andthenclickRun. Type D:\SETUP.EXE at the prompt. (This
assumes that your CD-ROM drive is the D:\ drive.)
2 When you are prompted to choose the method of installation,
click Installer Customization Utility.
3 Select the language and operating system versions for which you
want to create disk images, and then choose the drivers package
you want included in the disk images.
4 Click Browse to assign a path to the drive and directory where
you want to copy the disk images.
5 Click Next and then follow the instructions on the screen.
52 – Task 18
EN
Page 55

Task 19 Install the software for network clients
(optional)
Before a client can print to the printer, the printing system software
must be installed on the client’s workstation. Procedures for installing
the software vary, depending on the operating system you are using.
Use the instructions below that apply to your operating system.
Windows
The procedures for installing end-user software on client workstations
are similar to the installation procedures for network administrators.
1 Install the end-user software on client workstations by running
SETUP.EXE.
2 Follow the instructions on the screen.
Note To install the end-user software onto a Windows NT 4.0 or Windows
2000 workstation, you must have administrator privileges on that
workstation.
●
Do not install the PCL driver or PostScript®3 emulation driver(s)
onto Windows NT workstations when you install other end-user
software. Clear the PCL and PostScript Driver check boxes in the
Components list during the Custom Install. The driver(s) will be
installed from the server when you connect to the network printer
in Task 20, “Connect to the printer”.
●
Users of a shared network version of Windows can install only
those software components that the network administrator
installed during the network administrator installation.
●
For a minimal install (driver only) in Windows 3.1x, install using
the operating system.
●
For a minimal install in Windows 9x, Windows NT 4.0, or
Windows 2000, use the Add Printer Wizard.
EN
Task 19 – 53
Page 56

Macintosh
The Macintosh partition contains an installer program for each
language. Find the language that is appropriate for your operating
system and then use the installer program for that language.
54 – Task 19
EN
Page 57

Task 20 Connect to the printer
These installation instructions are for single users and network
administrators using a Macintosh-compatible computer. After
installing the end-user software on a client workstation, connect the
printer drivers to the proper printer port. This enables the client to
print to the printer.
Macintosh
1 Quit all open applications.
2 Insert the compact disc into the CD-ROM drive.
3 Double-click the Installer icon and follow the instructions on the
screen.
4 Open the Chooser from the Apple menu.
5 Click the Apple LaserWriter 8 icon. If the icon is not there,
contact your Macintosh dealer.
6 If you are on a network with multiple zones, select the zone in the
AppleTalk Zones box where the printer is located. If you do not
know the zone where the printer is located, ask your network
administrator.
7 Double-click the desired printer. A Desktop Printer icon should
appear.
8 Close the Chooser.
EN
Task 20 – 55
Page 58

Troubleshooting checklist
Problem or error message Solution
The control panel display is blank. Make sure the printer’s power switch is on.
The printer may be in PowerSave mode. Press GOto check.
Make sure all power cables are securely attached and plugged
into a grounded power outlet. Verify that the short cable on the
back of the duplex printing accessory is connected to the printer
and that the power cord is connected correctly between the
optional duplex printing accessory and the outlet.
The control panel displays
Cannot print from the computer using a
parallel cable.
Cannot print using a sharing (switchbox)
device.
Random “garbage” characters are
printing.
Control panel displays
OFFLINE
13.X PAPER JAM.
.PressGO.
The cable might be bad or installed incorrectly, or might be too
long. Remove the cable and reconnect it, making sure it is
securely connected. Try another bidirectional parallel cable
(IEEE-1284 compliant) with a “C-size” connector under 10 m
(32 ft) in length. Replace the cable with an HP C2946A cable or
equivalent.
There may be a bad port on the computer or printer. Try using a
different port, or, if possible, a different computer or printer to
help isolate the problem.
Remove the sharing device to isolate the cause of the problem.
Test the printer using a cable connected directly from the
computer to the printer. Contact the sharing device vendor for
troubleshooting steps.
The cable might be bad or installed incorrectly, or might be too
long. Remove the cable and reconnect it, making sure it is
securely connected. Try another bidirectional parallel cable
(IEEE-1284 compliant) with a “C-size” connector under 10 m
(32 ft) in length. Replace the cable with an HP C2946A cable or
equivalent.
There may be a bad port on the computer or printer. Try using a
different port, or, if possible, a different computer or printer to
help isolate the problem.
Paper may be jammed in one of several locations. Clear all
jams according to instructions in the online user guide, or
see an online virtual demonstration at http://www.hp.com/
lj4550_solve_a_problem. Make sure packing spacers are
removed from all media trays.
56 – Troubleshooting checklist
EN
Page 59

Problem or error message Solution
Control panel displays an error message. Turn the printer off and back on. If the message does not clear,
Cannot find the printer in the network Verify cabling connections.
– OR –
The HP JetDirect configuration page
indicates an “I/O CARD NOT READY”
message.
see the online user guide, or see
http://www.hp.com/lj4550_solve_a_problem.
Ensure your configuration parameters are correct. See the
troubleshooting section in the HP JetDirect Print Server
Administrator’sGuide.
For more messages and solutions, see the chapter called “Solving
Problems with the Printer” in the online user guide.
EN
Troubleshooting checklist – 57
Page 60

Communicating with an optional HP JetDirect
Print Server
If the printer contains an optional HP JetDirect print server, and you
cannot communicate with the printer over the network, verify the
operation of the print server. Print an HP JetDirect configuration page.
If the message “I/O CARD READY” does not appear on the
configuration page, see the troubleshooting section of the
HP JetDirect Print Server Administrator’sGuide.
HP JetDirect 10/100TX print server
If the printer contains an optional HP JetDirect 10/100TX print server,
check to see that the print server was able to link to the network:
●
Check the link-speed indicators (10 or 100) on the print server. If
both are off, the print server failed to link to the network.
●
Check the HP JetDirect configuration page. The message “LOSS
OF CARRIER ERROR” indicates that the print server failed to link
to the network. If the print server failed to link, verify that all
cables are correctly connected. If all cables are correctly
connected and the print server still fails to link, follow the steps
below:
1 UsetheEIOmenuattheprinter’s control panel to manually
set the HP JetDirect print server’s operating mode.
2 Verify that the configuration of the connecting network device
(such as a 10/100TX network switch) matches. For example,
to set the print server for 100TX Full-duplex operation, the
port on the network switch must also be set for 100TX
Full-duplex operation.
3 Turn the printer on and check the print server operation. If the
print server fails to link, contact HP for assistance. Refer to
“Support information” on page 60 or in the online user guide
for URLs and phone numbers.
58 – Communicating with an optional HP JetDirect Print Server
EN
Page 61

Regulatory statements
FCC regulations
This equipment has been tested and found to comply with the limits
for a Class A digital device, pursuant to Part 15 of the FCC rules.
These limits are designed to provide reasonable protection against
harmful interference in a residential installation. This equipment
generates, uses, and can radiate radio frequency energy. If it is not
installed and used in accordance with the instructions, it may cause
harmful interference to radio communications. However, there is no
guarantee that interference will not occur in a particular installation. If
this equipment does cause harmful interference to radio or television
reception, which can be determined by turning the equipment off and
on, the user is encouraged to try to correct the interference by one or
more of the following measures:
●
Reorient or relocate the receiving antenna.
●
Increase separation between equipment and receiver.
●
Connect equipment to an outlet on a circuit different from that to
which the receiver is located.
●
Consult your dealer or an experienced radio/TV technician.
Note Any changes or modifications to the printer that are not expressly
approved by HP could void the user’s authority to operate this
equipment.
Use of a shielded interface cable is required to comply with the Class A
limits of Part 15 of FCC rules.
Canadian DOC regulations
Complies with Canadian EMC Class A requirements.
« Conforme à la classe A des normes canadiennes de compatibilité
électromagnétiques (CEM). »
EN
Regulatory statements – 59
Page 62

Support information
HP Customer Care
Online services:
access to information over your
modem, we suggest these
services:
for 24-hour
Obtaining software
utilities and electronic
information for U.S.:
For Canada:
For Asia-Pacific
countries/regions:
For Australia, New
Zealand, and India:
For European English:
World Wide Web URL
plus product and support information may be obtained from the
following URLs:
in the U.S. http://www.hp. com/support/lj4550
in Europe http://www2.hp.com
Printer drivers may be obtained from the following sites:
in Japan ftp://www.jpn.hp.com/drivers
in Korea http://www.hp.co.kr
in T aiwan http://www.hp.com.tw
or the local driver website http://www.dds.com.tw
Phone:
(805) 257-5565
Fax:
(805) 257-6995
HP website: http://www.hp.com
(905) 206-4663
Contact Mentor Media at (65) 740-4477 (Hong Kong, Indonesia,
Philippines, Malaysia, or Singapore). For Korea, call
(82) (2) 3270-0805 or (82) (2) 3270-0893.
For Australia and New Zealand, call (61) (2) 565-6099.
For India, call (91) (11) 682-6035.
For U.K., call (44) (142) 986-5511. For Ireland and outside U.K.,
call (44) (142) 986-5511.
—Printer drivers, updated HP software,
Mail:
Hewlett-Packard Distribution
P.O. Box 907
Santa Clarita, CA 91380-9007
U.S.A.
60 – Support information
EN
Page 63

HP Customer Care (continued)
HP direct ordering for
accessories or supplies:
HP Support Assistant
compact disc:
HP Service Information:
HP Service Agreements:
Call 1-800-538-8787 (U.S.) or 1-800-387-3154 (Canada) or link to
U.S. – http://www.hp.com/go/ljsupplies or
Worldwide – http://www.hp.com/ghp/buyonline.html to order supplies
online.
This support tool offers a comprehensive online information system
designed to provide technical and product information on HP
products. To subscribe to this quarterly service in the U.S. or Canada,
call 1-800-457-1762. In Hong Kong, Indonesia, Malaysia, or
Singapore, call Mentor Media at (65) 740-4477.
To locate HP-authorized Dealers, call 1-800-243-9816 (U.S.) or
1-800-387-3867 (Canada)
To locate HP-authorized Dealers on the Web see http://www.hp.com/
support/lj4550 and click
Call 1-800-835-4747 (U.S.) or 1-800-268-1221 (Canada).
Extended Service 1-800-446-0522
Assistance
.
EN
Support information – 61
Page 64

HP Customer Care options worldwide
In addition to the phone numbers listed below, the online user guide
contains worldwide sales and service addresses and phone numbers
for countries/regions not listed here.
HP Customer Care worldwide
Customer support
and product repair
assistance for the
U.S. and Canada:
Call 1-208-323-2551 Monday through Friday from 6 am to 6 pm (Mountain
Time) free of charge during the warranty period. However, your standard
long-distance phone charges still apply. Have your system nearby and your
serial number ready when calling.
If you know your printer needs repair, call 1-800-243-9816 to locate your
nearest HP-authorized service provider, or call 1-208-323-2551 for HP
centralized service dispatch.
Post-warranty telephone assistance is available to answer your product
questions. Call 1-900-555-1500 ($2.50* per minute, U.S. only) or call
1-800-999-1148 ($25* per call, Visa or MasterCard, U.S. and Canada)
Monday through Friday from 6 am to 6 pm (Mountain Time). Charges begin
only when you connect with a support technician. *Prices subject to change.
To solve problems fast using the Internet see http://www.hp.com/support/
lj4550 and click on
Solve a Problem
.
European Customer Support Center language and in-country/regions options
available
Open Monday through Friday 8:30 to 18:00 CET
HP provides a free telephone support service during the warranty period. By calling a telephone number
listed below, you will be connected to a responsive team waiting to help you. If you require support after
your warranty has expired, you can receive support for a fee through the same telephone number. The fee
is charged on a per-incident basis. When calling HP, have the following information ready: product number
and serial number, date of purchase, and description of the problem.
English
Dutch
French
Ireland:
U.K.:
International:
Belgium:
Netherlands:
France:
Belgium:
Switzerland:
(353) (0) (1) 662-5525
(44) (0) (171) 512-5202
(44) (0) (171) 512-5202
(32) (0) (2) 626-8806
(31) (0) (20) 606-8751
(33) (0) (1) 43-62-3434
(32) (0) (2) 626-8807
(41) (0) (84) 880-1111
German
Norwegian
Danish
Finnish
Swedish
Italian
Spanish
Portuguese
Germany
Austria:
Norway:
Denmark:
Finland:
Sweden:
Italy:
Spain:
Portugal:
(49) (0) (180) 525-8143
(43) (0) 7114 201080
(47) 22 11-6299
(45) 39 29-4099
(358) (0) 203-47-288
(46) (0) (8) 619-2170
(39) (0) (2) 264-10350
(34) (90) 232-1123
(351) (0) (1) 317-6333
62 – Support information
EN
Page 65

Customer Support Worldwide (continued)
-
In
country/region support numbers:
warranty period. By calling a telephone number listed below, you will be connected to a responsive team
waiting to help you. If you require support after your warranty has ex pired, you can receiv e support for a fee
through the same telephone number. The fee is charged on a per-incident basis. When calling HP, have
the following information ready: product number and serial number, date of purchase, and description of
the problem.
Argentina (54) (1) 778-8380 Malaysia (60) (3) 295-2566
Australia (61) (3) 8877-8000 Mexico 01 800-472-6684
Brazil (011) 829-6612 New Zealand (64) (9) 356-6640
Canada (1) (208) 323-2551 Philippines (63) (2) 867-3551
China (86) (0) (10) 6564-5959 Poland (48) (22) 519-0600
Chile 800-360-999 Portugal (351) (0) (1) 317-6333
Czech Republic (420) (2) 6130-7310 Russia (7) (0) (95) 797-3520
Greece (30) (0) (1) 689-6411 Singapore (65) 272-5300
Hong Kong (852) 800-96-7729 S outh Afric a (27) (86) 000-1030
Hungary (36) (0) (1) 382-1111 Taiwan (886) (2) 2717-0055
India (91) (11) 682-6035 Thailand (66) (2) 661-4000
Indonesia (62) (21) 350-3408 Turkey (90) (212) 224-5925
Israel (972) (0) (9) 952-4848 Venezuela 800-47-888
Japan (81) (3) 3335-8333 Venezuela (Caracas) 207-8488
Korea (82) (2) 3270-0700 Vietnam (84) (0) 8 823-4530
Korea (outside Seoul) (82) (080) 999-0700
HP provides a free telephone support service during the
EN
Support information – 63
Page 66

64 – Support information
EN
Page 67

Page 68

copyright © 2002
Hewlett-Packard Company
www.hp.com/support/lj4550
*C7085-90948*
english
*C7085-90948*
C7085-90948
 Loading...