

Page 1

HP
Colorado
Backup II
User’s Guide
Page 2

ii
HP Colorado Backup II
© Copyright 1999 by Hewlett-Packard Company.
The information contained in this document is subject to change without
notice.
This document contains proprietary information which is protected by
copyright. All rights are reserved. No part of this document may be
photocopied, reproduced or translated to another language without the prior
written consent of Hewlett-Packard Company.
Hewlett-Packard shall not be liable for errors contained herein or for incidental
or consequential damages (including lost profits) in connection with the
furnishing, performance, or use of this material whether based on warranty,
contract, or other legal theory.
— Software License Agreement
March 1999
Software License Agreement
ATTENTION: USE OF THE SOFTWARE IS SUBJECT TO THE HP SOFTWARE
LICENSE TERMS SET FORTH BELOW. USING THE SOFTWARE INDICATES YOUR
ACCEPTANCE OF THESE LICENSE TERMS. IF YOU DO NOT ACCEPT THESE
LICENSE TERMS, YOU MAY RETURN THE SOFTWARE FOR A FULL REFUND. IF
THE SOFTWARE IS BUNDLED WITH ANOTHER PRODUCT, YOU MAY RETURN
THE ENTIRE UNUSED PRODUCT FOR A FULL REFUND.
HP SOFTWARE LICENSE TERMS
LICENSE GRANT. HP grants you a license to Use multiple copies of the Software but only for Use
in conjunction with the HP hardware product that accompanied the Software. “Use” means
storing, loading, installing, executing or displaying the Software. You may not modify the
Software or disable any licensing or control features of the Software.
Page 3

HP Colorado Backup II — Software License Agreement iii
OWNERSHIP. The Software is owned and copyrighted by HP or its third party suppliers. Your
license confers no title or ownership in the Software and is not a sale of any rights in the
Software. HP's third party suppliers may protect their rights in the event of any violation of these
License Terms.
COPIES AND ADAPTATIONS.
archival purposes or when copying or adaptation is an essential step in the authorized Use of the
Software. You must reproduce all copyright notices in the original Software on all copies or
adaptations. You may not copy the Software onto any bulletin board or similar system.
NO DISASSEMBLY OR DECRYPTION.
unless HP's prior written consent is obtained. In some jurisdictions, HP's consent may not be
required for limited disassembly or decompilation. Upon request, you will provide HP with
reasonably detailed information regarding any disassembly or decompilation. You may not
decrypt the Software unless decryption is a necessary part of the operation of the Software.
TRANSFER.
transfer, you must deliver the Software, including any copies and related documentation, to the
transferee. The transferee must accept these License Terms as a condition to the transfer.
TERMINATION.
these License Terms. Upon termination, you must immediately destroy the Software, together
with all copies, adaptations and merged portions in any form.
Your license will automatically terminate upon any transfer of the Software. Upon
HP may terminate your license upon notice for failure to comply with any of
You may only make copies or adaptations of the Software for
You may not disassemble or decompile the Software
EXPORT REQUIREMENTS. You may not export or re-export the Software or any
copy or adaptation in violation of any applicable laws or regulations.
U.S. GOVERNMENT RESTRICTED RIGHTS.
The Software and any accompanying documentation have been developed
entirely at private expense. They are delivered and licensed as “commercial
computer software” as defined in DFARS 252.227-7013 (Oct 1988), DFARS
252.211-7015 (May 1991) or DFARS 252.227-7014 (Jun 1995), as a “commercial
Page 4

iv
item” as defined in FAR 2.101(a), or as “Restricted computer software” as
defined in FAR 52.227-19 (Jun 1987)(or any equivalent agency regulation or
contract clause), whichever is applicable. You have only those rights provided
for such Software and any accompanying documentation by the applicable FAR
or DFARS clause or the HP standard software agreement for the product
involved.
Page 5

Contents
HP Colorado Backup II — Software License Agreement . . . . . . . . . . . . . . . . . . . . ii
Chapter 1:
Getting Started . . . . . . . . . . . . . . . . . . . . . . . . . . . . . . . . . . . . . . . . . . . . . . . . . . . . . . 9
Installing HP Colorado Backup II . . . . . . . . . . . . . . . . . . . . . . . . . . . . . . . . . . . . . . . 10
Starting HP Colorado Backup II . . . . . . . . . . . . . . . . . . . . . . . . . . . . . . . . . . . . . . . . 12
One-Button Backup . . . . . . . . . . . . . . . . . . . . . . . . . . . . . . . . . . . . . . . . . . . . . . . . . . . 12
One-Button Restore . . . . . . . . . . . . . . . . . . . . . . . . . . . . . . . . . . . . . . . . . . . . . . . . . . 14
Using HP Colorado Backup II . . . . . . . . . . . . . . . . . . . . . . . . . . . . . . . . . . . . . . . . . . 15
Where to Look—Getting Started . . . . . . . . . . . . . . . . . . . . . . . . . . . . . . . . . . . . . 9
System Requirements . . . . . . . . . . . . . . . . . . . . . . . . . . . . . . . . . . . . . . . . . . . . . 10
Installing Directly from a CD-ROM . . . . . . . . . . . . . . . . . . . . . . . . . . . . . . . . . . 11
Installing from Floppy Diskettes . . . . . . . . . . . . . . . . . . . . . . . . . . . . . . . . . . . . 11
Configuring Your Backup Device . . . . . . . . . . . . . . . . . . . . . . . . . . . . . . . . . . . 12
Menus . . . . . . . . . . . . . . . . . . . . . . . . . . . . . . . . . . . . . . . . . . . . . . . . . . . . . . . . . . . 15
Toolbar . . . . . . . . . . . . . . . . . . . . . . . . . . . . . . . . . . . . . . . . . . . . . . . . . . . . . . . . . . 15
Selection Panes . . . . . . . . . . . . . . . . . . . . . . . . . . . . . . . . . . . . . . . . . . . . . . . . . . . 16
Help . . . . . . . . . . . . . . . . . . . . . . . . . . . . . . . . . . . . . . . . . . . . . . . . . . . . . . . . . . . . . 18
Exiting HP Colorado Backup II . . . . . . . . . . . . . . . . . . . . . . . . . . . . . . . . . . . . . . 19
Chapter 2:
Using Backup . . . . . . . . . . . . . . . . . . . . . . . . . . . . . . . . . . . . . . . . . . . . . . . . . . . . . . 21
Where to Look—Backup . . . . . . . . . . . . . . . . . . . . . . . . . . . . . . . . . . . . . . . . . . . 21
One-Button Backup . . . . . . . . . . . . . . . . . . . . . . . . . . . . . . . . . . . . . . . . . . . . . . . . . . . 22
Backup Jobs . . . . . . . . . . . . . . . . . . . . . . . . . . . . . . . . . . . . . . . . . . . . . . . . . . . . . . . . . . 23
Using the Backup Wizard . . . . . . . . . . . . . . . . . . . . . . . . . . . . . . . . . . . . . . . . . . . . . . 24
The Backup Window . . . . . . . . . . . . . . . . . . . . . . . . . . . . . . . . . . . . . . . . . . . . . . . . . . 28
Backup Jobs List . . . . . . . . . . . . . . . . . . . . . . . . . . . . . . . . . . . . . . . . . . . . . . . . . . 28
What to Back Up . . . . . . . . . . . . . . . . . . . . . . . . . . . . . . . . . . . . . . . . . . . . . . . . . . 28
Where to Back Up . . . . . . . . . . . . . . . . . . . . . . . . . . . . . . . . . . . . . . . . . . . . . . . . 29
How to Back Up . . . . . . . . . . . . . . . . . . . . . . . . . . . . . . . . . . . . . . . . . . . . . . . . . . 29
Backing Up Files with the Backup Window . . . . . . . . . . . . . . . . . . . . . . . . . . . . . . 29
Using Backup Jobs . . . . . . . . . . . . . . . . . . . . . . . . . . . . . . . . . . . . . . . . . . . . . . . . . . . . 30
Backup Progress Window . . . . . . . . . . . . . . . . . . . . . . . . . . . . . . . . . . . . . . . . . . 32
The Backup Set . . . . . . . . . . . . . . . . . . . . . . . . . . . . . . . . . . . . . . . . . . . . . . . . . . . 33
Backup Options . . . . . . . . . . . . . . . . . . . . . . . . . . . . . . . . . . . . . . . . . . . . . . . . . . . . . . 33
Backup Job Options Dialog Box . . . . . . . . . . . . . . . . . . . . . . . . . . . . . . . . . . . . 33
Scheduling a Backup Job . . . . . . . . . . . . . . . . . . . . . . . . . . . . . . . . . . . . . . . . . . . . . . 39
Setting Frequencies for the Scheduled Job . . . . . . . . . . . . . . . . . . . . . . . . . . 40
Changing When a Scheduled Backup Job Runs . . . . . . . . . . . . . . . . . . . . . . . 41
Page 6

vi Contents
Chapter 3:
Using Restore . . . . . . . . . . . . . . . . . . . . . . . . . . . . . . . . . . . . . . . . . . . . . . . . . . . . . . 45
Creating the Disaster Recovery Set . . . . . . . . . . . . . . . . . . . . . . . . . . . . . . . . . . . . . 46
Disaster Recovery for Windows 9x . . . . . . . . . . . . . . . . . . . . . . . . . . . . . . . . . . . . . 48
Disaster Recovery for Windows NT . . . . . . . . . . . . . . . . . . . . . . . . . . . . . . . . . . . . 52
One-Button Restore . . . . . . . . . . . . . . . . . . . . . . . . . . . . . . . . . . . . . . . . . . . . . . . . . . 53
Restoring All Your Files . . . . . . . . . . . . . . . . . . . . . . . . . . . . . . . . . . . . . . . . . . . . . . . 54
Using the Restore Wizard . . . . . . . . . . . . . . . . . . . . . . . . . . . . . . . . . . . . . . . . . . . . . 56
The Restore Window . . . . . . . . . . . . . . . . . . . . . . . . . . . . . . . . . . . . . . . . . . . . . . . . . 58
Restoring Files with the Restore Window . . . . . . . . . . . . . . . . . . . . . . . . . . . . . . . 65
Editing a Scheduled Backup Job . . . . . . . . . . . . . . . . . . . . . . . . . . . . . . . . . . . . 42
Removing a Scheduled Backup Job . . . . . . . . . . . . . . . . . . . . . . . . . . . . . . . . . 43
Where to Look—Restore . . . . . . . . . . . . . . . . . . . . . . . . . . . . . . . . . . . . . . . . . . 45
Testing your Disaster Recovery Set . . . . . . . . . . . . . . . . . . . . . . . . . . . . . . . . . 47
Restore From . . . . . . . . . . . . . . . . . . . . . . . . . . . . . . . . . . . . . . . . . . . . . . . . . . . . . 59
File Find . . . . . . . . . . . . . . . . . . . . . . . . . . . . . . . . . . . . . . . . . . . . . . . . . . . . . . . . . 59
What to Restore . . . . . . . . . . . . . . . . . . . . . . . . . . . . . . . . . . . . . . . . . . . . . . . . . . 60
Where to Restore . . . . . . . . . . . . . . . . . . . . . . . . . . . . . . . . . . . . . . . . . . . . . . . . . 62
How to Restore . . . . . . . . . . . . . . . . . . . . . . . . . . . . . . . . . . . . . . . . . . . . . . . . . . . 62
Restore Progress Window . . . . . . . . . . . . . . . . . . . . . . . . . . . . . . . . . . . . . . . . . 66
Chapter 4:
Using Compare . . . . . . . . . . . . . . . . . . . . . . . . . . . . . . . . . . . . . . . . . . . . . . . . . . . . . 67
Where to Look—Compare . . . . . . . . . . . . . . . . . . . . . . . . . . . . . . . . . . . . . . . . . 67
The Compare Window . . . . . . . . . . . . . . . . . . . . . . . . . . . . . . . . . . . . . . . . . . . . . . . . 68
Compare From . . . . . . . . . . . . . . . . . . . . . . . . . . . . . . . . . . . . . . . . . . . . . . . . . . . 68
What to Compare . . . . . . . . . . . . . . . . . . . . . . . . . . . . . . . . . . . . . . . . . . . . . . . . 68
Where to Compare . . . . . . . . . . . . . . . . . . . . . . . . . . . . . . . . . . . . . . . . . . . . . . . 69
Comparing Files with the Compare Window . . . . . . . . . . . . . . . . . . . . . . . . . . . . 70
Compare Progress Window . . . . . . . . . . . . . . . . . . . . . . . . . . . . . . . . . . . . . . . . 71
Chapter 5:
Tools . . . . . . . . . . . . . . . . . . . . . . . . . . . . . . . . . . . . . . . . . . . . . . . . . . . . . . . . . . . . . . 73
Where to Look—Tools . . . . . . . . . . . . . . . . . . . . . . . . . . . . . . . . . . . . . . . . . . . . 73
Media Tools . . . . . . . . . . . . . . . . . . . . . . . . . . . . . . . . . . . . . . . . . . . . . . . . . . . . . . . . . 73
HP Media Monitor . . . . . . . . . . . . . . . . . . . . . . . . . . . . . . . . . . . . . . . . . . . . . . . . . . . 77
Report Tools . . . . . . . . . . . . . . . . . . . . . . . . . . . . . . . . . . . . . . . . . . . . . . . . . . . . . . . . . 78
Import Catalog . . . . . . . . . . . . . . . . . . . . . . . . . . . . . . . . . . . . . . . . . . . . . . . . . . . . . . . 78
Catalog Clean Up . . . . . . . . . . . . . . . . . . . . . . . . . . . . . . . . . . . . . . . . . . . . . . . . . . . . 79
Preferences . . . . . . . . . . . . . . . . . . . . . . . . . . . . . . . . . . . . . . . . . . . . . . . . . . . . . . . . . 80
Chapter 6:
Troubleshooting Tips . . . . . . . . . . . . . . . . . . . . . . . . . . . . . . . . . . . . . . . . . . . . . . . . 81
Page 7

vii
Where to Look—Troubleshooting . . . . . . . . . . . . . . . . . . . . . . . . . . . . . . . . . . 81
Backup Device Configuration . . . . . . . . . . . . . . . . . . . . . . . . . . . . . . . . . . . . . . . . . . 81
Conflicts With Drivers from Other Backup Programs . . . . . . . . . . . . . . . . . 81
SCSI Backup Devices . . . . . . . . . . . . . . . . . . . . . . . . . . . . . . . . . . . . . . . . . . . . . . 84
Parallel Port Backup Device . . . . . . . . . . . . . . . . . . . . . . . . . . . . . . . . . . . . . . . . 84
System and Software Lockups . . . . . . . . . . . . . . . . . . . . . . . . . . . . . . . . . . . . . . . . . . 86
HP Colorado Backup II Locks Up During Installation . . . . . . . . . . . . . . . . . . 86
System Locks Immediately After Installation . . . . . . . . . . . . . . . . . . . . . . . . . 86
HP Colorado Backup II Locks Up While Displaying Selection
Information Before a Backup . . . . . . . . . . . . . . . . . . . . . . . . . . . . . . . . . . . . . . . 87
Common Error Messages . . . . . . . . . . . . . . . . . . . . . . . . . . . . . . . . . . . . . . . . . . . . . . 88
ASPI Manager Not Found or ASPI Manager Not Responding . . . . . . . . . . . 88
DMA Conflict During Backup or Compare . . . . . . . . . . . . . . . . . . . . . . . . . . . 88
Media Not Formatted or Unreadable . . . . . . . . . . . . . . . . . . . . . . . . . . . . . . . . 88
Chapter 7:
Customer Support Services . . . . . . . . . . . . . . . . . . . . . . . . . . . . . . . . . . . . . . . . . . 91
Where to look — Customer Support . . . . . . . . . . . . . . . . . . . . . . . . . . . . . . . . 91
Contacting Customer Support . . . . . . . . . . . . . . . . . . . . . . . . . . . . . . . . . . . . . . . . . 92
Internet Support . . . . . . . . . . . . . . . . . . . . . . . . . . . . . . . . . . . . . . . . . . . . . . . . . . 92
Fax Support . . . . . . . . . . . . . . . . . . . . . . . . . . . . . . . . . . . . . . . . . . . . . . . . . . . . . . 93
Telephone Support . . . . . . . . . . . . . . . . . . . . . . . . . . . . . . . . . . . . . . . . . . . . . . . 93
Page 8

viii Contents
Page 9

Getting Started
HP Colorado Backup II is a powerful backup solution for Windows designed to
protect your valuable data. This user manual provides detailed information and
procedures for installing, using, and navigating within HP Colorado Backup II.
Other valuable information is available through HP Colorado Backup II's Online Help.
Where to Look—Getting Started
For information about See
1
Installing and configuring
HP Colorado Backup II
Backing up and restoring your
files quickly
Using Disaster Recovery for
Windows 9x
Using Disaster Recovery for
Windows NT
Creating the Disaster Recovery
Set
Restoring all your files without
Disaster Recovery diskette(s)
Using HP Colorado Backup II’s
Wizards to create backup and
restore jobs
The Backup window and
options
Installing HP Colorado Backup II on
page 10
One-Button Backup on page 12 and
One-Button Restore on page 14
Disaster Recovery for Windows 9x on
page 48
Disaster Recovery for Windows NT
on page 52
Creating the Disaster Recovery Set on
page 46
Restoring All Your Files on page 54
Using the Backup Wizard on page 24
and Using the Restore Wizard on
page 56
Where to Look—Backup on page 21
Page 10

10 Getting Started
For information about See
The Restore window and
options
The Compare window and
options
Solving common problems Troubleshooting Tips on page 81
Getting technical assistance Customer Support Services on
Where to Look—Restore on page 45
Where to Look—Compare on page 67
page 91
Installing HP Colorado Backup II
This section provides system requirements and installation instructions.
System Requirements
For Windows NT
Make sure your computer meets the following requirements before you begin
the installation.
■
IBM or 100% compatible 486 or higher
■
16 MB RAM or more
■
Windows NT Workstation 4.0
■
A hard drive with at least 10 MB free
■
A Microsoft or 100%-compatible mouse is highly recommended
Note: This product is not intended for use on an NT server.
For Windows 9x
Make sure your computer meets the following requirements before you begin
the installation.
■
IBM or 100% compatible 486/DX or higher
Page 11

■
10 MB RAM or more
■
Windows 95 or Windows 98
■
A hard drive with at least 10 MB free
■
A Microsoft or 100%-compatible mouse is highly recommended
Installing Directly from a CD-ROM
To install HP Colorado Backup II directly from your CD-ROM:
1. Insert the CD-ROM disc into your CD-ROM drive.
The CD Browser appears.
2. Follow the instructions on your screen to install the program.
Or,
1. If the CD Browser does not appear, select Run from the Start menu.
Installing HP Colorado Backup II 11
2. Type (Your CD-ROM drive letter):\
The CD Browser appears.
3. Follow the instructions on your screen to install the program.
Installing from Floppy Diskettes
The CD-ROM version of this software contains a utility that lets you create
floppy installation diskettes using a friend or associate’s CD-ROM drive.
Note: Creating a floppy installation set requires four floppy diskettes.
To create a floppy installation set, click the diskette icon in the CD Browser (see
Installing Directly from a CD-ROM on page 11). Then follow the instructions
below to install your software.
1. Start Windows.
2. Insert the installation diskette in drive a: (or b:).
3. Choose Run from the Start menu and type
SETUP.EXE
a:setup
and press Enter.
b:setup
or (
).
4. Select the destination directory for your files.
5. Review the README file.
Page 12

12 Getting Started
Reboot your system to complete the installation.
Configuring Your Backup Device
Most types of backup devices are automatically detected and configured the
first time you run HP Colorado Backup II. Your backup device will be listed in
the Where to Back Up box.
Note: For Windows 9x only-- If your backup device is not detected, see
Backup Device Configuration on page 81 for troubleshooting
information.
Starting HP Colorado Backup II
When you install HP Colorado Backup II, the program and its folder are added
to the Windows Start menu. If you chose to have an HP Colorado Backup II
icon added to your desktop during installation, you may double-click this icon
to open the program.
To start your backup software:
1. Click the Start button on the Windows taskbar.
2. Select Programs, HP Colorado Backup II and point to the
HP Colorado Backup II folder.
3. Click HP Colorado Backup II.
4. HP Colorado Backup II opens and also appears on the taskbar.
5. The HP Colorado Backup II Startup window displays.
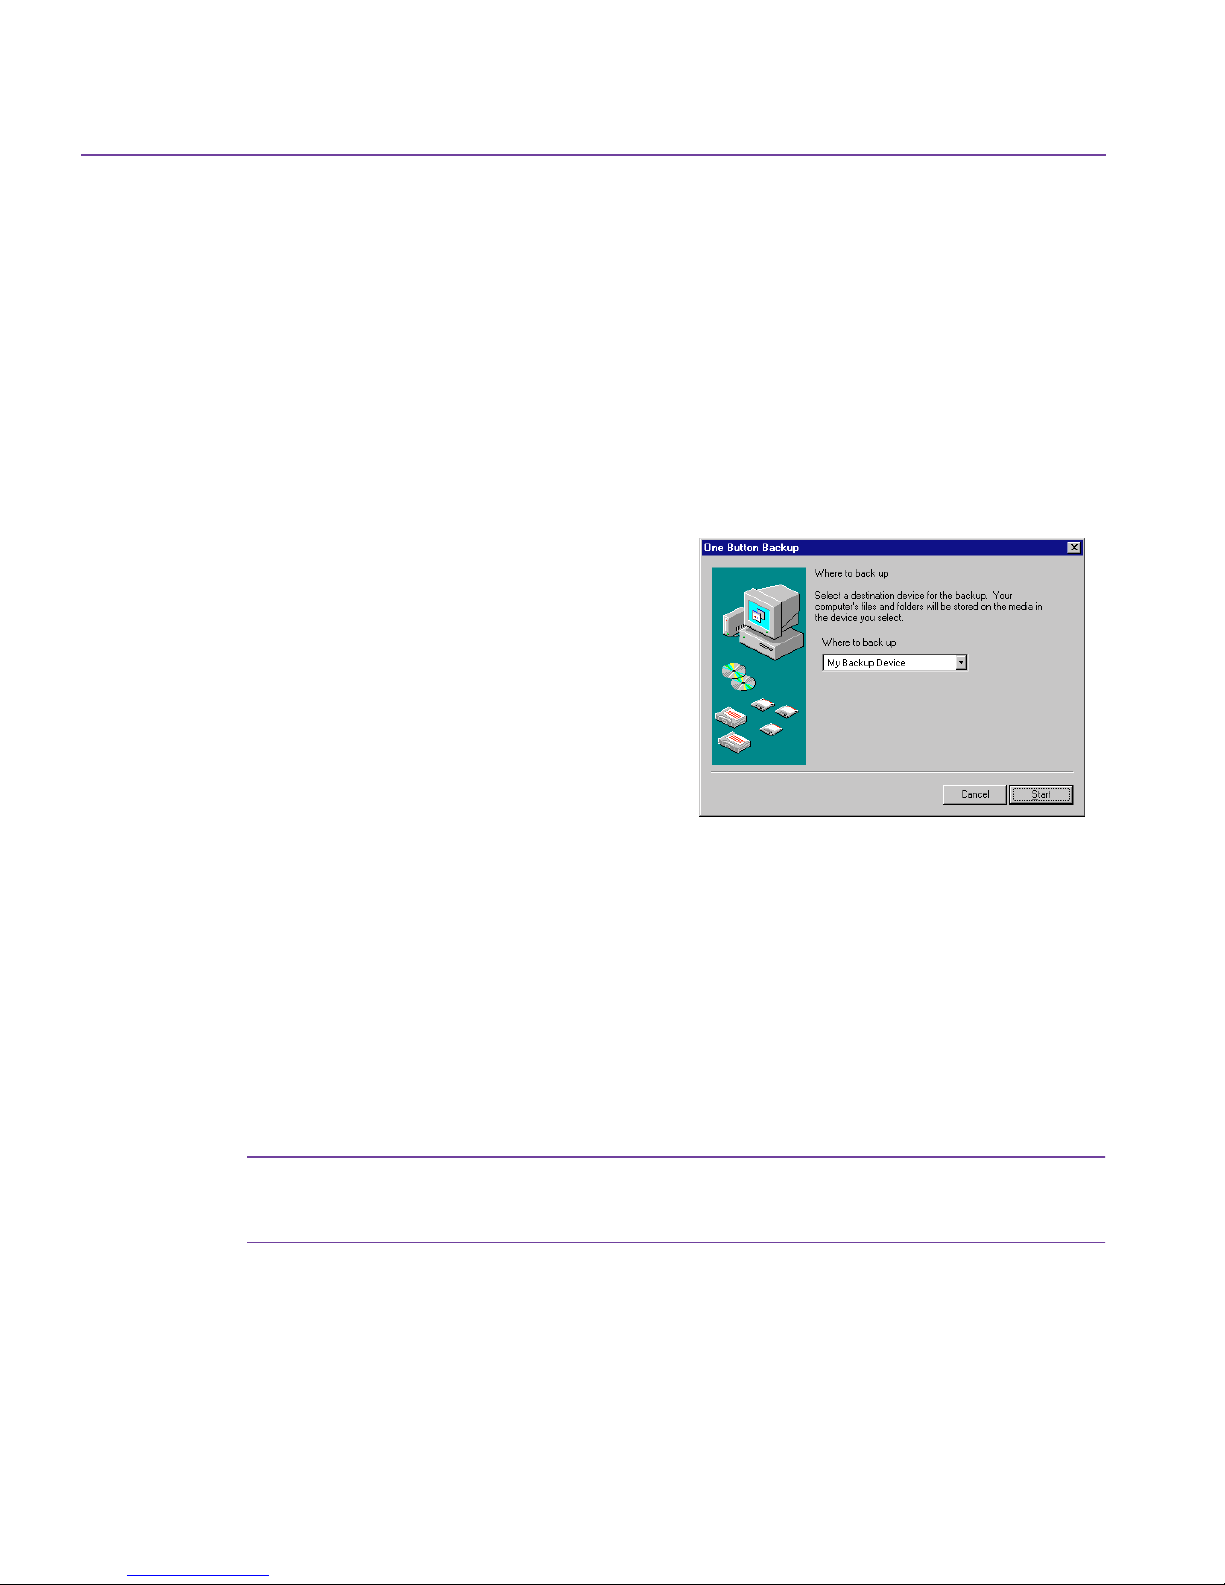
One-Button Backup
One-Button Backup launches a backup of all local hard disks, including the
Registry.
Page 13
One-Button Backup 13
To use One-Button Backup:
1. Double-click the One-Button Backup icon on the Desktop. Or, click the
Start menu, select Programs, HP Colorado Backup II, and then click One-
Button Backup.
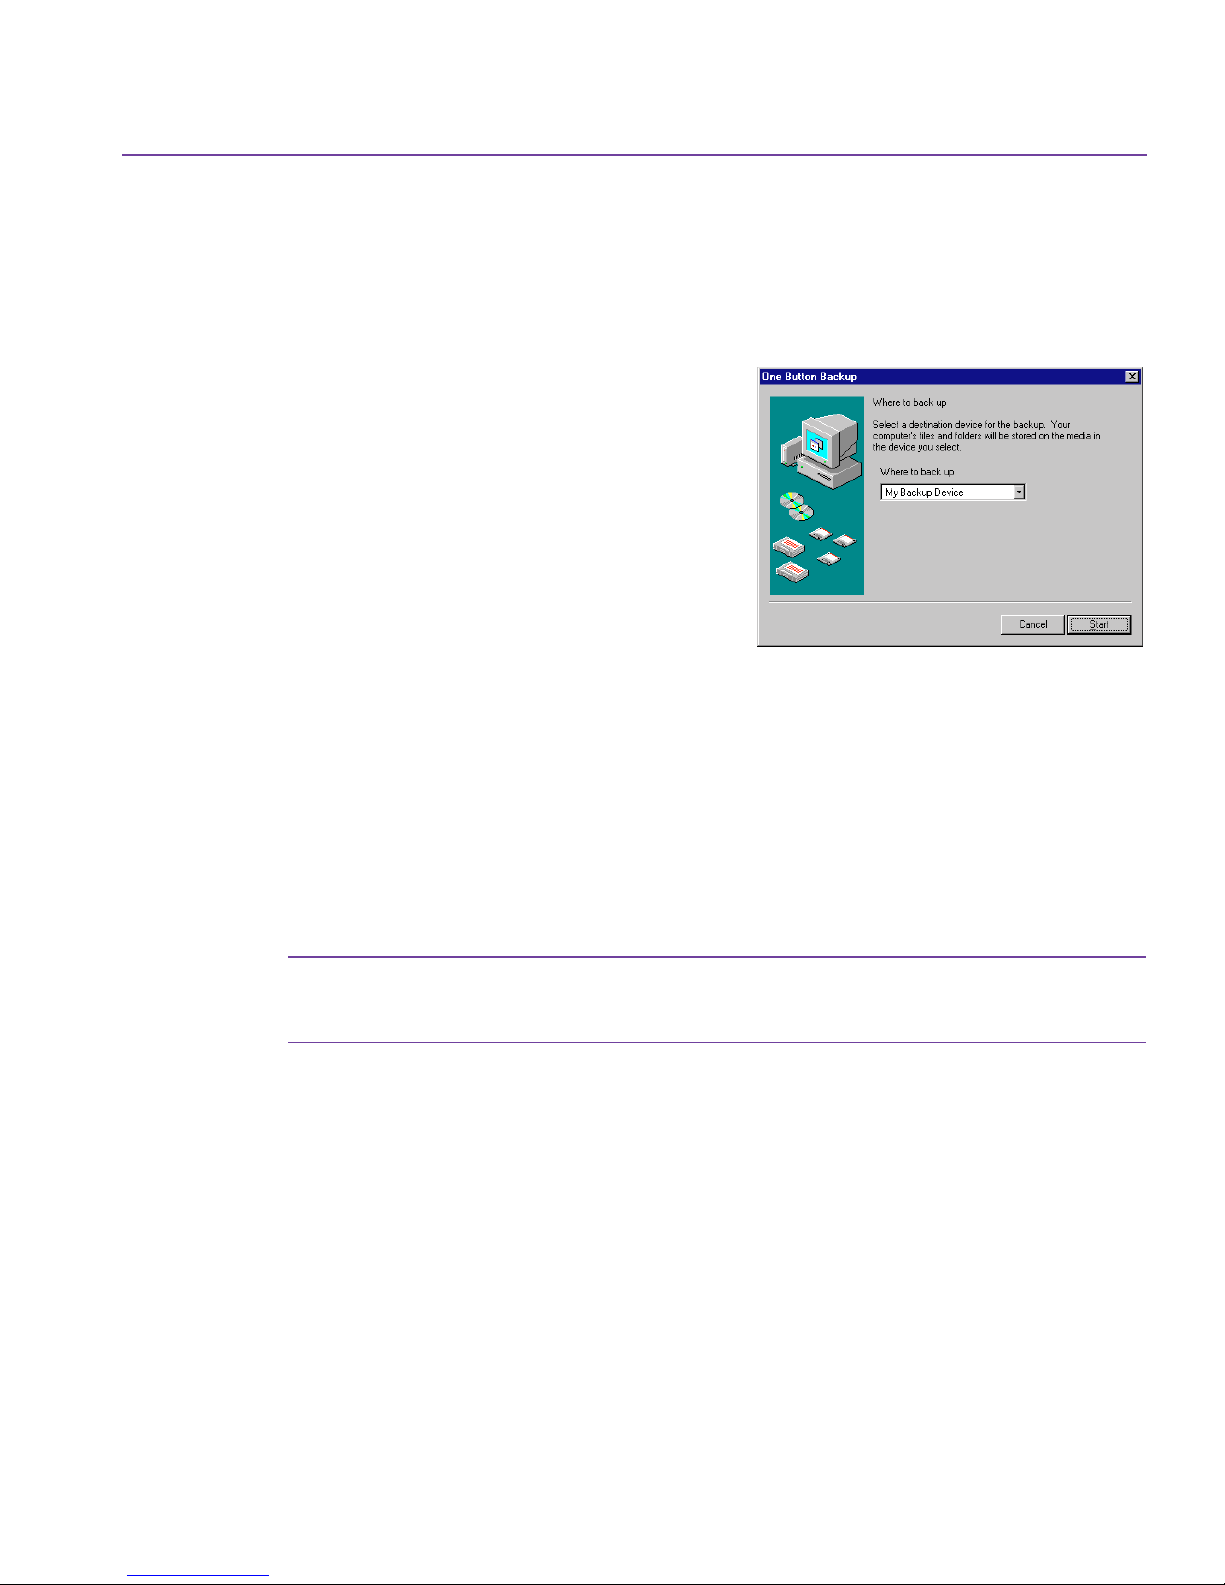
One-Button Backup
The
dialog appears.
2. Select a device in the drop-down list
box. See Where to Back Up on page 29
for more information.
3. Click Start.
The backup will run as either a full or
differential backup (with default
settings) depending on the following
criteria.
An All Selected Files backup is performed if:
■
Ten differential backups have been performed since the last All Selected
Files backup, regardless of dates.
■
More than seven days have passed since the last backup.
A differential backup is performed if:
■
No more than seven days have passed since the last All Selected Files
backup.
Note: For more information on full and differential backup types, see
Backup types on page 36.
Default Backup Job Settings
Your backup job will run with the following default settings:
■
What to back up—All Selected Files. See What to Back Up on page 28.
■
Where to back up—Backup device. See Where to Back Up on page 29.
■
How to back up—
Full Backup—Verify, Compress, Overwrite.
Differential Backup—Verify, Compress, Append.
Page 14

14 Getting Started
See How to Back Up on page 29.
One-Button Restore
One-Button Restore launches a series of dialogs which help you perform a
restore in just a few steps.
To run One-Button Restore:
1. Click the Start menu, select Programs, HP Colorado Backup II, and then
click One-Button Restore.
One-Button Restore
The
appears.
2. Select a device in the drop-down list
box.
dialog box
3. Click Next to continue.
4. Check the drives, folders, and files you
want to restore.
5. Click Start to begin restoring your files.
Restore Default Settings
Your restore will run with the following
default settings:
■
What to Restore—Folder view. See
What to Restore on page 60.
■
Where to restore—Original Location. See Where to Restore on page 62.
■
How to restore—Always replace. See How to Restore on page 62.
Page 15
Using HP Colorado Backup II 15
Using HP Colorado Backup II
This section provides an overview of the various tools and features that
HP Colorado Backup II offers.
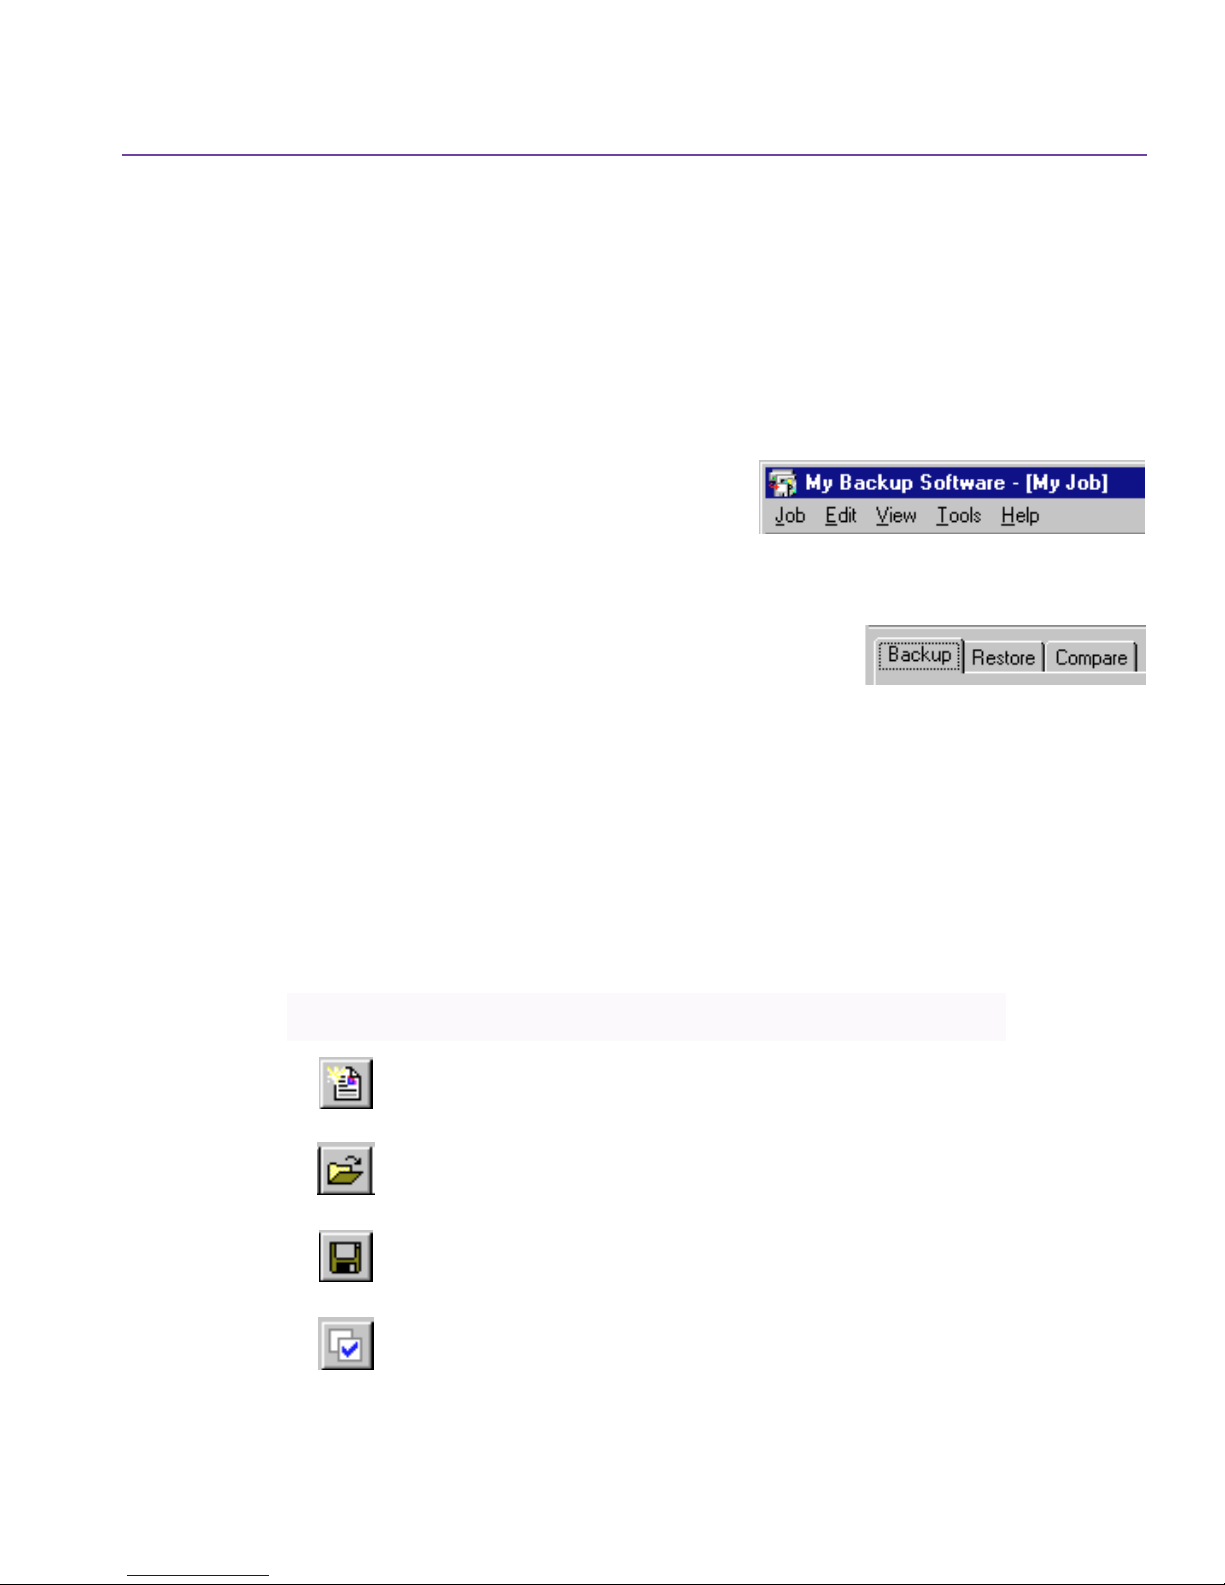
Menus
Toolbar
The title bar contains five menu items:
Edit, View, Tools
these menus and the submenu items at any
time.
Backup, Restore
The
the top of the main application window. Click these
tabs to move between program functions.
Use HP Colorado Backup II’s toolbar to select program features with a single
mouse click. Hold the cursor over a button for a short description of its
function.
Toolbar buttons (listed from left to right) perform the following functions:
Click: To do this:
, and
Help
, and
. You can access
Compare
Job
,
tabs appear at
Create a new untitled backup job.
Open a saved backup job.
Save the current backup job for future use.
Select one or more highlighted drives, folders, or files, and
place check marks next to them.
Page 16
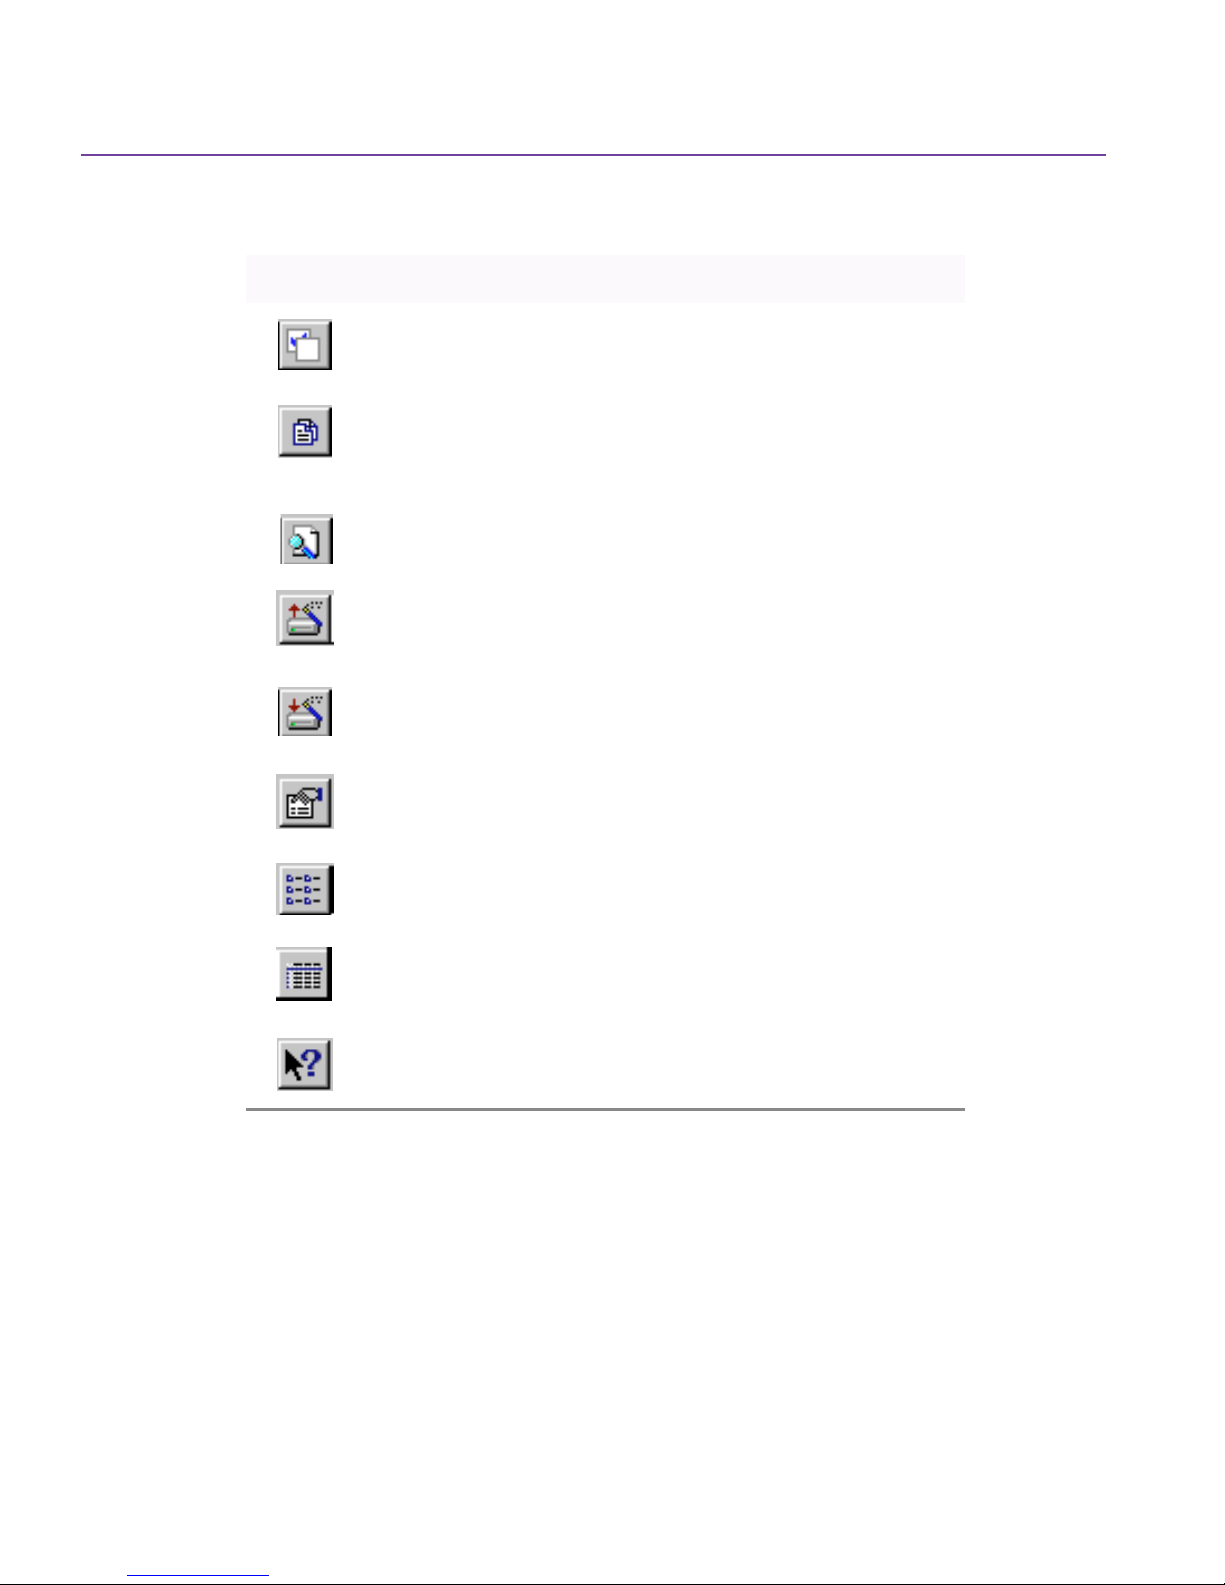
16 Getting Started
Click: To do this:
Deselect one or more highlighted drives, folders, or files, and
remove the check marks next to them.
Open the Restore File Version dialog box to choose the specific version of a file you want restored.
Open the File Find dialog box to find a file for restore. You
can search by name, location, or date modified.
Open the Backup Wizard, which leads you step-by-step
through the selection of files, settings, and options for your
backup.
Open the Restore Wizard, which leads you step-by-step
through the selection of files, settings, and options for your
restore.
Selection Panes
Drives and files are selected the same way in HP Colorado Backup IIas they are
in Windows Explorer. Selection panes are used to select and deselect drives,
folders, and files for backup and restore.
The two sections of the selection panes are:
Open the Job Options dialog box, where you can select
options for the current backup job.
Display your files as small icons in vertical rows (List View).
Display your files in a vertical list with file size, type, and modified date (Detail View).
Display a short description of menu items, windows, buttons,
and boxes when the item is clicked.
Page 17
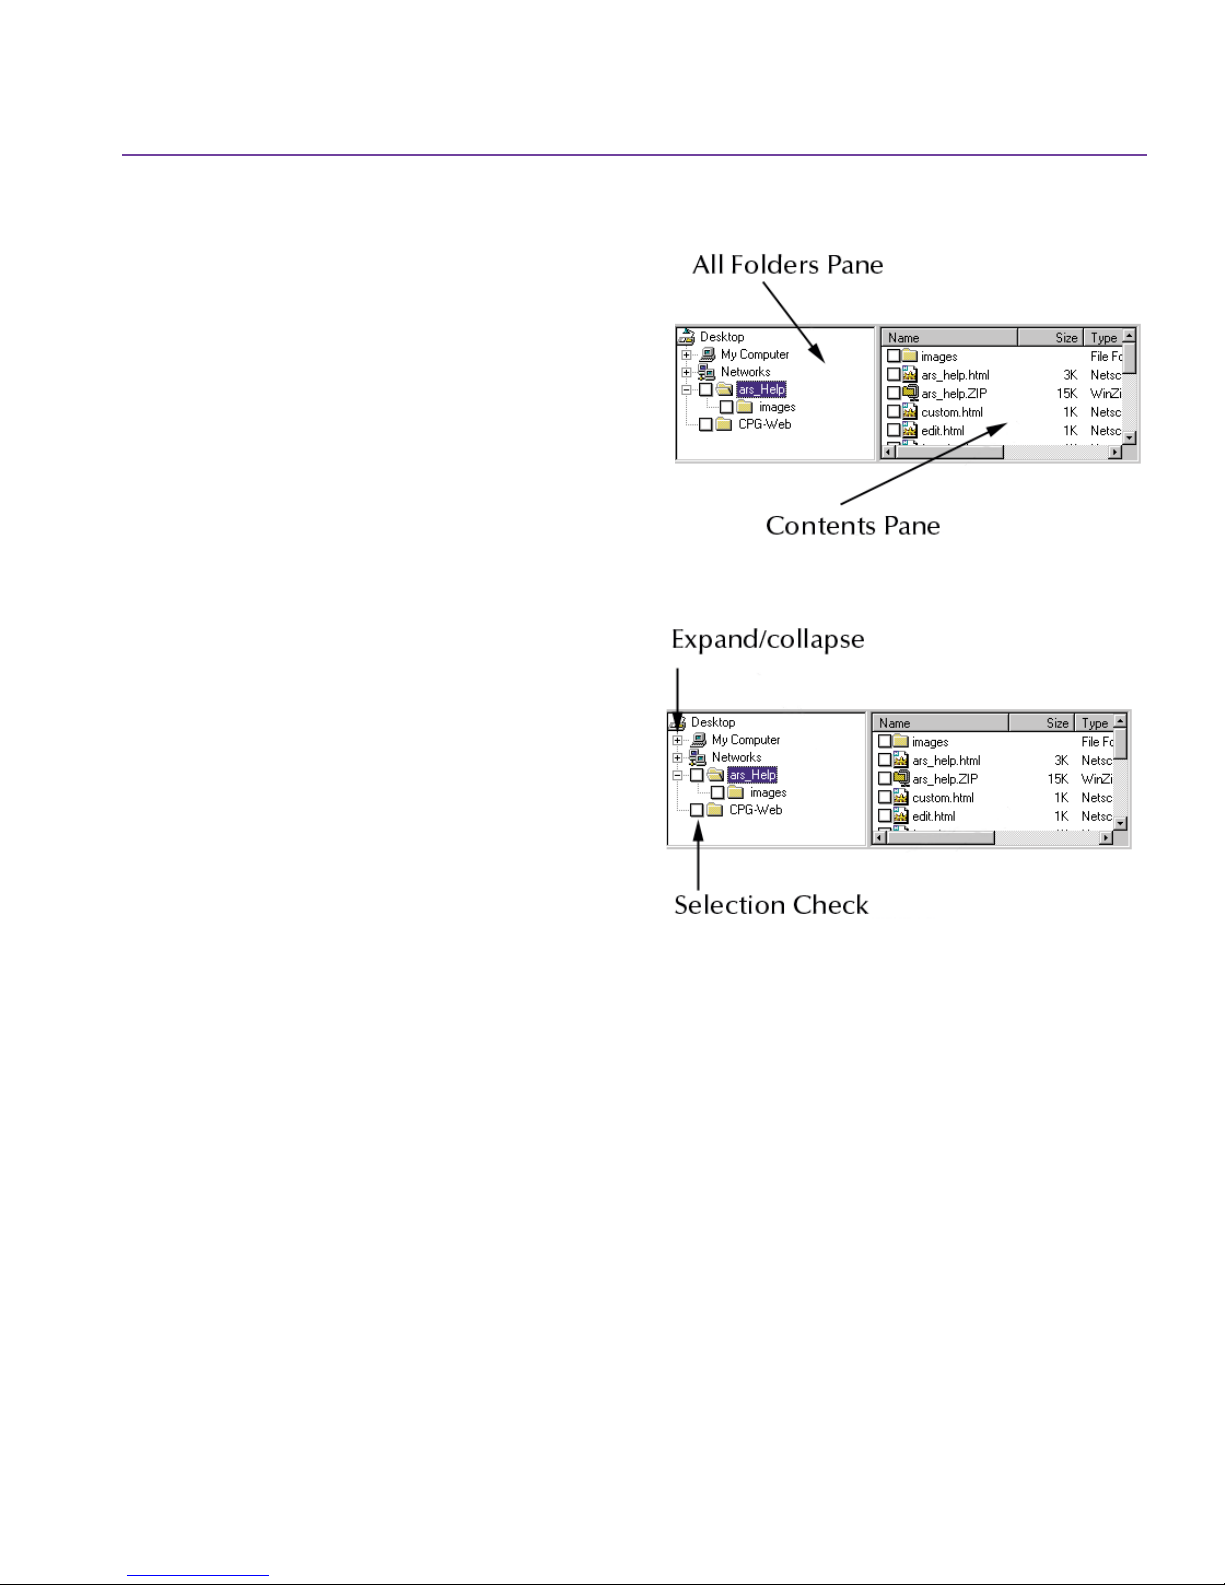
■
All Folders Pane—On the left.
Displays a list of your
computer’s drives and folders.
■
Contents Pane—On the right.
When a folder is highlighted in
the All Folders Pane, the files
and folders in that folder
appear in the Contents Pane.
Click the Expand/Collapse button
to expand or collapse a folder.
■
A plus sign (+) means the
listing can be expanded to
display additional folders.
Using HP Colorado Backup II 17
■
A minus sign (–) means the
listing can be collapsed so that
folders beneath it are not
displayed.
■
Folders without buttons
indicate there are no
subfolders.
Click a selection check box to select or deselect files and folders.
■
An empty check box means the drive, folder, or file has not been selected
for backup or restore.
■
A blue checkmark means one or more items in a folder have been selected
for backup or restore.
■
A gray checkmark means that some, but not all, of a drive or folder has been
selected.
■
A red X means that the file’s type has been excluded. See Exclude Tab on
page 36 for more information.
Page 18
18 Getting Started
Help
The HP Colorado Backup IIon-line help system provides in-depth information
about the program and its functions.
Context-Sensitive Help
Context-sensitive help provides you with information about the current
window, dialog box, or program message. To get context-sensitive help on the
current operation, press Shift+F1 on your keyboard.
Help Menu
The Help menu provides help for each program function and assistance with
backup and restore concepts and skills. There are three items in the Help
menu:
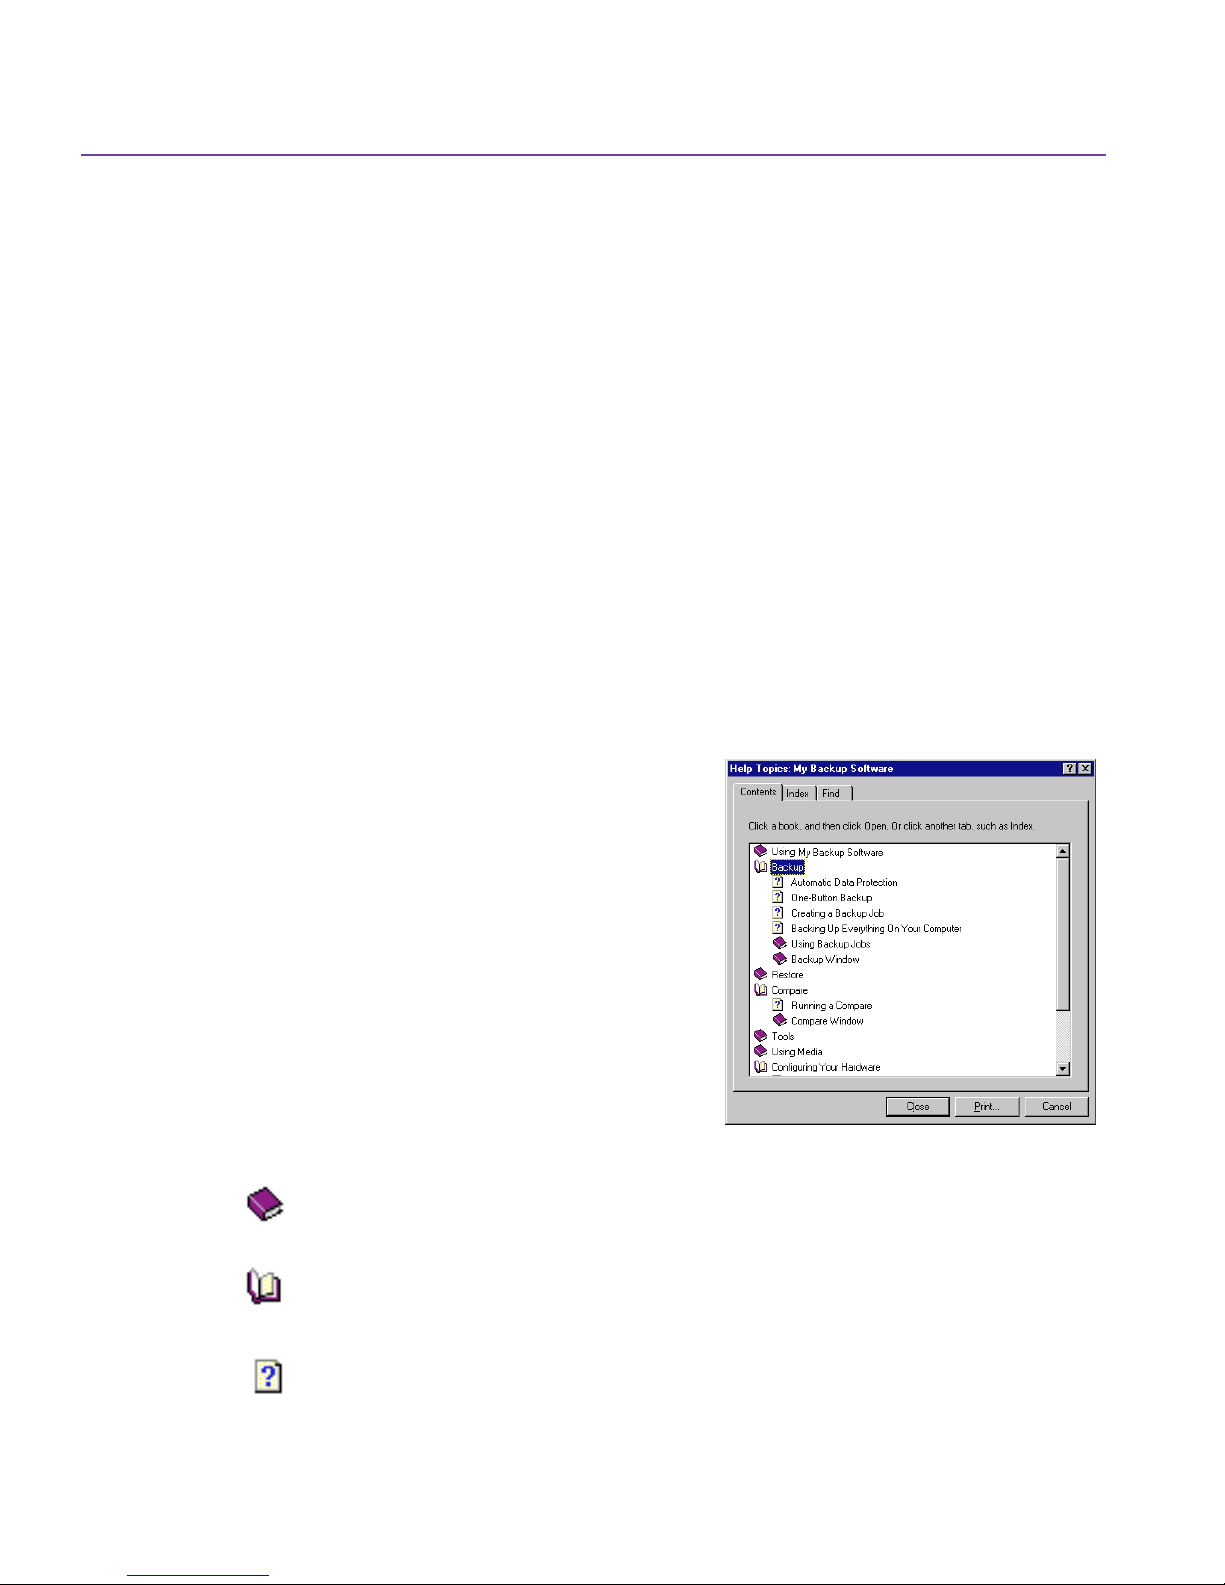
Help Topics
Help Topics, Using Help
, and
About HP Colorado Backup II
.
Help Topics opens the Help window, which
contains three tabs.
■
The Contents tab displays a list of topics
in the help system arranged by category.
A book represents a help category containing subtopics.
Double-click the book to open it.
An open book displays a list of topics and books.
A page represents a help topic. Double-click it to open the
help window for that topic.
Page 19
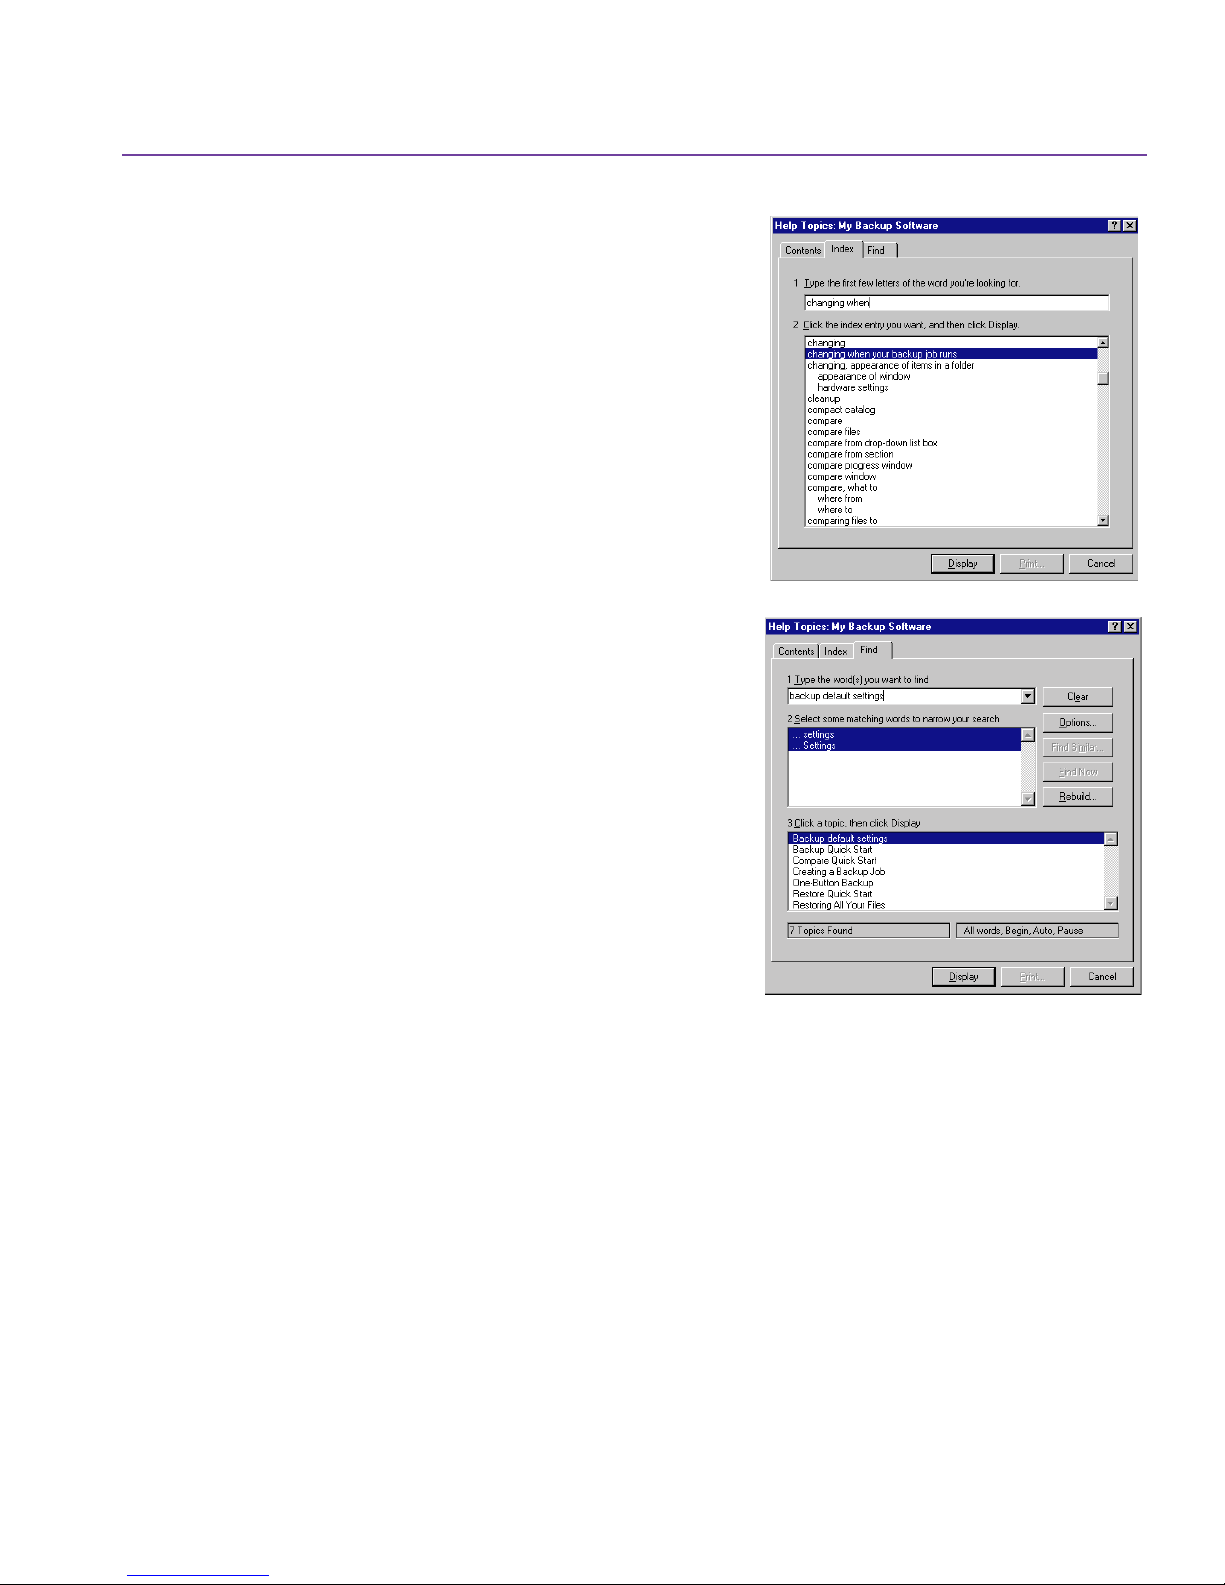
■
The Index tab lists keywords
alphabetically. Type the first few letters
of a keyword and the first matching
item is highlighted.
■
The Find tab provides a full-text search
utility for any word or phrase in help.
You must set up the search file the first
time you use the Find tab. Then type a
word or phrase and select a topic from
the list.
Using HP Colorado Backup II 19
Using Help
Using Help
The
menu item provides help
for the help system. It explains how to use
Help effectively and how to customize your
Help system.
About HP Colorado Backup II
About HP Colorado Backup II
displays your software’s version number and
licensing information.
Exiting HP Colorado Backup II
■
On the Job menu, click Exit.
Or,
■
Click the Close button.
You are asked if you want to save any changes to your current backup job.
Click Yes to save your backup job or click No to discard the changes. The
application closes.
Page 20

20 Getting Started
Page 21

Using Backup
This chapter explains how to use the Backup window to copy files from your
computer to a backup location. It begins by describing the steps needed to
perform a backup using HP Colorado Backup II.
Your first backup should be of your entire computer. After you have backed up
your computer, you can create backup jobs to save your options and file
selections. By creating several jobs, you can customize your backups and
protect your data quickly and, if you wish, automatically.
You can use the Backup Wizard or the Backup window to create a backup job.
Selections and options are described in later sections of this chapter.
Where to Look—Backup
2
For more help on backup topics, see:
One-Button Backup on page 22
■
Backup Jobs on page 23
■
Using the Backup Wizard on page 24
■
The Backup Window on page 28
■
Backing Up Files with the Backup Window on page 29
■
Using Backup Jobs on page 30
■
The Backup Set on page 33
■
Backup Options on page 33
■
Advanced Tab on page 38
■
Page 22
22 Using Backup
One-Button Backup
One-Button Backup launches a backup of all local hard disks, including the
Registry.
To use One-Button Backup:
1. Double-click the One-Button Backup icon on the Desktop. Or, click the
Start menu, select Programs, HP Colorado Backup II, and then click One-
Button Backup.
One-Button Backup
The
appears.
2. Select a device in the drop-down list
box. See Where to Back Up on
page 29 for more information.
3. Click Start.
dialog
The backup will run as either a full or
differential backup (with default
settings) depending on the following
criteria.
An All Selected Files backup is performed if:
■
Ten differential backups have been performed since the last All Selected
Files backup, regardless of dates.
■
More than seven days have passed since the last backup.
A differential backup is performed if:
■
No more than seven days have passed since the last All Selected Files
backup.
Note: For more information on full and differential backup types, see
Backup types on page 36.
Default Backup Job Settings
Your backup job will run with the following default settings:
■
What to back up—
Page 23

Full Backup—All Selected Files.
Differential Backup—New and changed files
See What to Back Up on page 28.
■
Where to back up—Backup Device. See Where to Back Up on page 29.
■
How to back up—
Full Backup—Verify, Compress, Overwrite.
Differential Backup—Verify, Compress, Append.
See How to Back Up on page 29.
Backup Jobs
HP Colorado Backup II uses backup jobs to save and reuse file and option
selections. You create a backup job by selecting drives and files for backup,
choosing program settings and options, and saving your selections with a new
job name.
Backup Jobs 23
A backup job includes all selections made at the time it is saved:
■
Drives, folders, and files to back up
■
Backup type
■
Backup device
■
Options selected or default selections
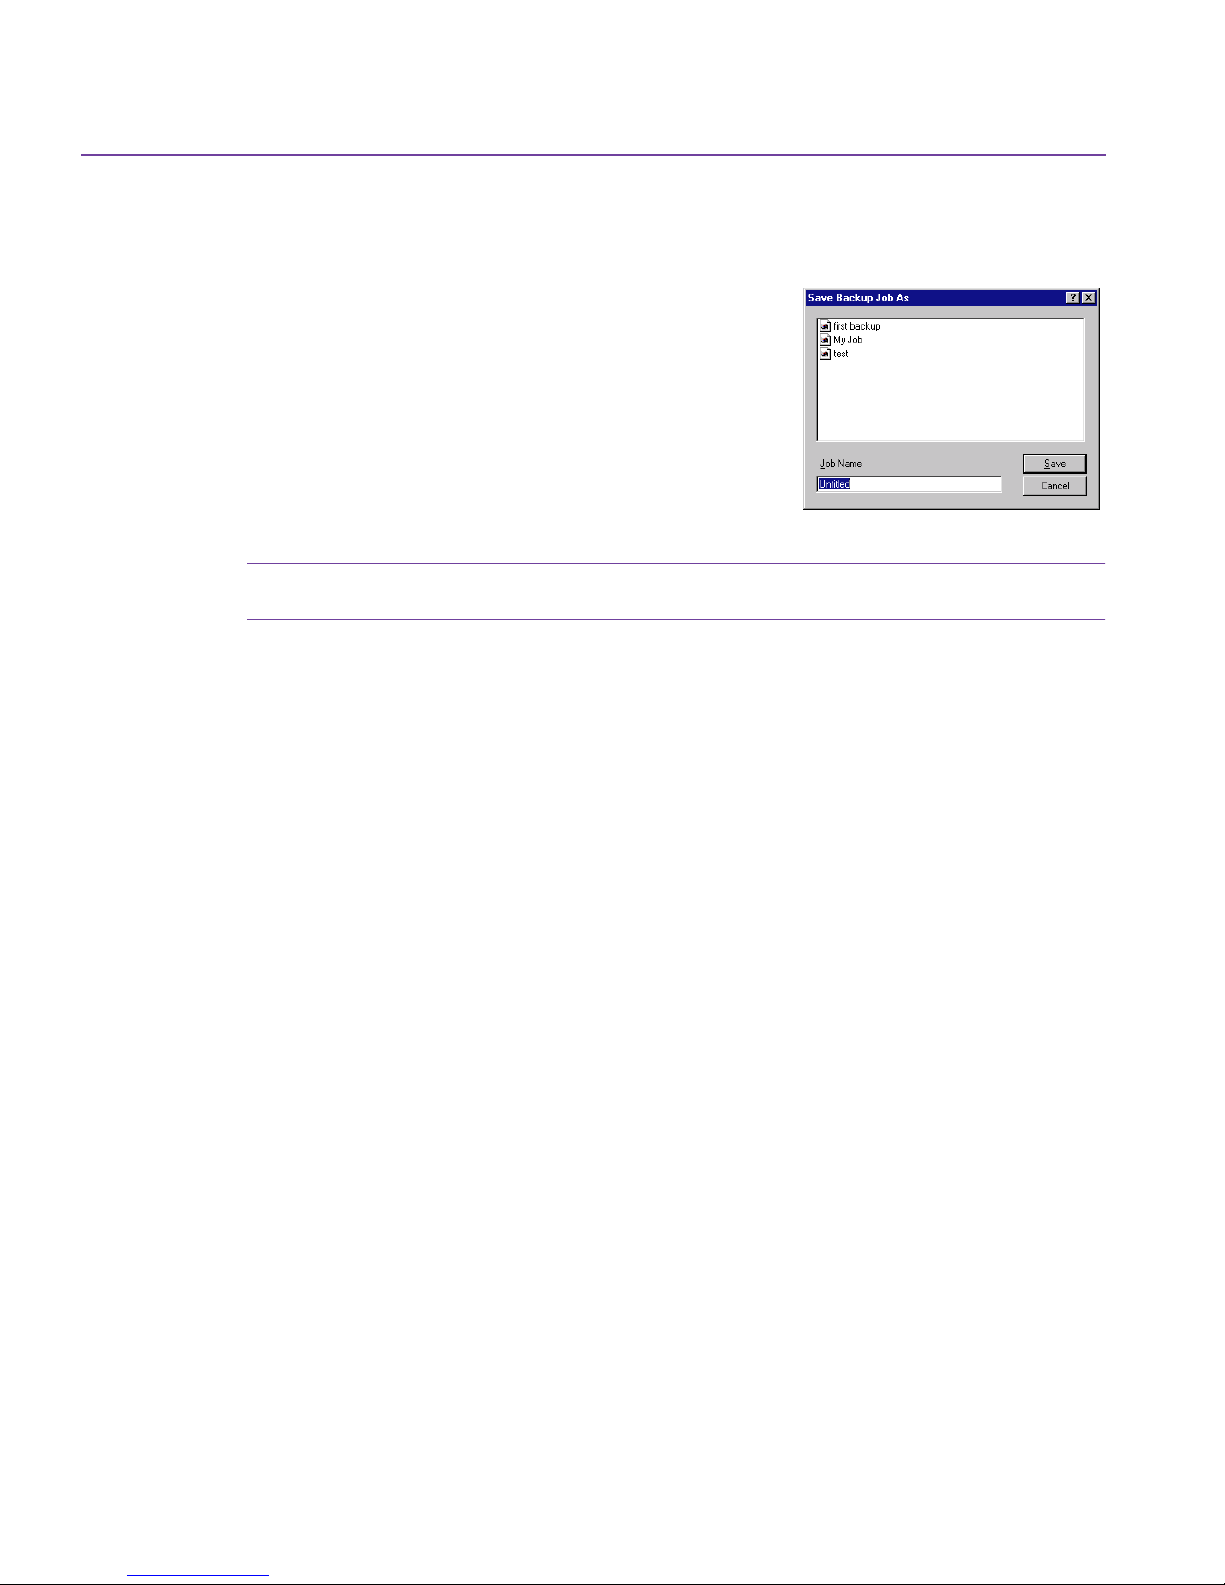
Backup jobs can be opened, saved, and deleted using the Job menu. In the
Backup window, you can open a backup job with the
Backup Job
list.
To change a backup job, simply make new file or option selections. When you
run a backup, your changes are automatically saved. To save your changes
under a different name, choose Save As from the Job menu and enter a new
name, or type the new name in the
Job Name
field. If you attempt to save a new
job using an existing name, the program asks you whether or not to overwrite
the existing job. If you choose overwrite, the new job replaces the existing job.
You can use the Backup Wizard (Using the Backup Wizard on page 24) or the
Backup window (see The Backup Window on page 28) to create new backup
jobs or you can modify and rename existing job files.
Page 24
24 Using Backup
By saving your backup jobs, you can run them again without making your
selections again.
Backup Job
The
Type a new name in the box to save the job under a
different name.
Note: You must make file selections before saving your backup job.
box lists your saved backup jobs.
Using the Backup Wizard
The Backup Wizard is a series of dialog boxes that guides you through the steps
required to create a new backup job.
The Backup Wizard is used to create new backup jobs. It cannot be used to
modify an existing job.
Using the Wizard is easy. All you need to do is make selections by clicking the
appropriate options. After you’ve made your selections, click the Next button
and the Wizard displays the next step.
To create a job using the Backup Wizard:
1. Click Backup Wizard in the Startup window, then click OK.
Or,
Click the Backup Wizard icon on the toolbar.
Page 25

Using the Backup Wizard 25
What to Back Up
The
window of the
Backup Wizard is displayed.
2. Select the drives and files you want to
back up.
To back up all files, folders, and drives
on your computer, click Back up My
Computer . Click Next to continue. The
Backup Type Wizard
window appears.
Or,
To back up only some of the files,
folders, or drives on your computer, click Back up selected files, folders
and drives.
Backup Wizard Selection Panes
The
appear.
Select the specific drives, folders, and
files you want to back up. For more
information on selecting files, see
Selection Panes on page 16.
3. Click Next to continue.
4. Select a backup type.
Click All Selected Files
to back up all
selected files, then click Next.
Or,
Click New and Changed Files Only to
back up only files that are new or have
changed since the last
All Selected Files
backup and click Next.
Note: New and Changed Files Only
For more information on backup types, see Backup types on
page 36.
will use a differential backup type.
Page 26

26 Using Backup
5. Select a destination for the backup
from the
Where to Back Up on page 29.
6. Click Next to continue.
How to Back Up Wizard
The
appears.
7. Click options to select or deselect
them. For information about Backup
Options, see Backup Options on
page 33.
Where to back up
list. See
window
8. Click Next to continue.
When to Back Up Wizard
The
window
appears.
9. Click Now to begin this backup
immediately, or click Later to schedule
this backup for a later time.
Note: If you select Later, Microsoft System Agent (Windows 95 only),
or Scheduler must be running.
Page 27
Using the Backup Wizard 27
To back up later, specify the frequency, then set the time, date, and/or days
of the week to run this backup job. For more information on scheduling
your backup job, see Scheduling a Backup Job on page 39.
10. Click Next to continue.
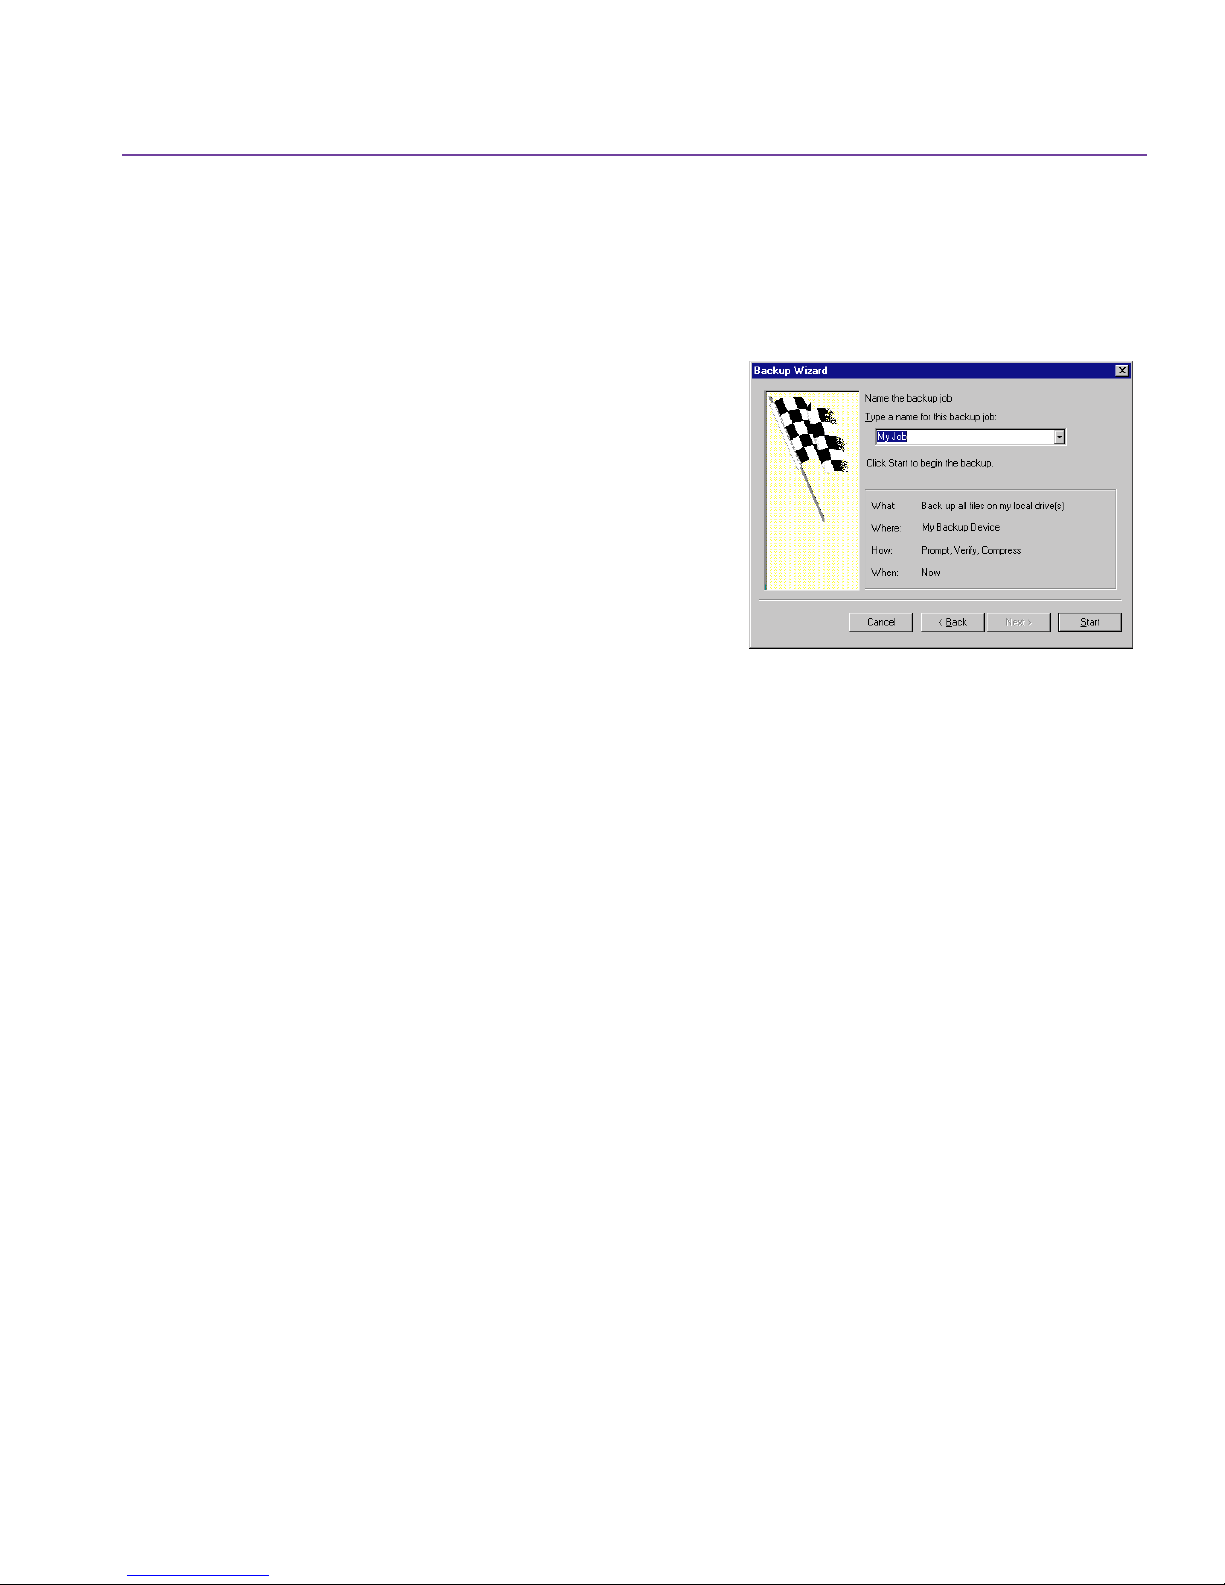
Name the Backup Job
The
window
appears.
11. Type a name for this backup job.
12. Review the backup job’s summary. To
change an option, use the Back and
Next buttons.
13. Click Start to begin this backup job.
Backup Progress
The
window appears
Backup Progress Window on page 32
Or, Click OK to run your job as
scheduled.
Page 28
28 Using Backup
The Backup Window
This section first describes the Backup window. For step-by-step instructions
on creating backup jobs, see Backing Up Files with the Backup Window on
page 29.
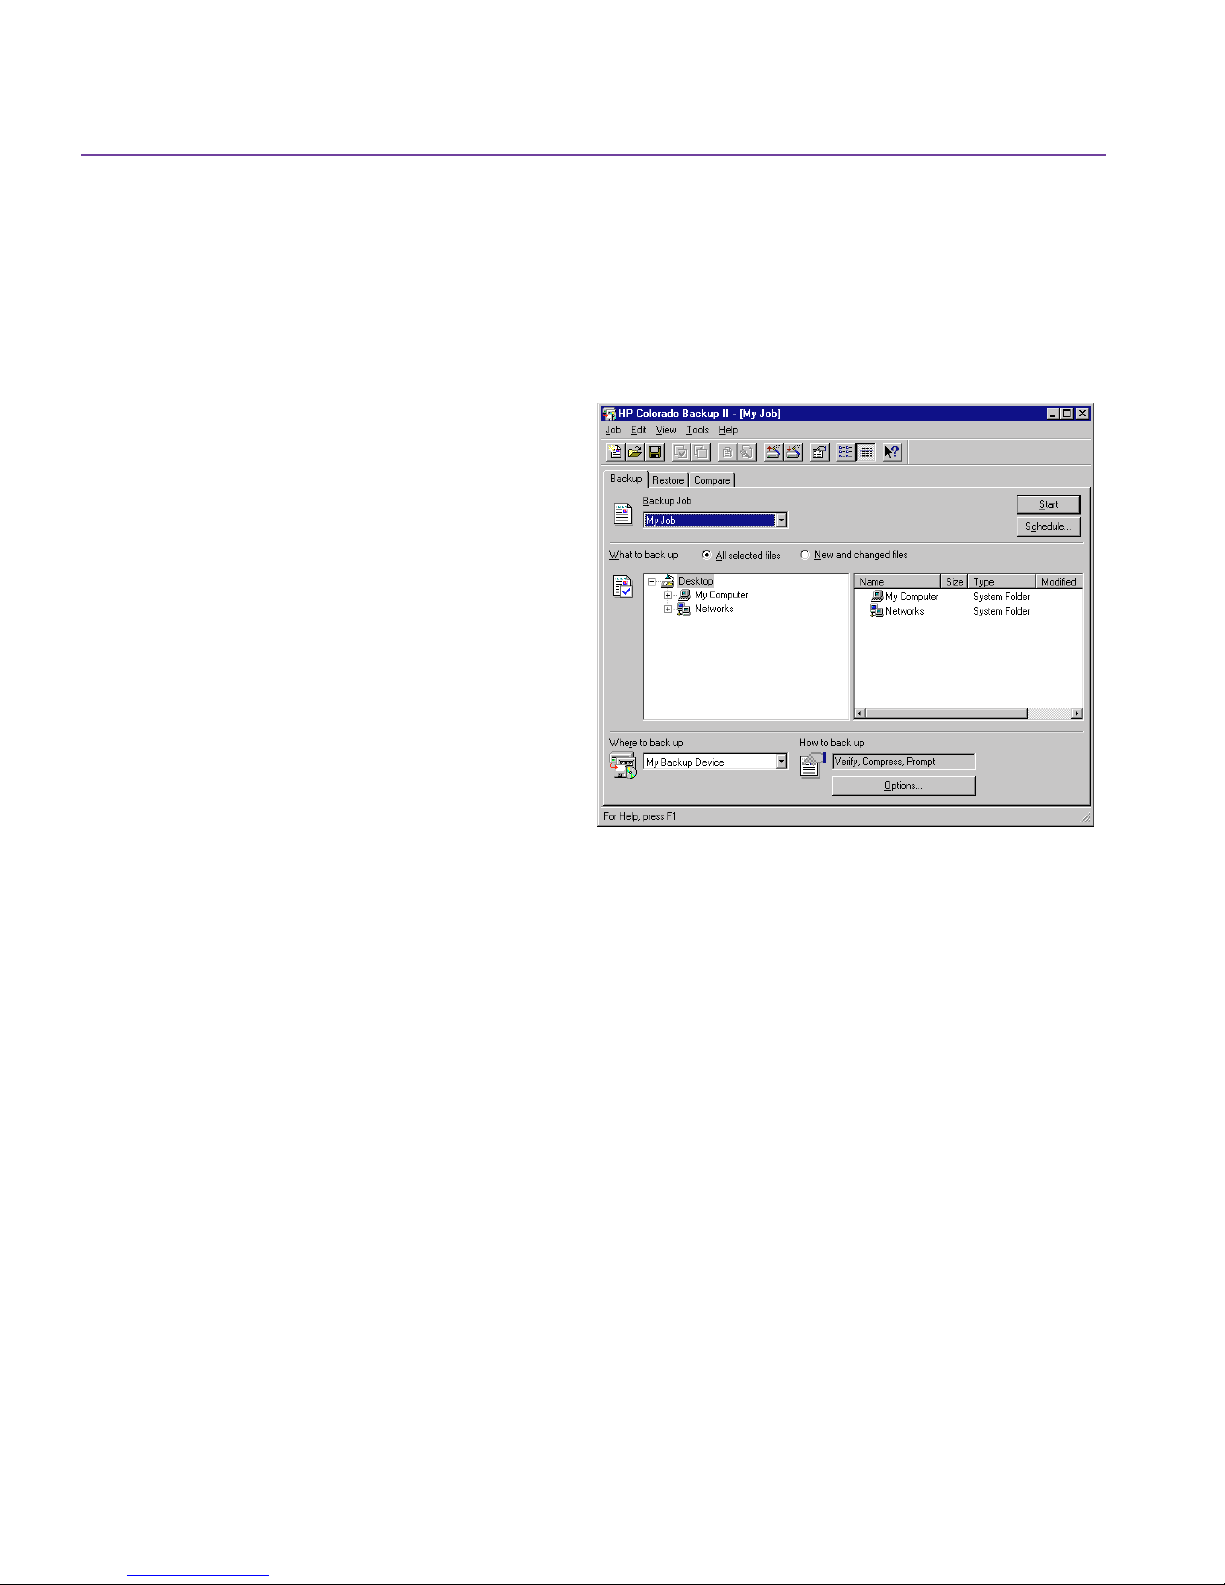
The Backup window gives you
quick access to all the backup
job options, and includes four
main sections.
■
Backup Job—Select your
Backup Job from the dropdown list.
■
What to Back Up—Select
your drives and files to back
up from the selection pane.
Choose the backup type.
■
Where to Back Up —Select a
device to back up to.
■
How to Back Up—Lists your
option settings, and displays the Options button.
Backup Jobs List
The Backup Job list box contains all available backup jobs. If you are creating a
new backup job,
job, click Save from the Job menu.
What to Back Up
Select your backup type and files in the
Two backup types are displayed in the Backup window under
All Selected Files
■
All Selected Files—Backs up all selected files.
■
New and Changed Files—Backs up all the selected files that have changed
since the last All Selected Files backup.
Untitled
, and
New and Changed Files
appears as the default name. To save a new backup
What to back up
.
section.
What to back up
:
Page 29

If you choose New and Changed Files, the default setting is differential backup.
Use the Options button to change your backup type. See Type Tab on page 36
for more information and a complete description of each type.
Backup Selection Panes
HP Colorado Backup II uses the same drive and file selection methods as
Windows. Drives and folders are selected in the All Folders Pane and individual
files and folders are selected in the Contents Pane. Select drives and files to
back up by clicking the check box next to the item. For more information, see
Selection Panes on page 16.
Where to Back Up
Backing Up Files with the Backup Window 29
The drop-down list box in the
contains the names of all your backup devices. Your
backup device is automatically selected as your backup
location. To change your backup location, select another
device in the drop-down list box.
Where to back up
section
How to Back Up
The Backup Job Options dialog box lets you set your backup options, password
protect your backup set, and change your backup type. Current option settings
are listed above the Options button. For information about backup options,
see Backup Options on page 33.
Backing Up Files with the Backup Window
To back up your files using the Backup window:
1. Select New from the Job menu.
Backup
The
2. Select What to back up.
files
is the default setting. To change
your backup type, click New and
changed files.
window appears.
All selected
Page 30

30 Using Backup
See Type Tab on page 36 for more information.
3. Select the files to back up. Click the check boxes next to the drives and files
you want to back up.
A checkmark indicates the drive, file, or folder is selected for backup. A red
X
indicates that the file’s type is excluded.
See Selection Panes on page 16 for more information.
4. Select Where to back up. To change your backup
destination, make your selection in the drop-down list.
See Where to Back Up on page 29.
5. Select How to back up. The default settings are
Compression
options, click Options. The
lets you set each of your options. See Backup Options
on page 33.
6. Click Schedule to run your job at a later time. See Scheduling a Backup Job
on page 39.
Or,
Click Start to run your backup job now. Your backup job is saved. See
Backup Progress Window on page 32.
Or,
Select Save from the Job menu to save your job for future use. The name
you give it will appear in the Backup Job list.
and
Prompt
. To change your backup
Backup Options
Full
dialog box
Using Backup Jobs
To open a backup job:
1. Click the Backup tab in the main application window.
Page 31

Using Backup Jobs 31
2. Highlight a job name in the
Backup Job
The backup job settings appear.
Or,
Choose Open from the Job menu.
The Open Backup Job dialog box appears.
3. Select a Backup Job from the list.
Or,
Type a job name (description) in the
open
text box.
Job to
4. Click Open.
To change settings in an existing backup job:
combo box.
1. Open the backup job you want to modify and make your changes.
2. Choose Save As from the Job menu.
Save Backup Job As
The
identical to the
Open Job
3. Type a name into the
dialog box appears. It is
dialog box.
Job Name
text box. You
may type a name of up to 130 characters
(including spaces).
4. Click Save.
To delete a backup job:
1. Choose Delete... from the Job menu.
Delete Backup Job
The
is identical to the
dialog box appears. It
Open Job
dialog box.
2. Select a Backup Job, or type a job name
(description) in the
Job Name
text box.
3. Click Delete. You are asked to confirm your
action. Click Yes to continue.
Page 32

32 Using Backup
To run your backup job:
❖ Click Start.
If your backup job is new or modified, the program prompts you to save the
backup. The new job overwrites an older backup job, if one exists.
Backup Progress Window
The Backup Progress window appears when you
start your backup. It continually updates
information about your backup job.
The name of the backup job in progress is
displayed in the window title bar.
The top section displays the backup device,
media name, and the current status of the
backup job.
The center section displays a progress bar
showing the percentage of the backup job
completed and the estimated time remaining,
along with time elapsed since job start.
The bottom section displays the name of the file currently being processed, the
estimated number and size of files to be backed up and already processed, and
the compression ratio.
When the backup is complete, the OK and
button. Click Report for a summary of your backup or click OK to continue.
Report
button replace the
Cancel
Canceling Your Backup
You can cancel the backup at any time by clicking Cancel or pressing Esc.
Canceling your backup may take several minutes, depending on the size of the
backup set.
Caution: If you cancel a backup, some backup devices will not be able to
recover the space already used by the backup on the media. To
use this space, you will have to erase or overwrite the entire
media.
Page 33

Viewing Your Backup Report
Backup Options 33
When the backup completes, the
button is displayed below it. Click Report to view a summary of your backup or
click OK to continue. You can also use the Report option in the Tools menu to
view your backup report at a later time.
The Backup Set
After you perform a backup job, your files are stored on the media in a special
format called a backup set. If your backup uses two or more media, one backup
set is stored on each piece of media. Information about each backup set is
stored in the catalog. For information about catalogs, see Import Catalog on
page 78.
Backup Options
To open the Backup Job Options dialog box:
❖ Click Options in the
Cancel
How to backup
button changes to OK, and a
section.
Report
Backup Job Options
The
■
General Tab on page 34
■
Password Tab on page 35
■
Type Tab on page 36
■
Exclude Tab on page 36
■
Report Tab on page 38
■
Advanced Tab on page 38
dialog box appears.
Backup Job Options Dialog Box
The Backup Job Options dialog box contains the following tabs:
To display an option group:
❖ Click on a tab.
option group
The
appears.
Page 34

34 Using Backup
To select an option or change an option setting:
❖ Click on the check box or button next to the option.
To save your current settings and change option groups:
1. Click Apply.
2. Click the next option group’s tab.
To save your option settings and return to the Backup window:
❖ Click OK.
Your backup options are saved and you return to the Backup window.
General Tab
Use the General tab to set the Verify data and
Compression options and tell
HP Colorado Backup II how to handle media that
already contain backups.
■
Verify data by performing a file-by-file
compare after the backup has been
completed.
If you back up with the Verify Data option on,
HP Colorado Backup II will verify the data by
reading it back from the backup media after
writing it and comparing it to data on the disk.
Because Verify Data takes twice as long, you
may choose to turn this option off. However, it is strongly recommended
that you use Verify Data to help ensure the reliability of your backups.
■
When backing up to media
Never c ompress the data—Turns data compression off (does not control
hardware compression).
Compress data to save time during backup—Compresses your data as
much as possible with a minimum reduction in speed.
Maximize compression to save space on media—Compresses your data as
much as possible without regard to speed. This may cause your backup to
take longer, however the resulting backup set will use less space.
Page 35

Backup Options 35
Compression uses a “shorthand” to reduce file sizes, so that data can be
written in less space.
Note: If your data has already been compressed, select Never
compress the data. Compressing data that has already been
compressed causes the data to occupy more media space.
■
If the media already contains backups
Append this backup to my media—Your data is placed after the last backup
set on the media.
Overwrite the media with this backup—Overwrite works differently
depending on your backup location. Overwrite replaces all files on the
media with the files selected for backup. To avoid overwriting all files on
the media, choose Append.
Caution: All files on the media are erased before the new backup set(s)
are written.
Let me choose this option during the backup—The name of the media in
the drive is displayed when the backup job begins, and you are prompted
to choose Overwrite or Append.
■
If the media is blank
Use this media name—You can name the media if it is blank by typing a
name in the text box.
Click Apply, then click OK or another options tab.
Password Tab
Use the Password tab to provide data security by password-protecting your
backup. Your password is required to compare or restore files in the backup
set.
Your password may consist of up to 8 characters. Passwords are case-sensitive.
For example, “my pass” is not the same as “My Pass”.
Page 36

36 Using Backup
Caution: Make careful note of your password. Without it, you will not be
1. Click Protect this backup with a Password.
able to access or recover data in your password-protected
backup set. To create a password:
2. Type your password in the
3. Retype your password in the
Password
text box.
Confirm password
text box.
4. Click Apply.
5. Click OK or select another options tab.
Type Tab
Use the Type tab to choose a backup type.
Backup types
■
All selected files—Backs up all the files you
have selected.
■
New and changed files only—If you choose
New and changed files, two additional backup
types are displayed.
Differential backup type—Backs up all the
selected files that have changed since the last
All Selected Files backup.
Incremental backup type—Backs up all
selected files that have changed since the most recent All Selected Files or
Incremental backup.
Exclude Tab
Use the Exclude tab to exclude certain file types from your Backup Job. File
exclusions are made based on registered types or custom types.
Page 37

Backup Options 37
Note: Excluded file types are marked in the selection panes with a red
X.
To exclude files by registered type:
1. Click the Exclude tab in the
Exclude
The
tab appears.
Backup Job Options
2. Click Add.
Exclude files from backup
The
dialog box
appears.
3. Click Registered type.
4. Select the file type you want to exclude in the
Registered types
list.
5. Click OK.
Your exclusion appears in the
these file types
list box. To exclude additional
Do not back up
registered file types, repeat steps 2 through 5.
To exclude files by custom type:
1. Click the Exclude tab in the
Exclude
The
tab appears.
Backup Job Options
dialog box.
dialog box.
2. Click Add.
Add Exclude
The
3. Click Custom type.
4. Type a three letter file extension in the
For example, type
5. Click OK.
Your exclusion appears in the
To exclude additional file types, repeat steps 2 through 5.
dialog box appears.
bat
to exclude all your batch files.
Do not back up these file types
Custom type
text box.
list box.
Page 38

38 Using Backup
To remove a file type from the Do not back up these file types list:
1. Select the file type you want to remove from the list.
2. Click Remove.
Report Tab
Use the Report tab to specify the items you want
to include in your backup report and to set your
unattended backup option.
■
List all files that were backed up—Includes a
list of the files that were selected and
successfully backed up.
■
List files that were not backed up—Includes a
list of the files that were selected, but not
successfully backed up.
■
List errors reported while backing up files—
Includes a list of any errors encountered
while performing a backup of files.
■
List warnings reported while backing up files—Includes a list of any
warnings encountered while performing a backup of files.
■
List unattended messages and prompts—Includes a list of any messages
and prompts encountered while performing an unattended backup.
■
Show report summary—Includes a report summary of the results of the
backup job.
Unattended backup
Check Unattended backup to run unattended backup jobs. This option
enables the program to bypass most prompts during a backup operation.
Unattended backup
is the default setting.
Advanced Tab
Use the Advanced tab to specify whether or not the Windows Registry files are
backed up.
■
Back up Windows Registry—Backs up the Windows Registry. The Registry is
automatically selected for backup when your local drive is selected.
Page 39

To set the Advanced Options:
Scheduling a Backup Job 39
1. Click the Advanced tab in the
Advanced
The
2. Check the options you want.
3. Click OK.
tab appears.
Backup Job Options
Scheduling a Backup Job
HP Colorado Backup II provides a simple, yet flexible way to schedule your
backup jobs. The scheduling process is simplified by a series of dialog boxes
that guide you through the process of scheduling your backup job.
dialog box.
If you are running Microsoft System Agent or Internet Explorer (4.x or higher)
Task Scheduler on your machine, these schedulers will automatically be used
to run your scheduled backup jobs.
If neither System Agent nor Task Scheduler is installed on your machine,
HP Colorado Backup II provides a scheduler for you.
Note: The HP Colorado Backup II Scheduler will not run if you have
the Microsoft System Agent or Task Scheduler installed.
When running HP Colorado Backup II after initial installation, a prompt
appears asking if you would like to start the HP Colorado Backup II Scheduler.
Click Yes to start the scheduler. If No is selected at this time, the prompt will reappear when you attempt to schedule a backup job.
Page 40

40 Using Backup
To Schedule a backup job:
1. Click Schedule on the Backup window.
Schedule Backup Job
The
appears. The name of the selected
Backup Job is displayed on the title
bar.
2. Select Once, Daily, Weekly, or
Monthly.
The program displays option settings that correspond to your selection. For
example, if you select Weekly, the program prompts you to choose a time
and the day of the week for your backup job. See Setting Frequencies for
the Scheduled Job on page 40 for additional information.
3. Choose your settings.
4. Click OK, then click Yes to confirm the operation or No to cancel.
dialog box
Note: HP Colorado Backup II will not be able to run a scheduled
backup job if Windows is not running at the time your backup
job is scheduled to run, or if your Advanced Power Management
settings have turned off the hard disks after a set period of time.
Setting Frequencies for the Scheduled Job
When you schedule a backup job, the settings that appear depend on the
frequency you choose:
■
Once— Set the time and the date.
■
Daily—Set the time. If you want to specify
certain days of the week for your job to run,
click Which Days, then check the days you
want your job to run.
Page 41

Scheduling a Backup Job 41
■
Weekly—Set the time and the day of the
week.
■
Monthly—Set the time and the day of the
month.
Note: If Task Scheduler is installed on your machine, the Which Days
button will be available when the Weekly setting is selected.
Changing When a Scheduled Backup Job Runs
HP Colorado Backup II allows you to modify a scheduled backup job by
changing the settings in the Backup window, or Schedule button. When you
are done modifying a particular backup job, click Save from the Job menu, and
the modified backup job will run at the next scheduled time.
To change your backup job schedule from HP Colorado Backup II:
1. From the Backup window, select the job you wish to change in the Backup
Job drop-down list box.
2. Click the Schedule button and select the new settings for your scheduled
backup job.
3. Click OK.
These changes will be updated in the Microsoft System Agent, Microsoft
Internet Explorer 4.x Task Scheduler, or the HP Colorado Backup II Scheduler,
depending on which is installed.
Note: The HP Colorado Backup II Scheduler will not run if the
Microsoft System Agent or Internet Explorer 4.x Task Scheduler
is installed on your system.
To change a scheduled backup job with the Microsoft System Agent:
1. Double-click the calendar icon on the taskbar to open the Microsoft
System Agent.
Page 42

42 Using Backup
Microsoft System Agent
The
2. Highlight the scheduled backup job you want to change, then select
Change Schedule... from the Program menu.
3. Make your changes, then click OK.
Refer to your Windows documentation for instructions on using the
Microsoft System Agent.
To change a scheduled backup job with Task Scheduler:
1. Double-click the calendar icon on the taskbar to open Task Scheduler.
Note: If you are running Windows NT, open the Task Scheduler from
appears.
the Start menu, Programs, Administrative Tools, then click
Scheduled Tasks.
Task Scheduler
2. Highlight the scheduled backup job you want to change, then select
Properties from the File menu.
3. Make your changes, click Apply, then click OK.
Refer to your Windows documentation for instructions on using Task
Scheduler.
Note: If you modify Advanced settings in Task Scheduler or System
appears.
Agent, you will not be able to edit the job from
HP Colorado Backup II.
Editing a Scheduled Backup Job
To edit a scheduled backup job:
1. From the Backup window, select the job you wish to edit in the
drop-down list box.
Backup Job
2. Click the Options button and select the new settings for your backup job
from the Options tabs.
3. Click Apply, then click OK or select another Options tab.
Page 43

4. From the Job menu, click Save.
These changes will be updated in the Microsoft System Agent, Microsoft
Internet Explorer 4.x Task Scheduler, or the HP Colorado Backup II Scheduler,
depending on which is installed.
Removing a Scheduled Backup Job
You can use the HP Colorado Backup II Scheduler or your installed scheduler
to remove a scheduled backup job. For more information on the
HP Colorado Backup II Scheduler, refer to the HP Colorado Backup II
Scheduler Help by running the HP Colorado Backup II Scheduler and
choosing from the Help menu.
To remove a scheduled backup job from HP Colorado Backup II:
1. Select Delete... from the Job menu.
2. Highlight the item you wish to remove, or type the job name in the text box,
then click Delete.
Scheduling a Backup Job 43
3. Click Yes to confirm the operation or No to cancel.
To remove a scheduled backup job from the Microsoft System Agent:
1. Double-click the calendar icon on the taskbar to open the Microsoft
System Agent.
Microsoft System Agent
The
2. Highlight the scheduled backup job you wish to remove, then select
Remove from the Program menu.
3. Click Yes to confirm the operation, or No to cancel.
To remove a scheduled backup job from Task Scheduler:
1. Double-click the calendar icon on the taskbar to open the Task Scheduler.
Note: If you are running Windows NT, open the Task Scheduler from
the Start menu, Programs, Administrative Tools, then click
Scheduled Tasks.
appears.
Task Scheduler
appears.
Page 44

44 Using Backup
2. Highlight the scheduled backup job you wish to remove, then select Delete
from the File menu.
3. Click Yes to confirm the operation or No to cancel.
Note: Removing a scheduled backup job using the Microsoft Internet
Explorer 4.x Task Scheduler or Microsoft System Agent will
prevent the scheduled backup from running, but will not delete
the backup job in HP Colorado Backup II.
Page 45

Using Restore
This chapter explains how to use the Restore Wizard and the Restore window
to restore files to your hard disk. Restore reads the selected backup sets and
restores your files to a specified location (usually their original location). You
can restore one file, several selected files, or all files from a backup set. You can
also select individual versions of a file, specify the destination for the restored
files, and set options.
Whether you are restoring your entire system, a single file, or a particular
version of a file, HP Colorado Backup II makes it simple to set up the restore
process. You can use either the Restore Wizard or the Restore window to
specify your restore.
3
Where to Look—Restore
For more help on restore topics, see:
Disaster Recovery for Windows 9x on page 48
■
Disaster Recovery for Windows NT on page 52
■
One-Button Restore on page 53
■
Restoring All Your Files on page 54
■
Using the Restore Wizard on page 56
■
The Restore Window on page 58
■
Restoring Files with the Restore Window on page 65
■
Restore Progress Window on page 66
■
Advanced Tab on page 64
■
Page 46

46 Using Restore
Creating the Disaster Recovery Set
The first step in securing the data on your system is creating the Disaster
Recovery (DR) Set. The DR Set will contain the information necessary to
recover your system.
The Recovery Wizard will guide you through the steps required to create the
DR Set with easy-to-follow instructions for protecting your valuable data. Once
the DR Set has been created, it will allow you to recover your system should
your hard drive fail, even if your Windows operating system will not start.
The first time HP Colorado Backup II launches, you are prompted to create
Disaster Recovery Diskettes. If you do not create Disaster Recovery Diskettes at
that time, you may do so later by choosing Recovery Wizard from the Tools
menu.
If you installed a new backup device since you created your DR Set, you must
create a new DR Set to accompany your new backup device. If the backup
device listed is not found, Disaster Recovery cannot complete.
What you will need
To create the Disaster Recovery Set, you will need the following items:
For Windows 9x
■
One or more blank, formatted 1.44MB diskettes
■
Windows 9x installation CD
■
Media for your backup device
For Windows NT
■
Five (5) blank, formatted 1.44MB diskettes
■
Windows NT installation CD
■
Media for your backup device
Note: The amount of media required for the DR Set will depend on the
amount of data on your system.
Page 47

Creating the Disaster Recovery Set 47
To create your Disaster Recovery Set:
1. Select Recovery Wizard from the Tools menu.
Recovery Wizard
The
2. Follow the instructions on the Wizard screens to create your Disaster
Recovery Set.
It is recommended that you label your media when prompted in the
Wizards, and store your DR Set in a safe place. A new Disaster Recovery Set
should be created when new hardware or software has been added to your
system, or if many changes have been made to your files since the last DR
Set was created.
Note: For Windows 9x only — If you are using a SCSI device for
Disaster Recovery, you may be prompted for a DOS ASPI driver.
Please refer to the README.TXT for instructions on entering the
correct drivers when creating the DR Set.
appears.
Testing your Disaster Recovery Set
Note: This section applies to Windows 9x only.
After you have created the Disaster Recovery Set, you will be asked if you
would like to test the DR Set. Testing the DR Set is very similar to performing an
actual recovery; however, be sure to stop before recovering your data. This test
is to verify that your drive is responding properly.
To test your Disaster Recovery Set:
1. Insert the Windows Startup Disk (diskette #1 of the DR Set) into your
machine’s 3.5” boot floppy drive and restart your computer.
A DOS screen appears.
2. If a Windows Startup Diskette #2 was created (not all systems require the
creation of a second diskette), insert that diskette into your machine’s 3.5”
boot floppy drive, then press any key.
The Disaster Recovery screen appears.
3. Press F5.
Page 48

48 Using Restore
Your system files will be copied from the diskette to your hard drive.
The following prompt should appear:
Please insert Disaster Recovery Media #1 into your
(device name).
4. Insert media #1 of your DR Set into your device when prompted, then press
Enter .
Disaster Recovery scans the media to verify that the drive and the DR Set
are responding properly. When Disaster Recovery is done scanning the
media, you should receive a message indicating that the test was successful.
5. Press F10 to exit.
Caution: Do not continue past this step. The test is complete. Please
remove the Windows Startup Disk and media #1 from your
drives and restart your computer.
If you see any error messages during this process, then there is a problem
communicating with the backup device. Most likely, the problem is a
missing DOS driver that is required for your backup device, or incorrect
command line parameters for the driver. Consult the documentation for
your backup device for information on configuring it for use in DOS.
Disaster Recovery for Windows 9x
The Disaster Recovery (DR) process enables you to recover from hard disk
failure and should be used in emergency situations only. If you do not have a
Disaster Recovery Set, see Creating the Disaster Recovery Set on page 46. If you
created a DR Set, follow the steps below.
Before using Disaster Recovery, decide if another recovery method can be
implemented instead. For example, if the problem appears to be a Windows
system problem, such as a corrupt registry, try to recover by following the steps
outlined in your Microsoft Windows User's Manual before using Disaster
Recovery.
If your hard drive failed completely and you have replaced it, Disaster Recovery
may be the best method for recovery. However, you may also consider re-
Page 49

Disaster Recovery for Windows 9x 49
installing Windows, re-installing your backup software, then selectively
restoring the rest of the files you need.
To use Disaster Recovery:
1. Replace any lost hard drives with comparable drives.
Note: In order to recover all of your information, Disaster Recovery
must have at least as much hard disk space as existed before the
drive failure.
2. Insert the Windows Startup Disk (diskette #1 of the DR Set) into your
machine’s 3.5” boot floppy drive and restart your computer.
A DOS screen appears.
3. If a Windows Startup Diskette #2 was created, (not all systems require the
creation of a second diskette) insert that diskette into your machine’s 3.5”
boot floppy drive, then press any key.
The Disaster Recovery screen appears.
4. If necessary, you can prepare your hard disk at this time using the following
tools, by pressing Enter:
◆
DDIFF—Displays any differences between your current and original
hard drive configurations
◆
*FDISK—Re-partitions your hard disk
Note: After using the FDISK utility, repeat steps 2-4 before continuing
with the recovery.
◆
*FORMAT—Formats one or more partitioned drives
◆
*SYS—Installs the system boot files onto the hard disk
*For instructions on the use of these utilities, please refer to your operating
system user manual or contact your operating system’s manufacturer.
When you are done preparing your hard disk, at the prompt, type (Your
boot floppy drive letter):\
RECOVER
, and press Enter.
5. To continue with Disaster Recovery, press F5.
6. Your system files will be copied from the diskette to your hard drive.
Page 50

50 Using Restore
The following prompt should appear:
Please insert Disaster Recovery Media #1 into your (device
name).
7. Insert media #1 of your DR Set into your device when prompted, then press
Enter .
Note: If your Disaster Recovery Set consists of more than one piece of
You will then be prompted to select a drive, or volume to recover. If you
have only one drive, it will be automatically selected for recovery and this
prompt will not appear.
8. Select the volume that you wish to recover by highlighting the volume
using the Up and Down arrow keys, then pressing Enter.
media, you will be prompted to insert each media in the order it
was created.
You will then be asked to confirm your selections before recovering your
information.
9. Press Enter
to confirm your selections.
Note: If media #1 of your DR Set is not in your drive, you will be
prompted to insert it at this time.
Disaster Recovery will begin recovering the Windows File System.
10. Once the volume has been recovered, a summary of the process will be
displayed. To exit this screen, press Enter. If there is more than one volume
to be recovered, you may select it at this time.
After recovering the volume(s), you may wish to view the REPORT.TXT file
which contains a text summary of the files that could not be recovered. If you
wish to view this file, you must first exit the program by pressing the ESC key
twice, then typing
EDIT REPORT.TXT
. After reading the text, press ALT+F, then
press X to exit the editor.
Your recovery is complete. Remove any media from your machine and restart
your computer.
Page 51

Disaster Recovery for Windows 9x 51
Note: It may be necessary to restart your computer more than once if
any hardware in your system has changed since your DR Set was
created.
Page 52

52 Using Restore
Disaster Recovery for Windows NT
A minimal install of the Windows NT Workstation will be performed from the
Disaster Recovery Set.
Disaster Recovery screens will display messages instructing you when to insert
each of the four diskettes from your Disaster Recovery Set.
To use Disaster Recovery:
1. Insert the Windows NT Workstation Setup Boot Disk (diskette #1 of the DR
Set) and restart your computer. You will be guided through a partial NT
installation.
Only the boot drive and the NT installation drive need to be partitioned at
this time. You will be able to partition and format other drives at a later time
through the Disk Administrator in the Disaster Recovery process.
2. Restart your computer when prompted.
The Recovery Wizard should appear now and guide you through the steps
necessary to recover your system.
Note: If setup determines that your primary partition is not set up (i.e.
if your C drive is not partitioned or formatted), then you will be
prompted to do so. You should attempt to partition any new
drive(s) to the same settings as were set before the drive failure.
3. After you have restored all the files from your backup volumes, reboot the
machine to complete your recovery.
Page 53

One-Button Restore
One-Button Restore launches a series of dialogs which help you perform a
restore in just a few steps.
To run One-Button Restore:
1. Click the Start menu, select Programs, HP Colorado Backup II, and then
click One-Button Restore.
One-Button Restore
The
appears.
2. Select a device in the drop-down list
box.
3. Click Next to continue.
One-Button Restore 53
dialog box
4. Check the drives, folders, and files you
want to restore.
5. Click Start to begin restoring your files.
Restore Default Settings
Your restore will run with the following default settings:
■
What to Restore—Folder view. See What to Restore on page 60.
■
Where to restore—Original Location. See Where to Restore on page 62.
■
How to restore—Always replace. See How to Restore on page 62.
Page 54

54 Using Restore
Restoring All Your Files
This section explains how to quickly and easily restore all your files in the event
of a hard disk failure. This procedure can also be used to transfer all your files
to a new computer.
Before you can restore your files after a hard disk failure, you must first prepare
your hard disk and reinstall Windows. Then follow these steps:
For Windows 9x
1. Install and configure HP Colorado Backup II. See Installing
HP Colorado Backup II on page 10.
2. Collect the media containing your most recent All Selected Files and your
New and Changed Files backups. Which backup sets you’ll need to restore
depends on your backup strategy.
If you performed:
All Selected Files only—restore only your most recent backup set.
All Selected Files and Differential New and Changed Files—restore your All
Selected Files backup first, then restore the most recent Differential backup
set.
All Selected Files and Incremental New and Changed Files—restore your All
Selected Files backup first, then restore each of the Incremental backups
sets in order, starting with the oldest.
3. Restore the All Selected Files backup set. Make the following option
selections on the Restore window:
What to Restore—Click Device vie w, then select each local drive.
Where to Restor e —Choose Original Locations.
How to Restore—Choose Always replace.
4. Click Start.
5. If you used the
registry, a prompt will appear asking if you would like to restore the
Windows Registry. See Advanced Tab on page 38 for information on this
option.
Back up Windows Registry...
option and backed up the
Page 55

Restoring All Your Files 55
Caution: Restoring the Registry may cause serious problems if your
hardware configuration has changed since you last backed up
the Registry.
If your system’s hardware configuration and system settings
changed
since the last backup of the registry, click Yes to restore the
have not
Windows Registry.
The entire registry will be restored along with all selected local drives.
Or,
If your system’s hardware configuration
has
changed, (i.e. you’ve added a
new drive or changed the IRQ settings on a card) click No when prompted
to restore the hardware and system settings in the registry. Only those
portions of the registry containing your software settings and configuration
will be restored along with all selected local drives.
6. When the restore is complete, you are prompted to reboot your computer.
Click Yes to reboot (recommended).
7. Restore any New and Changed Files backup sets using step 3 and 4.
For Windows NT
1. Install and configure HP Colorado Backup II. See Installing
HP Colorado Backup II on page 10.
2. Collect the media containing your most recent All Selected Files and your
New and Changed Files backups. Which backup sets you’ll need to restore
depends on your backup strategy.
If you performed:
All Selected Files only—restore only your most recent backup set.
All Selected Files and Differential New and Changed Files—restore your All
Selected Files backup first, then restore the most recent Differential backup
set.
All Selected Files and Incremental New and Changed Files —restore your All
Selected Files backup first, then restore each of the Incremental backups
sets in order, starting with the oldest.
3. Restore the All Selected Files backup set. Make the following option
selections on the Restore window:
Page 56

56 Using Restore
What to Restore—Click De vice vie w, then select each local drive.
Where to Restor e —Choose Original Locations.
How to Restore—Choose Always replace.
Caution: Restoring the Registry may cause serious problems if your
hardware configuration has changed since you last backed up
the Registry.
If your system’s hardware configuration and system settings
changed
window and select Rest ore Windows Registry from the Advanced tab. For
more information on the Advanced tab, see Advanced Tab on page 64.
The entire registry will be restored along with all selected local drives.
Or,
If your system’s hardware configuration
new drive or changed the IRQ settings on a card) make sure the Restore
Windows Registry checkbox is not selected. Only files selected from your
local drives will be restored.
4. Click Start.
5. When the restore is complete, you are prompted to reboot your computer.
Click Yes to reboot (recommended).
6. Restore any New and Changed Files backup sets using step 3 and 4.
since the last backup of the registry, click Options in the Restore
Using the Restore Wizard
have not
has
changed, (i.e. you’ve added a
The Restore Wizard guides you through the steps required to run a restore,
using a series of windows to let you choose the options used to create your
restore job. After choosing an option, click Next to continue.
To create your restore job using the Restore Wizard:
1. Click Restore Wizard in the Startup window and click OK, or click the
Restore Wizard button on the toolbar, or select Restore Wizard from the
Tools menu.
Page 57

Rest ore From
The
window appears.
2. Choose the backup device to restore
from, then click Next.
View files to restore
The
window
appears.
3. You may select your files from the
catalog stored on your hard disk or
from the media in your drive.
Using the Restore Wizard 57
See File Views on page 60 for more
information.
4. Click Next to continue.
Restore selection
The
pane window
appears.
5. Click the check boxes next to the items
you want to restore. For more
information on file selection, see
Selection Panes on page 16.
6. Click Next to continue.
Page 58

58 Using Restore
Where to Restore
The
7. Choose a destination for your restored
files.
8. If you choose to restore to another
location, type a path into the text box
or click Browse.
9. Files are restored in their original
folder structure unless you check
Rest ore all files to a single folder. See
Where to Restore on page 62.
10. Click Next to continue.
How to Restore
The
11. Select an option. See How to Restore
on page 62.
window appears.
window appears.
12. Click Start.
Media Required
The
Follow the instructions on the screen,
then click OK.
The Restore Progress window appears.
See Restore Progress Window on
page 66.
box appears.
The Restore Window
This section first describes the Restore window. For tep-by-step instructions for
restoring your files, see Restoring Files with the Restore Window on page 65.
The Restore window gives you quick access to all the restore options. The
Restore window is composed of four sections.
Page 59

■
Restore from—Select the
backup device to restore
from.
■
File find—Locate the files
you want to restore.
■
What to restore—Select the
files you want to restore.
■
Where to restore —Select
the location to restore your
files to.
■
How to rest ore—Select your
overwrite option.
The Restore Window 59
Restore From
The Restore from box lists all available backup devices to restore from. To
change the device you want to restore from, select another device in the dropdown list box.
File Find
The File Find option enables you to locate file(s) for restore. You can search by
filename, location, and date modified. HP Colorado Backup II lists all the
backed up files that match your criteria.
You may terminate the File Find operation at any time by clicking the Close
button.
To search for files with the File Find option:
1. From the Restore tab, select the device that you used to back up your file(s).
2. Click the File Find button on the Toolbar, or select File Find from the Edit
menu.
File Find
The
window appears.
Page 60

60 Using Restore
3. Enter a file name and path (if no path is entered, HP Colorado Backup II
searches all paths).
4. To search by date, click the Date Modified tab and enter a date or date
range.
5. To start searching, click Find Now.
HP Colorado Backup II searches the catalog that corresponds to the
selected device and displays a list of all files that match the search criteria.
6. When the search is completed, the file name and path will appear in the
window. Set options, if necessary, by clicking the Options button and
choosing from the Restore Options tabs. Set your options, then click Start.
7. The
Media Required
then click OK.
What to Restore
Select a file view and files to restore in the
Catalog
Each time you make a backup, creates a backup catalog. This catalog contains
information about the files and folders that were backed up and the Backup
Job used. HP Colorado Backup II uses the information in the backup catalog to
restore or compare backed-up files.
After viewing the backup catalog, you may find items you no longer need to
restore or compare. To remove these items from the backup catalog, use the
Catalog Clean Up
page 79 for more information.
Note: If you get a message indicating the catalog is empty, select
box appears. Follow the instructions on the screen,
What to restore
tool located on the Tools menu. See Catalog Clean Up on
Device view on the Restore window.
section.
File Views
HP Colorado Backup II provides three different view options to help you select
the files you need to restore.
Page 61

The Restore Window 61
■
Folde r view—displays the catalog on the hard disk using the traditional file
tree system. Folder view displays cataloged files filtered by the selected
backup device.
■
Media view—displays the catalog on the hard drive sorted by media. Media
view displays cataloged files for all devices.
■
Device view—displays the contents of
the media currently in the drive.
Device view displays all logged files for
the selected device.
Note: If you wish to view a backup set during Device View that spans
more than one media, you must insert all media in sequence.
Restore Selection Panes
HP Colorado Backup II uses the same drive and file selection methods as the
Windows Explorer. Drives and folders are selected in the All Folders pane, and
individual files and folders are selected in the Contents pane. Select drives and
files to restore by clicking the check box next to the item. For more
information, see Selection Panes on page 16.
Multiple File Versions
If you back up the same set of files more than once, you will be able to restore
any version of the files you backed up.
By default, HP Colorado Backup II restores the
most recent file version. To restore an older
version, choose Version from the Edit menu or
toolbar and use the
lists each available version’s size and date/time
modified.
You can also open the
right-click a file in the Restore selection pane, and
then click Version.
File Version
File Version
dialog box, which
dialog if you
Page 62

62 Using Restore
Where to Restore
You’ll usually want to restore files to the same place from which you backed
them up. However, if you want to restore your files to a different location, use
Where to restore
the
■
Original Location—All files and folders are restored to the same path from
which they were backed up. This is the default setting.
■
Alternate Location—All files and folders are restored using the original tree
as backed up, but the root of the tree is set to the specified path.
■
Single Directory—All files and folders are restored to a single folder,
specified in the path text box.
To restore your files to an alternate location:
box. The following selections are available:
1. Select Alternate Location from the
2. Type a path into the text box.
Or,
Click Browse, select a folder in the list, then click OK. The folder appears in
the text box.
To restore your files to a single folder:
1. Select Single Directory from the
2. Type a folder (directory) name into the text box.
Or,
Click Browse, select a folder from the list, then click OK. The folder appears
in the text box.
How to Restore
Where to restore
Where to Restore
list.
drop-down list box.
Restore options lets you choose how to treat files in your backup set with the
same name as those on your hard drive.
To set your restore options:
1. Click Options in the Restore window.
Page 63

Restore Options
The
dialog box appears:
2. Choose a Restore option.
General Tab
■
Do not replace—Never replace the files on the
hard disk, even if the backed-up file is a more
recent version than the file on the hard disk.
■
Replace older files—Replace only older files
with the most recent file versions.
Always replace—Always replaces the files on the
disk.
The Restore Window 63
Caution: Always Replace will always overwrite the files on your hard disk
with the backed up files.
Report Tab
Use the Report tab to specify the items you want
to include in your restore report and to set your
unattended restore option.
■
List all files that were restored—Includes a list
of the files that were selected and successfully
restored.
■
List files that were not restor ed—Includes a list
of the files that were selected, but not
successfully restored.
■
List errors reported while restoring files—
Includes a list of any errors encountered while
restoring files.
Page 64

64 Using Restore
■
List warnings reported while rest oring files—Includes a list of any warnings
encountered while restoring files.
■
List unattended messages and prompts—Includes a list of any messages
and prompts encountered while performing an unattended restore.
■
Show report summary—Includes a report summary of the results of the
restore.
Unattended restore
Check Unattended restore to run unattended restore jobs. This option enables
the program to bypass most prompts during a restore operation.
restore
is the default setting.
Advanced Tab
Use the Advanced tab to specify whether or not to restore the Windows
Registry.
Unattended
■
Restore Windows Registry—Restores the Windows Registry.
■
Restore NTFS File Permissions—Restores user’s permissions to files and
directories.
Note: If you are running under Windows 9x, the
Permissions
option will not be available.
Restore NTFS File
To set the Advanced Options:
1. Click the Advanced tab in the Restore Options dialog box.
Page 65

Restoring Files with the Restore Window 65
Advanced
The
2. Check the option you want.
3. Click OK.
tab appears.
Restoring Files with the Restore Window
To restore files using the Restore window:
1. Click Blank R estor e Job in the Startup window, or click the Restore tab from
the Main or Program window.
Restore
The
2. Select the backup device containing the files you wish to restore.
3. To choose your files from your backup device instead of from the catalog
on your hard disk, select Device view. See File Views on page 60.
4. Place a checkmark in the box next
to the drive and files you want to
restore.
window appears.
Page 66

66 Using Restore
5. To change your restore location, select another location in the
restore
6. To change your restore options, click Options. Change the settings for the
restore job under the options tabs, click Apply, then click OK. See How to
Restore on page 62.
7. On the Restore window, click Start.
8. The
then click OK.
box. See Where to Restore on page 62.
Media Required
box appears, follow the instructions on your screen,
Restore Progress Window
The Restore Progress window appears when you
click OK, and provides information about your
restore job. It is divided into three sections.
The top section lists the selected backup device
and the name of your media. It also displays the
current status of your restore job.
Where to
The center section displays a progress bar and
the time elapsed since the start of restore.
The bottom section lists the name of the file
currently being restored, and the estimated
number and size of the files restored.
You can cancel the restore job at any time by
clicking the Cancel button or pressing Esc.
When the restore job is complete, the
Report
or click OK to continue.
button is displayed below it. Click R eport for a summary of your restore
Cancel
button changes to OK and a
Page 67

Using Compare
This chapter explains how to use the Compare window to read data from the
backup set and compare it to the data on the hard disk. You can compare one
file, selected files, or all files in the backup set.
Compare is a separate function designed to provide maximum data security.
After you have created a backup set, you can go to the Compare window and
verify that the information contained on the backup media is identical to the
data on the hard disk and that it can be restored.
It is strongly recommended that you perform compares after your first few
backups and after changing your system’s configuration. This will confirm
HP Colorado Backup II is running properly on your computer.
Performing a compare at any time in the future lets you see how the files in the
backup set differ from the files currently on the hard disk.
4
Where to Look—Compare
For more help on compare topics, see:
The Compare Window on page 68
■
Comparing Files with the Compare Window on page 70
■
Compare Progress Window on page 71
■
Page 68

68 Using Compare
The Compare Window
The Compare window gives you
quick access to all the compare
options. It consists of three main
sections:
■
Compare from—Select the
backup device to compare
.
from
■
What to compare—Select the
files you want to compare.
■
Where to compare—Select
the location to compare your
files to.
Compare From
The Compare from drop-down list box lists all available backup devices to
compare from. To change the drive you want to compare from, select another
drive in the drop-down list box.
What to Compare
Select the files to compare in the What to compare section.
File Views
HP Colorado Backup II provides three
different view options to help you select
the files you want to compare.
Page 69

The Compare Window 69
■
Folde r view—displays the catalog on the hard disk using the traditional file
tree system. Folder view displays cataloged files filtered by the selected
device.
■
Media view—displays the catalog on the hard drive sorted by media. Media
view displays cataloged files for all devices.
■
Device view—displays the contents of the media currently in the drive.
Device view displays all logged files for the selected device.
Compare Selection Panes
HP Colorado Backup II uses the same drive and file selection methods as the
Windows Explorer. Drives and folders are selected in the All Folders pane, and
individual files and folders are selected in the Contents pane. Select drives and
files to compare by clicking the check box next to the item. For more
information, see Selection Panes on page 16.
Where to Compare
You’ll usually want to compare files to the same drive and directory as the one
from which they were backed up. If their location has changed, however, the
Where to compare
To compare your options to an alternate location:
1. Select Alternate Location from the Where to compare drop-down list box.
2. Type a path in the text box.
Or,
Click Browse, select a folder in the list, then click OK. The folder appears in
the text box.
To start comparing your files:
Click Start.
❖
box lets you specify where the original files are now located.
Page 70

70 Using Compare
Comparing Files with the Compare Window
To compare your files:
1. Click the Compare tab in the Main Application window.
Compare
The
2. Select the backup device containing the backup set you wish to compare in
the Compare from drop-down list box.
3. Select the files you wish to compare.
See Selection Panes on page 16 for
more information.
window appears.
4. Select a location in the Where to
Compare drop-down list box.
5. Click Start.
6. The Media Required box appears. Follow the instructions on your screen,
then click OK.
Compare Progress
The
window appears.
Page 71

Compare Progress Window
The Compare Progress window appears when
you click OK, and provides information about
your compare. It is divided into three sections.
The top section lists the selected backup device
and the name of your media. It also displays the
current status of your compare job.
The center section displays a progress bar and
the time elapsed.
The bottom section lists the name of the file
currently being compared, and the estimated
number and size of the files compared.
You can cancel the compare at any time by clicking the Cancel button.
Comparing Files with the Compare Window 71
When the compare is complete, the OK and
button. Click Report for a summary of your compare or click OK to continue.
Report
button replace the
Cancel
Page 72

72 Using Compare
Page 73

Tools
HP Colorado Backup II offers several tools to help you handle your media,
catalog, and reports. This chapter describes how to use Media Tools, Report
Tools, Catalog Tools, and Preferences.
Where to Look—Tools
For more help about tools topics, see:
Media Tools on page 73
■
HP Media Monitor on page 77
■
Report Tools on page 78
■
5
Import Catalog on page 78
■
Catalog Clean Up on page 79
■
Preferences on page 80
■
Media Tools
The following Media Tools commands are located on the Tools menu.
Note: If you have more than one backup device configured, each
Identify
This command displays the media name and contents.
device will be listed and will have its own set of tools. Different
drive types use different tool sets.
Page 74

74 Tools
To identify a media:
1. Select Media from the Tools menu, then select Identify.
2. To view the backup sets on the media, click Device View in the Identify
3. Select OK to close the Identify window.
Initialize
This command erases the media and prepares it for use.
To initialize a media:
Identify
The
displayed.
Progress window.
Caution: Initializing a piece of media destroys all data on the media.
window appears. The device name and media name are
1. Select Media from the Tools menu, then select Initialize.
If the media contains data, you are prompted to confirm the initialize.
2. Click Yes to confirm the operation or No to cancel.
If you are using SCSI media, you may enter a new media name.
3. Click OK.
Initialize Progress
The
window appears.
Erase
This command erases all files on the media, and positions the media to start
recording.
To erase a piece of media:
Caution: Erasing destroys all data on the media.
1. Select Media from the Tools menu, then select Erase.
If the media contains data, a message box appears asking you to confirm
the erase.
Page 75

Media Tools 75
2. Click Yes to confirm the operation or No to cancel.
Erase Progress
The
window appears.
Retension
This command winds and rewinds a tape to remove any slack and evenly
tension the tape by performing a fast forward and rewind.
To retension a tape:
❖ Select Media from the Tools menu, then select Retension.
Ret ension Progress
The
window appears.
Rename
Note: This section applies to Windows 9x only
Use this command to rename your QIC medium.
If you rename your medium, be aware that backup sets with the old medium
name will be removed from the catalog. If you want to restore or compare files
that you backed up before you renamed your medium, you need to perform a
Device View. Any backup sets that you create after you rename your medium
will appear in the catalog.
To rename a QIC medium:
1. Select Media from the Tools menu, then select Rename.
A dialog appears displaying the name for the inserted QIC medium.
2. If you wish to rename your QIC medium, type a name in the text box, then
click OK.
Security Erase
This command erases the cartridge and overwrites the data with zeros, so that
it cannot be read. Security Erase can take several hours to complete, depending
on the media type.
Page 76

76 Tools
To security erase a tape:
1. Select Media from the Tools menu, then select Security Erase.
2. Click OK to erase or Cancel to cancel the security erase operation.
Format
This command formats media. When media is formatted, all data on the media
is lost. Formatting can take several hours to complete, depending on the media
type.
Your tape will spin for several seconds. If your tape contains one or more
backup sets, a warning is displayed before the security erase begins.
Note: This section applies to Windows 9x only
Note: SCSI devices use the Initialize media tool instead of the Format
media tool.
To format QIC media:
Caution: Formatting destroys all data on the media.
1. Select Media from the Tools menu, then select Format.
If the media contains data, a message box appears asking you to confirm
the operation.
2. Click Yes to confirm the operation or No to cancel.
3. Enter a new media name, then click OK.
If the drive supports multiple capacities, you are prompted to select either
a high or low capacity format.
Page 77

HP Media Monitor
HP Media Monitor is a feature of HP cartridge tapes that tracks tape usage.
When tape with HP Media Monitor is used with the HP Colorado 14GB tape
drive (or later models) and the HP Colorado Backup II software, the software is
able to report the condition of the tape.
Whenever you use HP Colorado Backup II to backup, restore,
or compare files, the HP Media Monitor icon appears in the
Windows taskbar next to the time display, like this:
A warning message also appears if HP Media Monitor detects that the tape is
approaching the end of its useful life.
The HP Media Monitor icon contains a traffic signal, with green, yellow, or red
lights that indicate the current condition of the tape. You can double-click the
icon to view a more detailed status of your tape, and one of the following
messages will appear:
HP Media Monitor 77
Table 1: HP Media Monitor Icon
Media Status: Good — A green light indicates that your
tape is in good condition and within HP’s recommended usage level.
Media Status: Replacement Recommended — A yellow light indicates that your tape is nearing HP’s recommended usage level and should be replaced soon.
Media Status: Replacement Recommended — A red
light indicates that your tape has exceeded HP’s recommended usage level and should no longer be used to
perform backups. It is still possible to read the data on
the tape.
Media Status: Unknown — No light indicates that the
tape is not an HP tape with Media Monitor support.
The usage level can not be determined.
Page 78

78 Tools
Tip: To check on the status of your tape at any time while using
Report Tools
Report tools give you access to the backup log or report, which provides
backup information and error messages. The following commands are
available under the Report sub-menu.
■
View—Launches Notepad with the log file loaded and displays the last five
reports.
■
Print—Launches Notepad, prints the log file, and exits Notepad.
HP Colorado Backup II, from the Tools menu, select Media,
Identify.
Tip: Click Report on the Progress window to view the report for the
current backup, compare, or restore operation.
Import Catalog
To add backup sets to your catalog, use the Import Catalog command from the
Tools menu. This allows you to recatalog backup sets or media that have been
deleted or to add files from media that have been backed up on a different
system.
To import items into your backup catalog:
1. On the Restore or Compare window, select Import Catalog from the Tools
menu.
2. Select the backup set you wish to add to your catalog in the Select Backup
Sets dialog box.
3. Click OK. The items in the backup set are added to your catalog.
Device Vie w
is selected.
Page 79

Note: The media is searched and catalog information is added to your
catalog. If the backup set is very large, this operation can take
several minutes.
Catalog Clean Up
The Catalog Clean Up tool helps you manage your catalog. Use this tool to
delete backup sets or media from the backup catalog. This command displays
the Catalog Clean Up dialog box. See Catalog on page 60 for more information.
Note: If you remove backup sets or media from the catalog, you must
perform a Device View to restore or compare them.
Catalog Clean Up 79
To delete items from the backup catalog:
1. On the Restore or Compare window, select Catalog Clean Up from the
Tools menu.
Catalog Clean Up
The
2. Select media or a backup set in the
from catalog
3. Click Remove.
4. Click Yes to confirm this operation or No to
cancel.
Tip: If you want to compact the catalog so that it occupies less space,
list box.
click Compact on the Catalog Clean Up dialog box.
dialog box appears.
Remove
Page 80

80 Tools
Preferences
The Preferences dialog box lets you set the following options:
General
■
Show startup dialog when HP Colorado Backup II is started.—The startup
screen is displayed each time the program starts.
■
Show the number and size of files before backing up, restoring and
comparing data.—The estimated number and size of files selected are
displayed. This option also enables HP Colorado Backup II to display time
estimates and file counts in the Progress windows.
■
Show HP Media Monitor dialog.—The HP Media Monitor dialog is
displayed when the tape in your drive is not an HP tape with Media Monitor
support.
Page 81

Troubleshooting Tips
This chapter provides troubleshooting tips to solve the most common
configuration, compatibility, and other issues.
Where to Look—Troubleshooting
For more help on troubleshooting topics, see:
Backup Device Configuration on page 81
■
System and Software Lockups on page 86
■
Common Error Messages on page 88
■
6
Backup Device Configuration
This section is designed to help you configure your system. You will find useful
troubleshooting tips that can help you solve most of the problems you may
encounter.
*HP Colorado Backup II supports plug and play operation. However, if for
some reason your backup device is not automatically detected, this section
provides instructions on manually configuring your drive or controller.
Chances are you won’t need to manually configure either of them. See your
device type below for specific steps.
*For Windows 9x only
Conflicts With Drivers from Other Backup Programs
Some driver files from other backup programs and Windows 3.1 applications
may conflict with your backup software. Table 1: Driver File Lines and Associate
Page 82

82 Troubleshooting Tips
Applications on page 82 lists the driver files, with their associated applications,
that may be causing a conflict.
As a troubleshooting step, disable any drivers on your system that might cause
conflict.
Caution: If you are running the applications associated with these driver
files, do not remove them permanently.
To disable drivers that may be creating conflicts:
1. Make a copy of your SYSTEM.INI file (found in your Windows folder) and
name the copy SYSTEMBKUP.INI. This provides an unmodified copy of your
original file.
2. Click Run on the Start menu.
3. Type
4. In the [386Enh] section of your SYSTEM.INI file, type a semi-colon (
system.ini
and click OK. The SYSTEM.INI file opens in Notepad.
;
) at the
beginning of the driver file lines listed below. The semi-colon disables the
driver that may be causing a conflict.
5. Save the modified SYSTEM.INI file and restart your computer.
If you find that any of the programs listed below with a dagger (†) are causing
the conflict, you should obtain the Windows version of the software to
eliminate the problem.
Table 1: Driver File Lines and Associate Applications
Driver File Line Application
device=cmswtape.386 Colorado Backup for Windows
device=cmsdtape.386 Colorado Backup for DOS
device=vfintd.386 Backup Exec, Conner Backup,
Iomega Backup, Norton Backup
device=cpbvxd.386 Central Point Backup
†device=symevnt.386 Symantec Norton Utilities
†device=adw30.386 After Dark Screen Savers
†device=awdos.386 PCanywhere for DOS
Page 83

Backup Device Configuration 83
Table 1: Driver File Lines and Associate Applications (continued)
Driver File Line Application
†device=vpcaw.386 PCanywhere for Windows
device=fastback.386 Fastback Backup
device=irw286.drv Irwin Eztape Backup
device=novabkp.386 Novastor Backup
device=virwt.386 Irwin EZtape Backup
Conflicts With Other Programs
If the problem persists:
1. Make a copy of your WIN.INI file (found in your Windows folder) and name
the copy WINBKUP.INI. This provides an unmodified copy of your original
file.
2. Click Run on the Start menu.
3. Type win.ini and click OK. The WIN.INI file opens in Notepad.
4. Type a semi-colon (
;
) at the beginning of the load= and run= lines, then
save the file.
5. Restart your computer and run HP Colorado Backup II.
Conflicts With Other Device Drivers
If the problem continues, try changing the file extension of any
HP Colorado Backup II drivers that are not in use to .old.
To change the file extension of HPColorado Backup II drivers that are not in use:
1. Open the Explorer, double-click Windows, double-click System, then
double-click Iosubsys.
The contents of the Iosubsys folder appear in the right pane.
2. Search for the files listed in Table 2, and change their file extensions to .old.
For example, rename drvwppqt.vxd to drvwppqt.old
Page 84

84 Troubleshooting Tips
3. Restart your computer and run HP Colorado Backup II.
Table 2: Drivers Not In Use
If you are using this
device:
SCSI backup device drvwppqt.vxd
SCSI Backup Devices
If your system cannot locate your SCSI backup device, disable any real-mode
drivers loading in your CONFIG.SYS file. Follow the steps below:
1. Click Run on the Start menu.
2. Type
3. Click on the CONFIG.SYS window.
4. Type
example,
5. Save the CONFIG.SYS file.
6. Restart your computer and run HP Colorado Backup II.
sysedit.exe
rem
at the beginning of each line that contains a real-mode driver. For
rem device=C:\aspi\aspi4dos.sys
Change these files:
drvwq117.vxd
and click OK.
Parallel Port Backup Device
If your system cannot locate your Parallel Port device, you may have an IRQ
conflict.
To check for IRQ conflicts:
1. Right-click the My Computer icon and select Properties.
2. Click the Device Manager tab in the System Properties window.
3. Computer is highlighted and appears at the top of the list. Click Properties.
4. Make sure your printer port drive is the only device with an IRQ setting of
07. If another device has the same IRQ setting, change that device’s IRQ
setting to avoid conflicts.
Page 85

Backup Device Configuration 85
Note: Your printer port may not appear in this list. If it does not appear,
change your printer port IRQ setting using the steps in the next
section.
5. Restart your computer and rerun HP Colorado Backup II.
To change your printer port IRQ setting to 07:
1. Right-click the My Computer icon and select Properties.
2. Click the Device Manager tab in the System Properties window.
3. Double-click Ports in the list box, select Printer Port (LPT1), then click
Properties.
4. Click the Resources tab, then write down your current Input/Output Range
settings.
5. Uncheck Automatic Settings and select Basic Configuration 1 in the Setting
based on drop-down list box.
Interrupt Request
appears in the list box.
6. Highlight Interrupt Request and click Change Setting.
7. Select 07 for the new interrupt.
8. Click OK and verify that the Input/Output Range is at the setting you wrote
down.
9. Click OK, then restart your computer.
If the problem persists:
■
Remove any conflicting drivers or programs. See Conflicts With Drivers
from Other Backup Programs on page 81.
■
Some drives may be incompatible with enhanced parallel ports (ECP/EPP).
Check with your computer hardware vendor to confirm the kind of parallel
port you have and to learn how to change the setting from ECP or EPP to a
compatible setting, such as bi-directional.
Page 86

86 Troubleshooting Tips
System and Software Lockups
If your system or software stops responding, there is often a conflict with
outdated software drivers or with other software. This section will help you
eliminate those and other conflicts.
HP Colorado Backup II Locks Up During Installation
If you are using DriveSpace or Stacker, install HP Colorado Backup II on a noncompressed volume.
To determine which volume is non-compressed:
1. Click the Start button on the taskbar.
2. Click Programs, Accessories, System To ols, DriveSpace 3.
3. You should now see a list of the compressed volumes as well as the Host
drive (the host drive is non-compressed). If you double-click on the host
volume it will indicate how much space is available.
4. Ensure that you have at least 10 MB available on the host drive.
5. Ensure that the host drive is not hidden. To unhide the host drive, click on
the host drive and click the Properties button. Uncheck the Hide this host
drive option.
6. Install HP Colorado Backup II to the host drive.
If HP Colorado Backup II still locks up after installation, boot Windows in Safe
Mode by holding down F8 during boot-up. Install HP Colorado Backup II while
in Safe Mode. When the installation is complete, reboot the system in normal
mode and then run HP Colorado Backup II. If this procedure does not resolve
the problem, contact HP Customer Support (See Customer Support Services
on page 91) and request replacement installation diskettes.
System Locks Immediately After Installation
If your system is locking up immediately after HP Colorado Backup II is
installed, there may be conflicts between HP Colorado Backup II and other
applications.
Page 87

To disable other applications:
System and Software Lockups 87
1. Press the CTRL, ALT and DELETE key at the same time to display the
Program
The only application that can be running is the Explorer.
2. Close other applications by highlighting the desired application and
clicking the End Task button.
If all applications have been disabled and HP Colorado Backup II is still not
responding, rename (using an .OLD extension) the HP Colorado Backup II
drivers not being used. See Conflicts With Other Device Drivers on page 83.
dialog box.
Close
HP Colorado Backup II Locks Up While Displaying Selection
Information Before a Backup
Files in your Recycle Bin may be conflicting with other files on your hard drive.
Delete the files in your Recycle Bin before using HP Colorado Backup II.
To empty the Recycle Bin:
❖ Click the right mouse button on the Recycle Bin located on the Desktop,
then select Empty Recycle Bin.
To delete any protected files in the Norton Recycle Bin:
❖ Right click on the Norton Protected Recycle bin located on the desktop.
Select Empty Norton Protected Files.
If the problem continues, files in TEMP and cache folders may be causing the
backup software to appear locked up. Delete any on-line service TEMP folder
files or Cache folder files. Most on-line and web browsers allow you to purge
their disk cache (for example, Netscape, Microsoft Internet Browser, or
AOLnet).
To delete these temp files:
1. In NetScape Navigator, click Options, Net work Preferences, Clear Disk
Cache Now.
Or,
In Microsoft Internet Explorer, click View, Options, then Advanced tab. In
the cache box, click Empty.
Page 88

88 Troubleshooting Tips
2. Launch HP Colorado Backup II and start the backup again.
Common Error Messages
This section lists some common backup device errors.
ASPI Manager Not Found or ASPI Manager Not Responding
1. Lower the rate at which data is transferred to the backup device from the
SCSI BIOS to 5MB/sec. Refer to your hardware manual for complete
instructions.
2. Ensure the SCSI backup device has a low SCSI ID (for example, a lower ID
than a CD-ROM installed on the system).
3. Contact your hardware vendor for the latest BIOS or Firmware for your
SCSI adapter card and/or backup device and get the latest Windows
miniport driver for your SCSI controller.
4. First see Conflicts With Drivers from Other Backup Programs on page 81 for
troubleshooting tips.
DMA Conflict During Backup or Compare
If the problem continues, follow the steps below.
1. Go to Device Manager and double-click the backup device item.
2. Select the backup device and click Properties.
3. Select the Settings tab and disable high speed burst mode, concurrent
video update, and concurrent hard disk access.
4. Reduce the transfer rate to its lowest setting (500 Kb/Sec).
If you still have a DMA conflict problem, use the lowest resolution setting
available on your video card. If this fixes the problem, contact your video card
or computer manufacturer for available driver updates for Windows.
Media Not Formatted or Unreadable
If you are receiving a “media not formatted or unreadable by drive” error and
are using an internal backup device, try these steps:
Page 89

Common Error Messages 89
1. Right-click the My Computer icon and select Properties.
2. Click the Device Manager tab in the System Properties window.
3. Click the plus sign next to your backup device type to expand the tree, then
double-click your backup device.
4. Click the Settings tab in the Properties window.
5. Uncheck the High speed burst transfers option and click OK.
6. Restart your computer.
Page 90

90 Troubleshooting Tips
Page 91

7
Customer Support Services
If you are having software problems, you can obtain support from HP directly
either through free 24-hours/day interactive electronic services or by
telephone (free during warranty).
Many problems can be solved with the on-line help system or User's Guide.
You can always press F1 to get help for the active window or dialog box. If you
have a problem that cannot be solved using the on-line help or this User's
Guide, collect the information described in “Preparing for Customer Support,”
then contact customer support.
Where to look — Customer Support
For more help on customer support topics, see:
Contacting Customer Support on page 92
■
Internet Support on page 92
■
Fax Support on page 93
■
Telephone Support on page 93
■
Preparing for Customer Support
Write down your exact problem. Include the following information:
Name and version number of your program copy.
■
The wording of any error messages from your backup software, DOS,
■
Windows, or any other application involved in the problem.
Your computer name and model.
■
Names and models of any additional hardware (expanded memory boards,
■
special video cards, tape drive controllers, etc.).
Operating system and version number (including Windows).
■
Page 92

92 Customer Support Services
■
Can you consistently reproduce the problem you are having?
■
Has this problem occurred previously? If it is new, did you change your
system configuration recently?
When calling, follow these guidelines:
■
Call from a phone next to your computer.
■
Please have your notes ready with the information described above, then
contact technical support.
Contacting Customer Support
Internet Support
America Online
Compuserve
World Wide Web
. . . . . . . . . . . . . . . . . . . . . . . . . . . . . . . . . . . . . . . . . . . . . . . . . . . . . . . Keyword: hpstor
. . . . . . . . . . . . . . . . . . . . . . . . . . . . . . . . . . . . . . . . . . . . . . . . . . . . . . . . . . . . . . . .Go HPSYS
. . . . . . . . . . . . . . . . . . . . . . . . . . . . . . . . . . . . . . . . http://www.hp.com/isgsupport
Bulletin board site (8,N,1,F, 1200-28.8K baud)
Europe . . . . . . . . . . . . . . . . . . . . . . . . . . . . . . . . . . . . . . . . . . . . . . . . +31 495 546909
Asia/Pacific
Australia . . . . . . . . . . . . . . . . . . . . . . . . . . . . . . . . . . . . . . . . . . . . . . . . . . . . . . . . . . .(03) 9890 0276
Korea . . . . . . . . . . . . . . . . . . . . . . . . . . . . . . . . . . . . . . . . . . . . . . . . . . . . . . . . . Hitel: (02) 762-0228
Access: Go HPK
Chollian: (02) 220-2001
New Zealand . . . . . . . . . . . . . . . . . . . . . . . . . . . . . . . . . . . . . . . . . . . . . . . . . . . . . . . .(09) 356 6642
Taiwan . . . . . . . . . . . . . . . . . . . . . . . . . . . . . . . . . . . . . . . . . . . . . . . . . . . . . . . . . . .(886) 2 29233233
First Name: HP
Last Name: BBS
E-mail. . . . . . . . . . . . . . . . . . . . . . . . . . . . . . . . . . . . . . . . . Colorado_Support@hp.com
FTP Site . . . . . . . . . . . . . . . . . . . . . . . . . . . . . . . . . . . . . . . . . . . . . . . . . . . . . . ftp.hp.com
Login: . . . . . . . . . . . . . . . . . . . . . . . . . . . . . . . . . . . . . . . . . . . . . . . . . . . . . . . . . . . . . . anonymous
Password: . . . . . . . . . . . . . . . . . . . . . . . . . . . . . . . . . . . . . . . . . . . . . . . . . . (Your email address)
Directory: . . . . . . . . . . . . . . . . . . . . . . . . . . . . . . . . . ./pub/information_storage/hp-colorado
Page 93

Fax Support
Faxes are answered within 48 hours.
Asia/Pacific
Australia . . . . . . . . . . . . . . . . . . . . . . . . . . . . . . . . . . . . . . . . . . . . . . . . . . . . . . . . . . .(03) 9272 4099
India. . . . . . . . . . . . . . . . . . . . . . . . . . . . . . . . . . . . . . . . . . . . . . . . . . . . . . . . . . . . .+91 (11) 6826041
Japan . . . . . . . . . . . . . . . . . . . . . . . . . . . . . . . . . . . . . . . . . . . . . . . . . . . . . . . . . . . +81 (3) 3335-8338
Korea . . . . . . . . . . . . . . . . . . . . . . . . . . . . . . . . . . . . . . . . . . . . . . . . . . . . . . . . . . . . . .(02) 3270-0707
New Zealand . . . . . . . . . . . . . . . . . . . . . . . . . . . . . . . . . . . . . . . . . . . . . . . . . . . . (+61 3) 9272 4099
Singapore . . . . . . . . . . . . . . . . . . . . . . . . . . . . . . . . . . . . . . . . . . . . . . . . . . . . . . . . . . .(65) 274-2033
Taiwan . . . . . . . . . . . . . . . . . . . . . . . . . . . . . . . . . . . . . . . . . . . . . . . . . . . . . . . . . . .(886) 2 25140276
Telephone Support
USA and Canada (M-F, 6 am-6 pm Mountain time)
Contacting Customer Support 93
There is no charge for technical support during the warranty period; a perincident charge applies after the warranty period.
Literature and dealer referral . . . . . . . . . . . . . . . . . . . . . . . . . . . . . . . . . . . . . . . . . .970-635-1500
Canada (for French-speaking customers)
pour assistance en français . . . . . . . . . . . . . . . . . . . . . . . . . . . . . . . . . . . . . . . . . . 1-800-387-3867
During warranty period
Technical support (USA Mountain Time . . . . . . . . . . . . . . . . . . . . . . . . . . . . . . . .970-635-1500
Technical support (Canada, Eastern Standard Time. . . . . . . . . . . . . . . . . . . . . . . 905-206-4663
After warranty period (charges begin only when you connect to a support
technician, prices are subject to change without notice)
Technical Support . . . . . . . . . . . . . . . . . . . . . . . . . . . . . . . . . . . . . . . . . . . . . . . . . . . .800-810-0130
(Per incident fee of $25 US dollars charged to
Visa, MasterCard or American Express)
U.S. only Technical Support . . . . . . . . . . . . . . . . . . . . . . . . . . . . . . . . . . . . . . . . . . .900-555-1800
($2.50 per minute/maximum of $25. You must be 18 years of age or have parental
permission to call 900 numbers.)
Europe (M-F, 8:30-18:00 Central European Time)
Use these technical support numbers during and after your warranty period.
No charge for technical support during warranty period. Per incident charge
after wa rranty pe riod.
Page 94

94 Customer Support Services
Austria (German). . . . . . . . . . . . . . . . . . . . . . . . . . . . . . . . . . . . . . . . . . . . . . . . . . . . .0711 4201080
Belgium
- Dutch. . . . . . . . . . . . . . . . . . . . . . . . . . . . . . . . . . . . . . . . . . . . . . . . . . . . . . . . . . . . . . .02 626 88 06
- French . . . . . . . . . . . . . . . . . . . . . . . . . . . . . . . . . . . . . . . . . . . . . . . . . . . . . . . . . . . . . .02 626 88 07
Denmark . . . . . . . . . . . . . . . . . . . . . . . . . . . . . . . . . . . . . . . . . . . . . . . . . . . . . . . . . . . . . .39 29 40 99
Finland. . . . . . . . . . . . . . . . . . . . . . . . . . . . . . . . . . . . . . . . . . . . . . . . . . . . . . . . . . . . . . .02 03 47 288
France . . . . . . . . . . . . . . . . . . . . . . . . . . . . . . . . . . . . . . . . . . . . . . . . . . . . . . . . . . . . . 01 43 62 34 34
Germany . . . . . . . . . . . . . . . . . . . . . . . . . . . . . . . . . . . . . . . . . . . . . . . . . . . . . . . . . . .0180 52 58 143
Ireland (English). . . . . . . . . . . . . . . . . . . . . . . . . . . . . . . . . . . . . . . . . . . . . . . . . . . . . . .01 662 55 25
Italy. . . . . . . . . . . . . . . . . . . . . . . . . . . . . . . . . . . . . . . . . . . . . . . . . . . . . . . . . . . . . . . . .02 2 641 0350
Netherlands . . . . . . . . . . . . . . . . . . . . . . . . . . . . . . . . . . . . . . . . . . . . . . . . . . . . . . . . . 020 606 8751
Norway . . . . . . . . . . . . . . . . . . . . . . . . . . . . . . . . . . . . . . . . . . . . . . . . . . . . . . . . . . . . . . .22 11 62 99
Portugal. . . . . . . . . . . . . . . . . . . . . . . . . . . . . . . . . . . . . . . . . . . . . . . . . . . . . . . +351 (0) 1 318 00 65
Spain . . . . . . . . . . . . . . . . . . . . . . . . . . . . . . . . . . . . . . . . . . . . . . . . . . . . . . . . . . . . . . . .90 23 21 123
Sweden . . . . . . . . . . . . . . . . . . . . . . . . . . . . . . . . . . . . . . . . . . . . . . . . . . . . . . . . . . . . . .08 61 92 170
Switzerland (French, Italian, and German). . . . . . . . . . . . . . . . . . . . . . . . . . . . . . 08 48 80 11 11
United Kingdom . . . . . . . . . . . . . . . . . . . . . . . . . . . . . . . . . . . . . . . . . . . . . . . . . . . .0171 512 52 02
English language support from other countries. . . . . . . . . . . . . . . . . . . . . . +44 171 512 52 02
Asia/Pacific
Australia (M-F 7am-7pm, Eastern Standard Time). . . . . . . . . . . . . . . . . . . . . +61 (03) 887 8000
China (M-F 8:30-17:30) . . . . . . . . . . . . . . . . . . . . . . . . . . . . . . . . . . . . . . . . . . . . . (8610)-62625666
extensions 5602 through 5609, 5611 and 561
(8610)-62614174
(8610)-62624175
(8610)-62614176
Hong Kong . . . . . . . . . . . . . . . . . . . . . . . . . . . . . . . . . . . . . . . . . . . . . . . . . . . . . . . . . . . 800 96-7729
India (M-F, 9:30 to 17:30) . . . . . . . . . . . . . . . . . . . . . . . . . . . . . . . . . . . . . . . . . . . . (91) 11 682 6035
Indonesia . . . . . . . . . . . . . . . . . . . . . . . . . . . . . . . . . . . . . . . . . . . . . . . . . . . . . . . . (62) 21-350-3406
Japan (M-F, 9:00 to 12:00, 13:00-17:00). . . . . . . . . . . . . . . . . . . . . . . . . . . . . . . . +81 (3) 3335-8338
Korea (M-F, 9:00-18:00) . . . . . . . . . . . . . . . . . . . . . . . . .(02) 3270-0700 / 080-999-0700 (toll free)
Malaysia. . . . . . . . . . . . . . . . . . . . . . . . . . . . . . . . . . . . . . . . . . . . . . . . . . . . . . . . . . . (60) 3-295-2566
New Zealand (M-F, 9am to 9pm Auckland Time) . . . . . . . . . . . . . . . . . . . . . . . . .(09) 356 6640
Philippines . . . . . . . . . . . . . . . . . . . . . . . . . . . . . . . . . . . . . . . . . . . . . . . . . . . . . . . . (63) 2-867-3551
Singapore (M-F, 9:00-17:00) . . . . . . . . . . . . . . . . . . . . . . . . . . . . . . . . . . . . . . . . . . . .(65) 272-5300
Taiwan (M-F, 8:30-18:00) . . . . . . . . . . . . . . . . . . . . . . . . . . . . . . . . . . . . . . . . . . . .(886) 2 27170055
Thailand. . . . . . . . . . . . . . . . . . . . . . . . . . . . . . . . . . . . . . . . . . . . . . . . . . . . . . . . . . . (66) 2 661-4011
Page 95

Contacting Customer Support 95
Copyright 1999. Hewlett-Packard, a division of Hewlett-Packard. All rights reserv ed. Hewl ett-Packard is a registered trademark of the
Hewlett-Packard Company. Windows, Windows 95, and Windows NT are U.S. registered trademarks of Microsoft Corp. Travan is a
U.S. registered trademark of 3M.
March 1999
USA: Hewlett-Packard, 815 SW 14th Street Bldg. E, Loveland, CO 80537
 Loading...