

Page 1
SATA Hard Drive
Installation Guide
SATAハー ド デ ィ スク ドライブ
インストール ガイ ド
Document Part Number: 345524-B21
August 2003
This document provides instructions on installing a serial
advanced technology attachment (SATA) hard drive into your
computer.
このマニュアルでは、コンピュータに Serial ATA(SATA)ハードディ
スク ドライブを取り付ける方法について説明します。
Page 2

Page 3

1
Preparing for Installation
Although HP computers are designed for easy access to the
upgradeable areas, it is strongly recommended that only an HP
authorized dealer, reseller, or service provider install accessories.
HP authorized dealers, resellers, and service providers are
company trained in the installation of accessories and can ensure
that the accessory is installed and functioning properly.
If you decide to install the hard drive accessory yourself, you will
need a Torx T-15 screwdriver.
For additional information on SATA
technology, consult the white paper
“Implementation of Serial ATA on HP
Business Desktops” available at
http://www.hp.com/support.
Page 4

Preparing for Installation
Disassembling the Computer
CAUTION: Ensure that the power to the computer is off
Ä
and the AC power cord disconnected to avoid electrical
shock or damage to the computer.
1. Turn off the computer and any external devices.
2. Disconnect the AC power cord and any external devices.
3. Unlock the external chassis keylock (if applicable).
4. If necessary, loosen the screws on the computer to remove
the access panel or computer cover.
5. Remove the access panel or computer cover and front bezel.
Refer to the documentation that came with your computer
for model specific instructions on accessing the inside of the
computer.
HP accessories are for use in HP computer
products. They have been extensively tested for
reliability and are manufactured to high quality
standards. HP warrants only those accessories that
are manufactured or sold by HP.
1–2 SATA Hard Drive Installation Guide
Page 5

Installing a Hard Drive
If you are installing a SATA hard drive on an
hp workstation xw series, please refer to
www.hp.com/go/bizsupport for
workstation-specific installation information.
This information may be in the form of a SATA
whitepaper and/or embedded in the service
and technical reference guide
(www.hp.com/support/workstation_manuals)
for your specific workstation.
This chapter covers:
Q Installing an additional hard drive.
Q Replacing an existing hard drive.
2
Page 6

Installing a Hard Drive
It is strongly recommended that only an HP
authorized dealer, reseller, or service
provider replace your primary hard drive.
WARNING: To reduce the risk of personal
Å
injury from hot surfaces, allow the internal
system components to cool before touching.
CAUTION: Ensure that the power to the computer
Ä
is off. Disconnect the AC power cord to avoid
electrical damage to the computer. Electrostatic
discharge (ESD) can damage electronic
components. Be sure you are properly grounded
before beginning this procedure. Refer to
Appendix A, “Electrostatic Discharge,” for more
information.
Refer to the documentation that came with your
computer for detailed instructions on installing an
optional drive.
2–2 SATA Hard Drive Installation Guide
Page 7

Installing a Hard Drive
Installing an Additional Hard
Drive
1. If your system uses guide screws to hold the drives in the
bay, install the screws on the hard drive. These guide screws
are stored behind the front bezel.
SATA Hard Drive Installation Guide 2–3
Page 8
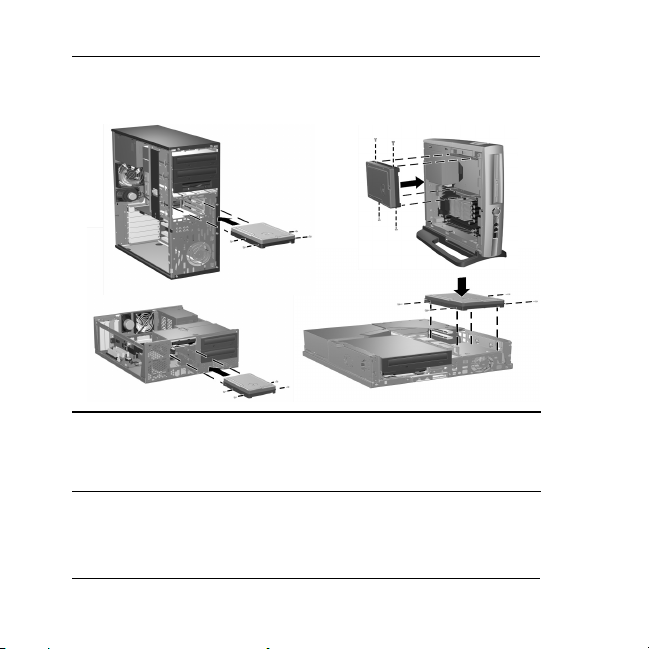
Installing a Hard Drive
2. Install the hard drive assembly by sliding it into the drive
bay as shown in the illustration below.
For comprehensive instructions on installing an
additional hard drive, refer to the documentation
that came with your computer.
2–4 SATA Hard Drive Installation Guide
Page 9
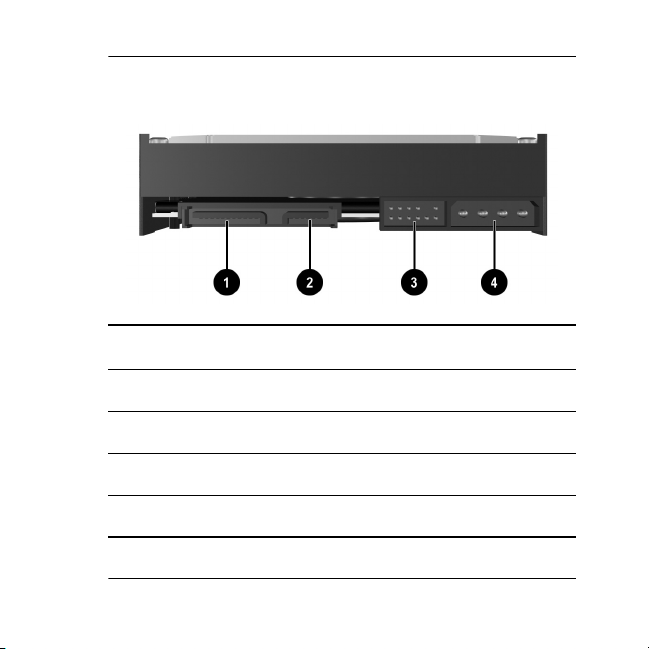
Installing a Hard Drive
3. Locate the appropriate connectors, identified in the
following illustration, on the back of the SATA hard drive.
Hard Drive Connectors
1 SATA power connector
2 SATA data connector
3 Debugging connector
4 Legacy power connector (not present on all models)
SATA Hard Drive Installation Guide 2–5
Page 10

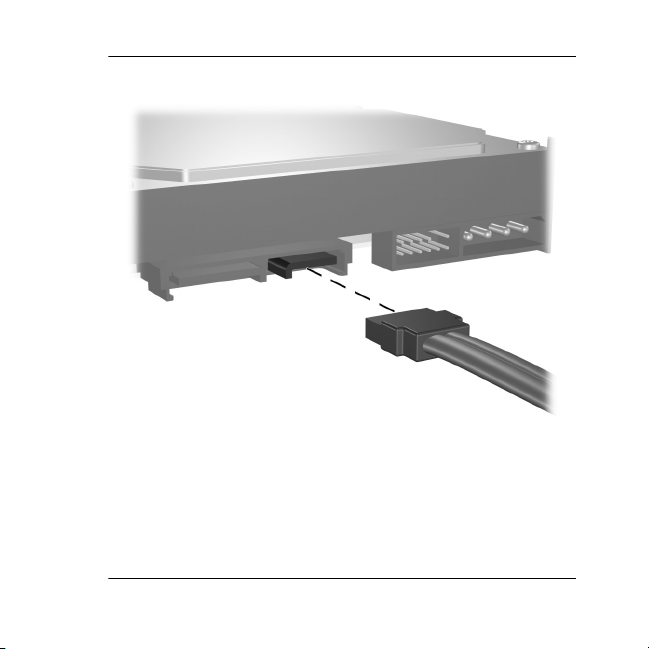
Installing a Hard Drive
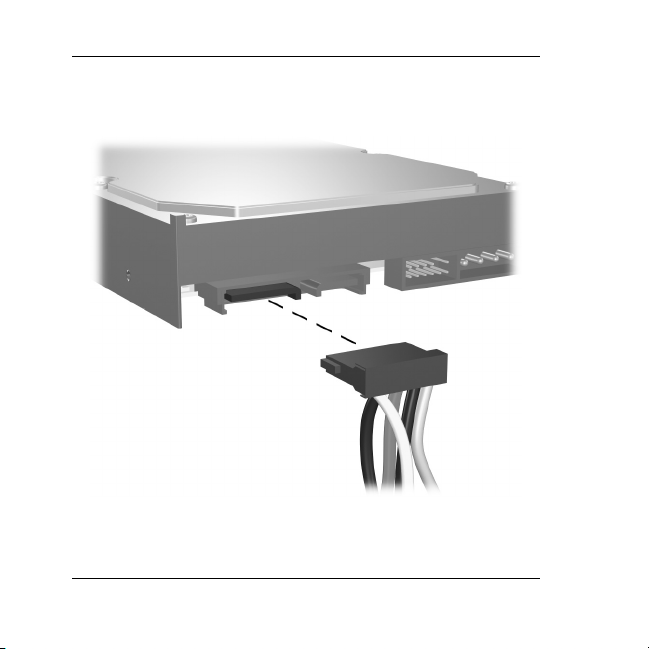
4. Connect the data cable to the SATA data connector on the
new drive as shown in the following illustration.
Five data cables are provided in the kit. Refer
to the “SATA Hard Drive Cables” card
included in the kit to determine which cable
is required for your system board.
CAUTION: The data cable end is keyed to
Ä
ensure proper alignment. To avoid damage
to the cable header pins, check the
header/connector alignment and push
gently when connecting the data cable
header to the SATA connector on the drive
and system board.
2–6 SATA Hard Drive Installation Guide
Page 11
Installing a Hard Drive
SATA Hard Drive Installation Guide 2–7
Page 12
Installing a Hard Drive
5. Connect the power cable to the SATA power connector as
shown in the illustration below.
2–8 SATA Hard Drive Installation Guide
Page 13

Installing a Hard Drive
CAUTION: For SATA hard drives use the
Ä
SATA or legacy power connector. Do not
plug in both.
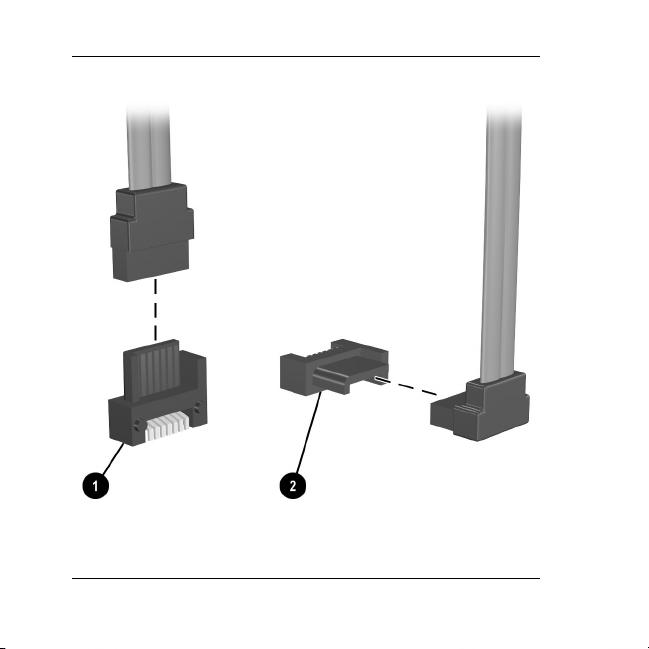
6. Connect the opposite end of the SATA data cable to the
system board as shown in the following illustration. Because
system boards vary, your system board may contain up to
two vertical SATA connectors 1 or up to two horizontal
SATA connectors 2. Horizontal SATA connectors require a
data cable with a 90 degree angled header.
SATA Hard Drive Installation Guide 2–9
Page 14
Installing a Hard Drive
2–10 SATA Hard Drive Installation Guide
Page 15

Installing a Hard Drive
CAUTION: If your system has only one
Ä
SATA hard drive, you must connect the hard
drive to the connector labeled SATA 0 first to
avoid any hard drive performance problems.
Replacing an Existing Hard Drive
CAUTION: Prior to replacing an existing
Ä
hard drive, be sure to back up your data. If
your computer supports only one hard drive,
you must use a second system with third-party
software to copy the data to the new hard
drive.
SATA Hard Drive Installation Guide 2–11
Page 16

Installing a Hard Drive
HP strongly recommends that only an HP
authorized dealer, reseller, or service
provider replace your primary hard drive.
However, if you choose to perform a
self-install, follow the steps in the previous
section, “Installing an Additional Hard
Drive.” You may also refer to the technical or
service-related documentation applicable to
your computer for more comprehensive
instructions.
2–12 SATA Hard Drive Installation Guide
Page 17

Installing a Hard Drive
Reassembling the Computer
1. Replace the front bezel.
2. Replace the computer cover or access panel and tighten the
screws. (if applicable)
3. Lock the external chassis keylock (if applicable).
4. Reconnect any external devices to the computer.
5. Plug the AC power cord into the computer, then into a
grounded AC outlet.
WARNING: This equipment is designed for
Å
connection to a grounded (earthed) outlet.
The ground type plug is an important safety
feature. To avoid the risk of electric shock or
damage to your equipment, do not disable
this feature.
If you need additional assistance, refer to the
documentation that came with your computer for
product-specific information about reassembling
the computer.
SATA Hard Drive Installation Guide 2–13
Page 18

Installing a Hard Drive
2–14 SATA Hard Drive Installation Guide
Page 19

3
Configuring the Computer
The information in this chapter is only applicable if you
installed an additional (second) drive. If you just
upgraded your existing hard drive and transferred your
data from an old drive to the new drive, you may skip
the procedures on drive partitioning unless you
encounter problems upon start up.
If you are installing a SATA drive in your computer for
the first time, you must refer to the white paper
“Implementation of Serial ATA on HP Business Desktops”
for operating system instructions. The white paper is
located at http://www.hp.com/support.
System configuration is the process of specifying the devices and
programs that make up a computer system. When you add or
remove accessories, the computer must be reconfigured to
recognize these changes.
Page 20

Configuring the Computer
Turn on your computer and read the messages that appear during
startup.
Q If the system recognizes the new drive, information about
the drive displays on the screen and you are prompted to
press F1 to save and continue.
Q If you are not prompted to press F1, there is a problem with
the installation of the drive, and you need to diagnose the
problem. Start by reviewing the steps in this guide.
Creating a Partition Using Microsoft
Windows 2000
To create a partition for the additional drive using Microsoft
Windows 2000:
1. Log in as Administrator.
2. From the Windows desktop click Start > Settings > Control
Panel.
3. Click Administrative Tools.
4. Click Computer Management.
5. Click Storage.
SATA Hard Drive Installation Guide 3–2
Page 21

Configuring the Computer
6. Click Disk Management. This starts the Write Signature and
Upgrade Disk Wizard. Click Cancel to stop the wizard.
You will be prompted by the system to upgrade to a
Dynamic drive. Refer to www.microsoft.com/support for
more information or refer to the Microsoft OS Manual
that shipped with your computer. Otherwise, select the
default to continue.
7. Right-click the Disk 1 Unallocated area.
8. Select Create Partition and run the wizard.
9. Click Next.
10. Select the partition needed or use the defaults.
11. Click Next.
12. Specify the partition size or use the defaults.
13. Click Next.
14. Specify the drive letter of the partition or use the default.
15. Click Next.
16. Select Choose Partition File System and other Partition
Parameters or use the defaults.
SATA Hard Drive Installation Guide 3–3
Page 22

Configuring the Computer
17. Click Next.
18. Verify that the information in the Settings box is correct
before finalizing the partition information.
19. Click Finish to create the partition.
Creating a Partition Using Microsoft
Windows XP
To create a partition for the additional drive using Microsoft
Windows XP:
1. Log in as Administrator.
2. From the desktop click Start > Control Panel.
3. Click Administrative Tools.
4. Click Computer Management.
5. Click Storage.
6. Click Disk Management. This starts the Write Signature and
Upgrade Disk Wizard. Click Cancel to stop the wizard.
SATA Hard Drive Installation Guide 3–4
Page 23

Configuring the Computer
You will be prompted by the system to upgrade to a
Dynamic drive. Refer to www.microsoft.com/support for
more information or refer to the Microsoft OS Manual
that shipped with your computer. Otherwise, select the
default to continue.
7. Right-click the Disk 1 Unallocated area.
8. Click Initialize Disk.
9. Click OK.
10. Right-click the black bar above the Unallocated Disk area.
11. Click New Partition to run the New Partition Wizard.
12. Click Next.
13. Select the partition needed or use the defaults.
14. Click Next.
15. Specify the partition size or use the defaults.
16. Click Next.
17. Specify the drive letter of the partition or use the default.
18. Click Next.
SATA Hard Drive Installation Guide 3–5
Page 24

Configuring the Computer
19. Select Choose Partition File System and other Partition
Parameters or use the defaults.
20. Click Next.
21. Verify that the information in the Settings box is correct
before finalizing the partition information.
22. Click Finish to create the partition and begin the format
process.
SATA Hard Drive Installation Guide 3–6
Page 25

A
Electrostatic Discharge
A discharge of static electricity from a finger or other conductor
may damage system boards or other static-sensitive devices. This
type of damage may reduce the life expectancy of the device.
Preventing Electrostic Discharge
To prevent electrostatic damage, observe the following
precautions:
Q Avoid hand contact by transporting and storing parts in
static-safe containers.
Q Keep electrostatic-sensitive parts in their containers until
they arrive at static-free workstations.
Q Place parts on a grounded surface before removing them
from their container.
Page 26

Electrostatic Discharge
Q Avoid touching pins, leads, or circuitry.
Q Always be properly grounded when touching a
static-sensitive component or assembly.
Grounding Methods
There are several methods for grounding. Use one or more
of the following measures when handling or installing
electrostatic-sensitive parts:
Q Use a wrist strap connected by a ground cord to a grounded
workstation or the computer chassis. Wrist straps are
flexible straps with a minimum of 1 meg. ohm +/- 10
percent resistance in the ground cords. To provide a proper
ground, wear the strap snug against the skin.
Q Use heelstraps, toestraps, or bootstraps at standing
workstations. Wear the straps on both feet when standing on
conductive floors or dissipating floor mats.
Q Use conductive field service tools.
Q Use a portable field service kit with a folding
static-dissipating work mat.
A–2 SATA Hard Drive Installation Guide
Page 27

Electrostatic Discharge
If you do not have any of the suggested equipment for proper
grounding, have an HP authorized dealer, reseller, or service
provider install the part.
For additional information on static electricity or for
assistance with the installation of this product,
contact your HP authorized dealer, reseller, or
service provider.
SATA Hard Drive Installation Guide A–3
Page 28

Electrostatic Discharge
A–4 SATA Hard Drive Installation Guide
Page 29

B
Technical Support
Using the Worldwide Web
Before contacting customer services, refer to the support Web
site at http://www.hp.com/support for online access to technical
support information and tools.
Technical Support by Phone
The HP technical support phone number is
1-800-652-6672 or (970) 635-1000
Additional Technical Information
For additional information on SATA technology, consult the
white paper “Implementation of Serial ATA on HP Business
Desktops” available at http://www.hp.com/support.
Page 30

Technical Support
If you are installing a SATA hard drive on an hp workstation xw
series, please refer to www.hp.com/go/bizsupport for
workstation-specific installation information. This information
may be in the form of a SATA whitepaper and/or embedded in
the service and technical reference guide
(www.hp.com/support/workstation_manuals) for your specific
workstation.
B–2 SATA Hard Drive Installation Guide
Page 31

1
取り付けの準備
HPのコンピュータは、アップグレードを行う部分に簡単に手が届くよ
う設計されています。
ハードディスク ドライブ オプションをご自身で取り付けるには、トル
クスT15ドライバが必要です。
SATAテクノロジについて詳しくは、http://www.hp.com/support/
に掲載されているホワイトペーパー「Implementation of Serial
ATA on HP Business Desktops」(英語版)を参照してください。
コンピュータの分解
注意 : 感電またはコンピュータの損傷を防ぐため、作業を始
Ä
める前に、コンピュータの電源が切断されていることおよび
AC電源ケーブルが取り外されていることを確認してくださ
い。
1. コンピュータおよび外付けデバイスの電源を切ります。
Page 32

取 り 付けの準備
2. コンピュータの電源ケーブルを取り外し、外付けデバイスのコネ
クタを取り外します。
3. 必要に応じて、外部シャーシのロックを外します。
4. コンピュータのアクセス パネルまたはカバーを取り外すため、必
要に応じてコンピュータからネジを取り外します。
5. コンピュータのアクセス パネルまたはカバーおよびフロント パ
ネルを取り外します。コンピュータの内部にアクセスする方法に
ついては、お使いのコンピュータに付属のマニュアルを参照して
ください。
HPのオプションはHPコンピュータ製品用に設計されていま
す。また、徹底した信頼性検査が行われ、高い品質基準にお
いて製造されています。HPでは、自社で製造販売したオプ
ションのみ品質保証します。
1–2 SATAハード ディ ス ク ドライブ インストール ガイ ド
Page 33

ハー ド デ ィ ス ク ドライブの取り付け
SATAハードディスク ドライブをhpワークステーションxwシ
リーズに取り付ける場合は、お使いのワークステーションへ
の取り付け方法について、http://www.hp.com/go/bizsupport/(英
語サイト)を参照してください。情報はSATAのホワイトペー
パーまたはhttp://www.hp.com/support/workstation_manuals/(英
語サイト)から参照できる、お使いのワークステーションの
『service and technical reference guide』(英語版)に記載されて
います。
この章では、次のことを説明します。
Q ハードディスク ドライブの追加
Q 取り付けられているハードディスク ドライブの交換
2
Page 34

ハー ド デ ィ スク ド ラ イ ブの取 り 付け
警告 : 火傷の危険がありますので、本体内部の温度が下がっ
Å
ていることを確認してから作業してください。
注意 : 作業を始める前に、コンピュータの電源が切断されて
Ä
いることを確認してください。また、コンピュータの損傷を
防ぐため、AC電源ケーブルを取り外しておいてください。
静電気の放電(ESD)により、コンピュータ本体や周辺機器
の電子部品が破損することがあります。以下の手順を始める
前に、アースされた金属面に触れるなどして、身体にたまっ
た静電気を放電してください。詳しくは、「付録A 静電気対
策」を参照してください。
別売のドライブを取り付ける方法について詳しくは、お使い
のコンピュータに付属のマニュアルを参照してください。
2–2 SATAハード ディ ス ク ドライブ インストール ガイ ド
Page 35

ハー ド デ ィ ス ク ドライブの取り付け
ハー ドデ ィ スク ドライブの追加
1. システムでドライブを固定するためにガイド用ネジが使用され
ている場合は、ネジをハードディスク ドライブに取り付けます。
予備のガイド用ネジはフロント パネルの裏側に付属しています。
2. 下の図に示すように、ハードディスク ドライブ アセンブリをド
ライブ ベイにスライドさせて取り付けます。
ハードディスク ドライブの追加方法について詳しくは、お使
いのコンピュータに付属のマニュアルを参照してください。
SATAハー ド デ ィ スク ドライブ インストール ガイ ド 2–3
Page 36

ハー ド デ ィ スク ド ラ イ ブの取 り 付け
3. 下の図を参照して、SATA ハードディスク ドライブの背面にある
コネクタの位置を確認します。
ハー ド デ ィ ス ク ドライブのコネクタ
1 SATA電源コ ネク タ
2 SATAデータ コネクタ
3 デバ ッ グ コネクタ
4 旧式電源 コ ネ ク タ (一部のモ デルのみ)
2–4 SATAハード ディ ス ク ドライブ インストール ガイ ド
Page 37

ハー ド デ ィ ス ク ドライブの取り付け
4. 次ページの図のように、データ ケーブルを新しいドライブのSATA
電源コネクタに接続します。
キットには5本のデータ ケーブルが同梱されています。お使
いのシステム ボードに適合するケーブルを確認するには、
キットに付属の『シリアルATA ハードディスク ドライブ用
ケーブル』カードを参照してください。
注意 : データ ケーブルの端には、位置合わせのためのピン
Ä
が付いています。データ ケーブル ヘッダをドライブおよび
システム ボードのSATAコネクタに接続するときは、ケーブ
ル ヘッダのピンの損傷を防ぐため、ヘッダとコネクタの位
置を正しく合わせてゆっくりと差し込んでください。
SATAハー ド デ ィ スク ドライブ インストール ガイ ド 2–5
Page 38

ハー ド デ ィ スク ド ラ イ ブの取 り 付け
2–6 SATAハード ディ ス ク ドライブ インストール ガイ ド
Page 39

ハー ド デ ィ ス ク ドライブの取り付け
5. 下の図のように、電源ケーブルを SATA 電源コネクタに接続しま
す。
注意 : SATA ハードディスク ドライブでは、SATA電源コネ
Ä
クタまたは旧式電源コネクタのどちらか一方に差し込んで
ください。
SATAハー ド デ ィ スク ドライブ インストール ガイ ド 2–7
Page 40

ハー ド デ ィ スク ド ラ イ ブの取 り 付け
6. 下の図のように、SATAデータ ケーブルのもう一方の端をシステム
ボードに接続します。システム ボードの種類によって、最大2つの
縦向きのSATAコネクタ1または最大2つの横向きのSATAコネクタ
2があります。縦向きのSATAコネクタに接続するには、90°の角
度のヘッダが必要です。
2–8 SATAハード ディ ス ク ドライブ インストール ガイ ド
Page 41

ハー ド デ ィ ス ク ドライブの取り付け
注意 : システムに搭載するSATAハードディスク ドライブが
Ä
1台の場合は、パフォーマンスへの悪影響を防ぐため、SATA
0と書かれているコネクタにドライブを接続してください。
取り付けられているハードディスク ドライブ
の交換
注意 : 取り付けられているハードディスク ドライブを交換
Ä
する前に、必ずデータをバックアップしておきます。お使い
のコンピュータに1つしかハードドライブを取り付けられな
い場合は、別のコンピュータで他社製のソフトウェアを使用
して、データを新しいハードディスク ドライブにコピーす
る必要があります。
メイン ハードディスク ドライブの交換は、HPのサポート担
当者にご依頼になることを強くお勧めします。ご自身で取り
付ける場合は、前の項「ハードディスク ドライブの追加」の
手順に従ってください。また、詳しい手順については、お使
いのコンピュータに対応した技術文書または修理に関する
マニュアルを参照してください。
SATAハー ド デ ィ スク ドライブ インストール ガイ ド 2–9
Page 42

ハー ド デ ィ スク ド ラ イ ブの取 り 付け
コ ン ピ ュータ の再組み立て
1. フロント パネルを取り付けなおします。
2. 必要に応じて、コンピュータのカバーまたはアクセス パネルを取
り付けなおして、ネジを締めます。
3. 必要に応じて、外部シャーシのケーブルをロックします。
4. 外付けデバイスをコンピュータに接続しなおします。
5. AC電源ケーブルをコンピュータに接続し、アース端子付きのAC
コンセントに接続します。
警告 : この装置は、アース端子付きのコンセントに接続する
Å
ように設計されています。感電や装置の損傷を防ぐため、必
ず電源ケーブルのアース端子を使用して設置してください。
ACコンセントが2極の場合は、アース付き国内変換プラグを
利用することができます。
不明な点がある場合は、お使いのコンピュータに付属のマ
ニュアルに記載されている、コンピュータの再組み立てに関
する説明を参照してください。
2–10 SATAハード ディ ス ク ドライブ インストール ガイ ド
Page 43

3
コンピュータの
コンフィギュレーション
この章は、2つ目のドライブを追加した場合にのみお読みく
ださい。取り付けられているハードディスク ドライブを
アップグレードして、データを古いドライブから新しいドラ
イブに移動しただけの場合は、起動時にトラブルが発生しな
い限り、ドライブのパーティションに関する手順を省略でき
ます。
SATAドライブをコンピュータに初 めて取り付けるときは、
オペレーティング システムに関する操作手順について、ホ
ワイトペーパー「Implementation of Serial ATA on HP Business
Desktops」(英語版)を参照してください。このホワイトペー
パーはhttp://www.hp.com/support/(英語サイト)から入手で
きます。
システム コンフィギュレーションは、コンピュータ システムを構成す
る装置やプログラムを検出するプロセスです。オプションを増設また
は取り外したときは、システムによってその変更が認識されるよう、
コンピュータを再コンフィギュレーションする必要があります。
Page 44

コンピュータの コンフ ィギュレーション
コンピュータの電源を入れ、起動時に表示されるメッセージを読みま
す。
Q システムによって新しいドライブが認識されると、ドライブに関
する情報が画面に表示されます。さらに、この情報を保存してコ
ンフィギュレーションを続行するために[F1]キーを押すように指
示するメッセージが表示されます。
Q [F1]キーを押すように指示するメッセージが表示されない場合、ド
ライブの取り付けに問題があるため、問題を解決する必要があり
ます。まず、このガイドに記載されている手順を読みなおしてみ
てください。
Microsoft Windows 2000を使用し た
パーテ ィ シ ョ ンの作成
Microsoft Windows 2000を使用して、新しいドライブのパーティショ
ンを作成するには、以下の手順で操作します。
1. Administrator権限を持つアカウントでログインします。
2. Windowsデスクトップから
ル]
の順にクリックします。
3. [管理ツール]をダブルクリックします。
4. [コンピュータの管理]をダブルクリックします。
5. [記憶域]をダブルクリックします。
SATAハー ド デ ィ スク ドライブ インストール ガイ ド 3–2
[スタート]→[設定 ]→[コントロール パネ
Page 45

コンピュータの コンフ ィギュレーション
6. [ディスクの管理(ローカル)]をダブルクリックします。[ディス
クのアップグレードと署名ウィザード]が開始します。ウィザード
を終了するには[キャンセル]をクリックします。
ダイナミック ディスクにアップグレードするよう求める画
面が表示されます。詳しくは、http://support.microsoft.com/ま
たはコンピュータに付属のMicrosoft のオペレーティング シ
ステム マニュアルを参照してください。これらを参照しな
い場合は、デフォルトの設定を選択して進みます。
7. [ディスク1 未割り当て]領域を右クリックします。
8. [パーティションの作成]を選択し、ウィザードを実行します。
9. [次へ]をクリックします。
10. 必要なパーティションを選択するか、デフォルトのパーティショ
ンを使用します。
11. [次へ]をクリックします。
12. パーティションのサイズを指定するか、デフォルトのパーティ
ション サイズを使用します。
13. [次へ]をクリックします。
14. パーティションに割り当てるドライブ名を指定するか、デフォル
トのドライブ名を使用します。
15. [次へ]をクリックします。
SATAハー ド デ ィ スク ドライブ インストール ガイ ド 3–3
Page 46

コンピュータの コンフ ィギュレーション
16. [このパーティションを以下の設定でフォーマットする]を選択す
るか、デフォルトの設定を使用します。
17. [次へ]をクリックします。
18. パーティションの情報を確定する前に、[ 設定] ボックスに表示さ
れている情報が正しいことを確認します。
19. [完了]をクリックすると、パーティションが作成されます。
Microsoft Windows XPを使用 し た
パーテ ィ シ ョ ンの作成
Microsoft Windows XPを使用して、新しいドライブのパーティションを
作成するには、以下の手順で操作します。
1. Administrator権限を持つアカウントでログインします。
2. デスクトップから
ンスとメンテナンス]
3. [管理ツール]をダブルクリックします。
4. [コンピュータの管理]をダブルクリックします。
5. [記憶域]をダブルクリックします。
6. [ディスクの管理(ローカル)]をダブルクリックします。[ディス
クのアップグレードと署名ウィザード]が開始します。ウィザード
を終了するには[キャンセル]をクリックします。
SATAハー ド デ ィ スク ドライブ インストール ガイ ド 3–4
[スタート]→[ コントロール パネル ]→[パフォーマ
の順にクリックします。
Page 47

コンピュータの コンフ ィギュレーション
ダイナミック ディスクにアップグレードするよう求める画
面が表示されます。詳しくは、http://support.microsoft.com/ま
たはコンピュータに付属のMicrosoft のオペレーティング シ
ステム マニュアルを参照してください。これらを参照しな
い場合は、デフォルトの設定を選択して進みます。
7. [ディスク1 未割り当て]領域を右クリックします。
8. [ディスクの初期化]をクリックします。
9. [OK]をクリックします。
10. [未割り当てディスク]領域の上の黒いバーを右クリックします。
11. [ 新しいパーティション]をクリックして [ 新しいパーティション]
ウィザードを開始します。
12. [次へ]をクリックします。
13. 必要なパーティションを選択するか、デフォルトのパーティショ
ンを使用します。
14. [次へ]をクリックします。
15. パーティションのサイズを指定するか、デフォルトのパーティ
ション サイズを使用します。
16. [次へ]をクリックします。
17. パーティションに割り当てるドライブ名を指定するか、デフォル
トのドライブ名を使用します。
18. [次へ]をクリックします。
SATAハー ド デ ィ スク ドライブ インストール ガイ ド 3–5
Page 48

コンピュータの コンフ ィギュレーション
19. [このパーティションを以下の設定でフォーマットする]を選択す
るか、デフォルトの設定を使用します。
20. [次へ]をクリックします。
21. パーティションの情報を確定する前に、[ 設定] ボックスに表示さ
れている情報が正しいことを確認します。
22. [完了]をクリックすると、パーティションが作成され、フォーマッ
トのプロセスが開始されます。
SATAハー ド デ ィ スク ドライブ インストール ガイ ド 3–6
Page 49

A
静電気対策
人間の指など、導電体からの静電気の放電によって、システム ボード
などのデバイスが損傷したり、耐用年数が短くなることがあります。
静電気の防止
静電気による損傷を防ぐには、以下のことを守ってください。
Q 部品を運搬したり保管したりする際は、静電気防止用のケースに
入れ、手で直接触れることは避けます。
Q 静電気に弱い部品は、静電気防止措置のなされている作業台に置
くまでは、専用のケースに入れたままにしておきます。
Q 部品をケースから取り出す前に、まずケースごとアースされてい
る面に置きます。
Q ピン、リード線、回路には触れないようにします。
Q 静電気に弱い部品に触れるときには、つねに自分の身体に対して
適切なアースを行います。
Page 50

静電気対策
アースの方法
アースにはいくつかの方法があります。静電気に弱い部品を取り扱う
ときには、以下のうち1つ以上の方法でアースを行ってください。
Q すでにアースされているコンピュータのシャーシにアース バン
ドをつなぎます。アース バンドは柔軟な帯状のもので、アース
コード内の抵抗は、1 MΩ±10 %です。アースを正しく行うため
に、アース バンドは肌に密着させてください。
Q 立って作業する場合には、かかとやつま先にアース バンドを付け
ます。導電性または静電気拡散性の床の場合には、両足にアース
バンドを付けます。
Q 磁気を帯びていない作業用具を使用します。
Q 折りたたみ式の静電気防止マットが付いた、携帯式の作業用具も
あります。
上記のような、適切にアースを行うための器具がない場合は、HPのサ
ポート担当者に取り付けをご依頼ください。
静電気について、およびこの製品の取り付けについて詳しく
は、HPのサポート窓口にお問い合わせください。
A–2 SATAハー ド デ ィ スク ドライブ インストール ガイド
Page 51

B
テクニカル サポー ト
インターネッ トWebサイ ト
HPのサポートWeb サイト(http://www.hp.com/jp/support/)で各種情報を
提供していますので、HPのサポート窓口に問い合わせる前に、参照し
てみてください。
テクニカル サポー ト
HPのテクニカル サポートについては、保証規定を参照してください。
Page 52

テクニカル サポー ト
その他 の情報 の参照先
SATAテクノロジについて詳しくは、http://www.hp.com/support/に掲載さ
れているホワイトペーパー「Implementation of Serial ATA on HP Business
Desktops」(英語版)を参照してください。
SATA ハードディスク ドライブをhpワークステーションxwシリーズに
取り付ける場合は、お使いのワークステーションへの取り付け方法に
ついて、http://www.hp.com/go/bizsupport/(英語サイト)を参照してく
ださい。情報はSATAのホワイトペーパーまたはhttp://www.hp.com/
support/workstation_manuals/(英語サイト)から参照できる、お使いの
ワークステーションの『service and technical reference guide』(英語版)
に記載されています。
B–2 SATAハードデ ィ ス ク ドライブ インストール ガイ ド
Page 53

Page 54

© 2003 Hewlett-Packard Development Company, L.P. The information contained
herein is subject to change without notice. The only warranties for HP products and
services are set forth in the express warranty statements accompanying such
products and services. Nothing herein should be construed as constituting an
additional warranty. HP shall not be liable for technical or editorial errors or
omissions contained herein. Product names mentioned herein may be trademarks
and/or registered trademarks of their respective companies. First Edition, August
2003.
345524-B21
 Loading...