

Honeywell UV100A1000, UV100A1018, UV100A1026, UV100A1059, UV100A2008 Installation Manual
...
UC100 Ultraviolet System
Replacement Bulb/Handle Assembly
INSTALLATION INSTRUCTIONS
APPLICATION
The UC100 Ultraviolet System Replacement Bulb/Handle
Assembly is for use with the UV100 Ultraviolet System. See
Table 1 for your model.
INSTALLATION
When Installing this Product…
1. Read these instructions carefully. Failure to follow them
could damage the product or cause a hazardous
condition.
2. Check the rating given in the instructions and on the
product to make sure the product is suitable for your
application.
3. Removal and replacement of the ultraviolet lamps can
easily be done by the homeowner following these
instructions. The homeowner can also call an
experienced service technician.
4. After installation is complete, check out product
operation as provided in these instructions.
CAUTION
Personal Injury Hazard.
Power supply can cause electrical shock.
Disconnect power supply before replacing ultraviolet
bulb(s).
Do not open base unit or lamp handle; there are no
user-serviceable components inside.
WARNING
UV Light Hazard.
Harmful to bare skin and eyes.
Can cause temporary or permanent loss of vision.
Never look at bulbs while illuminated.
View illumination only through light indicator located
on lamp handle.
To prevent exposure to ultraviolet light, disconnect
power to Ultraviolet System before servicing any part
of heating and air conditioning system.
CAUTION
UV Lamp Burn Hazard.
Harmful to bare skin.
Can cause severe burns.
Disconnect power and wait 15 minutes before
removing ultraviolet bulb(s).
CAUTION
Breakable Glass Hazard.
Can cause personal injury.
Be careful when inserting bulb(s) into lamp base.
Wear protective gloves when handling bulb(s).
69-1444-5
UC100 ULTRAVIOLET SYSTEM REPLACEMENT BULB/HANDLE ASSEMBLY
MERCURY NOTICE
This device contains mercury in the sealed ultraviolet
bulb(s). Do not place your used bulb(s) in the trash.
Dispose of properly.
Broken Bulb Cleanup.
Do not use a household vacuum.
Sweep debris (phosphor/glass) into a plastic bag and
dispose of properly.
Contact your local waste management authority for
instructions regarding recycling and the proper
disposal of old bulb(s).
Replacing Your Bulbs
SmartLamp™ Models (UV100E1043, UV100E2009,
and UV100E3007)
Replacement of your bulbs is required when LED on front of
unit is lighted solidly.
NOTE: LED blinking slowly, one second on and one second
IMPORTANT
off, indicates that ten percent or less of bulb life
remains and homeowner must order new bulb(s).
Remember to press the reset button for five seconds
after replacing the bulb(s).
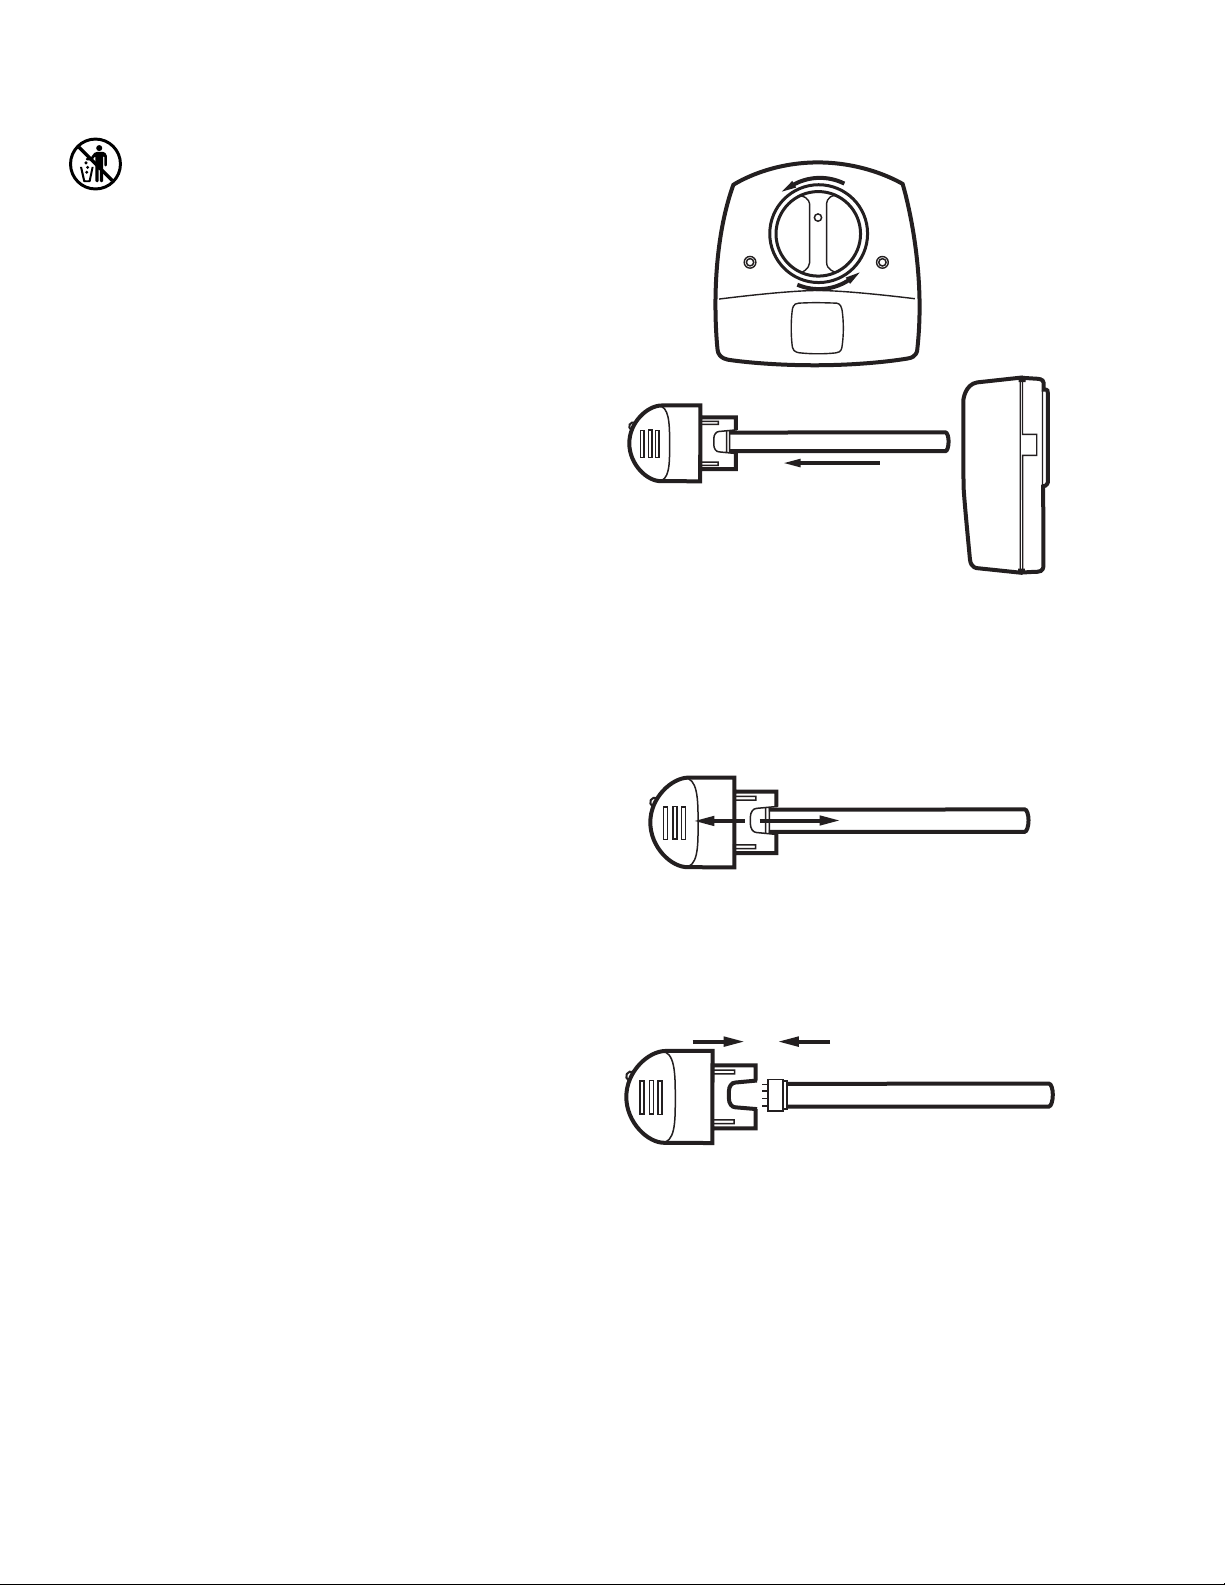
5. If you have a SnapLamp™ handle, follow steps 5 and 6;
otherwise, proceed to step 7. Grasp the SnapLamp™
handle in one hand and the bulb glass in the other and
pull straight apart. See Fig. 2.
M22841
Fig. 1. Remove lamp bulb.
UV100A1000, UV100A1018, UV100A1026,
UV100A1059, UV100A2008, UV100E1001,
UV100E1019, UV100E1027, UV100E1035 Models
Annual replacement of your bulbs is required.
To replace your bulbs:
1. Select and obtain the correct replacement bulb for your
unit. See Table 1.
2. Disconnect the power to your heating and cooling
system.
3. Unplug or turn off power to your UV System and allow
the bulbs to cool for at least 15 minutes.
4. Rotate the lamp handle counterclockwise and gently
pull the lamp handle to remove the bulb. See Fig. 1.
IMPORTANT
If the bulb in your model has external wires running
along the glass surface, be sure to avoid pulling on
those wires.
M22851
Fig. 2. Disconnect bulb from SnapLamp™ handle.
6. Insert the new bulb into the SnapLamp™ handle by
aligning the notch and pushing straight together.
See Fig. 3.
M22853
Fig. 3. Replace bulb in SnapLamp™ handle.
7. Insert the lamp handle into the base with the lamp light
indicator at the eleven o’clock position. Continue
pushing and gently rotating counterclockwise until the
lamp inserts fully into the base. See Fig. 4.
69-1444—5 2
 Loading...