

Page 1

T9 Smart thermostat with Smart Room sensor
User Guide
Welcome
This user guide is designed to help you get acquainted with your new T9 Smart thermostat. Check out the table of contents on page 2
to browse by topic.
Need help? Get in touch.
WEB: honeywellhome.com
PHONE: 18006333991
SOCIAL: Twitter: @HoneywellHome, Facebook: Honeywell Home
Page 2

TABLE OF CONTENTS
Thermostat Features ..........................................................................page 3
Thermostat overview .......................................................................... page 4
Honeywell Home App overview ..................................................... page 5
Basic thermostat operation
Main thermostat menu options ....................................................page 6
Using Priority for sensors ................................................................page 6
Selecting system mode ..................................................................... page 8
Auto changeover mode ..................................................................... page 9
Emergency heat mode ......................................................................page 9
Setting the fan ................................................................................... page 10
Setting the Time/Date .................................................................... page 11
WiFi settings and connectivity
Connecting to a WiFi network ................................................... page 12
Disconnecting and reconnecting to a WiFi network ........ page 13
Turning thermostat WiFi on and off ......................................page 13
Scheduling options
Scheduling on thermostat ............................................................ page 14
Scheduling on App .................................................................... page 1516
Geofence and Smart scheduling ............................................... page 16
Schedule override on device ........................................................ page 17
Setting Preferences (language, time/date, F/C, etc.) ....... page 18
Cleaning the display ....................................................................... page 19
Security settings ............................................................................... page 19
Configuration settings ............................................................page 2023
Advanced features
Adaptive Intelligent Recovery ...................................................... page 24
Compressor protection .................................................................. page 24
P + I control ......................................................................................... page 24
Alerts and notifications ........................................................... page 2526
Maintenance reminders ................................................................ page 27
Adding or removing a wireless sensor ..................................... page 28
Wireless sensor information ........................................................ page 29
Identifying a wireless sensor ....................................................... page 29
Replace sensor batteries ............................................................... page 30
Frequently Asked Questions (FAQs) .................................. page 3132
Troubleshooting ................................................................................ page 33
Regulatory information .................................................................. page 34
Specifications .................................................................................... page 34
Warranty information ..................................................................... page 35
33-00428–01 2
Page 3

Thermostat Features
Flexible scheduling: You can choose to use location-based temperature control (geofence technology), program a set schedule or
use a combination of both to make sure your home is always comfortable.
• Location-based temperature control: Using geofence technology, the T9 Smart thermostat will automatically use your
smartphone’s location, which can save you energy when you leave and make your home comfortable by the time you return.
• Smart Scheduling: Adds a Sleep period to location-based temperature control.
• Time-based scheduling: You can program a schedule where every day is different, a schedule where weekdays and
weekends are different or a schedule where every day is the same. There are four adjustable periods per day: Wake, Away,
Home, and Sleep.
• No schedule: You can also choose not to set a schedule and adjust the thermostat manually.
• You can also choose not to set a schedule and adjust the thermostat manually
• Schedule Using Sensors
• Up to 20 wireless indoor temperature/humidity/motion sensors per thermostat.
• Sensor Priority for each program period or when used manually.
Tip: The Honeywell Home app can be used to manage multiple thermostat and multiple users in a household.
Smart Alerts: The T9 Smart thermostat will send alerts for things like extreme indoor temperatures and reminders for
!
things like filter changes.
Auto change from heat to cool: When Auto mode is selected, the T9 Smart thermostat can automatically determine
whether your home needs heating or cooling to reach the desired temperature.
Adaptive Intelligent Recovery: The T9 Smart thermostat learns your heating and cooling cycle times to make sure the
system delivers the temperature you want, when you want it.
3 33-00428–01
Page 4
Getting the most from the T9 Smart Thermostat
Prioritize Rooms
Prioritize a specific room or multiple rooms, or let comfort follow your move using built-in motion detection.
Control on the Go
Adjust your thermostat from anywhere using your tablet or smartphone.
Save Energy
With geofencing, you can save money on the most expensive part of your energy bill while you’re away.
Simple Installation
The thermostat automatically programs itself. Just answer a few simple questions and you’ll be up and running in no time.
WholeHome Range
With a 200-foot range, 20 sensors with temperature, humidity, and occupancy detection can connect to your thermostat from
throughout your home.
Keep an eye on your home
Get customizable alerts on your mobile device when the basement is so cold a pipe could burst, or if the baby’s room is getting
warm.
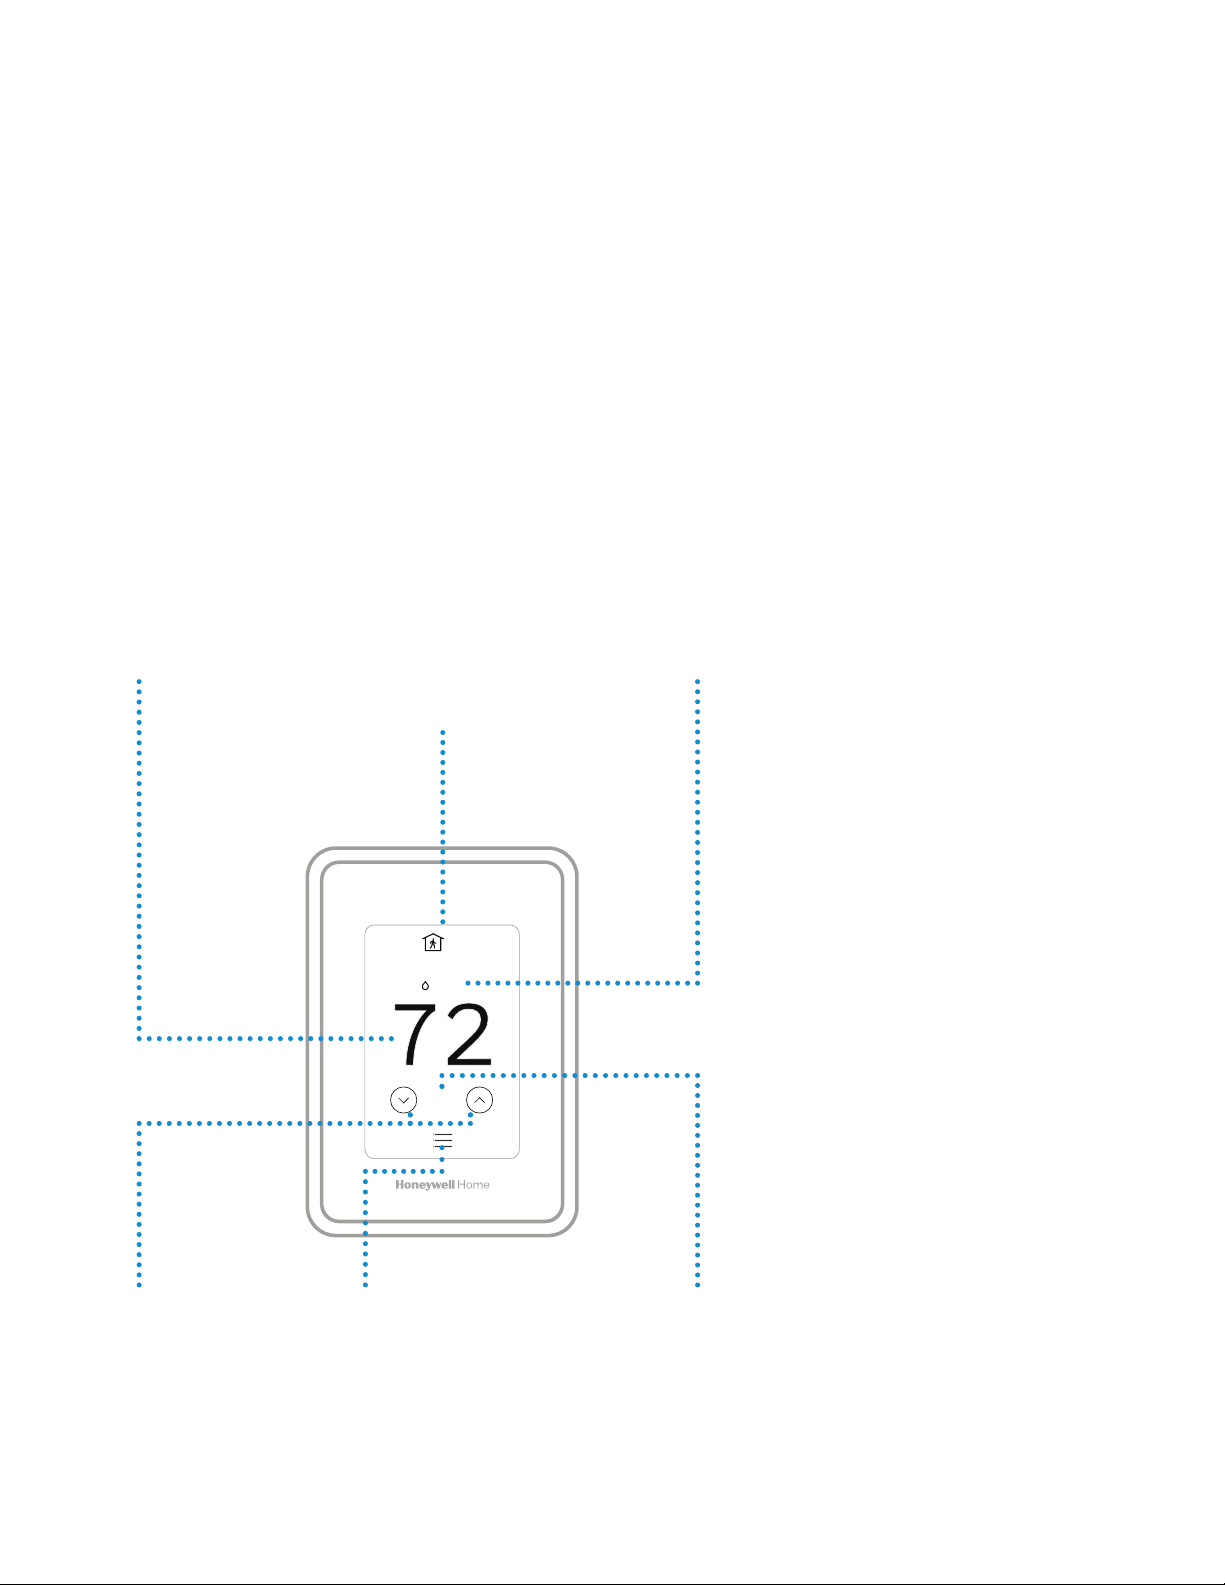
Using Your Thermostat
The screen will wake up by pressing the center area of the displayed temperature.
Indoor Temperature
Displays the current
indoor temperature.
Current Priority
Displays the type of
priority and number
of rooms being
prioritized.
2
18%
74
Indoor Humidity
Displays the current
indoor humidity.
Adjust Temperature
Touch the up and
down arrows to
set your desired
temperature.
Menu
Contains features
such as mode, fan,
schedule, priority,
and other thermostat
settings.
33-00428–01 4
Desired
Temperature
Displays the desired
temperature.
Page 5
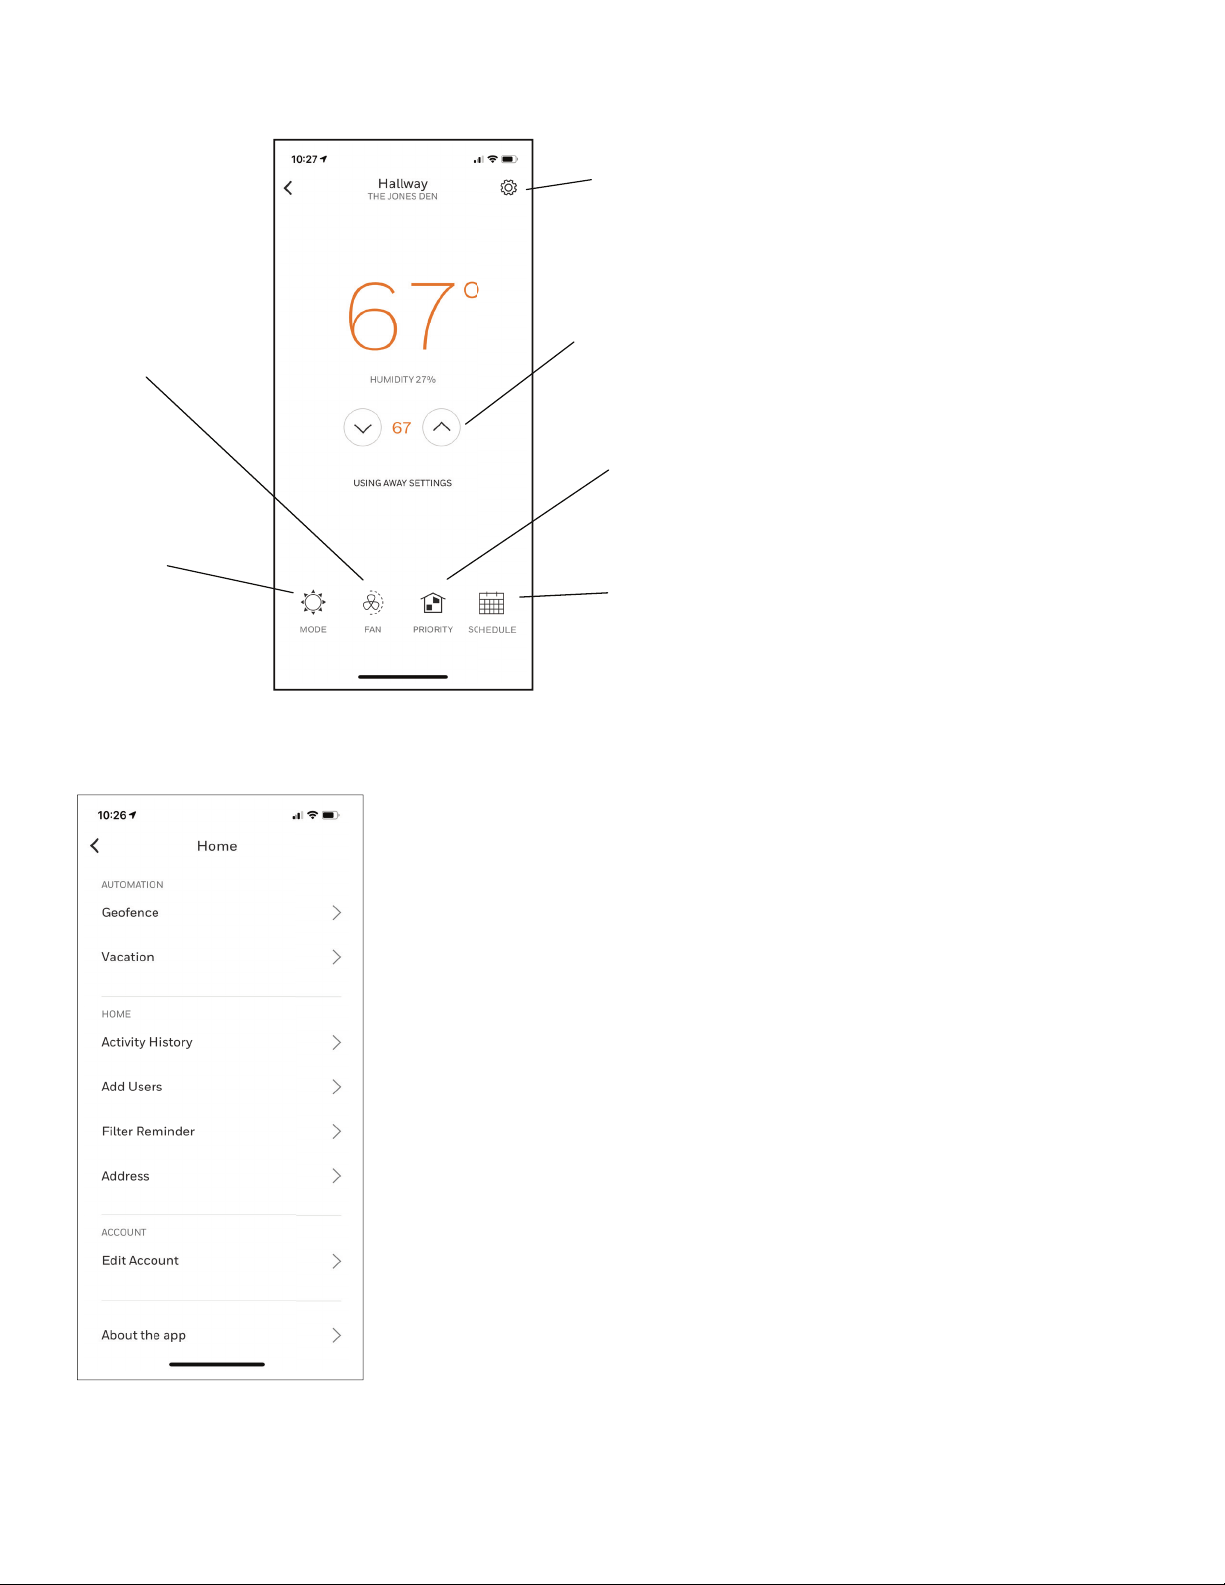
Using the Honeywell Home App
Cha
Mo
Ch
Se
Home Screen
ange Fan
tting
nge System
de
Access Menu
Options
Available options
shown in screens
below
Set Desired
Temperature
Set Sensor Priority
Change Schedule
Type
Menu Options
5 33-00428–01
Page 6
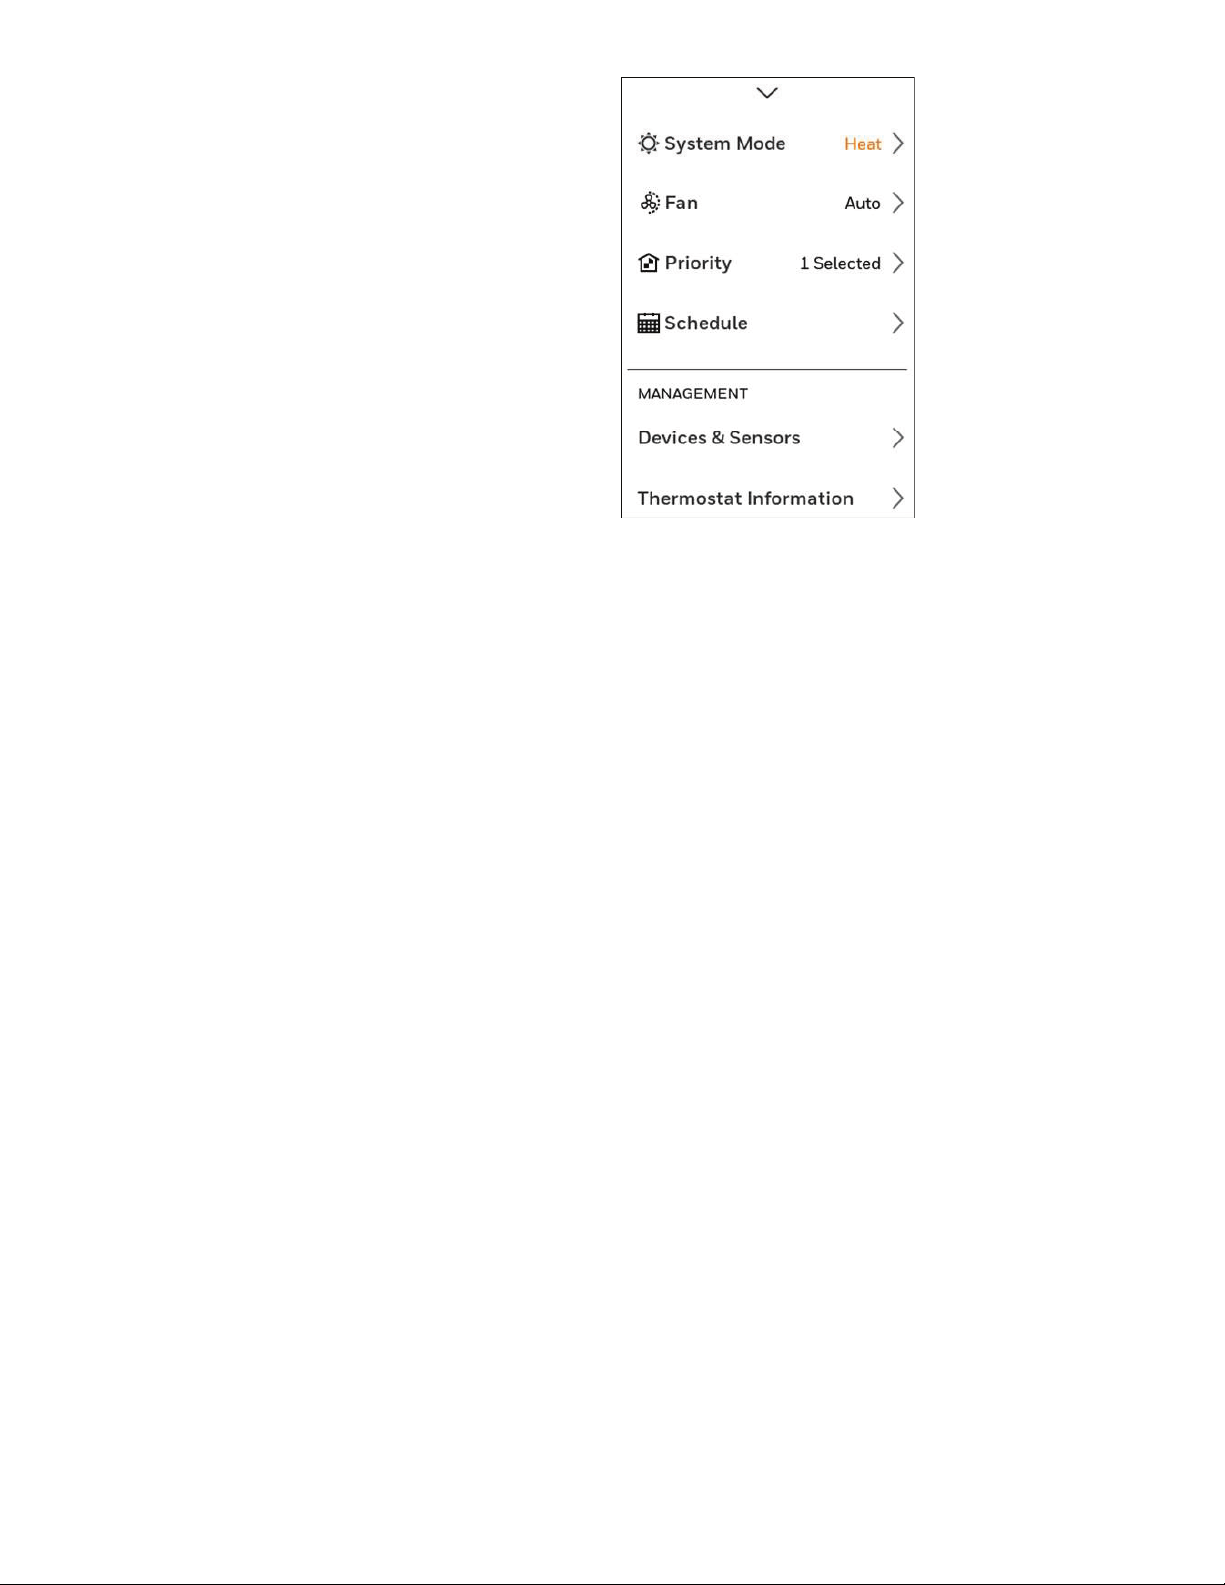
Main Menu on Thermostat
From Home Screen, press the menu icon at bottom of the
display (3 horizontal lines). If this is not shown at home
screen, touch screen to wake display first.
Main Menu options
System mode (Available modes vary depending on how the
thermostat was configured)
• Heat
• Off
• Cool
• Auto – Operation on page 9.
• Em Heat – Operation on page 9.
Fan (Fan setting not available for all system types)
• Auto (Fan only runs with a call for heat or cool)
• On (fan runs continous)
• Circulate (fan runs randomly approx. 33% of the time)
Priority
If wireless indoor temperature/humidity/motion sensors are
used, select which sensors are used for temperature control.
You can choose active sensor (ones detecting motion) or
manually select which sensors to use.
Schedule
• Create new schedule (Set a time-based schedule)
• Disable schedule
• Reset to default schedule
NOTE: To enable geofencing, use the Honeywell Home app.
Management:
Devices & Sensors
• View the temperature and humidity reading from Smart
Room Sensors
• Identify a Smart Room Sensor
• Add a new Smart Room Sensor
• Remove a Smart Room Sensor
Thermostat information
• Mac Address
• IP Address
• Date Code
• Model Number
• Build Date
• Collection Version
• WiFi Bootloader Version
• WiFi Application Version
Equipment Status
• System mode
• Heat stages (on or off)
• Cool stages (on or off)
• Fan on or off
Configuration:
• WiFi
• Connect App
• Security
• Preferences
• Advanced Setup
Scroll down to see more options
33-00428–01 6
Page 7
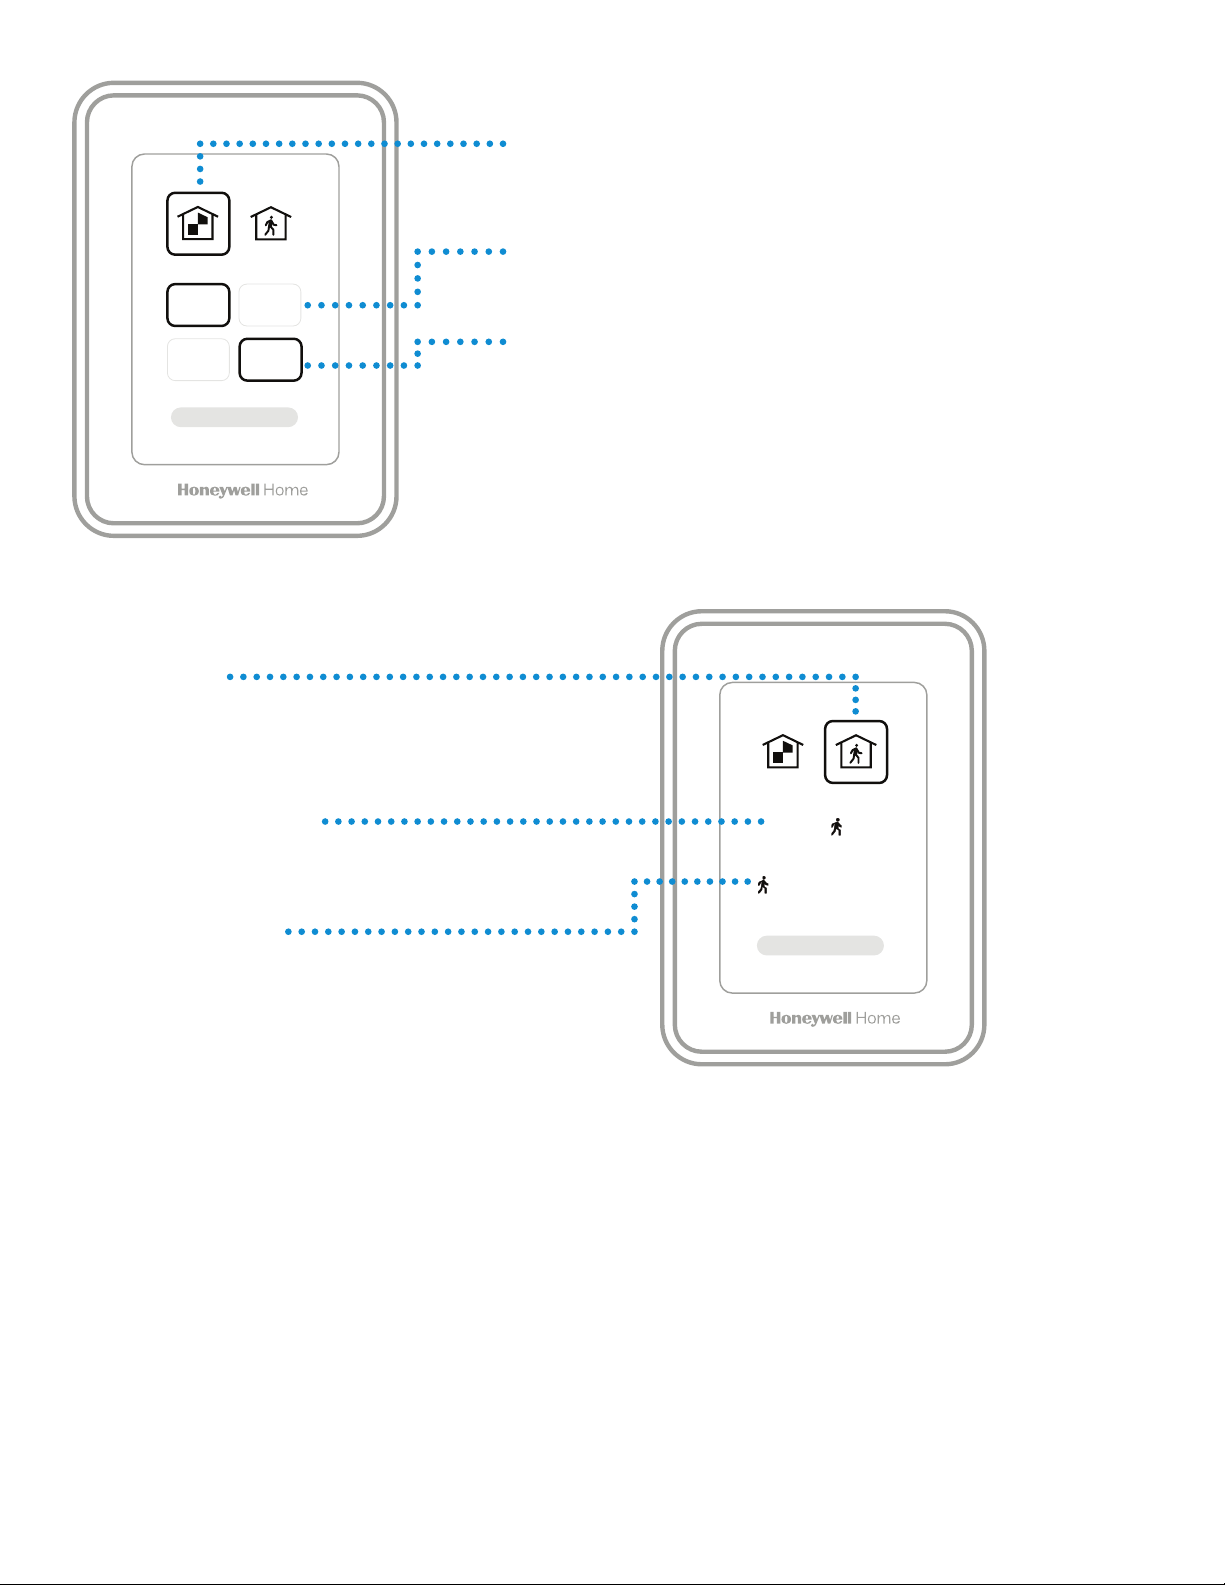
72 72
Active Rooms
Rooms with detected motion are automatically
selected to create an average temperature in
your home
Room without Activit
No motion is detected. Will not contribute to
the average temperature.
Room with Activit
Motion is detected. Will contribute to the
average temperature.
Selected Rooms
Rooms you manually select create an average
temperature in your home.
Unselected Room
Will not contribute to the average temperature.
72 72
.
Selected Room
Will contribute to the average temperature.
y
72 72
72 72
y
For questions regarding how motion-based priority work with multiple people in the house, and how long are rooms considered
“Active” after motion has last been detected, see “Frequently Asked Questions (FAQs)” on page 31.
7 33-00428–01
Page 8
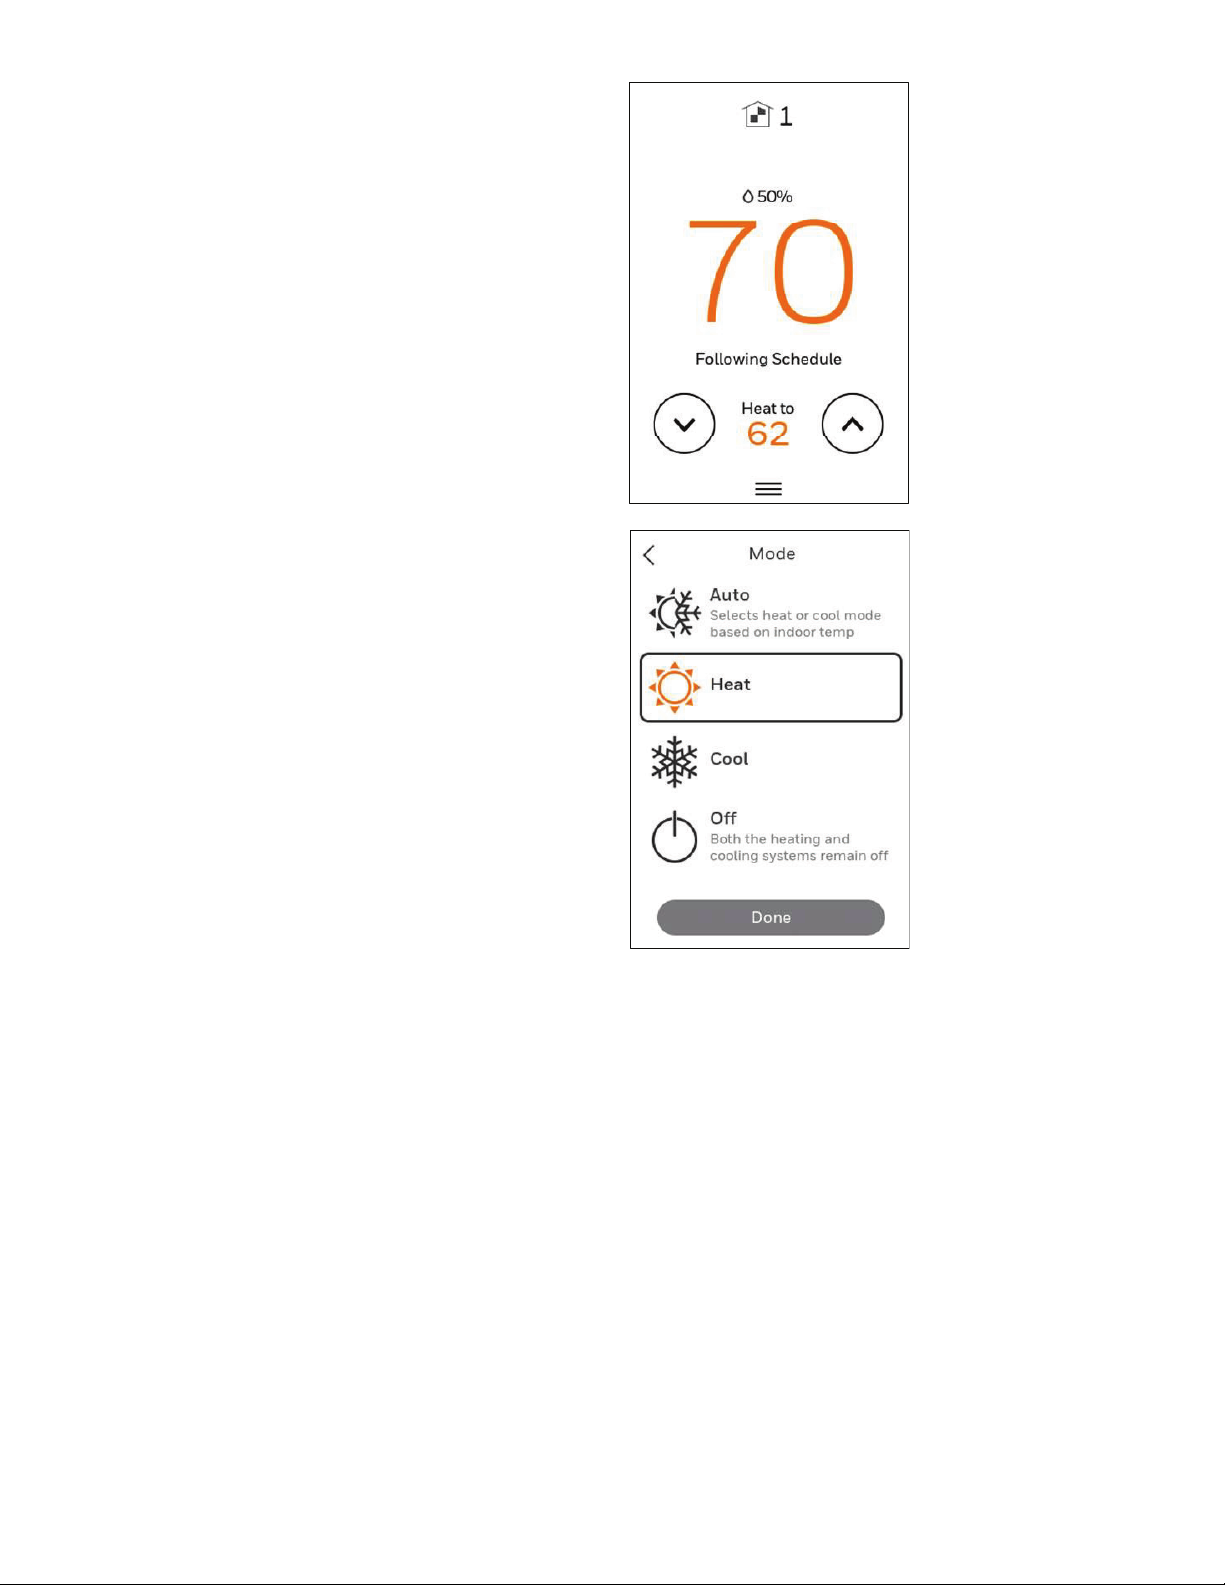
Selecting system mode
Touch homescreen to wake the thermostat.
Touch the menu icon and then touch “Select Mode.”
• Heat: Controls the heating system.
• Cool: Controls the cooling system.
• Off: Turns the heating and cooling systems off.
• Auto: When enabled, the thermostat will automatically
use heating or cooling to reach the desired temperature.
Operation on page 9.
• Em Heat: Controls auxiliary or emergency heat; only
available on systems with a heat pump. Operation on
page 9.
Notes:
• All available modes may not be shown for some
applications. Scroll down to see more mode options (if
available).
• Auto mode may not appear on the thermostat screen or
in the app depending on your equipment, and how your
thermostat is configured.
• When Auto is selected, “Heat to” and “Cool to” will both
be shown from the “active” home screen.
• Em Heat is only available for heat pump systems. The
thermostat must also be configured to control a heat
pump and an auxiliary/emergency heat stage.
• When Auto is selected, “Heat to” and “Cool to” will both
be shown from the “active” home screen.
33-00428–01 8
Page 9

Auto Changeover operation
Auto changeover is available if the thermostat is configured for at least 1 heat stage and 1 cool stage and the installer enabled
auto changeover.
When configured this way, you can select “Auto” as one of the options under “System mode”.
When in auto mode, you can always set the heat and cool setpoint to the same temperature, although most customer prefer to
have a cool setpoint that is at least 3 degrees above the heat setpoint.
A 1.5°F differential is enforced behind the scenes to ensure the heat doesn’t come on after cooling shuts off or vice-versa.
Em Heat mode
Emergency heat runs when you manually switch the thermostat to the em heat mode. When the thermostat is in emergency heat
mode, the heat pump is locked out. When the thermostat is set to em heat mode, the heat pump is locked out and the backup
heat is used to maintain the heat setpoint.
Emergency heat mode is only available when the thermostat was configured for a heat pump with Backup heat by the installer.
From home screen touch the menu icon and then “system Mode”. You can set the thermostat to heat, off, cool, emergency heat,
or auto (auto only available if configured by installer).
9 33-00428–01
Page 10
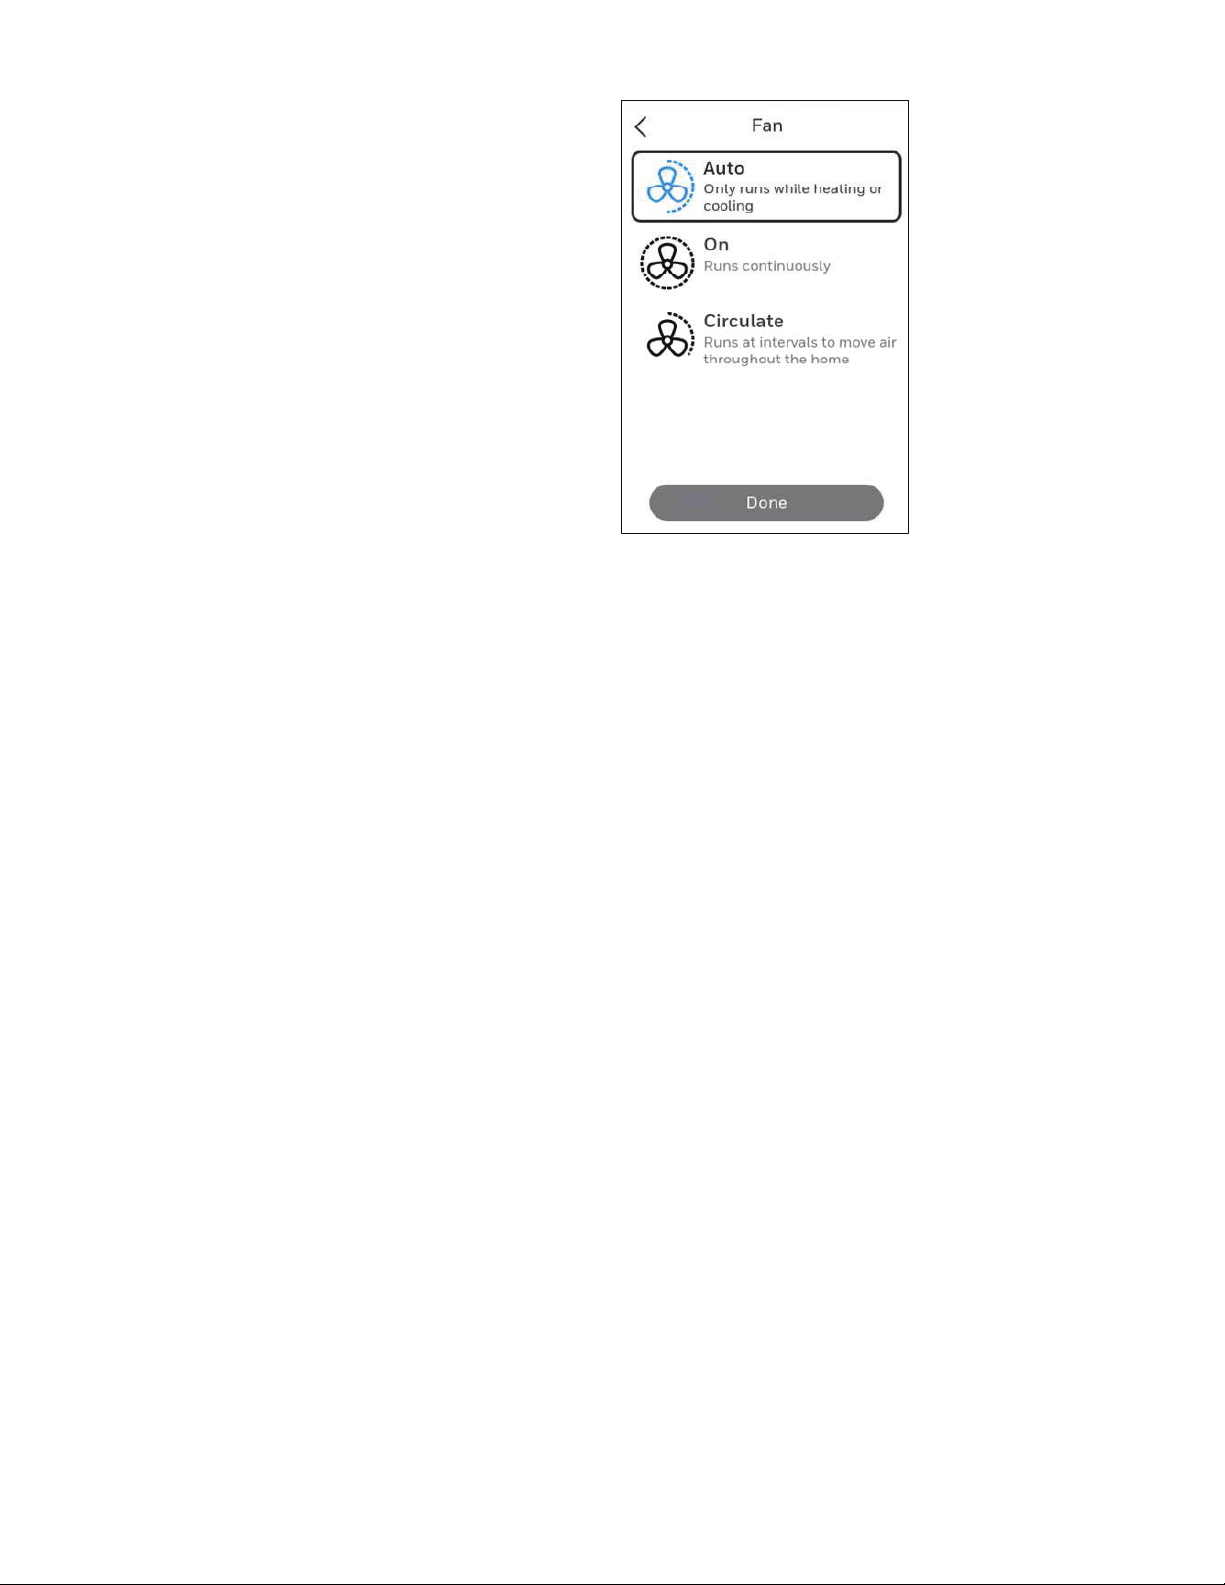
Setting the Fan
Note: Fan setting not available for all system types.
1. Touch any part of the display to wake the thermostat.
2. Touch the MENU icon at the bottom of the screen.
3. Touch Fan
Choose on, auto, or circulate.
Touch arrow in upper left to return to previous screen.
Auto setting only runs the fan with the heating or cooling
system.*
On setting runs the fan continuously.
Circ setting runs the fan approx 33% of the time to ensure air
circulation.
Scheduling the Fan
You can set the fan to on, auto, or circ for each program when
using time-based scheduling or geofencing.
33-00428–01 10
Page 11
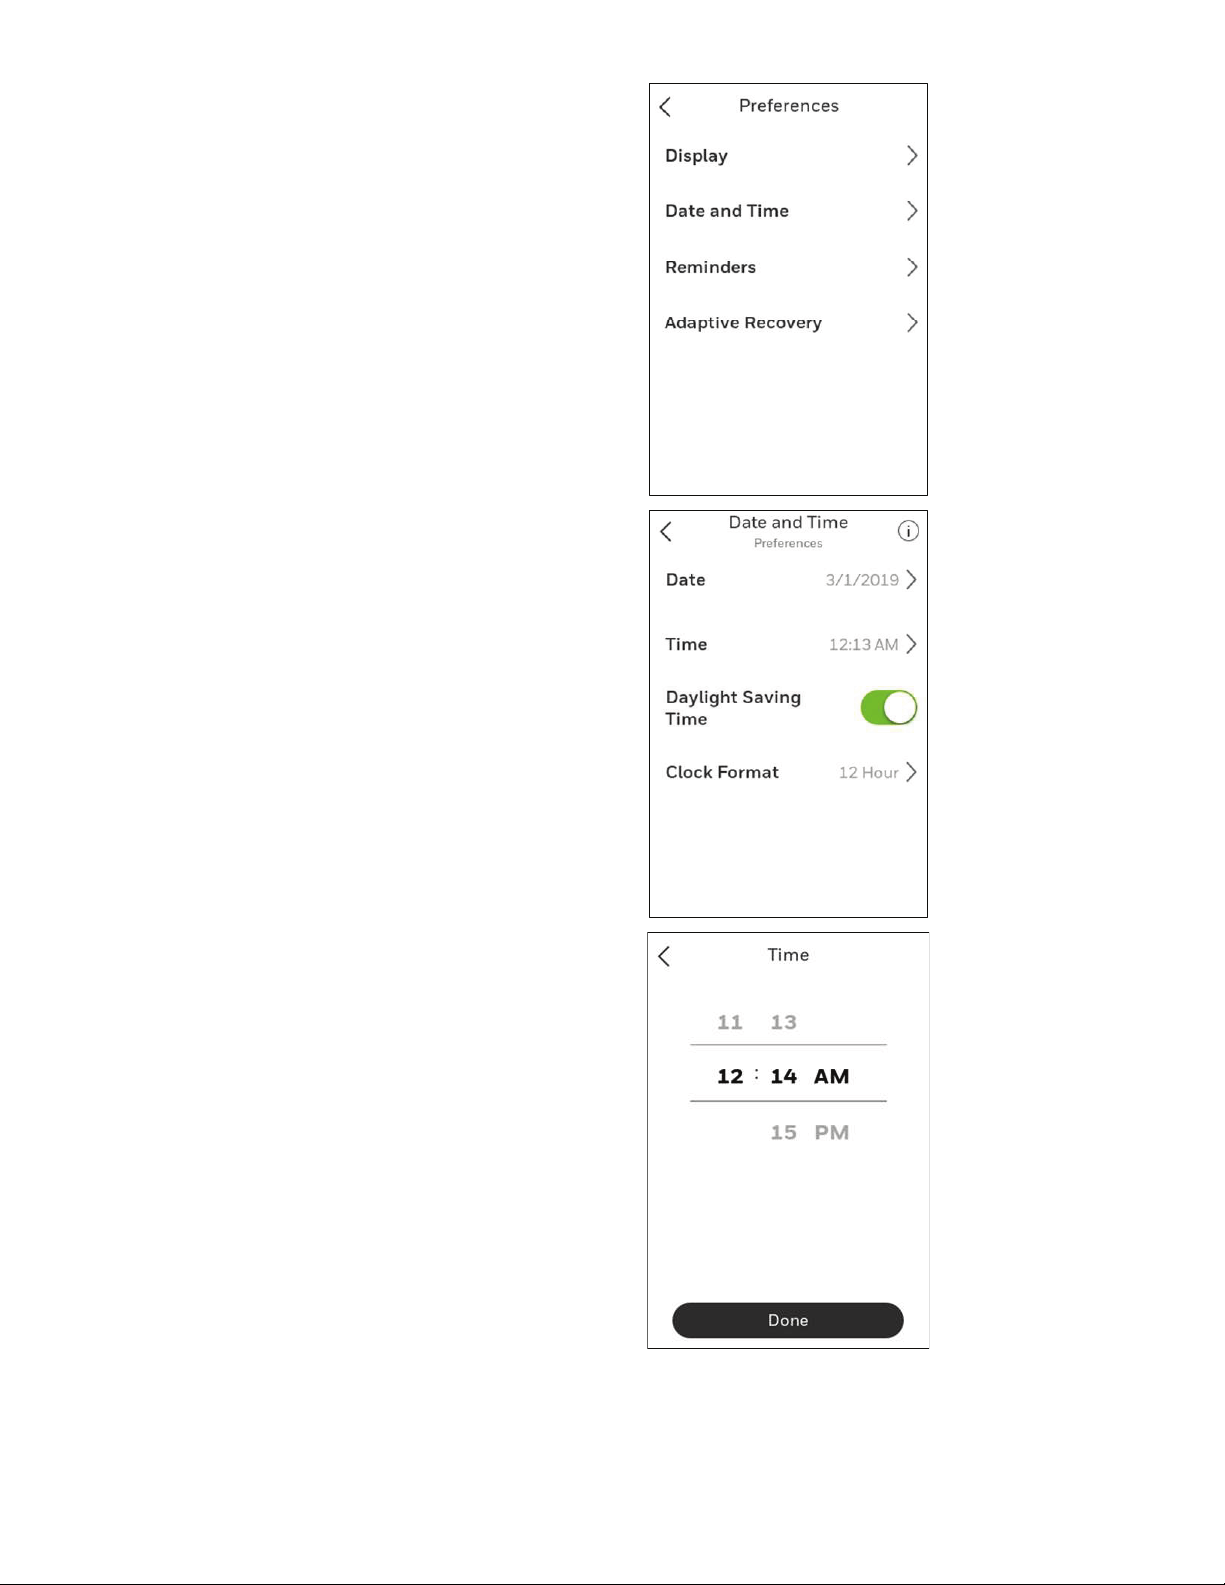
Setting the Time/Date
When the thermostat is linked to the home WiFi router and
registered to an account using the Honeywell Home app, the
date and time will update automatically.
If not using WiFi you can set the time/date as follows:
1. Touch any part of the display to wake the thermostat.
2. Touch the MENU icon at the bottom of the screen.
3. Scroll down and select “Preferences”.
4. Select “Date and Time”.
5. Date and time information are displayed.
Set date
• If the date shown is incorrect, touch “date”.
• Scroll up or down on the left of the display until the
correct month is in the middle of screen.
• Scroll up or down on the center of the display until the
correct day is in the middle of screen.
• Scroll up or down on the right of the display until the
correct year is in the middle of screen.
• Touch “Done”.
Set time
• If the time shown is incorrect, touch “time”.
• Scroll up or down on the left of the display until the
current hour is in the middle of screen.
• Scroll up or down on the center of the display until the
current minutes are in the middle of screen.
• Scroll up or down on the right of the display until the
correct am or pm is in the middle of screen.
• Touch “Done”.
After touching “Done”. Use the arrow at the top of the display
to return to the previous menu. To return to home screen from
main menu, press the arrow at top center of display.
11 33-00428–01
Page 12

Connect to WiFi
1 2
Connect
App
3
s
1. Open the Menu
2. Scroll to and select “WiFi”
3. Tap “Choose Network”
4. Select a network
1 2
Wi-Fi
Connect to the Honeywell Home App
1. Open the Menu
2. Tap “Connect App”
3. Follow the on-screen instructions
3
Choose
Network
4
1. Select thermostat model
2. Select location where the thermostat is installed or create a new location.
Found T9: Downstair
33-00428–01 12
Page 13

Enabling or disabling WiFi and
disconnecting and reconnecting to a WiFi
network
On thermostat
Enable WiFi
1. Touch any part of the display to wake the thermostat.
2. Touch the MENU icon at the bottom of the screen.
3. Scroll down and select “WiFi”
4. Verify “Enable” is selected.
Connecting to a WiFi network
1. Verify WiFi is enabled using steps above.
2. Touch “Choose network”
3. Select the network you wish to connect to from the list and
enter the password.
Disable WiFi
1. Touch any part of the display to wake the thermostat.
2. Touch the MENU icon at the bottom of the screen.
3. Scroll down and select “WiFi”
4. Verify “Enable” is de-selected.
Disconnecting from a WiFi network
1. Touch any part of the display to wake the thermostat.
2. Touch the MENU icon at the bottom of the screen.
3. Scroll down and select “WiFi”.
4. Touch “Choose network”
5. Select the network you wish to connect to from the list and
enter the password.
NOTE: For WiFi troubleshooting, get help at https://www.
honeywellhome.com/questions/why-is-my-thermostat-wifinot-working
13 33-00428–01
Page 14

Setting a schedule on thermostat
Select the menu icon at the bottom of the homescreen
display. Then select Schedule.
• If you want all days the same, select “grouped days.”
• Touch the period you wish to edit (Wake, Away, Home, or
sleep).
• If you want all days separate, select “Single days.”
• Touch the period of the day you wish to edit (Wake, Away,
Home, or sleep). Scroll down to see additional days).
• If you want weekdays grouped but weekend days
separate, or if you do not want to use a schedule, select
“Schedule
• Touch “create new schedule”. The thermostat will then
walk you through the schedule setup.
• Touch “Time” to edit the time for that schedule period.
• Touch “priority” to select which sensors will be used for
that period.
• Touch “Temperature” to set the heat and cool setpoints
for that period.
• Touch “Fan” to select fan on, auto, or circ for that period
(See page 10).
NOTE: to utilize Geofencing, set the schedule through the app
33-00428–01 14
Page 15

Scheduling through the app
Flexible scheduling: You can choose to use location-based temperature
control (geofence technology), time-based scheduling, or use a combination
of both to make sure your home is always comfortable.
• Location-based temperature control: Using geofencing technology,
the T9 Smart thermostat will automatically use your smartphone’s
location, which can save energy when you leave and make your home
comfortable by the time you return.
• Smart scheduling: Adds a Sleep period to location-based temperature
control.
• Time-based scheduling: You can program a schedule where every day
is different, a schedule where weekdays and weekends are different, or a
schedule where every day is the same. There are four adjustable periods
per day: Wake, Away, Home, and Sleep.
• No schedule: You can also choose not to set a schedule and adjust the
thermostat manually.
• Sensor Priority: Select which sensors are used for each program period
or when used manually.
1. In the Honeywell Home app, select the thermostat you wish to schedule.
Touch the calendar icon in the lower right of the display
2. Select Grouped days for all days the same or Single day if you want some
days to be scheduled different than others.
15 33-00428–01
Page 16

Scheduling through the app (continued)
1. Select “Options” to turn schedule off, create a new time-based
schedule, or switch to Geofencing.
2. Set priority sensor(s) for each program.
When location-based temperature control is used, the thermostat active
homescreen display will show ”Using Home settings”, “Using Away
Settings” or “Using “sleep settings” below the room temperature. If you set
an additional Sleep period in the Honeywell Home app, you’ll also see the
Following Schedule in the upper left corner of the thermostat screen.
If you manually change the temperature when location-based temperature
control is active, the new temperature will remain in effect until you cross
the geofence.
To adjust the geofence boundary, follow the steps below.
1. Open the Honeywell Home app, tap the menu icon
corner and then tap Geofence.
2. Tap Geofence Radius, and when the map and current geofence appear,
touch, hold and drag the black dot to adjust the geofence boundary.
3. Tap SAVE to finish.
in the upper left
33-00428–01 16
Page 17

Schedule override on Device
With thermostat in heat, cool, auto, or em heat mode, press the up or down arrow to change the setpoint. (if thermostat is in auto
mode, you need to press “heat to” or “cool to” first).
If scheduling is enabled it will say “Hold until” and show a time at the bottom of the screen. Touch this.
Display says “Use current temperature, fan, and comfort priority settings until…”
Options are:
• Next Period
• A Specific Time
• Permanently
• Remove hold
Choose the appropriate option. If you chose “A Specific time” Select the time you want to hold to.
Press “Done” to return to Home screen.
17 33-00428–01
Page 18

Setting Preferences
Preference menu options let you select how the thermostat
displays information or responds to certain situations.
To access the Preferences menu:
1. Touch any part of the display to wake the thermostat.
2. Touch the MENU icon at the bottom of the screen.
3. Scroll down and select “preferences”.
Select an option and follow prompts:
Display
• Temperature units (Fahrenheit or Celsius)
• Language (English French or Spanish)
• Inactive backlight setting (0% to 100%)
• Inactive Sleep backlight setting (0% to 100% and
inactive sleep time settings. Note: these can be set
different than the schedule sleep times)
• Indoor display offsets (temperature and humidity)
• Clean screen (allows you 30 seconds to clean display
without accidently adjusting a setting)
Date and Time
• Set date
• Set time
• Set to 12 or 24 hour clock
• Set for daylight savings time
Reminders (these vary based on ISU settings)
• Air Filter
• Humidifier Pad
• Dehumidifier
• Filter
• Ventilator Filter
Adaptive recovery
• On or Off
Touch Done to save your settings.
33-00428–01 18
Page 19

Cleaning the Thermostat Screen
When you select the Clean Screen option, the screen is locked
to prevent accidental changes to the thermostat while you
clean the screen.
1. Touch any part of the display to wake the thermostat.
2. Touch the MENU icon at the bottom of the screen.
3. Scroll down and select “Preferences”.
4. Select “Display”.
5. Select “Clean Screen”
A prompt asks if you want to clean the screen for 30 seconds.
6. Touch Yes. A countdown timer displays elapsed time until
the screen is reactivated.
NOTE: Do NOT spray any liquid directly on the thermostat.
Spray liquids onto cloth, then use the damp cloth to clean the
screen. Use water or household glass cleaner. Avoid abrasive
cleansers.
Adjusting Security Settings
You can adjust security options to prevent unauthorized
changes to system settings.
1. Touch any part of the display to wake the thermostat.
2. Touch the MENU icon at the bottom of the screen.
3. Scroll down and select Security.
4. Select “Change lock mode” or “create password”.
Lock mode options
• Unlocked: Full access allowed.
• Partially locked: Only temperature can be changed.
• Fully locked: No access allowed.
NOTE: If you choose to create a password for additional
security, write it down for reference.
19 33-00428–01
Page 20

Configuration settings (new installation)
NOTE: not all of the settings shown in the charts are shown in
the initial installation menu. After saving those you could view
all available settings using the revising settings option below)
1. After the thermostat has powered up, touch “GET
STARTED” on the thermostat.
2. After selecting the correct option for each setting, Touch
NEXT at the bottom of the display to advance to the next
option.
3. To see a list of all setup parameters, go to “Installer setup
(ISU)” starting on page 3. The thermostat displays the ISU
name.
4. To finish setup and save your settings, TOUCH “Done” in
the upper left of display
Configuration settings (revising settings)
If this is not a new installation and you want to access the
configuration menu to view or revise settings-
1. Touch the menu icon (3 horizontal lines at bottom of
display)
2. Scroll down and touch “Advanced setup”
3. Then touch “modify configuration”.
4. After selecting the correct option for each setting, Touch
NEXT at the bottom of the display to advance to the next
option.
5. To see a list of all setup parameters, go to “Configuration
settings” starting on the next page.
6. To finish setup and save your settings, TOUCH “Done” in
the upper left of display
Language
What language would you
like to use?
English
Français
Español
Next
33-00428–01 20
Advanced Setup
Page 21

CSU # Configuration
Settings Default Notes
Setup Name
1000 Language • English
• Francais
• Espanol
None Room • Bedroom
• Living space
• Other
None Room Bedroom:
1050 Temperature
Format
None Do you have
any wireless
sensors to
add?
1060 Outdoor
temperature
2000 System Type • Conventional Forced Air
2010 Equipment
Type
2060 Reversing
Valve
• Guest Bedroom
• Master Bedroom
• Add room
Living Space:
• Family room
• Living Room
• Rec Room
• Add room
Other:
• Dining Room
• Kitchen
• Basement
• Hallway
• Add room
• Fahrenheit
• Celsius
• Add a device
• Set up later
• None
• Internet
Heat
• Heat Pump
• Radiant Heat
• None (cool only)
Conventional Forced Air Heat
• Standard Efficiency Gas
Forced Air
• High Efficiency Gas
forced air
• Oil Forced Air
• Electric Forced Air
• Hot water Fan Coil
Heat Pump
• Air to Air
• Geothermal
Radiant Heat
• Hot Water Radiant Heat
• Steam
None (cool only)
• O (O/B on Cool)
• B (O/B on Heat
English
No defaulted
value
Fahrenheit Which temperature scale would you like to use?
None Outdoor temperature can be displayed on the
Conventional
Forced Air
Heat
O (O/B on
Cool)
In what type of room will this thermostat be
installed?
These questions are asked for two reasons-
1. Other Smart Room Sensors could be used for
other spaces in the home. When these sensors
are used, the customer is able to select certain
sensors to have priority under certain conditions
(active rooms based on motion detection,
selected rooms based on schedule settings).
2. There may be multiple thermostats in the same
location controlled via the app.
This is only shown in the initial setup
Use to connect Smart Room Sensors.
This is only shown on initial setup. To add wireless
indoor sensors later, see the section on adding
sensors.
thermostat when connected to the WiFi and
registered to an account.
On initial setup this will not be shown. Instead the
thermostat determines the system type based on
wire detection
On initial setup this will not be shown. Instead the
thermostat determines the system type based on
wire detection
This ISU is not displayed when ISU 2000 Heating
System Type is set to None (Cool Only).
Available options depend on “System Type” setting
Cycle Rate and Fan Operation automatically default
to the correct settings based on the equipment type
selected.
Only displayed if the system type (ISU 2000) is set
to Heat Pump) or wire detection senses a wire on
O/B.
Note: multiple Configuration settings can be grouped together on the same display screen.
21 33-00428–01
Page 22

ISU # Configuration
Settings Default Notes
Setup Name
2070 Cool Stages /
Compressor
stages
2070 Heat stages /
Backup heat
stages
3000 Changeover • Manual
4090 Adaptive
Intelligent
Recovery
4100 Minimum Cool
Setpoint
4100 Maximum Cool
Setpoint
4100 Minimum Heat
Setpoint
4100 Maximum Heat
Setpoint
0, 1, 2 1 0 setting not available if the wire is detected on Y or system type
0, 1, 2 1 Maximum of 2 Heat Stages for conventional systems.
• Automatic
No, Yes Yes No: The system will begin heating or cooling recovery at the
50° F to 99° F *
10.0° C to 36.5° C
50° F to 99° F *
31° C to 37° C
40° F to 90° F *
4.5° C to 32° C
40° F to 90° F *
4.5° C to 32° C
(ISU 2000) is set to Heat Pump)
On initial setup this will not be shown. Instead the thermostat
determines the system type based on wire detection
Maximum of 1 Backup Heat Stages for heat pump applications.
Note: this is not counting the compressor heat stages on heat
pump systems.
On initial setup this will not be shown. Instead the thermostat
determines the system type based on wire detection
Automatic Not displayed if equipment type (ISU 2000) is set to cool only or
50° F
(10° C)
90° F
(32° C)
Verify this
when they
update this
50° F
(10° C)
90° F
(32° C)
Verify this
when they
update this
cool stages (ISU 2070) is set to 0.
scheduled time.
Yes: The thermostat will begin heating or cooling recovery early
to ensure that the temperature is reached at the scheduled time.
The thermostat will adjust the start time of the equipment based
on how quickly the scheduled temperature was reached on
previous days.
The user cannot set the cool setpoint below this level.
Thermostat needs to be configured for at least 1 cool/
compressor stage.
* The minimum cool setpoint cannot be set higher than the
maximum cool setpoint.
If these settings are the same, the cool setpoint is not adjustable
from home screen.
The user cannot set the cool setpoint above this level.
Thermostat needs to be configured for at least 1 cool/
compressor stage.
* The maximum cool setpoint cannot be set lower than the
minimum cool setpoint.
If the max cool and min cool settings are the same, the cool
setpoint is not adjustable from home screen.
The user cannot set the Heat setpoint below this level.
Thermostat needs to be configured for at least 1 heat stage.
* The minimum heat setpoint cannot be set higher than the
maximum heat setpoint or the minimum cool.
If these settings are the same, the heat setpoint is not adjustable
from home screen.
NOTE: you need to scroll down to see this setting if cooling is
used.
The user cannot set the Heat setpoint above this level.
Thermostat needs to be configured for at least 1 heat stage.
* The maximum heat setpoint cannot be set lower than the
minimum heat setpoint.
If these settings are the same, the heat setpoint is not adjustable
from home screen.
Note: you need to scroll down to see this setting if cooling is
used.
Note: multiple Configuration settings can be grouped together on the same display screen.
33-00428–01 22
Page 23

ISU # Configuration
Settings Default Notes
Setup Name
4110 Keypad lockout Unlocked
7000 Filter Type None
7110 Air filter 1
replacement
reminder
8100 Humidifier Pad
Replacement
Reminder
9120 Dehumidification
Filter
Replacement
Reminder
10170 Ventilator Filter
Cleaning
Reminder
11000 Number of UV
Devices
11050 Replace UV Bulb 1Off, 6, 12, 24
11050 Replace UV Bulb 2Off, 6, 12, 24
14010 Clock Format • 12 Hour Clock
14015 Daylight Savings
Time
14020 Indoor
Temperature
Display Offset
14020 Indoor Humidity
Display Offset
Partially locked
Fully Locked
Media
Off
Run Time:
10, 20, 30, 45, 60, 90,
120, 150 days
Calendar:
30, 45, 60, 75 days
3, 4, 5, 6, 9, 12, 15
months
• Off
• 60 Run Time Days
• 90 Run Time Days
• 6 Calendar Months
• 12 Calendar
Months
Off, 30, 60, Calendar
Days
3 to 12 Calendar
Months (in 1 month
increments)
Off
3, 6, 9, 12
Calendar Months
0, 1, 2 0 Some systems may have two UV devices, one for the
Calendar Months
Calendar Months
• 24 Hour Clock
• No
• Yes
3° F to 3° F in 1° F
increments
(1.50° C to 1.50° C in
.5° C increments)
12% to 12% (in 1%
increments)
Unlocked Unlocked: User has access to all thermostat settings.
Partially Locked: User can modify only temperature
settings.
Fully Locked: User cannot modify any settings
Media
Off Only shown if ISU 7020 is set to 1 or 2
Off
Off
Off
ACoil and another for Air Treatment. A replacement
reminder can be setup for each one. Select 0 if no UV
devices are installed.
Off
Off
12 Hour
Clock
Yes Set to Off in areas that do not follow Daylight Saving
0° F
(0.00° C)
0° F 0% - No difference in displayed humidity and the actual
Time.
0° F - No difference in displayed temperature and the
actual room temperature.
The thermostat displays up to 3°F (1.5°C) lower or
higher than the actual measured temperature.
room humidity. The thermostat displays up to 12% lower
or higher than the actual measured humidity.
Note: multiple Configuration settings can be grouped together on the same display screen.
23 33-00428–01
Page 24

Advanced Features
ADAPTIVE RECOVERY
Over time, the T9 thermostat “learns” how long it takes your system to reach your programmed temperature setting.
The thermostat turns on the heating/cooling system early and assures that the programmed temperature setting is reached at
the programmed time regardless of weather conditions. For example, if the Wake program period is set to 6:00 am with a heat
setting of 70 degrees, the heat will turn on before 6:00 am, so the temperature is 70 degrees at 6:00 am. The thermostat displays
“In Recovery” when it turns the system on early.
Adaptive Intelligent Recovery® calculates the recovery ramp based on how far the room temperature is away from the
temperature setting, previous equipment performance and weather history, allowing the thermostat to start recovery at the
optimal time so it can reach the programmed temperature setting at the programmed time.
COMPRESSOR PROTECTION
The thermostat keeps the compressor off for a few minutes before restarting, to prevent equipment damage. During this “off”
time, the message “Waiting for Equipment” is displayed on screen.
33-00428–01 24
Page 25

Alerts and notifications
1. The red dot above the Menu icon indicates an active alert or notification. Touch the Menu icon to view active Alerts &
Notifications.
2. Touch Notifications to open this menu.
3. Touch the alert message to see more information about the alert.
1 2
Notifications
3
Notifications
Set the Date
and Time
Set the Date
and Time
When there is an active alert or notification, you must select the notification banner and acknowledge the message before you
are allowed to access the menu icon.
25 33-00428–01
Page 26

Alerts
Alert Message Meaning Action
SET DATE AND TIME Date and time are required for features such as schedule Touch “Set Date and Time” button below
WIFI MODULE ERROR There is a failure of the WiFi module in the thermostat. Replace the thermostat
NEED TO REGISTER
ONLINE
NO INTERNET
CONNECTION
WIFI SIGNAL LOST The WiFi connection has been lost. Try reconnecting or
WIFI NOT CONFIGURED WiFi has not been configured on this thermostat. Touch “View WiFi Settings” under alert
INTERNET REQUIRED
FOR OUTDOOR
TEMPERATURE
POWER RESTORED There was an interruption in the power to the thermostat,
HEAT PUMP FAILURE An issue was detected. Contact professional to diagnose
MEMORY ERROR There is a failure of the memory chip in the thermostat. Replace the thermostat
INTERNAL SENSOR
ERROR
INTERNAL HUM TEMP
FAILURE
THERMOSTAT MEMORY
ERROR
THERMOSTAT
UNKNOWN TIME
LOW SENSOR
BATTERIES
INDOOR SENSOR
ERROR
INDOOR SENSOR
CONNECTION ERROR
Sign in to the Honeywell Home App and follow the
instructions to add a thermostat.
The thermostat is connected to (Network name) but can’t
reach the Internet.
choosing a new network.
To receive outdoor temperature, the thermostat needs
to be connected to the Internet. The installer may have
configured the thermostat to use outdoor temperature
for equipment lockouts.
but it has been restored.
and service your heat pump. (L wire energized).
There is a failure of the sensor in the thermostat. Replace the thermostat
There is a failure of the sensor in the thermostat. Replace the thermostat
Internal issue with thermostat memory chip. Replace the thermostat
Power was lost and the time is not able to update
through WiFi either because the thermostat was not
registered or there is poor WiFi communication.
Display says, “Change the batteries in the (Sensor name)
soon”
An issue with the wireless (SENSOR NAME) was
detected. The sensor may need to be replaced.
(SENSOR NAME) is no longer connected. Replace the batteries and make sure it
alert message or register thermostat to
Honeywell Home account.
Try checking your router and modem.
Touch “View WiFi settings” below
the message on screen and follow
instructions.
to either connect to a network or disable
WiFi.
Touch “View WiFi settings”below alert
message to link thermostat to network.
No Action Required.
Call contractor to determine what is
wrong with heat pump.
Reset the time or Verify WiFi
connection.
Replace the AAA Alkaline batteries for
the sensor named in alert message
Replace the sensor
is placed in an acceptable location.
33-00428–01 26
Page 27

IAQ REMINDERS
You can set up IAQ reminders in the thermostat to remind users when filters, pads, UV bulbs, etc. need cleaning or replacement.
• Air Filter 1
• Humidifier Pad
• Dehumidifier
• Filter
• Ventilator Filter
• UV Bulb 1
• UV Bulb 2
If you want to disable the alert, go MENUPREFERENCESREMINDERS to turn reminder off.
To access or adjust the reminder settings
1. Touch any part of the display to wake the thermostat.
2. Touch the MENU icon at the bottom of the screen.
3. Scroll down and select “preferences.”
4. Select the reminder you want to set from the list (shown above).
5. Press ^ or v to set the timer length. Ranges, increments, and units will change based on the reminder.
6. Press Done to save the reminder.
7. Press Reset Timer when you have completed the recommended maintenance or you can extend the timer setting to turn off
the alert and remind you later to do the recommended maintenance.
• Repeat these steps for all reminders you want to set
NOTE: When set for run time days, the thermostat tracks the amount of time the fan has run and compares that time against the
number of run time days selected. Fan run time is counted when there is a call for forced air heating, cooling, or fan.
27 33-00428–01
Page 28

Adding a wireless sensor
1. Touch any part of the display to wake the thermostat.
2. Touch the MENU icon at the bottom of the screen.
3. Scroll down and touch “Devices and Sensors”.
4. Touch “Add”
5. Follow the on-screen directions to pair and name your new sensor
To Remove a Sensor from the T9 (from thermostat)
1. Touch any part of the display to wake the thermostat.
2. Touch the MENU icon at the bottom of the screen.
3. Scroll down and select “Devices and Sensors”
4. Select the sensor you wish to remove. Select the “Options” button at the bottom of the display.
5. Touch “Delete”.
To Remove a Sensor from the T9 (From the sensor)
1. Locate the sensor you wish to remove from your thermostat
2. Remove Sensor Cover and verify the batteries are inserted
3. With the cover off, Press and Hold the Connect button for 30 seconds. (The Sensor LED will switch from steady green to red.)
4. Release the Connect button. Your sensor will now be removed from the “Devices and Sensors” list.
If a sensor was previously paired with another T9 Smart thermostat, you will need to remove it from the previous thermostat prior
to pairing it with your new T9 Smart thermostat. Sensors are only compatible with one thermostat at a time.
33-00428–01 28
Page 29

Smart Room Sensor information
When one or more wireless temperature/humidity/motion sensors have been linked to the thermostat by the installer, you can
check the status of the sensor using the following steps.
Checking the status of a sensor
1. Touch any part of the display to wake the thermostat.
2. Touch the MENU icon at the bottom of the screen.
3. Scroll down and touch “Devices and Sensors”.
• View the sensors, add a sensor or identify a sensor
• To identify a sensor, touch “Identify” and then remove the cover from a sensor and press the button on that sensor. The
thermostat will indicate the room name of that sensor.
• Touch a sensor name from the list to get information on that sensor
3
2
3
2
3
4
71 °
72°
69°
72°
• Touch Motion Sensitivity to adjust setting
• Touch “Blink lights” to make the light on the selected sensor flash for 5 seconds.
29 33-00428–01
Page 30

Battery Replacement (indoor sensor)
The T9 thermostat does not use any batteries. It is powered by 24 volts from the HVAC transformer using the C (common) wire.
The wireless indoor sensors use AAA Alkaline batteries.
Batteries:
Replace batteries in your indoor sensor when a warning appears on the thermostat screen, about 60 days before batteries are
depleted.
When the sensor status light begins flashing red, battery power is critically low and will be depleted within 23 weeks. During
normal operation, the status light remains off.
To replace the batteries:
1. Remove cover from sensor.
2. Install 2 fresh AAA alkaline batteries. If the status light flashes green, batteries are good; if it flashes red, you must use fresh
batteries.
3. Snap cover back on sensor. The sensor will restore communication with the thermostat a few seconds after new batteries are
installed.
33-00428–01 30
Page 31

Frequently Asked Questions (FAQs)
WiFi connection questions
Q: Will the thermostat still work if the WiFi connection is lost?
A: Yes, you can still manually adjust the temperature at the thermostat. However, some features such as location-based
temperature control (geofencing technology) can only be managed through the Honeywell Home app and will not function
without a WiFi connection. The thermostat will automatically reconnect to WiFi once the network is restored.
Q: Is there a way to extend the strength of my WiFi signal?
A: The range (distance) of your WiFi signal is determined by your router. Try moving your router closer to the location of the
thermostat, or use a router with a stronger signal range.
Q: There’s an alert that says “WiFi signal lost” - what should I do?
A: Wait 5 minutes for the thermostat to reconnect or select an alternate network (if you have one) in the Honeywell Home app
configuration menu. If the thermostat isn’t able to reconnect, you’ll need to troubleshoot the router to determine the cause.
Honeywell Home account and app questions
Q: Why haven’t I received an account activation email?
A: If you haven’t received an activation email after 5 minutes, check your Spam folder and look for an email from
honeywellhomesupport@honeywell.com. If you don’t see it, tap Resend to have the activation email resent. If you still don’t
receive it, please contact the Technical Support team at 18006333991.
Q: Can I set up my thermostat with multiple users?
A: Yes. To add users, log into the Honeywell Home app and tap the menu icon in the upper left corner. Select Manage Users, tap
Add User and type in the email addresses of the people you’d like to invite. If they already have a Honeywell Home account set
up, the thermostat and its location will automatically be added to their account. If they don’t have an account, they’ll receive an
email prompting them to download the Honeywell Home app and create a new account.
Q: Can I set up location-based temperature control with multiple users?
A: Yes. Location-based temperature control (geofence technology) will activate based on the last person who leaves and the
first person to return. Each user will need to create their own Honeywell Home account with a login ID and password. Two users
should not share the same account. Each user will then need to enable location-based temperature control.
Q: Why doesn’t a change I made in the app show up on the thermostat?
A: There may be a short delay when you make temperature and settings changes in the Honeywell Home app. Wait a few
minutes, and if you still don’t see your changes on the thermostat, make sure the thermostat is still connected to WiFi and
restart your Honeywell Home app.
Software and security questions
Q: How can I be sure my thermostat is running the most up-to-date firmware?
A: When your thermostat is connected to WiFi, it will automatically receive over-the-air firmware updates from the Honeywell
Home app. These firmware updates contain things such as new features as well as security upgrades. Keep your thermostat
connected to WiFi to ensure it receives these updates.
Q: How can I prevent a cybercriminal from making unathorized changes to my thermostat?
A: If a cybercriminal gains access to your WiFi router, they can tamper with a wide range of online activities, including the
settings on your connected devices. Make sure you change the default password on your WiFi router, and when you select a new
password, make sure it uses multiple upper- and lower-case letters and special characters.
31 33-00428–01
Page 32

Other questions
Q: How can I uninstall my T9 Smart thermostat?
A: If you want to replace your T9 Smart thermostat, or if you’re moving out of your home and leaving the thermostat behind,
you’ll first want to clear out the personal settings that are stored on the thermostat. (Even when disconnected from power, the
thermostat will keep your settings and home router information in memory.) We recommend resetting the thermostat’s WiFi and
HomeKit settings (if previously connected).
Q: Is there a motion sensor in the thermostat?
A: There is not a motion sensor in the thermostat. In most homes, the thermostat is mounted in a hallway, so when using active
rooms for priority sensing, we would want to exclude the thermostat.
Q: What happens if “Active rooms” is used and no motion is detected in any of the rooms with sensors?
A: If the thermostat is set to control by active rooms, and no motion is detected, the sensor in the thermostat is used and the
remote sensors are excluded. Most people schedule the sleep period to use “Selected sensors” rather than “active sensors” and
choose the bedrooms for the sleep schedule.
Q: When using active rooms, how long are those rooms considered after motion has last been detected?
A: The sensor has a dynamic occupancy algorithm based on how many motion events it sees within a certain timeframe. If
someone walks through a room, then the room will be occupied for 10 minutes. If someone is in a room longer, then the timeout
will be increased automatically.
Q: How do the wireless indoor sensors detects motion.
A: The sensors use a Passive Infrared Sensor (PIR) detector.
Q: How does motion-based priority work with multiple people in the house?
A: If the thermostat priority setting is set to ‘Active Rooms’, then any room that detects motion will become prioritized, and those
Rooms’ temperatures will be averaged together to be used as the effective indoor temperature. If people leave the room, then the
sensor will need to wait for the timeout.
Q: What’s the range of detection on the motion sensor?
A: There are many factors that can affect this (height, body size, layers of clothing, temperature of clothing, angle, etc.). The
typical range of our sensor is up to 20 feet.
Q: How does motion-based priority work with multiple people in the house?
A: If the thermostat’s priority is set to ‘Active Rooms’, then any room that detects motion will become prioritized. The average of
those rooms’ temperatures will be monitored so that the thermostat can adjust to your preferred temperature setpoint. If one of
the sensors no longer detects people in that room, that sensor will adjust after a period of time, using the algorithm based on
motion events that it sees within a certain timeframe.
Q: When using active rooms, how long are those rooms considered “Active” after motion has last been detected?
A: The sensor has an occupancy algorithm based on how many motion events it sees within a certain timeframe. This was set up
so that if someone briefly walks through a room, the sensor will tell the thermostat that the room is “occupied” for 10 minutes. If
someone is in a room longer, then the timeout will be increased automatically.
Sensors communicate directly with the thermostat via Honeywell Home RedLINK technology. After sensing motion, the
communication should take less than 3 seconds to assign the room priority, depending on battery and signal strength.
33-00428–01 32
Page 33

Troubleshooting
If you have difficulty with your thermostat, please try the following suggestions. Most problems can be corrected quickly and
easily.
Display is blank
• Check circuit breaker and reset if necessary.
• Make sure power switch for heating and cooling is on.
• Make sure furnace door is closed securely.
• Make sure the C-wire is connected.
• Make sure R/Rc slider tab is set correctly (see wiring diagrams).
Heating or cooling system does not respond
• Press Menu > System Mode > Heat > Done to set the system to Heat mode. Make sure the desired temperature is higher
than the indoor temperature.
• Press Menu > System Mode > Cool > Done to set the system to Cool mode. Make sure the desired temperature is lower than
the indoor temperature.
• Check circuit breaker and reset if necessary.
• Make sure power switch for heating and cooling system is on.
• Make sure furnace door is closed securely.
• Wait 5 minutes for the system to respond.
Temperature settings do not change
Make sure desired temperature is within acceptable ranges:
• Heat: 40 °F to 90 °F (4.5 °C to 32.0 °C)
• Cool: 50 °F to 99 °F (10.0 °C to 37.0 °C)
Aux heat runs in cooling
• For heat pump systems, verify there is not a wire attached to W on the UWP.
Cool runs with a call for heat
• For heat pump systems, verify there is not a wire attached to W on the UWP.
Sensor will not connect
• Press and hold Connect on the wireless sensor for 15 seconds. The LED will turn Amber. Return to the thermotat menu and
press Menu > Devices and Sensors. Follow the on-screen instructions to add the sensor.
33 33-00428–01
Page 34

Specifications
Temperature Ranges
• Heat: 40 °F to 90 °F (4.5 °C to 32.0 °C)
• Cool: 50 °F to 99 °F (10.0 °C to 37.0 °C)
Operating Ambient Temperature
• 32 °F to 120 °F (0 °C to 48.9 °C)
Shipping Temperature
• 20 °F to 120 °F (28.9 °C to 48.9 °C)
Operating Relative Humidity
• 5% to 90% (non-condensing)
Physical Dimensions in inches (mm) (H x W x D)
• T9 Smart Thermostat:
4.9” x 3.7” x 0.93” (125.4 x 94.1 x 23.68)
• UWP Mounting System (included):
29/32” x 213/64” x 243/64” (58 x 56 x 10)
• Standard Installation Adapter (included):
329/32” x 357/64” x 21/32” (99 x 99 x 17)
• Cover Plate – Large (THP2400A1068):
67/64” x 67/64” x 9/32” (155 x 155 x 7)
Electrical Ratings
Terminal Voltage
(50/60Hz)
W Heating 2030 Vac 0.021.0 A
W2 (Aux) Heating 2030 Vac 0.021.0 A
E Emergency Heat 2030 Vac 0.020.5 A
Y Compressor Stage 1 2030 Vac 0.021.0 A
Y2 Compressor Stage 2 2030 Vac 0.021.0 A
G Fan 2030 Vac 0.020.5 A
O/B Changeover 2030 Vac 0.020.5 A
L/A Input 2030 Vac 0.020.5 A
Running
Current
Regulatory Information
FCC REGULATIONS
§ 15.19 (a)(3)
This device complies with part 15 of the FCC Rules. Operation
is subject to the following two conditions:
1. This device may not cause harmful interference, and
2. This device must accept any interference received,
including interference that may cause undesired operation.
IC REGULATIONS
RSS-GEN
This device complies with Industry Canada’s license-exempt
RSSs.
Operation is subject to the following two conditions:
1. This device may not cause interference; and
2. This device must accept any interference, including
interference that may cause undesired operation of the
device.
FCC Warning (Part 15.21) (USA only)
Changes or modifications not expressly approved by the party
responsible for compliance could void the user’s authority to
operate the equipment.
This product should not be disposed of with other household
waste. Check for the nearest authorized collection centers
or authorized recyclers. The correct disposal of end-of-life
equipment will help prevent potential negative consequences
for the environment and human health.
U Not used
Power Consumption
3 VA
33-00428–01 34
Page 35

2-year limited warranty
Resideo warrants this product, excluding battery, to be free from defects in workmanship or materials, under normal use and
service, for a period of two (2) years from the date of first purchase by the original purchaser. If at any time during the warranty
period the product is determined to be defective due to workmanship or materials, Resideo shall repair or replace it (at Resideo’s
option).
If the product is defective,
(i) return it, with a bill of sale or other dated proof of purchase, to the place from which you purchased it; or
(ii) call Resideo Customer Care at 18006333991. Customer Care will make the determination whether the product should
be returned to the following address: Resideo Return Goods, 1985 Douglas Dr. N., Golden Valley, MN 55422, or whether a
replacement product can be sent to you.
This warranty does not cover removal or reinstallation costs. This warranty shall not apply if it is shown by Resideo that the defect
was caused by damage which occurred while the product was in the possession of a consumer.
Resideo’s sole responsibility shall be to repair or replace the product within the terms stated above. RESIDEO SHALL NOT BE
LIABLE FOR ANY LOSS OR DAMAGE OF ANY KIND, INCLUDING ANY INCIDENTAL OR CONSEQUENTIAL DAMAGES RESULTING,
DIRECTLY OR INDIRECTLY, FROM ANY BREACH OF ANY WARRANTY, EXPRESS OR IMPLIED, OR ANY OTHER FAILURE OF THIS
PRODUCT.
Some states do not allow the exclusion or limitation of incidental or consequential damages, so this limitation may not apply to
you.
THIS WARRANTY IS THE ONLY EXPRESS WARRANTY RESIDEO MAKES ON THIS PRODUCT. THE DURATION OF ANY IMPLIED
WARRANTIES, INCLUDING THE WARRANTIES OF MERCHANTABILITY AND FITNESS FOR A PARTICULAR PURPOSE, IS HEREBY
LIMITED TO THE TWO YEAR DURATION OF THIS WARRANTY. Some states do not allow limitations on how long an implied
warranty lasts, so the above limitation may not apply to you.
This warranty gives you specific legal rights, and you may have other rights which vary from state to state. If you have any
questions concerning this warranty, please write Resideo Customer Care, 1985 Douglas Dr, Golden Valley, MN 55422 or call
18006333991.
Resideo Inc., 1985 Douglas Drive North
Golden Valley, MN 55422
www.resideo.com
This product is manufactured by Resideo Technologies, Inc., Golden Valley, MN, 1-800-468-1502
© 2019 Resideo Technologies, Inc. The Honeywell Home trademark is used under license from Honeywell International Inc.
All rights reserved.
33-00478—01 M.S. 06-19 | Printed in United States
 Loading...