

Honeywell RTH8580ZW Quick Start Manual
Welcome
Quick Start Guide
Touchscreen
Thermostat
RTH8580ZW
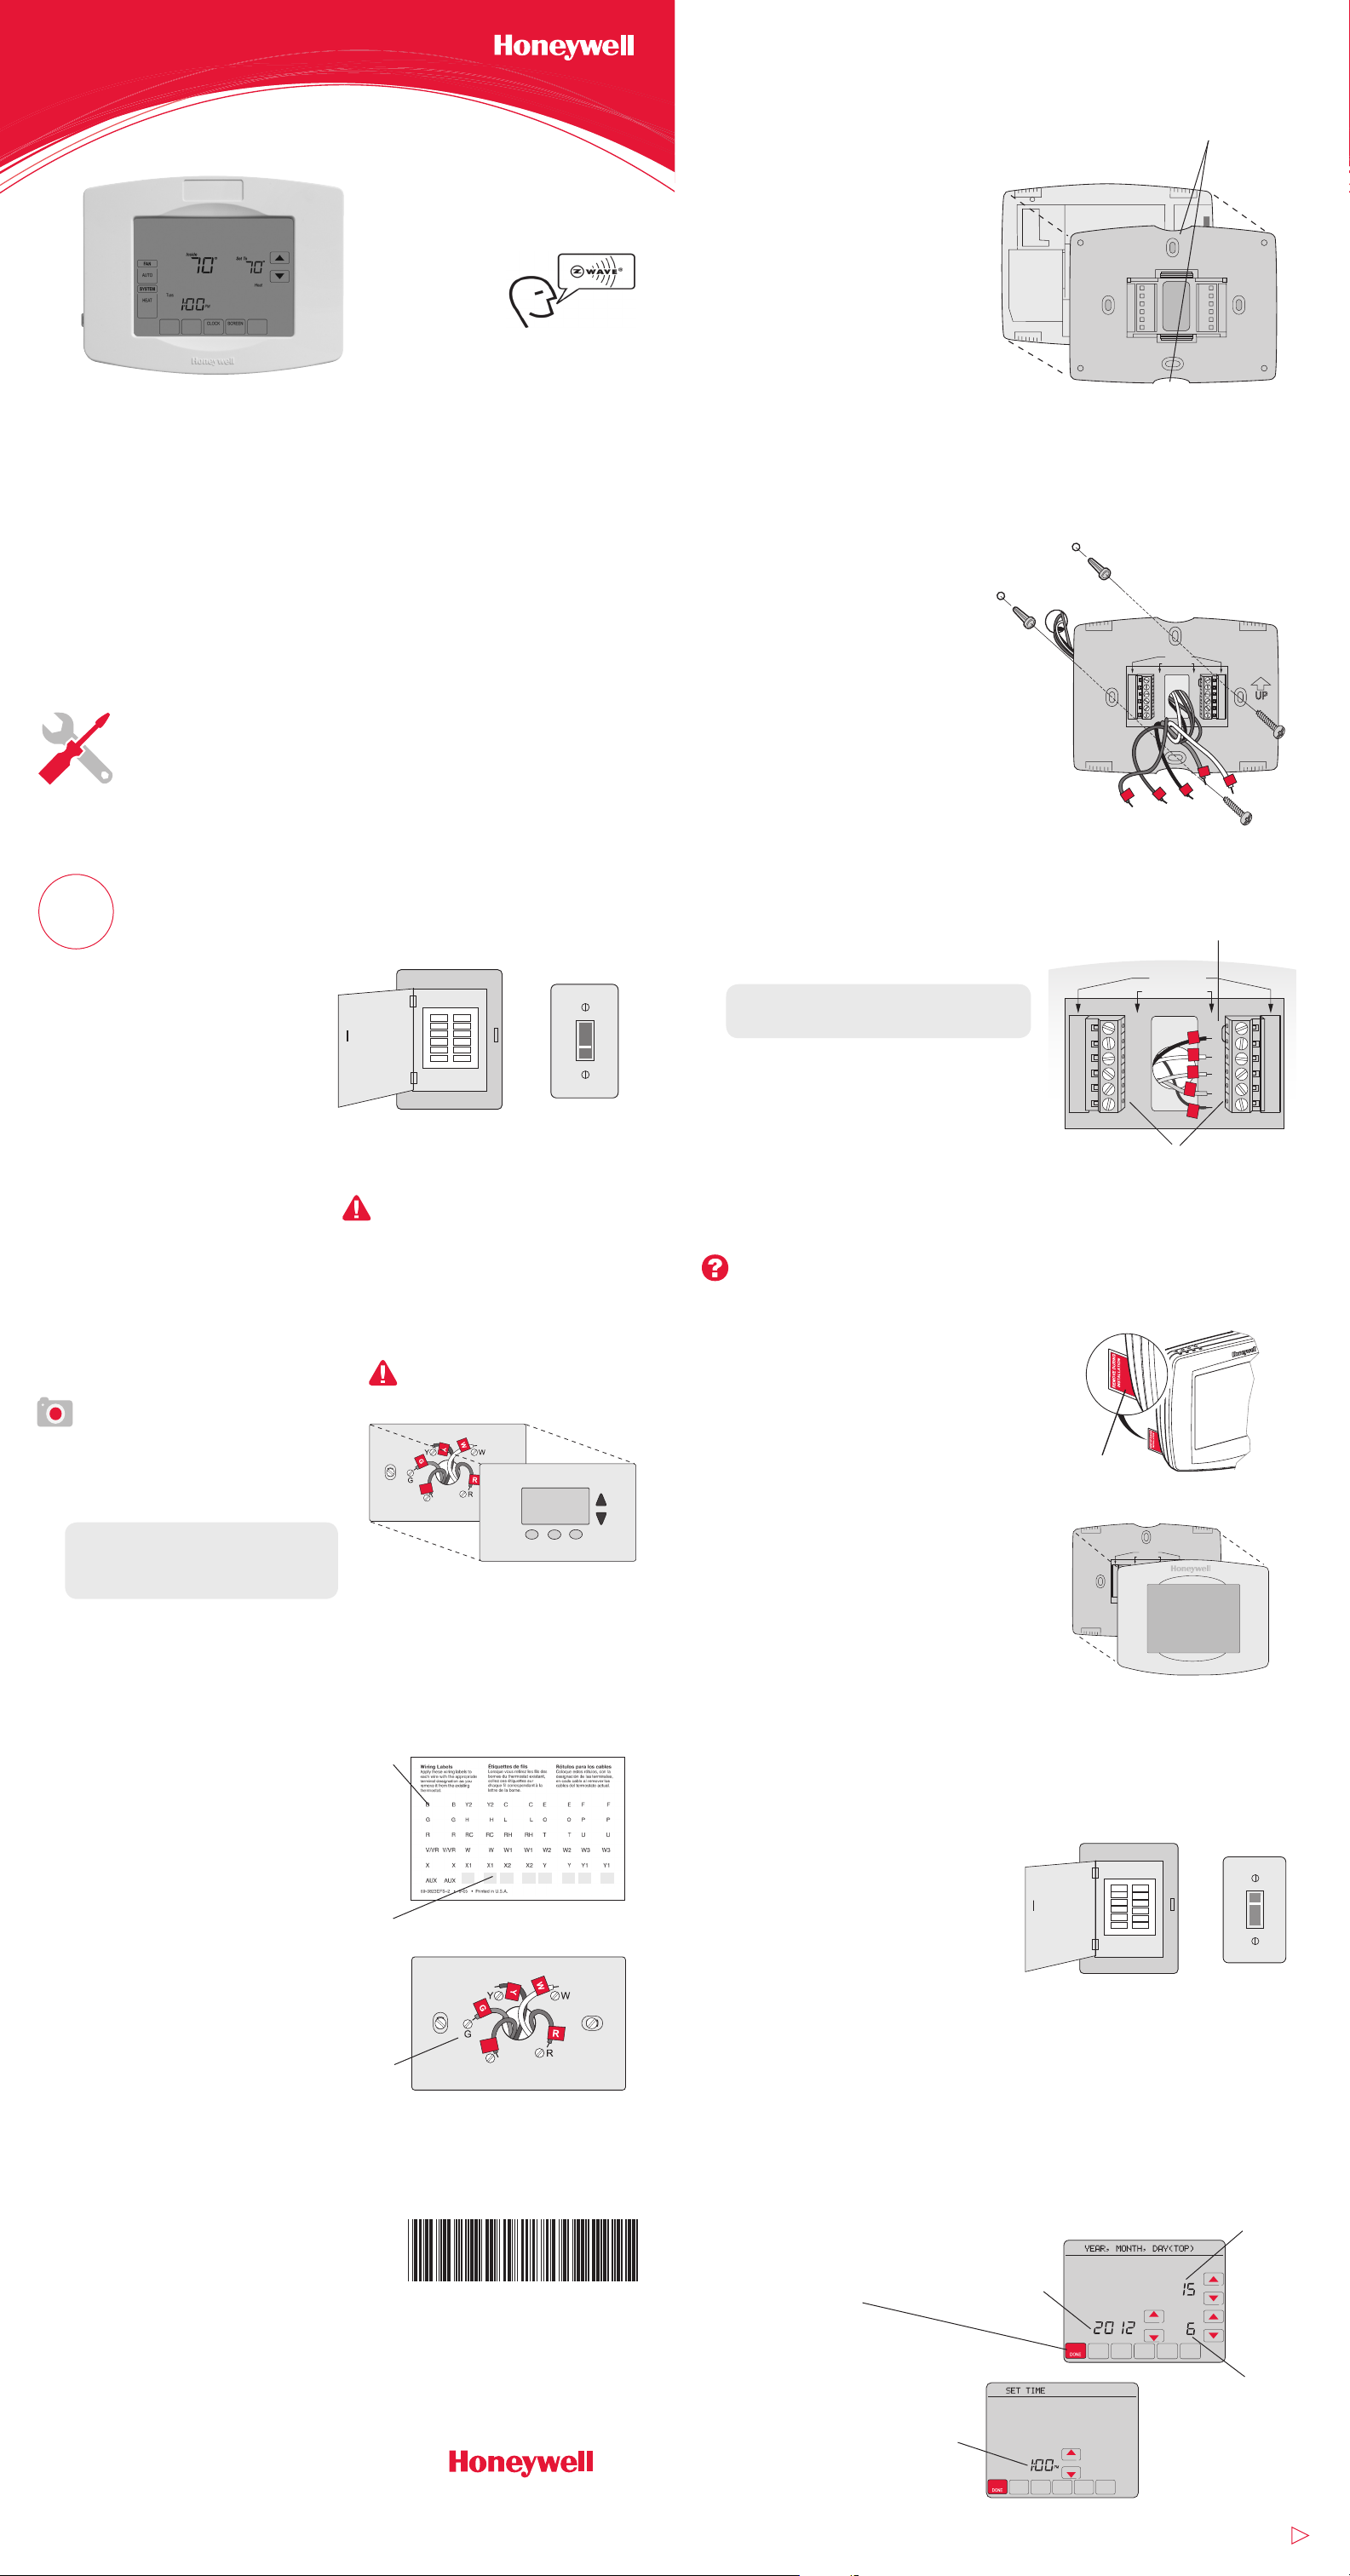
1.5 Separate Z-Wave thermostat
and its wallplate
On your new thermostat, grasp the
finger holds on the top and bottom of
the wallplate with one hand and the
thermostat (front) with the other hand.
Pull pieces apart.
Finger holds
Thermostat
Wallplate (back view)
Getting set up and ready is simple.
Install your thermostat.
1
Setup your thermostat
2
Connect thermostat to the Z-Wave network.
3
Before you
begin
Gather
• Smallscrewdriver
Need Help?
For assistance with this product please
visit http://yourhome.honeywell.com
or call Honeywell Customer Care tollfree at 1-800-468-1502.
• Drill(ifneeded)
Install your thermostat
1
1.1 Switch OFF power to your
heating/cooling system
1.1a Important! To protect your
equipment, switch OFF
the power to your heating/
cooling system at the
breaker box or the system
switch.
1.1b Confirm power is OFF. Try
to turn on heating/cooling
equipment by changing
temperature on your old
thermostat. Your power is
OFF if your system does not
turn ON.
This thermostat works with common 24 volt
systems such as forced air, hydronic, heat
pump, oil, gas, and electric.
It will not work with millivolt systems, such as
a gas fireplace, or with 120/240 volt systems
such as baseboard electric heat.
Circuit
breaker
box
or
Heating/cooling
system power
switch
1.6 Mount wallplate for Z-Wave
thermostat
Mount your new wallplate using
screws and anchors included with
the thermostat.
If necessary:
• Drill3/16-inholesfordrywall
• Drill7/32-inholesforplaster
Note: You may be able to use your
existing wall anchors. Hold the
wallplate up to the existing anchors
to check for alignment.
1.7 Connect wires
1.7a StartingwiththeCWire,match
the sticky tag on the wire to the
terminal labels.
Important! C wire is required and is the
primary power source. Without a C wire,
your thermostat will not power up.
1.7b Loosenscrew,insertwireoninside
edge of terminal, then tighten
screw.
1.7c Verifywireisfirmlysecuredby
gently pulling on wire.
1.7d Repeatsteps1.7a–1.7cforall
other wires.
1.7e Pushanyexcesswirebackinto
the wall opening after all wires are
installed.
Labels don’t match or have heat pump system?
See User Guide.
Wallplate
HEAT PUMP
CONVENTIONAL
Y2
L
E/AUX
W2
K
K
C
G
RC
RC
M31543
R
R
O/B
W
Y
Y
G
G
C
C
Y
W
R
Remove metal jumper only if you
have both R and RC wires
HEAT PUMP
CONVENTIONAL
Y2
L
E
AUX
K
Y2
W2
K
RC
R
R
W
W
Y
Y
G
G
C
C
Insert wires here
Note: The wiring for your
application might be different
than the wiring from above.
RC
R
O/B
Y
G
C
1.2 Remove old thermostat
faceplate and leave wires
connected
1.2a Take a picture of the wire
connections for later reference.
1.2b If no wire is connected to a
terminal labeled C or no C
terminal exists on the old
thermostat, call 1-800-4681502 for wiring assistance.
Important! C wire is required and is
the primary power source for your
thermostat. Without a C wire, your
thermostat will not power up.
1.3 Label wires
Do not label by wire color.
Use the supplied sticky tags to label
each wire as you disconnect it. Label
wires according to old thermostat
terminal designations, not by wire
color.
Note: If no tag matches a terminal
designation, write the appropriate letter
on a blank sticky tag.
1.4 Remove wallplate
Remove the old wallplate from the
wall after all wires are labeled and
disconnected.
Sticky
tag
Blank
sticky
tag
Terminal
designation
If you have an older thermostat with a
sealed mercury tube, see warning page
for proper disposal instructions.
C
C
C
C
1.8 Remove battery tab
The thermostat is shipped from the
factory with the coin cell installed. To
keep the battery from discharging during
shipment and storage, the thermostat is
shipped with a plastic tab inserted in the
battery holder. Simply pull the plastic tab
out of the battery tray. Make sure that
the battery tray is fully inserted into the
thermostat.
1.9 Attach thermostat to wallplate
Align the thermostat onto wallplate and
snap into place.
1.10 Switch heating/cooling
system ON
Important!
1.10a Verify that the C wire is
connected at the thermostat
and at the heating/cooling
system.
1.10b Make sure the heating/
cooling system door is firmly
secured.
1.10c Switch power back ON for
your heating/cooling system
at the breaker box or its
power switch.
Remove tab.
Wallplate
HEAT PUMP
CONVENTIONAL
Y2
L
AUX
W2
/E
K
K
Circuit
breaker
box
RC
RC
M31543
R
R
O/B
W
Y
Y
G
G
C
C
Thermostat
or
Heating/cooling
system power
switch
Automation and Control Solutions
Honeywell International Inc.
1985 Douglas Drive North
Golden Valley, MN 55422
yourhome.honeywell.com
® U.S. Registered Trademark.
© 2013 Honeywell International Inc.
33-00012—01 M.S. 10-13
Printed in U.S.A.
33-00012-01
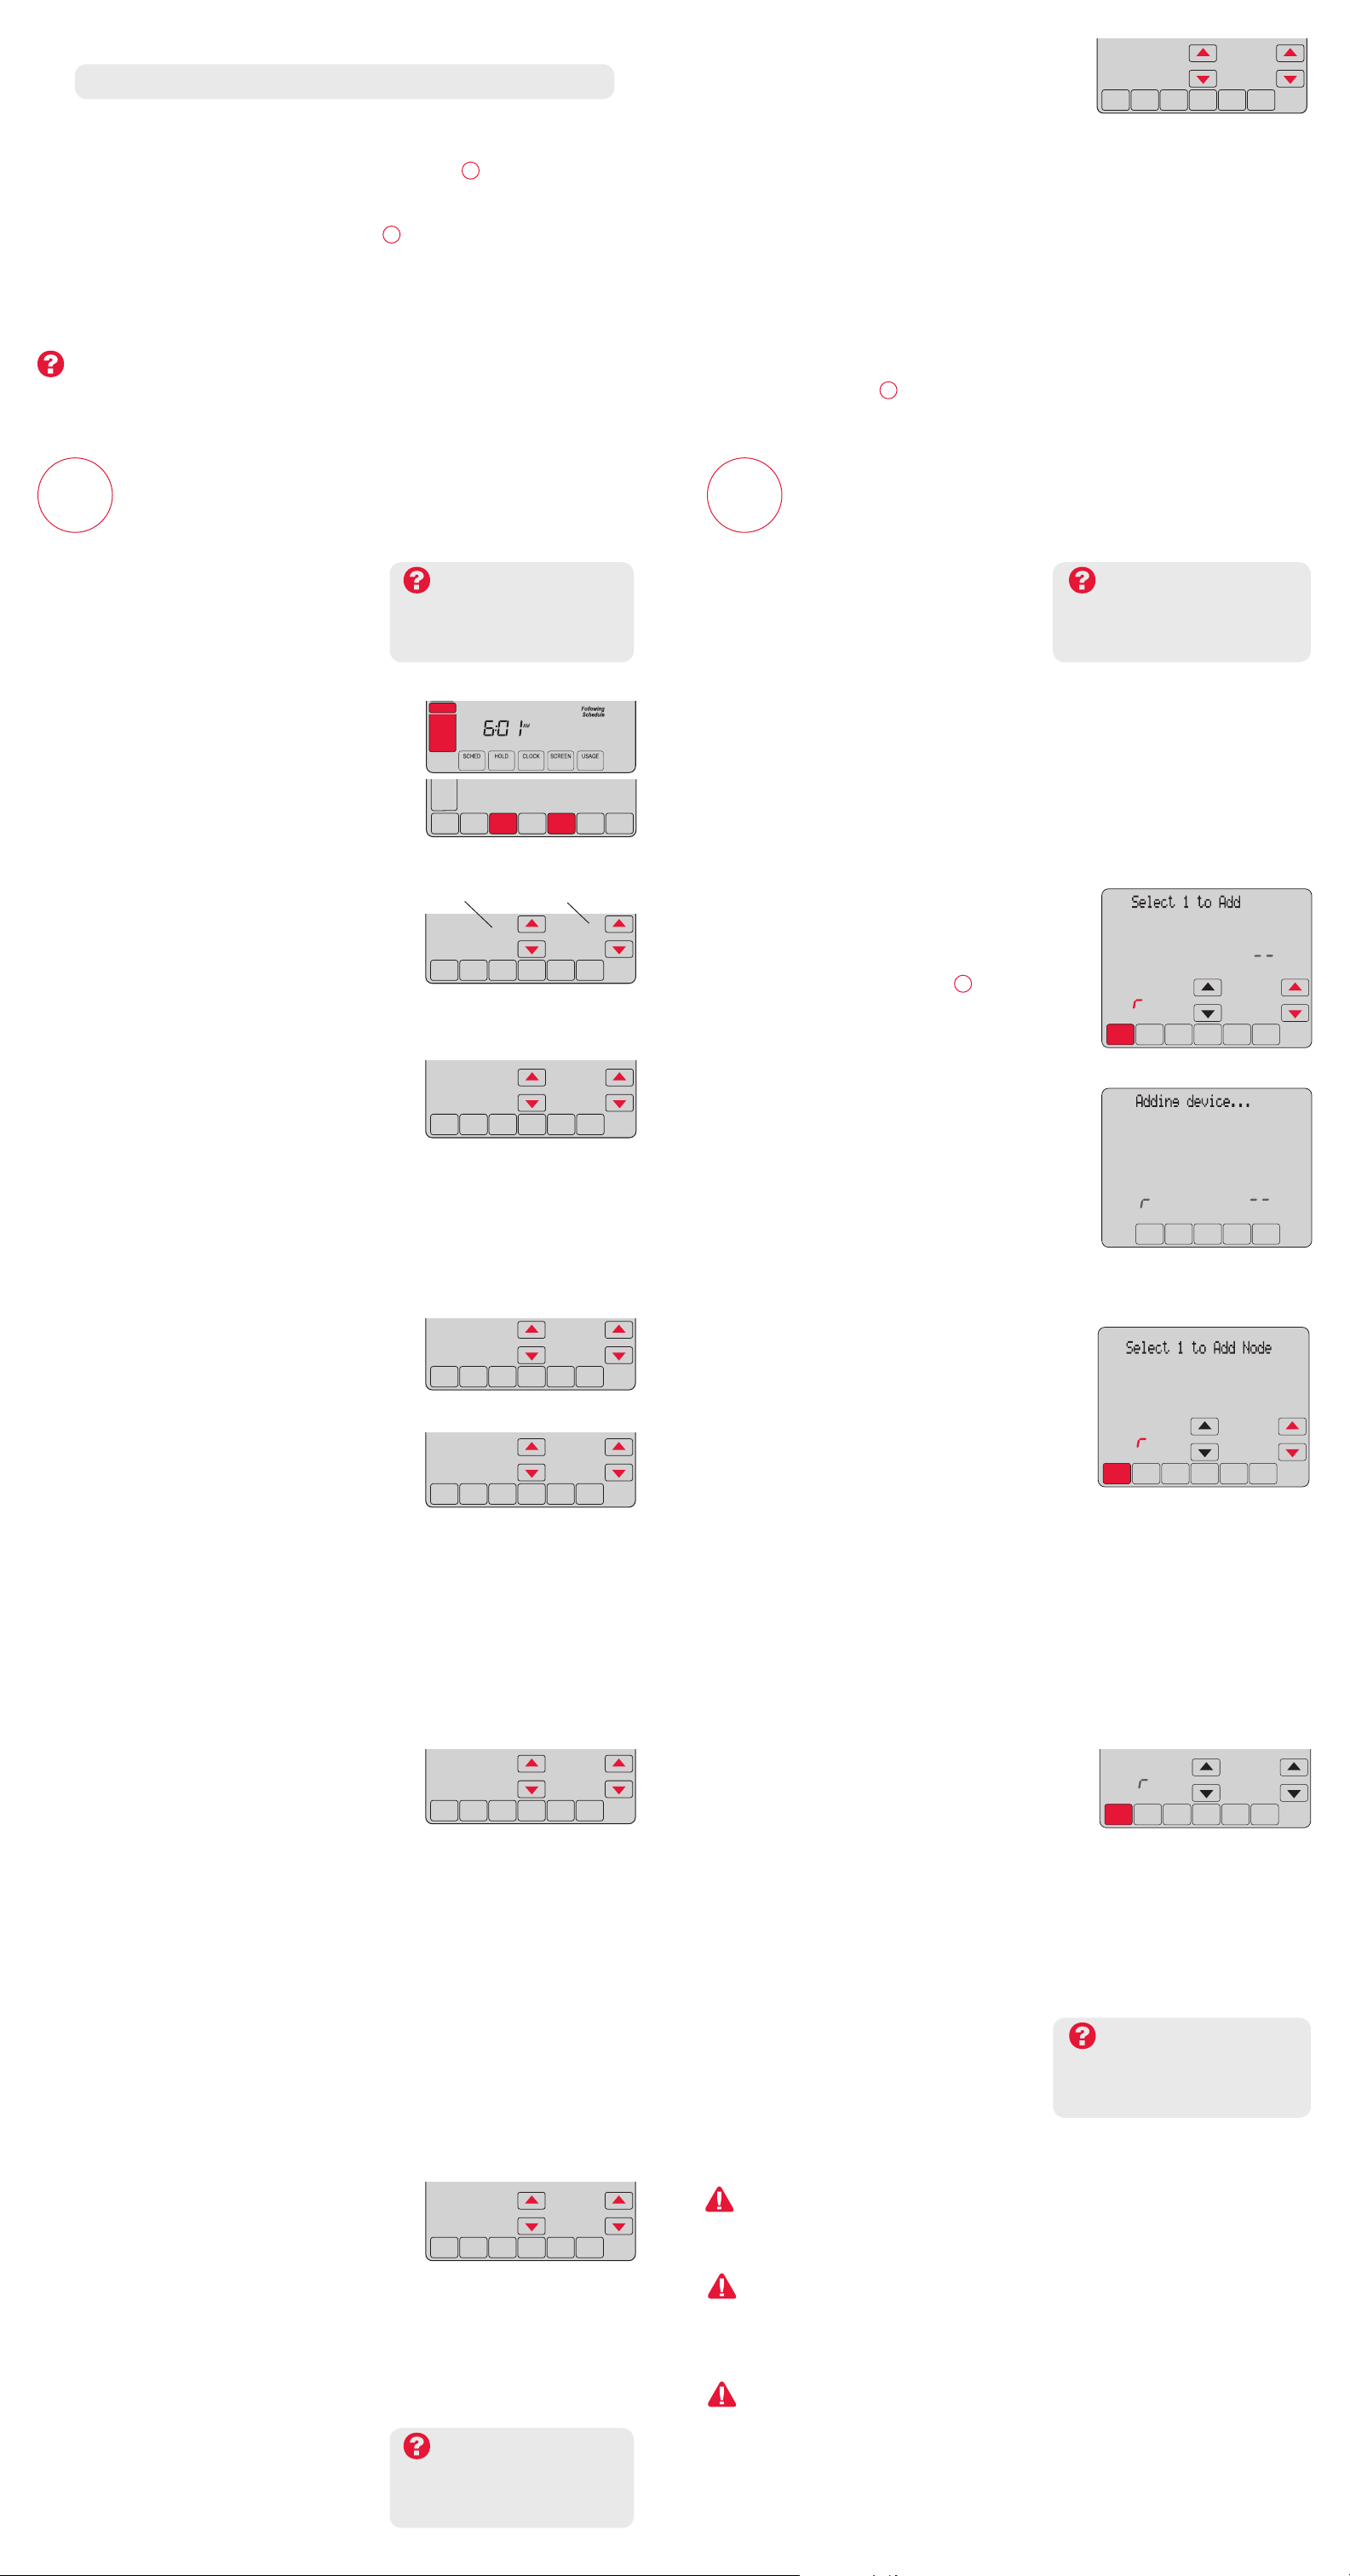
1.11 Set date and time
1.11a Touch s or t buttons to
change displayed time and date.
1.11b Press and hold an arrow to
quickly change a setting.
1.11c Press DONE to save changes.
Time
Year
Day
Month
Turn over
1.12 Determine your heating/cooling system type
DONE
TUE
Inside
Set To
70
0120
70
20
FAN
AUTO
TUE
Inside
Set To
70
70
FAN
AUTO
SYSTEM
HEAT
SUN
TUE
Inside
Set To
70
70
FAN
AUTO
TUE
Inside
Set To
70
70
FAN
AUTO
TUE
Inside
Set To
70
70
FAN
AUTO
TUE
Inside
Set To
70
70
FAN
AUTO
TUE
Inside
Set To
70
70
FAN
AUTO
TUE
Inside
Set To
70
70
FAN
AUTO
Important! Heating/cooling system type must be set so that your thermostat
operates properly and does not damage your system.
If you have a traditional system (single stage heating and cooling), your
thermostat is set up by default to control this system. However, you will still
need to connect your thermostat to a Z-Wave network. To do this, enter
system setup (see step 2.1) and then proceed to Step 3
If you DO NOT have a single stage heating and cooling system, You MUST
changethesystemtypebysettingsystemfunction0170.Seepage40inthe
User Guide for a list of options.
Not sure of your heating/cooling system type?
Visit yourhome.honeywell.com or call Honeywell Customer Care toll-free at
1-800-468-1502.
Go to Step 2
2.5 Selecting system type
Function 0170 sets your heating/cooling
system type.
2.5a Press s next to the function number
to select function 0170.
2.5b Press st next to the option number
to select your system type.
1 (default) is a single stage heating
and cooling system. For a list of other
system types, see page 40 in the
User Guide.
2.5c
Press s next to the function number
to scroll through the remaining
functions. For a list of functions and
their options, see pages
user guide.
2.5d Press s next to the four digit function
number to scroll to function rf10.
Go to Step 3
Option
38–48inthe
DONE
0170
1
Setup your thermostat
2
2.1 Accessing system setup
You can change options for a number
of system functions. Available functions
depend on the type of system you have.
The functions, designated with four-digit
numbers, along with their available options
aredescribedonpages38–48oftheuser
guide.
2.1a
Press SYSTEM. You’ll see several
blank buttons on the bottom of the
display.
2.1b
Press and hold the buttons on either
side of the center button until the
screen changes (approximately 5
seconds).
2.2 Setting the date
2.2a Function 0120 appears first by
default. It sets the first two digits of
the year, e.g., 2013.
to the option number to select the
first two digits of the year.
2.2b
Press s next to the function number
to select function
0130 sets the last two digits of the
year, e.g., 2013.
2.2c
Press st next to the option
number to select the last two digits
of the year.
Press st next
0130. Function
Getting Help
Need more help? Find additional
information in the User Guide.
SYSTEM
HEAT
DONE CANCEL
Function Option
0130
DONE
6:01
SUN
AM
12
Join Z-Wave network
3
3.1 Connect to other Z-Wave
enabled devices
The RTH8580ZW is powered
by Z-Wave technology so it is
compatible with Z-Wave enabled
devices from other manufacturers.
With a separate Z-Wave controller,
for example, you can change your
thermostat settings from your
bedroom or elsewhere in the house.
3.1a To join a Z-Wave network,
set the Z-Wave controller to
INCLUDE mode.
3.1b On the thermostat, be sure
function rf10 is selected. If it is
not selected, see Step 2
3.1c
Press s next to the option
number to select
add thermostat to Z-Wave
network.
option 1 to
Getting Help
Need more help? Find additional
information in the User Guide.
DONE
F
10
0
2.2d
Press s next to the function number
to select function
0140 sets the month.
2.2e
Press st next to the option
number to select the month.
2.2f
Press s next to the function number
to select function
0150 sets the date.
2.2g
Press st next to the option
number to select the date.
0140. Function
0150. Function
DONE
DONE
0140
0150
15
Wait
F
10
3.2 Share Z-Wave network
6
3.2a
To share the thermostat Node
information with additional
Z-Wave devices, press s next
to the function number to select
function
3.2b Press s next to the option
number, and select option 1.
rf20.
DONE
F20
0
2.3 Selecting a schedule format
Function 0160 sets the schedule format. You
can select between nonprogrammable and
programmable.
2.3a Press s next to the function number
to select function 0160.
2.3b Press st next to the option number
to change the schedule format.
0 Program schedule is off.
Thermostat cannot be
programmed.
4 Programscheduleison(7-day
programmable).
2.4 Restore schedule defaults
2.4a Press s next to the function number
to select function 0165.
2.4b Press st next to the option number
to restore schedule defaults.
0 Continue using programmed
schedule.
1 Restore thermostat program to
energy saving settings.
DONE
DONE
0160
0165
0
0
3.3 Exit system setup
When you have made all changes,
press DONE to save and exit.
F20
DONE
Getting Help
For explanation of Z-Wave
messages, see the User Guide.
This thermostat contains a Lithium battery which may contain Perchlorate material.
Perchlorate Material—special handling may apply.
See www.dtsc.ca.gov/hazardouswaste/perchlorate
MERCURY NOTICE: Do not place your old thermostat in the trash if it contains
mercury in a sealed tube. Contact the Thermostat Recycling Corporation at
www.thermostat-recycle.org or 1-800-238-8192 for information on how and
where to properly and safely dispose of your old thermostat.
0
NOTICE: To avoid possible compressor damage, do not run air conditioner
if the outside temperature drops below 50°F (10°C).
Getting Help
Need more help? Find additional
information in the User Guide.
Need more help?
For assistance with this product please visit yourhome.honeywell.com or call Honeywell
Customer Care toll-free at 1-800-468-1502 before returning the thermostat to the store.
 Loading...