


69-2206EF-01
Quick Installation Guide
RTH7600 Series
Touchscreen Programmable Thermostat

Installation is Easy
Label wires and remove your old thermostat
Install and wire your new thermostat
Set your new thermostat to match your heating/cooling
system
– This thermostat works with virtually all System
Types
– It is preset for the most common system
We are here to help.
Call 1-800-468-1502 for wiring
assistance before returning
the thermostat to the store.
69-2206EF—01 ii

Turn Off Power to Heating/
M28097
1
Cooling System
1 69-2206EF—01

Remove Old Thermostat
M28099
2
Remove old thermostat but leave wallplate with
wires attached.
Is there a sealed tube containing
Leave wallplate
in place
Old thermostat
mercury? If so, see back cover
for proper disposal instructions.
Cover
69-2206EF—01 2

Label Wires with Tags
M28100
M28093
3
Label the wires using the supplied wire labels as you
disconnect them.
Wire Labels
3 69-2206EF—01

M28073
Separate Wallplate from
4
New Thermostat
Remove wallplate from the new thermostat and mount
onto wall.
Wallplate
69-2206EF—01 4

Mount Wallplate
M28094
5
Mount the new wallplate using the included screws
and anchors.
Drill 3/16-in. holes for drywall
Drill 3/32-in. holes for plaster
5 69-2206EF—01

M28070
W2
Y2
C
G
Y
W
RC
R
LABELED WIRES
SCREW
CONVENTIONAL
INSERT WIRES
THEN TIGHTEN SCREWS
WIRE HOLE
Y
G
R
W
CO
NVEN
T
IO
N
A
L
Connect Wires
6
Simply match wire labels.
Remove metal jumper if you have both R and Rc wires.
Labels don’t match? See page 21.
Have a Heat Pump system? See pages 22–23.
We are here to help.
Call 1-800-468-1502 for wiring assistance.
69-2206EF—01 6

M28101
Install Batteries
M27518
7
Install two AA alkaline batteries and remove tab.
Back of thermostat
Remove tab.
7 69-2206EF—01

Install Thermostat onto Wallplate
M27519
8
Install thermostat onto the wallplate on the wall.
69-2206EF—01 8

Turn Power Back On
M28098
9
Turn the power back on to the heating/cooling system.
9 69-2206EF—01
10
Go Back
Next
Done
6
15
2006
M27520
Done
M27521
10:10
Press s or t to set month, then press NEXT.
Press s or t to set day, then press NEXT.
Press s or t to set year, then press DONE.
Month Year Day
Press s or t to set time, then press DONE to save and
exit.
Set Time and Date
69-2206EF—01 10

11
If your system type is...
If your system type is:
q Single Stage Heat and Cool
Congratulations, you’re done!
If your system type is:
q Multistage Heat and Cool
q Heat Pump* without Backup Heat
q Heat Pump* with Backup Heat
q Heat Only
q Cool Only
Continue with advanced installation
on next page to match your thermostat to your system type.
*Heat Pump—an air conditioner that provides cooling
in the summer, and also runs in reverse in the winter to
provide heating.
If you are not sure of your system type or if you have
other questions, call us toll-free at 1-800-468-1502.
This thermostat works on 24 volt or 750 mV systems. It
will NOT work on 120/240 Volt systems.
11 69-2206EF—01

Advanced Installation
System setup ......................................................................13
Wiring ..................................................................................21
Troubleshooting ..................................................................24
Customer assistance .........................................................26
Limited warranty .................................................................27
RTH7600
20
0120
System & Fan
Schedule
Clock & More
M27522
20
0120
System
Fan
Done
M27523
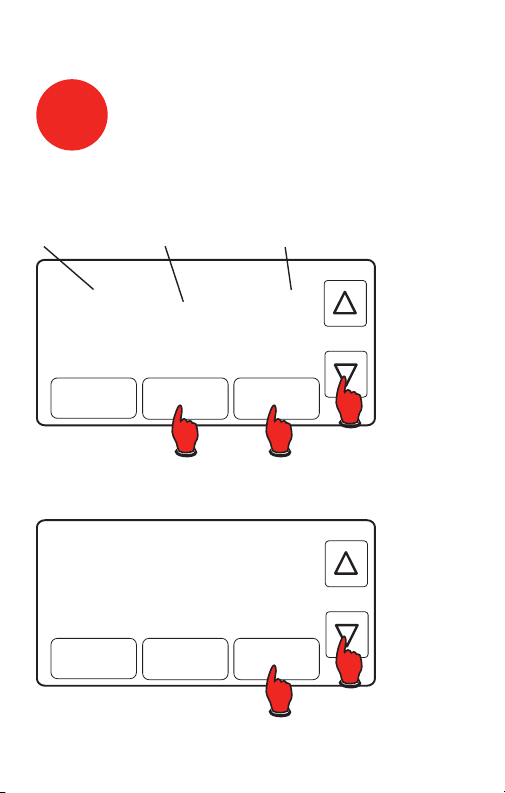
About your new thermostat
System setup
Step 1
Press System & Fan.
Step 2
Press and hold the center key until the screen changes
(approximately 5 seconds).
SETUP WIRING ASSISTANCE TROUBLESHOOTING
13 69-2206EF—01

Advanced Installation Guide
20
0120
Go Back
Next
Done
M27524
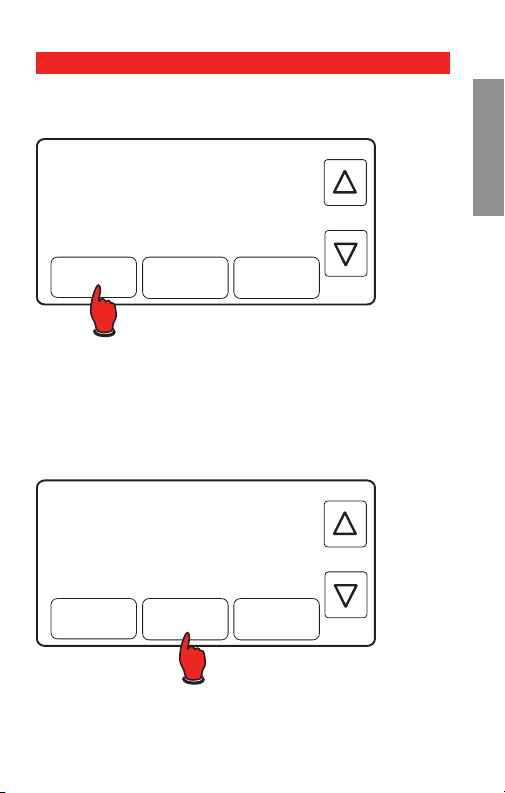
About your new thermostat
Changing settings
See pages 15–20 to change Function Settings.
Press s t to change setting.
SETUPWIRINGASSISTANCETROUBLESHOOTING
Function
Press NEXT to advance to
next function.
NOTE: Some functions in the following pages
may not appear due to previous selections
made.
Setting
Press DONE to save &
exit.
69-2206EF—01 14

About your new thermostat
System setup
NOTE: If you set the time and date as shown on
page 10, press NEXT to function 0170 and go to
page 16.
See page 14 to navigate between functions.
Function Settings & Options
0120 Year Setting
(rst two
digits)
0130 Year Setting
(second two
digits)
0140 Month Setting
0150 Date Setting
Press s/t to change the rst two
digits of the year:
20 = Year 20xx
21 = Year 21xx
Press s/t to change the last two
digits of the year:
01 - 99 (i.e., 2001 - 2099)
Press s/t to change the current
month:
01 - 12 (i.e., January - December)
Press s/t to change the current
date:
01 - 31
RTH7600
SETUP WIRING ASSISTANCE TROUBLESHOOTING
15 69-2206EF—01

Advanced Installation Guide
About your new thermostat
System setup
See page 14 to navigate between functions.
Function Settings & Options
0170 Select System
SETUPWIRINGASSISTANCETROUBLESHOOTING
Type
Press s/t to select your system
type:
1 Heat/cool: Gas, oil or electric
heating with central air conditioning.
2 Heat pump: Heat pump with-
out backup or auxiliary heat.
3 Heat only: Gas, oil or electric
heat without central air conditioning.
4 Heat only with fan: Gas, oil or
electric heat without central air
conditioning.
5 Hot water heat only (no fan):
Gas, oil or hot water heat without central air conditioning.
6 Cool only: Central air condi-
tioning only.
7 Heat pump: Heat pump with
backup or auxiliary heating.
8 Heat/Cool Multiple stages:
2 heat stages (wires on W and
W2), 2 cooling stages (wires on
Y and Y2).
9 Heat/Cool Multiple stages:
2 heat stages (wires on W and
W2), 1 cooling stage (wire on
Y).
10 Heat/Cool Multiple stages: 1
heat stage (wire on W), 2 cooling stages (wires on Y and Y2).
69-2206EF—01 16
 Loading...