

Page 1

DRAFT
CT50
Mobile Computer
with Android™ 4.4 Operating System
User Guide
Page 2

DRAFT
Disclaimer
Honeywell International Inc. (“HII”) reserves th e right to make changes in specifications and
other information contained in this docu ment without prior notice, an d the reader should in all
cases consult HII to determine whether any such changes hav e been made . The inf o rmation
in this publication does not represent a commitment on the part of HII.
HII shall not be liable for technical or editorial errors or omissions contained herein; nor for
incidental or consequential damages resulting from the furnishing, performance, or use of
this material. HII disclaims all responsibility for the selection and use of software and/or
hardware to achieve intended results.
This document contains proprietary information that is protected by copyright. All rights are
reserved. No part of this document may be photocopied, reproduced, or translated into
another language without the prior written consent of HII.
Trademarks
Android, Google, and other marks are trademarks of Google Inc.
Microsoft, Windows are either registered trademarks or registered trademarks of Microsoft
Corporation in the United States
and/or other countries.
The Bluetooth trademarks are owned by Bluetooth SIG, Inc., U.S.A. and licensed to
Honeywell.
Other product names mentioned in this man ual m ay be trademarks or registered tradem arks
of their respective companies and are the property of their respective owners.
Patents
For patent information, see www.hsmpats.com.
Copyright © 2015 Honeywell International Inc. All rights reserved.
ii Dolphin CT50 Mobile Computer User Guide
Page 3

DRAFT
Contents
Customer Support. . . . . . . . . . . . . . . . . . . . . . . . . . . . . . . . . . . . . . . . . . . . . . . . . . vii
Product Service and Repair . . . . . . . . . . . . . . . . . . . . . . . . . . . . . vii
Limited Warranty . . . . . . . . . . . . . . . . . . . . . . . . . . . . . . . . . . . . . . vii
Send Feedback . . . . . . . . . . . . . . . . . . . . . . . . . . . . . . . . . . . . . . . vii
About the Computer Features . . . . . . . . . . . . . . . . . . . . . . . . . . . . . . . . 1
1
About the Dolphin CT50 Mobile Computer . . . . . . . . . . . . . . . . . . . . . . . . . . . . . . . . 2
Contents
About the Battery . . . . . . . . . . . . . . . . . . . . . . . . . . . . . . . . . . . . . . . . . . . . . . . . . . . 6
Power On the CT50. . . . . . . . . . . . . . . . . . . . . . . . . . . . . . . . . . . . . . . . . . . . . . . . . 13
Unlock the Screen. . . . . . . . . . . . . . . . . . . . . . . . . . . . . . . . . . . . . . . . . . . . . . . . . . 14
About the Good Read LED . . . . . . . . . . . . . . . . . . . . . . . . . . . . . . . . . . . . . . . . . . . 15
Configure the Screen Backlight. . . . . . . . . . . . . . . . . . . . . . . . . . . . . . . . . . . . . . . . 16
About the Audio Features . . . . . . . . . . . . . . . . . . . . . . . . . . . . . . . . . . . . . . . . . . . . 16
Insert a MicroSD Card. . . . . . . . . . . . . . . . . . . . . . . . . . . . . . . . . . . . . . . . . . . . . . . 20
How to Transfer Files. . . . . . . . . . . . . . . . . . . . . . . . . . . . . . . . . . . . . . . . . . . . . . . . 23
How to Browse Files on the CT50. . . . . . . . . . . . . . . . . . . . . . . . . . . . . . . . . . . . . . 23
Charge the Battery. . . . . . . . . . . . . . . . . . . . . . . . . . . . . . . . . . . . . . . . . . . . 6
Change the Batttery. . . . . . . . . . . . . . . . . . . . . . . . . . . . . . . . . . . . . . . . . . . 7
About the Battery Status . . . . . . . . . . . . . . . . . . . . . . . . . . . . . . . . . . . . . . . 9
Check the Battery Level . . . . . . . . . . . . . . . . . . . . . . . . . . . . . . . . . . . . . . . 11
About Battery Life and Conservation . . . . . . . . . . . . . . . . . . . . . . . . . . . . . 11
Battery Recommendations and Safety Precautions. . . . . . . . . . . . . . . . . . 12
Enable Airplane Mode . . . . . . . . . . . . . . . . . . . . . . . . . . . . . . . . . . . . . . . . 12
Adjust Ringtone and Notification Volume. . . . . . . . . . . . . . . . . . . . . . . . . . 16
Enable Vibrate Mode . . . . . . . . . . . . . . . . . . . . . . . . . . . . . . . . . . . . . . . . . 18
Audio Settings . . . . . . . . . . . . . . . . . . . . . . . . . . . . . . . . . . . . . . . . . . . . . . 19
Dolphin CT50 Mobile Computer User Guide iii
Accessories for the CT50 . . . . . . . . . . . . . . . . . . . . . . . . . . . . . . . . . . . . . . . . . . . . 24
Page 4

DRAFT
Contents
About the User Interface and Applications . . . . . . . . . . . . . . . . 27
2
About the User Interface . . . . . . . . . . . . . . . . . . . . . . . . . . . . . . . . . . . . . . . . . . . . . 28
About the Home Screen. . . . . . . . . . . . . . . . . . . . . . . . . . . . . . . . . . . . . . . 28
Navigation and Function Buttons . . . . . . . . . . . . . . . . . . . . . . . . . . . . . . . . 29
Common Status and Notification Icons? . . . . . . . . . . . . . . . . . . . . . . . . . . 29
Remap a Button . . . . . . . . . . . . . . . . . . . . . . . . . . . . . . . . . . . . . . . . . . . . . 29
View Notifications. . . . . . . . . . . . . . . . . . . . . . . . . . . . . . . . . . . . . . . . . . . . 30
Manage Notifications . . . . . . . . . . . . . . . . . . . . . . . . . . . . . . . . . . . . . . . . . 30
Customize the Home Screen . . . . . . . . . . . . . . . . . . . . . . . . . . . . . . . . . . . 31
Customize the Favorites Tray. . . . . . . . . . . . . . . . . . . . . . . . . . . . . . . . . . . 31
Use Google™ Search . . . . . . . . . . . . . . . . . . . . . . . . . . . . . . . . . . . . . . . . 31
About Screen Gestures . . . . . . . . . . . . . . . . . . . . . . . . . . . . . . . . . . . . . . . 32
Set the Time Zone . . . . . . . . . . . . . . . . . . . . . . . . . . . . . . . . . . . . . . . . . . . 32
About Honeywell Applications. . . . . . . . . . . . . . . . . . . . . . . . . . . . . . . . . . . . . . . . . 33
About the Scanner . . . . . . . . . . . . . . . . . . . . . . . . . . . . . . . . . . . . . . . . . . . . 35
3
About the Scanner . . . . . . . . . . . . . . . . . . . . . . . . . . . . . . . . . . . . . . . . . . . . . . . . . 36
How to Send Data as Android Keyboard Input. . . . . . . . . . . . . . . . . . . . . . 36
Change the Scanner Settings . . . . . . . . . . . . . . . . . . . . . . . . . . . . . . . . . . 37
Restore Default Scanner Settings . . . . . . . . . . . . . . . . . . . . . . . . . . . . . . . 38
Scanners Default Settings . . . . . . . . . . . . . . . . . . . . . . . . . . . . . . . . . . . . . 38
Data Processing Settings . . . . . . . . . . . . . . . . . . . . . . . . . . . . . . . 38
Symbology Settings. . . . . . . . . . . . . . . . . . . . . . . . . . . . . . . . . . . . 40
Imager Settings . . . . . . . . . . . . . . . . . . . . . . . . . . . . . . . . . . . . . . . 41
Trigger Settings. . . . . . . . . . . . . . . . . . . . . . . . . . . . . . . . . . . . . . . 41
Notification Settings. . . . . . . . . . . . . . . . . . . . . . . . . . . . . . . . . . . . 41
Use the Phone . . . . . . . . . . . . . . . . . . . . . . . . . . . . . . . . . . . . . . . . . . . . . . . . . 43
4
iv Dolphin CT50 Mobile Computer User Guide
Scan a Bar Code. . . . . . . . . . . . . . . . . . . . . . . . . . . . . . . . . . . . . . . . . . . . . . . . . . . 42
About the Phone . . . . . . . . . . . . . . . . . . . . . . . . . . . . . . . . . . . . . . . . . . . . . . . . . . . 44
Activate the UMTS Phone . . . . . . . . . . . . . . . . . . . . . . . . . . . . . . . . . . . . . 44
Activate the CDMA Phone . . . . . . . . . . . . . . . . . . . . . . . . . . . . . . . . . . . . . 47
Make a Phone Call. . . . . . . . . . . . . . . . . . . . . . . . . . . . . . . . . . . . . . . . . . . 47
Answer the Phone . . . . . . . . . . . . . . . . . . . . . . . . . . . . . . . . . . . . . . . . . . . 48
Switch Apps During a Phone Call . . . . . . . . . . . . . . . . . . . . . . . . . . . . . . . 48
Check Your Voicemail . . . . . . . . . . . . . . . . . . . . . . . . . . . . . . . . . . . . . . . . . . . . . . . 48
Set Your Voicemail Number . . . . . . . . . . . . . . . . . . . . . . . . . . . . . . . . . . . . 49
Change Voicemail Settings . . . . . . . . . . . . . . . . . . . . . . . . . . . . . . . . . . . . 49
Page 5

DRAFT
Make an Emergency Phone Call. . . . . . . . . . . . . . . . . . . . . . . . . . . . . . . . . . . . . . . 49
Configure Phone Settings . . . . . . . . . . . . . . . . . . . . . . . . . . . . . . . . . . . . . . . . . . . . 49
Use the Camera. . . . . . . . . . . . . . . . . . . . . . . . . . . . . . . . . . . . . . . . . . . . . . . . 51
5
About the Color Camera . . . . . . . . . . . . . . . . . . . . . . . . . . . . . . . . . . . . . . . . . . . . . 52
Adjust the Camera and Video Settings . . . . . . . . . . . . . . . . . . . . . . . . . . . . . . . . . . 52
How to Zoom . . . . . . . . . . . . . . . . . . . . . . . . . . . . . . . . . . . . . . . . . . . . . . . 52
Change Camera Settings. . . . . . . . . . . . . . . . . . . . . . . . . . . . . . . . . . . . . . 52
Take a Picture . . . . . . . . . . . . . . . . . . . . . . . . . . . . . . . . . . . . . . . . . . . . . . . . . . . . . 52
Record a Video . . . . . . . . . . . . . . . . . . . . . . . . . . . . . . . . . . . . . . . . . . . . . . . . . . . . 53
Change Video Settings . . . . . . . . . . . . . . . . . . . . . . . . . . . . . . . . . . . . . . . . . . . . . . 53
Configure the Computer. . . . . . . . . . . . . . . . . . . . . . . . . . . . . . . . . . . . . . 55
6
How to Configure the Computer . . . . . . . . . . . . . . . . . . . . . . . . . . . . . . . . . . . . . . . 56
Start the Settings App . . . . . . . . . . . . . . . . . . . . . . . . . . . . . . . . . . . . . . . . 56
About the Structure of the Settings App. . . . . . . . . . . . . . . . . . . . . . . . . . . 56
Contents
Dolphin CT50 Mobile Computer User Guide v
About Network Communications. . . . . . . . . . . . . . . . . . . . . . . . . . . . . . . . . . . . . . . 60
Connect to a Wi-Fi Network . . . . . . . . . . . . . . . . . . . . . . . . . . . . . . . . . . . . 60
Configure Proxy Settings for a Wi-Fi Network. . . . . . . . . . . . . . . . 61
Disable Wi-Fi Notifications . . . . . . . . . . . . . . . . . . . . . . . . . . . . . . 62
Connect to an Ethernet Network . . . . . . . . . . . . . . . . . . . . . . . . . . . . . . . . 62
How to Connect to Virtual Private Networks . . . . . . . . . . . . . . . . . . . . . . . 63
Add a VPN. . . . . . . . . . . . . . . . . . . . . . . . . . . . . . . . . . . . . . . . . . . 63
Connect to a VPN . . . . . . . . . . . . . . . . . . . . . . . . . . . . . . . . . . . . . 63
Edit VPN Information. . . . . . . . . . . . . . . . . . . . . . . . . . . . . . . . . . . 64
About Wireless Security . . . . . . . . . . . . . . . . . . . . . . . . . . . . . . . . . . . . . . . . . . . . . 64
About Certificates. . . . . . . . . . . . . . . . . . . . . . . . . . . . . . . . . . . . . . . . . . . . 64
Load a Certificate . . . . . . . . . . . . . . . . . . . . . . . . . . . . . . . . . . . . . 65
Disable or Remove Certificates. . . . . . . . . . . . . . . . . . . . . . . . . . . 65
About Bluetooth Communications. . . . . . . . . . . . . . . . . . . . . . . . . . . . . . . . . . . . . . 66
Connect a Bluetooth Device. . . . . . . . . . . . . . . . . . . . . . . . . . . . . . . . . . . . 66
Configure Bluetooth Settings . . . . . . . . . . . . . . . . . . . . . . . . . . . . . . . . . . . 68
Making the CT50 Discoverable . . . . . . . . . . . . . . . . . . . . . . . . . . . . . . . . . 68
Rename or Disconnect a Paired Device. . . . . . . . . . . . . . . . . . . . . . . . . . . 68
Page 6

DRAFT
Contents
About Serial and USB Communications . . . . . . . . . . . . . . . . . . . . . . . . . . . . . . . . . 69
About Near Field Communication (NFC). . . . . . . . . . . . . . . . . . . . . . . . . . . . . . . . . 70
Specifications. . . . . . . . . . . . . . . . . . . . . . . . . . . . . . . . . . . . . . . . . . . . . . . . . 71
A
Physical and Environmental Specifications. . . . . . . . . . . . . . . . . . . . . . . . . . . . . . . 72
vi Dolphin CT50 Mobile Computer User Guide
Page 7

DRAFT
Customer Support
If you need assistance installing or trou bleshoo ting your product, contact
us by using one of these methods:
Knowledge Base: www.hsmknowledgebase.com
Our Knowledge Base provides thousands of immediate solutions. If the
Knowledge Base does not help you solve your problem, log into the
Technical Support Portal to submit your problem or ask your question.
Technical Support Portal: www.hsmsupportportal.com
Log into the Technical Support Portal to search our Knowledge Base,
submit your problem or quest ion, request a call back, or provide
feedback. When filling out one of the forms, provide as much detail as
possible. You can even include attachments.
Telephone: www.honeywellaidc.com/locations
For our latest contact information, please check our website.
Product Service and Repair
Honeywell International Inc. provides service for all of its products
through service centers throughout the world. To find your service
center, go to www.honeywellaidc.com and select Support > Contact
Support > Service and Repair. Contact your service center to obtain a
Return Material Authorization number (RMA #) before you return the
product.
To obtain warranty or non-warranty service, return your product to
Honeywell (postage paid) with a copy of the dated purchase record.
Customer Support
Dolphin CT50 Mobile Computer User Guide vii
Limited Warranty
For warranty information, go to www.honeywellaidc.com and click
Resources > Warranty.
Send Feedback
Your feedback is crucial to the continual improvement of our
documentation. To provide feedback about this manual, please contact
the Technical Communications department directly at
ACSHSMTechnicalCommunications@honeywell.com.
Page 8

DRAFT
Customer Support
viii Dolphin CT50 Mobile Computer User Guide
Page 9

DRAFT
1
About the Computer Features
This chapter introduces the Dolphin CT50 Mobile
Computer with the Android 4.4 operating system. Use this
chapter to learn about the basic computer features,
functions, and accessories.
1
Page 10

DRAFT
Chapter 1 — About the Computer Features
About the Dolphin CT50 Mobile Computer
The Honeywell Dolphin CT50 Mobile Computer is an ente rprise-foc used
smartphone that uses the Android operating system to provide reliable
and secure management of corporate data and wireless
communications. The CT50 offers a long availability cycle and key
features such as a large display, long-lasting battery, bar code imager,
and rugged durability.
• Android 4.4 operating system.
• 2 GB DRAM, 16 GB flash memory
• Large, sunlight-readable display with responsive multi-touch screen
• High performance 2D imager with ergonomic scan trigger keys
• Software-definabl e LTE/UMTS or CDMA/EVDO wireless WWAN
radio for high speed data and quality voice support across all network
technologies
• IEEE 802.11a/b/g/n radio
• Bluetooth radio
• NFC technology for short-range wireless data exchange
• Value-added software components supporting specialized imaging
and OCR functions
• Mid-tier rugged specifications with IP67 sealing
• Customer-accessible microSD slot for removable memory cards (up
to 32 GB)
• Integrated GPS receiver (with WWAN radio option)
• 8-megapixel color camera
2 Dolphin CT50 Mobile Computer User Guide
Page 11
DRAFT
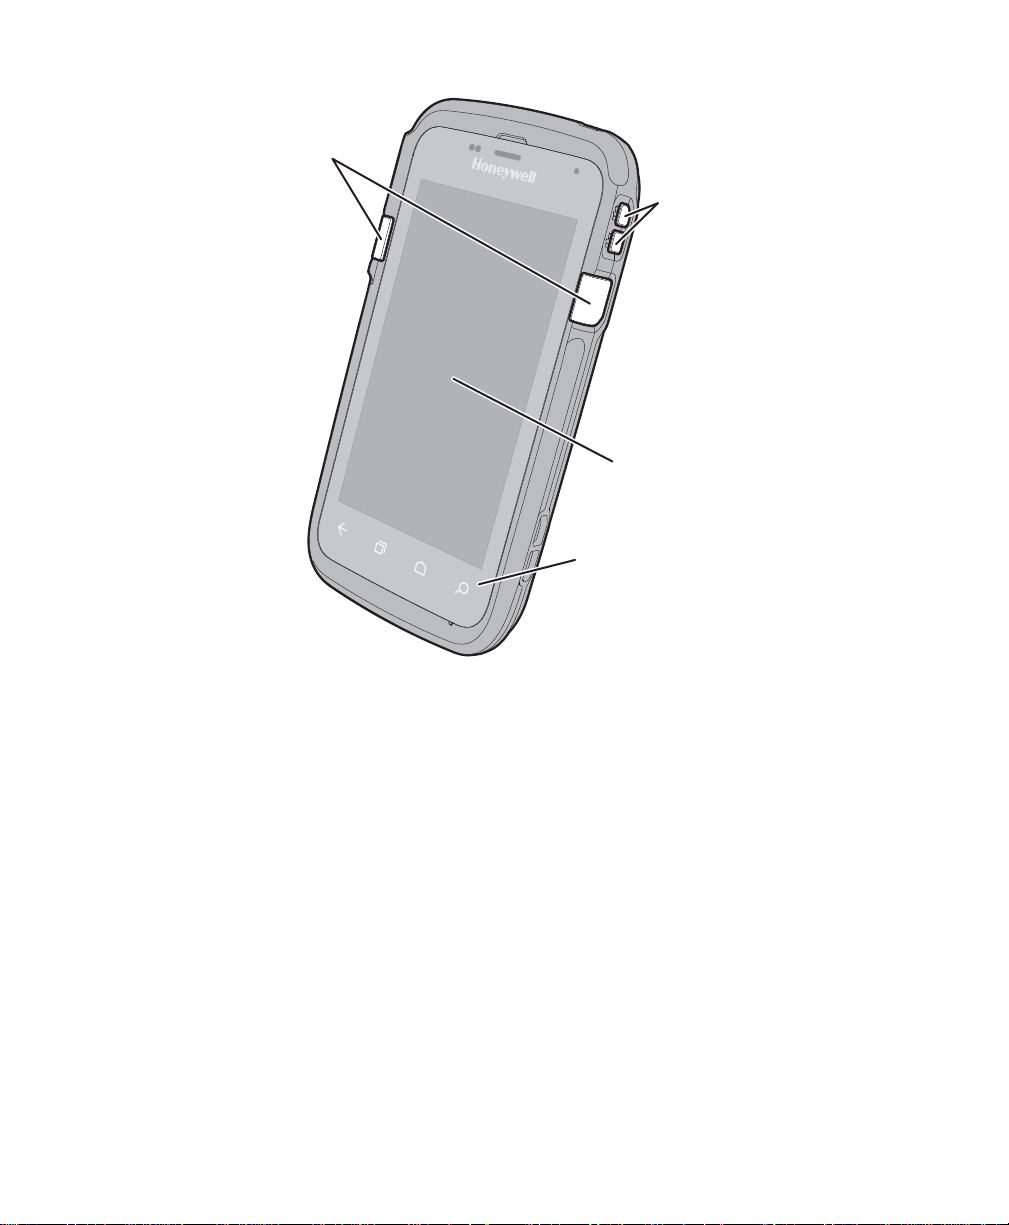
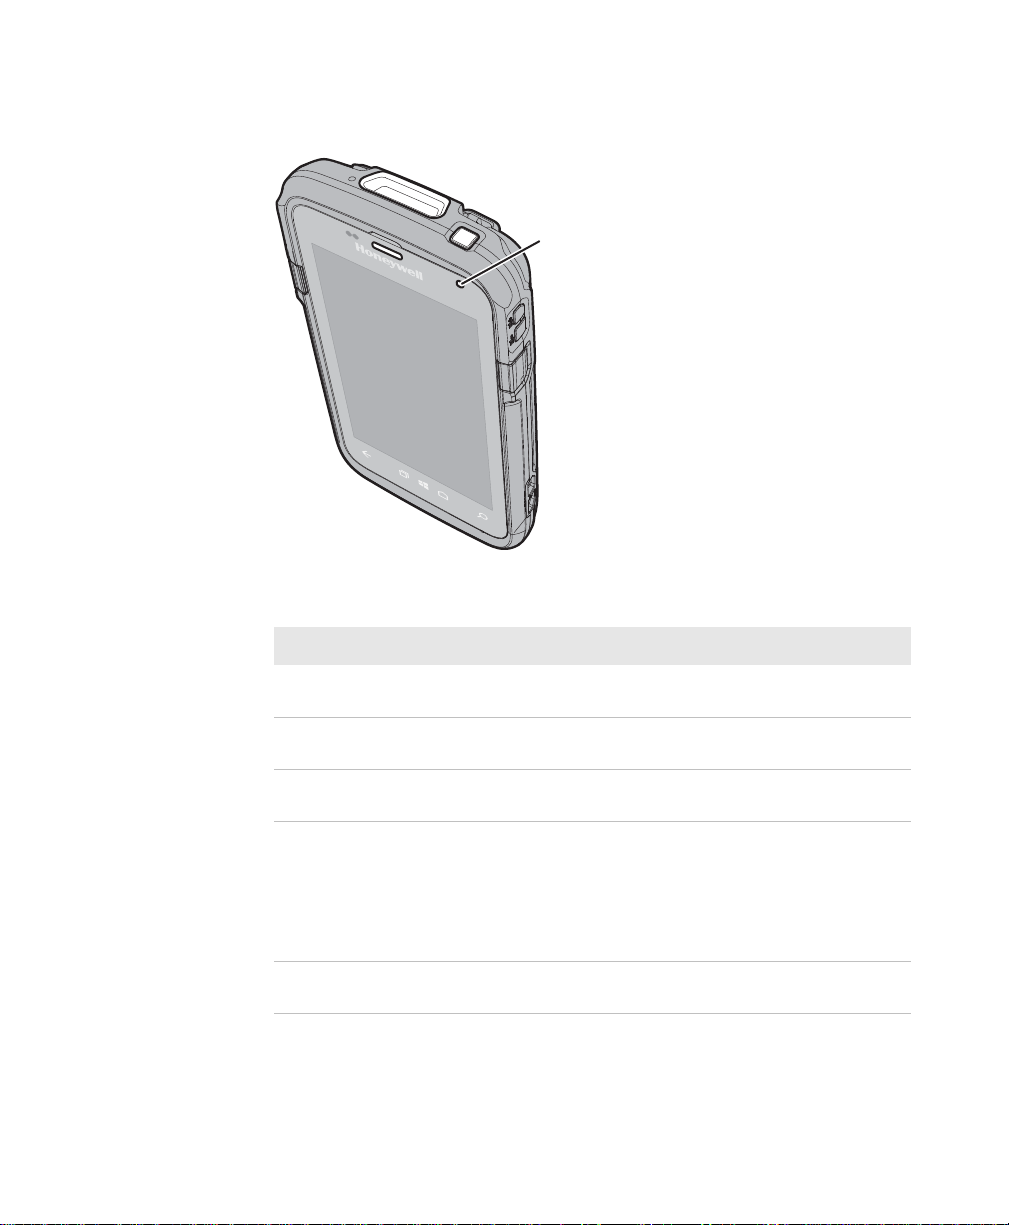
Scan buttons
Chapter 1 — About the Computer Features
Volume buttons
Touch panel
Navigation panel
Dolphin CT50 Mobile Computer User Guide 3
Front View of the CT50
Page 12

DRAFT
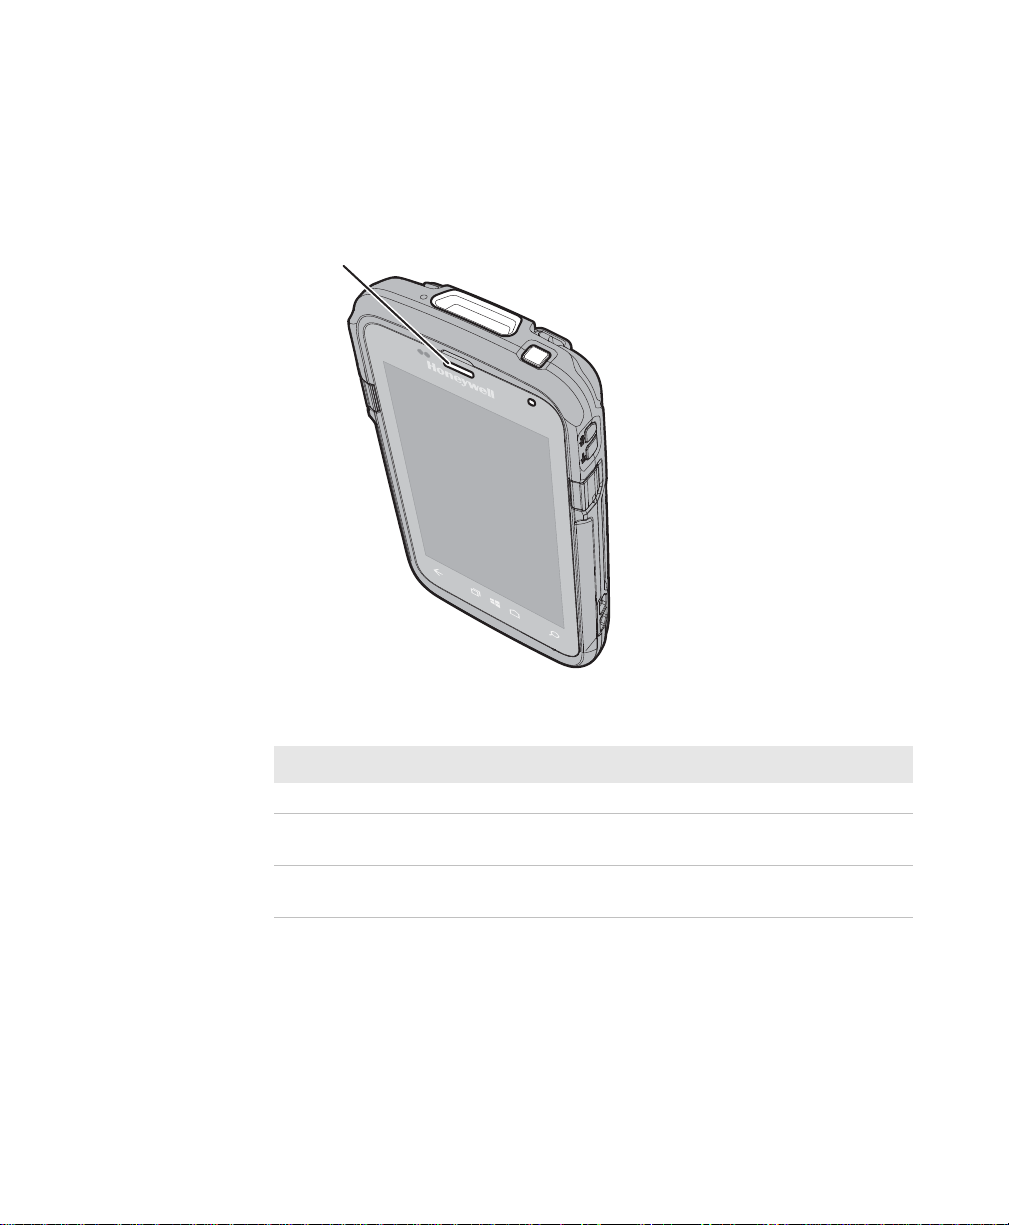
Chapter 1 — About the Computer Features
Good read LED
Top View of the CT50
Scanner window
Power button
Battery status LED
4 Dolphin CT50 Mobile Computer User Guide
Page 13
DRAFT
Chapter 1 — About the Computer Features
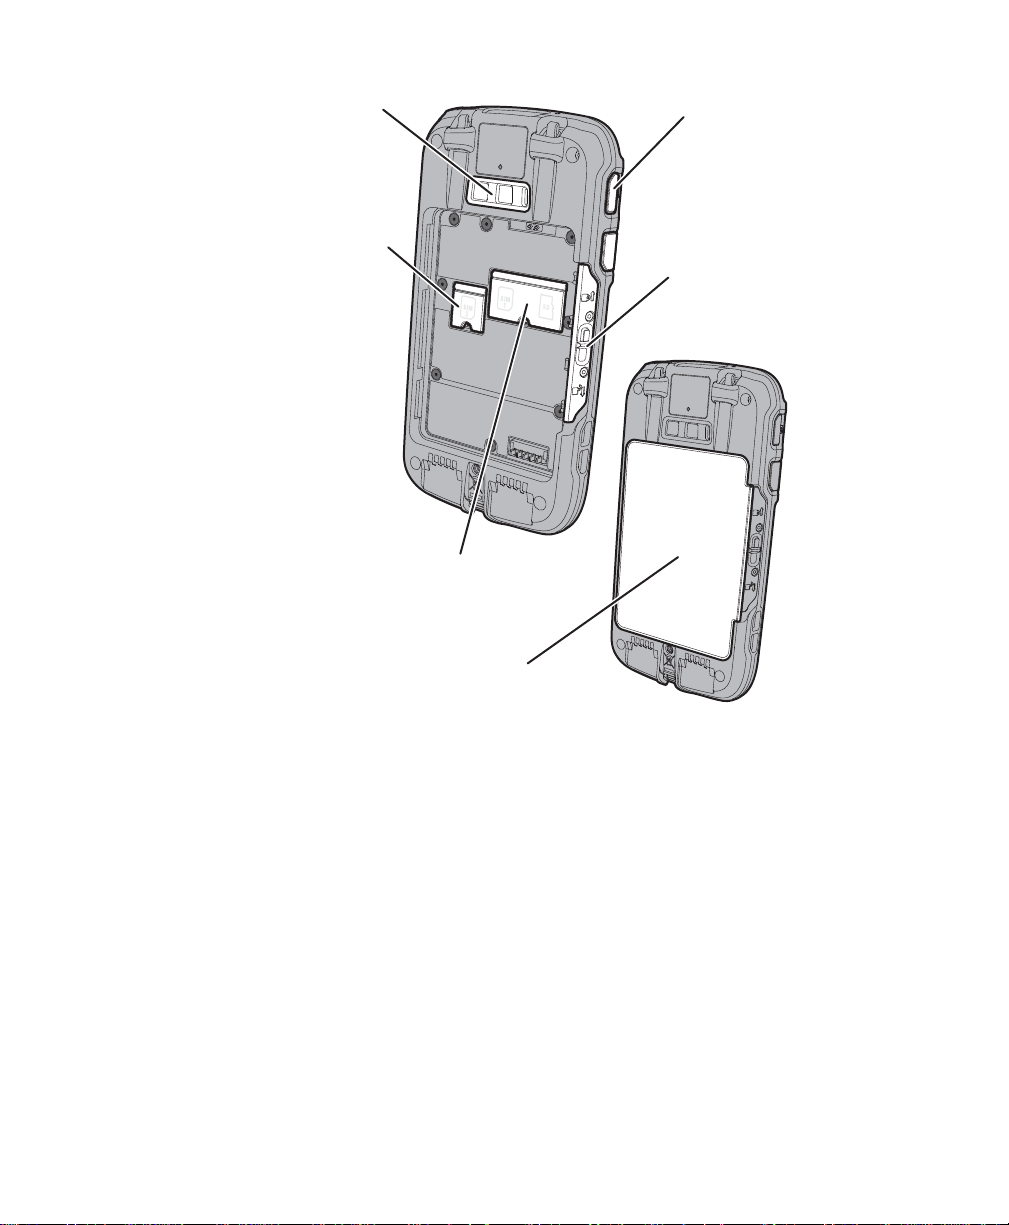
Camera lens
SIM door
SIM and MicroSD door
Camera
Battery door latch
Battery
Dolphin CT50 Mobile Computer User Guide 5
Back View of the CT50
Page 14

DRAFT
Chapter 1 — About the Computer Features
About the Battery
The CT50 uses a rechargeable 3.6 Vdc Li-ion battery as its main power
source. The battery has a 14.6 watt hour capacity. Several factors
determine the life of your battery, such as display brightness, display
timeout, input device, extreme temperature, and your usage. Honeywell
recommends that you keep the battery charged at all times to prevent
data loss.
Honeywell recommends that y ou k eep the ba ttery charged at all times to
prevent data loss. When you change the battery, the computer
automatically does into a power-off state and then cold boots.
Caution: The battery used in this device may present a fire or
chemical burn hazard if it is mistreated. Do not disasse mble it, heat
it above 100 °C (212 °F), or incinerate it. Dispose of used batteries
promptly. Keep away from children.
Contact your Honeywell representative for replacement batteries.
Charge the Battery
Make sure you fully charge the battery (Model CT50-BTSC) before you
use your CT50. You can charge the battery before or after you install it in
the CT50.
• Insert the battery into a Quad Battery Charger or the battery well of
an eHomeBase.
or
• Insert the CT50 with the battery installed into an eHomeBase,
ChargeBase, NetBase, USB Adapter, or Vehicle Power Adapter.
6 Dolphin CT50 Mobile Computer User Guide
Battery Charge Times
Charging Accessory Charge Time
eHomeBase 6 hours
ChargeBase 6 hours
NetBase 6 hours
Quad Battery Charger 6 hours
USB Adapter 6 hours
Vehicle Power Adapter 6 hours
Page 15

DRAFT
Change the Batttery
If your battery power is low, you need to either charge the battery in the
computer, or replace it with a charged battery.
1 Save your files and close any open applications.
2 Press and hold the Power button. This screen appears:
Chapter 1 — About the Computer Features
Dolphin CT50 Mobile Computer User Guide 7
3 Tap Power off.
4 When prompted that the CT50 will shut down, tap OK.
Page 16
DRAFT
Chapter 1 — About the Computer Features
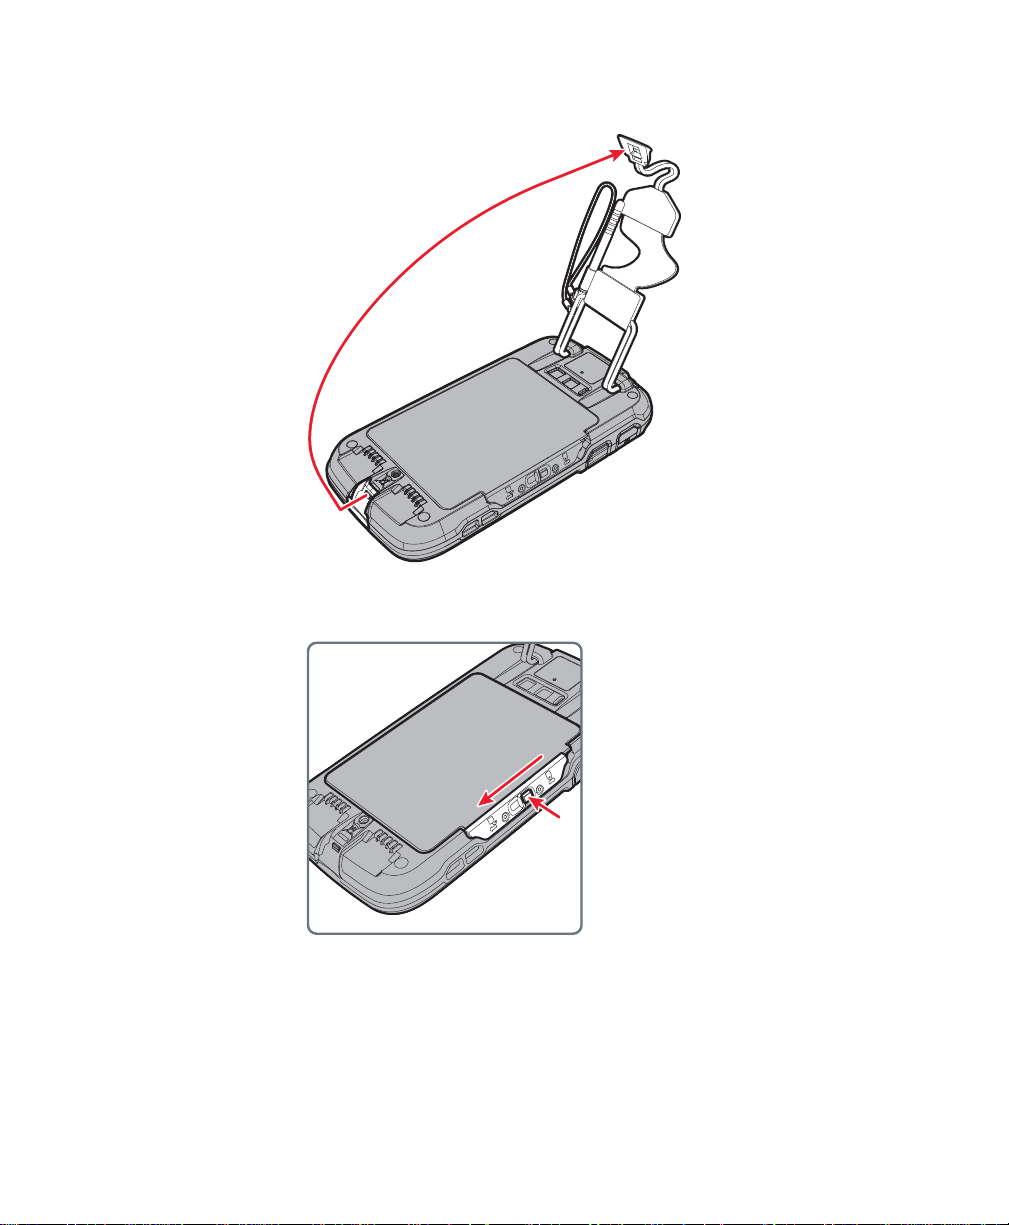
5 Disconnect the handstrap from the bottom of the computer.
6 Press and slide the battery door toward the bottom of the computer
to unlock the door.
8 Dolphin CT50 Mobile Computer User Guide
Page 17
DRAFT
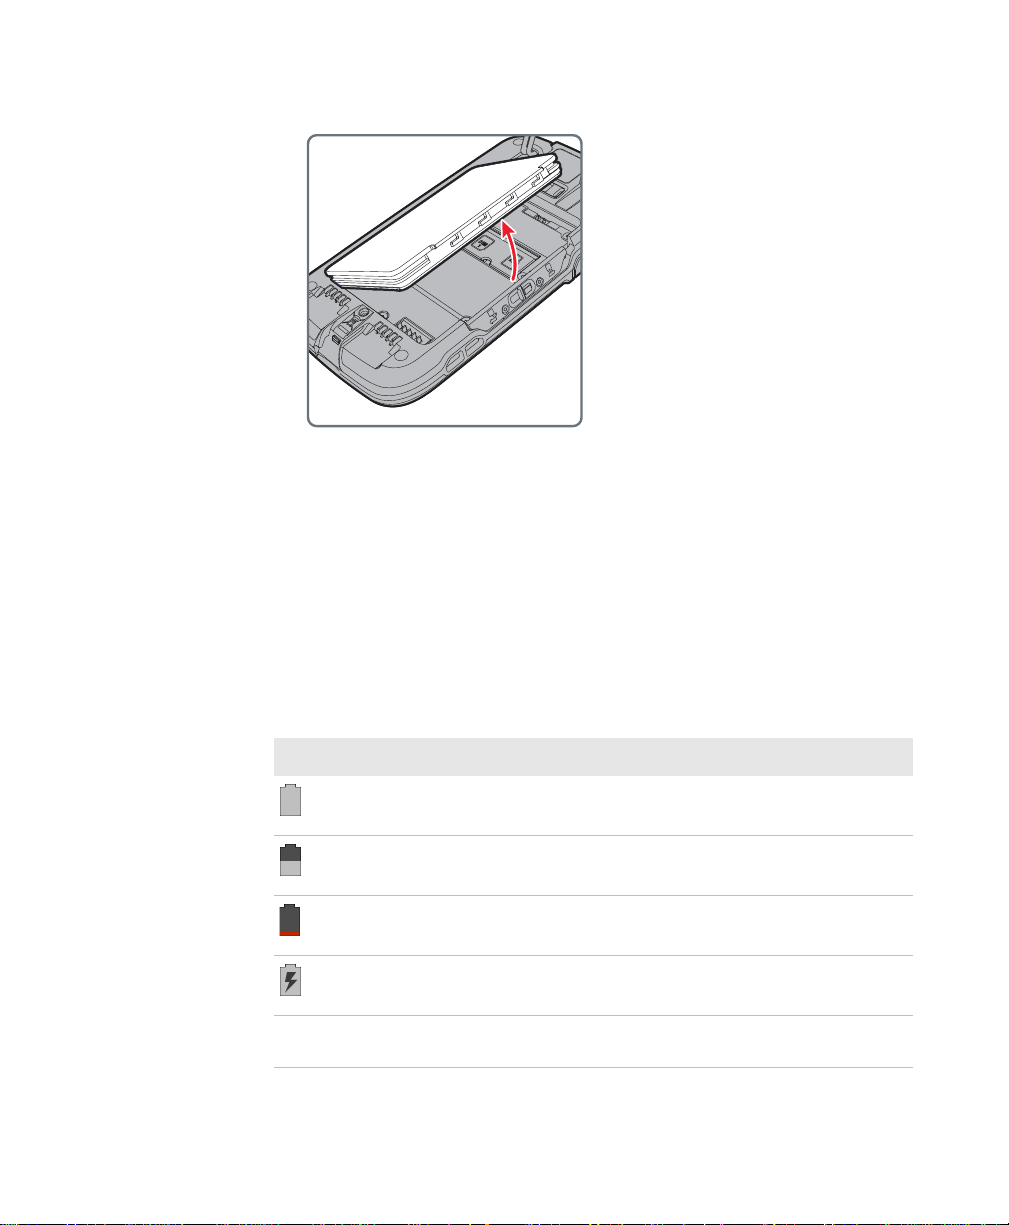
7 Lift up on the edge of the battery and remove it from the computer.
8 Insert the charged battery into the computer.
9 Press in on the battery door and slide it into the locked position.
About the Battery Status
Use the battery icon in the Status bar to see the power status of your
battery. The table below only includes some of the icons. The icon
actually goes from 100 percent all the way down to 15 percent? If you
want more detailed information on your battery, such as usage time or
charge remaining on the battery, go to Settings > Battery.
Chapter 1 — About the Computer Features
Dolphin CT50 Mobile Computer User Guide 9
Battery Status Icons
Icon Status
The battery charge is at 100%.
The battery charge is at 50%.
The battery is critically low. You need to replace the
battery now.
The computer is connect to external power and the
battery is charging.
?? There is a battery error. Install another battery. If the
problem persists, call Honeywell Product Support.
Page 18
DRAFT
Chapter 1 — About the Computer Features
The Battery status LED in the upper right corner of the computer
indicates the charging status of the battery.
Battery Status LED Descriptions
Battery status LED
10 Dolphin CT50 Mobile Computer User Guide
LED State Description
Steady green The computer is connected to a charger and the
battery is more than 95% charged.
Steady red The computer is connected to a charger and the
battery is less than 95% charged.
Blinking red The battery is very low. The computer will soon go into
Suspend mode. Charge or replace the battery.
Amber There is a battery error. The battery is not charging
because it is missing, faulty, or outside the allowable
charging temperature range. If it is outside the
charging temperature range, charging will resume
when the battery tem peratur e re tu rns to the
acceptable range of 0 °C to 45 °C (32 °F to 113 °F).
Off The computer is not connected to external power and
the battery is operating normally.
Page 19

DRAFT
Chapter 1 — About the Computer Features
Check the Battery Level
In addition to the Battery status icons and the Battery status LED, you
can get the battery status from the Settings app.
1 Tap the Settings app.
2 Tap Battery. The current percentage of battery power rem aining and
the amount of usage time left on the battery appear on the screen. A
list shows the battery usage for individual apps and services.
For usage details, tap one of the apps or services in the list.
About Battery Life and Conservation
If you store the batteries outside of the computer f or long periods of time ,
they slowly discharge. Honeywell recommends storing the battery in a
charger to maintain battery performance.
Battery Conservation Tips
When You Want to: Do this to Save Battery Power:
Use the computer and
the low battery status
icon appears or the
battery light turns on.
Stop using the
computer for 5 minu tes
or more.
Store the computer for
more than a day.
Store the battery
outside of the
computer.
Connect the computer to an external power
source. Press and hold the Power button and
then select Power off from the menu. After the
computer turns off, remove the battery and
insert a fully charged battery.
Make sure that the low bat tery status icon is not
on the screen and that the battery status LED
is not on. Press the Power button to suspend
the computer.
• If you are storing the computer for a few
days (such as over the weekend), install a
charged battery or connect the computer to
a power source.
• If you are storing the computer for a longer
period of time, remove and charge the
battery. When the battery is done charging,
store both the battery and the computer is a
cool location.
• If you store the battery for several months,
recharge the battery periodically to keep it at
peak performance.
Store the batteries in a charger.
Dolphin CT50 Mobile Computer User Guide 11
Page 20

DRAFT
Chapter 1 — About the Computer Features
Battery Recommendations and Safety Precautions
• Charge the battery before use. Battery ships with a partial charge
only.
• See “Charge the Battery” on page 6 for approved charging
methods. Use of this battery in other devices could result in damage
to the device or battery.
• The temperature range for charging this battery is 0 °C to 45 °C
(32 °F to 113 °F). Do not charge this battery outside of this rang e. F or
maximum battery life, charge at 23 °C (73 °F).
• Do not store the battery at temperatures above 60 °C (140 °F), such
as inside a car on a hot day or in direct sunlight. Stor age abov e 60 °C
(140 °F) may damage the battery.
• Avoid dropping the battery or computer. If you suspect that the
battery or computer is damaged, send it to Honeywell service center
for inspection.
• Replace this battery only with an ot he r m od el CT 50 -B TSC battery.
These batteries have been test ed in accordance with applicable
safety standards. Contact your Honeywell sales representative or
distributor if this battery is no longer available.
• Discarded batteries may create a safety hazard. Before disposal,
cover the battery contacts with electrical insulating tape.
• Do not modify the battery or at tem p t to ins ert foreign objects into it.
• Do not solder directly to the battery contacts.
• Do not short circuit the battery, and keep it away from metallic items.
• Do not drop the battery or apply mechanical shocks or pressure to it .
• Do not disassemble or o pen, crush, bend or deform, puncture, shred
or burn the batter y.
• Do not immerse the battery in water or get the battery wet.
• Battery usage by children should be supervised.
Enable Airplane Mode
12 Dolphin CT50 Mobile Computer User Guide
If you do not need to connect to any wireless networks, you can enable
Airplane mode to turn off all the radios and save battery power.
1 Tap the Settings app.
2 In the Wireless & Networks section, tap More.
3 Select the Airplane mode check box to enable it.
Page 21

DRAFT
Power On the CT50
The first time you power on the CT50, a Welcome screen appears.
Follow the prompts on the Welcome screen as the setup wizard helps
you:
• set the default language for the CT50.
• set up the Wi-Fi network connections.
• set the time, date, and time zone.
• personalize (name) the CT50.
After you have fully charged and installed a battery, power on the CT50
for the first time:
• Press and release the Power button.
Note: Once you complete the Setup Wizard, the Welcome screen no
longer appears when you power on the CT50. You will now see the Lock
screen each time you pow er it on.
Chapter 1 — About the Computer Features
Dolphin CT50 Mobile Computer User Guide 13
Page 22

DRAFT
Chapter 1 — About the Computer Features
Unlock the Screen
Every time you power on the CT50, you will need to unlock it.
• Drag the lock toward any edge of the screen to unlock it.
14 Dolphin CT50 Mobile Computer User Guide
After you start using the CT50, you shou ld se t a password to protect the
computer. Tap All Apps > Settings > Security.
Page 23
DRAFT
Chapter 1 — About the Computer Features
Good read LED
About the Good Read LED
The Good Read LED indicates the status of the scanner. For more
information on how to scan bar codes, see “Scan a Bar Code” on
page 42.
Dolphin CT50 Mobile Computer User Guide 15
I
Good Read LED Descriptions
LED Color Description
Green Good read of a bar code.
Blinking red Bad read of a bar code. Include information on
what you should do? Bad bar code?
Blinking green The data collection engine is processing or starting
up.
Page 24

DRAFT
Chapter 1 — About the Computer Features
Configure the Screen Backlight
The display has an ambient light sensor tha t automatically adjusts
the backlight intensity to conserve po wer and ensure the displa y is
readable. You can set the backlight intensity level as needed for
your environment.
1 Tap the Settings app.
2 Tap Display > Brightness.
3 Tap AUTO to use the ambient light sensor to aut omatically adjust t he
brightness for yo ur work environment.
Or, adjust the slider to set the brightness level.
About the Audio Features
The CT50 has a speaker, a microphone, and several software tools for
configuring the volume of sounds.
Adjust Ringtone and Notification Volume
You can quickly adjust the volume of ringtone and noti ficati on sou nds by
using the side volume buttons.
Note: This method of adjusting the volume only affects the volume of
ringtone and notification sounds. To change the volume for other so unds,
open the Settings app and tap Sound > Volumes.
16 Dolphin CT50 Mobile Computer User Guide
Page 25

DRAFT
Chapter 1 — About the Computer Features
1 Press one of the buttons on the right side of the computer. The
Volume slider appears.
Dolphin CT50 Mobile Computer User Guide 17
2 Press the buttons or adjust the slider to change the volume.
Page 26

DRAFT
Chapter 1 — About the Computer Features
Enable Vibrate Mode
You can switch to Vibrate mode an d d isa ble the speaker if necessary for
your working environment .
1 Press and hold the Po we r b utton. The po wer optio ns screen appears .
18 Dolphin CT50 Mobile Computer User Guide
2 Tap to turn on Vibrate mode.
Page 27

DRAFT
Audio Settings
This section describes the audio and sound settings you can conf igure in
the Settings app. To change audio settings, start the Settings app and
tap Sound.
Audio and Sound Settings
Setting Description
Volumes Use the sliders to set the volume for:
Phone ringtone Select a ringtone.
Vibrate when ringing Select to enable vibrate mode when the
Default notification sound Select a notification sound.
Dial pad touch tones Select to enable audio tones when y ou use
Touch sounds Select to enable audio sounds when you
Screen lock sound Select to enable an audio tone when the
Vibrate on touch Select to enable vibrate mode when you
Chapter 1 — About the Computer Features
• music, video, games, and other media.
• ringtone and notifications. You can also
use the side volume buttons to change
the volume.
• alarms.
phone is ringing.
the phone keypad.
use the touch screen.
screen is locked.
touch the screen.
Dolphin CT50 Mobile Computer User Guide 19
Page 28

DRAFT
Chapter 1 — About the Computer Features
Insert a MicroSD Card
You can use a microSD card to increase file storage capacity or to install
software. Honeywell recommends the use of Single Level Cell (SLC)
industrial grade microSD or microSDHC memory cards with the CT50
computer for maximum performance and durability.
Note: Format memory card before initial use.
1 Power off the computer.
2 Disconnect the handstrap from the bottom of the computer.
20 Dolphin CT50 Mobile Computer User Guide
3 Press and slide the battery door toward the bottom of the computer
to unlock the door.
Page 29

DRAFT
Chapter 1 — About the Computer Features
4 Lift up on the edge of the battery and remove it from the computer.
5 Press down on the SD card door and slide it to ward the top of the
computer to open it.
Dolphin CT50 Mobile Computer User Guide 21
Page 30

DRAFT
Chapter 1 — About the Computer Features
6 Insert the SD card into the door.
7 Press down on the SD card door and slide the door toward the
bottom of the computer to lock it.
8 Insert the battery into the computer.
9 Press in on the battery door and slide it into the locked position.
10 Replace the handstrap.
22 Dolphin CT50 Mobile Computer User Guide
Page 31

DRAFT
How to Transfer Files
You can transfer files between your desktop PC and the CT50 with the
HomeBase or USB adapter and a standard USB cable.
computer is
drop to move files back and forth to a Windows PC. If you are
transferring files to and from a Mac, use the Android File Transfer
application (availab l e from www.android.com/filetransfer).
By default, the computer connects us ing MTP (Media Transfer Protocol).
If you are transferring mainly camera images, you can configure the
connection to use PTP (Picture Transfer Protocol). If your Windows PC
does not support MTP, you may be able to tr ansfer files using PTP
instead.
Note: The CT50 supports Hi-Speed USB communications (USB 2.0)
with a maximum data transfer rate of 480 Mbps.
11 Connect the CT50 to your PC.
12 On the CT50, select either Connected as a media device (MTP) or
Camera (PTP). The CT50 stores your selection as the default.
13 Browse to the CT50 from your PC. You can now copy, delete, or
move files betw een the CT50 and your PC.
connected through USB, y o u ca n br o w se t o it and drag-and-
Chapter 1 — About the Computer Features
When the
How to Browse Files on the CT50
Dolphin CT50 Mobile Computer User Guide 23
You can use the File Browser application in Power Tools to browse the
files on the CT50 and the microSD card.
Note: Due to system permissions, some file cannot be opened.
Depending on the associated application, a choice of applications may
be available to open the file.
1 Touch All Apps > Power Tools > File Browser .
2 Touch a folder name or file name to open it.
Page 32

DRAFT
Chapter 1 — About the Computer Features
Accessories for the CT50
The CT50 with a battery. All other accessories are ordered and shipped
separately. For help, contact your local sales representative.
CT50 Accessories and Descriptions
Accessory Description
CT50 Battery
(Model CT50-BTSC)
eHomeBase Use the eHomeBase to hold a CT50 with its
ChargeBase
NetBase
Vehicle Power Adapter Use the vehicle power adapter to charge the
V ehicle Dock Use the vehicle doc ks to hold and char ge the
Quad Charger Use the quad charger to charge up to 4
USB Adapter Use this snap-on adapter to provide USB
The battery provides hours of power to the
CT50. You may want to purchase spare
battery packs for longer shifts.
battery installed, charge a spare battery
pack, charge the main battery pack , and
provide power to the mobile computer. The
dock has USB host and client connectors as
well as an Ethernet connector.
The CT50 ChargeBase is a 4-slot charging
cradle that can power four computers, and
charge their main batteries in 6 hours.
The Net Base enables up to four CT50
computers to communicate with a host
device over an Ethernet network. The Net
Base also provides a second RJ45 Ethernet
port for connection to an additional device
such as a printer, w orkstation, or another Net
Base.
battery installed in the CT50 from the
accessory port in your vehicle.
CT50 while using it on a vehicle.
batteries.
host and client communications through the
CT50.
24 Dolphin CT50 Mobile Computer User Guide
Page 33

DRAFT
Chapter 1 — About the Computer Features
CT50 Accessories and Descriptions
Accessory Description
DEX Adapter Use this snap-on adapter to provide a DEX
connector for the CT50.
Scan Handle Attach to a CT50 to have an ea sy wa y to grip
the computer and scan labels.
Holster Use the holster to carry the CT50 hands-free
in the work environment.
Screen Protector Use the screen protector to keep the
touchscreen free of scratches and dirt.
Dolphin CT50 Mobile Computer User Guide 25
Page 34

DRAFT
Chapter 1 — About the Computer Features
26 Dolphin CT50 Mobile Computer User Guide
Page 35

DRAFT
2
About the User Interface and
Applications
Use this chapter to learn about the Android user interface
and how to interact with the screen. You can also use this
chapter to learn about the Honeywell applications on the
computer.
27
Page 36

DRAFT
Chapter 2 — About the User Interface and Applications
About the User Interface
The Android 4.4 operating system provides a touch-friendly and easy to
navigate user interface.
About the Home Screen
When you turn on the mobile computer, the Home screen is the first
screen that appears after language provisioning is complete.
Status bar
Search bar
28 Dolphin CT50 Mobile Computer User Guide
Favorites tray
Understand the Home Screen
Item Description
Status bar Status icons to the left tell you when an app has sent
notifications, such as an arriving message or a meeting
notice. System icons to the right display the current
wireless and network connection state and battery level.
Favorites tray App icons in the tray are visible on every Home screen.
The All Apps icon is always in the center of the Fav orites
tray.
Search bar Search the internet or the computer using Google.
Page 37

DRAFT
Chapter 2 — About the User Interface and Applications
Navigation and Function Buttons
There are navigation and f unction buttons be low the F a vorites tra y on the
front panel of the CT50.
Navigation and Function Buttons
Button Description Function
Back Takes you back to the previous
screen.
Recent Apps Lets you view and switch between
recently used apps.
Home Returns you to the Home screen
Search Starts a search on the computer or the
internet.
Volume Raises or lowers the volume of the
speaker.
Common Status and Notification Icons?
Remap a Button
Dolphin CT50 Mobile Computer User Guide 29
Should I include a table with the icons and descriptions here?
You can change the default function of the Left Scan, Right Scan, or
Camera buttons.
1 Tap All Apps > Settings > Key remap.
2 Touch to button you want to remap.
3 Tap KEYS or APP to view the available functions.
4 Select the function you want to assign to the b utton. The function y ou
selected now appears under the button name.
Page 38

DRAFT
Chapter 2 — About the User Interface and Applications
View Notifications
You can view the notifications shade to see a list of events on the CT50.
Manage Notifications
30 Dolphin CT50 Mobile Computer User Guide
• To open the shade, swipe down from the top of the screen.
• To close the shade, swipe up from the bottom of the screen, or tap
the Back or Home buttons.
When an app sends a notification to the CT50, y ou can easily respond to
it.
1 When a notification icon appears, swipe down from the top of the
screen.
2 To respond to a notification, touch it. The associated app opens so
that you can respond.
• To dismiss a notification, swipe it sideways.
• To dismiss all notifications, tap the X in the top right corner.
Page 39

DRAFT
Chapter 2 — About the User Interface and Applications
Customize the Home Screen
You can add application icons to any Home screen to access them more
easily.
1 Touch . The All Apps screen appears.
2 To add an app icon to a Home screen, touch and hold the icon f or th e
app, and then slide your finger to place the icon on one of the Home
screens.
To add a widget icon to a Home screen, touch WIDGETS at the top
of the screen, touch and hold the icon for the widget, and then slide
your finger to place the widget icon on one of the Home screens.
3 To remove an app or widget from the Home screen, touch and hold
the icon and slide it over Remove at the top of the screen.
Customize the Favorites Tray
You can add application icons to the Favorites tray to access them more
easily.
1 Touch . The All Apps screen appears.
2 Touch and hold an icon in the Favorites tray, and slide it over
X Remove at the top of the screen.
3 To add an app icon to the Favorites tray, touch and hold the icon for
the app, and then slide your finger to place the icon in the Favorites
tray.
To add a Widget icon to th e F a vorites t ra y, touch WIDGETS at the top
of the All Apps screen, touch and hold the icon for the widget, and
then slide your finger to place the icon in the Favorites tray.
Use Google™ Search
Dolphin CT50 Mobile Computer User Guide 31
Use the Google Search field at the top of the Home screen to help you
find anything you need on the computer or on the web.
1 At the top of any Home screen, touch Google to type your search
term. As you type, suggestions from Google web sear ch appear
below the Search box, and results from the computer (such as apps
or contacts) appear below the web search results.
2 Tap a suggestion to search for it immediately, or touch its arrow just
to add the term to the search field without starting to search.
Page 40

DRAFT
Chapter 2 — About the User Interface and Applications
About Screen Gestures
Use your fingers or the stylus to manipulate icons, buttons, menus, the
onscreen keyboard, and other items on the screen.
• To select or activate something, tap it.
• To type something, such as a name or password, touch where you
want to type. A keyboard appears that lets you type into the field.
Other common gestures include:
• Touch and hold: Touch and hold an item by touching it and lifting y our
finger until an action occurs.
• Drag: Touch and hold an item for a moment. Without lifting your
finger, move your finger on the screen until you reach the target
position. For example, you can drag to reposition shortcuts on the
Home screen.
• Swipe or slide: Quickly move your finger across the screen, without
pausing when you first touch. For example, you can slide a Home
screen left or right to view the other Home screens.
• Double-tap: Tap quickly twice on a web page, map , or other screen to
zoom in. Double-tap ag ain to zoom out.
• Pinch: In some apps, y ou can zoom in and out by placing tw o f inger s
on the screen at once and pinching them together (to zoom out) or
spreading them apart (to zoom in).
Set the Time Zone
32 Dolphin CT50 Mobile Computer User Guide
The CT50 gets the current date and time from its network
connection.
1 Start the Settings ap p.
2 Tap Date & time.
3 Clear the check box for Automatic time zone.
4 Tap Select time zone and select the time zone for your location.
You can manually set the time zone for your location.
Page 41

DRAFT
Chapter 2 — About the User Interface and Applications
About Honeywell Applications
Should I add anything about Power Tools or Demos here?
Or maybe applications that might be on the product like Launcher for
Android?
Can you download HTML5 Browser?
Dolphin CT50 Mobile Computer User Guide 33
Page 42

DRAFT
Chapter 2 — About the User Interface and Applications
34 Dolphin CT50 Mobile Computer User Guide
Page 43

DRAFT
3
About the Scanner
Use this chapter to understand how to scan bar codes and
how to configure the scanner.
35
Page 44

DRAFT
Chapter 3 — About the Scanner
About the Scanner
The internal scanner can read 1D and 2D bar code symbologies,
composite symbologies, and postal codes. It also supports omnidirectional scanning for greater flexibility in real-world settings. The
image engine can also capture black and white images, such as
signatures and pictures of damaged inventory.
How to Send Data as Android Keyboard Input
The scan wedge feature sends scanned bar code data to an active
application as Android ke ypad input. By default, scan wedging is enable d
on the CT50 computer. You can use applications that are coded to use
the scanner or applications that receive data through the scan wedge
feature. If a n application cl aims the scanner through t he BarcodeReader
API, the scan wedge feature is temporarily disabled. You can find
information on how to create custom applications for the CT50 in the
Software Development Kit (SDK) available for download at
www. honeywellaidc.com.
Use this table to understand the settings associat ed with each step in
the scan data process.
Scan Data Processing and Settings
Process Step Associated Scan Setting
Decode bar code. Symbology Settings
Interpret bar code as ISO8859-1. Symbology Settings
Detect special bar codes and
implement specific action instead of
normal processing.
• URL bar code start s browser
• Scan-to-Intent starts an application
• EZConfig bar code starts EZConfig
Convert to selected character set. Data Processing Settings Charset
36 Dolphin CT50 Mobile Computer User Guide
Data Processing Settings Launch Browser
Scan to Intent
Launch EZConfig
Page 45

DRAFT
Chapter 3 — About the Scanner
Scan Data Processing and Settings
Process Step Associated Scan Setting
Attach Prefixes and Suffix. The data
string is composed in the following
order:
• Prefix
• Symbology prefix
• Bar code data
• Suffix
Interpret substitutions of the Prefix and
Suffix strings.
Activate a Total Freedom plugin. Data Processing Settings Data Editing Plugin
Inject the final data string as Android
KeyEvents.
Substitutions occur within the Prefix and Suffix string values.
Prefix and Suffix Interpretation
Substring Replacement Character Code Wedged as a KeyEvent
Data Processing Settings Prefix
Symbology Prefix
Suffix
Data Processing Settings Wedge
Change the Scanner Settings
Dolphin CT50 Mobile Computer User Guide 37
\r 13 No
\n 10 Yes
\t 9 Yes
\\ ‘\’ No
Changes you make to t he Default profile apply to all applications with no
profile.
1 Tap the Settings app.
2 Tap Scanning.
3 Tap Default.
4 Select Data Processing Settings, Symbology Settings, Imager
Settings, Trigger Settings, or Notification Settings.
5 Modify the settings to meet your application needs.
Page 46

DRAFT
Chapter 3 — About the Scanner
Restore Default Scanner Settings
You can easily discard all changes you made to the Default profile and
restore the default values.
Note: When you select to restore the default values of one of the
settings, it also restores the default values of all settings within the
profile.
1 Tap (insert graphic of three dots) in the upper right corner of any of
the scan settings screens.
2 Tap Restore all defaults.
Scanners Default Settings
Use these tables to understand the Data Processing Settings,
Symbology Settings, Imager Settings, Trigger Settings, and Not ification
Settings.
Data Processing Settings
Use the Data Processing Settings to specify how bar code data is
processed by the CT50.
Data Processing Settings
Setting Description Default
Wedge Enable or disable sending the bar code data as Android
Charset Select the character set to use when inte rpreting the bar
Prefix Defines the string added before the decoded bar code
Suffix Defines the string added after the decoded bar code
38 Dolphin CT50 Mobile Computer User Guide
Enabled
KeyEvents when sending data to the active application.
ISO-8859-1
code data into a string. Options include:
• ISO-8859-1
• US-ASCII
• UTF-16
• UTF-16BE
• UTF-16LE
• UTF-8
Corresponds to BarcodeReader property:
PROPERTY_DATA_PROCESSOR_CHARSET
None
data.
None
data.
Page 47

DRAFT
Chapter 3 — About the Scanner
Data Processing Settings (continued)
Setting Description Default
Data Editing Plugin Specify a Total Freedom data editing plug-in. None
Symbology Prefix Specify a symbology identifier prefix to th e ba r co de
data. Options include:
• None
• Honeywell
• AIM
Launch Browser Enable or disable URL bar code handling. If a bar code
starts with http:// or https://, the browser opens using the
bar code data as a URL.
Corresponds to BarCodeReader property:
PROPERTY_DATA_PROCESSOR_LAUNCH-
BROWSER
Scan to Intent Enable or disable special handling of scan-to-intent bar
codes. Applies to bar codes in one of the following
formats:
‘//’ ACTION
‘//’ intent-suffix ‘$’ extra-data
Where:
ACTION and extra-data are any string of characters.
Launches an application listening for the in tent:
Intent action: “com.honeywe ll.scantointent.intent.action. ”
+ ACTION
Intent extra
“com.honeywell.scantointen t.intent.extra.DA TA” contains
the remainder of the bar code data after the first ‘$’
character.
Corresponds to BarCodeReader property:
PROPERTY_DATA_PROCESSOR_SCAN_TO_INTENT
Launch EZ Config Enable or disable special handling of EZConf ig bar
codes. Applies to EZConfig bar codes, which are
encoded with the Aztec symbology and containing
specific header data.
Corresponds to BarcodeReader property:
PROPERTY_DATA_PROCESSOR_LAUNCH_EZ_
CONFIG
None
Enable
Enabled
Enabled
Dolphin CT50 Mobile Computer User Guide 39
Page 48

DRAFT
Chapter 3 — About the Scanner
Symbology Settings
Use the Symbology Settings to enable and disable bar code
symbologies. Tap a symbology to view and modify the symbology
configuration parameters.
Symbology Settings
Setting Default
Code 128 Enabled
GS1-128 Enabled
Code 39 Enabled
Datamatrix Enabled
UPC-A Enabled
UPC-E Disabled
EAN-8 Disabled
EAN-13 Enabled
Aztec Enabled
China Post Disabled
Codabar Enabled
Codablock A Enabled
Codablock F Disabled
Code 11 Disabled
Code 93 Disabled
Composite Disabled
Han Xin Disabled
IATA 2 of 5 Disabled
Interleaved 2 of 5 Enabled
Korean Post Disabled
Matrix 2 of 5 Disabled
Maxicode Disabled
Micro PDF 417 Disabled
MSI Disabled
PDF 417 Disabled
QR Code Disabled
RSS (GS1) Disabled
Standard 2 of 5 Disabled
40 Dolphin CT50 Mobile Computer User Guide
Page 49

DRAFT
Chapter 3 — About the Scanner
Symbology Settings (continued)
Setting Default
Telepen Disabled
TLC 39 Disabled
Trioptic Disabled
2D Postal Settings Disabled
OCR Disabled
Imager Settings
You should not need to modify the Imager Settings. The Override
Recommended Values setting is disabled by default. The recommend ed
Imager Settings are designed to work in a wide range of environments
and should only be modified if yo u have an advanced understanding of
imagers.
Trigger Settings
Use the Trigger Settings to configure how the scan buttons work.
Trigger Settings
Notification Settings
Setting Description Default
Good Read Notification Enables or disables a good read notification.
Dolphin CT50 Mobile Computer User Guide 41
Setting Description Default
Decode Timeout Scanning automati cally turns off after this
number of seconds if the scan trigger is
pressed and nothing has successfully
decoded.
20
Notification Settings
Use the Notification Settings to configure ho w your CT50 responds whe n
you scan a bar code.
Enabled
The notification consists of a green blink of the
Good Read LED, a short beep, and an optional
short vibration.
Page 50

DRAFT
Chapter 3 — About the Scanner
Notification Settings
Setting Description Default
Bad Read Notification Enables or disables notification of a failed scan.
The notification consists of a red blink of the
Good Read LED, an error beep , and an optional
short vibration.
Vibrate Enabled Enables or disables whether the computer
vibrates when there is a good or bad read.
Disabled
Disabled
Scan a Bar Code
The scanner has an aiming beam to help you corre ctly fr ame ba r code s .
It also supports omni-directional (360°) scanning to make it easier for
you to scan bar codes.
Note: Before you start scanning bar codes, use the Setting s app to
enable only the bar code symbologies that you need.
1 Point th e scanner window at the bar code and hold the computer
steady a few inches from the label.
2 Press one of the Scan buttons. The illumination frame appears.
42 Dolphin CT50 Mobile Computer User Guide
Make sure the entire bar code is inside of the frame. When the
scanner successfully reads a bar code, you hear a high beep and the
Good Read LED turns on briefly.
3 Release the Scan button.
Page 51

DRAFT
4
Use the Phone
You can use the phone feature to mak e and receive phone
calls as well as transmit data through wireless wide-area
networks (WWANs).
43
Page 52

DRAFT
Chapter 4 — Use the Phone
About the Phone
Phone features on the computer include a speaker and a microphone.
You can also use a Bluetooth headset or hands-free kit. The phone
feature is enab led by default.
The WAN radio in your computer determines the supported network
types:
• If your computer includes the UMTS/HSPA+ WAN radio, you can
connect to UMTS networks.
• If your computer includes the Flexible Network Radio, you can
connect to CDMA or UMTS networks in all regions that support these
technologies. The Fle xible Ne twork Radio is a software-def ined radio
(SDR) that can be configured for CDMA or UMTS depending on your
wireless communication needs.
Honeywell supports these CDMA network carriers:
• Sprint (United States only)
• Verizon (United States only)
For other carriers, contact Honeywell Technical Support.
After you turn on the phone and activate service with your wireless
carrier, you can customize the phone features and network settings in
the Wireless & Networks section of the Settings app.
Note: Both WWAN radios support Network Information and Time Zone
(NITZ) messages to automatically set the system time.
Activate the UMTS Phone
44 Dolphin CT50 Mobile Computer User Guide
Activating the UMTS phone on y our CT50 is done the same w ay whether
your computer has the Fle xible Netw ork Radio or the UMTS/HSPA+WAN
radio.
You use a SIM card to activate the UMTS phone on the CT50. You can
purchase the SIM card from your network provider.
1 Power off the CT50.
2 Disconnect the handstrap from the bottom of the computer.
3 Press and slide the battery door toward the bottom of the computer
to unlock the door.
4 Lift up on the edge of the battery and remove it from the computer.
Page 53

DRAFT
Chapter 4 — Use the Phone
5 Lift up on the SIM and MicroSD door.
6 Press down and slide the SIM door toward the top of the CT50 to
open it.
Dolphin CT50 Mobile Computer User Guide 45
Page 54

DRAFT
Chapter 4 — Use the Phone
7 Insert the SIM card in the door.
8 Close the SIM card door and slide it to ward the bottom of the CT50 t o
secure it.
46 Dolphin CT50 Mobile Computer User Guide
9 Replace the battery, reconnect the handstrap, and press the Power
button to turn on the CT50. The phone is now ready to use.
Page 55

DRAFT
Activate the CDMA Phone
To activate the CDMA phone in your mobile computer, you need to
contact your wireless carrier and set up an account.
You also need to provide the carrier with the Mobile Equipment Identifier
(MEID) for the computer. You can find the MEID:
• on a label located in the battery compartment.
• on the outside of the computer shipping box.
Note: For the CDMA phone, settings are permanently stored in the
WWAN radio after activation. CDMA settings persist through a factory
data reset.
The activation process is slightly different for each CDMA carrier. Your
carrier sales contact and an Honeywell representative can guide you
through the process. In general, you activate the CDMA phone as
follows:
1 Contact your wireless provider and giv e the pro vider the MEID f or the
computer.
2 If your carrier is Sprint, reboot the computer. As soon as the Sprint
network detects your phone, Hands-Free Activation (HFA) begins,
and a series of notification messages appear. When activation is
complete, a completion message appears and the WAN radio
reboots. The phone is ready to use.
If your carrier is Verizon, tap , enter
and tap . After a short wait, a message a ppears , confirming either
success or failure of the activation. After successful activation, the
phone is ready to use.
Chapter 4 — Use the Phone
*228 on the phone keypad,
Make a Phone Call
Dolphin CT50 Mobile Computer User Guide 47
Once the phone is activated, you can make a phone call.
1 On the Home or All Apps screen, tap .
If the Phone app opens to a list of numbers instead of the keypad,
swipe left or touch to return to the keypad.
2 Touch the keys to enter the number, and then touch below the
keypad to dial.
3 To end a call in progress, tap .
Page 56

DRAFT
Chapter 4 — Use the Phone
Answer the Phone
When you receive a phone call, the Incoming Call screen opens,
showing the caller ID. All incoming calls are recorded in the Call log. If
you miss a call, you receive a notification.
When a call arrives, touch the white phone icon and slide ov er one of the
icons:
• To answer the call:
• To send the call to voicemail:
• To send a message from a list of default text messages:
Switch Apps During a Phone Call
You can switch apps while a phone call is in progress. For example, you
can use the People ap p to look up contact information during your call.
Note: If you have only a WWAN connections, apps that need a data
connection may be unable to access online data while the phone call is
in progress. If simultaneous phone calls and stat connections are not
possible due to provider limitations, voice calls receive priority. Check
with your provider for more information.
• During a phone call, tap another app icon on the Home or All Apps
screen to run that application. The green Phone icon appears in the
Status bar while the call is underway.
Check Your Voicemail
48 Dolphin CT50 Mobile Computer User Guide
When you hav e a ne w voicema il message, th e voicema il icon appears at
the top left of the screen.
Note: Consult your service provider for mo re information on setting up
your voicemail account.
1 Swipe down from the top of the screen to view your notifications. The
voicemail notification shows the number of unread messages and a
number to dial.
2 Touch New voicemail. The phone dials the number. Follow the
instructions to retrieve your messages.
Page 57

DRAFT
Set Your Voicemail Number
To access your voicemail, you must set your voicemail number in the
Phone app.
Note: This procedure does not apply if you are a Verizon customer.
1 Tap .
2 Tap and then tap Settings. A list of call settings appears.
3 Tap Voicemail > Setup > Voicemail number.
4 If you are a Sprint customer, delete “*86” from the entry field and
enter your voicemail number.
If you are an AT&T customer, enter your voicemail number.
5 Tap OK.
Change Voicemail Settings
1 Tap on a Home or All Apps screen.
2 Tap and then tap Settings.
3 Tap the voicemail setting you want to change.
Chapter 4 — Use the Phone
Make an Emergency Phone Call
Configure Phone Settings
Dolphin CT50 Mobile Computer User Guide 49
You can use the phone to make an emergency phone call, even if the
SIM card is missing from your UMTS phone or if you do not have a valid
CDMA account. In either case, the phone shows that you have no
service. However, if you dial certain emergency numbers (such as 112,
911, 000, 08, 118, 119, or 999) the call will go through.
You can customize settings for the phone, including th e ringtone,
voicemail options, keypad tones, int ernet call settings, and other options.
1 Tap .
2 Tap and then tap Settings. The Call settings menu appears.
3 Change phone settings as necessary.
Page 58

DRAFT
Chapter 4 — Use the Phone
50 Dolphin CT50 Mobile Computer User Guide
Page 59

DRAFT
5
Use the Camera
Use this chapter to learn how to take pictures and record
videos with the color camera.
51
Page 60

DRAFT
Chapter 5 — Use the Camera
About the Color Camera
The CT50 contains an 8-megapixel color camera for taking pictures and
videos. The camera and flash are located on t he back of the computer.
Use the Gallery app to view photos and videos stored on the CT50.
Adjust the Camera and Video Settings
The camera and video settings are adjustable from within the Camera app.
How to Zoom
The camera zoom is controlled using a pinching motion on the touch
screen. Place two fingers on the screen at the same time, and then:
• spread them apart to zoom in (enlarge and object).
• pinch them together to zoom out.
Change Camera Settings
You can change the camera settings for best results when taking
pictures.
1 Press the Camera button and then tap .
2 Tap
3 Tap HDR or one of the icons to change basic camera settings.
• When HDR is enabled, the computer automatically captures
multiple photos and combines them into one photo creating the
best quality image possible.
• Enable or disable different options such as scene mode, store
location, and picture size.
Take a Picture
52 Dolphin CT50 Mobile Computer User Guide
1 Press the Camera button or tap All Apps and then tap Camera .
2 Using the screen as a viewfinder, move the computer until you see
the image you want to capture.
3 Tap the screen to set the focus. By default, the camera senses the
lighting in the environment and turns the torch on if needed.
Page 61

DRAFT
(Optional) To zoom in or out, drag the slider at the bottom of the
viewfinder.
4 Press Enter or the shutter button . The camera takes a picture
and a thumbnail image of the picture appears in the corner of the
screen.
• To view the picture, tap the thumbnail image.
• To return to the Camera app, swipe the thumbnail image to the
right.
Record a Video
This section explains how to record video with the camera in the
computer.
1 Press the Camera button or tap All Apps and then tap Camera .
2 Tap .
3 Tap to begin recording video. To zoom in or out, drag the slider at
the bottom of the viewfinder.
4 When you are done recording, tap .
Change Video Settings
Chapter 5 — Use the Camera
Dolphin CT50 Mobile Computer User Guide 53
You can change the camera settings for best results when recording
video.
1 Press the Camera button or tap All Apps and then tap Camera .
2 Tap .
3 Tap .
4 Tap
5 Tap one of the icons to change basic video settings.
Page 62

DRAFT
Chapter 5 — Use the Camera
54 Dolphin CT50 Mobile Computer User Guide
Page 63

DRAFT
6
Configure the Computer
Use this chapter to learn how to configure the CT50. You
will also find information on how to configure network
communications and wireless security.
55
Page 64

DRAFT
Chapter 6 — Configure the Computer
How to Configure the Computer
You can configure many parameters on the computer such as the
code symbologies it decodes, or the network settings. The values
bar
you set for these parameters determine how the computer operates.
You configure the computer using the Settings app.
Start the Settings App
The Settings app is located in the All Apps menu.
• Tap All Apps > Settings.
About the Structure of the Settings App
56 Dolphin CT50 Mobile Computer User Guide
Use this section to learn about the structure of the Settings app so you
can find parameters quickly.
Page 65

DRAFT
Chapter 6 — Configure the Computer
Wireless & Networks
Setting Description
Wi-Fi Turns the Wi-Fi radio on and off . Wh en Wi- Fi is tu rned
on, tap the bar to see a list of Wi-Fi networks.
Bluetooth Turns the Bluetooth radio on and off. wh en bluet ooth is
turned on, tap the bar to see a list of Bluetooth devices
in range.
Data usage Displays a list of phone data usage for the current data
usage cycle. Tap the Data usage cycle list to select
another date range.
More... Airplane mode: Turns airplane mode on and off.
VPN: Sets the password parameters for a virtual
private network (VPN).
Mobile networks: Includes settings for mobile
networks, including enabling dat a access and roaming
over mobile networks, selecting access points and
network operators, or selecting only 2G networks (to
save battery life).
Mobile plan: ??
Cell broadcasts: Sets what emergency inf ormation you
want to receive and how you want to receive it.
Dolphin CT50 Mobile Computer User Guide 57
Device
Setting Description
Sound Settings for the phone and notification sounds,
including tones and volume.
Display Settings for the display brightness, wallpaper, sleep
timeout, font size, and screen auto-rotation.
Storage Shows the remaining amount of storage.
Battery Shows battery usage data and the current battery
state.
Apps Lists downloaded and running apps.
Page 66

DRAFT
Chapter 6 — Configure the Computer
Personal
Setting Description
Location Turns location services (Google and GPS
Security Sets screen lock and administrator privileges.
Language & input Selects the active language and default
Backup & reset Restores factory default settings.
Honeywell Settings
Setting Description
Key remap Remaps the Left Scan, Right Scan, and Camera
Smart sensors Configures the integrated motion detection sensors for
Battery LED Configures the battery LED behavior. Do I need to
Battery Health View the current health of the battery.
Logger Activates a logging service that creates an Android
Scanning Configures the CT50 imager. For help, see “Change
Web
applications
satellite data) on and off.
keyboard. Set s auto-typing features such as
capitalization and punctuation. Adjusts the
pointer speed for an external mouse or trackpad.
buttons. For help, see “Remap a Button” on
page 29.
advanced power management.
explain the diff erence in t he choices? Does the battery
LED work the same as the D75e?
logcat log and kernel log for APP and system
troubleshooting.
the Scanner Settings” on page 37.
Enables the web interface settings and lets you set a
port.
58 Dolphin CT50 Mobile Computer User Guide
Accounts
Setting Description
Add account Adds a Corporate or Email account to the CT50.
Page 67

DRAFT
Chapter 6 — Configure the Computer
System
Setting Description
Date & time Configures all date and time settings
Accessibility Sets accessibility levels, such as larger display text
and enabling text-to-speech output.
Printing
Developer options Enables developer-specific options such as USB
debugging and SD card protection.
About phone
Dolphin CT50 Mobile Computer User Guide 59
Page 68

DRAFT
Chapter 6 — Configure the Computer
About Network Communications
You can use the mobile computer in your wireless or wired data
collection network. You can connect your computer using:
• 802.11 radio communications.
• Ethernet communications.
• Bluetooth communications.
• USB and serial communications.
Connect to a Wi-Fi Network
The CN51 has an 802.11 radio to transfer data using wireless
communications. Before you connect to a Wi-Fi network, you need to
know about your network security protocol and its requ ire d cr ed en tia ls.
By default, the 802.11 radio is disabled.
1 Start the Settings app and slide the Wi-Fi switch on.
2
When the switch turns blue, tap Wi-Fi. A list of discovered
networks appears.
60 Dolphin CT50 Mobile Computer User Guide
Page 69

DRAFT
Chapter 6 — Configure the Computer
3 To quickly connect to a network through Wi-Fi Protected Access
(WPS), tap . To search for a network not in the list, tap and
type the network name.
4 Tap a network name in the list to view details:
Dolphin CT50 Mobile Computer User Guide 61
If the network is secured, a list of required information appears
(such as a certificate name, a password, or other credentials). To
connect to the secured network, enter the required information and
tap Connect.
• To leave a connected network, tap Forget. For example, you
could choose to for get a network you no longer use.
• To close the network details screen, tap Cancel.
Configure Proxy Settings for a Wi-Fi Network
If you need to connect to netw ork resources thr ough a pr oxy server, you
can configure settings for the proxy server for each Wi-Fi network you
add. By default, the Wi-Fi networks you add are not configured to
connect through a proxy server.
Page 70

DRAFT
Chapter 6 — Configure the Computer
Note: Proxy settings apply only to the Wi-Fi network you modify. You
must change proxy settings for each network requiring a proxy server.
1 Open the Settings app and tap Wi-Fi. The list of available Wi-Fi
networks appears.
2 Tap and hold the network name and then tap Modify network. A list
of network settings appears.
3
At the bottom of the list of network settings, select Show
advanced options.
4 If the network has no proxy settings, tap None in the Proxy Settings
list, and then tap Manual in that list.
5 Enter the proxy settings for the network.
6 Tap Save.
Disable Wi-Fi Notifications
By default, when Wi-Fi is enab le d, y ou re ceive notifications in the Status
bar when the computer discovers a wireless network. You can disable
these notifications.
1 Start the Settings ap p.
2 Tap and hold Wi-Fi.
3 Tap and then tap Advanced. The Advanced Wi-Fi menu appears.
4 Clear the Network notification check box to disable notifications.
Connect to an Ethernet Network
62 Dolphin CT50 Mobile Computer User Guide
To connect the computer to an Ethernet network, you need an Ethernet
dock.
1 Make sure the dock is conne cted to your Ethernet network.
2 Place the computer in the dock.
3 Start the Settings app and make sure Ethernet is enabled (Ethernet
is enabled by default).
To enable Ethernet, slide the Ethernet switch on. When the switch
turns blue, Ethernet is enabled.
Page 71

DRAFT
Chapter 6 — Configure the Computer
4 Tap Ethernet. The Ethernet list shows the name of the current
Ethernet connection. By default, the co mputer assumes a DHCP
connection, and that your network has assigned an IP address
automatically. If DHCP is working, the Ethernet dock should indicate
that communication with the network is occurring.
(Optional) To assign a static IP address, tap the connection
5
name
a Tap DHCP and then select Static from the list.
b Enter the required network information and then tap Apply.
(for example, eth0). The IP settings dialog box appears.
How to Connect to Virtual Private Networks
The computer supports connecting to virtual private networks (VPNs).
This section describes how to add and connect to VPNs. To configure
VPN access, you must obtain details from your network administrator.
You view and change VPN settings in the Settings app.
Note: Bef ore y ou can access VPNs, y ou need to set a loc k screen PIN or
password.
Add a VPN
Before you can connect to a VPN, you must add VPN information.
1 Start the Settings ap p.
2 In the Wireless & Networks section, tap More.
3 Tap VPN .
4 Tap Add VPN Profile.
5 Enter information for the VPN.
6 Tap Save. The VPN name appears in the VPN list.
Dolphin CT50 Mobile Computer User Guide 63
Connect to a VPN
1 Start the Settings ap p.
2 In the Wireless & Networks section, tap More.
3 Tap VPN .
4 Tap the name of the VPN in the list, and enter any necessary
credentials when prompted.
5
Tap Connect. The computer connects to the VPN, and a
Status
To disconnect from the VPN, tap the notification.
icon and notification appear.
Page 72

DRAFT
Chapter 6 — Configure the Computer
Edit VPN Information
1 Start the Settings ap p.
2 In the Wireless & Networks section, tap More.
3 Tap VPN .
4 Tap and hold the name of the VPN you want to edit, and select Edit
network from the list.
5 Edit VPN settings as necessary.
6 When you are done, tap Save.
About Wireless Security
The computer provides these security solutions for your wireless
network:
• Wi-Fi Protected Access 2 (WPA2™)
• Wi-Fi Protected Access (WPA)
• 802.1x
• LEAP
• WEP
Honeywell recommends WPA2 security with PSK (Personal) or 802.1x
(Enterprise) key management.
Before you set security, you need to enable the radio, set the date, and
set the SSID on your comput er. To use 802.1x security , y ou ne ed to load
a root certificate on your computer. To use transport layer security (TLS)
with 802.1x security, you also need to load a user certificate.
Use the Settings app to access and configure all wireless security
settings.
About Certificates
64 Dolphin CT50 Mobile Computer User Guide
You can use digital certificates to identify the computer for network
access or authentication to servers. To use a certificate to identify your
device, you must install it in the trusted credential storage on the
computer.
Page 73

DRAFT
Chapter 6 — Configure the Computer
Android supports DER-encoded X.509 certificates saved in files with a
.crt or .cer file extension. To install a valid certificate with a .der or it.
Android also supports X.509 certificates saved in PKCS#12 key store
files with a .p12 or .pfx entension. To install a valid key store file with
another extension, you must change the extension to .p12 or .pfx to
install it. When you install a certificate from a PKCS#12 key store,
Android also installs any accompanying private key or certificate
authority certificates.
Load a Certificate
To use a certificate, yo u must install it in the trusted credential stor age on
the computer.
Note: Apps such as Email and Browser that support certificates allow
you to install certificates directly from within the app. For more
information, see the Help that comes with the app.
1 Copy the certificate or key store from your PC to a microSD card.
2 Install the microSD card in the computer and turn the computer on.
3 Start the Settings app and tap Security > Install from SD card.
4 Tap the name of the certificate or key store to install it. If prompted,
enter the key store password and tap OK.
5 Enter a name for the certificate and tap OK.
Dolphin CT50 Mobile Computer User Guide 65
Disable or Remove Certificates
If a certificate is compromised, or your organization chooses not to trust
it, you can disable or remove it.
1 Start the Settings app and tap Security > Trusted credentials. The
trusted credentials screen has two tabs:
•System shows CA certificates that are installed in the ROM.
•User shows CA certificates you have installed yourself.
2 Tap the name of the certificate to disable or remove. The certificate
details screen appears.
3 Scroll to the bottom of the details screen and tap Disable (for System
certificates) or Remove (for User certificates).
If necessary, you can enable a disabled System certificate from this
location. If you remove a User certificate, you must install it again to
enable it.
4 Tap OK.
Page 74

DRAFT
Chapter 6 — Configure the Computer
About Bluetooth Communications
The CN51 is Bluetooth-enabled, which lets you connect to other
Bluetooth devices.
You need to turn on the Bluetooth radio before you can discover and
connect to Bluetooth devices. By default, the radio is turned off.
The Bluetooth radio maintains its current state th rough a system rese t. If
you perform a factory data reset, you must recreate pairings to devices.
The System bar icons indicate Bluetooth status.
Connect a Bluetooth Device
To connect to a Bluetooth device, you must enable Bluetooth and then
select the device from a list of discovered devices.
1 Start the Settings ap p.
2 If Bluetooth is off, slide the Bluetooth switch on.
3 Tap Bluetooth. A list of available Bluetooth devices appears.
66 Dolphin CT50 Mobile Computer User Guide
Page 75

DRAFT
Chapter 6 — Configure the Computer
4 (Optional) If the device you want does not appear in the list, make
sure the device is turned on and discoverable, and tap Search for
devices.
5
Tap a device in the list to select it. If a pairing request message
appears, enter the de vice PIN a nd tap OK. When the device is paired
with the computer, the device name appears in Paired Devices at
the top of the list.
Dolphin CT50 Mobile Computer User Guide 67
6 To disconnect a paired de vice , tap the Quic k Settings icon next to
the device name and then tap Unpair.
Page 76

DRAFT
Chapter 6 — Configure the Computer
Configure Bluetooth Settings
You configure Bluetooth settings in the Settings app.
1 Start the Settings app and tap Bluetooth.
2 Tap the Menu icon and select a setting from the menu:
• Tap Rename phone to change the computer device name. Type
the new name and then tap Rename.
• Tap Vi si bi lit y timeout to set the amount of time that the
computer is visible to other Bluetooth devices. By default, the
timeout is set to 2 minutes. You can select 5 minutes, one hour, or
no timeout. Setting a shorter timeout value preserves battery life.
• Tap Show received files to view statistics on the received files.
Making the CT50 Discoverable
By default, the CT50 is not discoverable, which means that the computer
will not be found by other Bluetooth devices.
1 Tap All Apps > Settings.
2 Verify the Bluetooth radio is activated.
3 Tap Bluetooth.
4 Tap CT50 (the default computer name) at the top of the screen to
make the device d iscoverable. The computer starts a 2 minute count
down during which time the computer is tempo rar ily discoverable by
other devices using Bluetooth technology.
Rename or Disconnect a Paired Device
68 Dolphin CT50 Mobile Computer User Guide
You can rename or disconnect a paired Bluetooth device from the
Settings app.
1 Open the Settings app and tap Bluetooth.
2 Tap the Settings icon in the Paired Devices list.
3 To rename the de vice, t ap Rename, type the new name , and then tap
OK.
• To disconnect the device, tap Unpair.
Page 77

DRAFT
Chapter 6 — Configure the Computer
About Serial and USB Communications
You can use these accessories to transmit data to and receive data from
another device through serial or USB communications:
• vehicle dock
• HomeBase
• USB snap-on adapter
• RS-232 DEX adapter
For information on these accessories, contact your local sales
representative.
Dolphin CT50 Mobile Computer User Guide 69
Page 78

DRAFT
Chapter 6 — Configure the Computer
About Near Field Communication (NFC)
NFC technology provides the ability for short-range, wireless data
transfer betw ee n t he CT50 an d NFC tags or o th er NF C e nabled devices
placed in close proximity to the back of the computer. NFC equipped
CT50 models support the following modes of operation:
• NFC tag reader/writer mode: The computer reads and/or writes
digital information from or to an NFC tag.
• Peer- to-Peer (P2 P) mode: The computer uses Android Be am and/or
Bluetooth technology to transfer screen content (such as a picture,
contact information, Web page url, or file) between NFC enabled
devices.
• NFC card emulation mode: Th e computer emulates an NFC card
(smart card) that an external card reader can access. You have the
option to enable the embedded secure el ement (eSE) SmartMX™ or
Host Emulation. Secure element implementation is commo nly used
for financial transactions or coupon and loyalty mobile marketing
applications that require a secure memory and execution
environment f or the stor age of personal inf ormation (such as account
information and credentials) and running custom smart card applets.
Note: Sleep Mode (Suspend Mode) and the screen lock temporarily
turns the NFC radio off.
70 Dolphin CT50 Mobile Computer User Guide
Page 79

DRAFT
A
Specifications
71
Page 80

DRAFT
Chapter A — Specifications
Physical and Environmental Specifications
This sections lists the physical and environmental specifications for the
CT50.
Physical Dimensions
Length: 160 mm
Width: 82.5 mm
Depth: 22 mm
Weight (with battery): 350 g (including battery)
Tumble and Drop Specifications
Tumble specification: 1000 1 m tumbles
Drop specification: 5 ft multiple drops to unyielding ste el plate, -10
to +50 °C temperature range and 4 ft drop at
20 ° C
Power and Electrical Specifications
Operating battery: Rechargeable Lithium-ion 3.7 V, 4000 mAh
battery
Backup battery: ??
Electrical rating: ??
72 Dolphin CT50 Mobile Computer User Guide
Temperature and Humidity Specifications
Operating temperature: -20 °C to 50 °C (-4 °F to 122 °F)
Storage temperature: -30 °C to 70 °C (-22 °F to 158 °F)
For maximum battery life, store at 23 °C
(73 °F) at 50% charge.
Charging temperature: ??
Relative humidity
(operating):
Environmental rating: IP67, Category 1
5% to 95% non-condensing
Screen Specifications
4.8-inch TFT color LCD with backlight, 720-pixel HD, outdoor viewable
touch screen.
Page 81

DRAFT
Chapter A — Specifications
Language Support
World-wide English, French, German, Italian, Spanish, Simplified
Chinese, Traditional Chinese.
Imager Reading Distances - what imager is in the
CT50??
MVT9V022 non-decoded slim imager
I need specifications and depth of field information.
Dolphin CT50 Mobile Computer User Guide 73
Page 82

DRAFT
Chapter A — Specifications
74 Dolphin CT50 Mobile Computer User Guide
 Loading...