

Page 1
75 Series
Mobile Computer Powered by Android® 6
CN75, CN75e, CN75 NI, CN75e NI, CK75
User Guide
Page 2

Disclaimer
Honeywell International Inc. (“HII”) reserves the right to make changes in specifications and other information contained in
this document without prior notice, and the reader should in all cases consult HII to determine whether any such changes
have been made. The information in this publication does not represent a commitment on the part of HII.
HII shall not be liable for technical or editorial errors or omissions contained herein; nor for incidental or consequential
damages resulting from the furnishing, performance, or use of this material. HII disclaims all responsibility for the
selection and use of software and/or hardware to achieve intended results.
This document contains proprietary information that is protected by copyright. All rights are reserved. No part of this
document may be photocopied, reproduced, or translated into another language without the prior written consent of HII.
Copyright 2017 Honeywell International Inc. All rights reserved.
Web Address:
Android, Google, and other marks are trademarks of Google Inc.
Microsoft, Windows, and Internet Explorer are either registered trademarks or registered trademarks of Microsoft Corporation in the United States and/or other countries.
Bluetooth is a trademark of Bluetooth SIG, Inc., U.S.A.
Wi-Fi is a registered certification mark of the Wi-Fi Alliance.
This product includes software developed by the OpenSSL Project for use in the OpenSSL Toolkit (www.openssl.org).
Other product names or marks mentioned in this document may be trademarks or registered trademarks of other
companies and are the property of their respective owners.
For patent information, refer to www.hsmpats.com.
www.honeywellaidc.com
Page 3

TABLE OF CONTENTS
Customer Support ....................................................................................................................... vii
Technical Assistance ............................................................................................................vii
Product Service and Repair ............................................................................................... vii
Limited Warranty ................................................................................................................... vii
Send Feedback ....................................................................................................................... vii
Chapter 1 - About the Computer Features...................................................1
About the 75 Series Mobile Computers ................................................................................1
Overview of 75 Series Features.......................................................................................... 1
About the Battery ........................................................................................................................... 5
Charge the Battery .................................................................................................................. 5
About the I/O Cover on Non-Incendive Models .......................................................... 6
About Battery Replacement ................................................................................................ 8
About Battery Status ........................................................................................................... 10
Set the Battery Status LED Activity ............................................................................... 11
About Battery Life and Conservation .................................................................................. 12
Enable Airplane Mode ........................................................................................................ 12
About the Status LEDs ....................................................................................................... 13
About the Keypad ........................................................................................................................ 14
About the Keypad Backlight ............................................................................................. 16
About the Color-Coded Keys ............................................................................................ 16
Enter Characters on the QWERTY Keypad ................................................................. 17
Enter Characters on the Numeric Keypad .................................................................. 17
Enter Characters on the CK75 Keypads ...................................................................... 18
About the Power Button............................................................................................................ 19
75 Series Mobile Computer User Guide i
Page 4

About the Screen Backlight and Sleep Mode ...................................................................19
Configure the Screen Brightness....................................................................................20
Configure Sleep Mode......................................................................................................... 20
About the CK75 Cold Storage Model Heater ....................................................................20
How Automatic Mode Works.............................................................................................21
How Preemptive Mode Works ..........................................................................................21
How to Manually Turn the Heaters On/Off.................................................................22
Configure the Heater Feature ..........................................................................................22
About Audio Features................................................................................................................. 25
Adjust the Speaker Volume ...............................................................................................25
Enable Vibrate Mode............................................................................................................26
Configure Audio Settings...................................................................................................26
Insert a MicroSD Card................................................................................................................27
Install a MicroSD Card in a CN75 or CN75e ..............................................................27
Install a MicroSD Card in a CK75 ...................................................................................29
How to Transfer Files .................................................................................................................. 32
Configure USB Connection and Transfer Files .........................................................32
70 Series Accessories.................................................................................................................33
Chapter 2 - About the User Interface and Applications......................... 35
About the User Interface...........................................................................................................35
About the Home Screen...................................................................................................... 35
Notification and Status Icons...........................................................................................37
About Screen Gestures .......................................................................................................38
About Honeywell Applications................................................................................................ 39
Applications Available on the Computer .....................................................................39
Applications You Can Download to the Mobile Computer.................................... 40
Unlock Developer Options.................................................................................................41
Chapter 3 - Use the Imager........................................................................... 43
About the Imager .........................................................................................................................43
How to Scan Bar Codes as Keyboard Input.......................................................................43
Change the Scanner Settings.................................................................................................44
ii 75 Series Mobile Computer User Guide
Page 5

Restore Default Scanner Settings...................................................................................44
Add a Scanning Profile........................................................................................................44
Delete a Scanning Profile...................................................................................................45
Scan Bar Codes.............................................................................................................................45
Use the Scan Demo App............................................................................................................46
How to Change the Default Symbology Settings in the App................................46
Use the Imager as a Flashlight ........................................................................................47
Chapter 4 - Use the Phone.............................................................................49
About the Phone...........................................................................................................................49
How to Add and Switch Between Network Carriers ........................................................49
Activate the UMTS Phone...................................................................................................50
Activate the CDMA Phone ..................................................................................................52
Make a Phone Call .......................................................................................................................52
Answer a Phone Call ...................................................................................................................53
Make an Emergency Phone Call ............................................................................................53
Configure Phone Settings ........................................................................................................53
Chapter 5 - Use the Camera ..........................................................................55
About the Color Camera ............................................................................................................55
Take a Picture.................................................................................................................................55
Change Basic Camera Settings .......................................................................................56
Record a Video...............................................................................................................................56
Change Basic Video Settings............................................................................................57
Change Advanced Camera App Settings............................................................................57
Chapter 6 - Configure the Computer ..........................................................59
How to Configure the Computer ............................................................................................59
Start the Settings App..........................................................................................................59
About the Structure of the Settings App ......................................................................59
About Network Communications ..........................................................................................62
Connect to a Wi-Fi Network...............................................................................................62
Connect to an Ethernet Network.....................................................................................64
75 Series Mobile Computer User Guide iii
Page 6

How to Connect to Virtual Private Networks ..............................................................64
About Wireless Security.............................................................................................................65
About Certificates .................................................................................................................66
Load a Certificate.................................................................................................................. 66
About Bluetooth Communications ................................................................................67
Rename the Computer........................................................................................................69
View a List of Received Files .............................................................................................69
About Serial and USB Communications...................................................................... 69
How to Share Your Mobile Data Connection ....................................................................69
Share the Data Connection Through USB ..................................................................69
Share the Data Connection Through Bluetooth ....................................................... 70
Share the Data Connection as a Portable Hotspot..................................................70
Chapter 7 - Manage and Maintain the Computer.................................... 71
About File Transfers Through a USB Connection ...........................................................71
How to Update the System Software ...................................................................................71
Update Computers Using a Device Management System ...................................71
Upgrade the System Software .........................................................................................72
Reset the Computer....................................................................................................................72
Perform a Factory Data Reset.................................................................................................73
Factory Reset: Method 1.....................................................................................................73
Factory Reset: Method 2.....................................................................................................74
Clean the Computer....................................................................................................................75
Chapter A - Specifications ............................................................................ 77
Computer Agency Information...............................................................................................77
Label Locations .....................................................................................................................77
Physical and Environmental Specifications ..................................................................... 78
CN75/CN75e..........................................................................................................................78
CN75/CN75e Non-Incendive (NI).................................................................................. 79
CK75 ........................................................................................................................................... 80
Back Accessory Interface Pin-outs ................................................................................81
Imager Specifications ................................................................................................................82
iv 75 Series Mobile Computer User Guide
Page 7

Bar Code Symbologies ........................................................................................................82
EA30 Extended Reading Range.......................................................................................83
EA30 Minimum Reading Distances...............................................................................84
EX25 Minimum Reading Distance .................................................................................85
EX25 Typical Reading Distance (1D) .............................................................................86
EX25 Typical Reading Distance (2D) .............................................................................87
N5603 Extended Range Reading Distances ..............................................................88
75 Series Mobile Computer User Guide v
Page 8

vi 75 Series Mobile Computer User Guide
Page 9

Customer Support
Technical Assistance
To search our knowledge base for a solution or to log in to the Technical Support
portal and report a problem, go to www.hsmcontactsupport.com.
For our latest contact information, see www.honeywellaidc.com/locations.
Product Service and Repair
Honeywell International Inc. provides service for all of its products through service
centers throughout the world. To find your service center, go to
www.honeywellaidc.com and select Support. Contact your service enter to obtain a
Return Material Authorization number (RMA #) before you return the product.
To obtain warranty or non-warranty service, return your product to Honeywell
(postage paid) with a copy of the dated purchase record. To learn more, go to
www.honeywellaidc.com and select Service & Repair at the bottom of the page.
Limited Warranty
For warranty information, go to www.honeywellaidc.com and click Get Resources >
Product Warranty.
Send Feedback
Your feedback is crucial to the continual improvement of our documentation. To
provide feedback about this manual, contact the Honeywell Technical Communications department at ACSHSMTechnicalCommunications@honeywell.com.
75 Series Mobile Computer User Guide vii
Page 10

viii 75 Series Mobile Computer User Guide
Page 11

CHAPTER
1
ABOUT THE COMPUTER FEATURES
This chapter introduces the 75 Series Mobile Computers with Android® 6 operating
system. Use this chapter to learn about the basic features and functions of each
computer, as well as the available accessories for it.
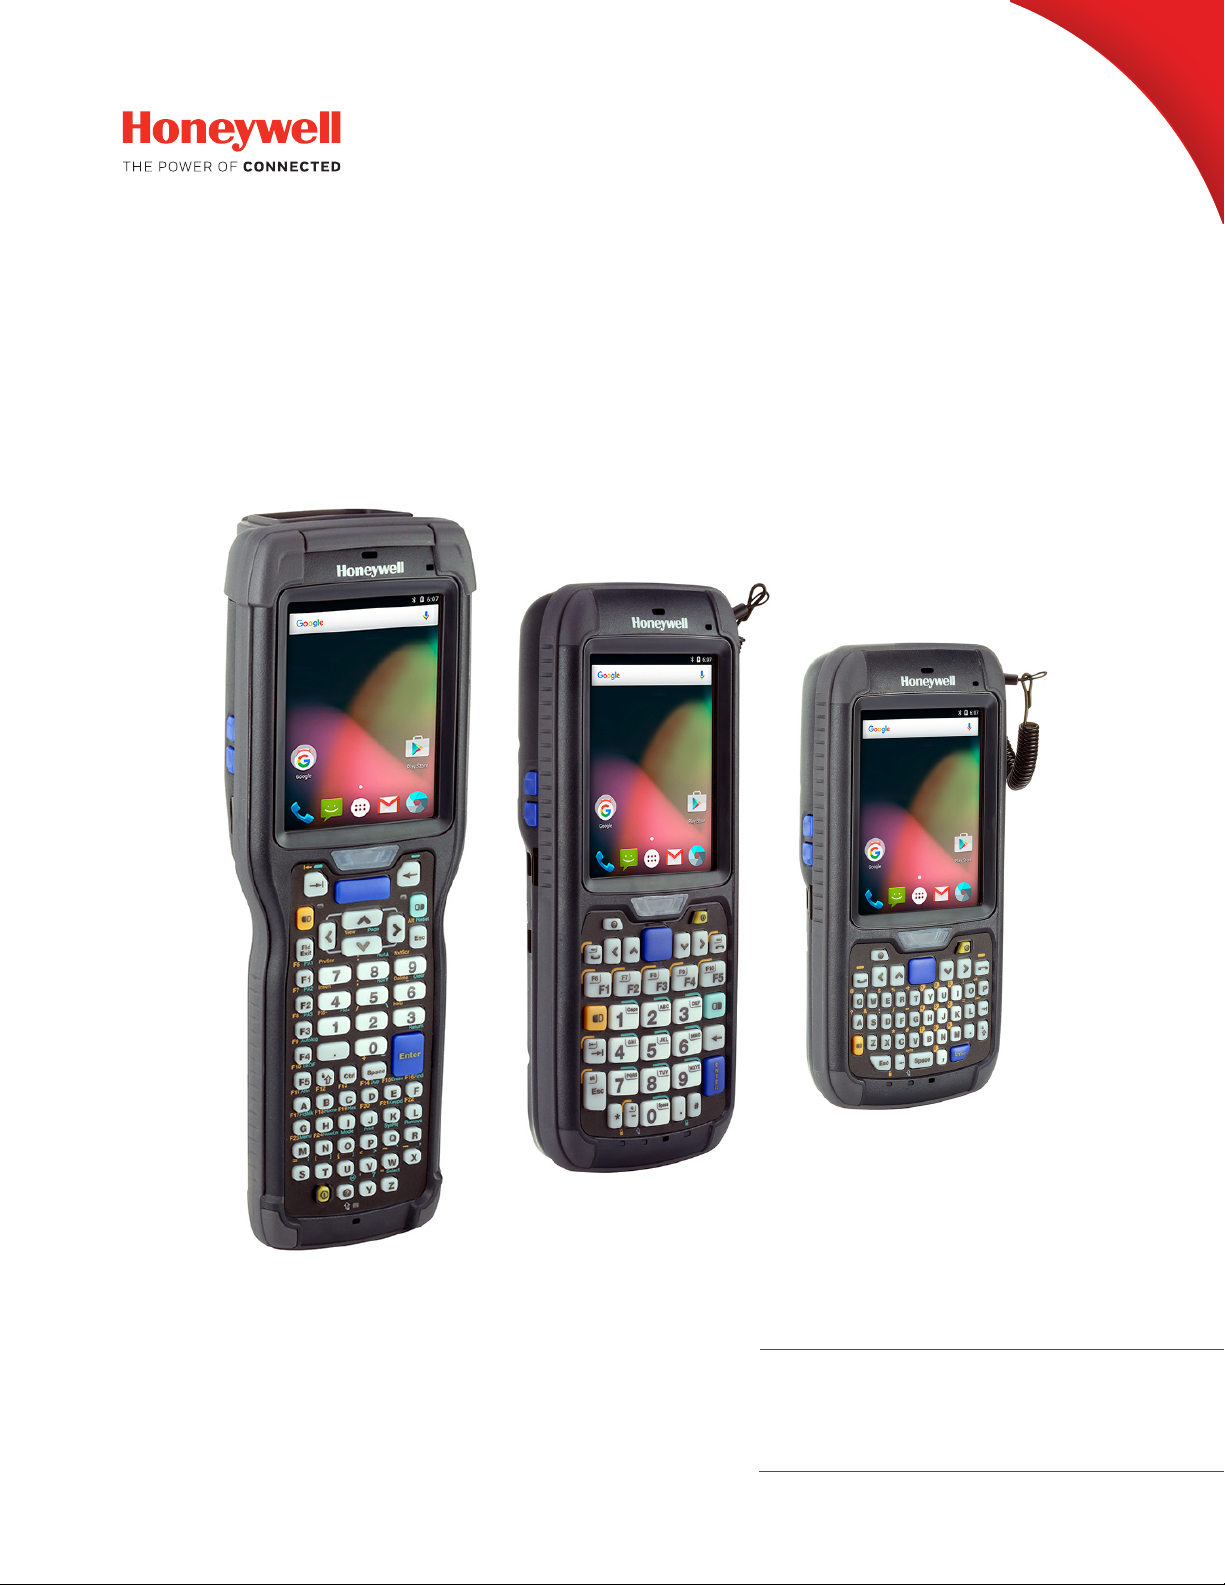
About the 75 Series Mobile Computers
The ergonomically-designed Honeywell 75 Series Mobile Computers are built on
the Android 6 operating system. They are lightweight, easy-to-use, and run most
software developed for the Android 6 platform, including standalone, client-server,
and browser-based applications.
The 75 Series consists of three different models: CN75, CN75e and CK75.
The CN75 and CN75e computers have the same features except that the CN75e
offers a larger keypad for data-input intensive applications. The CK75 has most of
the same features as the CN75, but the CK75 offers a choice of imager options and
does not offer WWAN or GPS radio versions. Honeywell offers heater-equipped
cold storage CK75 versions to extend the use of the CK75 in cold storage and
freezer environments. Non-incendive (NI) versions for hazardous environments are
offered of the CN75 and CN75e.
Throughout this manual, all versions of the mobile computer are referred to as 75
Series unless information is specific to a particular model of computer. Pictures of
the CN75 and CK75 represent the three models of the 75 Series computers.
Non-incendive models can be identified by the device label verifying nonincendive certification and a teal colored label on the front/top of the computer.
Overview of 75 Series Features
The 75 Series includes these standard features:
Standard Features CK75 CN75 CN75e
EA30 high-performance 2D imager x x
Choice of EX25 or N5603ER high-performance 2D imager x
75 Series Mobile Computer User Guide 1
Page 12
Standard Features CK75 CN75 CN75e
Notification LED
Scan Button
Microphone
Power Button
Battery Status LED
Good Read LED
Speaker
Touch Panel
Volume Buttons
1.5 GHz dual-core, multi-engine processor with
2 GB RAM and 16 GB Flash
802.11a/b/g/n and Bluetooth® radios x x x
Customer-accessible microSD slot for memory cards up to 32 GB x x x
The 75 Series offers the following optional features:
Optional Features CK75 CN75 CN75e
CDMA, UMTS Flexible Network Radio capability x x
GPS radio on CDMA, UMTS Flexible Network Radio computers x x
5-megapixel auto-focus color camera with LED flash* x* x x
Customer-accessible SIM card slot x x
Camera feature is not available in CK75 cold storage modes.
The 75 Series Mobile Computer with an IEEE 802.11a/b/g/n radio installed is
Wi-Fi® certified for interoperability with other 802.11a/b/g/n wireless LAN devices.
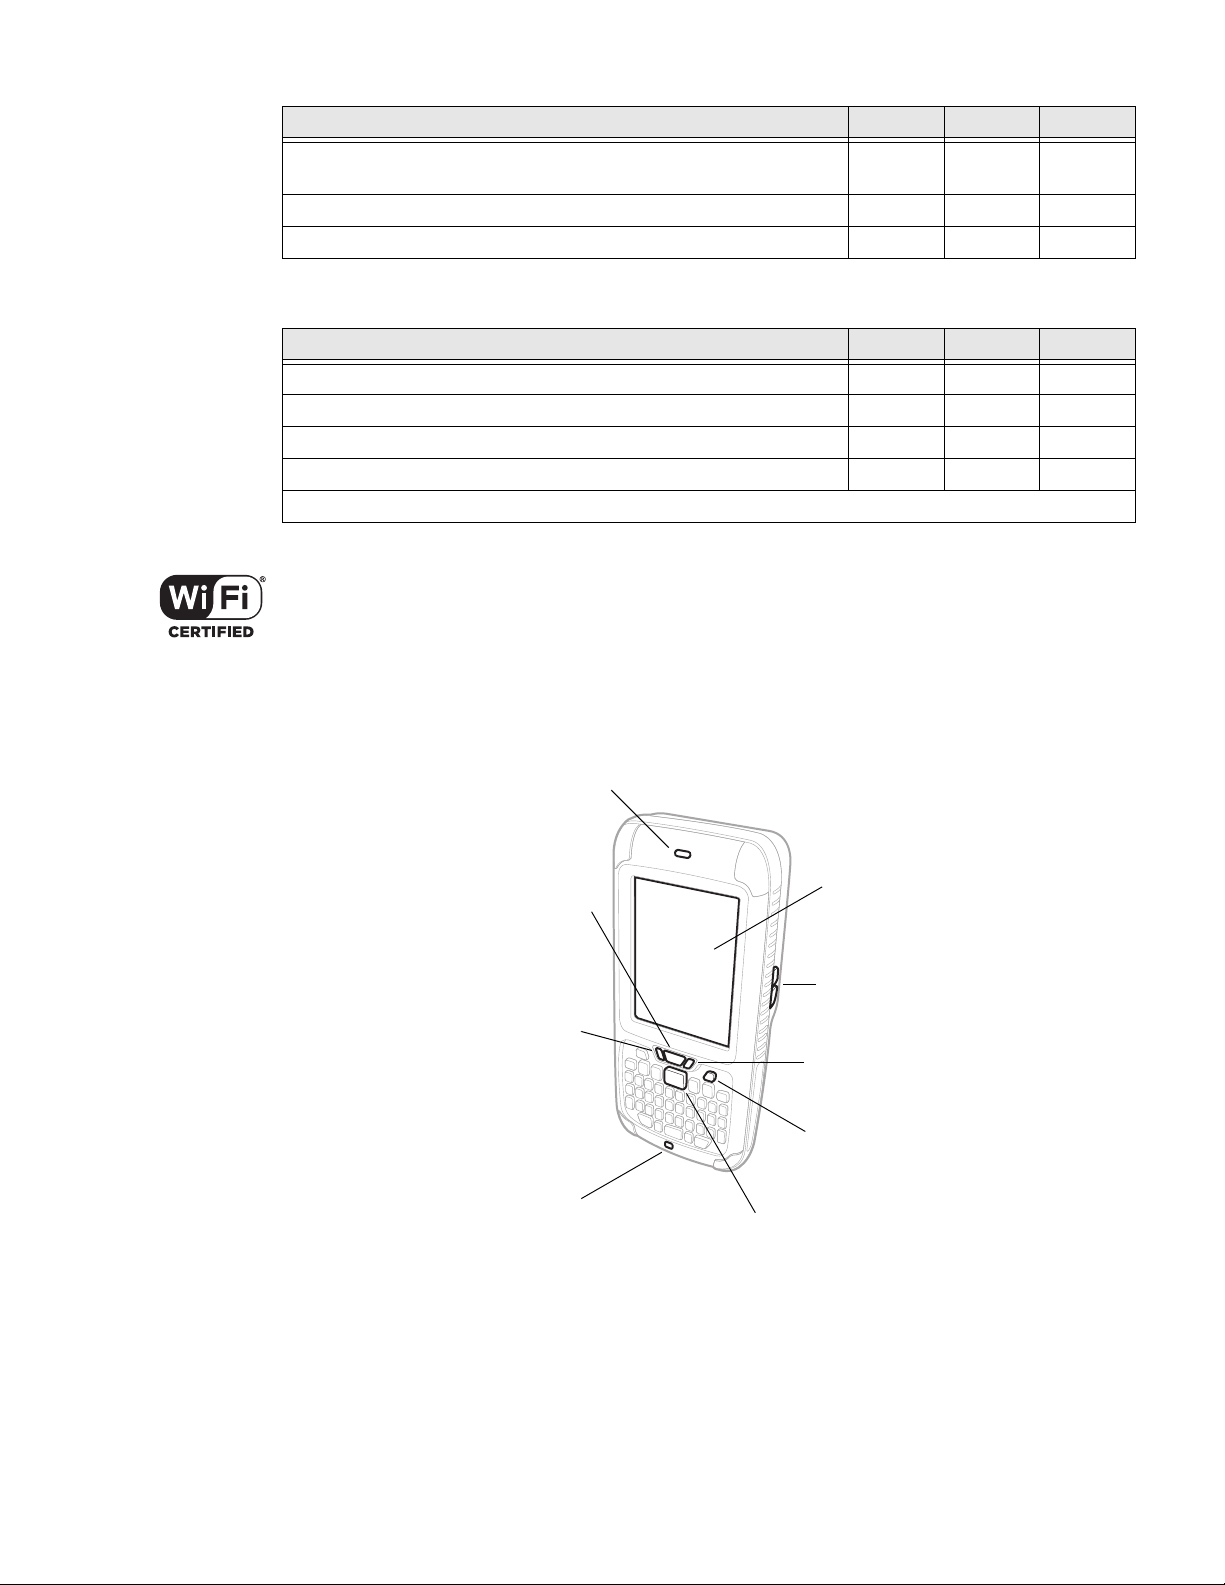
CN75 Front and Right Side View
xxx
2 75 Series Mobile Computer User Guide
Page 13

CN75 Back and Left Side View
Side Scan Button
Speaker Port
Battery
Camera
Imager
(LED/Laser Aperture)
Laser Safety Label Location
Application Button
Battery Latch
SIM/microSD Card Socket
(Located Under Battery)
Screws
Note: Hand strap not shown.
CN75 and CN75e Non-Incendive I/O Cover
An I/O cover is supplied with non-incendive versions of the CN75 and CN75e
computers. Non-incendive models can be identified by the device label verifying
non-incendive certification and a teal colored label on the front/top of the
computer.
To learn more, see About the I/O Cover on Non-Incendive Models on page 6.
Warning: The I/O cover must be attached when using the CN75/CN75e NI in a
dangerous environment.
Avertissement : Le couvercle entrée-sortie doit être fi xé lorsque le CN75/CN75e
NI est utilisé dans un environnement incendiaire.
75 Series Mobile Computer User Guide 3
Page 14
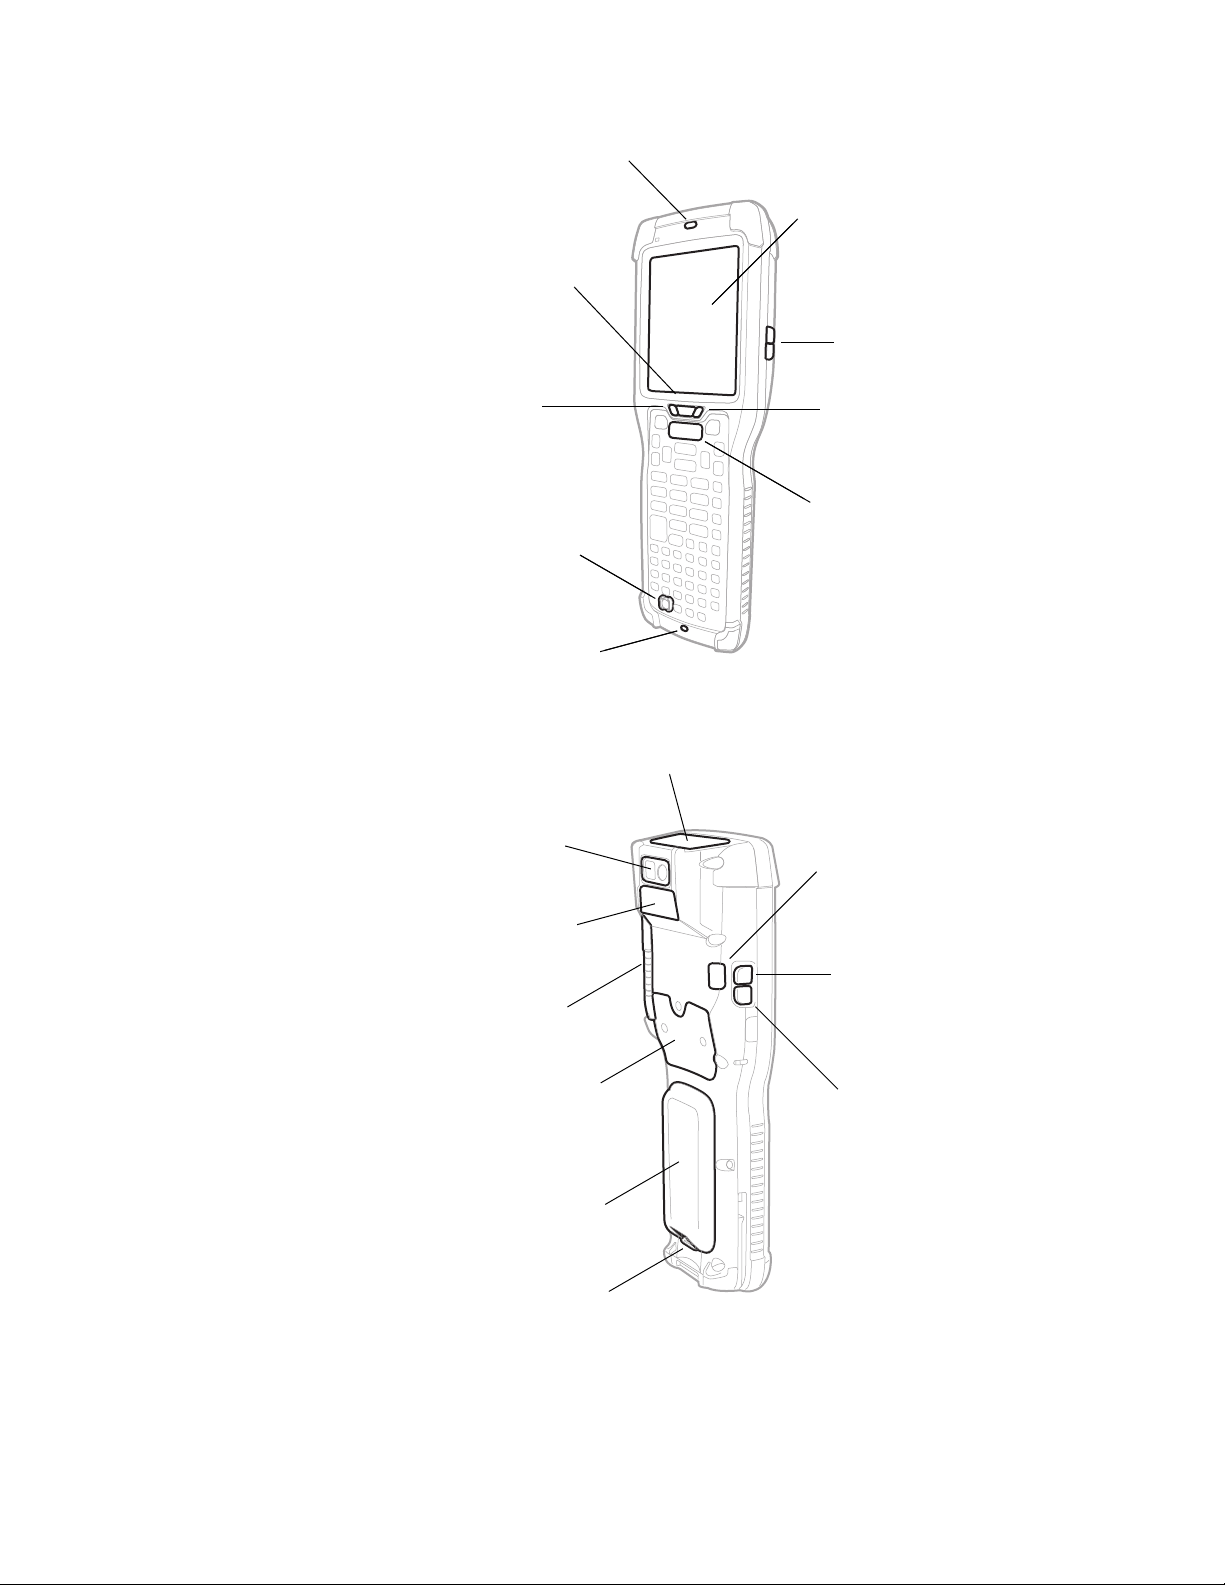
CK75 Front and Right Side View
Notification LED
Scan Button
Microphone
Power Button
Battery Status LED
Good Read LED
Speaker
Touch Panel
Volume Buttons
Side Scan Button
Speaker Port
Battery
Camera
Imager
(LED/Laser Aperture)
Laser Safety Label Location
Application Button
Battery Latch
microSD Card Socket
(Located Under Access Door)
Stylus
CK75 Back and Left Side View
4 75 Series Mobile Computer User Guide
Note: Hand strap not shown.
Page 15
About the Battery
The computers use the following rechargeable Lithium-ion battery packs as their
main power source:
Computer Battery Model Part Number Description
CN75
CN75e
CK75 1001AB01 318-046-031 3.7 V, 5200 mAH (19.2 Wh)
CK75 (Cold Storage) 1001AB01 318-046-032 3.7 V, 5200 mAH (19.2 Wh)
We recommend use of Honeywell Li-ion battery packs. Use of any non-Honeywell
battery may result in damage not covered by the warranty.
Caution: The battery used in this device may present a fire or chemical burn
hazard if it is mistreated. Do not disassemble it, heat it above 100 °C
(212 °F) or incinerate it. Dispose of used batteries promptly. Keep away
from children.
1000AB02
1000AB02
About CN75 NI and CN75e NI models
Warning: Explosion Hazard - Batteries must only be changed or charged in an
area known to be non-hazardous. Use ONLY Honeywell CN75 NI battery
part number 1000AB02.
Avertissement : Risqued’explosion-Les batteries doivent uniquement être
remplacées ou rechargées dans un endroit non dangereux.
Utilisez UNIQUEMENT Honeywell CN75 NI batterie P/N
1000AB02.
318-043-033 3.7 V, 4000 mAH (14.8 Wh)
318-043-033 3.7 V, 4000 mAH (14.8 Wh)
Charge the Battery
Fully charge the battery before using your computer for the first time. You can
charge the battery before or after you install it in the computer. A fully discharged
battery charges in approximately 6 hours.
You can charge t he 1000AB02 battery with these accessories:
• DX1 Desktop Base (Model 1002UU01) with Battery Cup Model 1002UC01 and
power supply
• DX2 Dual Base (Model 1002UU02, 1002UU03) with Battery Cup Model
1002UC01 and power supply
• DX4 Quad Base (Model 1002UU04, 1002UU05) with Battery Cup Model
1002UC01 and power supply
You can charge t he 1001AB01 battery with these accessories:
75 Series Mobile Computer User Guide 5
Page 16

• DX1 Desktop Base (Model 1002UU01) with Battery Cup Model 1002UC02 and
power supply
• DX2 Dual Base (Model 1002UU02, 1002UU03) with Battery Cup Model
1002UC02 and power supply
• DX4 Quad Base (Model 1002UU04, 1002UU05) with Battery Cup Model
1002UC02 and power supply
You can charge a 1000AB02 battery installed in a CN75 or CN75e with these
accessories:
• DX1 Desktop Base (Model 1002UU01) with Computer Cup Model 1002UD01
and power supply
• DX2 Dual Base (Model 1002UU02, 1002UU03) with Computer Cup Model
1002UD01 and power supply
• DX4 Quad Base (Model 1002UU04, 1002UU05) with Computer Cup Model
1002UD01 and power supply
• Snap-On Adapters (Model 1000AA01, 1000AA02, 1000AA03, 1000AA04,
1000AA05, 1000AA06) and power supply
•Vehicle Power Adapter
You can charge a 1001AB01 battery installed in a CK75 with these accessories:
• DX1 Desktop Base (Model 1002UU01) with Computer Cup Model 1002UD02
and power supply
• DX2 Dual Base (Model 1002UU02, 1002UU03) with Computer Cup Model
1002UD02 and power supply
• DX4 Quad Base (Model 1002UU04, 1002UU05) with Computer Cup Model
1002UD02 and power supply
• Snap-On Adapters (Model 1000AA01, 1000AA02, 1000AA03, 1000AA04,
1000AA05, 1000AA06)
About the I/O Cover on Non-Incendive Models
An I/O cover is supplied with non-incendive versions of the CN75 and CN75e
computers. Non-incendive models can be identified by the device label verifying
non-incendive certification and a teal colored label on the front/top of the
computer. After charging the battery, always immediately install the I/O cover.
Warning: The I/O cover must be attached when using the CN75/CN75e NI in a
dangerous environment.
Avertissement : Le couvercle entrée-sortie doit être fi xé lorsque le CN75/CN75e
NI est utilisé dans un environnement incendiaire.
6 75 Series Mobile Computer User Guide
Page 17
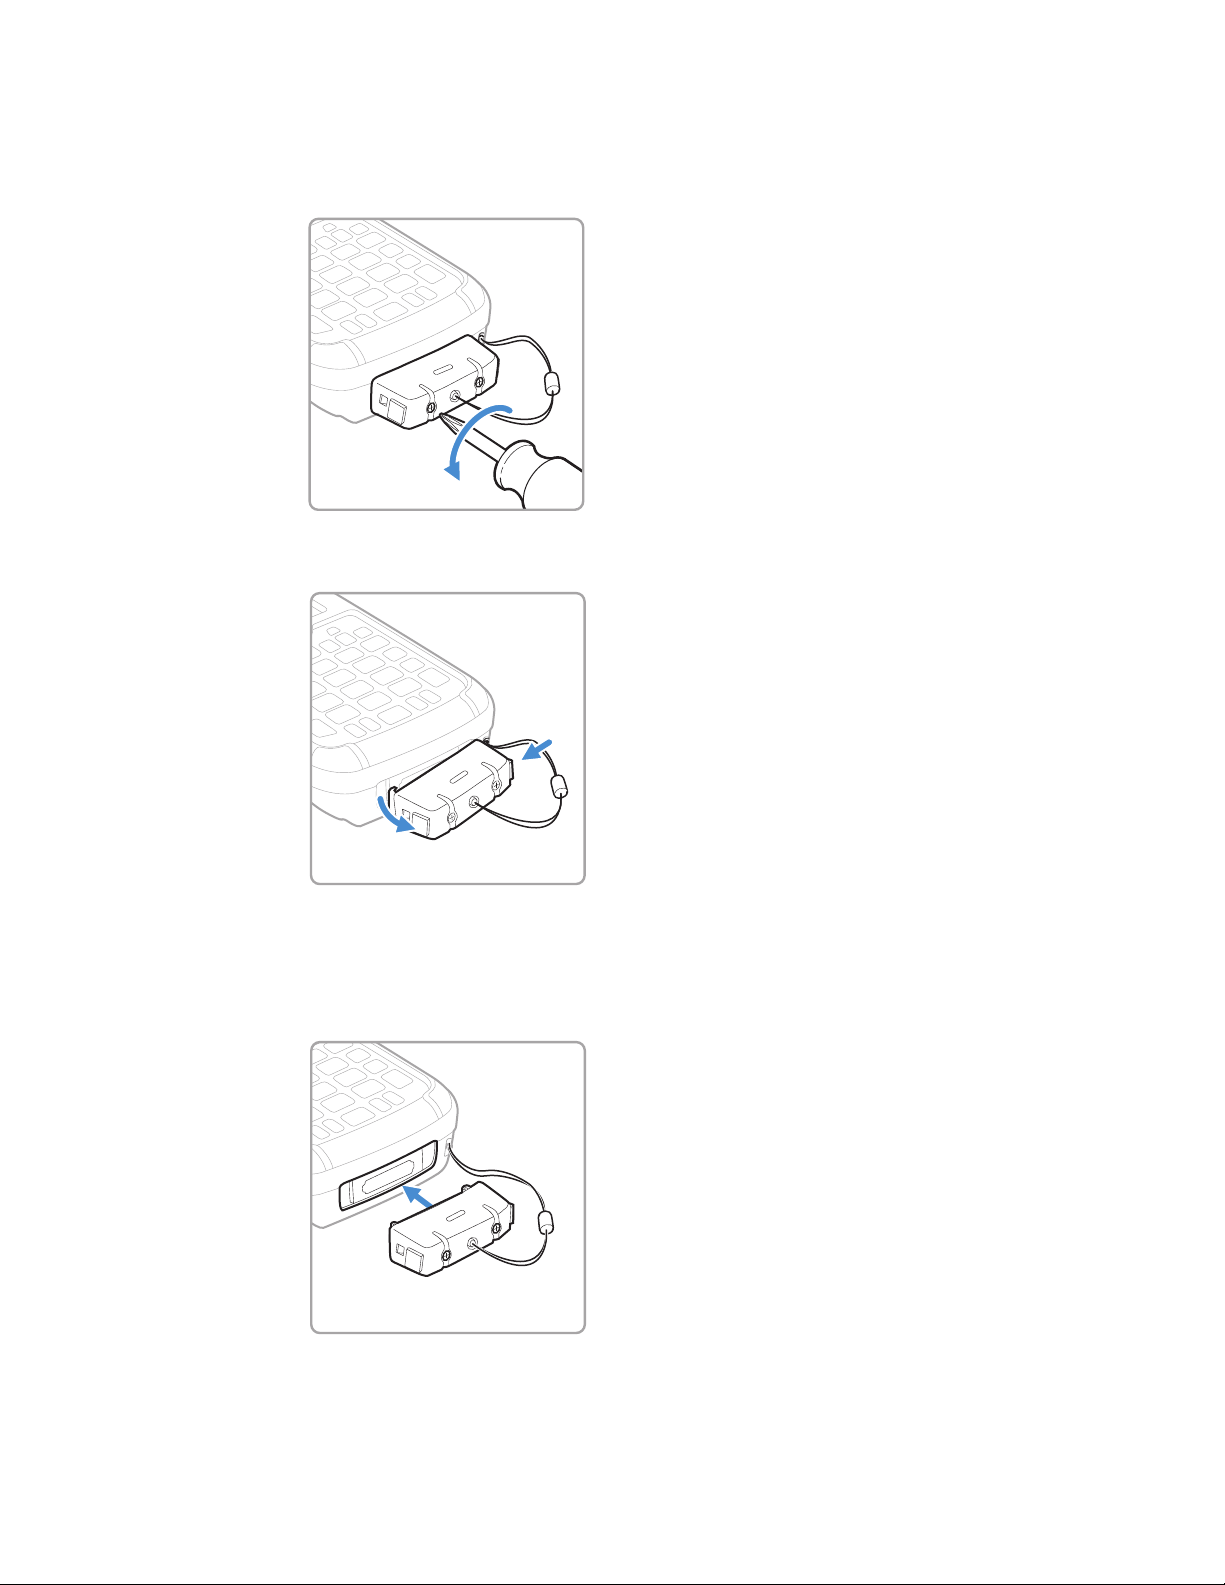
How to Replace the I/O Cover
1. Loosen the screws securing the I/O cover to the computer.
2. Press the release buttons on the sides of the cover, and then remove the cover.
3. Detach the security tether.
4. Attach the security tether on the replacement I/O cover to the computer.
5. Snap the new cover into place.
75 Series Mobile Computer User Guide 7
Page 18

6. Tighten the screws to secure the I/O cover to the computer.
About Battery Replacement
When the battery in the computer has a low charge, replace it with a charged
battery.
You should always place the computer in Battery Swap mode before removing the
battery. Battery Swap mode places the computer in a low power state so that the
battery can be removed for a short period of time.
Note: When you remove a battery from the computer, Honeywell recommends that you
install a charged battery within one minute to maintain your network connections.
We recommend use of Honeywell Li-ion battery packs. Use of any non-Honeywell
battery may result in damage not covered by the warranty.
Ensure all components are dry prior to placing the battery in the computer.
Mating wet components may cause damage not covered by the warranty
About Battery Replacement for Non-Incedive Models
Warning: CN75 NI and CN75e NI Models
Explosion Hazard - Batteries must only be changed or charged in an
area known to be non-hazardous. Use ONLY Honeywell CN75 NI battery
part number 1000AB02.
Avertissement : Modèles CN75 NI and CN75e NI
Risqued’explosion-Les batteries doivent uniquement être
remplacées ou rechargées dans un endroit non dangereux.
Utilisez UNIQUEMENT Honeywell CN75 NI batterie P/N
1000AB02.
How to Replace the Battery
1. Save your files and close all open applications.
2. Press and hold the Power button, and then select Battery Swap from the menu.
8 75 Series Mobile Computer User Guide
Page 19
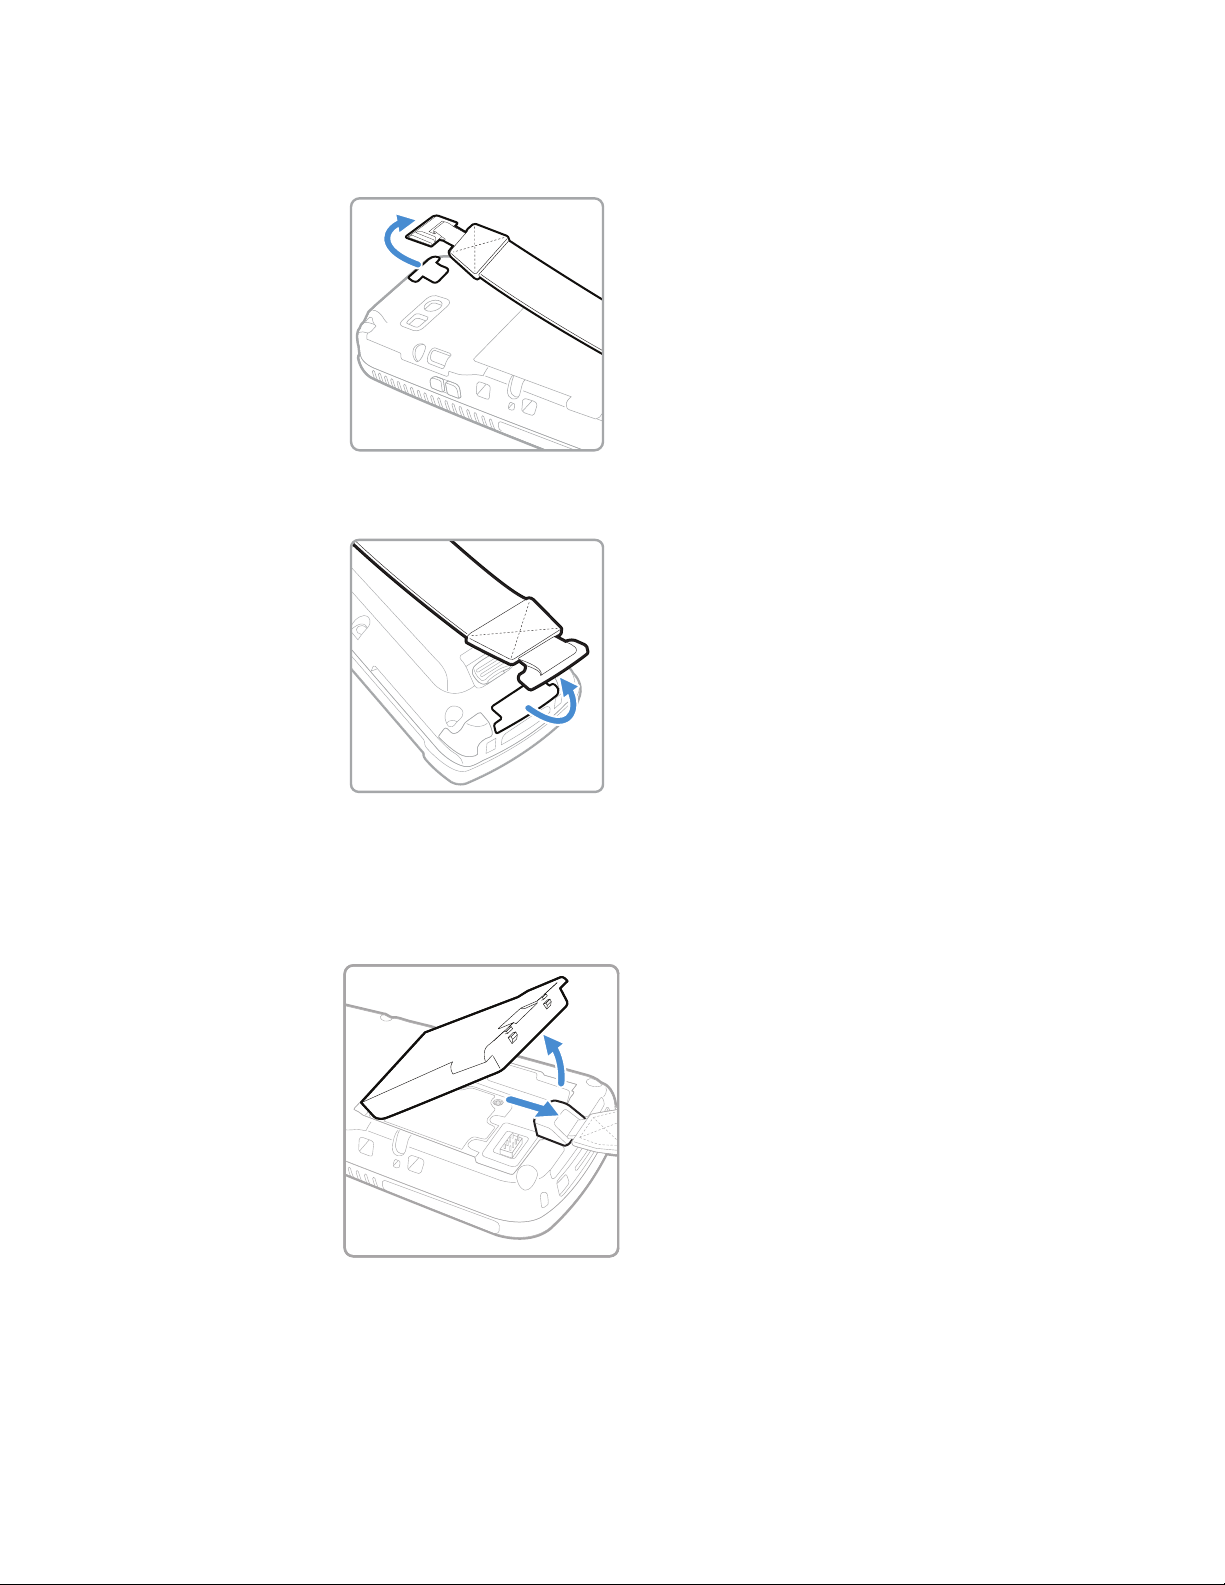
3. Detach one end of the hand strap from the computer.
• Detach the Hand Strap From a CN75 or CN75e.
• Detach the Hand Strap From a CK75.
4. Remove the battery.
• On the CN75 or CN75e, push the battery latch toward the bottom of the
computer until the battery releases, and then lift the battery away from the
computer.
75 Series Mobile Computer User Guide 9
Page 20
• On the CK75, push the battery latch toward the top of the computer until the
battery releases, and then lift it away from the computer.
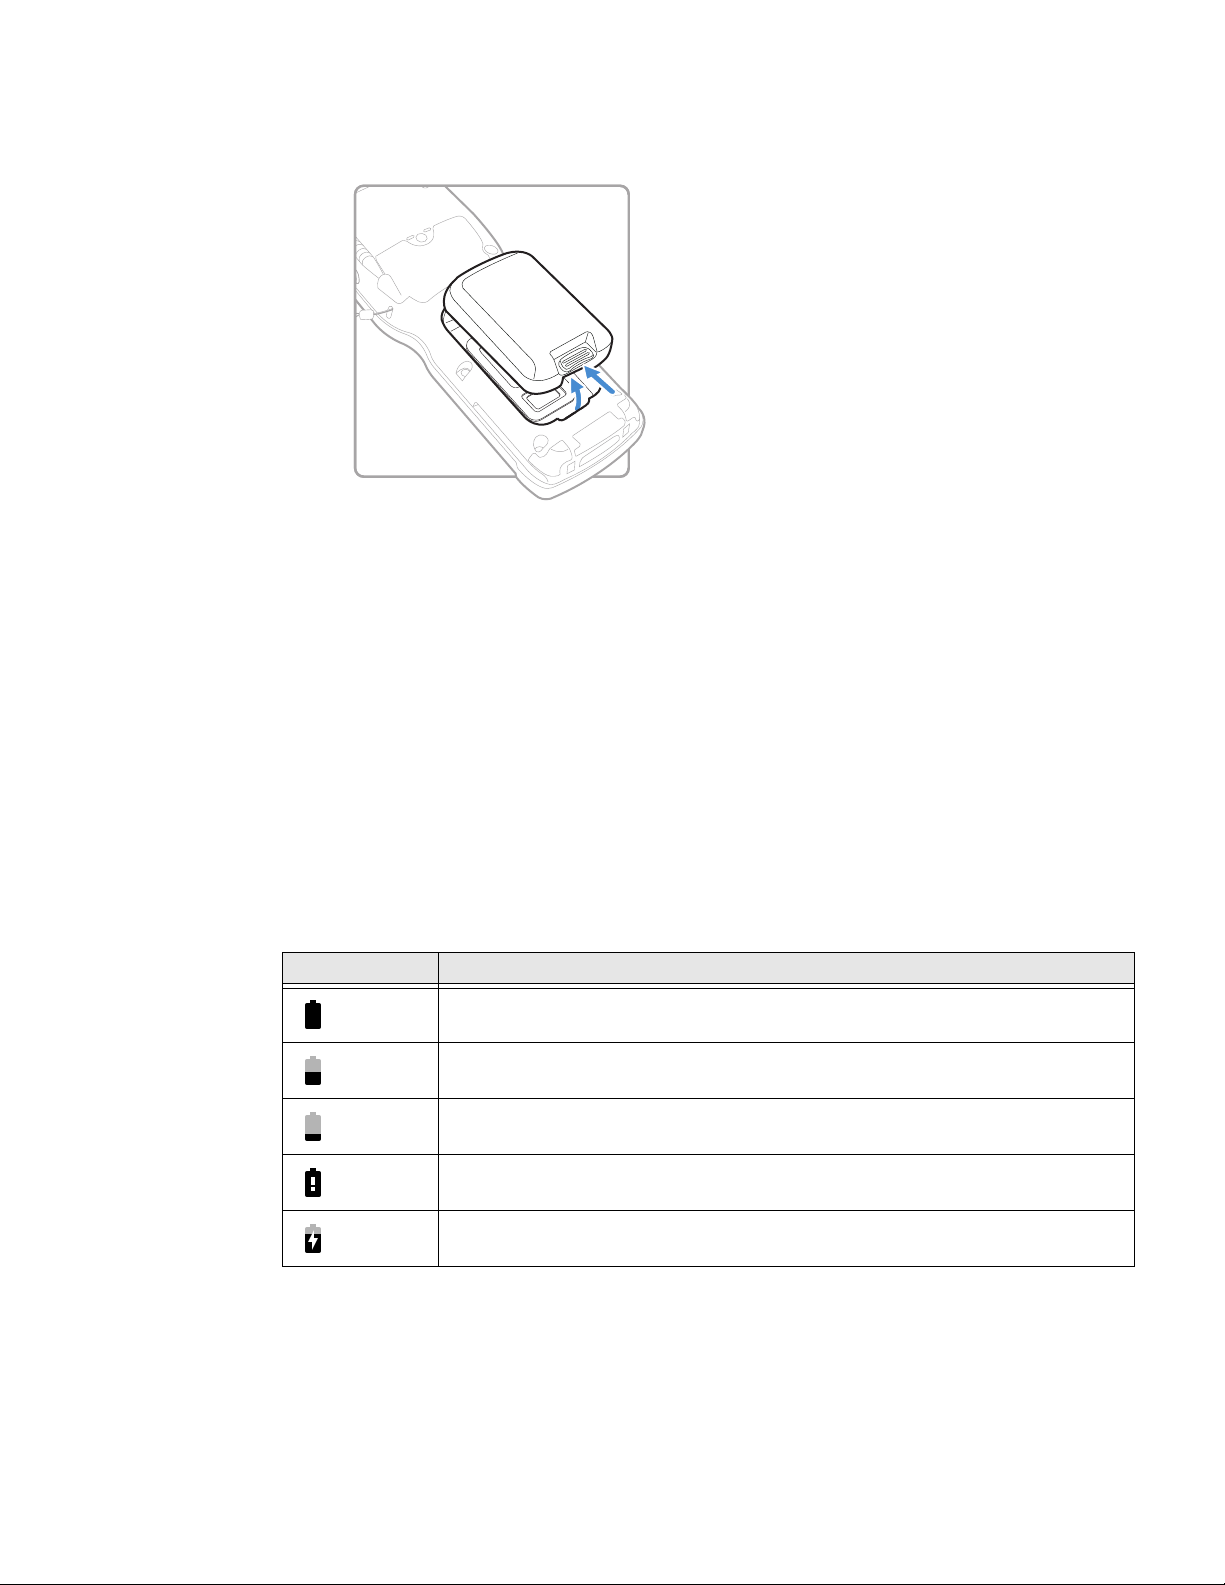
5. Insert the top end of a fully charged battery into the computer, and press down
firmly on the bottom until the battery clicks into place. Make sure that the
battery latch is fully engaged.
6. Attach the hand strap.
7. Press the Power button.
About Battery Status
Use the battery icon on the status bar to view the power status of your battery.
If you want more information on your battery such as usage time or voltage, select
All apps > Settings > Battery Info under Honeywell settings.
Battery Icon Status Descriptions
Battery Icon Status
Battery charge is at 100%.
Battery charge is at 50%.
Battery is low. You need to charge or replace the battery soon.
Battery is critically low. You need to replace the battery now or immediately
connect the computer to a charging accessory.
Battery is charging. Computer is connected to an external power source.
10 75 Series Mobile Computer User Guide
Page 21
The battery status LED below the computer screen indicates the charging status of
CN75/CN75e
Battery Status LED
CK75
Battery Status LED
the battery.
Out-of-Box Battery Status LED
The HSM Battery LED option is active as the out-of-box default.
HSM Battery LED Status Descriptions
Connected to Power LED State Battery Level
No Blinking amber Below 15%
No Off More than 20%
Yes Steady amber Between 0% and 60%
Yes Blinking green Between 60% and 95%
Yes Steady green Above 95%
Either Blinking red Battery error
Set the Battery Status LED Activity
You can change the behavior of the Battery status LED if the out-of-box default
behavior for a charging battery (blinking green) is not acceptable to your
environment.
In addition to the out-of-box battery status LED behavior, you can choose:
• Android Default Battery LED
• No Battery LED
Use the Android Default Battery LED setting if you want the status LED to turn on
steady amber and then steady green when charging. Select the No Battery LED
setting if you want to use the LED as a notification LED for applications or device
management solutions.
Android Default Battery LED Status Descriptions
Connected to Power LED State Battery Level
No Blinking red Below 15%
No Off 15% or more
Yes Steady red Below 15%
Yes Steady amber Between 15% and 90%
Yes Steady green 90% or more
75 Series Mobile Computer User Guide 11
Page 22

To modify the battery status LED setting:
1. Select All Apps > Settings > Battery LED.
2. Select one of these options.
• HSM Battery LED (out-of-box default setting)
• Android Default Battery LED
• No Battery LED
About Battery Life and Conservation
Batteries that are stored outside the computer for long periods of time slowly
discharge. Honeywell recommends storing the battery in a charger to maintain
battery performance.
When you want to: Do this to save battery power:
Use the computer but the
low battery status icon
appears or the battery
light comes on.
Stop using the computer
for 5 minutes or longer.
Store the computer for
more than a day.
Store the battery outside
the computer.
Enable Airplane Mode
If you do not need to connect to any wireless networks, you can enable Airplane
mode to turn off all the radios and save battery power.
• Connect the computer to an external power source.
• Press and hold the Power button, and then select Battery Swap.
After the computer turns off, remove the battery and insert a fully
charged battery.
Make sure that the low battery icon is not on the screen and the battery
LED is not on. Press the Power button to place the computer in sleep
mode.
If you are storing the computer for a few days, like over the weekend,
install a charged battery or connect the computer to a power source.
If you are storing the computer for longer, remove and charge the
battery, and then store both the battery and computer in a cool
location. Do not place the charged battery in the computer, which runs
the battery down over time even when the computer is not in use.
If you store the battery for several months, recharge the battery to keep
it at peak performance.
Store the battery in a charger.
There are three ways to enable or disable Airplane mode:
•Press and hold the Power button until the menu appears, and then select
Airplane mode to toggle the mode on or off.
• In the Settings app, tap More, and then select Airplane mode to enable the
mode. If Airplane mode is already enabled, tap it to disable the mode.
12 75 Series Mobile Computer User Guide
Page 23
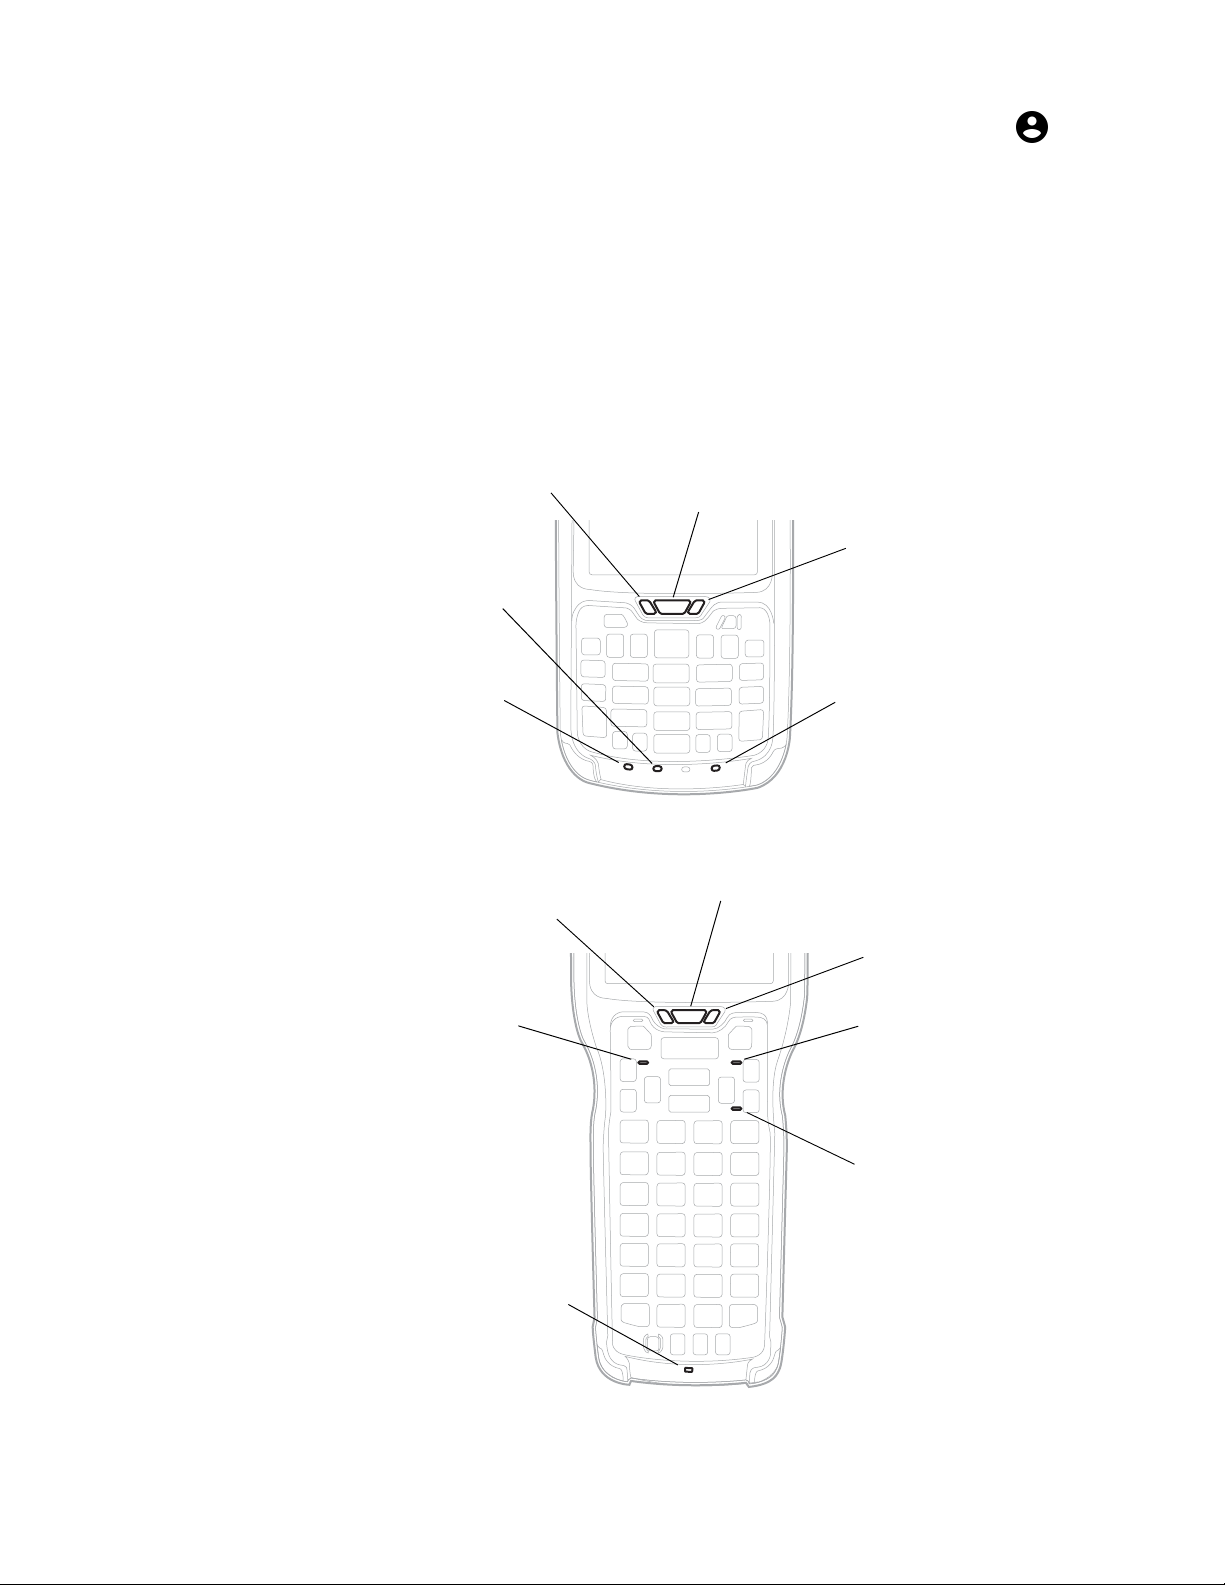
• On the home screen, swipe down from the status/notification bar. Tap on the
Notification LED
Battery status LED
Green key status LED
(keypad type dependent)
Orange key status LED
Good Read and Ready-to-Work Status LED
Shift key status LED
Notification LED
Battery Status LED
Green Key Status LED
Orange Key Status LED
Good Read and Ready-to-Work Status LED
Shift Key Status LED
(CK75 Function Numeric)
Shift Key Status LED
(CK75 Alphanumeric)
status bar, and then tap Airplane mode to enable the mode. If Airplane mode is
already enabled, tap it to disable the mode.
About the Status LEDs
The status LEDs turn on, turn off, or blink to indicate a specific activity on your
computer. All six status LEDS are not available on every 75 Series computer. For
example, the QWERTY versions of the CN75 and CN75e do not have a Green key
status LED.
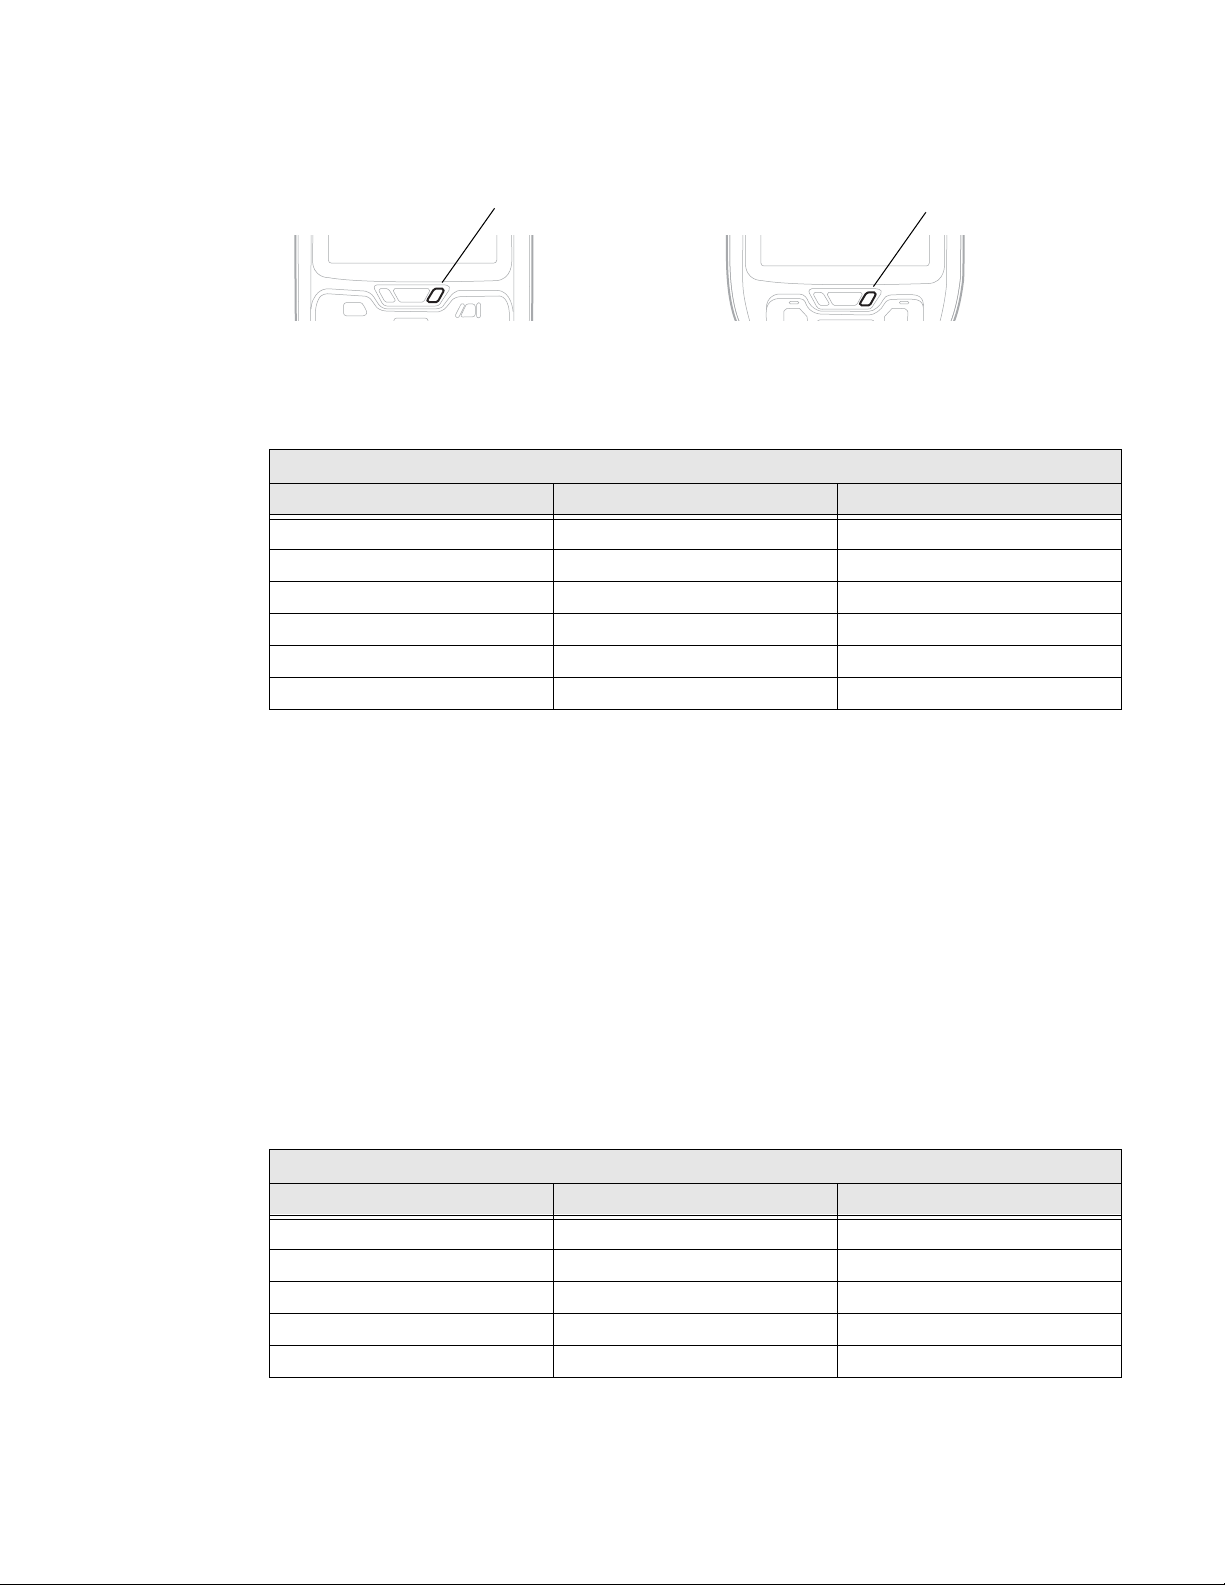
Location of the CN75 Status LEDs
Location of the CK75 Status LEDs
75 Series Mobile Computer User Guide 13
Page 24

Status LED Descriptions
LED Color Description
Notification Amber This LED is user-programmable.
Good Read Green The computer successfully decoded a bar code.
Ready-to-Work Blue If you have Honeywell Enterprise Terminal Emulator (TE),
Battery Status See About Battery Status on page 10.
Key Status Green The Green function key is enabled.
Shift Red The Shift key is enabled.
the application is running and connected to the host.
If you do not have Enterprise TE, you can configure the
Ready-to-Work indicator to turn on or off to indicate a
healthy state.
Blinking blue Enterprise TE is running but not connected to the host.
The computer is unhealthy.
Off Enterprise TE is not installed or not running.
The computer is healthy.
Orange The Orange function key is enabled.
About the Keypad
The 75 Series is available in these keypad configurations:
• The QWERTY keypad is available for both the CN75 and CN75e but the CN75e
also includes a larger keypad with numeric keys (phone-style with 1-2-3 digits
across the top). The QWERTY keypad is designed for applications that require
primarily alphabetic data. This keypad also lets you enter special characters by
pressing color-coded key sequences.
• The numeric keypad is available for both the CN75 and CN75e but the CN75e
also includes a larger keypad with a row of function keys. The numeric keypad is
for applications that require mainly numeric data. This keypad also lets you
enter special characters, including the alphabet, by pressing color-coded key
sequences.
• The full numeric and function keypad is available for the CK75. The calculatorstyle (7-8-9 digits across the top) numeric key layout with additional function
keys (F1-F12) is designed for applications that require mainly numeric data.
This keypad also lets you enter special characters, including the alphabet, by
pressing color-coded key sequences.
• The alphanumeric keypad is available for the CK75. The alphanumeric keypad is
designed for a wider range of applications that require both numeric and
alphabetic data. The layout includes calculator-style (7-8-9 digits across the
top) numeric keys, alphabetical keys, and function keys. This keypad also lets
you enter special characters and alternate functions by pressing color-coded
key sequences.
14 75 Series Mobile Computer User Guide
Page 25
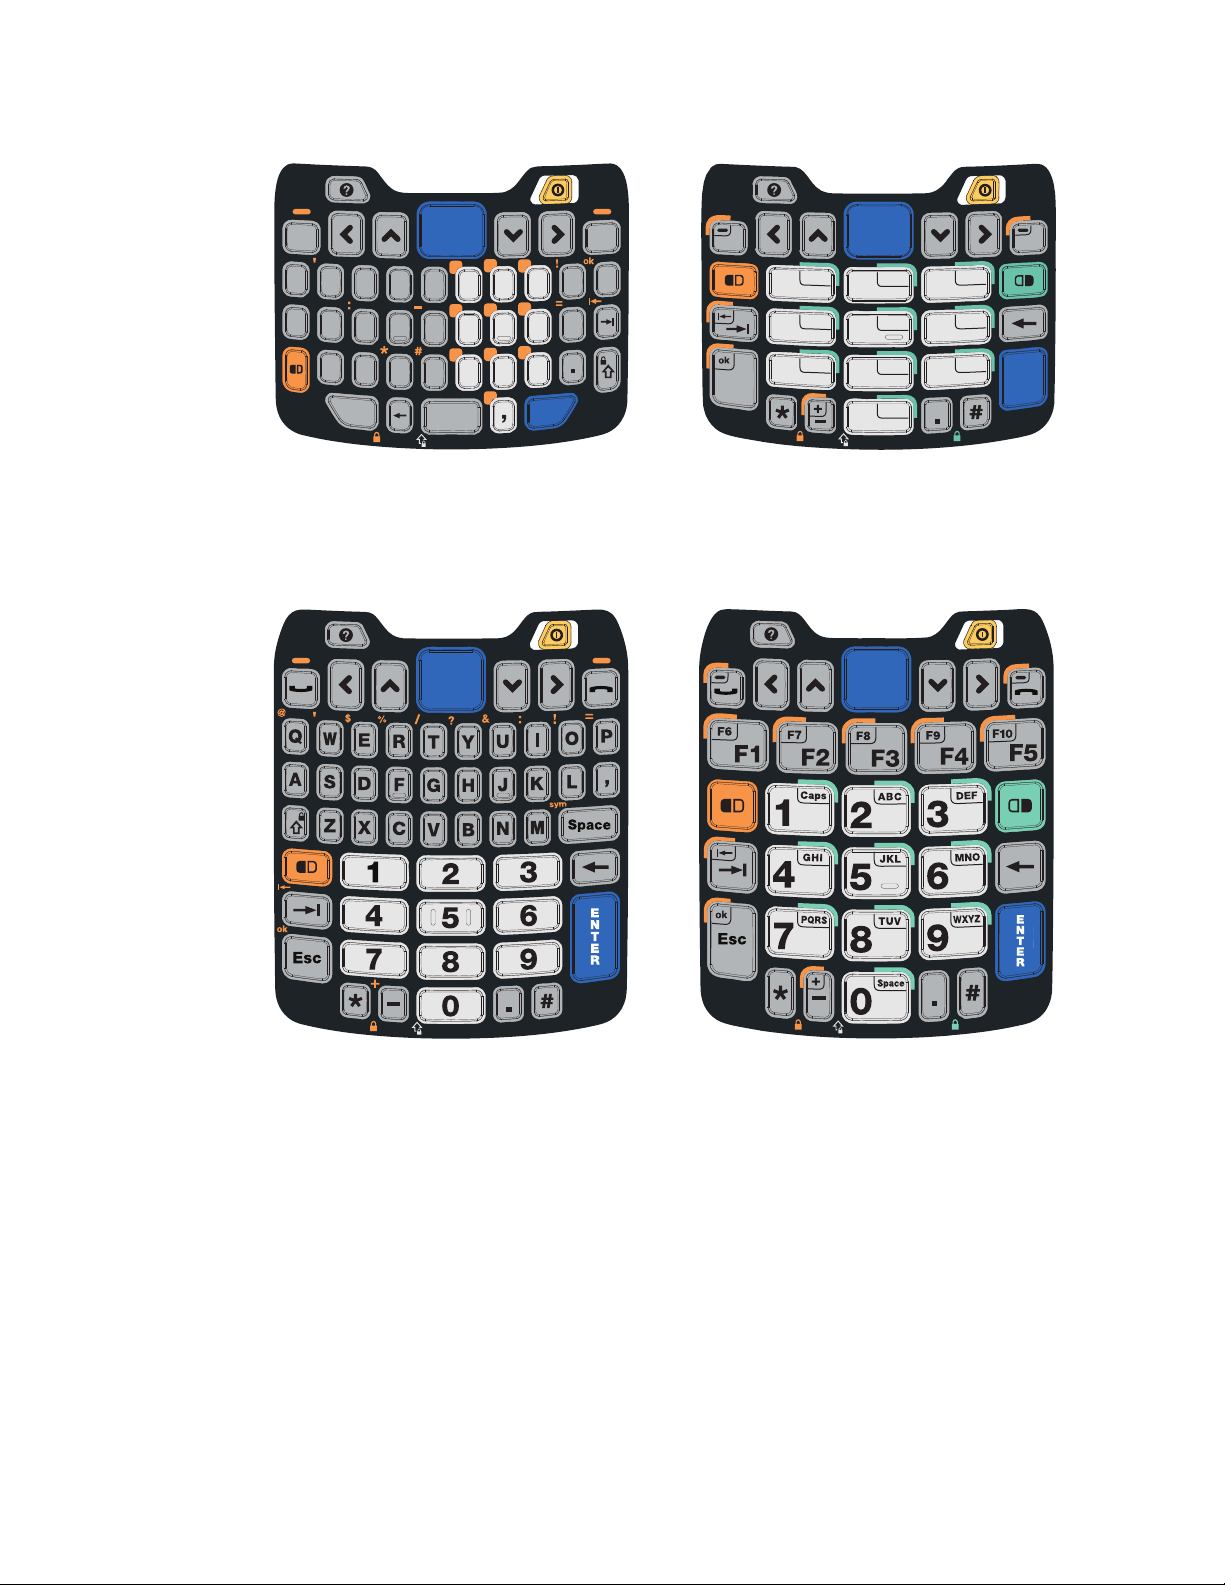
CN75 QWERTY Keypad / CN75 Numeric Keypad
Space
F
D
S
A
G H
J
K
L
C
X
Z
V
B
N
M
Esc
Enter
R
E
Q
W
T Y
I
O
P
U
%
&
?
@
$
sym
1
2
3
4
5
6
7
8
0
9
+
/
1
2
3
4
5
6
7
8
0
9
Caps
ABC
DEF
GHI
JKL
MNO
PQRS
TUV
Space
WXYZ
Esc
Enter
CN75e QWERTY Numeric Keypad / CN75e Numeric Keypad
75 Series Mobile Computer User Guide 15
Page 26

CK75 Alphanumeric Keypad /CK75 Numeric Function Keypad
About the Keypad Backlight
Press the key to turn the keypad backlight on for approximately 5 seconds.
About the Color-Coded Keys
Note: The QWERTY keypads on the CN75 and CN75e do not include a green key.
Use the orange key and the green key to access additional characters,
symbols, and functions printed on the keypad overlay. After you understand how to
use the color-coded keys and key sequences, you can access all of the additional
features printed on the keypad overlay.
Press the Green or Orange key twice to lock it. When the key is locked, the LED
turns on. Press the key once to unlock it.
16 75 Series Mobile Computer User Guide
Page 27

Enter Characters on the QWERTY Keypad
You need to use the orange modifier key and the shift key to access all
characters and functions on the QWERTY keypad.
To type a character:
• Press the key for that character.
To type a character or access a function on the overlay:
• Press and then press the key for the character or function.
To only type characters or access functions on the overlay:
• Press to lock the orange modifier key to stay on, and then press the keys
for the characters or functions.
To type a single uppercase letter:
• Press and then the letter key.
To type all uppercase letters:
• Press to turn on Caps Lock, and then press the letter keys.
You can still type orange modifier characters by pressing and then the key for
that character.
To turn off Caps Lock, press .
Enter Characters on the Numeric Keypad
You need to use the orange modifier key and the green modifier key to
access all characters and functions on the Numeric keypad.
To type a character or access a function printed in orange or green on the overlay:
• Press or , and then press the key for the character or function.
To type letters in the upper right corner of a key:
• Press and then press the key one to three times depending on the position
of the letter.
For example, in the upper right corner of the
• To type “c”, press
•To type “C,” press
2 2 2.
1 and then press c 2 2 2.
2 key there are the letters “ABC”:
Note: On the calculator-style keypad, the
75 Series Mobile Computer User Guide 17
2 is replaced by the 8.
Page 28

To only type letters:
• Press to lock the green modifier key, and then press the key one to four
times depending on the position of the letter.
While the green modifier key is locked, press
and lowercase letters.
To unlock the green modifier key, press .
Note: If uppercase letters are enabled and you unlock the green modifier key, you may need
to press
1 to type lowercase letters.
Enter Characters on the CK75 Keypads
You need to use the orange modifier key , the green modifier key , and the
Shift or Caps Lock key to access all characters and functions on the Alpha,
Alphanumeric, and Numeric Function keypads.
To type a character or access a function printed in orange on the overlay or in the
upper left corner of a key:
• Press and then press the key for the character or function.
To type a character or access a function printed in green on the overlay:
• Press and then press the key for the character or function.
1 to toggle between only uppercase
To type a single uppercase letter:
• Press and then the letter key.
To type all uppercase letters:
• Press to turn on Caps Lock, and then press the letter keys.
You can still type orange or green modifier characters by pressing or and
then the key for that character.
To turn off Caps Lock, press .
18 75 Series Mobile Computer User Guide
Page 29

About the Power Button
Press the Power button to turn the computer on.
Once the computer is turned on, a quick press of the Power button toggles the
computer in or out of Sleep mode. Sleep mode turns the touch panel off and
initiates the screen lock. The phone can still receive incoming calls on WWAN
equipped models.
Note: By default, the computer enters Sleep mode automatically after the computer is
inactive for a programmed period of time. To learn more about the feature, see
Configure Sleep Mode on page 20.
To select a power mode, press and hold the Power button, and select a power mode
from the list that appears:
Use the following table to understand the menu options:
Power Menu Option Description
Power off Turns the computer off, including the phone. The computer will not
receive incoming calls.
Reset Performs a system reboot. The computer does not save the current
system state, but the registry and file systems are saved. Data in open
apps may be lost if not saved before the reset. The computer shuts
down all running processes and restarts.
Battery Swap Places the computer in a low power state and saves your settings while
you install a charged battery. When you press the Power button after
installing the charged battery, the computer resumes where you left off
prior to entering Battery Swap mode.
Use this setting only for swapping the battery. If you installing a SIM or
microSD card, Power off the computer.
Airplane mode Turns Airplane Mode on or off. When Airplane mode is on, the wireless
radios are disabled and do not transmit or receive.
About the Screen Backlight and Sleep Mode
The display has an ambient light sensor that automatically adjusts the backlight
intensity to conserve power and ensure the display is readable. You can set the
backlight intensity levels as needed for your environment.
75 Series Mobile Computer User Guide 19
Page 30

To save power, the computer enters Sleep mode automatically if left inactive. Sleep
mode turns off the screen and activates the screen lock. You can change the time
limit before Sleep mode activates.
Note: By default, the computer enters Sleep mode automatically after the computer is
inactive for a programmed period of time. To modify the timeout limit, select All Apps
> Settings > Display > Sleep.
Configure the Screen Brightness
You can configure the screen brightness in the Settings app.
1. Tap All Apps > Settings > Display.
2. Modify one of the following:
• To have the computer automatically adjust the brightness for your work
environment, tap the Adaptive brightness setting. Tap Adaptive brightness
to toggle the setting on or off .
• To set the brightness level manually, verify the Adaptive brightness setting
is turned off , and then tap Brightness level. Adjust the slider to set the
brightness level.
Configure Sleep Mode
By default, the computer enters Sleep mode automatically after the computer is
inactive for a programmed period of time. To modify the timeout limit:
1. Tap All Apps > Settings > Display.
2. Tap Sleep.
3. Select the amount of inactive time (minutes) before Sleep mode activates.
About the CK75 Cold Storage Model Heater
CK75 Cold Storage (CS) models come equipped with touch screen and scan
window heaters to support extended use in freezers as well as transitions into and
out of freezer areas.
CK75 cold storage models have external temperature monitoring enabled by
default to determine when the computer enters a cold storage environment. Once
the ambient temperature drops below the Heater enable temperature, the system
starts a Chill timer.
Once the Chill timer expires, the system operates in one of two configurable
modes:
• Automatic mode for maximizing battery life in cold storage environments and
average window defrost times. Manual mode is disabled.
20 75 Series Mobile Computer User Guide
Page 31

• Preemptive mode (pre-heat) for minimizing window defrost times with average
battery life in cold storage environments. Manual mode is enabled.
How Automatic Mode Works
Automatic mode maximizes the cold storage battery life by only turning the heater
on once the following conditions are met in the order listed:
1. The computer detects the ambient temperature has lowered below the set
Heater enable temperature.
2. The Chill timer expires. A snowflake icon appears in the status bar.
3. The computer detects a quick rise in the ambient temperature indicating an exit
from cold storage.
If you remove the computer from cold storage before the Chill timer expires, the
system does not turn on the heater, saving battery power.
Note: When the heaters turn on in Automatic Mode, the icon changes from a
snowflake to a heater .
In Automatic mode, cold storage battery life may exceed 6 hours (scanning a bar
code every ten seconds). Window defrost times should be a minute or less with
factory default settings implemented.
You can configure the heater operation for your individual environment from the
Heater option in the Settings app or by editing the Heater key values in the
DeviceConfig.xml file. To learn more, see Configure the Heater Feature on page 22.
How Preemptive Mode Works
Preemptive mode minimizes screen defrosting time but slightly reduces cold
storage battery life since the heaters enter a low power pre-heat stage before the
computer detects a rise in the ambient temperature.
The heater only enters the low power pre-heat stage once the following conditions
are met in the order listed:
1. The computer detects the ambient temperature has lowered below the set
Heater enable temperature.
2. The Chill timer expires. A snowflake icon appears in the status bar.
3. The heater Power on time delay timer expires.
Note: Once the computer enters the pre-heat stage, the icon changes from a
snowflake to a heater .
75 Series Mobile Computer User Guide 21
Page 32

Pre-heating keeps the windows warm to minimize condensation and frost when
the computer is removed from cold storage allowing for quicker defrost times. The
heaters switch to full power to defrost the windows when the computer detects a
quick rise in the ambient temperature.
In Preemptive mode, the cold storage battery life ranges from a maximum of
6 hours to a minimum of 1.5 hours depending on the heater Power on time set.
The window defrost times range from zero to a maximum of one minute with
factory default settings.
You can configure the heater operation for your individual environment from the
Heater option in the Settings app or by editing the Heater key values in the
DeviceConfig.xml file. To learn more, see Configure the Heater Feature on page 22.
How to Manually Turn the Heaters On/Off
If you want to manually turn the heaters on or off while in cold storage, tap the
snowflake or heater icon in the status bar.
If the Manual mode (Preemptive mode) setting is enabled, the heater Power on
time delay timer is not stopped if the icons are used to turn the heater on or off. The
timer continues to run and the heaters still turn on when the timer expires.
If the Manual mode (Preemptive mode) setting is disabled, the heater Power on
time delay timer is not used and pre-heating does not automatically start, but the
snowflake icon can still be tapped to turn on the heaters for pre-heating.
Configure the Heater Feature
You can configure the following parameters in the Settings app or the
DeviceConfig.xml file to optimize the Heater feature to fit your specific application
environment.
To learn more about how to configure the heater using the Settings app or by
modifying the DeviceConfig.xml file with EZConfig, see page 24.
Settings App:
Heater Setting
Heater Enable Enable or Disable the heater feature and
Turn heater on when
the temperature has
changed by:
DeviceConfig.xml:
Heater Key
DeltaT Set the sensitivity of the cold storage exit trigger.
Description
temperature monitoring. Tap the switch button at
the top of the screen to toggle the feature on or off.
The default is ON.
To detect a cold storage exit, the computer looks
for a quick rise in temperature (°C), defined by this
setting, over a brief period of time. The default is
0.5°C.
22 75 Series Mobile Computer User Guide
Page 33

Settings App:
Heater Setting
Duration: Heater DurationHeater Set the length of time (minutes) the heaters stay on
Low battery
threshold
Heater enabled
temperature
Chill time ChillTime Set the time limit (minutes) for how long the
Update Tap to apply changes made to settings.
Default Tap to set the Heater settings back to their default
Manual/Automatic DriverMode Tap the button to switch between Automatic mode
DeviceConfig.xml:
Heater Key
LowBatteryThreshold Set a low charge battery threshold (%) that triggers
EnableT Set the temperature (°C) that the computer must
Description
at full power (100%) once the computer detects a
quick rise in temperature, defined by the DeltaT
value (the Turn heater on when the temperature
has changed by “x” value).
The default value is 5 minutes.
Note: The heaters may turn off before the timer has
expired if a temperature reading indicates the
computer is warm enough or you manually
turn off the heaters by tapping the heater
icon once.
the computer to turn off the heaters to conserve
battery power. The default value is 25%.
fall to before the heaters turn on. The Heater
enabled temperature is used to identify cold
storage entry. Once this temperature is detected,
the Chill timer starts.
computer must remain at or below the defined
Heater enable temperature before:
• the heaters turn on if in Automatic mode,
or
• the timer for the heater Power on time
delay starts when Preemptive mode
(Manual mode) is enabled.
Note: If you remove the computer from cold storage
before the timer expires, the system does not
turn on the heaters, saving battery power.
values.
or Manual (preemptive) mode.
When Manual mode (preemptive mode) is enabled:
• You can use the heater Power on time
setting to configure when the computer
pre-heats the windows in cold storage
environments.
• The Heater on/off button next to the
Manual/Automatic button is active. You
can tap the button to toggle the heater on
or off.
75 Series Mobile Computer User Guide 23
Page 34

Settings App:
Heater Setting
DeviceConfig.xml:
Heater Key
Description
Heater Cycle Time
Duration
Duration:
Scanner heater
(seconds)
Duration:
LCD heater
Fast monitoring
interval
Slow monitoring
interval
Sample Window SampleTimes Set how many temperature samples are used to
Power on time PowerOnTime Set the length of time (minutes) that the computer
Disable temperature DisableT Set the temperature limit (°C) that triggers turning
Blanking Toggles turning the heater on or off during
DurationScanner Set the length of time (seconds) that the scanner
DurationLCD Set the length of time (seconds) that the screen
FastInterval Set sampling interval time (seconds) used once the
SlowInterval Set sampling interval time (seconds) used once the
When the heaters are activated, the computer
cycles power between the scanner window heater
and the display window heater. You can
independently adjust the cycle time for each
heater.
Note: During pre-heating, there is a small buffer
time between heater cycles when both
heaters are turned off. The length of the
buffer is not configurable.
heater is cycled on.
heater is cycled on.
computer detected cold storage entry (defined by
the Heater enabled temperature.
computer detects cold storage exit (defined by
DeltaT).
calculate a true DeltaT event (cold storage exit).
waits after the Chill timer has expired before
activating the low power pre-heat window feature.
off the heater.
scanning.
Configure the Heater in the Settings App
1. Tap All apps > Settings.
2. Tap Heater under Honeywell settings.
3. Modify the heater parameters.
4. Tap Update to apply the changes.
5. Tap OK.
Configure the Heater in the EZConfig
You can also configure the heater by modifying key values in EZConfig.
1. Tap All apps > Settings > Power Tools > EZConfig.
2. Tap Menu > Generator.
24 75 Series Mobile Computer User Guide
Page 35

3. Select the DeviceConfig.xml file.
Sections
Keys
4. Drill down to Honeywell Settings > Heater. You can expand sections by
selecting the plus sign next to the section name.
5. Modify the heater parameters.
a. Tap a Key in the Heater section.
b. Tap and edit the Value field for the Key.
6. Tap , and then select Save.
7. Tap again, and then select Update Configure.
8. If prompted, Reboot the computer.
About Audio Features
Your mobile computer has a speaker, a microphone, and several software tools to
configure sound volume or enable vibration feedback.
Adjust the Speaker Volume
Use the volume buttons on the right side of the computer to adjust the volume of
ringtones, media, notifications or alarms.
1. Press either the Volume Up or Volume Down button. The volume slider appears.
2. Tap the down arrow to expand the options.
3. Use the stylus or the Volume buttons to adjust each volume type.
75 Series Mobile Computer User Guide 25
Page 36

• Use the slider for notifications and rings.
• Use the slider for media (e.g., music, videos and other media).
• Use the slider for alarms.
Enable Vibrate Mode
You can use the Volume down button to quickly enable Vibrate mode so the
computer vibrates instead of emitting sound for notifications and rings.
If you still want to hear alarms, turn on the Alarms only feature.
1. Press the Volume Down button until the computer vibrates.
2. To turn on the Alarms only feature, press the Volume Down button again with
the volume slider open.
The status bar at the top of the screen indicates the active mode:
• When vibrate mode is active, appears.
• When Alarms only mode is active, the Do Not Disturb icon appears.
Configure Audio Settings
This section describes additional audio and sound settings you can configure in
the Settings app.
• To change audio settings, start the Settings app and tap Sound & notifications.
Setting Description
Volume Use the sliders to adjust the volume level for media (music, videos
Also vibrate for calls Enable or disable vibration when the phone rings.
Do not disturb • Set what kinds of alarms, notifications, events, or selected
Phone ringtone Select a ringtone.
Default notification ringtone Select a notification sound.
and other media), alarms and rings (notifications and ringtones).
callers are allowed to interrupt Do not disturb mode.
• Set rules for automatically turning Do not disturb mode on or off
(e.g., weekend, weeknight, or during calendar events).
26 75 Series Mobile Computer User Guide
Page 37

Setting Description
Other sounds
Dial pad tones Enable or disable audio tones when you use the phone keypad.
Screen locking sounds Enable or disable an audio tone when the screen is locked.
Charging sounds Enable or disable an audio tone when the computer is charging.
Touch sounds Enable or disable audio sounds when you use the touch screen.
Vibrate on touch Enable or disable vibrate mode when you touch the screen.
Insert a MicroSD Card
You can use a micro Secure Digital (SD) card to increase file storage capacity or to
install software. The 75 Series mobile computers support an optional microSD™
card (up to 32 GB maximum capacity).
Note: Always power off the computer and remove the battery before attempting to install or
remove a card.
Install a MicroSD Card in a CN75 or CN75e
You need a Phillips screwdriver to install the microSD card. Format the microSD
card before initial use.
1. Press and hold the Power button, and then select Power off.
2. Release the handstrap and remove the battery (see page 8).
3. Remove the two screws and open the card access door.
75 Series Mobile Computer User Guide 27
Page 38

4. Slide the SIM card holder to the left and up to reveal the microSD card holder.
5. Slide the microSD card holder towards the top of the computer, and then lift up
to reveal the microSD card socket.
6. Place the microSD card in the holder with the contacts facing away from the
holder.
28 75 Series Mobile Computer User Guide
Page 39

7. Close and latch the microSD card holder and SIM card holder.
8. Close the card access door and install the two screws.
9. Install the battery. Press down firmly on the bottom of the battery, and make
sure that the battery release tab is fully engaged.
10. Attach the handstrap.
11. Press the Power button. Once the computer finishes the power up sequence
and identifies the new card, a set up query appears.
12. Select how you want the microSD card used: Use as portable storage or
Use as internal storage.
13. Tap Next and then Done once the SD card is ready message appears.
Install a MicroSD Card in a CK75
You need a slotted screwdriver to install the microSD card. Format the microSD
card before initial use.
1. Press and hold the Power button, and then select Power off.
2. Remove both ends of the handstrap.
3. Remove the battery (see page 9).
75 Series Mobile Computer User Guide 29
Page 40

4. Remove the two screws that attach the card access door to the back of the
computer.
5. Slide the SIM card holder to the left and up to reveal the microSD card holder.
6. Slide the microSD card holder towards the top of the computer, and then up to
reveal the microSD card socket.
30 75 Series Mobile Computer User Guide
Page 41

7. Place the microSD card in the holder with the contacts facing away from the
holder.
8. Close and latch the microSD card holder and SIM card holder.
9. Replace the door and secure it with the two screws removed in Step 4.
10. Install the battery. Press down firmly on the bottom of the battery, and make
sure that the battery release latch is fully engaged.
11. Attach the handstrap.
12. Press the Power button. Once the computer finishes the power up sequence
and identifies the new card, a set up query appears.
13. Select how you want the microSD card used: Use as portable storage or
Use as internal storage.
14. Tap Next and then Done once the SD card is ready message appears.
75 Series Mobile Computer User Guide 31
Page 42

How to Transfer Files
To transfer files you need to physically connect the mobile computer to your
desktop PC through a USB connection. When the computer is connected through
USB and configured for file or photo transfer, you can browse to it and drag-anddrop to move files back and forth to a Windows® PC. If you are transferring files to
and from a Mac, use the Android File Transfer application (available from
www.android.com/filetransfer).
Note: File transfer through a USB connection is disabled by default. You need to configure
the USB connection for transferring files or photos. USB tethering must be turned off
before you can transfer files through USB.
You can use these accessories to connect your mobile computer to your PC:
• USB snap-on adapter with power supply and USB cable
• Desktop Base with battery cup, power supply and USB cable
Note: To learn more about accessories available for 75 Series computers, go to
www.honeywellaidc.com or contact your local Honeywell sales representative.
Configure USB Connection and Transfer Files
1. Connect the mobile computer to your PC using a USB charge/communication
accessory.
2. By default, the mobile computer is in USB charging only mode.
To enable file transfers, swipe down from the notification/status bar.
3. Swipe down from the notification/status bar at the top of the screen.
4. Tap the USB for Charging notification.
5. Select Transfer files (MTP) or Transfer photos (PTP).
6. Open a file browser on you PC and navigate to the 75 Series computer.
You can now copy, delete, paste and/or move files or folders between the two
computers and any SD card installed.
32 75 Series Mobile Computer User Guide
Page 43

70 Series Accessories
The mobile computer ships with a battery, a stylus and hand strap. Non-Incendive
models also ship with an I/O cover. All other accessories are sold and ordered
separately. For help, contact your local Honeywell sales representative.
Note: All 75 Series mobile computers are compatible with 70 Series accessories.
Accessory Description
Audio Snap-On Adapter Use the audio adapter to connect the computer to a headset.
Back Accessory Interface Use the back accessory interface to attach accessories such as
Battery Model 1001AB01 This battery provides main power to the CK75.
Battery Model 1000AB02 This battery provides main power to the CN75 and CN75e.
Desktop Stand Use the desktop stand to hold the 75 Series computer on your
DEX/UCS Snap-On Adapter Use this adapter to receive and send serial communications
DX1 Desktop Dock with USB
connectivity
DX2 Dual Dock and DX4 Quad
Dock. The DX2 and DX4 are
available in charge-only and
Ethernet configurations.
Ethernet Snap-On Adapter Use the Ethernet adapter to be able to connect the computer to
Handstrap Replacement Kit You can order and install a replacement handstrap for the CN75,
Holster Use the holster to store the computer when you need your hands
RS-232 Snap-On Adapter Use the RS-232 adapter to convert the connector on the bottom
Scan Handle Use the scan handle to provide better ergonomics to the
Tethered Stylus Replacement
Kit
USB Snap-On Adapter Use this adapter to convert the bottom connector of the
the magstripe reader adapter to the CK75.
• Standard Rechargeable Li-ion battery
(Model 1001AB01/PN 318-046-031)
• Cold Storage Rechargeable Li-ion battery
(Model 1001AB01/PN 318-046-032)
Standard Rechargeable Li-ion battery
(Model 1000AB02/PN 318-043-033).
desk or a stable surface.
through a DEX/UCS connection.
Use the desktop dock with the:
• Computer cup to charge the battery while it is installed in
the computer.
• Battery cup to charge the battery.
Use these charger bases with the:
• Computer cup to charge batteries while they are installed
in the computer.
• Battery cup to charge two batteries.
an Ethernet network.
CN75e, and CK75. Each kit contains 5 handstraps.
free.
of the computer to a serial connector.
computer for high-volume scanning applications.
You can order and install a replacement stylus.
computer to a USB connector.
75 Series Mobile Computer User Guide 33
Page 44

Accessory Description
Vehicle Dock Use the vehicle dock to provide power and hold your computer
while you are using it in a vehicle.
Vehicle Holder Use the vehicle holder to hold your computer while you are using
it in a vehicle.
Vehicle Power Adapter Use the vehicle power cable adapter to provide power to the
computer from your vehicle.
Vocollect
® Snap-On Adapter
Use this adapter to be able to use the Vocollect voice solution in
your warehouse.
34 75 Series Mobile Computer User Guide
Page 45

CHAPTER
2
ABOUT THE USER INTERFACE AND
Notification/Status Bar
Navigation Buttons
Search Bar
Favorites Tray and All Apps Icon
Home Screen Panels
Touch to initiate a voice search or command.
APPLICATIONS
Learn about the Android user interface and how to interact with the screen. You
can also use this chapter to learn about the Honeywell applications on your
computer, as well as additional applications available for download from
www.honeywellaidc.com.
About the User Interface
The Android 6.0 operating system provides a touch-friendly and easy to navigate
user interface.
About the Home Screen
When you turn on your mobile computer, the Home screen is the first screen that
appears after language provisioning is complete.
Screen Feature Description
Notification/Status Bar Use the notification/status bar icons to quickly view current status and
system information. Status icons to the left tell you when and app has
sent a notifications, such as a new message or meeting notice. System
icons to the right and provide information such as network signal
strength and battery power status.
75 Series Mobile Computer User Guide 35
Page 46

Screen Feature Description
Favorites tray App icons in the tray are visible on every Home screen.
All Apps Icon Select the All Apps icon to access all the apps available on the computer.
Navigation buttons
Back
Home
Recent Apps
Customize the Home Screen
You can add application icons to any Home screen for easier access.
1. Tap to open the All Apps screen.
2. Tap and hold the app you want to add. The computer vibrates, and then
switches to a smaller view of the Home screen panels.
3. Drag and drop the app icon into place.
The All Apps icon
Tap to return to the previous screen, even if that screen was in a
different app.
Tap to return to the Home screen. If there are multiple Home screens,
tap to return to the center Home screen.
Tap to view and switch between recently opened apps.
is always in the center of the Favorites tray.
• If you want to add another home screen, drag the icon to the right edge of the
screen before releasing the icon.
• If you want to create a folder, drag and drop the icon on top of another icon.
To add a Widget:
1. Tap and hold an empty section of the Home screen.
2. Tap Widgets.
3. Tap and hold the Widget you want to add.
4. Drag and drop the Widget into place on the Home screen.
Customize the Favorites Tray
Modify the Favorites tray to contain the apps you use the most.
1. Tap and hold the app icon you want to replace on the Favorites tray.
2. Drag and drop the app to the word “Remove” at the top of the screen.
3. Tap All Apps.
4. Tap and hold the icon for the app you want to add.
5. Drag and drop the icon into position on the Favorites tray.
36 75 Series Mobile Computer User Guide
Page 47

View and Manage Notifications
When notification icons appear at the top of the screen, swipe down from the
status bar.
• Tap a notification to view more details in the relevant app or to change available
settings.
• Swipe left or right on a single notification to dismiss only that notification.
• Select to dismiss all the notifications listed.
To close the notification drawer, swipe up from the bottom of the screen, or tap
Back or Home.
Open Quick Settings
Use the Quick Settings screen to access common settings. Tap an icon to toggle
the feature on/off or open additional settings.
To open Quick Settings, swipe down twice from the status bar at the top of the
screen. To close Quick Settings, tap the top of the screen, Back
or Home.
Notification and Status Icons
Icons in the Notification/Status bar at the top of the screen immediately show you
the status of your network, your phone, the volume, the battery, and the time. Use
the following table to understand what the icons mean.
Icon Description Icon Description
Note: Notification and status icons are hardware and software dependent. Some of the icons listed
below may not be relevant for your Dolphin model.
Pending calender event Sound is turned off
Pending alarm and Alarm is set Vibrate mode is turned on
New text message or multimedia
message
75 Series Mobile Computer User Guide 37
Battery charge is at 100%
Page 48

Icon Description Icon Description
Error with text or multimedia message
delivery
New Gmail™ message Terminal is connected to external power
New E-mail Airplane mode is turned on
ADB active (USB debugging enabled) Bluetooth incoming file notification
Uploading data Bluetooth technology is turned on
Downloading data Wi-Fi network connected with full signal
Synchronizing data Wi-Fi network connected but no Internet
Error with sync or sign-in Ethernet status - connected.
Terminal is connected to external power
and the battery is charging.
and the battery is fully charging.
strength
The terminal could not synchronize data
with the computer
GPS is turned on Receiving location data from GPS
The Chill timer has expired and
computer is cold enough the
heaters can be turned on. For more
information, see About the CK75 Cold
Storage Model Heater (page 20).
About Screen Gestures
Use your fingers or the stylus to manipulate icons, buttons, menus, the on-screen
keyboard, and other items on the screen.
• Tap
Tap to select something, toggle a setting on or off, or activate a field for text
entry. An on-screen keyboard automatically appears for text entry.
• Tap and hold
Tap and hold an item but do not lift your finger or stylus until an action occurs.
• Drag and drop
Tap and hold an item, and then slide your stylus or finger across the screen until
you reach the target position. Lift your finger or stylus off the screen to drop the
item in place.
SD card is full
Heaters are turned on. For more
information, see About the CK75 Cold
Storage Model Heater (page 20).
• Swipe or slide
Quickly move your finger across the screen, without pausing when you first
touch. For example, you can slide a Home screen left or right to view the other
Home screens.
• Double-tap
Tap quickly twice on a web page, map, or other screen to zoom in. Double-tap
again to zoom out.
38 75 Series Mobile Computer User Guide
Page 49

• Pinch
In some apps, you can zoom in and out by placing two fingers on the screen at
once and pinching them together (to zoom out) or spreading them apart (to
zoom in).
About Honeywell Applications
Honeywell provides several useful applications to help you configure,
troubleshoot, and connect your computer to other devices and networks. You can
also download additional applications from the Honeywell website at
www.honeywellaidc.com to help you use all of the features of your computer.
Applications Available on the Computer
Many of the applications in this table are located in the Power Tools folder. For
more information on Power Tools, look for Dolphin Power Tools user guide at
www.honeywellaidc.com.
Icon Application Description
AutoInstall
Settings
Carrier Select Use the Carrier Selection application to quickly change your network
ConfigApps Provides a way to disable/enable apps and uninstall updates.
Configure
Autorun
Backup Backup and restore settings and user data.
BattMon Monitor the charge status of the battery.
Demos Use ScanDemo to demonstrate how the scanner works. You can use it
Diagnostic
Information
EZConfig Configure the device and applications efficiently with bar code and
File Browser Provides an efficient way to browse files on the computer.
Use to automatically install packages, APKs, and configure during the
boot sequence.
carrier.
Configure which applications you want to run during the boot
sequence.
to scan a bar code, set the symbologies it scans, and determine the
computer response to a scanned bar code.
Use the DiagnosticInfo app to view device information, Honeywell Apps,
Radio Information, Battery Information, Memory Information, and
Scanner Information.
configuration files.
IPConfig Use IPConfig to view network adapter information.
75 Series Mobile Computer User Guide 39
Page 50

Icon Application Description
LogView Displays LogCat and Dmesg information in real time.
Ping Use Ping to verify communication links or to make sure a specific IP
address is working.
Route Route displays and allows editing of the rules for packet destination
across the subnets.
WiFi Info Wi-Fi Info enables and disables the Wi-Fi radio, provides information on
access points and tracks roaming statistics.
Applications You Can Download to the Mobile Computer
You can download Honeywell applications to extend the capabilities of the
computer. You may need to purchase an license to run some applications. To learn
more about the applications described in this section and other Honeywell
software solutions, go to www.honeywellaidc.com > Browse Products > Software.
About Honeywell Enterprise Browser
Enterprise Browser for Microsoft® Internet Explorer® is a locked-down enterprise
Web client application designed for Honeywell computers. It provides a controlled
Web application environment that helps enterprises increase productivity and
reduce IT management expenses. You can configure Enterprise Browser for your
specific application requirements and design custom web applications that run
through the Enterprise Browser to provide your users with an easy-to-use yet controlled experience.
If Enterprise Browser is not included on your computer model, you can download a
trial version for evaluation. After the evaluation period expires, you need to
purchase a license. For more information about Enterprise Browser, visit
www.honeywellaidc.com.
About Honeywell HTML5 Browser
HTML5 Browser is an open platform HTML5 application environment for select
Honeywell mobile computers. HTML5 Browser is free from licensing fees or licensing activation requirements and provides an easy way for developers to run crossplatform applications. Honeywell’s HTML5 Browser supports applications
designed to run on-line (connected to the web server), off-line (no connection to
the web server) or a combination of the two. Data can be stored locally on the
device until synchronization with the back-end server is available. HTML5 Browser
includes a true web browser application that provides a URL bar, browsing history,
favorites list and other elements common to typical web browsers.
HTML5 can be downloaded at no charge from the Honeywell website. For more
information, visit www.honeywellaidc.com.
40 75 Series Mobile Computer User Guide
Page 51

About Honeywell Launcher
Launcher is a configurable locked-down menu program designed for Honeywell
computers that prevents end-users from accessing the start menu and other nonauthorized applications. Use Launcher to provide a platform where your mobile
computer users are limited to running only company-approved applications and
prevent them from initiating unauthorized configuration changes. You can also
use Honeywell Launcher together with Honeywell Enterprise Browser to create a
single-purpose device configuration.
If Launcher is not included on your computer model, you can download a trial
version of the software for evaluation. After the evaluation period expires, you need
to purchase a license. For more information about Launcher, visit
www.honeywellaidc.com.
About Enterprise Terminal Emulator
Enterprise Terminal Emulator (TE) is a terminal emulation client designed for
enterprise-level data collection. In a single client, Enterprise TE supports multiple
emulation protocols. Its features include session persistence, remote management
and configuration, and multiple security options. Enterprise TE provides a consistent user interface and a common menu structure (Enterprise Settings), simplifying the use and management of applications running on Honeywell mobile
computers.
If Enterprise TE is not included on your computer model, you can download a trial
version of the software for evaluation. After the evaluation period expires, you need
to purchase a license. For more information about Enterprise TE, visit
www.honeywellaidc.com.
Unlock Developer Options
If you are an application developer, unlock the Developer options to easily test and
debug your apps. Once you unlock the feature, Developer options appears under
the System heading in the Settings app.
1. Start the Settings app.
2. Tap About phone.
3. Tap Build number seven times. A popup message appears informing you that
you are now a developer.
75 Series Mobile Computer User Guide 41
Page 52

42 75 Series Mobile Computer User Guide
Page 53

CHAPTER
3
USE THE IMAGER
This section describes how to use and configure the scanner to scan bar codes.
About the Imager
The internal imager can read 1D and 2D bar code symbologies, composite
symbologies, and postal codes. You can also use the internal imager to take
pictures as if it were a camera or use the integrated flash as a flashlight.
You can also use Bluetooth communications to connect the computer to cordless
scanners, such as the Granit™ 1981i and 1911i.
How to Scan Bar Codes as Keyboard Input
The scan wedge feature sends scanned bar code data to an active application as
Android keypad input. To scan a bar code as keyboard input, open an application
that accepts text input and then scan a bar code. By default, the scan wedge
feature is enabled on the computer.
You can use applications that are coded to use the scanner or applications that
receive data through the scan wedge feature. If an application claims the scanner
through the BarcodeReader API, the scan wedge feature is temporarily disabled.
You can find information on how to create custom applications for the computer in
the Honeywell Mobility SDK for Android, available from the Honeywell Technical
Support Downloads Portal at https://hsmftp.honeywell.com. Once you create an
account and enter the portal, navigate to Software > Software and Tools >
Developer Library > SDKs for Android.
75 Series Mobile Computer User Guide 43
Page 54

Change the Scanner Settings
Changes you make to the Default profile apply to all applications with no profile.
1. Tap All Apps > Settings.
2. Tap Scanning.
3. Tap Internal Scanner > Default Profile.
4. Select from the following:
• Data Processing Settings,
• Symbology Settings,
• Decode Settings,
• Imager Settings,
• Trigger Settings, or
• Notification Settings.
5. Modify the settings to meet your application needs.
Restore Default Scanner Settings
You can easily discard all changes you made to the Default profile and restore the
default values.
Note: When you select to restore the default values of one of the settings, it also restores the
default values of all settings within the profile.
1. Open the Default profile.
2. Tap in the upper right corner of any of the scanner settings screens.
3. Tap Restore all defaults.
Add a Scanning Profile
To create a scan setting profile for a custom app on the computer:
1. Touch All Apps > Settings > Scanning.
2. Touch Internal Scanner.
3. Touch in the upper right corner of the screen.
4. Tap the profile name field and add a name using the keypad or tap the select an
application and choose an app from the list.
The new profile appears on the Internal Scanner profile list. You can now select
and modify the scan settings of the new profile.
44 75 Series Mobile Computer User Guide
Page 55

About the On-Screen Keyboard
If you want to use the on-screen keyboard when you input a new profile name:
1. Tap the profile name field.
2. Tap the keyboard icon in the lower right corner of the screen.
3. Tap the on/off button next to Show input method enable the on-screen
keyboard. You may have to select the add profile icon again.
Delete a Scanning Profile
Open the Internal Scanner profile list. Tap and hold the profile you want to delete,
and then select Delete.
Scan Bar Codes
The internal imager supports omni-directional (360°) bar code scanning. An
aiming beam is provided to help assist with targeting when scanning bar codes.
Note: Before you start scanning bar codes, use the Settings app to enable only the bar code
symbologies that you need. By reducing the active symbology list, you can increase
the scan speed.
1. Point the computer at the bar code. For optimum performance, avoid reflections by scanning the bar code at a slight angle.
2. Press and hold the Scan button.
3. Center the aiming beam over the bar code. When the scanner successfully
reads the bar code, the computer beeps, and the Good Read LED turns on
briefly. The bar code information is entered into the application in use.
4. Release the Scan button.
75 Series Mobile Computer User Guide 45
Page 56

Use the Scan Demo App
Use the Scan Demo app to read bar codes, or to test your symbology decode
settings.
1. Tap All Apps > Demos.
2. Swipe left or right on the screen until the Scan Demo app is selected.
The selected application is listed below the turntable.
3. Tap on the center of the box image to open the app.
4. Aim the scanner window at the bar code and press and hold the Scan button.
5. Center the aiming beam over the bar code. When the scanner successfully
scans the bar code, the computer beeps, and the Good Read LED briefly turns
on. A list of bar code information appears.
Note: In the Scan Demo app, not all bar code symbologies are enabled by default. If a bar
code does not scan, the correct symbology may not be enabled.
How to Change the Default Symbology Settings in the App
To enable or disable decoding for specific symbologies:
1. In the Scan Demo app, tap and select Symbology Settings.
2. Tap the box next to a symbology name to enable (check mark) or disable (no
check mark) decoding for that symbology.
3. (Optional) Tap the Symbology name to see and modify additional configuration
settings for the symbology selected.
46 75 Series Mobile Computer User Guide
Page 57

Use the Imager as a Flashlight
To use the imager as a flashlight.
1. Open Quick Settings.
2. Tap the Flashlight icon. Select again to turn the flashlight off.
75 Series Mobile Computer User Guide 47
Page 58

48 75 Series Mobile Computer User Guide
Page 59

CHAPTER
4
USE THE PHONE
You can use the phone feature to make and receive telephone calls, as well as
transmit data through wireless world wide area networks (WWAN).
Note: Phone features are only supported on CN75 and CN75e WWAN models (CN75WAN).
About the Phone
Phone features on the computer include a speaker and a microphone. You can also
use a Bluetooth headset or hands-free kit.
On CN75 and CN75e WWAN models the phone feature is enabled by default and a
Flexible Network Radio provides the ability to connect to CDMA or UMTS networks
in all regions that support these technologies. The flexible network radio is a
software-defined radio (SDR) that can be configured for CDMA or UMTS
depending on your wireless communication needs.
After you turn on the phone and activate service with your wireless carrier, you can
customize the phone features and network settings in the Wireless & networks
section of the Settings app.
Note: The WWAN radio supports Network Information and Time Zone (NITZ) messages to
automatically set the system time.
How to Add and Switch Between Network Carriers
The SDR radio in CN75 and CN75e WWAN models makes it easy for you add
carriers and switch between them as needed.
Use the Carrier Selection app to quickly change your WWAN radio network carrier.
1. Tap All Apps > Carrier Selection.
75 Series Mobile Computer User Guide 49
Page 60

2. Tap and hold --Please Select--, and then select a carrier from the list.
3. Tap OK to confirm carrier change.
• If the update is successful, the Carrier Selection screen appears and displays
the updated carrier information.
• If the update is unsuccessful, a message box appears. Tap Ok to return to the
Carrier Selection screen.
Activate the UMTS Phone
You use a SIM card to activate the UMTS phone on your CN75/CN75e WWAN
model computer. You can purchase the SIM card from your network provider.
A Phillips screwdriver is needed to install the SIM card.
Note: Phone features are only supported on CN75 and CN75e WWAN models (CN75WAN).
1. Select a network carrier. For more information, see How to Add and Switch
Between Network Carriers on page 49.
2. Press the Power button, and then select Power off.
3. Detach one end of the hand strap from the computer (see page 8).
4. Push the battery latch toward the bottom of the computer until the battery
releases, and then lift the battery away from the computer.
5. Remove the two Phillips screws and open the card access door.
50 75 Series Mobile Computer User Guide
Page 61

6. Slide the SIM card holder to the left and up.
7. Place the SIM card in the holder with the contacts facing away from the holder.
8. Close and latch the SIM card holder.
9. Close the card access door and install the two screws.
10. Insert the top end of the battery into the computer, and press down firmly on
the bottom until the battery clicks into place. Make sure that the battery latch is
fully engaged.
11. Attach the hand strap.
75 Series Mobile Computer User Guide 51
Page 62

12. Press the Power button.
Note: AT&T network users, tap Yes if prompted to allow automatic connection selection for
the SIM card. If you are using a custom APN, select No. You must manually configure
the connection instead of using the automatic option. Connection charges may
apply.
Activate the CDMA Phone
To activate the CDMA radio module in your mobile computer, you need to contact
your wireless carrier and set up an account.
You also need to provide the carrier with the Mobile Equipment Identifier (MEID)
for the computer. You can find the MEID:
• on a label located in the battery compartment.
• on the outside of the computer shipping box.
Note: For the CDMA phone, settings are permanently stored in the WWAN radio after
activation. CDMA settings persist through a factory data reset.
The activation process is slightly different for each CDMA carrier. In general, you
need to contact your wireless provider and give the provider the MEID for the
computer.
1. Select a network carrier. For more information, see How to Add and Switch
Between Network Carriers on page 49.
2. Contact your wireless provider and give the provider the MEID for the computer.
3. If your carrier is Sprint, reboot the computer. As soon as the Sprint network
detects your phone, Hands-Free Activation (HFA) begins, and a series of
notification messages appear. When activation is complete, a completion
message appears and the WWAN radio reboots. The phone is ready to use.
If your carrier is Verizon, tap Phone , enter *228 on the phone keypad, and
press Talk. After a short wait, a message appears, confirming either success or
failure of the activation. After successful activation, the phone is ready to use.
Note: Data connections are to the public domain on your network.
Make a Phone Call
Once the phone is activated, you can make a phone call.
Note: Phone features are only supported on CN75 and CN75e WWAN models (CN75WAN).
1. On the Home or All Apps screen, tap .
52 75 Series Mobile Computer User Guide
Page 63

2. Use one of the methods below to enter the telephone number you want to call.
• Press the numbers on the computer keypad.
• Tap and use the on-screen dialer.
• Select a person on your saved contact list .
• Select a favorite on your speed dial list .
• Select a number from the recent calls list
3. Tap call .
4. To end the call, tap end call .
Answer a Phone Call
When you receive a phone call, the Incoming Call screen opens. If the caller telephone number is available, it appears on the screen. Depending on your calling
plan, you may also see a Caller ID information. All incoming calls are recorded in
the Call log. If you miss a call, you receive a notification.
1. On the Incoming Call screen, tap and hold the white call icon.
2. Three icons appear:
• To answer the call, drag the icon to .
• To send the caller directly to voice mail, drag the icon to .
• To send a txt message back to the caller instead of answering, drag the icon
to .
Make an Emergency Phone Call
You can use the phone to make an emergency phone call even if the SIM card is
missing from your UMTS phone or if you do not have a valid CDMA account. The
phone shows no service but the call still goes through if you dial certain emergency
numbers (e.g., 112, 911, 000, 08, 118, 119, and 999).
Configure Phone Settings
You can customize settings for the phone, including the ringtone, voicemail
options, keypad tones, internet call settings, and other options.
1. Tap .
75 Series Mobile Computer User Guide 53
Page 64

2. Tap next to the microphone icon.
3. Select Settings. The Call settings menu appears.
4. Change phone settings as necessary.
54 75 Series Mobile Computer User Guide
Page 65

CHAPTER
5
USE THE CAMERA
Learn to use the color camera to take pictures and record videos, read bar codes,
perform document capture, or perform signature capture.
About the Color Camera
The camera lens and flash are located on the back of the computer.
You can open the Camera app from the Favorites tray on the Home screen or
from the All Apps screen. Use the Camera app capture pictures or videos.
Use the Photos app to view, organize, edit and share photos and videos stored
on the computer. The Photos app can be opened from the Home screen or All Apps
screen. By default the photos and videos captured with the Camera app are saved
on the computer under Internal storage\DCIM\Camera.
Take a Picture
1. In the All Apps screen, tap Camera .
2. Using the screen as a viewfinder, move the computer until you see the image
you want.
3. Tap the screen to set the focus point. By default, the camera senses the lighting
in the environment and turns the torch (flash) on if needed.
4. Press the Enter key or tap . The camera takes a picture and a small
thumbnail image of the picture appears.
• To view the picture, tap the thumbnail image or swipe to the left.
You can share , edit , or delete the video.
• To return to the Camera app, tap .
75 Series Mobile Computer User Guide 55
Page 66

Change Basic Camera Settings
You can change the camera settings for best results when taking pictures.
1. In the All Apps screen, tap Camera .
2. Tap to view the camera options.
3. Tap one of the icons to change basic camera settings.
• Timer: Set the amount of time from when you tap the Camera icon until it
takes a photo. Options for the timer are 3 seconds or 10 seconds.
• Grid: Turn on a grid to help you frame your photos.
Options for the grid are enabled or disabled.
• Flash: Turn on the flash to take photos in low light conditions.
Options for flash are on, off, and automatic.
Record a Video
You can record video with the camera in the computer.
1. In the All Apps screen, tap Camera .
2. When the Camera screen appears, swipe to the right. This menu appears:
3. Tap . The Video screen appears.
4. Tap to begin recording video.
5. When you are done recording, tap .
• To view the captured video, swipe left and tap . You can share or delete
the video.
• To return to the Camera app, tap .
56 75 Series Mobile Computer User Guide
Page 67

Change Basic Video Settings
You can change the camera settings for best results when recording video.
1. In the All Apps screen, tap Camera .
2. When the Camera screen appears, swipe to the right.
3. Tap . The Video screen appears.
4. Tap to view the video options.
5. Tap the grid or the flash icon to turn the option on or off.
Change Advanced Camera App Settings
1. In the All Apps screen, tap Camera .
2. When the Camera screen appears, swipe to the right.
3. Tap .
4. Tap a setting to modify.
• Resolution & quality: Set photo resolution and video quality.
• Save location: Enable or disable saving location information with captured
pictures and videos.
• Advanced: Enable or disable manual exposure feature.
75 Series Mobile Computer User Guide 57
Page 68

58 75 Series Mobile Computer User Guide
Page 69

CHAPTER
6
CONFIGURE THE COMPUTER
Use this chapter to learn about the available methods for configuring your mobile
computer. You can also use this chapter to learn how to configure network
communications and wireless security.
How to Configure the Computer
You can configure many parameters on the computer such as the bar code
symbologies it decodes or the network settings. The values you set for these
parameters determine how the computer operates.
Start the Settings App
You can access the Settings app through the All Apps menu or Quick Settings.
•Tap All Apps > Settings or open the Quick Settings and select .
About the Structure of the Settings App
Use this section to learn about the structure of the Settings app so you can find
parameters quickly.
Wireless & Networks Settings Description
Wi-Fi • Turn Wi-Fi radio on or off.
• Lists available Wi-Fi networks in range when the radio is
turned on.
•View saved networks.
• Add a network Wi-Fi connection.
• Access advanced Wi-Fi options.
75 Series Mobile Computer User Guide 59
Page 70

Wireless & Networks Settings Description
Bluetooth • Turn the Bluetooth radio on or off.
• Lists Bluetooth enabled devices in range when the radio
is turned on.
• Connect to a Bluetooth Device.
• Rename the computer.
• Show received files.
Ethernet • Turn Ethernet configuration on or off.
• Configure Ethernet connections and set up proxy
settings when Ethernet is turned on.
Data usage • Displays a list of phone data usage for the current data
usage cycle.
• Tap the Data usage cycle list to select another date
range.
More
Airplane Turn Airplane mode on or off.
Tethering & portable hotspot • Enable or Disable USB tethering or Bluetooth tethering
• Enable or Disable using the computer as a portable Wi-Fi
hotspot.
• Configure Wi-Fi hotspot.
VPN Set the password parameters for a virtual private network
(VPN) connection.
Cellular networks Modify mobile network settings, including enabling data
access and roaming over mobile networks, selecting access
points and network operators, or selecting only 2G networks
(to save battery life).
Mobile plan Provides information on your cell phone plan.
Device Settings Description
Display Adjust display settings.
• Set Brightness level or turn Adaptive brightness on or off.
• Set the wallpaper.
• Set Sleep mode timeout length (minutes).
• Enable and configure the daydream feature.
• Set screen font size,
• Turn screen auto-rotation on or off.
Sound & notification • Adjust volume levels for media, alarms, and rings (phone
calls and notifications).
• Set the phone ringtone and turn vibration during call
ringing on or off.
• Configure the Do not disturb feature.
• Turn sounds on or off for touch, charging, screen lock,
dial padtones.
• Set when app notifications show.
60 75 Series Mobile Computer User Guide
Page 71

Device Settings Description
Apps • View a list of downloaded and running apps.
• Access app configuration (e.g., permissions, links,
defaults, power setting).
• Reset app preferences.
Storage & USB • View Internal storage statistics.
• Eject or mount optional microSD card.
• View microSD card content in standard browser format.
Battery • Shows battery usage data and the current battery state.
• Access Battery Saver and Battery Optimization features.
Memory View statistics about the average memory use and memory
used by apps.
Users • Modify the owner profile name and add profiles other
people who use the computer.
• Activate a different user profile.
Honeywell Settings Description
Battery LED Set the battery LED status behavior. Options include: HSM
Battery LED (the Honeywell default), the Android Default LED,
or No Battery LED.
Battery info View battery information, including status, serial number,
health, voltage and current, and other useful data.
Logger Enable or disable a logging service that creates an Android
logcat log and kernel log for app and system troubleshooting.
Key Remap Change (remap) a button or key function.
Scanning Configures the imager.
Web applications Enables access for the Honeywell Mobility SDK for Web apps
and lets you set a port.
Personal Description
Location • Turn location services (Google and GPS satellite data) on
or off.
• Set location mode accuracy.
• View location request history.
Security • Set device security settings (e.g., screen lock).
• Encrypt phone.
• Manage administrator privileges.
• Manage credentials.
• View app usage access.
Accounts Add a corporate or email account to the computer.
Google Create and manage Google accounts and services.
75 Series Mobile Computer User Guide 61
Page 72

Personal Description
Language & input • Set the active language and default keyboard (on-screen
and physical keyboard).
• Configure auto-typing features such as capitalization,
punctuation, spell check, and the personal dictionary.
• Set text-to-speech output.
• Adjusts the pointer speed for an external mouse or
trackpad.
Backup & reset • Turn data backup to Google servers on or off.
• Configure data backup.
• Reset network settings.
• Restore factory default settings.
System Settings Parameter You Can Configure
Date & time Configure all date and time settings.
Accessibility Set accessibility levels, such as larger display text and
enabling text-to-speech output.
Printing Configure the printing options.
Developer options Enables developer-specific options such as USB debugging
and SD card protection.
About phone Lists device-specific information including the model
number, phone number, operating system version, software
patch version, radio versions, build number and legal
information.
About Network Communications
You can easily add the mobile computer to your wireless or wired data collection
network. You can connect your computer using:
•802.11a/b/g/n radio communications.
• Ethernet communications.
• Bluetooth communications.
• USB and serial communications.
Connect to a Wi-Fi Network
The mobile computer contains an 802.11a/b/g/n radio to transfer data using
wireless communications. Before you connect to a Wi-Fi network, you need to know
about your network security protocol and its required credentials.
By default, the 802.11 radio is disabled.
1. Tap All Apps > Settings > Wi-Fi.
62 75 Series Mobile Computer User Guide
Page 73

2. Tap the Wi-Fi on/off switch to turn the radio On . A list of discovered
networks appears.
3. On the list, tap the network name to initiate a connection.
To add a network to the list:
a. Tap , and then select Add network.
b. Type the Wi-Fi network name (SSID).
c. Choose a security protocol and add any required information.
Press the down key if you do not see the Security field.
d. Tap SAVE.
4. Enter any required information if the network is secured (e.g., password, key or
certificate name).
5. Tap CONNECT.
Once you have saved and connected to a Wi-Fi network:
• Tap the Wi-Fi network name on the list to view details (e.g., status, signal
strength, speed, frequency, security type). Select CANCEL to close details
screen.
• The computer automatically connects to the same network when the network is
in range and the Wi-Fi radio is turned on.
• To remove a network from your saved list, tap and hold the network name and
select Forget network. You can do this for networks you no longer use.
• To modify a network from your saved list, tap and hold the network name and
select Modify network. You can do this if you changed your network password.
• To view a list of your saved networks, tap and then select Saved networks.
Configure Proxy Settings for a Wi-Fi Network
If you need to connect to network resources through a proxy server, you can
configure settings for the proxy server for each Wi-Fi network you add. By default,
the Wi-Fi networks you add are not configured to connect through a proxy server.
Note: Proxy settings apply only to the Wi-Fi network you modify. You must change proxy
settings for each network requiring a proxy server.
1. Tap All Apps > Settings > Wi-Fi.
2. Verify Wi-Fi is turned On .
3. Tap and hold the connected network name, and then tap Modify network.
4. At the bottom of the list of network settings, select Advanced options.
If needed, press the down key to move to the bottom of the list.
5. Under Proxy, tap to open the menu, and then tap Manual.
75 Series Mobile Computer User Guide 63
Page 74

6. Enter the proxy settings for the network.
7. Tap Save.
Disable Wi-Fi Notifications
By default, when Wi-Fi is enabled, you receive notifications in the Status bar when
the computer discovers a wireless network. You can disable these notifications.
1. Tap All Apps > Settings > Wi-Fi.
2. Tap , and then select Advanced.
3. Tap the Network notification switch to disable notifications.
Connect to an Ethernet Network
To connect the computer to an Ethernet network, you need an Ethernet dock.
1. Make sure the dock is connected to your Ethernet network.
2. Place the computer in the dock.
3. Tap All Apps > Settings > Ethernet.
4. Verify Ethernet is On .
5. Tap Ethernet. The Ethernet list shows the name of the current Ethernet
connection. By default, the computer assumes a DHCP connection, and that
your network has assigned an IP address automatically. If DHCP is working, the
Ethernet dock should indicate that communication with the network is
occurring.
6. (Optional) To assign a static IP address.
a. Tap the connection name (for example, eth0).
b. Tap DHCP and then select Static from the list.
c. Enter the required network information, and then tap Apply.
How to Connect to Virtual Private Networks
The computer supports connecting to virtual private networks (VPNs). This section
describes how to add and connect to VPNs. To configure VPN access, you must
obtain details from your network administrator.
You manage VPN connections in the Settings app.
Note: Before you can add or connect to a VPN network, you must enable a screen lock
method.
64 75 Series Mobile Computer User Guide
Page 75

Add a VPN
Before you can connect to a VPN, you must create a VPN profile.
1. Tap All Apps > Settings > More > VPN.
2. Set up a screen lock security method if prompted.
3. Tap to add a VPN new profile.
4. Enter the required information for the VPN.
5. Tap Save. The VPN name appears in the VPN list.
Connect to a VPN
Once a VPN profile is created, you can connect to the VPN.
1. Tap All Apps > Settings > More > VPN.
2. Tap the name of the VPN in the list.
3. Enter any necessary credentials when prompted.
4. Tap Connect. The computer connects to the VPN, and a Status icon and
If needed, press the down key to access all the required information fields.
notification appear.
To disconnect from the VPN, tap the notification.
Edit VPN Information
Editing an existing VPN profile can also be done from VPN screen.
1. Tap All Apps > Settings > More > VPN.
2. Tap to the right of the VPN profile you want to edit.
3. Edit the VPN settings as necessary.
4. When you are done, tap Save.
About Wireless Security
The computer provides these security solutions for your wireless network:
• Wi-Fi Protected Access 2 (WPA2™)
• Wi-Fi Protected Access (WPA)
• 802.1x
•LEAP (Funk security only)
•WEP
75 Series Mobile Computer User Guide 65
Page 76

Honeywell recommends WPA2 security with PSK (Personal) or 802.1x (Enterprise)
key management.
Before you set security, you need to enable the radio, set the date, and set the SSID
on your computer. To use 802.1x security, you need to load a root certificate on
your computer. To use transport layer security (TLS) with 802.1x security, you also
need to load a user certificate.
About Certificates
You can use digital certificates to identify the computer for network access or
authentication to servers. To use a certificate to identify your device, you must
install it in the trusted credential storage on the computer.
Android supports DER-encoded X.509 certificates saved in files with a .crt or .cer
file extension. To install a valid certificate with a .der or other extension, you must
change the extension to .crt or .cer to install it.
Android also supports X.509 certificates saved in PKCS#12 key store files with a
.p12 or .pfx extension. To install a valid key store file with another extension, you
must change the extension to .p12 or .pfx to install it. When you install a certificate
from a PKCS#12 key store, Android also installs any accompanying private key or
certificate authority certificates.
Load a Certificate
To use a certificate, you must install it in the trusted credential storage on the
computer.
Note: Apps such as email and browsers that support certificates allow you to install
certificates directly from within the app. For more information, see the help that
comes with the app.
1. Copy the certificate or key store from your PC to a microSD card.
2. Install the microSD card in the computer and turn the computer on.
3. Tap All Apps > Settings > Security.
4. Under Credential storage, tap Install from SD card.
5. Tap the name of the certificate or key store to install it. If prompted, enter the
key store password and then tap OK.
6. Enter a name for the certificate and tap OK.
Disable or Remove Certificates
If a user or system certificate is compromised, or your organization chooses not to
trust it, you can disable or remove the certificate.
Note: If you remove a User certificate, you must install it again to enable it.
66 75 Series Mobile Computer User Guide
Page 77

1. Tap All Apps > Settings > Security > Trusted credentials.
The trusted credentials screen has two tabs:
• System shows CA certificates that are installed in the ROM.
• User shows CA certificates you have installed yourself.
2. Tap the name of the certificate to disable or remove. The certificate details
screen appears.
3. Scroll to the bottom of the details screen and tap
Disable (for System certificates) or Remove (for User certificates).
4. Tap OK.
About Bluetooth Communications
Your mobile computer is equipped to communicate with other devices using
Bluetooth technology. You need to turn on the Bluetooth radio before you can
discover, pair and connect to other Bluetooth devices. By default, the radio is
turned off. System bar icons indicate Bluetooth status.
Note: The Bluetooth radio maintains its current state through a system reset. If you perform
a factory data reset, you must recreate pairings to devices.
How to Turn the Bluetooth Radio On/Off
You need to turn on the Bluetooth radio in the mobile computer before you can
discover and connect to Bluetooth devices. By default the radio is turned off.
Note: When the Bluetooth radio is enabled, the computer is visible to nearby devices.
1. Tap All Apps > Settings > Bluetooth.
2. Tap the Bluetooth on/off switch to turn the radio On .
The icon appears in the status bar and a list of available Bluetooth devices
appears.
Pair and Connect a Bluetooth Device
Once you turn on the Bluetooth radio, you can pair and connect with other
Bluetooth enabled devices.
Note: When the Bluetooth radio is enabled, the computer is visible to nearby devices.
1. Tap All Apps > Settings > Bluetooth.
2. Verify the radio is turned On .
75 Series Mobile Computer User Guide 67
Page 78

A list of available Bluetooth devices appears.
3. (Optional) If the device you want does not appear in the list, make sure the
device is turned on and set to discoverable, tap , and then tap Refresh.
4. Tap a device on the list to initiate a pairing request.
5. When the pairing request message appears, verify the Bluetooth pairing code is
the same on both devices and then tap Pair.
If the pairing request requires a PIN, enter the PIN and tap OK.
When the device is paired with the computer, the device name appears under
Paired Devices at the top of the list.
6. (Optional) Once paired to a device, you can connect manually to the device.
Tap the paired but unconnected device.
When the computer and paired device are connected, they show as connected
in the list. The status icon changes from to .
• To disconnect a paired device, tap the name of the paired device and then tap OK
when the Disconnect? screen appears.
• To unpair a device, tap the next to the device and then select Forget.
68 75 Series Mobile Computer User Guide
Page 79

Rename the Computer
You can change the computer Bluetooth name from the Settings app.
1. Tap All Apps > Settings > Bluetooth.
2. Tap the Bluetooth on/off switch to turn the radio On .
3. Tap , and then select Rename this device.
4. Type the new name, and then tap OK.
View a List of Received Files
You can view a list of files received through the computer’s Bluetooth connections
with other devices.
1. Tap All Apps > Settings > Bluetooth.
2. Tap , and then select Show received files. A list of files received through the
Bluetooth connection appears.
About Serial and USB Communications
You can use these 75 Series accessories to transmit data to and receive data from
another device through serial or USB communications:
• RS-232 Snap-On Adapter (Model 1000AA03)
• USB Snap-On Adapter (Model 1000AA07)
For information on these accessories, contact your local sales representative.
How to Share Your Mobile Data Connection
You can share the mobile data connection through USB tethering or Bluetooth
tethering. You can also use the computer as a Wi-Fi hotspot to share the connection with other devices.
Share the Data Connection Through USB
After you connect the computer to another device through USB, you can share the
data connection through USB tethering.
1. Connect the mobile computer to another device through a USB dock, cable, or
other connection.
2. Tap All Apps > Settings > More.
3. Tap Tethering & portable hotspot.
75 Series Mobile Computer User Guide 69
Page 80

4. Tap USB tethering to enable feature. The device is now sharing the
computer data connection.
To stop sharing the connection, disconnect the USB cable, or disable USB
tethering.
Share the Data Connection Through Bluetooth
If your device is Bluetooth-capable, you can configure the computer to share its
mobile data connection with the device through Bluetooth.
1. Tap All Apps > Settings > More.
2. Tap Tethering & portable hotspot.
3. Tap Bluetooth tethering to enable feature. You should now be able to pair
your device with the computer to share the data connection.
4. To stop sharing the data connection, tap the on/off switch to disable
Bluetooth tethering.
Share the Data Connection as a Portable Hotspot
You can configure the computer to act as a portable Wi-Fi hotspot for up to eight
other devices.
1. Tap All Apps > Settings > More.
2. Tap Tethering & portable hotspot.
3. Tap Portable Wi-Fi hotspot to enable feature. The computer begins to
broadcast its network name (SSID) so you can connect to it with up to eight
other devices.
4. To restrict access to the computer when you are using it as a Wi-Fi hotspot, tap
Set up Wi-Fi hotspot to select the security protocol and set up a password.
When other devices try to connect to the hotspot, users are prompted to enter
the password before the devices are allowed to connect.
Or, to remove secure access, select Open from the Security list.
5. Tap Save.
70 75 Series Mobile Computer User Guide
Page 81

CHAPTER
7
MANAGE AND MAINTAIN THE COMPUTER
Use this chapter to understand how to upgrade software, reset the computer, and
maintain the computer.
About File Transfers Through a USB Connection
To transfer files you need to physically connect the mobile computer to your
desktop PC through a USB connection. File transfer through a USB connection is
disabled by default. You need to configure the USB connection for transferring files
or photos. USB tethering must be turned off before you can transfer files through
USB. To learn more, How to Transfer Files on page 32.
How to Update the System Software
You can use these methods to update the system software on the computer:
• You can update individual computers, or multiple computers at the same time,
using a device management system. For help, see the documentation for your
device management system.
• You can update individual computers by copying the software update file to the
internal storage (or an installed microSD card) on each computer. Then you can
manually start the system update from the Settings app.
Update Computers Using a Device Management System
You can update multiple computers at the same time using a device management
system. Several mobile device management systems support the 75 Series mobile
computers powered by Android, including SOTI MobiControl, Honeywell Skynax™
Mobility Management System, and other third-party solutions. Contact these suppliers for information about obtaining their agent or client software for use with the
75 Series.
75 Series Mobile Computer User Guide 71
Page 82

Upgrade the System Software
Upgrades for Power Tools and other system software on the computer are provided
as compressed .zip files and are available from the Honeywell Technical Support
Downloads Portal at https://hsmftp.honeywell.com.
1. Copy the upgrade .zip file into one of these folders on the computer:
• Internal storage\honeywell\autoinstall
• IPSM card\honeywell\autoinstall
• \honeywell\autoinstall (on a microSD card if installed)
2. Tap All Apps > Autoinstall Settings.
3. Verify that Autoinstall is enabled.
4. Select Packages Update from the screen. The computer automatically initiates
a reboot and installs the software upgrade.
Reset the Computer
You may need to restart the mobile computer to correct conditions where an application stops responding to the system or the computer seems to be locked up. You
may lose data in open apps when you reset the computer. All your settings are
saved during a reset.
1. Press and hold the Power button until the options menu appears.
2. Tap Reset.
3. Tap OK to confirm. The computer restarts.
To restart the computer if the touch panel display is unresponsive:
•Press and hold the Power button for approximately 8 seconds until the
computer restarts.
72 75 Series Mobile Computer User Guide
Page 83

Perform a Factory Data Reset
Caution: Performing a factory data reset completely erases all data, files,
and downloaded apps from the computer memory. Back up your
data and files before proceeding.
You can perform a factory data reset, which restores all default settings on the
computer and erases all data, files, and downloaded apps. Because a Factory reset
can result in data loss, use it only after trying a standard restart and if all other
recovery methods have failed.
Note: These methods of recovery may not be available if your system administrator has set
policies to prevent their use.
Factory Reset: Method 1
Use this Factory Reset method if you want a clean configuration without any of the
custom apps, settings, and data you added to the computer.
Before You Start
• If you recently reset your Google Account password, wait 24 hours before
performing a Factory reset.
• Make sure you have your screen lock password, PIN or pattern if you activated
one. You will need this to reset the computer.
• If you have a Google Account, back up your data and settings to your Google
Account so you can restore them if needed.
• Connect the computer to an external power source or make sure you have a full
battery charge.
• Make sure you have an Internet connection.
To Perform a Factory Reset Using the Touch Screen
1. Tap All Apps > Settings > Backup & reset.
2. Select Factory data reset.
3. If you also want to erase all data in the IPSM partition as well as internal
storage, swipe to the bottom of the screen and check the box next to Erase
IPSM.
4. Tap RESET PHONE.
5. If prompted, enter your screen lock security pattern, PIN or password.
6. Tap ERASE EVERYTHING. The computer indicates a factory reset is in
progress. When the process is finished, the computer restarts and the initial set
up screen appears.
75 Series Mobile Computer User Guide 73
Page 84

Factory Reset: Method 2
You should never use this method unless all other recovery methods have failed
and the computer is still completely unresponsive.
Before You Start
• If you added a Google Account to the 75 Series computer, make sure you have
your Google username and password associated with the computer. If you do
not have the username and password, you will not be able to use the computer
after the reset. This is a security measure that prevents unauthorized users from
using the device if they try a factory reset.
If you did not add a Google Account to the computer, the extra security level is
not enabled and you will not need a Google username and password.
• If you recently reset your Google Account password, wait 24 hours before
performing a Factory reset.
• Connect the computer to an external power source or make sure you have a full
battery charge.
• Make sure you have an Internet connection.
To Perform a Factory Reset for an Unresponsive computer
To perform a Factory Reset if the 75e is unresponsive and all other recovery
methods have failed:
1. Press and hold the Power button for approximately 8 seconds until the computer starts to reboot.
2. When the Honeywell splash screen appears, press and hold the Power and
Volume down buttons until the Recovery screen appears.
3. Verify “Recovery Mode” appears at the top of the screen.
If “Recovery Mode” does not appear, press either Volume button to move
through the options until “Recovery Mode” appears.
4. Press the Power button to enter the advanced options screen.
5. Use the Volume down button to highlight Wipe data/factory reset.
6. Press the Power button.
7. After the reset is complete, press the Power button to reboot.
74 75 Series Mobile Computer User Guide
Page 85

Clean the Computer
To keep the computer in good working order, you may need to clean the scanner
window, color camera window, and the touch screen. Clean the windows and the
touch screen as often as needed for the environment in which you are using the
computer. To clean the computer, use one of these recommended cleaning agents:
• Acetic acid, 10% in water
• Ethyl alcohol, 10% in water
• Mild soap solutions
• 5% to no more than 10% bleach or sodium hypochlorite with water
Caution: There are no user-serviceable parts inside the main body of the
computer. Opening the computer will void the warranty and may
cause damage to the internal components.
Note: The installation or replacement of the 75 series computer
battery, a microSD card and/or SIM card as described in this user
manual does not void the warranty.
Honeywell recommends that you leave the battery installed and on CK75 models
the SD Card Door installed when you clean the computer as described.
1. Press the Power button to suspend the computer.
2. Dip a clean cloth towel in the cleaning agent and wring out the excess.
3. Wipe off the scanner window, camera lens, and flash area. Do not allow any
abrasive material to touch these surfaces.
4. Wipe dry with a clean, soft, dry cloth.
5. Allow the computer to fully air dry before using again.
75 Series Mobile Computer User Guide 75
Page 86

76 75 Series Mobile Computer User Guide
Page 87

APPENDIX
A
SPECIFICATIONS
Compliance
Labels
Compliance
Label Locations
Computer Agency Information
All 75 Series mobile computers meet or exceed the requirements of all applicable
standards organizations for safe operation. The best way to ensure safe operation
is to use the mobile computer according to the agency guidelines on the product
regulatory sheet, quick start guide and in this user guide. Read all guidelines
before using your computer.
Product documentation is available for download from www.honeywellaidc.com.
Public certificates are available for download from
www.honeywellaidc.com/compliance.
Label Locations
75 Series Mobile Computer User Guide 77
Page 88

Physical and Environmental Specifications
This section lists the physical and environmental specifications for the computer.
Note: Product data sheets are available for download at www.honeywellaidc.com.
CN75/CN75e
Parameter Specification
Physical Dimensions (Battery Included)
Length (CN75) 16.9 cm (6.65 in)
Length (CN75e) 19.5 cm (7.66 in)
Width 8.0 cm (3.16 in)
Depth 3.4 cm (1.34 in)
Weight (CN75) 450 g (15.9 oz)
Weight (CN75e) 491 g (17.3 oz)
Tumble and Drop
Tumble Specifications 2,000 (1 m) tumbles per IEC 60068-2-32 specification
Drop Specifications 2.4 m (8 ft) to concrete per MIL-STD 810G; 1.8 m (6 ft) to
concrete across operating temperature range per MIL-STD
810G
Power and Electrical
Rechargeable Li-ion battery pack Model 1000AB02 (PN 318-043-033)
Battery configuration 1S2P (1 cell in series and 2 cells in parallel)
Nominal output and capacity 3.7 VDC, 4000 mAh (14.8 Wh)
Environmental
Operating temperature -20°C to 60°C (-4°F to 140°F)
Storage temperature -20°C to 60°C (-4°F to 140°F)
Charging temperature 5°C to 35 °C (41°F to 95°F)
Relative humidity (operating) 5% to 95% non-condensing,
Electrostatic Discharge (ESD) +/-15 kV air discharge, +/-8 kV direct discharge
Sealant rating IP67
Screen Specifications
78 75 Series Mobile Computer User Guide
Page 89

Parameter Specification
Touch screen • 480 x 640 pixels
Keypad Options
Keypad Options (CN75) • Numeric
Keypad Options (CN75e) • Large Numeric
CN75/CN75e Non-Incendive (NI)
Parameter Specification
Physical Dimensions (includes Battery but excludes I/O cover)
Length (CN75 NI) 16.9 cm (6.65 in)
Length (CN75e NI) 19.5 cm (7.66 in)
Width 8.0 cm (3.16 in)
Depth 3.4 cm (1.34 in)
Weight (CN75 NI) 450 g (15.9 oz)
Weight (CN75e NI) 491 g (17.3 oz)
• 8.9 cm (3.5 in) Transmissive VGA
• 65,536 (16-bit RGB) colors
• Hardened Corning® Gorilla® Glass display
• LED backlight
• Ambient light sensor
•Qwerty
•Qwerty Keypad
Tumble and Drop
Tumble Specifications 2,000 (1 m) tumbles per IEC 60068-2-32 specification
Drop Specifications 2.4 m (8 ft) to concrete per MIL-STD 810G; 1.8 m (6 ft) to
concrete across operating temperature range per MIL-STD
810G
Power and Electrical
Rechargeable Li-ion battery pack Model 1000AB02 (PN 318-043-033)
Battery configuration 1S2P (1 cell in series and 2 cells in parallel)
Nominal output and capacity 3.7 VDC, 4000 mAh (14.8 Wh)
Environment
Operating temperature* -20°C to 50°C (-4°F to 122°F)
Storage temperature -20°C to 60°C (-4°F to 140°F)
Charging temperature 5°C to 35 °C (41°F to 95°F)
Relative humidity (operating) 5% to 95% non-condensing
75 Series Mobile Computer User Guide 79
Page 90

Parameter Specification
Electrostatic Discharge (ESD) +/-15 kV air discharge, +/-8 kV direct discharge
Sealant rating IP67
The CN75 and CN75e mobile computers with non-incendive (NI) certification comply with the
following specifications for North America and Canada regions only.
Location Suitable for use in Division 2 locations
Safety cULus Listing - ISA/ANSI 12.12.01
Gases Class I - Groups A, B, C, D
Dusts Class II - Groups F, G
Fibers and flyings Class III
* Max. Ambient T6 rating with a maximum temperature of 50 °C (122 °F)
Screen Specifications
Touch screen • 480 x 640 pixels
• 8.9 cm (3.5 in) Transmissive VGA
• 65,536 (16-bit RGB) colors
• Hardened Corning® Gorilla® Glass display
• LED backlight
• Ambient light sensor
CK75
Keypad Options
Keypad Options (CN75 NI) • Numeric
•Qwerty
Keypad Options (CN75e NI) • Large Numeric
•Qwerty Keypad
Parameter Specification
Physical Dimensions (Includes Battery)
Length 23.7 cm (9.33 in)
Width 8.0 cm (3.16 in)
Depth 5.0 cm (1.98 in)
Weight 584 g (20.6 oz)
Tumble and Drop
Tumble Specifications 2,000 (1 m) tumbles per IEC 60068-2-32 specification
Drop Specifications 2.4 m (8 ft) to concrete per MIL-STD 810G; 1.8 m (6 ft) to
concrete across operating temperature range per MIL-STD
810G
80 75 Series Mobile Computer User Guide
Page 91

Parameter Specification
Power and Electrical
Rechargeable Li-ion battery pack
(Standard Model)
Rechargeable Li-ion battery pack
(Cold Storage Model)
Nominal output and capacity 3.7 VDC, 5200 mAh (19.2 Wh)
Environment
Standard Model
Operating temperature -20°C to 60°C (-4°F to 140°F)
Storage temperature -20°C to 60°C (-4°F to 140°F)
Charging temperature 5°C to 35 °C (41°F to 95°F)
Sealant rating IP67
Cold Storage Model
Operating temperature -30°C to 60°C (-22°F to 140°F)
Storage temperature -30°C to 60°C (-22°F to 140°F)
Charging temperature 5°C to 35 °C (41°F to 95°F)
Sealant rating IP65
Relative humidity (operating) 5% to 95% non-condensing
Electrostatic Discharge (ESD) +/-15 kV air discharge, +/-8 kV direct discharge
Model 1001AB01 (PN 318-046-031)
Model 1001AB01 (PN 318-046-032)
Screen Specifications
Touch screen • 480 x 640 pixels
• 8.9 cm (3.5 in) Transmissive VGA
• 65,536 (16-bit RGB) colors
• Hardened Corning® Gorilla® Glass display
• LED backlight
• Ambient light sensor
Keypad Options
Keypad Options • Numeric with Function Keys
• Alphanumeric
Back Accessory Interface Pin-outs
The back accessory interface provides power for peripheral devices out the back of
the 75 Series computers.
Pin Pin Name I/O Description
1 OTB_PWR Output Power supply for peripheral
75 Series Mobile Computer User Guide 81
Page 92

Pin Pin Name I/O Description
2GND
3 OTB_RX Input DTE Data Receive
4 OTB_TX Output DTE Data Transmit
5 OTB_I/O_Voltage Input I/O Voltage Level
6 OTB_ID BiDir One Wire Bus for ID
7 OTB_RTS Output DTE Ready do Send
8 OTB_CTS Input DTE Clear to Send
Imager Specifications
The 75 Series offers these high-performance imager options.
Parameter Specification
Imager
EA30 (CN75/CN75e only) EA30 High-Performance Motion-Tolerant 2D Imager with
EX25 (CK75 only) Near/Far High-Performance 2D Imager
N5603ER (CK75 only) High-Performance 2D Imager:
(up to 500 in/s) white LED illumination, red laser aimer and
framer optimized for all lighting conditions.
Capable of scanning all common 1D and 2D bar codes, including
1D as small as 4 mils and 2D as small as 6.6 mils.
Capable of scanning 1D and 2D bar codes from 15.2 cm to 16.2 m
(6 in to 50 ft).
Capable of scanning all common 1D and 2D bar codes, including
1D as small as 5 mil and standard UPC codes up to 53 cm (21 in).
Bar Code Symbologies
Supported Bar Code Symbologies
AustraliaPost DataMatrix Maxicode
Aztec Dutch Post Micro PDF417
BPO EAN/UPC MSI
Canada Post GS1 Composite PDF417
China Post GS1 DataBar Expanded Planet
Codabar GS1 DataBar Limited Plessey
Codablock A HanXin Postnet
Codablock F Infomail QR Code
Code 11 Interleaved 2 of 5 Standard 2 of 5
Code 39 Japan Post Telepen
Code 93 KoreanPost TLC 39
Code 128/GS1-128 Matrix 2 of 5
82 75 Series Mobile Computer User Guide
Page 93

EA30 Extended Reading Range
4"
8"
0"
4"
8"
12"
12"
cm
0.5 mm / 20 mils
1 mm / 40 mils
in
0" 36" 40"32"28"24"20"16"12"8"4"
0908070605040302010
100
EAN/UPC
0.125mm/5 mils
10
0
10
20
20
30
30
PDF417 10 mils
Data Matrix 10 mils
These typical reading distances are measured in an office environment (250 lux)
for the EA30 standard model with Extended Reading Range activated. Extended
Reading Range is enabled by default.
Symbology Density
Distance
Minimum Maximum
Code 39 0.125 mm/5 mils 6.50 cm/2.56 in 24.50 cm/9.65 in
0.50 mm/20 mils 7 cm/ 2.76 in 62.50 cm/24.61 in
75 Series Mobile Computer User Guide 83
EAN/UPC 100% 0.33 mm/13 mils 6 cm/2.36 in 40 cm/15.75 in
1 mm/40 mils 14.50 cm/5.71 in 97.50 cm/38.39 in
Page 94

EA30 Minimum Reading Distances
cm
PDF417 10 mils
0.5 mm / 20 mils
1 mm / 40 mils
Data Matrix 10 mils
in
0" 28"24"20"16"12"8"4"
070605040302010
EAN/UPC
0.125mm/5 mils
4"
8"
0"
4"
8"
12"
12"
10
0
10
20
20
30
30
Minimum distances are measured in the dark (0 lux).
Symbology Density
Distance
Minimum Maximum
Code 39 0.10 mm (4 mils) 9.5 cm (3.74 in) 10.5 cm (4.13 in)
0.13 mm (5 mils) 8 cm (3.15 in) 14 cm (5.51 in)
0.50 mm (20 mils) 7 cm (2.76 in) 45 cm (17.72 in)
1 mm (40 mils) 9.5 cm (3.74 in) 62 cm (24.41 in)
EAN/UPC 100% 0.33 mm/13 mils 6 cm/2.36 in 31.5 cm (12.4 in)
Data Matrix 0.18 mm (7 mils) 8 cm (3.15 in) 15.5 cm (6.1 in)
0.25 mm (10 mils) 6.5 cm (2.56 in) 21.5 cm (8.46 in)
0.38 mm (15 mils) 5.5 cm (2.17 in) 31.5 cm (12.4 in)
PDF417 0.25 mm (10 mils) 5.5 cm (2.17 in) 25 cm (9.84 in)
038 mm (15 mils) 7 cm (2.76 in) 34 cm (13.39 in)
84 75 Series Mobile Computer User Guide
Page 95

EX25 Minimum Reading Distance
in
0
50
cm
0” 32” 64” 80”16”
100% EAN contrast UPC
0.5 mm/20 mils
1 mm/40 mils
100 150 200 250 300 350 400 450
48” 96”
112”
128”
144” 160”
176”
1.4 mm/55 mils
32”
16”
48”
64”
16”
0”
80”
32”
48”
64”
80”
80
40
0
40
80
120
160
160
120
200
200
0.25 mm/10 mils
Minimum reading distances are measured in the dark (0 lux). The following
graphic does not include the 0.24 cm (0.09 in) setback for the CK75.
EX25 Minimum Reading Distances with 0.24 cm (0.09 in) Setback
Distance
Symbology Density
Code 39 0.08 mm (3 mils) 15 cm (5.91 in) 35 cm (13.78 in)
0.1 mm (2.8 mils) 15 cm (5.91 in) 45 cm (17.72 in)
0.25 mm (10 mils) 15 cm (5.91 in) 115 cm (45.28 in)
0.5 mm (20 mils) 16 cm (6.30 in) 210 cm (82.68 in)
1 mm (40 mils) 25 cm (9.84 in) 310 cm (122.05 in)
1.3 mm (51 mils) 40 cm (15.75 in) 310 cm (122.05 in)
EAN 100% 0.33 mm (13 mils) 15 cm (5.91 in) 145 cm (57.09 in)
Minimum Maximum
75 Series Mobile Computer User Guide 85
Page 96

EX25 Typical Reading Distance (1D)
32”
in
0 100
cm
160
80
0
80
160
240
320
320
240
400
400
0” 40”
80”
0.25 mm
10 mils
0.5 mm/20 mils
1 mm/40 mils
200 300 600400 700500 1100
120” 160” 200”
64”
0”
32”
64”
800 900 1000
240” 280” 320” 360” 400” 440”
96”
128”
160”
96”
128”
160”
100% EAN
contrast UPC
480”
1200
2.5 mm/100 mils
Typical reading distances are measured in an office environment (200 lux).
The following graphics do not include the 0.24 cm (0.09 in) setback for the CK75.
EX25 1D Symbologies Typical Reading Distances with 0.24 cm (0.09 in) Setback
86 75 Series Mobile Computer User Guide
Symbology Density
Minimum Maximum
Code 39 0.25 mm (10 mils) 15 cm (5.91 in) 135 cm (53.15 in)
0.5 mm (20 mils) 16 cm (6.30 in) 280 cm (110.24 in)
1 mm (40 mils) 25 cm (9.84 in) 550 cm (216.54 in)
1.4 mm (55 mils) 40 cm (15.75 in) 720 cm (283.46 in)
2.5 mm (100 mils) ** 1200 cm (472.44 in)
Code 128
retro-reflective
EAN 100% 0.33 mm (13 mils) 15 cm (5.91 in) 160 cm (62.99 in)
** Minimum distance depends on bar code width and scan angle.
2.5 mm (100 mils) ** 1300 cm (511.81 in)
Distance
Page 97

EX25 Typical Reading Distance (2D)
160”
128”
96”
64”
32”
0”
32”
64”
96”
128”
0” 40”
in
80”
0.25 mm
10 mils
0.76 mm/30 mils
1.4 mm/55 mils
120” 160” 200”
2.5 mm/100 mils
240” 280” 320” 360” 400” 440”
480”
400
320
240
160
80
0
80
160
240
320
160”
0 100
200 300 600400 700500 1100
800 900 1000
1200
EX25 2D Symbologies Typical Reading Distances with 0.24 cm (0.09 in) Setback
Distance
Symbology Density
Minimum Maximum
DataMatrix 0.25 mm (10 mils) 15 cm (5.91 in) 90 cm (35.43 in)
0.76 mm (30 mils) 25 cm (9.84 in) 310 cm (122.05 in)
1.4 mm (55 mils) ** 450 cm (177.17 in)
2.5 mm (100 mils) ** 1100 cm (433.07 in)
7.5 mm (300 mils) 20 cm (7.87 in) 1524 cm (600 in)
** Minimum distance depends on bar code width and scan angle.
400
cm
75 Series Mobile Computer User Guide 87
Page 98

N5603 Extended Range Reading Distances
Red Illumination Monochrome and Monocolor Sensors - Guaranteed Specifications
Minimum reading distances are measured in the dark (0 lux).
Symbology Near Distance Far Distance Delta
5 mil Code39/128 14.7 cm/5.8 in 22.4 cm/8.8 in 7.6 cm/3.0 in
7.5 mil Code 39/128 11.2 cm/4.4 in 33.2 cm/13 in 21.8 cm/8.6 in
10 mil Code 39/128 8.1 cm/3.2 in 40.9 cm/16.1 in 32.8 cm/12.9 in
15 mil Code 39/128 5.1 cm/2.0 in 48.3 cm/19.0 in 43.2 cm/17.0 in
20 mil Code 39/128 7.9 cm/3.1 in 57.9 cm/22.8 in 50 cm/16.2 in
100% UPC 7.1 cm/2.8 in 48.3 cm/19.0 in 41.2 cm/16.2 in
5 mil PDF417 15.5 cm/6.1 in 18.8 cm/7.4 in 3.3 cm/1.3 in
6.7 mil PDF417 11.9 cm/4.7 in 24.9 cm/9.8 in 13.0 cm/5.1 in
10 mil PDF417 6.1 cm/2.4 in 37.8 cm/14.9 in 31.8 cm/12.5 in
10 mil DataMatrix/
Aztec
20 mil DataMatrix 10.2 cm/4.0 in 40.6 cm/16.0 in 30.5 cm/12.0 in
10 mil QR Code 10.9 cm/4.3 in 26.4 cm/10.4 in 15.5 cm/6.1 in
20 mil QR Code 5.3 cm/2.1 in 45.0 cm/17.7 in 39.6 cm/15.6 in
32 mil Maxicode 10.7 cm/4.2 in 45.0 cm/17.7 in 34.3 cm/13.5 in
13.5 cm/5.3 in 25.4 cm/10.0 in 11.9 cm/4.7 in
White Illumination Monocolor Sensor Only - Guaranteed Specifications
Minimum reading distances are measured at 535 lux.
Symbology Near Distance Far Distance Delta
5 mil Code39/128 14.7 cm/5.8 in 21.6 cm/8.5 in 6.9 cm/2.7 in
7.5 mil Code 39/128 11.2 cm/4.4 in 31.0 cm/12.2 in 19.8 cm/7.8 in
10 mil Code 39/128 8.1 cm/3.2 in 38.9 cm/15.3 in 30.7 cm/12.1 in
15 mil Code 39/128 5.1 cm/2.0 in 46.5 cm/18.3 in 41.4 cm/16.3 in
20 mil Code 39/128 7.9 cm/3.1 in 53.3 cm/21.0 in 45.5 cm/17.9 in
100% UPC 7.1 cm/2.8 in 46.5 cm/18.3 in 39.4 cm/15.5 in
5 mil PDF417 15.5 cm/6.1 in 18.3 cm/7.2 in 2.8 cm/1.1 in
6.7 mil PDF417 11.9 cm/4.7 in 24.1 cm/9.5 in 12.2 cm/4.8 in
10 mil PDF417 6.1 cm/2.4 in 36.8 cm/14.5 in 30.7 cm/12.1 in
10 mil DataMatrix/
Aztec
20 mil DataMatrix 10.2 cm/4.0 in 39.4 cm/15.5 in 29.2 cm/11.5 in
10 mil QR Code 10.9 cm/4.3 in 24.6 cm/9.7 in 13.7 cm/5.4 in
20 mil QR Code 5.3 cm/2.1 in 40.6 cm/16.0 in 37.8 cm/14.9 in
32 mil Maxicode 10.7 cm/4.2 in 43.7 cm/17.2 in 33.0 cm/13.0 in
13.5 cm/5.3 in 24.6 cm/9.7 in 11.2 cm/4.4 in
88 75 Series Mobile Computer User Guide
Page 99

Red Illumination Monochrome and Monocolor Sensors - Typical Specifications
Minimum reading distances are measured at 535 lux.
Symbology Near Distance Far Distance Delta
10 mil Code 39/128 6.1 cm/2.4 in 44.2 cm/17.4 in 38.1 cm/15.0 in
15 mil Code 39/128 3.8 cm/1.5 in 54.9 cm/21.6 in 51.1 cm/20.1in
100% UPC 6.1cm/2.4 in 53.3 cm/21.0 in 47.2 cm/18.6 in
10 mil PDF417 5.6 cm/2.2 in 39.6 cm/15.6 in 34.0 cm/13.4 in
32 mil Maxicode 7.9 cm/3.1 in 52.8 cm/20.8 in 44.9 cm/17.7 in
White Illumination Monocolor Sensor Only- Typical Specifications
Minimum reading distances are measured at 535 lux.
Symbology Near Distance Far Distance Delta
10 mil Code 39/128 6.1 cm/2.4 in 42.7 cm/16.8 in 36.6 cm/14.4 in
15 mil Code 39/128 3.8 cm/1.5 in 54.9 cm/21.6 in 51.1 cm/20.1in
100% UPC 6.1cm/2.4 in 53.3 cm/21.0 in 47.2 cm/18.6 in
10 mil PDF417 5.6 cm/2.2 in 39.6 cm/15.6 in 34.0 cm/13.4 in
32 mil Maxicode 7.9 cm/3.1 in 52.8 cm/20.8 in 44.9 cm/17.7 in
Field of View/Resolution
Horizonal Field Angle (degrees) ±15.8
Vertical Field Angle (degrees) ±12.2
Focus Extended Range (ER)
75 Series Mobile Computer User Guide 89
Page 100

™
Honeywell
9680 Old Bailes Road
Fort Mill, SC 29707
www.honeywellaidc.com
Cx75-W65-EN-UG Rev A
10/17
 Loading...