

Honda 450X (2005), CRF450X, CRF450X (2005) Owner's Manual & Competition Handbook
2005
Honda CRF450X
OWNER’S MANUAL & COMPETITION HANDBOOK
Introduction
Congratulations on choosing your Honda CRF
off-road motorcycle.
When you own a Honda, you’re part of a
worldwide family of satisfied customers-people
who appreciate Honda’s reputation for building
quality into every product.
Your Honda was designed as a recreational
motorcycle for off-road use by one rider only.
Before riding, take time to get acquainted with
your CRF and how it works. To protect your
investment, we urge you to take
responsibility for keeping your CRF well
maintained. Scheduled service is a must, of
course. But it’s just as important to observe the
break-in guidelines, and perform all the pre-ride
and other periodic checks detailed in this manual.
You should also read the owner’s manual before
you ride. It’s full of facts, instructions, safety
information, and helpful tips. To make it easy to
use, the manual contains a table of contents, a
detailed list of topics at the beginning of each
section, and an index at the back of the book.
As you read this manual, you will find
information that is preceded by a
symbol. This information is intended to help you
avoid damage to your Honda, other property, or
the environment.
Unless you are mechanically qualified and have
the proper tools, you should see your Honda
dealer for the service and adjustment procedures
discussed in this manual.
NOTICE
The official Honda Service Manual for your CRF
is available (page 164). It is the same manual
your dealer uses. If you plan to do any service
on your CRF beyond the standard maintenance
procedures in this manual, you will find the
Service Manual a valuable reference.
Your new Honda is covered by Noise Control
Warranty (USA only).
There are responsibilities, restrictions, and
exclusions which apply to this warranty. Please
read the Honda Motorcycle Warranties Booklet
given to you by your Honda dealer at the line of
purchase. Be sure to keep your Honda owner’s
card (USA only) with your Warranties Booklet.
It is important to realize that your warranty for
your Honda applies to defects in material or
factory workmanship. Your warranty coverage
does not apply to normal wear or deterioration
associated with using the motorcycle.
Your warranty coverage will not be voided if you
choose to perform your own maintenance.
However, you should have the proper tools and
service information and be mechanically
qualified. Failures that occur due directly to
improper maintenance or lack of maintenance are
not covered.
This motorcycle has no cooling fan. For this
reason, engine overheating and coolant loss will
occur if the engine is kept idling too long when
hot. Additionally, when riding in mud or sand, or
any condition that causes high engine load at low
vehicle speed, the time it takes for the engine to
overheat will be shortened, especially when the
ambient temperature is high. Continuing to
operate the unit in these conditions will result in
engine damage.
Whenever you ride, tread lightly. By staying on
established trails and riding only in approved
areas, you help protect the environment and keep
off-road riding areas open for the future.
If you have any questions, or if you ever need a
special service or repairs, remember that your
Honda dealer knows your CRF best and is
dedicated to your complete satisfaction.
Please report any change of address or ownership
to your Honda dealer so we will be able to
contact you concerning important production
information.
You may also want to visit our website at
www.honda.com
Happy riding!
California Proposition 65 Warning
WARNING: This product contains or emits
chemicals known to the State of California to
cause cancer and birth defects or other
reproductive harm.
Introduction

A Few Words About Safety
Your safety, and the safety of others, is very important. And operating this motorcycle safely is an important responsibility.
To help you make informed decisions about safety, we have provided operating procedures and other information on labels and in this manual.
This information alerts you to potential hazards that could hurt you or others.
Of course, it is not practical or possible to warn you about all hazards associated with operating or maintaining a motorcycle. You must use your own good
judgment.
You will find important safety information in a variety of forms, including:
•
Safety Labels –– on the motorcycle.
• Safety Messages –– preceded by a safety alert symbol and one of three signal words: DANGER, WARNING, or CAUTION.
These signal words mean:
You WILL be KILLED or SERIOUSLY HURT if you don’t follow instructions.
You CAN be KILLED or SERIOUSLY HURT if you don’t follow instructions.
You CAN be HURT if you don’t follow instructions.
• Safety Headings –– such as Important Safety Reminders or Important Safety Precautions.
• Safety Section –– such as Motorcycle Safety.
• Instructions –– how to use this motorcycle correctly and safety.
This entire book is filled with important safety information–– please read it carefully.
Safety Messages
DANGER
WARNING
CAUTION

Contents
Motorcycle Safety..............................................1
Important Safety Information..............................2
Loading................................................................3
Accessories & Modifications ..............................4
Safety Labels.......................................................5
Operating Controls ...........................................7
Component Locations .........................................8
Before Riding.....................................................9
Are You Ready to Ride?....................................10
Is Your Motorcycle Ready to Ride?..... .............11
Basic Operating Instructions .........................13
Safe Riding Precautions................................14
Starting & Stopping the Engine ........................15
Shifting Gears....................................................17
Braking ..............................................................18
Parking ..............................................................19
Post-ride Inspection...........................................20
Break-in Guidelines ..........................................21
Servicing Your Honda .....................................23
Before You Service Your Honda
The Importance of Maintenance .......................24
Maintenance Safety...........................................25
Important Safety Precautions........................25
Maintenance Schedule ......................................26
General Competition Maintenance ...................29
Before & After Competition Maintenance........33
Service Preparations
Component Locations .......................................35
Seat Removal.....................................................36
Fuel Tank Removal ...........................................37
Subframe Upright Position................................39
Service Procedures
Fluids & Filters
Fuel System.......................................................41
Engine Oil .........................................................43
Transmission Oil ...............................................46
Coolant ..............................................................48
Air Cleaner ........................................................51
Crankcase Breather ...........................................53
Engine
Throttle ..............................................................54
Clutch System ...................................................56
Hot Start Lever..................................................60
Spark Plug .........................................................61
Exhaust Pipe/Muffler ........................................62
Spark Arrester....................................................65
Va lve Clearance.................................................66
Piston/Piston Rings/Piston Pin..........................75
Chassis
Suspension.........................................................83
Brakes................................................................87
Wheels...............................................................91
Tires & Tubes ....................................................92
Side Stand..........................................................94
Drive Chain .......................................................95
Additional Maintenance Procedures .................98
Electrical
Battery .............................................................100
Headlight & Taillight ......................................102
Appearance Care .............................................104
Adjustments for Competition.......................107
Front Suspension Adjustments........................108
Rear Suspension Adjustments.........................122
Suspension Adjustments for Track
Conditions...................................................126
Suspension Adjustment Guidelines.................127
Carburetor Adjustments & Turning Tips.........130
Chassis Adjustments........................................137
Gearing ............................................................138
Tire Selection for Track Conditions................139
Personal Fit Adjustments ................................140
Tips .................................................................141
Transporting Your Motorcycle ........................142
Storing Your Honda.........................................143
You & the Envionment....................................145
Troubleshooting...............................................146
Taking Care of the
Unexpected........................................147
If a Fuse Blows..........................................148
If Your Battery is Low (or Dead)...............149
Technical Information...................................151
Vehicle Identification ......................................152
Specifications ..................................................153
Torque Specifications......................................155
Emission Control Systems ..............................158
Oxygenated Fuels............................................159
Competition Logbook .....................................160
Optional Parts List...........................................162
Spare Parts & Equipment................................163
Wiring Diagram...............................................164
Consumer Information .................................165
Authorized Manuals ........................................166
Contacting Honda............................................167
Your Honda Dealer..........................................168
The Honda Rider’s Club (USA only) .............169
Table of Contents...........................................170
Index ...............................................................172
Quick Reference ............................................176
Contents

Motorcycle Safety
This section presents some of the most important
information and recommendations to help you
ride your CRF safely. Please take a few
moments to read these pages. This section also
includes information about the location of safety
labels on your CRF.
Important Safety Information...............................2
Important Safety Precaution ...........................2
Loading ...........................................................3
Accessories & Modifications..........................4
Safety Labels ..................................................5
Motorcycle Safety 1

Important Safety Information
Important Safety Precautions
Your CRF can provide many years of pleasure, if
you take responsibility for your own safety and
understand the challenges you can meet in
competitive racing.
There is much that you can do to protect yourself
when you ride. You’ll find many helpful
recommendations throughout this manual. The
following are a few that we consider most
important.
Always Wear a Helmet. It’s a proven fact:
helmets significantly reduce the number and
severity of head injuries. So always wear an
approved motorcycle helmet. We also
recommended that you wear eye protection,
sturdy boots, gloves, and other protective gear.
Never Carry a Passenger. Your CRF is designed
for one person only. There are no handholds,
footrests, or seat for a second person–so never
carry a passenger. A passenger could interfere
with your ability to move around to maintain
your balance and control of the motorcycle.
Ride Off-Road Only. Your CRF is designed and
manufactured for off-road use only. The tires are
not made for pavement, and the CRF does not
have turn signals and other features required for
use on public roads. If you need to cross a paved
or public road, get off and walk your CRF across.
Always Wear Protective Gear. We recommend
that you wear sturdy, boots, gloves, and other
protective gear. The exhaust system becomes
very hot during operation, and it remains hot
after operation. Never touch any part of the hot
exhaust system. Wear clothing that fully covers
your legs.
Keep Your Honda In Safe Condition. It’s
important to keep your CRF properly maintained
and in safe riding condition. Having a breakdown
can be difficult, especially if you are stranded
off-road far from your base. To help avoid
problems, inspect your CRF before every ride
and perform all recommended maintenance.
2
Motorcycle Safety
Do not wear loose clothing which could catch on
the control levers, kickstarter, footpegs, drive
chain, or wheels.
Ta ke Time to Learn and Practice. Developing
off-road riding skills is a gradual, step-by-step
process. Start by practicing at low speed in a safe
area and slowly build your skills.
Personal instruction from an experienced rider
can also be valuable.
If you need assistance, ask your dealer about
riding groups in your area.
Also be sure to read the
Tips & Practice Guide
for the Off-Highway Motorcyclist booklet that
came with your CRF (USA only).
Be Alert for Off-Road Hazards. The terrain can
present a variety of challenges when you ride
off-road. Continually ‘‘read” the terrain for
unexpected turns, drop-offs, rocks, ruts, and other
hazards. Always keep your speed low enough to
allow time to see and react to hazards.
Ride within Your Limits. Pushing limits is
another major cause of motorcycle accidents.
Never ride beyond your personal abilities or
faster than conditions warrant. Remember that
alcohol, drugs, fatigue, and inattention can
significantly reduce your ability to make good
judgments and ride safety.
Don’t Drink and Ride. Alcohol and riding don’t
mix. Even one drink can reduce your ability to
respond to changing conditions, and your
reaction time gets worse with every additional
drink. So don’t drink and ride, and don’t let your
friends drink and ride either.
Loading
Your CRF was designed as a rider-only
motorcycle. It was not designed to carry a
passenger or cargo. A passenger or cargo could
interfere with your ability to move around to
maintain your balance and control of the CRF.
In addition, exceeding the weight limits or
carrying an unbalanced load can seriously affect
your CRF’s handling, braking, and stability.
Adding accessories or making modifications that
change this CRF’s design and performance can
also make it unsafe. Also, the weight of any
accessories will reduce the maximum load the
motorcycle can carry.
More specific information on load limits,
accessories, and modifications follows.
Loading
How much weight you put on your CRF, and
how you load it, are important to your safety. If
you decide to carry cargo, you should be aware
of the following information.
Loading Guidelines
As discussed on this page, we recommended that
you do not carry any cargo on this motorcycle.
However, if you decide to carry cargo, ride at
reduced speeds and follow these commonsense
guidelines:
•Keep cargo small and light. Make sure it
cannot easily be caught on brush or other
objects, and that it does not interfere with
your ability to shift position to maintain
balance and stability.
•Place weight as close to the center of the
motorcycle as possible.
• Do not attach large or heavy items (such as a
sleeping bag or tent) to the handlebar, fork, or
front fender.
• Make sure that all cargo is tied down securely.
• Check that both tires are inflated properly.
Motorcycle Safety 3
WARNING
Overloading or carrying a passenger can
cause a crash and you can be seriously
hurt or killed.
Follow all loading guidelines in this
manual.

Accessories & Modifications
Accessories
We strongly recommend that you use only
genuine Honda accessories that have been
specifically designed and tested for your CRF.
Because Honda cannot test all other accessories,
you must be personally responsible for proper
selection, installation, and use of non-Honda
accessories. Check with your Honda dealer for
assistance and always follow this guideline:
• Make sure the accessory does not reduce
ground clearance and lean angle, limit
suspension travel or steering travel, alter your
riding position, or interfere with operating any
controls.
Modif
ications
We strongly advise you not to remove any
original equipment or modify your CRF in any
way that would change its design or operation.
Such changes could seriously impair your CRF’s
handling, stability, and braking, making it unsafe
to ride.
We also advice you not to make any
modifications or remove any equipment (such as
the USDA qualified spark arrester or emission
control system components) that would make the
motorcycle illegal in your area.
4
Motorcycle Safety
Accessories & Modifications
Modifying your CRF or using non-Honda
accessories can make your CRF unsafe.
Before you consider making any modifications or
adding an accessory, be sure to read the
following information.
WARNING
Improper accessories or modifications
can cause a crash in which you can be
seriously hurt or killed.
Follow all instructions in this owner’s
manual regarding modifications and
accessories.
Motorcycle Safety 5
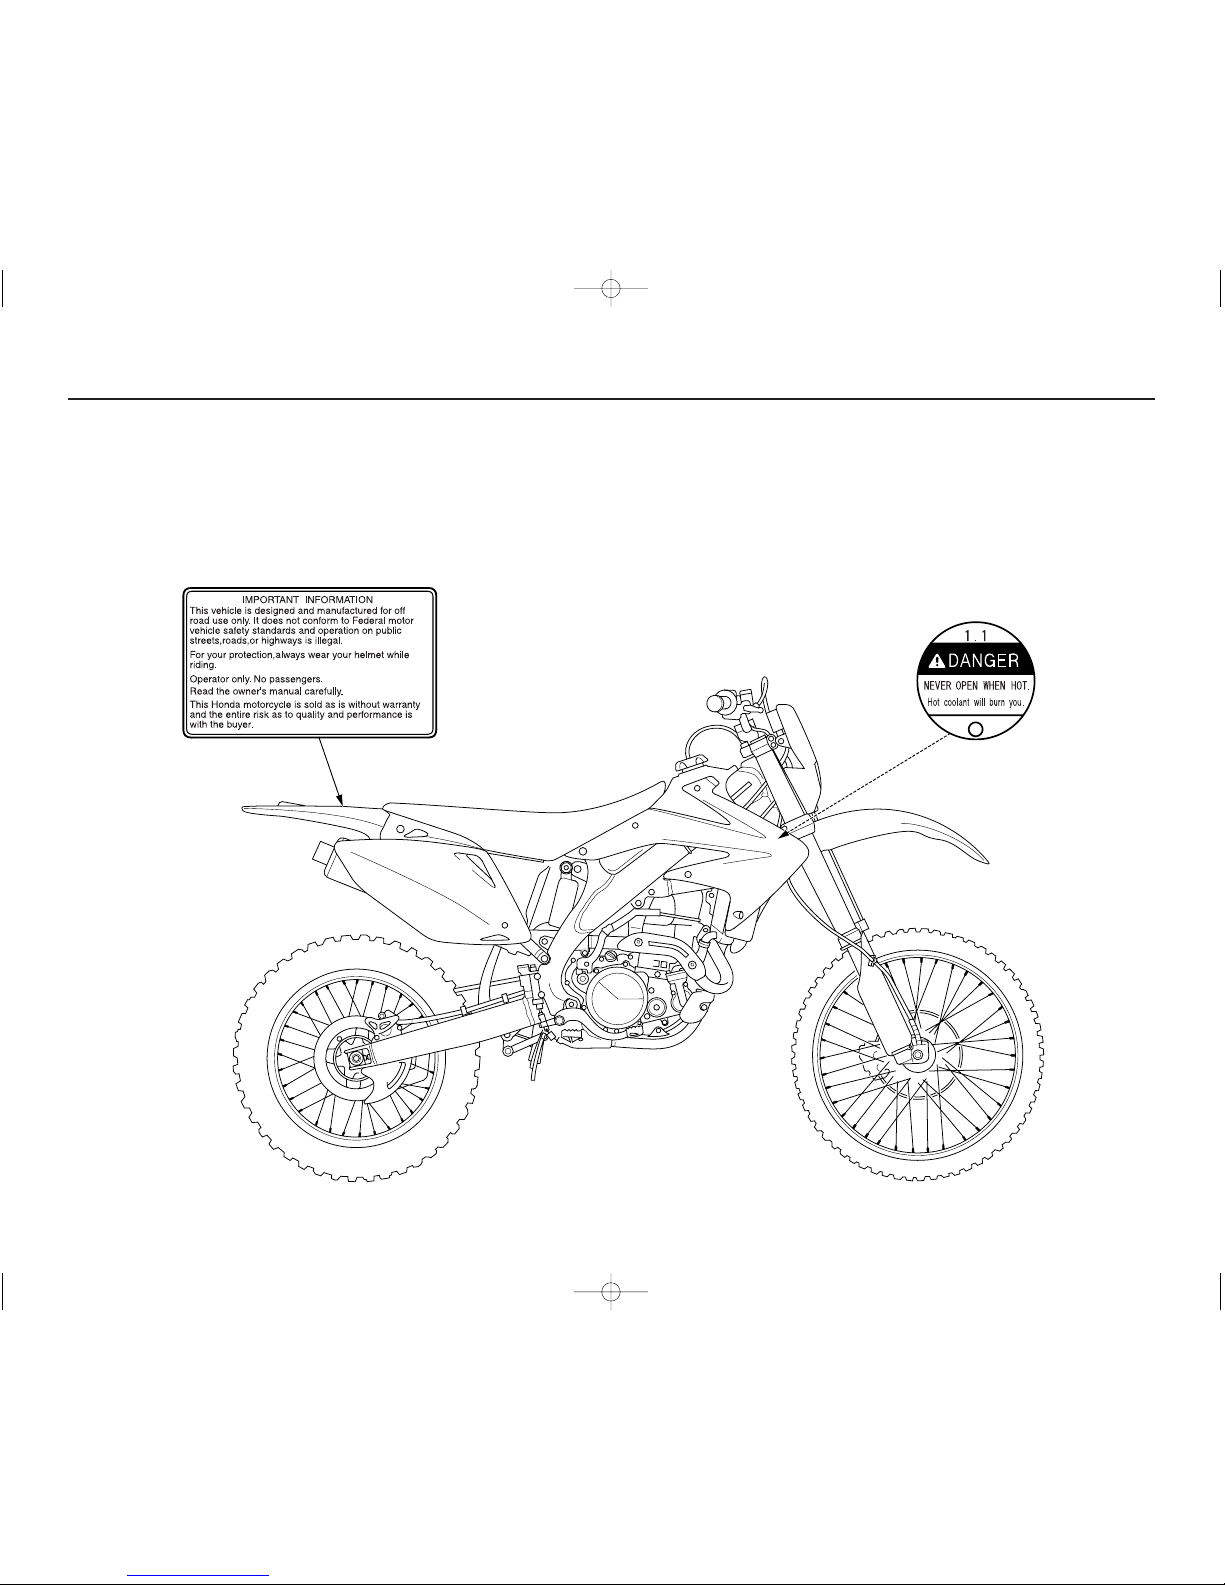
Safety Labels
This page shows the locations of safety labels on your CRF. Some labels warn you of potential hazards that could cause serious injury. Others provide
important safety information. Read these labels carefully and don’t remove them.
If the label comes off or becomes hard to read, contact your Honda dealer for replacement.

6 Motorcycle Safety

Operating Controls 7
Operating Controls
Read this section carefully before you ride. It
presents the location of the basic controls on your
CRF.
Component Locations ..........................................8
8 Operating Controls
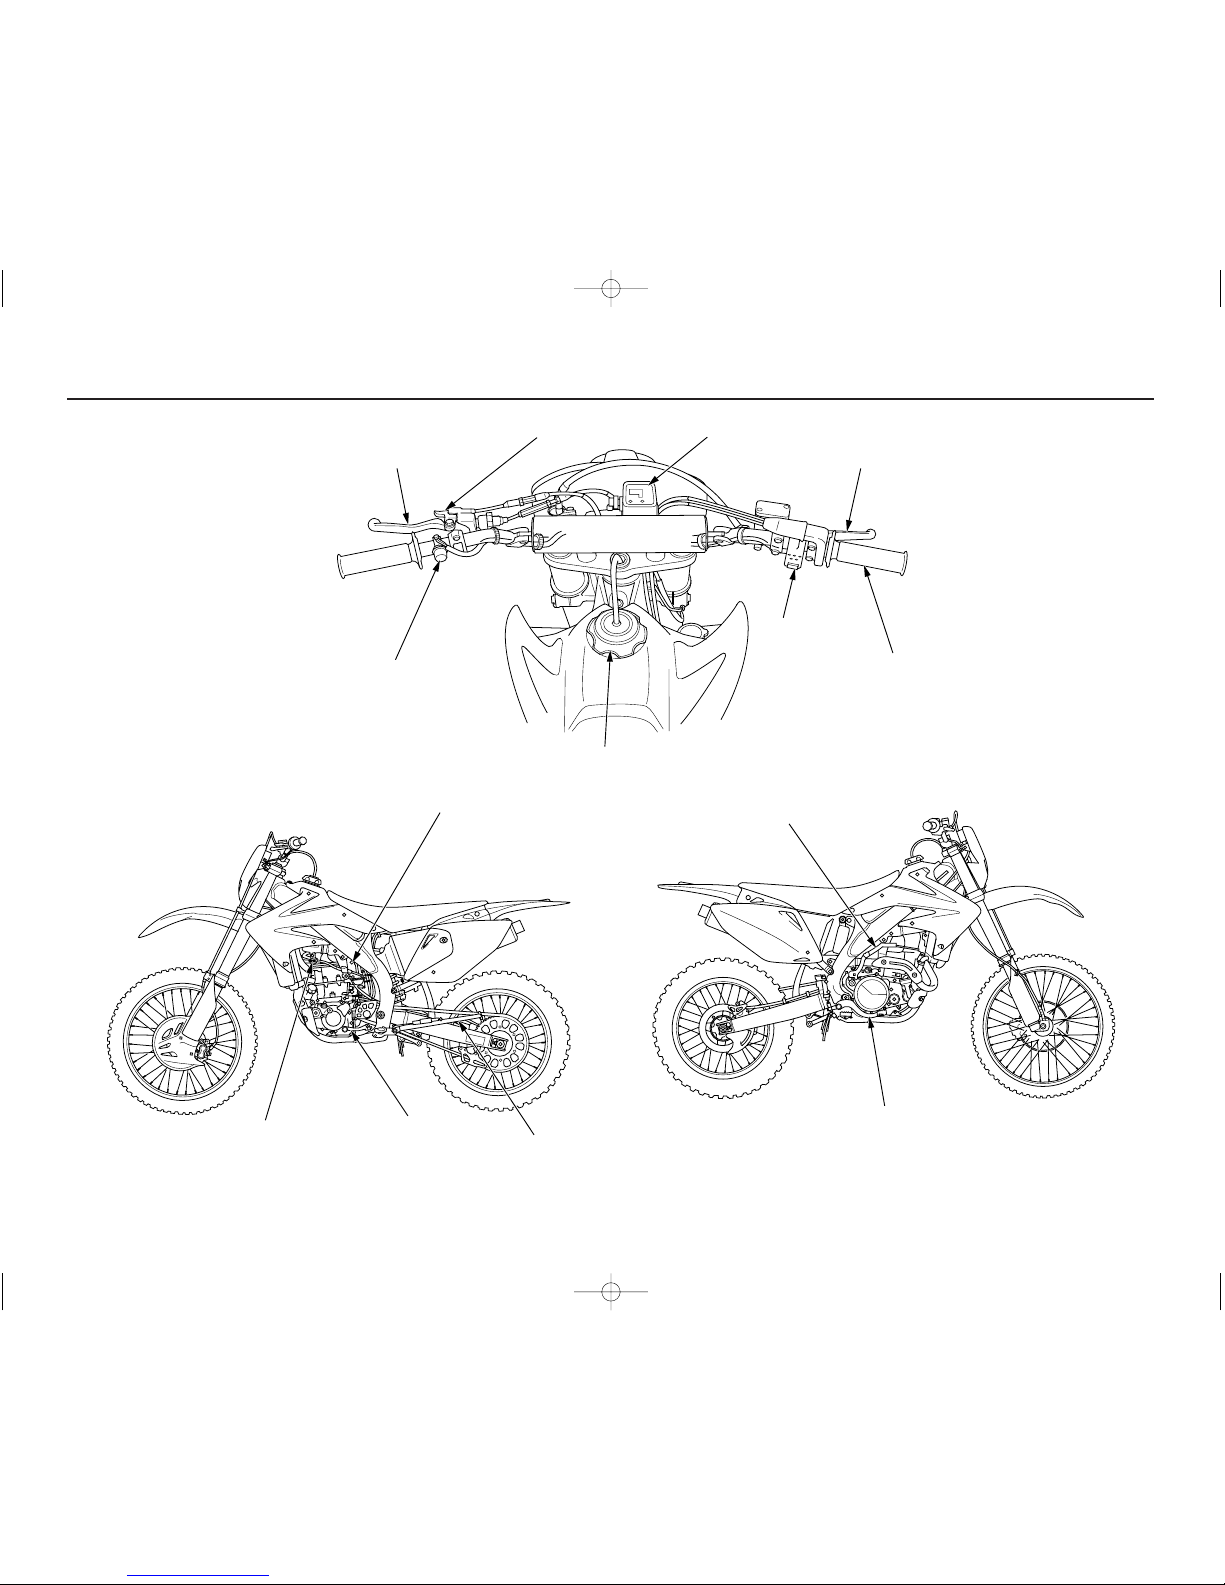
Component Locations
clutch lever
hot start lever
front brake lever
engine stop button
fuel fill cap
throttle grip
tripmeter
start button
choke knob
fuel valve
shift lever
side stand
kickstarter
rear brake pedal

Before Riding 9
Before each ride, you need to make sure you and
your Honda are both ready to ride. To help get
you prepared, this section discusses how to
evaluate your riding readiness, and what items
you should check on your CRF.
For information about suspension, carburetor and
other adjustment see page 107.
Before Riding
Are You Ready to Ride?.....................................10
Is Your Motorcycle Ready to Ride? ...................11
Pre-ride Inspection........................................11
10 Before Riding
Are You Ready to Ride?
Before riding your CRF for the first time, we
recommend that you read this owner’s manual,
make sure you understand the safety messages,
and know how to operate the controls.
Before each ride, it’s also important to make sure
you and your CRF are both ready to ride.
For information about suspension, carburetor, and
other adjustments, see page 107.
Whether you’re preparing for competition or for
practice, always make sure you are.
•In good physical and mental condition
•Free of alcohol and drugs
•Wearing an approved helmet, eye protection,
and other appropriate riding gear
Although complete protection is not possible,
wearing the proper gear can reduce the chance or
severity of injury when you ride.
WARNING
Not wearing a helmet increases the
chance of serious injury or death in a
crash.
Be sure you always wear a helmet, eye
protection and other protective apparel
when you ride.
Before Riding 11
Is Your Motorcycle Ready to Ride?
Competitive riding can be tough on a motorcycle,
so it’s important to inspect your CRF and correct
any problems you find before each ride. Check
the following items (page numbers are at the
right):
Pre-ride Inspection
Check the following before each ride:
• Engine oil level.............................................44
•Transmission oil level...................................47
• Coolant for proper level................................48
• Cooling system and hoses for condition.......49
• Spark plug for proper heat range, carbon
fouling and high tension cord terminal for
looseness .......................................................61
•Air cleaner for condition and
contamination................................................51
•Clutch operation and free play .....................56
•Steering head bearings and related parts
for condition..................................................98
• Carburetor throttle operation ........................55
• Engine idle speed for stable and proper
RPM ............................................................136
•Tires for damage or improper inflation
pressure ........................................................92
• Spokes for looseness.....................................91
•Rim locks for looseness................................91
•Front and rear suspension for proper
operation ..................................................83,84
•Front and rear brakes, check operation ........87
•Drive chain for wear or damage and
adequate lubrication......................................96
•Drive chain guide, sliders and guide rollers
for damage or wear.......................................97
• Exhaust pipe/Muffler inspection,
removal and installation...........................62,63
•Every possible part for looseness (such as
cylinder head nuts, engine mounting bolts,
axle nuts, handlebar holder bolts, fork bridge
pinch bolts, drive chain adjuster, drive chain
guide, wire harness connectors, kickstarter
mounting bolt, etc.) .............................155-157
WARNING
Improperly maintaining this motorcycle or
failing to correct a problem before riding
can cause a crash in which you can be
seriously hurt or killed.
Always perform a pre-ride inspection
before every ride and correct any
problems.

12 Before Riding

Basic Operating Instructions 13Basic Operating Instructions 13
Basic Operating Instructions
This section gives basic information on how to
start and stop your engine as well as break-in
guidelines.
Safe Riding Precautions................................14
Side Stand .....................................................14
Tripmeter.......................................................14
Starting & Stopping the Engine .........................15
Preparation ....................................................15
Fuel Valve .....................................................15
Starting Procedure ........................................15
Flooded Engine.............................................16
How to Stop the Engine................................16
Shifting Gears.....................................................17
Braking ...............................................................18
Parking................................................................19
Post-ride Inspection............................................20
Break-in Guidelines ...........................................21
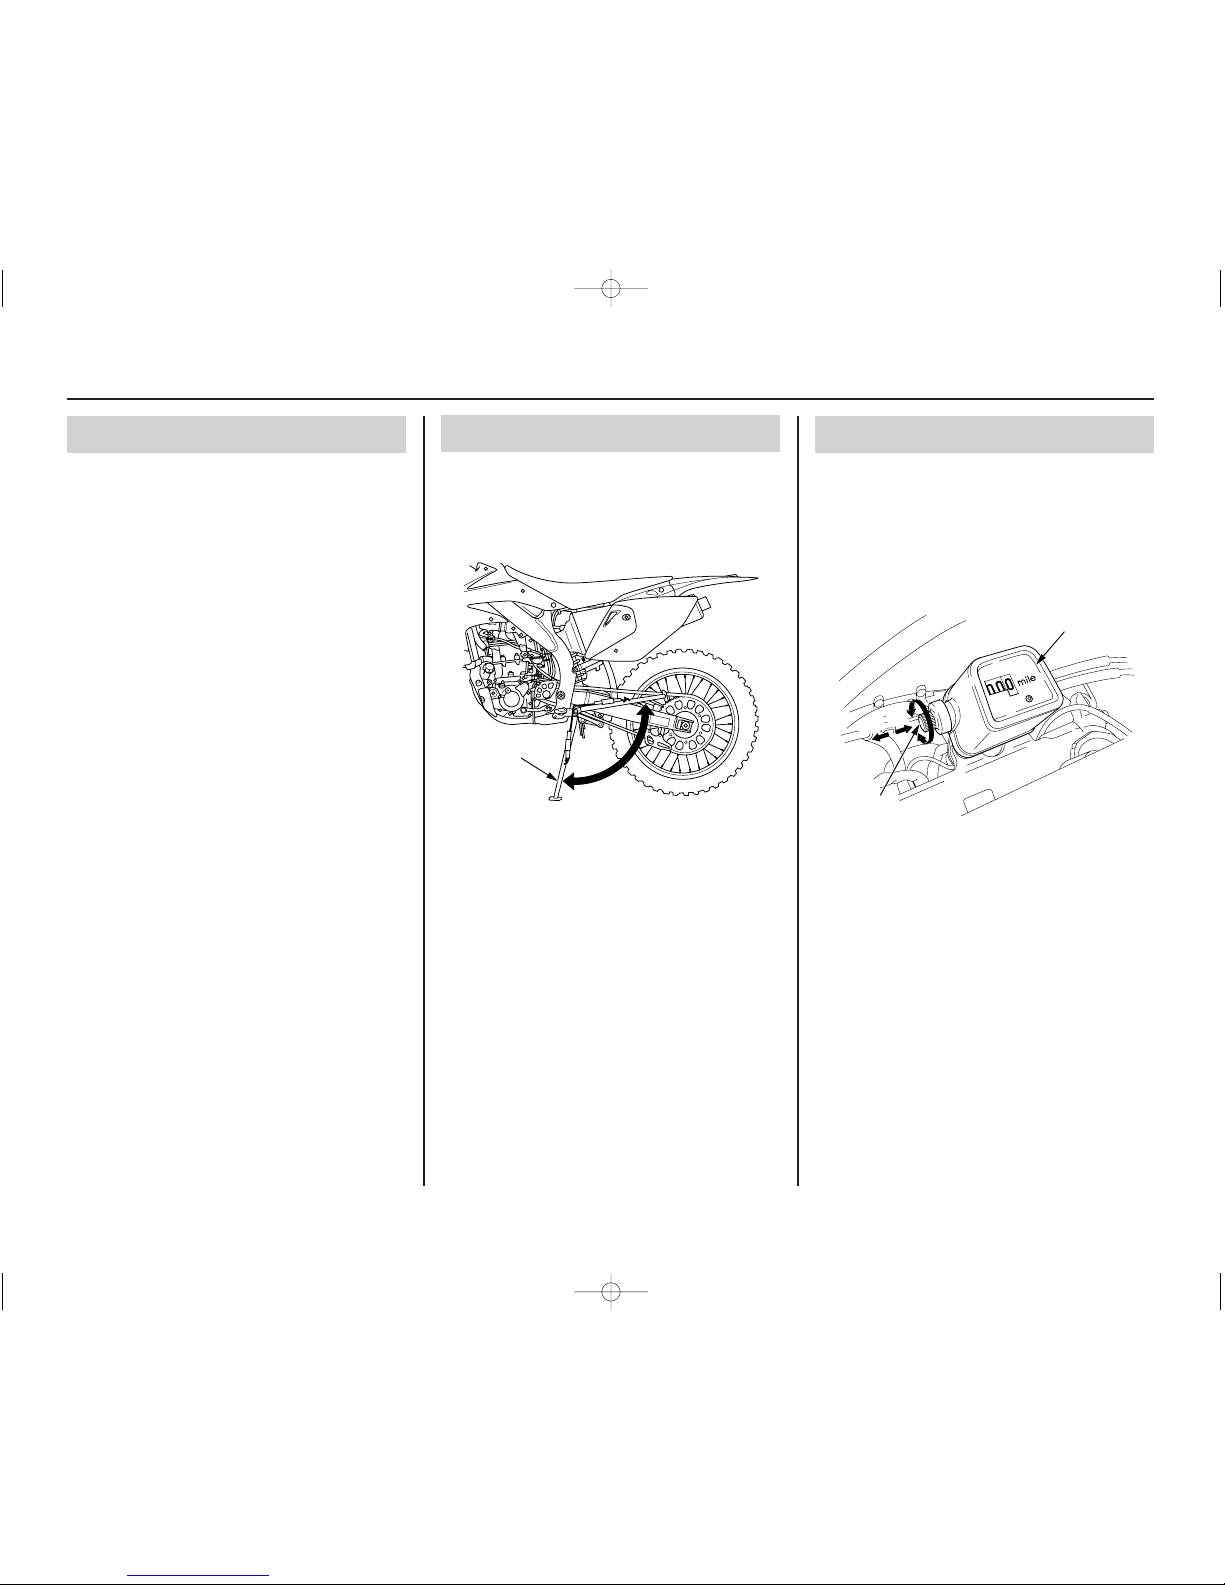
Tripmeter
The tripmeter (1) is used to record the distance
traveled (USA: miles, Canada: kilometers) per
trip or section of route.
To operate, pull the tripmeter reset knob (2) out
(OFF) and turn it until the meter shows all zeros
(0), then push the knob in (ON).
14
Basic Operating Instructions14 Basic Operating Instructions
Basic Operating Instructions
Safe Riding Precautions
Before riding your CRF for the first time, please
review the Important Safety Precaution
beginning on page 2 and the previous section,
titled Before Riding.
For your safety, avoid starting or operating the
engine in an enclosed area such as a garage.
Your CRF’s exhaust contains poisonous carbon
monoxide gas which can collect rapidly in an
enclosed area and cause illness or death.
(1) side stand
(1) tripmeter
(2) tripmeter reset knob
(1)
O
F
F
O
N
(1)
(2)
Side Stand
The side stand (1) is used to support your CRF
while parked (page 19). To operate, use your foot
to lower the side stand until it is fully extended.
Before riding, raise the side stand.
Starting & Stopping the Engine
Always follow the proper starting procedure
described below.
Your CRF can be started with the transmission in
gear by pulling in the clutch lever before
operating the kickstarter or start button.
Preparation
Make sure that the transmission is in neutral.
Turn the fuel valve ON.
Fuel Valve
Starting Procedure
Always follow the proper starting procedure
described as follow.
5. Warm up the engine; don’t operate the
throttle.
6. About 15 seconds after the engine starts, push
the choke knob back all the way to fully OFF.
If idling is unstable, open the throttle slightly.
Extended use of the choke may impair piston and
cylinder wall lubrication and damage the engine.
High
Air Temperature 35°C (95°F) or above
1. Turn the fuel valve (1) ON.
2. Do not use the choke.
3. Keep the throttle fully closed.
4. Start the engine following step 4 under
“Normal Air Temperature.”
Low Air Temperature 10°C (50°) or below
1. If the temperature is below 32°F (0°C), open
the throttle two or three times. (The engine
requires a richer mixture for starting in cold
weather. When the throttle is so opened, the
accelerator pump will feed extra fuel to the
cylinder, thereby facilitating starting in cold
weather.)
2. Follow steps 1-5 under “Normal Air
Temperature.”
3. Continue warming up the engine until it runs
smoothly and responds to the throttle when
the choke knob is pushed back all the way to
fully OFF.
Extended use of the choke may impair piston and
cylinder wall lubrication and damage the engine.
(cont’d)
NOTICE
NOTICE
Basic Operating Instructions 15
(1) fuel valve
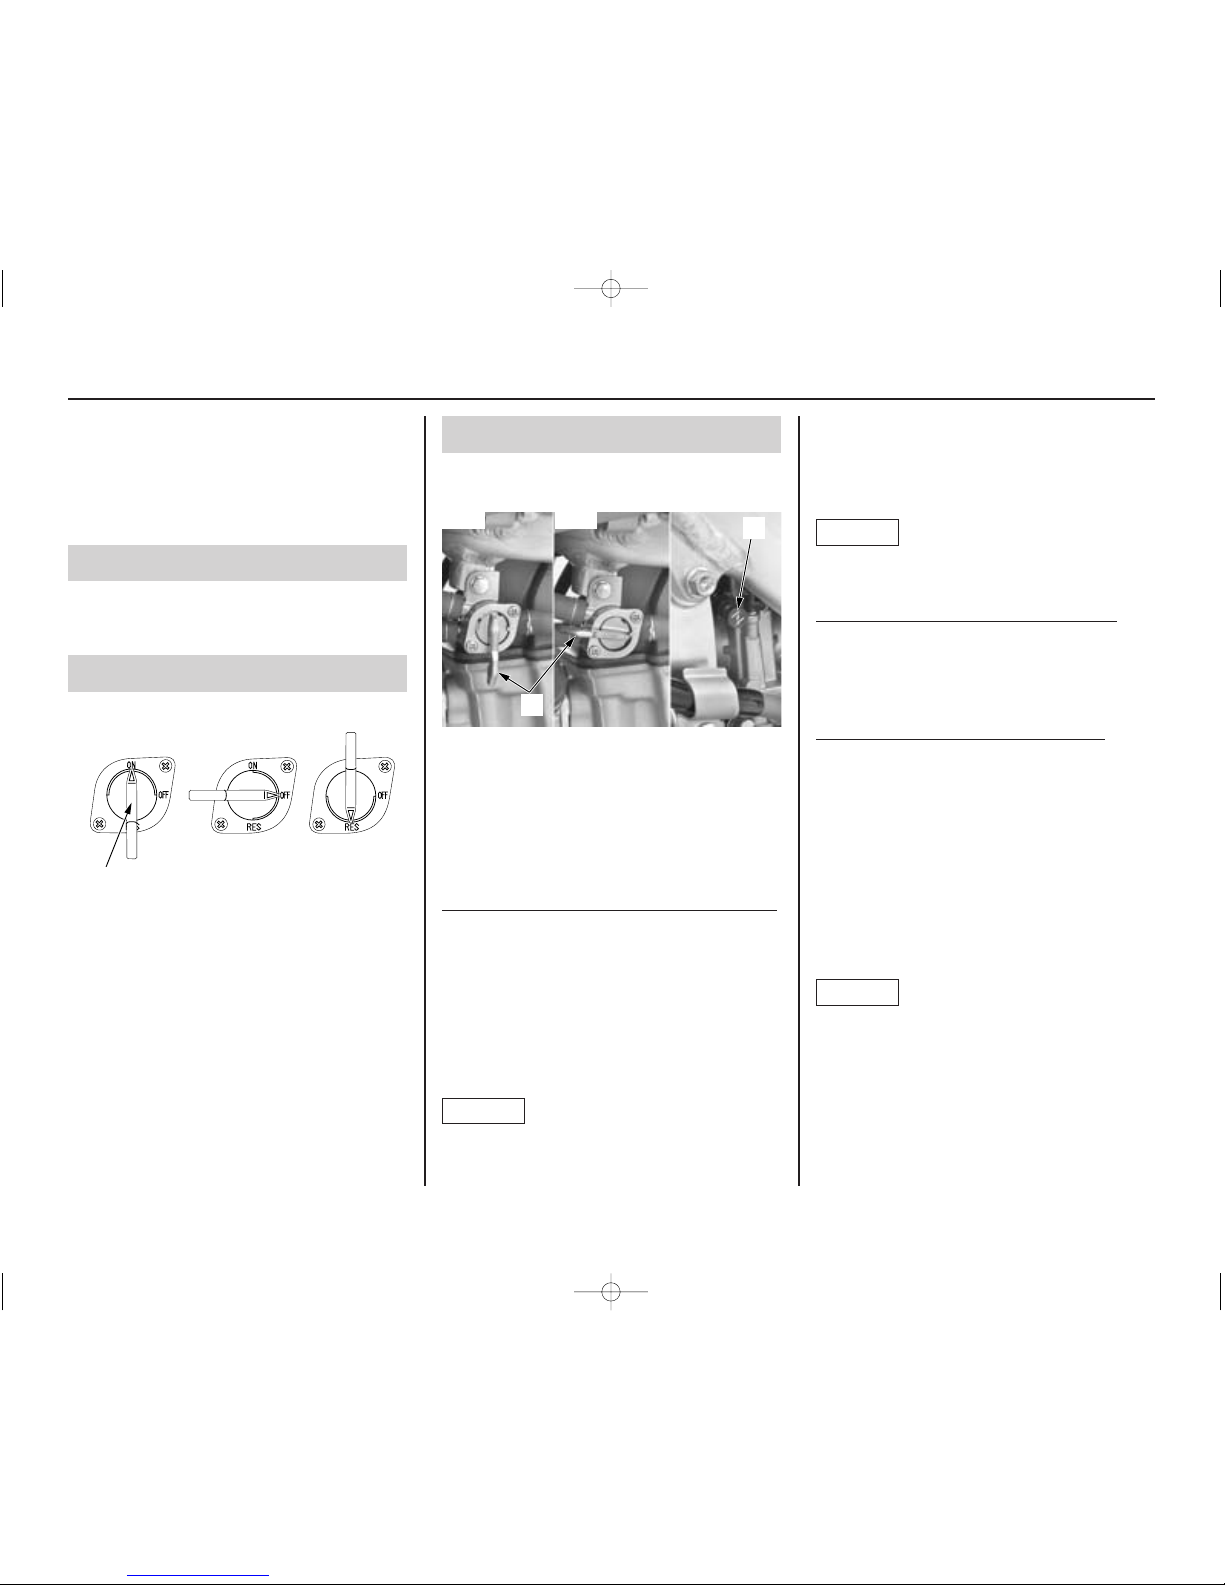
The three-way fuel valve is used to control the
flow of fuel from the fuel tank to the carburetor.
ON–Turning the fuel valve ON before attempting
to start the engine allows fuel to flow from the
fuel tank to the carburetor.
OFF–Turning the fuel valve OFF prevents the
flow of fuel from the fuel tank to the carburetor.
RES–Turning the fuel valve to RES allows fuel
to flow from the reserve fuel supply to the
carburetor.
(1) fuel valve (2) choke knob
Check the engine oil, transmission oil and
coolant levels before starting the engine (pages
44,47,48).
To restart a warm engine, follow the procedure
for ‘‘High Air Temperature.”
Normal
Air Temperature 10°C-35°C (50°F-95°F)
1. Turn the fuel valve (1) ON.
2. Pull the choke knob (2) fully ON, if the
engine is cold.
3. Keep the throttle fully closed.
4. Pull the clutch lever all the way in, and depress
the start button. Or operate the kickstarter to
start the engine. Starting from the top of the
stroke, kick through to the bottom with a rapid,
continuous motion. Do not operate the throttle.
Allowing the kickstarter to snap back freely
against the pedal stop can damage the engine
case.
NOTICE
ON OFF RES
(1)
(1)
(2)
ON
OFF
Starting & Stopping the Engine
Flooded Engine
Starting the engine after a stall during riding or
after a fall:
1. Shift the transmission into neutral.
2. Pull the hot start lever all the way in and start
the engine. (Do not open the throttle).
3. As soon as the engine starts, release the hot
start lever.
Starting a flooded engine:
(Using the start button)
1. Do not use the choke.
2. Shift the transmission into neutral with the
throttle fully opened.
3. Pull the clutch and hot start levers all the way
in and depress the start button for 5 seconds.
If the engine starts, quickly close the throttle,
then open it slightly if idling is unstable. If the
engine does not start, wait 10 seconds, and
then follow the starting the engine.
4. As soon as the engine starts, release the hot
start lever.
(Using the kickstarter)
1. Do not use the choke.
2. Shift the transmission into neutral with the
throttle fully opened, repeat kickstarter
operation approximately 10 times very slowly
to discharge excessive fuel from the engine.
Close the throttle.
3. Pull the hot start lever all the way in and start
the engine. (Do not open the throttle.)
4. As soon as the engine starts, release the hot
start lever.
16
Basic Operating Instructions
How to Stop the Engine
(1)
(2)
(1) throttle (2) engine stop button
Normal Engine Stop
1. Shift the transmission into neutral.
2. Turn the fuel valve OFF.
3. Lightly open the throttle (1) 2 – 3 times, and
then close it.
4. Depress the engine stop button (2) until the
engine stops completely.
Failure to close the fuel valve may cause the
carburetor to overflow, result in hard starting.
Emer
gency Engine Stop
To stop the engine in an emergency, depress the
engine stop button.
Hot Engine Starting
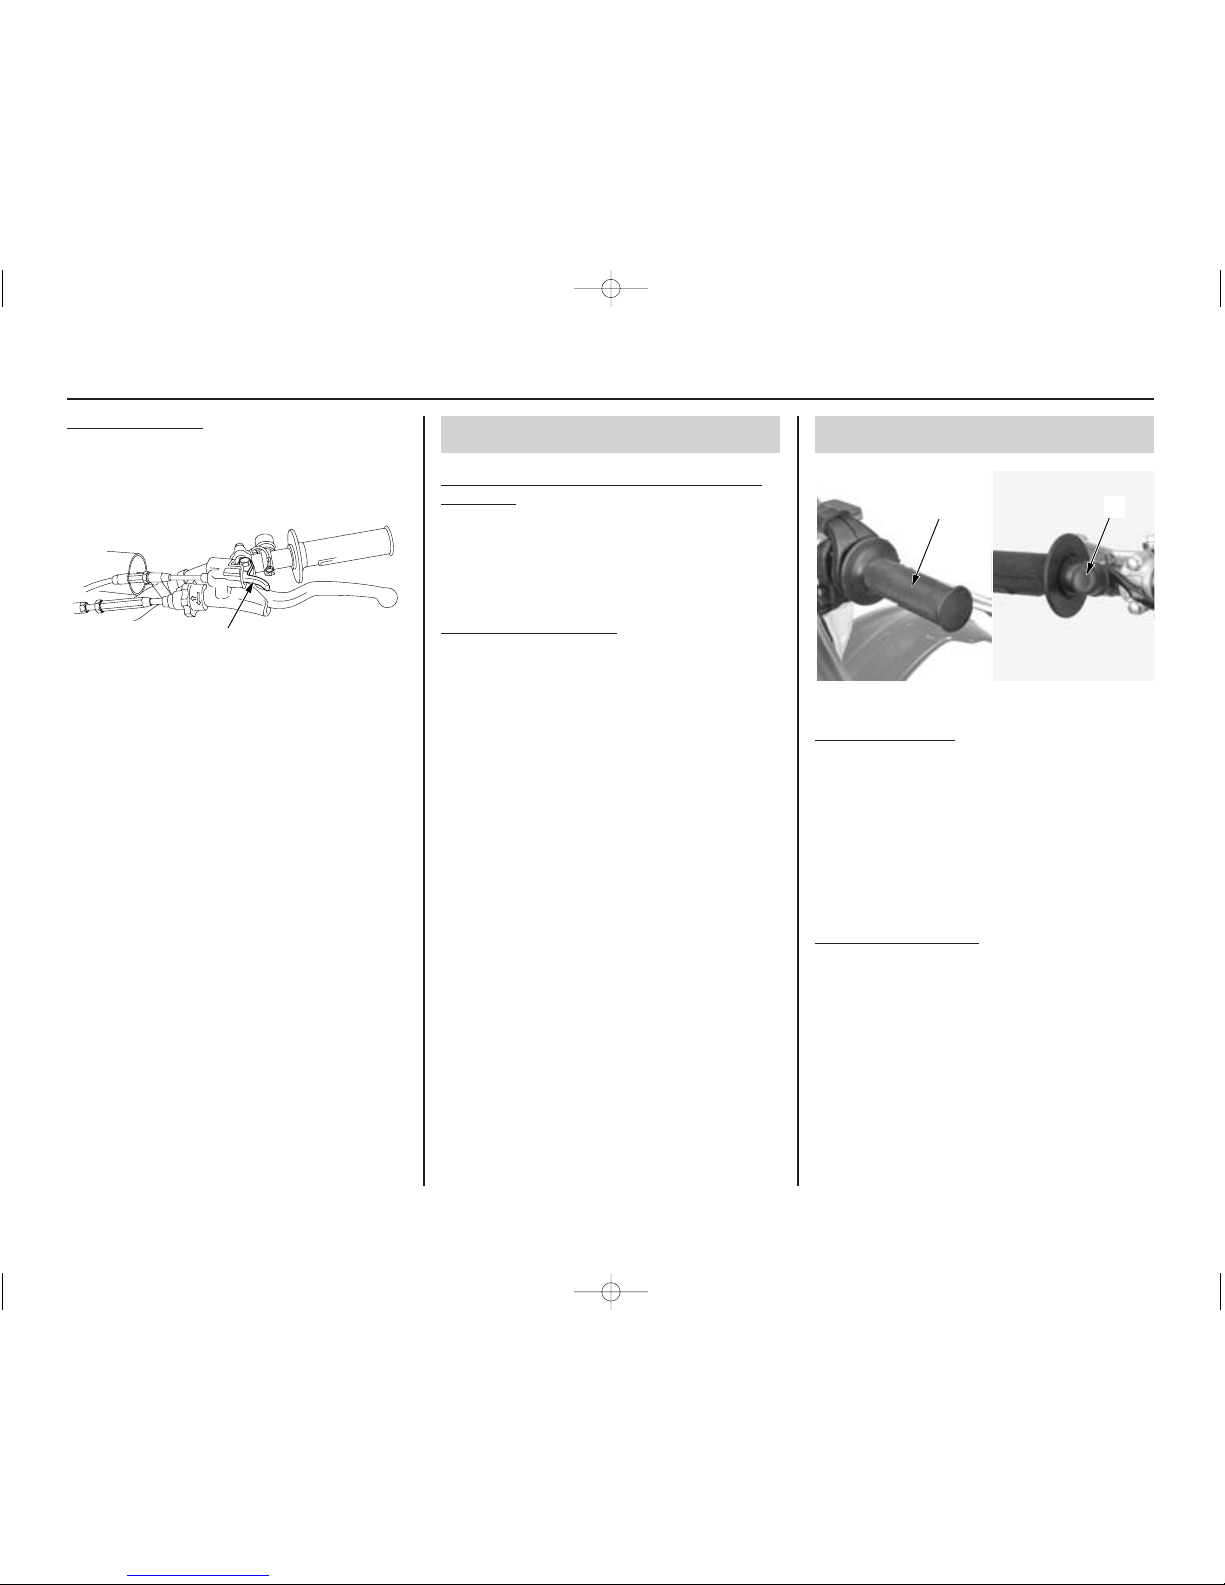
1. Pull the hot start lever (3) all the way in and
start the engine following step 4 under
“Normal Air Temperature.”
2. As soon as the engine starts, release the hot
start lever.
(3)
(3) hot start lever

Shifting Gears
Remember to close the throttle and pull the
clutch lever in completely before shifting.
Improper shifting may damage the engine,
transmission, and drive train.
Learning when to shift gears comes with
experience. Upshift to a higher gear or reduce
throttle before engine rpm (speed) gets too high.
Downshift to a lower gear before you feel the
engine laboring (lugging) at low rpm.
NOTICE
Basic Operating Instructions 17
Your CRF has five forward gears in a one-down,
four-up shift pattern.
To start riding, after the engine has been warmed
and the side stand raised.
1. Close the throttle and pull the brake lever in.
2. Pull the clutch lever all the way in.
3. Depress the shift lever from neutral down to
first gear.
4. Release the brake lever. Gradually open the
throttle while you slowly release the clutch
lever. If the engine rpm (speed) is too low
when you release the clutch lever, the engine
will stall.
If the engine rpm (speed) is too high or you
release the clutch lever too quickly, your CRF
may lurch forward.
5. When you attain a moderate speed, close the
throttle, pull the clutch lever in, and raise the
shift lever. After shifting, release the clutch
lever and apply the throttle.
6. To continue shifting up to each higher gear,
repeat step 5.
7. To shift down to a lower gear, close the
throttle, pull the clutch lever in, and depress
the shift lever. After shifting, release the
clutch lever and apply the throttle.

Braking
To slow or stop, apply the front brake lever and
rear brake pedal smoothly, while downshifting to
match your speed. Gradually increase braking as
you feel the brakes slowing your speed. To
prevent stalling the engine, pull the clutch lever
in before coming to a complete stop. For support,
put your left foot down first, then your right foot
when you are through using the rear brake pedal.
For maximum braking, close the throttle and
firmly apply the front brake lever and rear brake
pedal controls.
Applying the brakes too hard may cause the
wheels to lock and slide, reducing control of your
CRF. If this happens, release the brake controls,
steer straight ahead until you regain control, then
reapply the brakes more gently.
Generally, reduce your speed or complete
braking before beginning a turn. Avoid braking or
closing the throttle quickly while turning. Either
action may cause one or both wheels to slip. Any
wheel slip will reduce your control of your CRF.
When riding in wet or raining conditions, or on
loose surfaces, the ability to maneuver and stop
will be reduced. All of your actions should be
smooth under these conditions. Rapid
acceleration, braking, or turning may cause loss
of control. For your safety, exercise extreme
caution when braking, accelerating, or turning.
When descending a long, steep grade, use engine
compression braking by downshifting, with
intermittent use of both brakes.
When you brake to a stop, pull the clutch lever in
before stopping completely to prevent stalling the
engine. For support, put your left foot on the
ground first, then your right foot when you’re
through braking.
18
Basic Operating Instructions

Parking
Lower the side stand to support your CRF.
If you’re through riding for the day, also turn the
fuel valve OFF. Always choose a level place to
park.
Basic Operating Instructions 19

Post-ride Inspection
When you return home after riding thoroughly
clean your CRF and remove any dirt, mud, brush,
rocks or other objects you may have picked up
along the way.
After cleaning, carefully inspect your CRF for
leaks or damage.
Be sure to lubricate the drive chain (page 97) to
prevent rusting.
20
Basic Operating Instructions

Basic Operating Instructions 21
Break-in Guidelines
Help assure your CRF’s future reliability and
performance by paying extra attention to how
you ride during the first operating day or 15
miles (25 km).
During this period, avoid full-throttle starts and
rapid acceleration.
This same procedure should be followed each
time when:
•piston is replaced
•piston rings are replaced
•cylinder is replaced
•crankshaft or crank bearings are replaced

22 Basic Operating Instructions
Servicing Your Honda 23
Servicing Your Honda
Keeping your CRF well maintained is absolutely
essential to your safety. It’s also a good way to
protect your investment, get maximum
performance, avoid breakdowns, and have more
fun.
To help keep your CRF in good shape, this
section includes a Maintenance Schedule for
required servicing and step-by-step instructions
for specific maintenance tasks. You’ll also find
important safety precautions, information on oils,
and tips for keeping your Honda looking good.
The ICM (Ignition Control Module) system is
used on this motorcycle; consequently, routine
ignition timing adjustment is unnecessary. If you
want to check the ignition timing, refer to the
Honda Service Manual (page 166).
Before You Service Your Honda
The Importance of Maintenance ........................24
Maintenance Safety............................................25
Important Safety Precautions........................25
Maintenance Schedule .......................................26
General Competition Maintenance ....................29
Before & After Competition Maintenance.........33
Between Motos & Practice Maintenance .....33
After Competition Maintenance ...................33
Service Preparations
Component Locations ........................................35
Seat Removal......................................................36
Fuel Tank Removal ............................................37
Subframe Upright Position.................................39
Service Procedures
Fluids & Filters
Fuel System........................................................41
Engine Oil ..........................................................43
Transmission Oil ................................................46
Coolant ...............................................................48
Air Cleaner .........................................................51
Crankcase Breather ............................................53
Engine
Throttle ...............................................................54
Clutch System ....................................................56
Hot Start Lever...................................................60
Spark Plug ..........................................................61
Exhaust Pipe/Muffler .........................................62
Spark Arrester.....................................................65
Va lve Clearance..................................................66
Piston/Piston Rings/Piston Pin...........................75
Chassis
Suspension..........................................................83
Brakes.................................................................87
Wheels................................................................91
Tires & Tubes .....................................................92
Side Stand...........................................................94
Drive Chain ........................................................95
Additional Maintenance Procedures ..................98
Electrical
Battery ..............................................................100
Headlight & Taillight .......................................102
Appearance Care ..............................................104
24 Servicing Your Honda
WARNING
Improperly maintaining this motorcycle or
failing to correct a problem before you
ride can cause a crash in which you can
be seriously hurt or killed.
Always follow the inspection and
maintenance recommendations and
schedules in this owner’s manual.
The Importance of Maintenance
A well-maintained motorcycle is essential for
safe, economical, and trouble-free riding. It will
also help reduce air pollution. Careful pre-ride
inspections and good maintenance are especially
important because your CRF is designed to be
ridden over rough off-road terrain.
To help you properly care for your CRF, this
section of the manual provides a Maintenance
Schedule. The service intervals in this schedule
are based on average riding conditions.
More frequent service is needed if you subject
your CRF to severe use or ride in unusually wet
or dusty areas.
Frequent servicing of the air cleaner is especially
important to help you avoid a possible costly
engine repair.
If your CRF overturns or is involved in a crash,
be sure your Honda dealer inspects all major
parts, even if you are able to make some repairs.
Remember, proper maintenance is your
responsibility. Be sure to inspect your
CRF before each ride and follow the
Maintenance Schedule in this section.
Servicing Your Honda 25
Maintenance Safety
This section includes instructions on how to
perform some important maintenance tasks.
Some of the most important safety precautions
follow. However, we cannot warn you of every
conceivable hazard that can arise in performing
maintenance. Only you can decide whether or
not you should perform a given task.
Important Safety Precautions
• Make sure the engine is off before you begin
any maintenance or repairs.
This will help eliminate several potential
hazards:
Carbon monoxide poisoning from engine
exhaust. Be sure there is adequate ventilation
whenever you operate the engine.
Burns from hot motorcycle parts. Let the
engine and exhaust system cool before
touching.
Injury from moving parts. Do not run the
engine unless instructed to do so.
• Read the instructions before you begin, and
make sure you have the tools and skills
required.
•To help prevent the motorcycle from falling
over, park it on a firm, level surface, using the
side stand or a workstand to provide support.
•To reduce the possibility of a fire or
explosion, be careful when working around
gasoline. Use only a non-flammable (high
flash point) solvent such as kerosene —not
gasoline— to clean parts. Keep cigarettes,
sparks, and flames away from all fuel-related
parts.
WARNING
Failure to properly follow maintenance
instructions and precautions can cause
you to be seriously hurt or killed.
Always follow the procedures and
precautions in this owner’s manual.

26 Servicing Your Honda
Maintenance Schedule
To maintain the safety and reliability of your
CRF, regular inspection and service is required
as shown in the Maintenance Schedules –
Regular OFF ROAD Use (non-competition) and
Competition Use-that follow.
The Maintenance Schedule lists items that can be
performed with basic mechanical skills and hand
tools. Procedures for these items are provided in
this manual.
The Maintenance Schedule also includes items
that involve more extensive procedures and may
require special training, tools, and equipment.
Therefore, we recommend that you have your
Honda dealer perform these tasks unless you
have advanced mechanical skills and the required
tools. Procedures for items in this schedule are
provided in a service manual available for
purchase from your Honda dealer (page 168).
Because your CRF does not have an odometer,
service intervals in the maintenance schedules are
expressed in terms of riding days as well as
miles. To avoid overlooking required service, we
urge you to develop a convenient way to record
the number of days and/or distance traveled
(USA: miles, Canada: kilometers) you ride.
If you do not feel capable of performing a given
task or need assistance, remember that your
Honda dealer knows your CRF best and is fully
equipped to maintain and repair it. If you decide
to do your own maintenance, use only genuine
Honda parts or their equivalents for repair or
replacement to ensure the best quality and
reliability.
Perform the pre-ride inspection (page 11) at each
scheduled maintenance period.
Each item on the maintenance schedule requires
some mechanical knowledge. Certain items
(particularly those marked *and**) may require
more technical information and tools. Consult
your Honda dealer.
* Should be serviced by your Honda dealer,
unless the owner has the proper tools and
service data and are mechanically qualified.
Refer to the official Honda Service Manual
(page 166).
** In the interest of safety, we recommend these
items be serviced only by your Honda dealer.
Maintenance Procedures:
I: inspect and clean, adjust, lubricate, or replace,
if necessary
C: clean
L: lubricate
R: replace
 Loading...