

Hobart Hydroline Pure RO-C User Manual
Starting from Serial No.:
USER MANUAL
INSTALLATION INSTRUCTIONS
EN
GEBRAUCHSANWEISUNG
INSTALLATIONSANLEITUNG
DE
HANDLEIDING
INSTALLATIEHANDLEIDING
NL
MANUEL D’UTILISATION
INSTRUCTIONS D’INSTALLATION
FR
MANUAL DEL USUARIO
INSTUCCIONES PARA LA
INSTALACIÓN
ES
BRUKSANVISNING
INSTALLATIONSANVISNING
SE
KULLANICI KILAVUZU
MONTAJ TALIMATLARI
TU
MANUALE PER L’UTENTE
ISTRUZIONI PER
L’INSTALLAZIONE
IT
WP 05 / 8251328-00 / JON-KB 1146
USER MANUAL
INSTALLATION INSTRUCTIONS
EN
GEBRAUCHSANWEISUNG
INSTALLATIONSANLEITUNG
DE
HANDLEIDING
INSTALLATIEHANDLEIDING
NL
MANUEL D’UTILISATION
INSTRUCTIONS D’INSTALLATION
FR
MANUAL DEL USUARIO
INSTUCCIONES PARA LA
INSTALACIÓN
ES
BRUKSANVISNING
INSTALLATIONSANVISNING
SE
KULLANICI KILAVUZU
MONTAJ TALIMATLARI
TU
MANUALE PER L’UTENTE
ISTRUZIONI PER
L’INSTALLAZIONE
IT
REV. 18.11.201114100001
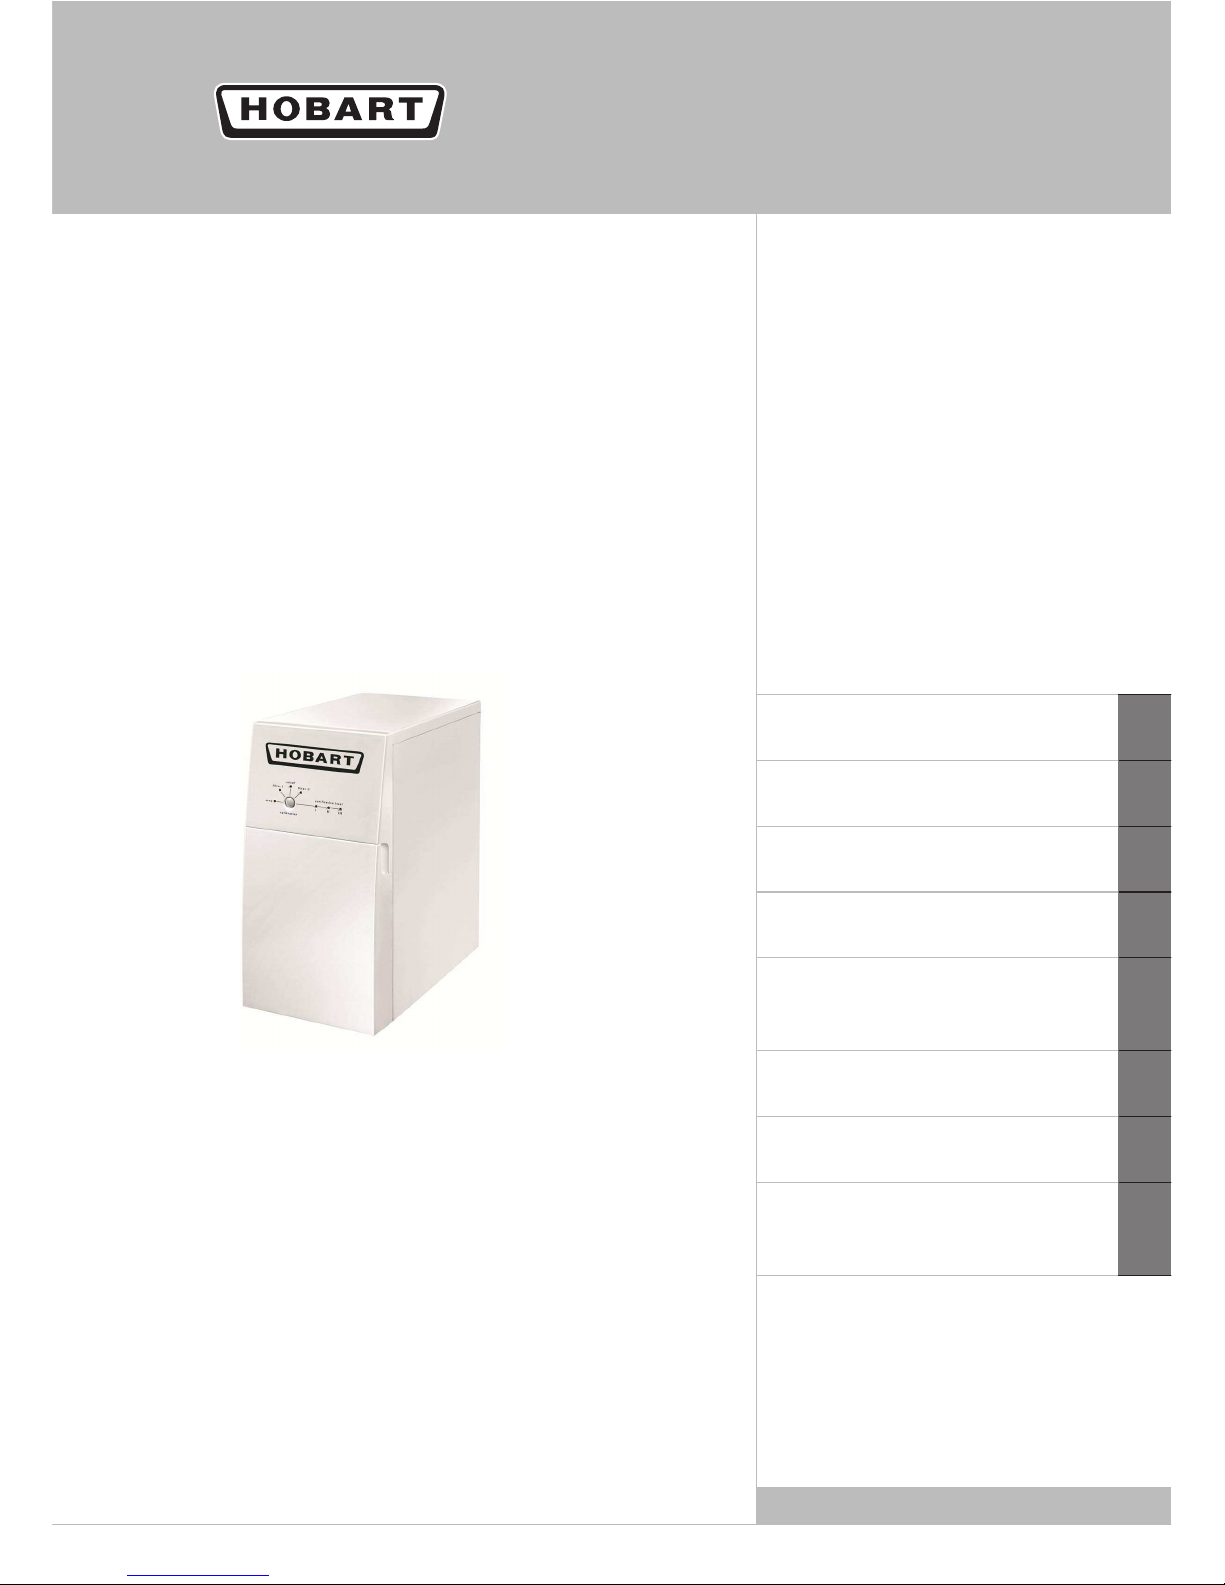
WATER PURIFIER
REVERSE OSMOSIS
REV. 18.11.2011
HYDROLINE
PURE RO-C


2
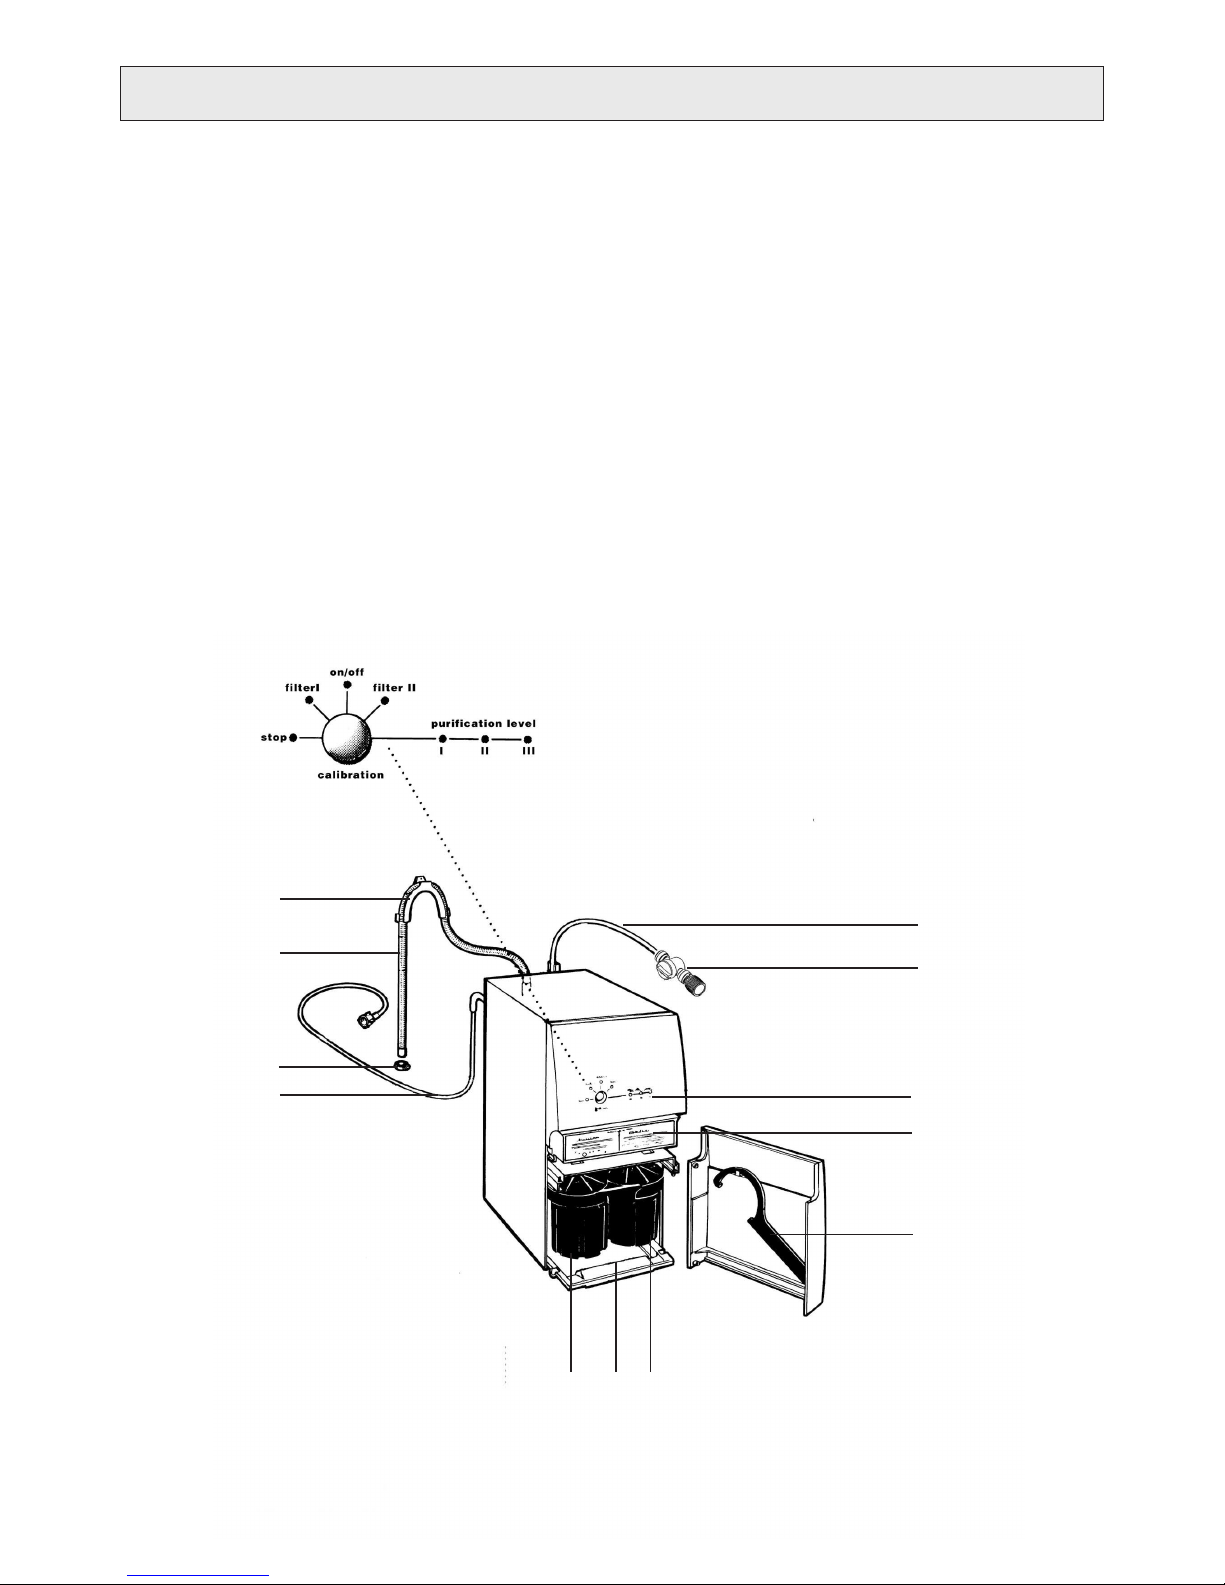
PRODUCT DESCRIPTION
EN
Bracket for reject water hose1.
Reject water hose2.
Hose clips (2)3.
Hose for feed water4.
Filter spanner5.
Information decal6.
Control panel7.
Connector with shut-off valve8.
Purified water hose9.
Filter container I10.
Base plate11.
Filter container II12.
DE
Knickschutzbogen für Abwasserschlauch1.
Abwasserschlauch2.
Schlauchschellen (2)3.
Zulaufschlauch4.
Filterschlüssel5.
Informationsschild6.
Kontrolltafel7.
Anschluss mit Absperrventil8.
Reinwasserschlauch 9.
Filterbehälter I10.
Bodenplatte11.
Filterbehälter II12.
NL
Steun voor de afvoerslang1.
Afvoerslang2.
Slangklemmen (2)3.
Voedingswaterslang4.
Filtersleutel5.
Typeplaatje6.
Controle paneel7.
.Connector with shut-off valve8.
Slang voor gezuiverd water9.
Filterhouder I10.
Basisplaat11.
Filterhouder II12.
FR
Étrier pour tuyau d’évacuation des eaux usées1.
Tuyau d’évacuation des eaux usées2.
Attache pour tuyau (2)3.
Tuyau d’amenée de l’eau4.
Clé pour installation des filtres5.
Fiche d’information auto-adhésive6.
Tableau de commande7.
.Connector with shut-off valve8.
Tuyau de sortie de l’eau purifiée 9.
Compartiment filtre I10.
Socle11.
Compartiment filtre II12.
ES
Abrazadera de la manguera de desagüe1.
Manguera de desagüe2.
Abrazaderas para manguera (2)3.
Manguera del agua de alimentación4.
Llave de tuercas del filtro5.
Adhesivo informativo6.
Panel de control7.
.Connector with shut-off valve8.
Manguera de agua purificada9.
Recipiente del filtro I10.
Base11.
Recipiente del filtro II12.
SE
Hållare för avloppsslang1.
Avloppsslang2.
Slangklämmor, 2 st.3.
Tilloppsslang4.
Filternyckel5.
Informationsdekal6.
Kontrollpanel7.
Koppling med avstängningskran8.
Renvattenslang 9.
Filterbehållare I10.
Bottenplatta11.
Filterbehållare II12.
3
6
1
2
3
4
5
8
9
10 11 12
7
PRODUCT DESCRIPTION
TU
Gider suyu hortumu mesnedi1.
Gider suyu hortumu2.
Hortum kelepçesi (2)3.
Besleme suyu hortumu kelepçesi 4.
Filtre anahtarı5.
Bilgi etiketi6.
Kumanda paneli7.
.Connector with shut-off valve8.
Arıtılmış su hortumu9.
Filter container I10.
Taban plakası11.
Filtre kabı II12.
IT
Supporto per tubo acque reflue1.
Tubo acque reflue2.
Fermagli tubo (2)3.
Tubo acqua di alimentazione4.
Chiave filtro5.
Etichetta informativa6.
Quadro di comando7.
.Connector with shut-off valve8.
Tubo acqua depurata9.
Recipiente filtro I10.
Piastra di appoggio11.
Recipiente filtro II12.

4
YOUR NEW WATER PURIFIER
THANK YOU for entrusting us to supply your new water purifier, which we hope will provide you with many
years of trouble-free use. To avoid problems, it is important for you to read through the user instructions and
carefully to follow the SAFETY INFORMATION and the INSTALLATION instructions. Everybody using the water
purifier should be familiar with how to operate it and its safety features. The manual should be kept and stay
with the water purifier if it is ever moved or changes owners, so that everyone who uses the appliance can read
about the various functions and safety instructions.
VIELEN DANK, dass Sie unseren Wasseraufbereiter gewählt haben. Wir hoffen, dass Sie viele Jahre Freude an
dem Gerät haben werden. Um Probleme zu vermeiden, ist es wichtig, diese Gebrauchsanweisung aufmerksam
zu lesen und die Anweisungen und Informationen der SICHERHEITSHINWEISE und der INSTALLATIONSAN-
LEITUNG zu beachten. Alle, die den Wasseraufbereiter benutzen, sollten mit seiner Bedienung vertraut sein und
wissen, was in einem Störungsfall zu tun ist. Dieses Handbuch ist immer bei dem Wasseraufbereiter aufzubewahren. Geben Sie diese Unterlagen im Falle eines Verkaufs an den neuen Besitzer weiter.
HARTELIJK DANK voor uw bestelling van onze nieuwe waterzuiveraar. Wij hopen dat u er veel plezier
aan zult beleven. Om problemen te voorkomen is het belangrijk dat u de gebruiksaanwijzing doorleest en de
VEILIGHEIDSINFORMATIE en de instructies voor de INSTALLATIE nauwkeurig opvolgt. Iedereen die gebruik
maakt van de waterzuiveraar dient op de hoogte te zijn van hoe het apparaat moet worden bediend en de bijbehorende veiligheidsaspecten. De handleiding dient bij de waterzuiveraar te worden bewaard, zodat wanneer het
apparaat wordt verplaatst of een andere eigenaar krijgt, iedereen die het gebruikt kan lezen over de verschillende
functies en veiligheidsinstructies.
MERCI de nous faire confiance en optant pour votre nouveau purificateur d’eau qui, nous l’espérons, vous
servira sans défaillance et vous donnera satisfaction pendant de nombreuses années. Afin d’éviter tout problème,
ne manquez pas de lire la section intitulée SÉCURITÉ, ni de vous conformer scrupuleusement aux instructions
d’INSTALLATION. Quiconque utilise le purificateur devra en connaître le maniement et les dispositifs de sécu-
rité. Conserver avec soin le présent manuel d’instructions et veiller à ce qu’il accompagne le purificateur en cas
de déplacement ou de vente de ce dernier, de façon à ce que tout utilisateur puisse à tout moment consulter le
manuel d’instructions complet et les instructions de sécurité.
GRACIAS por confiar en nosotros al adquirir su nuevo purificador de agua del que esperamos que disfrute por
muchos años sin ningún tipo de problema. Para evitar problemas, es importante que lea el manual de instrucciones y que siga con atención la INFORMACIÓN SOBRE SEGURIDAD y las instrucciones de INSTALACIÓN. Cual-
quier persona que utilice el purificador de agua deberá estar familiarizada con el funcionamiento y las advertencias de seguridad. Conserve el manual próximo al purificador de agua, incluso si se coloca en otro sitio o cambia
de propietario, para que quien lo utilice pueda conocer las distintas funciones y las instrucciones de seguridad.
TACK för att vi fick förtroendet att leverera Din nya vattenrenare, som vi hoppas ska ge Dig många års bekymmersfri användning. För att undvika problem är det viktigt att Du läser igenom bruksanvisningen och noga
följer SÄKERHETSINFORMATIONEN och anvisningarna om INSTALLATION. Alla som använder vattenrenaren
ska vara väl förtrogna med användningssättet och säkerhetsdetaljerna. Spara manualen och låt den följa med
vattenrenaren vid flytt eller ägarbyte, så att alla som använder produkten kan läsa om de olika funktionerna och
säkerhetsinstruktionerna.
Yeni su arıtma cihazınızı bizden temin etmeniz dolaysı ile TEŞEKKÜR EDERİZ. Size herhangi bir arıza
çıkarmaksızın uzun yıllar hizmet vereceğinden eminiz. Bir sorunla karşılaşılmaması için, bu kullanıcı kılavuzunu okumalısınız. “Güvenlik bilgileri” ve “Montaj” talimatlarını özellikle dikkatli okuyunuz. Su arıtma cihazı
kullanan herkesin onun nasıl çalıştırılacağı ve güvenlik esaslarını biliyor olmaları gerekir. Yeri veya sahibi
değiştirilmiş olduğunda, cihaz kullanıcısı, içindeki çeşitli fonksiyon ve güvenlik talimatlarına başvurabilmesi
için kullanıcı kılavuzunun su arıtma cihazı yakınında bulundurulması gerekir.
GRAZIE per aver scelto il nostro depuratore, che ci auguriamo possa offrirLe un servizio eccellente per molti
anni. Per evitare problemi, è importante leggere con attenzione le seguenti istruzioni e seguire le indicazioni di
sicurezza e le istruzioni per l’installazione. Tutti coloro che maneggiano un depuratore devono essere a conoscenza del suo funzionamento e delle avvertenze di sicurezza. Il manuale deve essere conservato insieme al
depuratore e deve sempre accompagnarlo, anche nel caso il proprietario cambi, in modo che tutti coloro che lo
utilizzano siano a conoscenza delle sue funzioni e delle avvertenze sulla sicurezza.
EN
DE
NL
FR
ES
SE
TU
IT

EN1
CONTENTS
FOR THE USER
PRODUCT DESCRIPTION __________________ 2-3
FOR THE INSTALLER
CONTENTS _________________________________EN1
SAFETY INFORMATION ______________________EN2
INSTALLATION . . . . . . . . . . . . . . . . . . . . . . . . . . . . . . . . . . EN2
USE . . . . . . . . . . . . . . . . . . . . . . . . . . . . . . . . . . . . . . . . . . . EN2
INFORMATION ______________________________EN3
WASTE MANAGEMENT . . . . . . . . . . . . . . . . . . . . . . . . . . . EN3
CONSUMABLES . . . . . . . . . . . . . . . . . . . . . . . . . . . . . . . . . EN3
ACCESSORIES . . . . . . . . . . . . . . . . . . . . . . . . . . . . . . . . . . EN3
USING THE WATER PURIFIER _________________EN4
PRODUCTION OF PURIFIED WATER . . . . . . . . . . . . . . . . EN4
AUTOMATIC FLUSHING. . . . . . . . . . . . . . . . . . . . . . . . . . . EN4
LOW PRESSURE RESTART . . . . . . . . . . . . . . . . . . . . . . . EN4
REGULAR CARE OF THE WATER PURIFIER _____EN4
MAINTENANCE _____________________________EN5
REPLACING THE FILTERS . . . . . . . . . . . . . . . . . . . . . . . . EN5
CLEANING THE GRID . . . . . . . . . . . . . . . . . . . . . . . . . . . . EN5
CLEANING/DESCALING . . . . . . . . . . . . . . . . . . . . . . . . . . EN6
DISINFECTION . . . . . . . . . . . . . . . . . . . . . . . . . . . . . . . . . . EN7
STORAGE . . . . . . . . . . . . . . . . . . . . . . . . . . . . . . . . . . . . . . EN7
TROUBLESHOOTING TABLE __________________EN8
SERVICE AND SPARE PARTS _________________EN9
TECHNICAL FACTS _________________________EN10
INSTALLATION _____________________________EN11
UNPACKING . . . . . . . . . . . . . . . . . . . . . . . . . . . . . . . . . . . .EN11
POSITIONING THE WATER PURIFIER . . . . . . . . . . . . . . .EN11
AFFIXING THE INFORMATION DECAL . . . . . . . . . . . . . . .EN11
AFFIXING THE CLIP FOR FILTER SPANNER . . . . . . . . . .EN11
WATER CONNECTION . . . . . . . . . . . . . . . . . . . . . . . . . . .EN11
ELECTRICAL CONNECTION . . . . . . . . . . . . . . . . . . . . . . EN12
FLUSHING . . . . . . . . . . . . . . . . . . . . . . . . . . . . . . . . . . . . EN12
CALIBRATION . . . . . . . . . . . . . . . . . . . . . . . . . . . . . . . . . . EN12
MOVING THE WATER PURIFIER . . . . . . . . . . . . . . . . . . EN12
GUIDELINES FOR USING THE USER INSTRUCTIONS
The following symbols in the text will help you to read the user instructions:
Safety information
Environment information
Step by step instructions
Tips and information
APPENDIX A - ILLUSTRATIONS _______________APP-1

EN2
SAFETY INFORMATION
Carefully read through the user instructions, which contain directions and warnings, before installing and starting to use
the water purifier. It will then work in a proper manner and provide the greatest benefit. Everybody using the water purifier should be familiar with how to operate it and its safety features.
This appliance is not intended for use by persons (including children) with reduced physical, sensory or mental
capabilities, or lack of experience and knowledge, unless they have been given supervision or instruction concerning
use of the appliance by a person responsible for their safety.
Children should being supervised to ensure that they do not play with the appliance.
INSTALLATION
Check that the water you want to clean satisfies the require-•
ments in TECHNICAL FACTS.
The water purifier should be connected to an earthed electri-•
cal supply. As some operations require the power supply to
be temporarily interrupted, it is best to connect using a plug
that is also easily accessible after installation. Permanent
wiring to the electrical supply may only be carried out by a
qualified electrician and should be per-formed with a safety
switch. Incorrect installation can result in personal injury
and/or damage to property which are not covered by any
warranty.
Plumbing work should be performed by a qualified plumber. •
If you do the installation yourself, you must acquaint your-
self with the applicable standards and adhere to them.
A hose for feed water is supplied with the unit. This hose •
should be used and any old hose-set should not be reused.
It is important for the purifier to be installed upright on a •
horizontal surface, and that hoses and cables are neither ten-
sioned nor get jammed when moving the purifier, e.g. during
installation and cleaning.
If the feed water is classed as unfit, have the purified water •
checked after installation. After this, test the purified water
once a year or if there is any change in the taste or odour.
Do not drink/use the water if the results are unsatisfactory.
Contact your dealer.
When the water purifier is new, the purified water may not •
be used until flushing and calibration have been completed.
Calibration of the water purifier may only be carried out: •
- the first time the water purifier is taken into use
- if the water quality changes (e.g. when moving)
- after replacing the membrane
The reverse osmosis technique reduces most substances •
extremely effectively. For this reason, the content of those
substances that normally protect pipes, tanks, valves, etc.,
are very low in the purified water from the water purifier.
Consider the risk of corrosion and elution when choose ma-
terials in peripheral equipment for the water purifier.
•
USE
The water purifier is intended to produce water for applica-•
tions that require purified water.
Purified water should only be used when the control panel’s •
lights II or III (purification levels) are lit. It can take up to
60 seconds before the water purifier indicates good water
quality.
The water purifier must be connected to water and electricity •
in order for the automatic flushing system to work. Automatic flushing takes place approximately every 12 hours.
The top of the water purifier should not be used as a place •
for storing anything.
Do not use purified water in aluminium vessels. There is a •
risk of corrosion of the vessel and a higher concentration of
aluminium in the purified water.
Do not change or modify the water purifier in any way. This •
can result in personal injury and/or damage to property
which is not covered by any warranty.
If the water purifier is to be disconnected from water and •
electricity for an extended period (several days), it should be
stored as described in STORAGE. This also provides protection against freezing.
The water purifier may not be used without a filter (except •
during cleaning and storage). It could be seriously damaged.
If the water purifier contains preserving or descaling agents, •
it must be flushed in accordance with FLUSHING before the
purified water may be used.
Once a month, check that the connections are watertight. •
Leaks outside the appliance cannot be detected by the internal safety system. If leakage occurs, immediately switch
off the water supply and break the current to the appliance
by pulling the plug out of the wall socket or unscrewing the
fuse in the electrical distribution board.
If the mains lead has been damaged in some way, it must be •
replaced by a qualified person to avoid damage or injury.

EN3
INFORMATION
WASTE MANAGEMENT
OLD AND DAMAGED WATER PURIFIERS
At the end of the water purifier’s useful life, disconnect the •
plug from the electrical supply and cut the lead at the point
where it enters the appliance. Make sure that children do not
play with the severed lead. Contact your dealer for informa-
tion about where the water purifier can be left.
Break the current to a damaged water purifier by pulling out •
the plug. Otherwise remove the water purifier’s fuse (the
plug) from the electrical distribution board.
Appliances bearing this symbol must be •
deposited at the designated local reception
point for the disposal of electrical and elec-
tronic equipment. It is not permitted that this
product be disposed of by way of the normal
household refuse collection system.
SYMBOL IDENTIFICATION
80% of the plastic and rubber components in the appliance •
and its packaging are identified with symbols to assist the
process of recycling and disposal of the water purifier.
This labelling is carried out in accordance with international •
standards.
The cardboard parts are made from recyclable paper and can •
be deposited at collection points for recycling.
CONSUMABLES
Part No.
Filter, Carbon block 01-294214-201
Descaling/cleaning agent 01-294214-103
Preservative and antifreeze liquid 01-294289-001
Membrane service kit 01-294214-104
Pump service kit 01-294214-105
ACCESSORIES
Part No.
By-Pass kit 01-294214-101
Consumables and accessories can be ordered through your
dealer. Specify the parts’ numbers as listed above.
EN4
LOW PRESSURE RESTART
The low pressure restart function (i.e. low inlet pressure), attempts to automatically restart the water purifier after a low
pressure stop. The water purifier will make three attempts to
restart: after 3 minutes, 20 minutes and 4 hours. If the pressure
is not sufficient after three attempts the water purifier will make
no further attempts but stop.
When idle in restart mode the water purifier will
start when calibration button is pressed but this may
also happen as a consequence of a sudden power
failure. Thus, the cover or housing may never be
removed when the water purifier is idle after a low
pressure stop.
The low pressure restart is a function to ensure
maximum availability of water. In any case of a
low pressure stop, the reason for the low pressure
stop must be eliminated (even if following restart
attempts are successful). If not, the pump may be
permanently damaged.
When the water purifier has been installed, flushed and calibrated according to the instructions, it is ready to be used. The
water purifier has an electronic control system that makes it
easy to use. Remember the following:
Change the filter when filter replacement is indicated on the •
control panel (2–3 times/year).
Clean the water purifier when the flow is reduced and/or at •
least every 6 months.
PRODUCTION OF PURIFIED WATER
The water purifier starts production of purified water when the
connected equipment/machine/tank releases the pressure in the
purified water hose (i.e. when a valve is opened or when the
pressure in the tank falls) that is connected to the water purifier.
AUTOMATIC FLUSHING
Every time after drawing water, or every 15 minutes in each •
operating cycle automatic flushing takes place. The length of
the flushing process varies between 5-120 seconds, depend-
ing on how long the previous drawing of water lasted.
When the water purifier is connected to water and electric-•
ity, flushing is automatically performed every 12 hours.
Flushing takes place regardless of when purified water was
last produced.
USING THE WATER PURIFIER
Listed below are things you need to remember in the regular care of your water purifier. The points are listed according how often
they need to be performed:
Every day, check that the indicator lights are not indicating •
that something is calling for remedial action.
Keep the water purifier clean. Externally, the appliance may •
only be cleaned with a damp cloth. Do not use a wet cloth
and do not pour water over the appliance. Do not use descaling agents.
Once a month, check that all the connections are in place •
and are watertight. Wipe off any condensation that has collected on the base plate.
Make sure that you always replace filters in time. The life-•
time of the pre-filters depends on your feed water.
After replacing a filter, stand the filter so that most
of the water runs out over a few minutes. The filters
can be discarded with normal household rubbish, as
they do not contain any environmentally hazardous
substances.
Depending primarily on the hardness of the feed water and •
its content of microorganisms, the water purifier should be
cleaned when the flow is reduced or at least every 6 months
and disinfected if the water smells or tastes bad.
When the capacity of the purifier is reduced even after filter •
replacement and cleaning, contact your dealer for membrane
replacement.
REGULAR CARE OF THE WATER PURIFIER
Only use the water from the water purifier when
purification level II or III is indicated.
If the water purifier has not been used for a time, it
may take up to 60 seconds before the optimum water
purification level is reached, as shown by lights on
the control panel.

EN5
MAINTENANCE
For illustrations, see FIG. 1.
Ensure that the appliance has stopped and then pull 1.
out the plug. Open the front cover in front of the two
pre-filters using the manoeuvre as illustrated in
FIG 1.
Pull the filter containers out towards you as far as 2.
possible.
Use the filter spanner to unscrew the containers. 3.
Remember that the containers are full of water and
that it can overflow!
Remove the old filters.4.
Wipe up any water on the base plate.5.
Clean the filter containers with a brush and water.6.
Insert the new filters with the connector pointing up. 7.
Ensure that the sealing rings are in the filter containers’ groove.
Screw the containers into place using the filter span-8.
ner. Tighten the filter containers so that the dots are
somewhere between the two outermost white lines.
Push the filter containers into the water purifier.9.
Close the front cover and connect the plug. The 10.
water purifier flushes automatically.
Wait for the flushing to be completed.11.
Reset the appliance’s timer after the filter replace-12.
ment:
Hold the button (calibration) depressed for approximately 7 seconds until the light for filter II has gone
out.
If the filters are replaced prior to filter II indication,
hold the button until the diod for filter II first go on,
and then switch off.
Check that the containers are not leaking after filter 13.
replacement, and perform follow-up checks.
Replacement of filters is now completed and the
water purifier is ready to be used as normal.
REPLACING THE FILTERS
It is important to pay attention to filter replacement, as the
filters’ primary job is to protect the membrane.
When the light for filter I or II is lit, it is time to change both
filters. First eliminate other possible fault cases, for further
information please refer to TROUBLESHOOTING TABLE.
For better understanding, filter I indication is based on blockage
of the filters and filter II on operation/calendar time.
CLEANING THE GRID
The grid blocks larger particles and is situated by the feed
connection. If the filter I light for blocked filter or low inlet
pressure is lit, the grid may be blocked.
Pull out the plug.1.
Close the shut-off valve at the water connection.2.
Disconnect the feed water hose from the water puri-3.
fier.
Using pliers or similar, grip and pull out the grid, 4.
see FIG. 2. Clean out and rinse before replacing the
grid in the inlet (turn the mounting for the pliers
outwards).
Screw on the feed water hose.5.
Open the shut-off valve and check that no water 6.
leaks.
Connect the plug and the water purifier will flush.7.
EN6
METHOD B
During the cleaning procedure, which takes approximately
30 minutes, you cannot use the water purifier.
Mix approximately 2.5 dl of descaling agent (equiva-1.
lent to 200 g) with 2 litres of lukewarm water in a
bucket. Stir until the powder has dissolved.
Pull out the plug. Remove both filter I and filter II 2.
from the containers in accordance with REPLACING
THE FILTERS. (Do not discard the filters. They can
be reused.)
Fill the filter containers with water and screw the 3.
containers into place again.
Lead the purified water hose to a reject water outlet, 4.
to ensure that chemicals is not produced to connect-
ed equipment. Leave the shut-off valve open during
the procedure.
Close the shut-off valve at the water connection. 5.
Disconnect the feed water hose from the water connection and the reject water hose from the reject
water outlet.
Immerse the ends of the feed water and reject water 6.
hoses into the bucket. Ensure that the ends remain
below the surface throughout the cleaning procedure.
Connect the plug and allow the water purifier to 7.
flush automatically. Pull out the plug after approxi-
mately 30 seconds.
During flushing, the water purifier draws in the mixture
from the bucket.
Dissolution of scale (mineral deposits, mainly from Calcium Carbonate) produce air to the drain hose. This is normal
and will continue until all scale is dissolved.
Wait 2 minutes. Repeat step 7 again.8.
Repeat step 8 until air bubbles seen from the drain 9.
hose is gone or nearly gone.
(minimum 5 times / maximum 10 times)
Reconnect the feed water hose to the water connec-10.
tion and the reject water hose to the reject water outlet. Open the shut-off valve on the water connection.
Connect the plug and allow the water purifier to per-11.
form a complete automatic flush. Then produce purified water to the reject water outlet for 30 seconds
before pulling out the plug.
Put back the filters in the containers, see 12. REPLAC-
ING THE FILTERS for instructions, except that the
previously used filters are reused. (Do not reset
timer).
Flush the water purifier, see 13. FLUSHING for instruc-
tions.
Connect the pure water hose again to the equipment. 14.
Cleaning/Descaling is now completed. The water
purifier is ready to be used as normal.
MAINTENANCE
CLEANING/DESCALING
When the flow is reduced (due to scaling), the water purifier
should be cleaned to extend its lifetime. When an acceptable
flow cannot be restored despite cleaning/descaling, contact
your dealer for possible membrane replacement.
Cleaning/Descaling the water purifier is performed:
When the flow from the water purifier has reduced•
At least every 6 months•
Descaling agents can be ordered from your dealer, see CONSUM-
ABLES.
The descaling agent must be kept out of the reach of
children! Wash your hands after cleaning.
Water containing descaling agent will be produced.
This water must not be drunk or routed into
peripheral equipment or another product.
There are 2 methods for cleaning/descaling the water purifier.
Method A takes 10 hours and method B takes approximately
30 minutes.
METHOD A
During the cleaning procedure, which takes approximately
10 hours in total, you cannot use the water purifier.
Pull out the plug.1.
Lead the purified water hose to a reject water outlet, 2.
to ensure that chemicals is not produced to con-
nected equipment.
Connect the power plug again so that the water puri-3.
fier flushes.
Stop purified water production by closing the shut-4.
off valve on the pure water hose.
Keep the water purifier connected to the mains.5.
Unscrew filter container II, see 6. REPLACING THE
FILTERS for instructions. Place the filter to one side.
(The filter in container I should not be removed.)
Add approximately 2.5 dl descaling agent (equiva-7.
lent to 200 g) in the filter container. Fill with lukewarm water (20 – 40 °C) almost up to the edge. Stir
until the powder has dissolved.
Screw the filled container into place.8.
Open the shut-off valve to start production and allow 9.
the water purifier to produce water to the reject water
outlet for 45 seconds.
With the shut-off valve still open, pull out the 10.
power plug.
Close the shut-off valve and allow the water purifier 11.
to stand for approximately 10 hours (e.g. overnight).
Remove the filter container after this period. Pour 12.
away the content and rinse out with water.
Put back the filter in the container, see 13. REPLACING
THE FILTERS for instructions, except that the previ-
ously used filter is reused. (Do not reset timer).
Flush the water purifier, see 14. FLUSHING for instruc-
tions.
Connect the pure water hose again to the equipment. 15.
Cleaning/Descaling is now completed. The water
purifier is ready to be used as normal.
 Loading...