

Page 1

HLX Self-Service
Scale System
Operator Manual
ML-29309 HLX Self-Service Scale
701 S. RIDGE AVENUE
TROY, OHIO 45374
www.hobartcorp.com
F-35536 (March 2010)
Page 2

Page 3

HLX Self-Service Scale System Operator Manual
TABLE OF CONTENTS
Chapter 1: Introduction. . . . . . . . . . . . . . . . . . . . . . . . . . . . . . . . . . . . . . . . . . . . . . . . . . . . . . . . . . . . . . .1-1
Welcome. . . . . . . . . . . . . . . . . . . . . . . . . . . . . . . . . . . . . . . . . . . . . . . . . . . . . . . . . . . . . .1-1
FCC Note . . . . . . . . . . . . . . . . . . . . . . . . . . . . . . . . . . . . . . . . . . . . . . . . . . . . . . . . . . . . .1-1
Industry Canada Note. . . . . . . . . . . . . . . . . . . . . . . . . . . . . . . . . . . . . . . . . . . . . . . . . . . .1-1
Verify Correctness of Weight and Price. . . . . . . . . . . . . . . . . . . . . . . . . . . . . . . . . . . . . .1-2
Operator Manual Terminology. . . . . . . . . . . . . . . . . . . . . . . . . . . . . . . . . . . . . . . . . . . . .1-2
Important Information . . . . . . . . . . . . . . . . . . . . . . . . . . . . . . . . . . . . . . . . . . . . . . . . . . .1-2
Electrical Connections . . . . . . . . . . . . . . . . . . . . . . . . . . . . . . . . . . . . . . . . . . . . . . . . . . .1-2
Chapter 2: Using the HLX Scale System . . . . . . . . . . . . . . . . . . . . . . . . . . . . . . . . . . . . . . . . . . . . . . . . .2-1
Power Up the System . . . . . . . . . . . . . . . . . . . . . . . . . . . . . . . . . . . . . . . . . . . . . . . . . . . .2-1
Operator Start Screen . . . . . . . . . . . . . . . . . . . . . . . . . . . . . . . . . . . . . . . . . . . . . . . . . . . .2-1
Random Weight Product Screen. . . . . . . . . . . . . . . . . . . . . . . . . . . . . . . . . . . . . . . . . . . .2-2
By Count Product Screen . . . . . . . . . . . . . . . . . . . . . . . . . . . . . . . . . . . . . . . . . . . . . . . . .2-4
Search for Product . . . . . . . . . . . . . . . . . . . . . . . . . . . . . . . . . . . . . . . . . . . . . . . . . . . . . .2-5
Rezero Weigher . . . . . . . . . . . . . . . . . . . . . . . . . . . . . . . . . . . . . . . . . . . . . . . . . . . . . . . .2-7
Chapter 3: Maintenance & Cleaning . . . . . . . . . . . . . . . . . . . . . . . . . . . . . . . . . . . . . . . . . . . . . . . . . . . .3-1
Removing the Label Cassette . . . . . . . . . . . . . . . . . . . . . . . . . . . . . . . . . . . . . . . . . . . . .3-1
Installing the Label Cassette. . . . . . . . . . . . . . . . . . . . . . . . . . . . . . . . . . . . . . . . . . . . . . .3-1
Removing the Label Roll . . . . . . . . . . . . . . . . . . . . . . . . . . . . . . . . . . . . . . . . . . . . . . . . .3-2
Loading the Label Cassette. . . . . . . . . . . . . . . . . . . . . . . . . . . . . . . . . . . . . . . . . . . . . . . .3-2
Removing the Scale Platter. . . . . . . . . . . . . . . . . . . . . . . . . . . . . . . . . . . . . . . . . . . . . . . .3-3
Installing the Scale Platter . . . . . . . . . . . . . . . . . . . . . . . . . . . . . . . . . . . . . . . . . . . . . . . .3-3
Adjusting Console Position . . . . . . . . . . . . . . . . . . . . . . . . . . . . . . . . . . . . . . . . . . . . . . .3-3
Adjusting the Scale Feet. . . . . . . . . . . . . . . . . . . . . . . . . . . . . . . . . . . . . . . . . . . . . . . . . .3-4
Cleaning the Printhead . . . . . . . . . . . . . . . . . . . . . . . . . . . . . . . . . . . . . . . . . . . . . . . . . . .3-5
Cleaning the Exterior of Scale . . . . . . . . . . . . . . . . . . . . . . . . . . . . . . . . . . . . . . . . . . . . .3-6
Troubleshooting . . . . . . . . . . . . . . . . . . . . . . . . . . . . . . . . . . . . . . . . . . . . . . . . . . . . . . . .3-6
Index: . . . . . . . . . . . . . . . . . . . . . . . . . . . . . . . . . . . . . . . . . . . . . . . . . . . . . . . . . . . . . . . . . . . . . . . . . . . . I-1
F-35536 (February 2010) i Table of Contents
Page 4

HLX Self-Service Scale System Operator Manual
Java is a trademark of Sun Microsystems, Inc.
Copyright 2007 General Software Inc. All Rights Reserved
Hobart, A division of ITW Food Equipment Group LLC 2007
Table of Contents ii F-35536 (February 2010)
Page 5

HLX Self-Service Scale System Operator Manual
Chapter 1: Introduction
Introduction
Welcome The HLX Self-Serve Scale System is perfect for weighing appli-
cations. All the consumer has to do is enter the product code
number, weigh, and print.
FCC Note
Industry Canada Note
HLX Self-Serve Scale System
All necessary operator data appears on the touch screen.
This equipment has been tested and found to comply with the
limits for a Class A digital device, pursuant to Part 15 of the FCC
rules. These limits are designed to provide reasonable protection
against harmful interference when the equipment is operated in a
commercial environment. This equipment generates, uses and can
radiate radio frequency energy and, if not installed and used in
accordance with the instruction manual, may cause harmful interference to radio communications. Operation of this equipment in
a residential area is likely to cause harmful interference, in which
case, the user will be required to correct the interference at their
own expense.
The term “IC:” before the equipment certification number only
signifies that the Industry Canada Technical Specifications were
met.
F-35536 (March 2010) 1-1 Introduction
Page 6
HLX Self-Service Scale System Operator Manual
Verify Correctness of
Weight and Price
Operator Manual Terminology
Routinely verify label information. Check the multiplication of
price per pound times weight, and check the scale weight against
printed label weight. Weigh the same package several times to
verify outcome consistency. Packages that weigh near the middle
of the 0.005 lb. increment will vary up or down by 0.005 lb. Variation greater than 0.005 lb indicates the need for weigher adjustment. In such a case, or whenever necessary, contact your local
Hobart Representative.
This manual uses the following terminology for keystrokes and
data manipulation procedures:
• The word TOUCH means to activate an entry shown on the
Operator Display screen.
The following special instructions are used in the manual:
Note
A Note is information that you need to know , but is not an actual
step in the process.
Look At This
Important Information
Electrical Connections
Look At This is information to alert you that you may be doing
something that will permanently alter your system.
The following warning is provided for your protection.
WARNING
FLUORESCENT LAMP IN DISPLAY PANEL CONTAINS A
SMALL AMOUNT OF MERCURY. PLEASE DISPOSE OF
ACCORDING TO LOCAL, STATE, OR FEDERAL LAWS.
A power cord is located on the bottom of the scale. Electric
power of 120 V., 60 Hz., 1 phase (2-wire plus groun d) is required.
Look At This
The scale should be installed and/or moved only by a qualified
Hobart Service Technician. The system can operate in a temperature range from 32°F to 104°F (0°C to 40°C).
Introduction 1-2 F-35536 (March 2010)
Page 7
Chapter 2: Using the HLX Scale System
Using the HLX Scale System
HLX Self-Service Scale System Operator Manual
Power Up the System
Operator Start Screen
Standard Option
To power up the HLX Scale System, plug the power cord into a
dedicated electrical receptacle.
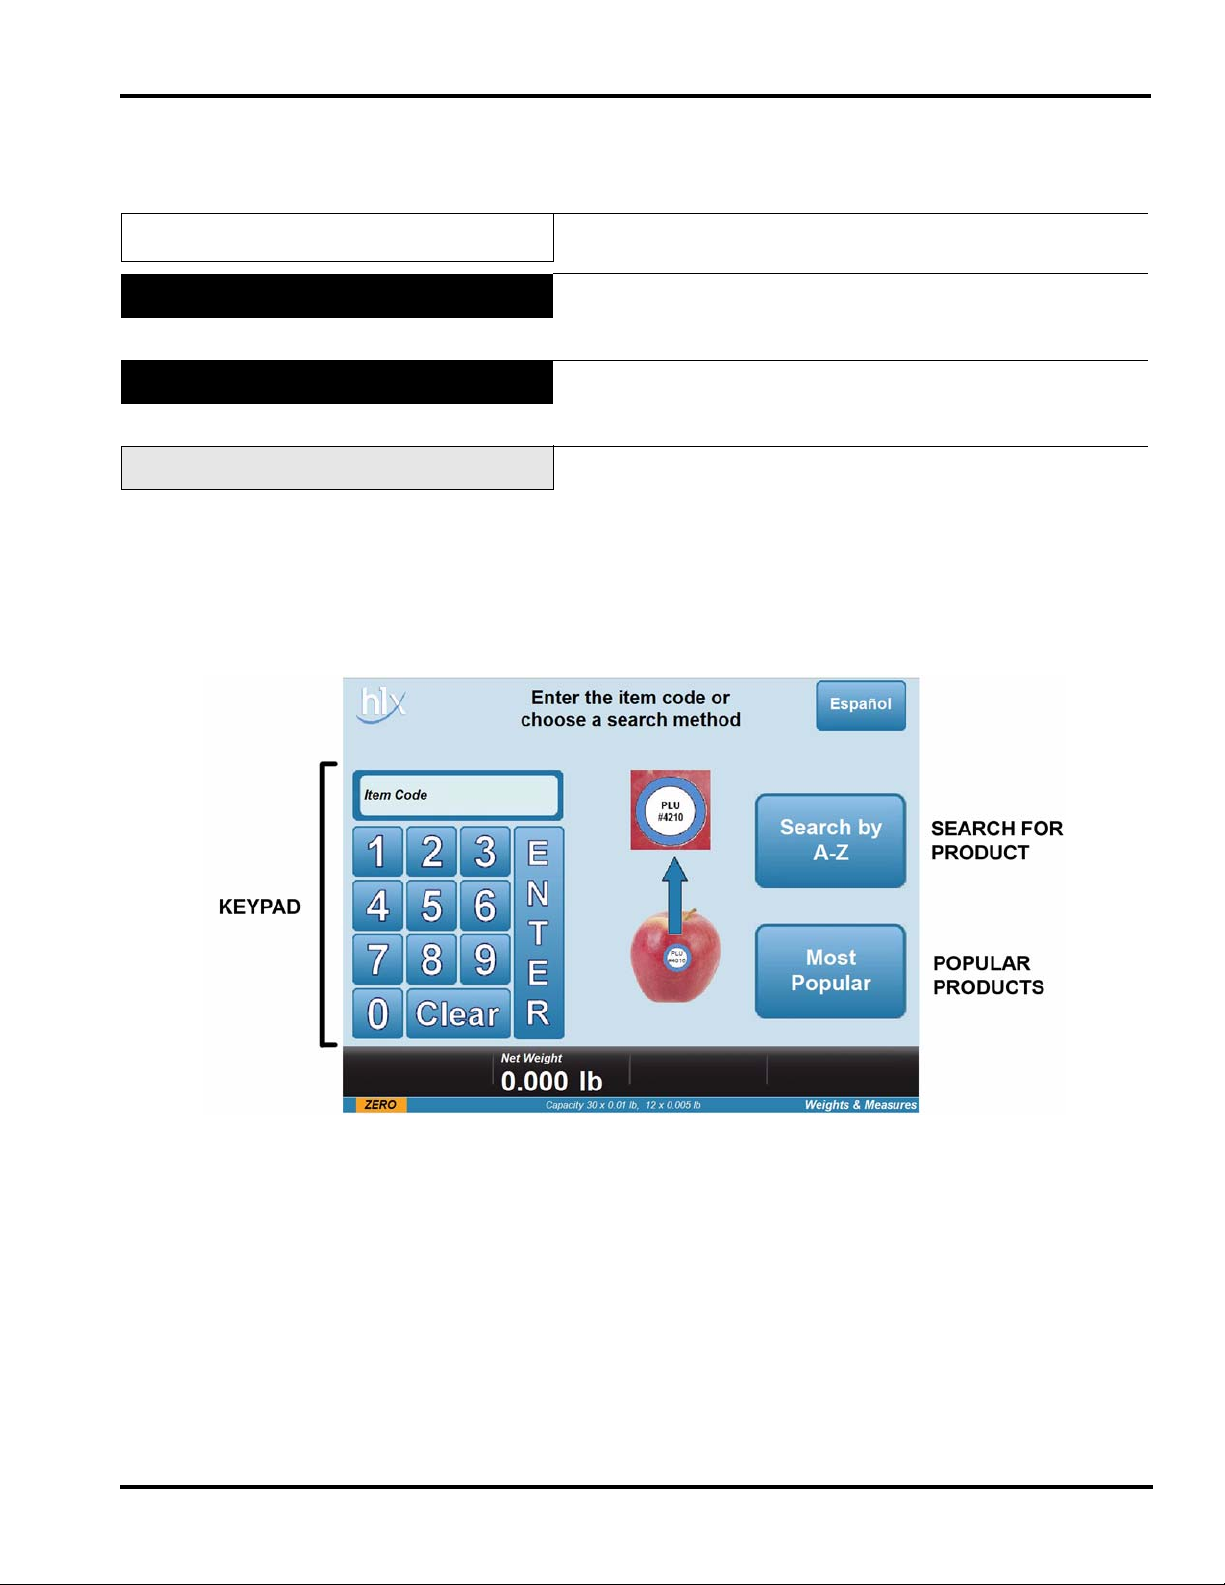
The Operator Start screen is the starting point for scale operation.
The start screen can be the Starndard Option or Expanded Option.
The Standard Option is basically divided into three sections. The
keypad, most popular flashkey and search by A-Z flashkey. The
keypad is used to enter the PLU (Product Look Up) number. The
most popular flashkey will display the most popular products
weighed by the scale. The search by A-Z flashkey is a way to
look up products alphabetically.
F-35536 (March 2010) 2-1 Using the HLX Scale System
Page 8
HLX Self-Service Scale System Operator Manual
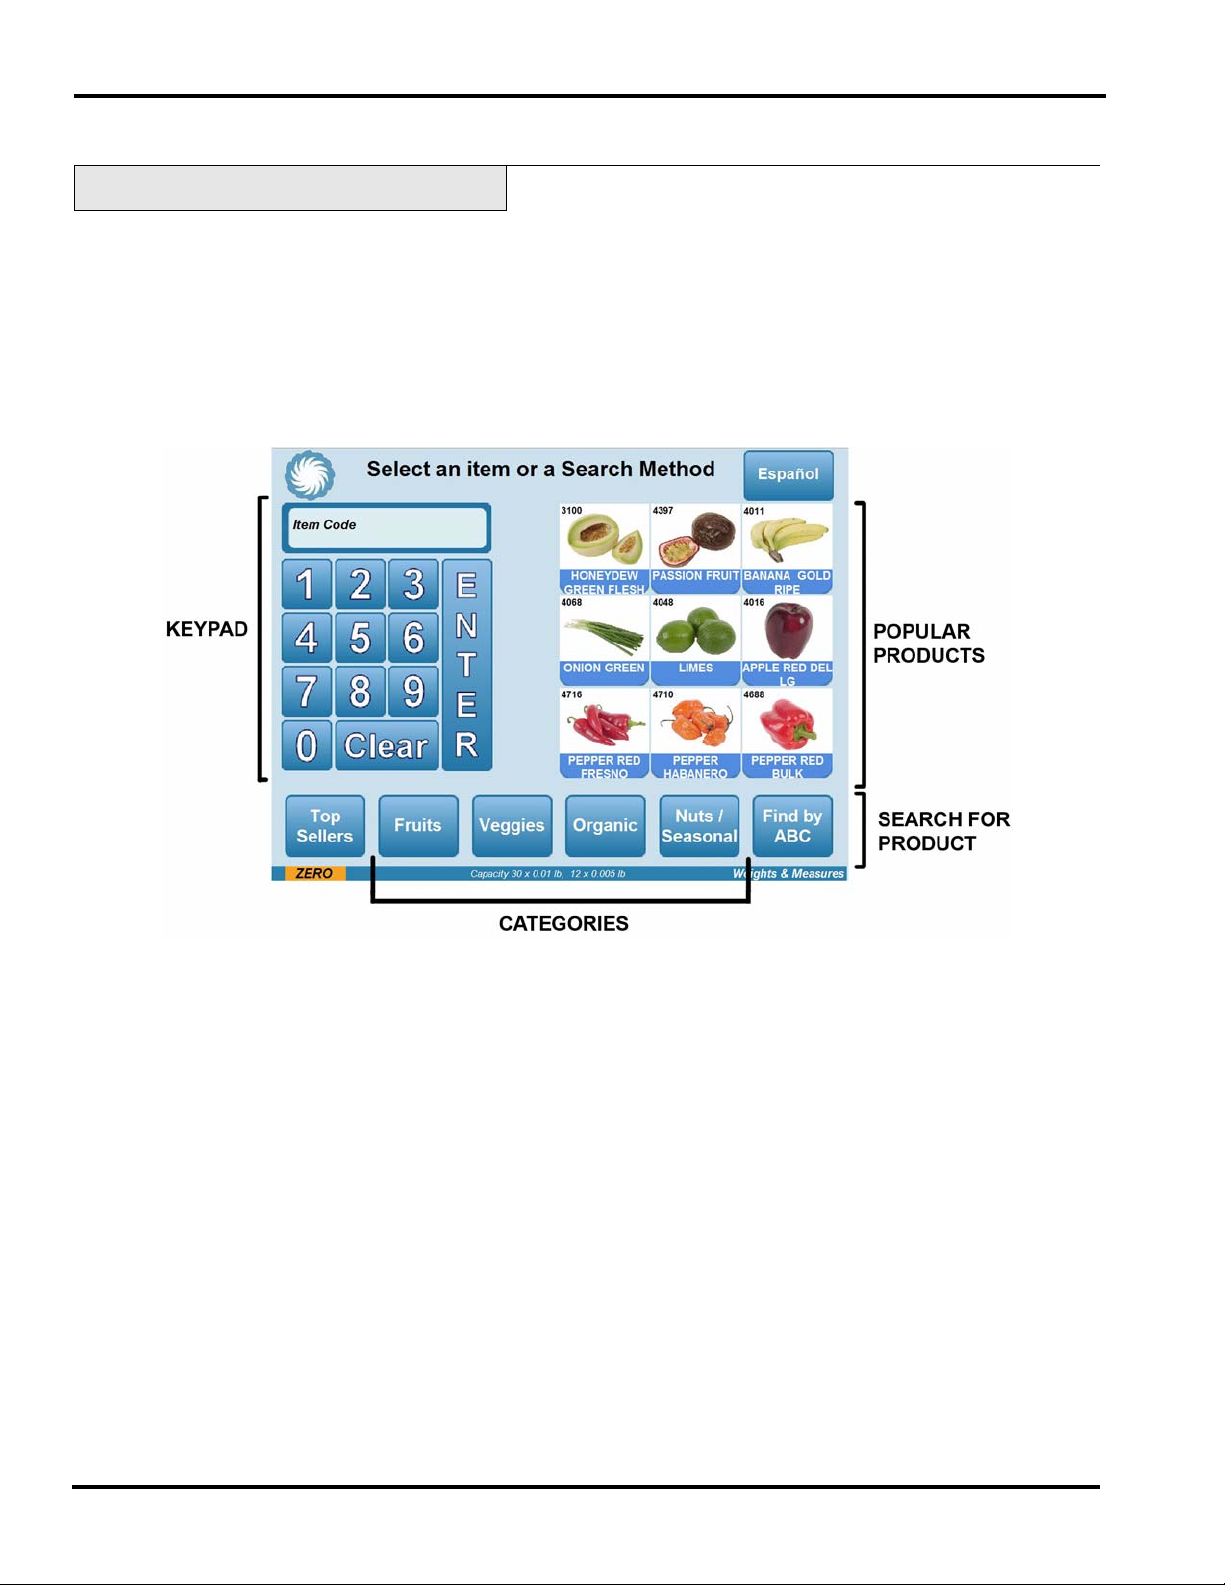
Expanded Option
The Expanded Option is basically divided into four sections. The
keypad, popular products flashkeys, categories and search for
product flashkeys. The keypad is used to enter the PLU (Product
Look Up) number. The popular products flashkeys section will
display the nine most popular products weighed by the scale. The
categories flashkeys organize products by descriptions such as
organic or fruits. The search for product (Find by ABC) flashkey
is a way to look up products alphabetically.
Using the HLX Scale System 2-2 F-35536 (March 2010)
Page 9

Random Weight Product Screen
HLX Self-Service Scale System Operator Manual
Some products are sold by weight. When a product is sold by
weight, use the following instructions:
From the Operator Start Screen, TOUCH a Flashkey–OR–enter
the PLU on the keypad and TOUCH Enter. You should now be on
the Random Weight Screen for the desired product. If the wrong
product appears on the screen, TOUCH Start Over.
F-35536 (March 2010) 2-3 Using the HLX Scale System
Page 10

HLX Self-Service Scale System Operator Manual
The Random Weight Screen displays the following information:
Place product on scale and TOUCH Press Here to Print Label. An
icon will appear indicating the label printed. Remove label and
place on package.
• Product PLU.
• Product description.
• Picture of product, if available.
• T are - The weight of the packing material for which the
consumer does not pay.
• Net weight displayed in lbs.
• Unit Price - The price per unit measure.
• Total Price.
• Discount Unit Price, if available.
• Discount Total Price, if available.
• Discount Savings, if available.
Note
If the Press Here to Print Label is not touched within 20 seconds
after placing the product on the scale, the scale will return to the
Operator Start Screen without printing a label.
Using the HLX Scale System 2-4 F-35536 (March 2010)
Page 11

By Count Product Screen
HLX Self-Service Scale System Operator Manual
Some products are sold by count and not weight. When a product
is sold by count, use the following instructions:
From the Operator Start Screen, TOUCH a Flashkey–OR–enter
the PLU on the keypad and TOUCH Enter. You should now be on
the By Count Product Screen for the desired product. If the
wrong product appears on the screen, TOUCH Start Over.
The By Count Screen displays the following information:
• Product PLU.
• Product description.
• Picture of product, if available.
• Numeric Keypad
• Quantity
• Unit Price - The price per unit measure.
• Total Price.
Enter the quantity required for the product and TOUCH Enter . An
icon will appear indicating the label printed. Remove label and
place on package.
Note
If Enter is not touched within 20 seconds after the quantity has
been touched, the scale will return to the Operator Start Screen
without printing a label.
F-35536 (March 2010) 2-5 Using the HLX Scale System
Page 12

HLX Self-Service Scale System Operator Manual
Search for Product
The Search for Product flashkeys provide a quick way to find the
PLU number for any given product. The scale can search by
product types or alphabetically.
T o search alphabetically, TOUCH the Find by ABC button on the
screen. You should now be on the Alphabetical Search Screen.
TOUCH the letter of the product to find.
Note
The scale will search the database for products that have the
selected letter as the beginning letter of any of the words in the
products description. Example: White Onion can be found under
the letter O for Onion and the letter W for White.
Using the HLX Scale System 2-6 F-35536 (March 2010)
Page 13

HLX Self-Service Scale System Operator Manual
TOUCH the Previous or Next arrows on the screen to look
through more options if necessary. If the wrong letter was
touched, TOUCH Previous.
Touch the picture of the desired product. You should now be on
the Product Screen for that product.
F-35536 (March 2010) 2-7 Using the HLX Scale System
Page 14

HLX Self-Service Scale System Operator Manual
Rezero Weigher
The operator can be given the ability to rezero the scale. Prior to
placing any product on the scale, the word ZERO should appear
in the lower left hand corner of the screen in orange. If this is not
true, follow these procedures:
Once on the Product Screen, TOUCH Rezero.
A screen will appear starting the progress.
Using the HLX Scale System 2-8 F-35536 (March 2010)
Page 15

HLX Self-Service Scale System Operator Manual
If the amount to rezero is greater than the amount set by the scale
administrator, a different message will appear.
Remove any excess water or debris from the scale platter and try
again. If this message appears again, contact store personnel.
If the scale senses negative weight, the following screen will
appear. TOUCH Rezero to set the scale to zero weight.
F-35536 (March 2010) 2-9 Using the HLX Scale System
Page 16

HLX Self-Service Scale System Operator Manual
Weights and Measures Screen
From the operator start screen, TOUCH W eights and Measures in
the lower right hand corner. You should now be on the Weights
and Measures Screen.
Note
The information on this screen will vary depending on the
peripherals attached.
Using the HLX Scale System 2-10 F-35536 (March 2010)
Page 17

Chapter 3: Maintenance & Cleaning
Maintenance & Cleaning
HLX Self-Service Scale System Operator Manual
Removing the Label Cassette
Installing the Label Cassette
To remove the Label Cassette:
1. Press down on the black label Cassette Eject Button. The
Label Cassette will partially eject one to two inches.
2. Grasp the Label Cassette and slide it toward the front.
To install the Label Cassette:
1. Line up the Guide Rail on the Label Cassette with the track
on the base of the scale.
2. Slide the Label Cassette into the Printer Area.
3. There will be a slight resistance the last 1-2 inches of travel
as the mechanism engages. The motion should be similar to
closing a cash register drawer.
4. Press it firmly
place.
F-35536 (March 2010) 3-1 Maintenance & Cleaning
until you hear the cassette latch lock into
Page 18

HLX Self-Service Scale System Operator Manual
Removing the Label Roll
To remove the label roll:
1. Remove the Label Cassette.
2. Lift the metal Captive Key up and remove any remaining
labels and backing paper from the take-up spool.
3. Remove the label roll from hub.
Loading the Label Cassette
To load the Label Cassette:
1. Remove labels from the first 10 inches of the label roll.
2. Place the label roll on the Hub in the Label Cassette.
3. Thread the leader between Peel Bar and Label Cassette
Housing.
4. Pull the Captive Key up and wrap leader around the take-up
spool, then Slide the Captive Key down onto spool.
5. Turn spool counterclockwise until edge of first label is even
with peel bar.
6. Install the Label Cassette.
Maintenance & Cleaning 3-2 F-35536 (March 2010)
Page 19

Removing the Scale Platter
HLX Self-Service Scale System Operator Manual
To remove the Scale Platter:
1. Lift up on the front lip of the platter.
2. Pull it straight up to remove.
Installing the Scale Platter
Adjusting Console Position
To install the Scale Platter:
1. Locate the Platter Locating Studs on the bottom of the
platter.
2. Line the Studs up with the hole in the Center of the Rubber
Platter Mounts on the sub-platter.
The HLX Scale System is designed so you can place the scale
anywhere in your operation and adjust the screen for best
visibility.
The Console may be pivoted into eight different positions. To
adjust the console position:
1. Press the two Console Adjustment Buttons located on each
side of the Console.
2. Pivot the Console to the desired position for best viewing.
3. Release Console Adjustment Buttons to lock it into place.
F-35536 (March 2010) 3-3 Maintenance & Cleaning
Page 20

HLX Self-Service Scale System Operator Manual
Adjusting the Scale Feet
There are four Scale Feet located underneath the Scale System.
You may need to adjust these feet slightly in the event the scale
isn’t sitting on the table/case properly.
Proper adjustment of these feet helps you maintain the proper
scale balance.
To check Scale balance:
1. Remove the Platter.
2. Locate the Level on the Scale sub-platter. It can be seen
through a hole in the Scale main housing.
3. Adjust the feet until the “bubble” is in the middle of the
level.
To increase the length of the scale feet:
1. Rotate the feet in a counterclockwise direction.
2. Rotate the lock nut until it is firmly against the scale base
housing to lock the adjustment in place.
To decrease the length of the scale feet:
1. Rotate the feet in a clockwise direction.
2. Rotate the lock nut until it is firmly against the scale base
housing to lock the adjustment in place.
Maintenance & Cleaning 3-4 F-35536 (March 2010)
Page 21

HLX Self-Service Scale System Operator Manual
Cleaning the Printhead
The printhead of your HLX Scale System should be cleaned
approximately once each week, or whenever labels are obstructed
due to a residue buildup on the printhead and/or roller . It is a good
idea to clean the printhead roller whenever a new roll of labels is
installed. To obtain a Printhead Cleaning Kit, contact your local
Hobart Representative; request Part Number 00-184326.
Look At This
•Do not use a metal tool on the printhead. This could
scratch or break the printhead. In addition, monitor the
printer to look for labels stuck on the printer parts. If found,
remove these labels at once following the instructions given
below.
• Do not dampen labels, electronic parts, or connections. Do
not allow water to enter the openings in the housing. This
could damage the scale system.
1. Use the scraper from the Printhead Cleaning Kit to remove
stuck-on label stock.
2. To remove burnt-on adhesive, gently rub the printhead
surface with the eraser from the Printhead Cleaning Kit.
3. Using the cleaner and a swab from the Printhead Cleaning
Kit, scrub the printhead until all of the residue is removed.
4. Clean the roller with the cleaner and swabs.
5. Allow the printhead and roller to dry before loading the
labels.
F-35536 (March 2010) 3-5 Maintenance & Cleaning
Page 22

HLX Self-Service Scale System Operator Manual
Cleaning the Exterior of Scale
Carefully clean the exterior of the HLX Scale System with a
clean sponge or cloth and a warm water and mild detergent
solution (i.e., Palmolive green or Ivory liquid dishwashing
detergents).
CAUTION
• Do not dampen labels, electronic parts, or connections.
• Do not allow water to enter the openings in the housing.
This could damage the scale system.
Troubleshooting
In the event that your HLX Scale System does not operate as
expected, please reference the following troubleshooting steps
before calling for service.
If you are experiencing problems with the system, the following
scenarios may be of help.
Problem Possible Cause Action/Solution
There is no display on the
display unit.
Y ou may not have power running to the
system.
Verify the following connections:
• Power cord is plugged into a
working electrical outlet.
• Power cord is plugged into the
console.
The Operator ID was not
accepted.
You may have entered the wrong ID. Verify that you are entering the proper
ID. If correct, have your supervisor
check the ID number.
Product number was not
found.
System prompts you to take
a label. No label is present.
You may have entered an invalid product number.
A portion of the label may be ‘hidden’
in the label exit.
Verify the product number.
Make sure that the label exit is clear.
Partial non-printed label is
exposed.
System prints blank labels or
partially printed labels.
The labels may be improperly
threaded.
The labels may be improperly threaded
or the printhead or roller may be dirty.
Verify that labels are properly
threaded.
Check to see that labels are threaded
properly. If the problem persists,
clean the printhead using the Hobart
Printhead Cleaning Kit.
Maintenance & Cleaning 3-6 F-35536 (March 2010)
Page 23

HLX Self-Service Scale System Operator Manual
Index
Adjusting Console Position, 3-3
Adjusting the Scale Feet, 3-4
Alphabetical Screen, 2-6
By Count Product Screen, 2-5
By Count Screen, 2-5
Cleaning the Exterior of Scale, 3-6
Cleaning the Printhead, 3-5
Electrical Connections, 1-2
Expanded Option, 2-2
FCC Note, 1-1
HLX Sef-Serve Scale System, 1-1
Important Information, 1-2
Installing the Label Cassette, 3-1
Installing the Scale Platter, 3-3
Loading the Label Cassette, 3-2
Maintenance & Cleaning, 3-1
A
B
C
E
F
H
L
M
O
Operator Manual Terminology, 1-2
Operator Start Screen, 2-1, 2-3
P
Power Up the System, 2-1
Printhead Cleaning Kit, 3-5
Printhead cleaning kit part number, 3-5
Product Screen, 2-8
R
Random Weight Product Screen, 2-3
Random Weight Screen, 2-3
Removing the Label Cassette, 3-1
Removing the Label Roll, 3-2
Removing the Scale Platter, 3-3
Rezero Weigher, 2-8
S
Search for Product, 2-6
Standard Option, 2-1
T
I
Troubleshooting, 3-6
U
Using the HLX System, 2-1
V
Verify Correctness of Weight and Price, 1-2
W
Welcome, 1-1
Weights and Measures Screen 2-10
F-35536 (March 2010) I-1 Index
Page 24

 Loading...