

Page 1

CLR TREATMENT KIT No. 817972
Instructions
FOR DELIMING AND CLEANING
COUNTERTOP STEAMERS AND OTHER STEAMERS HAVING
AN INDIVIDUAL, SELF-CONTAINED, STEAM GENERATOR
FOR EACH STEAMING COMPARTMENT.
The Treatment Kit contains a piece of tubing, a funnel, a measuring cup, and a 28 FL.OZ. bottle of CLR.
Plastic or Rubber Gloves and Towels (not supplied) should be ready for use during the deliming
procedure.
MODELS
HSF3, HSF4, HSF5, and HSF90 —
Follow procedure on page 2.
MODEL
ES5 — Follow procedure on page 3.
FORM 34479 (Aug. 2000)
701 S. RIDGE AVENUE
TROY, OHIO 45374-0001
937 332-3000
www.hobartcorp.com
Page 2
DELIMING AND CLEANING PROCEDURE
MODELS HSF3, HSF4, HSF5, and HSF90
WARNING: READ AND FOLLOW THE INSTRUCTIONS ON THE CLR BOTTLE. USE
PLASTIC OR RUBBER GLOVES TO AVOID SKIN CONTACT. IF CLR LIQUID COMES IN
CONTACT WITH THE SKIN, RINSE WITH CLEAN WATER.
WARNING: THE STEAMER AND ITS PARTS ARE HOT. USE CARE WHEN OPERATING,
CLEANING OR SERVICING THE STEAMER. THE COOKING COMPARTMENT CONTAINS
LIVE STEAM. STAY CLEAR WHEN OPENING DOOR.
STEP 1. Drain the steam generator by turning the switch off. Set the cooking timer to zero.
If there is a DELIME GENERATOR Light, turn the O
N/OFF/DELIME switch to DELIME. If there is no
DELIME GENERATOR Light, turn the water supply off and turn the On-Off switch ON (this will close
the drain valve).
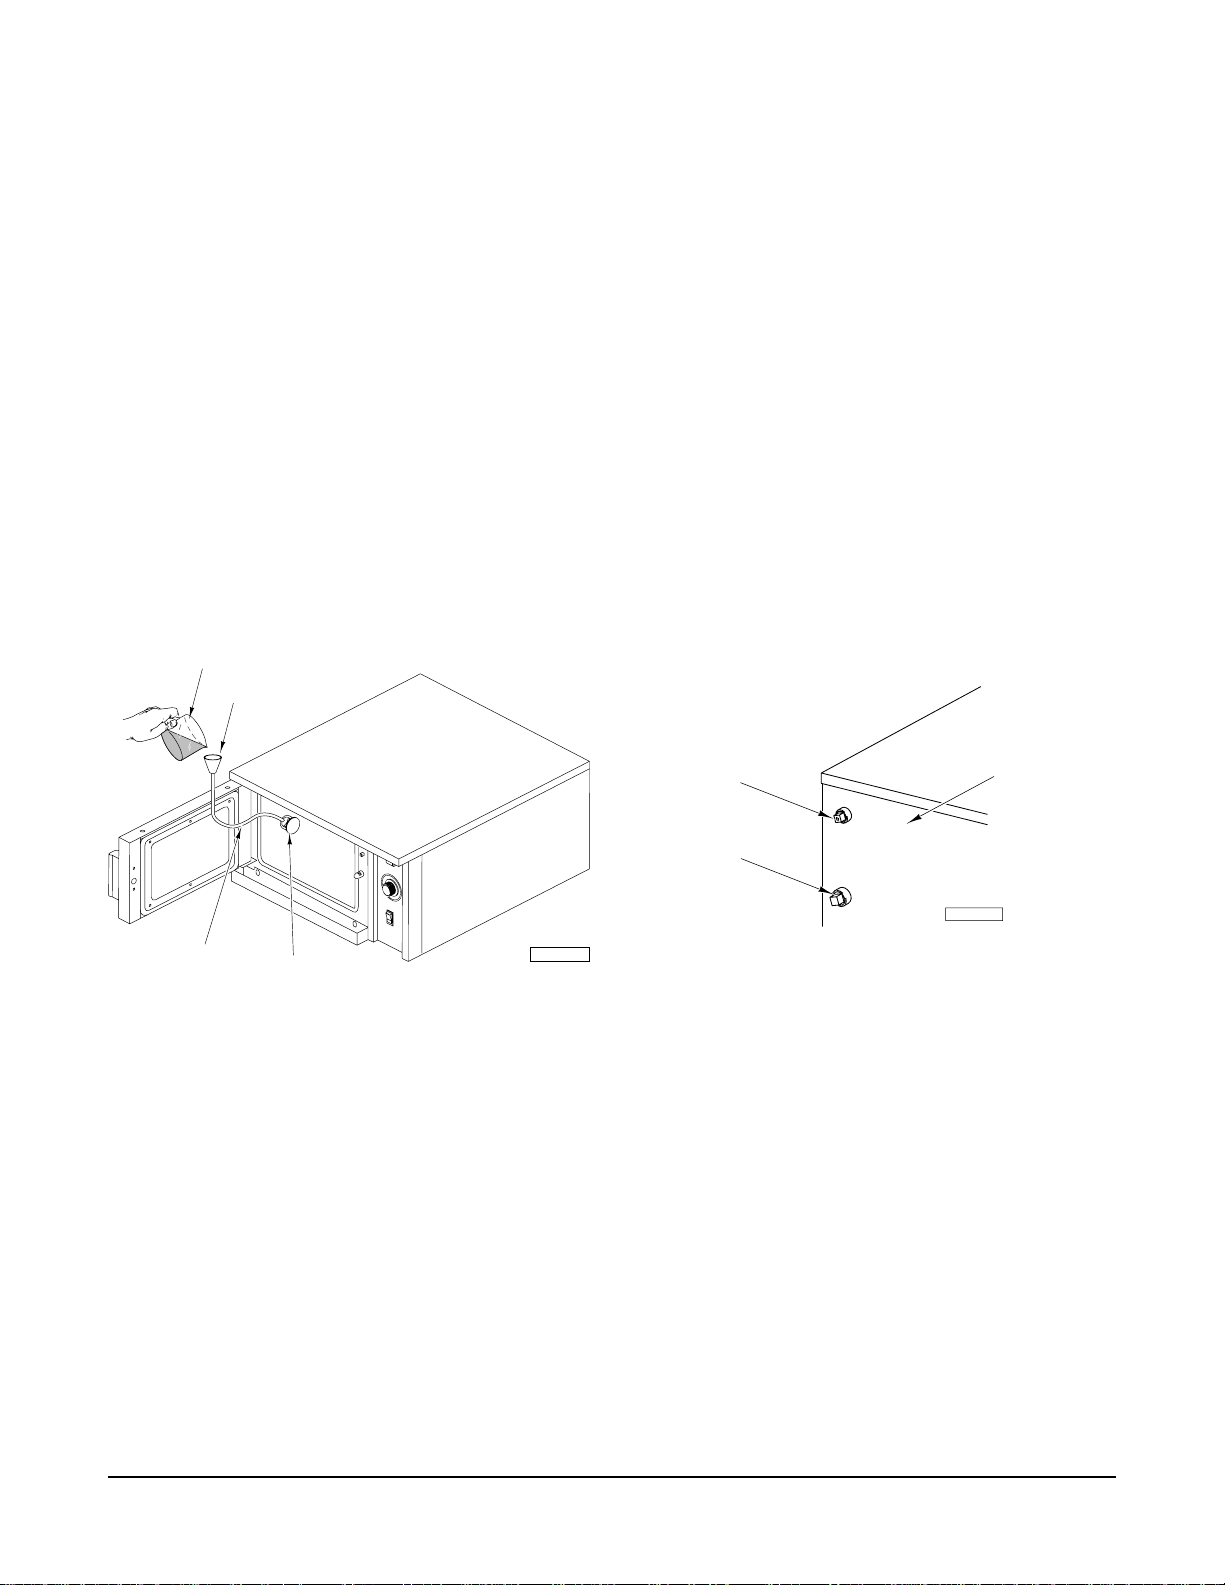
STEP 2. If the Deliming Plug is inside the cooking
compartment (Fig.1), unscrew the plug so the
hole points upwards.
BEAKER
FUNNEL
PLASTIC TUBE
DELIMING PLUG
Fig. 1
PL-51511
ALTERNATE STEP 2. If the Deliming Plug is
outside on the left side panel (Fig. 2), remove the
top plug.
Deliming Plug
Drain Plug
Fig. 2
Left Side Panel
PL-50823
STEP 3. Insert the Plastic Tube in the Deliming Port. Connect the Funnel to the other end of the tube.
Pour 28
FL.OZ. of CLR liquid into the generator slowly to avoid spillage. Pour in water to rinse Deliming
Plug. Remove Tube and Funnel. Replace Deliming Plug so it seals tightly.
STEP 4. Turn steamer on (if not previously done). Turn water supply on if it was previously turned off.
1
Allow to remain at READY cycle for 1
/2 hours. Then turn off and allow to drain.
STEP 5. FLUSH CYCLE. Turn steamer on. When the READY Light comes on, turn switch off to drain.
Repeat this step three times to completely flush generator.
STEP 6. Clean exterior and interior of steamer cabinet. Use a mild solution of soap and water. Rinse
with clean water. Dry with a soft cloth. Leave compartment door open when not in use.
THE STEAMER IS NOW READY FOR USE OR TURN OFF FOR OVERNIGHT SHUTDOWN.
– 2 –
Page 3

DELIMING AND CLEANING PROCEDURE
MODEL ES5
WARNING: READ AND FOLLOW THE INSTRUCTIONS ON THE CLR BOTTLE. USE
PLASTIC OR RUBBER GLOVES TO AVOID SKIN CONTACT. IF CLR LIQUID COMES IN
CONTACT WITH THE SKIN, RINSE WITH CLEAN WATER.
WARNING: THE STEAMER AND ITS PARTS ARE HOT. USE CARE WHEN OPERATING,
CLEANING OR SERVICING THE STEAMER. THE COOKING COMPARTMENT CONTAINS
LIVE STEAM. STAY CLEAR WHEN OPENING DOOR.
STEP 1. Make sure the steamer has been turned off for at least 6 minutes so the boiler has drained.
Your ES5 Steamer may be equipped with a standpipe and/or a steam port
— the CLR liquid may be poured
into the boiler either down the standpipe or through the steam port.
• Standpipe: Remove the cap on the standpipe at the back of the steamer and use the funnel (Fig. 3).
• Steam Port: Push the tube into the steam port (Fig. 4). Insert the tube approximately 8 inches and
connect the funnel to the other end of the tube.
Fig. 3 Fig. 4
STEP 2. With Cooking Timer set at 0, turn the ON/OFF switch On and carefully pour 28 FL.OZ. of CLR
liquid into the boiler, either down the standpipe or through the steam port. Carefully remove the funnel
and tube. Close and latch the door, rinse the funnel and tube in a sink with clean water, and replace
1
the cap on the standpipe (if applicable). Leave the steamer on so the READY light is on for 1
/2 hours
while the CLR cleans out the boiler.
STEP 3. After the 1
1
/2 hour ON cycle, turn the ON/OFF switch Off for 6 minutes to allow the boiler to
drain and flush.
STEP 4. With Cooking Timer set on 0, again turn the ON/OFF switch On and allow the boiler to fill with
water and to heat. After the READY light comes on, turn the ON/OFF switch OFF again to drain and
flush out the boiler. Repeat this step at least three times to completely flush boiler.
STEP 5. Clean exterior and interior of steamer cabinet. Use a mild solution of soap and water. Rinse
with clean water. Dry with a soft cloth. Leave compartment door open when not in use.
THE STEAMER IS NOW READY FOR USE OR TURN OFF FOR OVERNIGHT SHUTDOWN.
– 3 –
Page 4

NOTES
– 4 –FORM 34479 (Aug. 2000) PRINTED IN U.S.A.
 Loading...