

Page 1

Model No: AXM209UK
Slim DAB Micro System with docking for iPod
Slim DAB Micro System with docking for iPod
Page 2

SOME DOS AND DON'TS ON THE SAFE USE OF EQUIPMENT
This equipment has been designed and manufactured to meet international safety standards
but, like any electrical equipment, care must be taken if you are to obtain the best results and
safety is to be assured.
***************
DO
read the operating instructions before you attempt to use the equipment.
DO ensure that all electrical connections (including the mains plug, extension leads and
inter-connections between the pieces of equipment) are properly made and in
accordance with the manufacturer's instructions. Switch off and withdraw the mains
plug before making or changing connections.
DO consult your dealer if you are ever in doubt about the installation, operation
or safety
of your equipment.
DO be careful with glass panels or doors on equipment.
DO route the mains lead so that it is not likely to be walked on, crushed, chafed, or
subjected to excessive wear and tear or heat.
***************
DON'T remove any fixed cover as this may expose dangerous voltages.
DON'T obstruct the ventilation openings of the equipment with items such as newspapers,
tablecloths,
curtains, etc. Overheating will cause damage and shorten the life of the
equipment.
DON'T allow electrical equipment to be exposed to dripping or splashing, or objects filled
with liquids, such as vases, to be
placed on the equipment.
DON'T place hot objects or naked flame sources such as lighted candles or nightlights on,
or close to equipment. High temperatures can melt plastic and lead to fires.
DON'T use makeshift stands and NEVER fix legs with
wood screws - to ensure complete
safety always fit the manufacturer’s approved stand or legs with the fixings provided
according to the instructions.
DON'T use equipment such as personal stereos or radios so that
you are distracted from
the requirements of traffic safety.
DON'T listen to headphones at high volume, as such use can permanently damage your
hearing.
DON'T leave equipment switched on when it is
unattended unless it is specifically stated
that it is designed for unattended operation or has a stand-by mode. Switch off
using the switch on the equipment and make sure that your family knows how to
do
this. Special arrangements may need to be made for infirm or handicapped people.
DON'T continue to operate the equipment if you are in any doubt about it working normally,
or if it is
damaged in any way - switch off, withdraw the mains plug and consult your
dealer.
ABOVE ALL
− NEVER let anyone especially children push anything into holes, slots or any other
opening in the case - this could result in a fatal electric shock;
− NEVER guess or take chances with electrical equipment of any kind
− it is better to be safe than sorry!
***************
UK-1
Page 3
The above mark is in compliance with the Waste Electrical and Electronic Equipment Directive
2002/96/EC (WEEE).
The mark indicates the requirement NOT to dispose the equipment including any spent or
discarded batteries as unsorted municipal waste, but use the return and collection systems
available. If the batteries or accumulators included with
this equipment display the chemical
symbol Hg, Cd, or Pb, then it means that the battery has a heavy metal content of more than
0.0005% Mercury, or more than 0.002% Cadmium or more than, 0.004% Lead.
UK-2
Page 4
SAFETY PRECAUTIONS
To achieve the utmost in enjoyment and performance, please read this manual carefully before attempting to
operate the unit in order to became familiar with its features, and assure you years of faithful, trouble free
performance and listening pleasure.
Important Notes
* Keep these instructions: the safety and operating instructions should be retained for future
reference.
* Avoid installing the unit in locations described below:
* Places exposed to direct sunlight or close to heat radiating appliances such as electric heaters; on
top of other stereo equipment that radiates too much heat; places lacking ventilation or dusty
places; places subject to constant vibration; humid or moist places.
* Make sure not to obstruct the ventilation holes. Ventilation should not be impeded by covering the
ventilation holes with items such as newspapers, table-clothes, curtains etc.
* Before turning on the power for the first time, make sure the power cord is properly installed. The
mains plug is used as the disconnect device and it must always remain readily operable.
completely disconnect the equipment from the mains supply, the mains plug of apparatus must be
disconnected from the mains socket.
* The product must not be exposed to dripping or splashing and no objects filled with liquids, such
As Vase s , should be placed on the equipment.
* Keep a minimum distance of 10 cm around the apparatus to allow adequate ventilation.
* Please dispose of spent batteries in an environmentally friendly manner by using a local recycling
scheme.
*
Only use this equipment in moderate climates.
* No naked flame sources such as lighted candles should be placed on the apparatus.
* Do not expose batteries to excessive heat such as sunshine, fire or the like.
To
For safety reasons, do not remove any covers or attempt to
Refer any servicing to qualified personnel.
Do not attempt to remove any screws, or open the casing of the unit; there are no user serviceable parts
inside, refer all servicing to qualified service personnel.
CAUTION: TO REDUCE THE RISK OF ELECTRIC SHOCK DO NOT REMOVE COVER (OR BACK), NO
USER SERVICEABLE PARTS INSIDE, REFER SERVICING TO QUALIFIED SERVICE
PERSONNEL.
DANGEROUS VOLTAGE
There is high voltage within this product's enclosure that may be of sufficient magnitude
constitute a risk of electric shock.
ATTENTION
The owner's manual contains important operating and maintenance instructions, for your safety,
it is necessary to refer to the manual.
Note:
- This unit will become warm when used for a long period of time. This is normal and does not indicate
a problem
- Excessive sound pressure from earphones and headphones can cause hearing loss.
- If an unusual condition occurs in the display window or with an operating button, switch the unit off and then
on again.
with the unit.
gain access to the inside of the product.
to
UK-3
Page 5
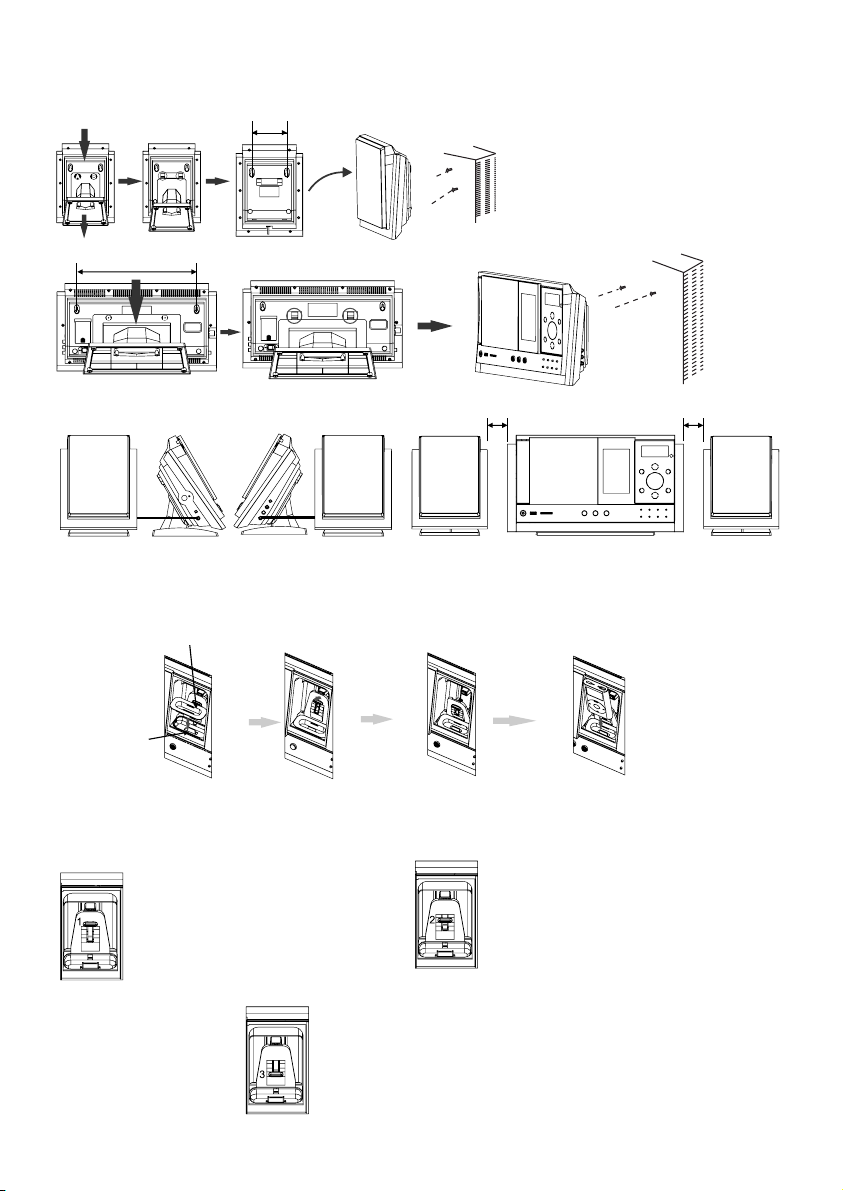
Assembly Drawing of Unit and speaker
1. Fixing the whole set of the unit on the wall
Note: Nails size:3.5*25BA(screws are not included)
84 mm
300 mm
2. Speakers connection
50 mm
50 mm
Note: When wall-mounting the set of product in line, suggest keeping at least 50mm distance from the main
unit to the speakers to achieve better stereo effect and to ensure the slide CD door with prefect movement.
3. Docking bracket and iPod Adjusting pad panel
Universal Dock adapter (Using the Dock Adapters to support all type of the iPod players.)
Connector
dock
1. IPod Adjusting Pad Panel(Press the iPod Adjusting pad panel lightly out from the lock holder.)
2. IPod Adjusting Pad Panel (Let theiPod Players easy to insert into the connector fixedly, and then press and push
them toward the lock holder until it snaps on.)
4. Adjust the adjusting pad knob
Adjust the pad knob
1. Made for iPod with color display
(4th generation)40GB, 60GB only
2. iPod(4th generation)40GB only
iPod with vide (5th generation)
30GB only
3. iPod classic 80GB
4. IPod classic 2nd generation 120GB
to level 1
Adjust the pad knob to level 2
1. Made for iPod mini (1st generation)
40GB, 60GB only
2. iPod (4th generation)20GB only
3. iPod (4th generation)20 & 30 GB
Color (U2 Special Edition)
4. iPod with video (5th generation)
60 & 80 GB
5. iPod classic 160GB
Adjust the pad Knob to level 3
1. Made for iPod nano
(1st generation)1GB, 2GB, 4GB
only
2. iPod touch 8GB/16GB/32GB
3. iPod touch 2nd generation
8GB/16GB/32GB
UK-4
Page 6

The unit supports the listed iPods
***iPods shown are not included***
Made for iPod mini
(4GB, 6GB only)
Made for iPod with
color display
(4th generation)
(20GB, 30GB only)
Made for iPod with video
(5th generation)
(60GB, 80GB only)
Made for iPod nano
(3rd generation)(video)
(4GB, 8GB only)
Made for iPod
(4th generation)
(20GB only)
Made for iPod with
color display
(4th generation)
(40GB, 60GB only)
Made for iPod nano
(1st generation)
(1GB, 2GB, 4GB only)
Made for
iPod nano
(4th generation)
(8GB, 16GB only)
Made for iPod
(4th generation)
(40GB only)
Made for iPod with video
(5th generation)
(30GB only)
Made for iPod nano
(2nd generation)(aluminum)
(2GB, 4GB, 8GB only)
Made for iPod classic
(80GB, 160GB only)
Made for iPod classic
(2nd generation)
(120GB only)
Made for iPod touch
(8GB, 16GB, 32GB only)
UK-5
Made for iPod touch
(2nd generation)
(8GB, 16GB, 32GB only)
Page 7

FEATURES AND CONTROLS
1
34
33
2
35
27 29
2826
40
3
4
5
6
879
101112
1314
25
2
23
22
2
18
17
16
15
4
4
1
1
20
19
38
3
7
36
1. SPEAKER
2. SPEAKER STAND
3. STANDBY LED INDICATOR
4. SD/MMC CARD IN SLOT
5. HEADPHONES JACK
6. USB DEVICE IN PORT
7. CD OPEN/CLOSE BUTTON
8. STANDBY/ON BUTTON
9. iPod OPEN/CLOSE BUTTON
10. MEMORY BUTTON
11. CLOCK BUTTON
12. INTRO BUTTON
13. TIMER BUTTON
14. RANDOM
15. EQ BUTTON
REMOTE CONTROL
1. STANDBY BUTTON
2. MUTE BUTTON
3. CD OPEN/CLOSE BUTTON
4. iPod OPEN/CLOSE BUTTON
5. SKIP/TUNE SEARCH DOWN BUTTON
6. RANDOM BUTTON
7. SLEEP BUTTON
8. CLOCK/DISPLAY BUTTON
9. EQ BUTTON
10.VOLUME UP BUTTON
11.CD/iPod BUTTON
12.USB/CARD/AUX BUTTON
13.VOLUME DOWN BUTTON
14.FM/DAB BUTTON
15.PLAY/PAUSE BUTTON
16.SELECT/REPEAT BUTTON
17.SKIP/TUNE SEARCH UP BUTTON
18.STOP/MENU/MONO/ST. BUTTON
19.PRESET/FOLDER UP
20.MEMORY BUTTON
21.PRESET/FOLDER DOWN BUTTON
22.NUMBER SEARCH BUTTON
BUTTON
16. PRESET/FOLDER DOWN BUTTON
17. PRESET/FOLDER UP BUTTON
18. SELECT/REPEAT TOUCH PLATE
19. STOP/MENU TOUCH PLATE
20. VOLUME DOWN TOUCH PLATE
21. SKIP/TUNE SEARCH DOWN TOUCH
PLATE
22. VOLUME UP TOUCH PLATE
23. CD/iPod TOUCH PLATE
24. IR SENSOR
25. LCD DISPLAY WINDOW
26. CD DOOR
USB/CARD/AUX TOUCH PLATE
27.
28. FM/DAB TOUCH PLATE
29. PLAY/PAUSE/ENTER TOUCH PLATE
BUTTON
42
31
39
30
32
3 F A NNA
0. M NTE
1. EA R “3 SP KE OUT
2. A N UNI AND3 MI T ST
3.
K BRA3 DOC ING CKET
4. o
A ING A
5. o CO CT3 iP d NNE
6. EA R “3 SP
KE OUT R”
7. UT JCK3 VIDEO OA
8. A3 DC JCK
9. HOL3 HITCHING E
0. PLA ER DO4 iPod Y OR
1 I / UNE S RCH 4. SK P
T EA UP
TA
OUCH PL E
2
INE IN C4. LJA
PUTTING THE BATTERIES INTO
1
2
3
4
5
6
7
8
9
THE REMOTE CONTROL UNIT
10
Press down the compartment cover, and
11
slide the cover off to open the compartment.
12
Place the two (UM4), (AAA), (R03) batteries
13
in the remote control according to the
14
polarity markings ("+" and " - ") inside the
15
compartment and on the batteries. Place
16
17
the cover over the compartment, press down
and push it upward until it snaps on.
lightly,
18
19
Note: Remove the batteries from the remote
control if not in use for long period of
20
the time. Do not mix normal batteries with
21
rechargeable batteries, when the batteries
22
become weak, remote control will not
function and replace with new batteries.
**BATTERIES NOT
INCLUDED**
L”
OR
T
K
B3 iP d DJUST PD KNO
POWER CORD CONNECTION
Power Cord Connection
1. Connect the AC/DC Adaptor Tip to the DC jack on the right
side of the unit firstly.
2. Connect the AC/DC Adaptor Plug to the AC outlet socket
secondly.
Note: In any time, the iPod PLAYERS must be fixed well
under in the standby mode to avoid them were damaged.
UK-6
DC Adap te r Tip
Page 8

OPERATING THE UNIT
When you first plug the unit into the AC outlet, the unit will be in standby mode, the black light of standby is red.
You can now press the STANDBY/ON button on the unit or remote control to switch the unit ON. The black light of
the standby and multi function
switch off completely.
POWER/STANDBY
1. Press the STANDBY/ON button on the unit or or press the STANDBY button on remote control to switch the
unit on.
2. Select the sound source (CD, iPod), (USB, CARD, AUX) and (DAB or TUNER) by touch the (CD, iPod),
(USB, CARD, AUX) and
AUX) and (DAB or TUNER) button separately on remote control. The corresponding display will light up.
3. Adjust the volume with the VOLUME (UP or DOWN) touch plate on the unit or press the VOLUME
on the remote control.
4. Press the STANDBY/ON button on the unit or press the STANDBY button on the remote control again to
turn off the unit.
Note: 1. If there is no signal under the CD/USB DEVICES/ SD & MMC CARD/iPod mode, the main
switched off within 15 minutes automatically.
2. During in the iPod mode, there is not insert the iPod Player on the iPod docking bracket. The main unit
you do not use it.
will also turn off within15 minute automatically. Please turn the main switch off to save energy, when
touch plate will light on blue. Pull the AC plug out of the wall socket if you want to
(DAB or TUNER) touch plate separately or press the (CD, iPod), (USB, CARD,
buttons
unit will be
CLOCK SETTING
The clock will be automatically synchronized to the DAB clock if you can receive DAB signals in your location.
If you can only receive FM, then you have to set the clock manually. The manual clock setting must be done in
standby mode.
Manual clock setting
1. When the unit is first connected
“00:00” and flash.
2. During standby, press and hold the CLOCK/DISPLAY button on the remote control/unit the hour digits flash
in the display, t
SKIP/TUNE SEARCH(UP or DOWN) button on the remote control
CLOCK/DISPLAY button on the remote control/unit again to confirm.(F1)
3. After the hour is set, the minute digits will then flash, T
plate or press the SKIP/TUNE SEARCH(UP or DOWN) button on the remote control
minute.(F2)
4. When the display shows the correct time, press the
again to confirm, the manual clock setting is now completed.
Synchronise the clock to DAB local time
1. Press the POWER button on the unit or press the STANDBY button on the remote control once to switch
the unit on.
ouch the FM/DAB touch plate or on the remote control
2. TPress the FM/DAB button
3. Tune to a DAB station and the clock will be automatically synchronized to the DAB local time.
TIMER SETTING
This function allows you to switch on and off the system at your desired time and mode:
1. Press the TIMER button to toggle the timer function between on and off, the display will show “Timer On” or
“Timer Off”. The display will show “ ”
2. To set the on timer clock, press and hold the TIMER button until the display shows “On Timer” and the “hour”
digit of the timer clock will flash.(F4)
3. Touch the SKIP/TUNE SEARCH (UP or DOWN) touch plate or press the
button on the remote control to set to the desired hour, then press the TIMER button to confirm, first set the
hour and finally the minute, the on timer clock is set.
4. T hen you will enter into the off
flash. Touch the SKIP/TUNE SEARCH (UP or DOWN) touch plate or press the SKIP/TUNE SEARCH (UP or
DOWN) button on the remote control to set to the desired hour, the n press the
set the hour and finally the minute, the off timer clock is set.
5. Finally touch the SKIP/TUNE SEARCH (UP or DOWN) touch plate or press the SKIP/TUNE SEARCH(UP or
DOWN) button on the remote control to select the
then press the TIMER button to confirm. The timer setting is now completed.
6. To check the timer setting, repeatedly press the CLOCK button until the display shows the on timer and the
off timer setting.
TO SET SLEEP FUNCTION (on the remote control)
This function allows you to program the system to switch off itself after a set period of time. You can set your
sleep time in power on mode:
1. T o activate the sleep function, press the SLEEP button on the remote, the display will show “SLEEP-90”
and flash.
2. R epeatedly press the SLEEP button to select the sleep time, it will change in sequence on every press:
ouch the SKIP/TUNE SEARCH (UP or DOWN) touch plate or press the
to the AC mains outlet, it will be in standby mode, and the display will show
to set to the correct
ouch the SKIP/TUNE SEARCH (UP or DOWN) touch
CLOCK/DISPLAY button on the remote control/unit
to indicate timer function on.(F3)
SKIP/TUNE SEARCH(UP or DOWN)
timer clock setting, the display will show “Off Timer” and the “hour” digit will
timer on mode - CD, DAB, FM, USB, SD CARD or iPod,
hour, then press the
to set to the correct
to select DAB mode.
TIMER button to confirm, first
UK-7
Page 9

3. When the display shows your desired sleep time, release the button, the sleep timer is now activated. The
display will show “S#” in which “S1” is to indicate “10 minutes” sleep time and so on. When the sleep time
counts to zero, the unit will go off.(F5)
4. To cancel sleep, press the SLEEP button once again, the display will show “SLEEP-OFF”
and the “S#” will disappear.
F1
F4
LISTENING TO YOUR RADIO
Hints for better reception
This unit carries a single lead wire DAB/FM antenna, to obtain the best performance, you should fully extend
the wire antenna and adjust the position as well as the direction until you find the best reception.
For ideal DAB reception, always maintain the lead wire antenna
downward behind the unit) is highly recommended.
DAB mode
When the unit is powered up for the first time, it will be in standby mode. Press the POWER button on the unit
or press the STANDBY button on the remote control once to turn the radio on, it will then automatically enter
into the DAB mode and perform full scan function. During scan, the display will show “Scanning …” together
with a slide bar that indicates the progress of the scan and the amount of stations that have been found so
far.(F6)(F7)
Once the scan has finished, the radio will select the first alphanumerically found station. To explore the found
stations, first Touch the REPEAT/SELECT touch plate or press the REPEAT/SELECT button on the remote
control and then select the REPEAT/SELECT mode for selection, when your desired station appears on the
display, touch the REPEAT/SELECT touch plate or press the REPEAT/SELECT button on the remote control
again to confirm your selection.
DAB auto scan modes
There are two types of DAB auto scan modes, one is local scan and the other is full scan. Local scan will only
search for the UK DAB Band III channels
After the scan has finished, the first alphanumerically found station will be automatically selected.
1. To activate local scan, t STOP/MENU ress the STOP/MENU/MONO/ST. button on
the remote once to enter into the “Setup menu”, then select
selection, when the display shows “Local scan”, t REPEAT/SELECT ress the
REPEAT/SELECT button on the remote to confirm, the display will show “Scanning …” and a quick
progressing slide bar.(F8)
2. To activate full scan, t STOP/MENU ress the STOP/MENU/MONO/ST. button on
remote once to enter into the “Setup menu”, then select the REPEAT/SELECT mode for selection,
when the display shows “Full scan”, t REPEAT/SELECT ress the REPEAT/SELECT
button on the remote to confirm, the display will show “Scanning …” and a slower
bar.(F9)
3. All the stations that have been found will be stored automatically, to explore the stations that have been
found, first t REPEAT/SELECT ress the REPEAT/SELECT button on the remote
once, then select the REPEAT/SELECT mode for selection, when
like to listen to, t REPEAT/SELECT ress the REPEAT/SELECT button on the
remote .
DAB manual tune
1. To select manual tune, t STOP/MENU ress the STOP/MENU/MONO/ST. button on
the remote to enter into the “Setup menu”, when the display shows “Manual tune”,
touch plate or p control
confirm.(F10)
2. Select the REPEAT/SELECT mode to scroll through the DAB channels, the display will show “5A to 13F”
and their associated frequencies.
3. W hen your desired frequency appears in
The name of the station group (ensemble/multiplex) will be displayed.
4. To see what stations are present on the found ensemble/multiplex, first t REPEAT/SELECT
plate or p control
REPEAT/SELECTmode,
ress the REPEAT/SELECT button on the remote again to select.
Secondary Services
On some occasions you will see a “>” symbol appeared after the name of the station, this indicates that there
are secondary services available to that station. These secondary
to the primary station. E.g. a sports station may want to add extra commentaries. The secondary services are
inserted directly after the primary station. To select the secondary station, t REPE/SELE
or p control
and full scan will search for all DAB Band III channels.
control
control
control
ouch the touch plate or p
control
REPEAT/SELECT ress the REPEAT/SELECT button on the remote once to
control ouch the
ouch the touch plate or p
ouch the touch plate or p
control
ouch the touch plate or p
control
ouch the touch plate or p
ouch the touch plate or p
ouch the touch plate or
the display, select the REPEAT/SELECT mode to confirm.
ress the REPEAT/SELECT button on the remote once, and then select the
touch plate or p control
when your desired station appears in the display, REPEAT/SELECT
ress the REPEAT/SELECT button on the remote when the “>” appears in the display.
F2
F5
in a vertical position (holding it upward or
the REPEAT/SELECT mode for
you find a station that you would
p
ouch the touch
touch the
services contain extra services that relate
ouch the touch plate
F3
the
progressing slide
t
UK-8
Page 10

FM
mode
1. To select FM, T Press the DAB/FM button on the remote , the display
will how FM and the frequency.
2. To activate frequency auto search, tand hold
press the SKIP/TUNE SEARCH (UP or DOWN) button on the remote
down or up the frequency band; it
3. You can also t
(UP or DOWN) button
ouch the touch plate or p control
4. T STOP/MENU ress the STOP/MENU/MONO/ST. button on the remote to
toggle select between the FM “STEREO” and “MONO” reception.
STORING AND RECALLING STORED PRESET STATIONS
In either DAB or FM mode, you can store up
get direct access to your favourite stations.
1. To store a preset, first tune to your desired station, then press the MEMORY button on the remote control
once, the display will show “PRESET#” and flash.(F11)
2.
Press the PRESET/FOLDER (UP or DOWN) button on the remote controlto select your desired station
preset number, then press the MEMORY button on the remote control to confirm your selection; the display
will show
“Preset # saved” in DAB mode.(F12)
3. To recall
the stations that you have stored; the display will show “Preset # loaded” in DAB mode.
4. If you press a preset that hasn’t been allocated a station; In DAB mode, the
Note: The stored stations will be saved into its memory and power off will not erase it. Storing a new
station into a preset location will erase the previously stored station in that location.
ouch the FM/DAB touch plate or control
and hold control until it starts to scan
ouch the SKIP/TUNE SEARCH (UP or DOWN) touch plate or press the SKIP/TUNE SEARCH
on the remote control
ouch the SKIP/TUNE SEARCH (UP or DOWN) touch plate or
will stop automatically once a station has been found.
to select your desired frequency.
to 20 stations to the favourite presets; this will enable you to
a preset station, press the PRESET/FOLDER (UP or DOWN) button on the remote control to select
display will show “Preset # free”.
F6
F9
DAB RESET
When you move the radio to another part of the country, your pre-tuned and stored DAB stations may no
longer be available. If this is the case then you will need to reset your radio back to its original factory
settings; to perform a DAB reset, please do the following:
ouch the FM/DAB touch plate or p control
1. Tress the DAB/FM button on the remote to select DAB mode.
ouch the touch plate or p control
2. T STOP/MENU ress the STOP/MENU/MONO/ST. button on the remote
once to enter into the “Setup menu”, then select the REPEAT/SELECT mode for selection.
3. When the display shows the “DAB Reset”, REPEAT/SELECT ress the
REPEAT/SELECT button
reset …”.(F13)(F14)
ouch the touch plate or p control
4. T REPEAT/SELECT ress the REPEAT/SELECT button on the remote
again to confirm, the display will show “Scanning …” and it will perform DAB full scan function.
5. After the scan
Note: All of your stored DAB presets will be lost once the reset has taken place.
DAB DISPLAY MODES
During DAB mode, repeatedly press the CLOCK/DISPLAY button will cycle through the following display
modes:
Signal strength
The display will show a slide bar
will be from left to right.
DLS
DLS stands for Dynamic Label Segment which is a scrolling message that the broadcaster may include in
their transmissions. The message usually includes information such as programme details …etc.
Programme type
This describes the
has finished, the radio will select and display the first alphanumerically found station.
style of the programme that is being broadcast.
on the remote once, the display will show“Press SELECT to confirm
F11 F12
to indicate the signal strength, the stronger the signal, the longer the bar
touch the touch plate or p
control
F7
F10
F13
F8
UK-9
F14
Page 11

Ensemble/Multiplex (Group name)
The Ensemble/Multiplex is a collection of radio stations that are bundled and transmitted together in a single
frequency. There are national and local multiplexes, local ones contain stations that are specific to that area.
Time and date
The time and date will be automatically updated by the broadcasted information; there is no need to
manually.
Frequency
The frequency of the present station will be displayed.
Audio bit rate
The display will show the digital audio bit rate being received
COMPACT DISC
1. Always use a compact discs bearing the mark as shown.
2. Notes on handling discs
Removing the disc from its storage case and loading it.
* Do not touch the reflective recorded surface.
* Do not stick paper
* Do not bend the disc.
3. Storage
* Store the disc in its case.Do not expose discs to direct sunlight or high temperatures, high humidity or
dusty places.
4. Cleaning a
* Should the disc become soiled, wipe off dust, dirt and fingerprints with a soft cloth. The disc should be
cleaned from the center to the edge.
* Never use benzene, thinners, record cleaner fluid or anti
disc
or write anything on the surface.
area.
static spray.
set the clock
FROM THE CENTRE
TO THE EDGE
CORRECT INCORRECT
* Be sure to close the CD door so the lens is not contaminated by dust.
* Do not touch the lens.
CD/MP3/WMA OPERATION
Listening To Compact Disc (CD/MP3/WMA)
1. Press the CD DOOR (OPEN/CLOSE) button on the audio device unit (or remote control) to open the CD
DOOR.
2. Insert the CD/MP3/WMA disc into the CD compartment, press the CD DOOR (OPEN/CLOSE) to close it.
3. Press the FUNCTION button on
unit will read the CD/MP3 disc.
Important : Please do not force to open the CD DOOR manually.It may cause the CD DOOR to
OPEN/CLOSE.
In the CD mode
A)
This audio device unit can read CD, CD-R, CD-RW, MP3 and WMA DISCS.
B) In the MP3 mode
This audio device unit is also available to play :
1. It can read " 8 cm " and " Multi Section " of MP3 DISC. "Playback Transfer
2. In MP3 : Transfer bit rate : 32 - 320 kbps. In WMA : Transfer bit rate : 64 - 320 kbps. The "Max Readable
99 folders and 999 tracks".
the audio device unit (or remote control) to CD mode. The audio device
Rate" in MP3 AND WMA".
UK-10
Page 12

Playing The Entire CD/MP3/WMA
- CD
1. Insert the CD disc into the CD compartment, the main unit will automatically read the total number of the
folders and tracks at the same time.
2. Touch the PLAY/PAUSE touch plate on the unit or press the PLAY/PAUSE
the unit will play the first track of the CD disc automatically.(F17)
3. Touch the PLAY/PAUSE touch plate on the unit or press the PLAY/PAUSE button on the remote control
once again, the time elapsed indicator will flash.(F18)
4. Touch the
SKIP/TUNE SEARCH (UP or DOWN) touch plate on the unit once or (on the remote control) to skip fast
forward or backward of each song.
5. To resume playback, touch
the remote control once more again.
6. To stop playback, touch the STOP/MENU touch plate on the unit or press the STOP/MENU button on the
remote control once.
- MP3/WMA
1.
Insert the MP3/WMA disc into the CD compartment, the main unit will automatically read the total umber
of the folders and tracks at the same time.
2. Touch the PLAY/PAUSE touch plate on the unit or press the PLAY/PAUSE button on the remote control,
the unit
3. Touch the PLAY/PAUSE touch plate on the unit or press the PLAY/PAUSE button on the remote control
once again, the time elapsed indicator will flash.(F20)
4. To change Track NO., touch SKIP/TUNE SEARCH(UP or DOWN) touch plate
PLAY/PAUSE button on the remote control once. And touch and hold the SKIP/TUNE SEARCH (UP or
DOWN) touch plate on the unit once or (on the remote control) to skip fast forward or backward of each
song.
5. To resume playback, touch the PLAY/PAUSE touch plate on the unit or press the PLAY/PAUSE button on
the remote control once more again.
6. To change the ALBUM NO., press the PRESET/FOLDER UP or PRESET/FOLDER ON buttonon the unit
(or the remote control) once.
(or remote control).
Note: 1. If the main unit is not working properly, disconnect the power source and then reconnect it again.
2. The display only supports English characters and does
USB/SD CARD OPERATION
During in the STANDBY mode
1. Insert the USB DEVICE or SD/MMC CARD, and then press the STANDBY button on the main unit
(or remote control) to power"ON" the unit.
2. Touch the USB/CARD/AUX touch plate on the main unit or press the USB/CARD/AUX button on the
remote control to select the USB or SD CARD mode. The main unit will automatically read the total
number of the folders and tracks at the same time. (F21)
3. If the USB memory device more than one folder.
a. Press the PRESET/FOLDER (UP or
control to select each folder.
b. Touch the SKIP/TUNE SEARCH (UP or DOWN) touch plate or press the SKIP/TUNE SEARCH (UP or
DOWN) button on the remote control to
Note : 1. The main unit can play MP3/WMA only in this mode.
2. This unit can support most of USB devices and SD/MMC cards. The memory capacity up-to 32GB.
It can
others to access it.
3. It can support USB version 1.1 and 2.0. The main unit does not support the WMA file
protected by “DRM FILE”.
Playing The Entire flash disc
1. Playback will start by touching the PLAY/PAUSE touch plate on the unit or press the PLAY/PAUSE button
on the remote control. Playback starts with the first track. The display shows the current track number
and its elapsed time.(F22)
2. To interrupt playback, touch the PLAY/PAUSE touch plate on the unit or press the PLAY/PAUSE button on
the remote control. The time elapsed indicator will flash.(F23)
3. To resume playback, touch the PLAY/PAUSE touch plate on the unit or press the PLAY/PAUSE button on the
remote control again.
4. To stop playback, touch the STOP/MENU or press the STOP/MENU/MO.ST. button on the remote control.
Note :
unit and USB DEVICE or SD CARD were damaged.
SKIP/TUNE SEARCH(UP or DOWN) touch plate once to change Tr ack NO., touch and hold the
the PLAY/PAUSE touch plate on the unit or press the PLAY/PAUSE button on
will play the first track of the CD disc automatically.(F19)
To stop playback, touch the STOP/MENU touch plate once on the unit
not support other languages in this unit.
DOWN) button or press the USB/CARD/AUX button on the remote
select current track in desired folder.
not access (or access a longer time) the memory capacity over 32GB. Otherwise, make an
In any time, the USB DEVICE or SD
CARD must be fixed well under in the STANDBY mode to avoid the main
button on the remote control,
on the unit or press the
which is
F15
F18
UK-11
F16
F19
F17
F20
Page 13

F21
REPEAT PLAY FUNCTION
- CD
1. Touch the SELE/REPE touch plate on the unit or press the SELECT/REPEAT button on the remote control
once, " “ is displayed. CD will play the current track repeatedly.(F24)
2. Touch the SELE/REPE touch plate on the unit or press
twice, " is displayed. CD will play all tracks repeatedly.(F25)
3. Touch the SELE/REPE touch plate on the unit or press the SELECT/REPEAT button on the remote control
once more again, REPEAT function will
- MP3/WMA/USB/SD CARD
1. Touch the SELE/REPE touch plate on the unit or press the SELECT/REPEAT button on the remote control
once, then" " is displayed. It will play the current track repeatedly.(F26)
2. Touch the SELE/REPE touch plate on the unit or
twice, " " is displayed. It will play all tracks repeatedly.(F27)
3. Touch the SELE/REPE touch plate on the unit or press the SELECT/REPEAT button on the remote control
thrice, "
4. Touch the SELE/REPE touch plate on the unit or press the SELECT/REPEAT button on the remote control
once more again, then REPEAT function will be off.
PROGRAM FUNCTION
User can make the program up to 60 tracks in CD/MP3/WMA/USB/SD CARD mode in any desired order.
Program mode is activated while in stop mode.
1. How to play the program
- CD
1) Press the MEMORY button, shift to MEMORY mode.(F29)
2) Touch the SKIP/TUNE SEARCH (UP
(UP or DOWN) button on remote control, the track number will be changed. Press the MEMORY button to
confirm it.
- MP3/WMA
1) Press the MEMORY button, shift to MEMORY mode.
2) Press the PRESET/FOLDER(UP or DOWN) button on the unit or on the remote control, the album number
will be changed. Press the MEMORY button, the first track number will be displayed.(F31)
4) Touch the SKIP/TUNE SEARCH(UP or DOWN)
(UP or DOWN) button on remote control, the track number will be changed.
5) Press the MEMORY button to confirm the favorite track number.
2. PROGRAM
Touch the PLAY/PAUSE touch plate on the unit or press the PLAY/PAUSE button on remote control. The unit
will play the first track of the program. When all tracks have been played, the unit display will be shows the
number of tracks and the playing time of the CD/MP3/WMA songs.
3. CANCEL PROGRAM
1. Touch the STOP/MENU touch plate on the unit or press the STOP/MENU/MO.ST. button on remote control
once, or open the CD tray door that the memory will be erased. Set a new program, the existing one will be
cleared.
Note :
1. Touch the REPEAT touch plate on the unit or press the REPEAT button on the remote control once,
the " " indicator will light on the display. Then the unit will repeat the current track.
2. Touch the REPEAT
" " will light on the display. Then the unit will repeat all the total number of tracks.
3. Touch the REPEAT touch plate on the unit or press
again. The unit will return to play the program in normally.
RANDOM PLAY
You can press the RANDOM button on the unit or on the remote control to select the random play unction:
1. During CD stop, press the RANDOM button once to select random play, the display will show “RANDOM”,
one track will be randomly selected and started playing.
During playback, first press the RANDOM button once, the display will show “RANDOM”, then touch the
2.
SKIP/ TUNE SEARCH (UP or DOWN) touch plate or press the SKIP/TUNE SEARCH(UP or DOWN) button
on the remote control, one track will be randomly selected and started to
3. To resume normal playback, press the RANDOM button again until “NORMAL” is displayed.
4. To cancel random play, touch the STOP/MENU touch plate or press the STOP/MENU/MONO/ST. button on
the remote control, playback will be stopped and the display will show “STOP”.
"
be off.
press the SELECT/REPEAT button on the remote control
" is displayed. It will play all tracks in the current folder repeatedly .(F28)
or DOWN) touch plate on the unit or press the SKIP/TUNE SEARCH
touch plate on the unit or press the SKIP/TUNE SEARCH
PLAY
During in the program mode.
touch plate on the unit or press the REPEAT button on the remote control twice, the
the REPEAT button on the remote control once more
F22
the SELECT/REPEAT button on the remote control
The album number is flashing. (F30)
play.
F23
UK-12
Page 14

INTRO PLAY
Press the
playing the first 10 seconds of each track.(F32) Press the INTRO button again, the display will show
“NORMAL”.
iPod OPERATION
During the unit in STANDBY mode:
1.
on.
2. P Insert the iPod players in
the iPod docking bracket on the front of the main unit fixedly.
3. T to the iPod mode,
th e iPod indicator will appear on the main unit display, and the iPod will
4. Adjust the volume control by touch the
button.
5. the PLAY/PAUSE PLAY/PAUSE once to pause the
current track.
7. To skip forwards or backwards, t the (U P or DOWN) ress the
/TUNE SEARCH control
During the unit in
1. During the unit in iPod mode, t STOP/MENU ress the STOP/MENU/MONO/ST.
button on the remote once, the unit will enter to the iPod MENU mode.
To select the current menu as belows :
Mus ic > Extras > Photo Import (without this
Backlight > Now Playing will shows on the iPod Player display.
2. Pr es s the PRESET/FOLDER (UP or DOWN) touch plate on the unit (or remote control) to search the current
menu.
3. the
4. the (UP or DOWN) touch plate on the unit (or remote control) to search the
current content in the each desired menu folder.
5. If you want return to the iPod menu,
button on the remote again.
Charging the iPod Player battery through the main unit:
1. iP od Player has a internal nonremovable battery, the battery may need to be charged that is not used for a
while.
2. Yo u
mode.
Note : 1. The iPod Player battery is 80-percent charged in about an hour, and fully charged in about a few hours.
If you
2. It is not better to charge under the TUNER mode. It may interfere the reception.
INTRO button on the unit to start intro play only. The display will show “INTRO” and will start
Press the POWER button on the unit or or press the STANDBY button on remote control to switch the unit
ress the iPod OPEN/CLOSE button once on the unit first to open the iPod door.
ouch the CD/iPod touch plate on the unit or press the CD/iPod button
VOLUME (UP or DOWN) button or press the VOLUME (UP or DOWN)
Touch touch plate or press the button on remote control
(UP or DOWN) button on the remote to select the desired track.
iPod MENU mode:
control
Touch
Touch SKIP/TUNE SEARCH
SELE/REPE touch plate or press the SELECT/REPEAT button enter to the desired menu folder.
control
can charge the iPod Player through the main unit automatically under the STANDBY or POWER ON
charge it while playing music, it may take longer.
ouch SKIP/TUNE SEARCH touch plate or pSKIP
ouch the touch plate or p
function display on the iPod Mini) > Settings > Shuffle Songs >
t the STOP/MENU touch plate ress the STOP/MENU/MONO/ST.
ouch or p
on remote control
play automatically.(F33)
F24
F27
F30 F31
F25
F28
F26
F29
F32
F33
Note:
1. In any time, you can control the iPod player on the main unit, remote control or iPod player
unit in the "iPod" mode.
2. In any time, the iPod player must be fixed well under in the STANDBY mode to avoid the unit and iPod
player were damaged.
3. During the unit in iPod mode. The video function of the iPod
latest version of the iPod video function from the apple web-site.
UK-13
with ahnormal working normally. Update the
itself while the
Page 15

VIDEO OUT SETTING (for i-Pod Video only and Video cable "RCA-type cable" not
included
1. During the unit in the STANDBY mode : Connect the TV set with a videos cable (RCA-type cables) to the
VIDEO out jack on the rear of the unit.
2. During the unit in the iPod mode : Press the "MENU" button on the iPod Click Wheel to set the video
function.
3. To set iPod to display videos on a TV :
(a) Choose Videos > Video Settings, and then set TV Out to Ask or On.
(b) If you set TV Out to Ask, iPod gives you the option of showing videos on TV
time you play a video.
Note :1. The Video mode only support that the iPod players have a Video function.
2. iPod classic 80/160GB, iPod nano 3rd generation(Video) 4/8GB and iPod touch 8/16GB should be
fixed well under in the STANDBY mode before operation of the Video function.
AUX IN PLAY( Aux in cable not included)
1. Touch the USB/CARD/AUX touch plate on the unit or press the USB/CARD/AUX button on the remote
2. Use a cable with RCA
EQ CONTROL
When you touch the EQ touch plate or press the EQ button on the remote control, the sound tone changes as
below:
MUTE SETTING (on the remote control)
Press the MUTE button on the remote control to stop the sound from the speakers temporarily, the sound
stops and the display will show “MUTE”. To cancel mute, press the MUTE button again or press the
VOLUME +/-, “MUTE” disappears in the display and the sound is restored.
LISTEN TO THE MUSIC BY USING HEADPHONE
Plug your headphones (3.5mm mini-stereo plug) into the headphones jack on the front penal of the unit. The
sound will be heard through the headphones, not the speaker.
Note: You may damage the eardrum by superfluous sound pressure.
SPECIFICATION
POWER SUPPLY :
OUTPUT POWER :
UNIT DIMENSION :
SPEAKER BOX DIMENSION :
N. W. :
RADIO SECTION
FREQUENCY RANGE : FM 87.5 - 108 MHz
COMPACT DISC SECTION
OPTICAL PICKUP :
FREQUENCY RESPONSE : 100Hz - 16kHz
SPECIFICATION SUBJECT TO CHANGE WITHOUT
Ventilation warning : " The normal ventilation of the product shall not be impeded for intended use."
CONTACT DE TA IL S
We trust you are completely satisfied with this product from Argos Ltd, however please feel free to contact us if
you experience any difficulties, or if you would like to express your views regarding our products.
Please write to:
Customer Services
Argos Ltd
489-499 Avebury Boulevard
Saxon gate West
Central Milton Keynes
MK9 2NW
Helpline: 0870 600 3030
Through the process of continuous improvement, Argos Limited reserves the right to change or alter
specifications without prior notice. E&OE
)
or on iPod while every
control, until the "AUX” indicator light on the display. This unit can input analog audio through the
AUX(LINE) IN jack on the right of the unit.
DAB 174 - 240
jack to connect external audio source.
AC/DC ADAPTOR INPUT 100-240V-50/60Hz
10 Wa tts x 2
3 - BEAM LASER
460 (W) x 142 (D) x 212 (H) mm
OUTPUT DC 12V 4.0A
160 (W) x 142 (D) x 212 (H) mm
5.1 kg
FURTHER NOTICE.
MHz
UK-14
Page 16

AXM209UK Warranty
Hitachi Europe Ltd.
Product Guarantee
This product is guaranteed against manufacturing defects for a period of
This does not cover the product where the fault is due to misuse, abuse, use in contravention
of the instructions, or where the product has been the subject of unauthorised modifications or
alterations, or has been the subject of commercial use
In the event of a problem with the product within the guarantee period please return it to your
nearest Argos store
If the item is shown to have had an inherent defect present at the time of sale, the store will
provide you with a replacement
Your statutory
iPod® is a registered trademark of Apple Computer, Inc., registered in the US and other countries.
1 year
rights remain unaffected
Guarantor; Argos Ltd
489 499 Avebury Boulevard
Central Milton Keynes
MK9 2NW
 Loading...