

Page 1

APRIL 2003 HHEA-MANUFACTURING DIVISION
PA
No. 0174
32HDT50/55: PT3-E Chassis
42HDT50/55: PT3-G Chassis
AVC50: AVC3-U Chassis
R/C: CLU-5726TSI (32/42HDT50/55)
R/C: CLU-120S (32/42HDT55)
NNTTSSCC
PPTT33--EE//GG AAVVCC33--UU
CChhaassssiiss
SERVICE MANUAL
CONTENTS
SAFETY PRECAUTIONS . . . . . . . . . . . . . . . . . . . . . . . . . . . . . . . . . . . . . . . . . . . . . . 2
PRODUCT SAFETY NOTICE . . . . . . . . . . . . . . . . . . . . . . . . . . . . . . . . . . . . . . . . . . . .3
SERVICING PRECAUTIONS . . . . . . . . . . . . . . . . . . . . . . . . . . . . . . . . . . . . . . . . . . . .4
AGENCY REGULATORY INFORMATION . . . . . . . . . . . . . . . . . . . . . . . . . . . . . . . . . . .8
ACKNOWLEDGMENTS AND TRADEMARKS . . . . . . . . . . . . . . . . . . . . . . . . . . . . . . . .9
INTRODUCTION . . . . . . . . . . . . . . . . . . . . . . . . . . . . . . . . . . . . . . . . . . . . . . . . . . . .10
SPECIFICATIONS . . . . . . . . . . . . . . . . . . . . . . . . . . . . . . . . . . . . . . . . . . . . . . . . . . .11
BASIC SETUP & OPERATION . . . . . . . . . . . . . . . . . . . . . . . . . . . . . . . . . . . . . . . . . .14
ADJUSTMENTS . . . . . . . . . . . . . . . . . . . . . . . . . . . . . . . . . . . . . . . . . . . . . . . . . . . . .29
TROUBLESHOOTING FLOWCHARTS . . . . . . . . . . . . . . . . . . . . . . . . . . . . . . . . . . . .48
WAVEFORMS . . . . . . . . . . . . . . . . . . . . . . . . . . . . . . . . . . . . . . . . . . . . . . . . . . . . . .53
DC VOLTAGE TABLES . . . . . . . . . . . . . . . . . . . . . . . . . . . . . . . . . . . . . . . . . . . . . . . .56
CIRCUIT SCHEMATIC DIAGRAMS . . . . . . . . . . . . . . . . . . . . . . . . . . . . . . . . . . . . . .69
PRINTED CIRCUIT BOARDS . . . . . . . . . . . . . . . . . . . . . . . . . . . . . . . . . . . . . . . . . . .84
BLOCK DIAGRAMS . . . . . . . . . . . . . . . . . . . . . . . . . . . . . . . . . . . . . . . . . . . . . . . . . .91
CONNECTION DIAGRAMS . . . . . . . . . . . . . . . . . . . . . . . . . . . . . . . . . . . . . . . . . . . .97
WIRING DIAGRAMS . . . . . . . . . . . . . . . . . . . . . . . . . . . . . . . . . . . . . . . . . . . . . . . . .99
EXPLODED VIEW DIAGRAMS . . . . . . . . . . . . . . . . . . . . . . . . . . . . . . . . . . . . . . . . .104
PARTS LIST . . . . . . . . . . . . . . . . . . . . . . . . . . . . . . . . . . . . . . . . . . . . . . . . . . . . . . .107
QUICK REFERENCE PARTS LIST . . . . . . . . . . . . . . . . . . . . . . . . . . . . . . . . . . . . . .130
DVI CABLE PIN CONFIGURATION . . . . . . . . . . . . . . . . . . . . . . . . . . . . . . . . . . . . .131
CAUTION: These servicing instructions are for use by qualified service personnel only. To reduce the risk of
electric shock do not perform any servicing other than that contained in the operating instructions
unless you are qualified to do so. Before servicing this chassis, it is important that the service
technician read the “IMPORTANT SAFETY INSTRUCTIONS” in this service manual.
SAFETY NOTICE
USE ISOLATION TRANSFORMER WHEN SERVICING
Components having special safety characteristics are identified by a on the schematics and on the parts list in this
Service Data and its supplements and bulletins. Before servicing the chassis, it is important that the service technician
read and follow the “Important Safety Instructions” in this Service Manual.
PLASMA DISPLAY PANEL
SPECIFICATIONS AND PARTS ARE SUBJECT TO CHANGE FOR IMPROVEMENT
!
TO GO TO A CHAPTER, CLICK ON ITS HEADING BELOW
Page 2
2
PT3-E/G AVC3-U
NOTICE: Comply with all cautions and safety-related notes
located on or inside the cover case and on the chassis or plasma
module.
WARNING: Since the chassis of the AVC unit and Plasma Panel
unit is connected to both sides of the AC power supply during
operation, whenever the receiver is plugged in, service should
not be attempted by anyone unfamiliar with the precautions
necessary when working on this type of receiver.
1. When service is required, an isolation transformer should be
inserted between power line and the receiver before any
service is performed on a “HOT” chassis receiver.
2. When replacing a chassis in the receiver, all the protective
devices must be put back in place, such as barriers, nonmetallic knobs, insulating cover-shields, and isolation
resistors, capacitors, etc.
3. When service is required, observe the original lead dress.
4. Always use manufacturer’s replacement components. Critical
components as indicated on the circuit diagram should not be
replaced by another manufacturer’s. Furthermore, where a
short circuit has occurred, replace those components that
indicate evidence of over heating.
5. Before returning a serviced receiver to the customer, the
service technician must thoroughly test the unit to be certain
that it is completely safe to operate without danger of electrical
shock, and be sure that no protective device built into the
receiver by the manufacturer has become defective, or
inadvertently defeated during servicing.
Therefore, the following checks should be performed for the
continued protection of the customer and service technician.
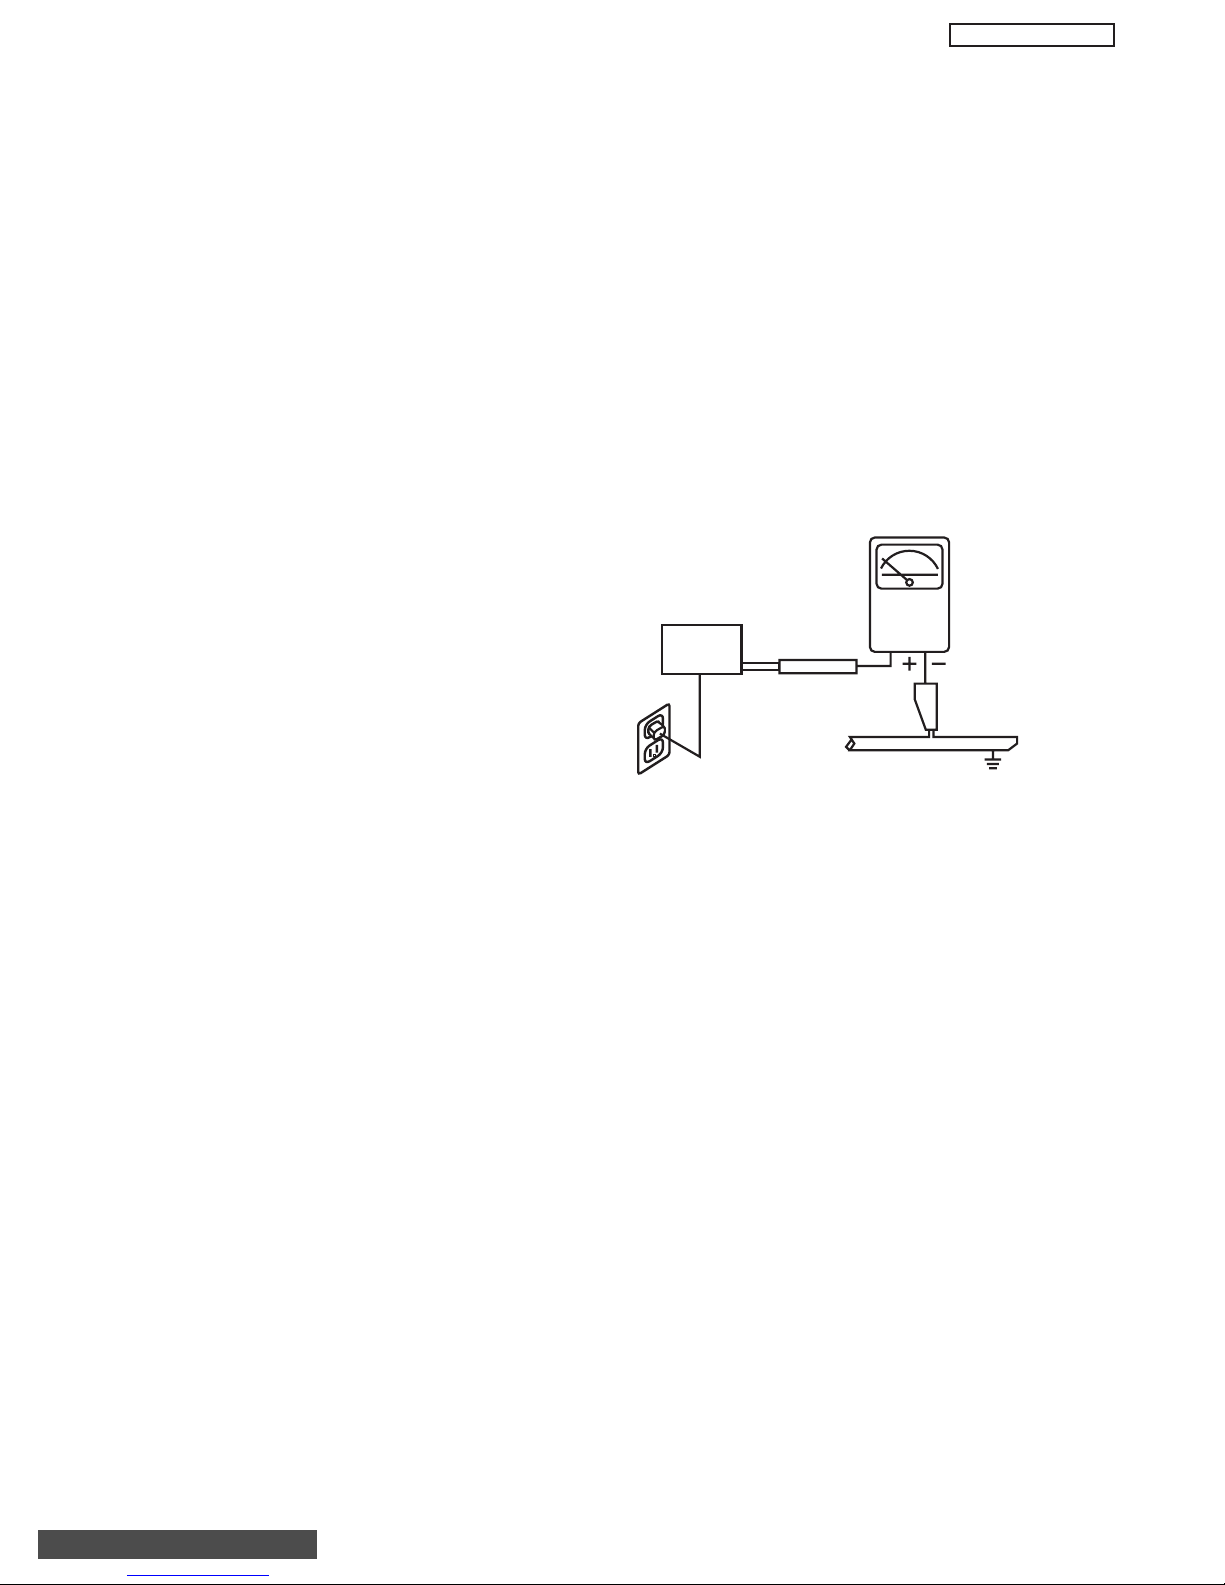
Leakage Current Cold Check
With the AC plug removed from the 120V AC 60Hz source,
place a jumper across Line 1 and Line 2 of the three plug
prongs, do not connect with the third prong, which is physical
ground.
Using an insulation tester (DC500V), connect one of its leads
to the AC plug jumper and touch with the other lead each
exposed metal part (antennas, screwheads, metal overlays,
control shafts, etc.), particularly any exposed metal part
having a return path to the chassis should have a resistor
reading over 4MΩ. Any resistance value below this range
indicates an abnormality which requires corrective action. An
exposed metal part not having a return path to the chassis will
indicate an open circuit.
SAFETY PRECAUTIONS
Leakage Current Hot Check
This check must be done considering the AVC or the PDP
monitor as one instrument each.
With any of the instruments completely reassembled (being
the instrument either the AVC center or the PDP monitor), plug
the AC line cord directly into a 120V AC outlet. (Do not use an
isolation transformer during this test.) Use a leakage current
tester or a metering system that complies with the American
National Standards Institute (ANSI) C101.0 Leakage Current
for Appliances. In the case of the PDP monitor set the AC
switch first in the ON position and then in the OFF position,
measure from across Line 1 and Line 2 of the three plug
prongs, do not connect with the third prong, which is physical
ground, to all exposed metal parts of the instrument
(antennas, handle bracket, metal cabinet, screw heads,
metallic overlays, control shafts, etc.), especially any exposed
metal parts that offer an electrical return path to the chassis.
Any current measured must not exceed 0.5 MIU. Reverse the
instrument power cord plug in the outlet and repeat test.
AC LEAKAGE TEST
ANY MEASUREMENTS NOT WITHIN THE LIMITS OUTLINED
ABOVE ARE INDICATIVE OF A POTENTIAL SHOCK HAZARD
AND MUST BE CORRECTED BEFORE RETURNING THE
RECEIVER TO THE CUSTOMER.
D
TABLE OF CONTENTS
(READING
SHOULD NOT
BE ABOVE 0.5MIU)
EARTH
GROUN
DEVICE
UNDER
TEST
TEST ALL
EXPOSED
METAL SURFACES
3-WIRE CORD
ALSO TEST WITH PLUG
REVERSED
(USING AC ADAPTER
PLUS AS REQUIRED)
LEAKAGE
CURRENT
TESTER
Page 3

3
PT3-E/G AVC3-U
PRODUCT SAFETY NOTICE
Many electrical and mechanical parts in HITACHI television
receivers have special safety-related characteristics. These are
often not evident from visual inspection nor can the protection
afforded by them necessarily be obtained by using replacement
components rated for higher voltage, wattage, etc. Replacement
parts which have these special safety characteristics are
identified in this Service Manual.
Electrical components having such features are identified with a
1 mark in the schematics and parts list in this Service Manual.
The use of a substitute replacement component which does not
have the same safety characteristics as the HITACHIrecommended replacement component, shown in the parts list in
this Service Manual, may create shock, fire, X-radiation, or other
hazards.
Product safety is continuously under review and new instructions
are issued from time to time. For the latest information, always
consult the current HITACHI Service Manual. A subscription to,
or additional copies of HITACHI Service Manuals may be
obtained at a nominal charge from HITACHI Sales Corporation.
AVC50 - Audio Video Control Unit
1. Follow the general caution recommendations from “Safety
precautions” section.
32HDT50M/55M - Plasma Monitor Unit
42HDT50M/55M - Plasma Monitor Unit
1. Follow the general caution recommendations from “Safety
precautions” section.
2. Since the Panel module and front filter are made of glass,
sufficient care shall be taken when handling the broken
module and filter in order to avoid injury.
3. If necessary to replace Panel module, this work must be
started after the panel module and the AC/DC Power supply
becomes sufficiently cool.
4. Special care must be taken with the display area to avoid
damaging its surface.
5. The Panel Module shall not be touched with bare hands to
protect its surface from stains.
6. It is recommended to use clean soft gloves during the
replacing work of the Panel module in order to protect, not
only the display area of the panel module but also the
serviceman.
7. The Chip Tube of the panel module (located upper left of the
back of the panel module) and flexible cables connecting
Panel glasses to the drive circuitry Printed Wiring Boards
(P.W.B.) are very weak, so sufficient care must be taken to
prevent breaking or cutting any of these. If the Chip Tube
breaks the panel module will never work, replacement for a
new plasma panel module will be needed.
8. Signal, power supply P.W.B.’s and PDP driving circuits
P. W.B.’s are assembled on the rear side of the PDP module,
take special care with this fragile circuitry; particularly, Flexible
Printed Circuits bonded to surrounding edges of the glass
panel. They are not strong enough to withstand harsh outer
mechanical forces. Avoid touching the flexible printed circuits
by not only your hands, but also tools, chassis, or any other
object. Extreme bending of the connectors must be avoided
too. In case the flexible printed circuits are damaged, the
corresponding addressed portions of the screen will not be lit
and exchange of a glass panel will be required.
PDP Module Handling
When there is need to replace a broken PDP module which is the
displaying device from the Plasma monitor unit, consider the
following:
1. When carrying the PDP module, two persons should stand at
both shorter-edge sides of the glass-panel and transport it with
their palms. Avoid touching the Flexible Printed Circuits or the
chip tube on the corner of the glass-panel. Handle only by the
surface of the glass panel. In case of some PDP modules,
electrode repair is done by connecting between regular
terminal with Cu tape and Cu wire. Please do not hook and/or
damage this repair line. If it is damaged, the module will not
function unless the glass-panel is exchanged with a new
glass-panel.
2. When carrying PDP module, watch surrounding objects, such
as tables, and also do not carry it alone since it may be
dangerous and it will be damaged due to excessive stress to
the module (glass-panel).
3. Please do not stand the module with the edge of the glasspanel on the table since this might result in damage to the
glass-panel and/or flexible printed circuits due to excessive
stress to the module (glass-panel).
WARNING
Lead in solder used in this product is listed by the California
Health and Welfare agency as a known reproductive toxicant
which may cause birth defects or other reproductive harm
(California Health and Safety Code, Section 25249.5).
When servicing or handling circuit boards and other components
which contain lead in solder, avoid unprotected skin contact with
solder. Also, when soldering make sure you are in a well
ventilated area in order to avoid inhalation of any smoke or
fumes released.
SAFETY NOTICE
USE ISOLATION TRANSFORMER
WHEN SERVICING
POWER SOURCE
This television receiver is designed to operate on 120
Volts/60Hz, AC house current. Insert the power cord into a 120
Volts/60Hz outlet.
NEVER CONNECT THE TV TO OTHER THAN THE
SPECIFIED VOLTAGE OR TO DIRECT CURRENT.
!
TABLE OF CONTENTS
Page 4

4
PT3-E/G AVC3-U
CAUTION: Before servicing instruments covered by this
service data and its supplements and addenda, read and
follow the “Important Safety Instructions” on page 3 of this
publication.
NOTE: If unforeseen circumstances create conflict between
the following servicing precautions and any of the safety
precautions on page 3 of this publication, always follow the
safety precautions. Remember: Safety First.
General Servicing Guidelines
1. Always unplug the instrument AC power cord from the AC
power source before:
a. Removing or reinstalling any component, circuit
board, module, or any other instrument assembly.
b. Disconnecting or reconnecting any instrument
electrical plug or other electrical connection.
c. Connecting a test substitute in parallel with an
electrolytic capacitor in the instrument.
CAUTION: A wrong part substitution or incorrect
polarity installation of electrolytic
capacitors may result in an explosion
hazard.
2. Do not spray chemicals on or near this instrument or any
of its assemblies.
3. Unless specified otherwise in these service data, clean
electrical contacts by applying the following mixture to the
contacts with a pipe cleaner, cotton-tipped stick or
comparable nonabrasive applicator: 10% (by volume)
Acetone and 90% (by volume) isopropyl alcohol (90%99% strength).
CAUTION: This is a flammable mixture. Unless
specified otherwise in these service data,
lubrication of contacts is not required.
4. Do not defeat any plug/socket of voltage interlocks with
which instruments covered by this service data might be
equipped.
5. Do not apply AC power to this instrument and/or any of its
electrical assemblies unless all solid-state device heatsinks are correctly installed.
6. Always connect the test instrument ground lead to the
appropriate instrument chassis ground before connecting
the test instrument positive lead. Always remove the test
instrument ground lead last.
7. Use with this instrument only the test fixtures specified in
this service data.
CAUTION: Do not connect the test fixture ground strap
to any heatsink in this instrument.
Electrostatically Sensitive (ES) Devices
Some semiconductor (solid state) devices can be damaged
easily by static electricity. Such components commonly are
called Electrostatically Sensitive (ES) Devices. Examples of
typical ES devices are integrated circuits and some fieldeffect transistors and semiconductor “chip” components. The
following techniques should be used to help reduce the
incidence of component damage caused by static electricity.
1. Immediately before handling any semiconductor
component or semiconductor-equipped assembly, drain
off any electrostatic charge on your body by touching a
known earth ground. Alternatively, obtain and wear a
commercially available discharging wrist strap device,
which should be removed for potential shock reasons
prior to applying power to the unit under test.
2. After removing an electrical assembly equipped with ES
devices, place the assembly on a conductive surface
such as aluminum foil, to prevent electrostatic charge
buildup or exposure of the assembly.
3. Use only a grounded-tip soldering iron to solder or
desolder ES devices.
4. Use only an anti-static type solder removal device. Some
solder removal devices not classified as “anti-static” can
generate electrical charges sufficient to damage ES
device.
5. Do not use freon-propelled chemicals. These can
generate electrical charges sufficient to damage ES
devices.
6. Do not remove a replacement ES device from its
protective package until immediately before you are
ready to install it. (Most replacement ES devices are
packaged with leads electrically shorted together by
conductive foam, aluminum foil or comparable conductive
material.)
7. Immediately before removing the protective material from
the leads of a replacement ES device, touch the
protective material to the chassis or circuit assembly into
which the device will be installed.
CAUTION: Be sure no power is applied to the chassis or
circuit, and observe all other safety
precautions.
8. Minimize bodily motions when handling unpackaged
replacement ES devices. (Otherwise harmless motion
such as the brushing together of your clothes fabric or the
lifting of your foot from a carpeted floor can generate
static electricity sufficient to damage an ES device.)
SERVICING PRECAUTIONS
TABLE OF CONTENTS
Page 5
5
PT3-E/G AVC3-U
General Soldering Guidelines
1. Use a grounded-tip, low-wattage soldering iron and
appropriate tip size and shape that will maintain tip
temperature within the range 500°F to 600°F.
2. Use an appropriate gauge of resin-core solder composed
of 60 parts tin/40 parts lead.
3. Keep the soldering iron tip clean and well-tinned.
4. Thoroughly clean the surfaces to be soldered. Use a
small wire-bristle (0.5 inch or 1.25 cm) brush with a metal
handle. Do not use freon-propelled spray-on cleaners.
5. Use the following desoldering technique.
a. Allow the soldering iron tip to reach normal
temperature (500°F to 600°F).
b. Heat the component lead until the solder melts.
Quickly draw away the melted solder with an antistatic, suction-type solder removal device or with
solder braid.
CAUTION: Work quickly to avoid overheating the
circuit board printed foil.
6. Use the following soldering technique.
a. Allow the soldering iron tip to reach normal
temperature (500°F to 600°F).
b. First, hold the soldering iron tip and solder strand
against the component lead until the solder melts.
c. Quickly move the soldering iron tip to the junction of
the component lead and the printed circuit foil, and
hold it there only until the solder flows onto and
around both the component lead and the foil.
CAUTION: Work quickly to avoid overheating the
circuit board printed foil or components.
d. Closely inspect the solder area and remove any
excess or splashed solder with a small wire-bristle
brush.
Removal
1. Desolder and straighten each IC lead in one operation by
gently prying up on the lead with the soldering iron tip as
the solder melts.
2. Draw away the melted solder with an anti-static suctiontype solder removal device (or with solder braid) before
removing the IC.
Replacement
1. Carefully insert the replacement IC in the circuit board.
2. Carefully bend each IC lead against the circuit foil pad
and solder it.
3. Clean the soldered areas with a small wire-bristle brush.
(It is not necessary to reapply acrylic coating to areas.)
“Small-signal” Discrete Transistor Removal/Replacement
1. Remove the defective transistor by clipping its leads as
close as possible to the component body.
2. Bend into a “U” shape the end of each of the three leads
remaining on the circuit board.
3. Bend into a “U” shape the replacement transistor leads.
4. Connect the replacement transistor leads to the
corresponding leads extending from the circuit board and
crimp the “U” with long nose pliers to insure metal to
metal contact, then solder each connection.
Power Output Transistor Devices Removal/Replacements
1. Heat and remove all solder from around the transistor
leads.
2. Remove the heatsink mounting screw (if so equipped).
3. Carefully remove the transistor from the circuit board.
4. Insert new transistor in circuit board.
5. Solder each transistor lead, and clip off excess lead.
6. Replace heatsink.
Diode Removal/Replacement
1. Remove defective diode by clipping its leads as close as
possible to diode body.
2. Bend the two remaining leads perpendicularly to the
circuit board.
3. Observing diode polarity, wrap each lead of the new
diode around the corresponding lead on the circuit board.
4. Securely crimp each connection and solder it.
5. Inspect (on the circuit board copper side) the solder joints
of the two “original leads”. If they are not shiny, reheat
them and, if necessary, apply additional solder.
IC Removal/Replacement
Some Hitachi unitized chassis circuit boards have slotted
holes (oblong) through which the IC leads are inserted and
then bent flat against the circuit foil. When holes are the
slotted type, the following technique should be used to
remove and replace the IC. When working with boards using
the familiar round hole, use the standard technique as
outlined in paragraphs 5 and 6 above.
Use Soldering Iron to Pry Leads
Page 6
6
PT3-E/G AVC3-U
Fuses and Conventional Resistor Removal/Replacement
1. Clip each fuse or resistor lead at top of circuit board
hollow stake.
2. Securely crimp leads of replacement component around
stake 1/8 inch from top.
3. Solder the connections.
CAUTION: Maintain original spacing between the
replaced component and adjacent
components and the circuit board, to
prevent excessive component
temperatures.
Circuit Board Foil Repair
Excessive heat applied to the copper foil of any printed
circuit board will weaken the adhesive that bonds the foil to
the circuit board, causing the foil to separate from, or “liftoff,” the board. The following guidelines and procedures
should be followed whenever this condition is encountered.
In Critical Copper Pattern Areas
High component/copper pattern density and/or special
voltage/current characteristics make the spacing and
integrity of copper pattern in some circuit board areas more
critical than in others. The circuit foil in these areas is
designated as Critical Copper Pattern. Because Critical
Copper Pattern requires special soldering techniques to
ensure the maintenance of reliability and safety standards,
contact your Hitachi personnel.
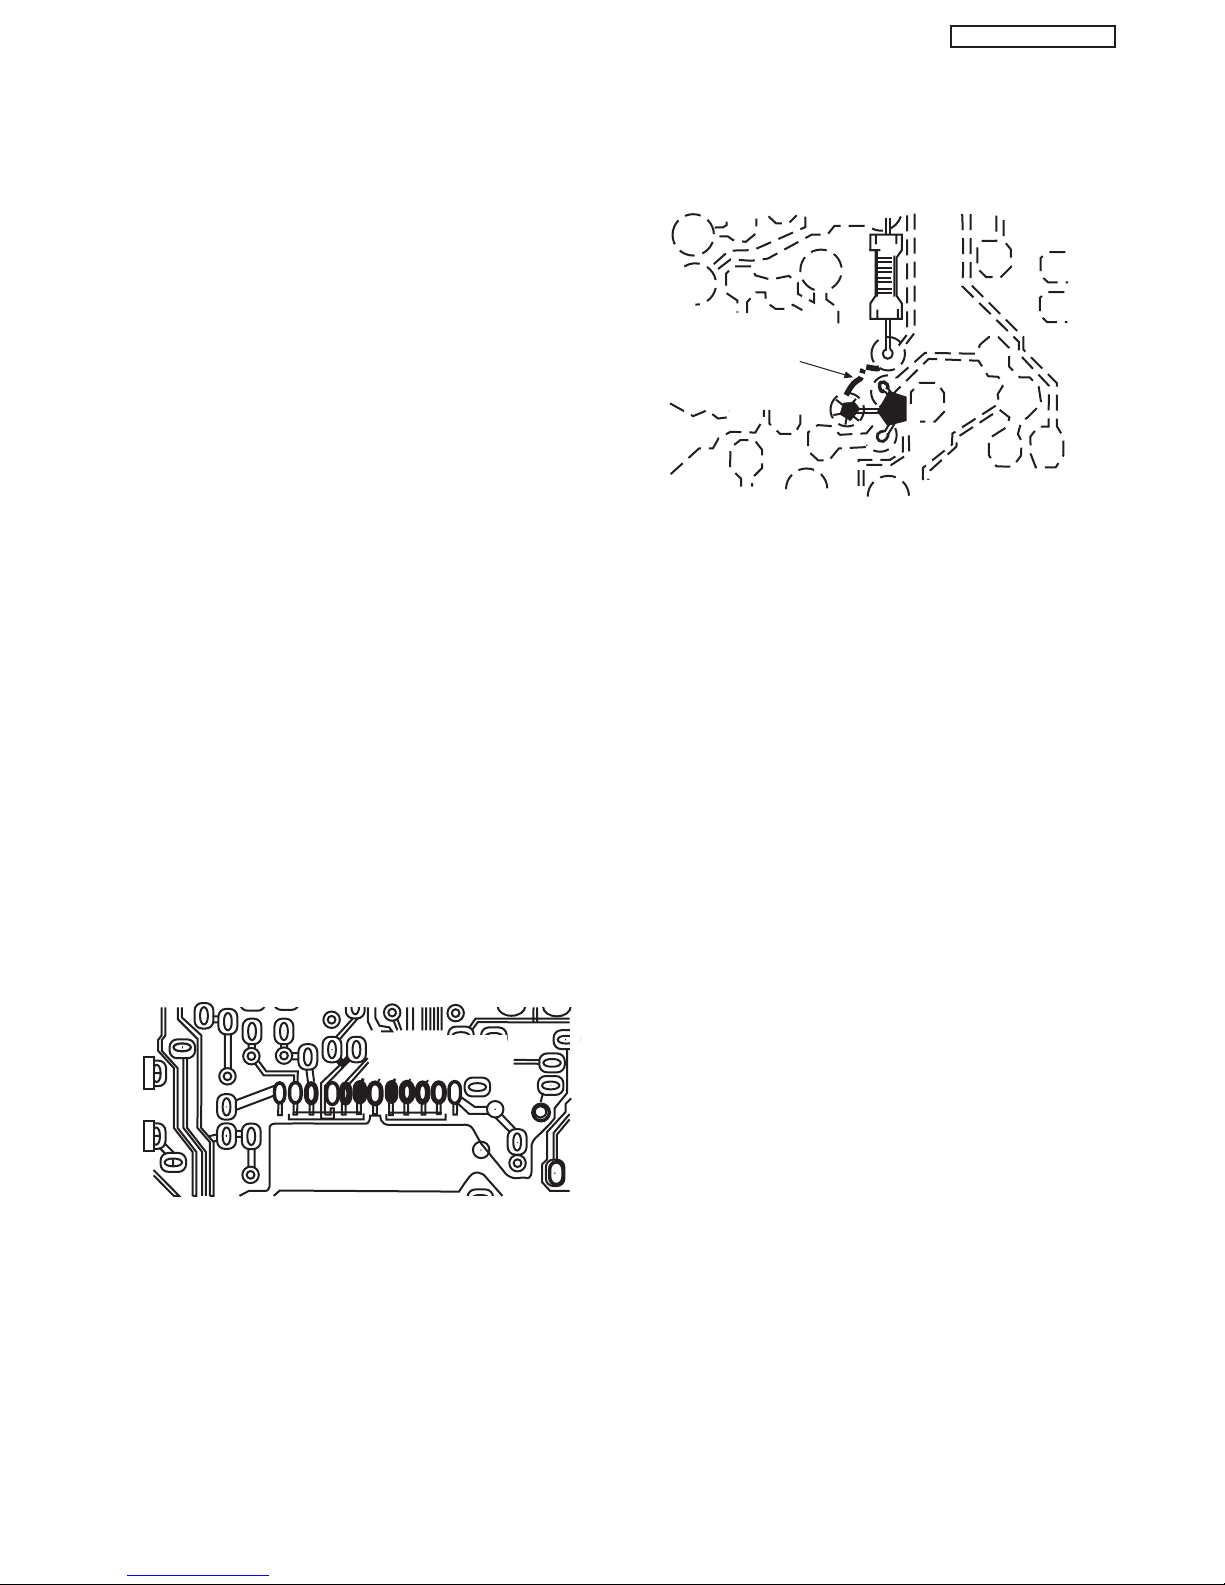
At IC Connections
To repair defective copper pattern at IC connections, use the
following procedure to install a jumper wire on the copper
pattern side of the circuit board. (Use this technique only on
IC connections.)
1. Carefully remove the damaged copper pattern with a
sharp knife. (Remove only as much copper as absolutely
necessary.)
2. Carefully scratch away the solder resist and acrylic
coating (if used) from the end of the remaining copper
pattern.
3. Bend a small “U” in one end of a small-gauge jumper wire
and carefully crimp it around the IC pin. Solder the IC
connection.
4. Route the jumper wire along the path of the cut-away
copper pattern and let it overlap the previously scraped
end of the good copper pattern. Solder the overlapped
area, and clip off any excess jumper wire.
1. Remove the defective copper pattern with a sharp knife.
Remove at least 1/4 inch of copper, to ensure hazardous
condition will not exist if the jumper wire opens.
2. Trace along the copper pattern from both wire sides of
the pattern break and locate the nearest component
directly connected to the affected copper pattern.
3. Connect insulated 20-gauge jumper wire from the
nearest component on one side of the pattern break to
the lead of the nearest component on the other side.
Carefully crimp and solder the connections.
CAUTION: Be sure the insulated jumper wire is
dressed so that it does not touch
components or sharp edges.
CRIMP AND
SOLDER
BARE JUMPER
WIRE
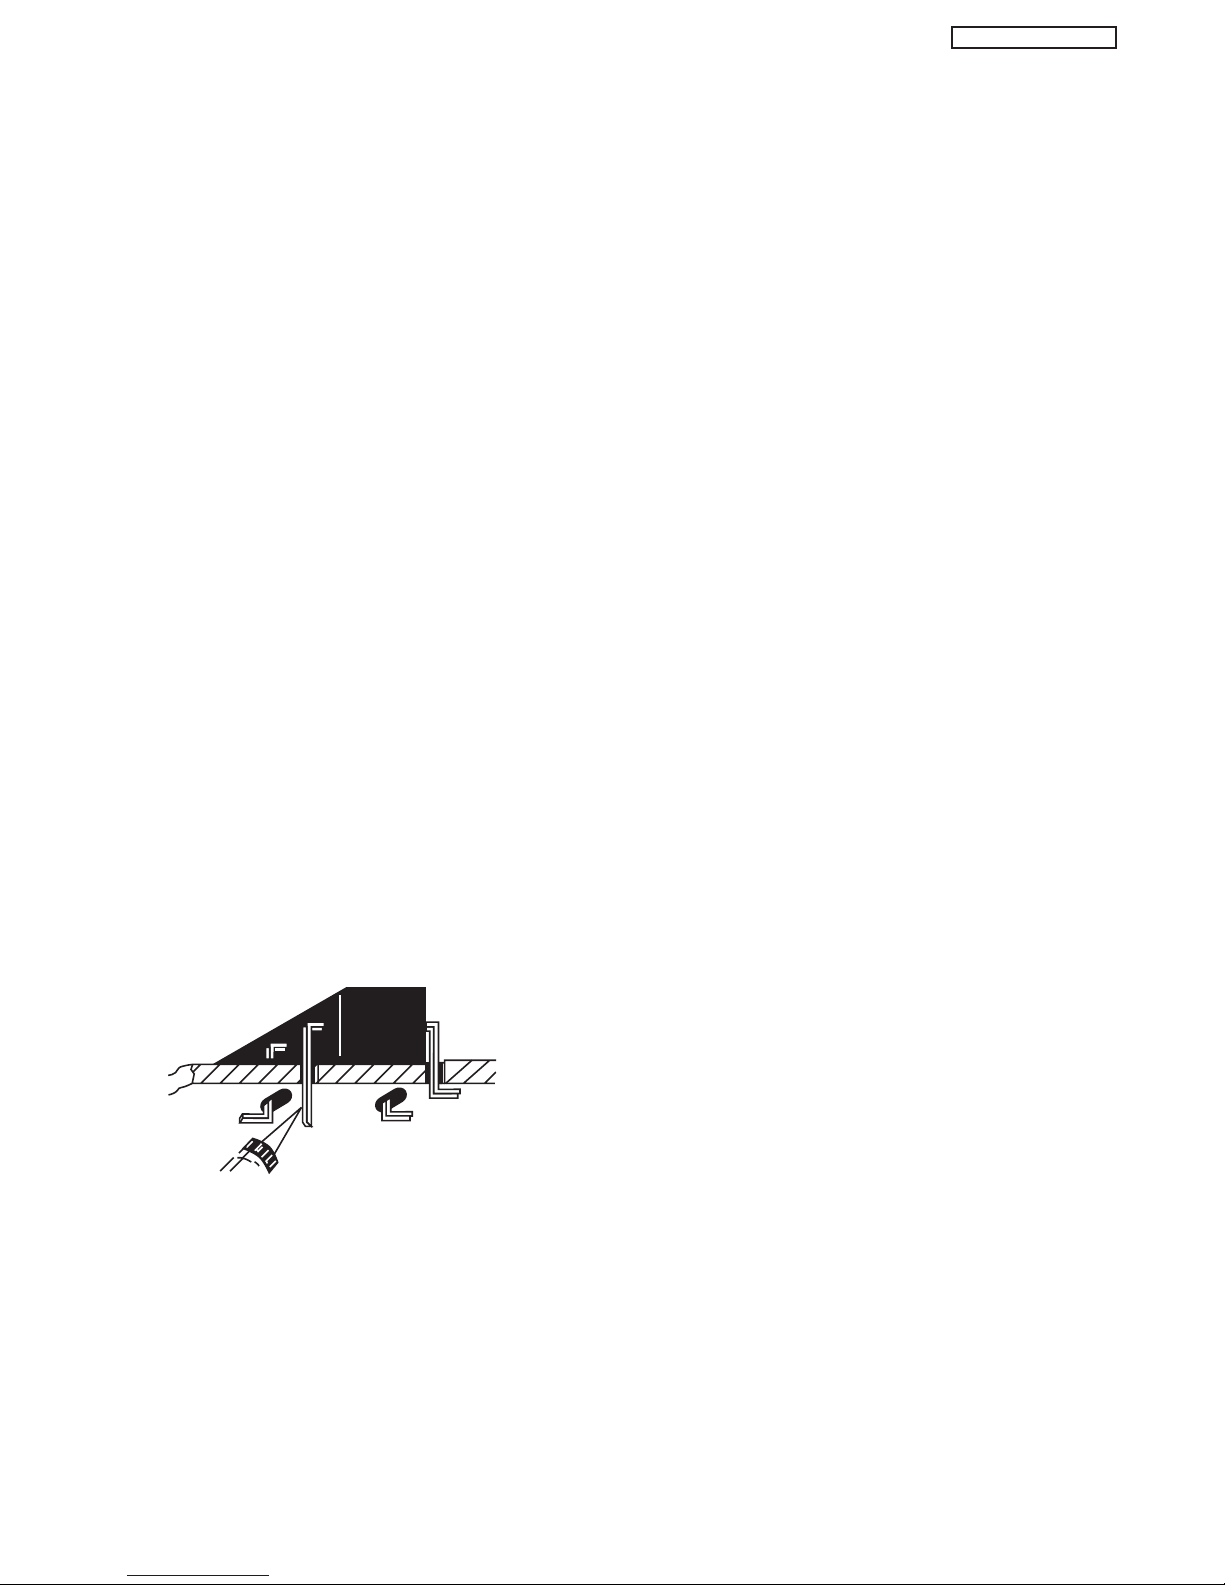
Install Jumper Wire and Solder
DEFECTIVE
COPPER
REMOVED
Insulated Jumper Wire
At Other Connections
Use the following technique to repair defective copper
pattern at connections other than IC Pins. This technique
involves the installation of a jumper wire on the component
side of the circuit board.
Page 7
7
PT3-E/G AVC3-U
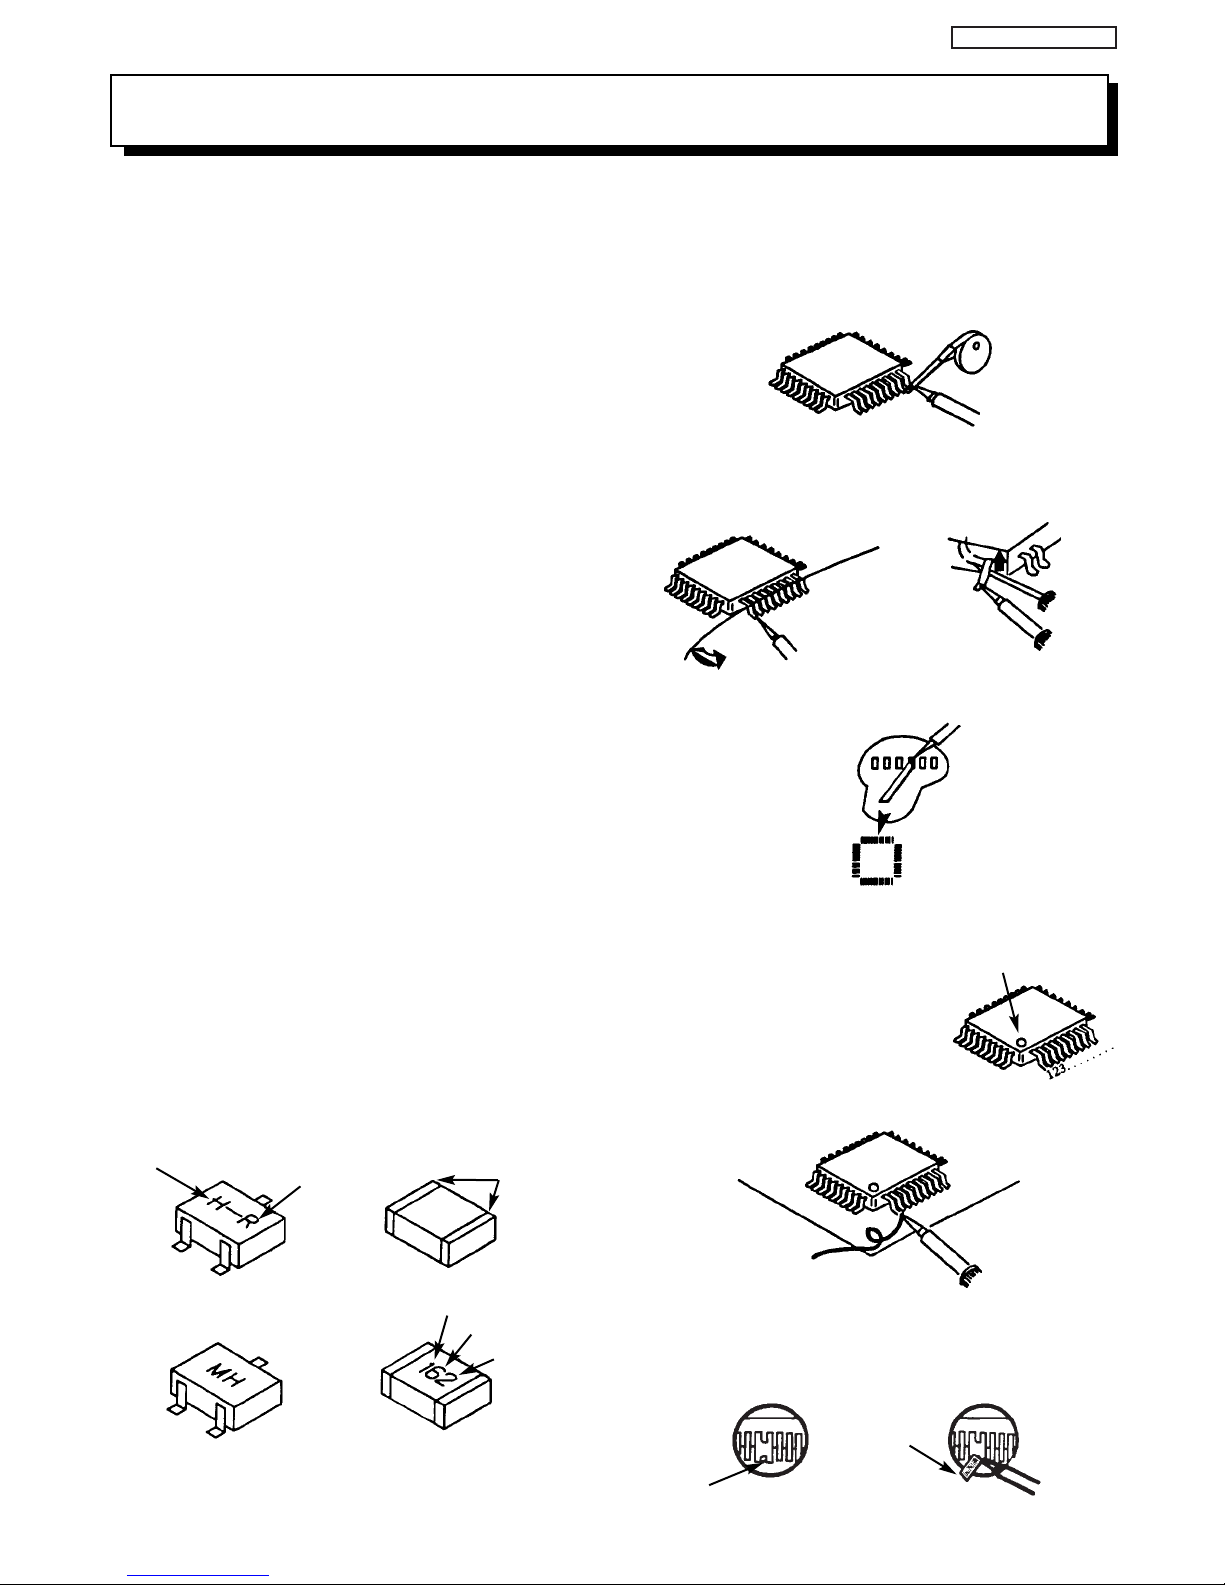
MH DIODE
RESISTOR
Leadless Chip Components
(surface mount)
Chip components must be replaced with identical
chips due to critical foil track spacing. There are no
holes in the board to mount standard transistors or
diodes. Some chip capacitor or resistor board solder
pads may have holes through the board, however the
hole diameter limits standard resistor replacement to
1/8 watt. Standard capacitors may also be limited for
the same reason. It is recommended that identical
chip components be used. .
Chip resistors have a three digit numerical resistance
code -1st and 2nd significant digits and a multiplier.
Example: 162 = 1600 or 1.6KΩ resistor, 0 = 0Ω
(jumper).
Chip capacitors generally do not have the value
indicated on the capacitor. The color of the component
indicates the general range of the capacitance.
Chip transistors are identified by a two letter code. The
first letter indicates the type and the second letter, the
grade of transistor.
Chip diodes have a two letter identification code as
per the code chart and are a dual diode pack with
either
common anode or common cathode. Check the parts
list for correct diode number.
Component Removal
1. Use solder wick to remove solder from component
end caps or terminals.
2. Without pulling up, carefully twist the component
with tweezers to break the adhesive.
3. Do not reuse removed leadless or chip
components since they are subject to stress
fracture during removal .
Chip Component Installation
1. Put a small amount of solder on the board
soldering pads.
2. Hold the chip component against the soldering
pads with tweezers or with a miniature alligator
clip and apply heat to the pad area with a 30 watt
iron until solder flows. Do not apply heat for more
than 3 seconds
How to Replace Flat-lC
—Required Tools—
• Soldering iron • iron wire or small awl
• De-solder braids • Magnifier
1. Remove the solder from all of the pins of a Flat-lC
by using a de-solder braid.
2. Put the iron wire under the pins of the Flat-lC and
pull it in the direction indicated while heating the
pins using a soldering iron. A small awl can be
used instead of the iron wire.
3. Remove the solder from all of the pads of the
Fiat-lC by using
a de-solder braid.
4. Position the new Flat-lC in place (apply the pins of
the Flat-lC to the soldering pads where the pins
need to be soldered). Properly
determine the positions of the
soldering pads and pins by
correctly aligning the polarity
symbol.
6. Check with a magnifier for solder bridge between
the pins or for dry joint between pins and soldering
pads. To remove a solder bridge, use a de-solder
braid as shown in the figure below.
NOTE: These components are affixed with glue. Be careful not to break or damage any foil under the
component or at the pins of the ICs when removing. Usually applying heat to the component for a short
time while twisting with tweezers will break the component loose.
Chip Components
TYPE
GRADE
C
B
E
SOLDER
CAPS
TRANSISTOR
CAPACITOR
1ST DIGIT
2ND DIGIT
MULTIPLIER
= 1600 = 1.6K
ANODES
SOLDER CAPS
COMMON CATHODE
De-Solder
Braid
Soldering
Iron
Soldering
Iron
Soldering
Iron
Soldering
Iron
Soldering
Iron
Soldering
Iron
De-Solder
Braid
Flat-IC
Solder
Bridge
Solder
De-Solder
Braid
Iron
Wire
Pull
Awl
Polarity Symbol
5. Solder all pins to the soldering pads using a fine
tipped soldering iron.
Page 8

8
PT3-E/G AVC3-U
AGENCY REGULATORY
INFORMATION
Federal Communications Commission Notice
This equipment has been tested and found to comply with the limits for a Class B digital device, pursuant to Part 15 of
the FCC Rules. These limits are designed to provide reasonable protection against harmful interference in a residential
installation. This equipment generates, uses and can radiate radio frequency energy and if not installed and used in
accordance with the instructions, may cause harmful interference to radio communications. However, there is no
guarantee that interference will not occur in a particular installation. If this equipment does cause harmful interference
to radio or television reception, which can be determined by turning the equipment off and on, the user is encouraged
to try to correct the interference by one or more of the following measures:
• Reorient or relocate the receiving antenna.
• Increase the separation between the equipment and the receiver.
• Connect the equipment into an outlet on a circuit different from that to which the receiver is connected.
• Consult the dealer or an experienced radio/television technician for help.
Modifications
The FCC requires the user to be notified that any changes or modifications made to this device that are not expressly
approved by Hitachi Home Electronics (America), Inc. may void the user’s warranty.
Cables
Connections to this device must be made with shielded cables with metallic RFI/EMI connector hoods to maintain
compliance with FCC Rules and Regulations.
Any cables that are supplied with the system must be replaced with identical cables in order to assure compliance with
FCC rules. Order Hitachi spares as replacement cables.
Declaration of Conformity
This device complies with Part 15 of the FCC Rules. Operation is subject to the following two conditions: (1) this device
may not cause harmful interference and (2) this device must accept any interference received, including interference
that may cause undesired operation.
For questions regarding this declaration, contact:
Hitachi America, LTD.
Home Electronics Division
900 Hitachi Way
Chula Vista, CA 91914
Tel. 1-800-448-2244 (1-800-HITACHI)
ATTN: CUSTOMER RELATIONS
TABLE OF CONTENTS
Page 9
9
PT3-E/G AVC3-U
ACKNOWLEDGMENTS
AND TRADEMARKS
This Plasma Television complies with VESADDC2B specifications, Plug & Play
is a system with computer, peripherals (including monitors) and operating
system. It works when the monitor is connected to a DDC ready computer that
is running an operating system software that is capable for the plug & play.
When a Plug and Play PC is powered on, it sends a command to the Monitor
requesting identification. The Monitor sends back a string of data including its
characteristics.
TRADEMARK ACKNOWLEDGMENT
DDC is a trademark of Video Electronics Standard Association.
IBM PC/AT and VGA are registered trademarkds of International Business Machines Corporation of the U.S.A.
Apple and Macintosh are registered trademarks of Apple Computer, Inc.
VESA is a trademark of a nonprofit organization, Video Electronics Standard Association.
This Class B digital apparatus meets all requirements of the Canadian Interference-Causing Equipment Regulations.
This Class B digital apparatus complies with Canadian ICES-003.
Cet appareil numérique de la classe B est conforme à la norme NMB-003 du Canada.
Cable Compatible Television Apparatus- Tèlèvision câblocompatible, Canada.
Notes on Closed Caption:
This Plasma Television receiver will display television closed captioning, ( or ), in accordance with
paragraph 15.119 of the FCC rules.
TM
TruBass and the SRS ®symbol are trademarks of SRS Labs, Inc. TruBass technology is incorporated under license
from SRS Labs, Inc.
TABLE OF CONTENTS
Page 10
10
PT3-E/G AVC3-U
CIRCUIT PROTECTION
CAUTION: Below is an EXAMPLE only. See Replacement Parts List for details. The following symbol near the fuse
indicates fast operation fuse (to be replaced). Fuse ratings appear within the symbol.
Example:
“RISK OF FIRE - REPLACE FUSE AS MARKED”
The rating of fuse F901 is 6A - 125V.
Replace with the same type fuse for continued protection
against fire.
INTRODUCTION
The 32HDT50M/55M and 42HDT50M/55M are a Plasma Television sets; They are constituted by the combination of two main parts, an
AUDIO VIDEO CONTROL Center, and the Plasma Display monitor.
Each part has a model name and a chassis name:
The AVC center is a box that controls most of the user functions of the complete TV set and conditions the signal before it arrives to the
monitors.
The 32” and 42” monitors contain the displaying device, which is the plasma display panel module, and the driving circuitry, which
receives the signal from the AVC center and after processing, delivers the image to the display module.
This HITACHI Service Manual is intended for the qualified service personnel and it contains the necessary information for
troubleshooting the Plasma television set in case of malfunction.
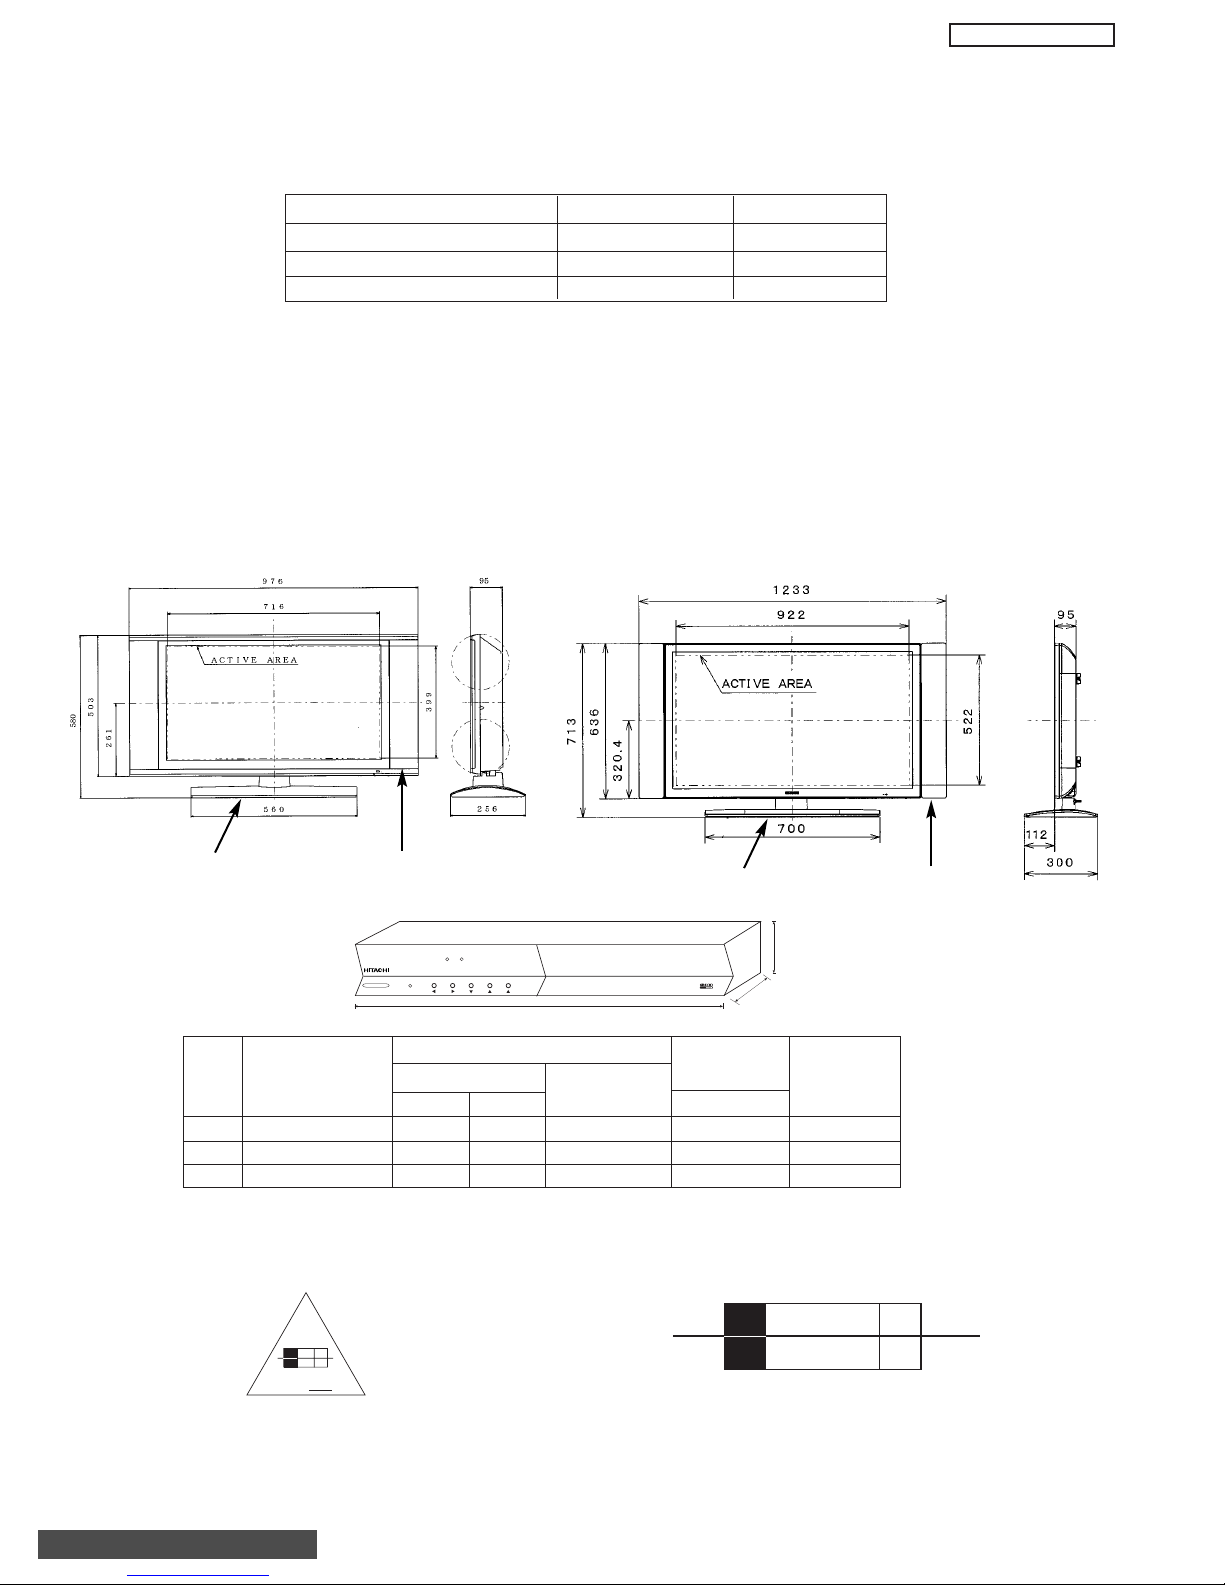
DIMENSIONS:
32HDT50M/55M 42HDT50M/55M
AVC50
POWER RATINGS:
1 32HDT50M/55M 210 2.2 134 0.8 PT3-E
2 42HDT50M/55M 332 3.2 198 0.8 PT3-G
3AVC50 30 0.5 26 2.7 AVC3-U
No.
Model Name
Indicated Value
Max Rating
Average
Rating (W)
(W)
Chassis
P
ST(W)
(W) (A)
Stand
Speakers
Stand
Speakers
TABLE OF CONTENTS
Part Model Name Chassis Name
Audio Video Control Center AVC50 AVC3-U
32” Plasma Display Monitor 32HDT50M/55M PT3-E
42” Plasma Display Monitor 42HDT50M/55M PT3-G
STANDBY (RED) ON (GREEN)
POWER
CH+CH-VOL+VOL- INPUT/EXIT
430mm
AUDIO VIDEO CONTROL CENTER
PULL
85mm
240mm
F
6 A 125V
6A
125V
Page 11
11
PT3-E/G AVC3-U
Destination U.S.A. / CANADA "
Exterior Cabinet Dimensions:
(Main Body) 976x503x95mm 1030x636x95mm
(Speaker & stand included)
976x580x258mm 1233x713x300mm
Cabinet Color
Bluish Black,Bright Silver/Bright Silver Bluish Black,Bright Silver/Bright Silver
Stand Included "
Weight (Main Body) 24.1 kg typ. 29.5 kg typ.
(Speaker & Stand 28.2 kg typ. 39.8 kg typ.
included)
(Main Body:Packed) 35.0 kg typ. (Packed) 44 kg typ. (Packed)
Screen Size 716.68x399mm 922x522mm
(32”: 16x9) (42”: 16x9)
Display Panel Resolution 852x1024 pixels 1024x1024 pixels
Dot Pitch (H) 0.84mm 0.90mm
Dot Pitch (V) 0.39mm 0.51mm
Viewing Angle (H) ±85˚ "
Viewing Angle (V) ±85˚ "
Front Filter Surface Finishing AR Coating, Mesh "
Brightness Peak Brightness Over 230 cd/m
2
(When VIDEO, Over 245 cd/m2 (When VIDEO,
(4% window) Sports, Color temperature ‘HIGH’ Sports, Color termperature ‘HIGH’
Input Signal Amplitude 100% is Input Signal Amplitude 100% is
set) set)
Over 230 cd/m
2
(When RGB is (Over 245 cd/m2 (When RGB is
set) set)
All White Pattern Over 50 cd/m
2
Over 55 cd/m
2
Contrast Contrast ratio 550:1 (typ.) 600:1 (typ.)
Color Color Reproduction Over 16.7 million colors "
Reproduction
Audio Output Audio Output 7w + 7w (6Ω) 10w + 10w (6Ω)
Panel Main Power Switch PUSH (LOCK) 1 Switch "
Operation Sub Power Switch PUSH (NON-LOCK) 1 Switch "
Input Terminal Video/Audio Input 24 pin DVI connector 1 system "
8 pin Mini DIN connector 1
Output Audio Line Output Sub Woofer Output 1 system "
Terminal Speaker Output None "
Power Supply Connector 3 Polarity Receptacle "
Source Input Voltage Single Phase AC108~132V,60Hz "
Guaranteed Temp. (Operating) 5˚C~35˚C (41˚F~95˚F) "
Environment Temperature (Stored) -15˚C~60˚C(5˚F~140˚F) "
Condition Humidity (Operating) 20~80%RH (Non-condensing) "
Humidity (Stored) 20~90%RH (Non-condensing) "
Atmospheric 800 to 1114hPa "
Pressure (altitude: 1888m to -757m,
(Operating) 6194’ to -2484’)
Atmospheric 300 to 1114hPa "
Pressure (altitude: 9727m to -757m,
(Stored) 31,912’ to -2484’)
Item Model Name 32HDT50M/55M 42HDT50M/55M
PDP MONITOR SPECIFICATIONS
TABLE OF CONTENTS
Page 12
12
PT3-E/G AVC3-U
AVC SPECIFICATIONS (1 of 2)
A
Model _ AVC50
Size 1 430mmx85mmx240mmDimension
Weight 2 3.5 kg
A/C
Input
Voltage
Front
End
Input
Signal
Picture
Sound Enhancement 22 TruBass (High, Medium, Low, Off)
djustment
General
Function
Input AC Voltage 3 AC108 ~132(with 3 Plug AC Power Cord
inlet type ,1.8m length
Input AC Frequency 4 60Hz
Power Consumption 5 30w, Standby less than 2.7w
Front End 6 ENGE6106DR/ENG36614GR
Available Channel
Video Signal 10 NTSC
Component Signal 11 480i/p,1080I, 720p
PC Signal 1 2 VGA ~ SXGA
DVI Signal 1 3 480i,480p,720p,1080i(EIA-861A)
Y/C separation 14 3D Y/C (ON fix)
Line Correction 1 5 No
I-P Conversion 1 6 Motion Adaptive & Multi Angle Interpolation FC4
Picture Mode 17 (Day, Night)
Display Mode
Settings for Video
Signal
Settings for Video
Signal
Settings for PC
Raster
Settings for Sound 25 Vol, Balance, Bass, Treble, Source, Intenal
PinP
Mode
Wide Mode 3 2 6Mode (only NTSC,480i,480p)
Aspect
Selection
Film Theater 35 With (Auto M ov ie Mo de : O n/ Of f)
Color Temperature 36 4Mode ; High/Medium/Standard/Black & White
Input Signal Selection 37 RGB,VIDEO1/2/3/4/5, ANT A, ANT B
Split 26 With(All video signal combinations, except PC signal)
Strobe 27 With(4Pix:only ANT A/B,Video,480i)
Surf 28 With(SURF12:only ANT A/B)
POP 29 With(Main: ANT A/B,Video,480i Sub: ANT A/B,Video,480i,1080i)
PIP 30 With(Main:1080i Sub: ANT A/B,Video,480i,1080i)
PC-Window 31 With(Main: RGB Sub: All video signal, except PC signal)
Video 33 4:3 Standard/16:9 Standard/
PC 34 Full/Normal/Real (Real only VGA/SVGA/XGA mode)
72 ~13 VHF
8 14 ~ 69 UHF
9 A-5 ~ A-1, A ~ W, W+1 ~ W+84 CATV
(fH:24KHz-109KHz,fV:50Hz-85Hz)
18 1024i (50inch:768p) Video Signal
19 1024i (50inch:768p) Component Signal
20 1024i (50inch:768p) PinP Mode
21 1024i (50inch:768p) PC Signal
Matrix Surround (On/Off)
22 Picture, Contrast, Brightness, Color, Tint
,Sharpness, W/B Temp, Black Enhancement
,Contrast Mode, Color Management/Decoding
,Auto Color, Noise Reduction, Auto Movie Mode.
,Black Side Panel
23 Contrast, Brightness, W/B Temp,
Enhancer, Input Level, Black Side Panel.
24 Hor/Vert Raster Position, Horizontal Clock
,Clock Phase.
Speaker, Auto Noise Cancel, Perfect Volume, Mute.
4:3 Expanded/Zoom 1/Zoom 2/16:9 Zoom
Page 13
13
PT3-E/G AVC3-U
AVC SPECIFICATIONS (2 of 2)
Model AVC50
General
Function
R/C Handset 46 RML-CLU-5726TSI ALPS
Gamma Correction 38 Only for Service Menu
Picture Enhancer 39 With (only RGB)
Input Signal Identification 40 Yes
Audio Special Mode 4 1 No
Power Save Mode 42 With (RGB In)
43 With (On/Off) (Video In)
Burning Protection 4 4 With (Raster Shift:3 option, All White Pattern)
Language (VIDEO/PC) 45 ENGLISH,FRANCAIS,ESPANOL
46 CLU-120S (for 32/42HDT55) UE I
LED Normal: Green
Power Save: Orange
Stand by: Red
In/Out
Terminal
Front
Key
Input (RGB) 47 1 Input: Mini Dsub-15PX1
Composite Video Input
VIDEO2_5
S-In (S 2 Terminal)
Video/S are
common selector,
priority is S-In .
Component Signal Input
(VIDEO1,VIDEO2)
Digital Input(DVI+HDCP) 51 1 Input: DVI-D(24P)X1 (Selected by component
Audio In L / R L ch:mono 5 2
CATV In 53 1 Input (VIDEO2 LINK)
Video Control Terminal (BS) 54 No
U/V Ant Input 55 ANT-A IN,ANT-B IN ,TO CONV.
BS-IF Input 56 No
Video Monitor Out Terminal 57 1 Output: RCA Pin x 1
Audio Output Terminal 5 8 1 Output L/R RCA Pin x 2
Audio Monitor Out Terminal 59
IR-OUTPUT 60 2 Terminal
Headphone Terminal 61 1 Terminal (only for AVC)
PDP Interface Terminal 62 DVI-D(26p)+Mini 8PIN-DIN
Main Power Switch 6 3 No
Power On/off Switch 64 With (link to PDP)
IR Receiving Unit 65 With (link to PDP)
Power Indicator LED 66 With
Menu Control Key 67 With (Channel U/D, Vol U/D,
48 4 Input: RCA pin 4
(1 Input Front Panel)
49 3 Input: Mini Din-4P
(1 S-In on Front Panel)
50 2 Input: RCA pin 6(Y of VIDEO2 is common
input for Composite-In)
Video1,Digital input priority)
6 Input;RCA pin 12
(RGB:1 Input,Video:5 Input)
1 Output L/R RCA Pin x 2
A/V Input Select, Menu Select)
Page 14
14
PT3-E/G AVC3-U
BASIC SETUP & OPERATION
VIEWING
The major benefit of the HITACHI Plasma Television is its large viewing screen. To see this
large screen at its best, test various locations in the room to find the optimum spot for viewing.
The best picture is seen by sitting directly in front of the TV and about 8 to 18 feet from the
screen.
During daylight hours, reflections from outside light may appear on the screen. If so, drapes
or screens can be used to reduce the reflection or the TV can be located in a different section
of the room.
If the TV’s audio output will be connected to a Hi-Fi system’s external speakers, the best
audio performance will be obtained by placing the speakers equidistant from each side of the
receiver cabinet and as close as possible to the height of the picture screen center. For best
stereo separation, place the external speakers at least four feet from the side of the TV, place
the surround speakers to the side or behind the viewing area. Differences in room sizes and
acoustical environments will require some experimentation with speaker placement for best
performance.
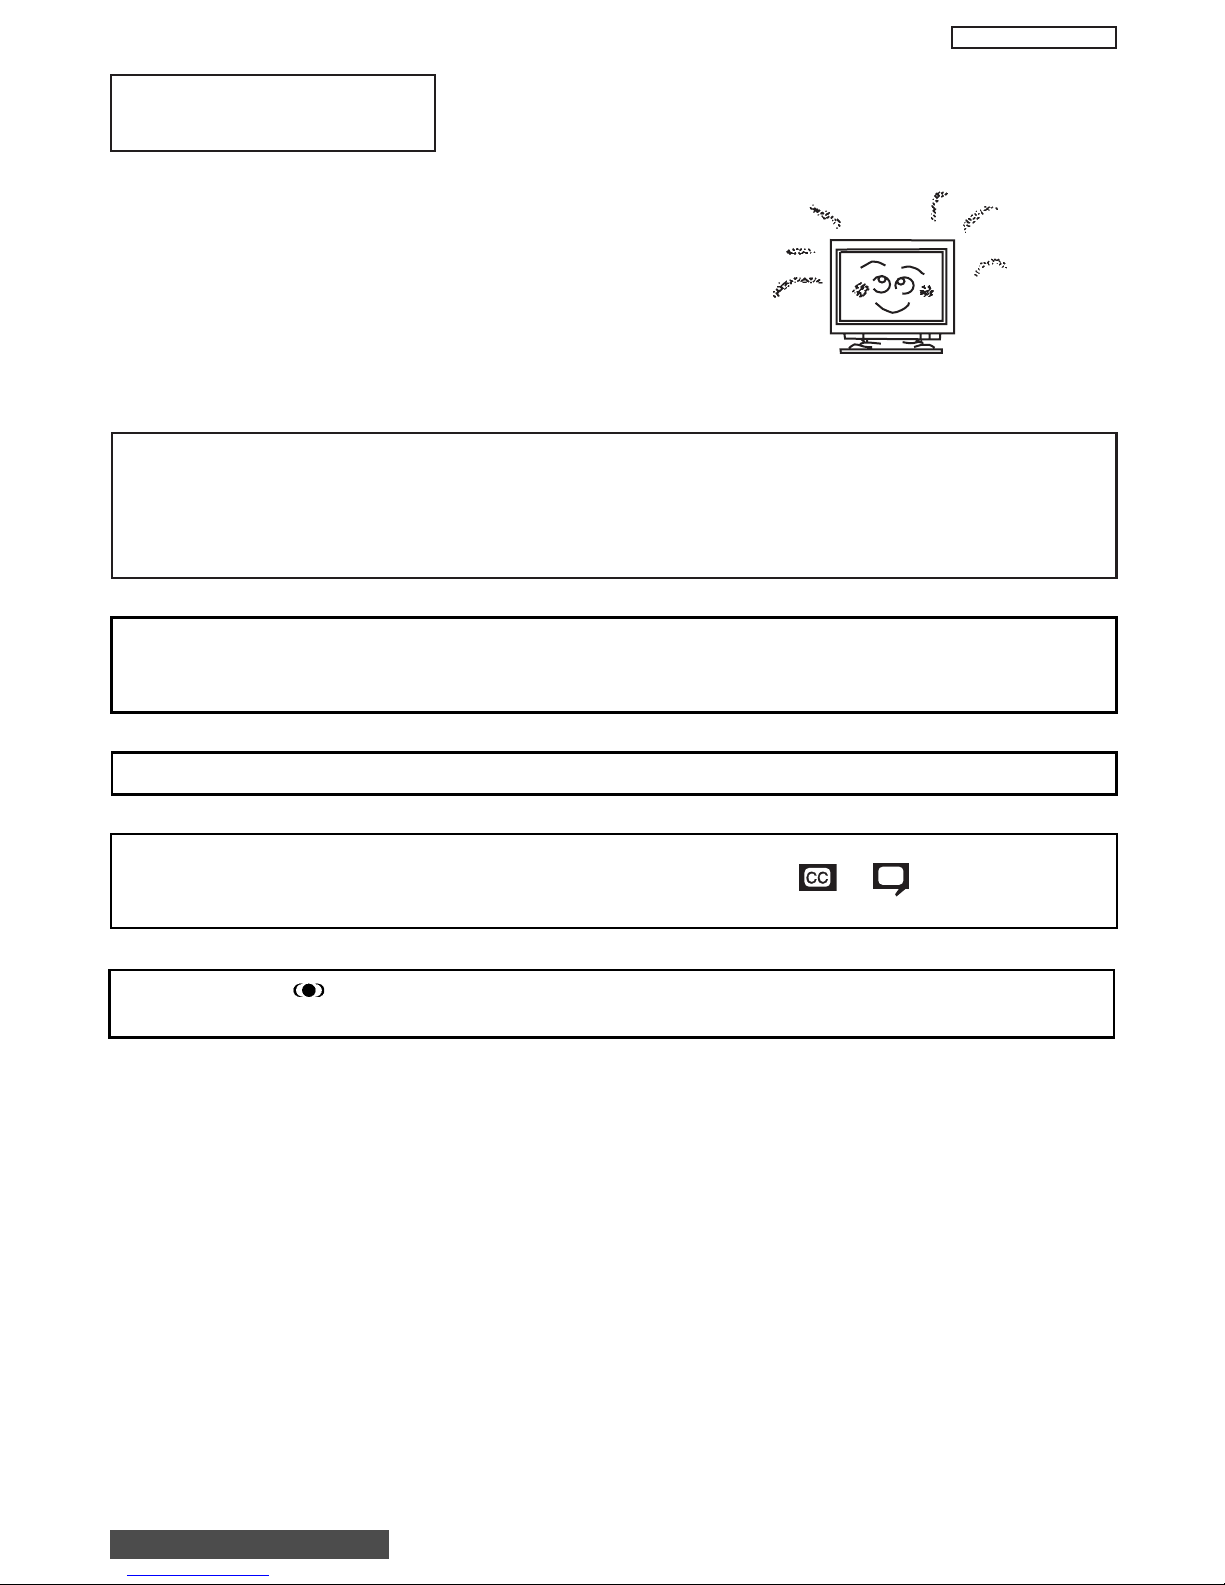
A buzzing sound might be heard when the plasma display monitor is turned on in a very quiet
room. This is due to the plasma panel drive circuit when it is functioning. This arching sound
is normal and it is not a malfunction.
Some infrared rays are emitted from the plasma display monitor’s panel that might affect other
infrared controlling equipment.
High-precision technology is used to manufacture the plasma display panel; But in some
cases, there are minor defects in some parts of the screen. Points that do not light, points
with brightness different from that of the periphery, points with color different from that of the
periphery, etc. Some pixels will always be on or always off. Please note that this is not a
malfunction.
When receving still picture signals, (e.g. channel number indication or clock indication) for a
while, you can see image-like when the picture varied. This is not a defect.
The plasma display panel is lighting the phosphors by the discharge of internal radiation. In
some cases, this may cause the temperature of the panel surface to increase. Please note
that this is not a malfunction. The Plasma TV surface temperature is higher than a
Cathode-ray-tube.
The plasma panel is made from glass. Heavy shock on the front panel might damage it.
When the PDP monitor is transported horizontally, the glass panel has the possibility of being
broken or increasing the picture defects. At the time of transportation, horizontal style is
prohibited. More-over, please treat the plasma panel with great care because of a precision
apparatus. Please instruct transporters so that it should be put into the packing box at the time
of shipment.(There is a possibility that breakage of the panel or defects will increase.)
Rough transportation might cause damage to the panel and pixel failure.
The plasma monitor illuminates phosphor to display images. The phosphor has a finite
illumination life. After extended periods of illumination, the brightness of the phosphor will be
degraded to such extent that stationary images would burn-in that part of the screen as
grayed-out images.
Tips to prevent such image retention are:
- Do not display images having sharp brightness differences or hi-contrast images, such as
monochrome characters and graphic patterns, for long.
- Do not leave stationary images appearing for long, but try to refresh them at appropriate
intervals of time, or try to move them using screen saver function.
-Turn down the contrast and brightness controls.
PDP television has luminosity and low contrast compared with CRT television.
When a screen is seen at point-blank range, a random fine grain may be visible to a dark part.
If an apparatus (VCR, etc.) antenna line is arranged near the monitor, the image may shake,
or disturbance may be received.
There is some time lag betweeen the picture and the sound. You can see lip motion that is
delayed compared to the sound.
Electric discharge/luminescence characteristic of the PDP panel also changes with peripheral
temperature. Moreover, since there is also high power consumption value, a specified
temperature environment is required.
Storing the plasma television for a period of more than 2 to 3 months without use might cause
an unstable picture when the set is turned on.
Operating altitude: 800 to 1114hPa (6194ft to -2484ft). Operating temperature: 41ûF to 95ûF.
Storage Altitude: 300 to 1114hPa (31,912 to -2484ft). Storage temperature: 5ûF to 140ûF.
Frequent use of the Power ON or OFF might trigger the power protection circuit. If the TV
does not turn ON, please wait a little before turning ON again.
1 Arching sound from
plasma display monitor’s
panel.
2 Interference for infrared
equipment.
3 Bright and dark spots
4 Picture Image (Spectrum)
5 Display panel surface
temperature is too high
6 Plasma Surface
7Transportation
8 Image retention
9 Luminosity and contrast
10 Granular spots
11 Disturbance to video
apparatus
12 Lip Sync
13 About the use
environment of PDP
television (temperature)
14 Caution on prolonged
storage
15 Operating
16 Storage
17 Power ON or OFF
No. Items Notes
IMPORTANT NOTES
TABLE OF CONTENTS
R
4" Minimum
4" Minimum
L
20
3’
0’
5’
10’
50
BEST
HORIZONTAL
5’
10’
VIEWING ANGLE
50
BEST
VERTICAL VIEWING
ANGLE
15’
20’
15’
20’
S
S
Page 15

15
PT3-E/G AVC3-U
Securing to a table-top
1. Using wood screws (two) fasten the set to the clamping screw holes on the rear of the Plasma Display stand as shown below.
2. Using commercially available wood screws, secure the set firmly in position.
To take measures to prevent the Plasma Display from tipping over and prevent possible injury it is important to mount the unit
in a stable place.
Caution when moving the main unit
As this product is heavy, whenever it is moved, two people are required to transport it safely. Whenever the unit is moved it should be
lifted forward using the two handgrips at the back, and the unit should then be held at the base on both sides for stability. When moving
the Display Monitor, lift the handles and the bottom frame as shown below. Do not grab the speakers or the back cover when lifting.
NOTES: 1.
Do not block the ventilation holes of the Plasma Display monitor or the AVC center. Blocking the ventillation holes might cause fire
or defect.
2. The plasma television has two AC cords, one on the AVC center and the other on the Plasma Display monitor. In case of an
abnormal symptom, unplug both AC cords.
3. If you purchased the wall mount bracket option, please ask for professional installer. Do not install by yourself.
ANTENNA
Unless your Plasma Television is connected to a cable TV system or to a centralized antenna system, a good outdoor color TV antenna
is recommended for best performance. However, if you are located in an exceptionally good signal area that is free from interference
and multiple image ghosts, an indoor antenna may be sufficient.
LOCATION
Select an area where sunlight or bright indoor illumination will not fall directly on the picture screen. Also, be sure that the location
selected allows a free flow of air to and from the perforated back cover of the set.
To avoid cabinet warping, cabinet color changes, and increased chance of set failure, do not place the TV where temperatures can
become excessively hot, for example, in direct sunlight or near a heating appliance, etc.
Securing to a wall
1. Keep the Plasma Display monitor four inches away from the
wall except those hung to the wall mount bracket.
2. Secure the monitor to the wall as shown below.
10cm (4 inches) or more
Wire
AVC Vertical Position (Using AVC Stand)
1. Install AVC Stand with screws provided.
2. AVC ventilation holes should be facing out.
PULL
POWER
STANDBY (RED) ON (GREEN)
CH+CH-VOL+VOL- INPUT/EXIT
AUDIO VIDEO CONTROL CENTER
POWER
STANDBY (RED) ON (GREEN)
CH+CH-VOL+VOL- INPUT/EXIT
AUDIO VIDEO CONTROL CENTER
32HDT50M/55M
42HDT50M/55M
Wood screw
two places
32"
42”
32”
Handgrips
42"
Page 16
16
PT3-E/G AVC3-U
FRONT PANEL CONTROLS
FRONT VIEW
MENU/SELECT button
This button allows you to enter the MENU, making it possible to set TV features to your preference without using the remote. This
button also serves as the SELECT button when in MENU mode.
INPUT/EXIT button
Press this button to select the desired input, VIDEO 1 to 5, RGB, or Ant A/B source. Your selection is shown in the top right corner
of the screen. This button also serves as the EXIT button when in MENU mode.
CHANNEL selector
Press these buttons until the desired channel appears in the top right corner of the TV screen. These buttons also serve as
the cursor down () and up () buttons when in MENU mode.
VOLUME level
Press these buttons to adjust the sound level. The volume level will be displayed on the TV screen. These buttons also serve as
the cursor left () and right () buttons when in MENU mode.
32”
DISPLAY
MONITOR
AUDIO VIDEO
CONTROL
CENTER
42”
DISPLAY
MONITOR
STANDBY (RED) ON (GREEN)
MAIN POWER
STANDBY (RED) ON (GREEN)
MAIN POWER
PULL
POWER
MENU/SELECT
L/(MONO) R
VIDEO
S-VIDEO
INPUT 5
PHONES
AUDIO
STANDBY (RED) ON (GREEN)
CH+CH-VOL+VOL- INPUT/EXIT
AUDIO VIDEO CONTROL CENTER
NOTES: Your remote control does not have an INPUT button. To change to video inputs, press VID1~VID5 buttons depending
on the input you wish to switch to. Press TV/RGB button on the remote control to toggle between TV and RGB
(ANALOG INPUT).
32/42HDT50M - Bluish Black
32/42HDT55M - Bright Silver
Page 17
17
PT3-E/G AVC3-U
POWER button
Display Monitor “MAIN POWER” button
This power button is for the complete system, and must be turned ON/OFF manually. It is recommended to leave the “MAIN
POWER” to ON condition (lights red) for stand-by mode.
AVC POWER button
The AVC power can be turned ON/OFF manually or by remote control. Turning on the AVC Power will only turn on the AVC box if
the “MAIN POWER” of the display monitor is off.
POWER light indicator
To turn the monitor ON, press the main power switch located on the lower right side of the monitor. A red stand-by indicator la mp
located on the lower right corner of the front bezel will illuminate. The PDP is now ready for remote on/off operation.
REMOTE CONTROL sensor
Point your remote at this area when selecting channels, adjusting volume, etc.
FRONT INPUT JACKS (for VIDEO: 5)
Use these audio/video jacks for a quick hook-up from a camcorder or VCR to instantly view your favorite show or new recording.
press the VID5 button on the remote control button and VIDEO: 5 appears in the top right corner of the TV screen. If you have
mono sound, insert the audio cable into the left audio jack.
PHONES JACK
Use this jack for your head-phones. The TV’s internal speakers can also be heard. Turn off the internal speakers (see page 46) if
you wish to listen to the head-phones only.
LEARNING AV NET Sensor
Point your equipment’s remote control at this area while using the AV NET Learning Wizard.
NOTES: 1. Your HITACHI Plasma TV will appear to be turned OFF (lights orange) if there is no video input when VIDEO: 1, 2,
3, 4, 5, or RGB is selected. Check the Power Light to make sure the Display Monitor is turned off or in Stand-by
mode (lights red) when not in use.
2. Remote Control can not turn ON/OFF the “MAIN POWER” of the display monitor.
TANDBY (RED) ON (GREEN)
MAIN POWER
Indicating Lamp Power Status Operating
Off Off When the main power switch is set
OFF.
Lights Red Off When the main power switch on the display
(Stand-by) monitor is ON, and the AVC Center is OFF.
Lights Green On Display monitor MAIN POWER is ON and
AVC Center power is ON.
Lights Orange Off Display monitor MAIN POWER is ON and
(Flashing) (Power Saving) and AVC Center power is ON, with no signal
input except antenna (no sync. signal).
Page 18
18
PT3-E/G AVC3-U
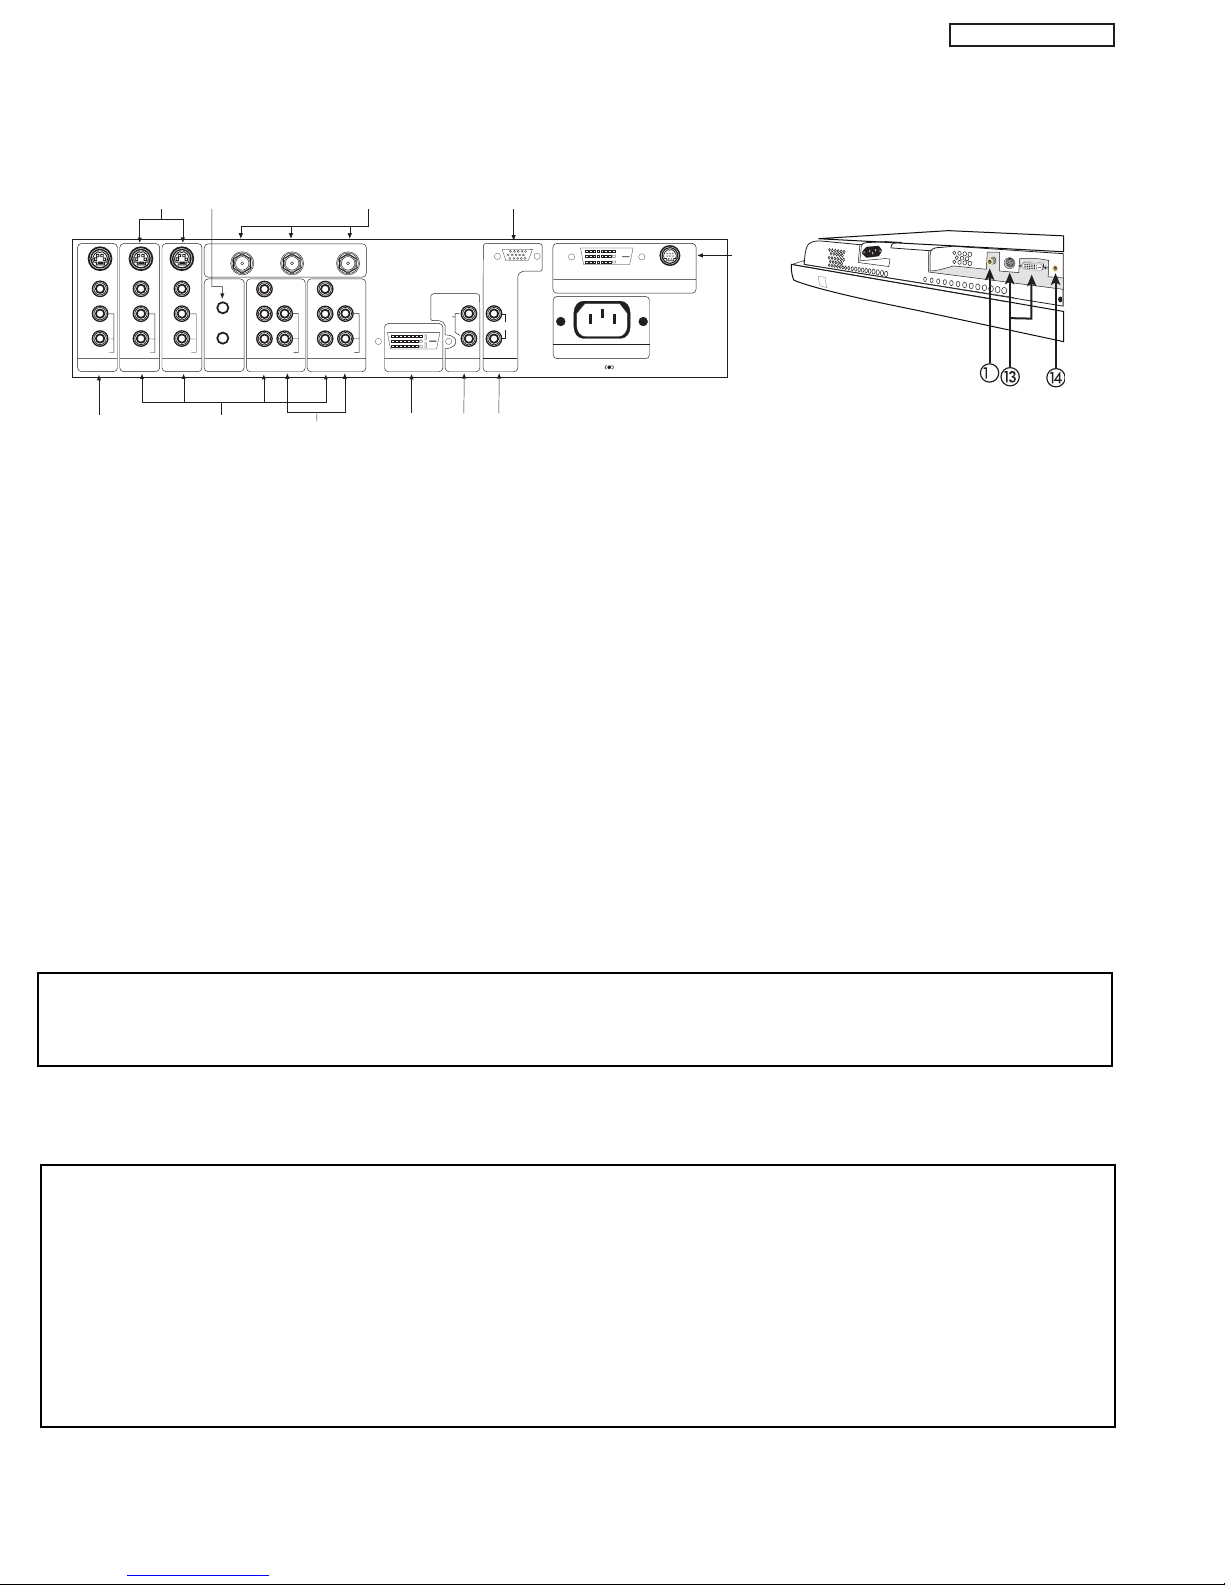
REAR PANEL JACKS
Component: Y-P
BPR
Inputs
Inputs 1 and 2 provide Y-P
BPR
jacks for connecting equipment with this capability, such as a DVD player or Set Top Box. You may
use composite video signal for INPUT 2. INPUT 1 does not accept composite video signal.
NOTES: 1. DO NOT connect composite VIDEO and S-VIDEO to Input 3, 4 or 5 at the same time. S-Video has a higher priority
over video input.
2. Your component outputs may be labeled Y, B-Y, and R-Y. In this case, connect the components B-Y output to the AVC
Box’s PBinput and the components R-Y output to the AVC Box’s PRinput.
3. Your component outputs may be labeled Y-CBCR. In this case, connect the component CBoutput to the AVC Box’s
PBinput and the component CRoutput to the AVC Box’s PRinput.
4. It may be necessary to adjust TINT to obtain optimum picture quality when using the Y-PBPR inputs.
5. To ensure no copyright infringement, the MONITOR OUT output will be abnormal, when using the Y-PBPRjacks.
Antenna Input/Output
The remote control allows you to switch between two separate 75-Ohm RF antenna inputs, ANT A and ANT B. ANT A input can
be displayed as a main picture or sub-picture. ANT B can only be displayed as a main picture. (ANT B cannot be displayed as a
sub-picture). The antenna output labeled “TO CONVERTER” allows the ANT A connection to pass directly to a different source
such as a cable box, only when ANT B is displayed as a main picture.
Audio/Video Inputs 1, 2, 3 and 4
The VID1~VID4 buttons will select each video source each time they are pressed. Use the audio and video inputs to connect
external devices, such as VCRs, camcorders, laserdisc players, DVD players etc. (If you have mono sound, insert the audio cable
into the left audio jack.)
MONITOR OUT
These jacks provide fixed audio and video signals (ANT A/B, INPUT 2~5) which are used for recording. Use the S-VIDEO Output
for high quality video output. Component signal to Input 1 and 2 will not have monitor output.
AUDIO OUT
These jacks provide fixed audio output for all audio sources (ANT A/B, INPUT1~5, and RGB) to a separate stereo amplifier.
S-VIDEO Inputs 3 and 4
Inputs 3 and 4 provide S-VIDEO (Super Video) jacks for connecting equipment with S-VIDEO output capability.
REAR PANEL OF THE AVC CENTER
P
B
P
R
P
B
P
R
Y/VIDEO
R
L/(MONO)
AUDIO
L
R
S-VIDEO
VIDEO
AUDIO
R
S-VIDEO
VIDEO
AUDIO
R
S-VIDEO
VIDEO
MONITOR OUT INPUT 4 INPUT 3 IR BLASTER
L/(MONO)L/(MONO)
AUDIO
Y
R
L/(MONO)
AUDIO
INPUT 2 INPUT 1
ANT B
TO CONVERTER
ANT A
DVI-HDTV
INPUT 1
L
AUDIO
R
AUDIO OUT
ANALOG INPUT
L/(MONO)
R
AUDIO
RGB
TruBass SRS and symbol are trademarks of SRS Labs, Inc.
AC IN
TO MONITOR
Please use HITACHI specified cable.
NOTES: 1. You may use VIDEO or S-VIDEO inputs to connect to INPUT 3 and 4, but only one of these inputs may be used at a
time.
2. S-VIDEO output may be used for recording, only when the input is of S-VIDEO type.
32”/42” Monitor Bottom View
2
Page 19
19
PT3-E/G AVC3-U
PDP MONITOR
Self Diagnostic
This button is also a troubleshooting aid, when a PDP monitor failure occurs, the pressing of the sub-power button, for more
than 5 seconds, generates a blinking series of the power indicator light. See page 47 for self-diagnostic function.
RGB - Analog Input
Use this 15-pin D-Sub input for your external devices with RGB output.
RGB - Audio Input
Connect audio for RGB input.
DVI - HDTV - Digital Input
Use this DVI Digital input for your external devices with digital output capability, such as a Set-Top-Box, high band DTV decoders
and DVD players with digital content protection. DVI is INPUT 1 and has priority over component input. Signal priority are as
follows; DVI, Component, S-Video, then composite. When using a Set-Top-Box, it is recommended to use a 1080i or 720p input
signal.
To Monitor
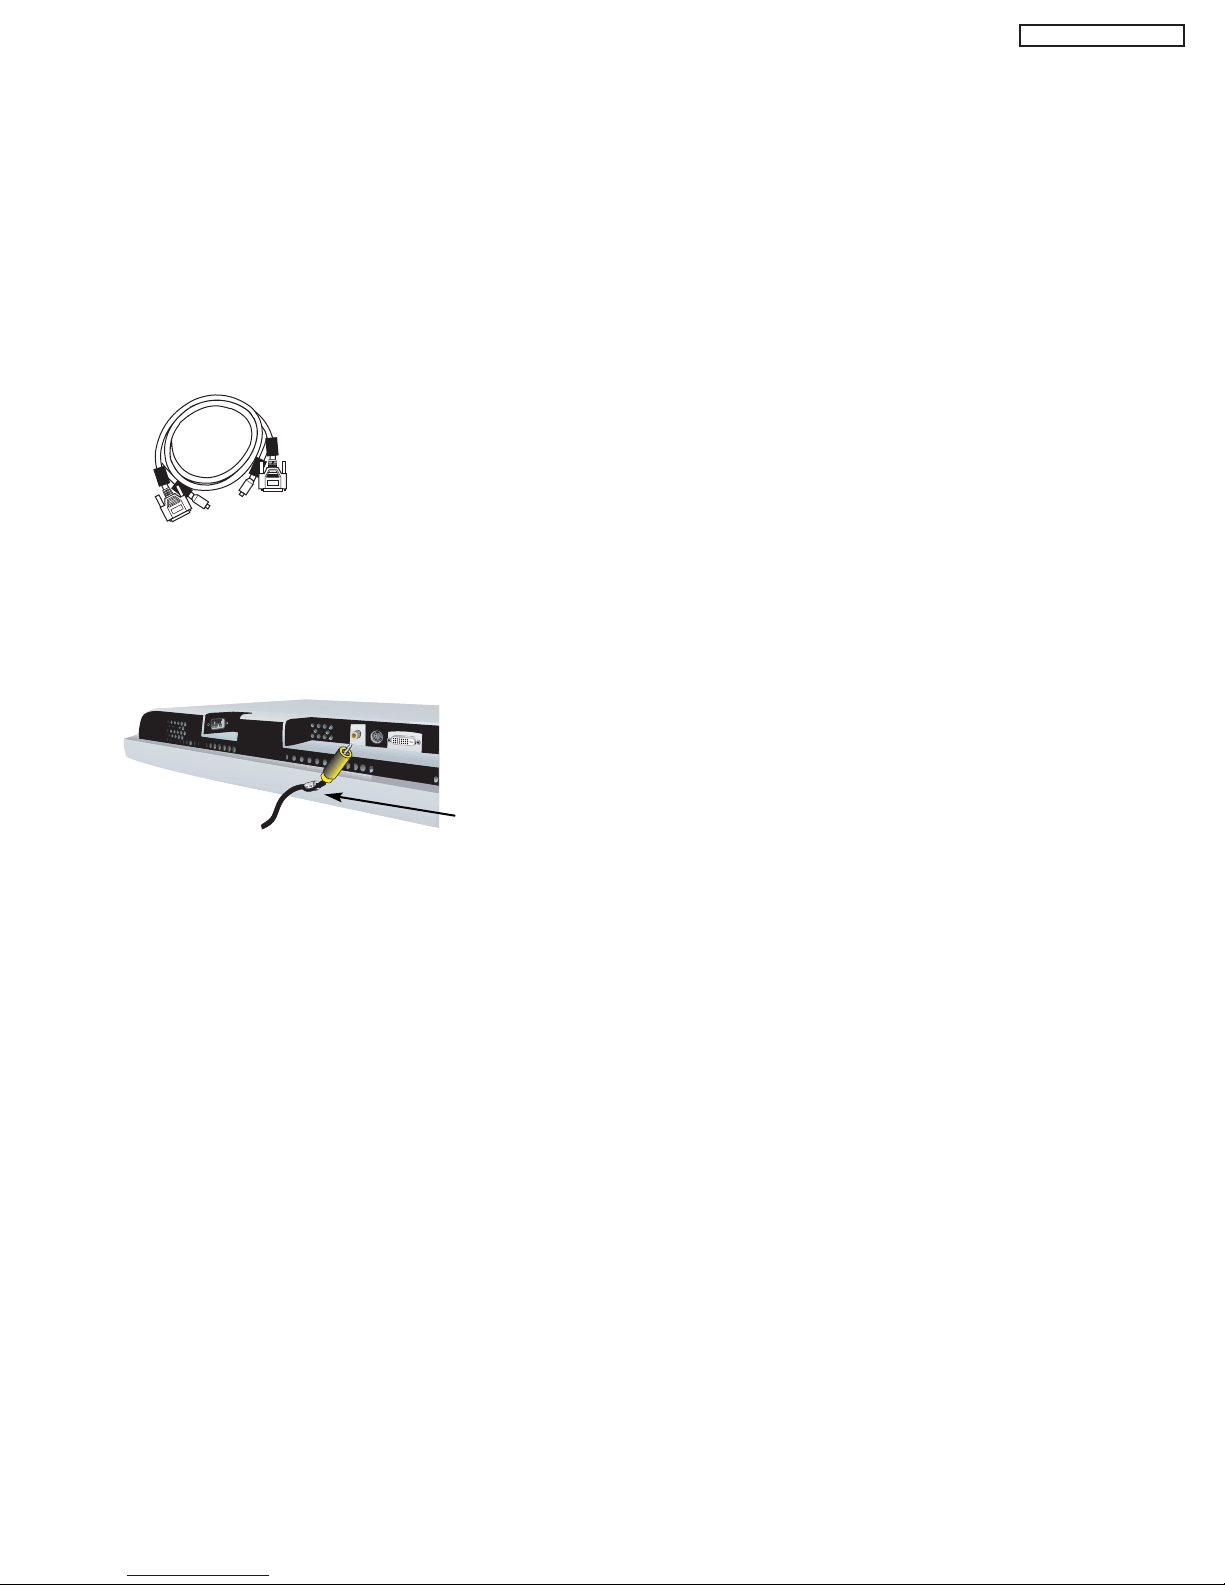
Connect the Monitor Connection Cable to the AVC center’s “TO MONITOR” connector, and to the display monitors “FROM AVC”
connector.
IR Blaster
This jack provides IR output to your external components (VCR, Cable box, DVD player, etc.). With this connection, your external
components can automatically be controlled by the AV network feature. This connection will allow you to control the external
components with your Plasma Television’s remote control in TV mode.
Subwoofer Out
Connect this SUB WOOFER OUT output to the external audio component input using the sub woofer cable provided.
To AVC
Connect the Monitor Connection cable from the AVC center’s “TO MONITOR” to these connectors (“FROM AVC”).
SUB-POWER button
This power is for serviceman usage.
Ferrite Core
Page 20
20
PT3-E/G AVC3-U
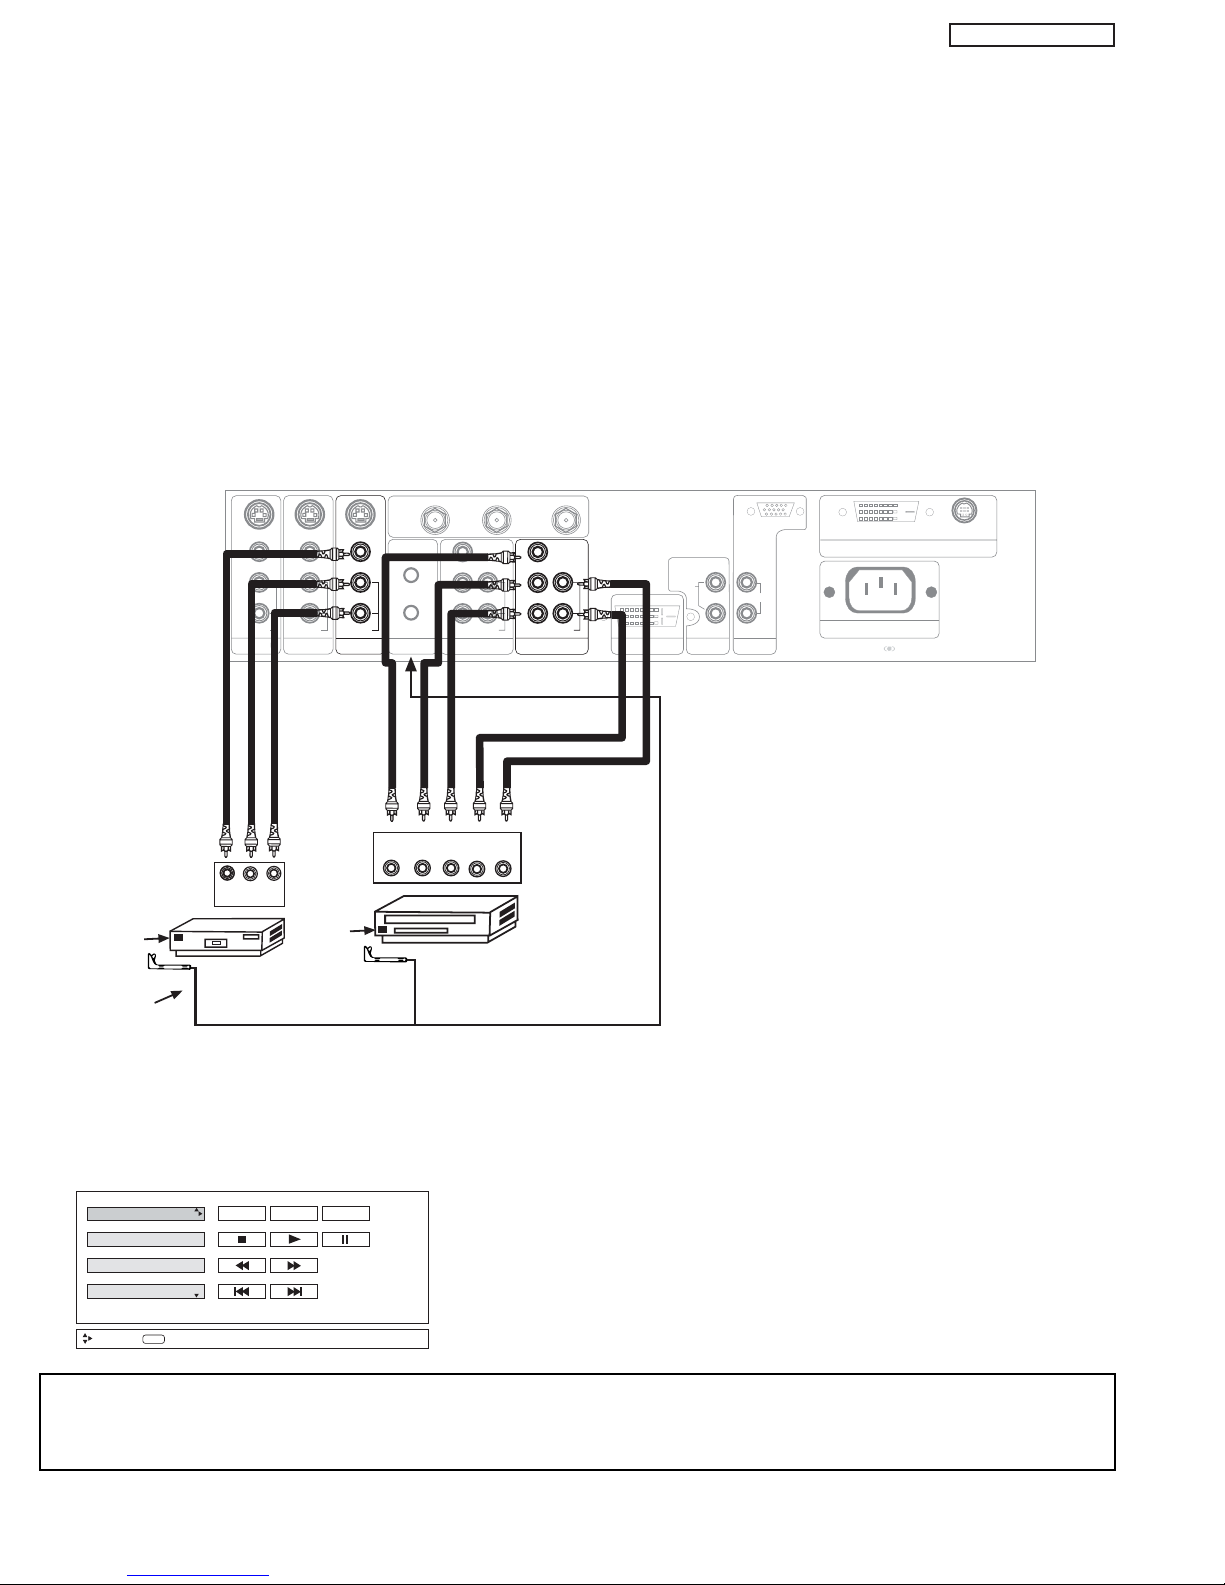
CONNECTING AV NETWORK
Your Hitachi Plasma Television is equipped with an AV Network feature. This feature helps to control your external Audio/Video
equipment (VCR, Set Top Box, DVD, etc.). Once this is setup, it allows your IR Mouse connector to control your equipment using
your Hitachi Plasma TV Remote Control. You can use your Hitachi remote control to control the Audio/Video equipment command
without the equipment’s remote control.
The Plasma Television AVC Center has 2 IR BLASTER jacks. Each IR Mouse cable can connect up to 2 external Audio/Video
components. Therefore, you can connect the Plasma Television with up to four components. Please see the following example of
an AV Network setup between your Hitachi Plasma Television and external Audio/Video equipment (VCR and DVD Player).
CONNECTING EXTERNAL AUDIO/VIDEO COMPONENTS TO IR BLASTER FOR AV NETWORK
1. Connect your external Audio/Video components to the AVC Center shown in the example below.
2. Connect the IR Mouse cable to the IR BLASTER output of the AVC Center.
3. Place the IR mouse in front of the infrared sensor of the external components you wish to control.
4. Press the AV NET button on the remote control. Use THUMB STICK or to highlight the component you wish to set up.
Use THUMB STICK to enter component’s “SOFT KEY” control button. The AV Network Setup Wizard will automatically start
upon the very first use. You can access the Setup Menu Wizard again in the future by pressing the AV net button and then
pressing the INFO button.
NOTES: 1. The AVC Center has two IR BLASTER outputs which can control up to a total of four external components.
2. The IR Mouse must be placed in front of the external components infrared sensor for the AV Network to work.
3. The correct codes must be entered for each of the Audio/Video components for the AV Network to function properly.
4. Audio/Video component codes for AV network are on page 22.
P
B
P
R
P
B
P
R
DVI-HDTV
INPUT 1
L
AUDIO
R
AUDIO OUT
ANALOG INPUT
L/(MONO)
R
AUDIO
RGB
TruBass SRS and symbol are trademarks of SRS Labs, Inc.
AC IN
TO MONITOR
Please use HITACHI specified cable.
Rear Panel of AVC Center
Y/VIDEO
R
L/(MONO)
AUDIO
L
R
S-VIDEO
VIDEO
AUDIO
R
S-VIDEO
VIDEO
AUDIO
R
S-VIDEO
VIDEO
MONITOR OUT INPUT 4 INPUT 3 IR BLASTER
L/(MONO)L/(MONO)
AUDIO
Y
R
L/(MONO)
AUDIO
INPUT 2 INPUT 1
ANT B
TO CONVERTER
ANT A
DVD Player
AUDIO
R
V L R
OUTPUT
VCR
Infrared
Sensor
Infrared
Sensor
IR
Mouse
OUTPUT
YP
B/CBPR/CR
R L
AV Receiver
PV Recorder
VCR
DVD
Move
POWER MENU MORE
INFO
Device Setting
Page 21
21
PT3-E/G AVC3-U
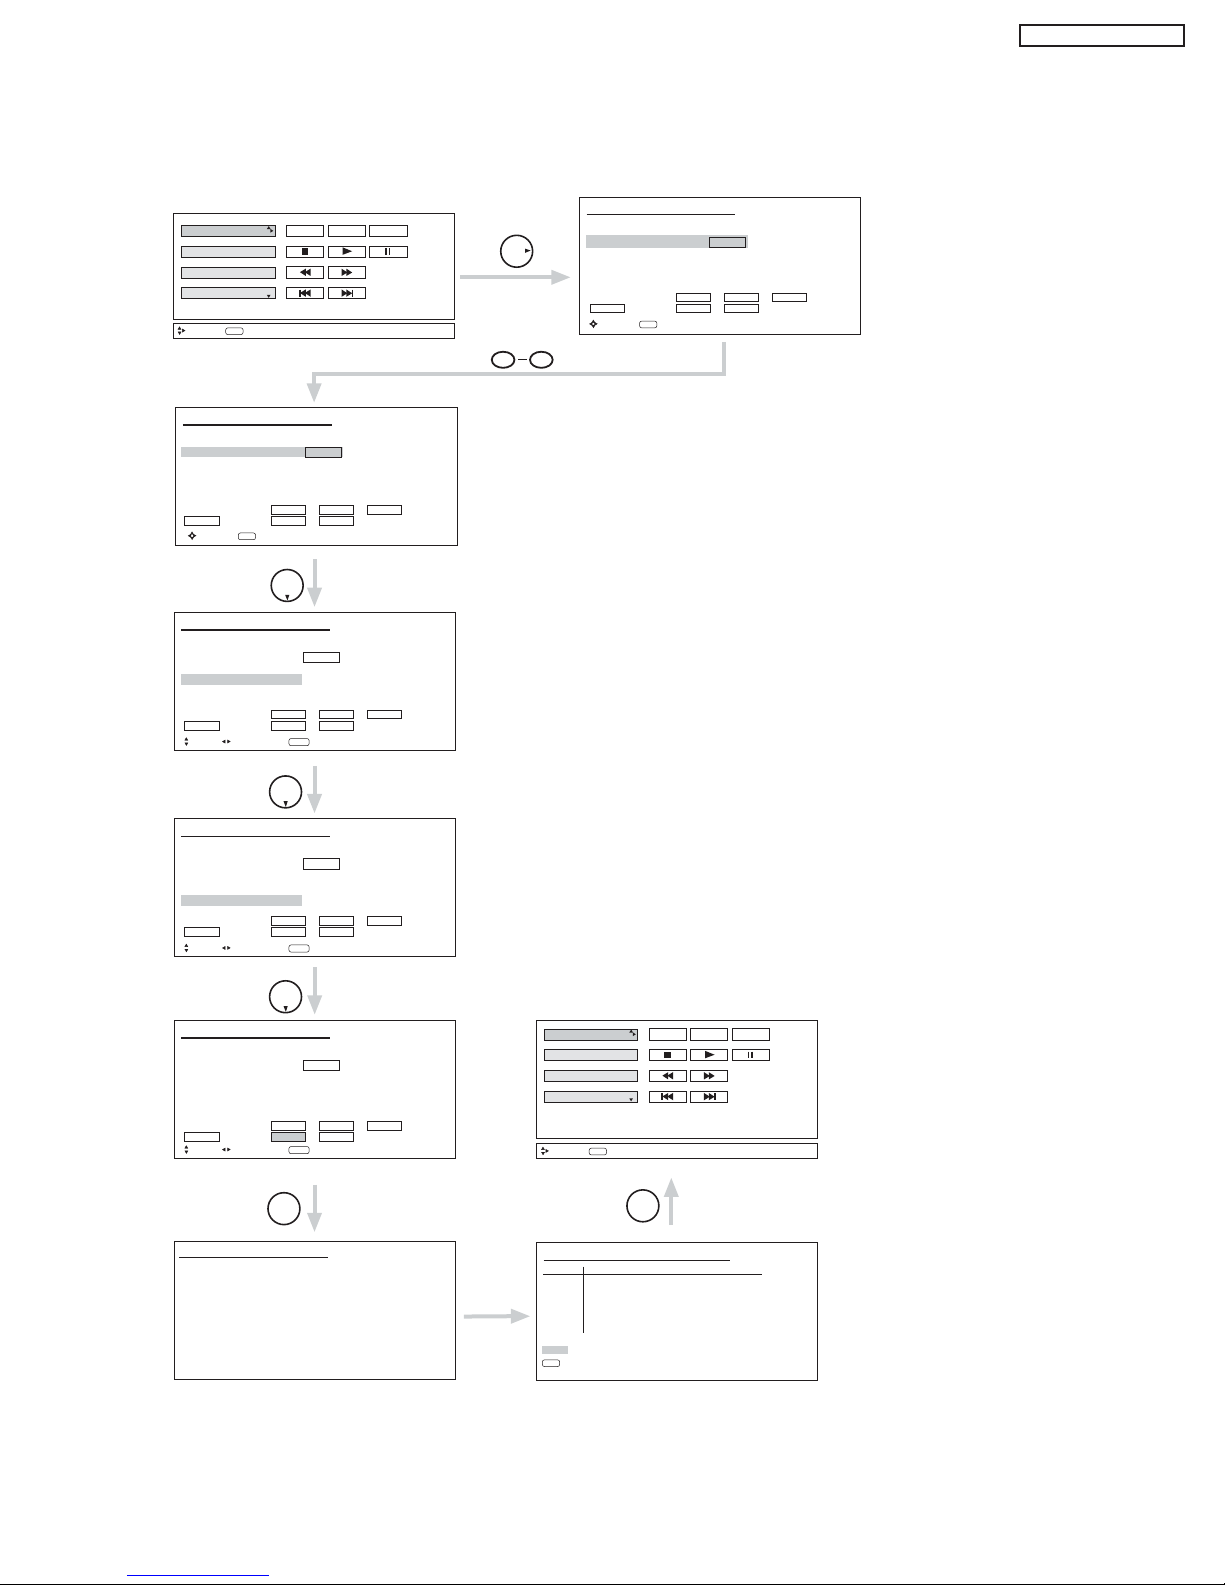
AV NETWORK SETUP WIZARD
5. Follow the steps below to setup the AV network (See page 22 for AV Network Codes).
There are six steps in the setup procedure (VCR setup example below).
HITACHI AV NET SET UP
Proper Code Entered
from page 21.
AV Receiver
PV Recorder
VCR
DVD
Move
POWER MENU MORE
INFO
Device Setting
DVD
Device Code - - - -
(Enter code “9999” to uninstall)
Video Input No Connection
Audio Input No Connection
Transmission Test POWER PLAY CH UP
BACK OK EXIT
HITACHI AV NET SET UP
DVD
Device Code 0 6 7 2
(Enter code “9999” to uninstall)
Video Input No Connection
Audio Input No Connection
Transmission Test POWER PLAY CH UP
BACK OK EXIT
Congratulations
Your DVD is now
connected to your AV network.
HITACHI AV NET SETTING LIST
Device Code Video Audio
DVD 0672 INPUT 1 Using TV
VCR ---- Not Setup Not Setup
PVR ---- Not Setup Not Setup
AVR ---- Not Setup Not Setup
CBL ---- Not Setup Not Setup
STB ---- Not Setup Not Setup
Custom ---- Not Setup Not Setup
EXIT
HITACHI AV NET SET UP
DVD
Device Code 0 6 7 2
(Enter code “9999” to uninstall)
Video Input Input 1
Audio Input Using TV
Transmission Test POWER PLAY CH UP
BACK OK EXIT
Move
SEL Select
Set Input
AV Receiver
PV Recorder
VCR
DVD
POWER MENU MORE
Move
INFO
Device Setting
HITACHI AV NET SET UP
DVD
Device Code 0 6 7 2
(Enter code “9999” to uninstall)
Video Input Input 1
Audio Input No Connection
Transmission Test POWER PLAY CH UP
BACK OK EXIT
Move
SEL Select
Set Input
HITACHI AV NET SET UP
DVD
Device Code 0 6 7 2
(Enter code “9999” to uninstall)
Video Input Input 1
Audio Input Using TV
Transmission Test POWER PLAY CH UP
BACK OK EXIT
Move
SEL Select
Set Input
HITACHI AV NET SET UP
SEL
Select
Move
0-9
Input
Move
0-9
Input
THUMB
STICK
THUMB
STICK
THUMB
STICK
THUMB
STICK
SELECT
THUMB
STICK
SELECT
THUMB
STICK
(x2)
90
6. To uninstall or change device (equipment), press INFO button on the remote control when the device (DVD, VCR, etc.) is
highlighted.
Enter the device (equipment) code listed on page 22.
Use THUMBSTICK to select the input that the device (equipment)
is hooked-up to.
Transmission test for the device to confirm that the proper code was
set, by selecting (POWER, PLAY, etc.) soft keys shown. If the device
responds to the transmission test soft key, then it is properly set up.
Select OK to continue.
Page 22

22
PT3-E/G AVC3-U
AUDIO/VIDEO CODES FOR AV NETWORK
VCR BRAND . . . . . . . . . . . . . . . . . . . . . . . . . . . CODE
Admiral. . . . . . . . . . . . . . . . . . . . . . . . . . . . 0048, 0209
Adventura . . . . . . . . . . . . . . . . . . . . . . . . . . . . . . .0000
Aiko . . . . . . . . . . . . . . . . . . . . . . . . . . . . . . . . . . . 0278
Aiwa . . . . . . . . . . . . . . . . . . . . . . . . . . . . . . 0000, 0037
Akai . . . . . . . . . . . . . . . . . . . . . . . . . . . . . . . . . . . 0041
America Action . . . . . . . . . . . . . . . . . . . . . . . . . . . 0278
American High . . . . . . . . . . . . . . . . . . . . . . . . . . . 0035
Asha . . . . . . . . . . . . . . . . . . . . . . . . . . . . . . . . . . 0240
Audiovox . . . . . . . . . . . . . . . . . . . . . . . . . . 0037, 0278
Beaumark. . . . . . . . . . . . . . . . . . . . . . . . . . . . . . . 0240
Bell & Howell . . . . . . . . . . . . . . . . . . . . . . . . . . . . 0104
Broksonic . . . . . . . . . . . . . . . . 0121, 0184, 0002, 0209,
. . . . . . . . . . . . . . . . . . . . . . . . . . . . . 0479, 1479, 0278
CCE . . . . . . . . . . . . . . . . . . . . . . . . . . . . . . 0072, 0278
Calix. . . . . . . . . . . . . . . . . . . . . . . . . . . . . . . . . . . 0037
Canon . . . . . . . . . . . . . . . . . . . . . . . . . . . . . . . . . 0035
Carver . . . . . . . . . . . . . . . . . . . . . . . . . . . . . . . . . 0081
Cineral . . . . . . . . . . . . . . . . . . . . . . . . . . . . . . . . . 0278
Citizen . . . . . . . . . . . . . . . . . . . . . . . 0278, 0037, 1278
Colt . . . . . . . . . . . . . . . . . . . . . . . . . . . . . . . . . . . 0072
Craig . . . . . . . . . . . . . . . . . . . . 0037, 0072, 0047, 0240
Curtis Mathes. . . . 0035, 0041, 0060, 0162, 0760, 1035
Cybernex . . . . . . . . . . . . . . . . . . . . . . . . . . . . . . . 0240
Daewoo . . . . . . . . . . . . . . . . . . . . . . 0278, 1278, 0045
Denon . . . . . . . . . . . . . . . . . . . . . . . . . . . . . . . . . 0042
Dynatech . . . . . . . . . . . . . . . . . . . . . . . . . . . . . . . 0000
Electrohome. . . . . . . . . . . . . . . . . . . . . . . . . . . . . 0037
Electrophonic . . . . . . . . . . . . . . . . . . . . . . . . . . . . 0037
Emerex . . . . . . . . . . . . . . . . . . . . . . . . . . . . . . . . 0032
Emerson . . . . . . . . . . . . . . . . . . . . . 0184, 0002, 0209,
. . . . . . . . . . . . . . . . . . . . . . . . 0121, 0000, 0037, 0043
Fisher . . . . . . . . . . . . . . . . . . . . . . . . . . . . . 0104, 0047
Fuji . . . . . . . . . . . . . . . . . . . . . . . . . . . . . . . 0033, 0035
Funai . . . . . . . . . . . . . . . . . . . . . . . . . . . . . . . . . . 0000
GE . . . . . . . 0035, 0060, 0240, 0760, 0807, 1035, 1060
Garrard . . . . . . . . . . . . . . . . . . . . . . . . . . . . . . . . 0000
Go Video . . . . . . . . . . . . . . . . . . . . . . . . . . . . . . . 0432
GoldStar . . . . . . . . . . . . . . . . . . . . . . 0037, 0038, 1237
Gradiente . . . . . . . . . . . . . . . . . . . . . . . . . . . . . . . 0000
HI-Q. . . . . . . . . . . . . . . . . . . . . . . . . . . . . . . . . . . 0047
Harley Davidson. . . . . . . . . . . . . . . . . . . . . . . . . . 0000
Harman/Kardon . . . . . . . . . . . . . . . . . . . . . 0038, 0081
Harwood . . . . . . . . . . . . . . . . . . . . . . . . . . . . . . . 0072
Hitachi . . . . . . . . . . . . . . . . . . . . . . . 0000, 0041, 0042
Hughes Network Systems. . . . . . . . . . . . . . . . . . . 0042
JVC . . . . . . . . . . . . . . . . . . . . . . . . . . . . . . 0067, 0041
Jensen . . . . . . . . . . . . . . . . . . . . . . . . . . . . . . . . . 0041
KEC . . . . . . . . . . . . . . . . . . . . . . . . . . . . . . 0037, 0278
KLH . . . . . . . . . . . . . . . . . . . . . . . . . . . . . . . . . . . 0072
Kenwood. . . . . . . . . . . . . . . . . . . . . . 0041, 0067, 0038
Kodak. . . . . . . . . . . . . . . . . . . . . . . . . . . . . 0035, 0037
LXI . . . . . . . . . . . . . . . . . . . . . . . . . . . . . . . . . . . . 0037
Lloyd's . . . . . . . . . . . . . . . . . . . . . . . . . . . . . . . . . 0000
Logik . . . . . . . . . . . . . . . . . . . . . . . . . . . . . . . . . . 0072
MEI . . . . . . . . . . . . . . . . . . . . . . . . . . . . . . . . . . . 0035
MGA. . . . . . . . . . . . . . . . . . . . . . . . . . . . . . 0043, 0240
MGN Technology . . . . . . . . . . . . . . . . . . . . . . . . . 0240
MTC . . . . . . . . . . . . . . . . . . . . . . . . . . . . . . 0000, 0240
Magnasonic . . . . . . . . . . . . . . . . . . . . . . . . . . . . . 1278
Magnavox . . . . . . . . . . . . . . . . . . . . 0035, 0081, 0563,
. . . . . . . . . . . . . . . . . . . . . . . . 0000, 0039, 0149, 1781
Magnin. . . . . . . . . . . . . . . . . . . . . . . . . . . . . . . . . 0240
Marantz . . . . . . . . . . . . . . . . . . . . . . . . . . . 0081, 0035
Marta . . . . . . . . . . . . . . . . . . . . . . . . . . . . . . . . . . 0037
Matsushita . . . . . . . . . . . . . . . . . . . . 0035, 0162, 0454
Memorex . . . . . . . . . . . . . . . . 0047, 0037, 0104, 0209,
. . . . . . . . . . . . . . . . . . . 0454,0048, 0039, 0240, 0000,
. . . . . . . . . . . . . . . . . . . 0479, 1037, 1162, 1237, 1262
Minolta . . . . . . . . . . . . . . . . . . . . . . . . . . . . . . . . . 0042
Mitsubishi. . . . . . . . . . . . . . . . . . . . . 0807, 0043, 0067
Motorola . . . . . . . . . . . . . . . . . . . . . . . . . . . 0035, 0048
Multitech. . . . . . . . . . . . . . . . . . . . . . . . . . . 0000, 0072
NEC . . . . . . . . . . . . . . . . . . . . 0038, 0041, 0067, 0104
Nikko . . . . . . . . . . . . . . . . . . . . . . . . . . . . . . . . . . 0037
Noblex . . . . . . . . . . . . . . . . . . . . . . . . . . . . . . . . . 0240
Olympus. . . . . . . . . . . . . . . . . . . . . . . . . . . . . . . . 0035
Optimus . . . . . . . . . . . . . . . . . 1062, 0162, 0037, 0048,
. . . . . . . . . . . . . . 0104, 0432, 0454, 1048, 1162, 1262
Orion . . . . . . . . . . . . . . . 0184, 0209, 0002, 0479, 1479
Panasonic. . . . . . . . . . 1062, 0035, 01625, 0225, 0454,
. . . . . . . . . . . . . . . . . . . . . . . . 0616, 1035, 1162, 1262
Penney. . . . . . . . . . . . . . . . . . 0035, 0037, 0240, 0042,
. . . . . . . . . . . . . . . . . . . . . . . . . . . . . 0038, 1035, 1237
Pentax . . . . . . . . . . . . . . . . . . . . . . . . . . . . . . . . . 0042
Philco . . . . . . . . . . . . . . . . . . . . . . . . 0035, 0209, 0479
Philips . . . . . . . . . . . . . . 0081, 0035, 0618, 1081, 1181
Pilot . . . . . . . . . . . . . . . . . . . . . . . . . . . . . . . . . . . 0037
Pioneer . . . . . . . . . . . . . . . . . . . . . . . . . . . . . . . . 0067
Polk Audio . . . . . . . . . . . . . . . . . . . . . . . . . . . . . . 0081
Profitronic. . . . . . . . . . . . . . . . . . . . . . . . . . . . . . . 0240
Proscan . . . . . . . . . . . . . . . . . . . . . . 0060, 0760, 1060
Protec . . . . . . . . . . . . . . . . . . . . . . . . . . . . . . . . . 0072
Pulsar . . . . . . . . . . . . . . . . . . . . . . . . . . . . . . . . . 0039
Quasar. . . . . . . . . . . . . . 0035, 0162, 0454, 1035, 1162
RCA . . . . . . . . . . . . . . . . . . . . 0060, 0240, 0042, 0149,
. . . . . . . . . . . . . . . . . . . . . . . . 0760, 0807, 1035, 1060
Radio Shack . . . . . . . . . . . . . . . . . . . . . . . . 0000, 1037
Radix . . . . . . . . . . . . . . . . . . . . . . . . . . . . . . . . . . 0037
Randex. . . . . . . . . . . . . . . . . . . . . . . . . . . . . . . . . 0037
Realistic . . . . . . . . 0035, 0037, 0048, 0047, 0000, 0104
ReplayTV . . . . . . . . . . . . . . . . . . . . . . . . . . 0614, 0616
Runco . . . . . . . . . . . . . . . . . . . . . . . . . . . . . . . . . 0039
STS . . . . . . . . . . . . . . . . . . . . . . . . . . . . . . . . . . . 0042
Samsung . . . . . . . . . . . . . . . . . . . . . . . . . . 0045, 0240
Sanky . . . . . . . . . . . . . . . . . . . . . . . . . . . . . 0039, 0048
Sansui . . . . . . . . . 0000, 0067, 0209, 0041, 0479, 1479
Sanyo . . . . . . . . . . . . . . . . . . . . . . . . 0047, 0240, 0104
Scott . . . . . . . . . . . . . . . . . . . . 0184, 0045, 0121, 0043
Sears . . . . . 0035, 0037, 0047, 0000, 0042, 0104, 1237
Semp. . . . . . . . . . . . . . . . . . . . . . . . . . . . . . . . . . 0045
Sharp . . . . . . . . . . . . . . . . . . . . . . . . 0048, 0807, 0848
Shintom . . . . . . . . . . . . . . . . . . . . . . . . . . . . . . . . 0072
Shogun . . . . . . . . . . . . . . . . . . . . . . . . . . . . . . . . 0240
Singer . . . . . . . . . . . . . . . . . . . . . . . . . . . . . . . . . 0072
Sonic Blue . . . . . . . . . . . . . . . . . . . . . . . . . 0614, 0616
Sony. . . . . . 0035, 0032, 0000, 0033, 0636, 1032, 1232
Sylvania. . . . . . . . . . . . . 0035, 0081, 0000, 0043, 1781
Symphonic . . . . . . . . . . . . . . . . . . . . . . . . . . . . . . 0000
TMK. . . . . . . . . . . . . . . . . . . . . . . . . . . . . . . . . . . 0240
Tatung . . . . . . . . . . . . . . . . . . . . . . . . . . . . . . . . . 0041
Teac. . . . . . . . . . . . . . . . . . . . . . . . . . . . . . 0000, 0041
Technics. . . . . . . . . . . . . . . . . . . . . . . . . . . 0035, 0162
Teknika. . . . . . . . . . . . . . . . . . . . . . . 0000, 0035, 0037
Thomas . . . . . . . . . . . . . . . . . . . . . . . . . . . . . . . . 0000
Tivo . . . . . . . . . . . . . . . . . . . . . . . . . . . . . . 0618, 0636
Toshiba. . . . . . . . . . . . . . . . . . . . . . . . 0045, 0043, 845
Totevision. . . . . . . . . . . . . . . . . . . . . . . . . . 0037, 0240
Unitech. . . . . . . . . . . . . . . . . . . . . . . . . . . . . . . . . 0240
Vector . . . . . . . . . . . . . . . . . . . . . . . . . . . . . . . . . 0045
Vector Research. . . . . . . . . . . . . . . . . . . . . . . . . . 0038
Video Concepts . . . . . . . . . . . . . . . . . . . . . . . . . . 0045
Videomagic . . . . . . . . . . . . . . . . . . . . . . . . . . . . . 0037
Videosonic . . . . . . . . . . . . . . . . . . . . . . . . . . . . . . 0240
Wards. . . . . . . . . . . . . . . . . . . 0060, 0035, 0048, 0047,
. . . . . . . . . 0081, 0240, 0000, 0042, 0072, 0149, 0760
White Westinghouse . . . . . . . . . . . . . 0072, 1278, 0209
XR-1000 . . . . . . . . . . . . . . . . . . . . . . 0072, 0000, 0035
Yamaha . . . . . . . . . . . . . . . . . . . . . . . . . . . . . . . . 0038
Zenith. . . . . . . . . . . . . . . . . . . 0039, 0000, 0209, 0033,
. . . . . . . . . . . . . . 0479, 1479, 0033, 0034, 0209, 0479
DVD BRAND . . . . . . . . . . . . . . . . . . . . . . . . . . . CODE
Aiwa. . . . . . . . . . . . . . . . . . . . . . . . . . . . . . . . . . . 0641
Apex. . . . . . . . . . . . . . . . . . . . 0672, 0717, 0755, 0794,
. . . . . . . . . . . . . . . . . . . . . . . . 0795, 0796, 0797, 0830
Audiologic . . . . . . . . . . . . . . . . . . . . . . . . . . . . . . 0736
B & K . . . . . . . . . . . . . . . . . . . . . . . . . . . . . 0655, 0662
Blue Parade . . . . . . . . . . . . . . . . . . . . . . . . . . . . . 0571
Brooksonic . . . . . . . . . . . . . . . . . . . . . . . . . . . . . . 0695
DVD2000 . . . . . . . . . . . . . . . . . . . . . . . . . . . . . . . 0521
Daewoo . . . . . . . . . . . . . . . . . . . . . . . . . . . . . . . . 0784
Denon . . . . . . . . . . . . . . . . . . . . . . . . . . . . 0490, 0634
Emerson . . . . . . . . . . . . . . . . . . . . . . . . . . . . . . . 0591
Enterprise. . . . . . . . . . . . . . . . . . . . . . . . . . . . . . . 0591
Fisher. . . . . . . . . . . . . . . . . . . . . . . . . . . . . . . . . . 0670
GE . . . . . . . . . . . . . . . . . . . . . . . . . . 0522, 0717, 0815
GPX . . . . . . . . . . . . . . . . . . . . . . . . . . . . . . 0699, 0769
Go Video . . . . . . . . . . . . . . . . . . . . . . . . . . . . . . . 0715
Gradiente . . . . . . . . . . . . . . . . . . . . . . . . . . . . . . . 0651
Greenhill . . . . . . . . . . . . . . . . . . . . . . . . . . . . . . . 0717
Harman/Kardon . . . . . . . . . . . . . . . . . . . . . 0582, 0702
Hitachi . . . . . . . . . . . . . . . . . . . . . . . . . . . . 0573, 0664
Hiteker . . . . . . . . . . . . . . . . . . . . . . . . . . . . . . . . . 0672
JBL . . . . . . . . . . . . . . . . . . . . . . . . . . . . . . . . . . . 0702
JVC . . . . . . . . . . . . . . . . . . . . . . . . . 0623, 0558, 0867
KLH . . . . . . . . . . . . . . . . . . . . . . . . . . . . . . . . . . . 0717
Kenwood. . . . . . . . . . . . . . . . . . . . . . 0490, 0534, 0682
Konka . . . . . . . . . . . . . . . . . . . . . . . . 0711, 0719, 0721
Koss. . . . . . . . . . . . . . . . . . . . . . . . . . . . . . . . . . . 0651
Lasonic . . . . . . . . . . . . . . . . . . . . . . . . . . . . . . . . 0798
Magnavox. . . . . . . . . . . . . . . . . . . . . . . . . . 0503, 0675
Malata . . . . . . . . . . . . . . . . . . . . . . . . . . . . . . . . . 0782
Marantz . . . . . . . . . . . . . . . . . . . . . . . . . . . . . . . . 0539
Microsoft . . . . . . . . . . . . . . . . . . . . . . . . . . . . . . . 0522
Mintek . . . . . . . . . . . . . . . . . . . . . . . . . . . . . . . . . 0717
Mitsubishi. . . . . . . . . . . . . . . . . . . . . . . . . . . . . . . 0521
Nesa . . . . . . . . . . . . . . . . . . . . . . . . . . . . . . . . . . 0717
Onkyo. . . . . . . . . . . . . . . . . . . . . . . . . . . . . 0627, 0503
Oritron . . . . . . . . . . . . . . . . . . . . . . . . . . . . . . . . . 0651
Panasonic. . . . . . . . . . . . . . . . . . . . . 0490, 1362, 0632
Philips . . . . . . . . . . . . . . . . . . . 0503, 0539, 0646, 0854
Pioneer . . . . . . . . . . . . . . . . . . . . . . . 0525, 0571, 0632
Polk Audio . . . . . . . . . . . . . . . . . . . . . . . . . . . . . . 0539
Princeton . . . . . . . . . . . . . . . . . . . . . . . . . . . . . . . 0674
Proscan . . . . . . . . . . . . . . . . . . . . . . . . . . . . . . . . 0522
RCA . . . . . . . . . . . . . . . . . . . . 0522, 0571, 1022, 0717
Samsung . . . . . . . . . . . . . . . . . . . . . . . . . . 0573, 0820
Sansui . . . . . . . . . . . . . . . . . . . . . . . . . . . . . . . . . 0695
Sanyo . . . . . . . . . . . . . . . . . . . . . . . . . . . . . . . . . 0670
Sharp . . . . . . . . . . . . . . . . . . . . . . . . . . . . . . . . . . 0630
Sherwood. . . . . . . . . . . . . . . . . . . . . . . . . . . . . . . 0633
Sony . . . . . . . . . . . . . . . . . . . . . . . . . . . . . . . . . . 0533
Sylvania . . . . . . . . . . . . . . . . . . . . . . . . . . . . . . . . 0675
Technics. . . . . . . . . . . . . . . . . . . . . . . . . . . . . . . . 0490
Techwood. . . . . . . . . . . . . . . . . . . . . . . . . . . . . . . 0692
Theta Digital. . . . . . . . . . . . . . . . . . . . . . . . . . . . . 0571
Toshiba. . . . . . . . . . . . . . . . . . . . . . . . . . . . 0503, 0695
Urban Concepts . . . . . . . . . . . . . . . . . . . . . . . . . . 0503
Yamaha . . . . . . . . . . . . . . . . . . . . . . 0490, 0545, 0539
Zenith . . . . . . . . . . . . . . . . . . . . . . . . . . . . . 0591, 0503
CABLE BRAND. . . . . . . . . . . . . . . . . . . . . . . . . CODE
ABC . . . . . . . . . . . . . . . . . . . . 0003, 0008, 0014, 0017
Americast. . . . . . . . . . . . . . . . . . . . . . . . . . . . . . . 0899
Bell & Howel . . . . . . . . . . . . . . . . . . . . . . . . . . . . .0014
Bell South . . . . . . . . . . . . . . . . . . . . . . . . . . . . . . 0899
Director . . . . . . . . . . . . . . . . . . . . . . . . . . . . . . . . 0476
General Instrument . . . . . . . . . 0003, 0476, 0276, 0810
GoldStar. . . . . . . . . . . . . . . . . . . . . . . . . . . . . . . . 0144
Hamlin . . . . . . . . . . . . . . . . . . . . . . . . . . . . 0009, 0273
Jerrold. . . . . . . . . .0476, 0003, 0276, 0012, 0014, 0810
Memorex. . . . . . . . . . . . . . . . . . . . . . . . . . . . . . . .0000
Motorola . . . . . . . . . . . . . . . . . 0476, 1106, 0276, 0810
Pace . . . . . . . . . . . . . . . . . . . . . . . . . . . . . . . . . . 0237
Panasonic. . . . . . . . . . . . . . . . . . . . . . . . . . 0107, 0000
Philips . . . . . . . . . . . . . . . . . . . . . . . . . . . . 0305, 0317
Pioneer . . . . . . . . . . . . . . . . . . 0144, 0533, 0877, 1877
Pulsar . . . . . . . . . . . . . . . . . . . . . . . . . . . . . . . . . 0000
Quasar . . . . . . . . . . . . . . . . . . . . . . . . . . . . . . . . .0000
Regal. . . . . . . . . . . . . . . . . . . . . . . . . . . . . .0273, 0279
Runco . . . . . . . . . . . . . . . . . . . . . . . . . . . . . . . . . .0000
Samsung. . . . . . . . . . . . . . . . . . . . . . . . . . . . . . . .0144
Scientific Atlanta . . . . . . 0877, 0008, 0017, 0477, 1877
Sony . . . . . . . . . . . . . . . . . . . . . . . . . . . . . . . . . . 1006
Starcom . . . . . . . . . . . . . . . . . . . . . . . . . . . . . . . . 0003
Supercable. . . . . . . . . . . . . . . . . . . . . . . . . . . . . . 0276
Tocom . . . . . . . . . . . . . . . . . . . . . . . . . . . . . . . . . 0012
Torx . . . . . . . . . . . . . . . . . . . . . . . . . . . . . . . . . . . 0003
Toshiba . . . . . . . . . . . . . . . . . . . . . . . . . . . . . . . . 0000
Zenith . . . . . . . . . . . . . . . . . . . . . . . . 0000, 0525, 0899
SATELLITE BRAND (Set-Top-Box). . . . . . . . . . CODE
AlphaStar . . . . . . . . . . . . . . . . . . . . . . . . . . . . . . . 0772
Chapparral . . . . . . . . . . . . . . . . . . . . . . . . . . . . . . 0215
Crossdigital. . . . . . . . . . . . . . . . . . . . . . . . . . . . . . 1109
DishPro . . . . . . . . . . . . . . . . . . . . . . . . . . . 1005, 0775
Echostar . . . . . . . . . . . . . . . . . . . . . . . . . . . 1005, 0775
Expressvu . . . . . . . . . . . . . . . . . . . . . . . . . . . . . . 0775
GE . . . . . . . . . . . . . . . . . . . . . . . . . . . . . . . . . . . . 0566
GOI . . . . . . . . . . . . . . . . . . . . . . . . . . . . . . . . . . . 0775
General Instrument. . . . . . . . . . . . . . . . . . . . . . . . 0869
HTS . . . . . . . . . . . . . . . . . . . . . . . . . . . . . . . . . . . 0775
Hitachi . . . . . . . . . . . . . . . . . . . . . . . . . . . . . . . . . 0819
Hughes Network Systems . . . . . . . . . 1142, 0749, 1749
JVC . . . . . . . . . . . . . . . . . . . . . . . . . . . . . . . . . . . 0775
Magnavox. . . . . . . . . . . . . . . . . . . . . . . . . . 0724, 0722
Memorex . . . . . . . . . . . . . . . . . . . . . . . . . . . . . . . 0724
Mitsubishi. . . . . . . . . . . . . . . . . . . . . . . . . . . . . . . 0749
Motorola. . . . . . . . . . . . . . . . . . . . . . . . . . . . . . . . 0869
Next Level . . . . . . . . . . . . . . . . . . . . . . . . . . . . . . 0869
Panasonic. . . . . . . . . . . . . . . . . . . . . . . . . . 0247, 0701
Paysat . . . . . . . . . . . . . . . . . . . . . . . . . . . . . . . . . 0724
Philips . . . . . . . . . 1142, 0749, 0724, 1076, 0722, 1749
Proscan . . . . . . . . . . . . . . . . . . . . . . . . . . . . . . . . 0392
RCA . . . . . . . . . . . . . . . . . . . . 0392, 0566, 0855, 0143
Radioshack . . . . . . . . . . . . . . . . . . . . . . . . . . . . . 0869
SKY . . . . . . . . . . . . . . . . . . . . . . . . . . . . . . . . . . . 0856
Samsung . . . . . . . . . . . . . . . . . . . . . . . . . . . . . . . 1109
Sony . . . . . . . . . . . . . . . . . . . . . . . . . . . . . . . . . . 0639
Star Choice . . . . . . . . . . . . . . . . . . . . . . . . . . . . . 0869
Toshiba. . . . . . . . . . . . . . . . . . . . . . . 0749, 0790, 1749
Uniden . . . . . . . . . . . . . . . . . . . . . . . . . . . . 0724, 0722
Zenith . . . . . . . . . . . . . . . . . . . . . . . . . . . . . 0856, 1856
AMPLIFIER BRAND . . . . . . . . . . . . . . . . . . . . . CODE
Aiwa . . . . . . . . . . . . . . . . . . . . . . . . . . . . . . . . . . .0406
Bose . . . . . . . . . . . . . . . . . . . . . . . . . . . . . . . . . . 0674
Carver . . . . . . . . . . . . . . . . . . . . . . . . . . . . . . . . . 0269
Curtis Mathes . . . . . . . . . . . . . . . . . . . . . . . . . . . .0300
Denon . . . . . . . . . . . . . . . . . . . . . . . . . . . . . . . . . .0160
GE . . . . . . . . . . . . . . . . . . . . . . . . . . . . . . . . . . . .0078
Harman/Kardon . . . . . . . . . . . . . . . . . . . . . . . . . . .0892
JVC. . . . . . . . . . . . . . . . . . . . . . . . . . . . . . . . . . . .0331
Left Coast . . . . . . . . . . . . . . . . . . . . . . . . . . . . . . 0892
Linn. . . . . . . . . . . . . . . . . . . . . . . . . . . . . . . . . . . .0269
Luxman . . . . . . . . . . . . . . . . . . . . . . . . . . . . . . . . 0165
Magnavox . . . . . . . . . . . . . . . . . . . . . . . . . . . . . . 0269
Marantz. . . . . . . . . . . . . . . . . . . . . . . 0269, 0321, 0892
NEC. . . . . . . . . . . . . . . . . . . . . . . . . . . . . . . . . . . 0264
Nakamichi . . . . . . . . . . . . . . . . . . . . . . . . . . . . . . 0321
Optimus . . . . . . . . . . . . . . . . . . . . . . . . . . . 0395, 0300
Panasonic. . . . . . . . . . . . . . . . . . . . . . . . . . 0308, 0521
Parasound . . . . . . . . . . . . . . . . . . . . . . . . . . . . . . 0246
Philips . . . . . . . . . . . . . . . . . . . . . . . . . . . . 0269, 0892
Pioneer. . . . . . . . . . . . . . . . . . . . . . . . . . . . 0013, 0300
Polk Audio . . . . . . . . . . . . . . . . . . . . . . . . . 0269, 0892
RCA. . . . . . . . . . . . . . . . . . . . . . . . . . . . . . . . . . . 0300
Realistic . . . . . . . . . . . . . . . . . . . . . . . . . . . . . . . .0395
Sansui . . . . . . . . . . . . . . . . . . . . . . . . . . . . . . . . . 0321
Shure . . . . . . . . . . . . . . . . . . . . . . . . . . . . . . . . . . 0264
Sony. . . . . . . . . . . . . . . . . . . . . . . . . . . . . . 0689, 0220
Soundesign. . . . . . . . . . . . . . . . . . . . . . . . . 0078, 0211
Technics. . . . . . . . . . . . . . . . . . . . . . . . . . . 0308, 0521
Victor . . . . . . . . . . . . . . . . . . . . . . . . . . . . . . . . . . 0331
Wards . . . . . . . . . . . . . . . . . . . . . . . . 0013, 0078, 0211
Yamaha . . . . . . . . . . . . . . . . . . . . . . . . . . . 0354, 0133
RECEIVER BRAND (Amplifier). . . . . . . . . . . . . CODE
ADC. . . . . . . . . . . . . . . . . . . . . . . . . . . . . . . . . . . 0531
Adcom . . . . . . . . . . . . . . . . . . . . . . . . . . . . . . . . . 0616
Aiwa. . . . . . . . . . . . . . . . . . . . 1089, 1405, 0121, 0158,
. . . . . . . . . . . . . . . . . . . . . . . . 0189, 0405, 1321, 1388
Akai . . . . . . . . . . . . . . . . . . . . . . . . . . . . . . 0076, 0224
Alco . . . . . . . . . . . . . . . . . . . . . . . . . . . . . . . . . . . 1390
Anam . . . . . . . . . . . . . . . . . . . . . . . . . . . . . 1074, 1609
Apex Digital . . . . . . . . . . . . . . . . . . . . . . . . . . . . . 1257
Arcam. . . . . . . . . . . . . . . . . . . . . . . . . . . . . . . . . . 1120
Audiotronic . . . . . . . . . . . . . . . . . . . . . . . . . . . . . . 1189
Audiovox . . . . . . . . . . . . . . . . . . . . . . . . . . . . . . . 1390
Bose . . . . . . . . . . . . . . . . . . . . . . . . . . . . . . . . . . 1229
Capetronic. . . . . . . . . . . . . . . . . . . . . . . . . . . . . . .0531
Carver . . . . . . . . . 1089, 1189, 0008, 0042, 0189, 0360
Casio . . . . . . . . . . . . . . . . . . . . . . . . . . . . . . . . . . 0195
Celestion . . . . . . . . . . . . . . . . . . . . . . . . . . . . . . . 1264
Clarinette . . . . . . . . . . . . . . . . . . . . . . . . . . . . . . . 0195
Compaq . . . . . . . . . . . . . . . . . . . . . . . . . . . . . . . . 1136
Curtis Mathes. . . . . . . . . . . . . . . . . . . . . . . . . . . . 0080
Denon . . . . . . . . .1104, 0004, 0273, 0771, 1311, 1360
Emerson . . . . . . . . . . . . . . . . . . . . . . . . . . . . . . . 0424
Fisher . . . . . . . . . . . . . . . . . . . . . . . . 0042, 0219, 0360
GPX. . . . . . . . . . . . . . . . . . . . . . . . . . . . . . . . . . . 1299
Garrard. . . . . . . . . . . . . . . . . . . . . . . . . . . . 0424, 0463
Glory Horse . . . . . . . . . . . . . . . . . . . . . . . . . . . . . 1263
Harman/Kardon . . . . . . . . . . . . . . . . . 0891, 0110, 0189
Hewlett Packard . . . . . . . . . . . . . . . . . . . . . . . . . . 1181
Inkel. . . . . . . . . . . . . . . . . . . . . . . . . . . . . . . . . . . 0062
JBL. . . . . . . . . . . . . . . . . . . . . . . . . . . . . . . 0110, 1306
JVC . . . . . . . . . . . . . . . . . . . . . . . . . 0074, 1263, 1374
Kenwood. . . . . . . 1313, 1027, 1570, 1569, 0027, 0042,
. . . . . . . . . 0077, 0186, 0313, 0314, 0569, 1051, 1052
Koss. . . . . . . . . . . . . . . . . . . . . . . . . . . . . . 0424, 1366
LXI . . . . . . . . . . . . . . . . . . . . . . . . . . . . . . . . . . . . 0181
Lexicon . . . . . . . . . . . . . . . . . . . . . . . . . . . . . . . . 1076
Linn. . . . . . . . . . . . . . . . . . . . . . . . . . . . . . . . . . . .0189
Lloyd's . . . . . . . . . . . . . . . . . . . . . . . . . . . . . . . . . 0195
MCS. . . . . . . . . . . . . . . . . . . . . . . . . . . . . . 0039, 0346
Magnavox . . . . . . . . . . . . . . . . . . . . 1089, 1189, 0128,
. . . . . . . . . . . . . . . . . . . . . . . . 0189, 0195, 0391, 0531
Marantz . . . . . . . . . . . . . 1089, 1189, 0039, 0128, 0189
Modulaire . . . . . . . . . . . . . . . . . . . . . . . . . . . . . . . 0195
Musicmagic . . . . . . . . . . . . . . . . . . . . . . . . . . . . . 1089
NAD. . . . . . . . . . . . . . . . . . . . . . . . . . . . . . . . . . . 0320
NEC. . . . . . . . . . . . . . . . . . . . . . . . . . . . . . . . . . . 0235
Nakamichi. . . . . . . . . . . . . . . . . . . . . . . . . . 0097, 0347
Onkyo . . . . . . . . . . . . . . 0100, 0135, 0380, 0842, 1298
Optimus . . . . . . . 1023, 0042, 0080, 0177, 0181, 0186,
. . . . . . . . . . . . . . 0219, 0531, 0670, 0738, 0801, 1074
Panasonic . . . . . . . . . . . . . . . . . . . . 1518, 0039, 0309,
. . . . . . . . . . . . . . . . . . . . . . . . 0367, 0518, 1288, 1350
Penney. . . . . . . . . . . . . . . . . . . . . . . . . . . . . . . . . 0195
Philips . . . . . . . . . . . . . . . . . . 1089, 1189, 1269, 0189,
. . . . . . . . . . . . . . . . . . . . . . . . 0391, 1120, 1268, 1283
Pioneer. . . . . . . . . . . . . . . . . . 1023, 0014, 0080, 0150,
. . . . . . . . . . . . . . . . . . . 0244, 0531, 0630, 1343, 1384
Polk Audio . . . . . . . . . . . . . . . . . . . . . . . . . . . . . . 0189
Proscan . . . . . . . . . . . . . . . . . . . . . . . . . . . . . . . . 1254
Quasar. . . . . . . . . . . . . . . . . . . . . . . . . . . . . . . . . 0039
RCA . . . . . . . . . . 1023, 1254, 0054, 0080, 0346, 0360,
. . . . . . . . . . . . . . 0530, 0531, 1074, 1154, 1390, 1609
Radio Shack. . . . . . . . . . . . . . . . . . . . . . . . . . . . . 1263
Realistic . . . . . . . . . . . . . . . . . . . . . . 0163, 0181, 0195
Samsung . . . . . . . . . . . . . . . . . . . . . . . . . . . . . . . 1295
Sansui. . . . . . . . . . . . . . . . . . . 0189, 1089, 0193, 0346
Sanyo . . . . . . . . . . . . . . . . . . . . . . . . 0219, 0801, 1251
Scott. . . . . . . . . . . . . . . . . . . . . . . . . . . . . . 0163, 0322
Sharp . . . . . . . . . . . . . . . . . . . . . . . . . . . . . . . . . . 0186
Sherwood . . . . . . . . . . . . . . . . 0062, 0491, 0502, 1653
Sony. . . . . . . . . . . . . . . . . . . . 1058, 1258, 1158, 0158,
. . . . . . . . . . . . . . . . . . . 0168, 0474, 1042, 1458, 1758
Soundesign . . . . . . . . . . . . . . . . . . . . . . . . . . . . . 0670
Stereophonics . . . . . . . . . . . . . . . . . . . . . . . . . . . 1023
Sunfire . . . . . . . . . . . . . . . . . . 1313, 0313, 0314, 1052
Teac . . . . . . . . . . . . . . . . . . . . . . . . . 0463, 0163, 1074
Technics. . . . . . . . . . . . . . . . . . . . . . 1308, 1309, 1518,
. . . . . . . . . . . . . . . . . . . . . . . . 0039, 0208, 0309, 0518
Thorens . . . . . . . . . . . . . . . . . . . . . . . . . . . . . . . . 1189
Victor . . . . . . . . . . . . . . . . . . . . . . . . . . . . . . . . . . 0074
Wards. . . . . . . . . . . . . . .0014, 0054, 0080, 0158, 0189
Yamaha. . . . . . . . . . . . . . . . . . . . . . . 0176, 0186, 1176
Yorx. . . . . . . . . . . . . . . . . . . . . . . . . . . . . . . . . . . 0195
Zenith. . . . . . . . . . . . . . . . . . . . . . . . . . . . . . . . . . 0857
AUDIO BRAND . . . . . . . . . . . . . . . . . . . . . . . . . CODE
Aiwa . . . . . . . . . . . . . . . . . . . . . . . . . . . . . . 0010, 0159
AudioSource. . . . . . . . . . . . . . . . . . . . . . . . . . . . . 0351
Cambridge Soundworks . . . . . . . . . . . . . . . . . . . . 0351
Carver . . . . . . . . . . . . . . . . . . . . . . . . . . . . . . . . . 0351
Fisher. . . . . . . . . . . . . . . . . . . . . . . . . . . . . . . . . . 0052
Fosgate . . . . . . . . . . . . . . . . . . . . . . . . . . . . . . . . 0259
Harmon/Kardon . . . . . . . . . . . . . . . . . . . . . . . . . . 0477
JBL . . . . . . . . . . . . . . . . . . . . . . . . . . . . . . . . . . . 0477
JVC . . . . . . . . . . . . . . . . . . . . . . . . . . . . . . . . . . . 0073
KLH . . . . . . . . . . . . . . . . . . . . . . . . . . . . . . . . . . . 0351
Magnavox . . . . . . . . . . . . . . . . . . . . . . . . . . . . . . 0325
Nikko . . . . . . . . . . . . . . . . . . . . . . . . . . . . . . . . . . 0376
Paramount Pictures . . . . . . . . . . . . . . . . . . 0317, 0351
RCA. . . . . . . . . . . . . . . . . . . . . . . . . . . . . . . . . . . 0056
SSI. . . . . . . . . . . . . . . . . . . . . . . . . . . . . . . . . . . . 0317
Sansui . . . . . . . . . . . . . . . . . . . . . . . . . . . . . . . . . 0325
Schneider. . . . . . . . . . . . . . . . . . . . . . . . . . . . . . . 0376
Sony. . . . . . . . . . . . . . . . . . . . . . . . . . . . . . 0010, 0576
Soundesign . . . . . . . . . . . . . . . . . . . . . . . . . . . . . 0376
Yorx . . . . . . . . . . . . . . . . . . . . . . . . . . . . . . . . . . . 0376
SET TOP BOX BRAND . . . . . . . . . . . . . . . . . . . CODE
Panasonic . . . . . . . . . . . . . . . . . . . . . . . . . . . . . . 1120
Pioneer . . . . . . . . . . . . . . . . . . . . . . . . . . . . . . . . 1010
Princeton . . . . . . . . . . . . . . . . . . . . . . . . . . 0113, 0295
Samsung . . . . . . . . . . . . . . . . . . . . . . . . . . . . . . . 1190
Sensory Science. . . . . . . . . . . . . . . . . . . . . . . . . . 1126
Sharp . . . . . . . . . . . . . . . . . . . . . . . . . . . . . . . . . . 1010
Sony . . . . . . . . . . . . . . . . . . . . . . . . . . . . . . . . . . 0639
PERSONAL VIDEO RECORDER BRAND . . . . . CODE
Panasonic . . . . . . . . . . . . . . . . . . . . . . . . . . . . . . 0616
Philips . . . . . . . . . . . . . . . . . . . . . . . . . . . . . . . . . 0618
ReplayTV . . . . . . . . . . . . . . . . . . . . . . . . . . 0614, 0616
SonicBlue . . . . . . . . . . . . . . . . . . . . . . . . . . 0614, 0616
Sony . . . . . . . . . . . . . . . . . . . . . . . . . . . . . . . . . . 0636
Tivo . . . . . . . . . . . . . . . . . . . . . . . . . . . . . . 0618, 0636
Page 23
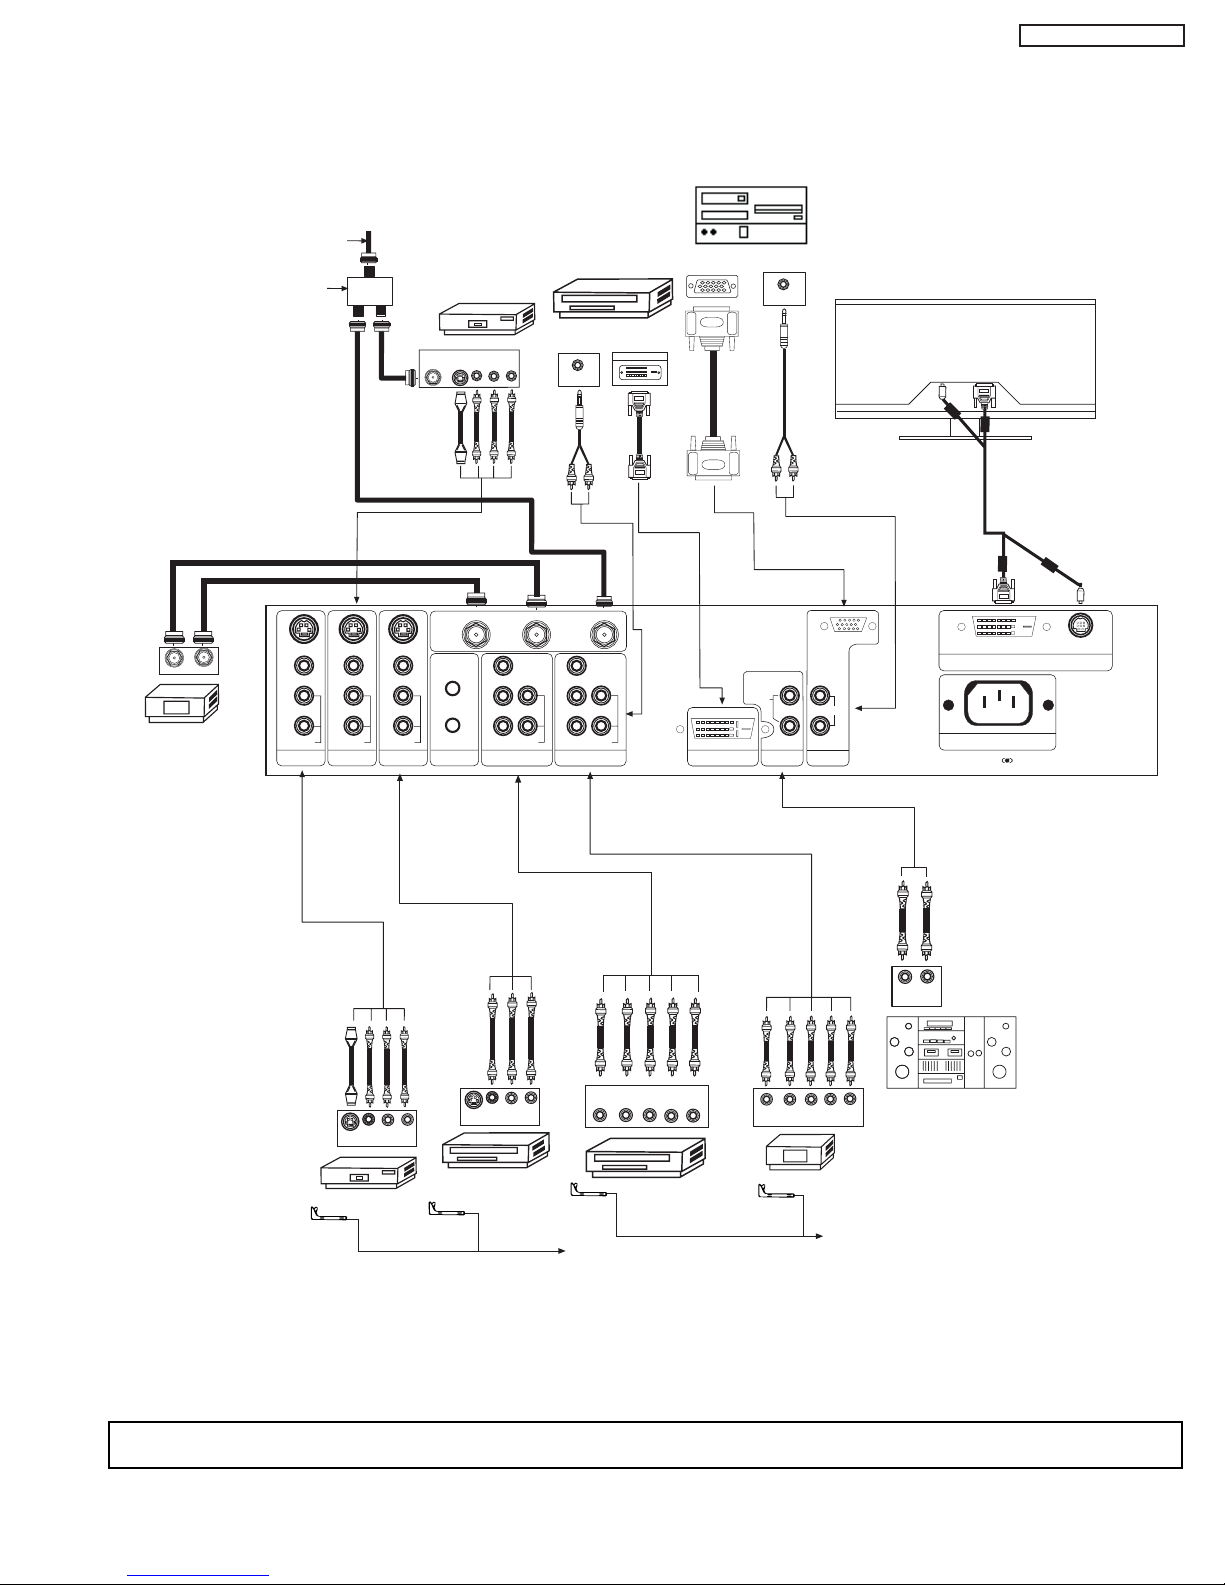
23
PT3-E/G AVC3-U
REAR PANEL CONNECTIONS
Rear Panel of Display Monitor
VCR #1
Outside antenna or
cable TV coaxial cable
2-Way signal splitter
ANT
IN
OUTPUT
S-VIDEO
VLR
Stereo System Amplifier
LR
INPUT
Laserdisc player, VCR,
camcorder, etc.
OUTPUT
Y P
B
P
R
L R
HDTV Set-Top Box
DVD Player
Cable TV Box
OUTPUT
INPUT
(PROVIDED)
(PROVIDED)
(PROVIDED)
DIGITAL
OUTPUT CAPABILITY
DIGITAL OUTPUT
P
B
P
R
P
B
P
R
Y/VIDEO
R
L/(MONO)
AUDIO
L
R
S-VIDEO
VIDEO
AUDIO
R
S-VIDEO
VIDEO
AUDIO
R
S-VIDEO
VIDEO
MONITOR OUT INPUT 4 INPUT 3 IR BLASTER
L/(MONO)L/(MONO)
AUDIO
Y
R
L/(MONO)
AUDIO
INPUT 2 INPUT 1
ANT B
TO CONVERTER
ANT A
DVI-HDTV
INPUT 1
L
AUDIO
R
AUDIO OUT
ANALOG INPUT
L/(MONO)
R
AUDIO
RGB
TruBass SRS and symbol are trademarks of SRS Labs, Inc.
AC IN
TO MONITOR
Please use HITACHI specified cable.
OUTPUT
YP
B/CBPR/CR
L R
VCR #2
V L R
OUTPUT
S-VIDEO
V L R
INPUT
S-VIDEO
CONNECT TO
IR BLASTER
CONNECT TO
IR BLASTER
AUDIO OUT
RGB
OUTPUT
AUDIO OUT
12345
678910
1112131415
NOTE: Cables are optional, except when specified.
Page 24

24
PT3-E/G AVC3-U
TIPS ON REAR PANEL CONNECTIONS
• S-VIDEO connections are provided for high performance laserdisc players, VCRs etc. that have this feature. Use these
connections in place of the standard video connection if your device has this feature.
• If your device has only one audio output (mono sound), connect it to the left audio jack on the AVC Center.
• Refer to the operating guide of your other electronic equipment for additional information on connecting your hook-up cables.
•Asingle VCR can be used for VCR #1 and VCR #2, but note that a VCR cannot record its own video or line output (INPUT: 4 in
the example on page 23). Refer to your VCR operating guide for more information on line input-output connections.
• Connect only 1 component (VCR, DVD player, camcorder, etc.) to each input jack.
• COMPONENT: Y-PBPR (Input 1 & 2) connections are provided for high performance components, such as DVD players and settop-boxes. Use these connections in place of the standard video connection if your device has this feature.
•Your component outputs may be labeled Y, B-Y, and R-Y. In this case, connect the components B-Y output to the TV’s PBinput
and the components R-Y output to the TV’s PRinput.
•Your component outputs may be labeled Y-CBCR. In this case, connect the components CBoutput to the TV’s PBinput and the
components CRoutput to the TV’s PRinput.
• It may be necessary to adjust TINT to obtain optimum picture quality when using the Y-PBPRinputs.
•To ensure no copyright infringement, the MONITOR OUT output will be abnormal, when using the
Y-PBP
R
jacks.
• Input 1 can accept component
Y-PBPRsignal only.
• Input 2 can accept both component Y-PBPRand composite video signal.
•You may use VIDEO or S-VIDEO inputs to connect to INPUT 3, 4 or 5, but only one of these, VIDEO or S-VIDEO, may be used
at a time for each input. S-VIDEO has priority over VIDEO.
•S-VIDEO output may be used for recording only when the input is of S-VIDEO type.
• When using a DVI input from a Set-Top-Box, it is recommended to use a 1080i or 720p input signal.
Page 25
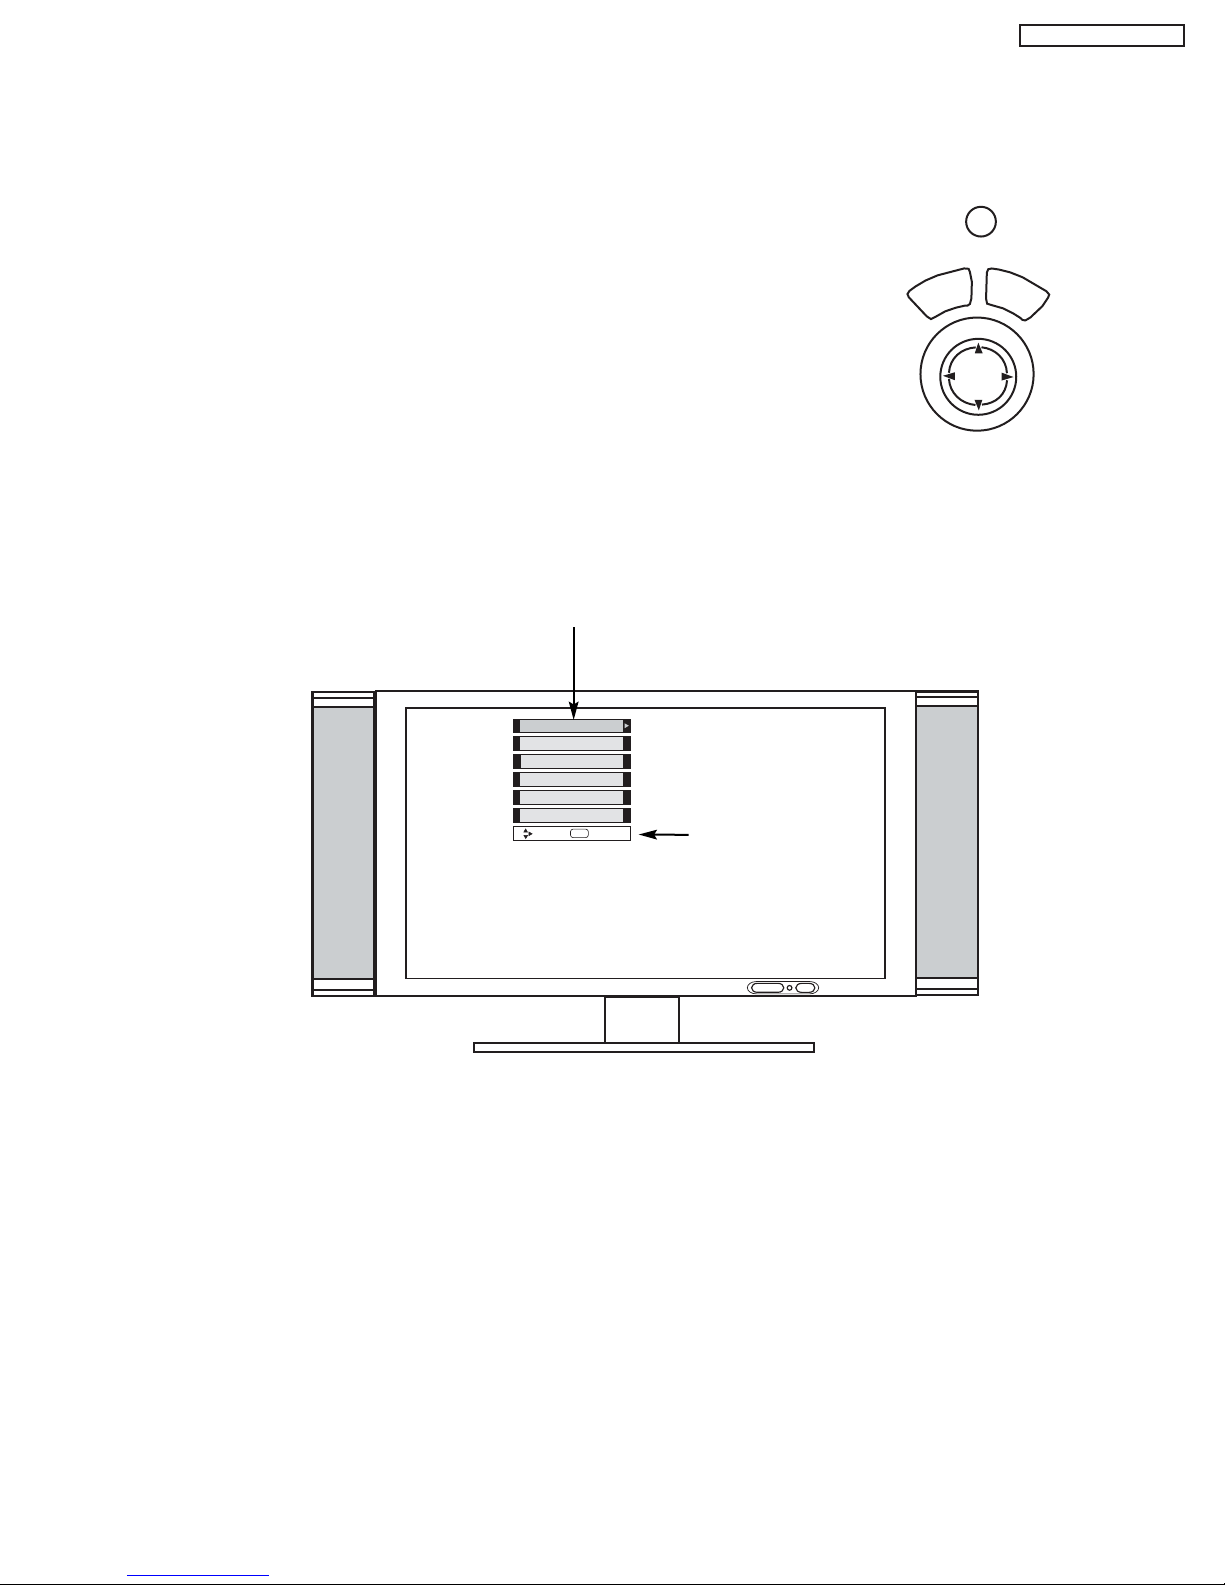
25
PT3-E/G AVC3-U
TV MODE ON-SCREEN DISPLAY
1. Press MENU on the remote control to display the different features on your HITACHI Plasma TV.
2. Use the THUMB STICK to navigate to a different menu item.
3. Press EXIT on the remote control to quickly exit from a menu.
4. Press AV NET on the remote control to access the AV Network menu to control
external components.
A/V Net
EXIT
MENU
SELECT
Locks
Chan. Manager
Aspect
Audio
Video
Move
SEL
Sel
Setup
This part of the screen shows
which selections are available.
This part of the screen
shows which Remote
Control buttons to use.
Page 26
26
PT3-E/G AVC3-U
TV MODE ON-SCREEN DISPLAY
Picture Mode Select between the two picture modes; Day
and Night.
Contrast Adjust contrast.
Brightness Adjust brightness.
Color Adjust color.
Tint Adjust tint.
Sharpness Adjust sharpness.
Color Temperature Set this to High for less intense color with more blue, set to Medium
for natural color, set to Standard for standard colors or Black and
White for more reddish color.
Black Enhancement Adjust shadow detail in dark screens.
Contrast Mode Choose Automatic Contrast settings.
Reset Video Settings Choose the Reset Video settings.
Color Management Adjust and balance individual colors to make either deeper or more
pure according to preference.
Color Decoding Adjust the percentage of Red, Green and Color according to
preference.
Auto Color
The AUTO COLOR function automatically monitors and adjusts the
color to maintain constant color levels even after a program or channel
changes. It also maintains natural flesh tones while preserving fidelity
of background colors.
Noise Reduction Reduces conspicuous noise in the picture.
Auto Movie Mode Turn ON/OFF the 3:2 Pulldown detection feature.
Treble Adjust the treble.
Bass Adjust the bass.
Balance Adjust the balance.
SRS TruBass Select TruBass and Matrix surround settings.
Matrix Surround Improve sound performance.
Audio Source Select between three Audio Sources.
Internal Speakers Select internal or external speakers.
Auto Noise Cancel Eliminates the noise between stations.
Perfect Volume Adjust volume in fixed setting.
Mode Choose the picture format aspect ratio.
Ant A View/edit Channel ID, Scan, and Lock settings in antenna A.
Ant B View/edit Channel ID, Scan, and Lock settings in antenna B.
Change Access Code Change Lock access code.
Engage Lock Choose to lock channel, video input, and front panel.
TV Time Lock Set specific time to Lock TV.
Movie Ratings Block various types of movies and video types based on motion
picture ratings.
TV Ratings Block various types of movies and television programming based on a
parental guide ratings.
Canadian Ratings (ENG) Block various types of movies and television programming based on
the Canadian ratings system.
Canadian Ratings (FRN) Block various types of movies and television programming based on
the Canadian French ratings system.
Menu Preference Choose English, French, or Spanish text.
Screen Saver Set Screen Saver to prevent screen burn.
Set The Clock Set the TV clock. It must be set before using the Lock feature.
Set The Inputs Label Video Inputs , VCR, DVD, etc.
Set The Color System Set tint and color coordinates for DTV programs.
Set Black Side Panel Set the gray side bars on/off when watching 4:3 signals in
standard mode.
Set Event Timer Turn TV on and off once, daily, or weekly.
Set Closed Captions Feature to display dialogue/text.
Video
Audio
Aspect
Chan.
Manager
Locks
Setup
Page 27
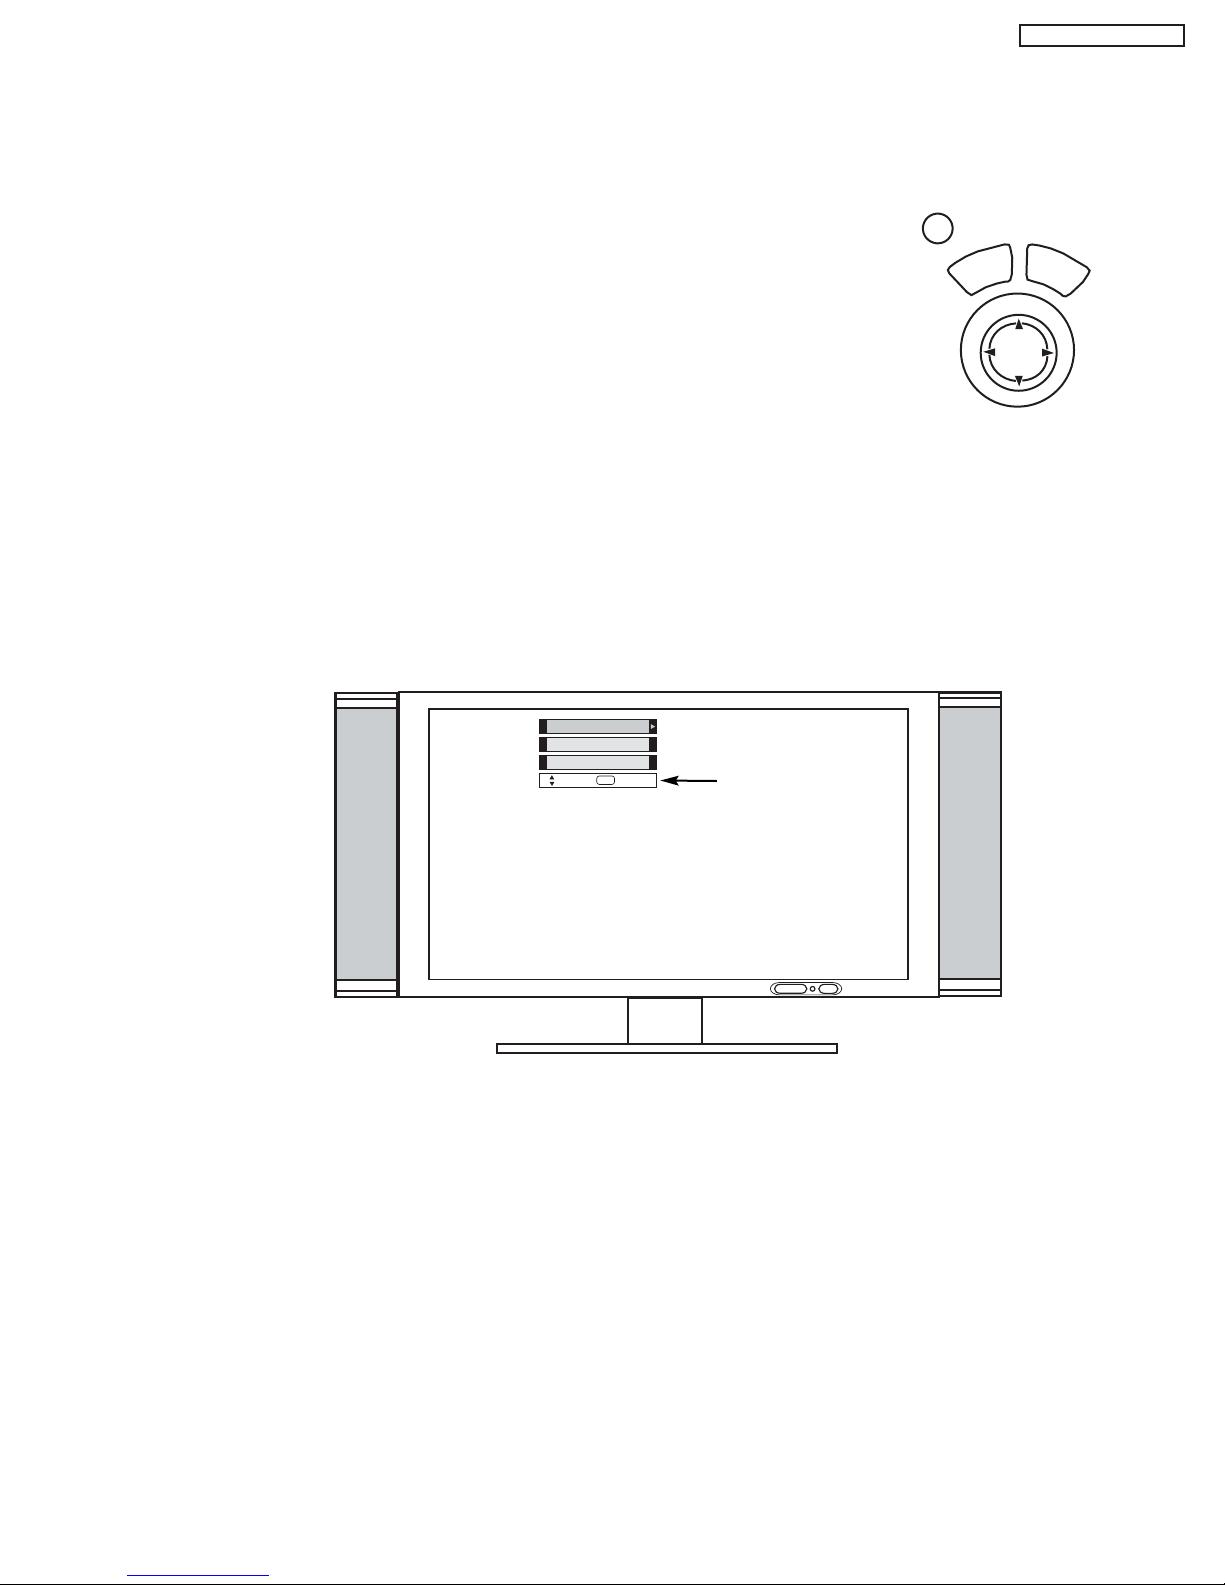
27
PT3-E/G AVC3-U
RGB MODE ON-SCREEN DISPLAY
1. Press TV/RGB button on the remote control to switch between TV and RGB modes.
2. Press MENU on the remote control to display the different features in RGB MODE.
3. Press the THUMB STICK , , , buttons to highlight a different feature.
4. Press EXIT on the remote control to quickly exit from a menu.
TV/RGB
EXIT
MENU
SELECT
Setup
Aspect
Video
Move
SEL
Sel
This part of the screen
shows which Remote
Control buttons to
use.
Page 28
28
PT3-E/G AVC3-U
RGB MODE ON-SCREEN DISPLAY
Contrast Change the contrast between black and white levels in the
picture.
Brightness Adjust overall picture brightness.
Color Temperature Select between HIGH (9,300K), MEDIUM (7,500K),
STANDARD (6,500K), or Black/White (5,400K).
Enhancer Enhance picture details (Off, Low, Middle or High).
Reset Recall the factory preset data of the RGB Video Settings.
Real Aspect as it is presented in its true resolution.
Normal Aspect in 4:3 standard.
Full Aspect in 16:9 standard.
Auto Adjust Automatically adjust the geometry to fit the screen.
Horizontal Position Adjust horizontal position.
Vertical Position Adjust vertical position.
Horizontal Clock Adjusts the dot clock frequency to reduce the vertical stripe.
Clock Phase Adjusts the phase to correct blurred or unstable images.
Reset Recall the factory preset data of the RGB setup settings.
Input Level Set the preferred input signal level.
Black Side Panel Turns the gray side bars ON/OFF when watching 4:3 signals in
standard mode. Turning ON the gray side bars will prolong the
life of the PRT.
Video
Aspect
Setup
Page 29

29
PT3-E/G AVC3-U
ADJUSTMENTS TABLE OF CONTENTS
1 Adjustment procedure start up....................................................................................................30
1.1 How to get into adjustment mode................................................................................30
1.2 Changing data and selecting adjustment code............................................................30
2 Memory initialize ........................................................................................................................30
2.1 Memory initialize operation..........................................................................................30
2.2 Factory and service adjustments ................................................................................31
3 Amplitude Adjustment ................................................................................................................31
3.1 RGB Amplitude Adjustment ........................................................................................31
3.2 Sub-Contrast Adjustment ............................................................................................31
3.3 Brightness Check ........................................................................................................31
4 Vs, Va Voltage Adjustment..........................................................................................................32
5 White balance adjustment ..........................................................................................................33
5.1 Video Color Temperature Adjustment (High) ..............................................................33
5.2 Video Color Temperature Adjustment (Medium) ..........................................................33
5.3 Video Color Temperature Adjustment (Standard)........................................................34
5.4 Video Color Temperature Adjustment (Black and White) ............................................34
5.5 PC Color Temperature Adjustment (High) ..................................................................34
5.6 Color Temperature Setting Correction ........................................................................34
5.7 White Balance Adjustment OSD Flowchart Diagram ..................................................35
6 Screen Check ............................................................................................................................36
7 Factory Reset ............................................................................................................................36
TO GO TO A SECTION, CLICK ON ITS HEADING BELOW
TABLE OF CONTENTS
Page 30
30
PT3-E/G AVC3-U
1 ADJUSTMENT PROCEDURE START-UP
The 32HDT50M/55M and 42HDT50M/55M PDP TV sets
undergo thorough adjustment procedures during their
assembly process. These adjustments must be done to
assure the best performance of the PDP set for the
consumer.
Also, after servicing, these same adjustments must be
done. The adjustments are all made through the I
2
C bus
by changing data in the Adjustment mode menu.
Table 2 on pages 38-46 shows the complete parameter
list with a brief description, signal format, the adjustment
range and the initial data.
1.1 HOW TO GET TO ADJUSTMENT MODE
Chassis adjustment can be done by using the AVC50
front control panel buttons with PDP set turned off.
Press “POWER” and “INPUT” keys at the same time,
and hold for more than 3 seconds. Release the
“POWER” button first and then immediately the
“INPUT” button. The PDP set turns on in adjustment
mode with OSD as follows.
To escape from Adjustment Mode press “INPUT” key to exit
service adjustment mode.
Table 2 can be found on pages 38-46.
1.2 CHANGING DATAAND SELECTING ADJUSTMENT
CODE
When the PDP set is in adjustment mode, the cursor , ,
, and MENU keys of the remote control or front panel
may be used as the adjustment keys.
A. Use any Hitachi remote control when making an
adjustment.
, keys are used for selecting adjustment code.
, keys are used for changing data values.
MENU key is used to advance through the adjustment
mode menus and pages.
BACK TO ADJUSTMENTS
B. To make a selection, use the CURSOR keys on the AVC
front control panel or the Remote Control.
C. After finishing the necessary adjustment press the R/C
EXIT key or EXIT key on the front panel.
Adjustment mode is released and PDP set returns to
normal condition.
2 MEMORY INITIALIZE
2.1 MEMORY INITIALIZE OPERATION
NOTE: The execution of this function returns the
adjustment codes to the preset values, therefore,
adjustment data will be lost.
There are two procedures for memory initialize, this is
the first.
Procedure 1
(1) Enter Adjustment mode by the method described in
sub-items 1.1 and 1.2 from item 1 (“Adjustment
procedure start up”).
(2) Get to the second page of Adjust Mode by pressing
remote control “Menu” key once, or with either the
R/C or front panel
, cursor keys several times.
(3) Select MEMORY INIT adjust code.
(4) Activate MEMORY INIT by pressing
cursor key for
more than 3 seconds.
(5) Check that the receiving channel goes to CH03. Unit
is set to preset values.
Increase
Data Value
Front Panel of AVC
POWER
STANDBY (RED) ON (GREEN)
Remote Control Buttons
MENU
EXIT
SELECT
Volume/LeftRight Cursor
Change
Selection (Up)
Increase
Data Value
Change
Selection (Down)
Infrared
Sensor
INPUT/
CH+CH-VOL+VOL- INPUT/EXIT
EXIT
FIRMWARE
ADJUST MODE XXXX
RGB(480P)
FACT RESET
V POSITION - -
VERSION
MENU
EXIT
SELECT
Channel/Up-
Power
Button
Indicator
LED
PHONES
Down Cursor
INPUT 5
VIDEO
S-VIDEO
L/(MONO) R
AUDIO
MENU/SELECT
Page 31

31
PT3-E/G AVC3-U
2.2 FACTORY AND SERVICE ADJUSTMENTS
The adjustment item that is affected by the memory
initialize operation is shown below:
3 AMPLITUDE ADJUSTMENT
(AVC CENTER)
3.1 RGB AMPLITUDE ADJUSTMENT
Preparation
(1) Select “Video” - “Picture Mode” - “Day” - “Reset”. Set
“Reset” of “Video” menu when PC input is selected.
(2) Input 525p(480p) of RGB amplitude adj. signal into
INPUT1(Component) input.
(3) Input VGA(60Hz) RGB amplitude adj. signal into
RGB input.
Note: Perform pre heat-run for more than 30 min. before
adjusting.
Adjustment
(1) Receive 525p(480p) signal (Aspect 16:9 Standard).
(2) Select ‘RGB(480p)’ of Service Adj. menu. Press
right cursor key () over 2 seconds and have it
perform automatic adjustment. When it’s completed,
‘Auto Adjusting’ on the screen will disappear.
(3) Receive PC signal (VGA(60Hz)), (Aspect Full).
(4) Similarly as (2), select ‘RGB(PC)’ of Service Adj.
Menu, by pressing SEL button. Press for 2 sec. to
do automatic adjustment.
3.2 SUB-CONTRAST ADJUSTMENT
Preparation
(1) Receive Sub-contrast adjustment signal (Fig. 1).
Adjustment
(1) Select ‘SUB CONTRAST’ of Service Adj. Menu.
Press for over 2 seconds and have it perform
automatic adjustment. When it’s completed, ‘Auto
Adjusting’ on the screen will be disappeared.
V1V
2
Fig. 1
Full White
(RF Input ANT A))
V
1
=1.0 Vp-p (when
V
2
=100IRE)
Procedure 2
(1) Short PRST connector on the AVC AV PWB and
check that the set return to delivery settings (CH 03).
(2) Do not unplug from AC outlet until this operation is
completed and do not perform any key operation
either. After this operation, each factory setting and
adjust mode data should reset to delivery setting
automatically.
3.3 BRIGHTNESS CHECK
Preparation
(1) Start checking 20 minutes or more after the power is
turned ON.
(2) Receive the color bar signal.
(3) The vertical incident illumination on the screen
should be 20 lux or less.
(4) Picture Format is 16:9 standard mode.
(5) Select Day mode and reset.
Checking Procedure
(1) Check the brightness as below.
Note: If set black level is NG, readjust item 3.1 RGB
amp. adj. and 3.2 Sub Contrast adj.
Measuring Conditions
(1) At the signal electric field strength 75± dBu, the
specification mentioned above should be satisfied.
(2) At the input electric field 46-106dBu, there should be
no abnormality.
* From color bar pattern below.
A
A
A
10
0
Adj. Items Memory Init.
W/B
Init.(No
need to
use)
change
of FCunit
change of
PDP-module
or change of
I002(EEPROM
) on
SIG/AUDIO
PWB
change of
I003(EEPR
OM) on
AV PWB
or Memory
Init.
Video white
blance Adj.
affect Adj.
PC white
blance Adj.
affect Adj.
Video RGB
Amplitude
Adj.
Adj.
PC RGB
Amplitude
Adj.
Adj.
Sub-contrast
Adj.
affect
(M-CONT4;
S-CONT4)
Adj.
Initialization
Adjustment
BACK TO ADJUSTMENTS
AVC50
Can be seen at black A 3*
Can be seen slightly from black A 5*
7 step gray scale
7A6A5A4A3A2A1
White 100%
Color Bar Signal
-Remarks
RGB amplitude adj. signal
Black
White
0.7V
Recommended Equipment:
ASTRO VG-823 Digital Video Generator
with RB-649 Remote Box.
4 has tolerance.
4 can be between black and
Slightly from black.
Page 32

32
PT3-E/G AVC3-U
2003ï 3ï 5
TITLE
4. Vs, Va voltage adjustment
Adjustment part::VR51
-Preparation
1.Turn on the set and perform pre-heat run more than 1min.with snow noize screen.
2.Receive full black pattern (blanking level) signal (or Video No signal; in this case,
it will be autmatically turned off after a few seconds because of power save function).
3.Connect voltmeter leads to the Vs or Va and GND test points on power unit.
(Measurement error of voltmeter should be Less than 0.02V)
-Adjustment
(1)Turn VsADJ(VR51) to adjust Vs voltage to be within ± 0.1V of the value specified
in the label on the panel. *
1
(2)Turn VaADJ(VR51) to adjust Vs voltage to be within ± 0.2V of the value specified
in the label on the panel. *
1
(3)Reconfirm that Vs voltage remains within± 0.1V of the value.Readjust if Itís outside the margin.
Label example*
2
Label position (Reference)
-Remarks
*1. Permissive level of voltage in case sufficient time of heat-run performed.
Vs: within ± 0.45V, Va: within ± 0.55V
Power unit for 32 inch
PIN502• GND
<LOT>N6
Vs=80.0V Va=60.0V
V• =140.0V Vx=60.0V
32 inch screen: Upper left.
42 inch screen: Bottom left corner.
PIN501• VS
VR51• VsADJ(on IC591 PWB)
PIN301 vA
VR51• VaADJ(on IC391 PWB)
Power unit for 42 inch
PIN502• GND
PIN501• VS
VR51• VsADJ(on IC591 PWB)
PIN301 vA
VR51• VaADJ(on IC391 PWB)
BACK TO ADJUSTMENTS
Page 33

33
PT3-E/G AVC3-U
5 WHITE BALANCE ADJUSTMENTS
(PDP MONITOR)
General Notes for White Balance
(1) If the incident illumination is more than 20 lux,
change the environment (location, lighting, etc.) and
ensure it to be less than 20 lux.
(2) At least one of the color drive codes must stay at its
maximum value, FF
H
.
(3) WBC code must be 00 during W/B adjustment.
5.1 VIDEO COLOR TEMPERATURE ADJUSTMENT
(HIGH)
Preparation 1
(1) Set the output of signal generator to white raster.
(Ratio:100%)
(2) Component signal
Video level: 0.714Vp-p
SYNC: 0.286Vp-p
Set-up level: 0V
(3) Input white raster signal into COMPONENT input
terminal of AVC.
(4) Set user control to Day mode. (Picture Mode)
(5) Confirm that the mode is set as “Factory Setting
Mode”.
(6) Aspect: Video: Expanded
PC: FULL
Preparation 2
(1) Set service adjustment menu to “DEVICE ADJUST
MODE”.
(2) Set WBC to “0”.)
Adjustment
(1) Perform the following adjustment with the remote
control.
(2) Set the CRT color analyzer (CA-100) at the center of
the panel.
(3) Set color temperature to “HIGH”.
(4) Ensure that Adjustment R/G/B DRIVE (HIGH) are all
set as FF.
(5) After receiving White raster signal, step down the two
(or one) among Adjustment R/G/B DRIVE (HIGH)
and adjust the value shown in the following:
At least one of the data should be FF.
Remarks
(1) Color temperature should be adjusted under the
condition in which the screen is the brightest, thus
the initial value for adjustment is set to its maximum.
(2) Adjustment is made by reducing brightness only.
Reduce a bright color for adjustment.
(3) Video color temperature & Adjustment No. are the
same, but addresses in the memory are different,
thus there’s no problem.
5.2 VIDEO COLOR TEMPERATURE ADJUSTMENT
(MEDIUM)
Preparation
(1) Same as “Video Color Temperature adjustment:
(HIGH)”.
Adjustment
(1) Perform the following adjustment with the remote
control.
(2) Set the CRT color analyzer (CA-100) at the center of
the panel.
(3) Set color temperature to “MEDIUM”, using SEL key.
(4) Ensure that Adjustment R/G/B DRIVE (MEDIUM) are
all set as FF.
(5) After receiving White raster signal, step down the two
(or one) among Adjustment R/B/G DRIVE (MEDIUM)
and adjust the value shown below.
At least one of the data should be FF.
Remarks
(1) Same as “Video Color Temperature adjustment
(HIGH)”
BACK TO ADJUSTMENTS
Specification
Video Color temperature (HIGH)
Specification
Video Color temperature (MED)
x = 0.301 ± 0.005
y = 0.314 ± 0.005
(Color temp: 7500K)
x = 0.285 ± 0.005
y = 0.298 ± 0.005
(Color temp: 9200K)
Page 34

34
PT3-E/G AVC3-U
5.3 VIDEO COLOR TEMPERATURE ADJUSTMENT
(STD)
Preparation
(1) Same as “Video Color Temperature adjustment:
(HIGH)”.
Adjustment
(1) Perform the following adjustment with the remote
control.
(2) Set the CRT color analyzer (CA-100) at the center of
the panel.
(3) Set color temperature to “STD”.
(4) Ensure that Adjustment R/G/B DRIVE (STD) are all
set as FF.
(5) After receiving White raster signal, step down the two
(or one) among Adjustment R/B/G DRIVE (STD) and
adjust the value shown below.
At least one of the data should be FF.
Remarks
(1) Same as “Video Color Temperature adjustment
(HIGH)”
5.4 VIDEO COLOR TEMPERATURE ADJUSTMENT
(B/W)
Preparation
(1) Same as “Video Color Temperature adjustment:
(HIGH)”.
Adjustment
(1) Perform the following adjustment with the remote
control.
(2) Set the CRT color analyzer (CA-100) at the center of
the panel.
(3) Ensure that Adjustment R/G/B DRIVE (B/W) are all
set as FF.
(4) After receiving White Raster signal, step down the
two (or one) among Adjustment R/B/G DRIVE (B/W)
and adjust the value shown below.
At least one of the data should be FF.
Remarks
(1) Same as “Video Color Temperature adjustment
(HIGH)”
5.5 PC COLOR TEMPERATURE ADJUSTMENT
(HIGH)
Preparation
(1) This adjustment should be done after video color
temperature adjustment.
(2) Confirm that it’s set as factory adjustment mode.
(3) Input WINDOW signal (window ratio 6.25%) into
RGB terminals at VGA (60) 0.7V (No set-up).
(4) Set AVC to shipment.
(5) Confirm that the screen size is ‘FULL’.
Adjustment
(1) Perform the following adjustment with the remote
control.
(2) Set the CRT color analyzer (CA-100) at the center of
the panel.
(3) Ensure that Adjustment R/G/B DRIVE (HIGH) are all
set as FF.
(4) After receiving PC signal, step down the two (or one)
among Adjustment R/B/G DRIVE (HIGH) and adjust
the value shown below.
At least one of the data should be FF.
(5) Write Adjustment value of video color temperature to
the equivalent PC color temperature adjustment
items..
Remarks
(1) Color temperature should be adjusted under the
condition in which the screen is the brightest, thus
the initial value for adjustment is set its maximum.
(2) Adjustment is made by reducing brightness only.
Reduce a bright color for adjustment.
(3) Video color temperature & Adjustment No. are the
same, but addresses in the memory are different,
thus there’s no problem.
5.6 COLOR TEMPERATURE CORRECTION
SETTING
This adjustment should be done after color
temperature adjustment.
(1) Set service adjustment menu to “DEVICE ADJUST
MODE - PDP”.
(2) Set WBC to “1”.
BACK TO ADJUSTMENTS
Specification
Video Color temperature (STD)
x = 0.314 ± 0.005
y = 0.327 ± 0.005
(Color temp: 6500K)
Specification
PC Color temperature (HIGH)
x = 0.285 ± 0.005
y = 0.294 ± 0.005
(Color temp: 9300K)
Specification
Video Color temperature (B/W)
x = 0.335 ± 0.005
y = 0.343 ± 0.005
(Color temp: 5400K)
Video Color Temperature PC Color Temperature
R/G/B DRIVE (MEDIUM) data R/G/B DRIVE (MEDIUM) data
R/G/B DRIVE (STD) data R/G/B DRIVE (STD) data
R/G/B DRIVE (B/W) data R/G/B DRIVE (B/W) data
Page 35

35
PT3-E/G AVC3-U
5.7 WHITE BALANCE ADJUSTMENT OSD FLOW DIAGRAM
BACK TO ADJUSTMENTS
Page 36

36
PT3-E/G AVC3-U
6. SCREEN CHECK
Preparation
(1) Set AC120±1V.
(2) Turn on the power and leave it more than 5 min.
(3) Receive circle pattern at 4:3 Expanded mode.
(4) Input 480p and 1080i circle pattern into Component
1. (ASPECT 16:9 Standard)
(5) Input XGA (60Hz) circle pattern into RGB. (ASPECT
Full)
Checking
(1) Receive RF, 480p, 1080i and XGA (60Hz) signal,
then check the following items 1~4:
1. Check the symmetry of the pattern (right/left).
2. Check the horizontal position and the balance
(right/left).
3. Check the symmetry of the pattern (top/bottom).
4. Check the vertical position and the balance
(top/bottom).
Remarks
(1) RGB: XGA (60Hz).
( )
3
SCREEN
0 1 2 2 1 0
A B
7. FACTORY RESET
After all of the adjustments of main chassis are finished,
perform FACTORY RESET.
(1) Enter Adjustment Mode by the method described in
sub-items 1-1 and 1-2 from page 30. (“Adjustment
Procedure Start-up”).
(2) From the first menu in Adjustment Mode, select
FACT RESET adjustment code.
(3) Activate FACT RESET by pressing “Right” cursor
key once.
(4) Check that the receiving channel goes to CH03.
Unit is set to factory settings.
(5) This procedure returns user settings to the values
and states shown in Table 1 on the following pages.
BACK TO ADJUSTMENTS
Page 37

37
PT3-E/G AVC3-U
Table 1 - Factory Reset
NTSC Channel(Main, Sub) 03Channel
Input Mode Ant A
Sleep Timer Not Registered
Favorite Channels Not Registered
Multi Window Mode Off
Freeze Mode POP Main Freeze
Master Volume 20 Step
Video
Picture Mode(Day/Night) Day
Contrast 100% Picture Mode (Day)
Brightness 50% Picture Mode (Day)
Color 50% Picture Mode (Day)
Tint 50% Picture Mode (Day)
Sharpness 50% Picture Mode (Day)
Color Temperature
(High/Medium/Standard/Black&White)
Black Enhancement
(High/Middle/Low/Off)
Contrast Mode Dynamic Picture Mode (Day)
Color Management Off
Magenta 71%
Red 70%
Yellow 50%
Green 50%
Cyan 40%
Blue 76%
Color Decoding RGB
Red 50%
Green 50%
Color 50% Picture Mode (Day)
Tint 50% Picture Mode (Day)
Auto Color Off Picture Mode (Day)
Noise Reduction Low Picture Mode (Day)
Auto Movie Mode Off Picture Mode (Day)
Audio
Treble 50%
Bass 65%
Balance 50%
SRS Trubass Medium
Matrix Surround Off
Audio Source(Stereo/Mono/SAP) Stereo
Internal Speakers On
Auto Noise Cancel Off
Perfect Volume Off
Aspect
4:3 Standard, 4:3 Expanded
4:3 Zoom1, 4:3 Zoom2
Auto Aspect Off
Vertical Position 0
Channel Manager
Channel Source
Antenna/Cable1/Cable2
Auto Channel Scan
Antenna/Cable1/Cable2
Channel List
Ant A
CH ID Not Registered
Scan 2_13CH
Lock Not Registered
Ant B
CH ID Not Registered
Scan 2_13CH
Lock Not Registered
Function Initial Data/Condition Note
POP (Bottom Right) Main: NTSC/480i, Sub: NTSC/480iPIP Mode
PIP (Bottom Right) Main: 1080i, Sub: NTSC/480i
(Bottom Right)
High Picture Mode (Day)
Middle Picture Mode (Day)
4:3 Standard On Input Signal (NTSC, 480i, 480p)16:9 Sandard, 16:9 Zoom
16:9 Sandard On Input Signal (720p, 1080i)
Antenna
Not Registered
Page 38

38
PT3-E/G AVC3-U
Table 1 - Factory Reset (Continued)
Channel Lock Not Registered
Input Lock Not Registered
Front Panel Lock Not Registered
TV Time Out
Start/Stop Time Not Registered
Repeat(Once/Daily/Weekly) Not Registered
Movie Rating Not Registered
TV Rating Not Registered
TV Rating(Canadian-English) Not Registered
TV Rating(Canadian-French) Not Registered
Setup
Menu Preference
Menu Language English
Menu Background Shaded
Screen Saver
Main Picture Moving Option 1
Screen Wipe
Set The Clock
Time Not Registered
Set The Inputs
Input 1 Rename Not Registered
Input 2
Rename Not Registered
Auto Link(Auto/Remote/Off) Off
Input 3 Rename Not Registered
Input 4 Rename Not Registered
Input 5 Rename Not Registered
Video Power Save On
Color System
YPBPR1 Auto On Input Signal
YPBPR2 Auto On Input Signal
_
Sun - -:- - AM
Black Side Panel Off
Set Event Timer (Event1/2/3/4) Not Registered
Set Closed Caption
Caption Display Auto
Mode(Captions/Text) Captions
Channel(1/2/3/4) Channel 1
PC Mode
Video
Contrast 100%
Brightness 50%
Color Temperature High
Enhancer Off
Setup
Auto Adjust
Horizontal Position 0
Vsertical Position 0
Horizontal Clock 0
Clock Phase 0
Reset
Input Level 0.7V
Black Side Pnael Off
Function Initial Data/Condition Check
_
_
Page 39

39
PT3-E/G AVC3-U
Table 2 - I2C Adjustment Code and Data
ADJUSTMENT
MODE OSD
V POSITION
V POSITION Vertical Position
BURN-IN (PDP)
BURN-IN PDP Burn-In 0 2 0 1
WHITE BALANCE (PDP)
R DRIVE Red Drive Gain Control
G DRIVE Green Drive Gain Control
B DRIVE Blue Drive Gain Control
R CUTOFF Red Cutoff Control
G CUTOFF Green Cutoff Control
B CUTOFF Blue Cutoff Control
UPD64083 (3D-Y/C) (B9H) Read Mode
SYNCDET
F-STD Frame Sync Nonstandard Detection
V-STD Vertical Sync Nonstandard Detection
H-STD Horizontal Sync Nonstandard Detection
NOISE Noise Level Detection
Sync Detection
0: Sync, 1: No Sync
0: Standard, 1: Non standard
0: Standard, 1: Non standard
0: Standard, 1: Non standard
00: Noise Small FF: Noise Large
ADJUSTMENT ITEM ADJUSTMENT
RANGE(HEX)
480i 7E 3F
480p 7E 3F
720p 7E 3F
1080i 7E 3F
HIGH
MEDIUM -
STD
B/W
HIGH -
MEDIUM -
STD -
B/W
HIGH -
MEDIUM -
STD -
B/W
HIGH -
MEDIUM -
STD
HIGH -
MEDIUM -
STD
B/W -
HIGH -
MEDIUM
FF
FF
FF
3E
3E
3E
01
01
01
01
FF
INITIAL
DATA(HEX)
-
-
-
-
-
-
-
-
-
-
-
-
-
ADJUST
VALUE(HEX)
Page 40

40
PT3-E/G AVC3-U
Table 2 - I2C Adjustment Code and Data (Continued)
* This data is an approximate service code data. This value is adjusted by 3.2 SUB-CONTRAST ADJUSTMENT.
ADJUSTMENT
MODE OSD
UPD64083 (3D-Y/C) (B8H)
MSS Compulsion Frame/Line Setting 03 00
CDL-1 C Signal Delay Adjustment 07 03
CDL-3 C Signal Delay Adjustment 07 04
DYCO Y Motion Detection Coring Level 0F 02
DYGA Y Motion Detection Gain 0F 09
DCCO C Motion Detection Coring Level 0F 03
DCGA C Motion Detection Gain 0F 06
YNRK Frame Cycle YNR Non-linear Filter Gain 01 00
YNRIN Frame Cycle YNR Filter 01 00
YNRLI Frame Cycle YNR Non-linear Filter Limit Level 03 01
CNRK Frame Cycle CNR Non-linear Filter Gain 01 00
CNRIN Frame Cycle CNR Filter 01 00
CNRLI Frame Cycle CNR Non-linear Filter Limit Level 03 01
VAPGA 32/37/42" 07 04
APGA
VAPIN 32/37/42 1F 1F
APIN
YPFG 32/37/42" 0F 08
PFG
YHC1
YHC1-NR TV, NR = High 03 02
YHC3 NTSC,NR <> High 03 00
YHC3-NR
HC1
HC1-NR
HC3 NTSC,NR <> High 03 00
HC3-NR
TA1383F Main Read Mode (D9H)
HSYNC-M Main H-Sync Signal FF -
VSYNC-M Main V-Sync Signal 7F -
CSYNC-M Main C-Sync Signal 01 -
TA1383F SUB Read Mode
HSYNC-S Sub H-Sync Signal FF
VSYNC-S Sub V-Sync Signal 7F
CSYNC-S Sub C-Sync Signal 0 1 -
TA1383F MAIN (D8H)
M-CONT4
M-CONTP
M-CONTG
M-CLR-4
M-CLR-P
M-CLR-G
MCLR-4 Sub Color Control 50"
MCLR-P 00: MIN(-3dB)
MCLR-G 1F: MAX(+3dB)
MTINT-4
MTINT-P
Vertical Aperture Control
Gain
Vertical Aperture Control
Invert
Y Peaking Filter Gain
Y Output High Frequency
Coring
Y Output High Frequency
Coring
Sub Contrast Control
00: MIN(-3dB)
1F: MAX(+3dB)
Sub Color Control 32/37/42"
00: MIN(-3dB)
1F: MAX(+3dB)
Sub Tint Control
0: MIN(-7deg)
F: MAX(+7deg)
ADJUSTMENT ITEM ADJUSTMENT
RANGE(HEX)
50" 07 04
50" 1F 1F
50" 0F 08
32/37/42"
TV, NR <> High
NTSC,NR = High
50"
TV, NR <> High
TV, NR = High
NTSC,NR = High
TV/NTSC
480i/480p SDTV
720p/1080i HDTV
TV/NTSC
480i/480p SDTV
720p/1080i HDTV
TV/NTSC
480i/480p SDTV
720p/1080i HDTV
TV/NTSC
480i/480p SDTV
03 00
03 02
03 00
03 02
03 02
1F 0F 13*
1F 13
3F 21
1F 1C
1F 1A
1F 1E
1F 1C
1F 1A
1F 1E
0F 09
0F 0A
INITIAL
DATA(HEX)
-
-
ADJUST
VALUE(HEX)
Page 41

41
PT3-E/G AVC3-U
Table 2 - I2C Adjustment Code and Data (Continued)
* This data is an approximate service code data. This value is adjusted by 3.2 SUB-CONTRAST ADJUSTMENT.
MTINT-G
MYBLAC4
MYBLACD
MTOFF00
MTOFQ-0
TA1383F SUB (DAH)
S-CONT4
S-CONTP
S-CONTG
S-CLR-4
S-CLR-P
S-CLR-G
SCLR-4 Sub Color Control 50"
SCLR-P 00: MIN(-3dB)
SCLR-G 1F: MAX(+3dB)
STINT-4
STINT-P
STINT-G
SYBLAC4
SYBLACD
STOFF00
STOFQ-0
TA1383F MAIN/SUB D8H/DAH
Y-DL1-4
Y-DL1-D
Y-DL2-0
BBLACKM
BBLACK6 480p FE 00
BBLACK7 720p FE 00
BBLACK8
RBLACKM
RBLACK6 480p FE 00
RBLACK7 720p FE 00
RBLACK8
AFCRAN4
AFCRAND
F-DET-4
F-DET-D
Main Y Black Level Control
00: OFF 01: MIN_FE: MAX
Main NTSC TOF Center
Frequency Switch
0: OFF, 1: MIN(0.8 fsc)
7: MAX(1.5 fsc)
Main NTSC TOF Q
Characteristic Switch
0: MIN(0.6), 7: MAX(1.2)
Sub Contrast Control
00: MIN(-3dB)
1F: MAX(+3dB)
Sub Color Control 32/37/42"
00: MIN(-3dB)
1F: MAX(+3dB)
Sub Tint Control
0: MIN(-7deg)
F: MAX(+7deg)
Sub Y Black Level Control
00: OFF 01: MIN_FE: MAX
Main NTSC TOF Center
Frequency Switch
0: OFF, 1: MIN(0.8 fsc)
7: MAX(1.5 fsc)
Main NTSC TOF Q
Characteristic Switch
0: MIN(0.6), 7: MAX(1.2)
Y Delay Time Adjust 1
Base Band Section
0: -10 ns, 1: 0 ns
2: +10 ns, 3: +20 ns
Y Delay Time Adjust 2
NTSC Section
0: OFF, 1: +40 ns
2: +80 ns, 3: +120 ns
32/37/42"
CB(PB) Black Level Control
00: OFF 01: MIN_FE: MAX
32/37/42"
CR(PR) Black Level Control
00: OFF 01: MIN_FE: MAX
Horizontal AFC Switch
0: Normal
1: Narrow
Frequency Detection Input
Switch
0: 480i-1 NTSC
1: 480i-2 NTSC
2: D-SYNC2 3: HD/VD
720p/1080i HDTV
TV/NTSC
480i/480p720p/1080i
TV/NTSC
TV/NTSC
TV/NTSC
480i/480p SDTV
720p/1080i HDTV
TV/NTSC
480i/480p SDTV
720p/1080i HDTV
TV/NTSC
480i/480p SDTV
720p/1080i HDTV
TV/NTSC
480i/480p SDTV
720p/1080i HDTV
TV/NTSC
480i/480p720p/1080i
TV/NTSC
TV/NTSC
TV/NTSC
480i/480p/720p/1080i/By
pass(YPBPR/DVI)
ALL
TV/NTSC/480i
1080i FE 00
TV/NTSC/480i
1080i FE 00
TV/NTSC
480i/480p/720p/1080i/By
pass(YPBPR/DVI)
TV/NTSC
480i/480p/720p/1080i/By
pass(YPBPR/DVI)
0F 07
FE B5
FE 00
07 00
07 00
1F 15 12*
1F 18
3F 20
1F 1C
1F 1A
1F 1E
1F 1C
1F 1A
1F 1E
0F 09
0F 0A
0F 07
FE B5
FE 00
07 00
07 00
03 01
03 00
03 00
FE 0 0
FE 0 0
01 00
01 00
03 00
03 02
Page 42

42
PT3-E/G AVC3-U
Table 2 - I2C Adjustment Code and Data (Continued)
HSEPL-4
HSEPL-5 480i 03 00
HSEPL-6 480p 03 00
HSEPL-C
VSEPL-4
VSEPL-5
VSEPL-6
VSEPL-C
DSEPL-A
DSEPL-C
AFCMD-L TV
AFCMD-3
AFCMD-D
VMODE-4
VMODE-5
48ISEP4
B.WM
B.WM-NR
B.WN
B.WN-NR
BWM
BWM-NR
BWN
BWN-NR
HDPOSI4
HDPOSI5
HDPOSI6
HDPOSI7
HDPOSIK
OSD-HP
OSD-VP OSD Vertical Position 0F 0 7
CCD-HP
CCD-VP CCD Vertical Position (not available) 7F 1 8
Horizontal Sync Separation
Level Switch
0: 20%, 1: 27%
2: 34%, 3: 40%
Vertical Sync Separation
Level switch
0: 40%, 1: 50%
2: 60%, 3: 70%
D-SYNC2-IN Sync Separation
Level Switch
0: 20%, 1: 30%
2: 40%, 3: 50%
AFC Gain Switch
0: AUTO 1, 1: AUTO 2
2: AUTO 3,3: AUTO 4,4:+6dB,5:
0 dB, 6: -12 dB
7: OFF(Horizontal Free Run≈j
Vertical Sync Mode Switch
0: Normal PLL Mode
1: Sync Output Mode
480i Separator Mode Switch
0: ON, 1: OFF
32/37/42"
Band Width Filter Switch
0: OFF, 1: 11.3MHz/-3dB
2: 16MHz/-3dB, 3: Mute
Band Width Filter Switch
0: OFF, 1: 11.3MHz/-3dB
2: 16MHz/-3dB, 3: Mute
HD Output Phase
Adjustment
0: 800 ns Advance
F: Sync Center
OSD Horizontal Position
CCD Horizontal Position
TV/NTSC
720p/1080i/Bypass 03 00
TV/NTSC 03
480i 03
480p 03
720p/1080i/Bypass 03
480i/480p 03
720p/1080i/Bypass 03
NTSC 0 7
480i/480p/720p/1080i/
Bypass
TV/NTSC 01
480i 01
TV/NTSC 01
TV/NTSC/480i 0 3
TV/NTSC/480i -NR 0 3
480p/720p/1080i 03
480p/720p/1080i -NR 03
50"
TV/NTSC/480i 0 3
TV/NTSC/480i -NR 0 3
480p/720p/1080i 03
480p/720p/1080i -NR 03
TV/NTSC 0F
480i 0F
480p 0F
720p 0F
1080i/Bypass 0F
03 00
07
07
0F 07
4F 39
00
00
00
00
00
00
06
02
02
00
00
00
02
01
00
02
02
01
00
02
08
09
01
00
00
Page 43

43
PT3-E/G AVC3-U
Table 2 - I2C Adjustment Code and Data (Continued)
ADJUSTMENT
MODE OSD
PDP
R-DRVH
G-DRVH
B-DRVH
R-DRVM
G-DRVM
B-DRVM
R-DRVL
G-DRVL
B-DRVL
R-DRVE
G-DRVE
B-DRVE
GAMMA-D
GAMMA-H
BURN-IN
APC32
APC3742
PDP-VER
PDP-TM
CCFMD-D
CCFMD-H
CCFORMF
CCFORMG
CCFORMH
DCBONH
DCBONML
DCBON-H
WBC
HAPC
Q.MODE
V CHIP
SMPLING
POLLING
START
TIMEOUT
STATUS
IR BLASTER
IRDELAY
IRREPT
Sync Frequency Detection
HFRQ-N
Red Drive Gain Adjustment (HIGH) FF FF
Green Drive Gain Adjustment (HIGH) FF FF
Blue Drive Gain Adjustment (HIGH) FF FF
Red Drive Gain Adjustment (MEDIUM) FF FF
Green Drive Gain Adjustment (MEDIUM) FF FF
Blue Drive Gain Adjustment (MEDIUM) FF FF
Red Drive Gain Adjustment (STD) FF FF
Green Drive Gain Adjustment (STD) FF FF
Blue Drive Gain Adjustment (STD) FF FF
Red Drive Gain Adjustment (B/W) FF FF
Green Drive Gain Adjustment (B/W) FF FF
Blue Drive Gain Adjustment (B/W) FF FF
gamma selection
0:1.0, 1:2.2, 2:2.8
Burn-In Mode 02 0 1
APC Control 32" 01 00
APC Control 37/42" 01 0 0
PDP Microcomputer Version Display 03E7 -
PDP Panel Drive Time FFFF -
Brightness/Gradation
Priority Switch
NTSC/EBU Switch SDTV 0 1 0 0
Tracking Adjustment Switch
White Balance Correction 0 00 003
Heat APC Selection 01 0 1
Q.MODE 0:On,1:Off 32/37/42":valid,50":invalid 0 1 0 0
Rating Detection Sampling Time T1=32xN ms FE 0 0
Rating Detection Polling Counter FE 0F
Rating Block Start Counter 07 0 2
Rating Block Release Timeout 1E 05
Rating Block Release Counter 0 7 0 2
IR Start Delay Time 1 0 0 3
IR Send Data Repeat Time 80 2 0
The number of times of Sync Frequency 0F 0 3
ADJUSTMENT ITEM ADJUSTMENT
RANGE(HEX)
TV/Video 0 2 0 1
PC 0 2 0 1
TV/VID 0 1 0 0
PC 0 1 00
HDTV 0 1 0 0
PC 0 1 0 0
TV/VID Col.Temp:High 0 1 0 0
TV/VID
Col.Temp:Med/Std/BW
PC 0 1 0 1
01 01
INITIAL
DATA(HEX)
ADJUST
VALUE(HEX)
Page 44

44
PT3-E/G AVC3-U
T
Table 2 - I2C Adjustment Code and Data (Continued)
ADJUSTMENT
MODE OSD
FC4 Read Mode
TVCINE
MAXLVL1
MAXLVL2
FC4
SHP-L TV 1F 1F
SHPL-NR TV-NR 1F 0D
TV≈^Cinema Detection display On=1 0 1
Maximum input level(Main) display FE
Maximum input level(Sub ) display FE
32/37/42"
Sharpness
ADJUSTMENT ITEM ADJUSTMEN
RANGE(HEX)
SHP-3 NTSC 1F 14
SHP-5 480i 1F 14
SHP3-NR NTSC-NR 1F 0B
SHP5-NR 480i-NR 1F 0B
SHP-6 480p 1F 0E
SHP-7 720p 1F 0B
SHP-8 1080i 1F 0B
SHPN-NR
HP-L TV 1F 1F
HPL-NR TV-NR 1F 0D
Sharpness
480p/720p/1080i-NR 1F 06
50"
HP-3 NTSC 1F 14
HP-5 480i 1F 14
HP3-NR NTSC-NR 1F 0B
HP5-NR 480i-NR 1F 0B
HP-6 480p 1F 0E
HP-7 720p 1F 0B
HP-8 1080i 1F 0B
HPN-NR
H.EL TV 03 00
H.EL-NR TV 03 00
H.E3 NTSC 03 01
Horizontal Enhance Gain
0_3 Gain
32/37/42"
480p/720p/1080i-NR 1F 06
H.E5 480i 03 00
H.E3-NR NTSC-NR 03 00
H.E5-NR 480i-NR 03 00
H.EB 720p/1080i 03 03
H.E6 480P 03 03
H.EN-NR
HEL TV 03 00
HEL-NR TV-NR 03 00
HE3 NTSC 03 01
Horizontal Enhance Gain
0_3 Gain
480p/720p/1080i-NR 03 00
50"
HE5 480i 03 00
HE3-NR NTSC-NR 03 00
HE5-NR 480i-NR 03 00
HEB 720p/1080i 03 03
HE6 480P 03 03
HEN-NR
480p/720p/1080i-NR 03 00
INITIAL
DATA(HEX)
-
-
-
ADJUST
VALUE(HEX)
Page 45

45
PT3-E/G AVC3-U
Table 2 - I2C Adjustment Code and Data (Continued)
V.EL TV 03 00
V.EL-NR
V.E3 NTSC 03 03
Vertical Enhance Gain
0_3 Gain
32/37/42"
TV-NR 03 00
V.E5 480i/480p 03 03
V.E3-NR NTSC-NR 03 00
V.E5-NR 480i-NR 03 00
V.EB 720p/1080i 03 00
V.E6 480P 03 03
V.EN-NR 480p/720p/1080i-NR 03 00
VEL TV 03 00
VEL-NR TV-NR 03 00
VE3 NTSC 03 03
Vertical Enhance Gain
0_3 Gain
50"
VE5 480i/480p 03 03
VE3-NR NTSC-NR 03 00
VE5-NR 480i-NR 03 00
VEB 720p/1080i 03 00
VE6 480P 03 03
VEN-NR
CVHE-L TV 1F 10
CVHE-M NTSC/480i 1F 10
C V H Enhance GAIN
0_31 Gain
CVHE-N
YNR-LVL TV 07 04
YNR-LV3 NTSC 07 04
YNR Input Level
0:OFF 1_7:Input Gain
480p/720p/1080i-NR 03 00
480p/720p/1080i 1F 0D
YNR-LV5 480i 07 04
YNR-LV6 480p 07 04
YNR-LVB
CNR-LVL TV 07 04
CNR-LV3 NTSC 07 04
CNR Input Level
0:OFF 1_7:Input Gain
720p/1080i 07 04
CNR-LV5 480i 07 01
CNR-LV6 480p 07 01
CNR-LVB
V-POSI7 720p 7E 3F
V-POSI8
BLK-LV4 TV/NTSC FE 7F
BLK-LVD 480i/480p/720p/1080i/Bypass FE 7F
TV Vertical Position
0:-63_63:0_126:+63
Brightness Amp
0:-127_127:0_254:+127
BLK-LVH
RGBAMPD TV/Video FE 7F
RGBAMPH
BRTCEN4 TV/NTSC/Multi FE 80
BRTCENA 480i/480p FE 7C
Contrast Amp
0:-127_127:0_254:+127
32/37/42"
Brightness
720p/1080i 07 01
1080i 7E 3F
PC FE 7F
PC FE 7F
BRTCENB 720p/1080i FE 7C
BRTCENH
RTCEN4 TV/NTSC/Multi FE 85
RTCENA 480i/480p FE 81
Brightness
50"
PC FE 80
RTCENB 720p/1080i FE 81
RTCENH
CNTCEN4 TV/NTSC FE 89
Contrast
PC FE 80
CNTCEND 480i/480p/720p/1080i FE 89
CNTCENH PC FE 80
CNTCENE
offset at SPLIT FE 3C
Page 46

46
PT3-E/G AVC3-U
Table 2 - I2C Adjustment Code and Data (Continued)
NRMLCNT
BSGOFS
COLOR-F
COLOR-G
TINT-F
TINT-G
INT-F
INT-G
HDMODE8
FLAON
R-C.O-H
G-C.O-H
B-C.O-H
R-C.O-M
G-C.O-M
B-C.O-M
R-C.O-L
G-C.O-L
B-C.O-L
R-C.O-E
G-C.O-E
B-C.O-E
FC4.ORG
ETC
POWSAVE
POWS-TM
INPUT1
INPUT2
S.CSTEP
S.C-UP
S.C-LOW
M-MAX
S-MAX
TA1383
ID1-CCD
ID1-3D
M-CONTQ 480i/480p(DVI)
M-CONTR VGA(DVI)
M-CONTS
M-CLR-R
MCLR-R
S-CONTQ 480i/480p(DVI)
S-CONTR
Brightness max
Black Stretch Gain Offset
Color
Tint 32/37/42"
Tint 5 0"
not use
Automatic Signal Adjustment
R Gamma Offset
G Gamma Offset
B Gamma Offset
R Gamma Offset
G Gamma Offset
B Gamma Offset
R Gamma Offset
G Gamma Offset
B Gamma Offset
R Gamma Offset
G Gamma Offset
B Gamma Offset
FC4 Adjustment MENU
PC Power Save 0:OFF 1:ON 0 1 0 1
PC Power Save Timer (second) FE 0F
Main: YPbPr freq. detection fixed mode
Sub : YPbPr freq. detection fixed mode
Sub Contrast adjustment step
Sub Contrast adjustment maximum limit
Sub Contrast adjustment minimum limit
Main:maximum luminosity display
Sub :maximum luminosity display
TA1383F/TA1340F selection TA1383:1,TA1340:0
VideoID read data(CCD core S/W)
0:4x3,1:16x9,2:LB,3:(no use),4:NoData
VideoID read data(3DYC IC)
0:4x3(No Data),1:16x9,2:LB,3:(no use)
TA1383F:
Sub Contrast Control
00: MIN(-3dB)
1F: MAX(+3dB)
Sub Color Control 32/37/42
Sub Color Control 50
TA1383F:
Sub Contrast Control
00: MIN(-3dB)
1F: MAX(+3dB)
Normal/Real FE BC
ALL 3F 1F
SDTV(NT1/NT2/HD3/HD4/H
D6) 7F 55
HDTV(NT3/HD2/HD1/HD5) 7F 5E
SDTV(NT1/NT2/HD3/HD4/H
D6) FE 89
HDTV(NT3/HD2/HD1/HD5) FE 81
SDTV(NT1/NT2/HD3/HD4/H
D6) FE 8E
HDTV(NT3/HD2/HD1/HD5) FE 8A
HD1/HD4 01 00
C.Temp=High
C.Temp=Medium
C.Temp=Low
C.Temp=B/W
720p/1080i(DVI)
VGA(DVI)
VGA(DVI)
VGA(DVI)
__
3E 1F
3E 1F
3E 1F
3E 1F
3E 1F
3E 1F
3E 1F
3E 1F
3E 1F
3E 1F
3E 1F
3E 1F
__
04 00
04 00
FE 06
FE E6
FE E0
FE *
FE *
01 01
04 *
03 *
1F
1F
1F
1F
1F
1F
1F
0E
07
0E
0F
0F
13
0C
Page 47

47
PT3-E/G AVC3-U
Table 2 - I2C Adjustment Code and Data (Continued)
S-CONTS 720p/1080i(DVI)
S-CLR-R
SCLR-R
V-POSI5 480i 44 3F
V-POSI6
BBLCKM TV/NTSC/480i FE
BBLCK6 480p FE
Sub Color Control 32/37/42
Sub Color Control 50
FC4:
Vertical Position
TA1383F 50"
CB(PB) Black Level Control
00: OFF 01: MIN_FE: MAX
VGA(DVI)
VGA(DVI)
480p 44 3F
1F
1F
1F
BBLCK7 720p FE
BBLCK8
RBLCKM TV/NTSC/480i FE
RBLCK6 480p FE
TA1383F 50"
CR(PR) Black Level Control
00: OFF 01: MIN_FE: MAX
1080i FE
RBLCK7 720p FE
RBLCK8
BBLACKQ DVI(480i/480p) FE
BBLACKS
RBLACKQ DVI(480i/480p) FE
RBLACKS
BBLCKQ DVI(480i/480p) FE
BBLCKS
RBLCKQ DVI(480i/480p) FE
RBLCKS
DUMMY0
DUMMY1
DUMMY2
DUMMY3
DUMMY4
DUMMY5
DUMMY6
DUMMY7
DUMMY8
CB(PB) Black Level Control
00: OFF 01: MIN_FE: MAX
CR(PR) Black Level Control
00: OFF 01: MIN_FE: MAX
CB(PB) Black Level Control
00: OFF 01: MIN_FE: MAX
CR(PR) Black Level Control
00: OFF 01: MIN_FE: MAX
dummy FF FF
dummy FF FF
dummy FF FF
dummy FF FF
dummy FF FF
dummy FF FF
dummy FF FF
dummy FF FF
dummy FF FF
32/37/42"
32/37/42"
1080i FE
DVI(720p/1080i) FE
DVI(720p/1080i) FE
50"
DVI(720p/1080i) FE
50"
DVI(720p/1080i) FE
13
0D
0D
00
00
00
00
00
00
00
00
00
00
00
00
00
00
00
00
Page 48

48
PT3-E/G AVC3-U
(PDP MONITOR)
Burn-in mode check (*1)
NG?
Is AVC Power Indicator
always red and no sound
of Relay heard?
Yes
No
No picture
No sound
No
Yes
Check AVC POWER PWB
Caution!
It should be always confirmed that C907(CE220uF/450V)
is discharged when touching POWER P.W.B. with fingers
or soldering iron after power-off in order to prevent
the electric shock and second damage.
Check D901, D902,
C901~C907, etc.
Is R915
open?
Trouble of Main Switching-regulator
(Page 49)
Check I901, D911, T901,
C913, C918, etc.
Check H901, C909, etc.
Protection circuit Operation
(Page 50)
Is Q933(G) voltage
over 1.0V?
Yes
Yes
Yes
No
Yes
No
No
No
A.
B.
Has F902
blown?
Has F901
blown?
Check AVC AV PWB
I001, Q227, Q228, etc.
Note (*1)
Disconnect the MONITOR connection cables (DVI/DIN)
and press Sub-Power button for more than 5 seconds.
•
Test patterns will be displayed
(Trouble of PDP MONITOR
(Page 51)
)
C
TROUBLESHOOTING FLOWCHARTS
(1 OF 4)
TABLE OF CONTENTS
Page 49

49
PT3-E/G AVC3-U
A.
TROUBLESHOOTING FLOWCHARTS
(2 OF 4)
Trouble of Main Switching-regulator
Is Q930(C) voltage
over 3.5V?
No
Is I901 in
intermittent oscillation?
No
Is I901(4)pin voltage
at the moment of power-ON
below 16V?
No
Is I901(4) regular voltage
below 10V?
No
Check Q934, D936, D938,
I902, D909, etc.
Yes
Yes
Yes
Yes
Check Q930, Q931, etc.
Check C910, D938,
T901, I901, I902, etc.
Check D903, D906, etc.
Check D905, C912, etc.
Page 50

50
PT3-E/G AVC3-U
B.
TROUBLESHOOTING FLOWCHARTS
(3 OF 4)
Protection circuit Operation
Is D944(K) voltage
below 2.8V?
No
Is D940(A) voltage
below 3.8V?
No
Is D939(A) voltage
below 3.8V?
No
Is D947(K) voltage
above 5.7V?
No
Is D948(K) voltage
above 6.6V?
No
Yes
Yes
Yes
Yes
Yes
Check D933, D936, etc.
Or check AV PWB.
Check D934, I930, I931,
I933, etc.
Check D935 etc.
Or check AV PWB.
Check I931, D950, etc.
Check I933, D949, etc.
Is D955(K) voltage
above 9.5V?
No
Check Q933 etc.
Yes
Check I930, D959, etc.
Page 51

51
PT3-E/G AVC3-U
(
Trouble of PDP MONITOR
)
TROUBLESHOOTING FLOWCHARTS
(4 OF 4)
C.
Is the power indicator
LED always dark?
Yes
No
LED color red even though it's powered
ON by remote controller or AVC front switch
Is the power indicator
with cable connection to AVC?
No
Presume the wrong PWB
by Self-Diagnostic function
Trouble of
Power Supply Unit
Yes
Check SIGNAL/AUDIO PWB
I001, Q005, Q006, etc.
Page 52

52
PT3-E/G AVC3-U
SELF DIAGNOSIS FUNCTION
• PDP Monitor
Sub-Power button also activates Self Diagnosis mode for a PDP monitor failure with no picture.
To enter to Self Diagnosis mode, follow the next conditions and steps:
Conditions:
1) The connection cable between the Monitor and AVC (DVI and DIN) must be unplugged from the Monitor.
2) Make sure Power Cord of AC line is connected to the PDP Monitor.
3) The Main Power switch must be turned on.
Procedure:
1) Press Sub-Power button for more than 5 seconds.
2) Make sure Power Cord of AC line is connected to the PDP Monitor.
3) If PDP Monitor has no failure, it enters Burn-in mode.
4) Turning off the Main Power switch would cancel the Self Diagnosis mode.
5) The next table shows the PDP PWB in which failure most probably would be allocated according to the number of
blinks.
[Blinking condition of power indication light]
ex. 2 blinks
Number of red blinks
of power indication light
1
2
3
4
5
6
7
8
Presumed failing PWB
Logic
X-SUS
Y-SUS
X-SUS, Y-SUS, SDM, PSU
ADM, PSU, ABUS
ADM
ADM
All PWB’s
SDM: Scan Driver Module
PSU: Power Supply Unit
ADM: Address Driver Module
Note: SDM is permanently contacted to glass part
1 sec 1 sec 2 sec OFF
Repeat
Page 53

53
PT3-E/G AVC3-U
I001 Pin 29 I001 PIN 30 I001 PIN 28
I001 PIN 31 I001 PIN 23 I001 PIN 25
I001 PIN 62 I001 PIN 64 I001 PIN 56
I001 PIN 53 I001 PIN 52 I001 PIN 55
1
2
3
4
5
6
7
8
9
10
11
12
WAVEFORMS AT EACH SECTION
Numbers inside circle correspond to locations shown in the circuit diagram.
TABLE OF CONTENTS
Page 54

54
PT3-E/G AVC3-U
TP301 (PS0FP PIN 24) TP302 (P50FP PIN 23) TP303 (P50FP PIN 22)
TP304 (P50FP PIN 20) TP305(P50FP PIN 19) TP306 (P50FP PIN 17)
TP307 (P50FP PIN 16) TP308 (P50FP PIN 15) TP309 (P50FP PIN 13)
TP310 (P50FP PIN 12) U102 PIN 18 U101 PIN 18
22
23
24
19
20
21
16
17
18
13
14
15
WAVEFORMS AT EACH SECTION
Numbers inside circle correspond to locations shown in the circuit diagram.
Page 55

55
PT3-E/G AVC3-U
TPX51 (IX01 PIN 44) TPX54 (IX01 PIN 56) TPX55 (IX01 PIN 58)
TPW03 (IW01 PIN 84, after LPF) TPZ23 (IW01 PIN 83, after chroma) I001 PIN 54
I001 PIN 55 I001 PIN 59 I001 PIN 58
31
32
33
28
29
30
25
26
27
WAVEFORMS AT EACH SECTION
Numbers inside circle correspond to locations shown in the circuit diagram.
Page 56

56
PT3-E/G AVC3-U
DC VOLTAGE TABLES
AVC3-U Audio/Video Board (Signal)
Symbol pin No. DC Voltage Symbol pin No. DC Voltage Symbol pin No. DC Voltage Symbol pin No. DC Voltage
1 0.28 51 3.16 1 0.00 1 3.28
2 1.33 52 3.25 2 0.00 2 3.29
3 5.11 53 3.25 I002 3 0.00 3 0.00
4 5.09 54 0.20 4 3.28 4 3.29
5 0.00 55 3.25 1 0.00 5 3.29
I001 6 0.00 I001 56 0.00 2 0.00 I201 6 0.00
7 1.43 57 3.25 I003 3 0.00 7 3.29
8 0.00 58 3.25 4 0.00 8 0.24
9 0.00 59 3.12 5 5.11 9 0.00
10 3.26 60 0.00 6 5.11 10 0.00
11 3.26 61 3.81 7 0.00 11 0.00
12 3.28 62 0.00 8 5.11 12 3.29
13 1.69 63 3.81 1 0.00 13 0.00
14 0.00 64 3.28 2 0.00 14 0.00
15 1.65 65 0.00 3 3.25 15 0.00
16 3.28 66 0.00 4 3.25 16 0.00
17 1.01 67 0.00 5 2.60 17 3.29
18 3.27 68 0.00 6 0.00 18 3.29
19 2.91 69 0.00 7 0.00 19 0.00
20 0.00 70 0.00 I004 8 0.00 20 0.00
21 0.00 71 0.00 9 5.11 21 0.00
22 0.00 72 0.00 10 5.11 22 0.00
23 2.83 73 3.18 11 5.11 I202 23 0.00
24 0.00 74 3.18 12 0.00 24 3.29
25 2.84 75 3.24 13 0.00 25 0.00
26 1.58 76 3.79 14 0.00 26 0.00
27 0.00 77 3.72 15 0.00 27 0.00
28 5.11 78 3.28 16 5.11 28 0.00
29 5.11 79 3.26 1 3.68 29 0.00
30 5.11 80 0.00 2 5.24 30 3.29
31 5.11 81 3.27 3 0.00 31 3.29
32 0.00 82 3.27 4 0.00 32 3.29
33 0.00 83 0.00 5 0.00 33 3.29
34 0.00 84 0.00 6 0.00 34 3.29
35 0.00 85 3.19 I201 7 0.00 35 3.29
36 0.00 86 3.19 8 0.00 36 3.29
37 3.26 87 3.25 9 0.00 37 3.29
38 0.00 88 0.00 10 0.00 38 0.00
39 3.26 89 0.00 11 0.00 39 0.00
40 3.26 90 0.00 12 5.23 40 0.00
41 0.00 91 0.00 13 3.61 41 0.00
42 2.52 92 1.74 14 5.24 42 3.29
43 0.00 93 1.47 15 5.24 43 3.29
44 0.00 94 3.27 16 9.02 44 3.29
45 0.00 95 0.51
46 0.00 96 1.31
47 3.25 97 2.05
48 3.25 98 0.00
49 0.00 99 5.11
50 0.00 100 2.05
TABLE OF CONTENTS
Page 57

57
PT3-E/G AVC3-U
DC VOLTAGE TABLES
AVC3-U Audio/Video Board (Signal) (Cont.)
Symbol pin No. DC Voltage Symbol pin No. DC Voltage Symbol pin No. DC Voltage Symbol pin No. DC Voltage
1 0.00 1 0.00 E 3.01 Q222 B 5.22
2 0.00 2 4.64 Q204 B 2.43 C 0.00
3 5.11 3 4.98 C 0.00 E 5.18
4 0.00 4 4.94 E 2.40 Q223 B 4.90
5 0.00 5 0.13 Q205 B 3.01 C 9.01
6 5.09 I207 6 0.00 C 4.98 E 4.35
7 0.00 7 4.86 E 4.92 Q224 B 3.95
8 0.00 8 0.00 Q206 B 4.62 C 0.00
I203 9 5.11 9 0.00 C 0.00 E 0.00
10 0.00 10 4.98 E 4.30 Q231 B 0.00
11 3.26 11 4.98 Q207 B 4.92 C 5.11
12 0.00 12 4.86 C 4.98 E 0.00
13 0.00 13 0.00 E 4.56 Q233 B 0.00
14 5.07 14 0.00 Q208 B 5.19 C 1.08
15 0.00 15 4.94 C 9.02 E 0.00
16 0.00 16 4.98 E 4.60 Q234 B 0.70
17 3.28 1 0.00 Q209 B 5.23 C 0.00
18 0.00 2 0.00 C 9.02 E 0.00
19 0.00 3 0.00 E 0.00 Q235 B 0.00
20 5.11 I208 4 0.00 Q210 B 0.70 C 1.08
1 5.09 5 3.29 C 0.00 E 0.00
2 5.09 6 3.29 E 0.00 Q236 B 0.70
3 5.09 7 0.00 Q211 B 0.70 C 0.00
4 5.09 8 3.29 C 0.00 Symbol pin No. DC Voltage
5 5.09 Symbol pin No. DC Voltage E 0.00 E 0.00
I204 6 0.00 E 0.00 Q212 B 0.33 Q241 B 0.10
7 0.00 Q001 B 0.00 C 1.57 C 3.44
8 0.00 C 0.46 E 0.00 E 0.00
9 5.09 E 0.00 Q313 B 0.00 Q242 B 0.10
10 5.09 Q002 B 0.00 C 3.28 C 3.43
11 5.09 C 5.11 E 0.00 E 0.00
12 5.11 E 0.00 Q214 B 0.00 Q246 B 0.00
13 5.11 Q101 B 0.70 C 5.09 C 5.12
14 5.11 C 0.00 E 0.00 E 0.00
15 5.09 E 0.00 Q215 B 0.10 Q247 B 0.64
16 5.11 Q102 B 0.70 C 2.84 C 0.00
1 0.00 C 0.00 E 5.75 E 0.00
2 3.25 E 0.00 Q216 B 5.86 Q251 B 0.56
3 5.11 Q103 B 0.63 C 0.50 C 1.00
4 3.25 C 0.00 E 5.85 E 0.00
5 4.95 E 0.00 Q217 B 5.22 Q252 B 0.74
6 3.25 Q104 B 0.63 C 0.00 C 0.00
7 5.10 C 0.00 E 5.18 E 0.00
8 0.00 E 0.00 Q218 B 4.90 Q253 B 0.00
I206 9 0.00 Q202 B 0.00 C 9.01 C 4.87
10 0.00 C 0.00 E 4.26 E 0.10
11 0.00 E 0.00 Q219 B 3.83 Q254 B 0.56
12 0.00 Q203 B 0.62 C 0.00 C 1.43
13 3.26 C 0.00 E 0.00 E 4.51
14 5.11 Q220 B 0.10
15 4.94 C 2.86
16 4.99 E 5.74
17 3.25 Q221 B 5.86
18 5.11 C 0.50
19 0.00 E 5.85
20 5.11
Page 58

58
PT3-E/G AVC3-U
DC VOLTAGE TABLES
AVC3-U Audio/Video Board (Sound, Power)
Symbol pin No. DC Voltage Symbol pin No. DC Voltage Symbol pin No. DC Voltage Symbol pin No. DC Voltage
Q403 B 5.11 E 0.00 1 4.43 1 3.94
C 8.99 Q407A B 0.00 2 4.51 I904 2 0.00
E 4.51 C 0.00 3 4.43 3 1.28
Q403A B 5.11 E 3.90 4 0.00 4 2.48
C 8.99 Q408 B 4.53 5 0.25 5 3.25
E 0.00 C 8.99 6 0.00 1 5.67
Q404 B 0.60 E 3.90 7 0.00 2 4.93
C 0.00 Q408A B 4.53 I401 8 0.00 I905 3 5.67
E 0.00 C 8.99 9 0.00 4 3.92
Q405 B 0.60 E 0.00 10 0.00 5 0.00
C 0.00 Q409 B 0.00 11 0.00 6 0.00
E 3.77 C 0.00 12 4.43 7 4.99
Q406 B 4.22 E 0.00 13 4.43 8 4.99
C 8.99 Q409A B 0.00 14 0.00 1 5.65
E 3.77 C 0.00 15 4.49 2 4.90
Q406A B 4.22 E 3.97 16 8.99 I906 3 5.65
C 8.99 Q411 B 4.53 1 4.49 4 3.92
E 0.00 C 8.39 2 1.37 5 0.00
Q407 B 0.00 E 3.95 3 4.53 6 0.00
C 0.00 Q411A B 4.53 4 8.99 7 4.97
C 8.38 I402 5 4.50 8 4.97
E 8.99 6 0.00 1 3.93
Q412 B 8.39 7 3.48 I907 2 9.83
C 4.79 8 4.53 3 0.00
E 8.99 9 5.48 4 9.00
Q412A B 8.39 10 4.49 5 9.00
C 4.80 1 0.00 1 3.93
E 3.09 2 2.84 2 9.83
Q413 B 2.48 3 5.20 I908 3 0.00
C 0.00 4 2.88 4 9.00
E 0.00 5 0.00 5 9.00
Q414 B 0.00 6 0.00 1 3.93
C 5.47 I403 7 2.88 2 9.83
E 5.02 8 0.00 I909 3 0.00
Q415 B 5.63 9 5.73 4 9.00
C 4.10 10 2.88 5 9.00
E 5.02 11 0.00 1 5.11
Q416 B 0.63 12 3.07 2 4.44
C 0.00 13 2.88 3 5.11
14 5.20 I910 4 5.11
15 2.84 5 0.00
16 2.89 6 0.00
7 3.29
8 3.29
Page 59

59
PT3-E/G AVC3-U
DC VOLTAGE TABLES
AVC3-U Audio/Video Board (DVI)
Symbol pin No. DC Voltage Symbol pin No. DC Voltage Symbol pin No. DC Voltage
1 3.29 1 0.00 1 0.00
2 3.29 2 0.00 2 0.00
3 3.29 3 0.00 3 0.00
4 0.00 IJ04 4 0.00 IJA3 4 0.00
5 3.29 5 4.66 5 0.00
IJ01 6 3.29 6 4.66 6 0.00
7 3.29 7 4.68 7 0.00
8 3.29 8 4.68 8 0.00
9 3.29 1 5.67 E 0.00
10 0.00 2 5.03 QJA0 B 0.00
11 3.29 3 6.67 C 0.20
12 0.00 IJ05 4 5.67 E 0.20
13 3.29 5 0.00 QJA4 B 0.00
14 3.29 6 0.00 C 0.00
15 3.29 7 4.99 E 0.20
16 0.00 8 4.99 QJA8 B 0.00
17 3.29 1 4.99 C 0.00
18 0.00 2 4.40 E 0.00
19 0.00 3 4.99 QJC2 B 0.00
20 3.29 IJ06 4 4.99 C 0.20
21 0.00 5 0.00
22 3.29 6 0.00
23 0.00 7 3.30
24 3.29 8 3.30
25 0.00 E 0.65
26 0.00 QJ01 B 0.00
27 3.29 C 0.00
28 0.00 E 0.65
29 0.00 QJ05 B 0.00
30 3.29 C 0.00
31 0.00 E 0.65
32 3.29 QJ09 B 0.00
33 0.00 C 0.00
34 0.00 E 0.00
35 0.00 QJ13 B 0.00
36 0.00 C 0.65
37 3.30 E 0.00
38 3.30 QJ14 B 0.00
39 3.30 C 1.55
40 0.00
41 3.30
42 3.30
43 0.00
44 0.00
45 0.00
46 3.30
47 0.00
48 3.29
49 3.29
50 0.00
51 3.29
52 3.29
Page 60

60
PT3-E/G AVC3-U
DC VOLTAGE TABLES
AVC3-U Audio/Video Board (Input)
Symbol pin No. DC Voltage Symbol pin No. DC Voltage Symbol pin No. DC Voltage Symbol pin No. DC Voltage
1 0.00 43 8.87 37 0.00 E 3.20
2 2.20 44 4.43 38 6.26 QV05 B 3.79
3 2.76 45 4.46 39 8.84 C 8.97
4 2.44 46 3.63 40 4.16 E 2.20
5 1.24 47 4.35 41 0.00 QV06 B 2.80
IV01 6 0.00 IX01 48 0.10 42 4.21 C 8.32
7 0.00 49 5.03 43 0.00 E 8.97
8 4.96 50 4.42 44 4.22 QV07 B 8.34
9 0.00 51 4.36 45 8.81 C 5.79
10 2.25 52 4.43 46 4.18 E 5.16
11 2.09 53 4.57 IX02 47 0.00 QV08 B 5.79
12 3.35 54 4.43 48 4.18 C 8.97
13 3.79 55 3.64 49 0.00 E 6.15
14 1.43 56 4.32 50 4.28 QV09 B 6.77
15 3.71 57 0.00 51 8.82 C 8.97
16 4.91 58 4.28 52 8.82 E 2.98
1 3.97 59 4.40 53 5.14 QV10 B 2.36
2 4.41 60 5.20 54 0.00 C 0.00
3 3.92 61 4.40 55 4.85 E 0.00
4 4.42 62 4.40 56 0.00 QX01 B 0.00
5 4.36 63 4.87 57 4.85 C 0.00
6 0.10 64 4.40 58 8.82 E 0.00
7 0.00 1 0.67 59 5.14 QX02 B 0.00
8 3.89 IX02 2 0.50 60 0.00 C 0.00
9 4.40 3 0.69 61 4.85 E 3.86
10 3.89 4 8.82 62 0.00 QX03 B 4.53
11 4.40 5 4.87 63 4.85 C 8.89
12 4.36 6 0.00 64 4.95 E 2.97
13 0.10 7 4.60 1 2.90 QX04 B 3.63
14 4.85 8 0.00 2 0.00 C 8.89
IX01 15 3.88 9 4.63 3 2.08 E 3.68
16 4.40 10 4.60 4 0.00 QX05 B 4.34
17 3.88 11 0.80 5 2.08 C 8.89
18 4.40 12 0.60 IX03 6 0.97 E 0.00
19 4.36 13 0.79 7 0.00 QX08 B 0.42
20 0.10 14 8.82 8 1.72 C 3.30
21 4.86 15 4.93 9 1.75 E 3.85
22 3.88 16 0.00 10 0.00 QX12 B 4.47
23 4.40 17 4.65 11 2.84 C 8.87
24 3.88 18 0.00 12 0.00 E 3.85
25 4.40 19 4.66 13 4.89 QX13 B 4.47
26 4.36 20 4.84 14 2.90 C 8.87
27 0.10 21 1.36 15 0.00 E 3.73
28 4.85 22 1.17 16 2.84 QX14 B 4.35
29 4.40 23 1.36 E 3.08 C 8.87
30 4.37 24 0.00 QV01 B 3.71 E 3.69
31 4.40 25 0.00 C 8.95 QX15 B 4.31
32 0.00 26 4.85 E 2.22 C 8.87
33 5.00 27 4.91 QV02 B 2.82 E 3.67
34 4.97 28 4.95 C 8.32 QX16 B 4.28
35 0.00 29 0.00 E 8.95 C 8.87
36 0.00 30 0.00 QV03 B 8.32 E 3.95
37 4.35 31 0.00 C 4.92 QX17 B 4.56
38 4.43 32 4.57 E 4.30 C 8.87
39 3.64 33 0.00 QV04 B 4.93 E 2.37
40 4.43 34 5.28 C 4.95 QX21 B 1.74
41 4.56 35 0.00 C 0.00
42 8.87 36 5.12
Page 61

61
PT3-E/G AVC3-U
DC VOLTAGE TABLES
AVC3-U Audio/Video Board (Input) (CONT.)
Symbol pin No. DC Voltage Symbol pin No. DC Voltage
1 2.90 E 2.34
2 0.00 QX22 B 1.70
3 2.08 C 0.00
4 0.00 E 2.32
5 2.08 QX23 B 1.69
IX04 6 1.44 C 0.00
7 0.00 E 2.35
8 2.20 QX24 B 1.72
9 1.80 C 0.00
10 0.00 E 2.35
11 2.84 QX25 B 1.72
12 0.00 C 0.00
13 4.89 E 2.33
14 2.90 QX26 B 1.70
15 0.00 C 0.00
16 2.84 E 3.61
QX30 B 4.22
C 8.82
E 3.66
QX31 B 4.28
C 8.82
E 2.37
QX37 B 1.77
C 0.00
E 4.25
QX38 B 3.67
C 0.00
Page 62

62
PT3-E/G AVC3-U
DC VOLTAGE TABLES
AVC3-U Video
Symbol pin No. DC Voltage Symbol pin No. DC Voltage Symbol pin No. DC Voltage Symbol pin No. DC Voltage
1 0.00 59 4.92 12 8.90 10 0.00
2 0.00 60 4.84 13 4.84 11 0.00
3 0.00 61 0.13 IZ01 14 4.90 IZ03 12 8.77
4 0.00 62 0.13 15 0.00 13 4.55
5 0.00 63 0.00 16 2.41 14 4.84
IW01 6 0.00 IW01 64 2.42 17 4.58 15 4.56
7 0.00 65 0.00 18 0.00 16 2.87
8 0.00 66 0.00 19 2.42 1 5.18
9 0.00 67 0.00 20 2.25 2 0.00
10 0.60 68 0.00 21 3.89 3 4.45
11 3.25 69 0.00 22 3.65 4 0.00
12 3.25 70 0.00 23 3.58 IZ04 5 4.45
13 0.00 71 0.00 24 4.13 6 3.38
14 0.00 72 0.00 25 4.84 7 0.00
15 0.00 73 0.00 26 2.89 8 4.05
16 0.00 74 0.00 27 0.00 9 4.05
17 0.00 75 0.00 28 2.21 10 0.00
18 0.00 76 2.91 29 2.21 11 5.24
19 0.00 77 0.00 30 2.35 12 3.22
20 0.00 78 0.00 1 8.89 13 8.77
21 0.00 79 0.00 2 2.51 14 5.18
22 0.00 80 0.00 3 4.12 15 0.00
23 0.00 81 2.41 4 1.95 16 5.24
24 0.00 82 1.02 5 0.00
25 0.00 83 1.44 6 2.35
26 0.00 84 1.44 7 0.00
27 0.00 85 1.02 8 4.66
28 0.00 86 0.00 9 6.19
29 0.00 87 0.00 10 5.02
30 0.00 88 1.08 11 0.00
31 2.43 89 0.64 12 0.00
32 2.43 90 0.74 13 4.80
33 0.00 91 1.21 14 4.89
34 0.00 92 2.41 15 0.00
35 0.00 93 2.41 16 2.41
36 0.00 94 0.00 17 4.58
37 0.00 95 0.00 18 0.00
38 3.25 96 1.07 19 2.41
39 0.00 97 0.00 20 2.26
40 0.00 98 0.00 21 3.89
41 0.00 99 0.00 22 3.61
42 0.00 100 2.42 23 3.61
43 0.00 1 0.00 24 4.00
44 0.00 IW02 2 0.00 25 4.84
45 2.42 3 0.00 26 2.88
46 2.43 4 3.25 27 0.00
47 1.15 5 3.25 28 2.21
48 1.15 1 8.89 29 2.21
49 0.00 2 2.51 30 2.35
50 1.67 3 4.12 1 5.95
51 0.00 4 2.50 2 6.23
52 1.24 5 0.00 3 5.95
53 2.43 6 2.35 4 0.10
54 0.00 IZ01 7 0.00 IZ03 5 0.00
55 0.00 8 4.74 6 5.94
56 0.00 9 6.18 7 5.95
57 3.25 10 5.02 8 5.93
58 0.00 11 0.00 9 0.00
Page 63

63
PT3-E/G AVC3-U
DC VOLTAGE TABLES
AVC3-U Video (Cont.)
Symbol pin No. DC Voltage Symbol pin No. DC Voltage Symbol pin No. DC Voltage Symbol pin No. DC Voltage
E 4.77 E 1.28 E 2.68 E
QZ01 B 4.13 QZ34 B 1.88 QW05 B 2.04 QW14 B
C 0.00 C 8.78 C 0.00 C
E 4.22 1 8.13 E 2.09 E 8.97
QZ02 B 3.58 QZ35 2 8.13 QW06 B 2.32 QW15 B 8.35
C 0.00 3 8.76 C 3.13 C 6.35
E 4.29 4 5.21 E 3.24
QZ03 B 3.65 5 3.49 QW07 B 3.13
C 0.00 6 2.96 C 0.00
E 5.60 E 3.78 E 0.00
QZ04 B 6.25 QZ36 B 3.93 QW08 B 0.00
C 8.89 C 8.90 C 2.91
E 3.80 1 8.14 E 2.06
QZ05 B 3.93 2 8.14 QW09 B 1.44
C 8.89 QZ7 3 8.78 C 0.00
E 5.38 4 5.77 E 1.22
QZ06 B 6.02 5 3.49 QW10 B 1.82
C 8.89 6 2.92 C 8.34
E 0.00 E 3.81 E 8.96
QZ07 B 0.00 QZ38 B 4.44 QW11 B 8.34
C 6.02 C 8.77 C 2.79
E 3.52 1 8.16 E 2.17
QZ11 B 2.90 2 8.16 QW12 B 2.79
C 0.00 QZ39 3 8.78 C 8.96
E 3.51 4 3.92 E 8.97
QZ12 B 2.90 5 3.47 QW13 B 8.35
C 0.00 6 2.92 C 6.33
E 3.61 E 3.81
QZ13 B 4.25 QZ40 B 4.44
C 8.90 C 8.78
E 3.75 E 0.67
QZ14 B 3.93 QZ41 B 0.00
C 8.90 C 0.00
E 5.35 E 0.67
QZ15 B 5.99 QZ42 B 0.00
C 8.90 C 0.00
E 0.00 E 0.67
QZ16 B 0.00 QZ43 B 0.00
C 5.99 C 0.00
E 3.95 E 0.00
QZ21 B 4.58 QZ46 B 0.52
C 4.85 C 0.10
E 3.94 E 4.52
QZ22 B 4.58 QZ47 B 3.86
C 4.85 C 0.00
E 0.00 E 6.33
QZ27 B 0.00 QZ48 B 5.70
C 4.98 C 0.00
E 0.00 E 5.84
QZ28 B 0.00 QZ49 B 5.22
C 4.99 C 0.00
E 2.21 E 4.23
QZ30 B 2.82 QZ50 B 3.61
C 8.78 C 0.00
E 1.37 E 4.24
QZ32 B 1.97 QZ51 B 3.61
C 8.78 C 0.00
1 8.78
2 3.87
QZ52 3 4.49
4 0.00
5 2.43
6 1.81
E 8.97
QW15 B 8.35
C 6.35
Page 64

64
PT3-E/G AVC3-U
DC VOLTAGE TABLES
AVC3-U Video and Power
Symbol pin No. DC Voltage Symbol pin No. DC Voltage Symbol pin No. DC Voltage Power PWB
E 4.77 E 1.28 E 2.68
QZ01 B 4.13 QZ34 B 1.88 QW05 B 2.04 Symbol pin No. DC Voltage
C 0.00 C 8.78 C 0.00 1 1.96
E 4.22 1 8.13 E 2.09 2 0.00
QZ02 B 3.58 QZ35 2 8.13 QW06 B 2.32 I901 3 122.40
C 0.00 3 8.76 C 3.13 4 15.09
E 4.29 4 5.21 E 3.24 5 0.00
QZ03 B 3.65 5 3.49 QW07 B 3.13 1 9.05
C 0.00 6 2.96 C 0.00 I902 2 8.08
E 5.60 E 3.78 E 0.00 3 4.02
QZ04 B 6.25 QZ36 B 3.93 QW08 B 0.00 4 15.09
C 8.89 C 8.90 C 2.91 1 4.77
E 3.80 1 8.14 E 2.06 I905 2 6.91
QZ05 B 3.93 2 8.14 QW09 B 1.44 3 1.69
C 8.89 QZ7 3 8.78 C 0.00 4 4.95
E 5.38 4 5.77 E 1.22 1 0.00
QZ06 B 6.02 5 3.49 QW10 B 1.82 2 0.00
C 8.89 6 2.92 C 8.34 3 0.00
E 0.00 E 3.81 E 8.96 4 5.57
QZ07 B 0.00 QZ38 B 4.44 QW11 B 8.34 5 3.48
C 6.02 C 8.77 C 2.79 6 0.00
E 3.52 1 8.16 E 2.17 I930 7 9.47
QZ11 B 2.90 2 8.16 QW12 B 2.79 8 9.56
C 0.00 QZ39 3 8.78 C 8.96 9 0.00
E 3.51 4 3.92 E 8.97 10 17.34
QZ12 B 2.90 5 3.47 QW13 B 8.35 11 17.34
C 0.00 6 2.92 C 6.33 12 15.28
E 3.61 E 3.81 E 13 0.00
QZ13 B 4.25 QZ40 B 4.44 QW14 B 14 0.88
C 8.90 C 8.78 C 15 1.00
E 3.75 E 0.67 E 8.97 16 0.00
QZ14 B 3.93 QZ41 B 0.00 QW15 B 8.35 1 0.00
C 8.90 C 0.00 C 6.35 2 5.64
E 5.35 E 0.67 I931 3 3.45
QZ15 B 5.99 QZ42 B 0.00 4 1.76
C 8.90 C 0.00 5 17.36
E 0.00 E 0.67 6 7.89
QZ16 B 0.00 QZ43 B 0.00 7 1.00
C 5.99 C 0.00 8 1.00
E 3.95 E 0.00 1 5.68
QZ21 B 4.58 QZ46 B 0.52 2 5.00
C 4.85 C 0.10 I932 3 5.68
E 3.94 E 4.52 4 5.68
QZ22 B 4.58 QZ47 B 3.86 5 0.00
C 4.85 C 0.00 6 0.00
E 0.00 E 6.33 7 4.97
QZ27 B 0.00 QZ48 B 5.70 8 4.97
C 4.98 C 0.00 1 17.36
E 0.00 E 5.84 I933 2 5.28
QZ28 B 0.00 QZ49 B 5.22 3 0.00
C 4.99 C 0.00 4 3.27
E 2.21 E 4.23 5 2.33
QZ30 B 2.82 QZ50 B 3.61 D 0.80
C 8.78 C 0.00 Q930 G 0.22
E 1.37 E 4.24 E 0.00
QZ32 B 1.97 QZ51 B 3.61 E 0.00
C 8.78 C 0.00 Q931 B 0.00
1 8.78 C 1.35
2 3.87 E 4.61
QZ52 3 4.49 Q932 B 4.61
4 0.00 C -0.70
5 2.43 K 0.00
6 1.81 Q933 D 5.15
G 0.00
E 5.93
Q934 B 6.55
C 8.11
E 0.00
Q936 B 0.70
C 0.00
E 0.00
Q937 B 0.00
C 5.65
E 0.00
Q938 B 0.00
C 2.33
Page 65

65
PT3-E/G AVC3-U
DC VOLTAGE TABLES
PT3-E/G Signal
Symbol Pin No. DC Voltage Symbol Pin No. DC Voltage Symbol
Pin No.
DC Voltage Symbol Pin No. DC Voltage
1 5.1 41 0.0 1 0.0 1 3.3
2 1.7 42 0.0 2 4.9 2 1.3
3 2.1 43 0.0 3 0.0 3 1.6
4 4.9 44 5.2 4 4.9 4 1.5
5 5.2 45 5.2 5 0.0 5 0.0
6 5.2 46 5.2 6 0 6 1.5
7 4.9 47 5.2 7 0 I231 7 1.5
8 5.1 48 5.2 I201 8 1.3 8 0.0
9 0.0 49 0.0 9 0 9 1.5
I001 10 5.0 5 0 0.0 10 0 10 1.5
11 0.0 51 5.2 11 0 11 1.4
12 0.0 52 0.0 12 1.6 12 0.0
13 0.0 53 0.0 13 0 13 0.0
14 5.2 54 5.0 14 3.3 14 1.6
15 0.0 55 5.0 15 0 15 1.5
16 0.0 56 0.0 16 3.3 16 1.5
17 0.0 57 0.0 17 0 17 0.0
18 0.0 58 5.2 18 3.3 18 1.9
19 0.0 59 5.2 19 0 19 1.6
20 0.0 60 5.2 20 3.3 20 0.0
21 0.0 61 5.2 21 0.0
22 0.0 62 5.2 22 1.5
23 0.0 63 0.0 Symbol
Pin No.
DC Voltage 23 1.4
24 3.3 64 5.2 1 0.0 24 1.6
25 0.7 65 3.3 I002 2 0.0 25 1.6
26 3.3 66 5.1 3 0.0 26 3.3
27 0.0 67 5.0 4 0.0 27 3.2
28 0.1 68 5.1 5 5.2 28 3.3
29 5.2 69 5.1 6 5.2 29 0.0
30 5.2 70 0.0 7 0.0 30 2.5
31 0.0 71 0.0 8 5.2 31 1.7
32 4.7 72 0.0 1 0.0 32 3.3
33 0.0 73 0.0 2 0.0 33 0.0
34 0.1 74 0.1 I003 3 0.0 34 0.0
35 5.2 75 5.2 4 5.1 35 0.0
36 3.5 76 0.1 5 5.2 36 0.0
37 0.0 77 0.1 37 1.2
38 0.0 78 5.1 38 1.3
39 3.3 79 5.1 39 1.3
40 0.0 80 0.0 40 1.3
41 1.3
42 1.2
43 0.0
44 2.3
45 1.0
46 1.0
47 1.0
48 0
49 1.2
50 1.6
51 1.6
52 1.5
53 0
54 1.7
55 1.7
56 1.6
Page 66

66
PT3-E/G AVC3-U
DC VOLTAGE TABLES
PT3-E/G Signal (Cont.)
Symbol Pin No. DC Voltage Symbol Pin No. DC Voltage
1 3.4 26 1.3
2 3.4 27 1.5
3 3.3 28 0.0
4 0.0 29 3.3
5 0.0 30 1.5
6 3.2 31 1.5
7 3.3 32 1.5
8 3.3 33 1.5
9 3.3 I600 34 1.3
10 1.6 35 1.1
11 1.6 36 1.6
12 1.6 37 1.3
I600 13 1.6 3 8 3.2
14 1.3 39 0.0
15 1.5 40 0.0
16 1.4 41 3.4
17 1.9 42 0.0
18 3.3 43 3.3
19 0.0 44 1.7
20 1.6 45 0.0
21 1.3 46 2.4
22 1.3 47 3.3
23 1.2 48 3.3
24 1.2 49 0.0
25 1.2 50 0.0
51 0.0
52 0.0
53 0.0
54 0.0
55 0.0
56 0.0
57 3.3
58 0.0
59 0.0
60 0.0
61 0.0
62 0.0
63 0.0
64 0.0
65 0.0
66 0.0
67 3.2
68 0.0
69 0.0
70 0.0
71 0.0
72 0.0
73 0.0
74 0.0
75 0.0
Page 67

67
PT3-E/G AVC3-U
DC VOLTAGE TABLES
PT3-E/G Signal (Cont.)
Symbol Pin No. DC Voltage Symbol Pin No. DC Voltage Symbol
Pin No.
DC Voltage Symbol Pin No. DC Voltage
76 0.0 1 6.0 16 12.0 17 0.0
77 0.0 2 0.0 17 6.0 18 0.0
78 3.3 3 0.0 18 6.0 19 0.0
79 0.0 4 0.0 19 0.0 20 0.0
80 3.0 5 6.0 20 12.0 21 14.2
81 3.0 6 0.0 21 4.3 IC404 2 2 14.2
82 3.2 7 6.1 IC402 22 6.2 23 0.0
83 0.0 IC401 8 6.1 23 6.2 24 14.2
84 3.2 9 0.0 24 6.2 25 14.2
85 3.0 10 6.0 25 6.2 26 0.0
I600 86 3.0 11 1.1 26 6.2 27 14.2
87 0.0 12 0.0 27 6.2 28 0.0
88 0.0 13 5.0 28 6.2 29 22.0
89 0.0 14 5.0 29 6.2 30 5.1
90 3.0 15 0.0 30 6.2 31 16.8
91 3.0 16 12.0 1 6.1 32 6.8
92 0.0 17 0.0 2 6.1 B 0.9
93 3.0 18 4.9 3 6.1 Q001 C 0.1
94 3.0 19 5.3 IC403 4 6.1 E 0.0
95 3.2 20 5.5 5 6.1 B 4.4
96 3.1 21 1.8 6 0.0 Q005 C 5.0
97 3.3 22 6.0 7 0.0 E 5.1
98 0.0 23 6.0 8 0.0 B 5.1
99 0.0 24 6.0 9 4.9 Q006 C 0.1
100 3.3 25 6.0 10 0.0 E 5.1
1 7.2 26 6.0 11 0.1 S 0.7
2 9.9 27 6.0 12 0.1 Q201 D 0.0
3 2.6 28 0.0 13 4.2 G 0.0
I602 4 5.0 29 0.0 14 0.1 S 0.0
5 -4.6 30 6.0 1 5 4. 2 Q202 D 0.7
6 -9.4 1 6. 0 16 7.6 G 0.0
7 -9.4 2 6. 0 1 0 . 0 B 3.3
8 0.0 3 6.0 2 5.0 Q203 C 4.8
9 5.2 4 6.0 3 0.0 E 3.2
10 4.3 5 6.0 4 0.0 B 3.2
11 5.2 6 6.0 5 0.0 Q204 C 4.1
12 5.0 7 6.0 6 0.0 E 3.2
13 -6.7 IC402 8 6.0 7 0. 0
14 -8.4 9 6. 0 IC404 8 5 .0
15 0.0 10 6.0 9 2.5
16 5.2 11 6.0 10 2.5
1 0.0 12 6.0 11 0.0
2 0.0 13 0.0 12 2.5
I603 3 0.0 14 0.0 13 2.5
4 3.4 15 0.0 14 2.4
5 3.4 15 0.0
16 0.0
Page 68

68
PT3-E/G AVC3-U
DC VOLTAGE TABLES
PT3-E/G Signal (Cont.)
Symbol Pin No. DC Voltage
B 0.7
Q401 C 0.7
E 0.0
B 1.3
Q402 C 0.7
E 0.7
B 0.0
Q403 C 0.0
E 0.0
B 0.0
Q404 C 0.0
E 0.0
B 0.0
Q405 C 0.0
E 0.0
B 5.0
Q406 C 0.0
E 0.0
B -0.1
Q407 C 0.0
E 0.0
B 0.0
Q408 C 1.3
E 0.0
B 0.7
Q501 C 0.1
E 0.0
B 9.9
Q504 C 0.0
E 0.0
S 3.3
Q600 D 5.0
G 3.4
S 3.3
Q601 D 5.0
G 3.4
1 0.0
2 0.1
Q602 3 0.1
4 0.0
5 0.7
6 3.9
Page 69

1 234
5
6
A
B
C
D
E
All DC voltage to be measured with a tester (100k/V). Voltage taken on a complex color bar signal including a standard color bar signal.
Since this is a basic circuit diagram, the value of the parts is subject to be altered for improvement.
AVC3-U Control
PRODUCT SAFETYNOTE: Components marked with a and shaded have special characteristics important to
safety. Before replacing any of these components, read carefully the PRODUCTSAFETY NOTICE of this Service
Manual. Don’t degrade the safety of the receiver through improper servicing.
BASIC CIRCUIT DIAGRAM
PT3-E/G AVC3-U
Control
69
BACK TO TABLE OF CONTENTS
Page 70

16
15
17
14
13
18
19
20
21
22
1
2
4
3
13
6
5
8
7
9
12
10
11
1 234
5
6
A
B
C
D
E
All DC voltage to be measured with a tester (100k/V). Voltage taken on a complex color bar signal including a standard color bar signal.
Since this is a basic circuit diagram, the value of the parts is subject to be altered for improvement.
AVC3-U MPU
PRODUCT SAFETYNOTE: Components marked with a and shaded have special characteristics important to
safety. Before replacing any of these components, read carefully the PRODUCTSAFETY NOTICE of this Service
Manual. Don’t degrade the safety of the receiver through improper servicing.
BASIC CIRCUIT DIAGRAM
PT3-E/G AVC3-U
MPU
70
Page 71

24
23
1 234
5
6
A
B
C
D
E
All DC voltage to be measured with a tester (100k/V). Voltage taken on a complex color bar signal including a standard color bar signal.
Since this is a basic circuit diagram, the value of the parts is subject to be altered for improvement.
AVC3-U Tuner/Audio
PRODUCT SAFETYNOTE: Components marked with a and shaded have special characteristics important to
safety. Before replacing any of these components, read carefully the PRODUCTSAFETY NOTICE of this Service
Manual. Don’t degrade the safety of the receiver through improper servicing.
BASIC CIRCUIT DIAGRAM
PT3-E/G AVC3-U
Tuner/Audio
71
Page 72

27
26
25
1 234
5
6
A
B
C
D
E
All DC voltage to be measured with a tester (100k/V). Voltage taken on a complex color bar signal including a standard color bar signal.
Since this is a basic circuit diagram, the value of the parts is subject to be altered for improvement.
AVC3-U Input
PRODUCT SAFETYNOTE: Components marked with a and shaded have special characteristics important to
safety. Before replacing any of these components, read carefully the PRODUCTSAFETY NOTICE of this Service
Manual. Don’t degrade the safety of the receiver through improper servicing.
BASIC CIRCUIT DIAGRAM
PT3-E/G AVC3-U
Input
72
Page 73

29
28
1 234
5
6
A
B
C
D
E
All DC voltage to be measured with a tester (100k/V). Voltage taken on a complex color bar signal including a standard color bar signal.
Since this is a basic circuit diagram, the value of the parts is subject to be altered for improvement.
AVC3-U Video
PRODUCT SAFETYNOTE: Components marked with a and shaded have special characteristics important to
safety. Before replacing any of these components, read carefully the PRODUCTSAFETY NOTICE of this Service
Manual. Don’t degrade the safety of the receiver through improper servicing.
BASIC CIRCUIT DIAGRAM
PT3-E/G AVC3-U
Video
73
Page 74

All DC voltage to be measured with a tester (100k/V). Voltage taken on a complex color bar signal including a standard color bar signal.
Since this is a basic circuit diagram, the value of the parts is subject to be altered for improvement.
AVC3-U Power
PRODUCT SAFETYNOTE: Components marked with a and shaded have special characteristics important to
safety. Before replacing any of these components, read carefully the PRODUCTSAFETY NOTICE of this Service
Manual. Don’t degrade the safety of the receiver through improper servicing.
BASIC CIRCUIT DIAGRAM
PT3-E/G AVC3-U
Power
74
1 234
5
6
A
B
C
D
E
For MPU
For TUNER/AUDIO
For TUNER/AUDIO
For INPUT
For VIDEO
For TUNER/AUDIO A
For TUNER/AUDIO B
For MPU
For INPUT A
For VIDEO
For MPU
For TUNER/AUDIO
For INPUT
For MPU
For TUNER/AUDIO
Page 75

1 234
5
6
A
B
C
D
E
All DC voltage to be measured with a tester (100k/V). Voltage taken on a complex color bar signal including a standard color bar signal.
Since this is a basic circuit diagram, the value of the parts is subject to be altered for improvement.
AVC3-U DVI
PRODUCT SAFETYNOTE: Components marked with a and shaded have special characteristics important to
safety. Before replacing any of these components, read carefully the PRODUCTSAFETY NOTICE of this Service
Manual. Don’t degrade the safety of the receiver through improper servicing.
BASIC CIRCUIT DIAGRAM
PT3-E/G AVC3-U
DVI
75
Page 76

1 234
5
6
A
B
C
D
E
All DC voltage to be measured with a tester (100k/V). Voltage taken on a complex color bar signal including a standard color bar signal.
Since this is a basic circuit diagram, the value of the parts is subject to be altered for improvement.
AVC3-U Power (1/2)
PRODUCT SAFETYNOTE: Components marked with a and shaded have special characteristics important to
safety. Before replacing any of these components, read carefully the PRODUCTSAFETY NOTICE of this Service
Manual. Don’t degrade the safety of the receiver through improper servicing.
BASIC CIRCUIT DIAGRAM
PT3-E/G AVC3-U
Power
76
Page 77

1 234
5
6
A
B
C
D
E
All DC voltage to be measured with a tester (100k/V). Voltage taken on a complex color bar signal including a standard color bar signal.
Since this is a basic circuit diagram, the value of the parts is subject to be altered for improvement.
AVC3-U Power (2/2)
PRODUCT SAFETYNOTE: Components marked with a and shaded have special characteristics important to
safety. Before replacing any of these components, read carefully the PRODUCTSAFETY NOTICE of this Service
Manual. Don’t degrade the safety of the receiver through improper servicing.
BASIC CIRCUIT DIAGRAM
PT3-E/G AVC3-U
Power
77
Page 78

1 234
5
6
A
B
C
D
E
All DC voltage to be measured with a tester (100k/V). Voltage taken on a complex color bar signal including a standard color bar signal.
Since this is a basic circuit diagram, the value of the parts is subject to be altered for improvement.
AVC3-U A V Jig
PRODUCT SAFETYNOTE: Components marked with a and shaded have special characteristics important to
safety. Before replacing any of these components, read carefully the PRODUCTSAFETY NOTICE of this Service
Manual. Don’t degrade the safety of the receiver through improper servicing.
BASIC CIRCUIT DIAGRAM
PT3-E/G AVC3-U
AV Jig
78
Page 79

1 234
5
6
A
B
C
D
E
All DC voltage to be measured with a tester (100k/V). Voltage taken on a complex color bar signal including a standard color bar signal.
Since this is a basic circuit diagram, the value of the parts is subject to be altered for improvement.
PT3-E/G Filter
PRODUCT SAFETYNOTE: Components marked with a and shaded have special characteristics important to
safety. Before replacing any of these components, read carefully the PRODUCTSAFETY NOTICE of this Service
Manual. Don’t degrade the safety of the receiver through improper servicing.
BASIC CIRCUIT DIAGRAM
PT3-E/G AVC3-U
Filter
79
Page 80

33
31
30
32
1 234
5
6
A
B
C
D
E
All DC voltage to be measured with a tester (100k/V). Voltage taken on a complex color bar signal including a standard color bar signal.
Since this is a basic circuit diagram, the value of the parts is subject to be altered for improvement.
PT3-E/G Signal/Audio 1
PRODUCT SAFETYNOTE: Components marked with a and shaded have special characteristics important to
safety. Before replacing any of these components, read carefully the PRODUCTSAFETY NOTICE of this Service
Manual. Don’t degrade the safety of the receiver through improper servicing.
BASIC CIRCUIT DIAGRAM
PT3-E/G AVC3-U
Signal/Audio 1
80
For SIGNAL/AUDIO 2
For SIGNAL/AUDIO 4
For SIGNAL/AUDIO 3
For SIGNAL/AUDIO 4
Page 81

1 234
5
6
A
B
C
D
E
All DC voltage to be measured with a tester (100k/V). Voltage taken on a complex color bar signal including a standard color bar signal.
Since this is a basic circuit diagram, the value of the parts is subject to be altered for improvement.
PT3-E/G Signal/Audio 2
PRODUCT SAFETYNOTE: Components marked with a and shaded have special characteristics important to
safety. Before replacing any of these components, read carefully the PRODUCTSAFETY NOTICE of this Service
Manual. Don’t degrade the safety of the receiver through improper servicing.
BASIC CIRCUIT DIAGRAM
PT3-E/G AVC3-U
Signal/Audio 2
81
For SIGNAL/AUDIO 1
For SIGNAL/AUDIO 3
For SIGNAL/AUDIO 1
For SIGNAL/AUDIO 4
Page 82

1 234
5
6
A
B
C
D
E
All DC voltage to be measured with a tester (100k/V). Voltage taken on a complex color bar signal including a standard color bar signal.
Since this is a basic circuit diagram, the value of the parts is subject to be altered for improvement.
PT3-E/G Signal/Audio 3
PRODUCT SAFETYNOTE: Components marked with a and shaded have special characteristics important to
safety. Before replacing any of these components, read carefully the PRODUCTSAFETY NOTICE of this Service
Manual. Don’t degrade the safety of the receiver through improper servicing.
BASIC CIRCUIT DIAGRAM
PT3-E/G AVC3-U
Signal/Audio 3
82
For SIGNAL/AUDIO 1
For SIGNAL/AUDIO 4
For SIGNAL/AUDIO 1
For SIGNAL/AUDIO 4
Page 83

1 234
5
6
A
B
C
D
E
All DC voltage to be measured with a tester (100k/V). Voltage taken on a complex color bar signal including a standard color bar signal.
Since this is a basic circuit diagram, the value of the parts is subject to be altered for improvement.
PT3-E/G Signal/Audio 4
PRODUCT SAFETYNOTE: Components marked with a and shaded have special characteristics important to
safety. Before replacing any of these components, read carefully the PRODUCTSAFETY NOTICE of this Service
Manual. Don’t degrade the safety of the receiver through improper servicing.
BASIC CIRCUIT DIAGRAM
PT3-E/G AVC3-U
Signal/Audio 4
83
For SIGNAL/AUDIO 1
For SIGNAL/AUDIO 2
For SIGNAL/AUDIO 1
For SIGNAL/AUDIO 3
For SIGNAL/AUDIO 1
For SIGNAL/AUDIO 3
Page 84

PRINTED CIRCUIT BOARD
AVC3-U Audio/Video PWB
84
PT3-E/G AVC3-U
BACK TO TABLE OF CONTENTS
Page 85

PRINTED CIRCUIT BOARD
AVC3-U Audio/Video PWB
85
PT3-E/G AVC3-U
Page 86

PRINTED CIRCUIT BOARD
AVC3-U Power PWB
86
PT3-E/G AVC3-U
Page 87

PRINTED CIRCUIT BOARD
AVC3-U Power PWB
87
PT3-E/G AVC3-U
Page 88

PRINTED CIRCUIT BOARD
AVC3-U SW Jig/Control/Filter PWB
88
PT3-E/G AVC3-U
PT3 E/G FILTERPWB
Page 89

PT3-E/G AVC3-U
PRINTED CIRCUIT BOARD
PT3-E/G Signal/Audio PWB
89
Page 90

PRINTED CIRCUIT BOARD
PT3-E/G Signal/Audio PWB
90
PT3-E/G AVC3-U
Page 91

PT3-E/G AVC3-U
BLOCK DIAGRAM
AV/Control/Power for AVC3-U
J401
POWER BLOCK
Monitor Output
VIDEO__
S-VIDEO__
L/R__
JX01 Input 1
Y1 _
Pb1 _
Pr1 _
L/R1 _
IX01 CXA2069Q
AUDIO/VIDEO SELECTOR__________
Y/V/C/L/R-IN4 MONITOR OUT
Y/V/C/L/R-OUT3
Y/V/C/L/R/S-IN2 MAIN
Y/V/C-OUT2
Y/V/C/L/R/S-IN3 L/R-OUT2
Y/C/L/R-IN1
S-IN1 _Y/C IN
V/L/R-IN5
_SUB V-OUT1
V-IN6
L/R-IN6 V/L/R-IN-TV SUB Y/C-OUT1
_______________
U101
ENGE6106DR
Main F/E
Input 4
VIDEO4 _
S-VIDEO4 _
L/R4 _
Input 3
VIDEO3 _
S-VIDEO3 _
L/R3 _
TILT
CORRECTION
I402
AN5285K
Audio AGC
I201
BU4053BCF
CCD_SELECTO
R
Q215_217
Main NTSC_Sync Sep.
Q220_222
Sub NTSC_Sync Sep.
JX04
Input 5
(Front)
VIDEO5 _
S-VIDEO5 _
L/R5 _
AV/CONT/POWER FOR AVC
RGB AUDIO
INPUT L/R _
I401
BU4052BCF
Audio SW
QX01,02
L/R
VIDEO
LPF/CLAM
P
SYNC
SEP.
Y
LPF/AMPCLPF/AMP
VIDEO
LPF/CLAM
Y
LPF/AMPCLPF/AMP
IV01 TC90A45F
2Line Y/C_
_Separator_SDA1/SCL1
+9V
IZ02
TA1383FG
Main
Video
/Chroma CP
YPbPr
Selector
Y1 IN
C1 IN
Y2 IN YPbPr
C2 IN Out
YPbPr IN
HV-Sync IN
CW
+5V
+9V
SDA2/SCL2
IX02 MM1519XQ
YPbPr Selector
Y/Pb/Pr-IN1
L3OUT
L1OUT Y/Pb/Pr-IN2
MAIN Y/Pb/Pr OUT
L2OUT
IN2-SW
IN1-SW SUB Y/Pb/Pr
Y/Pb/Pr-IN3 OUT
Y/Pb/Pr-INT
IN3-SW
SDA2/SCL2
+9V
IZ01
TA1383FG
Sub
Video CW
/Chroma
YPbPr
Selector CP
Y1 IN
C1 IN
Y2 IN YPbPr
C2 IN Out
YPbPr IN
(MONITOR-OUT)
HV-Sync IN
+5V
+9V
SDA2/SCL2
IW01
_PD64083GF
3D Y/C
Separator
+3.3
+2.5
SDA2/SCL2
+5V
SDA2/SCL2
+9V
+5V
+33
QX08
SIG.
DET
Q212,254
AC CLOCK_DET.
IR IN1
Q206,207
Sub AFC Buffer
Q204,205
Main AFC Buffer
F MONO
MODE
SAP
STEREO
AFC
Main
Video/L/R-OUT
AFC
Sub
Video-OUT
MUTE
U102
ENG36614GR
Sub F/E
SDA2/SCL2
+9V
+5V
+33
Sub Video
Sub Y QX15,37
Sub C QX16,38
Y/C-IN
OSD-R/G/B
TRAPSW.S
TRAPSW.M
OSD- BLK
OSD- HALFTONE1H-H
1H-V
Audio L/R
Sub Y
Sub PB
Sub PR
Sub H
QZ21
Sub V
QZ27
Main Y
Main PB
Main PR
Main H
Main V
Remo-con
HM01 GP1U281R IR Receiver
TXD-P
SDA2/SCL2
C-SW
FC-ENA/DATA/CLK
J402
Head-Hone
(Front)
X-tal
3.58MH
X-tal
3.58MH
X-tal
16MHz
I002 RESET
BD472BG
+9V
+9V
Q442/442A
MUTE
Q413
Power
ON/OFF Det
I001 M306V7FHFP
TV MPU
PDP/IR BLASTER SEL
STB+3.3V
DM. ENOUT/TXD/RXD/ENIN/SCK/RESET
I003
CAT24W32
E2PROM
SDA1/SCL1
STB+5V
+9V
+9V
+9V
Audio L/R
HP Audio L/R
I202
S3*80F9
IR BLASTER
STB+5V
J201
IR-OUT
_
_
Q213_IR RESET
IR RXD
Sub AFC
Main AFC
ANT
MUTE
ST DET
SA DET
MTS
F MONO
SIG DET
SUB SYNC DET
MAIN SYNC DET
MAIN CCD IN
SUB CCD IN
IR DET
SUB CCD SEL
MAIN CCD SEL
AC IN
OSD VSYNC IN
OSD HSYNC IN
AUDIO SEL2
HPVOL
A-AGC
A MUTE1
A MUTE2
POWER1
POWER2
_POWER1
FSTB+5V
FA+5.5V
D+1.8V
D+3.3V
AVDET
+5.5VSTB+3.3V
STB+5V
POWER2
POWER1
AV_PWB
IR IN2
QX13 Y/V
QX14_CQ223,224
S.VIDEO
Q218,219
M.VIDEOPSPS
IR TXD
PDP/IR RXD
PDP/IR TXD
RXD-P
I204
BU4053BCF
+5V
I203
3.3V-5V
Buffer
I908 SI-3090KM
I907 SI-3090KM
+3.3V
_POWER1
I906 SI-3050LSA
_POWER1
I903 TK11133CS
DV+3.3V(3DYC)
AV+2.5V(3DYC)
AV BLOCK DIAGRAM 2003.2.5
I901SWREG
AC
INLET
AVC POWER PWB
CONTROL PWB
QZ36
QZ38
QZ40
QZ22
QZ11
QZ55
QZ54
QZ56
JX03
Q414
Q413
Q415
Q408/408A
Q410
Q405
Q404 AUDIO SEL1
SM01-06 CONTROL SW
Q248/249
/250
EAN
Q105
Q104
Q103
Q102
Q101
Q406
Q406A
Q403
Q403A
Q411/412
Q411A/412A
+6V
QX21
_QX23
QX24
_QX26
- 6dB
QX12 Y/V
QX17
QV09,10
QV01_04
QV05_08
QZ04_07
QW09_12
QW13_15
QW05_08
QW01_04
QZ12
Q235,236
Q209
Q211
_Q210
Q208
Q214
STB+5V
Q235,236
Q233,234
QX03_05
Q251
PMRST
Q001
Q231,232
Q225
I207
HC221FP
+5V
STB+5V
I905_SI-3050LSA
I904 TK11125CS
T901TRS
I90
TLP421F
STB+5V
DM+9V
H901 STB
+5V REG.
S901
RELAY
FE+30V
I902
TLP421F
P50FP
X201
8MHz
QZ28
TPZ20
TPZ21
TPZ22
TPZ24
TPZ16
DVI
PDJ2
Input 2
DVI-D 2
PDJ1
Input 1
DVI-D 1
IJA0 DVI
I/F
Sil907B
IJ01 DVI
I/F
Sil907B
IX03 NJM2584
+5V
IX04 NJM2584
+5V
YPBPR1/DVI1 SEL
YPBPR2/DVI2 SEL
DVI1.DET
DVI2.DET
SUB H/V
MAIN H/V
MC HV SEL
RGB2
RGB1
H/V
H/V
YPBPR1/RGB1
YPBPR2
Audio Mute
Q407/407A
Y/C/L/R
YPBPR
CONTROL
I403
BA3530FS Head-
PhoneAmp Vol.
+9V
IZ03
TA1287F
CCD MIX
Y Y
U U
V V
OSD-RGB
OSD-BLK
CP-IN
+9V
OSD-CS/DATA/CLK
I203_
3.3V-5V
Buffer
+33V
+16V
+9.5V
CONTROL SW
Digital Module
I930 SW-REG
SPI-8010A
I933 SW-REG
SI-8033JD
I931 SW-REG
SI-8010GM
I909 SI-3090KM
+16V
+9.5V
I932 SI-3050LSA
FAN
FAN.DET
FAN.LOCK
V+5V
FE+5V
FE+9V
V+9V-2
V+9V-1
JX02 Input 2
Y2/VIDEO2 _
AUDIO
OUTPUT L/R _
I910 SI-3033LSA
STB+5V
_POWER1
IJ06
SI-3033
LSA
+3.3V
+5V
IJ05
SI-
3050LSA
+5.5V
S/W
WRITING
CONNECTOR
PDP/IR BLASTER SEL
RXD/TXD/BUSY/SCLK/CNVSS/RESET
TRAP
QZ25
Q935 REG
+5V
-6dB
MY
SM07 MENU SW
+5V
IX05/06
BU4053BCF
+5V
SYMYSY
MAIN HV SEL/SUB HV SEL
VIDEO
LPF/CLAM
P
QW01_04
TILT
CORRECTION
BPF.SW
- 6dB
QX30
QX31
Sub Mono-OUT
DM02 PNZ313B IR Receiver
I208
CAT24WC16
E2PROM
SDA/SCL
IZ04
NJM2584M
SELECTOR
YPbPr
Y Y
Pb Pb
Pr Pr
SW
+9V
IZ05
TA1287F
CCD MIX
OSD-RGB
OSD-BLK
CP-IN
Y Y
U U
V
V
+9V
TPZ10
TPZ11
TPZ12
TPZ14
TPZ06
IZ06
BU4053BCF
+5V
LPF
QZ52
CCD_SW
SAMSUNG DVI
STB DET
H
Q202,203
IR DET
Q246
Q247
QZ13_16
QZ50
QZ51
QZ52
QZ30,32,34
6dB
QZ35
QZ37
QZ39
QZ01
QZ02
QZ03
QZ57
QZ58
QZ59
6dB
91
BACK TO TABLE OF CONTENTS
Page 92

PT3-E/G AVC3-U
BLOCK DIAGRAM
FC4 Unit
92
Page 93

93
A
S90
A
A
A
90
90
A
A
PROTECTION CIRCUIT BLOCK DIAGRAM
PT3-E/G AVC3-U
C in
120V
C INLET
VC3-U AV P.W.B
Reg. SI-3033LSA
Fuse F901
5A/125V
Reg. SI-3090KM
Reg. SI-3090KM
Reg. SI-3090KM
I910
C-Clock
Standby
rectifier
D902
I907
I909
I908
STB+5V
STB+3.3V
Photo-
coupler
Standby
DC/DC converter
FE+9V
V+9V-1
V+9V-2
I905
H901
FE+30V
POWER1
Reg. TK11125CS
I904
Reg. SI-3050LSA
I906
Reg. SI-3050LSA
I905
Reg. SI-3050LSA
IJ05
Reg. SI-3033LSA
+9.5V +3.3V +5.5V
DV+3.3V
V+2.5V
FE+5V
V+5V
DVI+5V
DVI+3.3V
IJ06
To frame
GND
Main
rectifier
D901
Switching
VC3-U POWER P.W.B
regulator
Fuse F902
2.5A/125V
I
1
Relay
Main
Switching
-regulator
T901
Photo-
coupler
I
2
LIVE COLD
1
(Detect
Voltage-down)
Error
Amp.
D941
<3.8V
Q934,
D938
Relay
driver
SW
Q930
Q932
16V
Protection
circuit
D944
<2.8V
D942
<3.8V
DC/DC converter
I931, D950, L931
DC/DC converter
I933, D949, L932
DC/DC converter
I930, D959, L933
Q931, Q933
D947
>5.7V
D948
>6.6V
DC/DC converter
(Detect
Voltage-over)
FE+30V
I932
+9.5V
D955
>9.5V
D+1.8V
FSTBY+5V
+3.3V
FC4
+5.5V
Page 94

94
PT3-E/G AVC3-U
A
16MHz
MPU CONTROL BLOCK DIAGRAM
Plasma Monitor
RLED
GLED
REM
STB+5V
RXD0
SUBSW
TXD0
PDP
Microcomputer
FVPP
MD1
RES
PDLVD
S
From AVC
VDET
PDP-GO
CPU-GO
IRQ
SDA1
SCL1
MUT
E
SPRL
Y
CONVERT
PDP PANEL
LEVEL
FRONT
PROGRAM
Writing
L/R
LVDS
TRANSMITTER
AUDIO
CONTROL
TRUBASS
AUDIO
OUT
Page 95

95
PT3-E/G AVC3-U
Audio Circuit Block Diagram
AUDIIO CIRCUIT BLOCK DIAGRAM
Plasma Monitor
RELAY CONT.
MUTE CONT.
SCL1
SDA1
Lch IN
Rch IN
PM ON
+12V
NJW1133A
MASTER VOL.
BALANCE
TONE CONT.
SURR.ON/OFF
POWER OFF DET.
TRUBASS
BU4052
NJM2192AM
TRUBASS
MUTE DRIVE
OVER LOAD
MUTE
MUTE
RELAY DRIVE
TA2020-020
DIGITAL
POWER AMP
RELAY
RELAY
SP OUT Lch
SP OUT Rch
MUTE
SUB
WOOFER
OUT
Page 96

96
PT3-E/G AVC3-U
A
A
p
A
A
BLOCK DIAGRAM APPLICATION
Plasma Monitor
4.1 Circuit Block Diagram
(1)Application MODELS:32,42HDT50M/55M 1
•
X Sustain Circuit
PDP Panel Unit
C120V
Filter
unit
X PWB
Filter PWB
Scan Driver
PDP Panel Module
Power
Power Unit
Address Driver
LVDS Receiver Signal Controller
Driver Controller
Data Controller
Y Sustain Circuit
Scan Driver
Y PWB
Logic Control
unit
Main Power
Remote
Control
VC≈@I/F
Connector
2 Systems
Sub Woofer
Output
SW
LED PWB
Sensor
Window
Signal/Audio
PWB
Digital RGB
Differential
Signal
udio Signal
OSC
16MHz
TMDS
Receiver
CPU
(system)
RGBHV
Signal Power
Transmitter
LVDS
Speaker X 2
udio Power
Audio
Processing
Audio Signal Processing unit
Digital
Audio
Am
lifier
Page 97

PT3-E/G AVC3-U
CONNECTION DIAGRAM
32HDT50/55
PSC PCS P50FP P001P
P501P PSC2 PSC2
1 POW LED
POW_LED
150GND GND 1
1 GND 1STB+5V STB+5V 1
2 POWER.SAVE POWER.SAVE 2 4 9 NC NC 2
2 TxD 2 REM REM 2
3 STB+5V STB+5V 3 48 GND GND 3
3 RxD 3 GND GND 3
4 GND GND 447DATA DATA 4
4RES 4 LED1 LED1 4
5 RM-IN RM-IN 5 4 6 CLK CLK 5
5 +5V 5 LED2 LED2 5
6 A+5V V+5V 6 45 GND GND 6
6 FEW 6 LED OFF LEDOFF 6
7
A/D KEY1
KEY1 7 44 FC-ENA FC-ENA 7
7 MD2
8
A/D KEY2
KEY2 8 43 OSD-CS OSD-CS 8
8 FCK
9 IR CAP IR CAP 942OSD-DATA OSD-DATA 9
41 OSD-CLK OSD-CLK 10
PDS CN1
40 GND GND 1 1
1 RXIN0- 2GND(LVDS) GND(LVDS) 2 RXIN0- 1
39 NC(2H) NC(2H) 12
P301P J601 3 RXIN0+ 4 SCL0 SCL 4 RXIN0+ 3
38 NC(K-DET) NC(K-DET) 13
1TX2 - TX2 - 1 5 RXIN 1- 6 GND GND 6 RXIN1- 5
37 NC(2V) NC(2V) 1 4
2 TX2 + TX2 + 2 7 RXIN1+ 8 SDA0 SDA8RXIN1+ 7
36 NC(KMASK) NC(KMASK) 15
3 TX2 SHIELD TX2 SHIELD 3 9 RX I N2- 10 GND(LVDS) GND(LVDS) 10 RXIN2- 9 Logic
35 GND GND 1 6
4NCNC4 11 RXIN2+ 12 CPU-G0 CPUG0 12 RXIN2+ 11
PAN EAN 3 4 232C-PDP(TXD) 232C-PDP(TXD) 17
5NCNC5 13 RXCLKIN- 14 PDP-G0 PDPG0 1 4 R XCLKIN- 13
1 ANT 1 3 3232C-PDP(RXD) 232C-PDP(RXD) 18
6 SCLH SCLH 6 1 5RXCLKIN+ 16 IRQ IRQ16RXCLKIN+ 15
2 GND 2 32 GND GND 1 9
7 SDAH SDAH 7 17 RX IN3- 18 PDWN PDWN 18 RX IN3- 17
3 FE+9V 3 3 1 AVDET AVDET 2 0
8NCNC8 19 RXIN3+ 20 GND(LVDS) GND(LVDS) 20 RXIN3+ 19
30 NC NC 2 1
9TX1 - TX1 - 9
29 Remo-PDP Remo-PDP 22
10 TX1 + TX1 + 1 0
28 GND GND 2 3
11 TX1 SHIELD TX1 SHIELD 11
27 NC(PMRST) NC(PMRST) 24
12 NC NC 12 PSU CN63 CN69 CN7
26 C.SW C.SW 25
13 NC NC 13 1STB+5V Vpr1(STB+5V) 1 1 NC 2 NC NC 2 NC 1
25 GND GND 2 6
14 AVDET AVDET 14 2 2 3NC 4 NC NC 4 NC 3
24 MY MY 27
15 GND GND 15 3 Vpr2 3.3V Vpr2(STB+3.3V) 3 5 GND 6 Vsago VSAGO 6 GND 5
23 MCb MCb 28
16 HPDET HPDET 16 4 LED OFF L ED-OFF 4 7 GND 8 Vcego VCEGO 8 GND 7
22 MCr MCr 29
17 TX0 - TX0 - 17 5 GND GND 5 9 GND 10 PFCg o PFCGO 1 0 GND 9 Logic
21 GND GND 3 0
18 TX0 + TX0 + 1 8 11 GND 12 Vra Vra 12 GND 11
20 MH MH 3 1
19 TX0 SHIELD TX0 SHIELD 19 13 GND 1 4 Vrs Vrs 14 GND 13
19 MV MV 32
20 NC NC 20 15 GND 16 Vlak Iak 16 GND 15
18 GND GND 3 3
21 NC NC 21 PPS CNPPS 17 GND 18 Vak Vak 18 GND 1 7
17 S-Y S-Y 34
22 TXC SHIELD TXC SHIELD 2 2 1 FAN LOCK SIG NC 1 19 GND 20 Vsk Vsk 20 GND 19
16 SCb SCb 3 5
23 TXC + TXC + 232POWER1 NC 2
15 SCr SCr 36
24 TXC - TXC - 24 3 NC NC 3
14 GND GND 3 7
4 GND GND 4
13 SH SH 3 8
5NC NC 5 CN68 CN6
12 SV SV 39
6 GND GND 61Vpr2(STB+3.3V) Vpr2 1
11 GND GND 4 0
P302P J602 7 GND GND 7 2 NC NC 2
10 GND(OSD/TXTG)
NC(OSD/TXTG)
41
1 TXD0TXD01 812V +12V 8 3 GND GND 3 Logic
9 GND(OSD/TXTB)
NC(OSD/TXTB)
42
2 RXD0 RXD0 2 9 12V +12V 9 4 GND GND 4
8 GND(OSD/TXTR)
NC(OSD/TXTR)
43
3 PARITY PARITY 3 5NC NC 5
7 NC(OSDBLK/Ys) NC(OSDBLK/Ys) 4 4
4 Remo-PDP Remo-PDP 4 6 Vcc(5.1V) Vcc 6
6 NC(HALFTONE/YM) NC(HALFTONE/YM) 45
5 Audio L Audio L 5
5 GND GND 4 6
6 Audio R Audio R 6 PPA CNPPA
4L L 47
7 PDDET PDDET 7 1 A.12V +13V 1
3 GND GND 4 8
8 AVDET2 AVDET2 8 2 A.12V +13V 2 CN64 CN23
2R R 49
3 A.GND GND 3 1 Va(60V) Va 1
1 GND GND 5 0
4 A.GND GND 4 2 NC NC 2
3 Vcc Vcc 3
4 GND GND 4
5 GND GND 5 Xsus
PFSH
6 GND GND 6
1 GND
7NC NC 7
2 RXD
8Vs(80V) Vs 8
3 BUSY
9Vs(80V) Vs 9
4 VPP
10 Vs(80V) Vs 10
5 VDD
PMW
6 SCLK
MD1 1
7 TXD
FEW/FWP 2
8 CNVSS
VIN 3 CN65 CN33
9 RESET
RESET 4 1 Vcc(5.1V) Vcc 1
PSP PSP 1 0GND
TXD 5 2 GND GND 2
1 TV.POWER POWER1 1
RXD 6 3 GND GND 3
2NC POWER2 2
GND 7 4 GND GND 4
3 AC.CLK AC.CLK 3
5 GND GND 5 Ysus
4NC FAN.DET 4 PRST
6NC NC 6
5 STBY+5V STB+5V 5 1 KEY2
7Vs(80V) Vs 7
6 GND GND 62KEY1
8Vs(80V) Vs 8
7 +3.3V +3.3V 7
9Vs(80V) Vs 9
8 +3.3V +3.3V 8
9 GND GND 9
10 GND GND 10 PJIG
11 +5.5V +5.5V 11 1 SCL2
CN66 CN42
12 GND GND 12 2 SDA2
1 Va(60V) Va 1
13 +9.5V +9.5V 13 3 GND
2NC NC 2
14 GND GND 14 4 SCL1
3NC NC 3
AC120V
15 +5.5V +5.5V 15 5 SDA1
4 GND GND 4 AbusR
16 GND GND 1 6 6 JIG
5 GND GND 5
17 +9.5V +9.5V 17 7 STB+5V
6NC NC 6
18 GND GND 1 8
7 Vcc(5.1V) Vcc 7
19 FE+30V FE+30V 19
PCHK3
1
SUB SYNC-OUT
CN67 CN52
2
SUB MONITOR-OUT PDA1 1 Va(60V) Va 1
3 MAIN SYNC-OUT
1 ROUT 2NC NC 2
4
MAIN MONITOR-OUT 2RIN 3NC NC 3
5 GND
3 GND 4 GND GND 4 AbusL
PMS1
4 LOUT 5 GND GND 5
DM.RESET 1
5 LIN 6NC NC 6
DM.ENOUT 2
6 GND 7 Vcc(5.1V) Vcc 7
DM.SCK 3
7SDA
DM.RXD 4
PAS1 8 SCL
DM.TXD 5
L+ 1 9 GND
DM.ENIN 6
L- 210AUDRST CN61 PPU1 AC120V
11 AUDDET 1 AC(L) AC 1
12 +12V 22PPU2
3 AC(N) AC 3 1 AC
PAS2 442AC
1 55
R+ 2 6FG FG 6
R- 3
PMS2
DM.YH 1
GND 2
PSW
DM.PB 3
1AC
DM.PR 4
EGND 2
GND 53DM.L 6
4AC
DM.R 75DM.Y 8
6AC
DM.C 97GND 1 0
8AC
STB+5V 11
SUB WOOFER OUT
DM+9VOUT 1 2
J401
SUB
GND
PFP1 P002P
1 F+5.5V F+5.5V 1
2 F+5.5V F+5.5V 2
3 GND GND 3
4 GND GND 4
5 FSTBY+5V FSTBY+5V 5
6 FSTBY+5V FSTBY+5V 6
7 GND GND 7
PFP2 P003P
1 D+1.8V D+1.8V 1
2 D+1.8V D+1.8V 2
3 GND GND 3
4 GND GND 4
5 DM+3.3V DM+3.3V 5
6 DM+3.3V DM+3.3V 6
7 DM+3.3V DM+3.3V 7
8 GND GND 8
9 GND GND 9
POWER
PWB
EH-19P
EH-19P
PH-12P
CONTROL
PWB
FPC-50P
FPC-50P
ESF
AV
PWB
M. TUNER
S. TUNER
EH.B-3P
EAN
EFEM
EFES
EH-3P
PH-6P
ZH-9P
ZH-9P
EFP2
ZH-7P
ZH-7P
EFP1
PH-10P
EH-7P
EH-2P
FC4
UNIT
DVI-D 24P
DIN-8P
PH-8P
UNX ANT SW
MEMORY INITIALIZE
DIGITAL MODULE
JIG
EH-5P
AVC50
PH-9P
PH-9P
ESC
DIGITAL MODULE
S/W WRITING
EAS1
EAS2
EH-3P
EH-2P
SP R
SP L
SIGNAL
/AUDIO
PWB
DVI-D 24P
EH-7P
DIN-8P
LED PWB
FILTER
PWB
PDP
MODULEACINLET
EDS
EPU1
MAIN
POWER
SW
E902
POWER
UNIT
ESC2
PH-6P
PH-6P
DF13-20DS-1.25C
DF13-20DP-1.25V
ESU
XHP-5P
B5B-XH
EPS
EH-9P
B9B-EH
EPA
EH-4P
B4B-EH
ECN69
ECN68
B6B-PH
B6B-PH
B10P-VH
B10P-VH
ECN66
B7B-PH
B7B-PH
ECN67
B7B-PH
B7B-PH
B9P-VH
B6P-VH
VH-6P
VT-2P
EPU2
ESW
VH-8P
32HDT50M/55M
ZH-12P
20FMN-BT
ECN64
ECN65
B9PS-VH
00 6200 520 330 000
97
BACK TO TABLE OF CONTENTS
Page 98

98
PT3-E/G AVC3-U
CONNECTION DIAGRAM
42HDT50/55
PSC PCS P50FP P001P
P501P PSC2 PSC2
1 POW LED
POW_LED
150GND GND 1
1 GND 1STB+5V STB+5V 1
2 POWER.SAVE POWER.SAVE 2 4 9 NC NC 2
2 TxD 2 REM REM 2
3 STB+5V STB+5V 3 48 GND GND 3
3 RxD 3 GND GND 3
4 GND GND 447DATA DATA 4
4RES 4 LED1 LED1 4
5 RM-IN RM-IN 5 4 6 CLK CLK 5
5 +5V 5 LED2 LED2 5
6 A+5V V+5V 6 45 GND GND 6
6 FEW 6 LED OFF LEDOFF 6
7
A/D KEY1
KEY1 7 44 FC-ENA FC-ENA 7
7 MD2
8
A/D KEY2
KEY2 8 43 OSD-CS OSD-CS 8
8 FCK
9 IR CAP IR CAP 942OSD-DATA OSD-DATA 9
41 OSD-CLK OSD-CLK 10
PDS CN1
40 GND GND 1 1
1 RXIN0- 2GND(LVDS) GND(LVDS) 2 RXIN0- 1
39 NC(2H) NC(2H) 12
P301P J601 3 RXIN0+ 4 SCL0 SCL4RXIN0+ 3
38 NC(K-DET) NC(K-DET) 13
1 TX2 - TX2 - 1 5 RXIN1- 6 GND GND6RXIN1- 5
37 NC(2V) NC(2V) 1 4
2 TX2 + TX2 + 2 7 RXIN1+ 8 SDA0 SDA8RXIN1+ 7
36 NC(KMASK) NC(KMASK) 15
3 TX2 SHIELD TX2 SHIELD 3 9 RXIN2- 10 GND(LVDS) GND(LVDS) 10 RXIN2- 9 Logic
35 GND GND 1 6
4NCNC4 11 RXIN2+ 12 CPU-G0 CPUG0 12 RXIN2+ 11
PAN EAN 3 4 232C-PDP(TXD) 232C-PDP(TXD) 17
5NCNC5 13 RXCLKIN-14PDP-G0 PDPG0 14 RXCLKIN- 1 3
1 ANT 1 3 3232C-PDP(RXD) 232C-PDP(RXD) 18
6 SCLH SCLH 6 1 5RXCLKIN+ 16 IRQ IRQ16RXCLKIN+ 15
2 GND 2 32 GND GND 1 9
7 SDAH SDAH 7 17 RXIN3- 18 PDWN PDWN 1 8 RXIN3- 1 7
3 FE+9V 3 3 1 AVDET AVDET 2 0
8NCNC8 19 RXIN3+ 20 GND(LVDS) GND(LVDS) 20 RXIN3+ 19
30 NC NC 2 1
9 TX1 - TX1 - 9
29 Remo-PDP Remo-PDP 22
10 TX1 + TX1 + 1 0
28 GND GND 2 3
11 TX1 SHIELD TX1 SHIELD 11
27 NC(PMRST) NC(PMRST) 24
12 NC NC 12 PSU CN63 CN69 CN7
26 C.SW C.SW 25
13 NC NC 13 1STB+5V Vpr1(STB+5V) 1 1 NC 2 NC NC 2 NC 1
25 GND GND 2 6
14 AVDET AVDET 14 2 2 3NC 4 NC NC 4 NC 3
24 MY MY 27
15 GND GND 15 3 Vpr2 3.3V Vpr2(STB+3.3V) 3 5 GND 6 Vsago VSAGO 6 GND 5
23 MCb MCb 28
16 HPDET HPDET 16 4 LED OFF L ED-OFF 4 7 GND 8 Vcego VCEGO 8 GND 7
22 MCr MCr 29
17 TX0 - TX0 - 17 5 GND GND 5 9 GND 10 PFCgo PFCGO 10 GND 9 Logic
21 GND GND 3 0
18 TX0 + TX0 + 1 8 11 GND 1 2V ra Vra 12 GND 11
20 MH MH 3 1
19 TX0 SHIELD TX0 SHIELD 19 13 GND 1 4 Vrs Vrs 14 GND 13
19 MV MV 32
20 NC NC 20 15 GND 16 Vlak Iak 16 GND 15
18 GND GND 3 3
21 NC NC 21 PPS CNPPS 17 GND 18 Vak Vak 18 GND 1 7
17 S-Y S-Y 34
22 TXC SHIELD TXC SHIELD 2 2 1 FAN LOCK SIG NC 1 19 GND 20 Vsk Vsk 20 GND 19
16 SCb SCb 3 5
23 TXC + TXC + 232POWER1 NC 2
15 SCr SCr 36
24 TXC - TXC - 24 3 NC NC 3
14 GND GND 3 7
4 GND GND 4
13 SH SH 3 8
5NC NC 5 CN68 CN6
12 SV SV 39
6 GND GND 61Vpr2(STB+3.3V) Vpr2 1
11 GND GND 4 0
P302P J602 7 GND GND 7 2 NC NC 2
10 GND(OSD/TXTG)
NC(OSD/TXTG)
41
1 TXD0 TXD0 1 8 12V +12V 8 3 GND GND 3 Logic
9GND(OSD/TXTB)
NC(OSD/TXTB)
42
2 RXD0 RXD0 2 9 12V +12V 9 4 GND GND 4
8 GND(OSD/TXTR)
NC(OSD/TXTR)
43
3 PARITY PARITY 3 5NC NC 5
7 NC(OSDBLK/Ys) NC(OSDBLK/Ys) 4 4
4 Remo-PDP Remo-PDP 4 6 Vcc(5.1V) Vcc 6
6 NC(HALFTONE/YM) NC(HALFTONE/YM) 45
5 Audio L Audio L 5
5 GND GND 4 6
6 Audio R Audio R 6 PPA CNPPA
4L L 47
7 PDDET PDDET 7 1 A.12V +13V 1
3 GND GND 4 8
8 AVDET2 AVDET2 8 2 A.12V +13V 2 CN64 CN23
2R R 49
3 A.GND GND 3 1 Va(60V) Va 1
1 GND GND 5 0
4 A.GND GND 4 2 NC NC 2
3 Vcc Vcc 3
4 GND GND 4
5 GND GND 5 Xsus
PFSH
6 GND GND 6
1 GND
7NC NC 7
2 RXD
8Vs(80V) Vs 8
3 BUSY
9Vs(80V) Vs 9
4 VPP
10 Vs(80V) Vs 10
5 VDD
PMW
6 SCLK
MD1 1
7 TXD
FEW/FWP 2
8 CNVSS
VIN 3 CN65 CN33
9 RESET
RESET 4 1 Vcc(5.1V) Vcc 1
PSP PSP 1 0GND
TXD 5 2 GND GND 2
1 TV.POWER POWER1 1
RXD 6 3 GND GND 3
2NC POWER2 2
GND 7 4 GND GND 4
3 AC.CLK AC.CLK 3
5 GND GND 5 Ysus
4NC FAN.DET 4 PRST
6NC NC 6
5 STBY+5V STB+5V 5 1 KEY2
7Vs(80V) Vs 7
6 GND GND 62KEY1
8Vs(80V) Vs 8
7 +3.3V +3.3V 7
9Vs(80V) Vs 9
8 +3.3V +3.3V 8
9 GND GND 9
10 GND GND 10 PJIG
11 +5.5V +5.5V 11 1 SCL2
CN66 CN42
12 GND GND 12 2 SDA2
1 Va(60V) Va 1
13 +9.5V +9.5V 13 3 GND
2NC NC 2
14 GND GND 14 4 SCL1
3NC NC 3
AC120V
15 +5.5V +5.5V 15 5 SDA1
4 GND GND 4 AbusR
16 GND GND 1 6 6 JIG
5 GND GND 5
17 +9.5V +9.5V 17 7 STB+5V
6NC NC 6
18 GND GND 1 8
7 Vcc(5.1V) Vcc 7
19 FE+30V FE+30V 19
PCHK3
1
SUB SYNC-OUT
CN67 CN52
2
SUB MONITOR-OUT PDA1 1 Va(60V) Va 1
3 MAIN SYNC-OUT
1ROUT 2NC NC 2
4
MAIN MONITOR-OUT 2RIN 3NC NC 3
5 GND
3 GND 4 GND GND 4 AbusL
PMS1
4 LOUT 5 GND GND 5
DM.RESET 1
5LIN 6NC NC 6
DM.ENOUT 2
6 GND 7 Vcc(5.1V) Vcc 7
DM.SCK 3
7SDA
DM.RXD 4
8 SCL
DM.TXD 5
9 GND
DM.ENIN 6
10 AUDRST CN61 PPU1 AC120V
11 AUDDET 1 AC(L) AC 1
12 +12V 22PPU2
3 AC(N) AC 3 1 AC
442AC
55
6FG FG 6
PMS2
DM.YH 1
GND 2
PSW
DM.PB 3
1AC
DM.PR 4
PAS1 PAS3 EGND 2
GND 5
1L+ L+ 1 3
DM.L 6
2L- L- 2 4AC
DM.R 75DM.Y 8
6AC
DM.C 97GND 1 0
8AC
STB+5V 11
SUB WOOFER OUT
DM+9VOUT 1 2
PAS2 PAS4
J401 1 1
SUB 2 R+ R+ 2
GND 3 R- R- 3
PFP1 P002P
1 F+5.5V F+5.5V 1
2 F+5.5V F+5.5V 2
3 GND GND 3
4 GND GND 4
5 FSTBY+5V FSTBY+5V 5
6 FSTBY+5V FSTBY+5V 6
7 GND GND 7
PFP2 P003P
1 D+1.8V D+1.8V 1
2 D+1.8V D+1.8V 2
3 GND GND 3
4 GND GND 4
5DM+3.3V DM+3.3V 5
6DM+3.3V DM+3.3V 6
7DM+3.3V DM+3.3V 7
8 GND GND 8
9 GND GND 9
POWER
PWB
EH-19P
EH-19P
PH-12P
CONTROL
PWB
FPC-50P
FPC-50P
ESF
AV
PWB
M. TUNER
S. TUNER
EH.B-3P
EAN
EFEM
EFES
EH-3P
PH-6P
ZH-9P
ZH-9P
EFP2
ZH-7P
ZH-7P
EFP1
PH-10P
EH-7P
EH-2P
FC4
UNIT
DVI-D 24P
DIN-8P
PH-8P
UNX ANT SW
MEMORY INITIALIZE
DIGITAL MODULE
JIG
EH-5P
AVC50
PH-9P
PH-P
ESC
DIGITAL MODULE
S/W WRITING
SIGNAL
/AUDIO
PWB
DVI-D 24P
EH-7P
DIN-8P
LED PWB
FILTER
PWB
PDP
MODULEACINLET
EDS
EPU1
MAIN
POWER
SW
E902
POWER
UNIT
SP TERM.
L PWB
ESC2
PH-6P
PH-6P
DF13-20DS-1.25C
DF13-20DP-1.25V
ESU
XHP-5P
B5B-XH
EPS
EH-9P
B9B-EH
EPA
EH-4P
B4B-EH
EJ201
EJ206
B6B-PH
B6B-PH
B10P-VH
B10P-VH
EJ204
B7B-PH
B7B-PH
EJ205
B7B-PH
B7B-PH
B9P-VH
B6P-VH
VH-6P
VT-2P
EPU2
ESW
VH-8P
EAS1
EH-2P
EH-2P
SP TERM.
R PWB
EAS2
EH-3P
EH-3P
42HDT50M/55M
ZH-12P
20FMN-BT
EJ202
EJ203
B9PS-VH
00 6200 520 330 000
E906
Page 99

PT3-E/G AVC3-U
AVC3-U CHASSIS WIRING DRAWING
99
BACK TO TABLE OF CONTENTS
Page 100

100
PT3-E/G AVC3-U
PT3-E/G CHASSIS WIRING DRAWING
42” Plasma Monitor Front
 Loading...