

Page 1
Model
DVD600II
DVD/CD/CD-R/CD-RW/VCD Changer
From the Cinema Propack
™
600II System
Servic e Manual
SPECIFICATIONS………………..…..….……2
SET-UP GUIDE……………………...…..…….4
FRONT PANEL CONTROLS……….…..……7
FRONT PANEL DISPLAY…………..….….…8
REAR PANEL CONNECTIONS……….…….9
REMOTE CONTROL FUNCTIONS….….…10
OPERATION………………………………….14
BASIC TROUBLESHOOTING………...…....21
EXPLODED VIEW……………………..…….24
EXPLODED/MECHANICAL P ARTS LIST…25
SERVICE BU LL ETIN JBL2002-01….……...26
JBL Consumer Products
250 Crossways Park Dr.
Woodbury, New York 117 97 Rev
CONTENTS
SERVICE BU LL ETIN JBL2003-01….…… . .2 8
SERVICE BU LL ETIN JBL2003-07….…… . .2 9
TECH TIP JBLTT2003-03…………………..30
BLOCK DIAGRAM………………………..…31
IC901 MICROPROCESSOR……………….32
ELECTRICAL PARTS LI ST…… …………… 38
PACKAGING…………………………………44
PCB DRAWINGS………………………….…45
POWER SUPPLY……………………………50
SCHEMATICS…….………………..……..….55
WIRING DIAGRAM…….…………………….63
2 9/20 05
Page 2
2
Playback Media: 5-inch (12cm) or 3-inch (8cm)
DVD-Video: Region 1, single or dual sides/layers, linear PCM,
Dolby Digital or DTS
CD, CD-R, CD-RW: Linear PCM Audio
MP3
Video CD (VCD): MPEG-1 Video, Linear PCM Audio
Video Section:
Signal format: NTSC
Composite Output: 1V p-p/75 ohms, sync, negative polarity
S Output: Y/Luminance: 1V p-p/75 ohms, sync, negative polarity
C/Chrominance: 0.286V p-p
Component Outputs: Y: 1V p-p/75 ohms, sync, negative polarity
Pr: 0.648V p-p/75 ohms
Pb: 0.648V p-p/75 ohms
Audio Section:
Coaxial Digital Output: 0.5V p-p/75 ohms
Frequency Response: 2Hz to 22kHz, +/– 0.5dB (44.1kHz sampling rate)
Dynamic Range: DVD: 105dB (20-bit)
CD: 100dB
Channel Separation: 90dB
THD: 0.0035%
Signal-to-Noise Ratio: 100 dB
Wow and Flutter: below measurable limits
General:
Unit Power Consumption: 25W
Unit Dimensions: Width: 17.3 inches (440mm)
Height: 5.1 inches (130mm)
Depth: 16.9 inches (420mm)
Unit Weight: 14.4 lb (7.6kg)
Depth measurement includes knobs and buttons.
Height measurement includes feet and chassis.
All features and specifications are subject to change without notice.
Technical Specifications
DVD600
II
This product incorporates copyright protection technology that is protected by method claims of certain U.S. patents and
other intellectual property rights owned by Macrovision Corporation and other rights owners. Use of this copyright protection
technology must be authorized by Macrovision Corporation and is intended for home and other limited viewing uses only,
unless otherwise authorized by Macrovision Corporation. Reverse engineering or disassembly is prohibited.
DVD600II
Page 3
1
O
)
DVD600II
3
DATE:SEP 26.2001
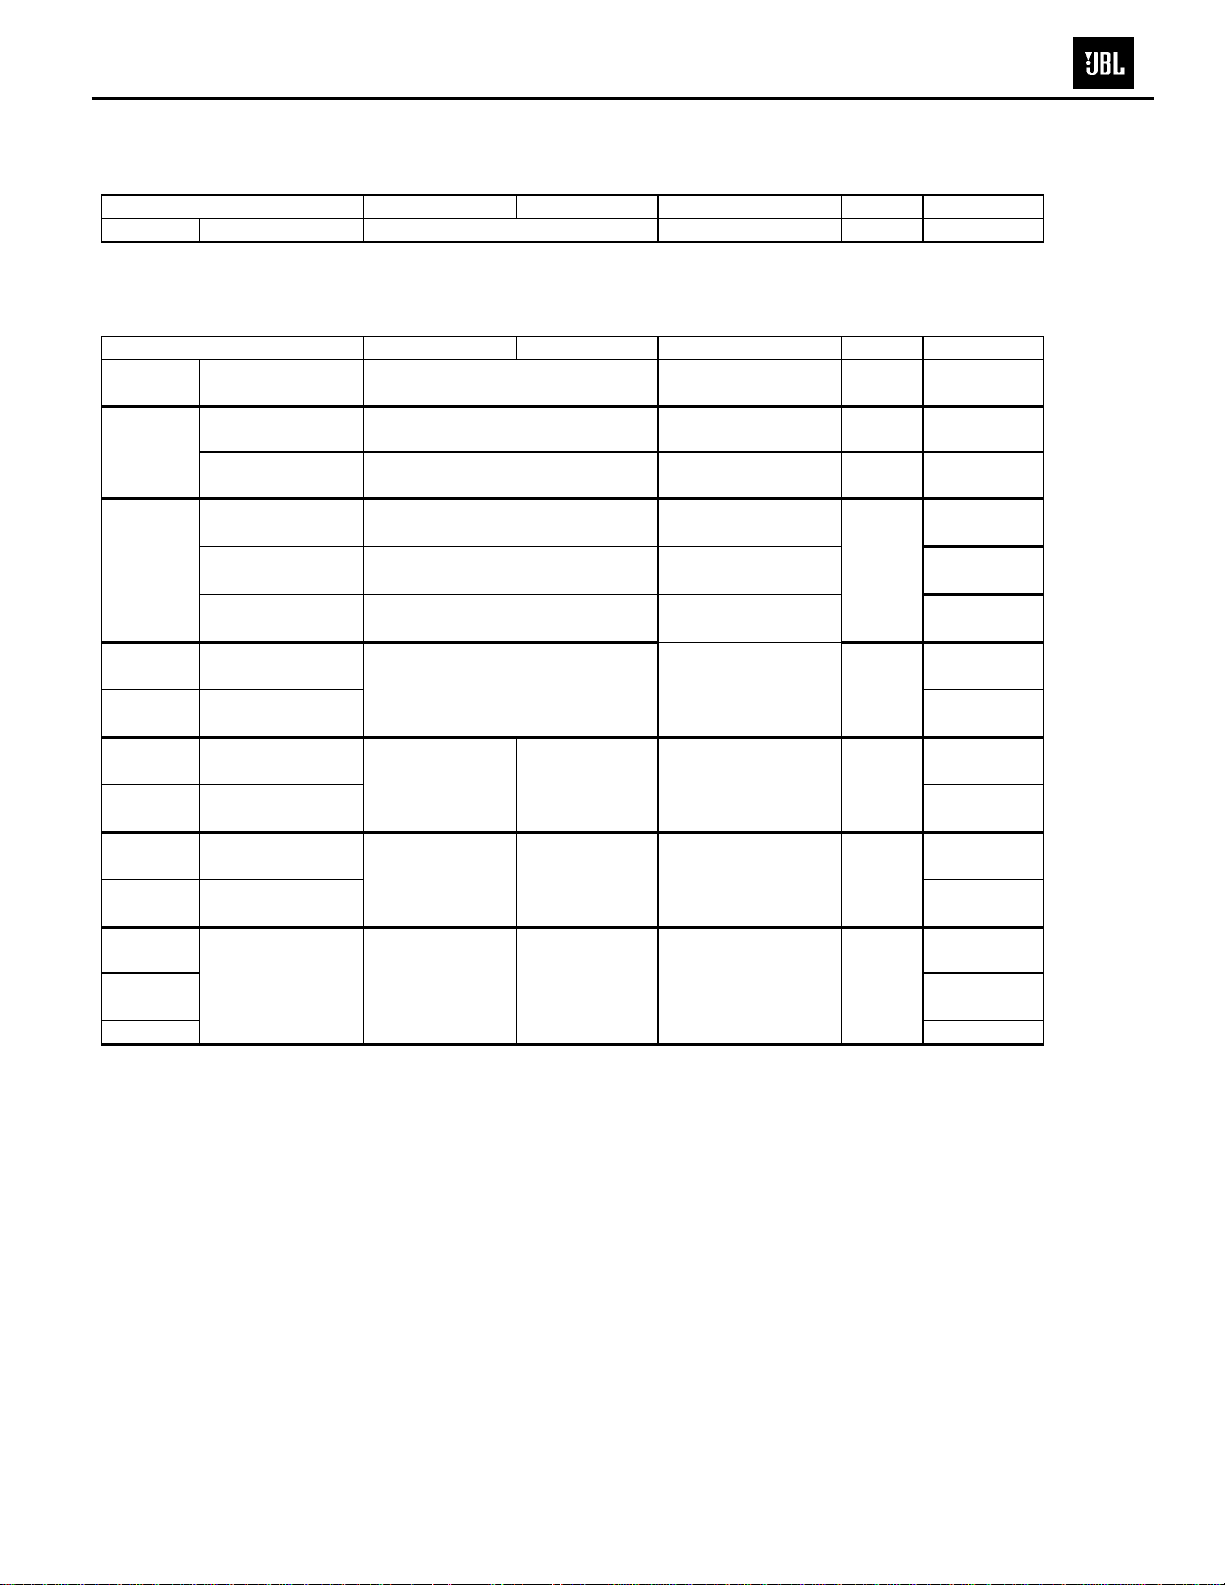
1. Audio
* Test Disc : YEDS 7(Sony),EIAJ CD-
Data
Coaxial(75Ω)
Item Test TrackTest ConditionsLimite Spec
Output Level
Nominal Spec
0.5 + 0.05V(p-p)
1
2. Video(75 Terminated) --->NTSC VIDE
* Test Disc : Navigation Vol 1 FOR SYSTEM(DVD-NF200
* VM700T
Norminal Spec
1.0V ± 0.1(p-p)
1.0V ± 0.1(p-p)
0.286V(p-p) ± 20%
Limite Spec Test Conditions
100% Flat
100% Flat
100% Flat
est Trac
1 - 1 -7
1 - 1 -7
1 - 1 -1
Data
C-Video
Output level
S - Video
Item
RCA JACK Level
(Y)Output Level
(C)Output Level
Y/Cb/Cr
Video
C-Video
S - Video
C-Video
S - Video
C-Video
S - Video
C-Video
S - Video
Y Output Level
Cb Output Level 0.7V(p-p) ± 20%
Cr Output Level
RCA JACK Freq. Resp.
S-JACK Freq.Resp
RCA JACK S/N
S- JACK S/N
RCA Jack Color S/N
S- Jack Color S/N
Color Burst Error
Frequency Response
Color S/N AM/PM
1.0V(p-p) ± 10%
0.7V(p-p) ± 20%
0±2.5dB
Frequency Response
Video S/N
60dB
Color S/N AM/PM
55dB60dB
Video S/N
55dB
±150Hz±120Hz
100% Flat
100% Color Bar
100% Color Bar
40 IRE
Multiburst
4.2 MHz±0.5MHz(NTSC)
50% Flat
BPF : 100KHz ~ 5.0MHz
WTD : Off, SC TRAP On
100% Red Color
HPF : 10KHz
LPF : 500KHz
75% Color Bar
1 - 1 -1
-1 - 8 -
1 - 1 - 6
- 1 - 8 -
1 - 1 - 1
Page 4
4
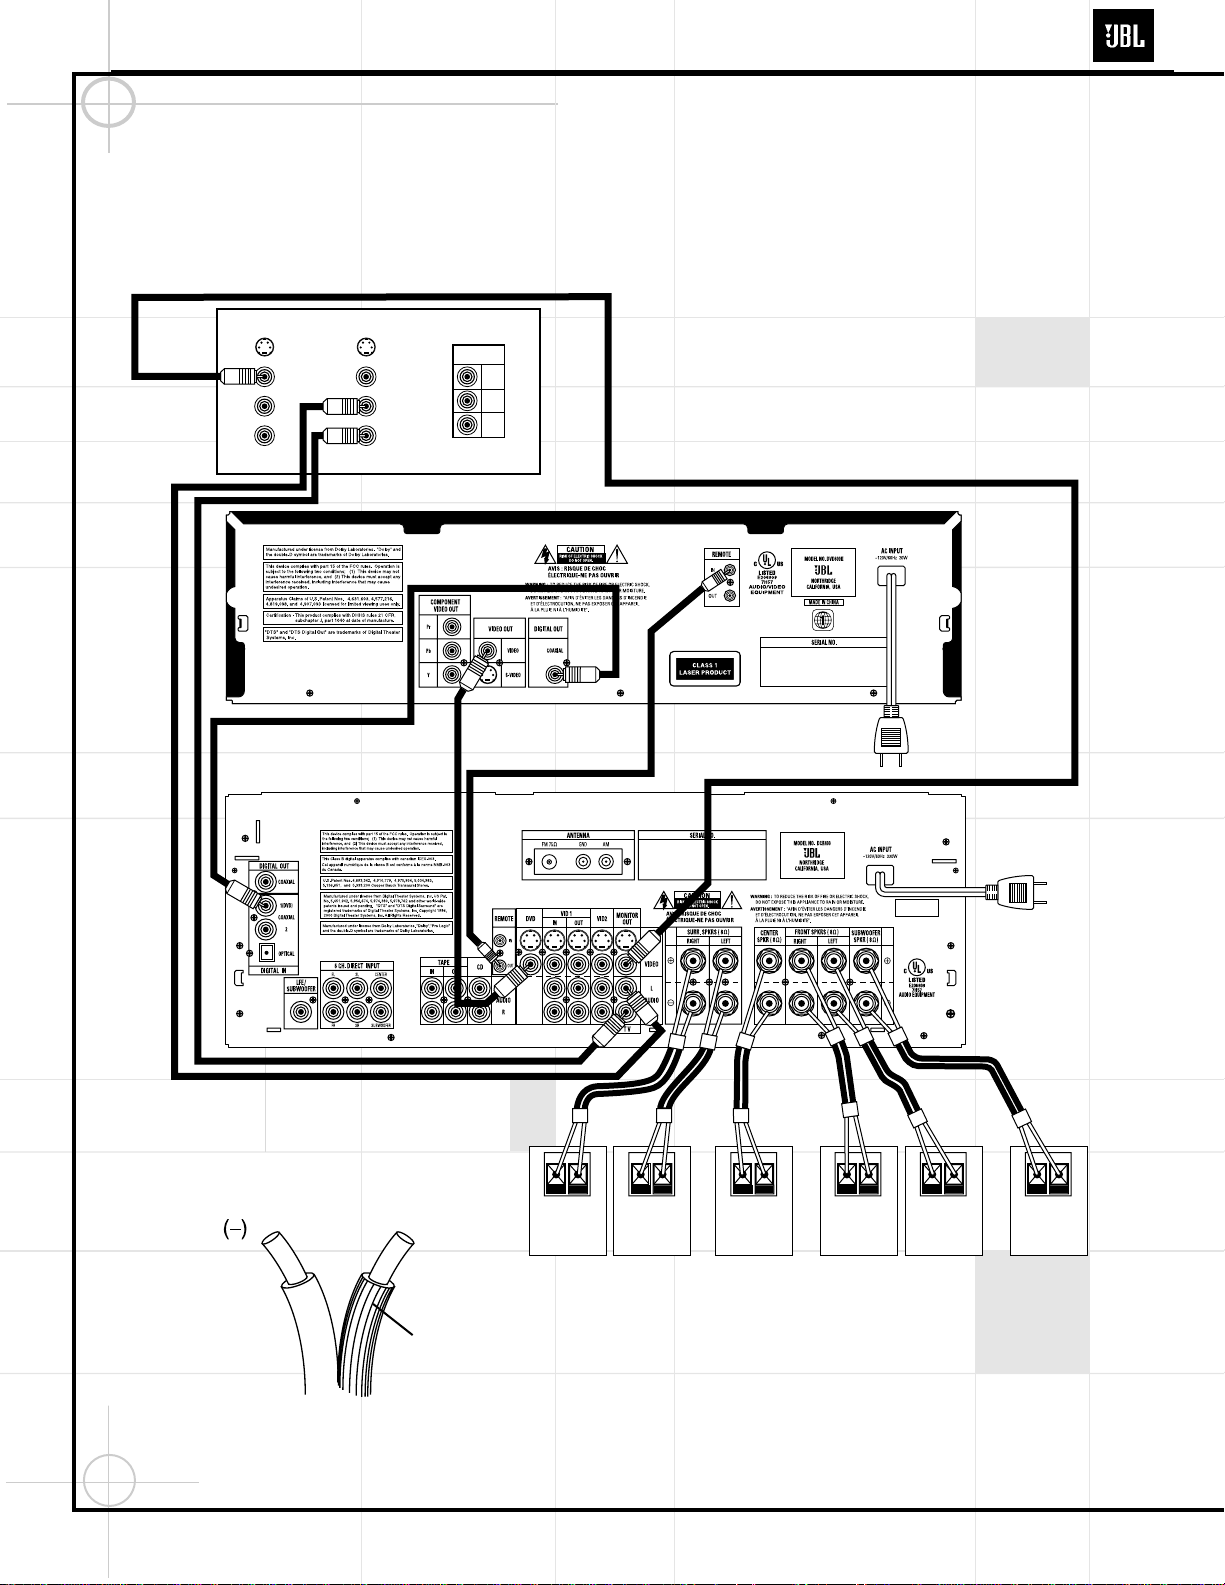
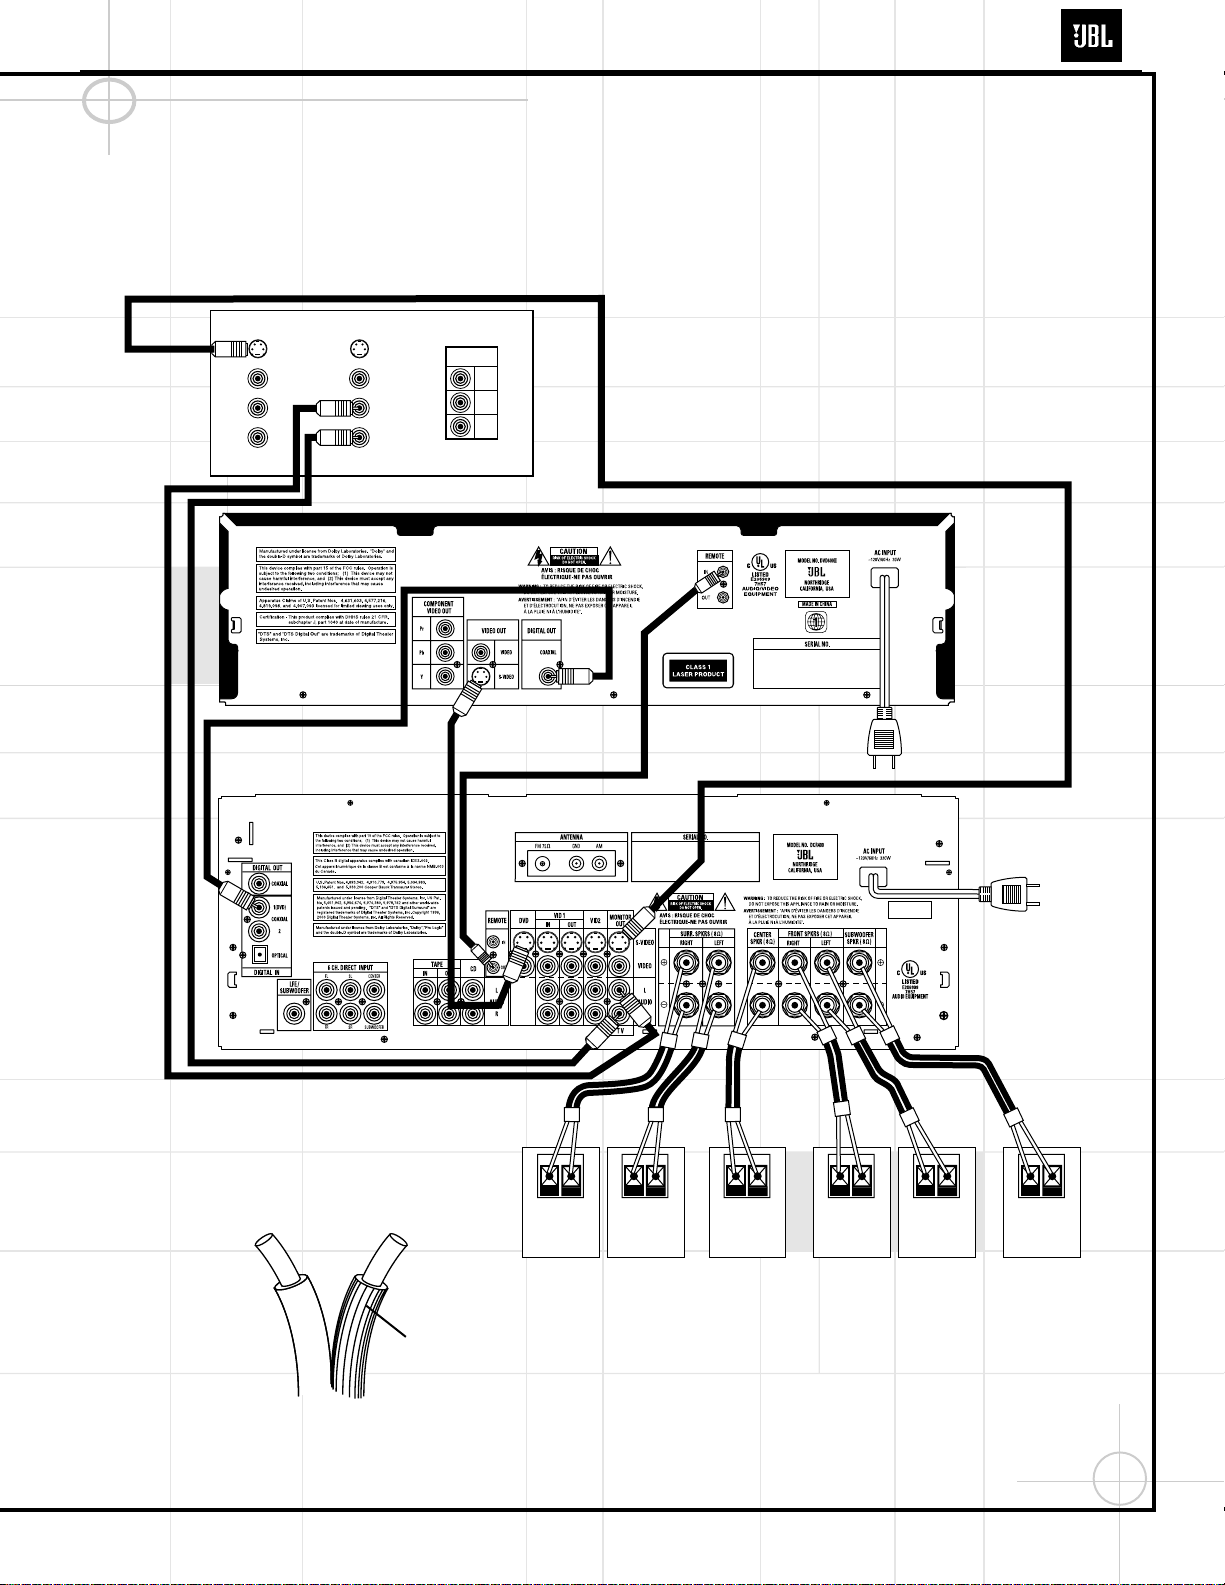
Quick Installation Diagrams
BASIC INSTALLATION: Your TV must at a minimum have a composite video input
(this connector usually has a yellow-colored core), and Left (usually has a
white-colored core) and Right (red-colored core) Stereo audio preamp-level
RCA outputs. All wires for this hookup are included.
TV
VIDEO IN
AUDIO IN
L
R
AUDIO OUT
L
R
VIDEO OUT
S-VIDEO IN
S-VIDEO OUT
COMPONENT
VIDEO IN
Pr
Pb
Y
White
Red
DCR600
II
DVD600
II
CONNECT TO
AC OUTLET
CONNECT TO
AC OUTLET
Yellow
Yellow BlackOrange
NOTES:
1. CONNECT “RIDGED” WIRE TO (+) COLORED TERMINAL AND CONNECT
“SMOOTH” WIRE TO (–) BLACK TERMINAL ON DCR600
II
AND SPEAKERS.
2. WIRE COLOR CODES ARE FOR EASE OF CONNECTION.
THE SPEAKER WIRES CAN BE INTERCHANGED IF NECESSARY.
(+)
Ridges
– +
SURROUND RIGHT
SPEAKER
– +
SURROUND LEFT
SPEAKER
– +
FRONT RIGHT
SPEAKER
– +
FRONT LEFT
SPEAKER
– +
CENTER
SPEAKER
– +
SUBWOOFER
Gray
Green
Red
White BrownBlue
DVD600II
Page 5
5
Quick Installation Diagrams
TV
VIDEO IN
AUDIO IN
L
R
AUDIO OUT
L
R
VIDEO OUT
S-VIDEO IN
S-VIDEO OUT
COMPONENT
VIDEO IN
Pr
Pb
Y
White
Red
DCR600
II
DVD600
II
CONNECT TO
AC OUTLET
CONNECT TO
AC OUTLET
BlackOrange
(–) (+)
Ridges
– +
SURROUND RIGHT
SPEAKER
– +
SURROUND LEFT
SPEAKER
– +
FRONT RIGHT
SPEAKER
– +
FRONT LEFT
SPEAKER
– +
CENTER
SPEAKER
– +
SUBWOOFER
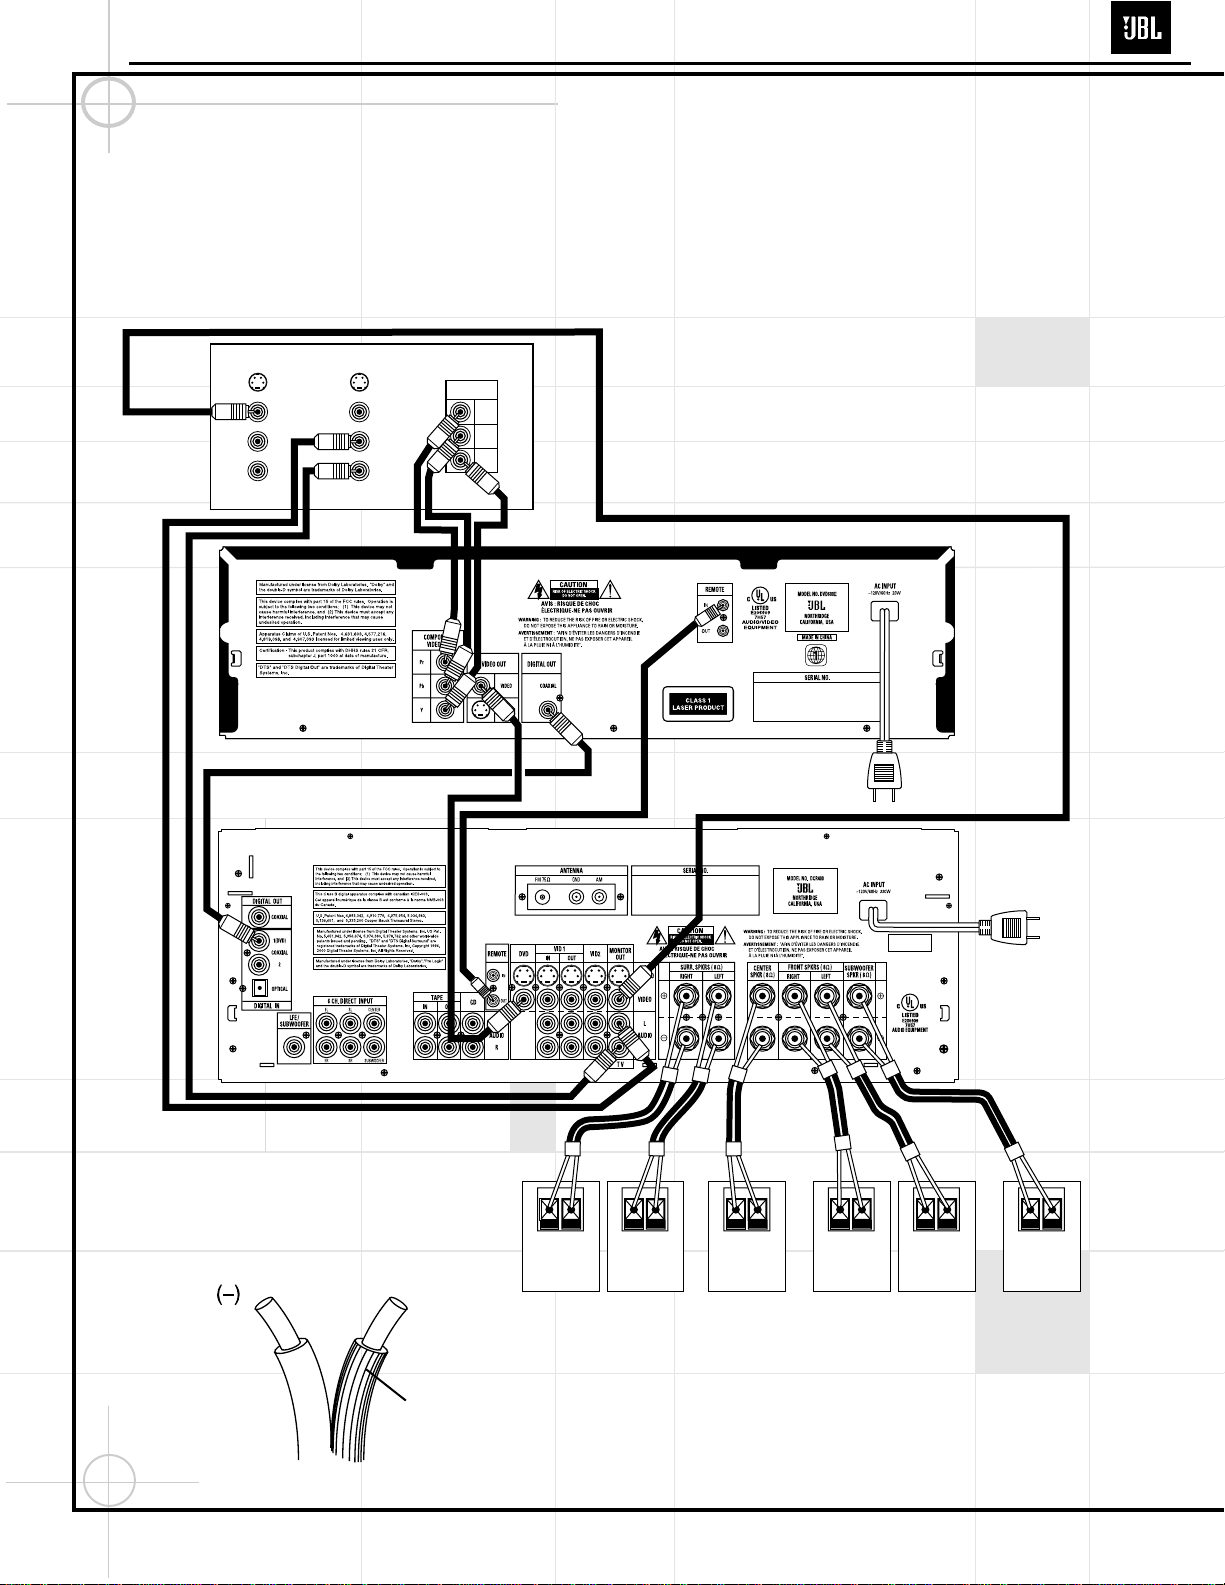
ALTERNATE INSTALLATION FOR BETTER PICTURE QUALITY: Y our TV
must have an S-Video input, and Left (usually has a white-colored core) and
Right (red-colored core) Stereo audio preamp-level RCA outputs. Two pieces
of S-Video cable are not included and should be purchased separately.
NOTES:
1. CONNECT “RIDGED” WIRE TO (+) COLORED TERMINAL AND CONNECT
“SMOOTH” WIRE TO (–) BLACK TERMINAL ON DCR600
II
AND SPEAKERS.
2. WIRE COLOR CODES ARE FOR EASE OF CONNECTION.
THE SPEAKER WIRES CAN BE INTERCHANGED IF NECESSARY.
S-Video cable
not included
S-Video cable
not included
Gray
Green
Red White BrownBlue
DVD600II
Page 6
6
Quick Installation Diagrams
TV
VIDEO IN
AUDIO IN
L
R
AUDIO OUT
L
R
VIDEO OUT
S-VIDEO IN
S-VIDEO OUT
COMPONENT
VIDEO IN
Pr
Pb
Y
White
Red
DCR600
II
DVD600
II
CONNECT TO
AC OUTLET
CONNECT TO
AC OUTLET
Yellow
Black
Orange
(+)
Ridges
– +
SURROUND RIGHT
SPEAKER
– +
SURROUND LEFT
SPEAKER
– +
FRONT RIGHT
SPEAKER
– +
FRONT LEFT
SPEAKER
– +
CENTER
SPEAKER
– +
SUBWOOFER
Yellow
ALTERNATE INSTALLATION FOR BEST PICTURE QUALITY: Your TV must have Y/Pr/Pb component
video inputs (three separate RCA connectors with red-, blue- and green-colored cores), and Left (usually
has a white-colored core) and Right (red-colored core) Stereo audio preamp-level RCA outputs. The
component video cable is not included and should be purchased separately. This setup requires that the
TV’s own video switching is utilized to access the DVD picture. All other video switching is still done through
the DCR600
II
.
NOTES:
1. CONNECT “RIDGED” WIRE TO (+) COLORED TERMINAL AND CONNECT
“SMOOTH” WIRE TO (–) BLACK TERMINAL ON DCR600
II
AND SPEAKERS.
2. WIRE COLOR CODES ARE FOR EASE OF CONNECTION.
THE SPEAKER WIRES CAN BE INTERCHANGED IF NECESSARY.
3. MUST USE VIDEO SWITCHING THROUGH TV TO ACCESS
COMPONENT VIDEO.
Gray
Green
Red White BrownBlue
Composite
Video cable not included
DVD600II
Page 7
7
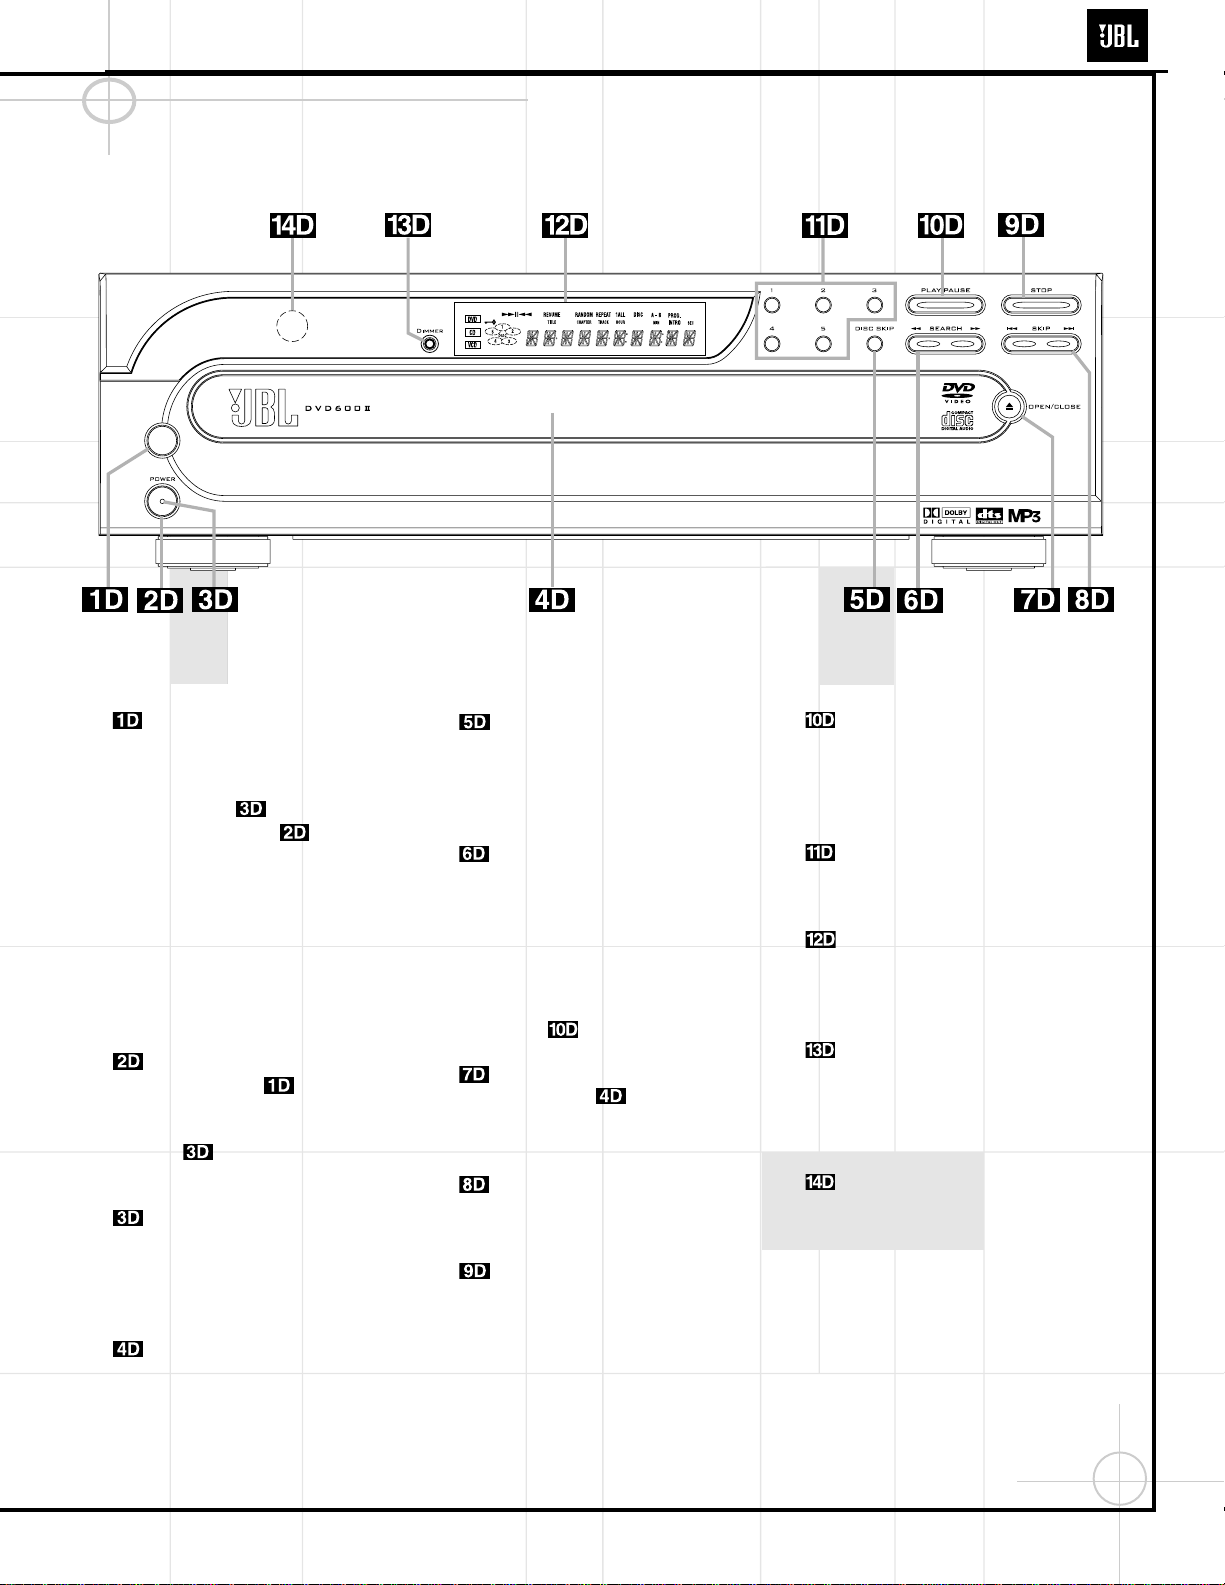
DVD600IIFront Panel Controls
Main Power Switch: Press this button
to apply power to the DVD600
II
. When the
switch is pressed in, the unit is placed in a
Standby mode, as indicated by the amber
Power Indicator surrounding the
System Power Control . This button
MUST be pressed in to operate the unit. To
turn the unit off and prevent the use of the
remote control, this switch should be pressed
until it pops out from the front panel so that
the word “OFF” may be read at the top of the
switch.
NOTE: This switch is normally left in the “ON”
position.
System Power Control: When the
Main Power Switch is “ON,” press
this button to turn on the DVD600
II
; press it
again to turn the unit off. Note that the Power
Indicator in the center of the switch
will turn green when the unit is on.
Power Indicator: This LED will be illuminated in amber when the unit is in the
Standby mode to signal that the unit is ready
to be turned on. When the unit is in operation,
the indicator will turn green.
Disc Tray: Holds up to five DVD or CD
discs that can be played one at a time in the
DVD600
II
.
Disc Skip: Press twice in quick succession to change the disc being played. This will
move the tray forward to the next occupied
position, skipping over the empty-disc
positions.
Search Forward/Reverse: Press to
move forward or backward through a disc at
one of four speeds. Each press and release will
increase the search speed, as indicated in the
on-screen display. Once you have selected the
desired speed, release the button and the disc
will continue to search at fast speed. To
resume normal playback speed, press the
Play Button .
Open/Close Button: Press to open or
close the Disc Tray . Upon closing the
disc tray, the On Screen Library system will
begin to identify all loaded discs.
Skip Forward/Reverse: Press to move
forward or backward through the music tracks
or chapters on a disc.
Stop: Press once to place the disc in the
Resume mode, which means that playback will
stop, but (as long as the tray is not opened or
the disc changed) DVD playback will continue
from the same point on the disc when the Play
button is pressed again. Resume will also work
if the unit was turned off. To stop a disc and
have play start from the beginning, press the
button twice.
Play/Pause: Press to begin playback of
a disc, or to momentarily pause playback. If a
DVD is playing, action will freeze and a still
picture will be displayed when the button is
pressed.
Direct Access Buttons: Press one of
these buttons to play any of the five discs
loaded in the Disc Tray.
Information Display: This display contains a variety of indicators that provide information about the status of the DVD600
II
and
the disc currently playing.
Display Dim: Press this button to adjust
the brightness of the Information Display by
50% or to turn the display off completely in the
following order: FULL BRIGHTNESS ➔ HALF
BRIGHTNESS ➔ OFF ➔ FULL BRIGHTNESS.
Remote Sensor: The sensor that
receives the infrared commands from the
remote control is behind this area. Do not
cover or obscure this part of the front panel, in
order to avoid a malfunction with the remote.
96KHz 24bit
DVD600II
Page 8
8
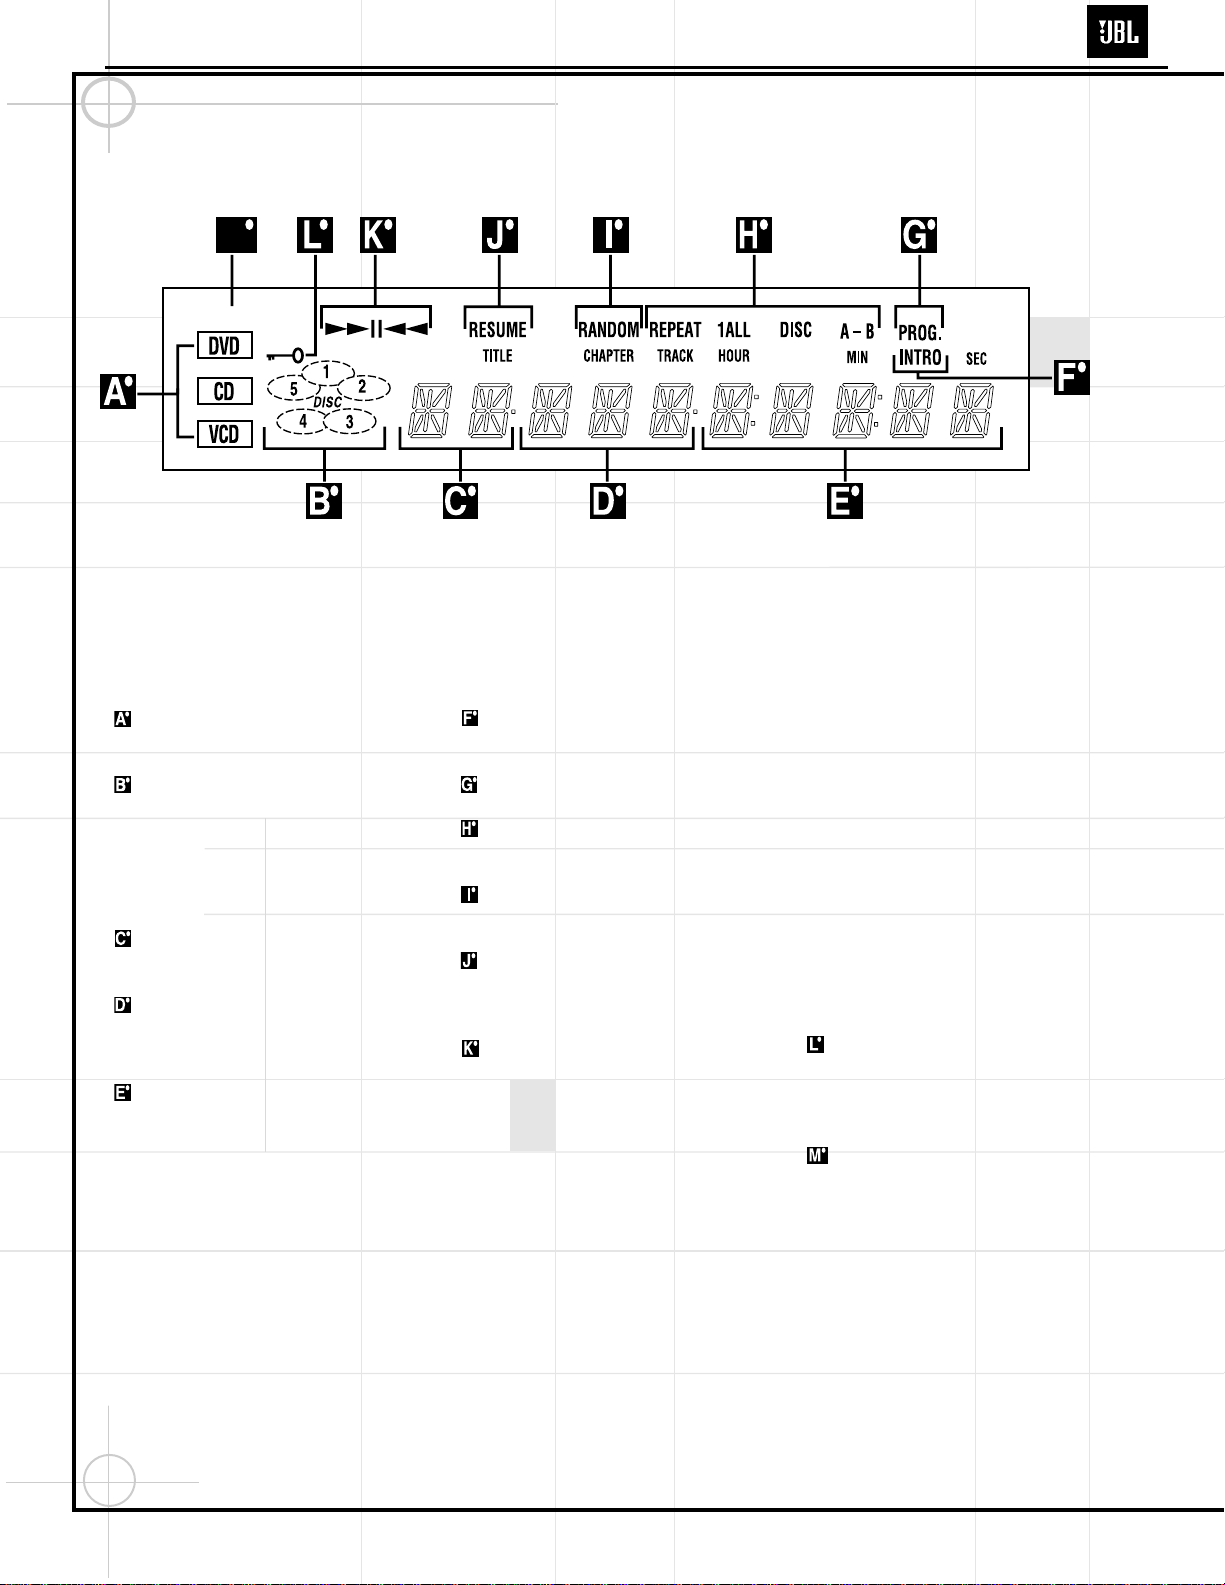
DVD600IIFront Panel Information Display
Disc Type: Lights to show the type of disc
currently being played.
Disc Number: Shows if a disc is loaded
in a tray position. The indicator for the disc in
play flashes. Note that if a disc is added to or
removed from the tray while a disc is playing,
the indicator will not show the change until all
discs are cycled.
Title:Shows the DVD title number currently
playing.
Chapter/Track Number:Shows the
current chapter (DVD) or current track
number (CD).
Program Time:Shows the running time
of a DVD; current track time; time remaining
in the current track; or the total remaining time
of a CD.
NOTE: The Program Time Indicators will also
display text messages about the DVD600
II
’s
status, including Reading when a disc is
loading, Bye when the unit is turned off, and
Disc Error when a disc not compatible
with the DVD600
II
is put into the play position.
Intro: Lights when the IntroScan function
is active.
Program: Lights during programming.
Repeat: Lights to indicate any of the
Repeat modes.
Random: Lights when the unit is in the
Random Play mode.
Resume: Lights when the Stop button has
been pressed once to put the unit in the
Resume mode.
Playback Mode: Lights to show the current playback mode:
› Lights when a disc is playing in the Normal
mode.
›› Lights when the disc is in the Fast Search
Forward mode. For DVDs, when both triangles
glow steadily, the disc plays at 2x normal
speed. When the right triangle is flashing, the
disc plays at 4x normal speed. When the left
triangle is flashing, the disc plays at 8x normal
speed. When both triangles are flashing, the
disc plays at 16x normal speed. For CDs, only
the first three Fast Search modes are available.
›± Lights when the disc is paused.
‹‹ Lights when the disc is in the Fast Search
Reverse mode. For DVDs, when both triangles
glow steadily, the disc plays at 2x normal
speed. When the left triangle is flashing, the
disc plays at 4x normal speed. When the right
triangle is playing, the disc plays at 8x normal
speed. When both triangles are flashing, the
disc plays at 16x normal speed. For CDs, only
the first three Fast Search modes are available.
Parental Lock Indicator: This indicator
lights when the parental-lock system is
engaged in order to prevent anyone from
changing the rating level without a code.
96kHz/24-Bit Indicator: When a highresolution, linear PCM bitstream with a sampling rate of 96kHz/24 bits is detected, this
indicator will light. Such a selection may be
found as an alternative audio track on a DVDAudio disc.
M
96KHz 24bit
DVD600II
Page 9
9
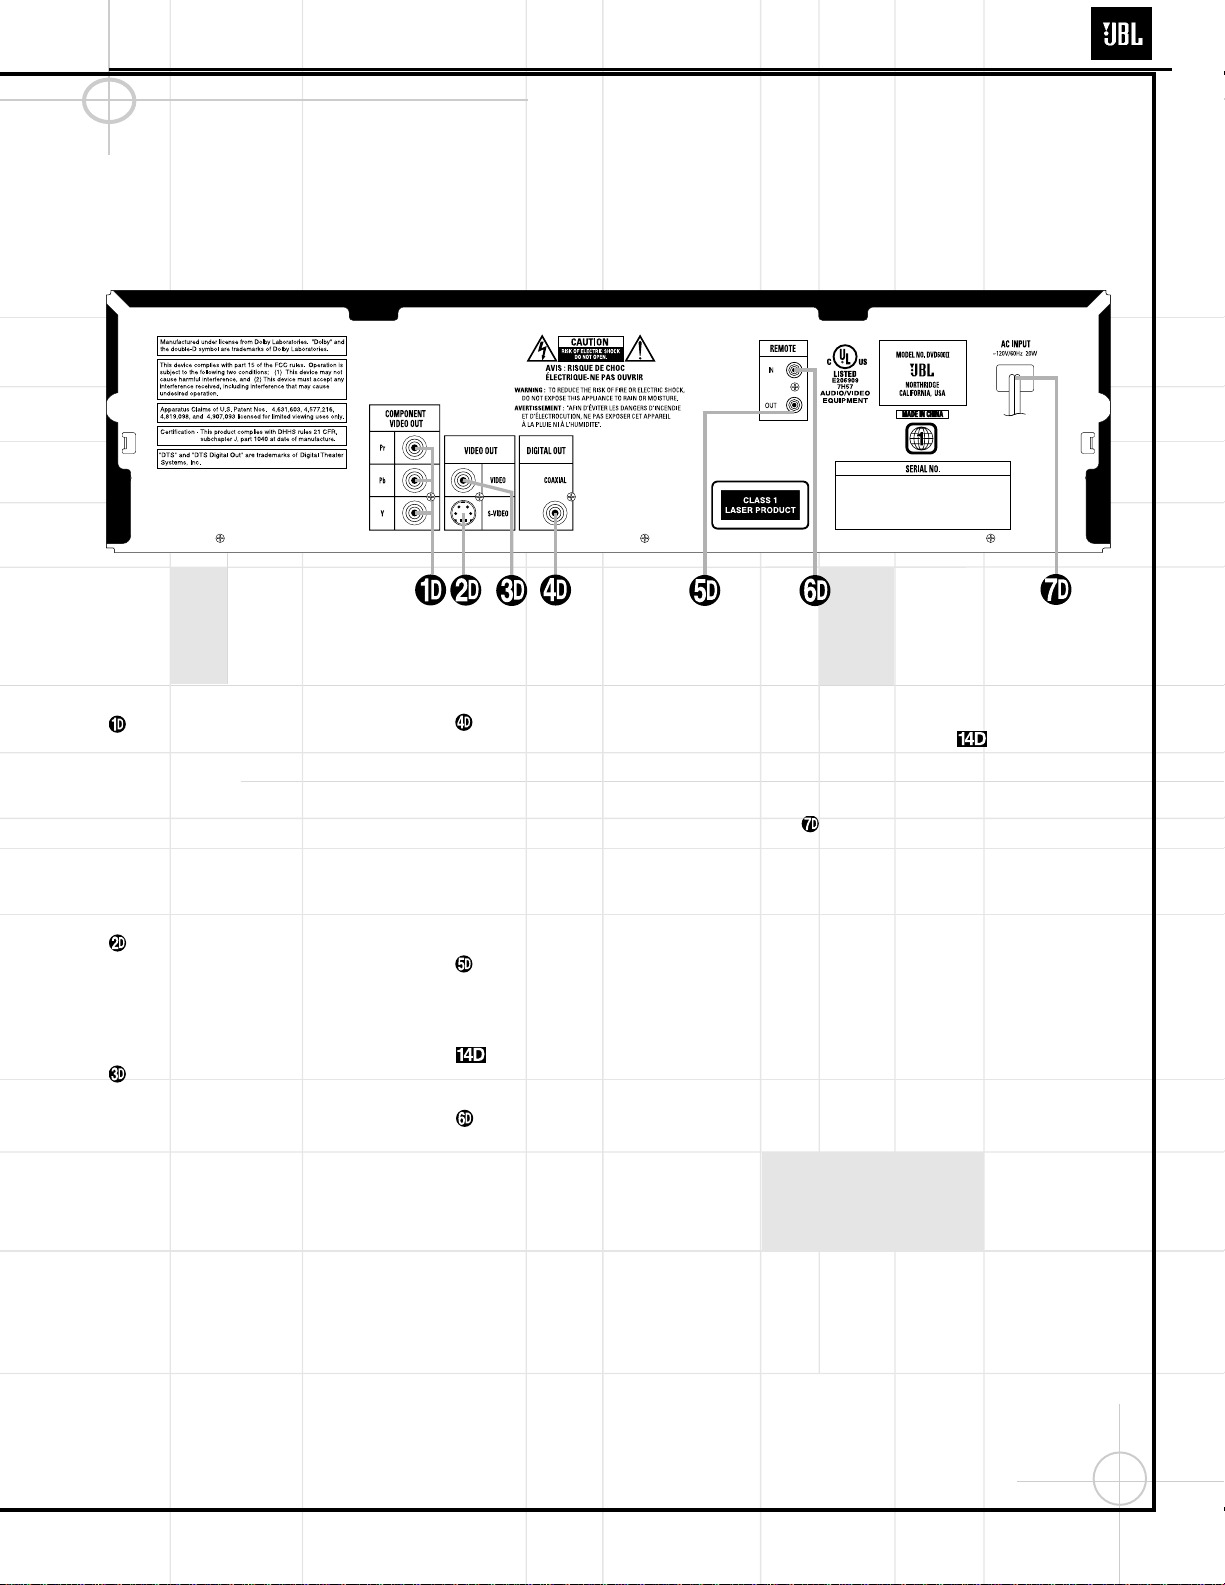
Component Video Outputs: If your TV or
video projector has component video inputs,
you may connect these output jacks to the set
for the highest video quality available. Note
that the component video inputs may be
labeled as Y/Pr/Pb or Y/Cr/Cb but, for connection purposes, they are the same. The outputs
of these jacks should NOT be connected to a
standard composite video input.
S-Video Output: Connect this jack to the
S-Video input on a television or video projector,
or to an S-Video input on an A/V receiver or
processor if you are using that type of device
for S-Video input switching.
Composite Video Output: Connect this
jack to the video input on a television or video
projector, or to a video input on an A/V receiver
or processor if you are using that type of
device for video input switching.
Coaxial Digital Output: Connect this jack
to the coaxial digital input of an A/V receiver
or surround processor for Dolby Digital, DTS or
PCM audio playback.
NOTE: The coaxial digital output should only
be connected to a digital input. Even though it
is the same RCA-type connector as standard
analog audio connections, DO NOT connect it
to a conventional analog input jack.
Remote Control Output: Connect this
jack to the infrared (IR) input jack of another
JBL (or other compatible) remote-controlled
product to have the built-in Remote Sensor
on the DVD600
II
provide IR signals to
other compatible products.
Remote Control Input: Connect the output of a remote infrared sensor, or the remote
control output of another JBL (or other compatible) product, to this jack. This will enable the
remote control to operate even when the front
panel Remote Sensor is blocked. This
jack may also be used with compatible IR
remote control-based automation systems.
AC Power Cord: Connect this plug to
an AC outlet. If the outlet is controlled by a
switch, make certain that it is in the ON
position.
DVD600IIRear Panel Connections
DVD600II
Page 10
10
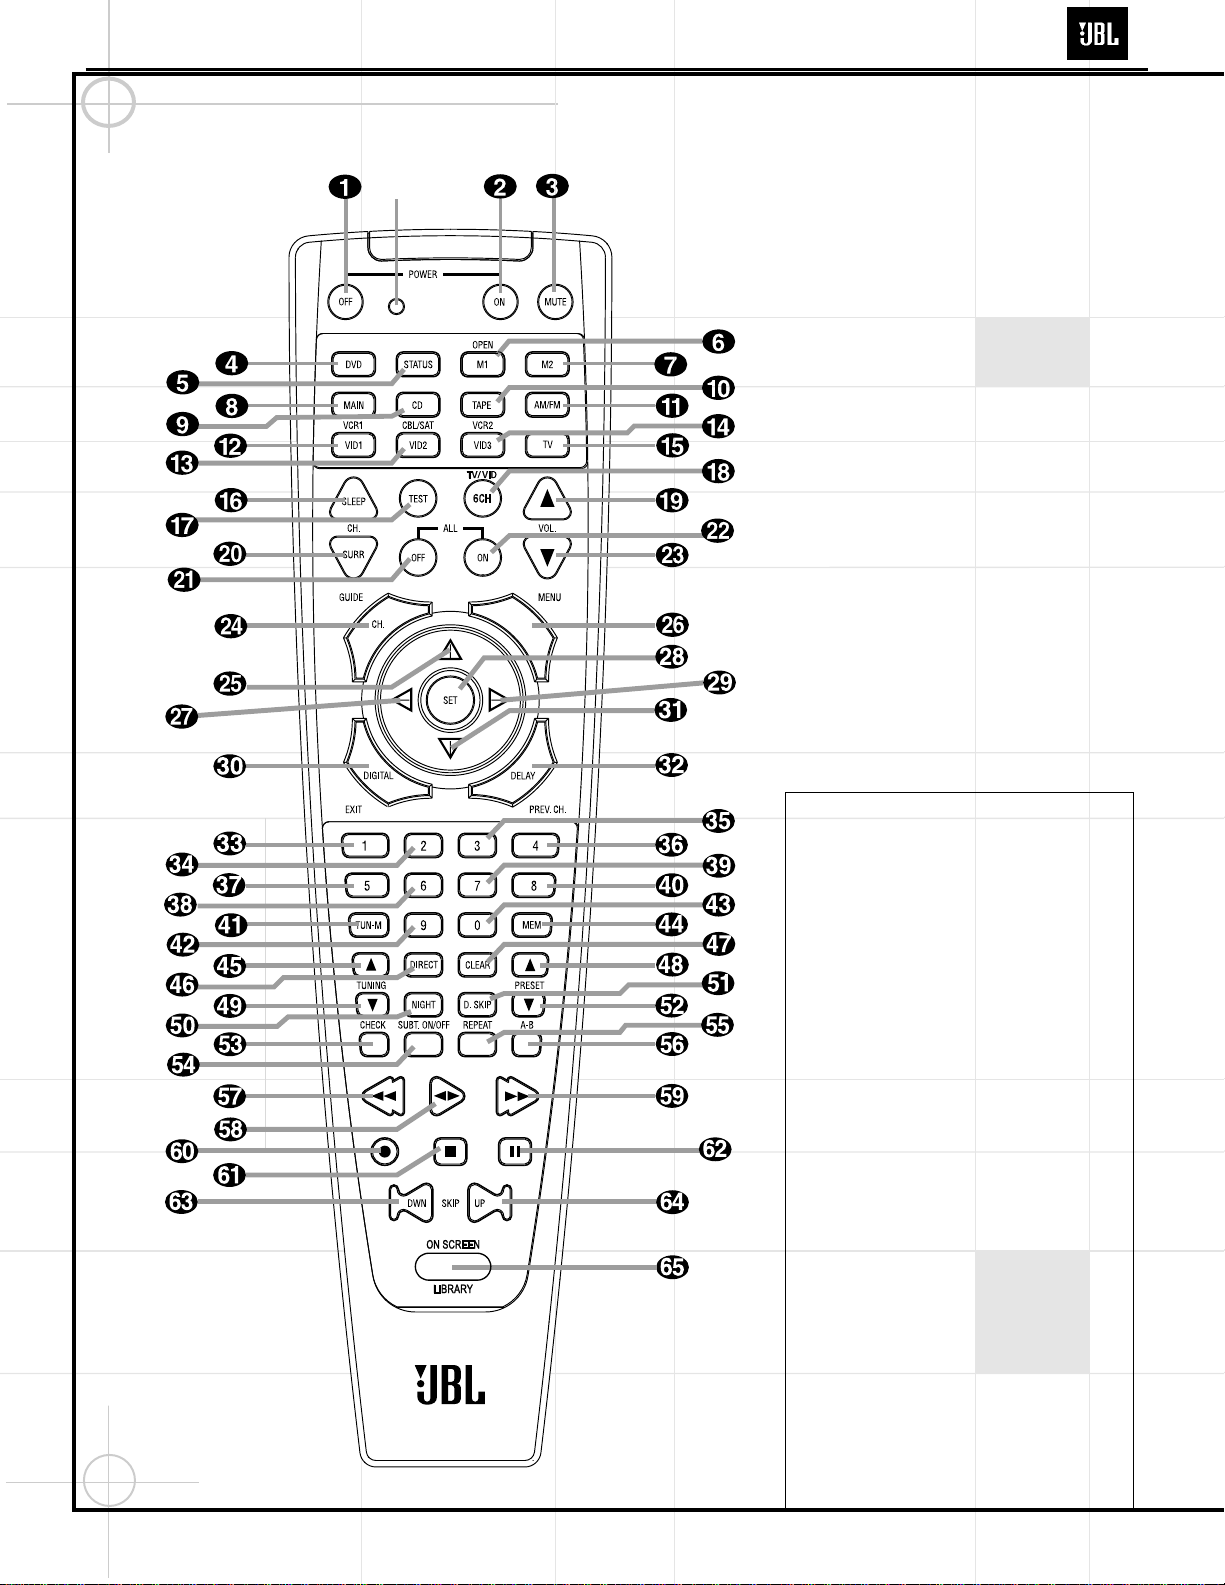
Remote Control Functions
IMPORTANT NOTE:The remote control for
the JBL Cinema ProPack 600
II
may be programmed to control up to eight devices, including the DCR600IIand DVD600II. It is helpful to
think of the remote as being organized into
“pages,” with one page for each device.
Depending on which device has been selected,
the buttons on that device’s page will perform
different functions, as listed starting on this
page. These functions may vary from the labels
on the remote, and from one device to the
next. Some buttons may perform no function
at all for a given device.
In order to go to the page for a particular
device, such as the DVD600
II
, you will need to
press the Input Selector button for that device
(DVD in this case), located in a grouping just
below the power buttons. The remote will then
function as if it were dedicated to the DVD600
II
.
If you would like to make an adjustment that
affects the DCR600
II
receiver, such as turning
the volume up or down, you must first go to
the page for the DCR600IIby pressing its Input
Selector button. This button is labeled “Main”
on the remote. The exception to this rule is
that the transport functions of the DVD600
II
–
Play, Forward and Reverse Search, Stop,
Pause, and Previous and Next Chapter/Track
Skip – may be accessed from the “Main” page,
without having to jump to the DVD page.
- -
PROGRAM
INDICATOR LED
a Power Off Button: Turns off the power
to a device selected by pressing its Input
Selector.
b Power On Button: Turns on the power
to a device selected by pressing its Input
Selector.
c Mute Button: Press to momentarily
silence the DCR600
II
or TV set being controlled, depending on which device has been
selected.
When the remote is being programmed to
operate an external device, such as a CD
player
, this button is pressed, together with
the Input Selector button for the new device,
to begin the programming process.
d DVD Input Selector: Pressing this
button will perform three actions: 1) If the
DCR600
II
is not turned on, it will power up.
2) It will select DVD as the input source.
3) It will switch to the page for the DVD600
II
,
which will cause the remote to operate only
the DVD changer. Press the Main Buttonh
to return the remote to control of the DCR600
II
receiver.
DVD600II
Page 11
11
e Status Button: This button operates only
when the DVD600
II
has been selected. When a
disc is playing, pressing this button will display
the Status Banner, which contains information
about the disc and enables you to change the
functions.
fg M1 and M2 Macro Buttons/OpenClose Button: Press these buttons to store or
recall a “Macro”, which is a preprogrammed
sequence of commands stored in the remote.
When the DVD600
II
has been selected, the M1
Button f functions to open or close the disc
tray drawer. (M2g has no function.) If the
drawer is opened while a disc is still playing,
playback will continue and discs not in use
may be changed. If the drawer is opened while
the unit is stopped, the disc that was playing
will be presented at the front-center position
of the tray.
h Main Input Selector: Pressing this
button will perform two actions: 1) If the
DCR600
II
is not turned on, it will power up.
2) It will switch to the page for the DCR600
II
,
which will cause the remote to operate only
the receiver and the transport functions of
the DVD600
II
.
i CD Input Selector: Pressing this button
will perform three actions: 1) If the DCR600
II
is
not turned on, it will power up. 2) It will select
CD as the input source. 3) It will switch to the
page for the CD player whose codes have been
programmed into the remote, which will cause
the remote to operate only the CD player. Press
the Main Button h to return the remote to
control of the DCR600
II
receiver.
j Tape Input Selector: Pressing this
button will perform three actions: 1) If the
DCR600
II
is not turned on, it will power up.
2) It will select TAPE as the input source.
3) It will switch to the page for the tape deck
whose codes have been programmed into the
remote, which will cause the remote to operate only the tape deck. Press the Main Button
h to return the remote to control of the
DCR600
II
receiver.
k AM/FM Tuner: Selects the receiver’s
tuner as the listening choice. Pressing this button when the tuner is already in use will select
between the AM and FM bands.
l Video 1 Input Selector (VCR 1): Pressing this button will perform three actions: 1) If
the DCR600
II
is not turned on, it will power up.
2) It will select VIDEO 1 as the input source. 3)
It will switch to the page for the video device
whose codes have been programmed into the
remote, which will cause the remote to operate only that video device. You may find it convenient to connect your VCR to the Video 1
input, since it is the only video source that also
features outputs for recording. Press the Main
Button h to return the remote to control of
the DCR600
II
receiver.
m Video 2 Input Selector (Cable or
Satellite): Pressing this button will perform
three actions: 1) If the DCR600
II
is not turned
on, it will power up. 2) It will select Video 2 as
the input source. 3) It will switch to the page
for the video device whose codes have been
programmed into the remote, which will cause
the remote to operate only that device. You
may find it convenient to connect your cable
television box or satellite receiver to this input.
Press the Main Button h to return the
remote to control of the DCR600
II
receiver.
n Video 3 Input Selector (VCR 2): Pressing this button will perform three actions: 1) If
the DCR600
II
is not turned on, it will power up.
2) It will select VIDEO 3 (the front panel input)
as the input source. 3) It will switch to the
page for the video device whose codes have
been programmed into the remote, which will
cause the remote to operate only that video
device. Since this input is located on the front
panel of the receiver, you may find it convenient to temporarily connect a camcorder, video
game, or a second video cassette player to the
Video 3 input. Press the Main Button h to
return the remote to control of the DCR600
II
receiver.
o TV Input Selector: Pressing this button
will perform three actions: 1) If the DCR600
II
is
not turned on, it will power up. 2) It will select
TV as the input source. 3) It will switch to the
page for the television whose codes have been
programmed into the remote, which will cause
the remote to operate only that device. You
may find it convenient to connect your television to this input, particularly since it does not
have a video input associated with it, the
assumption being that the program signal originates at the TV, and that the TV is already displaying the video portion of the signal. Press
the Main Button h to return the remote to
control of the DCR600
II
receiver.
p Sleep: Places the DCR600
II
in the Sleep
Timer mode. After the time shown in the
display has elapsed, the DCR600
II
will automatically go into Standby. Each press of this
button changes the time until turn-off in intervals of 10 minutes, starting with a maximum
of 90 minutes.
This button is also used to change channels on
your TV when the TV is selected.
This button is also used during the “Auto Search”
procedure when programming the remote.
q Test: Begins the sequence used to
calibrate the speaker output levels.
When the CD input has been selected and a CD
recorder is in use, this button is used to select
among the analog and digital inputs to the CDR.
r 6CH (TV/VID): Press to select the
6-Channel Direct Input ∞ as the input
source. When used with a compatibly programmed VCR, DVD, TV or Satellite receiver
that has a “TV/Video” function, pressing this
button will switch between the output of that
device and the external video input to that
device. Consult the owner’s manual for your
specific player or satellite receiver for the
details of how it implements this function.
s Volume Up: Use to raise the system
volume.
t Surround Mode/Audio: Begins the
process of changing the surround mode when
the DCR600
II
is selected. After the button has
been pressed, use the
⁄/¤
Buttons y
to select the desired surround mode.
When the DVD600
II
is selected, this button
allows you to select from the available audio
tracks (including audio surround modes) or languages on a DVD disc that is currently playing.
Press this button repeatedly until the desired
audio selection appears.
This button is also used to tune channels when
the TV is selected.
This button is also used during the “Auto
Search” procedure when programming the
remote.
u
All Off: This feature of the JBL One-Click
™
(patent pending) remote simultaneously sends
Power Off commands to all programmed
devices controlled by the remote.
v All On: This feature of the JBL One-Click
remote simultaneously sends Power On commands to all programmed devices controlled by
the remote.
w Volume Down: Use to lower the system
volume.
x Channel/Title/Guide:Starts the process
of setting the receiver’s speaker output levels
using an input source rather than the test tone.
Press this button, then use the
⁄/¤
Buttons
DVD600II
Page 12
12
y to select the channel being adjusted,
followed by the Set Button . You may
then use the
⁄/¤
Buttons y again to
change the level for that channel. Press the
Set Button to lock in the setting.
When using the DVD600
II
to play a DVD disc,
this button functions as a Title button, and displays the disc’s Title Select Menu, or a symbol
() if the disc either does not offer this function or has only one title.
When the Video 2 input has been programmed
for a cable or satellite service, this button will
access the service’s programming guide, if the
service is active.
y
⁄
: Used to change or scroll through items
in the on-screen menus, or to change configuration settings, such as output levels. When
changing an item such as the surround mode
or digital input directly, first press the function
or mode to be changed, such as Surround
Mode or Digital Input, and then press this button
to scroll through the list of available choices.
In
DVD mode, press this button to skip to the
next higher chapter of the current disc.
z Menu: Used only with video sources.
When DVD is selected, pressing this button
while a DVD disc is playing stops playback and
displays the disc’s menu. When the unit is
stopped, pressing this button displays the DVD
player’s Setup Menu.
`
‹
: Used to change the menu selection
or setting during some of the setup or other
procedures. In DVD mode, press this button to
play the current disc in Fast Reverse mode.
Set: Used to enter settings into the mem-
ory of the DCR600
II
, DVD600IIor video device
selected. Also used in the setup procedures for
delay time, speaker configuration and channel
output level adjustment. When the DVD600
II
has been selected, pressing this button will
select the item that is highlighted in the Status
Banner, or in the on-screen menu displayed by
a DVD disc. When the Status Banner has not
been activated, pressing this button will alternately Play or Pause the current disc. When
the On Screen Library is displayed on-screen,
pressing this button will begin play of the
currently selected disc.
›
: Used to change the menu selection
or setting during some of the setup or other
procedures. In DVD mode, press this button to
play the current disc in Fast Forward mode.
Digital/Subtitle/Exit: When the DCR600
II
is selected, press this button to assign one of
the digital inputs to a source. When the
DVD600
II
is selected, this button is used to
change the subtitle choice. For other video
devices, it exits the menu.
¤
: Used to change or scroll through
items in the on-screen menus, or to change
configuration settings, such as output levels.
When changing an item such as the surround
mode or digital input directly, first press the
function or mode to be changed, such as
Surround Mode or Digital Input, and then
press this button to scroll through the list of
available choices. In DVD mode, press this button once to return to the beginning of the current chapter or track, and twice to skip to the
next lower chapter or track of the current disc.
Delay/Return/Prev Ch.: Begins the
process for setting the delay times used by the
DCR600
II
when processing surround sound.
After pressing this button, the delay times are
entered by pressing the Set Button and
then using the
⁄/¤
Buttons y to
change the setting. Press the Set Button
again to complete the process.
This button is also used when viewing a menu
display from a DVD disc. Press it to return to
the previous menu screen.
When the Video 2 Input fl‡ has been programmed for a cable or satellite service, this
button will skip to the previous channel.
–
,
Numeric Keys: These
buttons serve as a ten-button numeric keypad
to enter tuner preset positions. They are also
used with the DVD600
II
to directly access a
disc (when pressed within 3 seconds after the
Disc Skip Button ) or track (when
pressed while a disc is playing), to enter data
for sequential programming, to enter or change
the access password for parental control, to
enter a language code, or to respond to menu
options presented by a disc. When the TV or
another video device is selected, they are used
to select channel numbers. They may also be
used to select track or chapter numbers when
playing a CD or DVD.
Tuner Mode/Angle:Press this button
when the tuner is in use to select between
automatic tuning and manual tuning. When
the button is pressed so that the AUTO
Indicator T goes out, pressing the Tuning
Buttons 8 will move the frequency
up or down in single-step increments. When
the AUTO Indicator T is lit, pressing the
Tuning Buttons 8 will cause the
tuner to search for the next station with an
acceptable signal. When the FM band is in
use, pressing this button when a station’s signal is weak will change to monaural reception.
When a DVD encoded with multiple-angle
information is playing, press to change the
angle in use. This function is only available
on discs that are specially prepared to take
advantage of the multiple-angle function, and
only for those parts of the disc that are recorded
with multiple-angle content. The DVD600IIwill
display a camera icon on the screen to indicate
when this feature is available.
Memory: Enters a radio station into the
DCR600II’s preset memory. Once the MEMORY
Indicator Q flashes, you have five seconds
to enter a preset memory location using the
Numeric Keys
–
,
. Repeat
the process to enter additional stations.
Tuning Up/Down/Step (Frame
Advance) Buttons: When the tuner is in use,
these buttons will tune up or down through the
selected frequency band. If the Tuner Mode
Button @ has been pressed so that the
AUTO Indicator T is illuminated, pressing
either of the buttons will cause the tuner to
seek the next station with acceptable signal
strength for quality reception. When the AUTO
Indicator T is NOT illuminated, pressing
these buttons will tune stations in single-step
increments.
When a DVD disc is playing, press these
buttons to move forward or backward one
frame at a time. Press the Play/Pause Button
to resume normal play. These
buttons do not function when a CD is playing.
Direct/Program Button: Pressing this
button in tuner mode, or while a CD or DVD is
playing, starts the sequence for direct entry of
a station’s frequency, a CD track or a DVD chapter. After pressing the button, simply press the
proper Numeric Keys –
,
to
select a station, track or chapter. You may also
skip to a track or chapter by entering its number,
without first pressing the Direct Button .
When the DVD600
II
is stopped, press this
button to display the program menu and enter
a programmed play sequence. When a disc is
playing, press to switch between normal play
and programmed playback, if a playlist has
been programmed.
Clear Button: Erases incorrect entries
when using the remote to directly enter a radio
station’s frequency.
When the DVD600
II
has been selected, press
this button to remove the Status Banner or
other displays from your video screen. This
button is also used to clear items from
programmed playlists.
DVD600II
Page 13
13
Preset Up/Down/Slow-Play
Buttons: When the tuner is in use, press these
buttons to scroll through the stations programmed into the receiver’s memory.
When a DVD disc is playing and the DVD600
II
has been selected, press these buttons to
move forward or backward through the disc in
slow speed. Each press of these buttons
changes the slow-play speed in the following
order: 1/16 Normal Speed ➔ 1/8 Normal
Speed ➔ 1/4 Normal Speed ➔ 1/2 Normal
Speed. To resume normal play, press the
Play/Pause Button . These buttons
do not function when a CD is playing.
Night Mode/Random: Activates the
Night mode of the DCR600
II
. This mode is
available in specially encoded digital sources,
and it preserves dialogue (center channel)
intelligibility at low volume levels.
When the DVD600
II
has been selected, press
to begin the playback of all tracks on a disc in
random order.
Disc Skip Button: Press twice in rapid
succession to move to the next available disc
in the tray when using a DVD or CD player.
This button has no direct effect on the
DCR600
II
. When a single press of this button is
followed by a disc number, the DVD600
II
will
skip directly to that disc.
Check: This button only functions when
the DVD600
II
has been selected. When a CD is
playing, press this button to check the status
of the current disc via the on-screen display.
This button is also used to verify the contents
of a programmed playlist via the front-panel
Information Display.
Subtitle On/Off: This button only
functions when the DVD600
II
has been selected.
When a DVD is playing, press this button to
turn the Subtitle Display on or off.
Repeat: This button only functions when
the DVD600
II
or a CD player has been selected.
Press to select one of the Repeat-Play modes:
Repeat All (discs), Repeat 1 Disc, Repeat Title,
Repeat Track/Chapter. Each press of the
button shows the choice selected in both the
on-screen Status Banner display or in the
Repeat Indicators in the front panel
Information Display.
Repeat A–B: This button only functions
when the DVD600
II
has been selected. Press
once to begin the selection of a portion of a
disc to be repeated. Press it again to choose
the end point of the repeat-play selection. This
function is unavailable during programmed or
random play.
NOTE: When any of the following buttons
–
is pressed while the remote has
selected the Main Page, the remote will
automatically switch to control of the DVD, as
indicated by the DVD Input Selector d
lighting.
Reverse Search/Rewind: When the
DVD600
II
has been selected, press to move
backward through a CD or DVD at one of four
speeds. Each press and release will increase
the search speed, in the following order: R.
Search x 2 ➔ R. Search x 4 ➔ R. Search x 8
➔ R. Search x 16. Once you have selected the
desired speed, release the button, and the
disc will continue to search at fast speed.
To resume normal playback, press the Play/
Pause Button .
When a tape deck or VCR has been selected,
this button rewinds the tape.
Play Button: Press to begin playback
when the DVD600
II
has been selected. If the
disc tray drawer is open, it will automatically
close when the button is pushed. Pressing the
Play button when the unit is in the Standby
mode will turn the unit on and begin playback
of the last disc in use.
When a CD player, tape deck or VCR has been
selected, pressing this button will also begin
playback. See the owner’s manual for that
device for more information on the operation
of the play function as it affects that device.
Forward Search/Fast Forward: When
the DVD600
II
has been selected, press to move
forward through a CD or DVD at one of four
speeds. Each press and release will increase
the search speed, in the following order:
F. Search x 2 ➔ F. Search x 4 ➔ F. Search
x 8 ➔ F. Search x 16. Once you have selected
the desired speed, release the button, and the
disc will continue to search at fast speed. To
resume normal playback, press the Play/
Pause Button . When a tape deck
or VCR has been selected, this button fastforwards the tape.
Record Button: This button only functions when a CD/CD-R, tape deck or VCR connected to the Video 1 Input lmno
has been selected. See the owner’s manual for
that device for further information on how to
make recordings.
Stop Button: This button has no effect
on the DCR600
II
. When the DVD600IIhas been
selected, press this button once to place the
disc in the Resume mode. Playback will stop,
and as long as the tray is not opened or the
disc changed, DVD playback will continue
from the same point on the disc when the
Play/Pause Button is pressed
again, even if the unit has been turned off in
the interim. To stop a disc without entering
Resume mode, press the Stop button twice.
This button also performs the Stop function
when a CD player, tape deck or VCR connected
to the Video 1 Input lmno has
been selected.
Pause Button: Press to pause the disc in
use. To resume playback, either press the
Pause button again, or press the Play/Pause
Button
.
Previous/Next: Press to move
backward or forward through the music tracks
on a CD disc or the chapters on a DVD disc.
This button also scans backward or forward
when a VCR connected to the Video 1 Input
lmno has been selected.
On Screen Library™ (patent pending):
This feature lists the titles and disc types of all
discs currently loaded in the DVD600
II
on your
video screen. The On Screen Library resets
automatically every time the DVD600
II
’s disc
tray is opened. When the tray is closed, the On
Screen Library will need to read and identify
all five discs, a process which will take approximately one minute. You may interrupt this
process by pressing the Stop Button .
The On Screen Library will resume the process
of identifying the discs when you press the On
Screen Library Button . You may also
prevent the On Screen Library from reading
and identifying the discs by closing the tray
with a press of one of the Direct Access
Buttons , which will begin play of that
numbered disc.
If you have not opened the disc tray since the
last time the On Screen Library was accessed,
and if the current disc is stopped, you may
press this button to display the On Screen
Library, even if you have not selected DVD as
the input source on the DCR600
II
. While in
DVD mode, use the
⁄/¤
Buttons y to
scroll through the list. Press the Set Button
to play the selected disc. Do not press a
Numeric Key –
,
while the
On Screen Library is displayed, as it will
remove the display without skipping to a
different disc.
Program Indicator LED: Lights while
programming the remote with device codes,
macros, punch-through functions and device
reassignments, or while resetting the remote
memory.
DVD600II
Page 14
14
Operating the DVD600IIDVD Changer
Loading Discs
To load discs in the DVD600II, first make certain
that the unit is turned on by pressing the Main
Power Switch so that it latches, and
then the System Power Control or the
Open/Close Button
f
or Play/Pause
Button . The Status Indicator
turns green.
Next, if needed, press the Open/Close Button
f until the Disc Tray opens.
Holding the discs by the edge, gently place each
one into one of the compartment slots in the
drawer. Note that there is a number embossed
onto the drawer tray at the right of the disc slot.
This is the number for that specific disc position;
it will be used to indicate the disc in both the
Information Display and the on-screen displays.
When loading discs, please note the following:
•
The DVD600
II
will play discs with the following
logos only. DO NOT attempt to play another
type of disc, as shown in the list on page 46.
•
The DVD600
II
will only play discs in the NTSC
video format. It will not play discs for other
standards such as PAL or SECAM.
•
Playback capability for CD-RW discs will vary
according to the quality of the CD-RW disc.
On some occasions, it is possible that CD-RW
discs may not play on the DVD600
II
. This does
not indicate any problem with the DVD600
II
.
•
The DVD600
II
will only play discs that are
coded for Region 1 or discs that are open to
being played in all regions. Discs that contain
a Region Code of 2, 3, 4, 5 or 6 (as noted by a
number inside a world map logo on the disc’s
cover jacket or case) will not play.
•
Both 5-inch (12cm) and 3-inch (8cm) discs may
be used.
•
When loading CD audio discs, load the discs
with the label side up.
•
When loading DVD discs with printed labels,
load them label side up.
•
Some DVD discs are double-sided. The title
information for these will be printed on the
inner ring of the disc, very close to the center
hole. The title for the side you wish to play
should be facing up.
•
The DVD600
II
is also capable of playing discs
containing MP3 audio files.
Notes on DVD-Audio discs:
• The DVD600
II
is not capable of playing selections in the DVD-Audio format. However, many
DVD-Audio discs include audio tracks in the
PCM, Dolby Digital or other formats which the
DVD600
II
is capable of playing. You may need
to press the Title Button x rather than the
Menu Button z in order to access these
formats.
• Some DVD-Audio discs display a still picture
while a selection is playing. Sometimes, this
picture may disappear when play is stopped and
the DVD600
II
is placed in the Resume mode. To
restore the picture, fully stop play by pressing
the Stop Button twice before contin-
uing play.
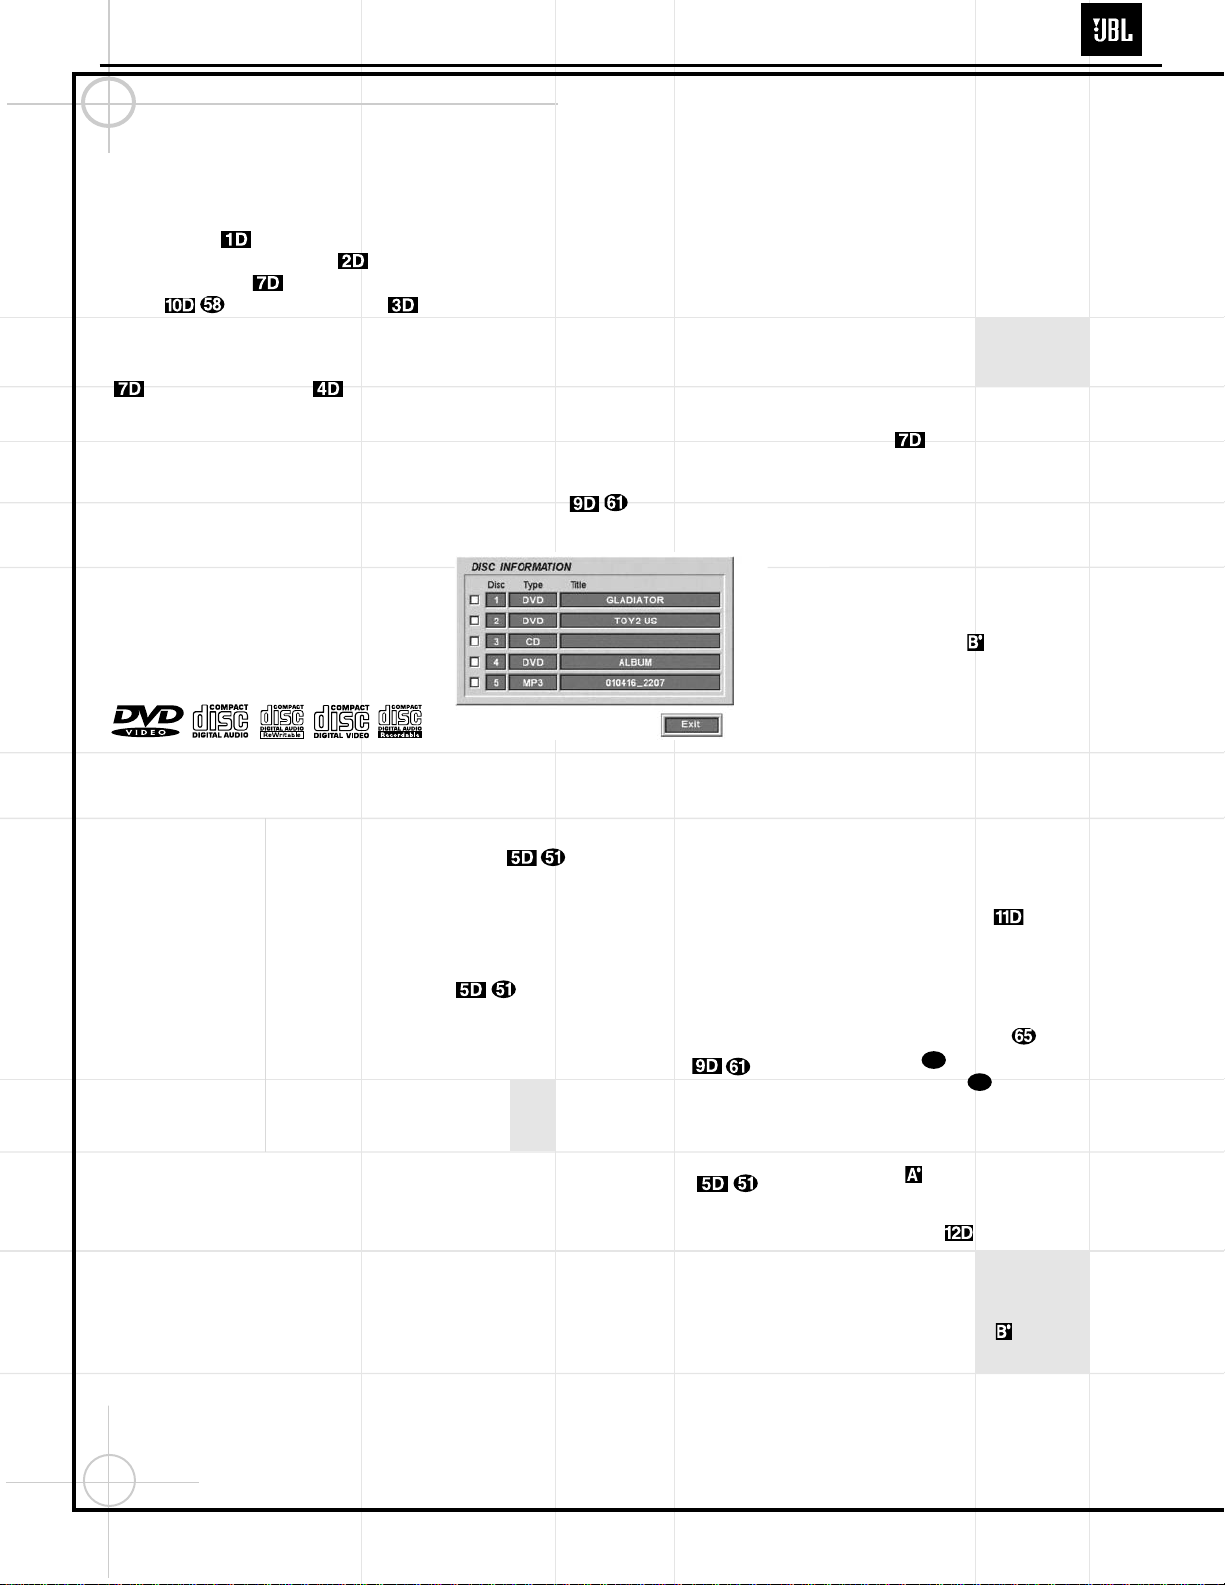
Figure 17. On Screen Library Display
To move the discs in the tray so that you may
insert discs in slots that are partially hidden
inside the disc tray drawer, press the Disc Skip
Button . Each press of the button will
move the carousel tray one position to the left
(counterclockwise). There may be a slight delay
of several seconds before the carousel moves to
the next disc, which is normal. You may avoid
the delay by pressing the Disc Skip Button
twice.
•
To access all disc positions, the unit must be
in the full-stop position. If the unit is in the
Play mode, press the Stop Button
twice.
•
If the disc tray drawer is opened while a disc
is playing, the Play Exchange feature allows
you to change the remaining four discs.
Simply press the Disc Skip Button
to move the discs in the tray in one direction
or the other.
IMPORTANT NOTES
ON DISC LOADING
•
Remove all discs from the tray before
moving the player.
•
Make certain that all discs are properly seated
before closing tray drawer.
•
Do not push the disc tray drawer with the
power off.
•
Do not attempt to change or touch the disc
tray carousel while it is moving.
•
Do not attempt to rotate the disc tray by
hand. If the tray drawer or carousel tray
appears to be stuck, contact your local JBL
authorized service center.
•
Do not load more than one disc in each slot in
the tray and do not attempt to place a standard 5-inch (12cm) disc over a smaller 3-inch
(8cm) disc.
Once the discs are loaded, press the Open/
Close Button
f
to close the disc tray.
When the tray drawer closes, the disc that was
last in the center position facing outward in the
tray will be readied for playback. After the
drawer closes, you will see an indication of
Reading in the Information Display to alert
you to the fact that the unit is determining the
type of disc (DVD, MP3 or CD) and is reading
the data for track, chapter, title and other information about the disc. At the same time, the
Disc Number Indicator for the disc in use
will begin to flash, indicating which disc is
ready to be played.
You will also see the On Screen Library displayed (see Figure 17). It will take about one
minute for all discs to be identified. You may
interrupt the process by pressing Stop, by pressing Enter to select a disc, or by scrolling down
to the Exit button. When the process is complete, press Play to play the current disc, or
scroll to select any disc.
If the tray was closed by pressing one of the
five Direct Access Buttons on the
front panel, the On Screen Library will not be
activated.
You may access the On Screen Library later by
stopping play of the current disc and pressing
the On Screen Library Button . Use the
⁄/¤
Buttons
y
to scroll to the desired
disc, and the Set Button to begin play of
that disc.
Once the disc’s data has been read, the type of
disc (DVD or CD) will be displayed by the Disc
Type Indicator and the disc will begin
playing. The disc’s track timing information
and other relevant data will appear in the
Information Display . For CD discs only,
a Status Menu Bar will appear in the on-screen
display. To view this display for DVD discs,
press the Status Button e.
The Disc Number Indicator will show a
lighted number for the disc slot positions that
are occupied, and the disc in use will flash.
Playback Basics
Basic playback with the DVD600IIinvolves functions similar to those you may be familiar with
for conventional CD players or changers:
28
31
DVD600II
Page 15
15
Operating the DVD600IIDVD Changer
•
Turn the unit on by pressing the System
Power Control , if it has not already
been engaged. If there are already discs
loaded in the unit, the last disc to be played
will automatically begin playing.
•
If the disc was stopped using the Resume
function, (by pressing the Stop Button
once) playback will begin from the
point where it was stopped. If the disc was
stopped by pressing the Stop Button
twice, the disc will begin playing from
its beginning.
•
Load any new discs as indicated in the
previous section.
•
After loading discs, press the Open/Close
Button
f
to proceed to the On Screen
Library, or press a
Direct Access Button
to begin play of the disc in that numbered
position.
Playback Features for DVD and CD Discs:
•
To move to the next discin the unit, press
the Disc Skip Button .
•
To select a specific disc in the player,
press
the Direct Access Button corre-
sponding
to the slot where that disc is loaded.
Or, using the remote, press the Disc Skip
Button ,followed within 3 seconds by
the number of the disc you wish to play. Or,
press the On Screen Library Button to
display on-screen a list of the discs currently
loaded. Use the
⁄/¤
Buttons y to
select a disc,
and press the Set Button
to begin play.
•
To momentarily pause playbackand
freeze the current picture frame on a DVD,
press the Play/Pause Button . To
resume playback after pressing the Pause button, press the Play/Pause Button
again.
•
To move forward or backward through
the tracks on a CD or the chapters on a DVD,
press the Skip Forward/Reverse Buttons
on the front panel or the Previous/
Next Buttons or the
⁄/¤
Buttons
y on the remote.
• To skip directly to a specific trackwhile
the current disc is playing, simply enter the
track number using the
Numeric Keys
–
, .
•
To move forward or backward through
the DVD or CD disc being played at fast
speed, press the Search Forward/Reverse
Buttons or the
‹/›
Buttons
` .
Once one of these buttons is
pressed, the fast search will continue until
the Play/Pause Button is
pressed. Note that the fast-play speeds
vary for CD discs and DVDs.
For DVD playback, there are four fast-play
speeds. Each press of the Search Forward/
Reverse Buttons ` will
cycle to the next speed in the following order:
•
In Fast Search x2, the
‹‹
and
››
Playback
Mode Indicators will both light steadily.
•
In Fast Search x4, the outside
‹‹
or
››
Playback Mode Indicator will flash and
the inside indicator will remain steadily lit.
•
In Fast Search x8, the inside
‹‹
or
››
Playback Mode Indicator will flash and
the outside indicator will remain steadily lit.
•
In Fast Search x16, both
‹‹
and
››
Playback
Mode Indicators will flash.
Note that there will be no audio playback during
fast-forward or -reverse play of DVD discs.
This is normal for DVD, as A/V receivers and
surround processors cannot process the digital
audio streams during fast-play modes; audio will
be heard during fast-play of conventional CDs.
For CD playback, there are three fast-play
speeds. Each press of the of the Search
Forward/Reverse Buttons will
cycle to the next speed in the following order:
•
In Fast Search x2, the
‹‹
and
››
Playback
Mode Indicators will both light steadily.
•
In Fast Search x4, the outside
‹‹
or
››
Playback Mode Indicator will flash and
the inside indicator will remain steadily lit.
•
In Fast Search x8, the inside
‹‹
or
››
Playback Mode Indicator will flash and
the outside indicator will remain steadily lit.
When playing a DVD disc, you may move forward or backward through the program being
played in one of four speeds by pressing the
Slow-Play Buttons on the remote.
Each press of the buttons will move to the next
speed in the following order:
•
In 1/16 Speed Slow mode, the
‹‹
and
››
Playback Mode Indicators will both
flash.
•
In the 1/8 Speed Slow mode, the inside
‹‹
and
››
Playback Mode Indicator will
flash and the outside indicator will remain
steadily lit.
•
In the 1/4 Speed Slow mode, the outside
‹‹
or
››
Playback Mode Indicator
will flash and the inside indicator will
remain steadily lit.
•
In the 1/2 Speed Slow mode, both the
‹‹
and
››
Playback Mode Indicators
will remain steadily lit.
The frame-by-frame Step Advance function is
available in either the forward or reverse direction by pressing the Step+ or Step–
button. The DVD600
II
will be placed in Pause
mode, and will step up or down one frame at
a time with each press of one of the Step
Advance buttons.
Note that there will be no audio playback during
slow-forward or -reverse play of DVD discs.
This is normal for DVD, as A/V receivers and
surround processors cannot process the digital
audio streams during slow modes. Slow play
is not available for CD discs.
•
When a camera icon appears on the screen,
this is your indication that there is multipleangle information on the disc being played. To
change the angle, press the Angle Button
until the desired angle view appears. An
on-screen banner message will appear to
indicate the angle view in use.
Using the DVD Disc’s Menu
One of the unique features of the DVD system is
that it offers a producer the opportunity to include
a wide range of features on a disc, including
multiple-language tracks; subtitles in a variety
of languages; special information such as movie
trailers and cast information; as well as other
custom-tailored information. In addition, producers may divide a movie or program into chapters
that allow for quick access to specific parts of the
program. These chapters may be accompanied
by thumbnail pictures of a scene from the
specific chapter to help you select the desired
spot on the disc.
When a disc is playing, press the Menu Button
z to pause the playback and display the disc’s
menu. As there are no hard rules about style
and content of DVD menus, the way they appear
on the screen and the information they contain
will vary from one disc to another. However, the
following general rules apply to most menus:
•
The first menu that appears is the Main
Menu, and you may move through the options
with the
⁄
/¤/‹/
›
Buttons
y`
as the disc’s programming allows. The
option selected will typically be highlighted in
a certain color or inside an outline box.
•
To select a highlighted option, which may
either play a portion of the disc or move to
a submenu, press the Enter Button
or Play/Pause Button .
29
29
31
28
31
(continued)
DVD600II
Page 16
16
Operating the DVD600IIDVD Changer
•
On some discs, when you select the DVD
menu during the playback of a movie, the disc
will return to the point in the program where
the menu was selected by offering a “Play
Movie” option. Press the Enter Button
or Play/Pause Button to
resume play. However, not all discs offer this
feature, and selecting the menu while playing
a movie may mean that you will either have
to go back to the beginning of the program or
the start of a chapter. This feature is out of
the control of the DVD600
II
, as it is set by the
disc’s internal programming.
•Some DVD discs also feature a Chapter
Selection menu. Press the Title Buttonx
to proceed directly to the disc’s Chapter
Selection option.
IMPORTANT NOTES
ON DVD PLAYBACK
Due to the nature of this product category, DVD
players, while being operated at elevated temperatures, may exhibit certain anomalies such
as picture freeze-ups. If this occurs, the
DVD600
II
needs to be “reset” by powering it
down and up again, using its master On/Off
switch. Should this occur with your DVD600
II
,
first check your discs for any damage, scratches
and fingerprints. If discs are OK, then ventilation
around the DVD600
II
needs to be increased to
ensure proper operation.
The DVD600
II
is capable of all the features and
options covered by the DVD standards. However,
it is up to the producer of a DVD disc to decide
which of those features and functions are available on any given disc. For that reason, not all
discs will function identically, and some discs
will not have many of the features of the DVD
system. For example, most current DVD discs do
not take advantage of the multiple-angle feature. When the player displays the “Feature
Prohibited” icon “”, this indicates that the disc
has not been programmed for that feature.
In addition, it is common for the producers of
DVD discs to block the use of certain functions
during only some parts of a disc. For example,
many discs prohibit the use of fast-play buttons
or prohibit access to the Chapter Menu display
during the playback of copyright notices, studio
logos, movie credits or trailers. The appearance
of the “Feature Prohibited” icon “”, or the
inability of certain features to operate when the
disc itself has prohibited them, does not indicate a problem with the DVD600
II
, as these fea-
tures are outside of the unit’s control.
Using the Menu Bar
The DVD600IIis equipped with a powerful on-
screen display system that serves the dual purpose of showing you the current status of the
DVD600
II
while enabling quick and easy
changes to settings and functions. Depending
on whether a DVD or CD is in use, the menu will
vary to display information that is specific to the
type of disc in play.
Menus and Controls
When a disc is playing, press the Status
Button e to view the status of the current
disc and to change the setting for key playback
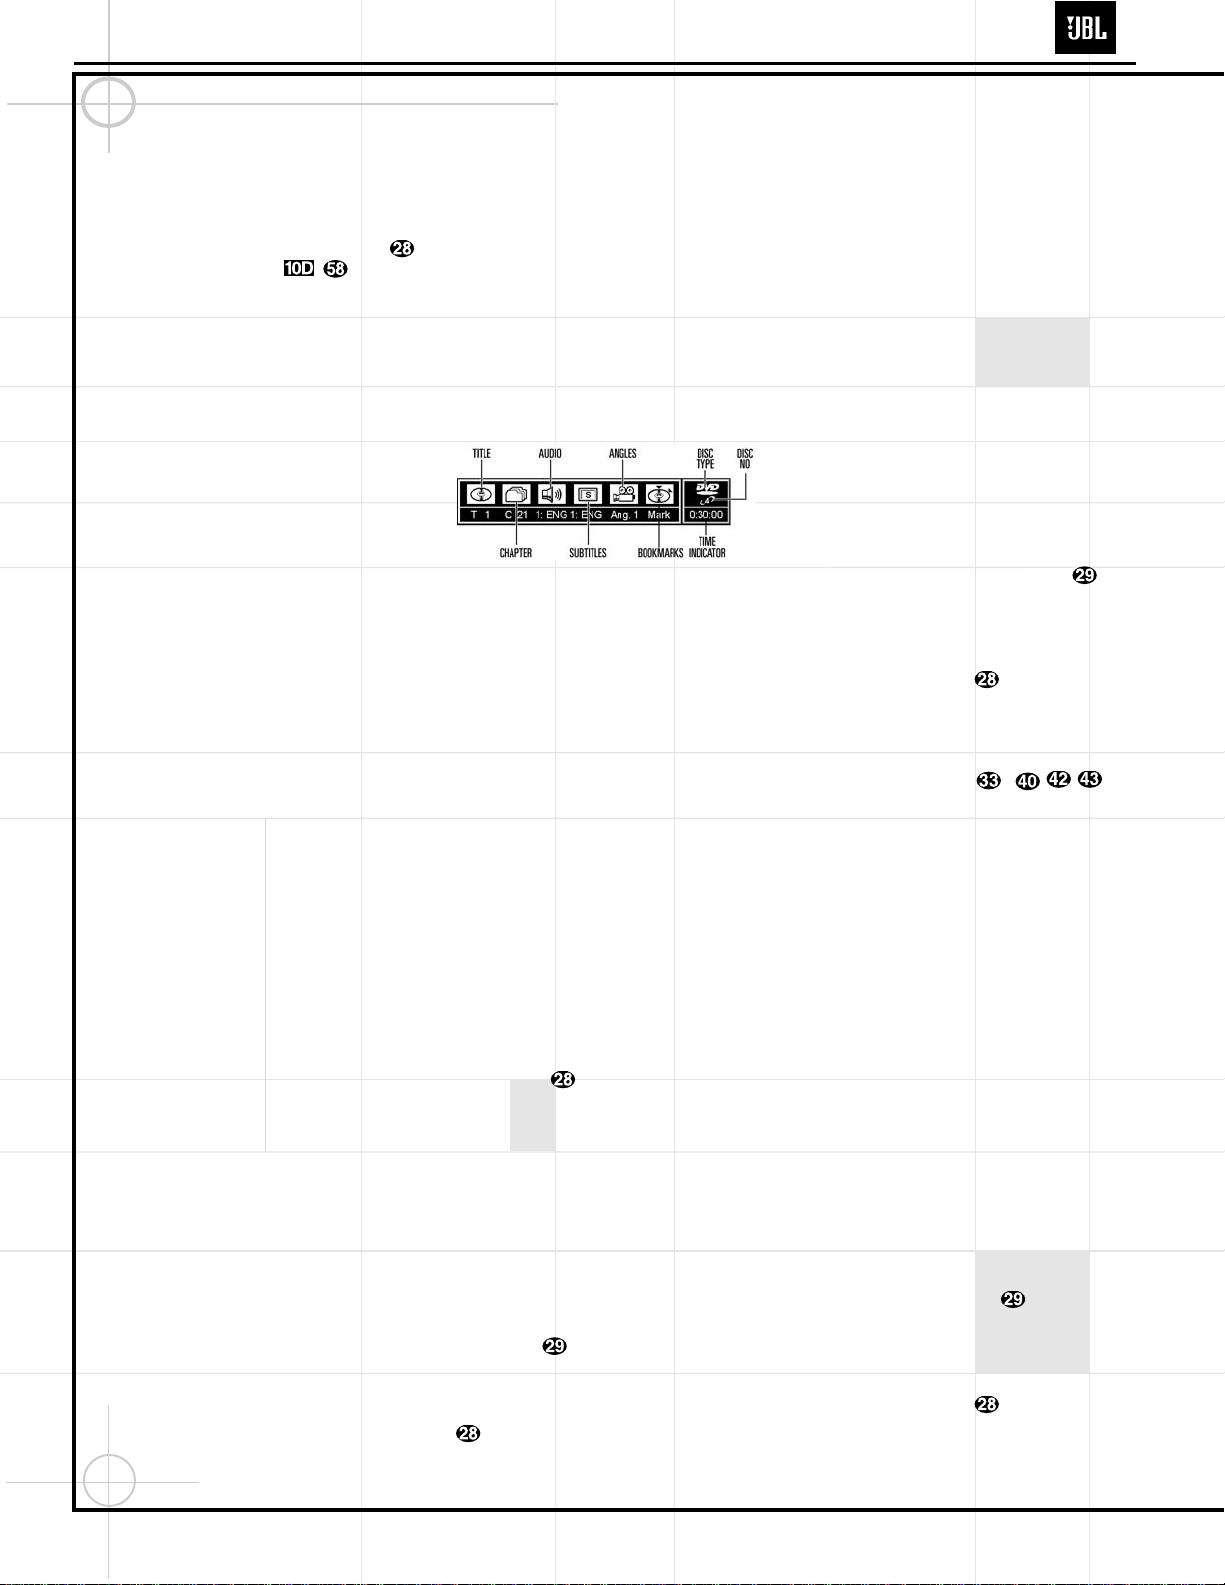
functions (Figure 18).
Figure 18
Title:The number shown indicates the number
of the title that is currently playing.
Chapter: The number shown indicates the
number of the chapter that is currently playing.
Audio: The number and abbreviation show the
audio language soundtrack that is currently
playing. Consult the DVD jacket for the key to
available audio tracks on the disc.
Subtitles: The number and abbreviation show
the subtitle language that is currently playing.
Consult the DVD jacket for the key to available
subtitle languages on the disc. A pound sign (#)
displayed next to the language selection indicates that subtitles are active.
Angles: The number shown indicates the
multiple-angle view that is currently playing.
Bookmarks: Highlight this area and press the
Enter Button to mark or go to previously
bookmarked locations on a disc.
Disc Type: The type of disc playing (DVD or CD)
is shown.
Disc Number: The slot number of the disc being
played is shown.
Time Indicator:The elapsed time of the current
title is shown.
Once the Menu Bar appears, press the
‹/›
Buttons ` to move across the display to
select the desired option. When the option to be
changed is highlighted in white with yellow
brackets on both sides, press the Enter Button
to change the setting for that option.
Selecting Titles and Chapters
Some discs contain more than one title.
Remember that a disc may contain one title or
two separate program titles, or the disc may use
the Title function to separate the special feature
sections or audio tracks on the disc. The use of
titles is optional with the producer of each DVD
disc, as is the way in which he/she may choose
to implement the feature. You may directly
access any chapter while the disc is playing or
in Pause mode simply by entering its number
using the remote.
To change the title on those discs using the
Menu Status Bar, follow these steps:
1. During disc playback, press the Status
Button e.
2. If needed, press the
‹
/
› Buttons `
until the disc icon for the current title, with the
letter “T” underneath it, is highlighted in white
between yellow brackets.
3. Press the Enter Button .
4. Note that the number to the right of the “T”
will be replaced with two dashes (– –).
5. Use the Numeric Keys –
to enter the number of the title to be accessed.
6. The desired title will automatically be started.
Titles may also be selected during the playback
of a DVD by pressing the Title Buttonx.
However, the action of the disc when pressing
this button will vary from disc to disc. On occasion, pressing this button will take you to the
disc’s main menu while, in other cases, pressing
this button will result in no action at all.
The movies or programs on most discs are divided
into individual chapters, as selected by the
disc’s producer. Using the on-screen Menu Bar,
you may view the number of the current chapter
and move to any chapter on the disc.
To change the chapter using the Menu Status
Bar, follow these steps:
1. During disc playback, press the Status
Button e.
2. Press the
‹
/
› Buttons ` until the
icon showing a disc and a file folder (second
from left), with the letter “C” beneath it, is
highlighted in white between yellow brackets.
3. Press the Enter Button .
4. Note that the number to the right of the “C”
DVD600II
Page 17
17
Operating the DVD600IIDVD Changer
will be replaced with two dashes (– –).
5. Using the Numeric Keys –,
enter the number of the chapter to be accessed.
6. The desired chapter will automatically be
started.
You may also simply enter the chapter number
while the disc is playing to skip to that chapter.
Changing Languages (Audio)
DVD discs may contain a variety of audio tracks,
including foreign languages, special commentaries, descriptive video for the sight-impaired,
and various digital formats. Some DVD-Audio
discs that contain linear PCM or Dolby Digital
5.1 audio tracks may allow you to access these
tracks using the Audio feature described in this
section. In normal play, the unit will always look
for the default setting for the audio track, but
you may change the audio track at any time
using the Menu Status Bar and following these
steps:
1. During disc playback, press the Status
Button e.
2. Press the
‹
/
› Buttons ` until the
speaker icon (third from the left) is highlighted
in white between yellow brackets.
3. Press the Enter Button .
4. Note that the main Menu Bar will be replaced
with a single display of the current language
type (Figure 19).
Figure 19
5. Press the Enter Button until the desired
audio track is displayed. Note that the audio
tracks available on a disc will vary and that they
are always listed on the disc’s jacket or cover.
6. Within a few seconds, the disc will continue
play with the newly selected audio track.
Note that the audio track type selected in this
fashion is temporary and will only remain in
effect until the player is turned off. When the
unit is turned on for subsequent play, the
default audio type will always be used.
The audio track may also be selected during
the playback of a DVD by pressing the Audio
Button t. After pressing the button, the audio
track may be changed by pressing the Enter
Button until the desired audio track is
shown. Note, however, that some discs do not
allow audio track change while a disc is playing.
When the Audio Button t is pressed on this
type of disc, the player will go to the disc’s own
menu page for audio track selection. In this
case, use the
‹/›
/⁄/
¤
Buttons y`
to make the selection from the menu
screen and then press the Enter Button .
The functionality of the Audio Button t may
vary from disc to disc. Many discs will allow you
to change the playback language while the disc
is playing, as noted earlier. However, when the
Audio Button t is pressed with some discs,
playback will stop and you will be taken to the
disc’s own audio menu. At that menu, use the
‹/›
/⁄/
¤
Buttons y` to high-
light the desired playback language. Press the
Enter Button when the choice is made
and the disc will either resume playback or
take you to the disc’s main menu. Note that
these functions are controlled by information
programmed within the disc, and are outside
of the control of the DVD600
II
.
DVD discs may contain a variety of subtitles. In
normal play, the unit will always look for the
default setting for the subtitle language, but you
may change that language at any time using the
Menu Status Bar and by following these steps:
1. During disc playback, press the Status
Button e.
2. Press the
‹
/
› Buttons ` until the
letter “S” icon (fourth from the left) is highlighted
in white between yellow brackets.
3. Press the Enter Button .
4. Note that the main Menu Bar will be replaced
with a single display of the subtitle language
(Figure 20).
Figure 20
5. Press the Enter Button until the desired
subtitle language is displayed. Note that the
subtitles available on a disc will vary, and they
are always listed on the disc’s jacket or cover.
Some discs may not offer alternative subtitles,
or any subtitles at all.
6. Press the Subtitle On/Off Button and
the Enter Button and within a few sec-
onds the disc will continue to play with the
newly selected subtitle language.
Note that the subtitle language selected in this
fashion is temporary, and will remain in effect
until the player is turned off. When the unit
is turned on for subsequent play, the default
subtitle language will always be used.
The subtitle language may also be selected during the playback of a DVD by pressing the
Subtitle Button . After pressing the button, the language may be changed by pressing
the Enter Button until the desired choice
is shown. Note, however, that some discs do
not allow audio track change while the disc is
playing. When the Subtitle Button is
pressed, the player will go to the disc’s own
menu page for subtitle disc selection. In this
case, use the
‹/›
/⁄/
¤
Buttons y`
to make the selection from the menu
screen and then press the Enter Button .
IMPORTANT NOTE:The steps indicated on
the page allow you to change the subtitle language, but they do not determine whether the
subtitles are actually displayed on the screen.
To have the subtitles appear at any time, press
the Subtitle On/Off Button to toggle the
subtitles on or off with each press of the button.
When the subtitles are active, a check-mark
icon “✔” will appear in the box to the right of
the subtitle description as shown earlier.
Also note that some DVD discs do not contain
subtitles. When the Subtitle On/Off Button
is pressed on a disc with no subtitles, the
Prohibit icon “” will appear on screen.
Changing Camera Angles
A special feature of the DVD format is its capability of showing more than one view, or camera
angle, of the same scene. This feature enables
you to become the director, selecting the view
of a scene that you wish. Note, however, that
this feature does not appear on many discs and,
when it does appear, it will typically be for only
certain scenes and not for the entire disc’s program. If you attempt to use the multiple-angle
feature on a disc that is not programmed for it,
you may see the “Prohibited Feature” icon “”
on the screen. This is not a fault of the player; it
simply indicates that the feature is not available
on the disc being played.
To see whether a disc contains multiple angles,
check the disc’s cover or jacket. When a disc
does contain scenes with multiple angles, the producers will usually include some sort of special
on-screen icon to alert you to the availability of
different angles of view. When you see such an
icon, the angle may be changed by the following
steps:
1. Press the Status Button e.
(continued)
DVD600II
Page 18
18
Operating the DVD600IIDVD Changer
2. Press the ‹
/
› Buttons ` until the
camera icon with the letters “Ang” below it (fifth
from the left) is highlighted in white between
yellow brackets.
3. Press the Enter Button .
4. Note that the main Menu Bar will be replaced
with a single display of the angle number
(Figure 21).
Figure 21
5. Press the Enter Button until the desired
angle is shown. Note that the number of angles
available is set by the disc’s producer, not the
DVD600
II
, and it may vary from disc to disc.
You may also change the angle directly by
pressing the Angle Button when multiple
angles are present, until the desired angle
appears on the screen.
Playing CDs
The DVD600IIallows you to take advantage of
the on-screen Menu Bar even when playing
CDs. The use of this graphical display makes it
easy to select CD Functions.
When a CD is playing, the Menu Bar will automatically appear in your video display, even
though there is no video on the CD itself. To
remove the Menu Bar at any time, press the
Clear Button . If the Menu Bar is not present, press the Status Button e to have it
appear on the screen (Figure 22).
Figure 22
Track:The number shown indicates the number
of the track that is currently playing.
IntroScan: When the IntroScan feature is
active, the musical notes in this icon will
change.
Bookmarks: Highlight this area and press enter
to enter or go to bookmarked locations on a disc.
Time Display Type: This shows the type of
time indication being shown: Time Remaining
for the Current Track, Total Elapsed for the Disc,
or Total Remaining for the Disc.
Disc Type: Shows the type of disc being played.
Disc Number: The slot number of the disc being
played is shown.
Time Indicator:The time indication selected
is shown.
Once the Menu Bar appears, press the
‹/›
Buttons ` to move across the display
to select the desired option. When the option to
be changed is highlighted, press the Enter
Button to change the setting for that
option.
Selecting a Track
To select any track on a CD, follow these steps:
Enter the track number while the disc is playing
or in Pause mode by entering its number, or:
1. During disc playback, press the Status Button
e if the Menu Bar is not already on the screen.
2. If needed, press the
‹
/
› Buttons `
until the disc icon with the letter “T” underneath
it is highlighted in white between yellow brackets.
3. Press the Enter Button .
4. Note that the number to the right of the “T”
will be replaced with two dashes (– –).
5. Using the Numeric Keys –,
enter the number of the track to be accessed.
6. The desired title will automatically be started.
Using IntroScan
The IntroScan feature allows you to sample the
tracks on a CD by playing the first ten seconds
of each track and then moving to the next track.
To use IntroScan, follow these steps:
1. During disc playback, press the Status Button
e if the Menu Bar is not already on the screen.
2. If needed, press the
‹
/
› Buttons `
until the musical score icon with the phrase
“IntroScan” underneath it (second from the left)
is highlighted.
3. Press the Enter Button .
4. Note that the disc will immediately begin to
play the first track on the disc and the musical
notes in the icon will change and flash.
5. The unit will play the first ten seconds of
each track on the disc, moving from one track to
the next.
6. To play a track during IntroScan, press the
Play/Pause Button .
7. If no track is selected, the disc will stop play-
ing when it has played the first ten seconds of
each track in order.
Note that while the IntroScan feature is in use,
the Intro Indicator will appear in the
Information Display .
Time Display Selection
When playing CDs, the DVD600
II
is capable of
displaying the time displays that you are familiar with from traditional CD-only players. The
choice of a time display is made through the use
of the on-screen Menu Bar, but any changes to
the display will also change the Time Display
mode for the Information Display.
To change the time display during CD playback,
follow these steps:
1. During disc playback, press the Status Button
e if the Menu Bar is not already on the screen.
2. If needed, press the
‹
/
› Buttons `
until the clock icon with the word “Time” next to it
is highlighted.
3. Press the Enter Button to select one of
these four choices. Each press of the button will
select the next option:
•
Track Elapsed:This shows the time that has
elapsed for the current track. At the start of
each track this display will reset to zero and
begin to count up again.
•
Track Remain:This shows the time
remaining for the current track. At the start of
each track the time will begin to count down
again, starting with the total time of the
track.
•
Disc Elapsed: This shows the total time that
the current disc has played for all tracks.
•
Disc Remain: This shows the total time
remaining for all tracks on the disc that have
not yet been played.
Playing MP3 and Video CD Discs
The DVD600IIis rare among DVD players in that
it is able to play discs containing MP3 audio
files. This means that you may enjoy the latest
music, using discs created in your computer,
through the high quality audio components in
your home the
ater system. As the way that MP3
files are recorded
on discs differs from the way
conventional CD audio discs are structured, MP3
playback is somewhat different from standard CDs.
DVD600II
Page 19
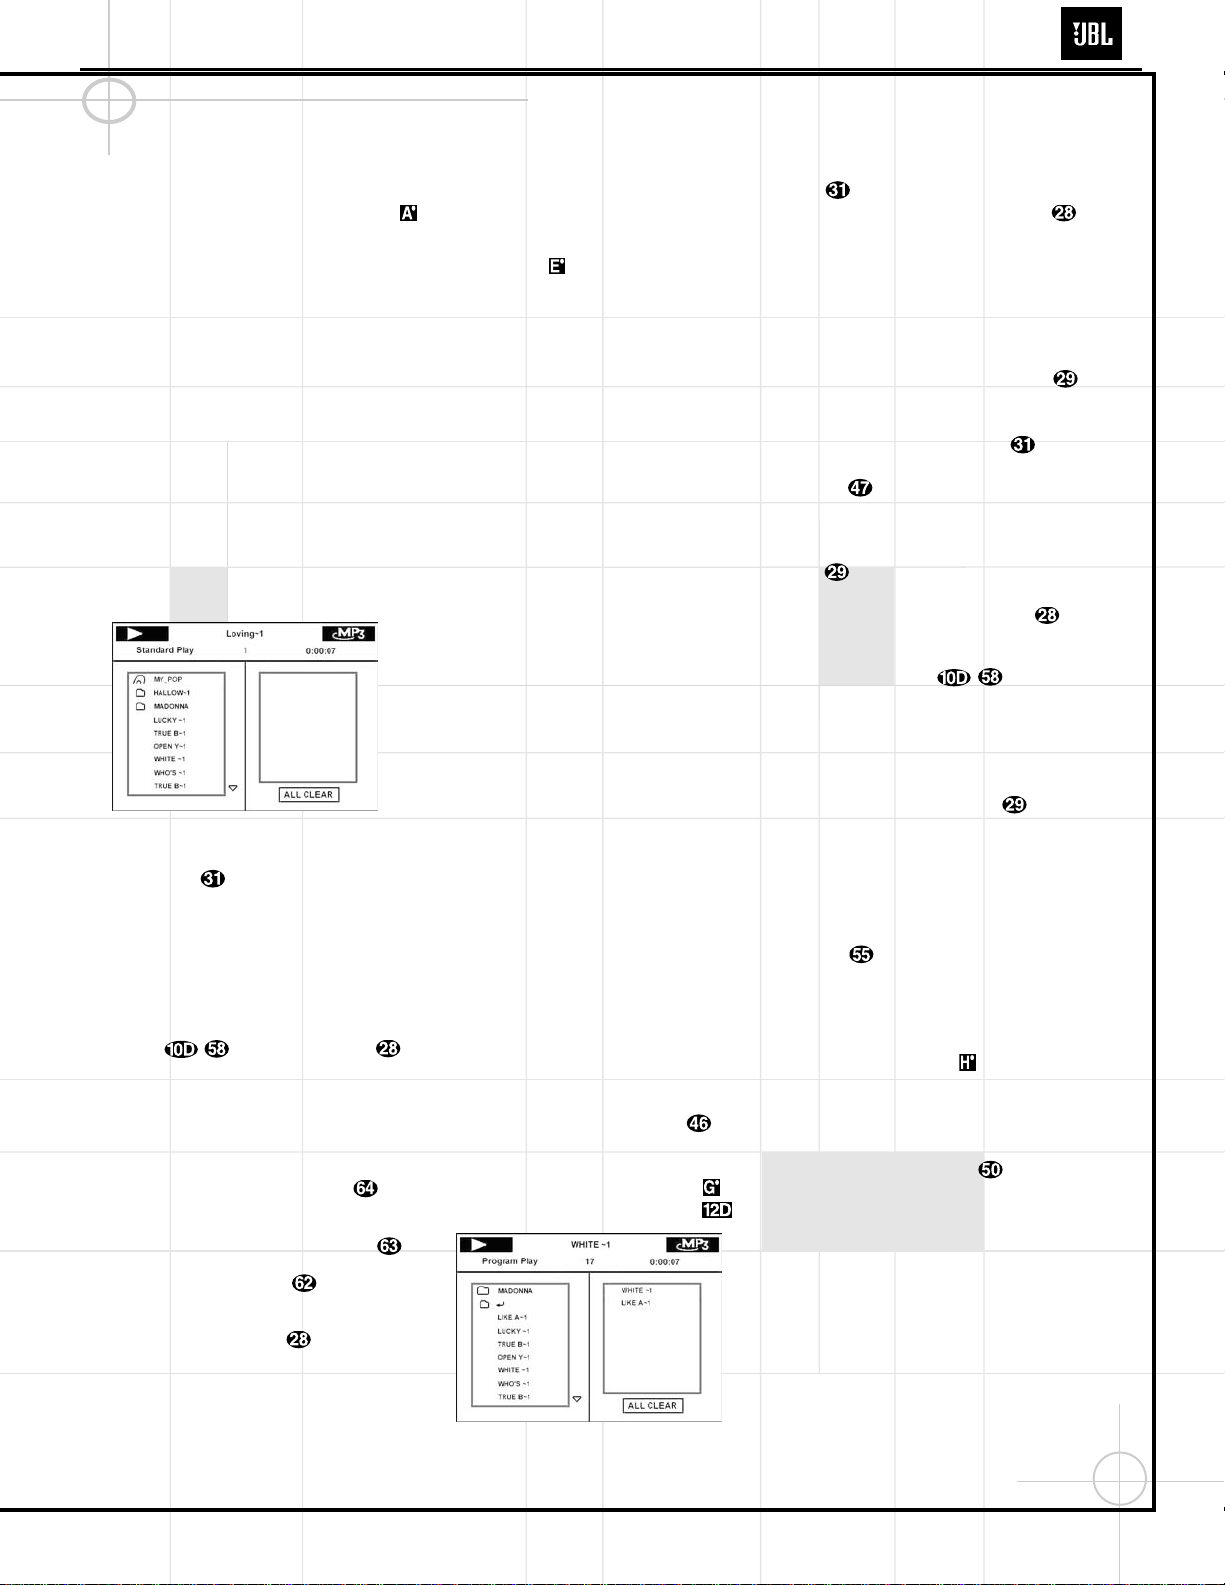
19
Operating the DVD600IIDVD Changer
MP3 Disc Playback
When the DVD600
II
reads a disc and recognizes
it as an MP3 disc, no Disc Type Indicator
will light; however, a listing of all the directories
and tracks on the disc will appear on the video
screen. (Figure 23). Note that the right side of
the screen will initially be blank, as that is used
for programming playlists for MP3 playback. The
black box in the upper left corner of the screen
will show the Play symbol while a track is playing, or the Play/Pause symbol when a track has
been paused, or no symbol when the unit is in
Stop mode. The box in the top center of the display will contain the file name of the currently
selected track.
The second row of boxes will display, from left
to right, an indication of whether the current
mode is Standard Play, Random Play or Repeat
Play; the track number currently playing, and the
elapsed time of the current track.
Figure 23
To play a track, press the
⁄/¤
Navigation
Buttons y until the desired track name
is highlighted. If the list of tracks is longer than
will fit on the screen, a
⁄
or ¤indicator will
appear at the top or bottom of the track list to
remind you that you may scroll through the list
to see additional titles.
To begin playback, press the Play/Pause
Button or the Enter Button .
During MP3 playback most of the standard
CD/DVD playback controls operate in their
normal fashion:
•
You may skip forward to the next track on the
disc by pressing the Next Button .
•
You may skip back to the previous track on the
disc by pressing the Previous Button .
•
Press the Pause Button to momentarily
stop playback. Press it again to resume play.
•Press the Enter Button to begin play, or
to restart play of the current track from the
beginning.
NOTES ON MP3 PLAYBACK
•
The Fast Forward and Reverse Search modes
are not available during MP3 playback.
•
During MP3 playback the Program Time
Indicators will show the elapsed time of
the track being played. Other time display
options are not available with MP3 playback.
•
The DVD600
II
is only compatible with standard MP3-encoded discs. Other compressed
audio formats used for Internet audio downloads will not play on the DVD600
II
.
•
Due to the differences in various versions of
the MP3 format, and the many differences
between the CD-R machines used to record
MP3 discs on a computer, it is possible that
some MP3 discs may not play on the
DVD600
II
even though they will work on a
computer. This is normal and does not
indicate a fault with the unit.
•
When a multisession disc with both standard
CD audio and MP3 content is in use, the
DVD600
II
will play only the CD audio sections
of the disc.
•
When an MP3 disc with multiple directories
is playing, the DVD600
II
will search out all
MP3 files on the disc and list them in the onscreen display in the order in which the directories are structured on the disc. Note that if
the same title is used for tracks in different
directories, this may result in the same
title appearing more than once in the track
listings.
Programmed Playback of MP3 Discs
The DVD600
II
is capable of creating playlists up
to 130 tracks long with the MP3 files on a properly recorded disc. To create a playback list for
MP3 titles, follow these steps:
Step 1: Load a compatible MP3 disc, but do not
put it into
play
or
stop play
if it begins automati-
cally.
Step 2: Press the Program Button to open
a playlist. The screen will change to Program
Play Mode, as indicated in the upper left corner
of Figure 24. The Program Indicator
will
also light in the Information Display .
Figure 24
Step 3: Use the
⁄/¤
Navigation Buttons
y to highlight the first track to be placed
in the list and press the Enter Button .
Note that the track name will now appear on
the right side of the screen.
Step 4: Repeat the step above until all desired
tracks are added to the playlist.
Step 5: To remove a track from the playlist, first
press the
‹/›
Navigation Buttons
`
so that the highlight moves to the right side of the
screen under the PROGRAM listing. Use the
⁄
/
¤ Navigation Buttons
y
to high-
light the track to be deleted and press the Clear
Button
.
Step 6: To clear all the tracks in the playlist and
start over, press the
‹/›
Navigation Buttons
` until the ALL CLEAR box at the
bottom of the right side of the screen is highlighted and press the Enter Button .
Step 7: To play the tracks on the list, press the
Play/Pause Button .
Once a playlist is created, it will remain available as long as the disc is not changed or the
power turned off. You may play any track on the
disc without erasing the playlist by pressing the
‹/›
Navigation Buttons `/ to return
the highlight bar to the left side of the screen
Repeat Playback of MP3 Discs
Repeat playback operation for MP3 discs differs
somewhat from the steps used for repeat playback of standard DVD discs. Press the Repeat
Button to cycle through the following
options, which will be displayed on the screen:
Repeat All Discs, Repeat 1
Disc, Repeat 1 Folder,
Repeat Track, Standard Play
The Repeat Indicators will also light to
reflect the current mode. The Repeat A–B function is not available for MP3 discs.
For Random Play of the files on the MP3 disc,
press the Random Button to toggle
between Random Play and Standard Play, as
displayed on the screen.
VCD Playback
VCD is a format that predates DVD which is
based on a different compression format than
DVD and a recording method that is similar to
CDs. Although the DVD has, for the most part,
replaced VCD as a format, the DVD600
II
offers
VCD playback so that you may play your existing
library of VCD discs.
(continued)
DVD600II
Page 20

20
Operating the DVD600IIDVD Changer
There are two versions of the VCD format: an
early version which is simply called “VCD” and
a later version with Playback Control which is
called “Version 2.0” or “PBC”. The DVD600
II
is
compatible with both forms of VCD, although
playback will vary according to which version
is used and the specific way in which the disc
was created.
However, the DVD600
II
is not capable of playing
SVCD (Super Video CD) discs. Also, do not confuse the Video CD format with the photo CDs
that you may receive when developing a roll of
film. Photo CDs may not be viewed using the
DVD600
II
.
Even though VCD discs provide video, since the
format is based on CD technology, the playback
functions for a VCD disc operate very closely to
those for CD. To play a VCD disc, place it in the
DVD600
II
as you would any other CD or DVD
disc. After the unit takes a few seconds to read
the disc’s contents the VCD segment of the
Disc Type Indicators will light and the
disc will begin playing. If the disc has been created under VCD Version 2.0, or if it otherwise
allows Playback Control functionality, the letters
PBC will appear in the Title/Track Indicators
.
However, keep in mind that the exact
level of functionality for any VCD will vary widely and it is ultimately determined by the way the
disc was created, not by the DVD600
II
.
When playing VCD discs, most standard
DVD/CD playback controls function as normal,
including Play, Stop, Pause, Forward or Reverse
Slow Play, and Fast Forward or Reverse Search
(x2, 4x and 8x speeds). The indications for fast
play in either direction work as described for CD
playback.
Using the On-Screen Status Bar
for VCD Playback
When playing many VCD discs, it is possible to
access the disc’s features using the on screen
menu bar in the same manner as shown for CD
playback. Note, however, that the while the
IntroScan icons will appear in the menu bar, the
IntroScan feature is not available for VCD discs.
Use of other functions will vary according to the
disc type. With some VCD discs, you may select
a track using the Track function on the menu
bar. If the menu bar is not visible on the screen
press the Status Button e to recall it to the
screen. Note that when PBC appears under
the disc icon in the far left position of the menu
bar it is not possible to change track numbers
directly.
Depending on the disc’s functionality, some VCD
discs allow the time display to be changed in
the same manner as described for CD discs.
Playback Control
VCD discs made under the Revision 2.0 specification will usually offer PBC, or playback control.
With PBC many discs include chapter selection
menus that are similar to those found on DVDs.
However, on VCD discs the menus are recalled
and controlled differently than on DVD discs.
•
To view the menu options on a PBC disc,
press the Next or Previous
buttons on the remote or the Skip Forward/
Reverse Buttons on the front panel.
•
Once the menu options appear on the screen,
make your selection by pressing the Numeric
Button - that corresponds
to your desired choice. The desired selection
will begin playingautomatically.
Note that the Menu Button used during DVD
playback is not used for VCD playback.
DVD600II
Page 21

21
SYMPTOM PROBABLE CAUSE SOLUTION
DCR600
II
does not function when Main • No AC Power • Make certain AC power cord is plugged into
Power Switch is pushed a live outlet.
• Check to see whether outlet is switch-controlled.
DVD600
II
does not turn on • Main Power Switch turned off • Press in Main Power Switch.
• No AC power • Check AC power plug and make certain any switched
outlet is turned on.
Display lights, but no sound • Intermittent input connections • Make certain that all input and speaker connections
are secure.
• Mute is on • Press Mute Button c.
• Volume control is down • Turn up volume control.
Unit turns on, but front panel • Display brightness is turned off • Follow the instructions in the Display Brightness section
display does not light up so that the display is set to VFD FULL.
No sound from any speaker; • Amplifier is in Protection mode • Check speaker wire connections for shorts at receiver and
light around power switch is red due to possible short speaker ends.
• Amplifier is in Protection mode • Contact your local JBL service center.
due to internal problems
No sound from any speaker • No audio signal is being transmitted • Check that DCR600
II
is on and a source is playing.
to the speakers • Check all wires and connections between the DCR600
II
and speakers. Make sure all wires are connected. Make sure
none of the speaker wires are frayed, cut or punctured.
• Review proper operation of the DCR600
II
.
• If in DVD mode, make sure that • Check Input assignment for DVD Input. DVD Input should be
analog input is not accidentally assigned set to COAX 1 and the DVD600
II
Digital Output should be
connected to Coaxial 1 Digital Input ™on the DCR600
II
.
• Intermittent connections • Check all audio connections.
• Incorrect digital audio selection • Check digital audio settings.
• DVD disc is in Fast or Slow mode • There is no audio playback on DVD discs during
Fast or Slow modes.
DVD600II
Troubleshooting the DCR600II and DVD600II
Page 22

22
Troubleshooting DCR600II and DVD600II (Cont'd)
No sound from one speaker • No audio signal is being transmitted • Check all wires and connections between the DCR600IIand
to the speakers speakers. Make sure all wires are connected. Make sure
none of the speaker wires are frayed, cut or punctured.
• In Dolby Digital or DTS modes, make sure that the DCR600
II
is configured so that the speaker in question is enabled.
No sound from surround or • Incorrect surround mode • Select a mode other than Stereo.
center speakers • Make sure the movie or TV show you are watching is
recorded in a surround sound mode. If it is not, try using
another surround mode.
• Input is monaural • There is no surround information from mono sources.
• Stereo or Mono program material • The surround decoder may not create center- or rear-channel
information from nonencoded programs.
• Review the operation of your DVD player and the jacket
of your DVD to make sure that the DVD features the desired
Dolby Digital or DTS mode, and that you have properly
selected that mode using both the DVD player’s menu and
the DVD disc’s menu.
• No audio signal is being transmitted • Check all wires and connections between the DCR600
II
and
to the speaker speaker. Make sure all wires are connected. Make sure
none of the speaker wires are frayed, cut or punctured.
• Incorrect configuration • If the DCR600
II
is set in Dolby Pro LogicII mode, make sure
the center speaker is not in Phantom mode.
• If the DCR600
II
is set in Dolby Digital or DTS mode, make
sure it is configured so that the center speaker is enabled.
• In Dolby Digital or DTS modes, make sure the DCR600
II
is
configured so that the surround speakers are enabled.
• Check all wires and connections between the DCR600
II
and
speakers. Make sure all wires are connected. Make sure
none of the speaker wires are frayed, cut or punctured.
System plays at low volume but • Speaker impedances are dropping too • Check all wires and connections between the DCR600
II
and
shuts off as volume is increased low for receiver to handle speakers. Make sure all wires are connected. Make sure
none of the speaker wires are frayed, cut or punctured.
• Do not use more than one pair of main speakers.
Low (or no) bass output • Speakers are connected out of phase • Make sure the connections to the left and right
Speaker Inputs have the correct polarity (+ and –).
• Subwoofer output of DCR600
II
not • In Dolby Digital or DTS modes, make sure the DCR600IIis
enabled configured so that the subwoofer and LFE output is enabled.
Unit does not respond to • Weak batteries in remote • Change remote batteries.
remote commands • Wrong device selected • Press the Main h or DVD d selector.
• Remote sensor is obscured • Make certain front panel sensor is visible to remote
or connect remote sensor.
Intermittent buzzing in tuner • Local interference • Move unit or antenna away from computers, fluorescent
lights, motors or other electrical appliances.
Letters flash in the channel indicator • Digital audio feed paused • Resume play for DVD.
display and digital audio stops • Check that Digital Input is selected.
(continued)
DVD600II
Page 23

23
Troubleshooting DCR600II and DVD600II (Cont'd)
Disc does not play • Disc loaded improperly • Load disc label-side up.
• Incorrect disc type • Check to see that disc is CD, CD-R, CD-RW, DVD-Movie, MP3
or Video CD; other types will not play.
• Invalid Region Code • Use Region 1 disc only.
• Rating is above parental preset • Enter password to override or change rating settings.
• Wrong source for CD was selected • If you are playing a CD in the DVD600
II
,
you must select the DVD source on the DCR600
II
,
not the CD source.
No picture • Intermittent connections • Check all video connections.
• Wrong input • Check input selection of TV or DCR600
II
.
• Different types of video connections • You may not mix video connection types. If you use S-Video
in use connections from the DVD600
II
to the DCR600II, you must
also use the S-Video input on your television. If you use the
composite video connections from the DVD600
II
to the
DCR600
II
, you must also use the composite video input
on your television.
Picture is distorted or jumps during • MPEG-2 decoding • It is a normal artifact of DVD playback for pictures
Fast Forward or Reverse Play to jump or show some distortion during rapid play.
Picture jumps or freezes during • Unit may be overheating • Due to the nature of this product category, DVD players,
normal play while being operated at elevated temperatures, may exhibit
certain anomalies such as picture freeze-ups. If this occurs,
the DVD600
II
needs to be “reset” by powering it down
and up again, using its master On/Off switch. Should this
occur with your DVD600
II
, first check your discs for any
damage, scratches, and fingerprints. If discs are OK, then
ventilation around the DVD600
II
needs to be increased
to ensure proper operation.
Some remote buttons do not operate • Function not available for this disc • Some discs do not include all DVDfeatures.
during DVD play
The menu is in a foreign language • Incorrect menu language • Change menu language selection.
“” symbol appears • Requested function not available at • Certain functions may be disabled during passages
this time of a disc.
Picture is displayed in the • Incorrect match of aspect ratio settings • Change Aspect Ratio settings.
wrong aspect ratio to disc
Disc will not copy to VCR • Macrovision protection • Most DVDs are encoded with Macrovision
to prevent copying to VCR.
DVD600II
Page 24

24
DVD600II
Page 25

y
A
A
A
A
-
-
A
K
5
A
A
3
A
A
A
A
-
A
A
A
A
A
A
L
A
A
-
)
A
-
A
A
-
A
A
A
)
K
25
DVD600II
DVD600II EXPLODED VIEW PARTS LIST
Ref# Part Number Qt
1 55190130 1.0 PCAC DEC DOOR TRAY DVD600II -2 55190150 1.0 PC
3 55190040 1.0 PC
4 55192630 1.0 PC
5 55192640 1.0 PC
6 55190080 1.0 PCAC DEC BUTTON CAP DIMMER DVD600II 7 55190090 1.0 PCAC DEC BUTTON DIMMER DVD600II -8 55190170 1.0 PC
9 55202510 1.0 PCAC PUN SHIELD COVER SMPS EU DV50
10 55190140 1.0 PCAC MLD BUTTON SHAFT POWER SW DVD600II -11 55190100 1.0 PC
12 55184690 1.0 PC
13 55186630 1.0 PCAC CPL CABINET CHASSIS FRONT DV505
14 55174760 4.0 PC
15 55190220 4.0 PCAC FOOT ASSY DCR600 ROUND 15.8MM 50MM
16 55190070 1.0 PC
17 55190050 1.0 PC
18 55190060 1.0 PCAC DEC BUTTON DISC DVD600II -19 55190320 1.0 PC
20 55174550 5.0 PC
21 55405550 1.0 PC
22 55190690 1.0 PC
23 55491610 1.0 PC
24 55190770 1.0 PC
25 55196510 1.0 PCAC SUPPORT 15*30*16 DV505 -- RU
26 55190680 1.0 PC
27 5518667A 1.0 PC
28 55186040 1.0 PCAC MSA ASY CDM5F(TVK15-1AA/502T
29 55174610 1.0 PCAC PUN BRACKET MECHA RIGHT GE5805P -30 55186680 1.0 PC
31 55190160 1.0 PCAC PUN BRACKET BKT GROUND DV505 -32 55178960 5.0 PC
33 55186640 3.0 PC
34 55190330 1.0 PCAC EMBD IMA MAIN BD DVD600II
35 55190340 1.0 PC
36 55190180 1.0 PC
37 55125180 1.0 PC
38 55011170 1.0 PC WIRE-MCRDM 0.75MM2 1830MM B
S1 55164800 46.0 PC SCREW 3MM 8MM DIN963 62 2182 B7
S2 55127120 3.0 PC SCREW-ST 3MM 8MM JIS B 1122 53 0 0
S3 55049000 4.0 PC SCREW-ST 3MM 06MM JIS B 1122 03 0 0
S4 55127070 9.0 PC SCREW-ST 3MM 10MM JIS B 1122 25 0 0
S5 55135460 4.0 PC SCREW-SPEC 3MM 10MM JIS 27 0 0
S6 55127090 4.0 PC SCREW-ST 4MM 8MM JIS B 1122 25 0 0
C DEC CRYSTAL WINDOW DISPLAY DVD600II
C DEC CABINET PANEL FRONT DVD600II
C DEC BUTTON STAND-BY JBL -C MLD BUTTON INDICATOR STAND-BY DCR600MK2 -
C PUN COVER TOP DVD600II METAL B
C DEC BUTTON POWER DVD600II -D ASY SMPS MODULE DV-C50
C FOOT RUBBER ROUND 3.0MM 25.0MM JIS 60 Y DI
C DEC BUTTON OPEN/CLOSE DVD600II -C DEC BUTTON PLAY DVD600II -
C EMBD IMA FRONT BD DVD600II
C RAW SHIELD GASKET 1 12X8X20
C PUN SHIELD COVER AS DV6050
C PUN SHIELD COVER DOWN LOAD DV505
C CPL CABINET CHASSIS MAIN DVD-600II
C FELT 38X120X0.3T BK NON-META
C PUN SHIELD COVER CNT BD DV505
C PUN BRACKET FRAME MECHA L02 -
C PUN BRACKET FRAME MECHA R02 -
C SPRING PLATE SPRING GND C5212 0.2T AVR520
C PUN BRACKET MAIN PCB DV505 -
C EMBD IMA OUT BD DVD600II
C CPL REAR PANEL DVD600II
C MLD CLAMP AC CORD RT2280/RT2250(PAV5007/PAV5005
Page 26

26
DVD600II
Service Bulletin
Service Bulletin JBL2002-01 Rev1 - September 2005 This is considered a Minor repair
To: All JBL Service Centers
Model: DVD600II
Subject: Will Not Play Enhanced CD’s or Some DVD Titles
Definition, Enhanced CD’s: A special audio Compact Disc, when placed in a CD or DVD player, offers a
multimedia experience. Enhanced CDs are compatible with audio CD players, DVD players, and properly
configured computer CD-ROM drives. They may include video clips, still pictures, interviews, discographies,
lyrics and other information, in addition to the recorded music.
In the event you receive a DVD600II DVD player with the complaint: “The unit will not play an En hanced
CD, or a certain DVD title” – the unit may exhibit one or more of the following symptoms: The counter
freezes in the displa y, all you hear is a repeating ski pping sound or intermittent noise coming from the
receiver, display goes to the last track, or navigation features do not work, follow the instruct ions
below:
1) For Enhanced CD: Verify that the CD causing the problem is an enhanced CD; it should be labeled as
“Enhanced CD”. If it’s not an enhanced CD, problems will not be corrected by this software upgrade
(Version 1.11 to 1.13). V erify that the unit will play r egular music CD’s successfully.
2) Verify the serial number range of the DVD600II (see below). If the unit falls into the affected serial number
range, it is a candidate for the software upgrade. Additionally, the software version can be checked by
following the simple procedure on page 2.
3) For additional information and current resources available to perform upgrades, please contact:
Harman Service Technical Support
Phone: 516-682-6435
E-mail: techsupport@harman.com
Model
DVD600II
DVD600II
DVD600II
Serial Number
120V
TH0055-01000
to
TH0055-15602
TH0055-15603
to
TH0055-18471
TH0055-18472
And above
STATUS
Will not play enhanced CD’s and
some DVD titles
Version 1.11
Will not play some DVD titles
Version 1.12
Modified by factory
Version 1.13
ACTION
Software upgrade needed to play Enhanced
CD’s and all DVD t itles
Software upgrade needed to play all DVD tit les
NONE REQUIRED
JBL Incorporated 250 Crossways Park Dr. Woodbury, New York 11797
Page 27

DVD600II
27
With the DVD600II in Stand By mode, (no display, Orange indicator ON):
Press BACK SEARCH and FORWARD SKIP buttons on the front panel simultaneously for at least 2 seconds
and then release them. In the display: Chapter Display will indicat e the revisio n, e.g. current Rev 1.13 will be
indicated as 113. Minutes will indicate the month when it was upgraded and seconds will indicate the day.
Press the Power button once to restore the display to normal.
Version Check DVD600II
DVD600II Upgrade Procedure
The following files are included in the floppy disc:
DVD_LINK.EXE
600MK113.BIN
Upgrade from the Floppy Disc:
Go to DOS prompt from Windows.
Insert the floppy disc. Change the directory to locate the 3 ½” floppy disc drive.
At the A: prompt (or whatever designator your 3 ½” floppy disc drive is), type: dvd_link 600mk113.bin
Be sure to leave a space between “link” and “600”.
Or, Upgrade from your computer’s Hard Drive:
Create a new subdirectory and copy the two files above to a new subdirectory you will name.
Once the files are copied there, on your hard drive:
Go to DOS prompt from Windows. Change the directory to locate the new subdirectory you have named,
with the files in it – for th is example, ca lling it C:\DVDUPGRADE. Type : dvd_link 600mk113.bin
Be sure to leave a space between “link” and “600”.
INSTRUCTIONS
1) Plug the unconnected end of the gray parallel port cable, connected to the Upgrade Interface PCB, into
your computer LPT1 port (unplug printer or any other cable already connected there, if necessary).
Computer must be configured so it is recognizing the LPT1 port. (or LPT2 port if you choose)
2) Remove any CD/DVD/VCD discs that may be in the DVD600II.
3) Unplug the AC power cord from the Unit Under Test; the MAIN AC POWER SWITCH should be pressed
until it pops out from the front panel, so that the word “OFF” may be read at the top of the switch (top
button on the left side – not
4) Turn the unit on it’s side so the bottom panel faces you; slightly off-center is a rectangular access hole
covered by a black ¾ x 1 ¼” cover; remove the cover. Inside is a female ribbon cable connector.
5) Carefully plug the male 15-conductor cable from the Upgrade Interface PCB into this connector.
IMPORTANT: Assure the bare (uninsulated) side of the cable end faces the front of the unit.
6) Plug in the AC power cord; depress the MAIN AC POWER SWITCH ONLY (top button – not
marked POWER). Do not press any other buttons or controls
7) The red LED on the Interface PCB should be ON.
8) Follow one of the two methods mentioned above to load the software. Hit Enter on your computer
keyboard.
9) You should get a prompt: “Do you want to program Flash Memory ?” Press “Y” for Yes.
10) Upgrade process should begin. You will see more promp ts, but no other action is necessary; there will be
a number counting up on-screen. LED’s on the Upgrade Interface PCB should blink Red & Green
alternately. The process should take about two minutes.
11) The upgrade is complete when the DOS prompt: “Complete !” or “DVD5link” is displayed.
12) Turn the MAIN AC POWER SWITCH off; unplug the ribbon cable, and replace the black cover. Set the
unit back level, flat on its feet.
13) Test the unit by playing an Enhanced CD disc or the problem DVD (if available).
the button marked POWER).
the button
. Orange Power indicator should be ON.
JBL Incorporated 250 Crossways Park Dr. Woodbury, New York 11797
Page 28

28
DVD600II
Service Bulletin
Service Bulletin JBL2003-01 Rev1 - June 2003 This is considered a Minor repair
To: All JBL Service Centers
Model: DVD600II (Cinema ProPack 600II system)
Subject: Unit Says In Standby Mode
In the event you receive a DVD600II DVD player with the complaint: “The unit stays in standby mode
(amber indicator), and will not switch ON, either with the remote control or the front panel button”,
check the following components and follow the instructions below:
Synopsis:
In the Front panel PCB:
IC901 microprocessor - check solder connections to all 80 pins – resolder if necessary
C903, C904 0.1uF 50V SMD capacitors – check and replace.
In the Power supply PCB:
R6 120Ω 1/8 watt resistor – check and replace if necessary.
1) Remove (8) screws holding the top cover on; remove the cover.
2) In the Power supply PCB, check and replace R6, 120Ω 1/8 watt resistor, with JBL part# 299-120. You
may be able to cut the defective resistor off the PCB and re-solder the new part on without removing the
power supply PCB.
3) Remove the five plated screws holding the front panel to the chassis (one is on the bottom)
4) Unplug the single 5-pin Molex plug to CN906 (near the power switch) to allow the front panel to be
disengaged from the chassis; cut and remove any cables ties, but note their location.
5) Remove the front panel from the unit; there are four tabs/catches that must be freed as the panel is
removed; two are on the sides and two are on the bottom.
6) Once the rear of the front panel PCB is exposed, locate IC901 microprocessor - check solder
connections to all 80 pins and resolder if required.
7) Locate C903, C904; 0.1uF 50V SMD capacitors; check and replace with JBL part# 2026729091.
8) Replace any cable ties that were cut; reassemble and test unit.
Model
DVD600II
Serial number
(120v)
All Serial numbers
affected
Serial number
(230v)
All Serial numbers
affected
Status Action
May need modification if
unit exhibits symptom
Check solder connections to IC901
Check and replace C903,C904 and R6
Page 29

29
DVD600II
Service Bulletin
Service Bulletin JBL2003-07 - June 2003 This is considered a Minor repair
To: All JBL Service Centers
Model: DVD600II (Cinema ProPack 600II system)
Subject: Dim Display
In the event you receive a DVD600II player with the complaint: “the display is too dim”, follow the
instructions below:
The DVD600II has a dimming feature that may be ON; this should be checked first. On the front panel, left of
the display, is the dimmer button. With the unit ON, press the button repeatedly and cycle through these
stages in the following order: FULL BRIGHTNESS>HALF BRIGHTNESS>OFF>FULL BRIGHTNESS.
If the FULL BRIGHTNESS setting is still dim,
In the Front panel PCB, replace C903 (0.1uF 50V SMD capacitor).
1) Remove (8) screws holding the top cover on; remove the cover.
2) Remove the five plated screws holding the front panel to the chassis (one is on the bottom)
3) Unplug the single 5-pin Molex plug to CN906 (near the power switch) to allow the front panel to be
disengaged from the chassis; cut and remove any cables ties, but note their location.
4) Remove the front panel from the unit; there are four tabs/catches that must be freed as the panel is
removed; two are on the sides and two are on the bottom.
5) Once the rear of the front panel PCB is exposed, locate C903, 0.1uF 50V SMD capacitor. Replace with
JBL part# 2026729091.
6) Replace any cable ties that were cut; reassemble and test the unit.
Model
DVD600II
Serial number
(120v)
All Serial numbers
affected
Serial number
(230v)
All Serial numbers
affected
Status Action
Dim Display Replace C903
Page 30

30
DVD600II
TECH TIPS
Troubleshooting tips and solutions to common service problems
For models: DVD600II (from the Cinema ProPack 600II System) TIP# JBLTT2003-03
Subject: Opening Tray Without Power
In the event you receive a DVD600II without power, and you have a need to open the tray manually:
On the bottom panel there is a 1 3/8” opening* covered by a black square plastic dust cover. Carefully,
with a sharp tool, peel it away from the opening and remove it. By inserting your finger in the opening, you
can feel the edge of a gear. With your fingernail, it is an easy matter to rotate the gear in the proper
direction; the tray will start to extract from the unit. If the top cover has been removed, once the tray is in
motion, you can push the tray out further from the back of the tray.
Replace the dust cover after you are finished servicing the unit.
* (NOTE: there are two – the correct one is the one with a square shape, closer to the front of the unit –
Not the rectangular one)
Page 31

31
DVD600II
Page 32

32
DVD600II
Page 33

33
DVD600II
Page 34

34
DVD600II
Page 35

35
DVD600II
Page 36

36
DVD600II
Page 37

37
DVD600II
Page 38

38
DVD600II
DVD600II Electrical Parts List
Ref. Designator Part Number Qty Description
MAIN PCB
Capacitors
C201P,C204,C206,C210,
C221,C232,C311,C406
C203,C205,C209,C220 1013896091 4 CCCFMIC 10N0F +10% -10% 50.0V X7R
C215,C217,C218,C222B,
C222C,C222G,C222R,C222S,
C222Y,C225,C234,C235,
C504,C201,C202,C207,C208,
C219,C222,C223,C224,C312,
C401,C402,C403
C216 2050668091 1 CCCFMIC 470P0F +5% -5% 50.0V NP0
C220B,C220C,C220G,C220R,
C220S,C220Y
C221B,C221C,C221G,C221R,
C221S,C221Y
C223B,C223C,C223G,C223R,
C223S,C223Y
C224B,C224C,C224G,C224R,
C224S,C224Y,C225B,C225C,
C225G,C225R,C225S,C225Y
C226,C227 1013734091 2 CCCFMIC 68P0F +10% -10% 50.0V NP0
C228,C229,C230 2026783030 3 CE 47U0F +20% 16.0V 85C
C233,C505 2026862030 2 CE 470U0F +20% 6.3V 85C
C237,C238,C239,C240,C241 2050659091 5 CCCFMIC 100P0F +5% -5% 50.0V NP0
C242,C243,C244,C245 2050654091 4 CCCFMIC 10P0F +0P5F -0P5F 50.0V NP0
C404,C405 1013855091 2 CCCFMIC 1N0F +10% -10% 50.0V X7R
C501 1037509091 1 CCCFMIC 20P0F +5% -5% 50.0V NP0
C502,C503 2050652091 2 CCCFMIC 22P0F +5% -5% 50.0V NP0
2026894030 8 CE 100U0F +20% 10.0V 85C
2028804091 25 CCCFMIC 100N0F +80% -20% 16.0V Y5V
2025267030 6 CE 470U0F +20% 10.0V 85C
1013867091 6 CCCFMIC 3N3F +10% -10% 50.0V X7R
2025265030 6 CE 220U0F +20% 16.0V 85C
2099397091 12 CCCFMIC 390P0F +5% -5% 50.0V NP0
Semiconductors
D303 2049651085 1 D-SLP 1SS355 35.0V 225MI0A
IC201 55130350IC 1 IC-VIDEOPROC STI5519 MPEG VIDEO DECODER
IC202 2094074065 1 IC-EEPROM M24C02WMN6
IC21P 20361320NR 1 IC-REGPOSFXD KIA7806PI NORMAL
IC301 55236130MS 1 IC-DRAM 100M0 HZ 6N0 64M(1M*16*4) HY57V641620HGT-H 133MHZ
IC401 55136720MS 1 IC-MEMFLASH M29W800AT90N1
IC501 55133310KV 1 IC-LOGIC M74HCU04M1R INVERTER HCT
Q201,Q202,Q203 2097046092 3 TR-SLPSWA KTC3875Y N 50V 150MI0A
Q220B,Q220C,Q220G,
Q220R,Q220S,Q220Y
Q221B,Q221C,Q221G,
Q221R,Q221S,Q221Y
Resistors
R201,R202,R203,R204,R221,
R273,R274,R303,R304,R305,
R306,R307,R308,R501,J301,
R301,R302,R309
R205,R209 1013508091 2 RMGCFMIC 18K0 OHM +5% 62MI5W
5513869056 6 TR-SLPLF KTN2907A P -600MI0A
5513871092 6 TR-SLPSWA KTD1304 N 20V 300MI0A
1013474091 18 RMGCFMIC 100R0 OHM +5% 62MI5W
Page 39

s
39
DVD600II
Ref. Designator Part Number Qty Description
R206B,R207G,R208R,R210Y,
R211C,R212S
R217S,R218C,R219Y,R220B,
R220G,R220R,R266,R438, R254
R221B,R221C,R221G,R221R,
R221S,R221Y
R222B,R222C,R222G,R222R,
R222S,R222Y
R223,R237,R238,R239,R240,
R241,R256,R262,R263,R267,
R268,R282,R283,R285,R289,
R290,R401,R402,R403,R409,
R421,R422,R423,R424,R425,
R426,R427,R428,R252,R404,
R407,R408,R410
R223B,R223C,R223G,R223R,
R223S,R223Y,R264,R265
R224B,R224C,R224G,R224R,
R224S,R224Y,R226B,R226C,
R226G,R226R,R226S,R226Y
R225B,R225C,R225G,R225R,
R225S,R225Y
R227B,R227C,R227G,R227R,
R227S,R227Y
R228,R250,R257 1013577091 3 RMGCFMIC 1K0 OHM +5% 62MI5W
R236,R315,R413,R429,R430,
R431,R432,R433,R434,R435,
R436
R243,R244,R245,R248,R251,
R280,R281,R288,R298,R405,
R406,R242,R253,R255,
R246,R247,R271,R310,R311,
R312,R313
R269,R270 1013584091 2 RMGCFMIC 1K8 OHM +5% 62MI5W
R474 5523277016 1 RMF 2R2 OHM +5% 500MI0W
R502 1013468091 1 RMGCFMIC 56R0 OHM +5% 62MI5W
R503 1013562091 1 RMGCFMIC 1M0 OHM +5% 62MI5W
RA301,RA302,RA303,RA304,
RA305,RA306,RA307,RA401,
RA402,RA403,RA404,RA405,
RA406,RA407,RA408
1013485091 6 RMGCFMIC 270R0 OHM +5% 62MI5W
1013441091 9 RMGCFMIC 10R0 OHM +5% 62MI5W
1013498091 6 RMGCFMIC 820R0 OHM +5% 62MI5W
1013586091 6 RMGCFMIC 2K2 OHM +5% 62MI5W
1013465091 33 RMGCFMIC 47R0 OHM +5% 62MI5W
1013471091 8 RMGCFMIC 75R0 OHM +5% 62MI5W
1013446091 12 RMGCFMIC 12R0 OHM +5% 62MI5W
1043498091 6 RMGCFMIC 8R2 OHM +5% 62MI5W
1013476091 6 RMGCFMIC 120R0 OHM +5% 62MI5W
1013522091 11 RMGCFMIC 47K0 OHM +5% 62MI5W
1013501091 14 RMGCFMIC 10K0 OHM +5% 62MI5W
1013594091 7 RMGCFMIC 4K7 OHM +5% 62MI5W
5512982050 15 RCA 47R0 OHM +5% 62MI5W 4
Miscellaneou
CC201 55182930NR 1 FFC-JUMPER 19X 1.25MM 180MM
CC202 55182940NR 1 FFC-JUMPER 19X 1.25MM 100MM
CN201 55182960NR 1 WIRECONASY UNIQUE 5P 130MM UL1007 PVC DISCRETE 26 1
CN205 55182970NR 1 WIRECONASY UNIQUE 12P 150MM UL1007 PVC DISCRETE 26 1
CN206 55123450 1 CONN 2.0MM 12 MA R NAT LW2003P12 0 0
CP202 55125910NR 1 CONN 1.0MM 15 FE ST BK 00-6232-015-006-800 0 0
CP205,CP201 55124600 2 CONN 1.25MM 19 FE ST WH GF120-19S-TS 2794 A6
J201,J202,J203,J204,J207,
R201P,R249,R279,R314,
L208,R230,R437
L201,L202,L203,L209 5518804091 4 LF-SMD 2U2H +10%
L211 5512671050 1 FBEAD SURFACE MT 120OHM FCM2012C-121T06
1032875091 12 RMGCFMIC 0 OHM +0% 62MI5W
Page 40

40
DVD600II
Ref. Designator Part Number Qty Description
L220B,L220C,L220G,L220R,
L220S,L220Y
L301,L501,L204,L205,L206,
L210,R415
X501 55128980NR 1 FILQZ 27M0 HZ +15 PPM 50.0 OHM FUNDAMENTAL 16P5 F
SECTION: PCM DAC AUDIO
Capacitors
C302L 1013862091 1 CCCFMIC 2N2F +10% -10% 50.0V X7R
C302R 1013862091 1 CCCFMIC 2N2F +10% -10% 50.0V X7R
C303L 2067807091 1 CCCFMIC 330P0F +5% -5% 50.0V NP0
C303R 2067807091 1 CCCFMIC 330P0F +5% -5% 50.0V NP0
C307L 2050659091 1 CCCFMIC 100P0F +5% -5% 50.0V NP0
C307R 2050659091 1 CCCFMIC 100P0F +5% -5% 50.0V NP0
C321 2050654091 1 CCCFMIC 10P0F +0P5F -0P5F 50.0V NP0
C304L 2028804091 1 CCCFMIC 100N0F +80% -20% 16.0V Y5V
C304R 2028804091 1 CCCFMIC 100N0F +80% -20% 16.0V Y5V
C322 1013839091 1 CCCFMIC 560P0F +10% -10% 50.0V X7R
C324 1013839091 1 CCCFMIC 560P0F +10% -10% 50.0V X7R
C326 1013839091 1 CCCFMIC 560P0F +10% -10% 50.0V X7R
C328 2050654091 1 CCCFMIC 10P0F +0P5F -0P5F 50.0V NP0
C329 2050654091 1 CCCFMIC 10P0F +0P5F -0P5F 50.0V NP0
C301L 2026783030 1 CE 47U0F +20% 16.0V 85C 20251640
C301R 2026783030 1 CE 47U0F +20% 16.0V 85C 20251640
C305L 2026783030 1 CE 47U0F +20% 16.0V 85C 20251640
C305R 2026783030 1 CE 47U0F +20% 16.0V 85C 20251640
C306L 2026783030 1 CE 47U0F +20% 16.0V 85C 20251640
C306R 2026783030 1 CE 47U0F +20% 16.0V 85C 20251640
C323 2026783030 1 CE 47U0F +20% 16.0V 85C 20251640
C327 1500213030 1 CE 10U0F +20% 16.0V 85C
C325 20252680AM 1 CE 1MI0F +20% 10.0V 85C
C331 20269180AM 1 CE 1MI0F +20% 6.3V 85C
5519045091 6 LF-SMD 2U7H +10%
5512667050 7 FBEAD SURFACE MT 1000OHM FCM2012H-102T04
Semiconductors
D301 5517107085 1 D-ZENER UDZS 2.2 B 2.2V 200MI0W
IC302 55156030MT 1 IC-CONV PCM1748 KE/S D/A
IC303 55128990MT 1 IC-OPERAMP BA4560F DUAL OP
Q301 5513318092 1 TR-SSD DTC114YKA N 10K0 OHM 47K0 OHM
Q301L 5503943092 1 TR-SSD DTC323TK N 2K2 OHM
Q301R 5503943092 1 TR-SSD DTC323TK N 2K2 OHM
Q302L 5513319092 1 TR-SSD DTA114YKA P 10K0 OHM 47K0 OHM
Q302R 5513319092 1 TR-SSD DTA114YKA P 10K0 OHM 47K0 OHM
Resistors
R321 1013459091 1 RMGCFMIC 33R0 OHM +5% 100MI0W
R301L 1013522091 1 RMGCFMIC 47K0 OHM +5% 100MI0W
R301R 1013522091 1 RMGCFMIC 47K0 OHM +5% 100MI0W
R302L 1013596091 1 RMGCFMIC 5K6 OHM +5% 100MI0W
R302R 1013596091 1 RMGCFMIC 5K6 OHM +5% 100MI0W
R303L 1013592091 1 RMGCFMIC 3K9 OHM +5% 100MI0W
R303R 1013592091 1 RMGCFMIC 3K9 OHM +5% 100MI0W
R304L 1013601091 1 RMGCFMIC 9K1 OHM +5% 100MI0W
Page 41

s
41
DVD600II
Ref. Designator Part Number Qty Description
R304R 1013601091 1 RMGCFMIC 9K1 OHM +5% 100MI0W
R307L 1013487091 1 RMGCFMIC 330R0 OHM +5% 100MI0W
R307R 1013474091 1 RMGCFMIC 100R0 OHM +5% 100MI0W
R308L 1013534091 1 RMGCFMIC 100K0 OHM +5% 100MI0W
R308R 1013534091 1 RMGCFMIC 100K0 OHM +5% 100MI0W
R309L 1013474091 1 RMGCFMIC 100R0 OHM +5% 100MI0W
R309R 1013474091 1 RMGCFMIC 100R0 OHM +5% 100MI0W
R322 1032875091 1 RMGCFMIC 0 OHM +0% 100MI0W
R323 1013491091 1 RMGCFMIC 470R0 OHM +5% 100MI0W
R324 1013540091 1 RMGCFMIC 180K0 OHM +5% 100MI0W
Miscellaneou
L302 1404174091 1 LF-SMD 2U2H +10%
FRONT PCB
Capacitors
C909 2025183039 1 CE 1U0F +20% 50.0V 85C
C903,C904,C905,C908,C911 2026729091 5 CCCFMIN 100N0F +80% -20% 50.0V Y5V
C906 2034184030 1 CE 100U0F +20% 16.0V 85C
C901,C915 2034206039 2 CE 47U0F +20% 16.0V 85C
C916,C907 5517833030 2 CE 470U0F +20% 6.3V 85C
Semiconductors
D907 20415060AA 1 D-SR 1N4004 400.0V 1.0A
D983 2049651085 1 D-SLP 1SS355 35.0V 225MI0A
D906 5517787088 1 D-SR SCHOTTKY RB501V-40 40.0V 100MI0A
D904 55179310NR 1 D-LEM RED/GREEN 3PIE RD RND CL
DG901 55190890 1 CON PHONO SCKT REMOTEIH 2 PINS
IC901 55286830HE 1 IC-MICROCONT CXP82532-196Q DVD600II
IC902 55177640NR 1 IC-REGNEGFXD KIA7042P 4V2 NORMAL
Q902 5513318092 1 TR-SSD DTC114YKA N 10K0 OHM 47K0 OHM
Q914 5517922056 1 TR-SLPSWA KRA107M P
OP901 55179630NR 1 PHOTCOUP PC-17T1 PHOTOCOUPLER DIP4
RM901 55155930NR 1 IC-REMOTE RPM6938-RSIP-A3 RECEIVER 38KHZ
Resistors
R984 6044438091 1 RMGCFMIN 270R0 OHM +5% 100MI0W
R927 6044440091 1 RMGCFMIN 22K0 OHM +5% 100MI0W
R901 7043420091 1 RMGCFMIN 100R0 OHM +5% 100MI0W
R914,R924,R934 8044042091 3 RMGCFMIN 33K0 OHM +5% 100MI0W
R986 1106642091 1 RMGCFMIN 390R0 OHM +5% 100MI0W
R974 1106644091 1 RMGCFMIN 3K3 OHM +5% 100MI0W
R913,R923,R933,R949 1106646091 4 RMGCFMIN 8K2 OHM +5% 100MI0W
R926,R943,R987 1106648091 3 RMGCFMIN 47K0 OHM +5% 100MI0W
R910,R947 2047195091 2 RMGCFMIN 1K0 OHM +5% 100MI0W
R911,R921,R931 2047197091 3 RMGCFMIN 2K4 OHM +5% 100MI0W
R912,R922,R932 4043830091 3 RMGCFMIN 6K8 OHM +5% 100MI0W
R909,R946 5088654091 2 RMGCFMIN 330R0 OHM +5% 100MI0W
R902,R938,R939,R940,R941,
R942,R944,R985
5088661091 8 RMGCFMIN 10K0 OHM +5% 100MI0W
Page 42

s
s
42
DVD600II
Ref. Designator Part Number Qty Description
Miscellaneou
FL901 55190620NR 1 DISPLAY HNV-11SM07 SAMSUNG
L902,L903,L904,L909,
L912,L913,L914
L901 5518510091 1 LF-SMD 22U0H +10%
L905,L910,L911,R945 8044051091 4 RMGCFMIN 0 OHM +0% 100MI0W
50 55177590 2 SPONGE -- 40MM X 13MM 3MM 3MM 0 0
70 55190870 1 SPONGE BK 15MM X 5.7MM 8MM 0MM 0 0
100 20634190 1 FELT BK 30.0MM X 25.0MM 0.8MM 0MM 0 0
CP904 55090080 1 CONN 2.0MM 3 MA ST NAT LW2002P03 0 0
CP903 55123310 1 CONN 2.0MM 4 MA ST NAT LW2002P04 0 0
CN905,CN906 55123320 2 CONN 2.0MM 5 MA ST NAT LW2002P05 0 0
CN901 55255440NR 1 WIRECONASY UNIQUE 5P 380MM UL2791 SHIELD 28
CN902 55182990NR 1 WIRECONASY UNIQUE 5P 220MM UL1007 PVC DISCRETE 26 1
CN903 55164170NR 1 WIRECONASY UNIQUE 4P 140MM UL1007 PVC DISCRETE 26 1
CN904 55287670NR 1 WIRECONASY UNIQUE 3P 540MM UL1007 PVC DISCRETE 26 1
SW901,SW903,SW905,
SW907,SW909,SW911SW913,
SW915,SW917SW919,SW921,
SW924,SW927,SW930,SW931
X901 55126140NR 1 CRESONATOR 10M0 HZ 25.0 OHM 0F
5512673050 7 FBEAD SURFACE MT 2000OHM FCM3216V-202T03
55145270KX 15 SWITACT VERTICAL TACTILE F/B 50MI0A 12.0V 500MI0OHM 1T 1P
OUTPUT PCB
Capacitors
C804 1105867091 1 CCCFMIN 100P0F +5% -5% 50.0V NP0
C803 1105934091 1 CCCFMIN 10N0F +10% -10% 50.0V X7R
C801 2026729091 1 CCCFMIN 100N0F +80% -20% 50.0V Y5V
C802 2026783030 1 CE 47U0F +20% 16.0V 85C
C720 2026862030 1 CE 470U0F +20% 6.3V 85C
Semiconductors
D711 7043654016 1 D-SLP 1N4148 100.0V 150E-3A
Q801 2097046092 1 TR-SLPSWA KTC3875Y N 50V 150MI0A
Q802 2097048092 1 TR-SLPSWA KTA1504Y P -50V -150MI0A
Resistors
R804 3094425091 1 RMGCFMIN 10R0 OHM +5% 100MI0W
R803 3094431091 1 RMGCFMIN 4K7 OHM +5% 100MI0W
R872,R873,R875 5512671050 3 FBEAD SURFACE MT 120OHM FCM2012C-121T06
R805 6044437091 1 RMGCFMIN 180R0 OHM +5% 100MI0W
R801,R806 7043420091 2 RMGCFMIN 100R0 OHM +5% 100MI0W
J894,R802,R807,R808,
R815,R820,R827L,R827R,
R829,R874,R876,R877
8044051091 12 RMGCFMIN 0 OHM +0% 100MI0W
Miscellaneou
CN01 55124600 1 CONN 1.25MM 19 FE ST WH GF120-19S-TS 2794 A6
J002,J057,L801,L804 20441240 4 BCL 0.5MM TIN ANNEALED COPPER 7.5MM 8MM FIG 1 20322610
Page 43

y
43
DVD600II
Ref. Designator Part Number Qty Description
J006,J009,J016,J017, J058 20441250 5 BCL 0.5MM TIN ANNEALED COPPER 12.5MM 8MM FIG 1 20322610
J010,J011 20876340 2 BCL 0.6MM TIN ANNEALED COPPER 17.5MM 8MM FIG 1 20322580
JK801 55164750 1 CON PHONO SCKT W/GN 1 PINS
JK804 55175270 1 CON PHONO SCKT RCA 3P RGB W/GND CAP JE030039FN
JK803 55191220 1 CON DIN SCKT MIX SOCKET RCA & S-VIDEO
J001,J003,J014 20329450 3 BCL 0.6MM TIN ANNEALED COPPER 25.0MM 8MM FIG 1 20322580
J013,J040,J736,R826L, R826R 20441180 5 BCL 0.5MM TIN ANNEALED COPPER 10.0MM 8MM FIG 1 20322610
CD5 ass'
20 55183170 1 AC ESABD IAU CDM5 BD DVC503
50 5502007A 1 AC PLATTER CD5G -- PL
50 55156840 1 AC PCB CDM5D DV505 SINGLE LAYER
60 20581820 1 AD ASY MOTOR DC FF-130SH-14230
70 20584560 2 AC RAW WHEEL BELT
80 20710160 1 AC BELT PLATTER CD5 -- RU
90 20634190 1 FELT BK 30.0MM X 25.0MM 0.8MM 0MM 0 0
100 20710170 1 AC MLD GEAR WORM CD5
110 20710180 1 AC MLD GEAR HELICAL CD5
120 20711380 1 AC SHAFT CD5 -- ME
130 20711410 1 AC PULLEY CD5 -- PL
140 20712060 1 AC SPRING CLIP CD5
150 20712120 5 AC ROLLER CD5 -- RU
160 20712170 5 AC ROLLER HUB CD5 -- PL
170 55020080 1 AC DRAWER CD5D -- PL
190 55020090 1 AC BASE CD5D -- PL
200 55020110 1 AC MLD GEAR MAIN CD5D
210 20712230 1 AC CAM LIFTER CD5 -- PL
220 20712240 1 AC MLD GEAR DRIVE CD5
230 20712250 1 AC MLD GEAR PULLEY CD5
240 20692300 3 SCREW-ST 3MM 10MM JIS B 1122 53 0 0
250 55517530 1 AD ASY MOTOR DC VERYGOOD VRF-500TB-14415
260 20712270 1 AC BELT DRIVE CD5 -- RU
270 20349530 2 SCREW 2.6MM 4MM JIS B 1111 53 0 0
280 20366370 4 SCREW-SPEC 3MM 10MM JIS LARGE WASHER HD 53 0 0
290 10733290 1 OK TVK 15-1AA/502T
300 20349380 4 SCREW-ST 3MM 08MM JIS B 1122 53 0 0
310 55190460 1 SCREW-ST 3MM 18MM JIS B 1122 25 0 0
320 55190600 1 WASHER 3MM 55MM 1MM 3 00 0 A4
420 55190760 1 AC CPL WASHER-SPR 7.3MM 14.0MM 0.4MM Y 00 0 0
430 55232980 1 AC CPL BRACKET SUPPORT LEFT SUS-304 0.5T
440 55232990 1 AC CPL BRACKET SUPPORT RIGHT SUS-304 0.5T
5000 55183130 1 AC EMBD IMA MECHA BD DVC503
C002,C004 20246950AF 2 CC 100N0F +10% -10% 25.0V Y5R
C001,C003 8043459071 2 CC 22P0F +5% -5% 50.0V NP0
C005 20268030AM 1 CE 1MI0F +20% 25.0V 85C
L001 20265120NR 1 LF 39U0H +10% 130MI0 OHM 1.5A
D001,D002 20414280 2 D-ZENER 1N5232B 5.6V 500MI0W
IC001,IC002 20656300NR 2 IC-MOTORCIR LB1641 MOTOR CONT WITH LOGI
IC001,IC002 20458950NR 0 IC-MOTORCIR BA6209N MOTOR CONT WITH LOGI
IC001,IC002 55183090NR 0 IC-MOTORCIR KA3082 SIP10 MOTOR DRIVER
Page 44

44
DVD600II
Ref. Designator Part Number Qty Description
JW14,JW15,JW18,JW22 20441180 4 BCL 0.5MM TIN ANNEALED COPPER 10.0MM 8MM FIG 1 20322610
JW06,JW07,JW13,JW17,JW21 20441260 5 BCL 0.5MM TIN ANNEALED COPPER 15.0MM 8MM FIG 1 20322610
JW03,JW08,JW10,JW20 20441270 4 BCL 0.5MM TIN ANNEALED COPPER 5.0MM 8MM FIG 1 20322610
LUG02 55184700NR 1 WIRECONASY UNIQUE 1 90MM UL1007 PVC DISCRETE 24 1
P003 20504010 1 CONN 2.0MM 6 MA ST NAT JST,B6B-PH-K 0 0
P004 20713210 1
P027 20713500NR 1 WIRECONASY 06187F 06 180MM UL20080 RIBBON SOFT 26 12
P406 55183020NR 1 WIRECONASY UNIQUE 12P 70MM UL1007 PVC DISCRETE 26 1
P406B 20649240 1 WCL 060-05-05 UL2468 RIBBON 26 60MM NONE 5 5 20372650 1.5MM
PI001,PI002,PI003 20586840NR 3 D-PHOTO ITR9606/F2(T)
PI001,PI002,PI003 20621240NR 0 D-PHOTO GP1S58V 20MI0A
PI004 20556130NR 1 D-PHOTO GP2S28 20MI0A
R001,R002 5088295016 2 RCF 100R0 OHM +5% 250MI0W
R003,R004 20549430 2 RCFF 2R2 OHM +5% 250MI0W
WCL 150-05-05 UL2468 RIBBON 26 150MM NONE 5 5 20372650
1.5MM
10733290 DVD600II laser mechanism, ass'y
PACKAGING
BE8V00 1 PC CPPII remote control
55186190 1 PC 3-foot, single-lead coaxial digital cable
55192120 1 PC 3-foot, single-lead RCA patch cord with yellow connectors
55208610 1 PC One single-lead mini phone jack
55281230 1 PC Outer Carton
55243110 1 PC AC CPL ENDCAP CUSHION LEFT DVD600MKII
55243120 1 PC AC CPL ENDCAP CUSHION RIGHT DVD600MKII
Page 45

DVD600II
45
Page 46

DVD600II
46
Page 47

DVD600II
47
Page 48

DVD600II
48
Page 49

DVD600II
49
Page 50

DVD600II
50
NOTE: Ordinarily DVD600II Power Supply module,
part# 55184690, is supplied only as a complete unit.
Supplied Schematic and Parts list are included only
for reference when the above part is not available
and/or repair to component level is necessary. Part
numbers listed in column "Part Code" are not valid.
Page 51

DVD600II
51
Page 52

DVD600II
52
Page 53

DVD600II
53
Page 54

DVD600II
54
Page 55

DVD600II
55
Page 56

DVD600II
56
Page 57

57
Page 58

DVD600II
58
Page 59

DVD600II
59
Page 60

60
Page 61

DVD600II
61
Page 62

DVD600II
62
Page 63

DVD600II_WIRING_MP_1102.sch-1-SatNov0309:16:032001
63
DVD600II
 Loading...