

Harman Kardon DVD-48 Service manual
harman kardon
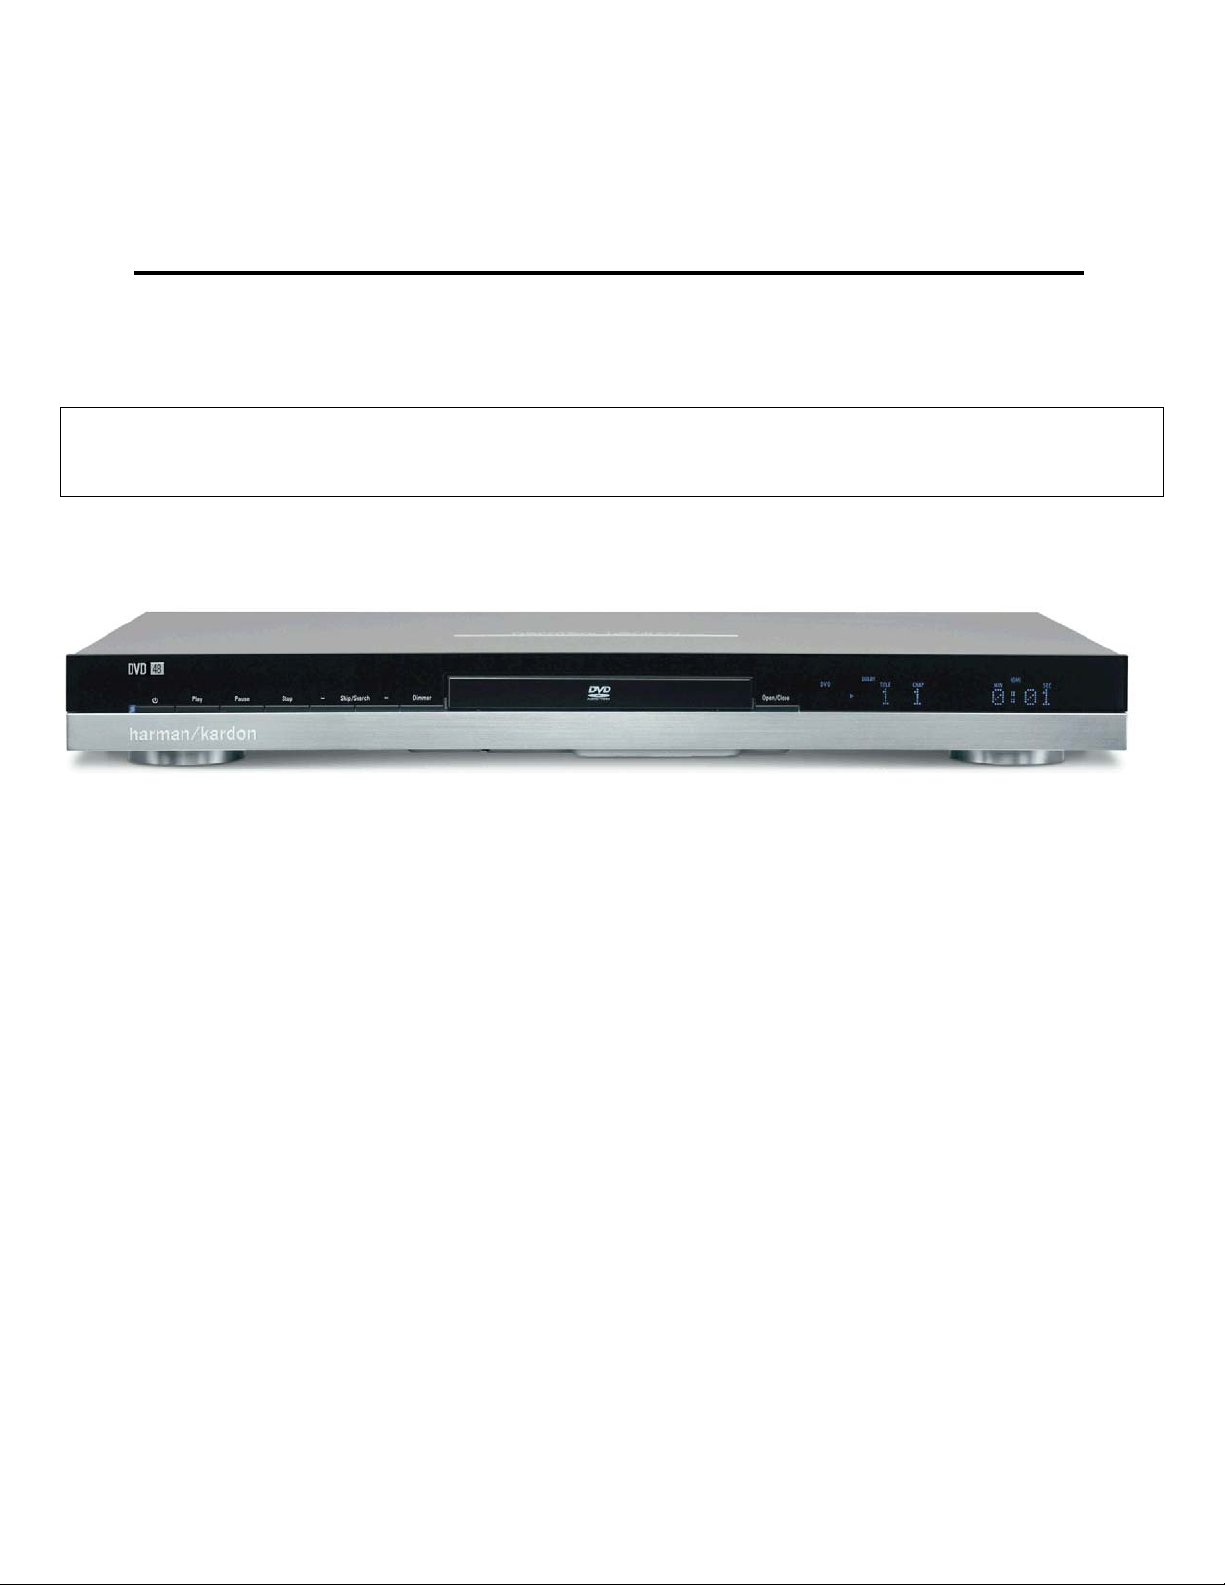
Model
DVD 48
DVD/CD/CD-R/CD-RW/VCD MP3 Player
Service Manual
- Contents -
SERVICE PREC AU TIONS…… …….… …….……2
BASIC SPECIFICATIONS………………………...5
DETAILED SPECIFICATIONS………………......6
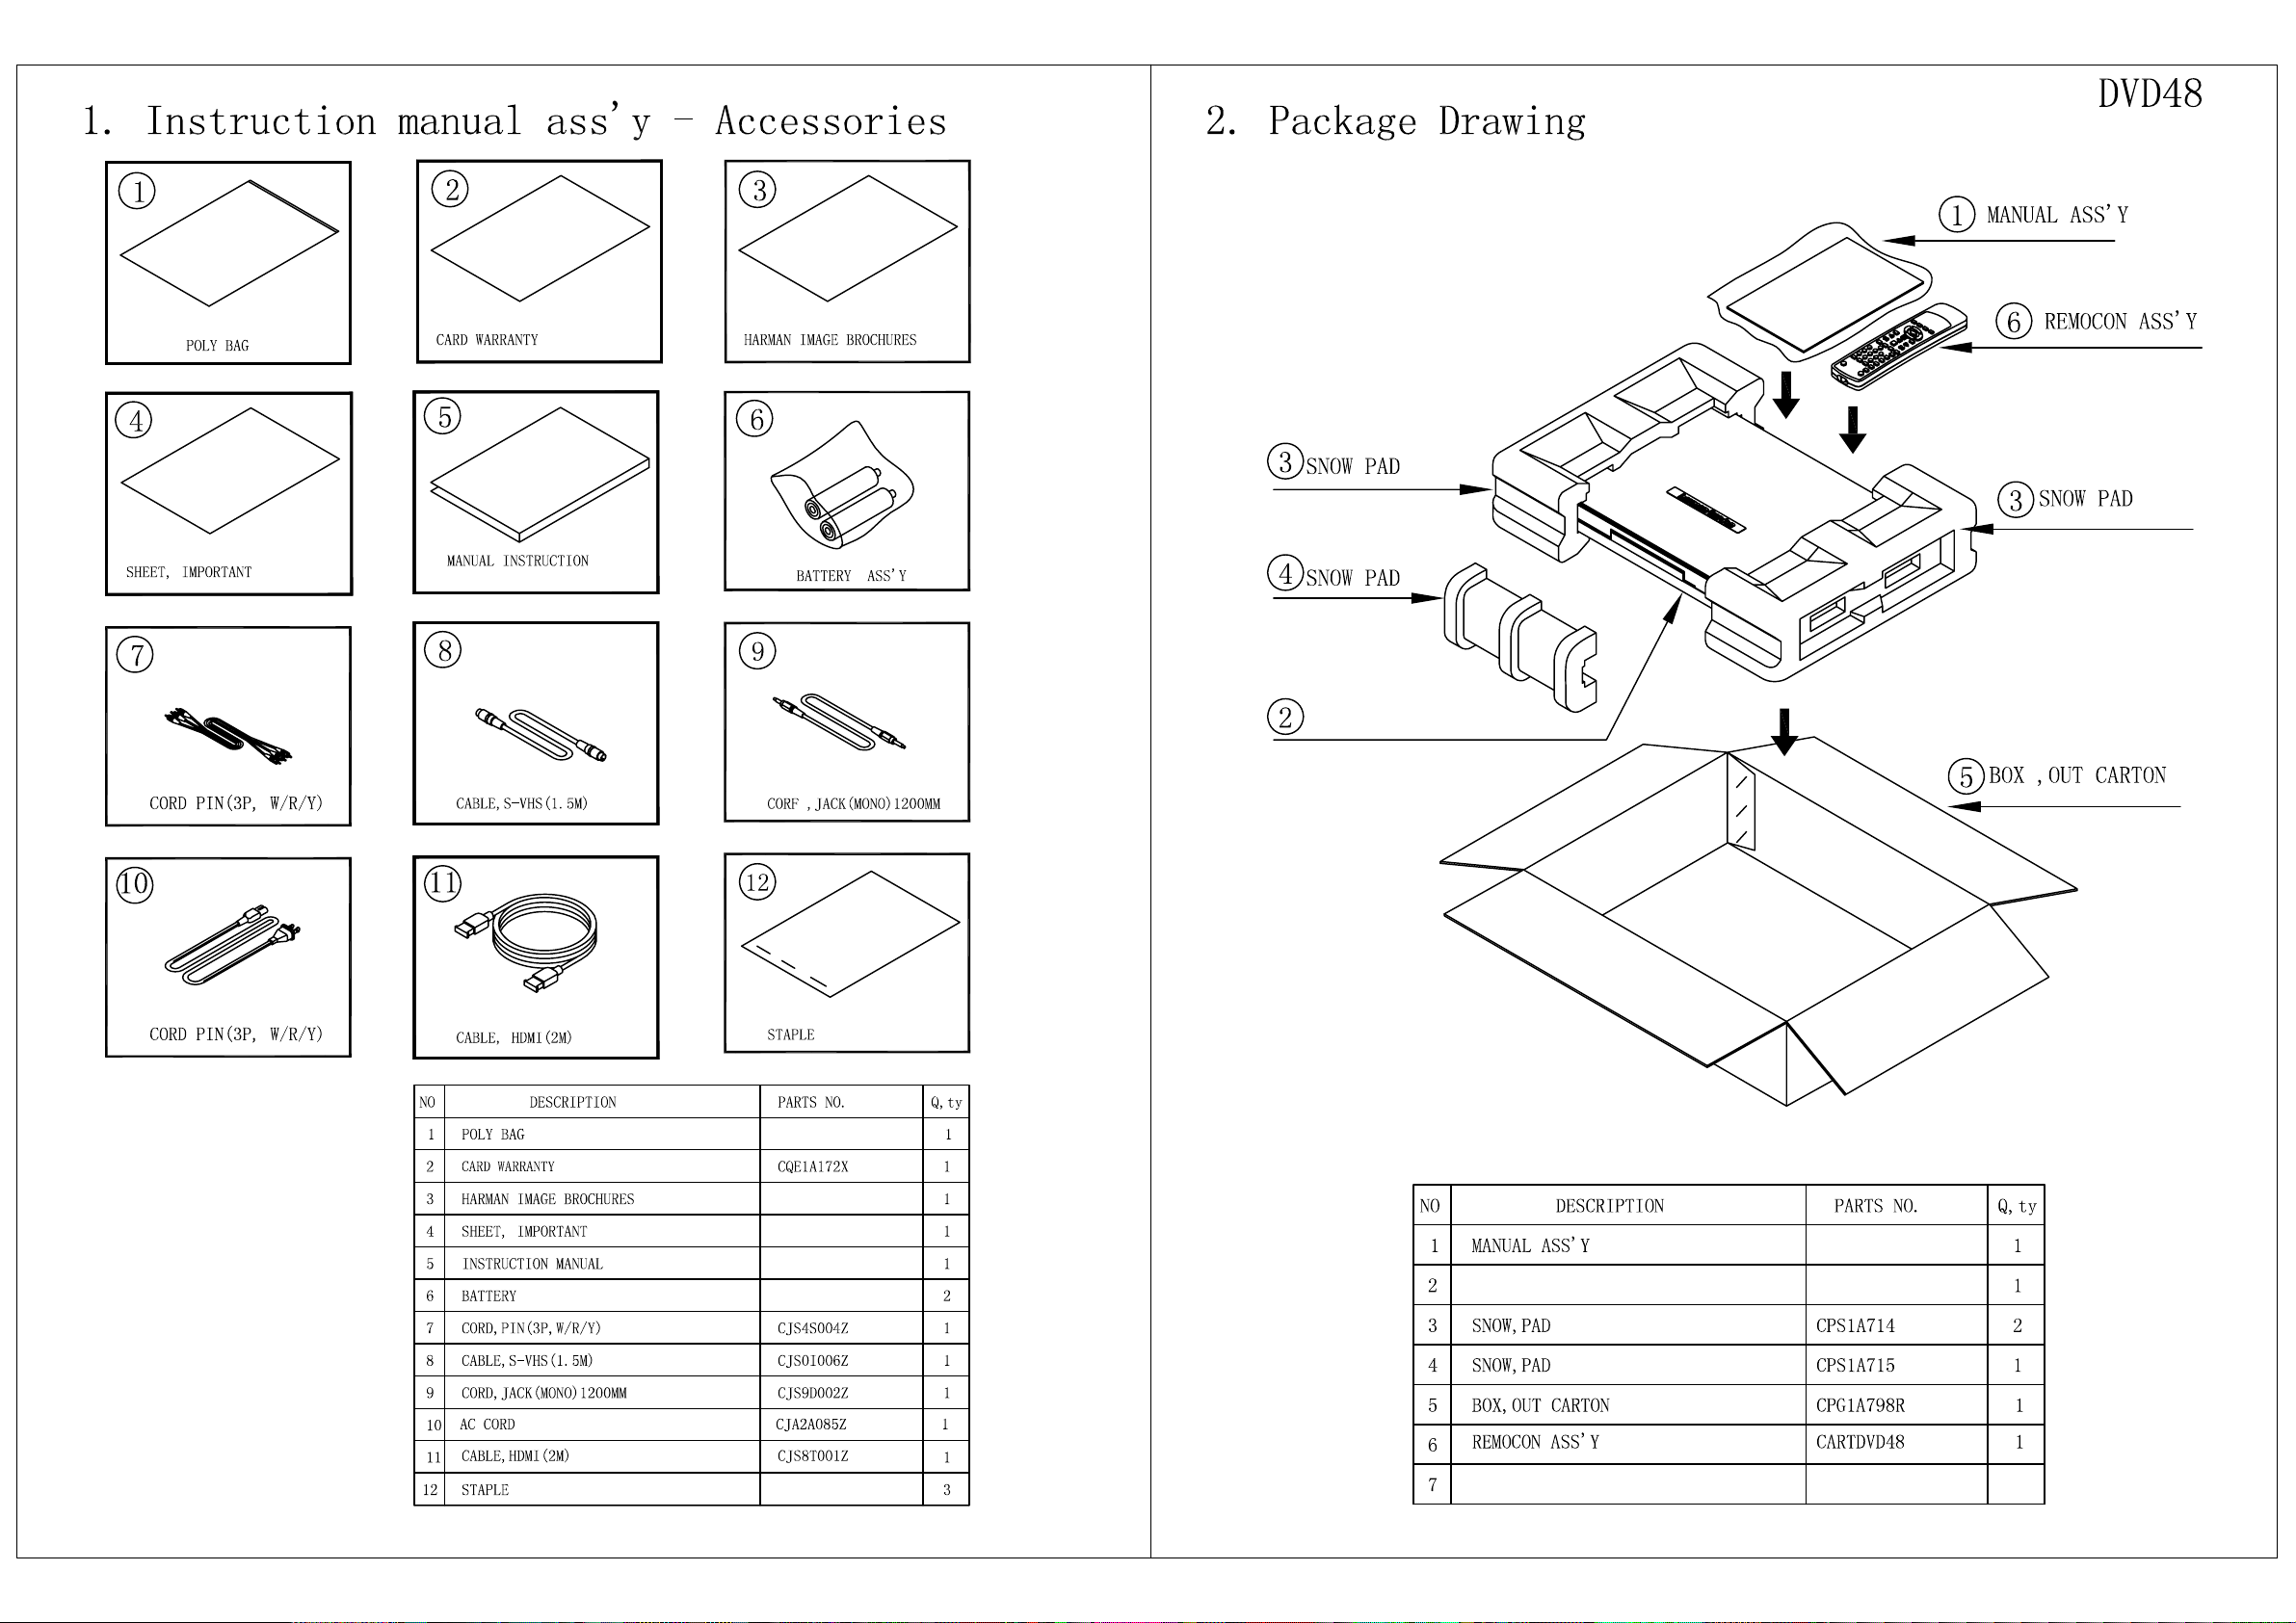
PACKAGE (120V)..………………....…….………10
FRONT PANEL CONTROLS…………………….11
INFORMATION DISPLAY…………….………….13
REAR PANEL CONNECTIONS……………..….14
REMOTE CONTROL……………………………..16
CONNECTIONS…………..……..………….........19
INSTALLATION…………………….....................22
harman/k ar don, I nc .
250 Crossways Park Dr.
Woodbury, New York 11797 Rev0 8/2007
BASIC TROUBLESHOOTING GUIDE…………25
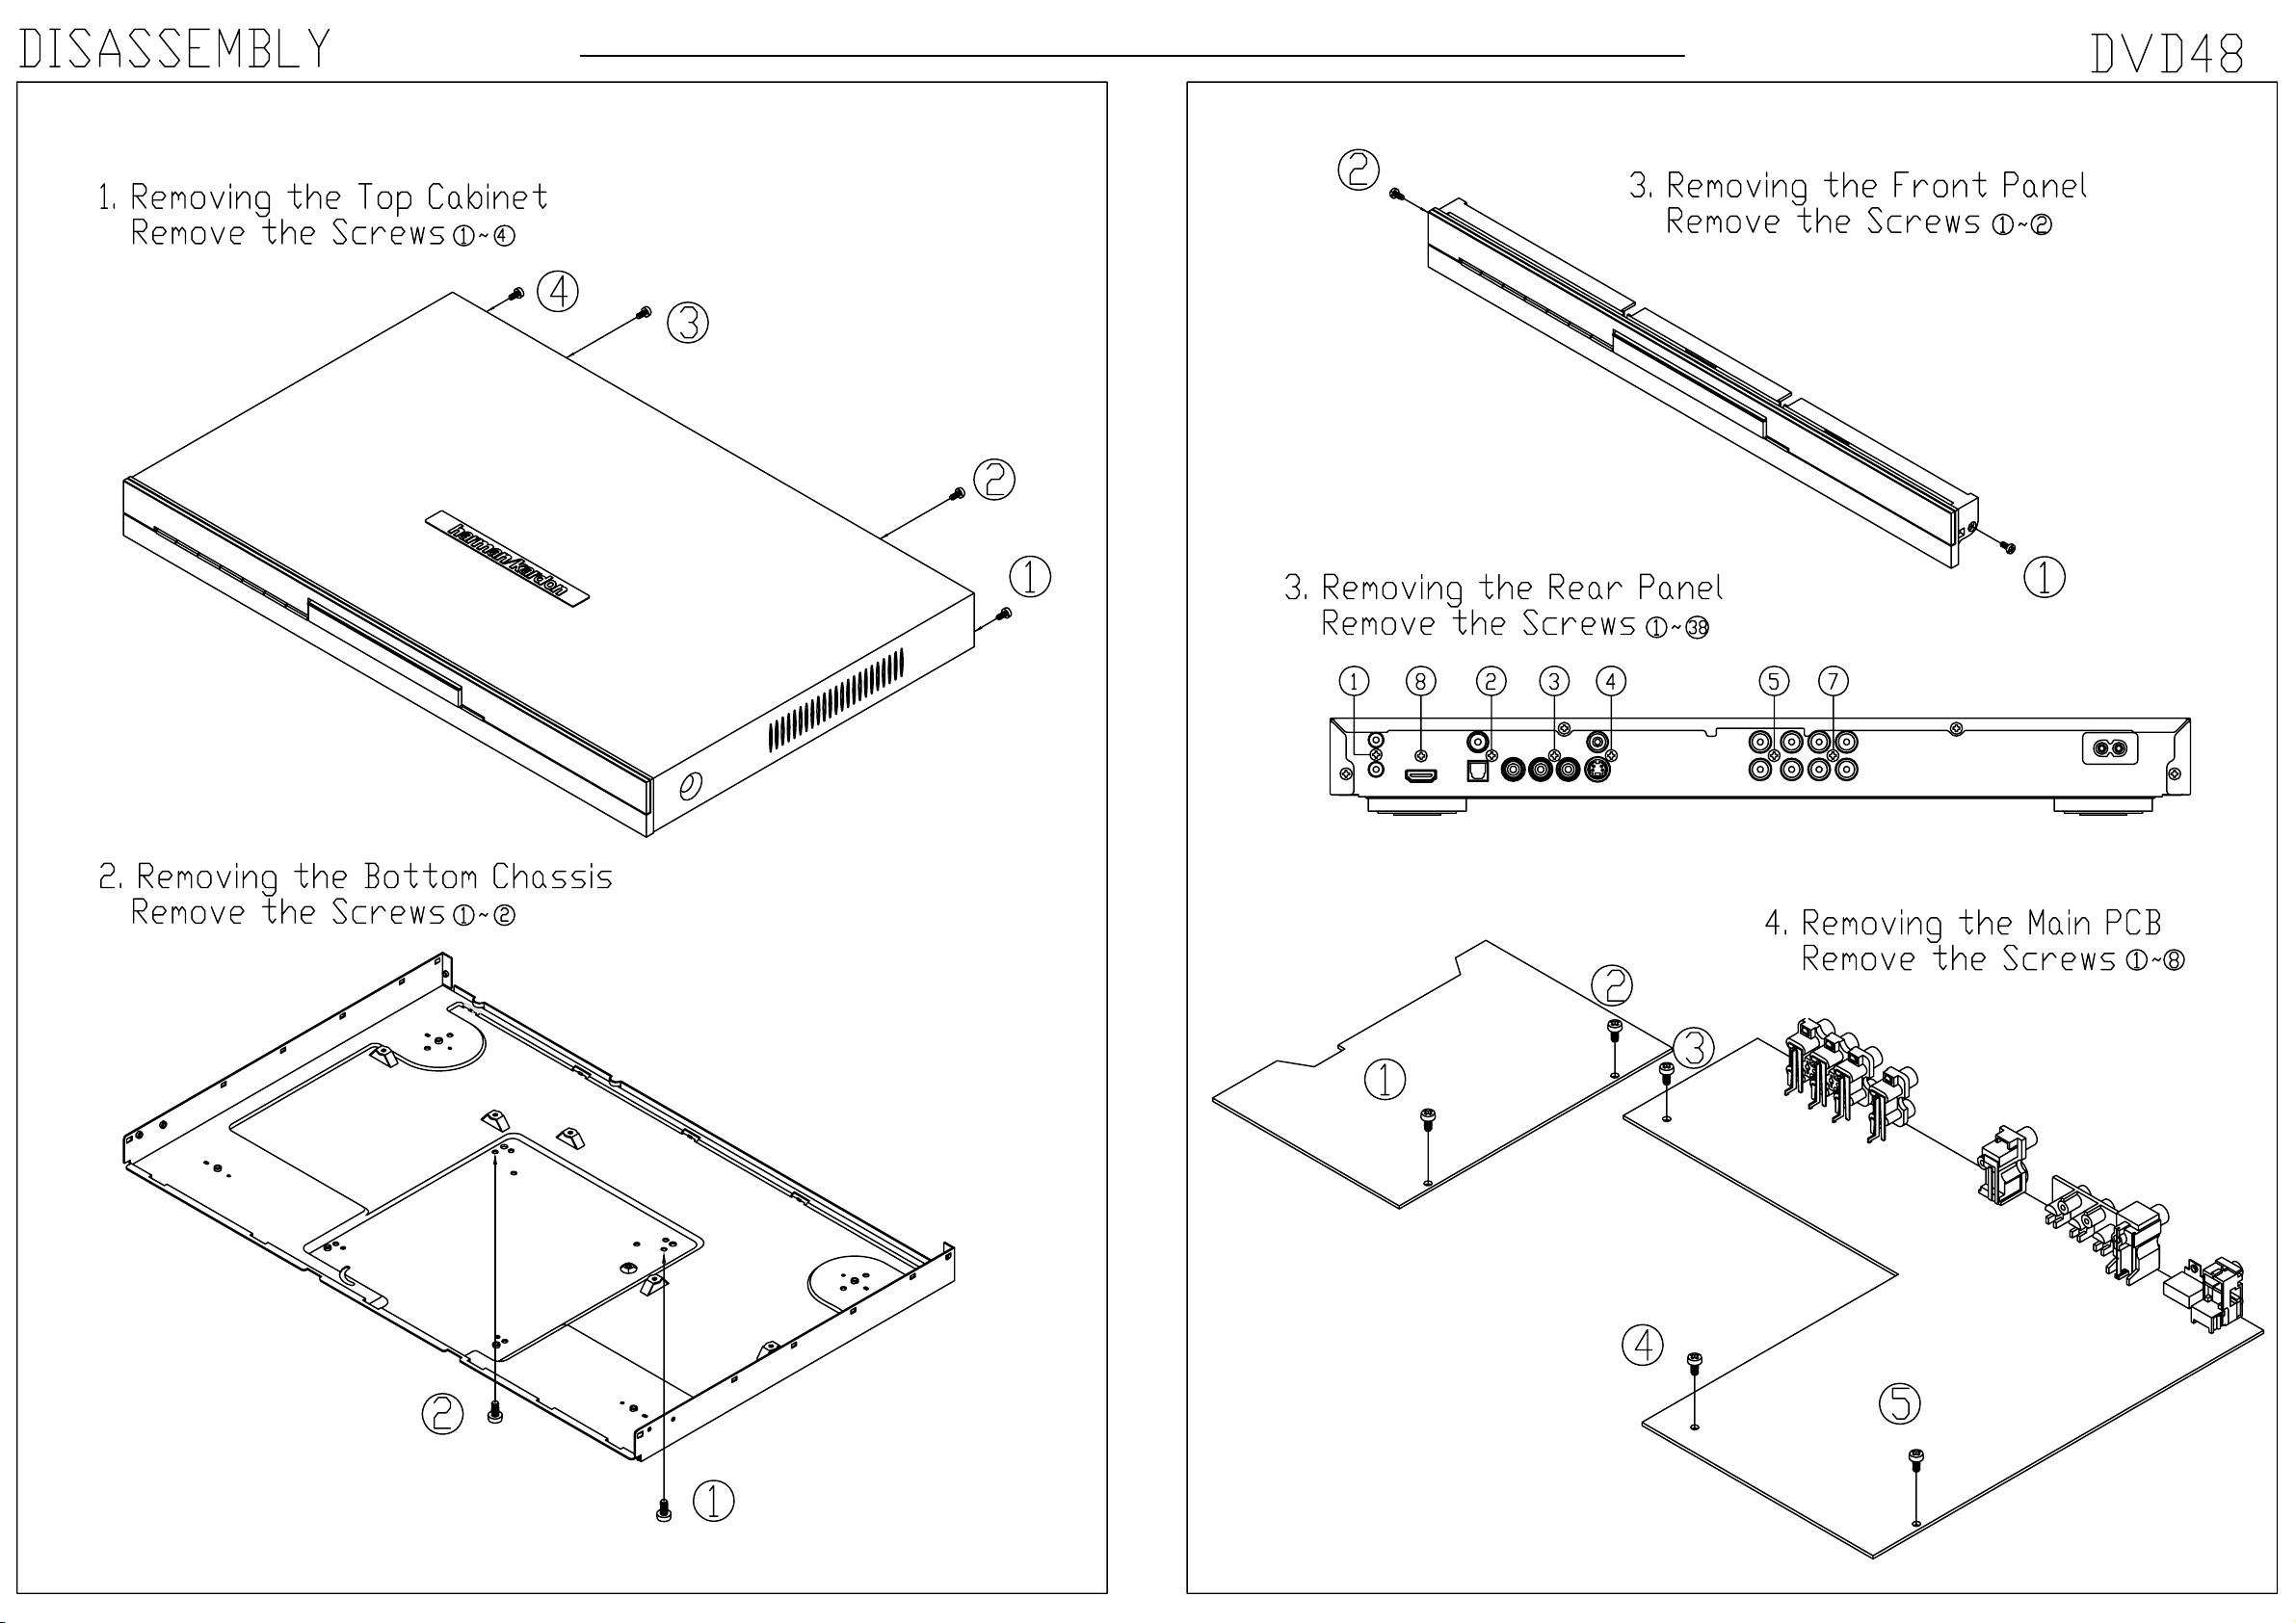
DISASSEMBLY PROCEDURE (120/230v).…...27
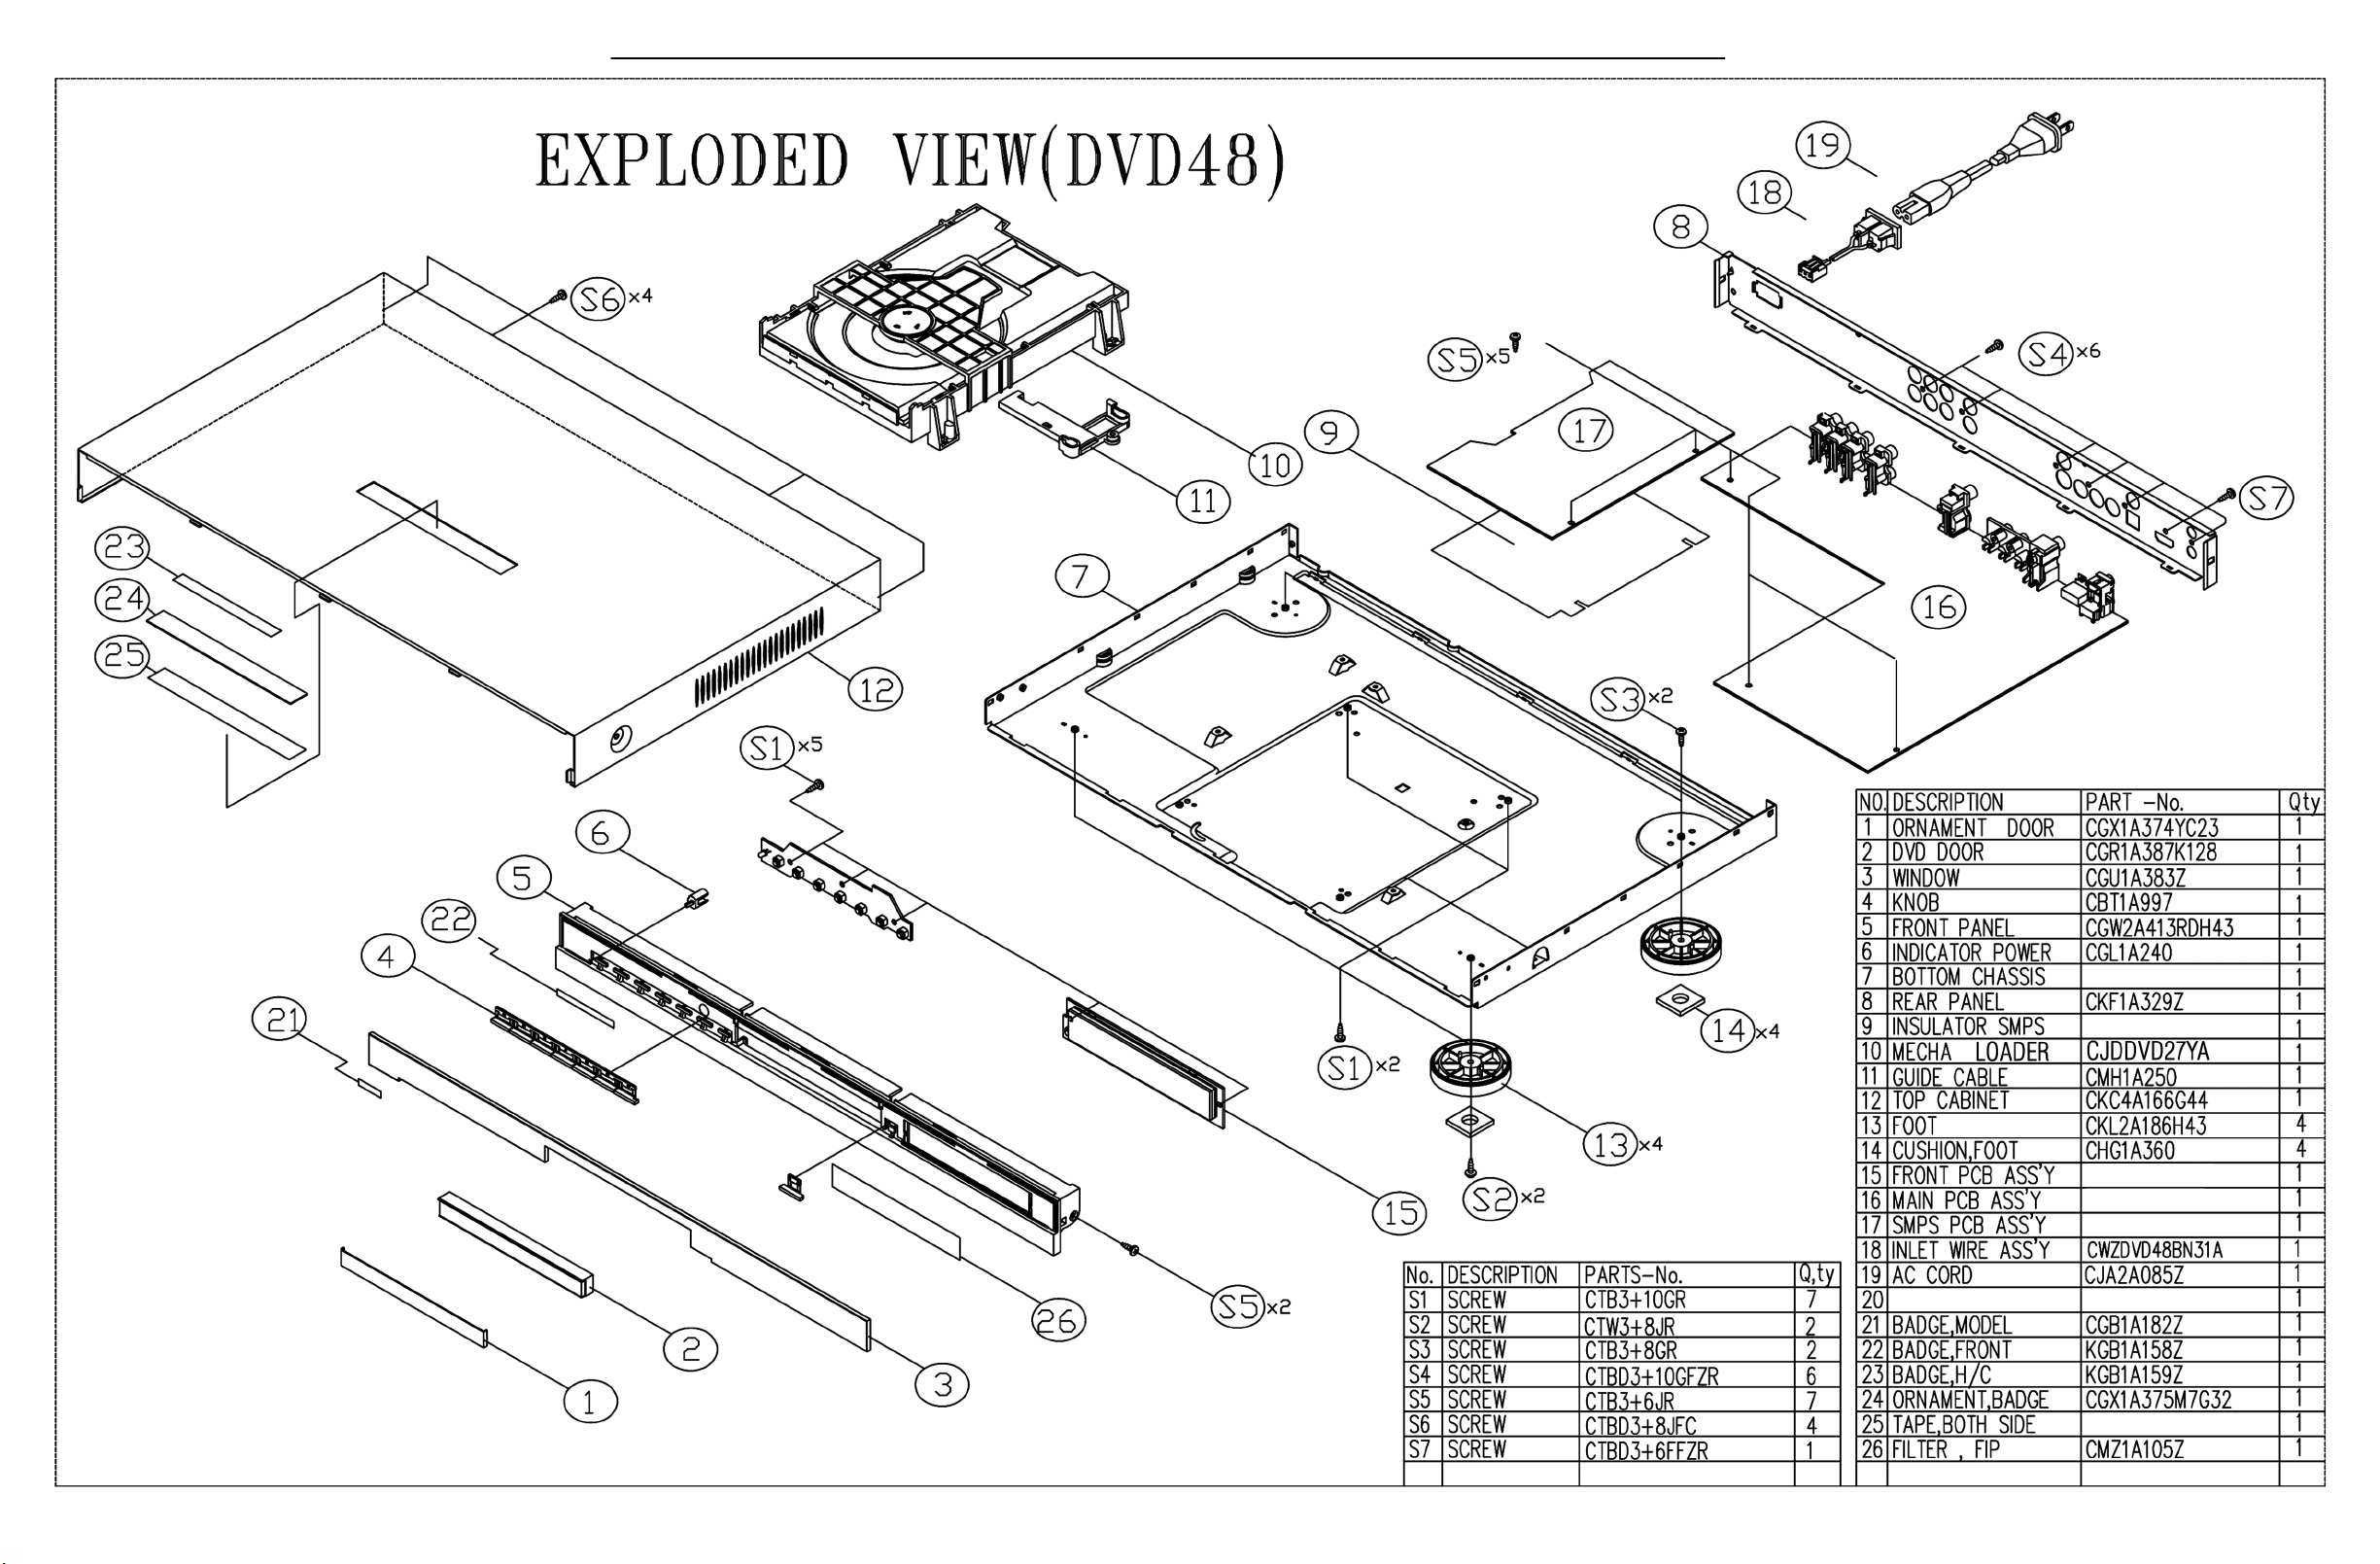
EXPLODED VIEW (120v)….……………………28
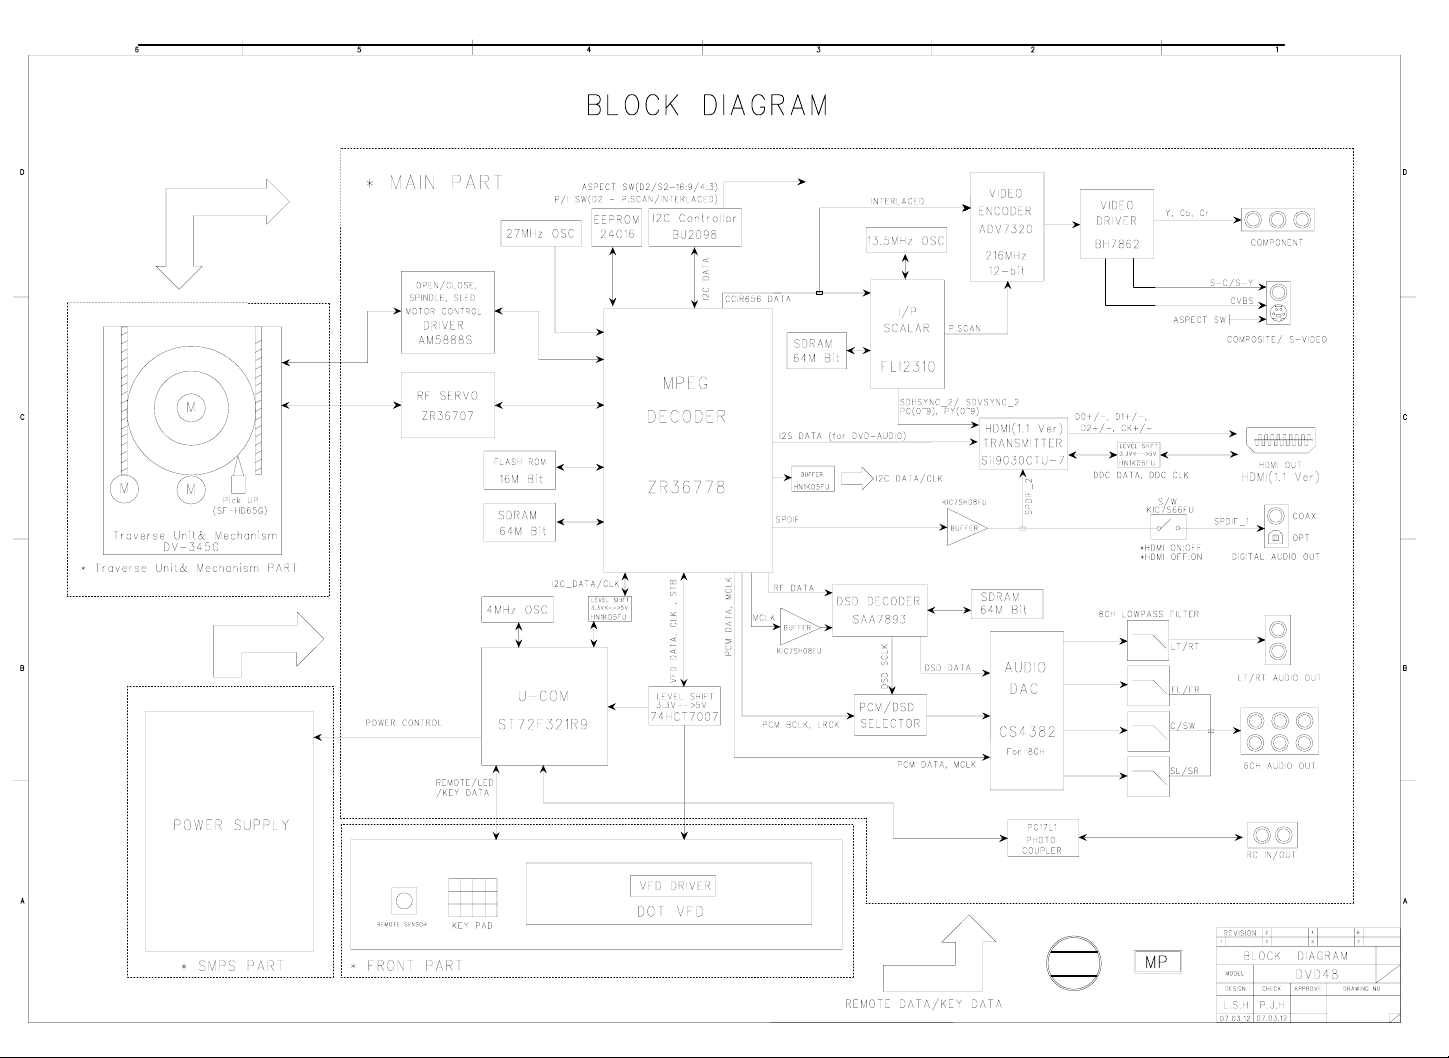
BLOCK DIAGRAM.……………..………………..29
ELECTRICAL PARTS LIST (120v)……… …….30
PCB DRAWINGS……………………..................53
SEMICONDUCTOR PINOUTS…………………59
SCHEMATICS………………………………..….168
WIRING DIAGRAM……………………………..174
Released 2007
Discontinued XXXX

SERVICING PRECAUTIONS
NOTES REGARDING HANDLING OF THE PICK-UP
1. Notes for transport and storage
1) The pick-up should always be left in its conductive bag until immediately prior to use.
2) The pick-up should never be subjected to external pressure or impact.
2. Repair notes
1) The pick-up incorporates a strong magnet, and so should never be brought close to magnetic materials.
2) The pick-up should always be handled correctly and carefully, taking care to avoid external pressure and
impact. If it is subjected to strong pressure or impact, the result may be an operational malfunction
and/or damage to the printed-circuit board.
3) Each and every pick-up is already individually adjusted to a high degree of precision, and for that reason
the adjustment point and installation
screws should absolutely never be touched.
4) Laser beams may damage the eyes!
Absolutely never permit laser beams to enter the eyes!
Also NEVER switch ON the power to the laser output part (lens, etc.) of the pick-up if it is damaged.
5) Cleaning the lens surface
If there is dust on the lens surface, the dust should be cleaned away by using an air bush (such as used
for camera lens). The lens is held by a delicate spring. When cleaning the lens surface, therefore, a cotton swab should be used, taking care not to distort this.
6) Never attempt to disassemble the pick-up.
Spring by excess pressure. If the lens is extremely dirty, apply isopropyl alcohol to the cotton swab. (Do
not use any other liquid cleaners, because they will damage the lens.) Take care not to use too much of
this alcohol on the swab, and do not allow the alcohol to get inside the pick-up.
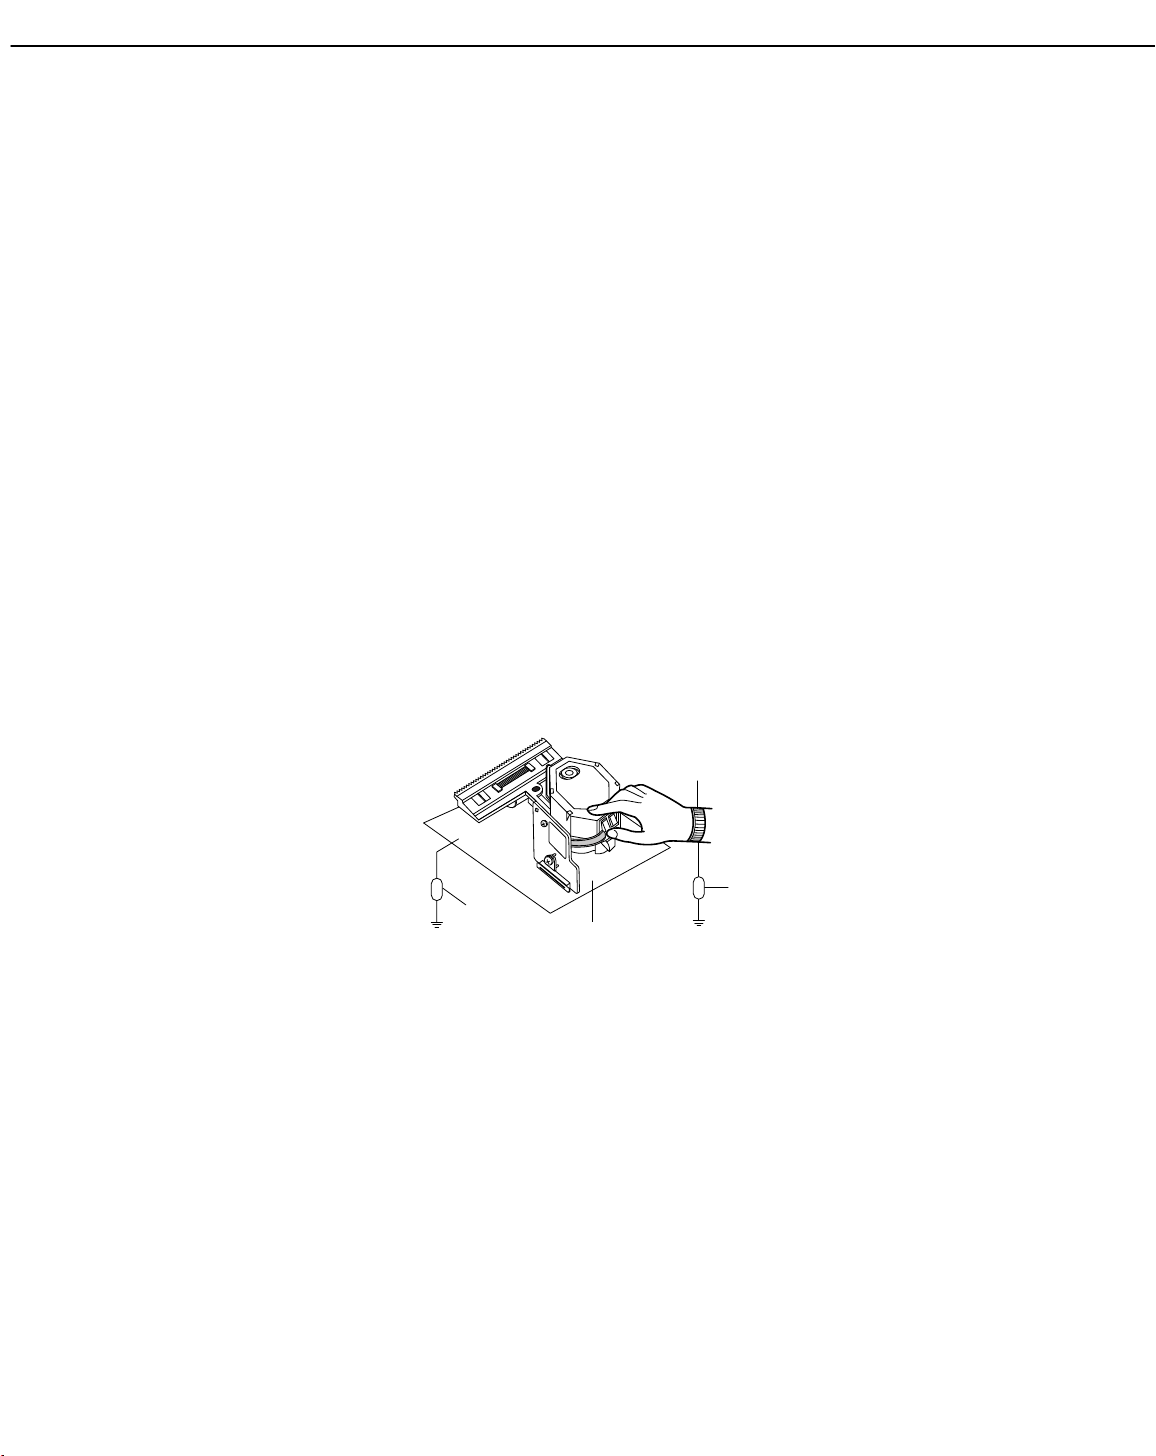
Storage in conductive bag
NEVER look directly at the laser beam, and don’t let contact
fingers or other exposed skin.
Magnet
How to hold the pick-up
Conductive Sheet
Cotton swab
Pressure
Pressure
Drop impact
2
NOTES REGARDING COMPACT DISC PLAYER REPAIRS
1. Preparations
1) Compact disc players incorporate a great many ICs as well as the pick-up (laser diode). These components are sensitive to, and easily affected by, static electricity. If such static electricity is high voltage,
components can be damaged, and for that reason components should be handled with care.
2) The pick-up is composed of many optical components and other high-precision components. Care must
be taken, therefore, to avoid repair or storage where the temperature of humidity is high, where strong
magnetism is present, or where there is excessive dust.
2. Notes for repair
1) Before replacing a component part, first disconnect the power supply lead wire from the unit
2) All equipment, measuring instruments and tools must be grounded.
3) The workbench should be covered with a conductive sheet and grounded.
When removing the laser pick-up from its conductive bag, do not place the pick-up on the bag. (This is
because there is the possibility of damage by static electricity.)
4) To prevent AC leakage, the metal part of the soldering iron should be grounded.
5) Workers should be grounded by an armband (1MΩ)
6) Care should be taken not to permit the laser pick-up to come in contact with clothing, in order to prevent
static electricity changes in the clothing to escape from the armband.
7) The laser beam from the pick-up should NEVER be directly facing the eyes or bare skin.
Resistor
(1 Mohm)
Conductive
Sheet
Resistor
(1 Mohm)
Armband
3
DVD48 harman/kardon

4
DVD48 harman/kardon
ESD PRECAUTIONS
Electrostatically Sensitive Devices (ESD)
Some semiconductor (solid state) devices can be damaged easily by static electricity. Such components commonly are called Electrostatically Sensitive Devices (ESD). Examples of typical ESD devices are integrated circuits and some field-effect transistors and semiconductor chip components. The following techniques should
be used to help reduce the incidence of component damage caused by static electricity.
1. Immediately before handling any semiconductor component or semiconductor-equipped assembly, drain off
any electrostatic charge on your body by touching a known earth ground. Alternatively, obtain and wear a
commercially available discharging wrist strap device, which should be removed for potential shock reasons
prior to applying power to the unit under test.
2. After removing an electrical assembly equipped with ESD devices, place the assembly on a conductive surface such as aluminum foil, to prevent electrostatic charge buildup or exposure of the assembly.
3. Use only a grounded-tip soldering iron to solder or unsolder ESD devices.
4. Use only an anti-static solder removal device. Some solder removal devices not classified as "anti-static"
can generate electrical charges sufficient to damage ESD devices.
5. Do not use freon-propelled chemicals. These can generate electrical charges sufficient to damage ESD
devices.
6. Do not remove a replacement ESD device from its protective package until immediately before you are
ready to install it. (Most replacement ESD devices are packaged with leads electrically shorted together by
conductive foam, aluminum foil or comparable conductive materials).
7. Immediately before removing the protective material from the leads of a replacement ESD device, touch the
protective material to the chassis or circuit assembly into which the device will by installed.
CAUTION : BE SURE NO POWER IS APPLIED TO THE CHASSIS OR CIRCUIT, AND OBSERVE ALL
OTHER SAFETY PRECAUTIONS.
8. Minimize bodily motions when handing unpackaged replacement ESD devices. (Otherwise harmless motion
such as the brushing together of your clothes fabric or the lifting of your foot from a carpeted floor can generate static electricity sufficient to damage an ESD device).

5
DVD48 harman/kardon
DVD 48 TECHNICAL SPECIFICATIONS
Applicable Disc:
Disc formats: 5-inch (12cm) or 3-inch (8cm) DVD-
Video,DVD-Audio, SACD,
™
standard-conforming
DVD-R, DVD+R, DVD-RW, DVD+RW,VCD,
CD,CD-R, CD-RW or MP3 discs
Region code: DVD video disc with Code 1 or 0 only
DVD layers: Single side/single layer,single side/dual
layer, dual side/dual layer
Audio formats: DVD Audio MLP Lossless,
MPEG,Windows Media
®
or DTS
audio discs
™
SACD,Linear PCM,
®
9, Dolby®Digital
Still-image format: JPEG
Video Signal System: NTSC or PAL
™
HDMI
Output: Video: 480p,720p, 1080i, 1080p
HDMI Version 1.1-compliant
HDCP Version 1.1-compliant
Composite Video Output: 1V p-p /75 ohms, sync negative polarity
S-Video Output:
Y/luminance: 1V p-p/75 ohms, sync negative polarity
C/chrominance: 0.286 V p-p
Component Video Output: Y:1V p-p/75 ohms, sync negative polarity
Pr: 0.7V p-p/75 ohms
Pb: 0.7V p-p/75 ohms
Analog Audio Output: 2V RMS (1kHz, 0dB)
Frequency Response:
DVD (linear PCM): 2Hz – 22kHz +0/–0.5dB (48kHz sampling)
2Hz – 44kHz +0/–1.5dB (96kHz sampling)
2Hz – 88kHz +0/–0.5dB (192kHz sampling)
CD: 2Hz – 20kHz +0/–0.5dB
SACD: 2Hz –100kHz +0/–0.5dB
Signal/Noise Ratio (SNR): 105dB (A-weighted)
Dynamic Range:
DVD: 100dB (18-bit)/105dB (20-bit)
CD/DVD: 96dB (16-bit)
THD/1kHz: DVD/CD:0.0025%
Wow & Flutter: Below measurable limits
AC Power: 110–240V AC/50–60Hz
Power Consumption: 1 Watt (on/standby)/13 watts (max)
Dimensions (H x W x D): 2" x 17-3/10" x 11-1/4"
(50mm x 440mm x 285mm)
Weight: 6 lb (2.7kg)
Shipping Dimensions (H x W x D): 5" x 14-3/8" x 20"
(127mm x 365mmx 508mm)
Shipping Weight: 8.8 lb (4kg)
The DVD 48 is Simplay HD
™
-verified for compatibility
via the HDMI connection with other Simplay HD-verified products.
Depth measurement includes knobs,buttons and terminal connections.Height measurement includes feet and chassis.
All features and specifications are subject to change without notice.
Harman Kardon and Logic 7 are trademarks of Harman International Industries,Incorporated, registered in the United States and/or other countries.
Designed to Entertain is a trademark of Harman International Industries,Incorporated.
Blu-ray Disc is a trademark of the Blu-ray Disc Association.
CEA (Consumer Electronics Association) is a registered trademark of the Consumer Electronics Association.
Dolby and Pro Logic are registered trademarks,and MLP Lossless is a trademark, of Dolby Laboratories.
DTS,DTS-ES,DTS Neo:6 and DTS 96/24 are registered trademarks of DTS,Inc.
HD-DVD is a trademark of the DVD Format/Logo Licensing Corporation (DVD FLLC).
HDMI (High-Definition Multimedia Interface) is a trademark of HDMI Licensing LLC.
Kodak is a registered trademark,and Photo CD is a trademark,of Eastman Kodak Company.
Microsoft,Windows and Windows Media are registered trademarks of Microsoft Corporation in the United States and/or other countries.
WMA (Windows Media Audio) is a proprietary file format developed by Microsoft.
SACD (Super Audio CD) is a trademark of Sony Corporation.
TrueLife is a trademark of Genesis Microchip Inc.
The Simplay HD logo and the Simplay,Simplay HD and Simplay Labs trademarks are owned by Silicon Image,Inc. and are used under license from Silicon Image,Inc.
and/or Simplay Labs,LLC.
This product incorporates copyright protection technology that is protected by method claims of certain U.S. patents and other intellectual property rights owned by Macrovision
Corporation and other rights owners.Use of this copyright protection technology must be authorized by Macrovision Corporation and is intended for home and other limited
viewing uses only unless otherwise authorized by Macrovision Corporation. Reverse engineering or disassembly is prohibited.
Please register your product on our Web site at www.harmankardon.com. Note:You’ll need your serial number. At the same time, you can choose to be notified about our
new products and/or special promotions.

tvklsGuhtlGGaGk}kG[_
tw蠯
k
h
XUhuhsvnGh|kpvGv|{w|{
s y
{lz{Gkpzj
YUGkpnp{hsGv|{w|{
S
tGp
6
DVD48 harman/kardon
GGGGGGGGGGGaGGjGz
G
{GkGGGGGGGGGGGGGaGGlkz^GOzvuPSGG{k}T\[WhGOhilP
{GjGGGGGaGGXWȳGsG{SGhjXWW}G\WV]Wo¡
{GtGGaGG}wT^^YYhGOhGh¡PGSjhzjhklGzzTY\YYOhwP
vGs} s
y
YUWG·GWUY
sG} GGGGGGGGWUY
mVGGi s
yUXo¡GWi s
ە
ڍٻڋٻڣ
ڌڋڋଝڣە
ڌڋଝڦڣە
ஊଝڦڣە
y
y
s
y
s
y
ஊ·GXUW
ஊ·GXUW
ஊ·GXUW
ஊ·GXU\
s
எڏଝڦڣە
ஊ·GXU\
y
lG s
ji y
yUXo¡GWi s
zVui s
"A" y
jGzi ˧
si s
T`WiG
"22K" y
{UoUkL s
kGyi s
T]WiG
"20K AES17" y
衒簙裿讟蘏莀L s
ୠ୲ୠ୕இ "22K" y
kGyi s
ୠ୲ୠ୕இ "20K AES17" y
衒簙裿讟蘏莀L s
ୠ୲ୠ[_இ "22K" y
kGyi s
ୠ୲ୠ[_இ "20K AES17" y
ஏଝڦڣە
ஐଝڦڣە
y
"22K" ˧
"22K" y
T[U\Z·XUW
T`UW[G·GXUW
XW\
eG`\
_`U\·Z
GWUWX
ஓZ
GWUWX
ஓ\
GWUWX
ஓ\
lkz^GOzvuP
{yhjrGX
lkz^GOzvuP
{yhjrGY
lkz^GOzvuP
lkz^GOzvuP
lkz^GOzvuP
{k}T\[WhGOhilP
{p{slG[Sjohw{ly
X]
h|kpvGz{ylhtGZ
lkz^GOzvuP
lkz^GOzvuP
lkz^GOzvuP
{yhjrGYZ
lkz^GOzvuP
{yhjrGZW
Z[
lkz^GOzvuP
{yhjrGYY
lkz^GOzvuP
{yhjrGX
lkz^GOzvuP
{yhjrGYW
{k}T\[WhGOhilP
{p{slGZSGjohw{lyGX
{k}T\[WhGOhilP
{p{slGZSGjohw{lyGY
{k}T\[WhGOhilP
{p{slGYSGjohw{lyGX
{k}T\[WhGOhilP
{p{slGYSGjohw{lyGY
GGGXPGvw{pjhsGv|{
GGqp{{lyGGGGGG[[UXo¡ uGG[[UXo¡
GGqp{{lyGGGGGGG`]o¡ uGG`]o¡
GGGYPGjvhphsGv|{
GGv|{w|{GsGGGGG} uGjkGGk}kG
GGwGGwGsGG^\Gs
O|pP jkGw
O|pP k}kGw
cG\W|p
cG\W|p
\WW·\WGO}P
w

tw
蠯
(p)
7
DVD48 harman/kardon
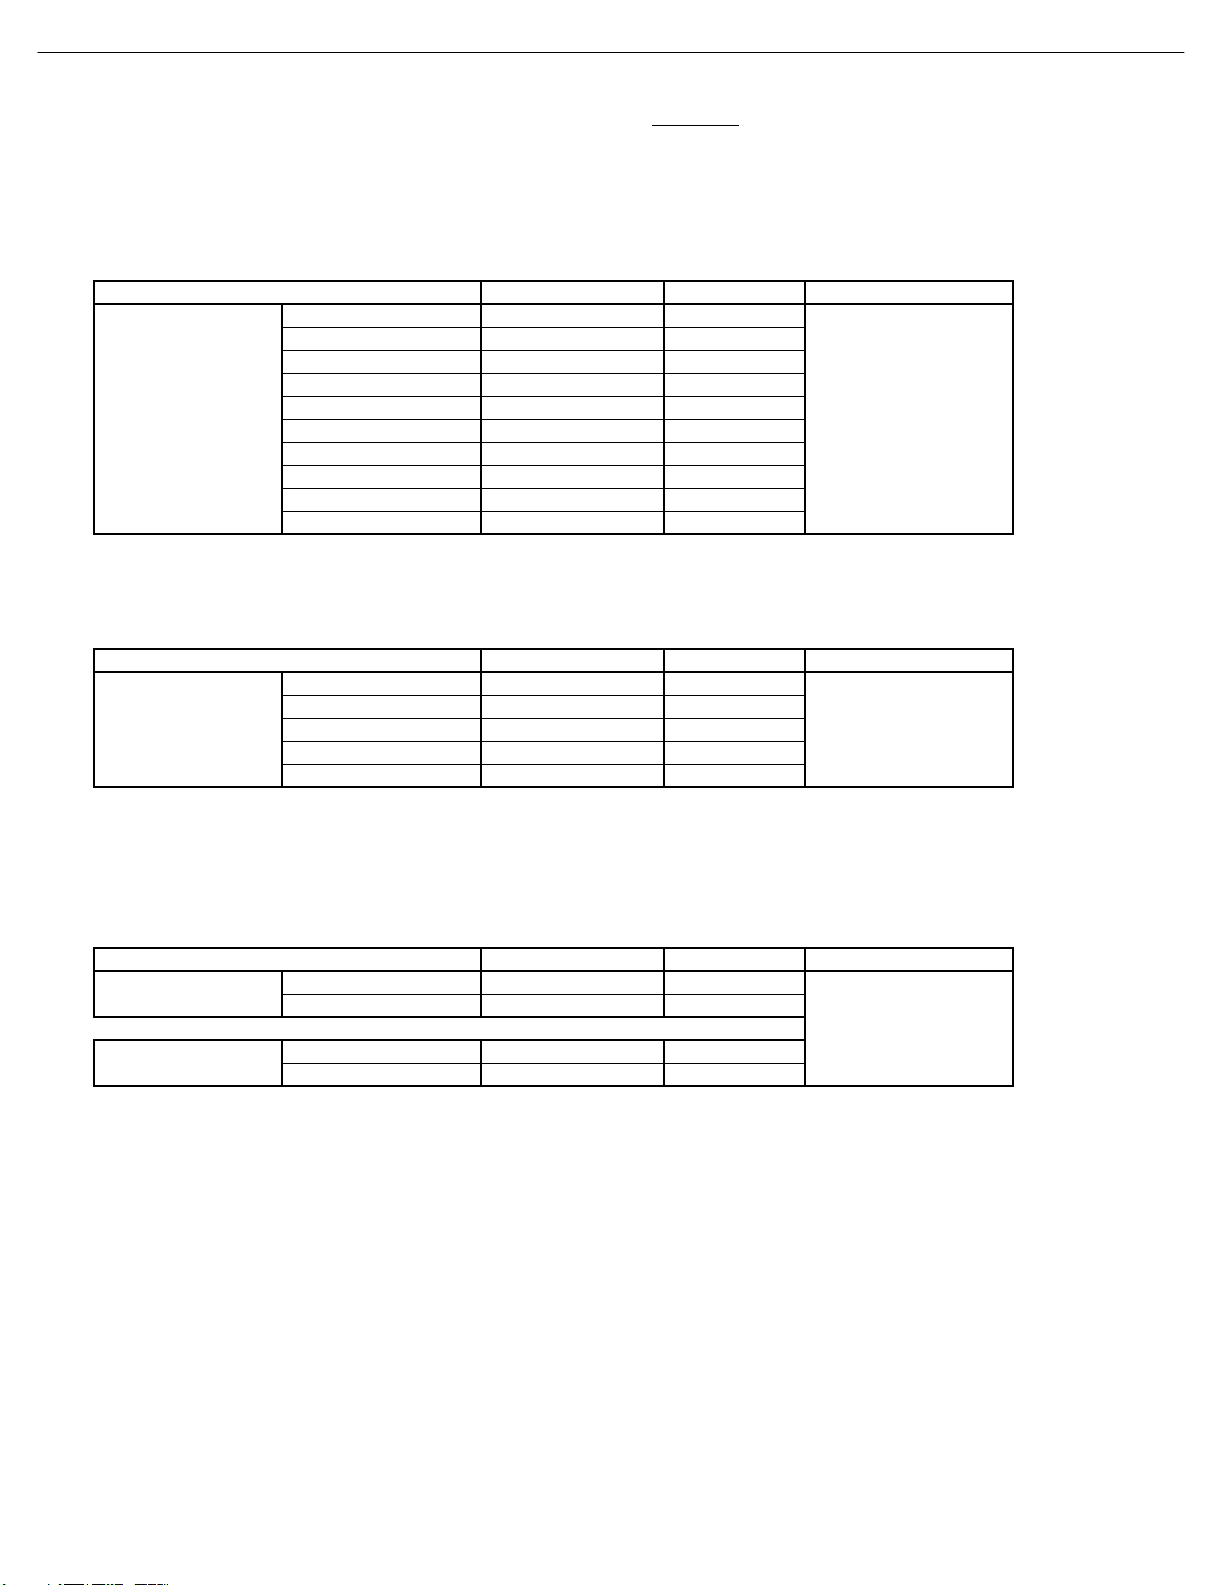
2. DVD-Audio Part (Test Disc V-612 , JVC)
ͽΚΞΚΥ΅ΣΒΔΜͺΟΗΠΣΞ
ΦΥΡΦΥͽΖΧΖΝ·
΅͵ͼΫͽͷ
ͷΣΖΦΖΟΔΪ
ΖΤΡΠΟΖΤΕͳ
ΖΗ΅Σ
΄ͿΕͳͲͷΚΝΥΖΣ
͵ΪΟΒΞΚΔΒΟΘΖΕͳ
΅ΣͼΫΕͳ ρ·ΣΞΤ
΅ΣͼΫΕͳ ײ
΅ΣΫ ρΕͳ
΅ΣͼΫ ρΕͳ
΅ΣͼΫ ρΕͳ
΅ΣΫ ρΕͳ
΅ΣͼΫ ρΕͳ
΅ΣͼΫ ρΕͳ
΅ΣΫ ρΕͳ
΅ΣͼΫ ρΕͳ
΅ΣͼΫ ρΕͳ
΅ΣͺΟΗΚΟΚΥΪΖΣΠ װΕͳ
΅ΣΕͳ װΕͳ
ఒ΄ΈͽΖΧΖΝ΅͵΅ΣΒΔΜΫΝΒΪ
ఒ΄ΈͷΣΖΦΖΟΔΪΖΤΡΠΟΖΤ΅ΣΒΔΜΫΕͳΖΗΖΣΖΟΔΖ
ఒ΅ΣΒΔΜΫ΅ΣΒΔΜΫ΅ΣΒΔΜΫΝΒΪ
͵ΠΨΟΞΚΩʹ ;ΦΚΥΚʹ
ͽ΅ ΅ ͷͽ ͷ ΄ͽ ΄ ʹ
΄Έ
3. SACD Part (Test Disc : DAC Ver1.2 , Philips)
͵ΠΨΟΞΚΩʹ
ͽ΅ ΅ ͷͽ ͷ ΄ͽ ΄ ʹ
ΦΥΡΦΥͽΖΧΖΝ·
΅͵ͼΫͽͷ
ͷΣΖΦΖΟΔΪ
ΖΤΡΠΟΖΤΕͳ
ΖΗ΅Σ
΄ͿΕͳͲͷΚΝΥΖΣ
͵ΪΟΒΞΚΔΒΟΘΖΕͳ
΅ΣΒΔΜͺΟΗΠΣΞ
΅ΣͼΫΕͳ ρ·ΣΞΤ
΅ΣͼΫΕͳ ײ
΅ΣΫ ρΕͳ
΅ΣͼΫ ρΕͳ
΅ΣͼΫ ρΕͳ
΅ΣͺΟΗΚΟΚΥΪΖΣΠ װΕͳ
΅ΣΕͳ װΕͳ
ͽΚΞΚΥ
ఒ΄Ͳʹ͵ͷΣΖΦΖΟΔΪΖΤΡΠΟΖΤ΅ΣΒΔΜͼΫΕͳΖΗΖΣΖΟΔΖ
;ΦΚΥΚʹ
΄Έ
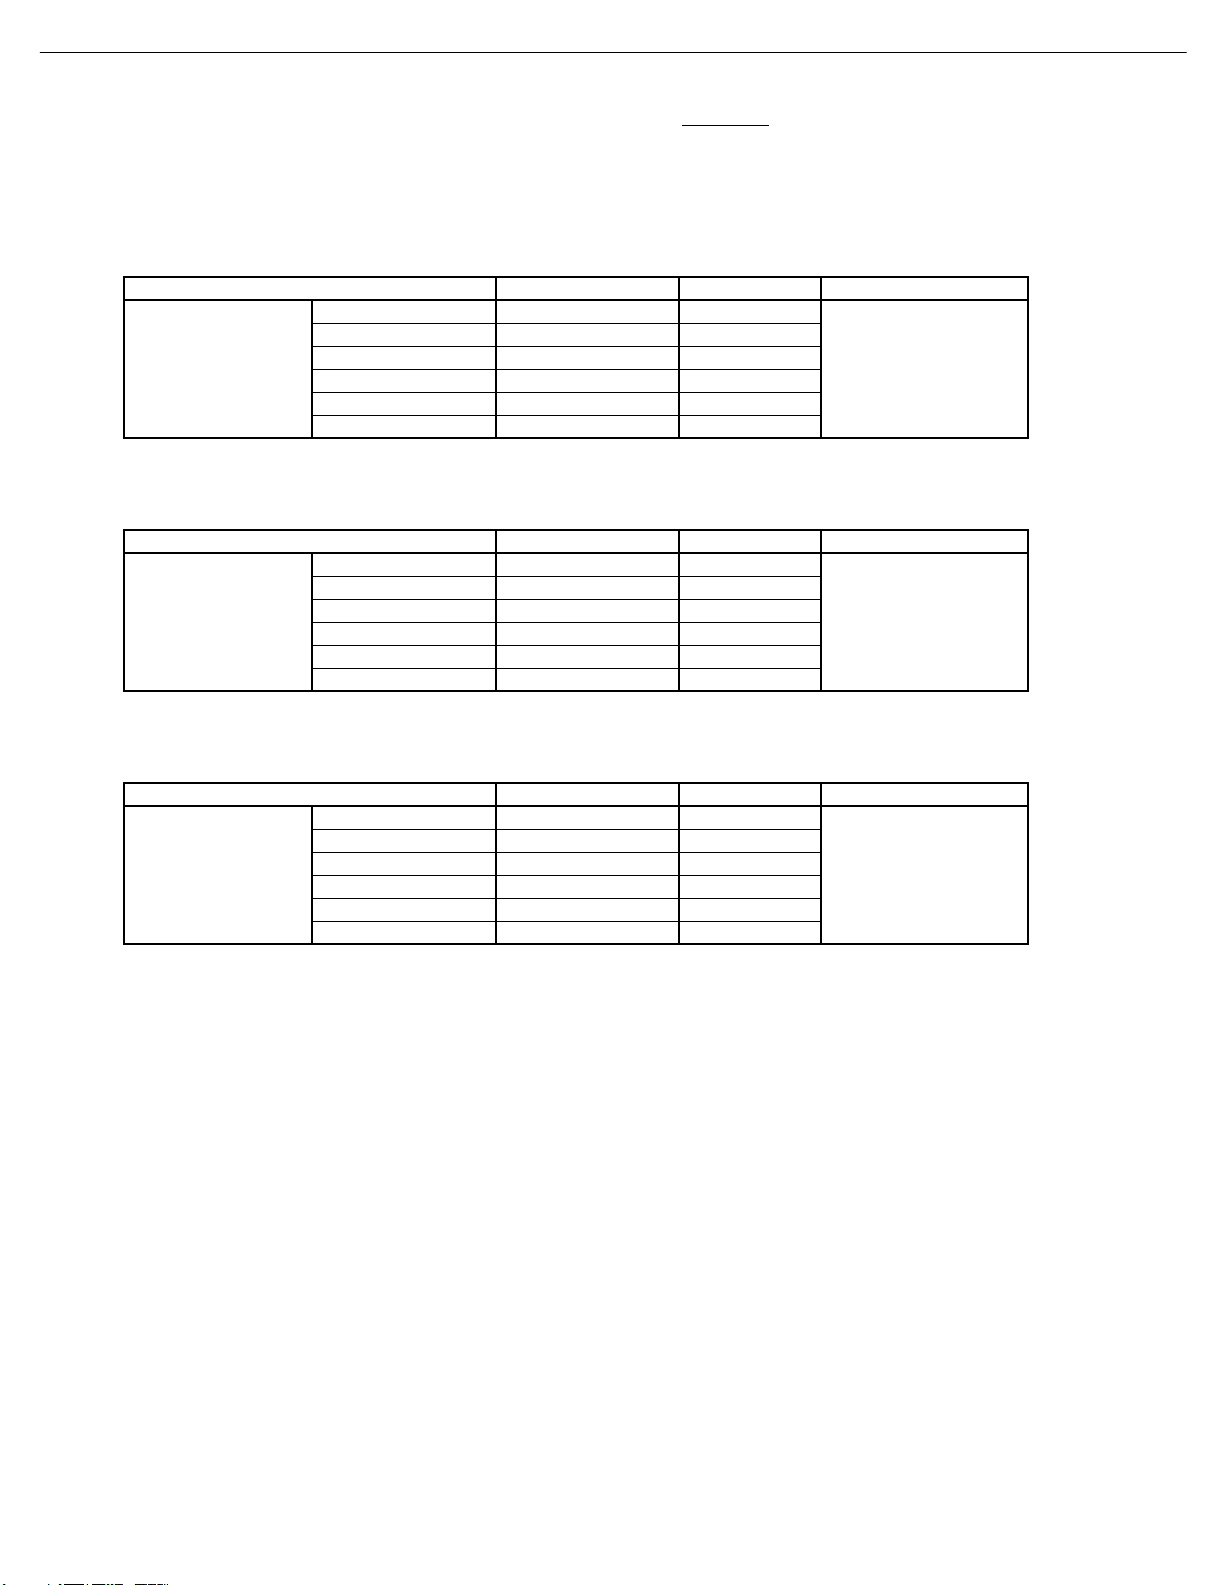
tvklsGuhtlGGGGaGk}k[_G
G}
zGuvUa
tw蠯
·ΚΕΖΠͽΖΧΖΝ΅ΖΤΥԽ΅ΖΣΞΚΟΒΥΖΕ
ͽΚΞΚΥ
·ΚΕΖΠ΄ͿΒΚΥΠ΅ΖΤΥԽ΅ΖΣΞΚΟΒΥΖΕ
ͽΚΞΚΥ
ʹΙΣΠΞΒ΄ΚΘΟΒΝͲ;;΅ΖΤΥԽ΅ΖΣΞΚΟΒΥΖΕ
ͽΚΞΚΥ
;ΖΒΤΦΣΖΞΖΟΥͺΥΖΞ ΖΤΦΝΥ ΅ΖΤΥ͵ΚΤΔ
;ΖΒΤΦΣΖΞΖΟΥͺΥΖΞ ΖΤΦΝΥ ΅ΖΤΥ͵ΚΤΔ
;ΖΒΤΦΣΖΞΖΟΥͺΥΖΞ ΖΤΦΝΥ ΅ΖΤΥ͵ΚΤΔ
8
DVD48 harman/kardon
kGGGGGGGGGGGaGGjGzGG
{GkGGGGGGGGGGGGGGaGG{k}T\[WhGOhilPGGGGSGtk}kTXXXGO{lhjPGGGGGGGGGGz
{GjGGGGGaGG^\ȳGsG{
hjGpGGGGGGGGGGGGGGGaGGmG|zhGOXYW}V]Wo¡PGGSGmGlGOYZW}V\Wo¡P
{GtGaGG}tT^WW{
ʹΠΞΡΠΤΚΥΖ ·ρ·
΄·ΚΕΖΠΊ ·ρ·
΄·ΚΕΖΠʹ Ξ·ρΞ·
ʹΠΞΡΠΟΖΟΥΊ ·ρ·
·ΚΕΖΠΠΦΥΡΦΥΌ·Ύ
ʹΠΞΡΠΟΖΟΥΓ Ξ·ρΞ·
ʹΠΞΡΠΟΖΟΥΣ Ξ·ρΞ·
΄ΔΒΣΥʹ·ͳ΄ ·ρ·
΄ΔΒΣΥΖΕ Ξ·ρΞ·
΄ΔΒΣΥΣΖΖΟ Ξ·ρΞ·
΄ΔΒΣΥͳΝΦΖ Ξ·ρΞ·
ʹΠΞΡΠΤΚΥΖ Εͳ
·ΚΕΖΠ΄ͿΌΕͳΎ
ͼΫί;Ϋ
ΆΤΖ΄ʹ΅ΣΒΡ
΄·ΚΕΖΠΊ Εͳ
ʹΠΞΡΠΟΖΟΥΊ Εͳ
ʹΠΞΡΠΟΖΟΥΓ Εͳ
ʹΠΞΡΠΟΖΟΥΣ Εͳ
;͵·͵Έ
΅ͺ΅ͽͶʹͲ΅Ͷ
ʹͽͳͲ
TDV-540A
΅ͺ΅ͽͶʹͲ΅Ͷ
ΣΒΪʹΠΝΠΣ
ʹΙΣΠΞΒͲ;ΌΕͳΎ
ί
ʹΙΣΠΞΒ;ΌΕͳΎ
ί
ʹΠΞΡΠΤΚΥΖʹΙΣΠΞΒ Εͳ
΄·ΚΕΖΠʹΙΣΠΞΒ Εͳ
ʹΠΞΡΠΤΚΥΖʹΙΣΠΞΒ Εͳ
΄·ΚΕΖΠʹΙΣΠΞΒ Εͳ
΅͵·Ͳ
΅ͺ΅ͽͶʹͲ΅Ͷ
;ΒΘΖΟΥΒ
ʹΠΝΠΣ
tvklsGuhtlGGGGaGk}k[_
G}
zGuvUa
tw蠯
·ΚΕΖΠͷΣΖΦΖΟΔΪΖΤΡΠΖΟΤԽ΅ΖΣΞΚΟΒΥΖΕ
ͽΚΞΚΥ
ͽΚΞΚΥ
ͽΚΞΚΥ
;ΖΒΤΦΣΖΞΖΟΥͺΥΖΞ ΖΤΦΝΥ ΅ΖΤΥ͵ΚΤΔ
;ΖΒΤΦΣΖΞΖΟΥͺΥΖΞ ΖΤΦΝΥ ΅ΖΤΥ͵ΚΤΔ
;ΖΒΤΦΣΖΞΖΟΥͺΥΖΞ ΖΤΦΝΥ ΅ΖΤΥ͵ΚΤΔ
9
DVD48 harman/kardon
kGGGGGGGGGGGaGGjGzGG
{GkGGGGGGGGGGGGGGaGG{k}T\[WhGOhilPGGGGSGtk}kTXXXGO{lhjPGGGGGGGGGGz
{GjGGGGGaGG^\ȳGsG{
hjGpGGGGGGGGGGGGGGGaGGmG|zhGOXYW}V]Wo¡PGGSGmGlGOYZW}V\Wo¡P
{GtGaGG}tT^WW{
;ΫΕͳΖΗ
;Ϋ ΕͳρΕͳ
ʹΠΞΡΠΤΚΥΖΌΕͳΎ
;Ϋ ΕͳρΕͳ
;Ϋ ΕͳρΕͳ
΅ͺ΅ͽͶʹͲ΅Ͷ
;Ϋ ΕͳρΕͳ
;Ϋ ΕͳρΕͳ
;ΫΕͳΖΗ
;Ϋ ΕͳρΕͳ
΄·ΚΕΖΠΊΌΕͳΎ
;Ϋ ΕͳρΕͳ
;Ϋ ΕͳρΕͳ
΅ͺ΅ͽͶʹͲ΅Ͷ
;Ϋ ΕͳρΕͳ
;Ϋ ΕͳρΕͳ
;ΫΕͳΖΗ
ʹΠΞΡΠΟΖΟΥΊ
ΌΕͳΎ
ͺΟΥΖΣΒΔΖ;ΠΕΖ
;Ϋ ΕͳρΕͳ
;Ϋ ΕͳρΕͳ
;Ϋ ΕͳρΕͳ
;Ϋ ΕͳρΕͳ
΅ͺ΅ͽͶʹͲ΅Ͷ
;Ϋ ΕͳρΕͳ
;͵·͵Έ
;ΦΝΥΚͳΣΦΤΥ
;͵·͵Έ
;ΦΝΥΚͳΣΦΤΥ
;͵·͵Έ
;ΦΝΥΚͳΣΦΤΥ
DVD 48
10
DVD 48
DVD 48
11
DVD48 harman/kardon
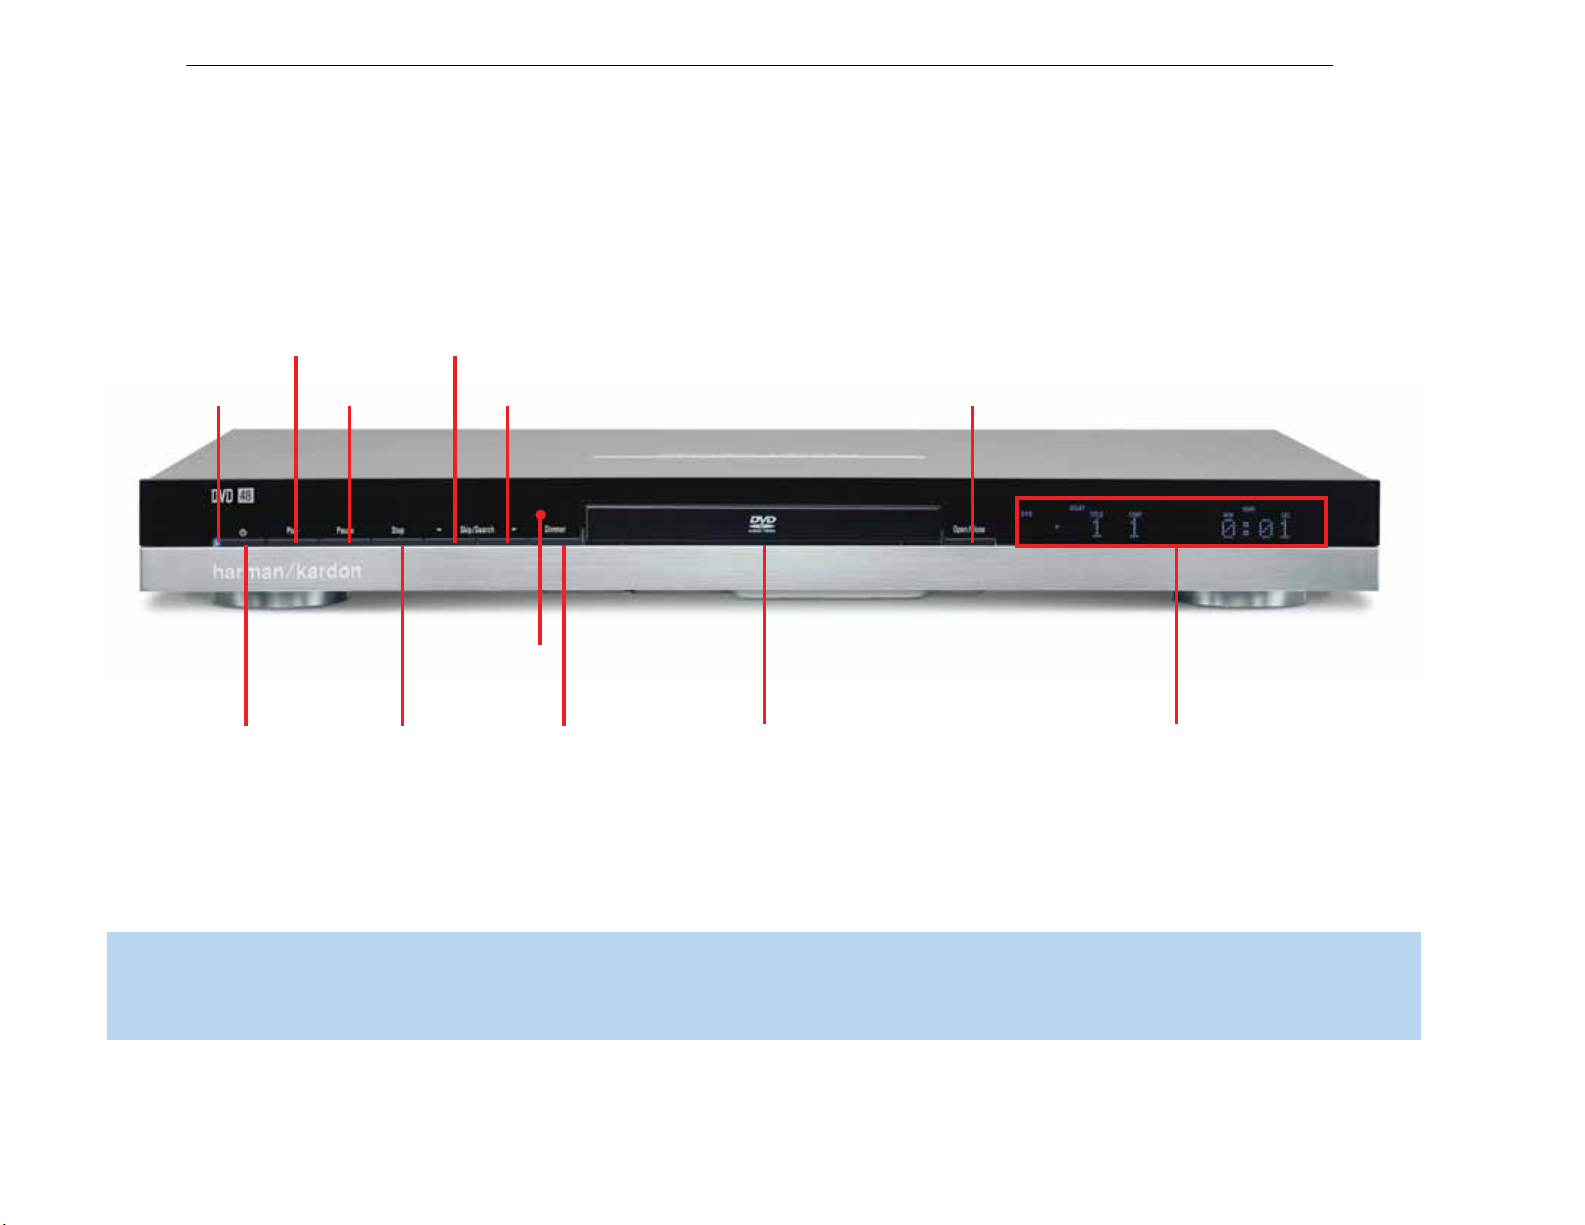
Power
Indicator
Play
Skip/Search
Reverse
Pause
FRONT PANEL CONTROLS
Skip/Search
Forward
Open/Close
FRONT-PANEL CONTROLS
Remote IR
Sensor
Standby/On
Stop
Display
Disc Drawer
Message Displays and Indicators
Dimmer
NOTE: To make it easier to follow the instructions throughout the manual that refer to this illustration,a copy of this page may be downloaded from the Product Support section at
www.harmankardon.com.
9

12
DVD48 harman/kardon
FRONT-PANEL CONTROLS
Standby/On Switch: This electrical switch turns the DVD 48 on
for playback, or leaves it in Standby mode for quick turn-on using this
switch or the remote control.
Power Indicator:This LED is next to the Standby/On Switch. When
the DVD 48 is plugged into AC power, the LED turns amber to indicate
that the DVD 48 is in Standby mode (ready to be turned on).When the
DVD 48 is turned on (by pressing the Standby/On Switch), the LED
turns blue.If this LED ever turns red, immediately unplug the DVD 48.
Check the wire connections.If the LED remains red,bring the DVD 48
to an authorized Harman Kardon service provider.
Open/Close: Press this button to open or close the disc drawer.
When the DVD 48 is in Standby mode,press this button to turn it on
and open the drawer. Before pressing this button, always make sure
that no objects are blocking the drawer. Remember to close the door
or turn off the DVD 48 when you have finished.The door will close
automatically after two and a half minutes.
Message Display:Various messages appear in this display
in response to commands.In addition,a variety of indicators will
light at various times to display the current playback mode,video
settings or other aspects of the DVD 48’s status.
Disc Drawer:This drawer holds a disc that is played in the DVD 48.
Press the Open/Close Button to access it. Be sure
discs in the recess in the drawer tray. To avoid damaging the drawer
accidentally, do not press down on it when open.The drawer will close
automatically after two and a half minutes of inactivity to prevent dust
or dirt from entering the DVD 48 and to prevent damage.If a disc is
present, it will begin playing.
to carefully seat all
Play: Press to start playback of a loaded disc,or to resume play after
the disc has been paused.
Pause: Press to pause play,or to resume after play has been momen-
tarily paused.When a DVD is playing,a still image of the frozen action
will appear on-screen. In Pause mode,you may access the Frame-byFrame Advance and Slow Search functions by pressing the forward or
reverse Step or Skip Buttons on the remote.
Stop: Press once to stop play and enter Resume mode,in which
pressing Play resumes playback from the point at which it was stopped.
Press this button twice to fully stop play of the disc.Resume mode is
not available for WMA files or VCDs without playback control.
Skip/Search Reverse: Press once to return to the beginning of
the current chapter or track. Quickly press again to skip to previous
chapters or tracks.Press and hold for fast search reverse within the
current chapter or track at the speed indicated on screen.
Skip/Search Forward:Each press advances to the next chapter
or track. Press and hold for fast search forward within the current
chapter or track at the speed indicated on-screen.
Remote IR Sensor:This sensor receives infrared commands from
the remote control. It is important to ensure that it is not blocked. If
covering the sensor is unavoidable,such as when the DVD 48 is placed
inside a cabinet, you may use an optional Harman Kardon HE 1000,
or other infrared receiver, connecting it to the Remote IR Input on the
DVD 48’s rear panel.Alternatively, connect the Remote IR Output of
another compatible component, such as a Harman Kardon AVR,to
the DVD 48’s Remote IR Input.Point the remote at the other device’s
remote sensor, and the command will be transmitted to the DVD 48.
An external IR “blaster”may also be used, positioned to point at this area.
Dimmer: Some people find the front-panel display distracting,
especially while watching a movie.Each press of this button cycles
through the front-panel brightness options of Full Brightness,Half
Brightness and Off. The Power Indicator always remains lit to remind
you that the DVD 48 is turned on, but the display will remain dimmed
or off, even when a command is entered. Dimming is canceled when
the DVD 48 is turned off.
Open/Close: Press this button to open or close the disc drawer.
10

13
DVD48 harman/kardon
FRONT-PANEL INFORMATION DISPLAY
Playback
Control
A-B
Repeat
HDMI
Video
Resolution
Random
Camera
Angle
Repeat Video Off
Disc-Type
Playback
Mode
Audio
Bitstream
Group/Title
Program
Parental
Lock
Chapter/Track Time
NOTE: To make it easier to follow the instructions that refer to the controls and connectors in this illustration,a larger copy may be downloaded
from the Product Support section for this product at www.harmankardon.com.
Disc-Type Indicators:The SACD, DVD, DVD-Audio, CD, VCD, MP3,
WMA or JPEG indicator will light to show the type of disc currently being played.
Audio Bitstream Indicators: When a Dolby Digital, DTS or Linear
PCM digital audio signal is detected, one of these indicators will light.
DVD-Audio,MP3 and WMA bitstreams will be indicated
by the Disc-
Type Indicator.
Parental-Lock Indicator: This indicator lights in red when the
parental-lock system is engaged to prevent changing the rating level
without a code.
Program Indicator: This indicator lights when a playlist has been
programmed using the menu system (available for CDs only).
Angle Indicator: This indicator blinks when alternative viewing angles
are available on the DVD currently playing.
Random Indicator: This indicator lights when the unit is in the Random
Play mode.
A-B Repeat Indicator: This indicator lights when a specific passage
for repeat playback has been selected.
VCD Playback Control Indicator: This indicator lights when the
playback control function is turned on for VCDs.
Repeat Indicators: These indicators light when any of the Repeat
functions are in use.
Video OFF Indicator: This indicator lights in red when the unit's video
output has been turned off by pressing the Video OFF Button on the
remote control.
HDMI Indicator: This indicator lights when the HDMI Output is enabled.
Press the HDMI Button on the remote to toggle between turning the
HDMI Output on and off. When the HDMI Output is on (and this indicator
is lit), the Component Video Outputs are deactivated, and vice versa.
Video Resolution Indicators: One of these indicators will light to
indicate the current video resolution of the HDMI Output, based on what
your video display is capable of handling.The HDMI Output will upscale
source materials to the higher resolution, as indicated in the HDMI SETUP
menu (explained in the Initial Setup section).You may change the HDMI
Video setting to a lower resolution to improve picture quality using the
VIDEO SETUP menu. As you select a specific HDMI Output video
resolution and the DVD 48 successfully determines that the video display
is capable of handling that resolution, its indicator will light and will appear
briefly in the Message Display.
Time Indicators:These positions show the running time of a disc in play.
NOTE: These positions will also display text messages about the DVD’s
status,including Loading when a disc is loading, Power Off when the
unit is turned off, and Unknown Disc when a disc not compatible with
the DVD 48 is loaded.
Chapter/Track Number Indicators: When a DVD disc is playing, these
two positions show the current chapter. When a DVD-Audio,SACD or
CD disc is playing,they will show the current track number.
Group/Title Indicators: These two positions show the current title
number when a DVD disc is playing,or the current group for a DVDAudio disc.
Playback-Mode Indicators: These indicators light to show the current
playback mode:
› Lights when a disc is playing in the Normal mode.This indicator
will flash when the disc is in Forward Slow Play mode. The on-screen
banner display indicates the selected speed (1/2x, 1/4x, 1/8x or 1/16x).
›› When the DVD 48 is in the Fast Search Play mode,two of these
indicators will light to show that the unit is in a Fast Play mode. The
selection will be displayed on screen as one of six steps that correspond
to the following speeds: ~1-1/2x, 4x, 6x, 8x, 16x or 32x. Fast Play
mode is not available for WMA files.
± Lights when the disc is paused.
‹‹
Lights when the disc is in the Fast Search Reverse mode. The
selection will be displayed on screen as one of six steps that correspond
to the following speeds: ~1-1/2x, 4x, 6x, 8x, 16x or 32x. Fast Search
Reverse mode is not available for WMA files.
‹
Flashes when the disc is in Reverse Slow Play mode.The on-screen
banner display indicates the selected speed (1/2x, 1/4x or 1/8x).
11

14
DVD48 harman/kardon
REAR-PANEL CONNECTIONS
Remote Infrared (IR) Input and Output: When the Remote IR sensor
on the front panel is blocked, such as when the DVD 48 is placed
inside a cabinet, connect the IR Output of your receiver/processor or
an optional IR receiver to the Remote IR Input jack for use with the
remote control.The Remote IR Output may be connected to the
Remote IR Input of a compatible source device (or other product) to
enable remote control through the DVD 48.When several devices are
used, connect them in “daisy chain” fashion.
HDMI Output: If you have an HDMI-compatible receiver or video
display device,connect this output to an HDMI input on the receiver
or video display for high-quality digital audio and video.Even if your
receiver is not capable of processing audio in the HDMI format, you
will still experience the superb reproduction of HDMI video.
In all cases,the video display must be HDCP-compliant in order to use
the HDMI output. For best results,we do not recommend HDMI connections in excess of ten feet without a repeater. If your video display has a
DVI input, you may use an optional HDMI-to-DVI cable or adapter for
the video connection to the display, and a separate audio connection.
The DVD 48 is Simplay HD-verified for compatibility via the HDMI
connection with other Simplay HD-verified products.
NOTE: To use the HDMI Output,make sure to turn it on by pressing the HDMI Button on the remote.When the HDMI Output is
turned on, the Component Video Outputs are not available for use.
The following audio formats may be output via the HDMI connection:
Audio CD – 2-Channel PCM or 5.1-channel DTS
DVD-Audio – 2-Channel or 5.1-channel PCM
DVD-Video – Up to 5.1-channel Dolby Digital, DTS or PCM
NOTE: To hear the high-resolution surround sound recorded on
SACD discs,connect the 6-Channel Audio Outputsto the corresponding input jacks on your receiver or processor. This format is
not output digitally. If your receiver is not capable of processing
the audio portion of an HDMI signal, use the 6-Channel Audio
Outputs to enjoy DVD-Audio discs as well.
To hear a 2-channel analog downmix via the 2-Channel Analog
Audio Outputs,select Stereo at the Analog Output setting in the
AUDIO SETUP submenu,or press the Audio Mode Button on the
remote repeatedly until the Stereo setting is selected.
Coaxial and Optical Digital Audio Outputs: If your receiver or
processor has an available digital audio input, connect either of these
digital audio outputs to the corresponding input on the receiver/processor
to enjoy digital audio formats such as Dolby Digital, DTS or standard
PCM (traditionally found on CDs and may be available on other discs).
Never connect both of these outputs to the same device simultaneously.
However, it is okay to connect one of the digital audio outputs plus the
analog audio outputs to the same device.
NOTE: The Coaxial Digital Output should only be connected to
a digital input. Even though it is the same RCA-type connector
as standard analog audio connections,DO NOT connect it to
a conventional analog input jack.
Component Video Outputs: If your television or video display and
receiver are component video-capable,and your display does not have
an HDMI input, connect these jacks to the corresponding inputs on the
receiver or TV that are labeled “Y/Pr/Pb” or “Y/Cr/Cb.” If your video
display is capable of handling resolutions of 480p or better, connect
these outputs to the HD (high-definition) component video inputs on
your display. If the display is capable of displaying progressive-scan
video,select On at the Progressive Scan setting in the VIDEO SETUP
submenu.
IMPORTANT NOTE: Do not connect the Component Video
Output jacks to standard composite video inputs on any device.
Composite and S-Video Outputs: If your video display does not have
HDMI or component video inputs,connect one of these two video
outputs to your receiver/processor or directly to the display. If available,
S-video is preferred. Do not connect more than one of the DVD 48’s
analog video outputs (component video,S-video, composite video) to
any other device at the same time.You may connect both the HDMI
Output and the Composite Video Output to your receiver if your receiver
distributes composite video through a multiroom system.
2-Channel Analog Audio Outputs: Connect these outputs to the left
and right analog audio inputs on your receiver/processor or TV.You
may connect these jacks in addition to a digital audio connection, and
it is recommended that you do so as a backup if you wish to use the
DVD 48 as a source device for a multiroom system or if you wish to
make analog recordings,as it is not possible to make digital recordings
of most DVDs.
6-Channel Analog Audio Outputs: Connect these outputs to the
matching 6-channel analog audio inputs on your receiver or surround
sound processor. This connection is required to listen to the multichannel
tracks on SACD discs.If the disc also contains a Linear PCM,Dolby
Digital or DTS track, you may listen to it using the HDMI Output, the
Coaxial or Optical Digital Audio Output or the 2-Channel Analog
Audio Outputs.
NOTE: A 2-channel downmix is not available simultaneously with
a 6-channel presentation. Set the Analog Output in the AUDIO
SETUP menu to Stereo to hear a 2-channel downmix, available
at both the 2-Channel Analog Audio Outputs and the front left and
right outputs of the 6-Channel Analog Audio Outputs. In Stereo
mode,no audio will be available at the center and surround outputs of the 6-Channel Analog Audio Outputs.
If the 6-Channel Analog Audio Outputs are connected to corresponding 6-channel inputs on your receiver, set the Analog Output
in the AUDIO SETUP menu to Multichannel to hear all six channels
(if available on the disc). In Multichannel mode,only the front left
and right channel information will be available at the 2-Channel
Analog Audio Outputs, without any center or surround information.
AC Power Input: Connect the AC power cord to an AC outlet, and plug
the cord’s female end into this receptacle. If the outlet is controlled by
a switch, make certain that it is in the ON position. If the cord somehow
becomes damaged, contact your authorized Harman Kardon dealer for
a replacement.
12
15
DVD48 harman/kardon
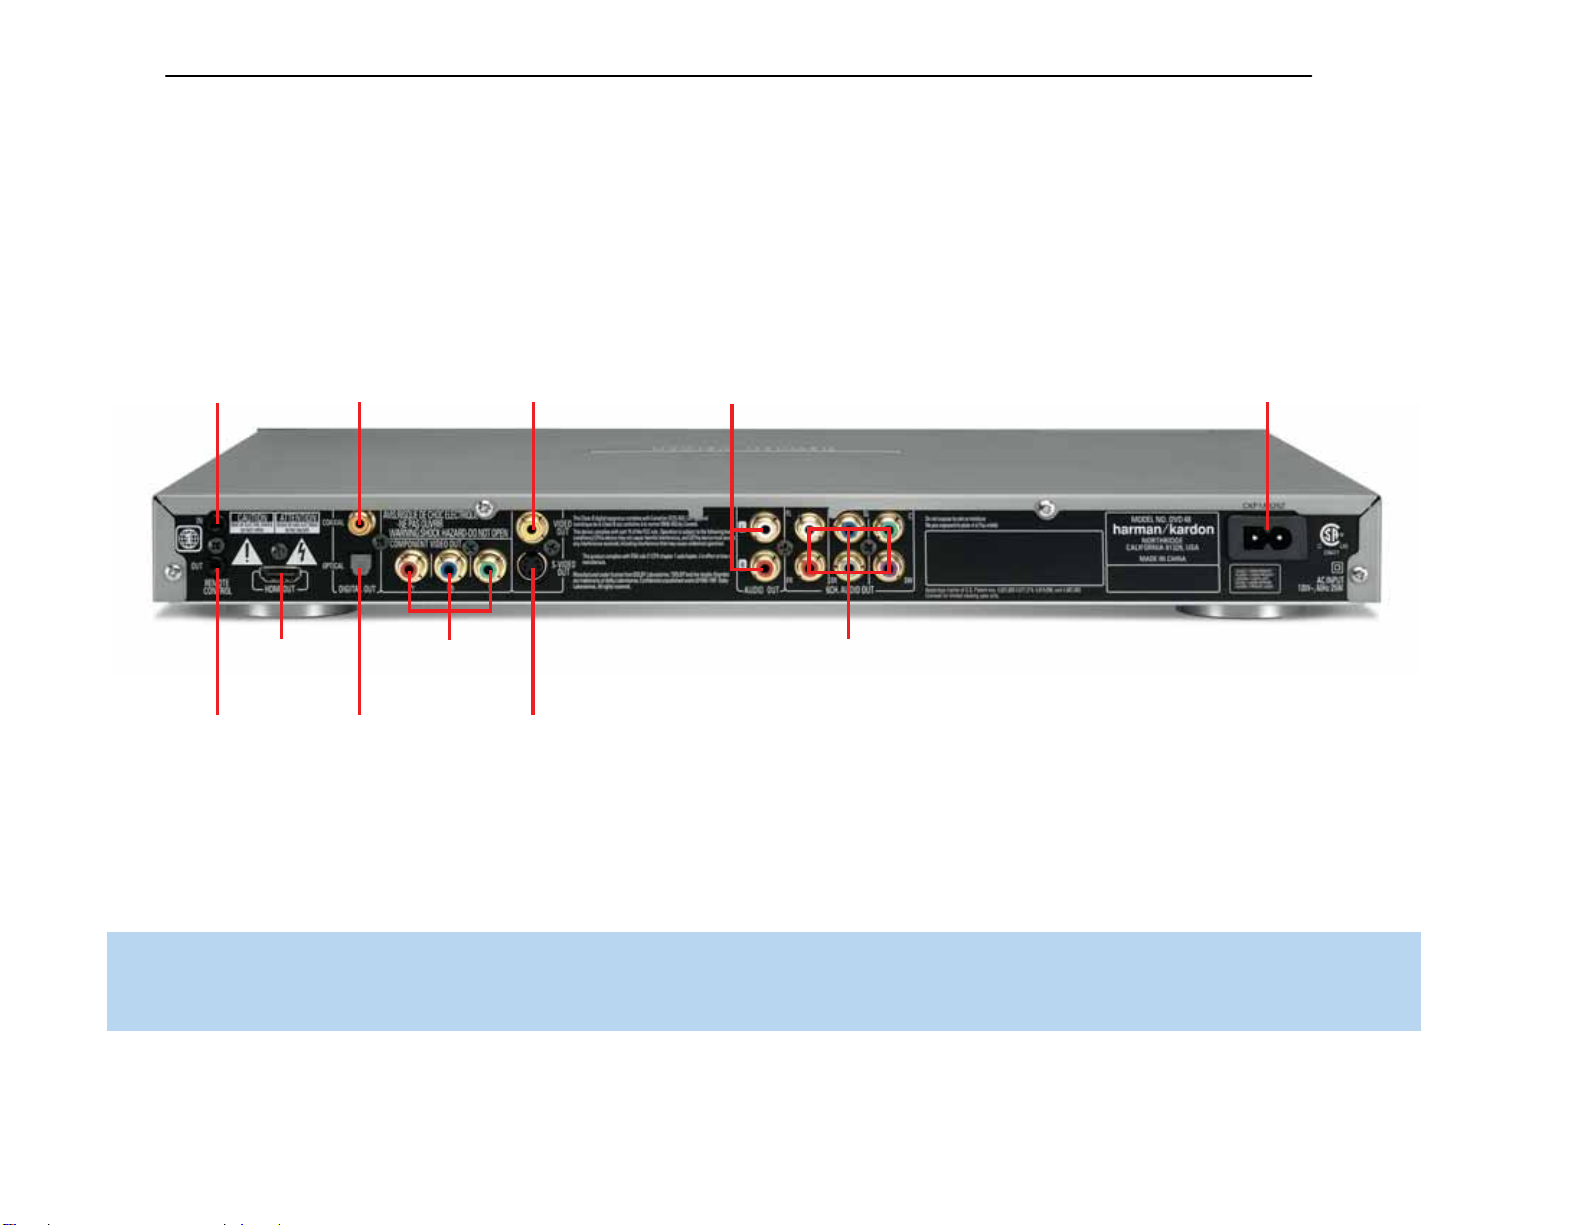
REAR PANEL CONNECTIONS
Remote
IR Input
Remote
IR Output
HDMI
Output
Coaxial Digital
Audio Output
Component
Video Outputs
Optical Digital
Audio Output
Composite
Video Output
S-Video
Output
2-Channel Analog
Audio Outputs
6-Channel Analog
Audio Outputs
REAR-PANEL CONNECTIONS
AC Power Input
NOTE: To make it easier to follow the instructions throughout the manual that refer to this illustration,a copy of this page may be downloaded from the Product Support section at
www.harmankardon.com.

16
DVD48 harman/kardon
REMOTE CONTROL FUNCTIONS
IR Transmitter Lens: As buttons are pressed on the remote,
infrared codes are emitted through this lens.Make sure it is pointing
toward the component being operated.
Power On: Press this button to tur n on the DVD 48 when it is in
Standby mode (plugged in with the Power Indicator lit up in amber).
Power Off: Press this button to tur n off the DVD 48, placing it in
Standby mode.
Open/Close: Press this button to open or close the disc drawer.
If the DVD 48 is in Standby mode,pressing this button will turn it on.
Page Up/Down: Some DVD-Audio discs allow you to select from
several still images associated with an audio selection while it is playing.
If the disc has implemented this feature,press these buttons to view
the images in forward or reverse order. If this feature is not available,the
feature-prohibited icon “Ø”will be displayed in the upper right corner
of the screen.
Audio: Press this button while a DVD is playing to display the current
audio track information and to select another audio format.
Clear: Press this button to clear a number you have started to enter.
This button may also be used to clear the on-screen displays.Press
and hold this button for five seconds while in Stop mode and with all
on-screen displays cleared, to reset the DVD 48 to its factory-default
settings.
Title:This button allows you to select from the titles stored on the disc,
which may include “making of”or other featurettes.Some DVD-Audio
and Video discs may display their disc menu.
Subtitle: Press this button while a DVD containing subtitle information
is playing,to turn subtitles off or to select a subtitle language.This
setting will only be in effect for the current disc.
NOTE: Due to the variations in how DVD discs are authored,
the subtitle languages displayed by the DVD 48 may not accurately reflect the actual languages available on the disc.It is
recommended that subtitles be selected using the disc’s menu.
Program: Press this button to display the Program screen, where you
may program a playlist in which the tracks may be played in a different
order than the order in which they appear on the disc.See the Programming
a Playlist section for more information.
Repeat: Press this button repeatedly to cycle through the Repeat
modes available with the current disc.This button is not used to access
A-B Repeat mode.
A-B Repeat:While a disc is playing, the A-B Repeat function allows
you to repeatedly play a passage,which may include several tracks or
chapters.Press the button once to select the starting point (“A”), and
a second time to select the end of the passage (“B”). Press the button
again to end repeat play.
Random:This button turns Random Play mode – which plays the
tracks on a CD in random order – on or off.
Numeric Keys: Use these buttons to directly enter a track or chapter
number to skip to that section of the disc,or to enter a password for the
parental control system.
Group:This button allows you to select from the groups stored on the
disc,which may include the same content recorded using different audio
formats.When the dialog box appears, the total number of groups will
be indicated. Use the Numeric Keys to enter the number of the desired
group,and press the Enter Button.The dialog box will disappear, and
the DVD 48 will begin playing the new group.
System Setup: Press this button to access the SYSTEM SETUP
menu. See the Initial Setup section for more information.
Disc Menu: Press this button while a DVD is playing to view the disc’s
menu. Some DVD-Audio discs may require you to press the Title Button
to access the disc menu.
Status:When a disc is playing, press this button to view the Status
Display, which contains playback mode information. The Status Display
is not available for MP3,WMA or JPEG discs.
Return: Press this button while viewing the DVD 48’s Setup menus or
Status Display to return to a previous screen or clear the display. It has
no effect on a disc’s menus.
Transport Controls: These buttons are used to operate the disc
player. Use the controls to skip forward or in reverse by track or chapter;
to fast-search forward or in reverse; and to play,pause or stop the disc.
After pressing the Pause Button,the Skip Buttons may be used to step
frame by frame through a video presentation, and the Fast-Search
Buttons may be used for slow play.
Angle:When a DVD encoded with multiple camera angles is playing
and when the Angle Icon appears to indicate that the multiple-angle
passage has been reached, press this button to cycle through the
various available angles.
This button is also used to rotate still images.Each press rotates the
image 90 degrees clockwise.
Zoom:When viewing a DVD,VCD or JPEG still image, press this button
repeatedly to enlarge the on-screen image by 1-1/2x, 2x, 3x or 4x
(1-1/2x, 2x or 3x only for VCDs) before returning to the original size.
Use the Navigation Buttons to explore the enlarged image.
⁄
/¤/‹/› Navigation and Enter Buttons: These buttons are
used together to make selections within the on-screen menu system.
Backlight: Press this button to turn on the backlight to make it easier
to see the buttons in a darkened room.The backlight will remain on for
a few seconds after your last button press before going out, or you may
turn off the backlight by pressing this button again.
Video Off: Some people prefer to tur n off the video display when
listening to audio-only discs.Pressing this button deactivates the video
circuitry,avoiding any possible interference with the audio. Moreover,
plasma and CRT video displays are subject to “burn-in”when a still
image,such as a menu,remains on screen for more than a short time.
14
17
DVD48 harman/kardon
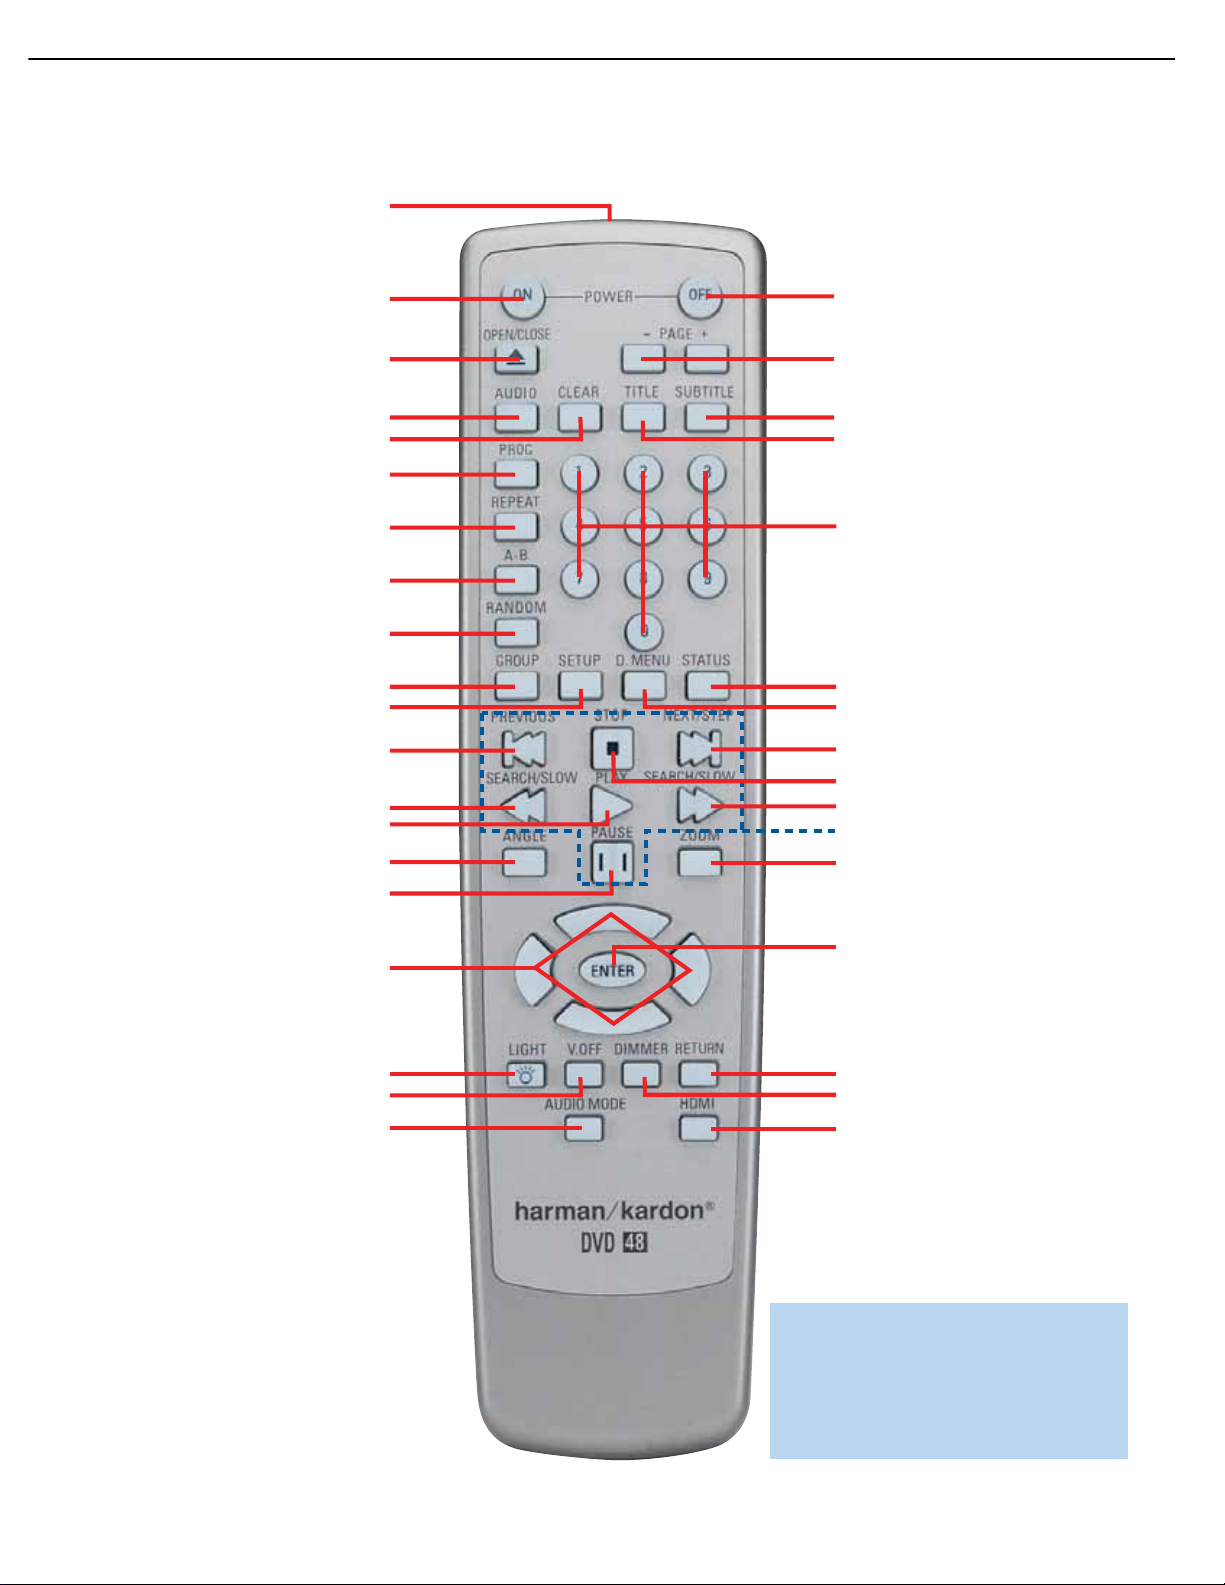
REMOTE CONTROL FUNCTIONS
IR T ransmitter Lens
Power On
Open/Close
Audio
Clear
Program
Repeat
A-B Repeat
Random
Group
System Setup
Previous Step/Skip
Search/Slow Reverse
Play
Angle
Pause
Power Off
Page Up/Down
Subtitle
Title
Numeric Keys
Status
Disc Menu
Next Step/Skip
Stop
Search/Slow Forward
Transport Controls
Zoom
⁄/
⁄
/‹/› Navigation
Backlight
Video Off
Audio Mode
Enter
Return
Dimmer
HDMI
NOTE: To make it easier to follow the instruc-
tions throughout the manual that refer to this
illustration, a copy of this page may be downloaded from the Product Support section at
www.harmankardon.com.

18
DVD48 harman/kardon
REMOTE CONTROL FUNCTIONS
We strongly recommend that plasma and CRT owners use the Video Off
function liberally. Press the button a second time to reactivate the video
displays.
NOTE: The DVD 48 features a screen saver that you may set
to appear automatically after a period of inactivity. However, the
screen saver does not become activated when the DVD 48’s
Setup menus are on screen.The DVD 48 also allows you to set
one of two Auto Power Off modes in the GENERAL SETUP
menu that turn off the DVD 48 after a longer period of inactivity.
See the Initial Setup section for more information.
Dimmer: Some people find the front-panel displays distracting,
especially while watching a movie in a darkened room. Each press of
this button cycles through the Full Brightness,Half Brightness and Off
settings.The Power Indicator will always remain lit to remind you that
the DVD 48 is turned on.
NOTE: You may enter commands and operate the DVD 48
normally even with the front-panel display fully dimmed.The
display will wake for about one second when a command
is entered.
Audio Mode:This button adjusts the Analog Output setting,which
is also found in the AUDIO SETUP menu.
There are two available settings: Multichannel and Stereo.The first
button press displays the current setting,and each additional press
toggles between the settings.
The Stereo,or 2-Channel,setting outputs a 2-channel downmixed signal to
both sets of Left/Right Analog Audio Outputs.The downmix incorporates
center and surround channel information, but no signal is available at the
center or surround jacks of the 6-Channel Analog Audio Outputs.
The Multichannel, or 6-Channel, setting outputs only the front left and
right channel information to both sets of Left/Right Analog Audio Outputs.
Although the correct signals are available at all of the 6-Channel Analog
Audio Output jacks,the 2-Channel Analog Audio Outputs will contain
incomplete information.
The DVD 48 does not make a 2-channel downmix available at the
2-Channel Analog Audio Outputs simultaneously with a multichannel signal
at the 6-Channel Analog Audio Outputs.
HDMI: Press this button to tur n the HDMI Output on or off.When the HDMI
Output is on, the Component Video Outputs are off. If your video display is
HDMI-capable,turn this setting on and use the HDMI connection.If your
video display does not have an HDMI input, turn this setting off to use the
Component Video Outputs.
16
16

A
Optical
19
DVD48 harman/kardon
CONNECTIONS
There are different types of audio and video connections used to
connect the DVD 48 to your receiver or processor and video display.
To make it easier to keep them all straight, the Consumer Electronics
®
Association (CEA
) has established a color-coding standard. Table 1
may be helpful to you as a reference while you set up your system.
Table 1 – Connection Color Guide
Audio Connections
Left Right
Front (FL/FR)
Center (C)
Surround (SL/SR)
Subwoofer (SUB)
Digital Audio Connections
Coaxial
Optical
Video Connections
Component Y Pb Pr
Composite
S-Video
HDMI™ Connections (digital audio and video)
HDMI
Input Output
Types of Connections
This section will briefly review different types of cables and connections
that you may use to set up your system.
Audio and video signals originate in what are known as “source
devices,” including a DVD/CD player such as the DVD 48.
Separate connections are required for the audio and video portions of
the signal unless an HDMI connection is used (see below).The types of
connections used depend upon what’s available on your receiver, and
for video signals,the capabilities of your video display.
Audio Connections
There are two formats for audio connections: digital and analog. Digital
audio signals are required for listening to sources encoded with digital
surround modes,such as Dolby Digital and DTS. There are two types
of digital audio connections commonly used: coaxial and optical. Either
type of digital audio connection may be used, but never both simultaneously. However, it’s okay to make both analog and digital audio connections at the same time to the same source.
NOTE: The DVD 48 outputs digital audio signals through the
HDMI connection. If your receiver/processor or video display
is capable of
processing
then you will not need to make a separate digital audio connection. However,as explained in the Analog Audio section below,
you may still need to make the analog audio connections.
If your receiver/processor is only capable of
signals,use HDMI for your video connection only and connect
either the DVD 48’s coaxial or optical digital audio output to
the corresponding input on your receiver.
In addition, SACD audio is not transmitted via HDMI. Use the
2- or 6-Channel Analog Audio Outputs to enjoy your SACD discs.
the audio portion of the HDMI signal,
switching
HDMI
Digital Audio
Coaxial digital audio jacks are usually color-coded in orange.Although
they look similar to analog jacks,they should not be confused,and you
should not connect coaxial digital audio outputs to analog inputs or
vice versa. See Figure 1.
Coaxial digital
audio cable
Figure 1 – Coaxial Digital Audio
Coaxial
Optical digital audio connectors are normally covered by a shutter to
protect them from dust.The shutter opens as the cable is inserted.
See Figure 2.
Optical digital
audio cable
Figure 2 – Optical Digital Audio
Due to the nature of digital signals as binary bits,they aren’t subject
to signal degradation the way analog signals are.Therefore, the quality
of coaxial and optical digital audio connections should be the same,
although it is important to limit the length of the cable.Whichever type of
connection you choose,Harman Kardon recommends that you always
select the highest quality cables available within your budget.
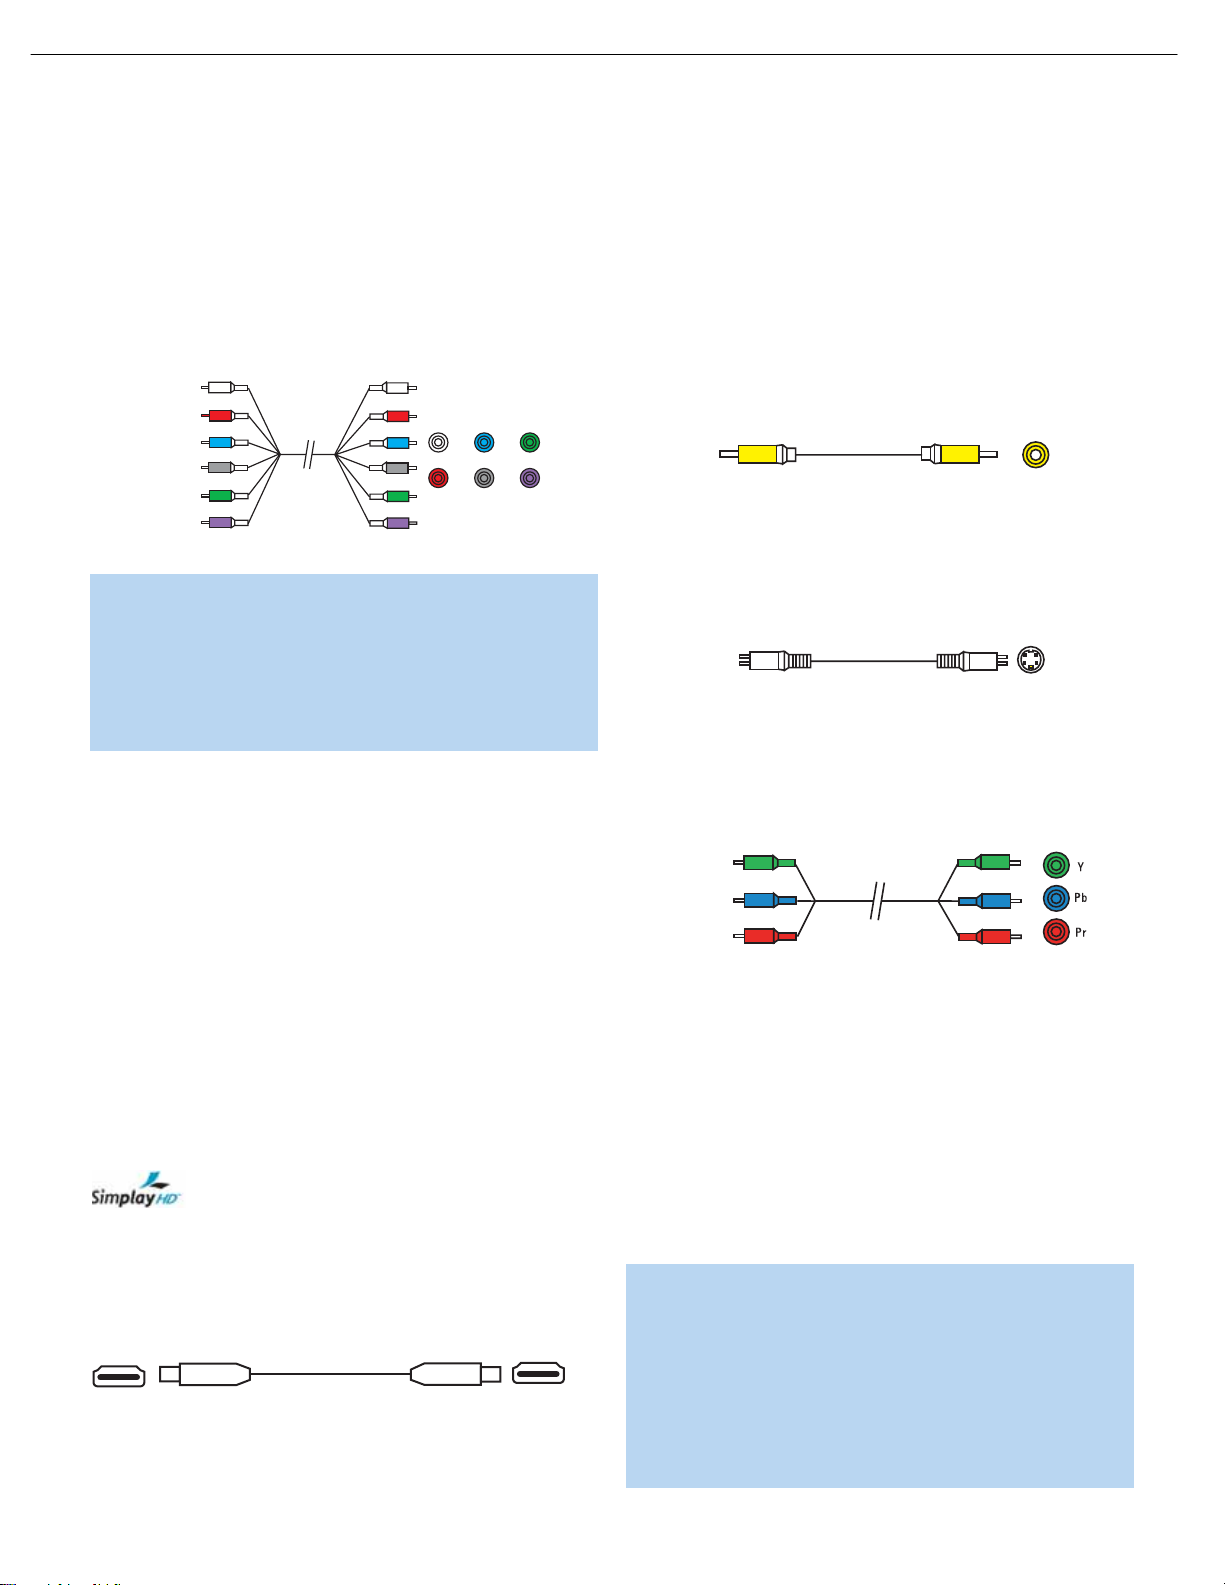
Analog Audio
Analog connections require two cables,one for the left channel (white)
and one for the right channel (red). See Figure 3. These two cables are
often attached to each other for most of their length. Most devices that
have digital audio jacks also have analog audio jacks.We recommend
that you always connect the DVD 48’s 2-Channel Analog Audio Outputs
to your receiver/processor, or to your TV if you are not using a receiver.
There are four reasons to use analog audio connections,even if you are
using one of the digital audio connections:
1.To make recordings.Most DVDs are protected from digital copying
and only analog copies are permitted. Please make sure to comply
with all copyright laws when making recordings for personal use.
2. In a multiroom system. Many receivers and processors require
sources used in multiroom systems to output analog audio signals.
3.When connecting the DVD 48 directly to a non-HDMI TV.The TV
may not have digital audio inputs.
4.When playing high-resolution 96kHz PCM audio discs. If your receiver
is not capable of processing 96kHz audio,you may need to use the
analog audio connection.
NOTE: The DVD 48 is capable of downmixing multichannel
materials and outputting a 2-channel downmix. Make sure
to adjust the Analog Output setting in the AUDIO SETUP
menu to Stereo.
nalog audio
cable (RCA)
Figure 3 – Analog Audio
L
R
18
18
20
DVD48 harman/kardon
CONNECTIONS
Multichannel analog connections are used with high-resolution audio
discs,where the copy-protected digital content is decoded inside the
DVD 48.These connections are required for playing SACD discs,and
depending on your receiver’s capabilities,may also be required for
DVD-Audio,HD-DVD or Blu-ray discs, unless the disc also carries twochannel PCM and 5.1-channel Dolby Digital or DTS soundtracks for use
with receivers/processors that are not equipped with 5.1-channel analog
inputs.Check the disc’s jacket for more information on alternate audio
tracks.See Figure 4.
Front Surround Center
Multichannel
analog audio
cable (RCA)
Subwoofer
Figure 4 – Multichannel Analog Audio
NOTE: In order to enjoy the full benefit of lossless multichannel
recordings,make sure the Analog Output setting in the AUDIO
SETUP menu is set to Multichannel.When the Stereo setting is
selected, the center and surround channel information will be
combined with the left and right channels,and will only be heard
through the front channels.This setting may also be accessed by
pressing the Audio Mode Button on the remote.
Video Connections
As mentioned above,the video signal is often transmitted separately
from the audio signal. Even when the HDMI connection described below
is used, sometimes the receiver is not capable of accessing the audio
portion of the HDMI signal, and a separate audio connection is required.
Digital Video
The DVD 48 is equipped with an HDMI (High-Definition Multimedia
Interface) output. HDMI is capable of carrying digital audio and video
information using a single cable,delivering high-quality picture and
sound.
The DVD 48 is capable of outputting up to 720p,1080i or 1080p
video and 2- or 6-channel PCM or up to 5.1-channel Dolby Digital or
DTS audio through its HDMI connection.The DVD 48 is in compliance
with HDCP (High-Definition Copy Protection) and the video display must
also be HDCP-compliant to be used with the DVD 48’s HDMI output.
The DVD 48 is Simplay HD-verified for compatibility
via the HDMI connection with other Simplay HD-verified products.
The physical HDMI connection is simple.The connector is shaped for
easy plug-in (see Figure 5). If your video display has a DVI input, you
may use an HDMI-to-DVI adapter (not included) to connect it to the
HDMI Output, but a separate audio connection is required.
Figure 5 – HDMI Connection
Analog Video
There are three types of analog video connections: composite video,
S-video and component video.
Composite video is the basic connection most commonly available.
The jack is usually color-coded yellow, and looks like an analog audio
jack, although it is important never to confuse the two.Do not plug a
composite video cable into an analog or coaxial digital audio jack, or
vice versa. Both the chrominance (color) and luminance (intensity)
components of the video signal are transmitted using a single cable.
See Figure 6.
Composite
video cable
Figure 6 – Composite Video
S-video,or “separate”video, transmits the chrominance and luminance
components using separate wires contained within a single cable.The
plug on an S-video cable contains four metal pins,plus a plastic guide
pin. Be careful to line up the plug correctly when you insert it into the
jack on the receiver, source or video display. See Figure 7.
S-video cable
Figure 7 – S-Video
Component video separates the video signal into three components –
one luminance (“Y”) and two sub-sampled color signals (“Pb” and “Pr”) –
that are transmitted using three separate cables.The “Y” cable is
color-coded green, the “Pb”cable is colored blue and the “Pr”cable
is colored red. See Figure 8.
Component
video cable
Figure 8 – Component Video
Do not confuse component video connections with composite video
(described above).Although the plugs and jacks may look similar, they
are not compatible and cross-connecting them will result in no picture
or a very distorted picture.Remember that component video uses three
connections,colored green,blue and red, while composite video uses
a single connection, which is often color-coded yellow.
If your video display is capable of handling progressive-scan signals
(480p or better), then connect the DVD 48’s Component Video Outputs
to the input jacks on your video display marked “HD Component”.Make
sure to configure your display for use with 480p video signals.Set the
Progressive Scan setting in the DVD 48’s VIDEO SETUP menu to On.
NOTES:
• The DVD 48’s component and HDMI outputs are not available
simultaneously. Press the HDMI Button on the remote to turn
the HDMI Output On or Off. When it is On, the Component
Video Outputs are Off, and vice versa.
• For simplified operation,connect one of the DVD 48’s video
outputs to your receiver or processor, and use the receiver/
processor as a switching device for all of your sources,
19
19

21
DVD48 harman/kardon
CONNECTIONS
connecting only the receiver/processor to your video display.
However, if your receiver is not capable of switching HDMI
signals,connect the DVD 48’s HDMI Output directly to an
HDMI-capable video display for superior picture quality.
• If you are using the DVD 48 with a multiroom receiver/
processor that is capable of distributing video,connect the
DVD 48’s Composite Video Output to the receiver in addition
to the HDMI, Component Video or S-Video Output.
If it’s available on your video display, HDMI is recommended as the
best-quality connection, followed in preference by component video,
S-video and then composite video.Except as indicated above for use
in a multiroom system, do not connect more than one video output from
the DVD 48 to another device.
Remote IR Input and Output
The DVD 48 is equipped with an infrared input and output to facilitate
use of your system with a remote control in a variety of situations.
When the DVD 48 is placed in such a way that aiming the remote at the
front-panel IR sensor is difficult, such as inside a cabinet or facing away
from the listener, you may connect an external IR receiver, such as the
optional Harman Kardon HE 1000, to the Remote IR Input jack.
If your receiver or any of your other components are equipped with a
compatible remote IR input, you may use the included 1/8" mini-plug
interconnect cable to connect the Remote IR Output to the device’s
remote IR input, which will pass any applicable remote signals transmitted
through the DVD 48 to the other device.This enables you to control
your devices even when the DVD 48 itself is controlled via an external
IR receiver.
To control more than one device using the Remote IR Output, connect
all devices in “daisy chain”fashion, with the receiver’s remote IR output
connected to the DVD 48’s Remote IR input,then the DVD 48’s Remote
IR Output connected to the next device’s remote IR input,that device’s
remote IR output connected to the next device’s remote IR input,and
so forth.
NOTE: Not all remote controllable devices are equipped with
compatible IR inputs and outputs.Check with the manufacturer
of the source device for more information on the type of IR
signal expected.The DVD 48 will output a “stripped carrier”
IR signal.
20
20
22
DVD48 harman/kardon
INSTALLATION
You are now ready to connect the DVD 48 to your system. Before beginning,make sure that all components, including the DVD 48,
completely off and their power cords are unplugged. Don’t plug any
of the power cords back in until you have finished making all
of your connections.
Many components in a home theater system, such as a receiver or
power amplifier, generate a great deal of heat that can interfere with the
operation of the DVD 48.Therefore,it is best to place the DVD 48 on
its own shelf instead of stacking it directly on top of another component.
It is also a good idea to check the finish of your shelf. Some wood or
other finishes can be affected over time by the DVD 48’s rubber feet.
Step One – Connect the DVD 48 to Other
Components
Select one of the following two sections,depending on whether you are
connecting the DVD 48 directly to a television or video display, or if you
are using an audio/video receiver or processor (this manual will use the
term “receiver”to refer to either a receiver or a processor) that incorporates the DVD 48 as part of a home theater system.
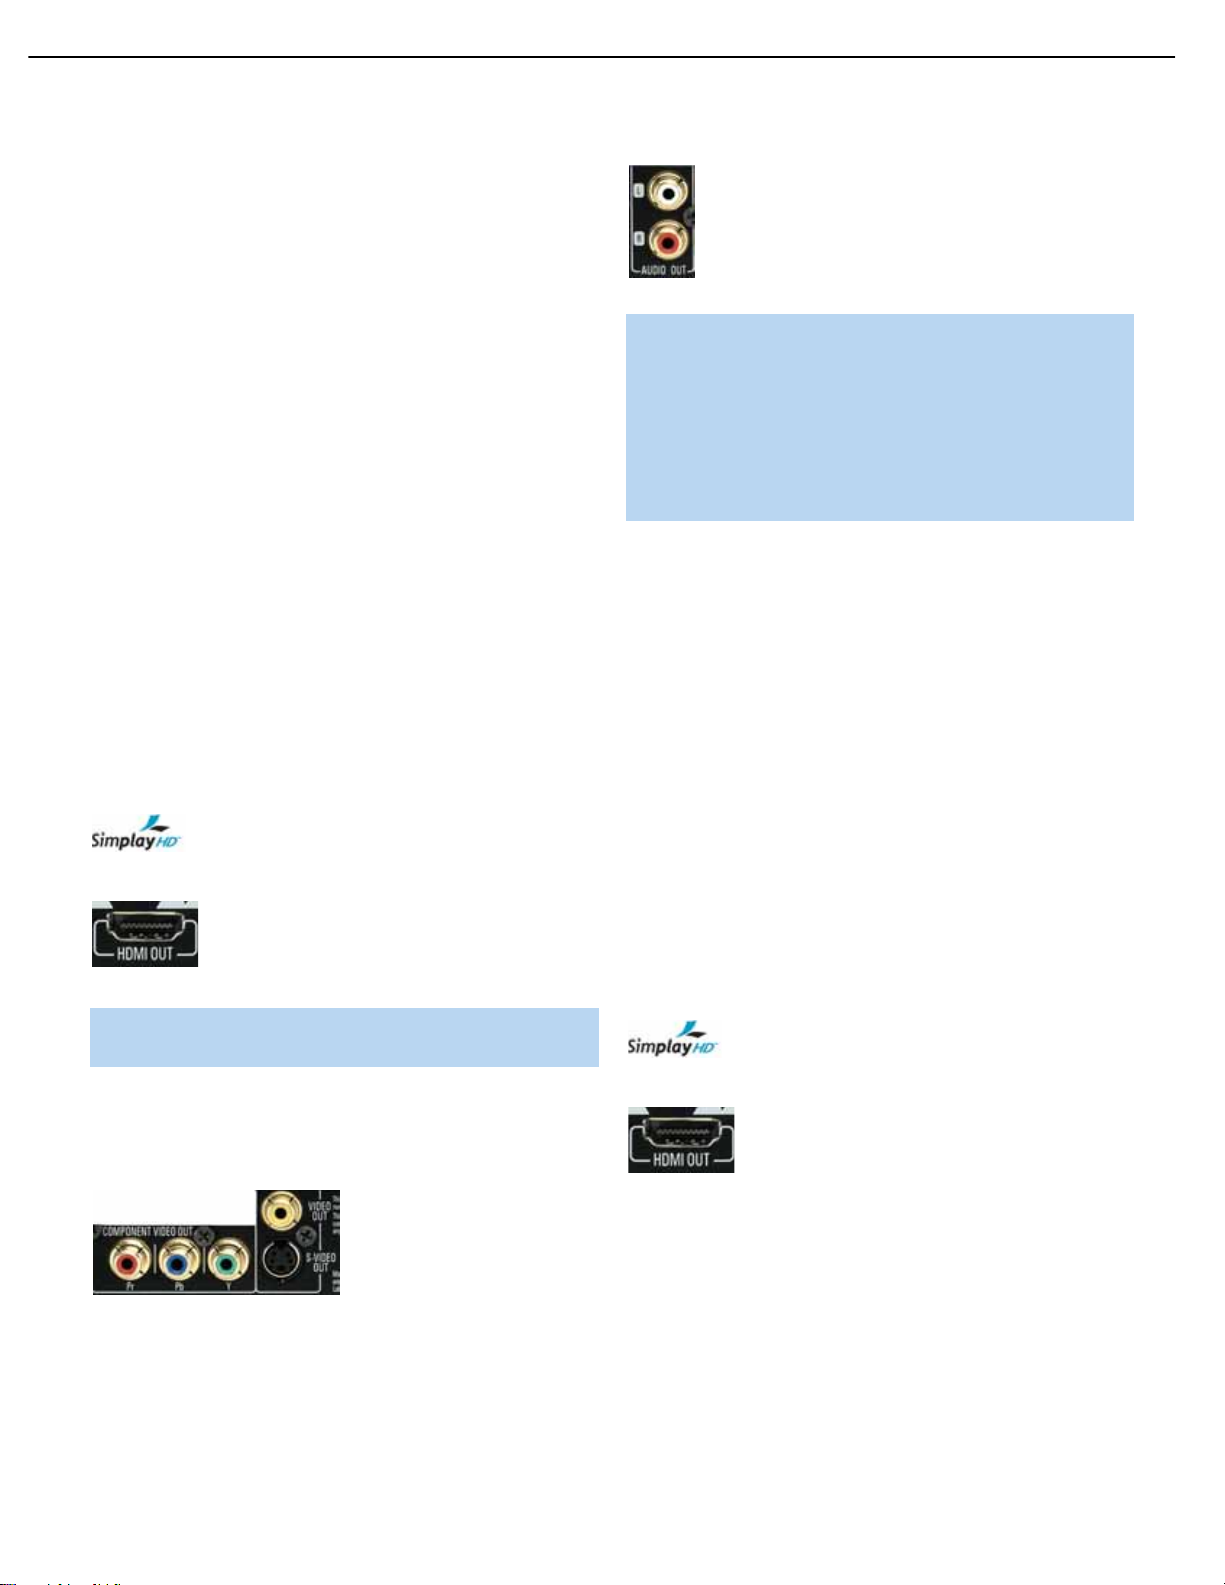
Connecting the DVD 48 Directly to a Television
If your television is HDMI-capable and HDCP-compliant, then only one
cable connection is required, and it will carry both audio and video
signals.Use the included HDMI cable to connect the DVD 48’s HDMI
output to your television’s HDMI input.See Figure 9. If your television
has a DVI input rather than an HDMI input, purchase an HDMI-to-DVI
cable or adapter, and make a separate audio connection to the TV.
The DVD 48 is Simplay HD- verified for compatibility
via the HDMI connection with other Simplay HD-verified products.
Figure 9 – HDMI Output
NOTE: When using the HDMI connection, tur n on the television
before
or video display
If your video display does not have an HDMI input, then separate audio
and video connections are required. Select one of these types of video
connections,in order of preference:component video,S-video,
composite video.See Figure 10.
Figure 10 – Component, S- and Composite Video Outputs
Most video displays are not equipped with coaxial or optical digital audio
inputs.If your display is, then it would be preferable to connect one of
the DVD 48’s digital audio outputs to the corresponding input on your
display. However, most likely you will use the 2-Channel Analog Audio
Outputs.See Figure 11.
the DVD 48.
are turned
Figure 11 – 2-Channel Analog Audio Outputs
NOTE: The DVD 48 is capable of downmixing 5.1-channel
materials to the 2-channel format, but it is necessary to adjust
the Analog Output setting in the AUDIO SETUP menu to Stereo.
You may also access this setting by pressing the Audio Mode
Button on the remote.If you leave the Analog Output setting at
Multichannel, the DVD 48 will only output content specific to the
front left and right channels through the 2-Channel Analog Audio
Outputs,losing the center and surround channel information.
After you have connected the DVD 48 to your television, skip to
Step Two for more information.
Connecting the DVD 48 to an Audio/Video Receiver
One of the major advantages of the DVD format is its ability to use a
variety of digital audio formats for the ultimate in sonic performance.
In addition, the DVD 48 is capable of playing DVD-Audio and SACD
discs,which contain high-resolution multichannel audio materials. In
order to benefit from these audio formats,we strongly recommend that
you connect the DVD 48 to a 5.1-, 6.1- or 7.1-channel audio/video
receiver with the ability to decode digital audio such as Dolby Digital and
DTS, and with 5.1-channel “direct”analog audio inputs.Harman Kardon
AVR Series receivers are compatible with the DVD 48.
The DVD 48 may also be used with an analog A/V receiver by connecting the 2-Channel Analog Audio Outputs to any one of the receiver ’s
inputs (in addition to a video connection).
If your receiver is HDMI-capable,connect the DVD 48’s HDMI Output
to one of the receiver’s HDMI inputs.See Figure 9.If the receiver is
equipped with a DVI port, purchase an HDMI-to-DVI cable or adapter,
and make a separate audio connection from the DVD 48 to the receiver.
The DVD 48 is Simplay HD-verified for compatibility
via the HDMI connection with other Simplay HD-verified products.
Figure 9 (repeated) – HDMI Output
Check your receiver’s owner’s manual to determine how it handles
HDMI signals.It may simply switch the signal,it may process the audio
portion of the signal but not the video portion, or it may be capable
of processing both the audio and video portions of the signal. If the
receiver only switches the signal, but is not capable of accessing and
processing the audio or video data, then a separate audio connection
is required, as explained below.
not
If the receiver is
connections are required. Select
tions,in order of preference:component video,S-video, composite
video.See Figure 10.
HDMI-capable,then separate audio and video
one
of these types of video connec-
21
23
DVD48 harman/kardon
INSTALLATION
Even if you connected one of the DVD 48’s digital audio outputs to
your receiver, you may wish to connect the 2-Channel Analog Audio
Outputs to your TV (if it isn’t HDMI-capable) so that you may watch a
DVD without turning on your complete home theater system. If you
make this connection, remember to also connect one of the DVD 48’s
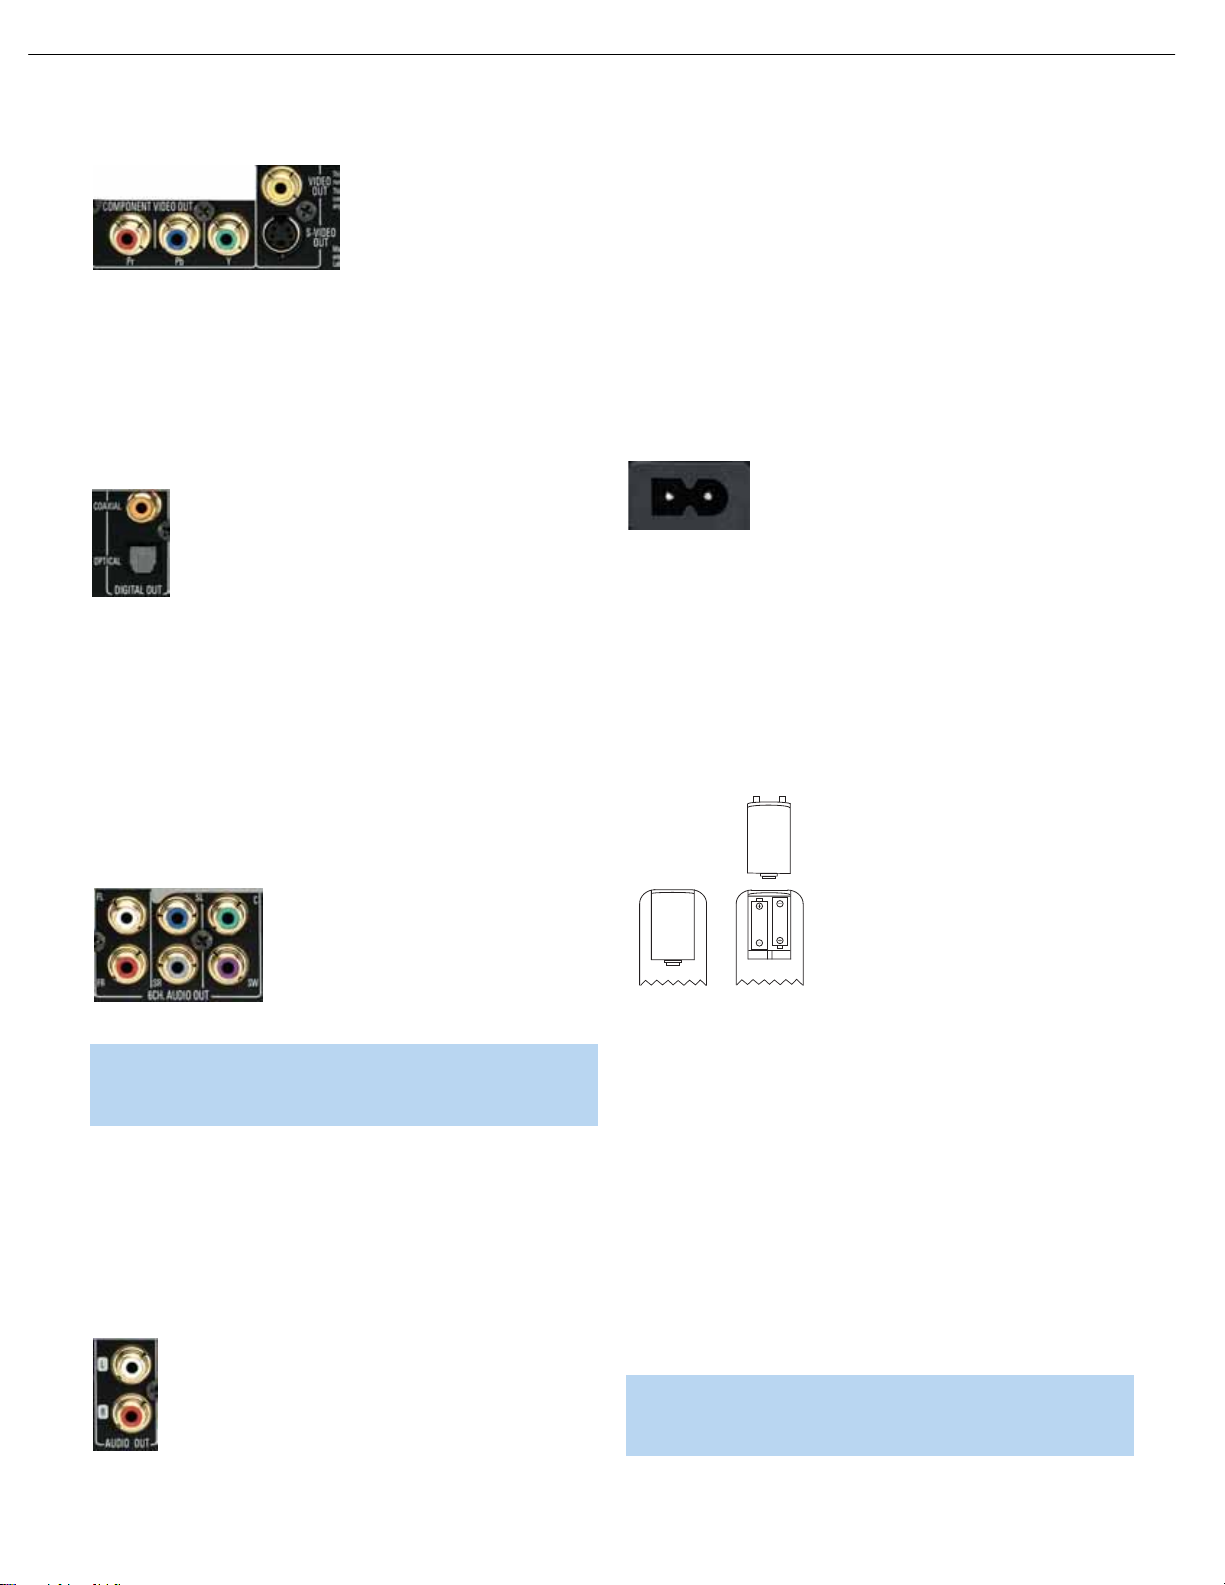
Figure 10 (repeated) – Component, S- and Composite Video Outputs
If your receiver is equipped with digital audio inputs,then select
coaxial or optical digital audio input, and connect it to the corresponding
output on the DVD 48. See Figure 12. This step also applies to a
receiver that is only capable of HDMI switching and cannot process
the audio portion of the HDMI signal. If your HDMI-capable receiver
processes the HDMI audio,then do not make another digital audio
connection.
Figure 12 – Coaxial and Optical Digital Audio Outputs
If you wish to enjoy SACD discs in their native lossless format, connect
the DVD 48’s 6-Channel Analog Audio Outputs to the corresponding
6-channel analog audio inputs on the receiver. This connection is necessary because the digital content is copy-protected and decoded by the
DVD 48, with only the analog audio output available.If your receiver is
not capable of processing the audio portion of an HDMI signal, use the
6-Channel Analog Audio Outputs to enjoy DVD-Audio discs, or change
the DVD Audio mode setting in the GENERAL SETUP menu to DVDVideo to listen to any Dolby Digital, DTS or PCM materials that may
be available on the disc (check the disc’s jacket).See Figure 13.
either
video outputs directly to the TV.
a
Step Two – Plug In AC Power
Having made all of your wiring connections,it is now time to power
up the DVD 48. Plug the AC Power cord into a working, unswitched
AC outlet, and plug the female end into the receptacle on the DVD 48’s
rear panel. See Figure 14.
Figure 14 – AC Input for Power Cord
Step Three – Insert Batteries in Remote
The DVD 48 remote control uses two AAA batteries (included).
To remove the batter y cover located on the back of the remote, firmly
press the ridged area and slide the cover towards the bottom of
the remote.
Insert the batteries as shown in Figure 15, making sure to observe
the correct polarity.
Figure 13 – 6-Channel Analog Audio Outputs
NOTE: When using the 6-Channel Analog Audio Outputs,
remember to adjust the Analog Output setting in the AUDIO
SETUP menu to Multichannel for full 5.1-channel playback.
As explained in the Connections section, there may be several reasons
for using the DVD 48’s 2-channel Analog Audio Outputs in addition to
the Digital Audio Outputs. If you wish to make recordings,to use the
DVD 48 as an audio source for a multiroom system, to play 96kHz
discs when your receiver is not capable of processing 96kHz audio,or
if your receiver is not equipped with digital audio inputs,then connect
the DVD 48’s 2-Channel Analog Audio Outputs to any pair of analog
audio inputs on the receiver. See Figure 11.
Figure 11 (repeated) – 2-Channel Analog Audio Outputs
22
Figure 15 – Remote Battery Compartment
When using the remote,remember to point the lens toward the front
panel of the DVD 48. Make sure no objects,such as furniture,are
blocking the remote’s path.Bright lights,fluorescent lights and plasma
video displays may interfere with the remote’s functioning.The remote
has a range of about 20 feet, depending on the lighting conditions.
It may be used at an angle of up to 30 degrees to either side of the
DVD 48.
If the remote seems to operate intermittently, make sure the batteries
have been inserted correctly, or replace all three batteries with fresh ones.
Step Four – Turn On the DVD 48
Plugging the DVD 48 into AC power places it in Standby mode, which
is indicated by the Power Indicator (next to the Standby/On Switch)
turning amber.
NOTE: When HDMI connections are used, tur n on your
television or video display before turning on the receiver and
DVD 48.
24
DVD48 harman/kardon
INSTALLATION
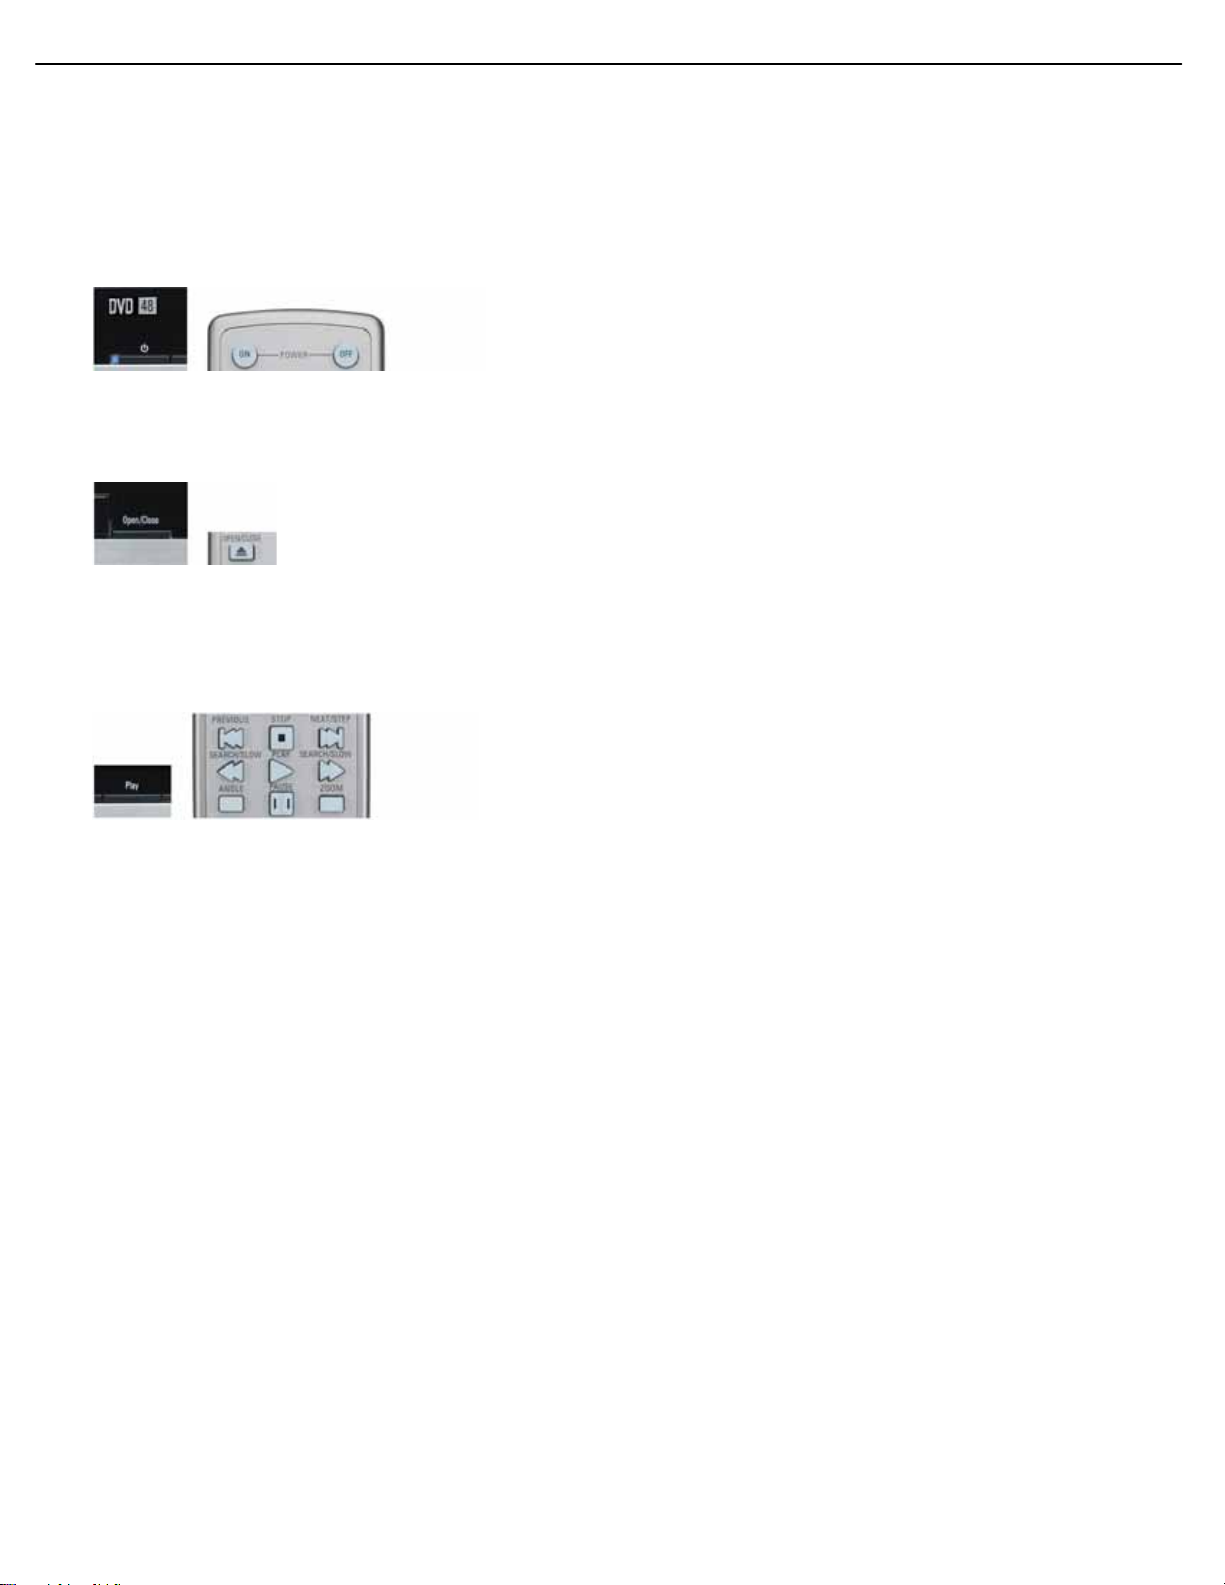
There are several ways in which the DVD 48 may be turned on from
Standby mode.
a) Press the Standby/On Switch on the front panel or remote.
See Figure 16.
Figure 16 – Standby/On Switch
b) Press the Open/Close Button on the front panel or remote.
See Figure 17.
Figure 17 – Open/Close Button
Pressing the Open/Close Button will also open the disc drawer.
c) Press the Play Button on the front panel or remote.If a disc is
present, it will begin playing automatically.See Figure 18.
Figure 18 – Play Button
After customizing a few settings in the Initial Setup section, you
may soon enjoy the finest in home entertainment.
23

25
DVD48 harman/kardon
TROUBLESHOOTING GUIDE
SYMPTOM CAUSE SOLUTION
Unit does not turn on • No AC power • Make certain AC power cord is plugged into
a live outlet.
• Check to see whether outlet is switch-controlled.
Unit does not respond to • Weak batteries in remote • Change remote batteries and insert with correct polarity.
remote commands • Remote sensor is obscured • Make certain front panel sensor is in line of sight of remote
or connect an optional remote sensor.
No picture • Intermittent connections • Check all video connections.
• Wrong input • Check input selection of TV or receiver.
• Progressive Scan output selected • Use Progressive Scan mode only with compatible TV.
Reset to Interlaced Scan by following these steps:
1. Press the Open/Close Button on the front panel to open
the disc drawer.
2. Press the Clear Button on the remote control.
3. Enter the numeric code “1211” on the remote.
4. Press the Audio Button (not Audio Mode).
Or perform a system reset that will require you to reenter all
user settings.Press and hold the Clear Button on the remote for
5 seconds.The display will blink, and all user settings will return
to their factory defaults.
• HDMI Output is connected to a video • The HDMI Output may not be used with video displays that
display that is not HDCP-compliant are not HDCP-compliant. Unplug the cable and select
another audio and video connection.
• Video Off feature active • Press Video Off Button to reactivate video circuitry.
• Wrong HDMI output setting • The HDMI and Component Video Outputs are not available
simultaneously. Press the HDMI Button on the remote to turn
the HDMI Output on or off. When the HDMI Output is on, the
Component Video Outputs are deactivated,and vice versa.
Disc does not play • Disc loaded improperly • Load disc label-side up; align the disc with the guides and
place it in its proper position.
• Incorrect disc type • Check to see that the disc is SACD, CD, CD-R, CD-RW,VCD,MP3,
WMA, JPEG,DVD-R/RW, DVD+R/RW (standard-conforming),
DVD-Audio or DVD-Video; other types will not play.
• SA-CD Mode setting in CD mode •
for non-hybrid SACD disc the SACD Mode setting in the GENERAL SETUP menu to SACD.
• Invalid Region Code • Use Region 1 or Open Region (0) disc only.
• Rating is above parental control setting • Enter password to override or change rating settings.
No sound • Intermittent connections • Check all audio connections.
• Incorrect digital audio input selection • Check digital audio settings on DVD 48 and on receiver.
• DVD disc is in fast or slow mode • There is no audio playback on DVD discs during fast
• Surround receiver not compatible • Change LPCM Output setting in AUDIO SETUP menu to 48kHz.
with 96kHz PCM audio
• SACD disc is loaded without • Use 6-Channel Audio Outputs or Analog Audio Outputs.
using analog audio connection
• Wrong Analog Output setting in • In order to hear a downmixed 2-channel signal at the Analog
AUDIO SETUP menu Audio Outputs, make sure to change the Analog Output setting
• DVD-Audio disc is playing with DVD- • Change DVD-Audio Mode setting in GENERAL SETUP menu to
Audio Mode setting in DVD-Video mode. DVD-Audio.
Non-hybrid SACD discs are not recognized by the DVD 48. Change
or slow modes.
to Stereo,or press the Audio Mode Button to change the setting.
47

26
DVD48 harman/kardon
TROUBLESHOOTING GUIDE
SYMPTOM CAUSE SOLUTION
Picture is distorted or jumps • MPEG-2 decoding • It is a normal artifact of DVD playback for pictures to jump
during fast forward or reverse play or show some distortion during rapid play.
Unit turns off by itself • Auto Power Off setting is active • Check Auto Power Off setting in GENERAL SETUP menu.
Some remote buttons do not operate • Function not permitted at this time • With most discs, some functions are not permitted at certain
during DVD play; prohibited symbol times (e.g., Track Skip) or at all (e.g.,direct audio track
Ø appears selection).
The OSD menu is in a foreign • Incorrect OSD language • Change the display language selection in the GENERAL SETUP
language menu.
The Ø symbol appears • Requested function not available • Certain functions may be disabled by the DVD itself during
at this time some passages of a disc.
Picture is displayed in the • Incorrect match of aspect-ratio • Change aspect-ratio settings.
wrong aspect ratio settings to disc
Disc will not copy to VCR • Copy protection • Many DVDs are encoded with copy protection to prevent
copying to VCR.
Password not accepted • Incorrect password being used or • Factory default password “1211”always remains active.
password has been forgotten
Screen saver not activated • Screen saver will not activate when • Clear on-screen menus or press Video Off Button to avoid
on-screen menus are displayed burn-in on plasma and CRT displays.
Cannot program playlist • Programmed play is not available for • Programmed play is available only for CDs.
all disc types
• DVD 48 must be in Stop mode to • Stop play of disc before programming a playlist.
program a playlist
Additional information on troubleshooting possible problems with your DVD 48, or installation-related issues, may be found in the list of "Frequently
Asked Questions" which is located in the Product Support section of our Web site at www.harmankardon.com.
48
27
DVD48 harman/kardon
28
DVD48 harman/kardon
29
DVD48 harman/kardon

30
DVD48 harman/kardon
DVD48 Electrical Parts List
Ref. Designator Part Number Description Qty
MAIN/FRONT PCB ASS'YS
Capacitors
C105 CCUS1H104KC CAP , CHIP 0.1UF ZF 1608 1 EA
C110 CCUS1H330JA CAP , CHIP 33PF JA 1608 1 EA
C115 CCUS1H104KC CAP , CHIP 0.1UF ZF 1608 1 EA
C116 CCUS1H104KC CAP , CHIP 0.1UF ZF 1608 1 EA
C123 CCUS1H104KC CAP , CHIP 0.1UF ZF 1608 1 EA
C125 CCUS1H104KC CAP , CHIP 0.1UF ZF 1608 1 EA
C126 CCUS1H562KC CAP , CHIP CERAMIC(1608, 5600p 5600PF KC 1608 1 EA
C128 CCUS1H562KC CAP , CHIP CERAMIC(1608, 5600p 5600PF KC 1608 1 EA
C130 CCUS1H471JA CAP , CHIP 470PF JA 1608 1 EA
C131 CCUS1H104KC CAP , CHIP 0.1UF ZF 1608 1 EA
C132 CCUS1H104KC CAP , CHIP 0.1UF ZF 1608 1 EA
C133 CCUS1H104KC CAP , CHIP 0.1UF ZF 1608 1 EA
C134 CCUS1H102KC CAP , CHIP 1000PF KC 1608 1 EA
C135 CCUS1H102KC CAP , CHIP 1000PF KC 1608 1 EA
C136 CCUS1H102KC CAP , CHIP 1000PF KC 1608 1 EA
C140 CCUS1H104KC CAP , CHIP 0.1UF ZF 1608 1 EA
C147 CCUS1H104KC CAP , CHIP 0.1UF ZF 1608 1 EA
C156 CCUS1H104KC CAP , CHIP 0.1UF ZF 1608 1 EA
C157 CCUS1H104KC CAP , CHIP 0.1UF ZF 1608 1 EA
C158 CCUS1H104KC CAP , CHIP 0.1UF ZF 1608 1 EA
C159 CCUS1H104KC CAP , CHIP 0.1UF ZF 1608 1 EA
C160 CCUS1H104KC CAP , CHIP 0.1UF ZF 1608 1 EA
C161 CCUS1H104KC CAP , CHIP 0.1UF ZF 1608 1 EA
C162 CCUS1H104KC CAP , CHIP 0.1UF ZF 1608 1 EA
C163 CCUS1H104KC CAP , CHIP 0.1UF ZF 1608 1 EA
C164 CCUS1H104KC CAP , CHIP 0.1UF ZF 1608 1 EA
C165 CCUS1H104KC CAP , CHIP 0.1UF ZF 1608 1 EA
C170 CCUS1H102KC CAP , CHIP 1000PF KC 1608 1 EA
C183 CCUS1H104KC CAP , CHIP 0.1UF ZF 1608 1 EA
C184 CCUS1H104KC CAP , CHIP 0.1UF ZF 1608 1 EA
C185 CCUS1H104KC CAP , CHIP 0.1UF ZF 1608 1 EA
C186 CCUS1H104KC CAP , CHIP 0.1UF ZF 1608 1 EA
C187 CCUS1H104KC CAP , CHIP 0.1UF ZF 1608 1 EA
C188 CCUS1H104KC CAP , CHIP 0.1UF ZF 1608 1 EA
C189 CCUS1H104KC CAP , CHIP 0.1UF ZF 1608 1 EA
C190 CCUS1H104KC CAP , CHIP 0.1UF ZF 1608 1 EA
C191 CCUS1H104KC CAP , CHIP 0.1UF ZF 1608 1 EA
C192 CCUS1H104KC CAP , CHIP 0.1UF ZF 1608 1 EA
C193 CCUS1H104KC CAP , CHIP 0.1UF ZF 1608 1 EA
C194 CCUS1H104KC CAP , CHIP 0.1UF ZF 1608 1 EA
C195 CCUS1H104KC CAP , CHIP 0.1UF ZF 1608 1 EA
C196 CCUS1H104KC CAP , CHIP 0.1UF ZF 1608 1 EA
C197 CCUS1H104KC CAP , CHIP 0.1UF ZF 1608 1 EA
C198 CCUS1H104KC CAP , CHIP 0.1UF ZF 1608 1 EA
C199 CCUS1H104KC CAP , CHIP 0.1UF ZF 1608 1 EA
C200 CCUS1H104KC CAP , CHIP 0.1UF ZF 1608 1 EA
C201 CCUS1H104KC CAP , CHIP 0.1UF ZF 1608 1 EA
C202 CCUS1H104KC CAP , CHIP 0.1UF ZF 1608 1 EA
C203 CCUS1H104KC CAP , CHIP 0.1UF ZF 1608 1 EA
C210 CCUS1H104KC CAP , CHIP 0.1UF ZF 1608 1 EA
C211 CCUS1H104KC CAP , CHIP 0.1UF ZF 1608 1 EA
C212 CCUS1H104KC CAP , CHIP 0.1UF ZF 1608 1 EA
C213 CCUS1H104KC CAP , CHIP 0.1UF ZF 1608 1 EA
C214 CCUS1H104KC CAP , CHIP 0.1UF ZF 1608 1 EA
C215 CCUS1H104KC CAP , CHIP 0.1UF ZF 1608 1 EA
C216 CCUS1H104KC CAP , CHIP 0.1UF ZF 1608 1 EA
C217 CCUS1H104KC CAP , CHIP 0.1UF ZF 1608 1 EA
 Loading...