

Page 1
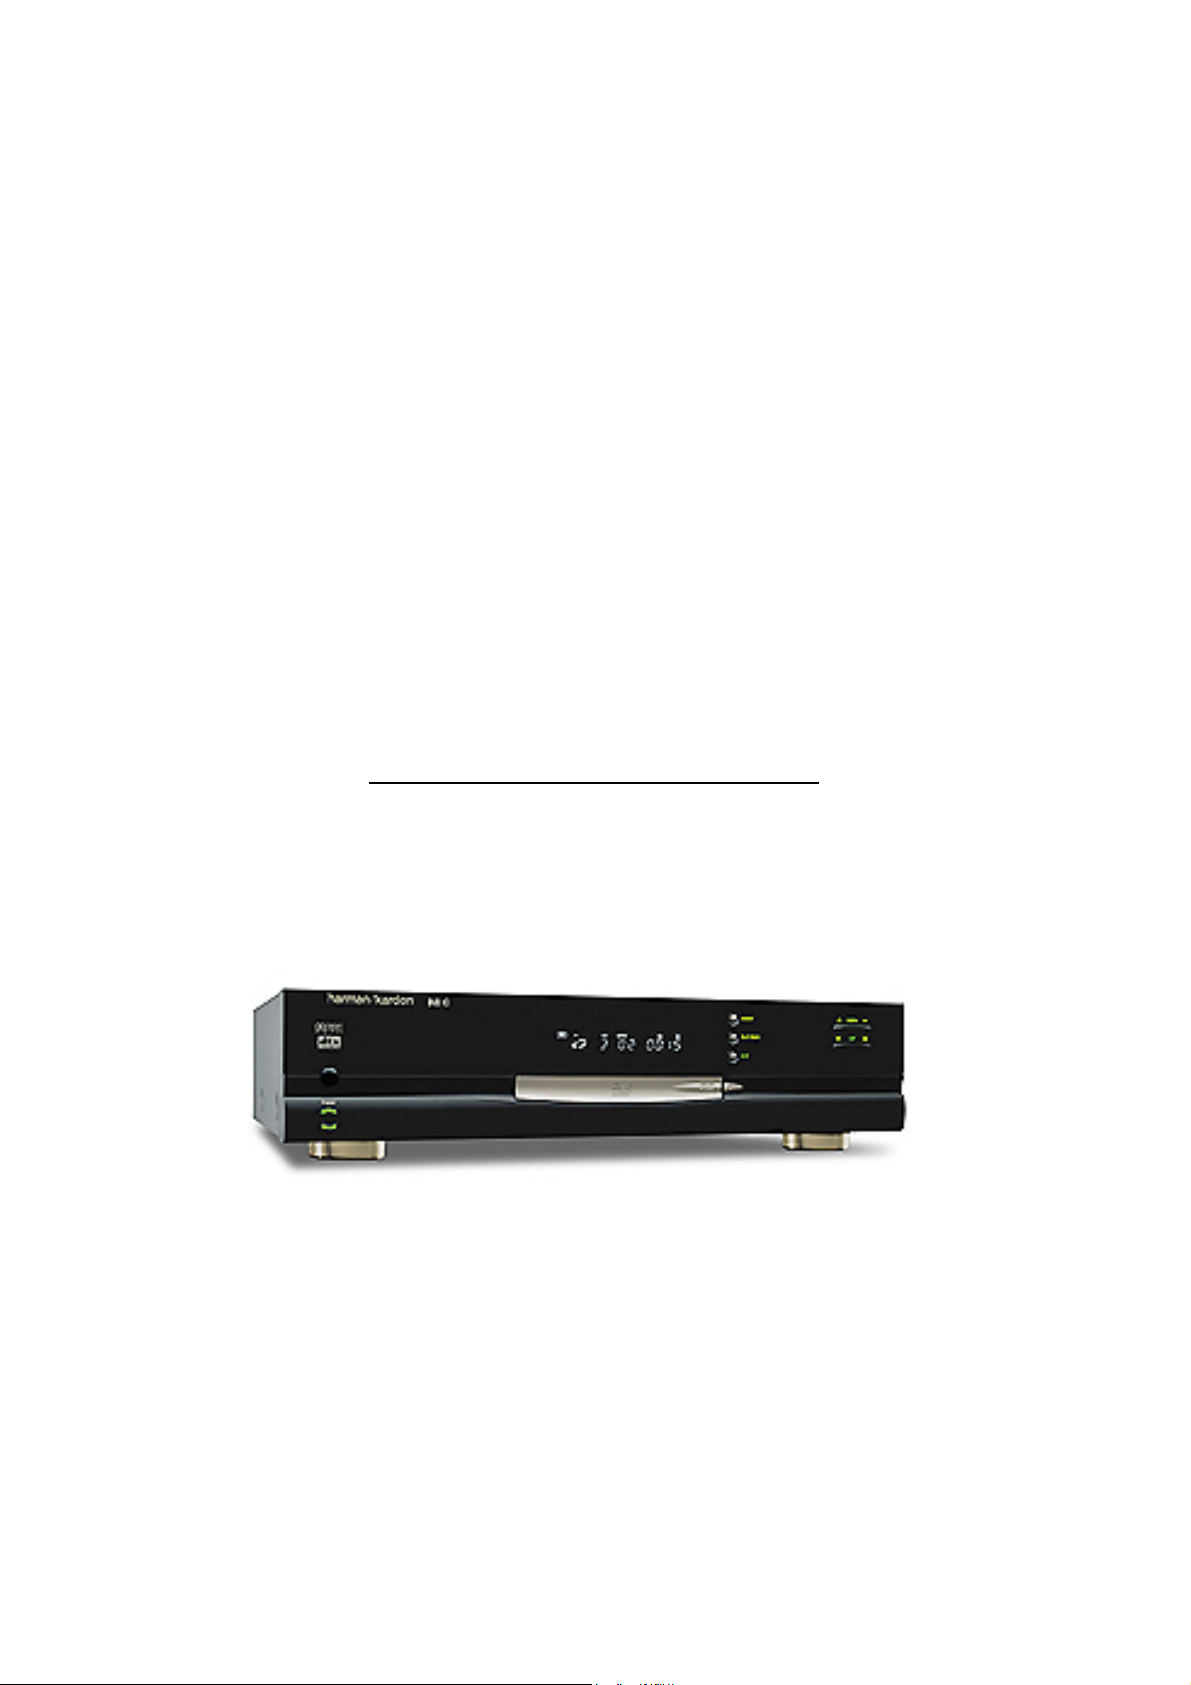
DVD20
Digital Versatile Disc Player
Dolby Digital / DTS / PCM / MP3 decoding
PRELIMINARY
Service – Technical Manual
Harman International SNC - Harman Consumer International 2, route de Tours 72500 Château du Loir FRANCE
Page 2

TECHNICAL SPECIFICATIONS 35
Technical Specifications
Applicable Disc: 5 inch (12 cm) or 3 inch (8 cm) DVD-Movie,VCD, CD-i, CD, CD-R or CD-RW discs,
Region 2 DVD-Movie Discs,
DVD: Single Side/Single Layer, Single Side/Dual Layer, Dual Side/Dual Layer,
Linear PCM, MPEG, Dolby Digital or DTS Audio Discs
Video Signal System: PAL/NTSC
Composite Video Output: 1 V p-p/75 Ohms, sync negative polarity
S Video Output: Y/Luminance: 1 V p-p/75 Ohms, sync negative polarity
C/Chrominance: 0.286 V p-p
Analog Audio Output: 2 Vrms max
Frequency Response: DVD (Linear PCM): 2 Hz - 22 kHz +0/-0.5 dB (48 kHz sampling)
2 Hz - 44 kHz +0/-0.5 dB (96 kHz sampling)
CD: 2 Hz - 20 kHz +0/-0.5 dB
Signal/Noise Ratio (SNR): 110 dB (A-weighted)
Dynamic Range: DVD: 100 dB (18 Bit) / 105 dB (20 Bit)
CD/DVD: 96 dB (16 Bit)
THD/1kHz: DVD/CD: 0.0025 %
Wow & Flutter: Below Measurable Limits
AC Power: 220-240 V/50 Hz
Power Consumption: 12 Watts (On) /20 Watts (Max)
Dimensions (WxHxD): 440x100x330 mm
Weight: 7 Kg
All specifications subject to change without notice.
Harman Kardon and Power for the digital revolution are trademarks of Harman Kardon, Inc.
Manufactured under license from Dolby Laboratories. Dolby, AC-3, ProLogic and the double-D symbol are trademarks of Dolby Laboratories. Confidential.
Unpublished Work. © 1992-1997 Dolby Laboratories, Inc.All rights reserved.
DTS is a trade mark of Digital Theater Systems, Inc.
This product incorporates copyright protection technology that is protected by method claims of certain U.S. patents and other intellectual property rights
owned by Macrovision Corporation and other rights owners. Use of this copyright protection technology must be authorized by Macrovision Corporation and
is intended for home and other limited viewing uses only unless otherwise authorized by Macrovision Corporation. Reverse engineering or diassembly is
prohibited.
Page 3
4 FEATURES
Features
High quality video
• Advanced sophisticated 10-bit MPEG-2 video
decoding circuits.
• Direct RGB output via SCART (selectable) for
optimum video performance. SCART connector
also configurable for Video and S-Video output.
• Second SCART connector for throughput of
VCR or other video source to TV with only one
SCART input.
• Test screen videos available for testing video
performance and setup.
• PAL 60 option for NTSC discs.
• Dual-layer compatibility for extended play
DVD.
High quality digital audio
• By connecting a DTS (Digital Theater Systems)
or a Dolby Digital decoder, you can enjoy high
quality 5.1 digital surround sound from DTS or
Dolby Digital discs.
• With linear PCM audio at 16-24 bits and 4496 kHz (also on digital output, see table page
14), audio quality exceeding that of CD
becomes possible.
• Optical and coaxial digital audio output.
Many convenient features
• On-Screen Menu lcons for disc information or
player information and access to many major
functions of this unit.
• Subtitles may be displayed in one of numerous
languages*.
• The multi-angle function allows you to choose
the viewing angle of scenes which were shot
from a number of different angles (Limited to
DVD’s recorded with multiple camera angles.)
• Multiple options for dialog language and
soundtrack selection (limited to DVD’s recorded with multiple dialog languages or soundtracks).
• Programming of up to 9 scenes in memory
(markers).
• Parental lock settings to prevent play of discs
unsuitable for some audiences [DVD only].
• Intuitive menu operating system.
• Separate Buttons for convenient Fast
Forward/Fast Reverse Search and Track Skip.
• 2x/4x Zoom during play and pause, selection
movable over screen in all directions.
• Backlit, ergonomically designed remote control.
* The number of languages recorded depends
on the software.
Compatible with CD as well as
DVD
• The DVD20 will play any conventional Audio
CD or recordable (CD-R) or erasable CD (CDRW), bearing the logos shown here, as any
VCD or DVD with the region code 0 or 2.
Disc formats supported by this
player
The unit can play discs bearing any of the following logos:
DVD CD
3"(8 cm) disc 3"(8 cm) disc
5"(12 cm) disc 5"(12 cm) disc
CD-RW CD-R VCD
5"(12 cm) disc 3"(8 cm) disc 5"(12 cm) disc
5"(12 cm) disc 5"(12 cm) disc
NOTE: Due to differences in the format of
certain discs, it is possible that some discs may
include a mix of features that are not compatible
with the DVD 20. Similarly, although the DVD 20
is capable of a wide range of features, not all
discs include every capability of the DVD system.
For example, although the DVD 20 is compatible
with multi-angle discs, that feature is only possible when the disc is specially encoded for multiple-angle play. In addition, the DVD 20 is capable of playing back both Dolby Digital and DTS
soundtracks, but the number and types of tracks
available will vary from disc to disc.To make certain that a specific feature or soundtrack option
is available, please check the options noted on
the disc jacket.
■ Playback capability for CD-R and CD-RW
discs may vary due to variations in the quality
of the disc and the recorder used to create
the disc.
ReWritable
Page 4
FRONT PANEL CONTROLS 5
Front Panel Controls
Main Power On/Off: Press this switch to
apply power to the DVD 20. When the unit is
first turned on, the Status Indicator
B
will
turn orange. Once the unit has been turned on
with this switch, it may be operated from either
the front panel or remote control. Press the
switch again to turn the unit completely off.
1
Power On/Off (Standby): Press the button
once to turn the DVD 20 on, press it again to
put the unit in the Standby mode. Note that in
order for this switch to operate, the Main
Power Switch
must be pressed in so that it
is in the ON position.
2
Headphone Jack: Connect standard headphones to this jack for private listening.
3
Headphone Level Control: Turn this
control to adjust the volume level to the headphones. Note that the use of this control will not
change the analog output levels at the rear
panel audio outputs.
4
Open/Close Button: Press this button to
open or close the Disc Tray.
5
TEST: Press this button to bring a test picture to the screen, that enables you to optimally
adjust all important parameters of colour videos
like brightness, contrast, colour intensitiy and
tint.
6
Dimmer: Press this button to reduce the
brightness of the Information Display by 50% or
to turn the display off completely in the following order: FULL BRIGHTNESS ➔ HALF BRIGHTNESS ➔ OFF ➔ FULL BRIGHTNESS.
7
Stop: Press this button once to place the
disc in the Resume mode, which means that
playback will stop, but as long as the tray is not
opened or the disc changed, DVD playback will
continue from the same point on the disc when
the Play Button is pressed again. Resume will
also work if the unit was turned off. To stop a
disc and have play start from the beginning,
press the button twice.
8
Skip Preview/Next: Press this button to
move forward or backward through the music
tracks on a CD disc or the chapters on a DVD
disc.
9
Search Reverse/Forward: Press this button to move forward or backward through a CD
or DVD at one of four speeds. Each press and
release will increase the search speed, as indicated in the on-screen display. Once you have
selected the desired speed, release the button
and the disc will continue to search at fast
speed. To resume normal playback speed, press
the play button.
A
Play/Pause: Press this button to momentarily pause playback. To resume playback, press
the button again. If a DVD is playing, action will
freeze and a still picture will be displayed when
the button is pressed.
B
Status Indicator: When the DVD 20 is in
the On mode, this indicator will glow green.
When the unit has been placed in the Standby
mode by pressing the Power-Off button on the
remote, the indicator will glow orange, indicating that the unit is still connected to the AC
main supply and is ready to be turned on from
the remote control.
Main Power On/Off
1
Power On/Off (Standby)
2
Phone Jack
3
Phone Level
4
Open/Close
5
TEST
6
Dimmer
7
Stop
8
Skip (Preview/Next)
9
Search (Reverse/Forward)
A
Play/Pause
B
Status Indicator
DVD 20
4
3
5
8 7 A 96
2
B
1
STOP
DIMMER
TEST
SKIP
PLAY/PAUSE
SEARCH
Page 5
6 FRONT PANEL INFORMATION DISPLAY
RESUME
TITLE
RANDOM
CHAPTER
REPEAT
TRACK HOUR
A – B
MIN
INTRO PBC
PROG.
1 ALL
SEC
DVD
CD
VCD
—±‚
A
B
C
D
E
M
K
JIH
L
G F
96kHz 24-Bit
N
A Disc Type Indicators
B Play/Search Speed Indicator
C Title Indicators
D Chapter/Track Number Indicators
E Time Indicators
F VCD Playback Control Indicator
G Program Indicator
H Intro Indicators
I Repeat Indicator
J Random Indicator
K Resume Indicator
L Playback-Mode Indicators
M Parental Lock Indicator
N 96kHz/24-Bit Indicator
A Disc Type Indicators: The DVD,VCD or CD
indicator will illuminate to show the type of disc
currently being played.
B This indicator illuminates and spins during
playback, slow playback and search, varying the
spin speed corresponding to the play/search
speed.
C Title Indicators: These two positions in the
display will show the current title number when
a DVD disc is playing.
D Chapter/Track Number Indicators: When
a DVD disc is playing, these two positions in the
display will show the current chapter. When a
CD disc is playing they will show the current
track number.
E Time Indicators: These positions in the
indicator will show the running time of a DVD in
play.When a CD is playing, these indicators will
show the current track time, time remaining in
the current track, or the total remaining time on
the disc.
NOTE: The Indicators CD E will also display
text messages about the DVD 20’s status,
including Reading when a disc is loading,
STAND-BYE when the unit is turned off,
and Disc Error when a disc not compatible with the DVD 20 is put into the play
position.
F VCD Playback Control Indicator: This
indicator lights when the playback control function is turned on with VCDs.
G Program Indicator: This indicator lights
when the programming functions are in use.
H Intro Indicator: This indicator lights when
the Intro Scan function is active.
I Repeat Indicators: These indicators light
when any of the Repeat functions are in use.
J Random Indicator: This indicator lights
when the unit is in the Random Play mode.
K Resume Indicator: This indicator lights
when the Stop button has been pressed once to
put the unit in the Resume mode.
L Playback-Mode Indicators: These indica-
tors light to show the current playback mode:
› Lights when a disc is playing in the normal
mode
H
Lights when the disc is in the Fast Search
Forward mode. For DVD’s, when both triangles
glow steadily, the disc plays at 2x normal speed.
When the right triangle is flashing, the disc plays
at 4x normal speed. When the left triangle is
flashing, the disc plays at 8x normal speed.
When both triangles are flashing, the disc plays
at 16x normal speed. For CDs, only the first three
Fast Search modes are available.
N1
Lights when the disc is paused.
G
Lights when the disc is in the Fast Search
Reverse mode. For DVDs, when both triangles
glow steadily, the disc plays at 2x normal speed.
When the left triangle is flashing, the disc plays
at 4x normal speed. When the right triangle is
flashing, the disc plays at 8x normal speed.
When both triangles are flashing, the disc plays
at 16x normal speed. For CDs, only the first three
Fast Search modes are available.
M Parental Lock Indicator: This indicator
lights when the parental-lock system is engaged
in order to prevent anyone from changing the
rating level without a code.
N 96kHz/24-Bit Indicator: 96kHz/24-Bit
Indicator: The 96kHz Indicator will light when a
disc recorded with 96kHz content is playing, the
24-Bit Indicator will light when a disc recorded
with 24-bit content is playing. Note that for a
correct digital output the "Linear PCM" setting
must be made appropriately, see page 21 for
more information.
Front Panel Information Display
Page 6
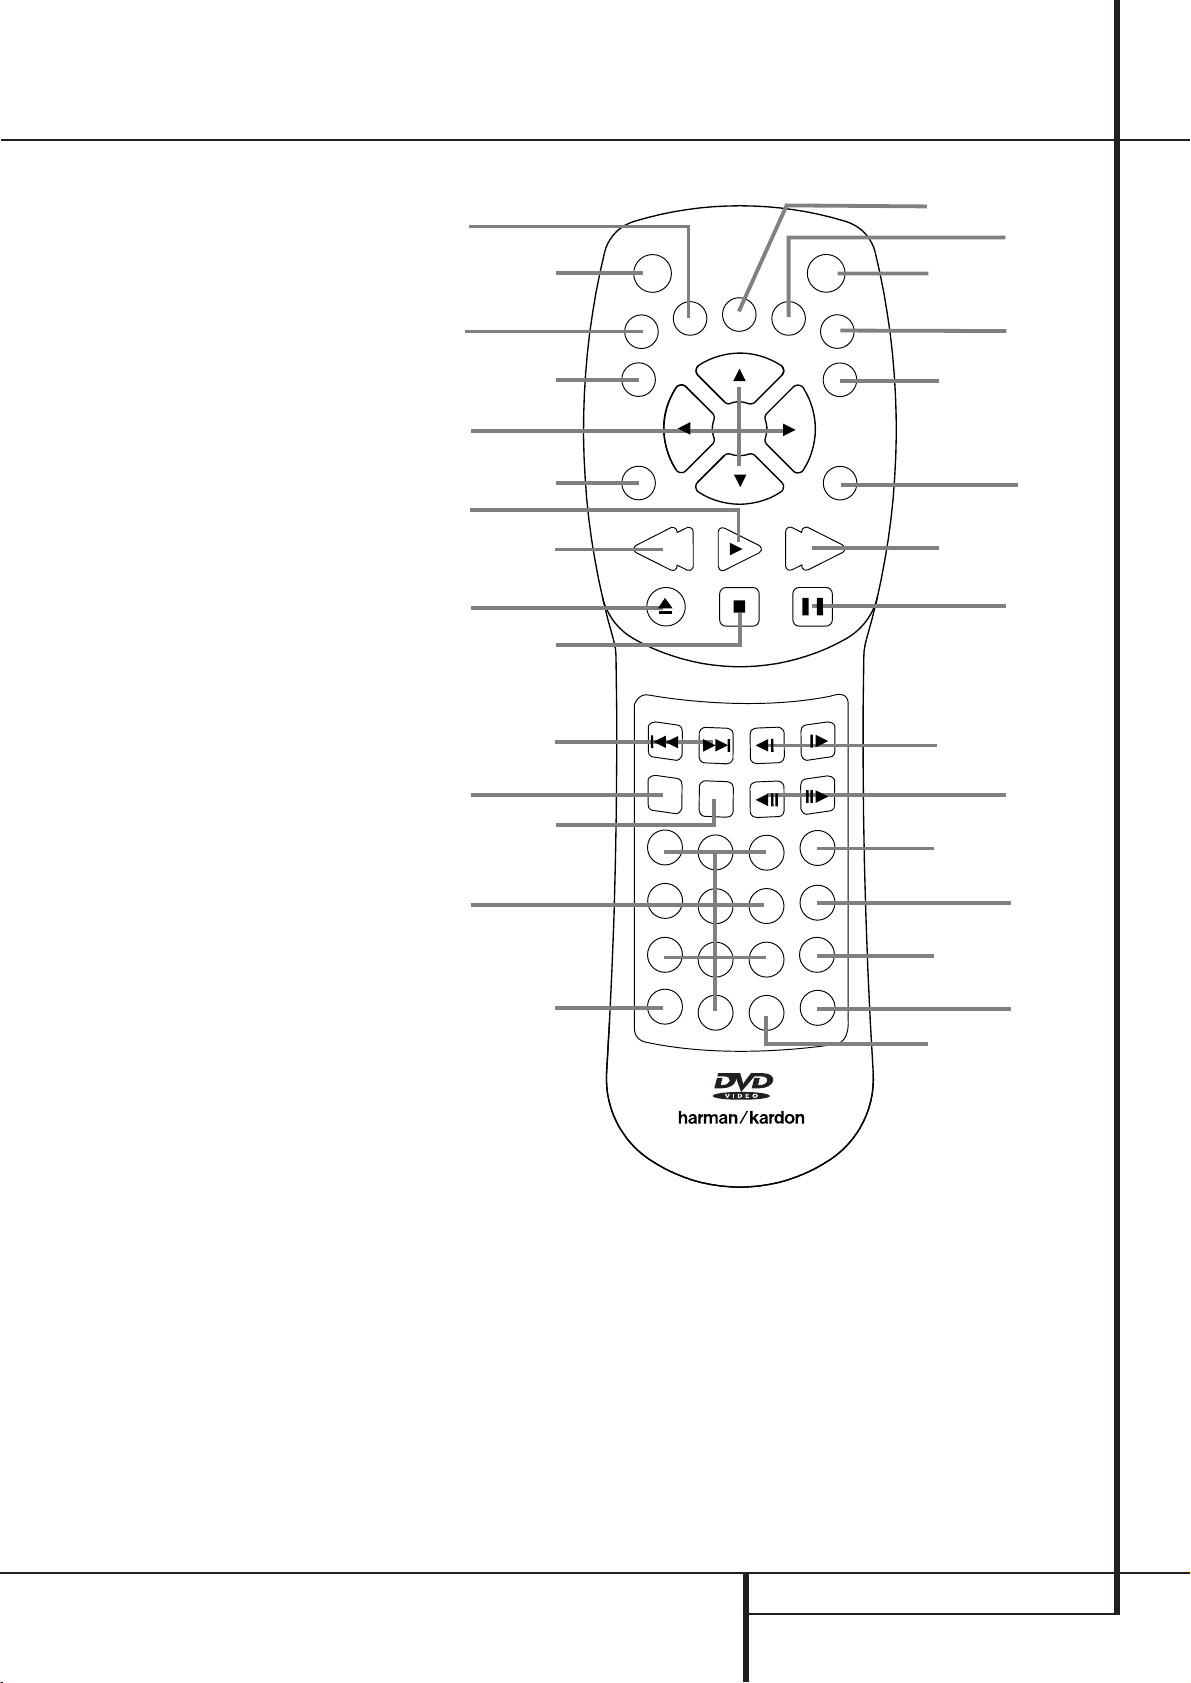
REMOTE CONTROL FUNCTIONS 7
Remote Control Functions
0
1
2
3
4
5
6
7
8
9
A
B
C
D
E
F
G
H
I
J
K
L
M
N
O
P
Q
POWER ON
POWER OFF
AUDIO
SUBTITLE
ANGLE
STATUS
TITLE
RETURN
SUBTITLE ON/OFF
ARROWS
ENTER
MENU
PLAY
SEARCH (REV)
SEARCH (FWD)
OPEN/CLOSE
PAUSE
STOP
PREV./NEXT
SLOW (REV/FWD)
RANDOM
STEP (REV/FWD)
NUMBERS
PROGRAM
CHECK
CLEAR
LIGHT
REPEAT
A-B-Repeat
ZOOM
2
5
9
C
F
K
M
0
7
A
D
H
I
ON
STATUS
RETURN
ENTER
SEARCH
OPEN/CLOSE
RANDOM
REPEAT
AUDIO
PREV.
1
4
7
POWER
SUBTITLE
PLAY
STOP
NEXT
ZOOM
2
5
8
A - B
0
DVD 20 RC
3
6
9
ANGLE
SLOW
STEP
OFF
SEARCH
PAUSE
PROG.
CHECK
CLEAR
LIGHT
3
4
1
TITLE
6
SUBTITLE
8
ON/OFF
MENU
B
E
G
J
L
N
O
P
Q
Page 7

8 REMOTE CONTROL FUNCTIONS
Remote Control Functions
0
POWER ON: Turns on the player when it is
in standby mode (Harman Kardon logo appears
on screen).
1
POWER OFF: Turns off the player to
standby mode.
2
AUDIO: Press to access various audio languages on a DVD (If the DVD contains multiple
audio streams).
3
SUBTITLE: When a DVD is playing, press
to access subtitles menu (If the DVD contains
subtitles).
4
ANGLE: Press to access various camera
angles on a DVD (If the DVD contains multiple
camera angles).
5
STATUS: Press while playing a disc to see
Banner Display on the screen. The Banner
Display contains various playback features and
information about the disc.
6
TITLE: When a disc is playing, press to see
the disc’s Title. Select Menu (Main DVD menu)
on the screen (if the disc was created with
Titles).
7
RETURN: When using the DVD Player’s
menu system, press to escape from the menu.
When playing any DVD menu, press to return to
preceding menu screen (depends on DVD title
format).
8
SUBTITLE ON/OFF: Turns the subtitles on
and off when playing a DVD (If the disc contains
subtitles).
9
ARROW buttons (LEFT/RIGHT/UP/
DOWN): Use to select and execute items or set-
tings.
A
ENTER: Press to select a highlighted menu
item.
B
MENU: Displays the actual DVD Disc
Menu on the TV screen in play mode and the
DVD player’s Setup Menu in stop mode.
C
PLAY: Begins to play disc (closes disc tray
first, if it is open.)
D
SEARCH (REV): Allows you to search in
reverse through a disc while it is in play mode.
Each time you press this button, search speed
changes as below:
DVD:
R.SEARCH1 ➜ R.SEARCH2 ➜ R.SEARCH3 ➜
R.SEARCH4 ➜ R.SEARCH1 ➜
CD:
R.SEARCH1 ➜ R.SEARCH2 ➜ R.SEARCH3 ➜
R.SEARCH1 ➜
E
FWD (SEARCH): Allows you to search forward through a disc while it is in play mode.
Each time you press this button, search speed
changes as below:
DVD:
F.SEARCH1 ➜ F.SEARCH2 ➜ F.SEARCH3 ➜
F.SEARCH4 ➜ F.SEARCH1 ➜
CD:
F.SEARCH1 ➜ F.SEARCH2 ➜ F.SEARCH3 ➜
F.SEARCH1 ➜
F
OPEN/CLOSE: Press to open or close the
disc tray.
G
PAUSE: Freezes a picture (with DVD/VCD)
and pauses the playback signal (CD) when a disc
is playing. Press again for normal playback.
H
STOP: Stops playing a disc.When disc is
playing, if you press STOP and PLAY, the disc will
resume play, i.e. it will start from the same point
on the disc where the unit was stopped. If you
press STOP twice and PLAY button, disc will start
play from the beginning.
I
PREV./NEXT: Allows you to move to the
previous chapter or track / the next chapter or
track on a disc.
J
SLOW:Allows you to play movie in slow
mode. Each time you press this button, slow
speed will be changed as below;
F.SLOW 1/16 ➜ F.SLOW 1/8 ➜ F.SLOW 1/4 ➜
F.SLOW 1/2 ➜ F.SLOW 1/16
R.SLOW 1/16 ➜ R.SLOW 1/8 ➜ R.SLOW 1/4 ➜
R.SLOW 1/2 ➜ R.SLOW 1/16
K
RANDOM: Press for RANDOM playback in
random order.
L
STEP(REV/FWD): Freeze a picture when a
disc is playing. Also the picture advances frame
by frame each time this button is pressed.
M
NUMBER (0~9): Select numbers by pressing these buttons.
N
PROG: Press to see Program Edit Display
on the screen when in STOP mode.
O
CHECK: Press during playback to check
the program status on VFD (front display). Press
during stop mode for program edit on VFD.
Escape from this display by pressing ”RETURN”.
P
CLEAR: Press to remove Banner menu
from the screen or programmed tracks/chapters
from the Program Edit Display.
Q
LIGHT: Press to lilluminate remote controller.
REPEAT: Press to go to the Repeat menu.
You can repeat a chapter, track or the entire
disc.
A-B: Press to select section A-B and to
play repeatedly.
ZOOM: When a DVD or VCD is playing,
press this button to zoom the picture so that it is
enlarged. There are 4 steps to the zoom function, each progressively larger. Press though
each of the zoom stages to return to a normal
picture.
Page 8
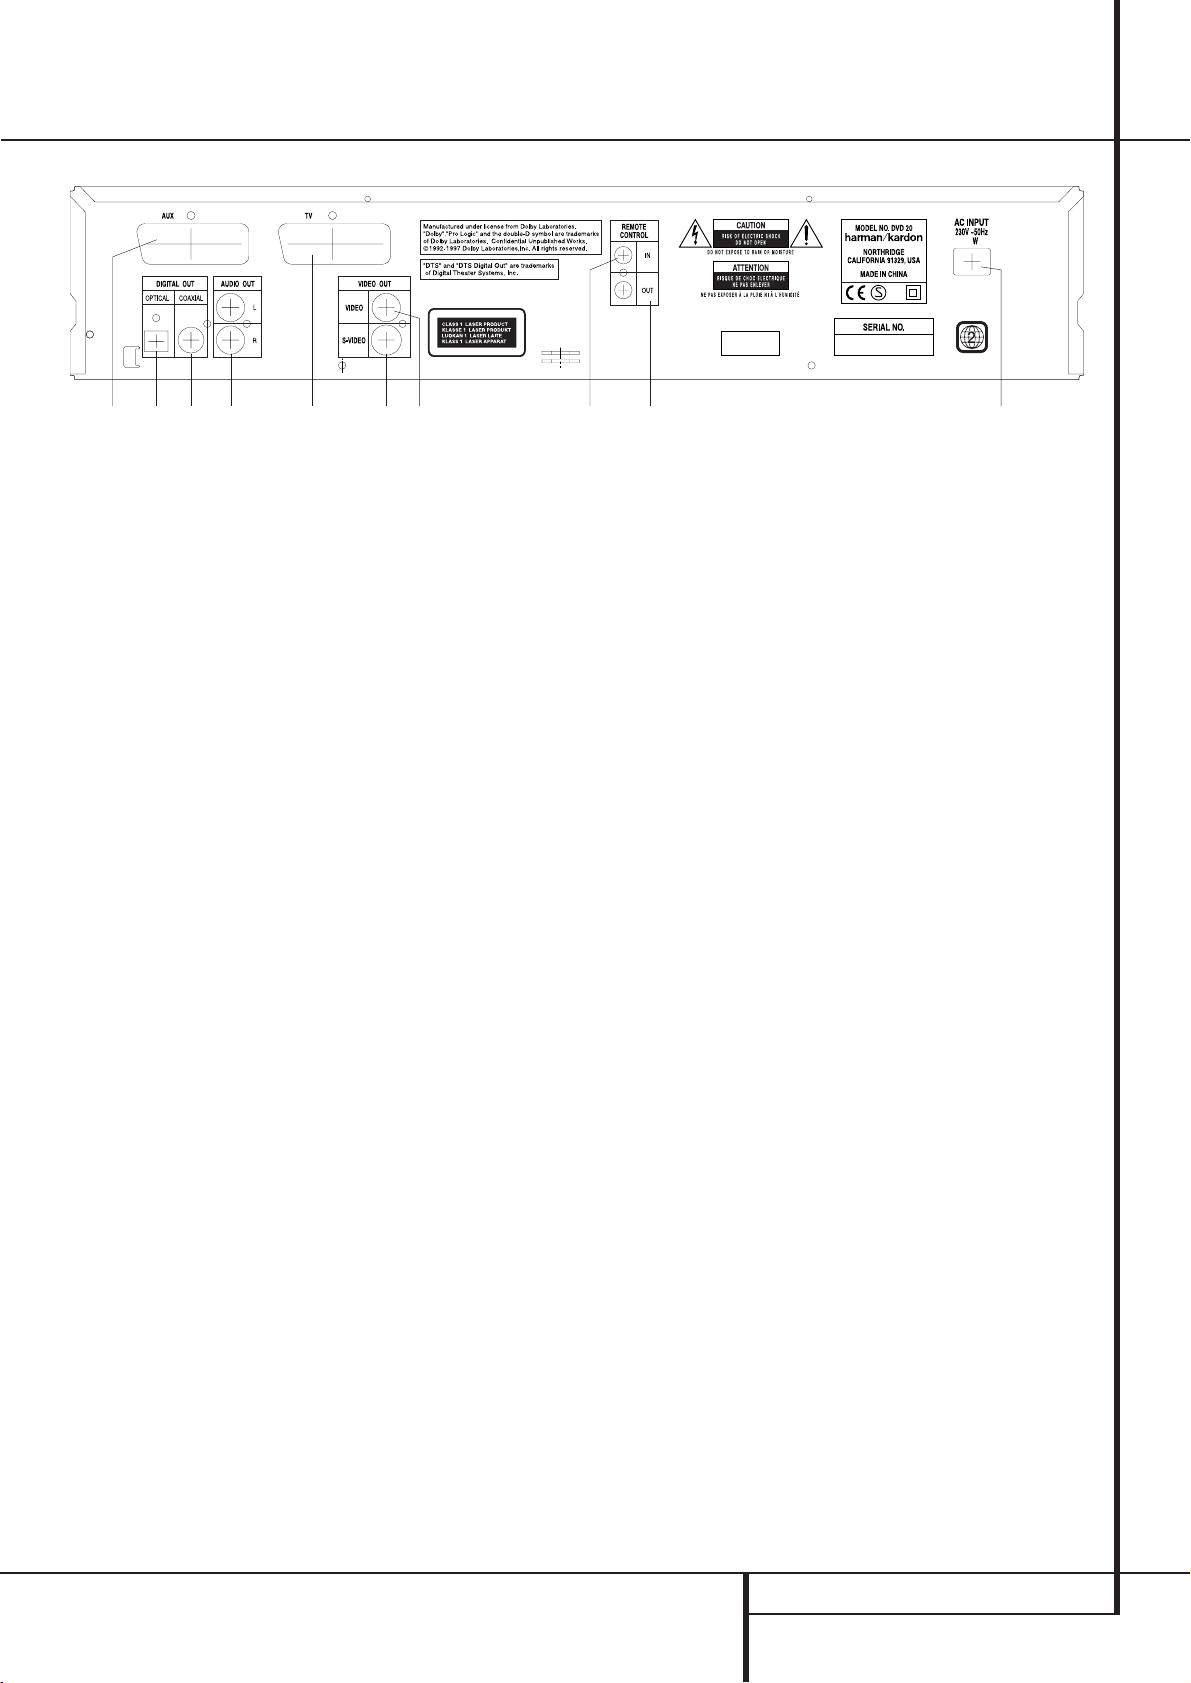
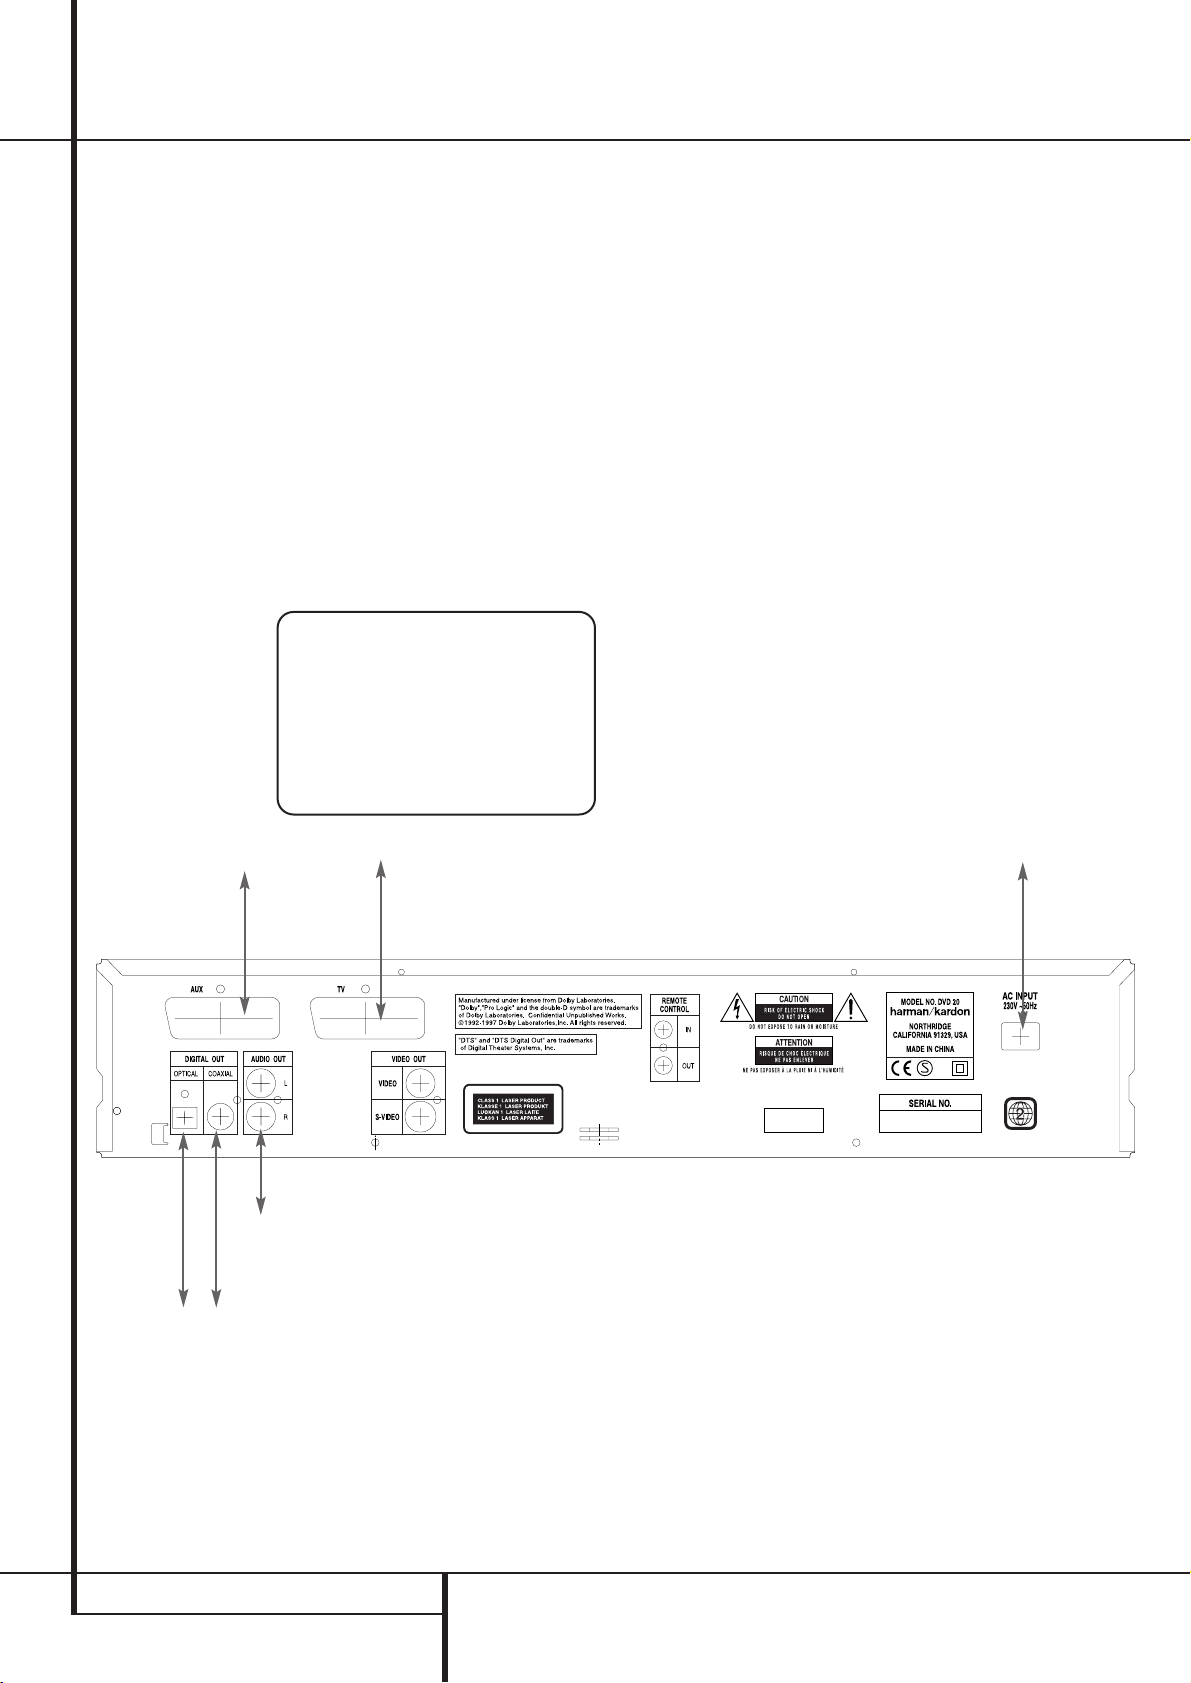
REAR PANEL CONNECTIONS 9
5 8 90 1 2 4 36 7
¡
Optical Digital Output
™
Coaxial Digital Output
£
Analog Audio Outputs
¢
Composite Video Output
∞
S-Video Output
§
Scart Input
¶
Scart TV Output
•
Remote Control Output
ª
Remote Control Input
‚
AC Power Cord
¡
Optical Digital Output: Connect this jack
to the optical digital input of an A/V receiver or
surround processor for Dolby Digital, DTS or
PCM audio playback.
™
Coaxial Digital Output: Connect this jack
to the coaxial digital input of an A/V receiver or
surround processor for Dolby Digital, DTS or
PCM audio playback.
NOTE: The coaxial digital output should only be
connected to a digital input. Even though it is
the same RCA-type connector as standard analog audio connections, DO NOT connect it to a
conventional analog input jack.
£
Analog Audio Outputs: Connect these
jacks to an audio input on an A/V receiver or
surround processor for analog audio playback.
¢
Composite Video Output: Connect this
jack to the video input on a television or video
projector, or to a video input on an A/V receiver
or processor if you are using that type of device
for video input switching.
∞
S-Video Output: Connect this jack to the
S-Video input on a television or video projector,
or to an S-Video input on an A/V receiver or
processor if you are using that type of device for
S-Video input switching.
§
SCART IN (AUX): If an external playback
unit has a SCART socket, you can connect a
SCART cable to it and to your DVD Player. The
SCART cable carries both audio and video signals of the external unit. These signals will be
routed through the SCART connector of the DVD
to the TV automatically when the DVD player is
turned off (in Standby) and the external unit
plays.
¶
SCART OUT (TV): If your TV has a SCART
socket, you can connect a SCART cable to your
TV and to your DVD Player for improved video
quality.The SCART cable carries both audio and
video.You can select Video (composite),
S-Video and RGB video for that SCART
connector’s video output signal (see page 19).
Your DVD 20 is equipped with two SCART connectors, one for direct connection to the TV, the
second for throughput of VCR (playback only) or
any other playback video source to a TV with
only one SCART input.
•
Remote Control Output: Connect this
jack to the infrared (IR) input jack of another
compatible Harman Kardon remote controlled
product to have the built-in Remote Sensor on
the DVD 20 provide IR signals to other compatible products.
ª
Remote Control Input: Connect the output of a remote infrared sensor, or the remote
control output of another compatible Harman
Kardon product, to this jack.This will enable the
remote control to operate even when the front
panel Remote Sensor on the DVD 20 is
blocked.This jack may also be used with compatible IR remote control-based automation systems.
‚
AC Power Cord: Connect this plug to an
AC outlet. If the outlet is controlled by a switch,
make certain that it is in the ON position.
Note: You’ll find more details about all
Audio/Video connections under Setup and
Connections on the following pages.
Rear Panel Connections
Page 9
10 SETUP AND CONNECTIONS
Setup and Connections
■ Ensure that the power switch of this unit and
other equipment to be connected is set to off
before commencing connection.
■ Do not block ventilation holes of any of the
equipment and arrange them so that air can
circulate freely.
■ Read through the instructions before connecting other equipment.
■ Ensure that you observe the color coding
when connecting audio and video cables.
Notes:
■ The Video output (yellow) combines the complete video signal (composite) and sends it to
the TV (or to the AV Receiver) by one line
only. Use the Video output, when your TV set
is equipped with a Video input jack only.
■ The S (separate) video output connector separates the color (C) and luminance (Y) signals
before transmitting them to the TV set in
order to achieve a sharper picture. Use the Svideo cable (optional) when connecting the
player to a TV equipped with an S-video input
for improved picture clarity. Never connect
both outputs,Video and S-Video, to your TV
or AV Receiver, only one of them.
■ Most European TV´s are equipped with SCART
connectors rather than with a normal video
input (yellow cinch). In that case the SCART
connection should be used, providing the
audio signal too, (see page 12). Separate analog audio connections to TV are needed only
if your TV is connected to the video or S-video
output.
■ When the audio signal is to be fed to a stereo
or Pro Logic amplifier/decoder or receiver
rather than to the TV, connect the Audio Out
jacks to any normal audio input on your
amplifier/decoder/receiver. The DVD 20 will
”downmix” Dolby Digital recordings to Pro
Logic, available on these connectors, all analog surround or stereo signals will be fed to
them directly.
You can also select the audio and video signals of all your video devices with your AV
Receiver/Amplifier. For more information see
”Note” on next page.
TV
To power outlet
(AC 230V/50 Hz)
To S-Video input connector
To audio input connector (Red/White) on the
TV or Stereo/Pro Logic Amplifier/Receiver
To Video input
connector (Yellow)
Connecting to a stereo TV and stereo or Pro Logic Amplifier/Receiver
DVD 20
Page 10
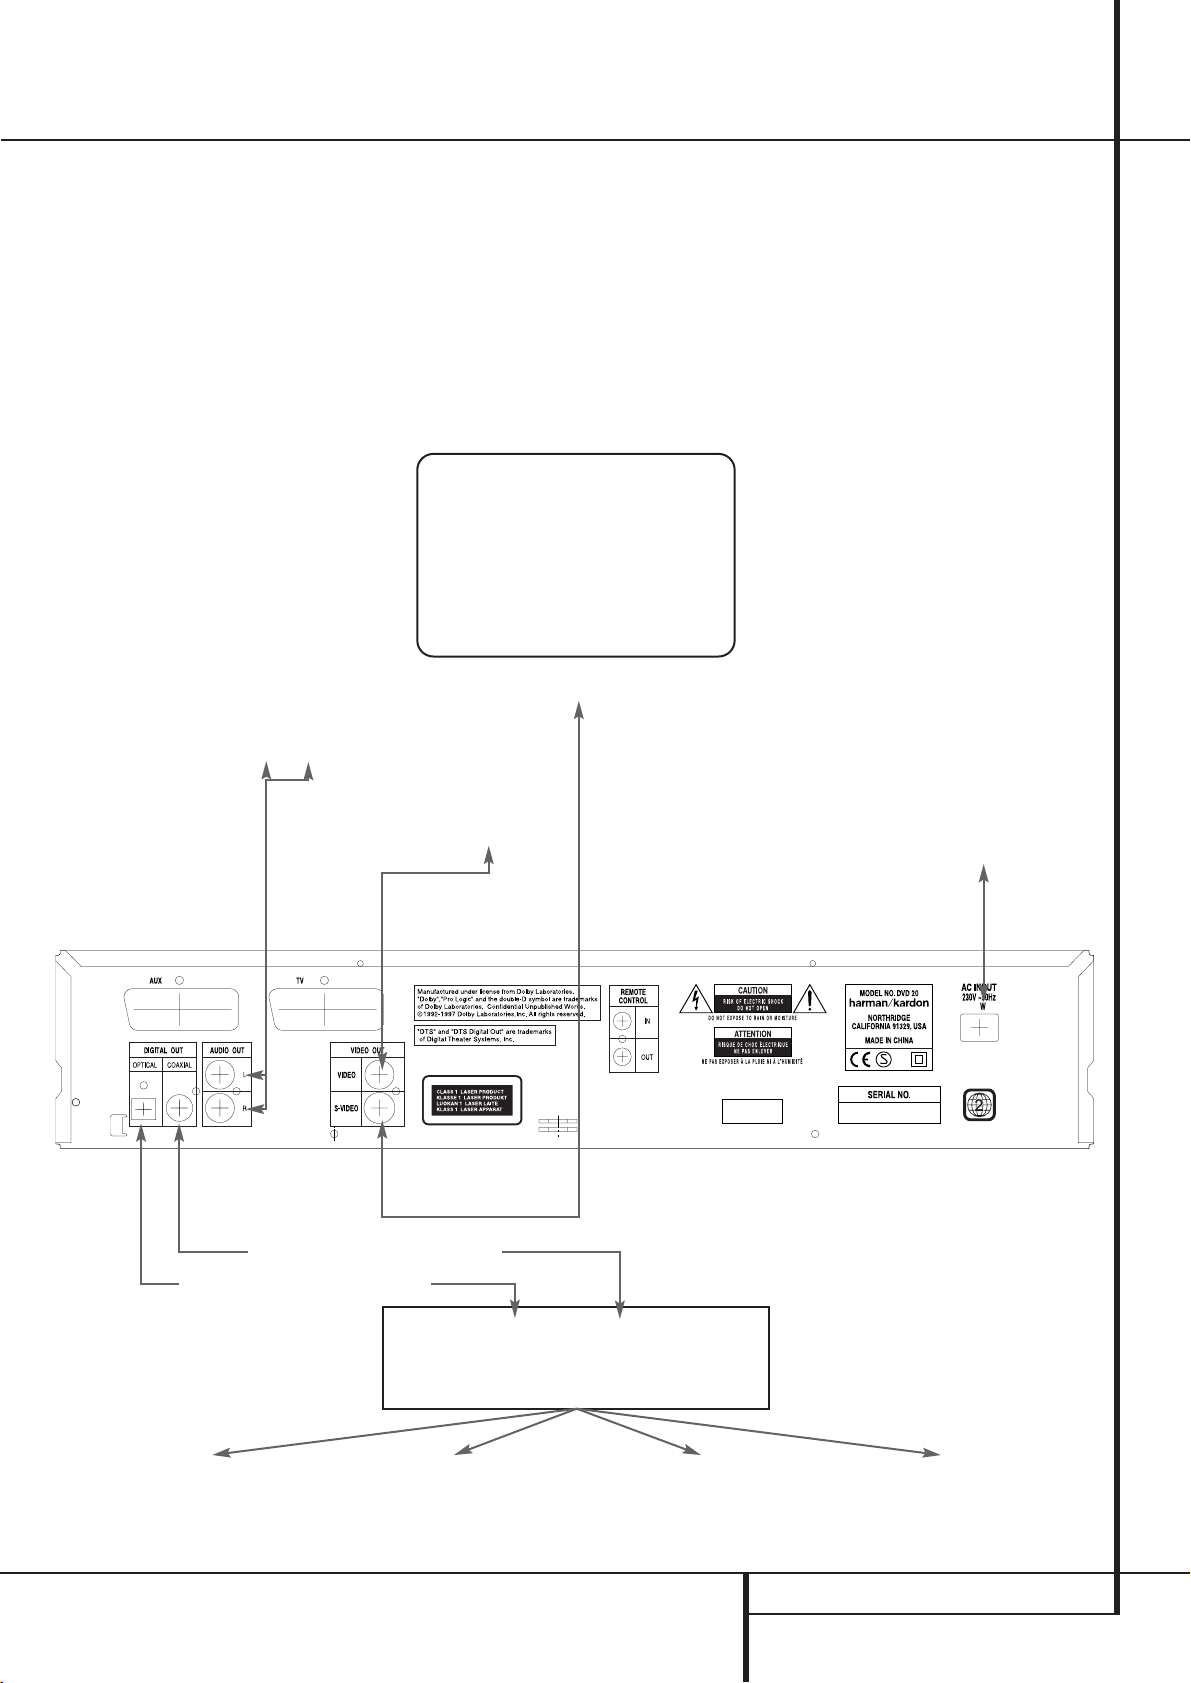
SETUP AND CONNECTIONS 11
Setup and Connections
When DVD´s encoded in Dolby Digital or DTS are
played, the Dolby Digital or DTS bitstream is output from the player’s OPTICAL or COAXIAL digital audio output. When the player is connected
to a Dolby Digital or DTS decoder, you can enjoy
theater-quality audio in your home. An optical
digital audio cable or coaxial audio cable (both
optional) is required for these connections, as
shown below. Only one connection is needed,
not both at the same time.
■ Note: With multiple video sources, your
Audio/Video device can be used for selecting
the video signal and routing it to the TV.
Connect the video or S-video output of the
DVD 20 (whatever is provided with your
device) to the video or S-video input on your
device and the video/S-video output of this
device to your TV. For more details, see the
manual of your Audio/Video amplifier/receiver.
■ Note for Analog Audio: The connection
from Audio Out to the TV is optional only.
Normally you´ll hear the sound from your AVsystem´s speakers, so the TV volume should
be completely turned down. If you plan to use
your DVD20 also without having to turn on
your complete system, this connection must
exist, then you can turn up the TV´s volume as
needed.
TV
To power outlet
(AC 230V/50 Hz)
To S-Video input connector
To audio input connector
(Red/White, optional only, see Note above)
Front Speaker (Left/Right) Center Speaker Surround Speaker (Left/Right) Subwoofer
To Video input
connector (Yellow)
Connecting to a receiver/amplifier with Dolby Digital (AC-3) or DTS (Digital Theater Systems) decoder
Dolby Digital or DTS decoder
DVD 20
To coaxial audio input connector
To optical audio input connector
Page 11
12 SETUP AND CONNECTIONS
Setup and Connections
Important Notes on SCART and RGB
format:
■ Your DVD 20 is equipped with two SCART
connectors, one for direct connection to the
TV, the second (AUX) for throughput of VCR
or any other video source to a TV with only
one SCART input.The signal from this video
source will be routed through the SCART connector of the DVD to the TV automatically
when the unit plays (composite video only)
and the DVD 20 is turned off (to Standby, not
completely).
■ Both SCART connectors provide the video
signal as well as audio (stereo L/R) signals.
■ The SCART connector for the TV provides the
composite video signal, the S-Video signal or
the direct RGB signal, delivering the best
video performance possible, all selectable in
the Setup menu. To view RGB video on your
TV, the RGB compatible SCART connector on
the TV must be used and the DVD 20´s TV
SCART connector must be set to "RGB" (see
page 19).
Note that with RGB video the color intensity
cannot be adjusted with most TVs.
■ When the RGB video signal is used, DVD´s
recorded with the NTSC format (with regional
code 0 or 2) can be viewed even on nonNTSC compatible TVs.
Connecting to a TV or monitor with SCART connectors
TV or Monitor
To power outlet
(AC 230V/50 Hz)
To SCART connector
To SCART connector
of any video source
To analog input of
stereo or Pro Logic
Amplifier/Receiver
To optical or coaxial
input of Dolby Digital/
DTS Decoder/
Amplifier/Receiver
DVD 20
Page 12
REMOTE CONTROL AND HEADPHONES 13
Remote Control and Headphones
Battery installation
Insert the batteries supplied while observing the
correct (+) and (–) polarities.
Service life of batteries
■ The batteries normally last for about one year,
although this depends on how often, and for
what operations, the remote control is used.
■ If the remote control unit fails to work even
when it is operated near the player, replace
the batteries.
■ Use size “AA” batteries.
Notes:
■ Do not attempt to recharge, short-circuit, disassemble, heat or throw the batteries into
fire.
■ Do not drop, step on or otherwise impact the
remote control unit. This may damage the
parts or lead to malfunction.
■ Do not mix old and new batteries.
■ Wipe away any leakage inside the remote
control unit, and install new batteries.
■ If leakage should come into contact with
parts of your body, wash it off thoroughly
with water.
■ Batteries contain chemical substances and we
recommend that you dispose of them properly
and in compliance with any local regulations.
Do not simply throw them away but return to
your dealer or special battery disposal centers.
Remote control operation range
Point the remote control unit from no more than
about 7 m from the remote control sensor and
within about 60 degrees of the front of the unit.
■ The operating distance may vary according to
the brightness of the room.
Notes:
■ Do not point bright lights at the remote control sensor.
■ Do not place objects between the remote
control unit and the remote control sensor.
■ Do not use this remote control unit while
simultaneously operating the remote control
unit of any other equipment.
Connecting headphones
1. Connect the headphones.
■ Headphones with a 6.3 mm stereo plug can
be connected.
2. Adjust the volume.
Caution: Avoid listening to sound at levels
which may be harmful to your ears.
DVD 20
°
30°30
POWER
FF
O
ON
LE
TIT
B
U
S
E
IO
L
D
G
U
N
A
A
E
L
IT
T
S
U
T
A
T
S
N
R
U
ET
R
E
L
IT
T
B
U
S
F
F
/O
N
O
NU
E
M
R
TE
N
E
Y
A
L
P
H
C
H
R
C
A
R
E
A
S
E
S
E
S
U
A
P
P
TO
S
E
S
O
L
/C
N
E
P
O
.
V
E
R
P
W
O
L
S
T
X
E
N
M
O
D
N
A
R
P
E
T
S
M
O
O
Z
.
G
O
R
P
1
3
2
K
C
E
H
C
4
6
5
R
A
E
L
C
7
8
9
T
A
E
P
E
R
T
H
IG
L
- B
A
0
DVD 20 RC
STOP
PLAY/PAUSE
DIMMER
SKIP
SEARCH
TEST
Phone Level
DVD 20
Headphones
STOP
PLAY/PAUSE
DIMMER
SKIP
SEARCH
TST
Page 13

14 DIGITAL AUDIO CONNECTIONS
Digital Audio Connections
Notes when connecting the optical digital audio cable (optional)
■ Remove the dust protection cap from the
optical digital audio output and connect the
cable firmly so that the configurations of both
the cable and the connector match.
■ Keep the dust protection cap and always
reattach the cap when not using the connector.
Audio output from the unit’s
optical/coaxial digital audio output connector
*1Digital Audio Output (see page 21) selected
”Dolby Digital” or ”PCM”.
*
2
Digital Audio Output selected ”DTS” or other
(see page 21).
For your reference:
■ Dolby Digital (AC-3) is a digital sound compression technique developed by the Dolby
Laboratories Licensing Corporation,
supporting 5.1-channel surround sound, as
well as stereo (2-channel) sound, this technique enables a large quantity of sound data
to be efficiently recorded on a disc.
■ Linear PCM is a signal recording format used
in CDs.While CDs are recorded in
44.1 kHz/16 bit, DVDs are recorded in
48 kHz/16 bit up to 96 kHz /24 bit.
■ If you have a Dolby Pro Logic Surround
decoder connected to the DVD 20’s analog
AUDIO OUT connectors, thanks to the
"Downmix" function of the DVD 20 you will
obtain the full benefit of Pro Logic from the
same DVD movies that provide full 5.1-channel Dolby Digital soundtracks, as well as from
titles encoded with Dolby Surround.
Caution for the optical/coaxial
digital audio outputs:
■ When connecting an amplifier (with an optical/coaxial digital input ) which does not contain a Dolby Digital (AC-3) or DTS decoder, be
sure to select “PCM” as initial setting in the
“Digital Audio Output” menu (see also page
21).
Otherwise, any attempt to play DVD may
cause such a high level of noise that it may
be harmful to your ears and damage your
speakers.
■ CD´s can be played as they would normally be
played.
Notes:
■ Some first generation DTS decoders which do
not support DVD-DTS interface may not work
properly with the DVD/CD player.
Manufactured under license from Dolby
Laboratories.“Dolby” and the double-D symbol
are trademarks of Dolby Laboratories.
Confidential Unpublished Works.1992-1997
Dolby Laboratories, Inc. All rights reserved.
Dolby Digital and DTS
Both Dolby Digital and DTS are audio formats
used to record 5.1-channel audio signals onto
the digital track of film. Both of these formats
provide six separate channels: left, right, center,
left rear, right rear, and common subwoofer.
Remember, that Dolby Digital or DTS will only
play 5.1-channel sound if you’ve connected the
optical or coaxial output of the DVD 20 to a DTS
or Dolby Digital receiver or decoder (see page
11) and if the disc was recorded in the Dolby
Digital or DTS format.
Dolby Digital is a trademark of Dolby Laboratories
Licensing Corporation.
DTS is a registered trademark of Digital Theater
Systems.
Disc:
DVD
CD
Sound recording
format:
Dolby Digital
(AC-3)
Linear PCM
(48/96 kHz
16/20/24bit)
DTS
Linear PCM
Optical/Coaxial digital
audio output
Dolby Digital bitstream
(2-5.1 ch) or PCM
(2 ch, 48 KHz/16bit)*
1
Linear PCM (2 ch)
(48/96 kHz
16/20/24bit)
Bitstream or no
output *
2
Linear PCM (44.1 kHz
sampling)
Page 14

DVD20BLOCK(MP1).sch-1-ThuJul1919:03:182001
Page 15

Page 16

Page 17

Page 18

Scart B'D after modification of pin 8 control
Page 19

DVD20SCART(MP1).sch-1 - Before modfication of Pin 8 control
Page 20

DVD20WIRING(MP1).sch-1-ThuJul1919:01:332001
Page 21

mecha assy Pick-Up + PCB
Power supply B'D ASSY
DVD20 B'D and Components Parts List
Page 22

Page 23

Page 24

Page 25

Page 26

Page 27

Page 28

Page 29

Page 30

Page 31

Page 32

Page 33

Page 34

Page 35

Page 36

Page 37

Page 38

 Loading...