

Page 1

DMC 1000
DIGITAL MEDIA CENTER
Page 2

SAFETY INFORMATION
Important Safety Instructions
1. Read these instructions.
2. Keep these instructions.
3. Heed all warnings.
4. Follow all instructions.
5. Do not use this apparatus near water.
6. The product’s cabinet may be cleaned by gently wiping with a soft cotton
or microfiber cloth. Do not use water or any liquid cleaners.
7. Do not block any of the ventilation openings. Install in accordance with the
manufacturer’s instructions.
8. Do not install near any heat sources such as radiators, heat registers, stoves
or other apparatus (including amplifiers) that produce heat.
9. Do not defeat the safety purpose of the polarized or grounding-type plug.
A polarized plug has two blades with one wider than the other. A grounding-type
plug has two blades and a third grounding prong. The wide blade or the third
prong is provided for your safety. When the provided plug does not fit into your
outlet, consult an electrician for replacement of the obsolete outlet.
10. Protect the power cord from being walked on or pinched, particularly at plugs,
convenience receptacles and the point where they exit from the apparatus.
11. Only use the attachments/accessories specified by the manufacturer.
12. Use only with a cart, stand, tripod, bracket or table specified by the
manufacturer, or sold with the apparatus. When a cart is used, use
caution when moving the cart/apparatus combination to avoid injury
from tip-over.
13. Unplug this apparatus during lightning storms or when unused for long
periods of time.
14. Refer all servicing to qualified service personnel. Servicing is required when
the apparatus has been damaged in any way, such as power supply cord
or plug is damaged, liquid has been spilled or objects have fallen into the
apparatus, the apparatus has been exposed to rain or moisture, does not
operate normally, or has been dropped.
Wet Location Marking
Apparatus shall not be exposed to dripping or splashing and no objects filled with
liquids, such as vases, shall be placed on the apparatus.
Service Instructions
CAUTION – These servicing instructions are for use by qualified service personnel
only. To reduce the risk of electric shock, do not perform any servicing other than
that contained in the operating instructions, unless you are qualified to do so.
Outdoor Use Marking
WARNING – To reduce the risk of fire or electric shock, do not expose this
apparatus to rain or moisture.
Perchlorate Material – Special Handling May Apply
See http://www.dtsc.ca.gov/hazardouswaste/perchlorate.
This product includes a battery or coin cell battery that may contain perchlorate
and may require special handling when recycled or disposed of in California.
2
Page 3

SAFETY INFORMATION
Important Safety Information
Verify Line Voltage Before Use
Your DMC 1000 has been designed for use with 110–240-volt AC current, and the
plug is specifically designed for 120-volt applications. Connection to a line voltage
other than that for which the plug is intended can create a safety and fire hazard
and may damage the unit.
If you have any questions about the voltage requirements for your specific model, or
about the line voltage in your area, contact your selling dealer before plugging the unit
into a wall outlet.
Do Not Use Extension Cords
To avoid safety hazards, use only the power cord attached to your unit. We do not
recommend that extension cords be used with this product. As with all electrical
devices, do not run power cords under rugs or carpets or place heavy objects on
them. Damaged power cords should be replaced immediately by an authorized service
center with a cord meeting factory specifications.
Handle the AC Power Cord Gently
When disconnecting the power cord from an AC outlet, always pull the plug; never
pull the cord. If you do not intend to use the unit for any considerable length of time,
disconnect the plug from the AC outlet.
Do Not Open the Cabinet
There are no user-serviceable components inside this product. Opening the cabinet
may present a shock hazard, and any modification to the product will void your
guarantee. If water or any metal object such as a paper clip, wire or staple accidentally
falls inside the unit, disconnect it from the AC power source immediately, and consult
an authorized service center.
Installation Location
• To ensure proper operation and to avoid the potential for safety hazards, place
the unit on a firm and level surface. When placing the unit on a shelf, be certain
that the shelf and any mounting hardware can support the weight of the product.
• Make certain that proper space is provided both above and below the unit for
ventilation. If this product will be installed in a cabinet or other enclosed area,
make certain that there is sufficient air movement within the cabinet. Under some
circumstances, a fan may be required. The unit should be placed on its own shelf,
not directly on top of another component.
• Do not place the unit directly on a carpeted surface.
• Avoid installation in extremely hot or cold locations, or in an area that is
exposed to direct sunlight or heating equipment.
• Avoid moist or humid locations.
• Do not obstruct the ventilation slots on the unit, or place objects directly
over them.
• Due to the heat generated by operation of the DMC 1000 and other components in your system, there is the remote possibility that the rubber padding
on the bottom of the unit’s feet may leave marks on certain wood or veneer
materials. Use caution when placing the unit on soft woods or other materials
that may be damaged by heat or heavy objects. Some surface finishes may be
particularly sensitive to absorbing such marks, due to a variety of factors beyond
Harman Kardon’s control, including the nature of the finish, cleaning materials
used, and normal heat and vibration caused by the use of the product, or other
factors. We recommend that caution be exercised in choosing an installation location
for the component and in normal maintenance practices, as your warranty will not
cover this type of damage to furniture.
Cleaning
When the unit gets dirty, wipe it with a clean, soft, dry cloth. If necessary, and only after
unplugging the AC power cord, wipe it with a soft cloth dampened with mild soapy
water, then a fresh cloth with clean water. Wipe it dry immediately with a dry cloth.
NEVER use benzene, aerosol cleaners, thinner, alcohol or any other volatile cleaning
agent. Do not use abrasive cleaners, as they may damage the finish of metal parts.
Avoid spraying insecticide near the unit.
Moving the Unit
Before moving the unit, be certain to disconnect any interconnection cords with other
components, and make certain that you disconnect the unit from the AC outlet.
NOTE: To avoid damage to the DMC 1000 that may not be covered by the warranty,
remove the disc from the unit before it is moved. Once the DMC 1000 is installed,
a disc may be left in the unit when it is turned off, but the unit should NEVER be
moved with a disc left in the disc tray.
Important Information for the User
This equipment has been tested and found to comply with the limits for a Class B
digital device, pursuant to Part 15 of the FCC Rules. The limits are designed to
provide reasonable protection against harmful interference in a residential installation.
This equipment generates,
installed and used in accordance with the instructions, may cause harmful interference
to radio communication. However, there is no guarantee that harmful interference will
not occur in a particular installation. If this equipment does cause harmful interference
to radio or television reception, which can be determined by turning the equipment
off and on, the user is encouraged to try to correct the interference by one or more
of the following measures:
• Reorient or relocate the receiving antenna.
• Increase the separation between the equipment and receiver.
• Connect the equipment into an outlet on a circuit
receiver is connected.
• Consult the dealer or an experienced radio/TV technician for help.
This device complies with Part 15 of the FCC Rules. Operation is subject to the
following two conditions: (1) this device may not cause harmful interference, and (2)
this device must accept interference received, including interference that may cause
undesired operation.
NOTE: Changes or modifications may cause this unit to fail to comply with Part
the FCC Rules and may void the user’s authority to operate the equipment.
CAUTION:
beam, do not open the cabinet enclosure or defeat any of the safety mechanisms provided
for your protection. DO NOT STARE INTO THE LASER BEAM. To ensure proper use of this
product, please read this Owner’s Manual carefully and retain it for future use. Should the
unit require maintenance or repair, please contact your local Harman Kardon service center.
Refer servicing to qualified personnel only.
The DMC 1000 uses a laser system. To prevent direct exposure to the laser
uses and can radiate radio-frequency energy
different from that to which the
and, if not
15 of
Unpacking
The carton and shipping materials used to protect your new receiver during shipment
were specially designed to cushion it from shock and vibration. We suggest that you
save the carton and packing materials for use in shipping if you move, or should the
unit ever need repair.
To minimize the size of the carton in storage, you may wish to flatten it. This is
done by carefully slitting the tape seams on the bottom and collapsing the carton. Other
cardboard inserts may be stored in the same manner. Packing materials that cannot be
collapsed should be saved along with the carton in a plastic bag.
If you do not wish to save the packaging materials, please note that the carton
and other sections of the shipping protection are recyclable. Please
environment and discard those materials at a local recycling center.
It is important that you remove the protective plastic film from the front-panel lens.
Leaving the film in place will affect the performance of your remote control.
respect the
3
Page 4

STAPLE INVOICE HERE
4
Page 5

TABLE OF CONTENTS
2 SAFETY INFORMATION
6 INTRODUCTION
7 FEATURES
8 MEDIA COMPATIBILITY
10 FRONT-PANEL CONTROLS
12 MESSAGE DISPLAY
14 REAR-PANEL CONNECTIONS
16 REMOTE CONTROL FUNCTIONS
19 INSTALLATION
19 Step One – Placement
19 Step Two – Connect the DMC 1000 to an A/V Receiver or Processor (Preferred)
19 Step Three – Connect the DMC 1000 Directly to a Television (Optional)
19 Step Four – Connect Media Sources
20 Step Five – Connect the DMC 1000 to a Multizone System (Optional)
20 Step Six – Connect the Remote IR Input and Output
20 Step Seven – Network Connection
20 Step Eight – Plug in AC Power
20 Step Nine – Insert Batteries in Remote
21 INITIAL SETUP
21 Step One – Turn On the DMC 1000
21 Step Two – Display the Setup Menu
21 Step Three – Media Library Setup
22 Step Four – DVD Player Setup
23 Step Five – Audio Setup
23 Step Six – Video Setup
24 Step Seven – General Setup
24 Step Eight – Advanced Setup
25 OPERATION
25 Turning On the DMC 1000
25 Using the DMC 1000
25 Playing DVDs and CDs
25 DVD Playback
27 Audio Playback From the Media Library
29 Data Media
29 The Play Queue and Playlists
30 Using The Bridge
30 Auxiliary Analog Audio Inputs
31 Content Transfer
33 Multizone Operation
34 TROUBLESHOOTING GUIDE
36 GLOSSARY
38 APPENDIX
41 END-USER LICENSE AGREEMENT
45 NOTES
47 TECHNICAL SPECIFICATIONS
47 TRADEMARK ACKNOWLEDGEMENTS
WARNING
To prevent fire or shock hazard, do not expose this appliance to rain or moisture.
For Canadian model
This Class B digital apparatus complies with Canadian
ICES-003.
For models having a power cord with a polarized plug:
CAUTION: To prevent electric shock, match wide blade
of plug to wide slot, fully insert.
Modèle pour les Canadien
Cet appareil numérique de la Classe B est conforme
à la norme NMB-003 du Canada.
Sur les modèles dont la fiche est polarisee:
ATTENTION: Pour éviter les chocs électriques, introduire
la lame la plus large de la fiche dans la borne
correspondante de la prise et pousser jusqu’au fond.
5
Page 6
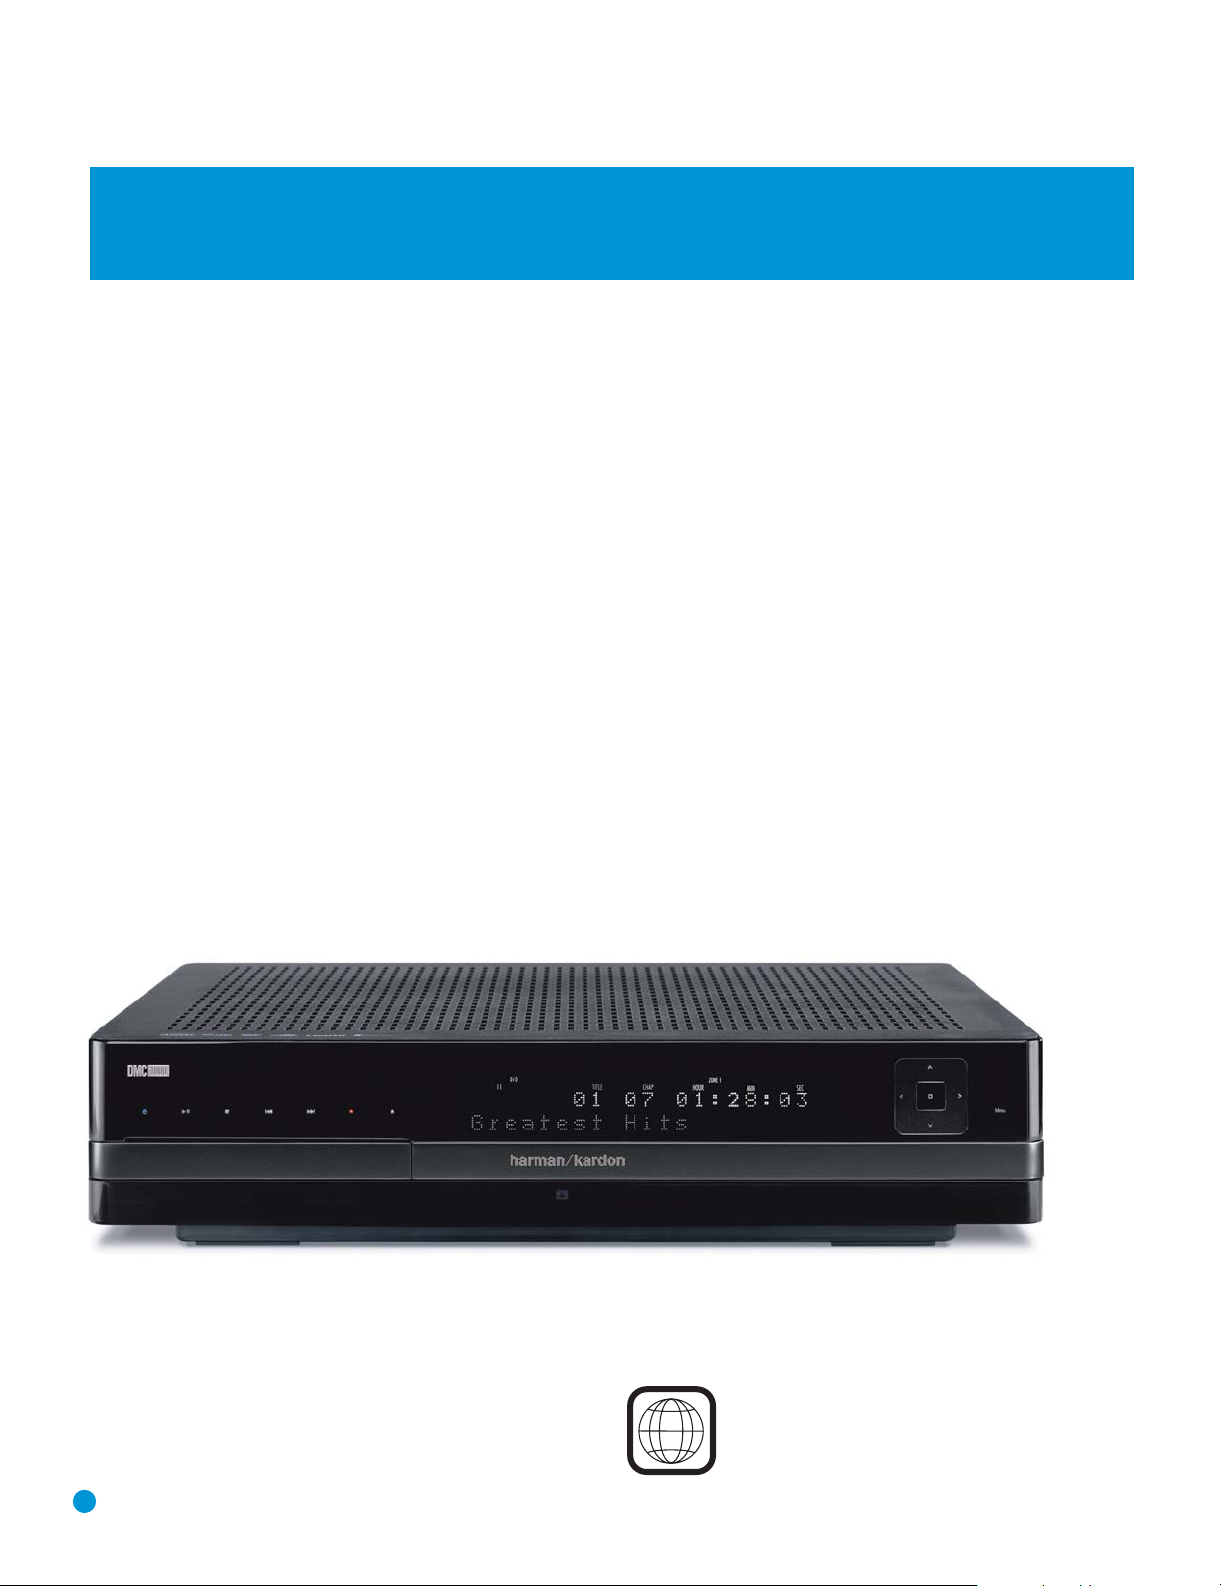
INTRODUCTION
Please register your product on our Web site at www.harmankardon.com.
Note: You’ll need the product’s serial number. At the same time, you can choose to be notified about our new products
and/or special promotions.
WWW.HARMANKARDON.COM
Thank you for choosing Harman Kardon!
For more than fifty years, Harman Kardon has been a leader not only in
the control and amplification of sound and images with our receiver and
amplifier products, but also with breakthrough source playback equipment,
from innovative turntable/stereo receiver combinations and the first audio
cassette decks with Dolby
CD recorder with 4x dubbing and today’s state-of-the-art DVD players.
The DMC 1000 Digital Media Center continues Harman Kardon’s tradition
of combining technology with ease of use, elegantly designed to deliver
a truly unique product.
The DMC 1000 merges a high-end DVD player, including upscaling to
1080p with an HDMI
60,000 songs on its 250Gb hard drive. Simultaneous playback of different
tracks is possible in up to four zones, or you may link any or all of the
zones to each other.
Thanks to Gracenote
DMC 1000’s hard drive is identified by album name, artist and genre, with
additional information to show the title of each track. Even better, for most
popular albums, the DMC 1000 will display the cover art when connected
to the Internet. The content is automatically organized by the identification
fields and by the cover, and you may select it and program playlists to suit
any mood or occasion. The graphical presentation of system content is
available in both high-definition and standard-definition outputs, for crisp,
easy-to-read displays on any video screen.
®
Type B Noise Reduction, to the first dual-well
™
output, with a media server capable of storing up to
®
MusicID,®* all content recorded from a CD to the
In addition to DVD and CD playback, the DMC 1000 offers audio and
still-image playback from both solid-state media cards and USB drives.
You can even record analog sources such as your old tapes, cassettes and
even vinyl records (with an optional, external phono preamp) to store virtually
any audio content for instant playback. And the DMC 1000 allows content
to be transferred from the hard drive to the memory cards or a USB drive,
or even a recordable CD. This flexibility lets you take your music with you in
a wide range of portable players, or in your car.
Additional features of the DMC 1000 include iPod audio playback through
Harman Kardon’s optional The Bridge accessory, with charging and navigation available to any zone in your system. System control options include the
unit’s backlit remote, optional external IR sensor/receivers, RS-232-based
control for popular home automation systems, custom-programmed home
network control and even wireless control through a Windows Mobile
PDA when an optional wireless bridge is connected.
If you have any questions about this product, its installation or its operation,
please contact your retailer or custom installer, or visit our Web site at
www.harmankardon.com.
Music recognition technology and related data are provided by Gracenote.Gracenote is the industry standard
*
in music recognition technology and related content delivery. For more information, visit www.gracenote.com.
®
-based
DMC 1000 Digital Media Center
6
1
NOTE: This player is designed and manufactured for compatibility with
Region Management Information that is encoded on most DVD discs. This
player is designed only for playback of discs with Region Code 1, or for
Region Code 0 discs, which do not contain Region Code information. If
there is any other Region Code on a disc, it will not play in the DMC 1000.
Page 7

FEATURES
Audio Inputs
• Analog Audio: 2-channel (RCA jacks)
Audio/Video Outputs
• Analog Audio: Zone 1 (main zone): 6-channel (RCA jacks)
Zones 2, 3 and 4: 2-channels per zone (RCA jacks)
• Digital Audio: coaxial and optical (S/P-DIF)
• Digital Audio/Video: HDMI
• Analog Video: composite, S-video and component
Memory Cards
• Card Slot 1: Secure Digital (SD), MultiMediaCard (MMC), xD-Picture
™
Card
and Memory Stick®(compatible with MagicGate®); miniSD,
microSD and Memory Stick Duo
™
cards with adapters (supplied by
the card manufacturer)
• Card Slot 2: CompactFlash
®
Type I (CF) cards, or cards using a
CompactFlash Type I-compatible adapter
• Cards with more than 8GB memory may not work correctly.
Data and Control Ports
• Front- and rear-panel USB jacks for flash drives and external USB
hard drives (client only, FAT or FAT32 formats only)
• Proprietary connection for iPod charging, audio* playback and
navigation through Harman Kardon’s The Bridge (sold separately)
• RS-232 port for bidirectional system control
• RJ45 Ethernet jack for connection to broadband network (required
for cover art)
• Remote control IR input and output
*
Requires compatible iPod.
Optical Disc Player
• Plays and records 5-inch (12cm) discs; plays 3-inch (8cm) discs
• Parental control system with user-programmable password
• Aspect-ratio adjustment
Audio/Video/Still-Image Formats Supported
• Still-image formats supported: JPEG
• Video formats supported: DVD, DVD-R/RW, DVD+R/RW, VCD
• Audio formats supported: CD, CD-R/RW, MP3, WAV
• MP3 bit rates: 32kbps – 320kbps
• JPEG files: 5 megapixels, 5MB file size, up to 250 files per disc
General Playback Features
• Video upscaling to 480p, 720p and 1080p via HDMI output
• Video upscaling to 1080p and 720p via component video outputs
(when not copy-protected)
• Fast Play: 2x, 4x, 8x,16x, 32x
• Slow Play: 1/2x, 1/4x, 1/8x, 1/16x
• Zoom (JPEGs only): Off, 1x, 2x, 3x
• Random Play
• Repeat Play: DVD-Video: 1 chapter, 1 title; VCD: 1 track, all;
MP3, JPEG: 1 track, 1 folder
• A-B Repeat Play
• Still-image rotation in 90-degree increments
• Thumbnail still-image menu
• User-selectable slideshow pace: slow,medium, fast
Recording Capabilities
• Automatically records audio CDs to Media Library (hard-disc drive)
• Recording sources: Media Library, disc player, memory cards,
USB device, analog audio via rear-panel Auxiliary Analog Audio Inputs
• Recording destinations:
■
Media Library (from any source)
■
Data CD-R/RW disc, Memory Card installed in Card Slot 1 or 2
or USB device (only from playlist programmed in Media Library)
• Recording speeds: CDs: 16x, AUX: 1x only
• Recording quality: lossless (.wav), best (MP3: 320kb/sec),
high (MP3: 256kb/sec), medium (MP3: 192kb/sec),
basic (MP3: 128kb/sec)
• Recorded format: data files – original format; analog audio – .wav files;
audio CDs – format and sampling rate determined by recording
quality setting
Ease of Use
• Graphic user interface in either high-resolution or standard-definition
video via HDMI or component video. Standard-definition (SD) video
through composite or S-video connections
• Two-line dot-matrix front-panel display
• Color-coded connections
• Backlit remote control
Supplied Accessories
The following accessory items are supplied with the DMC 1000. If any
of these items is missing, please contact Harman Kardon customer
service at www.harmankardon.com.
• System remote control
• Two AA batteries
• HDMI cable
• AC power cord
7
Page 8

MEDIA COMPATIBILITY
Disc Formats Supported by This Player
The DMC 1000 can play the following types of prerecorded discs:
ReWritable
The DMC 1000 will also play most recordable discs, but we cannot
guarantee complete playback compatibility, due to the wide variation
in recorders and blank discs.
Round 3" (8cm) or 5" (12cm) discs may be used. Do not use
odd-shaped, noncircular discs.
DVD-Video Disc Compatibility:
• Single-sided or double-sided discs
• Single-layer or dual-layer discs
®
• Dolby
• MPEG-2 digital video
• Discs are generally divided into one or more titles, which may be
Audio CD Compatibility
• Linear PCM digital audio
• Audio CDs are divided into tracks
CD-R/RW Compatibility
• Linear PCM or MP3 (32kbps – 320kbps) digital audio
• May contain JPEG still images (up to 5 megapixels, file size up to
• Linear PCM discs are generally divided into tracks like an audio CD.
VCD Compatibility
• Linear PCM, MP1 (MPEG-1, Layer 1) or MP3 (MPEG-1, Layer 3)
• MPEG-1 digital video
• May contain JPEG still images (Video CD Version 2.0).
• Some discs may contain menus and chapters, while other discs
• Some SVCD discs may play, depending on how they were recorded.
• CDs containing raw MPEG video files are not part of the VCD format,
Digital, DTS®, MPEG or Linear PCM digital audio tracks
further subdivided into chapters.
5MB, limit of approximately 250 files per disc).
MP3 and JPEG discs (or discs that contain more than one of these
formats) are divided into files, which may be organized into folders,
depending on how the disc was created.
digital audio
simply contain tracks. Version 2.0 discs may offer interactive playback
control (PBC).
and cannot be played on the DMC 1000.
The DMC 1000 Will NOT Play the Following:
• DVD discs with a Region Code other than 1 or 0
• DVD-ROM data discs
• DVD-RAM discs
• DVD-Audio discs
™
• High-definition optical discs such as WMVHD, HD-DVD
Blu-ray Disc
™
formats (the “SD-DVD” side of dual format
and
HD-DVD/DVD discs may be played)
™
• SACD
discs
• CD-I discs
• CD-G discs
®
• Kodak
Photo CD™and Picture CD discs
• Discs intended for use in video game consoles
• Discs recorded in the “VR” mode or at any speed other than “SP”
NOTES:
• Due to differences in the authoring of DVDs, it is possible that
some discs may include features that are not compatible with
the DMC 1000, and not all discs include every capability of the
DVD system. Example: although the DMC 1000 is compatible
with multiangle discs, that feature is available only with specially
encoded discs. Check the disc jacket to make certain that a
specific feature or soundtrack option is available.
• Playback of CD-R/RW and DVD±R/RW discs created on a
computer requires proper formatting and finalization of the disc.
• The DMC 1000 is compatible with most files encoded using
MP3. However, variations in the encoder or codec used and the
bit rate of the encoding may affect the DMC 1000’s ability to
play a specific file. As a result, we cannot guarantee complete
compatibility with all encoders and versions of the codecs. For
best results, we recommend that MP3 files be encoded at bit
rates ranging between 32kbps and 320kbps.
• JPEG files
should contain no more than 5 mega
pixels, and
the file size should be no larger than 5MB.
8
Page 9

MEDIA COMPATIBILITY
Memory Card Compatibility
The following types of memory cards may be used with the DMC 1000:
The DMC 1000 will play most recordable memory cards, but we
cannot guarantee complete playback compatibility, due to the wide
variation in software encoders, recorders and card technologies.
• Both Secure Digital (SD) and MMC (MultiMediaCard) memory cards
may be used in Card Slot 1. The smaller miniSD and microSD cards
may be used in Card Slot 1, but require an adapter (not included).
• Memory Stick cards may also be used in Card Slot 1. The full-size
Memory Stick cards are compatible as is, but an adapter (not included)
is required for the smaller Memory Stick Duo cards.
• xD-Picture Card may be used in Card Slot 1.
• CompactFlash Type I cards may be used in Card Slot 2. CompactFlash
Type II cards and microdrives are not compatible with the DMC 1000.
• Do not attempt to install a card in a slot other than the one designated
for its card type.
• Cards with memory capacity greater than 8 gigabytes are not
recommended for use with the DMC 1000.
• SDHC (Secure Digital High Capacity) cards are not compatible with
the DMC 1000.
USB Device Compatibility
USB client devices, such as flash drives and most external or portable
hard-disc drives that are formatted with the FAT or FAT32 file system,
may be connected to the DMC 1000’s front- or rear-panel USB ports.
Due to the wide variation in hard-disc drive technologies and formats,
we cannot guarantee compatibility with any particular device.
Many recent-model still cameras may also be connected directly to the
DMC 1000 via USB. In general, cameras or other USB devices that are
compatible with both Windows
be used with the DMC 1000.
Do not connect a personal computer directly to the DMC 1000. Due
to their software design, the iPod, most other USB peripheral devices
and accessories – such as card readers, keyboards and pointing devices –
and software-specific digital media players are not compatible with the
USB ports on the DMC 1000, even when placed in disc mode. To enjoy
audio materials stored on your compatible iPod, dock it in The Bridge
(optional, and available from your Harman Kardon dealer).
®
and Macintosh OS computers may also
9
Page 10
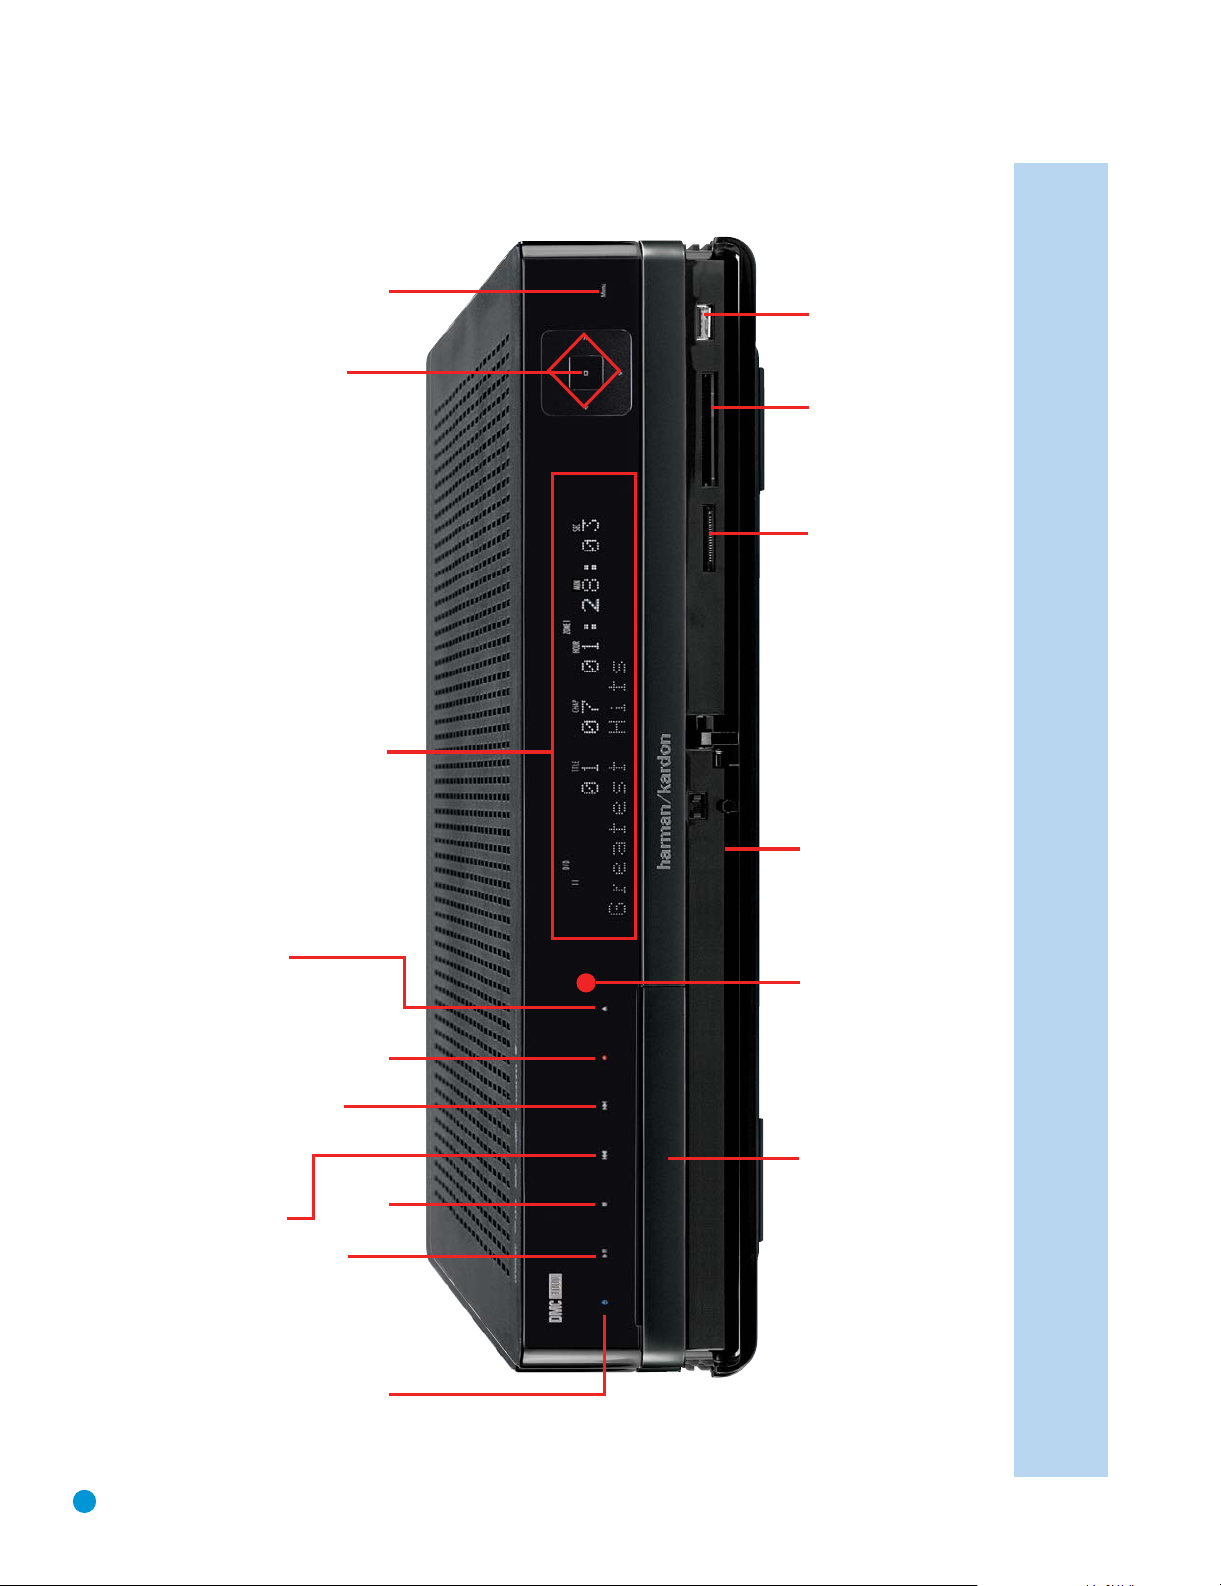
FRONT-PANEL CONTROLS
Navigation Controls
Open/Close
Message Display
Card Slot 2 USB Port
Card Slot 1
Front-Panel Door
Remote
IR Sensor
10
Skip/
Search Forward
Skip/
Search Reverse
Play/Pause
Stop Record Menu
Power
Disc Drawer
NOTE: To make it easier to follow the instructions throughout the manual that refer to this illustration, a copy of this page may be downloaded from the Product Support section at
www.harmankardon.com.
Page 11

FRONT- PANEL CONTROLS
IMPORTANT NOTE: The DMC 1000’s front-panel controls use
advanced touch-sensitive technology. To use the front panel, place a
finger over any of the illuminated icons. A gentle tap is all that is necessary.
Wait a few seconds for the DMC 1000 to process each command. To
remove fingerprints, wipe the front panel with a dry microfiber cloth.
Power: When the DMC 1000 is connected to an AC power source
and the rear-panel Master Power Switch is on, this control will indicate
one of four power states:
• Full-Off Mode (dim blue) – The DMC 1000, including its hard-disc
drive, is fully powered down.
• Sleep (Standby) Mode (amber) – The DMC 1000 will not respond
to any commands other than to power on.
• Server Mode (amber) – The DMC 1000 may be controlled via
the RS-232 Port or the Network Connection, but the on-screen menu
system is off.
• Full-Power Mode (bright blue) – The DMC 1000 operates normally.
The description of each mode and the DMC 1000’s response to the
power controls is shown in Table A7 in the Appendix.
G
B
Play/Pause (
current media source. To pause playback, press the button again. In
the Pause mode, access the DVD/VCD Frame-by-Frame Advance and
Slow Search functions by pressing the forward or reverse Step or Skip
Buttons on the remote.
Stop (A): Press to stop playback. When a video is playing, press it once
for Resume mode, and twice to fully stop playback. Resume mode is
not available during audio playback.
Skip/Search Reverse (
of the current chapter or track. Quickly press again to skip to previous
chapters or tracks. Press and hold for fast search reverse within the
current chapter or track at the speed indicated on screen.
Skip/Search Forward (
or track. Press and hold for fast search forward within the current chapter
or track at the speed indicated on screen.
Record (
on-screen recording menu. Pressing this button does not begin the
recording.
Open/Close: Press this button to open or close the disc drawer. Before
pressing this button, make sure that no objects are blocking the drawer.
Remote IR Sensor: This sensor receives infrared commands from the
remote control. Make sure that it is not blocked, although an optional
IR sensor such as the Harman Kardon HE 1000 may be connected to
serve as an external sensor when the unit is located in a different room,
installed behind cabinet doors or when the sensor is otherwise blocked.
For best results, always point your remote control at the DMC 1000’s
front panel.
Message Display: Various status messages appear in the two-line
text display. When content is playing, the track queue information and
running time appear in the upper line and identification data appears
): Press to start or resume playback of content on the
): Press once to return to the beginning
): Each press advances to the next chapter
): When content is playing, press this button to view the
•
in the lower line. A variety of other indicators will light at various times
to display the current playback mode, video settings or other aspects
of the DMC 1000’s status.
F/G/D
Navigation Controls (
controls to navigate the on-screen menus and displays. Press the Enter
Control to select an item or activate a menu feature.
Menu Control: Press to activate the on-screen menu system, or
to navigate back up one level in the menu system.
Disc Drawer: This drawer holds the discs that are played in the
DMC 1000. Press the Open/Close Control to access it. Carefully seat
all discs in the recess in the drawer tray. To avoid damaging the drawer
accidentally, do not press down on it when open.
Front-Panel Door: Open this door to access the two Card Slots and
the front-panel USB Port. To open it, gently press on the triangle in the
center of the door until it unlatches; the door will drop down. To close
the door, remove all media, then press the door closed at the same
center location until you hear the latch click. To avoid damaging the
door, do not open or close it by grabbing the edges.
Card Slot 1: This Card Slot accommodates SD, MMC, Memory Stick
or xD-Picture Card memory cards. To insert a card, push it gently into
the slot with the label side up until it clicks. To remove a card, gently press
in until it unlatches and then pull it out. This slot also accommodates
miniSD, microSD and Memory Stick Duo cards when used with an
adapter, which is generally supplied with the card.
Card Slot 2: This slot accommodates CompactFlash Type I memory
cards. To insert a card, gently push it into the slot label side up until it
is firmly seated. To remove a card, pull it straight out.
USB Port: Connect a USB storage device, such as a flash drive or
external hard-disc drive, to store additional content. DO NOT connect
computers, keyboards, pointing devices or other peripheral products to
the DMC 1000. Do not connect an iPod here; use The Bridge instead.
/E) and Enter Control (❏): Use these
11
Page 12
MESSAGE DISPLAY
Playback
Mode
Source
Indicators
Network
Camera Angle
Random
Parental
Lock
Repeat
Time
Message Area
NOTE: To make it easier to follow the instructions that refer to the controls and connectors in this illustration, a larger copy may be downloaded
from the Product Support section for this product at www.harmankardon.com.
Playback Mode: These indicators light to show the current playback mode:
›
Lights when content is playing in the Normal mode.
››
Lights in the Fast Search Forward and Slow Play modes, with
the speed shown briefly in an on-screen banner.
± Lights when the disc is paused.
‹‹
Lights when the disc is in the Fast Search Reverse mode, with
the speed shown briefly in an on-screen banner.
NOTE: Slow Play is not available for MP3 files.
Sources: One of these indicators will light to indicate the current media
source (DMC [the Media Library], DVD, VCD, USB 1 [front], USB 2 [back],
Card 1 [SD, MMC, Memory Stick, xD-Picture Card], Card 2 [CF], The
Bridge, AUX). During a recording, the source indicator will light.
Video Output
Resolution
Title
Video
Off
Track/Chapter
Video Output Resolution: Either the 480i or 480p indicator will light to
indicate whether the Component Video Outputs are in progressive scan
mode. When the Composite or S-Video Outputs are in use, this indicator
will always indicate the default 480i (interlaced scan) setting, even if you
attempt to change the Output Resolution setting in the Video Setup
menu to a higher video resolution.
When the HDMI Output is in use, its video resolution will be indicated.
Network: This indicator lights when the RJ45 jack is connected to
a live network.
Audio
NOTE: The 480i resolution is not available via the HDMI Output.
If the HDMI Output is connected simultaneously with the Composite
or S-Video Output, this indicator will reflect the HDMI Output’s
resolution, and the signal at the Composite and S-Video Outputs
will remain at 480i.
12
Page 13

Audio Format: When a Dolby®Digital or DTS®digital audio signal is
detected, one of these indicators will light. MP3 bitstreams are identified
in the on-screen display only.
Camera Angle: This indicator blinks when alternative viewing angles
are available.
Random: This indicator lights when the unit is in the Random Play
mode.
Parental Lock: This indicator lights in red when the parental-lock system
is engaged, to prevent changing the rating level without a code.
Repeat: These indicators light when any of the Repeat functions are in use.
Depending on the Repeat mode selected, the appropriate Title, Chapter
or Track indicator will flash.
Time: These positions show the running time of content that is playing.
Track/Chapter: When a DVD disc is playing, these two positions show
the current chapter. When a CD is playing, they will show the current
track number.
Video Off: This indicator lights in red when the unit’s analog video outputs
have been turned off by pressing the Video Off Button on the remote control.
NOTE: The Video Off command will not affect the HDMI Output
because it may be in use for audio. Avoid leaving the SETUP
MENU on screen for longer than a minute or two when using
the HDMI Output, as the screen saver will not operate on the
SETUP MENUS and there is a danger of “burning in” the image
on plasma or CRT displays.
Title: These two positions show the current title number when a DVD
disc is playing.
Message Area: Various messages appear in this two-line area. During
media playback, the track count and time are displayed on the upper
line, while identifying information scrolls on the lower line, depending
on the media type.
MESSAGE DISPLAY
13
Page 14
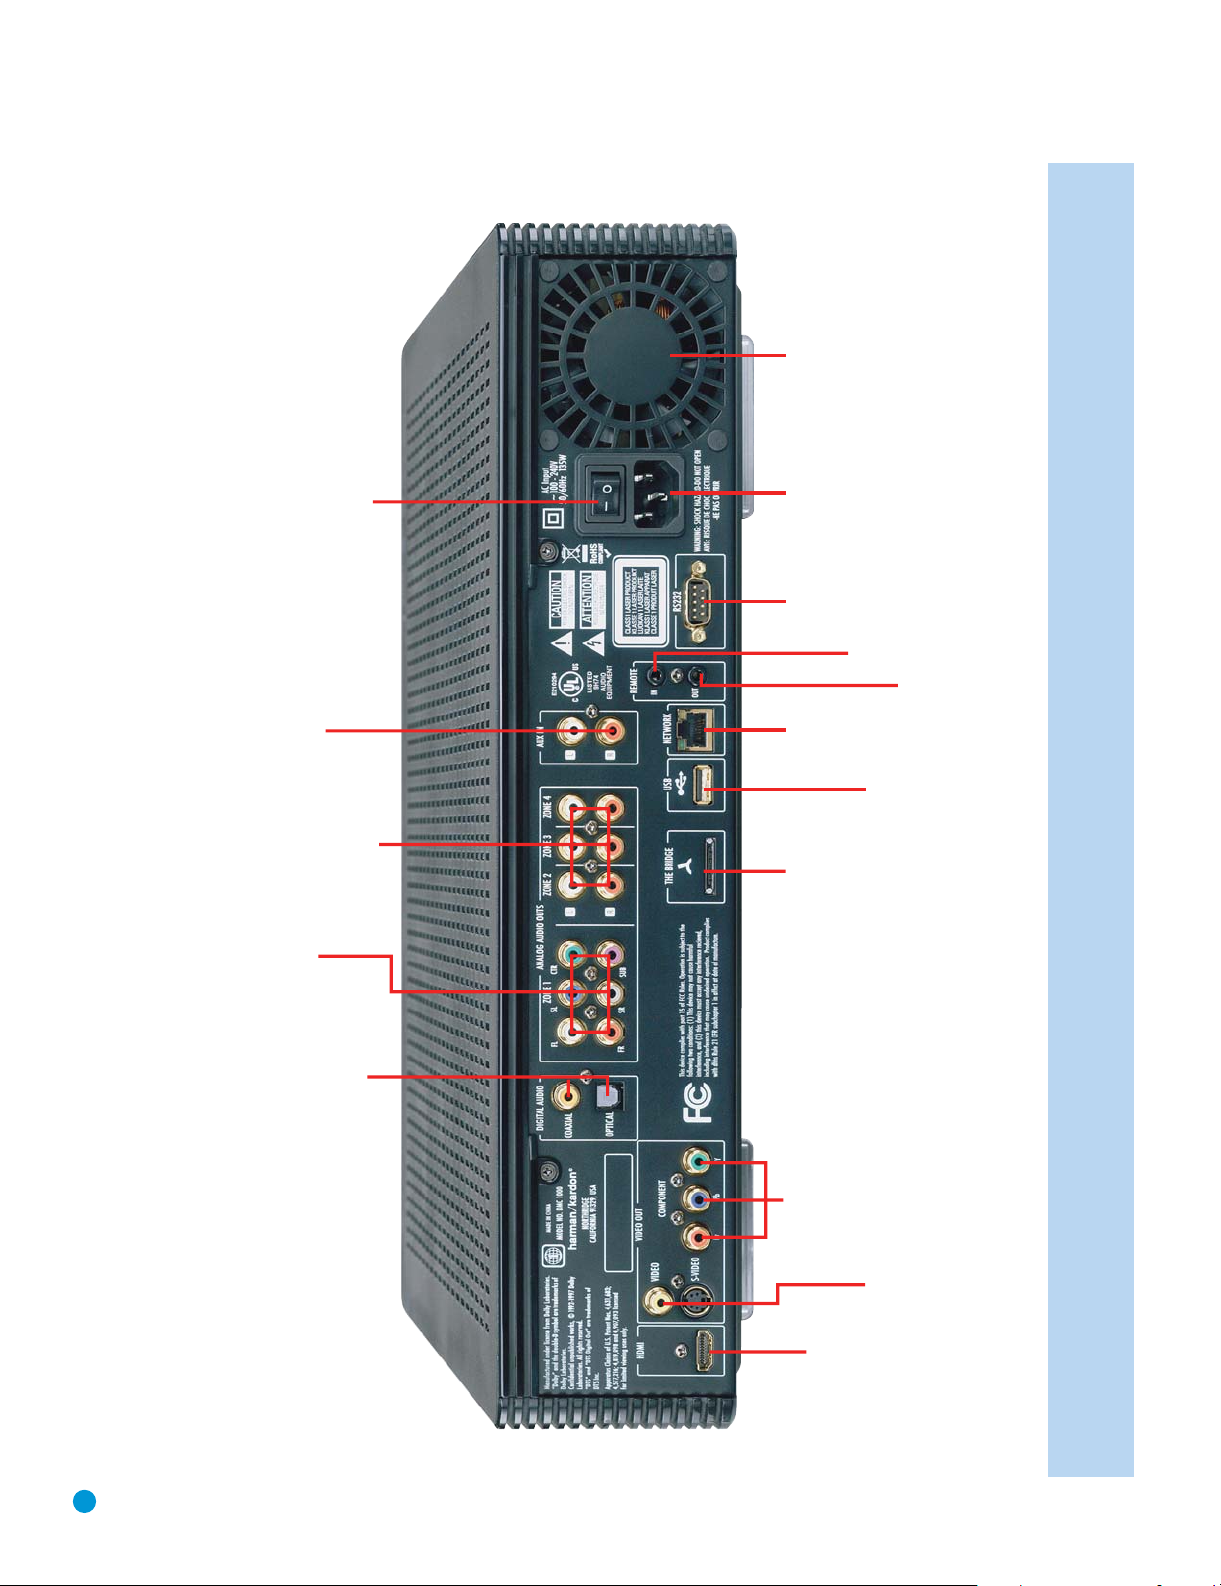
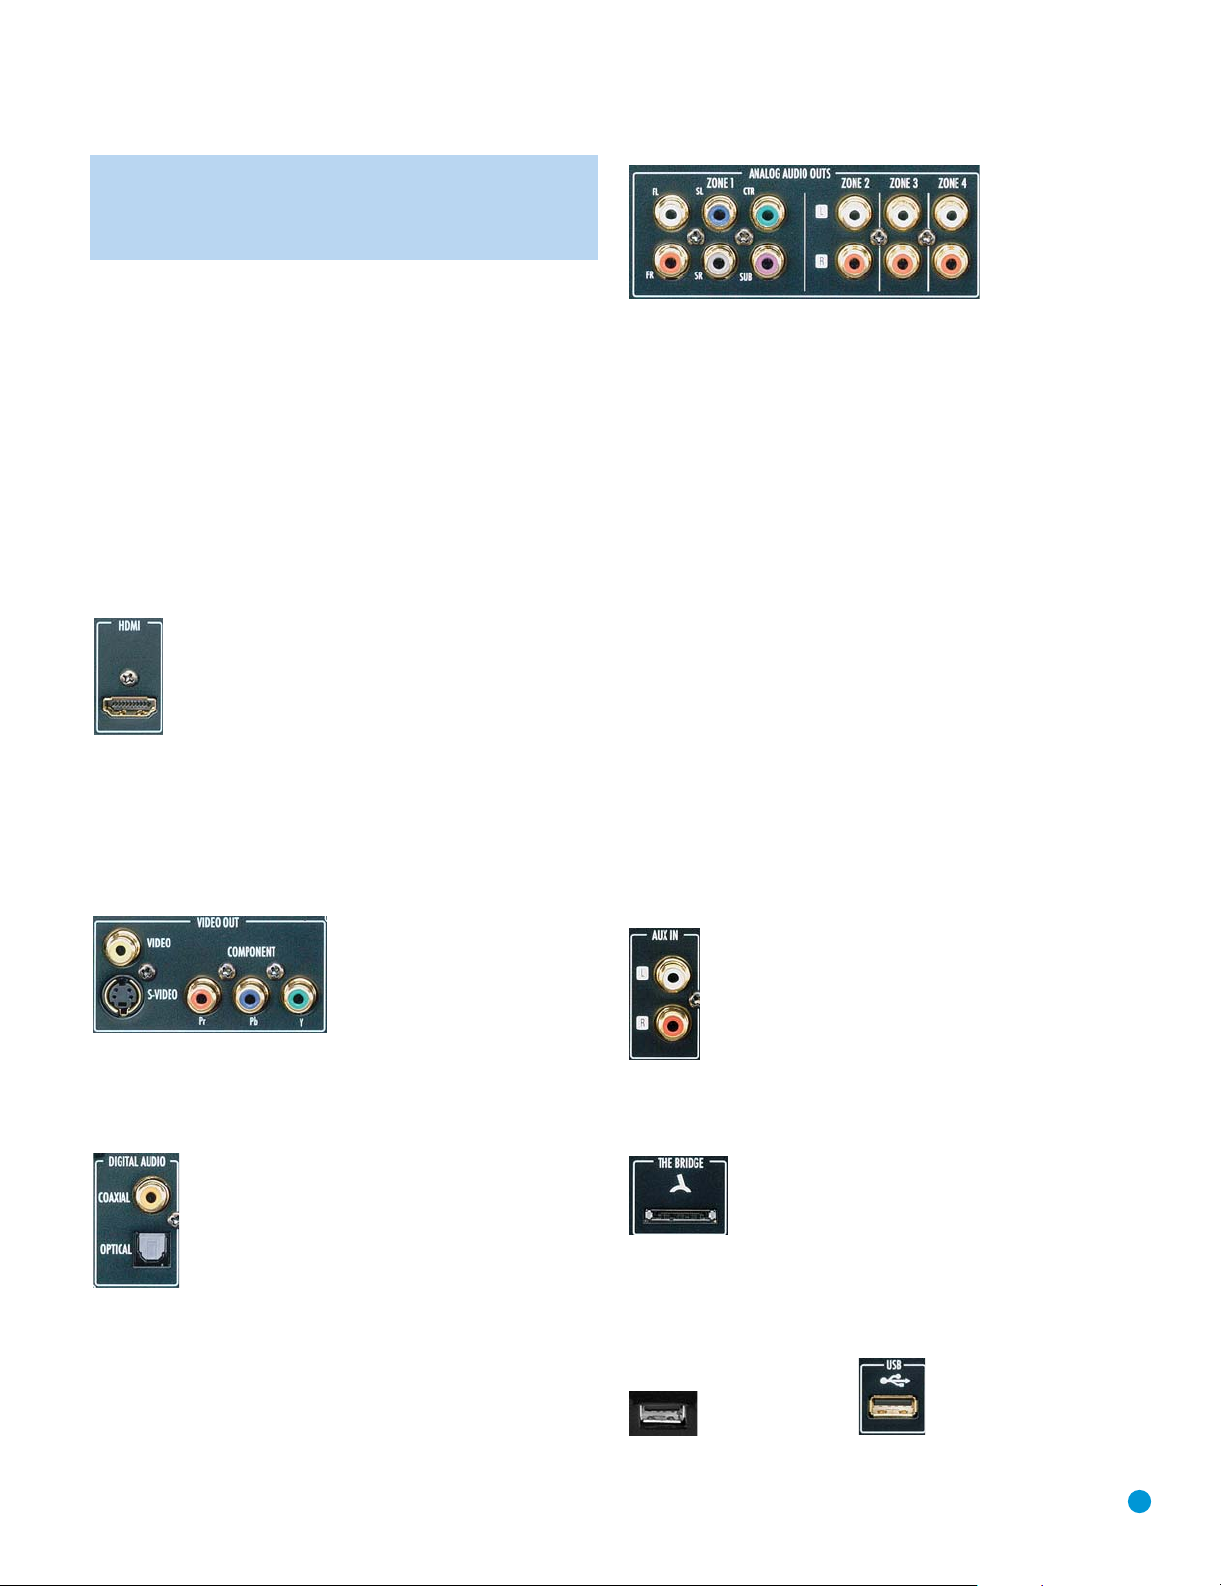
REAR-PANEL CONNECTIONS
Fan VentsNetwork
AC Power
Input
Master Power Switch
RS-232
Port
Remote IR Input
Auxiliary
Audio Inputs
Zone 2/3/4
Audio Outputs
Zone 1
Audio Outputs
Coaxial and Optical Digital
Audio Outputs
Jack
USB
The Bridge
Connection
Component
Video Outputs
Remote IR Output
Port
14
Composite
and
HDMI Output
S-Video
Outputs
NOTE: To make it easier to follow the instructions throughout the manual that refer to this illustration, a copy of this page may be downloaded from the Product Support section at
www.harmankardon.com.
Page 15

REAR-PANEL CONNECTIONS
HDMI Output: Connect this output to an HDMI input on an HDMIcompatible A/ V receiver or video display device. If your A/V receiver or
surround processor is capable of decoding audio (typically, these are
HDMI “repeater” products with HDMI Version 1.1 or higher), no further
audio connection is needed for the main room (Zone 1).
NOTE: If your A/V receiver or video display uses DVI connections,
use an optional HDMI-to-DVI adapter or cable, and make a
separate digital or analog audio connection. If your DVI-equipped
display is not HDCP-compliant, the digital video connection will
not work, and you must use an analog video connection.
Composite and S-Video Outputs: If your video display does not have
HDMI or component video inputs, connect one of these two video outputs
(but not both) to your A/ V receiver/processor or directly to the display.
An S-video connection, if available, is preferred. You may connect both
the HDMI Output and the Composite Video Output to the receiver if it
distributes composite video through a multiroom system.
Component Video Outputs: If your A/V receiver, surround processor
or video display is not equipped for HDMI or DVI, connect these jacks
to the corresponding inputs on the receiver or TV labeled “Y/Pr/Pb”
or “Y/Cr/Cb.” If your video display has component input jacks marked
“High Definition,” use those jacks. Do not connect the Component Video
Output jacks to standard composite video inputs on any device.
Coaxial and Optical Digital Audio Outputs: If your A/V receiver or
surround processor is not capable of processing the audio from an
HDMI stream, connect either of these digital audio outputs (but not
both) to the corresponding input on the receiver/processor. Even though
the Coaxial Digital Output uses the same RCA-type connector as standard analog audio connections, DO NOT connect it to a conventional
analog input jack.
Zone 1 Analog Audio Outputs: If you are not using either HDMI or
a separate optical or coaxial digital audio connection for the Zone 1
(Main Room) audio, connect these jacks to the matching inputs on your
A/V receiver or surround processor. Connect the left- and right-channel
jacks to the receiver to monitor an analog source connected to the
Auxiliary Inputs during recording.
Zone 2/3/4 Analog Audio Outputs: When the DMC 1000 is being
used for multizone operation, connect these jacks to the separate
Zone inputs on your multiroom controller or hub, or the amplifiers feeding
the multizone system.
The Bridge Connection: To use an iPod* as a source for the DMC 1000,
enabling you to select and listen to audio content and charge the iPod,
connect an optional Harman Kardon The Bridge here.
For iPod models with a dock connector.
*
USB Port: This USB port is primarily intended to connect an optional,
external USB hard drive to back up the DMC 1000’s Media Library,
although it may be used for content playback. DO NOT connect a
computer or other host device directly to the DMC 1000.
Auxiliary Inputs: Connect the “Tape Outputs” of an A/ V or stereo
receiver or a surround processor, or the line-level outputs of any audio
product, such as a phono preamp or tape/cassette deck, to transfer
content to the DMC 1000.
Network Jack: Connect this standard RJ45 jack to a broadband
network (Ethernet) connection so that you may take full advantage of
Gracenote MusicID, including obtaining cover art for stored albums,
updating both the database of album information and the system
software, and connecting the DMC 1000 to a home network. When
the network connection is “live,” the lights on either side of the jack
will flash to indicate network activity.
NOTE: When the DMC 1000 is used with an IP-based or wireless control device, connect a router/access point here, making
certain that one connection runs from the router to a broadband
Internet connection. When the DMC 1000 is not connected to the
Internet, Gracenote MusicID retrieves all of the tag information
other than the cover art from a database stored on the DMC 1000’s
hard-disc drive.
Remote Infrared (IR) Input and Output: When the front-panel Remote IR
sensor is blocked, connect the IR Output of your receiver/processor or
an optional IR receiver to the Remote IR Input jack. The Remote IR Output
may be connected to the Remote IR Input of a compatible source
device (or other product) for remote control through the DMC 1000.
When several devices are used, connect them in “daisy chain” fashion.
RS-232 Port: Connect the DMC 1000 to compatible system control
and automation products, using a standard RS-232 cable. As programming a control and automation system is a complex task, requiring specific information and training, we recommend that you consult a trained
installer.
Master Power Switch: Push this switch to the line position (I) to apply
power to the DMC 1000, placing it in the “Full-Off” power mode described
in Table 1. When the unit will not be used for an extended period of
time, or whenever it is necessary to remove the unit from the AC power
0
lines, push the switch to the circle position (
AC Power Input: Connect the AC power cord supplied with the
DMC 1000 to this socket first, and then to an unswitched AC outlet.
Should the cord become damaged, contact your authorized
Harman Kardon dealer for a replacement.
Fan Vent: This area contains vents used by the DMC 1000’s fans to
cool the system. Maintain a clearance of at least three inches to the
nearest surface, to avoid overheating the unit.
) to turn the unit off.
15
Page 16

REMOTE CONTROL FUNCTIONS
Power On
IR Transmitter Lens
Power Off
Menu
Disc Menu
Find
Enter
Next/Step
Search/Slow Forward
Title
Stop
A-B Repeat
Audio
Pause
Open/Close
Status
Back
Previous/Step
Search/Slow Reverse
Play
Record
Play Mode
Setup
Light
Subtitle
/
‹/›
Navigation
⁄
/
⁄
Zoom
Info
Angle
Video Off
Video Mode
Dimmer
Numeric Keys
Clear
16
NOTE: To make it easier to follow the instructions throughout the manual that refer to this
illustration, a copy of this page may be downloaded from the Product Support section at
www.harmankardon.com.
Page 17

REMOTE CONTROL FUNCTIONS
IR Transmitter Lens: When buttons are pressed on the remote, infrared
codes are emitted through this lens. Make sure it is pointing toward the
DMC 1000. An icon will appear in the lower right corner of the frontpanel display to acknowledge that a command has been received.
Power On: Press to turn on the DMC 1000 when it is in the Full-Off,
Sleep or Server power mode. See Table A7 in the Appendix for more
information on the four power modes.
Power Off: Press to turn off the DMC 1000, placing it in the Full-Off,
Sleep or Server mode, depending on the current power mode and the
duration of the button press. See Table A7 in the Appendix for more
information.
Open/Close: Press to open or close the disc drawer.
Menu: Press to display the main menu for media playback and control.
Title: Press to show the title list when a DVD is playing. Some DVD-Video
discs may display their disc menu when this button is pressed.
Status: Press during DVD playback to select a track or chapter, or to
change the time display mode. The progress bar on the top line of the
pop-up box shows the progress of the disc’s playback in relation to its
total time.
Disc Menu: Press to view a DVD’s menu.
Back: Press to return to the previous menu or menu selection level.
Find: When browsing content from the Media Library, press to search
for any audio track stored on the system’s hard-disc drive. When the
Find Track box opens, use the Numeric Keys to enter the name of the
desired track (see Numeric Keys description).
When a DVD is playing, press the Find Button to jump to a desired
chapter, title or time on the disc. Select the desired mode in the Find
menu, and use the Numeric Keys to specify the desired place on the
disc, then press Enter.
F/G/D
Navigation Buttons (
/E): These buttons are used to navigate
the on-screen menus to highlight a desired item. Press the Enter Button
to select the item. When the Zoom function is used with still images,
use these buttons to explore the enlarged image. While viewing a still
G
image, press the
F
Button to rotate it 90º counterclockwise.
Button to rotate the image 90º clockwise, or the
speeds. When a DVD is paused, press this button for slow-play reverse,
each press cycling through the available speeds.
Search/Slow Forward: Press this button to scan forward through the
current program. Each press cycles through the available fast-forward
play speeds. When a DVD is paused, press this button for slow-motion
play, each press cycling through the available speeds.
Record: Press this button to open a menu that allows you to record
content from one media source to another.
NOTES:
• Audio CDs are automatically recorded to the Media Library
when they are inserted.
• Audio sources connected to the Auxiliary Analog Audio Inputs
may only be recorded to the Media Library. You may later
transfer that content from a playlist to a memory card, a
recordable CD or a USB drive.
• To copy recordings from the Media Library to a memory card,
a USB drive or a CD-R/RW disc, first create a playlist of the
desired content. If the content was originally imported to
the Media Library from a memory card or USB device, the
DMC 1000 automatically created a playlist at that time.
• When using the pull-down menus to select a recording
source (“From”) and a destination (“To”) only those sources
with available content will appear. The Auxiliary Analog Audio
Inputs will always appear, because the DMC 1000 is not
capable of detecting the presence of an audio signal.
Pause: Press to momentarily pause audio or video playback. Press
again to resume. While paused, press the Previous or Next Step Buttons
for frame-by-frame advance, or press the Forward or Reverse Search
Buttons for slow-motion play.
Stop: When audio content is playing, press to stop playback. When
a DVD is playing, press once to place the unit in the Resume mode,
where pressing the Play button will resume playback from the place
where it stopped. Press the Stop Button twice when a DVD is playing
to bring the unit to a “full stop.”
Subtitle: Press to select from the available subtitle language options
on a DVD.
Enter Button: Press this button to enter a menu selection or activate
a feature.
Previous/Step: When audio content is playing from a CD or the Media
Library, press this button once to return to the start of the current selection. Press it again to step through previous selections or tracks.
When a DVD is playing, press to return to the beginning of the current
chapter. Press the button again to step back through previous chapters.
Next/Step: When audio content is playing from a CD or the Media
Library, each press advances to the next track. When a DVD is playing,
each press advances to the next chapter.
Play: Press to begin playback.
Search/Slow Reverse: Press this button to scan backward through the
current program. Each press cycles through the available reverse play
Play Mode: Press this button while content is playing, to program
repeat or random play functions.
Audio: Press to select from the available audio format and/or language
options on a DVD.
A-B Repeat: Press to select a passage for repeat play. The first press
determines the beginning of the passage, the second press defines the
end point and the third press cancels A-B Repeat play.
Clear: Press to clear menus from the on-screen display, or to cancel
alphanumeric entries.
Setup: Press to configure system options.
Info: Press to display a DVD’s contents and playback status. This feature
is also available when viewing JPEG still-image files.
17
Page 18

REMOTE CONTROL FUNCTIONS
Zoom: When viewing still images, press this button to toggle through
the available zoom magnifications for a close-up view of the picture.
After the zoom indication clears from the screen, use the Navigation
Buttons to explore the enlarged image.
Numeric Keys: Press these buttons to enter numeric data. Pressing
any numeric button when a DVD is playing will display the “Find” menu.
While managing the Media Library, these buttons may also be used
to enter letters and punctuation when naming playlists or content.
A character-entry dialog box will appear to guide you, as shown in
Figure 35 on page 28. You may use the
to highlight the desired character key and press the Enter Button repeatedly
until the desired character is displayed in the text bar at the top of
the character-entry dialog box. You may find it easier to press the
corresponding Numeric Key to directly select characters. Each press
of a Numeric Key cycles through the upper- and lowercase letters
or symbols shown on the remote and on screen.
Use the alphabetic keys to jump to desired areas of the Media Library
content. Example: While displaying the Media Library organized by artist,
press any letter key to jump to the first artist whose name begins with
that letter.
F/G/D
/ENavigation Buttons
Angle: When a DVD is playing and multiple-angle content is available
(as indicated either on the front-panel display or on screen), press this
button to toggle through the available views.
V/Off: Press to turn off the analog video outputs. This feature is strongly
recommended when a plasma or CRT video display is in use to prevent
“burn-in” of still images, such as menus that may remain on screen for
an extended time period. Press the button a second time to reactivate
the video display. The Video Off command will affect the HDMI Output by
muting both audio and video.
Video Mode: Press to cycle through the available video output settings.
If you inadvertently change the video setting in the on-screen menu
system and the picture is lost or scrambled, press this button to return
to a setting compatible with your video display.
Light: Press to activate the remote’s backlighting system.
Dimmer: Press to dim the front-panel indicators to half-brightness, to
turn them off, or to return them to full-brightness. When the indicators
are fully dimmed, the Power Indicator will remain lit at half-brightness
to remind you that the unit is on. Pressing any button on the remote
when the unit is dimmed will return the front panel to full-brightness.
18
Page 19
IMPORTANT NOTE: All components, including the DMC 1000,
should be turned off and unplugged from AC power before
beginning installation. Do not plug any components back in
until after all connections are completed.
Step One – Placement
Due to the heat generated by other system components, place the
DMC 1000 on its own shelf rather than stacking it directly on another
component. We do not recommend stacking other components on top
of the DMC 1000.
The DMC 1000 may be placed in a rack. See the Technical Specifications
for dimensions.
Step Two – Connect the DMC 1000 to an A/V
Receiver or Processor (Preferred)
If the receiver is HDMI-capable and HDCP-compliant, connect the
HDMI Output to the receiver’s HDMI Input to carry both audio and
video. See Figure 1.
Figure 1 – HDMI Output
If the receiver has only a DVI input, use an HDMI-to-DVI adapter,
and make a separate audio connection.
If the receiver does not have an HDMI or DVI input, select one video
connection, in order of preference: component video, S-video or
composite video. See Figure 2.
INSTALLATION
Figure 4 – Analog Audio Outputs
Skip to Step Four.
Step Three – Connect the DMC 1000 Directly
to a Television (Optional)
If the television is HDMI-capable and HDCP-compliant, connect the
HDMI Output to the TV’s HDMI Input to carry both audio and video.
See Figure 1.
If the TV has only a DVI input, use an HDMI-to-DVI adapter, and make
a separate audio connection. The TV must be HDCP-compliant.
If the television does not have an HDMI or DVI input, select one video
connection, in order of preference: component video, S-video or
composite video. See Figure 2.
For non-HDMI TVs, a separate audio connection is also required.
Although some TVs may be equipped with an optical or coaxial digital
audio connection, most likely you will use a 2-channel analog
connection. Connect the Zone 1 FL and FR audio output jacks
shown in Figure 4 to the corresponding inputs on the TV.
Step Four – Connect Media Sources
• Auxiliary Analog Audio Inputs (Figure 5): Connect the line-level or
“Tape” outputs of an analog device to these inputs. Do not connect a
turntable without a phono preamp. Contact the Harman Kardon Parts
Department to purchase one.
Figure 2 – Component, S- and Composite Video Outputs
For non-HDMI products, a separate audio connection is also required.
If available, connect either the Optical or Coaxial Digital Audio Output
to the corresponding input on the receiver. See Figure 3.
Figure 3 – Coaxial and Optical Digital Audio Outputs
The DMC 1000 is capable of outputting up to four separate analog audio
streams for use in multizone systems. Zone 1 is used for the main listening
room, and includes six channels. Connect the Zone 1 Analog Audio
Outputs to a receiver that does not have an available digital audio input.
If digital audio connections have been made to the receiver, make an
additional connection from the FL and FR jacks to the receiver to monitor
an analog source connected to the Auxiliary Inputs during recording.
See Figure 4.
Figure 5 – Auxiliary Analog Audio Inputs
• The Bridge (Figure 6): Connect Harman Kardon’s The Bridge (sold separately)
here to enjoy content stored on a compatible iPod (not included).
Figure 6 – The Bridge Input
• USB Devices (Figures 7 and 8): Connect a compatible USB client
device to either the front- or rear-panel USB Port. The front-panel port
is located behind the dropdown door.
Figure 7 – Front-Panel USB Port Figure 8 – Rear-Panel USB Port
19
Page 20

INSTALLATION
Step Five – Connect the DMC 1000 to a
Multizone System (Optional)
The DMC 1000 may be used with up to four zones simultaneously,
with any or all zones linked to each other. Zones 2, 3 and 4 are used to
distribute 2-channel audio to other locations. Zone 1 is the main listening
area. The system may be controlled remotely using the Remote IR Input,
the RS-232 Port or a network connection.
Connect the Analog Audio Outputs for each zone in the system to a receiver,
processor, multizone controller or amplifier. See Figure 4 on page 19.
Connect the RS-232 Port to a compatible control device using a standard
null modem cable or adapter. See Figure 9.
Figure 9 – RS-232 Port
Step Six – Connect the Remote IR Input
and Output
Connect the DMC 1000’s Remote IR Input to the compatible IR output
of another product, or to an IR receiver or controller, such as the optional
Harman Kardon HE 1000. When daisychaining devices to allow for remote
control up and down the chain, connect the Remote IR Output to the next
product’s IR input. See Figure 10. The DMC 1000 is compatible with
“stripped carrier” IR signals.
end into an unswitched AC outlet. Due to the DMC 1000’s power requirements, do not plug it into an accessory outlet on another component.
Figure 12 – Master Power Switch and AC Power Input
Step Nine – Insert Batteries in Remote
The DMC 1000 remote control uses two AA batteries (included).
To remove the battery cover located on the back of the remote, gently
lift the tab in the direction of the arrow until the latch releases, and lift
the battery cover up. To replace the cover, carefully insert the two small
tabs at the top of the cover into the recesses at the top of the battery
compartment, and lower the cover, gently pressing the latch at the
bottom until it snaps shut.
Insert the batteries as shown in Figure 13, making sure to observe
the correct polarity.
Figure 10 – Remote IR Input and Output
Step Seven – Network Connection
Connect the Network Jack to a router or Ethernet-compatible controller.
See Figure 11. The network connection is used by Gracenote MusicID
to obtain cover art and database updates via the Internet. When the
Network connection is not used, Gracenote MusicID obtains the tags from
a database stored internally on the DMC 1000’s hard-disc drive.To use
the DMC 1000 as a server on a home network, use the Setup menu to
look up the settings automatically generated when the DMC 1000 is
booted, and program your home network devices accordingly.
Figure 11 – Network Jack
Step Eight – Plug In AC Power
To avoid possible damage from a transient power surge at plug-in, switch
the Master Power Switch to
of the AC Power cord into the receptacle (see Figure 12), and the male
20
the circle position (0)
. Plug the female end
Figure 13 – Remote Battery Compartment
When using the remote, remember to point the lens toward the front
panel of the DMC 1000. The IR receiver is located immediately to the
left of the Message Display. Make sure no objects, such as furniture, are
blocking the remote’s path. Bright lights, fluorescent lights and plasma
video displays may interfere with the remote’s functioning. The remote
has a range of about 20 feet, depending on the lighting conditions.
It may be used at an angle of up to 30 degrees to either side of the
DMC 1000.
If the remote seems to operate intermittently, make sure the batteries
have been inserted correctly, or replace both batteries with fresh ones.
Page 21

INITIAL SETUP
Step One – Turn On the DMC 1000
The DMC 1000 has four power states, each designed to minimize
unnecessary power consumption. See page 25.
The description of each mode and the DMC 1000’s response to the
power controls is shown in Table A7 in the Appendix.
IMPORTANT NOTE:
the system components in reverse order, starting with the video
display, then any receiver or processor, and finally turn on the
DMC 1000.
The first time the system is used, turn it on as follows:
Switch the Master Power Switch to
DMC 1000 in Full-Off power mode. See Figure 14.
Figure 14 – Master Power Switch
The “Start DMC 1000”message will appear on the front panel, and
the “Starting . . .
a few minutes to fully start up.
The first time the DMC 1000 is turned on, the End User License Agreement
(EULA) will appear. See Figure 15. The unit will not respond to any other
commands until you have scrolled through the entire agreement, and
accepted its terms. A copy of the complete EULA appears in the back
of this manual, starting on page 41.
”
When the HDMI Output is used, turn on
the line position (I)
message will appear on screen. Allow the system
, placing the
Step Two – Display the Setup Menu
The first time the system is used, the Setup Menu should be configured.
After Initial Setup is completed, unless the user’s requirements change,
it is usually not necessary to revisit the Setup Menu. Press the Setup
Button (see Figure 17) to display the Setup Menu (see Figure 18).
Figure 17 – Setup Button
Figure 18 – Media Library Setup Menu
The Setup Menu, as with all menus on the DMC 1000, is navigated
F/G/D
using the
an item highlighted on screen.
There are six
General and Advanced.
/ENavigation Buttons. Press the Enter Button to select
Setup Menus:
Media Library, DVD Player, Audio, Video,
Figure 15 – End User Agreement
After you have accepted the EULA, the Main Menu will be
displayed. See Figure 16.
Figure 16 – Main Menu
The Main Menu is the usual starting point for each listening
or viewing session.
Step Three – Media Library Setup
The Media Library Setup Menu determines what action the DMC 1000
takes when an audio disc is loaded. Any time an audio CD is loaded, it is
automatically copied at high speed to the Media Library. The DMC 1000
does not play audio CDs directly from the disc; playback is from the
Media Library. See Figure 18.
Audio Disc Insert Preferences: Select Record Only to copy the disc to
the Media Library without playing it, or Play and Record to begin playback
from the Media Library after recording commences.
Audio Encoding Quality: Select the format to be used for recording
audio CDs to the Media Library.
•
Basic (MP3: 128kb/sec)
•
Medium (MP3: 192kb/sec)
•
High (MP3: 256kb/sec)
•
Best (MP3: 320kb/sec)
•
Lossless (.wav)
21
Page 22

INITIAL SETUP
Step Four – DVD Player Setup
Figure 19 – DVD Player Setup Menu
The DVD Player Setup menu (shown in Figure 19) contains settings that affect
DVD playback. The other media sources are not affected by these settings.
Preferred Subtitle Language: When available on the disc, the
DMC 1000 will automatically select this subtitle language. Choose from
English, French, German, Spanish, Italian, Other and Off. When Other is
selected, a dialog box appears, prompting for a numeric code. Look up
the code for the desired language in Table A8 in the appendix. When Off
is selected, no subtitles will be displayed unless selected during playback
using the Subtitle Button on the remote.
Due to variations in how DVD discs are authored, we
NOTE:
recommend selecting subtitles using the disc’s own menus. The
languages available are usually listed on the disc’s jacket.
Preferred Audio Language: When available on the disc, the DMC 1000
will automatically select this language for audio playback. Choose from
English, French, German, Spanish, Italian, Other and Off. When Other is
selected, a dialog box appears, prompting for a numeric code. Look up
the code for the desired language in Table A8 in the appendix. When Off
is selected, the disc’s default language will be used. The user may select
another language during playback by pressing the Audio Button on the
remote. The Audio command may offer a choice of surround sound
formats or director’s/cast’s commentary.
As with subtitles, we recommend selecting the audio
NOTE:
track using the disc’s own menu system.
Parental Control: This setting allows the user to restrict viewing of certain
materials by requiring a password to be entered before DVDs encoded
with a higher rating will play. The restrictions are based on a rating system
that roughly corresponds to the Motion Picture Association of America
(MPAA) voluntary ratings system.
Select this setting, and if no password was set previously, a dialog box
appears. Set a new password by entering a four-digit number, using the
Numeric Keys in the Password and Confirm Password boxes. If a password has
been set, you will be prompted to enter it before you may make any changes.
If you correctly enter the password, you may navigate to the
Rating Level Limit and select a new level:
• Off: Any DVD may be viewed without entering the password.
• 1–G: Corresponds to the MPAA’s “G” (General Audiences) rating,
and is considered suitable for all viewers.
• 2: Intermediate level between the “G” and “PG” ratings.
22
• 3–PG: Corresponds to the MPAA’s “PG” (Parental Guidance) rating.
• 4–PG-13: Corresponds to the MPAA”s “PG-13”
(Parental Guidance and 13 years old) rating.
• 5: Intermediate level between the “PG-13” and “R” ratings.
• 6–R: Corresponds to the MPAA’s “R” (Restricted) rating.
• 7–NC-17: Corresponds to the MPAA’s “NC-17”
(17 years and older) rating.
• 8–Adult: All DVDs, including adult materials, can be played.
When you have finished creating a new password and/or selecting a new
Rating Level Limit, navigate to the Save box and press the Enter Button.
Select Cancel if you don’t want to make any changes.
Video Presentation Mode: Select Original to display videos and
pictures in their native aspect ratio, or Full when the DMC 1000 is
connected to a 4:3 aspect ratio display.
When Full is selected, 16:9 materials will appear on 4:3 displays in
“letterbox” format, with black bars at the top and bottom of the screen.
On 16:9 displays, 16:9 materials will fill the screen, but 4:3 materials will
appear with black or gray bars on the left and right sides of the screen.
NOTE: The DMC 1000’s own menu screens are always output
in widescreen (16:9) mode at a maximum resolution of 720p,
depending on the display’s capabilities. When viewed on a 4:3
display, the menu screens will appear in letterbox format.
Dynamic Range Compression: When playing specially encoded Dolby
Digital DVDs, turn on Dynamic Range Compression to reduce the levels
of louder passages while maintaining the intelligibility of dialog and softer
passages. This feature is useful to avoid disturbing others while watching
action-packed DVDs. This is similar to the “Night Mode” function on many
DVD players and A/V receivers.
DVD Bass Management: If all six of the Zone 1 Analog Audio Outputs
are connected to a receiver or processor that does not perform bass
management on its 6-channel audio inputs, turn this setting on and
configure the speaker settings in the Audio Setup menu.
If the receiver is capable of analog bass management, leave this setting
in the default Bypass mode and configure the receiver’s speaker settings.
When this setting is off, the DMC 1000 speaker settings will have no effect.
Select the Stereo/LtRt setting to output a 2-channel recording, or a
downmix of a surround-encoded program, through the Left- and RightChannel jacks of the Zone 1 Analog Audio Outputs. When the Bass
Management setting is set to either of the other settings, these jacks
will only output the front left- and right-channel information, omitting the
center and surround information.
NOTE: The Stereo setting is required when either the Digital Audio
Out Format or HDMI Audio Out settings in the Audio Setup menu
are set to Uncompressed (i.e., output a 2-channel PCM signal).
Content Play Mode: This setting compensates for disc authoring errors
that occur when the frame rate is not properly maintained during the conversion from film to video. It only affects progressive scan display using the
HDMI Output or the Component Video Outputs. Three choices are available:
• Auto: This is the recommended setting. The DMC 1000 analyzes the
signals from the DVD, determines whether it was originally recorded
on video or shot on film, and adjusts the output accordingly.
Page 23
INITIAL SETUP
• Film: Choose this option for material that was originally shot on film,
even though you are viewing it on video via a DVD.
• Video: Choose this option for material that was shot directly to video,
such as concerts and sports programming.
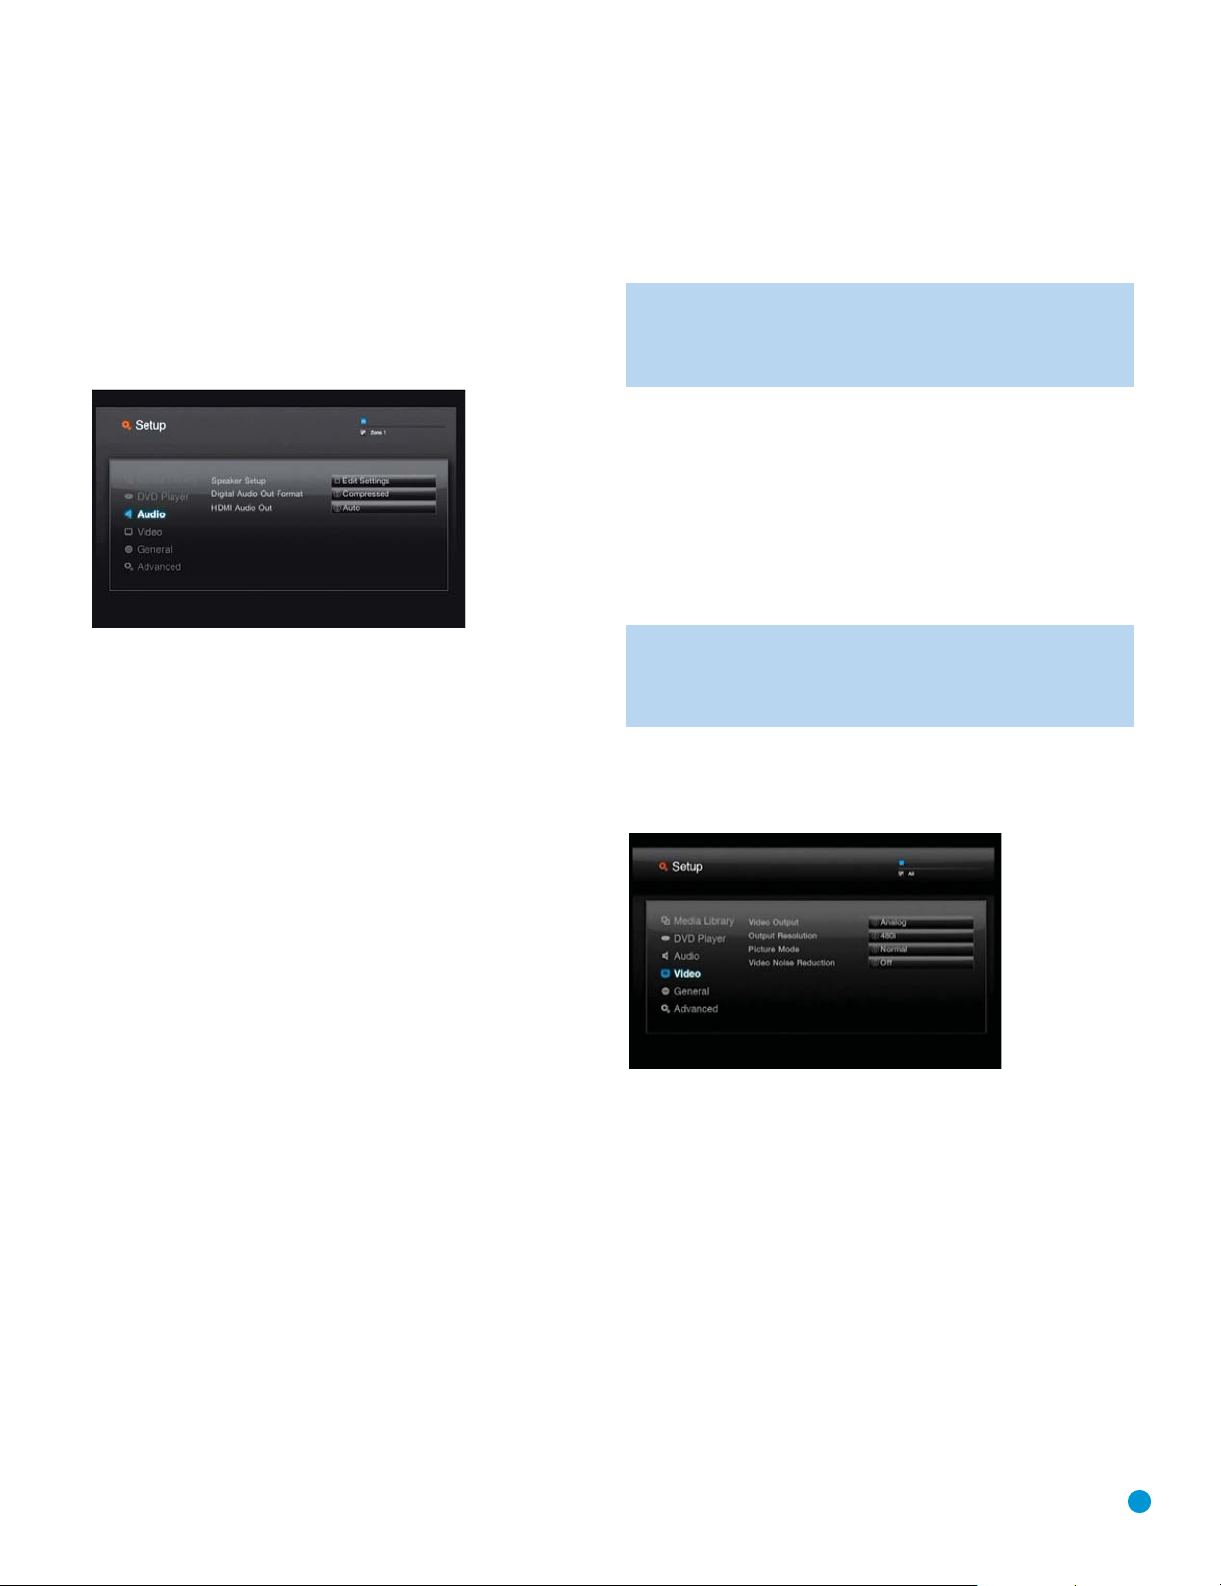
Step Five – Audio Setup
Each setting applies to a certain type of audio output, but only for
Zone 1. The audio output to Zones 2, 3 and 4 is always full-range,
2-channel analog line level. See Figure 20.
Figure 20 – Audio Setup Menu
Speaker Setup: A dialog box appears, allowing you to program the
Speaker Size settings used with the Zone 1 (6-Channel) Analog Audio
Outputs. The settings are dependent on the DVD Bass Management
setting in the DVD Player Setup menu.
• DVD Bass Management Bypass: This is the default system setting,
and should be used when the receiver or processor is capable of
performing bass management. Configure the speaker settings on the
receiver. All main speakers default to the Large (full-range) setting,
and the subwoofer is on. These settings may not be changed.
• DVD Bass Management On: Use this setting if the receiver is not capable
of performing bass management, to ensure that the low frequencies steered
to each channel match the frequency-response capabilities of the speakers.
■
The default settings are Small (only frequencies of 200Hz and higher
are passed) for all of the main speakers, and the subwoofer is on.
■
With the left and right speakers set to Large, the center speaker
may be set to Small or None, but not Large. Change the Center and
Surround settings to None for stereo mode when listening to 2-channel
recordings. The subwoofer will remain on. Use this configuration
when you desire the added power of a separate subwoofer for
the low frequencies.
■
Change the left and right speaker setting to Small when using
a speaker system consisting of small satellites and a subwoofer.
The Center and Surround settings will automatically change to Small,
and the Subwoofer setting will remain on; neither setting may be
changed.
• DVD Bass Management Stereo/LtRt: Use this setting to output
a 2-channel signal without a separate low-frequency channel for
the subwoofer. The front left and right speakers default to the Large
(full-range) setting, with the center, surround and subwoofer speakers
all disabled. These settings may not be changed.
Select Save when you have finished your adjustments, or Cancel to return
to the Audio Setup Menu without making any changes.
Digital Audio Out Format: This setting applies to the Optical and Coaxial Digital
Audio Outputs only. If the receiver or processor is capable of decoding Dolby
Digital, DTS or other compressed digital bitstreams, select the Compressed
setting to output these bitstreams in their original format. Otherwise, select
Uncompressed to output all audio as 2-channel PCM bitstreams.
NOTE: When Uncompressed is selected, change the DVD Bass
Management setting in the DVD Player Setup menu to “Stereo.”
It is not possible to simultaneously output a 5.1-channel analog
signal and a digital PCM (2-channel) signal.
HDMI Audio Out: We recommend leaving this setting at the default Auto,
in which the DMC 1000 will communicate with the device connected to
the HDMI Output and automatically select a compatible audio output setting
based on the other device’s capabilities. The other settings are:
• Compressed: Passes the audio bitstream in its original format,
such as Dolby Digital or DTS.
• Uncompressed: Decodes the audio bitstream into up to 5.1 channels
of PCM audio.
• Off: Mutes audio via the HDMI Output.
IMPORTANT NOTE:
When the HDMI Output is active for audio,
the Optical and Coaxial Digital Audio Outputs are muted. If the
HDMI Output is being used for video only and the S/P-DIF outputs
are required for audio, turn the HDMI Audio Out setting Off.
Step Six – Video Setup
These settings are usually set automatically by the DMC 1000, depending
on which video output is in use. See Figure 21.
Figure 21 – Video Setup Menu
Video Output: When both the analog video outputs and the HDMI Output
are connected, select the desired video output. Both HDMI and the analog
video outputs are not available simultaneously. Example: The HDMI Output
is connected to a display in the main listening room and the Composite
Video Output is being distributed to a multizone system.
Output Resolution: Select the desired video output resolution. If you
select a resolution higher than the display’s capabilities, the screen will go
blank or be scrambled. If that happens, press the Video Mode Button on
the remote to cycle through the settings until a compatible setting is
selected. The video output resolution is indicated on the front panel.
Picture Mode: Select from the Normal, Vivid, Sport and Nature picture
settings to optimize viewing of various types of programs. This setting is
a matter of taste, and there is no incorrect setting.
23
Page 24
INITIAL SETUP
Video Noise Reduction: We recommend that you leave this setting
at the default “Off”. If video signal noise is observed when using the
analog video outputs, turn this setting on to reduce the noise and
improve the picture quality.
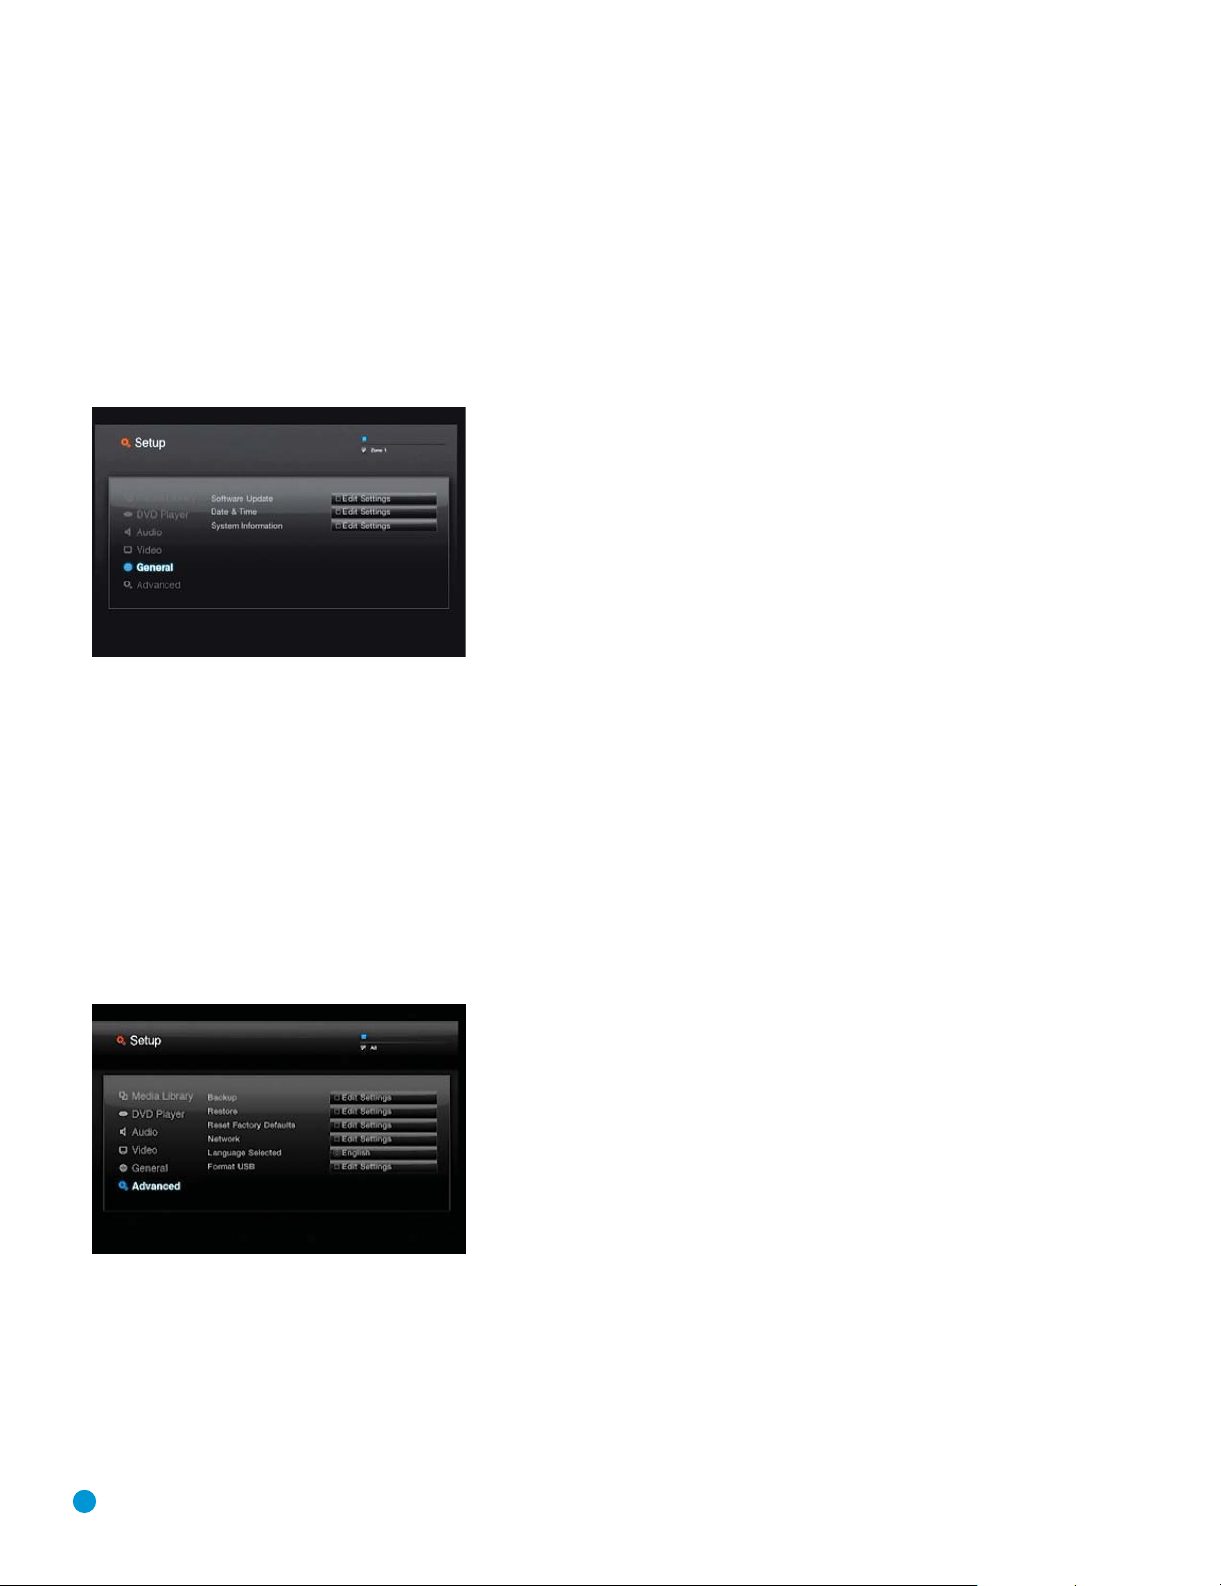
Step Seven – General Setup
These general system settings should be accessed with caution.
See Figure 22. If you are uncertain about the proper setting for
any of these options, consult with your dealer or installer, or contact
Harman Kardon Customer Service at www.harmankardon.com.
Figure 22 – General Setup Menu
Software Update: When system software updates are released, this
setting will be used during the installation process. Do not make any
changes here unless instructed to do so.
Date & Time: The first time the DMC 1000 is used, set the local time
and date here.
System Information: This setting displays the software version number
and the amount of hard-disc space available. It is informational only.
Reset Factory Defaults: This setting is used to return all of the Setup Menu
settings to their factory defaults. They will then have to be reconfigured
as required for your application. The contents of the Media Library are
not affected by this command.
Network: When the DMC 1000 is connected to a network, the network
settings are identified here. These settings may be used with other devices
when the DMC 1000 is to be used as a media server as part of a home
network. This feature also allows you to test the network connection to make
certain that Internet access is available. Press the “9” key on the remote
twice, to display the Internet Protocol (IP) address on the front panel.
Language Selected: Select the display language for the DMC 1000’s menus
here. Choose from the default English, or Spanish, French, German or Italian.
Format USB: This command allows you to reformat a USB device, which
completely erases the contents of the drive. Exercise great caution before
reformatting a drive.
Now that your DMC 1000 has been installed and configured, it’s easy
to enjoy your favorite audio and video programs from a variety of media,
including DVDs, CDs, memory cards, USB drives and the DMC 1000’s
own Media Library.
Step Eight – Advanced Setup
The settings shown in Figure 23 should be used with caution. If you have
any doubts about whether it is appropriate to change these settings, consult with your Harman Kardon dealer or custom installer.
Figure 23 – Advanced Setup Menu
Backup: This setting is used to back up the system and Media Library
contents to a USB storage device.
Restore: This setting is used to restore a backup copy of the system
settings and Media Library contents. The existing contents of the Media
Library will be erased. Use this feature only in the unlikely event that
the hard-disc drive in your DMC 1000 has been replaced.
24
Page 25
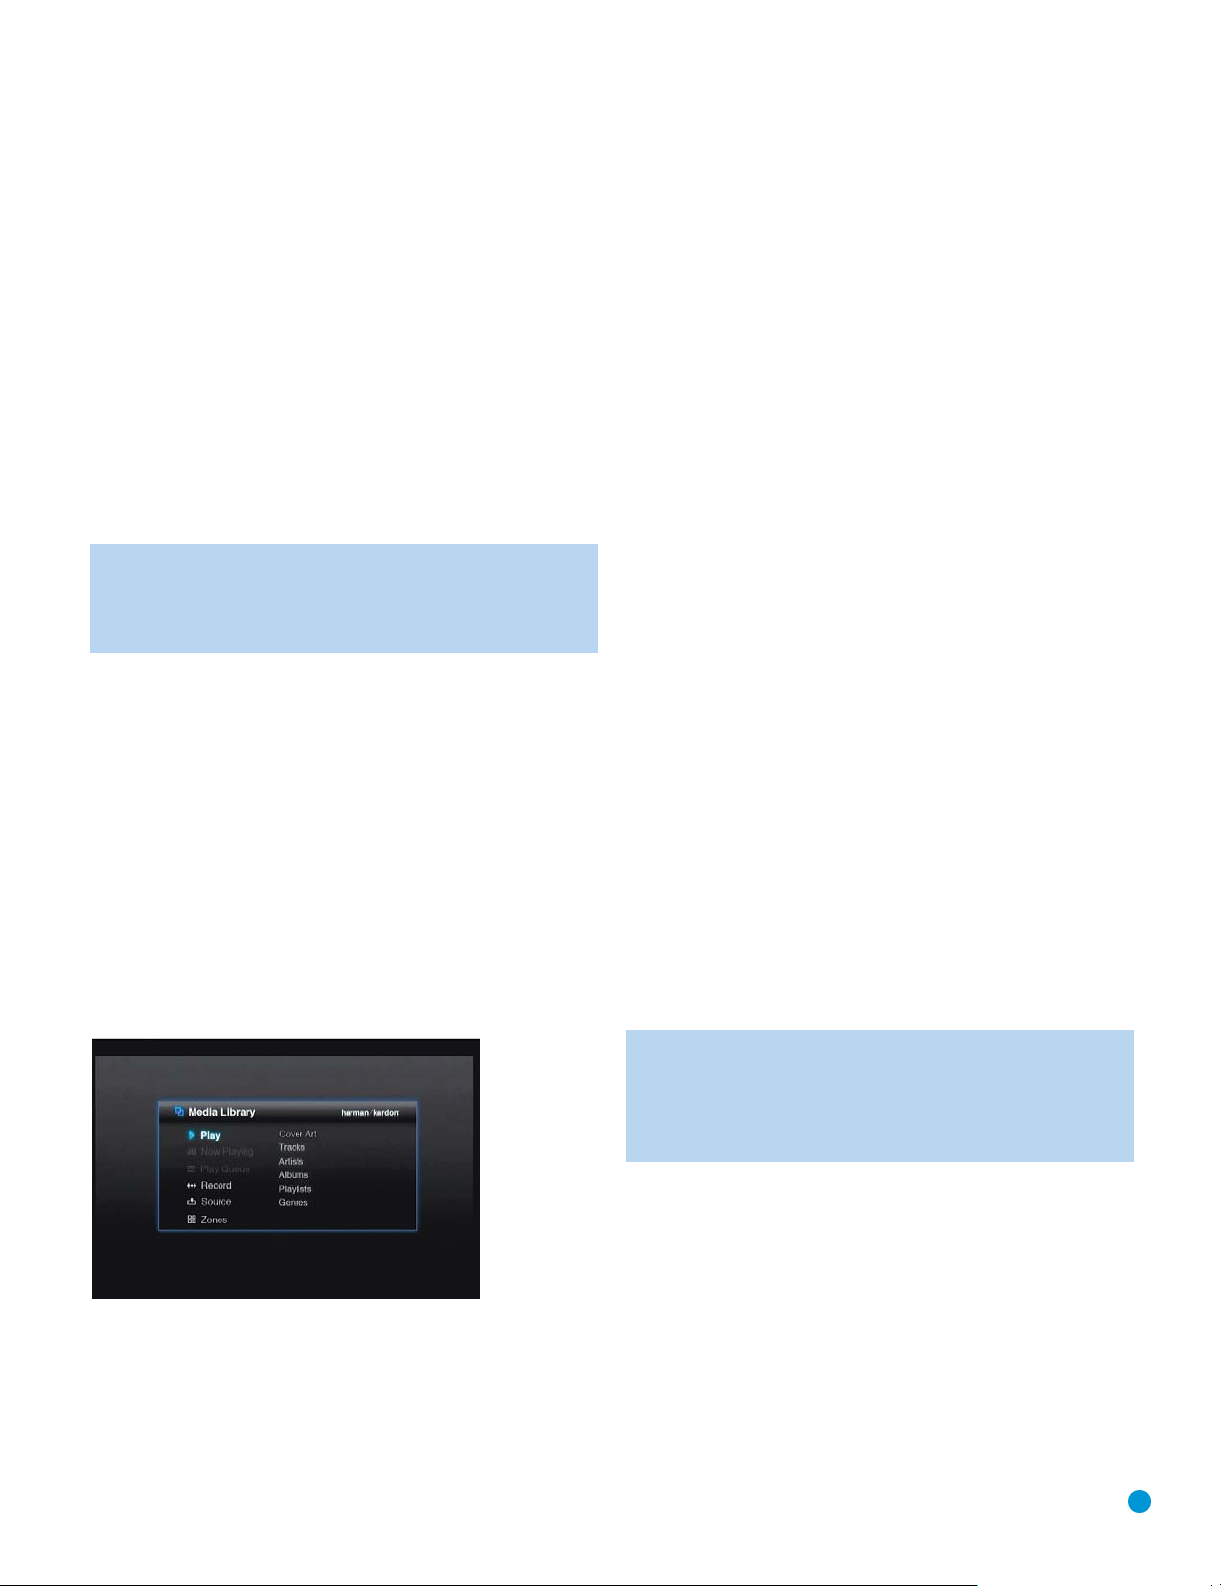
OPERATION
Turning On the DMC 1000
The DMC 1000 has four power states, each designed to minimize
unnecessary power consumption.
Full-Off Mode (Dim Blue) – The DMC 1000, including its hard-disc
•
drive, is fully powered down, but is ready to be turned on using the
front panel or remote control.
•
Sleep (Standby) Mode (Amber) – The DMC 1000 will not respond
to any commands other than to power on.
•
Server Mode (Amber) – The DMC 1000 may be controlled via the
RS-232 Port or the Network Connection, but the on-screen menu
system is off.
•
Full-Power Mode (Bright Blue) – The DMC 1000 operates normally.
See Table A7 in the Appendix for a description of each mode and the
DMC 1000’s response to the power controls.
NOTE:
There is technically a fifth state of “no power,” in which
the power cord is unplugged and/or the rear-panel Master
0
Power Switch is turned off in the circle position (
it is unlikely you will see this situation in normal use.
Press the front-panel
on the DMC 1000 when the
When the
Control
Indicator turns amber), or press and hold either control to turn the
DMC 1000 fully off (Power Indicator turns dim blue).
When the DMC 1000 is in
Server Mode message is displayed), press the
remote to switch to Sleep Mode (Power Indicator remains amber).
Power Indicator
or remote
Power Control
is bright blue, press the front-panel
Power Off Button
or remote
Power Indicator
to switch to
Server Mode
Power On Button
is dim blue or amber.
(Power Indicator is amber and
). However,
Server Mode
Power Off Button
(Power
to turn
Power
on the
Using the DMC 1000
After turn-on, the DMC 1000 will display its Main Menu (see Figure 24).
If the Media Library is loaded with content, any cover art will appear in
a mosaic in the background.
a memory card or a USB drive. You may also control audio playback in
up to four separate zones at a time. The DMC 1000’s sophisticated yet
easy-to-use on-screen menus will guide you at every stage.
Playing DVDs and CDs
With the DMC 1000 turned on, press the Open/Close Button on the front
panel or remote. Gently place the disc in the tray, making sure to seat it
properly. Refer to the Media Compatibility section for details on which disc
types may be played in the DMC 1000. Other disc types will not play.
The DMC 1000 will take a few moments to read and identify the disc.
If the disc is a DVD, it will automatically begin playing. Although we
recommend using the disc’s own menu system for navigation, audio track
selection and subtitle language selection, see the DVD Playback section
for instructions on using the DMC 1000’s commands for these functions.
If the disc is an audio CD, the DMC 1000 will automatically copy it to the
Media Library at high speed, displaying the progress of the recording as
a percentage. The DMC 1000 is capable of playing back the recording
almost as it is being made (if your unit has been set up for Play and Record
operation). Once the recording is completed, you may remove the disc and
continue to listen to the content as it is played from the Media Library.
When a CD or other music content is added to the Media Library, the
DMC 1000 accesses Gracenote MusicID, which includes a vast online
database containing identifying information for almost every commercial
CD in existence, as well as cover art for the vast majority of CDs. This
powerful service enhances the listening experience, as the user is able to
view album, artist and track information and the cover art during playback.
This information is then stored in the Media Library. A copy of the database
resides in the DMC 1000 so that even when it is not connected to the
Internet, the identifying information for most popular CDs (except for cover
art) is retrieved and stored with the audio in the Media Library. However,
for the latest and most complete version of the database, we recommend
connecting the DMC 1000 to a high-speed Internet access point. Music
recognition technology and related data are provided by Gracenote.
Gracenote is the industry standard in music recognition technology and
related content delivery. For more information, visit www.gracenote.com.
NOTE: When no cover art is available, the DMC 1000 will display
a generic musical-note icon (see, for example, Figure 37). This
may occur if the DMC 1000 is not connected to the Internet, if a
noncommercial disc is loaded, or in rare instances when there is
a gap in the database.
Figure 24 – Main Menu
From the Main Menu, you may play content from the Media Library or
select another source for playback. You may program a Play Queue of
items for immediate playback, or a Playlist that is stored for later retrieval.
Record an audio stream from a device connected to the Auxiliary Inputs,
or copy a playlist to any of the portable media, including a recordable CD,
DVD Playback
The DMC 1000 supports all of the features and options of standard
DVDs. However, not all discs offer each option at all times. If the “Function
Prohibited” icon (Ø) appears, then you are attempting a function that is
not available at that time or with that media, and it does not indicate a
problem with the DMC 1000.
25
Page 26
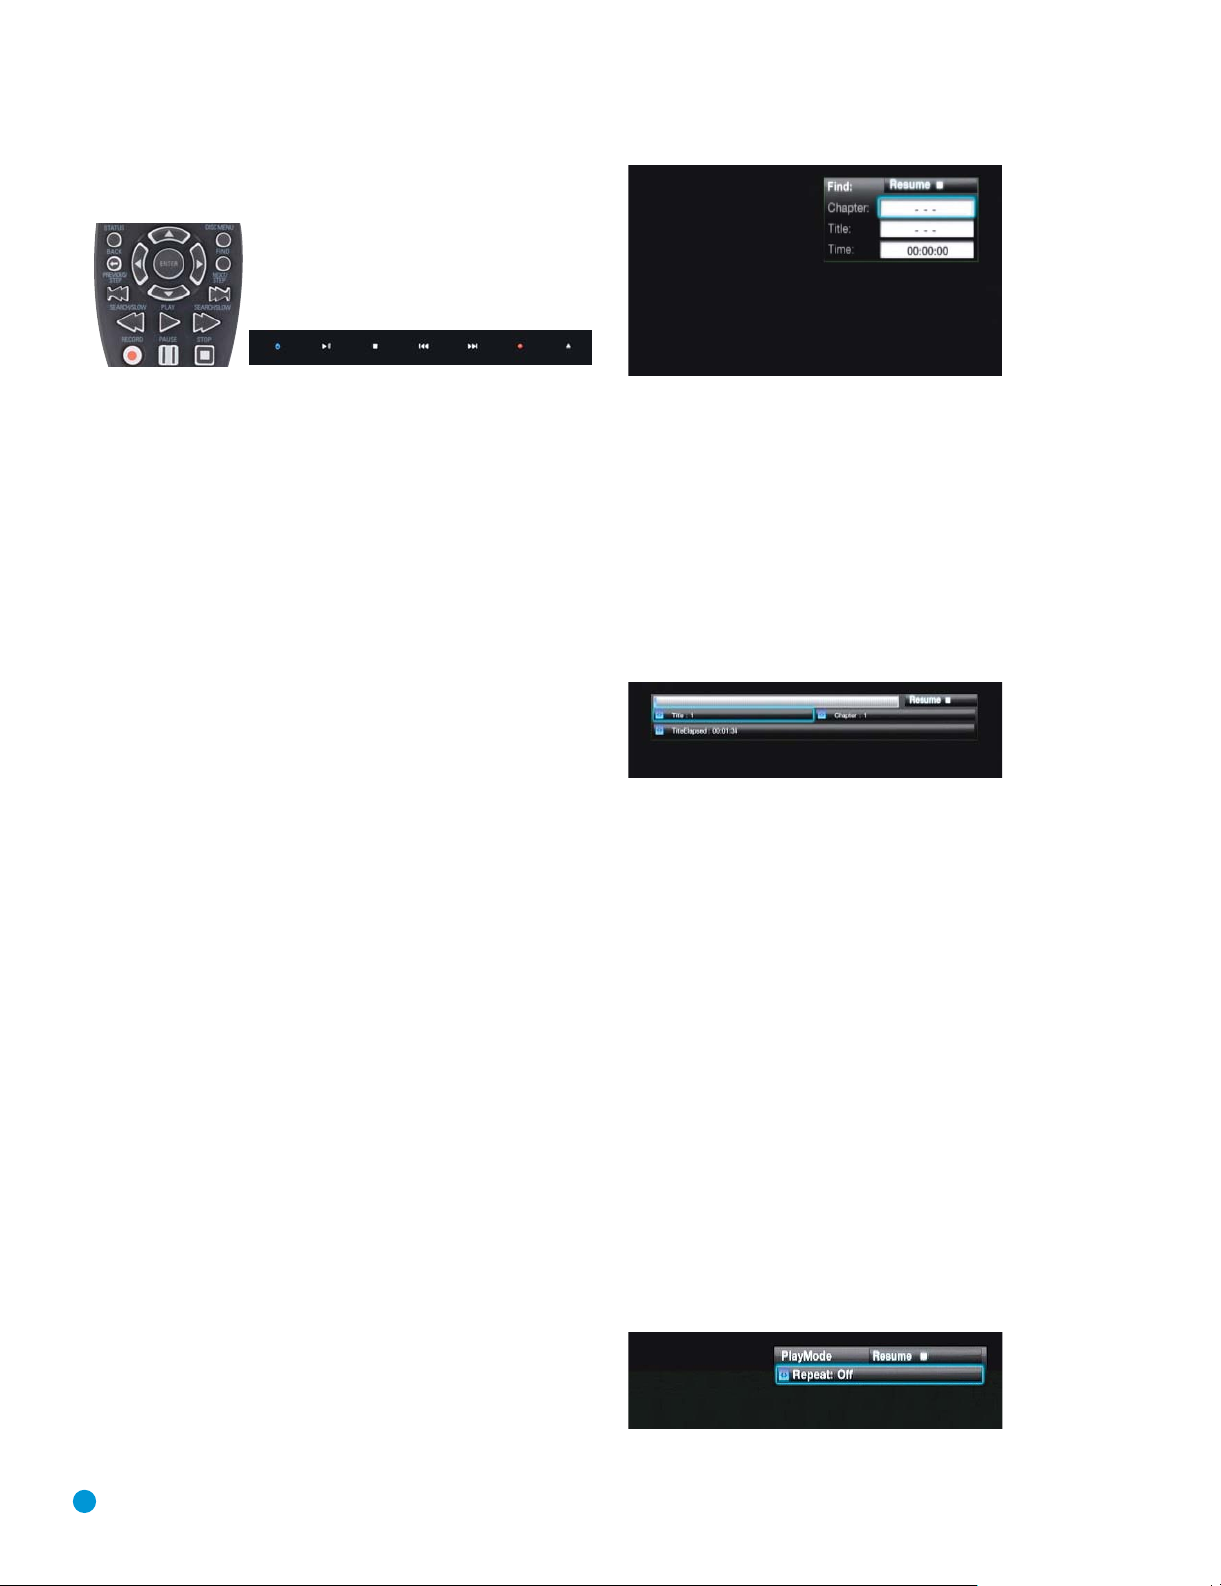
OPERATION
Use the transport controls on the front panel or remote for standard
disc playback. See Figure 25.
Figure 25 – Transport Controls
G
•
Play: Press Play (G) on the remote or Play/Pause (
B
) on the front
panel to begin playback or resume playback after it has been paused.
G
•
Pause: Press Pause (B) on the remote or Play/Pause (
B
) on the front
panel to pause playback.
•
Stop/Resume: Press Stop (A) to stop playback and place the DVD in
resume mode. Press the Play Button (
G
) to resume play from the point
where it was stopped. If the DVD is removed, when you reload it, the
DMC 1000 will recognize it as a previously played disc and automatically resume play from the point at which it was stopped. The Resume
and Disc Recognition features are not available for audio content.
•
Chapter/Track Skip: Press Next/Step () or Previous/Step ()
to move forward or backward by chapter on a DVD, or by track when
playing other content.
•
Fast Search: Press Forward Search (GG) or Reverse Search (FF)
on the remote or press, hold and release Next/Step (
Previous/Step (
) on the front panel to scan forward or backward
) or
at high speed within a chapter or track. Each additional press (or
press, hold and release) of these buttons cycles through the available
fast-search speeds: 2x, 4x, 8x,16x, 32x.
•
Slow Play: After pausing playback, press Forward Search (GG)
or Reverse Search (
Next/Step (
FF
) on the remote or press, hold and release
) or Previous/Step () on the front panel to play
the DVD in slow motion. Each additional press (or press, hold and
release) of these buttons cycles through the available slow-play
speeds: 1/2x, 1/4x, 1/8x, 1/16x.
•
Frame-by-Frame Advance: After pausing playback, press Next/Step
(
) to advance through the DVD one frame at a time. Frame-by-frame
movement is not available in reverse.
Chapters and Titles
DVDs contain one or more features organized as titles. We recommend
selecting titles using the disc’s menu system, where they are identified
by name.
Because titles can run for several hours, they are generally divided into
chapters, each of which is typically no more than a few minutes long,
encompassing one or more scenes. Chapter selection allows you to go
straight to your favorite section of the movie, or to easily skip past sections you’ve already viewed. Most discs offer a chapter selection menu
that includes thumbnail images for easy identification.
To select a chapter or title by number, press the Find Button on the
remote to display the Find Menu. See Figure 26. Pressing any Numeric
Key will also display the Find Menu, with the number shown in the
Chapter cell. Press the Enter Button to jump directly to that chapter.
Figure 26 – Find Menu
To select a title by number, navigate to the Title cell, enter the title number
and press the Enter Button.
To begin play from a specific time location within the title, also known as
“Time Search,” navigate to the Time cell and enter the desired starting
point. Press the Enter Button, and play will immediately begin at the
selected time.
You may also select a title or chapter, using the Status Display.
Status Display
Press the Status Button to view the Status Display (see Figure 27).
Figure 27 – Status Display
A temperature bar graphic appears at the top of the Status Display to
indicate the percentage of the selection that has been viewed.
o
Highlight either the Title or Chapter cell and press the Enter Button (
to view a list of the titles and chapters available. Use the
F/G/D
)
E
/
Navigation Buttons to select the desired title or chapter number, and press
the Enter Button to begin play at that point.
Highlight the Time Display cell at the bottom of the Status Display, and
each press of the Enter Button changes the time display both on screen
and on the DMC 1000’s front panel as follows: Title Elapsed, Title
Remaining, Chapter Elapsed and Chapter Remaining. The Time Search
function is not available in this display menu.
Press the Status Button or the Clear Button to remove the Status Display
from view without making a selection.
Repeat Play
You may repeat the current chapter or title, or select a passage to repeat
(A-B Repeat), and it will repeat until play is stopped or the repeat function
is turned off.
During playback, press the Play Mode Button to display the Play Mode
menu (Figure 28).
Figure 28 – Play Mode Menu
26
Page 27

OPERATION
With the Repeat cell highlighted, use the F/GNavigation Buttons to cycle
through the choices of Repeat Off, Repeat Chapter and Repeat Title.
Press the Enter Button when the desired option appears.
A-B Repeat Play
To initiate A-B Repeat Play, press the A-B Repeat Button at the beginning
of the section to be repeated. The A-B Repeat Display will appear
(see Figure 29). Press the A-B Repeat Button a second time to indicate
the end of the passage.
Figure 29 – A-B Repeat Display
The display will indicate the starting and ending times selected for
repetitive play, as well as the Title Elapsed time for reference. If you have
changed the time display mode to something other than Title Elapsed,
the starting and ending times will correspond to that display mode.
Press the A-B Repeat Button a third time to end repetitive play.
Audio Soundtracks
Many DVDs contain more than one audio soundtrack, which may include
different languages, surround sound formats (such as Dolby Digital and
DTS) or special commentaries by the director or cast.
Although we recommend using the disc’s menus to select from the
available soundtracks, you may display the current selection by pressing
the Audio Button during playback. See Figure 30.
Camera Angles
Some DVDs include multiple camera-angle views of certain scenes, allowing
you to gain a different perspective on the program. If multiple angles are not
available on the current disc, or during the current section of the disc, the
Prohibit Symbol (Ø) will appear if you try to use this feature..
When multiple-angle scenes are available, the Angle Display will appear
on screen (see Figure 32), indicating the current angle and the number
of available angles. Each press of the Angle Button changes to the next
viewing angle. The Angle Display remains on screen as long as multiple
angles are available.
Figure 32 – Angle Display
Audio Playback From the Media Library
The DMC 1000’s Media Library makes it easy to store all of your audio
content in one place for convenient playback in your main home theater
room, in three remote “zones” (if you have set up the DMC 1000 as part
of a multizone system), on a device connected to a home network, or
anywhere else when you transfer the content to portable media.
When you first turn on the DMC 1000, the assumption is that you will
most likely want to listen to content stored in your Media Library, and
the Main Menu (see Figure 33) is configured that way.
Figure 30 – Audio Display
Use the F/GNavigation Buttons to cycle through the available audio
soundtracks, and press the Enter Button when the desired option
is displayed.
Subtitles
Some DVDs contain one or more subtitle languages. Although we
recommend using the disc’s menu system to turn subtitling on or off
and to select a language, you may also do so by pressing the Subtitle
Button. The Subtitle Display (see Figure 31) will appear.
Figure 31 – Subtitle Display
Use the F/GNavigation Buttons to cycle through the available subtitle
language options (including the Off option to remove subtitles from display),
and press the Enter Button when the desired option appears.
Figure 33 – Main Menu
Press the Enter Button to select the highlighted “Play” option, and
the DMC 1000 will offer you a variety of sorting options. Large music
collections may be easier to manage when sorted by artist or album.
As shown in Figure 33, you may select from one of six possible sorts,
or views, of the Media Library.
Cover Art: Displays a mosaic of album covers retrieved by Gracenote
MusicID when the DMC 1000 is connected to the Internet. Cover art
may be organized alphabetically by name, by artist or in the order added,
starting with the most recent additions. As described below, use the
F/G/D
/ENavigation Buttons to move the “magnifying glass” to the
desired album, and press the Enter Button to see the playback options.
Tracks: Displays all tracks individually in alphabetical order. The tracks
may be organized alphabetically by name, artist, album or in the order
added, starting with the most recent additions.
27
Page 28
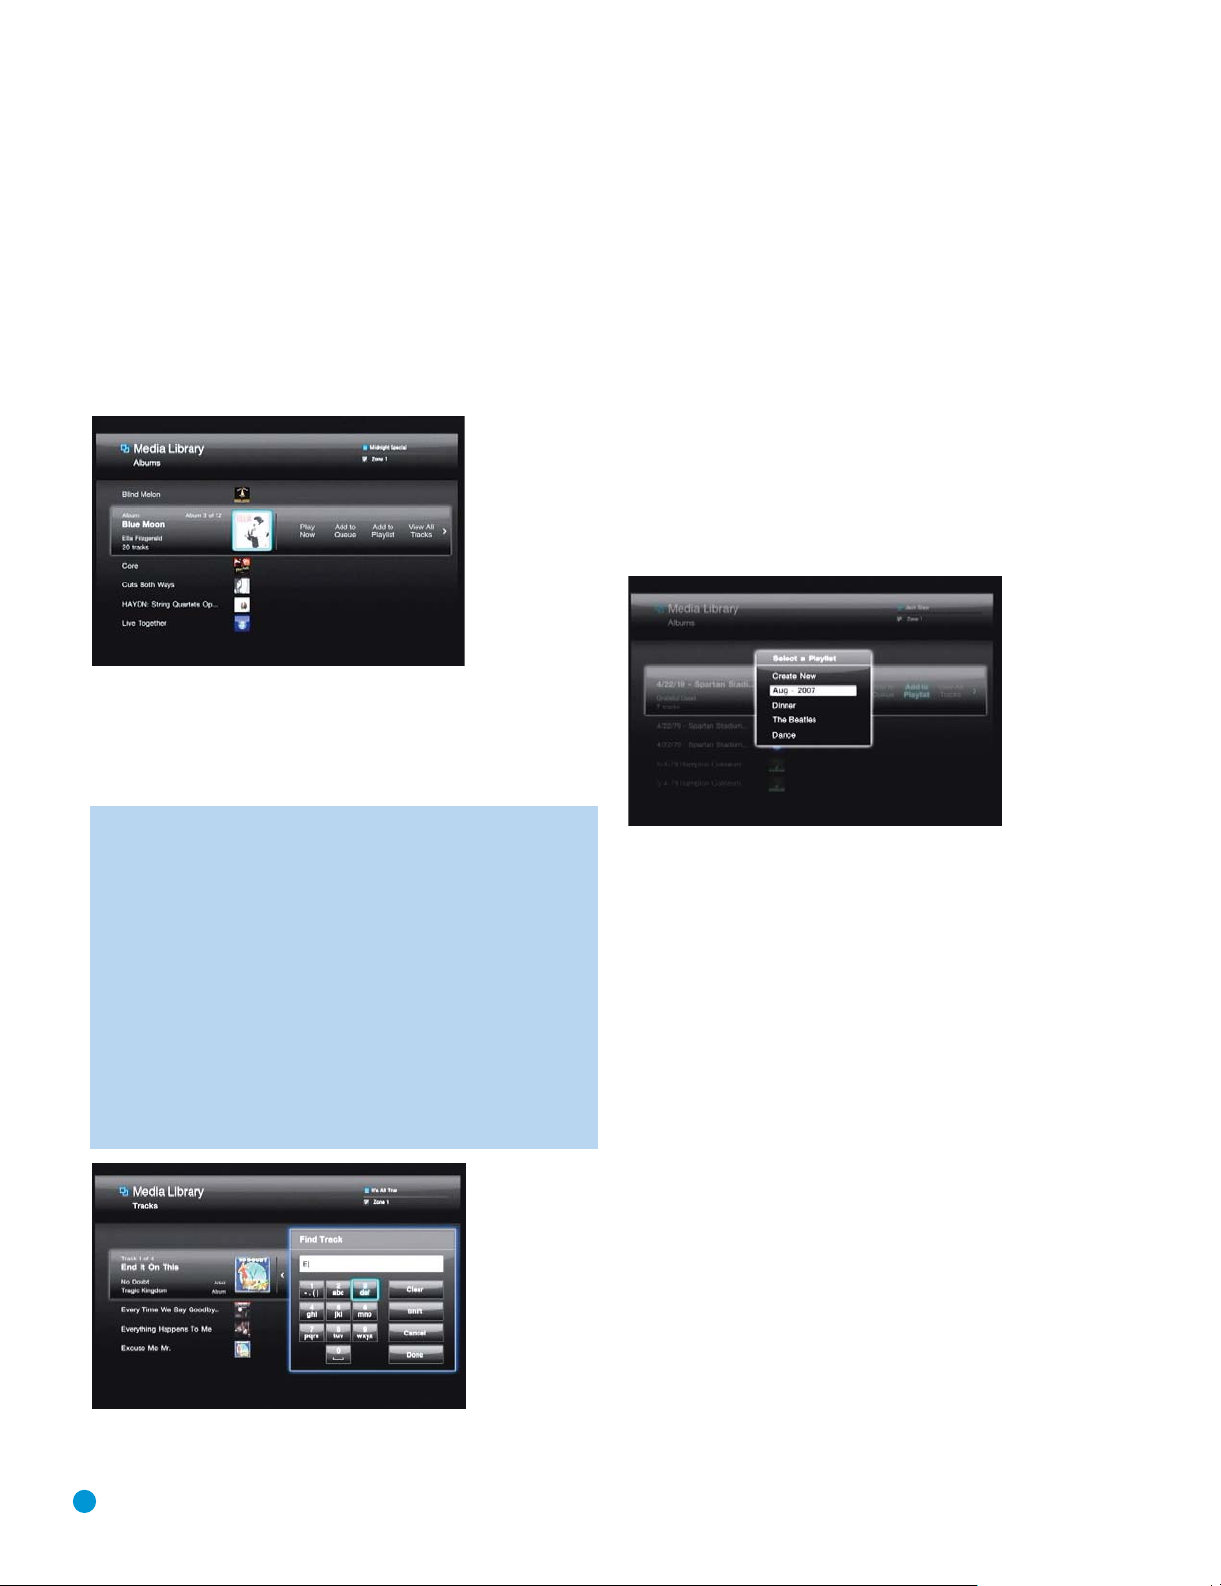
OPERATION
Artists: Displays all artists in alphabetical order. Select an artist and press
the Enter Button to view his or her albums.
Albums: Displays all albums in alphabetical order. Select an album and
press the Enter Button to display its tracks.
Playlists: Displays all playlists you have programmed.
Genres: Displays your library organized into genres. Select a genre and
press the Enter Button to view all artists tagged with that genre.
Navigate to the desired sorting option and press the Enter Button to
view the Media Library (see Figure 34).
Figure 34 – Media Library
The Media Library lists the items (in this case, albums) in your collection,
with the current selection highlighted by a magnifying bar. The cover art,
or an icon if the cover art could not be found, is highlighted. Press the
Enter Button to expand the album into a track view.
NOTE: You may have noticed that letters appear above the
Numeric Keys on the remote. The DMC 1000 is capable of
using alphabetic characters as well as numbers, which allows
you to search the Media Library by entering the Numeric Key
corresponding to the first letter of your selection. Each Numeric Key
represents three letters. The first press jumps to the selections
beginning with the first letter in the group, and the character-entry
dialog box appears. You may enter additional letters to refine
your search or change the first letter by navigating to the Clear
command and repeatedly pressing the Numeric Key until the desired
letter appears in the text bar. Navigate to the Done command
when you have finished entering a search term. Alphanumeric
entry is also used to edit content tags and to name playlists.
See Figure 35.
Use the F/GNavigation Buttons to scroll through the playback options
described below. The availability of each of these options and commands
depends on how the Media Library is sorted.
• Play Now: The current selection is played immediately, replacing other
content in the Play Queue. The Play Queue is a list of content in line to
be played. It is saved until the DMC 1000 is powered down to Full-Off
mode (dim blue).
• Add to Queue: The current selection is added to the end of the Play
Queue, and the media currently playing continues until it is finished.
The Play Queue may be accessed from the Main Menu.
• Add to Playlist: The current selection is added to a new or existing
playlist. A dialog box will pop up, asking you to select from the existing
playlists or create a new one (see Figure 36). The DMC 1000 is
programmed with several empty playlists named to fit different moods
or occasions, including Dance and Dinner. Up to four playlists are
shown at a time. The playlists may be accessed from the Main Menu.
Figure 36 – Select a Playlist
• View Artists: Available when the Media Library is sorted by genre,
this command displays all artists within the selected genre.
• View Albums: Available when the Media Library is sorted by artist,
this command expands the current artist to view all of his or her
albums in the library.
• View All Tracks: Expands the current album into a track view.
• Open Playlist: Available when the Media Library is sorted by playlists,
this command opens the list.
• Edit Name: Available when the Media Library is sorted by playlists,
this command allows you to rename the playlist if you no longer want
to use the name selected when the playlist was created.
• Edit Info: This command is available for tracks and albums only. A
dialog box appears, allowing you to edit the identifying information,
including renaming tracks. See Figure 37. The box is slightly different
when the Media Library is sorted by tracks. A character-entry dialog box
appears when you select any field for editing. See Figure 35 and the
note on this page. Select the Find Info command to activate Gracenote
MusicID.
Figure 35 – Character-Entry Dialog Box
28
Page 29
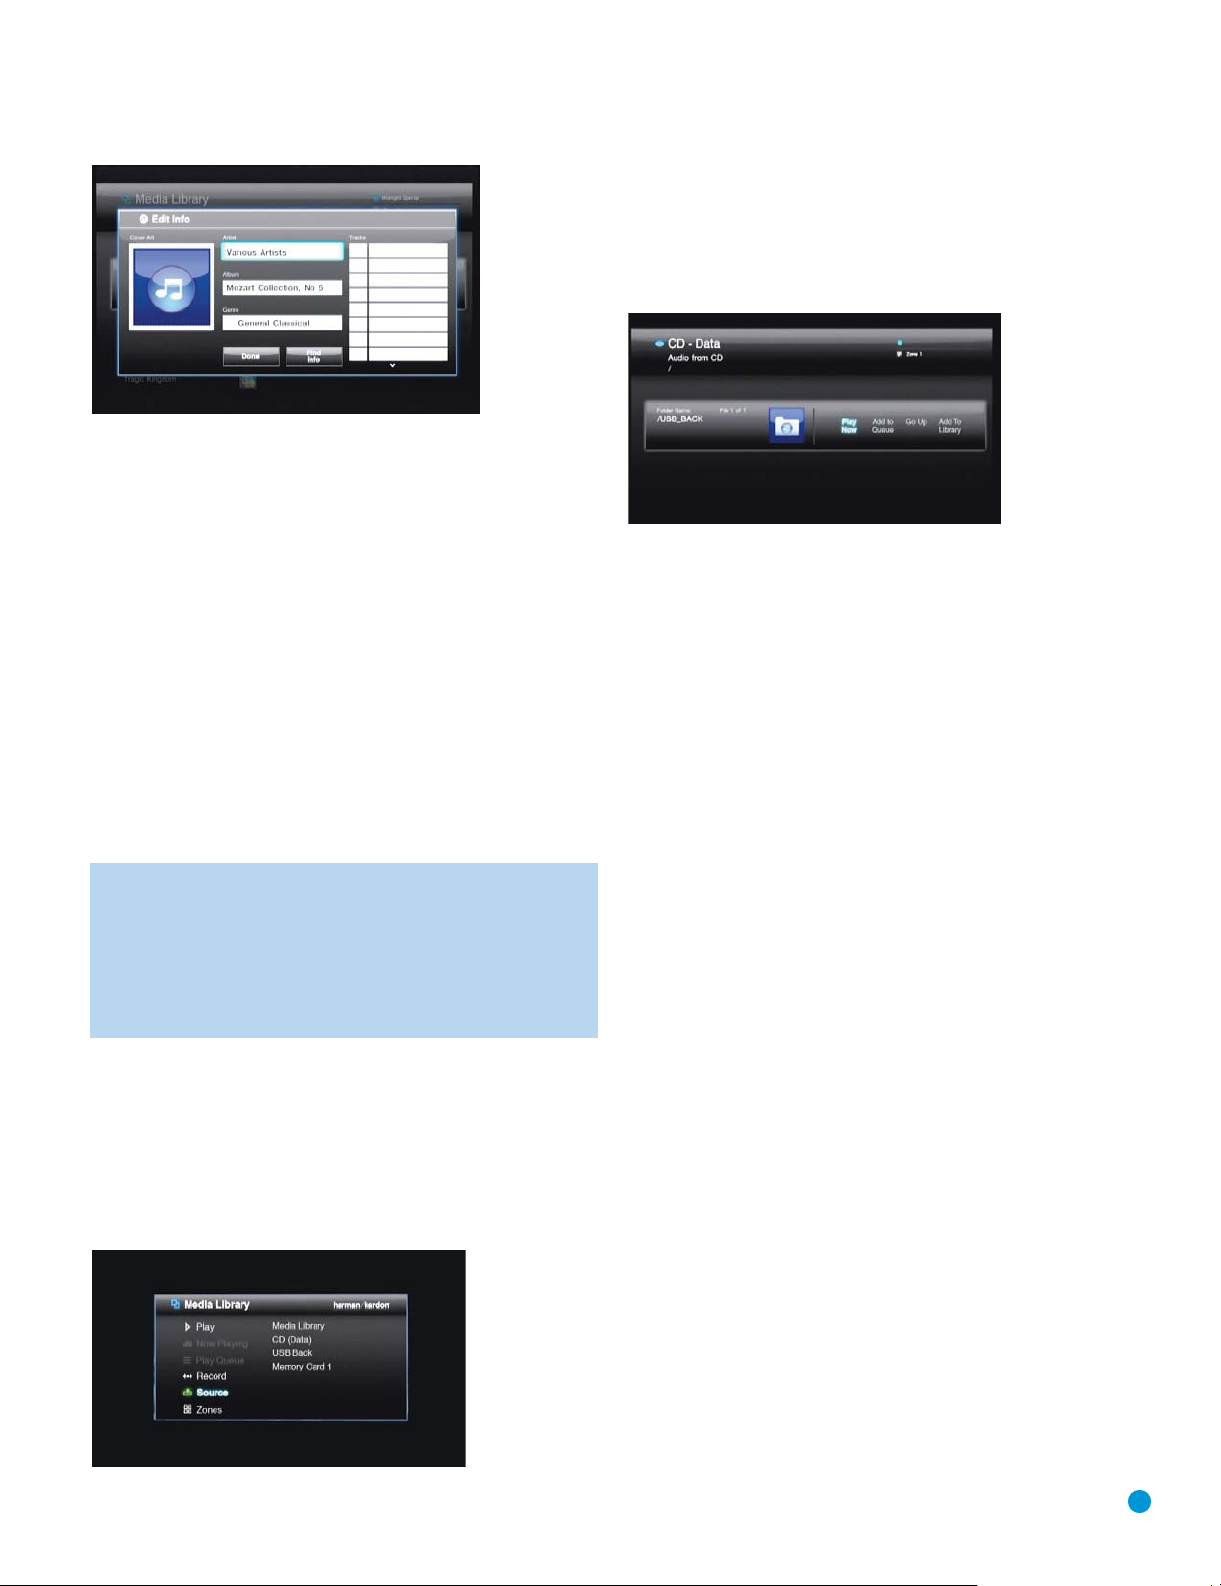
Figure 37 – Edit Info Dialog Box
• Delete: Select this command if you wish to remove the content from
the Media Library. Be aware that the DMC 1000 does not play audio
CD content directly from the disc. If you load the CD again, it will be
recopied to the Media Library.
Cover Art Sort
You may have noticed the cover art mosaic that appears in the background of the Main Menu when you turn on the DMC 1000. With the
Main Menu on screen, select the Cover Art sorting option for the Media
Library and the focus shifts to this mosaic. Use the Navigation Buttons
to move the “magnifying glass” to the desired album cover, identifying
the artist and album.
Press the Enter Button to display the playback options: Play, Add to
Queue, Add to Playlist, View Album, Edit Info and Delete Album. Select
View Album to switch to the regular Media Library view with the album
expanded to view the tracks. The other playback commands function in
the same way as in the Media Library view.
NOTE: When no cover art is available (e.g., if the DMC 1000 was
not connected to the Internet when the CD was loaded, if the disc
is noncommercial or if there is a gap in the database), the album
will not appear in the Cover Art sort, although you may select it when
viewing the Media Library by Tracks, Artists, Albums, Playlists or
Genres. A musical note icon, such as the one shown in Figure 37,
will appear in place of the missing cover art.
Data Media
The DMC 1000 recognizes media containing data files in the MP3, JPEG
and WAV formats.
Load a data CD in the disc player, or insert a memory card in the appropriate card slot, or connect a USB drive to either USB Port, and the
device will be available for selection as a media source in the Main Menu.
See Figure 38.
Figure 38 – Source Selection
OPERATION
When a data source is selected, the only sorting options are Audio and
Photos. Select one, and the regular Media Library will appear, except that
unlike audio CDs, which are organized as albums containing individual
tracks for each song, data sources are organized as folders containing individual
files for each song or still image. However, navigation of the content is
similar to audio. See Figure 39.
Figure 39 – Data CD
Press the Enter Button to expand a folder, or select the Go Up command
to collapse it. The other commands function as usual, and the Add to
Library command allows you to import the content to the Media Library
for playback after the media has been removed from the DMC 1000.
The Play Queue and Playlists
The DMC 1000 allows you to program playlists that are saved for future
playback, plus a play queue of items for immediate play.
The Play Queue
The Play Queue is simply a list of all items that are queued up to be
played. There are two ways to add an item to the play queue:
1. Display the desired content on screen by selecting the correct source
(the Media Library, a card slot, a data CD or a USB device) and selecting
the audio or still-image content. Scroll to the desired content, e.g., a
song track or file, use the
Now command, and press the Enter Button. The existing Play Queue
will stop and add the selected item, which will begin playing immediately.
The previous Play Queue items will be deleted.
2. With the desired content on screen and the item selected, use the
F/G
Navigation Buttons to highlight the Add to Queue command.
Press the Enter Button to add the item to the end of the Play Queue.
To view the play queue, press the Menu Button to display the Main Menu,
and navigate to the Play Queue line. Press the Enter Button. The Play
Queue is preserved unless the DMC 1000 is powered down to Full-Off
mode (by pressing and holding the Power Off Button on the remote so
that the front-panel Power Indicator turns dim blue). If the Play Queue line
in the Main Menu is dimmed, the Play Queue has been erased.
The Play Queue is not available during DVD playback, or when The Bridge
is the media source.
You may create playlists that are permanently saved by name for future
playback.
Programming a Playlist
Playlists are not only a convenient way to store a queue of your favorite
songs, but they are required to transfer audio from the Media Library to any of
the portable media. See the Content Transfer section for more information.
F/G
Navigation Buttons to highlight the Play
29
Page 30

OPERATION
To program a playlist, display the desired content on screen by selecting
the correct source (the Media Library, a card slot, a data CD or a USB
device) and selecting the audio or still-image content. Scroll to the desired
content, e.g., a song track or file, use the
highlight the Add to Playlist command, and press the Enter Button.
A pop-up screen will prompt you to select from an existing playlist, to
name a new playlist, or to select an empty prenamed playlist, such as
Dance or Chill. See Figure 40. If you select one of the prenamed playlists
and have already used that name, a number will be added to the end to
differentiate the new playlist. The pop-up dialog box displays up to four
playlists at a time. Scroll up or down to view the remaining playlists.
Figure 40 – Select a Playlist
Playlists may be edited by selecting the Playlist View from the Media Library.
Press the Menu Button to view the Main Menu, and navigate to the Playlists
view in the Media Library. Press the Enter Button, and scroll to the desired
playlist. The commands function as expected:
•
Play Now: Plays the selected playlist immediately, adding it to the
Play Queue.
•
Add to Queue: Adds the selected playlist to the end of the Play Queue.
•
Add to Playlist: Adds the selected playlist to a new or existing playlist.
•
Open Playlist: Opens the playlist to allow editing of individual tracks,
including removing a track from the playlist, changing the track’s order
within the list, selecting the track for immediate play, adding the track
to the Play Queue or a playlist, editing the track’s identifying information
or deleting the track from the Media Library.
•
Edit Name: Opens the character-entry dialog box to rename the playlist.
•
Delete Playlist: Deletes the playlist (but not its contents) from the
Media Library.
Using
The Bridge is an optional dock that may be used with a compatible iPod
(not included). When The Bridge is connected to its proprietary input on
the DMC 1000 and the iPod is docked, you may enjoy the audio and
still-image materials stored on your iPod.
When an iPod is docked in The Bridge, the IPOD FOUND message will
appear on the front panel, and a banner with The Bridge icon and the
Detected message will appear on screen. The iPod will be in “disc mode,”
and its screen will display the “OK to disconnect” message. Do not
physically undock the iPod while its content is playing. However, you
may select the Undock command at any time.
Select The Bridge as the media source from the Main Menu. The menu
shown in Figure 41 will appear.
30
The
Bridge
TM
F/G
Navigation Buttons to
Figure 41 – The Bridge menu
Navigate the contents of the iPod in a similar manner to other data media
sources. Select between the audio (music) and still-image (photo) content.
When Music is selected, you may sort it using views similar to those in
the iPod’s own menu: Playlists, Artists, Albums, Songs, Podcasts, Genres,
Composers or Audio Books.
Only three options are available for iPod content:
Play Now: Begins play of the selected item immediately. The Play Queue
is erased.
Open: If an individual track is selected, it begins play immediately. If
the selected item is in any other category, e.g., an artist or album, this
command opens the item so you may view its contents.
Undock iPod: This command ends play of any content on the iPod and
returns to the Media Library view of the Main Menu. The iPod’s own
menu appears on its screen. To resume playback, physically undock the
iPod from The Bridge and redock it.
Press the Back Button to return to the previous menu level, similar to
pressing the Menu button on the iPod itself.
You may not import content from the iPod to the Media Library, and you
may not add the iPod’s content to the Play Queue or a playlist. You may
not record from the Media Library to an iPod docked in The Bridge.
These are limitations of the iPod’s design, and do not reflect a problem
with the DMC 1000.
The Bridge may not be compatible with some iPod mod-
NOTE:
els, particularly the iPhone and the iPod touch. To enjoy content
stored on these devices, connect a cable from the device's headphone output to the DMC 1000's Auxiliary Analog Audio Inputs.
Auxiliary Analog Audio Inputs
In addition to digital media, the DMC 1000 also accommodates analog
source devices, such as cassette decks and turntables, but mainly as a
recording source. Connect the device to the rear-panel Auxiliary Inputs.
IMPORTANT NOTE:
DMC 1000 unless it includes an onboard phono preamp or is
connected to an external phono preamp which is then plugged
into the Auxiliary Inputs. You may purchase an accessory phono
preamp from the Harman Kardon Parts Department either
on our Web site, www.harmankardon.com, or by calling
516-255-HKHK. Phono preamps may also be available
from specialty audio shops or electronics stores.
Do not connect a turntable directly to the
Page 31
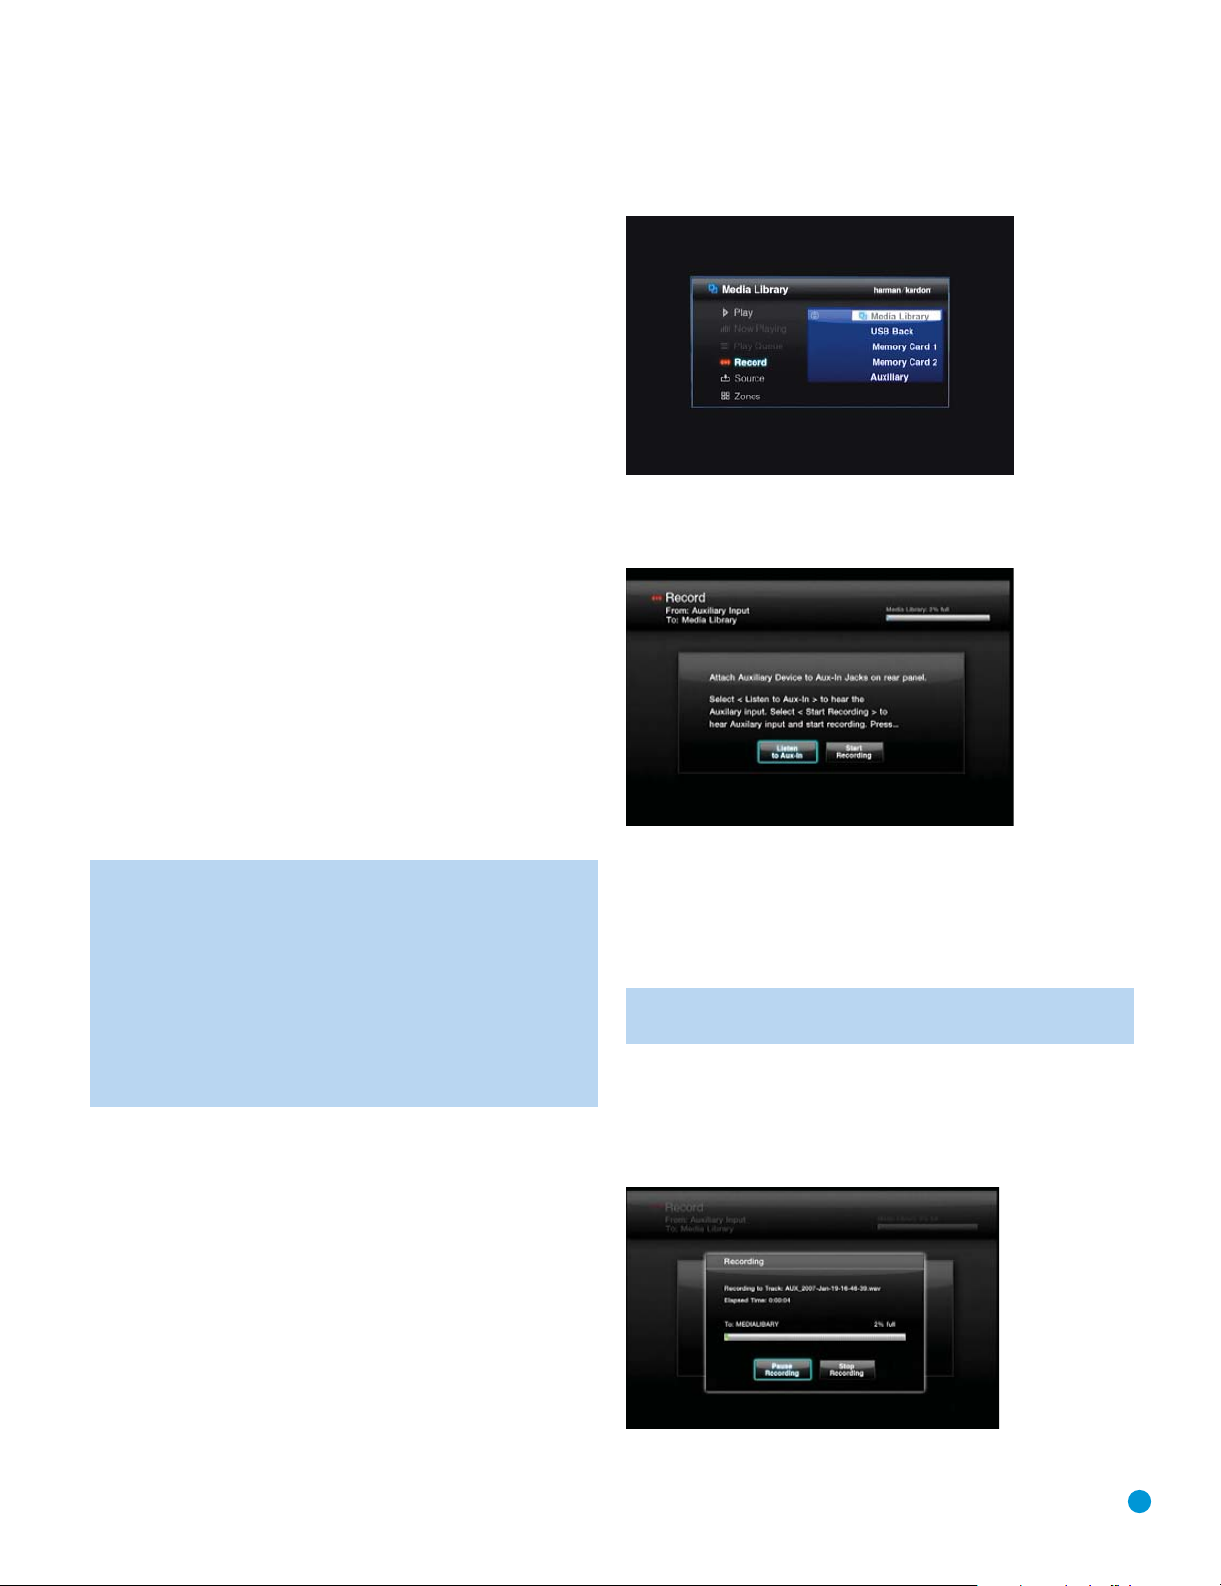
OPERATION
The device connected to the Auxiliary Inputs is not available for source
selection in the usual manner. It is selected as a recording source, as
described in the Content Transfer section, although it is possible to
monitor the source without making a recording.
Content Transfer
One of the DMC 1000’s most exciting features is its ability to transfer
content from one type of media to another, and to store your library
of music on its internal hard-disc drive.
The method for making recordings varies slightly, depending on the
source media.
Audio CDs
As soon as an audio CD is loaded, the DMC 1000 begins the process
of copying it to the Media Library at high speed. It displays the progress
of the recording as a percentage recorded.
At the same time, the DMC 1000 automatically begins playing the copy of
the CD from the Media Library, if you have programmed the DMC 1000’s
Setup Menu to do so.
The DMC 1000 uses Gracenote MusicID to identify the CD, tag it with
the correct information and import the album cover art, if available. If the
DMC 1000 is not connected to the Internet, Gracenote MusicID will tag
the content using the offline database stored on the DMC 1000’s harddisc drive; however, it will not display any cover art. For homemade discs,
the service will attempt to identify the content based on any tags that were
created when the disc was recorded.
After the DMC 1000 has finished copying the CD to the Media Library,
you may remove the disc and store it.
NOTE: The DMC 1000 initially copies the CD to .wav files.
If you have adjusted the Audio Encoding Quality setting in the
Media Library Setup menu to one of the MP3 formats, the
DMC 1000 will then encode the .wav files as MP3 files at the
specified sampling rate. If you attempt to transfer the CD from
the Media Library to a memory card, recordable CD or USB
drive before the encoding is completed, the files will be transferred
as .wav files. Since .wav files are much larger than MP3 files,
depending on your destination media, you may not have enough
space to complete the transfer.
Data CDs
Data CDs are discs that contain sound and image files. They are recognized when loaded, but operation is handled differently.
To transfer the CD’s content to the Media Library:
1. Select it as a playback source, and view the audio files. Still-image files
may not be added to the Media Library.
2. The CD is listed as a single folder, which you may expand as usual.
Select the Add to Library option to import it to the Media Library.
Audio files are transferred in their original format, e.g., as MP3 files.
Auxiliary Inputs
With the analog audio device connected to the Auxiliary Inputs and
the media loaded, either press the Record Button, or press the Menu
Button to view the Main Menu. Scroll to the Record line and press
the Enter Button.
Select “Auxiliary” from the dropdown menu as the recording source.
See Figure 42.
Figure 42 – Select a Recording Source
Next, select the Media Library (the only option) as the recording destination.
The screen shown in Figure 43 will appear.
Figure 43 – Record From the Auxiliary Inputs
Select the Listen to Aux In option to monitor the analog device. Begin
playing the device, and cue it up to the desired starting point. Example:
most cassette tapes include about five seconds of blank leader tape, plus
additional blank tape at the beginning. Play until the audio begins so as
to minimize the amount of dead air in the recording.
The DMC 1000 does not detect the presence or absence
NOTE:
of an audio signal at the Auxiliary Inputs.
When you are ready to begin the recording, select the Start Recording
option and begin playback of the analog device. You may experiment
by making several recordings and deleting those you don’t want.
While the recording is in progress, a screen similar to the one shown
in Figure 44 will appear.
Figure 44 – Recording in Progress
31
Page 32

OPERATION
Make a note of the file name automatically generated by the DMC 1000 to
easily locate the recording later. The DMC 1000 also displays the elapsed
time, and a graphic and numeric display of the space available on the
hard-disc drive.
Select the Pause Recording option to pause the recording without starting
a new file when recording is resumed. This feature is useful if you wish to
record a series of audio tracks as one file while skipping breaks in between,
such as when recording an entire side of a cassette tape into one file.
Select the Stop Recording option to end recording of the file. The screen
shown in Figure 45 will appear.
Figure 45 – Recording Complete
Select Done if you are finished, or Record Next to record another track,
which returns to the screen shown in Figure 43, allowing you to cue up
the next track.
To locate the newly recorded tracks, view the Media Library by Track and
by Last Added. The track will be displayed at the top of the list. You may
also sort the Track view by Name, looking for tracks starting with “AUX.”
You may wish to view the Tracks by Artist, as all tracks with artist “Unknown”
will be listed first, and the recordings will appear here.
Select the Edit Info option to rename the tracks and add other identifying
information. Enter as much information as possible about the track to
enable Gracenote MusicID to locate any cover art and properly tag the
track. This is particularly useful when you have recorded commercial
albums from cassette, vinyl or other analog media.
Media Library
You may transfer audio content from the Media Library to any of the
portable media – memory cards installed in the card slots, a USB device
connected to one of the USB Ports, or a recordable CD loaded in the
Disc Player.
1. Create a playlist of the desired content. The Play Queue may not be
used for this purpose.
2. Press the Record Button, or select the Record command from the
Main Menu, and select the Media Library as the source, with the other
media as the destination.
NOTES:
• When a blank recordable CD has been loaded, you will be
presented with the options of recording it as an audio disc or
as an MP3 disc. Audio discs conform to the “red book” standard and may be played in any standard CD player. Many CD
players are not capable of playing MP3 discs. Check with the
manufacturer of the player for more information.
• Any standard CD-R disc may be used. Special Music/Audio
Recordable CDs are not required.
3. The DMC 1000 will display the playlists in the Media Library.
Select one or more playlists for recording.
4. When all selections have been made, select the “Record Selected”
option to begin the transfer.
Selections are transferred in the same format in which they are stored
in the Media Library. Thus, if your CDs are automatically recorded to the
Media Library in the MP3 format, they will be transferred to the portable
media as MP3s. Analog audio streams are recorded from the Auxiliary
Inputs as lossless WAV files, and are transferred in that format to the
portable media.
NOTE: If recordings made from the Auxiliary Analog Audio Inputs
were tagged by Gracenote MusicID, the DMC 1000 will generate
new file names in the format of [artist] – [three-digit track
number].wav. The tags will be transferred to the portable media
with the file. Thus, if you upload the file from the media to your PC
using software that is capable of recognizing the tags, the track
will appear with its correct song title and other information.
Solid-State Media
You may transfer content from any of the solid-state media (memory
cards or USB device) to the Media Library in a similar fashion to recording
from the Media Library. However, it is not necessary to create a playlist,
since the data media are already organized as file folders.
1. Press the Record Button, or select the Record command from the
Main Menu, and select the solid-state media as the source, with the
Media Library (the only option) as the destination.
2. The DMC 1000 will display the folders and files stored on the media.
Select one or more items for recording.
3. When all selections have been made, select the “Record Selected”
option to begin the transfer.
Content may only be transferred from one of the solid-
NOTE:
state media to the Media Library, not from one of the solid-state
media to the other. If you wish to transfer content from one type
of media to another, first add the content to the Media Library,
and then record it to the other type of media.
32
Page 33

Multizone Operation
The DMC 1000 is capable of streaming audio to up to four independent
zones simultaneously, allowing users in different areas of the home to
enjoy unique programs. The zones may easily be linked or unlinked to
each other, to play the same program in more than one zone. Manage
the zones by displaying the Main Menu and selecting the Zones command.
The screen shown in Figure 46 will appear.
Figure 46 – Zones Menu
Zone 1 is the current zone, as indicated by the checkmark in the box to
its left. Each zone is assigned a different color box, indicating none of the
zones are linked to other zones.
To rename a zone, highlight the button containing its name and press the
Enter Button. Select one of the default names, such as Den or Dining
Room, or create a new name. The DMC 1000’s character-entry dialog
box will appear to guide you. (See Figure 35.)
To link zones together, highlight the line for what will be the “master” zone.
If other zones are linked to the master zone, content playing in the master
zone is streamed to any zones linked to it. Select the Zone Links option,
and then select one or more of the other three zones to link to the
master zone.
To unlink zones, highlight the master zone and select the Zone Links option.
Click on a linked zone to select it for unlinking.
To begin playback in any zone, navigate to its line, make sure the colored
box to the left of the zone name is highlighted and press the Enter Button.
A checkmark will appear in the box. Press the Menu Button to display
the Main Menu, and the current zone, along with any other zones linked
to it, will be identified in the upper right corner of the video display.
Select content for playback in that zone as usual.
When you return to the Zones menu, the cover art for the current selection,
or a generic icon when no cover art was found, appears to the left of the
line for each active zone.
Interrupt playback to any zone by navigating to it and selecting the Pause
Playback option. The DMC 1000 will remember its location in the
current selection when the Play Button is pressed to resume playback.
When the Stop Playback option is selected, the DMC 1000 will not
remember the location, and when the Play Button is pressed,
playback will start from the beginning of the selection.
OPERATION
33
Page 34

TROUBLESHOOTING GUIDE
SYMPTOM CAUSE SOLUTION
Unit does not turn on • No AC power • Make certain AC power cord is plugged into
a live outlet.
• Check to see whether outlet is switch-controlled.
• Make sure Master Power Switch on rear panel is turned on
to the “1” position.
• If DMC 1000 was in “Full-Off” Power Mode (Power Indicator
dim blue), wait for system to reboot.
Unit does not respond to • Weak batteries in remote • Change remote batteries and insert with correct polarity.
remote commands • Remote sensor is obscured • Make certain front-panel sensor is in line of sight of remote
or connect an optional remote sensor.
• Unit not in Full-On Power Mode • If Power Indicator is amber or dim blue, press Power On
control to turn unit fully on.
No picture • Intermittent connections • Check all video connections.
• Wrong input • Check input selection of TV or receiver.
• Video display is not capable of • Press the Video Mode Button repeatedly to change the video
handling selected video output output resolution.
resolution
• HDMI Output is connected to a video • The HDMI Output may not be used with video displays that
display that is not HDCP-compliant are not HDCP-compliant. Unplug the cable and select
another audio and video connection.
• HDMI communications need • Turn off all HDMI devices (DMC 1000, receiver, TV). Turn on
to be reset devices in this order: TV, then receiver, then DMC 1000.
• Video Off feature is active • Press Video Off Button to reactivate video circuitry.
Disc does not play • Disc is loaded improperly • Load disc label-side up; align the disc with the guides and
place it in its proper position.
• Incorrect disc type • Check to see that the disc is CD, CD-R, CD-RW, VCD, MP3,
WMA, JPEG, DVD-R/RW, DVD+R/RW (standard-conforming)
or DVD-Video; other types will not play.
• Invalid Region Code • Use Region 1 or Open Region (0) disc only.
• Rating is above parental control setting • Enter password to override or change rating settings.
No sound • Intermittent connections • Check all audio connections.
• Incorrect digital audio input selection • Check digital audio settings on DMC 1000 and on receiver.
• DVD disc is in fast or slow mode • There is no audio playback on DVD discs during fast
or slow modes.
• Surround receiver is not compatible • Change Digital Audio Out setting in AUDIO SETUP menu to
with 96kHz PCM audio COMPRESSED.
• Incorrect zone selection • Use the Zones command in the Main Menu to select the
desired zone for playback.
• Zone not linked to active zone • Use the Zones command in the Main Menu to link or unlink
zones to each other.
• Attempting to use Coaxial or Optical • The HDMI and other digital audio outputs are not available at
Digital Audio Output with HDMI the same time. To use the Coaxial or Optical Digital Audio
Output active Outputs, change the HDMI Audio Out setting in the
Audio Setup menu to Off.
Picture is distorted or jumps • MPEG-2 decoding • It is a normal artifact of DVD playback for pictures to jump
during fast forward or reverse play or show some distortion during rapid play.
• DTS decoding • Due to the format of DTS recordings, fast-play may overshoot
or undershoot desired place.
34
Page 35

TROUBLESHOOTING GUIDE
SYMPTOM CAUSE SOLUTION
Some remote buttons do not operate; • Function is not permitted at this time • With most discs, some functions are not permitted at certain
Prohibit icon Ø appears times (e.g., Track Skip) or at all (e.g., direct audio track
selection).
The OSD menu is in a foreign • Incorrect OSD language • Change the Language Selected in the Advanced Setup menu.
language
Picture is displayed in the • Incorrect match of aspect-ratio • Change aspect-ratio setting in the DVD Player Setup menu.
wrong aspect ratio settings to disc
Disc will not copy to VCR • Copy protection • Many DVDs are encoded with copy protection to prevent
copying to VCR.
Password not accepted • Incorrect password is being used or • As a last resort, use the Reset Factory Defaults setting in
password has been forgotten the Advanced Setup menu, then set a new password using
the Parental Control setting in the DVD Player Setup menu.
All other system settings will need to be reentered, including
naming zones. However, the Media Library’s contents,
including playlists, are not affected.
Screen saver not activated • Screen saver will not activate when • Clear Setup menus or press Video Off Button to avoid
Setup menus are displayed burn-in on plasma and CRT displays.
Cannot program playlist • Current source is other than • Playlists may only be programmed from content stored
Media Library in the Media Library. Transfer the other source’s content
to the Media Library, view it from within the Media Library
and then create a playlist.
Unable to select desired media • No media is present • Insert the appropriate memory card into one of the card
source slots, connect a USB drive to the USB port or insert a disc.
• Wrong type of USB drive was inserted • Only USB drives that do not function as stand-alone MP3
in USB port players are compatible. Hard-disc drives that are formatted
using the FAT or FAT32 file system are compatible, but NTFSformatted drives are not.
• Media was not inserted correctly • Remove media and carefully insert it.
Additional information on troubleshooting possible problems with your DMC 1000, or installation-related issues, may be found in the list of
“Frequently Asked Questions,” which is located in the Product Support section of our Web site at www.harmankardon.com.
35
Page 36

GLOSSARY
Aspect Ratio: This is a description of the width of a video image in
relation to its height. A conventional video screen is four units wide for
every three units of height, making it almost square. Newer wide-aspectratio video displays are 16 units wide for every nine units of height,
making them more like the screen in a movie theater. The program
material on a DVD may be recorded in either format and, in addition,
you may configure the DMC 1000 to play back in either format,
depending on the features recorded on a disc.
Chapter: DVD programs are divided into chapters and titles. Chapters
are the subsections programmed into a single title on a disc. Chapters
may be compared to the individual tracks on an audio CD. Press the
Disc Menu Button to see a listing of the chapters on a disc.
Component Video: This form of video signal eliminates many of the
artifacts of traditional composite video signals by splitting the signal into
a separate luminance channel (the “Y” signal channel) and two colordifference signals (the “Pr” and “Pb” signal channels). With a component
video connection, you will see greater picture resolution and eliminate
many picture imperfections, such as the moiré patterns often seen on
check-patterned cloth. However, in order to benefit from component
video, you must have a video display with Y/Pr/Pb component video
inputs. Do not connect the component video outputs of the DMC 1000
to the standard composite or S-video inputs of a TV or recorder.
HDCP (High-Bandwidth Digital Content Protection): HDCP is the
specification for protecting digitally encoded content from unauthorized
copying when it is transmitted from a video source to a display using
HDMI or DVI connections. To take advantage of the high-resolution
output of the DMC 1000 via its HDMI output, your display must be
HDCP-compliant. All displays with HDMI inputs are HDCP-compliant,
but not all DVI-equipped displays are. If you are using the DMC 1000
with an optional HDMI-to-DVI cable or adapter, check the owner’s
manual for your display to determine whether it is HDCP-compliant.
or USB drives. The Media Library automatically organizes the content so
that you may view it by track name, album, artist, genre, cover art (when
available) or playlists that you have created. When a multizone system
has been connected, each zone may access different content stored
in the Media Library. When connected to other properly programmed
devices in the home using the Network Jack or the RS-232 Port, the
Media Library may be used as a server, allowing you to enjoy content
throughout your home.
MP3 Files: MP3 is an audio compression format that was developed
by the Moving Picture Experts Group as an adjunct to the MPEG-1 video
compression format. The main benefit of MP3 is that it reduces the size
of audio files considerably, depending on the amount of compression
selected during the encoding process, enabling you to store many more
songs on one compact disc than in the standard audio CD format. The
DMC 1000 is capable of playing MP3 files stored on a disc or stored
on a memory card or USB device, using its advanced graphic interface.
Multiple Angle: DVDs have the capability to show up to four different
views of the same scene in a program. When a disc is encoded with
multiple-angle information, pressing the Angle Button will enable you to
switch between these different views. Few discs take advantage of this
capability and, when they do, the multiple-angle technology will only be
present for short periods of time. Producers will usually insert some sort
of icon or graphic in the picture to alert you to the availability of multipleangle scenes. In addition, the DMC 1000’s angle indicator will remain lit
in the front-panel display during multi-angle availability.
Multizone: A multizone system is used to distribute audio to various
rooms in the house so that the occupants of each room may independently
choose different program material. The DMC 1000 permits up to four
different zones to stream audio simultaneously. Multizone control is usually
set up by the custom installer, using either control devices connected to a
home network, or devices connected to the DMC 1000’s RS-232 port.
HDMI (High-Definition Multimedia Interface): HDMI is a serial-bus
form of communication between an audio/video source and a video
display or audio/video receiver. It is capable of passing digital audio
and high-definition digital video using a single cable. With HDMI, the
DMC 1000 is capable of outputting high-resolution (720p, 1080i or
1080p) video and 5.1-channel PCM, Dolby Digital or DTS digital audio,
with the convenience of a single cable connection.
JPEG Files: JPEG stands for the Joint Photographic Experts Group,
which developed a standard for compressing still images, such as
photographs. JPEG files may be created on a personal computer by
importing images from a digital camera, or scanning printed photographs.
These files may be burned onto a compact disc or stored on a memory
card or USB device. The DMC 1000 is capable of recognizing JPEG
files and enabling you to view them on your video screen.
Media Library: The Media Library refers to the content stored on the
DMC 1000’s internal hard-disc drive. It contains all of the content that
you have transferred to the DMC 1000, including copies of audio CDs,
captures of audio streams from the Auxiliary Analog Audio Inputs, and
MP3 audio and JPEG image files transferred from memory cards, discs
3636
Progressive Scan: Progressive-scan playback formats the video output
at a high-scan-rate with twice the scan lines of conventional video
images. Progressive-scan outputs must be connected to “digital-ready”
or high-definition video displays, regardless of the technology of the
specific display (e.g., CRT direct-view television, front or rear projector,
plasma display panel or LCD). In some cases, the displays may have
special inputs for use with high-scan-rate inputs, and in others you may
need to make adjustments to the display’s setup menus to make certain
that the inputs used are configured for an “HD” signal. Although the
progressive-scan output uses the component video jacks, it is not
compatible with older analog video displays with component inputs,
unless you change the Output Resolution setting in the Video Setup
submenu to 480i.
Reading: You will see this message when you insert a disc while the
player examines the contents of the disc to determine its type, and then
extracts information about the material on the disc, such as languages,
aspect ratios, subtitles, number of titles and more. The slight delay while
the contents of the disc are read is normal.
Page 37

Resume: The Stop Button on the DMC 1000 works differently from a
CD player. On a traditional CD player, when you press the Stop Button,
the unit does just that – it stops playback. On a CD player, when you
press the Start Button again, the disc starts from the beginning.
With the DMC 1000, however, you have two options when playing most
discs. Pressing the Stop Button once will stop the playback, but it actually
puts the unit in the Resume mode. This means that you can turn the
machine off and, when you press the Play Button the next time, the disc
will resume playback from the point on the disc where the Stop Button
was pressed. This is helpful if you are watching a movie and must
interrupt your viewing session but wish to pick up where you left off.
Pressing the Stop Button twice will stop the machine in a traditional
manner and, when the disc is played again, it will start from the beginning. In Resume mode, the Harman Kardon screen will appear, and the
RESUME message will appear in the Information Display.
For DVDs, CDs, MP3 files, JPEG files and VCDs with PBC (Playback
Control) only, the resume function will be retained even after the
DMC 1000 has been placed in Standby mode by pressing the
Standby/On Switch, but not after the unit has been unplugged
from AC power.
GLOSSARY
The Resume function is not available while playing content from the
Media Library.
Server: A server is a computer device with a large amount of storage
that delivers content to other devices. The DMC 1000 may be accessed
as a server from a home network when appropriate devices are connected.
When placed in Server Mode, the DMC 1000 may still be used as a server,
even though its four zones are inactive.
Title: For a DVD, a title is defined as an entire movie or program. There
may be as many chapters within a title as the producers decide to
include. Most discs include only one title, but some may have more than
one, to give you a “Double Feature” presentation or to include other
special features. Press the Title Button to see a listing of the titles on a
disc. When a disc has only one title, pressing the Title Button may show
a list of the chapters.
Zone: A zone is a section of a multizone system in which all loudspeakers
in the zone play the same source program. By connecting the DMC 1000’s
audio outputs for a specific zone to a multichannel amplifier, you may
include a number of loudspeakers in a variety of room locations within the
zone. Example: A four-channel amplifier connected to the Zone 2 Outputs
may power a pair of speakers in the living room and a stereo ceiling
speaker in the connected dining room, so that you and your guests may
enjoy the same program anywhere within the zone.
37
Page 38

APPENDIX
Appendix – Default settings and worksheets
Table A1 – Media Library Setup Menu
Setting Default Your Settings
Auto Disc Insert Preferences Play & Record
Audio Encoding Quality MP3 192kbps (Medium)
Table A2 – DVD Player Setup Menu
Setting Default Your Settings
Preferred Subtitle Language Off
Preferred Audio Language English
Parental Control Level Off
Video Presentation Mode Original
Dynamic Range Compression Off
DVD Bass Management Off
Table A3 – Audio Setup Menu
Setting Default Your Settings
Speaker Setup Front L & R: Large Front L & R:
Surround L & R: Large Surround L & R:
Center: Large Center:
Subwoofer: Yes Subwoofer:
Digital Audio Out Format Compressed
HDMI Audio Out Auto
Table A4 – Video Setup Menu
Setting Default Your Settings
Video Output Depends on physical connections.
Output Resolution Depends on physical connections:
Analog (composite or S-video): 480i
Analog (component): 480p
HDMI: Auto
Table A5 – General Setup Menu
NOTE:
These settings are not adjusted in normal use.
Setting Purpose Your Settings
Software Update If a system software upgrade Not used.
becomes available in the future,
download it to a CD and follow the
instructions here.
Date & Time Set system date and time after a reset. Adjusted only after a reset.
System Information Displays software version and Not used.
hard-disc drive usage.
38
Page 39

APPENDIX
Table A6 – Advanced Setup Menu
Setting Purpose Your Settings
Backup Backs up hard-disc drive as a After your custom installer transfers your
precaution. music collection to the Media Library, he
or she should back it up as a precaution.
Restore In case the hard-disc drive is replaced, Keep your backup of the Media Library
restores the Media Library from updated.
the last version that was backed up.
Reset Factory Defaults System reset. Use only as a last resort. Requires
reconfiguring all system settings.
The Media Library’s contents are
not affected.
Network Displays network identification Ethernet:
parameters. IP Address:
Subnet Mask:
Gateway Address:
DNS 1:
DNS 2:
Proxy Address:
Proxy Port Number:
Language Selected Sets system display language.
Default is English.
Format USB Reformats a USB device, Exercise extreme caution before using
erasing all content. this command.
Table A7 – Power Modes
Power Indicator Functionality Front-Panel Remote Control Remote Control
Mode Power Control Power On Power Off
Full-Off Mode Dim blue System powered down System boots and goes System boots and goes No action
to Full-Power Mode to Full-Power Mode
Sleep Mode Amber Standby; unit is ready Full-Power Mode Full-Power Mode No action
for quick turn-on
Server Mode Amber Remote-zone and Full-Power Mode Full-Power Mode Sleep Mode
network control
available; on-screen
menus off
Full-Power Bright blue Operates normally Single press
Server Mode Server Mode
Press and hold
Full-Off Mode Full-Off Mode
➝
➝
No action Single press
Press and hold
➝
➝
39
Page 40

APPENDIX
Table A8 – DVD Language Codes
The availability of specific languages for the main audio track or subtitles is dependent on the choices made by a disc’s producer.
You should always consult the disc’s jacket for information on languages for any disc. In the case of some languages, you may be required
to enter a code from the list below to access that language.
Language Code
Abkhazian 6566
Afar 6565
Afrikaans 6570
Albanian 8381
Ameharic 6577
Arabic 6582
Armenian 7289
Assamese 6583
Aymara 6588
Azerbaijani 6590
Bashkir 6665
Basque 6985
Bengali, Bangla 6678
Bhutani 6890
Bihari 6672
Bislama 6673
Breton 6682
Bulgarian 6671
Burmese 7789
Byelorussian 6669
Cambodian 7577
Catalan 6765
Chinese 9072
Corsican 6779
Croatian 7282
Czech 6783
Danish 6865
Dutch 7876
English 6978
Esperanto 6979
Estonian 6984
Faroese 7079
Fiji 7074
Finnish 7073
French 7082
Frisian 7089
Galician 7176
Language Code
Georgian 7565
German 6869
Greek 6976
Greenlandic 7576
Guarani 7178
Gujarati 7185
Hausa 7265
Hebrew 7387
Hindi 7273
Hungarian 7285
Icelandic 7383
Indonesian 7378
Interlingua 7365
Interlingue 7369
Iunpiak 7375
Irish 7165
Italian 7384
Japanese 7465
Javanese 7487
Kannada 7578
Kashmiri 7583
Kazakh 7575
Kinyarwanda 8287
Kirghiz 7589
Kirundi 8278
Korean 7579
Kurdish 7585
Laothian 7679
Latin 7665
Latvian, Lettish 7686
Lingala 7678
Lithuanian 7684
Macedonian 7775
Malagsy 7771
Malay 7783
Malayalam 7776
Maltese 7784
Language Code
Maori 7773
Marathi 7782
Moldavian 7779
Mongolian 7778
Naru 7865
Nepali 7869
Norwegian 7879
Occitan 7967
Oriya 7982
Oromo (Afan) 7977
Panjabi 8065
Pashto, Pushto 8083
Persian 7065
Polish 8076
Portuguese 8084
Quechua 8185
Rhaero-Romance 8277
Romanian 8279
Russian 8285
Language Code
Samoan 8377
Sangho 8371
Sanskrit 8365
Scots Gaelic 7168
Serbian 8382
Serbo-Croatian 8372
Sesotho 8384
Setswana 8478
Shona 8378
Sindhi 8368
Singhalese 8373
Siswati 8383
Slovak 8375
Slovenian 8376
Somali 8379
Spanish 6983
Sundanese 8385
Language Code
Swahili 8387
Swedish 8386
Tagalog 8476
Tajik 8471
Tamil 8465
Tatar 8484
Telugu 8469
Thai 8472
Tibetan 6679
Tigrinya 8473
Tonga 8479
Tsonga 8483
Turkish 8482
Turkmen 8475
Twi 8487
Ukrainian 8575
Urdu 8582
Uzbek 8590
Vietnamese 8673
Volapuk 8679
Welsh 6789
Wolof 8779
Xhosa 8872
Yiddish 7473
Yoruba 8979
Zulu 9085
40
Page 41

EULA
END-USER LICENSE AGREEMENT (EULA)
IMPORTANT. READ CAREFULLY. THIS END-USER LICENSE AGREEMENT (“AGREEMENT”) DEFINES THE LEGAL AGREEMENT BETWEEN YOU
(INDIVIDUAL OR ENTITY) AND HARMAN CONSUMER GROUP, INC. (“HARMAN”). YOU ARE PERMITTED TO USE THE DMC1000 (“PRODUCT”)
AND THE SOFTWARE CONTAINED AND EMBEDDED IN THE PRODUCT (“SOFTWARE”) ONLY IF YOU ACCEPT ALL OF THE TERMS AND
CONDITIONS CONTAINED IN THIS AGREEMENT. BY USING THE PRODUCT AND SOFTWARE, YOU ARE AGREEING TO BE BOUND BY THE TERMS
AND CONDITIONS OF THIS AGREEMENT. IF YOU DO NOT AGREE TO BE BOUND, YOU MUST STOP USING THE PRODUCT AND SOFTWARE.
YOU AND HARMAN AGREE AS FOLLOWS:
1. Grant of License. Subject to the restrictions defined in this Agreement, You are permitted
to use the Software solely as a part of and in connection with your use of the Product for
personal entertainment and enjoyment purposes.
2. License Restrictions. You will not, or assist or direct any third person to: (i) extract, sepa-
rate, remove or otherwise copy the Software; (ii) disassemble, decompile, reverse engineer
or otherwise convert any part of the Software to source code or a human-perceivable
form; (iii) adapt, modify or create a derivative work of the Software; (iv) distribute, encumber,
lease, rent, sell, transmit, transfer, or otherwise dispose of the Software, in whole or in part,
except You may transfer the Software upon and as an intact part of a permanent and
permissible transfer of the Product; or (v) use the Software with any other product or for
any other purpose.
3. Ownership of Software. The Software consists of Harman’s proprietary software and soft-
ware obtained from third-party licensors. You acknowledge that the Software is the sole
property of Harman and its licensors. Harman and its licensors retain all rights, title and
interest in and to the Software, including any and all modifications, updates, derivative
works and all associated intellectual property rights therein. Except as expressly granted to
You under the terms of this Agreement, Harman does not grant You any right, title or interest
in or to the Software.You will not delete, remove or otherwise alter any copyright, trademark,
confidentiality or other proprietary notice appearing in the Software. You will not take any action
to jeopardize, limit or interfere in any manner with Harman’s or its licensors’ ownership of
the Software. Harman reserves the sole and exclusive right at its discretion to assert claims
against third parties for infringement or misappropriation of its intellectual property rights in
the Software.
4. Termination. This Agreement is effective until terminated by Harman. Your rights to use the
Product and Software will automatically terminate, with or without notice, upon any violation
or breach of this Agreement by You, in which case you will immediately stop all use of the
Product and Software..
5. SEPARATE LIMITED WARRANTY. HARMAN OFFERS A LIMITED WARRANTY TO YOU
FOR YOUR USE OF THE PRODUCT AS DEFINED BY THE HARMAN LIMITED WARRANTY
INCLUDED WITH THE PRODUCT (“LIMITED WARRANTY”). THIS AGREEMENT DOES NOT
CONTAIN OR CONSTITUTE A NEW OR SEPARATE WARRANTY REGARDING THE PRODUCT
OR SOFTWARE AND DOES NOT MODIFY OR EXTEND THE LIMITED WARRANTY. THIS
AGREEMENT DOES NOT: (I) PROVIDE YOU ANY ADDITIONAL REMEDIES; OR (II) CONSTITUTE
A MODIFICATION OR EXTENSION OF THE REMEDIES AVAILABLE TO YOU AS SET FORTH
IN THE LIMITED WARRANTY.
6. DISCLAIMER OF WARRANTIES. TO THE MAXIMUM EXTENT PERMITTED BY APPLICABLE
LAW, HARMAN PROVIDES THE SOFTWARE “AS IS” AND WITHOUT WARRANTY. HARMAN
DISCLAIMS ALL COMMON LAW AND STATUTORY WARRANTIES AS TO THE CONDITION,
QUALITY, FITNESS, MAINTENANCE AND USE OF THE SOFTWARE, INCLUDING AND
WITHOUT LIMITATION, THE WARRANTIES OF MERCHANTABILITY, FITNESS FOR ANY
PARTICULAR PURPOSE OR NON-INFRINGEMENT OF THIRD PARTY INTELLECTUAL
PROPERTY RIGHTS. NO HARMAN DEALER, AGENT OR EMPLOYEE IS AUTHORIZED TO
CREATE, MODIFY, EXTEND OR OTHERWISE MAKE ANY WARRANTY ON BEHALF OF
HARMAN.
7. LIMITATION OF LIABILITY. TO THE MAXIMUM EXTENT PERMITTED BY APPLICABLE
LAW, IN NO EVENT WILL HARMAN, INCLUDING ITS PARENT COMPANY, AFFILIATES,
EQUITY HOLDERS, DIRECTORS, OFFICERS, EMPLOYEES AND AGENTS, OR ITS SUPPLIERS
BE LIABLE TO YOU OR ANY THIRD-PARTY FOR ANY INCIDENTAL, INDIRECT, SPECIAL,
REMOTE, EXEMPLARY, PUNITIVE OR CONSEQUENTIAL DAMAGES, INCLUDING AND
WITHOUT LIMITATION, COSTS OF PROCUREMENT OF SUBSTITUTE OR REPLACEMENT
PRODUCTS, LOSS OF INFORMATION, DATA OR CONTENT, LOSS OF REVENUE OR PROFITS
OR ATTORNEY’S FEES,ARISING FROM OR CAUSED BY, DIRECTLY OR INDIRECTLY,THE
SALE OR USE OF OR INABILITY TO USE THE SOFTWARE OR PRODUCT, REGARDLESS
OF THE FORM OF ACTION, WHETHER IN CONTRACT, TORT, STRICT LIABILITY OR
OTHERWISE AT LAW OR IN EQUITY, EVEN IF HARMAN HAS BEEN ADVISED OF THE
POSSIBILITY OF SUCH DAMAGES.THIS LIMITATION SHALL BE EFFECTIVE EVEN IF ANY
REMEDY IN THIS AGREEMENT OR OTHERWISE PROVIDED BY HARMAN FAILS OF ITS
ESSENTIAL PURPOSE. TO THE EXTENT PERMITTED BY APPLICABLE LAW, IN NO
EVENT WILL HARMAN’S TOTAL AND AGGREGATE LIABILITY FOR ANY AND ALL CLAIMS
UNDER THIS AGREEMENT OR ARISING FROM THE SOFTWARE, REGARDLESS OF THE
FORM OF ACTION, WHETHER IN CONTRACT, TORT, STRICT LIABILITY OR OTHERWISE,
AT LAW OR IN EQUITY, EXCEED THE PURCHASE PRICE OF THE PRODUCT.
8. Irreparable Harm. You agree that Your breach or threatened breach of any provision of
this Agreement will cause irreparable harm to Harman for which a remedy at law would be
inadequate. Harman is entitled to seek all available remedies at law and in equity, including
injunctive relief, to enforce any provision of this Agreement and to restrain You from adapting,
disclosing, distributing, modifying, publishing, transferring, using or otherwise disposing of
the Software, in whole or in part, directly or indirectly, in breach of this Agreement.
9. U.S. Government Restricted Rights. Use, duplication and disclosure by the U.S.
Government is subject to restrictions set forth in this Agreement.
10. Export Restrictions. You will obey the laws and regulations of the United States governing
exports and re-exports of the Product and/or Software.
11. Governing Law. This Agreement shall be governed by and construed in accordance with the
substantive laws of the state of New York, excluding all applicable laws pertaining to conflicts
of law and the United Nations Convention on Contracts for the International Sale of Goods.
12. Limitation of Transfer. The Software and this license to use the Software is transferable,
provided that: (i) all Software updates are included in the transfer; (ii) You do not retain
a copy of the Software; (iii) You transfer the Software upon and as an intact part of a
permanent and permissible transfer of the Product; and (iv) the transferee agrees to be
bound by the terms and conditions of this Agreement in connection with the use of the
Product. The terms and conditions of this Agreement will bind and inure to the benefit
of such permitted transferees.
13. Survival. Sections 3, 4, 6, 7, 11 and 13 will survive the termination and expiration of
this Agreement.
14. Entire Agreement. This Agreement is the complete and final agreement between You
and Harman with respect to the subject matter of this Agreement. To the extent that any
terms of any Harman policies or programs for support services conflict with the terms of
this Agreement, the terms of this Agreement shall control.
15. Severability. If any court or other tribunal of competent jurisdiction finds or holds any
provision of this Agreement to be void, invalid, illegal or otherwise unenforceable the
remaining provisions of this Agreement will remain in full force and effect.
16. Copyright Notices, Attributions and Licenses. Some of Harman’s licensors require
the reproduction of certain copyright notices and authorship attribution in Harman’s documentation. Such notices, attributions and licenses are as follows:
LAME-3.93.1. © 2002 Steve Lhomme.
in the Product uses the LAME software. LAME is licensed to Harman and You under the
GNU Lesser General Public License – Version 2.1, see below for license terms. Harman
does not modify the LAME software. For more information visit
Libtar-1.2.11. © 1998-2003 University of Illinois Board of Trustees, © 1998-2003 Mark
D. Rothall. All rights reserved. http://www.feep.net/libtar. Redistribution and use in source
and binary forms, with or without modification, are permitted provided that the following
conditions are met: (1) Redistributions of source code must retain the above copyright
notice, this list of conditions and the following disclaimer; (2) Redistributions in binary form
must reproduce the above copyright notice, this list of conditions and the following
disclaimer in the documentation and/or other materials provided with the distribution;
Steve.lhomme@free.fr
The Software contained
http://www.mp3dev.org.
41
Page 42

EULA
and (3) Neither the name of the <ORGANIZATION> nor the names of its contributors
may be used to endorse or promote products derived from this software without specific
prior written permission. THIS SOFTWARE IS PROVIDED BY THE COPYRIGHT HOLDERS
AND CONTRIBUTORS "AS IS" AND ANY EXPRESS OR IMPLIED WARRANTIES, INCLUDING,
BUT NOT LIMITED TO, THE IMPLIED WARRANTIES OF MERCHANTABILITY AND FITNESS
FOR A PARTICULAR PURPOSE ARE DISCLAIMED. IN NO EVENT SHALL THE COPYRIGHT
OWNER OR CONTRIBUTORS BE LIABLE FOR ANY DIRECT, INDIRECT, INCIDENTAL,
SPECIAL, EXEMPLARY, OR CONSEQUENTIAL DAMAGES (INCLUDING, BUT NOT LIMITED
TO, PROCUREMENT OF SUBSTITUTE GOODS OR SERVICES; LOSS OF USE, DATA, OR
PROFITS; OR BUSINESS INTERRUPTION) HOWEVER CAUSED AND ON ANY THEORY OF
LIABILITY, WHETHER IN CONTRACT, STRICT LIABILITY, OR TORT (INCLUDING NEGLIGENCE
OR OTHERWISE) ARISING IN ANY WAY OUT OF THE USE OF THIS SOFTWARE, EVEN IF
ADVISED OF THE POSSIBILITY OF SUCH DAMAGE.
Libxm-2.6.19. © 1998-2003 Daniel Veillard. For more information visit
Permission is hereby granted, free of charge, to any person obtaining a copy of this software and associated documentation files (the “Software”), to deal in the Software without
restriction, including without limitation the rights to use, copy, modify, merge, publish, distribute,
sublicense, and/or sell copies of the Software, and to permit persons to whom the Software
is furnished to do so, subject to the following conditions: The above copyright notice and
this permission notice shall be included in all copies or substantial portions of the Software.
THE SOFTWARE IS PROVIDED “AS IS,” WITHOUT WARRANTY OF ANY KIND, EXPRESS
OR IMPLIED, INCLUDING BUT NOT LIMITED TO THE WARRANTIES OF MERCHANTABILITY,
FITNESS FOR A PARTICULAR PURPOSE AND NONINFRINGEMENT. IN NO EVENT SHALL
THE AUTHORS OR COPYRIGHT HOLDERS BE LIABLE FOR ANY CLAIM, DAMAGES OR
OTHER LIABILITY, WHETHER IN AN ACTION OF CONTRACT, TORT OR OTHERWISE,
ARISING FROM, OUT OF OR IN CONNECTION WITH THE SOFTWARE OR THE USE OR
OTHER DEALINGS IN THE SOFTWARE.
Gracenote EULA
Gracenote and Muze
This device contains software from Gracenote, Inc. of 2000 Powell St. Emeryville,
California 94608 (“Gracenote”) and may include portions of content belonging to or
licensed from Muze Inc. of 304 Hudson Street, New York, New York 10013 (“Muze”).
The software from Gracenote (the “Gracenote Software”) enables this device to do disc
and music file identification and obtain music-related information, including name, artist,
track, and title information (“Gracenote Data”) from online servers (“Gracenote Servers”),
and to perform other functions. You may use Gracenote Data only by means of the
intended End User functions of this device.
You agree that you will use the content from Muze (“Muze Content”), Gracenote Data, the
Gracenote Software, and Gracenote Servers for your own personal, non-commercial use
only.You agree not to assign, copy, transfer or transmit the Muze Content, Gracenote
Software or any Gracenote Data (except in a Tag associated with a music file) to any third
party.YOU AGREE NOT TO USE OR EXPLOIT MUZE CONTENT, GRACENOTE DATA,
THE GRACENOTE SOFTWARE, OR GRACENOTE SERVERS, EXCEPT AS EXPRESSLY
PERMITTED HEREIN.
You agree that your non-exclusive licenses to use the Muze Content, Gracenote Data, the
Gracenote Software, and Gracenote Servers will terminate if you violate these restrictions.
If your licenses terminate, you agree to cease any and all use of the Muze Content,
Gracenote Data, the Gracenote Software, and Gracenote Servers. Gracenote and Muze,
respectively, reserve all rights in Gracenote Data, the Gracenote Software, and the Gracenote
Servers and Muze Content, including all ownership rights. Under no circumstances will
either Gracenote or Muze become liable for any payment to you for any information that
you provide, including any copyrighted material or music file information. You agree that
Gracenote and/or Muze may enforce its respective rights, collectively or separately, under
this agreement against you, directly in each company's own name.
Gracenote uses a unique identifier to track queries for statistical purposes. The purpose of
a randomly assigned numeric identifier is to allow Gracenote to count queries without
knowing anything about who you are. For more information, see the web page at
www.gracenote.com for the Gracenote Privacy Policy.
THE GRACENOTE SOFTWARE, EACH ITEM OF GRACENOTE DATA AND THE MUZE
CONTENT ARE LICENSED TO YOU “AS IS.” NEITHER GRACENOTE NOR MUZE MAKES
ANY REPRESENTATIONS OR WARRANTIES, EXPRESS OR IMPLIED, REGARDING THE
ACCURACY OF ANY GRACENOTE DATA FROM THE GRACENOTE SERVERS OR MUZE
CONTENT. GRACENOTE AND MUZE COLLECTIVELY AND SEPARATELY RESERVE THE
RIGHT TO DELETE DATA AND/OR CONTENT FROM THE COMPANIES’ RESPECTIVE
SERVERS OR, IN THE CASE OF GRACENOTE, CHANGE DATA CATEGORIES FOR ANY
CAUSE THAT GRACENOTE DEEMS SUFFICIENT. NO WARRANTY IS MADE THAT EITHER
®
Terms of Use
http://xmlsoft.org/.
MUZE CONTENT OR THE GRACENOTE SOFTWARE OR GRACENOTE SERVERS ARE
ERROR-FREE OR THAT THE FUNCTIONING OF THE GRACENOTE SOFTWARE OR
GRACENOTE SERVERS WILL BE UNINTERRUPTED. GRACENOTE IS NOT OBLIGATED
TO PROVIDE YOU WITH ANY ENHANCED OR ADDITIONAL DATA TYPES THAT
GRACENOTE MAY CHOOSE TO PROVIDE IN THE FUTURE AND IS FREE TO DISCONTINUE
ITS ONLINE SERVICES AT ANY TIME. GRACENOTE AND MUZE DISCLAIM ALL WARRANTIES
EXPRESS OR IMPLIED, INCLUDING, BUT NOT LIMITED TO, IMPLIED WARRANTIES
OF MERCHANTABILITY, FITNESS FOR A PARTICULAR PURPOSE, TITLE, AND NONINFRINGEMENT. NEITHER GRACENOTE NOR MUZE WARRANTS THE RESULTS THAT
WILL BE OBTAINED BY YOUR USE OF THE GRACENOTE SOFTWARE OR ANY
GRACENOTE SERVER. IN NO CASE WILL GRACENOTE OR MUZE BE LIABLE FOR
ANY CONSEQUENTIAL OR INCIDENTAL DAMAGES OR FOR ANY LOST PROFITS OR
LOST REVENUES FOR ANY REASON WHATSOEVER. © Gracenote 2006
17. Open Source. Certain libraries are licensed to You under the terms of the GNU Lesser
General Public License, Version 2.1 (“GNU LGPL”). Harman is not allowed to sub-license
the GNU LGPL libraries to You as You are deemed to have Your own direct license from
the original licensee. Harman does not modify these libraries in any way. Harman hereby
offers to You, upon Your request and for the actual costs of materials and shipping, all
source code and object code files for all GNU LGPL libraries contained in the Software.
18. GNU Lesser General Public License, Version 2.1, February 1999
Preamble: The licenses for most software are designed to take away your freedom to share
and change it. By contrast, the GNU General Public Licenses are intended to guarantee your
freedom to share and change free software – to make sure the software is free for all its
users. This license, the Lesser General Public License, applies to some specially designated
software packages – typically libraries – of the Free Software Foundation and other authors
who decide to use it. You can use it too, but we suggest you first think carefully about
whether this license or the ordinary General Public License is the better strategy to use
in any particular case, based on the explanations below.
When we speak of free software, we are referring to freedom of use, not price. Our General
Public Licenses are designed to make sure that you have the freedom to distribute copies
of free software (and charge for this service if you wish); that you receive source code or
can get it if you want it; that you can change the software and use pieces of it in new free
programs; and that you are informed that you can do these things.
To protect your rights, we need to make restrictions that forbid distributors to deny you
these rights or to ask you to surrender these rights. These restrictions translate to certain
responsibilities for you if you distribute copies of the library or if you modify it. For example,
if you distribute copies of the library, whether gratis or for a fee, you must give the recipients
all the rights that we gave you. You must make sure that they, too, receive or can get the
source code. If you link other code with the library, you must provide complete object files
to the recipients, so that they can relink them with the library after making changes to the
library and recompiling it. And you must show them these terms so they know their rights.
We protect your rights with a two-step method: (1) we copyright the library, and (2) we
offer you this license, which gives you legal permission to copy, distribute and/or modify
the library.To protect each distributor, we want to make it very clear that there is no warranty
for the free library. Also, if the library is modified by someone else and passed on, the
recipients should know that what they have is not the original version, so that the original
author’s reputation will not be affected by problems that might be introduced by others.
Finally, software patents pose a constant threat to the existence of any free program. We
wish to make sure that a company cannot effectively restrict the users of a free program
by obtaining a restrictive license from a patent holder. Therefore, we insist that any patent
license obtained for a version of the library must be consistent with the full freedom of use
specified in this license. Most GNU software, including some libraries, is covered by the
ordinary GNU General Public License. This license, the GNU Lesser General Public License,
applies to certain designated libraries, and is quite different from the ordinary General
Public License. We use this license for certain libraries in order to permit linking those
libraries into non-free programs. When a program is linked with a library, whether statically
or using a shared library, the combination of the two is legally speaking a combined work,
a derivative of the original library. The ordinary General Public License therefore permits
such linking only if the entire combination fits its criteria of freedom. The Lesser General
Public License permits more lax criteria for linking other code with the library. We call this
license the “Lesser” General Public License because it does Less to protect the user’s
freedom than the ordinary General Public License. It also provides other free software
developers Less of an advantage over competing non-free programs. These disadvantages
are the reason we use the ordinary General Public License for many libraries. However,
the Lesser license provides advantages in certain special circumstances. For example, on
rare occasions, there may be a special need to encourage the widest possible use of a
42
Page 43

EULA
certain library, so that it becomes a de-facto standard. To achieve this, non-free programs
must be allowed to use the library. A more frequent case is that a free library does the
same job as widely used non-free libraries. In this case, there is little to gain by limiting the
free library to free software only, so we use the Lesser General Public License. In other
cases, permission to use a particular library in non-free programs enables a greater number
of people to use a large body of free software. For example, permission to use the GNU C
Library in non-free programs enables many more people to use the whole GNU operating
system, as well as its variant, the GNU/Linux operating system.Although the Lesser
General Public License is Less protective of the users’ freedom, it does ensure that the
user of a program that is linked with the Library has the freedom and the wherewithal to
run that program using a modified version of the Library. The precise terms and conditions
for copying, distribution and modification follow. Pay close attention to the difference
between a “work based on the library” and a “work that uses the library.” The former
contains code derived from the library, whereas the latter must be combined with the
library in order to run.
Terms and Conditions for Copying, Distribution and Modification
0. This License Agreement applies to any software library or other program which contains
a notice placed by the copyright holder or other authorized party saying it may be
distributed under the terms of this Lesser General Public License (also called “this
License”). Each licensee is addressed as “You.”
A “library” means a collection of software functions and/or data prepared so as to be
conveniently linked with application programs (which use some of those functions and
data) to form executables.
The “Library,” below, refers to any such software library or work which has been distributed
under these terms. A “work based on the Library” means either the Library or any derivative work under copyright law: that is to say, a work containing the Library or a portion
of it, either verbatim or with modifications and/or translated straightforwardly into another
language. (Hereinafter, translation is included without limitation in the term “modification.”)
“Source code” for a work means the preferred form of the work for making modifications
to it. For a library, complete source code means all the source code for all modules it
contains, plus any associated interface definition files, plus the scripts used to control
compilation and installation of the library.
Activities other than copying, distribution and modification are not covered by this
License; they are outside its scope. The act of running a program using the Library is not
restricted, and output from such a program is covered only if its contents constitute a
work based on the Library (independent of the use of the Library in a tool for writing it).
Whether that is true depends on what the Library does and what the program that uses
the Library does.
1. You may copy and distribute verbatim copies of the Library’s complete source code as
you receive it, in any medium, provided that you conspicuously and appropriately publish
on each copy an appropriate copyright notice and disclaimer of warranty; keep intact all
the notices that refer to this License and to the absence of any warranty; and distribute
a copy of this License along with the Library.
You may charge a fee for the physical act of transferring a copy, and you may at your
option offer warranty protection in exchange for a fee.
2. You may modify your copy or copies of the Library or any portion of it, thus forming a
work based on the Library, and copy and distribute such modifications or work under
the terms of Section 1 above, provided that you also meet all of these conditions:
a) The modified work must itself be a software library; b) You must cause the files
modified to carry prominent notices stating that you changed the files and the date of
any change; and c) You must cause the whole of the work to be licensed at no charge
to all third parties under the terms of this License; and d) If a facility in the modified
Library refers to a function or a table of data to be supplied by an application program
that uses the facility, other than as an argument passed when the facility is invoked,
then you must make a good faith effort to ensure that, in the event an application does
not supply such function or table, the facility still operates, and performs whatever part
of its purpose remains meaningful. (For example, a function in a library to compute
square roots has a purpose that is entirely well-defined independent of the application.
Therefore, Subsection 2d requires that any application-supplied function or table used
by this function must be optional: if the application does not supply it, the square root
function must still compute square roots.)
These requirements apply to the modified work as a whole. If identifiable sections of
that work are not derived from the Library, and can be reasonably considered independent and separate works in themselves, then this License, and its terms, do not
apply to those sections when you distribute them as separate works. But when you
distribute the same sections as part of a whole which is a work based on the Library,
the distribution of the whole must be on the terms of this License, whose permissions
for other licensees extend to the entire whole, and thus to each and every part regardless
of who wrote it.
Thus, it is not the intent of this section to claim rights or contest your rights to work written
entirely by you; rather, the intent is to exercise the right to control the distribution of derivative
or collective works based on the Library.
In addition, mere aggregation of another work not based on the Library with the Library
(or with a work based on the Library) on a volume of a storage or distribution medium
does not bring the other work under the scope of this License.
3. You may opt to apply the terms of the ordinary GNU General Public License instead of
this License to a given copy of the Library. To do this, you must alter all the notices that
refer to this License, so that they refer to the ordinary GNU General Public License, version 2,
instead of to this License. (If a newer version than version 2 of the ordinary GNU
General Public License has appeared, then you can specify that version instead if you
wish.) Do not make any other change in these notices.
Once this change is made in a given copy, it is irreversible for that copy, so the ordinary
GNU General Public License applies to all subsequent copies and derivative works made
from that copy.
This option is useful when you wish to copy part of the code of the Library into a program
that is not a library.
4. You may copy and distribute the Library (or a portion or derivative of it, under Section 2)
in object code or executable form under the terms of Sections 1 and 2 above provided
that you accompany it with the complete corresponding machine-readable source code,
which must be distributed under the terms of Sections 1 and 2 above on a medium
customarily used for software interchange.
If distribution of object code is made by offering access to copy from a designated
place, then offering equivalent access to copy the source code from the same place
satisfies the requirement to distribute the source code, even though third parties are
not compelled to copy the source along with the object code.
5. A program that contains no derivative of any portion of the Library, but is designed to
work with the Library by being compiled or linked with it, is called a “work that uses the
Library.” Such a work, in isolation, is not a derivative work of the Library, and therefore
falls outside the scope of this License.
However, linking a “work that uses the Library” with the Library creates an executable
that is a derivative of the Library (because it contains portions of the Library), rather
than a “work that uses the library.” The executable is therefore covered by this License.
Section 6 states terms for distribution of such executables.
When a “work that uses the Library” uses material from a header file that is part of the
Library, the object code for the work may be a derivative work of the Library even
though the source code is not. Whether this is true is especially significant if the work
can be linked without the Library, or if the work is itself a library. The threshold for this
to be true is not precisely defined by law.
If such an object file uses only numerical parameters, data structure layouts and accessors,
and small macros and small inline functions (ten lines or less in length), then the use of
the object file is unrestricted, regardless of whether it is legally a derivative work. (Executables
containing this object code plus portions of the Library will still fall under Section 6.)
Otherwise, if the work is a derivative of the Library, you may distribute the object code
for the work under the terms of Section 6. Any executables containing that work also
fall under Section 6, whether or not they are linked directly with the Library itself.
6. As an exception to the Sections above, you may also combine or link a “work that uses
the Library” with the Library to produce a work containing portions of the Library, and
distribute that work under terms of your choice, provided that the terms permit modification of the work for the customer's own use and reverse engineering for debugging
such modifications.
You must give prominent notice with each copy of the work that the Library is used in it
and that the Library and its use are covered by this License. You must supply a copy of
this License. If the work during execution displays copyright notices, you must include
the copyright notice for the Library among them, as well as a reference directing the
user to the copy of this License. Also, you must do one of these things: a) Accompany
the work with the complete corresponding machine-readable source code for the
Library including whatever changes were used in the work (which must be distributed
under Sections 1 and 2 above); and, if the work is an executable linked with the
Library, with the complete machine-readable “work that uses the Library,” as object
code and/or source code, so that the user can modify the Library and then relink to
produce a modified executable containing the modified Library. (It is understood that
43
Page 44

EULA
the user who changes the contents of definitions files in the Library will not necessarily
be able to recompile the application to use the modified definitions.); b) Use a suitable
shared library mechanism for linking with the Library. A suitable mechanism is one that
(1) uses at run time a copy of the library already present on the user's computer system,
rather than copying library functions into the executable, and (2) will operate properly
with a modified version of the library, if the user installs one, as long as the modified
version is interface-compatible with the version that the work was made with; c) Accompany
the work with a written offer, valid for at least three years, to give the same user the
materials specified in Subsection 6a, above, for a charge no more than the cost of
performing this distribution; d) If distribution of the work is made by offering access to
copy from a designated place, offer equivalent access to copy the above specified
materials from the same place; and e) Verify that the user has already received a copy
of these materials or that you have already sent this user a copy.
For an executable, the required form of the “work that uses the Library” must include
any data and utility programs needed for reproducing the executable from it. However,
as a special exception, the materials to be distributed need not include anything that is
normally distributed (in either source or binary form) with the major components (compiler,
kernel, and so on) of the operating system on which the executable runs, unless that
component itself accompanies the executable.
It may happen that this requirement contradicts the license restrictions of other proprietary
libraries that do not normally accompany the operating system. Such a contradiction
means you cannot use both them and the Library together in an executable that you
distribute.
7. You may place library facilities that are a work based on the Library side-by-side in a
single library together with other library facilities not covered by this License, and
distribute such a combined library, provided that the separate distribution of the work
based on the Library and of the other library facilities is otherwise permitted, and
provided that you do these two things: a) Accompany the combined library with a copy
of the same work based on the Library, uncombined with any other library facilities.
This must be distributed under the terms of the Sections above; and b) Give prominent
notice with the combined library of the fact that part of it is a work based on the Library,
and explaining where to find the accompanying uncombined form of the same work.
8. You may not copy, modify, sublicense, link with, or distribute the Library except as expressly
provided under this License. Any attempt otherwise to copy, modify, sublicense, link with,
or distribute the Library is void, and will automatically terminate your rights under this License.
However, parties who have received copies, or rights, from you under this License will
not have their licenses terminated so long as such parties remain in full compliance.
9. You are not required to accept this License, since you have not signed it. However,
nothing else grants you permission to modify or distribute the Library or its derivative
works. These actions are prohibited by law if you do not accept this License. Therefore,
by modifying or distributing the Library (or any work based on the Library), you indicate
your acceptance of this License to do so, and all its terms and conditions for copying,
distributing or modifying the Library or works based on it.
10. Each time you redistribute the Library (or any work based on the Library), the recipient
automatically receives a license from the original licensor to copy, distribute, link with
or modify the Library subject to these terms and conditions. You may not impose any
further restrictions on the recipients’ exercise of the rights granted herein. You are not
responsible for enforcing compliance by third parties with this License.
11. If, as a consequence of a court judgment or allegation of patent infringement or for any
other reason (not limited to patent issues), conditions are imposed on you (whether by
court order, agreement or otherwise) that contradict the conditions of this License, they
do not excuse you from the conditions of this License. If you cannot distribute so as to
satisfy simultaneously your obligations under this License and any other pertinent obligations, then as a consequence you may not distribute the Library at all. For example, if a
patent license would not permit royalty-free redistribution of the Library by all those
who receive copies directly or indirectly through you, then the only way you could satisfy
both it and this License would be to refrain entirely from distribution of the Library.
If any portion of this section is held invalid or unenforceable under any particular
circumstance, the balance of the section is intended to apply, and the section as a
whole is intended to apply in other circumstances.
It is not the purpose of this section to induce you to infringe any patents or other property
right claims or to contest validity of any such claims; this section has the sole purpose
of protecting the integrity of the free software distribution system which is implemented
by public license practices. Many people have made generous contributions to the wide
range of software distributed through that system in reliance on consistent application
of that system; it is up to the author/donor to decide if he or she is willing to distribute
software through any other system and a licensee cannot impose that choice.
44
This section is intended to make thoroughly clear what is believed to be a consequence
of the rest of this License.
12. If the distribution and/or use of the Library is restricted in certain countries either by
patents or by copyrighted interfaces, the original copyright holder who places the
Library under this License may add an explicit geographical distribution limitation
excluding those countries, so that distribution is permitted only in or among countries
not thus excluded. In such case, this License incorporates the limitation as if written
in the body of this License.
13. The Free Software Foundation may publish revised and/or new versions of the Lesser
General Public License from time to time. Such new versions will be similar in spirit to
the present version, but may differ in detail to address new problems or concerns.
Each version is given a distinguishing version number. If the Library specifies a version
number of this License which applies to it and “any later version,” you have the option
of following the terms and conditions either of that version or of any later version
published by the Free Software Foundation. If the Library does not specify a license
version number, you may choose any version ever published by the Free Software
Foundation.
14. If you wish to incorporate parts of the Library into other free programs whose distribution
conditions are incompatible with these, write to the author to ask for permission. For
software which is copyrighted by the Free Software Foundation, write to the Free
Software Foundation; we sometimes make exceptions for this. Our decision will be
guided by the two goals of preserving the free status of all derivatives of our free
software and of promoting the sharing and reuse of software generally.
NO WARRANTY
15. BECAUSE THE LIBRARY IS LICENSED FREE OF CHARGE, THERE IS NO WARRANTY
FOR THE LIBRARY, TO THE EXTENT PERMITTED BY APPLICABLE LAW. EXCEPT
WHEN OTHERWISE STATED IN WRITING THE COPYRIGHT HOLDERS AND/OR
OTHER PARTIES PROVIDE THE LIBRARY “AS IS” WITHOUT WARRANTY OF ANY KIND,
EITHER EXPRESSED OR IMPLIED, INCLUDING, BUT NOT LIMITED TO, THE IMPLIED
WARRANTIES OF MERCHANTABILITY AND FITNESS FOR A PARTICULAR PURPOSE.
THE ENTIRE RISK AS TO THE QUALITY AND PERFORMANCE OF THE LIBRARY IS
WITH YOU. SHOULD THE LIBRARY PROVE DEFECTIVE, YOU ASSUME THE COST
OF ALL NECESSARY SERVICING, REPAIR OR CORRECTION.
16. IN NO EVENT UNLESS REQUIRED BY APPLICABLE LAW OR AGREED TO IN WRITING
WILL ANY COPYRIGHT HOLDER, OR ANY OTHER PARTY WHO MAY MODIFY
AND/OR REDISTRIBUTE THE LIBRARY AS PERMITTED ABOVE, BE LIABLE TO YOU
FOR DAMAGES, INCLUDING ANY GENERAL, SPECIAL, INCIDENTAL OR CONSEQUENTIAL DAMAGES ARISING OUT OF THE USE OR INABILITY TO USE THE
LIBRARY (INCLUDING BUT NOT LIMITED TO LOSS OF DATA OR DATA BEING
RENDERED INACCURATE OR LOSSES SUSTAINED BY YOU OR THIRD PARTIES
OR A FAILURE OF THE LIBRARY TO OPERATE WITH ANY OTHER SOFTWARE),
EVEN IF SUCH HOLDER OR OTHER PARTY HAS BEEN ADVISED OF THE
POSSIBILITY OF SUCH DAMAGES.
Page 45

NOTES
45
Page 46

NOTES
46
Page 47

DMC 1000 TECHNICAL SPECIFICATIONS
Media Sources:
Disc Formats: 5" (12cm) or 3" (8cm) DVD-Video,
standard-conforming DVD-R, DVD+R, DVD-RW,
DVD+RW, VCD, CD, CD-R, CD-RW or MP3 discs
Region Code: DVD-Video disc with Code 1 or 0 only
DVD Layers: Single side/single layer, single side/dual
layer, dual side/dual layer
Memory Cards: Slot 1: Secure Digital (SD), xD-Picture Card,
MultiMediaCard (MMC) and Memory Stick
(compatible with MagicGate®) cards; other card
types may be used with a compatible adapter,
but are not guaranteed to be recognized by the
DMC 1000
Slot 2: CompactFlash
®
I (CF) cards, or cards
using a CompactFlash I-compatible adapter
Card capacity: up to 8GB
USB Port: Up to USB 2.0-compatible hard-disc and
flash drives
Drive capacity: Up to 160GB
Audio Formats: Linear PCM, MPEG, Windows Media
®
9,
Dolby®Digital
Still-Image Format: JPEG
Video Signal System: NTSC or PAL
™
Output: Video: 480p, 720p, 1080p
HDMI
™
Version 1.1-compliant
HDMI
HDCP Version 1.1-compliant
Composite Video Output: 1V p-p /75 ohms, sync negative polarity
S-Video Output:
Y/Luminance: 1V p-p/75 ohms, sync negative polarity
C/Chrominance: 0.286 V p-p
Component Video Output: Y: 1V p-p/75 ohms, sync negative polarity
Pr: 0.7V p-p/75 ohms
Pb: 0.7V p-p/75 ohms
Analog Audio Output: 2V RMS (1kHz, 0dB)
Frequency Response:
DVD (Linear PCM): 2Hz – 22kHz +0/–0.5dB (48kHz sampling)
®
2Hz – 44kHz +0/–1.5dB (96kHz sampling)
2Hz – 88kHz +0/–0.5dB (192kHz sampling)
CD: 2Hz – 20kHz +0/–0.5dB
Signal/Noise Ratio (SNR): 105dB (A-weighted)
Dynamic Range:
DVD: 100dB (18-bit)/105dB (20-bit)
CD/DVD: 96dB (16-bit)
THD/1kHz: DVD/CD: 0.0025%
Wow & Flutter: Below measurable limits
AC Power: 110–240V AC/50–60Hz
Power Consumption: 12 Watts (on/standby) /60 watts (max)
Dimensions (H x W x D): 4-1/16" x 17-1/8" x 15-15/16"
(103mm x 438mm x 405mm)
Weight: 19.1 lb (8.7kg)
Shipping Dimensions (H x W x D): 8" x 22" x 20"
(203mm x 559mm x 508mm)
Shipping Weight: 25.7 lb (11.7kg)
Depth measurement includes knobs, buttons and terminal connections. Height measurement includes feet and chassis.
All features and specifications are subject to change without notice.
Harman Kardon and Logic 7 are trademarks of Harman International Industries, Incorporated, registered in the United States and/or other countries.
Designed to Entertain and The Bridge logo are trademarks of Harman International Industries, Incorporated.
Blu-ray Disc is a trademark of the Blu-ray Disc Association.
CompactFlash is a trademark of the CompactFlash Association.
Manufactured under license from Dolby Laboratories. Dolby and the double-D symbol are trademarks of Dolby Laboratories. Copyright 1992–1997 Dolby Laboratories. All rights reserved.
Manufactured under license under U.S. Patents: 5,451,942; 5,956,674; 5,974,380; 5,978,762; 6,487,535 and other U.S. and worldwide patents issued and pending. DTS and
DTS Digital Surround are registered trademarks and the DTS logos and Symbol are trademarks of DTS, Inc. © 1996–2007 DTS, Inc.All rights reserved.
HD-DVD is a trademark of the DVD Format/Logo Licensing Corporation (DVD FLLC).
HDMI, the HDMI logo and High-Definition Multimedia Interface are trademarks or registered trademarks of HDMI Licensing LLC.
iPod is a trademark of Apple Inc., registered in the U.S. and other countries.
Kodak is a registered trademark, and Photo CD is a trademark, of Eastman Kodak Company.
Memory Stick, MagicGate, Memory Stick Duo and SACD are trademarks or registered trademarks of Sony Corporation.
Muze is a registered trademark of Muze Inc.
Windows,Windows Mobile and Windows Media are registered trademarks of Microsoft Corporation in the United States and/or other countries.
WMA (Windows Media Audio) is a proprietary file format developed by Microsoft.
xD-Picture Card is a trademark of Olympus Optical Co. Ltd.
This product incorporates copyright protection technology that is protected by method claims of certain U.S. patents and other intellectual property rights owned by Macrovision Corporation
and other rights owners. Use of this copyright protection technology must be authorized by Macrovision Corporation and is intended for home and other limited viewing uses only unless
otherwise authorized by Macrovision Corporation. Reverse engineering or disassembly is prohibited.
CD and music-related data from Gracenote, Inc., copyright © 2000–2007 Gracenote. Gracenote Software, copyright © 2000 –2007 Gracenote. This product and service may practice one
or more of the following U.S. Patents: 5,987,525; 6,061,680; 6,154,773; 6,161,132; 6,230,192; 6,230,207; 6,240,459; 6,330,593; and other patents issued or pending. Some services
supplied under license from Open Globe, Inc. for U.S. Patent: 6,304,523. Gracenote, MusicID and CDDB are registered trademarks of Gracenote.The Gracenote logo and logotype, and the
“Powered by Gracenote” logo are trademarks of Gracenote.
Please register your product on our Web site at www.harmankardon.com. Note: You’ll need the product’s serial number. At the same time, you can choose to be notified
about our new products and/or special promotions.
47
Page 48

®
250 Crossways Park Drive, Woodbury, New York 11797
www.harmankardon.com
© 2007 Harman International Industries, Incorporated. All rights reserved.
Part No. 25A08G-0DMC0-Q00
 Loading...