


2009 VRod Muscle Owner's Manual
Safety First
Safe Operating Rules: VRSC Models
Motorcycles are different from other vehicles. They operate, steer, handle and brake differently. Unskilled or improper use could result in loss of control, death or serious injury. (00556c)
Take a rider training course.
Read Owner's Manual before riding, adding accessories or servicing.
Wear a helmet, eye protection and protective clothing.
Never tow a trailer.
Before operating your new motorcycle it is your responsibility to read and follow the operating and maintenance instructions in this manual, and follow these basic rules for your personal safety.
Know and respect the rules of the road (see RULES OF THE ROAD section). Carefully read and observe the rules contained in the RIDING TIPS booklet accompanying this Owner's Manual. Read and familiarize yourself with the contents of the MOTORCYCLE HANDBOOK for your state.
Before starting engine, check for proper operation of brake, clutch, shifter, throttle controls, correct fuel and oil supply.
Do not use aftermarket parts and custom made front forks which can adversely affect performance and handling. Removing or altering factory installed parts can adversely affect performance and could result in death or serious injury. (00001a)
Use only HarleyDavidson approved parts and accessories. Use of certain other manufacturer's performance parts will void your new motorcycle warranty. See your Harley Davidson dealer for details.
Stop the engine when refueling or servicing the fuel system. Do not smoke or allow open flame or sparks near gasoline. Gasoline is extremely flammable and highly explosive, which could result in death or serious injury. (00002a)
Do not remove radiator filler cap when engine is hot. The cooling system is under pressure and hot coolant and steam can escape, which could cause severe burns. Allow engine to cool before servicing the cooling system. (00091a)
At operating temperature, the radiator and oil cooler contain hot fluids. Contact with the radiator or oil cooler can result in minor or moderate burns. (00141a)
When refueling your motorcycle, the following rules should be observed.
Refuel in a well ventilated area with the engine turned off. Remove fuel filler cap slowly.
Do not smoke or allow open flames or sparks when refueling or servicing the fuel system. Leave air space to allow for fuel expansion.
Do not store motorcycle with gasoline in tank within the home or garage where open flames, pilot lights, sparks or electric motors are present. Gasoline is extremely flammable and highly explosive, which could result in death or serious injury. (00003a)
Engine exhaust from this product contains chemicals known to the State of California to cause cancer, and birth defects or other reproductive harm. (00004f)
Wheel weights on wheels without spokes contain lead and lead compounds, chemicals known to the State of California to cause cancer, and birth defects or other reproductive harm. (00356d)
Do not run motorcycle in a closed garage or confined area. Inhaling motorcycle exhaust, which contains poisonous carbon monoxide gas, could result in death or serious injury. (00005a)
The jiffy stand locks when placed in the full forward (down)

position with vehicle weight on it. If the jiffy stand is not in the full forward (down) position with vehicle weight on it, the vehicle can fall over which could result in death or serious injury. (00006a)
Be sure jiffy stand is fully retracted before riding. If jiffy stand is not fully retracted, it can contact the road surface causing a loss of vehicle control, which could result in death or serious injury. (00007a)
A new motorcycle must be operated according to the special breakin procedure. See
Breakin Riding Rules: VRSC Models.
Operate motorcycle only at moderate speed and out of traffic until you have become thoroughly familiar with its operation and handling characteristics under all conditions.
NOTE:
We recommend that you obtain information and formal training in the correct motorcycle riding technique. In the United States, the Motorcycle Safety Foundation® offers beginning and advanced rider safety courses. Call (949)7273227 for information.
Travel at speeds appropriate for road and conditions and never travel faster than posted speed limit. Excessive speed can cause loss of vehicle control, which could result in death or serious injury. (00008a)
Do not exceed the legal speed limit or drive too fast for existing conditions. Always reduce speed when poor driving conditions exist. High speed increases the influence of any other condition affecting stability and increases the possibility of loss of control.
Pay strict attention to road surfaces and wind conditions. Any two wheeled vehicle may be subject to upsetting forces such as wind blasts from passing trucks, holes in the pavement, rough road surfaces, rider control error, etc. These forces may influence the handling characteristics of your motorcycle. If this happens, reduce speed and guide the motorcycle with a relaxed grip to a controlled condition. Do not brake abruptly or force the handlebar. This may aggravate an unstable condition.
Keep cargo weight concentrated close to the motorcycle and as low as possible to minimize the change in the motorcycle's center of gravity. Distribute weight evenly on both sides of the vehicle and do not load bulky items too far behind the rider or add weight to the handlebars or front forks. Do not exceed maximum specified load in each saddlebag.
NOTE:
New riders should gain experience under various conditions while driving at moderate speeds.
Operate your motorcycle defensively. Remember, a motorcycle does not afford the same protection as an automobile in an accident. One of the most common accident situations occurs when the driver of the other vehicle fails to see or recognize a motorcycle and turns into the oncoming motorcyclist. Operate only with headlamp on.
Wear an approved helmet, clothing, and foot gear suited for motorcycle riding. Bright or light colors are best for greater visibility in traffic, especially at night. Avoid loose, flowing

garments and scarves.
Avoid contact with exhaust system and wear protective clothing that completely covers legs while riding. Exhaust pipes and mufflers get very hot when engine is running and remain too hot to touch, even after engine is turned off. Failure to wear protective clothing could result in burns or other serious injury. (00009a)
When carrying passengers, it is your responsibility to instruct them on proper riding procedures. (See Riding Tips included in your HarleyDavidson Owner's Kit.)
Do not allow other individuals, under any circumstances, to operate your motorcycle unless you know they are experienced, licensed riders and are thoroughly familiar with the operation of your particular motorcycle.
Protect your motorcycle against theft. After parking your motorcycle, lock the steering head and remove ignition key from switch. Set security alarm if present.
Safe motorcycle operation requires alert mental judgment combined with a defensive driving attitude. Do not allow fatigue, alcohol or drugs to endanger your safety or that of others. Vehicles equipped with a sound system should have the volume adjusted to a nondistracting level before operating vehicle.
Maintain your motorcycle in proper operating condition in accordance with Regular Service Intervals: 2009 VRSC Models. Particularly important to motorcycle stability is proper tire inflation pressure, tread condition, and proper adjustment of wheel bearings and steering head bearings.
Do not operate vehicle with forks locked. Locking the forks restricts the vehicle's turning ability, which could result in death or serious injury. (00035a)
Perform the service and maintenance operations as indicated in the regular service interval table. Lack of regular maintenance at the recommended intervals can affect the safe operation of your motorcycle, which could result in death or serious injury. (00010a)
Do not operate motorcycle with loose, worn or damaged steering or suspension systems. Contact a Harley Davidson dealer for repairs. Loose, worn or damaged steering or suspension components can adversely affect stability and handling, which could result in death or serious injury. (00011a)

Regularly inspect shock absorbers and front forks. Replace leaking, damaged or worn parts that can adversely affect stability and handling, which could result in death or serious injury. (00012a)
Use HarleyDavidson replacement fasteners. Aftermarket fasteners can adversely affect performance, which could result in death or serious injury. (00013a)
See a HarleyDavidson service manual for proper torque values.
Aftermarket fasteners may not have the specific property requirements to perform properly.
Be sure tires are properly inflated, balanced and have adequate tread. Inspect your tires regularly and see a HarleyDavidson dealer for replacements. Riding with excessively worn, unbalanced or underinflated tires can adversely affect stability and handling, which could result in death or serious injury. (00014a)
Replace punctured or damaged tires. In some cases, small punctures in the tread area may be repaired from within the demounted tire by a HarleyDavidson dealer. Speed should NOT exceed 50 mph (80 km/h) for the first 24 hours after repair, and the repaired tire should NEVER be used over 80 mph (130 km/h). Failure to follow this warning could result in death or serious injury. (00015a)
Do not exceed the motorcycle's Gross Vehicle Weight Rating (GVWR) or Gross Axle Weight Rating (GAWR). Exceeding these weight ratings can affect stability and handling, which could result in death or serious injury. (00016e)
GVWR is the sum of the weight of the motorcycle, accessories, and the maximum weight of the rider, passenger and cargo that can be safely carried.
GAWR is the maximum amount of weight that can be safely carried on each axle.
The GVWR and GAWR are shown on the information plate, located on the frame down tube.
Do not tow a disabled motorcycle. Towing can adversely

affect stability and handling, which could result in death or serious injury. (00017a)
Do not pull a trailer with a motorcycle. Pulling a trailer can cause tire overload, reduced braking efficiency and adversely affect stability and handling, which could result in death or serious injury. (00018b)
Direct contact of D.O.T. 4 brake fluid with eyes can cause irritation. Avoid eye contact. In case of eye contact flush with large amounts of water and get medical attention.
Swallowing large amounts of D.O.T. 4 brake fluid can cause digestive discomfort. If swallowed, obtain medical attention. Use in well ventilated area. KEEP OUT OF REACH OF CHILDREN. (00240a)
Batteries, battery posts, terminals and related accessories contain lead and lead compounds, and other chemicals known to the State of California to cause cancer, and birth defects or other reproductive harm. Wash hands after handling. (00019e)
Consult a HarleyDavidson dealer regarding any questions or problems that occur in the operation of your motorcycle. Failure to do so can aggravate an initial problem, cause costly repairs, cause an accident and could result in death or serious injury. (00020a)
Be sure all equipment required by federal, state and local law is installed and in good operating condition.
If ABS lamp remains on continuously, the ABS is not operating. The standard brake system is operational, but wheel lock up can occur. Contact a HarleyDavidson Dealer to have ABS repaired. A locked wheel will skid and can cause loss of vehicle control, which could result in death or serious injury. (00361a)

ABS cannot prevent lockup of rear wheel due to engine braking. ABS will not aid in cornering or on loose/uneven surfaces. A locked wheel will skid and can cause loss of vehicle control, which could result in death or serious injury. (00362a)
Rules of the Road
Always sound your horn, actuate your turn signals, and exercise caution when passing other vehicles going in the same direction. Never try to pass another vehicle going in the same direction at street intersections, on curves, or when going up or down a hill.
At street intersections give the rightofway. Do not presume you have the rightofway, as the other driver may not know it is your turn.
Always signal when preparing to stop, turn or pass.
All traffic signs, including those used for the control of traffic at intersections, should be obeyed promptly. SLOW DOWN signs near schools and CAUTION signs at railroad crossings should always be observed and your actions governed accordingly.
When intending to turn, signal at least 100 feet 30.5 meters before reaching the turning point. If turning across an intersection, move over to the centerline of the street (unless local rules require otherwise). Slow down when entering the intersection and turn carefully. Never anticipate a traffic light. When a change is indicated from GO to STOP (or vice versa) in the traffic control systems at intersections, slow down and wait for the light to change. Never run through a yellow or red traffic light.
While turning either right or left, watch for pedestrians, animals, as well as vehicles.
Do not leave the curb or parking area without signaling. Be sure your way is clear to enter moving traffic. A moving line of traffic always has the rightofway.
Be sure your license plate is installed in the position specified by law and is clearly visible at all times. Keep the plate clean.
Ride at a safe speed that is consistent with the type of highway you are on. Pay strict attention to whether the road is dry, oily, icy or wet.
Watch for debris such as leaves or loose gravel.
Weather and traffic conditions on the highway dictate adjusting your speed and driving habits accordingly.
Accessories and Cargo
HarleyDavidson Motor Company cannot test and make specific recommendations concerning every accessory or combination of accessories sold. Therefore, the rider must be responsible for safe operation of the motorcycle when installing accessories or carrying additional weight.
See the Accessory and Cargo section in your Owner's Manual. Improper loading of cargo or installation of accessories can affect motorcycle stability and handling, which could result in death or serious injury. (00021a)
Do not exceed the motorcycle's Gross Vehicle Weight
Rating (GVWR) or Gross Axle Weight Rating (GAWR). Exceeding these weight ratings can affect stability and handling, which could result in death or serious injury. (00016e)
GVWR is the sum of the weight of the motorcycle, accessories, and the maximum weight of the rider, passenger and cargo that can be safely carried.
GAWR is the maximum amount of weight that can be safely carried on each axle.
The GVWR and GAWR are shown on the information plate which is located on the frame down tube.
Do not pull a trailer with a motorcycle. Pulling a trailer can cause tire overload, reduced braking efficiency and adversely affect stability and handling, which could result in death or serious injury. (00018b)
Accessory and Cargo Guidelines
The following guidelines should be used when equipping a motorcycle, carrying passengers and/or cargo.
Travel at speeds appropriate for road and conditions and never travel faster than posted speed limit. Excessive speed can cause loss of vehicle control, which could result in death or serious injury. (00008a)
Do not exceed the legal speed limit or drive too fast for existing conditions. Always reduce speed when poor driving conditions exist. High speed increases the influence of any other condition affecting stability and increases the possibility of loss of control.
Pay strict attention to road surfaces and wind conditions. Any two wheeled vehicle may be subject to upsetting forces such as wind blasts from passing trucks, holes in the pavement, rough road surfaces, rider control error, etc. These forces may influence the handling characteristics of your motorcycle. If this happens, reduce speed and guide the motorcycle with a relaxed grip to a controlled condition. Do not brake abruptly or force the handlebar. This may aggravate an unstable condition.
Keep cargo weight concentrated close to the motorcycle and as low as possible. This minimizes the change in the motorcycle's center of gravity.
Distribute weight evenly on both sides of the vehicle.
Do not load bulky items too far behind the rider or add weight to the handlebars or front forks.
Do not exceed maximum specified load in each saddlebag.
Luggage racks are designed for lightweight items. Do not overload racks.
Be sure cargo is secure and will not shift while riding and recheck the cargo periodically. Accessories that change the operator's riding position may increase reaction time and affect handling of the motorcycle.
Additional electrical equipment may overload the motorcycle's electrical system possibly
resulting in electrical system and/or component failure.
The front and/or rear guard(s) can provide limited leg and cosmetic vehicle protection under unique circumstances. (Fall over while stopped, very slow speed slide.) It is not made or intended to provide protection from bodily injury in a collision with another vehicle or any other object.
(00022a)
Large surfaces such as fairings, windshields, back rests, and luggage racks can adversely affect handling. Only genuine HarleyDavidson items designed specifically for the motorcycle model should be used with proper installation.
Do not use aftermarket parts and custom made front forks which can adversely affect performance and handling. Removing or altering factory installed parts can adversely affect performance and could result in death or serious injury. (00001a)
Only Touring HarleyDavidson Motorcycles are suitable for sidecar use. Consult a HarleyDavidson dealer. Use of motorcycles other than Touring models with sidecars could result in death or serious injury. (00040a)
Noise Control System
Tampering
Owners are warned that removal or replacement of any noise control system component may be prohibited by law. This prohibition applies prior to vehicle sale or delivery to the ultimate purchaser. Use of a vehicle on which noise control system components have been removed or rendered inoperative may also be prohibited by law.
Identification
Vehicle Identification Number: VRSC Models
See V.I.N. Stamping Location: VRSC Models. The full 17digit serial or Vehicle Identification Number (V.I.N.) is stamped on the steering head and on a label located on the left frame tube above the front engine cylinder.
An abbreviated V.I.N. is stamped on the left side crankcase above the sump.

NOTE:
Always give the full 17digit Vehicle Identification Number when ordering parts or making any inquiry about your motorcycle.
V.I.N. Stamping Location: VRSC Models
Typical HarleyDavidson V.I.N.: 2009 VRSC Models
HarleyDavidson V.I.N. Breakdown: 2009 VRSC Models
POSITION |
DESCRIPTION |
|
POSSIBLE VALUES |
|
|
|
|
|
|
1 |
|
Market |
|
1=Originally manufactured for sale within the United States |
|
|
designation |
|
5=Originally manufactured for sale outside of the United States |
|
|
|
|
|
|
|
|
|
|
2 |
|
Manufacturer |
|
HD=HarleyDavidson |
|
|
|
|
|
3 |
|
Motorcycle type |
|
1=Heavyweight motorcycle (901 cc and larger) |
|
|
|
|
|
4 |
|
Model |
|
See V.I.N. model table |
|
|
|
|
|
5 |
|
Engine type |
|
H=Revolution®, 1250 cc liquidcooled, fuel injected |
J=Revolution®, 1250 cc liquidcooled, fuel injected 105 HP HDI only
6Introduction date 1=Regular
2=Midyear
3=California/regular
4=Cosmetic changes and/or special introductory date
|
|
|
|
|
5=California/cosmetic changes and/or special introductory date |
|
|
|
|
|
|
6=California/midyear |
|
|
|
|
|
|
||
|
7 |
|
V.I.N. check digit |
|
Can be 09 or X |
|
|
|
|
|
|
||
|
8 |
|
Model year |
|
9=2009 |
|
|
|
|
|
|
||
|
9 |
|
Assembly plant |
|
K=Kansas City, MO USA |
|
|
|
|
|
|
||
|
10 |
|
Sequential |
|
Varies |
|
|
|
|
number |
|
|
|
|
|
|
|
|
|
|
V.I.N. Model Codes: 2009 VRSC Models
|
|
|
|
|
|
|
|
|
|
CODE |
|
MODEL |
|
CODE |
|
MODEL |
|
|
|
|
|
|
|
|
|
|
|
HF |
|
VRSCAW VRod™ |
|
HH |
|
VRSCDX Night Rod Special® |
|
|
|
|
|
|
|
|
|
|
|
HP |
|
VRSCF VRod Muscle® |
|
|
|
|
|
|
|
|
|
|
|
|
|
|
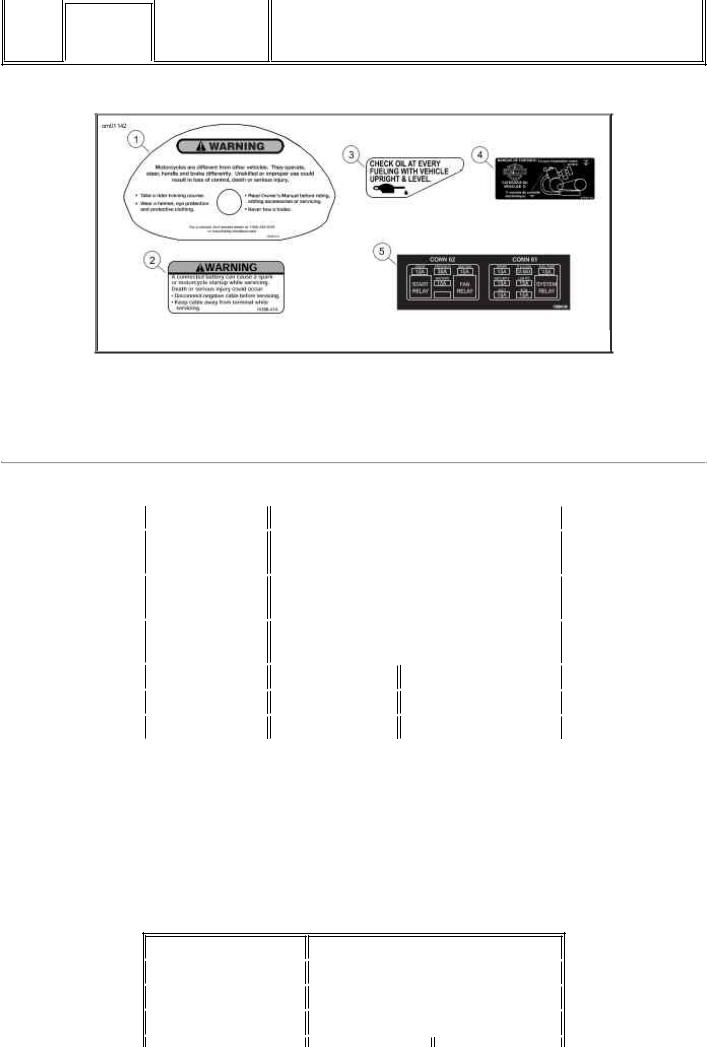
Labels
See Labels: VRSC Models for safety and maintenance labels which were on the vehicle when new. If removed, replacement labels may be purchased for your motorcycle. Refer to Labels: VRSC Models for label descriptions.
NOTE:
Some labels may be available in different languages for destinations outside the U.S. See a HarleyDavidson dealer for all labels available for purchase.
|
|
|
|
|
|
|
Labels: VRSC Models |
|
|
|
|
|
|
|
|
||
|
LABEL |
|
PART NO. |
|
DESCRIPTION |
|
LOCATION |
|
|
|
|
|
|
|
|
||
|
1 |
|
1534801A |
|
General |
|
Rear of airbox cover. |
|
|
|
|
|
|
warnings |
|
|
|
|
|
|
|
|
|
|
||
|
2 |
|
1536801A |
|
Battery |
|
Under seat, rear of fuel tank. |
|
|
|
|
|
|
warning |
|
|
|
|
|
|
|
|
|
|||
|
3 |
|
1536901 |
|
Check oil level |
|
Under seat, rear of fuel tank. |
|
|
|
|
|
|
|
|||
|
4 |
|
1536709 |
|
Antitampering |
|
Under seat on right frame tube. |
|
|
|
|
(VRSCAW) |
|
label |
|
|
|
|
|
|
|
|
|
|
|
|
|
|
|
|
|
|
|
|
|
|
|
|
1539609 |
|
|
|
|
|
|
|
|
(VRSCDX) |
|
|
|
|
|
|
|
|
|
|
|
|
|
|
|
|
|
1539809 |
|
|
|
|
|
|
|
|
(VRSCF) |
|
|
|
|
|
|
|
|
|
|
|
|||
|
5 |
|
1372508 |
|
Fuse block |
|
Label with START RELAY and FAN RELAY is located |
|
|
|
|
(ABS |
|
labels |
|
behind front right side cover. Other half of label is on fuse |
|
|
|
|
|
|
|
block under passenger seat, behind fuel filler. |
||
|
|
|
models) |
|
|
|
|
|
1369407
(NonABS)
Labels: VRSC Models
Specifications
Specifications: 2009 VRSC Models
|
|
|
Engine: 2009 VRSC Models |
|||
|
|
|
|
|
|
|
|
ITEM |
|
SPECIFICATION |
|
||
|
|
|
|
|
|
|
|
Number of |
|
2 |
|
|
|
|
cylinders |
|
|
|
|
|
|
|
|
|
|
||
|
Type |
|
4cycle, DOHC, 60 degree VType, |
|
||
|
|
|
water cooled |
|
|
|
|
|
|
|
|
|
|
|
Compression |
|
11.51 |
|
|
|
|
ratio |
|
|
|
|
|
|
|
|
|
|
|
|
|
Bore |
|
4.134 in. |
|
105.00 mm |
|
|
|
|
|
|
|
|
|
Stroke |
|
2.835 in. |
|
72.00 mm |
|
|
|
|
|
|
|
|
|
Displacement |
|
76.28 cu. in. |
|
1250.00 cu. cm |
|
|
|
|
|
|
|
|
NOTE:
Specifications in this publication may not match those of official certification in some markets due to timing of publication printing, variance in testing methods, and/or vehicle differences. Customers seeking officially recognized regulatory specifications for their vehicle should refer to certification documents and/or contact their respective dealer or distributor.
Ignition System: 2009 VRSC Models
ITEM |
|
SPECIFICATION |
||
|
|
|
|
|
Timing setting |
|
Not adjustable |
|
|
|
|
|
|
|
Battery |
|
12 volt, 19 amp/hr, 270 CCA |
||
|
|
|
|
|
Spark plug type |
|
10R12A |
|
|
|
|
|
|
|
Spark plug gap |
|
0.035 in. |
|
0.89 mm |

|
|
|
|
|
|
|
|
|
|
|
|
|
|
|
Spark plug torque |
|
17 ftlbs |
|
23 Nm |
|
|
|
|
|
|
|
|
Engine Torque: 2009 VRSC Models
|
|
|
|
|
|
|
|
MODEL |
|
TORQUE |
|
||
|
|
|
|
|
|
|
|
VRSCAW (DOM/HDI) |
|
84.00 ftlbs |
|
113.90 Nm |
|
|
|
|
@7000 RPM |
|
@7000 RPM |
|
|
|
|
|
|
|
|
|
VRSCAW (France |
|
80.00 ftlbs |
|
108.48 Nm |
|
|
opt. Germany) |
|
@6500 RPM |
|
@6500 RPM |
|
|
|
|
|
|
|
|
|
VRSCAW (Japan) |
|
77.00 ftlbs |
|
104.41 Nm |
|
|
|
|
@7000 RPM |
|
@7000 RPM |
|
|
|
|
|
|
|
|
|
VRSCDX (DOM) |
|
85.00 ftlbs |
|
115.26 Nm |
|
|
|
|
@7000 RPM |
|
@7000 RPM |
|
|
|
|
|
|
|
|
|
VRSCDX (HDI) |
|
83.00 ftlbs |
|
112.55 Nm |
|
|
|
|
@7500 RPM |
|
@7500 RPM |
|
|
|
|
|
|||
|
VRSCDX (France opt. |
|
78.00 ftlbs |
|
105.77 Nm |
|
|
Germany) |
|
@7000 RPM |
|
@7000 RPM |
|
|
|
|
|
|
|
|
|
VRSCDX (Japan) |
|
79.00 ftlbs |
|
107.12 Nm |
|
|
|
|
@7000 RPM |
|
@7000 RPM |
|
|
|
|
|
|
|
|
|
VRSCF (DOM) |
|
86.00 ftlbs |
|
116.62 Nm |
|
|
|
|
@6500 RPM |
|
@6500 RPM |
|
|
|
|
|
|
|
|
|
VRSCF (HDI) |
|
85.00 ftlbs |
|
115.26 Nm |
|
|
|
|
@6500 RPM |
|
@6500 RPM |
|
|
|
|
|
|
|
|
|
VRSCF (France opt. |
|
84.00 ftlbs |
|
113.90 Nm |
|
|
Germany) |
|
@6250 RPM |
|
@6250 RPM |
|
|
|
|
|
|
|
|
|
VRSCF (Japan) |
|
81.00 ftlbs |
|
109.84 Nm |
|
|
|
|
@6500 RPM |
|
@6500 RPM |
|
|
|
|
|
|
|
|
Capacities: 2009 VRSC Models
|
|
|
|
|
|
|
|
ITEM |
|
U.S. |
|
LITERS |
|
|
|
|
|
|
|
|
|
Fuel tank |
|
5.00 gal |
|
18.93 |
|
|
|
|
|
|
|
|
|
Low fuel warning lamp on |
|
0.50 gal |
|
1.89 |
|
|
|
|
|
|
|
|
|
Oil capacity with filter |
|
4.50 qt. |
|
4.26 |
|
|
|
|
|
|
|
|
|
Coolant capacity |
|
2.50 qt. |
|
2.37 |
|
|
|
|
|
|
|
|
|
|
|
Transmission: 2009 VRSC Models |
|
|
|
|
|
|
|
ITEM |
|
SPECIFICATION |
|
|
|
|
|
|
|
Type |
|
foot shift |
|
|
|
|
|
|
|
Speeds |
|
5 forward |
|
|
|
|
|
|
|
Gears |
|
1st, 5th spur gears |
|
|
|
|
|
|
 2nd, 3rd, 4th helical gears
Drivetrain: 2009 VRSC Models
|
|
|
|
|
|
COMPONENT |
|
TYPE |
|
|
|
|
|
|
|
Primary drive |
|
gear |
|
|
|
|
|
|
|
Final drive |
|
belt |
|
|
|
|
|
|
|
Rear sprocket |
|
compensated |
|
|
|
|
|
|
|
Clutch |
|
hydraulic, slip and assist |
|
|
|
|
|
|
Sprocket Teeth: 2009 VRSC Models
|
|
|
|
|
|
|
|
ITEM |
|
DOMESTIC |
|
INTERNATIONAL |
|
|
|
|
|
|
||
|
Transmission |
|
28 |
|
30 |
|
|
|
|
|
|
||
|
Rear wheel |
|
72 |
|
72 |
|
|
|
|
|
|
||
|
Ratio |
|
0.42 |
|
0.39 |
|
|
|
|
|
|
|
|
Gear Ratios: 2009 VRSC Models
|
|
|
|
|
|
|
|
GEAR |
|
DOMESTIC |
|
INTERNATIONAL |
|
|
|
|
|
|
||
|
1st gear |
|
11.752 |
|
10.969 |
|
|
|
|
|
|
||
|
2nd gear |
|
7.898 |
|
7.371 |
|
|
|
|
|
|
||
|
3rd gear |
|
6.322 |
|
5.900 |
|
|
|
|
|
|
||
|
4th gear |
|
5.459 |
|
5.095 |
|
|
|
|
|
|
||
|
5th gear |
|
4.889 |
|
4.563 |
|
|
|
|
|
|
|
|
Dimensions: 2009 VRSC Models
ITEM |
|
|
VRSCAW |
|
|
VRSCDX |
|
|
VRSCF |
||||||
|
|
|
|
|
|
|
|
|
|
|
|
|
|
|
|
|
|
IN. |
|
|
MM |
|
IN. |
|
|
MM |
|
IN. |
|
|
MM |
|
|
|
|
|
|
|
|||||||||
Wheelbase |
|
67.20 |
|
|
1706.88 |
|
67.20 |
|
|
1706.88 |
|
67.00 |
|
|
1701.80 |
|
|
|
|
|
|
|
|||||||||
Overall length |
|
94.40 |
|
|
2397.76 |
|
94.40 |
|
|
2397.76 |
|
92.80 |
|
|
2357.12 |
|
|
|
|
|
|
|
|||||||||
Overall width |
|
34.50 |
|
|
876.30 |
|
34.60 |
|
|
878.84 |
|
40.20 |
|
|
1021.08 |
|
|
|
|
|
|
|
|||||||||
Overall height |
|
47.70 |
|
|
1211.58 |
|
45.50 |
|
|
1155.70 |
|
45.70 |
|
|
1160.78 |
|
|
|
|
|
|
|
|||||||||
Road clearance |
|
5.00 |
|
|
127.00 |
|
4.20 |
|
|
106.68 |
|
4.80 |
|
|
121.92 |
|
|
|
|
|
|
|
|||||||||
Seat height* |
|
26.00 |
|
|
660.40 |
|
25.20 |
|
|
640.08 |
|
25.60 |
|
|
650.24 |
 *With 180 lb. (82 kg) rider on seat.
Weights: 2009 VRSC Models
|
ITEM |
|
VRSCAW |
|
VRSCDX |
|
VRSCF |
|
||||||
|
|
|
|
|
|
|
|
|
|
|
|
|
|
|
|
|
|
LB. |
|
KG |
|
LB. |
|
KG |
|
LB. |
|
KG |
|
|
|
|
|
|
|
|
|
|
||||||
|
Weight (as shipped from factory) |
|
637.00 |
|
288.94 |
|
643.00 |
|
291.66 |
|
640.00 |
|
290.30 |
|
|
|
|
|
|
|
|
|
|
||||||
|
GVWR |
|
1075.00 |
|
487.61 |
|
1075.00 |
|
487.61 |
|
1075.00 |
|
487.61 |
|
|
|
|
|
|
|
|
|
|
||||||
|
GAWR Front |
|
377.00 |
|
171.00 |
|
377.00 |
|
171.00 |
|
377.00 |
|
171.00 |
|
|
|
|
|
|
|
|
|
|
||||||
|
GAWR Rear |
|
698.00 |
|
316.61 |
|
698.00 |
|
317.61 |
|
698.00 |
|
317.61 |
|
|
|
|
|
|
|
|
|
|
|
|
|
|
|
|
NOTE:
Gross Vehicle Weight Rating GVWR (maximum allowable loaded vehicle weight) and corresponding Gross Axle Weight Ratings (GAWR) are given on a label located on the left frame tube above the front engine cylinder.
|
|
|
|
|
Tire Sizes: 2009 VRSC Models |
|
|
|
|
|
|
|
|
|
|
|
|
|
|
|
|
MOUNT |
|
SIZE |
|
NUMBER |
|
|
|
|
|
|
|
|
|
Front |
|
19 in. |
|
D208F 120/70ZR19 60W |
|
|
|
|
|
|
|
|
|
Rear |
|
18 in. |
|
D419 240/40R18 79V |
|
 All 2009 models use Dunlop radial tires only.
Tire Pressures: 2009 VRSC Models
|
|
|
|
|
|
|
|
|
|
|
|
|
|
LOAD |
|
|
|
|
TIRE PRESSURE (COLD) |
|
|||||
|
|
|
|
|
|
|
|
|
|
|
|
|
|
|
|
|
FRONT |
|
|
REAR |
|
||||
|
|
|
|
|
|
|
|
|
|
|
|
|
|
|
|
PSI |
|
|
kPa |
|
PSI |
|
|
kPa |
|
|
|
|
|
|
|
|
||||||
|
solo rider |
|
36 |
|
|
248 |
|
38 |
|
|
262 |
|
|
|
|
|
|
|
|
||||||
|
rider and passenger |
|
36 |
|
|
248 |
|
42 |
|
|
290 |
|
|
|
|
|
|
|
|
|
|
|
|
|
|
Bulb Chart: 2009 VRSC Models
LAMP |
|
DESCRIPTION |
|
BULBS |
CURRENT DRAW |
|
HD PART |
|
|
|
(ALL LAMPS 12 VOLT) |
|
REQUIRED |
(AMPERAGE) |
|
NUMBER |
|
|
|
|
|
|
|
|
|
|
Headlamp |
|
low beam |
|
1 |
|
4.30 |
|
6888101 |
|
|
|
|
|
|
|
|
|
|
|
|
|
|
|
|
||
VRSCAW, VRSCF |
|
high beam |
|
1 |
|
5.10 |
|
6771701 |
|
|
|
|
|
|
|
||
Headlamp |
|
low beam/high beam |
|
1 |
|
4.58/5.00 |
|
6832903 |
VRSCDX |
|
|
|
|
|
|
|
|
|
|
|
|
|
|
|
||
Position lamp |
|
position lamp |
|
1 |
|
0.36 |
|
5343697 |
international |
|
|
|
|
|
|
|
|
|
|
|
|
|
|
|
|
|
Tail and stop lamp |
|
tail/stop lamp |
|
1 |
|
0.59/2.25 |
|
6816889A |
|
|
|
|
|
|
|
||
VRSCAW, |
|
license plate illumination |
|
2 |
|
0.33 |
|
6819395 |
|
|
|
|
|
|
|
|
|
|
tail/stop lamp international |
1 |
|
0.42/1.75 |
|
6816990A |
||
VRSCDX |
|
|
|
|||||
|
|
|
|
|
|
|
|
|
license plate illumination |
2 |
0.37 |
5343697 |
international |
|
|
|
Tail and stop lamp
VRSCF
License plate illumination
VRSCF
Turn signal lamp
VRSCAW,
VRSCDX
Turn signal lamp
VRSCF
 Instrument cluster
Illuminated with LEDs. Replace entire assembly upon failure.
Illuminated with LEDs. Replace entire assembly upon failure.
front/running |
|
2 |
|
2.25/0.59 |
|
6816889 |
|
|
|
|
|
||
rear |
|
2 |
|
2.25 |
|
6857264B |
|
|
|
|
|||
front/running international |
|
2 |
|
1.75 |
|
6816384 |
|
|
|
|
|||
rear international |
|
2 |
|
1.75 |
|
6816384 |
|
|
|
||||
front/running |
|
Illuminated with LEDs. Replace entire |
||||
|
|
assembly upon failure. |
|
|
||
|
|
|
||||
rear |
|
Illuminated with LEDs. Replace entire |
||||
|
|
assembly upon failure. |
|
|
||
 Illuminated with LEDs. Replace entire assembly upon failure.
Tire Data: VRSC Models
Match tires, tubes, air valves and caps to the correct wheel rim. Contact a HarleyDavidson dealer. Mismatching can result in damage to the tire bead, allow tire slippage on the rim or cause tire failure, which could result in death or serious injury. (00023a)
Use only HarleyDavidson approved tires. See a Harley Davidson dealer. Using nonapproved tires can adversely affect stability, which could result in death or serious injury. (00024a)
Tubeless tires are used on all HarleyDavidson cast and disc wheels.
Tire sizes are molded on the tire sidewall. Inner tube sizes are printed on the tube.
HarleyDavidson front and rear tires are not the same. Interchanging front and rear tires can cause tire failure, which could result in death or serious injury. (00026a)
Do not inflate tire beyond maximum pressure as specified on sidewall. Over inflated tires can blow out, which could result in death or serious injury. (00027a)
HarleyDavidson tires are equipped with wear bars that run horizontally across the tread. When wear bars become visible and only 1/32 in. (0.8 mm) tread depth remains, replace tire immediately. Using a worn tire can adversely affect stability and handling, which could result in death or serious injury. Use only HarleyDavidson approved replacement tires. (00090b)
See Specifications: 2009 VRSC Models for tire pressures and sizes.
Catalytic Converters: VRSC Models
All international (HDI) motorcycles are equipped with catalytic converters. Domestic and destination Japan motorcycles are not equipped with catalytic converters.
Do not operate catalytic converterequipped vehicle with engine misfire or a nonfiring cylinder. If you operate the vehicle under these conditions, the exhaust will become abnormally hot, which can cause vehicle damage, including emission control loss. (00149a)
Gasoline Blends
Your motorcycle was designed to get the best performance and efficiency using unleaded gasoline. Most gasoline is blended with alcohol and/or ether to create oxygenated blends. The type and amount of alcohol or ether added to the fuel is important.
Do not use gasoline that contains methanol. Doing so can result in fuel system component failure, engine damage and/or equipment malfunction. (00148a)
Gasoline containing METHYL TERTIARY BUTYL ETHER (MTBE): Gasoline/MTBE blends are a mixture of gasoline and as much as 15% MTBE. Gasoline/MTBE blends can be used in your motorcycle.
ETHANOL is a mixture of 10% ethanol (Grain alcohol) and 90% unleaded gasoline. Gasoline/ethanol blends can be used in your motorcycle if the ethanol content does not exceed 10%.
REFORMULATED OR OXYGENATED GASOLINES (RFG): Reformulated gasoline is a
term used to describe gasoline blends that are specifically designed to burn cleaner than other types of gasoline, leaving fewer tailpipe emissions. They are also formulated to evaporate less when you are filling your tank. Reformulated gasolines use additives to oxygenate the gas. Your motorcycle will run normally using this type of gas and Harley Davidson recommends you use it when possible, as an aid to cleaner air in our environment.
Do not use race gas or octane boosters. Use of these fuels will damage the fuel system.
Some gasoline blends might adversely affect the starting, driveability or fuel efficiency of the motorcycle. If any of these problems are experienced, try a different brand of gasoline or gasoline with a higher octane blend.
Fuel
Refer to Octane Ratings. Always use a good quality unleaded gasoline. Octane ratings are usually found on the pump.
Avoid spills. Slowly remove filler cap. Do not fill above bottom of filler neck insert, leaving air space for fuel expansion. Secure filler cap after refueling. Gasoline is extremely flammable and highly explosive, which could result in death or serious injury. (00028a)
Use care when refueling. Pressurized air in fuel tank can force gasoline to escape through filler tube. Gasoline is extremely flammable and highly explosive, which could result in death or serious injury. (00029a)
Modern service station pumps dispense a high flow of gasoline into a motorcycle fuel tank making air entrapment and pressurization a possibility.
Octane Ratings
SPECIFICATION
 Pump Octane (R+M)/2
RATING
91 (95 RON)
Controls and Indicators
General: Controls and Indicators
Read the CONTROLS AND INDICATORS section before riding your motorcycle. Failure to understand the

operation of the motorcycle could result in death or serious injury. (00043a)
Some features explained are unique to certain models. These features may be available as accessories for your HarleyDavidson motorcycle. See a HarleyDavidson dealer for a complete list of accessories that will fit your specific motorcycle.
Ignition Switch: VRSC Models
The automaticon headlamp feature provides increased visibility of the rider to other motorists. Be sure headlamp is on at all times. Poor visibility of rider to other motorists can result in death or serious injury. (00030b)
See the YOUR OWNER'S MANUAL section at the beginning of this manual. Be sure to record all your key numbers in the space provided at the front of this book.
The ignition switch controls electrical functions of the motorcycle.
Protect your vehicle against theft. After parking your motorcycle, lock the steering head and ignition switch. Failure to lock your motorcycle can result in theft and/or equipment damage. (00491c)
Do not operate vehicle with forks locked. Locking the forks restricts the vehicle's turning ability, which could result in death or serious injury. (00035a)
Do not lubricate barrel locks with petroleum based lubricants or graphite. Inoperative locks may result. (00152a)
Turn the ignition switch to the OFF position before locking the motorcycle. Leaving the switch in the ACC position will keep the instrument lights on and result in a discharged battery. (00492b)
To review the functions of each switch position, refer to Ignition Switch: VRSC Models.
1. See Ignition Switch: VRSC Models. To remove the key from the ignition, turn it to the
OFF position.
2.To remove the key from ignition, pull the key outward.
3.Always turn switch to LOCK position and remove key after operation and when leaving bike parked.
NOTES:
ACCAccessories and hazard warning flasher can be turned on. Instrument lamps are on. Brake lamp and horn can be activated. Key may be removed.
The lamps operate when the switch is in the IGN position, as required by law in some localities.
HarleyDavidson recommends removing key from ignition/fork lock before operating motorcycle. If you do not remove key, it can fall out during operation.
The ignition key also fits the front fork lock.
|
|
|
|
|
Ignition Switch: VRSC Models |
|
|
|
|
|
|
|
|
|
|
|
|
|
|
|
|
SWITCH |
|
REMOVE |
|
FUNCTIONS |
|
|
POSITION |
|
KEY |
|
|
|
|
|
|
|
|
|
|
|
OFF |
|
Yes |
|
Turns off ignition, lamps and accessories (disconnects battery voltage |
|
|
|
|
|
|
from IGN and ACC terminals). |
|
|
|
|
|
|
|
|
|
ACC |
|
Yes |
|
Turns on accessories. Hazard warning flashers can be operated. |
|
|
|
|
|
|
Instrument lamps are on. Brake lamp and horn can be activated (connects |
|
|
|
|
|
|
battery voltage to ACC terminal). |
|
NOTE: When switching to the ACC position, a startup diagnostic performs a systems check. The instrument background lighting illuminates, gauge needles sweep their full range of motion and the battery, security, coolant temperature and check engine indicator lamps illuminate.
IGN |
|
Yes |
|
Turns on ignition, lamps and accessories. |
1.Accessory position
2.OFF position
3.Ignition position
Ignition Switch: VRSC Models
Hand Controls: Basic Operation
Electric Starter Switch
NOTE:
Off/Run switch MUST be in RUN position to operate engine.
See Handlebar Controls: VRSC Models. The electric starter switch is located on the right handlebar control group. See Starting the Engine: VRSC Models for detailed operation procedures.
1.Put the engine off/run switch in the RUN position and the transmission in neutral. Neutral (green) indicator lamp should be illuminated.
2.See Ignition Switch: VRSC Models. Turn ignition/headlamp key switch to IGNITION and push the START switch to operate starter motor.
Engine OFF/RUN Switch
See Handlebar Controls: VRSC Models. The engine off/run switch (7) turns the ignition power ON or OFF. The engine off/run switch is located on the right handlebar control. Push the top portion of the engine off/run switch to turn off ignition power and shut the engine off. Push the bottom portion of the engine off/run switch to turn on ignition power.
NOTES:
The engine off/run switch must be in the RUN position to start or operate the engine.
The engine off/run switch should be used to shut the engine off.
1.To shut the engine off, push the top of the off/run switch to the ignition OFF position.
2.See Ignition Switch: VRSC Models. Turn the ignition key to the OFF position to turn the ignition power completely OFF.
Throttle Control Grip
See Handlebar Controls: VRSC Models. The throttle control grip (9) is located on the right handlebar control and is operated with the right hand.
To reduce rider fatigue on long trips, a spring loaded throttle friction adjustment screw (10) is located at the bottom of the throttle grip clamp on noncruise equipped models.
1.Slowly turn throttle control grip clockwise (toward the front of the bike) to close the throttle (decelerate).
2.Slowly turn throttle control grip counterclockwise (toward rear of bike) to open the throttle (accelerate).
Do not tighten throttle friction adjustment screw to the point where the engine will not return to idle automatically. Overtightening can lead to loss of vehicle control, which could result in death or serious injury. (00031b)
3.Unscrew the throttle friction adjustment screw so the throttle returns to the idle position when the hand is removed from the grip.
4.Screw the throttle adjustment screw in to increase friction on grip. This provides a damping effect on throttle motion.
NOTE:
The throttle friction adjustment screw should not be used under normal stop and go operating conditions.
Clutch Hand Lever
Do not position fingers between hand control lever and handlebar grip. Improper hand positioning can impair control lever operation and cause loss of vehicle control, which could result in death or serious injury. (00032a)
See Handlebar Controls: VRSC Models. The clutch hand lever (1) is located on the left handlebar and is operated with the fingers of the left hand.
1. Slowly pull clutch hand lever in against handlebar grip to fully disengage clutch.

2.Shift to first gear using the gear shifter lever. See Shifting Gears.
3.Slowly release the clutch hand lever to engage clutch.
A clutch switch is incorporated into the left handlebar switch assembly. It enables the rider to start the vehicle in any gear (or in neutral) as long as the clutch lever is pulled in. If the clutch is not disengaged, the vehicle will not start.
Horn Switch
See Handlebar Controls: VRSC Models. The horn is operated by pushing on the horn switch
(2) located on the left handlebar control group.
Headlamp Dimmer Switch
See Handlebar Controls: VRSC Models. The headlamp dimmer switch (3) is located on the left handlebar. The switch has two positions to activate the headlamps high or low beams.
Press the top of the headlamp dimmer beam switch to activate the high beam. Press the bottom of the headlamp dimmer switch to return to the low beam.
See Indicator Lamps: VRSC Models. The (blue) high beam indicator lamp will illuminate when the high beam is on.
Turn Signal Switches
See Handlebar Controls: VRSC Models. Each handlebar control group contains a turn signal switch.
The right turn signal switch (11) operates the right front and right rear flashing lamps. The left turn signal switch (4) operates the left front and left rear flashing lamps.
NOTE:
Front turn signal lamps also function as running lamps (except International models).
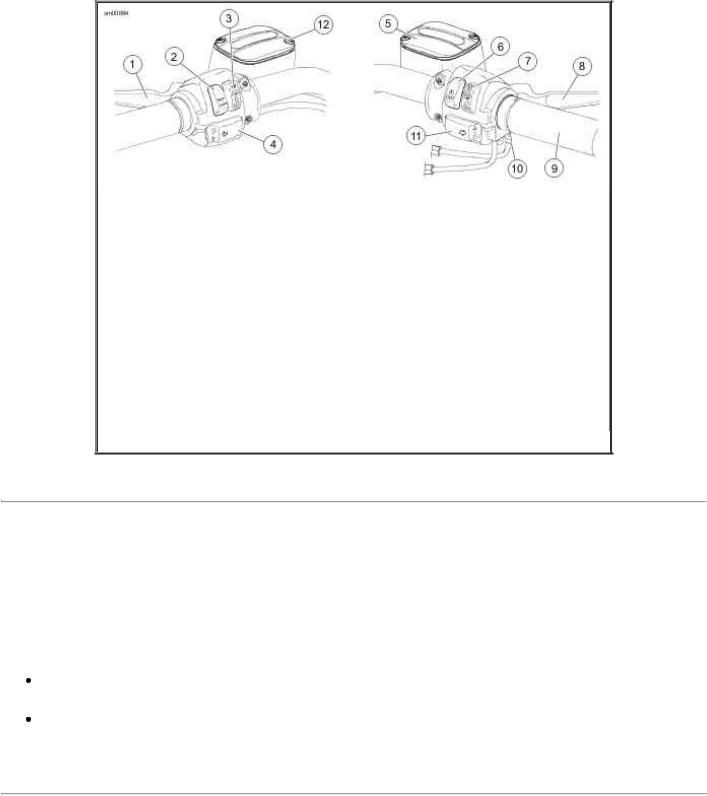
1.Clutch hand lever
2.Horn switch
3.Headlamp dimmer switch
4.Left turn signal switch
5.Front brake master cylinder reservoir
6.Electric starter switch
7.Engine off/run switch
8.Brake hand lever
9.Throttle control grip
10.Throttle friction adjusting screw
11.Right turn signal switch
12.Clutch master cylinder reservoir
Handlebar Controls: VRSC Models
Turn Signal Switch Operation
The turn signal switches are used by the turn signal module to control turn signal operation based on vehicle speed, vehicle acceleration and turn completion.
Momentarily depress the desired turn signal switch. The turn signal lamps will begin and continue flashing until they are manually or automatically cancelled. As long as the motorcycle is stationary, the signals will flash.
NOTES:
If you are signaling to turn in one direction and you depress the switch for the opposite turn signal, the first signal is cancelled and the opposite side begins flashing.
If you want to stop the lamps from flashing, briefly depress the turn signal switch a second time. The turn signal lamps will stop flashing.
Hazard Warning 4Way Flasher
Use the following method to activate the fourway flashers.
1.With the ignition key ON and security system disarmed (if equipped), press the left and right turn signal switches at the same time.
2.Turn the ignition key OFF and arm the security system if present and desired. The fourway flashers will continue for two hours.
3.To cancel fourway flashing, disarm the security system if necessary, turn the ignition key ON and press the left and right turn signal switches at the same time.
This system allows a stranded vehicle to be left in the fourway flashing mode and secured until
help is found.
Indicator Lamps: VRSC Models
See Indicator Lamps: VRSC Models. Eleven indicator lamps are provided in the instrument cluster.
The two green TURN indicator lamps flash when turn signals are activated; therefore, flashing indicates the chosen turn direction. When the 4way hazard flashers are operating, both turn indicators flash simultaneously.
The blue HIGH BEAM indicator lamp, when lit, signals high beam headlamp operation. The green NEUTRAL lamp, when lit, signals the transmission is in neutral gear.
The red OIL PRESSURE indicator lamp, when lit, signals that oil is not circulating through the engine.
The red ENGINE COOLANT TEMPERATURE indicator lamp, when lit, signals the coolant temperature has exceeded 243° F (117° C).
The red ENGINE DIAGNOSTIC indicator lamp, when lit, signals that the vehicle's computer has detected an engine malfunction.
The red ALTERNATOR indicator lamp, when lit, signals there is a malfunction in the charging circuit and the battery is not being properly charged.
The red SECURITY STATUS indicator lamp indicates the status of the vehicle's security system. It is normal for this to light with or without a security system.
The yellow LOW FUEL indicator lamp, when lit, signals the fuel tank is almost empty. On ABS equipped models, the amber ABS indicator lamp begins to flash at key ON to
indicate that the system is operational. It continues to flash until motorcycle speed exceeds 3 mph 5 km/h . Continuous illumination of the lamp will only occur when ABS detects that the system is malfunctioning. In the diagnostic mode, the lamp will also illuminate to indicate the presence of diagnostic trouble codes (DTCs). See a HarleyDavidson dealer for service.
If ABS lamp remains on continuously, the ABS is not operating. The standard brake system is operational, but wheel lock up can occur. Contact a HarleyDavidson Dealer to have ABS repaired. A locked wheel will skid and can cause loss of vehicle control, which could result in death or serious injury. (00361a)
NOTES:
The OIL PRESSURE indicator lamp will glow when the ignition is turned on prior to starting the engine. With the engine running, the lamp should be off when engine speed is above idle.
To learn more about the SECURITY STATUS indicator lamp, see the HD Factory Security Section later in this manual.
Several other circumstances that could cause the red oil pressure indicator lamp to illuminate include:
An insufficient or diluted oil supply causing the oil pressure indicator lamp to remain lit at speeds above idling.
An oil feed clogged with ice and sludge in freezing weather, preventing oil circulation. A grounded oil signal switch wire.
A faulty oil signal switch.
A damaged or improperly installed check valve.
Trouble with the oil pump.
If the oil pressure indicator lamp remains lit, always check the oil supply first. If the oil supply is normal and the lamp is still lit, stop the engine at once and do not ride further until the trouble is located and the necessary repairs are made. Failure to do so may result in engine damage. (00157a)
Several other circumstances that could cause the red engine coolant temperature indicator lamp to illuminate include:
Cooling fan malfunction.
Low coolant level.
Thermostat malfunction.
Temperature gauge malfunction.
Blocked coolant passages.
Radiator cap malfunction.
Coolant malfunction.
If the engine coolant temperature indicator lamp remains lit, always check the coolant level. If the coolant level is normal and the lamp is still lit, stop the engine at once and do not ride further until the trouble is located and the necessary repairs are made. Failure to do so may result in engine damage. (00158a)
Do not remove radiator filler cap when engine is hot. The cooling system is under pressure and hot coolant and steam can escape, which could cause severe burns. Allow engine to cool before servicing the cooling system. (00091a)
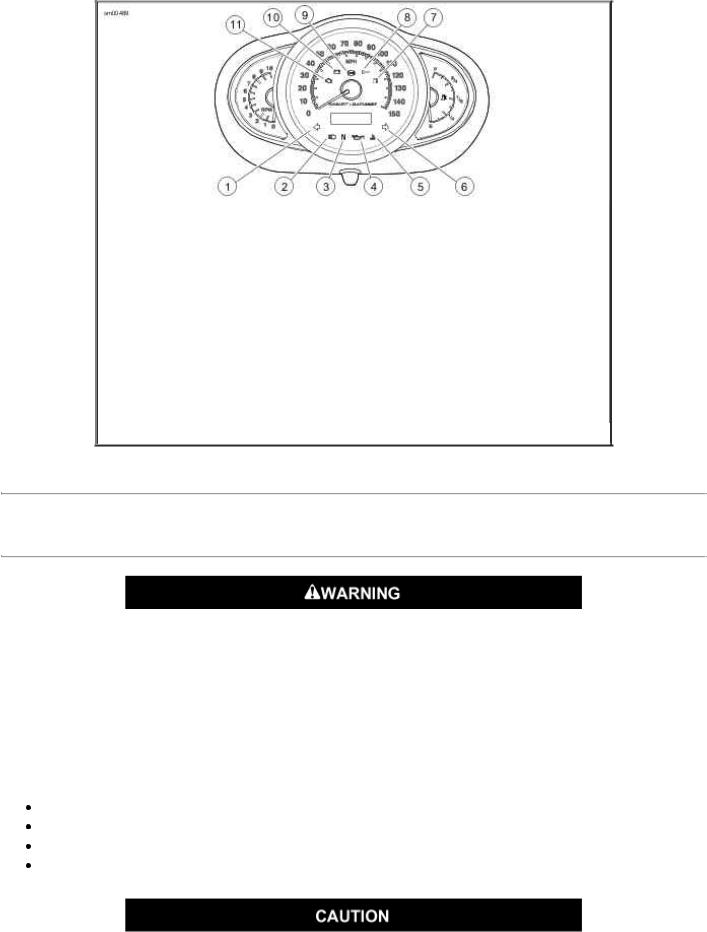
1.Left turn
2.High beam
3.Neutral
4.Oil
5.Engine coolant
6.Right turn
7.Low fuel
8.Security system
9.ABS
10.Alternator
11.Engine diagnostic
Indicator Lamps: VRSC Models
Instruments: VRSC Models
Speedometer
Travel at speeds appropriate for road and conditions and never travel faster than posted speed limit. Excessive speed can cause loss of vehicle control, which could result in death or serious injury. (00008a)
See Instrument Cluster: VRSC Models. The speedometer registers miles per hour (U.S. models) or kilometers per hour (international models) of forward speed. The speedometer also provides the following selectable functions:
Odometer
Trip odometers A and B 12 or 24 hour clock Fuel range
Never attempt to tamper with or alter the vehicle odometer. This is illegal. Tampering with or altering a vehicle odometer may cause equipment damage. (00160a)
The speedometer has a single display window for the above functions.

1.See Instrument Cluster: VRSC Models. Pressing the function switch with the ignition switch in any position will activate the odometer reading and time. Time and mileage or kilometers may be checked without unlocking ignition switch. Press and release function switch once to view odometer. Press and release switch again to display time.
2.To check mileage on trip odometers, the ignition switch must be in the ACC or IGNITION position. Press and release the function switch until the desired trip odometer reading is displayed. An 'A' or 'B' in the upper left of the display window identifies trip odometers.
3.To reset or zero trip odometers, have desired odometer (A or B) in display window. Press function switch and hold switch for 23 seconds. The trip odometer will be reset to zero.
4.Repeat the previous step if you wish to zero both trip odometers.
Setting Clock
1.Turn the ignition switch to ACC or IGNITION.
2.See Instrument Cluster: VRSC Models. Press function switch until time (hour and minutes) is displayed. Press and hold the function switch for five seconds or until 12HR begins to blink in the speedometer display window. Release the button.
3.Press and release the function switch once to advance to a blinking 24HR military style time display. Each time you press and release the button, the display will switch between 12HR and 24HR.
4.When the desired time style is displayed, press and hold the function switch for five seconds. The display will switch to the time display with the hours blinking.
5.Press and release the function switch repeatedly to advance the hours. Each time you press and release the switch, the display will advance one hour.
NOTE:
No AM or PM time setting is required. When correct hour is reached, press and hold function switch to advance to minute setting.
6.When the correct hour is displayed, press and hold the function switch for five seconds. The minutes display will start blinking.
7.Press and release the function switch repeatedly to advance the minutes display. Each time you press and release the button, the display will advance one minute.
8.When the correct minutes are displayed, press and hold the function switch for five seconds. The minutes display will stop blinking, indicating that the clock has been set.
9.Turn the ignition switch OFF.
Fuel Range Function
The fuel range function shows the approximate mileage available with the amount of fuel left in the fuel tank.
1. With the ignition switch in the ACC or IGNITION position, press function switch until fuel
range function is displayed, as indicated by the letter 'r' in the left side of the odometer display. The calculated remaining distance (miles or kilometers) to empty is displayed, based on the amount of fuel in tank. Range can be accessed at any time using the function switch.
2.When the low fuel warning lamp illuminates, the range feature will automatically be displayed in the odometer unless this automatic popup feature is disabled by a press and hold of the function switch while in range display mode. Automatic range popup feature will show that it is disabled by blinking twice. Likewise, automatic range popup can be reactivated by a press and hold of the function switch. Range will blink once when the automatic popup feature is reenabled.
NOTE:
When the low fuel warning lamp turns on, there is approximately 0.50 gallon 1.89 liters of fuel remaining in the tank. Refuel as soon as possible.
The range display is only updated when the vehicle is moving.
3.After the range calculation reaches 10 miles 16 kilometers remaining, the range display will display "r Lo" to indicate that the vehicle will shortly run out of fuel.
4.Resetting the low fuel warning lamp and range requires an ignition cycle change.
Tachometer
See Instrument Cluster: VRSC Models. The tachometer registers the engine speed in revolutions per minute (RPM).
See OPERATING RECOMMENDATIONS section. Do not operate the engine above maximum safe RPM as shown under OPERATION (red zone on tachometer). Lower the RPM by upshifting to a higher gear or reducing the amount of throttle. Failure to lower RPM may cause equipment damage. (00159a)
Tip Indicator Lamp
If tip occurs, check all controls for proper operation. Restricted control movement can adversely affect the performance of the brakes, clutch or ability to shift, which could result in loss of vehicle control and death or serious injury. (00350a)
Should motorcycle be tipped over, the word "tip" will appear in the odometer window. Engine will not start until reset. To reset, cycle ignition/headlamp key switch ONOFFON.
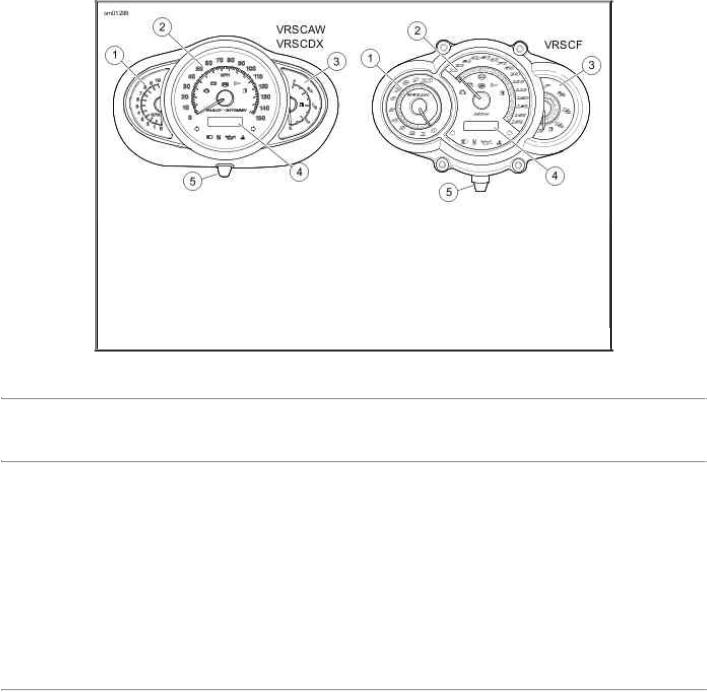
1.Tachometer
2.Speedometer
3.Fuel gauge
4.Odometer/tripodometer/clock/fuel range display
5.Function switch
Instrument Cluster: VRSC Models
Sequential Port Fuel Injection
Check Engine Lamp
See Check Engine and Low Fuel Lamp: VRSC Models. The engine check lamp is located inside the instrument cluster. Its purpose is to indicate whether or not the engine/engine management system is operating normally. The engine lamp color is red.
The engine lamp normally comes on when the bike's ignition is first turned on and remains on for approximately 4 seconds, as the engine management system runs a series of selfdiagnostics.
If the engine lamp comes on at any other time, see a HarleyDavidson dealer.
Low Fuel Lamp
See Check Engine and Low Fuel Lamp: VRSC Models. There is a low fuel warning lamp within the instrument cluster. The low fuel lamp lights up to indicate that there is approximately 1 gallon (3.8 liters) of gasoline left in the tank. The low fuel lamp color is amber.
 Loading...