


¨
Desoldering Tool
Instruction Manual
Thank you for purchasing the Hakko 470B Desoldering Tool.
Please read the manual before using the Hakko 470B. Store the manual in a safe, easily accessible place for future reference.
 CAUTION : Remove the pump securing screws (M4x25 marked red) from the bottom of the station.
Failure to do so may result in serious problems.
Table of Contents
Packing List················································1 ·· Precautions················································2 ·· Part Names (Desoldering Gun)··················3
(Station)··································4
Operation (Preparation-
Assembly and Connection)······5·6 (Desoldering)························7·8 (Cleaning during Operation)········9 (Problems during Desoldering)
(Post-operation Maintenance)···10
(Troubleshooting Guide)········11
Maintenance (Desoldering Gun)···········12~14 (Station)···························15·16
Replacement Parts
(Replacing Heating Element)·····17·18
Parts List (Station)····························19·20 (Desoldering Gun)················21
Specifications, Wiring·······························22

Packing List |
Please check to make sure that all the items listed below |
|
are included in the Hakko 470B package. |
||
|
|
|
Station················································· ···1 |
Ceramic Paper Filter (S)···································· 2 |
||
Desoldering Gun···································· 1 |
Ceramic Paper Filter (L)···································· 4 |
||
Iron Holder Base···································· 1 |
Spring Filter··············································· ········ 3 |
||
Spring Iron Holder··································1 |
Cleaning Pin (for Ø1.0mm [0.04 in.] nozzle)······ 1 |
||
Cleaning Sponge····································1 |
Cleaning Pin (for Heating Element)··················· 1 |
||
Filter Pipe···············································1 |
Cleaning Pin Holder··········································· 1 |
||
|
|
Cleaning Drill (for Ø1.0mm [0.04 in.] nozzle)······ 1 |
|
|
|
SIlicone Grease··············································· ···1 |
|
|
|
Spanner················································· ·············1 |
|
|
|
Instruction Manual·············································· 1 |
|
Station |
Spanner |
|
|
Iron Holder Base |
Spring Iron Holder |
Cleaning Sponge |
|
|
Ceramic Paper Filter (S) |
|
|
Filter Pipe |
|
Ceramic Paper Filter (L) |
Spring Filter |
Cleaning Pin for Ø1.0 mm (0.04 in.) Nozzle |
Cleaning Pin for Heating Element |
Cleaning Pin Holder |
|
Cleaning Drill for Ø1.0 mm (0.04 in.) Nozzle |
Silicone Grease |
Desoldering Gun |
|
1 |
|
|
|
Safety Instructions
 WARNING
Warnings, cautions are placed at critical points in this manual to direct the operator’s attention to significant items. They are defined as follows:
 WARNING: Failure to comply with a WARNING may result in serious injury or death.
 CAUTION : Failure to comply with a CAUTION may result in injury to the operator, or damage to the items involved.
For your own safety, be sure to comply with these precautions.
 CAUTION
Remove the pump securing screws (M4x25 marked red) from the bottom of the station.
Failure to do so may result in serious problems.
When the power is ON, the nozzle temperature is between 380˚C and 480˚C (716˚F and 896˚F).
Since mishandling may lead to burns or fire, be sure to comply with the following precautions.
·Do not touch the metal parts near the nozzle, nearby plastic parts and the spring iron holder .
·Do not use the product near flammable items.
·Advise those in the work area that the unit can reach very high temperatures and should be considered potentially dangerous. ·Turn the power OFF when no longer using the Hakko 470B or when
leaving it unattended.
·Before replacing parts or storing the unit, allow the unit to cool and then turn the power OFF.
To prevent accidents and failures, be sure to take the following precautions:
·Do not use the unit for applications other than desoldering.
·Do not rap the desoldering gun against the work bench to shake off residual solder, or otherwise subject the iron to severe shocks.
·Do not modify the unit.
·Use only genuine Hakko replacement parts.
·Do not wet the unit or use the unit with wet hands.
·Set the ceramic paper filter (S) for the filter retainer (station), and the ceramic paper filter (L) for the filter pipe (gun).
·Maintain the desoldering gun and the station.
·While using the unit, don't do anything which may cause bodily harm or physical damage.
2
Part Names (Refer to p.19,20,21 for part nos.)
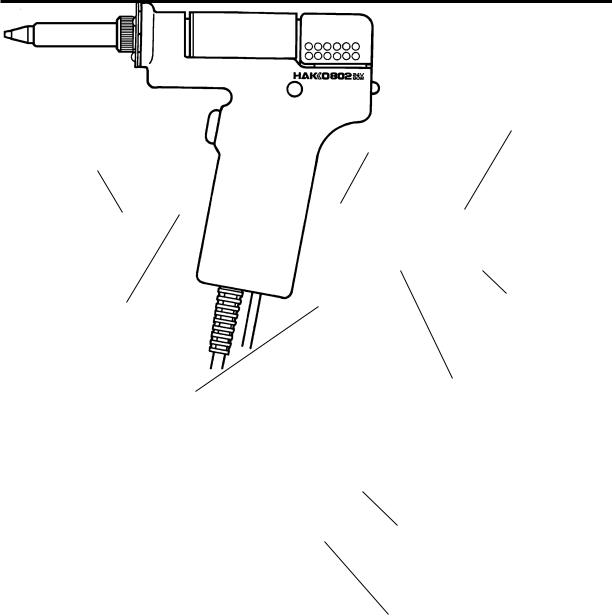
 Desoldering Gun
Nozzle |
Filter Pipe |
|||
Transmits heat for melting solder. |
Set the ceramic paper filter (L) (No. A1033). |
|||
Entrance for melted solder. |
Contains melted solder and flux using filters. |
|||
Expendable part |
|
Filter are expendable parts. |
||
|
|
|
|
|
Heating Element
Inside requires cleaning.
Trigger
Squeeze to start absorption. Do not pull the trigger before fully heating the nozzle.
Back Holder
Assembly
Secures the filter pipe.
Release Knob
Push down to remove the filter pipe.
Indicator
Indicates when nozzle and heating element need cleaning and when filters need replacing.
Hose
Connects to the vacuum outlet cap (station).
Cord Assembly
Connects to the receptacle (station).
3
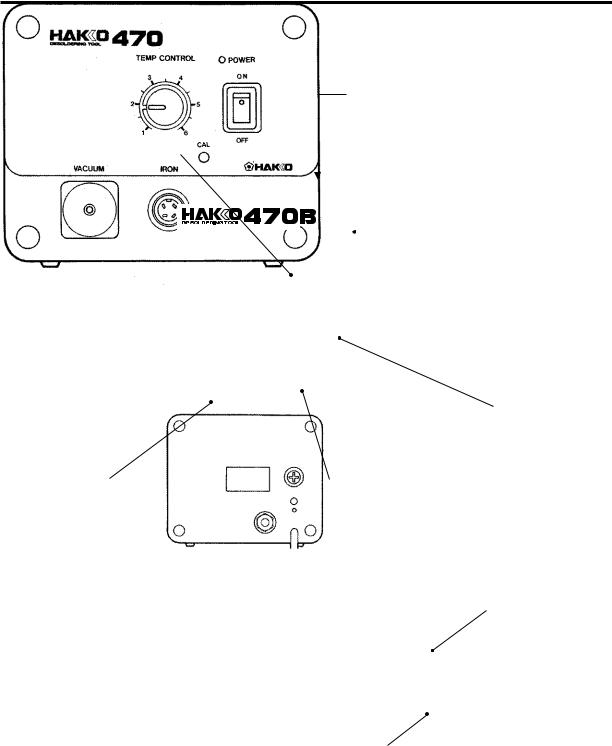
 Station
Temperature Control Knob
Provides nozzle temperature control. (refer to p.7)
Temperature Control Set Screw Clamp
Prevents the temperature control knob from being reset. (refer to p.7)
 Power Lamp
Lights up when the power switch is turned to ON.
 Power Switch
When turned to ON, the heating element starts to heat up.
CAL (Calibration)
Used for calibrating the temperature after replacing the Heating Element.
Vacuum Outlet Cap |
Receptacle |
|
Set the ceramic paper filter (S) |
Connector for the cord |
|
(No, A1009). |
assembly. |
|
Connects with the hose, Filter |
|
|
inside vacuum outlet cap is |
|
|
expendable. |
|
|
Fuse Holder
·120V unit contains 250V-2A (U) fuse.
Power Cord
4
Operation
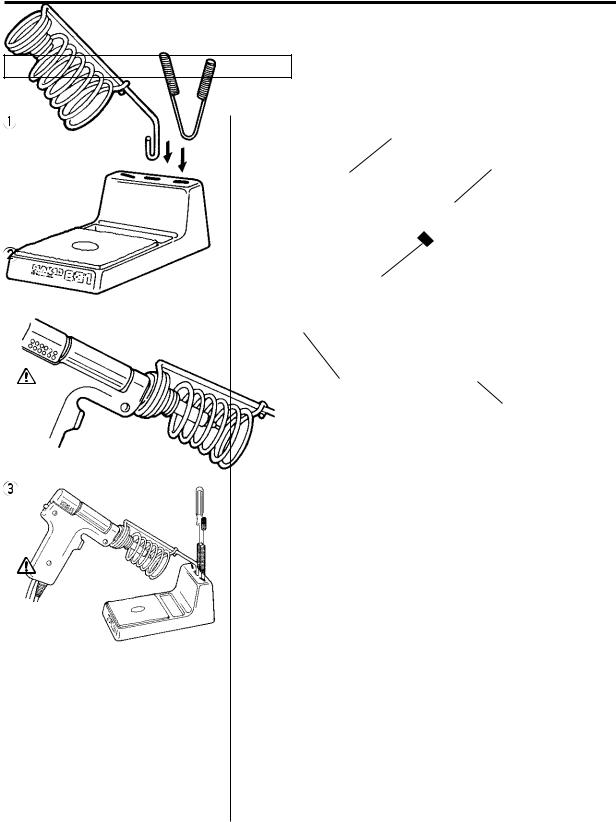
Preparation–Assembly and Connection
Assemble the Hakko 470B on a flat surface.
Remove the pump securing
screws (M4x25 marked red) Spring Iron Holder
(No. B1094)
from the bottom of the station. Cleaning Pin Holder
(No. B1095)
Assemble the iron holder. |
|
|
·Set the spring iron holder and |
Tube (red) |
|
cleaning pin holder in the iron |
||
Securely insert the |
||
holder base. |
cleaning pin holder. |
|
·Dampen the cleaning sponge |
Cleaning Sponge |
|
with water and then squeeze |
|
|
it dry. |
|
|
CAUTION |
|
|
The sponge is compressed. |
|
|
It will swell when moistened with water. |
Iron Holder Base |
|
Be sure to dampen the sponge with |
|
|
water before use. |
|
|
Be sure to remove the round portion |
|
|
of the sponge. |
|
|
Insert the desoldering gun |
|
|
and cleaning pins. |
|
|
·Fully insert the desoldering |
|
|
gun into the spring iron holder. |
|
|
CAUTION |
|
|
The spring iron holder becomes |
|
|
extremely hot during operation of the |
|
|
desoldering gun. Do not touch the |
|
|
spring iron holder during and |
|
|
immediately after using the gun. |
|
5
 Connections
 CAUTION
Be sure to turn the power switch off before connecting or disconnecting the cord assembly and the power plug. Failure to do so may damage the P.W.B.
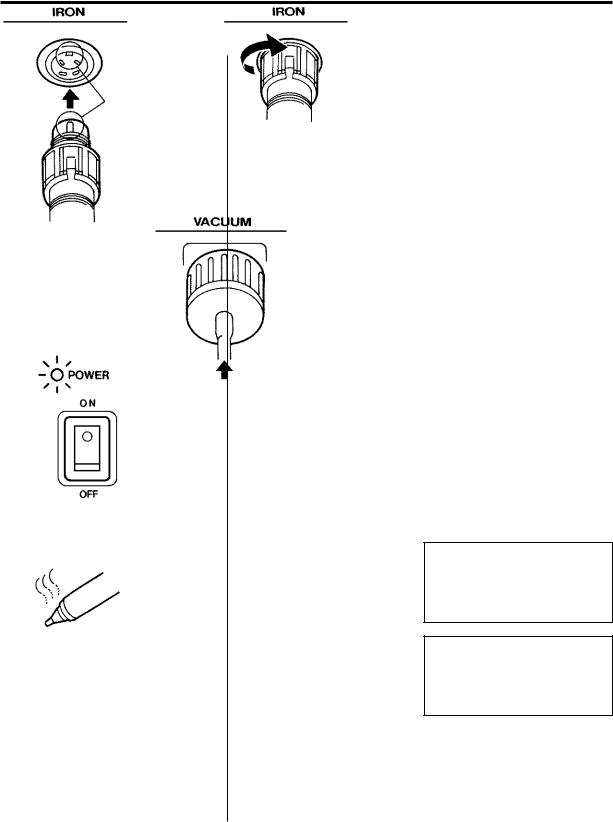
·Connect the cord assembly to the receptacle (marked "IRON").
·Connect the hose to the vacuum outlet cap (marked "VACUUM").
 Power switch
·Confirm that the power switch is set in the OFF position, then connect the power plug to the power source.
 CAUTION
The entire unit is constructed of conductive materials. Always ground the unit.
·Turn the power switch to ON. The power lamp should light up.
·The nozzle begins to heat up as soon as the power switch is turned to ON.
 After turning the power switch to ON, wait three (3) minutes before beginning desoldering operations.
Insert the cord assembly by keying the plug to the key
on the receptacle.
Secure the plug by turning it clockwise.
The power lamp lights up.
Fully insert the hose into the vacuum outlet cap.
The power lamp doesn’t light up.
1.Is the power cord properly connected?
2.Is the fuse blown?
The nozzle doesn’t heat up.
1.Is the cord assembly properly connected?
2.Is the heating element broken?
The nozzle heats up.
 CAUTION : The desoldering gun must be placed in the iron holder when not in use.
6
 Loading...