


LE42A300
Haier LE42A300, LE55A300, LB32R3A, LB42R3A, LB46R3A Owner's Manual
...
Please READ this manual carefully before
operating your TV, and retain it forfuture
reference.
OWNER’S MANUAL
LED-LCD TELEVISION
LE32A300
LE42A300
LE55A300

Contents
2 LED -LCD television Owner’s Manual
Contents
Warning 3
Important Safety Instructions 4
Introduction 6
Panel Control .......................................................6
Connection Option ..............................................7
Remote Control 8
Battery loading ....................................................8
Precautions ..........................................................8
Remote Control Function 9
Function introduction .........................................9
External Equipment Connections 10
Antenna Connection .........................................10
Choose Your Connection ...................................11
VCR Connection ..................................................................11
External AV Source ............................................................. 11
Connecting a DVD player ................................................ 11
HDMI or DVI Setup ............................................................. 12
PC Setup ................................................................................12
Monitor Out Setup ............................................................. 13
Power source ......................................................13
Basic Receiving and Playing
Operations 14
Switching ON/OFF the TV set
...........................14
Switching ON/OFF the TV set ........................................ 14
Choose the Menu Language .......................................... 14
Choose the Input source .................................................14
Picture Menu .....................................................14
How to select the picture mode ...................................14
How to customize your own picture status .............. 15
Sound Menu .......................................................15
How to select the sound mode ..................................... 15
How to customize your own sound status................ 16
Channel Menu ....................................................16
Programme Edit .................................................................. 16
Auto Tuning .......................................................................... 17
Exchange ............................................................................... 17
Function Menu ................................................... 18
Function Menu Set ............................................................ 18
Adjust Menu ....................................................... 19
Time Menu ..........................................................19
Lock Setup ..........................................................20
How to use the password function .............................. 20
Streaming Media Playing System ....................21
Start/Exit Streaming Media Playing system .............. 22
Operating Method of Streaming Media Menu ........ 22
Playing a Picture ................................................................. 22
Playing a Movie ................................................................... 23
Playing Music
......................................................................... 23
Tex t
..........................................................................................23
Settings
................................................................................... 23
Maintenance 24
Troubleshooting 24
Specification 25
Format 25
Warning
LED -LCD television Owner’s Manual 3
WARNING
!
WARNING:
TO REDUCE THE RISK OF ELECTRIC SHOCK DO NOT REMOVE COVER (OR BACK). NO USER SERVICEABLE PARTS
INSIDE. REFER TO QUALIFIED SERVICE PERSONNEL.
*
To avoid electric hazards, it is strongly suggested that the back cover not be opened, as there is no any
accessory inside the casing.
*
lf necessary, please contact authorized after-sales services.
*
A lighting ash mark in a triangle: A potentially hazardous situation, which, if not avoided, could result in
serious injury by high voltage.
*
An exclamation mark in a triangle: Major part or accessory of which technical specications must be followed if
it is to be replaced.
RISK ELECTRIC SHOCK
DO NOT OPEN
WARNING: To avoid fire or electric hazards, never place your television receiver in an area with heavy
moisture. Attention should be paid to avoid accidental scratches or impacts onto the screen.
CAUTION:
Please read this manual carefully before using your television and keep this manual in a
good place for future reference.
To achieve the best performance of your television, read this User’s Manual carefully and
properly store it for future reference.
Information of screen displays and figures in the User’s Manual may vary due to technical
innovations.
CAUTION:
Unauthorized disassembly of this product is prohibited.
Warning
Important Safety Instructions
4 LED -LCD television Owner’s Manual
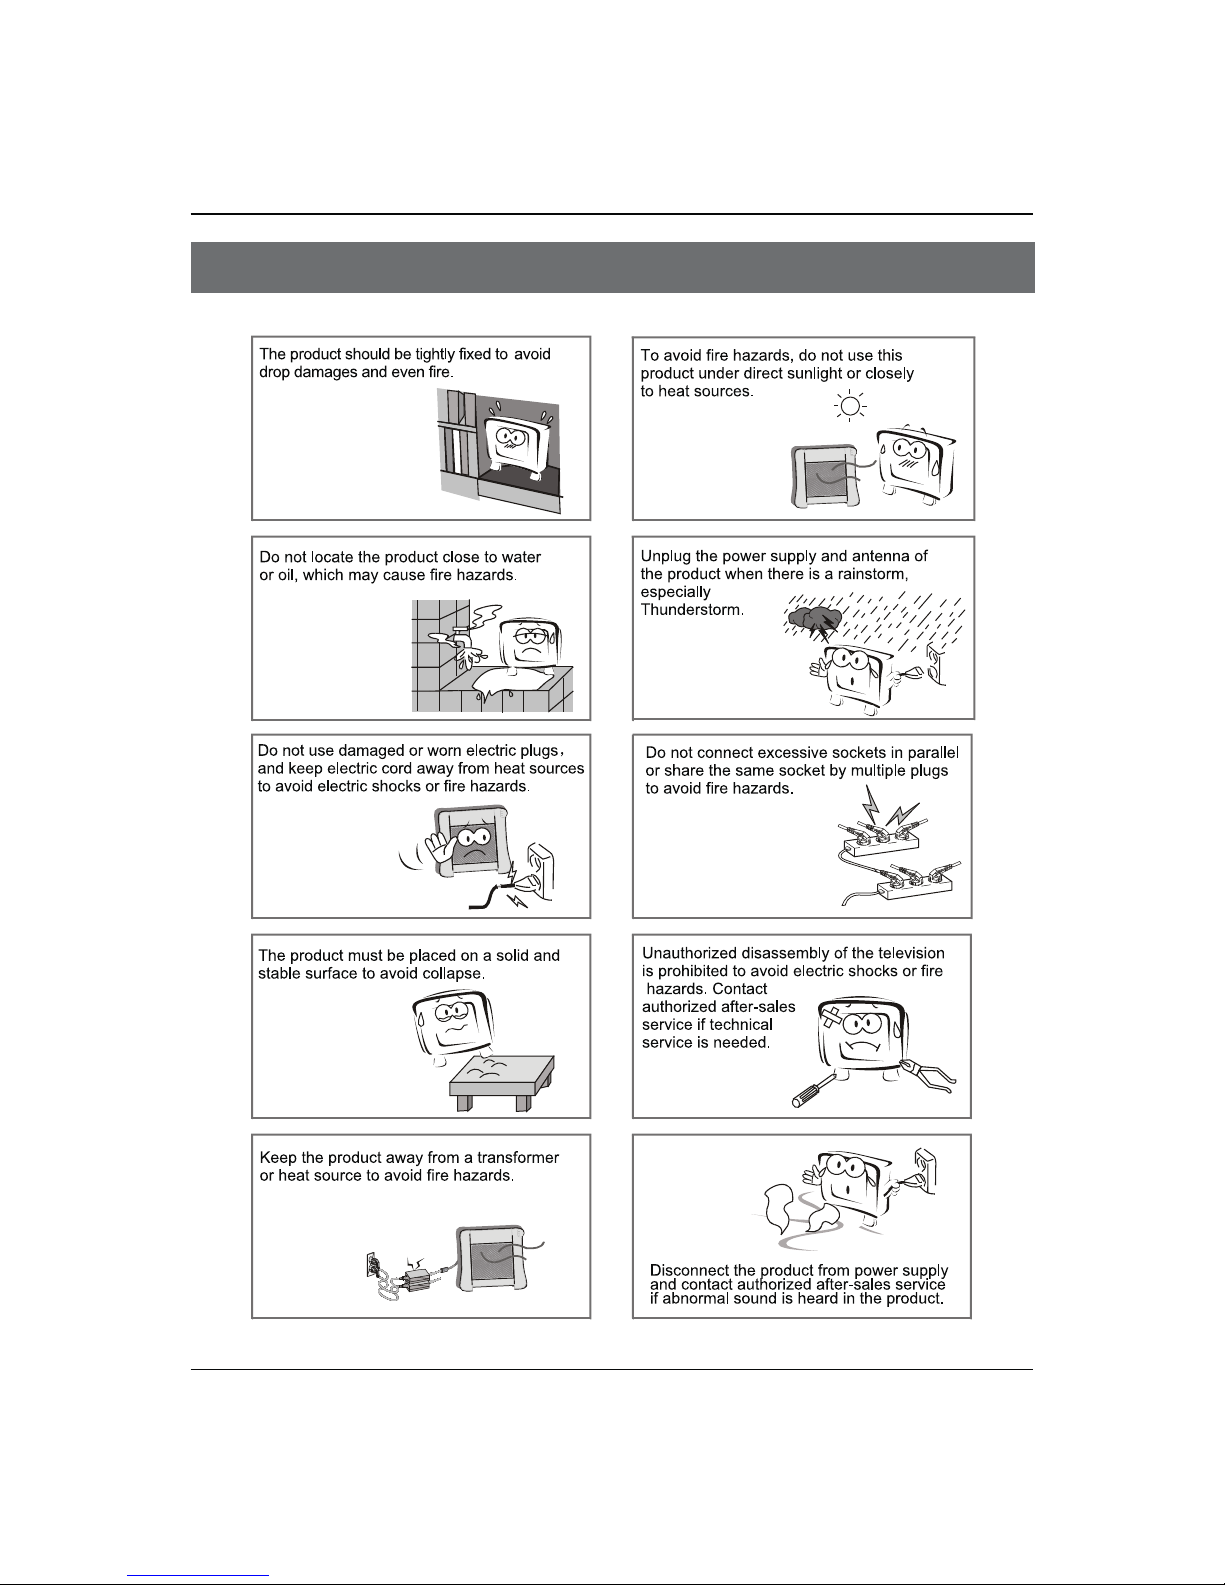
Important Safety Instructions
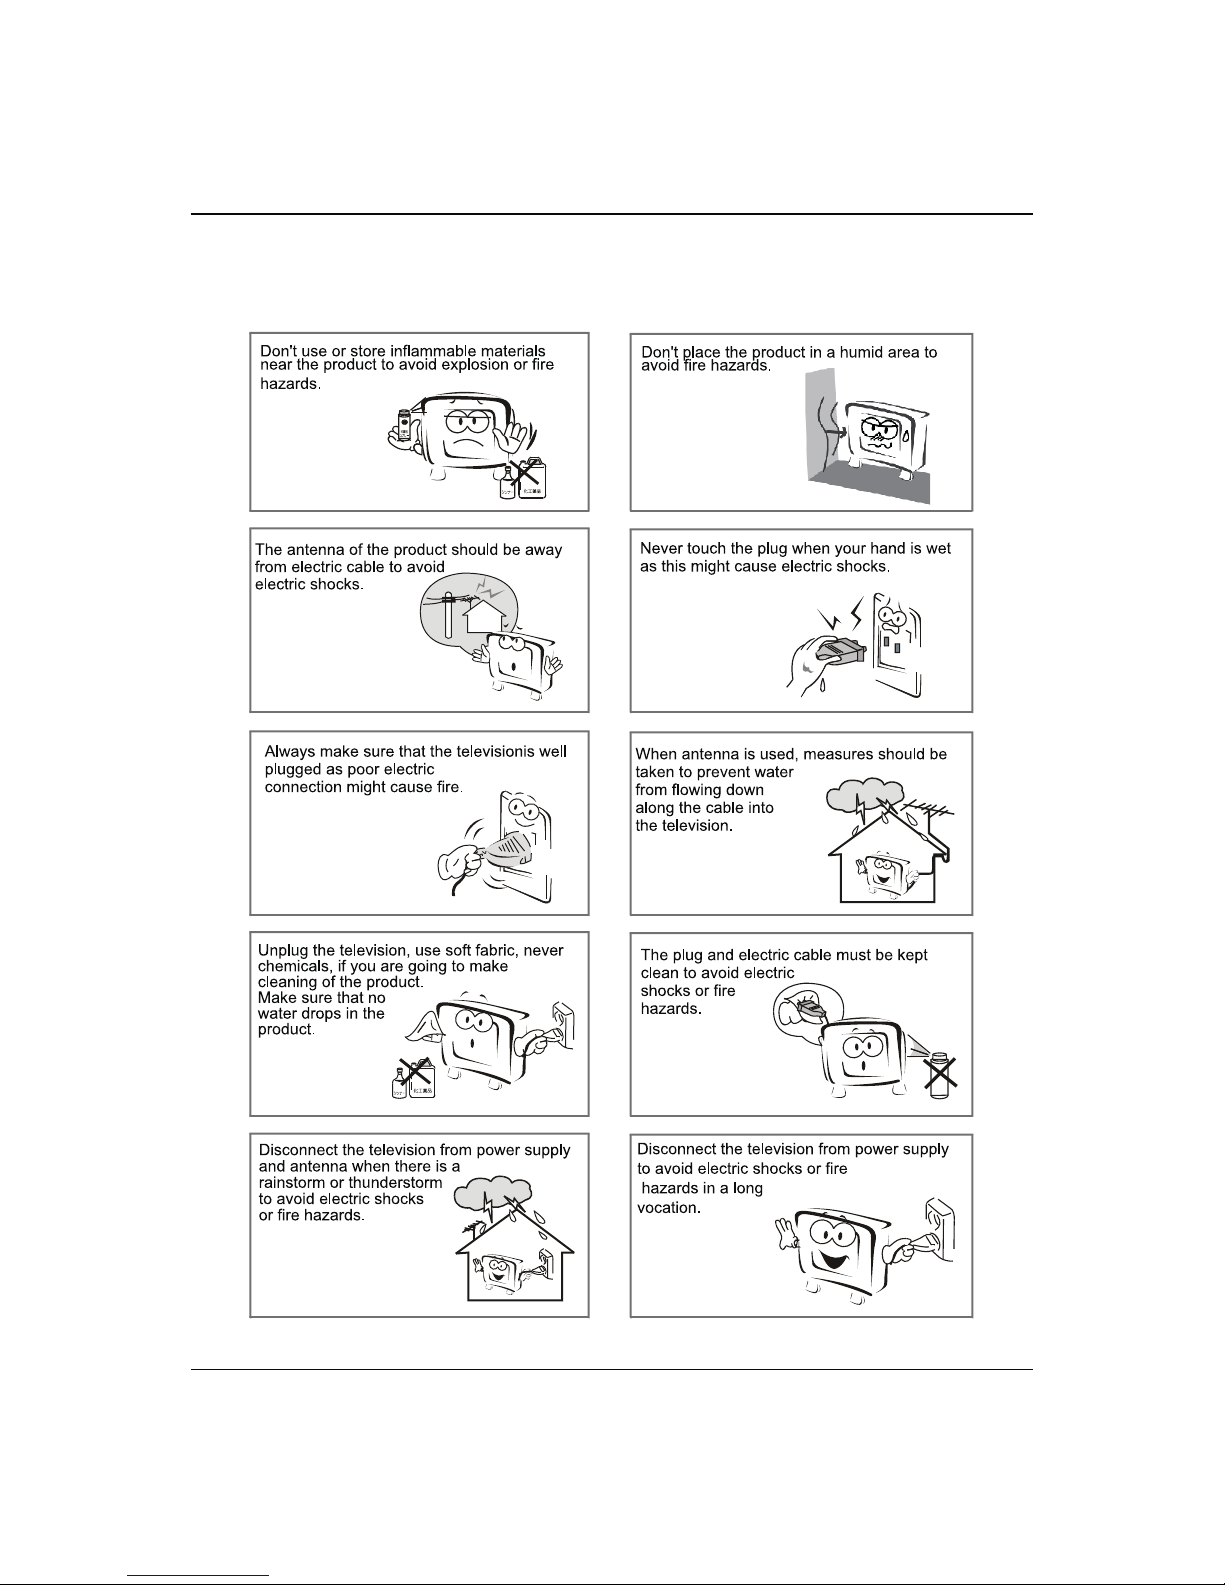
Important Safety Instructions
LED -LCD television Owner’s Manual 5
Panel Control and Rear Terminals Control
6 LED -LCD television Owner’s Manual
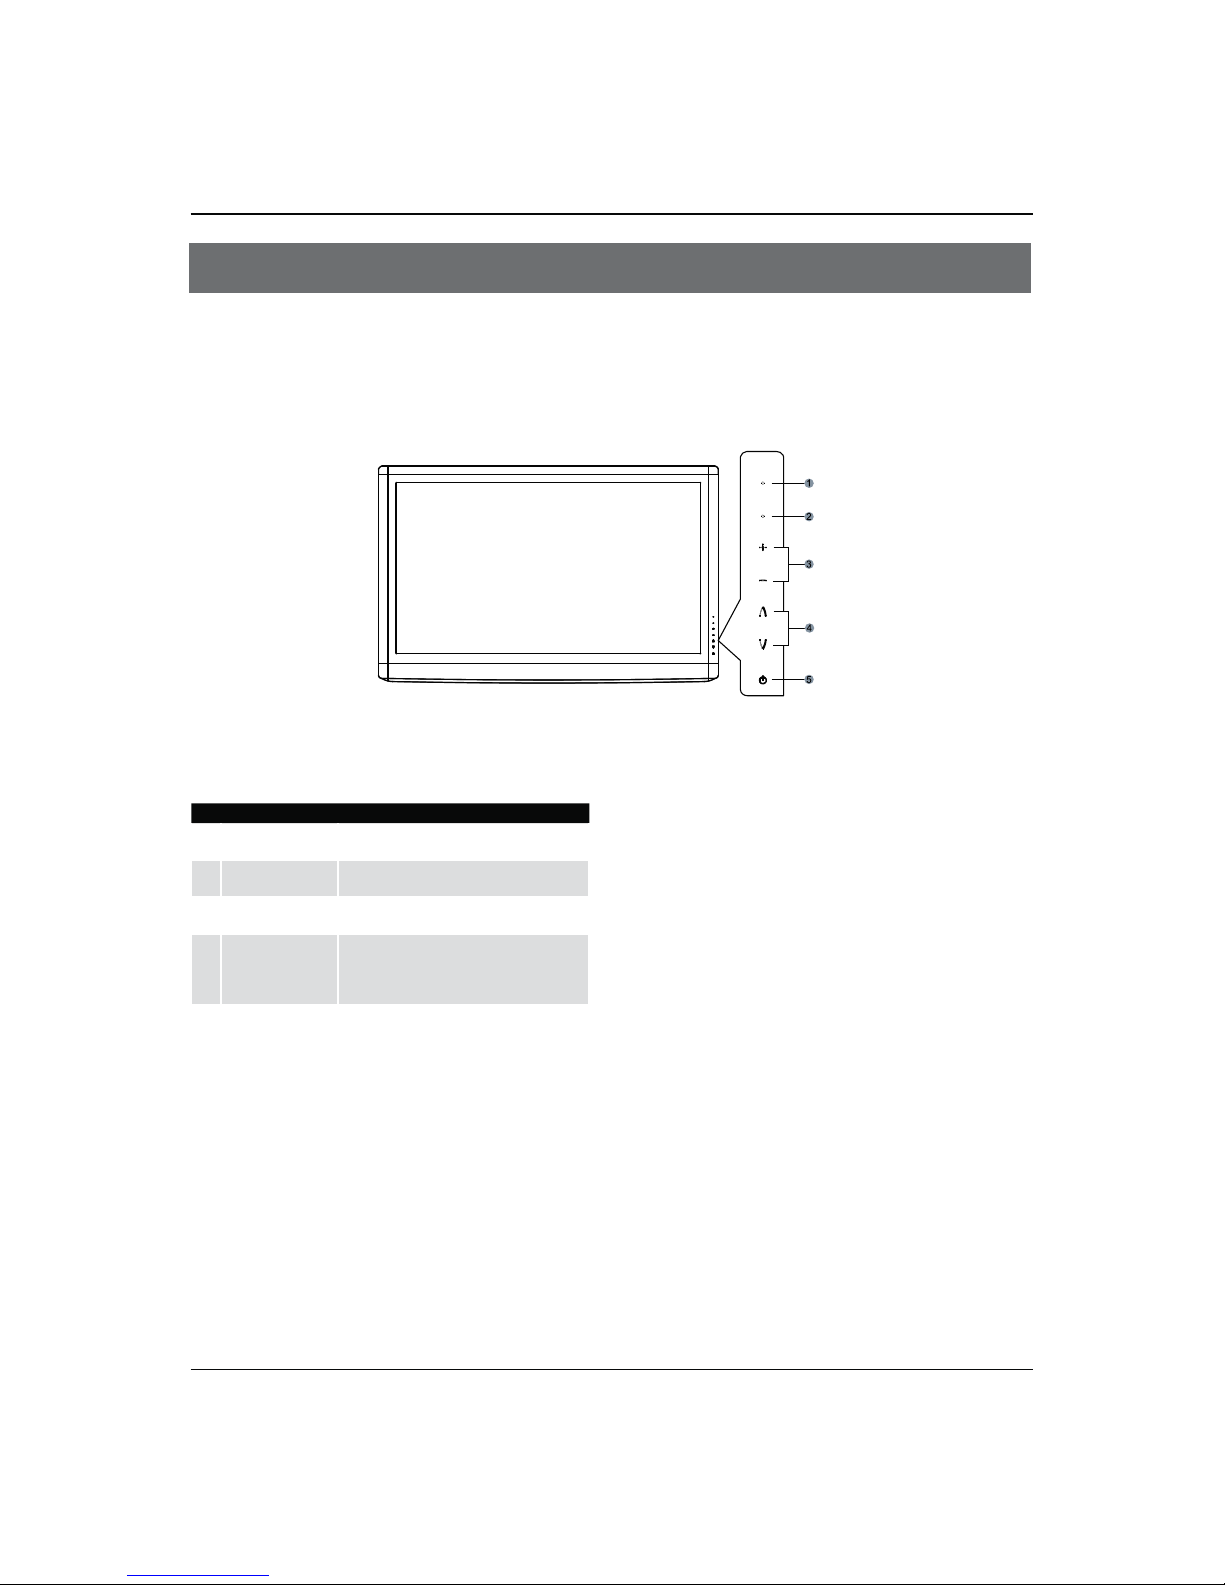
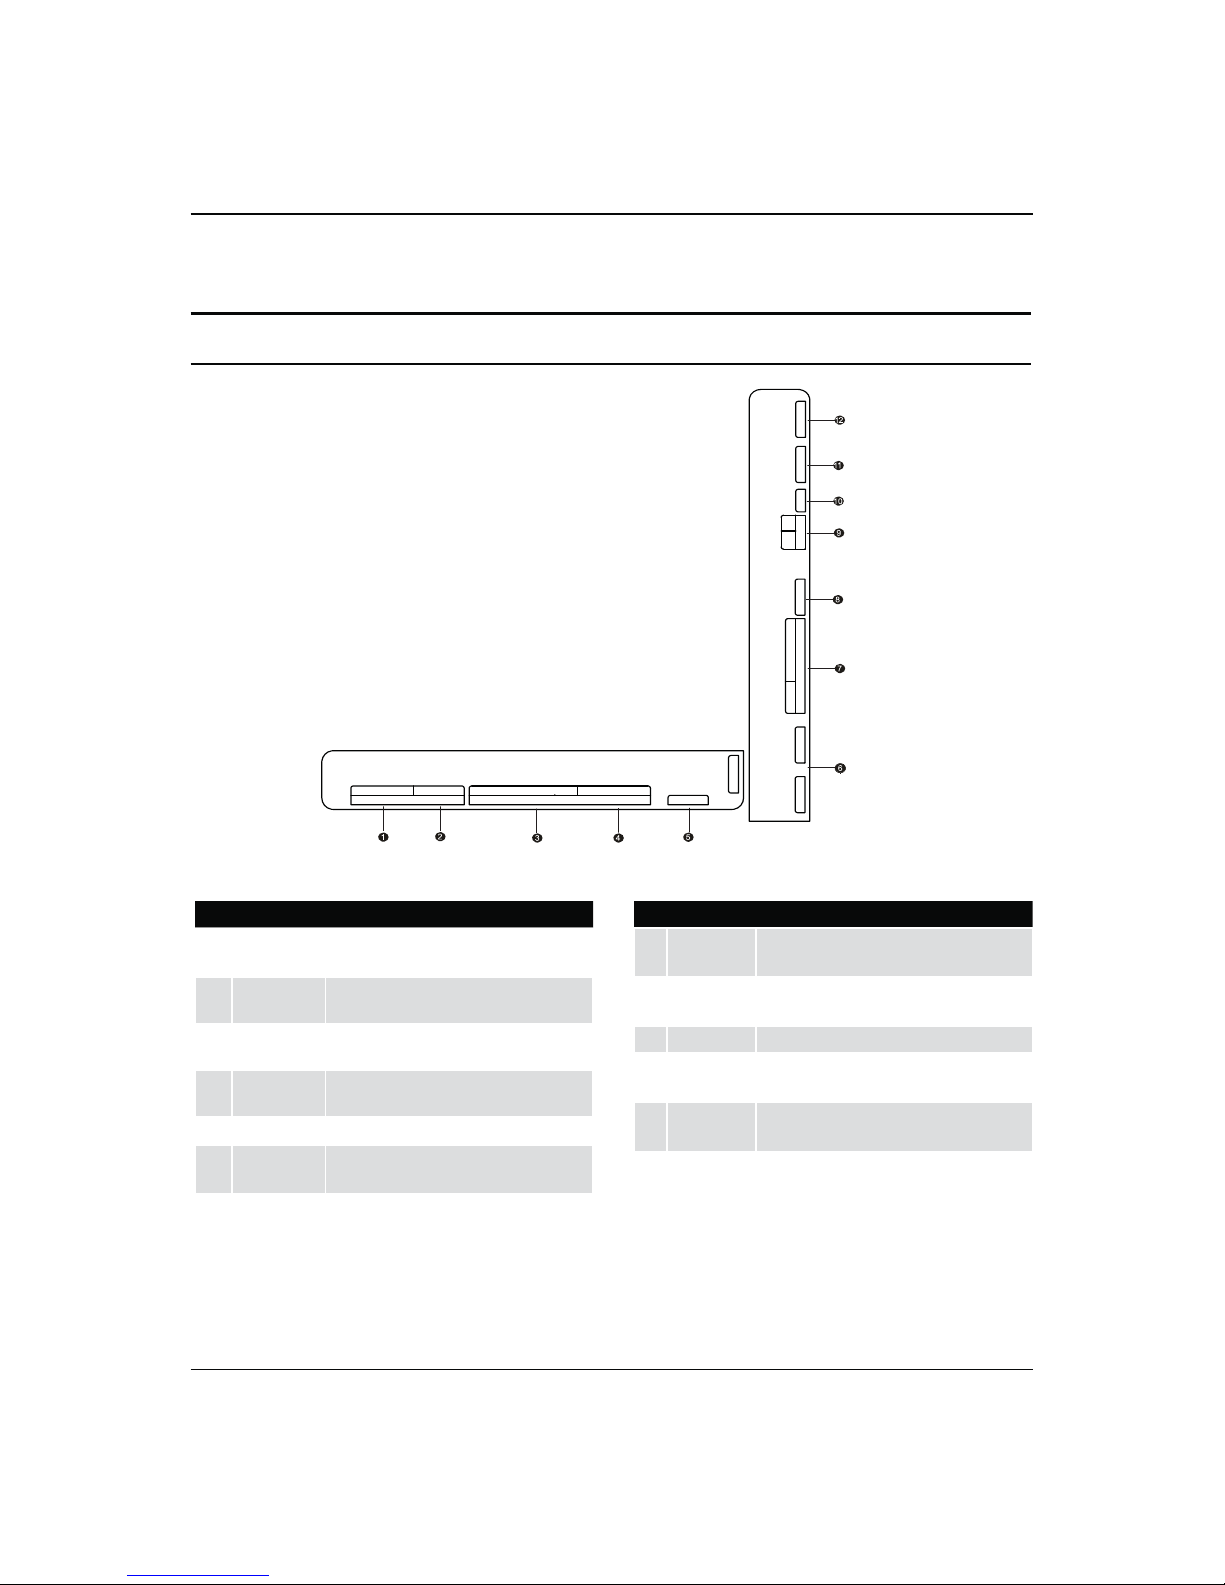
- This is a simplified representation of front panel.
- Here shown may be somewhat dierent from your TV.
Panel Control
LOV
HC
UNEM
TV/AV
1
TV/AV
Press this key to open/close signal source
options menu.
2
MENU
Menu display. Press to access the on-screen
menu display.
3
VOL +/-
Press to adjust the volume. In the MENU screen,
these buttons serve as right/left buttons.
4
CH +/-
Press to scan through channels. To scan quickly
through channels, press and hold down either
+/- . In the MENU screen, these buttons serve
as up/down buttons.
5
POWER
Press to turn on and o the TV.
Introduction
Remote Control
LED -LCD television Owner’s Manual 7
HDMI 3 IN
COMPONENT / AV2 IN
Y / VIDEO
P
b
P
r
L
- AUDIO -
R
PC IN
PC/DVI AUDIOPC
DSMB
HDMI 2 IN ANT IN
Mini USB
HDMI 1 IN AV1 IN
VIDEO
LR
- AUDIO-
AV OUT
L
VIDEO
AUDIO
R
SPDIF USB
Connection Options
Back panel connections
1
PC Video In
Connect a video cable from a computer to this
jack.
.
2
PC/DVI AudioInConnect the audio L/R cables from a computer
to this jack.
3
Component
Video In
Connect a component video device to these
jacks.
4
Component
Audio In
Connect the audio L/R cables from the
component video signal source to these jacks.
5
DSMB Mo-Box jack .
6
HDMI1-3 In
Connect a HDMI device to receive digital audio
and uncompressed digital video.
7
AV1 In Connect the video signal from a video device.
8
ANT In
Connect cable pr antenna signal to the TV, either
directly or through your cable box.
9
AV OUT
Connect the audio L/R and video cables to your
other video equipment.
0
SPDIF
Digital Audio Optical output.
A
Mini USB
Connect a USB ash drive to view videos,images
or listen music.
B
USB jack
Connect a USB ash drive to view videos,images
or listen music
.
Panel Control and Rear Terminals Control
8 LED -LCD television Owner’s Manual
Remote Control
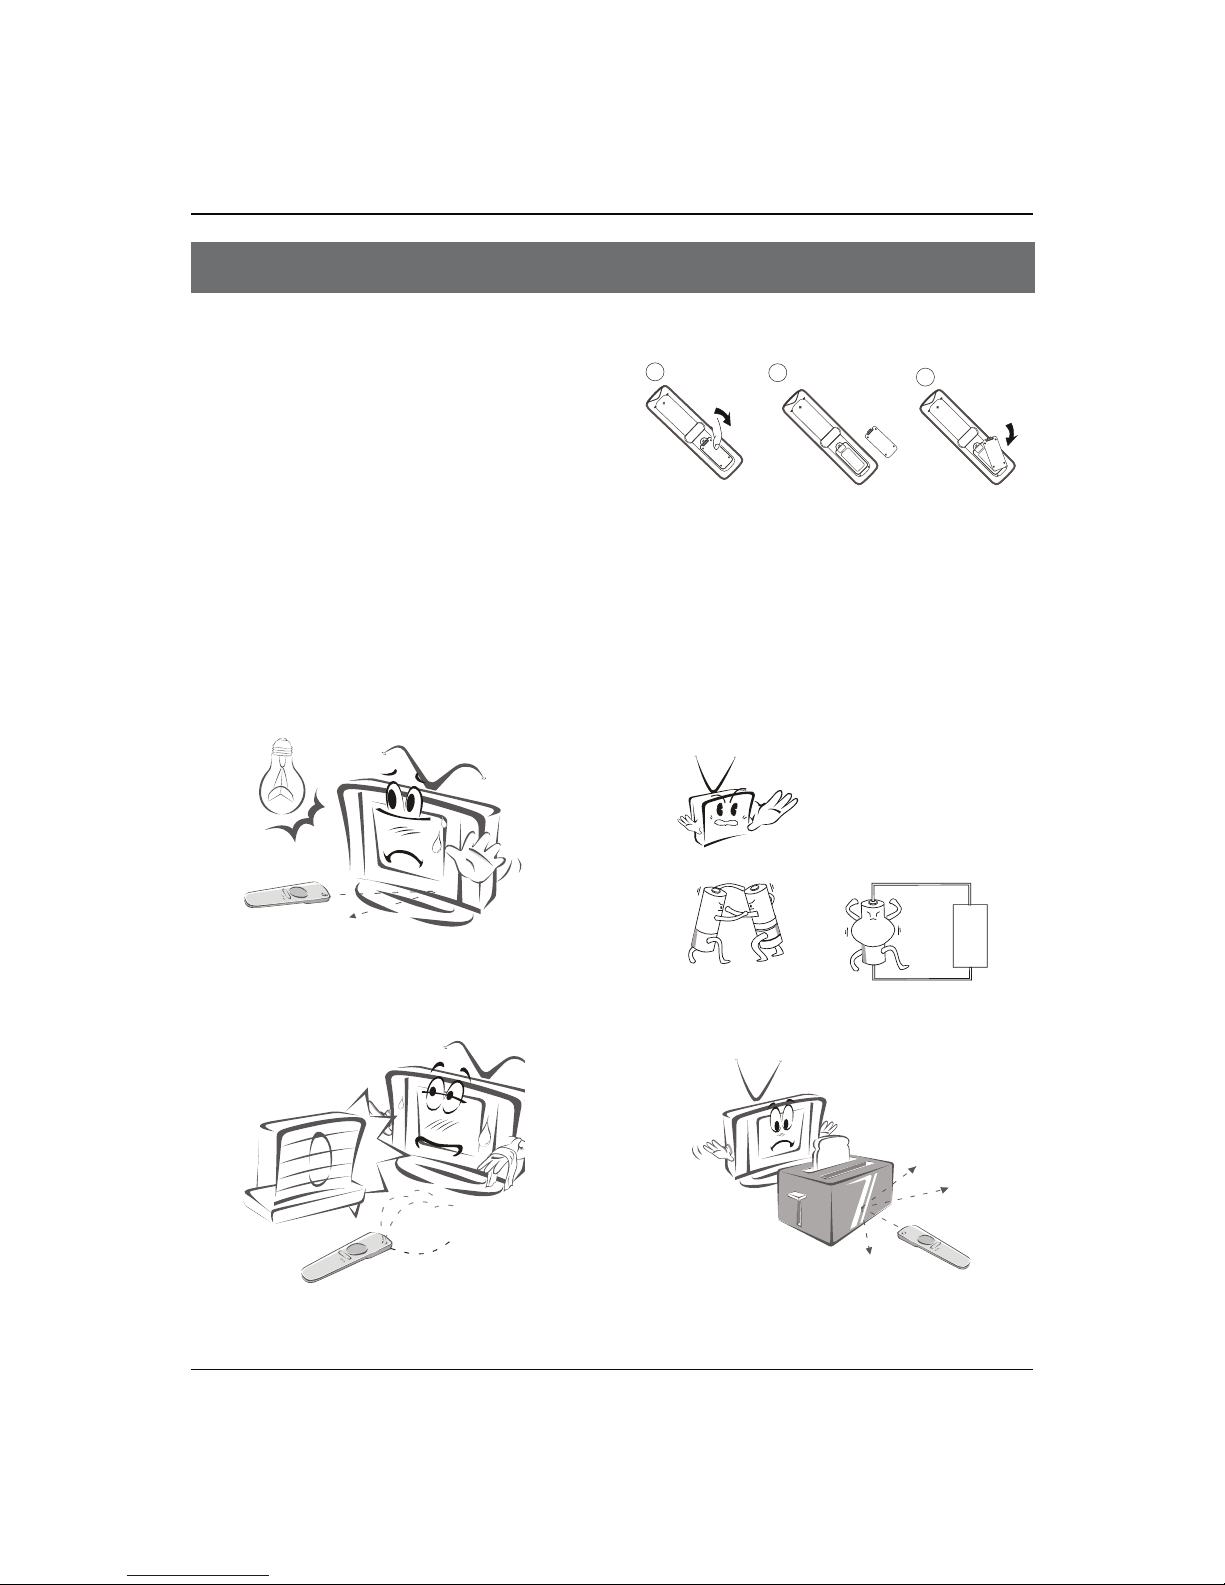
Battery loading
1. Slide open the cover of the battery compartment on
the back of the remote controller.
2. Load two 7# (AAA) alkaline batteries in the
compartment, (plus and minus poles to respective mark)
3. Replace the cover of the battery compartment.
Precautions
As strong light may interfere the signals, change your
position to operate the remote controller if the television
cannot be turned on or o as you expect.
Keep the remote controller away from heat source or
humid area to ensure eective performance of the
remote controller.
Make sure that two AAA alkaline batteries are loaded.
The batteries must be of the same type. The batteries
must be located properly. The batteries are not
rechargeable.
Make sure that there is no obstacle between the remote
controller and television set.
External Equipment Connections
LED -LCD television Owner’s Manual 9
- The remote control cannot be operated unless the batteries are properly loaded.
- When using the remote control, aim it at the remote control sensor on the TV.
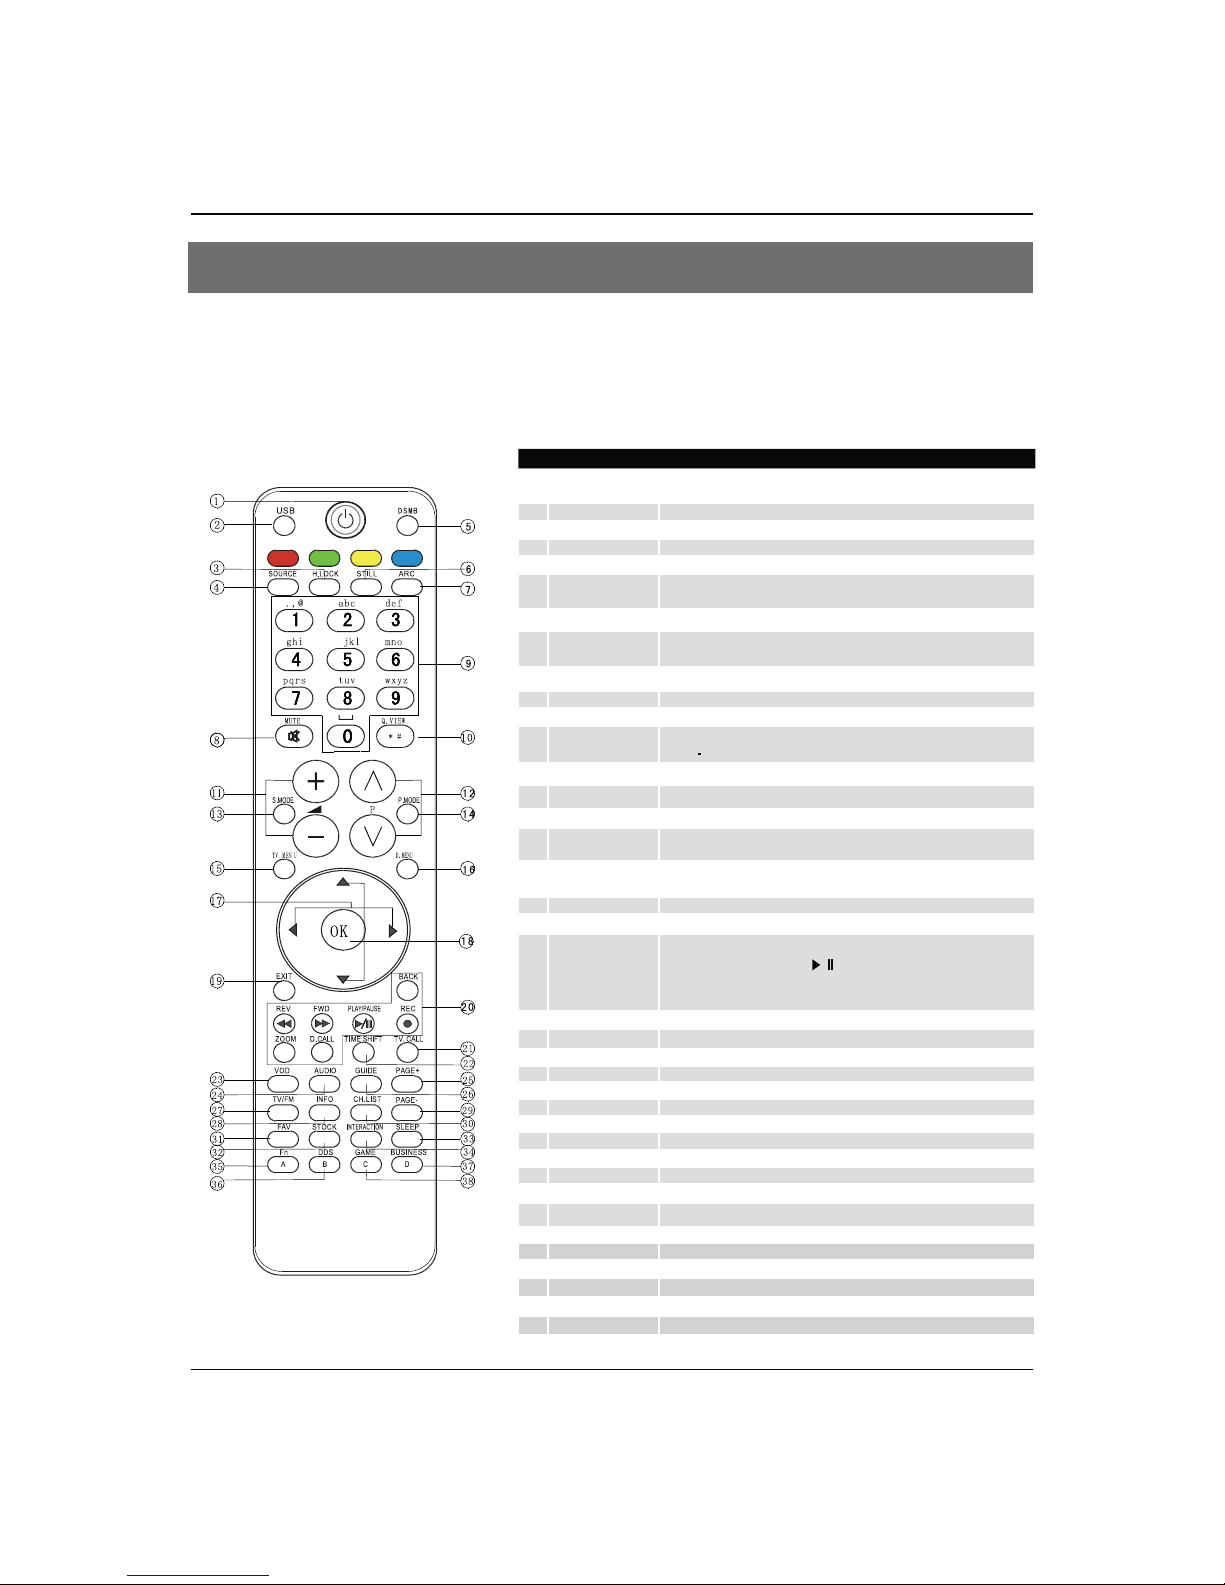
Function introduction
1
POWER
Press this key to start TV from standby mode, press it again to return to standby
mode.
2
USB Press this key for quick switching of streaming media.
3
H. LOCK Refer to the Functional Description on
Page 20.
4
SOURCE Press this key to open/close signal source options menu.
5
DSMB Press this key for quick switching of MO-Car.
6
STILL
Press this key to freeze the image. Press it again to return to normal screen. (Note:
Do not display a still picture for a long time to prevent the screen from burns.).
7
ARC
Press this key to select the screen display proportion.
8
MUTE
Press this key to mute the sound, press it again to activate the sound. The sound
may be activated by turning the TV on again or increasing the volume.
9
0-9
These keys are used to select a channel.
0
Q. VIEW
Press this key to return to the previous TV program(only work in the TV mode).
A
VOL+ /-
Used to adjust the volume when the screen menu is closed.
B
CH+/-
Used to select a TV channel when the screen options menu is closed, specically,
press P
to decrease the channel and press Pto increase the channel..
C
Sound Mode
Press this key continuously to select the sound mode.
D
Picture Mode Press this key continuously to select the picture mode.
E
TV.MENU Press this key to display or exit the main menu.
F
D.MENU
Press this key to display the Special Function Menu (it functions when special
modules are inserted).
G
THUMBSTICK (Up/
Down/Left/Right)
Allows you to navigate the on-screen menus and adjust the system settings to
your preference.
H
OK Press this key to conrm the selection.
I
EXIT
Clears all on-screen displays and returns to TV viewing from any menu.
J
USB
Control the USB System.
Backward Forward Play/Pause BACK: Back REC: no available
ZOOM: Press to magnify/minify an image D.CALL: Press to display program
information.
K
TV.CALL
Display on/o.
L
TIMESHIFT
No available.
M
VOD
No available.
N
AUDIO
No available.
O
PAGE+
No available.
P
GUIDE
No available.
Q
TV/FM No available.
R
INFO No available.
S
PAGE- No available.
T
CH.LIST No available.
U
FAV
Press this key to display the favorite program list menu.
V
STOCK
No available.
W
SLEEP
Displaying the sleep time.
X
INTERACTION
No available.
Y
Fn
No available.
Z
DDS
No available.
[
BUSINESS
No available.
\
GAME
No available.
Remote Control Function
 Loading...