

Page 1
I
CE
Helmet Cameras Race car & Onboard Video Waterproof Video Systems
Following is the official GoPro user manual though we have added the LCD
readout icons for clarification. We also have an
GoPro firmware update links and instructions. Feel free to visit us online at
www.IcePlanter.com or call us at 877-499-3580.
INSTRUCTIONS
Capture the Moment Ç Protect your Gear
P
LANTER
unofficial GoPro tip sheet and
System Requirements
The GoPro camera is compatible with Microsoft® ME/2000/XP VISTA or Mac OS 9.1/10.1/10.2+
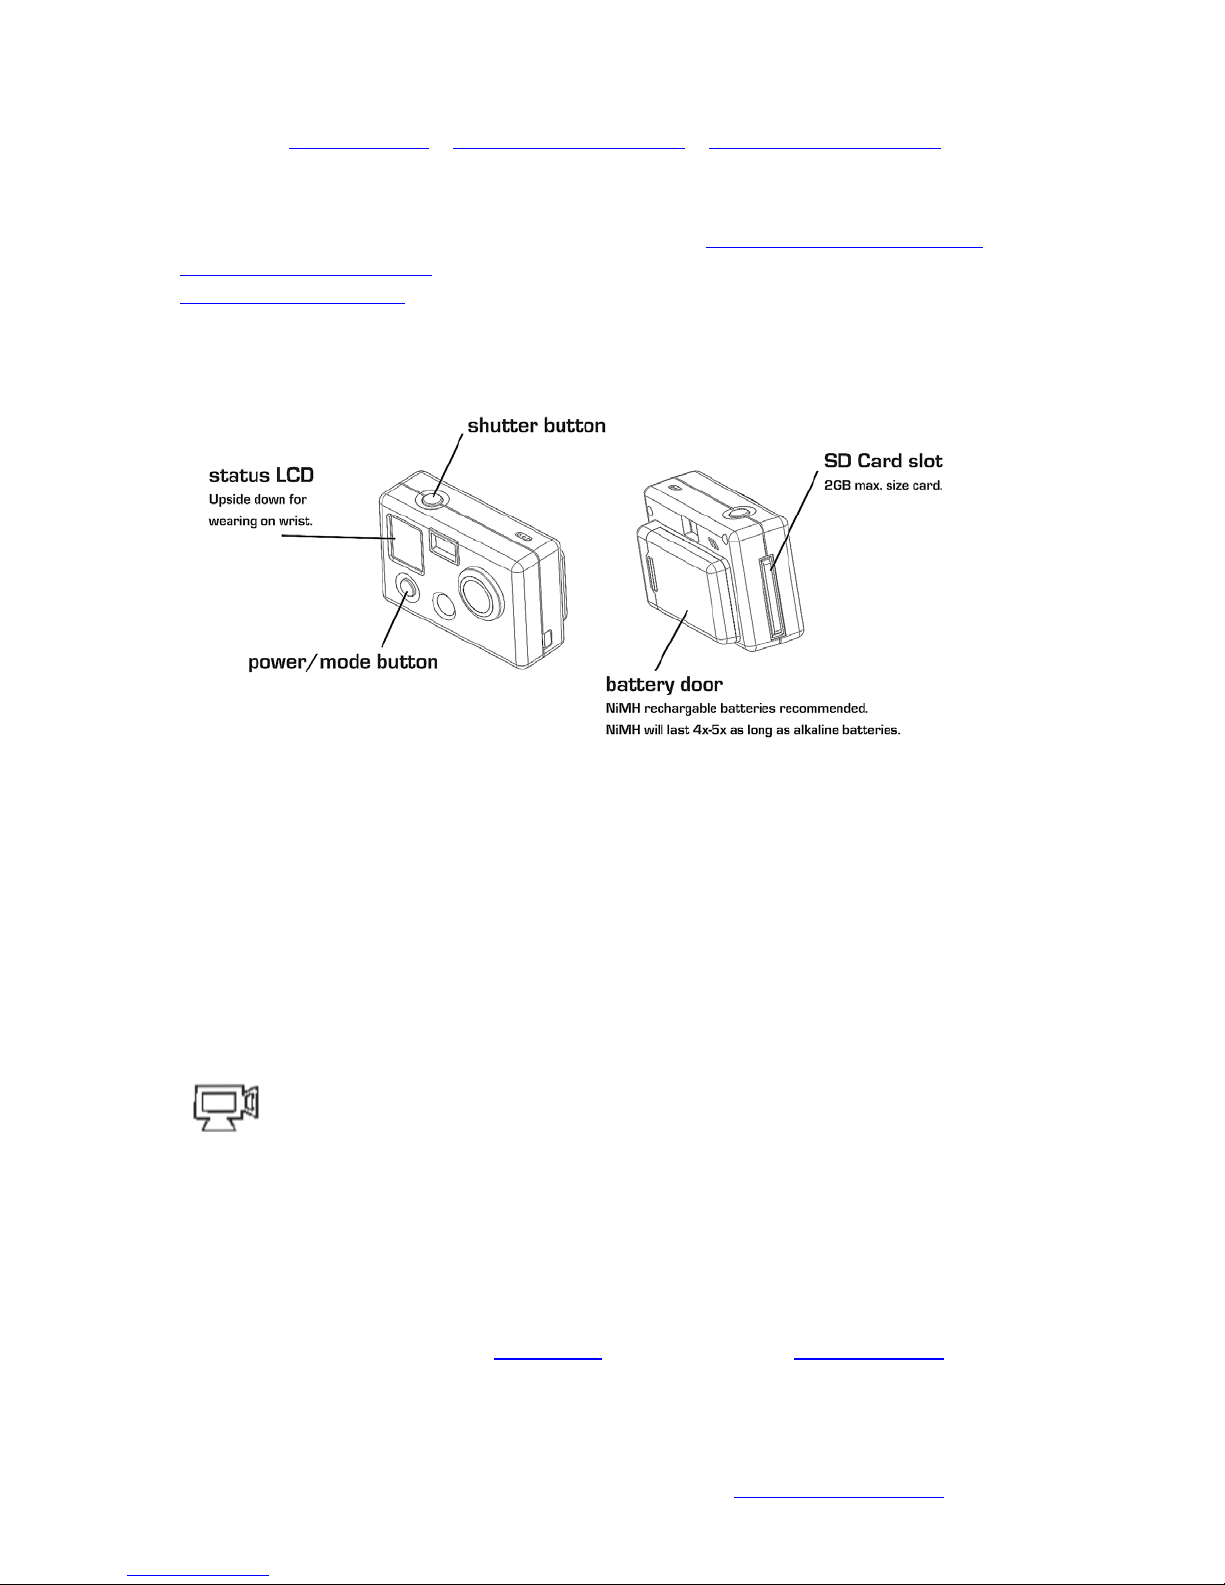
POWER/MODE select button
Located on the front of the camera, the POWER/MODE select button turns the camera on and
off and serves as a mode select button when the camera is turned on.
Press and hold the POWER/MODE button for 2 seconds and release to turn camera off.
SHUTTER button
Located on top of the camera, the shutter button acts as the shutter button for shooting photos
and videos. When in SET mode for setting camera functions, the shutter button acts as a
setting selection button.
To Shoot Video
1. Turn on camera by pressing POWER/MODE button.
2. The camera will turn on in video mode by default.
3. Press shutter button to begin recording video. Red light will blink in viewfinder while
video is recording.
4. Press shutter button to stop recording or camera will automatically stop recording
when the memory is full (56 minutes when you use a 2GB SD card or 112 minutes on
Hero Wide cameras with a
4GB SD card ONLY after applying firmware update).
SALES & SUPPORT: 877-499-3580 WWW.ICEPLANTER.COM
Page 2

Using Self-Timer
1. Press the POWER/MODE button until you see the SELF TIMER icon and then press the
shutter button.
2. Press the SHUTTER button and the camera will automatically shoot a photo in 10
seconds.
To Shoot Photos in “Photo every 2 seconds” Mode (blinking)
Press POWER/MODE button.
Press POWER/MODE button until you see the blinking camera icon. This indicates you are in
“Photo ever 2 seconds” mode.
Press the shutter button to start “Photo every 2 seconds” mode. Press the shutter again to
stop.
Assuming you are using a 2GB SD card, the camera will shoot approxim ately 1940+ photos with
fully charged NiMH or Lithium batteries before the SD card is full.
To Shoot Photos
Press POWER/MODE button.
Press the POWER/MODE button repeatedly until you see the solid, non blinking camera icon.
Press SHUTTER button to take a photo.
A beep will sound and red light will flash in the viewfinder window to indicate a photo has been
taken and saved to memory.
To Shoot Triple Shot Sequence Photos
Turn on camera by pressing POWER/MODE button.
Press POWER/MODE button until you see the triple shot icon on the front LCD status screen.
Press the shutter button to shoot 3x photos in a single sequence.
Delete all pictures
Press the POWER/MODE button repeatedly until you see the DELETE ALL icon, 3 squares with a
line through them.
Press the SHUTTER button to delete the all pictures. The icon screen will blink for 5 seconds. If
you press the SHUTTER button again during this blinking period, you will delete all the photos
in the camera. If you do nothing during this blinking period, no photos will be deleted and the
camera will return to single photo mode.
Delete only the last picture
Press POWER/MODE button repeatedly until you see the DELETE LAST icon.
Press the SHUTTER button to delete the last photo.
ALES & SUPPORT: 877-499-3580 WWW.ICEPLANTER.COM
S
Page 3

Transfer pictures and video files to your computer
Connect the camera to a computer via the included USB cable. Turn on camera by pressing
POWER/MODE button.
In WINDOWS, double click on MY COMPUTER and you will see a “Removable Disk” icon. If you
do not see this, close the MY COMPUTER folder and then re-open it and the ““Removable Disk”
icon should appear.
Double click the “Removable Disk” icon. Then double click the “DCIM” folder icon. Then double
click the “100GOPRO” icon. The photo and video files will be in the “100GOPRO” folder.
Highlight the pictures or video files and drag them to a folder of your choice or double click a
file to view it.
MAC USERS: Simply plug the camera into your MAC with the included USB cable and the MAC OS
will recognize the camera as either a mass storage device or external hard drive.
Setting the Camera
Press the POWER/MODE button repeatedly until you see the SET icon
Press the SHUTTER button to enter settings mode.
Press the POWER/MODE button to cycle through these options once in SET mode.
DEFAULT MODE SETTING AT POWER ON
You can program your camera to turn on in either Video mode, Photo mode, Triple Shot
Sequence mode, or Photo Every 2 Seconds mode.
F = Video mode (F stands for “Filming”)
P = Photo mode
3 = Triple Shot mode
PES = Photo Every 2 Seconds mode
Press the shutter button to cycle between choices, then press the POWER/MODE button to save
it and proceed to the next setting.
POWER FREQUENCY SETTING
This setting can affect the quality of indoor photos if not set to your region’s power frequency.
In the North America, Central and South America, please set your frequency to 60Hz. If you are
in Europe, Japan, Oceania, and Asia, please set your frequency to 50Hz.
Press the shutter button to cycle between choices, then press the POWER/MODE button to save
it and proceed to the next setting.
NTSC/PAL SETTING
This controls the video output of the camera when viewing on a TV.
Select NTSC if viewing on a TV in North America. Choose PAL if viewing on a TV outside of
North America or if viewing on a PAL TV in any region.
Press the shutter button to cycle between choices, then press the POWER/MODE button to save
it and proceed to the next setting.
ALES & SUPPORT: 877-499-3580 WWW.ICEPLANTER.COM
S
Page 4

HI/LO SOUND RECORDING (VIDEO)
The camera has two settings for video sound recording levels, HI and LO.
HI setting is good for recording during normal wrist camera use and during any non-high
vibration activity.
LO setting is good for recording good sound and video during high vibration activities where the
camera might be strapped to bike handlebars, mounted on a car, motorcycle, shifter kart, or
similar high vibration device. If you hear sound breakup during your filming, choose the LO
setting for better sound.
Press the shutter button to cycle between HI/LO choices, then press the POWER/MODE button
to save it and proceed to the next setting.
UPSIDE DOWN IMAGE CAPTURE
If for some reason you need to mount your camera upside down to get the perfect phot o or
video angle, you can program the camera to save the photo or video upside down so that it
appears right side up when you review it on your computer or TV. This eliminates the need to
“flip” the photo or video later on your computer.
UP setting saves photos and videos in a normal “right side up” orientation.
UPd setting saves photos and videos upside down so that they appear right side up when you
review on your computer or TV.
Press the shutter button to cycle between UP/UPd choices, then press the POWER/MODE
button to save it and proceed to the next setting.
CHOOSING PHOTO EVERY 2 OR 5 SECONDS TIMING
You can program your camera to shoot a photo every 2 seconds or every 5 seconds when in
Photo Every “X” Seconds mode.
When you see P2 (photo every 2 seconds) in the SET menu of options, you can press the shutter
button to toggle to the P5 (photo every 5 seconds) setting.
Press the shutter button to cycle between choices, then press the POWER/MODE button to save
it and proceed to the next setting.
AUTO POWER OFF SETTING
You can program the camera to automatically turn off at 60, 120, 300 seconds, or you can set
the camera to OFF to keep the camera on until you manually turn it off. Press the shutter
button to cycle through the 60, 120, 300 and OFF (auto power off OFF) options and then press
POWER/MODE button to save it and proceed to the next setting.
ESC – press the shutter button when you see the ESC icon to exit the SETTINGS MODE and
return to PHOTO MODE.
Trouble shooting
LOW BATTERY WARNING: When the battery power is low, the LCD will blink and the camera
will turn off automatically.
BATTERY TIPS: Use rechargeable NiMH or Lithium batteries for maximum battery life. Use
lithium AAA batteries for maximum battery life in very cold temperatures.
COLD WEATHER TIPS: It is very important to use lithium AAA batteries in cold weather as they
are not affected by cold temperature. Other types of batteries will quickly lose their power
and will not work properly in cold weather.
ALES & SUPPORT: 877-499-3580 WWW.ICEPLANTER.COM
S
Page 5

SHORT VIDEOS: If your camera is shooting shorter videos than expected, it is likely because
your batteries are low and the camera is auto-saving the video before the batteries die.
For other problems or questions please email support@goprocamera.com and we will be happy
to assist you.
That’s it for the official information, click here for our unofficial GoPro tip
sheet.
For more information feel free to visit us online at www.IcePlanter.com or
contact GoPro customer support directly.
SALES & SUPPORT: 877-499-3580 WWW.ICEPLANTER.COM
 Loading...