

Page 1
Consultez gopro.com pour une
traduction des instructions.
翻訳された取扱説明書は
gopro.com から入手できま
す。
Übersetzte Anweisungen sind
unter gopro.com zu finden.
V
isita gopro.com para las instrucciones
traducidas.
Per le istruzioni tradotte in
altre lingue visitare il sito
gopro.com.
V
isite gopro.com para a tradução
das instruçðes.
1 - Status LCD Screen 5 - Battery Door
2 - Power/Mode Button 6 - Shutter Button
3 - LED Light 7 - SD Card Slot (8GB MAX)
4 - Combo USB Port / TV OUT
Basics of Using your Camera
POWER/MODE BUTTON - Front of Camera
POWER/MODE button turns camera on and off and works as a mode switching button once camera is on.
Turn Camera On Press the POWER/MODE button and the camera will turn on.
Turn Camera Off Press and hold the POWER/MODE button for 2 seconds to turn the camera off.
Changing Modes Once the camera is on, press the POWER/MODE button
to change modes from video mode to self-timer, to photo mode, etc.
SHUTTER BUTTON - Top of Camera
Shutter button starts and stops video recording and photo capture. When in the SET menu of options the
shutter button acts as a toggle button for changing settings. See the SETTINGS MENU section of these
instructions for more information.
Batteries - IMPORTANT
Only use Energizer Lithium batteries or NiMH rechargeable batteries in your HERO camera.
Alkaline and Nicad batteries do not work well in the HERO camera and are not
recommended. Video recording times will be very short with Alkaline and NiCad batteries.
Recording times with Energizer Lithium or NiMH rechargeable batteries will be +/- 3 hours.
Be sure to note the battery orientation (+) and (-) icons inside of the battery compartment
when inserting your batteries. Your HERO camera has battery springs on all four corners
for improved battery performance in high vibration activities.
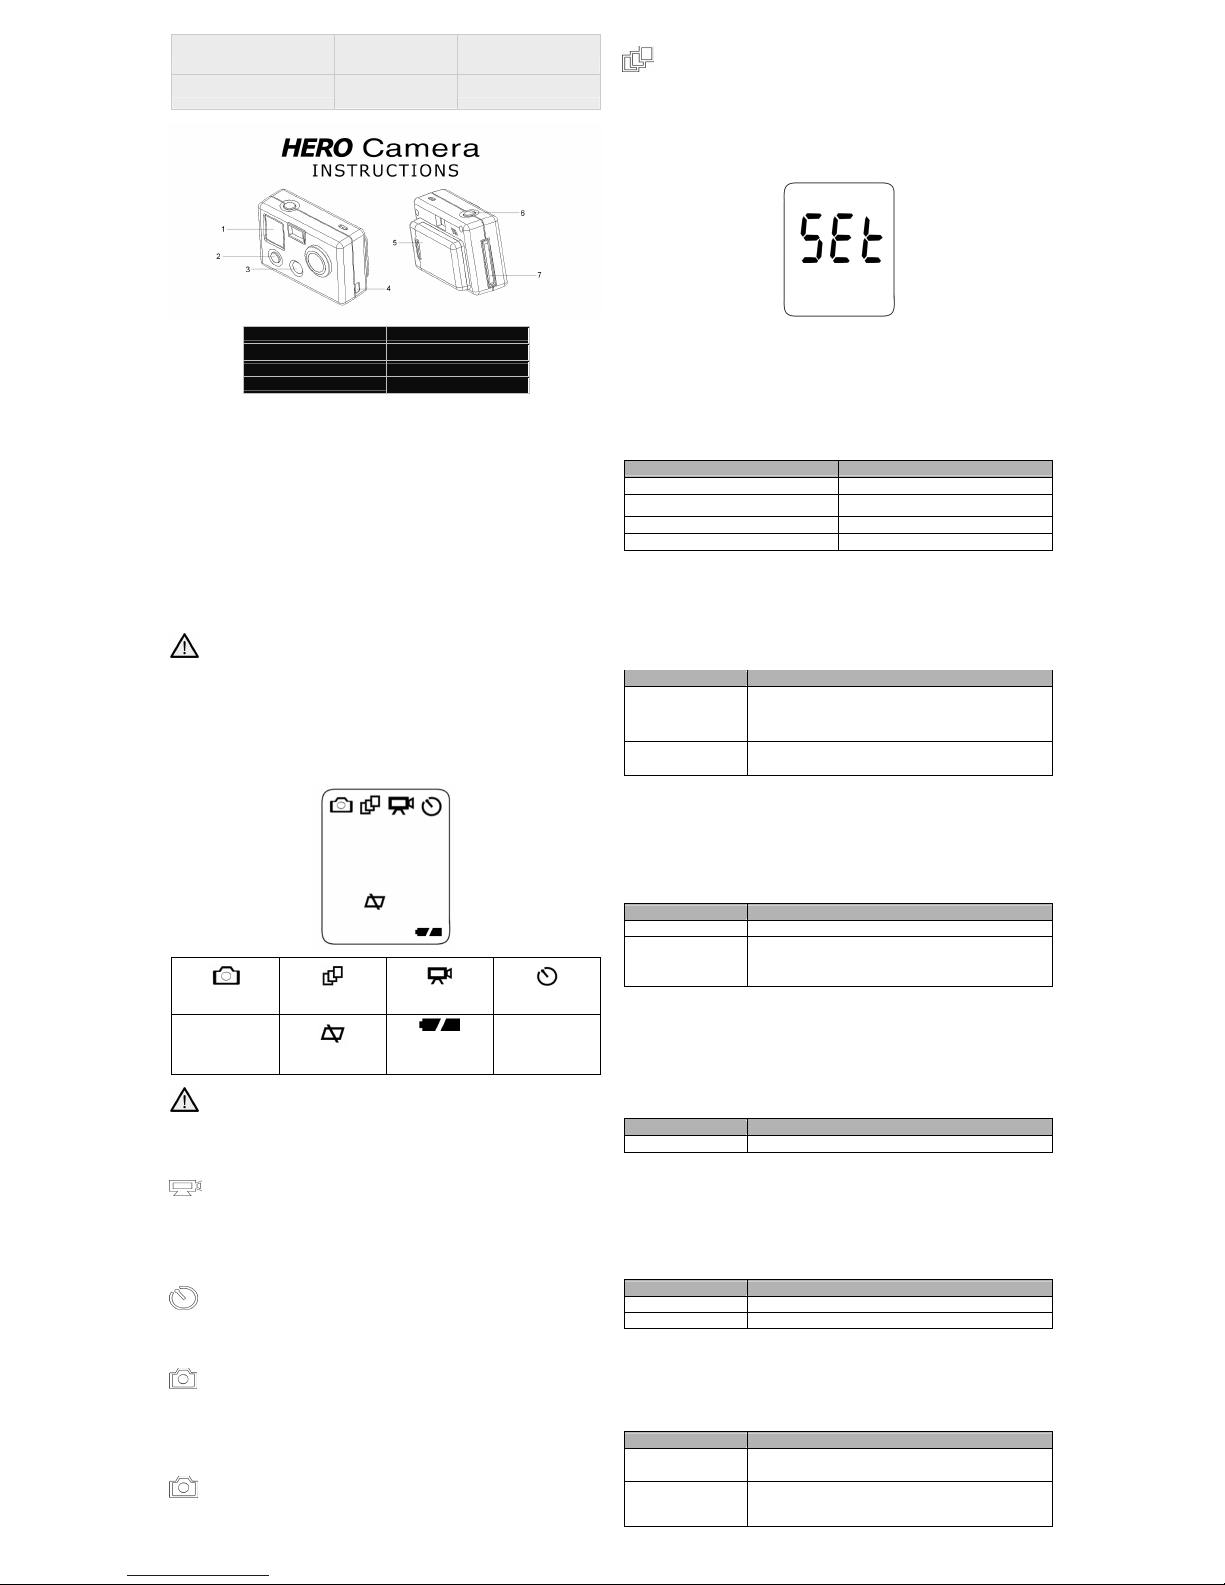
STATUS LCD ICONS
Photo Mode
Triple Shot Photo Mode
Video Mode
10 Second Timer Mode
Delete Last /
Format SD Card
Battery Meter
UPSIDE DOWN STATUS LCD SCREEN. The Status LCD Screen is upside down on your
HERO camera. This is is because the HERO camera originally began as a wrist camera and
this is the correct orientation for the LCD screen when wearing your HERO camera on your
wrist. Visit gopro.com to learn more about the HERO WRIST HOUSING and other
accessories available for your HERO camera.
TO SHOOT VIDEO
Turn on camera by pressing POWER/MODE button.
The camera will power on in VIDEO mode as the default mode.
Press shutter button to begin recording video.
Red LED light on front of the camera will blink while video is recording.
Press shutter button to stop recording or camera will automatically stop recording when your SD card is full
or your battery dies (approx 3 hours of battery life with Energizer Lithium batteries).
USING 10 SECOND TIMER
Press the POWER/MODE button until you see the 10 SECOND TIMER icon.
Press the SHUTTER button and the camera will automatically shoot a photo in 10 seconds.
As series of beeps and flashing red LED light will indicate when the photo has been taken.
(blinking icon)
TO SHOOT PHOTOS EVERY “X” SECONDS TIME LAPSE MODE
Press POWER/MODE button until you see the blinking camera icon.
The default timing is to shoot a PHOTO EVERY “2” SECONDS, automatically.
Press the shutter button to start taking photos. Press the shutter again to stop.
To change the timing to shoot a photo every 2, 5, 10, 30, or 60 seconds, see the SETTINGS MENU section
of these instructions.
TO SHOOT SINGLE SHOT PHOTOS
Press the POWER/MODE button repeatedly until you see the solid, non blinking camera icon.
Press SHUTTER button to take a photo.
A beep will sound and red LED will flash to indicate a photo has been taken.
TO SHOOT TRIPLE SHOT SEQUENCE PHOTOS
Press POWER/MODE button until you see the triple shot icon on the front LCD
status screen. Press the
shutter button to shoot 3x photo-sequence in 2 seconds.
SETTINGS MENU
ADVANCED FEATURES
ENTERING THE SETTINGS MENU
Press the POWER/MODE button repeatedly until you see the SEt icon (above).
Press the SHUTTER button to enter settings menu.
Press the POWER/MODE button to cycle through options once in settings menu.
CHOOSING DEFAULT MODE AT POWER UP
You can program your camera to turn on in either Video mode, Photo mode, Triple Shot Sequence mode, or
Photo Every "X" Seconds mode:
Symbol on LCD Screen Function
F (default setting) Video Mode (F means “Filming”)
PES Photo Every “X” Seconds Mode
P Single Shot Photo Mode
3 Triple Shot Photo Mode
Press the SHUTTER button to toggle between choices.
Press the POWER/MODE button to save whichever setting is showing on the screen and continue to the
next feature option.
CHOOSING HI / LO SOUND SETTING
The camera has two settings for video sound recording levels, HI and LO.
Symbol on LCD Screen Function
LO (default setting)
LO sound setting is good when the camera is mounted on any surface that
might conduct vibrtation, like a car bumper, bike or motorcycle handlebars,
vehicle bodywork, or a surfboard, etc. If you hear sound breakup during
your video recordings, choose the LO setting for better sound.
HI
HI sound setting is good when the camera is mounted on non-vibrating
surfaces like a helmet, your body, or similar surfaces that don’t conduct
vibration.
Press the shutter button to cycle between HI/LO choices, then press the POWER/MODE button to save it
and proceed to the next setting.
UPSIDE DOWN IMAGE CAPTURE
If you need to mount your camera upside down to get the perfect photo or video angle, you can program the
camera to save the photo or video upside down so that it appears right side up when you review it on your
computer or TV. This eliminates the need to “flip” the photo or video later on your computer.
Symbol on LCD Screen Function
UP (default setting) saves photos and videos in a normal “right side up” orientation
UPd
saves photos and videos upside down so that they appear right side up
when you review on your computer or TV. The video camera and photo
icons will blink quickly on the LCD screen to reminding you that you are
saving photos and videos in upside down mode.
Press the SHUTTER button to toggle between the UP / UPd choices.
Press the POWER/MODE button to save whichever setting is showing on the screen and continue to the
next feature option.
CHOOSING PHOTO EVERY 2, 5, 10, 30, 60 SECONDS TIMING
You can shoot a 5 megapixel photo every 2, 5, 10, 30, or 60 seconds, ongoing, with the “Photo every X
seconds” mode. When you see P2 (photo every 2 seconds is the default setting), you can press the
SHUTTER button to toggle the following options:
Symbol on LCD Screen Function
P2 / P5 / P10 / P30 / P60 shoots 5 megapixel photos in 2 / 5 / 10 / 30 / or 60 second intervals
Press the SHUTTER button to toggle between choices.
Press the POWER/MODE button to save whichever setting is showing on the screen and continue to the
next feature option.
CHOOSING NTSC / PAL SETTING
This controls the video output of the camera when viewing on a TV.
Select nSC (NTSC) if viewing on a TV in North America. Choose PAL if viewing on a PAL TV (most
televisions outside of North America). or if viewing on a PAL TV in any region.
Symbol on LCD Screen Function
nSC (default setting) NTSC TV setting for North America
PAL PAL TV setting for most regions outside of North America.
Press the SHUTTER button to toggle between choices.
Press the POWER/MODE button to save whichever setting is showing on the screen and continue to the
next feature option.
DELETE LAST FILE SAVED
When “LSt” is on the LCD screen, you can delete the last file saved to the SD card:
Symbol on LCD Screen Function
LSt
To delete last file saved to camera, press SHUTTER button when LSt is on
screen. LSt will start blinking as a warning.
LSt (blinking)
TO CHOOSE NO DELETE
"LSt" will blink as a warning that you are about to delete the last file saved
to the SD card. To cancel the DELETE LAST FILE option, press the
POWER/MODE button to skip it and advance to the next option in the
SET menu.
Page 2
LSt (blinking)
TO CHOOSE YES DELETE
If you press the shutter button while LSt is blinking, you will delete the last
saved file from the SD card.
DELETE ALL FILES AND FORMAT SD CARD
When “ALL” is on the LCD screen, you can delete all files and format the SD card:
Symbol on LCD Screen Function
ALL
To delete all files and FORMAT SD card, press SHUTTER button when ALL
is on screen. ALL will start blinking as a warning.
ALL (blinking)
TO CHOOSE NO FORMAT
"ALL" will blink as a warning that you are about to DELETE ALL / FORMAT
your SD card, erasing the entire SD card. To cancel DELETE ALL /
FORMAT function, press the POWER/MODE button to skip it and advance
to the next option in the SET menu.
ALL (blinking)
TO CHOOSE YES FORMAT
If you press the shutter button while ALL is blinking, you will format
the SD card, losing all files and data. IMPORTANT: this will format
your card and all data on the card will be deleted.
AUTO POWER OFF SETTING
You can program the camera to automatically turn off at 60, 120, 300 seconds, or you can set the camera to
OFF to keep the camera on until you manually turn it off.
Symbol on LCD Screen Function
OFF (default setting) camera will only turn off if manually turned off
60
camera will turn off 60 seconds after last button press (unless recording
video or shooting automatic photos)
120
camera will turn off 120 seconds (2 minutes) after last button press (unless
recording video or shooting automatic photos)
300
camera will turn off 300 seconds (5 minutes) after last button press (unless
recording video or shooting automatic photos)
Press the SHUTTER button to toggle between choices.
Press the POWER/MODE button to save whichever setting is showing on the screen and continue to the
next feature option.
EXITING THE SETTINGS MENU
When you see ESC on the screen, press the SHUTTER button to exit the SETTINGS MENU.
CONNECTING TO COMPUTER AND TV
SYSTEM REQUIREMENTS
The HERO camera is compatible with Microsoft® Me/2000/XP/VISTA or later, or Mac OS X 10.2 or later.
The HERO camera can also be plugged into any standard definition or HDTV that has RCA composite ports,
allowing for high quality playback.
USING SD CARDS
The HERO camera is compatible with 2GB, 4GB, 8GB capacity SD and SDHC cards. GoPro recommends
using name brand SD cards for best performance and reliability. Class 2 cards and faster work well with the
HERO camera.
To insert the SD card, slide the SD card into the SD card slot on the side of the camera with the SD card
label facing the back of the camera. The SD card will click into place once it is inserted past flush with the
camera. Use your finger nail to do this.
To remove the SD card, push it further into the camera and it will spring out from the camera far enough so
that you can pull it out.
TRANSFERRING VIDEO AND PHOTOS TO COMPUTER
On a PC with WINDOWS operating system:
1) Connect the camera to a computer with the included USB cable.
2) Turn on the camera by pressing POWER/MODE button. LCD screen will display “USB”.
3) Double click on MY COMPUTER and you will see a “Removable Disk” icon. If you do not see this,
close the MY COMPUTER folder and then reopen it and the “Removable Disk” icon should
appear.
4) Double click the “Removable Disk” icon.
5) Then double click the “DCIM” folder icon.
6) Then double click the “100GOPRO” icon.
7) The photo and video files will be in the “100GOPRO” folder.
8) Drag your photo and video files to your hard drive or double click a file to view it.
On a MAC:
Simply plug the camera into your MAC with the included USB cable and the MAC OS will recognize the
camera as an external hard drive.
IMPORTANT TIP FOR MAC USERS: When deleting files from your SD card you must empty the trash
before removing the SD card or unplugging the camera. If you do not empty your trash the photo and video
files will not be completely erased from your SD card.
CONNECTING CAMERA TO TV OR HDTV
Make sure your camera is set to the correct NTSC or PAL video setting or your camera will not work
properly with your TV. This is explained in the SETTINGS MENU section of these instructions.
STEPS TO REVIEW PHOTOS AND VIDEO ON A TV OR HDTV
1) Plug your camera into the RCA COMPOSITE ports on your TV or HDTV with the included
combination USB / RCA cable.
2) Once plugged in, turn on your camera.
3) The most recent video saved to the SD card will begin playing on the screen.
4) Press POWER/MODE button to advance to the next video or photo. Press the SHUTTER button
to return to the previous video or photo.
5) Unplug camera from the TV and turn camera off when finished reviewing.
 Loading...