

Page 1

1
Page 2

Join the GoPro Movement
@GoPro
@GoPro
@GoPro
@GoPro
facebook.com/GoPro
pinterest.com/GoPro
Page 3

Contents Contents
Meet Your HERO9 Black 6
Setting Up Your Camera
Gett ing to K now Your Go Pro 14
Customizing Your GoPro 27
HERO9 Black P ower Tools 36
Using QuikCapture 44
Addin g HiLight Tags 46
Setting the Screen Orientation 47
Recording Video 48
Video Settings 53
Taking Photos 56
Photo Setti ngs 63
Capturing Time Lapse 65
Time La pse Settin gs 70
Live St reami ng + Webc am Mode 73
Exposure Control 74
Controlling Your GoPro Wit h Your Voice 77
Playi ng Back Your Media 81
Conne cti ng to the G oPro A pp 85
Transferring Your Media 87
Setting Your Connections + Preferences 92
Important Messages 101
Resetting Your Camera 103
Mounting Your GoPro 105
Removing the Door 110
Maintenance 112
Battery Information 113
Troubleshooting 116
Tech Specs: Video 117
Tech Specs: Photo 127
Tech Spec s: Time Lapse 132
Tech Specs: Protune 137
Customer Support 145
Trademarks 145
Regulatory Information 145
HERO9 Black—Regulatory Model Number SPBL1
Page 4
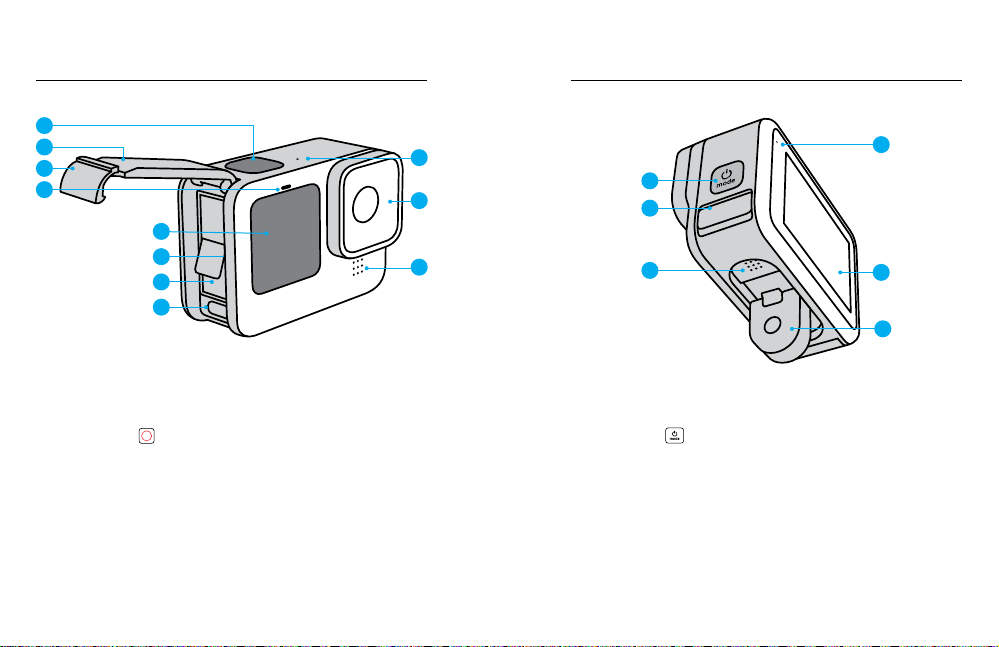
Meet Your HERO9 Black
Meet Your HERO9 Black
1
2
3
4
5
6
7
8
1. Shut ter Bu tton
2. Door
3. Door Latch
4. Status Light
5. Front Screen
6 7
6. microSD™ Card Slo t
7. Battery
8. USB -C Port
9. Microphone
10. Removable Lens
9
10
9
11. Mode But ton
12. Drain Microphone
Learn how to use the accessories that came with your GoPro.
See Mounting Your GoPro (page 105).
11
12
13
(Designed to drain water.
This is n ot a door/ latch.
Do not tr y to open.)
13. Speaker
14. Touch Screen
15. Folding Fingers
4
14
15
Page 5

Setting Up Your Camera Setting Up Your Camera
MICROSD CARDS
You’ll need a m icroS D card (sold separately) to save your videos
and pho tos. Us e a brand-name card that fits these requirements:
• microSD, microSDHC™, or microSDXC™
• C lass 1 0 or UHS-I ratin g
• C apac ity u p to 256GB
For a lis t of reco mmended mic roSD ca rds,
visit gopro.com/microsdcards.
Heads Up: Be sure your hands are clean and dry before handling your
SD card. Check the manufacturer’s guidelines to see your card’s
acceptable temperature range and other important information.
PRO TIP: Ke ep your S D card in g ood condit ion by reformat ting it
regularly. This will e rase all of your m edia, so be sure t o save it fi rst .
1. Swipe down on the re ar screen to acce ss the Dashbo ard.
2. Swipe l eft and tap Preferences > Rese t > Format SD Ca rd.
To learn how to save you r vide os and ph otos, s ee Transferring Your
Medi a (pag e 87).
8 9
RECHARGEABLE BATTERY
For maximum p erfo rmance, be sure to use th e GoPro Rechargeable
Batt ery ( HERO 9 Black) wit h your ne w GoPro.
PRO TIP: There’s an easy way to check y our bat tery’s status an d make
sure you’re using t he rig ht one.
1. Swipe down on the re ar screen to acce ss the Dashbo ard.
2. Swipe l eft and tap Preferences > Abo ut > Bat tery Info.
WARNING: Although non-GoPro batteries may fit in your
HERO9 Black, they’ll limit performance. Your camera’s
performance with any other battery is not guaranteed.
For more important information on battery safety and use,
see Bat tery Informa tion (page 113).
Page 6
Setting Up Your CameraSetting Up Your Camera
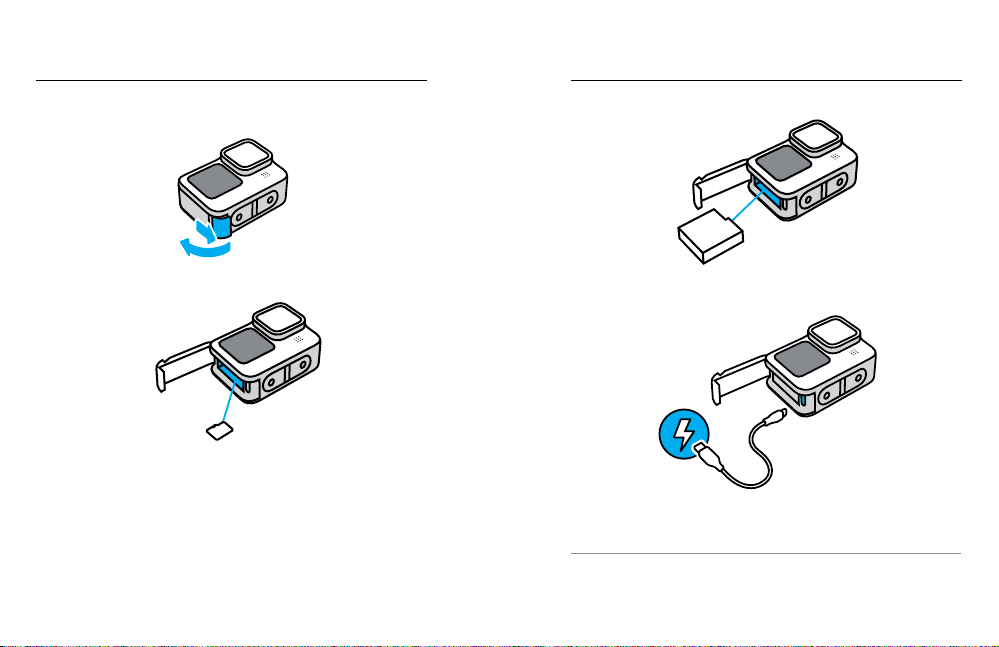
MICROSD CARD + BATTERY SETUP
1. Unlock th e door latch and fl ip the d oor op en.
2. With y our camera o a nd bat ter y remove d, ins ert t he SD ca rd into
the card slot with the label facing the battery compartment.
You can ejec t the card by pres sing i t into the slot w ith your finge rnail.
10 11
3. Insert the battery.
4. Connect yo ur camera to a US B charg er or com puter u sing t he
inclu ded USB-C cable .
It takes about 3 hours for the battery to fully charge. The camera
stat us ligh t will t urn o when it ’s done. To lea rn more, see Bat tery
Information (page 113).
PRO TIP: For the fastest charging, use the GoPro Supercharger
(sold separately).
Page 7
Setting Up Your CameraSetting Up Your Camera
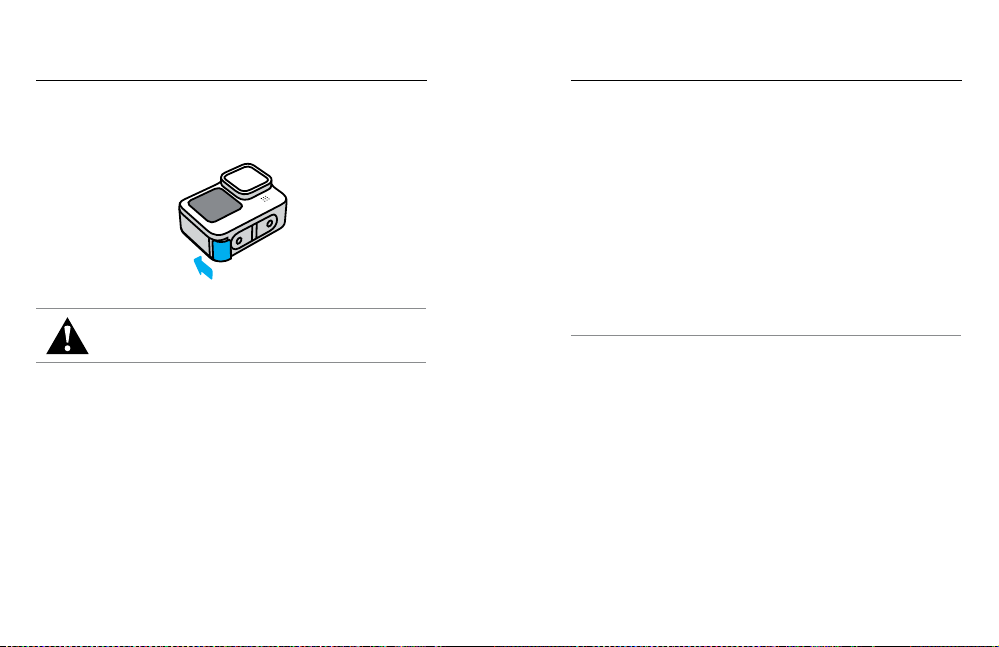
5. Unplu g the ca ble an d shut the door w hen charging is complete.
Be sure t he door l atch is c losed a nd loc ked before using your
camera.
UPDATING YOUR CAM ERA’S S OFT WARE
To get the lat est fea tures a nd bes t per formance from your Go Pro,
make sure i t’s using the m ost cu rrent s oft ware.
Updat ing With the GoPro Ap p
1. Download the app from the A pple
2. Follow the app’s on-screen instructions to connect your camera
to your mo bile device. If new camera software is available,
the app w ill tel l you how to inst all it .
©
App Sto re© or Google Play™.
Updating Manually
1. Visit gopro.com/update.
2. Choose HERO9 Black from th e list of camer as.
3. Select Update your camera manually and follow the instructions.
WARNING: Your camera’s door is rem ovable. Be sure t hat
the doo r is secur ely loc ked and sea led after clos ing.
PRO TIP: Want to kno w what soft ware version y ou’re usi ng?
Here’s wh ere you c an find ou t.
1. Swipe down on the re ar screen to acce ss the Dashbo ard.
2. Swipe l eft and tap Preferences > Abou t > Came ra Info.
12 13
Page 8
Getting to Know Your GoPro
Getting to Know Your GoPro
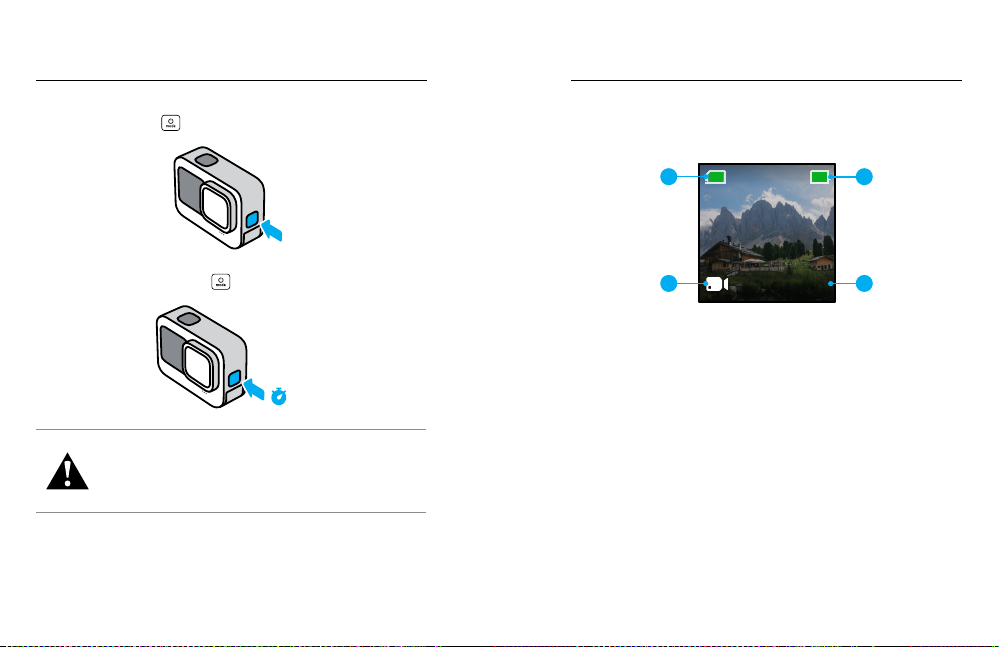
POWERING ON
Press t he Mod e but ton to turn on your HE RO9 Bl ack.
POWERING OFF
Press and hold t he Mod e but ton
WARNI NG: Use c autio n when us ing your G oPro an d
its mou nts an d accesso ries. A lways b e aware of yo ur
surroundings to avoid injuring yourself and others.
Be sure to f ollow al l local l aws incl uding a ll priva cy laws,
which may restrict recording in certain areas.
14 15
for 3 seco nds to tu rn it o.
3s
THE NE W FRONT SCREEN
HERO9 Black ’s new front scre en features a li ve view f rom the lens.
This ma kes it easy to cap ture pe rfec tly framed s hots .
1
3
1. Recording Time/Photos Remaining
2. Battery Status
3. Current Mod e (Video, P hoto, or T ime La pse)
4. Capture Settings
1H:14 100%
Standard
1080 | 60 | W
2
4
Page 9
Getting to Know Your GoPro Getting to Know Your GoPro
Display Options
The fro nt scre en incl udes fo ur disp lay opt ions t hat can easil y chang ed.
1. Swipe down on the re ar screen to acce ss the Dashbo ard.
2. Tap the
3. Tap the ico n of the setti ng tha t you wan t.
Setting Description
16 17
to acces s the front screen set tings.
Displ ays th e live pr eview a s a full -screen sho t.
Full Screen
Actual Screen
Statu s Only
Screen O
The ima ge is cro pped fo r the display, bu t will
be captured without cropping.
Displ ays th e live pr eview f rom the lens
without cropping.
Displ ays camera s tatus w ithout th e live
preview from t he lens .
Turns the screen o. Use thi s setting in d ark
environments where light from the screen
might interfere with your shot. This setting
also maximizes battery life.
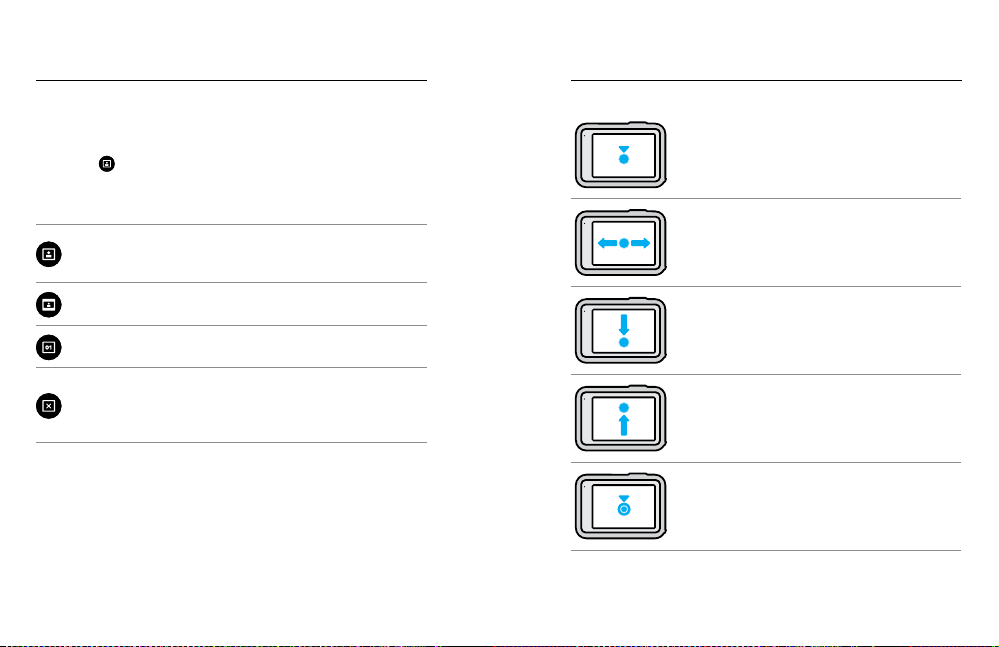
USING THE REAR TOUCH SCREEN
Tap
Selec t an item to turn it on or o.
Swipe Le ft or Ri ght
Switch betw een Video, Photo,
and Tim e Lapse modes .
Swipe D own From t he Edge of the Screen
Open the Dashboard when your camera
is in a lan dscap e orie ntat ion.
Swipe Up From the Edge of the Screen
See the last photo or v ideo yo u captu red
and access the Media Gallery.
Press an d Hold t he Capture Screen
Turn on and ad just E xposure Control.
PRO TIP: You can hide yo ur camera’s st atus in forma tion a nd icon s
on both t he fro nt and re ar screen by tap ping t he rear screen.
Tap the scre en agai n or pres s a but ton to br ing it all back .
Page 10
Getting to Know Your GoPro
VIDEO
Getting to Know Your GoPro
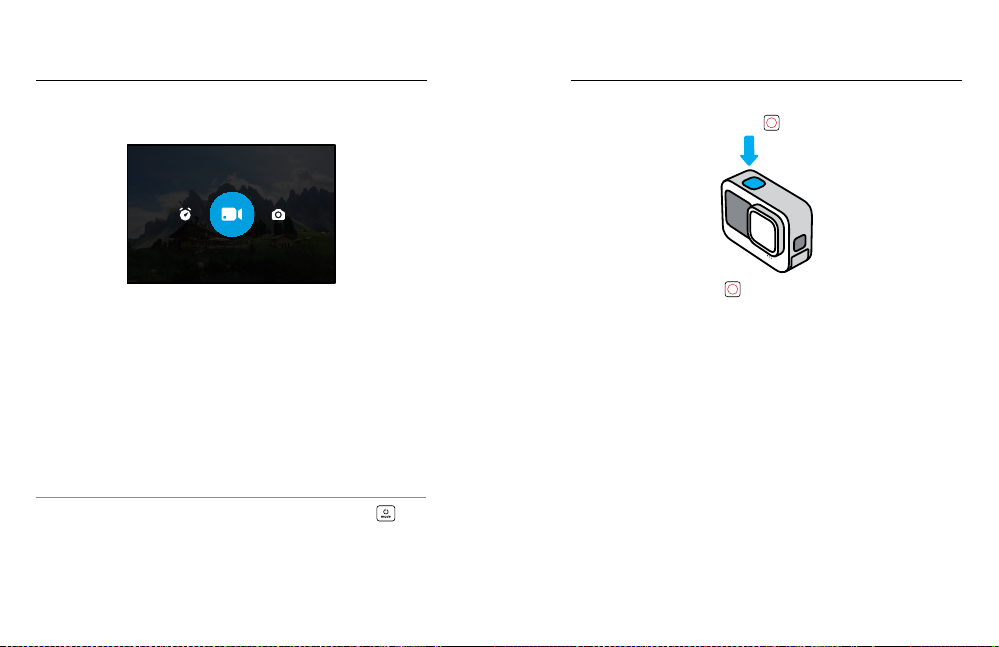
CAPTURE MO DES
Your GoPro h as three main c apture modes .
Using t he rear touch screen, s wipe l eft or r ight to the mode you want.
Video
Includes Standard, Activity, Cinematic, and Slo-Mo presets.
To learn mor e, see Recording Video (page 48 ).
Photo
Includes Photo, LiveBurst, Burst, and Night presets.
To learn mor e, see Taking Photos (p age 56).
Time Lapse
Includes TimeWarp, Time Lapse, and Night Lapse presets.
To learn mor e, see Cap turin g Time Lapse (page 65).
PRO TIP: With the came ra on, you can press the Mode bu tto n
to switch modes.
18 19
GETT ING TH E SHOT
1. Simply press the Shut ter button
2. Press t he Shu tter b utton again to s top recording ( Video,
Time La pse, an d Live St reaming onl y).
to star t recording.
Page 11
Getting to Know Your GoPro
Getting to Know Your GoPro
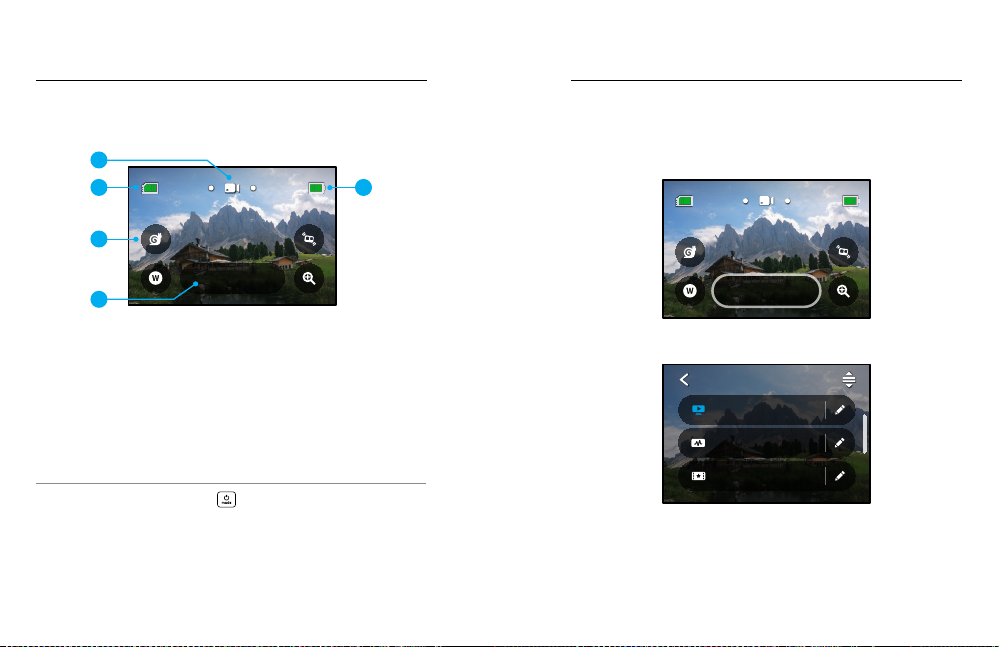
THE TOUCH SCREEN
The rear touch screen gives you access to your camera’s capture
sett ings .
1
2
100%9H:59
5
CHANGING PRESETS
Each ca pture mode has p reset s that m ake it ea sy to sw itch ba ck
and for th betwee n the best mod e and set tings for your shot.
1. Tap the capture settings.
100%9H:59
3
Standard
4
1080 | 60 | W
1. Current M ode ( Vide o, Photo , or Time L apse)
2. Recording Time/Photos Remaining
2. Tap the pres et that you wan t. All o f the pre set’s s ett ings will be
locked i nto you r camera and rea dy to go.
3. Customizable On-Screen Shortcuts
4. Capture Settings
5. Battery Status
Heads Up: The capture settings are not available when you turn your
GoPro t o take portr ait shots. B e sure to ch oose t he set ting s you wan t
before rotating your camera.
PRO TIP: Press the Mode b utt on
screen from almost anywhere.
20 21
to quick ly jum p back to t his
Standard
1080 | 60 | W
VIDEO
Standard
1080 | 60 | Wide
Activity
2.7K | 60 | SuperView
Cinematic
4K | 30 | L+
Page 12
Getting to Know Your GoPro Getting to Know Your GoPro
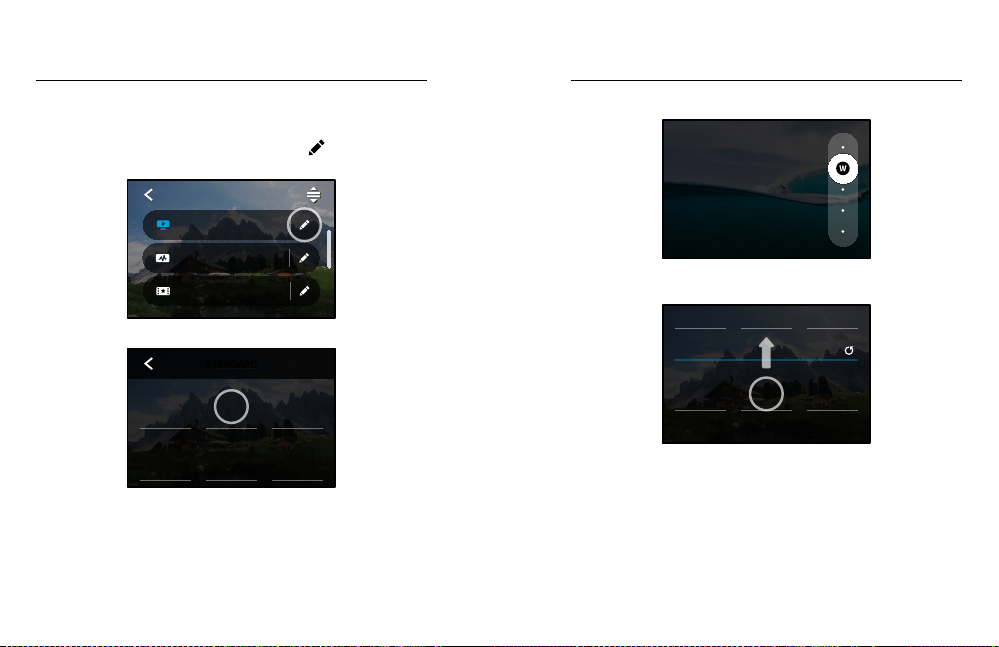
CUSTOMIZING THE PRESETS
You can chan ge the settings in your presets w ith ju st a few ta ps.
1. With your camera in landscape orientation, tap
preset y ou want to adjust.
VIDEO
Standard
1080 | 60 | Wide
Activity
2.7K | 60 | SuperView
Cinematic
4K | 30 | L+
next to t he
2. Tap the set ting t hat you want to change.
STANDARD
HyperSmooth
RES | FPS
1080 | 60
Scheduled
Capture
Lens
Wide
Duration
No Limit O O
High
HindSight
The on -scre en ins truc tions will gi ve you a rundow n of your o ptions.
LENS
Wide (16-34mm)
Wide field of view.
For det ails on sett ings , see Tech Specs (start ing pag e 117).
3. Scroll down fo r the mo re advanced setti ngs.
1.0xOO
PROTUNE
Auto
EV Comp
0
ISO MaxISO MinWhite Balance
Bit Rate
Standard
For det ails on all adv anced sett ings , see Protune (starting page
137).
Shutter
22 23
Page 13
Getting to Know Your GoPro Getting to Know Your GoPro
4. Tap to save your changes and return to the presets screen.
STANDARD
HyperSmooth
RES | FPS
1080 | 60
Scheduled
Capture
Heads Up: You can’ t delet e the pre loaded presets, b ut you can
customize them any way you want. You can a lso cre ate your own
custom presets.
Lens
Wide
Duration
No Limit O O
High
HindSight
To learn mor e, see Cre ating Your Own Presets (pa ge 27).
PRO TIP: From the capture screen, you can press and hold the capture
sett ings to s kip straig ht to the sett ings m enu.
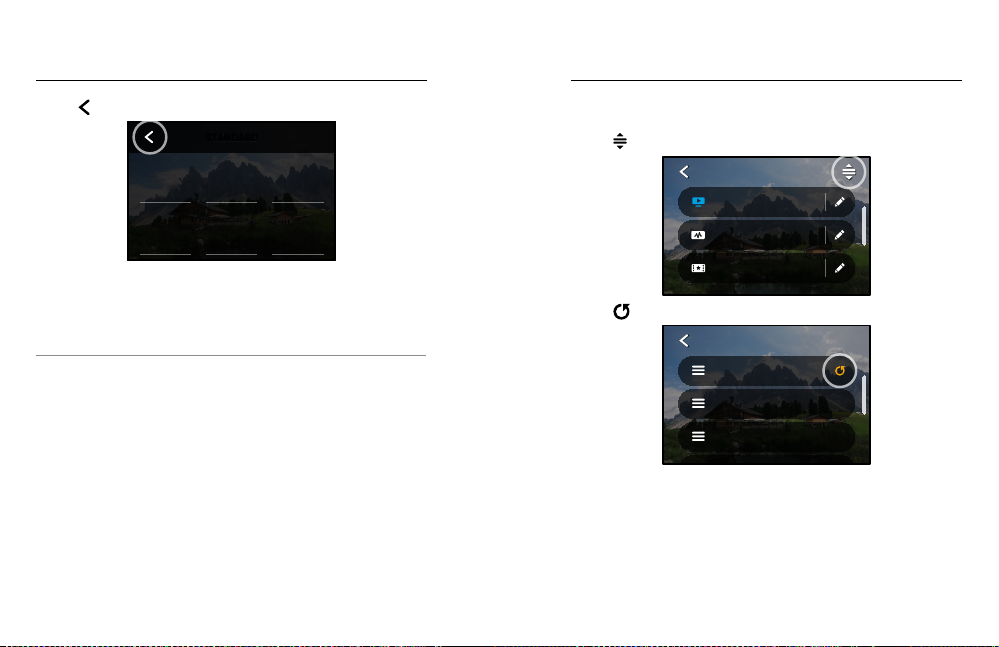
RESTORING PRESETS TO THEIR ORIGINAL SETTINGS
You can go bac k to your presets’ original settings anytime.
.
1. Tap
VIDEO
Standard
1080 | 60 | Wide
Activity
2.7K | 60 | SuperView
Cinematic
4K | 30 | L+
2. Tap .
MANAGE
Standard
1080 | 60 | Wide
Activity
2.7K | 60 | SuperView
Cinematic
4K | 30 | L+
3. Tap Done.
Heads Up: You can also scro ll to the end of th e list o f sett ings
and tap R estor e.
24 25
Page 14

Getting to Know Your GoPro
Customizing Your GoPro
NAVIGATING WITH THE BUT TONS
Although your GoPro is w aterp roof, t he touch screen won’t wo rk under
water. Us e the bu tton s and fro nt scre en to cha nge pre sets i n the mo de
you’re usi ng.
1. With your c amer a on, hold down t he Mod e but ton
the Shu tte r button
. A menu wi ll appear on th e front screen .
and press
2. Press t he Mod e but ton to scroll th rough t he pres ets.
3. Use the Shut ter bu tton to select a preset.
Heads Up: The Dashboard and Media Gallery are not available when
navig atin g with t he but tons.
CREATING YOUR OWN PRESETS
The per fect capture settings f or a day ou t on the s lopes m ay not be s o
great when you’re record ing ind oors . Custom pres ets le t you set u p
and save sett ings fo r both s o you can s witc h back an d fort h in no time.
1. Tap the capture settings, and then scroll to th e bottom of th e
preset s list and tap
.
Activity
2.7K | 60 | SuperView
Cinematic
4K | 30 | L+
Slo-Mo
1080 | 240 | Wide
2. Choose a preset mode.
MODE
Video
Record stunning videos
in resolutions up to 5K.
26 27
Page 15

Customizing Your GoPro
Customizing Your GoPro
Tap a setti ng to cha nge it .
CHOOSE SETTINGS
RES | FPS
Mode
1080 | 60
Video
Scheduled
HyperSmooth
High O
The on -scre en ins truc tions will gi ve you a rundow n of your o ptions.
For det ails on all set tings, see Tech Specs (starting pa ge 117).
Capture
Lens
Wide
Duration
No Limit
3. Scroll down fo r the mo re advanced setti ngs.
1.0xOO
PROTUNE
Bit Rate
Standard
Shutter
Auto
EV Comp
0
ISO MaxISO MinWhite Balance
For det ails on advanced settin gs, se e Protune (start ing page 137).
4. Tap when you’re finished.
CHOOSE SETTINGS
Mode
Video
HyperSmooth
High O
RES | FPS
1080 | 60
Scheduled
Capture
Lens
Wide
Duration
No Limit
5. Choose an icon and name for your preset.
NAME PRESET
Custom
Air
Bike
Epic
6. Tap to save you r prese t.
You may need to fine-tune your presets after trying them out.
Tap
next to t he preset to make adjus tmen ts.
28 29
Page 16
Customizing Your GoPro
Customizing Your GoPro
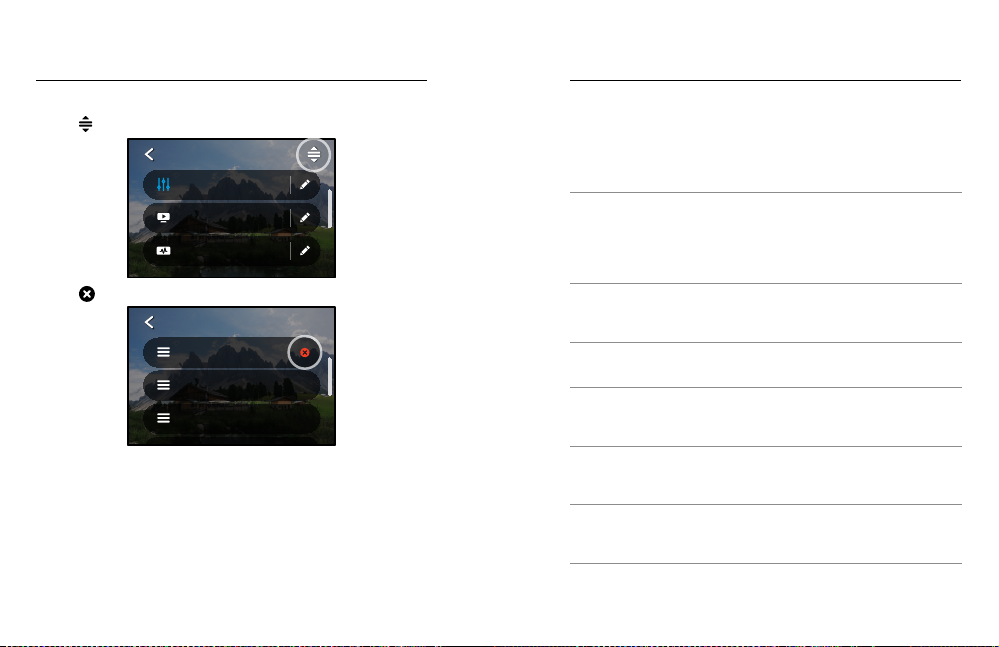
DELETING YOUR PRESET
1. Tap
.
VIDEO
Custom
1440 | 60 | Wide
Standard
1080 | 60 | Wide
Activity
2.7K | 60 | SuperView
2. Ta p .
MANAGE
Custom
1440 | 60 | Wide
Standard
1080 | 60 | Wide
Activity
2.7K | 60 | SuperView
Heads Up: You can also scro ll to the end of th e list o f sett ings
and tap Delete.
30 31
SUGGESTED SETTINGS
Here are s ome of t he bes t modes a nd set tings for capturi ng your
favorite ac tivities. Try the m as start ing poi nts fo r your presets,
and then exp erim ent to fin d what wo rks be st for yo u.
Activity Video Photo
Air • 4K60, Wide Lens
Bike • 2.7K60 4:3, W ide Len s
• 1080p120, Wide Lens
• 15x TimeWar p Vide o
• 1440p60, Wide Lens
• 15x TimeWar p Vide o
Indoor • 1440p30, Wide Lens
• 1080p 30, Wide Lens
Motor • 2.7K60 4:3, W ide Len s
Mounted • 5K30, Wide Lens
Outdoor • 5K30, Wide Lens
• 1440p60, Wide Lens
• 15x TimeWar p Vide o
• 1440p 60, Wi de Lens
• Auto TimeWarp Video
• 1440p60, Wide Lens
• 10x TimeWarp Video
• Time Lapse Photo
(1-second interval)
1080 p120, Wi de Lens
• Burs t (30/3 Rate) ,
Wide Lens
• Time Lapse Photo
(5-second interval),
Wide Lens
• Photo or Co ntinuous
Photo, Wide Lens
• Time Lapse Photo
(5-second interval),
Wide Lens
• Time Lapse Photo
(5-second interval),
Wide Lens
• Photo or Co ntinuous
Photo, Wide Lens
Page 17
Customizing Your GoPro
Customizing Your GoPro
Activity Video Photo
*
POV
• 1440p60, Wide Lens
• 1440p120, Wide Lens
• 15x TimeWar p Vide o
Selfie • 4K30 4:3, Na rrow Len s
• 1440p 60, Na rrow Len s
Snow • 4K60, Wide Lens
Tra il • 4K30 4:3 , Wide Le ns
Tra ve l • 5K30, Wide Le ns
Water • 4K60, Wide Lens
*
Point- of-view (POV) sh ots are those taken f rom your point of vie w using a body mount
or handheld mount.
32 33
• 1080p120, Wide Lens
• 15x TimeWar p Vide o
• 1440p60, Wide Lens
• 15x TimeWar p Vide o
• 1440p60, Wide Lens
• 10x TimeWarp Video
• 1080p240, Wide Lens
• 1440p60, Wide Lens
• Time Lapse Photo
(2-second interval),
Wide Lens
• Burst ( 30/3 Rate),
Wide Lens
• Photo, Narrow Lens,
SuperPhoto,
Photo Timer
• Time Lapse Photo
(1-second interval),
Wide Lens
• Burst ( 30/3 Rate),
Wide Lens
• Photo, Wide Lens
• Photo or Co ntinuous
Photo, Wide Lens
• Time Lapse Photo
(2- or 5-second
interval), Wide Lens
• Burst ( 30/6 Ra te),
Wide Lens
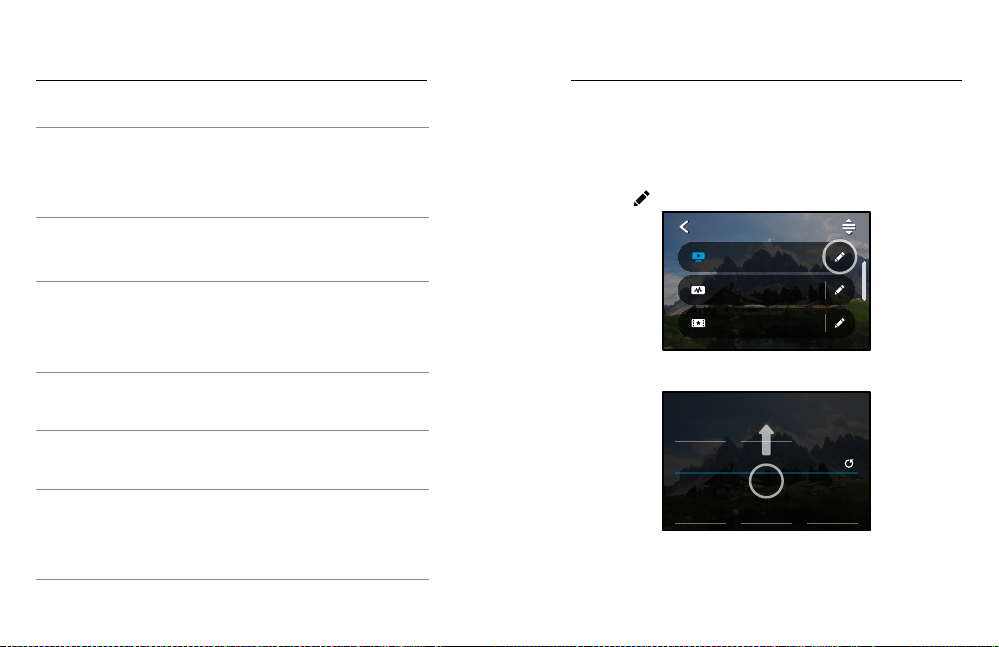
PERSONALIZING YOUR ONSCREEN SHORTCUTS
On-screen shortcuts give you quick one-tap access to your camera’s
captu re set tings. Each m ode has i ts ow n defau lt shortcu ts, but you ca n
chang e them to t he set tings that y ou use mo st. You can even se t up
dierent shortcuts for each preset.
1. Tap the
next to t he preset you want to adjust .
VIDEO
Standard
1080 | 60 | Wide
Activity
2.7K | 60 | SuperView
Cinematic
4K | 30 | L+
2. Scrol l down to t he On-Scre en Shortcuts.
Media Mod
Wind
Camera Mics
Auto
SHORTCUTS
Lower Left
Lens
Lower Right
Zoom
Upper Left
Slo-Mo
Page 18
Customizing Your GoPro
Customizing Your GoPro
3. Tap where you’d like to pu t your ne w shor tcut .
SHORTCUTS
Zoom
Upper Left
Slo-Mo
Lower Left
Upper Right
HyperSmooth
4. Scroll through all of the available shortcuts on the right and choose
the one you want.
UPPER RIGHT
HindSight
Set the HindSight
duration of your video.
For det ails on shor tcut s, see Tech Specs (star ting page 117 )
and Protune (star ting p age 137 ).
Lower Right
Lens
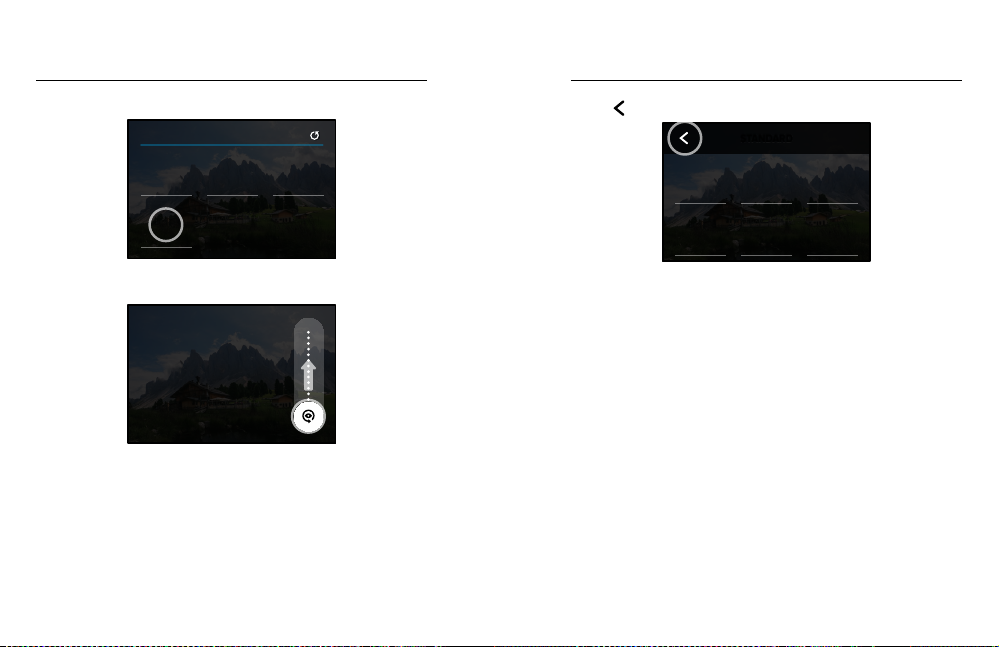
5. Tap to save your changes and return to the presets screen.
STANDARD
HyperSmooth
RES | FPS
1080 | 60
Scheduled
Capture
Lens
Wide
Duration
No Limit O O
High
HindSight
Now you c an simp ly tap t he shortcu t to chan ge set ting s.
34 35
Page 19
HERO9 Black Power Tools
HERO9 Black Power Tools
HERO9 Black comes wi th Power Tools— a full suite of smart c apture
sett ings t hat ex tend the capt ure opt ions beyond si mply p ressi ng the
shut ter button .
HINDSIGHT
HindS ight is a power ful ne w featu re that c an capture up to 3 0 seconds
of vide o before you pres s the Sh utter but ton. This let s you rec ord key
moments even after they happen.
Using HindSight
Imagine your kid making the game-winning play during their big game.
This is a m oment you don’ t want to m iss. W ith H indSi ght on, you can
frame y our sho t, but you don’ t have to s tar t recording. You ca n press
the Shu tte r button
the vi deo it c aptured befor e you pres sed th e Shut ter button (u p to 30
secon ds) and w ill con tinue record ing unt il you s top th e video.
afte r they ma ke the bi g play. HindSig ht will save
Setting Up HindSight
1. After choosing a video preset, press and hold the capture settings
to go to the sett ings menu.
100%9H:59
Standard
1080 | 60 | W
36 37
2. Tap HindSight.
STANDARD
HyperSmooth
RES | FPS
1080 | 60
Scheduled
Capture
Lens
Wide
Duration
No Limit O O
High
HindSight
3. Set HindSig ht for ei ther 1 5 or 30 se conds .
HINDSIGHT
O
Capture video with
HindSight on. Your video
will start when the Shutter
button is pressed.
Heads Up: HindSigh t work s by capt uring video the entire ti me that it’s
on (even when you’re not actively recording). Depending on how you
use it, HindSight may use your camera’s battery capacity faster than
recording in normal video mode.
Page 20
PHOTO
HERO9 Black Power Tools HERO9 Black Power Tools
LIVEBURST
LiveB urs t captu res a bur st of photos bo th 1. 5 secon ds befo re and
1.5 se conds a fter t he Shu tter b utt on
throu gh the burst t o find the perf ect sh ot or sha re the w hole bu rst
as a shor t video.
is pressed. You can look
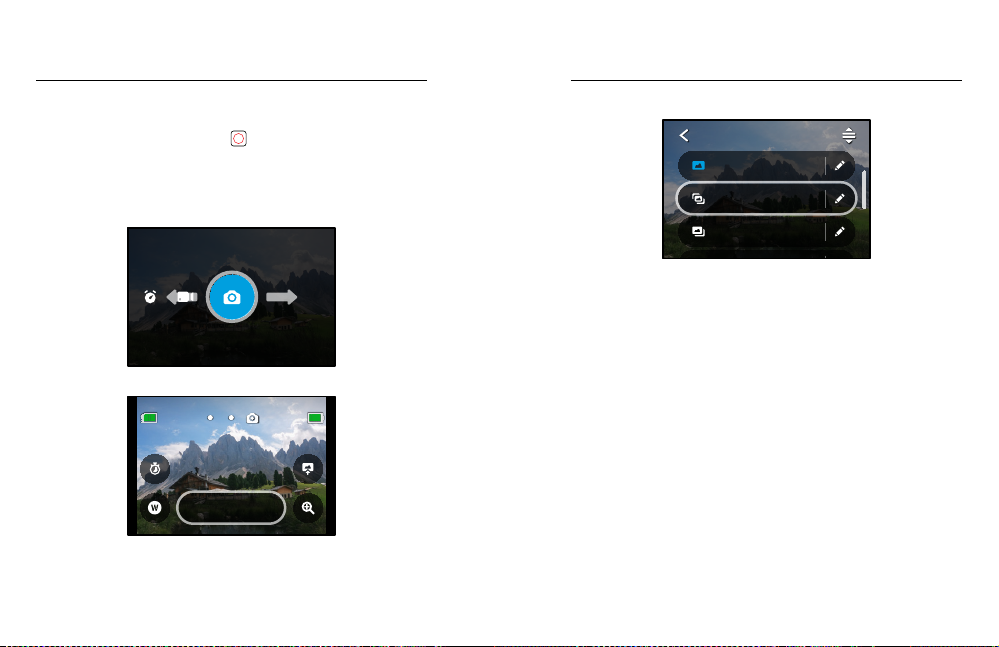
Sett ing Up Li veBur st
1. Swipe to switch to Ph oto mod e.
3. Select LiveBur st from the li st of presets.
PHOTO
Photo
Wide
Live Burst
Wide
Burst
Auto | Wide
2. Tap the settings.
999+ 100%
Photo
Wide
38 39
Page 21
HERO9 Black Power Tools HERO9 Black Power Tools
OFF
PM
32
31
30
29
4
3
2
1
Current Time: 12:30PM 3/29/20
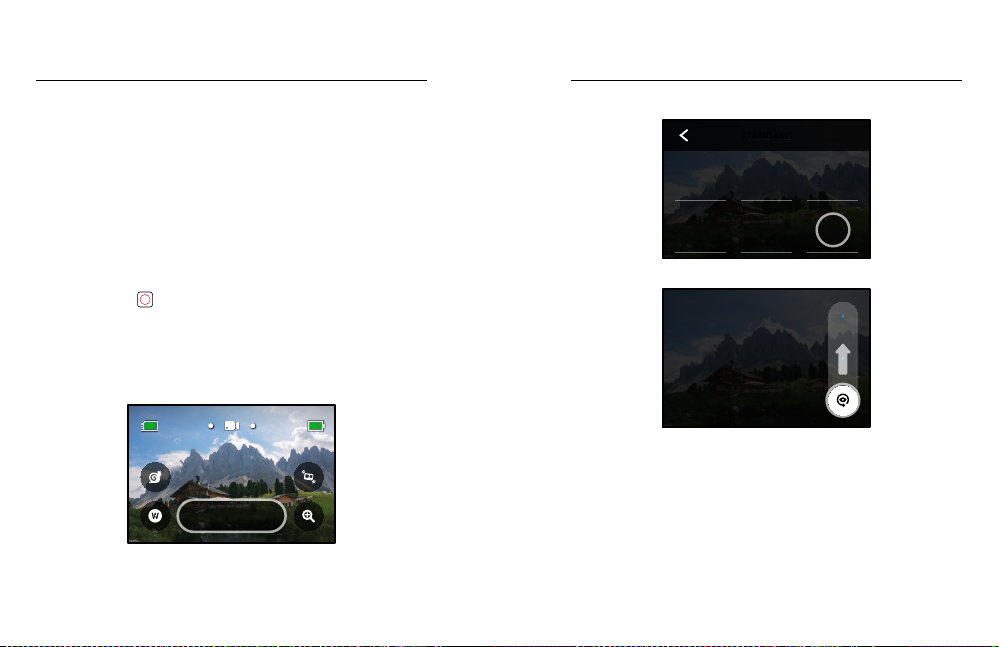
SCHEDULED CAPTURE
OFF
SCHEDULED CAPTURE
Scheduled capture lets you set your GoPro to automatically turn
itse lf on and captu re a shot up to 24 hours i n adva nce. It ’s available
for all presets.
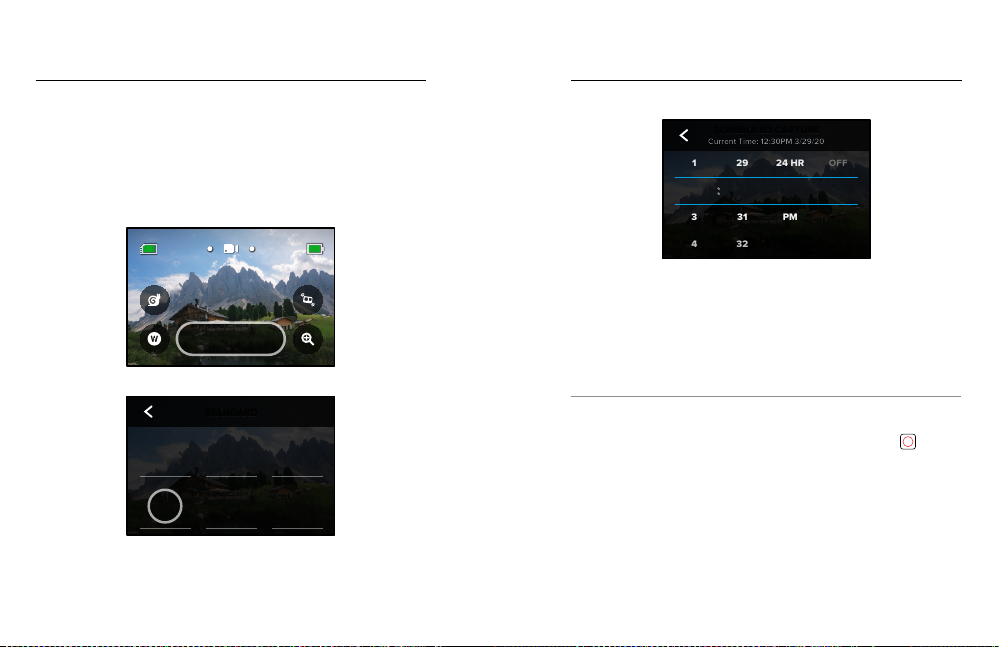
Setting Up Scheduled Capture
1. Press and hold the capture settings on the capture screen
to go to the sett ings menu.
100%9H:59
Standard
1080 | 60 | W
2. Tap Scheduled Capture.
STANDARD
HyperSmooth
RES | FPS
1080 | 60
Scheduled
Capture
40 41
Lens
Wide
Duration
No Limit O O
HindSight
High
3. Set when you want your GoPro to capture the shot.
24 HR
ON
AM
PM
4. After set ting t he tim e, you ca n turn yo ur GoP ro o or continue
using your camera’s other presets.
Heads Up: Your Go Pro wil l stay o n after taki ng the s hot. I t will turn
itself o after idling for the length of time set in Preferences.
1. Swipe down on the re ar screen to acce ss the Dashbo ard.
2. Swipe l eft and tap Preferences > General > Auto Power O.
PRO TIP: Use duration capture to choose the shot length when using
scheduled capture. Your camera will automatically stop recording
afte r it get s the sh ot. You’ll h ave to pre ss the S hutter but ton
stop re cording if you’re not using dura tion c aptur e.
to
Page 22
HERO9 Black Power Tools HERO9 Black Power Tools
DURATION CAPTURE
Use dur atio n captu re to set how long yo ur GoP ro records befo re it stops.
It’s av ailab le in Video, Ti meWarp, T ime La pse, an d Night Lapse m odes
in incre ment s from 1 5 secon ds to 3 hou rs.
Sett ing Up Du ratio n Capture
1. Press and hold the capture settings on the capture screen
to go to the sett ings menu.
100%9H:59
Standard
1080 | 60 | W
2. Tap Durat ion.
STANDARD
HyperSmooth
RES | FPS
1080 | 60
Scheduled
Capture
42 43
Lens
Wide
Duration
No Limit O O
High
HindSight
3. Choose your duration for your shot.
DURATION
No Limit
Record with no time limit.
Press the Shutter button
to stop recording.
4. Press the Shu tter button to star t recording. Your GoPro will
automatically stop after recording for the set duration.
Heads Up: Duratio n captu re set s how lon g your GoPro wi ll record.
The len gth of your fina l video will va ry ba sed on t he mode you’re usi ng.
TimeWarp and time lapse videos will be shorter than the set duration.
PRO TIP: Choose N o Limi t to capt ure foot age wi thou t a time l imit .
Press t he Shutter b utto n to stop record ing.
Page 23

Using QuikCapture
Using QuikCapture
QuikCaptu re is the faste st and e asies t way to power on yo ur GoP ro
and get t he shot . All it takes is t he push o f the Sh utte r but ton.
RECORDING VIDEO WITH QUIKCAPTURE
1. With your c amer a o, pres s the Sh utter but ton
2. Press t he Shu tter b utton again to s top recording a nd turn o
your camera.
Heads Up: When using QuikCapture, your camera will start recording
with t he set ting s that y ou used l ast .
For more Video options, see Record ing Video (pag e 48).
44 45
.
TAKING TIME LAPSE WITH QUIKCAPTURE
1. With your c amer a o, pres s and ho ld the S hutter but ton
your ca mera tu rns on (a bout 3 s econd s). It wi ll sta rt re cording in
the las t Time Lapse m ode that you used.
3s
2. Press t he Shu tter b utton again to s top Time Lapse and tur n o
your camera.
For mor e Time Lapse op tions, see Capturin g Time Lapse (page 6 5).
TURNING OFF QUIKCAPTURE
QuikCaptu re is on by d efaul t, bu t you can t urn it o.
1. Swipe down on the re ar screen to acce ss the Dashbo ard.
.
2. Tap
PRO TIP: Since it o nly turns the camer a on when it’s recordin g,
QuikCaptu re is a great way to ma ximize battery li fe.
until
Page 24

Adding HiLight Tags
Setting the Screen Orientation
Mark fa vori te moments in y our videos an d photo s by pressing th e Mode
button
durin g recording or p layba ck. Th is adds a HiLight Tag that
makes those moments easier to find when you’re watching your footage,
creat ing a video, or lookin g for a cer tain shot.
You can also a dd HiL ight Tags by sayin g, “Go Pro, Hi Light” whe n Voice
Control is on and by tap ping
the Go Pro app.
PRO TIP: The GoP ro app lo oks for H iLig ht Tags whe n it crea tes vid eos.
This he lps to ensu re that favorite mom ents a re incl uded in y our stories .
46 47
when wa tchin g your footage w ith
You can easi ly swi tch bet ween landsc ape and p ort rait shots by rotat ing
your camera. HERO9 Black can even capture photos and videos rightside up when it’s mounted upside down.
The ori enta tion is locked i n when yo u press the Shu tter button
If your c amera tilt s duri ng recording , like on a ro ller co aster, your
footage will t ilt with it . You’ll cap ture every t wis t and tur n.
LOCKING THE ORIENTATION
HERO9 Black l ets yo u lock the screen in landscap e or por trait
orientation. This is e spec ially u seful w hen you’re using body and
handheld mounts. That’s when accidentally shooting in the wrong
orien tati on is mostly l ikely to happe n.
Swipe d own on t he rear screen to a ccess t he Dash board .
1. Turn your camera to the orientation you want.
2. Ta p
on the Dashboard.
The scre en is now locked a nd will match t he orie ntat ion of yo ur camera.
Heads Up: Locking th e scree n in this way wil l only work whe n the
Orien tation is set to All (default) in Preferences.
SETTING LANDSCAPE LOCK
You can also set your GoPro to record only in landscape orientation.
Swipe d own on t he rear screen to a ccess t he Dash board .
1. Swipe lef t and tap Preferences > Displays > Orientation.
2. S witch f rom Au to (defa ult) to L ands cape.
Your GoPro will record right-side up whether your camera is right-side
up or ups ide dow n. You can al so lock the ori enta tion on the Das hboard.
.
Page 25

Recording Video Recording Video
Your GoPro c omes lo aded w ith four video presets. Each has its ow n
specialty. Once you’ve chosen your preset, press the Shutter button
to star t recording.
STANDARD DEFAULT
A versa tile p reset t hat’s g reat for a ll- purpose reco rding . It sho ots 1 080p
video at 60 fra mes per secon d (fps) for full -screen playbac k on your
phone a nd TV. The d igit al lens is set to Wide to ca pture more of the
scene in the frame.
ACTIVITY
Use thi s prese t to capt ure ult ra imm ersi ve foot age of yo ur favorite
activit ies. I t records 2.7K video at 6 0 fps wi th the Super View digital
lens. T his gi ves your video the cla ssic G oPro lo ok wit h high -res olut ion
full-screen playback.
CINEMATIC
Captures stunning 4K high-resolu tion video a t 30 fps . This p reset
uses th e Linea r + Hori zon Leveling dig ital l ens to sm ooth out the
fish- eye eect and g ive you r foota ge a dramatic c inema tic feel
with a u ltra s tead y horizo n.
SLO MO
Great fo r fast-action shots, th is pres et reco rds 1080p foo tage a t
240 fps. T his let s you sl ow thin gs dow n to 8x nor mal speed dur ing
playb ack and c atch amazing d etail s you can’t see with th e naked ey e.
ONSCREEN SHORTCUTS
The video presets feature four defau lt shor tcuts, but you can s wap
them ou t wit h any sho rtcu ts you’d like.
To learn mor e, see Personalizing Your On-Screen Shortcuts (page
33).
Heads Up: The Slo- Mo pre set doe s not hav e defau lt shor tcuts.
Slo-Mo
Tapping the Slo -Mo s hor tcut au tomat ical ly rese ts the frame r ate to
120 fps. This wi ll let yo u slow th e foota ge dow n to 4x normal spe ed
during playback.
Heads Up: Tappin g Slo -Mo b efore re cording 4K30 or 2.7K3 0 (4:3) v ideo
will bu mp the f rame rate up to 60 f ps. Th is will let you sl ow the fo otag e
down to 2 x norma l spee d durin g play back. Slo- Mo is unavail able when
record ing in 5K .
1. Tap
before you start rec ordin g.
100%9H:59
Standard
1080 | 60 | W
2. Press t he Shu tter b utton to star t recording.
48 49
Page 26

Recording Video
Recording Video
Digital Lenses
Chang ing dig ital l enses o n your G oPro is j ust li ke swit ching o ut the
lense s on an old -school camera. T hey ae ct th e field of v iew, the
cropping, and th e fisheye eec t in your s hot.
1. Tap
.
100%9H:59
Standard
1080 | 60 | W
2. Scrol l throu gh the o ptions to see a live prev iew of each opt ion,
and the n tap th e one th at you wa nt.
Wide
16-34mm
Heads Up: Some digital lenses only work with select frame rates.
If needed, HERO9 Black wi ll auto matically a djus t the fr ame ra te
when you switch lenses.
50 51
HyperSmooth Boost
Use HyperSmooth Boost to maximize video stabilization when the
terrain get s rough .
1. Tap
before you start rec ordin g.
100%9H:59
Standard
1080 | 60 | W
2. Press t he Shu tter b utton to star t recording.
To learn mor e, see HyperSmooth Video Stabilization (page 126).
Heads Up: HyperSmooth Boost is automatically on when you choose
the Narrow digital lens.
PRO TIP: HyperSmooth Boost provides ultimate video stabilization
by tigh tly cr oppin g the im age. Turn H yper Smooth o for u ncrop ped,
unst abilized footage, or u se the O n or High sett ings fo r stab ilized
video with a w ider field of vi ew.
Page 27

Recording Video Video Settings
Tou ch Zo om
Touch Zoom helps you capture a closer view of the action.
1. Tap
.
100%9H:59
Standard
1080 | 60 | W
2. Use the slide r to choose how mu ch you want to zoom .
1.5x
Here’s a breakdow n of the v ideo setti ngs. Tap th e and then the
setting to make changes.
RES | FPS
1080 | 60
Scheduled
Capture
STANDARD
HyperSmooth
Lens
Wide
Duration
No Limit O O
High
HindSight
VIDEO
Standard
1080 | 60 | Wide
Activity
2.7K | 60 | SuperView
Cinematic
4K | 30 | L+
MODE AVAILA BLE WH EN CREATING A CUSTOM PR ESET
Choose the mode you want—Video (for traditional video), Looping,
or Slo- Mo.
Looping
Looping lets you save s pace on y our SD card by rec ordin g in a
continuous loop until you’ve captured the moment you want. Use it
when yo u’re wait ing for somet hing to happen ( like fis hing) o r when
nothi ng may ha ppen ( like a das hcam) .
Here’s how it work s:
• If you select 5- minute intervals, only the previous 5 minutes are
saved w hen you p ress th e Shut ter bu tton
3. The zoom level is l ocked u ntil you readjust it, s witc h captu re mode s,
or turn o your ca mera .
52 53
• I f you record for 5 mi nutes a nd don’ t press t he Shu tter butt on
your ca mera will loo p back an d record over the star t of the video.
Slo -M o
These h igh- fram e rate se tti ngs let y ou slow your foot age do wn to 8x
or 4x normal spe ed during playback . Set the resolution to 108 0p and
frame r ate to 240 f ps for 8x s uper sl ow motion. Ch oose a 2.7K, 14 40p,
or 108 0p reso luti on wit h a fram e rate of 1 20 fps for 4 x slow mo tion .
to stop recording.
,
Page 28

Video Settings Video Settings
RES | FPS
Resolutions (RES) are gro uped by aspec t rat io. Tall 4:3 re solutions
(great f or selfies and p oint- of-view sh ots) are listed in the t op row.
Widescreen 16:9 resolutions (great for cinematic shots) are in the
bottom row.
Frame s per second (f ps) are li sted a t the bottom of the screen. Fr ame
rates for the resolution you selected are in white. Unavailable frame
rates are in gray. U se high er frame rate s to capt ure fas t act ion or
slo-mo shots.
The default resolution and fps will vary based on the preset
you choose.
To learn mor e, see:
• V ideo Res oluti on (pag e 133)
• Frames pe r Second ( FPS) (p age 120)
• Aspect Ratio (page 121)
LENS
Choose the best digital lens for your shot—SuperView, Wide, Linear,
Linear + Horizo n Leveli ng, or N arrow. The default len s will v ary based
on the preset . Heads Up: Available lenses will vary based on the
resolution and frame rate you select.
To learn mor e, see Digital Lenses (Vi deo) (page 122).
INTERVAL LOOPING
Choos e how lon g your GoPro records before looping b ack to record
over th e star t of the video. T he defa ult interv al is 5 min utes.
To learn mor e, see Looping Interval (page 126).
54 55
HYPERSMOOTH
Perfect for biking, skiing, handheld shots, and more, HyperSmooth
video stabilization delivers insanely smooth gimbal-like footage
without the gimbal. The available settin gs are Bo ost , High, On, and O .
To learn mor e, see HyperSmooth Video Stabilization (page 126).
SCHEDULED CAPTURE
Set whe n your GoPro wi ll turn itse lf on and star t reco rding .
DU RATI ON
Choose how long your camera records before automatically stopping.
HINDSIGHT
Choose whether HindSight saves 15 or 30 seconds video before
you pres s the Sh utter but ton
TIMER
Set up a 3 - or 10 -second ti mer for your vid eo.
ZOOM
Touch Zoom helps you capture a closer view of the action.
Use the s lider on the right to lock in th e zoom lev el.
PROTUNE
Protune gives you m anual c ontrol of adv anced settings, including
Bit Rate, Colo r, ISO Limit, Exposu re, and microphone settings.
To learn mor e, see Protune (starting page 137).
.
Page 29

Taking Photos
Taking Photos
Your GoPro has four Photo presets. Simply cho ose th e typ e of phot o
you wan t and press the Shutter but ton
are captured at 20 MP, w ith th e defau lt dig ital l ens set to Wide.
PHOTO D EFAULT
Use thi s prese t to capt ure a single pho to or a ser ies of co ntinuous
photos. A single p ress of t he Shu tter b utto n
photo. P ress an d hold t he Shutter butto n
at a rate of up to 30 pe r secon d (depe nding o n lighting co ndit ions).
LIVEBURST
LiveB urs t captu res a bur st of photos bo th 1. 5 secon ds befo re and
1.5 se conds a fter t he Shu tter b utt on
throu gh the burst t o find the perf ect sh ot or sha re the w hole bu rst
as a shor t video.
BURST
Burst captures a series of photos at blistering rates. This makes it perfect
for fast-action shots. This preset automati call y shoot s up to 25 photos in
1 second based on lighting conditions.
NIGHT
The Night preset automatically adjusts your camera’s shutter speed
to let in mo re ligh t for you r shot . It’s pe rfect for dim or dar k scenes,
but it ’s not recommended for handheld or mounted shots when the
camer a is mov ing.
56 57
to get th e shot. All photos
will ca pture a s ingle
to take continu ous ph otos
is pressed. You can look
ONSCREEN SHORTCUTS
The photo presets feature four default shortcuts, but you can swap
them ou t wit h any sho rtcu ts you’d like.
To learn mor e, see Personalizing Your On-Screen Shortcuts (page 57).
Heads Up: Output is onl y a defau lt shor tcut for the Ph oto preset,
but you c an also set it up i n Burs t and Ni ght mo des.
Photo Timer
Use the T imer to set up a selfie, group shot, and more.
1. Tap
.
999+ 100%
Photo
Wide
Page 30

Taking Photos
Taking Photos
2. Choos e 3 secon ds (gre at for se lfies) o r 10 seconds (g reat for
group shots).
3s
3. Press the Shu tter butt on
It will also be ep, and t he fron t sta tus lig ht wil l blink . Both will sp eed
up as the t ime wi nds down befor e snapp ing th e photo.
. Your camera will start the countdown.
3
Heads Up: To help pr event b lurr y low-light shot s, the timer i s
autom atically se t to 3 seco nds when you sw itch to N ight photo mode.
58 59
Digital Lenses
Digit al len ses ae ct th e field of v iew, th e cropp ing, an d the fis heye eect
in your photo. Sw itch them up to se e what works best for y our sho t.
1. Tap
.
999+ 100%
Photo
Wide
2. Scrol l throu gh the o ptions to see a live prev iew of each opt ion,
and the n tap th e one th at you wa nt.
Wide
16-34mm
Heads Up: LiveBurst uses only the Wide lens.
Page 31

Taking Photos Taking Photos
Output
HERO9 Black lets you decide how your photos are processed and
saved . Photo mode (shootin g one ph oto at a ti me) giv es you th e most
options.
1. Tap .
999+ 100%
Output Mode Description
Automatically uses advanced
SuperPhoto Photo
HDR Photo
image p roces sing to give you t he
most brilliant photos possible in
any lighting. May take long er to
process each shot.
Takes and combines multiple
photos into a sin gle shot. Br ings ou t
the details in scenes that mix bright
light and shadows.
2. Scrol l throu gh the o ptions on the r ight , and then tap the one
that yo u want .
Photo
Wide
SuperPhoto
Standard Photo, Burst, Night S aves ph otos as s tand ard .jp g files .
RAW Photo, Burst, Night
60 61
Save each photo a s a .jpg a nd .gpr
files for use with your f avori te phot o
editing programs.
Page 32

Taking Photos
Photo Settings
Tou ch Zo om
Touch Zoom helps you capture a closer view of the action.
1. Tap
.
999+ 100%
Photo
Wide
2. Use the slide r to choose how mu ch you want to zoom .
Here’s an overv iew of t he avai lable p hoto se ttings. Tap th e
the set tings menu, and then tap the setting itself to make changes.
PHOTO
Photo
Wide
Live Burst
Wide
Burst
Auto | Wide
LENS
Choose best digital lens for your shot—Wide, Linear, or Narrow.
Scroll throu gh them on the right si de to see a l ive preview of e ach,
and then tap the one you want.
Lens
Wide
O
to acces s
PHOTO
Scheduled
Capture
Output
Standard O
ZoomTimer
1.0x
To learn mor e, see Digital Lenses (Photo) (star ting page 130).
1.5x
OUTPUT PHOTO, BURST, NIGHT
Set the l evel of p roces sing for your sho t and how t he file s are saved.
Choose SuperPhoto, HDR, Standard, or RAW Format.
To learn mor e, see:
• SuperPhoto (startin g page 127 )
3. The zoom level is l ocked u ntil you readjust it, s witc h captu re mode s,
or turn o your ca mera .
PRO TIP: You can set up yo ur shot u sing an y combi nation of Bur st,
Photo Timer, and Zoom.
62 63
• High Dynamic Range (HDR) (starting page 127 )
• R AW Format (s tart ing pag e 131)
SCHEDULED CAPTURE
Set whe n your GoPro wi ll turn itse lf on and take a pho to.
Page 33

Photo Settings
Capturing Time Lapse
TIMER
Set up a 3 - or 10 -second ti mer for your pho to.
ZOOM
Touch Zoom helps you capture a closer view of the action. Use the slider
on the right to lock in th e zoom lev el.
MEGAPIXELS LIVEBURST
Choos e 8MP or 12MP res olut ion for y our LiveBur st sho ts. 8 MP (def ault )
is compatible wit h most p hones . 12MP i s only co mpat ible with th e lates t
high-end phones.
SHUTTER NIGHT
Set how long you r camer a’s shut ter stays open for nig ht shots.
Choose longer exposures for darker shots.
To learn mor e, see Shu tter Speed (p age 129).
BURST RATE BURST
Choos e how man y photo s your ca mera will take i n a 1, 3, 6 , or 10 second
burs t.
To learn mor e, see Burst Rate (page 129).
PROTUNE PHOTO, BURST, NIGHT
Protune gives you manual control of advanced settings including
Shut ter, Bit Rate, Color, ISO Li mit, and Ex posure.
To learn mor e, see Protune (star ting page 137).
64 65
Time La pse turns lon g event s into short sharea ble vi deos by t akin g
a frame o f vide o at set in tervals. Your GoPro h as thre e Time L apse
preset s. All you have to d o is pres s the Sh utte r but ton
record ing, and then p ress i t again to stop.
TIMEWARP (DE FAU LT )
HERO9 Black l ets yo u speed u p time b y using T imeWar p vide o
stab ilizat ion to capture u ltra smoot h time l apse video wh ile you ’re on
the mov e. This p reset c aptures 1080p vid eo wit h the Wide dig ital l ens
while automatically adjusting your capture speed for the best results.
Tap the scre en duri ng reco rding to activate S peed Ra mp. Thi s slows
down yo ur TimeWarp to rea l speed or half s peed . Tap the scre en agai n
speed b ack up.
PRO TIP: You can also us e the Mode but ton to act ivate Speed
Ramp. Sc roll do wn to Sho rtcuts in t he set ting menu to se t it up.
TIME LAPSE
Use this preset to capture time lapse video when your camera is
mounted and still. It’s great for sunsets, street scenes, art projects, and
other s hots t hat un fold ove r a long period o f time. I t records 10 80p video
with t he Wid e digi tal len s whil e captu ring a shot ever y 0.5 seconds .
NIGH T LAP SE
Night L apse was made to captu re time l apse v ideo in d ark and low- light
envir onmen ts. I t autom atic ally a djus ts the shut ter spe ed to let i n more
light a nd pick s the in terval tha t will g ive you t he bes t resul ts. I t recor ds
1080 p vide o with the Wi de digi tal le ns. Ni ght Lap se isn’t recommended
for handheld or mounted shots when the camera is moving.
PRO TIP: HERO9 Black can also capture Time Lapse and Night Lapse
photos. Simp ly go to F ormat i n settings and chose Photo .
to star t
Page 34

Capturing Time Lapse Capturing Time Lapse
ONSCREEN SHORTCUTS
The tim e lapse preset s include two d efaul t shor tcuts, but y ou can s wap
them ou t wit h any sho rtcu ts you’d like.
To learn mor e, see Personalizing Your On-Screen Shortcuts (page
33).
PRO TIP: Although there a re only t wo def ault sh ort cuts , you ca n have
up to four.
Digital Lenses
Swap out digital lenses to change th e field of v iew, the cropping,
and the fi sheye e ect i n your sh ot.
1. Tap
.
100%9H:59
TimeWarp
1080 | Auto | W
66 67
2. Scrol l throu gh the o ptions to see a live prev iew of each opt ion,
and the n tap th e one th at you wa nt.
Wide
16-34mm
Heads Up: Available lenses will vary based on the mode you select.
Page 35

Capturing Time Lapse
Capturing Time Lapse
Tou ch Zo om
Touch Zoom helps you capture a closer view of the action.
1. Tap
.
100%9H:59
TimeWarp
1080 | Auto | W
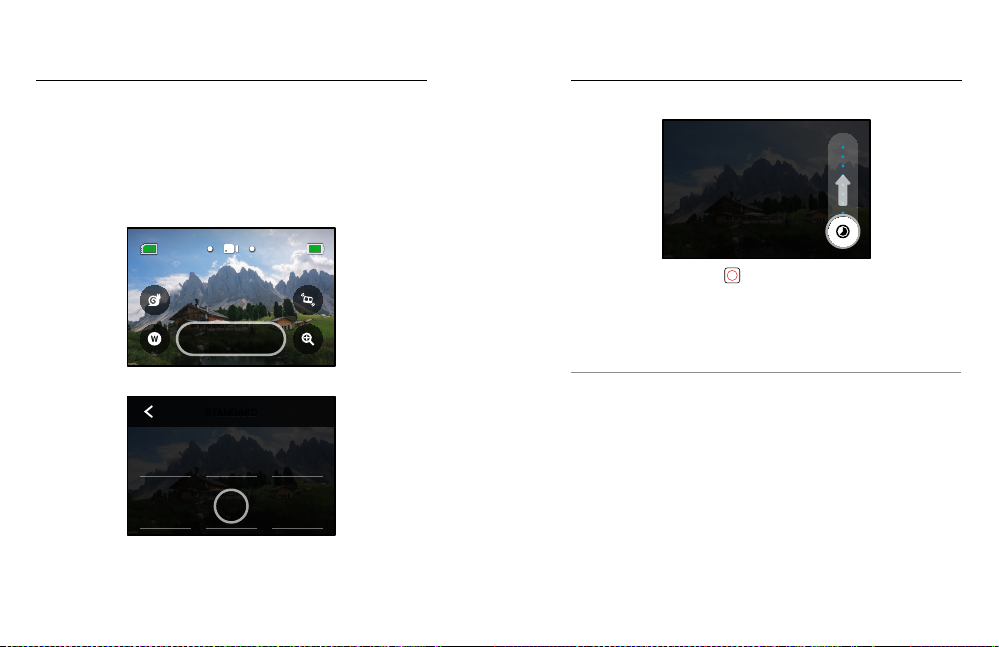
Speed Ramp (TimeWarp)
Set Spe ed Ramp t o slow your TimeWarp video dow n to 1x real speed
(30 fp s) or 0.5x h alf speed (60 f ps).
Heads Up: Half spee d is avai lable w hen shootin g 144 0p and 1 080p
footage.
1. Tap
to switch Speed Ramp f rom real s peed (d efaul t)
to half speed.
100%9H:59
2. Use the slide r to choose how mu ch you want to zoom .
TimeWarp
1080 | Auto | W
2. Tap the scre en while recor ding to s low dow n your video.
1.5x
3. The zoom level is l ocked u ntil you readjust it, s witc h captu re mode s,
or turn o your ca mera .
68 69
Tap again to sp eed ba ck up.
9H:59
00:09
Stop
Half Speed
100%
Page 36

Time Lapse Settings
Time Lapse Settings
Here’s where you can make adjustments to your Time Lapse settings.
Tap the
RESOLUTION
Resolutions (RES) are gro uped by aspec t ratio. Tall 4:3 resolut ions (g reat
for selfies and p oint- of-view sho ts) are l isted in the to p row. Wid escre en
16:9 resolut ions ( great fo r cinem atic s hots) a re in the b ottom row.
and then tap the setting to make changes.
TIME LAPSE
TimeWarp
1080 | Auto | Wide
Time Lapse
1080 | 0.5s | Wide
Night Lapse
1080 | Auto | Wide
Resolution
1080
Speed Ramp
Real Speed O
TIMEWARP
Lens
Wide
Scheduled
Capture
Speed
Auto
Duration
No Limit
To learn mor e, see:
• V ideo Resolution (TimeWarp, Time Lapse Video) (page 13 3)
• Aspect Ratio (page 121)
LENS
Choose best digital lens for your shot—Wide, Linear, or Narrow.
Scroll throu gh them on the right si de to see a l ive preview of e ach,
and then tap the one you want.
Heads Up: Available lenses will vary based on the mode you select.
To learn mor e, see Digital Lenses (Photo) (page 1 30).
70 71
SCHEDULED CAPTURE
Set whe n your GoPro wi ll turn itse lf on and star t recording.
DU RATI ON
Choos e how lon g your camera re cords b efore au tomatically stoppin g.
TIMER
Set up a 3 - or 10 -second ti mer for your tim e lapse .
ZOOM
Touch Zoom helps you capture a closer view of the action. Use the slider
on the right to lock in th e zoom lev el.
SPEED TIMEWARP
Set your video speed . Choo se a lower speed ( 2x or 5x ) for short
activit ies or higher speeds (10x , 15x, o r 30x) f or long er activi ties .
Leave speed on Au to (default) to let you r GoPr o autom atic ally
adjus t the sp eed ba sed on motion , scene d etec tion , and lig htin g.
To learn mor e, see TimeWarp Vi deo Spe ed (pag e 132).
SPEED RAMP TIMEWARP
Choos e to slow your Tim eWarp vi deo down to real s peed o r half sp eed
while recording.
To learn mor e, see TimeWarp Vi deo Spe ed (pag e 132).
FORMAT TIME LAPSE, NIGHT LAPSE
Switch from ca pturi ng Tim e Lapse a nd Nig ht Laps e vide o to Time Lapse
and Night Lapse photo. The photo format takes a continuous series of
photos at set in terv als. T his let s you focus on your acti vit y instead of on
your camera. You can then look through all of your photos and find the
best shots later.
Page 37

Time Lapse Settings
Live Streaming + Webcam Mode
INTERVAL TIME LAPSE
Choose how often your camera captures a frame of video or takes a
photo. Use shorter intervals for quick activities and longer intervals
for extended activities.
To learn mor e, see Time Lapse Interva l (page 1 34).
INTERVAL NIGHT LAPSE
Set how often your camera takes a shot in low and ultra low-light scenes.
Choose short intervals for scenes with a lot of movement and more light.
Use lon ger interv als in sc enes wi th little or no movement o r light .
To learn mor e, see Night Lapse Interv al (pag e 136).
OUTPUT TIME LAPSE PHOTO, NIGHT LAPSE PHOTO
Save you r photo s as sta ndard . jpg or R AW files.
To learn mor e, see RAW F ormat ( page 131).
SHUTTER NIGHT LAPS E
Set how long you r camer a’s shut ter stays open for nig ht shots.
Choose longer exposures for darker shots.
To learn mor e, see Shu tter Speed (p age 129).
PROTUNE TIMEWARP, TIME LAPSE VIDEO, NIGHT LAPSE VIDEO
Take manual contro l of advanced v ideo setti ngs.
To learn mor e, see Protune (star ting page 137).
72 73
SETT ING UP A L IVE ST REAM
1. Connec t to the GoPro ap p. For de tails, see Co nnect ing to the GoPro
App (pa ge 85).
2. In the app, tap
and foll ow the i nstr uct ions to s et up you r stre am.
3. Tap
For com plete s tep-by- step i nstr uct ions ,
visit gopro.com/live-stream-setup.
USIN G YOUR GOPRO AS A WE BCAM
Both yo ur GoP ro and co mpute r must b e set up fo r webca m mode b efore
you go li ve. Your cam era is in w ebcam mode by d efaul t. Connec t your
camer a to your comput er usin g the include d USB -C ca ble, an d then
follow t he ste p-by-s tep setup instruc tion s at gopro.com/webcam.
Follo w these steps i f you need to put your cam era in we bcam m ode:
1. Swipe down on the re ar screen to acce ss the Dashbo ard.
2. Swipe l eft and tap Co nnec tions > USB Co nnec tion.
3. Choose GoPro Connect.
to control your camera.
Page 38

Exposure Control
Exposure Control
HERO9 Black scans the entire scene to choose the exposure level for
your shot. Ex posu re Cont rol let s you decide if only a sectio n of the shot
should be used to set the exposure.
Check o ut the s hot preview on y our touch screen. Try Exposu re Cont rol
if there are sec tions that ar e too dar k or too li ght.
SETTING EXPOSURE CONTROL USING AUTO EXPOSURE
With t his op tion, the camera au tomat ical ly bases expo sure on t he area
that you select.
Imagine your camera is mounted on your dashboard. You probably
want to set the ex posur e based o n the scene out side instead of the
dashboard. This will help prevent your shots from being overexposed
(too bright).
1. Press the to uch scr een until a set o f bracke ts wi th a dot in the mid dle
appea rs in th e cente r of the sc reen. T his is t he Spot M eter. It w ill base
the exp osure o n the cen ter of the shot .
2. Drag t he brackets aw ay from t he cen ter if you want to u se anot her
area of the shot to s et the ex posu re. (You ca n also t ap that a rea
inste ad of dra ggin g the bracket s.)
3. Check the scr een to se e if the ex posu re look s good . Tap
lower right corner.
AUTO EXPOSURE
74 75
in the
SETT ING EXPOSU RE CONTROL USING LOCKED E XPOS URE
With this option, your camera locks the exposure until you cancel it.
If you’re snowbo ardin g on a sunn y day, you mi ght tr y locking the
exposure on your subject’s jacket. This will help prevent your shots from
being underexposed (too dark) compared to the bright snow.
1. Press the to uch scr een until a set o f bracke ts wi th a dot in the mid dle
appea rs in th e cente r of the sc reen. T his is t he Spot M eter. It w ill
base th e exposure on the cente r of the shot.
2. Drag t he brackets aw ay from t he cen ter if you want to u se anot her
area of the shot to s et the ex posu re. (You ca n also t ap that a rea
instead of dragging the brackets.)
3. Tap insid e the br acket s to lock t he exposure.
4. Check the scr een to se e if the exposu re look s good . Tap
lower right co rner to l ock it in.
LOCKED EXPOSURE
in the
Page 39

Exposure Control
Controlling Your GoPro With Your Voice
Turning Ex posur e Control O
Expo sure Co ntrol is automatic ally t urned o when y ou swi tch cap ture
modes or restart your camera. It can also be turned o manually.
1. Press the touch screen until a square appears in the middle.
in the lo wer lef t corner.
2. Tap
Heads Up: After canceling Exposure Control, your camera will go back
to automatically using the entire scene to set the exposure level.
76 77
Voice Con trol gives you eas y, han ds-f ree con trol of y our Go Pro.
It’s great whe n you’re bu sy wit h hand lebar s, ski p oles , and more.
Just tell your G oPro w hat you w ant it to do.
TURN ING VOI CE CON TROL ON + OFF
1. Swipe down o n the rea r scree n to acces s the Da shboa rd.
to turn Voi ce Cont rol on or o.
2. Ta p
CAPTURING WITH VOICE CONTROL
With Voi ce Control on , you can s impl y tell your GoPro
to start capturing.
Command Description
GoPro, capture Starts capturing with the mode your
GoPro, stop capture Stops capture i n Vide o and Ti me Laps e
PRO TIP: Sayin g “GoPro, capt ure” and “GoPro , stop c apture” is the
hands -fre e way of pre ssing the Shu tte r but ton. Th ey will s tar t and
stop capture u sing t he mode a nd set ting s you current ly have o n
your camera.
camer a is set to.
modes. Photo, LiveBurst, and Burst
mode s top on th eir own .
Page 40

Controlling Your GoPro With Your Voice
Controlling Your GoPro With Your Voice
LIST OF VO ICE CO MMA NDS
There are two t ypes o f voice commands: Action commands and
Mode commands.
Using Action Commands
These comman ds let yo u switch mode s on the fl y. If you ju st reco rded
a video, you can s ay, “GoPro, t ake a photo” to snap a p hoto wi thou t
manually switching modes.
Action Command Description
GoPro , star t recording Start s recording video.
GoPro , HiLight A dds a Hi Light Tag to your video
GoPro, stop recording Stops recording video.
GoPro , take a photo Takes a single p hoto.
GoPro , shoot b urst Takes burst photos.
GoPro , star t time lapse Star ts ca pturi ng wit h the la st time lapse
GoPro , stop t ime lap se Stops capturing time lapse.
GoPro , turn on Turns your camera on
GoPro , turn o Turns your c amer a o.
78 79
during recording.
mode yo u used.
(Wake o n Voice mus t be on).
Using Mode Commands
Use the se comm ands to s witc h captu re modes on the g o. Then s ay,
“GoPr o, capt ure” or press the Shut ter button to g et the s hot.
Mode Command Description
GoPro, Video mode Switches your camera to Video mode
GoPro, Photo mode Switches your camera to Photo mode
GoPro , Time Lapse mo de Switches your camera to Time Lapse
PRO TIP: If you’re recordin g vide o or tim e lapse, you mus t stop
record ing by pr essin g the Sh utte r but ton or by s aying, “GoPro,
stop capture” b efore t ryi ng a new co mmand .
(does not star t recording).
(does not ta ke a photo) .
photo mode (does not star t taking tim e
lapse photos).
Page 41

Controlling Your GoPro With Your Voice
00:00 / 04:14
Playing Back Your Media
TURN ING ON YOUR GOPRO WITH YOU R VOIC E
With t his setting, you r GoPro will tu rn on and respon d to voice
commands whe n it’s o.
1. Swipe down on the re ar screen to acce ss the Dashbo ard.
2. Tap
to turn on Voice Con trol.
3. Swipe left a nd tap Preferen ces > Voice C ontro l >
Wake on Voice > O n.
4. Power o your ca mera by s ayin g, “Go Pro, tur n o”
or by pres sing and holding the M ode bu tton
5. Turn on your c amer a by sayi ng, “G oPro, turn on.”
Heads Up: Your camera will listen for commands for 1 hour after
you’ve t urned i t o.
SEE A COMPLET E LIST O F COMM ANDS O N YOUR CA MER A
1. Swipe down o n the rea r scree n to acces s the Da shboa rd.
2. S wipe left an d tap Pre ferences > Voice Co ntrol > Comma nds.
CHANGING YOUR VOICE CONTROL LANGUAGE
1. Swipe down o n the rea r scree n to acces s the Da shboa rd.
2. S wipe left an d tap Pre ferences > Voice Co ntrol > Langu age.
Heads Up: Voice Contro l may be aecte d by win d, nois e, and yo ur
distance from the camera. Keep your camera clean and wipe away
any debris for the best performance.
80 81
.
Swipe u p to see th e last v ideo, photo, o r burs t you too k. Swi pe lef t and
right to flip through the other files on your SD card.
The Media Gallery includes the following playback options:
Pause playback
Resume playback
See all o f the media on your SD card
Delete t he file f rom you r SD card
Play back at slo-mo or normal speed
Use a slider to scan through your videos, bursts,
and time lapse photos
Add/remove Hi Lig ht Tag
Page 42

Playing Back Your Media
Playing Back Your Media
00:09
MEDIA
30
.
Adjus t the pl ayback volume
Go to the p revious or nex t photo in a burs t or group
of continuous photos
Heads Up: The playba ck opt ions will var y based on the t ype of m edia
you’re vi ewing .
PRO TIP: Some playback options are not available when you’re
holdi ng your c amera in por trai t orie ntat ion. M ake adju stm ents t o
those settings in landscape orientation before rotating your camera.
USIN G GALLE RY VIE W
Gallery view gives you quick access to all of the videos and photos
store d on your S D card .
1. From the pla ybac k screen, tap
2. Swipe u p to scroll thro ugh you r media .
3. Tap a video or photo to see it i n full -screen vie w.
to select files.
4. Tap
to go back to the pl aybac k scree n.
5. Tap
Heads Up: Gallery view is not available when you’re holding your camera
in por trai t orie ntat ion. A lso, the more co ntent y ou have on your SD c ard,
the lon ger it w ill ta ke to load .
82 83
Page 43

Playing Back Your Media
Connecting to the GoPro App
DELETING MULTIPLE FILES
.
1. Tap
2. Tap all of the fi les th at you wa nt to del ete. Tap a file again if you want
to de- select it .
to delete the selected files.
3. Tap
VIEW ING VIDEOS + P HOTOS ON A M OBILE DEV ICE
1. Connec t your ca mera to t he GoPro app. F or det ails, see Connecting
to the GoPro App (p age 85).
2. Use the contr ols on the app to p lay back, edi t, and s hare your vide os
and photos.
PRO TIP: Use the G oPro app to grab stil l photo s from videos , create
shor t share able videos f rom full-l engt h footage, save media to your
phone, and more.
VIEWING VIDEOS + PHOTOS ON A COMPUTER
To see your me dia on a co mpute r, you mus t first save th e files to
the com puter. To learn more, s ee Transferring Your Media (page 87.
CONNECTING TO THE GOPRO APP
Use the G oPro a pp to con trol yo ur HER O9 Black, sha re vide os and
photos on the go, an d autom atic ally t rans form yo ur foot age int o
awesom e vide o stor ies sy nced with ee cts and mus ic.
Connecting for the First Time
1. Download the Go Pro app f rom the Apple
Google Play
2. Follow the app’s on-screen instructions to connect your camera.
Heads Up for iOS
from th e GoPr o app so yo u know when your video i s ready.
To learn mor e, see Cre ating a Video Story (p age 87).
After the First Time
After you’ve connected once, you can start connecting through
your camera’s Connections menu.
1. If your came ra’s wireless i s not already on , swip e down o n the
rear screen to access the Dashboard.
™
.
®
: When pr ompte d, be sur e to allow notifications
©
App Sto re© or
2. S wipe left an d tap Pre ferences > Conn ect ions > Connec t Device.
3. Foll ow the o n-screen instr uct ions in t he GoPro app to c onnec t.
84 85
Page 44

Connecting to the GoPro App
Transferring Your Media
SETTING THE CONNECTION SPEED
Your GoPro i s set to us e the 5G Hz Wi-Fi band (the fastest av ailab le)
when connecting to other mobile devices.
Chang e the Wi -Fi band to 2.4GHz i f your device or region d oes not
support 5GHz.
1. Swipe down on the re ar screen to acce ss the Dashbo ard.
2. S wipe left an d tap Connec tion s > Wi- Fi Ban d.
86 87
CREATING A VID EO STORY
You can set up your GoPro to automatically send videos and photos
to your ph one. Th e GoPr o app will use th em to create fully edi ted
video stor y comp lete wi th mus ic and eect s.
1. Connec t your ca mera to t he GoPro app. F or det ails, see Connecting
to the GoPro App (p age 85).
2. Swipe d own on t he app’s home scre en. Sh ots fr om your m ost
recent s ession will b e copie d to your p hone an d tran sformed
into a fu lly edited vi deo.
3. Tap your vi deo to v iew it .
4. Make any edit s you’d like.
5. Save th e stor y or share it wit h your f riend s, fam ily, and fo llowe rs.
Finding the Best Shots
Be sure to m ark you r best s hots w ith H iLigh t Tags. The G oPro a pp looks
for tag s when it create s vide os. This helps ensure t hat fa vorit e momen ts
are included in your stories.
HERO9 Black also knows when you face the camera, smile, and more.
It auto mati cally tags t hese sh ots wi th dat a so the a pp can handpi ck
them for your videos.
To learn mor e, see Add ing HiLight Tags (page 46).
Page 45

Transferring Your Media Transferring Your Media
TRANSFERRING TO A COMPUTER
Copy your medi a from your SD card to a comp uter for playb ack
and editing.
1. Remove the S D card f rom your camer a.
2. Inser t the card into a n SD car d reader or adap ter.
3. Plug the card reader i nto your compu ter’s USB por t,
or inse rt th e adapt er into t he SD ca rd slot .
4. Copy the files to your co mpute r.
88 89
AUTO UPLOAD ING TO TH E CLOUD
With a G oPro subscr iption, you c an auto mati cally uploa d your me dia
to the cl oud where you ca n view, edit, a nd shar e it from a ny device.
1. Subscribe to GoPro:
a. Download t he GoPro app to y our dev ice fro m the Ap ple Ap p
Store or G oogl e Play.
b. Follow the app’s on-screen instructions to connect your camera.
c. If you’re conn ect ing for t he first tim e, follo w the on -screen
inst ructions t o subsc ribe to G oPro. O therwise, tap
on the camera chooser screen.
2. Connect your camera to a power outlet. The upload will start
automatically.
Afte r first-time setu p, your camera won’t need to conn ect to the app
to star t Auto Upload.
Heads Up: Your original files remain on your camera even after they’ve
been ba cked up to t he clo ud.
Page 46

Transferring Your Media Transferring Your Media
MANUALLY UPLOADING TO THE CLOUD
Transfer y our med ia to the cloud w itho ut wai ting fo r your camera to
fully charge . (Your GoPro mu st st ill be co nnec ted to a po wer out let,
and Aut o Uploa d must be o.)
1. Subscribe to GoP ro.
2. Connect your camera to a power outlet.
3. Swipe down on t he rear s creen to access t he Das hboar d.
4. Swipe left a nd tap C onnec tions > GoPro Subsc ription >
Manua l Upload.
ACCESS ING YOU R CLOUD M EDI A
1. Open the G oPro ap p on your d evice .
and sel ect Cloud to v iew, edi t, and share yo ur content.
2. Tap
PRO TIP: Use your c loud media to cr eate vi deo st ories w ith t he GoP ro
app. Simply ch oose C loud Media wh en you s tar t a new sto ry.
90 91
TURN ING OF F AUTO UPLOA D
You can keep yo ur camera fro m try ing to upload e very t ime
it’s connec ted to a power out let and fully charge d.
1. Swipe down on the re ar screen to acce ss the Dashbo ard.
2. Swipe l eft and tap Co nnec tions > GoPro Subscript ion >
Auto Upload.
3. Tap O.
CONNECTING TO A DIFFERENT WIRELESS NETWORK
1. Swipe down on the re ar screen to acce ss the Dashbo ard.
2. Swipe l eft and tap Co nnec tions > GoPro Subscript ion > Networ ks.
3. Choose a net work . The net work can’t be hidden o r requi re an
end-user license agreement (for example, a network in a hotel).
4. Enter the pas sword i f need ed.
to save the network.
5. Tap
CHANGING YOUR GOPRO SUBSCRIPTION PREFERENCES
Manage your Auto Upload settings, set up your wireless network,
and more.
1. Swipe down on the re ar screen to acce ss the Dashbo ard.
2. Swipe l eft and tap Co nnec tions > GoPro Subscript ion.
Heads Up: GoPro Subscription will be available in your Preferences
after you’ve signed up.
Page 47

Setting Your Connections + Preferences Setting Your Connections + Preferences
USING THE DASHBOARD
With y our cam era in landsc ape or ienta tion , swip e down on the rea r
screen to access the Dashboard.
GPS
App
DASHBOARD FEATURES
The Dashboar d lets you quic kly ta p the fol lowing set tings on and o :
01:52 PM
09/16/20
Voice Control Grid
Camera Beeps Front S creen S ettings
QuikCapture Orientation Lock
Screen Lock Max Lens M od Mod e
92 93
CONNECTIONS
Swipe down on the rear screen to access the Dashboard, and then
swipe left . Tap Conne cti ons to ad just t he followin g sett ings :
Wireless Connections
Turn your camera’s wireless connections on and o.
Conne ct Dev ice
Choos e to connect to t he GoP ro app or T he Remo te.
To learn mor e, see Con necting to the G oPro Ap p (page 85).
USB Connection
Use Go Pro Con nect t o set up HERO9 Black as a we bcam o r MTP
to transfer your media to your computer.
Camera Info
See your camera’s name and password.
Wi- Fi Band
Choos e 5GHz or 2.4GH z as your connec tion speed. Set 5GHz only
if your p hone an d regio n support it. To learn m ore, see Setting the
Connection Speed (page 86).
Reset Connections
Clear all connections to your devices and reset your camera’s password.
This me ans you’ ll have to reconn ect ea ch device.
Page 48

Setting Your Connections + Preferences Setting Your Connections + Preferences
Anti-Flicker
PREFERENCES
Swipe down on the rear screen to access the Dashboard, and then
swipe left. Tap Preferences to set up your GoPro.
GENERAL
Here’s everything you’ll find under General settings:
Beep Volume
Choos e High (d efaul t), Med, Low, or M ute. The volume you set here can
be togg led on or o using the Das hboard.
QuikCapture
QuikCaptu re is on by d efaul t. You can turn it o h ere. It c an als o be
toggl ed on or o u sing t he Dash board .
Default Preset
Set the preset your GoPro c aptures in when you turn it on using th e
Mode button
Auto Powe r O
Choos e 5 Min, 1 5 Min (de fault ), 30 Min, or Never.
LEDs
Set which status lights blink. Choose A ll On (d efaul t), Al l O,
or Front O Only.
94 95
. This setting does n ot aec t QuikCapture.
Choos e the regional frame r ate for re cordi ng and playba ck on a T V.
Set 60Hz (NTS C) for Nort h Amer ica. Try 5 0Hz (PA L) if you’re outside of
Nor th Ame rica. The rig ht form at for yo ur regi on will h elp pre vent fli cker
on a TV/ HDTV w hen you p lay back video that wa s recorded ind oors .
Video Compression
Set the fi le format for yo ur vid eos. Choose H EVC (t o reduce file sizes)
or H.264 + HE VC (to us e H.26 4 to max imize com pati bility with older
devices whil e using HEVC fo r adva nced settings).
Time and Date
Use to manuall y adjus t the t ime and d ate. Bo th are au tomatical ly
updated when you connect your camera to the GoPro app.
Date Format
This is s et automatically based on the language that you chose
at setup. You can also change it manually here.
Page 49

Setting Your Connections + Preferences
Setting Your Connections + Preferences
VOICE CONTROL
Choose your Voice Control settings and see all of the available
commands.
Voice Control
Turn Voice Con trol o n and o. It can als o be togg led on o r o usin g
the Dashboard.
Wake on Voice
Lets yo u wake you r camer a by saying, “GoP ro, tur n on.”
Language
Choose your Voice Control language.
Commands
See a com plete l ist of vo ice com mands .
To learn mor e, see Con trolling Your GoP ro With Your Voice (page 77).
96 97
DISPLAYS
Adjust Orientation, set the Screen Saver, and adjust brightness.
Orientation
Keeps your screen right-side up when you rotate your camera.
To learn mor e, see Set ting the Scre en Orie ntation (page 47).
Screen Saver Rear
Set rear s creen s aver to 1 , 2 (defa ult) , 3, or 5 min utes . Choos e Never
to leave your scre en on.
Heads Up: The cam era bu tton s and Voice Control still wor k even
when the screen is o.
Screen Saver Fro nt
Set fro nt scre en saver to 1, 2, 3, o r 5 minutes. You can also choose
Never or Match Rear (def ault ) to sync with t he rear s creen s aver.
Brightness
Use the slider to adjust your screen’s brightness.
Page 50

Setting Your Connections + Preferences
Setting Your Connections + Preferences
REGIONAL
Turn on GPS, choose your language, and see all of your camera’s
regulatory information.
GPS
Turn on GPS t o track your speed, distance, and m ore. Ad d data ov erlay s
using t he GoP ro app to s how how fast, far, and hi gh you we re going in
your videos. For more information and mobile device compatibility,
check o ut gopro.com/telemetry.
Language
Choose the language that appears on the camera.
MODS
Use the se set ting s wit h HERO 9 Black M ods.
Max Lens Mod
Adds Ma x Lens Mod cont rol to your came ra’s Dash board.
Media Mod
Choose the type of external microphone you’re connecting
to Medi a Mod.
98 99
ABOUT
Update your GoPro, plus find your camera’s name, serial number,
battery condition, and software version.
GoPro Updates
Updat e your camera’s software to ens ure you have the latest feature s
and performance upgrades.
Camera Info
Find your camera’s name and serial number, and see which software
version your camera is using.
Battery Info
Check y our bat tery’s health here. Be sure to use th e GoPro
Rechargeable Bat tery (HER O9 Black). Us ing an ol der Go Pro bat tery
or non-GoPro battery could greatly limit your camera’s performance.
REGULATORY
See you r GoPro’s cert ifica tion s.
Page 51

Setting Your Connections + Preferences
RESET
Format your SD card or reset your camera’s settings.
Format SD Card
Reform at your S D card. This wi ll erase all of yo ur media, so be s ure
to save it fi rst .
Reset Presets
Reset the preloaded presets to their original settings and delete
all cus tom pre sets .
Reset Camera Tips
See all o f the ca mera tips fro m the beginni ng.
Factory Reset
Restore all of your camera’s settings and clear all connections.
100 101
Important Messages
Problems are rare, but HERO9 Black w ill let y ou know if any thin g comes
up. Here are some of the messages you might see.
CAME RA IS TOO HOT
The Temperature icon appears on the touch screen if your camera
becom es too ho t and nee ds to coo l down . Your camer a was de signe d
to recog nize whe n it’s at r isk of ov erhea ting a nd will s hut down when
neede d. Sim ply let it sit an d cool before using it ag ain.
Heads Up: The operating ambient temperature range of your
HERO9 Black i s 14
cause your camera to use more power and drain the battery faster.
PRO TIP: Shooting vid eo at a high resolution and fr ame ra te will a lso
cause your camera to heat up faster, especially in hot environments.
Try switching t o a lower re solu tion and fram e rate to l ower th e risk
of overh eati ng your GoPro.
SD CARD ERROR
This me ssage indic ates th at your c amer a has detecte d a probl em wit h
the SD c ard. It will au tomat ical ly tr y to fix th e problem. On v ery r are
occas ions, t he onl y fix is to re forma t the ca rd. Unfortu natel y, you’ll l ose
all of you r media. Your came ra wil l only re forma t the ca rd as a las t resor t.
°
F ~ 95° F (10° C ~ 35° C). High temperatures will
Page 52

Important Messages
REPAIRING YOUR FILE
HERO9 Black w ill au tomat ically tr y to fix dam aged fi les. Files ca n be
damaged if your camera loses power while recording or if there’s
a probl em savi ng the fi le. The F ile Rep air ico n will appear o n the
touch screen when a repa ir is in progres s. Your cam era wi ll let yo u
know wh en it’s finished and if t he file w as fixed .
MEMORY CARD FULL
Your camera will let you know when your SD card is full. You’ll need
to move or d elete s ome file s if you want to keep record ing.
BATTERY LOW, POWERING OFF
A low bat tery messa ge will a ppea r on the to uch scr een when the ba tter y
charge drops below 10 %. If t he charge run s out wh ile recording video,
your ca mera will sto p recording, s ave the v ideo , and tur n its elf o.
102 103
Resetting Your Camera
RESTARTING YOUR GOPRO
If your c amera is not res ponding, pr ess and h old th e Mode b utton
for 10 seconds. This will restart your camera. There will be no changes
to your settings.
RESTORE PRESETS TO TH E DEFAU LTS
This will reset all of your camera’s original preset settings to the defaults.
1. Swipe down on the re ar screen to acce ss the Dashbo ard.
2. Swipe left and tap Preferences > Reset > Reset Presets.
Heads Up: Restoring your camera’s original preset settings to their
defaults will delete your custom presets.
RESETTING CONNECTIONS
This will clear your device connections and reset your camera’s
password. Re setting co nnec tion s means y ou’ll ha ve to reco nnec t
all of your devices.
1. Swipe down on the re ar screen to acce ss the Dashbo ard.
2. Swipe left and tap Connections > Reset Connections.
RESE TTIN G THE CAMER A TIPS
Want to se e the ca mera tips aga in? Here’s ho w to see them
all from the beginning.
1. Swipe down on the re ar screen to acce ss the Dashbo ard.
2. Swipe left and tap Preferences > Reset > Reset Camera Tips.
Page 53

Resetting Your Camera
RESTORING FACTORY SETTINGS
This wi ll restore all o f your ca mera’s origin al set ting s, clear all device
connections, and deregister your camera from GoPro Subscription.
This is u seful i f you’re gi ving y our camera to a f riend a nd want to
compl etely re set it to its or igina l state.
1. Swipe down on the re ar screen to acce ss the Dashbo ard.
2. Swipe left and tap Preferences > Reset> Factory Reset.
Heads Up: Restorin g the fa ctor y settings will no t delete any content
from your SD car d or have a ny eec t on you r camer a’s sof tware.
104 105
Mounting Your GoPro
1 2 3
MOUNTING HARDWARE
1. Mounting Buckle
2. Thumb Screw
3. Curved Adhesive Mount
Page 54

Mounting Your GoPro
Mounting Your GoPro
USING THE MOUNTING FINGERS
Depending on the mount you’re using, you’ll either use a mounting
buckl e or at tach yo ur GoP ro directl y to the mo unt it self .
See Using the Adh esive Mounts (page 10 8) for tips on us ing adh esive
mounts.
1. Flip the folding finge rs dow n into the moun ting p osit ion.
2. Inter lock t he folding fingers on your camera with the mounting
finger s on the b uckl e.
3. Secure your camera to the mou ntin g buckle wit h a thumb screw.
106 107
4. Attach the mounting buckle to the mount.
a. Fl ip up the mount ing bu ckle plug.
b. Slid e the bu ckle in to the m ount un til it c licks into place.
c. P ress the plug b ack dow n so tha t it sit s flush w ith t he buck le.
Page 55

Mounting Your GoPro
Mounting Your GoPro
USIN G THE AD HESIVE MOUNTS
Follow these guidelines when attaching adhesive mounts to helmets,
vehicles, and gear:
• At tach mounts at least 24 hours before you use them.
• O nly at tach the mounts to smooth s urf aces. T hey won’ t sti ck
properly to porous or textured surfaces.
• F irml y press mount s into p lace. Be sure the adhes ive is in f ull con tac t
with the surface.
• O nly us e on clean, dr y sur faces . Wax, oil, dir t, or other de bris w ill
weaken the bond, and you could lose your camera.
• A tta ch moun ts in dry roo m tempe rature condi tion s. They won’t s tick
prope rly in co ld or damp envi ronme nts or on cold or damp surfac es.
• C heck s tate and loca l regul ations and laws to ens ure tha t att achin g
a camer a to equi pmen t (such as hunti ng gear) is pe rmit ted. Always
compl y with regula tion s that re str ict the use of co nsumer elec tronics
or cameras.
WARNING: To avoid injury, do not use a tether when mounting
your cam era on a he lmet. Do not mount the camera directly
on skis o r snowbo ards.
For more information about mounts, visit gopro.com.
108 109
USIN G YOUR GOPRO IN + AR OUND WATER
HERO9 Black is water proof to 33f t (10 m) wit h the do or locked. You won’t
need an a ddit ional h ousing before divi ng in.
The touch scree n was designe d to work w hen wet , but yo u may nee d
to wipe i t o if it h as trou ble sensing your commands . Although i t will
not wor k under w ater, you c an use t he camera’s buttons to navigate
the men us whe n you’re submerged. To learn m ore, se e Navigating with
the But tons (page 26).
PRO TIP: Use a camera tether and a Floaty (sold separately) to keep
your camera afloat in case it detaches from the mount.
To capture ex treme adven tures d own to 19 6ft (60m) , pick up t he
Protective Housing (HERO9 Black), sold separately.
For mor e infor matio n on Cam era Tethe rs, Fl oat y, and the Protec tive
Housi ng, vi sit gopro.com.
WARNING: Always use a helmet that meets applicable safety
stand ards if yo u’re usin g a GoPro h elmet mo unt or st rap.
Choose the right helmet for your sport or activity, and make
sure tha t it’s the right size a nd fit for y ou. Che ck to see th at
your hel met’s in g ood con dition , and alw ays foll ow the
manufacturer’s instructions on safe use.
Replace any helmet that’s been subjected to a major impact.
No helmet can protect against injury in every accident.
Be safe.
Page 56

Removing the Door
Removing the Door
There might be times when you need to remove your camera’s door.
WARNI NG: Onl y remove t he door i n a dry, dus t-fre e
environment. The camera is not waterproof when the
door is open or removed.
REMOVING THE DOOR
1. Unlock th e latch , and flip t he doo r open .
2. With t he doo r in a horizontal posit ion, g entl y pull outward unt il it
snaps o.
WARNI NG: Avoi d using H ERO9 Bl ack wit h the doo r o.
The battery could slide out during use.
110 111
RE ATTACH ING TH E D OO R
1. Line the do or up wi th the s mall si lver ba r.
2. Press t he doo r tightly in to the sm all sil ver bar u ntil i t snaps into place
and is securely attached.
WARNING: Your camera’s door is rem ovabl e. Be sure t hat the
door is se curel y locked a nd seale d afte r closin g.
Page 57

Maintenance
Battery Information
Follow these tips to get the best performance from your camera:
• Your G oPro i s water proof to 33f t (10 m)— no housing ne eded. Be sure
the door is clo sed befo re usin g it in or a round water, dir t, or sand.
• B efore cl osing the doo r, be sure t he seal i s free of d ebris. Use a cl oth
to clean t he sea l if needed.
• M ake sure y our Go Pro is dr y and clean befo re open ing th e door.
Rinse your cam era wi th fresh water a nd dr y it wit h a clot h if nee ded.
• If sand or debris hardens around the door, soak your camera in warm
tap water for 15 minutes and then rinse thoroughly to remove the
debris. Make sure your camera is dry before opening the door.
• F or the b est au dio perfor mance, shake your came ra or blow on the
mic to rem ove wate r and debris from the m icrophone ho les. Do not
use compress ed air to b low into the mic h oles . This co uld dam age
the internal waterproof membranes.
• A fter ever y use in sa lt water, rinse y our cam era wi th fre sh wate r,
and dr y it with a sof t clot h.
• T he lens cover is m ade fro m ext remel y tough s tren gthe ned gla ss,
but it c an sti ll be scratched or cra cked. Ke ep it cle an wit h a sof t,
lint-free cloth.
• I f debr is get s stuc k between th e lens an d trim r ing, fl ush it out
with w ater or a ir. Do not in ser t foreig n objects a round t he lens.
112 113
MAXIMIZING BATTERY LIFE
Here are s ome th ings yo u can do to m axim ize bat tery l ife:
• C apture video at lower frame rates and resolutions.
• Use the Screensaver and lower the screen Brightness.
• Turn o the front screen.
• Turn o GPS .
• Turn o Wireless Connections.
• Use these settings:
• QuikCapture (page 94)
• Auto Power O (pag e 94)
RECOR DING WHEN P LUGGE D INTO A POWER SOURCE
You can use the USB -C cable th at cam e with y our HE RO9 Bla ck to sho ot
videos and ph otos wh ile you r camer a is plu gged in to a USB -cha rging
adapter, the GoPro Supercharger, another GoPro charger, or the
GoPro P ort able Po wer Pac k. Thi s is per fect for capturin g long v ideos
and time lapse events.
Even though your camera is charging, the battery will not charge during
record ing. I t will s tar t charg ing when you st op recording . You cannot
record w hile yo ur cam era is pl ugge d into a computer.
Heads Up: Because t he door is open , your ca mera is not waterpro of
when charging.
Page 58

Battery Information Battery Information
WARNING: Using a non-GoPro wall charger could damage
your cam era bat tery a nd could l ead to fire o r leakag e. With t he
exception of the GoPro Supercharger (sold separately), only
use chargers marked Output 5V 1A. If you don’ t know your
charge r’s volt age and cu rrent , use the i nclud ed USB -C cab le
to charg e your cam era wit h a comput er.
BATTERY STO RAGE + HAND LING
HERO9 Black i s full of s ensitive co mpon ents , including t he bat ter y.
Avoid exposing your camera to very hot or cold temperatures. Extreme
temperatures may temporarily shorten battery life or cause your camera
to temporarily stop working properly. Avoid dramatic temperature or
humidity changes as condensation may form on or within the camera.
Do not dr y your camera w ith an e xter nal hea t sourc e such as a
microw ave oven o r a hair dryer. Da mage to t he cam era or ba ttery
caused by contact with liquid inside the camera is not covered under
the warranty.
Do not store you r batt ery w ith me tal object s like co ins, key s, or
neckl aces. I f the ba tter y terminals come in contac t wit h metal o bjec ts,
this ma y cause a fire.
Do not ma ke any una utho rized al terat ions to your camera. D oing so may
compromise safety, regulatory compliance, and performance, and may
void the warranty.
Heads Up: Batteries have red uced ca pacity in co ld weat her. Thi s aec ts
older batteries even more. If you regularly shoot at low temperatures,
replace batteries yearly for optimal performance.
PRO TIP: Fully charge your camera before storing it away to help
maximize battery life.
114 115
BATTERY DISPOSAL
Most rechargeable lithium-ion batteries are classified as non-hazardous
waste a nd are sa fe for dis posal in the no rmal municipal was te stream.
Many regions require bat tery recyc ling. C heck your loc al laws t o make
sure that you can dispose of rechargeable batteries in your regular
trash . To safely dispos e of lit hium -ion batte ries, protec t terminals from
exposure to other met al wit h packing, ma sking, or ele ctr ical t ape so t hey
do not ca use a fire w hile being tr ansporte d.
Lithium-ion batteries, however, do contain recyclable materials and
are accepted for recycling by t he Rech argea ble Batter y Recycling
Corporation’s (RBRC) Battery Recycling Program. We encourage
you to visit Call2Rec ycle a t call2recycle.org o r call 1 -80 0- BATTE RY
in Nor th Am erica to find a con venie nt rec yclin g location.
Never dispos e of a bat tery in a fire be cause i t may explode .
WARNING: Do not drop, disassemble, open, crush, bend,
deform, puncture, shred, microwave, incinerate, or paint your
camera o r batt ery. Do no t inser t foreig n objec ts into any
openin g on the ca mera, s uch as th e USB- C port. Do not u se
your cam era if it ’s been da maged —for example, if c racked ,
punctured, or harmed by water. Disassembling or puncturing
the inte grated b atte ry can c ause an ex plosio n or fire.
WARNING: Only use GoPro replacement batteries
for your camera.
Page 59

Troubleshooting Tech Specs: Video
MY GOPRO WON’T POWER ON
Make sure your Go Pro is ch arged . See Mi croSD Ca rd + Bat tery Setup
(page 10). If chargin g the ba tter y doesn’t wor k, tr y rest art ing your
camer a. See Restar ting Your G oPro (page 103 ).
MY GOPRO WON’ T RESPOND W HEN I PR ESS A BU TTON
See Restarting Your GoP ro (page 103).
PLAYBACK ON MY COMPUTER IS CHOPPY
Chopp y playback is u suall y not a pro blem w ith th e file. If your foo tage
skips , one of t hese is sues is p robab ly the cause:
• T he comp uter doesn’t work wi th HE VC files . Try dow nload ing th e
lates t versi on of th e GoPro Player for Mac
gopro.com/apps.
• Your computer doesn’t meet the minimum requirements of the
soft ware you’re using for play back .
I FORGOT MY CAM ERA’S U SERN AME O R PASSWO RD
Swipe d own on t he rear screen to a ccess t he Dash board , swip e lef t and
then tap Preferences > Connections > Camera Info.
I DON’ T KNOW WHICH S OFT WARE VE RSION I HAVE
Swipe d own on t he rear screen to a ccess t he Dash board , swip e lef t and
then tap Preferences > About > Camera Info.
I CAN’ T FIND MY CAM ERA’S S ERIAL NUM BER
The serial number is stamped inside the battery compartment of your
camer a. You can al so find i t by swiping down on the rear scr een to
access the Dashboard, swipe lef t and then tap P references > Ab out >
Camera Info.
®
or Windows® for free a t
VIDEO RESOLUTION RES
Video resolution refers to the number of horizontal lines used in each
frame o f vide o. A 108 0p vid eo is made up of 10 80 hor izonta l lines . A
5K video is mad e up of 5120 ho rizont al line s. Sin ce more li nes equals
greate r resol utio n, 5K will deli ver a mor e detai led picture than 1080p.
Video Resolution Description
Our highest resolution video. Captures
5K
4K 4:3
4K
2.7K 4:3
2.7K
breat htak ing ultra HD v ideo i n the 16:9 aspe ct
ratio. Can be u sed to gr ab 14.7 5MP stills f rom
your video.
Ultr a HD vid eo with tall 4 :3 aspe ct ra tio
captures more of the scene than 16:9 shots.
Great for point-of-view footage and grabbing
12MP stills f rom you r vide o.
Ultr a HD vid eo with 16:9 a spec t rat io. Great for
tripod and fixed- posit ion sh ots. C an be us ed to
grab 8MP stills fr om your v ideo.
Great for high-resolution point-of-view
body and gear- moun ted sho ts with fluid
slo-mo playback.
High re solut ion 16:9 vid eo that provi des
stunning, cinema-quality results for
professional productions.
For mor e answe rs to com monl y asked quest ions, see gopro.com/help.
116 117
Page 60

Tech Specs: Video
Tech Specs: Video
Video Resolution Description
Tall 4:3 aspect ra tio fit s more into the f rame
1440p
1080p
118 119
than 1080p. Great fo r capt uring f ast ac tion
and poi nt-of-vi ew shot s and for sharin g to
social media.
Stand ard HDT V resol utio n that ’s great f or all
shots and sharing to social m edia. H igh 240 f ps
and 120 fp s opti ons ena ble sup er slo-mo
durin g edit ing.
This chart co mpare s the fr ame size of e ach res olut ion:
5K
PRO TIP: B e sure th at your p hone, c omputer, or TV c an supp ort
the setting you choose, especially if you’re using a high resolution
and fra me rate .
4K 4:3
4K
2.7K 4:3
2.7K
1440p
1080p
Page 61

Tech Specs: Video
Tech Specs: Video
FRAM ES PER S ECON D FPS
Frames per second refers to the number of frames captured in each
secon d of vide o. Higher fps v alues (60, 120, o r 240) are b ette r at
captu ring fast- act ion sho ts. You can also us e high fp s footage for
slo-mo playback.
Resolu tion + FPS
Higher video resolutions capture more detail and clarity, but they’re
generally available at lower fps values.
Lower video resolutions capture less detail and clarity, but they can
be shot a t highe r fps values.
When ch oosin g a resol utio n on the R ES | FPS s creen , all of the available
frame r ates fo r the res olut ion you s elec ted are s hown in w hite.
Unava ilabl e frame rates a re in gray.
120 121
ASPECT RATIO
Aspe ct ratio refe rs to the widt h and hei ght of an i mage. H ERO9 B lack
captures videos and photos in two aspect ratios.
4:3
The tall 4:3 format captures more of the scene than the 16:9 widescreen
format. It’s great for selfies and point-of-view footage. The 4:3
resolu tions are lis ted in the top row of t he RES | F PS screen.
16:9
This is t he standard format used for HDTV an d edit ing pro gram s.
The widescreen format is ideal for capturing dramatic cinematic
footage. The 1 6:9 resolutions are liste d below t he 4:3 re solutions
on the RES | FPS sc reen.
Heads Up: Black bars will appear on both sides of the screen when
playi ng back 4 :3 foot age on an H DTV.
Page 62

Tech Specs: Video
Tech Specs: Video
DIGITAL LENSES VIDEO
Digital lenses let you choose how much of the scene is captured by your
camera. The dierent lenses also aect the zoom level and the fish eye
eec t in your shot. For Video mode, SuperView captures the largest field
of view while Narrow captures the smallest.
Digital Lens Description
SuperView
(16mm)
Wide
(16–34mm)
Linear
(19–39mm)
Linear + Horizo n
Leveling (19–39mm)
Narrow
(27mm)
Heads Up: Only the le nses t hat are co mpat ible w ith th e resol utio n and
frame rate you selected will be available.
122 123
Wides t and tallest fi eld of v iew, ser ved up as
16:9 vi deo.
Wide field of v iew tha t captures as mu ch as
possi ble wi thin t he fra me.
Wide field of vi ew wit hout t he fisheye eec t
of SuperView and Wide.
Captu res a wid e field of view wi thou t the fisheye
eec t of Supe rView and Wid e. Keeps y our
footage smoo th and l evel eve n if your c amer a
tilt s whil e recording.
Heads Up: Your footage will tilt if your camera
rotates beyond 28
sett ings) w hile re cordi ng.
Narrow field of v iew wi thou t the fis heye ee ct
of SuperView and Wide.
°
-45° (depending on chosen
HERO9 BLACK VIDEO SETTINGS
Here’s a ru ndown of your camera’s v ideo resolu tion s along w ith
available fp s, len ses, an d aspe ct ratio for each.
Video
Resolution
(RES)
5K
4K 60/50
4K
4K 4:3
*
60Hz (NT SC) and 50 Hz (PAL) refer to the video for mat, which dep ends
on your region. To learn more, see Anti-Flicker (page 95).
FPS (60 Hz/
*
50Hz)
30/25
24/ 24
30/25
24/ 24
30/25
24/ 24
Digit al
Lenses
Wide, Linear,
Linear + Horizo n
Leveling, Narrow
Wide, Linear,
Linear + Horizo n
Leveling, Narrow
SuperView, Wide,
Linear, Linear +
Horizon Leveling,
Narrow
Wide, Liner,
Line r + Horizon
Leveling, Narrow
Screen
Resolution
Aspect
Ratio
5120x2880 1 6:9
3840x2160 16:9
3840x2160 16:9
4096x3072 4:3
For tips on whi ch set ting s to use, s ee Suggested Set tings (page 31).
Page 63

Tech Specs: Video
Tech Specs: Video
Video
Resolution
(RES)
2.7K
2.7K 4:3 60/50
1440p
1080p
1080p
*
60Hz (NTS C) and 50Hz (PAL) refer to t he video format, w hich depends on yo ur
region. To learn more , see Anti-Flicker (page 95).
FPS (60 Hz/
*
50Hz)
120/100
60/50
120/100
60/50
30/25
24/ 24
240/200
120/100
60/50
30/25
24/ 24
Digit al
Lenses
SuperView, Wide,
Linear, Linear +
Horizon Leveling,
Narrow
Wide, Linear,
Linear+ Hor izon
Leveling, Narrow
Wide, Linear,
Linear + Horizo n
Leveling, Narrow
Wide, Linear,
Linear + Horizo n
Leveling, Narrow
SuperView, Wide,
Linear, Linear +
Horizon Leveling,
Narrow
Screen
Resolution
Aspect
Ratio
2704x1520 16:9
2704x2028 4:3
1920x1440 4:3
1920x1080 16:9
1920x1080 16:9
High Resolutions/High Frame Rates
Shooting high-resolution or high-fps video when it’s warm out can cause
your camera to heat up and use more power.
Lack of airflo w and con nec ting to t he GoPro app c an caus e your camera
to warm up even more, use even more power, and shorten recording
time.
If heat ’s a prob lem, t ry rec ordin g shor ter vi deos . Also limit us e of
featur es that take a lot o f power, su ch as the GoPro a pp. The G oPro
Smart Remote (sold separately) can control your GoPro while using less
energy.
Your camer a will te ll you if it need s to shut down an d cool o.
To learn mor e, see Important Messages (p age 101 ).
For tips on whi ch set ting s to use, s ee Sugg ested Settin gs (pag e 31).
124 125
Page 64

Tech Specs: Video
Tech Specs: Photo
HYPERSMOOTH VIDEO STABILIZATION
Hype rSmo oth de liver s ultra smoo th foot age by correc ting for camera
shake. It crops yo ur videos whi le reco rding , which lets i t buer the
footage. This makes it p erfect for bikin g, skat ing, s kiing, hand held sh ots ,
and more. HERO 9 Black has four HyperSmooth settings:
Setting Description
Boost
High
On
O Records without video stabilization or cropping.
PRO TIP: You can smoot h out yo ur foot age eve n more by u sing Touch
Zoom to crop your sh ots before you s tart record ing. T his wil l give your
camera an even bigger buer to use when stabilizing your video. Using
the Linear + Horizon Leveling lens will also enhance stabilization.
LOOPING INTERVAL
You can set your GoP ro to record 5 (defa ult) , 20, 60, or 1 20 minute loop s.
It can also be se t to Max, whic h will re cord un til your SD card is full
before l oopin g back to record ov er the s tar t of the v ideo.
126 127
Maximum video stabilization with tight
cropping.
Stronger video stabilization with minimal
cropping (Wide le ns is cro pped by 10%).
Stabilized video with minimal cropping
(Wi de lens i s cropp ed by 10 %).
SUPE RPHOTO
SuperPhoto automatically analyzes the scene and intelligently applies
the bes t image proces sing fo r the sho t.
Depen ding on the lig htin g, movement in your shot, and other conditions,
SuperPhoto will choose one of four options:
High Dynamic Range (HDR)
Our imp roved H DR take s and com bines multiple ph otos in to a
singl e shot to bring out the details in scenes that mix bright light
and shadows.
Local Tone Mappin g
Enhances photos by boosting the details and contrast only where
it’s needed.
Multi-Frame Noise Reduction
Automatically co mbine s mult iple shots into a sing le photo with less
digital distortion (noise).
No Additional Processing
Captures photos with no advanced processing when conditions
are per fec t.
Super Photo o nly works for s ingle p hotos . Beca use of the ext ra tim e
neede d to appl y imag e proce ssing , it may t ake a lit tle longer to process
and save each shot.
Heads Up: SuperPhoto does not work with RAW photos, Protune,
or Exp osure C ontrol.
Page 65

Tech Specs: Photo
Tech Specs: Photo
Turning On SuperPhoto
Super Photo i s o by def ault . Here’s how to turn i t on.
1. From the Pho to set ting s scree n, tap O utpu t.
2. Select SuperPhoto.
HDR
High Dynamic Range (HDR) is one of the image-processing techniques
SuperPhoto uses to enhance your shots. It combines multiple shots into
a singl e photo w ith be tter result s than ever. Choose thi s setting if you
want to u se HDR every t ime you take a pho to.
1. From the Pho to set ting s, tap O utpu t.
2. Selec t HDR.
HDR On c an onl y be used for sing le photos. Fo r the be st resu lts ,
use it in h igh- contrast s hots w ith mi nimal motio n.
Heads Up: HDR do es not wo rk wit h RAW or E xposure Control.
128 129
SHUT TER SPEED N IGHT + N IGHT LAPSE PHOTO
Shut ter spe ed let s you de cide ho w long yo ur camera’s shu tter s tays
open in N ight a nd Nigh t Laps e Photo m odes. Here are y our opt ions ,
plus tips on wh en to use t hem:
Speed Examples
Auto
(up to 30 se conds)
2, 5, 10, o r 15 seco nds
20 seconds Nigh t sky ( wit h light ).
30 seconds Night stars, Milk y Way (complete darkness).
PRO TIP: To reduce blur when us ing Night and N ight L apse ph oto,
mount y our cam era on a t ripo d or plac e it on a st able surfa ce where it
won’t wobble or shake.
BU RST R ATE
Capture fast-action scenes with one of these high-speed settings:
• A uto (up to 25 photos in 1 second base d on ligh ting c onditions)
• 3 0 photos in 3, 6, o r 10 sec onds
• 25 p hotos i n 1 secon d
• 1 0 photos in 1 or 3 se conds
• 5 p hotos i n 1 secon d
• 3 p hotos i n 1 secon d
Sunrise, sunset, dawn, dusk, twilight, night.
Dawn, d usk, t wilight, t rac at night ,
Ferris wheel, fireworks, light painting.
Page 66

Tech Specs: Photo
Tech Specs: Photo
DIGITAL LENSES PHOTO
Digital lenses let you choose how much of the scene is captured by your
camer a. They also aect the zoom le vel and fi sheye eect i n your shot.
There are three lens options for photos:
Digital Lens Description
Wide
(16–34mm)
Linear
(19–39mm)
Narrow
(27mm)
Wide field of v iew tha t captures as mu ch as
possi ble wi thin t he fra me.
Wide field of vi ew wit hout t he fisheye eec t
of Wide .
Narrow field of v iew wi thou t the fis heye ee ct
of Wide .
RAW FORMAT
When this set ting is turne d on, all photos a re save d as a .jpg image ( for
viewi ng on you r came ra or sha ring w ith th e GoPr o app) an d a .gpr fil e.
The .gpr file is ba sed on t he Adob e
used in A dobe C amera R aw (ACR ), vers ion 9.7 or later. You can a lso
use Adobe Photoshop
Adobe Photoshop
In Photo mode, R AW Format is av ailab le for Ph oto, Burst, Night ,
Time Lapse photo, and Night Lapse photo, with these conditions
and exceptions:
®
Lightroom® CC (2015.7 rele ase or la ter) an d
®
Lightroom® 6 (version 6.7 o r later ).
®
DNG format . These files ca n be
• S uper Photo must be o .
• Digital lenses must be set to Wide.
• Zoom mus t be o.
• R AW Format is not a vaila ble for c aptur ing continu ous ph otos.
• F or Tim e Lapse photo, t he Interval must be at lea st 5 seconds.
• F or Nig ht Lap se photo, the Sh utte r setting mu st be at least
5 seconds.
PRO TIP: Photos in .gpr for mat are s aved in t he same locat ion an d with
the sam e file name as .jp g files . To access th e files , inser t your SD card
into a ca rd reade r and lo cate th em wit h your co mputer’s file explo rer.
130 131
Page 67

Tech Specs: Time Lapse
Tech Specs: Time Lapse
TIMEWARP VIDEO SPEED
You can increase TimeWarp video speed up to 30 x to turn l onger
activit ies into share able mo ment s. The d efaul t set ting is Auto, which
autom atically se ts the speed f or you.
You can also set the speed yourself. Use this chart to estimate the length
of your v ideos . For example, record ing at 2x speed f or 4 minu tes will
give yo u about 2 minutes of Tim eWarp vi deo.
Speed Recording Time Video Length
2x 1 minute 30 seconds
5x 1 minute 10 seconds
10x 5 minutes 30 seconds
15x 5 minutes 20 seconds
30x 5 minutes 10 seconds
Heads Up: Record ing ti mes are a pproximate. T he vid eo leng th may v ary
depending on the movement in your shot.
Speed Examples
2x–5x Driving through a scenic route.
10x Hiking and exploring.
15x–30x Running and mountain biking.
PRO TIP: For the b est res ults, leave the speed on the Auto setti ng whe n
shoot ing foo tage t hat may g et bump y.
132 133
SPEED RAMP TIMEWARP
Tap the rear to uch screen while reco rding T imeWar p to ramp down th e
speed o f your vi deo. Tap again to spe ed it ba ck up. Ch oose t he spee d
before re cordi ng by tapping
TimeWarp set ting s menu. T here are two op tions:
Speed Frames per Second Sound
Real Speed (1x) 30 fps On
Half Sp eed (0 .5x slo -mo) 60 fps O
PRO TIP: You can also us e the Mode but ton
Ramp. Sc roll do wn to Sho rtcuts in t he set ting menu to se t it up.
VIDEO RESOLUTION TIMEWARP, TIME LAPSE VIDEO
HERO9 Black s hoot s TimeWa rp and T ime Lap se vid eo in fou r
resolutions:
Resolution Aspect Ratio
4K 16: 9
2.7K 4:3
1440p 4:3
1080p 16:9
To learn mor e, see:
• V ideo Resolution (page 133)
• Aspect Ratio (page 121)
on the capture s creen o r going to the
to act ivate Speed
Page 68

Tech Specs: Time Lapse
Tech Specs: Time Lapse
TIME LAPSE INTERVAL
The Interval sets how often your camera takes a shot in Time Lapse
video and Tim e Lapse p hoto mo des.
Availa ble interv als are 0.5 (defa ult) , 1, 2, 5, 1 0, and 3 0 secon ds; 1, 2, 5 ,
and 30 minutes; and 1 hour.
Interval Examples
0.5–2 seconds Surfin g, biking, or o ther s por ts.
2 seconds Busy s treet corner.
5–10 seconds Clouds or outdoor scenes for long durations.
10 seco nds–1 minut e Art projects or other lengthy activities.
1 minute–1 hour C onst ruc tion w ork or other ac tivities that take
134 135
place ov er a ver y long p eriod of time.
Time Lapse Vid eo Reco rding T ime
Use this chart to determine the length of your videos.
Interval Recording Time Video Length
0.5 second 5 minutes 20 seconds
1 second 5 minutes 10 seconds
2 seconds 10 minutes 10 seconds
5 seconds 1 hour 20 seconds
10 seconds 1 hour 10 seconds
30 seconds 5 hours 20 seconds
1 minute 5 hours 10 seconds
2 minutes 5 hours 5 seconds
5 minutes 10 hours 4 seconds
30 minutes 1 week 10 seconds
1 hour 1 w eek 5 seconds
PRO TIP: For the b est res ults, moun t your camera o n a trip od or place it
on a sta ble sur face where it won’t wob ble or shake. Use TimeWarp video
to capture tim e lapse v ideo w hen you’re on the move.
Page 69

Tech Specs: Time Lapse
Tech Specs: Protune
NIGHT LAPSE INTERVAL
Choos e how of ten you r GoPro snaps a shot in Ni ght Lapse mod e. Nigh t
Lapse i nter vals a re Auto; 4 , 5, 10, 1 5, 20, and 30 seco nds; an d 1, 2, 5, 3 0,
and 60 mi nutes .
Auto (de fault) syn cs the Inter val with the S hut ter set ting. If the shutter
speed i s set to 10 seconds and th e Interval is set to Au to, your camer a
will ta ke a shot ev ery 1 0 seconds.
Interval Examples
Auto
4–5 seconds
10–15 seconds
20–30 seconds
136 137
Great fo r all exposure s (capt ures as q uickl y as
possible depending on the Shutter setting).
Evening city scene, street lighting, or scenes
with movement.
Dim lig htin g with s low sce ne chan ges, su ch as
night c louds w ith a b right moon.
Very low light o r very slow sce ne chan ges,
like st ars wi th min imal am bient o r stre et light.
Protune unlocks your camera’s full creative potential by giving you
manual contr ol of advanced settings, including Color, White Balance,
and Shutter Speed. It’s compatibl e with profes siona l color c orrec tion
tools and other editing software.
Here are s ome th ings to ke ep in min d:
• P rotun e is avai lable for all mo des exce pt Loop ing and LiveBurst.
Scroll down in t he set tings menu to s ee all of the Protune settings.
• Some Protune settings are not available when you use
Exposure Control.
• C hanges to Prot une set tings in one pr eset ap ply on ly to that preset.
For example, changi ng the W hite Ba lance fo r Time L apse do es not
aect White Balance for Burst photos.
PRO TIP: You can restore all Protune settings to their defaults
by tapp ing
BI T R ATE
Bit rate deter mines t he amo unt of da ta use d to recor d a secon d of video.
HERO9 Black l ets yo u choos e between high or low.
Bit Rate Description
Low (default) Use a lower bit rate to minimize file sizes.
High
in the se tti ngs men u.
Use hig her bit rates up to 100 Mbps (4 K and 2.7 K
video) for opt imal im age qualit y.
Page 70

Tech Specs: Protune
Tech Specs: Protune
COLOR
Color l ets yo u adjus t the color profi le of you r vide os or photos. S croll
betw een the optio ns to see a l ive pre view of e ach set ting, and then tap
the one y ou want.
Color Setting Description
GoPro Color (default)
Flat
WHITE BALANCE
White B alanc e lets y ou adju st the color te mper ature of v ideo s and
photos to optimize for cool or war m lighting co ndit ions. Scroll betw een
the opt ions to see a liv e previ ew of eac h sett ing, and then tap the one
you wan t.
Options for t his set ting are Auto (d efaul t), 23 00K , 2800 K, 320 0K,
4000K, 45 00K , 5000K, 55 00K , 6000K, 65 00K , and Na tive. Lower
values will give you warmer tones.
You can also choose Auto to let your GoPro set the White Balance or
the Native setting to create a minimally colo r-cor rected file t hat all ows
for more precise adjustments in post-production.
138 139
Captures photos and videos with the classic
GoPro color-corrected profile.
Provides neu tral c olor pr ofile t hat can b e colorcorrected to b ette r match footag e captured
with o ther equipm ent, o erin g more flexibility
in post-pro duc tion. Due to it s long curve,
Flat ca pture s more details i n shado ws and
highlights.
ISO MINIMUM/MAXIMUM
ISO Min imum and ISO Ma ximu m let you s et a rang e for the camer a’s
sensi tivity to l ight and imag e noise. Image n oise refers to t he degr ee
of graininess in the shot.
In low li ght, h igher I SO val ues result in br ighte r images but with more
image noise. Lower values result in darker images with less image noise.
Scroll betw een the optio ns to see a l ive pre view of e ach set ting, and
then tap the one you want.
The default for ISO Maximum i s 3200 for both v ideos a nd photos.
The default for ISO Minimum is 100.
100 200 400 800 1600 3200 6400
Darker image
Lower image noise
Heads Up: For the Vid eo and Photo modes, ISO behavior de pend s on
the Pro tune Sh utter set ting . The ISO M axim um tha t you sel ect is used
as the ma ximu m ISO value. The I SO val ue that is appl ied mig ht be lower
depending on the lighting conditions.
PRO TIP: To lock the IS O at a spec ific va lue, set ISO Minimum and ISO
Maximum to the same values.
Brighter image
Greater image noise
Page 71

Tech Specs: Protune
Tech Specs: Protune
SHUTTER
The Protune Shutter setting only applies to the Video, Photo, and
LiveB urs t modes. This s ett ing determin es how lo ng the shutter sta ys
open. S croll b etwe en the o ptio ns to see a l ive preview of e ach set ting,
and the n tap th e one you w ant. The default se tti ng is Aut o.
For Pho to, the o ptions are Au to, 1/ 125, 1/ 250, 1/ 500, 1 /10 00, an d 1/20 00
second.
For Video, th e opti ons dep end on t he fps setti ng, as s hown be low.
Shutter
Auto Auto Auto
1/fps 1/ 30 sec 1/60 sec
1/(2x fps) 1/60 sec 1/ 120 sec
1/(4xfp s) 1/120 sec 1/24 0 se c
1/(8x fps) 1/240 sec 1/480 sec
1/(16x fps) 1 /480 se c 1 /960 s ec
PRO TIP: To reduce the amount of blur in videos and photos when
using t he Shu tter s ett ing, mo unt your came ra on a tr ipod or other
stab le sur face where it won’t wob ble or s hake.
140 141
Examp le 1:
1080p30
Examp le 2:
1080p60
EXPOSURE VALUE COMPENSATION (EV COMP)
Exposure Value Compensation aects the brightness of your photos and
videos. Adj usti ng thi s sett ing ca n impro ve imag e quali ty wh en shooting
scenes with sharpl y cont rast ing li ghti ng cond itio ns.
Options for t his set ting range from -2.0 to +2.0. T he defa ult set ting is 0.
Scroll betw een the optio ns on th e right side of t he EV Co mp scre en
to see a li ve prev iew of each set ting , and then tap the one you want.
Higher values result in brighter images.
Heads Up: For Video, this se tti ng is ava ilabl e only i f Shut ter is set
to Auto.
You can also adjust the exposure based on a certain area of your scene.
To learn mor e, see Ex posure Control (page 74).
PRO TIP: EV Comp a djus ts brightness wi thin t he exi stin g ISO settin g.
If brightne ss has alread y reached the ISO set ting in a low- light
environment, increasing the EV Comp do es not ha ve any eect .
To continue increasing the brightness, select a higher ISO value.
Page 72

Tech Specs: Protune
Tech Specs: Protune
SHARPNESS
Sharpness controls the quality of details captured in your video footage
or photos. Opt ions for this s ett ing are H igh (default ), Med ium, a nd Low.
Scroll betw een the optio ns to see a l ive pre view of e ach set ting, and
then tap the one you want.
PRO TIP: If you plan to increase sharpness during editing, select Low
for thi s sett ing.
142 143
RAW AUDIO
This setting creat es a sepa rate .wa v file for your vid eo, in ad dition to
the st andard .mp4 a udio t rack . You can sele ct th e level o f processing
to appl y to the R AW audio track.
RAW Settin g Description
O (default) No separate .w av file is create d.
Low
Med
High
Inser t your SD card in to a card reader to a ccess t he .wav files with your
compu ter. They ’re save d with t he sam e name an d in the s ame locatio n
as the .mp4 files.
Applies minimal pro cessing. Id eal if you want to
apply audio p rocessing in p ost- production.
Applies mod erate p roces sing ba sed on t he
Wind -No ise Red uct ion set ting. Ideal if you
want to apply yo ur own gain.
Applies full audio processing (automatic gain
and Win d- Noise R educ tion). Idea l if you wa nt
processed audio without AAC encoding.
Page 73

Tech Specs: Protune
Customer Support
WIND-NOISE REDUCTION
Your HERO9 Blac k uses three microphones to capture sound while
record ing vi deo. You can c ustomize how they’re u sed bas ed on
condi tions where you’re shooting a nd the t ype of sound you want
in your finished video.
Setting Description
Auto (default)
On
O
Automatically fil ters o ut exces sive w ind
(and water) noise.
Use to fil ter out e xcessi ve win d noise o r when
your Go Pro is mo unted on a movi ng vehi cle.
Use when wind will not aect sound quality and
you wan t to ensure that yo ur GoPro is recordin g
in stereo.
GoPro i s dedicated to provi ding the best possi ble ser vice.
To reach GoP ro Cus tomer S uppor t, visit gopro.com/help.
Trademarks
GoPro , HERO a nd their respe cti ve log os are tr ademarks or r egis tered
trademark s of GoP ro, Inc . in the U nited S tates a nd oth er coun trie s.
© 2021 GoP ro, Inc . All right s reser ved. For patent informati on, vi sit
gopro.com/patents. GoPro, In c., 3025 C lear view Way, San Mate o CA
944 02 | GoPro GmbH , Floe sserg asse 2, 8 1369 M unich, Germany
Regulatory Information
To see the com plete l ist of countr y certific atio ns, refe r to the I mpor tant
Product + Safety In str uctions in clude d with your ca mera or v isit
gopro.com/help.
144 145
REVB
 Loading...