

Page 1
USER MANUAL
Page 2

To downlo ad this us er manual i n a differen t languag e, visit gopro.com/support.
Pour té lécharg er ce manue l de l’util isateur da ns une aut re langu e, rendez- vous
sur gopro.com/support.
/ Join the GoPro Movement
facebook.com/GoPro
twitter.com/GoPro
2 3
youtube.com/GoPro
instagram.com/GoPro
Wenn Si e dieses Be nutzer handbu ch in einer a nderen S prache h erunter laden
möch ten, besu chen Sie gopro.com/support.
Per sc aricar e questo ma nuale ute nte in un’altra l ingua, v isita gopro.com/support.
Para d escarg ar este man ual de usua rio en otro i dioma, vi site gopro.com/support.
Para b aixar est e manual do u suário e m outro idio ma, aces se gopro.com/support.
このユーザーマニュアルの他言 語版をダウンロードするには、
gopro.com/supportにア ク セ スし てくだ さ い 。
若要下載其他語言版本的使用說明書,請前往:gopro.com/support。
如需下载本用户手 册的其他语言版本,请访问 gopro.com/support。
Чтоб ы загру зить это р уководс тво пол ьзова теля на др угом язы ке, посет ите
страницу gopro.com/support.
Page 3

/ Table of Contents / Table of Contents
The Ba sics
Getting Started
Capturing Video and Time Lapse Photos
Accessing Camera Settings
Camera Icons
Video Mode
Photo Mode
Multi-Shot Mode
Setup Mode
™
Protune
4 5
6
7
16
20
25
27
42
45
53
66
Transferring Files to a Computer
Playing Ba ck Video and Photos
Important Messages
The Frames
Mounting Your Camera
Battery
Troubleshooting
Customer Support
Regulatory Information
70
72
74
77
80
90
95
101
101
Page 4
/ The Basic s
/ Getting Started
CHARGING THE BATTERY
The integra ted batter y comes par tially cha rged. No damage oc curs
to the camera or battery if used before being fully c harged.
To Charge the Battery:
6
7
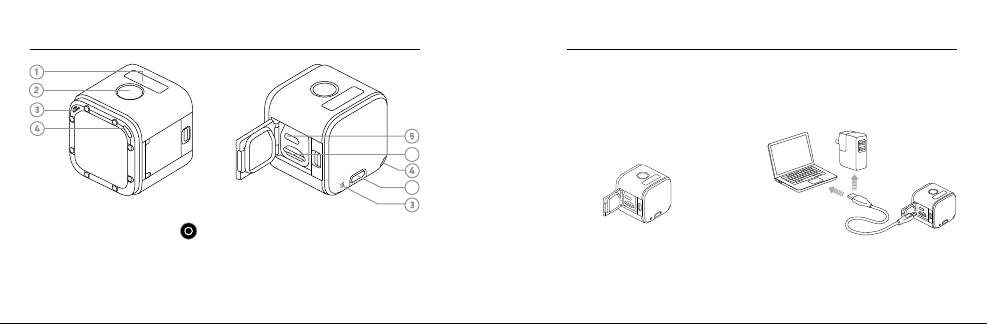
1. Camera Status Screen
2. Shutter/Select Button [ ]
3. Microphone
4. Camera Status Light (red) /
Wireless Status Light (blue)
6 7
5. Micro-USB Port
6. microSD Card Slot
7. Info/Wireless Button
1. Open the side d oor. 2. Charge the b attery using the
included USB cab le.
Note: The bat tery canno t be removed from t he camera.
Page 5

/ Getting Started
The camera statu s lights (red) tur n on during chargi ng and turn
off when charging is c omplete. Whe n charging t he camera with a
computer, be sure that th e computer is c onnecte d to a power source.
If the camer a status lights do n ot turn on to ind icate char ging, use a
different USB port.
WARNING: Us ing a wall ch arger oth er than a GoP ro Wall Charger
can dama ge the GoP ro camer a batter y and could result in fir e or
leakag e. Only use ch argers ma rked: Output 5V 1A . If you do not
know the vo ltage an d current of y our charg er, use the incl uded
USB cabl e to charge t he camer a from your co mputer.
8 9
For more batte ry information, see Battery (page 90).
WARNING: Us e cautio n when usin g your GoPr o as part o f your
active l ifest yle. Alway s be aware of yo ur surro undings t o avoid
injury t o yoursel f and other s.
Abide by a ll local l aws when us ing your Go Pro and rel ated
mounts a nd access ories, i ncludin g all priv acy laws , which may
restri ct record ing in cer tain area s.
/ Getting Started
Page 6

/ Getting Started
INSERTING + REMOVING MEMORY CARDS
Insert the SD card at a downward angle w ith the lab el facing do wn.
Use brand na me memory c ards
(sold separately) that meet these
requirements:
• microSD, microSDHC,
or microSDXC
• Clas s 10 or UHS-I r ating
• Capacit y up to 64GB
For a lis t of the recommend ed microSD cards , visit gopro.com/support.
10 11
NOTICE: Use care w hen handling mem ory card s. Avoid liquids, du st,
and de bris. As a preca ution, powe r off the camer a before inserting or
removing the card. Check manufacturer guidelines regarding use in
acceptable temperature ranges.
CAMERA SOFTWARE UPDATES
To get the latest features and be st perfor mance from your
HERO4 S ession camera, make sure you are using t he most curr ent
came ra soware. You can up date your camera sowa re with the
GoPro A pp, GoPro Stud io, or at gopro.com/getstarted.
/ Getting Started
Page 7

/ Getting Started
POWERING ON + OFF
HERO4 Session automatically powers on when
you press the Shutter/Select button [
capturing video or Time Laps e photos. Whe n you
press the Shutter/Select button [
recording , the camer a automatic ally powers off to
conserve battery power.
PRO TIP: When car rying you r camera in a bag or pocket, place t he
came ra upside down in a fr ame (with th e Shutter/Select but ton [
covere d) to protec t the camera from accidentally capturi ng video or
Time Lapse p hotos. To prevent the fra me from mark ing the sur face of
the ca mera, leave the latch on the fra me open.
12 13
] to begi n
] again t o stop
]
DISPLAYING STATUS INF O
Shor t press the Info/ Wireless but ton to displ ay status information
abou t your camer a. The scre en cycles throug h the information b elow,
then automatically turns off.
Note: To exit these s creens soon er, press and hold th e Info/Wireless b utton for thre e seconds.
• Video resolution/FPS/FOV
• Time Lapse p hoto resolution/
FOV/interval
• Remaining microSD card
memor y for each mode
• Protune status
• Spot Meter sta tus
• Wireless status
• Battery status
/ Getting Started
Page 8

/ Getting Started
HELPFUL TIPS
Follow these guide lines to get th e best performa nce from
your camera:
• The camera is waterproof to 33’ (10m)— no housing n eeded.
Ensure that t he side door is close d before usin g the camera in
or arou nd water, dirt, or san d.
• Before closing the si de door, be sure the seal i s free of debr is.
• Befor e opening the side d oor, be sure the c amera is free of wate r or
debr is. If need ed, rins e the camer a with water an d dry it wit h a cloth.
• If san d or debris ha rdens around the side door, soak the cam era
in war m tap water for 15 min utes and the n rinse thorough ly to
remove the de bris before o pening the door.
14 15
• For bes t audio per formance, shake t he camera or blow on t he mic
to remove water a nd debris f rom the micropho ne holes.
• Aer every use in sa lt water, rinse th e camera w ith fr esh wa ter,
and dr y with a so cloth.
• If the camer a lens becom es foggy, let it sit w ith the door open until
it dries.
PRO TIP: During water ac tivities, tether your ca mera for added
secu rity and use a Floa ty to keep your camera afloat (sold s eparately).
For more infor mation, visit gopro.com.
/ Getting Started
Page 9

/ Capturing Video and Time Lapse Photos / Capturing Video and Time Lapse Photos
When your ca mera is not con nected to the remote (sold separately)
or the GoPro Ap p, two capture modes are availa ble: Video a nd Time
Laps e. To access more mo des or change cam era settings, se e
Accessing Camera Settings (page 20).
CAPTURING VIDEO
The default video resol ution is 1080p30.
To Start Recording Video:
Shor t press the Shutter/Select button [
autom atically powers o n, emits three beeps, and begins re cording
vide o. The camera status lig hts blink while the came ra is recording.
16 17
]. Your cam era
If the memor y card is full or the batter y is out of power, your
camera automatically stops recording and saves the video b efore
powering o ff.
To Stop Recording:
Shor t press the Shutter/Select button [
autom atically stops re cording, b eeps once, and powe rs off to
maximize battery life.
PRO TIP: You can turn off the cam era status l ights and yo ur camera’s
sound. For mo re informat ion, see Setup Mode (page 53).
]. The c amera
Page 10

/ Capturing Video and Time Lapse Photos / Capturing Video and Time Lapse Photos
HILIGHT TAGGING
You can mark spe cific moments in your video as
they happen with HiLight Tags. HiLi ght Tags make
it easy to find the best moments to sh are.
Note: HiLight Tags a re visible dur ing playbac k on the GoPro App or i n
GoPro Studi o.
To Add HiLight Tags During Recording:
Shor t press the Info/ Wireless button.
PRO TIP: You can a lso add HiLi ght Tags du ring recor ding with th e
GoPro A pp or the Smar t Remote.
18 19
CAPT URING TIME LAPSE PHOTOS
The default inter val for Time L apse photos is 0.5 second.
To Start Capturing Time Lapse Photos:
Press and ho ld the Shutter/Select butt on [
until the Time Laps e photo icon [
] for about two seco nds
] appea rs on the cam era status
scre en. Your camera automatic ally powers o n, emits tw o beeps, and
begins capturing Time Lapse photos. The c amera status lig hts blink
while t he camera is capturing photos .
To Stop Recording:
Shor t press the Shutter/Select but ton [
]. The c amera aut omatical ly
stops r ecording , beeps once, and powers off to maxim ize batter y life.
Page 11
/ Accessing Camera Settings
To access m ore modes or a djust came ra setting s, connec t your
came ra to the remote (sold separ ately) or the GoPro App.
VIDEO
Record video
LOOPING VIDEO
Record continuously
PHOTO
Capt ure a single photo
20 21
TIME LAPSE PHOTOS
Shoot p hotos at
time intervals
BURST PHOTO
Capt ure 10 photos in
1 second
SETTINGS
Adjust all camera settings
All mod es and settings that you selec t are saved aer you di sconnec t
the ca mera. However, only Vi deo and Time Laps e modes can b e
accessed w hen the cam era is not connected to th e remote or the a pp.
CONNECTING TO THE GOPRO APP
The GoPro App lets yo u adjust mod es and camera set tings using
a smar tphone or tablet . Features in clude full camera cont rol, live
previ ew, playback and s haring of content, and ca mera sow are
updates. To lear n more about t he app, see gopro.com/getstarted.
/ Accessing Camera Settings
Page 12

/ Accessing Camera Settings / Accessing Camera Settings
To Connec t to the GoPro App:
1. Download th e GoPro App to yo ur smartphone/t ablet from the
®
App Sto re, Google Play, or Windows® Phone store.
Apple
2. Open the app.
3. Follow the ap p’s on-screen instructions to conn ect your ca mera.
Note: If need ed, the defau lt password fo r your camera is go prohero.
For com plete pairin g instruc tions, visit
gopro.com/support
.
PAIRING WITH THE REMOTE
The Smart Remote lets you change capture modes and settings,
power your GoPro on/off, start/stop recording, and add HiLight Tags.
Note: HERO4 Sessi on is compatib le with the Smar t Remote and the Wi-Fi R emote.
22 23
To Pair with the Remote:
1. On the camer a, short press th e Info/Wireless button to display the
status screen.
2. Short press the Info/ Wireless button re peatedly to c ycle to RC,
then short press the Shutter/Select but ton [
] to sele ct it. The
camera automatically begins pairing.
Note: If you al ready paire d your HERO4 Sessio n with the GoPro App or a G oPro remote, cyc le to
Add New ins tead of RC. For det ails, see the u ser manual for yo ur remote.
3. Put the remote into pairing mode. For more information, see t he
user ma nual for your remote at gopro.com/getstarted.
Page 13
/ Accessing Camera Settings / Camera Icons
CONNECTING AFTER PAIRING
Aer co nnectin g your camer a to the GoPro App or the remote for the
first time, you c an connec t in the future thro ugh the wireless menu.
To Connec t Your Camera aer Pairing:
1. On the camer a, short press th e Info/Wireless button to disp lay
the st atus scree n, then shor t press it repeatedly unt il you get to the
setting tha t you want (Ap p, RC, or App & RC).
2. Short press the Shutter/Select but ton [
Note: App & RC app ears only if yo ur smartpho ne/tablet use s Bluetooth® LE. This option l ets you
connec t your camera to ei ther the remote o r the app.
The wi reless status lig hts (blue) bl ink when wir eless is on an d the
came ra is not recor ding.
24 25
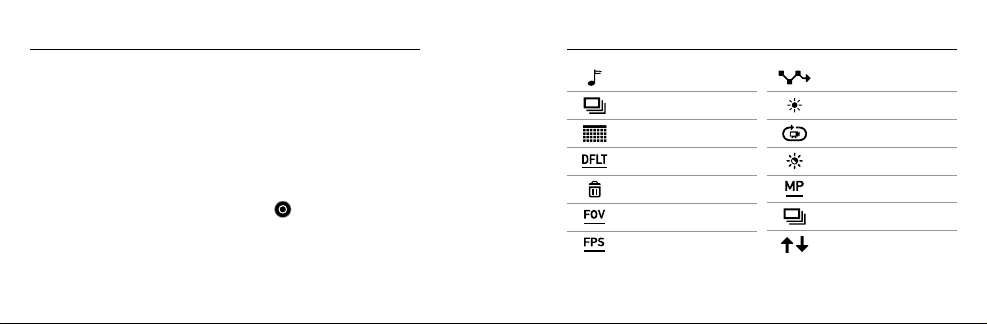
Beeps
Burst Photos
Date/Time
Default Mod e
Delete
] to sele ct it.
Field of View
Frame s Per Second
Interval
LEDs
Looping Video
Low Light
Megapixels
Multi-Shot Mode
Orientation
Page 14

/ Camera Icons
Photo Mode
™
Protune
Burst Rate
Setup Mode
Spot Meter
Time Lapse
26 27
Video Format
Video Mode
Video Resolution
Wireless
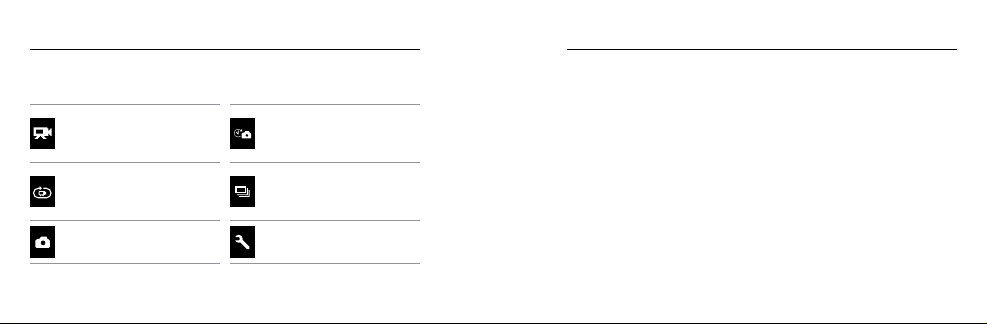
VIDEO CAPTURE MODES
When you connect your ca mera to the GoPro Ap p or the remote,
you can access two captu re modes in Video mo de: Video and
Looping Video.
Capture Mode Description
Video (default) Captures video.
Lets yo u continuou sly record and save only
Looping Video
the moment s that you want to save, w hich
helps to cons erve spac e on your micro SD
card . For more infor mation, se e Interval
(page 30).
/ Video Mode
Page 15

/ Video Mode
CAPTURING VIDEO
1. Select Video mode [ ] on the GoPro App or the remote.
2. If necessa ry, select a differ ent capture m ode (Vid eo or
Looping Video).
3. Ta p the record butto n on the app, or s hort pres s the Shutter/
Select but ton [
beeps once a nd the camera status lig hts flash while the came ra
] on the remote or t he camera . The camer a
Note: When you r camera is conn ected to the GoPr o App or the remote, it r emains in stan dby mode
aer captur ing video or ph otos. If you want to p ower off the camera, ta p the Power but ton on the
app or pres s the Power/Mode bu tton on the remot e. Wireless remai ns on so your came ra is still
connec ted to the app or th e remote.
PRO TIP: Videos ca ptured at lower reso lutions such as 720 p30 fps are
supporte d by more mobil e devices an d are easier to s hare and upload
to the web.
/ Video Mode
is recording.
4. To stop ca pturing, t ap the Reco rd button on t he app, or sho rt press
the Shutter/Select button [
] on the remote or t he camera .
The camera statu s lights fla sh three times and t he camera beeps
multiple times.
28 29
Page 16

/ Video Mode
VIDEO SETTINGS
You can change t he video set tings by con necting HE RO4 Sessio n to
the GoP ro App or the re mote. When you connect to t he remote, the
capture mod e that you sele ct (Video or Loo ping Video) d etermines t he
settings th at appear when you p ress the Settings/Tag button [
].
Interval
The Interv al setting a pplies to Loo ping Video. Inter val determ ines the
lengt h of a video loop segment.
30 31
Availa ble intervals for Loop ing are 5, 20, 60, a nd 120 minutes. For
examp le, if you selec t a 5-minute inter val, only th e previous 5 mi nutes
is save d when you sto p recordin g.
You can al so select M ax as the interval. Wit h this option , the camera
records unt il the memor y card is full, then over writes th e content if
you do not stop re cording and save t he footage.
Note: To use Loopin g, be sure that you r microSD card has s ufficient space to cr eate the loop se gment
based on th e interval th at you select. I f the microSD card b ecomes full, Lo oping does not o verwrite
the content.
/ Video Mode
Page 17

/ Video Mode
Resolution, FPS, and FOV
HERO4 S ession feat ures the vid eo resolutions listed below.
The default video resol ution is 1080p30.
Video
Resolution
144 0p 30/25 Ultra W ide 1920x1440, 4:3
1080p SuperView
108 0p
32 33
FPS
(NTSC/PAL)
48/48
™
30/25
60/50
30/25
FOV
Ultra W ide 19 20x10 80, 16:9
Ultra W ide,
Medium
Screen
Resolution
192 0x1080 , 16:9
Video
Resolution
960p
720p SuperView
720p
WVGA 120/100 Ultra Wid e 848x480, 16:9
FPS
(NTSC/PAL)
60/50
30/25
60/50
30/25
100/100
60/50
30/25
FOV
Ultra W ide 1280x960, 4:3
Ultra W ide 1280x720, 16:9
Ultra W ide,
Medium
/ Video Mode
Screen
Resolution
1280x720, 16:9
Page 18

/ Video Mode
/ Video Mode
Resolution Best Us e
144 0p
1080p SuperView
34 35
Good for advance d users who wa nt to
capture a ful l image and th en edit to the
desired aspect ratio.
SuperView delivers th e world’s most
immersive field of view. Recommended for
body-or gear-mounted shots. Mo re vertical
4:3 content is automatically str etched to ful lscre en 16:9 for stu nning wide screen playba ck
on your c omputer.
Resolution Best Us e
108 0p
960p
Great fo r all shots. High res olution and fram e
rate yield stunning results.
Good for users who wa nt to capture a
full image and then edit to t he desired
aspect ratio.
Page 19

/ Video Mode
/ Video Mode
Resolution Best Us e
SuperView delivers th e world’s most
immer sive field of view. Good for bod y-or
720p SuperView
36 37
gear-mounted shots . More verti cal 4:3
content is automati cally stret ched to
full-screen 16:9 for stu nning wide screen
play back on your c omputer.
Resolution Best Us e
Good for hand held shots a nd when slow
720p
WVGA
motion is desi red. 720p is optimal for sharing
on social media sites. 720p100 is great for
slow motion.
Good when super slow motion is desired
and standard definition is acceptable.
Page 20

/ Video Mode
/ Video Mode
FOV Best Us e
Largest field of view. Recommended for
Ultra W ide (W)
Medium (M)
PRO TIP: Easily crea te epic GoPro -style videos using free GoPro
Studio sowa re. Learn mor e at gopro.com/getstarted.
38 39
body-and g ear-mounted sh ots. Good fo r
action shots where you w ant to captur e
as muc h as possible within the frame.
Mid-range field of view. Good for shots where
you want the su bject to fill the fra me.
Low Light
Auto Low L ight allows you to shoot in low-light e nvironments or
when q uickly tra nsitioning in and o ut of low-light condition s. The
came ra automati cally adju sts fps accordi ng to lighting condition s to
achi eve the optima l exposure and bes t results.
Auto Low L ight is available at 48 fps a nd higher. Auto Low Light is
not availab le for WVGA. T he options fo r this setting are On (default)
and Off.
Page 21

/ Video Mode
/ Video Mode
Spot Meter
Spot Meter is good for filming into a sett ing where th e lighting is
Protune
For det ails abou t Protune set tings, see Protune (page 66).
differ ent from where you are. Examples i nclude film ing the outdoors
from within a c ar or filming a shade d environment whi le standin g in
the sun. Spot Meter automatically set s the exposu re based on a si ngle
spot in t he middle of the imag e. The option s for this setting are Off
(default) an d On.
Note: Chang es that you make to Sp ot Meter in Video set tings apply on ly to video captu re. To adjust
this setti ng for photo capt ure, adjust Spo t Meter in Photo setti ngs. To adjust this se tting for multi-s hot
capture, ad just Spot Meter i n Multi-Shot settings.
40 41
Page 22

/ Photo Mode
PHOTO CAPTURE MODE
When you connect your ca mera to the GoPro Ap p or the remote, you
can access one ca pture mode in Photo mode: Single photo.
CAPT URING A SINGLE PHOTO
1. Select Single photo mode [
] on the GoPro App or the remote.
2. Ta p the Record b utton on the a pp, or short press the Shutter/
Select but ton [
] on the remote or t he camera . The camer a
beeps once, t he camera s tatus light s flash, and the counter on the
came ra status sc reen incre ases by one.
Note: When you r camera is conn ected to the GoPr o App or the remote, it r emains on in sta ndby mode
aer captur ing video or ph otos.
42 43
PHOTO SETTINGS
You can change t he photo sett ings by conn ecting HER O4 Session
to the GoPro Ap p or the remote.
Megapixels
HERO4 S ession captures photos a t 8MP and 5MP.
8MP Ultr a Wide
(default)
5MP Medium
Note: Chang es that you make to Me gapixels in P hoto settings app ly only to photo cap ture. To adjust
this setti ng for multi-shot ca pture, adjust S pot Meter in Multi-Shot settings.
Largest fiel d of view. Good for acti on shots.
Mid-range field of view. Good for shots where
you want the su bject to fill the fra me.
/ Photo Mode
Page 23

/ Photo Mode
Spot Meter
Spot Meter is good for ca pturing ph otos in a setting where the lighting
is diffe rent from where you a re. Example s include captur ing photos
of the ou tdoors from within a car or in a shaded environment while
stan ding in the su n. Spot Meter a utomatica lly sets the e xposure based
on a sing le spot in the middle of the ima ge. The optio ns for this set ting
are Off (d efault) and On.
Note: Chang es that you make to Sp ot Meter in Photo se ttings apply o nly to photo captu re. To adjust
this setti ng for video ca pture, adjust Sp ot Meter in Video set tings. To adjust th is setting for mu lti-shot
capture, ad just Spot Meter i n Multi-Shot settings.
44 45
MULTI-SHOT CAPTURE MODES
When you connect your ca mera to the GoPro Ap p or the remote,
you can access two captu re modes in Multi-Shot mode: Time Lapse
and Burst.
Capture Mode Description
Capt ures a series of photos at specified
Time Lapse
(default)
inter vals. You ca n use Time Lapse to ca pture
photos of any activ ity, so you can c hoose the
best o nes later.
/ Multi-Shot Mode
Page 24

/ Multi-Shot Mode / Multi-Shot Mode
Capture Mode Description
Capt ures up to 10 photos in 1 s econd. Burst is
Burst
perfect f or capturi ng the definitive moment in
fast-action sports.
CAPT URING TIME LAPSE PHOTOS
1. Select Tim e Lapse mode [
] on the GoPro App or the remote.
2. Ta p the Record b utton on the a pp, or short press the Shutter/
Select but ton [
] on the remote or t he camera . The camer a
beeps once a nd the camera status lig hts flash ea ch time a photo
is captured.
46 47
3. To s top captur ing, tap the Record button on th e app, or shor t press
the Shutter/Select button [
] on the remote or t he camera .
The camera statu s lights fla sh three times and t he camera beeps
multiple times.
Note: When you r camera is conn ected to the GoPr o App or the remote, it r emains in stan dby mode
aer captur ing video or ph otos.
CAPT URING BURST PHOTOS
1. Select Bur st mode [ ] on the GoPro App or the remote.
2. Ta p the Record b utton on the a pp, or short press the Shutter/
Select but ton [
] on the remote or t he camera . The camer a
status lights fla sh and the ca mera beeps m ultiple time s.
Page 25

/ Multi-Shot Mode
MULTI-SHOT SETTINGS
You can change t he Multi-Shot settings by c onnecti ng HERO4 Ses sion
to the GoPro Ap p or the remote. W hen you conn ect to the remote, th e
capture mod e that you sele ct (Burst o r Time Lapse) determines t he
settings th at appear when you p ress the Settings/Tag button [
Interval
The Interv al setting a pplies to Time Lapse photos. Inte rval determin es
the am ount of time that passes betwee n each captured fr ame.
48 49
].
Time Lapse Intervals
Availa ble intervals r ange from 0.5 second (default) to 60 seconds .
INTERVAL EXAMPLES
0.5-2 seconds Surfing, biking , or other spor ts
2 seconds Bus y street cor ner
5-10 seconds Sunset
10-60 seconds
PRO TIP: Create a vide o from your Time Lapse phot os with free
GoPro St udio soware. Lea rn more at gopro.com/getstarted.
Lengthy activities, such as construction
projects or family gatherings
/ Multi-Shot Mode
Page 26

/ Multi-Shot Mode
/ Multi-Shot Mode
Megapixels
Rate ap plies only to B urst photos. Phot os can be captured at the
following rates:
3 photos in 1 second
5 photos in 1 second
10 photos in 1 secon d (default)
10 photos in 2 secon ds
50 51
HERO4 S ession captures photos a t 8MP and 5MP. Smaller megapi xel
value s take up less space on the microSD c ard.
Setting Description
8MP Ultr a Wide
(default)
5MP Medium
Note: Chang es that you make to Me gapixels in Multi-Shot setti ngs apply only to m ulti-shot captur e.
To adjust this se tting for phot o capture, adjus t Megapixel s in Photo settings.
Largest fiel d of view. Good for acti on shots.
Mid-range field of view. Good for shots where
you want the su bject to fill the fra me.
Page 27

/ Multi-Shot Mode
Spot Meter
Spot Meter is good for ca pturing ph otos in a setting where the lighting
is diffe rent from where you a re. Example s include captur ing photos
of the ou tdoors from within a car or in a shaded environment while
stan ding in the su n. Spot Meter a utomatica lly sets the e xposure based
on a sing le spot in the middle of the ima ge. The optio ns for this set ting
are Off (d efault) and On.
Note: Chang es that you make to Sp ot Meter in Multi-Shot settings a pply only to multi- shot capture.
To adjust this se tting for vid eo capture, adju st Spot Meter in Vid eo settings. To adjust this setting for
photo captu re, adjust Spot M eter in Photo settings.
52 53
SETUP MODE SETTINGS
In Setup mode, you can chan ge settings that apply to a ll camera
modes. To chang e a setting, your ca mera must be c onnecte d to
the GoP ro App or the re mote. For more information , see Accessing
Camera Settings (page 20).
When you disconnect your camera from the app or the remote, your
came ra saves the s ettings an d returns to t wo capture modes: Video
and Ti me Lapse.
/ Setup Mode
Page 28

/ Setup Mode / Setup Mode
Wireless
This setting lets y ou connec t your camer a to the GoPro App or the
remote. When w ireless is on , a wireless status i con appears on the
came ra status sc reen and th e blue wireless lights blink intermit tently.
The bl ue wireless l ights do not b link durin g recording.
Opening the Wireless Control Menu:
1. Shor t press the Info/Wireless but ton to display the status i nfo.
2. When Wirele ss Control a ppears, sh ort press t he Info/Wireless
button to open the menu.
54 55
3. Short press the Info/ Wireless button to m ove through the
wireless settings, then use the Shutter/Select button [
to sele ct a setting.
PRO TIP: To quickly exit the wireless menu or the status info screens,
press and hold the Info/ Wireless button for three seconds.
Setting Description
App
Conn ects the c amera to the GoPro A pp. For
instruc tions on con necting to this app, see
Connec ting to the GoPro App (pa ge 21).
]
Page 29

/ Setup Mode
/ Setup Mode
Setting Description
Conn ects the c amera to the remote c ontrol.
RC
For ins tructio ns on pairin g, see Pairing with
the Remote (page 22).
Turns off th e camera. T his option appears
only if w ireless is on and th e camera moves
Turn Cam era Off
out of ra nge of the GoPro App or the GoP ro
remote, or you close the app. If you sele ct
this option, the ca mera turns off, but wi reless
remains on.
56 57
Setting Description
Turns off wi reless. Th is option appears o nly
Turn WiFi O ff
if wireless is on. Wh en wireless i s off, the
avail able captu re modes on th e camera are
Vide o and Time La pse.
Pairs your ca mera with an addi tional remote
or with the GoP ro App on an ad ditional
Add New
smartphone/tablet. This option appears
only if you already p aired your camera with a
Note: If your sm artphone/t ablet uses Blu etooth® LE, the App and RC op tions are comb ined into one
(App & RC) aer you co nnect for the fir st time. App & RC lets y ou connect y our camera to eit her the
remote or the a pp.
GoPro remote or a s martpho ne/tablet.
Page 30

/ Setup Mode
Resetting Your Camera’s Wireles s Name and Pas sword
1. Press and hold the Info/Wireless button until the reset options
appear (abo ut 8 seconds).
2. Short press the Info/ Wireless button again to highlight Yes.
3. Short press the Shutter/Select but ton [
reset your ca mera name an d password. The default pas sword
is goprohero.
PRO TIP: When you tur n off your camera with the ap p or the remote,
wireless remains o n so that you ca n quickly reconnect . To save
battery power, turn off wireless when you a re finished u sing it.
58 59
] to sele ct Yes and
Orientation
This setting lets y ou determin e if you want you r captured v ideo to be
upsid e down or right-side up.
Note: This set ting applie s only when captu ring video.
Setting Description
(Auto Image Rot ation) Camera aut omatically
selects U p or Down, bas ed on the orientat ion
Auto (default)
of the camera when r ecording b egins. This
option elimi nates the need to flip your vid eo
duri ng editing w hen the cam era is mounte d
upside down.
/ Setup Mode
Page 31

/ Setup Mode
/ Setup Mode
Setting Description
Up
Down
60 61
Camera is us ed right-sid e up.
Camera is us ed upside do wn. This option
eliminates t he need to flip your vid eo during
editing when the camera is mounted
upside down.
Default Mode
This setting applies on ly when HERO4 Sess ion is conne cted to the
GoPro A pp or the remote. You can select the ca pture mode that
appears wh en the came ra is powered o n with the ap p or the remote.
The options are Vid eo (default), Photo, Looping Vid eo, Burst, a nd Time
Lapse.
Page 32

/ Setup Mode
/ Setup Mode
LED
This setting determines whether the cam era status l ights (red) are
on (default) or off.
Note: This set ting does not affe ct the wirele ss status light s (blue). If wireless i s on, you cannot tu rn off
the wirele ss status light s. These light s do not blink du ring record ing.
Beeps
You can set t he volume for t he sound ind icators to be 100% (defa ult),
70%, or Off.
62 63
Video Format
The NT SC/PAL settings govern fr ame rates for recor ding and
play back when v iewing vid eo on a TV/HDTV.
Setting Description
NTSC (default)
PAL
Viewing video on a n NTSC TV/HDTV (m ost
televisions in Nor th Americ a)
Viewing video on a PAL T V/HDTV (most
televisions outs ide of North America)
Page 33

/ Setup Mode
Date/Time
Your camera’s date a nd time are automat ically set w hen you conn ect
your ca mera to the GoPro Ap p or GoPro Studio. Thi s setting let s you
manually set the date and ti me, if neede d.
Delete
This setting lets y ou delete the l ast file, or delete all files and forma t
the memor y card. The c amera status lig hts blink un til the operation
NOTICE: If you sele ct All/Format, the memor y card is refor matted,
whic h deletes ever y video a nd photo file on yo ur card.
Camera Reset
With this set ting, you ca n reset your ca mera’s settings to th eir default
value s. This option does not res et the Date/Time set ting, the camer a’s
name a nd wireless pass word, or remote control pairing. This o ption is
avail able only if your camera is connecte d to a GoPro remote.
Note: If your ca mera is not respo nding but you d o not want to lose y our settings , press and hol d the
Shutter/Select button until you r camera power s off.
/ Setup Mode
is complete.
64 65
Page 34

/ Protune
PROTUNE BENEFITS
Protune unlocks the camera’s full potential, yielding stunning
image q uality an d cinema-caliber video optimized for professional
producti ons. Protune gives content creators mo re flexibilit y and
work flow efficienc y than ever before.
Protune is compati ble with professio nal color cor rection to ols,
GoPro soware, an d other video editing so ware.
Protune ena bles manual control of ISO L imit and Sharpne ss for
adva nced contr ol and custo mization of yo ur video foot age.
66 67
PROTUNE
The options for this setting are O ff (default) a nd On. When P rotune
is on, PT a ppears on the cam era status s creen. Protune is avail able
for the se video res olutions (Ultra W ide FOV only): 144 0p, 1080p, and
960p60/50. Protu ne is not avail able for Looping Vi deo or photos .
/ Protune
Page 35

/ Protune
/ Protune
ISO LIMIT
ISO Limit adjusts the ca mera’s sensit ivity in low-ligh t environme nts,
and cr eates a balance bet ween brig htness and resulting image noise.
Image n oise refers to the de gree of grain iness in the i mage.
Setting Resulting Quality
1600 (default)
400
68 69
Moderately bright video in low light,
moderate image noise
Darke r video in low light, reduc ed
image noise
SHARPNESS
Shar pness cont rols the level of det ail and contrast in your vi deo.
Setting Resulting Quality
On (default) Moderately sharp video
Off
PRO TIP: If you plan to i ncrease sh arpness d uring editing, t urn this
set ting off.
Soer v ideo that al lows for more flexibil ity
during post-production
Page 36

/ Transferring Files to a Computer
To play bac k your video a nd photos on a co mputer, you must fi rst
tran sfer these files to a compute r. Transfer ring also f rees up space
on your m icroSD card for new c ontent.
To Transfer Files to a Computer
1. Download an d install GoPro Stu dio from gopro.com/getstarted.
The HER O4 Session camera was d esigned to communicat e with
GoPro St udio to help yo u easily locate and t ransfer yo ur files.
2. Connect the ca mera to your co mputer usin g the includ ed
USB cable.
70 71
3. Short press the Shutter/Select button [ ] to power on the
came ra and open GoPro Stu dio Importer.
4. Follow the on-screen instructions.
PRO TIP: You can al so transfer files to a comp uter using a ca rd reader
(sold s eparately). C onnect t he card reader to your comp uter and ins ert
the microSD c ard into the re ader. You can then t ransfer yo ur files to
your compute r or delete sele cted files on your ca rd.
/ Transferring Files to a Computer
Page 37

/ Playing Back Video and Photos
PLAYING BACK CONTENT ON A COMPUTER
1. Download an d install GoPro Stu dio from gopro.com/getstarted.
The HER O4 Session camera was d esigned to communicat e with
GoPro St udio to help yo u easily locate and t ransfer yo ur files.
2. Transfer your files to you r computer. For more informati on,
see Transferring Files to a Computer (page 70).
3. Use GoPro Stu dio to play ba ck the files.
72 73
PLAYING BACK CONTENT ON A SMARTPHONE/TABLET
1. Connect your camera to t he GoPro App. For more infor mation,
see Connecting to the GoPro App ( page 21).
2. Use the controls on the ap p to play back your footage on your
smartphone/tablet.
/ Playing Back Video and Photos
Page 38

/ Impor tant Messages
MICROSD CARD MESSAGES
NO SD CARD
SD FULL Card i s full. Delete files or s wap card.
SD ERROR
74 75
No card prese nt. The cam era require s a
microSD, microSDHC or microSDXC card to
capture vid eos and photos.
Camera is un able to read c ard format ting.
Reformat the c ard in the ca mera.
NOTICE: If you sele ct Yes to reformat the
card , all of the content on the car d is deleted.
PRO TIP: Reformat you r microSD card on a reg ular basis t o ensure
that th e card can co ntinue to rec eive inform ation from th e camera.
IMPORTANT CAMERA MESSAGES
If your l ast video fil e was corru pted during
recording , the camer a displays REPAIRING
REPAIRING FILE
FILE wh ile it tries to re pair the file. When this
proce ss is finishe d, the came ra powers off if
it is not co nnected to the GoPro Ap p or
the remote.
/ Impor tant Messages
Page 39

/ Impor tant Messages
If the camer a is connec ted to the GoPro App
REPAIRING FILE
(continued )
or the remote, tap the Shutter button on the
app or short press the Shutter/Select button
] on the remote or the camera when the
[
repai r is finished t o continue us ing the cam era.
The Temperature icon and CAMERA TOO HOT
appear on th e camera status screen when
the ca mera becomes too h ot and needs to
cool down. Simply let it sit an d cool before
attem pting to use it a gain.
76 77
Your HERO4 S ession com es with two frames: the St andard Fra me
and th e Low-Profile Fr ame. Both frames work gre at in all scenarios.
For the m ost compac t mounting , use the Low-P rofile Frame.
Note: To prevent th e frame from mar king the surf ace of your came ra, leave the latc h on the frame
open when s toring your ca mera in a frame for a l ong period of ti me.
The HER O4 Session camera is waterpr oof to 33’ (10m) with the
side door closed—no additional h ousing is needed when using th e
came ra in or around water.
NOTICE: The Sta ndard Fram e and the Low-P rofile Frame d o not
provide additio nal waterproof protect ion for your ca mera.
/ The Frames
Page 40

/ The Frames
TO SECURE THE CAME RA IN T HE FR AME:
1. Open the latch.
2. Rotate the camera to t he desired orient ation, and then sl ide it into
the fr ame. The back of the frame has a ra ised edge. B e sure the
back of the ca mera sits flu sh against it.
3. Close the latch.
78 79
PRO TIP: For added secu rity duri ng water activities, tether the fra me
to the mo unt. On the St andard Fra me, loop the tether over the sm all
bar be hind the mou nting finger s. On the Low-P rofile Frame, loop the
tether throu gh the point s on the back c orner of the f rame. Camera
Tethers are sold separately.
/ The Frames
Page 41

/ Mounting Your Camera
ATTACHING YOUR CAMERA TO MOUNTS
To attach your HER O4 Session c amera to a mou nt, you need a
Mounting Buckle, thumb screw, or h ardware depending on the mount
you are u sing.
WAYS TO MOUNT
1
Horizontal Mounting
Low-Profile Frame +
Vertical Mounting Buckle
2
Side Mounting
/ Mounting Your Camera
Low-Profile Frame +
Ball Joint Buckle
Mounting
Buckle
Thumb Screw Frame Complete Unit
3
Vertical Mounting
Standard Frame +
Vertical Mounting Buckle
80 81
Page 42

/ Mounting Your Camera
WAYS TO MOUNT
1
/ Mounting Your Camera
USING CURV ED + FLAT ADHESIVE MOUNTS
The Curve d + Flat Adhesive Mounts make it easy to at tach the ca mera
to cur ved and flat surfaces of helmets, vehicl es, and gear. Using the
Mounting Buckle, the fra me can be clicked on a nd off the sec ured
3
Cur ved or Flat Ad hesive Mounts.
2
PRO TIP: If you mount yo ur HERO4 Ses sion upside d own, the ca mera
autom atically changes the orientation of your image to b e right-side
Chesty (Chest Harness)
Sold Separately
Flat Adhesive Mount Curved Adhesive Mount
up. For more informat ion, see Orientation (page 59).
82 83
Page 43

/ Mounting Your Camera
MOUNTING GUIDELINES
Follow these guidelines when attaching mounts:
• Attach the a dhesive mounts a t least 24 hour s before use.
Allow 72 h ours for comp lete adhesi on.
• Adhesive mounts m ust be mounte d only on smooth sur faces.
Porou s or textured surf aces do not enable a proper b ond. When
applying the mount, firmly press it into place and en sure full
conta ct over the entire su rface.
• Apply adhe sive mounts to clea n surface s only. Wax, oil, dirt , or
other d ebris red uce adhesi on, which c an result in a weak bon d
and risk of losing the camera should the connecti on fail.
84 85
• Attach adhesive mount s in room temp erature con ditions.
Adhesives d o not bond properly if appl ied in cold or damp
environme nts to cold or da mp surfa ces.
• Chec k state and lo cal regulation s and laws to en sure that
atta ching a camera to eq uipment (su ch as huntin g equipment)
is permitte d. Always comply with reg ulations that res trict the u se
of cons umer electroni cs or camer as.
WARNING: To avoid in jury, do no t use a tethe r when moun ting
the came ra on a helme t.
/ Mounting Your Camera
Page 44

/ Mounting Your Camera
For more infor mation on mou nts, see gopro.com.
WARNING: If u sing your c amera wi th a GoPro h elmet moun t or
strap, a lways sel ect a helme t that meet s the appl icable s afety
standard.
Choose t he right he lmet for yo ur parti cular sport or a ctivit y
and make su re that it is t he right fit a nd size for y ou. Insp ect
your helm et to ensure t hat it is in go od condit ion, and f ollow the
helmet ma nufact urer's ins truct ions on sa fe helmet u se.
Any helmet t hat has sustained a m ajor impa ct shoul d be
replace d. No helme t can prote ct again st injur y in every accident .
86 87
SECURING LOCKING PLUGS
If you are using HERO4 Sessio n in sport s such as sur fing or skiing,
the integrated loc king plug se curely lock s the finger s on the Ball Joint
Buckle and the Vertical M ounting Buc kle into plac e.
The white locking plug is used with the Mounting Buckle. Th e circular
ring a cts as a leash to prevent dropping or losi ng the plug.
/ Mounting Your Camera
Page 45

/ Mounting Your Camera
To Secure th e Integrated Locking Plug:
1. Flip up t he plug.
2. Slide the bu ckle into the mount un til it clicks into place.
3. Press down on the plug so that it sit s flush with th e buckle.
88 89
To Attach the White Locking Plug:
1. Loop th e circular r ing over the thumb screw. The circ ular ring a cts
as a leash to prevent droppin g or losing the l ocking plug.
2. Slide the Mountin g Buckle into the mount until it clicks into p lace.
3. Press the U-shaped par t of the plug into the U-shaped space in the
Mounting Buckle.
/ Mounting Your Camera
Page 46

/ Battery
Your HERO4 S ession camera a nd batter y are integra ted. You cannot
remove the batter y from the ca mera.
The ba ttery ico n displaye d in the camera status screen blink s
when t he batter y drops below 10%. If the ba ttery rea ches 0% while
recording , the camer a saves the file a nd powers off.
MAXIMIZING BATTERY LIFE
Extreme cold temperatures can decrease batter y life. To maximize
battery life in cold cond itions, keep cam era in a warm pl ace prior
to use.
90 91
When you are not using HERO4 Sessio n, rotate it in the fra me so the
Shutter/Select but ton [
] is cover ed to prevent the cam era from
accidentally turning on.
Note: To prevent th e frame from mar king the surf ace of your came ra, leave the latc h on the frame
open when s toring your ca mera in a frame for a l ong period of ti me.
CHARGING TIME
The ba ttery cha rges to 80% in approxi mately one hour and 100% i n
approximately two hours when using GoPro’s USB-compatible Wall
Charger, Auto Charger, or other USB charging adapter. Other chargers
might charge at a slower rate.
/ Battery
Page 47

/ Battery
WARNING: Us ing a wall ch arger oth er than a GoP ro Wall Charger
can dama ge the GoP ro camer a batter y and could result in fir e or
leakag e. Only use ch argers ma rked: Output 5V 1A . If you do not
know the vo ltage an d current of y our charg er, use the incl uded
USB cabl e to charge t he camer a from your co mputer.
USING THE CAMERA WHILE CHARGING
You can ca pture video and ph otos while the camera is plu gged in to
a USB charging adapter, or the GoPro Wall Ch arger or Auto C harger
BATTERY STORAGE A ND HANDLING
The camera contains sensitive components, including the battery.
Avoid exp osing your ca mera to ver y cold or very h ot temperat ures.
Low or high temp erature con ditions may tempo rarily shorten t he
battery life or ca use the cam era to tempor arily stop worki ng properly.
Avoid dramati c changes in temperatur e or humidit y when using t he
came ra, as cond ensation may form on or wit hin the camera.
/ Battery
with the include d USB cable. ( You cannot record while cha rging the
came ra through a comput er.) When yo u stop recording, the ca mera
battery begins to charge.
Note: Becau se the side doo r is open, the cam era is not waterpr oof during ch arging.
92 93
Page 48

/ Battery
Do not dr y the came ra or batter y with an externa l heat source such
as a microwave oven or hair dr yer. Damage to th e camera or batter y
caus ed by contac t with liqui d inside the c amera is not covered unde r
the warranty.
WARNING: Do not drop, di sassem ble, open , crush, b end, defo rm,
punctu re, shred, m icrowave, i ncinera te, or paint t he camer a.
Do not inse rt forei gn objects into any o pening on t he camer a,
such as th e micro- USB por t. Do not us e the came ra if it has b een
damaged —for example, if cr acked, puncture d, or harm ed by
water. Disas sembling or punc turing t he integra ted batter y can
cause an ex plosion or fire.
94 95
MY GOPRO WON’T POWER ON
Make sure your Go Pro is charged. To char ge your camera, us e the
included USB cab le and a computer. You can al so use a charg ing
device manufac tured by GoPro.
MY GOPRO WON’T RE SPOND WHEN I PRE SS A BUTTON
Press and ho ld the
Shutter/Select but ton
seco nds until you r camera pow ers off. This res et saves all of your
content and settings.
/ Troubleshooting
[ ] for a bout eight
Page 49

/ Troubleshooting / Troubleshooting
I WANT TO RESET MY GOPRO SETTINGS TO THE DEFAULTS
In Setup mode, select Ca mera Reset. T his option does not reset th e
Date/Time or y our camera’s usern ame and wireless p assword.
Note: Camera R eset is availa ble only when you r camera is conn ected to the GoPr o remote.
I FORGOT MY CAMERA’S USERNAME OR PASSWORD
See Reset ting Your Camera’s Wireless Name and Password
(page 58).
HOW DO I TURN OFF MY CAMERA?
If HERO4 Session i s not connec ted to the GoPro App or the Smart
Remote, it power s off automatically aer you stop re cording.
96 97
When your ca mera is conn ected to the GoPro A pp or the Smar t
Remote, ta p the Power icon in the app or p ress the Power/Mode
button on the Smar t Remote to turn off the camera. Wireless
remains on.
If your c amera goe s out of range of the GoP ro App or the S mart Remote ,
or you close the app, sh ort press t he Info/Wireless button to display
Turn Cam era Off, then pr ess the
Shutter/Select
[ ] button to s elect
it. Wir eless remai ns on.
To turn off wireles s and power off the cam era, shor t press the
Info/Wireless button to display Turn WiFi Off, th en press the
Shutter/Select
[ ] button to s elect it.
Page 50

/ Troubleshooting / Troubleshooting
I POWERED OFF MY GOPRO, BUT THE BLUE LIGHT IS
STILL BLINKING
The bl ue light indi cates that wireless is on. To turn off wireles s, short
press the Info/Wireless button to display Turn WiFi O ff, then press t he
Shutter/Select
MY PLAYBACK IS CHOPPY
Chop py playba ck is typic ally not a prob lem with the file. If your footage
skips , one of these s ituations is likely t he cause:
• Using a n incompatible vi deo player. Not all video players
support the H.264 c odec. For best res ults, use the late st
GoPro St udio soware.
98 99
[ ] button to s elect it.
• The co mputer does not meet the min imum requir ements for
HD play back. Th e higher the resolution and fra me rate of your
vide o, the harder the computer has to work to play it ba ck. If you
are usi ng GoPro Studio to pla y back your file s, be sure that your
computer meets the minimum system requirements, available
on gopro.com/getstarted.
• Play ing content direc tly from your c amera over a USB conn ection.
Transfer the file to the co mputer to pla y back. If you r computer
does not meet t he minimum re quirement s, record with Protune
off and make sure t hat all other programs on your com puter
are clo sed.
Page 51

/ Troubleshooting / Customer Support
WHAT SOF TWARE VERSION AM I RUNNING?
Shor t press the Info/ Wireless but ton to displ ay the statu s screen,
then short press it repeatedl y until you get to E xit. The soware
version number ap pears in the u pper le of the s tatus scre en. To exit
the menu, short press the
WHAT IS MY CAMERA’S SERIAL NUMBER?
The camera’s serial numb er is listed in s everal pla ces:
• On the inside of the camera’s side do or
• In the ve rsion.tx t file on your camera’s microSD c ard
• On your c amera’s orig inal packa ging
100 101
Shutter/Select but ton
[ ].
GoPro is dedicated to providing the best possible service. To reac h
GoPro Support, visit gopro.com/support.
/ Regulatory Information
To see the co mplete list of countr y certifi cations, r efer to the Important
Product + S afety Infor mation include d with your camera .
Page 52

/ Trademarks
GoPro, HERO, the GoPro logo, th e GoPro Be a Hero logo, Ba cPac,
Protune, Sup erView, and Wear It. Mount It . Love It. are tradem arks or
regis tered trad emarks of GoPro, In c. in the U.S. a nd internat ionally.
Other names and ma rks are the p roperty of their respe ctive own ers.
130-09768-000 REVC
102
 Loading...